

Samsung BC, CC, ProGourmet SMV9165SC, WC, ProGourmet SMV9165BC Owner's Manual
...
Code No. : DE68-02701A
ProGourmet
Oven
Owner’s Manual
SMV9165SC/BC/WC/CC
™
SMV9165SC_GB.fm Page 1 Tuesday, November 18, 2003 4:40 PM

2
S
AVE
T
HESE INSTRUCTIONS
Safety
P
RECAUTIONS TO
A
VOID
P
OSSIBLE
E
XPOSURE TO
E
XCESSIVE
M
ICROWAVE
E
NERGY
:
(a) Do not attempt to operate this oven with the door open
since open-door operation can result in harmful exposure to
microwave energy. It is important not to defeat or tamper
with the safety interlocks.
(b) Do not place any object between the oven front face and the
door or allow soil or cleaner residue to accumulate on
sealing surfaces.
(c) Do not operate the oven if it is damaged. It is particularly
important that the oven door close properly and that there is
no damage to the
1) Door (bent or dented),
2) Hinges and latches (broken or loosened),
3) Door seals and sealing surfaces.
(d) The oven should not be adjus ted or repaired by anyone
except properly qualified service personnel.
WARNING
Always observe Safety Precautions when using your oven.
Never try to repair the oven on your own – there is
dangerous voltage inside. If the oven needs to be repaired,
call 1-800-SAMSUNG for the name of an authorized service
center near you.
I
MPORTANT
S
AFETY INSTRUCTIONS
When using any electrical appliance, basic safety precautions
should be followed, including the following:
WARNING
To reduce risk of burns, electric shock, fire, personal injury
or exposure to excessive microwave energy:
• Read all safety instructions before using the appliance.
• Read and follow the specific “
PRECAUTIONS TO AVOID POSSI BLE
EXPOSURE TO EXCESSIVE MICROWAVE ENERGY
” on this page.
• This appliance must be grounded. Connect only to properly grounded
outlets. See “
IMPORTANT GROUNDING INSTRUCT IONS
” on page
4 of this manual.
• Install or place this appliance only in accordance with the installation
instructions provided.
• Some items, like whole eggs and food in sealed containers, may
explode if heated in this oven.
• Use this appliance only for its intended use as described in the
manual. Do not use corrosive chemicals or vapors in this appliance.
This type of oven is specifically designed to heat cook food. It is not
designed for industrial or laboratory use.
• As with any appliance, close supervision is necessary when used by
children.
• Do not operate this appliance if it has a damaged cord or plug, if it is
not working properly, or if it has been damaged.
• This appliance should be serviced only by qualified service personnel.
Contact the nearest authorized service facility for examination, repair,
or adjustment.
• Do not cover or block any of the openings on this appliance.
SMV9165SC_GB.fm Page 2 Tuesday, November 18, 2003 4:40 PM

3
S
AVE
T
HESE INSTRUCTIONS
Safety
Important Safety Instructions, continued
• Do not store this appliance outdoors. Do not use near water – for
example, near a kitchen sink, in a wet basement, or near a swimming
pool, etc.
• Keep the inside of the oven clean. Food particles or spatter ed oils
stuck to the oven walls or floor can cause paint damage and reduce
the efficiency of the oven.
• Do not immerse cord or plug in water.
• Keep cord away from heated surfaces.
• Do not let cord hang over edge of table or counter.
• When cleaning door and oven surfaces, use only mild, nonabrasive
soaps or detergents applied with a sponge or soft cloth.
• To reduce the risk of fire in the oven:
a. Do not overcook food. Watch appliance carefully if paper, plastic,
or other combustible materials are inside.
b. Remove wire twist-ties from plastic cooking bags before placing
bags in oven.
c. If materials inside the oven ignite, keep th e ov en door closed, turn
the oven off, disconnect the power cord, or shut off the power at
the fuse or circuit breaker panel. (If the door is opened, the fire may
spread.)
d. Do not use the oven compartment for storage purposes. Do not
leave paper products, cooking utensils, or food in the oven when
not in use.
• Do not cook without the glass tray place on the oven floor. Food will
not cooked properly without the tray.
• Do not defrost frozen beverages in narrow-necked bottles. The
containers can be break.
• Dishes and containers can become hot. Handle with care.
• Carefully remove container coverings, keep your hands and face from
direct steam.
• Remove lids from baby food before heating. After heati ng baby food,
stir well and test temperature by tasting before serving.
• Do not mount over a sink.
• Do not store anything directly on top of the appliance when it is in
operation.
• This over-the-range oven is designed for use over ranges no wider
than 76.2 cm(30 inches). It may be installed over both gas and electric
cooking equipments.
Important Safety Instructions for using the heater features
(
Brown, Combi, Convectio n, Warm, Preheat, Cook Boo k Menu, Auto
Cook Menu, Speed Cook Menu)
• Do not touch hot areas of oven, and always use hot pads, holders or
gloves when removing hot items from the oven.
• Do not use these features to heat baby food or bottles.
• Do not use these functions for defrosting your food. There is an “Auto
Defrost“ especially for this.
• Do not use the warm feature to reheat cold foods. Do not warm food
for more than 1 hour.
• Do not use paper, cardboard, plastic or anything containing these
substances.
• Do not move oven when it is hot.
• Use caution when disposing of hot grease.
• Do not clean with metal scouring pads. Residue from pads can contact
electrical parts increasing risk of electric shock.
• Do not use paper products when appliance is operated in the Brown,
Combi, Cook Book Menu, Auto Cook Menu Speed Cook Menu mode.
• Do not cover racks or any other part of the oven with metal foil unless
special instruction in the cookbook or this manual. This will cause
overheating of the oven.
• Use caution when heater features are in use. Heater functions are
Convection, Brown, Combi, Preheat, Warm, Auto Cook Menu, Cook
Book Menu , Speed Co ok M e nu.
• Do not let children use this oven unless under the supervision of an
adult.
• Failure to use caution can lead to bodily injury.
SMV9165SC_GB.fm Page 3 Tuesday, November 18, 2003 4:40 PM

4
S
AVE
T
HESE INSTRUCTIONS
Safety
I
MPORTANT GROUNDING
I
NSTRUCTIONS
This appliance must be grounded. In the eve nt of an electr ical
short circuit, grounding reduces the risk of electric shock by
providing an escape wire for the electric current.
This appliance is equipped with a power cord having a
grounding wire with a grounding plug.
The plug must be plugged into an outlet that is properly installed
and grounded.
WARNING
Improper use of the grounding plug can result in a risk of
electric shock.
Consult a qualified electrician or servicer if you do not
understand the grounding instructio ns or if you are no t sure
if the appliance is properly grounded.
Do not use an extension cord with this appliance. If the
power cord is too short, have a qualified electrician or
service technician install an outlet near the appliance.
WARNING
Do not cut or remove the third (ground) prong from the
power cord under any circumstances.
NOTE
Connect the oven only to a 20A or over de dicated circuit.
THE VENT FAN
The fan will operate automatically under certain conditions
(see page 27).Take care to prevent the starting and sprea ding of
accidental cooking fires while the vent fan is in use.
• Clean the underside of the microwave oven often. Do not allow grease
to build up on the microwave or the grease filters.
• In the event of a grease fire on the surface units below the microwave
oven, smother a flaming pan on the surface unit by covering the pan
completely with a lid, a cookie sheet or a flat tray.
• Use care when cleaning the grease filters. Corrosive cleaning agents,
such as lye-based oven cleaners, may damage the filters.
• Do not prepare flaming foods under the microwave when the fan is
operating.
• Never leave surface units beneath your microwave oven unattended
at high heat settings. Boilovers cause smoking and greasy spillovers
that may ignite and spread if the microwave vent fan is operating. To
minimize automatic fan operation, use adequate sized cookware and
use high heat on surface units only when necessary.
Liquids, such as water, coffee, or tea may overheat beyon d the
boiling point without appearing to boil. Visible bubbling or boiling
when the container is removed from the microw ave o ven is not
always present. THIS COULD RESULT IN SUDDEN BOILING
OVEN OF VERY HOT LIQUIDS WHEN THE CONTAINER IS
DISTURBED OR A SPOON OR OTHER UTENSIL IS
INSERTED INTO THE LIQUID.
To reduce the risk of injury to persons:
1. Do not overheat the liquid.
2. Stir the liquid both before and halfway t hrough heating it.
3. Do not use straight-sided containers with narrow necks.
4. After heating, allow the co nt aine r to stan d in the
microwave o ven for a sh or t tim e befo re rem ov ing the
container.
5. Use extreme care whe n i nser tin g a spo on or o th er ut ens il
into the container.
SMV9165SC_GB.fm Page 4 Tuesday, November 18, 2003 4:40 PM

5
Contents
Safety............................................................................................2
Contents.......................................................................................5
Your New ProGourmetTM oven...................................................6
Checking Parts....................................................................................... 6
Warranty and Service In fo rmation................ ......................... ................. 6
Setting Up Your ProGourmet
TM
Oven.................................................... 6
Control Panel Buttons
........................................................................... 7
Operation......................................................................................8
Turning on the Power and Selecting a Display......................................8
Selecting the Weight............................................... ............................... 8
Selecting the Sound..................................... .... .. ......... .... .. .... ......... .. .... ..8
Using the Settings feature......................................................................8
Setting the Remind End Signal .............................................................. 9
Selecting the Child Lock.......... ...............................................................9
Setting the Clock (12HR/24HR).............................................................9
Using the Clock Button........................................................................... 9
Setting the Word Speed......................................................................... 9
Setting the Daylight Saving Time adjustment......................................... 9
Setting the Demo Mode ......................................................................... 9
Using the Kitchen Timer....................................................................... 10
Using the Pause/Cancel Button...........................................................10
Using the Help Button........................................................................ ..10
Using the Start/+1 min. Butt o n............................................................. 10
Using the Popcorn Button.............................. ......................................10
Reheating Automatically ...................................................................... 11
Using the Power/Auto Defrosting Button..............................................11
Auto Defrosting Guide........................................... ............................... 12
Using the Cook Book Menu Button ......................................................12
Using the Auto Cook Menu Button............................................... .... .. ..15
Using the Speed Cook Menu Button.................................................... 19
Using the Microwave Setting Cooking Times & Power Levels............. 23
Multi-stage Cooking (Maximum of 3 stages)........................................ 23
Using the More/Less Button s............................................................... 23
Warming...............................................................................................24
Preheating the oven......................................... .. ......... .. .... .... .. ......... ....24
Brown................................................................................................... 24
Convection Cooking............ ...................................... ...........................25
Combination cooking (COMBI 1). ......................................................... 25
Combination cooking (COMBI 2). ......................................................... 26
Combination cooking (COMBI 3). ......................................................... 26
Combination cooking (COMBI 4). ......................................................... 27
Turning on the Turntable......................................................................27
Turning on the Light............................................................................ 27
Turning on the Vent..............................................................................27
Cooking Instructions.................................................................28
Cooking Utensils..................................................................................28
Testing Utensils....................................................................................28
Cooking Instructions................................................................ 29
Cooking Techniques.............................................................................29
General Microwave Tips.......................................................................29
Appendix....................................................................................30
Troubleshooting Guide ......................................................................... 30
Care and Cleaning.................................................. .. .. .. ..... .. .. .. .. .. .... .. ...30
How to Clean the Outside.......................................................... .. .. .. .. ...31
Light Bulb Replacement.................................. ......................................31
Exhaust Feature ...................................................................................32
Specifications........................................................................................ 33
Warranty.....................................................................................34
Guía Rápida...............................................................................35
Quick Reference..................................................... ...... ..... ...... ..35
SMV9165SC_GB.fm Page 5 Tuesday, November 18, 2003 4:40 PM
6
Your New ProGourmetTM oven
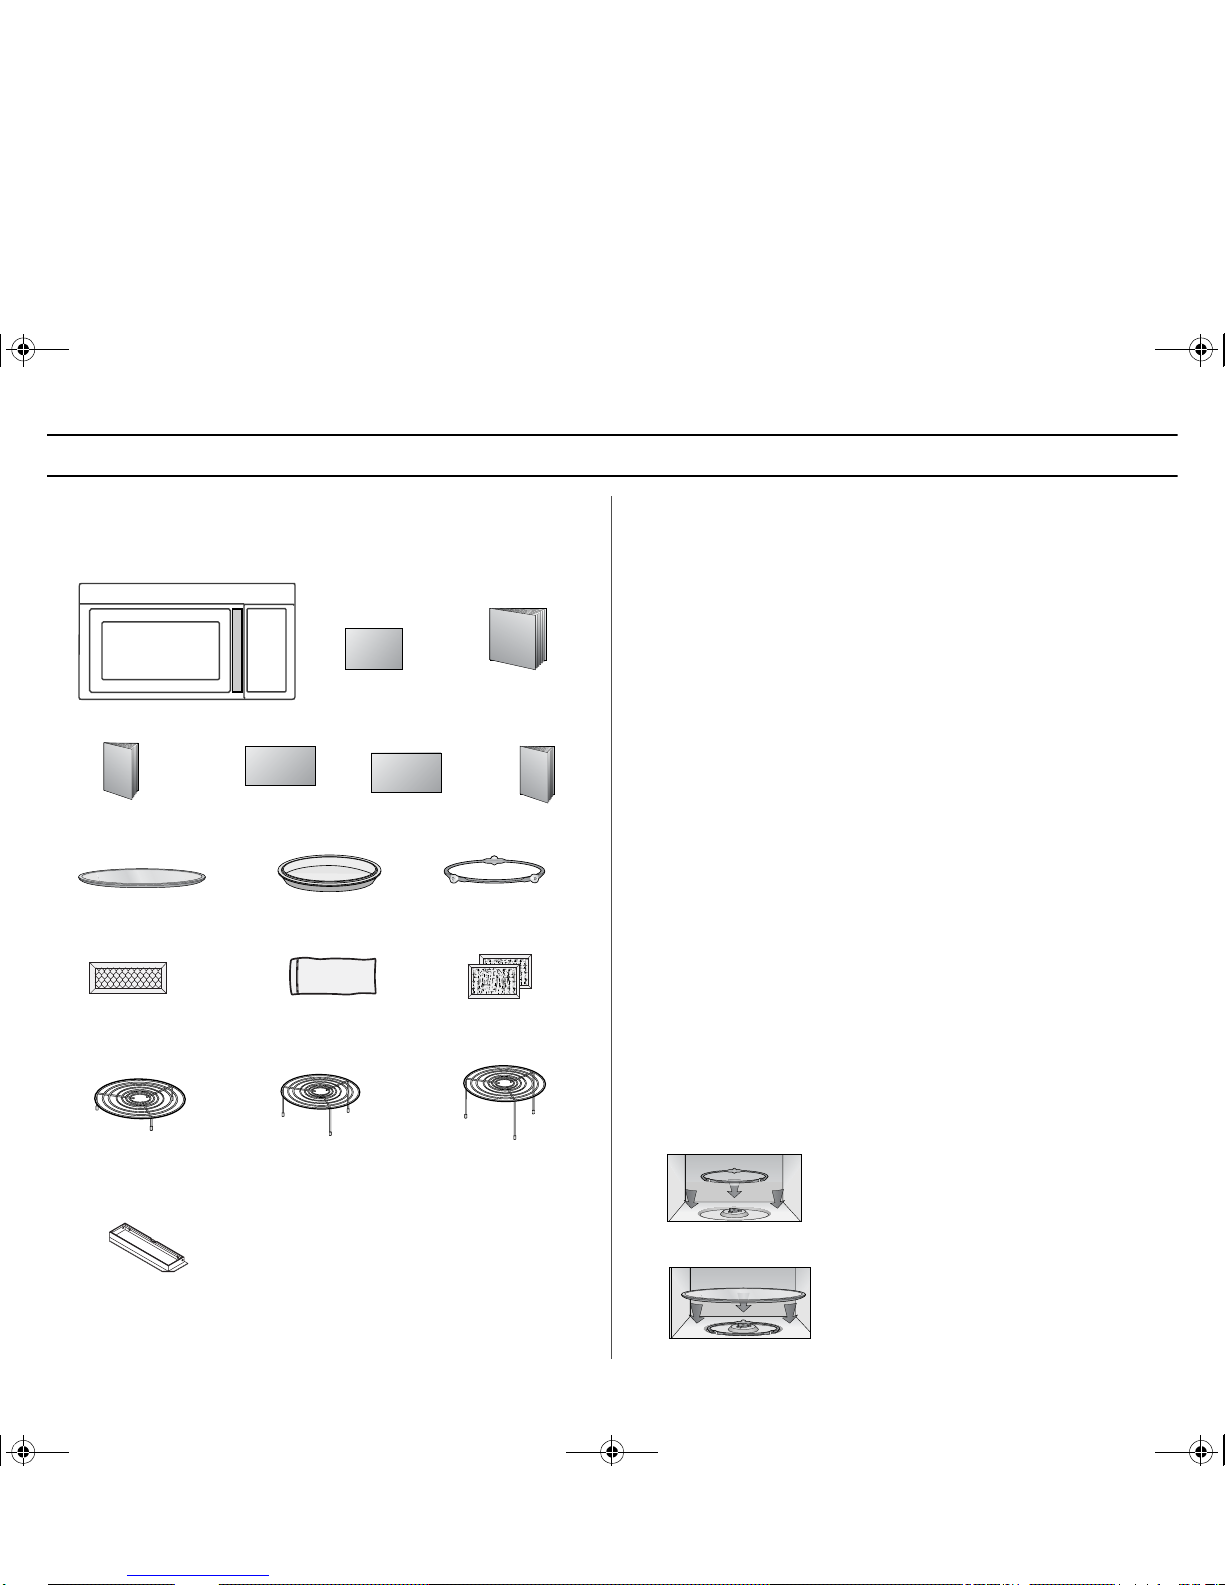
Checking Parts
Unpack your microwave oven and c heck to mak e sure that you have a ll the
parts shown here. If any part is missing or broken, c all your d ealer.
Warranty and Service Information
To help us to serve you better, please complete the enclo sed registration card
and promptly return it by mail. If the registration card is missin g, you c an call
Samsung Electronics America, Inc., at 1-800 -SAM SU NG ( 1-800-726-7864),
or register on-line at WWW.SAMSUNGUSA.CO M
When contacting Samsung, please provide the sp ecific model and serial num ber information which is usually located in the con trol pane l of the product.
Please record these numbers below, along with the other requested information. Keep this information in a safe place as a permanen t record of your purchase to aid in identification in case of theft or loss, and a copy of your sales
receipt as a proof of purchase if warranty service is needed.
MODEL NUMBER _______________________
SERIAL NUMBER _______________________
DATE PURCHASED _______________________
PURCHASED FROM _______________________
Warranty service can only be performed by a Sam sun g Authorized Service
Center. If you require warranty service, pro vide th e abov e inform ation w ith a
copy of your sales receipt to the Samsung Au th orized Serv ice Center.
For service assistance and the location of the nearest service center, please
call 1-800-SAMSUNG (1-800-726-7864), or go on-line to
WWW.SAMSUNGUSA.COM
Setting Up Your ProGourmetTM Oven
1
Plug the cord into a grounded outlet. Once plugged in, the display on
your oven will be showed:
ENJOY YOUR COOKING --- PRESS SETTINGS BUTTON FOR
PERSONAL OPTIONS
2
Open the oven door by pulling the handle on the right side of the door.
3
Wipe the inside of the oven with a damp cloth.
4
Place the pre-assembled ring in the indentation in the center of the
oven.
5
Place the glass tray securely in the center of the pre-assembled roller
guide.
Microwave oven
Glass Tray
(Part No. : DE74-20016A)
Exhaust Adaptor
(Part No. : DE92-90242A)
Installation
Instructions
Owner’s
Manual
Registration
Card
Top Template
Grease Filters
(Part No. : DE63-00196A
)
Roller Guide Ring
(Part No. : DE97-00368B)
Charcoal filter
(Part No. : DE63-30016D)
Wall Template
Hardware-kit
(Part No. : DE92-90505E)
Cook Book
Ceramic Enamel
Tray
Low Rack
(Part No. : DE47-00456C)
High Rack
(Part No. : DE47-00456A)
Medium Rack
(Part No. : DE47-00456B)
SMV9165SC_GB.fm Page 6 Tuesday, November 18, 2003 4:40 PM
7
Your New ProGourme tTM oven
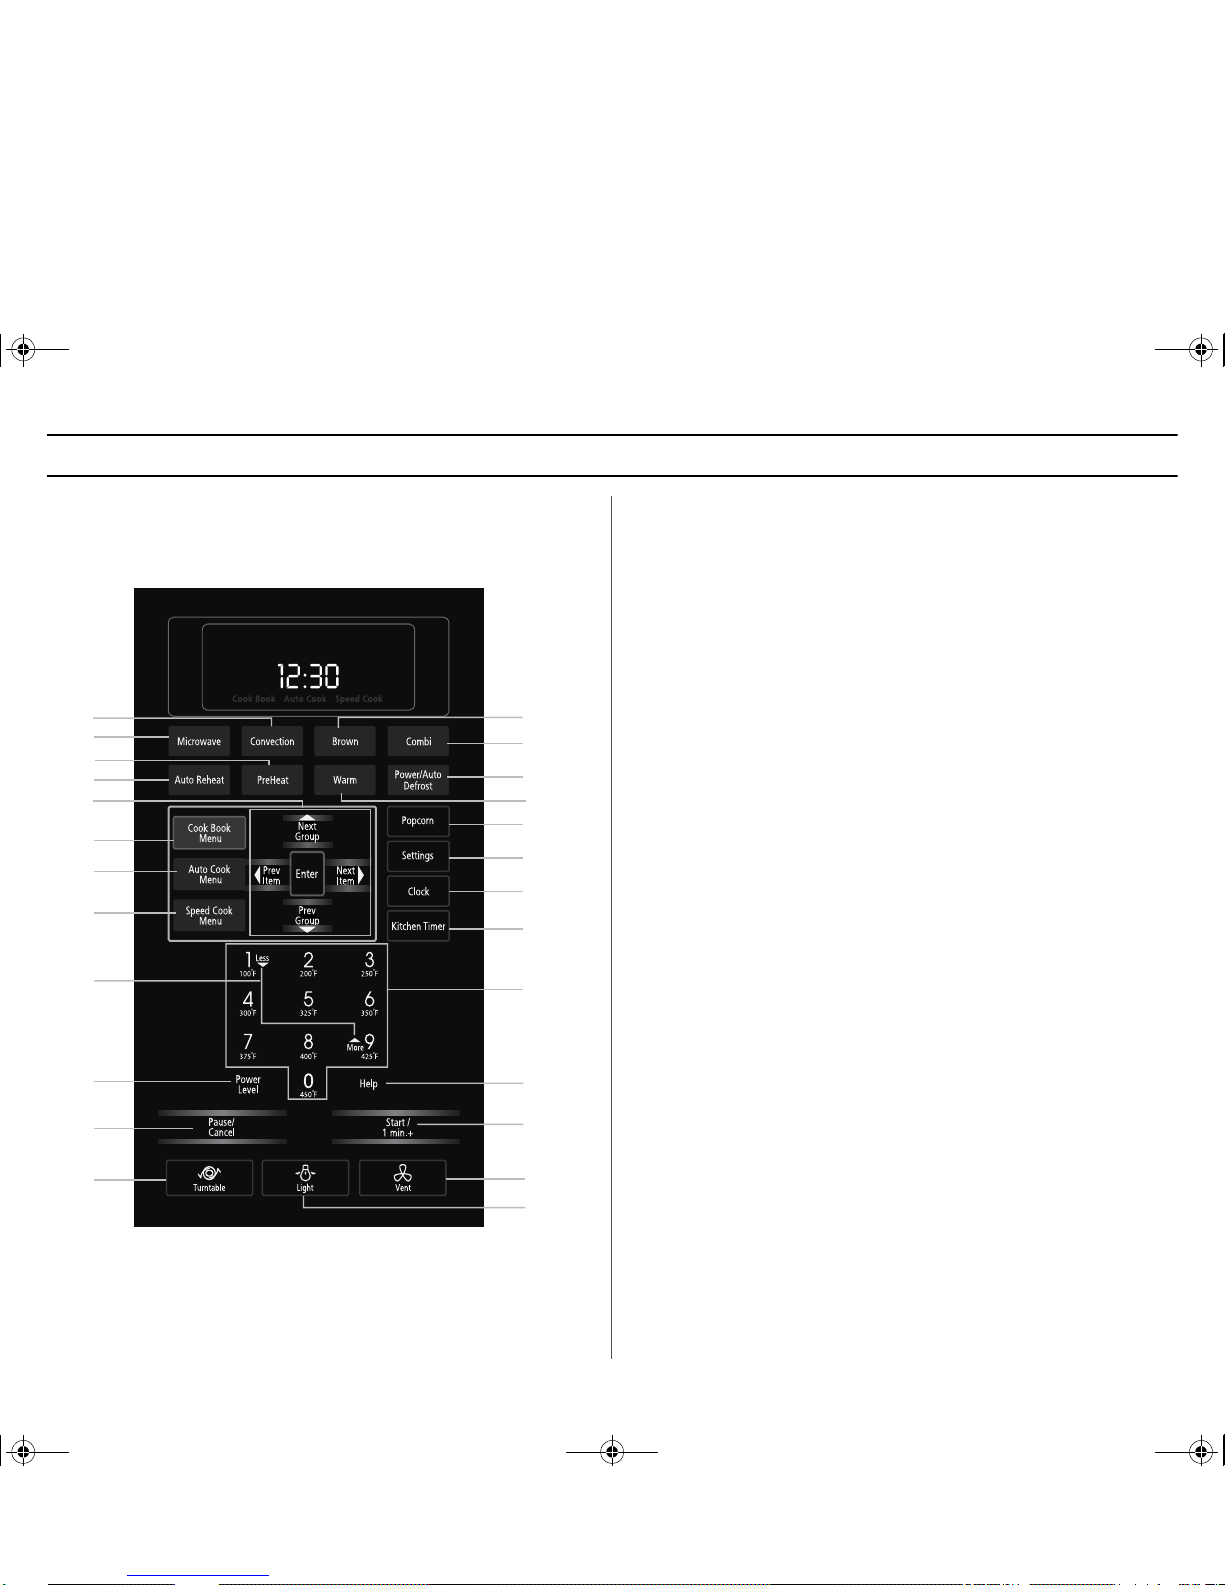
Control Panel Buttons Control Panel Buttons
1. Convection p.25
2. Microwave p.23
3. PreHeat p.24
For better results, preheat to desired tem pera ture
before cooking.
4. Auto Reheat p.11
Selects type of dish to be reheated
5. Prev Group, Next Group, Prev Item, Next Item
6. Cook Book Menu p.12~p.14
7. Auto Cook Menu p.15~p.19
8. Speed Cook Menu p.19~p.22
This time-saving function cooks by combining b oth
microwaving and heating.
9. More/Less p.23
Increase or decrease cooking time.
10. Power Level p.23
Press this button to set a power level other tha n high.
11. Pause/Cancel p.10
Press to pause oven or correct a mi stake .
12. Turntable p.27
13. Brown p.24
Browns meat and fish up to 60 minutes.
14. Combi p.25~p.27
15. Power/Auto Defrost p.11~p.12
Quickly thaws frozen food automatically by weig ht.
16. Warm p.24
Keeps food warm at 175 °F for up to one (1) hou r
17. Popcorn p.10
18. Settings p.8~p.9
Press to set non-cooking features.
19. Clock p.9
Sets current time.
20. Kitchen Timer p.10
Sets kitchen or convenience timer.
21. Number/Cooking Temperature Buttons
Sets Baking temperature, cooking time, amount,
and power level.
22. Help p.10
Press to see help information about the featu re you are using.
23. Start / 1 min. + p.10
Press to start cooking. Adds one (1) minute while
oven is operating.
24. Vent p.27
25. Light p.27
1
2
3
4
5
6
7
8
9
11
10
12
13
14
15
16
17
18
19
20
21
22
23
24
25
SMV9165SC_GB.fm Page 7 Tuesday, November 18, 2003 4:40 PM

8
Operation
Turning on the Power and Selecting a Display
The first time you plug the power cord into an outlet, or after there has been an
interruption in power, the display will be showed after fo ur sec onds
“1-WEIGHT 2-SOUND ON/OFF
3- REMIND ON/OFF 4- CHILD LOCK ON/OFF
5- CLOCK 12HR/24HR 6-WORD PROMPT SPEED
7- DAYLIGHT SAVING ON/OFF 8-DEMO MODE ON/OFF”.
1
Press
Settings
button immediately after plugging in your oven. The
display will show
“1-WEIGHT 2-SOUND ON/OFF
3- REMIND ON/OFF 4- CHILD LOCK ON/OFF
5- CLOCK 12HR/24HR 6-WORD PROMPT SPEED
7- DAYLIGHT SAVING ON/OFF 8-DEMO MODE ON/OFF”.
Selecting the Weight
You can choose between poun ds(LB S) an d kilogra ms( KG).
1
Press
Settings
button and then press the 1 button.
The display shows :
LBS OR KG --- PRESS SETTINGS BUTTON
2
Press
Settings
button.
The display shows :
KG
3
Press the
Settings
button repeatedly to select the weight
measurements you wish to use.
4
Press the
Start
button.
Selecting the Sound
1
Press
Settings
button and then press the 2 button.
The display shows :
SOUND VOLUME CONTROLS --- PRESS
SETTINGS BUTTON
2
Press the
Settings
button to select
Sound ON
.
Press again to select
Sound OFF
.
3
Press the
Start
button.
Using the Settings feature
Your new microwave oven can be customized to suit your personal tastes.
Simply press
Settings
to set these options. For your convenience , all the
options are summarized in the following table:
• If there is a power interruption, you will need to reset these options.
Item
No.
Settings
options
Description Operation
1
Display Weight Weight options are
pounds and kilograms.
Press
Settings, 1
and select by
repeatedly pressing
Settings
.
To set, press
Start
.
2
Sound Sound volume can be
turned On and Off.
Press
Settings, 2
and select by
repeatedly pressing
Settings
.
To set, press
Start
.
3
Remind End
Signal
The Remind End Signal
can be turned On and Off.
Press
Settings, 3
and select by
repeatedly pressing
Settings
.
To set, press
Start
.
4
Child Lock This feature prevents from
using of unsupervised
children.
Press
Settings, 4
and select by
repeatedly pressing
Settings
.
To set, press
Start
.
5
Clock The clock can display
either 12HR or 24HR time
modes.
Press
Settings, 5
and select by
repeatedly pressing
Settings
.
To set, press
Start
.
6
Word Prompt
Speed
There are five speeds,
from Level 1(slowest) to
Level 5(fastest).
Default is Level 3.
Press
Settings, 6
and select by
repeatedly pressing
Settings
.
To set, press
Start
.
7
Daylight
Savings Time
Adjustment
The time can be advanced
one hour for DST without
resetting the Clock.
Press
Settings, 7
and select by
repeatedly pressing
Settings
.
To set, press
Start
.
8
Demo Mode The Demo Mode can be
turned On and Off.
Press
Settings, 8
and select by
repeatedly pressing
Settings
.
To set, press
Start
.
SMV9165SC_GB.fm Page 8 Tuesday, November 18, 2003 4:40 PM

9
Operation
Setting the Remind End Signal
The Remind End Signal can be set On or Off.
1
Press the
Settings
button and then press the 3 button.
The display shows
:
REMIND END SIGNAL ON/OFF --- PRESS SETTINGS BUTTON
2
Press the
Settings
button to select ON.
Press again to select OFF.
3
Press the
Start
button. The display returns to the time of day.
To turn Remind End Signal off, repeat steps 1-3 above.
Selecting the Child Lock
1
Press the
Settings
button and then press the 4 button.
The display shows :
CHILD LOCK ON / OFF --- PRESS SETTINGS BUTTON
2
Press the
Settings
button to select
Lock ON
.
Press again to select
Lock OFF
.
3
Press the
Start
button.
Setting the Clock (12HR/24HR)
1
Press
Settings
button and then press the 5 button.
The display will show:
CLOCK 12HR/24HR --- PRESS SETTING
BUTTON
2
Press the
Settings
button to select
24HR
.
Press again to select
12HR
.
3
Press the
Start
button.
Using the Clock Button
1
Press the Clock button.
The display shows :
SET CLOCK WITH NUMERIC BUTTON
2
Use the number buttons to enter the current time.
You must press at least three numbers to set the clock.
For example, if the current time is 5:00, enter 5,0,0.
The display will show:
5:00
3
Press
Clock
again. A colon will appear, indicating that the time is set.
If there is a power interruption, you will need to reset the clock.
You can check the current time while cooking is in progress by pressing
the
Clock
button.
Setting the Word Speed
1
Press the
Settings
button and then press the 6 button.
The display shows :
WORD PROMPT SPEED --- PRESS SETTINGS BUTTON
2
Press the
Settings
button
The display shows :
SLOWEST
3
Press Settings button repeatedly to select the Word Speed you wish to
use:
SLOWEST, SLOW, NORMAL, FAST, FASTEST
If you continue to press
Settings
, the settings will cycle in the order
shown here:
SLOWEST, SLOW, NORMAL, FAST, FASTEST
4
Press the
Start
button
Setting the Daylight Saving Time adjustment
1
Press the
Settings
button and then press the 7 button.
The display will show:
DAYLIGHT SAVING TIME --- PRESS SETTINGS BUTTON
2
Press the
Settings
button to select
Time ON
.
Press again to select
Time OFF
.
3
Press the
Start
button. Time of day will advance one hour.
If OFF is selected, time will go back one hour.
If the clock is set for standard time, this function allows con venie nt time
changes without needing to reset th e clock. Daylight Savi ng Time begins
for most of the United States at 2 a.m. on the first Sund ay of A pril, and
reverts to Standard time at 2 a.m. on the last Sunday of October.
Setting the Demo Mode
1
Press the
Settings
button and then press the 8 button.
The display shows :
DEMO MODE ON/OFF --- PRESS SETTINGS
BUTTON
2
Press the
Settings
button to select
Demo ON
.
Press again to select
Demo OFF
.
3
Press the
Start
button
SMV9165SC_GB.fm Page 9 Tuesday, November 18, 2003 4:40 PM

10
Operation
Using the Kitchen Timer
1
Press the
Kitchen Timer
button.
(max. time 99 min. 99 sec.)
The display shows:
SET TIME WITH NUMERIC BUTTON
2
Use the
Number
buttons to set the length of time to run.
3
Press the
Start
button
The display counts down and beeps when the time has elapsed.
Using the Pause/Cancel Button
The
Pause/Cancel
button allows you to clea r ins truction s yo u have entered.
It also allows you to pause the oven’s cooking cy cle, so that you can check the
food.
• To pause the oven during cooking : press
Pause/Cancel
button once. To
restart, press
Start
button.
• To stop cooking, erase instructions, and return the oven display to the time of
day: press
Pause/Cancel
button twice.
• To clear instructions you have just entered: press
Pause/Cancel
button
once, then re-enter the instructions.
• To cancel a timer setting: press
Pause/Cancel
button once.
Using the Help Button
Your microwave offers helpful instructions fo r many proc edures.
• When you need feature information and helpful hints, press the Help button
and then press the button that you want to get information on.
Using the Start/+1 min. Button
This button offers a convenient way to heat food in one-m inute in crement at
the High power level.
1
Press the
Start/+1 min.
button once for each minute you wish to cook
the food. For example, press it twice for two minutes. The time will
display, and the oven starts automatically.
2
Add minutes to a program in progress by pressing the Start/+1 min.
button for each minute you want to add.
Using the Popcorn Button
1
Press the
Popcorn
button.
The display shows:
POPCORN 3.5 OZ
2
Press the button repeatedly to select the serving size you want. The
display will cycle through all available serving sizes. Once you select
the correct serving size, the microwave will begin cooking automatically.
If you don’t need to read all the menu options, s imply p ress th e
Start
button to begin cooking.
If you want to check the cooking time, press the
Popcorn
button.
When the cooking time is over, the oven will beep. The o ven w ill then
beep every minute until the door is opened .
Item Weight Remarks
Popcorn 3.5 oz
3.0 oz
1.75 oz
• Use one microwave-only bag of popcorn.
• Use caution when removing and opening
hot bag from oven.
SMV9165SC_GB.fm Page 10 Tuesday, November 18, 2003 4:40 PM

11
Operation
Reheating Automatically
To reheat food, select the type of dish and the number of serving s you want to
reheat, then the oven will automatically set the reheatin g time .
1
Press the
Auto Reheat
button.
The display shows :
SELECT ITEM WITH AUTO REHEAT BUTTON
2
Press the
Auto Reheat
repeatedly to select the type of dish you wish
to reheat. The initial serving size for each dish is one serving.
The display shows :
PLATE OF FOOD
CASSEROLE
PASTA REHEAT
SOUP REHEAT
You can select up to four servings for casseroles, pas ta reheat and Soup
Reheat . Only one serving is available for a plate of food.
3
Use the
Number
buttons to increase the serving size.
For example, for three servings, press the 3 button(Refer to
the Auto Reheat Chart below for the servings).
The display shows the number of servings you h ave se lected:
3 SERVINGS PRESS START
4
Press the
Start
button and reheating will begin.
Auto Reheat Chart
• Follow the instructions below when Auto Reheating different types of food.
Using the Power/Auto Defrosting Button
To thaw frozen food, s et the weight of the food and then the oven will automatically set the defrosting time, power level and standing time .
Please note that defrosting foods which w eigh more than 1 .0 lbs will take
several minutes longer than foods which weigh le ss.
1
Press the
Power/Auto Defrost
button.
The display shows:
SELECT ITEM
WITH
POWER DEFROST BUTTON
2
Press the
Power Defrost
button 1 to 4 times and the items below will
appear in sequence on the display:
Press once - MEAT 0.0 LBS
Press twice - POULTRY 0.0 LBS
Press three times - FISH 0.0 LBS
Press four times - BREAD 0.0 LBS
The display shows:
ENTER WEIGHT WITH NUMERIC BUTTON
3
Enter your desired weight with numeric button.
The display shows:
PRESS START
4
Press the
Start
button
5 When the oven beeps, open the door and turn food over.
Press the
Start
button to begin defrosting.
•
See page 12 Auto Defrosting Guide.
Item Weight Remarks
Plate of
Food
1 serving
• Use only pre-cooked, refrigerated foods.
• Cover plate with vented plastic wrap or wax
paper.
• Contents
- 3-4 oz. meat, poultry or fish
( up to 6 oz. with bone)
- ½ cup starch (potatoes, pasta, rice, etc.)
- ½ cup vegetables (about 3-4 oz.)
Casserole 1 to 4 servings
(8 oz./serving)
• Use only refrigerated foods.
• Cover with lid or vented plastic wrap.
• Stir foods well before serving.
Pasta
Reheat
1 to 4 servin gs
(8 oz./serving)
Soup
Reheat
1 to 4 servin gs
(8 oz./serving)
SMV9165SC_GB.fm Page 11 Tuesday, November 18, 2003 4:40 PM
 Loading...