

SAMSUNG WB610 User Manual [fr]
Quick Start Manual
Guide de prise en main rapide
WB600/WB610

2
Health and safety informationContents
Warnings
Do not use your camera near flammable or explosive
gases and liquids
Do not use your camera near fuels, combustibles, or
flammable chemicals. Do not store or carry flammable
liquids, gases, or explosive materials in the same
compartment as the camera or its accessories.
Keep your camera away from small children and pets
Keep your camera and all accessories out of the reach of
small children and animals. Small parts may cause choking
or serious injury if swallowed. Moving parts and accessories
may present physical dangers as well.
Prevent damage to subjects’ eyesight
Do not use the flash in close proximity (closer than 1m/3
ft) to people or animals. Using the flash too close to your
subject’s eyes can cause temporary or permanent damage.
Health and safety
information…………………… 2
Camera layout… …………… 4
Setting up your camera… … 5
Unpacking ……………………… 5
Inserting the battery and
memory card …………………… 6
Charging the battery ……………6
Turning on your camera ………… 7
Selecting options ……………… 7
Capturing photos or videos 8
Playing files ………………… 9
Transferring files to a PC
(Windows) ……………………10
Specifications ……………… 11
1
13
12
16
17
18
19
28
63
81
100

3
English
Exercise caution when connecting cables or adapters •
and installing batteries and memory cards. Forcing
the connectors, improperly connecting cables, or
improperly installing batteries and memory cards can
damage ports, connectors, and accessories.
Do not insert foreign objects into any of your camera’s •
compartments, slots, or access points. This type of
damage may not be covered by your warranty.
Protect batteries, chargers, and memory cards from
damage
Avoid exposing batteries or memory cards to very •
cold or very hot temperatures (below 0° C/32° F or
above 40° C/104° F). Extreme temperatures can
reduce the charging capacity of your batteries and
can cause memory cards to malfunction.
Prevent memory cards from making contact with •
liquids, dirt, or foreign substances. If dirty, wipe the
memory card clean with a soft cloth before inserting
in your camera.
Handle and dispose of batteries and chargers with
care
Use only Samsung-approved batteries and chargers. •
Incompatible batteries and chargers can cause serious
injuries or damage to your camera.
Never place batteries or cameras on or in heating •
devices, such as microwave ovens, stoves, or
radiators. Batteries may explode when overheated.
Cautions
Handle and store your camera carefully and sensibly
Do not allow your camera to get wet—liquids can •
cause serious damage. Do not handle your camera
with wet hands. Water damage to your camera can
void your manufacturer’s warranty.
Avoid using or storing your camera in dusty, dirty, •
humid, or poorly-ventilated areas to prevent damage
to moving parts and internal components.
4
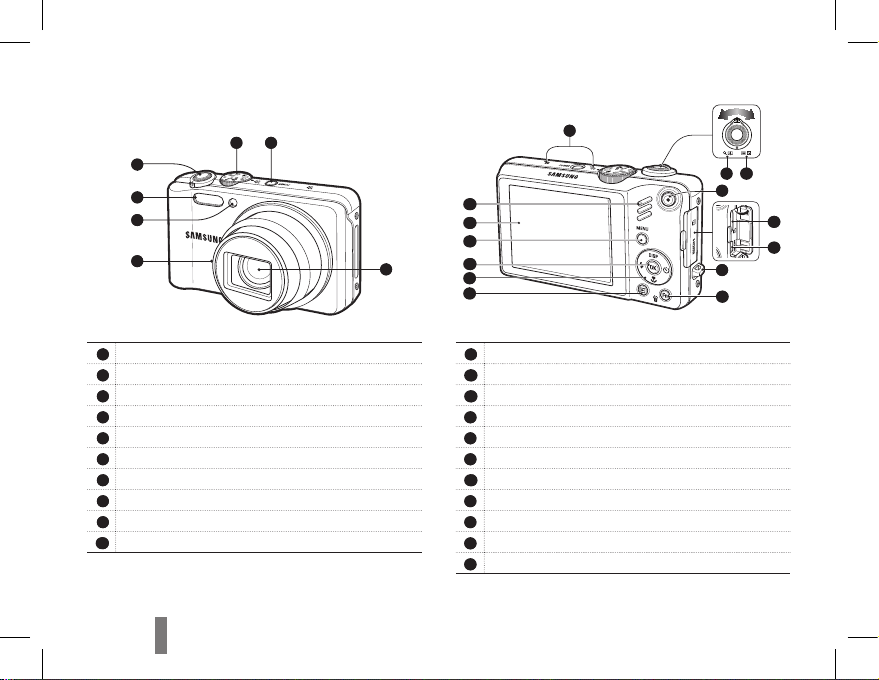
Camera layout
1
Mode dial
2
POWER button
3
Lens
4
Speaker
5
AF-assist light/timer lamp
6
Flash
7
Shutter button
8
Microphone
9
Zoom T Lever (Digital zoom)
10
Zoom W Lever (Thumbnail)
11
Video shooting button
12
USB and A/V port
13
HDMI port
ㄴ 14
Strap eyelet
15
Fn / Delete button
ㄴ 16
Play mode button
17
Navigation button
18
OK button
19
MENU button
ㄴ 20
Display
ㄴ 21
Status lamp
2
3
7
6
4
5
1
15
11
14
15
12
13
17
18
19
20
21
16
10
8
9
English
5
Setting up your camera
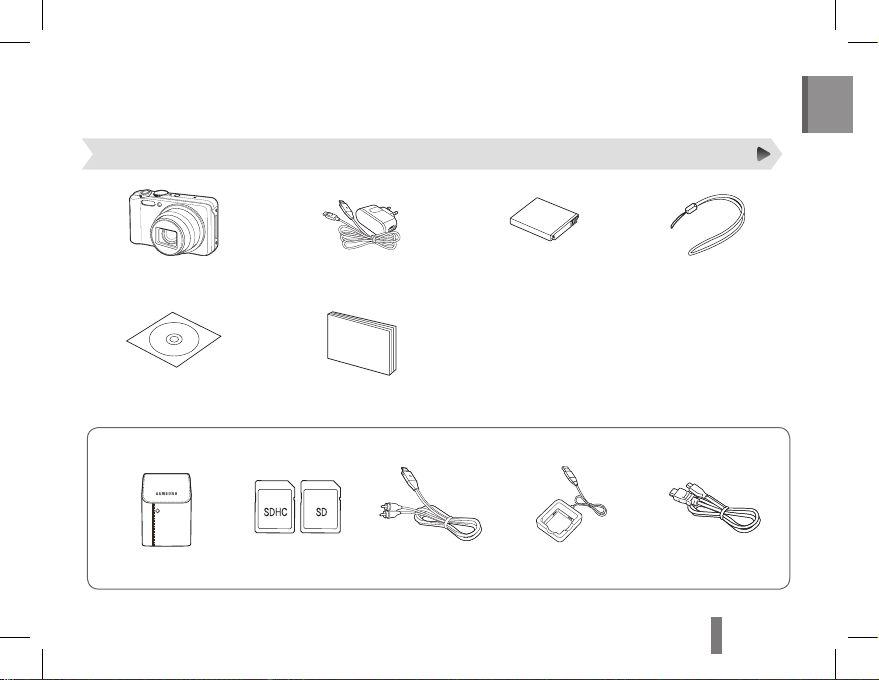
Unpacking
Sold Separately
Camera AC adapter/USB cable Rechargeable battery Strap
User Manual CD-ROM Quick Start Manual
Camera case Memory cards A/V cable Battery Charger HDMI cable

6
Setting up your camera
Inserting the battery and memory card Charging the battery
Push gently until the card
disengages from the camera and
then pull it out of the slot.
▼
Removing the battery
▼
Removing the memroy card
Be sure to charge the battery before using the
camera.
3
With the gold-coloured
contacts facing up
2
With the
Samsung logo
facing up
1
4
Indicator light
Red ▪ : Charging
Green ▪ : Fully charged
English
7
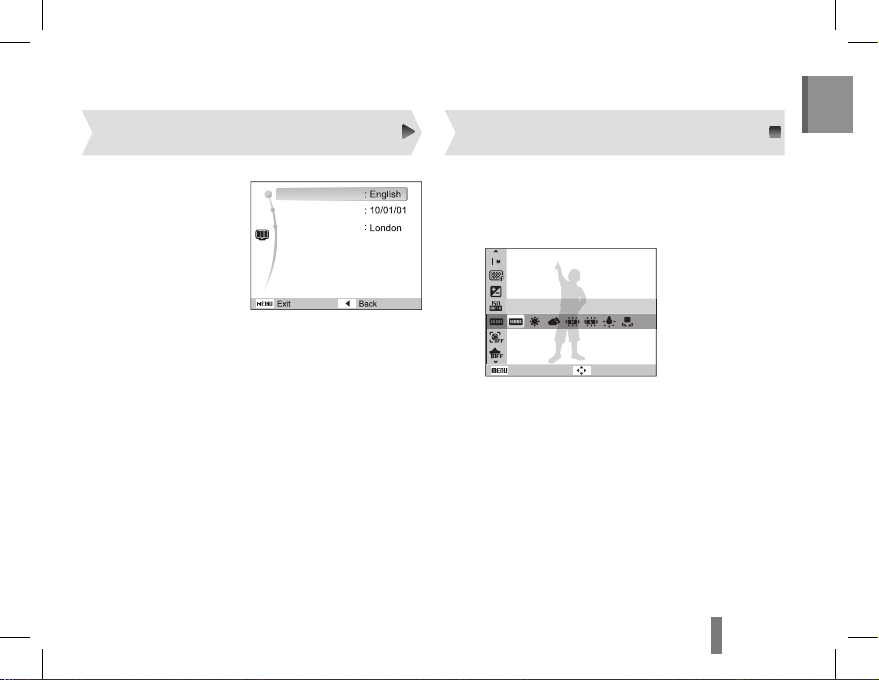
1
Press [POWER].
The intial setup ▪
screen appears.
2
Press [t] to select
Language and
press [o].
3
Press [D] or [M] to select Time Zone and
press [t].
4
Press [F] or [t] to select an item.
5
Press [D] or [M] to select Date & Time and
press [t].
6
Press [F] or [t] to select an item.
7
Press [D] or [M] to change the number or
select another date format and press [o].
1
In Shooting mode, press [m].
2
Use the navigation buttons to scroll to an
option or menu.
To move left or right, press [ ▪ F] or [t].
To move up or down, press [ ▪ D] or [M].
3
Press [o] to confi rm the highlighted option or
menu.
Press [ ▪ m] again to go back to the previous
menu.
Turning on your camera Selecting options
Back
White Balance
Move
Language
Date & Time
Time Zone

8
Recording a video
1
Rotate the mode dial to v.
2
Align your subject in the frame.
3
Press [Shutter].
Press [ ▪ o] to pause or resume.
4
Press [Shutter] again to stop the recording.
Note
Number of photos by resolution (for 1 GB SD)
These figures are measured under Samsung’s standard
conditions and may vary depending on shooting conditions
and camera settings.
Capturing photos or videos
Resolution
4000 x 3000
147 285
405
3984 x 2656
168 314
442
3840 x 2160
203 368
529
3264 x 2448
212 375
538
2560 x 1920
340 568
794
2048 x 1536
534 804
1068
1920 x 1080
872 1147
1441
1024 x 768
1475 1675
1878
Taking a photo
1
Rotate the mode dial to p.
2
Align your subject in the frame.
3
Press [Shutter] halfway down to focus
automatically.
A green frame means the subject in focus. ▪
4
Press [Shutter] all the way down to take the
photo.

English
9
Playing files
Viewing photos
1
Press [P].
2
Press [F] or [t] to scroll through files.
Press and hold to view files quickly. ▪
Viewing videos
1
Press [P].
2
Press [o].
Pause
3
Use the following buttons to control playback.
[F] Scan backward
[o] Pause or resume playback
[t] Scan forward
[Zoom W/T] left or
right
Adjust the volume level
10
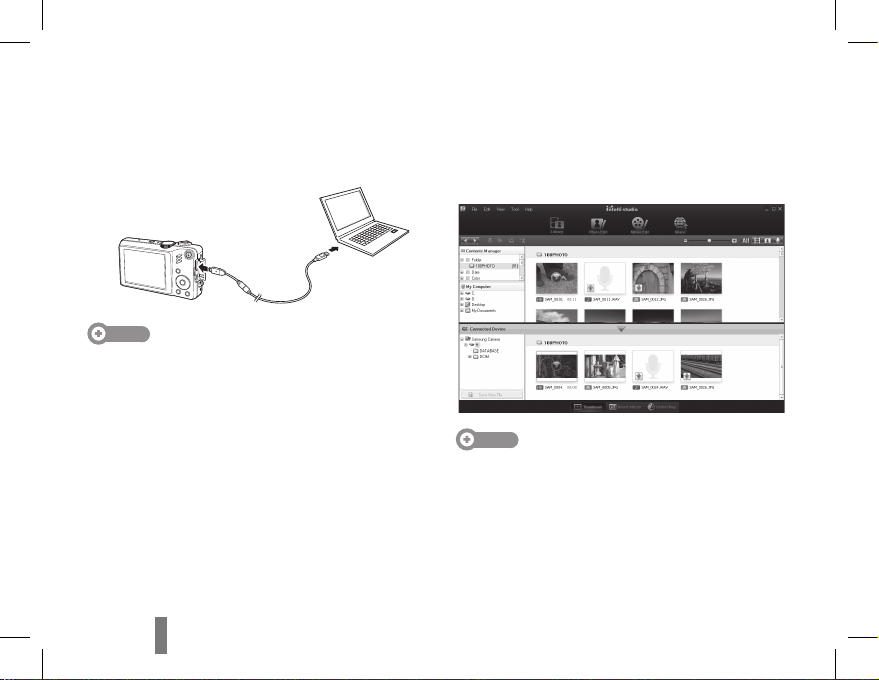
Transferring files to a PC (Windows)
1
Connect the camera to your computer with the
USB cable.
Note
Make sure that the PC Software option is set to On in the
settings menu.
2
Turn on the camera.
The computer recognizes the camera automatically. ▪
For Windows Vista, select ▪ Run iStudio.exe from
the AutoPlay window.
3
Select a folder on your computer to save new
files.
If your camera has no new files, the pop-up window ▪
for saving new files will not appear.
4
Select Ye s.
New files will be transferred to your computer. ▪
You can now use the Intelli-studio program.
Note
About Intelli-studio
Intelli-studio is a built-in program that allows you to play
back and edit files. You can also upload files to websites,
such as Flickr or YouTube.
 Loading...