

Page 1

User Manual
Basic Opreration
WB600/WB610
Page 2

2
Copyright information
Microsoft Windows and the Windows logo are registered •
trademarks of the Microsoft Corporation.
Mac is a registered trademark of the Apple Corporation.•
HDMI, the HDMI logo and the term "High Definition •
Multimedia Interface" are trademarks or registered
trademarks of HDMI Licensing LLC.
All brand and product names appearing in this manual are •
registered trademarks of their respective companies.
Camera specifications or contents of this manual may be •
changed without prior notice due to upgrade of camera
functions.
We recommend using your camera within a country where •
you purchase it.
For Open Source License information, refer to the •
"OpenSourceinfo.pdf" in the provided CD-ROM."
Contents
Get answers to common questions …3
Health and safety information ……… 4
Camera layout ………………………… 6
Setting up your camera ……………… 8
Unpacking …………………………………8
Inserting the battery and memory card …9
Removing the battery and memory card … 9
Charging the battery …………………… 10
Turning on your camera ………………… 10
Selecting a language …………………… 11
Setting the date and time ……………… 11
Selecting options …………………… 12
Capturing photos or videos ……… 13
Transferring files to a PC
(Windows) …………………………… 16
Specifications ……………………… 17
Page 3
3
English
Get answers to common questions
You can easily solve most problems by setting shooting options.
There are more details about how to set shooting options in the CD version of the user manual.
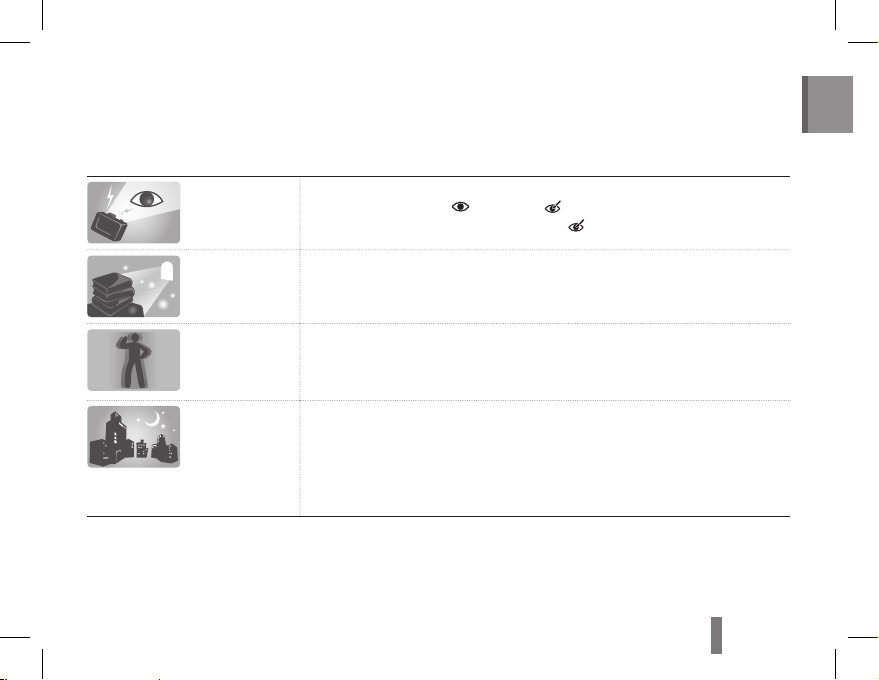
The subject's
eyes appear red.
This is caused by a reflection from the camera flash.
Set the flash option to •
Red–eye or Red–eye Fix.
If the photo has already been taken, select •
Red–eye Fix in the edit menu.
Photos have
dust
spots.
Dust particles floating in the air may be captured in photos when using the flash.
Turn off the flash or avoid taking photos in a dusty place.•
Set ISO speed options.•
Photos are
blurred.
This may be caused by taking photos in low light conditions or holding the camera
incorrectly.
Use the • d mode.
Press [• Shutter] halfway down to make sure the subject is focused.
Photos are
blurred when
shooting at night.
As the camera tries to let in more light, the shutter speed slows.
This can make it difficult to steady the camera and may result in camera shake.
Turn on the flash.•
Select • Night in the s mode.
Set ISO speed options.•
Use a tripod to prevent your camera from shaking.•
Page 4

4
Health and safety information
Comply with the following precautions to avoid dangerous
or illegal situations while operating the camera and keep
this manual handy for future reference.
Warnings
Do not use your camera near flammable or explosive
gases and liquids
Do not use your camera near fuels, combustibles, or
flammable chemicals. Do not store or carry flammable
liquids, gases, or explosive materials in the same
compartment as the camera or its accessories.
Keep your camera away from small children and pets
Keep your camera and all accessories out of the reach
of small children and animals. Small parts may cause
choking or serious injury if swallowed. Moving parts and
accessories may present physical dangers as well.
Prevent damage to subjects’ eyesight
Do not use the flash in close proximity (closer than 1m/3
ft) to people or animals. Using the flash too close to
your subject’s eyes can cause temporary or permanent
damage.
Handle and dispose of batteries and chargers
with care
Use only Samsung-approved batteries and chargers. •
Incompatible batteries and chargers can cause serious
injuries or damage to your camera.
Never dispose of batteries in a fire. Follow all local •
regulations when disposing of used batteries.
Never place batteries or cameras on or in heating •
devices, such as microwave ovens, stoves, or
radiators. Batteries may explode when overheated.
Page 5

5
English
Protect batteries, chargers, and memory cards from
damage
Avoid exposing batteries or memory cards to very cold •
or very hot temperatures (below 0° C/32° F or above
40° C/104° F). Extreme temperatures can reduce the
charging capacity of your batteries and can cause
memory cards to malfunction.
Prevent batteries from making contact with metal •
objects, as this can create a connection between the +
and – terminals of your battery and lead to temporary
or permanent battery damage.
Prevent memory cards from making contact with •
liquids, dirt, or foreign substances. If dirty, wipe the
memory card clean with a soft cloth before inserting in
your camera.
Use only Samsung-approved accessories
Using incompatible accessories may damage your
camera, cause injury, or void your warranty.
Protect your camera’s lens
Protect your lens from fingerprints and scratches. Clean
your lens with a soft, clean, debris-free lens cloth.
Cautions
Handle and store your camera carefully and sensibly
Do not allow your camera to get wet—liquids can •
cause serious damage. Do not handle your camera
with wet hands. Water damage to your camera can
void your manufacturer’s warranty.
Avoid using or storing your camera in dusty, dirty, •
humid, or poorly-ventilated areas to prevent damage
to moving parts and internal components.
Protect your camera from impact, rough handling, and •
excessive vibration to avoid serious damage.
Exercise caution when connecting cables or adapters •
and installing batteries and memory cards. Forcing
the connectors, improperly connecting cables, or
improperly installing batteries and memory cards can
damage ports, connectors, and accessories.
Do not insert foreign objects into any of your camera’s •
compartments, slots, or access points. This type of
damage may not be covered by your warranty.
Page 6
6
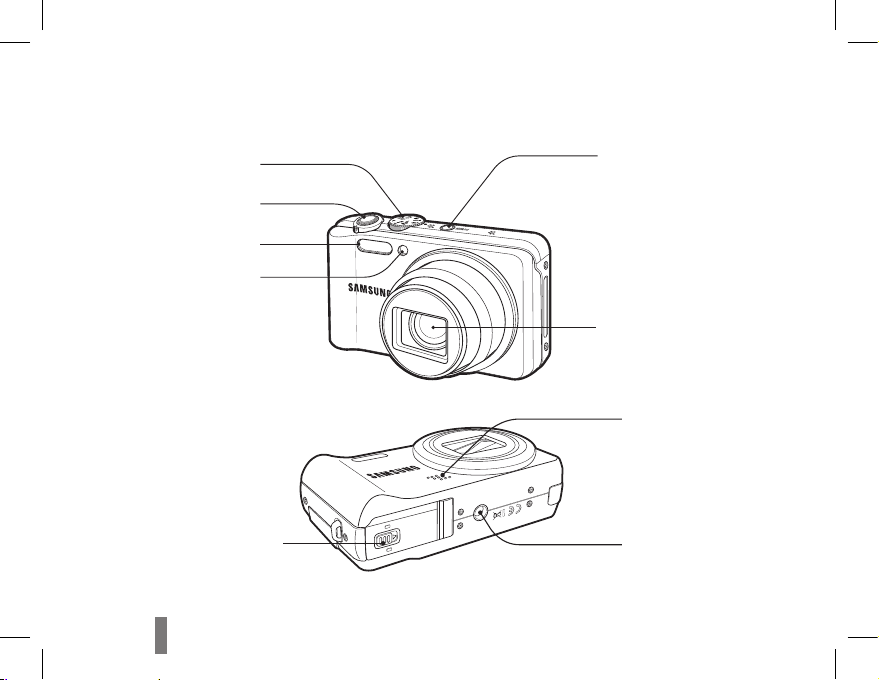
Camera layout
Mode dial
POWER button
Lens
Speaker
Tripod mount
Shutter button
Flash
AF-assist light/timer lamp
Battery chamber cover
Page 7

7
English
Status lamp
USB and A/V port
Video shooting button
HDMI port
Display
Microphone
Strap eyelet
Zoom button
Navigation button/
OK button
Playback button
Function / Delete button
MENU button
Page 8
8
Setting up your camera
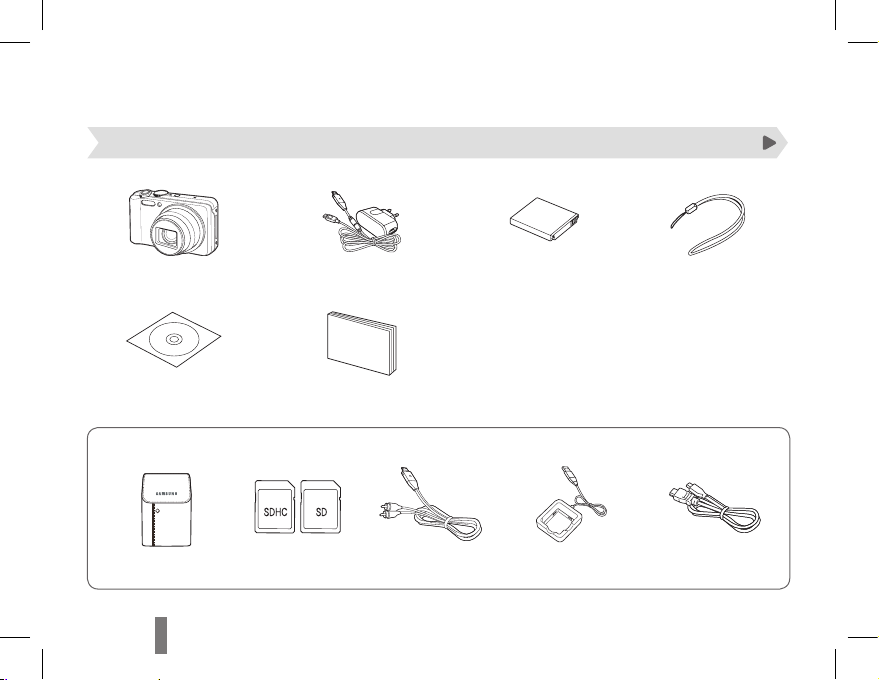
Unpacking
Sold Separately
Camera AC adapter/USB cable Rechargeable battery Strap
User Manual CD-ROM User Manual
Basic Operation
Camera case Memory cards A/V cable Battery Charger HDMI cable
Page 9
9
English
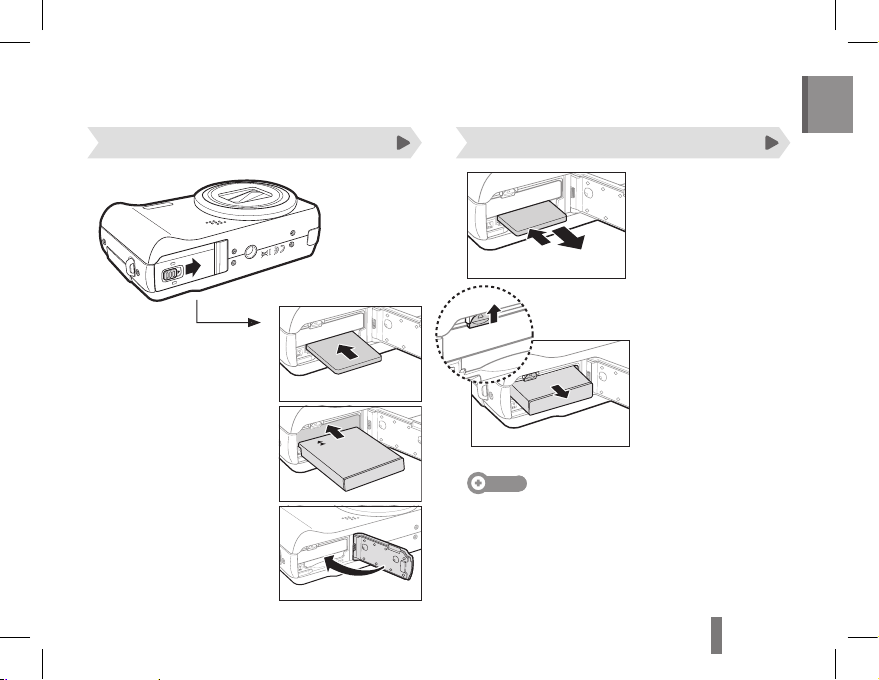
Inserting the battery and memory card Removing the battery and memory card
Note
The internal memory can be used as a temporary storage
device when the memory card is not inserted.
Insert a memory card
with the gold-coloured
contacts facing up.
Insert the battery with
the Samsung logo facing
down.
Push gently until the card
disengages from the
camera and then pull it
out of the slot.
Push the lock up to
release the battery.
Battery
Battery lock
Memory card
Page 10
10
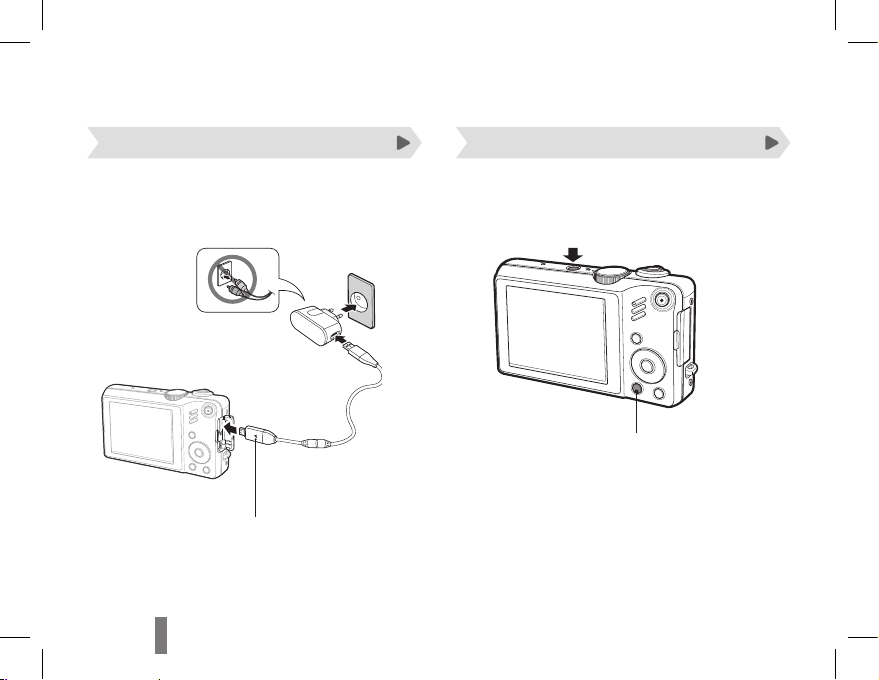
Press [POWER].
Setting up your camera
Charging the battery Turning on your camera
Indicator light
Red ▪ : Charging
Green ▪ : Fully charged
Before using the camera for the first time, you
must charge the battery.
Press [ ▪ P] to turn on the camera
in Playback mode.
Press and hold [ ▪ P] to mute
camera sounds.
Page 11

11
English
Press [5 F] or [t] to select a time zone and
press [o].
To set the daylight-saving time, press [ ▪ D].
Back DST
Press [6 D] or [M] to select Date & Time
(Date & Time) and press [t] or [o].
Press [
7
F] or [t] to select an item.
Press [
8
D] or [M] to set the date and time or
select a date format, and press [o].
Press [
1
POWER].
The initial setup screen appears when you turn on ▪
the camera for the first time.
Press [2 t] to select Language and press [t]
or [o].
English
穢剳檺
Français
Deutsch
Español
Italiano
Language
Date & Time
Time Zone
Back Set
Press [3 D] or [M] to select a language and
press [o].
Press [
4
D] or [M] to select Time Zone (Time
Zone) and press [t] or [o].
Performing the initial setup
Page 12
12
You can select options by pressing [m] and using the
navigation buttons ([D], [M], [F], [t]).
Note
You can also access shooting options by pressing [f] but
some options are not available.
In Shooting mode, press [1 m].
Use the navigation buttons to scroll to an option
2
or menu.
Back
White Balance
Move
To move left or right, press [ ▪ F] or [t].
To move up or down, press [ ▪ D] or [M].
Press [3 o] to confirm the highlighted option or
menu.
Going back to the previous menu
Press [m] again to go back to the previous menu.
Note
Press [Shutter] to return to Shooting mode.
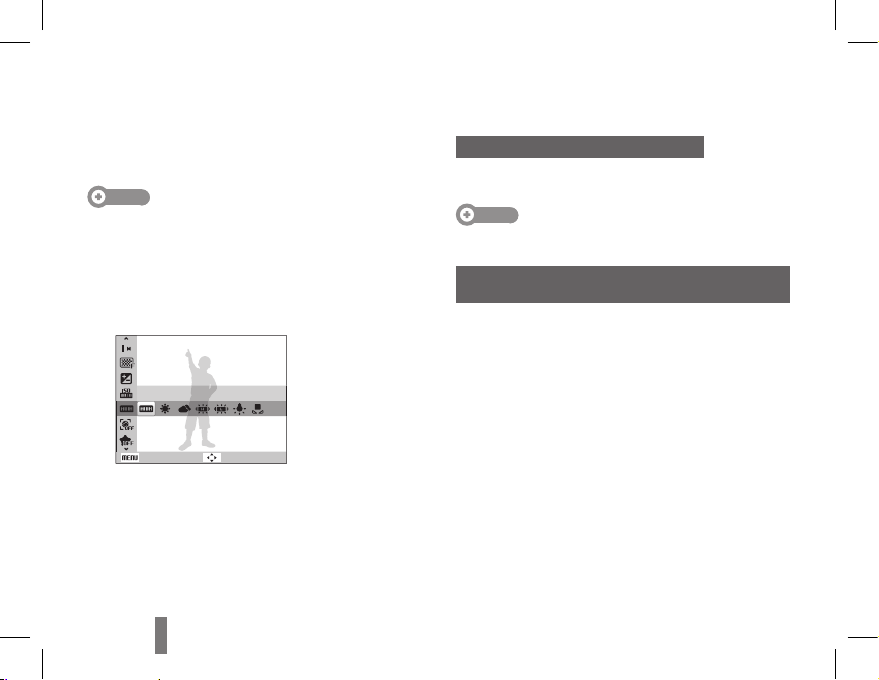
E.g. Selecting a white balance option in the
P mode
Rotate the mode dial to 1 p.
Press [
2
m].
Press [
3
D] or [M] to scroll to Shooting and
then press [t] or [o].
Press [
4
D] or [M] to scroll to White Balance
and then press [t] or [o].
Press [
5
F] or [t] to scroll to a white balance
option.
Press [
6
o].
Selecting options
Page 13

13
English
Press [3 Shutter] halfway down to focus
automatically.
A green frame means the subject in focus. ▪
Press [4 Shutter] all the way down to take the
photo.
Taking a photo
Rotate the mode dial to 1 p.
Align your subject in the frame.
2
Capturing photos or videos
Page 14

14
Note
Number of photos by resolution (for 1 GB SD)
Resolution
4000 x 3000
147 285
405
3984 x 2656
168 314
442
3840 x 2160
203 368
529
3264 x 2448
212 375
538
2560 x 1920
340 568
794
2048 x 1536
534 804
1068
1920 x 1080
872 1147
1441
1024 x 768
1475 1675
1878
These figures are measured under Samsung’s standard
conditions and may vary depending on shooting conditions
and camera settings.
Viewing photos
Press [1 P].
If the camera is off, it will turn on. ▪
Press [2 F] or [t] to scroll through files.
Press and hold to view files quickly. ▪
Capturing photos or videos
Page 15

15
English
Viewing videos
Press [1 P].
Press [
2
o].
Pause
Use the following buttons to control playback.
3
[F] Scan backward
[o] Pause or resume playback
[t] Scan forward
[Zoom W/T] left or
right
Adjust the volume level
Recording a video
Rotate the mode dial to 1 v.
Align your subject in the frame.
2
Press [3 Shutter].
Press [ ▪ o] to pause or resume.
Press [4 Shutter] again to stop the recording.
Note
You can record video of up to 20 minutes in length.
Page 16

16
Transferring files to a PC (Windows)
Connect the camera to your computer with the
1
USB cable.
Note
Make sure that the PC Software option is set to On in the
settings menu.
Turn on the camera.
2
The computer recognizes the camera automatically. ▪
For Windows Vista, select ▪ Run iStudio.exe from
the AutoPlay window.
Select a folder on your computer to save new
3
files.
If your camera has no new files, the pop-up window ▪
for saving new files will not appear.
Select 4 Yes.
New files will be transferred to your computer. ▪
You can now use the Intelli-studio program.
Note
About Intelli-studio
Intelli-studio is a built-in program that allows you to play
back and edit files. You can also upload files to websites,
such as Flickr or YouTube.
Page 17

17
English
Specifications
Image
sensor
Type
1/2.3" (Approx. 1.10 cm) CCD
Pixels
Effective pixels: Approx. 12.0 Megapixel, Total pixels: Approx. 14.2
Mega-pixel
Lens
Focal length
Schneider-KREUZNACH lens
f = 3.9 ~ 58.5mm (35 mm film
equivalent: 24 ~ 360mm),
15X optical zoom
F-stop range F3.2(W) ~ F5.8(T)
Display 3.0" TFT LCD (QVGA 230K dots)
Focusing
Type
TTL auto focus (Multi AF, Center AF,
Selection AF, Tracking AF, Manual
Focus, Face Detection AF,
Face Recognition AF)
Range
Wide (W) Tele (T)
Normal 80 cm - infinity 2 m - infinity
Macro 3 cm - 80 cm 1 m - 2 m
Auto Macro 3 cm - infinity 1 m - infinity
Manual 3 cm - infinity 1 m - infinity
Shutter speed
Auto: 1- 1/2,000 sec.•
Manual: 16 - 1/2,000 sec.•
Night: 8 - 1/2,000 sec.•
Firework: 2 sec.•
Shake reduction
Dual IS (OIS + DIS)
OIS (Optical Image Stabilization),
DIS (Digital Image Stabilization)
Storage
Internal memory: approx. 128 MB•
External memory (Optional): •
SD card (Up to 2GB guaranteed),
SDHC card (Up to 8GB
guaranteed)
Internal memory capacity may not match
these specifications.
Interface
Digital output USB 2.0 (20 pin)
Audio output
Mono (Internal speaker),
Stereo (Microphone)
Video output
AV: NTSC, PAL (selectable) •
HDMI 1.4: NTSC, PAL (selectable)•
DC power
input
connector
20 pin, 4.4 V
Rechargeable battery
Lithium-ion battery
(SLB-11A, 1,130 mAh)
Dimensions (W x H x D)
106.6 x 60.5 x 28 mm
(excluding protrusions)
Weight
210.7 g
(without battery and memory card)
Operating temperature 0 - 40° C
Operating humidity 5 - 85 %
Page 18

18
Correct Disposal of This Product
(Waste Electrical & Electronic Equipment)
(Applicable in the European Union and other
European countries with separate collection
systems)
This marking on the product, accessories or literature
indicates that the product and its electronic accessories
(e.g. charger, headset, USB cable) should not be
disposed of with other household waste at the end
of their working life. To prevent possible harm to the
environment or human health from uncontrolled waste
disposal, please separate these items from other types
of waste and recycle them responsibly to promote the
sustainable reuse of material resources. Household
users should contact either the retailer where they
purchased this product, or their local government office,
for details of where and how they can take these items
for environmentally safe recycling. Business users should
contact their supplier and check the terms and conditions
of the purchase contract. This product and its electronic
accessories should not be mixed with other commercial
wastes for disposal.
Correct disposal of batteries in this product
(Applicable in the European Union and other
European countries with separate battery
return systems)
This marking on the battery, manual or packaging
indicates that the batteries in this product should not be
disposed of with other household waste at the end of
their working life. Where marked, the chemical symbols
Hg, Cd or Pb indicate that the battery contains mercury,
cadmium or lead above the reference levels in EC
Directive 2006/66. If batteries are not properly disposed
of, these substances can cause harm to human health or
the environment.
To protect natural resources and to promote material
reuse, please separate batteries from other types of
waste and recycle them through your local, free battery
return system.
Samsung Eco-mark
It is Samsung’s own symbol mark is used to effectively
communicate Samsung’s environmental friendly product
activities to the consumers. The mark represents
Samsung’s continuous effort on development of
environmental conscious products.
Page 19

19
English
Memo
Page 20

TR-2
İçindekiler
Genel soruların yanıtları …………… 3
Sağlık ve Güvenlik Bilgileri ………… 4
Kamera yerleşimi …………………… 6
Kameranızı ayarlama ………………… 8
Paketi açma ………………………………8
Pili ve hafıza kartını takma ………………9
Pili ve hafıza kartını çıkarma ……………9
Pili şarj etme …………………………… 10
Kameranızı açma ……………………… 10
Dil seçme ……………………………… 11
Tarih ve saati ayarlama ……………… 11
Seçenekleri belirleme …………… 12
Fotoğraf veya video çekme ……… 13
Dosyaları bilgisayara aktarma
(Windows) ………………………… 16
Teknik Özellikler …………………… 17
Telif hakkı bilgileri
Microsoft Windows ve Windows logosu, Microsoft •
Corporation'ın tescilli ticari markalarıdır.
Mac, Apple Corporation'ın tescilli ticari markasıdır. •
HDMI, HDMI logosu ve "High Denition Multimedia •
Interface" terimi HDMI Licencing LLC'nin ticari
markaları veya tescilli ticari markalarıdır.•
Bu kılavuzda yer alan tüm marka ve ürün adları, ilgili •
rmalarının kayıtlı ticari markalarıdır.
Kameranın teknik özellikleri veya bu kılavuzun içeriği •
kamera işlevlerinin yükseltilmesi nedeniyle önceden
haber verilmeden değiştirilebilir.
Kameranızı satın aldığınız ülkede kullanmanızı •
öneriyoruz.
Açık Kaynak Lisans bilgileri için birlikte verilen •
CD-ROM’daki “OpenSourceInfo.pdf” dosyasına bakın.
Page 21

TR-3
Türkçe
Genel soruların yanıtları
Sorunların çoğunu çekim seçeneklerini ayarlayarak çözebilirsiniz.
Kullanım kılavuzunun CD sürümünde çekim seçeneklerinin ayarlanmasıyla ilgili daha ayrıntılı bilgi bulunur.
Öznenin
gözleri kırmızı
görünüyor.
Bunun nedeni kamera aşının yansımasıdır.
Flaş seçeneğini •
Kirmizi göz veya Kir.göz düzel. olarak ayarlayın.
Fotoğraf çekildiyse, düzenleme menüsünde •
Kir.göz düzel.'i seçin.
Fotoğrafta tozlu
noktalar var.
Flaş kullanıldığında havada uçuşan toz parçacıkları da fotoğrafta görünebilir.
Flaşı kapatın veya tozlu ortamda fotoğraf çekmeyin.•
ISO hız seçeneğini ayarlayın.•
Fotoğraar net
değil.
Bunun nedeni fotoğrafın az ışık koşullarında çekilmesi veya kameranın doğru
tutulmaması olabilir.
d• modunu kullanın.
Öznenin odaklandığından emin olmak için [• Deklanşör] düğmesine yarım basın.
Fotoğraar gece
çekiminde net
değil.
Kamera daha fazla ışık almaya çalıştıkça deklanşör hızını düşer. Bu durum
kameranın sabit tutulmasını zorlaştırır ve kameranın titremesine neden olabilir.
Flaşı açın.•
s•
modunda Gece'yi seçin.
ISO hız seçeneğini ayarlayın.•
Kameranızın titrememesi için üçayak kullanın.•
Page 22

TR-4
Sağlık ve Güvenlik Bilgileri
Kamerayı kullanırken tehlikeli veya yasa dışı
durumlarda kalmamak için aşağıdaki uyarılara dikkat
edin ve bu kitapçığı daha sonra kullanmak için el altında
bulundurun.
Uyarılar
Kameranızı yanıcı veya patlayıcı gazların ve
yakınında kullanmayın
Kameranızı benzin, yakıt veya yanıcı kimyasal
maddelerin yakınında kullanmayın. Yanıcı sıvı, gaz veya
patlayıcı malzemeleri kamera veya aksesuarlarıyla aynı
bölmede saklamayın veya taşımayın.
Kameranızı küçük çocuklardan ve evcil
hayvanlardan uzak tutun
Kameranızı ve tüm aksesuarlarını küçük çocukların ve
hayvanların erişmeyeceği yerde bulundurun. Küçük
parçalar çiğnenebilir veya yutulursa ciddi yaramalara
neden olabilir. Hareketli parçalar ve aksesuarlar da
ziksel tehlike arz edebilir.
Öznenin gözlerinin zarar görmemesine dikkat edin
Flaşı insanlara veya hayvanlara yakın mesafede (1m/3
ft'ten daha yakın) kullanmayın. Flaşı öznenin gözüne
çok yakın tutarak kullanmak geçici veya kalıcı hasarlara
neden olabilir.
Pilleri ve şarj aygıtlarını kullanırken veya atarken
olun
Yalnızca Samsung tarafından onaylanan pilleri ve •
şarj cihazlarını kullanın. Uyumsuz pil veya şarj cihazı
kullanılması ciddi yaralanmalara veya kameranızın
zarar görmesine neden olabilir.
Pilleri asla ateşe atmayın. Kullanılmış pilleri atarken •
tüm yerel düzenlemelere uyun.
Pilleri veya kameraları asla mikrodalga fırın, ocak, •
radyatör veya soba gibi ısıtıcıların içine ya da üzerine
koymayın. Piller fazla ısınırsa patlayabilir.
Page 23

TR-5
Türkçe
Pilleri, şarj cihazlarını ve hafıza kartlarını koruyun
Pilleri veya hafıza kartlarını çok düşük veya çok •
yüksek sıcaklıklara maruz bırakmayın (0º C/32º
F'den düşük veya 40º C/104º F'den yüksek). Çok
düşük veya çok yüksek sıcaklıklar pillerin şarj
kapasitesini düşürebilir ve hafıza kartlarının doğru
çalışmamasına neden olabilir.
Pillerin metal nesnelere temas etmemesine dikkat •
edin, aksi taktirde bu durum + ve - uçları arasında
bağlantı oluşmasına ve pilde geçici veya kalıcı
hasara neden olabilir.
Hafıza kartlarının sıvı, kir veya yabancı maddelerle •
temas etmemesine dikkat edin. Hafıza kartı
kirlenirse, kartı kameranıza takmadan önce yumuşak
bir bezle temizleyin.
Yalnızca, Samsung tarafından onaylanan
aksesuarları kullanın
Uyumsuz aksesuarların kullanılması kameranıza zarar
verebilir, yaralanmalara neden olabilir veya garantinizi
geçersiz kılabilir.
Kameranızın merceğini koruyun.
Merceğinizi parmak izi veya çizilmelere karşı koruyun.
Merceğinizi yumuşak, temiz, tüy bırakmayan bir mercek
beziyle temizleyin.
Dikkat
Kameranızı dikkatli ve makul bir şekilde kullanın ve
saklayın
Kameranızın ıslanmamasına dikkat edin; sıvılar •
kameraya ciddi hasar verebilir. Kameranızı ıslak
elle kullanmayın. Kameranızın su yüzünden zarar
görmesi, üretici garantisini geçersiz kılar.
Kameranın içindeki hareketli parçaların ve iç •
bileşenlerin zarar görmemesi için kameranızı tozlu,
kirli, nemli veya iyi havalandırılmamış yerlerde
kullanmayın ve saklamayın.
Kameranızı darbelere, sert kullanıma ve aşırı •
titreşime karşı koruyun, aksi takdirde ciddi zarar
görebilir.
Kabloları veya adaptörleri bağlarken ve pilleri veya •
hafıza kartlarını takarken dikkatli olun. Bağlantıları
zorlamak, kabloları doğru takmamak veya pilleri ve
hafıza kartlarını yanlış takmak bağlantı noktalarına,
girişlere ve aksesuarlara zarar verebilir.
Kameranın hiçbir bölümüne, yuvasına veya erişim •
noktasına herhangi bir yabancı nesne sokmayın.
Garantiniz bu tür hasarı kapsamayabilir.
Page 24

TR-6
Kamera yerleşimi
Mod düğmesi
Güç düğmesi (POWER)
Lens
Hoparlör
Üçayak bağlantısı
Deklanşör düğmesi
Flaş
AF-yardımcı ışığı /
zamanlayıcı lambası
Pil bölmesi kapağı
Page 25

TR-7
Türkçe
Durum lambası
USB ve A/V bağlantı
noktası
Video çekimi düğmesi
HDMI bağlantı
noktası
Ekran
Mikrofon
Kayış gözü
Yakınlaştırma düğmesi
Gezinti düğmesi/
OK düğmesi
Oynatma modu düğmesi
Fn / Sil düğmesi
MENU düğmesi
Page 26

TR-8
Kameranızı ayarlama
Paketi açma
Kamera AC adaptörü / USB kablosu Şarj edilebilir pil Askı
Kullanım Kılavuzu
CD-ROM'u
Kullanım Kılavuzu
Temel İşlemler
İsteğe bağlı aksesuarlar
Kamera çantası Hafıza kartları A/V kablosu Pil şarj cihazı HDMI kablosu
Page 27

TR-9
Türkçe
Pili ve hafıza kartını takma Pili ve hafıza kartını çıkarma
Not
Hafıza kartı takılı olmadığında yerleşik hafıza geçici
depolama aygıtı olarak kullanılabilir.
Hafıza kartını sarı renkli
temas noktaları yukarı
gelecek şekilde yerleştirin.
Pili, Samsung logosu
aşağı gelecek şekilde
yerleştirin.
Kart kameradan ayrılana
kadar yavaşça bastırın ve
kartı yuvasından çekerek
çıkarın.
Pili çıkarmak için kilidi
yukarı doğru bastırın.
Pil
Pil kilidi
Hafıza kartı
Page 28

TR-10
[POWER] düğmesine basın.
Kameranızı ayarlama
Pili şarj etme Kameranızı açma
Kamerayı kullanmaya başlamadan önce pili şarj
ettiğinizden emin olun.
Gösterge ışığı
Kırmızı ▪ : Şarj oluyor
Yeşil ▪ : Tam olarak şarj oldu
Kamerayı Oynatma modunda ▪
açmak için [P] düğmesine
basın.
Kamera seslerini kapatmak için ▪
[P] düğmesini basılı tutun.
Page 29

TR-11
Türkçe
Saat dilimini seçmek için [5 F] veya [t]
düğmesine basın ve sonra [o] düğmesine
basın.
Yaz saatini ayarlamak için [ ▪ D] düğmesine
basın.
Back DST
Date & Time6 (Trh&saat) seçeneğini belirlemek
için [D] veya [M] düğmesine basın ve
ardından [t] veya [o] düğmesine basın.
Bir öğeyi seçmek için [
7
F] veya [t]
düğmesine basın.
Tarih ve saati ayarlamak veya bir tarih biçimi
8
seçmek için [D] veya [M] düğmesine basın
ve [o] düğmesine basın.
[
1
POWER] düğmesine basın.
Kamerayı ilk açtığınızda başlangıç kurulum ekranı ▪
görüntülenir.
Language2 seçeneğini belirlemek için [t]
düğmesine basın ve ardından [t] veya [o]
düğmesine basın.
English
穢剳檺
Français
Deutsch
Español
Italiano
Language
Date & Time
Time Zone
Back Set
Bir dil seçmek için [3 D] veya [M] düğmesine
basın ve ardından [o] düğmesine basın.
Time Zone
4
(Saat Dilimi) seçeneğini belirlemek
için [D] veya [M] düğmesine basın ve
ardından [t] veya [o] düğmesine basın.
Başlangıç kurulumunu yapma
Page 30

TR-12
Seçenekleri [m] düğmesine basarak ve gezinti
düğmelerini ([D], [M], [F], [t]) belirleyebilirsiniz.
Not
Çekim seçeneklerine [f] düğmesine basarak da
erişebilirsiniz, ancak bu durumda bazı seçenekler
kullanılmaz.
Çekim modunda [1 m] düğmesine basın.
Bir seçeneğe veya menüye gitmek için gezinti
2
düğmelerini kullanın.
Beyaz dengesi
Geri Taşı
Sola veya sağa gitmek için [ ▪ F] veya [t]
düğmesine basın.
Yukarı veya aşağı gitmek için [ ▪ D] veya [M]
düğmesine basın.
Vurgulanan seçeneği veya menüyü
3
onaylamak için [o] düğmesine basın.
Önceki menüye geri gitme
Önceki menüye geri gitmek için [m] düğmesine
basın.
Not
Çekim moduna geri gitmek için [Deklanşör] düğmesine
basın.
Örn. P modunda beyaz dengesi seçeneğini
seçme
Mod düğmesini döndürerek 1 p seçeneğine
getirin.
[
2
m] düğmesine basın.
Çekiyor
3
gitmek için [D] veya [M]
düğmesine basın ve ardından [t] veya [o]
düğmesine basın.
Beyaz dengesi
4
gitmek için [D] veya [M]
düğmesine basın ve ardından [t] veya [o]
düğmesine basın.
Bir beyaz dengesi seçeneğine gitmek için [
5
F]
veya [t] düğmesine basın.
[
6
o] düğmesine basın.
Seçenekleri belirleme
Page 31

TR-13
Türkçe
Otomatik odaklama için [3 Deklanşör]
düğmesine yarım basın.
Yeşil çerçeve öznenin odakta olduğunu gösterir. ▪
Fotoğrafı çekmek için [4 Deklanşör] düğmesine
tam basın.
Fotoğraf çekme
Mod düğmesini döndürerek 1 p'ya getirin.
Çekeceğiniz özneyi çerçeveye yerleştirin.
2
Fotoğraf veya video çekme
Page 32

TR-14
Not
Çözünürlüğüne göre fotoğraf sayısı (1 GB SD için)
Çözünürlük
4000 x 3000
147 285
405
3984 x 2656
168 314
442
3840 x 2160
203 368
529
3264 x 2448
212 375
538
2560 x 1920
340 568
794
2048 x 1536
534 804
1068
1920 x 1080
872 1147
1441
1024 x 768
1475 1675
1878
Bu değerler Samsung'un standart koşullarına göre
ölçülmüştür ve çekim koşullarına ve kamera ayarlarına bağlı
olarak değişebilir.
Fotoğraarı görüntüleme
[1 P] düğmesine basın.
Kamera kapalıysa açılacaktır. ▪
Dosyalar içinde ilerlemek için [2 F] veya [t]
düğmesine basın.
Dosyaları hızlı bir şekilde görüntülemek için basılı ▪
tutun.
Fotoğraf veya video çekme
Page 33

TR-15
Türkçe
Videoları görüntüleme
[1 P] düğmesine basın.
[
2
o] düğmesine basın.
Duraklat
Oynatmayı kontrol etmek için aşağıdaki
3
düğmeleri kullanın.
[F] Geri taramanızı sağlar
[o]
Oynatmayı duraklatmanızı
veya devam ettirmenizi sağlar
[t] İleri taramanızı sağlar
[
Yakınlaştırma
W/T Kolu
] sola
veya sağa
Ses seviyesini ayarlamanızı
sağlar
Video kaydetme
Mod düğmesini döndürerek 1 v seçeneğine
getirin.
Çekeceğiniz özneyi çerçeveye yerleştirin.
2
[3 Deklanşör] düğmesine basın.
Duraklatmak veya devam ettirmek için [ ▪ o]
düğmesine basın.
Kaydı durdurmak için [4 Deklanşör] düğmesine
tekrar basın.
Not
En çok 20 dakika uzunluğunda video kaydedebilirsiniz.
Page 34

TR-16
Dosyaları bilgisayara aktarma (Windows)
USB kablosunu kullanarak kameranızı
1
bilgisayarınıza bağlayın.
Not
Ayarlar menüsünde PC Yazılımı seçeneğinin Açık olarak
ayarlandığından emin olun.
Kamerayı açın.
2
Bilgisayar kamerayı otomatik olarak tanır. ▪
Windows Vista’da, Otomatik Oynat penceresinde ▪
Run iStudio.exe seçin.
Yeni dosyaları kaydetmek için bilgisayarınızda
3
bir klasör seçin.
Kameranızda yeni dosya yoksa, yeni dosyaları ▪
kaydetme penceresi görüntülenmez.
Evet 4 seçeneğini belirleyin.
Yeni dosyalar bilgisayarınıza aktarılır. Intelli-studio ▪
programını kullanabilirsiniz.
Not
Intelli-studio hakkında
Intelli-studio, dosyaları kayıttan yürütmenize ve
düzenlemenize olanak sağlayan dahili bir programdır.
Flickr veya YouTube gibi web sitelerine de
yükleyebilirsiniz.
Page 35

TR-17
Türkçe
Görüntü
algılayıcı
Tip 1/2,3″ (Yakl. 1,10 cm) CCD
Piksel
Etkin piksel: Yaklaşık 12,0 Megapiksel,
Toplam piksel: Yaklaşık 14,2 Megapiksel
Mercek
Odak
uzunluğu
Schneider-KREUZNACH mercek f = 3,9
- 58,5 mm (35 mm lme eşdeğer: 24 360 mm), 15X optik yakınlaştırma
F-stop aralığı F3,2 (W) - F5,8 (T)
Ekran 3,0" TFT LCD (QVGA 230K nokta)
Odaklama
Tip
TTL otomatik odaklama (Çoklu oto.o.,
Merkez oto.o., Seçim oto.o.,
İzleme oto.o., Manüel Odak,
Yüz Algilama OO, Yüz Tanima OO)
Aralık
Geniş (W) Tele (T)
Normal 80 cm - sonsuz 2 m - sonsuz
Makro 3 cm - 80 cm 1 m - 2 m
Oto makro 3 cm - sonsuz 1 m - sonsuz
Manüel 3 cm - sonsuz 1 m - sonsuz
Deklanşör hızı
Otomatik: 1 - 1/2,000 sn.
•
Manüel: 16 - 1/2,000 sn. •
Gece: 8 - 1/2,000 sn. •
Havai şek: 2 sn.•
Titreme azaltma
Dual IS (OIS + DIS)
OIS (Optik Görüntü Dengeleme),
DIS (Dijital Görüntü Dengeleme)
Depolama
Dahili hafıza: yakl. 128 MB•
Harici hafıza (İsteğe bağlı): •
SD kartı (2GB’ye kadar garanti
edilmektedir), SDHC kartı (8GB’ye
kadar garanti edilmektedir)
Dahili hafıza kapasitesi bu teknik
özelliklere uymayabilir.
Arabirim
Dijital çıkış USB 2.0 (20 pin)
Ses çıkışı
Mono (Dahili hoparlör),
Stereo (Mikrofon)
Video çıkışı
AV: NTSC, PAL (seçilebilir)
•
HDMI 1.4: NTSC, PAL (seçilebilir)•
DC güç girişi
bağlantısı
20 pin, 4,4V
Doldurulabilir pil Lityum-iyon pil (SLB-11A, 1,130 mAh)
Boyutlar (G x Y x D)
106,6 x 60,5 x 28 mm
(uzantılar hariç)
Ağırlık
Yaklaşık 210,7 g
(pil ve hafıza kartı hariç)
Çalıştırma sıcaklığı 0 - 40˚C
Çalıştırma nem düzeyi 5 - 85 %
Teknik Özellikler
Page 36

TR-18
Bu ürünün doğru şekilde atılması
(Avrupa Birliği ve ayrı pil iade sistemleri olan
diğer Avrupa ülkeleri için geçerlidir)
Pildeki, kılavuzdaki veya ambalajdaki bu işaret bu
üründeki pillerin kullanım ömürlerinin sonunda diğer
ev atıkları ile birlikte atılmaması gerektiğini belirtir. Hg,
Cd veya Pb kimyasal sembolleri pilin EC Yönetmeliği
2006/66’da belirtilen referans değerlerin üstünde cıva,
kadmiyum veya kurşun içerdiğini gösterir. Piller düzgün
atılmazsa, bu maddeler insan sağlığına veya ortama
zarar verebilir.
Doğal kaynakları korumak ve malzemelerin yeniden
kullanılmasını özendirmek için pilleri diğer atık
türlerinden ayırıp bölgenizdeki ücretsiz pil iade sistemiyle
geri dönüştürülmesini sağlayın.
Bu Ürünü Doğru Bir Şekilde Atma
(Atık Elektrik ve Elektronik Ekipmanı)
(Avrupa Birliği ve farklı toplama sistemleri olan
diğer Avrupa ülkeleri için geçerlidir)
Üründe veya ürüne ait belgelerde yer alan bu işaret,
ürünün kullanım ömrü dolduğunda diğer ev atıklarıyla
birlikte atılmaması gerektiğini gösterir. Denetlenmeyen
atıklardan dolayı çevreye veya insan sağlığına zarar
verme olasılığını önlemek için lütfen bu cihazı diğer
atık türlerinden ayırın ve malzeme kaynaklarının tekrar
kullanılabilmesini sağlamak üzere gerektiği şekilde
geri dönüşüm sağlayın. Bireysel kullanıcılar çevre
açısından güvenli geri dönüşüm sağlamak için bu ürünü
nereye ve nasıl teslim edecekleri konusunda daha fazla
bilgi almak üzere ürünü satın aldıkları satıcıyla veya
yerel resmi kurumla iletişim kurmalıdırlar. Kurumsal
kullanıcılar tedarikçileriyle irtibat kurmalı ve satın alma
sözleşmesindeki hüküm ve koşulları kontrol etmelidir. Bu
ürün diğer ticari atıklarla karıştırılarak atılmamalıdır.
Samsung Eco-işareti
Bu sembol, Samsung’un çevreyle dost ürünlerini
tüketicilere etkili bir şekilde tanıtmak için
kullanılan, Samsung'a ait bir işarettir. Bu işaret
Samsung’un çevreye duyarlı ürünler geliştirmek
için sarf ettiği çabayı gösterir.
Page 37

SAMSUNG Electronics İstanbul Pazarlama ve Ticaret LTD.ŞTİ.
Flatofis İstanbul İş Merkezi,Otakçılar Cad. Bina
No: 78, Kat:3, No: B3, 34050, Eyüp, İstanbul /Türkiye
İthalatçı Firma
EEE Yönetmeliğine Uygundur
▪ Manufacturer: SAMSUNG DIGITAL IMAGING CO.,LTD.
▪ Address: 416, Maetan-3Dong, Yeongtong-Gu, Suwon-City,
Gyeonggi-Do, Korea 443-742
▪ City: Suwon
▪ Country: South Korea
▪ Manufacturer Tel / Fax: +82 31 8006 8314 / +82 31 8006 8789
Page 38

Please refer to the warranty that came with your product
or visit our website http://www.samsungimaging.com/
for after-sales service or inquiries.
AD68-04903A (1.1)
 Loading...