

Page 1

Washer
User manual
WA45K7600A* / WA45K7100A*
SSEC SEC
WA7700K_WA45K-03520S-00_EN.indd 1 2015/12/16 19:08:23
Page 2

SAVE THESE INSTRUCTIONS
Contents
Safety information 4
What you need to know about the safety instructions 4
Important safety symbols 4
Important safety precautions 5
Contents
Installation 13
Unpacking your washer 13
Overview of your washer 14
Basic location requirements 16
Important note to installer 20
Step-by-step installation 20
Operating instructions 28
Loading your washer 28
Getting started 28
Washing a load of laundry 30
Control panel 30
Cycle overview 32
Options 33
Washing clothes using the option button 36
ATC (Auto Temperature Control) 38
The basics 39
Detergent use 41
Features 42
Maintaining your washer 46
Cleaning the exterior 46
Cleaning the interior 46
Storing your washer 46
Preserving the top cover and the front frame 47
Cleaning the dispensers 47
Self Clean 49
Troubleshooting 50
Checkpoints 50
Information codes 54
2 English
WA7700K_WA45K-03520S-00_EN.indd 2 2015/12/16 19:08:23
Page 3

SAVE THESE INSTRUCTIONS
Specications 57
Fabric care chart 57
Helping the environment 59
Declaration of conformity 59
Specication sheet 60
Cycle chart 61
Contents
WA7700K_WA45K-03520S-00_EN.indd 3 2015/12/16 19:08:23
English 3
Page 4

SAVE THESE INSTRUCTIONS
Safety information
Congratulations on your new Samsung washer. This manual contains important information
on the installation, use and care of your appliance. Please take some time to read this manual
to take full advantage of your washer’s many benets and features.
Safety information
What you need to know about the safety instructions
Please read this manual thoroughly to ensure that you know how to safely and efciently
operate the extensive features and functions of your new appliance. Please store the manual
in a safe location close to the appliance for future reference. Use this appliance only for its
intended purpose as described in this instruction manual.
Warnings and Important Safety Instructions in this manual do not cover all possible
conditions and situations that may occur. It is your responsibility to use common sense,
caution and care when installing, maintaining and operating your washer.
Because the following operating instructions cover various models, the characteristics of your
washer may differ slightly from those described in this manual and not all warning signs
may be applicable. If you have any questions or concerns, contact your nearest service center
or nd help and information online at www.samsung.com.
Important safety symbols
What the icons and signs in this user manual mean:
Hazards or unsafe practices that may result in severe personal injury, death and/or property
damage.
WARNING
CAUTION
Hazards or unsafe practices that may result in personal injury and/or property damage.
NOTE
Indicates that a risk of personal injury or material damage exists.
4 English
WA7700K_WA45K-03520S-00_EN.indd 4 2015/12/16 19:08:23
Page 5

SAVE THESE INSTRUCTIONS
These warning signs are here to prevent injury to yourself and others.
Please follow them explicitly.
After reading this manual, store it in a safe place for future reference.
Read all instructions before using the appliance.
As with any equipment that uses electricity and moving parts, potential hazards exist. To
safely operate this appliance, familiarize yourself with its operation and exercise care when
using it.
WARNING
State of California Proposition 65 Warning (US only)
This product contains chemicals known to the State of California to cause cancer and birth
defects or other reproductive harm.
Important safety precautions
WARNING
To reduce the risk of re, electric shock, or injury to persons when using your appliance,
follow basic precautions, including the following:
1. Read all instructions before using this appliance.
2. Do not wash or dry articles that have been previously cleaned in, washed in, soaked in, or
spotted with gasoline, dry-cleaning solvents, other ammable or explosive substances as
they give off vapors that could ignite or explode.
3. Do not allow children to play on or in the appliance. Close supervision of children is
necessary when the appliance is used near children.
4. Before the appliance is removed from service or discarded, remove the lid of the washing
or drying compartment.
5. Do not reach into the appliance if the drum is moving.
6. Do not install or store this appliance where it will be exposed to the weather.
7. Do not tamper with the controls.
8. Do not repair or replace any part of the appliance or attempt any servicing unless it is
specically recommended in the user-maintenance instructions or in published userrepair instructions that you understand and have the skills to carry out.
9. Do not add gasoline, dry-cleaning solvents, or other ammable or explosive substances to
the wash water. These substances give off vapors that could ignite or explode.
Safety information
WA7700K_WA45K-03520S-00_EN.indd 5 2015/12/16 19:08:23
English 5
Page 6

SAVE THESE INSTRUCTIONS
Safety information
10. Under certain conditions, hydrogen gas may be produced in a hot water system that
Safety information
Critical installation warnings
Plug the power cord into an AC 120 V / 60 Hz/wall socket rated at 15 amps or higher. Use
the socket for this appliance only. In addition, do not use an extension cord.
• Sharing a wall socket with other appliances, using a power strip, or extending the power
• Do not use an electric transformer. It may result in electric shock or re.
• Ensure that the power voltage, frequency, and current match the product’s specications.
has not been used for 2 weeks or more. HYDROGEN GAS IS EXPLOSIVE. If the hot water
system has not been used for 2 weeks or more, before using a washer or combination
washer-dryer, turn on all hot water faucets and let the water ow from each for several
minutes. This will release any accumulated hydrogen gas. As the gas is ammable, do not
smoke or use an open ame during this time.
WARNING
cord may result in electric shock or re.
Failing to do so may result in electric shock or re.
Have this appliance installed by a qualied technician or service company.
• Failing to do so may result in electric shock, re, an explosion, problems with the product,
or injury.
Remove all foreign substances such as dust or water from the power plug terminals and
contact points using a dry cloth on a regular basis.
• Unplug the power plug and clean it with a dry cloth.
• Failing to do so may result in electric shock or re.
Plug the power plug into the wall socket in the right direction so that the cord runs towards
the oor.
• If you plug the power plug into the socket in the opposite direction, the electric wires
within the cable may be damaged and this may result in electric shock or re.
This appliance must be properly grounded.
Do not ground the appliance to a gas pipe, plastic water pipe, or telephone line.
• Improper grounding may result in electric shock, re, an explosion, or problems with the
product.
6 English
WA7700K_WA45K-03520S-00_EN.indd 6 2015/12/16 19:08:23
Page 7

SAVE THESE INSTRUCTIONS
• Never plug the power cord into a socket that is not grounded correctly. Make sure the
socket you use is grounded in accordance with local and national codes.
Do not install this appliance near a heater or ammable material.
Do not install this appliance in a humid, oily, or dusty location, or in a location exposed to
direct sunlight or water (rain drops).
Do not install this appliance in a location where gas may leak.
• This may result in electric shock or re.
Plug the power plug into the wall socket rmly. Do not use a damaged power plug, damaged
power cord, or loose wall socket.
• This may result in electric shock or re.
Do not pull or excessively bend the power cord.
Do not twist or tie the power cord.
Do not hook the power cord over a metal object, place a heavy object on the power cord,
insert the power cord between objects, or push the power cord into the space behind the
appliance.
• This may result in electric shock or re.
Do not pull the power cord when unplugging the power plug.
• Unplug the power plug by holding the plug.
• Failing to do so may result in electric shock or re.
Safety information
If the power plug or power cord are damaged, contact your nearest service center.
Installation cautions
CAUTION
Position the appliance so that the power plug is easily accessible.
• Failing to do so may result in electric shock or re due to electric leakage.
Install your appliance on a level and hard oor that can support its weight.
• Failing to do so may result in abnormal vibrations, noise, or problems with the product.
Unplug the power plug when the appliance is not being used for long periods of time or
during a thunder/lightning storm.
• Failing to do so may result in electric shock or re.
English 7
WA7700K_WA45K-03520S-00_EN.indd 7 2015/12/16 19:08:23
Page 8

SAVE THESE INSTRUCTIONS
Safety information
Critical usage warnings
WARNING
If the appliance is ooded, cut the power immediately and contact your nearest service
center.
Safety information
If the appliance emits a strange noise, a burning smell, or smoke, unplug the power plug
immediately and contact your nearest service center.
• Failing to do so may result in electric shock or re.
In the event of a gas leak (such as propane gas, LP gas, etc.), ventilate the area immediately.
Do not turn any appliance or light on or off.
• Do not use a ventilating fan.
• A spark may result in an explosion or re.
Do not wash items contaminated with gasoline, kerosene, benzene, paint thinner, alcohol or
other ammable or explosive substances.
• This may result in electric shock, re, or an explosion.
Do not force the washer lid open while the washer is operating (high-temperature washing/
drying/spinning).
• Water owing out of the washer may cause burns or cause the oor to be slippery.
• Forcing the lid open can damage the product or cause injury.
Make sure to remove the packaging (sponge, styrofoam) attached to the bottom of the
washer before using it.
Do not insert your hand under the washer.
• This may result in injury.
This may result in injury.
Do not touch the power plug with wet hands.
• This may result in electric shock.
Do not turn the appliance off by unplugging the power plug while the washer is in operation.
• Plugging the power plug into the wall socket again may cause a spark and result in
electric shock or re.
Keep all packaging materials well out of the reach of children, as packaging materials can be
dangerous to children.
• If a child places a bag over their head, the child may suffocate.
8 English
WA7700K_WA45K-03520S-00_EN.indd 8 2015/12/16 19:08:23
Page 9

SAVE THESE INSTRUCTIONS
Do not let children or inrm persons use this washer unsupervised.
• Failing to do so may result in electric shock, burns or injury.
Do not insert your hand or a metal object under the washer while it is operating.
• This may result in injury.
Do not attempt to repair, disassemble, or modify the appliance yourself.
• Do not use any fuse (such as copper, steel wire, etc.) other than the standard fuse.
• If you need to repair or reinstall the appliance, contact your nearest service center.
• Failing to do so may result in electric shock, re, problems with the product, or injury.
If any foreign substance such as water enters the appliance in any area other than the tub,
unplug the power plug and contact your nearest service center.
• Failing to do so may result in electric shock or re.
If the water supply hose comes loose from the faucet and oods the appliance, unplug the
power plug.
• Failing to do so may result in electric shock or re.
Usage cautions
CAUTION
Safety information
If the washer is contaminated by a foreign substance such as detergent, dirt, food waste, etc.,
unplug the power plug and clean the washer using a damp, soft cloth.
• Failing to do so may result in discoloration, deformation, damage or rust.
The clear portion of the lid can be broken by a strong impact. Take care when using the
washer.
• If the clear portion is cracked or broken, it may result in injury.
After a water supply failure or when reconnecting the water supply hose, open the faucet
slowly.
Open the faucet slowly after a long period of non-use.
• The air pressure in the water supply hose or the water pipe may result in damage to a
part or in water leakage.
If a drain error occurs during an operation, check if there is a draining problem.
English 9
WA7700K_WA45K-03520S-00_EN.indd 9 2015/12/16 19:08:23
Page 10

SAVE THESE INSTRUCTIONS
Safety information
• If the washer is used when it is ooded because of a draining problem, it may result in
Do not insert your hand under the washer.
• This may result in injury.
Insert the laundry into the washer completely so that laundry does not get caught in the lid.
Safety information
• If laundry gets caught in the lid, it may result in damage to the laundry or the washer, or
Ensure that the faucet is turned off when the washer is not being used.
• Ensure that the water supply hose connectors are properly tightened.
• Failing to do so may result in property damage or injury.
Open the faucet and check if the water supply hose connector is rmly tightened and that
there is no water leaking before using the product.
• If the water supply hose connectors are loose, it may result in water leakage.
Do not stand on top of the appliance or place objects (such as laundry, lighted candles,
lighted cigarettes, dishes, chemicals, metal objects, etc.) on the appliance.
• This may result in electric shock, re, problems with the product, or injury.
electric shock or re due to electric leakage.
result in water leakage.
Do not operate the appliance with wet hands.
• This may result in electric shock.
Do not spray volatile material such as insecticide onto the surface of the appliance.
• As well as being harmful to humans, it may also result in electric shock, re, or problems
with the product.
Do not place an object that generates a electromagnetic eld near the washer.
• This may result in injury due to a malfunction.
Since the water drained during a high-temperature wash or drying cycle is hot, do not touch
the water.
• This may result in burns or injury.
For waterproof fabrics, only use the WATERPROOF cycle.
• Do not use other cycles for waterproof fabrics.
This may result in injury or damage to the washer, walls, oor, or clothing due to
abnormal vibrations.
• Set the temperature and spin according to the attached care label.
Do not operate the washer when the detergent dispenser is removed.
10 English
WA7700K_WA45K-03520S-00_EN.indd 10 2015/12/16 19:08:24
Page 11

SAVE THESE INSTRUCTIONS
• This may result in electric shock or injury due to water leakage.
Do not insert your hand into the detergent dispenser after opening it.
• This may result in injury as your hand may be caught.
Do not place any non-laundry objects, such as shoes, food waste, or animals into the washer.
• This can cause abnormal vibrations that can damage the washer, and, in the case of pets,
cause severe injury or death.
Do not press the buttons using sharp objects such as pins, knifes, ngernails, etc.
• This may result in electric shock or injury.
Do not wash laundry contaminated by oils, creams, or lotions usually found in skincare shops
or massage clinics.
• This may result in the rubber seal becoming deformed and water leakage.
Do not leave metal objects (safety pins, hair pins, etc.) or bleach in the tub for long periods of
time.
• This may cause the tub to rust.
• If rust appears on the surface of the tub, apply a neutral cleansing agent to the surface
and use a sponge to clean it. Never use a metal brush.
Do not use dry cleaning detergent directly in the tub and do not wash, rinse, or spin laundry
contaminated by dry cleaning detergent.
• This may result in spontaneous combustion or ignition due to heat from the oxidation of
the oil.
Safety information
Do not use hot water from water cooling/heating devices.
• This may result in problems with the washer.
Do not use natural hand-washing soap in the washer.
• If it hardens and accumulates inside the washer, it may cause problems with the product,
discoloration, rust, or bad odors.
Do not wash large laundry items such as bedding in the washing net.
• Failing to do so may result in injury due to abnormal vibrations.
• Place smaller items, such as lace socks and lingerie in the washing net.
Do not use hardened detergent.
• If it accumulates inside the washer, it may result in water leakage.
Do not wash throw rugs or doormats.
English 11
WA7700K_WA45K-03520S-00_EN.indd 11 2015/12/16 19:08:24
Page 12

SAVE THESE INSTRUCTIONS
Safety information
• If you wash throw rugs or doormats, the sand will accumulate inside the washer. It may
result in error such as no draining.
Critical cleaning warnings
Safety information
Do not clean the appliance by spraying water directly onto it.
Do not use the strong acid cleaning agent.
Do not use benzene, paint thinner, or alcohol to clean the appliance.
• This may result in discoloration, deformation, damage, electric shock, or re.
Before cleaning or performing maintenance, unplug the appliance from the wall socket.
• Failing to do so may result in electric shock or re.
WARNING
12 English
WA7700K_WA45K-03520S-00_EN.indd 12 2015/12/16 19:08:24
Page 13

Installation
Follow these instructions carefully to ensure proper installation of the washer and to prevent
accidents when using it.
Unpacking your washer
Unpack your washer and inspect it for shipping damage. Make sure you have received all the
items shown below. If your washer was damaged during shipping, or you do not have all of
the items, contact 1-800-SAMSUNG (1-800-726-7864).
To prevent personal injury or strain, wear protective gloves whenever lifting or carrying the
unit.
WARNING
Packing materials can be dangerous to children; Keep all packing material (plastic bags,
polystyrene, etc.) well out of children’s reach.
CAUTION
When unpacking the washer, 2 person
collaboration is needed. To remove the
cushion bottom of the packing materials,
forward dumping is strictly prohibited.
Installation
English 13
WA7700K_WA45K-03520S-00_EN.indd 13 2015/12/16 19:08:24
Page 14

Installation
MAX
MAX
09
08
01
02
03
04
05
07
06
10
11
12
Installation
Overview of your washer
Make sure all the parts are included in the product package. If you have a problem with
the washer or the parts, contact a local Samsung customer center or the retailer.
01 Drain hose 02 Hose guide 03 Lid
04 Built-in sink 05 Water Jet 06 Tub
07 Leveling feet 08 Water hose (Cold) 09 Water hose (Hot)
10 Control panel 11 Detergent drawer 12 Power cord
14 English
WA7700K_WA45K-03520S-00_EN.indd 14 2015/12/16 19:08:24
Page 15

Parts supplied
Hose guide User manual Plastic zip hose tie Water intake cap
Parts not supplied
Water hose
Tools needed for installation
Installation
Wrench Philips screwdriver Level
NOTE
• If you lose an accessory and want to purchase a replacement, contact the Samsung
service center (1-800-SAMSUNG (1-800-726-7864)).
• The design of the parts and accessories may differ from the pictures above.
Their design is subject to change without notice for product improvement.
• Do not reuse old hoses. Only use new water supply hoses when you install the washer.
Old water supply hoses can leak or burst causing ooding and property damage.
• Conrm that there are rubber washers inside each coupling of the water supply hoses.
English 15
WA7700K_WA45K-03520S-00_EN.indd 15 2015/12/16 19:08:25
Page 16

Installation
Basic location requirements
Installation
Electrical
• 120 Volt 60 Hz 15 AMP fuse or circuit
breaker.
• Individual branch circuit serving only
your Washer is recommended.
• Your washer is equipped with a power
cord.
CAUTION
Never use an extension cord.
Grounding
Electrical grounding is required for this
appliance.
This appliance must be grounded. In
the event of malfunction or breakdown,
grounding will reduce the risk of electric
shock by providing a path of least resistance
for electric current.
This appliance is equipped with a power
cord having a three-prong grounding plug
for use in a properly installed and grounded
outlet.
The plug must be plugged into an
appropriate outlet that is properly installed
and grounded in accordance with all local
codes and ordinances.
WARNING
An improperly connected equipmentgrounding conductor can increase the risk
of electrical shock. Check with a qualied
electrician or serviceman if you are not sure
whether the appliance is properly grounded.
Do not modify the plug provided with the
appliance – if it does not t the outlet, have
a proper outlet installed by a qualied
electrician.
Important safety precautions
To prevent unnecessary risk of re,
electrical shock or personal injury, all wiring
and grounding must be done in accordance
with the National Electrical Code ANSI/
FNPA, No.70 Latest Revision and local
codes and ordinances. It is the personal
responsibility of the appliance owner to
provide adequate electrical service for this
appliance.
CAUTION
Never connect the ground wire to plastic
plumbing lines, gas lines, or hot water pipes.
Water
To correctly ll your Washer in the proper
amount of time, water pressure of 20 to
116psi (137 to 800kPa) is required.
Water pressure less than 20 psi may cause
water valve failure, or may not allow the
water valve to shut off completely, or may
extend the ll time beyond what your
Washer controls allow, causing your Washer
to turn off. A time limit is built into the
controls to prevent ooding in your home if
a hose becomes loose.
16 English
WA7700K_WA45K-03520S-00_EN.indd 16 2015/12/16 19:08:25
Page 17

The water faucets must be within 4 feet
(122 cm) to the back of your Washer to
match the inlet hoses provided with your
Washer.
NOTE
Accessory inlet hoses are available in
various lengths up to 10 feet (275 cm) for
faucets that are further away from the back
of your washer.
To avoid the possibility of water damage:
• Have water faucets easily accessible.
• Turn off faucets when the washer is not
in use.
• Periodically check that there is no
leakage from the water inlet hose
ttings.
WARNING
Check all connections at the water valve and
faucet for leaks
Drain facility
The recommended height of the standpipe
is 39 in (99 cm). The drain hose must be
routed through the drain hose clip to the
standpipe. The standpipe must be large
enough to accept the outside diameter of
the drain hose. The drain hose is attached to
the washer at the factory.
Never install your washer on a platform or
weakly supported structure.
Location considerations
Do not install your washer in areas where
water may freeze, since your washer will
always retain some water in its water valve,
pump, and hose areas. Frozen water can
damage the belts, the pump, hoses, and
other components.
Alcove or closet installation
Minimum clearances for closet and alcove
installations:
Sides
Rear
1 in /
25 mm
6 in /
152 mm
If the washer and dryer are installed
together, the closet front must have at least
a 72 in² (465 cm²) unobstructed air opening.
Your washer alone does not require a
specic air opening.
Closet
front
Top
2 in /
51 mm
21 in /
533 mm
Installation
Flooring
For best performance, you must install
your washer on a solidly constructed oor.
Wood oors may need to be reinforced to
minimize vibration and/or unbalanced load
situations. Carpeting and soft tile surfaces
are contributing factors to vibration which
can cause your washer to move slightly
during the spin cycle.
English 17
WA7700K_WA45K-03520S-00_EN.indd 17 2015/12/16 19:08:25
Page 18

Installation
Installation
Recessed area
A
A A
B B
A 1 in (2.5 cm)
B 27.0 in (68.6 cm)
Side view - closet or conned area
A
E
B
C
D
A 21 in (53.3 cm)
B 2 in (5.1 cm)
C 29.3 in (74.4 cm)
18 English
D 6 in (15.2 cm)
Gap between end of water
valve and the wall
• Case 1. Assemble supply
E
hose after installing : Over
3.9 in (10 cm).
• Case 2. Assemble supply
hose before installing :
Over 2.8 in (7 cm).
WA7700K_WA45K-03520S-00_EN.indd 18 2015/12/16 19:08:25
Page 19
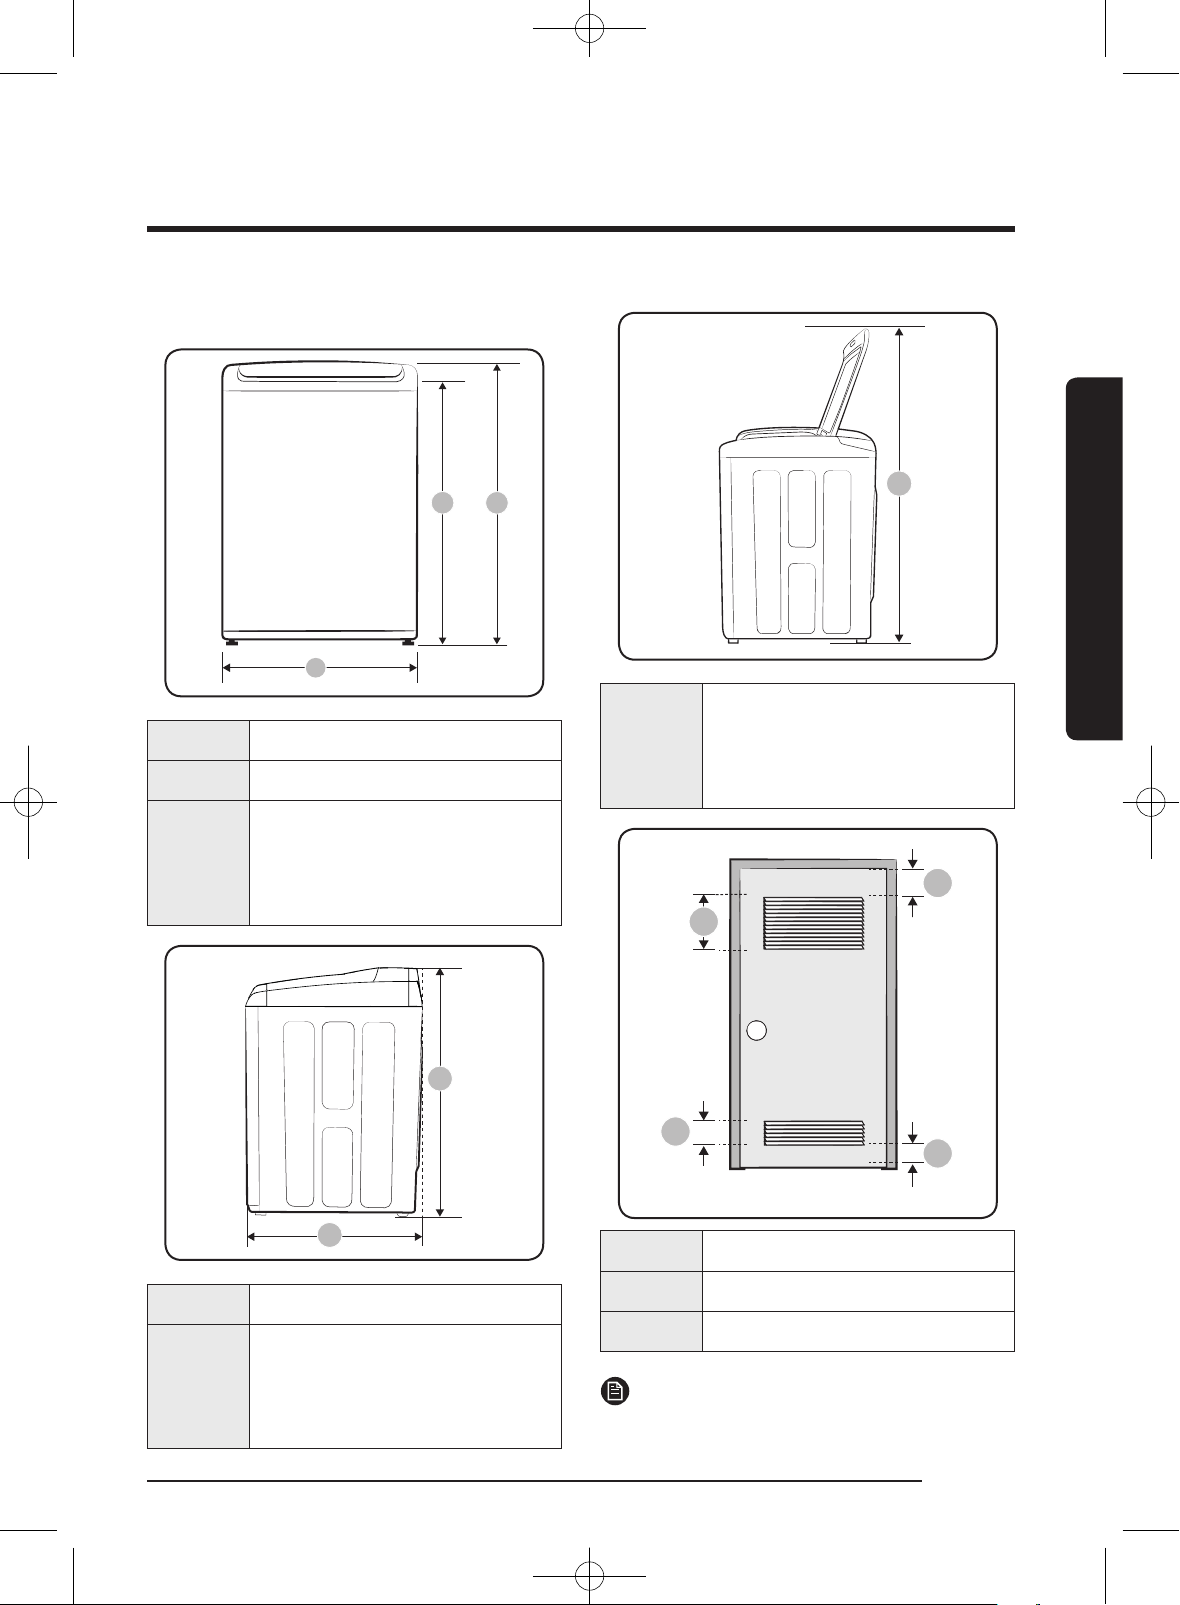
Required dimensions for Installation
B
A
A 27.0 in (68.6 cm)
B 39.2 in (99.5 cm)
42.4 in (107.7 cm)
C
(WA45K7600A*)
41.2 in (104.7 cm
(WA45K7100A*)
C
A
Installation
61.0 in (155.0 cm)
A
(WA45K7600A*)
59.8 in (152.0 cm)
(WA45K7100A*)
C
A
B
B
C
A
A* 48.0 in2 (310.0 cm2)
2
A 29.3 in (74.4 cm)
42.4 in (107.7 cm)
B
(WA45K7600A*)
41.2 in (104.7 cm
(WA45K7100A*)
WA7700K_WA45K-03520S-00_EN.indd 19 2015/12/16 19:08:26
B* 24.0 in
C 3.0 in (7.6 cm)
NOTE
* Required spacing
(155.0 cm2)
English 19
Page 20

Installation
Installation
Important note to installer
Please read the following instructions carefully before installing your washer.
These instructions should be retained for future reference.
We recommend you hire a professional to install this washer.
Installation ow chart
Removing the
Selecting a
location
Running a test cycle
Run Rinse+Spin with
small amount of
laundry (about 4~5
towels) as a test cycle
shipping bolts
(Front loading
washers only)
Does your washer
Connecting the
water and drain
vibrate?
Adjusting the
NO
Calibration Mode
leveling feet
Running
Powering your
washing machine
Finishing the
installation
YES
Check again before steps.
Step-by-step installation
STEP 1 Selecting a location
NOTE
Before you install the washer, make sure the location:
• Has a hard, level surface without carpeting or ooring that may obstruct ventilation.
• Is away from direct sunlight.
• Has adequate ventilation.
• Is not exposed to freezing temperatures (temperatures under 32 °F or 0 °C).
• Is away from heat sources such as oil or gas.
• Has enough space so that the washer doesn’t rest on its power cord.
20 English
WA7700K_WA45K-03520S-00_EN.indd 20 2015/12/16 19:08:26
Page 21

STEP 2 Connecting the water supply hose
CAUTION
Before installing the water supply hoses,
make sure there are rubber gaskets (B)
inside the couplings (A) at both ends of each
new water hose. Installing the water supply
hoses without rubber gaskets can cause
water leakage.
Installation
B
When you initially install the washer, be
sure to use new hoses. Failing to do so may
result in a water leakage or overow and
CAUTION
A
may damage your property.
CAUTION
Do not connect multiple water supply hoses
together to increase the length of the supply
hose. Hoses connected this way can leak
and the leakage can cause electrical shock. If
a hose is too short, replace the hose with a
longer, high pressure hose.
English 21
WA7700K_WA45K-03520S-00_EN.indd 21 2015/12/16 19:08:26
Page 22

Installation
Installation
1. Connect the ends of the water supply
BA
hoses to the hot (B) and cold (A) faucets.
2. Tighten the ttings by hand until they
are snug, and then tighten them an
additional two-thirds of a turn with a
wrench.
CAUTION
When you fasten the ttings, do not fasten
them too tightly or apply tape or sealant to
the faucets or water supply intakes. This can
damage the ttings.
NOTE
After you have connected the water supply
hoses to the faucets, ensure that they are
connected correctly by pulling the water
supply hoses downwards.
3. Place the unconnected ends of the hoses
into a bucket and open the faucets
connected to the two water supply hoses
for 10 or 15 seconds to remove any
foreign substances from the hoses. Close
the faucets before continuing.
22 English
WA7700K_WA45K-03520S-00_EN.indd 22 2015/12/16 19:08:26
Page 23

4. Connect the ends of the water supply
hoses to the water supply intake
connections at the back of the washer.
CAUTION
The water supply hose connected to the hot
faucet must be connected to the hot water
supply intake and the water hose connected
to the cold faucet must be connected to the
cold water supply intake.
5. Tighten the ttings by hand until they
are snug, and then tighten them an
additional two-thirds of a turn with a
wrench.
NOTE
To ensure the correct water usage, connect
both the hot and cold water faucets. If either
or both are not connected, an “4C” (no ll)
code can be displayed.
Installation
NOTE
If you do not want to use the hot water
supply hose, insert the water intake cap
into the hot water supply intake hole. In
this case, you must select the Tap Cold
for the water temperature. If you select
the Tap Cold, all the lamps for the water
temperature options are turned off.
CAUTION
Conrm that the water supply hoses are not
twisted or bent. If the hoses are twisted or
bent, the hoses can leak and cause electric
shock due to the water leakage.
6. Turn on the hot and cold water supplies
and check all the water supply intake
connections and the faucets for water
leaks.
English 23
WA7700K_WA45K-03520S-00_EN.indd 23 2015/12/16 19:08:27
Page 24

Installation
AA
Installation
STEP 3 Connecting the drain hose
B C
D
The end of the drain hose can be positioned
in three ways:
Over the edge of a wash basin
Secure the hose guide (A) to the side of the
basin wall with a hook or to the tap with
a piece of string to prevent the drain hose
from moving.
In a standpipe or laundry tub
The standpipe (B) and laundry tub (C) must
be no shorter than 39 in (99 cm)* and no
longer than 96 in (245 cm)*.
*
E
NOTE
• Make sure that the connection between
the drain hose and the standpipe is not
airtight.
24 English
WA7700K_WA45K-03520S-00_EN.indd 24 2015/12/16 19:08:27
Page 25

NOTE
Connect the hose guide (A) within 4 in (10
cm)* from the end of the drain hose. If the
drain hose is extended more than 4 in (10
*
A
cm) beyond the end of the hose guide, mold
or microorganisms could spread to the
inside of the washer.
NOTE
The drain hose can be installed to a 96
in (245 cm) maximum, but the draining
capability can be reduced at this height.
It can cause the washer to have an odor
because of remaining water in the drain
system.
NOTE
If the drain hose is installed below 39 in (99
cm), water can be drained in cycles due to a
siphon phenomenon. It causes the washer to
display “4C”.
Installation
STEP 4 Leveling your washer
A
See if the washer is level by checking the
position of the tub:
1. Slide the washer into position.
2. Open the lid of the washer, and pour
the water into the tub to just below the
pulsator level.
NOTE
WA45K7600A*, WA45K7100A* models have
the Built-in sink over the pulsator level.
That’s why the level is not revealed. Open
the Built-in sink and check the level with
eyes.
English 25
WA7700K_WA45K-03520S-00_EN.indd 25 2015/12/16 19:08:28
Page 26

Installation
B C
Installation
3. If the washer is level, the pulsator (A) is
positioned at the center of the water as
shown in the gure.
If not, level your washer by turning
the front leveling feet clockwise or
counterclockwise as necessary.
NOTE
Turn the front leveling feet clockwise (B) to
lower the washer, and counterclockwise (C)
to raise the washer.
STEP 5 Powering your washer
Plug the power cord into a 3-prong,
well grounded 120 volt 60 Hz approved
electrical outlet protected by a 15-amp fuse
or comparable circuit breaker.
Your washer is grounded through the third
prong of the power cord when plugged into
a three-prong grounded electrical outlet.
Test run
Make sure that you install your washer
correctly by running the Rinse+Spin after
the installation is complete.
26 English
WA7700K_WA45K-03520S-00_EN.indd 26 2015/12/16 19:08:28
Page 27

STEP 6 Running a test cycle
Run a test cycle as follows to check if your washer is properly installed.
1. Load about 6 pounds of laundry into the tub.
2. Press Power to turn on your washer.
3. Select Rinse+Spin by turning the Cycle Selector.
4. Press Start/Pause to start the test cycle.
5. The washer should not rock or vibrate excessively when water is supplied or when
washing or spinning, and should drain well during the spin cycle.
NOTE
If water leaks while water is being supplied or drained, check the water connections. Refer to
the “STEP 2 Connecting the water supply hose” section on page 21 for instructions.
NOTE
If the washer rocks and vibrates excessively, level your washer again. Refer to the “STEP
4 Leveling your washer” section on page 25 for instructions.
STEP 7 Calibration Mode
Your Samsung washer detects the laundry weight automatically.
For more accurate weight detection, please run Calibration Mode after the installation.
To run Calibration Mode, follow these steps:
1. Remove laundry or any contents in the machine.
2. Press and hold Temp. and Delay End simultaneously for at least 3 seconds when the
power is turned on.
3. Press Start/Pause to activate Calibration Mode.
4. The pulsator rotates clockwise and counterclockwise approximately 1 minute.
5. When Calibration Mode is nished, “0” appears on the display, and the washer
automatically turns off. The washer is now ready for use.
Installation
English 27
WA7700K_WA45K-03520S-00_EN.indd 27 2015/12/16 19:08:28
Page 28

Operating instructions
Operating instructions
WARNING
To reduce the risk of re, electric shock, or injury to persons when using your appliance,
follow basic precautions, including the following:
Loading your washer
• Fill the tub with dry, unfolded clothes evenly around in order to enhance washing
efciency and prevent excess wear, or wrinkling of the load.
• For optimal washing performance, make sure the laundry is piled up evenly.
• Wash delicate items such as bras, hosiery, and other lingerie in the Delicates cycle with
similar lightweight items.
• When washing big bulky items or a few smaller items that don’t ll the tub completely
– a rug, a pillow, stuffed toys, or one or two sweaters, for example – add a few towels to
improve spin performance.
• Do not insert bulky items except for Bedding in this cycle.
NOTE
During the spin cycle, the washer may add additional water to redistribute the clothes and
correct an imbalance inside the drum.
• When washing heavily soiled loads, do not overload your washer to ensure good cleaning
results.
To add a forgotten item:
1. Press Start/Pause to pause the washer.
2. Wait for the door to unlock automatically, and then open the door.
3. Add the item, close the door, and then press Start/Pause. The cycle will resume.
Getting started
1. Load your washer.
2. Add liquid (or powder) detergent and additives to the dispenser (see the "Detergent use"
section on page 41).
3. Select the appropriate cycle and options for the load (see the "Washing a load of laundry"
section page 30).
28 English
WA7700K_WA45K-03520S-00_EN.indd 28 2015/12/16 19:08:29
Page 29

4. Close the lid.
5. Press Start/Pause.
6. The Wash Indicator illuminates.
7. The estimated cycle time will appear in the display.
The time may uctuate to indicate the time remaining in the cycle.
NOTE
The actual time required for a cycle may differ from the estimated time in the display
depending on the water pressure, water temperature, detergent, and laundry.
8. Before your washer starts to ll, it will make a series of clicking noises to check the door
lock and do a quick drain.
NOTE
• When the cycle is complete, the Door Lock indicator will go out and “0” will appear in
the display.
• Pressing Power cancels the cycle and stops your washer.
• The Wash, Rinse, and Spin indicators will illuminate during those portions of the cycle.
Operating instructions
English 29
WA7700K_WA45K-03520S-00_EN.indd 29 2015/12/16 19:08:29
Page 30

Washing a load of laundry
03
04
01
05
06
07
08
09
10
11
13
12
02
WARNING
To reduce the risk of re, electric shock, or injury to persons, read the IMPORTANT SAFETY
INSTRUCTIONS before operating this appliance.
Control panel
Washing a load of laundry
01 Cycle Selector
02 Display
03 Temp.
Press to select a desired cycle in the left-most panel. When a cycle is
selected, the cycle indicator lights up.
Provides instructions and diagnostics while keeping you updated on
the cycle status and time remaining.
Press the button repeatedly to cycle through the different water
temperature options.
• Hot - Whites and heavily soiled, colorfast items.
• Warm - Colorfast items.
• Eco Warm - Moderately soiled, colorfast items; most wrinkle-free
items.
• Cold - Brightly colored, very lightly soiled items.
• Tap Cold - Cold water with no warm water added.
NOTE
If you select the Tap Cold option, all the lamps for the water
temperature options are turned off.
30 English
WA7700K_WA45K-03520S-00_EN.indd 30 2015/12/16 19:08:29
Page 31

04 Spin
05 Soil Level
06 Pre Soak
Press the button repeatedly to cycle through the different spin speed
options.
• High - Use for underwear, t-shirts, jeans, and sturdy cottons.
• Medium - Use for jeans, wrinkle-free or wash-and-wear items, and
synthetics.
• Low - Use for delicate items needing a slow spin speed.
• No Spin - Drains your washer without spinning. Use for extremely
delicate items that cannot tolerate any spin.
Press the button to select the soil level/washing time.
(Light > Normal > Heavy)
• Heavy - For heavily soiled loads.
• Normal - For moderately soiled loads. This setting is best for most
loads.
• Light - For lightly soiled loads.
It adds 18 minutes soaking time at the start of the wash cycle for
better stain removal.
Washing a load of laundry
07 Extra Rinse
08 Eco Plus
Change from spray rinse mode to deep rinse mode, and rinse once
again.
To increase your energy savings on your wash cycles. (Less hot water
consumption)
Press and hold for 3 seconds to save your own cycle.
09 My Cycle
Create and/or use a cycle you have customized temperature, spin
speed, soil level, options, etc.
10 Delay End
11 Self Clean
Delay the end of any cycle for up to 24 hours in one-hour increments.
Displayed hour indicates the time the wash will be ended.
Use to clean dirt and bacteria from the drum. Regular use (after every
20 washes) is recommended. No detergent or bleach is needed.
Press once to turn your washer on. Press again to turn your washer
12 POWER
off. If the washer is left on for more than 10 minutes without any
buttons being pressed, the power automatically turns off.
13 START/PAUSE Press to pause and restart cycles.
NOTE
We recommend that you untangle the items before washing.
Do not put objects on the washer, especially on the feature panel.
English 31
WA7700K_WA45K-03520S-00_EN.indd 31 2015/12/16 19:08:29
Page 32

Washing a load of laundry
Cycle overview
NOTE
To minimize wrinkling of laundry, select Perm Press.
Cycle Description
Washing a load of laundry
Normal
Heavy Duty
Delicates
Colors/Darks For brightly or dark colored casual garments.
Super Speed Normal soiled and normal loads (up to 8lb).
Bedding
For most fabrics including cottons, linens, and normally soiled
garments.
For sturdy, colorfast fabrics and heavily soiled garments. We
propose to use this function only when washing lot of heavily
soiled garments.
For sheer fabrics, bras, lingerie, silks, and other handwash-only
fabrics. For best results, use liquid detergent.
For bulky and large items, such as comforters, blankets and
sheets.
When washing comforters, use liquid detergent.
Waterproof sheets and all water resistant items should be
washed using the waterproof cycle.
CAUTION
※ Use the waterproof cycle for waterproof or water-resistant
items such as mattress covers, plastic mats, bath mats, ski
pants, raincoat and comforters which hardly absorb water.
Perm Press
Brilliant Whites For white fabrics with or without bleach.
Quick Wash For lightly soiled garments needed quickly.
WaterProof
32 English
WA7700K_WA45K-03520S-00_EN.indd 32 2015/12/16 19:08:29
For wash-and-wear, synthetic fabrics, and lightly to normally
soiled garments.
For waterproof or water-resistant items. (less than 14lbs)
CAUTION
※ Do not wash waterproof items and non-waterproof items
together.
※ Check the specication label on the fabric item and see if the
item is waterproof. Do not wash non-waterproof items with the
WATERPROOF cycle.
Page 33

Cycle Description
Rinse + Spin
Use for loads that need rinsing only or to add rinse-added
fabric softener to a load.
Spin Drains the water and spins at a high speed.
Options
Child Lock
Child Lock prevents children from playing
with your washer.
Activating the Child Lock function
Press and hold Spin and Soil Level
simultaneously for approximately 3 seconds.
• When you activate the Child Lock
function, the
blinks.
Using the Child Lock function
If the lid is opened when the Child Lock
function is on, “dC” is displayed and an
alarm sounds.
• If the water level in the tub is above the
safe water level, “dC” is displayed on the
LED display and the washer starts to
drain water by force after 30 seconds.
• If the water level in the tub is above
the safe water level and the Child Lock
function is turned on while the door
is open, “CL” is displayed on the LED
display even if the power of the washer
is turned off and the washer drains
water by force.
Child Lock indicator
• Even if the power of the washer is
turned off, if the lid is opened while the
water level in the tub is above the Reset
water level, “CL” is displayed on the LED
display without the alarm sounding and
the washer starts to drain water. When
the draining operation nishes, the
power is automatically turned off again.
• You have activated the Child Lock
function while the washer is running, the
Start/Pause button will not work.
• After the compulsory drain, the “CL”
blinks at 1 second intervals and the
product enters the “CL” mode. (When
the product is in the “CL” mode, only the
Power button works.)
• To cancel the “CL” mode, you need to
turn the power off and then on again.
• To cancel the “dC” mode, deactivate the
Child Lock function. To deactivate the
Child Lock function, press and hold Spin
and Soil Level simultaneously for at least
3 seconds.
Washing a load of laundry
English 33
WA7700K_WA45K-03520S-00_EN.indd 33 2015/12/16 19:08:29
Page 34

Washing a load of laundry
NOTE
You can change the My Cycle settings by
repeating the process above.
The last saved settings will be displayed the
next time you choose the My Cycle function.
NOTE
If you press My Cycle and release it within
3 seconds, the previously saved cycle and
options appear. If you press and hold My
Cycle for 3 second or longer, the currently
set cycle and options are saved and the LED
blinks for 3 seconds.
Delay End
You can set the washer to start your wash
automatically at a later time, by choosing a
delay time.
The hour displayed indicates the time at
which the wash will be ended.
1. Set your wash cycle.
2. Press Delay End repeatedly until the
delay time is set.
3. Press Start/Pause. The “Delay End”
indicator will be lit, and the clock will
begin counting down until it reaches the
set time.
4. To cancel a Delay End function, press the
Power button and then turn the washer
on again.
Pre Soak
Use this function when the laundry is
heavily contaminated or stained. This
function improves the wash performance by
adding a Pre Soak cycle.
• If you select this function, the total cycle
time is increased by 18 minutes.
Adding laundry when Child Lock is on
To add laundry, deactivate the Child Lock
function. To deactivate the Child Lock
function, press and hold Spin and Soil Level
simultaneously for at least 3 seconds. See
the “Pause Option” section on page 37 for
additional details.
Deactivating the Child Lock function
Press and hold both Spin and Soil Level
simultaneously for approximately 3 seconds.
• When you deactivate the Child Lock
• The Child Lock function prevents
If a child enters the washer, the child may
become trapped and suffocate.
Washing a load of laundry
• Once you have activated the Child Lock
• Forcing the lid open can result in injury
To add laundry after you have activated
the Child Lock function, you must rst
deactivate the Child Lock function.
Sound
The Sound Off function can be selected
during all cycles.
NOTE
function, the
turned off.
children or the inrm from accidently
operating the washer and injuring
themselves.
WARNING
CAUTION
function, it continues working even if
the power is turned off.
or damage to the product.
NOTE
Child Lock indicator is
Garment Plus
You can add or take out laundry items even
after the wash has started, as long as the
Garment Plus indicator is on. Pressing
Start/Pause unlocks the lid. If you open the
lid and want to continue the wash cycle,
close the lid, and then press Start/Pause.
NOTE
If you have activated the Child Lock, you
must deactivate it rst. See page 33.
My Cycle
Lets you save a custom wash cycle
(temperature, spin, soil level, etc.) and
then recall and use it with one button
convenience.
To save a cycle and selected options as your
My Cycle, follow these steps:
1. Press Power.
2. Select a cycle using the Cycle Selector.
3. After cycle selection, set each option.
NOTE
See the “Cycle chart” section on page 61 for
available option settings with each cycle.
4. You can then store the selected cycle
and options by pressing and holding
My Cycle for longer than 3 seconds.
The cycle and options you select will be
displayed the next time you choose the
My Cycle function.
5. Press My Cycle to load and use the
saved My Cycle options. The “My Cycle”
light will indicate activation. Also, the
chosen cycle and option lights will
icker.
34 English
WA7700K_WA45K-03520S-00_EN.indd 34 2015/12/16 19:08:30
Page 35

NOTE
You can change the My Cycle settings by
repeating the process above.
The last saved settings will be displayed the
next time you choose the My Cycle function.
NOTE
If you press My Cycle and release it within
3 seconds, the previously saved cycle and
options appear. If you press and hold My
Cycle for 3 second or longer, the currently
set cycle and options are saved and the LED
blinks for 3 seconds.
Delay End
You can set the washer to start your wash
automatically at a later time, by choosing a
delay time.
The hour displayed indicates the time at
which the wash will be ended.
1. Set your wash cycle.
2. Press Delay End repeatedly until the
delay time is set.
3. Press Start/Pause. The “Delay End”
indicator will be lit, and the clock will
begin counting down until it reaches the
set time.
4. To cancel a Delay End function, press the
Power button and then turn the washer
on again.
• When the Pre Soak cycle starts, the
washer repeats a wash cycle after
supplying water and then performs a
18-minute soak cycle.
• When the Pre Soak cycle is complete,
the congured wash cycle starts without
draining water.
Eco Plus
This function sets the temperature
somewhat lower than the typical washing
cycle and extends the wash time slightly.
With laundry time slightly extended, it’s
possible to keep the same level of washing
performance with cooler water. This function
reduces energy consumption and maintains
the quality of the wash.
Mist Shower
Mist Shower sprays water from a nozzle
that is independent of the main water
supply system. It states that is soaks the
laundry with water from the beginning of
the rinse cycle and ensures an effective
wash, but it’s not part of the wash cycle, it’s
part of the rinse cycle, so this needs to state
that it ensures an effective rinse.
(The Mist Shower function may not work if
there is too large of a load in the machine.)
Washing a load of laundry
Pre Soak
Use this function when the laundry is
heavily contaminated or stained. This
function improves the wash performance by
adding a Pre Soak cycle.
• If you select this function, the total cycle
time is increased by 18 minutes.
WA7700K_WA45K-03520S-00_EN.indd 35 2015/12/16 19:08:30
Smart Care
This function enables you to check the
status of the washer using a smartphone.
1. To enable the Smart Care function, press
and hold Eco Plus for 3 seconds after
turning the power on or when an error
occurs.
English 35
Page 36

Washing a load of laundry
The error code history is deleted after you
use this function.
2. The Smart Care indicator is lit on the
3. Run the Smart Care app on your smart
4. Focus your smart phone’s camera on the
5. If the smart phone’s camera is focused
6. If the smartphone fails to recognize the
Washing a load of laundry
NOTE
display.
phone.
• Android: Galaxy S series, Galaxy
Note series. (Other devices may not
be normal operation).
Supported OS : Android 2.2 or higher
• iOS: iPhone series
Supported OS : iOS 4.3 or higher
display panel of the washer.
on the display panel of the washer, the
panel and error message is automatically
recognized and the error type and
countermeasures are displayed on the
smart phone.
error code more than twice, please enter
the error code displayed on the display
panel of the washer manually into the
Smart Care app.
NOTE
Downloading the Smart Care app
• Download the Samsung Laundry App
into your mobile phone from the
Android market or Apple App store.
(Search word : Samsung Smart Washer/
Dryer)
NOTE
Precautions when using Smart Care
• If light from a light bulb, uorescent
bulb, or lamp is reected on the display
panel of the washer, the smartphone
may not be able to recognize the panel
or error message easily.
• If you hold the smartphone at too
large an angle relative to the front of
the display panel, it may not be able
to recognize the error code. For best
results, hold the smartphone so that the
front of the panel and the smartphone
are parallel or nearly parallel.
Washing clothes using the option button
Your new washer makes washing clothes
easy, using Samsung’s “Fuzzy Control”
automatic control system. When you select
a wash program, the machine will set the
correct temperature, washing time, and
washing speed.
1. Press Power.
2. Open the lid.
36 English
WA7700K_WA45K-03520S-00_EN.indd 36 2015/12/16 19:08:30
3. Load the articles of clothing one at a
time loosely into the drum, without
overlling it.
4. Add liquid (or powder) detergent,
softener, and/or bleach (if necessary) to
the appropriate compartments. See the
"Detergent use" section on page 41.
5. Close the lid.
Page 37

6. Use the option button to select the
appropriate cycle according to the
type of material: Normal, Heavy Duty,
Delicates, Colors/Darks, Super Speed,
Bedding, Perm Press, Brilliant Whites,
Quick Wash, WaterProof, Rinse+Spin,
and Spin. The relevant indicators will
illuminate on the control panel.
7. At this time, you can control the wash
temperature, the number of rinse cycles,
the spinning speed, and the delay time
by pressing the appropriate option
button.
8. Press Start/Pause and the wash will
begin. The process indicator will light up
and the remaining time for the cycle will
appear in the display.
Pause Option
To remove or add laundry items, follow
these steps:
1. Press Start/Pause to unlock the lid.
When the cycle is nished:
After the total cycle has nished, the power
will turn off automatically.
1. Open the lid.
2. Remove laundry.
Washing a load of laundry
NOTE
The lid cannot be opened when the water is
too HOT.
2. Remove or add laundry items.
3. Close the lid, and then press Start/Pause
to restart the wash.
NOTE
If you have Child Lock on, you must
deactivate it rst. See page 33.
English 37
WA7700K_WA45K-03520S-00_EN.indd 37 2015/12/16 19:08:31
Page 38

Washing a load of laundry
ATC (Auto Temperature Control)
ATC is the control function that the
washer controls water temperature with
temperature sensor (thermistor).
Because there are numerous water
temperatures depending on the customer’s
environments (cold areas, warm areas,
various water temperatures, settings of
heater temperature, etc.), ATC function in our
washer maintains the certain level of wash
temperature to output the best washing
performance at each cycle.
If you select NORMAL cycle, this cycle is the
regulation and UL cycle. Since new washers
must reduce the amount of energy usage as
a rst priority, customers will notice more
cold water entering the washer. But, this is
normal, not a problem.
In those regulation cycles, Hot temperature
is similar to acceptable adult bath-water
Washing a load of laundry
temperature and warm temperature is
similar to comfortable swimming-pool water
temperature.
NOTE
NOTE
NOTE
If customers want to wash clothes in specic
water temperatures, customers should
choose a different cycle at each temperature
(Hot/Warm/Eco Warm).
38 English
WA7700K_WA45K-03520S-00_EN.indd 38 2015/12/16 19:08:31
Page 39

The basics
Prewash (Water Jet & Built-in sink)
Water Jet and Built-in sink help you
handwash before the washing machine
starts operation. Water Jet is available only
when the door is open with the water level
set to less than High. For prewashing, use
the Built-in sink that is designed to facilitate
the hand-wash.
1. With the door open, lower the Built-in
sink . To open only the door, press and
release the front middle of the door. To
close and lock both the door and the
Built-in sink, press down the door until
you hear a clicking sound.
2. Put clothes to prewash in it.
3. Press Water Jet to supply water to the
Built-in sink, and hand-wash.
4. When done, gently lift up the Built-in
sink to drain water into the tub.
Washing a load of laundry
NOTE
• If you want to hand-wash while the
machine is operating, press Start/Pause
to stop operation, and then follow steps
1-4 above.
• If you open both the door and the
Builtin sink, lower the Built-in sink
manually for prewashing.
[Water Jet stops]
• Water Jet stops operation automatically
when the washing machine detects the
maximum water level.
• Water Jet stops operation automatically
5 minutes after it begins. To add more
water, press Water Jet again to resupply
water.
English 39
WA7700K_WA45K-03520S-00_EN.indd 39 2015/12/16 19:08:32
Page 40

Washing a load of laundry
[Water Jet drains]
• Select a cycle and press Start/Pause. Then
the washing machine drains the water to be
used during the prewash.
• When the washing machine is turned off
before starting the wash cycle, it drains
the water to be used during the prewash.
However, when it is turned off during the
wash cycle, it does not drain the water.
NOTE
• Water Jet extracts the water through the
Mist Shower nozzle for 1 second and then
through the Water Jet nozzle from then on
when it is rst activated after the washing
machine turns on.
• Do not abuse Water Jet. Excessive use of
• When running water to the tub, do that
Washing a load of laundry
• Use caution when removing laundry from
• Do not block the outlet of Water Jet with
• Put only clothes to prewash in the Built-in
• Do not open the Built-in sink in a hurry.
• Due to a difference in air pressure, Water Jet
• This lid must be closed tightly to do the
CAUTION
Water Jet increases water consumption.
gently. Otherwise, water may overow the
tub.
the tub. You may bump your head on the
Built-in sink.
hands. Water may leak outside the tub,
causing a system failure.
sink. Other items such as shoes, food, or
animals can not be used for prewash.
Remaining water in the sink may splash on
the door or control panel.
may splash water from its outlet when it is
rst activated.
laundry.
40 English
WA7700K_WA45K-03520S-00_EN.indd 40 2015/12/16 19:08:32
Page 41

Detergent use
Your washer is designed to use high efciency (HE) detergents.
• For the best cleaning results, use a high efciency detergent such as Tide HE, Wisk HE,
Cheer HE or Gain HE*. High efciency detergents contain suds suppressors that reduce
or eliminate suds. When fewer suds are produced, the load tumbles more efciently and
cleaning is maximized. (* Brand names are trademarks of their respective manufacturers.)
WARNING
Regular detergent is not recommended. Use HE detergents only.
NOTE
Reducing the amount of detergent may reduce the quality of cleaning. It is important to pre–
treat stains, sort carefully by color and soil level, and avoid overloading.
Washing a load of laundry
English 41
WA7700K_WA45K-03520S-00_EN.indd 41 2015/12/16 19:08:32
Page 42

Washing a load of laundry
Features
Automatic dispenser
Your washer has separate compartments for dispensing detergent and color-safe bleach and
fabric softener. Add all laundry additives to their respective compartments before starting
your washer.
The automatic dispenser must always be in place before you start your washer.
DO NOT open the automatic dispenser when your washer is running.
NOTE
• Never exceed the manufacturer’s recommendations when adding detergent.
• This compartment holds liquid detergent for the main wash cycle, which is added to the
load at the beginning of the cycle.
• When using powdered detergent, remove the liquid detergent compartment from the
detergent drawer. The washer will not dispense powdered detergent from the liquid
detergent compartment.
To add detergent to the automatic dispenser:
Washing a load of laundry
1. Open the dispenser drawer.
2. Load the recommended amount of liquid
(or powder) detergent into the detergent
compartment before you start your
wash.
3. Close the drawer slowly and smoothly
to avoid spilling, splashing, or premature
dispensing of the contents.
NOTE
It is normal for a small amount of water to
remain in the dispenser compartments at
the end of the cycle.
NOTE
Do not put chlorine bleach in the dispenser
drawer.
42 English
WA7700K_WA45K-03520S-00_EN.indd 42 2015/12/16 19:08:33
Page 43

Loading the Liquid (or Powder) detergent compartment
A
1. Pour the recommended amount of
laundry detergent directly into the
detergent compartment before starting
your washer.
2. If you are using color-safe bleach, add
it with the detergent to the detergent
compartment.
NOTE
When adding color-safe bleach with
detergent, it is best if both laundry products
are in the same form – liquid.
NOTE
When using powdered detergent, remove
the liquid detergent compartment (A) from
the detergent drawer. The washer will not
dispense powdered detergent from the
liquid detergent compartment.
Washing a load of laundry
English 43
WA7700K_WA45K-03520S-00_EN.indd 43 2015/12/16 19:08:33
Page 44

Washing a load of laundry
B
Loading the Bleach compartment
CAUTION
Use the liquid chlorine bleach only.
1. Add chlorine bleach to the bleach
compartment (B).
DO NOT exceed the bleach compartment.
NOTE
• Avoid splashing or over–lling the
compartment.
• Never pour undiluted liquid chlorine
bleach directly onto the load or into the
tub. It is a powerful chemical and can
cause fabric damage, such as weakening
of the bers or color loss, if not used
properly.
• If you prefer to use color–safe, non–
chlorine bleach, add it to the appropriate
detergent compartment.
DO NOT pour color–safe bleach into the
Bleach compartment.
Washing a load of laundry
44 English
WA7700K_WA45K-03520S-00_EN.indd 44 2015/12/16 19:08:33
Page 45

Loading the fabric softener compartment
C
1. Pour the recommended amount of
liquid fabric softener into the softener
compartment (C).
For smaller loads, use less than one
capful.
2. Dilute the fabric softener with water
until it reaches MAX FILL in the
compartment.
3. The dispenser automatically releases
liquid fabric softener at the proper time
during the rinse cycle.
NOTE
• Use the softener compartment ONLY for
liquid fabric softeners.
• DO NOT use the Downy Ball* in the
fabric softener compartment with this
washer. It will not add fabric softener at
the appropriate time.
Use the detergent compartment.
(* Brand names are trademarks of their
respective manufacturers.)
• Do not use liquid fabric softener that
is too sticky as it may not mix with the
water sufciently.
Washing a load of laundry
English 45
WA7700K_WA45K-03520S-00_EN.indd 45 2015/12/16 19:08:33
Page 46

Maintaining your washer
Cleaning the exterior
Maintaining your washer
1. Turn off the water faucets after nishing
the day’s washing.
This will shut off the water supply to
your washer and prevent the unlikely
possibility of damage from escaping
water. Leave the lid open to allow the
inside of your washer to dry out.
Cleaning the interior
Clean the interior of your washer
periodically to remove any dirt, soil, odor,
mold, mildew, or bacterial residue that
may remain in your washer as a result of
washing clothes.
Storing your washer
Washers can be damaged if water is
not removed from hoses and internal
components before storage.
Prepare your washer for storage as follows:
1. Select the Quick Wash cycle and add
bleach to the automatic dispenser. Run
your washer through the cycle without
a load.
2. Turn the water faucets off and
disconnect the inlet hoses.
3. Unplug your washer from the electrical
outlet and leave your washer lid open to
let air circulate inside the drum.
If your washer has been stored in
below–freezing temperatures, allow time
for any leftover water in your washer to
thaw out before use.
2. Use a soft cloth to wipe up all detergent,
bleach or other spills as they occur.
3. Clean the following as recommended:
Control Panel – Clean with a soft, damp
cloth. Do not use abrasive powders or
cleaning pads. Do not spray cleaners
directly on the panel.
Failure to follow these instructions may
result in unpleasant conditions, including
odors and/or permanent stains on your
washer or laundry.
Hard water deposits may be removed, if
needed. Use cleaners labeled “Washer safe”.
46 English
WA7700K_WA45K-03520S-00_EN.indd 46 2015/12/16 19:08:33
Page 47

Preserving the top cover and the front frame
Do not place any heavy or sharp objects or
a detergent box on the washer. They can
scratch or damage the top cover of the unit.
Cleaning the dispensers
NOTE
Since the entire washer has a high-gloss
nish, the surface can be scratched or
damaged.
Avoid scratching or damaging the surface
when using the washer.
The automatic dispenser may need to be
cleaned periodically due to laundry additive
buildup.
1. Pull the dispenser drawer straight back
until it stops.
Maintaining your washer
2. Push the ends of each side of the case at
the same time.
When you feel the ends push, pull out
the dispenser drawer.
English 47
WA7700K_WA45K-03520S-00_EN.indd 47 2015/12/16 19:08:34
Page 48

Maintaining your washer
B
A
3. Remove the inserts from the 3
compartments. Rinse the inserts and
the drawer with warm water to remove
traces of accumulated laundry products.
4. To clean the drawer opening, use a
small, non-metal brush to clean the
recess. Remove all residue from the
upper and lower parts of the recess.
5. Return the inserts to the proper
Maintaining your washer
48 English
WA7700K_WA45K-03520S-00_EN.indd 48 2015/12/16 19:08:34
compartments and replace the drawer
by placing the dispenser drawer rail (B)
on top of the compartment rail (A) (Tilt
the dispenser drawer downward and
insert it).
Then push the drawer in rmly and
slowly.
Page 49

Self Clean
Self Clean is a self-cleaning cycle that
removes mold that may occur inside the
washer.
1. Press Power.
2. Select Self Clean.
Once Self Clean is selected, the only
function that can be set is Delay End.
3. Press Start/Pause. Self Clean begins.
CAUTION
• Using Self Clean, you can clean the drum
without using a cleansing agent.
• Never use Self Clean when laundry is
in the washer. This may cause damage
to the laundry or a problem with the
washer.
NOTE
The Self Clean Auto Led Function
• If the “Self Clean” led is lit after a
wash, it led that tub (drum) cleaning
is required. In this case, remove the
laundry from the washing machine, turn
the power on, and clean the drum by
running Self Clean.
• If you do not run Self Clean, the “Self
Clean” led turns off. However, the “Self
Clean” led will light again after ve
washes. Not running Self Clean at this
point will not cause a problem with the
washing machine.
• Although the Self Clean Auto led appears
once a month or so, the frequency may
differ depending on the number of times
the washing machine is used.
Maintaining your washer
English 49
WA7700K_WA45K-03520S-00_EN.indd 49 2015/12/16 19:08:34
Page 50

Troubleshooting
Checkpoints
If you encounter a problem with the washer, rst check the table below and try the
suggestions.
Problem Action
• Make sure you use rated power for the product.
Does not turn on.
Does not start.
• Make sure the power cord is completely plugged in.
• Check the fuse or reset the circuit breaker.
• Make sure the door is closed.
• Make sure the water taps are open.
• Make sure to press or tap Start/Pause to start the washing
machine.
• Make sure Child Lock is not activated.
• Before the washing machine starts to ll, it will make a series
of clicking noises to check the door lock and does a quick
drain.
• Was the door opened during the spinning cycle? Close the
door, and press or tap Start/Pause to resume.
• The machine enters Standby or is in a soaking cycle. Please
wait.
• Check the fuse or reset the circuit breaker
Troubleshooting
50 English
Water is not supplied.
After a cycle,
detergent remains
in the automatic
dispenser.
• Make sure you press or tap Start/Pause after selecting the
water supply.
• Make sure the water taps are open.
• Is the lter net at the water supply hose connector clogged?
Clean the lter net by brushing with a toothbrush.
• Is the water supply cut off? If the water supply is cut off, close
the tap and power off.
• Straighten the water supply hoses.
• Open and close the door, then press or tap Start/Pause.
• If the water pressure is low, it takes longer to start washing.
• If the water level is not as high as necessary or lower than
expected, use the level selector to adjust the water level.
• Make sure the washing machine is running with sufcient
water pressure.
• Make sure the detergent drawer is properly inserted.
• Remove and clean the detergent drawer, and then try again.
WA7700K_WA45K-03520S-00_EN.indd 50 2015/12/16 19:08:34
Page 51

Problem Action
Vibrates excessively
or makes noise.
Stops.
• Make sure the washing machine is set on a level oor. If the
oor is not level, use the levelling feet to adjust the washing
machine.
• Make sure the washing machine is not contacting any other
object.
• Make sure the laundry load is balanced.
• Make sure the laundry is spread evenly in the washing
machine. Spread out the laundry evenly and start again.
• Make sure the space around the washing machine is free of
objects.
• Humming is produced normally during operation.
• Objects such as coins can cause noise. Remove these objects
from the washing machine after washing is complete.
• Plug the power cord into a live electrical outlet.
• Check the fuse or reset the circuit breaker.
• Close the door, and press or tap Start/Pause to start the
washing machine. For your safety, the washing machine will
not spin unless the door is closed.
• Before the washing machine starts to ll, it will make a series
of clicking noises to check the door lock and does a quick
drain.
• There may be a pause or soak period in the cycle. Wait briey
and the washing machine may start.
• Make sure the inlet hose screens at the taps are not clogged.
Periodically clean the screens.
• This problem occurs temporarily due to low voltages, and will
be solved when power recovers.
Troubleshooting
English 51
WA7700K_WA45K-03520S-00_EN.indd 51 2015/12/16 19:08:34
Page 52

Troubleshooting
Problem Action
• Fully open both water taps.
• Make sure the temperature selection is correct.
• Make sure the hoses are connected to the correct water taps.
Flush water lines.
• Disconnect the hoses and clean the screens. The hose lter
screens may be clogged.
Fills with the wrong
temperature water.
• While the washing machine lls, the water temperature may
change as the automatic temperature control feature checks
incoming water temperature. This is normal.
• While the washing machine lls, you may notice just hot and/
or just cold water going through the dispenser when cold or
warm temperatures are selected.
This is a normal function of the automatic temperature
control feature as the washing machine determines the water
temperature.
Troubleshooting
Door (Lid) locked or
will not open.
Does not drain and/
or spin.
Load is wet at the end
of the cycle.
• While the washing machine is operating, press or tap Start/
Pause to stop the washing machine.
• It may take a few moments for the door lock mechanism to
disengage.
• Check the fuse or reset the circuit breaker.
• Make sure the electrical voltage is normal.
• Make sure the washing machine is plugged in.
• Make sure the drain hose is pointed downward. (Natural drain
models only)
• Make sure the drain hose is not clogged.
• Make sure the drain hose is not kinked.
• Straighten the drain hose. If there is a drain restriction, call for
service.
• Close the door, and press or tap Start/Pause. For your safety,
the washing machine will not spin unless the door is closed.
• Use the High or Extra High spin speed. (Applicable model
only)
• Use high efciency (HE) detergent to reduce oversudsing.
• Load is too small. Small loads (one or two items) may become
unbalanced and not spin completely.
52 English
WA7700K_WA45K-03520S-00_EN.indd 52 2015/12/16 19:08:34
Page 53

Problem Action
Leaks water.
Excessive suds.
The spin basket or
drain/supply hose is
frozen.
• Make sure all hose connections are tight.
• Make sure the water supply hose's rubber packing is in the
correct position. Screw tightly again.
• Make sure the end of the drain hose is correctly inserted and
secured to the drain system.
• Avoid overloading.
• Use high efciency (HE) detergent to prevent oversudsing.
• Make sure the water supply hose is not kinked.
• If the water supply is too strong, water may leak. Close the
water tap a little.
• Make sure water is not leaking from the water tap. If so,
repair the water tap.
• Use high efciency (HE) detergent to prevent oversudsing.
• Reduce the detergent amount for soft water, small loads, or
lightly soiled loads.
• Non-HE detergent is not recommended.
• Use warm water to disconnect the water supply hose and
drain hose. Soak them in warm water.
• Fill the spin basket with warm water, and then wait for about
10 minutes.
• Put a hot towel on the drain hose connector.
• Reconnect the water supply hose and drain hose, and check if
water is supplied properly.
• Make sure the drain hose is not clogged, and is hung over the
drain hose hook. Fill the spin basket halfway with water, and
try spinning again.
Water drains out
immediately.
• Lift the end of the drain hose to prevent water from draining.
Fill the spin basket halfway with water, and then run spinning
after releasing the drain hose.
• Make sure the drain hose is installed correctly. See the
installation section of this user manual and adjust the position
of the drain hose as instructed.
Stains on clothes. • Clean the magic lter.
English 53
WA7700K_WA45K-03520S-00_EN.indd 53 2015/12/16 19:08:34
Troubleshooting
Page 54

Troubleshooting
Problem Action
• Excessive suds collect in recesses and can cause foul odours.
Has odours.
If a problem persists, contact a local Samsung service center.
Information codes
The washer may display information codes to help you understand what is occurring with
your washer better.
No Code Meaning
1 1C
• Run cleansing cycles to sanitize periodically.
• Dry the washing machine interior after a cycle has nished.
The WaterLevel sensor is not working properly.
•CheckWaterLevelSensorwireharness.
•Iftheinformationcoderemains,contactacustomerservice
centre.
NOTE
When the washer displays “1C”, the washer do draining for 3
minutes. During this time, the Power button is inoperative.
Troubleshooting
54 English
2 3C
3 4C
Check the motor for operation.
•Tryrestartingthecycle.
•Iftheproblemcontinues,callforservice.
Water is not supplied.
•Makesurethewatertapsareopen.
•Makesurethewaterhosesarenotclogged.
•Makesurethewatertapsarenotfrozen.
•Makesurethewashingmachineisoperatingwithsufcient
water pressure.
•Makesurethatthecoldwatertapandthehotwatertapare
properly connected.
•Cleanthemeshlterasitmaybeclogged.
NOTE
When the washer displays “4C”, the washer do draining for 3
minutes. During this time, the Power button is inoperative.
WA7700K_WA45K-03520S-00_EN.indd 54 2015/12/16 19:08:35
Page 55

No Code Meaning
•Makesurethecoldwatersupplyhoseisrmlyconnectedtothe
4 4C2
cold water tap.
If it is connected to the hot water tap, the laundry may be
deformed with some cycles.
Water is not draining.
•Makesurethedrainhoseisnotfrozenorclogged.
•Makesurethedrainhoseispositionedcorrectly,dependingon
the connection type.
5 5C
•Cleanthedebrislterasitmaybeclogged.
•Makesurethedrainhoseisstraightenedallthewaytothe
drain system.
•Iftheinformationcoderemains,contactacustomerservice
centre.
The electronic control needs to be checked (Over Voltage Error).
•CheckthePCBandwireharness.
6 9C1
•Checkifpowerissuppliedproperly.
•Iftheinformationcoderemains,contactacustomerservice
centre.
7 9C2
8 AC6
9 dC
10 HC
Low voltage detected
•Checkifthepowercordispluggedin.
•Iftheinformationcoderemains,contactacustomerservice
centre.
Inverter Communication problem
•ChecktheInverterPCBandwireharness.
•Iftheinformationcoderemains,contactacustomerservice
centre.
Operating the washer with the door open.
•Makesurethedoorisproperlyclosed.
•Makesurelaundryisnotcaughtinthedoor.
High temperature heating check.
•Iftheinformationcoderemains,contactacustomerservice
centre.
English 55
Troubleshooting
WA7700K_WA45K-03520S-00_EN.indd 55 2015/12/16 19:08:35
Page 56

Troubleshooting
No Code Meaning
Check the drain hose.
•Makesuretheendofthedrainhoseisplacedontheoor.
•Makesurethedrainhoseisnotclogged.
•Iftheinformationcoderemains,contactacustomerservice
11 LC
12 OC
13 PC
centre.
NOTE
When the washer displays “LC”, the washer do draining for 3
minutes. During this time, the Power button is inoperative.
Water is overowed.
•Restartafterspinning.
•Iftheinformationcoderemainsonthedisplay,contactalocal
Samsung service centre.
When position of the clutch can't be detected.
•Iftheinformationcoderemains,contactacustomerservice
centre.
Troubleshooting
After position of the clutch is detected, if the signal of the clutch
14 PC1
15 Ub
16 Ur
For any codes not listed above, call 1–800–726–7864 (1–800–SAMSUNG).
hall goes wrong.
•Iftheinformationcoderemains,contactacustomerservice
centre.
Spinning does not work.
•Makesurelaundryisspreadoutevenly.
•Makesurethewashingmachineisonaat,stablesurface.
•Redistributetheload.Ifonlyoneitemofclothingneeds
washing, such as a bathrobe or pair of jeans, the nal spin result
might be unsatisfactory, and an “Ub” check message will be
shown in the display.
Display for additional rinsing.
•Showadditionalrinsinginsensingunbalance.
•Methodofreleasingthedisplay.
- Any key input.
56 English
WA7700K_WA45K-03520S-00_EN.indd 56 2015/12/16 19:08:35
Page 57

Specications
Fabric care chart
The following symbols provide garment care
direction. The clothing care labels include
symbols for drying, bleaching, drying and
ironing, or dry cleaning when necessary. The
use of symbols ensures consistency among
garment manufacturers of domestic and
imported items. Follow care label directions
to optimize garment life and reduce
laundering problems.
Wash cycle
Normal
Permanent press/Wrinkle
resistant/Wrinkle control
Gentle/Delicates
Hand wash
Water temperature
The clothes washer can not ensure
these temperatures because the actual
temperature of the water entering your
washer depends on water heater settings
and regional water supply temperatures. For
example, cold water entering the home in
the northern states during winter may be
40 °F / 4 °C which is too cold for effective
cleaning. In this situation, you will need to
adjust the water temperature by selecting
a warm setting, adding some hot water to
the MAX FILL line, or using your Washer’s
heating option, if available.
Bleach
Any bleach (when needed)
Only non-chlorine (color-safe)
bleach (when needed)
Tumble dry
Hot
Warm
Cold
NOTE
This represents appropriate wash water
temperatures for various items. The
temperature range for Hot is 105° - 125 °F
/ 41° - 52 °C, for Warm 85° - 105 °F /
29° - 41 °C and for Cold 60° - 85 °F / 16°
- 29 °C. (Wash water temperature must be
a minimum of 60 °F / 16 °C for detergent
activation and effective cleaning.)
WA7700K_WA45K-03520S-00_EN.indd 57 2015/12/16 19:08:36
Normal
Permanent press/Wrinkle
resistant/Wrinkle control
Gentle/Delicates
Special instructions
Line dry/Hang to dry
Drip dry
Dry at
English 57
Specications
Page 58

Specications
Heat setting
High
Medium
Low
Any heat
No heat / Air
Iron dry or steam temperatures
High
Medium
Low
Dry-clean
Dry-clean
Do not dry-clean
Line dry / Hang to dry
Drip dry
Dry at
Specications
58 English
Warning symbols for laundering
Do not wash
Do not wring
Do not bleach
Do not tumble dry
No steam (added to iron)
Do not iron
WA7700K_WA45K-03520S-00_EN.indd 58 2015/12/16 19:08:38
Page 59

Helping the environment
• Your washer is manufactured from
recyclable materials. If you decide to
dispose of it, please observe local waste
disposal regulations. Cut off the power
cord so that the appliance cannot be
connected to a power source. Remove
the lid so that animals and small children
cannot get trapped inside the appliance.
Declaration of conformity
This appliance complies with UL2157.
• Do not exceed the detergent quantities
recommended in the detergent
manufacturers’ instructions.
• Use stain removal products and bleaches
before the wash cycle only when
necessary.
• Save water and electricity by only
washing full loads (the exact amount
depends upon the program used).
English 59
WA7700K_WA45K-03520S-00_EN.indd 59 2015/12/16 19:08:38
Specications
Page 60

Specications
Specication sheet
Dimensions
(inches (cm))
Water pressure (psi (kPa)) 20 - 116 (137 - 800)
NET weight (kg (lb)) 56 (123.5)
A
B
D
C
Type Top loading washer
Model name
WA45K7600A* WA45K7100A*
A. Height 42.4 (107.7) 41.2 (104.7)
B. Width 27.0 (68.6)
C. Height with lid open 61.0 (155.0) 59.8 (152.0)
D. Depth 29.3 (74.4)
Spin revolution 800 rpm
Washing 120 V / 700 W
Heater rating
Spin 120 V / 400 W
Drain 120 V / 80 W
Specications
60 English
WA7700K_WA45K-03520S-00_EN.indd 60 2015/12/16 19:08:38
Page 61

Cycle chart
Use this chart to set the best cycle and options for you laundry.
NOTE
Setting Temp. Spin Soil Level
: factory setting H: Hot H: High H: Heavy
: can be selected W: Warm M: Medium N: Normal
EW: Eco Warm L: Low L: Light
C: Cold NS: No Spin
TC: Tap Cold
Cycle
Normal
Heavy Duty
Delicates
Colors/Darks
Super Speed
Bedding
Perm Press
Brilliant Whites
Quick Wash
WaterProof
Rinse+Spin
Spin
Self Clean
Temp. Spin Soil Level
H W EW C TC H M L NS H N L
Specications
English 61
WA7700K_WA45K-03520S-00_EN.indd 61 2015/12/16 19:08:38
Page 62

Specications
Cycle
Normal
Heavy Duty
Delicates
Colors/Darks
Super Speed
Bedding
Perm Press
Brilliant Whites
Quick Wash
WaterProof
Rinse+Spin
Spin
Self Clean
Options
Pre Soak Extra Rinse Eco Plus
Specications
62 English
WA7700K_WA45K-03520S-00_EN.indd 62 2015/12/16 19:08:38
Page 63

Warranty (U.S.A)
SAMSUNG WASHER
LIMITED WARRANTY TO ORIGINAL PURCHASER
This SAMSUNG brand product, as supplied and distributed by SAMSUNG ELECTRONICS
AMERICA, INC. (SAMSUNG) and delivered new, in the original carton to the original consumer
purchaser, is warranted by SAMSUNG against manufacturing defects in materials and
workmanship for a limited warranty period of:
One (1) year part and labor, Three (3) years stainless tub part (Part Only), Ten (10) years
washing DD motor part (Part Only).
This limited warranty begins on the original date of purchase, and is valid only on products
purchased and used in the United States. To receive warranty service, the purchaser must
contact SAMSUNG for problem determination and service procedures. Warranty service can
only be performed by a SAMSUNG authorized service center. The original dated bill of sale
must be presented upon request as proof of purchase to SAMSUNG or SAMSUNG’s authorized
service center. SAMSUNG will provide in-home service during the warranty period at no
charge, subject to availability within the contiguous United States. In-home service is not
available in all areas.
To receive in-home service, product must be unobstructed and accessible to the service
agent. If service is not available, SAMSUNG may elect to provide transportation of the
product to and from an authorized service center.
SAMSUNG will repair, replace, or refund this product at our option and at no charge as
stipulated herein, with new or reconditioned parts or products if found to be defective during
the limited warranty period specied above. All replaced parts and products become the
property of SAMSUNG and must be returned to SAMSUNG. Replacement parts and products
assume the remaining original warranty, or ninety (90) days, whichever is longer.This limited
warranty covers manufacturing defects in materials and workmanship encountered in
normal, noncommercial use of this product and shall not apply to the following: damage that
occurs in shipment; delivery and installation; applications and uses for which this product
was not intended; altered product or serial numbers; cosmetic damage or exterior nish;
accidents, abuse, neglect, re, water, lightning, or other acts of nature or God; use of products,
equipment, systems, utilities, services, parts, supplies, accessories, applications, installations,
repairs, external wiring or connectors not supplied or authorized by SAMSUNG that damage
this product or result in service problems; incorrect electrical line voltage, uctuations and
surges; customer adjustments and failure to follow operating instructions, maintenance and
environmental instructions that are covered and prescribed in the instruction book; product
removal and reinstallation; problems caused by pest infestations.
English 63
WA7700K_WA45K-03520S-00_EN.indd 63 2015/12/16 19:08:39
Page 64

Warranty (U.S.A)
This limited warranty does not cover problems resulting from incorrect electric current,
voltage or supply, light bulbs, house fuses, house wiring, cost of a service call for instructions,
or xing installation errors. SAMSUNG does not warrant uninterrupted or error-free operation
of the product.
EXCEPT AS SET FORTH HEREIN, THERE ARE NO WARRANTIES ON THIS PRODUCT EITHER
EXPRESS OR IMPLIED, AND SAMSUNG DISCLAIMS ALL WARRANTIES INCLUDING, BUT NOT
LIMITED TO, ANY IMPLIED WARRANTIES OF MERCHANTABILITY, INFRINGEMENT OR FITNESS
FOR A PARTICULAR PURPOSE.
NO WARRANTY OR GUARANTEE GIVEN BY ANY PERSON, FIRM, OR CORPORATION WITH
RESPECT TO THIS PRODUCT SHALL BE BINDING ON SAMSUNG. SAMSUNG SHALL NOT BE
LIABLE FOR LOSS OF REVENUE OR PROFITS, FAILURE TO REALIZE SAVINGS OR OTHER
BENEFITS, OR ANY OTHER SPECIAL, INCIDENTAL OR CONSEQUENTIAL DAMAGES CAUSED BY
THE USE, MISUSE, OR INABILITY TO USE THIS PRODUCT, REGARDLESS OF THE LEGAL THEORY
ON WHICH THE CLAIM IS BASED, AND EVEN IF SAMSUNG HAS BEEN ADVISED OF THE
POSSIBILITY OF SUCH DAMAGES.
NOR SHALL RECOVERY OF ANY KIND AGAINST SAMSUNG BE GREATER IN AMOUNT THAN
THE PURCHASE PRICE OF THE PRODUCT SOLD BY SAMSUNG AND CAUSING THE ALLEGED
DAMAGE.
WITHOUT LIMITING THE FOREGOING, PURCHASER ASSUMES ALL RISK AND LIABILITY
FOR LOSS, DAMAGE, OR INJURY TO PURCHASER AND PURCHASER’S PROPERTY AND TO
OTHERS AND THEIR PROPERTY ARISING OUT OF THE USE, MISUSE, OR INABILITY TO USE
THIS PRODUCT. THIS LIMITED WARRANTY SHALL NOT EXTEND TO ANYONE OTHER THAN
THE ORIGINAL PURCHASER OF THIS PRODUCT, IS NONTRANSFERABLE AND STATES YOUR
EXCLUSIVE REMEDY.
Some states do not allow limitations on how long an implied warranty lasts, or the exclusion
or limitation of incidental or consequential damages, so the above limitations or exclusions
may not apply to you. This warranty gives you specic rights, and you may also have other
rights, which vary from state to state.
64 English
WA7700K_WA45K-03520S-00_EN.indd 64 2015/12/16 19:08:39
Page 65

To obtain warranty service, please contact SAMSUNG at:
Samsung Electronics America, Inc.
85 Challenger Road
Ridgeeld Park, NJ 07660
1-800-SAMSUNG (726-7864)
www.samsung.com/us/support
Visits by a Service Engineer to explain functions, maintenance or installation is not
covered by warranty.
Please contact your Samsung call agent for help with any of these issues.
English 65
WA7700K_WA45K-03520S-00_EN.indd 65 2015/12/16 19:08:39
Page 66

Warranty (CANADA)
SAMSUNG WASHER
LIMITED WARRANTY TO ORIGINAL PURCHASER
This SAMSUNG brand product, as supplied and distributed by SAMSUNG ELECTRONICS
CANADA, INC. (SAMSUNG) and delivered new, in the original carton to the original consumer
purchaser, is warranted by SAMSUNG against manufacturing defects in materials and
workmanship for a limited warranty period of:
One (1) year part and labor, Ten (10) years washing DD motor (Part only).
This limited warranty begins on the original date of purchase, and is valid only on products
purchased and used in the Canada. To receive warranty service, the purchaser must contact
SAMSUNG for problem determination and service procedures. Warranty service can only be
performed by a SAMSUNG authorized service center. The original dated bill of sale must be
presented upon request as proof of purchase to SAMSUNG or SAMSUNG’s authorized service
center. SAMSUNG will provide in-home service during the warranty period at no charge,
subject to availability within the Canada. In-home service is not available in all areas.
To receive in-home service, product must be unobstructed and accessible to the service
agent. If service is not available, SAMSUNG may elect to provide transportation of the
product to and from an authorized service center.
SAMSUNG will repair, replace, or refund this product at our option and at no charge as
stipulated herein, with new or reconditioned parts or products if found to be defective during
the limited warranty period specied above. All replaced parts and products become the
property of SAMSUNG and must be returned to SAMSUNG. Replacement parts and products
assume the remaining original warranty, or ninety (90) days, whichever is longer.This limited
warranty covers manufacturing defects in materials and workmanship encountered in
normal, noncommercial use of this product and shall not apply to the following: damage that
occurs in shipment; delivery and installation; applications and uses for which this product
was not intended; altered product or serial numbers; cosmetic damage or exterior nish;
accidents, abuse, neglect, re, water, lightning, or other acts of nature or God; use of products,
equipment, systems, utilities, services, parts, supplies, accessories, applications, installations,
repairs, external wiring or connectors not supplied or authorized by SAMSUNG that damage
this product or result in service problems; incorrect electrical line voltage, uctuations and
surges; customer adjustments and failure to follow operating instructions, maintenance and
environmental instructions that are covered and prescribed in the instruction book; product
removal and reinstallation; problems caused by pest infestations.
66 English
WA7700K_WA45K-03520S-00_EN.indd 66 2015/12/16 19:08:39
Page 67

This limited warranty does not cover problems resulting from incorrect electric current,
voltage or supply, light bulbs, house fuses, house wiring, cost of a service call for instructions,
or xing installation errors. SAMSUNG does not warrant uninterrupted or error-free operation
of the product.
EXCEPT AS SET FORTH HEREIN, THERE ARE NO WARRANTIES ON THIS PRODUCT EITHER
EXPRESS OR IMPLIED, AND SAMSUNG DISCLAIMS ALL WARRANTIES INCLUDING, BUT NOT
LIMITED TO, ANY IMPLIED WARRANTIES OF MERCHANTABILITY, INFRINGEMENT OR FITNESS
FOR A PARTICULAR PURPOSE.
NO WARRANTY OR GUARANTEE GIVEN BY ANY PERSON, FIRM, OR CORPORATION WITH
RESPECT TO THIS PRODUCT SHALL BE BINDING ON SAMSUNG. SAMSUNG SHALL NOT BE
LIABLE FOR LOSS OF REVENUE OR PROFITS, FAILURE TO REALIZE SAVINGS OR OTHER
BENEFITS, OR ANY OTHER SPECIAL, INCIDENTAL OR CONSEQUENTIAL DAMAGES CAUSED BY
THE USE, MISUSE, OR INABILITY TO USE THIS PRODUCT, REGARDLESS OF THE LEGAL THEORY
ON WHICH THE CLAIM IS BASED, AND EVEN IF SAMSUNG HAS BEEN ADVISED OF THE
POSSIBILITY OF SUCH DAMAGES.
NOR SHALL RECOVERY OF ANY KIND AGAINST SAMSUNG BE GREATER IN AMOUNT THAN
THE PURCHASE PRICE OF THE PRODUCT SOLD BY SAMSUNG AND CAUSING THE ALLEGED
DAMAGE. WITHOUT LIMITING THE FOREGOING, PURCHASER ASSUMES ALL RISK AND
LIABILITY FOR LOSS, DAMAGE, OR INJURY TO PURCHASER AND PURCHASER’S PROPERTY
AND TO OTHERS AND THEIR PROPERTY ARISING OUT OF THE USE, MISUSE, OR INABILITY TO
USE THIS PRODUCT. THIS LIMITED WARRANTY SHALL NOT EXTEND TO ANYONE OTHER THAN
THE ORIGINAL PURCHASER OF THIS PRODUCT, IS NONTRANSFERABLE AND STATES YOUR
EXCLUSIVE REMEDY.
Some provinces do not allow limitations on how long an implied warranty lasts, or the
exclusion or limitation of incidental or consequential damages, so the above limitations or
exclusions may not apply to you. This warranty gives you specic rights, and you may also
have other rights, which vary from province to province.
English 67
WA7700K_WA45K-03520S-00_EN.indd 67 2015/12/16 19:08:39
Page 68

Warranty (CANADA)
To obtain warranty service, please contact SAMSUNG at:
Samsung Electronics Canada Inc.
2050 Derry Road West
Mississauga, Ontario L5N 0B9 Canada
1-800-SAMSUNG (726-7864)
www.samsung.com/ca/support (English)
www.samsung.com/ca_fr/support (French)
Visits by a Service Engineer to explain functions, maintenance or installation is not
covered by warranty.
Please contact your Samsung call agent for help with any of these issues.
68 English
WA7700K_WA45K-03520S-00_EN.indd 68 2015/12/16 19:08:39
Page 69

Memo
WA7700K_WA45K-03520S-00_EN.indd 69 2015/12/16 19:08:39
Page 70

Scan this with your smartphone
DC68-03520S-00_EN
QUESTIONS OR COMMENTS?
COUNTRY CALL OR VISIT US ONLINE AT
U.S.A 1-800-SAMSUNG (726-7864) www.samsung.com/us/support
WA7700K_WA45K-03520S-00_EN.indd 70 2015/12/16 19:08:39
CANADA 1-800-SAMSUNG (726-7864)
www.samsung.com/ca/support (English)
www.samsung.com/ca_fr/support (French)
Page 71

Lave-linge
Manuel d'utilisation
WA45K7600A* / WA45K7100A*
SSEC SEC
WA7700K_WA45K-03520S-00_CFR.indd 1 2015/12/16 19:09:52
Page 72

CONSERVEZ SOIGNEUSEMENT CES CONSIGNES
table des matières
Consignes de sécurité 4
Remarques importantes sur les consignes de sécurité 4
Importants symboles de sécurité 4
Consignes de sécurité importantes 5
Installation 13
table des matières
Déballage de votre lave-linge 13
Présentation de votre lave-linge 14
Exigences de base relatives à l'installation 16
Remarque importante à l'intention de l'installateur 20
Installation étape par étape 20
Mode d'emploi 28
Chargement du lave-linge 28
Mise en marche 29
Effectuer un lavage 30
Panneau de commande 30
Présentation des cycles 32
Options 34
Lavage des vêtements en utilisant la touche d'option 38
ATC (Contrôle automatique de la température) 39
Les bases 40
Utilisation de la lessive 42
Fonctions 43
Entretien de votre lave-linge 47
Nettoyer l'extérieur 47
Nettoyer l'intérieur 47
Entreposage de votre lave-linge 47
Protection du capot supérieur et du panneau avant 48
Nettoyer les bacs 48
Self Clean (Autonettoyage) 50
Dépannage 51
Contrôles à effectuer 51
Codes d’erreur 55
2 Français
WA7700K_WA45K-03520S-00_CFR.indd 2 2015/12/16 19:09:52
Page 73

CONSERVEZ SOIGNEUSEMENT CES CONSIGNES
Caractéristiques techniques 58
Tableau des symboles d’entretien des textiles 58
Respect de l'environnement 60
Déclaration de conformité 60
Fiche technique 61
Tableau des programmes 62
table des matières
WA7700K_WA45K-03520S-00_CFR.indd 3 2015/12/16 19:09:52
Français 3
Page 74

CONSERVEZ SOIGNEUSEMENT CES CONSIGNES
Consignes de sécuritéConsignes de sécurité
Félicitations pour l’achat de votre nouveau lave-linge Samsung. Ce manuel contient
de précieuses informations concernant l'installation, l'utilisation et l'entretien de
votre appareil. Prenez le temps de le lire an de tirer pleinement prot de toutes les
fonctionnalités qu'offre votre lave-linge.
Consignes de sécurité
Remarques importantes sur les consignes de sécurité
Veuillez lire attentivement ce manuel pour vous assurer que vous savez comment utiliser
efcacement toutes les caractéristiques et fonctions de votre nouvel appareil en toute
sécurité. Conservez-le dans un endroit sûr à proximité de l’appareil pour vous y référer
ultérieurement. Utilisez uniquement cet appareil pour son usage prévu, tel que décrit dans
ce manuel d’utilisation.
Les consignes de sécurité et les avertissements décrits dans ce manuel ne sont pas
exhaustifs. Il est de votre responsabilité de faire preuve de bon sens, de prudence et de
discernement lors de l'installation, de l'entretien ou de l'utilisation de votre lave-linge.
Parce que les consignes d’utilisation suivantes concernent plusieurs modèles, les
caractéristiques de votre lave-linge sont peut-être légèrement différentes de celles
décrites dans ce manuel et l’ensemble des symboles d’avertissement peuvent ne pas
s’appliquer à vous. Pour toute question ou renseignement, contactez le service après-vente
le plus proche ou recherchez des informations et consultez l’aide en ligne sur
www.samsung.com.
Importants symboles de sécurité
Signication des icônes et signes repris dans ce manuel d'utilisation :
AVERTISSEMENT
Risques ou pratiques dangereuses susceptibles de provoquer des blessures corporelles
graves, le décès et/ou des dommages matériels.
ATTENTION
Risques ou pratiques dangereuses susceptibles de provoquer des blessures corporelles
graves et/ou des dommages matériels.
NOTE
Indique qu'un risque de blessure à la personne ou de dommage matériel existe.
4 Français
WA7700K_WA45K-03520S-00_CFR.indd 4 2015/12/16 19:09:52
Page 75

CONSERVEZ SOIGNEUSEMENT CES CONSIGNES
Ces symboles d’avertissement sont présents pour prévenir toute blessure, à vous-même
ou à d’autres personnes.
Veuillez les respecter scrupuleusement.
Après avoir lu ce manuel, conservez-la dans un endroit sûr pour vous y référer
ultérieurement.
Lisez attentivement toutes les consignes avant d'utiliser l'appareil.
Comme pour tout appareil électrique comportant des parties mobiles, des risques existent.
Pour utiliser cet appareil en toute sécurité, familiarisez-vous avec son fonctionnement et
faites preuve de prudence lorsque vous l’utilisez.
AVERTISSEMENT
Avertissement concernant la proposition 65 de l'État de la Californie (États-Unis
uniquement)
Cet appareil contient des produits chimiques connus de l'État de la Californie pour causer
le cancer et des anomalies congénitales ou des effets nocifs sur la reproduction.
Consignes de sécurité importantes
Consignes de sécurité
AVERTISSEMENT
An de réduire les risques d'incendie, d'électrocution ou de blessures physiques lors de
l'utilisation de l'appareil, des précautions de base doivent être prises :
1. Lisez toutes les consignes de sécurité avant d'utiliser l’appareil.
2. Ne lavez et ne faites sécher aucun article ayant été en contact de quelque manière
que ce soit (nettoyage, lavage, immersion ou tache) avec de l'essence, des solvants de
nettoyage à sec ou toute autre substance inammable ou explosive. Ces substances
dégagent en effet des vapeurs qui risquent de s'enammer ou d'exploser.
3. Ne laissez pas les enfants jouer sur ou dans l'appareil. Une surveillance attentive
s'impose lorsque l'appareil est utilisé à proximité d'enfants.
4. Avant la mise hors service ou au rebut de l'appareil, retirez le hublot du compartiment
de lavage ou de séchage.
5. Ne tentez pas d'ouvrir l'appareil lorsque le tambour est en mouvement.
6. N'installez et n'entreposez jamais cet appareil dans un endroit exposé aux intempéries.
7. N'utilisez pas les commandes du sèche-linge inutilement.
Français 5
WA7700K_WA45K-03520S-00_CFR.indd 5 2015/12/16 19:09:52
Page 76

CONSERVEZ SOIGNEUSEMENT CES CONSIGNES
Consignes de sécurité
8. Ne procédez pas à la réparation ou au remplacement des pièces de l'appareil et
ne tentez pas non plus de le réparer vous-même, sauf si le manuel d'entretien ou
de réparation contient des recommandations spéciques en la matière que vous
comprenez et êtes en mesure d'exécuter.
9. N'ajoutez jamais d'essence, de solvant de nettoyage à sec ou d'autres substances
inammables ou explosives dans l'eau du lave-linge. Ces substances dégagent en effet
des vapeurs qui risquent de s'enammer ou d'exploser.
Consignes de sécurité
10. Dans certaines conditions, de l'hydrogène peut s'accumuler dans les systèmes de
production d'eau chaude qui n'ont pas été utilisés depuis au moins deux semaines.
L'HYDROGÈNE EST UN GAZ EXPLOSIF. Si votre réseau d'eau chaude n'a pas été utilisé
pendant au moins 2 semaines, ouvrez tous les robinets d'eau chaude de votre maison
et laissez l'eau couler plusieurs minutes avant d'utiliser votre lave-linge ou votre
lave-linge/sèche linge combiné. Cela permettra d'éliminer l'éventuelle accumulation
d'hydrogène. L'hydrogène étant un gaz inammable, ne fumez pas et ne créez aucune
amme ni étincelle pendant cette opération.
Avertissements critiques pour l'installation
AVERTISSEMENT
Branchez le cordon d'alimentation sur une prise murale de 120 V CA / 60 Hz de 15 A
minimum. Ne branchez que cet appareil sur cette prise. N'utilisez pas de rallonge.
• Le fait de partager une prise murale avec d'autres appareils à l'aide d'une multiprise ou
d'une rallonge peut entraîner des chocs électriques ou des incendies.
• N'utilisez pas de transformateur électrique. Il pourrait entraîner un incendie ou un choc
électrique.
• Assurez-vous que la tension, la fréquence et le courant sont conformes aux
spécications de l'appareil. Le non-respect de cette consigne peut entraîner des chocs
électriques ou des incendies.
Cet appareil doit être installé par un technicien qualié ou un centre de réparation agréé.
• Le non-respect de cette consigne peut entraîner des chocs électriques, des incendies,
une explosion, des problèmes avec le produit ou des blessures.
Éliminez régulièrement toute eau, poussière ou corps étranger des prises murales et zones
de contact à l'aide d'un chiffon sec.
• Débranchez le cordon d'alimentation et nettoyez-le à l'aide d'un chiffon sec.
• Le non-respect de cette consigne peut entraîner des chocs électriques ou des incendies.
6 Français
WA7700K_WA45K-03520S-00_CFR.indd 6 2015/12/16 19:09:52
Page 77

CONSERVEZ SOIGNEUSEMENT CES CONSIGNES
Branchez le cordon d'alimentation dans la prise murale dans le bon sens, de sorte que le
cordon soit dirigé vers le sol.
• Si vous branchez le cordon d'alimentation dans l'autre sens, les ls électriques à
l'intérieur du câble pourront être endommagés, entraînant un risque de choc électrique
ou d'incendie.
Cet appareil doit être correctement mis à la terre.
Ne reliez pas le conducteur de terre de l'appareil à un tuyau de gaz, un tuyau de
canalisation en plastique ou une ligne téléphonique.
• Une mise à la terre incorrecte pourrait causer des chocs électriques, des incendies, une
explosion ou des problèmes avec le produit.
• Ne branchez jamais le cordon d'alimentation sur une prise qui n'est pas correctement
mise à la terre. Vériez que la prise utilisée est mise à la terre conformément aux
normes locales et nationales.
N'installez jamais cet appareil près d'un radiateur ou de matériaux inammables.
N'installez pas cet appareil dans un endroit humide, huileux ou poussiéreux, ou dans un
endroit exposé directement au soleil ou à l'eau (de pluie).
N'installez pas cet appareil dans un endroit présentant un risque de fuites de gaz.
• Cela pourrait entraîner un choc électrique ou un incendie.
Branchez correctement le cordon d'alimentation dans la prise murale. N'utilisez pas de
prise ou de cordon d'alimentation endommagé(e) ou de prise murale mal xée.
• Cela pourrait entraîner un choc électrique ou un incendie.
Consignes de sécurité
Ne tirez pas et ne pliez pas excessivement le cordon d'alimentation.
Ne vrillez pas et n'attachez pas le cordon d'alimentation.
N'accrochez pas le cordon d'alimentation sur un objet métallique, ne posez pas d'objet
lourd sur le cordon d'alimentation, ne l'insérez pas entre des objets et ne le coincez pas
dans l'espace situé derrière l'appareil.
• Cela pourrait entraîner un choc électrique ou un incendie.
Ne tirez pas sur le cordon d'alimentation pour le débrancher.
• Débranchez le cordon en tenant la prise.
• Le non-respect de cette consigne peut entraîner des chocs électriques ou des incendies.
Si la prise ou le cordon d'alimentation est endommagé(e), contactez le centre de réparation
le plus proche.
Français 7
WA7700K_WA45K-03520S-00_CFR.indd 7 2015/12/16 19:09:52
Page 78

CONSERVEZ SOIGNEUSEMENT CES CONSIGNES
Consignes de sécurité
Précautions d'installation
ATTENTION
Positionnez l'appareil de telle sorte que la prise reste facilement accessible.
• Le non-respect de cette consigne peut entraîner un choc électrique en cas de fuites de
courant.
Consignes de sécurité
Installez l'appareil sur un sol plan et dur, capable de supporter son poids.
• Le non-respect de cette consigne peut entraîner des vibrations et des bruits anormaux
ou des problèmes avec l'appareil.
Débranchez la prise d'alimentation lorsque l'appareil n'est pas utilisé pendant des périodes
prolongées ou lors d'orages violents.
• Le non-respect de cette consigne peut entraîner des chocs électriques ou des incendies.
Avertissements critiques pour l'utilisation
AVERTISSEMENT
Si l'appareil est inondé, coupez immédiatement l'alimentation électrique et contactez le
centre de réparation le plus proche.
Si l'appareil produit un bruit étrange ou dégage une odeur de brûlé ou de la fumée,
débranchez immédiatement la prise d'alimentation et contactez le centre de réparation le
plus proche.
• Le non-respect de cette consigne peut entraîner des chocs électriques ou des incendies.
En cas de fuite de gaz (propane, gaz LP, etc.) ventilez immédiatement la zone. Aucun
appareil ni aucune lumière ne doivent être allumés ou éteints.
• N'utilisez pas de ventilateur.
• Une étincelle peut entraîner une explosion ou un incendie.
Ne lavez jamais de linge ayant été en contact avec de l'essence, du kérosène, du benzène,
des diluants de peinture ou toute autre substance inammable ou explosive.
• Risque de choc électrique, d'incendie ou d'explosion.
Ne forcez pas l'ouverture du hublot pendant le fonctionnement de l'appareil (lavage à
haute température/séchage/essorage).
8 Français
WA7700K_WA45K-03520S-00_CFR.indd 8 2015/12/16 19:09:52
Page 79

CONSERVEZ SOIGNEUSEMENT CES CONSIGNES
• Un écoulement d'eau hors du lave-linge peut entraîner des brûlures ou rendre le sol
glissant.
Cela pourrait provoquer des blessures.
• L'ouverture forcée du hublot peut entraîner des dommages sur l'appareil et des
blessures.
Assurez-vous de retirer l'emballage (mousse, polystyrène) xé au bas du lave-linge avant
d'utiliser celui-ci.
N'insérez pas votre main sous le lave-linge.
• Cela pourrait provoquer des blessures.
Ne touchez pas la prise d'alimentation avec des mains mouillées.
• Cela pourrait entraîner un choc électrique.
Ne débranchez pas l'appareil si celui-ci est en cours de fonctionnement.
• Le fait de rebrancher la prise d'alimentation dans la prise murale peut provoquer une
étincelle et entraîner un choc électrique ou un incendie.
Conservez tous les matériaux d'emballage hors de portée des enfants ; les matériaux
d'emballage présentent des dangers pour les enfants.
• Si un enfant met un sac en plastique sur sa tête, il risque de s'asphyxier.
Ne laissez pas les enfants ou des personnes handicapées utiliser ce lave-linge sans
surveillance.
• Risque de choc électrique, de brûlure ou d'incendie.
Consignes de sécurité
N'insérez pas votre main ou un objet métallique sous le lave-linge pendant son
fonctionnement.
• Cela pourrait provoquer des blessures.
Ne tentez pas de réparer, de démonter ou de modier l'appareil vous-même.
• N'utilisez pas de fusible (cuivre, l d'acier, etc.) autres que le fusible standard.
• Si l'appareil a besoin d'être réparé ou réinstallé, contactez le centre de réparation le
plus proche.
• Le non-respect de cette consigne peut entraîner des chocs électriques, des incendies,
des problèmes avec le produit ou des blessures.
Si une substance étrangère telle que de l'eau pénètre dans une partie autre que le tambour
de l'appareil, débranchez-le et contactez le centre de réparation le plus proche.
• Le non-respect de cette consigne peut entraîner des chocs électriques ou des incendies.
Si le tuyau d'arrivée d'eau se déconnecte du robinet et inonde l'appareil, débranchez le
lave-linge.
• Le non-respect de cette consigne peut entraîner des chocs électriques ou des incendies.
Français 9
WA7700K_WA45K-03520S-00_CFR.indd 9 2015/12/16 19:09:52
Page 80

CONSERVEZ SOIGNEUSEMENT CES CONSIGNES
Consignes de sécurité
Précautions d'utilisation
ATTENTION
Si le lave-linge est contaminé par des corps étrangers (ex. : détergent, saletés, déchets
alimentaires etc.), débranchez-le et nettoyez-le à l'aide d'un chiffon doux humide.
• À défaut, une décoloration, une déformation, des dommages ou de la rouille peuvent
Consignes de sécurité
apparaître.
La vitre du hublot peut être endommagée par un impact fort. Utilisez le lave-linge avec
précaution.
• Si la vitre du hublot est endommagée, il existe un risque de blessure.
Après une interruption d'arrivée d'eau ou en rebranchant le tuyau d'arrivée d'eau au
robinet, ouvrez celui-ci lentement.
Ouvrez le robinet d'arrivée d'eau lentement après une période prolongée de nonutilisation.
• La pression d'air dans le tuyau d'arrivée d'eau ou la canalisation d'eau peut entraîner
des dommages à certaines pièces ou une fuite d'eau.
En cas de vidange défaillante durant un programme, vériez s'il y a un problème de
vidange.
• En cas d'inondation (problème de vidange), il existe un risque de choc électrique ou
d'incendie.
N'insérez pas votre main sous le lave-linge.
• Cela pourrait provoquer des blessures.
Introduisez complètement le linge dans le lave-linge an qu'il ne reste pas coincé dans la
porte.
• Si du linge reste coincé dans la porte, il peut être endommagé, ainsi que le lave-linge,
ou une fuite d'eau peut survenir.
Assurez-vous que le robinet est fermé lorsque le lave-linge n'est pas utilisé.
• Assurez-vous que les raccords du tuyau d'arrivée d'eau sont correctement serrés.
• Le non-respect de cette consigne peut entraîner des dommages matériels et des
blessures.
Ouvrez le robinet et vériez que le raccord du tuyau d'arrivée d'eau est fermement serré
et qu'il n'y a aucune fuite d'eau avant d'utiliser l'appareil.
• Si les raccords du tuyau d'arrivée d'eau sont desserrés, des fuites peuvent se produire.
Ne montez pas sur l'appareil et ne placez pas d'objets (tels que linge, bougies allumées,
cigarettes allumées, vaisselle, produits chimiques, objets métalliques, etc.) sur l'appareil.
• Cela pourrait causer des chocs électriques, des incendies, des problèmes avec l'appareil
ou des blessures.
10 Français
WA7700K_WA45K-03520S-00_CFR.indd 10 2015/12/16 19:09:53
Page 81

CONSERVEZ SOIGNEUSEMENT CES CONSIGNES
Ne faites pas fonctionner l'appareil avec des mains mouillées.
• Cela pourrait entraîner un choc électrique.
Ce pulvérisez pas de matières volatiles telles que de l'insecticide sur la surface de
l'appareil.
• En plus d'être nocives pour l'être humain, elles peuvent également entraîner des chocs
électriques, des incendies ou des problèmes avec l'appareil.
Ne placez pas d'objet générant un champ électromagnétique à proximité du lave-linge.
• Ceci pourrait entraîner des blessures résultant de dysfonctionnements.
L'eau vidangée durant un programme de séchage ou de lavage à haute température étant
chaude, ne touchez pas cette eau.
• Cela pourrait entraîner des brûlures ou des blessures.
Pour les tissus étanches à l'eau, utilisez uniquement le programme WaterProof
(Imperméables).
• N'utilisez pas d'autres programmes pour les tissus étanches à l'eau.
Risque de vibrations anormales, de blessures ou de dégâts matériels (lave-linge, murs,
sol ou linge).
• Réglez la température et l'essorage selon l'étiquette d'entretien apposée.
Ne faites jamais fonctionner le lave-linge sans le tiroir à lessive.
• Ceci pourrait entraîner un choc électrique ou des blessures résultant de la fuite d'eau.
Consignes de sécurité
N'introduisez pas votre main dans le distributeur de lessive après l'avoir ouvert.
• Cela pourrait entraîner des blessures car vous risquez de vous faire prendre la main.
Ne placez pas d'objets (ex. : chaussures, déchets alimentaires ou animaux) autres que du
linge dans le lave-linge.
• Risque de vibrations anormales et d'endommagement ; danger de mort pour les
animaux.
N'actionnez pas les boutons à l'aide d'objets tranchants tels que des aiguilles, des couteaux,
les ongles etc.
• Cela pourrait entraîner un choc électrique ou des blessures.
Ne lavez pas de linge entré en contact avec des huiles, crèmes ou lotions utilisées dans les
salons de beauté ou de massage.
• Ceci pourrait provoquer une déformation du joint en caoutchouc, entraînant des fuites
d'eau.
Ne laissez pas d'objets métalliques (ex. : épingles de sûreté, à cheveux, etc.) dans le
tambour ; ne laissez pas d'agent de blanchiment dans le tambour pendant des périodes
prolongées.
• Ceci pourrait entraîner l'apparition de rouille sur le tambour.
WA7700K_WA45K-03520S-00_CFR.indd 11 2015/12/16 19:09:53
Français 11
Page 82

CONSERVEZ SOIGNEUSEMENT CES CONSIGNES
Consignes de sécurité
• Si de la rouille apparaît sur la surface du tambour, appliquez un produit de nettoyage
neutre et frottez à l'aide d'une éponge. N'utilisez jamais de brosse métallique.
N'utilisez pas directement de solvants de nettoyage à sec dans le tambour et ne lavez, ne
rincez et n'essorez pas de linge entré en contact avec des solvants de nettoyage à sec.
• Risque de combustion ou d'inammation spontanée résultant de la chaleur dégagée par
l'oxydation de l'huile.
Consignes de sécurité
N'utilisez pas d'eau chaude provenant d'appareils de refroidissement/de réchauffement
d'eau.
• Ceci pourrait entraîner des dysfonctionnements du lave-linge.
N'utilisez pas de savon naturel pour les mains dans le lave-linge.
• Risque de dysfonctionnement, de décoloration, d'oxydation ou de dégagement de
mauvaises odeurs.
Ne lavez pas d'articles de grande taille tels que du linge de lit dans un let de lavage.
• Dans le cas contraire, des vibrations anormales peuvent engendrer des blessures.
• Placez les plus petits objets, tels que des chaussettes délicates et de la lingerie, dans le
let de lavage.
N'utilisez pas de détergent solidié.
• S'il s'accumule dans le lave-linge, des fuites d'eau peuvent en résulter.
Ne lavez pas les lingettes jetables ou les paillassons.
• Le sable risquerait de s'accumuler à l'intérieur du lave-linge. Les performances de
certaines fonctions s'en trouveraient altérées (ex. : essorage).
Avertissements critiques pour le nettoyage
AVERTISSEMENT
Ne nettoyez pas l'appareil en pulvérisant directement de l'eau dessus.
Ne pas utiliser d’agent nettoyant à l’acide puissant.
N'utilisez pas de benzène, de diluant ou d'alcool pour nettoyer l'appareil.
• Cela pourrait entraîner des décolorations, des déformations, des dommages, des chocs
électriques ou un incendie.
Avant d'effectuer un nettoyage ou un entretien, débranchez le cordon d'alimentation de la
prise murale.
• Le non-respect de cette consigne peut entraîner des chocs électriques ou des incendies.
12 Français
WA7700K_WA45K-03520S-00_CFR.indd 12 2015/12/16 19:09:53
Page 83

Installation
Suivez attentivement ces instructions an de garantir la bonne installation du lave-linge et
d'éviter des accidents lors de son utilisation.
Déballage de votre lave-linge
Déballez votre lave-linge et vériez qu'il n'a pas été endommagé pendant le transport.
Vériez que vous disposez de tous les éléments illustrés ci-dessous. Si votre lave-linge
a été endommagé pendant le transport ou si vous ne disposez pas de tous les éléments,
appelez immédiatement le 1-800-SAMSUNG (1-800-726-7864).
An de prévenir tout risque de blessures, munissez-vous de gants de protection pour
soulever ou porter le lave-linge.
AVERTISSEMENT
Tenez tous les matériaux d'emballage (sacs plastique, polystyrène, etc.) hors de portée des
enfants.
ATTENTION
Lors du déballage du lave-linge, il est
nécessaire d'être 2. Pour retirer le cache
du bas des matériaux d'emballage, il est
strictement interdit de renverser l'appareil
en avant.
Installation
Français 13
WA7700K_WA45K-03520S-00_CFR.indd 13 2015/12/16 19:09:53
Page 84

Installation
MAX
MAX
09
08
01
02
03
04
05
07
06
10
11
12
Installation
Présentation de votre lave-linge
Assurez-vous que toutes les pièces sont incluses dans l'emballage de l'appareil. Si
vous rencontrez un problème avec le lave-linge ou les pièces, contactez un centre
d'assistance clientèle Samsung local ou le magasin.
01 Tuyau de vidange 02 Guide du tuyau de
03 Couvercle
vidange
04 Évier intégré 05 Jet d'eau 06 Tambour
07 Pieds réglables 08 Tuyau d’arrivée d’eau
(froide)
09 Tuyau d’arrivée d’eau
(chaude)
10 Panneau de commande 11 Tiroir à lessive 12 Cordon d'alimentation
14 Français
WA7700K_WA45K-03520S-00_CFR.indd 14 2015/12/16 19:09:53
Page 85

Pièces fournies
Guide du tuyau de
vidange
Manuel d'utilisation Attache en plastique
pour tuyau
Bouchon de
l'arrivée d'eau
Pièces non fournies
Tuyau d’arrivée d’eau
Outils requis pour l'installation
Clé anglaise Tournevis cruciforme Niveau
NOTE
• Si vous perdez un accessoire et souhaitez en acquérir un neuf, appelez le centre de
service Samsung (1-800-SAMSUNG (1-800-726-7864)).
• La conception des pièces et accessoires ci-dessus peut varier sur votre modèle.
Leur conception est susceptible d'être modiée sans préavis en vue d'améliorer le
produit.
• Ne réutilisez jamais de tuyaux usagés. Utilisez uniquement des tuyaux d'arrivée
d'eau neufs lors de l'installation du lave-linge. Les tuyaux d'arrivée d'eau usagés sont
susceptibles de fuir ou de se rompre et de provoquer une inondation et des dommages
matériels.
• Vériez la présence des rondelles en caoutchouc situées à l'intérieur de chaque raccord
des tuyaux d'arrivée d'eau.
Installation
Français 15
WA7700K_WA45K-03520S-00_CFR.indd 15 2015/12/16 19:09:54
Page 86

Installation
Exigences de base relatives à l'installation
Installation
Electricité
• Fusible ou disjoncteur 120 V, 60 Hz,
15 A.
• Il est recommandé de relier votre lavelinge à un circuit distinct.
• Votre lave-linge est muni d'un cordon
d'alimentation.
ATTENTION
N'utilisez jamais de rallonge.
Mise à la terre
Cet appareil requiert une mise à la terre.
Cet appareil doit être mis à la terre. En
cas de panne ou de défaillance, la mise à
la terre réduit le risque d'électrocution en
fournissant au courant électrique un trajet
de moindre résistance.
Cet appareil est équipé d'un cordon doté
d'une prise à 3 broches, dont une de terre,
destinée à être branchée sur une prise
murale correctement installée et reliée à la
terre.
La prise doit être branchée sur une prise
secteur appropriée, correctement installée
et mise à la terre conformément aux
dispositions et aux réglementations en
vigueur.
AVERTISSEMENT
Un conducteur de mise à la terre connecté
de manière incorrecte peut augmenter
le risque d'électrocution. demandez à un
électricien qualié ou à un réparateur
de vérier si l'appareil est correctement
mis à la terre. Ne modiez pas la prise
fournie avec l'appareil ; si elle n'est pas
adaptée à la prise murale, faites appel à un
électricien qualié pour installer une prise
appropriée.
Consignes de sécurité importantes
An d'éviter tout risque d'incendie,
d'électrocution ou de blessure, il est
essentiel que le câblage et la mise à
la terre soient réalisés conformément
aux spécications de la NEC (National
Electrical Code) ANSI/FNPA n°70 dernière
révision ainsi qu'aux réglementations et
ordonnances locales. L'utilisation d'une
alimentation électrique adaptée à cet
appareil relève de la responsabilité de son
propriétaire.
ATTENTION
Ne reliez jamais un conducteur de terre à
une conduite de plomberie en plastique,
une conduite de gaz ou une conduite d'eau
chaude.
Eau
L'eau doit arriver à une pression de 20
à 116 psi (137 à 800 kPa) pour que le
lave-linge puisse se remplir dans les délais
nécessaires.
Une pression d'eau inférieure à 20 psi
peut provoquer une panne de la soupape
d'admission d'eau et l'empêcher de se
fermer correctement, ou augmenter la
durée de remplissage au-delà de celle
autorisée par le régulateur du lave-linge,
entraînant l'arrêt de ce dernier. Un limiteur
de durée de remplissage est intégré aux
commandes an d'éviter toute inondation
en cas de défaillance d'un tuyau.
Les robinets d'arrivée d'eau doivent se
trouver à moins de 4 pieds (122 cm) de
l'arrière de votre lave-linge an de pouvoir
y raccorder les tuyaux fournis avec celui-ci.
16 Français
WA7700K_WA45K-03520S-00_CFR.indd 16 2015/12/16 19:09:54
Page 87

NOTE
Il existe des tuyaux d'arrivée d'eau allant
jusqu'à 10 pieds / 275 cm de long pour
les robinets se trouvant à une trop grande
distance de votre lave-linge.
Pour prévenir les risques de dégât des
eaux :
• Faites en sorte que les robinets
d'arrivée d'eau soient facilement
accessibles.
• Fermez les robinets d'arrivée d'eau
lorsque vous n'utilisez pas le lave-linge.
• Vériez régulièrement l'absence de
fuite au niveau des raccords des tuyaux
d'arrivée d'eau.
AVERTISSEMENT
Vériez l'absence de fuite au niveau de
tous les raccords de la vanne d'eau et du
robinet
Système de vidange
La hauteur recommandée de la conduite
d'évacuation est de 39 pouces (99 cm).
Fixez le tuyau de vidange à la pince
prévue à cet effet, puis introduisez-le dans
le tuyau d'évacuation mural. Le tuyau
d'évacuation doit être sufsamment large
pour accueillir le tuyau de vidange du
lave-linge. Le tuyau de vidange est xé au
lave-linge en usine.
Sol
Pour un fonctionnement optimal, vous
devez installer votre lave-linge sur
un sol stable. Si le sol est en bois, il
est préférable de le renforcer an de
réduire les vibrations et/ou problèmes de
déséquilibre. La présence de moquette
ou de surfaces molles peut entraîner des
vibrations susceptibles de provoquer un
léger déplacement de votre lave-linge
durant l'essorage.
N'installez jamais votre lave-linge sur une
plate-forme ou sur une structure instable.
Choix de l'emplacement d'installation
N'installez pas votre lave-linge dans un
endroit qui risque d'être exposé au gel
: il reste en effet toujours une certaine
quantité d'eau dans la vanne, la pompe ou
les tuyaux. L'eau gelée peut endommager
les courroies, la pompe, les tuyaux ou
d'autres composants.
Encastrement dans une niche ou
installation dans un placard
Dégagements minimaux pour installation
dans un placard ou une niche :
A
Côtés
1 pouces
/ 25 mm
l'avant
du
placard
2 pouces
/ 51 mm
Installation
6 pouces
Arrière
WA7700K_WA45K-03520S-00_CFR.indd 17 2015/12/16 19:09:54
/
152 mm
Haut
21
pouces /
533 mm
Français 17
Page 88

Installation
Installation
Si le lave-linge et le sèche-linge
sont installés ensemble, prévoyez un
dégagement d'au moins 72 pouces²
(465 cm²) à l'avant du placard. Installé
seul, votre lave-linge ne nécessite aucun
dégagement.
Encastrement dans une niche
A
A A
B B
Vue latérale du placard ou de l'espace
réduit
A
E
B
C
D
A 21 pouces (53,3 cm)
B 2 pouces (5,1 cm)
C 29,3 pouces (74,4 cm)
A 1 pouces (2,5 cm)
B 27,0 pouces (68,6 cm)
18 Français
D 6 pouces (15,2 cm)
Espace entre l'extrémité de
la vanne d'arrivée d'eau et le
mur
• Cas 1. Assemblage du
exible d'arrivée après
E
l'installation : Plus de 3,9
pouces (10 cm).
• Cas 2. Assemblage du
exible d'arrivée avant
l'installation : Plus de 2,8
pouces (7 cm).
WA7700K_WA45K-03520S-00_CFR.indd 18 2015/12/16 19:09:54
Page 89

Dimensions requises pour
l'installation
A
B
C
A
A 27,0 pouces (68,6 cm)
B 39,2 pouces (99,5 cm)
42,4 pouces (107,7 cm)
C
(WA45K7600A*)
41,2 pouces (104,7 cm)
(WA45K7100A*)
B
Installation
61,0 pouces (155,0 cm)
A
(WA45K7600A*)
59,8 pouces (152,0 cm)
(WA45K7100A*)
C
A
B
C
A* 48,0 pouces2 (310,0 cm2)
A
A 29,3 pouces (74,4 cm)
42,4 pouces (107,7 cm)
B
(WA45K7600A*)
41,2 pouces (104,7 cm)
B* 24,0 pouces
C 3,0 pouces (7,6 cm)
NOTE
* Espace obligatoire
2
(155,0 cm2)
(WA45K7100A*)
Français 19
WA7700K_WA45K-03520S-00_CFR.indd 19 2015/12/16 19:09:55
Page 90

Installation
Installation
Remarque importante à l'intention de l'installateur
Lisez attentivement les consignes suivantes avant d'installer votre lave-linge.
Conservez ces instructions pour référence ultérieure.
Nous vous recommandons de faire appel à un professionnel pour installer votre lave-linge.
Dimensions requises pour
l’installation
Retrait des vis
de transport
Choisir un
emplacement
Lancement d'un cycle de test
Lancez un cycle de test
Rinse+Spin (Rinçage +
Essorage) avec une petite
quantité de linge (environ 4
ou 5 serviettes)
Veuillez vérier à nouveau les étapes
(lave-linge à
chargement
frontal
uniquement)
précédentes.
Votre lave-linge
vibre-t-il ?
OUI
Raccorder
l'arrivée d'eau
et le système
d'évacuation
Ajuster les pieds
NON
Utilisation du
mode de calibrage
réglables
Mettre votre lavelinge sous tension
Terminer
l'installation
Installation étape par étape
ÉTAPE 1 - Choix de l'emplacement
NOTE
Avant d'installer votre lave-linge, vériez que l'emplacement choisi :
• possède une surface dure et à niveau, sans moquette ou autre revêtement de sol
susceptible d'obstruer l'aération.
• n'est pas exposé à la lumière directe du soleil.
• dispose d'un espace d'aération sufsant.
• n'est pas exposé au gel (températures inférieures à 32 °F ou 0 °C).
• ne se trouve pas à proximité d'une source de chaleur (ex. : essence, gaz, etc.).
• dispose de sufsamment d'espace, de sorte que votre lave-linge ne repose pas sur son
cordon d'alimentation.
20 Français
WA7700K_WA45K-03520S-00_CFR.indd 20 2015/12/16 19:09:55
Page 91

ÉTAPE 2 - Raccordement du tuyau d'arrivée d'eau
ATTENTION
Avant d'installer les tuyaux d'arrivée
d'eau, vériez la présence de joints en
caoutchouc (B) à l'intérieur des raccords
(A) situés aux deux extrémités de chaque
tuyau d'arrivée d'eau neuf. Dans le cas
contraire, l'installation d'un tuyau d'arrivée
d'eau sans joints en caoutchouc est
B
A
susceptible d'entraîner une fuite d'eau.
ATTENTION
Lors de l'installation initiale du lave-linge,
veillez à utiliser un tuyau neuf. Le contraire
est susceptible d'entraîner une fuite d'eau
ou un trop-plein et de provoquer des
dommages matériels.
ATTENTION
Ne raccordez pas plusieurs tuyaux
d'arrivée d'eau ensemble pour augmenter
la longueur du tuyau d'arrivée. Ceci peut
avoir comme conséquence une fuite d'eau
et un choc électrique dû à la fuite d'eau. Si
le tuyau est trop court, remplacez-le par un
tuyau haute pression plus long.
Installation
Français 21
WA7700K_WA45K-03520S-00_CFR.indd 21 2015/12/16 19:09:55
Page 92

Installation
Installation
1. Raccordez les extrémités des tuyaux
BA
d'arrivée d'eau aux robinets d'eau
chaude (B) et d'eau froide (A).
2. Serrez autant que possible les raccords
à la main, puis faites deux tiers de tour
supplémentaires à l'aide d'une clé.
ATTENTION
Lorsque vous serrez les raccords, veillez
à ne pas trop les serrer et à n'appliquer ni
ruban adhésif, ni mastic sur les robinets
ou les arrivées d'eau. Cela est susceptible
d'endommager le raccord.
NOTE
Après avoir raccordé les tuyaux d'arrivée
d'eau aux robinets, vériez que le
branchement a été correctement effectué en
tirant les tuyaux d'arrivée d'eau vers le bas.
3. Placez les extrémités non raccordées
des tuyaux d'arrivée dans une bassine
et ouvrez les robinets raccordés aux
deux tuyaux d'arrivée d'eau pendant
10 ou 15 secondes an d'en éliminer
toute substance étrangère. Fermez les
robinets avant de continuer.
4. Raccordez les extrémités des tuyaux
d'arrivée d'eau aux raccords de la
vanne d'alimentation en eau située à
l'arrière du lave-linge.
ATTENTION
Le tuyau d'arrivée d'eau raccordé au
robinet d'eau chaude doit être raccordé à
l'arrivée d'eau chaude et le tuyau d'arrivée
d'eau raccordé au robinet d'eau froide doit
être raccordé à l'arrivée d'eau froide.
22 Français
WA7700K_WA45K-03520S-00_CFR.indd 22 2015/12/16 19:09:56
Page 93

5. Serrez autant que possible les raccords
à la main, puis faites deux tiers de tour
supplémentaires à l'aide d'une clé.
NOTE
Pour garantir un bon fonctionnement,
raccordez les deux robinets d'arrivée d'eau
(chaude et froide). Si l'un d'entre eux (ou
les deux) n'est pas raccordé, un code « 4C »
(pas de remplissage) risque de s'afcher.
NOTE
Si vous ne souhaitez pas utiliser le tuyau
d'arrivée d'eau chaude, insérez le bouchon
d'arrivée d'eau dans l'orice d'arrivée
d'eau chaude. Dans ce cas, vous devez
sélectionner l'option Tap Cold (Robinet
d'eau froide) pour la température de l'eau.
Si vous sélectionnez l'option Tap Cold
(Robinet d'eau froide), tous les voyants
correspondant aux options de température
sont désactivés.
Installation
ATTENTION
Vériez si le tuyau d'arrivée d'eau n'est pas
vrillé ou plié. Si le tuyau est vrillé ou plié,
il y a un danger d'une fuite d'eau et d'un
choc électrique dû à la fuite d'eau.
6. Ouvrez les robinets d'eau chaude
et froide puis vériez tous les
raccordements : les arrivées d'eau et les
robinets ne doivent présenter aucune
fuite.
Français 23
WA7700K_WA45K-03520S-00_CFR.indd 23 2015/12/16 19:09:56
Page 94

Installation
AA
Installation
ÉTAPE 3 - Raccordement du tuyau de vidange
L'extrémité du tuyau de vidange peut être
positionnée de trois manières différentes :
Sur le bord d'un lavabo
Fixez le guide du tuyau de vidange (A)
sur le côté de la paroi du lavabo avec un
crochet ou au robinet avec un lien, an que
le tuyau de vidange ne bouge pas.
Dans une conduite d'évacuation ou un bac
B C
D
*
E
à laver
La longueur du tuyau d'évacuation (B) et
du bac à laver (C) doit être comprise entre
39 pouces (99 cm) et 96 pouces (245 cm)*.
• Assurez-vous que le raccordement
NOTE
entre le tuyau de vidange et la conduite
d'évacuation n'est pas étanche à l'air.
24 Français
WA7700K_WA45K-03520S-00_CFR.indd 24 2015/12/16 19:09:56
Page 95

NOTE
Raccordez le guide du tuyau de vidange (A)
à maximum 4 pouces (10 cm)* de distance
de l'extrémité du tuyau de vidange. Si le
tuyau de vidange est étendu de plus de
*
A
4 pouces (10 cm) après l'extrémité du guide
du tuyau de vidange, des moisissures ou
des microorganismes peuvent se répandre
à l'intérieur du lave-linge.
NOTE
Le tuyau de vidange peut être installé à
maximum 96 pouces (245 cm) de distance,
mais la capacité de vidange peut être
altérée à cette hauteur. Cela entraîne des
mauvaises odeurs dans le lave-linge, du
fait de l’eau stagnant dans le système de
vidange.
NOTE
Si le tuyau de vidange est installé endessous de 39 pouces (99 cm), l’eau peut
être vidangée dans le programme en cours
ce qui entraîne un phénomène de siphon.
Le lave-linge afche alors « 4C».
Installation
ÉTAPE 4 - Mise à niveau de votre lave-linge
Vériez si le lave-linge est à niveau en
vériant la position de la cuve :
1. Faites glisser le lave-linge à
l'emplacement choisi.
2. Ouvrez le couvercle du lave-linge et
versez de l'eau dans la cuve jusqu'à
A
WA7700K_WA45K-03520S-00_CFR.indd 25 2015/12/16 19:09:57
atteindre un niveau immédiatement
inférieur à celui du pulsateur.
NOTE
Les modèles WA45K7600A*,WA45K7100A*
disposent de l'Évier intégré au-dessus du
niveau du pulsateur. C'est la raison pour
laquelle le niveau n'est pas visible. Ouvrez
l'Évier intégré et vériez visuellement le
niveau.
Français 25
Page 96

Installation
B C
Installation
3. Si le lave-linge n'est pas à niveau, le
pulsateur (A) est placé au centre de
l'eau de la manière indiquée sur le
schéma.
Sinon, mettez à niveau votre lave-linge
en tournant autant que nécessaire les
pieds réglables avant dans le sens
horaire ou anti-horaire.
NOTE
Tournez le pied réglable avant dans le sens
horaire (B) pour abaisser le lave-linge,
et dans le sens anti-horaire (C) pour le
surélever.
ÉTAPE 5 - Mise sous tension de votre lave-linge
Branchez le cordon d'alimentation sur une
prise électrique murale agréée de 120 V,
60 Hz et à 3 broches correctement mise
à la terre, protégée par un fusible de 15
ampères (ou un coupe-circuit comparable).
La troisième broche du cordon
d'alimentation permet de relier votre lavelinge à la terre une fois ce cordon branché
sur une prise électrique murale à trois
broches mise à la terre.
Réaliser un test
Pour naliser l'installation du lave-linge,
lancez un programme Rinse+Spin (Rinçage
+ Essorage) une fois l'appareil installé.
26 Français
WA7700K_WA45K-03520S-00_CFR.indd 26 2015/12/16 19:09:57
Page 97

ÉTAPE 6 - Lancement d'un cycle de test
Lancez un cycle à vide comme indiqué ci-dessous pour vérier si votre lave-linge est
correctement installé.
1. Mettez du linge dans le tambour de sorte d'atteindre un poids d'environ 6 livres.
2. Appuyez sur le bouton Power (Marche/Arrêt) pour allumer votre lave-linge.
3. Choisissez le programme Rinse+Spin (Rinçage + Essorage) en faisant tourner le
Sélecteur de cycle.
4. Appuyez sur le bouton Start/Pause (Départ/Pause) pour commencer le cycle de test.
5. Vériez si le lave-linge ne vibre pas excessivement lors de l'arrivée d'eau, et vériez si
l'évacuation de l'eau se fait de manière appropriée lors du programme d'essorage.
NOTE
Si de l'eau fuit lors de l'approvisionnement ou de la vidange, vériez les connexions
d'arrivée d'eau. Reportez-vous à la section « ÉTAPE 2 - Raccordement du tuyau d'arrivée
d'eau » à la page 21 pour obtenir des instructions.
NOTE
Si le lave-linge bouge et vibre excessivement, remettez-le à niveau. Reportez-vous à la
section « ÉTAPE 4 - Mise à niveau de votre lave-linge» à la page 25 pour obtenir des
instructions.
Installation
ÉTAPE 7 - Mode de calibrage
Votre lave-linge Samsung détecte le poids du linge automatiquement.
Pour une détection plus précise du poids, exécutez le mode de calibrage après
l'installation.
Pour exécuter le Calibration Mode (Mode de calibrage), respectez les étapes suivantes :
1. Retirez le linge ou le contenu de la machine.
2. Maintenez simultanément les boutons Temp. (Température) et Delay End (Arrêt différé)
enfoncés pendant au moins 3 secondes lors de la mise sous tension.
3. Appuyez sur le bouton Start/Pause (Départ/Pause) pour activer le mode de calibrage.
4. Le pulsateur tourne dans le sens horaire et anti-horaire pendant environ 1 minute.
5. Lorsque le Calibration Mode (Mode de calibrage) est terminé, « 0 » apparaît à l'écran, et
le lave-linge s'éteint automatiquement. Le lave-linge est maintenant prêt à être utilisé.
Français 27
WA7700K_WA45K-03520S-00_CFR.indd 27 2015/12/16 19:09:58
Page 98

Mode d'emploi
Mode d'emploi
AVERTISSEMENT
An de réduire les risques d'incendie, d'électrocution ou de blessures physiques lors de
l'utilisation de l'appareil, des précautions de base doivent être prises :
Chargement du lave-linge
• Remplissez la cuve de vêtements secs et non pliés tout autour et de manière uniforme
de manière à augmenter l'efcacité et à éviter l'usure excessive ou le froissement de la
charge.
• Pour des performances de lavage optimales, assurez-vous que le linge soit empilé de
manière uniforme.
• Lavez le linge délicat comme les soutiens-gorge, bas et autres types de lingerie à l'aide
du programme « Délicats », avec les articles légers similaires.
• Lorsque vous lavez des articles volumineux ou un faible nombre d'articles qui ne
remplissent pas complètement le tambour (ex : tapis, peluches, un ou deux pulls, etc.),
ajoutez quelques serviettes an d'améliorer l'essorage.
• N'insérez pas d'articles volumineux sauf pour le programme Literie.
NOTE
Lors de l'essorage, le lave-linge peut ajouter de l'eau pour redistribuer les vêtements an
de compenser les éventuels déséquilibres dans le tambour.
• Lorsque vous lavez du linge très sale, ne surchargez pas votre lave-linge an d'obtenir
un meilleur résultat de lavage.
Pour ajouter un article oublié :
1. Appuyez sur le bouton Start/Pause
(Départ/Pause) pour mettre le lave-
linge en pause.
2. Attendez le déverrouillage automatique du hublot, puis ouvrez-le.
3. Ajoutez l'article, fermez le hublot, puis appuyez sur le bouton Start/Pause (Départ/
Pause). Le programme redémarre.
28 Français
WA7700K_WA45K-03520S-00_CFR.indd 28 2015/12/16 19:09:58
Page 99

Mise en marche
1. Chargez votre lave-linge.
2. Versez de la lessive liquide (ou en poudre) et des additifs de lavage dans le distributeur
(reportez-vous à la section « Utilisation de la lessive » à la page 42).
3. Sélectionnez le cycle et les options appropriés en fonction de la charge de linge
(reportez-vous à la section « Effectuer un lavage » à la page 30).
4. Fermez le couvercle.
5. Appuyez sur Start/Pause (Départ/Pause).
6. Le voyant Wash (Lavage) s'allume.
7. La durée estimée du cycle s'afche à l'écran.
Cette durée varie régulièrement, car elle reète le temps restant avant la n du
programme.
NOTE
La durée réelle nécessaire à la réalisation d'un programme peut différer de la durée
estimée afchée sur l'écran en fonction de la pression et de la température de l'eau, du
type de lessive utilisé et du linge à nettoyer.
8. Avant de se remplir, votre lave-linge émet une série de cliquetis ; ces cliquetis
indiquent qu'il vérie que le hublot est bien verrouillé et qu'il effectue une vidange
rapide.
Mode d'emploi
NOTE
• Une fois le cycle terminé, le voyant de Verrouillage du hublot s'éteint et le message
« 0 » s'afche à l'écran.
• Appuyer sur le bouton Power (Marche/Arrêt) permet d'annuler le cycle et d'arrêter
votre lave-linge.
• Les voyants Wash (Lavage), Rinse (Rinçage) et Spin (Essorage) s'allument lorsque le
lave-linge commence ces différentes parties du cycle.
Français 29
WA7700K_WA45K-03520S-00_CFR.indd 29 2015/12/16 19:09:58
Page 100

Effectuer un lavage
AVERTISSEMENT
an de limiter les risques d'incendie, d'électrocution ou de blessures, consultez la section
CONSIGNES IMPORTANTES DE SÉCURITÉ avant d'utiliser cet appareil.
Panneau de commande
Effectuer un lavage
01 Sélecteur de
cycle
02 Afchage
03 Temp.
(Température)
01
12
13
02
03
04
06
07
08
05
Appuyez sur le panneau le plus à gauche pour sélectionner le cycle
de votre choix. Lorsqu'un cycle est sélectionné, le voyant du cycle
s'allume.
Il afche consignes et diagnostics tout en vous informant sur l'état
du programme et le temps restant.
Appuyez plusieurs fois sur ce bouton pour faire déler les
différentes températures disponibles.
• Hot (Chaud) - blancs et linge très sale, textiles grand teint.
• Warm (Tiède) - textiles grand teint.
• Eco Warm (Éco -Tiède) - linge moyennement sale, textiles grand
teint, la plupart des articles infroissables.
• Cold (Froid) linge très peu sale, couleurs vives.
• Tap Cold (Robinet d'eau froide) - eau froide sans ajout d'eau tiède.
09
10
11
NOTE
Si vous sélectionnez l'option Tap Cold (Robinet d'eau froide), tous
les voyants correspondant aux options de température d'eau sont
éteints.
30 Français
WA7700K_WA45K-03520S-00_CFR.indd 30 2015/12/16 19:09:58
 Loading...