

Page 1
WASHING MACHINE
User’s Manual
FEATURES 1
SAFETY INSTRUCTIONS 2
DESCRIPTION OF PARTS 3
CONTROL PANEL 4
WASHING PROCEDURE 5
Fuzzy(Digital) course 5
Blanket course 5
Speedy course 5
Wool course 5
Eco course 5
Delay start course 5
MANUAL FUNCTIONS 6
INSTALLATION & MAINTENANCE 7
Environment 7
Levelling 7
Connecting the water supply hose 7
Please read this manual before using and note
how to use in the proper manner.
Please be careful of keeping the manual.
Otherwise, it should be bought separately.
Assembling the
In case of pump-drained washer 8
Connecting the drain hose 8
How to add the fabric softener 8
How to put the detergent in 8
Water supply connector filter 9
Cleaning the filter net. 9
How to clean the filter 9
Warning in moving washing machine 9
TROUBLESHOOTING 10
SPECIFICATIONS
rat protection
panel 8
The User’s Manual is for common use.
Make use of the User’s Manual depending upon your washing machine model.
Page 2

FEA TURES
FUZZY(DIGITAL) CONTROL
• Fuzzy(Digital) control operates with best washing course
by sensing the washload like artificial intelligence.
TRANSPARENT WINDOW
• This Transparent Window is the new concept to solve the curiosity
of users to see inside of washing machine while operation.
While operation, the laundry progress inside of washing machine can be checked by
looking through the transparent window.
PULSATOR
• The Pulsator helps water and detergent to go through fabrics efficiently
while providing both the powerful water action to clean larger and heavier clothes and
the gentle water action to clean all delicates with less wear and tear on clothes.
WATERFALL FLOW
• The Waterfall Flow injected from under the pulsator cascades with full force back into the tub,
pushing down any clothes that float right under the water surface. It is this Waterfall Flow that
enables this washing machine to effectively wash large and heavy items, such as bluejeans
and blankets.
MAGIC FILTER
• This unique magic Filter ensures that all the lint inside the tub is captured for top quality filtering
results to deliver consistently effective cleaning results.
SOFTENER DISPENSER
• The Softener Dispenser releases the fabric
softener at the appropriate time when the last
rinsing proceeds.
CAS SYSTEM(i CONTROL SYSTEM)
• Child Lock Function ( page2)
• Auto Restart
The power is turned on automatically after power failure.
• Saving Energy
The Eco+ course, it is a wash course to saving the energy
reduces laundry time for frequent and soiled clothes.
1
Page 3

SAFETY INSTRUCTIONS
Please note that the following precautions for safety intend to prevent unpredictable danger and damage
by helping the proper use in safety.
When using hot water in washing, please make sure that the water should not exceed 50˚C.
• Plastic parts may be deformed or damaged, and an electric shock or a fire may take place.
WARNING
There might be serious injury or fatal accident when
you violate this instruction.
If the power supply cord or plug is damaged or
loosened, do not use.
• An electric shock or a fire may take place.
Do not pull the cord off or touch it with moist hands.
• An electric shock or a fire may take place.
Do not bend the power supply cord by force or
press it with heavy things.
• An electric shock or a fire may take place.
Do not install the washer nearby electric implement or
don’t put a candle light or cigarette light on the washer.
• A fire may take place.
Do not disassemble, repair or remodel it recklessly.
• When you need to repair it, please call service
agent. An electric shock or a fire may take place.
During operation, do not put your hands or metal
materials under the washer.
• You may be hurt by spinning board beneath
the washer.
Stay away from the washer when the bottom of the
washer sinks into the water.
• There might be an electric shock. Please
wait until the water drains out completely.
Do not put laundry stained with gasoline, benzene,
or alcohol in the washer, and keep the materials
away from the washer.
• An explosion or a fire may take place.
During spinning, don’t put your hand in the spinning tub.
• It may hurt your hands. If it does not stop within
15 seconds after you open the lid, call
service agent immediately.
CAUTIONS
There might be a slight injury or damage when you
violate this instruction.
Don’t’ install it in the area with moisture or outdoor
where it has rain or snow
• An electric shock or a fire may take place.
Please unplug the power supply cord when you do
not use it.
• An electric shock or a fire may take place.
If there is dust or water on the power supply plug
and its connected part, please remove it completely.
• An electric shock or a fire may take place.
Do not make your kids look into the inside of the
washer.
• If your kid falls into the washer, his life could be
in danger.
Ventilate immediately without touching the power
plug if gas is leaking.
• An electric shock or a fire may take place if it
catches flame.
If the washer makes strange noise, smell or smoke,
unplug it promptly and call service agent.
• An electric shock or a fire may take place.
When cleaning, don’t spray water to the parts of the
washer directly.
• It may make it’s life span shorten.
Also an electric shock or fire may take place
Don’t use several appliances together with an outlet.
• A fire may take place due to unusual heat.
Don’t press the button with an awl or pin.
• An electric shock or a fire may take place.
Child-Lock function: This is a device to protect children from being accidentally hurt while
How to start the Child-Lock function:
- Press the "Power" button to go to an initial washing mode.
-
By pressing "Start/Hold" button, you start washing and in case Child Lock function is needed during the laundry
- Push the "Course" button and get the function started.
(Note: You cannot perform the function without the "Power" button on.)
In the event that you would like to modify the Child-Lock function, "L" signal flashes in the "signal window
showing the rest of the set time" every two seconds, which means it is locked and indicates how much
time is left until the function is released.
To release the function of Child-Lock:
- In case the "Child-Lock" is programmed, press both the "Function" and "Course" buttons in sequence.
playing with the washer.
2
Page 4
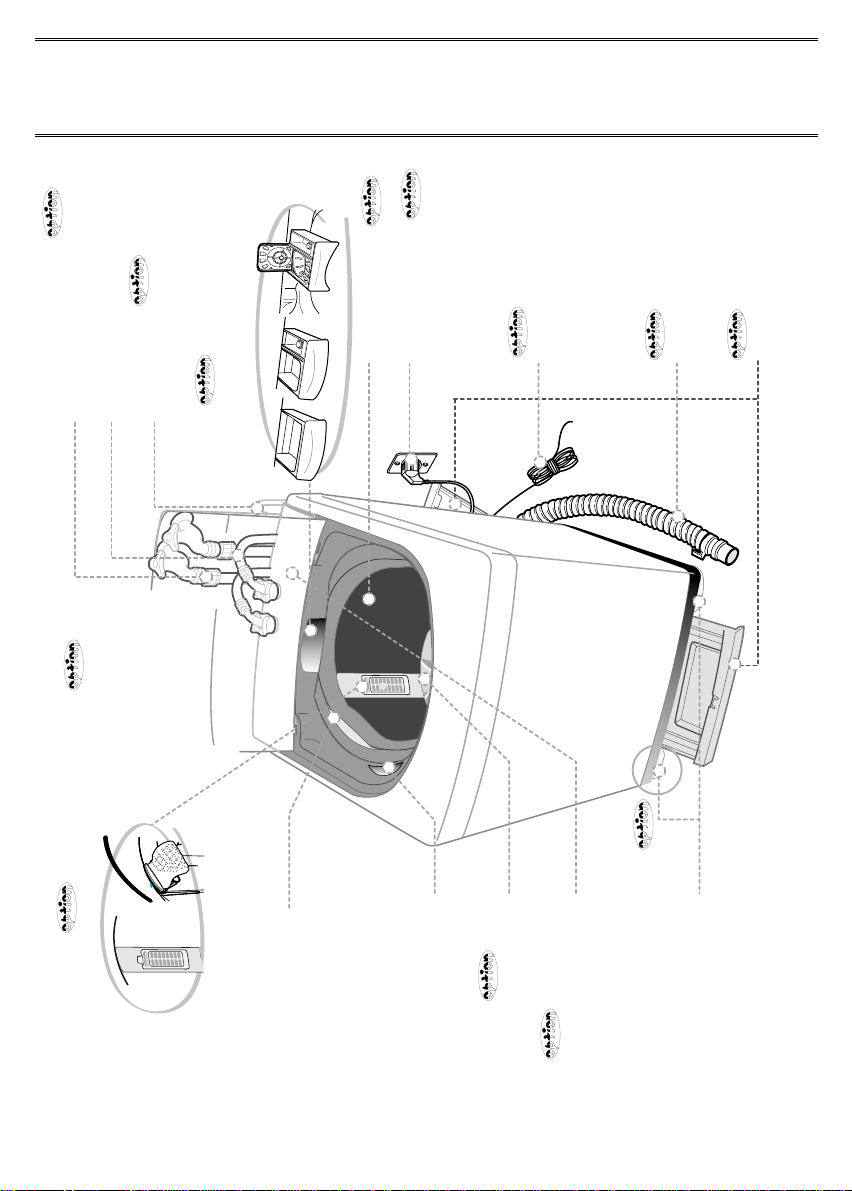
DESCRIPTION OF PARTS
Make use of the User’s Manual depending upon your washing machine model.
The User’s Manual is for common use.
SPIN BASKET
POWER CORD
GROUND LEAD
When the water pipe is
metal, make sure to cover
the end of the ground wire.
WATER DRAIN HOSE
RAT PROTECTION
PANEL
WATER SUPPLY HOSE(HOT)
DRAIN-HOSE (PUMP)
WATER SUPPLY HOSE (COLD)
LID
and spinning.
closed during washing
Be sure to keep the lid
FILTER
DETERGENT BOX
washing.
the filter during
Lint will be collected in
DISPENSER
FABRIC SOFTENER
PULSATOR
BLEACH INLET
PANEL
FRONT CONTROL
ADJUSTABLE LEGS
of the legs when
Adjust the length
installing the washer.
3
Page 5

For more details, see control panel of your washing machine.
CONTROL PANEL
POWER BUTTON
Press this button once to operate.
POWER
Press once again to turn the power off.
START/HOLD BUTTON
Use to pause and restart the operation.
START/
HOLD
To change the washing procedure during operation, press this button to stop,
and once again to restart after changing the procedure.
DELAY START BUTTON
Press this button when delay start washing is needed.
COURSE SELECT BUTTON
DELAY
START
COURSE
With every press of this button, the washing course changes;
FUZZY(DIGITAL)
BLANKET➔ SPEEDY➔ WOOL➔ECO
FUNCTION
➔
FUZZY(DIGITAL)
➔
FUNCTION SELECT BUTTON
With every press of this button, the function changes; SOAK,WASH,RI NSE,SPI N
WASH ➔ RINSE ➔ SPIN ➔ WASH&RINSE ➔ RINSE&SPIN ➔ WASH,RINSE,SPIN
WATER LEVEL SELECT BUTTON
According to the washload,select the water level ;
WATER
LEVEL
MED ➔ HIGH ➔ EXTRA LOW ➔ LOW
➔
WATER
WATER SUPPLYSELECT BUTTON
SUPPLY
As you press this button, the type of water is selected as follows.
➔
COLD
COLD + HOT➔ HOT➔ COLD
REMAINING TIME INDICATOR LIGHT
The indicator light shows the remaining time (in minutes) of each wash cycle.
At the end of the cycle,the power automatically switches off.
4
Page 6

WASHING PROCEDURE
Before starting washing, check the following;
Connect the water supply hose to the water tap. Leave a tap
open. Plug the power cord in. Make sure to lay down the
drain hose. (In case no drain pump)
FUZZY(DIGITAL) COURSE
Selects the best washing course
automatically.
POWER
START/
HOLD
1. Press the POWER Button to"ON".
2. Press the START/HOLD button.
Water level is selected automatically.
Washing,rinsing, and spinning follow.
If you want to pause, press the START/HOLD
button again.You can change the course when paused.
3. Close the lid.
BLANKET COURSE
POWER
COURSE
START/
HOLD
1. Press the power button to "ON".
2. Press the course select button once.
3. Press the START/HOLD button
Water level is selected automatically.
Washing, rinsing, and spinning follow.
If you want to pause, press the START/HOLD
button again.You can change the course when paused.
4. Close the lid.
SPEEDY COURSE
POWER
COURSE
START/
HOLD
Because washing is speedy, it is
good for light or less stained laundry.
1. Press the power button to "ON".
2. Press the course select button twice.
3. Press the START/HOLD button
Water level is selected automatically.
Washing, rinsing, and spinning follow.
If you want to pause, press the START/HOLD
button again.You can change the course when paused.
4. Close the lid.
Put the laundry into the washer and add detergent, too.
Be careful not to overload. Use right detergent
for the fabrics you are washing.
WOOL COURSE
POWER
COURSE
START/
HOLD
1.Press the power button to "ON".
2.Press the course select three times.
3.Press the START/HOLD button.
Washing,rinsing, and spinning follow.
If you want to pause, press the START/HOLD
button again.You can change the course when paused.
4. Close the lid.
CAUTION . . .
-Do not use water above 30˚C for WOOL washing.
-Refer to the tag attached on the clothes for washing
information.
-Fasten buttons and turn inside out before washing.
-Use the detergent indicated in the laundry.
-When the degree of dirt is extreme, soak the laundry in warm
water for about 10 minutes before pressing the WOOL course
button in order to enhance washing efficiency.
ECO COURSE
POWER
COURSE
START/
HOLD
1. Press the power button to "ON".
2. Press the course select button four times.
3. Press the START/HOLD button
Water level is selected automatically.
Washing, rinsing, and spinning follow.
If you want to pause, press the START/HOLD
button again.You can change the course when paused.
4. Close the lid.
DELAY START COURSE
POWER
COURSE
DELAY
START
START/
HOLD
Select this course when you have to go out or do
something else.
1. Press the power button to "ON".
2. Press the DELAYSTART button once.
You may change the delay start time with
use the DEALY START button. (from 3 hours to 18 hours)
3. Press the START/HOLD button and put
the proper amount of detergent into tub.
4. Close the lid.
The washing finishes by the time you reserved.
5
Page 7

MANUAL FUNCTIONS
Each washing course changes manually.
Ex) If you want to wash in the speedy course : Power - Select speedy course - Wash - Start/Hold button
SOAK FUNCTION (Including WASH, RINSE, SPIN)
Press the POWER button.
Select the course(Press the course button).
POWER COURSE
once
POWER
FUNCTION
twice
POWER
FUNCTION
three times
FUNCTION
START/
HOLD
START/
HOLD
START/
HOLD
➔ FUZZY
Press the FUNCTION SELECT button once.
Press the START/HOLD button once.
Water level is selected automatically.
Washing,rinsing, and spinning follow.
WASH ONLY
Press the POWER button.
Press the FUNCTION SELECT button twice.
Press the START/HOLD button once.
When the FUNCTION button is pressed during washing, the wash
time can be changed to between 3 and 25 minutes in duration.
RINSE ONLY
Press the FUNCTION button three times.
Press the START/HOLD button once.
When the FUNCTION button is pressed during rinsing, the rinse
times can be changed to between 1 to 5 times in duration.
(DIGITAL)
, BLANKET, SPEED, WOOL,
ECO
POWER
POWER
POWER
FUNCTION
four times
FUNCTION
five times
FUNCTION
six times
START/
HOLD
START/
HOLD
START/
HOLD
SPIN ONLY
Press the FUNCTION button four times.
Press the START/HOLD button once.
When the FUNCTION button is pressed during spinning,
the spin time can be changed to from 1 to 7 minutes.
WASH AND RINSE
Press the FUNCTION button five times.
Press the START/HOLD button once.
When the FUNCTION button is pressed during working, the rinse
times can be changed to between 1 to 5 times in duration.
RINSE AND SPIN
Press the FUNCTION button six times.
Press the START/HOLD button once.
Rinsing and spin drying follow.
When the FUNCTION button is pressed during working, the rinse
times can be changed to between 1 and 5 times in duration.
6
Page 8

INSTALLATION & MAINTENANCE
a
b
a
b
c
Make use of the User’s Manual depending upon your washing machine model.
ENVIRONMENT
Leave some space
Maintain at least 10cm between the washer and the wall.
Place the washer on a sturdy flat surface.
If the washer is placed on an uneven or weak surface,
noise or vibration occurs. (Allowable is 1˚)
Adjust the legs for even placement.
•
LEVELLING
If the washer is not leveled with the ground, it makes the machine tremble more or be out of order.
So, make sure that the washer is leveled properly.
SEE IF THE MACHINE IS PLACED LEVEL BY CHECKING
THE POSITION OF THE WASHING TUB.
•
Open the lid of the machine, pour water into the tub up to the level
just below the pulsator, and adjust the legs so that the pulsator is
positioned at the center of the water as shown in the figure.
•
Place the machine more than
10cm away from the wall.
•
Adjust the legs on feet
for levelling .
LockLoosen
CONNECTING THE WATER SUPPLY HOSE
1. Remove the adaptor
from the water
supply hose.
The User’s Manual is for common use.
Never install the washer near water.
Do not place the washer in steamy rooms or where the
washer is directly exposed to rain.Moisture may destroy the
electrical insulation causing an electrical shock hazard.
Avoid direct sunlight or heaters.
As plastic and electrical components are affected by direct
heat,never place the washer near furnaces, boilers, etc.
Do not place under direct sunlight.
1. Adjust the side horizontally
first and the front
in same direction ❷next.
2. If the thread is not
within the limit, adjust
the height of
the legs.
5. Connect the other end of the water
supply hose to the inlet water valve
at the back of the washer.
Screw the hose clockwise all the
way in.
2. First,using a "+" type
screw driver, loosen the
four screws on the adaptor.
Next,take the adaptor and
turn part(b) following the
arrow for gap about 5mm
between them.
3. Connect adaptor to the
water tap by tightening
the screws firmly.
Then, turn part (b)
following the arrow and
put (a) and (b)together.
4. Connect the water supply
hose to the adaptor. Pull down
the part (c) of the water supply
hose .When the part (c)is released,
the hose is automatically
connected to the adaptor
making a 'click' sound.
5-1.Connect the other end of the water
supply hose to the inlet water valve
at the top of the washer.
Screw the hose clockwise all the way in.
If the water tap is a screw type,assemble
a water supply hose that fits to the
tap as shown.
NOTICE After completing connection, if water leaks from the hose,
then repeat the same steps.
Use the most conventional type of faucet for water supply.
In case the faucet is square or too big,remove the spacing
ring before inserting the faucet into the adaptor.
7
Page 9

ASSEMBLING THE RAT PROTECTION PANEL
1.Insert the rat
protection panel
to the assembling
hole on front side
to the end.
IN CASE OF PUMP-DRAINED WASHER
Take out the cap-hose and
connect the outlet-hose.
cap-hose
outlet-hose
Be sure to join tightly the drain hose into
the drain-outlet on the back of the
machine.
CONNECTING THE DRAIN HOSE
After pressing the joint ring(a), insert the drain hose(b)
to drain direction.
HOW TO ADD THE FABRIC SOFTENER
•
When a proper amount (one time does) of fabric
softener is stored in the softener inlet,it is
automatically put in at the last rinsing cycle.
•
Do not use detergent, bleach or starch into
the Softener Inlet.
•
Using too much softener may produce
unsatisfactory results.
2.If you have difficulty
inserting the panel
lift up the washer a
little and insert it
Be sure to join tightly the drain
hose into the drain-outlet
on the side of the machine.
Install the drain hose in the
position of about 90~100cm
above the ground.
(a)
(b)
•
Do not open the lid during the Spin Dry cycle.
If added too early, its effectiveness will decrease.
•
Do not leave the softener
into the Softener
Dispenser for a long time.
Because softner
became stiff.
90~100cm
HOW TO PUT THE DETERGENT IN
1.Open the detergent box by pulling in the direction of the arrow as shown in the
figure and then put the powder detergent in the detergent box.
2. Put in one-time amount of detergent evenly so the detergent may not brim over the box.
Detergent Device
Put the detergent
in proportion to
water level
Softener Device
Softener
baseline
CAUTION : If softener is stored over the above base line, it may flow down at any time.
8
Page 10

WATER SUPPLY CONNECTOR FILTER
1.
Pull out the filter and wash well.
inlet water
valve
2.
Pull in the filter and connect
the hose to the inlet water
valve tightly.
3.
Check if there is a leakage.
Note to tighten up the
connector.
CLEANING THE FILTER NET
1. Push the upper part
of the filter and pull in.
1. Push up and
pull out the filter net.
Clean the filter net often to keep the washer clean.
2. Open the cover as
shown in the figure.
2.
Remove the collected
lint from the filter net.
HOW TO CLEAN THE FILTER
1. Place a rag under the washer filter not to wet the floor.
2. Rotate the filter counterclockwise
and pull out the filter.
3. Remove dirts and rotate
the filter clockwise
until it locks in position.
3. Clean the filter. 4. Close the cover and insert the
3. Clean the filter. 4.
(pump drained washer)
1.Place a rag under washer filter not to wet the floor.
2.Turn the filter-cap to the left.
3.Take the filter out and
remove dirts.
4. Reassemble in
reverse order.
lower part of the filter in the
basket first and then push the
filter with "click" sound .
Pull down the filter net.
WARNING IN MOVING WASHING MACHINE
When carrying washing machine,
please make sure two people move by grabbing
handles on both sides. If you carry it with its front
part on your back or on your knee, it might warp the
shape or cause some damage.
9
Page 11

TROUBLESHOOTING
Washing machine won't work
Is the water tap opened?
Is the washer plugged in?
Is the power cut off?
Is there enough water?
Water is not supplied
Is the water tap opened?
Is the water cut off?
Is the water supply hose or hose
connection clogged?
Is the water tap frozen?
If water is not supplied in 1 hour,a
buzzer will sound, and the remaining
time indicator will show "4E".
Water dose not drain
Is the drain hose down?(No pump)
Is the drain hose frozen?
Is the drain hose clogged?
If the water dose not drain in 15
minutes, a buzzer will sound,
and the remaining time indicator
will show "5E".
Spinning does not work
Is the laundry spread out evenly
in the washer?
Is the washer set on a sturdy
flat surface?
Water is overflowed
Restart after spinning.
If the error sign still indicates,
call agency.
10
Page 12

IN CASE THE NEED FOR SERVICING ARISES.
If any problem occurs with your products,do not hestitate to call any nearby.
Name, address, telephone number is required.
SPECIFICATIONS
POWER
CONSUMPTION
DIMENSIONS(mm)
WEIGHT
WATER PRESSURE
WASHING TYPE
WASH
SPIN
426W
270W
W588xD618xH955
38 kg
0.05~0.78 MPa
(0.5 ~ 8.0 kg. f/cm2)
Stirring Type
STANDARD
WATER LEVEL
WATER USAGE
PULSAT OR
ROTATING SPEED
SPIN SPEED
HIGH
MED
LOW
EXTRA LOW
CODE NO. : DC68-01488D
75 l
55 l
42 l
31 l
202
100 rpm
680 rpm
l
 Loading...