

LCD TV
LE15S51B/LE20S51B/LE20S51BU
LCD TV
LE15S51B
LE20S51B
LE20S51BU
Owner’s Instructions
Before operating the unit,
please read this manual thoroughly,
and retain it for future reference.
-
AFTER SALES SERVICE
-
Do not hesitate to contact your retailer or service agent if a
change in the performance of your product indicates that a
faulty condition may be present.
BN68-00963A-00
ON-SCREEN MENUS
PC DISPLAY
TELETEXT
This device is a Class B digital apparatus.
Register your product at
www.samsung.com/global/register
Correct Disposal of This Product
(Waste Electrical & Electronic Equipment)
(Applicable in the European Union and other European
countries with separate collection systems)
This marking shown on the product or its literature,
indicates that it should not be disposed with other
household wastes at the end of its working life. To prevent possible
harm to the environment or human health from uncontrolled waste
disposal, please separate this from other types of wastes and recycle
it responsibly to promote the sustainable reuse of material resources.
Household users should contact either the retailer where they
purchased this product, or their local government office, for details of
where and how they can take this item for environmentally safe
recycling.
Business users should contact their supplier and check the terms and
conditions of the purchase contract. This product should not be mixed
with other commercial wastes for disposal.
BN68-00816C-00Eng.qxd 7/11/05 12:13 PM Page 1
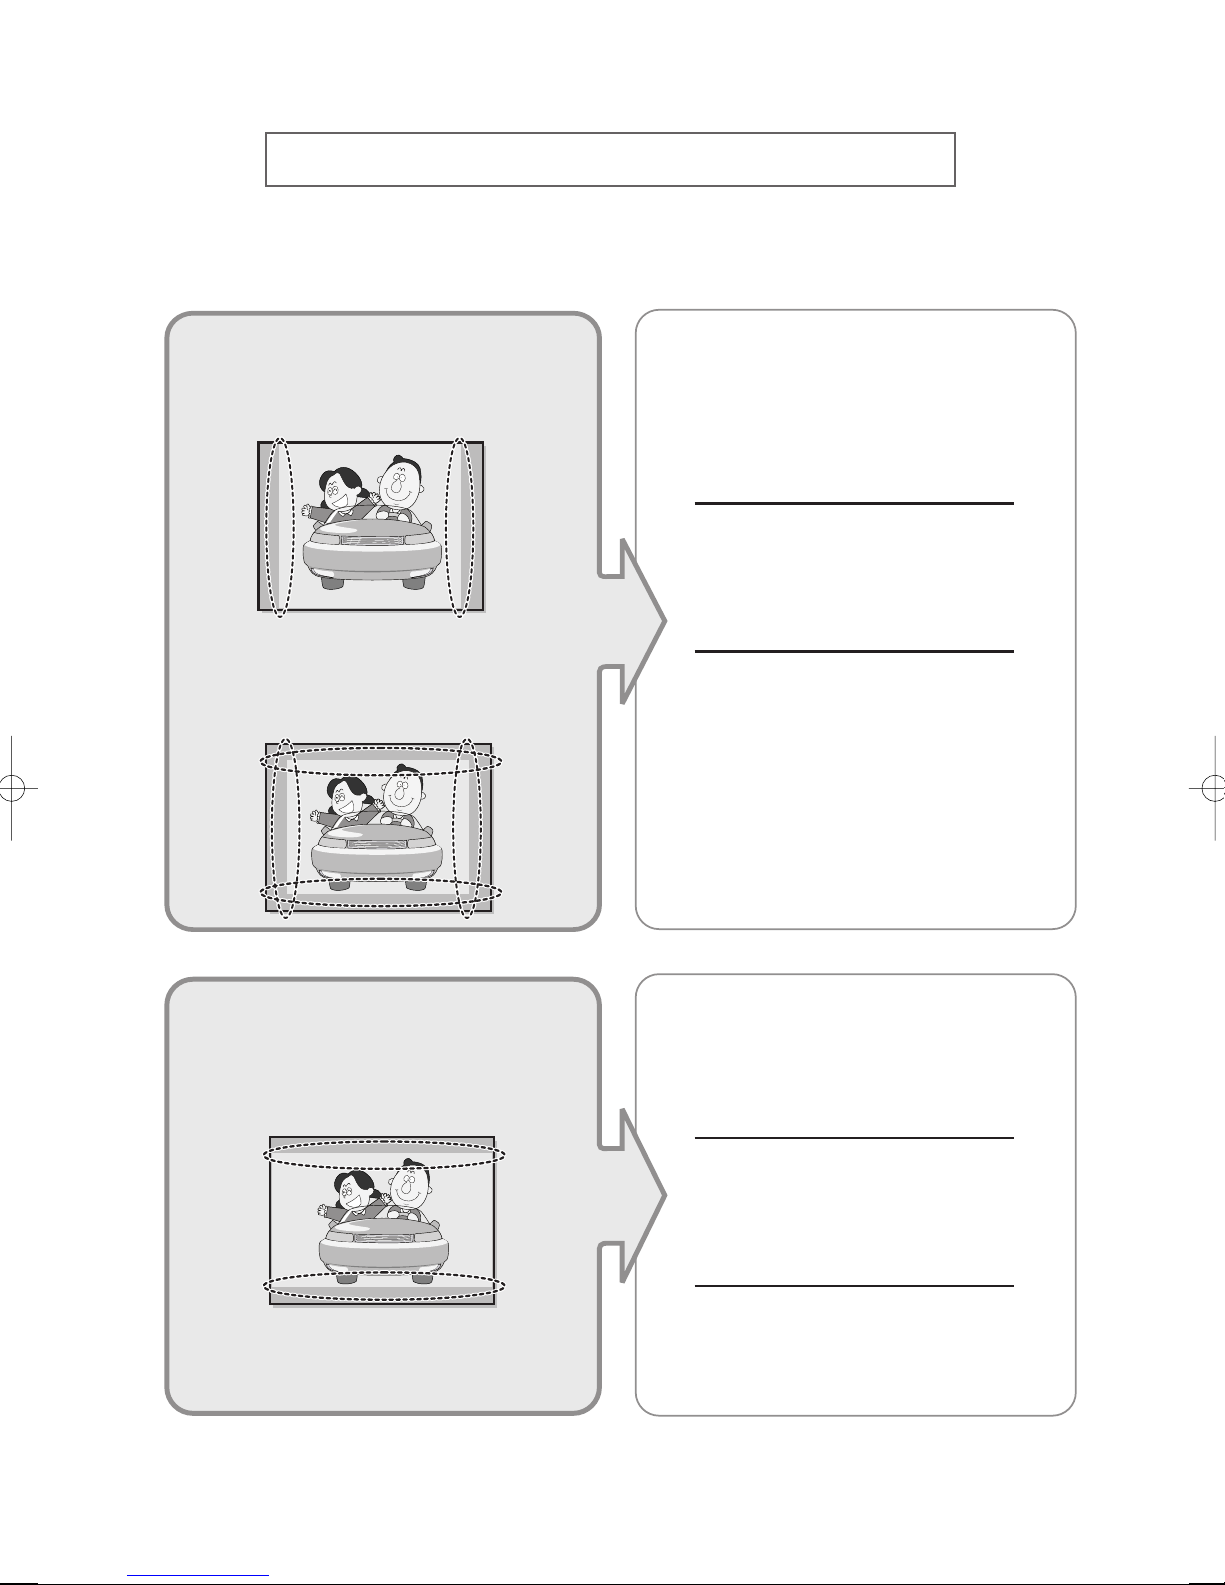
Precautions When Displaying a Still Image
A still image may cause permanent damage to the TV screen.
•
Digital Ready TV: When you
select the regular screen (4:3)
mode to watch an SD-grade
digital broadcast (and the set-top
box output is 480p).
•
Digital Ready TV: When you
select the wide screen (16:9)
mode to watch an SD-grade
digital broadcast (and the set-top
box output is 1080i).
Although digital broadcasting must be in the
wide screen (16:9) HD format, broadcasters
sometimes show programs made originally
in the regular screen format (4:3) by
converting the signals into digital form, in
which case the left and right side edges of
the screen are cropped.
Note : If the borders at the left, right and the
center of the screen remain fixed for
an extended period of time, the
amount of light transmission will also
remain varied and as a result the
borders may leave traces.
Do not leave the screen in pause mode for
extended periods of time as you may
experience the same problem with products
by other manufacturers.
•
Digital Ready TV: When the
TV receives HD-grade signals
(and the set-top box output is 1080i).
When you watch a digital HD-grade broadcast
on a regular (4:3) TV with the screen size
"16:9" or "Panorama" selected, you will be
able to watch the program but the top and
bottom edges of the screen will be cropped.
Note : If the borders at the top, bottom and
the center of the screen remain fixed
for an extended period of time, the
amount of light transmission will also
remain varied and as a result the
borders may leave traces.
Do not leave the screen in pause mode for
extended periods of time as you may
experience the same problem with products
by other manufacturers.
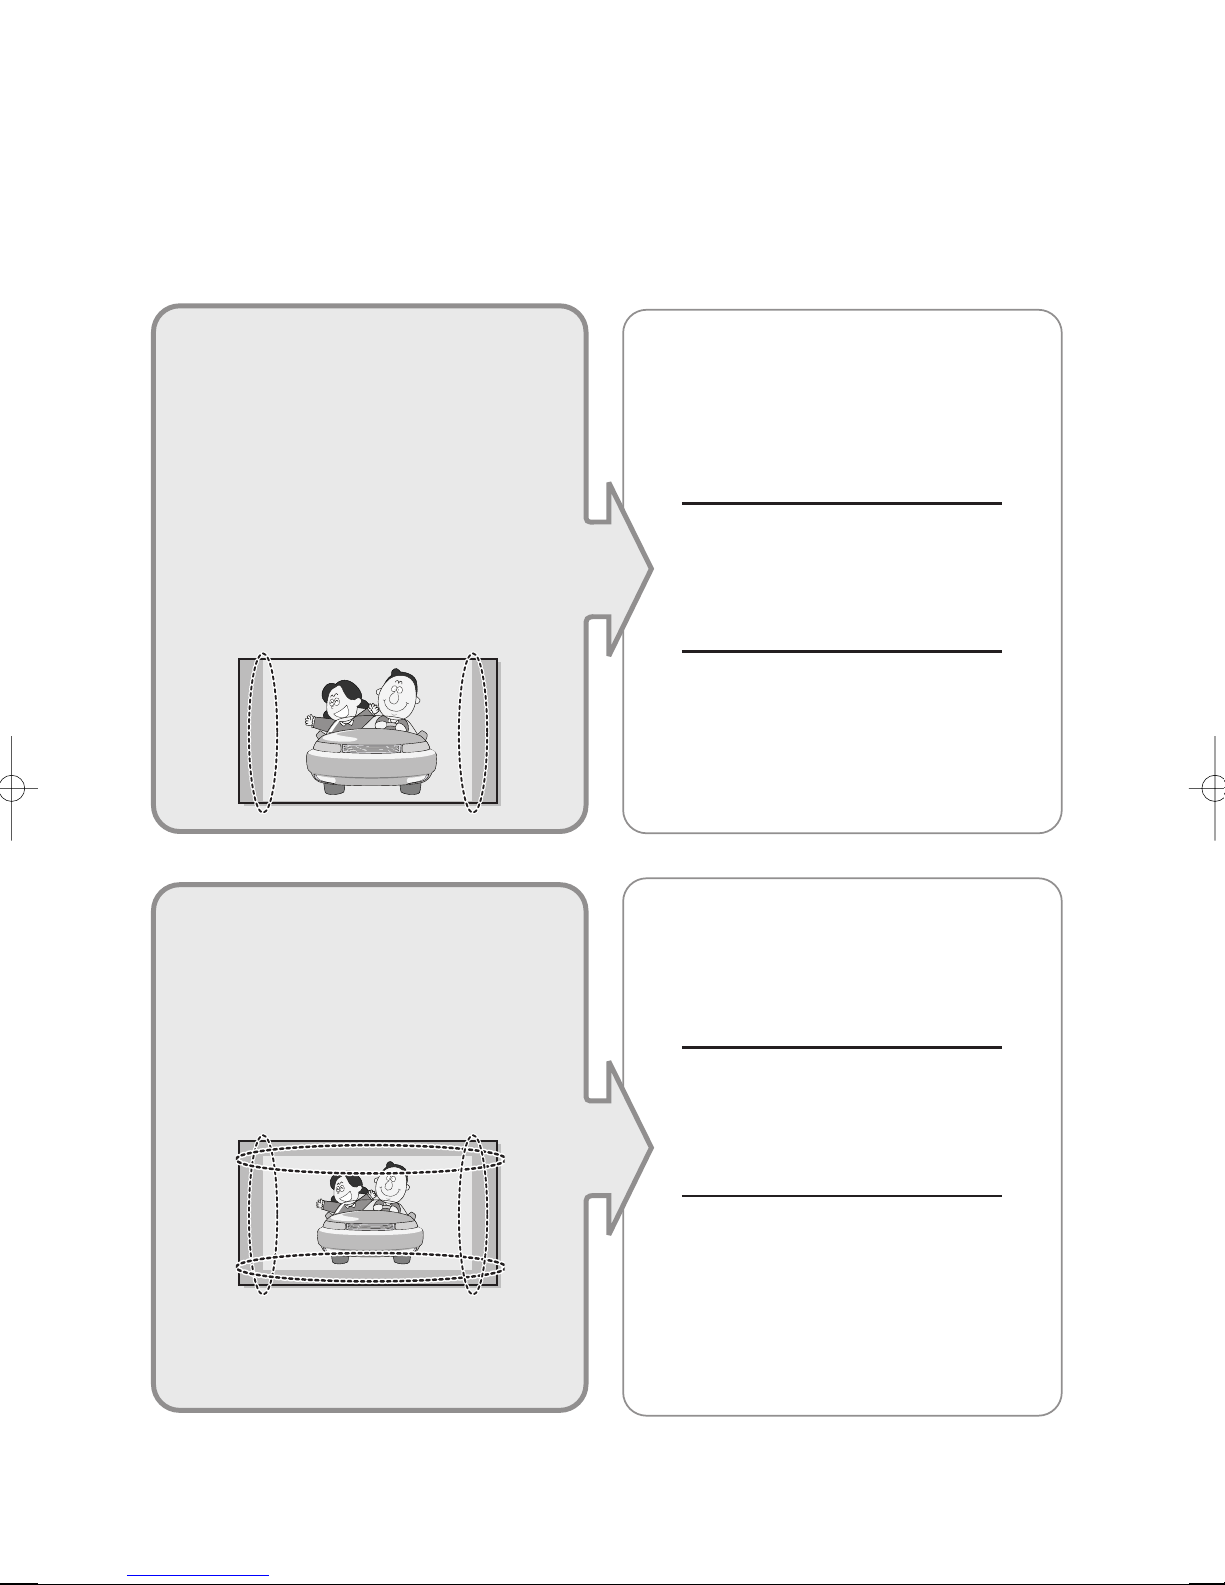
• Integrated
(Wide-screen): When the TV
receives SD-grade (regular)
broadcasting signals (receives
480p regular signals).
•
Digital Ready TV
digital TV: When the TV receives
SD-grade (regular) broadcasting
signals (with a set-top box).
Digital TV
(wide-screen):
• When you watch an analogue
(regular) broadcast on a
wide-screen TV (with the 4:3 screen
mode selected).
Although digital broadcasting must be in the
wide screen (16:9) HD format, broadcasters
sometimes show programs made originally
in the regular screen format (4:3) by
converting the signals into digital form, in
which case the left and right side edges of
the screen are cropped.
Note : If the borders at the left, right and the
center of the screen remain fixed for
an extended period of time, the
amount of light transmission will also
remain varied and as a result the
borders may leave traces.
Do not leave the screen in pause mode for
extended periods of time as you may
experience the same problem with products
by other manufacturers.
•
When you watch a DVD, CD or a
video in wide screen (21:9) format on
a wide-screen (16:9) TV.
• When you connect a computer or a
game console to the TV and select
the 4:3 screen mode.
If you connect a DVD player, computer or a
game console to the wide-screen TV and
watch a movie or play a game in regular
(4:3) or wide (21:9) screen mode, the left
and right side edges, or the top and bottom
edges of the screen will be cropped.
Note : If the borders at the left, right and the
center of the screen remain fixed for
an extended period of time, the
amount of light transmission will also
remain varied and as a result the
borders may leave traces.
Do not leave the screen in pause mode for
extended periods of time as you may
experience the same problem with products
by other manufacturers.

Contents
◆ CONNECTING AND PREPARING YOUR TV
■
Viewing the Control Panel............................................................................. 4
■
Viewing the Connection Panel ...................................................................... 5
-
Connecting an Aerial or Cable Television Network.................................... 6
-
Connecting a Set-Top Box, VCR or DVD .................................................. 6
-
Connecting a Computer............................................................................. 6
-
Connecting External A/V Devices.............................................................. 7
-
Kensington Slot.......................................................................................... 7
■
Viewing Pictures From External Sources...................................................... 8
■
Inserting the Batteries in the Remote Control............................................... 9
■
Viewing the Remote Control (All Functions Except Teletext)........................ 10
■
Viewing the Remote Control (Teletext Functions)......................................... 11
■
Switching On and Off .................................................................................... 12
■
Placing in Standby Mode .............................................................................. 12
■
Becoming Familiar with the Remote Control................................................. 13
■
Plug & Play.................................................................................................... 14
■
Selecting TV Mode or an Input Source......................................................... 16
■
Editing an Input Source Name ...................................................................... 17
■
Choosing Your Language .............................................................................. 18
◆ SETTING THE CHANNELS
■
Storing Channels Automatically..................................................................... 19
■
Storing Channels Manually ........................................................................... 20
■
Editing the Channels ..................................................................................... 22
■
Sorting the Stored Channels ......................................................................... 23
■
Giving Channels Names................................................................................ 24
◆ SETTING THE PICTURE
■
Changing the Picture Standard ..................................................................... 25
■
Adjusting the Custom Picture........................................................................ 26
■
Adjusting the Screen Background Colour ..................................................... 27
◆ SETTING THE SOUND
■
Changing the Sound Standard...................................................................... 28
■
Selecting Auto Volume Control...................................................................... 29
English-2
◆ SETTING THE TIME
■
Setting the Clock ........................................................................................... 30
■
Switching Off Automatically ........................................................................... 31
■
Switching the Television On and Off Automatically ....................................... 32
◆ USING THE VARIOUS FUNCTIONS
■
Setting the Blue Screen Mode ...................................................................... 33
■
Displaying Information................................................................................... 33
◆ USING THE TELETEXT FEATURE
■
Teletext Feature.............................................................................................
■
Displaying the Teletext Information ...............................................................
■
Selecting a Page by Number ........................................................................
■
Using FLOF to Select a Page .......................................................................
■
Storing Teletext Pages ..................................................................................
◆ USING THE PC FUNCTIONS
■
Setting Up Your PC Software........................................................................ 38
■
Coarse and Fine Tuning of the Image........................................................... 39
■
Changing the Image Position ........................................................................ 40
■
Initializing the Image Settings ....................................................................... 41
■
Adjusting the PC Screen Automatically......................................................... 42
■
Picture Mode ................................................................................................. 43
■
Adjusting the Custom Picture........................................................................ 43
■
Adjusting the Screen Background Colour ..................................................... 44
■
Customizing the colour.................................................................................. 45
Contents
34
35
36
37
37
RECOMMENDATIONS FOR USE
■
Troubleshooting: Before Contacting Service Personnel ............................... 46
■
Power Saver.................................................................................................. 47
■
Technical and Environmental Specifications ................................................. 48
■
Display Modes............................................................................................... 49
■
Retractable Stand.......................................................................................... 50
■
Using Your TV in Another Country ................................................................ 50
■
Using the Anti-Theft Kensington Lock........................................................... 51
■
Installing VESA compliant mounting devices................................................ 52
■
Installing the Wall Mount Kit.......................................................................... 53
Symbols
Press Important Note
English-3
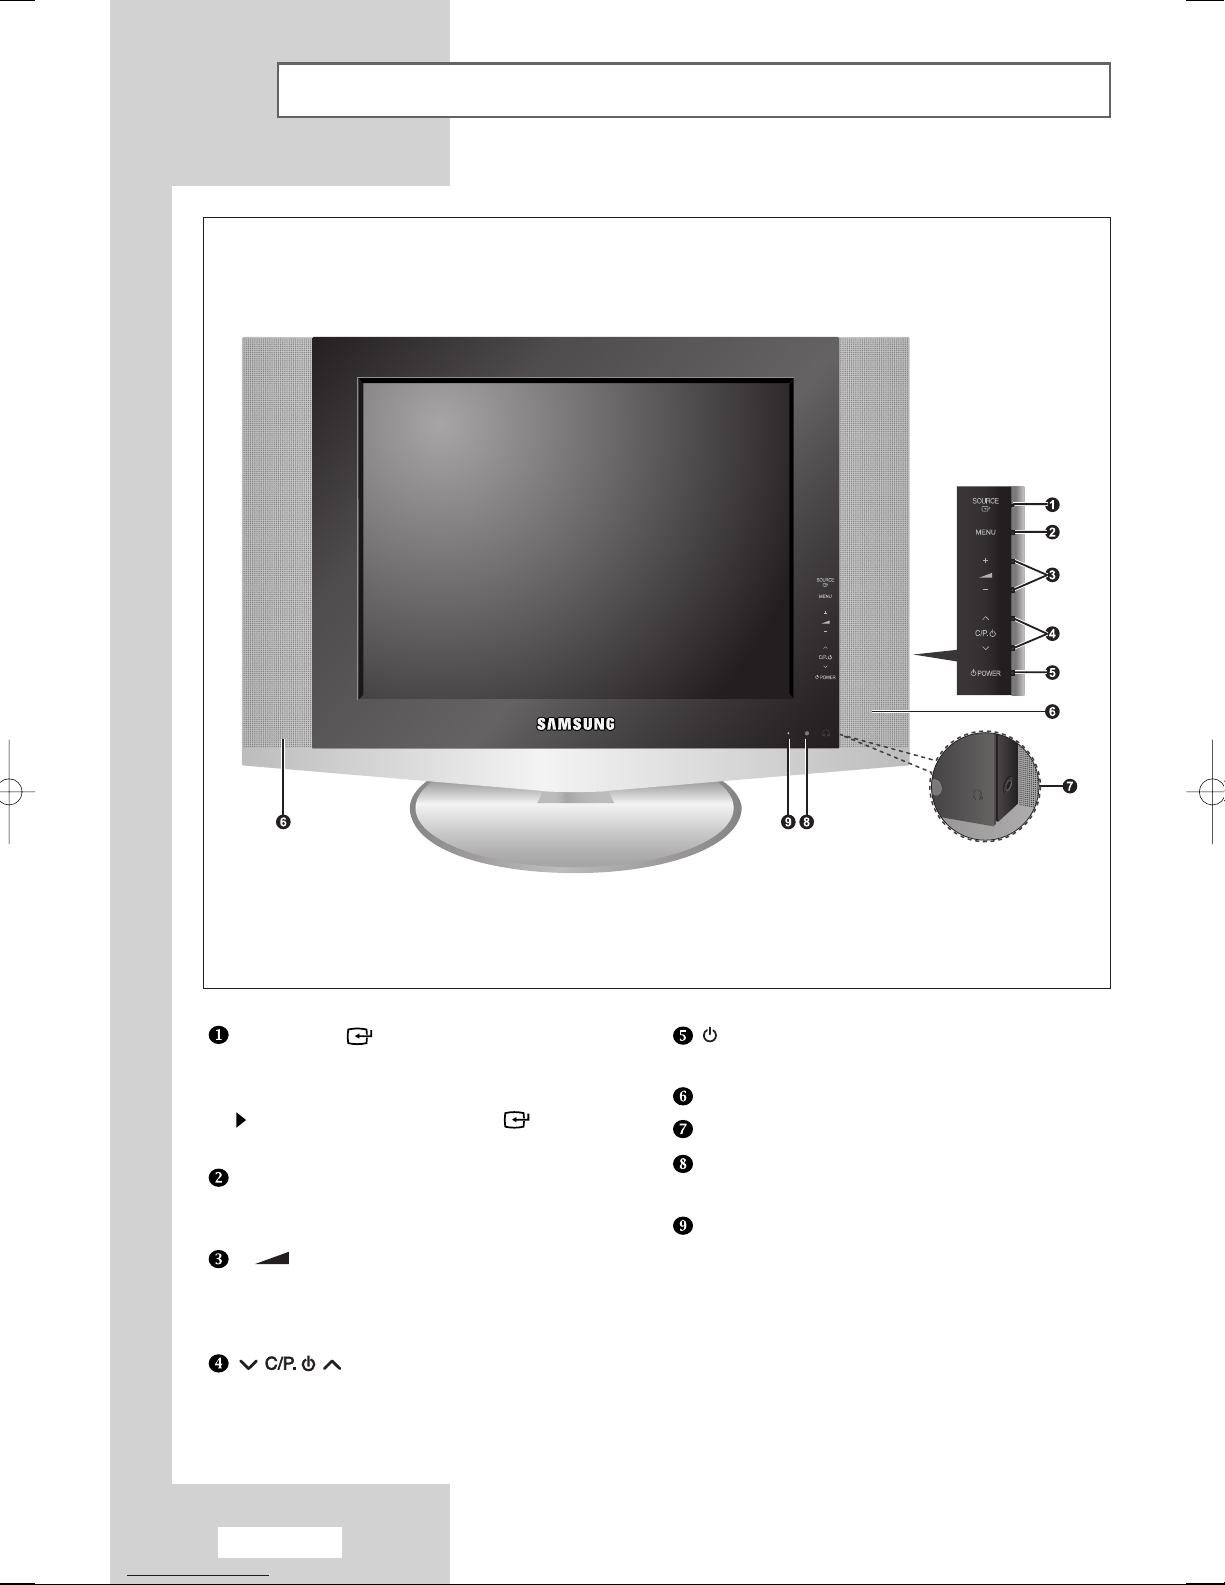
Viewing the Control Panel
SOURCE
Displays a menu of all of the available input sources
(TV - AV1 - AV2 - S-Video - PC).
You can also use the
on the TV’s control panel to make selections.
MENU
Press to see an on-screen menu of your TV’s
features.
- +
Moves the selector left or right on the OSD.
Decreases or increases the level of audio
volume and the values of the selected function.
Moves the selector down or up on the OSD.
Decreases or increases the channel number.
English-4
SOURCE() button
POWER
Turns ON/OFF your set.
SPEAKERS
HEADPHONE
REMOTE CONTROL SENSOR
Aims the remote control towards this spot on the TV.
POWER INDICATOR
Lights up when you turn the power off.
(Red light shows in stand-by mode, Red shows
when you turn the power on, and light is off after
the power is on. Green shows when you set Timer
on or off.)
English-5
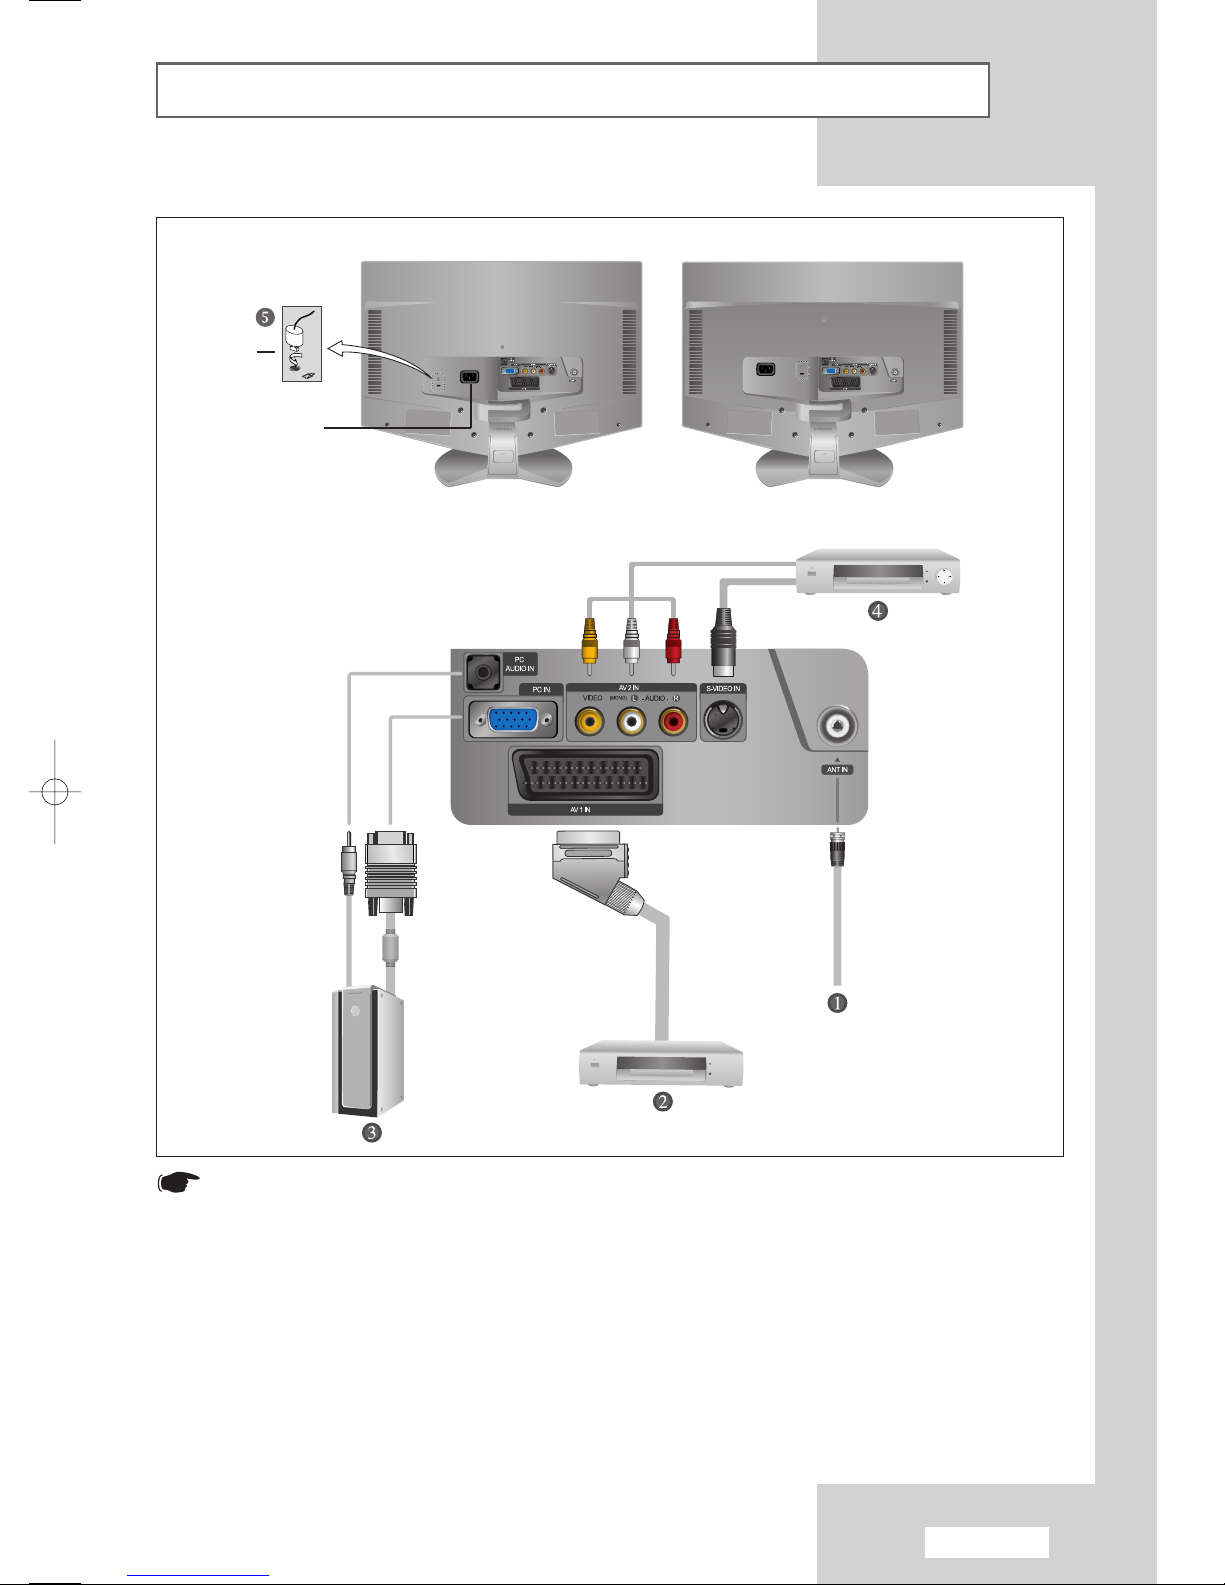
Viewing the Connection Panel
Power Input
Option
<LE15S51B> <LE20S51B/LE20S51BU>
Whenever you connect an audio or video system to your set, ensure that all elements are switched off.
Refer to the documentation supplied with your equipment for detailed connection instructions and
associated safety precautions.
Viewing the Connection Panel
Connecting an Aerial or Cable Television Network (depending on the model)
To view television channels correctly, a signal must be received by the set from one of the following sources:
- An outdoor aerial
-Acable television network
-Asatellite network
Connecting a Set-Top Box, VCR or DVD
- Connect the VCR, or DVD SCART cable to the SCART connector of the VCR, or DVD.
- If you wish to connect both the Set-Top Box and VCR (or DVD), you should connect the Set-Top Box to the
VCR (or DVD) and connect the VCR (or DVD) to your set.
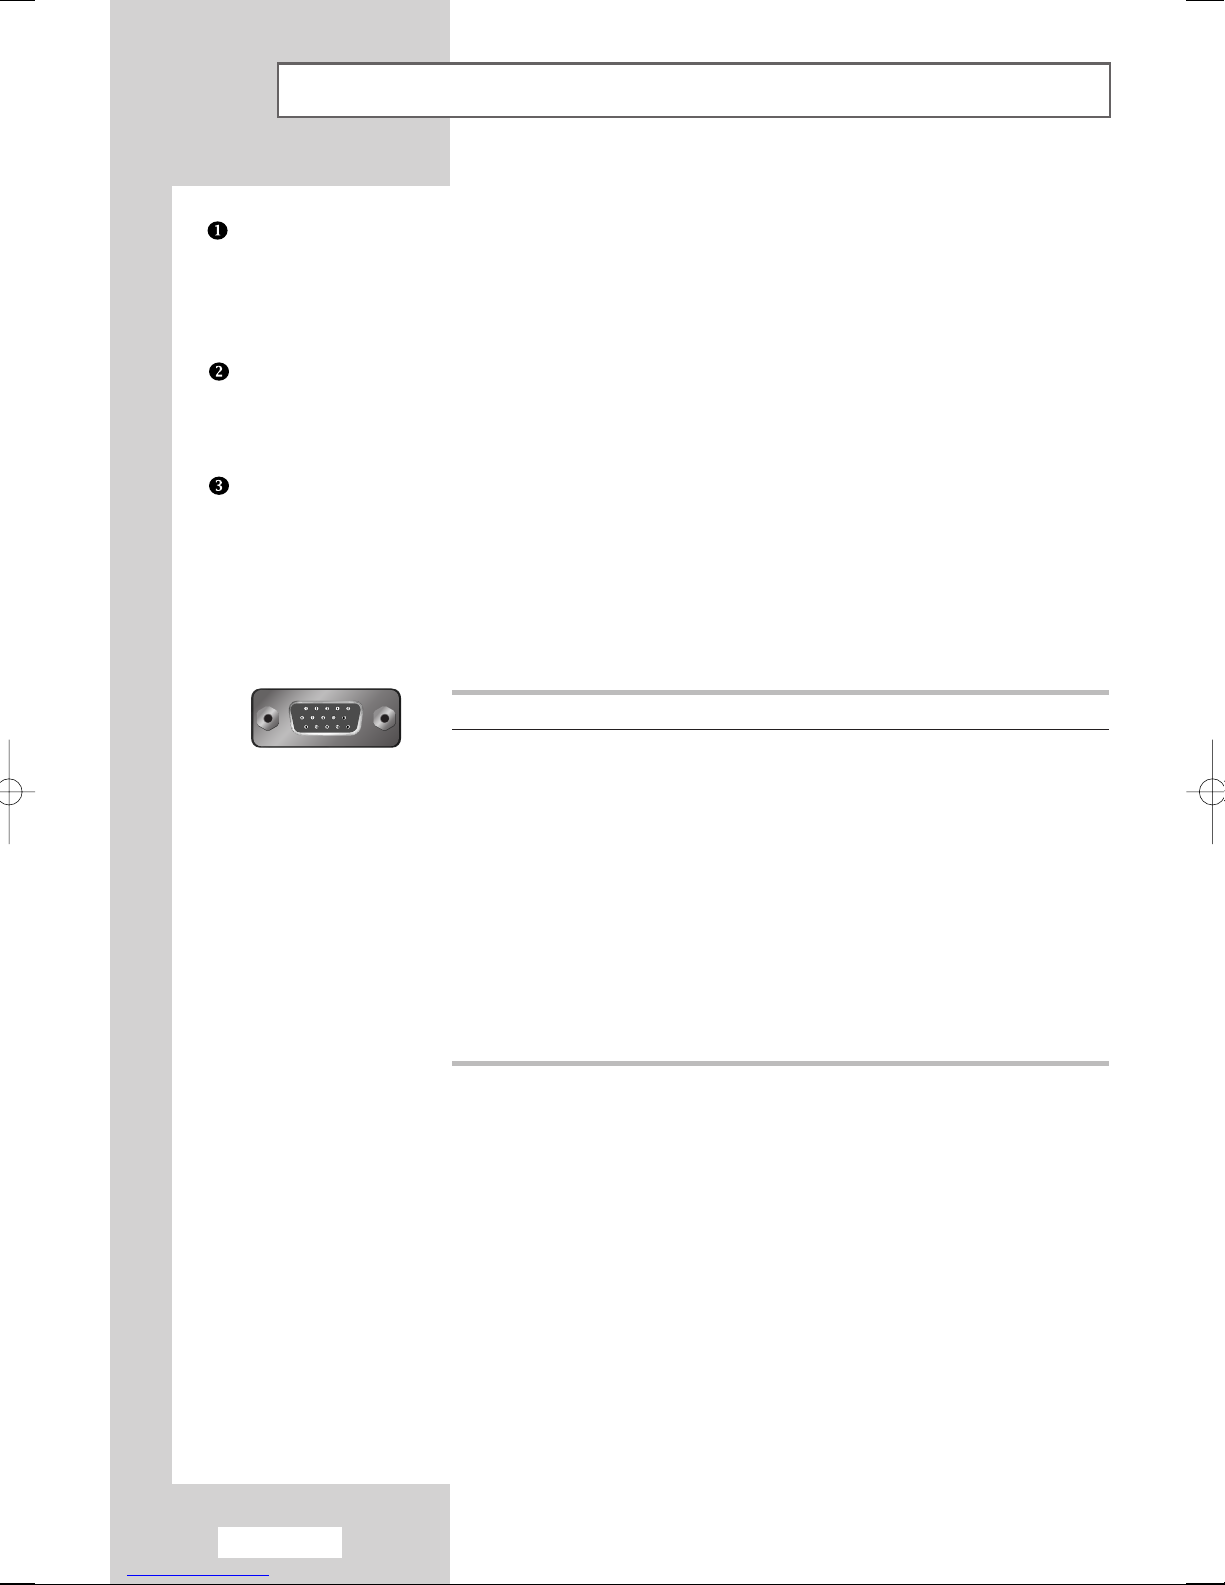
Connecting a Computer
- Connect the 15 Pin D-SUB connector to the PC video connector.
- Connect the stereo audio cable to the “PC AUDIO IN” jack on the rear of your set and the other end
to the “Audio Out” jack of the sound card on your computer.
15 Pin D-SUB connector
➣
Pin Separate H/V Composite H/V
1 Red (R) Red (R)
2 Green (G) Green (G)
3 Blue (B) Blue (B)
4 Grounding Grounding
5 Grounding (DDC return) Grounding (DDC return)
6 Grounding - Red (R) Grounding - Red (R)
7 Grounding - Green (G) Grounding - Green (G)
8 Grounding - Blue (B) Grounding - Blue (B)
9No connection No connection
10 Grounding - Sync. / Self test Grounding - Sync. / Self test
11 Grounding Grounding
12 DDC - SDA (Data) DDC - SDA (Data)
13 Horizontal Sync. Horizontal/Vertical Sync.
14 Vertical Sync. Not used
15 DDC - SCL (Clock) DDC - SCL (Clock)
English-6
Viewing the Connection Panel
Connecting External A/V Devices
- Connect RCA or S-VIDEO cables to an appropriate external A/V device such as a VCR, DVD or Camcorder.
- Connect RCA audio cables to “(MONO)L-AUDIO-R” on the rear of your set and the other ends to
corresponding audio out connectors on the A/V device.
Kensington Slot
- This television has been designed to apply a burglarproof lock. (See page 51)
English-7

Viewing Pictures From External Sources
Once you have connected up your various audio and video systems,
you can view the different sources by selecting the appropriate input.
1
Check that all the necessary connections have been made
(refer to pages
6
and 7for further details).
2
Press the TV button to choose TV mode.
Press the
The input sources are displayed in the following order:
AV1 - AV2 - S-Video - PC.
SOURCE button to choose Video mode.
English-8
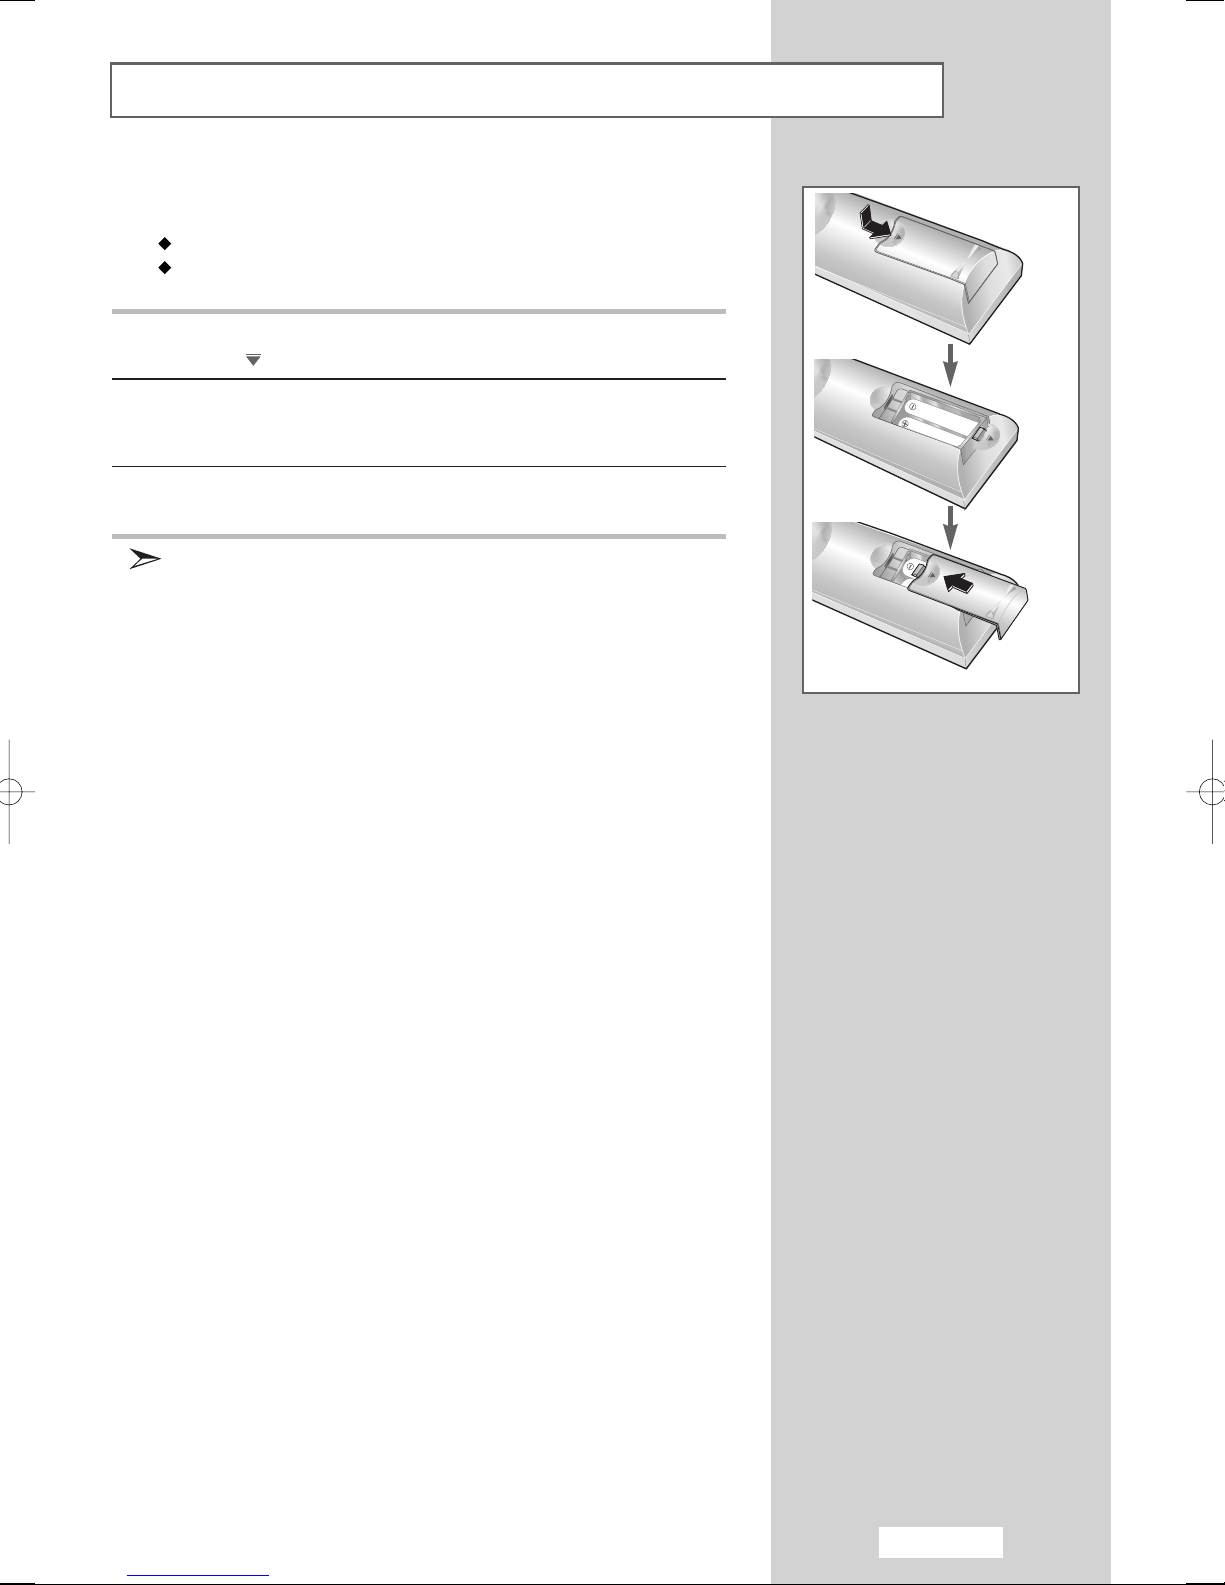
Inserting the Batteries in the Remote Control
You must insert or replace the batteries in the remote control when you:
Purchase your set
Find that the remote control is no longer operating correctly
1
Remove the cover on the rear of the remote control by pressing the
symbol ( ) downwards and then pulling firmly to remove it.
2
Install two
◆+on the battery against +on the remote control
◆-on the battery against -on the remote control
3
Replace the cover by aligning it with the base of the remote control
and pressing it back into place.
Do not mix battery types, i.e. alkaline and manganese.
AAA
size batteries.
English-9
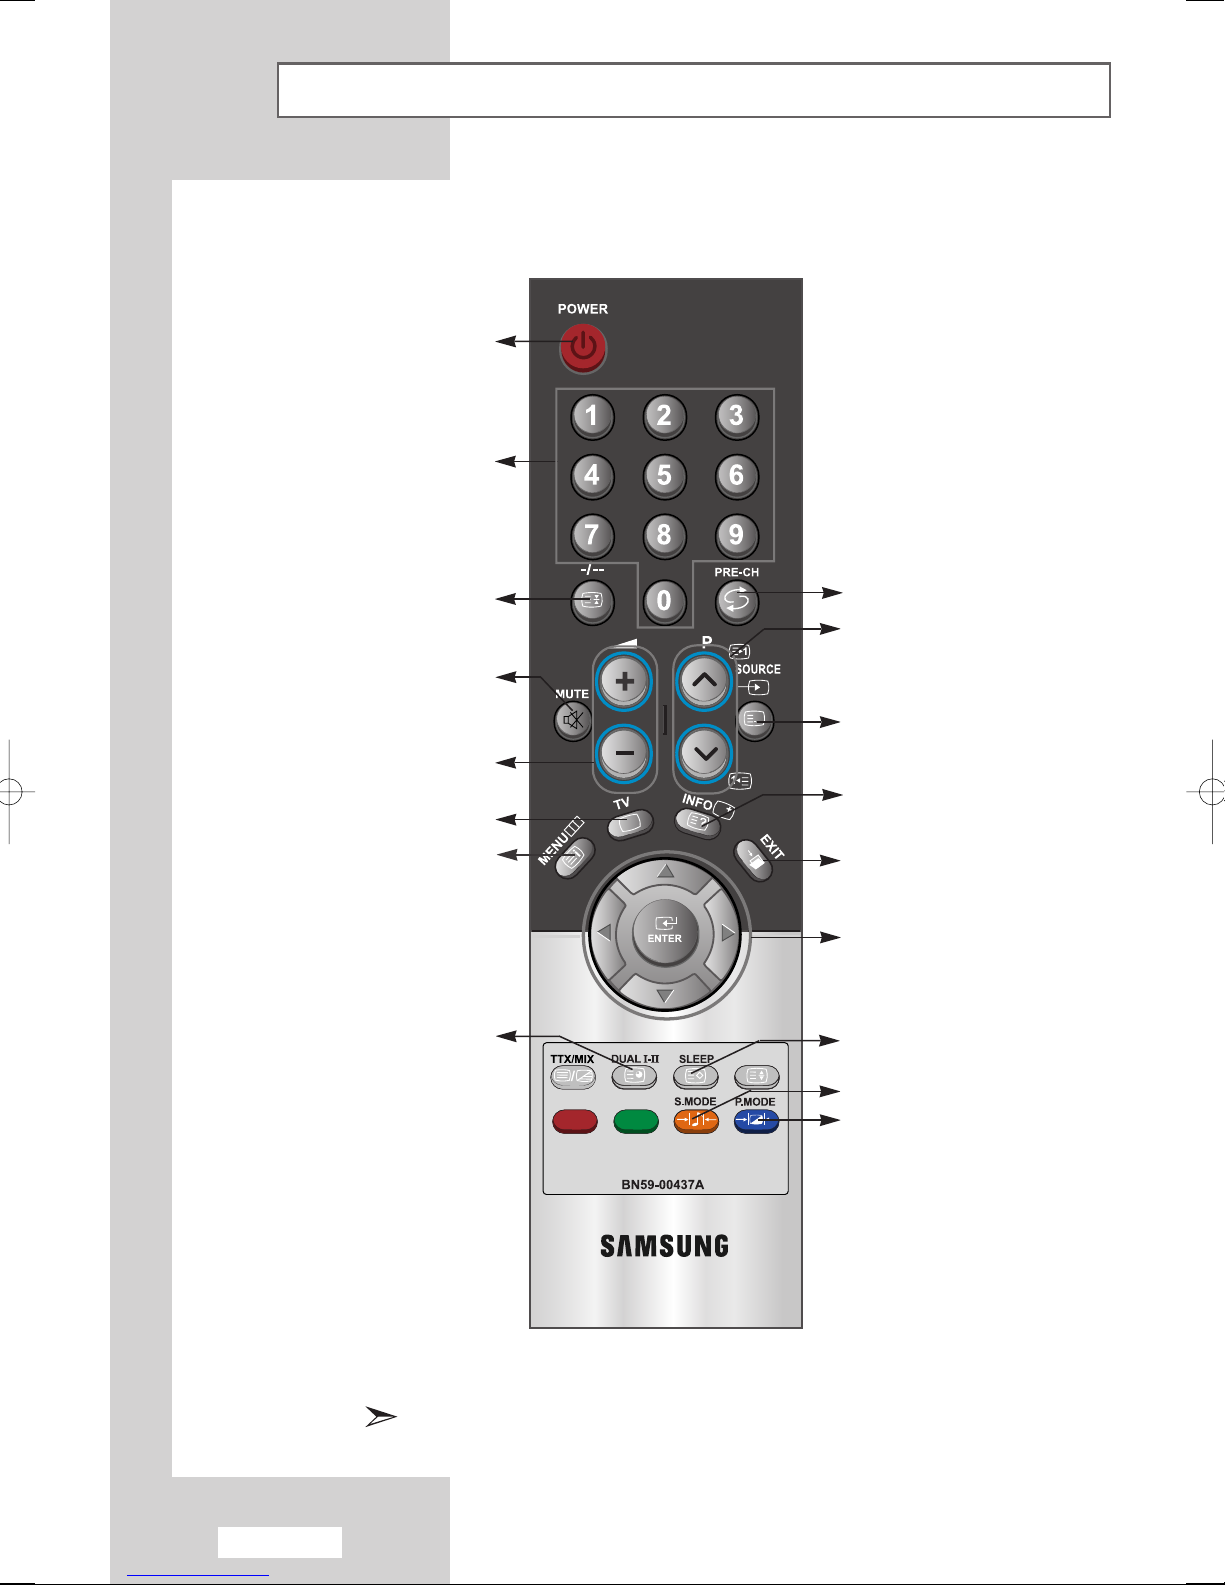
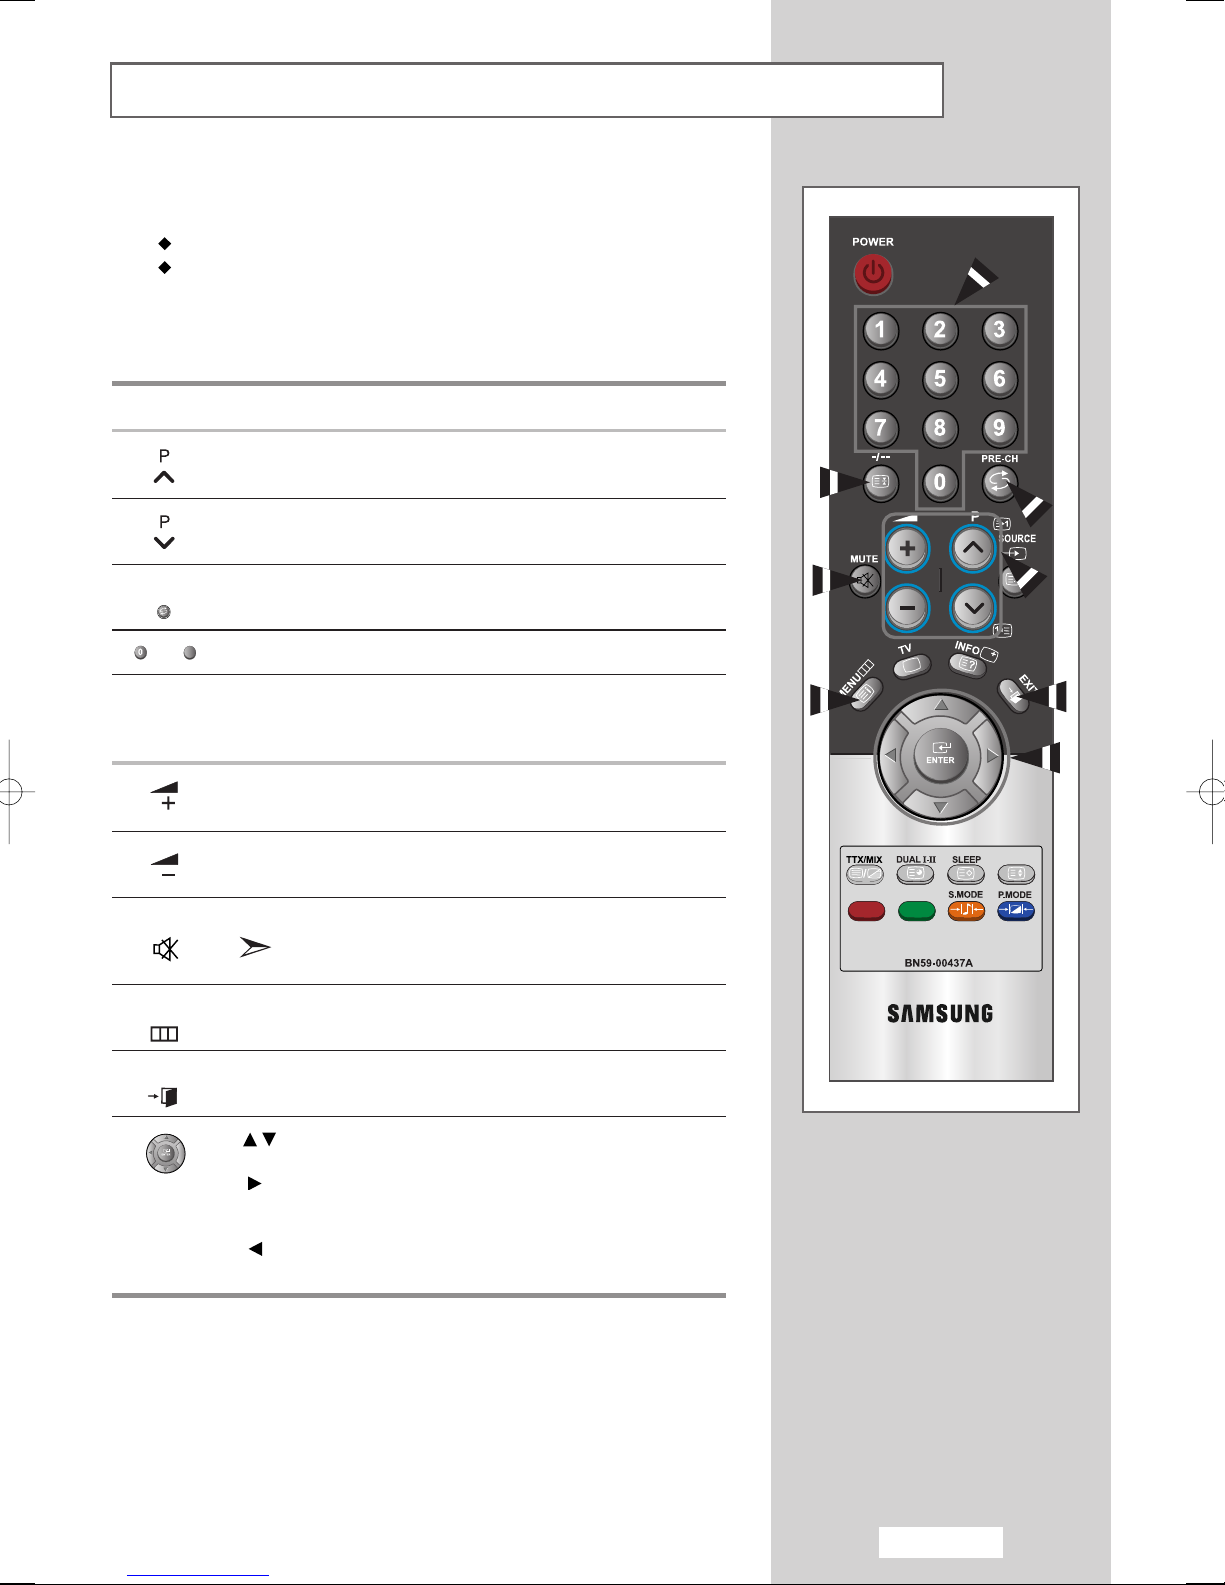
Viewing the Remote Control (All Functions Except Teletext)
Television On/Off
Numeric buttons for
direct channel access
One/Two-digit channel
selection
Temporary sound switch-off
Volume up or down
Select to the TV mode directly
Menu display and
change confirmation
Sound mode selection
Previous channel
-Next channel
-Previous channel
Available source selection
Use to see information on the
current broadcast.
Exit the OSD
Control the cursor in the menu
Automatic switch-off
Sound effect selection
Picture effect selection
The performance of the remote control may be affected by bright light.
English-10
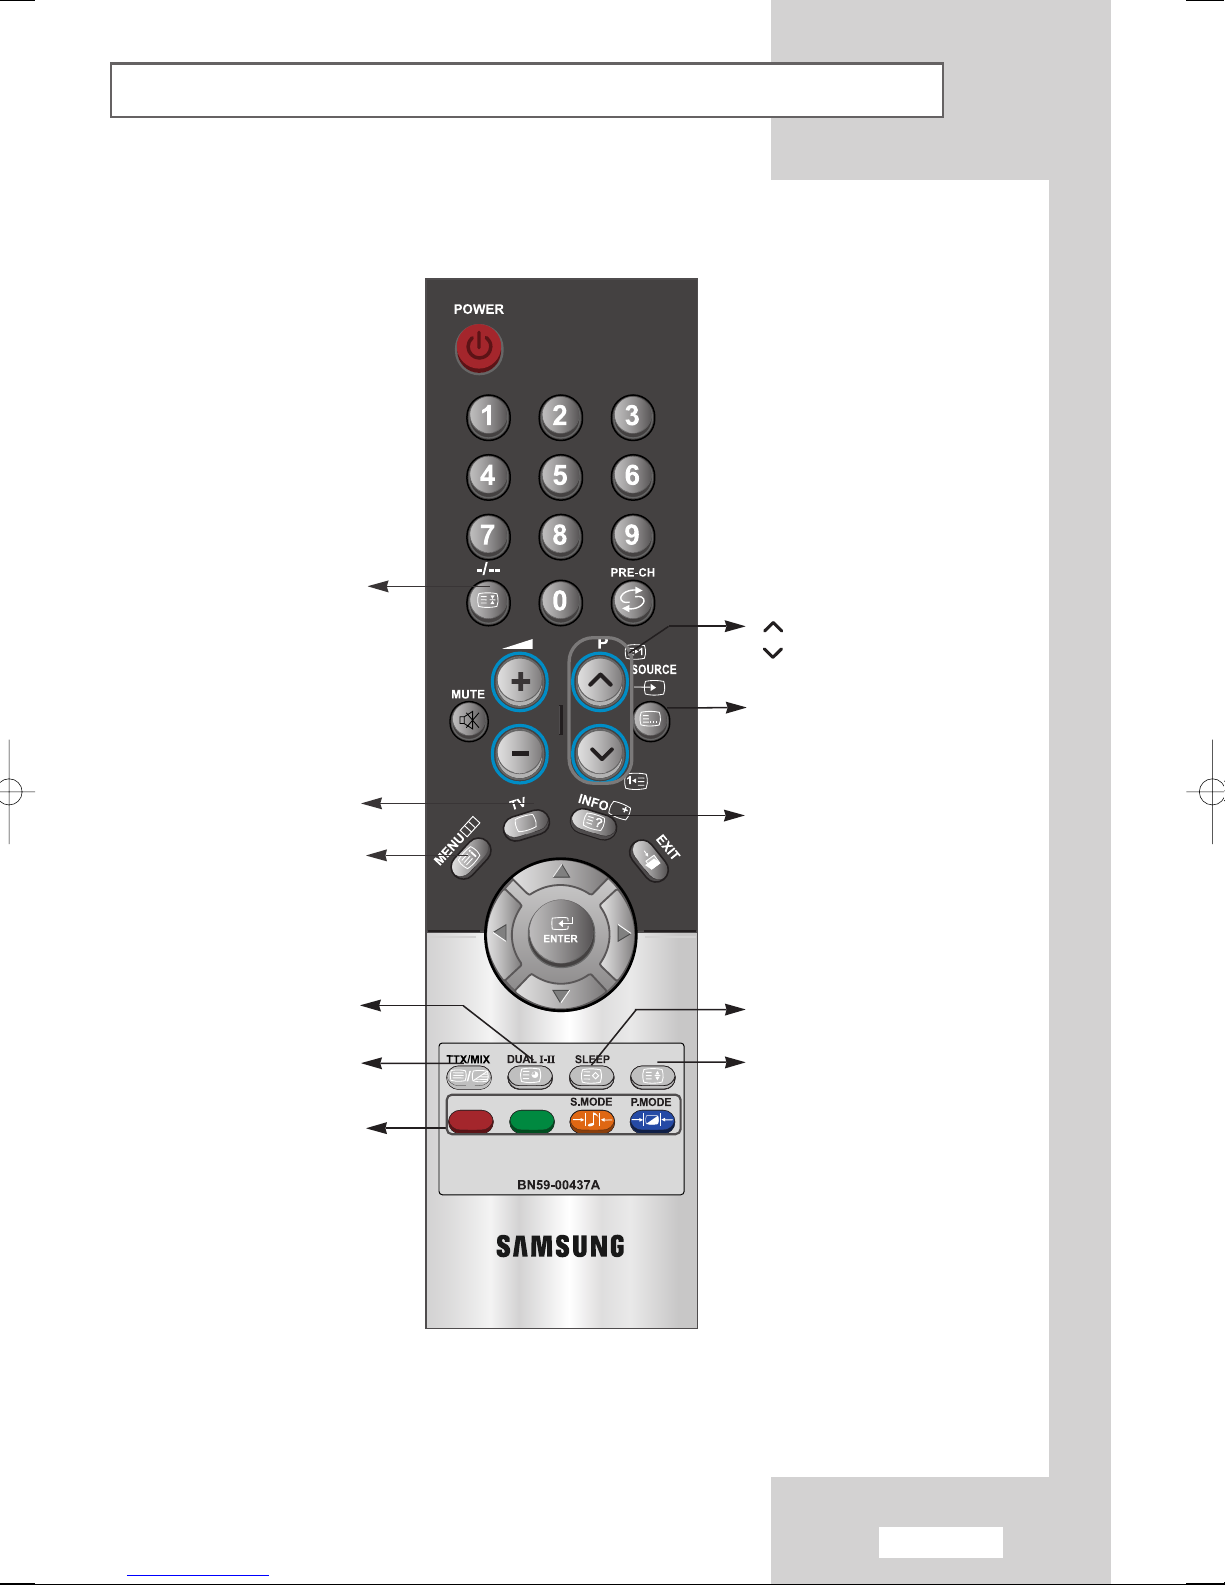
Viewing the Remote Control (Teletext Functions)
Teletext hold
P: Teletext next page
P: Teletext previous page
Exit from the teletext display
Teletext index
Teletext sub page
Teletext display/mix
both teletext information
and the normal broadcast
Fastext topic selection
Teletext mode selection
(LIST/FLOF)
Teletext reveal
Teletext store
Teletext size selection
English-11
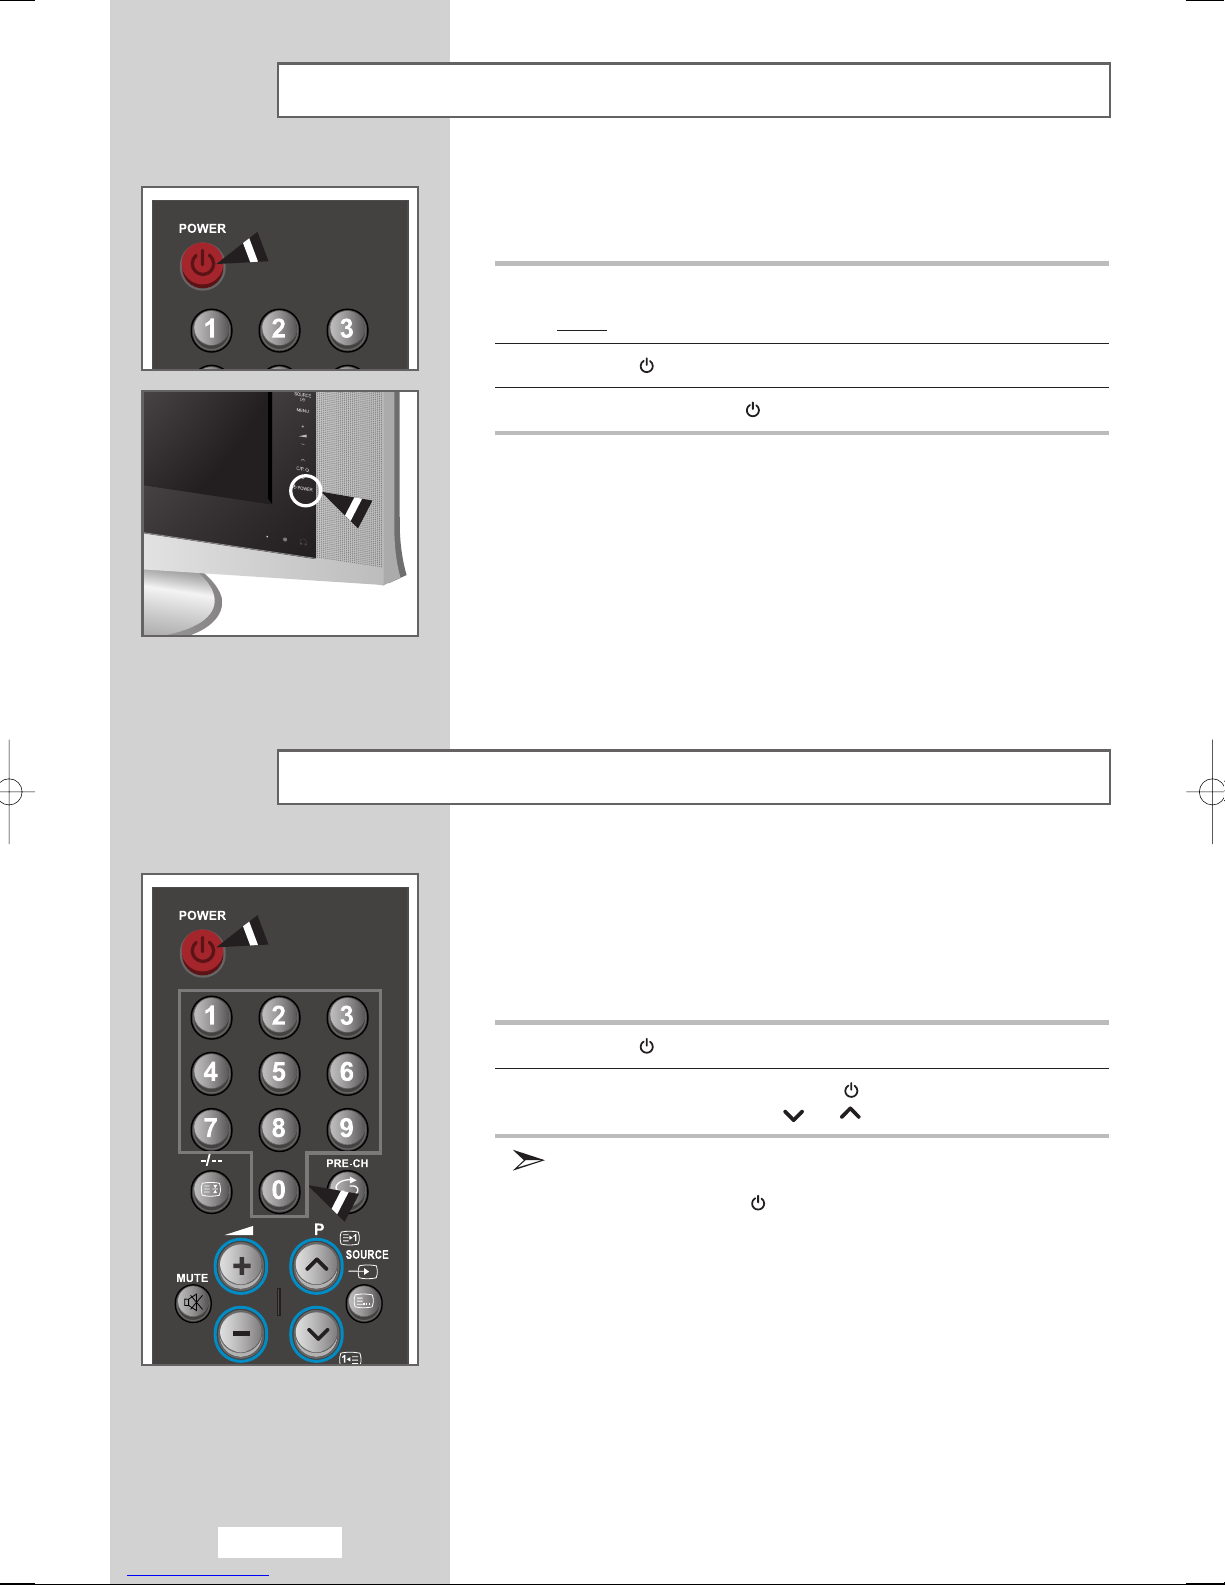
Switching On and Off
The mains lead is attached to the rear of your set.
1
Plug the mains lead into an appropriate socket.
Result
: When the power cord is plugged in, the LED turns red.
2
Press the
3
To switch off, press the
POWER
button to switch on.
POWER
button again.
Placing in Standby Mode
Your set can be placed in Standby mode in order to reduce the power
consumption.
The Standby mode can be useful when you wish to interrupt viewing
temporarily (during a meal, for example).
1
Press the
2
To switch back on, simply press the
numeric button, or
Do not leave your set in Standby mode for long periods of time
(when you are away on holiday, for example).
Turn off by pressing the
It is best to unplug the set from the mains and aerial.
POWER
button.
POWER
channel or button.
POWER
button.
button again, a
English-12
Becoming Familiar with the Remote Control
9
The remote control is used mainly to:
Change channels and adjust the volume
Set up your set using the on-screen menu system
The following table presents the most frequently used buttons and their
functions.
Button Viewing Function Menu Function
Used to display the next
stored channel.
Used to display the
previous stored channel.
PRE-CH Used to switch repeatedly between the last two channels
displayed. (
- Used to display the corresponding channels.
-/--
MUTE Used to switch the sound off temporarily.
MENU Used to display the Used to return to the previous
Used to select a channel numbered ten or over.
Press this button, and the “--” symbol is displayed.
Enter the two-digit channel number.
Used to increase the
volume.
Used to decrease the
volume.
on-screen menu system. menu or normal viewing.
PRE-CH; Previous Channel)
To turn the sound back on, press this button again,
or press the
+ or - button.
-
-
-
-
EXIT Used to exit the menu system and return directly to normal
viewing.
Used to move among the menu items.
Used to select a menu item or increase
the value of the selected item.
Used to return to the previous menu item or decrease
the value of the selected item.
English-13
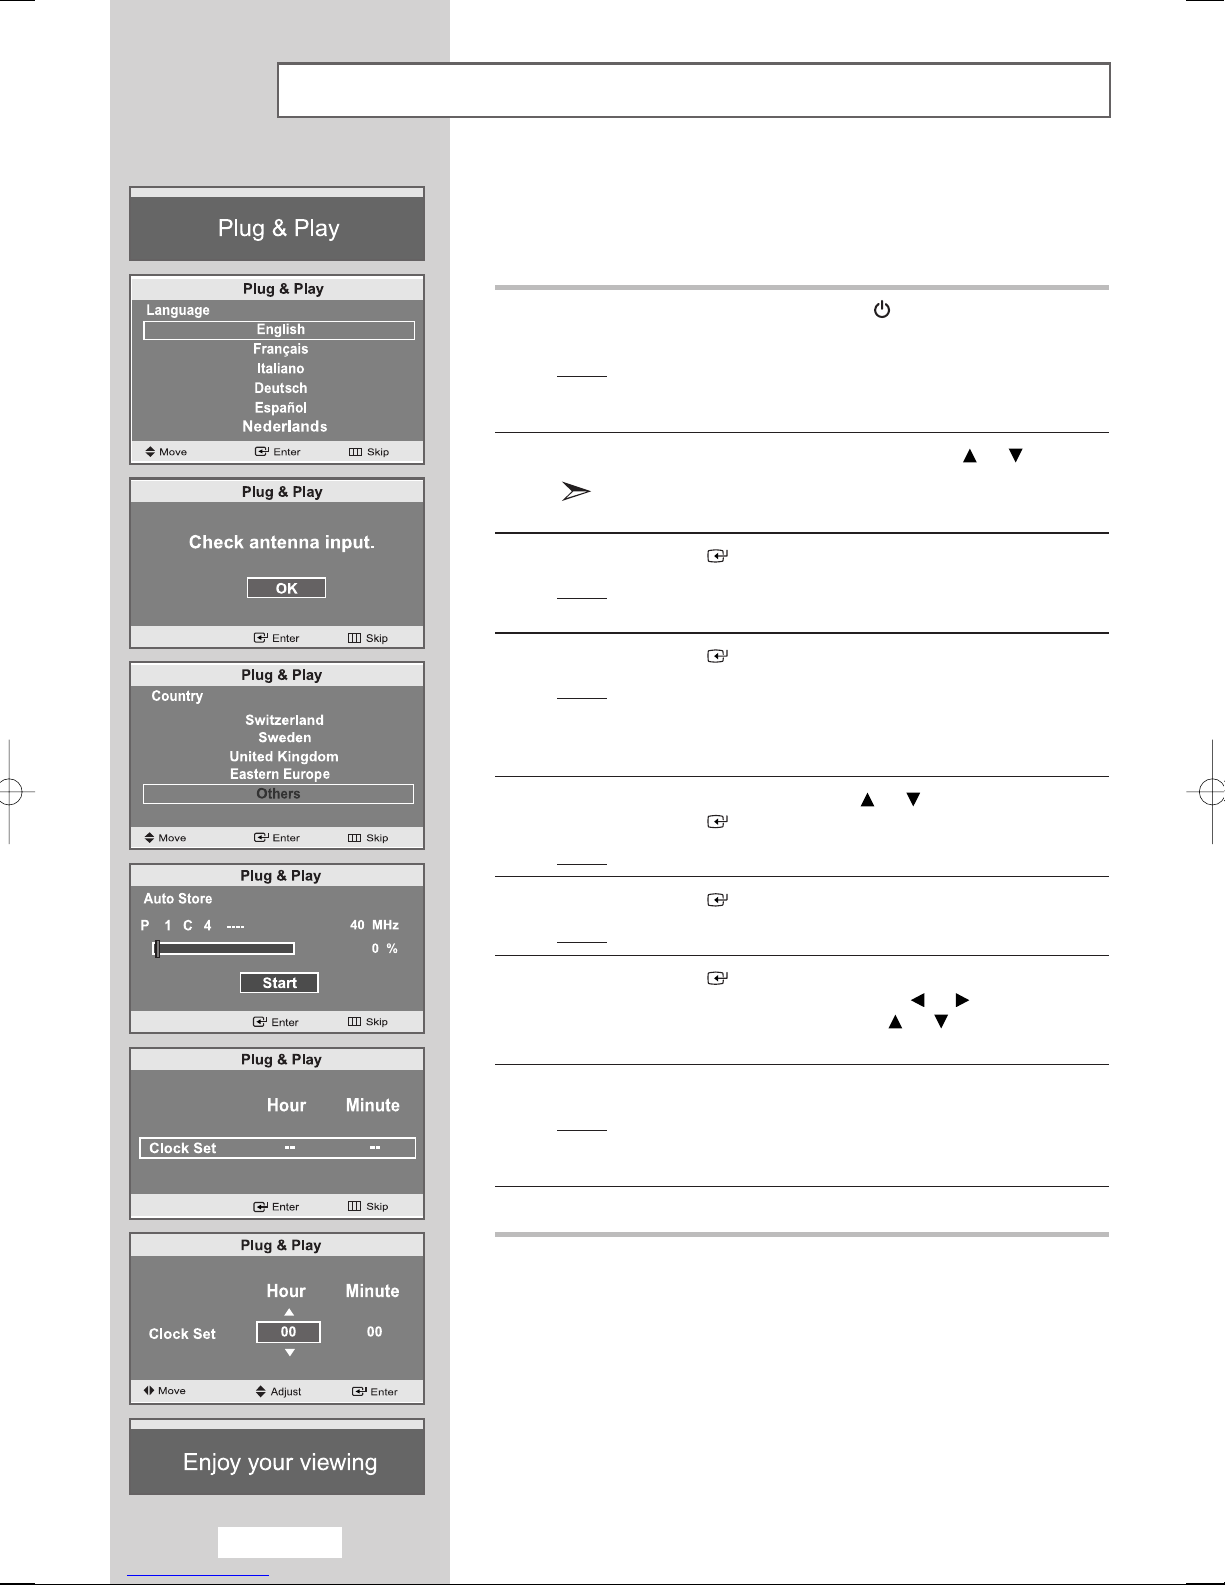
Plug & Play
When the set is initially powered ON, you are automatically presented
with a series of basic customer settings.
The following settings are available.
1
If the set is in standby mode, press the
on the remote control.
Result
: The message
It appears for a little while, and then the
is automatically displayed.
2
Select the appropriate
Plug & Play
Language
POWER
is displayed.
by pressing the or button.
button
Language
menu
3
Press the
Result
4
Press the
Result
5
Select your
Press the
Result: The
6
Press the
Result
7
Press the
Select the
Set the
(Refer to “
The available languages are listed
You can choose one of 12 languages.
ENTER
: The message
OK
selected.
ENTER
: The country menu is displayed:
Belgium - Germany - Spain - France - Italy Netherlands - Switzerland - Sweden - United
Kingdom - Eastern Europe - Others
Country
ENTER
Auto Store
ENTER
: The channel search will start and end automatically.
ENTER
Hour
Hour
or
Setting the Clock
button to confirm your choice.
“Check antenna input.”
button.
by pressing the or button.
button.
menu is displayed.
button.
button.
or
Minute
Minute
by pressing the or button.
by pressing the or button.
” on page 30)
.
is displayed with
English-14
8
9
Press the
Result
Press the
MENU
: The message
and then the channel which has been stored will be
activated.
EXIT button to exit
button to confirm your setting.
“Enjoy your viewing”
.
is displayed,
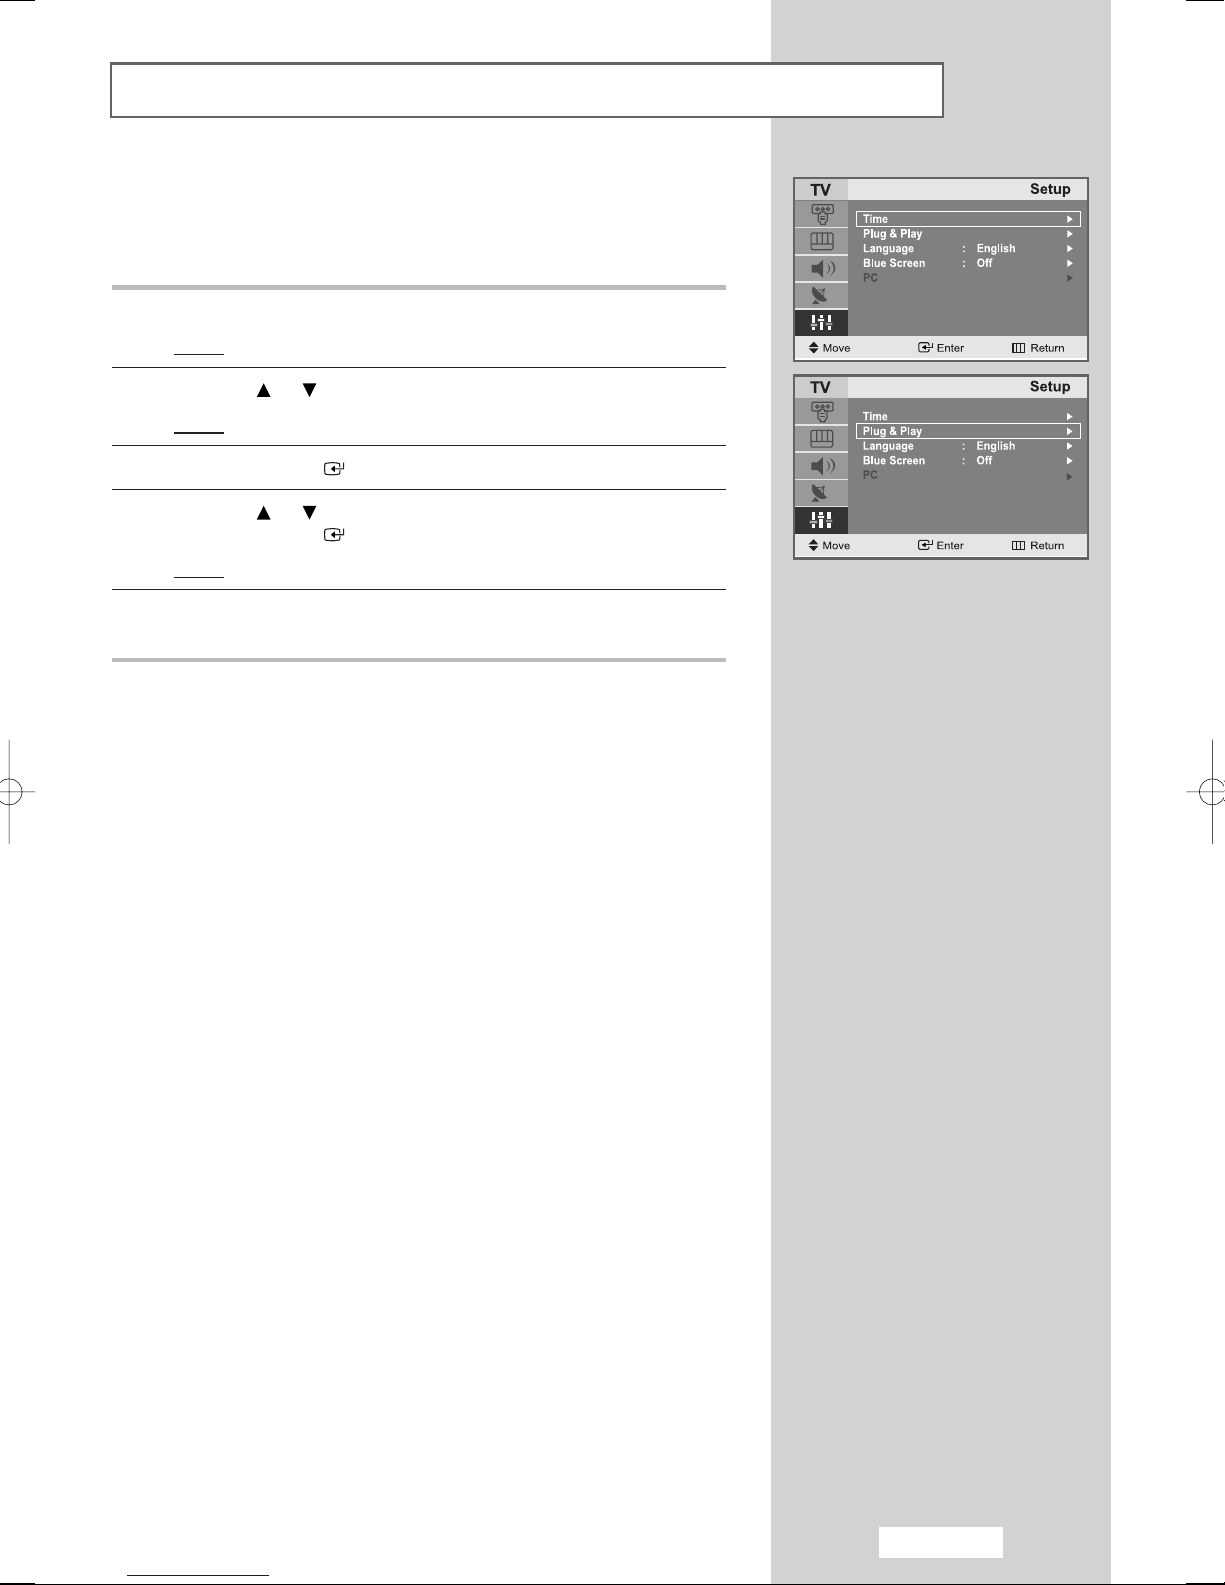
Plug & Play
If you want to reset this feature...
1
Press the
Result
2
Press the or button to select the
Result
3
Press the
4
Press the or button to select the
Press the
Result
5
For further details on how to set up this feature, refer to the
previous page.
MENU
: The main menu is displayed.
:
The options available in the
ENTER
ENTER
: The message
button.
button.
button.
Plug & Play
Setup
.
Setup
group are displayed.
Plug & Play
is displayed.
.
English-15
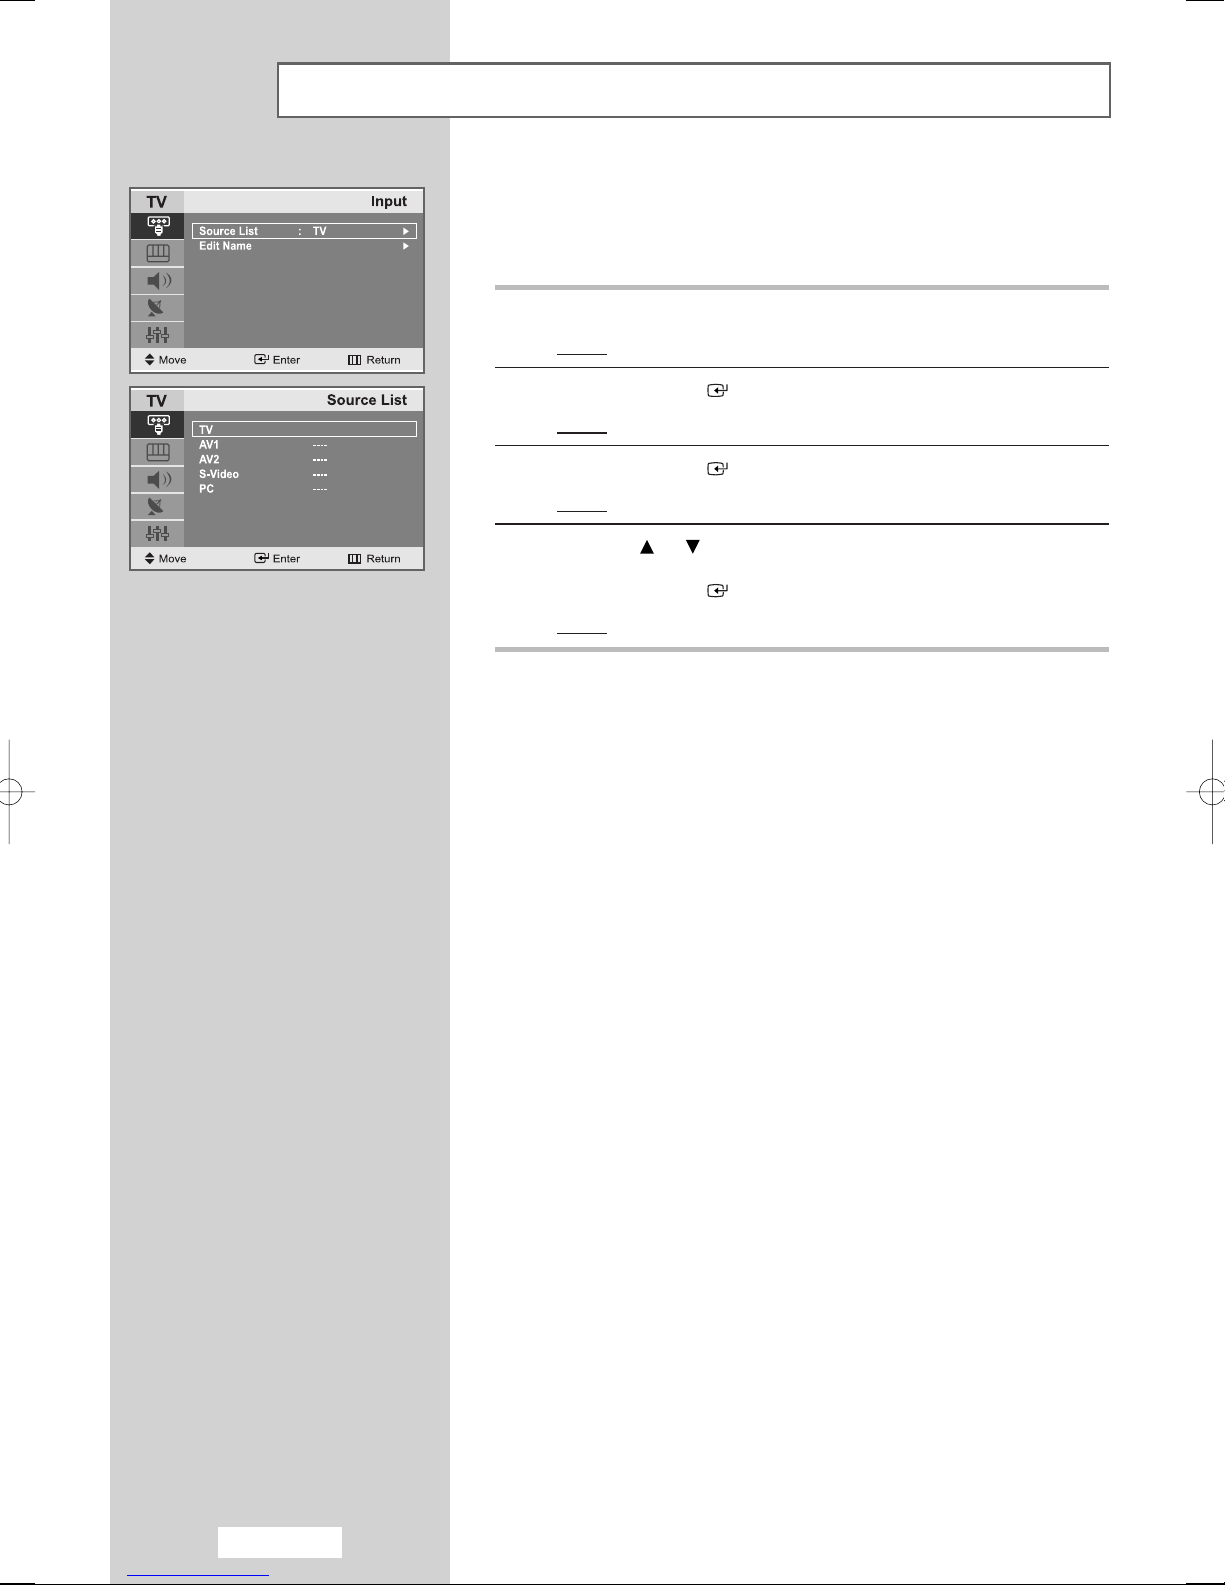
Selecting TV Mode or an Input Source
You can choose TV mode or change to an input source connected to
the TV set. Use this button to choose an input source that you would
like to watch.
1
Press the
Result
2
Press the
Result
3
Press the
Result
4
Press the or button to move to the input source that
you wish to choose.
Press the
Result
MENU
: The main menu is displayed.
ENTER
:
The options available in the
ENTER
: The
ENTER
: The input source changes to the one you have chosen.
button.
button to select the
button.
Source List
button.
Input
is selected.
Input
.
group are displayed.
English-16
 Loading...