

Page 1

MOBILE PHONE
User Manual
Please read this manual before operating your
phone and keep it for future reference.
Page 2

Intellectual Property
All Intellectual Property, as defined below, owned by or which is otherwise the property of Samsung or its respective suppliers relating to
the SAMSUNG Phone, including but not limited to, accessories, parts, or software relating there to (the “Phone System”), is proprietary to
Samsung and protected under federal laws, state laws, and international treaty provisions. Intellectual Property includes, but is not limited
to, inventions (patentable or unpatentable), patents, trade secrets, copyrights, software, computer programs, and related documentation
and other works of authorship. You may not infringe or otherwise violate the rights secured by the Intellectual Property. Moreover, you
agree that you will not (and will not attempt to) modify, prepare derivative works of, reverse engineer, decompile, disassemble, or
otherwise attempt to create source code from the software. No title to or ownership in the Intellectual Property is transferred to you. All
applicable rights of the Intellectual Property shall remain with SAMSUNG and its suppliers.
Open Source Software
Some software components of this product incorporate source code covered under GNU General Public License (GPL), GNU Lesser General
Public License (LGPL), OpenSSL License, BSD License and other open source licenses. To obtain the source code covered under the open
source licenses, please visit:
http://opensource.samsung.com
.
Disclaimer of Warranties; Exclusion of Liability
EXCEPT AS SET FORTH IN THE EXPRESS WARRANTY CONTAINED ON THE WARRANTY PAGE ENCLOSED WITH THE PRODUCT, THE
PURCHASER TAKES THE PRODUCT "AS IS", AND SAMSUNG MAKES NO EXPRESS OR IMPLIED WARRANTY OF ANY KIND WHATSOEVER
WITH RESPECT TO THE PRODUCT, INCLUDING BUT NOT LIMITED TO THE MERCHANTABILITY OF THE PRODUCT OR ITS FITNESS FOR ANY
PARTICULAR PURPOSE OR USE; THE DESIGN, CONDITION OR QUALITY OF THE PRODUCT; THE PERFORMANCE OF THE PRODUCT; THE
WORKMANSHIP OF THE PRODUCT OR THE COMPONENTS CONTAINED THEREIN; OR COMPLIANCE OF THE PRODUCT WITH THE
REQUIREMENTS OF ANY LAW, RULE, SPECIFICATION OR CONTRACT PERTAINING THERETO. NOTHING CONTAINED IN THE INSTRUCTION
MANUAL SHALL BE CONSTRUED TO CREATE AN EXPRESS OR IMPLIED WARRANTY OF ANY KIND WHATSOEVER WITH RESPECT TO THE
PRODUCT. IN ADDITION, SAMSUNG SHALL NOT BE LIABLE FOR ANY DAMAGES OF ANY KIND RESULTING FROM THE PURCHASE OR USE OF
VZN-i930_UM_English_LL2_PM_012113_F2
Page 3

THE PRODUCT OR ARISING FROM THE BREACH OF THE EXPRESS WARRANTY, INCLUDING INCIDENTAL, SPECIAL OR CONSEQUENTIAL
DAMAGES, OR LOSS OF ANTICIPATED PROFITS OR BENEFITS.
SAMSUNG IS NOT LIABLE FOR PERFORMANCE ISSUES OR INCOMPATIBILITIES CAUSED BY YOUR EDITING OF REGISTRY SETTINGS, OR
YOUR MODIFICATION OF OPERATING SYSTEM SOFTWARE.
USING CUSTOM OPERATING SYSTEM SOFTWARE MAY CAUSE YOUR DEVICE AND APPLICATIONS TO WORK IMPROPERLY.
Samsung Telecommunications America (STA), LLC
Headquarters:
1301 E. Lookout Drive
Richardson, TX 75082
Customer Care Center:
1000 Klein Rd.
Plano, TX 75074
Toll Free Tel: 1.888.987.HELP (4357)
Internet Address:
http://www.samsung.com
©
2013 Samsung Telecommunications America, LLC. Samsung and Focus are both registered trademarks of Samsung Electronics Co., Ltd.
Do you have questions about your Samsung Mobile Phone?
For 24 hour information and assistance, we offer a new FAQ/ARS System (Automated Response System) at:
www.samsung.com/us/support
Page 4

ACCESS® and NetFront™ are trademarks or registered trademarks of ACCESS Co., Ltd. in Japan and other countries.
The Bluetooth® word mark, figure mark (stylized “B Design”), and combination mark (Bluetooth word mark and “B Design”) are registered
trademarks and are wholly owned by the Bluetooth SIG.
Openwave® is a registered Trademark of Openwave, Inc.
Wi-Fi is a registered trademark of the Wireless Fidelity Alliance, Inc.
Your phone features earSmart™, an intelligent voice processor that delivers a clear voice experience, allowing you to
in nearly any environment. earSmart technology uses the science of human hearing to distinguish sounds, identify your voice, and
suppress surrounding noise for clear conversations just about anywhere.
How Does It Work?
•
The earSmart voice processor in your phone captures your voice and all the sounds around you.
•
Working like the human ear, it processes and distinguishes these sounds, isolates your voice conversation, and removes background noise – from both
ends of a call.
•
It also automatically equalizes and adjusts voice volume so you can hear and talk naturally, even in the noisiest places.
•
With earSmart technology, you can talk where you want, and have clear conversations for mobile calls, video chats, even speakerphone calls, without
worrying about surrounding noise.
hear and be heard
™
Page 5

Table of Contents
Section 1: Getting Started .......................... 5
Setting Up Your Phone . . . . . . . . . . . . . . . . . . . 5
Memory Card . . . . . . . . . . . . . . . . . . . . . . . . . 10
Switching the Phone On or Off . . . . . . . . . . . . 12
Locking and Unlocking the
Touch Screen . . . . . . . . . . . . . . . . . . . . . . . 12
Using the Start-up Wizard . . . . . . . . . . . . . . . 13
Setting Up Your Voice Mail . . . . . . . . . . . . . . . 15
Phone Updates . . . . . . . . . . . . . . . . . . . . . . . . 16
Troubleshooting . . . . . . . . . . . . . . . . . . . . . . . 16
Formatting a Windows Phone 8 . . . . . . . . . . . 17
Section 2: Understanding Your Phone ..... 18
Front View of Your Phone . . . . . . . . . . . . . . . 18
Side Views of Your Phone . . . . . . . . . . . . . . . . 19
Back, Top, and Bottom View of
Your Phone . . . . . . . . . . . . . . . . . . . . . . . . . 20
Display Layout . . . . . . . . . . . . . . . . . . . . . . . . 21
Speech Engine . . . . . . . . . . . . . . . . . . . . . . . . 24
Menu Navigation . . . . . . . . . . . . . . . . . . . . . . 25
Customizing Your Home Screen . . . . . . . . . . . 28
Section 3: Entering Text ............................31
Keys . . . . . . . . . . . . . . . . . . . . . . . . . . . . . . . . 31
Using the QWERTY Keyboard . . . . . . . . . . . . . 33
Changing the Text Input Mode . . . . . . . . . . . . 34
Using Alphabetic Mode . . . . . . . . . . . . . . . . . . 34
Using Symbol and Numeric Mode . . . . . . . . . . 35
Using Emoticon Mode . . . . . . . . . . . . . . . . . . . 36
Using Text Suggestions . . . . . . . . . . . . . . . . . 36
Keyboard Settings . . . . . . . . . . . . . . . . . . . . . 37
Copy and Paste . . . . . . . . . . . . . . . . . . . . . . . 37
Section 4: Call Functions ..........................39
Making a Call . . . . . . . . . . . . . . . . . . . . . . . . . 39
Making a Call from People . . . . . . . . . . . . . . . 40
Answering a Call . . . . . . . . . . . . . . . . . . . . . . 40
Options During a Call . . . . . . . . . . . . . . . . . . . 42
Section 5: Your People Hub ......................45
Importing SIM Contacts to Your Phone . . . . . . 45
Adding a New Contact . . . . . . . . . . . . . . . . . . 45
1
Page 6

Editing an Existing Contact . . . . . . . . . . . . . . .46
Deleting Contacts . . . . . . . . . . . . . . . . . . . . . . 47
Creating a New Group . . . . . . . . . . . . . . . . . . .47
Group Options . . . . . . . . . . . . . . . . . . . . . . . . .48
Using Your People List . . . . . . . . . . . . . . . . . . . 48
Linking People . . . . . . . . . . . . . . . . . . . . . . . . .50
Synchronizing Accounts . . . . . . . . . . . . . . . . .51
What’s New . . . . . . . . . . . . . . . . . . . . . . . . . . . 52
People Options . . . . . . . . . . . . . . . . . . . . . . . . 52
Additional People Options . . . . . . . . . . . . . . . . 53
Recent Activities . . . . . . . . . . . . . . . . . . . . . . . 53
Section 6: Multimedia ...............................54
Xbox Music Pass . . . . . . . . . . . . . . . . . . . . . . .54
Music + Videos . . . . . . . . . . . . . . . . . . . . . . . .54
Playing Music . . . . . . . . . . . . . . . . . . . . . . . . . 56
Playing Videos . . . . . . . . . . . . . . . . . . . . . . . . .57
Photos . . . . . . . . . . . . . . . . . . . . . . . . . . . . . . . 60
Camera . . . . . . . . . . . . . . . . . . . . . . . . . . . . . . 64
Photo Editor . . . . . . . . . . . . . . . . . . . . . . . . . .70
Slacker Radio . . . . . . . . . . . . . . . . . . . . . . . . . 72
2
Section 7: Messaging ...............................73
Types of Messages . . . . . . . . . . . . . . . . . . . . .73
Creating and Sending Text Messages . . . . . . .73
Voice to Text Messages . . . . . . . . . . . . . . . . . .74
Creating and Sending Multimedia Messages
Messaging Conversations . . . . . . . . . . . . . . . .75
Online Messaging . . . . . . . . . . . . . . . . . . . . . .80
Using Email . . . . . . . . . . . . . . . . . . . . . . . . . . .80
. . .75
Section 8: Changing Your Settings ..........91
System Settings . . . . . . . . . . . . . . . . . . . . . . .91
Application Settings . . . . . . . . . . . . . . . . . . . .109
Section 9: Connections ...........................119
Internet Explorer . . . . . . . . . . . . . . . . . . . . . .119
Wi-Fi . . . . . . . . . . . . . . . . . . . . . . . . . . . . . . .125
Bluetooth . . . . . . . . . . . . . . . . . . . . . . . . . . . .127
PC Connections . . . . . . . . . . . . . . . . . . . . . . .129
Section 10: Applications ......................... 130
GPS Applications . . . . . . . . . . . . . . . . . . . . . .130
Alarms . . . . . . . . . . . . . . . . . . . . . . . . . . . . . .131
Calculator . . . . . . . . . . . . . . . . . . . . . . . . . . .132
Calendar . . . . . . . . . . . . . . . . . . . . . . . . . . . .132
Page 7

Camera . . . . . . . . . . . . . . . . . . . . . . . . . . . . 134
Data Sense . . . . . . . . . . . . . . . . . . . . . . . . . 135
Games . . . . . . . . . . . . . . . . . . . . . . . . . . . . . 135
Help + Tips . . . . . . . . . . . . . . . . . . . . . . . . . 137
Internet Explorer . . . . . . . . . . . . . . . . . . . . . 137
Live Wallpaper . . . . . . . . . . . . . . . . . . . . . . . 138
Local Scout . . . . . . . . . . . . . . . . . . . . . . . . . 138
Maps . . . . . . . . . . . . . . . . . . . . . . . . . . . . . . 139
Messaging . . . . . . . . . . . . . . . . . . . . . . . . . . 142
MiniDiary . . . . . . . . . . . . . . . . . . . . . . . . . . . 142
Music + Videos . . . . . . . . . . . . . . . . . . . . . . 144
My Verizon Mobile . . . . . . . . . . . . . . . . . . . . 144
NFL Mobile . . . . . . . . . . . . . . . . . . . . . . . . . 144
Now . . . . . . . . . . . . . . . . . . . . . . . . . . . . . . . 145
Office . . . . . . . . . . . . . . . . . . . . . . . . . . . . . . 148
OneNote . . . . . . . . . . . . . . . . . . . . . . . . . . . . 149
People . . . . . . . . . . . . . . . . . . . . . . . . . . . . . 150
Phone . . . . . . . . . . . . . . . . . . . . . . . . . . . . . 150
Photo Editor . . . . . . . . . . . . . . . . . . . . . . . . . 150
Photos . . . . . . . . . . . . . . . . . . . . . . . . . . . . . 150
Settings . . . . . . . . . . . . . . . . . . . . . . . . . . . . 150
Store . . . . . . . . . . . . . . . . . . . . . . . . . . . . . . 151
Slacker Radio . . . . . . . . . . . . . . . . . . . . . . . . 151
Voicemail . . . . . . . . . . . . . . . . . . . . . . . . . . . 152
VZ Navigator . . . . . . . . . . . . . . . . . . . . . . . . . 152
Wallet . . . . . . . . . . . . . . . . . . . . . . . . . . . . . . 152
Section 11: Health and Safety
Information ...........................................153
Exposure to Radio Frequency (RF) Signals
Specific Absorption Rate (SAR) Certification
Information . . . . . . . . . . . . . . . . . . . . . . . . 158
FCC Part 15 Information to User . . . . . . . . . . 159
Smart Practices While Driving . . . . . . . . . . . 160
Battery Use and Safety . . . . . . . . . . . . . . . . . 161
Samsung Mobile Products and Recycling . . . 163
UL Certified Travel Charger . . . . . . . . . . . . . . 164
Display / Touch-Screen . . . . . . . . . . . . . . . . 164
GPS & AGPS . . . . . . . . . . . . . . . . . . . . . . . . . 165
Emergency Calls . . . . . . . . . . . . . . . . . . . . . 166
Care and Maintenance . . . . . . . . . . . . . . . . . 167
Responsible Listening . . . . . . . . . . . . . . . . . 168
Operating Environment . . . . . . . . . . . . . . . . . 170
Restricting Children's Access to
Your Mobile Device . . . . . . . . . . . . . . . . . . 172
. . . 153
3
Page 8

FCC Notice and Cautions . . . . . . . . . . . . . . . . 172
Other Important Safety Information . . . . . . . .172
Section 12: Warranty Information ..........174
Standard Limited Warranty . . . . . . . . . . . . . . 174
End User License Agreement for Software . . . 179
Section 13: Samsung Product
Registration ..........................................185
Index .........................................................186
4
Page 9
Section 1: Getting Started
This section explains how to start using your phone by first
configuring your hardware, activating your service, and then
setting up your voice mail.
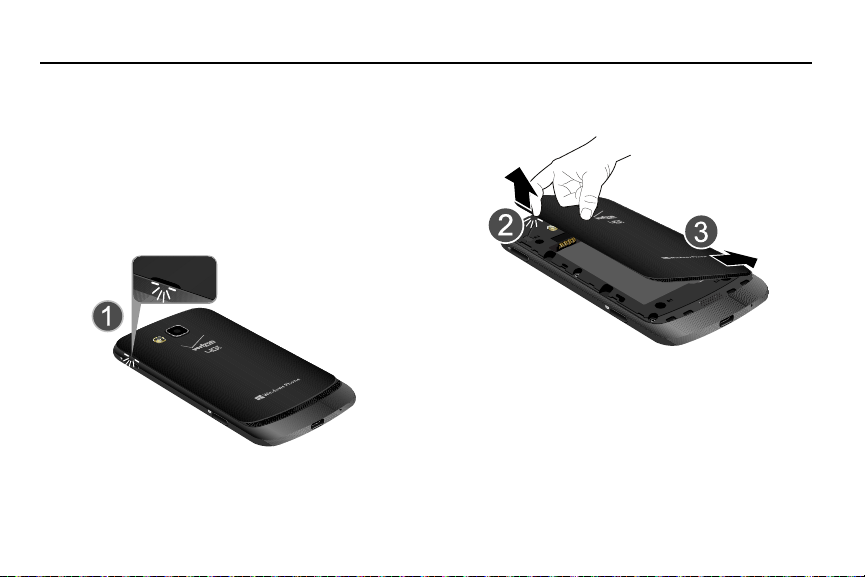
Setting Up Your Phone
Prior to use, it is necessary to install both the battery and SIM
into their corresponding internal compartments.
1. Remove the battery cover by placing your fingernail
into the slot in the side of the cover (1).
2. Pull the cover up (2) and then lift up and away from the
phone (3).
Getting Started 5
Page 10
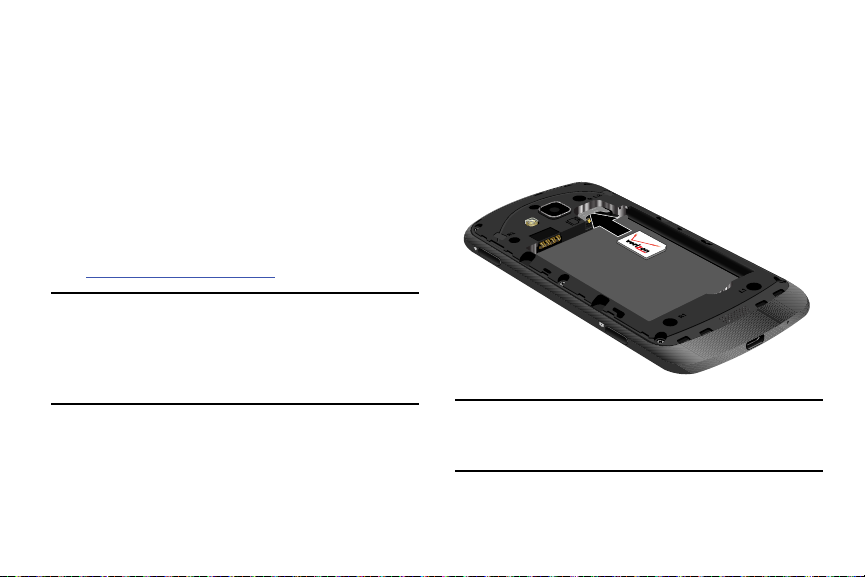
Installing the SIM Card
A Subscriber Identity Module (SIM Card) is a “smartcard” that
houses personal information, such as your mobile phone
number, calling plan, account information, and content, such
as contacts, text messages, and call history.
The Verizon Wireless 4G LTE SIM Card is compatible with any
Verizon Wireless 4G LTE certified device. You can move the
4G LTE SIM Card from one device to another and your
wireless service will work seamlessly as long as you have a
compatible device and service plan. To see which devices
are compatible with the Verizon Wireless 4G LTE SIM Card,
visit
verizonwireless.com/certifieddevice
.
With the battery removed, carefully slide the SIM card
into the SIM card socket (as shown) until the card locks
into place.
•
Make sure that the card’s gold contacts face into the phone
and that the upper-left angled corner of the card is positioned
as shown.
Important!
6
The plug-in SIM card information and its contacts
can be easily damaged by scratching or bending,
so be careful when handling, inserting, or
removing the card. Keep all SIM cards out of reach
of small children.
Note:
If the card is not inserted correctly, the phone will not
detect the SIM card. Re-orient the card back into the slot
if the SIM is not detected.
Page 11
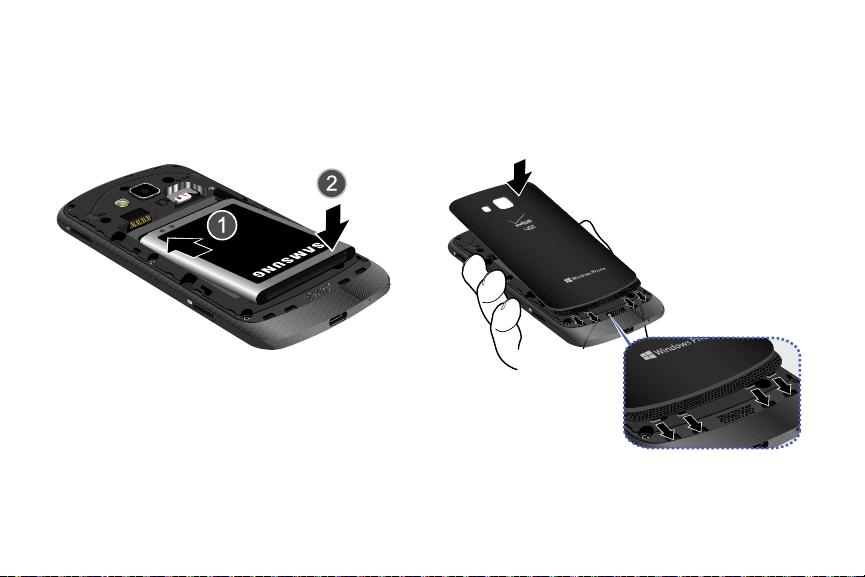
Installing the Battery
1. Insert the battery into the opening on the back of
the phone, making sure the three metal connectors
align (1).
2. Gently press down to secure the battery (2).
3. Replace the battery cover (the back of the phone) by
aligning the bottom of the battery cover with the phone
as shown.
4. Press the cover down into place.
Getting Started 7
Page 12
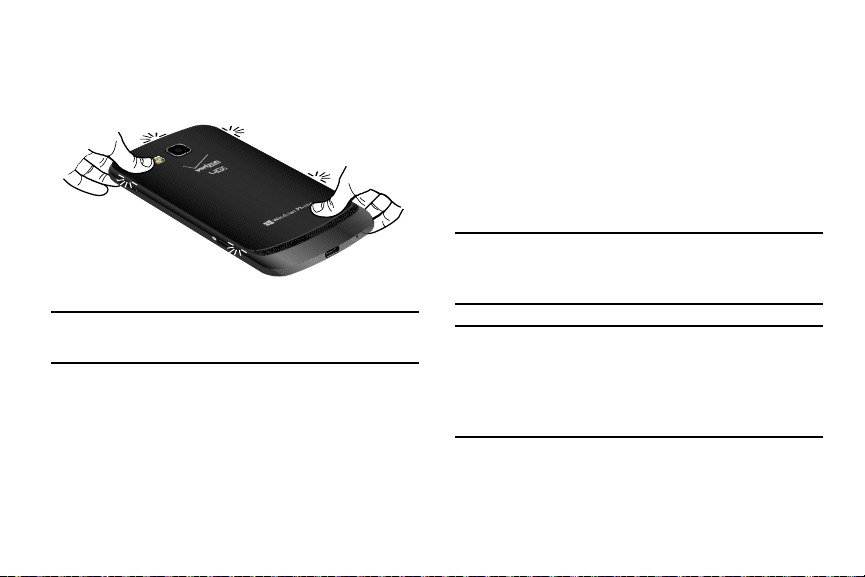
5. Press down firmly along the edges of the cover to
ensure that the cover is flush with the phone. You
should hear a light click as the cover locks in place.
Note:
Make sure the battery is properly installed before
switching on the phone.
8
Charging a Battery
Your phone is powered by a rechargeable Li-ion battery. The
Wall/USB Charger, which is used to charge the battery, is
included with your phone. Use only approved batteries and
chargers. Long backlight settings, searching for service,
vibrate mode, browser use, and other variables may reduce
the battery’s talk and standby times.
Although you can use the phone while the battery is
charging, doing so requires additional charging time.
Note:
You must fully charge the battery before using your
phone for the first time. A discharged battery recharges
fully in approximately 4 hours.
Important!
Verify that the handset battery is installed prior to
connection. If the battery is not properly installed
and the wall charger is connected, the handset
may power off and on continuously, preventing
proper operation.
Page 13
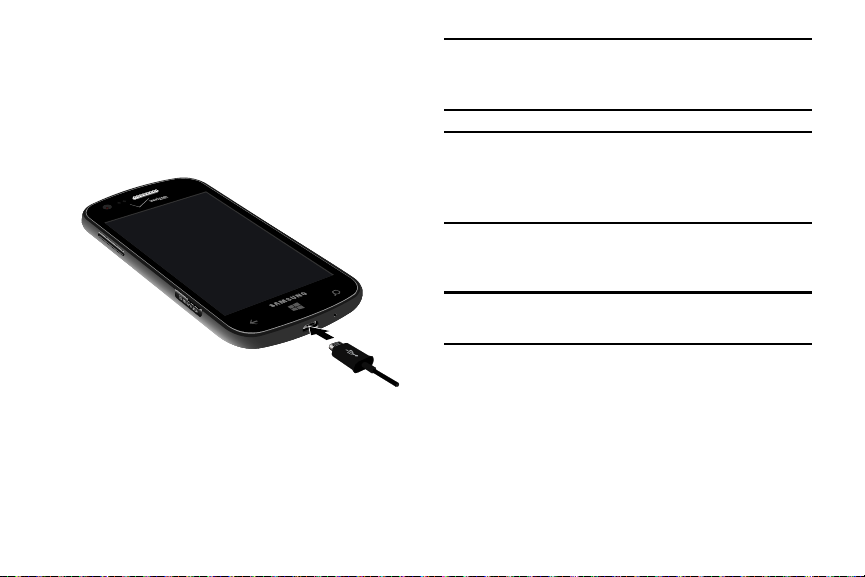
Using the Wall/USB Charger
1. Connect the USB cable to the power adapter.
2. Plug the power adapter into a standard
electrical outlet.
3. Connect the small end of the USB cable into the
phone’s Micro USB Charging Port.
Note:
When you connect the charger, your phone powers on
automatically. Your Windows phone stays powered on
whenever it is charging.
Warning!
While the device is charging, if the touch screen
does not function due to an unstable power supply,
unplug the USB power adapter from the power outlet
or unplug the USB cable from the device.
4. When charging is finished, remove the flat end from
the interface connector jack on the phone.
Note:
Failure to unplug the wall charger before you remove the
battery can cause damage to the phone.
Getting Started 9
Page 14

Low Battery Indicator
When the battery is weak and only a few minutes of talk time
remain, the “Battery critically low” warning appears and the
device sounds a warning tone at regular intervals.
For a quick check of your battery level, glance at the battery
charge indicator located in the upper-right corner of your
device’s display. A solid battery icon ( ) indicates a
full charge.
When the battery level becomes too low, the phone
automatically turns off.
Note:
If the phone automatically turns off because the battery
level is too low, you must charge the battery until the
phone turns on automatically.
10
Memory Card
Your device supports optional, removable, microSD or
microSDHC memory cards (not included) for storage of
music, pictures, and other files.
For more information about using memory cards, see
Storage”
on page 98.
Installing a Memory Card
1. Locate the microSD card slot on the side of the phone.
2. Place the card with the gold strips facing down.
3. Carefully slide the optional microSD card into the card
slot (as shown) until it “clicks” into place.
“Phone
Page 15

Removing a Memory Card
Warning!
To prevent damage to data stored on the memory
card, unmount the card before removing it from
the device.
1. From the Home screen, touch Settings . Under the
system menu, touch phone storage
➔ remove SD card.
2. At the prompt, read the warning and select OK to
continue. Wait for the SD card safe to remove icon to
appear in the Status bar and Notification panel.
3. Locate the microSD card slot on the side of the phone.
4. Push the memory card inward to release the lock, then
carefully pull the card out.
➔ SD card
Getting Started 11
Page 16
Switching the Phone On or Off
1. Press and hold the
upper right side of the phone) until the phone
switches on.
Note:
The display language is preset to English at the factory.
To change the language, use the Language menu. For
more information, refer to
page 102.
2. To switch off the phone, press and hold the
Power/Lock key
displays with the message
3. Touch the screen and swipe downward.
The phone displays
12
Power/Lock key
(on the
“Language + Region”
until the lock screen
slide down to power off
goodbye
and switches off.
on
Locking and Unlocking the
Touch Screen
1. Press the
2. Press the
.
Power/Lock key
touch screen.
Power/Lock key
main screen then swipe your finger upwards across
the glass to unlock the touch screen.
to lock the
again to display the
Page 17

Using the Start-up Wizard
The very first time you turn on your phone, the
Start-up Wizard screen displays.
Note:
Your phone is able to make emergency calls without
being set up or having a SIM card installed, if your
mobile operator allows. To place an emergency call,
touch emergency call and dial 911 or the appropriate
emergency phone number.
1. Touch
2. Touch the language you want to use and touch
get started
displays. The language you choose determines how
text displays on your phone.
•
If you choose a language other than English, the
YOUR LANGUAGE
phone and change the language or touch
the
CHOOSE A LANGUAGE
. The CHOOSE A LANGUAGE screen
screen displays. Touch ok to restart the
cancel
screen.
next
SWITCH
to return to
3. Read the Windows Phone Terms of Use and touch
accept
. The SET UP YOUR PHONE screen displays.
4. To uch
5. Touc h the What’s your home country/region? field
6. Touc h t he What time zone are you in? field and select
.
Note:
recommended
configure your phone to the recommended settings.
– or –
To uch
custom
yourself. If you select
instructions.
and select a country.
a time zone.
If there is no SIM card installed, you will need to
manually enter the current date and time.
to allow the Start-up Wizard to
to manually configure the phone
custom
, follow the on-screen
Getting Started 13
Page 18

7. Touch the
day, and year.
8. Touch the
current time.
9. Touch Send my location to Microsoft when my
phone is activated to help Microsoft improve its
phone setup procedure by providing the GPS location
of your phone.
•
•
10. Touch
14
What’s the date today?
What time is it now?
This information is collected this one time only (while the phone
is being activated), and is not used to track you or your phone.
Touch
Learn more
next
for more information.
.
field to set the month,
field to set the
Keep Your Life in Sync
To get apps, play games, automatically sync
Windows Live information to the web, and more,
you need a Microsoft account.
If you already have an Xbox LIVE, Hotmail, or Windows ID,
you already have a Microsoft account.
11. To sign into your existing account, touch
– or –
To create a new Microsoft account, touch
For more information, refer to
Account”
on page 90.
– or –
To create an account later, touch
When you are finished, the Almost done...
screen displays.
Note:
If you choose
your Microsoft account. A Microsoft account required
screen displays when you try to use a feature that
requires that you be signed in.
Sign in later
“Setting Up a Microsoft
, you can postpone setting up
sign in
create one
Sign in later.
.
.
Page 19
12. Touch
13. Read the Privacy Caution and Data Use information,
14. Review any additional information presented. Touch
next
to go set up Backup Assistant Plus, a free
service from Verizon Wireless that automatically backs
up your contacts.
To set up this service, touch next and follow the
prompts to configure Backup Assistant Plus.
– or –
To set this service up later, touch not now.
and touch accept.
next to continue, and touch done when finished.
Setting Up Your Voice Mail
1. From the Home screen, touch .
2. Dial *86 and touch Call, or touch .
3. If you hear a greeting, press # to interrupt, and follow
the setup tutorial.
Note:
These steps may be different depending on your
cellular network.
Accessing Your Voice Mail
1. From the Home screen, touch .
2. Dial *86 and touch Call, or touch .
3. When you hear the greeting, press # to interrupt, and
follow the prompts.
Accessing Your Voice Mail from Another Phone
1. Dial your wireless phone number.
2. When you hear the greeting, press the # to interrupt,
and follow the prompts.
Getting Started 15
Page 20
Important!
Voice mailboxes not set up within 45 days will be
canceled. Your voice mailbox is not password
protected until you create a password by following
the setup tutorial.
Visual Voice Mail
View a list of messages without dialing into a mailbox. Listen
or erase with the touch of a button.
From the Home screen, swipe left to display the
Applications menu and touch
the prompts to set up visual voice mail.
Note:
Data charges apply when using Visual Voice Mail.
16
Voicemail
. Follow
Phone Updates
Updating your phone can make it work better and add new
features. Updates can also make your phone more secure.
For more information, refer to
“Phone Update”
on page 104.
Troubleshooting
If your phone is frozen or unresponsive, try the following:
1. Restart your phone by pressing and holding the Power/
Lock key for 13 to 15 seconds. The phone will power
off and then turn on automatically.
2. If restarting your phone does not solve the problem,
turn off the phone, remove and replace the battery, and
turn on the phone.
Page 21
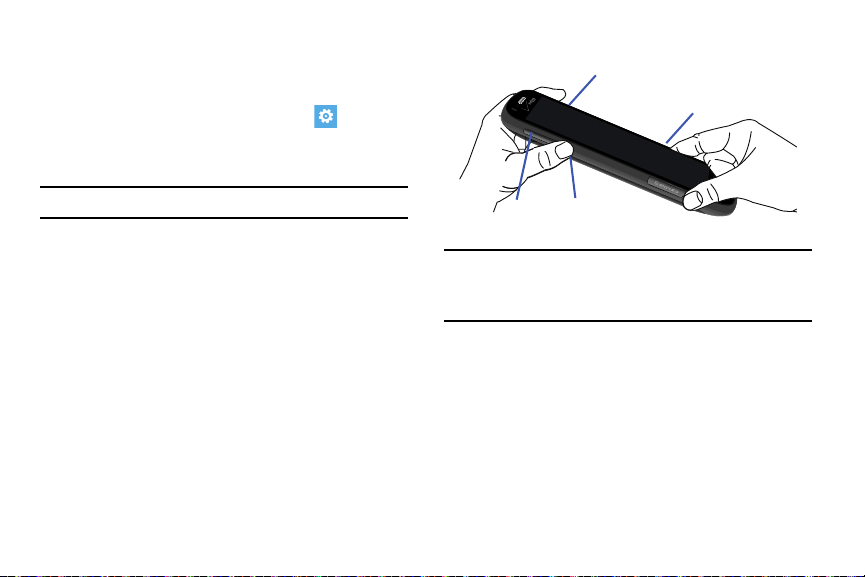
Formatting a Windows Phone 8
Power/Lock key
Volume
Down key
Camera key
Volume
Up key
Normally, if you want to reset your phone to the factory
default settings:
From the Home screen, touch
system
menu, touch
about ➔ reset your phone ➔ yes
For more information, refer to
Warning!
Formatting erases all user data stored on the device.
If necessary, there is another way to reset or format
your phone:
1. Press and hold the
Power/Lock key
phone, if necessary.
2. Press both the Power/Lock key and the
Volume Down key.
3. Press and hold only the Volume Down key.
4. The screen will display a large exclamation mark.
5. Press and release these keys in sequence:
Volume Up key ➔ Volume Down key ➔
Power/Lock key ➔ Volume Down key.
6. The phone will begin the reformatting process.
Settings .
“About”
on page 105.
to power off the
Under the
.
Warning!
Do not remove the battery while formatting your
phone. Wait until the device switches on and
displays the Home screen.
After formatting is complete, the Start-up Wizard screen
displays. For more information, refer to
Wizard”
on page 13.
“Using the Start-up
Getting Started 17
Page 22

Section 2: Understanding Your Phone
4
3
8
6 75
12
Front View of Your Phone
The following items can be found on the front of your phone.
1.
External speaker
Proximity and light sensors
2.
detects how close an object is to the surface of the
screen (such as when your face is against the phone
during a call or the phone is in your pocket), locks the
keys to prevent accidental key presses, and turns off
the screen. Light sensors use the ambient light level to
adjust screen brightness and contrast.
3.
Front-facing camera lens
or view yourself while video chatting.
Display
4.
phone, such as the Application Tiles, icons, and so on.
Back key
5.
menu or web page. Touch and hold the Back key to
view the current screen and up to six screens most
recently displayed.
18
: Used to hear the caller.
: Shows the information needed to operate your
: Used to step backwards when navigating a
: The Proximity sensor
: Used to photograph yourself,
Page 23
6.
Start Key
: Access the Home screen from any screen.
Touch and hold to activate the voice search engine.
Bing search key
7.
allows you to search for items on the internet, scout,
music, vision, and voice. For more information, refer to
“Bing Search”
Note:
Some applications, such as People and Store, display
a search button that allows you to search within
that application.
8. Indicator icons: Shows the information needed to
operate your phone, such as the received signal
strength, phone battery level, and time. If the icons are
not showing, touch the top of the display to show them.
: Access the Bing search engine, which
on page 23.
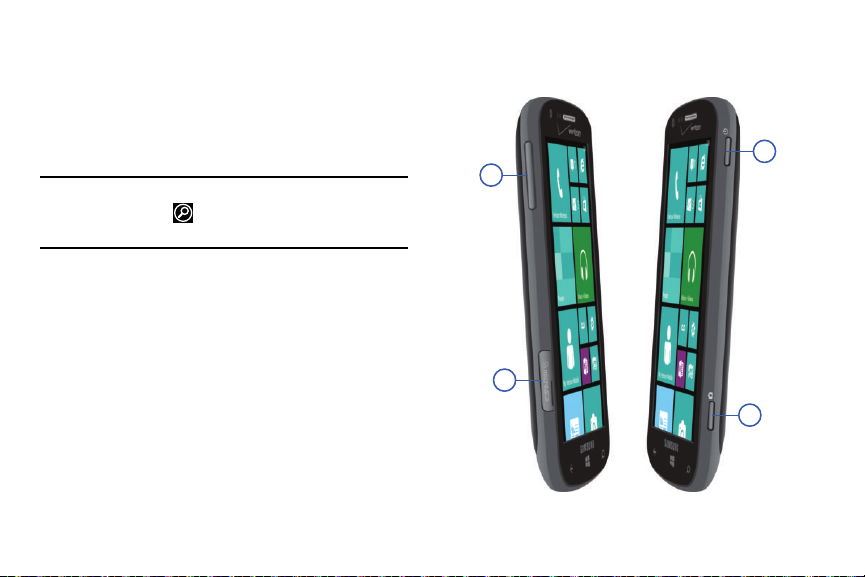
Side Views of Your Phone
The following items can be found on the sides of your phone.
3
1
2
4
Understanding Your Phone 19
Page 24
Volume keys
2 6
1
3
4
5
1.
: Adjusts the ringer volume while in
standby mode or adjusts the voice volume during a
call. When receiving an incoming call, briefly press
down either volume key (
ring tone. Also used to adjust the volume while playing
music or videos. While using playing music, or videos,
press the volume key to display additional controls.
2. MicroSD card slot : Stores the optional
microSD memory card (not included). For more
information, refer to
3. Power/Lock key : Press and hold the Power/
Lock key until the phone switches on. It can also be
used to lock or unlock the touch screen. For more
information on locking your phone, see
Unlocking the Phone”
4. Camera key : Used when you take pictures
or videos. Press and hold the camera key to launch
the Camera, even when the display screen is off
and locked.
“Memory Card”
on page 25.
) to mute the
on page 10.
“Locking and
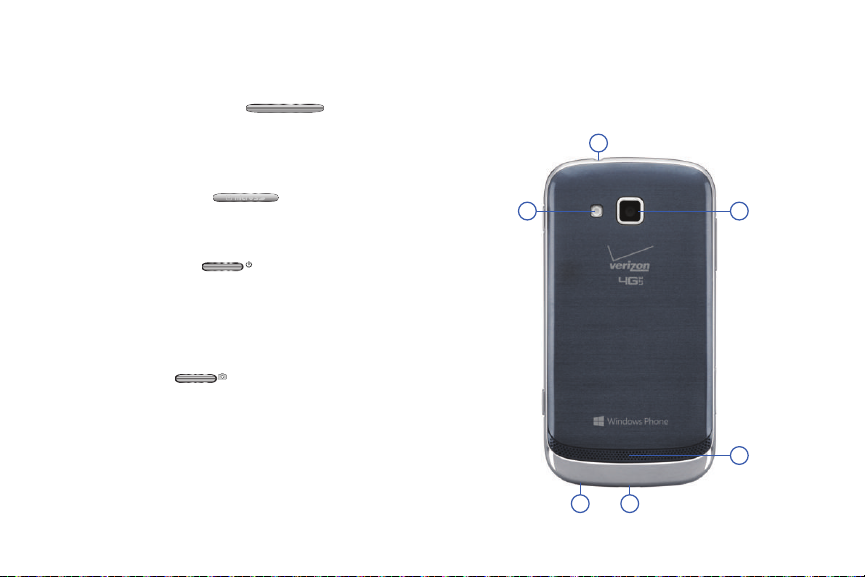
Back, Top, and Bottom View of
Your Phone
The following items can be found on the back, the top, and
the bottom of your phone.
20
Page 25

1.
3.5mm headset jack
Flash
: Lets you take pictures when the lighting is poor.
2.
Microphone
3.
speaking to them. Also allows you to use the voice
search engine.
4. Micro USB charging port: Used to connect a
charger or other optional accessories such as a
USB/data cable.
External speaker
5.
Speakerphone is turned on.
Rear-facing camera lens
6.
shoot videos.
: Plug in for accessories.
: Allows callers to hear you when you are
: Allows you to hear when the
: Used to take pictures and
Display Layout
Your display screen provides a wealth of information about
the phone’s status and options, as well as providing access
to application icons. For more information, refer to
View of Your Phone”
on page 18.
Indicator Icons
This list identifies the symbols that appear on your phone’s
display and Indicator area:
Note:
If there are no icons displayed, touch the top of the
screen to display them.
Displays your current signal strength. The greater
the number of bars, the stronger the signal.
Displays when there is no SIM card in the phone.
Displays when the SIM card is locked.
Displays your battery charge level. Icon shown is
fully charged.
Understanding Your Phone 21
“Front
Page 26
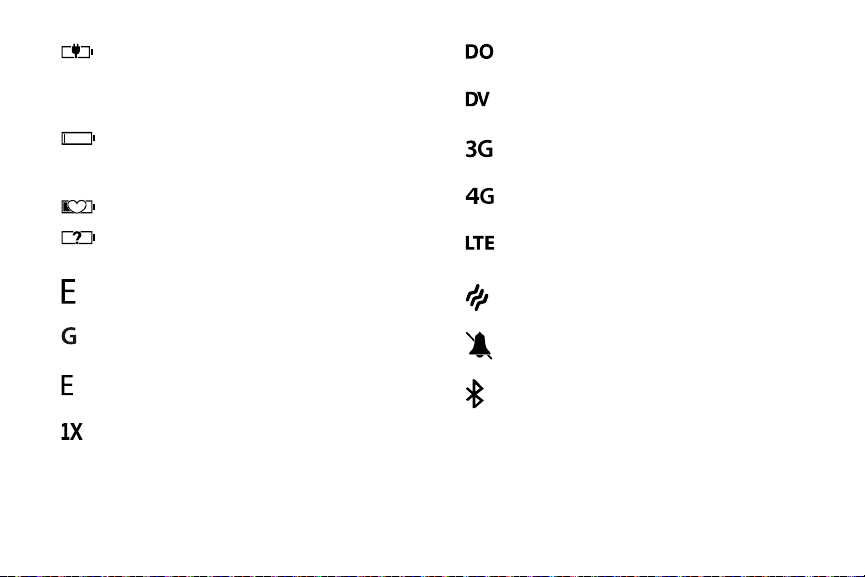
Displays when your battery is charging and
displays battery charge level. Displays when the
phone is connected to a computer via a supported
USB cable connection.
Battery critically low, which means your battery
needs to be charged soon or your phone will turn
off.
Displays when battery saver is on.
Displays when battery power or the state of the
battery is not currently known.
Displays when your connection to an EDGE
network is active.
Displays when your connection to an GPRS
network is active.
Displays when your connection to a HSDPA/HSUPA
network is active.
Displays when your connection to a RTT network
is active.
22
Displays when your connection to an EVDO
network is active.
Displays when your connection to an EVDV
network is active.
Displays when your connection to a UMTS
network is active.
Displays when your connection to a 4G network is
active.
Displays when your connection to a 4G LTE
network is active.
Displays when the ringtone is set to vibrate only.
Displays when the ringtone is set silent.
Displays when Bluetooth is activated and your
phone has been connected with a Bluetooth
device.
Page 27
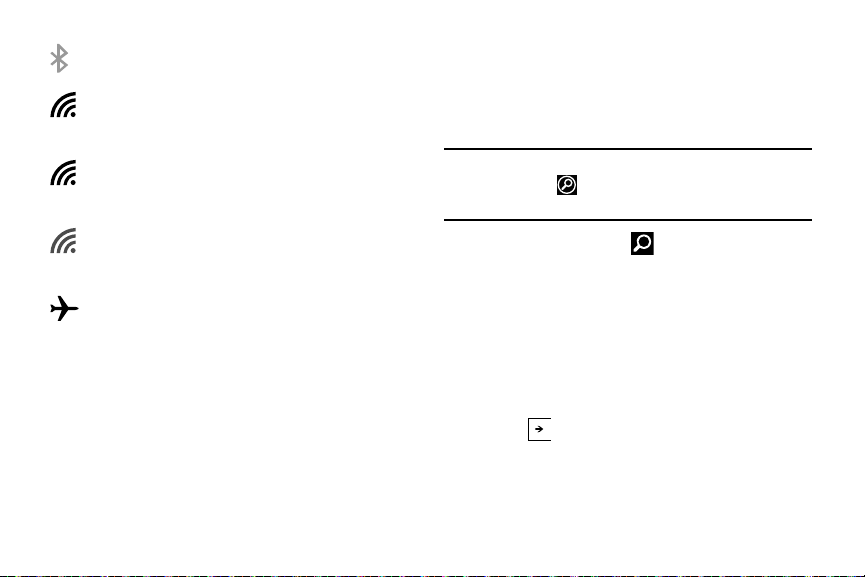
Displays when Bluetooth is activated, but your
phone has not connected with a Bluetooth device.
Displays when Wi-Fi is connected, active, and
communicating with a Wireless Access Point
(WAP).
Displays when Wi-Fi is connected, active, and
communicating with a Wireless Access Point
(WAP).
Displays when Wi-Fi is active, but there is a
communication issue with the target Wireless
Access Point (WAP).
Indicates that the Airplane Mode is active. You
cannot send or receive any calls or access online
information.
For more details on configuring your phone’s settings, see
“Changing Your Settings”
on page 91.
Bing Search
The Bing Search Bar provides an on-screen Internet search
engine. It also lets you link to Local Scout, listens to music
and searches for it, scans text that can be used as a search
term, and lets you say a search term.
Tip:
Some applications, such as People and Store, display a
search button that allows you to search within that
application.
1. From any screen, touch .
2. The first time you use the Bing Search, you are
prompted to allow the application to access and use
your location. This can help in the search procedure.
allow
or
cancel
To uch
3. Touc h the Bing Search bar.
4. Use the on-screen keyboard to enter the item you want
to search for.
5. Touch to see search results and then touch on a
link.
.
Understanding Your Phone 23
Page 28
music
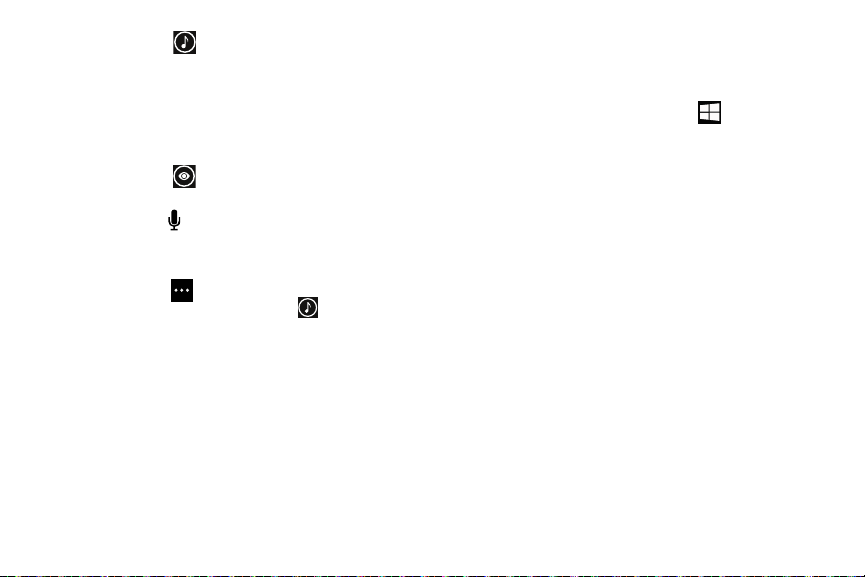
6. Touch
causing the phone to start listening for nearby music. If
the recorded sample can be found in the Windows
Phone Store, the artist and song appears in a pop-up
window with a direct link to the Windows Phone Store,
which lets you purchase and download the song.
7. Touch
Microsoft Tags, book covers, CDs, DVDs, or text.
8. Touch
Speak the word you want to search for, then follow the
on-screen instructions.
9. Touch
•Music history
music, your matches are saved here for future reference.
• Settings
information, refer to
24
to launch a Bing audio search,
vision
to scan barcodes, QR Codes,
voice
(in the search bar) to use Voice Search.
Menu
to access the following options:
: After touching
: Opens the Search settings screen. For more
“Search”
music
on page 117.
and searching for
Speech Engine
There is an intuitive speech engine integrated into the Start
key on your phone.
1. From any screen, touch and hold
intuitive speech engine.
2. Speak the words that you would like to search on or
the action that you would like to perform.
The following examples show the flexibility of the
speech engine:
•
“Call Chris mobile”
•
“Find coffee in Seattle”
•
“Open calendar”
•
“Text Brandy”
•
“Note send birthday card”
3. To change speech settings, see
page 103.
to activate the
“Speech”
on
Page 29
Note:
The first time you use the Speech engine, you are asked
to allow Microsoft to use your voice data to provide and
improve the service, which makes additional features
available to you. Touch accept or decline. Touch
Statement
for more information.
Privacy
Menu Navigation
You can tailor the phone’s range of functions to fit your needs
using menus. Menus, sub-menus, and features can be
accessed by scrolling through on-screen menus.
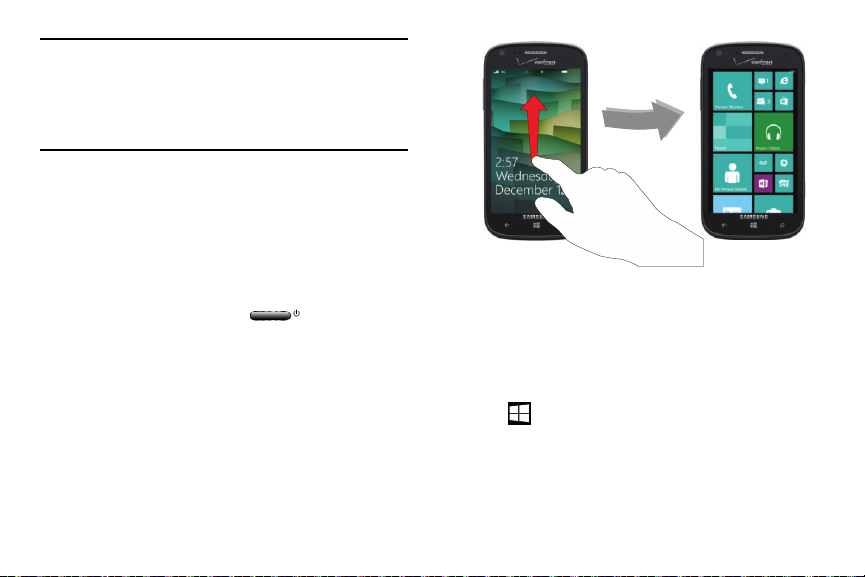
Locking and Unlocking the Phone
To unlock your phone:
1. Press the Power/Lock key located on the
upper right side of your phone. The lock screen
displays.
2. Swipe the lock screen in an upward direction.
3. The Home screen displays as shown.
Home Screen Overview
The Home screen is the starting point for many applications
and functions, and you can pin items like application icons,
shortcuts, contacts, and web pages to your Home screen to
give you instant access to information and applications. The
Home screen is accessible from any menu or application by
touching
.
Understanding Your Phone 25
Page 30
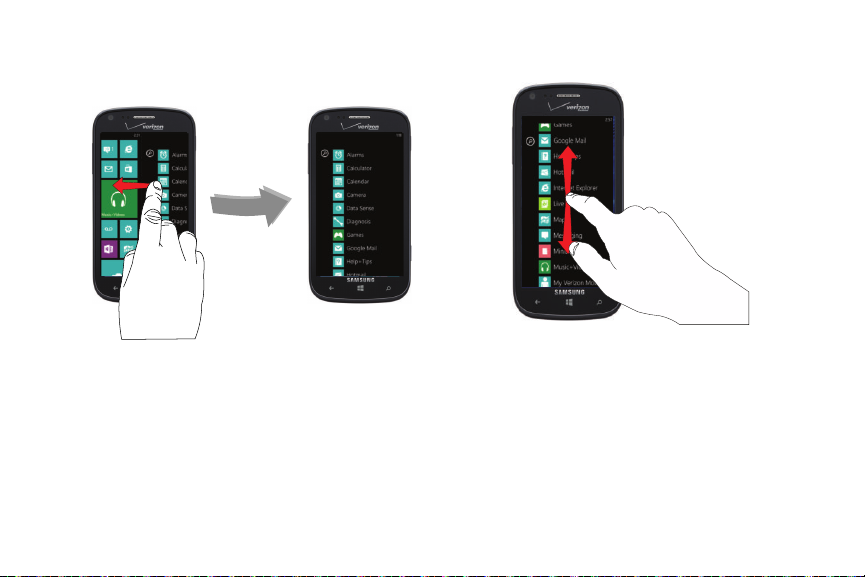
Navigating to the Application Menu
1. At the Home screen, swipe the screen to the left.
2. The Application Menu displays.
4. Swipe the screen up or down to access all of the
available application icons.
3. Touch one of the application icons to launch the app.
26
5. To return to the Home screen, swipe the display
right to left.
Page 31

Navigating Using Sub-Menus
Sub-menus are available when you are at any screen such
as Phone, People, Messaging, or Internet and Options
displays at the bottom of the screen.
Note:
Not all screens have options available.
1. Touch
your display
the screen.
2. Touch an option. The following example shows the call
history screen before and after touching
Options on the bottom right corner of
. A sub-menu appears at the bottom of
Options.
Understanding Your Phone 27
Page 32

Customizing Your Home Screen
You can customize your Home screen by doing the following:
•
Adding and removing application tiles on the Home screen
•
Repositioning application tiles
•
Changing the background
Adding a Tile from the Applications Menu
1. At the Home screen, swipe
the screen to the left. The
Application menu displays.
2. Touch and hold an
application.
3. Touch pin to start after it
displays under the icon.
The application now appears
as the bottom Tile on the
Home screen. You can then
move it if you would like.
For more information, refer to
“Moving Tiles on the Home
Screen”
on page 29.
28
Removing a Tile from the Home Screen
To delete an Application Tile from your Home screen, follow
these steps:
1. From the Home screen, touch and hold the Application
Tile that you want to remove.
2. Touch unpin to delete the Tile.
Note:
After deleting an Application Tile, you can add it back
later by pinning it to the home screen from the
Applications Menu. For more information, refer to
“Adding a Tile from the Applications Menu”
on page 28.
Page 33

Changing the Lock Screen Background
You can change the background of your Lock screen by
following these steps:
1. From the Home screen, swipe the screen to the left to
display the apps menu, then touch
2. Under the
3. Touch the
4. Touch the Power/Lock key twice to view the
system
menu, touch
Background
location:
• photo
: Sets a photo as the Lock screen background. Touch the
change photo
Slide the photo within the window to crop it, then touch to
save.
•Bing
: Randomly sets professional Bing images as the Lock
screen background.
• Live Wallpaper
background. Touch the
Wallpaper.
•Photo Editor
Touch the
open app
new Lock screen background.
field to choose an image
field to select a photo from your photo albums.
: Sets Live Wallpapers as the Lock screen
open app
: Edit the background image with Photo Editor.
field to launch Photo Editor.
Settings
lock screen
field to launch Live
.
Moving Tiles on the Home Screen
To move an Application Tile on your Home screen, follow
these steps:
1. From the Home screen, touch and hold the
.
Application Tile that you want to move.
2. Drag the Tile to the new location and release.
3. Touch the center of the icon to place it in the
new location.
•
Be careful not to touch
be deleted.
unpin
. If you do, the Tile will
Understanding Your Phone 29
Page 34

Resizing Tiles on the Home Screen
Tiles may be displayed as small, medium, or large tiles.
To resize an Application Tile on your Home screen, follow
these steps:
1. From the Home screen, touch and hold the Application
Tile that you want to resize.
2. Touch or to toggle between small, medium,
and large.
Note:
Not all tiles may be resized as small, medium, or large.
30
Changing your Color Theme
You can change the color theme of your phone by following
these steps:
1. From the Home screen, swipe the screen to the left to
display the apps menu, then touch
2. Under the
3. Touch the
4. Touch on
5. Touch the
6. Touch on a color that you like.
7. Touch to return to the Home screen.
Note:
Battery power is consumed at a faster rate when the
background is set as
system
menu, touch
Background
dark
or
light
Accent color
field.
to set your background color.
field.
light
.
theme
Settings
.
.
Page 35

Section 3: Entering Text
Create New Message
Portrait Keypad
This section describes how to select the desired text input
method when entering characters into your phone.
This section also describes the predictive text entry system
that reduces the amount of key strokes associated with
entering text.
Note:
Your phone comes equipped with an orientation detector
that can tell if the phone is being held in a portrait
(upright) or landscape (sideways) orientation. The
landscape orientation makes entering text easier. If the
phone is sideways or upright, an on-screen, QWERTY
keyboard displays.
Keys
You can enter characters into your phone by using an onscreen, QWERTY, portrait or landscape keyboard. In both
formats, the keys are associated with alphabetic letters,
special characters, or numbers, as shown in the
following layouts.
•
From a screen where you can enter text, such as the New
Message screen, hold your phone in an upright position to display
the portrait version of the on-screen QWERTY keyboard.
Entering Text 31
Page 36

•
Create New Message
Landscape Keypad
Create New Message
Number Keypad
Rotate your phone counterclockwise to display the landscape
version of the on-screen QWERTY keyboard.
•
Based on your keyboard settings, the first letter of an entry is
capitalized and all consecutive letters are kept in lowercase
unless you touch the
entering a character, the cursor automatically advances to the
next space. For more information, refer to
Shift key
or enter a period. After
“Keyboard” on
page 101.
32
•
For certain fields, such as the New Message To field, a dialer
123
keyboard displays when you touch the
recipient’s phone number. For more information, refer to
“Messaging”
on page 73.
key to enter a
Page 37

Using the QWERTY Keyboard
32
1
4 5 6 7
Your phone offers the convenience of an on-screen QWERTY
keyboard. Using the QWERTY keyboard to type letters,
numbers, punctuation, and other special characters into text
entry fields or other applications should be simple and fast.
The following keys perform special functions when entering
text. Some keys may perform differently depending on the
field in which text is being typed.
1.
Shift:
Used to switch between uppercase and
lowercase characters
caps lock mode.
. Tap twice to switch to
2.
123 or
&123:
Touch once to type special characters and
numbers that appear on the QWERTY keys. (Examples:
$, #, !, 1, 2, etc.) Touch the right arrow for additional
characters.
Semicolon
3.
4.
5.
6.
7.
The keyboard provides keys labeled with alphabetic
characters. Touch the key corresponding to the character you
want to enter.
or Emoticon : Touch the semicolon to
separate addresses or phone numbers. Touch to
display several screens of Emoticons. Touch a category
at the bottom of the screen, then swipe up or down to
display more Emoticons. Touch a character on the
screen to add it to your text.
@ or Comma
displayed, which may be the @ character or a comma,
depending on the field in which text is being typed.
Space
Enter:
in a message.
Backspace
similar to the backspace key on a computer keyboard.
: Touch once to type the character
: Touch to insert an empty space.
Touch to move the insertion point to the next line
: Touch to delete the previous character,
Entering Text 33
Page 38

Changing the Text Input Mode
&123
abcd
There are three main keyboard layout keys that change the
on-screen keys within the QWERTY keyboard.
The available Text Input modes are:
Note:
34
Symbol and Number Mode
number keys.
Alphabetic Mode
Switch between uppercase and lowercase by
touching the Shift key .
Emoticons
: Activates the Emoticon keys.
When in
abcd
&123
mode, the
mode, the
abcd
: Activates the symbol and
: Activates the default alphabet keys.
&123
key appears. When in
key appears.
Using Alphabetic Mode
1. Whenever you enter text (while creating a message, an
email, and so on), if desired, rotate your phone
counterclockwise to a landscape orientation.
2. A screen similar to the following displays:
abcd
The Text Input mode is initially set to
Note:
Some Text Input screens display black keys on a
light background.
mode.
Page 39

3. Touch the desired alphabetic characters. After typing
&123
the first letter, the following letters are lowercase.
4. Touch to input another uppercase letter. Touch
twice to switch to caps lock mode and the shift
key changes to . All following letters are uppercase
until you touch the shift key again.
Using Symbol and Numeric Mode
Use Symbol and Numeric mode to add numbers
and symbols.
1. To uch
screen displays:
2. Touch the desired number and symbol characters.
3. Touch either or to cycle through additional
symbol pages.
4. Touch to return to Alphabetic mode.
at the bottom of the screen. The following
abcd
Entering Text 35
Page 40

Using Emoticon Mode
Use Emoticon mode to add combinations of characters to
your text input.
1. Touch
screen displays:
Note:
Emoticons are not available for some input fields.
2. Touch a category at the bottom of the screen, then
swipe up or down to display more Emoticons.
3. After all characters have been selected, touch to
return to Alphabetic mode.
36
at the bottom of the screen. The following
Using Text Suggestions
Based on your keyboard settings, your phone suggests
alternatives to what you are typing including correct spelling
of words similar to what you are entering. For more
information, refer to
1. Touch a text input field.
Note:
Text suggestion and spell check are not available for
some input fields.
2. Begin typing a word. A list of word options displays.
abc
“Keyboard” on page 101.
Page 41

3. Touch one of the words to replace the word that has
already been typed or swipe across the list of words for
more word suggestions.
If you replace the word, a space is entered after the
word and the cursor automatically advances to the
next space.
4. Continue typing. When finished, touch
more information, refer to
“Messaging”
send
on page 73.
Keyboard Settings
You can customize the way your phone handles certain
functions while you enter text. You can also remove all the
words you have added to your suggestion list.
For more information, refer to
“Keyboard” on page 101.
. For
Copy and Paste
Windows Phone 8 supports copy and paste. You can copy
text from most locations on the phone and paste it in most
places you can type.
Copy
There are two copy and paste methods: Highlight option
and Menu Option.
Highlight Option
Some locations enable you to copy a specific text string by
highlighting it.
To copy text that supports the Highlight option:
1. Touch and briefly hold the text you want to copy to
highlight it.
2. Drag the arrows at each end of the highlighted text
until only the text you want to copy is highlighted.
3. To uch copy that displays near the highlighted text.
The following locations support the Highlight option:
•
Web pages in the browser.
•
Bodies of email messages.
•
Office documents.
•
Editable fields in native applications.
Entering Text 37
Page 42

Menu Option
Some locations enable you to copy an entire section of text
by using a menu option.
To copy text that supports the menu option:
1. Touch and hold the text or link you want to copy until a
menu appears.
2. Touch copy or
The following locations support this option:
•
Headings of email messages.
•
Directions in maps.
•
Links in the browser.
•
Information in contact cards and social networking profiles in the
People hub.
•
Messages you have sent or received.
•
Details pages for local search results.
38
copy link
.
Paste
To paste text that you have copied:
1. Touch where you want to paste the text.
2. Tou ch paste in the text suggestion bar above
the keyboard.
After you paste the text, the paste icon disappears.
However, you can paste the copied text again by
panning from left to right in the text suggestion bar to
bring back the paste icon.
•
You can paste text in editable fields in native applications,
including password fields.
Note:
When you copy text with special formatting (such as
bold, italic, or lists) or images, the text appears when
you paste it, but not the formatting or images.
Note:
Copying and pasting works only for languages that use a
Latin alphabet.
Page 43

Section 4: Call Functions
This section describes how to make or answer a call. It also
includes the features and functionality associated with
making or answering a call. For more information on call
settings, see
“Phone”
on page 115.
Making a Call
1. From the Home screen, touch ➔ and use the
on-screen keypad to enter the number you want to
dial.
2. Touch
Making an International Call
1. From the Home screen, touch ➔ , then touch
2. Use the on-screen keypad to enter the country code,
3. Touch
call
to make the call.
and hold . The + character appears.
area code, and phone number.
If you make a mistake, touch
numbers have been deleted.
call
to make the call.
until the desired
Correcting an Entered Number
After entering a number using the keypad, use the following
steps to correct a mis-typed entry when dialing.
1. If you make a mistake, touch
single character.
2. Touch and hold
of numbers.
to erase the entire string
to erase a
Ending a Call
Tou ch
end call
.
Dialing a Recent Number
All incoming, outgoing, and missed calls are recorded in the
history. If the number or caller is listed in your People, the
associated name is also displayed.
1. From the Home screen, touch .
The
history
screen displays.
2. Touch an entry to enter the contact’s detail
touch
call number
or
text
.
Call Functions 39
page, then
Page 44

Making a Call from People
You can store phone numbers that you use regularly in
the phone’s memory. These entries are collectively
called People.
For further details about the People feature, see
Messaging from People”
on page 48.
“Dialing or
Answering a Call
When a call is received, the phone rings and displays the
caller’s phone number and name if stored in People.
1. At the incoming call screen, touch
ignore
the call or
2. Touch
Note:
You can answer a call while using other applications.
After ending the call, the phone returns to the previously
active function screen.
40
to send the call to your voicemail.
end call
to end the call.
answer
to answer
Calling Back a Missed Call
To call back a missed call number:
1. From the Home screen, touch
The history screen displays a list of recent calls. If the
number or caller is listed in your People, the associated
name displays.
call
2. Tou ch
to call the displayed number.
.
Saving a Recent Call to People
1. From the Home screen, touch .
The history screen displays a list of recent calls.
2. Touch the call you want to save to your People.
The profile screen displays.
save
3. Tou ch
displays.
. The CHOOSE A CONTACT screen
Page 45

4. Touch
5. Touch the
6. When finished, touch
7. Touch the other fields to add name, other phone
8. Touch
For further details about the People feature, see
New Contact”
new
to add as a new contact or touch an
existing contact to edit manually.
The EDIT PHONE NUMBER screen displays. The
number
and
Phone number type
filled in with the information of the recent call.
Phone number
and use the keypad to edit if necessary.
The NEW PHONE CONTACT screen displays with the
Phone number already added.
numbers, email, ringtone, and other information.
save
.
on page 45.
fields are automatically
or the
Phone number type
save
.
Phone
field
“Adding a
Sending a Message to a Recent Call
1. From the Home screen, touch .
The history screen displays a list of recent calls.
2. Touch the call entry to which you want to send a
message. The call detail page displays.
3. To uch text.
4. Use the keyboard to type in a message.
5. When you are done with your message, touch
send .
For more information, refer to
Messages”
on page 73.
“Creating and Sending Text
Call Functions 41
Page 46

Deleting a Call from History
1. From the Home screen, touch . The history screen
displays a list of recent calls.
2. Touch and hold the call you want to delete from the call
log. Touch delete item.
The call is deleted from the call history.
Options During a Call
Your phone provides a number of control options that you can
use during a call.
Adjusting the Call Volume
During a call, to adjust the earpiece volume, use the
keys on the left side of the phone.
Press the Up volume key to increase the volume level
Down
and press the
volume level.
From the Home screen, you can also adjust the ringer volume
using these same keys.
42
volume key to decrease the
Volume
In-Call Options
During an active call, there are several options available by
touching a corresponding on-screen button.
•
end call
: T
erminates the call.
•
dialer
a number using DTMF (Dual Tone Multi-Frequency).
•
speaker
through the earpiece. Touch speaker to turn on the speakerphone.
Touch again to turn it off.
•
mute
mute your phone during a call. Touch again to unmute.
•
flash
current call on hold and answer the incoming call. Touch
again to place the incoming call on hold, and return to the
previous call. (Your cellular plan must include call-waiting to use
this feature.)
•
add call
conversation. For more information, refer to
Party) Calling”
: Displays the on-screen keypad, where you can enter
: Routes the phone’s audio through either the speaker or
: Turn the onboard microphone either on or off. Touch to
: When a second call is received, touch
: Allows you to add another call to your present
on page 44.
flash
to place your
flash
“3-Way (Multi-
Page 47

Making a New Call During a Call in Progress
1. Touch
2. Select a number from your recent calls, or touch
add call
. The history screen displays.
keypad
You can also touch
your People. Enter the number to add and touch
Once connected, the active call appears on the call
screen and the call on hold appears in a box at the top
of the display.
to dial a number.
people
to enter a number from
call
Switching Between Calls
When you have an active call and a call on hold, you may
switch between the two calls, changing the one on hold to
active and placing the other on hold.
1. Touch the bar at the top of your display to swap
.
between the two calls.
The current call (caller #2) is placed on hold and the
previous call on hold (caller #1) is then reactivated so
that you can continue conversing with that person. The
active call appears on the call screen.
2. Touch the bar at the top of your display again to
swap back.
3. To uch
on hold is then reconnected.
end call
to end the currently active call. The call
Call Functions 43
Page 48

Answering a Call During a Call in Progress
1. There are several options available when a call is
received when you have a call in progress. Touch one
of the following:
•answer
: Allows you to answer the incoming call and put the
first call on hold.
• ignore
: Sends the new call to your voicemail. The first call stays
connected.
2. If you selected
display to swap between the two calls.
answer
, touch the bar at the top of your
3-Way (Multi-Party) Calling
The 3-Way or Multi-Party feature allows you to make or
answer a series of incoming calls and place them on hold. If
this service is supported by the network, all calls can be
joined together.
1. While connected to two different callers (one is on
hold), touch
The three calls are conferenced together and are
displayed on the Conference screen.
2. Touch
44
merge calls
end call
to end the conference call.
.
Page 49

Section 5: Your People Hub
This section allows you to manage your daily contacts by
storing their name, number, email, and other information in
your phone using the People feature.
Importing SIM Contacts to Your Phone
You can import all contacts from your SIM card to
your phone.
1. From the Home screen, touch
2. Touch ➔
The phone then copies all contacts from your SIM card
to your phone.
Note:
The
import SIM contacts
are contacts stored on the SIM card.
settings. Tou ch
People
import SIM contacts
option is only available if there
.
.
Adding a New Contact
Use the following procedure to store a new contact to
your People.
1. From the Home screen, touch
2. From the All screen, touch .
3. The CREATE CONTACT IN screen displays.
4. Select an account to store the contact.
add photo
5. Touc h the
new entry. Select a picture from your photos or touch
the icon to take a new picture with your camera.
Touch when you have made a selection.
6. To uch
name
fields and use the on-screen keyboard to enter names
for each entry. You can also scroll down to enter
additional information. For more information, refer to
“Entering Text”
your entry.
icon and assign a picture to the
then touch the
on page 31. Touch
People
First name
Your People Hub 45
.
and
save
to save
Last name
Page 50

phone
7. Touch
numerical keypad displays. Enter a number.
Touch the
type. Touch
8. Touch
the on-screen keyboard to enter an email address.
Touch the
type. Touch
9. Touch
displayed list.
10. Touch
add to the contact.
11. Touch
46
then touch the
Phone number type
save
to save your input.
email
then touch the
Email address type
save
to save your input.
ringtone
then select a ringtone from the
other
then select any fields that you would like to
save
to save the contact information.
Phone number
field and select a number
Email address
field and select an email
field. The
field and use
Editing an Existing Contact
When editing an existing contact, you can touch a field and
change or delete the information, or you can add additional
fields to the contact’s list of information.
1. From the Home screen, touch
2. Swipe to the all screen, then touch the contact that you
want to edit.
3. At the contact profile screen, touch edit
bottom of the screen.
4. Touch the fields that you want to edit and then use the
keyboard to make any changes.
save
5. Tou ch
to save the edited information.
People
.
at the
Page 51

Deleting Contacts
You can delete contacts from your phone's memory.
To delete any People entry:
1. From the Home screen, touch
2. Swipe to the all screen, then touch and hold a contact
that you want to delete.
3. Touch
4. If there are linked profiles for the contact, the
5. At the
delete
on the displayed list.
PROFILE TO DELETE
that you want to delete.
Delete contact?
the contact or
screen displays. Touch the profile
cancel
People
prompt, touch
to exit.
delete
.
CHOOSE A
to delete
Creating a New Group
The Group function makes it possible to make individually
named groups of people you care about, such as family,
friends, coworkers, or social media friends. Once you create
a group, you can pin it to your home screen and it becomes a
live tile. Notifications appear as new posts, comments, or
pictures are added to this group.
Use the following procedure to create a new group of
your contacts.
1. From the Home screen, touch
2. Swipe to the together menu, then touch .
Group
3. To uch
4. To uch
keyboard to enter a group name. Touch
save.
5. To uch to add members to the group.
6. The CHOOSE A CONTACT screen displays. Scroll
through your contacts and touch a contact to add it to
the group.
7. Repeat Steps 5 and 6 until you have added all
group members.
8. Touch an entry in the list of group members to change
that person’s preferred phone number or email address
or to remove the entry from the group. Touch
to save the edited information.
.
NAME THE GROUP
People
and use the on-screen
Your People Hub 47
.
save
to
save
Page 52

Group Options
Once you have created a group, there are several options
available for editing, deleting, and so on.
1. From the Home screen, touch
2. Swipe to the together menu, then scroll down and
touch the group that you want to display. The group
screen displays.
text
3. Touch
the group.
4. Touch
members of the group.
5. Touch
6. Touch
screen. Touch to add more members to the group.
Touch an entry in the list of group members to change
that person’s preferred phone number or email address
or to remove the entry from the group. For more
information, refer to
7. Touch ➔
Note:
Deleting a group does not delete the contacts.
48
to send a text message to all members of
send email
pin
edit group
to send an email message to all
to pin the group to the home screen.
to display the EDIT GROUP
delete
People
“Deleting Contacts”
to delete the group.
.
on page 47.
Using Your People List
Dialing or Messaging from People
Once you have stored phone numbers in your People, you
can dial or message them quickly and easily.
1. From the Home screen, touch
2. Swipe to the all screen, then touch any letter (on the
left side of the display) to highlight all of the letters for
which you have contacts.
3. Touch a letter to quickly jump to the contacts beginning
with that letter.
People
.
Page 53

4. Touch the contact you want to call or message.
5. Touch
Note:
call mobile
send a message.
Depending on the phone type that you entered when the
contact was created, the display may show
call company, call phone
to make a phone call or
, and so on.
text
to
call home
Searching for People
You can also find a contact in your People list by using the
Search option.
1. From the Home screen, touch
➔ .
The search screen displays with a listing of all your
contacts’ names.
2. Use the on-screen keyboard to type the beginning
letters of the contact’s name that you are trying to find.
The list displays names that begin with the letters you
have typed.
3. Touch a name in the list to display the contact’s profile.
,
People
➔
all
For more information, refer to
Text Messages”
on page 73.
“Creating and Sending
Your People Hub 49
Page 54

Linking People
Linking People Information
Many people now maintain multiple email accounts, social
networking logins, and other similar account information. For
example, a Facebook account login name might differ from a
corporate email account login because they are maintained
separately and for different groups of people.
This device can synchronize with multiple accounts such as
Windows Live, Outlook, Google, Facebook, Twitter, and
LinkedIn. When you synchronize your phone with these
accounts, each account creates a separate contact entry in
the People list.
If one of your contacts (Amy Smith, for example) has a
regular email account that you maintain in Hotmail, but also
has a Facebook account under her maiden and married
name, as well as a Google account, when you merge these
accounts into your Contacts list you can link all of her entries
and view the information in one record.
50
The next time you synchronize your phone with your
accounts, any updates that contacts make to email account
names, email addresses, etc. automatically update in your
People list.
For more information about synchronizing accounts, see
“Synchronizing Accounts”
1. From the Home screen, touch
2. Touch a contact name (the name you want to link to
another entry). Typically, this is the same contact with
a different name or account information.
3. Touch .
4. Tou ch
5. Touch the second contact entry (the entry in which to
Note:
choose a contact
link). The second contact is now linked with the first
and the account information is merged into one screen.
The information is maintained in the first entry that you
selected.
on page 51.
.
People
.
Page 55

6. Touch the linked contacts to view the contact
2
information you linked. The contacts and information
displays with a label next to the contact name to
indicate what type of account information is contained
in the entry.
Unlinking People
1. From the Home screen, touch
2. Touch a contact name (the account name from which
you want to unlink an entry).
3. Touch . A number displays over the link symbol
showing how many contacts are linked to this
contact. The names of all the contacts that are linked
are displayed.
4. Touch the contact you want to unlink.
5. At the prompt, touch
“unlinked” and no longer displays in the
merged record screen.
People
unlink
. The contact is now
Synchronizing Accounts
From the Accounts menu you decide if you want applications
to synchronize, send, and receive data at any given time, or if
you want the applications to synchronize automatically.
After determining how you want the accounts to synchronize,
indicate which account to synchronize with your People list.
.
To set up an account, follow these steps:
1. From the Home screen, touch
2. Swipe to the
account
what’s new
.
3. Touch an account type to add. Select
People
screen, then touch
Outlook, Hotmail
Backup Assistant Plus, Google, Facebook, Twi tt e r
LinkedIn
, or
advanced setup
(used for accounts that use
Exchange ActiveSync).
4. Follow the on-screen instructions. The selected
account type synchronizes with your Contacts list.
Your People Hub 51
.
set up
,
,
Page 56

What’s New
Synchronized accounts display information on the
what’s new
account, you can see what your contacts are posting.
Importing Facebook Contacts
When you add your Facebook account, your profile picture
displays at the top of your People list. Touch the picture to go
to your Facebook profile. Your phone also imports all of your
Facebook contacts and creates a profile for each contact or
adds information to existing profiles.
You can limit imported Facebook contact information to the
existing contacts already on your phone. For more
information, refer to
screen. For example, if you add your Facebook
“People”
on page 113.
52
People Options
You can access several options while viewing the details
page for a specific entry.
1. From the Home screen, touch
2. Touch a specific contact entry.
3. Touch one of the following options:
pin
: Touch the pin icon to pin this contact to
your Home screen.
link
: Touch the link icon to link several contacts
together. For more information, refer to
“Linking People”
edit
: Touch the edit icon to make changes to
the contact’s information.
share contact: Touch the options icon, then
touch
share contact
a contact’s in formation via Tap + Send,
Messaging, or an email account.
delete
: Touch the options icon and then touch
delete
to delete the contact from your People
list.
People
on page 50.
. Touch
.
share
to send
Page 57

Additional People Options
Depending on your settings, additional information from
accounts such as Facebook, Twitter, or LinkedIn displays on
the profile pages of your contacts.
1. From your
on the information available on your accounts, phone
numbers, home addresses, company names, email
addresses, birthdays, and so on, are displayed. There
is also a
2. Swipe the screen to the left on any contact profile to
the
contact are displayed. Scroll down the posts to display
additional posts.
3. Swipe the screen to the left on any contact profile to
the history screen for that contact. Recent activity
from that contact is displayed. Scroll down the posts to
display additional posts.
Use the
information from accounts such as Facebook, Twitter, or
LinkedIn from displaying on the profile pages of your existing
contacts. For more information, refer to
page 113.
People
list, touch a contact entry. Depending
write on wall
what's new
filter my contact list
screen for that contact. Posts for the
option and a
option to limit additional
send email
“People”
on
option.
Recent Activities
From the recent screen, you can see the contacts that you
viewed last.
1. From the Home screen, touch
2. Swipe your screen to the left twice to display the
screen.
3. Touch a contact to see their profile.
People
Your People Hub 53
.
recent
Page 58

Section 6: Multimedia
This section explains how to use the multimedia features of
your phone, including Music Player, Video Player, Gallery,
Camera, and Camcorder.
Xbox Music Pass
Xbox Music Pass is a monthly music subscription service
giving you unlimited access to millions of songs. Download
or stream as many songs as you like and listen to them for as
long as your subscription is up to date. On your Windows
Phone, the streaming feature requires wireless network
access. Carrier fees may apply. For more information, go to
http://www.xbox.com/music
Note:
Before using Xbox Music to buy music, you must set up
a free Microsoft Live account. For more information,
refer to
“Setting Up a Microsoft Account”
54
.
on page 90.
Music + Videos
This section explains how to access music, videos, podcasts,
and radio on your phone. Navigate the Music + Video app
as follows:
1. From the Home screen, touch
2. Swipe left across the screen to view the
following menus:
• collection: Displays media categories such as music, video,
and podcasts, as well as a link to the Store app.
•history
: Displays thumbnails that indicate songs or videos you
have recently played. Touch the thumbnail to return to replay
that song or video.
•new
: Allows you to play music, videos, and podcasts
downloaded from your PC, as well as media stored on a
memory card. It also gives you access to the music area of the
Xbox Music Store.
Music + Videos
.
Page 59

•apps
: Displays links to other music applications, such as
Slacker Radio.
•xbox
: Displays featured artists from the Xbox Music Store.
Touch a thumbnail to play the song and see more details about
the artist from the Xbox Music Store.
Adding new music and videos
To add new music and videos with your Xbox Music Pass:
1. From the Home screen, touch
2. Swipe left across the screen to view the
3. Touch
4. Sign in with your account information, and follow the
To add new music and videos from your computer:
1. From the Home screen, touch
2. Swipe left across the screen to view the
3. Touch
Xbox Music Pass
online prompts to download new music and videos.
Connect to your computer to add stuff
.
Music + Videos
new
Music + Videos
new
menu.
menu.
.
4. There are several ways available to transfer music and
videos between your phone and computer, such as
using the cloud (Internet storage such as SkyDrive),
using a USB cable, using a Windows phone app, etc.
Select the appropriate set up for your phone, and
follow the online instructions to install and use the file
transfer software of your choice.
.
.
Multimedia 55
Page 60

Playing Music
1. From the Home screen, touch
2. Swipe left across the screen to view the
collection
menu.
music
3. Touch
songs, playlists, and genres.
4. Touch and hold a song to display the following option:
• add to now playing
currently playing.
•play smart dj mix
dynamic way to launch instant mixes based on any album,
artist, or song in your collection. Using criteria you provide,
Smart DJ selects similar songs from your collection and
suggests songs from Xbox Music. You can also create Smart
DJ playlists and sync them to your phone. For more
information, go to
•share
account or connection. (Note that sharing may be restricted for
some content due to copyright protection.)
56
. Songs are organized by artists, albums,
: Add the selected song to the list of songs
: Play your Smart DJ mix. Smart DJ is a
http://www.xbox.com/music
: Allows you to share the song with Tap + Send or via an
Music + Videos
.
•pin to start
.
• delete
5. Touch the song that you want to play. Song details such
as artist and time information (time played and time
remaining) are displayed.
6. The following music controls are available:
(albums only): Allows you to add a tile on the Home
screen for this album. For more information, refer to
Tiles on the Home Screen”
: Delete the song.
Pause the music.
Start the music after being paused.
Touch and hold to rewind the music. Tap
twice to play the previous song.
Touch and hold to fast-forward the
music. Touch to play the next song.
on page 29.
“Moving
Page 61

Playing Videos
To play videos from the Music + Videos app:
1. From the Home screen, touch
2. Swipe left across the screen to view the
collection
menu.
3. Touch
4. Touch and hold a video thumbnail to display the
videos. Videos will be organized by
movies
, and
personal
displayed in the
have to be downloaded from your PC will be displayed
under
following option:
• pin to start
this video. For more information, refer to
all
and
tv, music
, and
: Allows you to add a tile on the Home screen for
the Home Screen”
• delete
: Delete the video.
5. Touch the video that you want to play. The video begins
to play in landscape mode. At the bottom of the screen,
the video file name, the video controls, and the time
information (time played and total time) are displayed.
Music + Videos
all, tv, music
. Your personal videos are
personal
categories. Videos
movies
.
“Moving Tiles on
on page 29.
6. The following video controls are available:
Pause the video.
.
Start the video after being paused.
,
Note:
7. Touch to return to the thumbnails screen.
Touch and hold to rewind the video.
Touch and hold to fast-forward the video.
Display the video in full screen.
Display the video in a reduced format.
If no control icons are displayed on the screen in
addition to the picture, touch anywhere on the screen to
display them.
Multimedia 57
Page 62

Podcasts
1. From the Home screen, touch
2. Swipe left across the screen to view the
collection
menu.
podcasts
3. Touch
4. A thumbnail, the podcast name, the category, and the
date created are displayed for each file.
5. Touch and hold a podcast thumbnail to display the
following option:
• pin to start
this podcast. For more information, refer to
. Podcasts are organized by audio and video.
: Allows you to add a tile on the Home screen for
the Home Screen”
• delete
: Delete the podcast.
6. Touch the podcast that you want to play.
The podcast begins to play in portrait mode. At the
bottom of the screen, the time information (time played
and time remaining) and the podcast controls are
displayed.
58
Music + Videos
“Moving Tiles on
on page 29.
7. The following podcast controls are available:
.
Pause the podcast.
Start the podcast after being paused.
Rewind the podcast.
Fast-forward the podcast.
Page 63

Store
To visit the music area of the Store app from
Music + Videos:
1. From the Home screen, touch
2. Swipe left or right to view the
touch
store
.
music
. The
3. Touch
4. Swipe left or right to view more music categories.
The choices are:
releases
• artist of the week
the album, and the cost of each song. Touch the artist’s name
to view more albums. Touch and hold on a song to buy the
song or share it with friend in a message.
• new releases
Touch an album thumbnail to play sample music.
• top albums
songs on the albums. Touch an album thumbnail to play
sample music.
artist of the week
artist of the week, spotlight, new
,
top albums, top artists, and
: Displays the artist’s album, the songs on
: Displays recently released albums and songs.
: Displays one or more popular albums and the
Music + Videos
collection
displays.
genres
.
menu, then
.
•top artists
•genres
• spotlight
5. Touch any item to browse, review, or purchase.
: Displays one or more popular artists. Touch an
artist thumbnail to play sample music.
: Allows you to access music based on your music
genre preferences. Touch the name of a music genre to view
new releases, top songs, top albums, top playlists, and top
artists for that genre.
: Displays one or more featured artists. Touch an
artist’s name to display their albums and songs.
Multimedia 59
Page 64

Photos
The Photos application is where you view photos and play
back videos. You can set photos as your lock screen
background or share them as a picture message. And you
can use your camera to scan barcodes, QR Codes, Microsoft
Tags, books, CD’s, and other DVD’s and get more information
on these products with your Internet browser.
Uploading To SkyDrive
Windows Live SkyDrive provides free storage so you can
store photos online, share them with the people you
choose, and access them from any web browser. Various
options include
Microsoft account.
For more information about SkyDrive, go to
http://explore.live.com/
60
share on SkyDrive
and click on
if you have set up a
SkyDrive
.
Accessing Pictures and Videos
When you take a photo or shoot a video, the file is saved so
you can view your photos and videos at any time. To access
photos and videos:
1. From the Home screen, touch
2. Photos and videos are displayed depending on which
option you choose:
• camera roll
and videos.
•albums
as Camera Roll, Screenshots, etc. Other albums are displayed
depending on the accounts you have set up such as Microsoft,
Facebook, and so on.
•date
order of month and year created.
•people
have viewed from your accounts, such as Facebook, Twitter,
and LinkedIn. You can also touch
contact to load that contact’s posted pictures.
: Thumbnails are displayed for taken photos
: Thumbnails are displayed for groups of pictures such
: Thumbnails of all photos and videos are displayed in
: Thumbnails are displayed of all People photos that you
Photos
.
choose contact
and touch a
Page 65

3. Swipe left across the screen to view the
following menus:
•favorites: Photos added to favorites can set to display on the
animated Photos Tile on the Home screen, or may be pinned
there for one-tap access.
• what’s new: Displays photos posted by your contacts on
your synchronized accounts, such as Facebook, Twitter,
and LinkedIn.
•apps: Get direct access to photo apps such as Live Wallpaper
and Photo Editor.
Thumbnail Options
1. When viewing groups of thumbnails, additional
options may be available. Touch one or more
thumbnails. A check mark indicates selection
(touch again to deselect).
2. To uch Additional options to display the
following options:
• add to favorites : Adds the photo(s) to your favorites.
• delete : Deletes the photo.
•share : Share the photo(s) via Tap + Send
3. To uch
Options
to display the following options:
• select all
: Selects all thumbnails.
• save to SkyDrive
•save to SD card
(if installed).
•save to phone
phone’s storage.
: Saves the selected photo(s) to the SkyDrive.
: Saves the selected photo(s) to the SD card
: Saves the selected photo(s) to the
Multimedia 61
Page 66

Viewing Pictures
Once you locate the photo you want to view:
1. Touch the thumbnail to view the picture.
2. While viewing a photo, touch each side of the photo
and pinch inward or stretch outward to zoom in or out.
– or –
Tap the screen twice to zoom in or out.
You can magnify the photo up to 400 percent.
Touch and slide a magnified photo to move the focus to
the area you touch.
3. Swipe across the screen to the right or left to view
more photos and videos.
62
4. Touch and hold a photo or touch
the following options:
•share...
: Share the photo with others. Options are:
–
Tap + Send
–
Messaging
in-line. For more information, refer to
: Shares the photo via Bluetooth.
: Opens a
Options
New Message
Sending Multimedia Messages”
–
Email
: Opens a
New Email
screen with the photo in-line. This
option varies depending on how you have your email set up.
–
Facebook, Twi t te r, LinkedIn
synchronized account.
–
MiniDiary
: Adds the photo to today’s MiniDiary entry.
–
OneNote
: Adds the photo to OneNote as a Quick Note.
•edit
: Automatically adjust the photo. Options are
crop
, and
changes, touch
• delete
• add to favorites/remove from favorites
photo as a favorite.
Save
: Delete the photo or video.
: Upload the photo to a
fix
(auto color adjustment). If you like the
to replace the original photo.
to display
screen with the photo
“Creating and
on page 75.
rotate
: Add or remove the
,
Page 67

• set as lock screen
: Sets the photo as the lock screen
background.
• save to SkyDrive
“Uploading To SkyDrive”
•apps...
Note:
If your device displays that the memory is full when you
access
Pictures
: Upload the photo to SkyDrive (
on page 60
).
: Edit the photo with your installed photo editing apps.
, delete some of the files.
5. Touch to return to the thumbnails screen.
see
Viewing Videos
To view a video:
1. Touch the thumbnail to view the video. The first frame
of the video displays indicating the length of the video
in minutes and seconds (for example,
button is also displayed.
2. Touch to play the video. Touch to pause the
video playback. Touch and hold
through the video or touch and hold
video. Touch
to display the video in full screen.
Touch to display the video in a reduced format.
Note:
If no control icons are displayed on the screen in
addition to the video, touch anywhere on the screen to
display them.
01:25
). The play
to fast forward
to rewind
Multimedia 63
the
Page 68

Options
3. Touch and hold a video or touch
the following options:
•share...
: Share the photo with others. Options are:
–
Tap + Send
–
Messaging
line. For more information, refer to
Multimedia Messages”
–
Email
option varies depending on how you have your email set up.
• delete
•save to SkyDrive
“Uploading To SkyDrive”
4. Touch to return to the thumbnails screen.
You can also play videos from
information, refer to
64
: Shares the photo via Bluetooth.
: Opens a
New Message
: Opens a
New Email
screen with the photo in-line. This
: Delete the photo or video.
: Upload the photo to SkyDrive (see
on page 60
Music + Videos
“Playing Videos”
on page 75.
to display
screen with the photo in-
“Creating and Sending
).
on page 57.
see
. For more
Camera
This section explains how to use the camera and the
camcorder on your phone. You can take photographs and
shoot videos by using the built-in camera functionality. Your 5
megapixel camera produces photos in JPEG format.
To activate the camera:
From the Home screen, touch
– or –
Press the Camera key .
Camera
.
Page 69

Adding a Location Tag To Your Pictures
The first time you open the Camera application, you are
asked if a tag location (known as Geotagging) can be added
to your pictures. This allows you to see where your pictures
were taken.
Caution!
Be aware that your location may be present on a
photo when posting your photos on the internet.
If you are interested in this service:
1. Touch
2. Touch
Privacy Statement
Privacy Statement Highlights document.
allow
or
tagging.
to view the Windows Phone 8
cancel
to accept or reject location
Camera and Camcorder Mode
To toggle between Camera and Camcorder mode:
Tou ch the Camera or Camcorder Mode icon ( ).
Once you change the mode, the corresponding settings
appear. For more information, refer to
Camcorder Settings”
on page 68.
“Camera and
Taking Photos
Taking photos with your device’s built-in camera is as simple
as choosing a subject, pointing the camera, and pressing the
camera key.
Important!
Do not take photos of people without their
permission.
Do not take photos in places where cameras are
not allowed.
Do not take photos in places where you may
interfere with another person’s privacy.
Multimedia 65
Page 70

To activate the camera mode:
A
Preview
Photos and
Camera key
Options
Mode
Videos
Front
Facing
Camera
Flash
Lenses
(side of phone)
1. From the Home screen, touch
Camera
– or –
Press the Camera key .
2. Using the phone’s main display screen as a viewfinder,
adjust the image by aiming the camera at the subject.
Note:
When taking a photo in direct sunlight or in bright
conditions, shadows may appear on the photo.
3. Before you take a photo, pinch the screen to zoom out
or stretch the screen to zoom out. You can magnify the
picture up to 400 percent.
4. Touch to turn the flash On. Touch to turn the
flash Off. To use the automatic flash, touch .
5. To take a picture of yourself, touch the Front Facing
Camera icon ( ) to enable or disable the Front
Facing Camera.
66
.
6. If desired, before taking the photo, you can touch
Options
to access various photo and video
settings. For more information, refer to
Camcorder Settings”
on page 68.
“Camera and
7. Press the Camera key until the shutter
sounds.
– or –
Tap the screen.
Photos are automatically stored within your designated
storage location.
Page 71

Lenses
Your camera can scan barcodes, QR Codes, Microsoft Tags,
books, CD’s, and other DVD’s and instantly retrieve
information about these products using specialty apps called
Lenses. Text may also be scanned and translated or
searched.
Note:
Tou ch more lenses to download additional scanning
software and features.
Bing Vision
1. From the Home screen, touch
– or –
Press the Camera key ( ).
2. To uch Lenses (
3. Focus on the code or tag until the camera recognizes it
and displays a thumbnail of it. If the item is correctly
identified, touch the thumbnail to launch a Bing search
for the product. (If the item is not identified or incorrect,
try scanning the code or tag again).
4. To uch history to see recently scanned items.
5. To uch scan text to search text. Once scanned, each
word is highlighted.
•
Touch
translate
word is then translated.
•
To search on a word or words, touch each word to add to the
search bar at the top. Touch the search bar and use the
keyboard to edit any word if necessary. Touch
perform a Bing search on the selected word(s).
) ➔ Bing Vision.
and select a target language. Each highlighted
Camera
.
search
Multimedia 67
to
Page 72

Shooting Videos
Tip:
When shooting video in direct sunlight or in bright
conditions, it is recommended that you provide your
subject with sufficient light by having the light source
behind you.
1. From the Home screen, touch Camera .
– or –
Press the Camera key ( ).
2. Touch the Camera or Camcorder Mode icon (
switch to Camcorder mode ( ).
3. To shoot a video of yourself, touch the Front Facing
Camera icon ( ) to enable or disable the Front
Facing Camera.
4. Touch to turn on the camcorder’s light while
recording. Touch to turn the light off.
5. Using the phone’s main display screen as a viewfinder,
adjust the image by aiming the camcorder at the
subject.
68
6. Press the Camera key ( ) to begin shooting
video.
7. Press the Camera key ( ) to stop the recording
and save the video file to your Pictures folder.
Camera and Camcorder Settings
1. For photo options, touch
settings... The following options are available:
) to
•Focus Mode
• Anti-Shaking
• White Balance
choices: Auto (default), Cloudy, Daylight, Fluorescent,
or Tungsten.
•ISO
Valid values are: Auto, 100, 200, 400, or 800.
•EV
overexposed (too light or white) photos. Options are:
(minimum), -1 (low), 0 (medium), 1 (high), or 2 (maximum).
: Set focus to Normal or Macro.
: Set anti-shaking correction to Off or On.
: Set this option to one of the following
: Determines how sensitive the image sensor is to light.
: Helps you avoid underexposed (too dark) or
Options
➔ photo
-2
Page 73

• Effects
: Change the color tone or apply special effects to
the photo. Options include: Off (none), Negative, Sepia,
Mono, Washed, Vintage Warm, Vintage Cold, Solarize,
Posterize, Point Blue, Point Red-Yellow, Point Green,
or Cartoonize.
• Photo Resolution
2592x1944, 2048x1536, 1920x1080, 1600x1200,
1280x960, 1280x720, or 640x480.
2. For video options, touch
settings... The following options are available:
• White Balance
choices: Auto (default), Cloudy, Daylight, Fluorescent,
or Tungsten.
• Effects
the video. Options include: Off (none), Negative, Sepia,
Mono, Washed, Vintage Warm, Vintage Cold, Solarize,
Posterize, Point Blue, Point Red-Yellow, Point Green,
or Cartoonize.
• Photo Resolution
1920x1080, 1280x720, or 640x480.
: Set the image size. Options include:
Options
➔ video
: Set this option to one of the following
: Change the color tone or apply special effects to
: Set the video size. Options include:
Accessing Photos and Videos
When you take a photo or shoot a video, the file is saved in
the Photos folder. You can view your photos and videos
immediately or view them anytime in the Camera folder.
From the Home screen, touch
information, refer to
“Photos”
Photos
. For more
on page 60.
Multimedia 69
Page 74

Assigning an Image To a Contact
The Camera is also used to create an image that can be
assigned to the profile of one of your contacts or to your Me
profile.
1. From the Home screen, touch
2. From the People menu, touch the contact that you
want to edit.
3. At the contact profile screen, touch
bottom of the screen.
4. Touch
5. Take a photo and touch
6. Touch each side of the photo and swipe inward or
7. Touch to assign the cropped photo to the contact.
For more information, refer to
page 45.
add photo ➔ camera
outward to zoom in or out within the crop area. Touch
and slide the photo to move it within the crop area.
People
.
accept
or
retake
.
“Your People Hub”
.
at the
on
Setting a Photo as Your Lock Screen Background
You can set a photo as your Lock screen background
immediately. For more information, refer to
Lock Screen Background”
70
on page 29.
“Changing the
Photo Editor
Photo Editor is the ultimate photo editor for your Windows
Phone, combining an easy interface and professional grade
tools and effects.
1. From the Home screen touch
2. There are three ways to select a photo for editing:
•
Touch a thumbnail of a recently taken photo.
•
Touch
album to select a photo from a photo album.
•
Touch
camera to take a new photo.
The PHOTO EDITOR screen is displayed.
3. Tou ch Edit to resize, rotate, or crop the photo.
•Resize
: Change the photo’s size. Options are 25%, 50%, 75%
or 100%.
•Rotate
: Change the photo’s orientation. Options are 90°
clockwise, 90° anticlockwise, Flip vertically, or Flip horizontally.
•Crop
: Crop the photo. Options are Free ratio, 1:1, 3:4, 9:16,
or Lasso.
Photo Editor
.
Page 75

4. Tou ch Color to change the photo’s overall color.
Options are Original, Auto adjustment, Brightness,
Contrast, Saturation, Adjust RGB, Temperature,
Exposure, Hue, Darken, and Lighten.
•
Touch the
color tool icons
will display adjustment controls.
•
Touch
original
5. Touch Effect to add a special effect to the photo.
Options are Original, Vintage, Old photo, Pop art, Greyscale, Sepia, Retro, Sunshine, Downlight, Blue wash,
Nostalgia, Yellow glow, Faded colors, Invert, Cartoonify,
Sharpen, Soft glow, Magic pen, Oil paint, Posterise,
Sketch, Blur, Red eye, Tilt shift, Pixelise, Sphericity,
Twirl, and Mirror.
•
Touch the
effect tool icons
tools will display adjustment controls.
•
Touch
original
to apply the effect. Some color tools
to remove the color change.
to apply the effect. Some effects
to remove the effect.
6. To uch Decoration to add a decoration to
your photo.
•Frame
: Add a frame to your photo. Choose from several styles
and colors.
• Sticker
: Add clip art to your photos
Comics, Papers, and Graphical images.
•Multi-grid
7. To uch Undo to remove the last edit. Touch Redo
8. To uch Share to share the photo via Tap + Send,
Messaging, an email account, add the photo to today’s
MiniDairy entry, or add the photo to OneNote as a
Quick Note.
9. To uch Cancel to close the photo without
saving changes.
10. To uch
use as a Lock screen background.
11. To uch
: Take multiple separate photos and mix them
together. Options are Split in 2, Split in 3, or Split in 4.
to reapply the last edit.
Options
to select a Photo, take a photo, or
Save
to save the changes to the photo.
. Choose from Brushes,
Multimedia 71
Page 76

Slacker Radio
Listen to your personal Slacker radio station on your phone.
Note:
You must have a Slacker account to use the Slacker
Radio app. For more information, visit
http://www.slacker.com
1. From the Home screen, swipe left to display the
Applications menu and touch
2. Sign in with your Slacker account, if prompted.
3. Swipe left across the screen to view the
following menus:
•home: Organizes your radio stations. You can search for music,
create custom stations, add stations to your favorites, and
cache stations for playing when not connected to Wi-Fi or a
cellular data plan.
• recent
: Displays thumbnails that indicate songs you have
recently played. Touch the thumbnail to replay that song.
•genres
: Search radio stations by genre, such as sports, news,
classical, Jazz, and so on.
72
.
Slacker Radio
•featured music
Slacker Radio. Touch a thumbnail to listen to the featured
music station.
.
: Displays featured music and artists on
Page 77

Section 7: Messaging
This section describes how to send and receive different
types of messages. It also includes the features and
functionality associated with messaging.
Types of Messages
Your phone provides the following message types:
•
Text Messages
•
Multimedia (Picture) Messages
•
Email Messages
•
Online Messages
The Short Message Service (SMS) lets you send and receive
text messages to and from other mobile phones or email
addresses. To use this feature, you may need to subscribe to
your service provider’s message service.
Important!
When creating a message, adding an image to a
text message changes the message from a text
message to a multimedia message.
When messages are received, the number of messages
displays in the Messaging icon
on the Home screen.
Creating and Sending Text Messages
To create a new message and send it to another mobile
phone or an email address:
1. From the Home screen, touch
2. To uch
3. Touc h the To field to manually enter a recipient. Touch
new
.
the
123
key on the on-screen keypad to enter a
phone number.
– or –
Touch the button to the right of the
select a recipient from your People list. Valid entries
must have a wireless phone number. Contacts with
only an email address are not listed.
Messaging
.
To
Messaging 73
field to
Page 78

4. Touch the button to add additional recipients from
your People list. Each contact is placed in the
separated by a semicolon (;).
– or –
Add more recipients by touching the recipient field.
Note:
Each additional recipient entry must be separated by a
semicolon (;).
5. To remove recipients, touch the entry in the
To
field then touch
contact’s profile or
New Message screen.
6. Touch the
on-screen keyboard to type your message. For more
information, refer to
7. Review your message and touch
Note:
If you exit a message before you send it, the message is
saved as a draft.
74
remove
. You can also
cancel
and return to the
type a text message
“Entering Text”
box and use the
send
To
open
the
on page 31.
.
field
Voice to Text Messages
To create a new message using your voice:
1. Create a new message and add recipients in the
To
field. For more information, refer to
Sending Text Messages”
speak
2. Tou ch
displayed. When you stop speaking, your words
are displayed.
3. To repeat the message, touch
message is deleted and the new message is displayed.
4. Once your spoken message is correct, touch
send
and say your message when go is
.
on page 73.
“Creating and
speak
. The original
Page 79

Creating and Sending
Multimedia Messages
A multimedia message is a message that contains a picture
attachment. To create a multimedia message and send it to
another mobile phone or an email address:
1. From the Home screen, touch
2. Touch
3. Touch the To field or touch the button to the right
4. Touch the
5. Touch
6. To remove an attachment, touch and hold the
7. Review your message and touch
new
.
To
field to enter a recipient.
of the
For more information, refer to
Text Messages”
on-screen keyboard to type your message. For more
information, refer to
attach
location, a voice note, or a contact to the message.
attachment, then touch
pop-up menu.
on page 73.
type a text message
to add a picture, video, your current
Messaging
“Creating and Sending
box and use the
“Entering Text”
remove
from the
send
.
on page 31.
.
Messaging Conversations
Any messages you have sent or received can be viewed in
the Messaging
Sent and received text, picture, and online messages are
grouped into message threads. Threaded messages allow
you to see all the messages exchanged (similar to a chat
program) and displays a contact on the screen. Message
threads are listed in the order in which they were received,
with the latest message displayed at the bottom.
threads
list.
Messaging 75
Page 80

Displaying a Messaging Conversation
To view a conversation in the Messaging threads list:
1. From the Home screen, touch
➔
threads
.
The Messaging threads list displays any messages you
have sent or received.
All messages to or from another phone or email
address are grouped in one conversation.
Entries in the Messaging threads list contain the
recipient’s phone number, contact name, or email
address, the time that the last message was received
or sent, and the first words of the message.
An entry for conversations with multiple recipients
starts by indicating the number of recipients (such as
3recipients
76
) and then the recipients are listed.
Messaging
2. Touch an entry in the list. The Messaging conversation
displays. Each message to or from the recipient, and
the time that the message was sent or received, is
shown in a message box. Messages sent to you are
shown in a From message box
you sent are shown in a To message box
3. Touch the
keyboard to type a reply message to the recipient. For
more information, refer to
type a text message
. Messages that
and use the on-screen
“Entering Text”
on page 31.
.
Page 81

Viewing a Picture Attachment
To view a picture attached to a message:
1. Touch an entry in the Messaging conversations list.
2. Locate the message box that contains the picture
attachment.
3. Touch
4. Touch to return to Messaging conversations.
Get media content now
attachement. Touch the picture to open Photos and
display the picture. Pinch the screen with two fingers
to out or stretch the screen outward to zoom in.
to download the
Viewing a Video Attachment
To view a video attached to a message:
1. Touch an entry in the Messaging conversations list.
2. Locate the message box that contains the video
attachment. The file name is underlined.
3. Touch the video file name in the message box.
The video player opens and plays the video.
4. To pause playback of the video attachment, touch .
To continue playback of the video attachment,
touch
To stop playback of the multimedia message,
touch .
.
Messaging 77
Page 82

Listening To an Audio Attachment
To listen to an audio attached to a message:
1. Touch an entry in the Messaging conversations list.
2. Locate the message box that contains the audio
attachment.
3. Touch the file name to open the audio player and play
the audio file.
Deleting a Messaging Conversation
To delete a Messaging conversation:
1. From the Home screen, touch
The Messaging conversations list displays any
messages you have sent or received.
2. Touch and hold a message in the list, then touch
delete
.
– or –
Touch a message in the list, then touch
➔
delete thread
3. Touch
conversation or touch
conversations.
78
.
delete
to delete all messages in the selected
Messaging
cancel
to return to Messaging
.
Deleting a Message
To delete a message in a Messaging conversation:
1. Touch and hold the message box that contains the
message you want to delete.
delete, forward
The
2. Tou ch
3. Tou ch
delete
The Delete message? screen displays.
delete
return to Messaging conversations.
, and
copy
options display.
.
to delete the message or touch
cancel
to
Page 83

Forwarding a Message
To forward a message in a Messaging conversation:
1. Touch and hold the message box that contains the
message you want to forward. The
copy
options display.
forward
2. Touch
the contents of the selected message included.
3. Touch the
of the
information, refer to
Messages”
4. Touch
. The New Message screen displays with
To
field or touch the button to the right
To
field to enter a recipients. For more
“Creating and Sending Text
on page 73.
send
to forward the message.
delete, forward
Messaging Settings
To view and change messaging settings:
1. From the Home screen, touch
2. Touch ➔
The messaging settings screen displays. For more
information, refer to
settings
Messaging
.
“Messaging”
.
on page 111.
, and
Message Drafts
When you exit a message without sending, the message is
automatically saved as a draft.
1. From the Home screen, touch
2. Touc h ➔
3. Touch any message to resume editing. Once the
message is sent, it will be removed from drafts.
4. To delete a draft, touch and hold the message until the
delete menu appears. Touch delete to permanently
delete the message.
drafts
.
Messaging
.
Messaging 79
Page 84

Online Messaging
Once you sign in to Windows Live, you have access to
Windows Live Messenger and you can chat with friends
online. To set your status:
1. From the Home screen, touch
➔
online
.
2. Swipe to the
status and see who’s online
– or –
Touch
The SET CHAT STATUS displays.
3. Touch one of the following options to set your chat
status:
• available
chat messages.
•busy
•away
as at lunch.
• invisible
• offline
80
online
screen and touch
status
.
: You are online and available to send and receive
: You are online, but temporarily unavailable.
: You are online, but unavailable for a period of time, such
: You are online, but you appear as offline to others.
: You are offline.
Messaging
.
set your chat
Note:
Touching any option other than offline causes your
device to check and list who is online. Any contact who
has a Windows Live email address is listed along with
their status. Recent chat threads are also listed.
Using Email
Email enables you to review and create email using Windows
Live, Outlook, Google, and several other email services. You
can also receive text message alerts when you receive an
important email.
Note:
The options on screens and in menus may vary
depending on which email account you have enabled.
Page 85

Setting Up an Email Account
To set up an email account:
1. From the Home screen, touch
– or –
From the Home screen, touch E
➔ add email account
Options
– or –
From the Home screen, touch
the
system
menu, touch
add an account
The ADD AN ACCOUNT screen displays with the
possible email services choices.
2. Touch an email service, such as
Backup Assistant Plus, Yahoo! Mail, Google, Facebook,
Twitter, LinkedIn.
Touch
email accounts.
For some email accounts, such as Outlook, touch
advanced setup
.
other account
to add other types of
. For more information, refer to
“Advanced Email Setup”
Email
mail
.
Settings
email + accounts
Outlook
on page 82.
.
➔
. Under
➔
, Hotmail,
and
Domain
advanced
Email address
Password
Password
and touch
, enter the
Messaging 81
field.
3. Enter your email address in the
4. Enter your password in the
sign in
5. To uch
If your email information is found, your account
information is saved.
Attention required
If
correct your
6. For Outlook, enter the
If you think your information is incorrect, touch
again
and touch
.
displays, touch the account,
user name
. Otherwise, touch
sign in
.
field.
, and touch
sign in
Server
.
try
save
,
.
Page 86

Advanced Email Setup
For some email accounts, such as Outlook, entering your
email address and password may not be enough information.
You may need to enter additional information.
1. Touch
2. Enter your Email address and Password and touch
3. Touch
Note:
4. On the Exchange ActiveSync screen, enter the
82
advanced setup
The Advanced Setup screen displays.
Next
.
The next another Advanced Setup screen displays.
Exchange ActiveSync
depending on the kind of account you want to set up.
If you are not sure which option to choose, check with
your service provider.
and
Server
information and adjust any other
information as necessary.
– or –
.
or
Internet email
,
Domain
On the Internet Email Account screen, enter the
Incoming email server
and adjust any other information as necessary.
5. Tou ch
Important!
sign in
Only some “Plus” accounts include POP access
allowing this program to connect. If you are not
able to sign in with your correct email address and
password, you may not have a paid “Plus”
account. Launch the Web browser to access your
account.
and
Account type
.
information
Page 87

Checking Your Email
When you have new email, a number displays in the Email
icon on the Home screen. To check your email:
1. From the Home screen, touch the email icon (such as
Hotmail ) of the account you want to check.
The Inbox screen displays all emails in your inbox.
2. Swipe the screen left to display all, unread, flagged,
or urgent emails.
A list of emails displays. For each email, the sender’s
name, the day the email was sent, the subject of the
email, and the first words of the email are displayed.
3. Touch and hold an email entry in the list to display the
options
delete, mark as unread, move, set flag
complete flag
one email. (Available options may differ depending
upon your email service provider.)
4. Touch an entry in the list to open the email.
, or
clear flag
, which is applied only to that
,
Email Folder Options
The Inbox is one of many email folders. The options available
while viewing a folder are located at the bottom of the
screen.
Note:
Available options may differ depending upon your email
service provider.
The options are:
new
1.
2.
3.
4.
: Create a new email.
select
: Display the emails in this folder so they can
be marked.
•
Touch to the left of an email in the list to mark it with a check
mark.
•
Once you have marked the emails, touch:
move
, or touch ➔
unread
, set flag,
complete
, or
sync
: Synchronize your emails. For more information,
“Syncing Your Email Account”
refer to
search
: Use the keyboard to enter a word or phrase to
search for in the current inbox.
delete
or
mark as read, mark as
clear flag
.
on page 88.
Messaging 83
Page 88

more options
5.
•folders
folders
sent
,
trash
• settings
For more information, refer to
on page 87. Also allows you to always blind copy yourself,
organize emails into conversations, add an email signature to
your emails, and use a light background for emails.
–
From the
right to turn the option
conversation, bringing replies to a thread into a consolidated
view so it is faster and easier to stay on top of the conversation.
Touch the check box that displays to show replies and email
from all your synced folders.
–
From the
to turn the option
Sent from my Windows Phone
keyboard to create your signature.
84
: Display additional inbox options.
: Select which folders to display. Touch
to display a list of inbox folders:
, and
junk
.
: Displays the
sync settings
inbox, drafts, outbox,
for this email account.
“Email Account Settings”
Conversations
Signature
field, Touch and slide the slider to the
On
. Emails in your inbox are organized by
field, Touch and slide the slider to the right
On
. Touch the
type your signature here
field, and use the on-screen
show all
or
–
Tou c h
Always bcc myself
the email for yourself.
–
Tou c h
use light background for email
background while viewing emails.
• link inboxes
link to it. For more information, refer to
page 89.
• add email account
: Displays this inbox and other inboxes which can
to always generate a blind copy of
to use a light
“Linked Inboxes”
: Displays the Add an Account screen.
on
Page 89

Reading Emails
When you touch an email entry in a folder, such as the Inbox,
the email displays. Swipe up and down the screen to move
through the email. Swipe across the screen to view the
email. Touch each side of the email and pinch inward or
stretch outward to zoom in or out.
The options available while viewing an email are located at
the bottom of the screen. The options are:
respond
: Allows you to
either case a new email is started that contains the
current email information.
delete
: Delete the email being viewed.
newer
: Display the next email in the current folder that
was received at a more recent time.
older
: Display the next email in the current folder that
was received at a later time.
toggle flag
: Flag or unflag the email. When an email is
flagged, it appears in the flagged list of emails.
mark as unread
move
: Move the current email to another folder.
reply, reply all
: Mark the current email as unread.
, or
forward
. In
Creating and Sending an Email
To create a new email message and send it to another email
address:
1. From the Home screen, touch an email icon
(such as
Hotmail
).
2. Touch new .
The New Email Message screen displays.
To
3. Touc h the
on-screen keyboard to enter an email address.
– or –
Touch the button to the right of the
select a recipient from your Contacts list. Valid entries
must have an email address.
4. Touch the button to add additional recipients from
your Contacts list. Each contact is placed in the
separated by a semicolon (;).
– or –
Add more recipients by touching the recipient field.
field to manually enter a recipient. Use the
To
field to
To
field
Messaging 85
Page 90

Note:
Each additional recipient entry must be separated by a
semicolon (;).
Subject
5. Touch the
keyboard to enter a subject for your email.
6. Touch the body of the email and use the on-screen
keyboard to enter your message. For more information,
refer to
86
field and use the on-screen
“Entering Text”
on page 31.
The options available while creating an email are located at
the bottom of the screen. The options are:
send
: After you review your message, touch send to
deliver it.
attach
: Allows you to choose a picture. Swipe the screen
to choose from
close
: Allows you to
delete
editing the email.
record
converted to text.
priority
normal
show cc & bcc
additional recipients. Add recipients in these two fields
similar to the way
albums, date
the email. Touch
: Allows you to speak your message and have it
: Allows you to set the email’s priority to
, or
low
.
: Allows you copy and blind copy
, or
favorites
.
save
the email to the drafts folder or
Back
to cancel and keep
To
recipients are added.
high
,
Page 91

Email Account Settings
Once your Hotmail or email account is set up, you may want
to adjust some of your settings.
Note:
Available options may differ depending upon your email
service provider.
Settings
1. From the Home screen, touch
system
menu, touch
2. Touch the email entry (for example, Hotmail).
The Settings for your email account (for example,
Hotmail Settings) display.
3. Touch the field that contains the information you want
to change.
The following fields display depending on the email
account:
• Account name
on your phone for this account.
• Email address
email + accounts
: Use this field to change the name that appears
: Displays the email address for this account.
. Under the
.
• Download new content
your phone to download new emails for this account. Possible
values are: as items arrive, every 15 minutes,
every 30 minutes, hourly, and manually. If you choose
manually, see
• Download email from
downloaded to your phone for this account. Possible values
are: the last 3 days, the last 7 days, the last 2 weeks, the last
month, and any time.
• Content to sync
between your phone and the account, such as, Email,
Contacts, Calendar, and so on.
•user name
• Incoming email server
•user name
•Password
• Outgoing (SMTP) email server
: This is the name that appears on your messages.
: Displays your user name.
: Displays your password.
name.
: Allows you to set how often you want
“Syncing Your Email Account”
: Allows you to limit the email
: Indicates which content to synchronize
: Displays the email server name.
: Displays the email server
Messaging 87
on page 88.
Page 92

Touch the following to check or uncheck the option:
• Outgoing server requires authentication
requires authentication.
• Use the same user name and password for sending email
Use same login information for both outgoing and
incoming email.
• Require SSL for incoming email
incoming email.
• Require SSL for outgoing email
outgoing email.
Note:
Some fields on this screen should not be changed
without consulting your service provider.
: Access to server
: Use SSL security for
: Use SSL security for
Deleting an Email Account
To delete email accounts other than Windows Live:
1. From the Home screen, touch
system
menu, touch
2. Touch and hold the email account that you want to
delete. An option list displays.
delete
3. Touch
88
to delete the account.
Settings
email + accounts
. Under the
.
Note:
Windows Live email accounts cannot be deleted.
Syncing Your Email Account
:
In order to view email messages on your phone for any email
account, content has to be downloaded to your phone.
Syncing
is simply downloading content from your email
provider and storing it on your phone.
Use the following method if you choose to download new
content manually:
1. From the Home screen, touch
system
menu, touch
2. Touch and hold the email account that you want to
sync. An option list displays.
3. Tou ch
is downloaded.
sync. Syncing
displays while new content
Settings
email + accounts
. Under the
.
Page 93

Linked Inboxes
Each time you add a new email account, a tile is added to the
Home screen with the email name and to the Apps list.
When you add more than one email account, it is
possible to link two or more email accounts so
you can see all messages from those accounts
in one inbox. When email accounts are grouped
in this way, one tile is displayed on the Home screen for each
linked group instead of the individual email tiles. Linked
inboxes can be renamed.
Creating Linked Inboxes
To create linked inboxes:
1. From the Home screen, touch
Email
email accounts that you want to link and then touch
linked inboxes
➔
. This inbox and other inboxes to
which it can be linked are displayed.
2. Touch one or more of the other inboxes that you want
to link to this inbox.
3. Touch
rename linked inbox
to give the linked inboxes a
new name.
Back
4. Touch
to exit linked inboxes set up.
Linked inbox
for one of the
Unlinking Inboxes
To unlink inboxes:
1. From the Home screen, touch a linked inbox and
then touch ➔
linked inboxes
2. Touch the email account listed under
.
this inbox
you want to unlink.
unlink
3. To uch
account displays under
to unlink the inboxes. The unlinked email
other inboxes
.
Messaging 89
Linked inbox
that
Page 94

Setting Up a Microsoft Account
When you set up a Microsoft account, you are doing more
than just setting up an email account. You can get apps, play
Xbox LIVE games, and more.
1. From the Home screen, touch
system
menu, touch
Tou ch
1.
2. Read the information, including the Windows Phone
3. Touch the
4. Touch the
5. Touch Allow Microsoft to email me information and
6. Touch
7. Follow the instructions to set up your Microsoft account
90
Microsoft account
screen displays.
Terms of Use, and touch
Microsoft account
email address.
Password
Show password to display the characters.
tips about my Windows Phone. to enable this option.
sign in
.
to use SkyDrive, sync your text messages, and back up
your phone settings.
Settings
. Under the
email + accounts
.
. The BEFORE YOU SIGN IN...
next
.
field and enter your
field and enter your password
. Touch
Page 95

Section 8: Changing Your Settings
This section explains the sound and phone settings for your
phone. It includes such settings as: display, security,
memory, and any extra settings associated with your phone.
Settings are divided into system settings and applications
settings.
1. From the Home screen, touch
system menu displays.
2. Swipe left to display the
the
system
display
menu.
Settings
applications
. The
menu, or right to
System Settings
Ringtones + Sounds
1. From the Home screen, touch
system
menu, touch
Ringer
2. From the
right to turn the ringer On.
3. From the
right to turn the vibrate feature On.
4. Touch the
. Touch
field, touch and slide the slider to the
Vibrate
field, touch and slide the slider to the
Ringtone
field, choose a ringtone, and touch
get more
Settings
. Under the
ringtones + sounds
to add additional ringtones.
.
5. Touc h the
and touch .
6. Touc h the
and touch .
7. Touc h the
touch .
8. Touch one of the check boxes to play a sound for:
•Reminders
• Key press
• Lock and unlock
• Camera shutter
• All other notifications
New text or IM
New voicemail
New email
: Plays a sound when there is a scheduled
appointment.
: Plays a sound when you touch a key.
function.
Camera key .
field, choose an alert type,
field, choose an alert type,
field, choose an alert type, and
: Plays a sound when you lock or unlock a
: Makes a shutter sound when you press the
: Plays a sound for all other notifications.
Changing Your Settings 91
Page 96

Theme
Using the theme setting, you can change the background and
accent color for the screen.
1. From the Home screen, touch
system
menu, touch
2. Touch the
Note:
Battery power is consumed at a faster rate when the
background is set to
3. Touch the
Background
Accent color
Settings
theme
.
field and select
light
.
field and select a color.
. Under the
dark
or
light
Email + Accounts
1. From the Home screen, touch
system
menu, touch
2. Touch
3. Touch an existing account to modify its settings.
4. Touch and hold an existing account to sync or delete it.
For more information about email accounts, see
an Email Account”
92
add an account
on page 81.
Settings
email + accounts
to set up a new account
. Under the
.
.
“Setting Up
Internet Sharing
Internet sharing enables your phone as a mobile hotspot and
lets you share your phone’s internet connection with other
compatible devices. For more information about Internet
sharing, go to
.
Note:
1. From the Home screen, touch
2. Touch and slide the
http://wsmart.myvzw.com
Internet sharing may cause battery power to be
consumed at a faster rate.
system
sharing
menu, touch
On
.
internet sharing
sharing
or dial *611.
Settings
. Under the
.
slider to the right to turn
Page 97

Lock Screen
From this menu you can change the background, set a timeout screen that locks the phone after a specific amount of
time, and set up the phone to require a 4-digit password to
unlock the phone.
1. From the Home screen, touch
system
menu, touch
the
2. Touch
3. Touch and slide the
background
• photo
: Touch the
change photo
from your photos.
•Bing
: Professional photos from Bing will automatically be
displayed as the lock screen background.
• Live Wallpaper
select a new background photo.
•Photo Editor
select a new background photo.
slider to the right to turn the option
: Touch
: Touch
open app
Show artist when playing music
Settings
. Under the
lock screen
open app
.
field
to choose a photo source.
field to select a background
to launch Photo Editor and
to launch Photo Editor and
On
.
4. Touc h the Choose an app to show detailed status
field to select which app displays detailed activity
when the lock screen is active. Options are Calendar,
an email account, Messaging, or Phone.
5. Touch up to five + fields to select app that will display
limited activity when the lock screen is active. Options
are Games, an email account, Messaging, Phone, and
Voicemail.
6. Touc h the
screen time-out time. Options are 30 seconds,
1 minute, 3 minutes, or 5 minutes.
7. Touch and slide the
the password requirement mode
8. Touc h the
password. Touch Show password to display the
password as you type.
Screen times out after
Password
slider to the right to turn
New password
field and enter a 4-digit
Changing Your Settings 93
field and select a
On
.
Page 98

9. Touch the
digit password. Touch Show password to display the
password as you type. Touch
10. After you create a password, touch
create a new password.
11. After you create a password, touch the
password after
required. Options are each time, 30 seconds, or 1, 3, 5,
15, or 30 minutes.
Note:
To remove the password requirement, Touch and slide
the
requirement mode
Confirm password
field to set how often the password is
Password
slider to the left to turn the password
field and re-enter the 4-
done
to confirm
change password
Off
and enter the password.
Require a
Wi-Fi
1. From the Home screen, touch
system
menu, touch
2. Touch and slide the Wi-Fi networking slider to the
right to turn Wi-Fi
For more information, refer to
94
On
Wi-Fi
.
.
“Wi-Fi”
Settings
. Under the
on page 125.
Bluetooth
1. From the Home screen, touch
.
to
system
menu, touch
2. Touch and slide the Status slider to the right to turn
On
Bluetooth
For more information, refer to
.
Bluetooth
“Bluetooth”
Settings
.
. Under the
on page 127.
Tap + Send
Tap + send (NFC sharing) allows you to share photos,
websites, contacts, and more, or pair your phone by tapping
to another NFC-capable device.
1. From the Home screen, touch
system
menu, touch
2. Touch and slide
NFC sharing On.
the slider to the right to turn
tap + send
Settings
.
. Under the
Page 99

Airplane Mode
Airplane mode allows you to use many of your phone’s
features, such as Camera, Games, and more, when you are
in an airplane or in any other area where making or receiving
calls or data is prohibited.
Important!
Note:
When your phone is in Airplane Mode, it cannot
send or receive any calls or access online
information or applications.
Settings
1. From the Home screen, touch
system
menu, touch
2. Touch and slide the slider to the right to turn the
airplane mode
When you turn on airplane mode, cellular data mode is
automatically deactivated.
airplane mode
On
.
. Under the
.
Cellular
Enabling this feature allows you to use data features even
when you are roaming.
Important!
Note:
Note:
Roaming charges may apply when using data
features. Contact your Service provider for details.
Available options may differ depending upon your
service provider.
Settings
1. From the Home screen, touch
system
the
is displayed.
2. Touc h the
Activating the Data connection automatically turns off
airplane mode.
menu, touch
Data connection
cellular
field and select on or off.
. Under
. The Active network
3. Touc h t he
don’t roam
4. Touc h the
LTE and CDMA, or
Data roaming options
.
Mode selection
field and select
LTE, GSM, or UMTS
Changing Your Settings 95
field and select
Global mode
.
roam
or
,
Page 100

5. Touch the
2G, 3G, or 4G.
6. Touch the Network selection field and select
automatic, any available network, or search again.
7. Touch the For limited Wi-Fi connectivity field and
select use cellular data or don’t use cellular data.
Note:
Your phone won’t use cellular data when Wi-Fi
connectivity is limited. You may not be able to send or
receive data.
8. Touch the
(Access Point Name),
Proxy server/URL, Proxy port, and IP type (IPv4, IPv6,
or IPv4v6)
9. Touch to save your changes.
96
Highest connection speed
add internet apn
User name, Password
information.
field and select
field and enter the
,
APN
Location
The Location settings allow you to activate location services
so other applications (such as Maps) can access your
location information.
1. From the Home screen, touch
system
menu, touch
2. Touch and slide the
to turn the location mode
Note:
When Location services are on, your current location will
be available to any apps you’ve allowed to access it.
Location services
location
On
Settings
.
.
. Under the
slider to the right
 Loading...