

Page 1
Samsung Electronics 11-1
11. Operating Instructions
ENGLISH
Getting to Know Your Camcorder
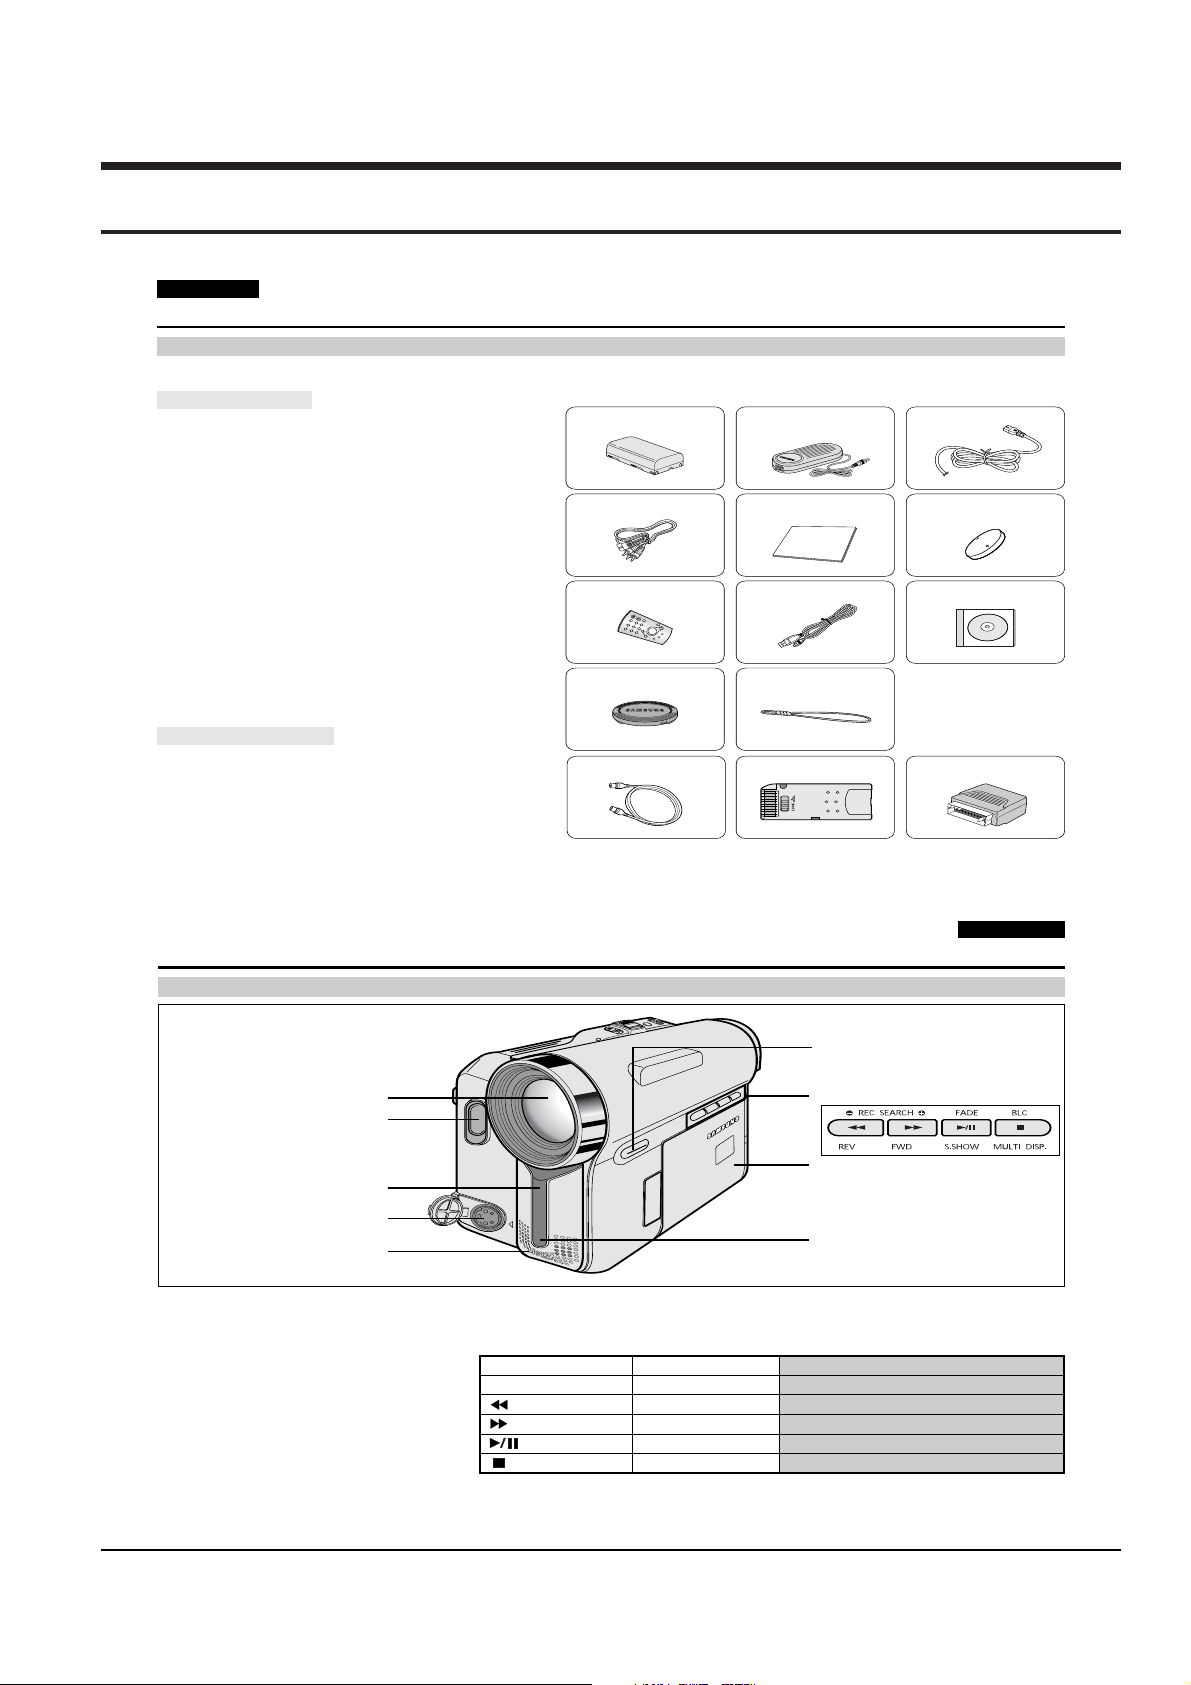
Accessories Supplied with Camcorder
Make sure that the following basic accessories are supplied with your digital video camera.
Basic Accessories
1. Lithium Ion Battery Pack
2. AC Power Adapter
(AA-E8 TYPE)
3. AC Cord
4. Audio/Video Cable
5. Instruction Book
6. Lithium Battery for
Remote Control (VP-D353(i)/D354(i)/D355(i) only)
or Clock. (TYPE: CR2025)
7. Remote Control
(VP-D353(i)/D354(i)/D355(i) only)
8. USB Cable (VP-D352(i)/D353(i)/D354(i)/D355(i) only)
9. Software CD
(VP-D352(i)/D353(i)/D354(i)/D355(i) only)
10. Lens Cover
11. Lens Cover Strap
Optional Accessories
12. S-Video Cable
13. Memory Stick (VP-D353(i)/D354(i)/D355(i) only)
14. Scart Adapter
1. Lithium Ion Battery Pack
4. Audio/Video Cable 5. Instruction Book 6. Lithium Battery
7. Remote Control 8. USB Cable 9.Software CD
10. Lens Cover 11. Lens Cover Strap
12. S-Video Cable
2. AC Power Adapter
(AA-E8 TYPE)
3. AC Cord
(CR2025)
14. Scart Adapter13. Memory Stick
1212
Getting to Know Your Camcorder
Front & Left View
1. Lens
(VP-D353(i)/D354(i)/D355(i) only)
(VP-D353(i)/D354(i)/D355(i) only)
1. Lens
2. LED light (see page 48)
(VP-D353(i)/D354(i)/D355(i) only)
3. Remote sensor
(VP-D353(i)/D354(i)/D355(i) only)
4. S-Video jack
5. Internal MIC
2. LED light
3. Remote sensor
4. S-Video jack
5. Internal MIC
6. EASY.Q button
(see page 40)
7. Function buttons
PLAYER CAMERA M.Player (VP-D353(i)/D354(i)/D355(i) only)
- EASY.Q : REW REC SEARCH – REV
: FF REC SEARCH + FWD
: PLAY/STILL FADE S.SHOW(SLIDE SHOW)
: STOP BLC MULTI DISP.
8. TFT LCD screen
9. IR(Infrared) light
ENGLISH
6. EASY.Q button
7. Function buttons
8. TFT LCD screen
9. IR(Infrared) light
1313
Page 2
DV
USB
AV
MIC
DV
USB
AV
MIC
Operating Instructions
11-2 Samsung Electronics
ENGLISH
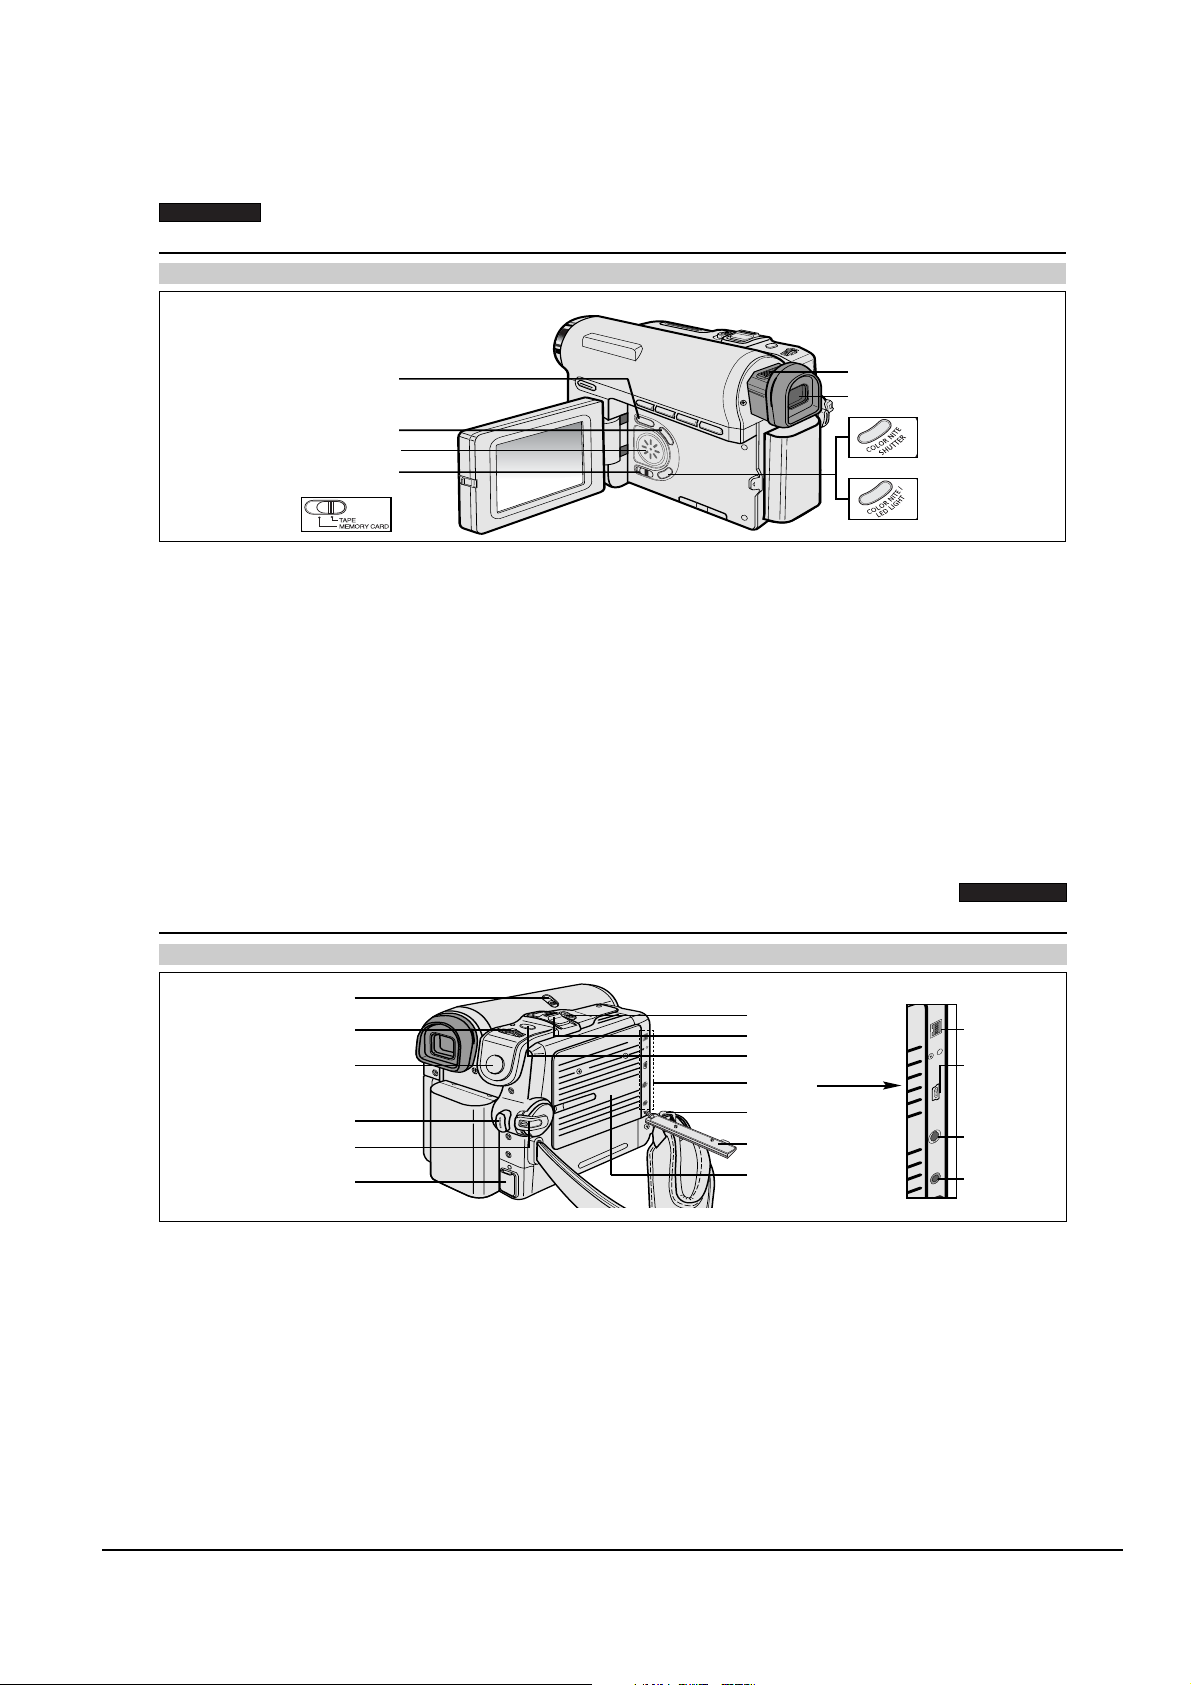
Getting to Know Your Camcorder
Left Side View
1. DISPLAY
2. MACRO/PB ZOOM
3. Speaker
(VP-D353(i)/D354(i)/D355(i) only)
4. Mode switch
1. DISPLAY (see page 25)
2. MACRO/PB ZOOM (see page 44/see page 75)
3. Speaker
4. Mode switch (MEMORY CARD/TAPE)
(VP-D353(i)/D354(i)/D355(i) only)
5. Focus adjustment knob
1414
Getting to Know Your Camcorder
Right & Top View
5. Focus adjustment knob
6. Viewfinder
6. Viewfinder
7. COLOR NITE SHUTTER (see page 47)
(VP-D351(i)/D352(i) only)
7. COLOR NITE/LED LIGHT (see page 48)
(VP-D353(i)/D354(i)/D355(i) only)
7. COLOR NITE
SHUTTER
(VP-D351(i)/D352(i)
only)
7. COLOR NITE/
LED LIGHT
(VP-D353(i)/D354(i)/
D355(i) only)
ENGLISH
1. NITE PIX switch
2. Menu selector (VOL/MF)
3. MENU button
7. TAPE EJECT
8. Zoom lever
9. PHOTO button
10. Jacks
4. Start/Stop button
5. Power switch
6. DC jack
1. NITE PIX switch
2. Menu selector (VOL/MF)
3. MENU button
4. Start/Stop button
5. Power switch (CAMERA or PLAYER)
6. DC jack
7. TAPE EJECT
8. Zoom lever
9. PHOTO button
(see page 68)
10. Jacks
11. Hand strap hook
12. Jack cover
13. Cassette door
11. Hand strap hook
12. Jack cover
13. Cassette door
IEEE1394
USB
(VP-D352(i)/D353(i)
/D354(i)/D355(i)
only)
AV
External
MIC
1515
Page 3
ENGLISH
Operating Instructions
Samsung Electronics 11-3
Getting to Know Your Camcorder
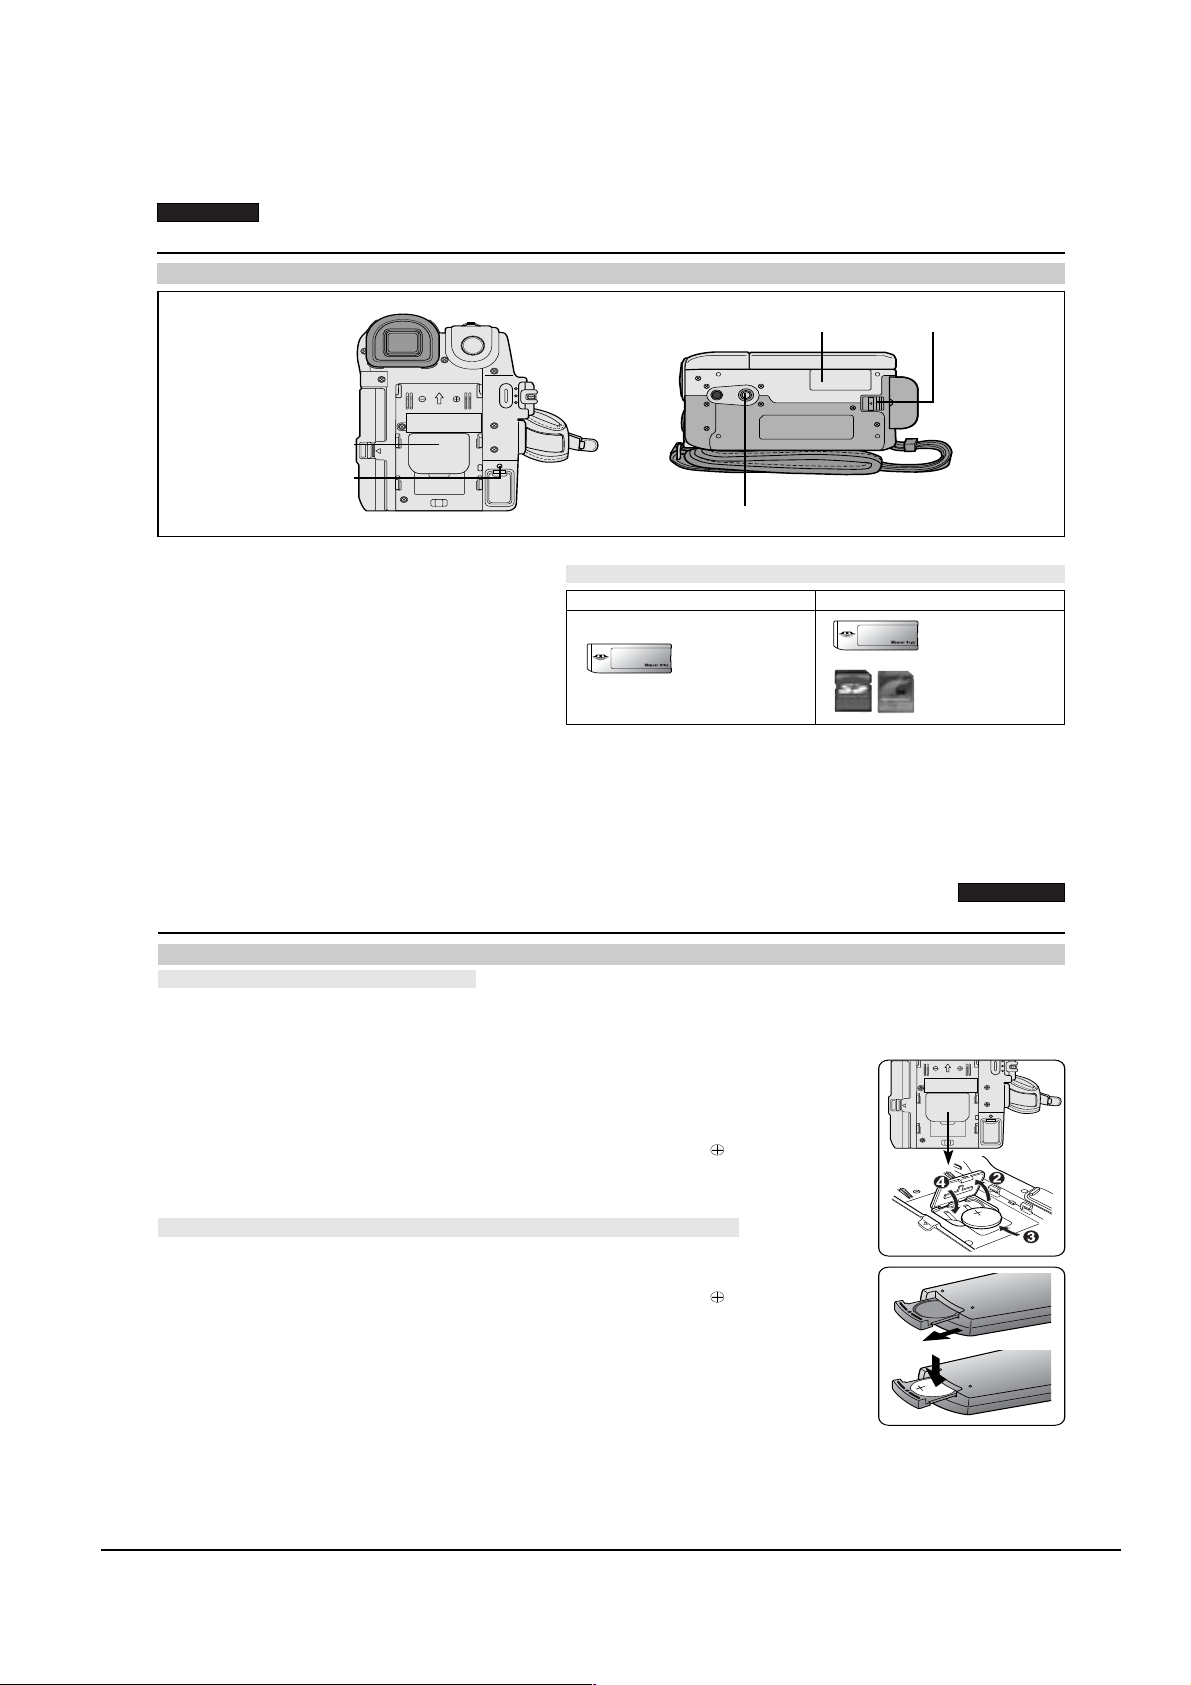
Rear & Bottom View
1. Lithium battery cover
2. Charging indicator
1. Lithium battery cover
2. Charging indicator
3. Memory card slot
(VP-D353(i)/D354(i)/D355(i) only)
4. Battery release
5. Tripod receptacle
1616
3. Memory card slot
(VP-D353(i)/D354(i)/D355(i)
only)
5. Tripod receptacle
Memory Card Slot (Usable Memory Card)
VP-D353(i) only
Memory Stick
Memory Stick PRO
4. Battery release
VP-D354(i)/D355(i) only
Memory Stick
Memory Stick PRO
SD/MMC
ENGLISH
Preparation
Lithium Battery Installation
Battery Installation for the Internal Clock
✤
The Lithium battery maintains the clock function and preset contents of the memory; even if the Battery pack or AC Power
adapter is removed.
✤
The Lithium battery for the Camcorder lasts about 6 months under normal operation from the time of installation.
✤
When the Lithium battery becomes weak or dead, the date/time indicator will display
00:00 1.JAN.2005 when you set the Date/Time to on.
When this occurs, replace the Lithium battery with CR2025 type.
1. Remove the Lithium-ion battery from the rear of the Camcorder.
2. Open the Lithium battery cover on the rear of the Camcorder.
3. Position the Lithium battery in the Lithium battery holder, with the positive ( )
terminal face up.
4. Close the Lithium battery cover.
Battery Installation for the Remote Control (VP-D353(i)/D354(i)/D355(i) only)
✤
You need to insert or replace the Lithium battery when:
-You purchase the Camcorder.
- The remote control doesn’t work.
✤
Position the Lithium battery in the Lithium battery holder, with the positive ( )
terminal face up.
✤
Be careful not to reverse the polarity of the battery.
[ Note ]
The Lithium battery must be inserted in the correct direction.
Warning: Keep the Lithium battery out of the reach of the children.
Should any battery be swallowed, consult a doctor immediately.
1919
Page 4

Operating Instructions
11-4 Samsung Electronics
ENGLISH
Preparation
Connecting a Power Source
There are two types of power source that can be connected to your Camcorder.
- The AC Power adapter and AC Cord: used for indoor recording.
- The Battery pack: used for outdoor recording.
To use the AC Power Adapter and DC Cable
1. Connect the AC Power adapter to the AC Cord.
2. Connect the AC Cord to a wall socket.
[ Notes ]
■
You must use an AA-E8 TYPE AC Power adapter.
■
The plug and wall socket type may differ according to
your resident country.
3. Connect the DC cable to the DC jack socket of the
Camcorder.
4. Set the Camcorder to each mode by holding down the tab
on the Power switch and turning it to the CAMERA or
PLA YER mode.
To Select the Camcorder Mode (VP-D353(i)/D354(i)/D355(i) only)
✤
If you want to use this unit as a Camcorder, set the Mode
switch to TAPE.
✤
If you want to use this unit as a DSC (Digital Still Camera), set the Mode
Set the Mode switch to MEMORY CARD.
Power Switch
<CAMERA mode> <PLAYER mode>
2020
Preparation
Using the Lithium Ion Battery Pack
✤
The amount of continuous recording time available depends on
- The type and capacity of the Battery pack you are using.
- How often the zoom function is used.
It is recommended that you have several batteries available.
Charging the Lithium Ion Battery Pack
1. Attach the Battery pack to the Camcorder.
2. Connect the AC Power adapter to an AC Cord and connect the AC Cord to
a wall socket.
3. Connect the DC cable to the DC jack socket on the Camcorder.
4. Turn the Power switch to Off, and the charging indicator will start to flash,
showing that the battery is charging.
Blinking time Charging rate
Once per second Less than 50%
Twice per second 50% ~ 75%
Three times per second 75% ~ 90%
Blinking stops and stays on 90% ~ 100%
On for a second and Error - Reset the Battery pack and
off for a second the DC cable
5. When the battery is fully charged, disconnect the Battery pack and the AC Power adapter from
the Camcorder.
Even with the Power switched Off, the Battery pack will still discharge.
[ Notes ]
■
The Battery pack may be charged a little at the time of purchase.
■
To prevent reduction in the life and capacity of the Battery pack, always remove it from the Camcorder after it is fully charged.
■
The amount of continuous recording time available depends on:
- The type and capacity of the Battery pack you are using.
- How often the zoom is used.
-Type of use (Camcorder/Camera/With LCD screen etc.).
- Ambient temperature.
It is recommended to have additional battery packs available.
■
Even when the Power switched Off, the Battery pack will still discharge if it is left attached to the device.
Power Switch
4
ENGLISH
<Charging indicator>
2121
Page 5

ENGLISH
Operating Instructions
Samsung Electronics 11-5
Preparation
Table of continuous Recording Time based on Model and Battery Type.
✤
If you close the LCD screen, it switches off and the Viewfinder switches on automatically.
✤
The continuous recording times given in the table below are approximations.
Actual recording time depends on usage.
Battery
SB-LSM80
Time
Charging
time
Approx.
1hr 20min
Continuous recording time
LCD ON VIEWFINDER ON
Approx.
1hr 20min
Approx.
1hr 30min
SB-LSM160
[ Notes ]
■
The Battery pack should be recharged in an environment between 32 °F (0 °C)and 104 °F (40 °C).
■
The Battery pack should never be charged in a room with a temperature that is below 32 °F (0 °C).
■
The life and capacity of the Battery pack will be reduced if it is used in temperatures below 32 °F (0 °C) or left in temperatures
above 104 °F (40 °C)for a long period of time, even when it is fully recharged.
■
Do not put the Battery pack near any heat source (i.e.fire or a heater).
■
Do not disassemble, apply pressure to or heat the Battery pack.
■
Do not allow the + and – terminals of the Battery pack to be short-circuited.
It may cause leakage, heat generation, induce overheating or fire.
■
Use SB-LSM80 or SB-LSM160 Battery pack only.
■
It is recommended to use original battery pack that is available at SAMSUNG service centre.
2222
Approx.
3hr
Approx.
2hr 40min
Approx.
3hr
Preparation
Battery Level Display
The battery level display indicates the amount of power remaining in the Battery pack.
a. Fully charged
b. 20~40% used
c. 40~80% used
d. 80~95% used
e. Completely used (Blinking)
(The Camcorder will turn off soon, change the battery as soon as possible)
ENGLISH
[ Notes ]
■
Please refer to the Table on page 22 for approximate continuous recording time.
■
The recording time is affected by temperature and environmental conditions.
■
The recording time shortens dramatically in a cold environment.
(Blinking)
The continuous recording times in the operating instructions are measured using a fully charged Battery pack at 77 °F (25 °C).
As the environmental temperature and conditions vary. The remaining battery time may differ from the approximate continuous
recording times given in the instructions.
2323
Page 6

Operating Instructions
11-6 Samsung Electronics
Playback
Tape Playback
✤
The playback function works only in Player mode.
Playback on the LCD Screen
✤
It is practical to view a tape using the LCD screen when in a car or outdoors.
Playback on a TV Monitor
✤
To play back a tape, the television must be PAL compatible.(see page 114)
✤
We recommend that you use the AC Power adapter as the power source for the Camcorder.
Connecting to a TV which has Audio/Video Input Jacks
1. Connect the Camcorder to your TV with the Audio/Video cable.
■
The yellow jack: Video
■
The white jack: Audio(L)-mono
■
The red jack: Audio(R)
If you connect to a monaural TV, connect the yellow jack (Video)
to the video input of the TV and the white jack (Audio L) to the audio input
of the TV.
■
You may use the SCART adapter. (optional)
2. Set the Power switch to PLAYER.
3. Set the Mode switch to TAPE. (VP-D353(i)/D354(i)/D355(i) only)
4. Turn on the TV and set the TV/VIDEO selector on the TV to Video.
Refer to the TV user’s manual.
5. Play the tape.
S-Video input
TV
Video input-Yellow
Audio input
(left)-White
Audio input
(right)-Red
Audio/Video
S-Video
ENGLISH
Camcorder
[ Notes ]
■
You may use an S-Video (optional) cable to obtain better quality pictures if you have a S-Video connector on your TV.
■
Even if you use an S-Video (optional) cable, you need to connect an audio cable.
■
If you connect the cable to the Audio/Video jack, you will not hear sound from the Camcorder's speakers.
■
If only a mono audio input is available on the TV set, use the audio cable with the white jack(Audio L).
ENGLISH
Playback
Connecting to a TV which has no Audio and Video Input Jacks
✤
You can connect your Camcorder to a TV through a VCR.
1. Connect the Camcorder to your VCR with the Audio/Video cable.
■
The yellow jack: Video
■
The white jack: Audio(L) - Mono
■
The red jack: Audio(R)
2. Connect a TV to the VCR.
3. Set the Power switch to PLAYER.
4. Set the Mode switch to TAPE. (VP-D353(i)/D354(i)/D355(i) only)
5. Turn on both the TV and VCR.
■
Set the input selector on the VCR to Line.
■
Select the channel reserved for your VCR on the TV set.
6. Play the tape.
Playback
✤
You can play the recorded tape in Player mode.
1. Connect a power source and set the Power switch to PLAYER.
2. Set the Mode switch to TAPE. (VP-D353(i)/D354(i)/D355(i) only)
3. Insert the tape you wish to play back.
4. Using the / (REW/FF) buttons, find the first position you wish to play back.
5. Press the (PLAY/STILL) button.
■
The images you recorded will appear on the TV after a few seconds.
■
If a tape reaches its end while being played back, the tape will rewind automatically.
[ Notes ]
■
The playback mode (SP/LP) is selected automatically.
■
If the VCR has an S-Video input terminal, you may use S-Video for better quality.
■
The S-Video terminal transmits video only. Connect audio cables for sound.
■
If only a mono audio input is available on the TV set, use the audio cable with the white jack(Audio L).
7272
Antenna
S-Video input
VCR
TV
Video input-Yellow
Audio input
(left)-White
Audio/Video
S-Video
Audio input
(right)-Red
7171
Camcorder
Page 7

IEEE 1394 Data Transfer
DV
USB
AV
MIC
DV
USB
AV
MIC
Operating Instructions
Samsung Electronics 11-7
Transferring IEEE1394 (i.LINK)-DV Standard Data Connections
Connecting to a DV Device (DVD Recorder, Camcorder, etc.)
■
Connecting to other DV standard products.
A standard DV connection is quite simple.
If a product has a DV port, you can transfer data by connecting to the DV port using the correct cable.
!!! Please be careful since there are two types of DV ports, (4pin, 6pin). This Camcorder has a 4pin terminal.
■
With a digital connection, video and audio signals are transmitted in digital format, allowing high quality images
to be transferred.
Connecting to a PC
■
If you want to transmit data to a PC, you must install an IEEE 1394 add-on card into the PC. (not supplied)
■
The frame rate for video capture is dependent on the capacity of the PC.
[ Notes ]
■
When you transmit data from the Camcorder to another DV device, some functions may not work.
If this occurs, please reconnect the DV cable or turn the power OFF and ON again.
■
When you transmit data from the Camcorder to PC, PC function button is not available in M.Player mode.
■
Do not use the Camcorder and IEEE1394 together as this will cause IEEE1394 to shut off.
■
Do not connect the Camcorder to a PC using both DV and USB cables. It may not operate properly.
■
Operation is not guaranteed for all computer environments recommended above.
■
The IEEE1394 cable (DV cable)is sold separately.
■
Video Capture software is commercially available.
■
Most DV enabled PCs have a 6 pin socket. In this case, a 6pin/4pin cable is required for the connection.
■
Most DV enabled Notebooks and Laptops have a 4 pin socket. Use a 4pin/4pin cable for the connection.
■
DIS and COLOR NITE SHUTTER are not available when in DV (IEEE1394) mode.
■
If DV(IEEE1394) mode is set, DIS and COLOR NITE SHUTTER modes will be released.
ENGLISH
ENGLISH
IEEE 1394 Data Transfer
System Requirements
■
CPU: faster Intel®Pentium III™ 450MHz compatible.
■
Operating system: Windows®98SE, ME, XP, Mac OS (9.1~10.2)
■
Main memory: more than 64 MB RAM
■
IEEE1394 add-on card or built in IEEE1394 card
Recording with a DV Connection Cable (VP-D351i/D352i/D353i/D354i/D355i only)
1. Set the Power switch to PLAYER.
2. Set the Mode switch to TAPE. (VP-D353i/D354i/D355i only)
3. Connect the DV cable (not supplied) from the DV jack of the Camcorder
to the DV jack of the other DV device.
■
Make sure that is displayed on the LCD screen.
4. Press the Start/Stop button to begin REC PAUSE mode.
■
PAUSE is displayed on the LCD screen.
5. Start playback on the other DV device while you monitor the picture.
6. Press the Start/Stop button to start recording.
■
If you want to pause recording momentarily, press the Start/Stop button again.
7. To stop recording, press the (STOP) button.
[ Notes ]
■
When using this Camcorder as a recorder, the pictures that appear on a monitor may seem uneven,
however recorded pictures will not be affected.
■
Operation is not guaranteed for all the recommended computer environments mentioned above.
■
While transmitting data from the Camcorder to PC at strong electric field and strong magnetic field, VIDEO signal or AUDIO signal
may transmit with noise.
7979
8080
Page 8

DV
USB
AV
MIC
DV
USB
AV
MIC
Operating Instructions
11-8 Samsung Electronics
USB Interface (VP-D352(i)/D353(i)/D354(i)/D355(i) only)
Transferring a Digital Image through a USB Connection
✤
The camcorder supports both USB 1.1 and 2.0 standards. (Depends on the PC specification)
✤
You can easily transfer a image from a Memory card to a PC without additional add-on cards via a USB connection.
✤
You can transfer a recorded file in memory card to a PC via a USB connection. (VP-D353(i)/D354(i)/D355(i) only)
✤
If you transfer data to a PC, you need to install the software (DV Driver, Video Codec , DirectX 9.0) supplied with the
Camcorder.
USB Connection speed depending on the System
High speed USB connection is supported by Microsoft (Windows) device drivers only.
■
Windows 98SE/ME - Full Speed USB
■
Windows 2000 - High speed USB on a system with Service Pack 4 or later installed.
■
Windows XP - High speed USB on a system with Service Pack 1 or later installed.
System Requirements
CPU Intel®Pentium III™, 600MHz Intel®Pentium 4™ , 2GHz
Minimum Recommended
OS(Operating System)
Memory 128MB 512MB
HDD capacity 1GB or more 2GB or more
Resolution 1024 x 768 dots 1024 x 768 dots
USB USB1.1 USB2.0 High Speed
■
It is not available for Macintosh systems.
[ Notes ]
■
USB 2.0 works only for removable disk functions.
■
On a slower PC than recommended, movie playback may not be smooth or video editing may take a long time.
■
On a slower PC than recommended, movie playback may skip frames or operate unexpectedly.
■
Intel®Pentium III™ or Pentium 4™ is a trademark of the Intel Corporation.
■
Windows®is a registered trademark of the Microsoft®Corporation.
■
All other brands and names are property of their respective owners.
■
Operations are not guaranteed for all of the recommended computer environments mentioned above.
■
Do not connect the Camcorder to a PC using both DV and USB cables. It may not operate properly.
■
In M.Cam or M.Player mode, be sure that the Memory card is inserted into Camcorder before connecting USB cable.
If no Memory card or an unformatted Memory card is inserted, PC will not recognise your Camcorder as a removable disk.
(VP-D353(i)/D354(i)/D355(i) only)
■
USB Streaming requires Video Codec, DV Driver and DirectX 9.0.
■
If you disconnect the USB cable from the PC or the Camcorder during the data transfer, the data transfer will stop and the data may be damaged.
■
If you connect the USB cable to a PC using a USB HUB or with other devices at the same time, it may cause conflict and may not work properly.
If this occurs, remove all other USB devices and try the connection again.
Windows®98SE/ME Windows®2000/XP
24bit Colour 24bit Colour
Windows System
ENGLISH
8181
ENGLISH
USB Interface (VP-D352(i)/D353(i)/D354(i)/D355(i) only)
Using the USB Streaming Function
✤
To use USB streaming, the DV Driver, Video Codec and DirectX 9.0. programs must be installed in the PC.
✤
You can view Camcorder video on your PC using USB streaming.
✤
You can also store it as a moving picture in the "avi" file format, or as a still image in the "jpg" file format on a PC.
1. Set the Mode switch to TAPE(VP-D353(i)/D354(i)/D355(i) only), set the Power switch to CAMERA or PLAYER.
2. Connect one end of the USB cable to the USB jack on the Camcorder and the other end to the USB port on your computer.
3.
Setup and execute Windows Movie Maker or the Ulead VIDEO Studio Software application provided on the CD.
- For detailed instructions for Ulead VIDEO Studio use, refer to the program’s Help function.
- Windows Movie Maker is used for WINDOWS ME and XP users. (C:\program files\Movie maker\moviemk.exe)
Using the removable Disk Function (VP-D353(i)/D354(i)/D355(i) only)
✤
You can easily transfer data from a Memory card to a PC without additional add-on cards via a USB connection.
1. Set the Mode switch to MEMORY CARD, set the Power switch to CAMERA or PLAYER.
2. Connect one end of the USB cable to the USB jack on the Camcorder and the other end to the USB port on your computer.
3.
To verify whether the removable disk has been properly recognised, open Windows Explorer and locate the removable disk.
Connecting to a PC
1. Connect a USB cable to the USB port on the PC.
■
If a USB cable is connected to the Camcorder's USB port, nothing is displayed on a TV.
2. Connect the other end of the USB cable into the USB jack on the Camcorder. (USB jack)
■
If a PC is connected to the Camcorder with a USB cable only, Zoom switch and NITE PIX operate.
Disconnecting the USB Cable
✤
After completing the data transmission, you must disconnect the cable in the
following way:
1. Select the removable disc icon and click the right mouse button to select [Eject].
2. Select [Confirm] and disconnect the USB cable when the Windows Splash screen
appears.
[ Notes ]
■
If you disconnect the USB cable from the PC or the Camcorder while transferring,
the data transmission will stop and the data may be damaged.
■
If you connect the USB cable to a PC via a USB HUB or simultaneously connect the USB cable along with other USB devices,
the Camcorder may not work properly.
If this occurs, remove all USB devices from the PC and reconnect the Camcorder.
■
While transmitting data from the Camcorder to PC at strong electric field and strong magnetic field, VIDEO signal or AUDIO signal
8686
may transmit with noise.
USB Cable
Page 9

ENGLISH
Operating Instructions
Samsung Electronics 11-9
Digital Still Camera Mode (VP-D353(i)/D354(i)/D355(i) only)
Inserting and Ejecting the Memory Card
Inserting the Memory card
1. Set the Power switch to Off.
2. Open the Memory card cover.
3. Insert the Memory card in the direction of the arrow into the Memory card slot
located on the bottom of the Camcorder.
Ejecting the Memory card
1. Set the Power switch to Off.
2. Open the Memory card cover.
3. Push the Memory card, then it comes out of the Camcorder automatically.
4. Pull out the Memory card.
Do not attempt to pull the Memory card out without first pushing it in.
[ Notes ]
■
Memory Stick Duo type or RS-MMC (VP-D354(i)/D355(i) only) should be inserted by
using the Adaptor (not supplied).
■
If you set the Camcorder to M.Player mode, the last recorded still image appears.
If there are no recorded images on the Memory card, No image! will display on the
screen.
■
While recording, loading, erasing or formatting, do not turn off the power or change the mode.
■
Please turn the power off before you insert or eject the Memory card.
You could lose data on the Memory card.
■
Do not allow metal substances to come in contact with the terminals of the Memory card.
■
Do not bend, drop or apply strong shock to Memory card.
■
After pulling the Memory card out from the Camcorder, please keep the Memory card in a soft case to prevent static shock.
■
The stored contents may be changed or lost as a result of misuse, static electricity, electric noise or repair.
Save important images separately.
■
Samsung is not responsible for data loss due to misuse.
VP-D353(i) only
VP-D354(i)/D355(i) only
(Usable Memory card)
Memory Stick
Memory Stick PRO
Memory Stick
Memory Stick PRO
SD/MMC
8888
Digital Still Camera Mode (VP-D353(i)/D354(i)/D355(i) only)
Selecting the Image Quality
✤
You can select the quality of a still images to be recorded.
Select the Image Quality
1. Set the Power switch to CAMERA.
2. Set the Mode switch to MEMORY CARD.
3. Press the MENU button.
■
The menu list will appear.
4. Move the Menu selector to the left or right to select Memory, then press the Menu selector.
5. Move the Menu selector to the left or right to select Photo Quality, then press the Menu
selector.
6. Move the Menu selector to the left or right to select desired image quality(Super Fine, Fine,
Normal), then press the Menu selector.
7. To exit, press the MENU button.
■
The selected icon will be displayed
Number of Images on the Memory Card
QUALITY 8MB 16MB
Super Fine Approx. 34 Approx. 68
Fine Approx. 45 Approx. 90
Normal Approx. 74 Approx. 148
The actual number of images that you can record varies depending on the nature of
the subject to be recorded.
[ Notes ]
■
The above approximation is based on a 8MB Memory Stick under normal recording conditions.
■
The number of pictures that can be stored on a memory card depends on various conditions.
ENGLISH
2
4
5
M.Cam Mode
√Memory
Photo Quality
File No.
Move Select Exit
M.Cam Mode
Back
Photo Quality
File No.
Move Select Exit
√Super Fine
√Series
Super Fine
Fine
Normal
MENU
MENU
9191
Page 10

Operating Instructions
11-10 Samsung Electronics
MEMO
 Loading...