

Page 1
Vacuum
Cleaner
For Household
use Only
Operating
Instructions
Read these instructions before operating the vacuum cleaner
※The design and specification may be different depending on the models.
Register your product at www.samsung.com/global/register
Page 2

Safety Instructions
Thank you for purchasing a Samsung vacuum cleaner. When using an electrical appliance,
basic precautions should always be followed, including the following:
PLEASE READ ALL WARNINGS AND INSTRUCTIONS BEFORE USING THIS APPLIANCE
Warning:
To reduce the risk of fire, electric shock, or injury:
·Do not leave appliance unattended when plugged in. Unplug the vacuum from the outlet
when it is not in use, or when it is being cleaned.
·Do not use outdoors or on wet surfaces.
·Do not allow to be used as a toy. Close attention is necessary when used by or near
children.
·Use only as described in this manual. Use only manufacturer’s recommended
attachments.
·Do not use with damaged cord or plug. If appliance is not working as it should, or has
been dropped, damaged, left outdoors or dropped in water, take it to a service center.
·Do not pull or carry the vacuum by the cord, or use the cord as a handle. Do not close a
door on cord, or pull the cord around sharp edges or corners. Do not run the appliance
over its cord. Keep the cord away from heated surfaces.
·Do not unplug the vacuum by pulling on the cord. To unplug, grasp the plug, not the
cord.
·Do not handle plug or appliance with wet hands.
·Do not put any object into vacuum openings. Do not operate with any opening blocked:
Keep free of dust, lint, hair and anything that may reduce air flow.
·Keep hair, loose clothing, fingers and all parts of body away from openings and moving
parts.
·Do not use to pick up anything that is burning or smoking, such as cigarettes, matches
or hot ashes.
·Do not use without dust bag and filters in place.
·Turn off all controls before unplugging.
·Use extra care when cleaning on stairs.
·Do not use to clean up flammable or combustible liquids such as gasoline. Do not use
the vacuum in areas where such liquids may be present.
·Store your cleaner indoors in a cool, dry area.
·Do not use extension cords or plug into an electrical outlet with inadequate current
carrying capacity.
·Avoid vacuuming up sharp objects.
·Always turn this appliance off before connecting or disconnecting the hose, replacing
bags, or removing the bottom plate for maintenance.
·Unplug electrical appliances before vacuuming them.
Save these instructions!
To reduce the risk of electrical shock, this appliance has a polarized plug with one blade
wider than the other. This plug will fit in a polarized outlet only one way. If the plug does
not fit in the outlet, reverse the plug. If it still does not fit, contact a qualified electrician to
replace the outlet. Do not change the plug in any way.
1
Page 3
Assembling Parts
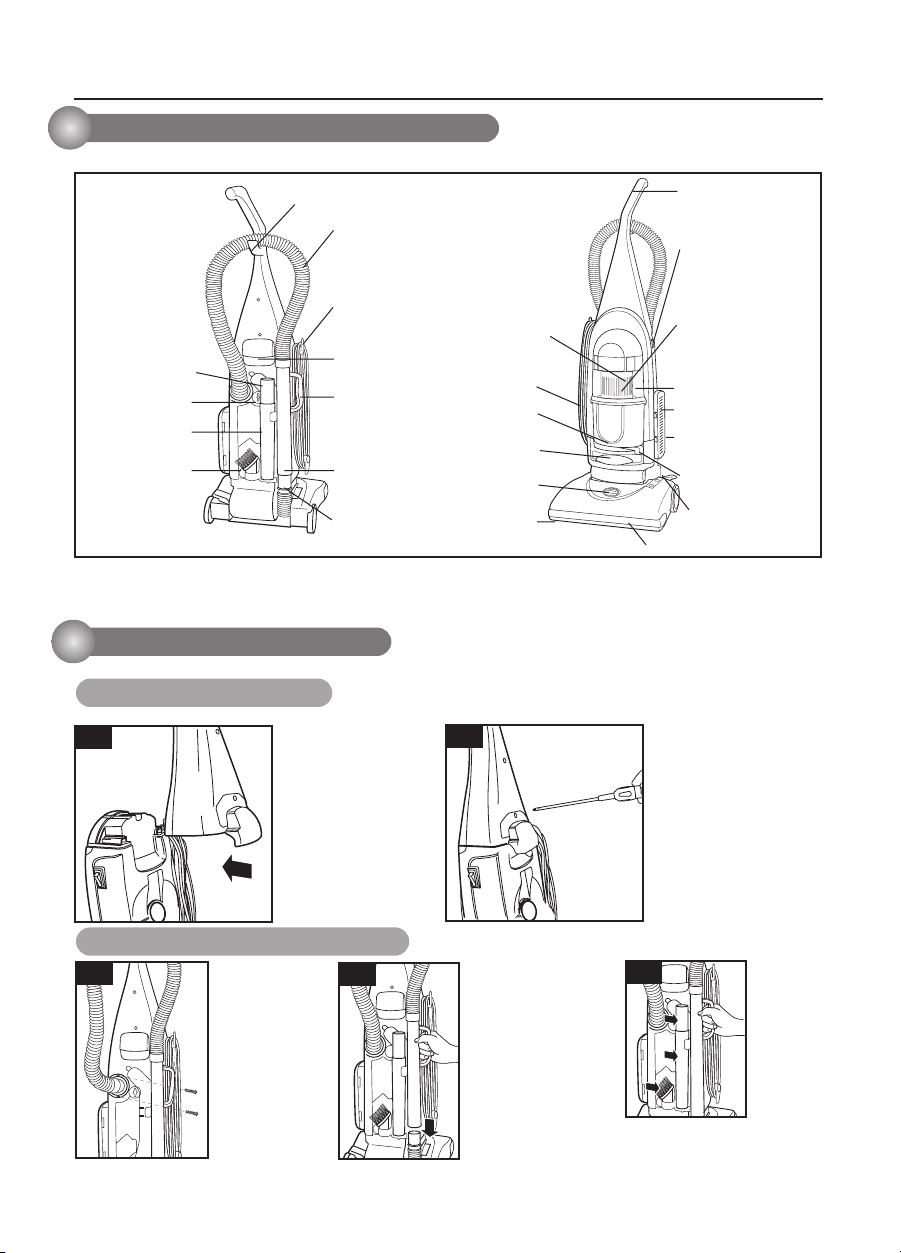
Assembled Vacuum Cleaner Parts
The assembled cleaner will look like the illustration to the left.
Hose Clip
Stretch Hose
Handle
Power Switch
Upper Tank
Frame and
Filter(Inside
Louvers)
Upper Tank
Post-Motor Filter
Hepa Media Filter
(Optional Item)
Lock ’n Seal™
Lever
Handle
Release Pedal
Furniture Protection Guard
Crevice Tool
Upper Tank Knob
Extension Wand
Quick Release
Cord Wrap
Carrying
Handle
Quick Reach
Handle
Hose WandDusting Brush
Hose
Wand Base
Louvers
Power Cord
Dirt Container
Pre-Motor Filter
Height
Adjustment
Knob
Powerfoot
WARNING!
OPERATE THE VACUUM CLEANER ONLY AT THE VOLTAGE SPECIFIED ON THE NAMEPLATE.
1. How to put it together.
Step 1. Attaching the Handle
1-1
Locate the vacuum
Handle and remove the
screw packet taped to
the base of the Handle.
Stand the vacuum
upright and slide the
base of the handle firmly
into the grooves at the
top of the vacuum body.
1-2
Check to be sure the Handle
is fitted to the vacuum body.
If there is a gap in front,
continue to push firmly until
the Handle is flush.
Insert one screw provided
from the screw packet into
the existing hole. Tighten
securely with a Philliphs
head screwdriver.
Step 2. Attaching the Hose and Tools
1-3
Position the Hose
Assembly on the
back of the
vacuum as shown.
Attach the Hose
with the remaining
two screws from
the packet.
Tighten securely
with a screwdriver.
1-4
Grasping the Quick
Reach Handle, slide the
end of the Hose Wand
onto the Hose Wand
Base. Snap the Hose
into the Hose Clip.
NOTE: The Powerfoot
will not operate
effectively unless the
Hose Wand is firmly
attached.
2
1-5
Slide the Dusting Brush Tool into
the storage clip as shown.
Slide the
Extension
Wand and
the Crevice
Tool together
into the
storage clip
as shown.
Page 4

Operation
2. How to use you samsung vacuum
2-1 2-2 2-3
ON-OFF Switch
1.To turn cleaner ON(I), press the
ON/OFF switch to the ON position.
2.To the cleaner OFF(O), press the
ON/OFF switch to the OFF position.
Handle positions
The handle of your cleaner has three
positions; upright for storage and
when using cleaning tools; operating
for general operation on carpet and
floors; low for reaching under low
furniture. Step on handle release
pedal to lower handle.
2-4 2-5
B
C
Carrying handle
The cleaner can also be moved by
using the carrying handle.
CAUTION:
The Rotating Floor Brush continues
to rotate while tools are in use. To
reduce the risk of injury from moving
parts, always move the cleaner with
the Carrying Handle at the back of
the cleaner. Always place vacuum
cleaner on floor with Handle in
Upright position when using tools.
Never place your fingers under the
cleaner when it is running. Never
place Powerfoot on furniture or
uneven surfaces. Do not place
vacuum cleaner close enough to
objects to pull them into rotating
brush.
Cleaning Tool attachments
Attachment tools can be used to clean
furniture or drapes, on stairs or in
corners. Place the vacuum on the floor
with the handle in the upright position.
To maintain maximum cleaning
performance, the following
maintenance steps must be
performed:
Empty the Dirt Container when the
dirt reaches the “Full” line on the
side.
Check the Upper Tank and PreMotor Filters monthly and clean or
replace as needed.
Clean or replace the Post-Motor
Filter every three months.
Note: More frequent filter
cleaning may be necessary if
you are vacuuming new carpet,
fine dust, or have allergy
concerns. Follow the
instructions on the following
pages to perform these simple
maintenance steps.
Transporting cleaner
To move your cleaner from room to
room, put the handle in upright
position, tilt the cleaner back on its
rear wheels and push forward.
Dusting Brush Tool:
Use to dust furniture, blinds, books,
lamps, shelves, draperies, cushions.
A
Crevice Tool:
Use in tight narrow spaces.
Extension Wand:
Use with desired attachment for a
longer reach.
NOTICE:
The Floor Brush will continue to
rotate while you use your vacuum
for above floor cleaning. To prevent
carpet damage, do not lean on the
vacuum or let the Powerfoot tilt
forward.
NOTICE:
While vacuuming, certain carpets
and low humidity conditions may
generate small static discharges.
The discharges are entirely
harmless and are not associated
in any way with the main power
supply.
WARNING:
To reduce the risk of electric
shock, turn Power Switch OFF
and disconnect plug from
electrical outlet before
performing mainte- nance or
troubleshooting checks.
3
Page 5

Maintenance
2-6
2-7
2-8
Cleaning lightweight flexible rugs
Stand on one end of rug and move
cleaner toward other end or edge.
Before reaching edge, push down on
handle. This will lift up the nozzle(front of
cleaner)and will prevent rug from clinging
to cleaner.
Continue to lift front of cleaner so that
when you have reached the edge, it is
completely off the rug. Move cleaner
back to start again, lower front of cleaner,
and use only forward strokes.
2-9
3. How to maintain youer samsung vacuum
Empty Dirt Container
The Dirt Container needs to be
emptied when the dirt reaches
the “Full” line on the side of the
Container.
3-1
Unlock
Position
Full Line
Lock Position
Cleaning The Upper Tank & Filter
3-2
3-3
Carpet height adjustment
Carpet and rug cleaning takes place at the
nozzle (A).
When it is necessary to raise and lower the
nozzle for various carpet pile heights, rotate
the nozzle control knob (B) to the desired
setting.
For maximum cleaning performance, The
following carpet height settings are recommended:
·Lowest setting: for all types of carpet
·Higher settings: for very deep pile carpet where
easier pushing effort is desired, while maintaining
good cleaning performance.
Note: If the cleaner is difficult to push, rotate knob to
the next higher setting.
Power control
To change the power level of the vacuum
cleaner, rotate the knob.
① Unplug the cleaner from electrical
outlet.
② The Upper Tank Filter can be
reached by removing the Dirt
Container, reaching underneath the
Upper Tank and turning the rim of
the Filter Frame to unlock. Pull
straight down to remove. Brush the
dirt off the Louvers and Upper Tank
Filter.
③ The foam Upper Tank Filter may be
removed and hand washed in cold
water with mild detergent. Rinse
well then air dry thoroughly before
replacing.
(some models only)
① Unplug the cleaner from electrical
outlet.
② Slide the Lock ‘n Seal Lever to
the "Unlock" position.
③ Grasp handle and pull the Dirt
Container straight out to remove
from vacuum.
④ Empty dirt into garbage
container.
⑤ Put the Dirt Container back in the
vacuum and slide the lever to the
"Lock" position.
④ The Upper Tank and Louvers may
also be wiped clean with a damp
cloth.
Note: The Dirt Container may
be washed in warm water
with a mild detergent. Make
sure it is completely dry
before using again.
4
Page 6

Maintenance
3-4
Note: For easier
access, the entire
Upper Tank may be
removed by turning the
knob on the back
of the cleaner to unlock
and pulling the entire
tank straight out.
The belt
The belt on your cleaner causes the
agitator to rotate and is important for
the effective operation of the
cleaner. The belt is located under
the bottom plate of the cleaner and
should be checked from time to time
to be sure it is in good condition.
When to replace
Disconnect cleaner from
electrical outlet.
To check belt, remove bottom plate
as shown in “How to replace.”
Replace belt it is stretched, cut or
broken.
3-7
Cleaning The Pre-Motor and
3-6
Post-Motor Filters
3-5
Post-Motor
Filter
Pre-Motor
Filter
The Pre-Motor Filter protects the
motor from dirt particles.
It is located in the slide out tray
underneath the Dirt
Container. If the filter becomes dirty,
pull out the tray, lift
out the filter and clean.
The Post-Motor Filter assists in the
filtration process to return clean air to
the room. It is located behind the
door on the side of the cleaner. If the
filter becomes dirty, open the door,
remove the filter and clean.
Note: A white, pleated HEPA
Media Filter is offered as an
optional item. This filter is not
washable and must be replaced.
WARNING:
Do Not operate cleaner with damp or
wet filters or without all
filters in place.
How to replace
Disconnect cleaner from electrical
outlet.
Place handle in low position and turn
cleaner over so bottom side is up.
Remove the 4 screws as shown with
a screw driver.
3-8
With lettering on outside of belt and
positioned as shown in box on (D),
slide new belt over motor pulley (B).
3-9
Remove agitator and used belt.
Discard used belt.
Insert agitator through belt and place
belt in belt guide (C) on agitator.
Should the agitator shield (D)
become dislodged while replacing
the belt or the agitator, reposition it
as shown, noting the placement of its
belt guide (D)
5
Page 7

Maintenance
3-10
Grasp agitator firmly and fit it into
position by first sliding the end opposite
the belt into the rectangular slot (F) on
side of cleaner.
Pull other side of agitator (G) into place.
Turn agitator, making sure belt is not
pinched between agitator and agitator
shield.
When to replace the
agitator brush roll
When agitator brushes are worn,
the agitator should be replaced.
To check condition of brushes,
disconnect cleaner from
electrical outlet.
Move the edge of a card across
bottom plate while turning agitator.
To maintain cleaning effectiveness,
replace agitator if brushes do not
touch card.
Cleaning Clogs
Low suction or poor pickup may be
due to a clog in the vacuum
cleaner. If you notice a change in
the sound of the motor or a
reduction in the spinning action,
check for clogs.
3-15
3-11
Reposition bottom plate and 4
screws. Tighten screws securely.
3-12
3-13
Empty Dirt Container.
Check Upper Tank for build up or
clogs.
Grasp the Quick Reach Handle
and lift Hose Wand to
separate from the suction opening.
Check for a clog in
the Base, the Wand or the Hose.
Remove the screw attaching the
Hose Wand Base to the
vacuum. Straighten the Hose
Wand Base and unclog
with long, narrow object.
How to replace
Disconnect cleaner from electrical
outlet.
Remove bottom plate, belt and
agitator following directions in “The
belt” section beginning with Fig. 3-10.
Discard old agitator.
Continue following the directions in
“The belt” section to reposition belt,
new agitator and bottom plate.
3-14
Suction Inlet
Remove the Upper Tank and check
the suction inlet for a clog.
WARNING:
To reduce the risk of injury from
moving parts and/ or electrical
shock, turn Power Switch OFF and
disconnect plug from electrical
outlet before performing
troubleshooting checks.
3-16
Air Passageway
If the clog persists, follow the
instructions for Checking
the Rotating Floor Brush on page 9
and inspect the Air
Passageway for obstructions.
6
Page 8

Troubleshooting
0870-SAMSUNG(726-7864)
Check this list of possible problems and solutions before bringing your vacuum to a service center.
Vacuum cleaner won't run.
Possible Causes
··
Power cord not firmly plugged in
··
Blown fuse or breaker
Vacuum cleaner won't pick up dirt.
Possible Causes
··
Incorrect Height Adjustment
··
Hose not attached to suction opening
··
Crack or hole in Hose
Vacuum cleaner won't pick up dirt continued.
Possible Causes
··
Broken or worn Drive Belt
··
Rotating Floor Brush bristles worn
··
Rotating Floor Brush jammed
··
Clog in vacuum
··
Dirt Container full
··
Dirt Container or Upper Tank not installed
properly
··
Filters are dirty
Tools won't pick up dirt.
Possible Causes
··
Crack or hole in Hose
··
Clog in vacuum
··
Dirt Container full
··
Dirt Container or Upper Tank not installed
properly
··
Filters are dirty
Vacuum cleaner is difficult to push.
Possible Causes
··
Incorrect Height Adjustment
Visible dirt escaping from cleaner.
Possible Causes
··
Dirt Container full
··
Filters missing or installed incorrectly
··
Dirt Container installed incorrectly
If suggested solutions do not correct the problem, call:
Esta aspiradora cumple las siguientes directivas
de EMC: 89/336/EEC, 92/31/EEC y 93/68/EEC
Directiva sobre seguridad en aparatos de bajo voltaje: 73/23/EEC y 93/68/EEC
Remedies
··
Check electrical plug
··
Check/replace fuse - Reset breaker
Remedies
··
Adjust Powerfoot to correct height setting
Grasp Quick Reach Handle and firmly push Hose
··
Wand onto the suction opening
··
Check Hose and replace if needed
Remedies
··
Replace Drive Belt, see pg. 9
··
Replace brush
··
Remove brush and clean debris from brush ends
··
Follow instructions on pg. 10 for clearing clogs
··
Empty Dirt Container
··
Position correctly and lock in place
··
Check and clean Upper Tank, Pre-Motor and PostMotor Filters
Remedies
··
Check Hose and replace if needed
··
Follow instructions on pg. 10 for clearing clogs
··
Empty Dirt Container
··
Position correctly and lock in place
··
Check and clean Upper Tank, Pre-Motor and PostMotor Filters
Remedies
··
Adjust Powerfoot to correct height setting
Remedies
··
Empty Dirt Container
··
Check Upper Tank, Pre-Motor and Post-Motor
Filters for correct installation
··
Pull out and re-insert Dirt Container correctly
DJ68-00148F REV(0.2
)
 Loading...