

Page 1

English
Vacuum Cleaner
user manual
SC12F50 series
✻ Before operating this unit, please read the instructions carefully.
✻ For indoor use only.
Thank you for purchasing a Samsung product.
To receive a more complete service,
please register your product at
www.samsung.com/register
Page 2
safety information
SAFETY INFORMATION
WARNING
WARNING
• Before operating the appliance, please read this manual thoroughly and retain it for your
reference.
• Because these following operating instructions cover various models, the characteristics of
your vacuum cleaner may differ slightly from those described in this manual.
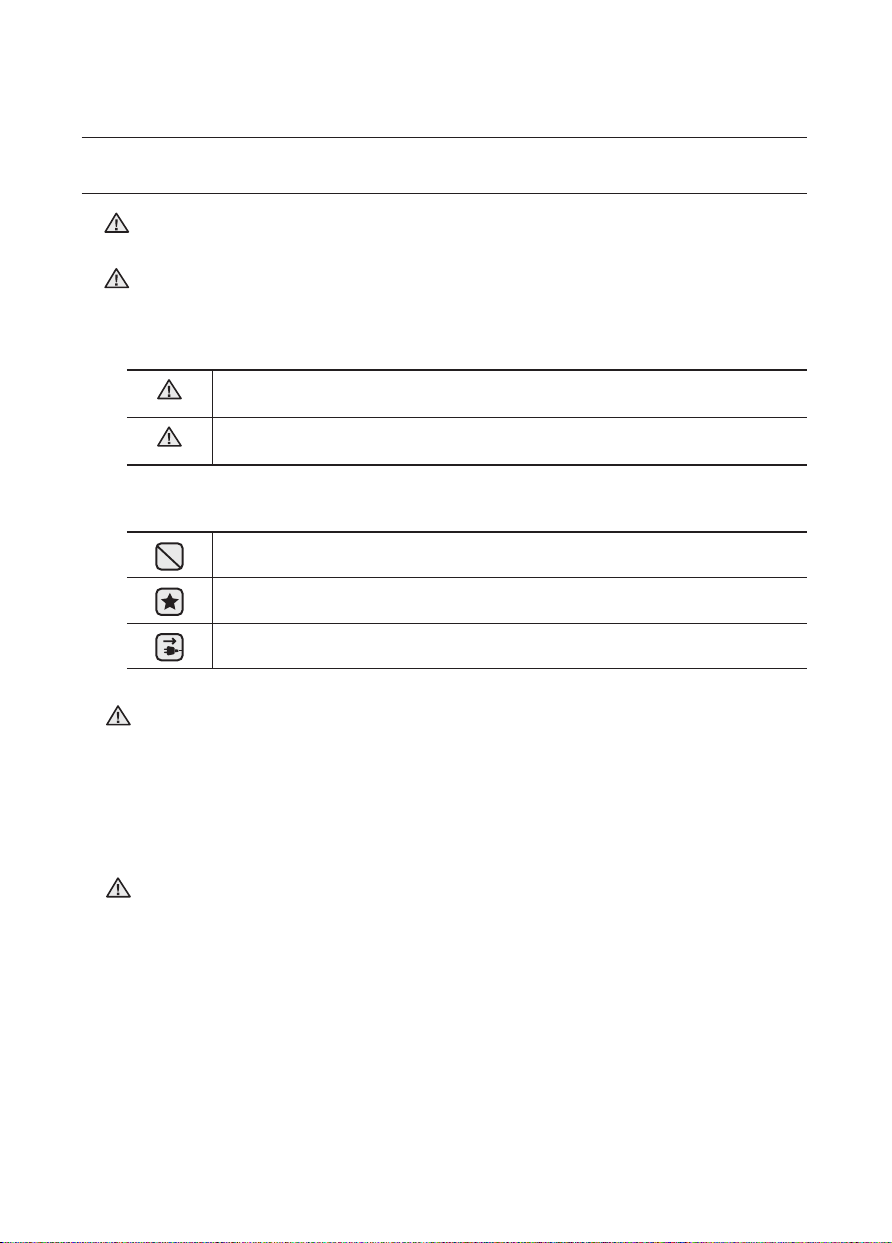
CAUTION/WARNING SYMBOLS USED
WARNING
CAUTION
Indicates that a danger of death or serious injury exists.
Indicates that a risk of personal injury or material damage exists.
OTHER SYMBOLS USED
Represents something you must NOT do.
Represents something you must follow.
Indicates that you must disconnect the power plug from the socket.
WARNING
This vacuum cleaner is designed for household use only.
Do not use this vacuum cleaner to clean building waste and debris.
Regularly keep the filters in clean conditions to prevent of collecting fine dust in them.
Do not use this vacuum cleaner with any of the filters removed.
Failure to meet these requirements could cause damage to the internal parts and
void your warranty.
State of California Proposition 65 Warning (US only)
WARNING
02_ safety information
This product contains chemicals known to the State of California to cause cancer
and reproductive toxicity.
Page 3

safety information
IMPORTANT SAFETY INSTRUCTIONS
When using an electrical appliance, you should always follow these basic precautions:
READ ALL INSTRUCTIONS BEFORE USING YOUR CANISTER
VACCUM
WARNING
– TO REDUCE THE RISK OF FIRE, ELECTRIC
SHOCK, OR INJURY:
1. Do not leave the appliance unattended when it is plugged in. Unplug from the outlet
when not in use and before servicing.
2. Do not use outdoors or on wet surfaces.
3. Do not allow the vacuum to be used as a toy. Pay close attention when the vacuum is
used by or near children.
4. Use only as described in this manual. Use only manufacturer’s recommended
attachments.
5. Do not use with a damaged cord or plug. If the appliance is not working as it should,
has been dropped, damaged, left outdoors, or dropped into water, bring it to a service
center.
6. Do not pull or carry by the cord, use the cord as a handle, close a door on the cord, or
pull the cord around sharp edges or corners. Do not run appliance over the cord.
Keep the cord away from heated surfaces.
7. Do not unplug by pulling on the cord. To unplug, grasp the plug, not the cord.
8. Do not handle the plug or appliance with wet hands.
9. Do not put any object into openings. Do not use with any opening blocked.
Keep free of dust, lint, hair, and anything that may reduce air flow.
10. Keep hair, loose clothing, fingers, and all parts of your body away from openings and
moving parts.
11. Turn off all controls before unplugging.
12. Use extra care when cleaning on stairs.
13. Do not use to pick up flammable or combustible liquids, such as gasoline, or use in
areas where they may be present.
14. Do not pick up anything that is burning or smoking, such as cigarettes, matches, or
hot ashes.
15. Do not use without the dirt cup and/or filters in place.
16. Do not use the vacuum cleaner in an enclosed space filled with vapors given off by oil
base paint, paint thinner, some moth proofing substances, flammable dust, or other
explosive or toxic materials.
safety information _03
Page 4

17. Do not pick up hard or sharp objects such as glass, nails, screws, coins, etc.
18. The hose contains electrical wires. Do not use when damaged, cut, or punctured.
Avoid picking up sharp objects.
19. Always turn off this appliance before connecting or disconnecting either the hose or
motorized nozzle.
20. Unplug before connecting the motorized nozzle.
21. Hold the plug when rewinding onto the cord reel. Do not allow the plug to whip when
rewinding.
SAVE THESE INSTRUCTIONS
POLARIZED PLUG INSTRUCTIONS
- To reduce the risk of electric shock, this appliance has a polarized plug (one blade is wider than the
other). This plug will fit in a polarized outlet only one way. If the plug does not fit fully in the outlet,
reverse the plug. If it still does not fit, contact a qualified electrician to install the proper outlet. Do not
change the plug in any way.
04_ safety information
Page 5

contents
ASSEMBLING THE CLEANER
06
OPERATING THE CLEANER
07
MAINTAIN TOOLS AND FILTER
11
TROUBLESHOOTING
21
07 Power cord
07 Power control
10 Power brush (SC12F50P Series)
11 Power brush (SC12F50P Series)
13 Using accessory
15 Maintain floor tools
17 Emptying the dust bin
18 Cleaning the dust filter
19 Cleaning the dust filter
20 Cleaning the outlet filter
20 Changing the battery
contents _05
Page 6
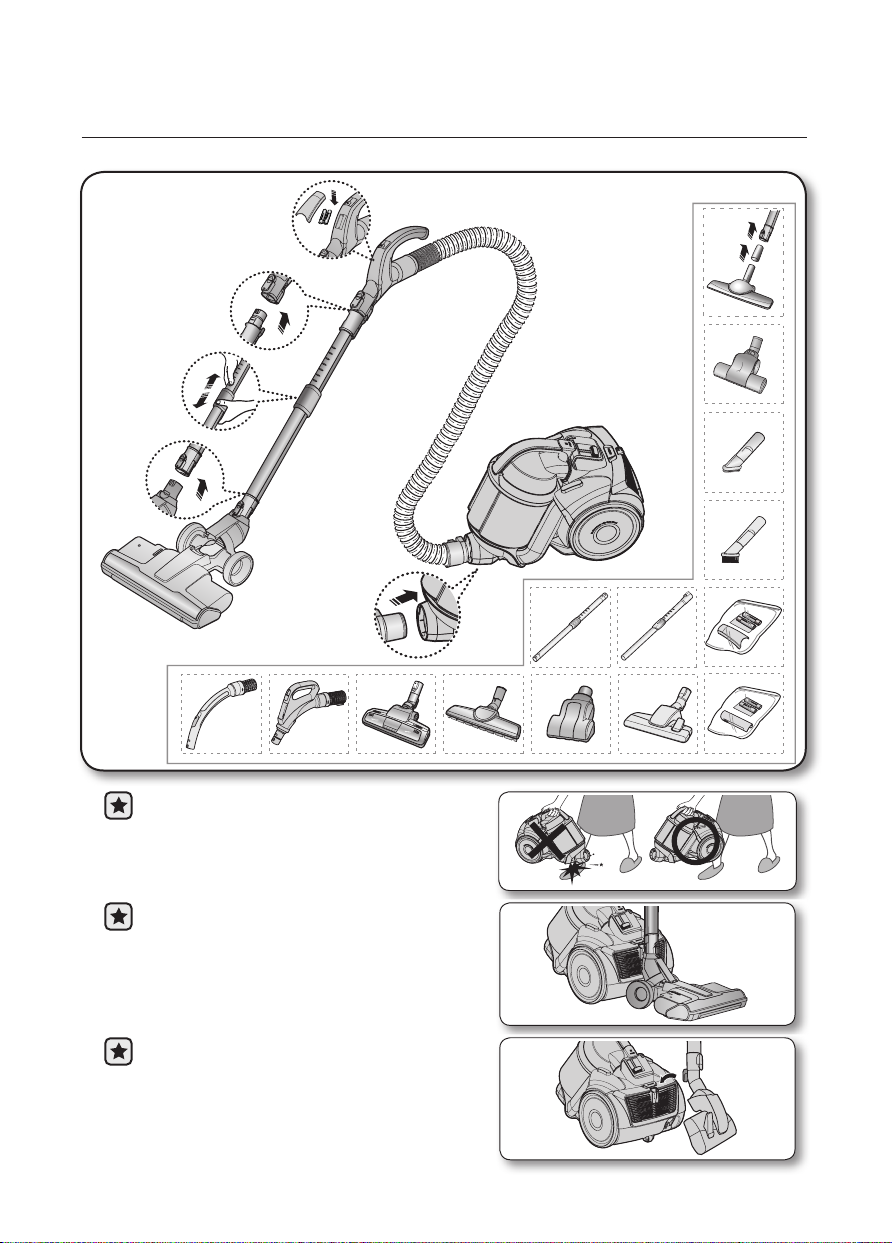
assembling the cleaner
Optional
• Please do not press the button of dust bin
handle when carrying machine.
• For storage, upright the pipe on the floor.
(SC12F50P Series)
• For storage, park the floor nozzle.
(SC12F50H,SC12F50V Series)
06_ assembling the cleaner
Page 7
operating the cleaner
POWER CORD
• When removing the plug from the electrical outlet, grasp the plug, not the
CAUTION
cord.
02 OPERATING THE CLEANER
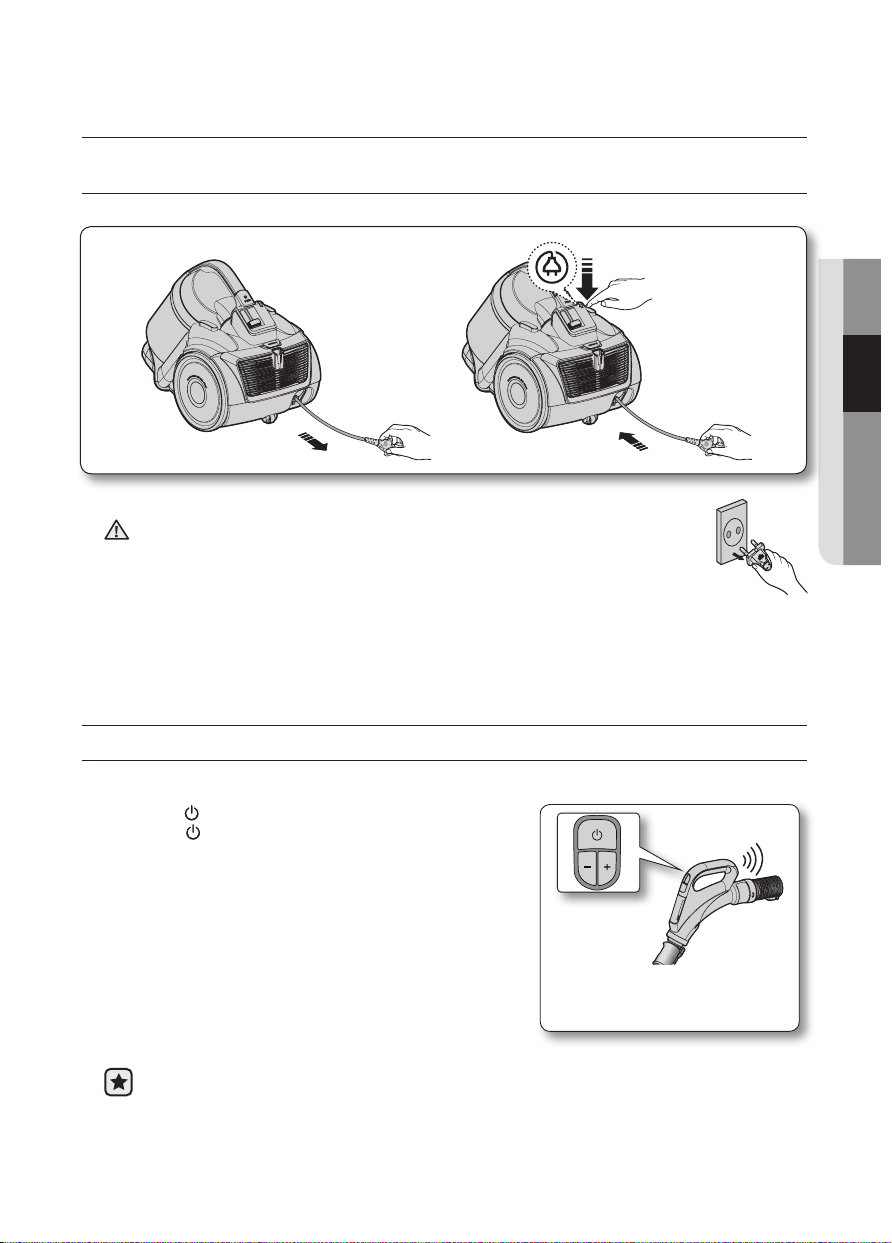
POWER CONTROL
Radio frequency remote-control (SC12F50H Series)
HOSE (SC12F50H Series)
1. ON/OFF [ ] Button
- Press the [ ] button to operate the vacuum cleaner. Press
again to stop the vacuum cleaner.
2. Suction [+], [-] Button
- Press the [+] button to operate the vacuum to high suction
power. Press the [-] button to operate the vacuum to low
suction power.
If no button is pressed for 30 minutes while cleaning, the safety device is activated and the
power is cut off.
In this case, press the [Power] button on the main unit or unplug and then plug the power
cord in again.
Handle Control
The cleaner is controlled by radio
frequency signals.
operating the cleaner _07
Page 8

operating the cleaner
HOSE (SC12F50P Series)
1. Vacuum cleaner ON/OFF( )
- Press the ON/OFF button to operate the vacuum cleaner.
Press again to stop the vacuum cleaner.
2. Vaccum cleaner suction(-/+)
- Press the SUCTION (+/) button to increase or decrease
the suction power. Each time you press the button, you
gradually increase the suction power. After the suction
power reaches its maximum, the next time you press the
button, you return the suction power to its minimum.
3. BRUSH ON/OFF
- Press the BRUSH ON/OFF button to operate the Power Brush. Press again to stop the Power Brush.
Don’t cover the handle transmitter when you use a handle control button.
Handle Control
The cleaner is controlled by radio
frequency signals.
transmitter
FCC NOTICE / FCC ID : A3LROH20S
This device complies with part 15 of the FCC Rules. Operation is subject to the following two
conditions:
1. This device may not cause harmful interference, and
2. This device must accept any interference received, including interference that may cause
undesired operation.
BODY
Press the power ON/OFF button repeatedly to start and to
stop the vacuum cleaner. (OFF → ON → OFF)
If the remote handle control is not working, the
cleaner can be operated using the ON/OFF button on
the body of the machine.
08_ operating the cleaner
The ON/OFF button operates the vacuum cleanner or stops it.
The filter light is illuminated when the dust pack requires checking or emptying.
1
2
Page 9
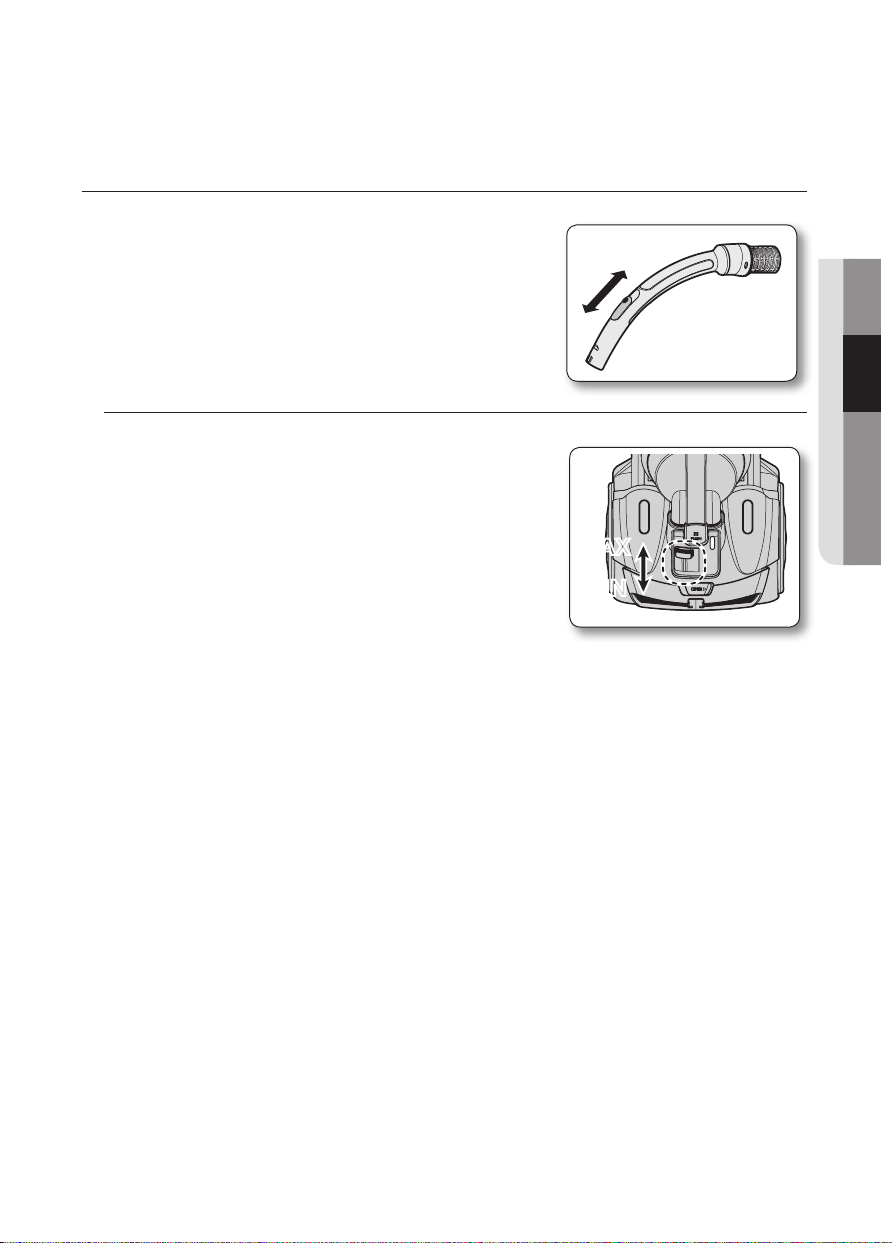
Body-control type (SC12F50V Series)
- HOSE
To reduce suction for leaning draperies, small rugs, and
other light fabrics, pull the tap air until the hole is open
- BODY
To control power level, just slide the power control up and
down.
MIN = For delicate fabrics, e.g.net curtains.
MAX = For hard floors and heavily soiled carpets.
MAX
MAX
MIN
MIN
02 OPERATING THE CLEANER
operating the cleaner _09
Page 10
operating the cleaner
POWER BRUSH (SC12F50P SERIES)
Vacuuming with the power brush
1. Attaching the power brush
The hose must be plugged into the canister and the power
brush must be plugged into the hose and extension wand.
2. Vacuuming
• For best results, move the power brush slowly using short,
overlapping strokes.
• For heavily soiled areas, repeat strokes in several directions.
CAUTION
Do not invert the power brush while it is running.
3. Checking the Performance of the power brush
You can check whether the power brush is operating correctly by lifting up the extension tube
slightly to view the back of the brush.
The power brush will not operate when it is jammed or the unit is turned off.
If the power brush is jammed, unplug the power cord from the electrical outlet.
Turn the power brush over and remove the jammed object.
Turn the power brush back to the vacuuming position and resume vacuuming.
Overload protector
The overload protector shuts off the brush motor if the
floor brush becomes obstructed. The floor brush will
stop, but the suction motor will continue to run. To reset
the overload protector, turn the vacuum off and unplug
it. Clear the obstruction from the floor brush area. Use
a pen tip to press down the reset switch. Turn the
vacuum on and continue cleaning.
Reset S/W
10_ operating the cleaner
Page 11
maintain tools and filter
POWER BRUSH (SC12F50P SERIES)
CHECKING the Rotating Floor Brush and Drive Belt
You should check your vacuum cleaner’s rotating floor brush and drive belt regularly for wear or
damage. You should also clean strings, hair, and carpet fibers off the brush and brush ends. These
can wrap around the brush and hamper its ability to effectively clean your carpet. Also remove any
debris that has accumulated under the brush cover.
1. Unplug the vacuum from the electrical outlet.
2. Place the handle in low position and turn the vacuum cleaner over so the bottom side is up.
3. Remove the five screws (at arrows, right) with a screwdriver.
4. Remove the brush cover from the floor brush.
5. Grasp the rotating floor brush at both ends and lift.
6. Clean string, hair and other debris off the rotating floor brush, paying particular attention to brush
ends.
7. Clean string, hair and other debris off the motor pulley and drive belt areas.
8. Check the drive belt carefully for wear, cuts or stressed areas.
9. Check the air passageway for obstructions. Remove debris from this area.
03 MAINTAIN TOOLS AND FILTER
CAUTION
The rotating floor brush could cause the fringe of a rug to become tangled within the
vacuum.
Use caution and turn off the floor brush when vacuuming throw rugs with fringe.
Brush
Cover
maintain tools and filter _11
Page 12
maintain tools and filter
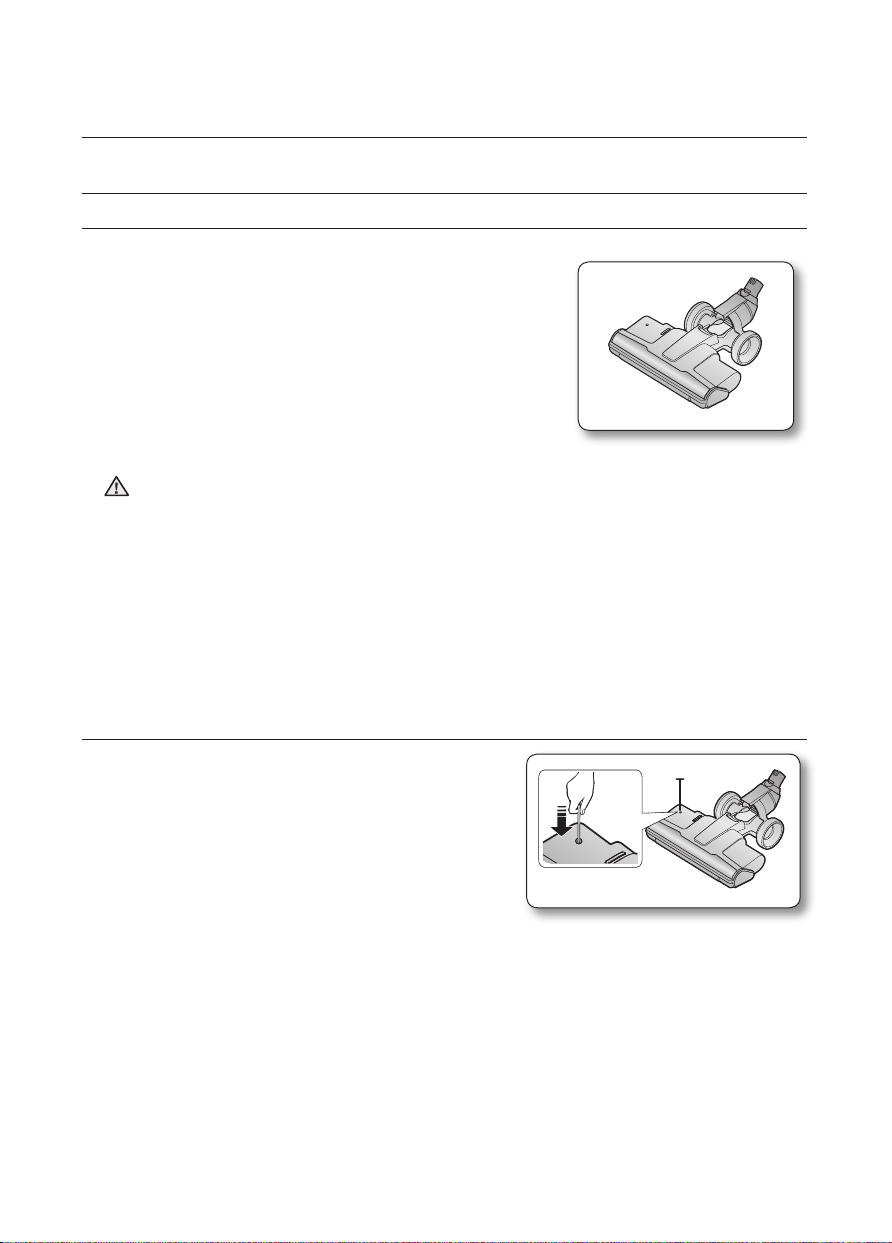
Parquet brush (OPTIONAL)
• Vacuums dust in a wide area at once.
• Remove waste matter completely from the
inlet if the inlet is blocked.
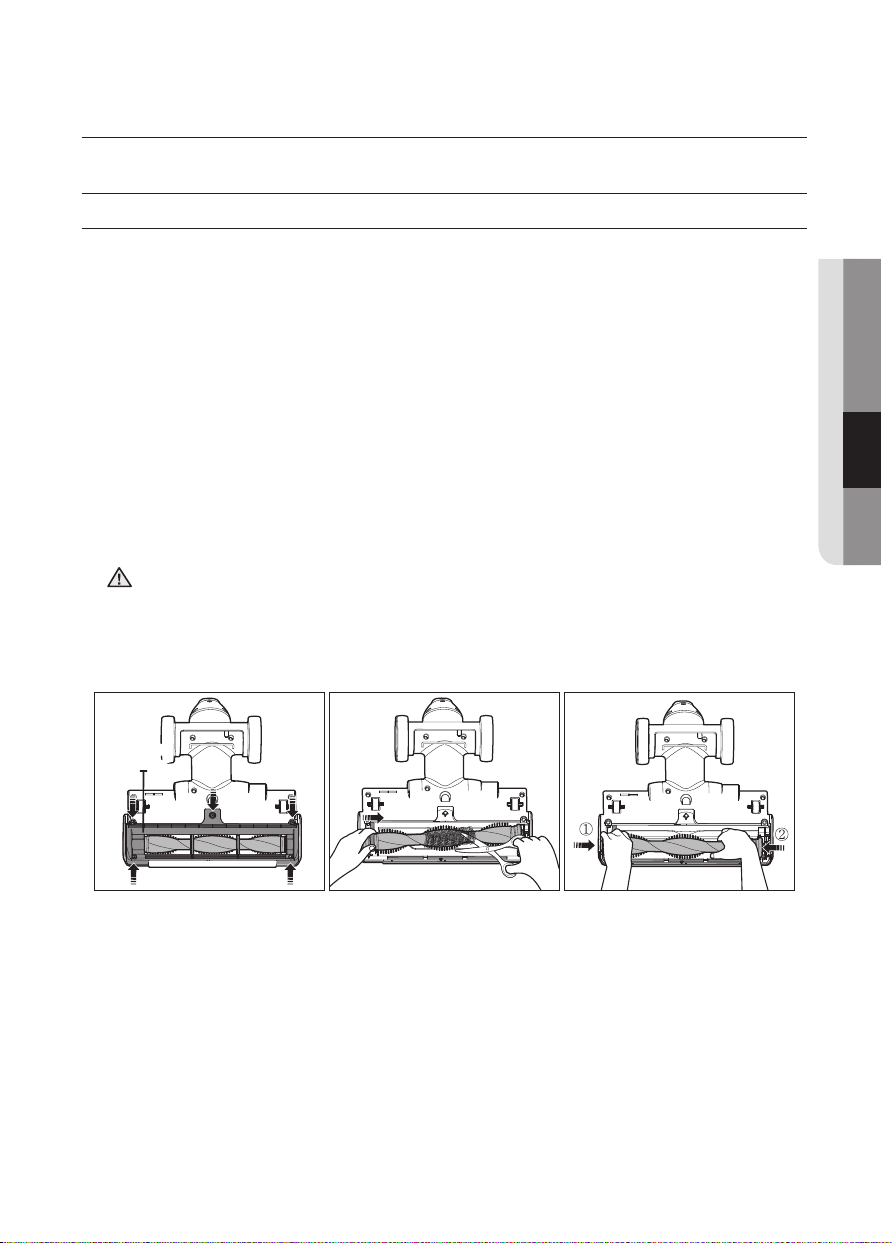
Blanket brush (OPTIONAL)
1
For picking up pet hair
and fibre on upholstery
and bed linen.
1. Remove waste matter completely when inlet is blocked.
2. Turn the lock button to ( ), and remove.
3. To reassemble, align the cover to the front of the main body and close. After closing the cover,
ensure that the lock button is turned to the ( ) position.
CAUTION
Use for bedclothes only. Be careful not to damage the brush during unclogging.
2 3
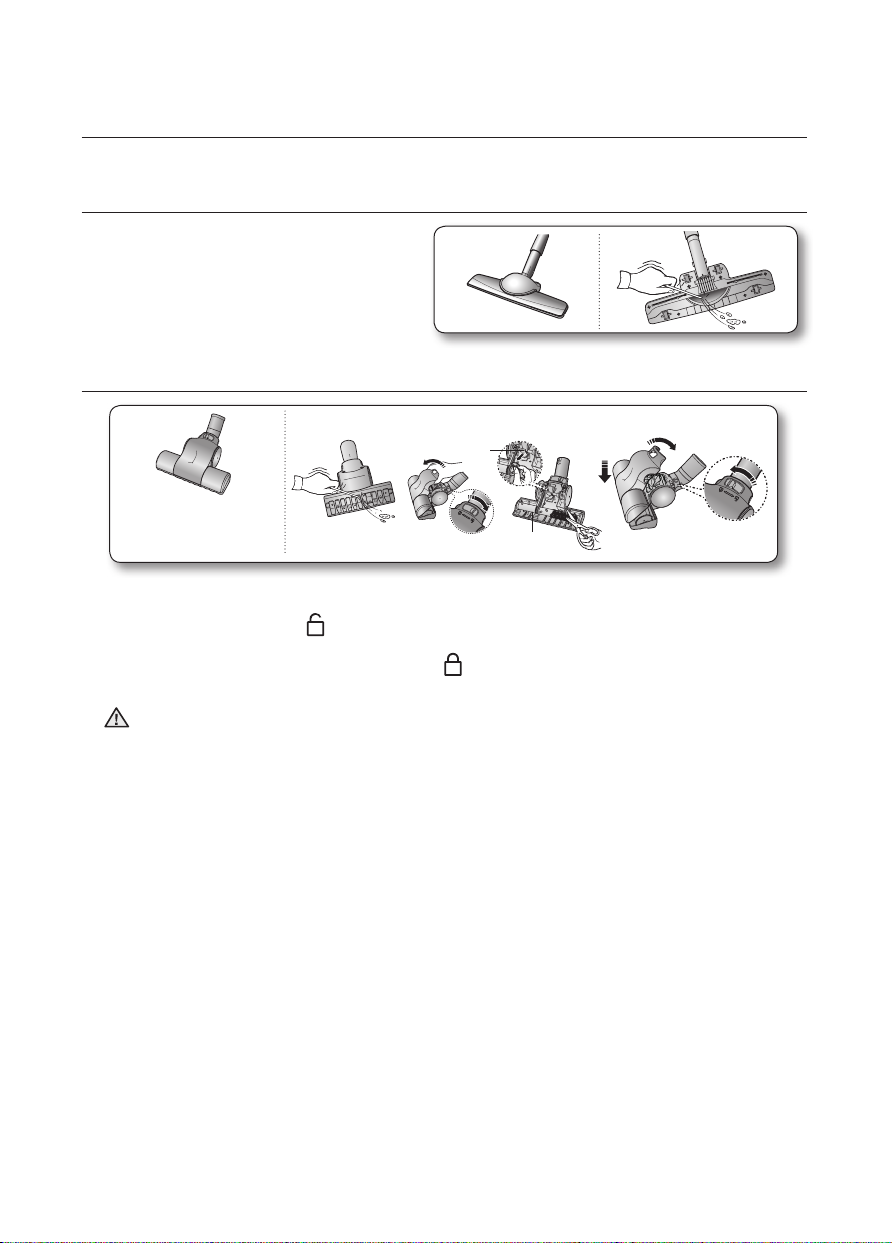
Turbine
Brush
12_ maintain tools and filter
Page 13

USING ACCESSORY
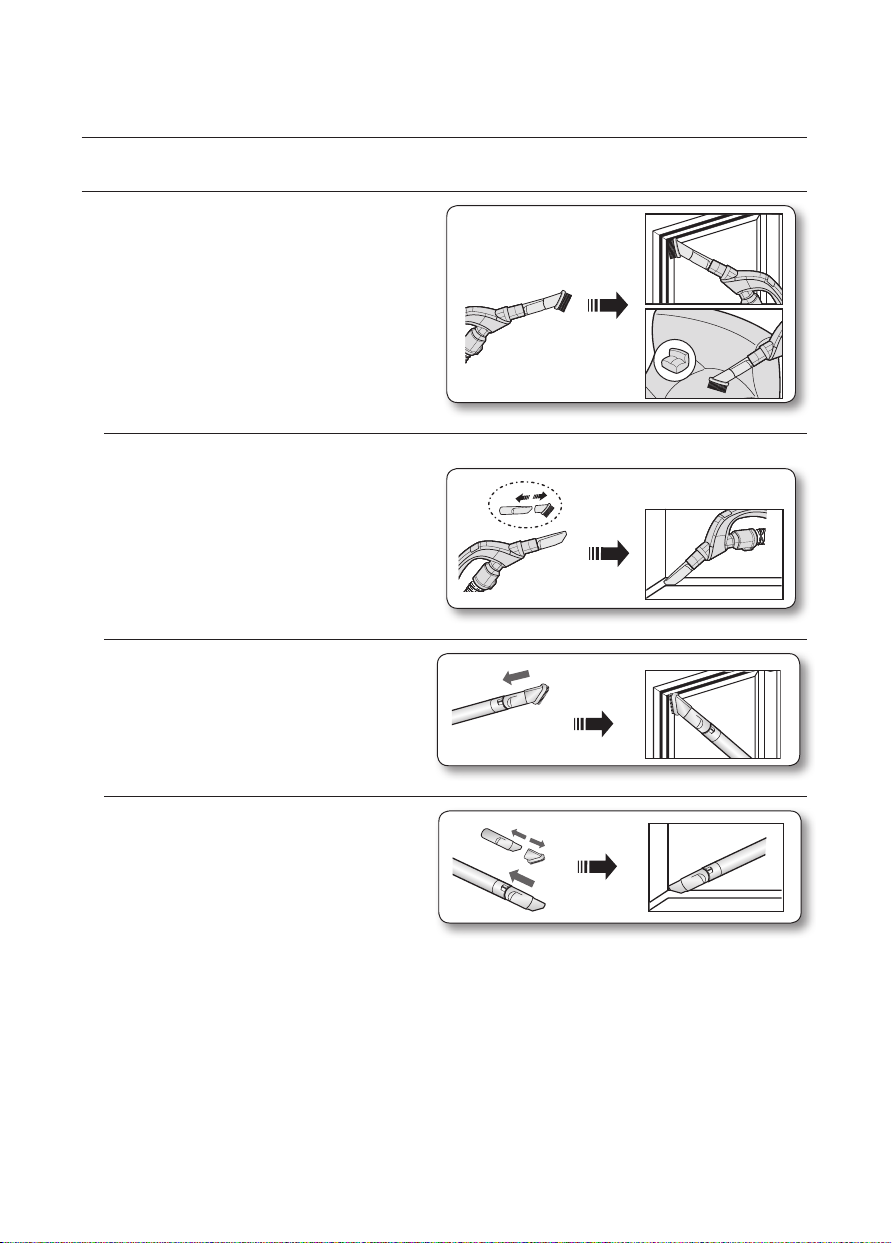
Pipe
• Adjust the length of the telescopic pipe by sliding the length control
button located in the center of the telescopic pipe back and forth.
• To check for blockages, separate the telescopic pipe and adjust to
shorten. This allows for easier removal of waste clogging the tube.
Accessory (SC12F50H,SC12F50V Series)
• To use the upholstery tool, push the accessory
on to the end of the hose handle.
03 MAINTAIN TOOLS AND FILTER
• Pull out the button, to use the dusting brush.
• To use the crevice tool, push the accessory on
to the end of the hose handle in the opposite
direction.
maintain tools and filter _13
Page 14
maintain tools and filter
Accessories (SC12F50P Series)
• Push the accessory onto the end of the hose
handle.
• Pull out the dusting brush to use the crevice
tool.
• Push the accessory onto the end of the pipe.
• Pull out the dusting brush to use the crevice
tool.
14_ maintain tools and filter
Page 15

MAINTAIN FLOOR TOOLS
2-Step Brush (Optional)
Carpet Cleaning Floor Cleaning
• Adjust the inlet lever according to the floor surface.
• Remove waste matter completely if the inlet is blocked.
Power Pet Plus Brush (Optional)
03 MAINTAIN TOOLS AND FILTER
1 2
For improved pickup
of pet hair and fibre on
carpets.
Frequent vacuuming of hair or pet fur may cause a falling-off of the rotation due to matters tangled around
the drum. In this case, clean the drum with care.
1. Push the Open button of the transparent screen cover to separate the cover.
2. Remove the brushbar from the transparent screen.
3. Remove waste matter such as dust and hair tangled around the brushbar using scissors.
4. Remove dust inside the brush housing using a dry duster or crevice tool.
5. Insert brushbar into rotating belt and assemble.
6. Click the transparent screen cover back into place to reassemble.
4 5
3
6
Parquet Master Brush (Optional)
• Vacuum dust in wide area at once.
• Remove waste matter completely if the inlet
is blocked.
maintain tools and filter _15
Page 16

maintain tools and filter
Mini turbo brush (Optional)
- To replace brushroll
1. If a clog is present or debris is visible, unscrew the two screws on
the back of the Mini turbo brush to remove the faceplate and clear
any obstructions.
2. Inspect condition of brushroll.
Replace brushroll if brushes are worn down.
To remove brushroll, pull up and out of end slots in nozzle housing.
Insert ends of brushroll into same slots to replace.
Inspect belt to ensure that it is in good condition.
If belt is broken or cracked, replace belt according to To Replace
Belt instructions.
3. Using at MAX.
Press the MAX button to operate the vacuum at maximum intake.
- To replace belt
1. Remove bottom plate.
See figure in to replace brushroll instructions.
2. Loop one end of new belt around shaft of pulley.
3. Loop other end of belt around designated area for it on brushroll.
Insert brushroll into slots in nozzle housing.
See figure in to replace brushroll instructions.
4. Fit Mini turbo brush back together as described in to replace
brushroll instructions.
16_ maintain tools and filter
Page 17
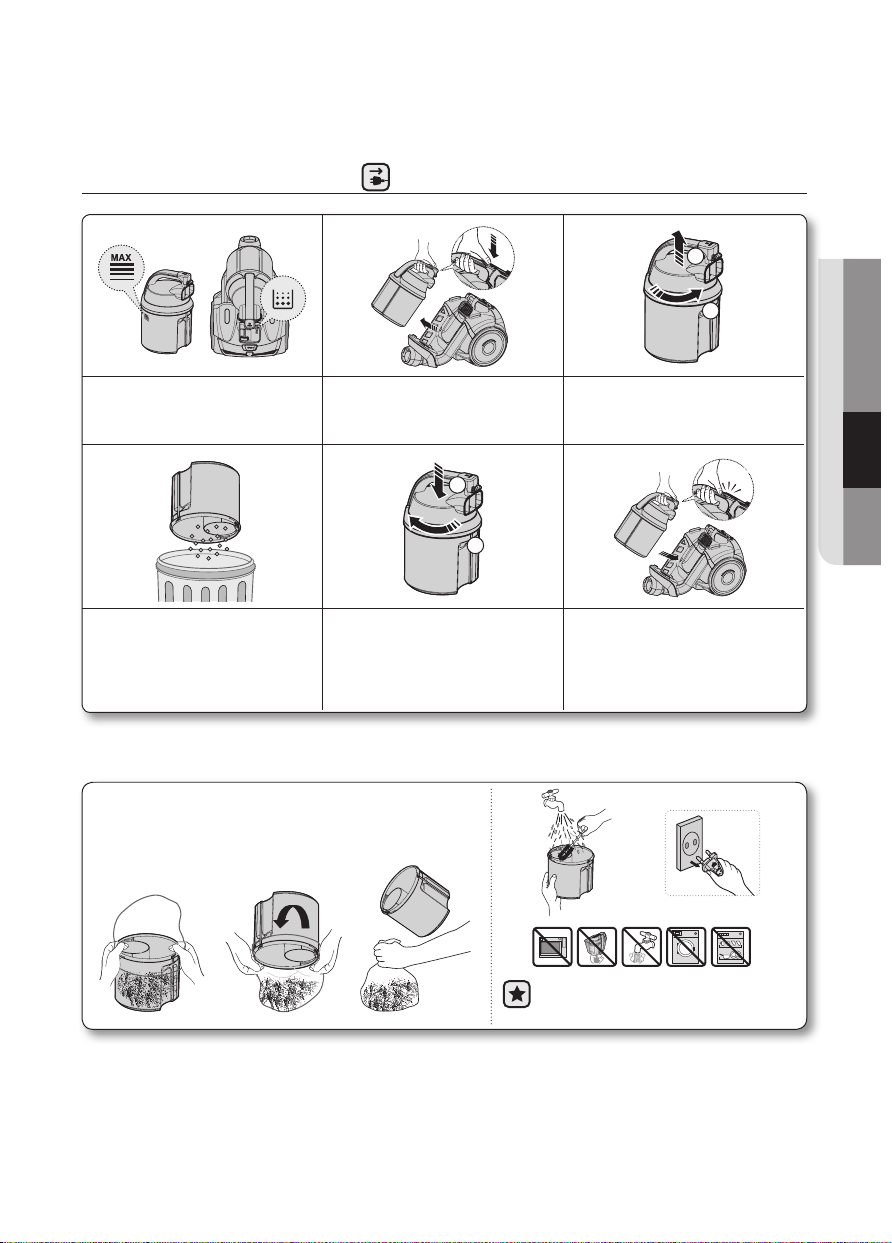
EMPTYING THE DUST BIN
1 2 3
2
1
03 MAINTAIN TOOLS AND FILTER
Once dust reaches the dust full
mark, empty the dust bin.
Take the dust bin out by pushing
the button.
4 5 6
1
2
Throw the dust away in the bin. Close the dust bin cover.
• Empty into a plastic bag.
(recommended for asthma/allergy sufferers)
Separate the dust bin cover.
Click
Before use, push the dust
bin into the main body of the
vacuum cleaner until you hear
the “click” sound.
You may rinse the dust bin with cold
water.
maintain tools and filter _17
Page 18
maintain tools and filter
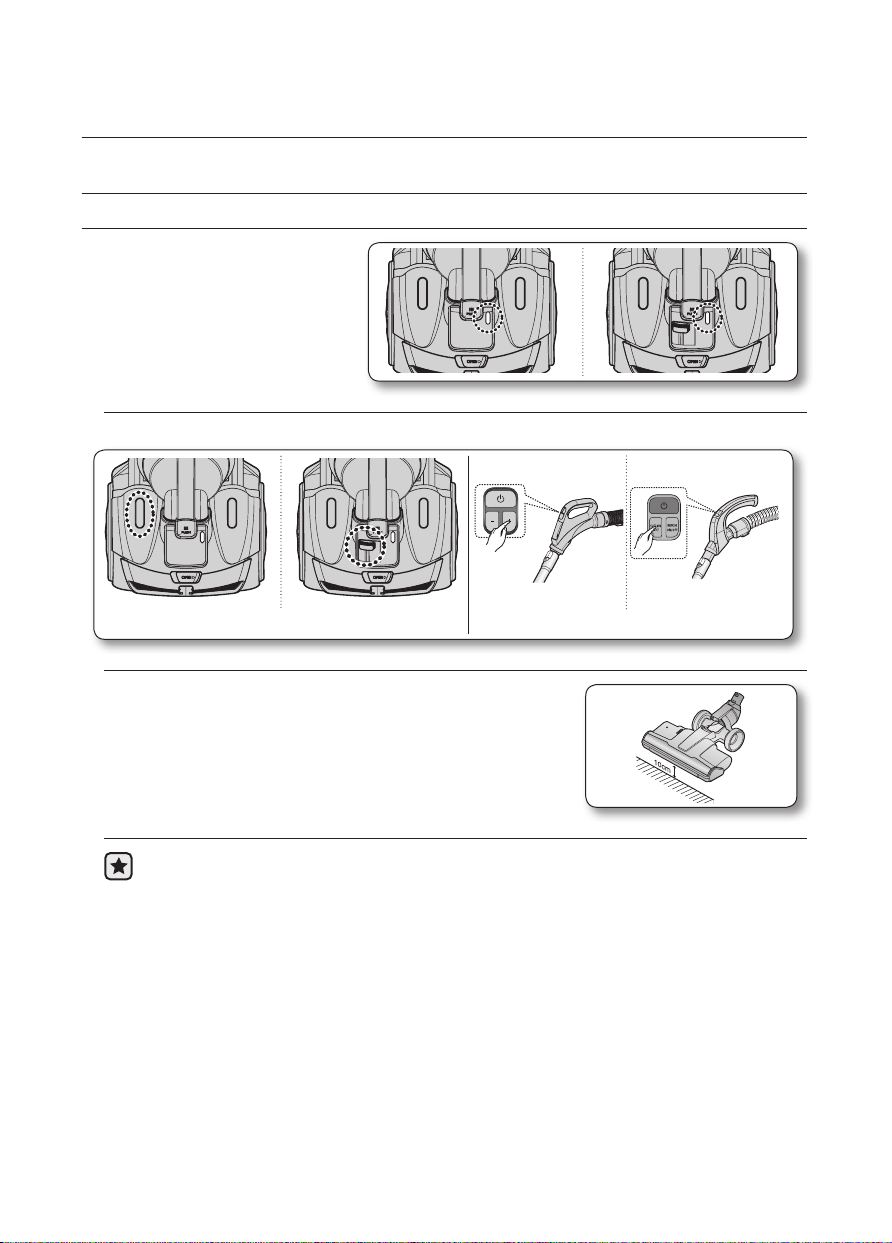
CLEANING THE DUST FILTER
When to clean the dust filter
• The lamp will turn red when suction
is reduced. If the light comes on,
please clean the dust filter.
• Turn the vacuum power to ‘MAX’.
• If the filter check indicator turns red with the inlet floating 10cm
above flat floor, clean the dust pack.
Handle ControlBody Control
When suction is noticeably reduced continuously or vacuum cleaner abnormally overheats,
please clean the dust pack.
18_ maintain tools and filter
Page 19
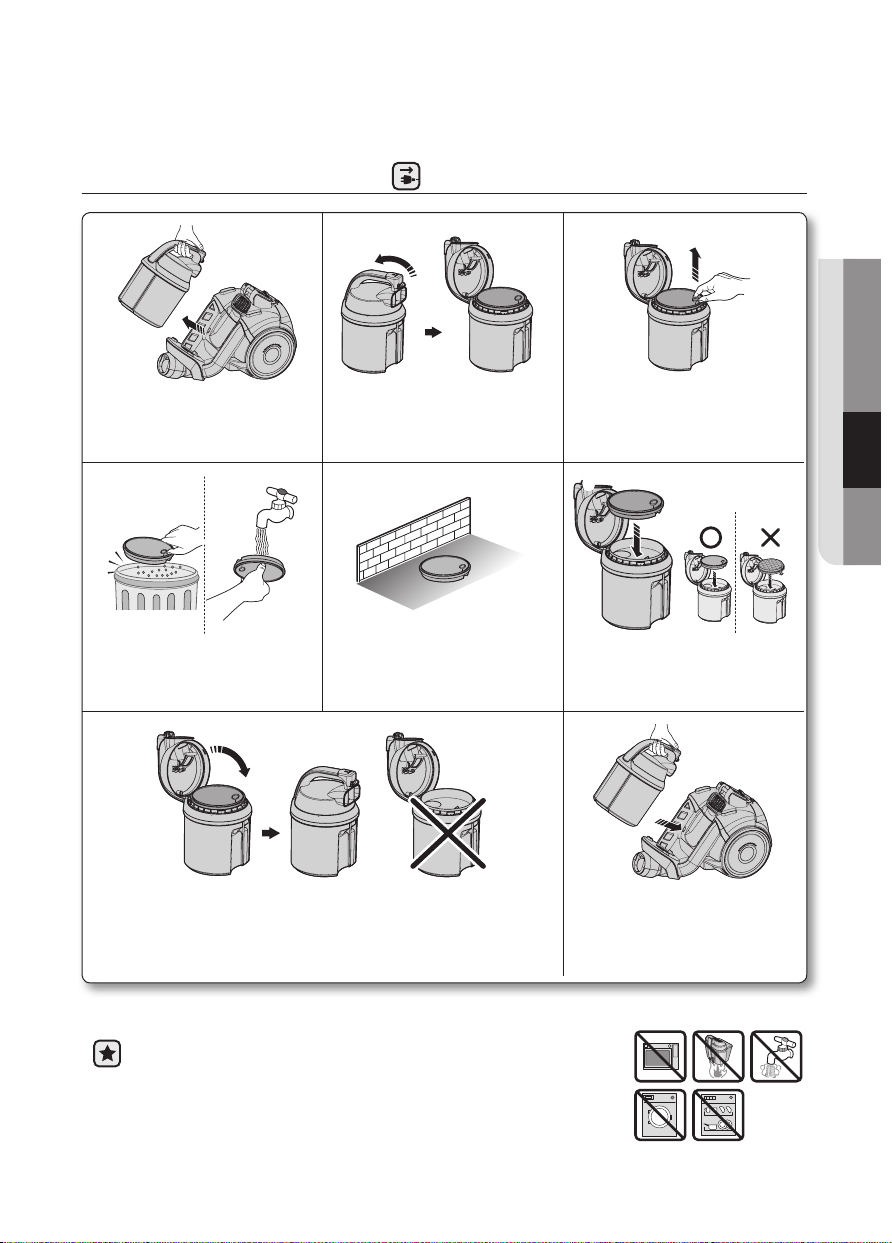
CLEANING THE DUST FILTER
1 2 3
03 MAINTAIN TOOLS AND FILTER
Take the dust bin out. Pull the dust bin cover to open.
4 5 6
Shake the filter over a garabage
can to remove loose dust, then
wash the filter with water.
Let the filter dry in the shade for
more than 12 hours.
7 8
Close the dust bin cover.
To close the dust bin cover,
filter should be assembled.
Remove the filter from the dust
bin.
Put the filter into the dust bin.
Before use, push the dust
bin into the main body of the
vacuum cleaner until you hear
the “click” sound.
Make sure the filter is completely dry before putting it back into the
vacuum cleaner. Allow 12 hours for it to dry.
maintain tools and filter _19
Page 20

CLEANING THE OUTLET FILTER
1 2 3
Remove the fixed frame part at
the back of the main body.
Pull out the HEPA filter using the
tab.
Pull out the micro filter
4 5
Clean the filter. Put the HEPA filter and frame part into the main body.
• When suction is noticeably reduced continuously or vacuum cleaner abnormally overheats,
please clean the outlet filter. Note. Do not wash HEPA filter.
If cleaning does not resolve the problem Please replace blocked out filter.
• Replacement filters are available at your local Samsung distributor.
CHANGING THE BATTERY
1. If the vacuum cleaner does not work, replace the batteries
in the handle.
If the problem persists, please contact an authorized
dealer.
2. Use 2 AAA batteries.
WARNING
20_ maintain tools and filter
1. Never disassemble or recharge the batteries.
2. Never heat up the batteries or throw them into a fire.
3. Do not reverse the (+), (-) poles.
4. Dispose of the batteries property.
BATTERY TYPE : AAA Size
Page 21

troubleshooting
PROBLEM SOLUTION
Motor does not start.
Suction force is gradually
decreasing.
Cord does not rewind
fully.
Vacuum cleaner does not
pick up dirt.
Low or decreasing
suction.
Body overheating. • Please check filters, if required clean as illustrated in the instruction.
Static electicity
discharge.
• Check cable, pulg and socket.
• Leave to cool.
• Check for blockage and remove.
• Pull the cord out 2-3m and push down the cord rewind button.
• Check hose and replace if required.
• Please check filter and, if required, clean as illustrated in the
instructions. if filters are out of condition change them to new ones.
• Please decrease power suction.
• This can also occur when air in the room is very dry.
Please ventilate the room to air humidity become a normal.
04 TROUBLESHOOTING
troubleshooting _21
Page 22

memo
Page 23

memo
Page 24

Page 25

Français
Aspirateur
manuel d'utilisation
Série SC12F50
✻ Avant d'utiliser cet appareil, veuillez lire attentivement les instructions.
✻ Utilisation intérieure uniquement.
Merci d'avoir choisi un produit Samsung.
Afin de bénéficier d'un service plus complet,
veuillez enregistrer votre produit à l'adresse
www.samsung.com/register
Page 26

consignes de sécurité
CONSIGNES DE SÉCURITÉ
AVERTISSEMENT
AVERTISSEMENT
• Avant d'utiliser cet appareil, veuillez lire attentivement ce manuel et le conserver pour toute
référence ultérieure.
• Les instructions d'utilisation suivantes concernent plusieurs modèles; il est donc possible
que les caractéristiques de votre aspirateur soient légèrement différentes de celles
spécifiées dans ce manuel.
SYMBOLES ATTENTION/AVERTISSEMENT UTILISÉS
AVERTISSEMENT
ATTENTION
Indique un danger de mort ou de blessure grave.
Indique un risque de blessure ou de dégât matériel.
AUTRES SYMBOLES UTILISÉS
Indique une action INTERDITE.
Indique une action que vous devez effectuer.
Indique que vous devez débrancher la fiche d'alimentation de la prise.
AVERTISSEMENT
Cet aspirateur est destiné à une utilisation domestique uniquement.
Ne l'utilisez pas pour le nettoyage de saletés et débris provenant de la construction.
Maintenez les filtres régulièrement propres afin d'éviter l'infiltration de toute fine poussière.
N'utilisez pas cet aspirateur lorsque l'un des filtres a été retiré.
Sinon, cela risquerait d'endommager les composants internes et d'annuler la
garantie.
État de Californie Proposition 65 Avertissement (États-Unis uniquement)
AVERTISSEMENT
02_ consignes de sécurité
Ce produit contient des produits chimiques reconnus par l’Etat de
Californie pour causer le cancer et la toxicité reproductive.
Page 27

consignes de sécurité
CONSIGNES IMPORTANTES DE
SÉCURITÉ
Lors de l'utilisation d'un appareil électrique, suivez toujours ces précautions de base:
LISEZ TOUTES LES INSTRUCTIONS AVANT D'UTILISER VOTRE
ASPIRATEUR TRAINEAU
AVERTISSEMENT
– POUR LIMITER TOUT RISQUE
D'INCENDIE, D'ÉLECTROCUTION OU DE BLESSURE:
1. Ne laissez pas l'appareil sans surveillance lorsqu'il est branché. Débranchez-le lorsque
vous ne l'utilisez pas ou avant toute opération d'entretien.
2. N'utilisez pas l'appareil à l'extérieur ni sur des surfaces mouillées.
3. Cet aspirateur ne doit pas être utilisé comme un jouet. Prêtez une attention particulière
aux enfants qui vous entourent lorsque vous utilisez l'aspirateur.
4. Utilisez cet appareil uniquement tel qu’indiqué dans le présent manuel. Utilisez des
accessoires recommandés par le fabricant uniquement.
5. N’utilisez jamais de cordon ou de prise endommagé(e). Si l'appareil fonctionne
anormalement, a reçu un choc, a été endommagé, laissé à l'extérieur ou plongé dans
l'eau, retournez-le au centre d'assistance.
6. Ne tirez pas sur le cordon; ne soulevez pas l’appareil par le cordon; n'utilisez pas le
cordon comme poignée; ne fermez pas de porte sur le cordon; ne tirez pas le cordon
sur des rebords ou des angles coupants. Ne placez pas l'appareil sur le cordon.
Maintenez le cordon éloigné des surfaces chauffées.
7. Ne débranchez pas l’appareil en tirant sur le cordon. Pour débrancher, tenez la prise
et non le cordon.
8. Ne manipulez pas la prise ou l'appareil si vous avez les mains mouillées.
9. N’insérez aucun objet dans les ouvertures. N’utilisez pas l’appareil si l’une des
ouvertures est obstruée.
Nettoyez régulièrement les ouvertures pour éliminer toute trace de poussière,
peluches, cheveux, ou toute autre chose risquant d'empêcher le passage de l’air.
10. Maintenez les cheveux, les vêtements larges, les doigts et toute autre partie de votre
corps loin des ouvertures et des pièces en mouvement.
11. Mettez hors tension tous les contrôles avant de débrancher l'appareil.
12. Soyez très prudent lorsque vous nettoyez les escaliers.
13. N’aspirez jamais de liquides inflammables ou combustibles tels que de l’essence et
n’utilisez jamais l’appareil si de tels liquides risquent d’être présents.
14. N’aspirez jamais d’objets en train de brûler ou de fumer, tels que des cigarettes, des
allumettes ou des cendres chaudes.
15. N'utilisez pas l'aspirateur si le bac à poussière et/ou les filtres ne sont pas à leur place.
16. N’utilisez pas l'aspirateur dans un espace clos rempli de vapeurs de peinture à l’huile,
consignes de sécurité _03
Page 28

de diluant, de substances antimites, de poussières inflammables et autres éléments
explosifs ou toxiques.
17. N’aspirez jamais d’objets pointus ou tranchants tels que des morceaux de verres, des
clous, des vis, des pièces de monnaie, etc.
18. Le tuyau contient des câbles électriques. Ne l'utilisez pas s'il est endommagé, coupé
ou percé.
N'aspirez pas d'objets pointus.
19. Mettez toujours cet appareil hors tension avant de connecter ou déconnecter le tuyau
ou le suceur motorisé.
20. Débranchez l'appareil avant de connecter le suceur motorisé.
21. Tenez la fiche lorsque vous rembobinez le cordon afin d’éviter qu'il ne vous blesse.
CONSERVEZ CE MANUEL
D'UTILISATION
INSTRUCTIONS DES PRISES POLARISÉES
- Pour limiter les risques d’électrocution, cet appareil dispose d’une prise polarisée (une broche est plus
large que l’autre). Cette prise ne doit s’insérer dans la prise murale polarisée que dans un seul sens. Si
la prise ne s’enfonce pas entièrement dans la prise murale, retournez-la. Si elle ne s’enfonce toujours
pas correctement, contactez un électricien qualifié pour faire installer une prise murale adéquate. Ne
remplacez et ne modifiez jamais la prise.
04_ consignes de sécurité
Page 29

table des matières
MONTAGE DE L'ASPIRATEUR
06
FONCTIONNEMENT DE
L'ASPIRATEUR
07
ENTRETIEN DES OUTILS ET DU
FILTRE
11
DÉPANNAGE
21
07 Cordon d'alimentation
07 Contrôle de la puissance
10 Brosse motorisee (Série SC12F50P)
11 Brosse motorisee (Série SC12F50P)
13 Utilisation des accessoires
15 Entretien des brosses
17 Vider le réservoir de poussière
18 Nettoyage du filtre à poussière
19 Nettoyage du filtre à poussière
20 Nettoyage du filtre de sortie
20 Remplacement des piles
table des matières _05
Page 30

montage de l'aspirateur
En option
• N'appuyez pas sur le bouton de la poignée
du réservoir de poussière lorsque vous
portez l'appareil.
• Pour le stockage, redresser le tuyau sur le
sol. (SC12F50P Série)
• Avant d'entreposer l'aspirateur, fixez le
suceur à parquets sur sa position de
rangement. (SC12F50H,SC12F50V Série)
06_ montage de l'aspirateur
Page 31

fonctionnement de l'aspirateur
CORDON D'ALIMENTATION
02 FONCTIONNEMENT DE L'ASPIRATEUR
ATTENTION
• Lorsque vous débranchez la fiche d'une prise électrique, tenez la fiche, non
le cordon.
CONTRÔLE DE LA PUISSANCE
Télécommande à radiofréquence (Séries SC12F50H)
TUYAU (Série SC12F50H)
1. Bouton Marche/Arrêt [ ]
- Appuyez une fois sur le bouton [ ] pour mettre en marche
l’aspirateur. Appuyez dessus une seconde fois pour l’arrêter.
2. Bouton Aspiration [+], [-]
- Appuyez sur le bouton [+] pour augmenter la puissance
d'aspiration. Appuyez sur le bouton [-] pour diminuer la
puissance d'aspiration.
Si aucun bouton n'est pressé pendant 30minutes lors du nettoyage, le dispositif de sécurité
est activé et coupe l'alimentation.
Dans ce cas, appuyez sur le bouton [Mise en marche] de l'unité motorisee ou débranchez
puis rebranchez le cordon d'alimentation.
Commande sur la poignée
L'aspirateur est commandé par signaux
radioélectriques.
fonctionnement de l'aspirateur _07
Page 32

fonctionnement de l'aspirateur
TUYAU (Série SC12F50P)
1. MARCHE/ARRÊT de l’aspirateur ( )
- Appuyez une fois sur le bouton MARCHE/ARRÊT pour
mettre en marche l’aspirateur. Appuyez dessus une
seconde fois pour l’arrêter.
2. Aspiration de l'aspirateur (-/+)
- Appuyez sur le bouton SUCTION (-/+) (ASPIRATION) (-/+)
pour augmenter ou diminuer la puissance d'aspiration.
Chaque fois que le bouton est actionné, la puissance
d'aspiration est augmentée progressivement. Lorsque
l'aspirateur atteint sa puissance d’aspiration maximale,
celle-ci revient à sa valeur minimale lorsque vous appuyez
à nouveau sur le bouton.
3. BRUSH ON/OFF (MARCHE/ARRÊT DE LA BROSSE)
- Appuyez une fois sur le bouton BRUSH ON/OFF (MARCHE/ARRÊT DE LA BROSSE) pour mettre en
marche la brosse motorisee. Appuyez dessus une deuxième fois pour l'arrêter.
Ne placez pas d'obstacle devant l'émetteur lorsque vous utilisez la commande sur la poignée.
Commande sur la poignée
L'aspirateur est commandé par signaux
radioélectriques.
émetteur
NORME FCC/FFC ID: A3LROH20S
Cet appareil est conforme à la section 15 des Règles de la FCC. Les deux conditions de
fonctionnement suivantes sont requises:
1. Cet appareil ne doit pas provoquer d'interférence nocives et
2. Cet appareil doit accepter toute interférence reçue, même celles pouvant provoquer un
fonctionnement indésirable.
CORPS DE L'ASPIRATEUR
Appuyez plusieurs fois sur le bouton MARCHE/ARRÊT pour
démarrer et arrêter l'aspirateur. (OFF (ARRÊT)→ ON (MARCHE)
→ OFF (ARRÊT))
Si la télécommande sur la poignée ne fonctionne pas,
vous pouvez utiliser le bouton MARCHE/ARRÊT situé
sur le corps de l'appareil.
08_ fonctionnement de l'aspirateur
Le bouton MARCHE/ARRÊT met en route ou arrête l'aspirateur.
Le témoin du filtre s'allume lorsque le groupe filtrant doit être vérifié ou vidé.
1
2
Page 33

Type commande sur l'appareil (Série SC12F50V)
- TUYAU
Afin de réduire la puissance d'aspiration pour nettoyer des
rideaux, des petits tapis et autres tissus délicats, faites
coulisser la glissière d'aération jusqu'à faire apparaître
entièrement l'ouverture.
- CORPS DE L'ASPIRATEUR
Pour contrôler la puissance, il suffit de glisser le bouton de
mise en marche vers le haut ou vers le bas.
MIN=Pour les tissus délicats, comme les rideaux par
exemple.
MAX=Pour les sols durs et les moquettes très sales.
MAX
MAX
MIN
MIN
02 FONCTIONNEMENT DE L'ASPIRATEUR
fonctionnement de l'aspirateur _09
Page 34

fonctionnement de l'aspirateur
BROSSE MOTORISEE (SÉRIE SC12F50P)
Aspiration avec la brosse motorisee
1. Fixation de la brosse motorisee
Le tuyau doit être raccordé au traineau et la brosse
motorisee doit être fixée au tuyau et au tube télescopique.
2. Aspiration
• Pour de meilleurs résultats, déplacez la brosse motorisee
doucement sur des distances courtes et se chevauchant.
• Dans des zones très sales, passez l'aspirateur dans
plusieurs sens.
ATTENTION
Ne retournez pas la brosse motorisee pendant son fonctionnement.
3. Vérification des performances de la brosse motorisee
Vous pouvez vérifier si la brosse motorisee fonctionne correctement en soulevant légèrement le
tube d'extension pour voir la partie arrière de la brosse.
La brosse motorisee ne fonctionne pas lorsqu'elle est bouchée ou lorsque l'unité est hors
tension.
Si la brosse motorisee est bouchée, débranchez le cordon d'alimentation de la prise électrique.
Retournez la brosse motorisee et retirez l'objet coincé.
Remettez la brosse motorisee en place et reprenez l'aspiration.
Protecteur contre surcharges
Le protecteur contre surcharges coupe le moteur de la
brosse si celle-ci devient bouchée. La brosse s'arrête,
mais le moteur d'aspiration continue de fonctionner.
Pour réinitialiser le protecteur contre surcharges, mettez
l'aspirateur hors tension et débranchez-le. Retirez
l'objet provoquant l'obstruction de la zone de la brosse.
Utilisez un stylo pour appuyer sur le commutateur
de réinitialisation. Activez l'aspirateur et continuez de
l'utiliser.
Commutateur de réinitialisation
10_ fonctionnement de l'aspirateur
Page 35

entretien des outils et du filtre
BROSSE MOTORISEE (SÉRIE SC12F50P)
VÉRIFICATION de la brosse rotative et de la courroie d'entraînement
Vous devez vérifier régulièrement si la brosse rotative et la courroie d'entraînement de votre
aspirateur sont endommagées ou usées. En outre, vous devez nettoyer les ficelles, les cheveux
et les fibres de moquette de la brosse et de ses extrémités. Ces éléments pourraient s'enrouler
autour de la brosse et réduire la capacité à nettoyer efficacement votre tapis. Retirez également
tous les débris accumulés sous le cache de la brosse.
1. Débranchez l'aspirateur de la prise électrique.
2. Placez la poignée sur la position inférieure et retournez l'aspirateur pour que la partie inférieure
se situe en haut.
3. Retirez les five vis (au niveau des flèches du dessin à droite) à l'aide d'un tournevis.
4. Retirez le cache de la brosse.
5. Saisissez la brosse rotative des deux extrémités et soulevez-la.
6. Retirez les ficelles, les cheveux et les autres débris de la brosse rotative et soyez particulièrement
attentif aux extrémités de la brosse.
7. Retirez les ficelles, les cheveux et les autres débris des zones de la poulie du moteur et de la
courroie d'entraînement.
8. Vérifiez si la courroie d'entraînement est usée, coupée ou endommagée.
9. Vérifiez si le passage d'air est obstrué. Retirez les débris de cette zone.
La brosse rotative pourrait provoquer le happement d'une frange d'un rideau à l'intérieur de
CAUTION
l'aspirateur.
Soyez prudent et désactivez la brosse lorsque vous aspirez des rideaux avec des franges.
03 ENTRETIEN DES OUTILS ET DU FILTRE
Cache de
la brosse
entretien des outils et du filtre _11
Page 36

entretien des outils et du filtre
Brosse pour parquet (EN OPTION)
• Aspire la poussière d'une large zone d'une
seule fois.
• Retirez les saletés entièrement de l'orifice
d'aspiration s'il est bouché.
Brosse pour couverture (EN OPTION)
1
Permet d'aspirer les poils
d'animaux et les fibres sur les tissus
d'ameublement et le linge de lit.
1. Retirez les saletés entièrement si l'orifice d'aspiration est bouché.
2. Placez le bouton de verrouillage sur ( ) et retirez les saletés.
3. Pour le remontage, alignez le capot à l'avant du corps principal et fermez. Une fois le capot
fermé, assurez-vous que le bouton de verrouillage est bien sur la position ( ).
ATTENTION
Utilisez cet accessoire uniquement pour le linge de lit. Prenez garde de ne pas endommager
la brosse lorsque vous devez la déboucher.
2 3
Turbine
Brosse
12_ entretien des outils et du filtre
Page 37

UTILISATION DES ACCESSOIRES
Tube
• Réglez la longueur du tube télescopique en faisant glisser d'avant
en arrière le bouton de contrôle de la longueur situé au centre du
tube.
• En cas d'obstruction, retirez le tube télescopique et réglez-le sur la
longueur minimale. Cela permet d'éliminer plus facilement tout objet
obstruant le tube.
Accessoire (Série SC12F50H, SC12F50V)
• Pour utiliser la brosse pour tissu, enfoncez-la
sur l'extrémité de la poignée.
03 ENTRETIEN DES OUTILS ET DU FILTRE
• Tirez sur le bouton pour utiliser la brosse à
épousseter.
• Pour utiliser le suceur plat, enfoncez
l'accessoire sur l'extrémité de la poignée dans
le sens opposé.
entretien des outils et du filtre _13
Page 38

entretien des outils et du filtre
Accessoires (Série SC12F50P)
• Enfoncez l'accessoire sur l'extrémité de la
poignée.
• Retirez la brosse à épousseter pour utiliser le
suceur plat.
• Enfoncez l'accessoire sur l'extrémité du tube.
• Retirez la brosse à épousseter pour utiliser le
suceur plat.
14_ entretien des outils et du filtre
Page 39

ENTRETIEN DES BROSSES
Brosse 2positions (en option)
Nettoyage de moquette Nettoyage de sol dur
• Réglez la manette d'aspiration en fonction de la surface à nettoyer.
• Retirez les saletés entièrement si l'orifice d'aspiration est bouché.
Brosse spéciale poils d'animaux (en option)
03 ENTRETIEN DES OUTILS ET DU FILTRE
1 2
Pour une meilleure
aspiration des poils
d’animaux et des fibres
sur les moquettes.
Une aspiration fréquente des cheveux ou des poils d’animaux peut entraîner un ralentissement de la
rotation en raison d’un enchevêtrement de ces éléments autour de la brosse. Dans ce cas, nettoyez la
brosse avec précaution.
1. Poussez le bouton Open (Ouvrir) du cache d'écran transparent pour retirer le cache.
2. Enlevez la barre de brosse de l'écran transparent.
3. Retirez la poussière et les cheveux enroulés autour de la barre de la brosse à l’aide de ciseaux.
4. Retirez la poussière à l’intérieur du logement de la brosse à l’aide d’un chiffon sec ou d’un suceur plat.
5. Insérez la barre de brosse dans la courroie pivotante et effectuez le montage.
6. Retournez le cache d'écran transparent dans sa position pour l'assembler à nouveau.
4 5
3
6
Brosse pour parquet (en option)
• Aspire la poussière d'une large zone en une
seule fois.
• Retirez les saletés entièrement si l'orifice
d'aspiration est bouché.
entretien des outils et du filtre _15
Page 40

entretien des outils et du filtre
Mini turbo brosse (en option)
- Remplacer la brosse rouleau
1. Si vous constatez que la brosse est obstruée par des débris,
dévissez les deux vis situées à l’arrière de la mini turbo brosse et
retirer le cache pour éliminer les corps étrangers.
2. Inspectez l'état de la brosse rouleau.
Remplacez la brosse rouleau lorsque les poils sont usés.
Pour retirer la brosse rouleau, tirez-la vers le haut et sortez-la des
logements d'extrémité dans le boîtier du suceur.
Insérez les extrémités de la brosse rouleau dans les mêmes
logements pour la replacer.
Contrôlez l’état de la courroie pour vous assurer qu'elle est en
bon état.
Si celle-ci présente des fissures ou des cassures, remplacezla en suivant la procédure décrite à la section Remplacer la
courroie.
3. Utilisation de la puissance MAXI.
Appuyez sur le bouton MAX (MAXI) pour utiliser l’aspirateur à sa
puissance maximale.
- Remplacer la courroie
1. Retirer la plaque inférieure.
Reportez-vous à la figure dans les instructions Remplacer la brosse
rouleau.
2. Enroulez l’une des extrémités de la courroie neuve autour de l’arbre
de la poulie.
3. Enroulez l’autre extrémité autour de la zone prévue à cet effet de la
brosse. Insérez la brosse rouleau dans les logements du boîtier du
suceur.
Reportez-vous à la figure dans les instructions Remplacer la brosse
rouleau.
4. Remettez en place la mini turbo brosse en suivant la procédure
décrite dans la section Remplacer la brosse rouleau.
16_ entretien des outils et du filtre
Page 41

VIDER LE RÉSERVOIR DE POUSSIÈRE
1 2 3
2
1
03 ENTRETIEN DES OUTILS ET DU FILTRE
Une fois le réservoir de poussière
plein (repère atteint), videz-le.
Sortez le réservoir de poussière
en appuyant sur le bouton.
4 5 6
1
2
Videz la poussière dans la
poubelle.
• Videz dans un sac plastique
(recommandé pour les personnes souffrant d'asthme
ou d'allergie)
Refermez le couvercle du
réservoir.
Retirez le couvercle du réservoir
de poussière.
Clic
Avant réutilisation, poussez le
réservoir à poussière à l'intérieur
du corps de l'aspirateur jusqu'à
entendre un «clic».
Vous pouvez rincer le réservoir à
poussière à l'eau froide.
entretien des outils et du filtre _17
Page 42

entretien des outils et du filtre
NETTOYAGE DU FILTRE À POUSSIÈRE
Quand nettoyer le filtre à poussière?
• Le témoin devient rouge lorsque
l'aspiration est réduite. Si la
lumière s'allume, nettoyez le filtre à
poussière.
• Réglez la puissance de l'aspirateur sur «MAX».
• Si l'indicateur de vérification du filtre devient rouge lorsque la brosse
est maintenue à 10cm du sol, nettoyez le groupe filtrant.
Lorsque la puissance d'aspiration est constamment réduite ou l'aspirateur surchauffe
anormalement, nettoyez le groupe filtrant.
18_ entretien des outils et du filtre
Commande sur la poignéeCommande sur l'appareil
Page 43

NETTOYAGE DU FILTRE À POUSSIÈRE
1 2 3
03 ENTRETIEN DES OUTILS ET DU FILTRE
Retirez le réservoir de
poussière.
Tirez le couvercle du réservoir à
poussière pour l'ouvrir.
4 5 6
Secouez le filtre au-dessus d'une
poubelle pour retirer la poussière
puis lavez le filtre avec de l'eau.
Laissez-le sécher à l'ombre
pendant 12heures minimum.
7 8
Refermez le couvercle du réservoir.
Pour fermer le couvercle du
réservoir à poussière, le filtre
doit être assemblé.
Retirez le filtre du réservoir à
poussière.
Replacez le filtre dans le
réservoir de poussière.
Avant réutilisation, poussez le
réservoir à poussière à l'intérieur
du corps de l'aspirateur jusqu'à
entendre un «clic».
Veillez à ce que le filtre soit totalement sec avant de le remettre
dans l'aspirateur. Laissez-le sécher pendant 12heures.
entretien des outils et du filtre _19
Page 44

NETTOYAGE DU FILTRE DE SORTIE
1 2 3
Retirez le cadre fixé à l'arrière de
l'appareil.
Tirez le filtre HEPA en utilisant la
languette.
Tirez le filtre micro
4 5
Nettoyez le filtre. Placez le filtre HEPA et le cadre dans l'appareil.
• Lorsque la puissance d'aspiration est constamment réduite de façon notable ou
l'aspirateur surchauffe anormalement, nettoyez le filtre de sortie. Remarque: ne pas laver
le filtre HEPA.
Si le nettoyage ne résout pas le problème, remplacez le filtre bouché.
• Des filtres de rechange sont disponibles auprès de votre distributeur Samsung local.
REMPLACEMENT DES PILES
1. Si l'aspirateur ne fonctionne pas, remplacez les piles dans
la poignée.
Si le problème persiste, veuillez contacter un revendeur
agréé.
2. Utilisez des piles 2 AAA.
AVERTISSEMENT
20_ entretien des outils et du filtre
1. Ne démontez jamais les piles ou ne les rechargez pas.
2. N'exposez jamais les piles à la chaleur, ne les jetez jamais
non plus dans le feu.
3. N'inversez pas les pôles (+) et (-).
4. Mettez les piles au rebut en respectant les règles en
vigueur.
TYPE DE PILE: type AAA
Page 45

dépannage
PROBLÈME SOLUTION
Le moteur ne démarre
pas.
La puissance d'aspiration
diminue progressivement.
Le cordon ne se
rembobine pas
entièrement.
L'aspirateur n'aspire plus. • Vérifiez le tuyau et remplacez-le si nécessaire.
Aspiration faible ou
de moins en moins
puissante.
Surchauffe de l'appareil.
Décharge électrostatique
• Vérifiez le câble, la fiche et la prise.
• Laissez-le refroidir.
• Vérifiez que rien n'obstrue l'appareil et débouchez-le si nécessaire.
• Tirez environ 2 à 3m de cordon et appuyez sur le bouton de
rembobinage.
• Vérifiez le filtre et si nécessaire, nettoyez-le comme indiqué dans les
instructions. Si les filtres sont usés, remplacez-les par des neufs.
• Vérifiez les filtres et si nécessaire, nettoyez-les comme indiqué dans les
instructions.
• Diminuez la puissance d'aspiration.
• Cela peut également se produire lorsque l'air de la pièce est très sec.
Aérez la pièce pour que l'humidité de l'air devienne normale.
04 DÉPANNAGE
dépannage _21
Page 46

mémo
Page 47

mémo
Page 48

Page 49

Español
Aspiradora
manual del usuario
Serie SC12F50
✻ Antes de poner en funcionamiento esta unidad, lea atentamente las instrucciones.
✻ Para uso en interiores solamente.
Gracias por adquirir un producto Samsung.
Para recibir un servicio más completo,
registre su producto en
www.samsung.com/register
Page 50

información sobre seguridad
INFORMACIÓN SOBRE SEGURIDAD
ADVERTENCIA
ADVERTENCIA
• Antes de poner en funcionamiento el aparato, lea detenidamente este manual y consérvelo
para su referencia.
• Debido a que las siguientes instrucciones de funcionamiento corresponden a diversos
modelos, es posible que las características de su aspiradora difieran ligeramente de las
que se describen en este manual.
SÍMBOLOS DE PRECAUCIÓN Y ADVERTENCIA UTILIZADOS
ADVERTENCIA
PRECAUCIÓN
Indica que existe riesgo de muerte o lesiones graves.
Indica que existe riesgo de lesión personal o daños materiales.
OTROS SÍMBOLOS UTILIZADOS
Representa algo que NO se debe hacer.
Representa algo que se debe respetar.
Indica que se debe desconectar el enchufe de la pared.
ADVERTENCIA
Esta aspiradora es solo de uso doméstico.
No utilice esta aspiradora para limpiar escombros y residuos.
Limpie los filtros con regularidad para impedir que se acumule polvo fino en ellos.
No utilice esta aspiradora sin alguno de sus filtros.
Si no cumple estos requisitos podría causar daños a los componentes internos e
invalidar la garantía.
Estado de California en la Propuesta 65 Advertencia (sólo EE.UU.)
ADVERTENCIA
02_ información sobre seguridad
Este producto contiene sustancias químicas que según el Estado de California
pueden ser causante de cáncer y ser nocivas para la fertilidad (reproducción)
Page 51

información sobre seguridad
INSTRUCCIONES DE SEGURIDAD
IMPORTANTES
Cuando se utilizan aparatos eléctricos, siempre se deben seguir estas instrucciones básicas de
seguridad:
LEA TODAS LAS INSTRUCCIONES ANTES DE USAR SU
ASPIRADORA DE TRINEO
ADVERTENCIA
– PARA REDUCIR EL RIESGO DE
INCENDIO, DESCARGAS ELÉCTRICAS O LESIONES:
1. No deje el electrodoméstico enchufado. Desenchúfelo cuando no lo utilice y antes de
realizar el mantenimiento.
2. No utilice la aspiradora en el exterior o sobre superficies húmedas.
3. No permita que se utilice la aspiradora como un juguete. Preste especial atención
cuando se utilice la aspiradora cerca de los niños.
4. Utilice la aspiradora solo como se describe en el manual. Utilice solo los accesorios
recomendados por el fabricante.
5. No utilice la aspiradora si el cable o el enchufe están dañados. Si el aparato no
funciona como corresponde, se ha caído, se ha dañado, ha permanecido a la
intemperie o se ha caído en el agua, llévelo a un centro de servicio.
6. No tire del cable ni lo utilice para trasladar la aspiradora, no lo utilice como asa, no
lo aplaste con la puerta ni tire de él contra bordes o esquinas filosas. No pase el
electrodoméstico sobre el cable.
Mantenga el cable alejado de superficies calientes.
7. No desenchufe la aspiradora tirando del cable. Para desenchufar, tome el enchufe, no
el cable.
8. No toque el enchufe o el electrodoméstico con las manos húmedas.
9. No inserte ningún objeto en las aberturas. No utilice la aspiradora si hay aberturas
obstruidas.
Manténgala libre de polvo, pelusa, cabello o cualquier cosa que reduzca el flujo de
aire.
10. Mantenga el cabello, la ropa suelta, los dedos y todas las partes de su cuerpo lejos de
las aberturas o piezas móviles.
11. Apague todos los controles antes de desenchufar.
12. Tenga especial cuidado cuando limpie las escaleras.
13. No utilice la aspiradora para aspirar líquidos combustibles o inflamables, tales como
gasolina, ni en áreas donde estas sustancias puedan estar presentes.
14. No aspire nada que esté encendido o humeando, como cigarrillos, fósforos o cenizas
calientes.
15. No utilice la aspiradora sin la cubeta para polvo y/o los filtros en su lugar.
información sobre seguridad _03
Page 52

16. No utilice la aspiradora en espacios cerrados donde se concentren vapores
despedidos por pinturas al óleo, disolventes de pinturas, sustancias antipolillas, polvos
inflamables y demás materiales tóxicos o explosivos.
17. No aspire objetos duros o cortantes, tales como vidrio, uñas, tornillos, monedas, etc.
18. La manguera contiene cables eléctricos. No la utilice si se encuentra dañada, cortada
o pinchada.
Evite aspirar objetos cortantes.
19. Siempre apague este aparato antes de conectar o desconectar la manguera o la
boquilla motorizada.
20. Desenchufe la aspiradora antes de conectar la boquilla motorizada.
21. Sujete el enchufe cuando enrolle el cable. No deje que el enchufe dé latigazos al
enrollarlo.
GUARDE ESTAS INSTRUCCIONES
INSTRUCCIONES SOBRE EL ENCHUFE POLARIZADO
- Para reducir el riesgo de descarga eléctrica, este electrodoméstico cuenta con un enchufe polarizado
(una punta es más ancha que la otra). Solo hay una manera en que el enchufe se conectará con
un tomacorriente polarizado. Dé vuelta el enchufe si no cabe totalmente en el tomacorriente. Si el
enchufe aún no cabe, comuníquese con un electricista calificado para que instale el tomacorriente
correcto. No modifique el enchufe de ninguna forma.
04_ información sobre seguridad
Page 53

contenido
ARMADO DE LA ASPIRADORA
06
FUNCIONAMIENTO DE LA
ASPIRADORA
07
HERRAMIENTAS DE
MANTENIMIENTO Y FILTRO
11
SOLUCIÓN DE PROBLEMAS
21
07 Cable de alimentación
07 Control de potencia
10 Cepillo poderso (serie SC12F50P)
11 Cepillo poderso (serie SC12F50P)
13 Uso de los accesorios
15 Herramientas de mantenimiento para piso
17 Vaciado del depósito de polvo
18 Limpieza del filtro del polvo
19 Limpieza del filtro del polvo
20 Limpieza del filtro de salida
20 Cambio de pilas
contenido _05
Page 54

armado de la aspiradora
Opcional
• No presione el botón de la manija del
depósito de polvo al trasladar la máquina.
• Para el almacenamiento, en posición vertical
de la tubería en el suelo. (SC12F50P Serie)
• Al guardar la aspiradora, deje la
boquilla para pisos como se muestra.
(SC12F50H,SC12F50V Serie)
06_ armado de la aspiradora
Page 55

funcionamiento de la aspiradora
CABLE DE ALIMENTACIÓN
02
FUNCIONAMIENTO DE LA ASPIRADORA
PRECAUCIÓN
• Cuando desenchufe el aparato del tomacorriente, sujete por el enchufe, no
por el cable.
CONTROL DE POTENCIA
Control remoto de frecuencia de radio (series SC12F50H)
MANGUERA (serie SC12F50H)
1. Botón [° °] ENCENDER/APAGAR
- Presione el botón [° °] para poner la aspiradora en
funcionamiento. Presiónelo nuevamente para detener la
aspiradora.
2. Botón Succión [+], [-]
- Presione el botón [+] para que la aspiradora funcione con un
nivel alto de potencia de succión. Presione el botón [-] para
que la aspiradora funcione con un nivel bajo de potencia de
succión.
Si no se presiona ningún botón por 30 minutos durante la limpieza, se activa el dispositivo de
seguridad y se corta la alimentación.
En este caso, presione el botón de encendido en la unidad principal o desenchufe y vuelva a
enchufar el cable de alimentación.
La aspiradora es controlada por señales
Control de la manija
de frecuencia de radio.
funcionamiento de la aspiradora _07
Page 56

funcionamiento de la aspiradora
MANGUERA (serie SC12F50P)
1. Encendido/apagado de la aspiradora ( )
- Presione el botón de encendido/apagado para poner la
aspiradora en funcionamiento. Presiónelo nuevamente
para detener la aspiradora.
2. Poder de succión (-/+) de la aspiradora
- Presione el botón SUCTION (+/) (SUCCIÓN [+/]) para
aumentar o reducir la potencia de succión. La potencia
de succión aumenta gradualmente cada vez que se
presiona el botón. Cuando se alcanza la potencia de
succión máxima, al presionar nuevamente el botón se
restablece la potencia de succión mínima.
3. Botón BRUSH ON/OFF (ENCENDIDO/APAGADO DEL CEPILLO)
- Presione el botón BRUSH ON/OFF (ENCENDIDO/APAGADO DEL CEPILLO) para poner el cepillo
poderso en funcionamiento. Presiónelo nuevamente para detener el cepillo poderso.
No cubra el transmisor de la manija cuando utilice un botón del control de la manija.
Control de la manija
La aspiradora es controlada por
señales de frecuencia de radio.
transmisor
AVISO DE LA FCC / FCC ID: A3LROH20S
Este aparato cumple con la sección 15 de las Normas de la FCC. El funcionamiento se encuentra
sujeto a las siguientes dos condiciones:
1. Este aparato no puede causar interferencia dañina, y
2. Este aparato debe aceptar la recepción de cualquier interferencia, incluidas aquellas que puedan
causar un funcionamiento indeseado.
CUERPO
Presione el botón de encendido/apagado repetidamente para
arrancar y detener la aspiradora. (APAGADO → ENCENDIDO
→ APAGADO)
Si el control remoto de la manija no funciona, la
aspiradora puede ponerse en funcionamiento
utilizando el botón de encendido/apagado ubicado
en el cuerpo de la máquina.
08_ funcionamiento de la aspiradora
El botón de encendido/apagado pone la aspiradora en funcionamiento o la detiene.
La luz del filtro se ilumina cuando la caja para polvo requiere verificación o vaciado.
1
2
Page 57

Tipo control en el cuerpo (serie SC12F50V)
- MANGUERA
Para reducir la potencia de succión en la limpieza de
cortinas, pequeñas alfombras y otros tejidos ligeros, deslice
la tapa del aire hasta que se abra el orificio.
- CUERPO
Para regular el nivel de potencia, simplemente deslice el
control de potencia hacia arriba o hacia abajo.
MÍN= Para telas delicadas, como cortinas de red.
MÁX = Para suelos duros y alfombras muy sucias.
MAX
MAX
MIN
MIN
02
FUNCIONAMIENTO DE LA ASPIRADORA
funcionamiento de la aspiradora _09
Page 58

funcionamiento de la aspiradora
CEPILLO PODERSO (SERIE SC12F50P)
Cómo aspirar con el cepillo poderso
1. Colocación del cepillo poderso
La manguera debe conectarse al trineo y el cepillo poderso
debe conectarse a la manguera y al tubo de extensión.
2. Aspiración
• Para obtener mejores resultados, desplace el cepillo
poderso lentamente haciendo recorridos cortos y
superpuestos.
• En áreas muy sucias, repita los recorridos en distintas
direcciones.
• Presione el botón de ajuste de altura para que coincida con
la superficie que está limpiando.
• Presione el botón de ajuste de altura de la parte inferior de
la varilla hasta que oiga un clic.
PRECAUCIÓN
No invierta el cepillo poderso mientras está en funcionamiento.
3. Verificación del rendimiento del cepillo poderso
Puede verificar si el cepillo poderso funciona con normalidad levantando levemente el tubo de
extensión para ver la parte posterior del cepillo.
El cepillo poderso no funcionará si se encuentra atascado o si la unidad está apagada.
Si el cepillo poderso se encuentra atascado, desenchufe el cable de alimentación del
tomacorriente.
Dé vuelta el cepillo poderso y quite el objeto atascado.
Vuelva a colocar el cepillo poderso en la posición adecuada y siga aspirando.
Protector contra sobrecarga
El protector contra sobrecarga apaga el motor del
cepillo si el cepillo para piso se obstruye. El cepillo para
piso se detendrá, pero el motor de succión seguirá en
funcionamiento. Para restablecer el protector contra
sobrecarga, apague la aspiradora y desenchúfela.
Elimine la obstrucción del cepillo para piso. Utilice la
punta de un bolígrafo para presionar el interruptor para
restablecer el protector. Encienda la aspiradora y siga
limpiando.
Interruptor de restablecimiento
10_ funcionamiento de la aspiradora
Page 59

herramientas de mantenimiento y filtro
CEPILLO PODERSO (SERIE SC12F50P)
Verificación del cepillo giratorio para piso y de la correa de accionamiento
Verifique regularmente que el cepillo giratorio para piso y la correa de accionamiento de la
aspiradora no estén desgastados o dañados. También debe quitar los hilos, los cabellos y las
fibras de la alfombra del cepillo y de los extremos del cepillo. Estos pueden enrollarse en el cepillo
y dificultar la eficacia para limpiar su alfombra. Extraiga también cualquier residuo que pueda
haberse acumulado debajo de la tapa del cepillo.
1. Desenchufe la aspiradora del tomacorriente.
2. Coloque la manija en una posición baja y dé vuelta la aspiradora de manera tal que la parte
inferior quede hacia arriba.
3. Retire los cinco tornillos (señalados con las flechas en la ilustración) con un destornillador.
4. Extraiga la tapa del cepillo para piso.
5. Tome el cepillo giratorio para piso de los dos extremos y levántelo.
6. Quite los hilos, los cabellos y otros residuos del cepillo giratorio para piso prestando especial
atención a los extremos del cepillo.
7. Quite los hilos, los cabellos y otros residuos de las áreas donde se encuentran la polea del
motor y la correa de accionamiento.
8. Verifique cuidadosamente que la correa de accionamiento no esté desgastada, ni presente
cortes o torceduras.
9. Verifique que no haya obstrucciones en la salida de aire. Retire los residuos de esta área.
03
HERRAMIENTAS DE MANTENIMIENTO Y FILTRO
PRECAUCIÓN
Tapa del
cepillo
El cepillo giratorio para piso puede hacer que los flecos de alfombras se enreden dentro de
la aspiradora.
Sea cauteloso y apague el cepillo para piso al aspirar alfombras con flecos.
herramientas de mantenimiento y filtro _11
Page 60

Cepillo para parqué (OPCIONAL)
• Aspira el polvo de una vez en áreas amplias.
• Extraiga completamente los materiales
de desperdicio de la entrada, si esta se
encuentra bloqueada.
Cepillo para mantas (OPCIONAL)
1
Para aspirar los pelos de
mascotas y las fibras de la
tapicería y la ropa de cama.
1. Extraiga completamente los materiales de desperdicio cuando la entrada está bloqueada.
2. Gire el botón de bloqueo a la posición ( ) y extráigalo.
3. Para rearmar, alinee la cubierta con la parte frontal del cuerpo principal y ciérrela. Luego de cerrar
la cubierta, asegúrese de que el botón de bloqueo esté en la posición ( ).
PRECAUCIÓN
Use solo para la ropa de cama. Tenga cuidado de no dañar el cepillo al desobstruirlo.
2 3
Turbina
Cepillo
12_ herramientas de mantenimiento y filtro
Page 61

herramientas de mantenimiento y filtro
USO DE LOS ACCESORIOS
Tubo
• Ajuste la longitud del tubo telescópico deslizando hacia atrás y
hacia adelante el botón del control de longitud ubicado en el centro
del tubo telescópico.
• Para verificar que no haya obstrucciones, separe el tubo telescópico
y ajústelo de manera tal de acortarlo. Esto facilita la extracción de
los desperdicios que obstruyen el tubo.
Accesorio (series SC12F50H,SC12F50V)
• Si desea utilizar el accesorio para tapicería,
coloque el accesorio en el extremo de la
manija de la manguera.
03
HERRAMIENTAS DE MANTENIMIENTO Y FILTRO
• Tire del botón para utilizar el cepillo para
polvo.
• Si desea utilizar la boquilla para rincones,
coloque el accesorio en el extremo de la
manija de la manguera en dirección opuesta.
herramientas de mantenimiento y filtro _13
Page 62

herramientas de mantenimiento y filtro
Accesorios (serie SC12F50P)
• Coloque el accesorio en el extremo de la manija
de la manguera.
• Extraiga el cepillo para polvo a fin de utilizar la
boquilla para rincones.
• Coloque el accesorio en el extremo del tubo.
• Extraiga el cepillo para polvo a fin de utilizar la
boquilla para rincones.
14_ herramientas de mantenimiento y filtro
Page 63

HERRAMIENTAS DE MANTENIMIENTO PARA PISO
2-Cepillo gradual (opcional)
Limpieza de alfombras Limpieza de pisos
• Ajuste la palanca de entrada según la superficie del piso.
• Extraiga completamente los materiales de desperdicio si la entrada está bloqueada.
Cepillo poderso de mascotas plus (opcional)
03
HERRAMIENTAS DE MANTENIMIENTO Y FILTRO
1 2
Para mejorar la
aspiración de los pelos
de las mascotas y las
fibras de las alfombras.
La aspiración frecuente de cabellos o pelo de mascotas puede reducir la rotación debido a los materiales
enredados en el rodillo. En ese caso, limpie el rodillo con cuidado.
1. Presione el botón de apertura en la cubierta de la pantalla transparente para separar la cubierta.
2. Retire la barra de cepillos de la pantalla transparente.
3. Extraiga los materiales de desperdicio como polvo o pelos enredados alrededor de la barra de cepillos
con una tijera.
4. Quite el polvo que está dentro del gabinete del cepillo usando un paño seco o la boquilla para
rincones.
5. Inserte la barra de cepillos en la correa giratoria y reármela.
6. Vuelva a colocar la cubierta de la pantalla transparente para rearmarla.
4 5
3
6
Cepillo maestro para parqué (opcional)
• Aspira el polvo de una vez en áreas amplias.
• Extraiga completamente los materiales de
desperdicio si la entrada está bloqueada.
herramientas de mantenimiento y filtro _15
Page 64

herramientas de mantenimiento y filtro
Cepillo mini turbo (opcional)
- Para reemplazar el cepillo giratorio
1. En caso de una obstrucción o presencia de residuos, retire los dos
tornillos de la parte posterior del cepillo mini turbo para separar la
placa frontal y quitar cualquier obstrucción.
2. Inspeccione el estado del cepillo giratorio.
Reemplace el cepillo giratorio si los cepillos están desgastados.
Para retirar el cepillo giratorio tire hacia arriba y hacia afuera de las
ranuras en los extremos del alojamiento de la boquilla.
Inserte los extremos del cepillo giratorio en las mismas ranuras para
el reemplazo.
Inspeccione la correa para asegurarse de que esté en buenas
condiciones.
Si la correa está rota o agrietada, reemplácela de acuerdo con
las instrucciones de reemplazo.
3. Uso en MÁX.
Pulse el botón MAX (MÁX) para que la aspiradora funcione con el
nivel máximo de entrada.
- Para reemplazar la correa
1. Retire la placa inferior.
Vea la figura de las instrucciones de Para reemplazar el cepillo
giratorio.
2. Enrolle un extremo de la nueva correa alrededor del eje de la polea.
3. Enrolle el otro extremo de la correa alrededor del área asignada
para ella en el cepillo giratorio. Inserte el cepillo giratorio en las
ranuras del alojamiento de la boquilla.
Vea la figura de las instrucciones de Para reemplazar el cepillo
giratorio.
4. Vuelva a encajar el cepillo mini turbo como se explica en las
instrucciones Para reemplazar el cepillo giratorio.
16_ herramientas de mantenimiento y filtro
Page 65

VACIADO DEL DEPÓSITO DE POLVO
1 2 3
Cuando el polvo llegue hasta
la marca que indica que la
aspiradora está llena, vacíe el
depósito de polvo.
4 5 6
Extraiga el depósito de polvo
presionando el botón.
1
2
2
1
Separe la tapa del depósito de
polvo.
Clic
03
HERRAMIENTAS DE MANTENIMIENTO Y FILTRO
Deseche el polvo del depósito.
Cierre la tapa del depósito de
polvo.
• Vacíe en una bolsa de plástico.
(recomendado para asmáticos/alérgicos)
Antes de utilizar la aspiradora
nuevamente, inserte el depósito de
polvo en el cuerpo principal de la
aspiradora hasta escuchar un clic.
Puede enjuagar el depósito de polvo
con agua fría.
herramientas de mantenimiento y filtro _17
Page 66

herramientas de mantenimiento y filtro
LIMPIEZA DEL FILTRO DEL POLVO
Cuándo limpiar el filtro del polvo
• Cuando la potencia de succión se
reduzca, la lámpara se pondrá roja.
Si la luz se enciende, limpie el filtro
del polvo.
• Suba la potencia de la aspiradora a ‘MÁX’.
Control de la manijaControl del cuerpo
• Si en un piso plano el indicador de verificación del filtro se pone rojo
cuando la entrada se encuentra a 10 cm, limpie la caja para polvo.
Si la potencia de succión disminuye considerablemente de forma continua o la aspiradora se
recalienta de manera anormal, limpie la caja para polvo.
18_ herramientas de mantenimiento y filtro
Page 67

LIMPIEZA DEL FILTRO DEL POLVO
1 2 3
03
HERRAMIENTAS DE MANTENIMIENTO Y FILTRO
Extraiga el depósito de polvo.
Tire de la tapa del depósito de
polvo para abrirla.
4 5 6
Sacuda el filtro sobre el bote de la
basura para eliminar el polvo suelto;
luego, lave el filtro con agua.
Deje secar el filtro a la sombra
por más de 12 horas.
7 8
Cierre la tapa del depósito de
polvo.
Antes de cerrar la tapa del
depósito de polvo se debe
montar el filtro.
Extraiga el filtro del depósito
de polvo.
Ponga el filtro en el depósito
de polvo.
Antes de utilizar la aspiradora
nuevamente, inserte el depósito de
polvo en el cuerpo principal de la
aspiradora hasta escuchar un clic.
Asegúrese de que el filtro esté completamente seco antes de volver
a colocarlo en la aspiradora. Espere 12 horas para que se seque.
herramientas de mantenimiento y filtro _19
Page 68

LIMPIEZA DEL FILTRO DE SALIDA
1 2 3
Retire la parte del armazón fijo
en la parte posterior del cuerpo
principal.
Extraiga el filtro HEPA usando la
lengüeta.
Extraiga el microfiltro.
4 5
Limpie el filtro. Coloque el filtro HEPA y la parte del armazón en el cuerpo principal.
• Si la potencia de succión disminuye considerablemente de forma continua o la aspiradora
se recalienta de manera anormal, limpie el filtro de salida. Nota: no lave el filtro HEPA.
Si la limpieza no resuelve el problema, reemplace el filtro bloqueado.
• Los filtros de repuesto están disponibles en su distribuidor local de Samsung.
CAMBIO DE PILAS
1. Si la aspiradora no funciona, reemplace las pilas de la
manija.
Si el problema continúa, comuníquese con un distribuidor
autorizado.
2. Utilice 2 pilas AAA.
ADVERTENCIA
20_ herramientas de mantenimiento y filtro
1. Nunca desarme las pilas ni las recargue.
2. Nunca caliente las pilas ni las tire en el fuego.
3. No invierta los polos (+) y (-).
4. Deseche las pilas de la manera correspondiente.
TIPO DE PILA: Tamaño AAA
Page 69

solución de problemas
PROBLEMA SOLUCIÓN
El motor no arranca.
La potencia de succión
disminuye gradualmente.
El cable no se enrolla
completamente.
La aspiradora no aspira
polvo.
Potencia de succión baja
o decreciente.
Recalentamiento del
cuerpo de la aspiradora.
Descarga de electricidad
estática.
• Verifique el cable, el enchufe y el tomacorriente.
• Deje enfriar.
• Verifique si hay obstrucciones y elimínelas.
• Tire del cable unos 2 a 3 m y luego presione el botón para enrollar el
cable.
• Limpie la manguera y reemplácela si es necesario.
• Verifique el filtro y, si es necesario, límpielo como se indica en las
instrucciones. Si los filtros están inutilizables, reemplácelos por otros
nuevos.
• Verifique los filtros y, si es necesario, límpielos como se indica en las
instrucciones.
• Baje la potencia de succión.
• Esto también puede suceder si el aire de la habitación es muy seco.
Ventile la habitación hasta que la humedad sea normal.
04 SOLUCIÓN DE PROBLEMAS
solución de problemas _21
Page 70

memo
Page 71

memo
Page 72

If you have any questions or comments relating to Samsung products,
please contact the SAMSUNG customer care center.
Country
U.S 1-800-SAMSUNG www.samsung.com
CANADA 1-800-SAMSUNG (726-7864) www.samsung.com
Customer Care Center
Web Site
DJ68-00699W-02
 Loading...