

Page 1
Instruction Manual
DVD-V4800
www.samsungusa.com
Page 2
Safety Instructions
ENG-2
Note to CATV system installer: This reminder is provided to call CATV system installer's attention to Article 820-40 of
the National Electrical Code (Section 54 of Canadian Electrical Code, Part I) that provides guidelines for proper grounding and, in particular, specifies that the cable ground shall be connected to the grounding system of the building as
close to the point of cable entry as practical.
Caution: FCC regulations state that any unauthorized changes or modifications to this equipment may void the user's
authority to operate it.
Caution: To prevent electric shock, match wide blade of plug to wide slot, fully insert.
Attention: Pour eviter les chocs electriques, introduire la lame le plus large de la fiche dans la borne correspondante de
la prise et pousser jusqu’au fond.
Important : One Federal Court has held that unauthorized recording of copyrighted TV programs is an infringement of
U.S. copyright laws.
Certain Canadian programs may be copyrighted and any unauthorized recording in whole or in part may be a violation
of these rights.
To prevent damage which may result in fire or electric shock hazard,
do not expose this appliance to rain or moisture.
Important Safety Instructions
1. Read these instructions.
2. Keep these instructions.
3. Heed all warnings.
4. Follow all instructions.
5. Do not use this apparatus near water.
6. Clean only with dry cloth.
7. Do not block any ventilation openings. Install in accordance with the manufacturer’s instructions.
8. Do not install near any heat sources such as radiators, heat registers, stoves, or other apparatus (including ampli
fiers) that produce heat.
9. Do not defeat the safety purpose of the polarized or grounding-type plug. Apolarized plug has two blades with one
wider than the other. A grounding type plug has two blades and a third grounding prong. The wide blade or the
third prong are provided for your safety. If the provided plug does not fit into your outlet, consult an electrician for
replacement of the obsolete outlet.
10. Protect the power cord from being walked on or pinched particularly at plugs, convenience receptacles, and the
point where they exit from the apparatus.
11. Only use attachments/accessories specified by the manufacturer.
12. Use only with cart, stand, tripod, bracket, or table specified by the manufacturer, or sold with the apparatus. When
a cart is used, use caution when moving the cart/apparatus combination to avoid injury from tip-over.
13. Unplug this apparatus during lightning storms or when unused for long periods of time.
14. Refer all servicing to qualified service personnel. Servicing is required when the apparatus has been damaged in
any way, such as power-supply cord or plug is damaged, liquid has been spilled or objects have fallen into the
apparatus, the apparatus has been exposed to rain or moisture, does not operate normally, or has been dropped.
RISK OF ELECTRIC SHOCK
DO NOT OPEN
CAUTION: TO REDUCE THE RISK OF ELECTRIC
SHOCK, DO NOT REMOVE COVER (OR BACK).
NO USER SERVICEABLE PARTS INSIDE. REFER
SERVICING TO QUALIFIED SERVICE PERSONNEL.
This symbol is intended to alert the user to the presence of uninsulated
“dangerous voltage” within the product’s enclosure that may be of sufficient
magnitude to constitute a risk of fire or electric shock to persons.
This symbol is intended to alert the user to the presence of important operating and maintenance (servicing) instructions in the literature accompanying the appliance.
Page 3

Table of Contents
ENG-3
Safety
Important Safety Instructions . . . . . . . . . . . . . 2
Welcome
Feature Summary . . . . . . . . . . . . . . . . . . . . . 4
Disc Type and Characteristics . . . . . . . . . . . . 4
1 - System Overview
Unpack . . . . . . . . . . . . . . . . . . . . . . . . . . . . . 5
Front Panel Overview . . . . . . . . . . . . . . . . . . 6
Rear Panel . . . . . . . . . . . . . . . . . . . . . . . . . . 6
Front Panel Display . . . . . . . . . . . . . . . . . . . . 7
Insert Batteries into Remote . . . . . . . . . . . . . 7
2 - Getting Started
Basic Connections/Auto Setup . . . . . . . . . . . 7
3 - Advanced Connections
Using the TV Buttons on the Remote Control . . 8
Stereo Connections . . . . . . . . . . . . . . . . . . . . 8
S-Video/Component Video Connections (for DVD)
. . . . 9
Monitor TV Connections
. . . . . . . . . . . . . . . . . 9
Connecting Other Video Equipment
. . . . . . . . . 10
4 - DVD Sound Setup
A/V Receiver Connections
. . . . . . . . . . . . . . . . 10
5 - Basic Operation
Deck Control Buttons
. . . . . . . . . . . . . . . . . . . 11
Basic DVD Operation
. . . . . . . . . . . . . . . . . . . 11
Basic VCR Operation
. . . . . . . . . . . . . . . . . . . 11
Basic TV Tuner Operations
. . . . . . . . . . . . . . . 12
6 - System Setup
On-Screen Menu Navigation
. . . . . . . . . . . . . . 12
Menu Language
. . . . . . . . . . . . . . . . . . . . . . . 12
Manual Clock Set
. . . . . . . . . . . . . . . . . . . . . . 13
Tuner Band Setting
. . . . . . . . . . . . . . . . . . . . . 13
RF Output Channel
. . . . . . . . . . . . . . . . . . . . . 14
Auto Channel Memory
. . . . . . . . . . . . . . . . . . . 14
Channel Add/Delete
. . . . . . . . . . . . . . . . . . . . 15
Front Panel Dimmer
. . . . . . . . . . . . . . . . . . . . 15
Auto Power Off
. . . . . . . . . . . . . . . . . . . . . . . . 16
7 - DVD Setup
Disc Menu Language
. . . . . . . . . . . . . . . . . . . 16
Audio Language
. . . . . . . . . . . . . . . . . . . . . . . 17
Subtitle Language
. . . . . . . . . . . . . . . . . . . . . . 17
Digital Output
. . . . . . . . . . . . . . . . . . . . . . . . . 18
DTS
. . . . . . . . . . . . . . . . . . . . . . . . . . . . . . . 18
Dynamic Compression
. . . . . . . . . . . . . . . . . . 19
PCM Down Sampling
. . . . . . . . . . . . . . . . . . . 19
TV Aspect Ratio
. . . . . . . . . . . . . . . . . . . . . . . 20
Black Level
. . . . . . . . . . . . . . . . . . . . . . . . . . 20
Alt Video Out
. . . . . . . . . . . . . . . . . . . . . . . . . 21
Parental
. . . . . . . . . . . . . . . . . . . . . . . . . . . . . 21
8 - DVD Operations
Special Playback Features
. . . . . . . . . . . . . . . 22
Disc Menu Navigation
. . . . . . . . . . . . . . . . . . . 23
EZ View
. . . . . . . . . . . . . . . . . . . . . . . . . . . . . 23
Title/Chapter/Time Selection
. . . . . . . . . . . . . . 24
Angle View
. . . . . . . . . . . . . . . . . . . . . . . . . . . 25
Subtitle
. . . . . . . . . . . . . . . . . . . . . . . . . . . . . 25
A to B Repeat
. . . . . . . . . . . . . . . . . . . . . . . . . 26
Repeat Chapter/Title
. . . . . . . . . . . . . . . . . . . . 26
Audio
. . . . . . . . . . . . . . . . . . . . . . . . . . . . . . . 27
Bookmarks
. . . . . . . . . . . . . . . . . . . . . . . . . . . 27
Function (DVD)
. . . . . . . . . . . . . . . . . . . . . . . . 28
9 - VCR Playback
Special VCR Playback Features
. . . . . . . . . . . . 28
Tracking
. . . . . . . . . . . . . . . . . . . . . . . . . . . . . 29
Auto Play
. . . . . . . . . . . . . . . . . . . . . . . . . . . . 29
S-VHS Playback
. . . . . . . . . . . . . . . . . . . . . . . 29
Variable Search System
. . . . . . . . . . . . . . . . . 30
10 - VCR Recording
Basic Recording
. . . . . . . . . . . . . . . . . . . . . . . 30
Special Recording Features
. . . . . . . . . . . . . . . 31
One-Touch Recording (OTR)
. . . . . . . . . . . . . . 31
Record Speed
. . . . . . . . . . . . . . . . . . . . . . . . 32
11 - Timer Recording
How to Set a Timer Recording
. . . . . . . . . . . . . 32
Function (VCR)
. . . . . . . . . . . . . . . . . . . . . . . . 33
12 - Advanced Functions.
How to insert a Memory Card
. . . . . . . . . . . . . 33
Clips Menu for MP3/WMA/JPEG
. . . . . . . . . . . 34
Folder Selection
. . . . . . . . . . . . . . . . . . . . . . . 34
MP3/WMA Play
. . . . . . . . . . . . . . . . . . . . . . . 35
JPEG Playback
. . . . . . . . . . . . . . . . . . . . . . . 36
Program Play & Random Play
. . . . . . . . . . . . . 37
Appendix - Help
Technical Specifications
. . . . . . . . . . . . . . . . . 38
Page 4
ENG-4
Feature Summary
DVD-VCR Features
• Perfect compatibility to play back DVDs,
Audio CDs, MP3, WMA discs, VCD, SVCD,
JPEG FILES CDs, or VHS Tapes.
• Enjoy a DVD movie while recording a TV
show to the VCR.
• Auto Setup instantly finds the time and runs
channel search.
• RF inputs and outputs for all kinds of TVs
available.
• Composite, S-Video, and Component Video
outputs.
• Universal remote provides the full operation
on DVD-VCR.
• On-Screen Program
(English/French/Spanish).
DVD Features
• 10-bit video digital to analog converter and
27MHz advanced digital filter.
• Playback of 96KHz/24-bit sources.
• 7 in 2 slot to support 7 types of memory
cards : MMC, SD, Smart Media Card,
Compact Flash, Micro Drive, Memory Stick
and Memory Stick-Pro.
• Play back MP3-CDs.
VCR Features
• Hi-Fi Stereo VCR.
• Superior slow motion and stop action
(with 4 heads).
• Playback of S-VHS tapes with a better than
standard resolution.
• INTRO Scan, Zero Return, and END Search.
• 7-event/1 month timer recording.
• Time remaining counter, real time counter.
Note
* Discs which cannot be played with this
player.
• DVD-ROM • DVD-RAM
• CDI • CDV
• HD layer of super Audio CD
• CDGs play audio only, not graphics.
* Ability to play back may depend on recording
conditions.
• DVD-R • CD-RW
• DVD+RW, -RW • CD-ROM
Disc Type and Characteristics
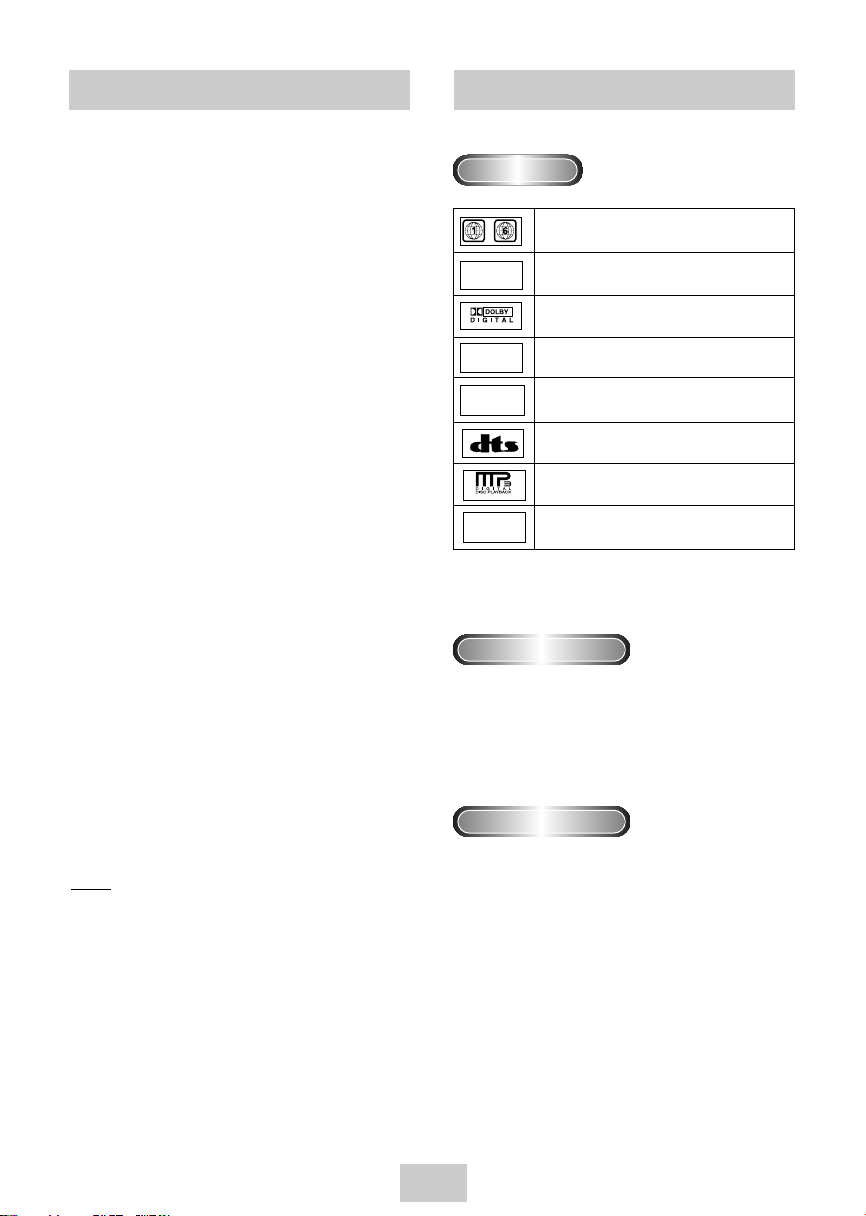
Disc Markings
Play Region Number
~
DIGITAL
SOUND
STEREO
NTSC
WMA
• Play Region Number
• NTSC broadcast system in U.S.A, Canada,
Korea, Japan, etc.
• Dolby Digital disc
• Stereo disc
• Digital Audio disc
• DTS disc
• MP3 disc
• WMA disc
Both the DVD player and the discs are coded by
region. These regional codes must match in order for
the disc to play. If the codes do not match, the disc
will not play.
The Region Number for this player is described
on the rear panel of the player.
Progressive Scan
‘CONSUMERS SHOULD NOTE THATNOT ALL
HIGH DEFINITION TELEVISION SETS ARE FULLY
COMPATIBLE WITH THIS PRODUCT AND MAY
CAUSE ARTIFACTS TO BE DISPLAYED IN THE
PICTURE. IN CASE OF 525 PROGRESSIVE SCAN
PICTURE PROBLEMS, IT IS RECOMMENDED THAT
THE USER SWITCH THE CONNECTION TO THE
‘STANDARD DEFINITION’OUTPUT. IF THERE ARE
QUESTIONS REGARDING OUR TV SET COMPATIBILITY WITH THIS MODEL 525p DVD PLAYER,
PLEASE CONTACT OUR CUSTOMER SERVICE
CENTER.’
Page 5
ENG-5
* It may not be to play CD-R,CD-RW and DVD-R in all cases due to the type of disc or condition of the recording.
Disc Types (Logos)
Recording Types
Disc Size Max. Playing Time Characteristics
12 Cm
8 Cm
Single-sided 240 min.
Double-sided 480 min.
Single-sided 80 min.
Double-sided 160 min.
Audio
+
Video
VIDEO-CD
AUDIO-CD
DVD
•
DVD contains excellent sound and video
due to Dolby Digital and MPEG-2 system.
•
Various screen and audio functions can
be easily selected through the on-screen
menu.
12 Cm
8 Cm
74 min.
20 min.
74 min.
20 min.
Audio
+
Video
•
Video with CD sound, VHS quality &
MPEG-1 compression technology.
12 Cm
8 Cm
Audio
•
An LP is recorded as an analog signal
with more distortion. CD is recorded as a
Digital Signal with better audio quality,
less distortion and less deterioration of
audio quality over time.
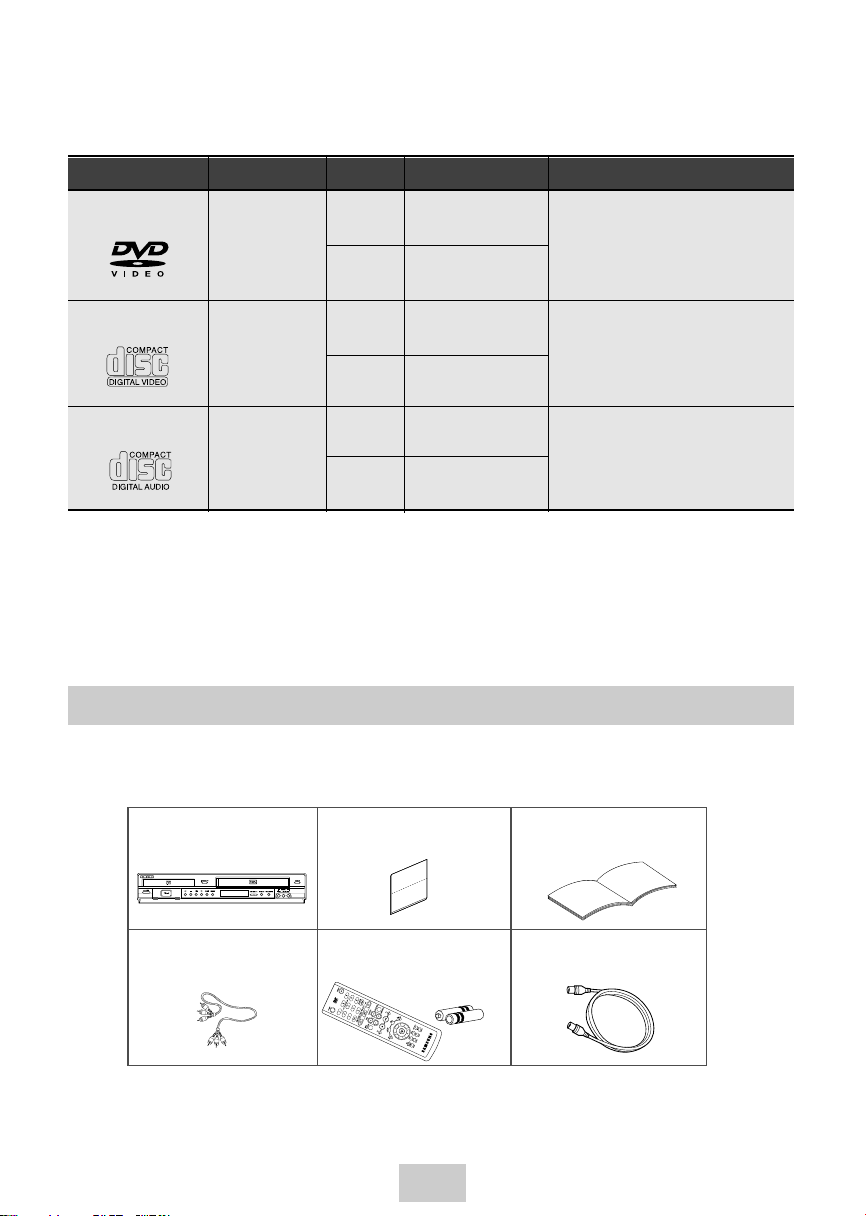
When you unpack the DVD-VCR, please check the following list of items is included in the packing case.
Unpack
DVD-VCR
RCA cable for Audio/Video
connection (AC97-01746A)
Remote Control (AK59-00008X)
&1.5V “AAA” Batteries- 2EA
(AC43-12002H)
RF (Radio Frequency) Antenna
Cable (AC39-42001J)
Registration Card
(AD68-00078A)
User’s Guide
(AK68-00353A)
Page 6
ENG-6
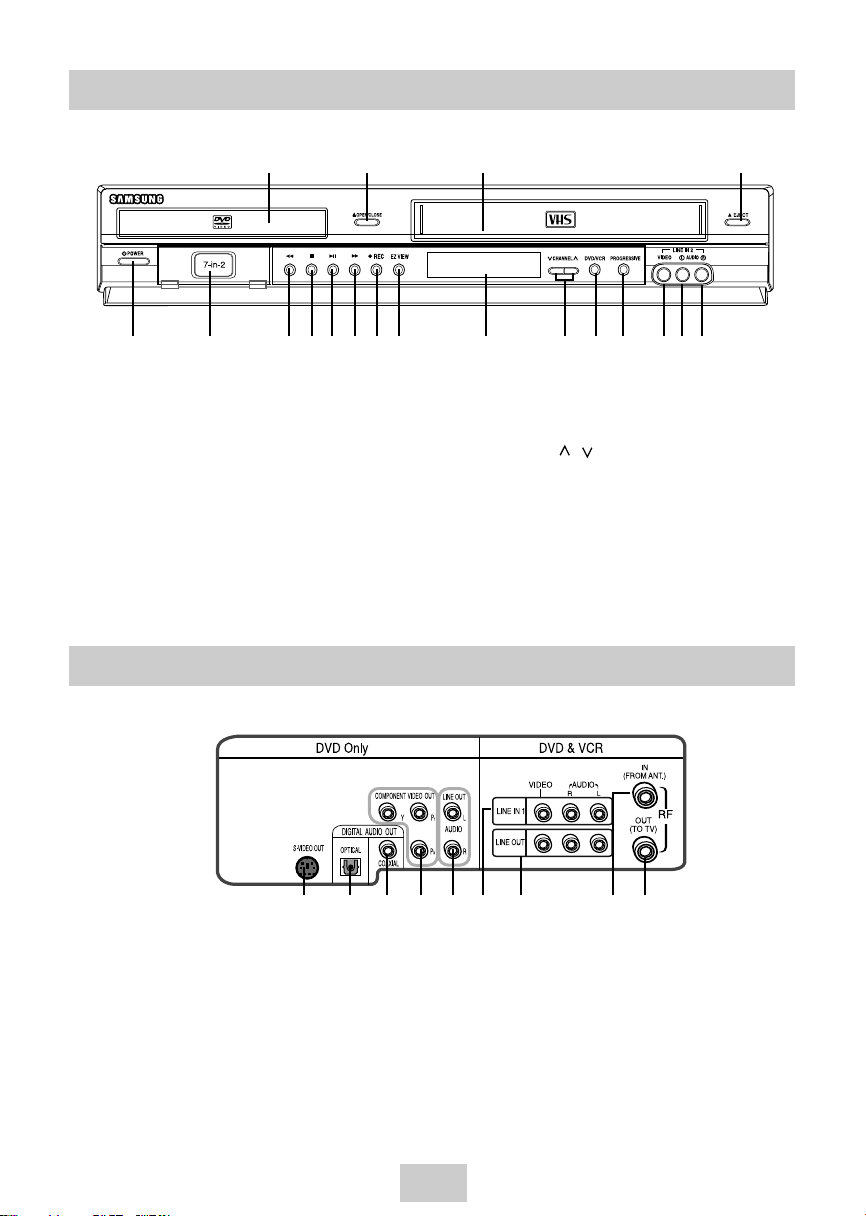
Front Panel Overview
Rear Panel
1 2 3 4
5 6 7 8 9 10 11 12 13 14 15 16 17 18 19
1 DVD DECK
2 DVD OPEN/CLOSE
3 VCR DECK
4 VCR EJECT
5 POWER
6 MULTI CARD INPUT
7 REWIND/REV
8 STOP
9 PLAY/PAUSE
10 FAST-FORWARD/FWD
11 RECORD
12 EZ VIEW
13 FRONT PANELDISPLAY
14 CHANNEL /
15 DVD-VCR SELECT
16 PROGRESSIVE
17 COMPOSITE VIDEO JACK
18 LEFT AUDIO JACK
19 RIGHT AUDIO JACK
1 2 3 4 5 6 7 8 9
1 S-VIDEO OUT
2 DIGITALAUDIO OUT(OPTICAL)
3 DIGITALAUDIO OUT(COAXIAL)
4 COMPONENT VIDEO OUT
5 AUDIO LINE OUT TO TV
(S-VIDEO OR COMPONENT)
6 LINE IN 1
7 LINE OUT TO TV (COMPOSITE)
8 RF ANTENNA INPUT
9 RF OUT TO TV
Page 7
ENG-7
Basic Connections/Auto Setup
3
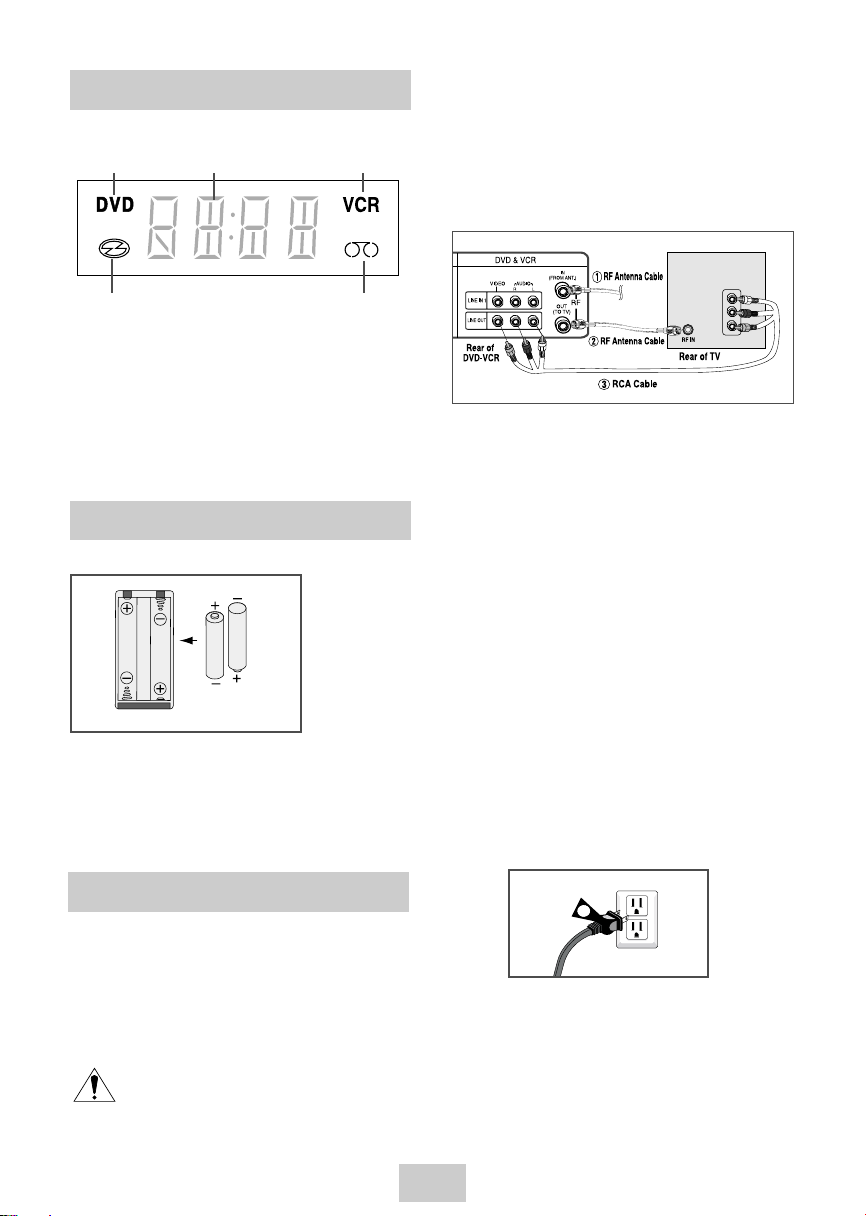
Insert Batteries into Remote
Front Panel Display
• Remove the battery cover on the remote
• Insert two 1.5V “AAA” batteries as shown,
making sure of the correct polarities(+/-)
• Slide the cover back onto remote.
4 5
1 2 3
1 When the light is on, DVD is operating.
2 The time, counter position, remaining time or
current deck status is indicated.
3 VCR is activated.
4 DVD or CD media is loaded.
5 VHS videotape is loaded.
4 Turn On your DVD-VCR
Turn on the power by pressing the POWER button
on the remote control or on the front panel of the unit.
5 Turn On your TV
Turn on the TV by pressing the POWER button on
the TV remote control.
6 Set the TV to Line (Only for line connection)
Set your TV to its Line Input.
2 Connect your DVD-VCR to a TV
RF Connection
Using the RF antenna cable
➁
, connect the OUT
jack (TO TV) on the rear panel of your DVD-VCR to
your TV’s Antenna Input.
Line Connection
Using an RCA-type audio/video cable
➂
(red, white,
yellow), connect the LINE OUT jacks on the rear
panel of your DVD-VCR to your TV's Line In jacks.
Use the three cables as follows: red for right audio,
white for left audio, and yellow for video.
NOTE: If your TV is equipped with RCA jacks, it is
better to use the Line Connection method.
3
Plug In
Your DVD-VCR's power should be plugged into a
standard 120V/60Hz wall outlet. Avoid pressing any
buttons on the remote control or on the unit during
an Auto Setup. While your DVD-VCR is running an
Auto Setup, “AUTO” will blink. When Auto Setup is
complete, the current time will be displayed on the
front panel display. In case Auto Clock set fails to
locate a channel to set the clock, you should set
the clock manually. See page 13.
You will need to connect the DVD-VCR to a TV and run
Auto Setup. The Auto Setup will automatically search for
channels and then set your DVD-VCR's internal clock.
NOTES:
• See page 8 for Advanced Connections.
• Standard RF or Line connection between your TV
and DVD-VCR are required to run DVD-VCR
setup menu, even if you connect S-Video or
Component Video Output for a better picture
quality.
LINE INPUT
1
Connect the RF Antenna Cable ①to your DVD-VCR
Connect an external indoor/outdoor antenna or wall
outlet antenna cable to the Ant-In jack on the rear
panel.
Page 8
ENG-8
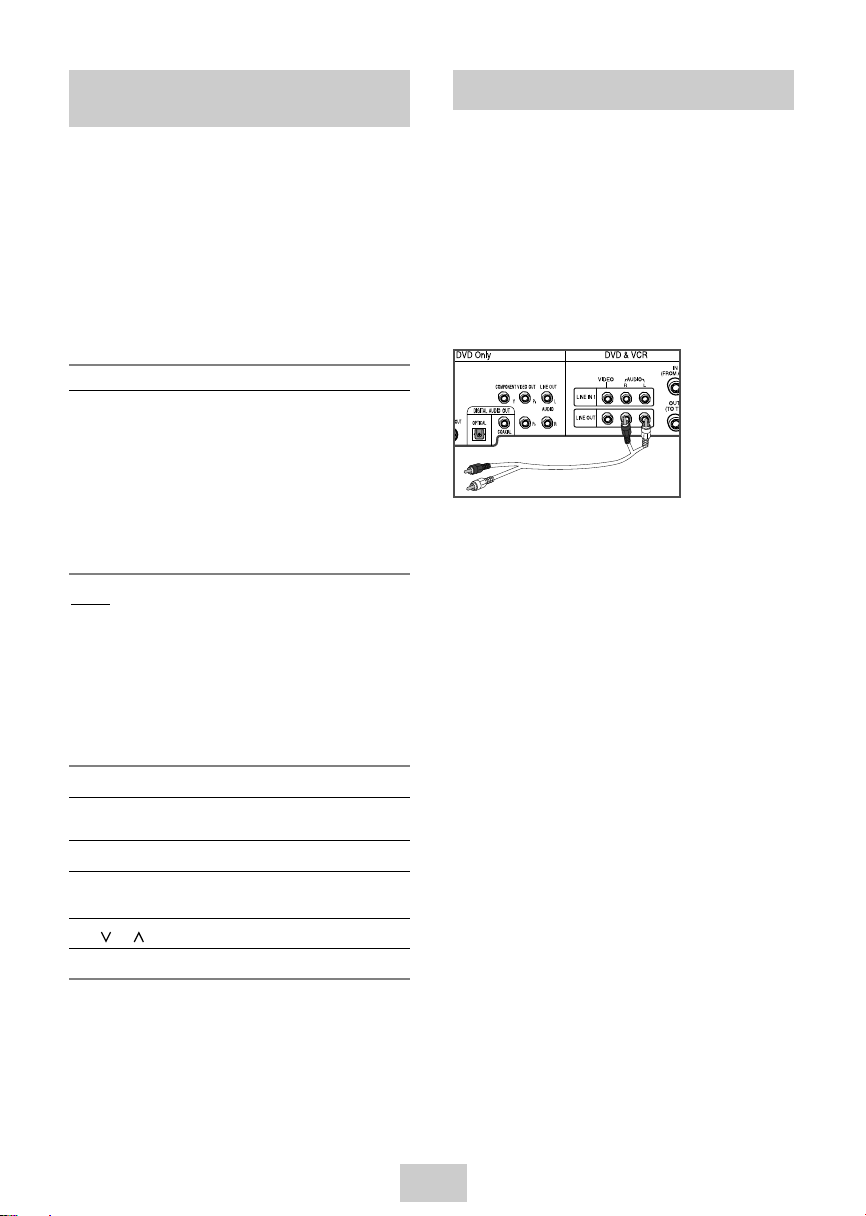
Stereo Connections
You can connect your DVD-VCR to your home stereo
system or stereo TV and enjoy stereo sound when
watching a movie or TV.
1 Connect DVD-VCR to Stereo
Using RCA cables, connect the Line Out Left and
Right Audio jacks on the rear panel of the DVD-VCR
to the Aux Input on your stereo receiver.
Connect the Video Output also in case you are using
a stereo TV.
2 Set Stereo to Auxiliary Mode
Set your stereo receiver or TV to either “Aux” or
“Tape” regardless of which line input you are using for
your particular device.
3 Play a Tape
Insert a DVD or Hi-Fi stereo videotape into your
DVD-VCR. Be sure to adjust the volume on your
stereo receiver or TV. Audio will be heard through
your stereo speakers
• If there is no stereo sound even after you have
inserted a Hi-Fi stereo videotape, press the AUDIO
button until “Hi-Fi” appears on the on-screen display.
Using the TV Buttons on the
Remote Control
Your VCR remote control will work with Samsung
televisions and compatible brands.
To determine whether your television is compatible,
follow the instructions below.
1 Switch your television on.
2 Point the remote control towards the television.
3 Hold down the TV button and enter the two-figure
code corresponding to the brand of your television,
by pressing the appropriate numeric buttons.
Brand Codes Brand Codes
SAMSUNG 01, 14, 15, 23 LOEWE 28
SHARP 02, 16, 22 ZENITH 17
SONY 03 LG 06, 08, 18
RCA 07, 29 MAGNAVOX 04
TOSHIBA 09 EMERSON 21
PANASONIC 12, 24 SANYO 05, 20
HITACHI 10 DAEWOO 19
NEWSAN 27 NOBLEX 25
TELEFUNKEN 26
Result: If your television is compatible with the
remote control, it will switch off. It is now
programmed to operate with the remote
control.
➢ If several codes are indicated for your television brand,
try each one in turn until you find one that works.
You can then control the television using the following buttons.
Button Function
POWER Used to switch the television on and
off.
INPUT SEL. Used to select an external source.
VOL + o r – Used to adjust the volume of the
television.
CH ( or ) Used to select the required channel.
TV MUTE Used to toggle the sound on and off.
➢
The various functions will not necessarily work on all
televisions. If you encounter problems, operate the
television directly.
Page 9
ENG-9
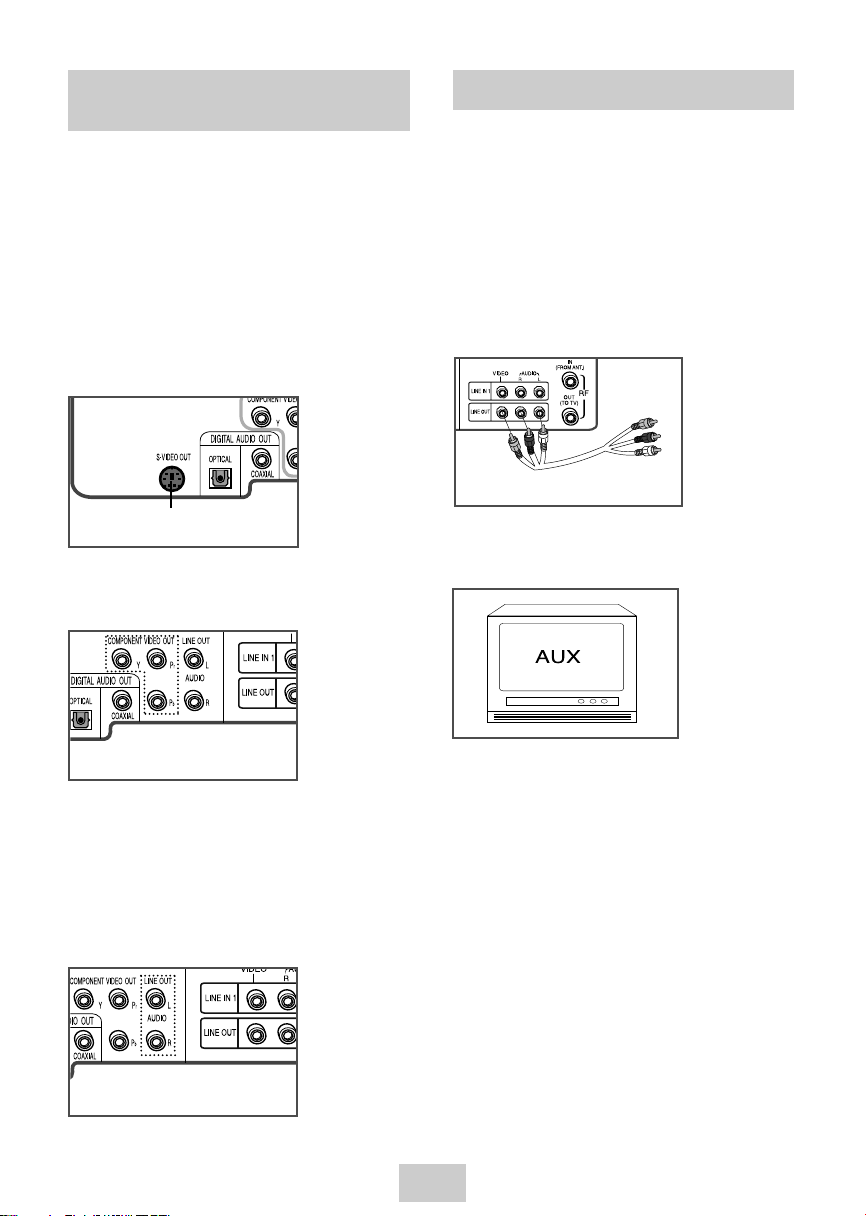
S-Video/Component Video
Connections (for DVD)
Use the S-Video or Component Video connection
method only for the DVD. The VCR can still be viewed
through the RF or line inputs.
To activate your alternative (S-Video or Component)
video selection, follow the “Alt Video Out” instructions
on page 21. Keep in mind that you can choose either
S-Video or Component only, but not both. A superior
video quality can be obtained when watching a DVD
on your DVD-VCR if your TV is equipped with S-Video
or Component Video inputs.
1 When using a S-Video cable
Connect the S-VIDEO OUT on the rear panel of your
DVD-VCR to the S-Video Input on your TV.
2 When using a Component video cable
connect the COMPONENT VIDEO OUT (Y, Pb, Pr)
on the rear panel of your DVD-VCR to the
Component Video Input on your TV.
3 Connect Audio Out (DVD only)
Using RCA audio cables, connect the LEFT/RIGHT
Line Out jacks on the rear panel of your DVD-VCR
to the LEFT/RIGHT Audio Line In jacks on your TV.
• When connecting your DVD-VCR to a TV with the
S-Video or Component Video Output, make sure
that you must, use these Line Out jacks to obtain
audio.
• To activate your connection, see “Alt Video Out”
on page 21.
To S-Video Input on Your TV
To Component Video Input
on Your TV
To Left/Right Audio Inputs
on Your TV
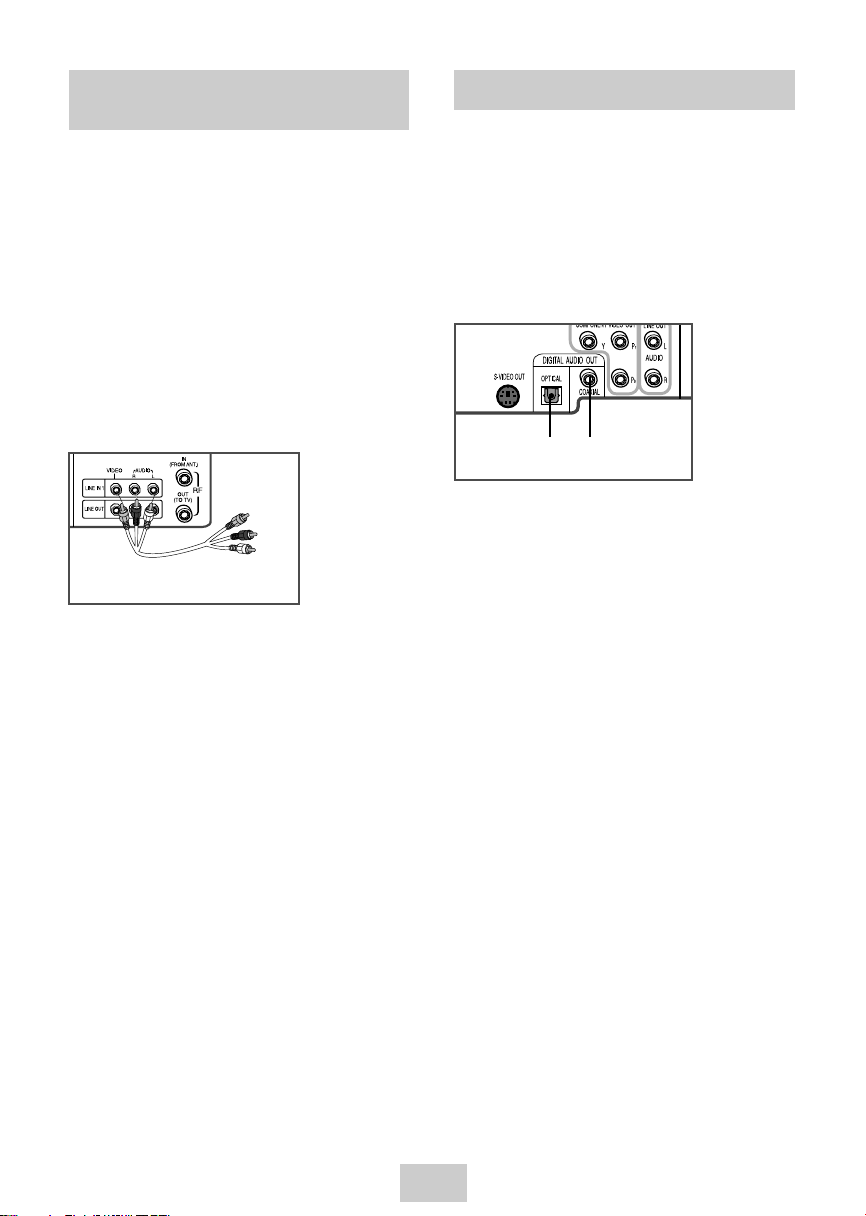
Monitor TV Connections
Monitor-style televisions offer improved sound and
picture over regular televisions because they receive
the audio and video signals directly from the DVD-VCR
through the line inputs.
NOTE: A monitor television is not the same as a
computer monitor.
1 Connect DVD-VCR to Monitor TV
Connect RCA cables from the Audio/Video Line Out
jacks on the rear panel of the DVD-VCR to the
Audio/Video Line Inputs of your monitor TV.
2 Set TV to Auxiliary Mode
Set your monitor TV to “Aux,” “Video,” or “Line.” Refer
to your monitor television owner’s manual for the
correct setting.
To Monitor TV Audio/Video Inputs
Page 10
ENG-10
A/V Receiver Connections
To take full advantage of the movie theater experience
that DVD offers, you may want to connect your DVDVCR to a complete Surround Sound system, including
an A/V Receiver and six Surround Sound speakers.
Before You Begin...
• If your A/V receiver is equipped with a Dolby
Digital Decoder, you have the option to bypass the
DVD-VCR’s built-in Dolby Digital Decoder. Use the
Digital Audio Out connection below.
1 Digital Audio Out
Connect a digital coaxial cable or an optical cable
from the Digital Audio Out jack on the rear panel of
the DVD-VCR to the corresponding Digital Audio
Input jack on your A/V Receiver:
• Optical
• Coaxial
• Use whichever connection is available on your
A/V Receiver.
To Digital Audio Input of an A/V
Receiver with a Dolby Digital Decoder
or
2 Play Device
Play your external device, then press the INPUT
SEL. button until the playback from Line1 (rear panel
inputs) or Line2 (front panel inputs) appears on your
TV screen.
3 Record Device
Press Record on the Front panel and Remote
Control.
4 Timer Record From Device
Select Line1 (L1) or Line2 (L2) as your record source
in the Timer Record menu. (See page 32)
All other Timer Record settings should be set in the
usual manner.
Connecting Other Video
Equipment
You can connect a wide variety of audio/video
equipment to your DVD-VCR, including:
• An additional VCR
• Laser Disc Player
• DVD Player
• Camcorder
• Satellite Receiver
• Video Game
Since all of these devices use essentially the same
connections, they will be described together.
1 Connect Device to DVD-VCR
Connect RCA cables from the Audio and Video Line
Outputs of your external device to the Line1(rear
panel inputs) or Line2 (front panel inputs)
From Audio/Video Outputs
of External Device
Page 11
ENG-11
Deck Control Buttons
The DVD-VCR uses one set of controls to operate both
decks. The following buttons are helpful in successfully
controlling each deck.
1 POWER Button
Press the POWER button on the remote control or
front panel to turn on the DVD-VCR.
2 DVD Button
Press the DVD button on the remote control or
DVD-VCR button on the front panel when you want
to control the DVD deck.
• The DVD indicator will light on the Front Panel
Display to show that the DVD deck is selected.
3 VCR Button
Press the VCR button on the remote control or
DVD-VCR button on the front panel when you want
to control the VCR deck.
• The VCR indicator will light on the Front Panel
Display to show that the VHS deck is selected.
4 INPUT SEL. Button
Press the INPUT SEL. button on the remote control
repeatedly to cycle through all of your input
sources, including the Tuner(Ch##), Line 1 (rear AV
input), and Line 2 (front AV input).
• Input selection is only available when the VCR
deck is selected.
Basic DVD Operation
Follow the instructions below to playback a DVD.
1 Open the Disc Tray
Press the OPEN/CLOSE button on your remote control or
on the front panel of the unit to turn on the power and
open the disc tray.
2 Insert a Disc
Put a disc in the center of the tray, with the label-printed
side facing up.
3 Close the Disc Tray
Press the OPEN/CLOSE button on your remote control or
on the front panel of the unit to close the disc tray.
4 Play a DVD
Press the
ll
(PLAY/PAUSE) button on your remote
control or on the front panel of the unit.
• Most discs will start to playback as soon as the tray
closes.
• If a DVD has a MENU, the menu may pop up on TV
screen.
5 Additional DVD Options
• See pages 16 ~ 21 for advanced DVD Setup options.
• See page 22 for special DVD Playback features.
Basic VCR Operation
To play a standard VHS videotape, just insert it into the
VCR deck and press the PLAY button. You can turn on
the Auto Play to enable the VCR deck to play
automatically when you insert a videotape that is
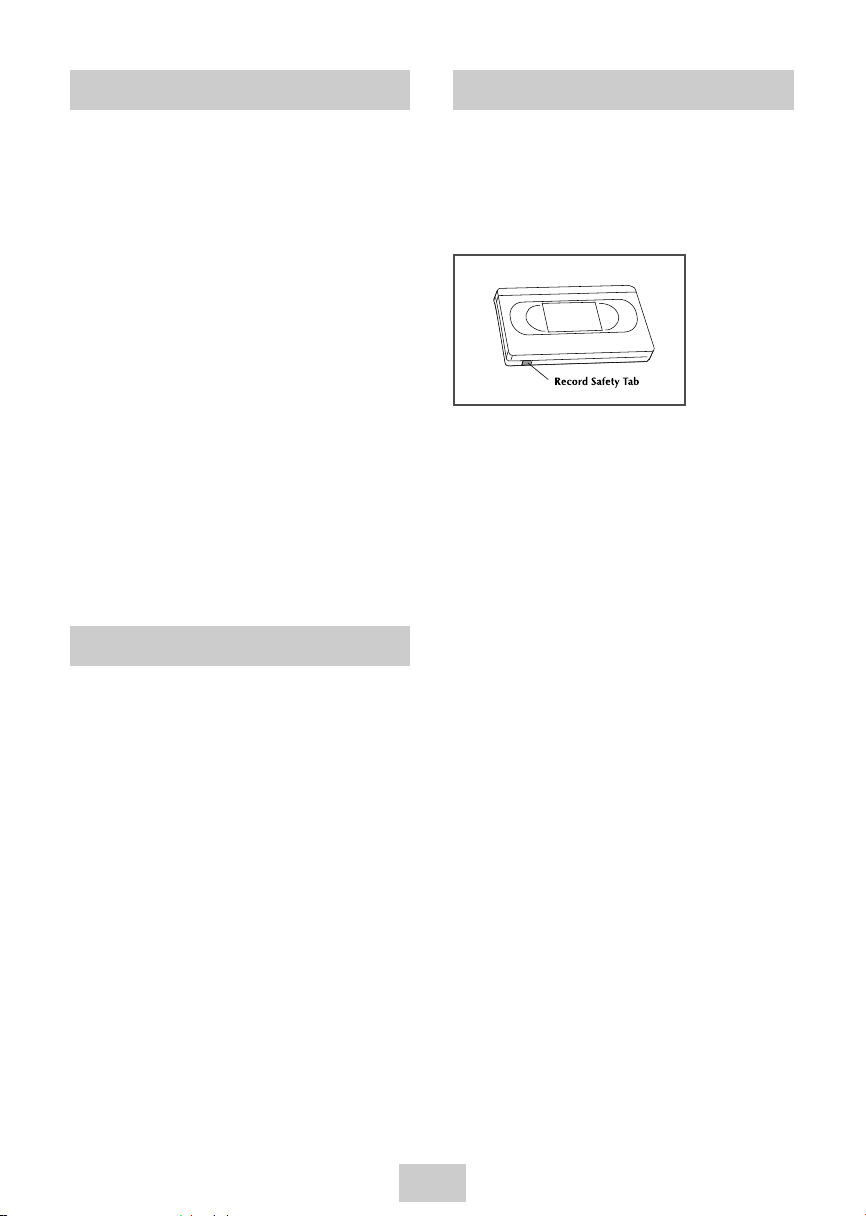
missing the Record Safety Tab. See page 29.
1 Insert VHS Tape
Insert a standard VHS videotape into the VCR
deck.
• When a videotape is inserted, power will turn on
automatically.
2 Play Tape
Press the ll(PLAY/PAUSE) button on the remote
control or on the front panel of the unit. The
videotape will begin to play automatically if it is
missing the Record Safety Tab and Auto Play is
turned on. See page 29.
3 Stop Playback
Press the ■(STOP) button on the remote control or
on the front panel of the unit.
4 Additional VCR Options
• See page 28 for special VCR Playback features.
• See pages 30~32 for VCR Recording features.
• See page 32 for Timer Recording features.
Page 12
ENG-12
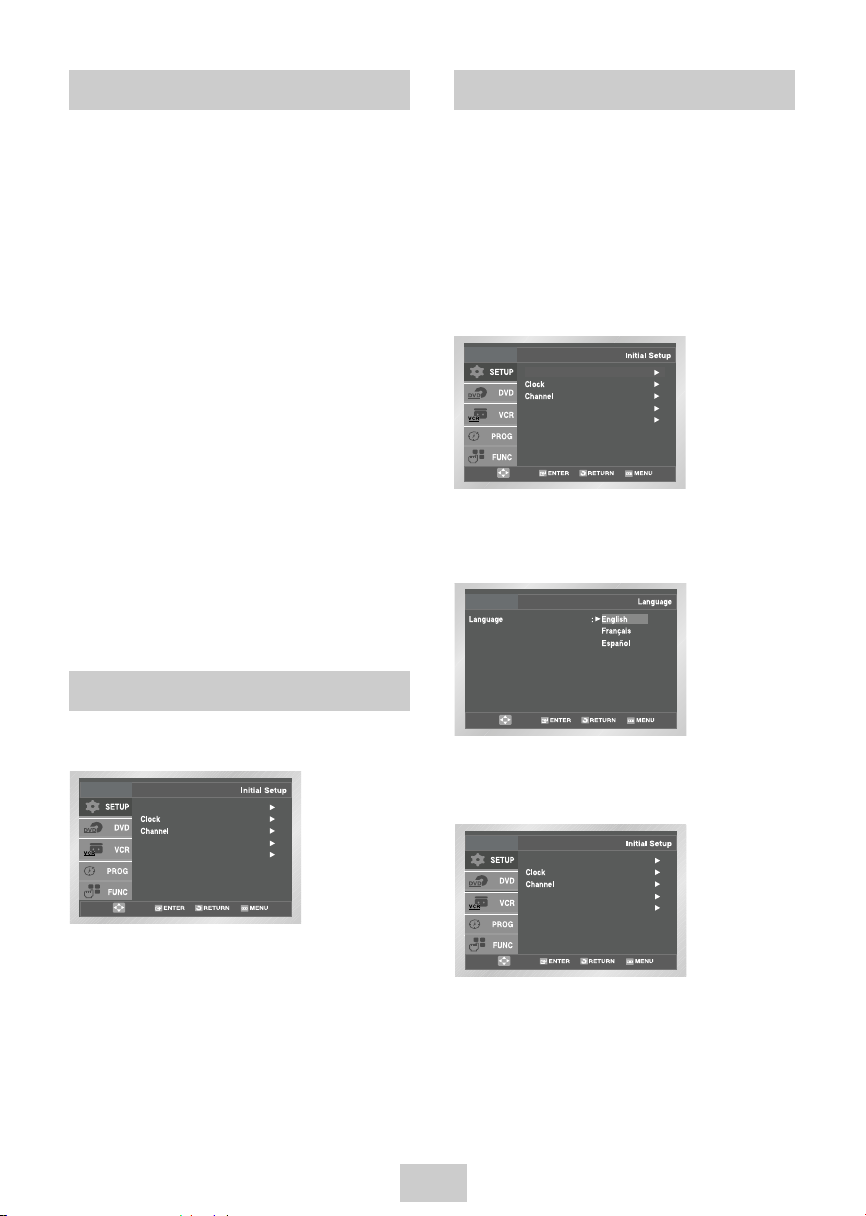
Menu Language
To change the on-screen MENU language to English,
French or Spanish, follow these steps.
1 Open “MENU”
Press the MENU button while the DVD is in Stop or
Play mode.
2 Select “SETUP”
Using the UP/DOWN buttons, move the selection
bar to “SETUP” then press ENTER to select.
3 Select “Language”
Use the UP/DOWN buttons to highlight “Language”
then press the ENTER button.
4 Set menu Language
Place the selection bar next to your desired
Language, then press the ENTER button.
Front Display : Auto
Auto Power Off : Off
Language : English
Language : English
Front Display : Auto
Auto Power Off : Off
Basic TV Tuner Operations
On-Screen Menu Navigation
The on-screen menus allow you to enable or disable
various functions on your DVD-VCR. Use the following
buttons to open and navigate through the on-screen menus.
1 MENU Button
Press this button while the DVD is in Stop or Play
mode to open the on-screen MAIN MENU.
2 UP/DOWN and LEFT/RIGHT
Use these buttons to move the selection bar
UP/DOWN and LEFT/RIGHT to cycle through the
menu options.
3 ENTER Button
Press this button to confirm any new settings.
4 RETURN Button
Press this button to return to the last MENU screen
displayed or to exit the on-screen MENU all together.
When watching TV using the DVD-VCR's built-in TV
tuner, use the buttons below.
1 TV/VCR
Press this button to switch between your TV’s tuner
and the VCR’s internal tuner.
• Use this button when you want to watch TV while
in recording mode.
2 Channel UP/DOWN
Use these buttons to move to the previous or the
next channel.
3 0-9 Buttons
Use these buttons to select the desired channel
directly.
4 100 + Buttons
Press this button to tune channels 100 and above.
First, press the 100+ button, then use the numeric
buttons(0-9) to enter the remaining digits of the
channel number desired.
• To activate this button, select Cable TV mode
during tuner band setting. (See page 13)
5 INFO. Button
Press this button to display the current channel in
VCR mode.
• This button also works and provides disc
information in DVD mode.
Language : English
Front Display : Auto
Auto Power Off : Off
Page 13
ENG-13
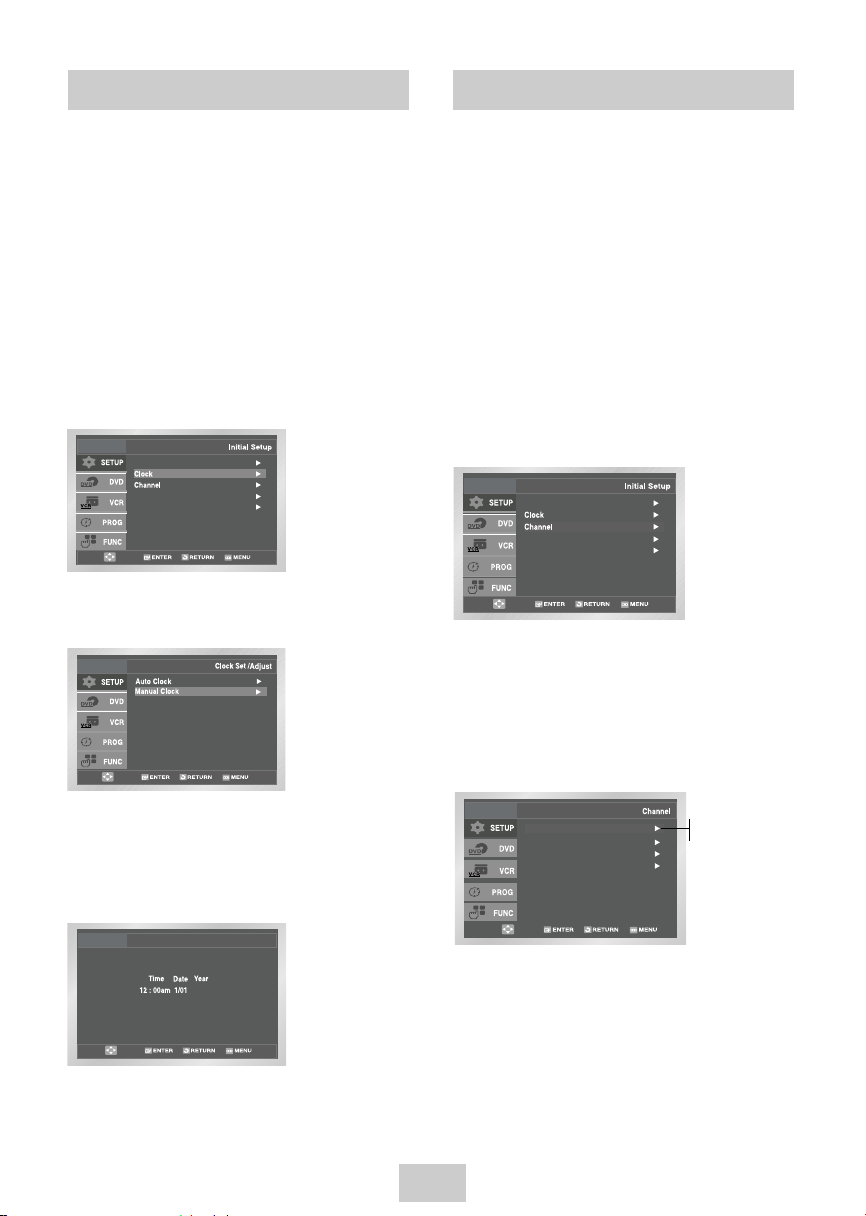
Manual Clock Set
If Auto Setup fails to set the DVD-VCR’s internal clock
by locating a local TV station, follow these steps to set
the date and time manually.
NOTE: For accurate Timer Recording, your DVD-VCR's
internal clock must be set correctly.
1 Open “MENU”
Press the MENU button while the DVD is in Stop or
Play mode.
2 Select “SETUP”
Using the UP/DOWN buttons, move the selection
bar to “SETUP” then press ENTER to select.
3 Select “Clock”
Use the UP/DOWN buttons to highlight “Clock ”
then press the ENTER button.
4 Select “Manual Clock”
Move the highlight to “Manual Clock”, then press
the ENTER button.
• The Clock Set/Adjust menu will change as shown.
5 Set the Clock
Use the LEFT/RIGHT buttons to select each of the
following options, then use the UP/DOWN buttons
to set each option:
• Hour – Set the hour • Month – Set the month.
• Minute – Set the minute. • Day – Set the day.
• Year – Set the year
6 Confirm Settings
Press the ENTER or RETURN button to confirm
your clock settings and to return to the Clock
Set/Adjust.
• Press the RETURN button three times to exit the
menu.
Language : English
Front Display : Auto
Auto Power Off : Off
Manual Clock
2004 THU
Tuner Band Setting
This feature allows you to manually set the DVD-VCR’s
tuner band to Antenna or Cable, whichever you
connected to the Antenna In jack during initial setup.
• Use this setting only if Auto Setup detected the
incorrect tuner band, i.e. channels are coming in on
the wrong channel numbers.
1 Open “MENU”
With the DVD in Stop or Play mode, press the
MENU button.
2 Select “SETUP”
Using the UP/DOWN buttons, move the selection
bar to “SETUP” then press ENTER to select.
3 Select “Channel”
Using the UP/DOWN buttons, move the selection
bar to “Channel”, then press ENTER to select.
4 Select “Ant./Cable”
Move the selection arrow to “Ant./Cable” then press
RIGHT button to select from the following options:
• Antenna - Select this if the DVD-VCR is
connected to an indoor or outdoor VHF/UHF
antenna.
• Cable TV - Select this if the DVD-VCR is
connected to Cable TV.
Language : English
Front Display : Auto
Auto Power Off : Off
Ant./Cable : Antenna
RF Output CH : 3CH
Auto Channel Memory
Channel Add/Delete
Cable TV
Antenna
Page 14
ENG-14
Auto Channel Memory
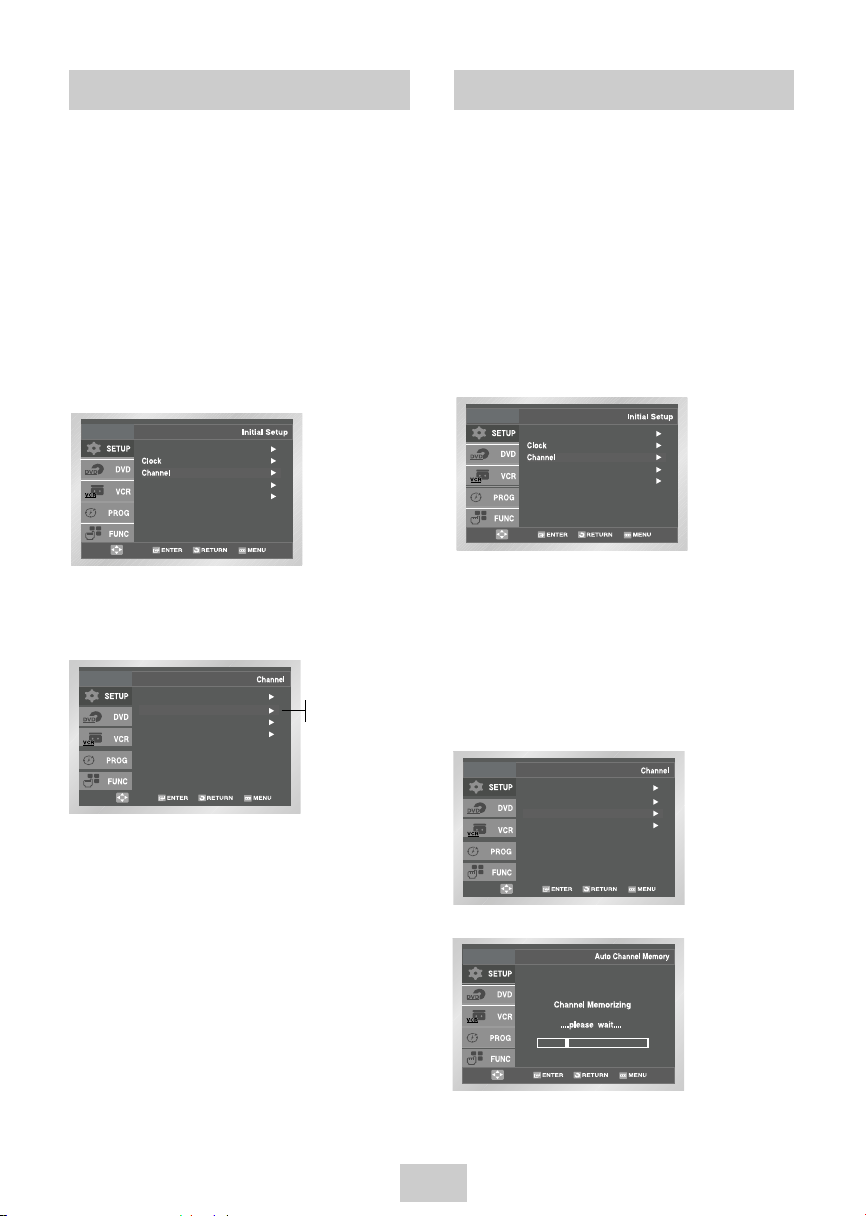
Auto Channel Memory will automatically seek and store
all active channels in your area.
1 Open “MENU”
With the DVD in Stop or Play mode, press the
MENU button.
2 Select “SETUP”
Using the UP/DOWN buttons, move the selection
bar to “SETUP” then press ENTER to select.
3 Select “Channel”
Using the UP/DOWN buttons, move the selection
bar to “Channel”, then press ENTER to select.
4 Run “Auto channel memory”
Move the selection arrow to “Auto Channel
Memory,” then press ENTER to select.
• The DVD-VCR will automatically search for all
available channels in the selected Tuner Band.
This procedure may take a few minutes to
complete.
• When finished, the lowest channel found will be
displayed.
Ant./Cable : Antenna
RF Output CH : 3CH
Auto Channel Memory
Channel Add/Delete
Language : English
Front Display : Auto
Auto Power Off : Off
RF Output Channel
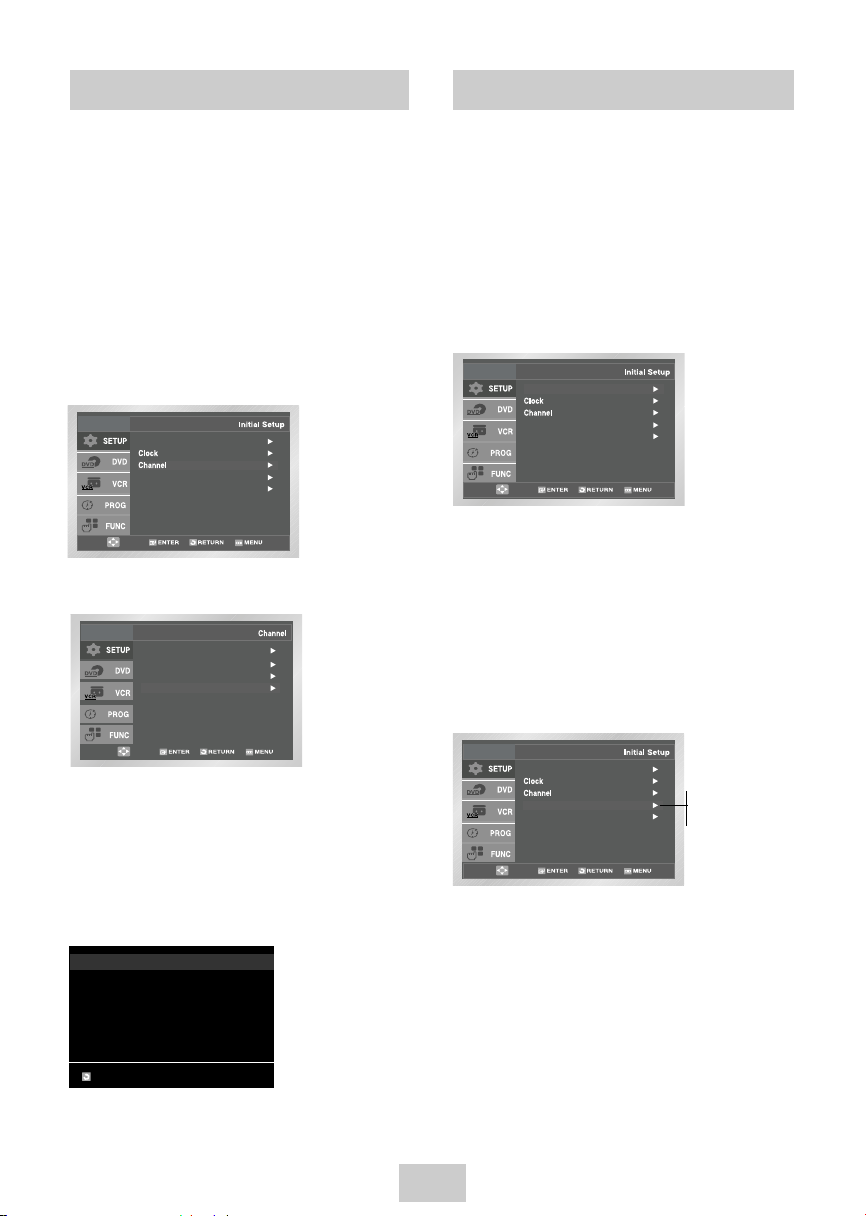
Use this feature if DVD-VCR is connected to TV using
RF antenna cable.
1 Open “MENU”
With the DVD in Stop or Play mode, press the
MENU button.
2 Select “SETUP”
Using the UP/DOWN buttons, move the selection
bar to “Setup” then press ENTER to select.
3 Select “Channel”
Using the UP/DOWN buttons, move the selection
bar to “Channel,” then press ENTER to select.
4 Select “RF Output CH”
Move the selection bar to “RF Output CH”, then
press right to change.
5 Change “RF Output CH”
A message will appear on your TV.
Then press ENTER to change.
6 Change “TV Channel”
A message will appear on your TV. When the
message disappears, change your TV to channel 3
or 4 to match the RF output channel of the player.
Language : English
Front Display : Auto
Auto Power Off : Off
Ant./Cable : Antenna
RF Output CH : 3CH
Auto Channel Memory
Channel Add/Delete
3CH
4CH
Page 15
ENG-15
Channel Add/Delete
Use this feature if Auto Channel Search missed a
channel that you would like to add or delete.
1 Open “MENU”
With the DVD in Stop or Play mode, press the
MENU button.
2 Select “SETUP”
Using the UP/DOWN buttons, move the selection
bar to “SETUP” then press ENTER to select.
3 Select “Channel”
Using the UP/DOWN buttons, move the selection
bar to “Channel”, then press ENTER to select.
4 Select “Channel Add/Delete”
Move the selection bar to “Channel Add/Delete,”
then press ENTER to select.
5 Select Channel to Add/Delete
Use the CH
/
buttons to tune in the channel
number you wish to add or delete.
6 Select “Channel Add/Delete”
Press RIGHT button to add or press left button to
delete the channel from your channel list.
• Repeat steps 4 and 5 to add or delete additional
channels.
Ant./Cable : Antenna
RF Output CH : 3CH
Auto Channel Memory
Channel Add/Delete
CHANNEL ADD/DELETE
Select channel : [02]
and press [] to ADD
press [¥] to DELETE
RETURN CH
Language : English
Front Display : Auto
Auto Power Off : Off
Front Panel Dimmer
You can set the Front Panel Display to be bright all the
time, dim all the time, dim during power off.
1 Open “ MENU”
With the DVD in Stop or Play mode, press the
MENU button.
2 Select “SETUP”
Using the UP/DOWN buttons, move the selection
bar to “SETUP” then press ENTER to select.
3 Set “Front Display”
Move the selection bar to “Front Display,” then
press RIGHT button to select from the following
options:
• Auto – Front Panel Display will dim automatically
during power off.
• Bright – Front Panel Display will be bright all the
time.
• Dim – Front Panel Display will be dim all the time.
Language : English
Front Display : Auto
Auto Power Off : Off
Auto
Bright
Dim
Front Display : Auto
Auto Power Off : Off
Language : English
Page 16
Disc Menu Language
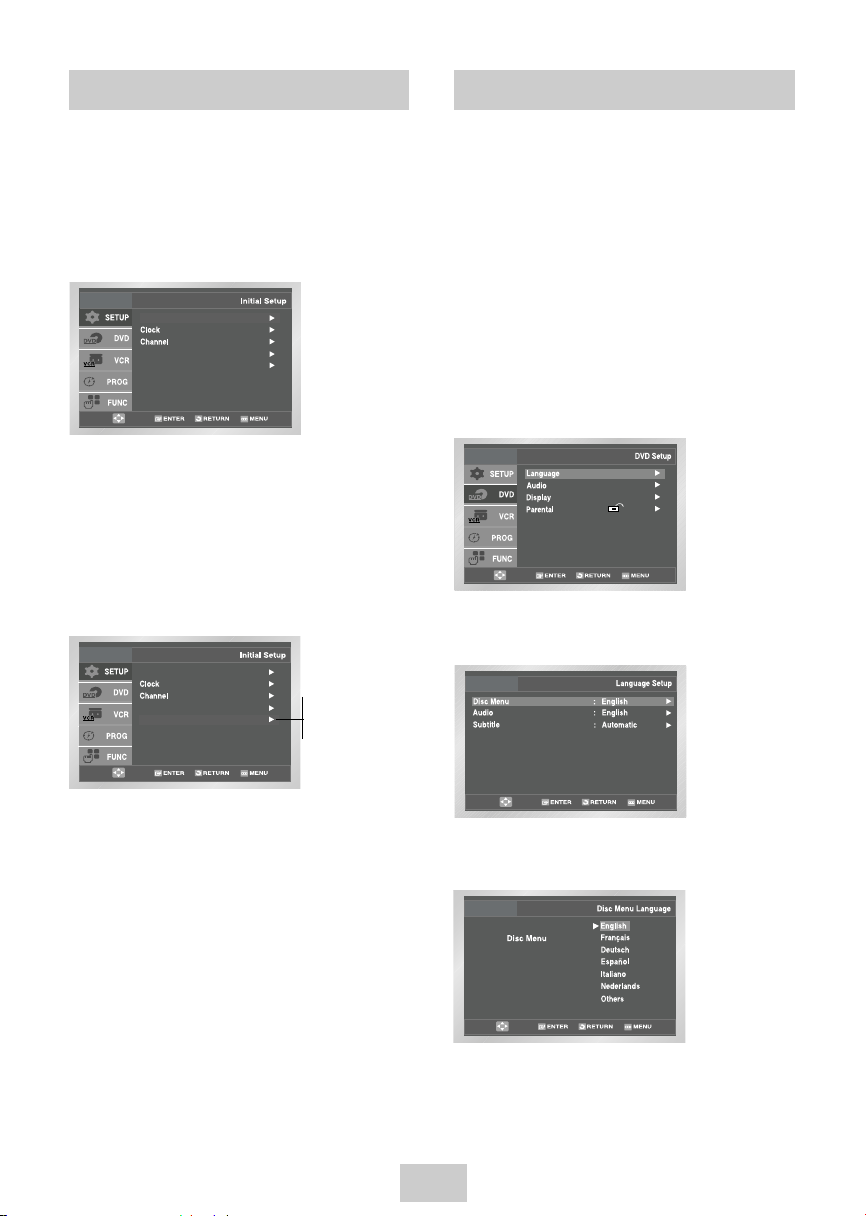
To set the Disc Menu Language to your preferred
language, follow these steps. If your preferred language
is available on a DVD, your Disc Menu Language will
automatically be set to the language you choose.
1 Open “MENU”
Press the MENU button while the DVD is in Stop
mode.
2 Select “DVD”
Use the UP/DOWN buttons to highlight “DVD”, then
press the ENTER button.
3 Select “Language”
Move the selection bar to “Language” then press
ENTER to select.
4 Select “Disc Menu”
Highlight “Disc Menu”, then press the ENTER
button.
5 Set “Disc Menu Language” Preference
Highlight your preferred language for disc menus,
then press the ENTER button.
ENG-16
Auto Power Off
1 Open “MENU”
With the DVD in Stop or Play mode, press the
MENU button.
2 Select “SETUP”
Using the UP/DOWN buttons, move the selection
bar to “SETUP” then press ENTER to select.
3 Set “Auto Power Off”
Move the selection bar to “Auto Power Off”, then
press RIGHT button to select from following options:
• Off – Auto power off is disabled.
• 1Hr – DVD-VCR will auto shut off 1 hour after the
last button is pressed.
• 2Hr – DVD-VCR will auto shut off 2 hours after
the last button is pressed.
Front Display : Auto
Auto Power Off : Off
Language : English
Language : English
Front Display : Auto
Auto Power Off : Off
Off
1Hr
2Hr
Page 17
ENG-17
Audio Language
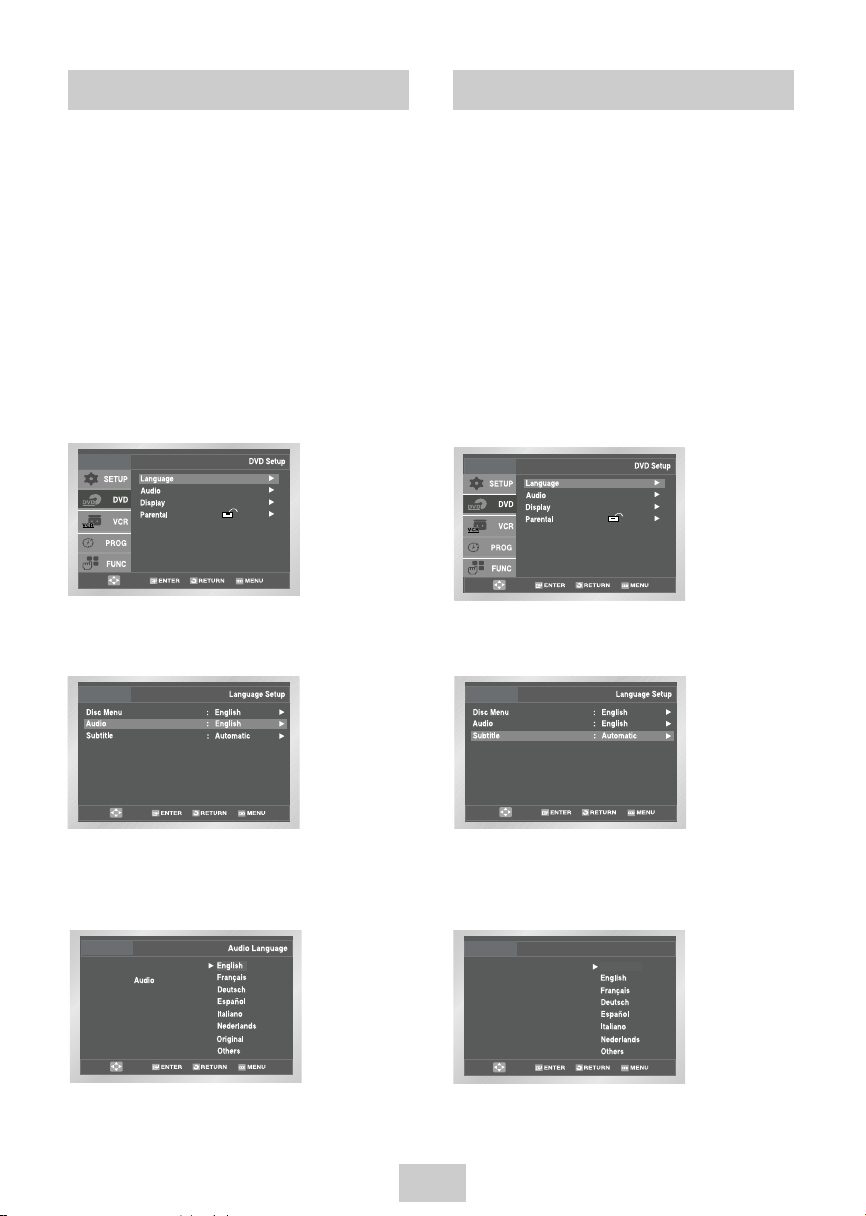
To set the Audio Language to your preferred language,
follow these steps. If your preferred language is
available on a DVD, your Audio Language will
automatically be set to the language you choose.
1 Open “MENU”
Press the MENU button while the DVD is in Stop
mode.
2 Select “DVD”
Use the UP/DOWN buttons to highlight “DVD” then
press the ENTER button.
3 Select “Language”
Move the selection bar to “Language” then press
ENTER to select.
4 Select “Audio”
Highlight “Audio,” then press the ENTER button.
5 Set “Audio Language” Preference
Highlight your preferred language for audio
soundtracks, then press the ENTER button.
Subtitle Language
To set the Subtitle Language to your preferred language,
follow these steps. If your preferred language is
available on a DVD, your Subtitle Language will
automatically be set to the language you choose.
1 Open “MENU”
Press the MENU button while the DVD is in Stop
mode.
2 Select “DVD”
Use the UP/DOWN buttons to highlight “DVD”
then press the ENTER button.
3 Select “Language”
Move the selection bar to “Language” then press
ENTER to select.
4 Select “Subtitle”
Highlight “Subtitle”, then press the ENTER button.
5 Set “Subtitle Language” Preference
Highlight your preferred language for subtitles, then
press the ENTER button.
Subtitle
Subtitle Language
Automatic
Page 18
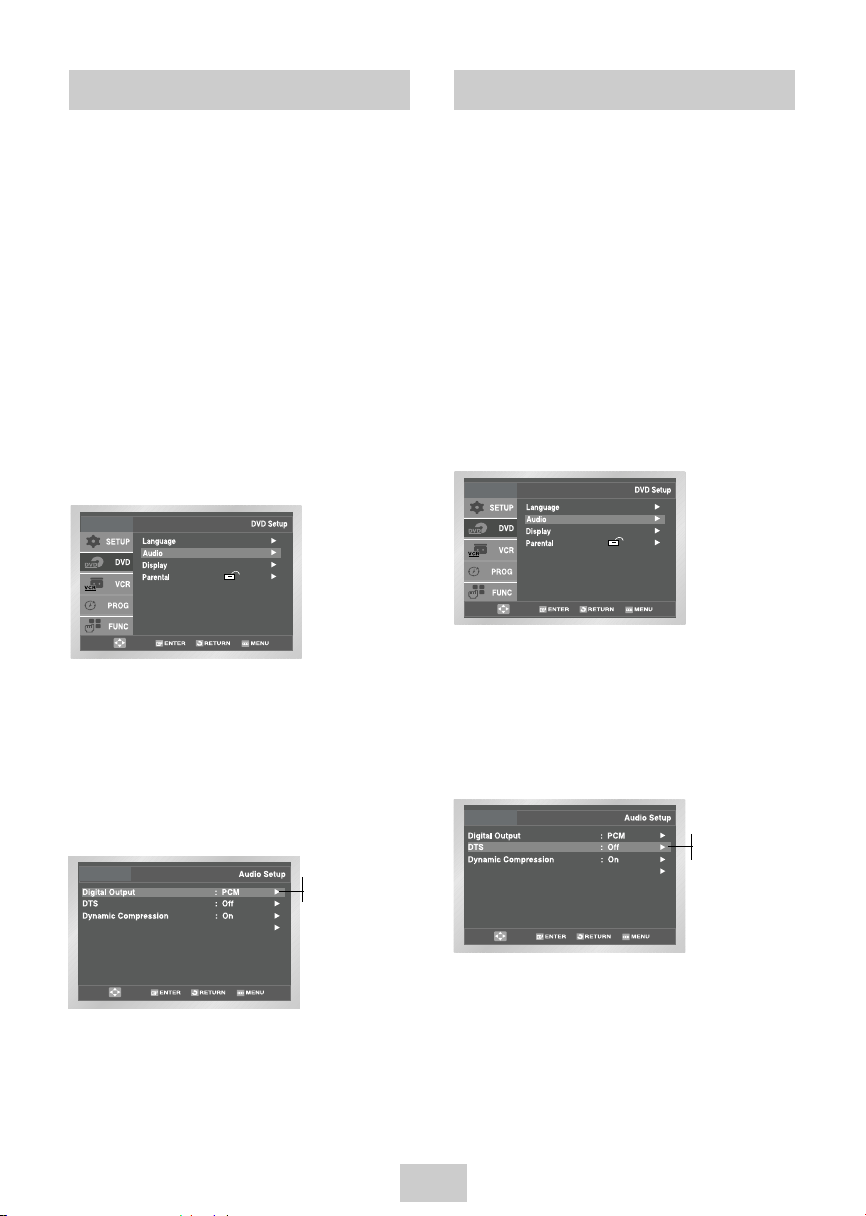
DTS
If your A/V receiver is equipped with a DTS decoder,
your DVD-VCR can output DTS digital sound, but you
MUST enable this feature in the menu system.
NOTE: Select “On” ONLY if you have connected a
DTS-equipped A/V receiver to the Digital audio
Out (coaxial) on the DVD-VCR rear panel.
1 Open “MENU”
Press the MENU button while the DVD is in Stop
mode.
2 Select “DVD”
Use the UP/DOWN buttons to highlight “DVD”
then press the ENTER button.
3 Select “Audio”
Highlight “Audio”, then press the ENTER button.
4 Set “DTS”
Highlight “DTS” then press the RIGHT button to
select one of the following options:
• Off – To use your DVD with an A/V receiver
NOT equipped with a DTS decoder.
• On – To use your DVD with an A/V receiver
equipped with a DTS decoder
PCM Down Sampling : On
Off
On
ENG-18
Digital Output
If your A/V receiver is equipped with a Dolby Digital
decoder, your DVD-VCR can output Dolby Digital 5.1
sound, but you MUST enable this feature in the menu
system to prevent damage to your speakers.
NOTE: Select “Bitstream” ONLY if you have connected
a Dolby Digital-equipped A/V receiver to the
Digital Output (coaxial) on the DVD-VCR rear
panel.
1 Open “MENU”
Press the MENU button while the DVD is in Stop
mode.
2 Select “DVD”
Use the UP/DOWN buttons to highlight “DVD”
then press the ENTER button.
3 Select “Audio”
Highlight “Audio”, then press the ENTER button.
4 Set “Digital Output”
Highlight “Digital Output” then press the RIGHT
button to select one of the following options:
• PCM – To use your DVD with an A/V
receiver without a Dolby Digital
decoder.
• Bitstream –To use your DVD with an A/V
receiver with a Dolby Digital decoder.
PCM Down Sampling : On
PCM
Bitstream
Page 19
ENG-19
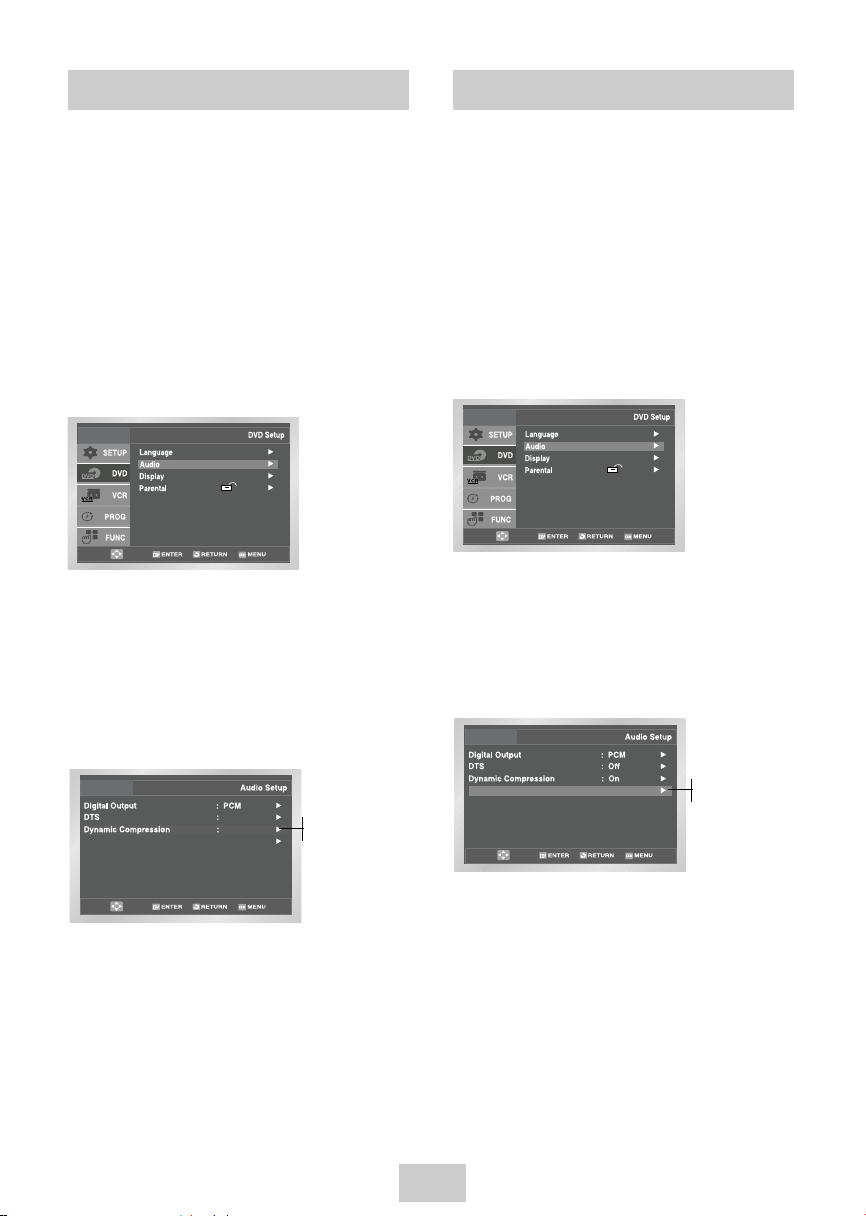
Dynamic Compression
Dynamic Compression restrains the dynamic range of
sounds, i.e. the difference between the loud and quiet
passages of a DVD audio track.
1 Open “MENU”
Press the MENU button while the DVD is in Stop
mode.
2 Select “DVD”
Use the UP/DOWN buttons to highlight “DVD”
then press the ENTER button.
3 Select “Audio”
Highlight “Audio”, then press the ENTER button.
4 Set “Dynamic Compression”
Highlight “Dynamic Compression”, then press the
RIGHT button to select one of the following options:
• On – This will compress the total dynamic range
of the DVD audio, making quiet passages
in the audio signal louder and loud
passages softer.
• Off – This will preserve the original dynamic
range.
PCM Down Sampling : On
Off
On
On
On
Off
PCM Down Sampling
If your amplifier is not capable of reproducing a 96kHz
signal, PCM downsampling should be set to on.
1 Open “MENU”
Press the MENU button while the DVD is in Stop
mode.
2 Select “DVD”
Use the UP/DOWN buttons to highlight “DVD ”
then press the ENTER button.
3 Select “Audio”
Highlight “Audio”, then press the ENTER button.
4 Set “PCM Down Sampling”
Highlight “PCM Down Sampling”, then press the
RIGHT button to select one of the following options:
• On – When a 96K audio disc is played, 96K will
be downsampled to 48K and outputted.
• Off – When a 96K disc is played, 96K will be
outputted.
PCM Down Sampling : On
On
Off
Page 20
Alt Video Out
Black Level
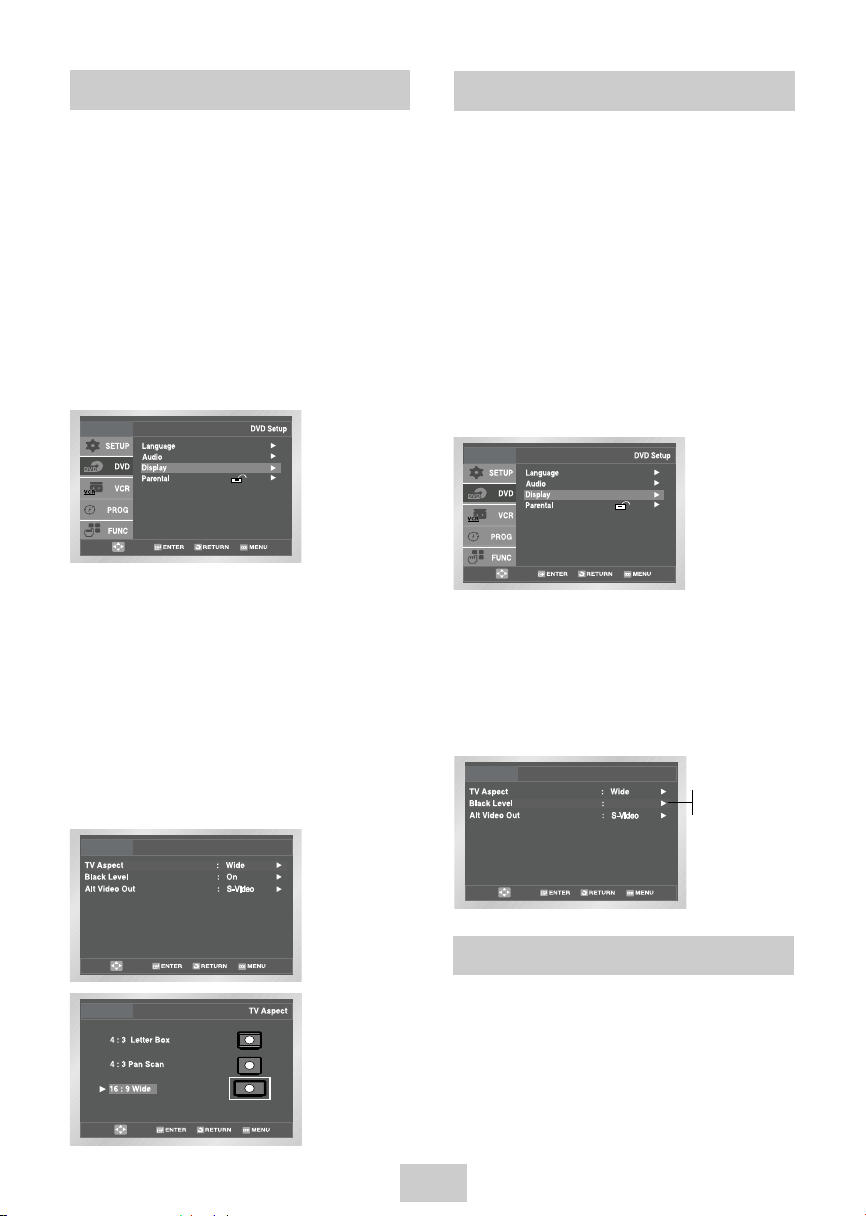
The Black Level feature adjusts the reference level of
black in the video signal to one of two choices:
• Off - Standard NTSC black level. Yields
consistent contrast through all sources.
• On - Enhanced black level, for increased contrast
during DVD playback.
1 Open “MENU”
Press the MENU button while the DVD is in Stop
mode.
2 Select “DVD”
Use the UP/DOWN buttons to highlight “DVD ”
then press the ENTER button.
3 Select “Display”
Highlight “Display”, then press the ENTER button.
4 Set “Black Level”
Highlight “Black Level,” then press the RIGHT
button to select one of the following options:
• On – This will enhance the Black Level for
increased brightness/contrast when
viewing DVDs.
• Off – This is the Standard NTSC reference Black
Level for consistent brightness/contrast
across all sources.
On
Display Setup
On
Off
The “Alt Video Out” option must be set in the on-screen
menu if you have connected your DVD-VCR to a TV using
the S-VIDEO OUT or COMPONENT VIDEO OUT jacks.
•
Use the S-Video or Component Video connection
method only for the DVD player. The tuner and VCR
can still be viewed through the RF or line outputs.
ENG-20
TV Aspect Ratio
Set the aspect ratio (length x width) of your TV screen
so the DVD player will display movies at the
appropriate size for your television. Choose from
standard, letterbox, or widescreen format.
1 Open “MENU”
Press the MENU button while the DVD is in Stop
mode.
2 Select “DVD”
Use the UP/DOWN buttons to highlight “DVD”
then press the ENTER button.
3 Select “Display”
Highlight “Display”, then press the ENTER button.
4 Set “TV Aspect”
Highlight “TV Aspect” then press the RIGHT button
to select one of the following options:
• Widescreen - This method allows you to view the
full 16:9 picture on a widescreen television.
• Letterbox - This method displays the full width of
the widescreen movie on a standard 4:3
television. As a result, black bars will appear at
the top and bottom of the screen.
• Pan-Scan - The familiar way of watching DVD
and VHS movies, this method selectively crops
(by panning and scanning to keep the most
important part of the picture visible) wide screen
movies to fit a standard 4:3 television screen.
Display Setup
Page 21
ENG-21
1 Open “MENU”
Press the MENU button while the DVD is in Stop
mode.
2 Select “DVD”
Use the UP/DOWN buttons to highlight “DVD,”
then press the ENTER button.
3 Select “Display”
Highlight “Display”, then press the ENTER button.
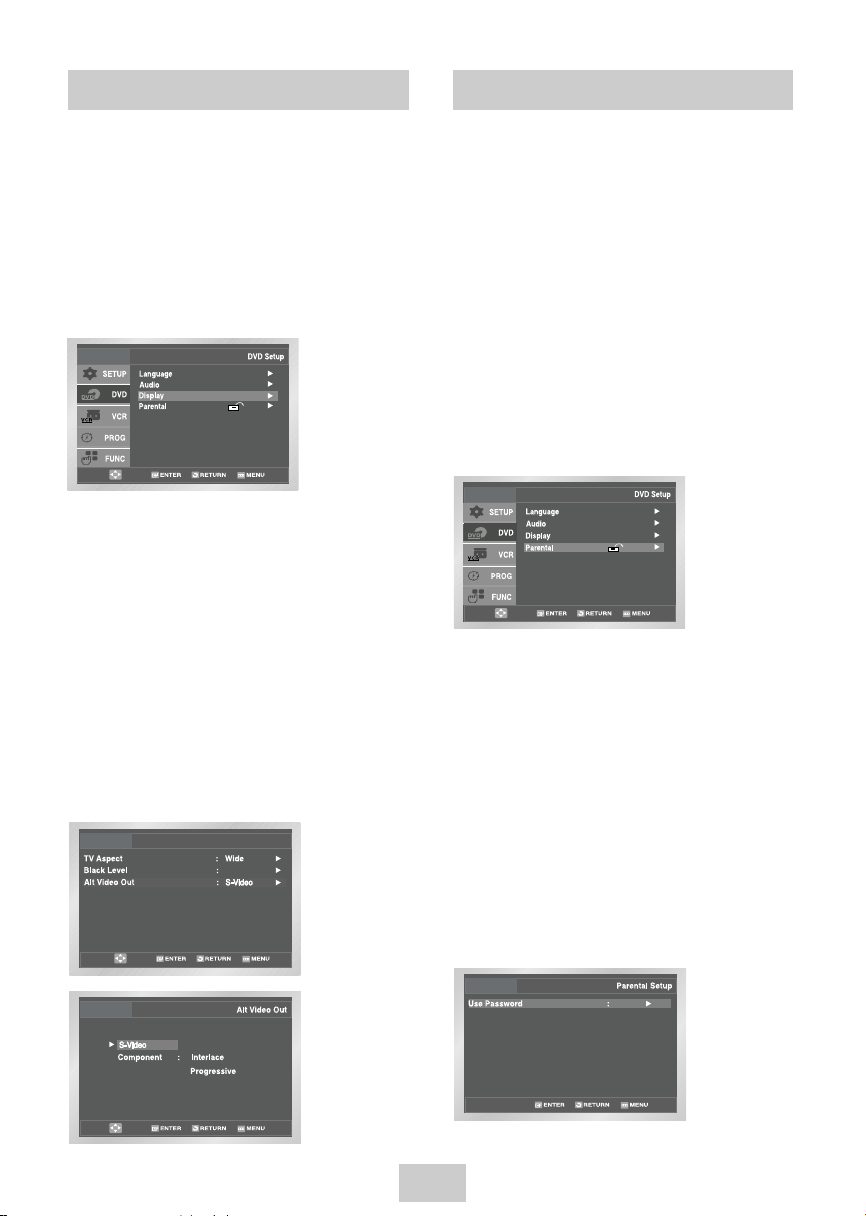
4 Set “Alt Video Out”
Highlight “Alt Video Out,” then press the RIGHT
button to select one of the following options:
• S-Video - Select this if you are using the S-Video
OUT jack on the rear panel to connect to a TV.
• Component - Select this if you are using the
COMPONENT VIDEO OUT jacks on the rear
panel to connect to a Progressive(480p) or
Interlaced (480i) TV.
• See your TV owner’s manual to determine what
type of TV you have.
- Interlace : Interlaced Scan mode will work.
- Progressive : Progressive Scan mode will work,
and Video and S-Video will not work.
• Press the PROGRESSIVE button on the front
panel in stop mode if you have a Progressive
scan TV only. Otherwise, the picture will be
disturbed.
On
Display Setup
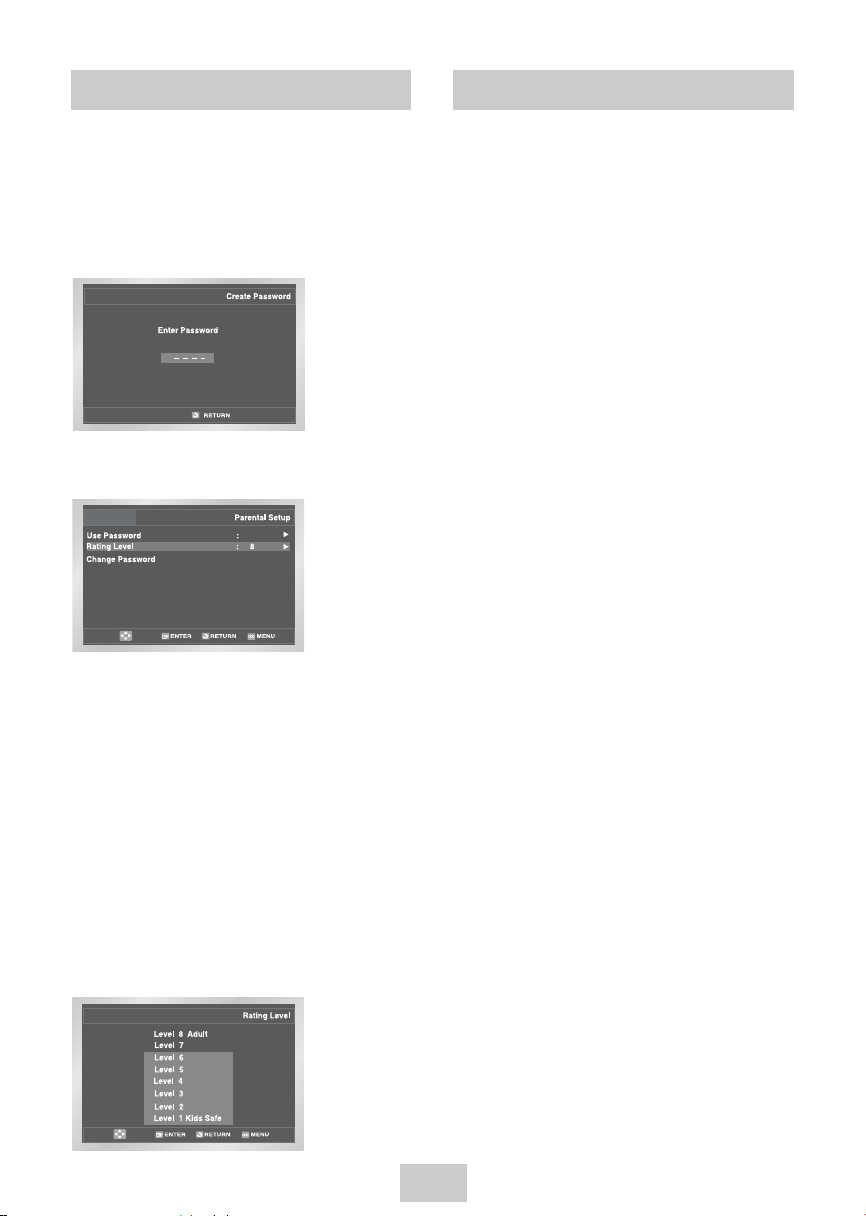
Alt Video Out Parental
Rating Control is a password protected system that
allows you to block playback of DVDs based on their
content. The system uses an eight level rating system.
• If you try to play a DVD that exceeds the selected
rating, an error message will appear.
• Not all discs are rated.
1 Open “MENU”
Press the MENU button while the DVD is in Stop
mode.
2 Select “DVD”
Use the UP/DOWN buttons to highlight “DVD ”
then press the ENTER button.
3 Select “Parental”
Highlight “Parental”, then press the ENTER button.
4 Select “Use Password”
Press the RIGHT button to select one of the
following options:
• No - No password is necessary to view a DVD or
to change the Rating Level. No additional
settings are necessary.
• Yes - A password is necessary to view a DVD and
to view the Rating Level. The menu will
change as shown.
NOTES:
• The first time “Use Password” is set to “No,”
you will be prompted to enter a new password.
• If the “Enter Password” screen appears, then
“Use Password” has already been set to
“Yes.” Please skip to Step 6.
• There is no default password.
No
Page 22
Special Playback Features
During DVD/CD playback you can select from the
following special playback options. To resume normal
playback, press the
ll
(PLAY/PAUSE) button.
1 PAUSE
Press the
ll
(PLAY/PAUSE) button on the remote
control during playback.
• The picture will pause and the audio will mute.
• To resume playback, press the
ll
(PLAY/PAUSE)
button.
• If the player is left in Pause mode for 5 minutes,
it will stop automatically.
2 Frame Advance (Step)
While in PAUSE mode, press the F.ADV/SKIPbutton
on the remote control to advance one frame at a time.
• Audio is muted during Frame Advance mode.
• Press
ll
(PLAY/PAUSE) to resume normal
playback.
NOTE: Frame Advance operates only in the
forward direction.
3 Skip Forward/Back
While a CD or DVD disc is in Play mode, press the
SKIP FORWARD/BACK (
l/l¥¥) buttons on the
remote control or front panel to jump forward and
backward through disc chapters/tracks.
• Skip Forward will jump to the next chapter/track.
• Skip Back will jump to the beginning of the current
chapter/track.
• Press Skip Back again to jump to the beginning of
the previous chapter/track.
Search Forward/Back
While a disc is in Play mode, press and hold the
FORWARD/BACK (
/¥¥
) buttons on the remote
control or front panel to visually search
forward/backward at 2X - 8X - 32X - 128X speed.
Press
ll
(PLAY/PAUSE) button to resume normal
speed.
NOTE: CD search speed - 2X, 4X, 8X
4 Slow Motion
During playback, press the
ll
(PLAY/PAUSE)button
to pause the image. Press and hold the Search
FORWARD () to play in slow motion at variable
speeds.
• Press and hold the FORWARD() button on
the remote and front panel to increase the speed
from normal playback to 1/8, 1/4 or 1/2 speed.
• Audio is muted during slow motion playback.
• Press the
ll
(PLAY/PAUSE) button to resume
normal playback.
NOTE: • Slow function is not available for CD.
• Slow motion operates only in the forward
direction
ENG-22
5 Enter Password
Use the numeric buttons (0-9) on the remote
control to enter the 4-digit password.
• Write your password down, and keep it in a safe
place in case you need to change your settings
later.
6 Select “Rating Level”
Move the selection bar to “Rating Level,” then
press ENTER to select.
7 Change Rating Level
Use the UP/DOWN buttons to select one of the
following ratings:
• Level 8 Adult • Level 4
• Level 7 • Level 3
• Level 6 • Level 2
• Level 5 • Level 1 Kids Safe
All ratings above the level you select will also be
blocked, e.g., if you select Level 6, then Levels 7
and 8 will also be blocked.
Press Enter to confirm your selection.
• If you forgot your password, press power on from
a cold start with no disc in the unit. Press the REW
and F.F buttons simultaneously on the front panel
for 5 seconds. The “Reset Ok” message will appear.
Press the POWER button.
0~9
Yes
Parental
Page 23
ENG-23
Disc Menu Navigation
5 Stop/Resume
• Press the STOP button once to stop playback. To
resume the DVD/CD from the point where the
disc stopped, press the
ll
(PLAY/PAUSE)
button.
• Press the (STOP) button twice to completely
stop playback. The next time you press
ll
(PLAY/PAUSE), the disc will start over from the
beginning.
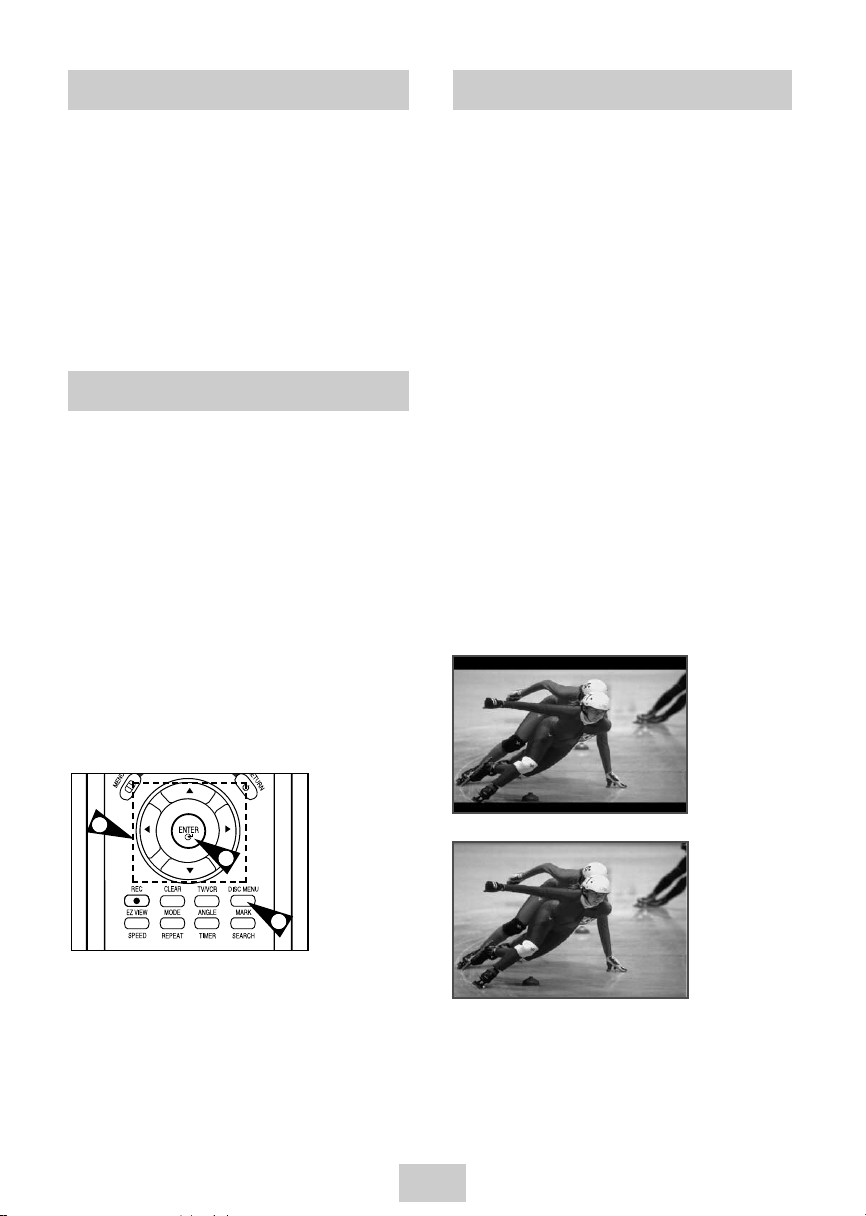
Many DVDs feature their own menu systems, where
you can select Titles, Chapters, Audio Tracks, Subtitles,
and special disc features, such as movie trailers, and
information on the cast. Use these buttons to make
selections in the Disc menus.
1 DISC Menu
Press to access the DVD’s Disc menu, if applicable.
2 Press UP/DOWN and LEFT/RIGHT to navigate
through DVD’s Disc menu options.
• Press UP/DOWN and LEFT/RIGHT to highlight
menu choices.
3 ENTER Button
Press to make your selections in the Disc menu.
3
1
2
Special Playback Features EZ View
1 Press the EZ VIEW button on the front panel.
• The screen size changes when the button is
pressed repeatedly.
• The screen zoom mode operates differently
depending on the screen setting in the initial setup
menu.
• To ensure correct operation of the EZ VIEW
button, you should set the correct aspect ratio in
the initial setup .(See the page 20)
2 If you are using a 16:9 TV
- For 16:9 aspect ratio discs
• Wide Screen
Displays the content of the DVD title in 16:9
aspect ratio.
• Screen Fit
The top and bottom of the screen are cut off.
When playing a 2.35:1 aspect ratio disc, the
black bars at the top and bottom of the screen
will disappear. The picture will look vertically
stretched. (Depending on the type of disc, the
black bars may not disappear completely.)
• Zoom Fit
The top, bottom, left and right of the screen are
cut off and the central portion of the screen is
enlarged.
- For 4:3 aspect ratio discs
• Normal Wide
Displays the content of the DVD title in 16:9
aspect ratio.
The picture will look horizontally stretched.
Page 24
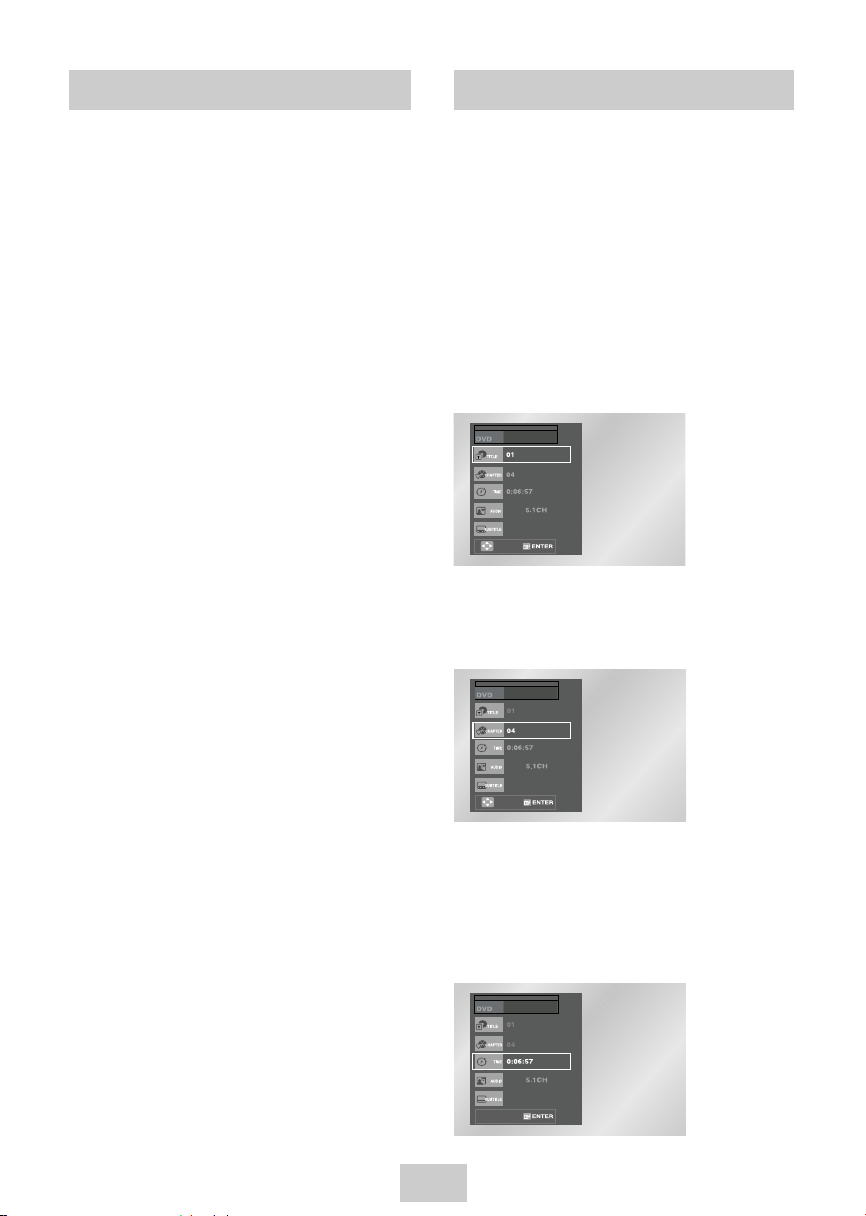
Title/Chapter/Time Selection
To view the current Title, Chapter/Track, and counter
position, press the INFO. button during playback.
The Information screen can also be used to quickly
choose a title, chapter/track, or playing time.
1 View the Display
During DVD/VCD/CD playback, press the INFO.
button on the remote control.
2 Select title
Use the UP/DOWN and LEFT/RIGHT buttons or
numeric buttons to select Title, then press the
ENTER buttons to change among all available
titles on the disc.
3 Select Chapter or Track
Use the UP/DOWN and LEFT/RIGHT buttons or
numeric buttons to select Chapter or Track, then
press the ENTER button to change among all
available Chapters/Tracks on the disc.
4 Select Counter Position
Use the UP/DOWN button to select the counter
position indicator, then use the numeric buttons
(0-9) to enter the desired counter position in the
format H:MM:SS (H = Hours, M = Minutes, S =
Seconds).
Then press the ENTER button to enter the desired
counter position.
ENG
ENG
MOVE
ENG
ENG
MOVE
ENG
ENG
0~9
ENG-24
EZ View
• Screen Fit
The top and bottom of the screen are cut off and
the full screen appears. The picture will look
vertically stretched.
• Zoom Fit
The top, bottom, left and right of the screen are
cut off and the central portion of the screen is
enlarged.
• Vertical Fit
When a 4:3 DVD is viewed on a 16:9 TV, black
bars will appear at the left and right of the screen
in order to prevent the picture from looking
horizontally stretched.
3 If you are using a 4:3 TV
- For 16:9 aspect ratio discs
• 4:3 Letter Box
Displays the content of the DVD title in 16:9
aspect ratio.
The black bars will appear at the top and bottom
of the screen.
• 4:3 Pan Scan
The left and right of the screen are cut off and
displays the central portion of the 16:9 screen.
• Screen Fit
The top and bottom of the screen are cut off and
the full screen appears. The picture will look
vertically stretched.
• Zoom Fit
When a 4:3 DVD is viewed on a 16:9 TV, black
bars will appear at the left and right of the screen
in order to prevent the picture from looking
horizontally stretched.
- For 4:3 aspect ratio discs
• Normal Screen
Displays the content of the DVD title in 4:3 aspect
ratio.
• Screen Fit
The top and bottom of the screen are cut off and
the full screen appears. The picture would look
vertically stretched.
• Zoom Fit
The top, bottom, left and right of the screen are
cut off and the central portion of the screen is
enlarged.
➢
This function may behave differently depending on
the type of disc.
Page 25
ENG-25
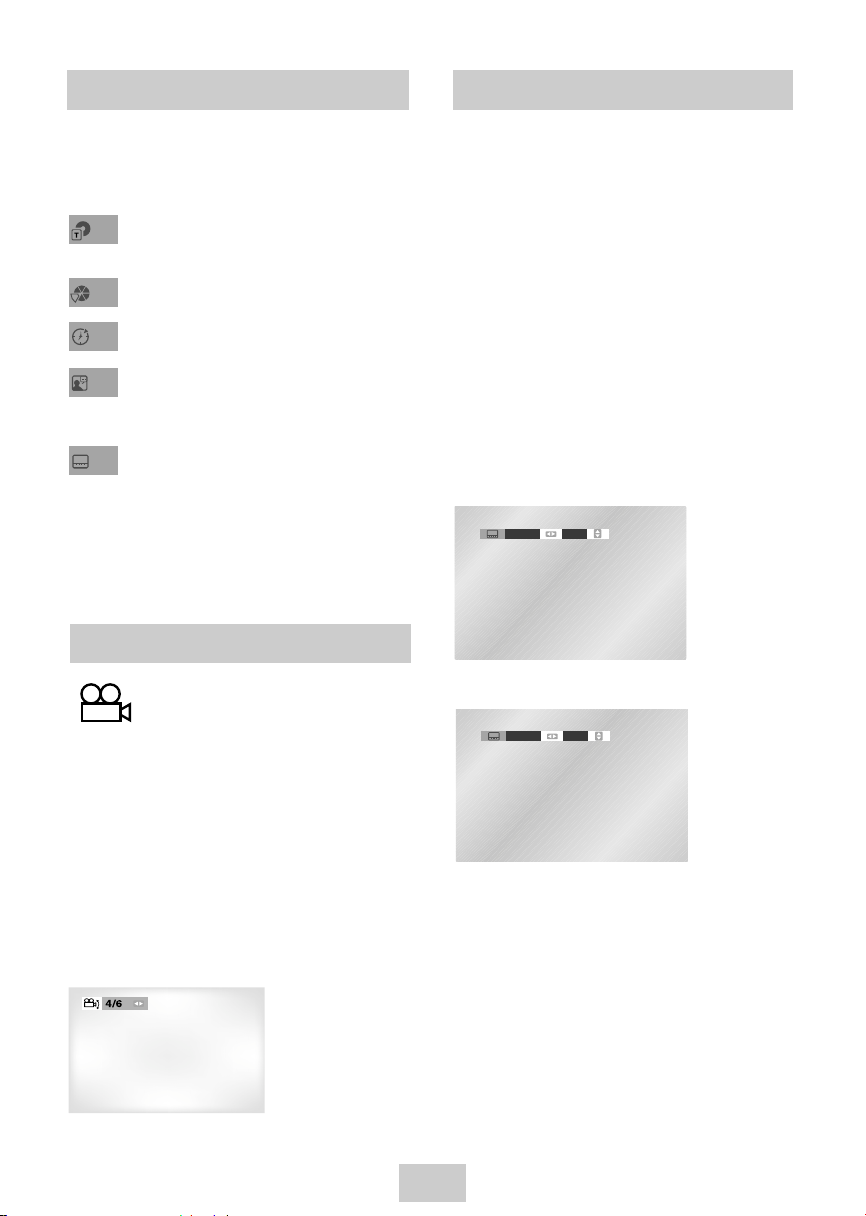
Angle View
Some DVD Movies provide you with various
camera angle views on the same scene while
they are playing. To activate the feature
press the ANGLE Button.
1 Check for the Angle Icon
If the DVD contains a Multi Angle function, the
Angle icon will appear at upper right hand of the
screen.
2 View Angle Menu Options
When the Angle Icon comes up on the screen press
the ANGLE button to see the Angle menu.
3 Select an Angle option
Press the
¥/
buttons to select a camera
angle you wish to see.
➢
To make the screen disappear, press the INFO
button again.
To access the desired title when there is more than
one in the disc. For example, if there is more than
one movie on a DVD, each movie will be identified.
Most DVD discs are recorded in chapters so that
you can quickly find a specific passage.
Allows playback of the film from a desired time.
You must enter the starting time as a reference.
Refers to the language of the film soundtrack. In the
example, the soundtrack is played in English 5.1CH.
A DVD disc can have up to eight different
soundtracks.
Refers to the subtitle languages available in the
disc. You will be able to choose the subtitles
language or, if you prefer, turn them off from the
screen. ADVD disc can have up to 32 different
subtitles.
➢
When in VCD 2.0 mode (MENU ON), this function dose not
work. Use the DISC MENU button in VCD 2.0 mode to
select MENU ON or OFF.
Title
Chapter
Time
Audio
Subtitle
Title/Chapter/Time Selection Subtitle
Some DVDs provide subtitles in one or more languages.
You can use the SUBTITLE button to quickly view and
change settings.
1 Open Subtitle Menu
During playback, press the SUBTITLE button.
2 Set Subtitle Language
Use the LEFT/RIGHT buttons to select from the
available subtitle languages.
• Subtitle languages are represented by
abbreviations.
3 Activate Subtitles
Use the UP/DOWN buttons to turn On or Off
subtitles.
• The default is "On".
• To make the screen disappear, press the
SUBTITLE button again.
ENG On
ENG Off
Page 26

Repeat Chapter/Title
You can repeat a single chapter or a complete title.
1 Open Repeat Menu
Press the REPEAT button while in Play mode to
open the Repeat menu.
• The current Repeat mode will be highlighted.
2 Select “Chapter / Title”
Use the LEFT/RIGHT buttons to select “Chapter/
Title”. Then press the ENTER button to repeat the
current Chapter/ Title
The menu will display “Track/Disc” in place of
“Chapter/Title” if you are playing a VCD/CD
1 Open Repeat Menu
Press the REPEAT button while in Play mode to
open the Repeat menu.
• The current Repeat mode will be highlighted.
2 Repeat Track
Use the LEFT/RIGHT buttons to select “Track/
Disc”. Then press the ENTER button to repeat the
current Track/ Disc.
Off
Track Disc A - B
Off
Chapter Title A - B
DVD
VCD/CD
ENG-26
A to B Repeat
A to B Repeat feature enables you to repeat the
designated section on a DVD, VCD or CD. To activate,
mark where to start(A) and where to end(B) of the
section you want to watch.
1 Select A-B Repeat Function
Press the REPEAT button while in Play mode, then
use the Left/Right buttons to select A-B Repeat.
• When you select A-B Repeat, “A-” will be
highlighted.
NOTE: The menu will display “Track” in place of
“Chapter” if you are playing a CD.
2 Mark the Starting Point
Press the ENTER button at the beginning of the
segment you want to repeat (Point A).
• Once you select Point “A”, “B” will be highlighted.
NOTE: The minimum A-B Repeat time is 5 seconds.
3 Mark the Ending Point
Press the ENTER button again at the end of the
segment you want to repeat (Point B).
• The segment will begin repeating in a continuous
loop.
4 Cancel A-B Repeat
Press the REPEAT button to open the Repeat
Menu, use the LEFT/RIGHT buttons to highlight
“Off,” then press the ENTER button.
➢
When in VCD 2.0 mode (MENU ON), this function dose not
work.
Off
Track Disc A - B
Off
Chapter Title A - B
DVD
VCD/CD
Page 27

Audio
Multiple audio language setup options, such as Dolby
Digital 5.1, Dolby Pro Logic, or LPCM 2 Channel audio,
are available on some DVDs. You can use the AUDIO
button to quickly view and select the options available
on a disc.
1 Open the Audio Menu
During playback, press the AUDIO button on the
remote control.
2 Select DVD Audio Track
Use the LEFT/RIGHT buttons to select the desired
audio language setup on the DVD.
• Languages are represented by abbreviations, e.g.
“ENG” for “English.”
Stereo
ENG
DOLBY DIGITAL 5.1CH
DVD
VCD/CD
ENG-27
Bookmarks
Up to three Bookmarks can be inserted for a given DVD
or VCD allowing you to quickly jump to your favorite
scene.
1 Open Bookmark Menu
During playback, press the MARK button on the
remote control.
The “MARK” header will be displayed on the screen.
2 Select Bookmark Placeholder
Use the LEFT/RIGHT buttons to move to one of the
three bookmark placeholders (- - -).
• The selected placeholder will be highlighted.
3 Set the Bookmark
Keep on playing the DVD up to the scene you want
to bookmark, then press the ENTER button. The
placeholder (-) will change to a number (1, 2 or 3).
• You may continue to set up to three bookmarks.
• Press the MARK button when complete.
• Depending on the disc, the bookmark function
may not work.
4 Play Bookmark
• During playback, press the MARK button on the
remote control.
• Use the LEFT/RIGHT buttons to move to a
previously set bookmark.
• Press the
ll
(PLAY/PAUSE) button to play the
bookmark.
• Press the CLEAR button to cancel the bookmark.
• Press the MARK button again to exit the
Bookmark menu.
CLEAR
– ––
➢
When in VCD 2.0 mode (MENU ON), this function dose not
work.
Page 28

Special VCR Playback Features
While a videotape is playing, you can enjoy a variety of
special playback features, including Still, Frame
Advance, Skip, Repeat, and more. Press the Play button
again to resume normal playback.
1 Pause
In Play mode, press
ll
(PLAY/PAUSE) to still a
single frame.
2 Frame Advance
In the pause mode, press F.ADV/SKIP to advance
to the next frame.
3 Fps/Review
In Play mode, press FORWARD (
) or
REWIND (¥¥) to Cue/Review at two speeds:
• Picture Search — Press and release to advance
the tape forward or backward at 5 times normal
speed.
• Jet Search — Press and hold to advance the tape
forward or backward at 7 times normal speed.
4 Skip
In Play mode, press F.ADV/SKIP to cue ahead
exactly 30 seconds. Press F.ADV/SKIP repeatedly
up to 4 times to cue ahead 2 minutes.
5 Repeat
• In Play mode, press Repeat to review the last
5 seconds of tape (SP mode).
• In Play mode, press Repeat to review the last
15 seconds of tape (SLP mode).
6 Shuttle
In Play mode, Shuttle >> gradually increases
the cue speed: Double Speed playback - Picture
Search - Jet Search. Shuttle << gradually
slows down speed: Slow mode – Still mode –
Reverse Picture Search – Reverse Jet Search.
Press the INFO. button to see the current status of
the VCR deck, as well as the tape counter position
and record speed.
Title Menu
Disc Menu
Information
Zoom
Bookmark
Repeat
EZ View
DVD Function
PLAY
0:00:00 SP
ENG-28
Function (DVD)
Use this feature to check your DVD.
1 Open “MENU”
With the DVD in Play mode, press the MENU
button.
2 Select “FUNCTION”
Use the UP/DOWN buttons to highlight
“FUNCTION” then press the ENTER button.
3 Select “DVD Function”
Using the UP/DOWN buttons to highlight “DVD
Function” then press ENTER to select.
4 Select “Title Menu”
Highlight “Title Menu”, then press the ENTER
button.
- Disc Menu
Highlight “ Disc Menu”, then press the ENTER
button.
- Information
Highlight “Information”, then press the ENTER
button.
- Zoom
Highlight “Zoom”, then press the ENTER button.
- Bookmark
Highlight “Bookmark”, then press the ENTER
button.
- Repeat
Highlight “Repeat”, then press the ENTER button.
- EZ View
Highlight “EZ View”, then press the ENTER
button.
Title Menu
Disc Menu
Information
Zoom
Bookmark
Repeat
EZ View
DVD Function
Page 29
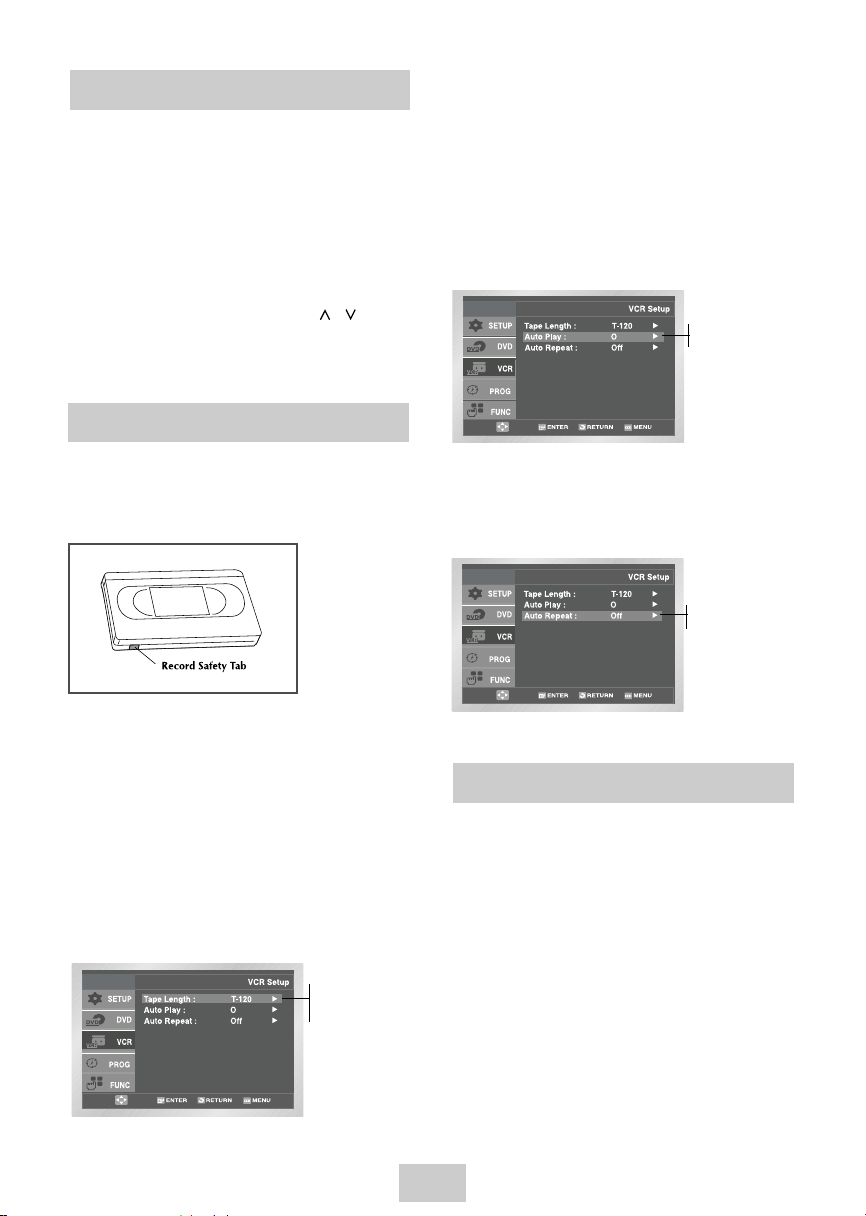
4 Select “Auto Play”
Move the selection bar to “Auto Play,” then press
right button to select from the following options:
• On - The VCR will automatically begin playing a
video tape when it is inserted, as long as the
safety tab of the cassette has been removed.
• Off - Auto play is disabled.
5 Select “Auto Repeat”
Move the selection bar to “ Auto Repeat”. It sets the
VCR to play a tape repeatedly [unless a tape
control is activated (stop, fast forward or rewind)].
If you want your videotapes to play automatically when
you insert them, turn on Auto Play.
NOTE: Only tapes that are missing the Record Safety
Tab will play automatically when inserted.
1 Open the “MENU”
With the VCR in Stop or Play mode, press the
MENU button.
2 Select “VCR”
Using the UP/DOWN buttons, move the selection
bar to “VCR” then press ENTER to select.
3 Select “Tape Length”
Press the RIGHT button to select the Tape Length.
This information is usually printed on the tape box.
The menu cycles through: T-120, T-160 or T-180.
Once the type of cassette is set, the VCR can
display the amount of time remaining on the tape
when you press the INFO. button.
Tracking
The Tracking adjustment removes the white lines that
sometimes appear during playback because of slight
differences in recording decks. The TRK button will
automatically align the recorded tracks with the
playback heads to solve this problem. You may also set
tracking manually.
1 Adjust Tracking Manually
During playback, press the CH/TRK /
buttons to remove white lines from the picture.
ENG-29
Auto Play
T-120
T-160
T-180
n
On
Off
n
Off
On
S-VHS Playback
The DVD-VCR allows you to playback high quality
S-VHS tapes.
1 Insert a S-VHS Tape
Insert an S-VHS tape into the VCR deck.
2 Start Playback
Press
ll
(PLAY/PAUSE) on the remote control to
begin playback of the S-VHS tape.
n
Page 30
Basic Recording
You can record a TV show in progress by inserting a
blank tape and pressing the z(REC) button. You can
even add time in 30-minute increments up to 4 hours
by pressing the z(REC)button repeatedly; see page 31.
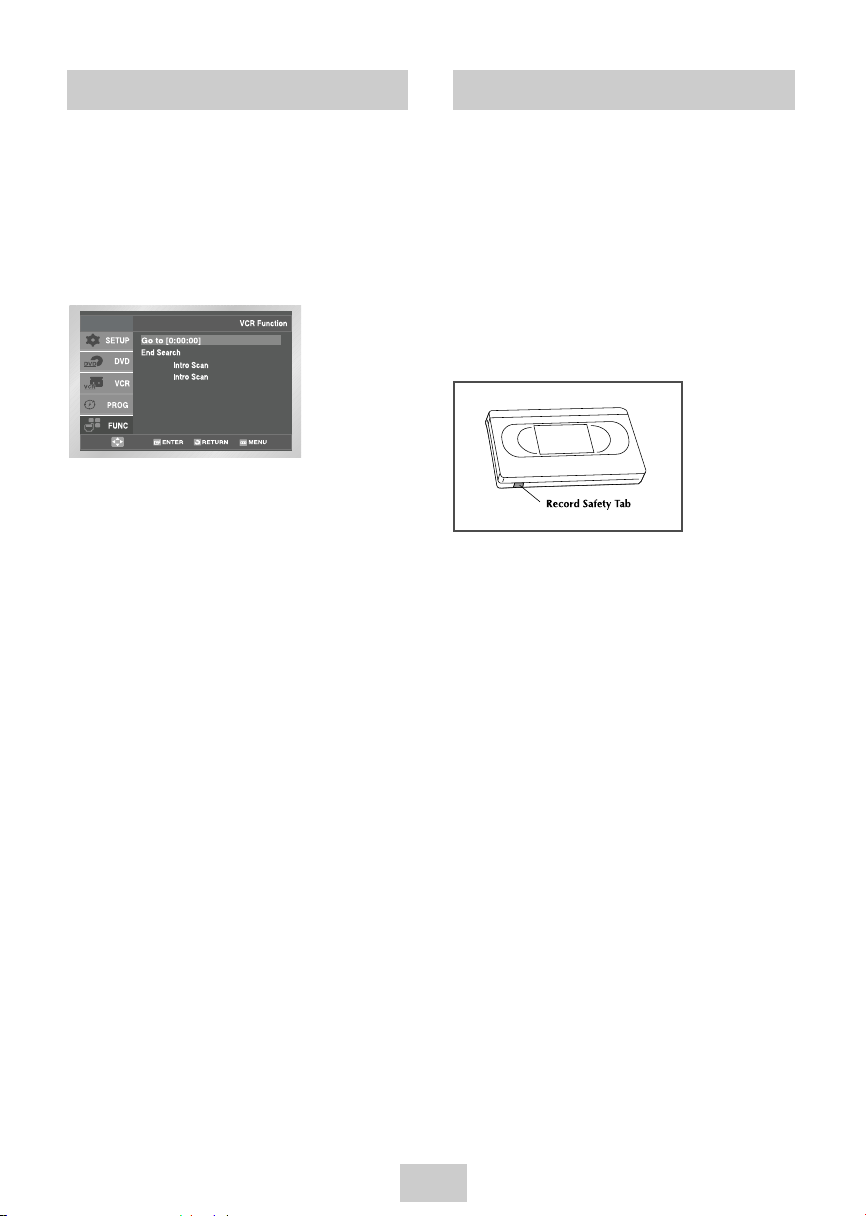
NOTE: Be sure your videotape has a Record Safety Tab.
If the tab is missing, you can cover the opening
with a small piece of tape. Warning: Do not
cover this opening unless you are sure you want
to record over the tape.
Before You Begin...
• Power on the DVD-VCR
• Power on the TV
1 Insert Tape
Insert a blank VHS tape into the VCR deck.
• Make sure the tape is long enough to record the
entire program.
To change the Recording Speed, see page 32.
2 Select a Channel to Record
Use the 0–9 buttons or the Channel UP/DOWN
arrow buttons to select the desired channel, or
press the INPUT SEL. button to select Line 1 or 2 if
recording from an external device connected to
the front or rear Line inputs, respectively.
3 Start Recording
Press the
z
(
REC)button on the remote control or
front panel.
4 Pause/Resume Recording
Press the
ll
(PLAY/PAUSE) button.
Pressz(
REC)again to resume.
5 Stop Recording
Press the
(STOP) button.
For options while recording is in progress, see
“Special Recording Features”.
➢
Recording from the DVD player to the VCR is not
possible.
ENG-30
Variable Search System
When a program is recorded, the starting point is given
an Index mark for easy location. However, the VHS
Index Search System (VISS) cannot recognize index
marks made by old VCRs. If the VCR has trouble finding
a mark, it is probably because the cassette was
recorded on a VCR without VISS. If you want to index
two programs in a row, set your VCR to stop, then start
recording each program.
Go to [0:00:00] stop
Use this feature when you want to search for
[0:00:00] counter position on a cassette. Press the
CLEAR button at the point where you want to set
the counter to [0:00:00].
1. Press the SEARCH button to display the search
screen.
2. Use the UP/DOWN buttons to select Go to
[0:00:00] and press ENTER or RIGHT button.
3. The VCR will rewind or fast forward, searching
for the [0:00:00] counter position, and then
automatically stop at that position.
End search
Use this feature when you want to search for a
blank position to record a program.
1. Press the SEARCH button to display the search
screen.
2. Use the UP/DOWN buttons to select End Search
and press ENTER or RIGHT button.
3. The VCR will fast forward, searching for a blank
position and then automatically stop at that
position.
Intro Scan(Forward/Reverse)
Use this feature when you don’t know exactly
where a recorded program is located on a cassette
tape.
1. Press the SEARCH button to display the search
screen.
2. Use the UP/DOWN buttons to select Forward/
Reverse Intro Scan and press ENTER or RIGHT
button.
3.When an index mark is found, DVD – VCR will
playback the tape for 5 seconds, after which it
will continue searching for next index mark.
4. If you want to watch from a particular index,
simply press
ll
.
Forward
Reverse
Page 31

ENG-31
Special Recording Features
While a recording is in progress, you can watch a
different channel, a DVD, or add recording time in 30minute increments.
1 To watch a different channel
Make sure that you connect the DVD-VCR to the
TV using an RF cable.
• During recording, Press the TV/VCR button on the
remote control. Press the TV button to control TV
and select a different channel.
2 To Watch a DVD
Insert a DVD in the DVD deck and press
ll
(PLAY/PAUSE). The output will automatically
change to the DVD.
3 To Add Recording Time
See One-Touch Recording (OTR) on the following.
Forward
Reverse
Forward
Reverse
One-Touch Recording (OTR) allows you to add
recording time in 30-minute increments up to 4 hours
at the touch of a button.
1 Start Recording
Follow the instructions on page 30 to begin
recording.
2 Activate OTR
While in Record mode, press the
z
(
REC)button
again to activate One-Touch Recording (OTR).
• Record length 0:30 appears on the On-Screen
Display and the DVD-VCR will record for exactly
30 minutes.
3 Add Recording Time
Continue pressing z(
REC)to add recording time in
30 minute increments up to 4 hours.
• The DVD-VCR stops recording automatically
when the time has elapsed. And DVD-VCR will
be Automatically turned off when the OTR
finished.
One-Touch Recording (OTR)
SP
0:30
1:00
1:30
4:00
Record length 0:30 07
Record 07
SP
Page 32
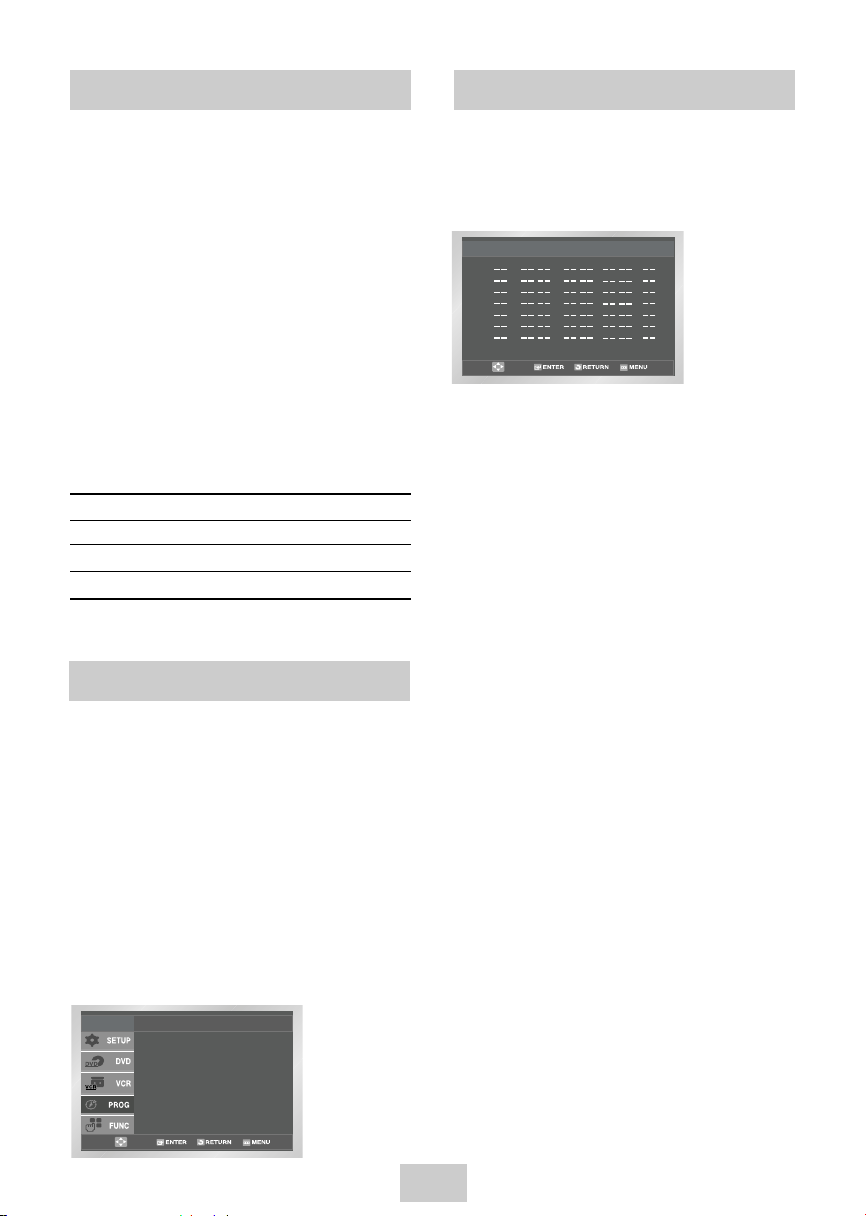
3 Select Channel Number
Use the Right and UP/DOWN buttons to set the
channel. Press the RIGHT button to move to the
next setting.
4 Set “Time/Date/Speed”
Repeat Step 3 above to set start time, end time,
date and record speed. Date can be set for one
time, daily or weekly recording. See below.
5 Save “Timer Recording”
Press the RETURN button to finish setting the timer
recording. Stop the VCR or turn the power off.
Then the VCR will automatically turn on and begin
recording at the time you set. To stop the timer
recording, press the POWER button or press the
(STOP) button twice.
Auto Speed Select
If the length of the videotape is not long enough for
a timer recording in the SP mode, set the recording
tape speed to “AUTO”. Recording will start in the
SP mode. If the length is not long enough, the tape
speed will automatically change from SP mode to
SLP mode.
Daily/Weekly Date Programming
Weekly [Sun’s~Sat’s]: Use this to record TV
programs on the same channel at the same time
every week. Daily [MO - FR] : Use this to record TV
programs on the same channel at the same time
every day Monday through Friday.
If you want to set
the timer program,
press the ENTER key
Timer Program
No Ch Start End Date Speed
: :
::
::
::
::
::
::
/
/
/
/
/
/
/
1
2
3
4
5
6
7
ENG-32
Record Speed
You can slow down the recording speed from SP to SLP
in order to fit six hours of programming on a T-120
tape.
1 Start Recording
Follow the Basic Recording instructions on page 30.
2 Set Record Speed
Press the SPEED button on the remote control to
set the Record Speed to one of the following
options:
• SP – Standard Play, for best quality.
• SLP – Super Long Play, for maximum recording
time (3 times SP).
NOTE: The selected Record Speed will appear on the
front panel display and on-screen display.
Maximum Recording Time - SP vs. SLP
Tape Length SP (Standard Play) SLP (Super Long Play)
T-120 2 hrs 6 hrs
T-160 2hrs 40 mins 8 hrs
T-180 3 hrs 9 hrs
How to Set a Timer Recording
How to Set a Timer Recording
Insert a blank videotape into the VCR deck. Be sure to
leave the Record Safety Tab intact.
With the Timer Recording function, you can program
up to 7 events at a time to record up to a month in
advance.
To Begin Setting the Timer Recording,
• Turn on your DVD-VCR, and
• Turn on your TV.
1 Open “MENU”
Press the MENU button or the TIMER button while
the VCR is in Stop or Play mode.
2 Select “Program”
Use the UP/DOWN buttons to highlight
“PROGRAM” then press the ENTER button.
Page 33
ENG-33
Function (VCR)
1 Open “MENU”
In the DVD in Stop or Play mode, press the MENU
button.
2 Select “FUNCTION”
Use the UP/DOWN buttons to highlight
“FUNCTION” then press the ENTER button.
3 Select “VCR Function”
Using the UP/DOWN buttons to highlight “VCR
Function” then press ENTER to select.
4 Select “Go to [0: 00: 00]”
Highlight “Go to [0: 00: 00]”, then press the
ENTER button.
- End Search
Highlight “End Search”, then press the ENTER
button.
- Forward Intro Scan
Highlight “Forward Intro Scan”, then press the
ENTER button.
- Reverse Intro Scan
Highlight “Reverse Intro Scan”, then press the
ENTER button.
Forward
Reverse
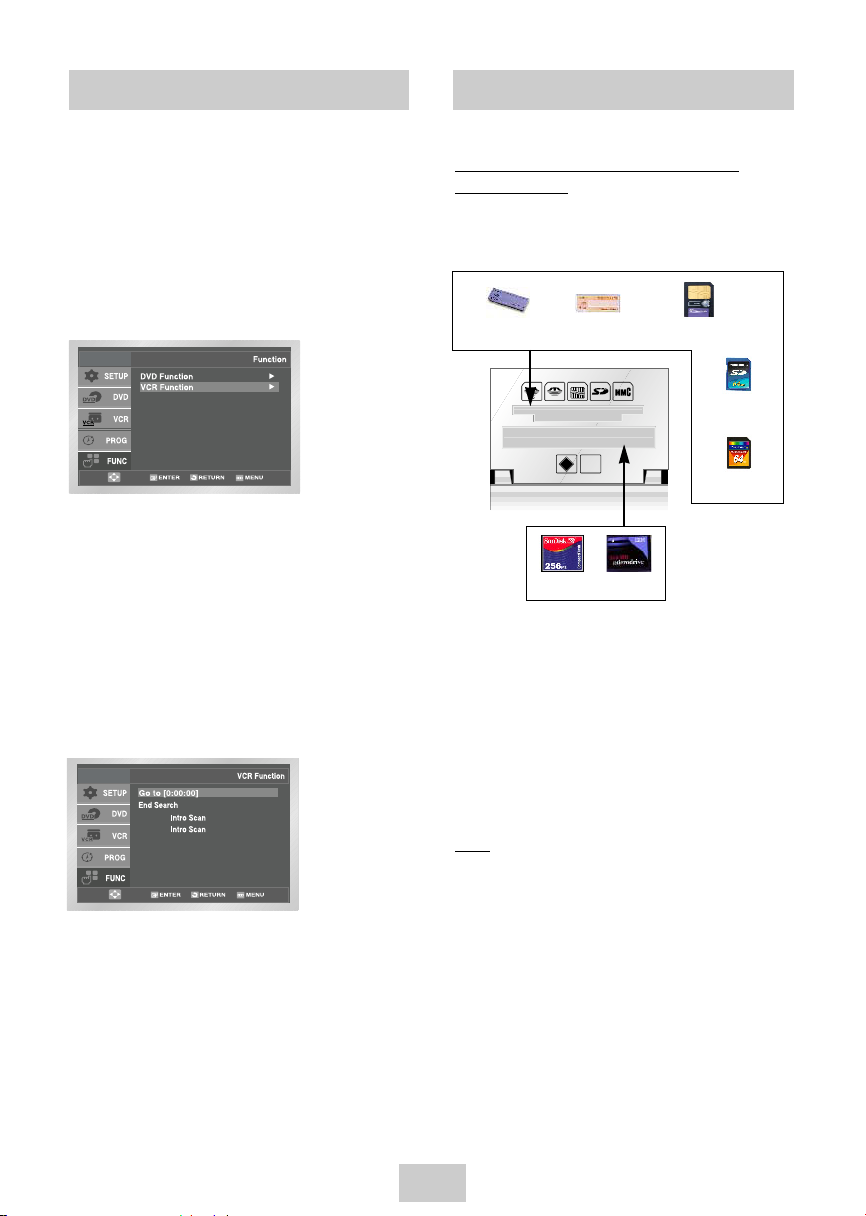
How to insert a Memory Card
This unit accepts 7 different types of
Memory Cards
Insert the Memory Card correctly with the label
facing up, otherwise it may not work.
This device supports 7 types of memory cards :
Memory Stick, Memory Stick Pro, SD Card, MMC
and Smart Media Card through upper slot and
Compact Flash, Micro Drive through below slot.
In case that cards are inserted in two slots, the
Compact Flash or Micro Drive in the below slot has
a priority. However if memory stick is inserted in
upper slot, these may not work.
Note
Note
• Memory Cards over 2GB use FAT 32, which may
be not compatible with this unit.
• If it is not fully inserted, the “Memory Card” will not
work.
• If you remove the “Memory Card” during Memory
Card operation, the recorded data may become
corrupted. It is better to remove it after pressing
DVD/M.CARD button to return to DVD/CD Mode.
M
icro
D
rive
CF
MEMORY STICK MEMORY STICK PRO Smart Media
Secure Digital
Multi Media
Compact Flash Micro Drive
Page 34
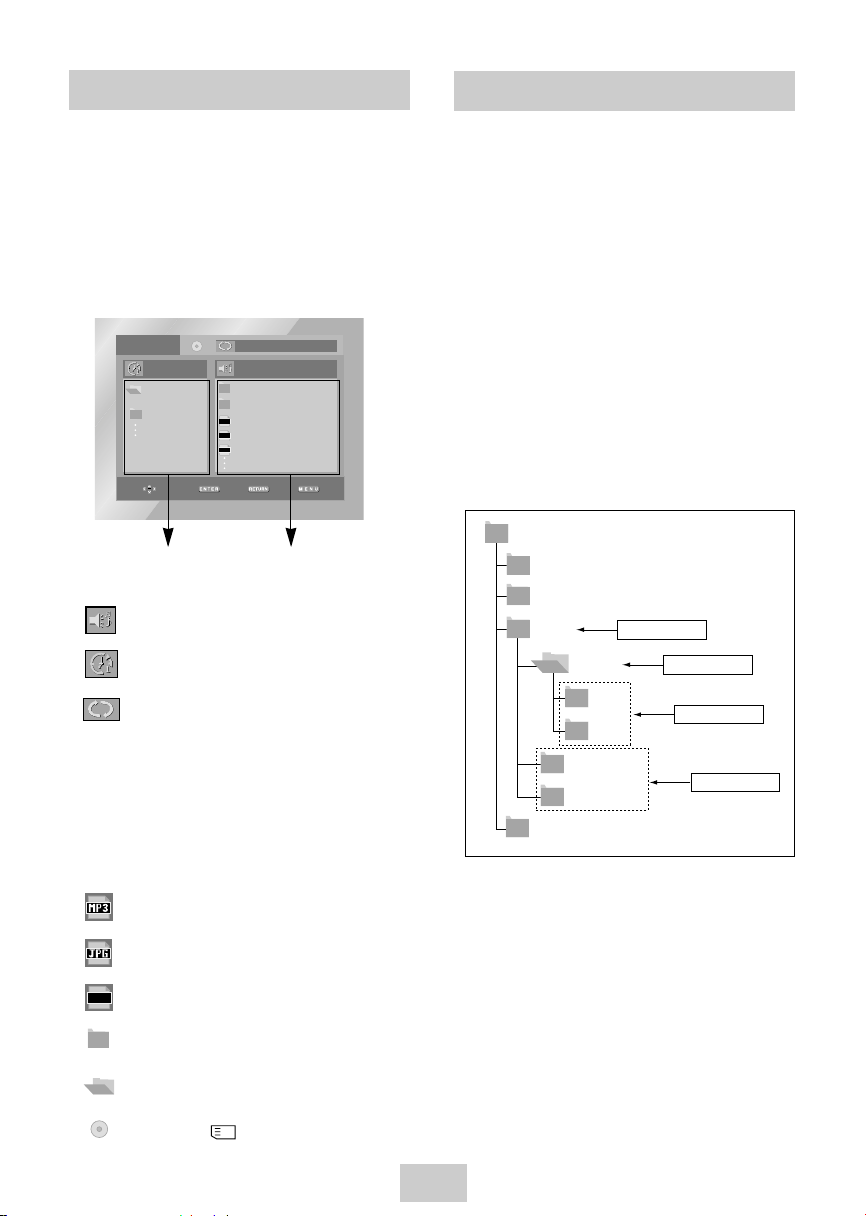
Folder Selection
The folder can only be selected in the Stop
mode.
• To select the Parent Folder
Press the RETURN button to go to parent folder,
or use the UP/DOWN buttons to select “..” and
press ENTER to go to the parent folder.
• To select the Peer Folder
Use the LEFT/RIGHT buttons to highlight left
window. Use the UP/DOWN buttons to select the
desired folder, then press ENTER.
• To select the Sub-Folder
Use the LEFT/RIGHT buttons to highlight right
window. Use the UP/DOWN buttons to select the
desired folder, then press ENTER.
Root
JPEG
WMA
MP3
SONG FILE 3
MUSIC
SONG FILE 1
SONG FILE 2
1st
2nd
Parent Folder
Current Folder
Sub-Folders
Peer Folders
ENG-34
Clips Menu for MP3/WMA/JPEG
1. Open the disc tray.
2. Place the disc on the tray.
- Place the disc with the labeled side up.
3. Close the tray.
- The tray closes and you should get a screen
that looks like the one below.
• : Name of currently playing file.
• : Current Playback Time.
• : Current Playback Mode : There are 4
modes, toggled by the REPEAT button.
(During playing a song)
- Off : Normal Playback
- Track : Repeats the current track.
- Folder : Repeats the current folder.
- Random : Files in the disc will be played
in random order.
• : MP3 file icon.
• : JPEG file icon.
• : WMA file icon.
• : Folder icon.
• : Current Folder icon.
• : Disc Mode ( : Memory Card Mode)
00:00:23 1_mp3
Because You
Sad Day
Cactus
Off
JPG
WMA
MP3
Parent Folder, Current Folder
and Peer Folders
Folders and Files in
Current Folder
WMA
Page 35
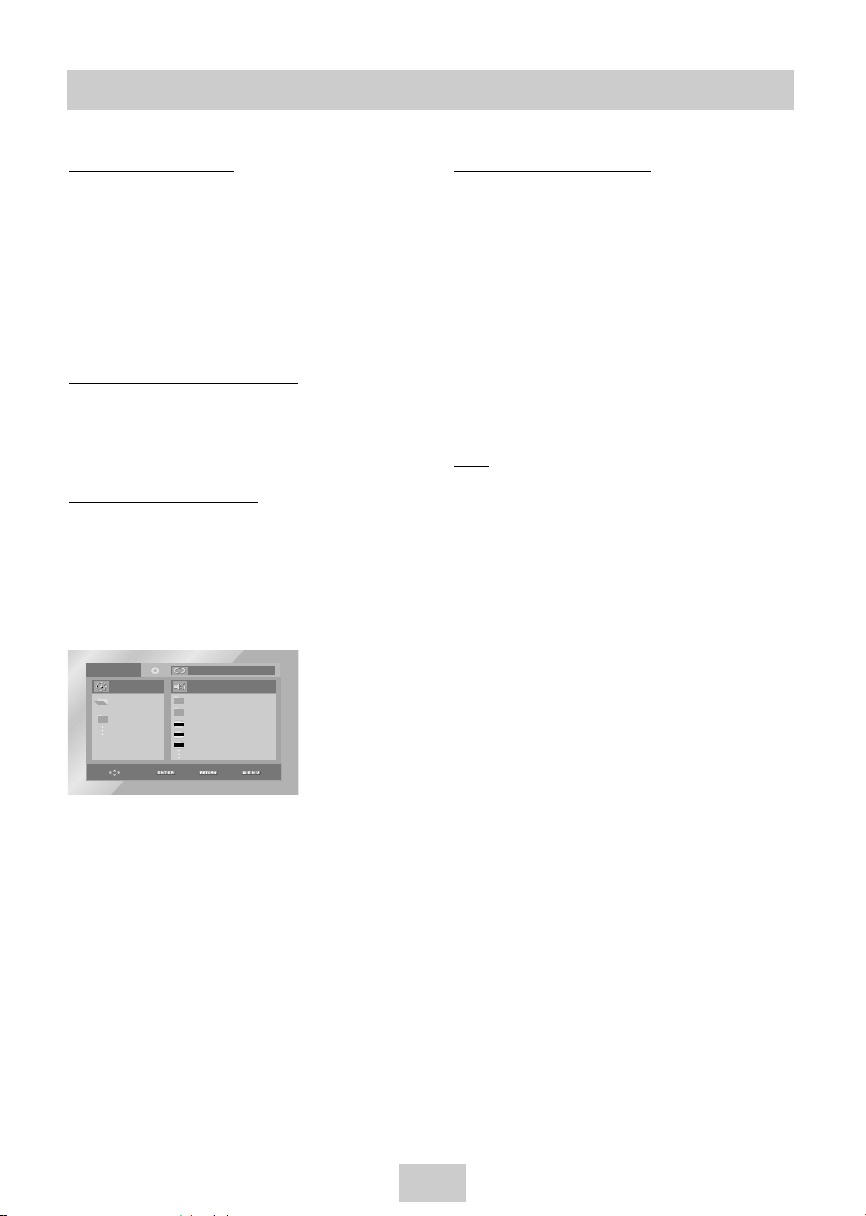
ENG-35
MP3/WMA Play
When playing a CD-R
1. Open the disc tray.
2. Place the disc on the tray.
- Place the disc with the labeled side up.
3. Close the tray.
- The tray closes and you should get a screen
that looks like the one below.
When playing a Memory Card
1. Insert a Memory Card.
2. Press the DVD/M.CARD button on the remote.
MP3/WMA Play Function
1. Select the desired folder. (See page 34 to select
the folder)
2. Use the UP/DOWN or LEFT/RIGHT buttons to
select a song file.
3. Press ENTER to begin playback of the song file.
00:00:23 1_mp3
Because You
Sad Day
Cactus
Off
JPG
WMA
MP3
Repeat/Random playback
Press the REPEAT button to change playback
mode. There are 4 modes including Off, Track,
Folder and Random.
- Off : Normal Playback
- Track : Repeats the current song file.
- Folder : Repeats the song files which have the
same extension in the current folder.
- Random : Song files which have the same
extension will be played in random
order.
* To resume normal play, press the CLEAR button.
Note
Note
• DVD/CD cannot be played in the Memory Card
mode. If you push the DVD/M.CARD or OPEN
button in M.CARD mode, the system will automatically enter the DVD/CD mode.
• Depending on the recording method, some MP3
CD-Rs may not be replayed.
• When pushing the DVD/M.CARD button to play
disc again, the player doesn’t remember where
you stopped.
• It is impossible to write MP3 or JPEG files to a
Memory Card in this unit as it is read only.
• Only MP3/WMA Format files with the “ .mp3 and
.wma” extensions can be played.
Page 36
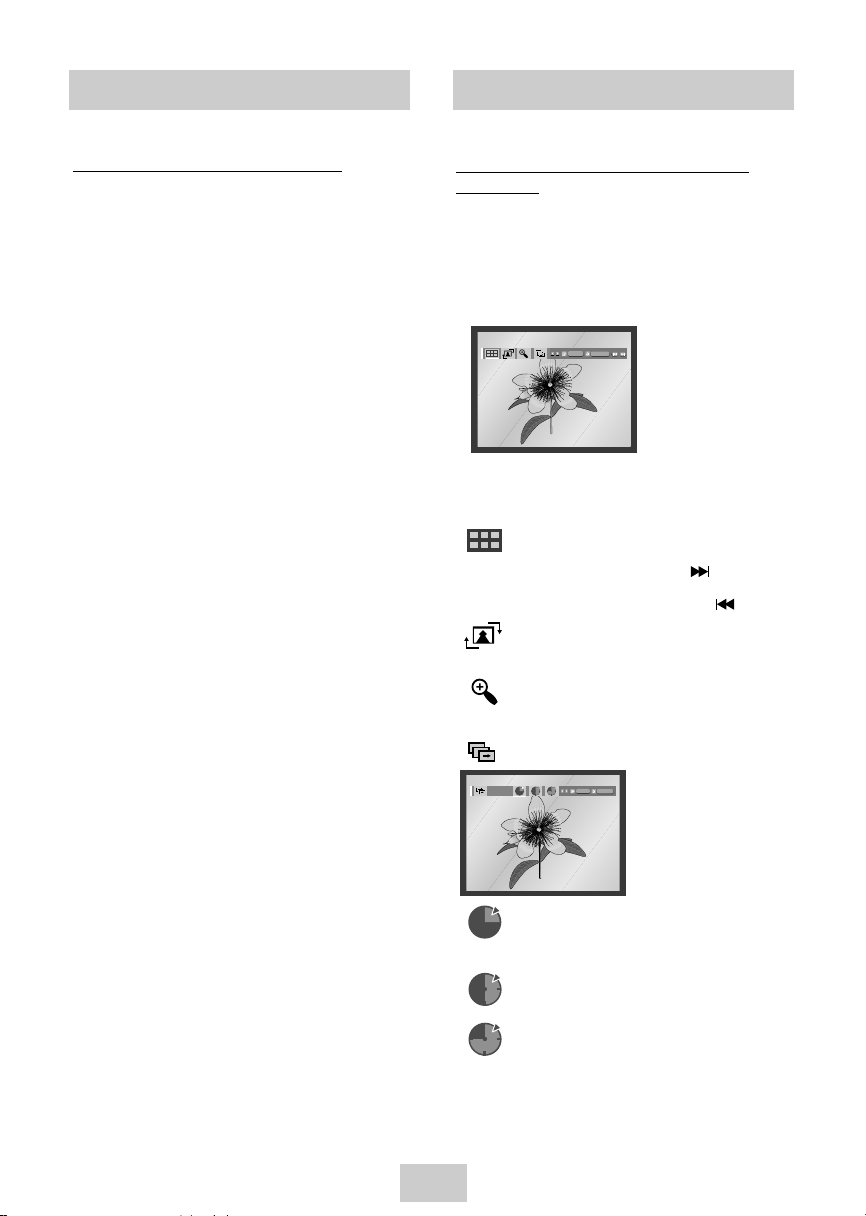
ENG-36
JPEG Playback
When playing a CD-R / Memory Card /
Picture CD
1. Select the desired folder. (See page 34 to select
the folder)
2.
Use the UP/DOWN buttons to select a Picture file in
clips menu and then press the ENTER button. You
should get a screen that looks like the one below.
• Use the INFO button on the remote control to select
the menu you want to view and then press the
ENTER button.
• : Returns to the Album Screen.
• To see the next 6 pictures, press the button.
• To see the previous 6 pictures, press the button.
• : Each time the ENTER button is pressed, the
picture rotates 90 degrees clockwise.
• : Each time the ENTER button is pressed, the
picture is enlarged up to 4X.
(Normal ➝ 2X ➝ 4X ➝ 2X ➝ Normal)
• : The unit enters slide show mode.
• : When this icon is selected and ENTER is
pressed, the pictures change automatically
with about 6 seconds interval.
• : The pictures change automatically with about
12 seconds interval.
• : The pictures change automatically with about
18 seconds interval.
*Depending on the file size, each interval between
images may take longer or shorter than the manual
suggests.
ENTER
RETURN
TIMER:
ENTER
RETURN
MP3/WMA Play
CD-R / Memory Card MP3/WMA file
When you record MP3/WMA files on the CDR/Memory Card, please refer to the following.
• Your MP3 or WMA files should be ISO 9660 or JOLIET
format.
ISO 9660 format and Joliet MP3 or WMA files are
compatible with Microsoft's DOS and Windows, and with
Apple's Mac.
This format is the most widely used.
• Only Memory Card with FAT16 format can be played.
• Memory Card over 2GB use FAT32, which may be not
compatible with this unit.
• When naming your MP3 or WMA files, do not exceed 8
characters, and enter “.mp3, .wma” as the file
extension.
General name format of: Title.mp3 or Title.wma. When
composing your title, make sure that you use 8 characters
or less, have no spaces in the name, and avoid the use of
special characters including: (.,/,\,=,+).
• Use a decompression transfer rate of at least 128
Kbps when recording MP3 files.
Sound quality with MP3 files basically depends on the rate
of compression/decompression you choose. Getting CD
audio sound requires an analog/digital sampling rate, that
is conversion to MP3 format, of at least 128 Kbps and up
to 160 Kbps. However, choosing higher rates, like 192
Kbps or more, only rarely give better sound quality.
Conversely, files with decompression rates below 128
Kbps will not be played properly.
•
Do not try recording copyright protected MP3 files.
Certain "secured" files are encrypted and code protected
to prevent illegal copying. These files are of the following
types: Windows MediaTM (registered trade mark of
Microsoft Inc) and SDMITM (registered trade mark of The
SDMI Foundation). You cannot copy such files.
• Important: The above recommendations cannot be taken
as a guarantee that the DVD player will play MP3
recordings, or as an assurance of sound quality. You
should note that certain technologies and methods for
MP3 file recording on CD-Rs prevent optimal playback of
these files on your DVD player (degraded sound quality
and in some cases, inability of the player to read the files).
• This unit can play a maximum of 3000 files and 300
folders per disc.
Page 37
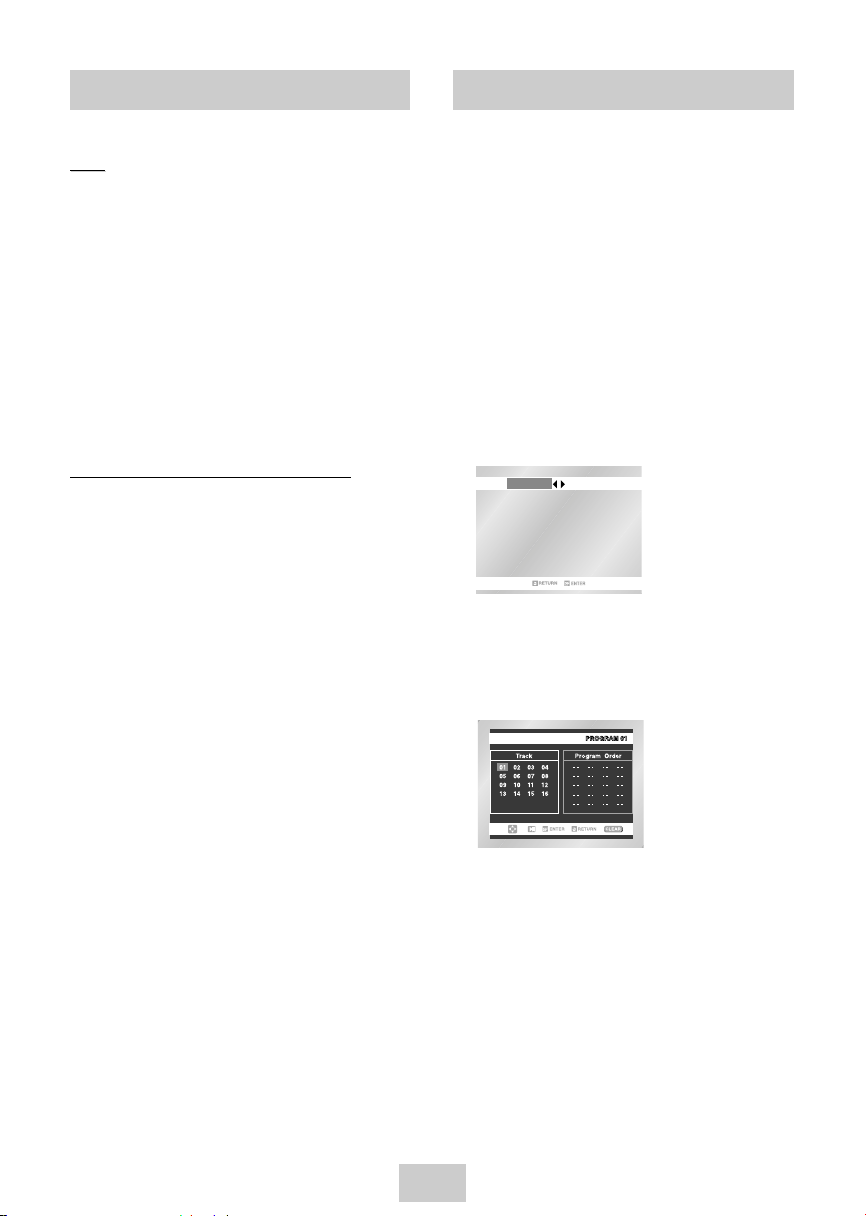
ENG-37
JPEG Playback Program Play & Random Play
Note
Note
• If no buttons on the remote control pressed for 10
seconds, the menu will disappear.
Press the INFO button on the remote control to
display the menu again.
• Press the STOP button to return to the clips menu.
• When playing a Kodak Picture CD, the unit
displays the Photo directly, not the clips menu.
• Every time you push the DVD/M.CARD button, the
system enters the Memory Card mode and the
DVD/CD mode in turn.
- Memory Card mode : Plays the Memory Card
- DVD/CD Mode : Plays the CD-R & Picture CD
CD-R / Memory Card / Picture CD JPEG
• Only files with the “.jpg” and ‘.JPG” extensions can be
played.
• If the disc is not closed, it will take longer to start
playing and not all of the recorded files may be
played.
• Only CD-R discs with JPEG files in ISO 9660 or Joliet
format can be played.
• Memory Card over 2GB use FAT32, which may be
not compatible with this unit.
• The name of the JPEG file may not be longer than 8
characters and should contain no blank spaces or
special characters (. / = +).
• Only a consecutively written multisession disc can be
played. If there is a blank segment in the multisession
disc, the disc can be played only up to the blank
segment.
• Amaximum of 500 images can be stored on a single
CD.
• Kodak Picture CDs are recommended.
• When playing a Kodak Picture CD, only the JPEG
files in the pictures folder can be played.
• Kodak Picture CD : The JPEG files in the pictures
folder can be played automatically.
• Konica Picture CD : If you want to see the Picture,
select the JPEG files in the clips menu.
• Fuji Picture CD : If you want to see the Picture, select
the JPEG files in the clips menu.
• QSS Picture CD : The unit cannot play QSS Picture
CD.
• If a number of files in 1 Disc are over 3000, only 3000
JPEG file can be played.
• If a number of folders in 1 Disc are over 300, only
JPEG files in 300 folders can be played.
You can listen to songs randomly or in the desired
sequence.
Up to 20 tracks can be programmed.
This function is available only with Audio CDs.
Before You Begin...
• Set the channel to "3" or use the TV/VIDEO
button on the TV to select the input source.
• Press the DVD button on the remote control to
switch to DVD mode.
1 In STOP mode, press the REPEATbutton.
• The Playback Sequence menu will appear.
2 Use
¥,
buttons to select PROGRAM, and then
press the
ENTER
button.
•
The Selective Play screen will appear.
- Select <RANDOM> and press the ENTER
button to play tracks in random order.
3
Use,or¥,buttons to select the desired
track (CD), and then press the ENTER button.
•
The selected track will be added to the
Program order.
- Press the CLEAR button. The track added last
will be deleted from the Program order.
4
To finish programming and start playback, press the
ll button.
•
Tracks will play in the order they are added.
➢
•
If the disc tray is opened during programming,
Program Play will be canceled.
•
Program Play can be set only when the CD is
in STOP mode.
•
To Cancel Programming
- Press the REPEAT or RETURN button.
The program will not be saved and the
program screen will disappear.
•
To Cancel Program Play
- During playback or in Stop mode, press
the CLEAR button.
RANDOM
PROGRAM
Page 38
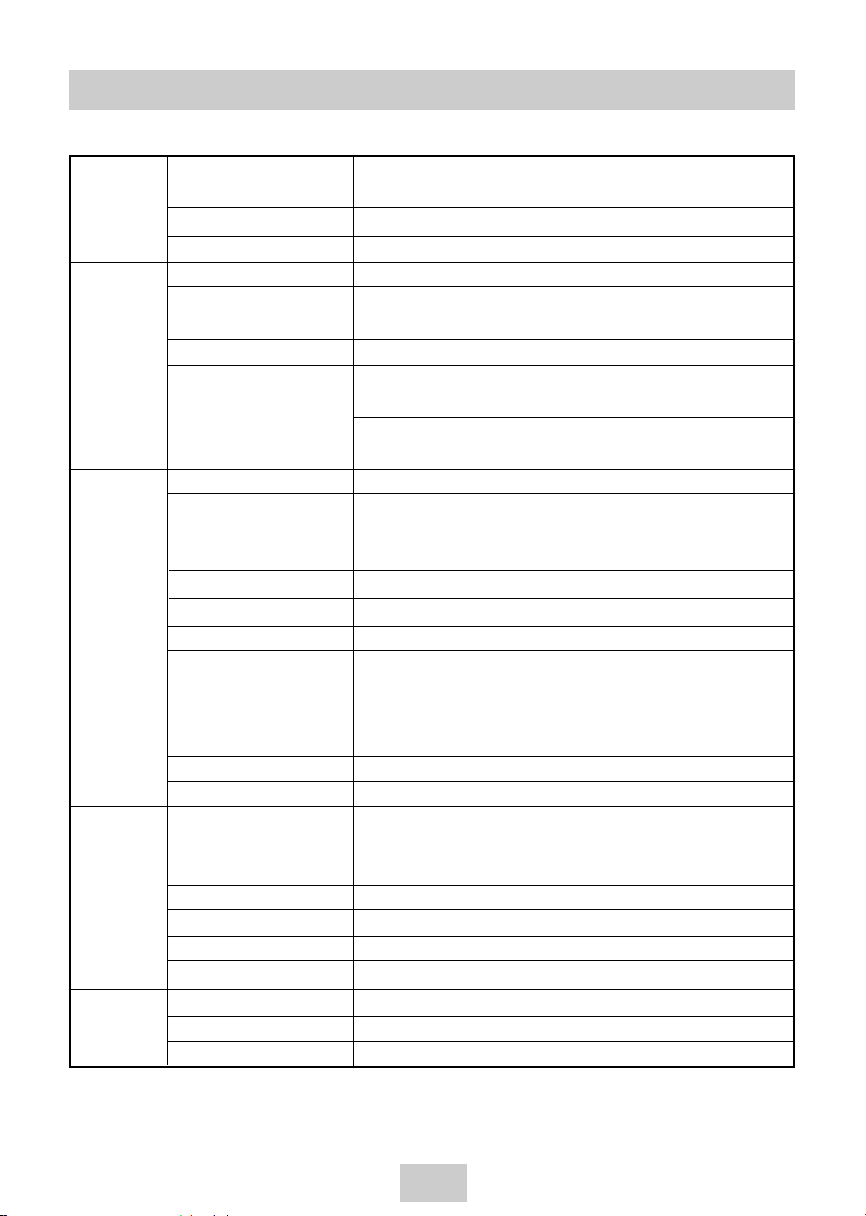
ENG-38
Technical Specifications
AUDIO 2 Stereo audio inputs, RCA Connector, -8dbm, 47KΩ,
front and rear
Inputs VIDEO 2 Composite video inputs, RCA Connector, 75Ω, 1Vp-p
RF Antenna or CATV Input, F-Connector, 75Ω
AUDIO 1 Stereo audio outputs, RCA Connector, -8dbm, 1.5KΩ
AUDIO (DVD only) 2 Digital audio output (1 coaxial, 1 Optical)
1 pair Stereo audio outputs
VIDEO 1 Composite video output, RCA Connector, 75Ω, 1Vp-p
Outputs VIDEO (DVD only) 1 S-Video output, S-Connector, 75Ω, Y=1.0Vp-p,
C=0.286Vp-p
1 Component video output, 75Ω, Y=1.0Vp-p, Pb=0.7Vp-p,
Pr=0.7Vp-p
RF
Channel 3 or 4
VIDEO SYSTEM
1/2-inch VHS system, 4 rotary head helical scanning;
FM azimuth luminance;chrominance: converted sub system
phase shift
AUDIO TRACK Normal: 1 track; Hi-Fi: 2 track
PLAY/RECORD TIME T-180 tape: SP 3 hours, SLP 9 hours
VCR FF/REW TIME T-120 tape: <2 minutes
HEADS Video: DA 4 rotary
Audio: 2 rotary heads (Hi-Fi); 1 stationary head (Linear)
Control: 1 stationary head
Erase: 1 full track, 1 audio track
WOW & FLUTTER Less than 0.005% (Hi-Fi)
FREQ. RESPONSE 20-20,000 Hz (Hi-Fi)
DISC COMPATIBILITY CD, CD-R, CD-R/W
DVD-Video, CD-Digital Audio (5” and 3.5”), VCD, MP3/WMAfiles
on CD-ROM
DVD FREQ. RESPONSE 96/48 kHz Sampling: 4 Hz-22kHz
S/N RATIO 110 dB
DYNAMIC RANGE 96 dB
THD 0.003 %
POWER REQUIREMENT 120V AC, 60Hz, 25watts
SYSTEM
ENVIRONMENT 41-104˚F (5-40˚C); 10%-75% humidity
WEIGHT 13.8 lbs.
Page 39

ENG-39
SAMSUNG COMBINATION DVD & VCR
LIMITED WARRANTY TO ORIGINAL PURCHASER
This SAMSUNG brand product, as supplied and distributed by Samsung Electronics America, Inc. (SAMSUNG) and
delivered new, in the original carton to the original consumer purchaser, is warranted by SAMSUNG against manufacturing defects in materials and workmanship for a limited warranty period of:
One (1) Year Parts and Labor*
(*90 Days Parts and Labor for Commercial Use)
This limited warranty begins on the original date of purchase, and is valid only on products purchased and used in
the United States. To receive warranty service, the purchaser must contact SAMSUNG for problem determination and
service procedures. Warranty service can only be performed by a SAMSUNG authorized service center. The original
dated bill of sale must be presented upon request as proof of purchase to SAMSUNG or SAMSUNG’s authorized service center. Transportation of the product to and from the service center is the responsibility of the purchaser.
SAMSUNG will repair or replace this product, at our option and at no charge as stipulated herein, with new or
reconditioned parts or products if found to be defective during the limited warranty period specified above. All
replaced parts and products become the property of SAMSUNG and must be returned to SAMSUNG. Replacement
parts and products assume the remaining original warranty, or ninety (90) days, whichever is longer.
SAMSUNG ís obligations with respect to software products distributed by SAMSUNG under the SAMSUNG brand
name are set forth in the applicable end user license agreement. Non-SAMSUNG hardware and software products, if
provided, are on an ”AS IS” basis. Non-SAMSUNG manufacturers, suppliers, publishers, and service providers may
provide their own warranties.
This limited warranty covers manufacturing defects in materials and workmanship encountered in normal, and except
to the extent otherwise expressly provided for in this statement, noncommercial use of this product, and shall not apply
to the following, including, but not limited to: damage which occurs in shipment; delivery and installation; applications
and uses for which this product was not intended; altered product or serial numbers; cosmetic damage or exterior finish; accidents, abuse, neglect, fire, water, lightning or other acts of nature; use of products, equipment, systems, utilities, services, parts, supplies, accessories, applications, installations, repairs, external wiring or connectors not supplied and authorized by SAMSUNG, or which damage this product or result in service problems; incorrect electrical
line voltage, fluctuations and surges; customer adjustments and failure to follow operating instructions, cleaning, maintenance and environmental instructions that are covered and prescribed in the instruction book; product removal or
reinstallation; reception problems and distortion related to noise, echo, interference or other signal transmission and
delivery problems. SAMSUNG does not warrant uninterrupted or error-free operation of the product.
THERE ARE NO EXPRESS WARRANTIES OTHER THAN THOSE LISTED AND DESCRIBED ABOVE, AND NO WARRANTIES
WHETHER EXPRESS OR IMPLIED, INCLUDING, BUT NOT LIMITED TO, ANY IMPLIED WARRANTIES OF MERCHANTABILITY
OR FITNESS FOR A PARTICULAR PURPOSE, SHALL APPLY AFTER THE EXPRESS WARRANTY PERIODS STATED ABOVE,
AND NO OTHER EXPRESS WARRANTY OR GUARANTY GIVEN BY ANY PERSON, FIRM OR CORPORATION WITH
RESPECT TO THIS PRODUCT SHALL BE BINDING ON SAMSUNG. SAMSUNG SHALL NOT BE LIABLE FOR LOSS OF REVENUE OR PROFITS, FAILURE TO REALIZE SAVINGS OR OTHER BENEFITS, OR ANY OTHER SPECIAL, INCIDENTAL OR
CONSEQUENTIAL DAMAGES CAUSED BY THE USE, MISUSE OR INABILITY TO USE THIS PRODUCT, REGARDLESS OF THE
LEGAL THEORY ON WHICH THE CLAIM IS BASED, AND EVEN IF SAMSUNG HAS BEEN ADVISED OF THE POSSIBILITY
OF SUCH DAMAGES. NOR SHALL RECOVERY OF ANY KIND AGAINST SAMSUNG BE GREATER IN AMOUNT THAN
THE PURCHASE PRICE OF THE PRODUCT SOLD BY SAMSUNG AND CAUSING THE ALLEGED DAMAGE. WITHOUT LIMITING THE FOREGOING, PURCHASER ASSUMES ALL RISK AND LIABILITY FOR LOSS, DAMAGE OR INJURY TO PURCHASER AND PURCHASERíS PROPERTY AND TO OTHERS AND THEIR PROPERTY ARISING OUT OF THE USE, MISUSE OR
INABILITY TO USE THIS PRODUCT SOLD BY SAMSUNG NOT CAUSED DIRECTLY BY THE NEGLIGENCE OF SAMSUNG.
THIS LIMITED WARRANTY SHALL NOT EXTEND TO ANYONE OTHER THAN THE ORIGINAL PURCHASER OF THIS PRODUCT, IS NONTRANSFERABLE AND STATES YOUR EXCLUSIVE REMEDY.
Some states do not allow limitations on how long an implied warranty lasts, or the exclusion or limitation of incidental
or consequential damages, so the above limitations or exclusions may not apply to you. This warranty gives you specific legal rights, and you may also have other rights which vary from state to state.
To obtain warranty hardware service, please contact SAMSUNG at:
SAMSUNG CUSTOMER CARE CENTER
400 Valley Road, Suite 201, Mt. Arlington, NJ 07856, Tel: 973-601-6000, Fax: 973-601-6001
1-800-SAMSUNG (1-800-726-7864) and www.SAMSUNGUSA.com
Page 40
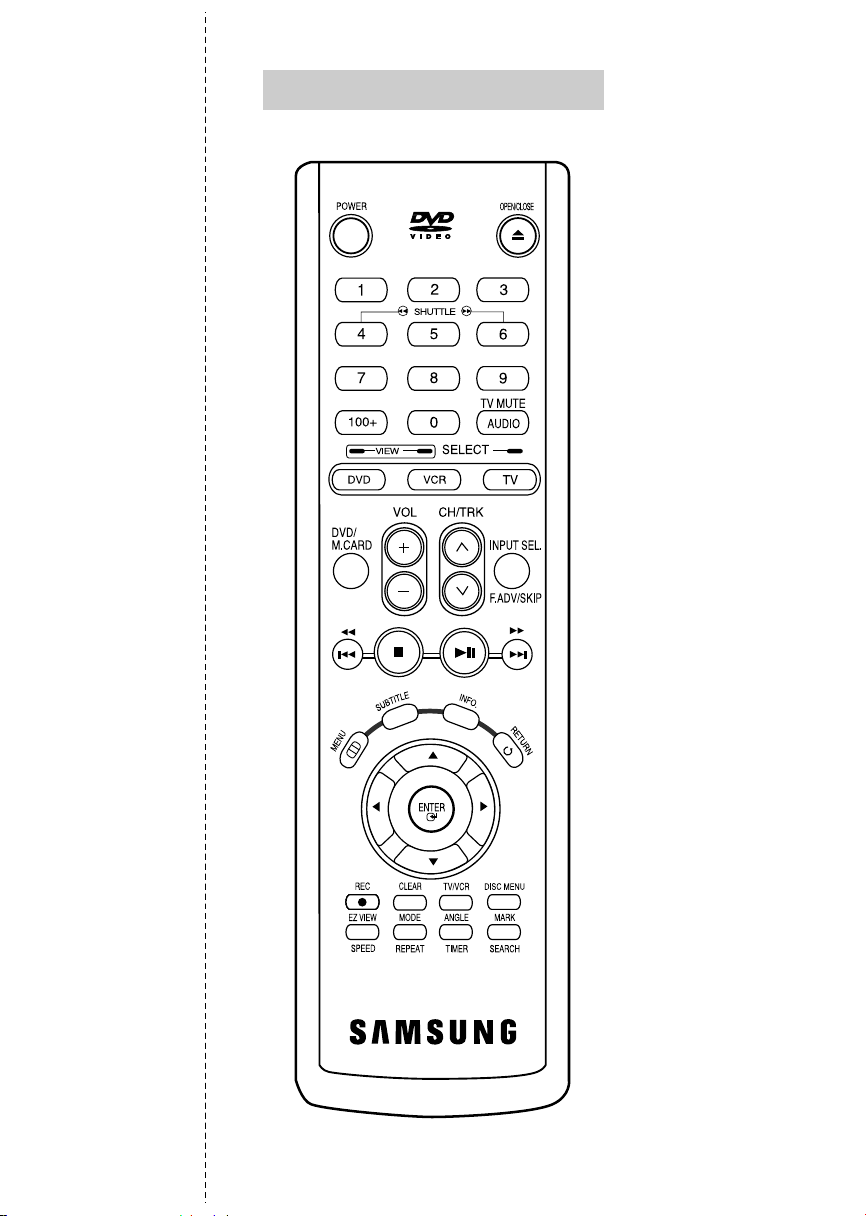
Remote Control Overview
Page 41

SAMSUNG ELECTRONICS AMERICA, INC.
HEADQUARTERS
105 Challenger Road, Ridgefield Park, N.J.
07660-0511
TEL: 1-800-SAMSUNG
SERVICE DIVISION
400 Valley Road, Suite 201, Mount Arlington, NJ 07856
1-800-SAMSUNG (1-800-726-7864)
www.SAMSUNGUSA.com
AK68-00353A
ELECTRONICS
 Loading...