

Samsung UN6006400, UN4606400, UN60D6450, UN4006450, UN5506400 User Manual
...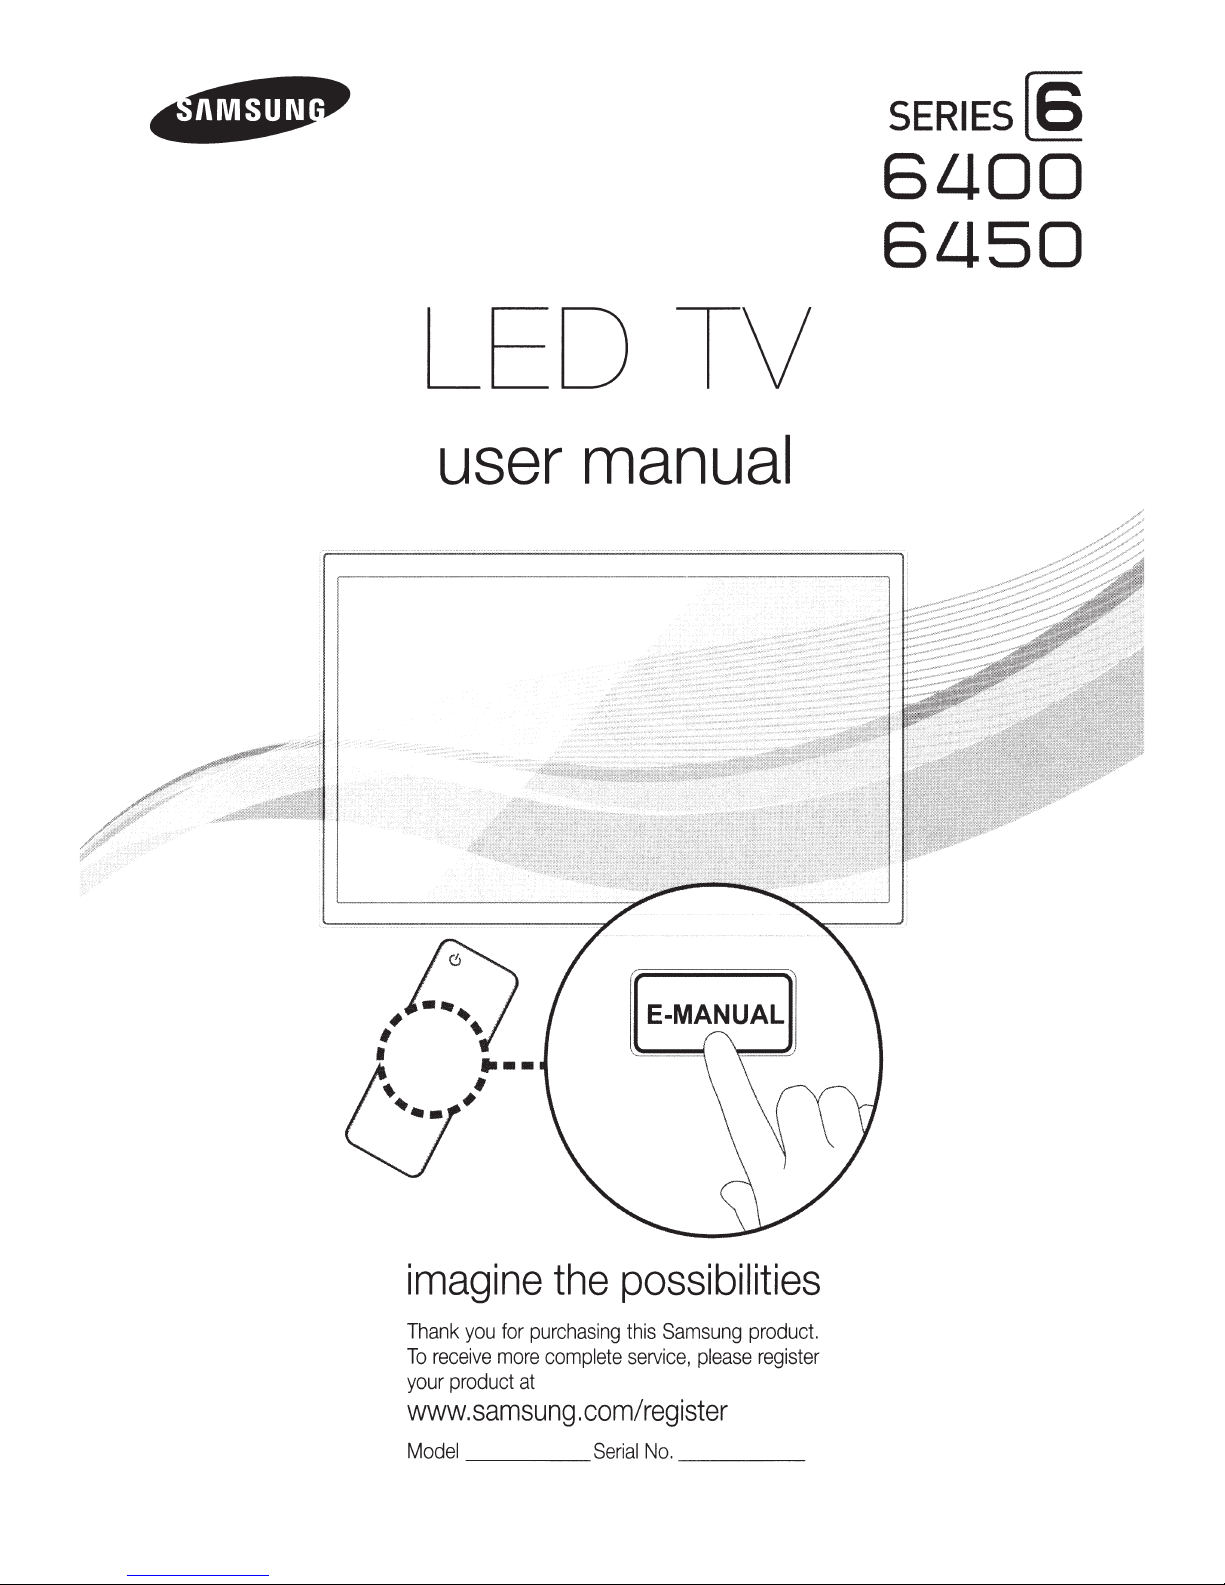
LED TV
SERIES[§
6LJ.OO
6LJ.50
#
0
*
1
0
user
....
#
#
manual
imagine
Thank
To
your
www.samsung.com/register
Model
you
receive
product
for
purchasing
more
comp
at
the
lete
Serial No.
possibilities
this Samsung
seNice,
__
please
product.
register
_ _
Figures
and
illustrations
design
and
Product
specifications
Important Warranty Information Regarding Television Format Viewing
~
See
the warranty card for more information
Wide
screen
format
LED
screen format full-motion
or expanded to
graphics
programming,
Additionally,
sites
or
that
exceed
images
not stationary patterns
formats
Be
careful
format selection
•
SAMSUNG
Subject to
Electronics
SAMSUNG
in
Canada,
specified,
The
Statement,
the
are
product.
Excluded,
repair
For
In
-
-
In
fill
the
screen
and
images
on
should
be
viewing
computer graphics
the
in
the
as a full
about
above described warranty
Service
limited
times,
the
location
the
United
Canada:
other stationary
above
guidelines
LED
picture.
or
screen
the
television
and
use,
ELECTRONICS
the
requirements,
(SAMSUNG)
will
additionally provide
and
in
Canada
and
to
the
the
Original
Center.
only
to manufacturing defects
but not limited
exchanges
of a SAMSUNG
States:
1-800-SAMSUNG
in
this
User
Manual
are
provided
may
be
changed
on
Displays
video.
screen,
limited
dark
picture.
as
Original
Transportation to
(16:9,
the
aspect
The
images
displayed
if
your
model
offers
this
such
as
the
dark
to
no
more
than
5%
images
and
patterns, should
can
To
avoid
this,
bars.
On
formats
well
as
burned
NORTH
conditions, exclusions
products,
on
SAMSUNG
Purchaser
repairs
Limited
Warranty
to,
are
any
or replacements, accessories, options, upgrades,
Authorized
1-800-SAMSUNG (1-800-726-7864)
and
cause
uneven
vary
LED
you
select
in
AMERICAN
and
the
Warranty
only.
must
and
originally
text
be
the
programming
models
and
images,
requirements,
Repair
products
be
Statement
from
in
material
Service
for
without
warranty
ratio
of
on
them
feature
sidebars
of
the
such
limited
aging
of
that
offer
the
length
are
not
LIMITED
and
Service
purchased
performed
and
the
Service
or workmanship,
specified
Center,
reference
notice.
terms.
the
screen
should
and
the
on
non-expanded standard format
total
television
as
stock market
as
described above
LED
Displays
and
picture
of
covered
WARRANTY
limitations
conditions, exclusions
in
by a SAMSUNG
a dated
Center
provisions
please
only
width to
primarily
images
viewing
images,
sizing
time
you
by
your
of
the
the
United States
in
the
United
Bill
of
is
the
and
for,
in-home
call
and
may
differ
height)
are
be
in
the
are
constantly
per
week.
reports, video
for
all
televisions.
that
leave
subtle,
and
primarily
features,
view
STATEMENT
original
Sale
responsibility of
toll-free:
use
them.
Samsung
Limited
and
on
States,
Authorized
as
Proof
only
those encountered
or
on-site
or
consumables.
from
actual
product appearance.
primarily
wide
game
display
these
Uneven
limited
limitations contained
SAMSUNG
for
Service
of
screen
moving.
television
displays,
Displaying
but
permanent
full
controls
LED
warranty.
Warranty
the
warranty
Purchase
the
purchaser.
services,
designed
16:9
Displaying
video
screen
to
aging
supplied
products
period
Center.
must
in
normal
minimum
to
view
wide
ratio
format,
stationary
and
station
logos,
stationary
burned-in ghost
moving
images,
view
different
as a result
with
Samsung
herein,
purchased
originally
Along
with this
be
presented to
Conditions
use
of
or
maximum
web
images
of
covered
the
Avoid
displaying
at
the
screen
can
cause
recommendations
•
Avoid
Always
•
•
Reduce
Use
•
still
bottom
image
displaying
try to display
brightness
all
TV
features
images
etc.),
burn-in
below:
the
(such
or
programs
on
the
LED
same
TV
any
image
and
contrast to
designed to
as
channel
in
reduce
jpeg picture
in
panorama
screen,
which
for
long
full
screen.
avoid
the
image
Still image warning
files),
still
image
or
4:3
will
affect
periods.
Use
the
TV
appearance
retention
elements
image
image
set's
of
after-images.
and
screen
format
picture format
on
quality.
burn.
(such
To
the
reduce
Refer
as
TV
screen.
menu
to
the
channel
Constantly
risk
of this
for
the
e-Manual
logos,
effect,
best
stock
displaying
please
possible
for
details.
or
news
still
pictures
follow the
match.
bars
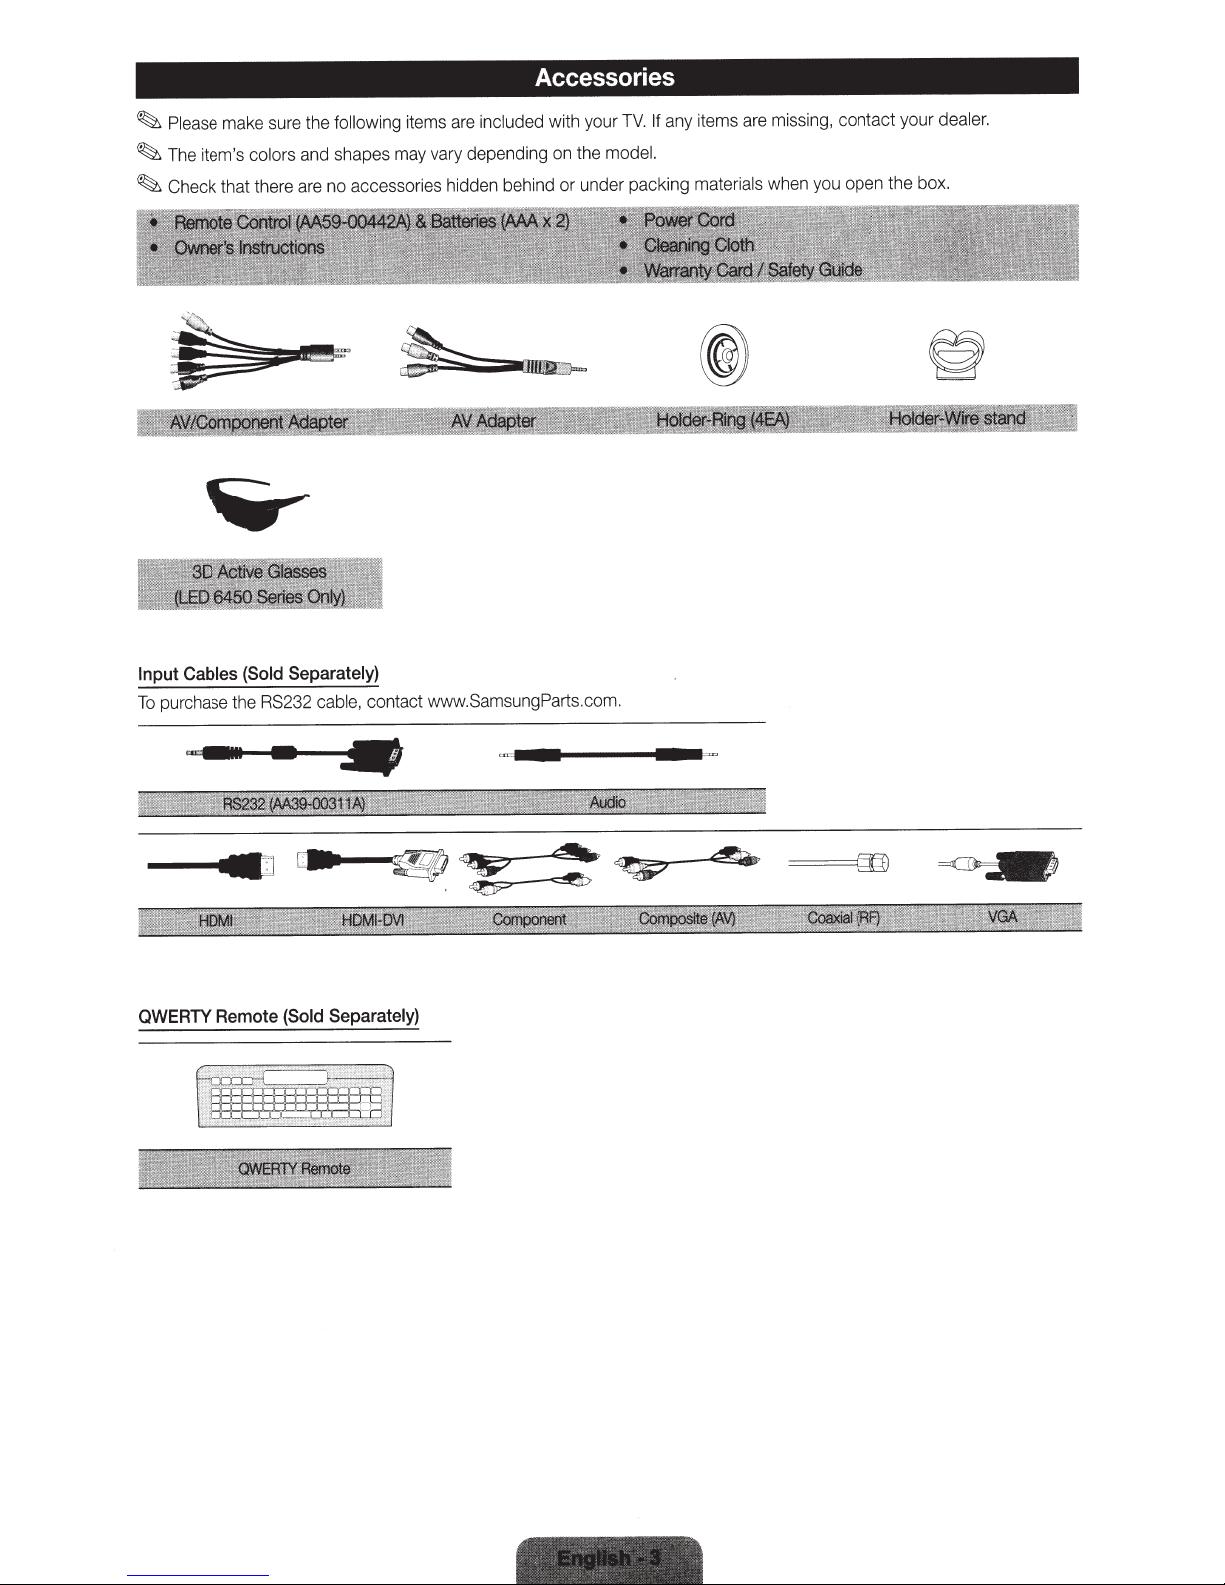
make sure the
Please
~
colors
~The
~
item's
Check that there are no accessories hidden behind
following
and shapes may vary depending on the model.
items are
included
Accessories
any items are missing, conta
If
with your
or
TV.
under packing
your
ct
materials when you ope n the box.
dealer.
Cables
Input
purchase the RS232
To
QWERTY
(Sold
n•I~
..
~zz
Remote
Separately)
contact
e,
cabl
--~IIIJ
....
Separately)
(Sold
H
.SamsungParts.com .
www
~
~
~
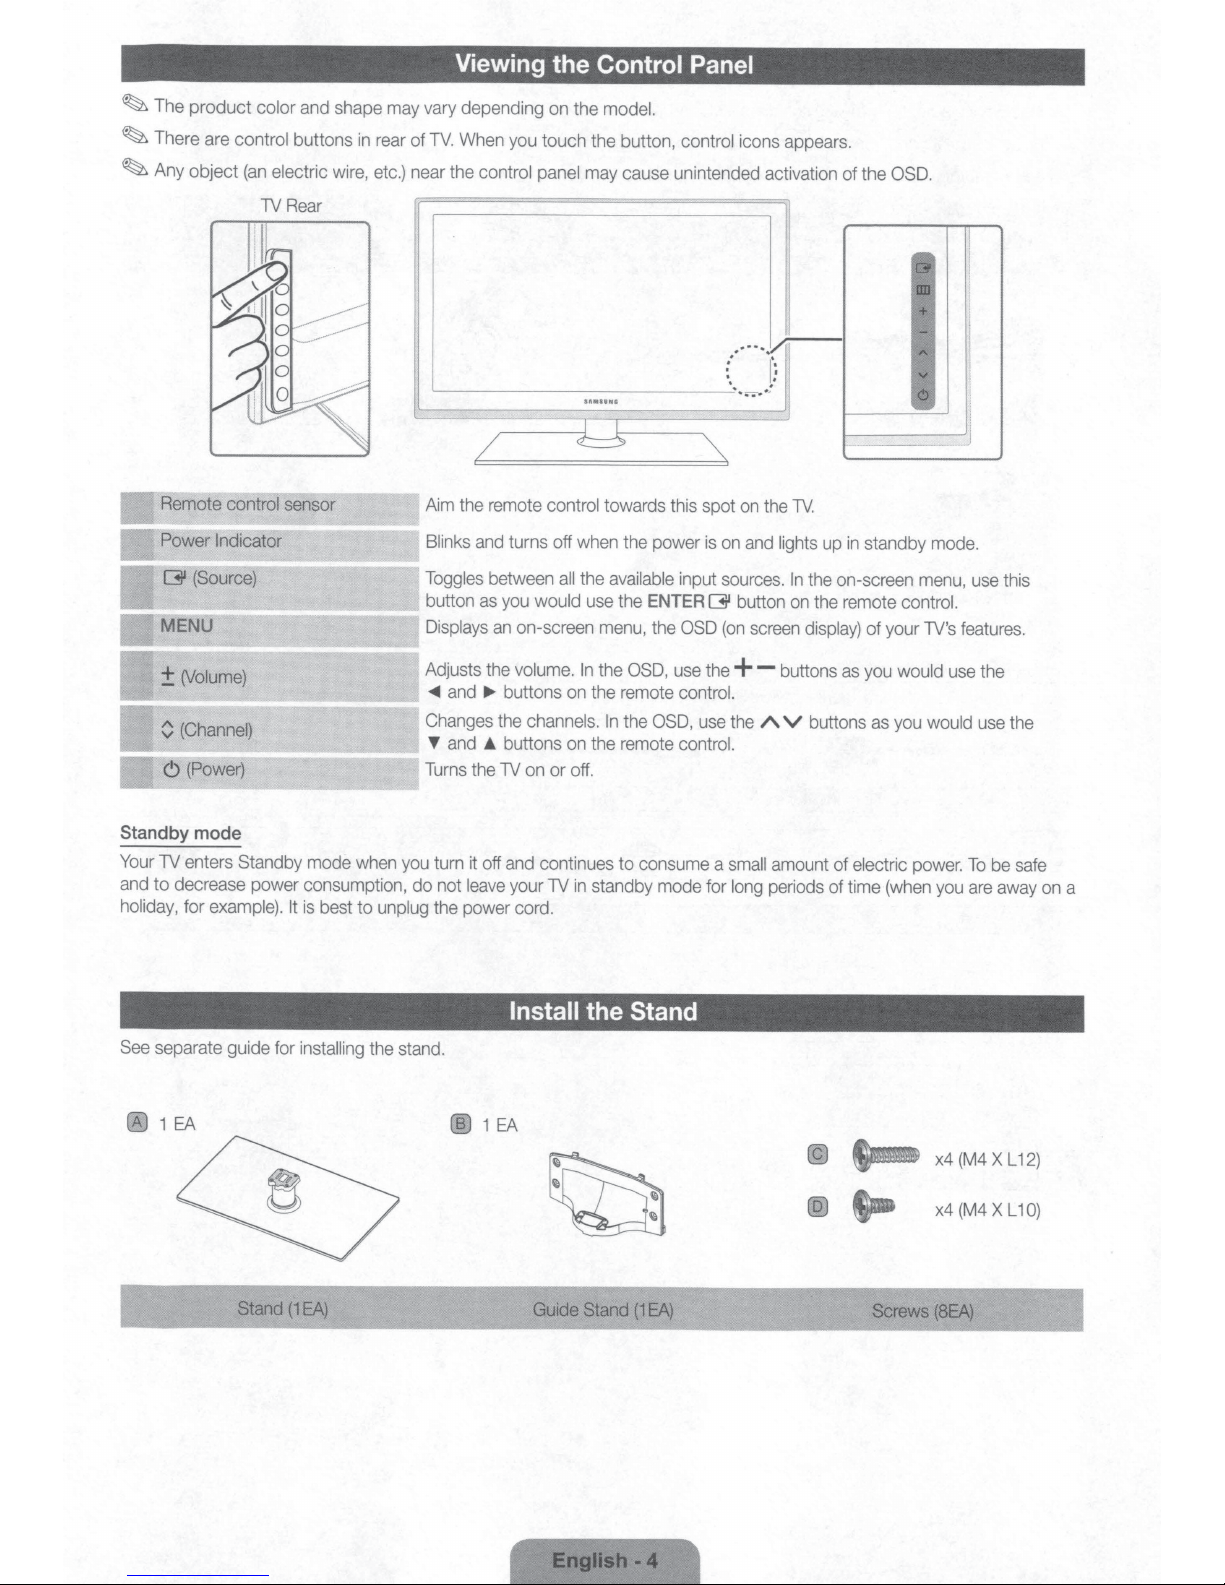
The
There
Any
product
are
control buttons
object
(an
color
electric
1V
and
Rear
shape
in
wire,
may
vary depending
rear
of
TV.
etc.)
near the control
L__
Viewing the Control
on
the
model.
When
you
touch the button, control icons appears.
panel
may
cause unintended activation of the
___________
Panel
.····~
:
'
__,
·~-
......
1
..
I
~
··
OSD.
Remote control sensor
Power
Indicator
Standby
Your
and
holiday, for
mode
1V enters Standby mode
when
to decrease power consumption, do not
example).
It
is
best to unplug the power cord.
~---l
l
/
Aim
the remote control towards this spot
Blinks
and
turns off when the power
Toggles
button
Displays
Adjusts the volume.
..,..
Changes
T
Turns
you
and
and
turn
between
as
an
..,_
the
A.
the 1V
it
off
leave
all
the
you
would
use
on-screen
buttons
channels.
buttons
on
and
your 1V
menu,
In
the
on
the remote control.
In
on
the remote control.
or
off.
continues to consume a
in
standby mode for
e----
l
available
the
ENTER
the
OSD
the
OSD,
,
---
input
OSD
use
""'
is
on
sources.
~
(on
the+-
use
the
small
long
on
the
lV.
and
lights
up
In
the
button
on
the remote control.
screen
display)
buttons
A V
buttons
amount of electric
periods of time
--
in
standby
on-screen
of your
as
you
would
as
you
(when
-
mode.
menu,
lV's
use
would
power.
you
:J
use
this
features.
the
use
the
To
be
are
away
safe
on
a
See
separate guide for
Stand
installing
(1EA)
the
stand.
@1EA
Install
Guide
the
Stand
Stand
(1
EA)
Screws
x4
(M4
x4
(M4
(SEA)
X
X
L12)
L10)
0
''•
It
~~f'tl
t,
~
I
O
'
lj
Ill···
~x4
M4XL12)
(
Ill
··
·
1 '
~<
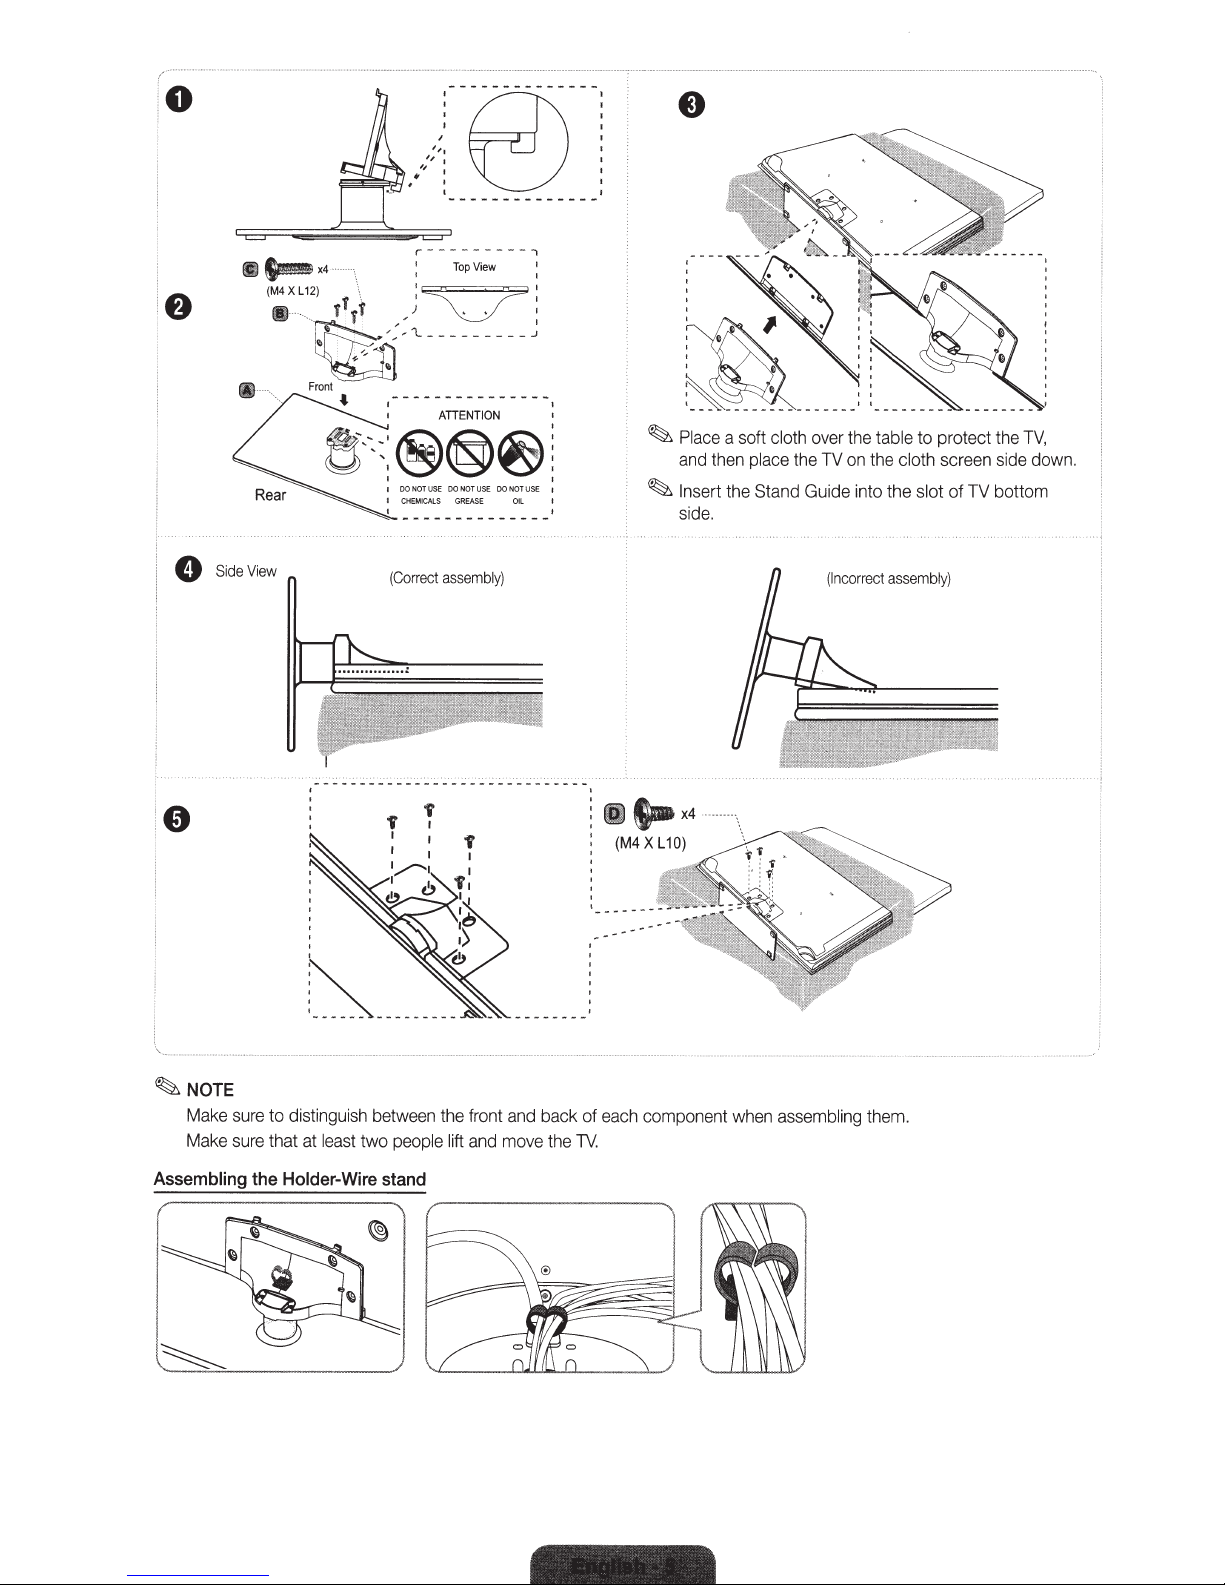
Front
e-:::®@~:
,-----------.
.
\
I I
(Correct
I
'
TopView
I~
I
\:__;./
___
:_:
ATIENTION
00
NOT
US
E
DO
NOT
CH
EM
I
CAL
S
GR
EASE
assembly)
USE
1
I
I
__
;
00
NOT
USE
1
OIL
IJ
~
Place
and
~
Inser
side
t-x4
a soft
then
t
t
.
place
he
cloth
over
the
TV
Stand Guide
(Incor
the
on
into
table
the
the
rect
to protect
cloth
screen
slot
assembly)
of
TV
the
TV,
side
down.
bottom
~NOTE
Mak
e s
ur
Make
sure
Assembling
the
'
~-
e to
distinguish
that at
least
Holder-Wire
--
-
--
--
-
betwe
en
the
two
peo
pl
e
lift
stand
front
and
and
move
back of
the
TV.
each
compon
en
t
when
assembling
them.
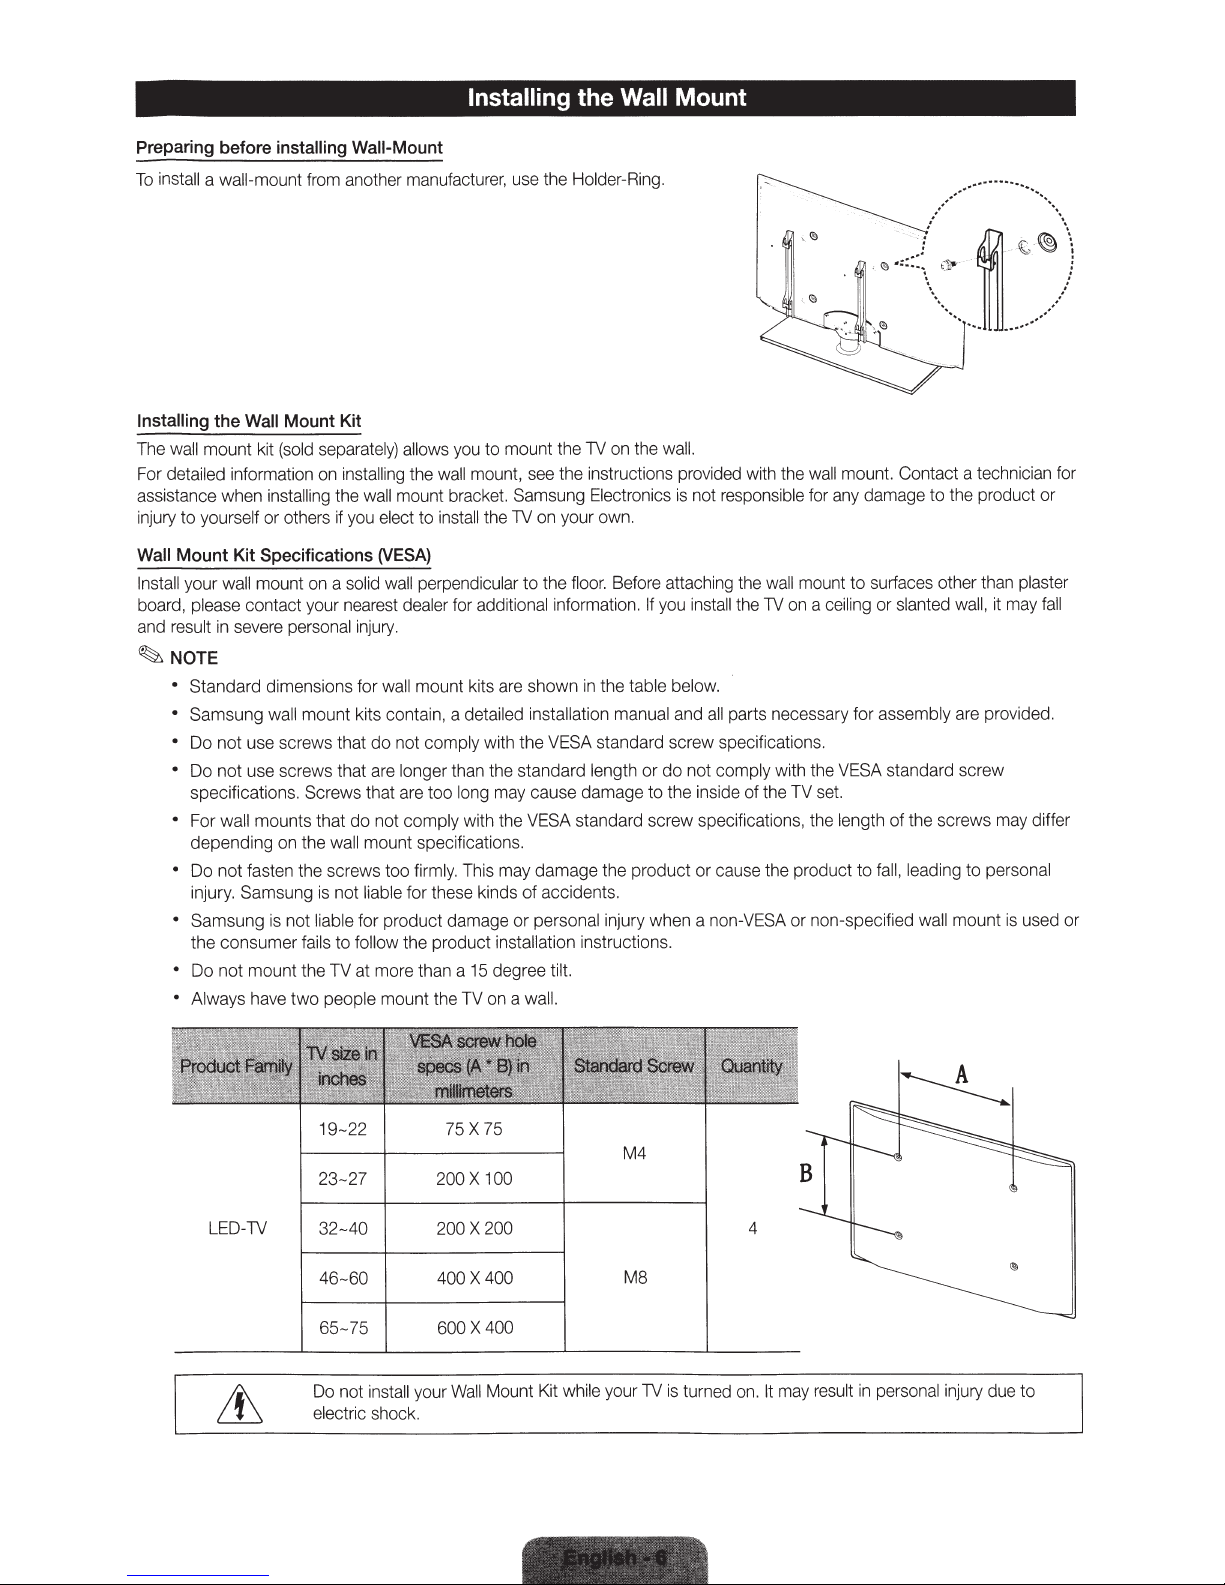
Installing the Wall Mount
Preparing
To
install a wall-mount from another manufacturer, use the Holder-Ring.
Installing
The wall mount kit (sold separately) allows you to mount the TV on the wall.
For detailed information on installing the wall mount, see the instructions provided with the wall mount. Contact a technician for
assistance when installing the wall mount bracket. Samsung Electronics
injury to yourself or others
Wall
Install your wall mount on a solid wall perpendicular
board, please contact your nearest dealer for additional information.
and result
before
the
Wall
Mount
Kit
Specifications
in
severe personal injury.
installing
Mount
if
Wall-Mount
Kit
you elect to install the TV on your own.
(VESA)
to
the floor. Before attaching the wall mount to surfaces other than plaster
is
not responsible for any damage to the product or
If
you install the
TV
on a ceiling or slanted wall, it may
fall
~NOTE
• Standard dimensions for wall mount kits are shown
• Samsung wall mount kits contain, a detailed installation manual and
• Do not use screws that do not comply with the VESA standard screw specifications.
not
• Do
• For wall mounts that do not comply with the VESA standard screw specifications, the length of the screws may differ
• Do not fasten the screws too firmly. This may damage the product
• Samsung
• Do not mount the
• Always have
use screws that are longer than the standard length
specifications. Screws that are too long may cause damage to the inside of the TV set.
depending on the wall mount specifications.
injury. Samsung
the consumer fails to follow the product installation instructions.
is
not liable for these kinds of accidents.
is
not liable for product damage
TV
at more than a
two
people mount the TV on a wall.
15
degree tilt.
or
in
the table below.
all
parts necessary for assembly are provided.
or
do
not comply with the VESA standard screw
or
cause the product to fall, leading to personal
personal injury when a non-VESA or non-specified wall mount
is
used or
19-22
23-27
LED-TV
32-40
46-60
65-75
Do not install your
electric shock.
75X
75
M4
200 X 100
200 X 200 4
400X
400
MS
600 X 400
Wall
Mount Kit while your TV
is
turned on.
It
may result
in
personal injury due to
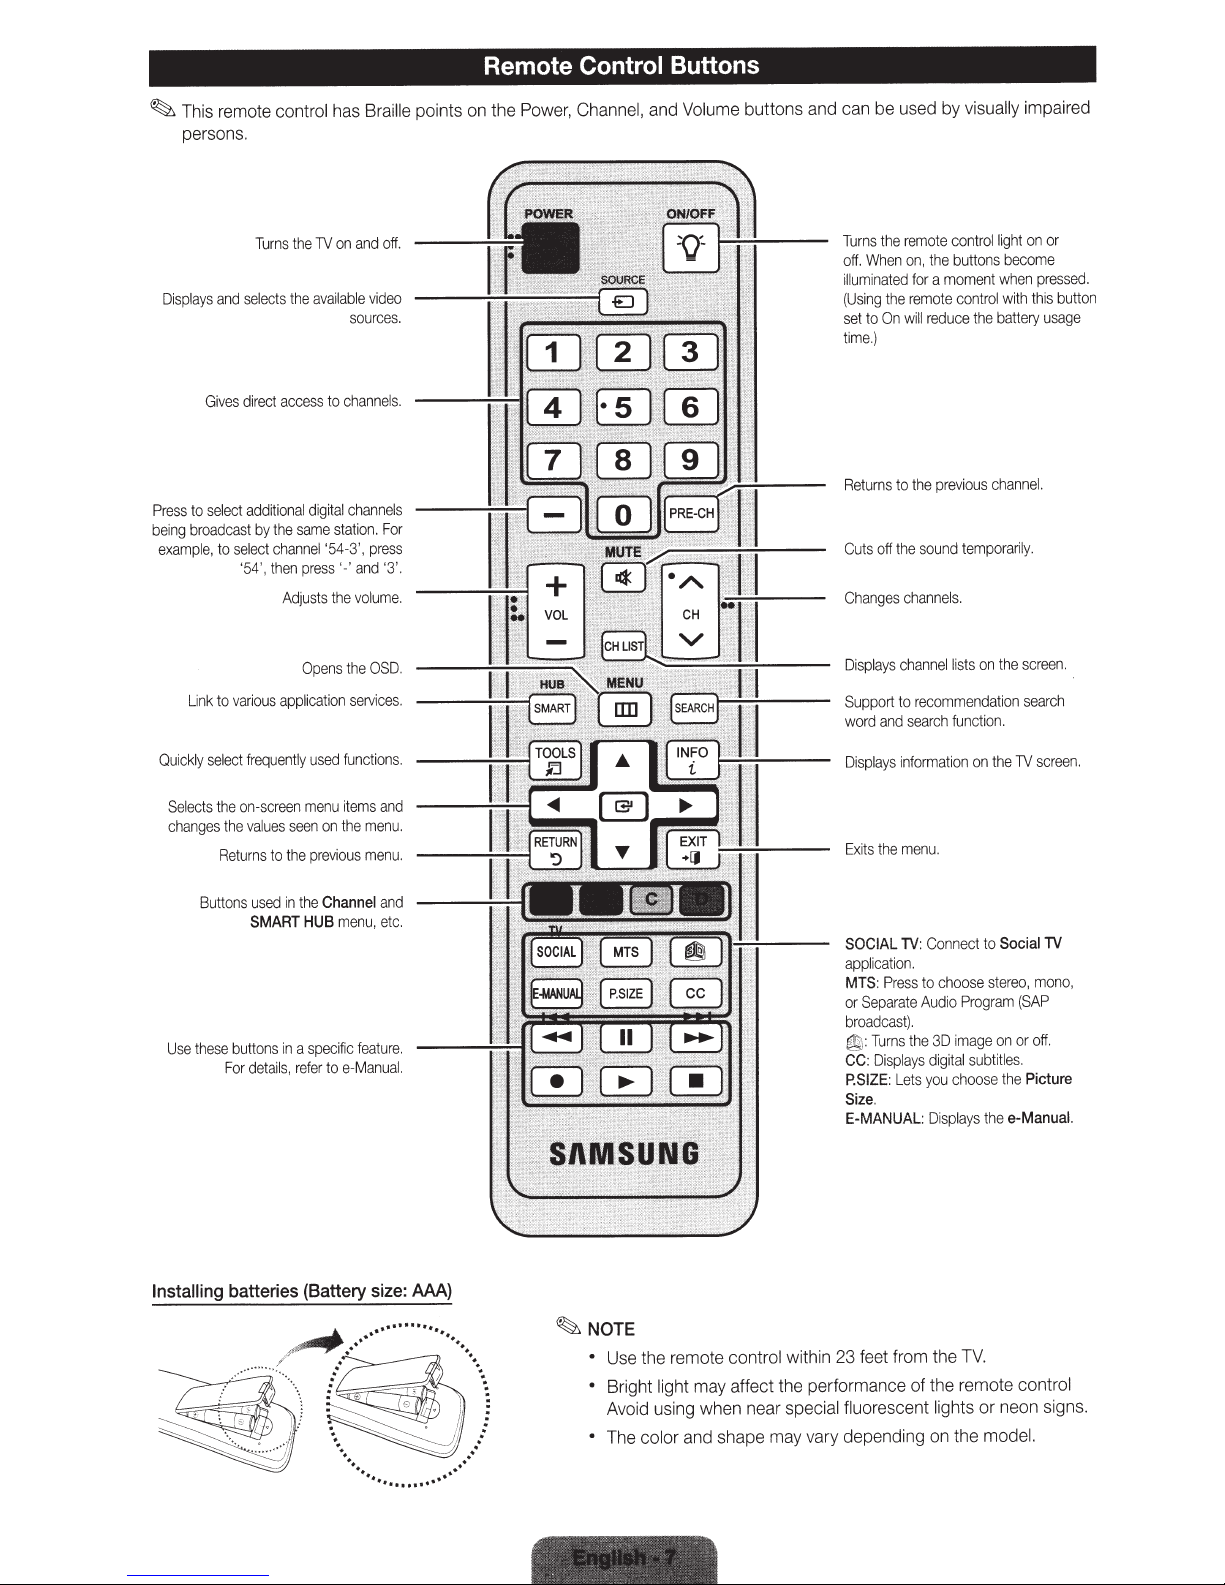
This remote
~
persons.
Displays
to
Press
broadcast
being
example,
and
Gives
select
to
Turns
selects
direct
additional
the
by
channel
ect
l
se
then
'54',
control
TV
the
available
the
access
digital
same
press'-'
Adjusts
has
on
chan
to
channels
station.
-3',
'54
the
Braille
off.
and
video
sources.
s.
nel
For
press
'3'.
and
lume
vo
Remote Control
points on the Power,
.
Channel,
Buttons
Volume buttons and can be used
and
Turns
off.
um
ill
(Using
set
me
ti
Retu
Cuts
Cha
the
When
ed
t
na
i
the
On
to
.)
rns
off
ges
n
remote
the
on,
a
for
remote
reduce the
will
previous
the
to
sound
the
channels.
visually
by
rol
nt
co
buttons
moment
control
tem
light
become
when
wi
battery
chan
pora
impaired
or
on
essed.
pr
button
is
th
th
usage
l.
ne
ly.
ri
Link
ckly
i
Qu
ects
l
Se
changes
se
U
to
select
he
t
the
Returns
Buttons
se
the
For
rious
va
frequently
on-screen
s
lue
va
to
used
SMART
buttons
details,
app
seen
the
1n
in
Opens
cat
li
used
menu
on
previous
Channel
the
HUB
ec
a sp
to
refer
OSD.
the
services.
ion
functions
items
men
the
menu
menu
fea
ic
if
e-Manual.
,
tu
and
u.
and
etc.
re.
screen.
the
on
ts
is
l
channel
lays
Disp
ch
r
on
subt
the
Social
to
stereo
am
on
e
tle
i
the
the
sea
r
sc
TV
TV
mo
,
(SAP
off.
or
s.
Picture
e-Manual
een.
no,
.
Support
and
word
.
.
isplays
D
the
Exits
SOCIAL
applicat
Pr
MTS:
Sepa
or
broadcas
urns
T
:
~
Dis
:
CC
:
P.SIZE
.
Size
E-MANUAL:
search
information
nu.
me
Connect
TV:
n.
io
choose
to
ess
Audio
ate
r
.
t)
3D
e
th
digital
plays
you
Lets
sp
Di
function.
Progr
mag
i
choose
ays
l
recommendation
to
Installing
batteries
(Battery
size:
AAA)
NOTE
~
Use the remote
•
Bright light
•
Avoid using when near
or
l
co
The
•
within 23 feet from the
control
may affect the performance
scent lights
special fluo
re
TV.
the remote
of
or
co
neon s
and shape may vary depending on the model.
ntrol
ig
ns.
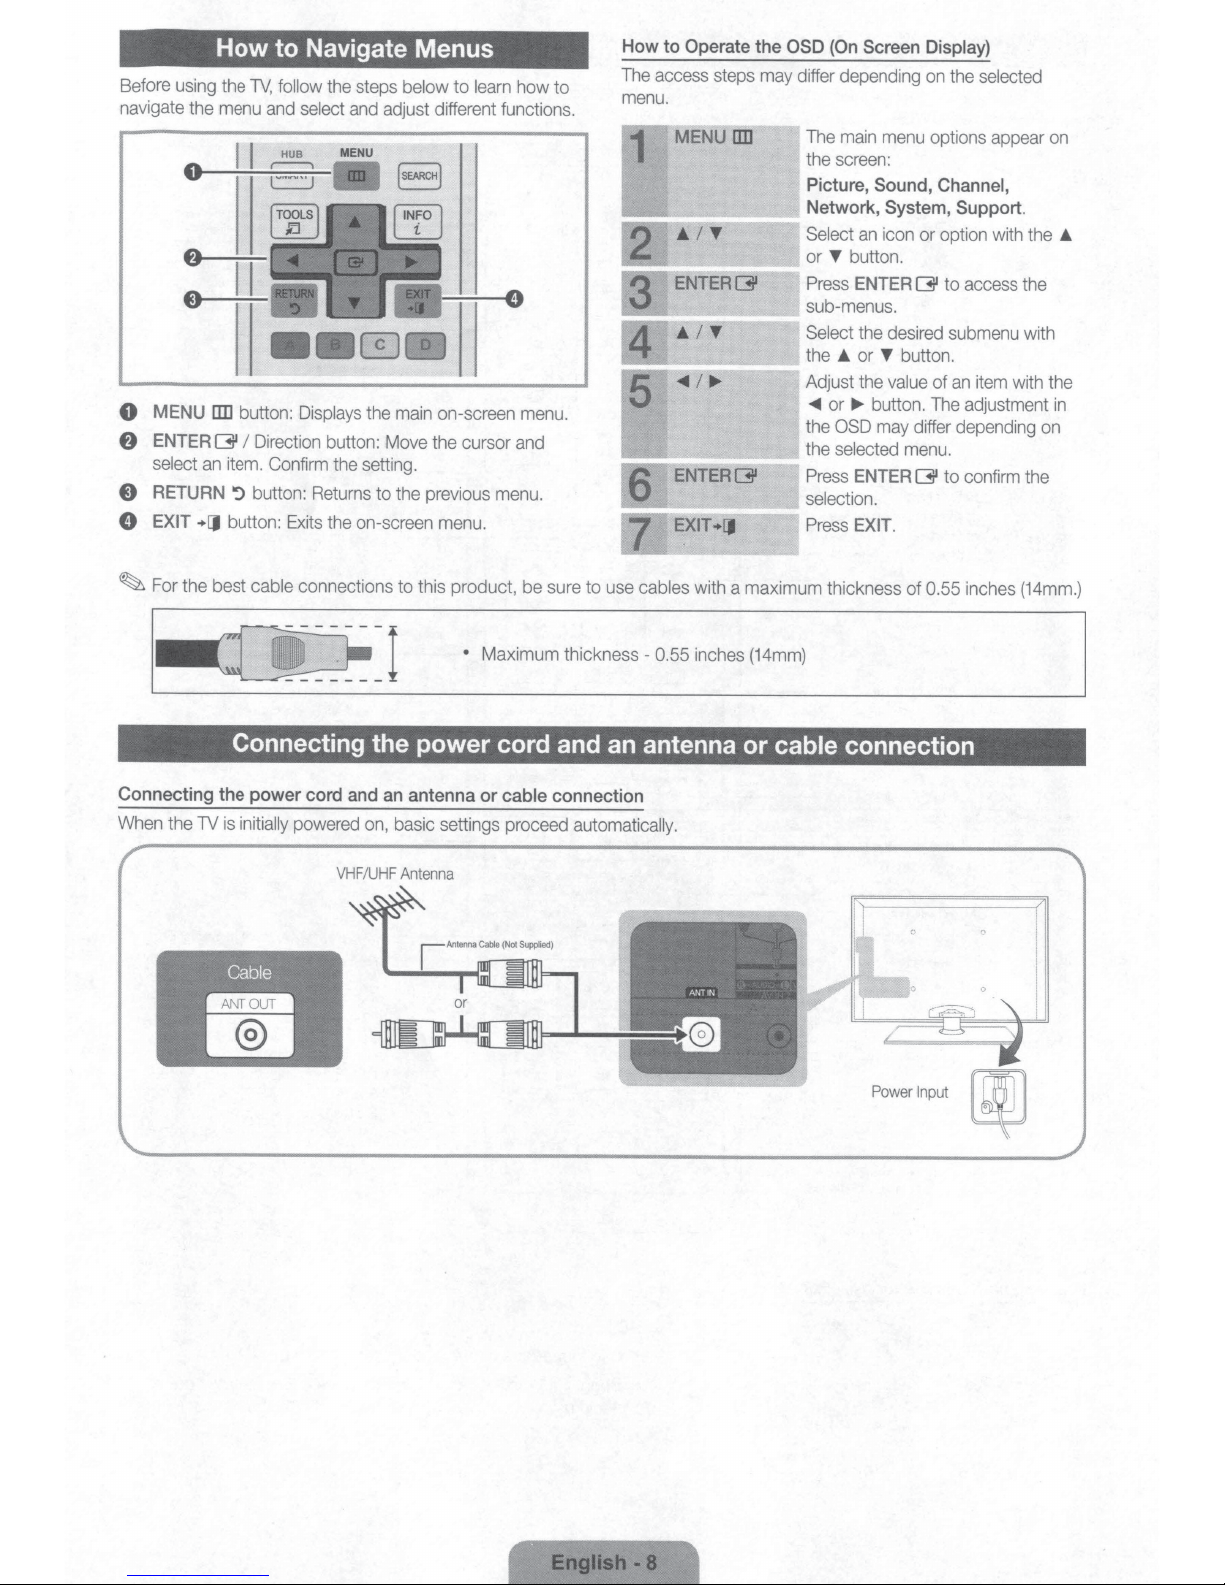
Before
navigate
0
MENU
f)
ENTER
select
E)
RETURN
8
EXIT
~
For
How
using
the
the
menu
liD
G
an
+[J
the best
to Navigate Menus
TV,
follow
the
steps
and
select
and
adjust
button:
I
Direction
item.
':)
button:
button:
cable
Displays
Confirm
Exits
connections
button:
the
Returns
the
on-screen
the
Move
setting.
to
below to
main
the
to
learn
different functions.
on-screen
the
cursor
previous
menu.
this product,
how
menu.
and
menu.
be
to
sure
How
to
The
access
menu.
Operate
MENU
ENTERG
steps
liD
the
may
OSD
differ
•IT
ENTERG
EXIT
+[J
to
use
cables with a maximum thickness of
(On
Screen
depending
The
main
menu
the
screen:
Picture,
Network,
Select
or
Press
sub-menus.
Select
the
Adjust
-<IIIII
the
the
Press
selection.
Press
an
T
button.
ENTER
the
•
or
the
or
~
button.
OSD
selected
ENTER
EXIT.
Sound,
icon
T
may
Display)
on
options
System,
or
G
desired
button.
value
of
The
differ
menu.
G
0.55
the
selected
appear
Channel,
Support.
option
with
to
access
submenu
an
item
adjustment
depending
to
confirm
inches
on
the
the
with
with
the
in
on
the
(14mm.)
•
Connecting
When
the
TV
•
Maximum thickness-
0.55
inches
Connecting the power cord and an antenna or
the
power
cord
and
an
is
initially
powered
Cable
-
DJI
VHF
on,
/
UHF
antenna
basic
Antenna
or
cable
connection
settings proceed
automatically.
(14mm)
cable
connection
Power
Input
When
you
the
TV,
press
~
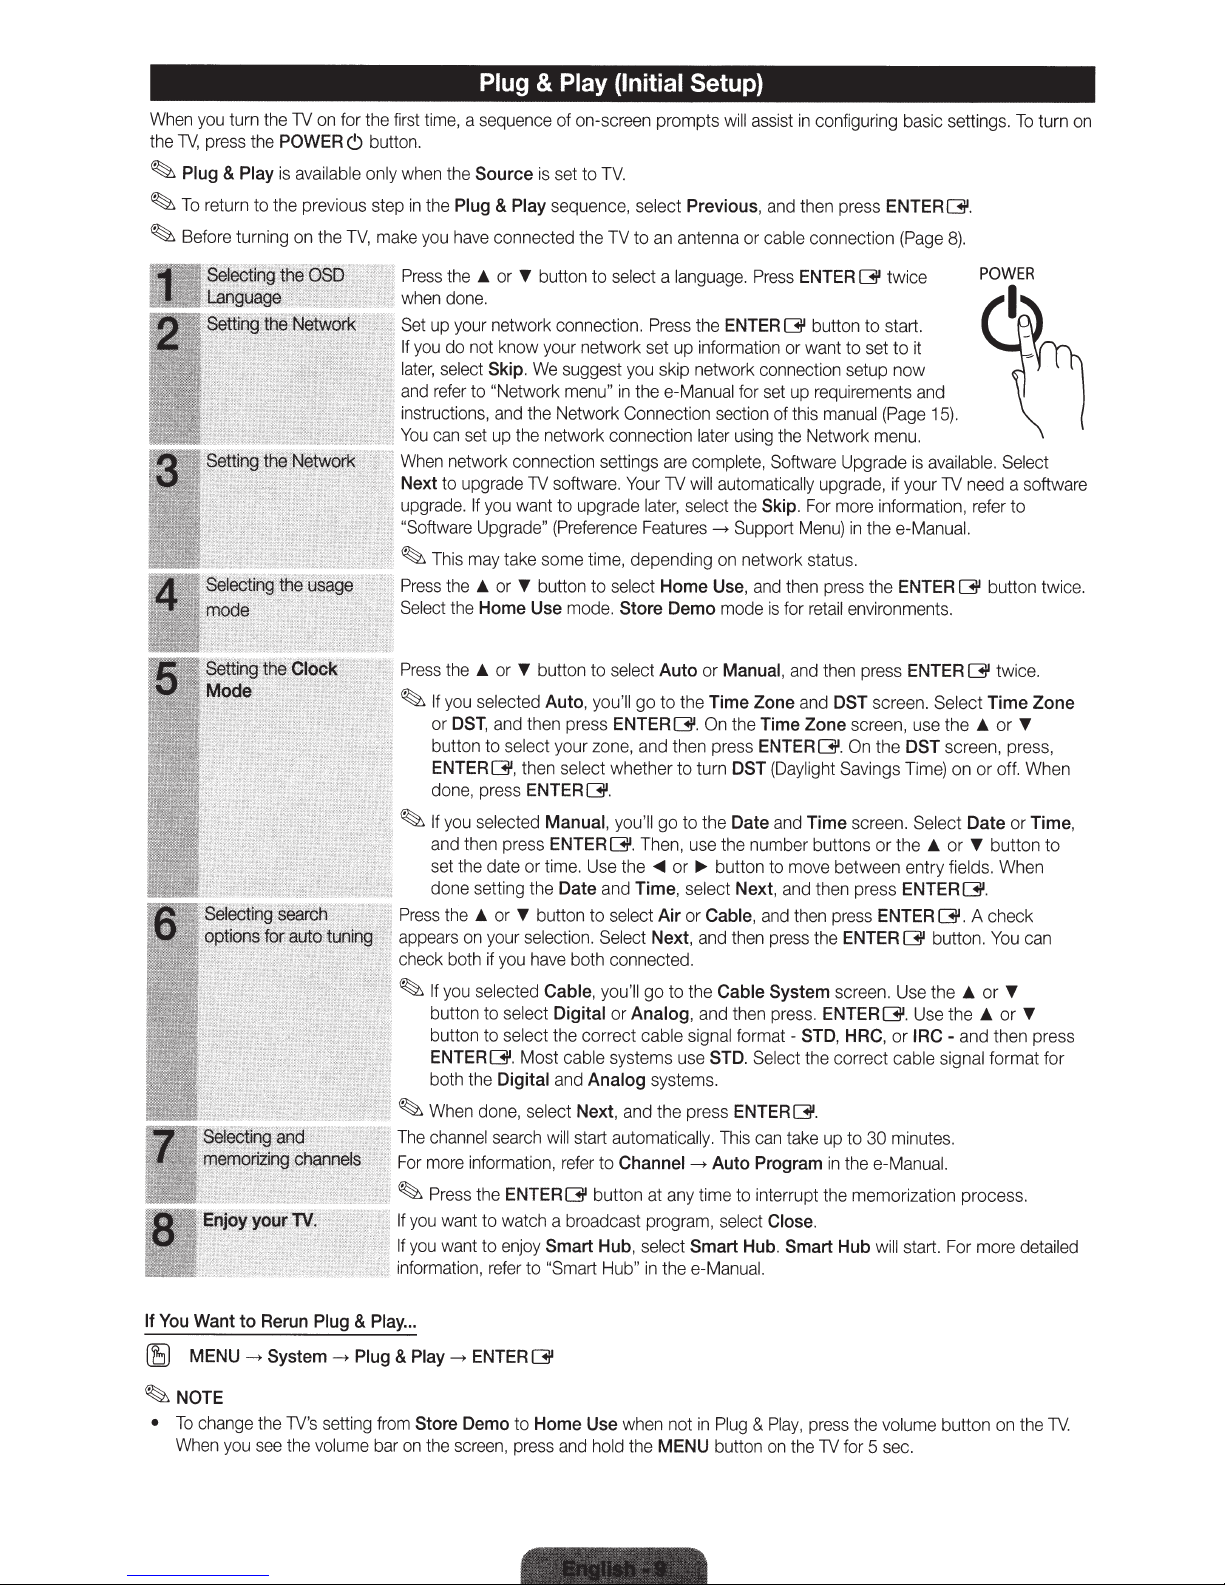
Plug
~
T
o
ret
~
Before turning
turn
&
urn
the
Play
to
the
TV
POWER
is
available
the
pr
on
on
ev
the
'"
for
iou
C)
s st
TV
"'''''"'
the
butto
on
ly
ep
,
mak
,
.....
fi
r
st
time,
a
n.
w
hen
the
in
the
Plug
e y
ou
h
ave
Press
the
w
hen
done.
Set
up
your
If
you
do not know
la
t
er
, select
a
nd
refer to
instructions
You
can
set
When
network
Next
to
upgrade
upgrade.
"
Soft
ware
~
T
hi
s m
Press
the
Select
the
Plug
&
Play (Initial
sequenc
Source
.&
If
Up
.&
Home
e of on-screen prompts
is
set to
&
Play
sequence,
co
nn
ected the
or
T
butt
on
to select
network c
Skip
"Netwo
,
and
up
yo
u
grad
ay
take
or
onnection.
your
network set up inform
.
We
sugge
rk
me
nu
the Network Connection
the network connection
co
n
ne
ct
ion
TV
so
ftware
wa
nt to upgrade
e"
(Prefer
some
tim
T
bu
tt
on
to
Use
mo
de.
TV.
s
ele
ct
TV
to an antenna or
a
language.
Pr
e
ss
st y
ou
sk
ip
"
in
the
e-
Manu
settings
ence
are
. Your
lat
er,
Fea
e,
depending
select
Home
Store
TV
tu
Demo
Setup)
w
ill
Previous
th
e
ENTER~
netw
ork
al
for
section
l
ate
r
using
comp
lete
w
ill
a
ut
o
sel
ect
t
he
res
->
Supp
on
Use
mo
as
s
,
and
ca
Press
ation
co
set
,
Software
maticall
Skip
ne
tw
,
a
nd
de
is
ist
nn
of
the
o
o
bl
or
up
this
rt
rk
then
for
in
configu
then
p
e
co
nnection
ENTER
butt
wan
t to set to it
ec
ti
on
requirem
manual
Netwo
y
upgrade
.
For mo
Me
nu
statu
press
re
t
ail
re
ss
~
on
to start.
se
tu
rk
Upgr
re
)
in
s.
en
r
th
th
viro
ing
basic settings.
ENTERQll.
(P
age
twice
p now
en
ts
and
(
Page
15).
menu.
ade
is
available.
, if your
TV
info
rmati
e
e-M
an
e
ENTER~
nments.
8).
on,
ua
need
re
fer to
l.
To
t
urn
on
S
el
ect
a softw
are
button twice.
Pr
ess
th
e
.&
or
~
If
yo
u
se
l
ec
or
DST
,
a
nd
button to
ENTER~
done
~
If
yo
and th
se
do
Pres
s
the
appears on
ch
eck
~
If
you
butt
bu
ENTER
bo
~
Wh
The
chan
For
more
~Press
If
yo
u
wa
If
you
wa
i
nf
o
rm
a
, pre
ss
u
se
l
ec
en
pr
t
th
e
da
ne
se
tting t
.&
or T
yo
ur
bo
th
if
yo
se
l
ec
on
to
se
tton to
se
[311.
th th
e
Digital
en don
ne
l
sea
inf
or
mati
th
e
ENTER[311
nt
to watch a
nt
to e
ti
on, refer to
sel
,
te or ti
e,
nj
T
butt
on
to
ted
Auto
,
yo
the
n
pre
ss
ect
your
zon
then
sel
ec
ENTER~.
t
ed
Manual,
ess
ENTER
me
. U
he
Date
button to sel
se
l
ec
t
io
n.
u h
ave
bo
th
t
ed
Cable
,
lect
Digital
lect
the
correct
M
os
t
cab
le
a
nd
Analog
s
el
ect
Next
rch
wi
ll
start
on,
refer
to
butt
broadcas
oy
Smart
"S
ma
rt
se
le
ct
Auto
u'
ll
go to the
ENTER~.
e,
and
then press
t
whether to
yo
u'
ll
go
~.
Then
se
th
e
~
or
and
Time,
ec
t
Air
Se
le
ct
Next,
co
nn
ec
t
ed.
you
'll
go to t
or
Analog
cable s
systems u
system
, a
nd
the p
automatical
Channel
on
at any
t progr
Hub
,
se
le
ct
Hub
"
in
th
ee
or
On
tu
to
th
,
use
~
se
lect
or
Cable
and
he
,
an
ig
se
s.
re
ly
->
ti
am,
Smart
-M
Manual
Time
Zone
the
rn
DST
e
Date
the
nu
bu
tton to
Next,
,
then
Cable
d
th
en
na
l
fo
rm
STD
.
Se
ss
ENTER
.
Th
is
ca
Auto
Program
me
to interrupt
se
lect
Hub.
an
ua
, and
and
Time
Zone
ENTER~
(
Da
ylight
a
nd
Time
mb
er
buttons or the
move
and then pr
a
nd
then
pr
ess
the
System
pr
ess
.
ENTER
at -
STD
l
ec
t
t
he
[311.
n
take
Close.
Smart
l.
th
en pr
ess
DST
scre
screen, use the
.
On
the
Sa
v
in
gs
sc
r
een
b
et
wee
n entry
ess
ENTER[311
pre
ss
ENTER
ENTER
[311
scree
n. U
[311.
,
HRC
, or
corr
ec
t
cable signal
up to
30
m
in
th
e e-
Manua
th
e memori
Hub
wi
ll
ENTER
en
DST
Time)
.
(31
.
Se
lect Time Zone
sc
reen
on
Se
lect
Date or
.&
or
T
fields.
[311.
butto
se
th
e
.&
U
se
the
IRC
-
and t
inu
tes.
l.
za
tion process.
start.
For more
t
wice.
.&
or
T
, pr
or off. W
button to
When
.
A c
he
ck
n.
You
or
T
.&
or
hen
format for
detailed
ess,
he
Time,
can
T
press
n
If
You
Want
to
Rerun
Plug
&
Play
...
(8
MENU
->
System
~
NOTE
•
To
ch
ange
t
he
Wh
en
you
see
TV
the
->
Plug
&
Play
's
se
tting
fr
om
vo
lum
e
bar
on the
Store
->
ENTER
Demo
scree
n, pr
to
ess
~
Home
and
Use
ho
ld
wh
the
en not
MENU
in
P
bu
lug
tton
&
Pl
on
ay,
the
pr
ess
TV
f
or
the
5
vo
sec.
lum
e
bu
tton on t
he
TV.
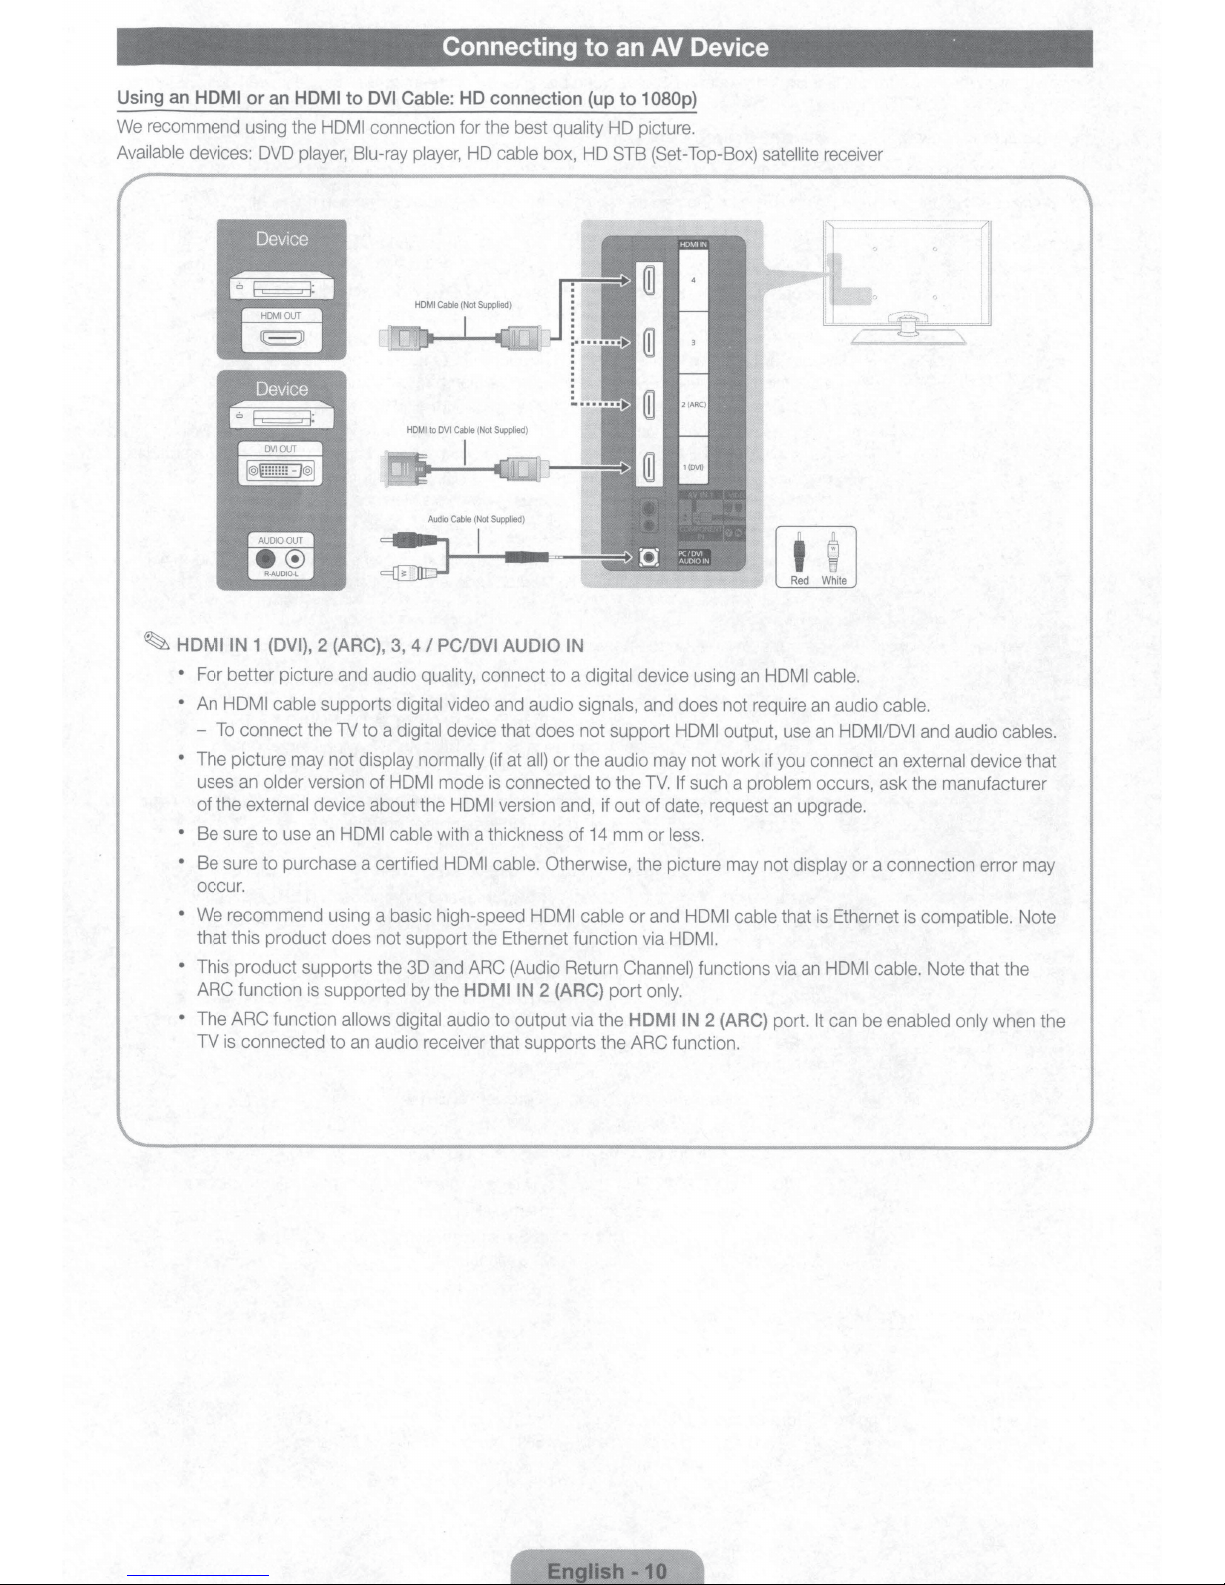
Connecting
to
an
AV
Device
·
Using an
We
Available
HDMI
recommend using the
devices:
~
HDMIIN
•
For better picture and audio quality, connect to a
•
An
HDMI
-
To
connect the TV to a digital
• The picture may not
uses an
of the external device about the
• Be sure to use
•
Be sure to purchase a certified HDMI cable.
occur.
•
We
recommend using a basic high-speed
that this product does not support the Ethernet function via
•
This product supports the 3D and
ARC function
•
The ARC function
TV
is
connected to
or
an
HDMI
HOM
DVD
player, Blu-ray
1 (DVI),
2 (ARC),
cable supports
older
version of HOM
an
is
supported by the
to
DVI
Cable:
HD connection (up to 1
I
connection for the best
player,
HD
3,
4
I
PC/DVI AUDIO IN
digital
video and audio signals, and does not require
device that does not support
display normally
HDMI cable
allows
digital audio to output via the
an
audio receiver that supports the ARC function.
(if
I mode
is
HOM
I
with a thickness of
ARC (Audio Return Channel)
HDMIIN
quality
cable
box, HD STB (Set-Top-Box) satellite receiver
digital
at
all)
or the audio may not work if you connect
connected
version and, if out of date, request
14
Otherwise, the picture may not
HDMI cable
2 (ARC)
HD
picture.
device using
to
the
mm
or and HOM
port
HDMIIN
080p)
TV.
or
only.
HOM
I
output, use
If
such a
less.
I cable
HDMI.
functions via
2 (ARC)
an
HOM
problem
an
that
port.
Red
White
I cable.
an
audio cable.
an
HDMI/DVI
occurs, ask the manufacturer
upgrade.
display
or a connection error may
is
Ethernet
an
HDMI cable.
It
can be
and audio
an
external device that
is
compatible. Note
Note that the
enabled only when the
cables.
a
Using
Available
Component
devices:
DVD
or
080p)
1
to
(up
player,
Blu-ray
player,
t t t t
AudioNideo
an
cable
t
i
box,
(480i
STB
only)
satellite
Cable
receiver,
VCR
(N~~~~
~
~
an
Using
Available
l l
(N~d~~
P~:~)
connecting
When
better picture
For
EX-Link
Devices:
EX
D.
AudioCable
----
d)
-
plie
-
up
s_
t
_
P~~:~)L.----
Cable
External
LINK
(No
the
IN,
AV
to
the
quality,
Connection
devices
that support
EX-LINK:
Component connection
color
ma:J=
AV
the
of
EX-Link.
Connector
IN
for
[VIDEO]
1
recommended
is
service
jack
only.
t
Red
(green)
I I
Yellow
White
will
over
video cable
the
match
not
the A/V connection.
(yellow).
Using
an
Available
,
DVD
~
~
Optical
devices:
Af:nplifier
Home
DIGITAL
•
When
of both
•
5.1
CH
•
When
the
TV
source
receiver
receiver.
cable
AUDIO
•
When
•
When
volume
(Digital)
Digital
or
Audio
an
I
Theater
~
~
AUDIO
you
the
box
OUT:
connecting,
you
OUT
connect a
the
TV
and
the
(channel}
is
receiving
is
and and
If
level
audio
receiver
a digital component
you
I
connect
(Home
a
you
want
STB
satellite receiver directly
Connects
use
with
the amplifier's volume control.
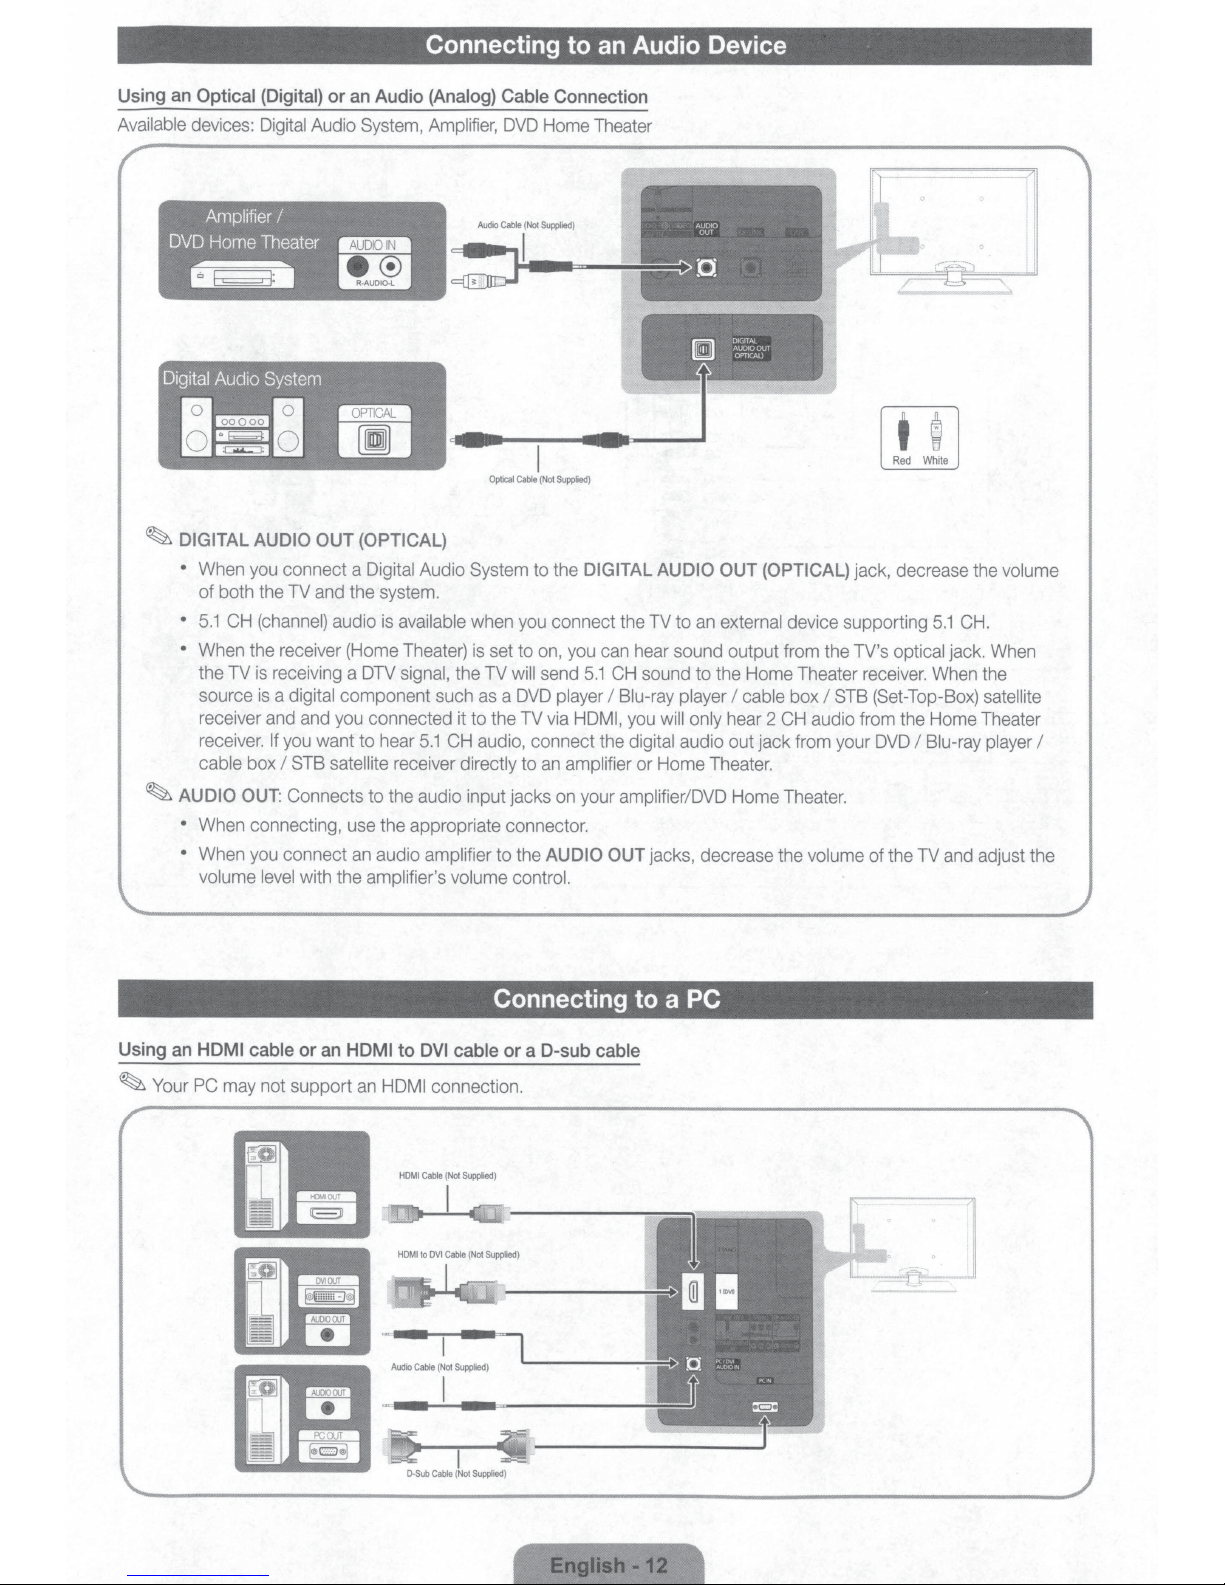
Connecting to
Audio
(Analog)
System,
(OPTICAL)
Digital
DTV
to
an
Amplifier,
Audio
system.
is
available
Theater)
signal,
such
connected it
hear
5.1
to
the audio input jacks
the appropriate connector.
audio amplifier
Cable
DVD
:J
CH
System
when
is
the
TV
as
to
audio,
...
Ie
Optical
Cable
you
set
to
will
a
DVD
the
TV
to
the
an
Audio Device
Connection
Home
Theater
i(
..
Not
.
Sup
.
plie
.
d)
,_...,..~
~ill
(Not
Supplied
)
to
the
DIGITAL
connect
on,
you
send
5.1
player
via
HDMI
connect
to
an
amplifier
on
your amplifieriDVD
AUDIO
AUDIO
the
TV
to
can
hear
sound output from
CH
sound
I
Blu-ray player
,
you
will
only
the
digital audio out jack
or
Home Theater.
OUT
jacks, decrease the
AUDIO
OUT
D.
OUT
an
external
to the
hear
DIGITAl
AUDIO
OUT
OPTICAL)
(OPTICAL)
device supporting
Home
Theater
I
cable
box
2
CH
from
Home
Theater.
jack, decrease
the
TV's
I
STB
audio
from
your
volume
Red
optical jack.
receiver.
(
Set-Top
the
DVD
I
of
the
TV
White
5.1
When
-Box)
Home
Blu-
and
the
CH.
When
the
satellite
Theater
ray
player
adjust the
volume
I
Using
an
HDMI cable
~
Your
PC
may
or
an
not support
HDMI
an
to
HDMI
DVI
cable
connection.
Connecting to a PC
or
a
D-sub
cable
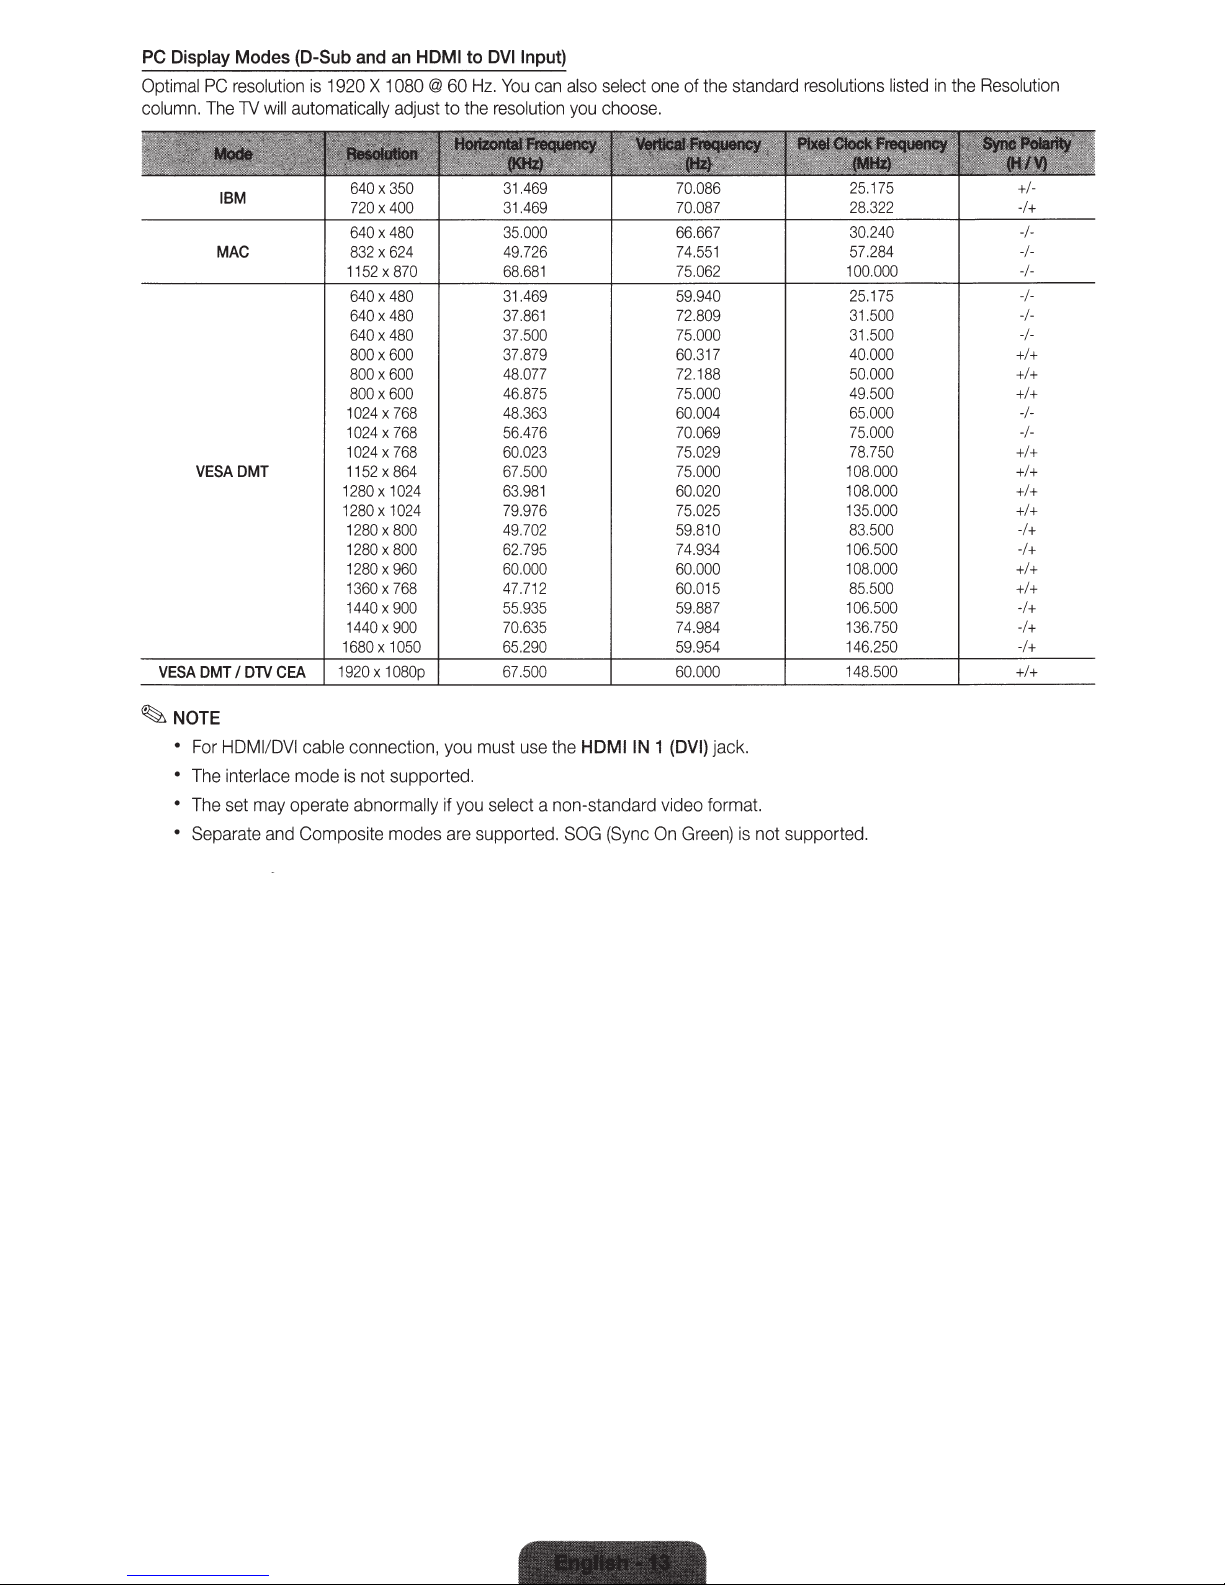
PC
Display
Optimal
column.
Modes
PC
resolution
The
TV
IBM
MAC
VESADMT
(D-Sub
is
will
automatically
and
1920 X 1
640
x350
720 X 400
640x480
832 X 624
1152
x870
640 X 480
640 X 480
640 X 480
800x
800 X 600
800x
1024
X 7
1024 X 768
1024 X 768
1152 X 864
1280x1024
1280x1024
1280x8
1280x
1280x
1360x
1440x 900
1440x
1680 X 1050
an
HDMI
080 @ 60
adjust
to
600
600
68
00
800
960
768
900
to
DVIInput)
Hz.
You
can
also
select
the
resolution
31.469
31.469
35.000
49.726
68.681
31.469
37.861
37.500
37.879
48.077
46
48.363
56.476
60.023
67.500
63.981
79.976
49.70
62.795
60.000
47.712
55.935
70.635 74.984
65.290
.87
you
choose.
5
2
one
of
the
70.086
70.087
66.667
74.55
75.062
59.9
40
72.809
75.000
60.317
72.188
75.00
60.004
70.069
75.029
75.000
60.020
75.025
59.810
74.93
60.000
60.015
59.887
59.954
standard
1
0
4
resolutions listed
25.175
28.322
30.24
0
57.284
100.
000
25.
175
31
.500
31.5
00
40.0
00
50.000
49.500
65.000
75.000
78.750
108.
000
1
08.000
135.0
00
83.500
106
.50
0 -I+
108.000
85.500
1
06.500
1
36.750
14
6.250
in
the
Resol
ution
+1-
·I+
-I-
-1-
-1-
-I-
-1-
-1-
+I+
+I+
+I+
-1-
-1-
+I
+
+I+
+I+
+I+
-I+
+I+
+I+
-I+
-I+
-1+
~
NOTE
•
•
•
•
For
HDMI/DVI
The
interlace mode
The
set
may
Separate
cable connect
operate abnor
and
Composite
ion,
is
not supported.
mally
modes are
you
must
use
the
HDMIIN
if
you
select a non-standard video for
supported.
SOG
(Sync
1 (DVI) jack.
mat.
On
Green
) is not supported.
Changing the Input Source
Source
Use
to
select
1V or
an
external
such
as a DVD
box I STB
1.
Press
player I Blu-ray
satellite
receiver
the SOURCE button
remote.
2.
Select a desired
You
can
the
All
and
change
Connected
external
the
or.,. button.
• TV I PC I
HDMI11DVII
All
~
You
connected to
Share
can
AV1
I AV21 COMPONENT I
HDMI21
only
choose
the
TV.
highlighted.
~
In
Source, PC
Edit
Name
Edit
Name
lets
so
urce.
To
access
Source.
• VCR I DVD I Cable STB I Satellite STB I PVR STB I
The
AV
Receiver I Game I Camcorder I PC I DVI PC I DVI
Devices
the device
input source
always
you
associate
Edit
following
I
TV
IIPTV
con
nected
selection
selections
input
source
player I
cable
.
on
your
input
source.
view
mode
among
by
pressing
HDMI31
the
HDMI41
external devices that
In
Source. connected inputs
stays
activated.
a device
Name,
I Blu-ray I
to
the
name
press the
appear
HD
input
jacks
TOOLS button
under
DVD I DMA:
easier.
~
to
to
SOURCE
USB I
are
an
input
Edit
Name
make
are
In
Name
your
~
~
~
Edit
In
Favorites.
Favorites.
Information
You
device
Refresh
In
the
connected dev
:
If
you
have
with
an
HOM I cable,
enter a device
If
you have
port with an
Edit
Name
If
you
connected
port with
under Edit
Favorites
Source,
Source,
can
see
.
TOOLS
press
You
detailed
If
the
button
connected a
name.
connected a
HDMI
to
to
enter
an
an
HOM
I to
Name
to
the
TOOLS button
can
set
an
information
external
to
select
ices.
PC
to
the
HDMIIN
1 (DVI) port
select PC under Edit Name to
PC
to
the
HDMIIN
DVI
cabl
e,
select DVI PC under
a device
AV
enter a
devices
name.
device to t
DVI
cable, select DVI Devices
external
Refresh,
device
to
input
about
are not
then
he
name.
select
the
source
displayed, press
1 (DVI)
HDMIIN
Edit
as
selected
search
1 (DVI)
a
external
for
the
 Loading...