


E-MANUAL
Contact SAMSUNG WORLDWIDE
If you have any questions or comments relating to Samsung products, please contact the SAMSUNG customer care center.
Comment contacter Samsung dans le monde
Si vous avez des suggestions ou des questions concernant les produits Samsung, veuillez contacter le Service Consommateurs
Samsung.
Country
CANADA 1-800-SAMSUNG (726-7864) www.samsung.com Samsung Electronics Canada Inc., Customer Service
U.S.A 1-800-SAMSUNG (726-7864) www.samsung.com Samsung Electronics America, Inc. 85 Challenger
Customer Care Center
Web Site Address
55 Standish Court Mississauga, Ontario L5R 4B2
Canada
Road Ridge eld Park, NJ 07660-2112
LED TV
user manual
© 2011 Samsung Electronics Co., Ltd. All rights reserved.
imagine the possibilities
Thank you for purchasing this Samsung product.
To receive more complete service, please register
your product at
www.samsung.com/register
Model _____________ Serial No. _____________
BN68-03330B-01

Figures and illustrations in this User Manual are provided for reference only and may differ from actual product appearance.
Product design and specifications may be changed without notice.
Important Warranty Information Regarding Television Format Viewing
✎
See the warranty card for more information on warranty terms.
Wide screen format LED Displays (with 16:9 aspect ratios, the ratio of the screen width to height) are primarily designed
to view wide screen format full-motion video. The images displayed on them should primarily be in the wide screen 16:9
ratio format, or expanded to fill the screen if your model offers this feature with the images constantly in motion. Displaying
stationary graphics and images on the screen, such as the dark side bars on non-expanded standard format television video
and programming, should be limited to no more than 5% of the total television viewing per week.
Additionally, viewing other stationary images and text such as stock market crawls, video game displays, station logos, web
sites or computer graphics and patterns, should be limited as described above for all televisions. Displaying stationary images
for more than 5% of total viewing time can cause uneven aging of your LED display and leave subtle, but permanent burnedin ghost images in the LED picture. To avoid this, vary the programming and images, and primarily display full screen moving
images, not stationary patterns or dark bars. On LED models that offer picture sizing features, use these controls to view
different formats as a full screen picture.
Be careful about the television formats you select and the length of time you view them. Uneven LED aging as a result of
format selection and use, as well as burned in images, are not covered by your Samsung limited warranty.
y SAMSUNG ELECTRONICS NORTH AMERICAN LIMITED WARRANTY STATEMENT
Subject to the requirements, conditions, exclusions and limitations of the original Limited Warranty supplied with Samsung
Electronics (SAMSUNG) products, and the requirements, conditions, exclusions and limitations contained herein,
SAMSUNG will additionally provide Warranty Repair Service in the United States on SAMSUNG products purchased
in Canada, and in Canada on SAMSUNG products purchased in the United States, for the warranty period originally
specified, and to the Original Purchaser only.
The above described warranty repairs must be performed by a SAMSUNG Authorized Service Center. Along with this
Statement, the Original Limited Warranty Statement and a dated Bill of Sale as Proof of Purchase must be presented to
the Service Center. Transportation to and from the Service Center is the responsibility of the purchaser. Conditions covered
are limited only to manufacturing defects in material or workmanship, and only those encountered in normal use of the
product.
Excluded, but not limited to, are any originally specified provisions for, in-home or on-site services, minimum or maximum
repair times, exchanges or replacements, accessories, options, upgrades, or consumables.
For the location of a SAMSUNG Authorized Service Center, please call toll-free:
– In the United States : 1-800-SAMSUNG (1-800-726-7864)
– In Canada : 1-800-SAMSUNG
Still image warning
Avoid displaying still images (such as jpeg picture files), still image elements (such as TV channel logos, stock or news bars
at the screen bottom etc.), or programs in panorama or 4:3 image format on the screen. Constantly displaying still pictures
can cause image burn-in on the LED screen, which will affect image quality. To reduce risk of this effect, please follow the
recommendations below:
y Avoid displaying the same TV channel for long periods.
y Always try to display any image in full screen. Use the TV set’s picture format menu for the best possible match.
y Reduce brightness and contrast to avoid the appearance of after-images.
y Use all TV features designed to reduce image retention and screen burn. Refer to the e-Manual for details.
English - 2
Accessories
✎
Please make sure the following items are included with your TV. If any items are missing, contact your dealer.
✎
The items’ colors and shapes may vary depending on the model.
✎
Check that there are no accessories hidden behind or under packing materials when you open the box.
y Remote Control (AA59-00442A) & Batteries (AAA x 2)
y Owner’s Instructions
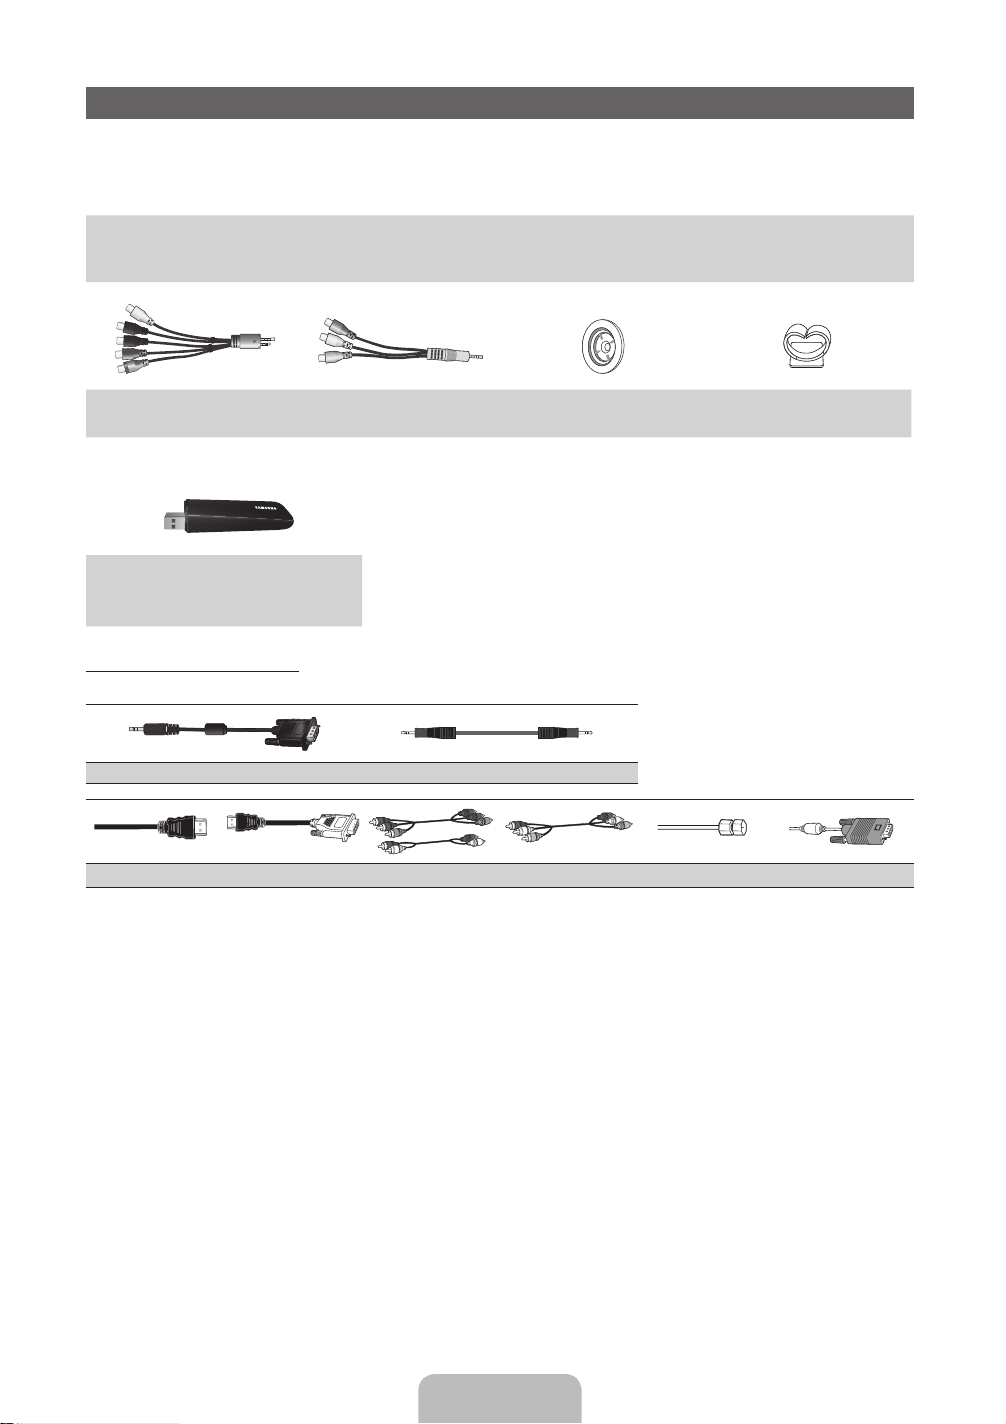
AV/Component Adapter AV Adapter Holder-Ring (4EA) Holder-Wire stand
(BN39-01154W) (BN39-01154H) (BN61-07295A) (BN61-05491A)
Samsung Wireless LAN
Adapter (LED 6050 Series only)
(AK98-01080A)
Input Cables (Sold Separately)
To purchase the RS232 cable, contact www.SamsungParts.com.
y Power Cord
y Cleaning Cloth
y Warranty Card / Safety Guide
RS232 (AA39-00311A) Audio
HDMI HDMI-DVI Component Composite (AV) Coaxial (RF) VGA
English - 3
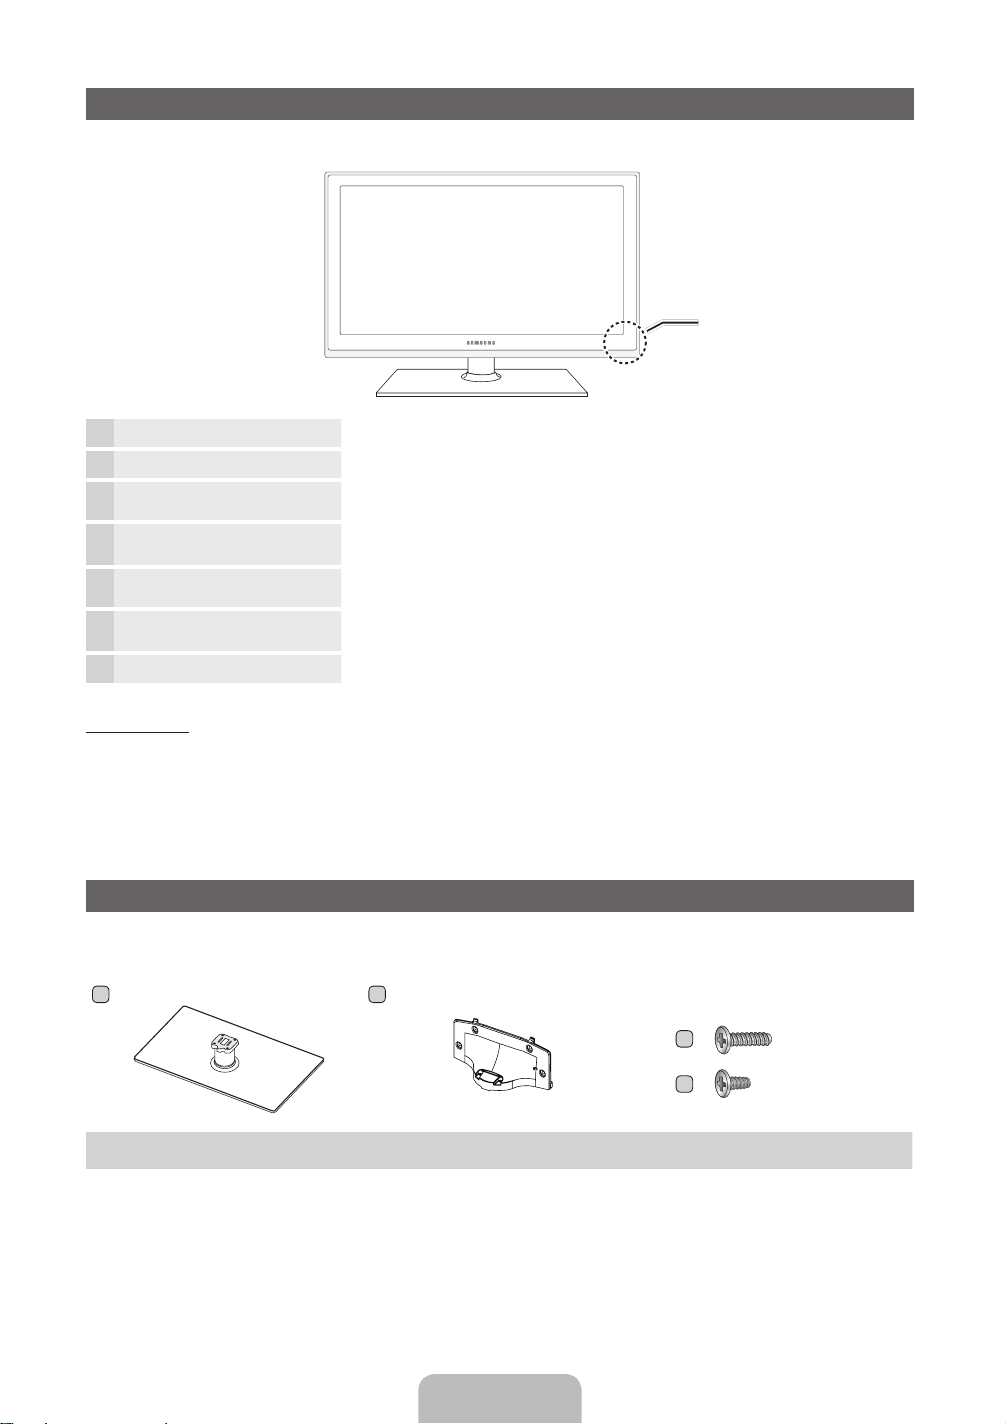
Viewing the Control Panel
✎
The product color and shape may vary depending on the model.
Control Panel
Remote control sensor Aim the remote control towards this spot on the TV.
Power Indicator Blinks and turns off when the power is on and lights up in standby mode.
SOURCE
MENU Displays an on-screen menu, the OSD (on screen display), which contains controls for
y Adjusts the volume. In the OSD, use the y buttons as you would use the
z
P
E
(Power)
Toggles between all the available input sources. In the on-screen menu, use this
button as you would use the ENTERE button on the remote control.
your TV’s features.
◄ and ► buttons on the remote control.
Changes the channels. In the OSD, use the z buttons as you would use the
▼ and ▲ buttons on the remote control.
Turns the TV on or off.
Standby mode
Your TV enters Standby mode when you turn it off and continues to consume a small amount of electric power. To be safe
and to decrease power consumption, do not leave your TV in standby mode for long periods of time (when you are away on
vacation, for example). It is best to unplug the power cord.
Install the Stand
See the separate stand installation guide for more detailed instructions.
A
1 EA
Stand (depending on the model) Guide Stand Screws
B
1 EA
C
D
x4 (M4 X L12)
x4 (M4 X L8)
English - 4
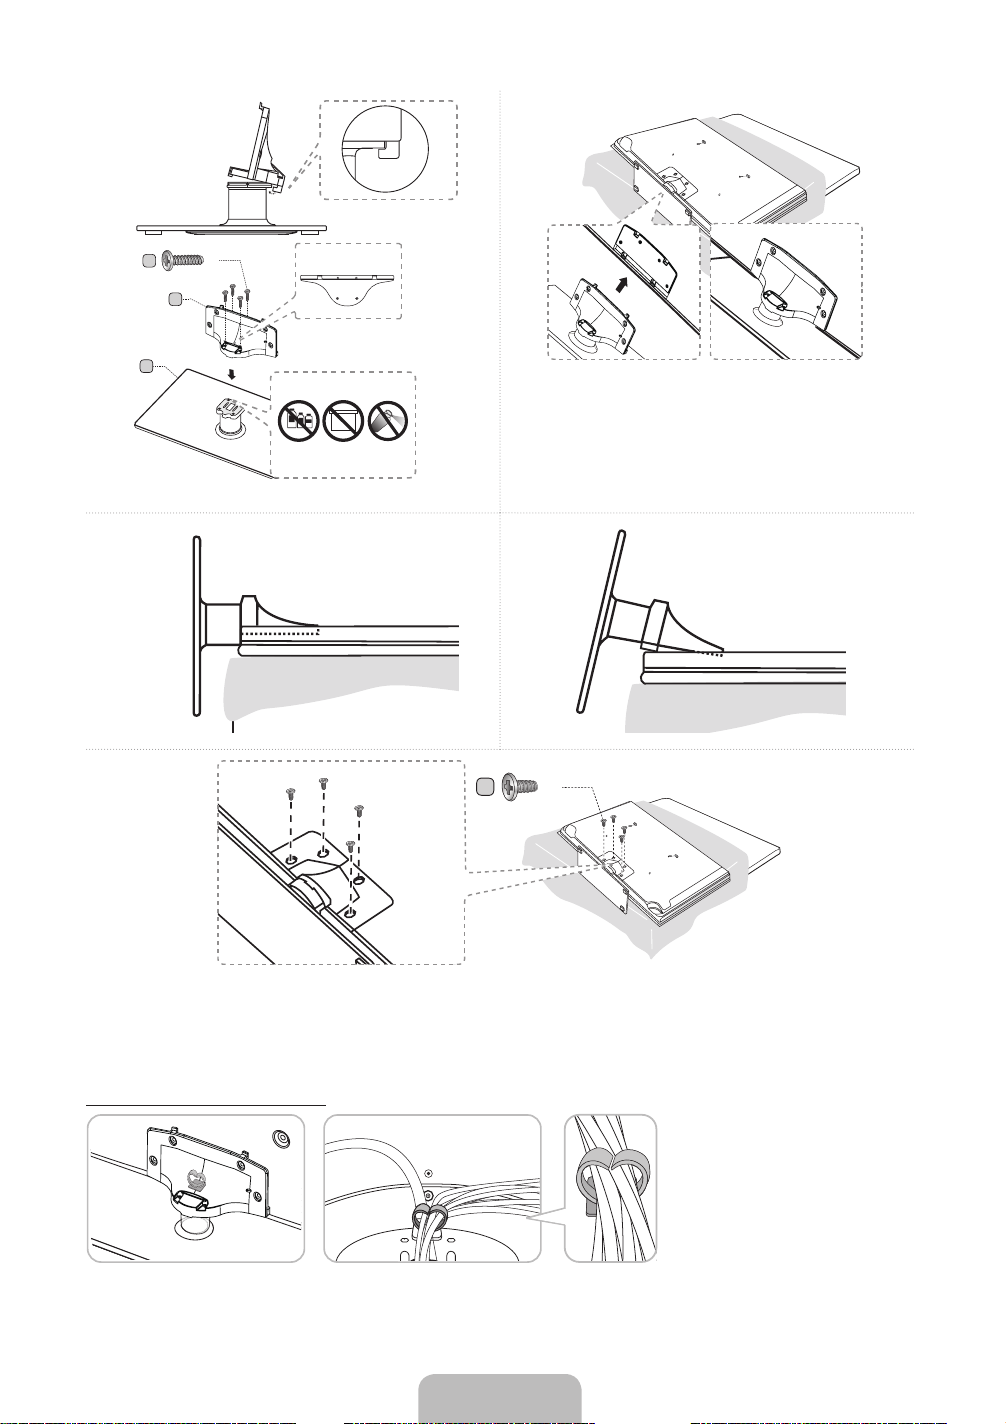
1
3
2
4
5
C
(M4 X L12)
A
Rear
Side View
x4
B
Front
Top View
ATTENTION
✎
Place a soft cloth over the table to protect the TV, and
then place the TV on the cloth screen side down.
✎
DO NOT USE
DO NOT USE
GREASE
DO NOT USE
OIL
CHEMICALS
(Correct assembly) (Incorrect assembly)
Insert the Stand Guide into the slot of TV bottom side.
D
x4
(M4 X L8)
✎
NOTE
Make sure to distinguish between the front and back of each component when assembling them.
x
Make sure that at least two people lift and move the TV.
x
Assembling the Holder-Wire stand
English - 5

Installing the Wall Mount
Preparing before installing Wall-Mount
To install a wall-mount from another manufacturer, use the Holder-Ring.
s
s
s
s
s
Installing the Wall Mount Kit
The wall mount kit (sold separately) allows you to mount the TV on the wall.
For detailed information on installing the wall mount, see the instructions provided with the wall mount. We recommend you
assistance when installing the wall mount bracket. Samsung Electronics is not responsible for any damage to the product or
injury to yourself or others if you elect to install the wall mount on your own.
Wall Mount Kit Specifications (VESA)
Install your wall mount on a solid wall perpendicular to the floor. Before attaching the wall mount to surfaces other than plaster
board, please contact your nearest dealer for additional information. If you install the TV on a ceiling or slanted wall, it may fall
and result in severe personal injury.
✎
NOTE
Standard dimensions for wall mount kits are shown in the table below.
x
Samsung wall mount kits contain a detailed installation manual and all parts necessary for assembly are provided.
x
Do not use screws that do not comply with the VESA standard screw specifications.
x
Do not use screws that are longer than the standard length or do not comply with the VESA standard screw
x
specifications. Screws that are too long may cause damage to the inside of the TV set.
For wall mounts that do not comply with the VESA standard screw specifications, the length of the screws may differ
x
depending on the wall mount specifications.
Do not fasten the screws too firmly. This may damage the product or cause the product to fall, leading to personal
x
injury. Samsung is not liable for these kinds of accidents.
Samsung is not liable for product damage or personal injury when a non-VESA or non-specified wall mount is used or
x
the consumer fails to follow the product installation instructions.
Our 55” model do not comply with VESA Specifications. Therefore, you should use our dedicated wall mount kit for
x
this model.
Do not mount the TV at more than a 15 degree tilt.
x
Always have two people mount the TV on a wall.
x
Product Family
LED-TV
TV size in
inches
19~22 75 X 75
23~27 200 X 100
32~40 200 X 200
60~65 600 X 400
Do not install your Wall Mount Kit while your TV is turned on. It may result in personal injury due to
electric shock.
VESA screw hole
specs (A * B) in
millimeters
Standard Screw Quantity
M4
4
M846~55 400 X 400
English - 6

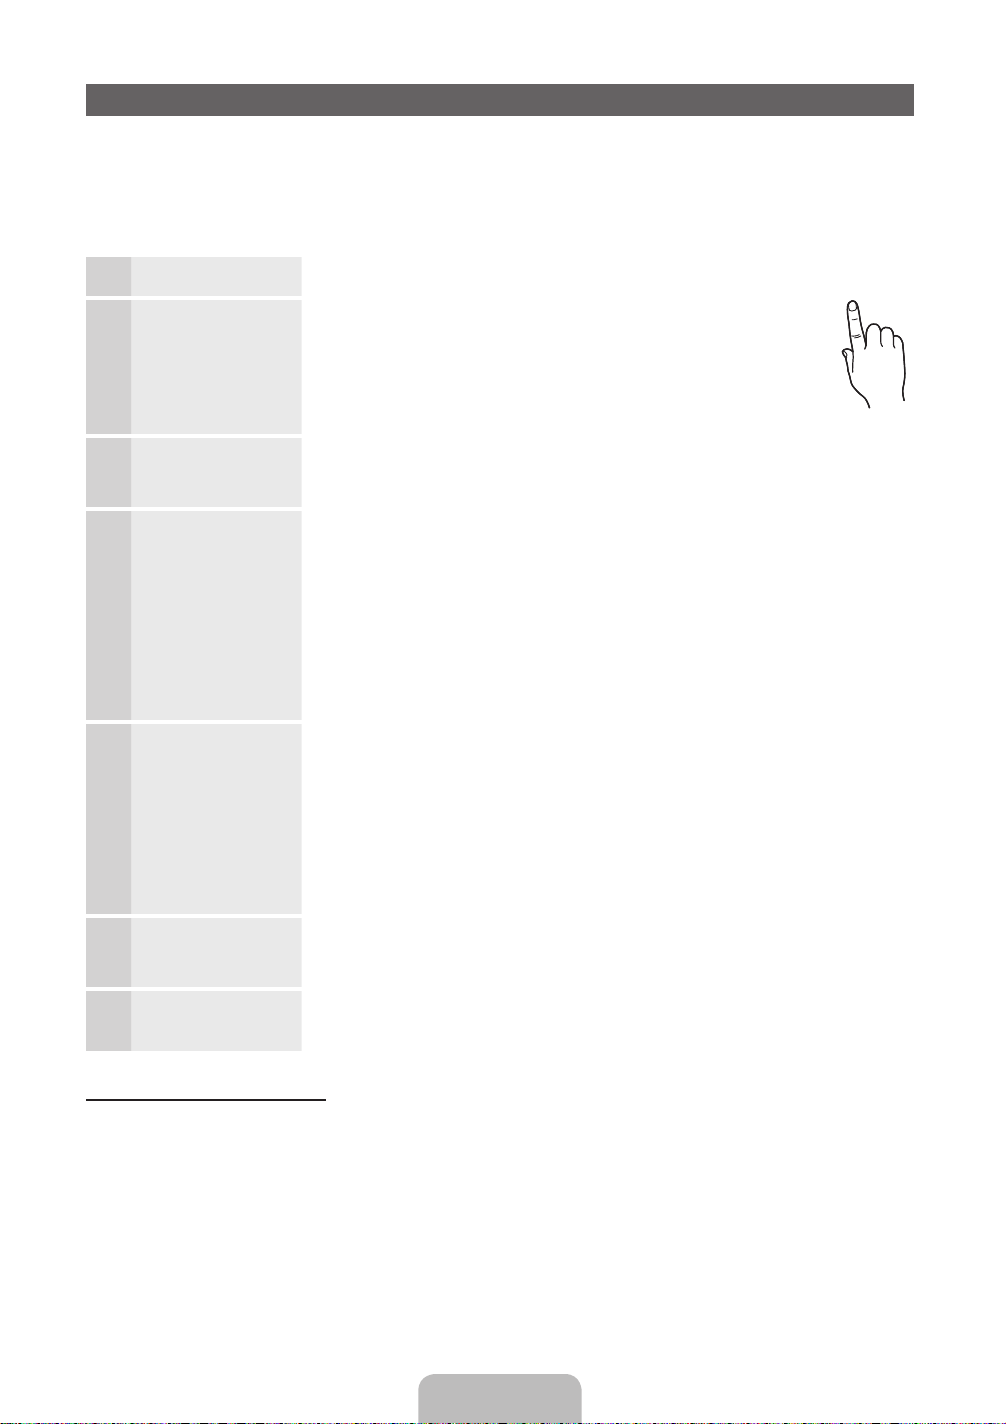
Remote Control Buttons
✎
This remote control has Braille points on the Power, Channel, and Volume buttons and can be used by visually impaired
persons.
Turns the TV on and off.
Displays and selects the available video
sources.
Gives direct access to channels.
Press to select additional digital channels
being broadcast by the same station. For
example, to select channel ‘54-3’, press
‘54’, then press ‘-’ and ‘3’.
Adjusts the volume.
Opens the OSD.
Link to various application services.
Quickly select frequently used functions.
Selects the on-screen menu items and
changes the values seen on the menu.
Returns to the previous menu.
POWER
SOURCE
1
4
2 3
5 6
7 8 9
0
MUTE
M
VOL CH
CH LIST
MENU
HUB
SMART
m
l
l
l
ON/OFF
PRE-CH
<
SEARCH
l
Turns the remote control light on or
off. When on, the buttons become
illuminated for a moment when pressed.
(Using the remote control with this button
set to On will reduce the battery usage
time.)
Returns to the previous channel.
Cuts off the sound temporarily.
Changes channels.
<
Displays channel lists on the screen.
Support to recommendation search
word and search function.
Displays information on the TV screen.
Exits the menu.
Buttons used in the Channel List and
SMART HUB menu, etc.
Use these buttons in SMART HUB and
Anynet+ (HDMI-CEC) modes.
Installing batteries (Battery size: AAA)
T V
SOCIAL
E-MANUAL
l
l
l
l
✎
English - 7
B C D
SOCIAL TV: Connect to Social TV
application.
MTS: Press to choose stereo, mono,
l
l
l
l
l
or Separate Audio Program (SAP
broadcast).
SRS: Turns the SRS TruSurround HD
on or off.
CC: Displays digital subtitles.
P.SIZE: Lets you choose the Picture
Size.
E-MANUAL: Displays the e-Manual.
NOTE
Use the remote control within 23 feet of the TV.
x
If you selectedBright light may affect the performance of the
x
remote control. Avoid using when near special fluorescent
lights or neon signs.
The color and shape may vary depending on the model.
x

How to Navigate Menus
PRE-CH
CH LIST
POWE
R
4
2
<
M
UTE
C
VOL
CH
SMART
ON/OFF
SOURCE
HUB
SEARCH
Before using the TV, follow the steps below to learn how to
navigate the menu and select and adjust different functions.
MENU
1
2
3
1 MENU button: Displays the main on-screen menu.
2 ENTER
3 RETURN button: Returns to the previous menu.
4 EXIT button: Exits the on-screen menu.
E
select an item. Confirm the setting.
/ Direction button: Move the cursor and
m
l
l
l
l
4
How to Operate the OSD (On Screen Display)
The access steps may differ depending on the selected
menu.
MENU The main menu options appear on
1
▲ / ▼ Select an icon or option with the ▲
2
ENTER
E
3
▲ / ▼
4
◄ / ►
5
ENTER
E
6
EXIT
e
the screen:
Picture, Sound, Channel,
Network, System, Support.
or ▼ button.
Press ENTERE to access the
sub-menus.
Select the desired submenu with
the ▲ or ▼ button.
Adjust the value of an item with the
◄ or ► button. The adjustment in
the OSD may differ depending on
the selected menu.
Press ENTERE to confirm the
selection.
Press EXIT.
7
✎
For the best cable connections to this product, be sure to use cables no thicker than 0.55 inches (14mm).
Maximum thickness - 0.55 inches (14mm)
x
Connecting the power cord and an antenna or cable connection
Connecting the power cord and an antenna or cable connection
VHF/UHF Antenna
Antenna Cable (Not Supplied)
Cable
ANT OUT
or
Power Input
English - 8
Plug & Play (Initial Setup)
INFO
GUIDE
When you turn the TV on for the first time, a sequence of on-screen prompts will assist in configuring basic settings. To turn on
the TV, press the POWERP button.
✎
Plug & Play is available only when the Source is set to TV.
✎
To return to the previous step in the Plug & Play sequence, select Previous, and then press ENTERE.
✎
Before turning on the TV, make you have connected the TV to an antenna or cable connection (p. 8).
Selecting the OSD
1
Language
Setting up the Network
2
Selecting the usage
3
mode
Press the ▲ or ▼ button to select a language. Press ENTER
when done.
Set up your network connection. Press the ENTER
you do not know your network set up information or want to set to it later,
select Skip. We suggest you skip network connection setup now and
refer to “Wired/Wireless Network Connection” in the e-Manual for set up
requirements and instructions, and the Network Connection section of this
manual (Page 15). You can set up the network connection later using the
Network menu.
Press the ▲ or ▼ button to select Home Use, and then press the ENTER
Select the Home Use mode. Store Demo mode is for retail environments.
E
E
twice
button to start. If
POWER
E
button twice.
Setting the Clock
4
Mode
Selecting search
5
options for auto tuning
Selecting and
6
memorizing channels
Enjoy your TV. If you want to watch a broadcast program, select Close.
7
If You Want to Rerun Plug & Play...
MENU → System → Plug & Play → ENTER
O
Press the ▲ or ▼ button to select Auto or Manual, and then press ENTER
✎
If you selected Auto, you’ll go to the Time Zone and DST screen. Select Time
Zone or DST, and then press ENTERE. On the Time Zone screen, use the ▲ or ▼
button to select your zone, and then press ENTERE. On the DST screen, press,
ENTERE, then select whether to turn DST (Daylight Savings Time) on or off. When
done, press ENTERE.
✎
If you selected Manual, you’ll go to the Date and Time screen. Select Date or Time,
and then press ENTER
set the date or time. Use the ◄ or ► button to move between entry fields. When
done setting the Date and Time, select Next, and then press ENTER
Press the ▲ or ▼ button to select Air or Cable, and then press ENTER
appears on your selection. Select Next, and then press the ENTERE button. You can
check both if you have both connected.
✎
If you selected Cable, you’ll go to the Cable System screen. Use the ▲ or ▼
button to select Digital or Analog, and then press. ENTERE. Use the ▲ or ▼
button to select the correct cable signal format - STD, HRC, or IRC - and then press
ENTERE. Most cable systems use STD. Select the correct cable signal format for
both the Digital and Analog systems.
✎
When done, select Next, and the press ENTERE.
The channel search will start automatically. This can take up to 30 minutes.
For more information, refer to Channel → Auto Program in the e-Manual.
✎
Press the ENTERE button at any time to interrupt the memorization process.
If you want to enjoy Smart Hub, select Smart Hub. Smart Hub will start. For more detailed
information, refer to “Smart Hub” in the e-Manual.
E
E
. Then, use the number buttons or the ▲ or ▼ button to
E
E
E
. A check
twice.
.
✎
NOTE
y To change the TV’s setting from Store Demo to Home Use when not in Plug & Play, press the volume button on the TV.
When you see the volume bar on the screen, press and hold the MENU button on the TV for 5 sec.
English - 9

Connecting to an AV Device
R-AUDIO-L
Using an HDMI or an HDMI to DVI Cable: HD connection (up to 1080p)
We recommend using the HDMI connection for the best quality HD picture.
Available devices: DVD player,, Blu-ray player, HD cable box, HD STB (Set-Top-Box) satellite receiver
Device
HDMI OUT
HDMI Cable (Not Supplied)
Device
DVI OUT
AUDIO OUT
✎
HDMI IN 1 (DVI), 2 (ARC), 3, 4 / PC/DVI AUDIO IN
For better picture and audio quality, connect to a digital device using an HDMI cable.
x
An HDMI cable supports digital video and audio signals, and does not require an audio cable.
x
HDMI to DVI Cable (Not Supplied)
Audio Cable (Not Supplied)
WR
WhiteRed
– To connect the TV to a digital device that does not support HDMI output, use an HDMI/DVI and audio cables.
The picture may not display normally (if at all) or the audio may not work if you connect an external device that
x
uses an older version of HDMI mode is connected to the TV. If such a problem occurs, ask the manufacturer
of the external device about the HDMI version and, if out of date, request an upgrade.
Be sure to use an HDMI cable with a thickness of 14 mm or less.
x
Be sure to purchase a certified HDMI cable. Otherwise, the picture may not display or a connection error may
x
occur.
We recommend using a basic high-speed HDMI cable or an HDMI cable that is Ethernet is compatible. Note
x
that this product does not support the Ethernet function via HDMI.
This product supports the ARC (Audio Return Channel) functions via an HDMI cable. Note that the ARC
x
function is supported by the HDMI IN 2 (ARC) port only.
The ARC function allows digital audio to output via the HDMI IN 2 (ARC) port. It can be enabled only when the
x
TV is connected with an audio receiver that supports the ARC function.
English - 10

Using a Component (up to 1080p) or an Audio/Video (480i only) Cable
Available devices: DVD player, Blu-ray player, cable box, STB satellite receiver, VCR
Y
Device
W
Y
W
R R RW
Red White Red Red
G
B
Blue White
Green Yellow
Device
VIDEO OUTAUDIO OUT
R-AUDIO-L
W
R
Audio Cable
Video Cable
(Not Supplied)
(Not Supplied)
✎
When connecting to AV IN, the color of the AV IN 1 [VIDEO] jack (green) will not match the video cable (yellow).
✎
For better picture quality, we recommend the Component connection over the A/V connection.
AUDIO OUT
COMPONENT OUT
R-AUDIO-L
PR PB Y
R R
W
B
G
Y
Component Cable
(Not Supplied)
Audio Cable
(Not Supplied)
Component Adapter
(Supplied)
G
B
W
RR
Y
W
R
Red
R
R
AV Adapter(Supplied)
Y
W
Y
W
White
Yellow
Audio Cable
(Not Supplied)
R
W
Y
Using an EX-Link Cable Connection
Available Devices: External devices that support EX-Link.
EX-LINK: Connector for service only.
Device
R-AUDIO-L
R
VIDEO OUTAUDIO OUT
W
Y
Video Cable
(Not Supplied)
English - 11
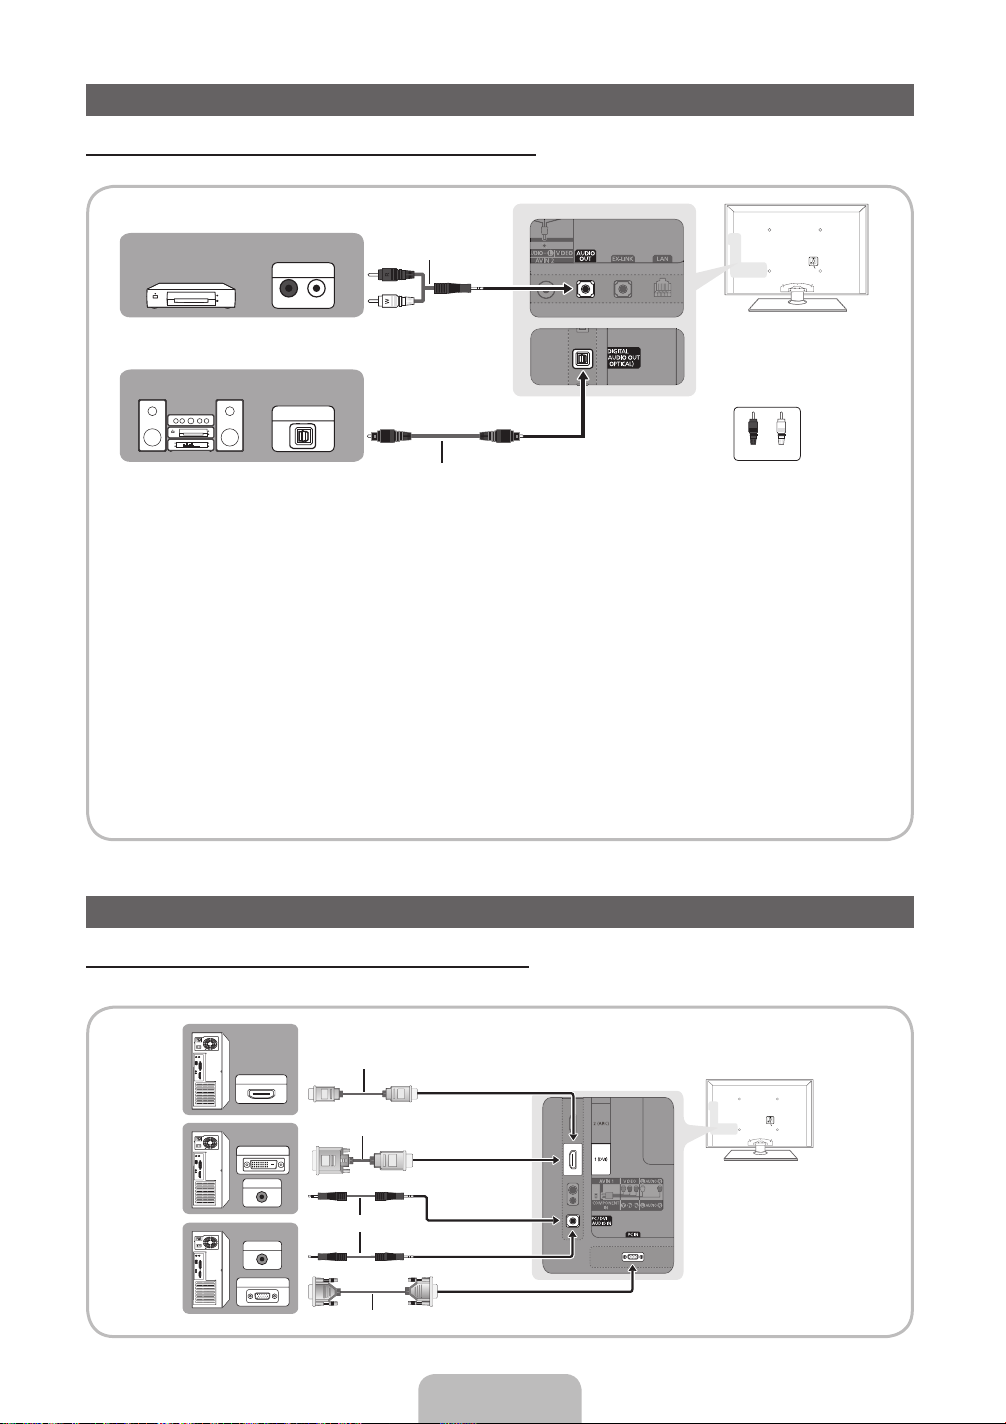
Connecting to an Audio Device
R-AUDIO-L
Using an Optical (Digital) or an Audio (Analog) Cable Connection
Available devices: Digital Audio System, Amplifier, DVD home theater
Amplifier /
DVD home theater
AUDIO IN
Audio Cable (Not Supplied)
Digital Audio System
OPTICAL
Optical Cable (Not Supplied)
✎
DIGITAL AUDIO OUT (OPTICAL)
When you connect a Digital Audio System to the DIGITAL AUDIO OUT (OPTICAL) jack, decrease the volume
x
WR
Red White
of both the TV and the system.
5.1 CH (channel) audio is available when you connect the TV to an external device supporting 5.1 CH.
x
When the receiver (home theater) is set to on, you can hear sound output from the TV’s optical jack. When the
x
TV is receiving a DTV signal, the TV will send 5.1 CH sound to the home theater receiver. When the source is a
digital component such as a DVD player / Blu-ray player / cable box / STB (Set-Top-Box) satellite receiver and
and you connected it to the TV via HDMI, you will only hear 2 CH audio from the home theater receiver. If you
want to hear 5.1 CH audio, connect the digital audio out jack from your DVD / Blu-ray player / cable box / STB
satellite receiver directly to an amplifier or home theater.
✎
AUDIO OUT: Connects to the audio input jacks on your amplifier/DVD home theater.
When connecting, use the appropriate connector.
x
When you connect an audio amplifier to the AUDIO OUT jacks, decrease the volume of the TV and adjust the
x
volume level with the amplifier’s volume control.
Connecting to a PC
Using an HDMI cable or an HDMI to DVI cable or a D-sub cable
✎
Your PC may not support an HDMI connection.
HDMI OUT
DVI OUT
AUDIO OUT
AUDIO OUT
PC OUT
HDMI Cable (Not Supplied)
HDMI to DVI Cable (Not Supplied)
Audio Cable (Not Supplied)
D-Sub Cable (Not Supplied)
English - 12

PC Display Modes (D-Sub and an HDMI to DVI Input)
Optimal PC resolution is 1920 X 1080 @ 60 Hz. You can also select one of the standard resolutions listed in the Resolution
column. The TV will automatically adjust to the resolution you choose.
Mode Resolution
IBM
MAC
VESA DMT
VESA DMT / DTV CEA
✎
NOTE
For HDMI/DVI cable connection, you must use the HDMI IN 1 (DVI) jack.
x
The interlace mode is not supported.
x
The set may operate abnormally if you select a non-standard video format.
x
Separate and Composite modes are supported. SOG (Sync On Green) is not supported.
x
640 x 350
720 x 400
640 x 480
832 x 624
1152 x 870
640 x 480
640 x 480
640 x 480
800 x 600
800 x 600
800 x 600
1024 x 768
1024 x 768
1024 x 768
1152 x 864
1280 x 1024
1280 x 1024
1280 x 800
1280 x 800
1280 x 960
1360 x 768
1440 x 900
1440 x 900
1680 x 1050
1920 x 1080p 67.500 60.000 148.500 +/+
Horizontal Frequency
(KHz)
31.469
31.469
35.000
49.726
68.681
31.469
37.861
37.500
37.879
48.077
46.875
48.363
56.476
60.023
67.500
63.981
79.976
49.702
62.795
60.000
47.712
55.935
70.635
65.290
Vertical Frequency
(Hz)
70.086
70.087
66.667
74.551
75.062
59.940
72.809
75.000
60.317
72.188
75.000
60.004
70.069
75.029
75.000
60.020
75.025
59.810
74.934
60.000
60.015
59.887
74.984
59.954
Pixel Clock Frequency
(MHz)
25.175
28.322
30.240
57.284
100.000
25.175
31.500
31.500
40.000
50.000
49.500
65.000
75.000
78.750
108.000
108.000
135.000
83.500
106.500
108.000
85.500
106.500
136.750
146.250
Sync Polarity
(H / V)
+/-
-/+
-/-
-/-
-/-
-/-
-/-
-/+/+
+/+
+/+
-/-
-/+/+
+/+
+/+
+/+
-/+
-/+
+/+
+/+
-/+
-/+
-/+
English - 13

Changing the Input Source
SOURCE
Source
Use to select TV or an external input source
such as a DVD player / Blu-ray player / cable
box / STB satellite receiver.
1. Press the SOURCE button on your
remote.
2. Select a desired external input source.
■■ TV / PC / AV1 / AV2 / Component /
HDMI1/DVI / HDMI2 / HDMI3 / HDMI4
/ USB / AllShare
✎
You can only choose external devices that are
connected to the TV. In Source, connected inputs will
be highlighted.
✎
In the Source, PC is always stays activated.
Edit Name
Edit Name lets you associate a device name to an input
source. To access Edit Name, press the TOOLS button In
Source. The following selections appear under Edit Name:
■ VCR / DVD / Cable STB / Satellite STB / PVR STB
/ AV Receiver / Game / Camcorder / PC / DVI PC /
DVI Devices / TV / IPTV / Blu-ray / HD DVD / DMA:
Name the device connected to the input jacks to make
your input source selection easier.
✎
If you have connected a PC to the HDMI IN 1 (DVI) port
with an HDMI cable, select PC under Edit Name to
enter a device name.
✎
If you have connected a PC to the HDMI IN 1 (DVI)
port with an HDMI to DVI cable, select DVI PC under
Edit Name to enter a device name.
✎
If you connected an AV device to the HDMI IN 1 (DVI)
port with an HDMI to DVI cable, select DVI Devices
under Edit Name to enter a device name.
Edit Favorites
In Source, press the TOOLS button to select
Edit Favorites. You can set an external input source as a
Favorites.
Information
You can see detailed information about the selected external
device.
Refresh
In Source, If the external devices are not displayed,
press the TOOLS button to select Refresh, then search for
the connected devices.
English - 14
Network Connection
You can set up your TV so that it can access the Internet through your local area network (LAN) using a wired or wireless
connection.
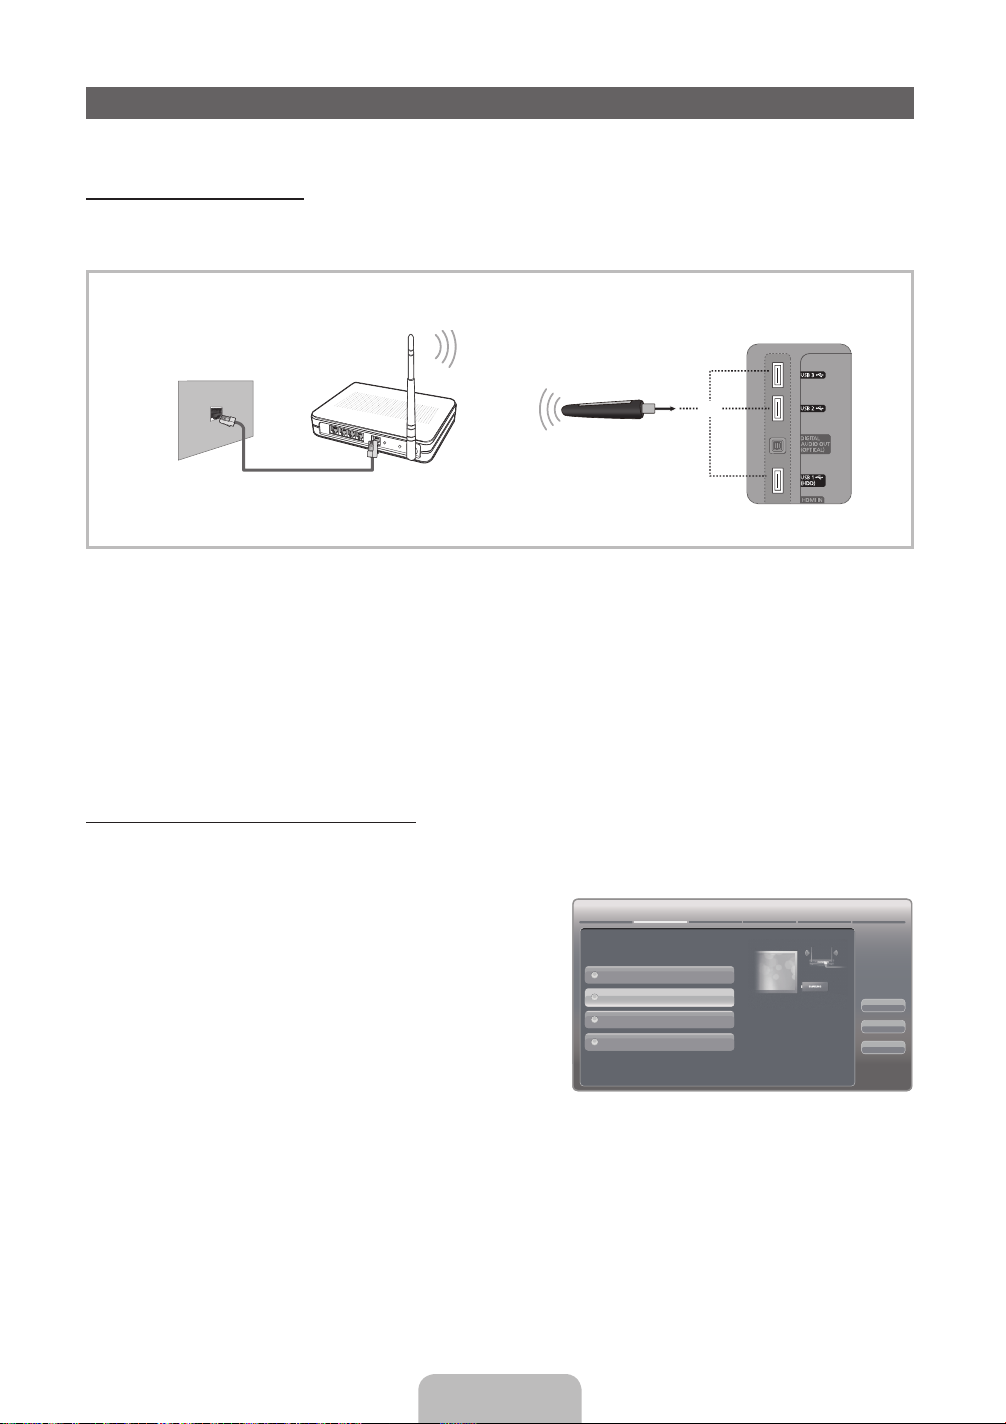
Network Connection - Wireless
You can connect your TV to your LAN through a standard wireless router or modem. To connect wirelessly, you must first
attach a “Samsung Wireless LAN Adapter” (WIS09ABGN, WIS09ABGN2, or WIS10ABGN - sold seperately) to either the USB
port on the back of your TV. See the illustration below.
Wireless IP Sharer
(AP having DHCP Server)
The LAN Port on the Wall
or
Samsung
Wireless LAN Adapter
LAN Cable (Not Supplied)
TV Rear Panel
Samsung’s Wireless LAN adapter is sold separately and is offered by select retailers, Ecommerce sites and Samsungparts.
com. Samsung’s Wireless LAN adapter supports the IEEE 802.11a/b/g and n communication protocols. Samsung
recommends using IEEE 802.11n. When you play video over a IEEE 802.11b-g connection, the video may not play smoothly.
Most wireless network systems incorporate a security system that requires devices that access the network through an access
point or AP (typically a wireless IP Sharer - router or modem) to transmit an encrypted security code called an access key.
Your TV is compatible with the following security protocols:
y Authentication Mode: OPEN, SHARED, WPAPSK, WPA2PSK
y Encryption Type: WEP, TKIP, AES
If you select Pure High-throughput (Greenfield) 802.11n mode and the Encryption type is set to WEP, TKIP or TKIP AES
(WPS2Mixed) on your AP or wireless router, Samsung TVs will not support a connection in compliance with new Wi-Fi
certification specifications.
Configuring the Network Connection - Wireless
The instructions below are for networks that use the Dynamic Host Configuration Protocol (DHCP) to configure network
connections automatically. If your have a Static IP network, see your user’s manual for configuration instructions.
To configure your network connection for a network that uses DHCP, follow these steps:
1. Connect your TV to your network as shown in the illustration
above.
2. Turn on your TV, press the MENU button on your remote, and
then select Network → Network Settings.
3. Select Wireless (General), press ENTER
E
, and then press
ENTERE again.
4. The Network function searches for available wireless networks.
When done, it displays a list of the available networks.
5. In the list of networks, press the ▲ or ▼ button to select a
network, select Next, and then press ENTER
E
.
6. If you have selected a wireless router that has security, the
Security Key screen appears. Enter the Security key (Security
key or PIN), select Next, and then press ENTER
✎
When you enter the Security Key (Security key or PIN),
E
.
use the ▲ / ▼ / ◄ / ► buttons on your remote to select numbers and characters.
7. The Network Connection screen appears and verifies the network connection. When the connection has been verified, the
“Internet connection successful.” message appears. Network set up is complete.
✎
For more detailed information, see “Wireless Network Connection” in the e-Manual.
Network Settings
Select a network connection type.
Wired
Wireless(General)
WPS(PBC)
One Foot Connection
✎
The displayed imange may differ depending
Set up wireless network
by selecting your Wireless
Router. you may need to enter
security key depending on
the setting of the Wireless
Router.
on the model.
Previous
Next
Cancel
English - 15

Network Connection - Wired
There are two main ways to connect your TV to your network using cable, depending on your network setup. They are
illustrated below:
The Modem Port on the Wall
The LAN Port on the Wall TV Rear Panel
✎
A network speed of lower of than 10 Mbps is not supported.
Extternal Modem
(ADSL / VDSL / Cable TV)
LAN Cable (Not Supplied)Modem Cable (Not Supplied)
LAN Cable (Not Supplied)
TV Rear Panel
Configuring the Network Connection - Wired
Most home networks use the Dynamic Host Configuration Protocol (DHCP) to configure network connections. Home networks
that support DHCP automatically provide the IP address, subnet mask, gateway, and DNS values your TV needs to access the
Internet so you don’t have to enter them manually.
To configure your network connection for a network that uses DHCP,
Network Setting
follow these steps:
1. Connect your TV to your network as shown in one of the
illustrations above.
2. Turn on your TV, press the MENU button on your remote, and
then select Network → Network Settings. The Network
Settings screen will appear.
3. Select Wired, press ENTER
E
, and then press ENTERE
Select a network connection type.
Wired
Wireless(General)
WPS(PBC)
One Foot Connection
Connect to the network using LAN
cable. Please make sure that the
LAN cable is connected.
Previous
Next
Cancel
again.
4. The Network Connection screen appears, and verifies the
network connection. When the connection has been verified,
the “Internet connection successful.” message appears.
Network set up is completed.
✎
If your TV cannot acquire network the connection values automatically or if you want to set the connection manually,
select IP Settings on the network test screen. Set Internet Protocol Setup to Manual. You must enter the IP
Address, Subnet Mask, Gateway, and DNS Server manually.
✎
For more detailed information, see “Wired Network Connection” in the e-Manual.
English - 16

How to view the e-Manual
E-MANUAL
To use the e-Manual, press the E-MANUAL button on your remote. Move
the cursor using the up/down/right/left buttons to highlight a category, then
a topic, and then press the ENTERE button. The e-Manual displays the
page you want to see.
You can also access it through the menu:
Screen Display
TV Screen: Displays the program,
You can fi nd instructions for your TV’s features in the e-Manual in your TV.
movie, video, etc. you are currently
Help: Displays the e-Manual
Guide or Product Guide. Press
ENTER
watching.
E
button.
MENUm → Support → e-Manual → ENTER
O
✎
If you want to return to the e-Manual, press the E-MANUAL button on your remote.
✎
You cannot use Try Now function if the TV menu is not activated.
E
The category list. Press
Basic Features
Changing the Preset Picture Mode
Adjusting Picture Settings
Changing the Picture Size
Changing the Picture Options
Setting up the TV with Your PC
IndexHelp
to select the category you
want.
Displays the sub-menu list. Use
the arrow buttons on your remote
to move the cursor. Press the
ENTER
E
button to select the sub-
menu you want.
Index: Displays index screen.
X: Exit the e-Manual.
l
or r button
Using the Help
Display the e-Manual Guide & the Product Guide by pressing Help.
How to view the e-Manual
You can fi nd instructions for your TV’s features
in the e-Manual in your TV. To use the e-Manual,
press the E-MANUAL button on your remote. Move
the cursor using the u/down/right/left buttons to
highlight a category, then a topic, and then press the
ENTERE button. The e-Manual displays the page
you want to see.
You can also access it through the menu:
m
→ Support → e-Manual → ENTER
O MENU
✎ If you want to return to the e-Manual, press the E-MANUAL button on your remote.
✎ You can not use Try now function if the TV menu is not activated.
E
Basic Features
Changing the Preset Picture Mode
Adjusting Picture Settings
Changing the Picture Size
Changing the Picture Options
Setting up the TV with Your PC
IndexHelp
Return
<e-Manual Guide>
The e-Manual guide appears as above.
English - 17
Sync media from multiple devices with AllShare
AllShare™ syncs your digital devices so you can
enjoy music, movies and photos from your PC,
camera and mobile devices, on your larger TV
screen. Connects you to multiple PCs, as well.
<Product Guide>
The product guide appears as above.
Return

How to toggle between the e-Manual and the corresponding OSD menu(s).
Basic Features > Changing the Preset Picture Mode (1/1)
Changing the Preset Picture Mode
■
Picture Mode t
Picture modes apply preset adjustments to the picture. Select a mode using the up
and down arrow keys, and then press the ENTERE button.
N In PC mode, you can only select Entertain and Standard.
• Dynamic: Suitable for a bright room.
• Standard: Suitable for a normal environment.
• Natural: Suitable for reducing eye strain.
• Movie: Suitable for watching movies in a dark room.
• Entertain (In PC mode only): Suitable for watching movies and games.
Help Try Now Home Zoom Index
✎
This function is not enabled in some menus.
Try Now
E-MANUAL
Method 1 Method 2
1. Select Try Now, if you want to execute the
corresponding menu(s).
2. To return to the e-Manual screen, press the E-MANUAL
button.
1. Press the ENTER
“Do you want to execute this?” appears. Select Yes,
and then press the ENTERE button. The OSD window
appears.
2. To return to the e-Manual screen, press the E-MANUAL
button.
Viewing the Contents
Basic Features > Changing the Preset Picture Mode (1/1)
Changing the Preset Picture Mode
O MENUm → Picture → Picture Mode → ENTER
■
Picture Mode t
Picture modes apply preset adjustments to the picture. Select a mode using
the up and down arrow keys, and then press the ENTERE button.
N In PC mode, you can only select Entertain and Standard.
• Dynamic: Suitable for a bright room.
• Standard: Suitable for a normal environment.
• Natural: Suitable for reducing eye strain.
• Movie: Suitable for watching movies in a dark room.
• Entertain (In PC mode only): Suitable for watching movies
and games.
E
Contents Area: Contains the topic contents
if you selected a sub-menu. To move to the
previous or next page, press the l or r button.
Picture
Picture Mode Standard
Picture
Backlight 14
Contrast 100
Brightness 45
Sharpness 50
Color 50
Tint (G/R) G 50 R 50
E
button when a topic is displayed.
Help Try Now Home Zoom Index
Try Now: Displays the OSD menu that corresponds to the topic. To return
to the e-Manual screen, press the E-MANUAL button
Home: Moves to the e-Manual home screen.
Zoom: Magnifies a screen.
Index: Displays index screen.
English - 18

Using the Zoom mode
When you are viewing an e-Manual instruction page, press
E
ENTER
to magnify the screen. You can scroll through the
magnified screen by using the u or d buttons.
✎
To return to the screen to normal size, press the
RETURN button.
Changing the Preset Picture Mode
O MENUm → Picture → Picture Mode → ENTER
■
Picture Mode t
Picture modes apply preset adjustments to the picture. Select a mode using the up and
down arrow keys, and then press the ENTERE button.
N In PC mode, you can only select Entertain and Standard.
• Dynamic: Suitable for a bright room.
• Standard: Suitable for a normal environment.
• Natural: Suitable for reducing eye strain.
• Movie: Suitable for watching movies in a dark room.
• Entertain (In PC mode only): Suitable for watching movies and games.
E
How to search for a topic on the index page
1. To search for a topic, press the left or right arrow button to select a letter, and then press ENTER
E
list of topics and keywords that begin with the letter you selected.
2. Press the up or down arrow button to select a topic or keyword you want, and then press the ENTER
a topic you want to see.
3. The e-Manual page with the topic appears.
✎
To close the Index screen, press the RETURN button.
Return
. The Index displays a
E
button to select
English - 19

Troubleshooting
If the TV seems to have a problem, first review this list of possible problems and solutions. Also review the Troubleshooting
section in the e-Manual. If none of the troubleshooting tips apply, visit “www.samsung.com,” and then click on Support, or call
Samsung customer service at 1-800-SAMSUNG.
Issues Solutions and Explanations
The TV won’t turn on. y Make sure the AC power cord is securely plugged in to the wall outlet and the TV.
y Make sure the wall outlet is working.
y Try pressing the POWER button on the TV to make sure the problem is not the
remote. If the TV turns on, refer to “Remote control does not work” below.
There is no picture/video. y Check the cable connections. Remove and reconnect all cables connected to the
The remote control does not work. y Replace the remote control batteries. Make sure the batteries are installed with their
The cable/set top box remote
control doesn’t turn the TV on or
off, or adjust the volume.
TV and external devices.
y Set the video outputs of your external devices (Cable/Sat Box, DVD, Blu-ray etc)
to match the TV input connections. For example, if an external device’s output is
HDMI, it should be connected to an HDMI input on the TV.
y Make sure your connected devices are powered on.
y Be sure to select the correct input source by pressing the SOURCE button on the
remote control.
y Reboot the connected device by unplugging and then reconnecting the device’s
power cable.
poles (+/–) in the correct direction.
y Clean the sensor’s transmission window on the remote.
y Try pointing the remote directly at the TV from 5~6 feet away.
y Program the Cable/Set remote control to operate the TV. Refer to the Cable/Set
user manual for the SAMSUNG TV code.
✎
Some functions and pictures shown in this manual are available on specific models only.
✎
To keep your TV in optimum condition, upgrade to the latest firmware on the Samsung web site by USB (samsung.com →
Support → Downloads).
License
List of Features
y Excellent Digital Interface & Networking: With a built-in HD digital tuner, your TV lets you watch non-subscription HD
broadcasts without a cable box or STB (Set-Top-Box) satellite receiver.
y SMART HUB: Your Gateway to all your content, integrated in one place:
– Provides diverse entertainment choices.
– Lets you control your entertainment life with an easy-to-use, user friendly UI.
– Gives you easy access to diverse Apps, with more being added every day.
– Lets you customize your TV by grouping and sorting Apps to your taste.
y AllShare™: AllShare™ connects your TV and compatible Samsung mobile phones/devices through a network.
y Anynet+(HDMI-CEC): Allows you to control all connected Samsung devices that support anynet+ with your Samsung
TV’s remote.
English - 20

Securing the TV to the Wall
Caution: Pulling, pushing, or climbing on the TV may cause the TV to fall. In particular, ensure your
children do not hang over or destabilize the TV. Doing so may cause the TV to tip over, causing serious
injuries or death. Follow all safety precautions provided in the included Safety Flyer with your TV. For
added stability and safety, you can purchase and install the anti fall device as described below.
The TV-Holder Kit (Sold Separately):
The parts below are included in the TV Holder kit. In addition, you need to provide a wood screw, screw and molly, or other
screw appropriate for the wall or cabinet you intend to secure the TV-Holder string to. We recommend a size M4xL20 wood
screw.
TV-Holder (BN96-15753A) Screw (M8 X L19)
Installing the TV-Holder
1. Remove the screw attached to the back of your TV, and then connect the TV-Holder to the TV with the screw included in
the TV-Holder Kit that is designated for your TV.
✎
Make sure to use only the appropriate supplied screw. If you use a different screw, you can damage your TV.
2. Firmly fasten the screw you provided (size M4xL20 or similar) to the wall or cabinet where the TV is to be installed.
✎
If you fasten the screw to the wall, we recommend you drive the screw into a stud. If that is not possible, use a
molly to anchor the screw.
3. Tie the TV-Holder cord to the screw fastened on the wall or cabinet so that the TV is fixed. See the illustrations below.
✎
Install the TV close to the wall so that it does not fall.
✎
When attaching the TV-Holder cord to the wall, tie the cord level with the ground or slanted downwards for safety
purposes.
✎
Check the cord occasionally to make sure it is secure.
✎
Before moving the TV, separate the connected cord first.
4. Verify all connections are properly secured. Periodically check the connections for any sign of fatigue or failure. If you have
any doubt about the security of your connections, contact a professional installer.
To purchase the TV-Holder Kit, contact Samsung Customer Care
In the United States: 1-800-SAMSUNG (1-800-726-7864)
–
In Canada: 1-800-SAMSUNG (1-800-726-7864)
–
English - 21

Securing the Installation Space
Keep the required distances between the TV, the wall, and other objects to ensure proper ventilation. Failing to do so may
result in a fire or a problem with the TV caused by an increase in its internal temperature.
✎
When using a stand or wall-mount, use parts provided by Samsung Electronics only.
If you use parts provided by another manufacturer, it may result in a problem with the product or an injury due to the
x
product falling.
Installation with a stand. Installation with a wall-mount.
4 inches
4 inches
Other Warnings
✎
The actual appearance of the TV may differ from the images in this manual, depending on the model.
✎
Be careful when you touch the TV. Some parts can be somewhat hot.
4 inches
4 inches
4 inches
4 inches
4 inches
Storage and Maintenance
✎
If you attached some stickers on the TV screen, it remains some debris after removing the sticker. Please clean it to
watch TV.
Do not spray water or a cleaning agent directly onto the
product. Any liquid that goes into the product may cause a
failure, fire, or electric shock.
Specifications
English - 22
Clean the product with a soft cloth dampened with a small
amount of water.

Specifications
Display Resolution 1920 x 1080
Environmental Considerations
Operating Temperature
Operating Humidity
Storage Temperature
Storage Humidity
Stand Swivel (Left / Right) -20˚ ~ 20˚
Model Name UN32D6000 UN40D6000
Screen Size
(Diagonal)
Sound
(Output) 10W X 2
Dimensions (WxDxH)
Body
With stand
Weight
Without Stand
With Stand
Model Name UN46D6000 UN55D6000
Screen Size
(Diagonal)
Sound
(Output) 10W X 2 15W X 2
Dimensions (WxDxH)
Body
With stand
Weight
Without Stand
With Stand
Model Name UN40D6050 UN46D6050 UN55D6050
Screen Size
(Diagonal)
Sound
(Output) 10W X 2 15W X 2
Dimensions (WxDxH)
Body
With stand
Weight
Without Stand
With Stand
(40.0" measured diagonally)
37.7 X 1.2 X 22.7 inches
(958.7 X 29.9 X575.9 mm)
37.7 X 10.0 X 25.5 inches
(958.7X 255.0 X 648.3 mm)
24.0 Ibs (10.9 kg)
31.3 Ibs (14.2 kg)
32" Class
(31.5" measured diagonally)
30.2 X 1.2 X 18.7 inches
(768.0 X 29.9 X 475.3 mm)
30.2 X 9.4 X 21.0 inches
(768.0 X 240.0 X 533.4 mm)
15.4 Ibs (7.0 kg)
21.4 Ibs (9.7 kg)
46" Class
(45.9" measured diagonally)
42.9 X 1.2 X 25.9 inches
(1090.6 X 29.9 X 657.1 mm)
42.9 X 10.8 X 28.1 inches
(1090.6 X 275.0 X 714.1 mm)
29.8 Ibs (13.5 kg)
37.7 Ibs (17.1 kg)
40" Class
50°F to 104°F (10°C to 40°C)
10% to 80%, non-condensing
-4°F to 113°F (-20°C to 45°C)
5% to 95%, non-condensing
(1281.2 X 305.0 X 820.9 mm)
46" Class
(45.9" measured diagonally)
43.1 X 1.2 X 25.7 inches
(1094.2 X 29.9 X 652.5 mm)
43.1 X 10.8 X 28.2 inches
(1094.2X 275.0 X 715.9 mm)
29.8 Ibs (13.5 kg)
37.7 Ibs (17.1 kg)
40" Class
(40.0" measured diagonally)
37.6 X 1.2 X 22.9 inches
(955.2 X 29.9 X 580.7 mm)
37.6 X 10.0 X 25.1 inches
(955.2 X 255.0 X 638.0mm)
24.0 Ibs (10.9 kg)
31.3 Ibs (14.2 kg)
55" Class
(54.6" measured diagonally)
50.4 X 1.2 X 30.1 inches
(1281.2 X 29.9 X 763.9 mm)
50.4 X 12.0 X 32.3 inches
39.7 Ibs (18.0 kg)
48.9 Ibs (22.2 kg)
55" Class
(54.6" measured diagonally)
50.6 X 1.2 X 29.9 inches
(1284.7 X 29.9 X 759.2 mm)
50.6 X 12.0 X 32.4inches
(1284.7 X 305.0 X 823.1 mm)
39.5 Ibs (17.9 kg)
48.7 Ibs (22.1 kg)
✎
Design and specifications are subject to change without prior notice.
✎
This device is a Class B digital apparatus.
✎
For information about the power supply, and more about power consumption, refer to the label attached to the product.
English - 23

■ Front view / Side view
Dimensions
1
2
3
5
6
7
4
8
(Unit: inches)
Model name
1 2 3 4 5 6 7 8
UN32D6000 30.2 27.5 15.5 17.5 18.7 21.0 1.2 9.4
UN40D6000 37.7 34.9 19.7 18.9 22.9 25.1 1.2 10.0
UN46D6000 42.9 40.1 22.6 19.5 25.9 28.1 1.2 10.8
UN55D6000 50.6 47.7 26.8 20.1 30.1 32.4 1.2 12.0
Model name
1 2 3 4 5 6 7 8
UN40D6050 37.7 34.9 19.7 18.9 22.7 25.5 1.2 10.0
UN46D6050 43.1 40.1 22.6 19.5 25.7 28.2 1.2 10.8
UN55D6050 50.6 47.7 26.8 20.1 29.9 32.4 1.2 12.0
■ Rear view
1
2
3
6
5
8
4
7
(Unit: inches)
Model name
1 2 3 4 5 6 7 8
UN32D6000 7.9 7.9 18.8 3.4 2.8 13.4 2.3 7.8
UN40D6000 7.9 7.9 23.0 3.5 5.9 14.1 4.4 7.9
UN46D6000
15.7 15.7 28.4 4.2 5.6 15.3 5.1 8.2
UN55D6000 15.7 15.7 34.0 4.3 6.8 15.5 5.1 8.8
Model name
1 2 3 4 5 6 7 8
UN40D6050 7.9 7.9 23.0 3.5 5.9 14.1 4.4 7.9
UN46D6050
15.7 15.7 28.4 4.2 5.6 15.3 5.1 8.2
UN55D6050 15.7 15.7 34.0 4.3 6.8 15.5 5.1 8.8
NOTE: All drawings are not necessarily to scale. Some dimensions are subject to change without prior notice. Refer to the
dimensions prior to performing installation of your TV. Not responsible for typographical or printed errors.
© 2011 Samsung Electronics America, Inc
English - 24

This page is intentionally
left blank.

TÉLÉVISEUR DEL
E-MANUAL
Guide de l’utilisateur
Imaginez les possibilités
Merci d’avoir acheté un produit Samsung. Pour
obtenir un service complet, veuillez enregistrer
votre produit à:
www.samsung.com/register
Modèle ___________N° de série _____________

Les figures et illustrations de ce mode d’emploi ne sont fournies qu’à titre de référence. L’apparence réelle du produit
pourrait être différente. Le design et les caractéristiques techniques du produit peuvent être modifiés sans préavis.
Remarques importantes sur la garantie relative au format de l'image du téléviseur
✎
Consultez la carte de garantie afin d'obtenir de plus amples renseignements sur les conditions de la garantie.
Le format écran large des écrans à DEL (16:9, soit le rapport hauteur/largeur de l'image) est conçu principalement pour les
vidéos plein écran à écran large. Les images affichées devraient être en format écran large 16:9 ou agrandi afin de remplir
l'écran si votre modèle offre cette caractéristique et que les images sont constamment en mouvement. L'affichage de
graphiques et d'images fixes, comme les barres noires des vidéos et émissions de télévision en format standard non agrandi,
doit être limité au maximum à 5% du temps d'écoute hebdomadaire.
De plus, il faut limiter l’affichage des autres images et textes fixes, comme les rapports boursiers, les affichages de jeux vidéo,
les logos des stations, les sites Web ou les images graphiques et les schémas des ordinateurs, tel qu'indiqué ci-dessus, et
ce pour tous les téléviseurs. L'affichage d'images fixes pendant une durée supérieure à 5 % du temps d'écoute total peut
entraîner un vieillissement inégal de l'écran à plasma n y créant des images fantôme subtiles mais permanentes. Pour éviter
ce problème, faites varier les émissions et les images et regarder principalement des images plein écran en mouvement et
non pas des images ou des barres foncées fixes. Dans les modèles d'écran à DEL qui offrent des caractéristiques de format
d'image, utilisez ces commandes pour obtenir différents formats en plein écran.
Prenez garde au choix des formats que vous utilisez pour regarder la télévision et à leur durée d'utilisation. Le vieillissement
inégal de l’affichage à DEL résultant du choix et de l’utilisation d’un format n’est pas couvert par la garantie limitée de
Samsung; les images rémanentes en sont également exclues.
y ÉNONCÉ DE GARANTIE LIMITÉE DE SAMSUNG ELECTRONICS POUR L'AMÉRIQUE DU NORD
Assujettie aux exigences, conditions, exclusions et limitations de la garantie limitée originale fournie avec les produits
de Samsung Electronics (SAMSUNG) et les exigences, conditions, exclusions et limitations de la présente garantie,
SAMSUNG offrira en plus un service de réparation sous garantie aux États-Unis pour les produits achetés au Canada et
un service de réparation sous garantie au Canada pour les produits achetés aux États-Unis pendant la période de garantie
précisée à l'origine et pour l'acheteur initial seulement.
Les réparations sous garantie décrites ci-dessus doivent être effectuées dans un centre de réparation agréé SAMSUNG.
En plus de la présente garantie, la garantie limitée originale et une facture datée en tant que preuve d'achat doivent être
présentées au centre de réparation. Le transport de l'appareil à destination et en provenance du centre de réparation
incombe à l'acheteur. Les conditions couvertes ne sont limitées qu'aux vices de matériaux et de fabrication dans des
conditions d'utilisation normale.
Exclues, mais sans s'y limiter, sont les dispositions précisées à l'origine pour le service à domicile ou sur place, durées de
réparation minimales et maximales, échanges ou remplacements, accessoires, options, mises à niveau ou produits non
durables.
Pour obtenir le nom d'un centre de réparation agréé Samsung, composez les numéros sans frais suivants:
– Aux États-Unis: 1-800-SAMSUNG (1-800-726-7864)
– Au Canada : 1-800-SAMSUNG
Avertissement relatif aux images fixes
Évitez l'affichage d'images fixes (telles que des fichiers photo en jpeg) ou d'éléments d'image fixes (logos de chaînes, barres
de défilement affichant les nouvelles ou la bourse au bas de l'écran, etc.) ou les émissions au format d’image panorama ou
4:3. L'affichage constant d'images fixes peut entraîner une brûlure de l’écran à DEL et réduire ainsi la qualité de l’image. Pour
éviter ce genre d'incident, veuillez suivre les recommandations ci-dessous:
y Évitez d'afficher la même chaîne pendant de longues périodes.
y Essayez de toujours afficher une image au format plein écran. Utilisez le menu de réglage du format de l'image pour
obtenir les meilleurs résultats.
y Réduisez la luminosité et le contraste pour éviter l'apparition d'images rémanentes.
y Utilisez toutes les fonctions du téléviseur conçues pour réduire les images rémanentes et la brûlure d'écran. Consultez le
guide électronique pour obtenir plus de détails.
Français - 2

Accessoires
✎
Veillez à ce que les articles suivants soient inclus avec votre téléviseur. Si des éléments sont manquants, communiquez
avec le détaillant.
✎
La forme et la couleur des articles peuvent varier selon le modèle.
✎
Vérifiez qu'il ne reste aucun accessoire dans les emballages après avoir ouvert la boîte.
y Télécommande (AA59-00442A) et piles (AAA x 2)
y Guide de l’utilisateur
AV/Adaptateur composantes Adaptateur AV Anneau de support (4EA) Support porte-fil
(BN39-01154W) (BN39-01154H) (BN61-07295A) (BN61-05491A)
Adaptateur LAN sans fil Samsung
(modèles à écran DEL série6050 seulement)
(AK98-01080A)
y Cordon d’alimentation
y Chiffon de nettoyage
y Carte de garantie / Guide de sécurité
Câbles d'entrée (vendus séparément)
Pour l'achat du câble RS232, consultez www.SamsungParts.com.
RS232 (AA39-00311A) Audio
HDMI HDMI-DVI Composante Composite (AV) Coaxial (RF) VGA
Français - 3

Présentation du panneau de configuration
✎
La couleur et la forme du produit peuvent varier en fonction du modèle.
Panneau de commande
Capteur pour la télécommande Orientez la télécommande vers le capteur sur le téléviseur.
Indicateur d'alimentation Clignote puis s'éteint lorsque le téléviseur est allumé. S'allume en mode veille.
SOURCE
MENU Permet d'afficher un menu (à l'écran) comprenant les fonctions de commande de
y Permet de régler le volume. Dans le menu à l'écran, utilisez les touches y de
z
P
E
(Alimentation)
Permet de passer d'une source d'entrée à l'autre. Dans le menu à l’écran, cette
touche a la même fonction que la touche ENTERE de la télécommande.
votre téléviseur.
la même manière que les touches ◄ et ► de la télécommande.
Permet de changer de chaîne. Dans le menu à l'écran, utilisez les touches z
de la même manière que les touches ▼ et ▲ de la télécommande.
Appuyez sur cette touche pour mettre le téléviseur sous tension ou hors tension.
Mode veille
Le téléviseur passe en mode veille lorsque vous l’éteignez et continue de consommer une petite quantité d’électricité. Par
mesure de sécurité et pour réduire votre consommation électrique, ne laissez pas votre téléviseur en mode veille durant de
longues périodes (par exemple lorsque vous partez en vacances). Il est conseillé de débrancher le cordon d'alimentation.
Installation du support
Reportez-vous au guide séparé pour des instructions détaillées sur l'installation du support.
A
1 EA
Support (Selon le modèle) Guide du support Vis
B
1 EA
C
D
x4 (M4 X L12)
x4 (M4 X L8)
Français - 4

1
3
2
4
Vue latérale
5
C
A
Arrière
(M4 X L12)
B
Avant
x4
Vue de dessus
ATTENTION
✎
P
our protéger le téléviseur, posez un tissu doux sur la table
NE PAS
NE PAS
UTILISER DE
GRAISSE
NE PAS
UTILISER
D'HUILE
UTILISER DE
PRODUITS
CHIMIQUES
(Assemblage approprié) (Assemblage inadéquat)
et placez le téléviseur écran vers le bas sur ce dernier.
✎
Insérez le guide du support dans la fente située sur la
partie inférieure du téléviseur.
D
x4
(M4 X L8)
✎
REMARQUE
Assurez-vous de bien distinguer le devant et l’endos de chaque élément au moment de l’assemblage.
x
Assurez-vous qu'au moins deux personnes soulèvent et déplacent le téléviseur.
x
Assemblage du support porte-fil
Français - 5

Installation du support mural
Préparatifs avant l'installation du support mural
Utilisez l'anneau de support pour installer un support mural provenant d'un
autre fabricant.
s
s
s
s
s
Installation de l’ensemble de fixation murale
L'ensemble de fixation murale (vendu séparément) permet de fixer le téléviseur au mur.
Pour obtenir des instructions détaillées sur l'installation du support mural, consultez les instructions fournies avec l'ensemble. Nous
recommandons de demander l'aide d'un technicien pour l'installation du support mural. Samsung Electronics n’est pas responsable
des dommages causés à l’appareil ni des blessures possibles occasionnées si vous tentez d’installer le support vous-même.
Spécifications de l'ensemble de fixation murale (VESA)
Installez le support mural sur un mur massif perpendiculaire au plancher. Avant de fixer le support à un matériau autre que le
placoplâtre, veuillez communiquer avec votre détaillant local. Si vous installez le téléviseur à la hauteur du plafond ou sur un
mur incliné, il risque de tomber et de causer des blessures.
✎
REMARQUE
Les dimensions standard pour les ensembles de fixation murale figurent dans le tableau ci-dessous.
x
Les ensembles de fixation murale de Samsung sont fournis avec un guide d'installation détaillé et toutes les pièces
x
nécessaires à l’assemblage.
N'utilisez pas de vis non conformes aux spécifications de vis standard VESA.
x
N’utilisez pas de vis plus longues que les longueurs standard ou non conformes aux spécifications VESA de vis
x
standard. Des vis trop longues pourraient endommager l'intérieur du téléviseur.
En ce qui a trait aux supports muraux non conformes aux spécifications de vis de la norme VESA, la longueur des vis
x
peut différer selon les spécifications du support mural.
Ne serrez pas trop les vis; cela pourrait endommager le produit ou provoquer sa chute et causer des blessures.
x
Samsung décline toute responsabilité dans le cas où de tels accidents se produisent.
Samsung ne saurait être tenu responsable des dommages au produit ou des blessures occasionnés par l'utilisation
x
d'un support mural non conforme aux spécifications VESA ou non recommandé, ou si le consommateur ne suit pas
les instructions d'installation du produit.
Notre modèle 55po (140cm) n'est pas conforme aux spécifications VESA. Par conséquent, vous devez utiliser notre
x
ensemble de fixation conçu pour ces modèles.
N'installez pas le téléviseur à un angle d'inclinaison de plus de 15 degrés.
x
Deux personnes sont nécessaires pour fixer le téléviseur au mur.
x
Type de
produit
Taille du
téléviseur
en pouces
19~22 75 X 75
23~27 200 X 100
Spécifications VESA
de l’orifice
de passage des vis
(A * B) en millimètres
Vis standard Quantité
M4
TV à DEL
32~40 200 X 200
M846~55 400 X 400
60~65 600 X 400
N’installez pas le support mural lorsque le téléviseur est sous tension. Il pourrait survenir des blessures
causées par un choc électrique.
4
Français - 6

Touches de la télécommande
✎
Cette télécommande dispose de points de braille sur les touches Power, Channel et Volume, permettant ainsi aux
personnes aveugles de l'utiliser.
Permet de mettre le téléviseur sous
tension et hors tension.
Permet d'afficher et de sélectionner les
sources vidéo disponibles.
Permet d'accéder directement aux
chaînes.
Appuyez sur cette touche pour choisir des chaînes
numériques supplémentaires diffusées par la même
station. Par exemple, pour sélectionner la chaîne
«54-3», appuyez sur «54», puis sur «3».
Permet de régler le volume.
Permet d'afficher le menu des fonctions.
Permet d'établir un lien vers divers
services d'application.
Permet de sélectionner rapidement les
fonctions fréquemment utilisées.
Permet de sélectionner les options de menu
à l'écran et de modifier les valeurs affichées.
Permet de retourner au menu précédent.
POWER
SOURCE
1
4
2 3
5 6
7 8 9
0
MUTE
M
VOL CH
CH LIST
MENU
HUB
SMART
m
l
l
l
ON/OFF
PRE-CH
<
SEARCH
l
<
Permet d'allumer ou d'éteindre
l'éclairage de la télécommande.
Lorsque cette touche est activée,
les touches s'illuminent pendant un
moment lorsqu'on appuie sur celles-ci.
(L’utilisation de la télécommande alors
que le rétroéclairage est activé réduit le
temps d’utilisation des piles.)
Permet de retourner à la chaîne
précédente.
Permet de couper temporairement le
son.
Permet de changer de chaîne.
permet d'afficher la liste des chaînes à
l'écran.
Soutien pour les fonctions de recherche
recommandées (recherche de mot par
exemple).
Permet d'afficher l'information à l'écran
du téléviseur.
Permet de quitter le menu.
Touches utilisées dans le menu Liste de
canaux et SMART HUB , etc.
Utilisez ces touches dans les modes
SMART HUB et Anynet+ (HDMI-CEC).
Insertion des piles (piles AAA)
T V
SOCIAL
E-MANUAL
l
l
l
l
✎
REMARQUE
Français - 7
B C D
SOCIAL TV: Permet de se connecter à
l'application Social TV.
MTS : Appuyez sur cette touche pour
l
l
l
l
l
Utilisez la télécommande à une distance maximale de 7 m (23
x
choisir entre les modes stéréo, mono ou
diffusion SAP (seconde piste audio).
SRS: Permet d'activer ou de désactiver
SRS TruSurround HD.
CC: permet d'afficher les sous-titres
numériques.
P.SIZE: Vous permet de sélectionner
Image Format.
E-MANUAL: permet d'afficher le guide
e-Manual.
pi) du téléviseur.
Une lumière vive peut entraver le bon fonctionnement de la
x
télécommande. Évitez de l'utiliser près d'une source lumineuse
fluorescente ou d'une enseigne au néon.
La couleur et la forme peuvent varier en fonction du modèle.
x

Navigation dans les menus
PRE-CH
CH LIST
POWE
R
4
<
M
UTE
C
VOL
CH
SMART
ON/OFF
SOURCE
HUB
SEARCH
Avant d'utiliser le téléviseur, suivez les étapes ci-dessous
pour apprendre comment naviguer dans les menus et
sélectionner et ajuster différentes fonctions.
MENU
1
2
3
1 Touche MENU : Affiche le menu principal à l'écran.
2 Touche ENTER
déplacer le curseur et sélectionner un élément. Confirme
le réglage.
3 Touche RETURN : Permet de retourner au menu
précédent.
4 Touche EXIT : Permet de quitter le menu à l’écran.
✎
Afin d'assurer une connexion optimale des câbles à ce produit, assurez-vous d'utiliser des câbles ayant une épaisseur
maximale de 14mm (0,55po).
E
m
l
l
/ touche de direction : Permet de
l
l
4
Utilisation de l'affichage à l'écran
La méthode d'accès peut différer selon le menu sélectionné.
MENU Les options du menu principal
1
▲ / ▼
2
ENTER
E
3
▲ / ▼
4
◄ / ► Appuyez sur la touche ◄ ou ►
5
ENTER
E
6
EXIT
e
apparaissent:
Image, Son, Chaîne, Réseau,
Système, Support technique..
Sélectionnez une icône ou une
option à l'aide de la touche ▲ ou ▼.
Appuyez sur ENTERE pour
accéder aux sous-menus.
Sélectionnez le sous-menu voulu à
l'aide de la touche ▲ ou ▼.
pour choisir la valeur d'une option.
Le réglage de l'affichage peut varier
en fonction du menu sélectionné.
Appuyez sur ENTERE pour
confirmer la sélection.
Appuyez sur EXIT.
7
Largeur maximale - 14 mm (0,55 pouce)
x
Branchement du cordon d’alimentation à la connexion antenne ou câble
Branchement du cordon d’alimentation à la connexion antenne ou câble
Câble
ANT OUT
Antenne VHF/UHF
ou
Puissance consommée
Français - 8

Prêt à l'emploi (réglage initial)
INFO
GUIDE
La première fois que vous mettez le téléviseur sous tension, une série de messages s'affiche pour faciliter la configuration des
réglages de base. Pour mettre le téléviseur sous tension, appuyez sur la touche POWERP.
✎
La fonction Prêt à l'emploi n'est disponible que lorsque Source est réglée à TV.
✎
P
our revenir à l'étape précédente de la marche à suivre « Prêt à l'emploi », sélectionnez Précédent, puis appuyez sur
ENTERE.
✎
A
vant de mettre le téléviseur sous tension, assurez-vous qu'il est branché à une antenne ou au câble (p. 8).
Sélection de la langue
1
d'affichage
Configuration du réseau Configurez votre connexion réseau. Pour commencer, appuyez sur
2
Sélection du mode
3
d’utilisation
Réglage de la fonction
4
Horloge
Mode
Sélection des options
5
de recherche pour
la syntonisation
automatique
Sélection et
6
mémorisation des
chaînes
En mode diffusion. Si vous souhaitez regarder une émission télévisée, sélectionnez Fermer.
7
Si vous voulez relancer la fonction Prêt à l'emploi...
MENU → Système → Prêt à l'emploi → ENTER
O
✎
REMARQUE
y Pour modifier le réglage du téléviseur de Démo magasin à Util. à domicile lorsque vous n'êtes pas en mode Prêt à
l'emploi, appuyez sur la touche du volume du téléviseur. Lorsque la barre du volume s'affiche à l'écran, appuyez sur la
touche MENU du téléviseur et maintenez-là enfoncée pendant 5 secondes.
Appuyez sur la touche ▲ ou ▼ pour choisir une langue. Appuyez sur
ENTER
E
lorsque vous avez terminé.
ENTERE. Si vous ne connaissez pas les paramètres de configuration
de
votre réseau ou souhaiter effectuer plus tard cette opération, sélectionnez
Passer.
Nous vous suggérons de sauter dans l'immédiat la configuration du réseau
et de consulter le menu « Réseau» dans le Guide électronique pour connaître
les exigences et les instructions relatives à la configuration, ainsi que la section
«Connexion des réseaux câblés ou sans fil» du présent guide (page15). Reportezvous au menu «Réseau» pour configurer ultérieurement cette connexion.
Appuyez sur la touche ▲ ou ▼ pour sélectionner Util. à domicile, puis appuyez deux fois
sur ENTER
Sélectionnez le mode Util. à domicile. Le mode Démo magasin est réservé à l'utilisation
en magasin.
Appuyez sur la touche ▲ ou ▼ pour sélectionner Auto ou Manuel, puis appuyez deux fois
sur ENTER
Appuyez sur la touche ◄ ou ► pour sélectionner Air ou Câble, puis appuyez sur ENTERE.
Une coche apparaît sur votre sélection. Sélectionnez Suivant, puis appuyez sur ENTERE.
Vous pouvez cocher les deux si vous disposez de ces deux types de connexion.
La recherche des chaînes commence automatiquement. L'opération peut durer jusqu'à
30minutes.
Pour plus de détails, reportez-vous à la section Chaîne → Prog. auto dans le guide
électronique.
Si vous voulez utiliser le service Smart Hub, sélectionnez Smart Hub. La fonction Smart Hub
démarre. Pour plus de détails, consultez la section «Smart Hub» dans le guide électronique.
E
.
E
.
✎
Si vous avez sélectionné Auto, l'écran Fuseau hor. et H. d'été apparaît. Sélectionnez
l'option Fuseau hor. ou H. d'été, puis appuyez sur ENTERE. À l'écran Fuseau
horaire, utilisez la touche ▲ ou ▼ pour sélectionner votre zone, puis appuyez sur
ENTERE. À l'écran H. d'été, appuyez sur ENTERE, puis choisissez d'activer ou
de désactiver la fonction H. d'été (heure d'été). Une fois l'opération terminée, appuyez
sur ENTERE.
✎
Si vous avez sélectionné Auto, l'écran Date et Heure apparaît. Sélectionnez Date
ou Heure, puis appuyez sur ENTERE. Utilisez ensuite les touches numériques ou
la touche ▲ ou ▼ pour régler la date ou l'heure. Appuyez sur la touche ◄ ou ►
pour vous déplacer d'un champ à l’autre. Une fois le réglage Date et Heure terminé,
sélectionnez Suivant, puis appuyez sur ENTERE.
✎
S
i vous avez sélectionné Câble, l'écran de sélection du système de câblodistribution
apparaît. Appuyez sur la touche ▲ ou ▼ pour sélectionner Numérique ou Analogique,
puis appuyez sur ENTERE. Appuyez sur la touche ▲ ou ▼ pour sélectionner le
format de signal pertinent - STD, HRC, ou IRC - puis appuyez sur ENTERE. La
plupart des systèmes de câblodistribution utilisent l'option STD. Sélectionnez le format
de signal pertinent pour les deux systèmes numérique et Analogique.
✎
Une fois terminé, sélectionnez Suivant, puis appuyez sur ENTERE.
✎
Appuyez sur ENTERE à n'importe quel moment pour interrompre la mémorisation
des chaînes.
E
POWER
Français - 9

Branchement à un appareil audiovisuel
R-AUDIO-L
Utilisation d'un câble HDMI ou HDMI/DVI: Branchement HD (jusqu’à 1080p)
Nous recommandons l’utilisation de la connexion HDMI pour obtenir une image HD de qualité optimale.
Appareils disponibles : lecteur DVD, lecteur Blu-ray, câblosélecteur ou récepteur satellite (boîtier décodeur) HD
HDMI OUT
DVI OUT
AUDIO OUT
✎
HDMI IN 1 (DVI), 2 (ARC), 3, 4 / PC/DVI AUDIO IN
Pour une image et un son de meilleure qualité, branchez le téléviseur à un appareil numérique à l'aide d'un
x
câble HDMI.
Un câble HDMI prend en charge les signaux vidéo et audio numériques; un câble audio n'est pas nécessaire.
x
– Pour brancher le téléviseur à un appareil numérique qui ne prend pas en charge une sortie HDMI, utilisez des
câbles HDMI/DVI et audio.
Il est possible que l'image soit anormale (s'il y a une image) ou que le son ne fonctionne pas si vous branchez
x
un appareil externe utilisant une ancienne version du mode HDMI au téléviseur. Si un tel problème survient,
renseignez-vous sur la version HDMI auprès du fabricant de l'appareil externe et, si elle trop ancienne,
demandez une mise à niveau.
Assurez-vous d'utiliser un câble HDMI d'une épaisseur de 14mm ou moins.
x
Vérifiez que vous achetez un câble HDMI certifié. Sinon, l'image risque de ne pas s'afficher ou une erreur de
x
connexion peut survenir.
Il est recommandé d'utiliser un câble HDMI haute vitesse de base ou un câble Ethernet. Veuillez noter que ce
x
produit ne prend pas en charge la fonction Ethernet par le biais d'un câble HDMI.
Ce produit prend pas en charge les fonctions ARC (Audio Return Channel) par l'intermédiaire d'un câble
x
HDMI. Notez que la fonction ARC n'est prise en charge qu'à la prise HDMI IN 2(ARC).
La fonction ARC permet au son numérique de sortir par la prise HDMI IN 2(ARC). Elle ne peut être activée
x
que lorsque le téléviseur est branché à un récepteur audio compatible avec la fonction ARC.
WR
Français - 10

Utilisation d'un câble composante (jusqu'à 1080p) ou audio/vidéo (480i seulement).
Appareils disponibles : magnétoscope, lecteur DVD, lecteur Blu-ray, câblosélecteur et récepteur satellite (boîtier décodeur)
Y
Appareil
W
Y
W
R R RW
Rouge Blanc Rouge Rouge
G
B
Bleu Blanc
Vert Jaune
Appareil
VIDEO OUTAUDIO OUT
R-AUDIO-L
W
R
✎
Pour le branchement à la prise AV IN, la couleur de la prise d'entrée AV IN 1[VIDEO] (vert) ne correspond pas à
AUDIO OUT
COMPONENT OUT
R-AUDIO-L
PR PB Y
R R
W
B
Y
G
G
B
W
RR
Y
R
R
Rouge
W
R
Blanc
Y
W
Y
W
Jaune
R
W
Y
la couleur du câble vidéo (jaune).
✎
Le branchement par composante est conseillé plutôt que le branchement A/V pour obtenir la meilleure qualité
d'image.
Connexion avec câble EX-Link
Appareils disponibles : appareils externes compatibles avec EX-Link.
EX-LINK : Connecteur utilisé à des fins de réparation seulement.
Appareil
R-AUDIO-L
R
W
VIDEO OUTAUDIO OUT
Y
Français - 11

Branchement à un appareil audio
R-AUDIO-L
Utilisation d'un câble optique (numérique) ou audio (analogique)
Appareils disponibles : chaîne audio numérique, amplificateur, cinéma maison à DVD
Amplificateur/
Chaîne de cinéma
maison à DVD
Système audionumérique
✎
DIGITAL AUDIO OUT (OPTICAL)
Lorsque vous connectez une chaîne audio numérique à la prise DIGITAL AUDIO OUT (OPTICAL), réduisez le
x
volume du téléviseur et de la chaîne.
Vous pouvez utiliser un son en 5.1 chaînes lorsque votre téléviseur est raccordé à un appareil externe offrant
x
cette fonction audio.
Lorsque le récepteur (cinéma maison) est activé, il est possible d’entendre le son provenant de la prise
x
optique du téléviseur. Lorsque le téléviseur reçoit des signaux numériques, il transmet le son en 5.1 canaux au
récepteur de la chaîne de cinéma maison. Lorsque la source est un composant numérique, comme un lecteur
DVD, un lecteur Blu-ray, un câblosélecteur ou un récepteur satellite (boîtier décodeur), et que cet appareil est
branché au téléviseur par câble HDMI, le récepteur de la chaîne de cinéma maison ne fera entendre qu'un
son en deux canaux. Pour entendre le son en 5.1 canaux, branchez directement la prise Digital Audio Out
du lecteur DVD/Blu-Ray, câblosélecteur ou récepteur satellite à un amplificateur ou une chaîne de cinéma
maison.
✎
AUDIO OUT : Se branche aux prises d’entrée audio de votre amplificateur/chaîne de cinéma maison à DVD.
Utilisez le connecteur approprié pour le branchement.
x
Lorsque vous branchez un amplificateur audio aux prises AUDIO OUT du téléviseur, baissez le volume de cet
x
appareil et réglez ce volume à l’aide de la commande de volume de l’amplificateur.
AUDIO IN
OPTICAL
WR
Rouge Blanc
Branchement à un PC
Utilisation d'un câble HDMI, d'un câble HDMI/DVI ou d'un câble D-Sub
✎
Votre ordinateur peut ne pas prendre en charge une connexion HDMI.
HDMI OUT
DVI OUT
AUDIO OUT
AUDIO OUT
PC OUT
Français - 12

Modes d'affichage de l'ordinateur (entrée D-Sub et HDMI/DVI)
La résolution optimale est 1920 x 1080 @ 60 Hz. Vous pouvez choisir une des résolutions standard indiquées dans la colonne
Résolution. Le téléviseur se réglera automatiquement à la résolution choisie.
Mode Résolution
IBM
MAC
VESA DMT
VESA DMT / DTV CEA
Fréquence horizontale
(kHz)
640 x 350
720 x 400
640 x 480
832 x 624
1152 x 870
640 x 480
640 x 480
640 x 480
800 x 600
800 x 600
800 x 600
1024 x 768
1024 x 768
1024 x 768
1152 x 864
1280 x 1024
1280 x 1024
1280 x 800
1280 x 800
1280 x 960
1360 x 768
1440 x 900
1440 x 900
1680 x 1050
1920 x 1080p 67.500 60.000 148.500 +/+
31.469
31.469
35.000
49.726
68.681
31.469
37.861
37.500
37.879
48.077
46.875
48.363
56.476
60.023
67.500
63.981
79.976
49.702
62.795
60.000
47.712
55.935
70.635
65.290
Fréquence verticale
(Hz)
70.086
70.087
66.667
74.551
75.062
59.940
72.809
75.000
60.317
72.188
75.000
60.004
70.069
75.029
75.000
60.020
75.025
59.810
74.934
60.000
60.015
59.887
74.984
59.954
Fréquence d'horloge
des pixels
(MHz)
25.175
28.322
30.240
57.284
100.000
25.175
31.500
31.500
40.000
50.000
49.500
65.000
75.000
78.750
108.000
108.000
135.000
83.500
106.500
108.000
85.500
106.500
136.750
146.250
Polarité
synchronisée
(H / V)
+/-
-/+
-/-
-/-
-/-
-/-
-/-
-/+/+
+/+
+/+
-/-
-/+/+
+/+
+/+
+/+
-/+
-/+
+/+
+/+
-/+
-/+
-/+
✎
REMARQUE
Pour brancher un câble HDMI/DVI, utilisez la prise HDMI IN 1(DVI).
x
Le mode entrelacé n’est pas pris en charge.
x
Si vous sélectionnez une résolution non standard, votre téléviseur peut ne pas fonctionner correctement.
x
Les modes séparé et composé sont pris en charge. Le mode synchronisation au vert n'est pas pris en charge.
x
Français - 13

Modification de la source d'entrée
SOURCE
Source
Permet de sélectionner le téléviseur ou
une autre source d’entrée externe comme
un lecteur DVD, un lecteur Blu-ray, un
câblosélecteur ou un récepteur satellite.
1. Appuyez sur la touche SOURCE de la
télécommande.
2. Permet de sélectionner la source externe
de signal d’entrée désirée.
■■ TV / PC / AV1 / AV2 / Composante /
HDMI1/DVI / HDMI2 / HDMI3 / HDMI4 / USB /
AllShare
✎
Seuls les appareils externes branchés au téléviseur
peuvent être sélectionnés. Dans Source, les entrées
branchées sont en surbrillance.
✎
Dans Source, l'option PC est toujours activée.
Entrer le nom
Le fonction Entrer le nom vous permet d’associer un nom
de dispositif à une source d’entrée. Pour accéder à cette
fonction, appuyez sur la touche TOOLS dans Source. Les
sélections ci-dessous apparaissent sous Entrer le nom:
■ Magnétoscope / DVD / Câble STB / Satellite STB /
PVR STB / Récepteur A/V / Jeu / Caméscope / PC
/ DVI PC / Appareils DVI / TV / IPTV / Blu-ray / HD
DVD / DMA: Entrez le nom de l'appareil branché aux
prises d'entrée afin de faciliter la sélection de la source
d'entrée.
✎
Si vous avez connecté un ordinateur à une prise HDMI
IN 1 (DVI) à l’aide d’un câble HDMI, sélectionnez PC
sous Entrer le nom pour entrer le nom du dispositif
choisi.
✎
Si vous avez connecté un ordinateur à une prise HDMI
IN 1 (DVI) à l’aide d’un câble HDMI à DVI, sélectionnez
DVI PC sous Entrer le nom pour entrer le nom du
dispositif choisi.
✎
Si vous avez connecté un dispositif audiovisuel à une
prise HDMI IN 1 (DVI) à l’aide d’un câble HDMI à DVI,
sélectionnez Appareils DVI sous Entrer le nom pour
entrer le nom du dispositif choisi.
Modifier favori
Dans Source, appuyez sur la touche TOOLS pour
sélectionner Modifier favori. Cette fonction vous permet de
régler la source d’entrée à Favoris.
Information
Vous pouvez obtenir des renseignements détaillés sur
l'appareil externe sélectionné.
Rafraîchir
Dans la liste Source, si les appareils externes ne s'affichent
pas, appuyez sur TOOLS pour sélectionner Rafraîchir pour
rechercher les appareils branchés.
Français - 14

Connexion au réseau
Vous pouvez configurer le téléviseur pour qu'il puisse accéder à Internet par l'entremise de votre réseau à l'aide d'une
connexion sans fil ou câblée.
Connexion au réseau - sans fil
Vous pouvez connecter votre téléviseur à votre réseau LAN par l'intermédiaire d'un routeur sans fil ou d'un modem standard.
Pour établir une connexion sans fil,
ous devez brancher un « adaptateur LAN sans fil de Samsung » (WIS09ABGN, WIS09ABGN2 ou WIS10ABGN - vendu
séparément) à la prise USB située à l'arrière de votre téléviseur. Voir l’illustration ci-dessous.
Routeur IP sans fil
(Point d'accès pourvu d'un serveur
utilisant le protocole DHCP)
Prise LAN murale
ou
Samsung
Adaptateur LAN sans fil
Câble LAN (non fourni)
Panneau arrière du téléviseur
L'adaptateur LAN sans fil Samsung est vendu séparément chez nos détaillants sélectionnés, dans les boutiques en ligne ou
sur le site Samsungparts.com. L'adaptateur LAN sans fil Samsung prend en charge les protocoles de communication IEEE
802.11a/b/g et n. Samsung recommande l'utilisation du protocole IEEE 802.11n. Lorsque vous regardez une vidéo à partir de
la connexion IEEE 802.11b/g, des problèmes d'interférence pourraient survenir pendant la lecture.
La plupart des systèmes de réseau sans fil comportent un système de sécurité intégré qui exige que les appareils accédant au réseau
par un point d'accès (en règle générale, un routeur IP sans fil ou un modem) transmettent un code de sécurité crypté appelé clé d'accès.
Votre téléviseur est compatible avec les protocoles de sécurité suivants:
y Mode d'authentification: OPEN, SHARED, WPAPSK, WPA2PSK
y Type de cryptage: WEP, TKIP, AES
Si le mode 802.11n à débit élevé pur (Greenfield) est sélectionné et que le type de chiffrement est réglé à WEP, TKIP ou
TKIPAES (WPS2 mixte) pour votre routeur sans fil, les téléviseurs Samsung ne reconnaîtront pas la connexion conformément
aux nouvelles spécifications de certification de produits sans fil.
Configuration de la connexion au réseau - sans fil
Les instructions ci-dessous concernent les réseaux qui utilisent le protocole DHCP (Dynamic Host Configuration Protocol) pour
configurer automatiquement les connexions au réseau. Si votre réseau est un réseau à adresse IP statique, reportez-vous au
guide de l'utilisateur pour les instructions de configuration.
Pour configurer la connexion à un réseau utilisant un protocole
DHCP, procédez de la manière suivante:
1. Connectez votre téléviseur au réseau conformément aux
illustrations ci-dessus.
2. Mettez votre téléviseur sous tension, appuyez sur la
toucheMENU de la télécommande, puis sélectionnez
Réseau → Paramètres réseaux.
3. Sélectionnez Sans fil (généraux), appuyez sur ENTER
E
, puis
de nouveau sur ENTERE.
4. La fonction « Réseau » recherche tous les réseaux sans fil
disponibles. Une fois l'opération de recherche terminée, une
liste des réseaux disponibles s'affiche.
5.
À partir de la liste de réseaux, appuyez sur la touche ▲ ou ▼
pour sélectionner un réseau, puis appuyez sur Suivant, puis
appuyez sur ENTERE.
6. Si vous avez sélectionné un routeur sans fil avec un code de sécurité, l’écran Code de sécurité s’affiche. Entrez le Code
de sécurité(code de sécurité ou NIP), sélectionnez Suivant, puis appuyez sur ENTERE.
✎
Au moment d'entrer le Code sécurité (code de sécurité ou NIP), utilisez les touches ▲ / ▼ / ◄ / ► de votre
télécommande pour sélectionner les chiffres et les caractères.
7. L’écran de connexion au réseau apparaît et vérifie cette connexion. Une fois la connexion vérifiée, le message «La
connexion à Internet a réussi. » s’affiche. La configuration réseau est terminée.
✎
Pour de plus amples renseignements, consultez la section «Connexion à un réseau sans fil» dans le guide
électronique.
Paramètres réseau
Sélectionnez un type de connexion au réseau.
Câble
Sans-l (généraux)
WPS (PBC)
One Foot Connection
✎
L'image affichée peut varier selon le modèle.
Configurez le réseau sans
fil en sélectionnant votre
point d'accès. Vous devrez
peut-être entrer le code de
sécurité selon le réglage du
point d'accès.
Préc.
Suivant
Annuler
Français - 15

Connexion au réseau - câblé
Il existe deux manières de connecter votre téléviseur par le câble, selon la configuration de votre réseau. Ces deux méthodes
sont illustrées ci-dessous:
Prise de modem murale
Prise LAN murale Panneau arrière du téléviseur
✎
Une vitesse de réseau inférieure à 10 Mbps n'est pas compatible.
Modem externe
(ADSL / VDSL / câblodistribution)
Câble LAN (non fourni)Câble de modem (non fourni)
Câble LAN (non fourni)
Panneau arrière du téléviseur
Configuration de la connexion au réseau - câblé
La plupart des réseaux domestiques utilisent un protocole DHCP (Dynamic Host Configuration Protocol) pour configurer
les connexions au réseau. Les réseaux domestiques qui prennent en charge le protocole DHCP fournissent l'adresse IP, le
masque de sous-réseau, la passerelle et les valeurs DNS dont votre téléviseur a besoin pour accéder à Internet, de sorte que
vous n'avez pas à les entrer manuellement.
Pour configurer la connexion à un réseau utilisant un protocole
DHCP, procédez de la manière suivante:
1. Connectez votre téléviseur au réseau conformément à une des
méthodes présentées dans les illustrations ci-dessus.
2. Mettez votre téléviseur sous tension, appuyez sur la touche
MENU de la télécommande, puis sélectionnez Réseau →
Paramètres réseau. L'écran Paramètres réseau s’affiche.
3. Sélectionnez Câble, appuyez sur ENTER
E
sur ENTER
.
E
, puis de nouveau
Paramètres réseau
Sélectionnez un type de connexion au réseau.
Câble
Sans-l (généraux)
WPS (PBC)
One Foot Connection
Se connecter au réseau à l'aide
d'un câble de réseau local sans
l. Assurez-vous que le câble
est branché.
Préc.
Suivant
Annuler
4. L’écran de connexion au réseau apparaît et vérifie cette
connexion. Une fois la connexion vérifiée, le message «La
connexion à Internet a réussi. » s’affiche. La configuration
réseau est terminée.
✎
Si votre téléviseur ne peut acquérir automatiquement les valeurs de connexion au réseau ou si vous souhaitez
configurer manuellement cette connexion, sélectionnez Paramètres IP à l'écran d'essai du réseau. Réglez l'option
Réglage pr. Internet à Manuel. Vous devez alors entrer les valeurs Adresse IP, Masq. sous-réseau, Passerelle et
Serveur DNS manuellement.
✎
Pour de plus amples renseignements, consultez la section «Connexion à un réseau câblé» dans le guide électronique.
Français - 16

Comment affi cher le guide électronique
E-MANUAL
fonctions de votre téléviseur. Pour utiliser ce guide électronique, appuyez sur la touche
E-MANUAL de la télécommande. Déplacez le curseur au moyen des touches haut/
bas/droite/gauche pour mettre en surbrillance une catégorie, puis une rubrique, puis
appuyez sur ENTERE. Le guide électronique affi che la page que vous voulez voir.
Vous pouvez également y accéder à l'aide du menu:
Affi chage à l'écran
Écran du téléviseur : Affi che
l'émission, le fi lm, la vidéo, etc. que
vous êtes en train de regarder.
Aide: Affi che le Guide e-Manual ou
Vous trouverez dans le guide électronique toutes les instructions concernant les
le Guide de produit. Appuyez sur
ENTER
E
MENUm → Support technique → e-Manual → ENTER
O
✎
Si vous voulez retourner au guide électronique, appuyez sur la touche E-MANUAL de la
E
télécommande.
✎
Vous ne pouvez pas utiliser la fonction Essayer si le menu n'est pas activé.
Liste des catégories. Appuyez sur la
l
ou r pour sélectionner la
Fonctions de base
Modi cation du mode d'image préréglé
Ajustement des paramètres de l'image
Modi cation de la taille de l’image
Modi cation des options de l'image
Con guration du téléviseur avec un ordinateur
IndexAide
.
Index: Permet d'affi cher un écran d'index.
X: Permet de quitter le guide électronique.
touche
catégorie que vous voulez.
Affi che la liste du sous-menu.
Utilisez les touches fl échées de
votre télécommande pour déplacer
le curseur. Appuyez sur ENTER
pour sélectionner le sous-menu
désiré.
E
Utilisation du menu Aide
Pour affi cher le guide électronique et le guide du produit en appuyant sur la touche Aide.
C
omment affi cher le guide électronique
V
ous trouverez dans le guide électronique toutes les
instructions concernant les fonctions de votre téléviseur. Pour
utiliser le guide électronique, appuyez sur la touche E-MANUAL
de la télécommande. Déplacez le curseur au moyen des
touches haut/bas/droite/gauche pour mettre en surbrillance une
catégorie, puis une rubrique, puis appuyez sur ENTERE. Le
guide électronique affi che la page que vous voulez consulter.
Vous pouvez également y accéder à l'aide du menu:
O MENUm → Support technique → e-Manual → ENTER
✎ Si vous voulez retourner au guide e-Manual, appuyez sur la touche E-MANUAL de la télécommande.
✎ Vous ne pouvez utiliser la fonction Essayer si le menu n'est pas activé.
<Guide e-Manual>
Le guide électronique s'affi che tel qu'illustré ci-dessus.
Fonctions de base
Modi cation du mode d'image préréglé
Ajustement des paramètres de l'image
Modi cation de la taille de l’image
Modi cation des options de l'image
Con guration du téléviseur avec un PC
E
IndexAide
Retour
<Guide de produit>
Le guide du produit s'affi che tel qu'illustré ci-dessus.
Français - 17
Synchronisation média entre plusieurs appareils avec AllShare
AllShare™ synchronise vos appareils numériques, ce qui vous permet d'écouter
de la musique et de visionner des lms et des photos sur le grand écran de votre
téléviseur à partir de votre ordinateur, appareil photo ou tout appareil mobile. Cette
fonction vous permet également de brancher plusieurs ordinateurs.
Retour

Comment permuter entre une rubrique du guide électronique et le(s) menu(s) d'affichage correspondant(s).
Fonctions de base > Modication du mode d'image préréglé (1/1)
Modification du mode d'image préréglé
O MENUm → Image → Image Mode → ENTER
■
Image Mode
Les modes Image appliquent à l’image les réglages préalablement définis.
Sélectionnez un mode à l’aide des touches fléchées vers le haut et vers le bas,
puis appuyez sur ENTERE.
N En mode PC, vous ne pouvez sélectionner que les options Divertiss.
et Standard.
• Dynamique : Convient aux pièces bien éclairées.
• Standard : Convient aux environnements habituels.
• Naturel: Pour ne pas fatiguer la vue.
• Cinéma : Convient aux pièces sombres utilisées pour regarder des films.
• Divertiss. (Disponible en mode PC seulement): Convient au visionnement
de films et aux jeux.
Aide Essayer Accueil Zoom Index
✎
Dans certains menus, cette fonction n'est pas activée.
E
Essayer
E-MANUAL
Image
Image Mode Standard
Image
Contre-jour 14
Contraste 100
Luminosité 45
Netteté 50
Couleur 50
Teinte (V/R) G 50 R 50
Méthode n°1: Méthode n°2:
1. Appuyez sur la touche rouge pour sélectionner Essayer,
si vous voulez exécuter les menus correspondants.
2. Pour retourner à l'écran du guide électronique, appuyez
sur la touche E-MANUAL.
1. Appuyez sur ENTER
E
lorsqu'une rubrique s'affiche.
Le message «Exécuter cette opération?» apparaît.
Sélectionnez Oui et appuyez sur ENTERE. La fenêtre
d'affichage s'ouvre.
2. Pour retourner à l'écran du guide électronique, appuyez
sur la touche E-MANUAL.
Affichage du contenu
Fonctions de base > Modication du mode d'image préréglé (5/10)
Modification du mode d'image préréglé
O MENUm → Image → Image Mode → ENTER
■
Image Mode
Les modes Image appliquent à l’image les réglages préalablement
définis. Sélectionnez un mode à l’aide des touches fléchées vers le haut
et vers le bas, puis appuyez sur ENTERE.
N En mode PC, vous ne pouvez sélectionner que les options
Divertiss. et Standard.
• Dynamique : Convient aux pièces bien éclairées.
• Standard : Convient aux environnements habituels.
• Naturel: Pour ne pas fatiguer la vue.
onvient aux pièces sombres utilisées pour regarder des films.
• Cinéma : C
• Divertiss. (Disponible en mode PC seulement): Convient au
visionnement de films et aux jeux.
E
Zone de contenu: Contient le contenu de la
rubrique si vous avez sélectionné un sous-menu.
Pour passer à la page précédente ou suivante,
appuyez sur la touche l ou r.
Aide Essayer Accueil Zoom Index
Essayer: Affiche le menu d'affichage correspondant à la rubrique recherchée. Pour retourner à
l'écran du guide électronique, appuyez sur la touche E-MANUAL.
Accueil: Permet de passer à l'écran d'accueil du guide électronique.
Zoom: Permet d'agrandir l'écran.
Index: Permet d'afficher un écran d'index.
Français - 18

Utilisation du mode Zoom
Lorsque vous visualisez les instructions du guide électronique,
E
appuyez sur ENTER
pour agrandir l'écran. Vous pouvez
parcourir l'écran agrandi à l'aide des touches u ou d.
✎
Pour retourner à la taille d'écran normale, appuyez sur la
touche RETURN.
Modification du mode d'image préréglé
O MENUm → Image → Image Mode → ENTER
■
Image Mode
L
es modes Image appliquent à l’image les réglages préalablement définis. Sélectionnez un
mode à l’aide des touches fléchées vers le haut et vers le bas, puis appuyez sur ENTERE.
N En mode PC, vous ne pouvez sélectionner que les options Divertiss. et Standard.
• Dynamique : Convient aux pièces bien éclairées.
• Standard : Convient aux environnements habituels.
aturel: Pour ne pas fatiguer la vue.
• N
• Cinéma : Convient aux pièces sombres utilisées pour regarder des films.
• Divertiss. (Disponible en mode PC seulement): Convient au visionnement de films
et aux jeux.
E
Retour
Comment chercher un mot clé à l'aide de la page d'index
1. Pour rechercher une rubrique, utilisez la touche fléchée gauche/droite pour sélectionner une lettre, puis appuyez sur
E
ENTER
. La fenêtre Index affiche une liste de rubriques et de mots clés commençant par la lettre sélectionnée.
2. Appuyez sur la touche fléchée haut/bas pour sélectionner la rubrique ou le mot clé que vous voulez, puis appuyez sur
ENTER
E
pour afficher la rubrique.
3. La page du guide électronique contenant la rubrique apparaît.
✎
Pour fermer l'écran Index, appuyez sur la touche RETURN.
Français - 19

Dépannage
Si le téléviseur semble présenter un problème, essayez d'abord de le corriger à l'aide de la présente liste des problèmes et
solutions possibles. Consultez également la section «Dépannage» dans le guide électronique. Si aucun de ces conseils de
dépannage ne fonctionne, consultez le site «www.samsung.com», puis cliquez sur Support technique ou communiquez avec
le service à la clientèle de Samsung en composant le 1-800-SAMSUNG.
Problèmes Solutions et explications
Le téléviseur ne s’allume pas. y Assurez-vous que le cordon d'alimentation c.a. est bien branché à la prise de
Il n’y a pas d'image. y Vérifiez le branchement des câbles. Débranchez et branchez à nouveau tous les
La télécommande ne fonctionne
pas.
La télécommande du câblosélecteur
ou récepteur numérique ne
commande pas la mise sous tension
ou la mise hors tension du téléviseur,
ou ne règle pas le volume.
courant murale et au téléviseur.
y Assurez-vous que la prise de courant murale est sous tension.
y Appuyez sur la touche POWER du téléviseur pour vous assurer que la
télécommande fonctionne correctement. Si le téléviseur s'allume, reportez-vous à
la section « La télécommande ne fonctionne pas » ci-dessous.
câbles du téléviseur et des appareils externes.
y Réglez la sortie vidéo de votre appareil externe (câblosélecteur, récepteur satellite,
lecteur DVD, lecteur Blu-ray, etc.) afin qu'elle corresponde à l'entrée vidéo du
téléviseur. Par exemple, si l’appareil externe a une sortie HDMI, il faut le brancher à
une entrée HDMI du téléviseur.
y Assurez-vous que les appareils branchés sont sous tension.
y Assurez-vous de choisir la source appropriée du téléviseur en appuyant sur la
touche SOURCE de la télécommande.
y Réinitialisez l'appareil connecté en débranchant puis en rebranchant son cordon
d'alimentation.
y Remplacez les piles de la télécommande. Lorsque vous insérez les piles, assurez-
vous de respecter les polarités appropriées (+/– ).
y Nettoyez la fenêtre de transmission de la télécommande.
y Essayez de pointer la télécommande directement vers le téléviseur d'une distance
de 1,5 à 1,8m (5 à 6 pi).
y Programmer la télécommande du câblosélecteur ou récepteur satellite pour faire
fonctionner le téléviseur. Consultez le guide d'utilisation du câblosélecteur ou
récepteur satellite pour obtenir le code de téléviseur SAMSUNG.
✎
Certaines des images et fonctions présentées dans ce guide sont disponibles sur des modèles particuliers seulement.
✎
Pour optimiser les performances de votre téléviseur, utilisez la dernière version du micrologiciel, téléchargeable à partir du
site Samsung à l'aide d'un clé USB (samsung.com → Support technique → Downloads).
Licence
Caractéristiques
y Interface numérique et réseautage excellents : Grâce au syntoniseur numérique HD intégré, vous pouvez écouter des
émissions en HD non payantes sans câblosélecteur ni récepteur satellite.
y SMART HUB : La passerelle pour tout le contenu intégré dans un seul emplacement.
– Offre divers choix de divertissement.
– Vous permet de commander votre mode de divertissement grâce à une interface utilisateur conviviale.
– Vous permet d'accéder facilement aux diverses applications dont le nombre s'ajoute chaque jour.
– Vous permet de personnaliser votre téléviseur en regroupant et en triant les applications selon votre choix.
y AllShare™: AllShareMC relie votre téléviseur à vos téléphones cellulaires et appareils mobiles par le biais d'un réseau.
y Anynet+(HDMI-CEC) : Permet de commander tous les appareils Samsung branchés qui prennent en charge anynet+ à
l’aide de la télécommande Samsung.
Français - 20

Fixation du téléviseur au mur
Mise en garde: Le fait de tirer, de pousser ou de monter sur le téléviseur peut en provoquer la chute.
Assurez-vous notamment que vos enfants ne se suspendent pas au téléviseur ni le déséquilibrent. Il
pourrait basculer et causer des blessures sérieuses ou un décès. Suivez toutes les mesures de sécurité
indiquées dans la brochure de votre téléviseur. Pour une stabilité et une sécurité accrues, vous pouvez
acheter et installer un dispositif anti-chute tel que décrit ci-dessous.
Dispositif de retenue pour téléviseur (vendu séparément)
Les pièces ci-dessous sont incluses dans l'ensemble du dispositif de retenue pour téléviseur. De plus, vous aurez besoin
d'une vis à bois, d'une vis et d'une cheville Molly ou d'un autre type de vis convenant à l'armoire ou au mur auquel vous avez
l'intention de fixer le cordon du dispositif de retenue. Nous recommandons l'utilisation d'une vis à bois M4xL20.
Support du téléviseur (BN96-15753A) Vis (M8 X L19)
Installation du dispositif de retenue
1. Retirez la vis fixée à l'arrière de votre téléviseur, puis reliez le dispositif de retenue à ce dernier à l'aide de la vis incluse dans
l'ensemble du dispositif qui convient à votre appareil.
✎
Veillez à utiliser uniquement la vis fournie appropriée. Si vous utilisez une vis différente, vous risquez
d'endommager votre téléviseur.
2. Vissez fermement la vis que vous avez fournie (taille M4 x L20 ou similaire) à l'armoire ou au mur sur lequel le téléviseur
doit être installé.
✎
Si vous vissez la vis dans un mur, il est préférable qu'elle pénètre dans un montant. Si cela est impossible, utilisez
une cheville Molly pour ancrer la vis.
3. Attachez le cordon du dispositif de retenue à la vis fixée au mur ou à l'armoire afin d'immobiliser le téléviseur. Voir les
illustrations ci-dessous.
✎
Installez le téléviseur à proximité du mur de sorte qu’il ne se renverse pas.
✎
Lorsque vous attachez le cordon du dispositif au mur, fixez-le de manière qu’il soit parallèle au sol ou incliné vers le
bas pour des raisons de sécurité.
✎
Vérifiez le cordon de temps en temps pour s'assurer qu'il est bien ancré.
✎
Avant de déplacer le téléviseur, détachez d’abord le cordon.
4.
Assurez-vous que tous les points d’ancrage sont solides. Vérifiez périodiquement les points d'ancrage afin de détecter tout
signe de fatigue ou de bris. En cas de doute au sujet des points d’ancrage, communiquez avec un installateur professionnel.
Pour acheter le dispositif de retenue pour téléviseur, communiquez avec le centre de service à la clientèle SAMSUNG.
Aux États-Unis: 1-800-SAMSUNG (1-800-726-7864)
–
Au Canada : 1-800-SAMSUNG (1-800-726-7864)
–
Français - 21

Sécurisation de l’espace d’installation
Respectez les distances requises entre le téléviseur et le mur et d’autres objets afin d’assurer une bonne ventilation. Le nonrespect de ces distances pourrait faire augmenter la température interne du produit et causer un incendie ou endommager le
téléviseur.
✎
Lorsque vous utilisez une base ou un support mural, utilisez seulement les pièces fournies par Samsung Electronics.
Si vous utilisez des pièces fournies par un autre fabricant, cela pourrait endommager le produit ou causer des
x
blessures engendrées par la chute de ce dernier.
Installation sur une base. Installation sur un support mural.
4 pouces
4 pouces
Autres avertissements
✎
L’aspect réel du téléviseur peut différer des illustrations dans le présent guide selon le modèle choisi.
✎
Faites attention lorsque vous touchez le téléviseur, car certaines parties peuvent être chaudes.
4 pouces
4 pouces
4 pouces
4 pouces
4 pouces
Entreposage et entretien
✎
Si vous essayez de détacher une vignette que vous avez fixée sur l’écran du téléviseur, certains débris restent encore
collés. Nettoyez-les pour pouvoir regarder la télévision.
Ne vaporisez pas de l'eau ou un produit nettoyant
directement sur l'appareil. Tout liquide qui s'infiltre dans
l'appareil risque de provoquer une défaillance, un incendie ou
un choc électrique.
Spécifications
Français - 22
Nettoyez l'appareil à l'aide d'un chiffon doux légèrement
humidifié.

Spécifications
Résolution d'affichage 1920 x 1080
Facteurs environnementaux
Température de fonctionnement
Niveau d'humidité en fonctionnement
Température d'entreposage
Niveau d’humidité en entreposage
Pivotement du support (Gauche/
Droite)
Nom du modèle UN32D6000 UN40D6000
Taille de l'écran
(diagonale)
Son
(sortie) 10W x 2
Dimensions (L x P x H)
Boîtier
Avec support
Poids
Sans support
Avec support
Nom du modèle UN46D6000 UN55D6000
Taille de l'écran
(diagonale)
Son
(sortie) 10W x 2 15W x 2
Dimensions (L x P x H)
Boîtier
Avec support
Poids
Sans support
Avec support
Nom du modèle UN40D6050 UN46D6050 UN55D6050
Taille de l'écran
(diagonale)
Son
(sortie) 10W x 2 15W x 2
Dimensions (L x P x H)
Boîtier
Avec support
Poids
Sans support
Avec support
(40.0 pouces en diagonale)
37.7 X 1.2 X 22.7 pouces
(958.7 X 29.9 X575.9 mm)
37.7 X 10.0 X 25.5 pouces
(958.7X 255.0 X 648.3 mm)
Classe 32 pouces
(31.5 pouces en diagonale)
30.2 X 1.2 X 18.7 pouces
(768.0 X 29.9 X 475.3 mm)
30.2 X 9.4 X 21.0 pouces
(768.0 X 240.0 X 533.4 mm)
7.0 kg (15.4lb)
9.7 kg (21.4lb)
Classe 46 pouces
(45.9 pouces en diagonale)
42.9 X 1.2 X 25.9 pouces
(1090.6 X 29.9 X 657.1 mm)
42.9 X 10.8 X 28.1 pouces
(1090.6 X 275.0 X 714.1 mm)
13.5 kg (29.8lb)
17.1 kg (37.7lb)
Classe 40 pouces
10.9 kg (24.0lb)
14.2 kg (31.3lb)
50°F à 104°F (10°C à 40°C)
10 à 80 %, sans condensation
-20 à 45 °C (-4 à 113 °F)
5 à 95 %, sans condensation
-20˚ ~ 20˚
(40.0 pouces en diagonale)
(955.2 X 29.9 X 580.7 mm)
37.6 X 10.0 X 25.1 pouces
(955.2 X 255.0 X 638.0mm)
(54.6 pouces en diagonale)
(1281.2 X 29.9 X 763.9 mm)
50.4 X 12.0 X 32.3 pouces
(1281.2 X 305.0 X 820.9 mm)
Classe 46 pouces
(45.9 pouces en diagonale)
43.1 X 1.2 X 25.7 pouces
(1094.2 X 29.9 X 652.5 mm)
43.1 X 10.8 X 28.2 pouces
(1094.2X 275.0 X 715.9 mm)
13.5 kg (29.8lb)
17.1 kg (37.7lb)
Classe 40 pouces
37.6 X 1.2 X 22.9 pouces
10.9 kg (24.0lb)
14.2 kg (31.3lb)
Classe 55 pouces
50.4 X 1.2 X 30.1 pouces
18.0 kg (39.7lb)
22.2 kg (48.9lb)
Classe 55 pouces
(54.6 pouces en diagonale)
50.6 X 1.2 X 29.9 pouces
(1284.7 X 29.9 X 759.2 mm)
50.6 X 12.0 X 32.4 pouces
(1284.7 X 305.0 X 823.1 mm)
17.9 kg (39.5lb)
22.1 kg (48.7lb)
✎
Le design et les spécifications peuvent faire l'objet de modifications sans préavis.
✎
Cet appareil est un appareil numérique de catégorie B.
✎
Pour les caractéristiques d’alimentation et de consommation électrique, voir l’étiquette fixée au produit.
Français - 23

■ Vue avant / vue latérale
Dimensions
1
2
3
5
6
7
4
8
(Unité : pouces)
Nom de modèle
1 2 3 4 5 6 7 8
UN32D6000 30.2 27.5 15.5 17.5 18.7 21.0 1.2 9.4
UN40D6000 37.7 34.9 19.7 18.9 22.9 25.1 1.2 10.0
UN46D6000 42.9 40.1 22.6 19.5 25.9 28.1 1.2 10.8
UN55D6000 50.6 47.7 26.8 20.1 30.1 32.4 1.2 12.0
Nom de modèle
1 2 3 4 5 6 7 8
UN40D6050 37.7 34.9 19.7 18.9 22.7 25.5 1.2 10.0
UN46D6050 43.1 40.1 22.6 19.5 25.7 28.2 1.2 10.8
UN55D6050 50.6 47.7 26.8 20.1 29.9 32.4 1.2 12.0
■ vue arrière
1
2
3
6
5
8
4
7
(Unité : pouces)
Nom de modèle
1 2 3 4 5 6 7 8
UN32D6000 7.9 7.9 18.8 3.4 2.8 13.4 2.3 7.8
UN40D6000 7.9 7.9 23.0 3.5 5.9 14.1 4.4 7.9
UN46D6000
15.7 15.7 28.4 4.2 5.6 15.3 5.1 8.2
UN55D6000 15.7 15.7 34.0 4.3 6.8 15.5 5.1 8.8
Nom de modèle
1 2 3 4 5 6 7 8
UN40D6050 7.9 7.9 23.0 3.5 5.9 14.1 4.4 7.9
UN46D6050
15.7 15.7 28.4 4.2 5.6 15.3 5.1 8.2
UN55D6050 15.7 15.7 34.0 4.3 6.8 15.5 5.1 8.8
REMARQUE: Les dessins ne sont pas nécessairement à l’échelle. Certaines dimensions pourraient être modifiées sans
préavis. Vérifiez les dimensions avant d’installer votre téléviseur. Nous ne sommes pas responsables des erreurs de
typographie ou d’impression.
© 2011 Samsung Electronics America, Inc
Français - 24

This page is intentionally
left blank.
 Loading...