

Samsung UN55C8000XFXZA Owner’s Manual

Contact SAMSUNG WORLDWIDE
if you have any questions or comments relating to Samsung products, please contact the SAMSUNG customer care center.
Comment oontacter Samsung darts le monde
Si vous avez des suggestions ou des questions concernant les produits Samsung, veuillez contacter le Service Consommateurs
Samsung.
Comuniquese con SAMSUNG WORLDWIDE
Si desea formular alguna pregunta o comentario en relaci6n con los productos de Samsung, comuniquese con el centro de
atenci6n al cliente de SAMSUNG.
F-
FN
E:J
"'4
<
C
3
1,..
CANADA 1-800-SAMSUNG (726-7864) www.samsung.com Samsung Electronics Canada Inc., Customer Service
U.S.A I-8O0-SAMSUNG (726-7864) www.samsung.com Samsung Electronics America, Inc. 105 Challenger
55 Standish Court Mississauga, Ontario L5R 4B2
Canada
Road Ridgefield Park, NJ 07660-0511
© 2010 Samsung Electronics Co., Ltd. All rights reserved.
I
BN68-02712A-01
==
C
Z
imagine the possibilities
Thank you for purchasing this Samsung product.
Toreceive more corn olete service, please register
your product at
www.samsung.com/register
Mode Serial No.
Figures and illustrations in this User Manual are provided for reference only and may differ from actual product appearance.
Product design and specifications may be changed without notice,
_ See thewarranty card for more information onwarranty terms.
Wide screen format LEDDisplays (16:9,the aspect ratio of the screen width to height)are primarilydesigned to viewwide screenformat full-motion video.
The images displayed on them should pdmadly bein the wide screen 16:9 ratio format, or expanded to fill the screen ifyour model offersthis featureand
the images are constantly moving. Displayingstationary graphics and images on screen, such as the dark sidebars on no expanded standard format
televisionvideo and programming, should be limited to no more than 5% of the total televisionviewing perweek.
Additionally, viewing otherstationary images and text such as stock market reports, video game displays, station Iogos,web sites or computer graphics
and patterns, should be limited as described above for alltelevisions. Displaying stationary images that exceed the above guidelines can cause uneven
aging of LED Displaysthat leavesubtle, but permanent burned-in ghost images inthe LED picture.To avoid this, vary the programming and images, and
primarily display full screenmoving images,not stationary _atternsor dark bars. On LED models that offer picture sizingfeatures, use these controls to
view different formats as a fullscreen picture.
Be careful inthe selection andduration of television formats used for viewing. Uneven LED agingas a result of format selection and use, aswell as burned
in images, are not covered by your Samsung limitedwarranty.
• SAMSUNG ELECTRONICSNORTH AMERICAN UMITEDWARRANTYSTATEMENT
Subject to the requirements, conditions, exclusions and limitations of the original LimitedWarranty supplied with Samsung Electronics(SAMSUNG)
products, and the requirements, conditions, exclusions and limitations contained herein, SAMSUNG will additionally provide Warranty Repair Service
in the United States onSAMSUNG products purchased in Canada, and in Canada on SAMSUNG products purchased inthe United States,for the
warranty period originally specified, and to the Original Purchaser only.
The above described warranty repairsmust be performed by a SAMSUNG AuthorizedServiceCenter. Along with this Statement, the OriginalLimited
Warranty Statement and a dated Bill of Sale as Proof of Purchase must be presented to the Service Center.Transportation to and from the Service
Center is the responsibility of the purchaser. Conditions covered are limited onlyto manufacturing defects in material orworkmanship, and only those
encountered in normal use ofthe product.
Excluded, but not limited to, are any originallyspecified provisionsfor, in-home or on-site services,minimum or maximum repairtimes, exchanges or
replacements, accessories, options, upgrades, or consumables.
Forthe location of a SAMSUNGAuthorized ServiceCenter, please call toll-free:
- In the United States : 1-800-SAMSUNG (1-800-726-7864)
- In Canada : 1-800-SAMSUNG
Avoid displaying still images (such as jpeg picture files) or still image elements (such as TV channel Iogos, panoramaor 4:3 image format, stock or news
bars at screen bottom etc.) on the screen. Constant displaying of stillpicture can cause ghosting of LED screen, which will affect image quality.Toreduce
risk of this effect, please follow below recommendations:
• Avoid displaying the same TVchannelfor long periods.
• Always try to display a fullscreenimage.
• Reducingbrightness and contrast will help to avoid the appearance of afterdmages.
• UseallTV features designed to reduce image retentionand screen burn, referto proper usermanual section for details.
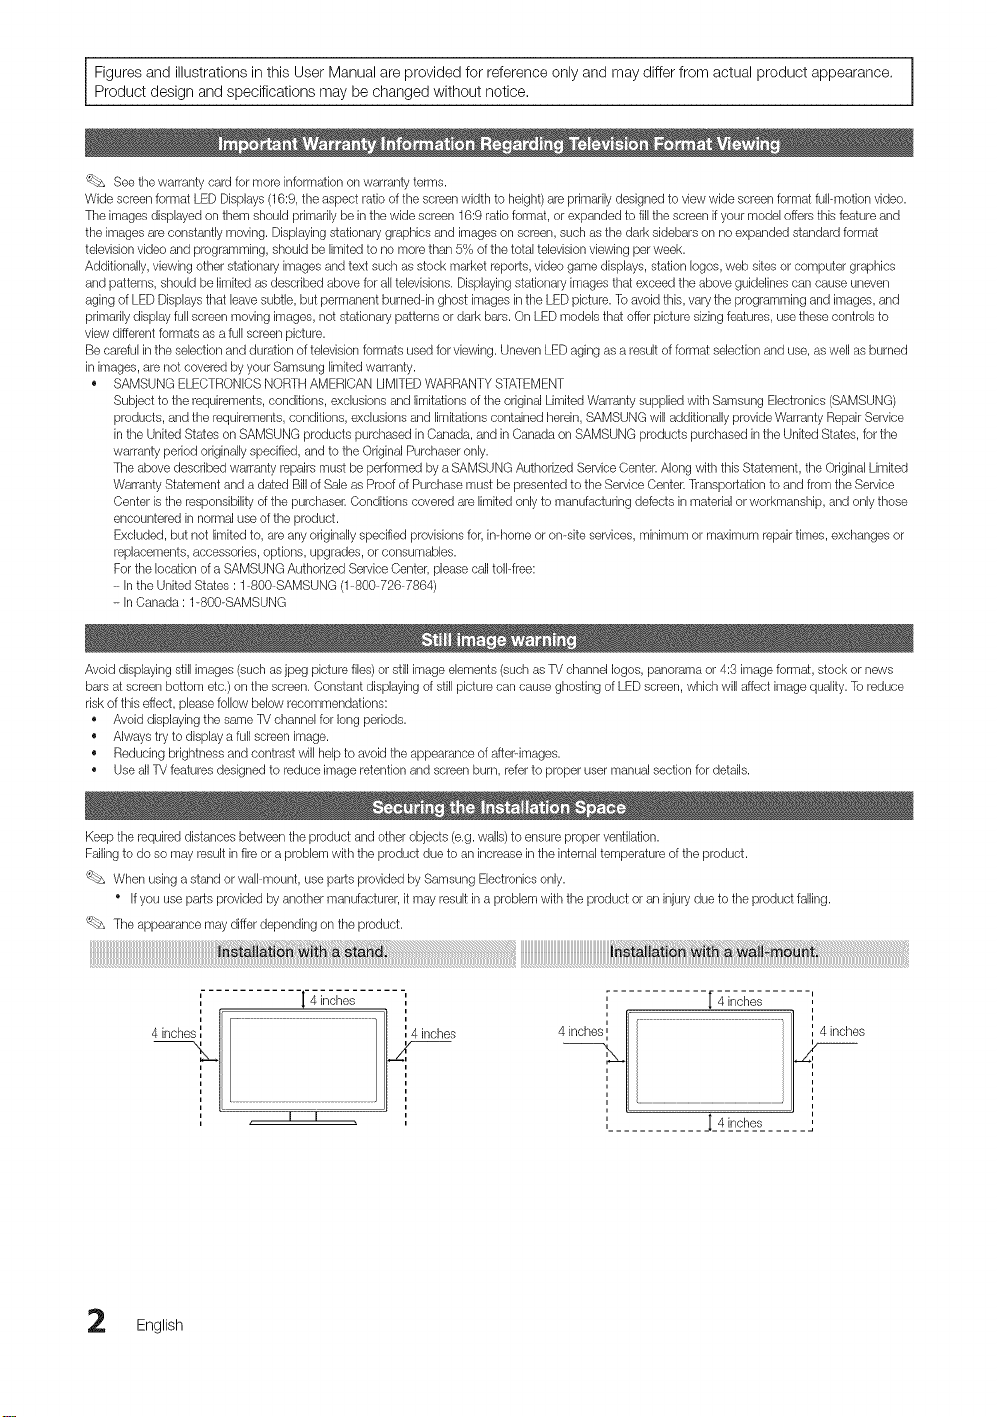
Keep the required distances between the product and other objects (e.g.walls)to ensure proper ventilation.
Failing to do so may result infire or a problem with the product due to an increase inthe internaltemperature of the product.
'_bs When using a stand or wall-mount, use parts provided by Samsung Electronics only.
Ifyou use parts provided by another manufacturel it may result ina problem with the product or aninjury due to the product failing.
The appearance may differ depending on the product.
4 inche_
•r 4 inches
4 inch 4 inches,_
I I
[ 4 inches
_I_4__-,_ ......
English
4 inches

Contents
+ List of Features ......................................................... 4
+ Accessories .............................................................. 4
+ Installthe Stand ........................................................ 5
+ Viewing the Control Panel ......................................... 6
+ Viewing the Remote Control...................................... 7
+ Connecting to an Antenna ........................................ 8
+ Plug & Play (Initial Setup) ........................................... 8
+ Connecting to an AV Device...................................... 9
+ Connecting to an Audio Device ............................... 11
+ Connecting to a PC ................................................ 12
+ Changing the Input Source ..................................... 13
+ How to Navigate Menus.......................................... 13
+ Channel Menu ....................................................... 14
SeeingChannels 14
Using FavoriteChannels 14
Memorizing Channels 14
Editing Channeb 15
Other Features 15
+ Picture Menu .......................................................... 16
Changingthe PresetPicture Mode
Adjusting PictureSettings
Economical Solutions
Changingthe PictureOptions
Viewing TV using the 3Dfunction
Setting upthe TVwith Your PC
+ Sound Menu ........................................................... 22
Changingthe PresetSound Mode 22
Adjusting Sound Settings 22
Sound Settings 23
+ Setup Menu ............................................................ 24
Setting theTime 24
Usingthe Sleep Timer 24
Setting the On/ Off Timer 24
Locking Programs 25
Other Features 26
Picture InPicture (PIP) 28
Support Menu......................................................... 28
• Network Connection ............................................... 30
Connecting to aWired Network 30
Connecting to aWireless Network 32
,, Media Play.............................................................. 37
Connecting a USB Device 37
Connecting to your PCthrough a network 37
Screen Display 39
Playing MultipleFiles 42
Media Play- Additional Functions 42
,, Anynet+ .................................................................. 44
Setting Up Anynet+ 45
Switching between Anynet+ Devices 45
Recording 46
Listeningthrough a Receiver 46
Troubleshootingfor Anynet+ 47
,, Internet@TV ............................................................ 48
Getting Started with Internet@TV 48
Setting up Internet@TV 49
Usingthe Internet@TVservice 51
PROFILEWidget 53
Widget Galbry 53
Help Website 54
AIIShare .................................................................. 55
About AIIShare 55
16
16
16
17
19
22
Setting Up AIIShare 55
• Assembling the Cables ........................................... 57
• Installing theWall Mount ......................................... 58
• Anti-theft Kensington Lock ...................................... 59
• Securing the TV to the Wall..................................... 60
• Troubleshooting ...................................................... 61
• License ................................................................... 64
• Specifications ......................................................... 64
• Dimensions ............................................................. 65
• Index ...................................................................... 66
Tilis function can be used by pressing tile
TOOLS button on tile remote controk
Check the Symbol!
%x
Note
Indicatesadditionalinformation.
®
Step by Step Guide
Check herefor instructions on how to open
the relevant submenu within the OSD (on
screen display).
English 3
Getting Started
• Excellent Digital Interface & Networking: With a built-in HD digital tuner, nonsubscription HD broadcasts can be viewed
without a cable box / STB (Set-Top-Box) satellite receiver.
• Media Play: Allows you to play music files, pictures, and movies saved on a USB device (p. 37).
• Internet@TV: You can use various internet services and view useful information and entertaining content (p. 48).
• AIIShare: AIIShare connects your TV and compatible Samsung mobile phones/devices through a network (p. 55).
• Self Diagnosis: You can check whether picture or sound operate normally (p. 28).
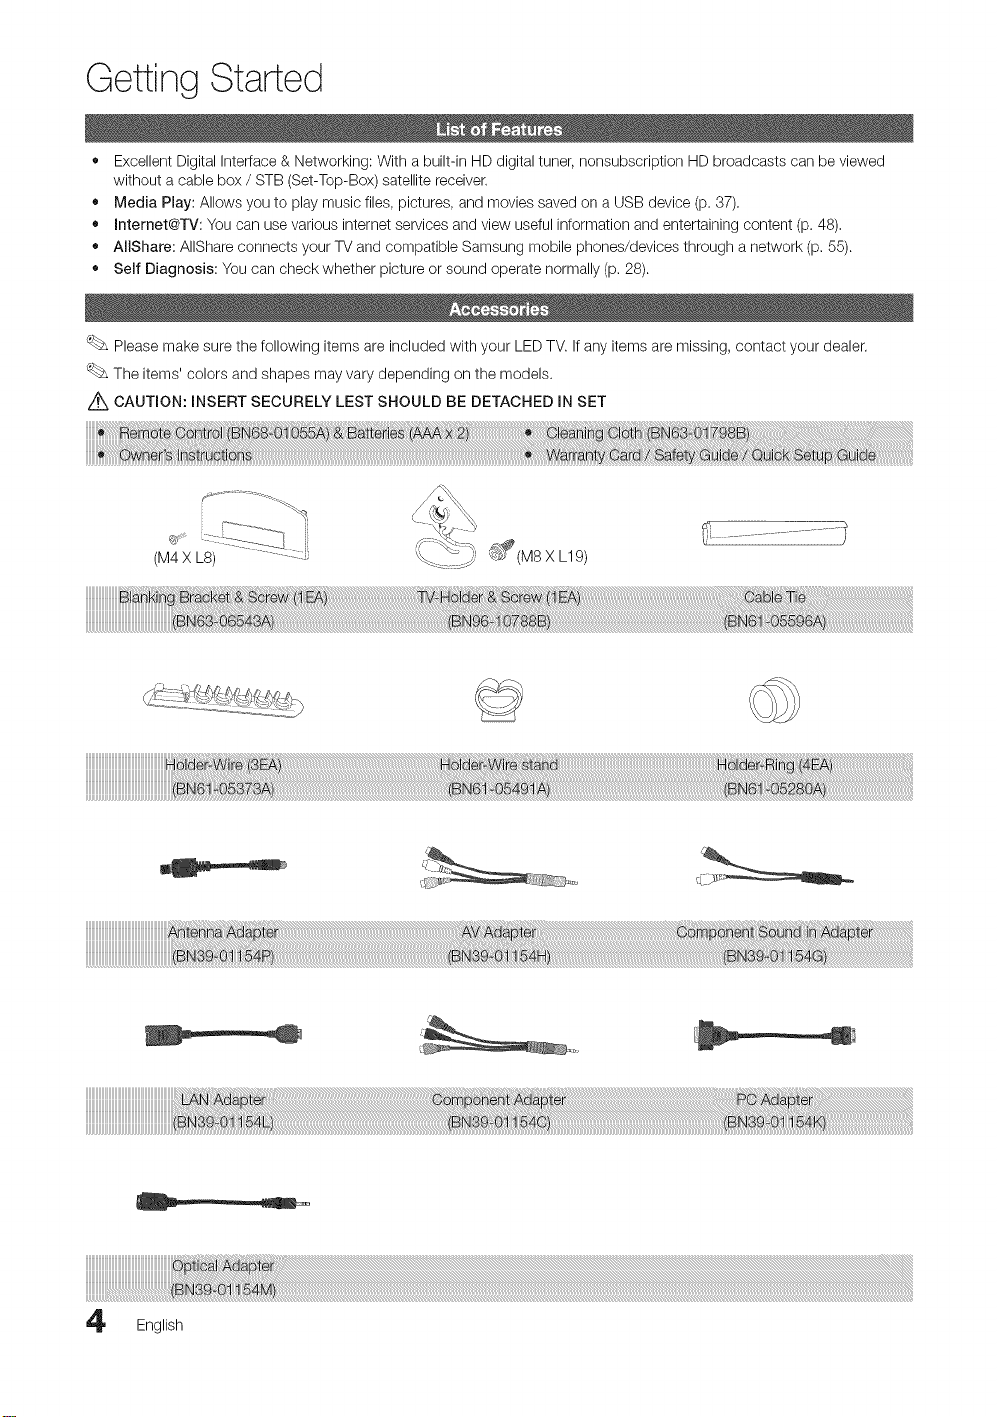
Please make sure the following items are included with your LED TV. If any items are missing, contact your dealer.
The items' colors and shapes may vary depending on the models.
Z_ CAUTION: INSERT SECURELY LEST SHOULD BE DETACHED IN SET
(M4 X LS) ............:z
_£ (M8 X L19)
English

Seeseparateguideforinstallingthestand.
_______________________________________________________________________________________________________________________8iaSt
Fellow the steps below to connect the TV to the stand+
9EA X
_ (M4 LS)
Screws(M4X L8)...... .yI+_I'
GuideStand........... __ i_
Stand--- _ i
Rear _......._ ............
1. Connect the Guide Stand to the Stand using four screws (M4 X L8) as shown.
c ++ ................ "
2. With your TV upright, connect the TV to the Stand. 3.
NOTE
+ Make sure to distinguish between the front and back of the Stand and Guide Stand when assembling them.
+ Make sure that at least two persons lift and move the LED TV.
+ Stand the product up and fasten the screws+ If you fasten the screws with the LED TV placed down, it may lean to
one side.
i Topview
Screws(M4X LS).....
V+
Fasten two screws (M4 X LS) at position O, and then
fasten three screws (M4 X L8) at position O.
English 5
Getting Started
For best cable connection to this product, be sure to use cables with a maximum thickness as below:
i • Maximum thickness - 0.55 inches (14mm)
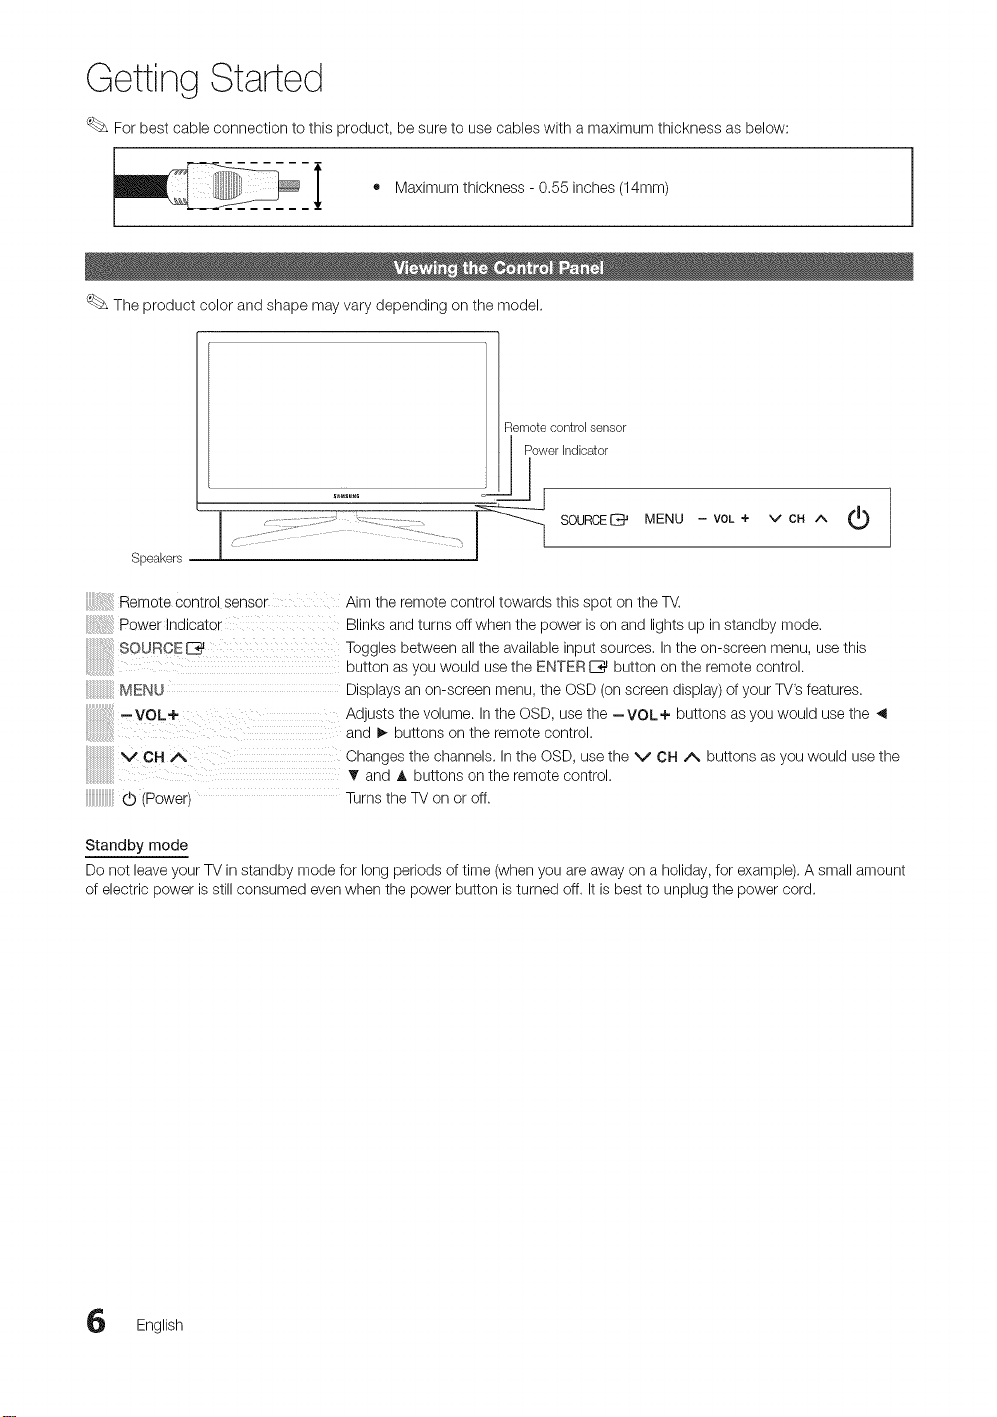
The product color and shape may vary depending on the model.
Remotecontrolsensor
Powerindicator
MENU - VOL + v CH ^
SpeakersI SOURCE
Remote control sensor Aim the remote control towards this spot on the TV.
Power Indicator Blinks and turns offwhen the power is on and lights up in standby mode.
SOURCED Toggles between all the available input sources, Inthe on-screen menu, use this
MENU Displays an on-screen menu, the OSD (on screen display) of your TV's features.
,VOL+ Adjusts the volume. Inthe OSD, use the --VOL÷ buttons as you would use the ,_
V CH/_ Changes the channels. In the OSD, use the V CH A buttons as you would use the
(b (Power) Turnsthe TV on or off.
button as you would use the ENTER IZ_ button on the remote control.
and I_ buttons on the remote control.
T and A buttons on the remote control.
Standby mode
Do not leave your TV in standby mode for long periods of time (when you are away on a holiday, for example). A small amount
of electric power is still consumed even when the power button is turned off. It is best to unplug the power cord.
English
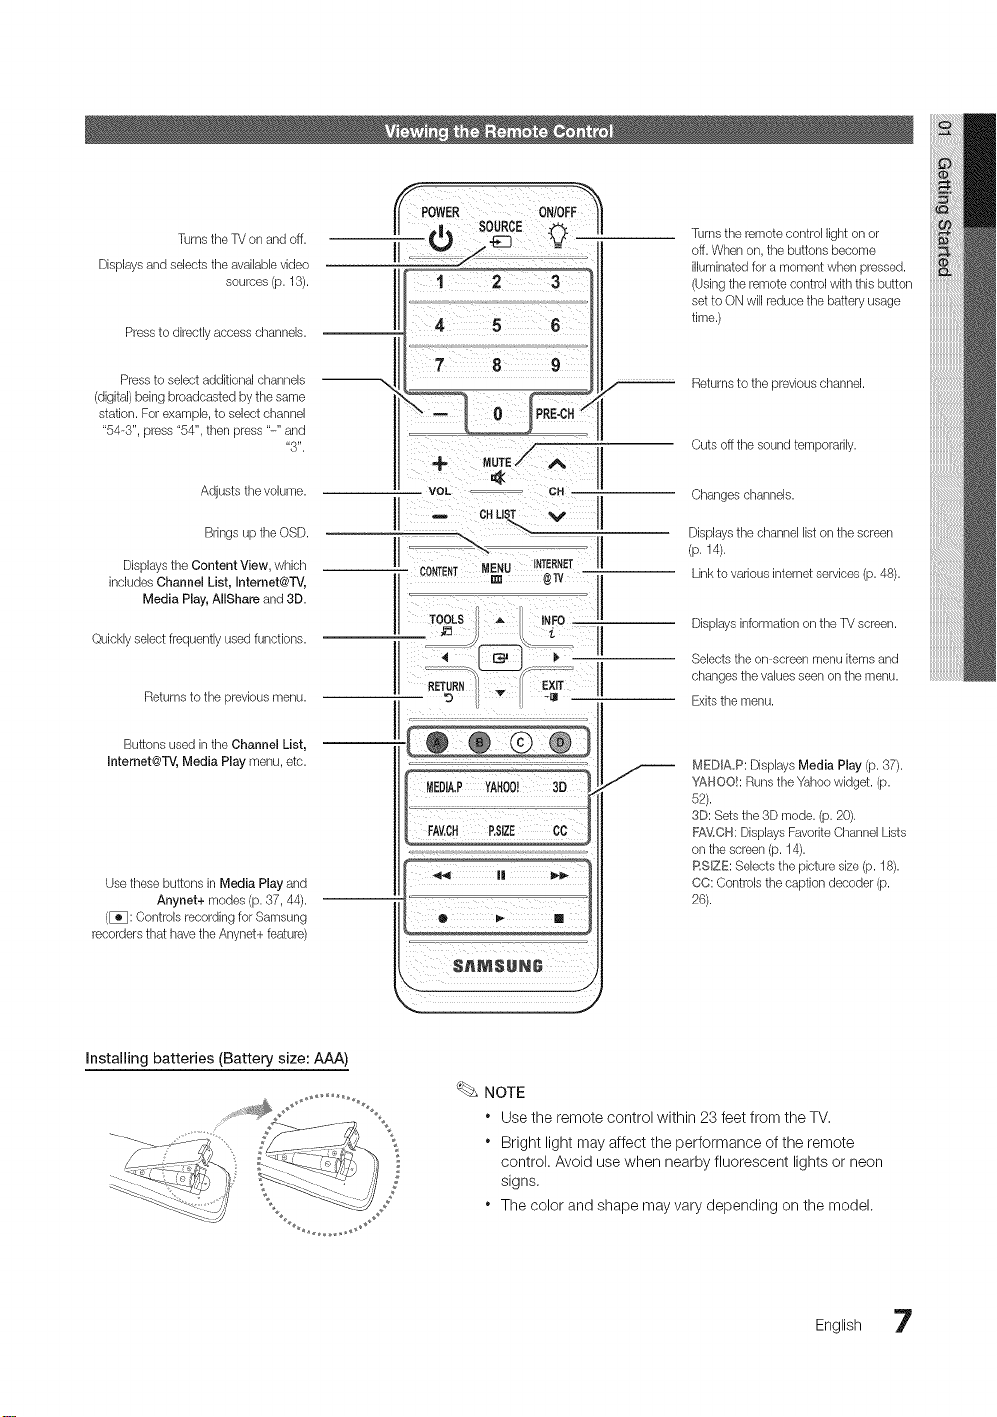
Turnsthe TV on andoff.
Displays and selects the available video
sources (p.13).
Press to directly accesschannels.
PowE o,io,F
II .!,, SOURCE_ II
II
Turns the remote control light on or
off.When on, the buttons become
illuminated for a moment when pressed.
(Usingthe remote control with this button
setto ON will reduce the battery usage
time.)
Pressto select additional channels
(digital)being broadcasted by the same
station. For example, to select channel
"54-3", press "54", then press "-" and
Adjusts the volume.
Brings up the OSD.
Displays the Content View, wtTich
includes Channel List, Internet@TV,
Media Play, AJlShareand 3D.
Quickly select frequently used functions.
Returns to the previousmenu.
Buttons used intlTeChannel List,
Intemet@TV, Media Play menu, etc.
Use these buttons in Media Play and
Anynet+ modes (p.37, 44).
([_3: Controls recording forSamsung
recordersthat havethe Anynet+ feature)
"3".
+
VOL _ CH
_ c, LiT V
!:
[
I.
Returnsto the previous channel.
Cuts offthe sound temporarily.
Changes channels.
Displays the channel list onthe screen
(p. 14).
Linkto various internet services(p. 48).
Displays information onthe TV screen.
Selects the on-screen menu items and
changes the values seen onthe menu.
Exitsthe menu.
MEDIA,P: Displays Media Play (p. 37).
YAHOO!: Runsthe Yahoo widget. (p.
62).
3D: Sets the 3D mode. (p. 20).
FAV,CH: Displays FavoriteChannel Lists
on the screen (p. 14).
RSlZE: Selects the picture size (p. 18).
CC: Controls the caption decoder (p.
26).
Installing batteries (Battery size: AAA)
_ J
NOTE
* Use the remote control within 23 feet from the TV,
* Bright light may affect the performance of the remote
control. Avoid use when nearby fluorescent lights or neon
S
signs,
* The color and shape may vary depending on the model.
English 7

I
When the TV is initially powered on, a sequence of on-screen prompts will assist in configuring basic settings. Press the
POWER (b button. Plug & Play is available only when the Input source is set to TV.
To return to the previous step, press the Red button.
Selecting a language
Press the A or T button, then press the ENTERE_ button. POWER
Select the desired OSD (OnScreen Display) language.
Selecting Store Demo
or Home Use
Press the _ or I_ button, then press the ENTERIZ_ button.
• Select the Home Use mode. Store Demo Mode isfor retail
environments.
• To return the unit's settings from Store Demo to Home Use
(standard): Press the volume button on the TV When you
see the volume OSD, press and hold MENU tor 5 sec.
Selecting an antenna
Press the A or _r button, then press the ENTERI_%_button. Select Air, Cable or Auto.
Press the A or T button, then press the ENTERE_ button. Select the channel source
Selecting a cnanne
_omemorize. When setting the antenna source to Cable, a step appears allowing you to
assign numerical values (channelfrequencies) to the channels. For more information, refer to
Channel _ Auto Program (p. 14).
Press the ENTERE*3J button at any time to interrupt the memorization process.
Setting the Clock
Mode
Set the Clock Mode automatically or manually.
• Auto: Allows you to select DST (Daylight Saving Time) mode and time zone.
• Manual: Allows you to manually set the current date and time (p. 24).
View the HD
The connection method for the best HD screen quality is displayed.
Connection Guide
Enjoy the TV.
Press the ENTERI_%_button.
If You Want to Reset This Feature...
(_ MENUiTrl _ Setup --_ Plug & Play _ ENTERI__
English

Connections
Using an HDMI or HDMI/DVI Cable: HD connection (up to 1080p)
We recommend using the HDMI connection for the best quality HD picture.
Available devices: DVD, Blu-ray player, HD cable box, HD STB (Set-Top-Box) satellite receiver
Audio Cable/Not Supplied}
HDM_ _NI(DV_), 2(ARC), 3, 4, PC./DV_AUDIO _N
* When using an HDMI/DVI cable connection, you must use the HDM_ _NI(DV{)jack for video. A DVD, Blu-ray
player, HD cable box, or HD STB satellite receiver may require a DVI-HDMI (DVI to HDMI) cable or DVI-HDMI
(DVIto HDMI) adapter. The PC/DW AUDIO _Njack is required for audio.
* Ifan external device such as a DVD / Blu-ray player / HD cable box / HD STB satellite receiver supporting
HDMI version older than 1.4is connected, the TV may operate abnormally (e.g. no screen display / no sound /
annoying flicker / abnormal color).
* Ifthere is no sound after connecting an HDMI cable, check the HDMI version of the external device. Ifyou
suspect the version is older than 1.4, contact the provider of the device to confirm the HDMI version and
request an upgrade.
* Samsung TVs support HDMI 1.4 (with 3D and Audio Return Channel). However, the ARC(Audio Return
Channel) function is only supported on HDM_ _N2(ARC).
- If 3D Auto View is On, some functions, such as Yahoo or Internet@TV, are disabled. To use these functions,
set 3D Auto View or 3D Mode to Off.
* The ARC function enables digital output of sound using the HDM_ _N2(ARC} port and can only be operated
when the TV is connected to an audio receiver that supports ARC.
- The ARC mode is only enabled when the TV is connected to a device with an HDMI Standard cable, HDMI
High Speed cable, Hdmi Standard with Ethernet cable or HDMI High Speed with Ethernet cable.
- When the Input Source is the TV,the ARC function allows audio to be heard from a receiver.The audio is sent
to a receiver from the TV via an HDMI cable without the need for a separate optical cable.
* It is recommended you purchase an HDMI-certified cable. Otherwise, the screen may appear blank or a
connection error may occur,
English 9

Connections
Using a Component (up to 1080p) or Audio/Video (480i only) Cable
Available devices: DVD, Blu-ray player, cable box, STB satellite receiver,VCR
[
For better picture quality, the Component connection is recommended over the A/V connection.
Using an EX-Link Cable Connection
Available Devices: External devices that support EX-Link.
)
0 English
Using an Optical (Digital) or Audio (Analog) Cable Connection
Available devices: Digital Audio System, Amplifier, DVD home theater
opt ca( CaNe (No_ Suppl_ed)
Optical Adapter (Suppied}
I
DIGITAL AUDIO OUT (OPTICAL)
" When a Digital Audio System is connected to the DIGITAL AVDIO OUT (OPTICAL} jack, decrease the volume
of both the TV and the system.
" 5.1OH (channel) audio is available when the TV is connected to an external device supporting 5.1 OH.
" When the receiver (home theater) is set to on, you can hear sound output from the TV's optical jack. When the
TV is receiving a DTV signal, the TV will send 5,1 CH sound to the home theater receiver. When the source is
a digital component such as a DVD / Blu-ray player / cable box / STB (Set-Top-Box) satellite receiver and is
connected to the TV via HDMI, only 2 OH audio will be heard from the home theater receiver. Ifyou want to
hear 5.1 OH audio, connect the digital audio out jack from your DVD / Blu-ray player / cable box / STB satellite
receiver directly to an amplifier or home theater.
AUDIO OUT: Connects to the audio input jacks on your amplifier/DVD home theater.
" When connecting, use the appropriate connector.
" When an audio amplifier is connected to the AUDIO OUT jacks: Decrease the volume of the TV and adjust the
volume level with the amplifier's volume control,
Englishii

Connections
Using an HDMI/DVI cable or a D-sub cable
0¸:¸¸::¸¸¸¸¸?¸¸:x:i:x:
Display Modes (D-Sub and HDMI/DVI Input)
Optimal resolution is 1920 X 1080 @60 Hz,
HDMI to BY] Cable (Not Supplied)
J
.....s
IBM
MAC
VESA CVT
VESA DMT
VESA GTF
VESA DMT/DTV CEA
640 x 350
720 x 400
640 x 480
832 x 624
1152 x 870
720 x576
1152 x 864
1280 x 720
1280 x 960
640 x 480
640 x 480
640 x 480
800 x 600
800 x 600
800 x 600
1024 x 768
1024 x 768
1024x 768
1152 x 864
1280 x 1024
1280 x 1024
1280x 720
1280x 800
1280x 800
1280x 960
1360 x 768
1440 x 900
1440x 900
1680 x 1050
1280 x 720
1280 x 1024
1920 x 1080p
31.469
31.469
35.000
49.726
68.681
35.910
53.783
56.456
75.231
31.469
37.861
37.500
37.879
48.077
46.875
48.363
56.476
60.023
67.500
63.981
79.976
45.000
49.702
62.795
60.000
47.712
55.935
70.635
65.290
52.500
74.620
67.500
70.086
70.087
66.667
74.551
75.062
59.950
59.959
74.777
74.857
59.940
72.809
75.000
60.317
72.188
75.000
60.004
70.069
75.029
75.000
60.020
75.025
60.000
59.810
74.934
60.000
60.015
59.887
74.984
59.954
70.000
70.000
60.000
25.175
28.322
30.240
57.284
100.000
32.750
81.750
95.750
130.000
25.175
31.500
31.500
40.000
50.000
49.500
65.000
75.000
78.750
108.000
108.000
135.000
74.250
83.500
106.500
108.000
85.500
106.500
136.750
146.250
89.040
128.943
148.500
+/-
-/+
-/+
-/+
-/+
-/+
+/+
+/+
+/+
+/+
+/+
+/+
+/+
+/+
-/+
-/+
+/+
+/+
-/+
-/+
-/+
-/+
+/+
NOTE
* For HDMI/DVI cable connection, you must use the HDMI IN I(DVI)jack.
* The interlace mode is not supported.
* The set may operate abnormally if a non-standard video format is selected.
* Separate and Composite modes are supported. SOG(Sync On Green) is not supported.
2 English
(_ MENUiTrl _ Input _ Source List _ ENTERI_
m
-IV / PC / AV / Component / HDMH/DVI / HDMI2 /
HDMI3 / HDMI4 / USB
You can only choose external devices that
are connected to the TM In the Source List,
connected inputs will be highlighted.
Inthe Source List, PC is always activated.
Basic Features
Edit Name
(_ MENUiTrl --_ Input _ Edit Name _ ENTERI_
VCR / DVD / Cable STB / Satellite STB / PVR STB /
AV Receiver / Game / Camcorder / PC / DVI PC / DVI
Devices / TV / IPTV / Blu-ray / HD DVD / DMA: Name
the device connected to the input jacks to make your
input source selection easier.
When a PC with a resolution of 1920 x 1080 @60Hz is
connected to the HDM_ _N I(DW) port, you should set
the TV to DVI PC mode under Edit Name.
When connecting an HDMI/DVI cable to the HDM_ IN
I(DW) port, you should set the TV to DVl PC or DVl
Devices mode under Edit Name.
Before using the TV,follow the steps below to learn how to
navigate the menu and select and adjust different functions.
O MENU button: Displays the main on-screen menu.
O ENTERI_ / Direction button: Move the cursor and
select an item. Confirm the setting.
RETURN button: Returns to the previous menu.
O EXIT button: Exits the on-screen menu.
How to Operate the OSD (On Screen Display)
The access step may differ depending on the selected menu.
MENU The main menu options appear on
Picture, Sound, Channel, Setup,
the screen:
Input, Application, Support.
A / • Select an icon with the A or T
........................ button.
_ ENTER[_ Press ENTERI_ to access the
..................................... sub-menu.
A! , Select the desired submenu with
.............................................the A or _r button.
:8 "J
ENTER _
EXiT -_Fl_ Press EXIT.
Adjust the value of an item with the
4 or _ button. The adjustment in
the OSD may differ depending on
the selected menu.
Press ENTERI_ to confirm the
selection.
English 13

Basic Features
Using Favorite Channels
Seeing Channels
Channel List
Add, delete or set Favorite channels and use
the program guide for digital broadcasts.
(_ MENUrITI _ Channel --_Channel List
ENTERI_
Select a channel inthe All Channels, Added
Channels, Favorite or Programmed screen by
pressing the _, / T and ENTERC_ buttons.
Then you can watch the selected channel.
II {_H_AIIChannels: Shows all currently available channels.
Ill _Added Channels: Shows all added channels.
Ill _ Favorite: Shows all favorite channels.
Ill _ Programmed: Shows all currently reserved
programs.
Using the color buttons with the Channel List
* _ Red (Antenna): Switches to Air or Cable.
* [3Green (Zoom): Enlarges or shrinks a channel
number.
* Yellow (Select): Selects multiple channel lists.
Select desired channels and press the Yellow button
to set all the selected channels at the same time. The
_/ mark appears to the left of the selected channels.
* 0 (Page): Move to next or previous page.
* _-_ (Tools): Displays the Channel List option menu.
(The options menus may differ depending on the
situation.)
Channel Status Display Icons
(_ MENUITTI _ Channel _ Channel List _ ENTERI_
Add to Favorite / Delete from Favorite
1. Select a channel and press the TOOLS button.
2. Add or delete a channel using the Add to Favorite or
Set channels you watch frequently as Favorites.
Delete from Favorite menu respectively.
To show all Favorite channels, click on the
button shown on the right.
Memorizing Channels
(_ MENUITTI --_Channel _ ENTERI_
Antenna (Air / Cable)
Before your television can begin memorizing the available
channels, you must specify the type of signal source that is
connected to the TV (i.e. an Air or a Cable system).
Auto Program ..........................................................................................................................................................................................
Ill Air: Air antenna signal.
Ill Cable: Cable antenna signal.
Ill Auto: Air and Cable antenna,
4 English
NOTE
WhenselectingtheCableTVsystem:STD,HRC
andIRCidentifyvarioustypesofcableTVsystems.
Contactyourlocalcablecompanytoidentifythe
typeofcablesystemthatexistsinyourparticular
area.Atthispoint,thesignalsourcehasbeen
selected.
Afteralltheavailablechannelsarestored,itstarts
toremovescrambledchannels.TheAutoProgram
menuthenreappears.
Editing Channels
MENUiTrl _ Channel --_Channel List --_ ENTERI_
Channel Name Edit
1. Select a channel and press the TOOLS button,
2. Edit the channel name using the Channel Name Edit
menu,
Ill Channel Name Edit (analog channels only): Assign your
own channel name.
Other Features
MENUiTrl _ Channel --_ENTERI_
Clear Scrambled Channel
This function is used to filter out scrambled channels after
Auto Program is completed. This process may take up to
20-30 minutes.
How to Stop Searching Scrambled Channels
1. Press the ENTERE_ button to select Stop.
2. Press the _ button to select Yes.
3. Press the ENTERI_ button.
This function is only available in Cable mode,
Channel List
Channel List Option Menu
Set each channel using the Channel List menu options (Add
/ Delete, Timer Viewing, Select All/Deselect All). Option
menu items may differ depending on the channel status.
1. Select a channel and press the TOOLS button.
2. Select a function and change its settings.
Ill Add / Delete: Delete or add a channel to display the
channels you want.
NOTE
* All deleted channels will be shown on the All
Channels menu.
* A gray-colored channel indicates the channel
has been deleted.
* The Add menu only appears for deleted
channels,
* Delete a channel from the Added Channels or
Favorite menu in the same manner.
m
Timer Viewing: You can set a desired channel to be
displayed automatically at the reserved time. Set the
current time first to use this function.
1. Press the _ / I_ / A / _ buttons to select the
desired channel in Channel List,
2. Press the TOOLS button, then select Timer
Viewing,
3. Scroll up or down to adjust the settings in the box,
or use the numeric buttons on your remote to enter
the date and time.
If you selected Once, Every Week or EveryDay
in Repeat you can enter the date you want.
4. Select OK, then press the ENTERI_ button when
done.
NOTE
* Only memorized channels can be reserved.
* Reserved programs will be displayed in the
Programmed menu.
* When a digital channel is selected, press the I_
button to view the digital program.
m
Select All: Select all the channels in the channel list.
Deselect All: Deselect allthe selected channels.
m
You can only select Deselect All when one or
more channels are selected.
Programmed
(inChannel List)
You can view, modify or delete a show you have reserved
to watch. Programmed timer viewing is displayed here.
Highlight a program and press the TOOLS button to display
Options.
Ill Change Info: Change a show you have reserved to
watch. Begin with step 3 of "Timer Viewing" above.
Ill Cancel Schedules: Cancel a show you have reserved
to watch.
This deletes the highlighted or selected
program(s).
English 15

Basic Features
m
information: Display a show you have reserved
to watch. (Youcan also change the reservation
Information.)
Alternatively, you can view Information by
highlighting a program and pressing the
ENTERIZ_ button.
Select All / Deselect All: Select or deselect all reserved
m
programs.
Fine Tune
(analog channels only)
if the reception is clear, you do not have to fine tune the
channel, as this isdone automatically during the search and
store operation, if the signal is weak or distorted, fine tune
the channel manually. Scroll to the left or right until the image
is clear.
Settings are applied to the channel you're currently
watching,
Finetuned channels that have been saved are marked
with an asterisk .....on the right-hand side of the
channel number in the channel banner.
To reset the fine-tuning, select Reset.
Changing the Preset Picture Mode
(_ MENUiTrl _ Picture -_ Mode -_ ENTERE_
Mode
Select your preferred picture type.
Ill Dynamic: Suitable for a bright room.
Ill Standard: Suitable for a normal environment.
Ill Natural: Suitable for reducing eye strain.
Natural is not available in PC mode.
Ill Movie: Suitable for watching movies in a dark room.
Adjusting Picture Settings
(_ MENUrlTI _ Picture _ ENTERI_
Backlight / Contrast / Brightness /
Sharpness / Color / Tint (G/R)
Your television has several setting options for picture quality
control.
NOTE
* When you make changes to Backlight, Contrast,
Brightness, Sharpness, Color or Tint (G/R) the
OSD will be adjusted accordingly.
* InPC mode, you can only make changes to
Backlight, Contrast and Brightness.
* Settings can be adjusted and stored for each
external device connected to the TV.
Economical Solutions
The Eco Function can be used to enhance your power
savings.
Eco Solution .........................................................................................................................................................
(_ MENU rlTl _ Picture _ Eco Solution _ ENTERI_
Ill Energy Saving (Off / Low / Medium / High / Picture
Off / Auto): This adjusts the brightness of the TV in order
to reduce power consumption. Ifyou select Picture Off,
the screen is turned off, but the sound remains on. Press
any button except volume button to turn on the screen.
Ill Eco Sensor (Off / On): To enhance your power savings;
the picture settings will automatically adapt to the light
in the room.
Ifyou adjust the Backlight, the Eco Sensor will
be set to Off.
Min Backlight: When Eco sensor is On, the minimum
screen brightness can be adjusted manually.
If Eco Sensor is On, the display brightness may
change (become slightly darker in most cases)
depending on the surrounding light intensity.
m No Signal Power Off (Off / 15 min. / 30 min. / 60
min.): To avoid unnecessary energy consumption,
set how long you want the TV to remain on if it's not
receiving a signal.
Disabled when the PC is in power saving mode.
6 English

Changing the Picture Options
Advanced Settings .......................................................................................................................................................
(_ MENU rlTI _ Picture _ Advanced Settings
ENTERC_
(Advanced Settings are available in Standard / Movie mode)
Compared to previous models, new Samsung TVs have a
more precise picture.
In PC mode, you can only make changes to Dynamic
Contrast, Gamma, White Balance and LED Motion
plus.
m
Black Tone (Off / Dark / Darker / Darkest): Select the
black level to adjust the screen depth.
m
Dynamic Contrast (Off / Low / Medium / High): Adjust
the screen contrast.
m
Gamma: Adjust the primary color intensity.
m
Expert Pattern (Off / Pattern1 / Pattern2): By
running the Expert Pattern function, the picture can
be calibrated. If the OSD menu disappears or a menu Ill
other than the Picture menu is opened, the calibration is
saved and the Expert Pattern window disappears.
Off: Turns the Expert Pattern function off.
Pattern1 :This is atest screen designed to demonstrate
the affects of display settings on shades.
Pattern2: This is a test screen designed to demonstrate
the affects of display settings on colors.
After selecting Pattern1 or Pattern2, you can
adjust any of the advanced settings to the desired Ill
effect.
While the Expert Pattern is running, sound is not
output.
Only enabled in DTV,Component and HDMI
modes.
Ill RGB Only Mode (Off / Red / Green / Blue): Displays
the Red, Green and Blue color for making fine
adjustments to the hue and saturation.
Ill Color Space (Auto / Native / Custom): Adjust the
range of colors available to create the image. To adjust
Color, Red, Green, Blue and Reset, set Color Space
to Custom.
Ill White Balance: Adjust the color temperature for a more
natural picture.
R-Offset / G-Offset / B-Offset: Adjust each color's
(red, green, blue) darkness.
R-Gain / G-Gain / B-Gain: Adjust each color's (red,
green, blue) brightness.
Reset: Resets the White Balance to it's default
settings.
Ill 10p White Balance (Off / On): Controls the white
balance in10 point intervals by adjusting the red, green,
and blue brightness.
Available when the picture mode is set to Movie
and when the external input is set to HDMI or
Component.
Some external devices may not support this
function.
Interval: Select interval to adjust.
Red: Adjust the red level.
Green: Adjust the green level.
Blue: Adjust the blue level.
Reset: Resets the 10p White Balance to its default
settings.
Ill Flesh Tone: Emphasize pink "Flesh Tone."
Ill Edge Enhancement (Off / On): Emphasize object
boundaries.
xvYCC (Off / On): Setting the xvYCC mode on
increases detail and color space when watching movies
from an external device (e.g. BD/DVD player) connected
to the HDMI or Component IN jacks.
Available when the picture mode is set to Movie
and when the external input is set to HDMI or
Component.
Some external devices may not support this
function.
LED Motion Plus (Off/Normal/Cinema/Ticker):
Removes drag from fast scenes with a lot of movement
to provide a clear picture.
English 17
Basic Features
Picture Options
(_ MENU iTR _ Picture _ Picture Options
ENTER[_
In PC mode, you can only make changes to the Color
Tone, Size and Auto Protection Time,
Ill Color Tone (Cool / Normal / Warm1 / Warm2)
Warm1 or Warm2 will be deactivated when the picture
mode is Dynamic.
Settings can be adjusted and stored for each external
device connected to an input on the TV.
Ill Size: Your cable box/satellite receiver may
have its own set of screen sizes as well.
However, we highly recommend you use
16:9 mode most of the time.
16:9 : Sets the picture to 16:9 wide mode.
Zoom1: Use for moderate magnification.
Zoom2: Use for a stronger magnification.
Wide Fit: Enlarges the aspect ratio of the picture to fit
the entire screen.
Available with HD 1080i / 720p signals in 16:9
mode.
4:3 : Sets the picture to basic (4:3) mode,
Do not watch in 4:3 format for a long time. Traces
of borders displayed on the left, right and center Ill
of the screen may cause image retention(screen
burn) which are not covered by the warranty.
Screen Fit: Displays the full image without any cut-off
when HDMI (720p / 1080i/1080p) or Component
(1080i / 1080p) signals are inputted.
NOTE
" When Double (_, iiq) mode has been set in PIP
(Picture-in-Picture), the Picture Size cannot be set.
" After selecting Zoom1, Zoom2 or Wide Fit:
1. Pressthe I_ button to select Position.
2. Pressthe ENTERIZ_ button.
3. Pressthe A or T button to move the picture up
or down.
4. Pressthe ENTERIZ_ button.
5. Pressthe I_ button to select Reset.
6. Pressthe ENTERIZ_ button to reset the picture
to its default position.
" After selecting Screen Fit in HDMI (1080i/1080p) or
Component (1080i/1080p) mode, you may need to
center the picture:
1. Pressthe _ or I_ button to select Position.
2. Pressthe ENTERI_ button.
3. Pressthe A, _r, _ or I_ button to move the
picture.
4. Pressthe ENTERE_ button.
5. Pressthe _ or I_ button to select Reset,
6. Pressthe ENTERI_ button,
HD (High Definition): 16:9 - 1080i/1080p (1920x1080),
720p (1280x720)
Settings can be adjusted and stored for each
external device you have connected to an input on
the TV.
ATV,AV, 16:9, Zoom1,
Component (480i, 480p) Zoom2, 4:3
DTV(1080i), 16:9, 4:3, Wide Fit,
Component (1080i, 1080p), Screen Fit
HDMI (720p, 1080i, 1080p)
PC 16:9, 4:3
Digital Noise Filter (Off / Low / Medium / High / Auto
/ Auto Visualisation): Ifthe broadcast signal received
by your TV is weak, you can activate the Digital Noise
Filter feature to reduce any static and ghosting that may
appear on the screen.
When the signal is weak, try other options until the
best picture is displayed.
Auto Visualisation: When changing analog channels,
displays signal strength.
Only available for analog channels.
When bar is green, you are receiving the best
possible signal.
8 English

Ill MPEGNoiseFilter(Off/ Low / Medium / High /
Auto): Reduces MPEG noise to provide improved
picture quality.
Ill HDMI Black Level (Normal / Low): Selects the black
level on the screen to adjust the screen depth.
Available only in HDMI mode.
Ill Film Mode (Off / Auto1 / Auto2): Sets the TV to
automatically sense and process film signals from all
sources and adjusts the picture for optimum quality.
Available in TV, AV, COMPONENT (480i/1080i)
and HDMI (480i/1080i).
Ill Auto Motion Plus 240Hz (Off / Clear / Standard /
Smooth / Custom / Demo): Removes drag from fast
scenes with a lot of movement to provide a clearer
picture.
If noise occurs on the screen, please set the
Auto Motion Plus 240Hz to Off. IfAuto Motion
Plus 240Hz is Custom, you can set up the
Blur Reduction, Judder Reduction or Reset
manually.
IfAuto Motion Plus 240Hz is Demo, you can
compare the difference between on and off
modes.
Blur Reduction: Adjusts the blur reduction level from
video sources.
Judder Reduction: Adjusts the judder reduction level
from video sources when playing films.
Reset: Reset the custom settings.
m Auto Protection Time (2 hours / 4 hours / 8 hours
/ 10 hours / Off): Set the time the screen remains idle
with a still image untilthe screen saver is activated. The
screen saver prevents the formation of ghost images on
the screen.
m
Smart LED (Off/Low / Standard / High / Demo):
Controls LED backlight to maximize picture clarity.
Demo: Displays the difference between Smart LED on
and off modes.
Viewing TV using the 3D function
{_ MENUITTI --_Picture _ 3D _ ENTERI_
IMPORTANT SAFETY INFORMATION, READ THE
FOLLOWING WARNINGS BEFORE YOU OR YOUR
CHILD USE THE 3D FUNCTION
Z_XWARNING
" Parents' careful supervision is required particularly
when children or teenagers view 3D images.
* Photosensitive Seizure Warning and Other Health
Risks
- Some viewers may experience an epileptic seizure
or stroke when exposed to certain flashing images
or lights contained incertain television pictures or
video games. Ifyou or any of your relatives has a
history of epilepsy or strokes, please consult with a
medical specialist before using the 3D function.
- Do not watch 3D pictures when you feel
incoherent, sleepy, tired or sick. Avoid watching 3D
pictures for long hours.
- Even those without a personal or family history
of epilepsy or stroke may have an undiagnosed
condition that can cause "photosensitive epileptic
seizures."
- Ifyou experience any of the following symptoms
immediately stop watching 3D pictures and
consult a medical specialist: (1) altered vision; (2)
lightheadedness; (3) dizziness; (4) involuntary,
movements such as eye or muscle twitching;
(5)confusion; (6) nausea; (7) loss of awareness;
(8)convulsions; (9) cramps; and/or (10)
disorientation. Parents should monitor and ask
their children about the above symptoms-children
and teenagers may be more likely than adults to
experience these symptoms.
* Note that watching TV while sitting too close to the
screen for an extended period of time may weaken
your eyesight.
* Note that watching TV while wearing 3D Active
Glasses for an extended period of time may cause a
headache or fatigue. Ifyou feel headache, fatigue or
dizziness, stop watching TV and rest.
* Some 3D pictures may startle viewers. The pregnant,
elderly, epileptic and those suffering from serious
physical conditions are advised to avoid utilizing the
unit's 3D functionality.
English 19
Basic Features
* We don't recommend watching 3D if you are in bad
physical condition, need sleep or have been drinking
liquor,
* Please take care to be aware of the world around
you. This product is designed to be immersive. DO
NOT use this product near open stairwells, cables,
balconies, or other objects that can be tripped over,
run into, knocked down, broken or fallen over. Being
startled or deluding yourself into thinking that the 3D
images are real may cause you to crush a nearby
object or get injured trying to move your body.
* Do not use the 3D Active Glasses for any other
purpose than for which it was designed. Wearing the
3D Active Glasses for any other purpose (asgeneral
spectacles, sunglasses, protective goggles, etc.)
may physically harm you or weaken your eyesight.
* Immersive video can potentially have adverse effects
on the user including motion sickness, perceptual
after effects, disorientation, eye strain, and
decreased postural stability. Take frequent breaks to
lessen the potential of these effects, as is commonly
suggested for other items, such as keyboards and
computer monitors, that you may tend to fixate or
concentrate on. Ifyour eyes show signs of fatigue or
dryness or if you have any of the above symptoms,
immediately discontinue use of this device and do
not resume using it for at least thirty minutes after
the symptoms have subsided.
* The ideal viewing distance should be three times
or more the height of the screen. We recommend
sitting with viewer's eyes on a level with the screen.
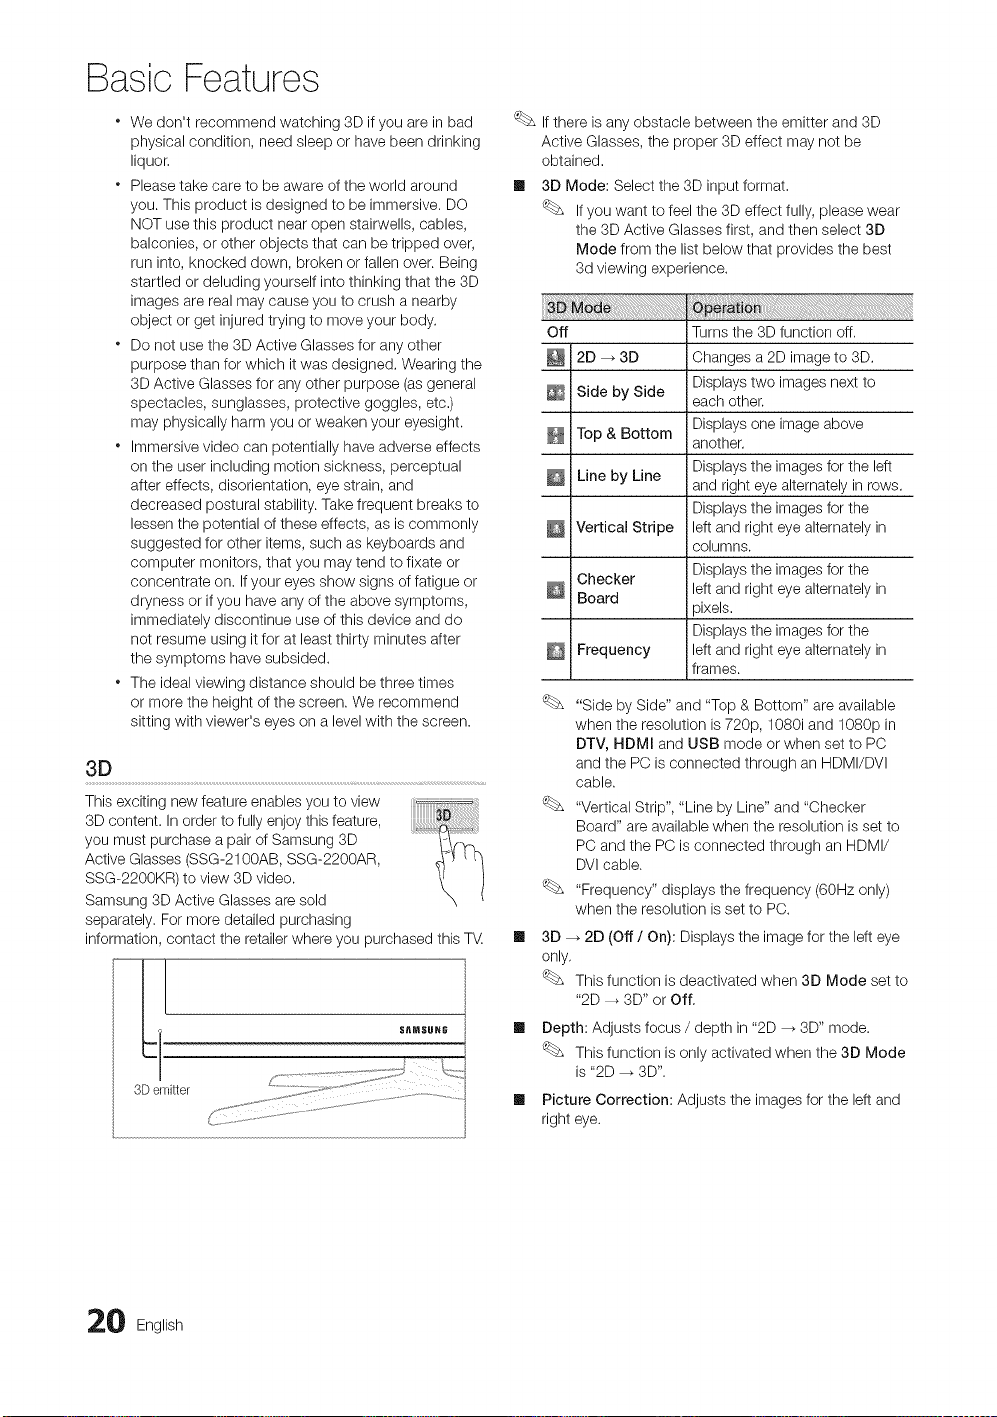
3D
This exciting new feature enables you to view
3D content. In order to fully enjoy this feature,
you must purchase a pair of Samsung 3D
Active Glasses (SSG-2100AB, SSG-2200AR,
SSG-2200KR) to view 3D video.
Samsung 3D Active Glasses are sold
separately. For more detailed purchasing
information, contact the retailer where you purchased this TV
S_MSUHG
3Demitter
#
Ifthere is any obstacle between the emitter and 3D
Active Glasses, the proper 3D effect may not be
obtained.
II 3D Mode: Select the 3D input format.
Ifyou want to feel the 3D effect fully, please wear
the 3D Active Glasses first, and then select 3D
Mode from the list below that provides the best
3d viewing experience.
Off Turns the 3D function off.
2D _ 3D Changes a 2D image to 3D.
Side by Side each other.
Top & Bottom another.
Line by Line Displays the images for the left
Vertical Stripe left and right eye alternately in
Checker Displaystheimagesforthe
Board
Frequency left and right eye alternately in
"Side by Side" and "Top & Bottom" are available
when the resolution is 720p, 1080i and 1080p in
DTV, HDMI and USB mode or when set to PC
and the PC is connected through an HDMI/DVI
cable.
"Vertical Strip", "Line by Line" and "Checker
Board" are available when the resolution is set to
PC and the PC is connected through an HDMI/
DVIcable.
"Frequency" displays the frequency (60Hz only)
when the resolution is set to PC.
II
3D _ 2D (Off / On): Displays the image for the left eye
only,
This function is deactivated when 3D Mode set to
"2D --_ 3D" or Off,
II
Depth: Adjusts focus / depth in "2D _ 3D" mode.
This function is only activated when the 3D Mode
is "2D _ 3D".
II
Picture Correction: Adjusts the images for the left and
right eye.
Displays two images next to
Displays one image above
and right eye alternately in rows.
Displays the images for the
columns.
left and right eye alternately in
_ixels.
Displays the images for the
frames.
0 English

m
3DAutoView(Off/ On): If 3D Auto View is set to On,
a "Side-By-Side" format HDMI signal with one of the
resolutions below is automatically switched to 3D. Here,
correct 3D information must be sent from the HDMI 1.3
transmitter.
Ifa 3D failure occurs due to a 3D information error,
set 3D Auto View to Off and manually select a
3D Mode using the 3D button or corresponding
menu.
Supportresolution(16:9only)
1. Press the CONTENT button, then the Content View
menu will appear.
2. Press the _ or I_ button, then select 3D,
To watch in 3D, wear 3D Active Glasses and press the
power button on the glasses.
3. Select OK, then press the ENTERI_ button.
4. Using the 41or I_ buttons on your remote control, select
the 3D Mode of the image you want to view.
Some 3D modes may not be available depending
on the format of the image source,
1280 x 720p 60 Hz
1920 x 1080i 60 Hz
1920 x 1080p 24 / 30 / 60 Hz
Resolution supported for HDMI PC mode
The resolution for HDMI PC mode is optimized to 1920 x
1080 input.
An input resolution other than 1920 x 1080 may not be
displayed properly in 3D display or full screen mode.
How to watch the 3D image
Supported formats and operating specifications for
HDMm1.4
1920x1080p@24Hzx2
1280x720p@60Hzx2
1280x720p@50Hzx2
The mode is automatically switched to 3D in one of the
source signal formats above,
For the HDMI 1.4@24Hz format, the TV is optimized as
follows:
- Resolution First Display Mode: IfAuto Motion Plus
is set to Off, Clear or Standard, you can watch the
video at a high resolution optimized to the resolution
of the source video.
- Judder Reduction Display Mode: When Auto
Motion Plus is set to Smooth or Custom, you can
watch a smooth picture without judder.
Before using 3D function...
NOTE
* You may notice a small amount of screen flickering
when watching 3D images in poor light conditions
(from a strobe light, etc.),or under afluorescent lamp
(50Hz _ 60Hz) or 3 wavelength lamp. Ifso, dim the
light or turn the lamp off.
* 3D mode is automatically disabled in following cases:
when changing a channel or the input source, or
accessing Media Play or Internet@TV.
* Some Picture functions are disabled in 3D mode.
* PIP is not supported in 3D mode.
* Auto Program is disabled in 3D mode.
* 3D Active Glasses from other manufacturers may not
be supported.
* When the TV is initially powered on, maytake some
time until the 3D display is optimized.
1920x2205p@24Hz
1280xl470p@60Hz
1280xl470p@50Hz
English 21

Basic Features
" If there is any other 3D product, electronic
devices such as a PDP or LCD TV, or wireless
communication devices nearby, the 3D Active
Glasses may not work properly due to mutual
interference. Ifthere is a problem, keep other
electronic devices as far away as possible from the
3D Active Glasses,
" Photos of Media Play are shown in "2D _ 3D"
mode only.
" If lying on your side, the 3D-effects may not be
displayed.
" Be sure to stay within the viewing angle and optimum
TV viewing distance when watching 3D pictures.
- Otherwise, you may not be able to enjoy proper 3D
effects.
Picture Reset (OK / Cance0
Resets your current picture mode to its default settings.
Setting up the TV with Your PC
Set the input source to PC.
(_ MENUITTI _ Picture --_ENTERE_
Auto Adjustment ..........................................................................................................................
Adjust frequency values/positions and fine tune the settings
automatically.
Not available when connecting with an HDMI/DVI cable.
Screen
Ill Coarse / Fine: Removes or reduces picture noise, Ifthe
noise is not removed by Fine-tuning alone, then adjust
the frequency as best as possible (Coarse) and Fine-
tune again. After the noise has been reduced, readjust
the picture so that it is aligned to the center of screen.
Ill Position: Adjust the PC's screen positioning if it does
not fit the TV screen, Press the A or T button to adjust
the Vertical-Position. Press the _ or I_ button to adjust
the Horizontal-Position.
Ill Image Reset: Resets the image to default settings.
Using Your iV as a Computer (PC) Display
Setting Up Your PC Software (Based on Windows XP)
Depending on the version of Windows and the video card,
the actual screens on your PC will probably look different, but
the same basic set-up information will apply in most cases.
(If not, contact your computer manufacturer or Samsung
Dealer.)
1. Click on "Control Panel" on the Windows start menu.
2. Click on "Appearance and Themes" in the "Control
Panel" window and a display dialog-box will appear.
3. Click on "Display" and a display dialog box will appear.
4. Navigate to the "Settings" tab on the display dialog-box.
• The correct size setting (resolution) [Optimum: 1920 X
1080 pixels]
• Ifa vertical-frequency option exists on your display
settings dialog box, the correct value is "60" or "60 Hz".
Otherwise, just click "OK" and exit the dialog box.
Changing the Preset Sound Mode
(_ MENUiTFI --_Sound _ SRS TheaterSound -_
ENTER I_
SRS TheaterSound
Ill Standard: Selects the normal sound mode.
m Music: Emphasizes music over voices,
Ill Movie: Provides the best sound for movies.
Ill Clear Voice: Emphasizes voices over other sounds.
Ill Amplify: Increase the intensity of high-frequency sound
to allow a better listening experience for the hearing
impaired.
Adjusting Sound Settings
(_ MENU iTrl --_Sound -_ Equalizer -_ ENTER E_
Equalizer
Adjusts the sound mode (standard sound mode only).
Ill Balance L/R: Adjusts the balance between the right and
left speaker,
Ill 100Hz / 300Hz / 1kHz / 3kHz / 10kHz (Bandwidth
Adjustment): Adjusts the level of specific bandwidth
frequencies.
Ill Reset: Resets the equalizer to its default settings.
2 English

Sound Settings
(_ MENUITTI _ Sound _ ENTERI_%_
SRS TruSurround HD (Off / On)
(standard sound mode only)
This function provides a virtual 5,1 channel surround sound
experience through a pair of speakers using HRTF (Head
Related Transfer Function) technology.
SRS TruDialog (Off / On)
(standard sound mode only)
This function allows you to increase the intensity of avoice
over background music or sound effects so that dialog can
be heard more clearly.
Preferred Language
(digital channels only)
DigitaI-TV broadcasts are capable of simultaneous
transmission of many audio tracks (for example,
simultaneous translations of the program into foreign
languages).
You can only select a language among the ones being
broadcasted.
MultFTrack Sound (MTS)
(analog channels only)
Ill Mono: Choose for channels that are broadcasting in
mono or if you are having difficulty receiving astereo
signal,
Ill Stereo: Choose for channels that are broadcasting in
stereo.
Ill SAP: Choose to listen to the Separate Audio Program,
which is usually a foreign-language translation.
Depending on the particular program being broadcast,
you can listen to Mono, Stereo or SAP.
Speaker Select (External Speaker / TV
Speaker)
A sound echo may occur due to a difference in decoding
speed between the main speaker and the audio receiver. In
this case, set the TV to External Speaker.
When Speaker Select is set to External Speaker, the
volume and MUTE buttons will not operate and the
sound settings will be limited.
When Speaker Select is set to External Speaker.
* TV Speaker: Off, External Speaker: On
When Speaker Select is set to TV Speaker.
* TV Speaker: On, External Speaker: On
Ifthere is no video signal, both speakers will be mute.
SPDIF Output
SPDIF(Sony Philips Digital Interface)is used to provide digital
sound, reducing interference going to speakers and various
digital devices such as an A/V Receiver/Home theater.
Ill Audio Format: During the reception of a digital TV
broadcast, you can select the DigitalAudio output
(SPDIF)format from the options PCM or Dolby Digital.
Ill Audio Delay: Correct audio-video sync problems, when
watching TV or video, and when listening to digital audio
output using an external device such as an AV receiver
(0ms - 250ms).
Sound Reset( OK! Cancel) ....................................................................................................
Reset all sound settings to the factory defaults.
Auto Volume (Off / Normal / Night)
To equalize the volume level on each channel, set to Normal,
Ill Night: This mode provides an improved sound
experience compared to Normal mode, making almost
no noise. It is useful at night.
English 23
Basic Features
Setting the On / Off Timer
Setting the Time
{_ MENUrlTI -_ Setup -_ Time -_ ENTERE__}_
Time
Clock: Setting the clock is for using various timer
features of the 7_
{_ The current time will appear every time you press
the _NFO button.
if you disconnect the power cord, you have to set
the clock again,
Clock Mode (Auto / Manual)
- Auto: Set the current time automatically using the
time from a digital channel.
The antenna must be connected in order to set
the time automatically,
- Manual: Set the current time manually.
Depending on the broadcast station and signal,
the auto time set up may not be correct. In this
case, set the time manually,
Clock Set: Set the Month, Day, Year, Hour, Minute and
am/pm manually.
Available only when Clock Mode is set to
Manual.
You can set the Month, Day, Year, Hour and
Minute directly by pressing the number buttons
on the remote control.
DST (Daylight Saving Time) (Off / On): Switches the
Daylight Saving Time function on or off.
This function is only available when the Clock
Mode is set to Auto.
Time Zone: Select your time zone.
This function is only available when the Clock
Mode is set to Auto.
Using the Sleep Timer
{_ MENU rlTt _ Setup _ Time _ Sleep Timer
ENTERIZ_
m
Sleep Timer _ :Automatically shuts off the TV
after a preset period of time. (30, 60, 90, 120, 150 and
180 minutes),
To cancel the Sleep Timer, select Off.
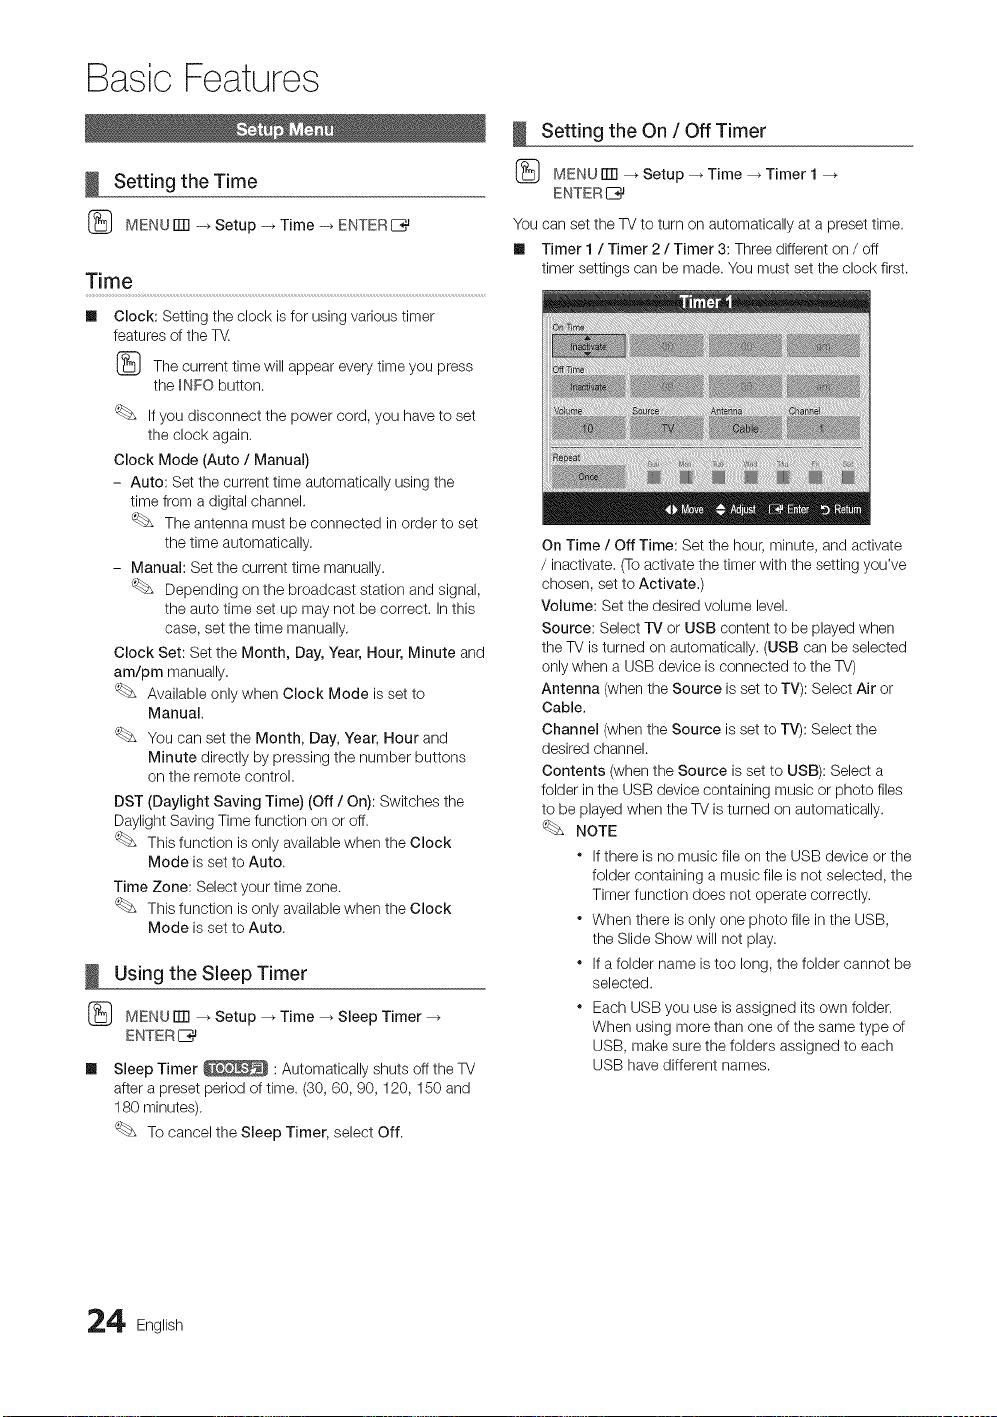
{_ MENUrlTI _ Setup _ Time _ Timer 1
ENTER
You can set the TV to turn on automatically at a preset time.
Ill Timer 1 / Timer 2 / Timer 3: Three different on / off
timer settings can be made. You must set the clock first.
On Time / Off Time: Set the hour, minute, and activate
/ inactivate, (To activate the timer with the setting you've
chosen, set to Activate.)
Volume: Set the desired volume level.
Source: Select -iV or USB content to be played when
the TV is turned on automatically, (USB can be selected
only when a USB device is connected to the TV)
Antenna (when the Source is set to TV): Select Air or
Cable.
Channel (when the Source is set to TV): Select the
desired channel.
Contents (when the Source is set to USB): Select a
folder inthe USB device containing music or photo files
to be played when the TV is turned on automatically.
NOTE
If there is no music file on the USB device or the
folder containing a music file is not selected, the
Timer function does not operate correctly.
* When there is only one photo file in the USB,
the Slide Show will not play.
* If a folder name is too long, the folder cannot be
selected.
* Each USB you use is assigned its own folder.
When using more than one of the same type of
USB, make sure the folders assigned to each
USB have different names.
4 English
Repeat:SelectOnce,Everyday,Mon~Fri,Mon~Sat,
Sat~SunorManualtosetatyouconvenience.Ifyou
selectManual,youcansetupthedayyouwantto
activatethetimer.
The_/markindicatesthedayisselected.
AutoPowerOff(availableonlywhentheTVisturned
onbytheTimer):TheTVwillbeautomaticallyturnedoff
after3hoursofbeingleftidletopreventoverheating,
Locking Programs
(_ MENUrm -_ Setup -_ Security -_ ENTERE_
Security
The PIN input screen appears, Enter your 4 digit PIN number.
m V-Chip: The V-Chip feature automatically locks out
programs that are deemed inappropriate for children.
The user must enter a PIN (personal identification
number) before any of the V-Chip restrictions are set up
or changed.
NOTE
* V-Chip is not available in HDMm,Component
or PC mode.
* The default PIN number of a new TV set is
"0-0-0-0",
* Allow All: Press to unlock all TV ratings.
" Block All: Press to lock all TV ratings.
V-Chip Lock (Off / On): You can block rated TV
Programs,
-IV Parental Guidelines: You can block TV programs
depending on their rating, This function allows you to
control what your children are watching.
- TV-Y: Young children / TV-Y7: Children 7 and over /
TV-G: General audience / rV-PG: Parental guidance
/ TV-14: Viewers 14 and over / TV-MA: Mature
audience
- ALL: Lock all TV ratings. / FV: Fantasy violence / V:
Violence / S: Sexual situation / L: Adult Language / D:
Sexually Suggestive Dialog
The V-Chip will automatically block certain
categories dealing with more sensitive material.
For example, if you block the TV-Y category,
then TV-Y7 will automatically be blocked,
Similarly, ifyou block the TV-G category, then
all the categories in the young adult group will
be blocked (TV-G, TV-PG, TV-14 and TV-MA).
The sub-ratings (D, L, S, V) work similarly. So,
if you block the L sub-rating in TV-PG, then
the L sub-ratings in TV-14 and TV-MA will
automatically be blocked.
MPAA Rating: You can block movies depending on
their MPAA rating. The Motion Picture Association of
America(MPAA) has implemented a rating system that
provides parents or guardians with advanced information
on which films are appropriate for children,
- G: General audience (no restrictions). / PG: Parental
guidance suggested, / PG-13: Parents strongly
cautioned. / R: Restricted. Children under 17 should
be accompanied by an adult. / NO-17: No children
under age 17. / X: Adults only, / NR: Not rated,
The V-Chip will automatically block any
category that deals with more sensitive material.
For example, ifyou block the PG-13 category,
then R, N0-17 and X will automatically be
blocked,
Canadian English: You can block TV programs
depending on their Anglophone Canadian ratings.
- C: Programming intended for children under age 8, /
08+: Programming generally considered acceptable
for children 8 years and over to watch on their own,
/ G: General programming, suitable for all audiences.
/ PG: Parental Guidance. / 14+: Programming
contains themes or content which may not be
suitable for viewers under the age of 14. / 18+: Adult
programming,
The V-Chip will automatically block any
category that deals with more sensitive material.
For example, ifyou block the G category, then
PG, 14+ and 18+ will automatically be blocked.
Canadian French: You can block TV programs
depending on their French Canadian rating.
- G: General / 8 ans+: Programming generally
considered acceptable for children 8 years and over
to watch on their own. / 13 ans+: Programming may
not be suitable for children under the age of 13. / 16
ans+: Programming is not suitable for children under
the age of 16. / 18 ans+: Programming restricted to
adults.
The V-Chip will automatically block any
category that deals with more sensitive material.
For example, ifyou block the 8 ans+ category,
then 13 ans+, 16 ans+ and 18 ans+ will
automatically be blocked also.
Downloadable U.S. Rating: Parental restriction
information can be used while watching DTV channels.
English 25

Basic Features
NOTE
* Ifinformation is not downloaded from the
broadcasting station, the Downloadable U.S.
Rating menu is deactivated.
* Parental restriction information is automatically
downloaded while watching DTV channels. It
may take several seconds.
* The Downioadable U.S. Rating menu
is available for use after information is
downloaded from the broadcasting station.
However, depending on the information from
the broadcasting station, it may not be available
for use.
* Parental restriction levels differ depending on
the broadcasting station. The default menu
name and Downioadable US Rating change
depending on the downloaded information.
* Even if you set the on-screen display to another
language, the Downloadable U.S. Rating
menu will appear in English only.
* The rating will automatically block certain
categories that deal with more sensitive
material.
* The rating titles (For example: Humor Level..etc)
and TV ratings (For example: DH, MH, H..etc)
may differ depending on the broadcasting
station.
m
Change PIN: The Change PIN screen will appear.
Choose any 4 digits for your PIN and enter them. As
soon as the 4 digits are entered, the Confirm New
PIN screen appears. Re-enter the same 4 digits. When
the Confirm screen disappears, your PIN has been
memorized.
How to watch a restricted channel
Ifthe TV istuned to a restricted channel, the V-Chip will
block it. The screen will go blank and the following message
will appear:
This channel is blocked by V-Chip. Please enter the PIN to
unblock.
Ifyou forget the PIN, press the remote-control buttons
in the following sequence, which resets the pin to '9-0-
0-0:" POWER (off) --_ MUTE _ 8 _ 2 --_ 4 --_POWER
(on)
Other Features
(_ MENUiTR --_Setup _ ENTERE_
Menu Language ...........................................................................................................................................................................
Set the menu language.
1. Select Menu Language and press the ENTERI_
button.
2. Choose desired language and press the ENTERI_
button.
Choose between English, Espa_ol and Fran_;ais.
Caption .......................................................................................................................................................................................................................................
(On-Screen Text Messages)
m Caption (Off / On): You can switch the
caption function on or off. If captions are
not available, they will not be displayed on
the screen.
The Caption feature doesn't work in
Component, HDMI or PC modes.
m Caption Mode: You can select the desired
caption mode.
The availability of captions depends on the
program being broadcast.
Default / OO1~004 / Text1 ~Text4: (analogchannels
only) The Analog Caption function operates in either
analog TV channel mode or when a signal is supplied
from an external device to the T_. (Depending on the
broadcasting signal, the Analog Caption function may or
may not work with digital channels.)
Default / Service1 ~Service6 / OO1~004 /
Text1 ~Text4: (digital channels only) The Digital Captions
function works with digital channels.
Service1~6 may not be available indigital caption
mode depending on the broadcast.
6 English
m
DigitalCaptionOptions:(digitalchannelsonly)
Size:OptionsincludeDefault,Small,Standardand
Large.ThedefaultisStandard.
FontStyle:OptionsincludeDefaultandStyles0to7.
ThedefaultisStyle0.
ForegroundColor:OptionsincludeDefault,White,
Black,Red,Green,Blue,Yellow,MagentaandCyan.You
canchangethecoloroftheletter.ThedefaultisWhite.
BackgroundColor:OptionsincludeDefault,White,
Black,Red,Green,Blue,Yellow,MagentaandCyan.
Youcanchangethebackgroundcolorofthecaption.
ThedefaultisBlack.
ForegroundOpacity:Thisadjuststheopacityoftext.
OptionsincludeDefault,Transparent,Translucent,Solid
andFlashing.
BackgroundOpacity:Thisadjuststheopacityof
thecaptionbackground.OptionsincludeDefault,
Transparent,Translucent,SolidandFlashing.
ReturntoDefault:ThisoptionsetseachSize,Font
Style,ForegroundColor,BackgroundColor,Foreground
OpacityandBackgroundOpacitytoitsdefault.
NOTE
* DigitalCaptionOptionsareavailableonly
whenDefaultandService1~ Service6 can be
selected in Caption Mode.
* The availability of captions depends on the
program being broadcasted.
* The Default setting follows the standards set by
the broadcaster.
* The Foreground and Background cannot be set
to have the same color.
* You cannot set both the Foreground Opacity
and the Background Opacity to Transparent,
Network (Network Type / Network Setup
/ Network Test / SWL (Samsung Wireless
Link) / SWL Connect )............................................................................................................................
For details on set up options, refer to the "Network
Connection" instructions (p. 30).
General
ml Game Mode (Off / On): When connecting to a game
console such as PlayStation TM or Xbox TM, you can enjoy
a more realistic gaming experience by selecting the
game menu.
NOTE
* Precautions and limitations for game mode
- To disconnect the game console and connect
another external device, set Game Mode to Off in
the setup menu.
- Ifyou display the TV menu in Game Mode, the
screen shakes slightly.
* Game Mode is not available when the input source
is set to TV or PC.
* After connecting the game console, set Game Mode
to On. Unfortunately, you may notice reduced picture
quality.
* IfGame Mode is On:
- Picture mode isset to Standard and Sound mode
is set to Movie.
- Equalizer is not available.
ml BD Wise (Off / On): Provides the optimal picture quality
for Samsung DVD, Blu-ray and Home Theater products
which support BD Wise. When BD Wise is turned On,
the picture mode is automatically changed to the optimal
resolution.
Available when connecting Samsung products
that support BD Wise through a HDMI cable.
ml Menu Transparency (Bright / Dark): Set the
Transparency of the menu.
ml Melody (Off / Low / Medium / High): Set so that a
melody playswhen the TV is turned on or off.
Melody is disabled when FastStart is On.
ml FastStart (Off / On): When the TV is powered on, the
screen will come on quickly with this feature.
ml Light Effect (Off / In Standby / Watching TV /
Always): You can turn the LED on/off on the front of T_.
Turn it off to save power or ifthe LED is too bright for
you.
Set the Light Effect to Off to reduce the power
consumption.
The color of light may very depending on the
model.
English 27
Basic Features
Wirebss Remote Contro( (Off / On)................................................
Turn on/off or give permission to Samsung mobile phones/
devices.
You must have a Samsung Mobile phone/device which
supports Wireless Remote Control. For more details, refer
to each device's manual.
Picture In Picture (PIP)
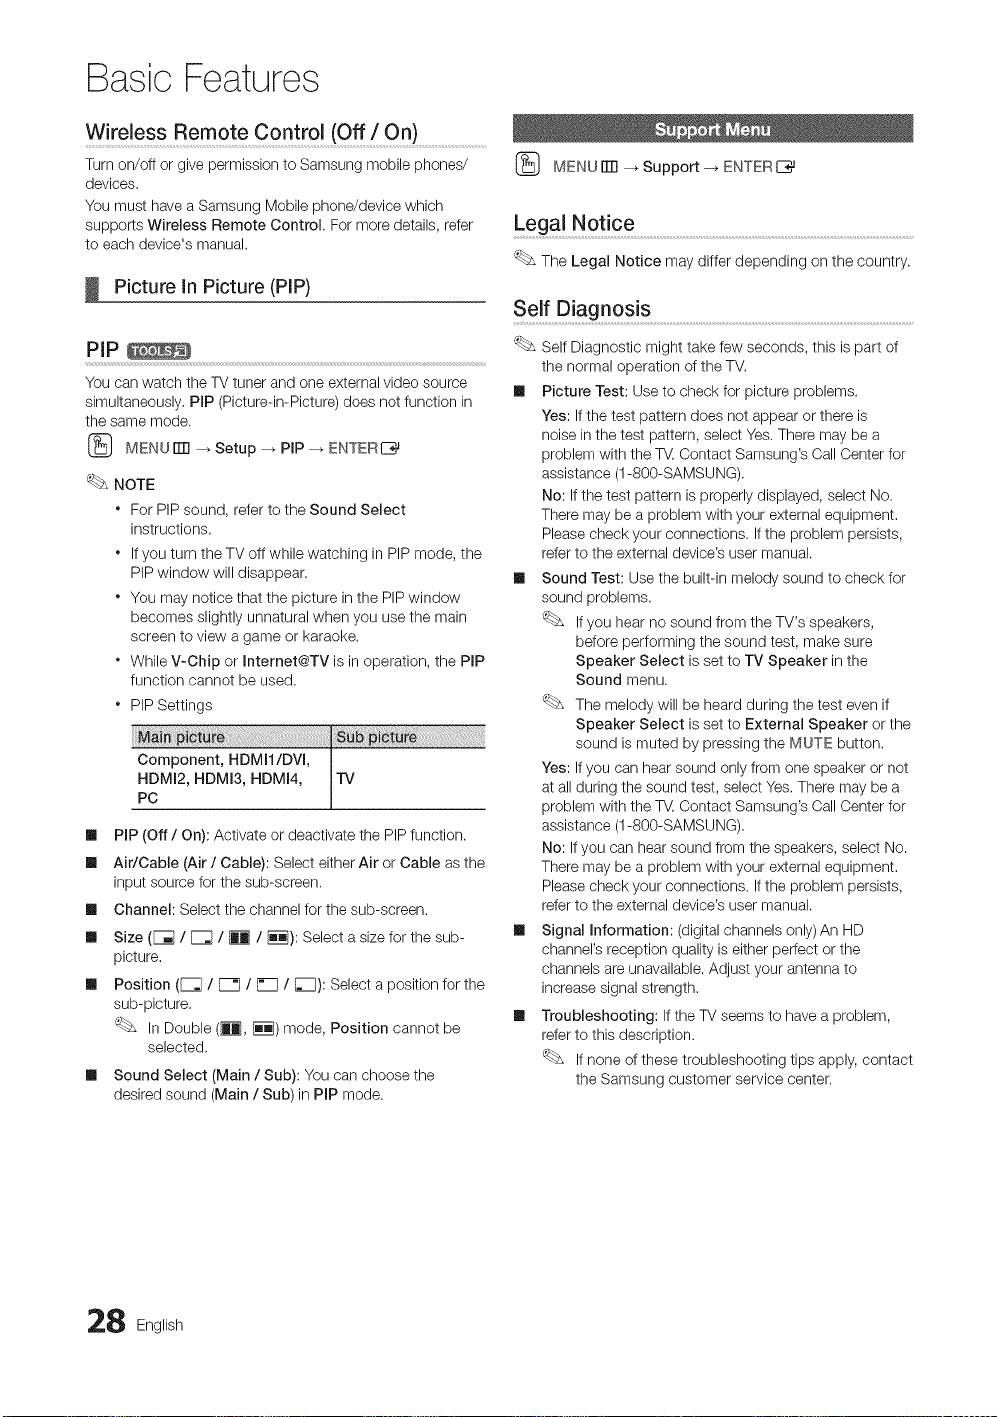
PIP_
You can watch the TV tuner and one external video source
simultaneously, PIP (Picture-in-Picture) does not function in
the same mode.
(_ MENU rlTl _ Setup --_ PiP --_ ENTERI_
NOTE
For PIP sound, refer to the Sound Select
instructions.
Ifyou turn the TV off while watching in PIP mode, the
PIP window will disappear.
You may notice that the picture in the PIP window
becomes slightly unnatural when you use the main
screen to view a game or karaoke.
While V-Chip or Internet@TV is in operation, the PiP
function cannot be used.
* PIP Settings
PC
Im
PIP (Off / On): Activate or deactivate the PIP function.
Im
Air/Cable (Air/Cable): Select either Air or Cable as the
input source for the sub-screen.
Im
Channel: Select the channel for the sub-screen.
Im
Size (F_I / _ / _ /iil): Select a size for the sub-
picture,
Im
Position ([_;} / [Z / [_ / [_): Select a position for the
sub-picture,
In Double (_, iiq) mode, Position cannot be
selected.
Im
Sound Select (Main / Sub): You can choose the
desired sound (Main / Sub) in PIP mode.
[_ MENU ITTI--_Support-_ ENTER IZ_
Legal Notice ...................................................................................................................................................................................................
The Legal Notice may differ depending on the country.
Self Diagnos!s .......................................................................................................................................................................................
Self Diagnostic might take few seconds, this is part of
the normal operation of the TM
m Picture Test: Use to check for picture problems.
Yes: Ifthe test pattern does not appear or there is
noise in the test pattern, select Yes, There may be a
problem with the T_, Contact Samsung's Call Center for
assistance (1-800-SAMSUNG),
No: If the test pattern is properly displayed, select No.
There may be a problem with your external equipment,
Please check your connections, Ifthe problem persists,
refer to the external device's user manual.
m Sound Test: Use the built-in melody sound to check for
sound problems.
Ifyou hear no sound from the TV's speakers,
before performing the sound test, make sure
Speaker Select is set to TV Speaker in the
Sound menu.
The melody will be heard during the test even if
Speaker Select is set to External Speaker or the
sound is muted by pressing the MUTE button.
Yes: Ifyou can hear sound only from one speaker or not
at all during the sound test, select Yes,There may be a
problem with the T_, Contact Samsung's Call Center for
assistance (1-800-SAMSUNG),
No: If you can hear sound from the speakers, select No.
There may be a problem with your external equipment,
Please check your connections, Ifthe problem persists,
refer to the external device's user manual.
m Signal Information: (digital channels only)An HD
channel's reception quality is either perfect or the
channels are unavailable. Adjust your antenna to
increase signal strength.
m Troubleshooting: Ifthe TV seems to have a problem,
refer to this description.
If none of these troubleshooting tips apply, contact
the Samsung customer service center.
8 English
Software Upgrade
Software Upgrade can be performed by network
connection or downloading the latest firmware from "www.
samsung,com." to a USB memory device.
Current Version - the software already installed in the T_.
Software is represented as "Year/Month/DayVersion/'
Installing the Latest Version
Ill By USB: Insert a USB
drive containing the
firmware upgrade file,
downloaded from "www.
samsung.com," into the
TV. Please be careful not
to disconnect the power or
remove the USB drive until
upgrades are complete.
The TVwill be turned off
and on automatically after
completing the firmware upgrade. When software is
upgraded, video and audio settings you have made will
return to their default settings. We advise you to to write
down your settings so that you can easily reset them
after the upgrade,
Ill By Online: Upgrade the software using the Internet.
First, configure your network. For detailed
procedures on using the Network Setup, refer to
the "Network Connection" instructions.
Ifthe internet connection doesn't operate properly,
the connection may be broken. Please retry
downloading. If the problem persists, download by
USB and upgrade,
Ill Alternative Software (backup): Displays the software
version downloaded through By Online. During the
software upgrading, When the Upgrade will discontinue
from last step, this function be activated.
TVRearPanel
N
; _Z2"2
USBDrive
HD Connection Guide
Refer to this information when connecting external devices
to the TV.
ContactSamsung..................................................................................
View this information when your TV does not work properly
or when you want to upgrade the software. You can find
information regarding our callcenters and how to download
products and software.
English 29
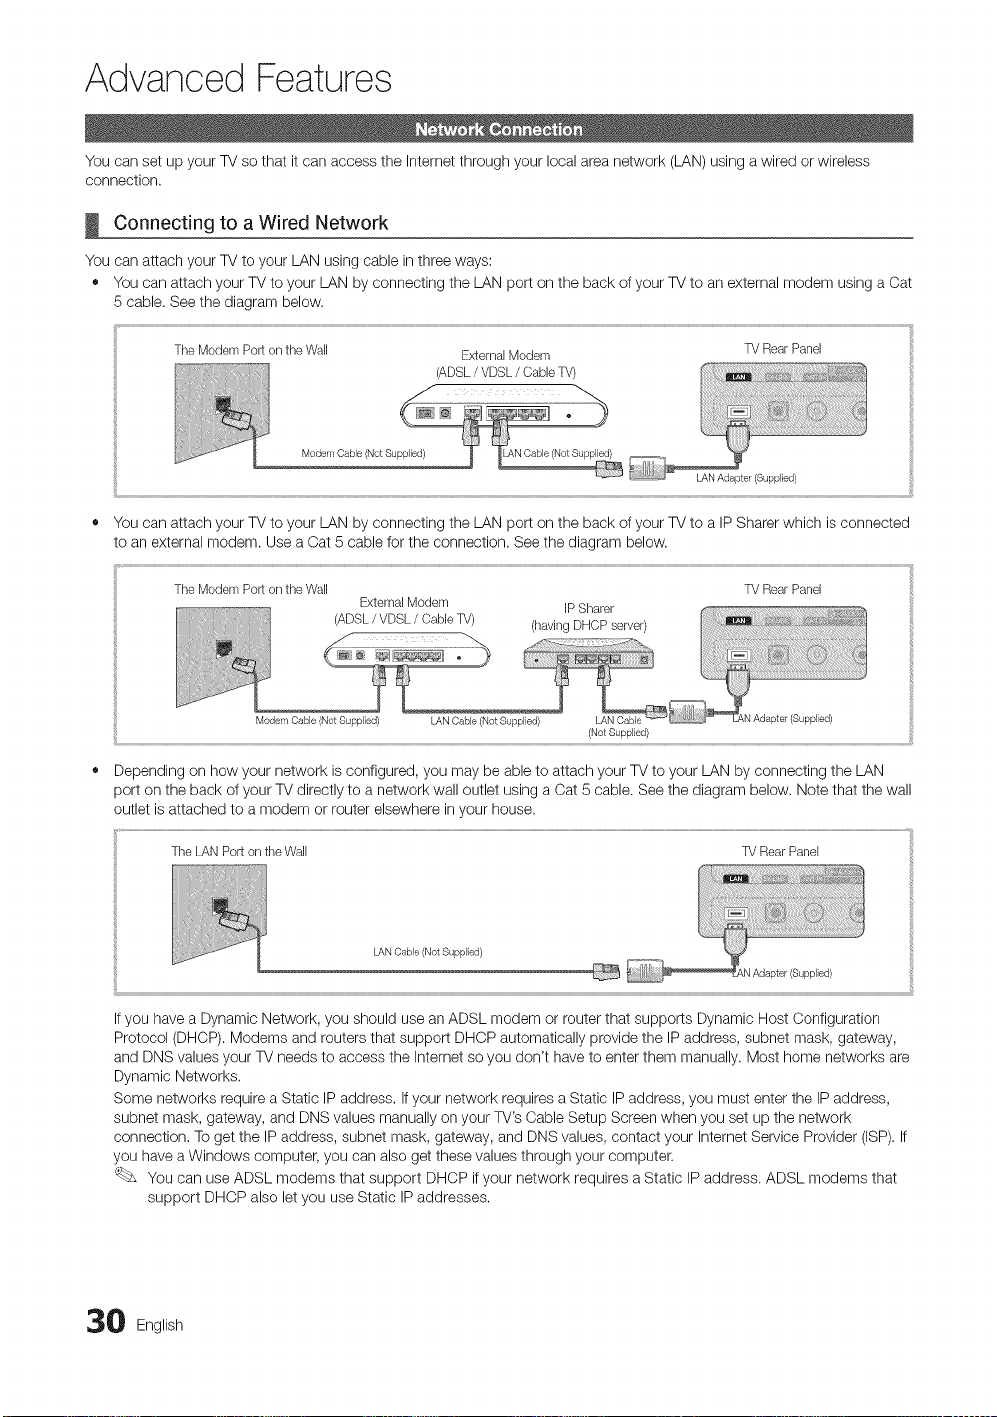
Advanced Features
You can set up your TV so that it can access the Internet through your local area network (LAN) using a wired or wireless
connection.
Connecting to a Wired Network
You can attach your TV to your LAN using cable in three ways:
• You can attach your TV to your LAN by connecting the LAN port on the back of your 77/to an external modem using a Cat
5 cable. Seethe diagram below.
TheModemPortontheWall ExternalModem 77/RearPanel
(ADSL/ VDSL/ CableTV)
LAN Adapter (Supplied)
You can attach your TV to your LAN by connecting the LAN port on the back of your 77/to a IP Sharer which is connected
to an external modem. Use a Oat 5 cable for the connection. Seethe diagram below.
TheModemPortontheWall
Modem Cable (Not Supplied)
ExternalModem
(ADSL/VDSL/ CableTV)
LAN Cable (Not Supplied) LAN Cable
LAN Sable (Not Supplbd)
IP Sharer
(having DHCP server)
(Not Supplied)
W Rear Panel
Ifyou have a Dynamic Network, you should use an ADSL modem or router that supports Dynamic Host Configuration
Protocol (DHCP). Modems and reuters that support DHCP automatically provide the IP address, subnet mask, gateway,
and DNS values your 77/needs to access the Internet so you don't have to enter them manually. Most home networks are
Dynamic Networks.
Some networks require a Static IPaddress. Ifyour network requires a Static IPaddress, you must enter the IP address,
subnet mask, gateway, and DNSvalues manually on your TV's Cable Setup Screen when you set up the network
connection. To get the IP address, subnet mask, gateway, and DNSvalues, contact your Internet Service Provider (ISP).If
you have a Windows computer, you can also get these values through your computer.
You can use ADSL modems that support DHCP ifyour network requires a Static IP address. ADSL modems that
support DHCP also let you use Static IPaddresses.
0 English
 Loading...