

Page 1
Contact SAIMISUNGWORLDWIDE
if you have any questions or comments relating to Samsung products, please contact the SAMSUNG customer care center.
Comuniquese con 8AMSUNG WORLDWIDE
Si desea formular alguna pregunta o comentario en relaci6n con los productos de Samsung, comuniquese con el centro de
atenci6n al cliente de SAMSUNG.
Comment contacter Samsung darts le monde
Si vous avez des suggestions ou des questions concemant les produits Samsung, veuillez contacter le Service
Consommateurs Samsung.
Samsung Electronics Canada Inc., Customer
Service 55 Standish Court Mississauga,
CANADA 1-800-SAMSUNG(726-7864) www.samsung.com/ca
U.S.A 1-800-SAMSUNG(726-7864) www.samsung.com/us 105 Challenger Road
Ontario L5R 4B2 Canada
Samsung Electronique Canada Inc., Service
& la Clientele 55 Standish Court Mississauga,
Ontario L5R 4B2 Canada
Samsung Electronics America, Inc.
Ridgefield Park, NJ 07660-0511
BN68-O1988E-O0
imagine the possibilities
Thank you for purchasing this Samsung product.
To receive more complete service, please
register your product at
www.sa msung. com/reg ister
Model Serial No.
Page 2
C)
important Warranty' information Regarding Television Format Viewing
See the warranty card for more information on warranty terms.
Wide screen format LED Displays (16:9, the aspect ratio ofthe screen width to height) areprimarily designed to view wide screen
format full-motion video. The images displayed on them should primarily be inthe wide screen 16:9 ratio format, or expanded to
fill the screen if your model offers this feature and the images are constantly moving. Displaying stationary graphics and images
on screen, such as the dark sidebars on nonexpanded standard format television video and programming, should be limited to no
more than 5% of the total television viewing per week.
Additionally, viewing other stationary images and text such as stock market reports, video game displays, station Iogos,web sites
or computer graphics and patterns, should be limited as described abovefor all televisions. Displaying stationary images that
exceed the above guidelines can cause uneven agingof LED Displays that leave subtle, but permanent burned-in ghost images in
the LED picture. Toavoid this, varythe programming and images, and primarily display full screen moving images, not stationary
patterns or dark bars.
On LED models that offer picture sizing features, use these controls to view different formats as afull screen picture.
Be careful in the selection and duration of television formats used for viewing. Uneven LED aging as a result of format selection
and use, as well asburned-in images, are not covered byyour Samsung limited warranty.
• U.S.AOnly
The product unit accompanying this user manual is licensed under certain intellectual property rights of certain third parties.
Inparticular, this product is licensed under the following US patents: 5,991,715, 5,740,317, 4,972,484, 5,214,678, 5,323,396,
5,539,829, 5,606,618, 5,530,655, 5,777,992, 6,289,308, 5,610,985, 5,481,643, 5,544,247, 5,960,037, 6,023,490, 5,878,080,
and under US Published PatentApplication No. 2001-44713-A1.
This license is limited to private non-commercial use byend-user consumers for licensed contents. No rights are granted for
commercial use. The license does not cover any productunit other than this product unitand the license doesnot extend to
any unlicensed product unit or process conforming to ISO/IEC 11172-3or ISO/IEC 13818-3 used or sold in combination with
this product unit.The license only covers the useof this product unit to encode and/or decode audio files conforming to the
ISO/IEC 11172-3or ISO/IEC 13818-3. No rights are granted under this license for product features or functions that do not
conform to the ISO/IEC 11172-3 or ISO/IEC 13818-3.
• Other countries
The product unit accompanying this user manual is licensed under certain intellectual property rights of certain third parties.
This license is limited to private non-commercial use byend-user consumers for licensed contents. No rights are granted for
commercial use. The license does not cover any productunit other than this product unitand the license doesnot extend to
any unlicensed product unit or process conforming to ISO/IEC 11172-3or ISO/IEC 13818-3 used or sold in combination with
this product unit.The license only covers the useof this product unit to encode and/or decode audio files conforming to the
ISO/IEC 11172-3or ISO/IEC 13818-3. No rights are granted under this license for product features or functions that do not
conform to the ISO/IEC 11172-3 or ISO/IEC 13818-3.
• SAMSUNG ELECTRONICS NORTH AMERICAN LIMITED WARRANTY STATEMENT
Subject to the requirements, conditions, exclusions and limitationsof the original Limited Warranty supplied with Samsung
Electronics (SAMSUNG) products, and the requirements, conditions, exclusions and limitations contained herein, SAMSUNG
will additionally provide Warranty Repair Service inthe United States on SAMSUNG products purchased in Canada, and
in Canada on SAMSUNG products purchased in the United States, for the warranty period originally specified, and to the
Original Purchaser only.
The above described warranty repairs must be performed by a SAMSUNG Authorized Service Center.Along withthis
Statement, the Original Limited Warranty Statement and a dated Bill of Sale as Proof of Purchase must be presented to the
Service Center. Transportation to andfrom the Service Center is the responsibility ofthe purchaser.
Conditions covered are limited only to manufacturing defects in material or workmanship, and only those encountered in
normal use of the product.
Excluded, but not limited to, are any originally specified provisions for, in-home or on-site services, minimum ormaximum
repair times, exchanges or replacements, accessories, options, upgrades, or consumables.
For the location of a SAMSUNG Authorized Service Center, please call toll-free:
{_ in the United States : 1-800-8AMSUNG (t-800-72G-7864)
{_ in Canada : 1-800-SAMSUNG
[]
Precautions When Displaying a Still image
A still image maycause permanent damage to the TV screen
• Donot display a still image on the LED panel for more than 2 hours as it can cause screen image retention. This image
retention isalso known as screen burn. To avoid such image retention, reduce the degree of brightness and contrast of the
screen when displaying a still image.
• Watching the LED TV in 4:3 format for a long period of time may leave traces of borders displayed on the
left, right and center of the screen caused bythe difference of light emission onthe screen. Playing a DVD or
a game console may cause a similar effect to the screen. Damages caused bythe above effect are not
covered by the Warranty.
• Displaying still images from Video games and PCfor longer than a certain period of time may produce partial after-images. To
prevent this effect, reduce the 'brightness' and 'contrast' when displaying still images.
© 2009 Samsung Electronics Co., Ltd. All rights reserved.
Page 3
CONTENTS
R Movie ListOption Menu.................................................................. 52
! List of Features..................................................................................2 ! Movie Play Option Menu ............................................................... 55
! Accessories .......................................................................................2 [] Using the Setup Menu .....................................................................56
! Viewingthe ControlPanel...................................... 3
! Findingthe Remote Control ............................................................. 5 ,=Setting the DLNA Network............................................................. 57
= MiniRemote Comrol......................................................................... 6 ! installing the DLNAAp;cication...................................................... 58
! installing Batteriesinme Remote Control .........................................6 ,,=Using the DLNAApptication.............................................................59
s Viewing the menus .......................................................................... 7 ! Using the DLNA Function.............................................................. 61
! Plug & Pla_Feature...........................................................................8
E Playing a Movie File ...................................................................... 52
! ConnecungVHF and UHFAntennas................................................ 9 ! SettingUp AnynetT ........................................................................63
! ConnectingCabte TV..................................................................... 10 ! Switching between An_net+ Devices............................................. 63
! Viewingthe ConnectionPanei..........................................................!1 ,,,Recording ......................................................................................64
! Channel Menu ................................................................................ 14
! ManagingChannels........................................................................ 15
,=Configunngthe PictureMenu ......................................................... !7 = Using the ContentManagement................................................... 68
,,=Viewing Picture-in-Picture............................................................ 21
! using YourTV as a Computer (PC) Display....................................22
,,=Settin£ up theTV with your PC.......................................................23 ,,=Getting Started with intemet@TV.................................................. 69
- Configuring the SoundMenu .......................................................... 24 ,,=Using theYahoo!® WeatherWlaget ................................................75
,=Configuringthe Setup Menu........................................................... 26 ,,=Us ng theYahoo _ F nance Wdget............................................. 77
,,=Setting the Time............................................................................ 29 ,,=Troubleshootingfor internet@TV.....................................................77
,,,Network Connection........................................................................31 ,,=Help Website ...................................................................................77
i Support Menu ...............................................................................37 ,,=Using theMessage Function......................................................... 8C
•,Connecting a USB Device............................................................. 40
! Media Pla', Function........................................................................4!
,,,Sorting the PhotoList ......................................................................43
,,,Photo ListOption Menu..................................................................44
•=Viewing a Photo or Slide Show........................................................45
,=Slide Show OptionMenu............................................................... 46
i Sorting the MusicList ......................................................................48
,,=Music ListOption Menu................................................................ 49
•=Playing Music ................................................ 50
,,=Music Playoption Menu ................................................................. 51
iSorting the Movie List.................................................................... 51
s ConnectingAnynetT 3evices....................................................... 62
! Listening through a Receiver(HomeTheater) ............................... 64
! Troubbshooting for Anynet_.......................................................... 65
=,Using the Content Library.............................................................. 66
I Using theTV MemorI Contents..................................................... 67
=,Editing Snippets in the Dock.......................................................... 72
,,=Using the ProfileWidge[ ..................................................................72
= Using theYahoo!® Widget Gallerl ................................................. 74
,,=Using theYahoo!® News Wiege_................................................. 75
,,=Using theYahoo!® Flickr Widget................................................... 76
,,=Using me Media Function................................................................81
! Troubleshooting...............................................................................82
,,,installing the Stand..........................................................................83
! Disconnecung the Stand..................................................................83
,,=Assembling theCables....................................................................84
,,=Wall Mount Kit Specifications(VESA) ...........................................85
mEPreparingbefore installing Wail-Mount.......................................... 86
,,=Anti-Theft Kensing[onLOCK............................................................. 8_
"=Securing the Installation Space ..................................................... 86
•=Securing the TV to aWall or Cabinet .......................................... 87
,,,Specifications..................................................................................88
,,,Dimensions......................................................................................89
[] License
SR$(_O_) TruSurround HD. SRS and (®) symbol are trademarks of SRS Labs. nc.TruSurround HD
technology is incorporated under license from SRS Labs, Inc
[][] DOLB¥ Manufactured under license from Dolby Laboratories. Dolby and the double-D symbol are
DIGITAL i trademarks of Dolby Laboratories.
DivX® Certified to play DivX® video, including premium content.
[] Symbol
A _ B
Press Note One-Touch Button TOOL Button
lish "1
Page 4
To use your TV, you first have to set itup to suit your environment.
Figures and illustrations in this User Manual are provided for reference only and may differ from actual product appearance.
Product design and specifications may be changed without notice in order to enhance product performance.
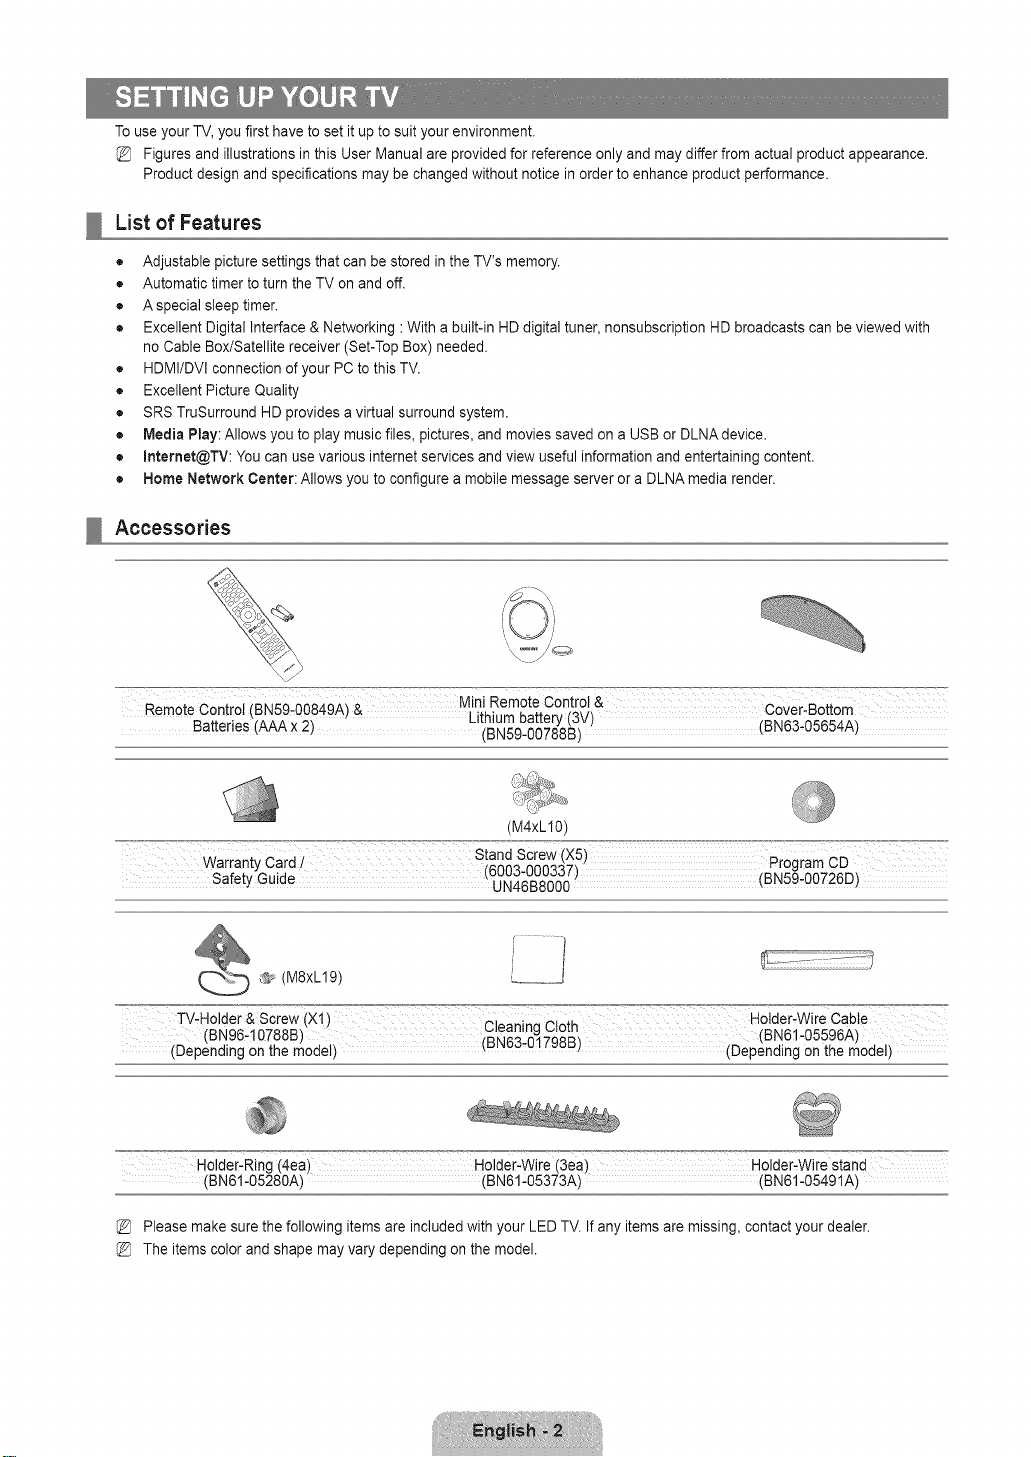
List of Features
• Adjustable picture settings that can be stored in the TV's memory.
• Automatic timer to turn the TV on and off.
• Aspecial sleep timer.
• Excellent Digital Interface & Networking :With a built-in HD digital tuner, nonsubscription HD broadcasts can be viewed with
no CableBox/Satellite receiver (Set-Top Box) needed.
• HDMI/DVl connection of your PC tothis TV.
• Excellent Picture Quality
• SRSTruSurround HD provides a virtual surround system.
• Media Play: Allows you to play music files, pictures, and moviessaved on a USB or DLNA device.
• Internet@TV: Youcan use various internet services and view useful information and entertaining content.
• Home Network Center: Allows you to configure a mobile message server or a DLNA media render.
Accessories
Remote Control (BN59-OO849A)& Lithium battery (3V) Cover-Bottom
Batteries (_ x 2) (BN5g-oo788B) BN63-O5654A)
(M4xLI0)
_:_=_'_==°°_°_°_ar_°';_an;y_C_r_°;i_ _'_''_ ___ __ __ ___ CD
Safety Guide t UN4_B8U(_00)(BN59,00726D)
_#, (M8xL19)
TV.Holder&sciew(xt) €leanin cloth Holder,wire cable
(BN96,t 0788B) _BN63,_g798B_ (BN61'05596A)
(Depending on the model) _ _ (Depending on the model)
............ (BN61-05280A) (BN61-05373A) (BN61-05491A)
Holder'Ring (4ea) Holder-wire (3ea) Holder-wire stand
Please make sure the following items are includedwith your LED TV. If any items are missing, contact your dealer.
The items color and shape may vary depending on the model.
Page 5
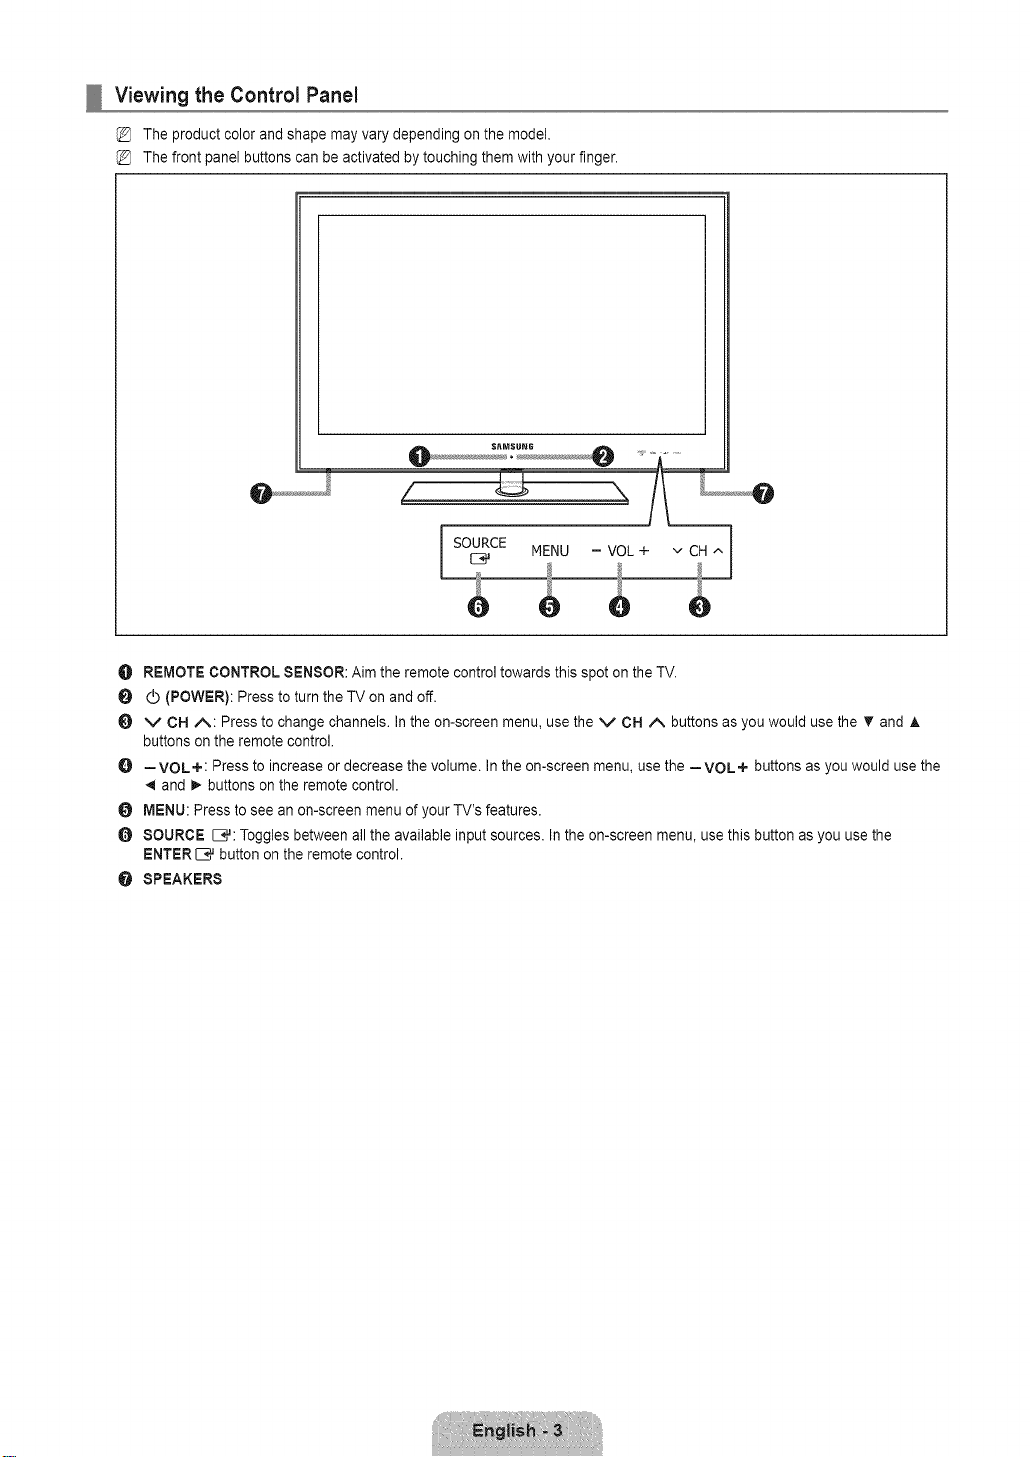
Viewing the Control Panel
The product color and shape may vary depending on the model.
The front panel buttons can be activated by touching them with your finger.
z
I MENo-voL+vcH^l
O REMOTE CONTROL SENSOR: Aim the remote control towards this spot on the TV.
O (_ (POWER): Press to turn the TV on and off.
O v CH A: Press to change channels. In the on-screen menu, use the V CH A buttons asyou would use the T and A
buttons on the remote control.
O =VOL+: Press to increase or decrease the volume. In the on-screen menu, use the =VOL+ buttons asyou would use the
and _ buttons on the remote control.
O MENU: Press to see an on-screen menu ofyour TV's features.
O SOURCE _#: Toggles between all the available input sources. In the on-screen menu, use this button as you use the
ENTER[B_ button onthe remote control.
O SPEAKERS
Page 6

Viewing the Remote Control
You can use the remote control up to a distance of about 23 feet from the TV.
The performance of the remote control may be affected by bright light.
The product color and shape may vary depending on the model.
O POWER :Turns the TV on and
off.
TV : Selects the TV mode
directly.
0 NUMERIC BUTTONS : Press to
change the channel.
O [_]: Press to select additional
channels (digital) being
broadcast by the same station.
For example, to select channel
'54-3', press '54', then press '[_]'
and '3'.
OH LIST : Used to display
Channel Lists on the screen.
O TOOLS : Use to quickly select
frequently usedfunctions.
INTERNET@ : Press to use
various internetservices to
view useful information and
entertaining content.
O COLOR BUTTONS : Use these
buttons in the Channel list,
Internet@TV, Media Play menu,
etc.
O SOURCE: Press todisplay
and select the available video
sources.
_) =VOL+ : Press to increase or
decrease the volume.
CONTENT: This function enables
you to view the Content Library.
_i_ MEDtA.P:Allows you to play
music files, pictures, and movies.
_) INFO: Press to display
information on the TV screen.
_) Use these buttons inthe Media
Play and Anynet + modes. ([_]:
This remote can be used to
control recording on Samsung
recorders withthe Anynet +
feature)
_) SENSING WINDOW: Senses
brightness of surroundings and
determines whether turn onthe
backlight of the remote control
button or not. You can find a
button more conveniently when
using remote control inthe dark
place.
PRE-CH :Enables you to return
to the previous channel you were
watching.
_iJ MENU :Displays the main on-
screen menu.
_) FAV.OH: Press to switch to your
favorite channels.
_) RETURN : Returns to the
previous menu
WHEEL(UPA 1DOWNT /
LEFT_I 1RtGHT_) 1ENTER _,_:
Press the Up/Down/Left/Right
sections of the wheel button and
Enter to select on-screen menu
items and change menu values.
You can navigate up and down
the menu, switch channels and
adjust the volume by turning the
wheel button.
EXIT : Press to exit the menu.
!_ v CH A : Press to change
channels.
t_ MUTE _ : Press to temporarily
cut offthe sound.
I_) P.SIZE: Picture size selection.
I_ MTS: Press to choose stereo,
mono or Separate Audio Program
(SAP broadcast).
!_ CO: Controls the caption
decoder.
PAIRING / RESET: Used for
pairing the TV and the Remote
Control. (see page 5)
POWER
® ©
O B
\
......0
-oD
This device complies with Part 15of FCC Rules. Operation is subject to the following two conditions:
(1)This device may not cause harmful interference, and
(2)This device must accept any interference received including interference that may cause undesired operation.
• Applicant's name :SAMSUNG ELECTRONICS CO,.LTD.
Model name : RemoteController
IC : 649E-SWPZ01TX
• Applicant's name :SAMSUNG ELECTRONICS CO,.LTD.
Model name : RfTransceiver
IC : 649E-SWPZ01RX
Page 7
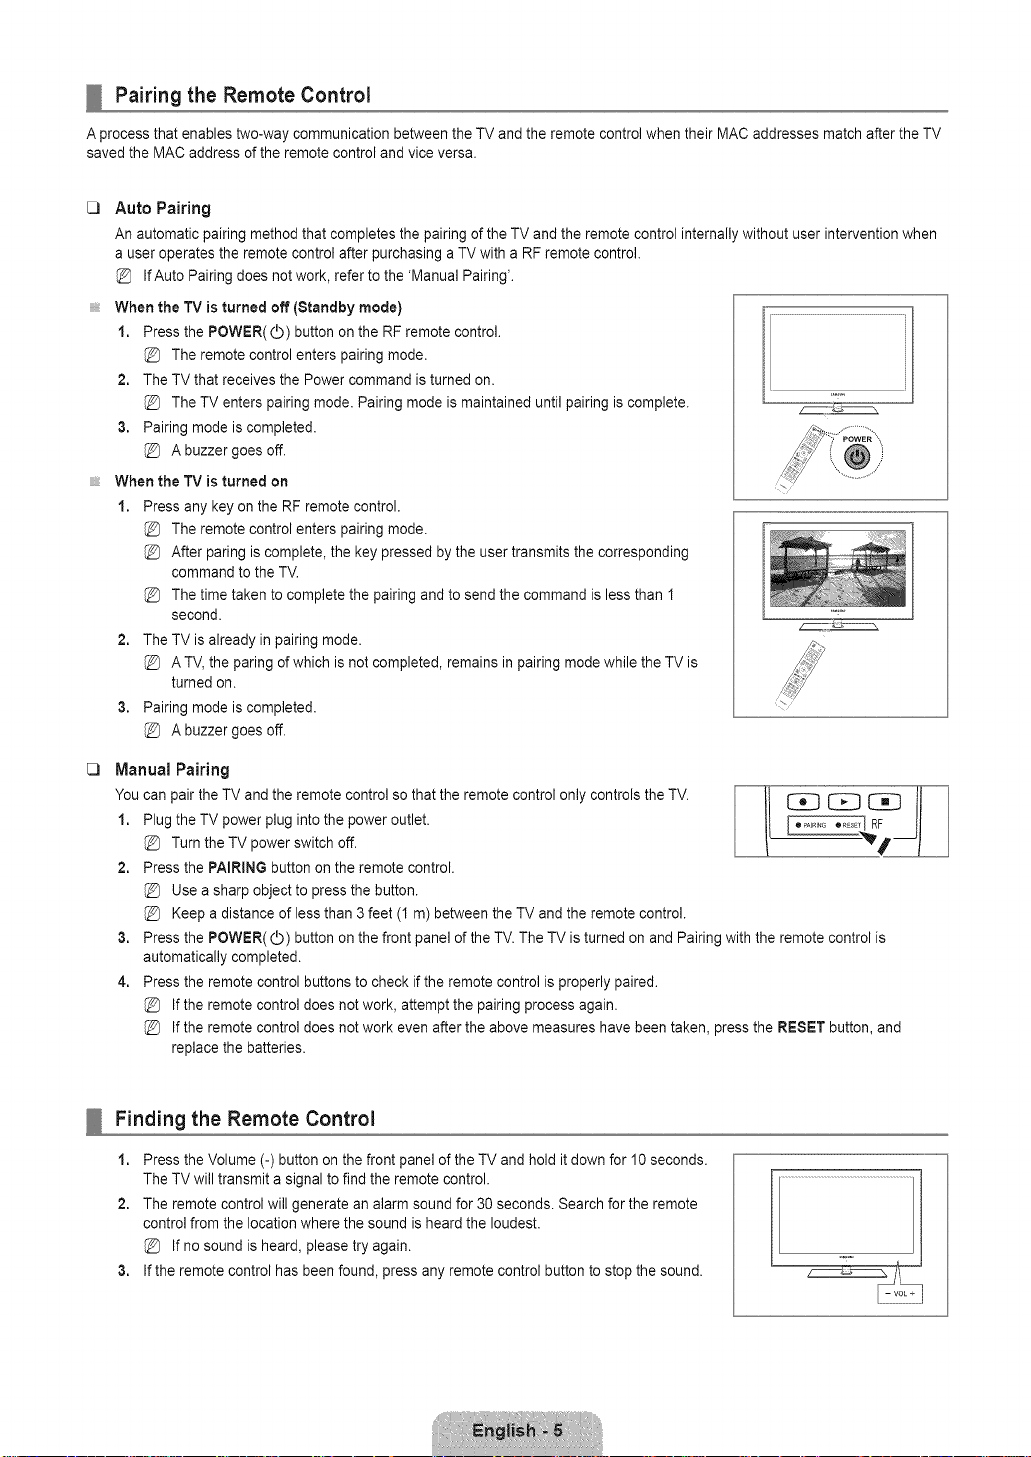
Pairing the Remote Control
Aprocess that enables two-way communication between the TV and the remote control when their MACaddresses match after the TV
saved the MAC address of the remote control and vice versa.
[]
Auto Pairing
An autornatic pairing method that completes the pairing of the TV and the remote control internally without user intervention when
a user operates the remote control after purchasing a TV with a RF remote control.
IfAuto Pairing does not work, refer to the 'Manual Pairing'.
When the TV is turned off (Standby mode)
1. Press the POWER(V) button on the RF remote control.
The remote control enters pairing mode.
2. The TV that receives the Power command is turned on.
The TV enters pairing mode. Pairing mode is maintained until pairing is complete. '::
3. Pairing mode is completed.....................
{_ A buzzer goes off.
When the TV is turned on
1. Pressany key onthe RFremote control,
{_ The remote controlenters pairing mode,
{_ After paring is complete, the key pressed by the user transmits the corresponding
command to the TV,
{_ The time taken to complete the pairing and to sendthe commandis lessthan I
second. 1"_1_.................................
2. The TV is already in pairing mode.
ATV, the paring of which is not completed, remains inpairing mode while the TV is
turned on.
3. Pairing mode is completed.
A buzzer goes off.
;" POWER "x
[]
Manual Pairing
You can pair the TV and the remote control so that the remote control only controls the TV.
1. Plug the TV power plug into the power outlet.
Turn the TV power switch off.
2. Press the PAIRING button on the remote control.
Use a sharp object to press the button.
Keep a distance of less than 3 feet (1 m)between the TV and the remote control.
3. Press the POWER((b) button on the front panel of the TV.The TV is turned on and Pairing withthe remote control is
automatically completed.
4. Press the remote control buttons to check if the remote control is properly paired.
Ifthe remote control does not work, attempt the pairing process again.
Ifthe remote control does not work even after the above measures havebeen taken, press the RESET button,and
replace the batteries.
Finding the Remote Control
1. Press the Volume (-) button on the front panel of the TV and hold itdown for 10 seconds.
The TV will transmit a signal to find the remote control.
2. The remote control will generate an alarm sound for 30 seconds. Search for the remote
control from the locationwhere the sound isheard the loudest.
If no sound is heard, please try again.
3. If the remote control has been found, press any remote control button to stop the sound.
Page 8
Mini Remote Control
The Mini Remote Control is a simplified remote control that consists of the
power, channel and volume buttons only.
O Power On/Offbutton
/% : Nextchannel / V : Previous channel
+ :Volume increase / = : Volume decrease
O IrDAtransmitter
Use the Mini Remote Control so that this part faces the TV.
%
The items color and shape may vary depending on the model.
CALIFORNIA USA ONLY
%
This Perchlorate warning applies only to primary CR (Manganese Dioxide) Lithium coin cells in the product sold or distributed
ONLY in California USA 'Perchloate Material - special handling may apply, Seewww.dtsc.ca.gov/hazardouswaste/perchlorate:'
installing Batteries in the Remote Control
Normal Remote Control
1. Lift the cover at the back of the remote control upward as shown in the
figure.
2. Install two AAA size batteries.
Make sure to match the '+' and '-' ends of the batteries with the
diagram inside the compartment.
3. Replace the cover.
Remove the batteries and store them in a cool, dry place if you won't
be using the remote control for a long time. (Assuming typical TV
usage, the batteries should last for about one year.)
Mini Remote Control
1. Turn the battery cover counterclockwise to unlock it and then separate the
battery cover.
2. Insert a 3V Lithium battery.
3. Place the battery cover into the remote control aligning it with the grooves
and then turn the battery cover clockwise to lock the cover.
%
Ifthe remote control doesn't work, check thefollowing:
• Is the TV power on?
• Are the plus and minus ends of the batteries reversed?
• Are the batteries drained?
• Is there a power outage or is the power cord unplugged?
• Is there a special fluorescent light or neon sign nearby?
Page 9

Viewing the menus
Before using the TV, follow the steps below to learn how to navigate the menu in order to select and adjust different functions.
MENU Button o,,,,_
[ EDE DO
Display the main on-screen menu. _ _
ENTERIB_ / WHEEL Button -- _ ..... _'_" _
Move the cursor and select an item. Select
the currently selected item. Confirm the
setting.
[]
Operation the OSD (On Screen Display)
The access step may differ depending on the selected menu.
1. Press the MENU button.
2. The mainmenu appears on the screen. The menu's leftside has icons • Picture, Sound,
Channel, Setup, input, Application, Support,
3. Press the A or T button to select one of the icons.
To move to a lower menu, turn the wheel clockwise when the menu is displayed. To
move to a higher menu, turn the wheel counterclockwise.
RETURN Button
Return to the previous menu.
EXiT
Exit the on-screen menu.
4. Then press the ENTERIB`# buttonto access the icon's sub-menu.
6. Press the A or T button to select the icon's submenu.
6. Press the _ or _- button to decrease or increase the value of a particular item. The
adjustment OSD may differ depending on the selected menu.
7. Press the ENTER _,_ button to complete the configuration. Press the EXIT button to exit.
Help icon
Page 10

Plug & Play Feature
When the TV is initially powered on, basicsettings proceed automatically and subsequently.
YOUcan also usethe POWER d) button on the TV.
The Plug & Play starting message is displayed. Press the ENTERIB# button.
1. Pressthe POWER(_ button onthe remote control. /J P°wE_ ¢-_q L
Ifthe remote control is not functioning properly, please follow the instructions to
repeat the process for pairing the remote control to the TV.
2. Press the ENTER[3,,Jbutton. Press the A. or V button to select the language, then press
the ENTER[B,,Jbutton. The message Select 'Home Use' when installing this TV in your
home. is displayed.
3. Press the _ or _ button to select Store Demo or Home Use, then press the ENTER _,,J
button. The message Select the Antenna source to memorize, is displayed.
We recommend setting the TV to Home Use mode for the best picture in your home
environment.
Store Demo mode is only intended for use in retail environments.
Ifthe unit is accidentally set to Store Demo mode and you want to return to Home Use (Standard): Press the volume
button onthe TV. When the volume OSD is displayed, press and holdthe MENU button on theTV for 5 seconds.
4. Press the A or _' buttonto memorize the channels of the selected connection. Press the ENTER _ button to select Start.
Air: Air antenna signal. / Cable: Cable antenna signal. / Auto: Air and Cable antenna signals.
In Cablemode, you can select the correct signal source among STD, HRC, and IRC by pressing the A, T, 4 or _.
button, then press the ENTER E_,,Jbutton. Ifyou have Digital cable, select the cable system signal source for both Analog
and Digital. Contact your localcable company to identify the type of cable system that exists inyour particular area.
6. Press the ENTERIZ_,,Jbutton to select Start. The TV will beginmemorizing all of the available channels.
To stop the search before it has finished, press the ENTERIB# button with Stop selected.
After all the available channels are stored, itstarts to remove scrambled channels. TheAuto program menu then
reappears. Press the ENTER _,,Jbutton when channel memorization is complete. The message Set the Clock Mode. is
displayed.
6. Press the ENTERIZ_,,Jbutton. Press the A or T button to select Auto, then Press the ENTER[B,,Jbutton. The message Set to
daylight saving time. is displayed. If you select Manual, Set current date and time. is displayed.
7. Press the A or T button to select Off, On or Auto, then press the ENTER _,,Jbutton.
8. Press the A or _' buttonto highlight the time zone for your local area. Press the ENTERIZ_,,Jbutton. If you have received a
digital signal, the time will be set automatically. If not, refer to the 'Setting the Time' instructions to set the clock.
(see pages 29~30)
9. The description for the connection method providing the best HD screen quality is displayed. Check the description and press
the ENTERIB_ button.
10. Press the _ or _. buttonto selectSee Product Guide or Watch TV. Press the ENTERIB,_ button.
• See Product Guide: You are moved to the Product Guide where you can view the introduction to the main functions of
your new HDTV.
• Watch TV: You can watch the memorized channels.
If you want to reset this feature...
1. Press the MENU button to display the menu. Press the ,& or T button to selectSetup,
then press the ENTER _ button.
2. Press the ENTERIB# button again to select Plug & Play.
The Plug & Play feature is only available in the TV mode.
Page 11
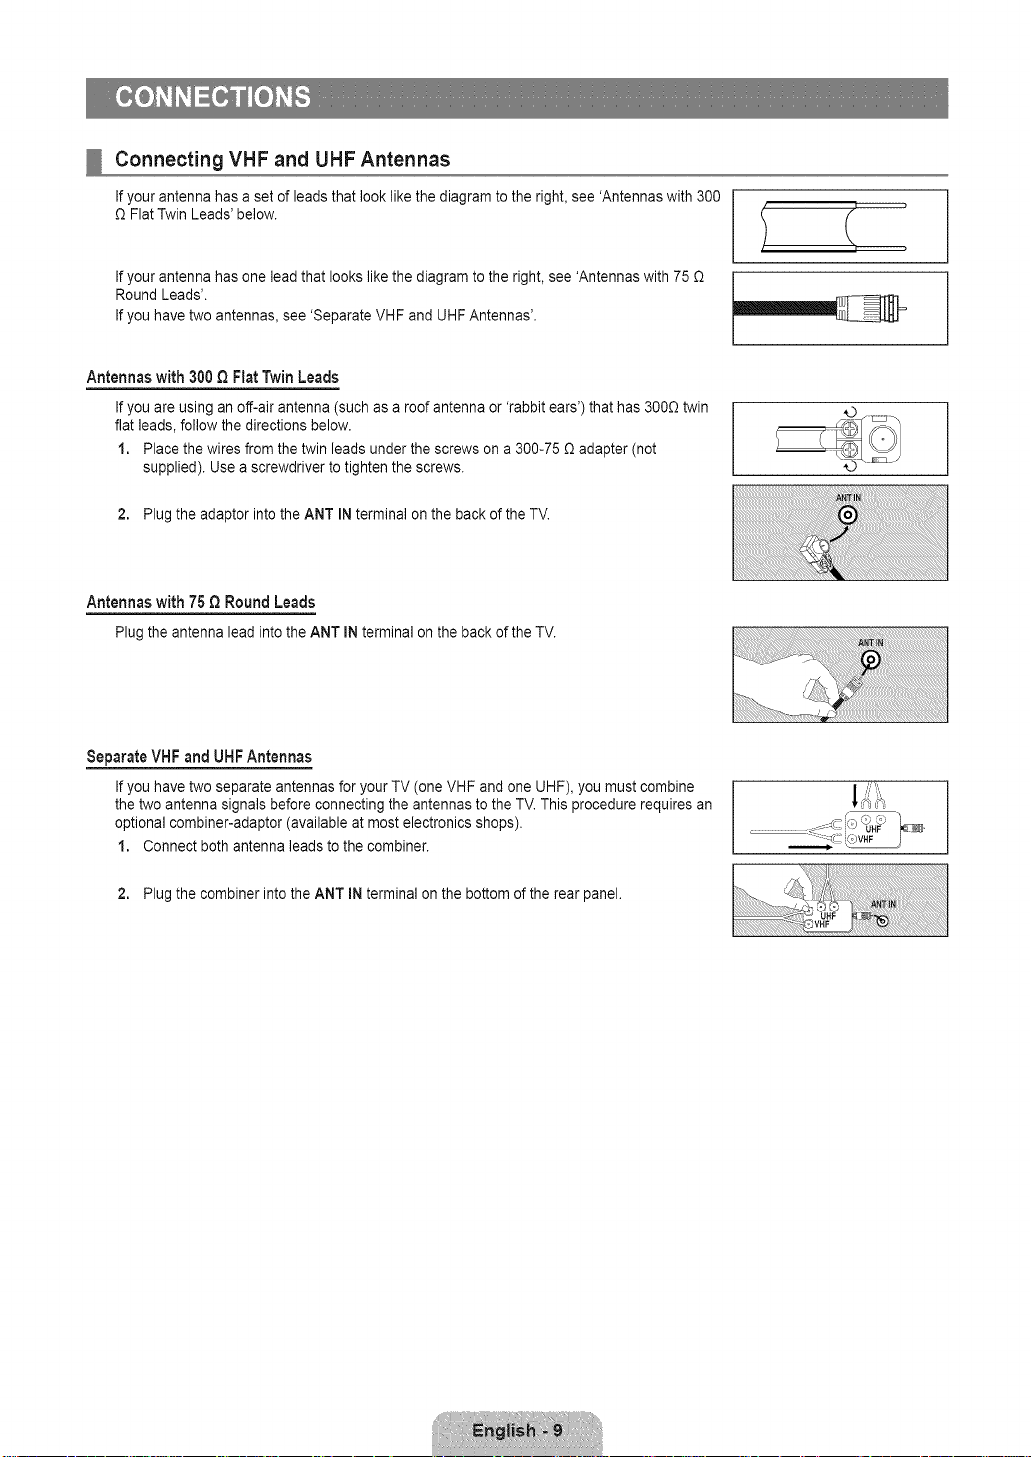
Connecting VHF and UHF Antennas
Ifyour antenna has a set of leads that look like the diagram to the right, see 'Antennas with 300
£2Flat Twin Leads'below.
Ifyour antenna has one lead that looks like the diagram to the right, see 'Antennas with75 £2
Round Leads'.
Ifyou have two antennas, see 'Separate VHF and UHF Antennas'.
Antennaswith300Q FlatTwinLeads
Ifyou are using an off-air antenna (such as a roof antenna or 'rabbit ears') that has 300£2twin
flat leads, follow the directions below.
1. Place the wires from the twin leads under the screws on a 300-75 £2adapter (not
supplied). Use a screwdriver to tighten the screws.
2. Plug the adaptor into the ANT IN terminal on the back ofthe TV.
Antennaswith 75_ RoundLeads
Plugthe antennaleadintotheANTiN terminalonthe backof theTV.
Separate VHF and UHF Antennas
Ifyou have two separate antennas for yourTV (one VHF and one UHF), you must combine
the two antenna signals before connecting the antennas to the TV.This procedure requires an
optional combiner-adaptor (available at most electronics shops).
1. Connect both antenna leads to the combiner.
2. Plug the combiner into the ANT IN terminal on the bottom of the rear panel.
Page 12

Connecting Cable TV
To connect to a cable TV system, follow the instructions below.
Cablewithout a Cable Box
Plug the incoming cable into the ANT IN terminal on the back of the TV.
Because this TV is cable-ready, you do not need a cable box to view unscrambled cable
channels.
Connecting to a Cable Box that Deserambles All Channels
1. Find the cable that is connected to theANT OUT terminal onyour cable box.
This terminal might belabeled 'ANT OUT', 'VHF OUT' or simply, 'OUT'.
2. Connect the other end ofthis cable to the ANT iN terminal on the back of the TV.
Connecting to a Cable Box that Deserambles Some Channels
Ifyour cable box descrambles only some channels (such as premium channels), follow the instructions below. Youwill need a two-
way splitter, an RF (A/B) switch and four lengths of RF cable. (These items are available at mostelectronics stores.)
/
CA8_
Incoming cable _
1. Find and disconnect the cable that is connected to the ANT INterminal on your cable box.
This terminal might belabeled 'ANT IN', 'VHF IN'or simply, 'IN'.
2. Connect this cable to atwo-way splitter.
3. Connect an RF cable between the OUTPUT terminal on the splitter andthe IN terminal on the cable box.
4. Connect an RF cable between the ANT OUT terminal onthe cable box and the B-IN terminal on the RF(A/B) switch.
6. Connect another cable between the other OUT terminal on the splitter and the A-IN terminal on the RF (A/B) switch.
6. Connect the last RF cable between the OUTterminal on the RF (A/B) switch and the ANT IN terminal on the rearof the TV.
After youhave made this connection, setthe A/B switch to the 'A' position for normal viewing. Set theA/B switch to the 'B'
position to view scrambled channels. (When you set the A/B switch to 'B', you will need to tune your TV to the cable box's
output channel, which isusually channel 3 or 4.)
Splitter
ou _F__ ' TVRear
CableBox
..............................................................:,;:uT;,
RF(A/B)Switch
Page 13
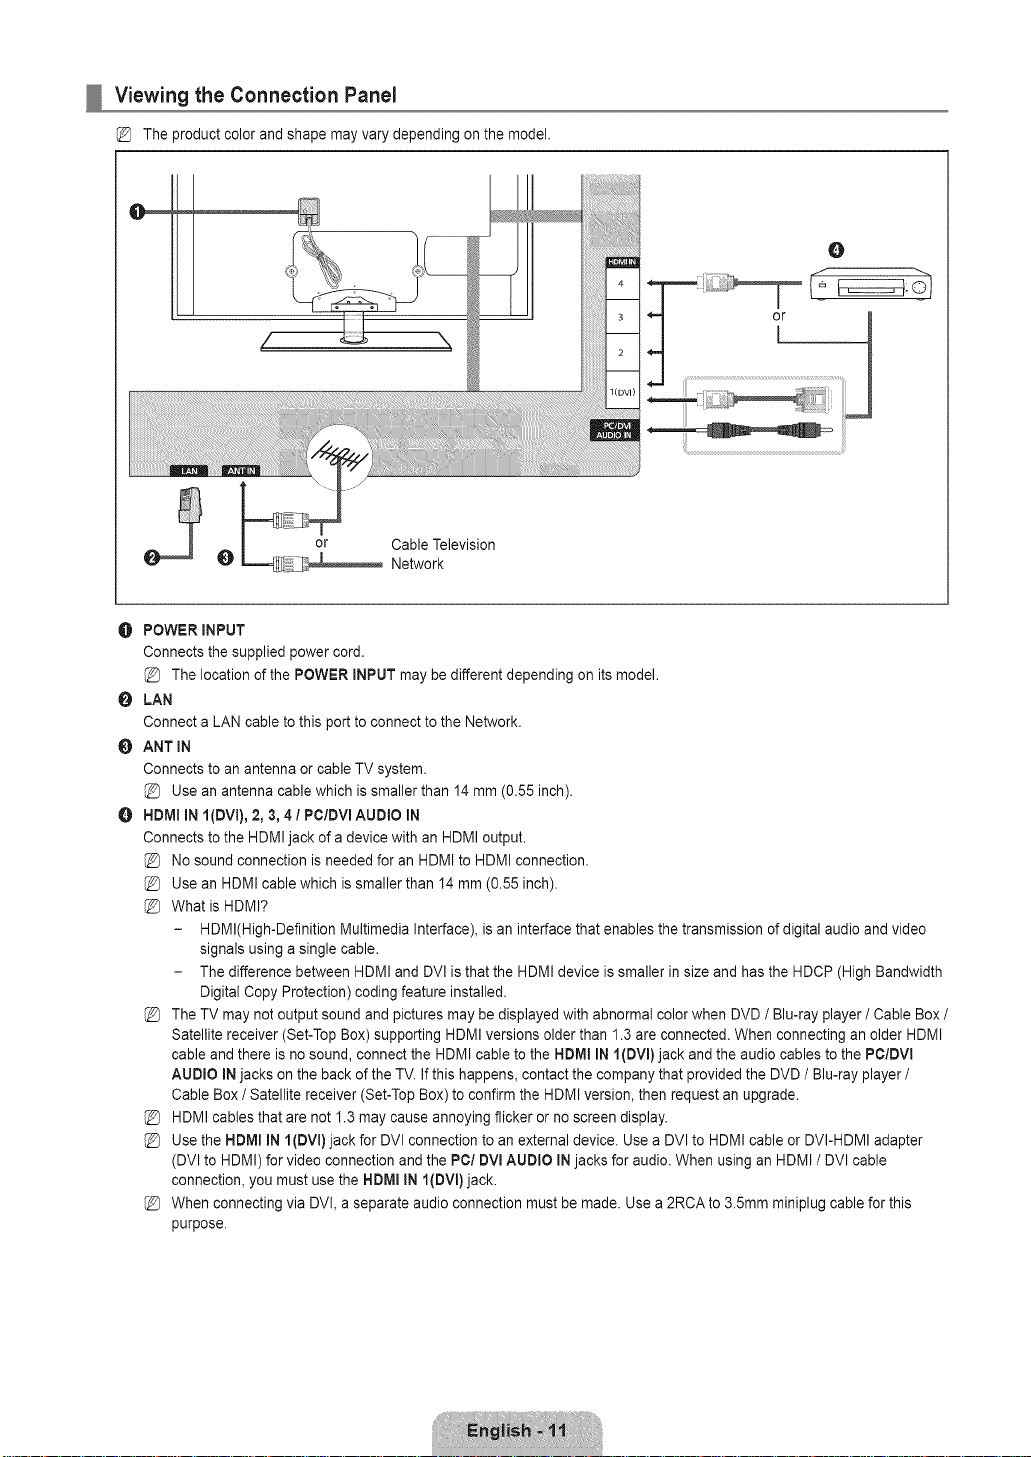
Viewing the Connection Panel
The product color and shape may vary depending on the model.
O
O Network
POWER INPUT
O
Connects the supplied power cord.
(_ The location of the POWER INPUT maybe different depending on its model.
O
LAN
Connect a LAN cable to this port to connect to the Network.
ANT IN
O
Connects to an antenna or cable TV system.
Use an antenna cable which is smaller than 14mm (0.55 inch).
O
NDMI IN I(DVI), 2, 3, 4 / PC/DVIAUDIO IN
Connects to the HDMI jack of a device with an HDMI output.
No sound connection isneeded for an HDMI to HDMI connection.
Use an HDMI cable which is smaller than 14 mm (0.55 inch).
What is HDMI?
- HDMl(High-Definition Multimedia Interface), is an interface that enables the transmission of digital audio and video
signals using a single cable.
- The difference between HDMI and DVl is that the HDMI device is smaller in size and has the HDCP (High Bandwidth
Digital Copy Protection) coding feature installed.
The TV may not output sound and pictures may be displayed with abnormal color when DVD / Blu-ray player / Cable Box /
Satellite receiver (Set-Top Box) supporting HDMI versions older than 1.3 are connected. When connecting an older HDMI
cable and there isno sound, connect the HDMI cable to the HDM! IN l{DVi)jack and the audio cables to the PC/DVl
AUDIO INjacks on the back of the TV. If this happens, contact the company that provided the DVD / Blu-ray player /
Cable Box/ Satellite receiver (Set-Top Box) to confirm the HDMI version, then request an upgrade.
HDMI cables that are not 1.3may cause annoying flicker orno screen display.
Use the HDMI IN I(DVl)jack for DVl connection to an external device. Use a DVl to HDMI cable or DVI-HDMI adapter
(DVl to HDMI) for video connection and the PC/DVl AUDIO IN jacks foraudio. When using an HDMI / DVl cable
connection, you must use the HDMI IN IIDVI)jack.
When connecting via DVI, a separate audio connection must be made. Use a 2RCA to 3.5mm miniplug cable for this
purpose.
or Cable Television
Page 14
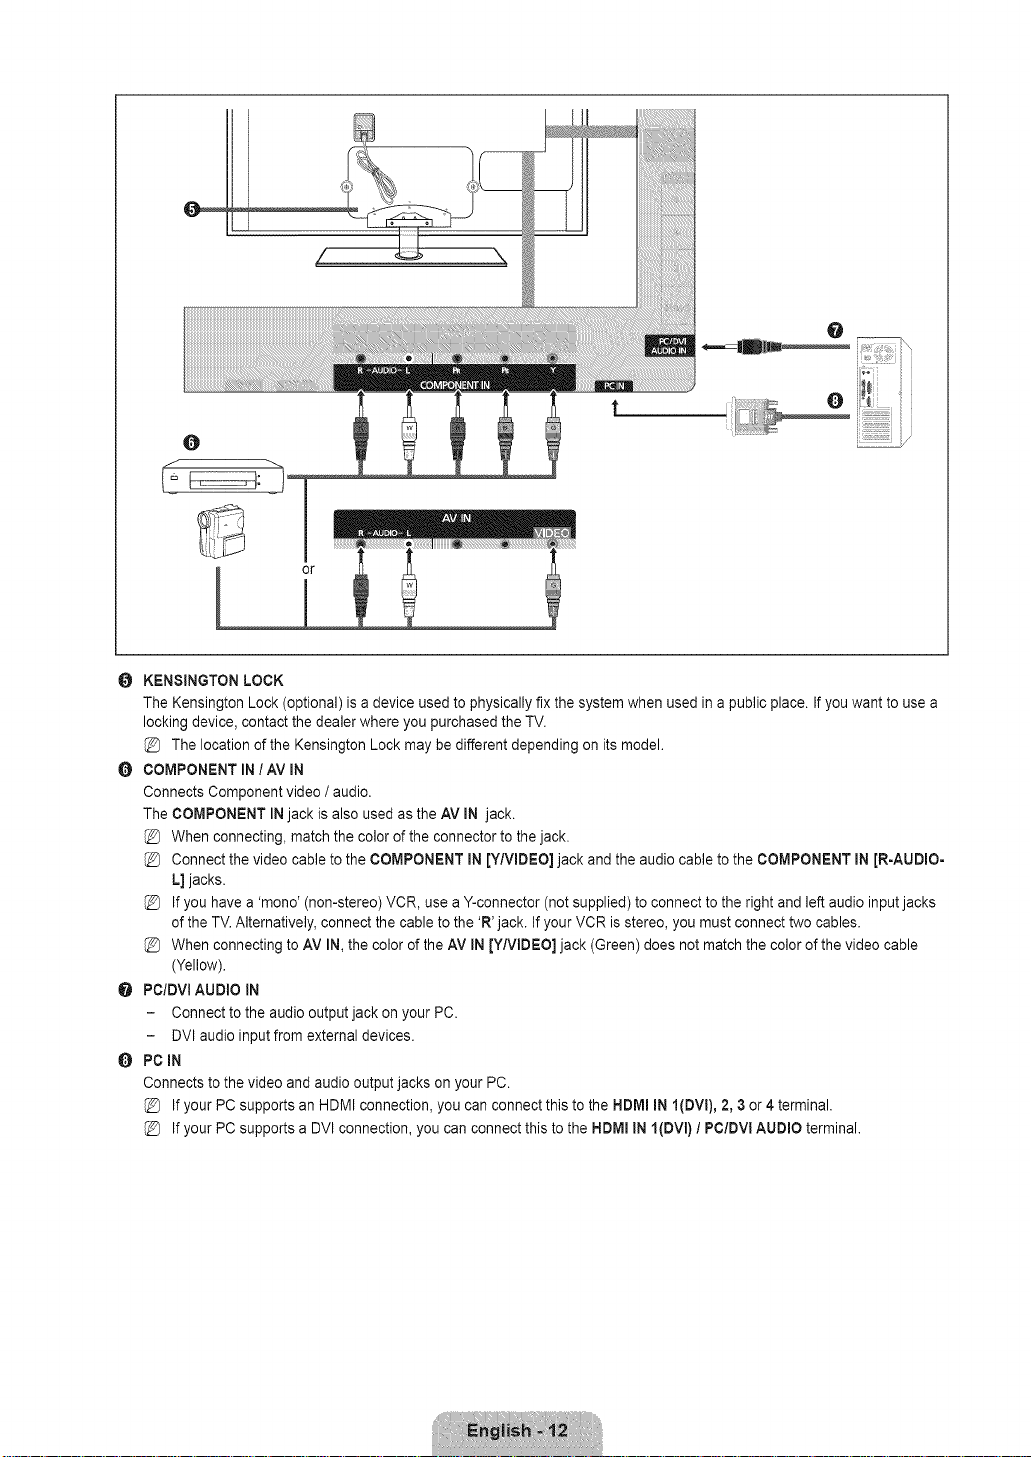
O
0 KENSINGTON LOCK
The Kensington Lock (optional) is a device used to physically fix the system when used ina public place. Ifyou want to use a
locking device, contact the dealer where you purchased the TV.
The location of the Kensington Lock may be different depending on its model.
0 COMPONENT IN / AV IN
Connects Component video / audio.
The COMPONENT INjack is also used as the AV IN jack.
When connecting, match the color of the connector to the jack.
Connect the video cable to the COMPONENT IN [YNIDEO] jack andthe audio cable to the COMPONENT IN JR-AUDIO-
L] jacks.
Ifyou have a 'mono' (non-stereo) VCR, use a Y-connector (not supplied) to connect to the right and leftaudio input jacks
of the TV. Alternatively, connect the cable to the 'R' jack. Ifyour VCR is stereo, you mustconnect two cables.
When connecting to AV IN, the color ofthe AV IN [Y/VIDEO] jack (Green) does not match the color of the video cable
(Yellow).
O PC/DVIAUDIO IN
- Connect to the audio output jack on your PC.
- DVI audio input from external devices.
0 PCIN
Connects to the video and audio output jacks on your PC.
Ifyour PC supports an HDMI connection, you can connect this to the HDMI IN I(DVl), 2, 3 or 4 terminal.
Ifyour PC supports a DVl connection, you can connect this tothe HDMI IN I(DVl} 1PO/DVl AUDIO terminal.
Page 15

iiiiiiiiiiiiiiiiiiiiiiiii_i!ii!i\
@
\
O EX-LINK
Connector for service only.
@ USBI(HDD)/USB2
Connector for software upgrades and Media Play, etc. You can connect to Samsung's network wirelessly using the 'Samsung
Wireless LANAdapter' (Sold separately).
For USB HDD, use the USBI(HDD) port.
Turning on or off the TV while a USBdevice is connected may damage the files on the USB device.
AUDIOOUT
Connects to the audio inputjacks onyour Amplifier/Home theater.
When connecting, use the appropriate connector (sold separately).
When an audio amplifier is connected to the AUDIO OUT jacks: Decrease the volume of the TV and adjust the volume
level with the Amplifier's volume control.
_) DIGITAL AUDIO OUT (OPTICAL)
Connects to a Digital Audio component such as a Home theater receiver.
When a DigitalAudio System is connected to the DIGITAL AUDIO OUT (OPTICAL) jack: Decrease the volume of the TV
and adjust the volume level with the system's volume control.
5.1CH audio is possible when the TV is connected to an external device supporting 5.1CH.
When the HomeTheater receiver is set to On, you can hear sound output from the TV's Optical jack. When the TV is
displaying a DTV(air) signal, the TV will send out 5.1 channel sound to the Hometheater receiver. When the source is a
digital component such as a DVD / Blu-ray player / Cable Box/ Satellite receiver (Set-Top Box) and is connected to the
TV via HDMI, only 2 channel sound will be heard from the HomeTheater receiver. Ifyou want to hear 5.1 channel audio,
connect the digital audio out jack on DVD / Blu-ray player / Cable Box / Satellite receiver (Set-Top Box) directly to an
Amplifier or Home Theater, notthe TV.
Page 16

YoucanconfigurevarioussettingsforyourTVchannelswithfeaturessuchasAutoProgram,FavoriteChannels,andSignal
Strength.
Channel Menu
[]
Antenna _ Air / Cable
Before your television can begin memorizing the available channels, you must specify the type
of signal source that is connected to the TV (i.e. an Air or a Cable system).
__ Press the TOOLS buttonto display the Tools menu. You canalso set the Antenna by
selecting Tools_ Switch to Cable (or Switch to Air).
[]
Auto Program
Air: Air antenna signal, / Cable: Cable antenna signal. / Auto: Air and Cable antenna
signals
When selecting the CableTV system: Selects the cable system. STD, NRC and IRC identify various types of cable TV
systems. Contact your localcable company to identify the type of cable system that exists inyour particular area. At this point
the signal source has beenselected.
After allthe available channels are stored, itstarts to remove scrambled channels (Removing scrambled channel). The Auto
program menu then reappears.
Ifyou want to stop Auto Programming, pressthe ENTERE},,Jbutton. The Stop Auto Program? message will be displayed.
Select Yes by pressingthe 4 or _. button, then press the ENTER _ button.
[]
Clear Scrambled Channel (digital channels only)
This function is used tofilter out scrambled channels after Auto Program is completed. This process may takeup to 20--30
minutes.
To stop searching scrambled channels: Press the ENTER _ button to select Stop. Press the _ button to select Yes, then
press the ENTERIB_ button.
This function is only available in Cable mode.
[]
Channel List
For detailed procedures on using the Channel List, referto the 'Managing Channels' instructions. (see pages 15~16)
You can select these options bysimply pressing the CH LIST button on the remote control.
[]
Fine Tune (analog channels only)
Use fine tuning to manually adjust a particular channel for optimal reception.
Ifyou do not store the fine-tuned channel in memory, adjustments are not saved.
'*' will appear nextto the name of fine-tuned channels.
To reset the fine tuning setting, pressthe T button to select Reset, then press the ENTER_,_ button.
Page 17

Managing Channels
Using this menu, you can add / delete or setfavorite channels and use the program guide for
digital broadcasts.
All Channels
Shows all currently available channels.
Added Channels
Shows all added channels.
Favorite
Shows all favorite channels.
To select the favorite channels you haveset up, press the FAV,OH button on the remote control.
Programmed
Shows all current reserved programs.
Select a channel inthe All Channels, Added Channels or Favorite screen by pressing the A / T buttons, and pressing the
ENTERIB,#button. Then youcan watchthe selected channel.
Using the color buttons with the Channel List
- Red (Antenna): Switches to Air or Cable.
- Green (Zoom): Enlarges or shrinks a channel number.
- Yellow (Select): Selects multiple channel lists. You can perform the add/delete or add to Favorite/delete from Favorite
function for multiple channels at the same time. Select the required channels and press the yellow button to set all the
selected channels at the same time. The ..,/ mark appears to the left of the selected channels.
- TOOLS (Tools): Displays the Add (or Delete),Add to Favorite (orDelete from Favorite), Timer Viewing, Channel
Name Edit, Select All (or Deseleet All) and Auto Program menus(The Options menus may differ depending on the
situation.)
Channel Status Display Icons
_/ : A channel selected by pressing the yellow button.
C_3: A program currently being broadcast.
V :A channel set as a Favorite.
(_) :A reserved program.
Channel List Option Menu (in All Channels / Added Channels / Favorite)
Press the TOOLS button to usethe option menu.
Option menu items maydiffer depending on the channel status.
Add / Detete
You can delete oradd a channel to display the channels you want.
All deleted channels will be shown on the All Channels menu.
A gray-colored channel indicates the channel has been deleted.
The Add menu only appears for deleted channels.
You can also delete a channel from the Added Channels or Favorite menu in the same
manner.
Page 18

AddtoFavorite / Delete from Favorite
You can set channels you watch frequently as Favorite.
_-_ Press the TOOLS button to display the Tools menu. You canalso set the add to (or delete from) Favorites by selecting Tools
Add to Favorite (or Delete from Favorite).
The 'V' symbol will be displayed and the channel will be set as a favorite.
All favorite channels will be shown on Favorite menu.
Timer Viewing
Ifyou reserve a program youwant to watch, the channel is automatically switched to the reserved channel in the Channel List;
even when you are watching another channel. To reserve a program, set the current time first.
Only memorized channels can be reserved.
You can set the channel, day, month, year, hour and minute directly bypressing the number buttons on the remote control.
Reserving a program will beshown in the Programmed menu.
Digital Program Guide and Viewing Reservation
When a digital channel is selected, and you press the _- button, the Program Guide for the channel appears. Youcan reserve
a program according to the procedures described above.
Channel Name Edit (analog channels only)
Channels canbe labeled so that their call letters appear whenever the channel is selected.
@ The names of digital broadcasting channels are automatically assigned andcannot be labeled.
Select All / Deselect Ai!
= Select All: Youcan select all the channels in the channel list.
• Deselect All: Youcan deselectall the selected channels.
You can only select Deselect All when there isa selected channel.
Auto Program
@ For detailed procedures on using the Auto Program, refer to the 'Channel Menu' instructions. (see page 14)
Channel List Option Menu (in Programmed)
You can view, modify or delete a reservation.
Press the TOOLS button to usethe option menu.
Change Info
Select to change a viewing reservation.
Cancel Schedules
Select to cancel a viewing reservation.
Information
Select to view aviewing reservation.
(You canalso change the reservation information.)
Select Atl
Select all reserved programs.
Page 19

Youcanconfigurevariouspictureoptionssuchasthepicturemode,aspectratio,andcolortosuityourpersonalpreferences.
Configuring the Picture Menu
[]
Mode
You can select the type of picture which best corresponds to your viewing requirements.
__ Press the TOOLS buttonto display the Tools menu. You canalso set the picture mode by
selecting Tools _ Picture Mode.
Dynamic
Selects the picture for increased definition ina bright room.
Standard
Selects the picture for the optimum display in a normal environment.
Natural
Selects the picture for an optimum and eye-comfortable display.
Natural is notavailable in PC mode.
Movie
Selects the picture for viewing movies in a dark room.
[]
Backlight / Contrast / Brightness / Sharpness / Color / Tint(G/R)
Your television has several setting options that allow you to control the picture quality.
• Backlight: Adjusts the brightness of LED back light.
• Contrast: Adjusts the contrast level of the picture.
• Brightness: Adjusts the brightness level of the picture
• Sharpness: Adjusts the edge definition of the picture.
• Color: Adjusts color saturation of the picture.
• Tint(G/R): Adjusts the color tint of the picture.
When you make changes to Backlight, Contrast, Brightness, Sharpness, Color or Tint(GIR) the OSD will be adjusted
accordingly.
In PCmode, you can only make changes to Backlight, Contrast and Brightness.
Settings can be adjusted and stored for each external device youhave connected to an input of the TV.
The energy consumed during use can be significantly reduced if the brightness level of the picture is lowered, which will
reduce the overall runningcost.
[]
Advanced Settings
Samsung's new TVs allow you to make even more precise picture settings than previous
models.
Advanced Settings isavailable inStandard or Movie mode.
In PCmode, you can only make changes to Dynamic Contrast, Gamma andWhite
Balance from among the Advanced Settings items.
Black Tone _ Off I Dark/ Darker / Darkest
You can select the black level on the screen to adjust the screen depth.
Page 20

DynamicContrast _ Off / Low/ Medium / High
You can adjust the screen contrast so that the optimal contrast is provided.
Gamma
You can adjust the primary color(red, green, blue) intensity.
Color Space
Color space is a color matrix composed of red, green and blue colors. Select your favorite colorspace to experience the most
natural color.
• Auto: Auto color space automatically adjusts to the most natural color tone based on program sources.
• Native: Native color space offers deep and rich color tone.
• Custom: Adjusts the color range to suit your preference.
@ Changing the adjustment value will refresh the adjusted screen.
@ Settings can be adjusted and stored for eachexternal device you have connected to an input of the TV. Forexample, if
you have a DVD player connected to HDMI 1and itis currently selected, settings and adjustments will be saved for the
DVD player.
- Color: Red, Green, Blue, Yellow, Cyan or Magenta
Color is available when Color Space is set to Custom.
In Color, you can adjust the RGB valuesfor the selected color.
To reset the adjusted RGB value, select Reset.
- Red: Adjusts the red saturation level of the selected color.
- Green: Adjusts the green saturation level ofthe selected color.
- Blue: Adjusts the blue saturation levelof the selected color.
- Reset: Resets the color space to the default values.
White Balance
You can adjust the color temperature for more natural picture colors.
• R-Offset: Adjusts the red color darkness.
• G=Offset:Adjuststhe green color darkness.
• B-Offset: Adjusts the blue color darkness.
• R-Gain: Adjusts the red color brightness.
• G=Gain:Adjuststhe green color brightness.
• B-Gain: Adjusts the blue color brightness.
• Reset: The previously adjusted white balance will be reset to the factory defaults.
Flesh Tone
You can emphasize the pink 'fleshtone' in the picture.
Changing the adjustment value will refresh the adjusted screen.
Edge Enhancement _ Off / On
You can emphasize object boundaries in the picture.
xvYCC -_ Off / On
Setting the xvYCC mode to on increases detail and color space when watching movies from an external device (ie. DVD player)
connected to the HDMI or Component INjacks.
xvYCC is available when the picture mode is set to Movie, and the external input is setto HDMI or Component mode.
Page 21
[]
Picture Options
In PCmode, you can only make changes to the Color Tone and Size from among the
items inPicture Options.
Color Tone _ Cool 1Normal 1Warm1 / Warm2 1Warm3
Warm!, Warm2 or Warm3 is only activated when the picture mode is Movie.
Settings can be adjusted and stored for each external device youhave connected to an
input of the TV.
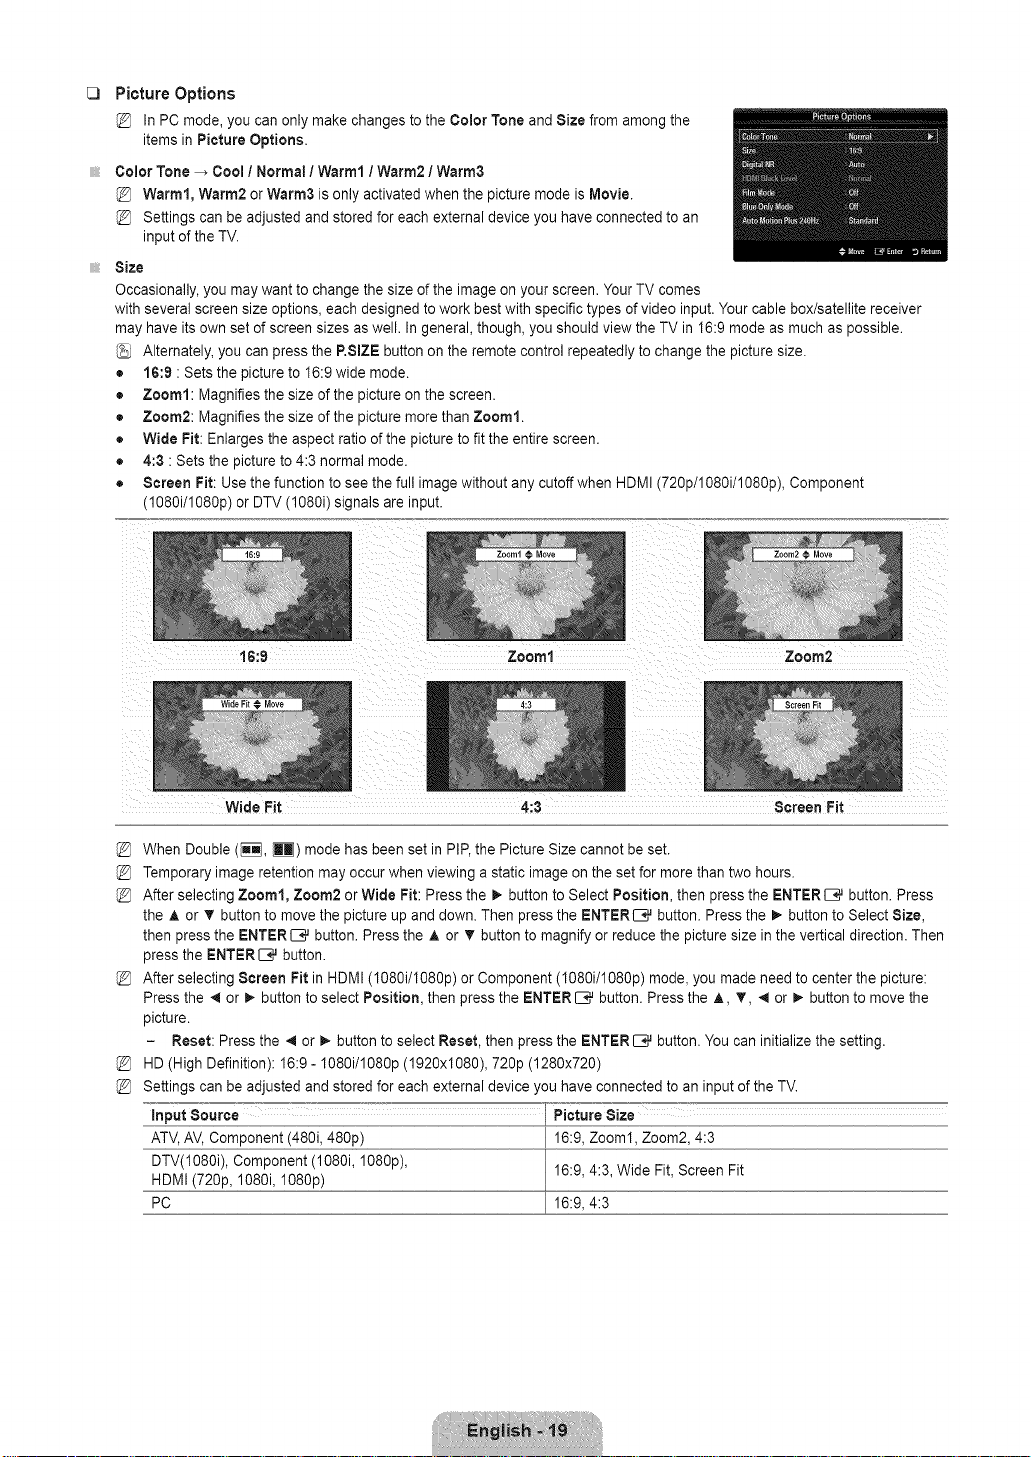
Size
Occasionally, you may want to change the size of the image on your screen. Your TV comes
with several screen size options, each designed to work best with specific types of video input. Your cable box/satellite receiver
may have its own setof screen sizes as well. In general, though, you should view the TV in 16:9 mode as much aspossible.
Alternately, you can press the P.SIZE button on the remote control repeatedly to change the picture size.
• 16:9 • Sets the picture to 16:9 wide mode.
• Zoom1: Magnifies the size of the picture on the screen.
• Zoom2: Magnifies the size of the picture more than Zoom1.
• Wide Fit: Enlarges the aspect ratio of the picture to fit the entire screen.
• 4:3 •Sets the picture to 4:3 normal mode.
• Screen Fit: Use the function to see the full image without any cutoff when HDMI (720p/1080i/1080p), Component
(1080i/1080p) or DTV (1080i) signals are input.
%
When Double ([_], H) mode has been set in PIP,the Picture Size cannot be set.
%
Temporary image retention may occur when viewing a static image on the set for more than two hours.
%
After selecting Zoom1, Zoom2 or Wide Pit: Press the m,-button to Select Position, then pressthe ENTER E_`.Jbutton. Press
the _, or T button to move the picture up and down. Then pressthe ENTER_,,J button. Press the _- button to Select Size,
then press the ENTER_ ,,Jbutton. Press the A or T button to magnify or reduce the picture size in the vertical direction. Then
press the ENTERIB_ button.
%
After selecting Screen Fit in HDMI (1080i/I080p) or Component (I080i/1080p) mode, you made need to center the picture:
Press the _ or _- button to selectPosition, then press the ENTER _,,J button. Press the A, T, _ or _. button to move the
picture.
- Reset: Press the _1or _- button to select Reset, then press the ENTER _,,J button.You can initialize the setting.
%
HD (High Definition): 16:9 - I080i/1080p (1920xi080), 720p (1280x720)
%
Settings can be adjusted and stored for each external device youhave connected to an input of the TV.
input Source Picture Size
ATV,AV, Component (480i,480p) 16:9, Zoom1, Zoom2, 4:3
DTV(1080i), Component (1080i, 1080p), 16:9,4:3, Wide Fit, Screen Fit
HDMI (720p, 1080i, 1080p)
PC 16:9,4:3
Page 22
DigitalNR_Off / Low/ Medium I High / Auto
Ifthe broadcast signal received by your TV is weak, you can activate the Digital Noise Reduction feature to helpreduce any static
and ghosting that may appear onthe screen.
When the signal is weak, select one of the other options until the best picture is displayed.
HDMI Black Level _ Normal 1Low
You can select the black level on the screen to adjust the screen depth.
This function is active only when an external device is connected to the TV via HDMI. The HDMI Black Level function may not
becompatible with all external devices.
Film Mode -_ Off / Auto1 / Auto2
The TV can be set to automatically sense and process film signals from all sources and adjust the picture for optimum quality.
Film Mode is supported in TV, Video, Component (480i/1080i) and HDMI (480i/I080i).
• Off: Turns the Film Modefunction off.
• Auto1: Automatically adjusts the picture for the best qualitywhen watching a film.
• Auto2: Automatically optimizes the video text on the screen (not including closed captions) when watching afilm.
Blue Only Mode _ Off / On
This function is forAV device measurement experts. This function displays the blue signal only by removing the red and green
signals from the video signal so as to provide a Blue Filter effect that is used to adjust the color and Tint of video equipment such
as DVD players, HomeTheaters, etc. Usingthis function, you can adjust the color and Tint to preferred values appropriate to
the signal level of each video device using the Red / Green / Blue / Cyan / Magenta /Yellow color Bar Patterns, without using an
additional Blue Filter.
Blue Only Mode is available when the picture mode is set to Movie or Standard.
Auto Motion Plus 240Hz _ Off I Clear / Standard / Smooth 1Custom / Demo
Removes drag from fast scenes with a lot of movement to provide a clearer picture.
if you enable Auto Motion Plus 240Hz, noise may appear on the screen, if this occurs, set Auto Motion Plus 240Hzto Off.
• Off: Switches Auto Motion Plus 240Hz off.
• Clear: Sets Auto Motion Plus 240Hz to minimum.
• Standard: SetsAuto Motion Plus 240Hz to medium.
• Smooth: Sets Auto Motion Plus240Hz to maximum.
• Custom: Adjusts the blur and judder reduction level to suit your preference.
- Blur Reduction: Adjusts the blurreduction levelfrom video sources.
- Judder Reduction: Adjusts the judder reduction levelfrom video sources when playing films.
- Reset: Resetthe custom settings.
• Demo: Displays the difference between Auto Motion Plus240Hz on and off modes.
[] Picture Reset -_ Reset Picture Mode / Cancel
Resets all picture settings to the default values.
Reset Picture Mode: Current picture values return to default settings.
Page 23
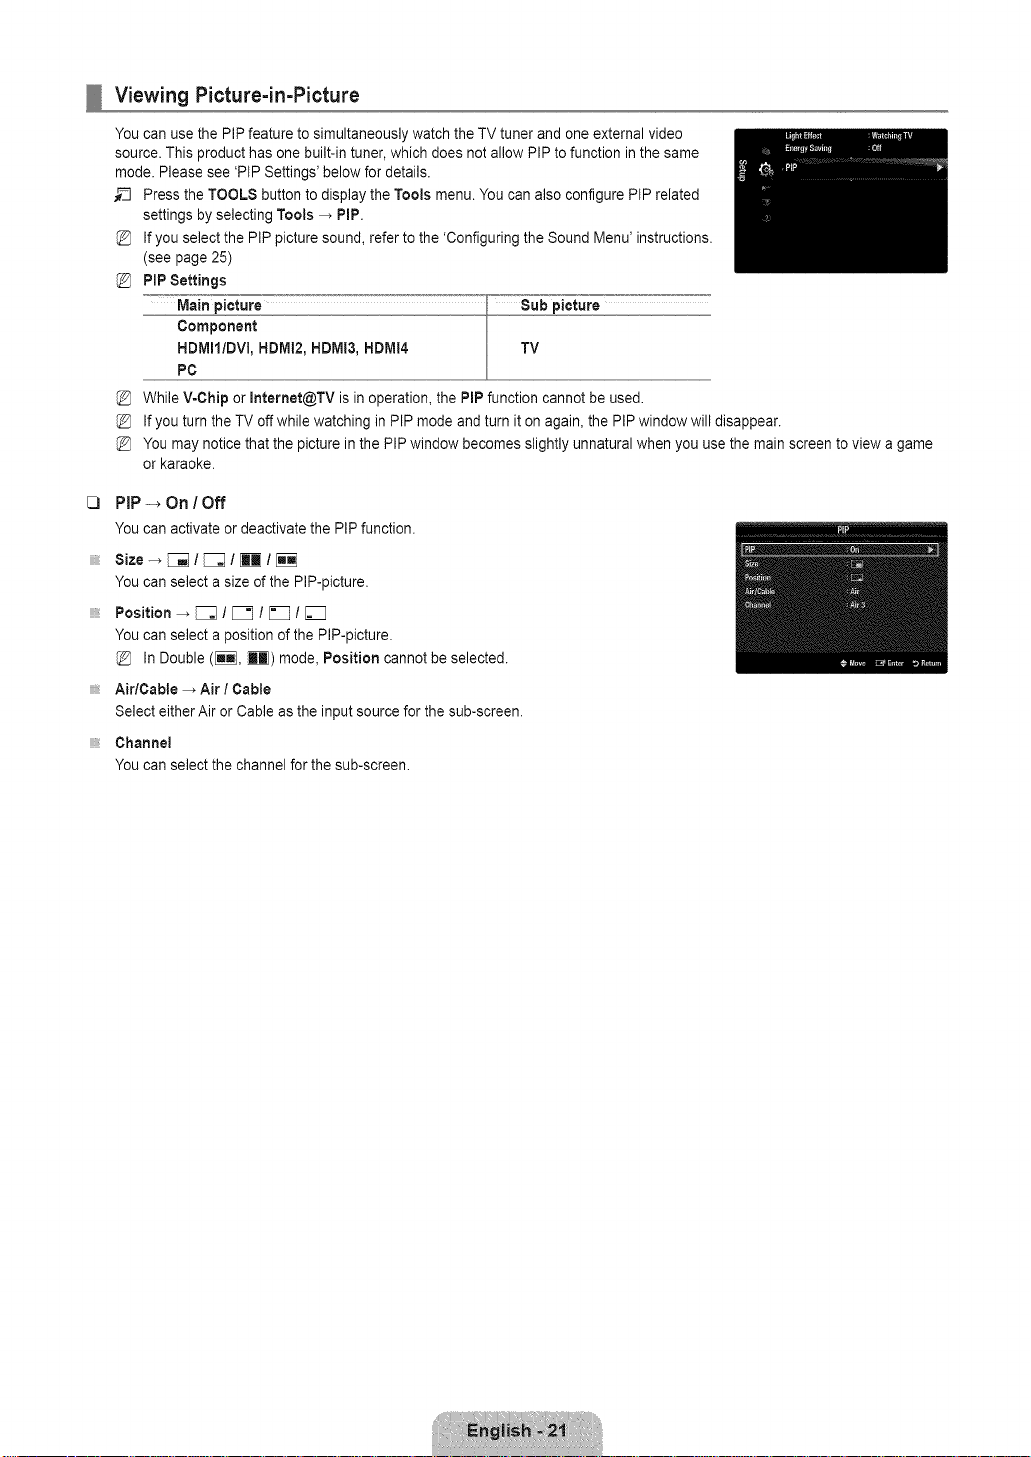
Viewing Picture-in-Picture
You can use the PIP feature to simultaneously watch the TV tuner and one external video
source. This product has one built-in tuner, which does not allow PIPto function in the same
mode. Please see 'PIP Settings' below for details.
_-_ Press the TOOLS button to display the Tools menu. You canalso configure PIP related
settings by selecting Tools _ PIP.
Ifyou select the PIP picture sound, referto the 'Configuring the Sound Menu' instructions.
(see page25)
PiP Settings
_=_=_=Mainpicture _°-=-_=-_=-_=-_=-_=-_=-_=-_=-_=-_=-_-"_';_°_°Su=bpi_ure'_='°'°;°'°'°'°'°'°'°'°'°'°;°'°'°'°'°'°'°'°'°'°;°'°''
Component
HDMII/DVl, HDMI2, HDMI3, HDMI4 TV
PC
While V=Chip or Internet@TV is in operation, the PiP function cannot be used.
Ifyou turn the TV off while watching in PIPmode and turn iton again, the PIP window will disappear.
You may notice that the picture in the PIP window becomes slightly unnatural when you use the mainscreen to view a game
or karaoke.
[] PIP-_ On / Off
YoucanactivateordeactivatethePIPfunction.
Size -_ _ l [_;_ l _ l [_
You can select a size of the PIP-picture.
Position _ [_ / _ 1 _ / [2_
You can select a position of the PIP-picture.
In Double (_], _) mode, Position cannot be selected.
Air/Cable _ Air / Cable
Select either Air or Cable as the input source for the sub-screen.
Channel
You can select the channel for the sub-screen.
Page 24
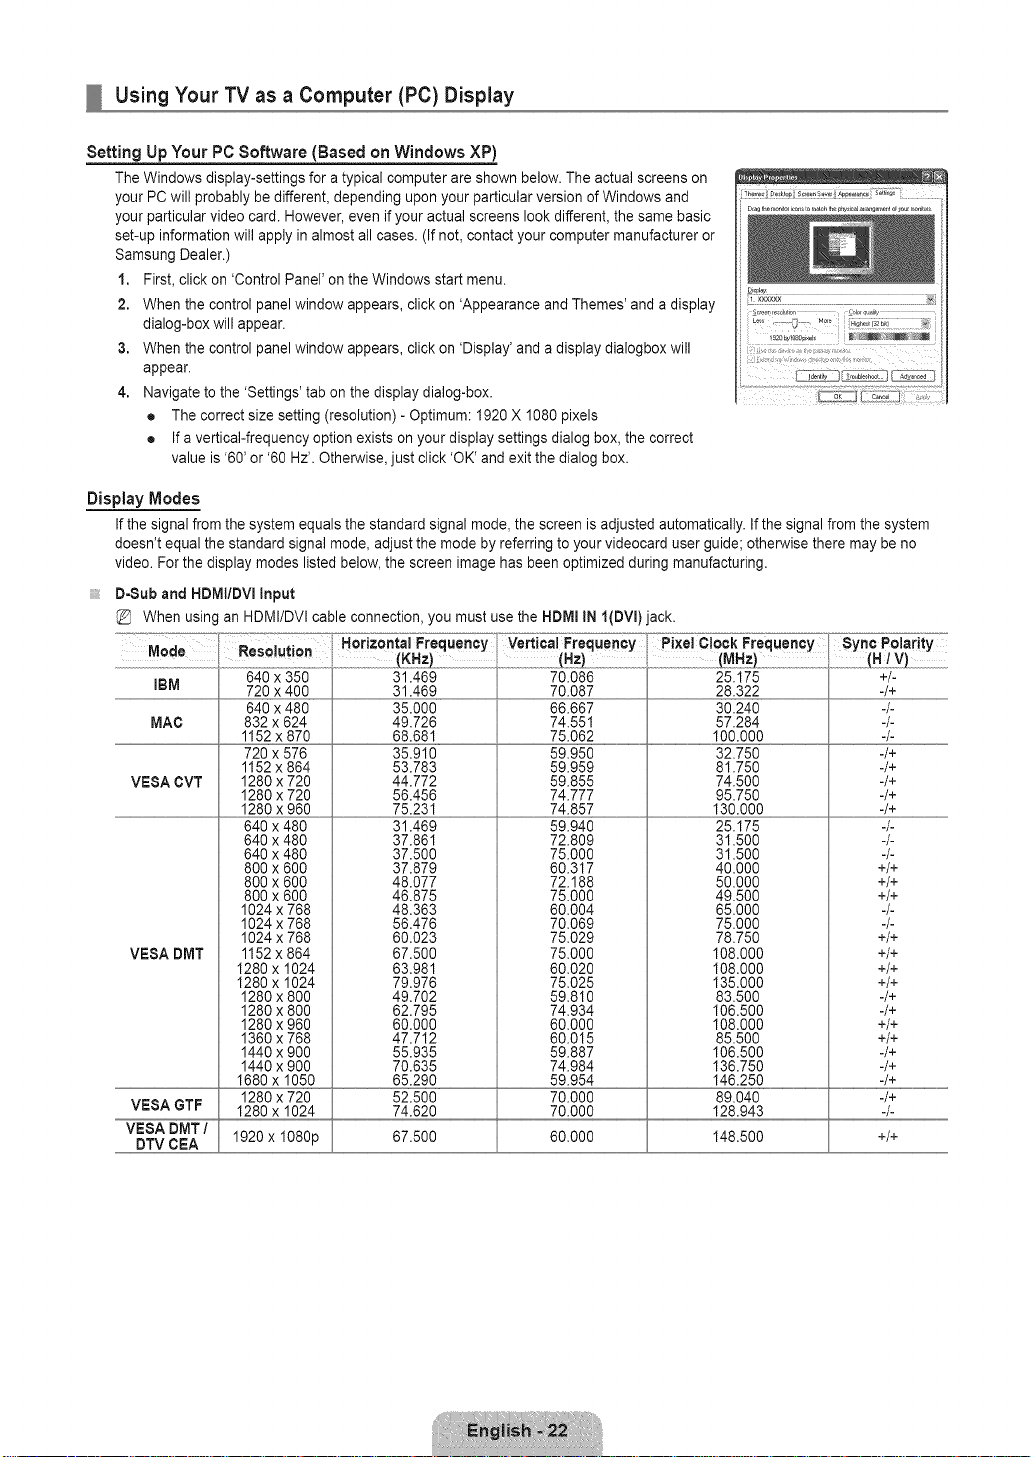
Using Your TV as a Computer (PC) Display
Setting Up Your PC Software (Based on Windows XP)
The Windows display-settings for a typical computer are shown below. The actual screens on
your PC will probably be different, depending uponyour particular version of Windows and
your particular video card. However, even if your actual screens look different, the same basic
set-up information will apply in almost all cases. (If not, contact your computer manufacturer or
Samsung Dealer.)
1. First, click on 'Control Panel' on the Windows start menu.
2. When the control panel window appears, click on 'Appearance and Themes' and a display
dialog-box will appear.
3. When the control panel window appears, click on 'Display' and a display dialogbox will
appear.
4. Navigate to the 'Settings' tab on the display dialog-box.
• The correct size setting (resolution) -Optimum: 1920X 1080 pixels
• Ifa vertical-frequency option exists on your display settings dialog box, the correct
value is '60' or '60 Hz'. Otherwise, just click 'OK' and exit the dialog box.
Display Modes
Ifthe signal from the system equals the standard signalmode, the screen is adjusted automatically. If the signal from the system
doesn't equal the standard signal mode, adjust the mode by referring to your videocard user guide; otherwise there maybe no
video. Forthe display modes listed below, the screen image has been optimized during manufacturing.
D-Sub and HDMIIDVI Input
When using an HDMI/DVI cable connection, you must use the HDMI IN I(DVI)jack.
192D by/08s3pi_l N N_ ;_
IBM
MAC
VESA CVT
VESA DMT
VESA GTF
VESA DMT/
DTV CEA 1920 x I080p 67.500
640 x350
720 x400
640 x480
832 x624
1152x 870
720 x576
1152x 864
1280 x720
1280 x720
1280 x980
640 x480
640 x480
640 x480
800 x600
800 x600
800 x600
1024 x768
1024 x768
1024 x768
1152x 864
1280 x 1024
1280 x 1024
1280 x800
1280 x800
1280 x960
1360 x768
1440 x900
1440 x900
1680 x 1050
1280 x720
1280 x 1024
31.469
31.469
35.000
49.728
68.681
35.910
53.783
44.772
56.456
75.231
31.469
37.861
37.500
37.879
48.077
48.875
48.363
56.476
60.023
67.500
63.981
79.976
49.702
62.795
60.000
47,712
55,935
70,635
65,290
52.500
74.620
70.086 25.175 +/-
70.087 28.322 -/+
66.667 30.240 -/-
74.551 57.284 -/-
75.082 100.000 -/-
59.950 32.750 4+
59.959 81.750 4+
59.855 74.500 4+
74.777 95.750 4+
74.857 130.000 4+
59.940 25.175 -/-
72.809 31.500 -/-
75.000 31.500 -/-
60.317 40.000 +/+
72.188 50.000 +/+
75.000 49.500 +/+
60.004 65.000 -/-
70.069 75.000 -/-
75.029 78.750 +/+
75.000 108.000 +/+
60.020 108.000 +/+
75.025 135.000 +/+
59.810 83.500 4+
74.934 106.500 4+
60.000 108.000 +/+
60.015 85.500 +/+
59.887 106.500 4+
74.984 136.750 4+
59.954 146.250 4+
70.000 89.040 4+
70.000 128.943 -/-
60.000 148.500 +/+
Page 25
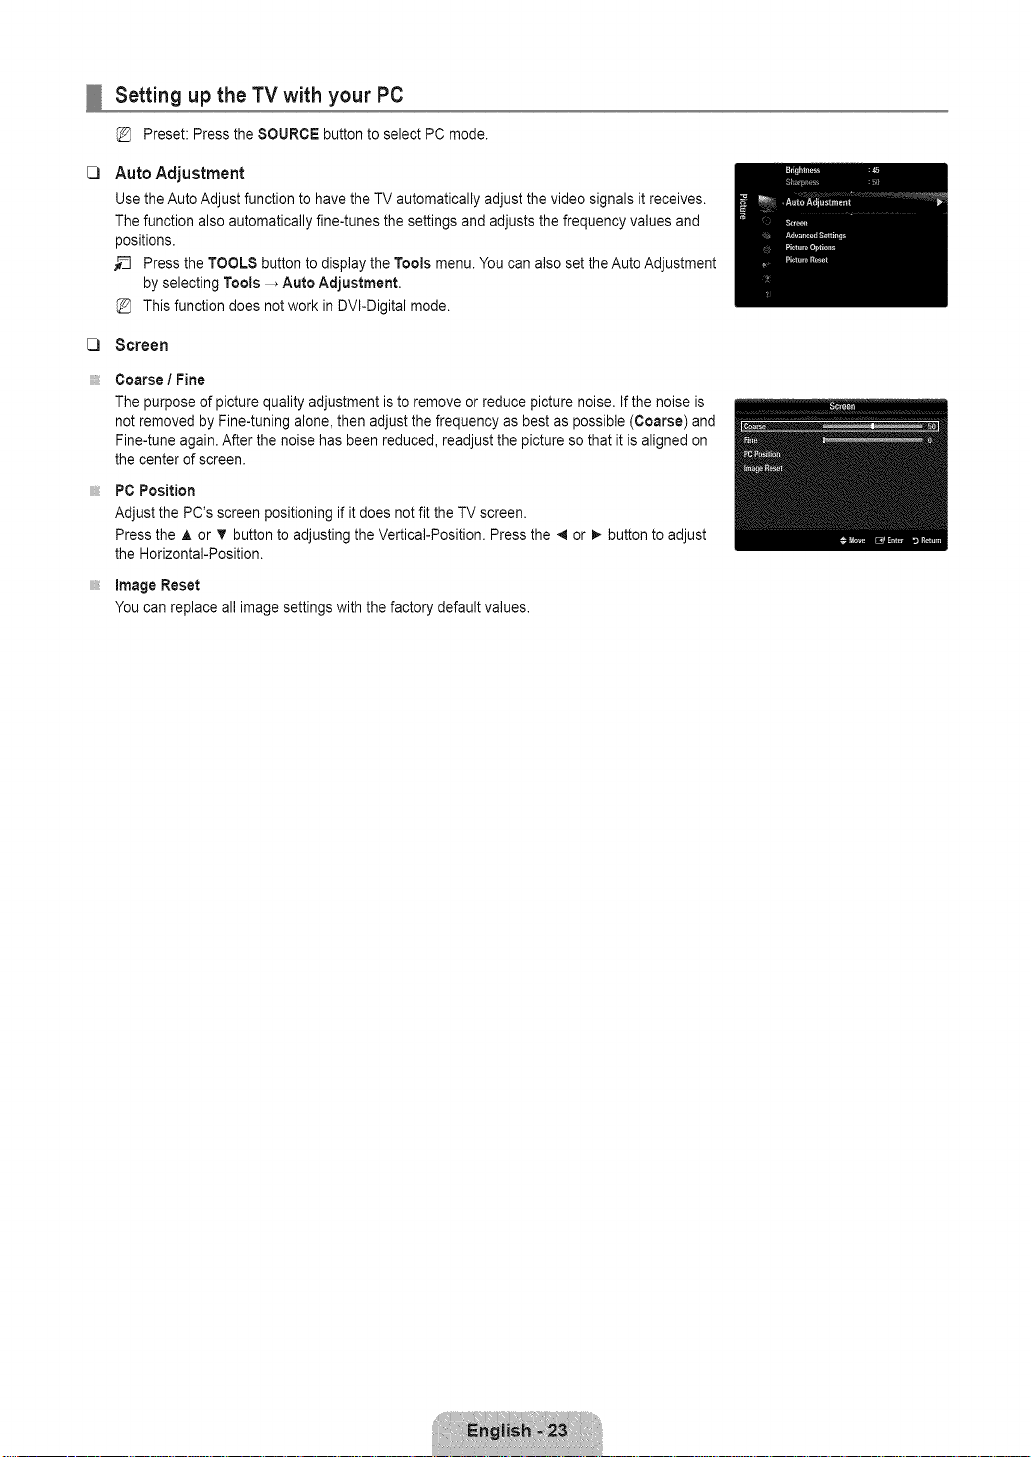
Setting up the TV with your PC
Preset: Press the SOURCE button to selectPC mode.
[]
Auto Adjustment
Use theAuto Adjust function to have the TV automatically adjust the video signals itreceives.
The function also automatically fine-tunes the settings and adjusts the frequency values and
positions.
__ Press the TOOLS buttonto display the Tools menu. You canalso set the Auto Adjustment
by selecting Tools _ Auto Adjustment.
This function does not work in DVI-Digital mode.
[]
Screen
Coarse / Fine
The purpose of picture quality adjustment isto remove or reduce picture noise. If the noise is
not removed by Fine-tuning alone, then adjustthe frequency as best as possible (Coarse) and
Fine-tune again. After the noise has been reduced, readjust the picture so that itis aligned on
the center of screen.
PC Position
Adjust the PC's screen positioning if it does not fit the TV screen.
Press the A or T button to adjusting the Vertical-Position. Press the 4 or i_ button to adjust
the Horizontal-Position.
Image Reset
You can replace all image settings with the factory default values.
Page 26
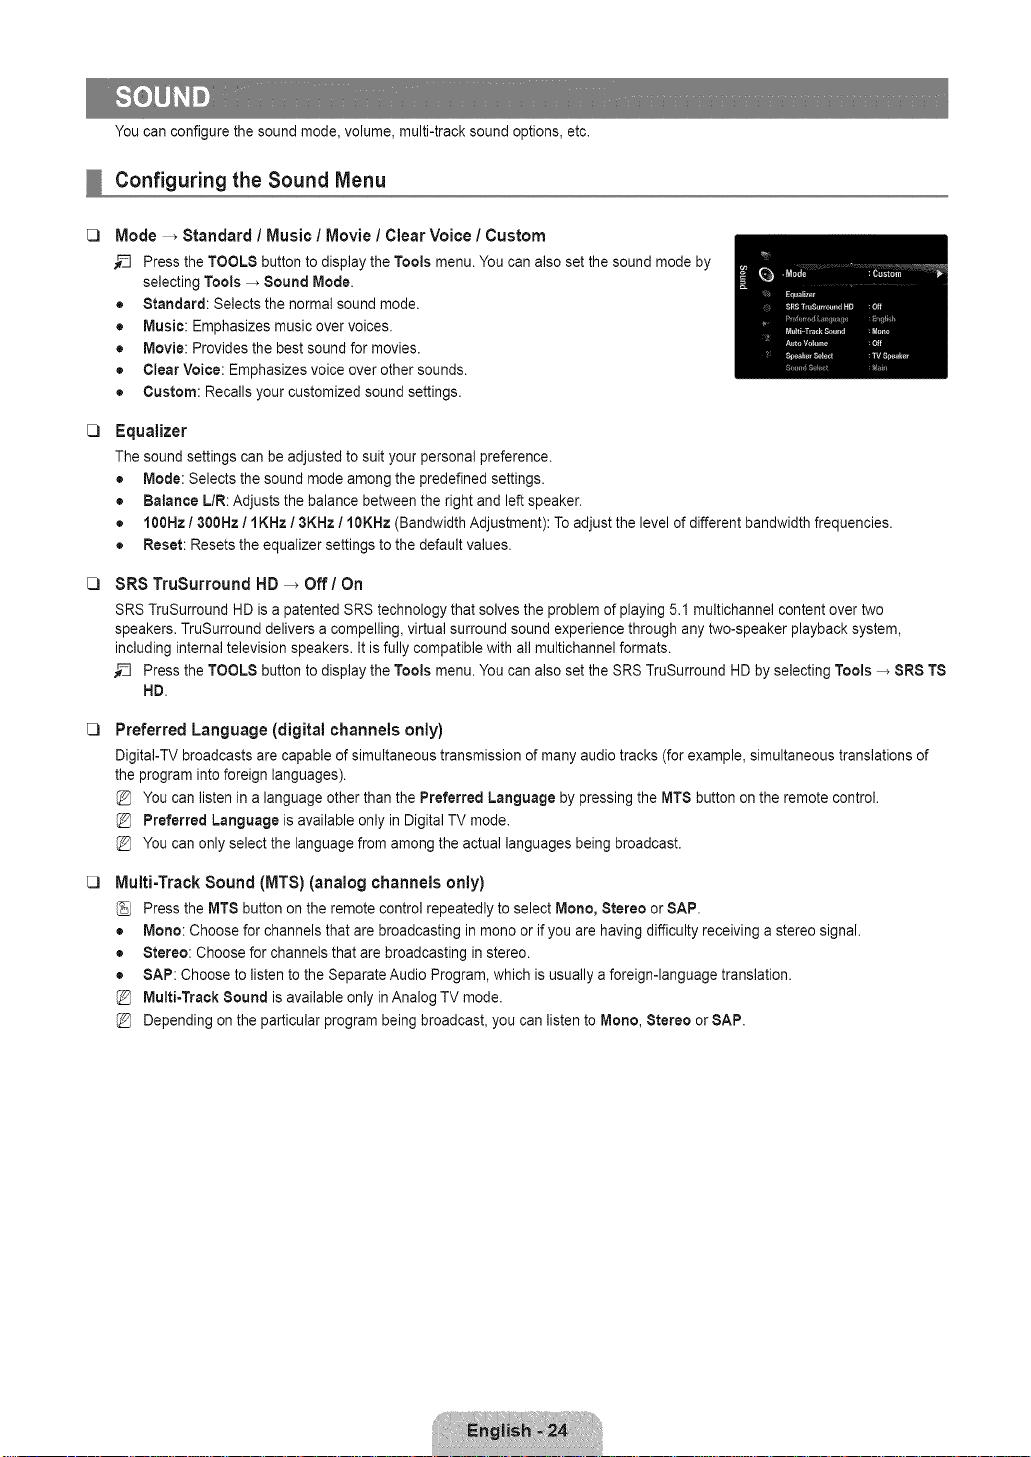
Youcanconfigurethesoundmode,volume,multi-tracksoundoptions,etc.
Configuring the Sound Menu
[]
Mode _ Standard / Music / Movie / Clear Voice / Custom
_-_ Press the TOOLS button to display the Tools menu. You canalso set the sound mode by
selecting Tools _ Sound Mode.
• Standard: Selects the normal sound mode.
• Music: Emphasizes musicover voices.
• Movie: Provides the best sound for movies.
• Clear Voice: Emphasizes voice over other sounds.
• Custom: Recalls your customized sound settings.
[]
Equalizer
The sound settings can be adjusted to suit your personal preference.
• Mode: Selects the sound modeamong the predefined settings.
• Balance L/R: Adjusts the balance between the right and left speaker.
• 100Hz / 300Hz / IKHz / 3KHz / 10KHz (Bandwidth Adjustment): To adjust the level of differentbandwidth frequencies.
• Reset: Resets the equalizer settings to the default values.
[]
SRS TruSurround HD _ Off / On
SRS TruSurround HD isa patented SRS technology that solves the problem of playing 5.1 multichannel content over two
speakers. TruSurround delivers a compelling, virtual surround sound experience through any two-speaker playback system,
including internal television speakers. It isfully compatible with all multichannel formats.
_-_ Press the TOOLS button to display the Tools menu. You canalso set the SRS TruSurround HD by selecting Tools _ SRS TS
HB.
[]
Preferred Language (digital channels only)
DigitaI-TV broadcasts are capable of simultaneous transmission ofmany audio tracks (for example, simultaneous translations of
the program into foreign languages).
You can listen in a language other than the Preferred Language bypressing the MTS button onthe remote control.
Preferred Language is available only in Digital TV mode.
You can only select the language from among the actual languages being broadcast.
[]
Multi=Track Sound (MTS) (analog channels only)
Press the MTS button on the remote control repeatedly to select Mono, Stereo or SAP.
• Mono: Choose for channels that are broadcasting in mono or if you are having difficulty receiving a stereo signal.
• Stereo: Choosefor channels that are broadcasting instereo.
• SAP: Choose to listen to the Separate Audio Program, which is usually aforeign-language translation.
Multi-Track Sound is available only in Analog TV mode.
Depending on the particular program being broadcast, you can listen to Mono, Stereo or SAP.
Page 27
[]
Auto Volume _ Off/On
Each broadcasting station has its own signal conditions, and so it is not easy to adjust the volume every time the channel is
changed. Thisfeature lets you automatically adjust the volume of the desired channel by lowering the sound output when the
modulation signal is highor by raising the sound output when the modulation signal is low.
[]
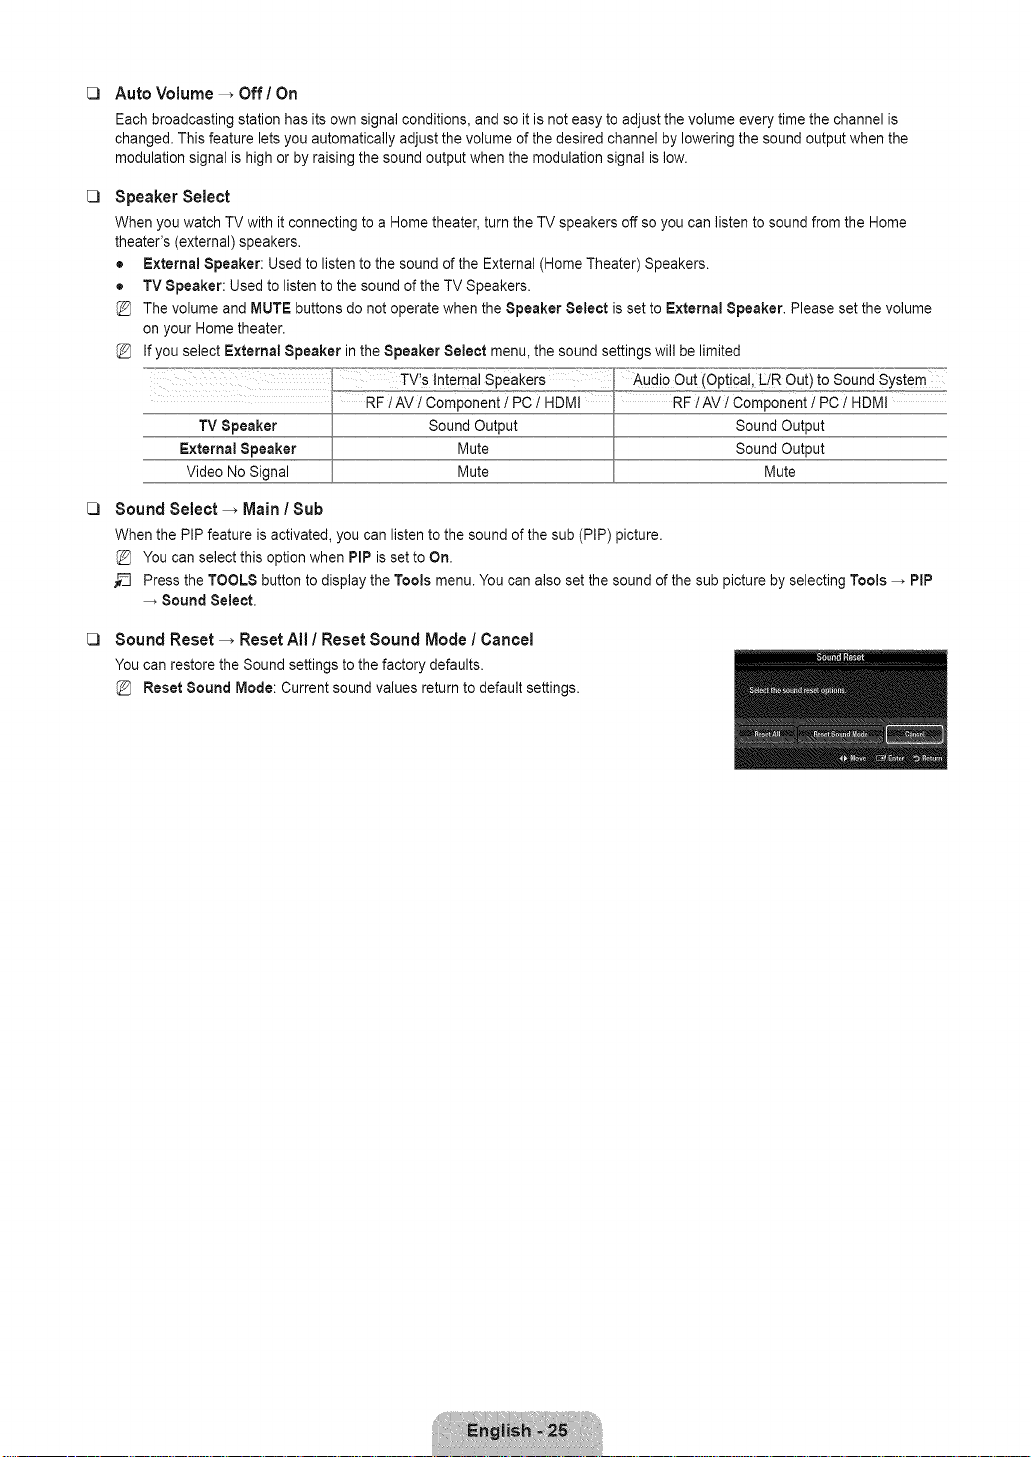
Speaker Select
When you watch TV with it connecting to a Home theater, turn the TV speakers off so you canlisten to sound from the Home
theater's (external) speakers.
• Externa! Speaker: Used to listen to the sound of the External (Home Theater) Speakers.
• TV Speaker: Usedto listen to the sound of the TV Speakers.
The volume and MUTE buttons do not operate when the Speaker Select is set to External Speaker. Please set the volume
on your Home theater.
Ifyou select External Speaker in the Speaker Select menu, the sound settingswill be limited
Mute
[]
Sound Select -_ Main / Sub
When the PIP feature is activated, youcan listen to the sound of the sub(PIP) picture.
You can select this option when PIP is set to On.
_-_ Press the TOOLS button to display the Tools menu. You canalso set the sound of the sub picture by selecting Tools _ PIP
Sound Select,
[]
Sound Reset -_ Reset All / Reset Sound Mode / Cancel
You can restore the Sound settings to the factory defaults.
Reset Sound Mode: Current sound values return to default settings.
Page 28
Youcansetupadditionalfunctions.
Configuring the Setup Menu
[]
Language
Youcansetthe menulanguage.
[]
Time
For detailed procedures on setting up options, referto the 'Setting the Time' instructions.
(see pages 29~30)
[]
Game Mode _ Off / On
When connecting to a game console such as PlayStationTM or XboxTM, you canenjoy a more realistic gaming experience by
selecting game menu.
Restrictions on game mode (Caution)
- To disconnect the game console and connect another external device, setGame Mode to Off in the setup menu.
- Ifyou display the TV menu in Game Mode, the screen shakes slightly.
Game Mode is not available in regular TV and PC mode.
While PIP is in operation, the Game Mode function cannot be used.
Ifthe picture is poor when external device is connected to TV, check if Game Mode is On. Set Game Mode to Off and
connect external devices.
IfGame Mode is On:
- Picture mode is automatically changed to Standard and cannot be changed.
- Sound mode is automatically changed to Custom and cannot be changed. Adjust the sound using the equalizer.
- The Reset Soundfunction is activated. Selecting the Reset function after setting the equalizer resets the equalizer
settings to the factory defaults.
[]
BD Wise _ Off / On
Provides the optimal picture quality for SAMSUNG DVD, Blu-ray and Home Theater products which support BD Wise. You can
enjoy a richer picture when using them connected to this Samsung TV.
Connect SAMSUNG products that have BD Wise using an HDMI cable.
When the BD Wise set to On, the picture mode is automatically changed to the optimal resolution.
{_ BD Wise is available in HDMI mode.
[]
Network Type / Network Setup
Fordetailedproceduresonsettingupoptions,refertothe 'SettingtheNetwork'instructions.(seepages31~36)
[] V-Chip
The V-Chip feature automatically locks out programs that are deemed inappropriate for children. The user must enter a PIN
(personal IDnumber) before any of the V-Chip restrictions areset up or changed.
V-Chip function is not available in HDMI, Component or PC mode.
The default PIN number of a new TV set is '0-0-0-0'
Allow all: Press to unlock all TV ratings. / Block all: Press to lock all TV ratings.
Change PiN
The Change PIN screen will appear. Choose any 4 digits for your PIN and enter them. As soon as the 4 digits are entered,
the Confirm New PIN screen appears. Re-enter the same 4 digits. When the Confirm screen disappears, your PIN hasbeen
memorized.
{_ Ifyou forget the PIN,press the remote-control buttons in the following sequence, which resets the pin to 0-0-0-0 : POWER
(off) _ MUTE _ 8 _ 2 _ 4 _ POWER (on).
Page 29

V-ChipLock_Off/ On
You can block rated TV Programs.
TV Parental Guidelines
You can block TV programs depending on their rating. This function allows you to control what
your children are watching.
• TV-Y: Youngchildren / TV-YT: Children 7 and over / TV-G: General audience / TV-PG:
Parental guidance / TV-14: Viewers 14 and over / TV-MA: Mature audience
• ALL: Lock allTV ratings. / FV: Fantasy violence / V: Violence / S: Sexual situation / L:
Adult Language / D: Sexually Suggestive Dialog
The V-Chip will automatically blockcertain categories that are more restrictive. For
example, ifyou block TV-Y category, then TV-Y7 will automatically be blocked. Similarly,
if you block the TV-G category, then all the categories in the young adult group will be
blocked (TV-G, TV-PG, TV-14 and TV-MA). The sub-ratings (D, L, S,V) work together
similarly.
The V-chip will automatically block certaincategories that are 'More restrictive'. For example, if you block L sub-rating in TV-
PG, then the L sub-ratings in TV-14 andTV-MA will automatically be blocked.
MPAA Ratirtg
You can block movies depending on their MPAA rating. The Motion PictureAssociation of
America(MPAA) has implemented a rating system that provides parents orguardians with
advance information on which films are appropriate for children.
• G: General audience (no restrictions).
• PC: Parental guidance suggested.
• PC-13: Parents strongly cautioned.
• R: Restricted. Children under 17should be accompanied by an adult.
• N0-17: No children under age 17.
• X:Adults only.
• NR: Not rated.
The V-Chip will automatically blockany category that is 'More restrictive'. For example, ifyou block the PC-13 category, then
R, NC-17 and X will automatically be blocked also.
Cartadiart Ertglish
• C: Programming intended for children under age 8.
• C8+: Programming generally considered acceptable for children 8 years and over to watch on their own.
• G: General programming, suitable for all audiences.
• PC: Parental Guidance.
• 14+: Programming contains themes or content which may not be suitable forviewers under the age of 14.
• 18+:Adult programming.
The V-Chip will automatically block any category that is 'More restrictive'. For example, if you blockG category, then PC, 14+
and 18+will automatically be blocked also.
Canadian Frertch
• G: General
• 8 arts+: Programming generally considered acceptable for children 8 years and over to watch ontheir own.
• 13arts+: Programming may not be suitable for children under the age of 13.
• 16arts+: Programming is notsuitable for children under the age of 16.
• 18arts+: Programming restricted to adults.
@ The V-Chip will automatically blockany category that is 'More restrictive'. For example, if you block 8 arts+ category, then 13
arts+, 16 arts+ and 18 arts+ will automatically be blocked also.
Page 30

DownloadableU,S, Rating
Parental restriction information can be used while watching DTV channels
If information is not downloaded from the broadcasting station, the Downioadable U.8.
rating menu isdeactivated.
Parental restriction information is automatically downloaded while watching DTV
channels. Itmay take several seconds.
The Downloadable LI.8. rating menu is available for use after information is
downloaded from the broadcasting station. However, depending on the information from
the broadcastingstation, itmay not be available for use.
Parental restriction levels differ depending on the broadcasting station. The default
menu name and Downloadable US rating changes depending on the downloaded
information.
Even if you set the On-screen display to your desired language, the Downloadable U.S. Rating menu will appear inEnglish
only.
The rating will automatically blockcertain categories that are more restrictive.
The rating titles (For example: Humor Level..etc) and TV ratings (For example: DH, MH, H..etc) may differ depending on the
broadcasting station.
How to Reset the TV after the V-Chip Blocks a Channel (Emergency Escape)
Ifthe TV is tuned to a restricted channel, the V-Chip will block it. The screen will go blank and
the following message will appear:
1. Enter your PIN,then press the A or T button to temporarily disable the V-Chip Lock.
Ifyou forget the PIN,press the remote-control buttons in the following sequence, which
resets the pin to 0-0-0-0 : POWER (off) _ MUTE _ 8 _ 2 _ 4 _ POWER (on)
[]
Caption (On-Screen Text Messages)
Caption -_ Off / On
You can switch the caption function on oroff. If captions are not available, they will not be displayed onthe screen.
Press the CO button on the remote control to turn the Caption on or off.
The Caption feature doesn't work in Component, HDMI or PC modes.
Caption Mode
You can select the desired caption mode.
@ The availability of captions depends on the program being broadcast.
• Default I CCt-CC4 / Textl~Text4 (analog channels only)
The Analog Caption function operates in either analog TV channel mode or when a signal is supplied from an external device
to TV. (Depending on the broadcasting signal, theAnalog Caption function may operate on digital channels.)
• Default / Servicel~Service6 / 001~004 / Text1~Text4 (digital channels only)
The Digital Captions function operates on digital channels.
Service1~6 in digital caption mode may not be available depending onthe broadcast.
Digital Caption Options (digital channels only)
• Size: This option consists of Default, Small, Standard and Large. The default is Standard,
• Font Style: This option consists of Default, Style 0 ~ Style 7. Youcan change thefont you want. The default is Style 0.
• Foreground Color: This option consists of Default, White, Black, Red, Green, Blue, Yellow, Magenta and Cyan. You can
change the color of the letter,The default is White.
• Background Color: This option consists of Default, White, Black, Red, Green, Blue, Yellow, Magenta and Cyan. Youcan
change the background color of the caption. The default is Black.
• Foreground Opacity: This option consists of Default, Transparent, Translucent, Solid and Flashing. You can change the
opacity of the letter.
Ratingtitle The numberof current rating information
Page 31

= Background Opacity: This option consists of Default, Transparent, Translucent, Solid and Flashing. You can change the
background opacity of the caption.
• Return to Default:This option sets each of Size, Font Style, Foreground Color, Background Color, Foreground Opacity
and Background Opacity to its default.
Digital Caption Options are available only when Default and Service1 - Service6 can be selected in Caption Mode.
The availability of captions depends on the program being broadcast.
Default means to follow the standard set bythe broadcaster.
Foreground and Background cannot be set to have the same color.
Foreground Opacity and Background Opacity cannot be both set to Transparent.
[]
Melody _ Off / Low / Medium / High
A melody sound can be set to corneon when the TV is powered On or Off.
The Melody does not play.
- When nosound is output from the TV because the MUTE button has been pressed.
- When nosound is output from the TV because the volume has been reduced to minimum with the VOL = button.
- When the TV isturned off by Sleep Timer function.
[]
Light Effect -_ Off / In Standby / Watching TV / Always
You can turn the LED on/off on the front of TV. Turn it off to save power or ifthe LED bothers
you.
• Off: LED is always Off.
• In Standby: LED is On when TV isturned off.
• Watching TV: LED is Onwhen watching TV.
• Always: LED is always On, regardless ofTV settings.
Set the Light Effect to Off to reduce the power consumption.
The color of light may vary depending on the model.
[]
Energy Saving -_ Off / Low / Medium / High / Auto
This feature adjusts the brightness of the TV in order to reduce power consumption. When watching TV at night, set the Energy
Saving mode option to Highto reduceeye fatigue aswell aspower consumption.
[]
PiP
Fordetailedproceduresonsettingupoptions,refertothe 'ViewingPicture-in-Picture'instructions.(seepage21)
Setting the Time
[] Clock
Setting the clock is necessary in order to usethe various timer features of the TV.
The current time will appear every time you press the INFO button.
Ifyou disconnect the power cord, you have to set the clock again.
Clock Mode
You can set up the current time manually or automatically.
• Auto: Setthe current time automatically using the time from the digital broadcast.
• Manual: Set the current time to a manually specified time.
Depending on the broadcast station and signal, the auto time maynot be set correctly. If
this occurs, set the time manually.
The Antenna or cable must beconnected in order to set the time automatically.
Clock Set
You can set the current time manually.
This function is only available when Clock Mode is set to Manual.
You can set the month, day, year, hour and minute directly by pressing the number buttons on the remote control.
Page 32

Time Zone
Select your time zone.
This function is only available when Clock Mode is setto Auto.
DST (Daylight Saving Time) _ Off / On/ Auto
Switches the Daylight Saving Time function on or off.
This function is only available when Clock Mode is set to Auto.
[]
Sleep Timer
The sleep timer automatically shuts off the TV after a preset time (30, 60, 90,120,150 and 180
minutes).
_-_ Press the TOOLS button to display the Tools menu. You canalso set the sleep timer by
selecting Tools-_ Sleep Timer.
To cancel the Sleep Timer function, select Off.
[]
Timer 1 / Timer 2 / Timer 3
Three different on / off timer settings can be made.
You must set the clock first.
On Time
Set the hour, minute, am/pm, and activate / inactivate.
(To activate the timer with the setting you've chosen, set to Activate.
Off Time
Set the hour, minute, am/pro, and activate / inactivate.
(To activate the timer with the setting you've chosen, set to Activate.
Volume
Set the desired volume level.
Source _ TV / USB / TV Memory
You can select the TV, TV Memory or USB device content to be played when the TV turns on automatically. Select TV, TV
Memory or USB.(Make sure that an USBdevice isconnected to your TV.)
When there is only one photo file in the USB or the TV Memory, the Slide Show will not play.
Antenna (when Source is set to TV)
Select Air or Cable.
Channel (when Source is set to TV)
Select the desired channel.
Contents (when Source is set to USB or TV Memory)
You can select a folder on the USB Device/TV Memory with music or photo filesto be played when the TV turns on automatically.
Ifthe folder name is too long, the folder can not be selected.
Ifyou are using two of the same type USB device, be sure the folder names are different so the correct USB is read.
Repeat
Select Once, Everyday, Mon~Fri, Mort~Sat, Sat-Sun or Manual.
@ When Manual is selected, press the _. button to select the desired day of the week. Press the ENTER _ button over the
desired day and the _/ mark will appear.
@ You can set the hour, minute and channel by pressing the number buttons on the remote control.
@ Auto Power Off
When you set the timer on, the television will eventually turn off, if no controls are operated for 3 hours after the TV wasturned
on bythe timer. This function is only available in timer on mode and prevents overheating, which may occur ifa TV is on for
too longtime.
Page 33

Network Connection
You can set up the Internet Protocol so that you cancommunicate with various connected networks.
[] Network Connection - Cable
LAN Connection for a DHCP Environment
The procedures to set up the network using Dynamic Host Configuration Protocol (DHCP) are described below. Since an IP
address, subnet mask, gateway, and DNS are automatically allocated when DHCP is selected, you do not have to enter them
manually.
1. Connect the LAN port on the rear panel of the TV and the external modem with a LAN Cable.
2. Connect the Modem port on the wall and the external modem with a Modem Cable.
The ModemPort on the Wall External Modem TV Rear Panel
0 Modem Cable LAN Cable
(ADSL/ VDSL / Cable TV)
You can connect the LAN via a Sharer (Router).
The Modem Port on the Wall
External Modem
(ADSL/ VDSL / Cable TV)
IP Sharer
You can connect the LAN port and the TV directly depending on your network status.
The LAN Port on the Wall
LANCable
TVRear Panel
TV RearPanel
The terminals (the position of the port and the type) of the external device may differ depending on the manufacturer.
If the IP address allocation by the DHCP server has failed, turn the external modem off, turn it on again after at least 10
seconds and then try again.
For the connections between the external modem and the Sharer (Router), refer to the owner's manual of the corresponding
product.
You can connect the TV tothe LAN directly without connecting it through a Sharer (Router)
You cannot use a manual-connection-type ADSL modem because it does not support DHCR Youhave to use an automatic-
connection-type ADSL modem.
Page 34

LAN Connection for Static IP Environment
The procedures to set up the network using a static IPaddress are described below. You have to manually enter the IP address,
subnet mask, gateway, and DNS that are provided by your Internet Service Provider (ISP).
1. Connect the LAN port onthe rear panel of the TV and the LAN port on the wall using the LAN cable.
The LAN Porton the Wall TVRear PaneE
O LAN Cable
You can connect the LAN via a Sharer (Router).
The LAN Port on the Wall TVRear Panel
IP Sharer
The terminals (the position of the port andthe type) of the external device may differ depending on the manufacturer.
Ifyou are using a static IP address, your ISPwill informyou of the IPaddress, subnet mask, gateway, and DNS. You must
enter these values to complete the network settings. Ifyou do not know the values, ask your network administrator.
For the information on how to configure and connect a Sharer (Router), refer tothe owner's manual for the corresponding
product.
You can connect the TV to the LAN directly without connecting it through a Sharer (Router).
Ifyou use an IP Sharer (IP Router) that supports DHCP,you can set up the device aseither DHCP or static IE
For the procedures to use a static IPaddress, ask your Internet Service Provider.
Page 35

[] Network Connection =Wireless
YoucanconnecttothenetworkwirelesslythroughawirelessIPsharer.
iiiiiiiiii_
The LAN Port onthe Wall
iiiiiiiiiiiiiiiiiii_
LAN Cable
1,
Connect the 'Samsung Wireless LANAdapter' into the USBI (HDD) or USB2 terminal of theTV.
You must use the 'Samsung Wireless LAN Adapter'(WlS09ABGN) to use awireless network.
Samsung's Wireless LAN adapter is sold separately. The WIS09ABGN Wireless LAN adapter is offered by select retailers,
Ecommerce sites and Samsungparts.com.
To use a wireless network, your TV must be connected to a wireless IPsharer. Ifthe wireless IPsharer supports DHCP,
your TV can use a DHCP or static IP address to connect to the wireless network.
Samsung's Wireless LAN adapter supports IEEE 802.11A, IEEE 802.11B, IEEE 802.11G, IEEE 802.11N.When you play
DLNAvideo over IEEE 802.11B/G connection, the video may not be played smoothly.
Ifthe wireless IP sharer allows youto turn the Ping connection function on/off, turn iton.
Select a channel forthe wireless IPsharer that is not currently being used. If the channel set for the wireless IP sharer is
currently being used by another device nearby, this will result in interference and communications may fail.
Ifyou apply a security system other than the systems listed below,it will not work with the TV.
- When applying the security key for theAP (wireless IPsharer), only the following is supported.
1) Authentication Mode : OPEN, SHARED, WPAPSK, WPA2PSK
2) Encryption Type : WEP,TKIE AES
- When applying the security key for theAd-hoc mode, only the following is supported.
1) Authentication Mode : SHARED, WPANONE
2) Encryption Type : WEP,TKIE AES
IfyourAP supports WPS(Wi-Fi Protected Setup), you can connect to the network via PBC (Push Button Configuration) or
PIN (Personal Indentification Number). WPS will automatically configure the SSID and WPA key in either mode.
Ifthe device isn't certified, it may not connect to the TV via the 'Samsung Wireless LANAdapter'.
Page 36

Setting the Network
[] Network Type
Select Cable or Wireless as the method to connect to the network.
The menu is activated only if the 'Samsung Wireless LAN Adapter' is connected.
Cable
Connect to the network using a cable.
Wireless
Connect to the network wirelessly.
[] Network Setup
Cable Network Setup (when Network Type is setto Cable)
Please check if the LAN cable is connected.
* Internet Protocol Setup _ Auto Setup / Manua! Setup
. Network Test: You can test or confirm the network connection status after setting up the network.
When unable to connect to a wired network
Ifyour Internet service provider has registered the MACaddress of the device used to connect to the Internet for the first time
and authenticates the MAC address each time you connect to the Internet, your TV may not be able to connect to the Internet
as the MAC address differs from that ofthe device (PC).
Inthis case, ask your Internet service provider about the procedures to connect devices other than your PC (such as your TV)
to the Internet. If your Internet service provider requires an ID or password to connect to the Internet (network), your TV may
not beable to connect to the Internet. In this case, you haveto enter your ID orpassword when connecting to the Internet
usingan Internet Sharer (Router).
The internet connection may fail due to a firewall problem. In this case, contact your Internet service provider. Ifyou cannot
connect to the Internet even if you havefollowed the procedures of your Internet service provider, please contact Samsung
Electronics at 1-800-SAMSUNG.
Cable Network Setup=Auto Setup
Ifyou connect the LAN cable and itsupports DHCP,the Internet Protocol (IP) Settingsare
automatically configured.
1. Set Network Type to Cable.
2. Select Cable Network Setup.
3. Set Internet Protocol Setup to Auto Setup.
The Internet Protocol is set automatically.
4. Select Network Test to check the network connectivity.
Cable Network Setup=Manual
To connect the TV to the LAN using a static IP address, you must setup the Internet Protocol
dP).
1. Set Network Type to Cable.
2. Select Cable Network Setup.
3. Set Internet Protocol Setup to Manual Setup.
4. Set up IP Address, Subnet Mask, Gateway and DNS Server.
Press the number buttons on the remote control when you set the Network manually.
6. Select Network Test to check the network connectivity.
Wireless Network Setup
The menu is activated only if the 'Samsung Wireless LAN Adapter' is connected.
* Internet Protocol Setup _ Auto Setup / Manua! Setup
. Network Test:You can test or confirm the network connection status after setting up the network.
Page 37

When unable to connect to anAP
%
Your TV may fail to locate anAP that is configured as a private SSID type. Inthis case, please change theAP settings and try
again. If your Internet service provider has registered the MAC address ofthe device used to connect to the Internet for the
first time and authenticates the MACaddress each time you connect to the Internet,your TV maynot be able to connect to the
Internet asthe MAC address differs from that of the device (PC).
Inthis case, ask your Internet service provider about the procedures to connect devices other than your PC (such as your TV)
to the Internet. If you cannot connect to the Internet even if you have followed the procedures of your Internet service provider,
please contact a Samsung Electronics at 1-800-SAMSUNG.
Select a network
- Access Point: You can select the IPsharer to usewhen using awireless network.
If awireless Access Point is not in theAccess Point list, press the Red button.
When the connection is made, you will be returned to the screen automatically.
If you have selected anAccess Point with a security authentication:
The Security Key input screen appears. Enter the security key and press the
Blue button on the remote control.
If security encryption type isWEP, 0~9, A~F will be available when you input
security key.
Connecting WPS (Wi-Fi Protected Setup)
= If Security Key is already set: Inaccess point list,select WPS.
You can select PBO, PIN, Security Key.
- Connecting by using PBO: Select a PBC (Push Button Configuration). Press the PBC
button onthe AP (access point)within 2 minutes, and wait for connection.
Connecting by using PIN: Select a PIN (Personal Identification Number).
The message showing the PIN Code is displayed. Inputthe PIN Code atAP
device within 2 minutes. Select OK and waitfor connection.
Try again ifconnecting operation doesn't work
When the connection is not established although tried again, reset the access point. Please refer to a manual of each
access point.
- Connecting by using Security Key: When selecting Security Key, the input window is
displayed. Input the security key and press Bluebutton.
Try again ifconnecting operation doesn't work.
IfSecurity Key is not set: When the security setting ofAP that supports WPS is NONE,
you can select PBC, PIN, None Security. None Security is capable of connecting to AP
directly without using WPS function.
Process of PBO, PIN is same as above. Referto ifSecurity Key isalready set.
Try again ifconnecting operation doesn't work.
Page 38

- Ad-hoc: You can connect to a mobile device without an access point through the 'Samsung Wireless LANAdapter' by
using a peer to peer network.
Now to connect to new Ad-hoc
1. Choose Select a network, then a device list is displayed.
2. While in the device list, press the Blue button on the remote or select Ad-
hoc.
@ The message Theexisting network system may have limited
functionality, Do you want to change the network connection? is
displayed.
3. Input the generated Network Name(SSID) and Security Key into the
device you want to connect.
How to connect an existing Ad-hoc device
1. Choose Select a network, the device list is displayed.
2. Select the device you want in the Device list.
3. If security key was applied, input the security key again.
@ If network doesn't operate normally, please check the Network
Name(SSID) and Security Key again. Ifthe Security Key is incorrect,
it may be the reason for the malfunction.
Wireless Network Setup=Auto Setup
Ifyou want to connect AID,AP should support DHCP.Only devices which support Ad-hoc mode
can be connected without DHCP.
1. Set Network Type to Wireless.
2. Select Wireless Network Setup.
3. Set Internet Protocol Setup to Auto Setup.
The Internet Protocol is set automatically.
4. Select a network through Select a network.
6, Select Network Test to check the network connectivity.
Wireless Network Setup=ManualSetup
1. Set Network Type to Wireless.
2. Select Wireless Network Setup.
3. Set Internet Protocol Setup to Manual Setup.
4. Set up IP Address, Subnet Mask, Gateway and DNS Server.
Press the number buttons on the remote control when you set the Network manually.
6. Select a network through Select a network.
6. Select Network Test to check the network connectivity.
Page 39

input Menu
[]
Source List
Use to select TV or other external input sources such as DVD / Blu-ray players / Cable Box /
Satellite receivers (Set-TopBox) connected to the TV. Useto select the input source ofyour
choice.
Press the SOURCE button onthe remote control to view an external signal source.
TV/AV / Component / PC/ HDMtI/DVI / HDMI2 / HDMI3 / HDMI4 / LISB
You can choose only those external devices that are connected to the TV. Inthe Source
List, connected inputs will be highlighted andsorted to the top. Inputs that are not
connected will be sorted to the bottom.
If USBdevices are connected to the USBI(HDD) and USB2 jacks, they are displayed as
USBI and USB2 in order.
PCalways stays activated.
Using the color buttons on the remote with the Source list
- Red (Refresh): Refreshes the connected external devices. Press this ifyour Source is
on andconnected, but does not appear inthe list.
- TOOLS (Tools): Displays the Edit Name and information menus.
[]
Edit Name
VCR / DVD / Cable STB / Satellite 8TB / PVR 8TB /AV Receiver / Game / Camcorder / PC / DVI / DVI PC / TV / IPTV / Blu-ray
/ HD DVD1DMA
Name the device connected to the input jacks to make your input source selection easier.
When a PC with a resolution of 1920x 1080@60Hz is connected to the HDMI IN I(DVm)port, you should set the NDMII/DVl
mode to DVl PC in the Edit Name of the Input mode.
(_ When connecting an HDMI/DVI cable to the HDMI IN I(DVl) port, you should set the HDMII/DVl mode to DVl or DVl PC in
the EditName of the Input mode. In this case, a separate sound connection is required.
Support Menu
[]
Legal Notice
View the Legal Notice and General Disclaimer regarding Third Party Contents and Service.
The General Disclaimer may differdepending on the country.
[]
Product Guide
The Product Guide gives you information onthe mostimportant features of this TV.
The descriptions provided by this function are in Engligh and French only.
Picture Quality
Medi@2.0
Eco-Friendly
Full HD 1080p
-- Mega Contrast
-- Auto Motion Plus 240Nz
-- Picture Mode
Internet@TV-Content Service
-- Content Library Flash
-- USB2.0 Movie
-- DLNAWireless
Energy Saving Mode
-- Eco Material
Page 40

Using the Remote Control Buttons in the Product Guide Menu
Button =': =Opera_t=i=ons:_'_!_--°°°_°7-°-°7!T7_ _:-° .... :°_::::::::::::::::_°=°-............................................................."
Yellow Button Shows the contents of the Product Guide sequentially. (Auto Play)
Wheel (_1/_.) Move the cursor and select an item.
ENTER[B# Select the currently selected item.
RETURN Return to the previous menu.
EXiT Stop the current function and return to the Product Guide main menu.
[] Self Diagnosis
Picture Test
Ifyou think you have a picture problem, perform the picture test. Check the color pattern on the
screen to see if the problem still exists.
• Yes: If the test pattern does not appear orthere is noise in the test pattern, select Yes.
There may be a problem with the TV. Contact Samsung's call center for assistance.
• No: If the test pattern is properly displayed, select No. There may bea problem with your
external equipment. Please check your connections. If the problem still persists, refer to the
external device's user manual.
Sound Test
Ifyou think you have a sound problem, please perform the sound test. Youcan checkthe sound by playing a built-in melody sound
through the TV.
Ifyou hear nosound from the TV's speakers, before performing the sound test, makesure Speaker Select is set to TV
speaker in the Sound menu.
The melody will be heard during the test even ifSpeaker Select is setto External Speaker orthe sound ismuted by pressing
the MUTE button.
• Yes: If during the sound test you canhear sound only from one speaker or not at all, select Yes. There may be a problem with
the TV. Contact Samsung's call center for assistance.
• No: If you can hear sound from the speakers, select No. There may be a problemwith your external equipment. Please check
your connections. If the problem still persists, refer to the external device's user manual.
Signal Strength (digital channels only)
Unlike analog channels, which canvary in reception quality from 'snowy' to clear, digital (HDTV) channels have either perfect
reception quality or you will not receive them at all. So, unlike analog channels, you cannot fine tune a digital channel. Youcan,
however, adjust your antenna to improve the reception of available digital channels.
Ifthe signal strength meter indicates that the signal is weak, physically adjust your antenna to increasethe signalstrength.
Continue to adjust the antenna untilyou find the best position with the strongest signal.
Page 41

[]
Software Upgrade
Samsung may offer upgrades for the TV's firmware in the future. These upgrades can be
performed via the TV when it is connected to the Internet, or by downloading the new firmware
from samsung.com to a USBmemory device.
Current Version is the software already installed in the TV.
Alternative Software (Backup) shows the previous version that will be replaced.
Software is represented as 'Year/Month/Day_Version'. The more recent the date, the
newer the software version. Installing the latest version is recommended.
By USB
Insert a USBdrive containing the firmware upgrade downloaded from samsung.com into the
TV. Please be careful to notdisconnect the power or remove the USB drive while upgrades
are being applied. The TV will turn off and turn on automatically after completing the firmware
upgrade. Please checkthe firmware version after the upgrades are complete (the new version
will have a higher number than the older version).
When software isupgraded, video and audio settings you have madewill return to their default
(factory) settings. We recommend youwrite down your settings so that you can easily reset
them after the upgrade.
By Online
Upgrades the software using the Internet.
First,configure your network. For detailed procedures on using the Network Setup, refer to
the 'Settingthe Network' instructions. (see pages 31~36)
Ifthe internet connection doesn't operate properly, connection can be broken, please retry downloading. If the problem still
happens, download by USB and upgrade.
Alternative Software (Backup)
Ifthere is an issue with the new firmware and it is affecting operation, you can change the software to the previous version.
Ifsoftware was changed, existing software is displayed.
You can change current software to alternative software by 'Alternative Software'.
TV RearPanel
[]
HD Connection Guide
This menu presents the connection method that provides the optimal quality for the HDTV. Refer to this information when
connecting external devices to the TV.
[]
Contact Samsung
View this information when your TV does not work properly or when you want to upgrade the software. You can view the
information regarding the call center, product and software file download method.
Page 42

Connecting a USB Device
1.
Press the POWER button to turn the TV on.
2.
Connect a USB device containing photo, music and/or movie files to the
USBI(HDD) or USB2 jack on the side of theTV.
3.
When the Application selection screen is displayed, press the ENTEREE,,Jbutton
to select Media Play (USB & DLNA).
{_ MTP (MediaTransfer Protocol) is not supported.
%
The file system supports FAT16, FAT32and NTFS.
%
Certaintypes of USB Digital camera and audio devices may not be
compatible with this TV.
%
Media Play only supports USB Mass Storage Class devices (MSC). MSC
is a Mass Storage Class Bulk-Only Transport device. Examples of MSC
are Thumb drives, Flash Card Readers and USB HDD (USB HUB are not
supported.).
%
Please connect directly tothe USBport of your TV. Ifyou are using a separate
cable connection, there may be a USB compatibility problem.
%
Before connecting your device to the TV, please back up your files to prevent
them from damage or loss of data. SAMSUNG isnot responsible for any data
file damage ordata loss.
%
Connect a USB HDD to the dedicated USBI(HDD) port. Warning: Do not
exceed 1.5 amperes.
%
Do not disconnect the USB device while itis loading.
%
MSCsupports MP3, JPEG and movie files, while a PTP device supports JPEG files only.
%
The higher the resolution of the image, the longer it takes to display on the screen.
%
The maximum supported JPEG resolution is 15360X8640 pixels.
%
For unsupported or corrupted files, the 'Not Supported File Format' message is displayed.
%
Ifsort key is set to Basic View, up to 1000 files can be displayed in each folder. The other sort key can display up to 10000
files.
%
MP3 files with DRM that have been downloaded from a non-free site cannot be played. Digital Rights Management (DRM)
is a technology that supports the creation of content, the distribution and management of the content inan integrated
and comprehensive way, including the protection of the rights and interestsof the content providers, the prevention of the
illegal copying of contents, aswell as managing billings and settlements.
%
When moving toa photo, loading may take a few seconds. At this point,the loading iconwill appear at the screen.
%
If more than 2 PTP devices are connected, you can only use one at a time.
%
If more than one MSC device is connected, some of them may not be recognized. If a device requires highpower (more
than 500mA or 5V), the USBdevice may not be supported.
%
Ifan over-power (Fail add new device USBI/USB2 Power Overload) warning message is displayed while you are
connecting or using a USB device, the device maynot be recognized or may malfunction.
TV Rear Panel
Page 43

Using the Remote Control Button in Media PlayMenu
Button
Wheel (A/T/_/_')
ENTER _P
RETURN
TOOLS
_/_
INFO
MEDIA.P
v CH A, EXIT,TV
Move the cursor and select an item.
Select the currently selected item. While playing a slide show, movie, or music file:
- Pressing the ENTER _,,Jbutton during play pauses the play.
- Pressing the ENTERE;,,Jbutton during pause resumes the play.
Playor pause the Slide Show, music ormovie.
Return to the previous menu ...............................................................................................................................................................................................................................................................................................................
Runvarious functions from the Photo, Music and Movie menus.
Stop the current slideshow, Music orMovie file.
Jump to previous group/Jump to next group.
Show file information.
Exit Media Play mode.
Stop Media Play mode and Returns to TV mode.
Media Play Function
This function enables you to view and listen to photo, music and/or movie files saved on a USB Mass Storage Class (MSC) device.
Entering the Media Play (USB & DLNA) Menu
1. Press the MENU button. Press the A or V button to select Application, then
press the ENTERI:::C_button.
2. Press the A or T button to select Media Play (USB & DLNA), then press the
ENTER[B_ button.
The Media Play (USB & DLNA) menu is displayed.
Press the MEDIA,P button on the remote control to display the Media Play
menu.
CA3EE3
Press the SOURCE button on the remote control to view the source list.Then
Press the A or V button to select USB.
3. Press the Red button, then press the A or V button to select the TV memory or USB Memory.Press the ENTER C,,Jbutton.
This function differs depending on the TV Memory / USB Memory Device / DLNA device.
The selected USBdevice name appears at the bottom left of the screen.
4. Press the _1or I_-button to select an icon (Photo, Music, Movie, Setup), then press the ENTER C,,Jbutton.
To exit Media Play mode, press the MEDIA.P button on the remote control.
Page 44

Removing a USB Memory Device Safely
You can remove the device safely from the TV.
1. Press the TOOLS button in the Media Play file list screen, or while a Slide Show,
music or movie is being played.
2. Press the A or T button to select Safe Remove, then press the ENTER _,_
button.
3. Remove the USB device from the TV.
Screen Display
Sort key List Section
Group List Section
File List Section
Move to either 'Sort key List Section', 'Group List Section' or 'File List Section' using the Up and Down buttons. After selecting a
section, press the _1or _. buttons to select an item.
O Current Sort key:This field shows the current standard for sorting files. Press the _ or _. button to change the standard for
sorting files.
O View Groups: Shows the detailed groups of the files sorted according to the selected Sort key.The sort group where the
currently selected file is contained is highlighted.
O Currently selected file: The selected file is the file you can now control. Photoand movie files are displayed as thumbnail
images.
Current Device: Shows the currently selected device name. Pressthe Red button to select a device.
• Red (Device) button: Selects a connected device.
O Help Items
• Green (Favorites Setting) button: Changes the Favorites Setting for the selected file. Press this button repeatedly until
the desired value appears.
• Yellow (Select) button: Selects file from the file list.Selected files are markedwith a symbol _/. Press the Yellow button
again to cancel a file selection.
• TOOLS (Tools) button: Displays the option menus. (The option menu changes according to the current status.)
Item Selection Information: Shows the number of files that are selected by pressing the Yellow button.
Page 45

Sorting the Photo List
You
can sort photos in the Photo List by a particular standard.
1.
Press the MEDIA.P button.
2.
Press the _ or _- button to selectPhoto, then press the ENTER _,_ button.
3.
Press the A button to move to the Sort key Section.
4.
Press the _ or D,-buttonto selecta sorting standard. (Basic View, Timeline,
Color, Folder, Preference)
The photos are sorted according to the newly selected sorting standard.
6,
Press the T button to move to the File List Section. Press the [_ (Play)/
ENTERC# button to start the Slide Show inthe order you selected.
To move to the previous/next group, press the _ (REW) or _ (FF) button.
Photo information is automatically set. The Color information extracted from a photo file may be differentfrom your
expectations. You can change the Color and preference.
PTP does not support folder sort mode.
[]
Basic View
Shows the folders on the USB memory device. If you select a folder and press the ENTER _,_ button, only the photo files
contained in the selected folder are displayed.
When sorted according to the Basic View, you cannot set Favorite files.
[]
Tirneline
Sortsphotosbydate.Itsortsbyyearandmonthfromtheearliestphoto.
[]
Color _ Red / Yellow / Green / Blue / Magenta / Black / Gray / Unclassified
Sorts photos by Color. Youcan change the photo Color information.
You should setthe Use Color View to on in the Setup menu before sorting photos by Color.
[]
Folder
Sorts photos by folder. If there are many folders in USB, the photos files are shown in order ineach folder. The photo file inthe
Rootfolder is shown first and the others are shown in alphabetical order by name.
[]
Preference -_ / _÷ / ,# _ / ;_ dr. ,;#.
Sorts photos by preference (Favorite). You can change the photo preferences.
Changing the Favorites Setting
Select the desired photo in the File List Section, then press the Green button repeatedly until the desired setting appears.
Upto 3 stars can be selected.
The stars are for grouping purposes only. For example, the 3 star setting does not have any priority over the one star setting.
Page 46

Photo List Option Menu
1. Press the MEDIA,P button.
2. Press the 41or _- button to select Photo, then press the ENTER _ button.
3. Press the _ or _. buttonto select the desired photo file.
Selecting Multiple Photos
- Press the _ or _ button to select the desired photo file. Then press the
Yellowbutton.
- Repeat the above operation to select multiple photo files.
- The mark _/ appears tothe selected photo file.
4. Press the TOOLS button.
The option menu changes according to the current status.
[]
Slide Show
Usingthismenu,youcanplaya SlideShowusingthephotofilesonthe USBmemorydevice.
[]
Copy / Copy Current Group / Copy the selected file (When multiple flies are selected)
Select a photo you want to copy. (Alternatively, select multiple files by pressing the Yellow button.) Press the TOOLS button to
select Copy (or Copy Current Group / Copy the selected file). The files on the USB device are saved to the TV memory.
You can only copy thefiles saved onthe USBdevice.
When the TV memory is full, files cannot be copied.
[]
Delete / Delete All / Delete Selected File (When multiple fiJes are selected)
Select a photo to delete. (Alternatively, select multiple files by pressing the Yellow button.) Press the TOOLS button to select
Delete (or Delete Al! / Delete Selected File).The files are deleted.
You can only delete the files saved in the TV memory.
You cannot recover a deleted file.
[]
Play Current Group
Usingthismenu,youcanplaya SlideShowusingonlythephotofilesinthecurrentlyselectedsortinggroup.
[]
Change Group Info (When the Sort key is the Color)
You can change a selected photo file's (or group of files) Color information inorder to move it from one Color group toanother.
This does not change the actual Color of the photo.
The group information of the current file is updated and the photos are moved to the new Color group.
To change the information of multiple files, selectthe files you want by pressing the Yellow button.
[]
Deselect All (When at least one file is selected)
You can deselect all files.
The _/ mark indicating the corresponding file is selected is hidden.
[]
information
Thephotofileinformationincludingthename,thesize,theresolution,thedatemodifiedandthepathis displayed.
You can view the information of photo files during a SlideShow using the same
procedures.
Press the mNFObutton to viewing the information.
[]
Safe Remove
YoucanremovethedevicesafelyfromtheTV.
Page 47

Viewing a Photo or Slide Show
Viewing a Slide Show
1. Press the T button to select the File List Section.
2. Press the TOOLS button.
3. Press the A.or T button to select Slide Show, then pressthe ENTER _ button.
All files inthe File List Section will be usedfor the Slide Show.
During the slideshow, files are displayed inorder from the currently shown file.
The Slide Show progresses in the order sorted in the File List Section.
Music files can be automatically played during the Slide Show if the Background
Music is set to On.
While a photo list is displayed, press the [:_](Play)/ENTER C_ buttonon the
remote control to start slide show.
SlideShow Control Buttons
ENTER _
Play/Pause the Slide Show.
Play the Slide Show.
Pause the Slide Show.
Exit Slide Show and returnto the photo list.
Change the S speed
TOOLS
Run various functions from the Photo menus.
Playing current group
1. Press the A button to move to the Sort key Section.
2. Press the 41or t,, buttonto select a sorting standard.
3. Press the T button to move to the Group List Section.
4. Select a group using the _ and l,, buttons.
6. Press the _ (Play) button.A slideshow begins withthe files ofthe selected group.
o
Alternatively
1.
Select a Sort key and then inthe File List Section, select the photos contained in
the desired group.
To move to the previous/next group, press the _ (REW) or _ (FF) button.
2,
Press the TOOLS button.
3.
Press the ,L or '_' button to select Play Current Group, then press the ENTERI:C#button.
Only the photos in the sorting group including the selected files will be used for the Slide Show.
Page 48

To perform a Slide Show with only the selected files
1. Press the T button to select the File List Section.
2. Press the _ or _. buttonto select the desired photo in the File List Section.
3. Press theYellow button.
4. Repeat the above operation to select multiple photos.
The _/ mark appears to the left of the selected photo.
Ifyou select one file, the Slide Show will not be performed.
To deselect all selected files, pressthe TOOLS button and select Deselect All.
6. Press the [_ (Play)/ENTER[B_ button.
The selected files will be used forthe Slide Show.
• Alternatively
1. In the File List Section, press the Yellowbutton to select the desired photos.
2. Press the TOOLS button.
3. Press the A or _' buttonto select Slide Show, then press the ENTER _ button.
The selected files will be used forthe Slide Show.
Slide Show Option Menu
1. During a slide show (or when viewing a photo), press the TOOLS button to set the
option.
2. Press the A or T button to select the desired option, then press the ENTER _
button.
[]
Stop Slide Show / Start Slide Show
Youcanstartorstopa SlideShow.
[]
Slide Show Speed -_ Slow / Normal / Fast
You can select the slide show speed.
This function is available only during a slide show.
You can also change the speed ofthe Slide Show by pressing the [_ (REW) or _ (FF)button during the Slide Show.
[] Slide Show Effect
You can select the screen transition effect used in the slideshow.
None / Fade1 / Fade2 1Blind 1Spiral 1Checker / Linear / Stairs / Wipe / Random
This function is available only during a slide show.
[] Rotate
You can rotate photos saved on a USB memory device.
Whenever you press the 41button, it rotates by 270°, 180,90, and 0°.
Whenever you press the _ button, itrotates by 90°, 180°, 270, and 0°.
The rotated file isnot saved.
Page 49

[] Zoom
You can magnify photos saved on a USB memory device. (xl _ x2 _ x4)
To move the enlarged photo image, press the ENTER _,,Jbutton, then press the ,_,/T/_I/I_- buttons. Note that when the
enlarged picture is smaller than the original screen size, the location change function doesn't work.
The enlarged file is not saved.
[] Background Music
You can select background music when watching a Slide Show.
To use this feature, there must be music and photo files stored on the USB device.
Loading music files is needed to change BGM mode. Play music files in music category to load.
Background Music _ Off / On
• Off: Background music is not played.
• On: When the background music is available, if you select On, the music is played back.
BGM Mode _ Mood / Selected File ! Shuffle
You can select a mode to use for the background music.
BGM Mood -_ Energetic / Rhythmical / Sad / Exciting / Calm / Unclassified
Music with the mood you selected is set as the background music.
Ifyou set BGM Mode to Mood, you can select a mood.
Select Music File (0 File(s) Selected)
Only the selected music file is set asthe background music.
Ifyou set BGM Mode to Selected File, you canselect a music file.
[]
Picture Setting / Sound Setting
Youcanselectthepictureandsoundsettings.
[]
Information
Thephotofileinformationisdisplayed.
[]
Safe Remove
YoucanremovethedevicesafelyfromtheTV.
Page 50

Sorting the Music List
You
can sort music files in the Music List by a particular standard.
1.
Press the MEDIA.P button.
2.
Press the _ or _- button to selectMusic, then press the ENTER _,_ button.
3.
Press the A button to move to the Sort key Section.
4.
Press the _ or _- button to selecta sorting standard. (Basic View, Title, Artist,
Mood, Genre, Folder, Preference)
The Music files aresorted according to the newly selected sorting standard.
6.
Press the T button to move to the File List Section. Press the _ (Play)/
ENTERIB# button to start playingmusic in the order selected by the user.
To move to the previous/next group, press the _ (REW) or _ (FF) button.
Music information is automatically set. The mood information extracted from a
music file maydiffer from the expectations of the user.You can change the mood and preference.
Ifthere is no title information for a music file, the filename is displayed.
If no information is available for theArtist, Album, Year,or Genre the corresponding item is displayed asblank.
[]
Basic View
Shows the folders of the USB memory device. If you select a folder and press the ENTER _,_ button, only the music files
contained in the selected folder are displayed.
When sorted according to the Basic View, you cannot set Favorite files.
[]
Title
Sortsthemusictitlesinsymbol/number/alphabet/specialorder,andshowsthemusicfile.
[]
Artist
Sortsthemusicfileby artistinsymbol/number/alphabet/specialorder.
[]
Mood _ Energetic/ Rhythmical / Sad/ Exciting/ Calm / Unclassified
Sortsmusicfilesbythemood.Youcanchangethe musicmoodinformation.
[]
Genre
Sortsmusicfilesbythegenre.
[]
Folder
Sorts music files by the folder. If there are many folders in USB,the files are shown inorder in each folder. The music file inthe
Rootfolder is shown first and the others are shown in alphabetical order by name.
[]
Preference -_ / _S_j / _ _z / _ ;_ dr.
Sorts music files by preference (Favorite). You can change the music files preferences.
Changing the Favorites Setting
Select the desired music file in the File List Section, then press the Green button repeatedly until the desired setting appears.
Upto 3 stars can be selected.
The stars are for grouping purposes only. For example, the 3 star setting does not have any priority over the one star setting.
Page 51

Music List Option Menu
1. Press the MEDIA,P button.
2. Press the 41or I_-button to select Music, then pressthe ENTER _ button.
3. Press the 41or _. buttonto select the desired Music file.
Selecting Multiple Music Files
- Press the_1or _. button to select the desired music file. Then press the
Yellowbutton.
- Repeat the above operation to select multiple music files.
- The mark _/ appears tothe selected music file.
4. Press the TOOLS button.
The option menu changes according to the current status.
[]
PlayCurrent Group
Usingthismenu,youcanonlyplaymusicfilesinthe currentlyselectedsortinggroup.
[]
Copy / Copy Current Group / Copy the selected file (When multiple files are selected)
Select the music to copy. (Alternatively, select multiple files by pressing the Yellow button.) Press the TOOLS button to select Copy
(or Copy Current Group / Copy the selected file). The files on the USBdevice aresaved to the TV memory.
You can only copy thefiles saved onthe USBdevice.
When the TV memory is full, files cannot be copied.
[]
Delete / Delete All / Delete Selected File (When multiple files are selected)
Select the file to delete. (Alternatively, select multiple files by pressing the Yellow button.) Pressthe TOOLS button to select Delete
(or Delete All I Delete Selected File). The files are deleted.
You can only delete the files saved in the TV memory.
You cannot recover a deleted file.
[]
Change Group Info (When the Sort key is Mood)
You can change the mood information of music files.
The group information of the current file isupdated andthe file is moved to the new group.
To change the information of multiple files, selectfiles by pressing the Yellow button.
[]
Deselect All (When at least one file is selected)
You can deselect all files.
The _/ mark indicating the corresponding file is selected is hidden.
[]
Information
The music file information including the name, the size, the date modified and the path is displayed.
You can view the music file information during Play Current Group using the
same procedures.
Press the INFO button to viewing the information.
[]
Safe Remove
YoucanremovethedevicesafelyfromtheTV.
l I
Page 52

Playing Music
Playing a music file
1. Press the T button to select the File List Section.
2. Press the _ or _. buttonto select a music file to be played.
3. Press the _ (Play)/ENTERI:E# button.
This menu only shows files with the MP3 file extension. Files with other
file extensions are not displayed, even ifthey aresaved on the same USB
device.
The selected file is displayed atthe top with its playing time.
To adjust the music volume, press the volume button on the remote control.
To mute the sound, press the MUTE button on the remote control.
Ifthe sound is odd when playing MP3files, adjust the Equalizer and SRS TruSurround HD in the Sound menu. (An
over-modulated MP3 file may cause a sound problem.)
The playing duration of a music file may bedisplayed as '00:00:00' ifits playing time information is notfound atthe start of
the file.
_ (REW) or _ (FF) buttons do not function during play.
Music Play Control Buttons
Music function information icon
_ all music files in thefolder (or the selected file) are repeated. Repeat Mode is On.
(_ iWhen all musicfiles in thefolder (orthe selected file) are played once. Repeat Mode is Off.
Playing the music group
1. Press the A button to move to the Sort key Section.
2. Press the _ or _. buttonto select a sorting standard.
3. Press the T orENTER C# button to move to the Group List Section.
4. Press the [_ (Play) button. Thefiles ofthe selected group will start playing.
• Alternatively
1. Select a sort keyand then inthe File List Section, select the files contained in the desired group.
To move to the previous/next group, press the _ (REW) or _ (FF) button.
2. Press the TOOLS button.
3. Press the A or _' buttonto select Play Current Group, then press the ENTERC_ button.
The music files inthe sorting group including the selected file areplayed.
Playing the selected music files
1. Press the T button to select the File List Section.
2. Press the ._ or _ button to selectthe desired music file.
3. Press theYellow button.
4. Repeat the above operation to select multiple music files.
The _/ appears to the left of the selected music file.
To deselect all selected files, pressthe TOOLS button and select Deselect All.
& Press the _ (Play)/ENTERE}# button.
The selected files will be played.
Page 53

Music Play option Menu
Music Play Option Menu
[] Repeat Mode _ On ! Off
You can play music files repeatedly.
[] Picture Setting / Sound Setting
You can configure the picture and sound settings.
[] Information
The music file information is displayed.
[] Safe Remove
You can remove the device safely from the TV.
Sorting the Movie List
You can sort movies in the Movie List bya particular standard.
1. Press the MEDIA.P button.
2. Press the 41or I_-button to select Movie, then pressthe ENTER _ button.
3. Press the A button to move to the Sort key Section.
4. Press the _1or _. buttonto select a sorting standard. (Basic View, Timeline,
Title, Folder, Preference)
The movie files are sorted according tothe newly selected sorting standard.
6. Press the _] (Play)/ENTER C# button to play the movie in the order selected.
Movie information is automatically set.You can change the preference.
[]
Basic View
Shows the folders of the USB memory device. If you select a folder and press the ENTER _ button, only the moviefiles
contained in the selected folder are displayed.
When sorted according to the Basic View, you cannot set Favorite files.
[]
Timeline
Sortsmoviesbydate. Itsortsby yearandmonthfromtheearliestmovie.
[]
Title
Sortsanddisplaysthemovietitlesin symbollnumber/alphabet/specialorder.
[]
Folder
Ifthere are many folders inUSB, the movies files are shown inorder ineach folder. The movie file in the Root folder is shown first
and the others are shown in alphabetical order by name.
[]
Preference -_ / _ / _;_ / ;_ dr. _.,
Sorts movies by preference. (Favorite) You can change the movie preferences.
Changing the Favorites Setting
Select the desired movie file inthe File List Section, then press the Green button repeatedly until the desired setting appears.
Upto 3 stars can be selected.
The stars are for grouping purposes only. For example, the 3 star setting does not have any priority over the one star setting.
Page 54

Movie List Option Menu
1. Press the MEDIA.P button.
2. Press the 41or _- button to select Movie, then press the ENTER _,_ button.
3. Press the 41or _. buttonto select the desired Movie file.
Selecting Multiple Movie Files
- Press the_ or _. button to select the desired movie file. Then press the
Yellowbutton.
- Repeat the above operation to select multiple movie files.
- The mark _/ appears tothe selected movie file.
4. Press the TOOLS button.
The option menu changes according to the current status.
[]
Play Current Group
Usingthismenu,youcanonlyplaymoviefiles inthecurrentlyselectedsortinggroup.
[]
Copy / Copy Current Group / Copy the selected file (When multiple files are selected)
Select the movie to copy. (Alternatively, select multiple files bypressing the Yellow button.) Pressthe TOOLS button to select
Copy (or Copy Current Group / Copy the selected file). The files on the USB device are saved to the TV memory.
You can only copy thefiles saved onthe USBdevice.
When the TV memory is full, files cannot be copied.
[]
Delete / Delete All / Delete Selected File (When multiple files are selected)
Select the file to delete. (Alternatively, select multiple files by pressing the Yellow button.) Press the TOOLS button to select Delete
(or Delete All I Delete Selected File). The files are deleted.
You can only delete the files saved in the TV memory.
You cannot recover a deleted file.
[]
Deselect All (When at least one file is selected)
You can deselect all files.
The _/ mark indicating the corresponding file is selected is hidden.
[]
Information
The movie file information including the name, the size, the date modified and the path
is displayed.
Press the INFO button to viewing the information.
[]
Safe Remove
YoucanremovethedevicesafelyfromtheTV.
Playing a Movie File
Playing a movie file
1. Press the T button to select the File List Section.
2. Pressing the _ or _ button to select a movie file to be played.
3. Press the _ (Play)/ENTERIB_ button.
The selected file is played.
The selected file is displayed atthe top with its playing time.
The playing duration of a movie file may be displayed as '00:00:00' if its
playing time information is not found at the start of thefile.
You can watch exciting gaming multimedia files, but the gaming function is not
supported.
Page 55

SupportedSubtitle Formats
=-! .............. _°_°T-°!!!!!!!"='Na m e
MPEG-4 time-basedtext
SAMI
SubRi£
SubViewer
Micro DVD
Supported Movie Formats
==F°°i_le-ext_en_'ior/_'- container =_°_ Video'=Deccoder _°!_:I_
Divx 3.11/ 4.x / 5.1/6.0
XviD
*.avi
*.mkv
*.asf
*.wmv
*.mp4
*.3gp
*.vro
*.mpg
*.mpeg
*,ts
*.tp
*.trp
AVl
MKV
ASF
ASF
MP4
(SMP4)
3GPP
VRO
VOB
PS
TS
H.264 BP / MP / HP
MPEG4 SP/ASP
Motion JPEG
Divx 3.11/ 4.x / 5.1/6.0
XviD
H.264 BP / MP / HP
MPEG4 SP/ASP
Motion JPEG
Divx 3.11/ 4.x / 5.1/6.0
XviD
H.264 BP / MP / HP
MPEG4 SP/ASP
Motion JPEG
VCl
H.264 BP / MP / HP
MPEG4 SP/ASP
XVID
H.264 BP / MP / HP
MPEG4 SP/ASP
MPEG2
MPEG1
MPEG1
MPEG2
MPEG2
H.264
VCl
Audio codec
MP3
AC3
LPCM
ADPCM
MP3
AC3
LPCM
ADPCM
MP3
AC3
LPCM
ADPCM
WMA
WMA
MP3
ADPCM
AAC
ADPCM
AAC
AC3
MPEG
LPCM
AC3
MPEG
PCM
AAC
MP3
Resolution
720x576
1920x1080
1920xi080
1920x1080
800x600
720x576
1920x1080
1920xi080
1920x1080
800x600
720x576
1920x1080
1920xi080
1920x1080
800x600
1920xi080
1920x1080
1920x1080
1920x1080
1920x1080
1920x1080
1920x1080
1920xi080
1920x1080
1920xi080
1920x1080
1920x1080
1920xi080
Video Play Control Buttons
............. Button
ENTERIB#
TOOLS
Wheel _
Wheel (A / T)
Play/Pause the movie file
Play the movie file
Pause the movie file
Run various functions from the Movie menus.
Exit play mode and return to the movie list.
the movie file.
Move to the first/last of the file.
Play thefile at double speed. This function may not be supported depending on the movie file.
Page 56

Playing the movie group
1. Press the A button to move to the Sort key Section.
2. Press the ,.,ior _. buttonto select a sorting standard.
3. Press the T orENTER _# button to move to the Group List Section.
4. Press the [_ (Play) button. Only the files of the selected group will start playing.
• Alternatively
1. Select a Sort key and then in the File List Section, select the files contained in the desired group.
To move to the previous/next group, press the _ (REW) or _ (FF) button.
2. Press the TOOLS button.
3. Press the A or T button to select Play Current Group, then press the ENTEREC_button.
The movie files in the sorting group including the selected file areplayed.
Playing the selected movie files
1. Press the T button to select the File List Section.
2. Press the ,_ or _ button to selectthe desired movie file.
3. Press theYellow button.
The V mark appears to the left ofthe selected moviefile.
To deselect all selected files, pressthe TOOLS button and select Deselect All.
4. Repeat the above operation to select multiple movie files.
6. Press the _ (Play)/ENTER[B# button.
Only the selected file is played.
Playing movie continuously (Resume Play)
Ifyou exit the playing movie function, the movie can be played later from the pointwhere it was stopped.
1. Select the movie file you want to play continuously by pressing the ,_ or _. buttonto select it from the File List Section.
2. Press the _ (Play)/ENTER_ button.
3. Select Play Continuously (Resume Play) bypressing the Blue button.
The Movie will begin to play from where itwas stopped.
IfContinuous Movie Play Help function is setOn in the Setup menu, a pop-up message will appear when you resume
play a movie file.
Page 57

Movie Play Option Menu
Movie PlayOption Menu
[]
Repeat Mode _ On / Off
Youcanplaymoviefilesrepeatedly.
[]
Picture Setting / Sound Setting
Youcanconfigurethe pictureandsoundsettings.
[]
Picture Size
Fit
Play video at the TV screen size.
Original
Play video at the original size.
[] Caption Setting
You can set the captions for the movie.
Caption _ On / Off
You can turn the captions for the movie on or off.
Caption Size _ Small 1Standard I Large
You can change the font size of the captions.
Caption Sync
You can adjust the caption sync.
Caption Sync Reset
You can reset the adjusted caption sync.
[][]information
Themoviefileinformationisdisplayed.
Safe Remove
YoucanremovethedevicesafelyfromtheTV.
Page 58

Using the Setup Menu
Setup displays the user settings of the Media Play menu.
1. Press the MEDmA,Pbutton.
2. Press the 41or _- button to select Setup, then press the ENTER _# button.
3. Press the A or _' buttonto select the desired option.
4. Press the _ or _- button to select the desired option.
To exit Media Play mode, press the MEDIA.P button on the remote control.
Use Color View _ On / Off
You can select sorting photos by Color. If this optionis set to On, the loading time may
be increased to collect Color information from the photos.
Continuous Movie Play Help _ On 1Off
Select to display the help pop-up message for continuous movie playback.
Get DivX@VOD registration code
Shows the registration code authorized for the TV. Ifyou connect to the DivXweb site
and register the registration code with a personal account, you can download the VOD
registration file.
Ifyou play the VOD registration using Media Play, the registration is completed.
For more information on DivX® VOD, visit www.DivX.com.
Get DivX® VOD deactivation code
When DivX® VOD is not registered, the registration deactivation code is displayed.
Ifyou execute this function when DivX® VOD isregistered, the current DivX® VOD registration is deactivated.
Screen Saver Run Time _ 4 hours 18 hours / 10 hours
Select to set the waiting time before the screen saver appears.
information
Select to viewing the informationof the connected device.
Safe Remove
You can remove the device safely from the TV.
Page 59

Setting the DLNA Network
DLNA allows you to watch pictures, musics and videos saved on your PC or on your TV through a network connection in Media
Play mode. This removes the need to copy them to a USB storage device and then connect the device to your TV.To use DLNA,
the TV must be connected to the network and the DLNA application must be installed on your PC.
Network Connection Diagram=Cable
TV
PC
LAN
LAN
.o_...... _....................................................
/------t"_X External Modem r---
(ADSLNDSL/Cable TV)
Network Connection Diagram=Wireless
PC
TV
,ANAd ,ol
1. For more information on how to configure your network, refer to 'Setting the Network'. (see pages 31~36)
You are recommended to locate both TV and PC in same subnet. The first 3 parts of the subnet address of the TV and
the PC IP addresses should be the same and only the last part (the host address) should bechanged. (e.g. IP Address:
123.456.789.**)
2. Connect the PC to which the 8amsung PC Share Manager program will be installed and the external modem using a LAN
cable.
You can connect the TV to the PC directly without connecting it through a Sharer (Router).
Page 60

Installing the DLNA Application
To play content on the PC onthe TV, you have to first install the application. Touse the DLNA function smoothly, use the
program in the CD-ROM supplied with the TV or use the Samsung PC Share Manager program corresponding to the TV
model that can be downloaded from the Samsung web site.
System Requirements
1. Insert the Program CD supplied with this TV intoyour PC.
2. 30MB of free hard disk space is needed forthe program installation.
Ifyou share files, up to 30MB of hard disk drive space is required for each 100 files.
Ifyou cancel file sharing, the hard disk drive space used for the thumbnail information isalso freed.
Supported Formats
• Image: JPEG/Audio: MP3/Video: AVI, MKV,ASF, MP4, 3GPP, PS, TS container. Fordetailed supported video formats, refer
to the 'Playing a Movie File' instructions. (see page 53)
Install the application
1. Run the Setup.exe file on the Program CD supplied with the product.
Alternatively, you can download the file from www.samsung.com.
2. Install the SAMSUNG PC Share Manager as shown in the figures.
3. When the installation is complete, the PC Share Manager iconappears onyour Desktop.
Double-click the icon to run the program.
Page 61

Using the DLNA Application
The Program Screen Layout
Folderi
_Folde_2
_3Folder4
Folders
;_i;;!!iii_iii ili!!
1. Menus: The following application menus are provided : File, 8hare, Server, and Help.
2. Click to share the selected PC server folder.
3. Click to cancel sharing.
4. Click to refresh the PCfolder and files.
6. Click to synchronize the share status.
6. The folders and files of the PC to be shared are listed.
7. Folders shared by the user are listed.
[] File
Property
Shows information on the selected file or folder.
• Method I: Select a file or folder and select the File menu and then select the Property sub-menu.
• Method 2: Selecta file or folder, right-click over the selected file or folder and then selectProperty from the pop-up menu.
<Method I>
<Method 2>
(
=
Exit
Exits the DLNA application.
Ifyou select Fxit without applying the changes after changing the shared status, a message will appear asking ifyou want to apply
the changed settings tothe PC. Select Yes to apply the changes and exit the application.
Page 62

[] Share
Sharing a Folder
You can share a folder from your PC to the TV. The maximum number of folders that can be shared is 32.
Your PC will operate as a server to the TV.
• Method I: Select a folder in My Computer, select the Share menu and then select the Share Folder sub-menu.
• Method 2: Selecta folder in My Computer, right-click over the selected folder and then select Share Folder from the pop@
menu.
• Method 3: Locate the mouse pointer over a folder in the MyComputer folder list in the left pane and drag&drop the folder into
the Shared Folders pane. If a message appears asking you to confirm the shared folder, selectYes.
Cancelling a Shared Folder
You can cancel a shared folder on your PC. Select a folder from the Shared Folder pane and select Unshare Folder.
• Method I: Select a folder from the Shared Folder pane, select the Share menu and then select Unshare Folder.
• Method 2: Selecta folder from the Shared Folder pane, right-click overthe selected folder and then select Unshare Folder
from the pop-up menu.
• Method 3: Locate the mouse pointer over a folder in the Shared Folder pane and drag&drop the folder into the My Computer
pane. Ifa message appears asking you to confirm the cancelation, select Yes.
<Method 1> <Method 2> <Method 3>
Applying the Current Settings
Perform thiswhen synchronization is necessary due to a new shared folder orcancelling a shared folder. The Set Changed State
menu applies changes to shared folders to the data saved with the PC share Program.
Since applying changes to the internal data is a time-consuming process, this function enables users to apply changes to the data
only when required.
Until the Set Changed State menu is selected, the changed state ofthe shared folder is not applied to the server.
Changes to the shared folders are not applied to your PC until you select the Set Changed State menu.
• Method I: Select the Share menuand select the Refresh DBsub-menu.
• Method 2: Click the Set Changed State icon.
<Method 1> <Method 2>
Page 63

Setting the Access Permission
To enable the TV to find your PC, the TV must be set to Set Device Policy in theAccess Permission Settings window. In addition,
the PC server and the TV must be on the same subnet.
• Method: Select the Share menuand select Set Device Policy. Rejected items are represented ingray. You can change the
access permissions by using the Allow Accept / Deny button. To delete an item, select the item and select Delete Item.
[]
Server
Server
Youcan run or stopusing your PCas a server.
Run DLNA Digital Media Server when Windows Starts
You can determine whether to startthe PC serverautomatically when Windows starts.
Change server name
You can rename the PCserver. Enter a new name and click OK. The new name will appear at the top right of the window and will
appear onthe TV.
[] Help
Version
The program version information message box appears.
Using the DLNA Function
Using the DLNA Menu
DLNA (Digital Living Network Alliance) enables content saved on a DLNA server (usually your PC) connected to your TV or over
a network to beplayed. Media Play enables playing content saved on a USB memory device connected to the TV,while DLNA
enables playing content saved on a DLNA server (your PC) connected to your TV or over the network. The procedures to usethe
content are the same as those for Media Play (USB & DLNA).
Ifyou install the PCshare manager program supplied with the TV onto a PC,you can have the PC perform the role of a DLNA
server over the network.
For detailed procedures on using the DLNA menu, refer to the 'Media Play' instructions. (see pages 40_56)
1. Press the MEDIA.P button on the remote control to display the DLNA menu.
2. Press the _ or _ button to select an icon (Photo, Music, Movie, Setup), then press the ENTER _ button.
To exit DLNA mode, press the MEDIA.P button on the remote control.
DLNAdoes not support the following functions.
- The Background Musicand Background Music Setting functions.
- Sorting files by preference in the Photo, Music, and Movie folders.
- The Change Group Info function.
- The Copy / Delete function.
- The Safe Remove function.
- The REW/FF ([_/_]) key functions while a movie is playing.
- Playing Movie Continuously (Resume Play) function.
The Skip function may not work with some container such as asf and mkv.
The Divx DRM, Multi-audio, embedded caption does not supported.
Samsung PC Share manager should be permitted by the firewall program onyour PC.
The Skip (4/_ keys) or Pause function may not work while a movie is playingfor the DLNAof other manufacturers,
depending on the corresponding content information.
The playing timemay not be displayed while a movie is playing.
Page 64

Connecting Anynet + Devices
What is Anynet+?
Anynet+ is a function that enables you to control all connected Samsung devices that support Anynet+ with your Samsung TV's
remote. The Anynet + system can be used only with Samsung devices that have the Anynet + feature. To be sure your Samsung
device has this feature, check if there is an Anynet+ logo on it.
To connect to aTV
TV
Anynet+ DeviceI Anynet+ Device2 Anynet+ Device 3 Anynet+ Device 4
........_
1. Connect the HDMI mN(I(DVm),2, 3 or 4)jack onthe TV andthe HDMI OUT jack of the corresponding Anynet+ device using an
HDMI cable.
To connect to HomeTheater
TV HomeTheater Anynet+ Device 1
HDMI 1.3 Cable
Anynet+ Device 2 Anynet+ Device 3 Anynet+ Device 4
HDMI1.3 Cable
1,
Connect the HDMI IN (1(DVl), 2, 3 or 4) jack on the TV and the HDMI OUT jack of the corresponding Anynet+ device using an
HDMI cable.
2.
Connect the HDMI INjack of the home theater and the HDMI OUT jack of the corresponding Anynet+ device using an HDMI
cable.
Connect the Optical cable between the DIGITAL AUDIO OUT (OPTICAL) jack on yourTV and the Digital Audio Input on
the Home Theater.
When following the connection above, the Optical jack only outputs 2 channel audio. You will only hear sound from the
Home Theater's Front Left and Right speakers and the subwoofer. Ifyou want to hear 5.1 channel audio, connect the
DIGITAL AUDIO OUT (OPTICAL) jack on the DVD / Satellite Box (ie Anynet Device 1or 2) directly to the Amplifier or
Home Theater, not the TV.
Connect only one Home Theater.
You can connect an Anynet+ device using the HDMI 1.3 cable. Some HDMI cables may not support Anynet + functions.
Anynet+ works when the AVdevice supporting Anynet+ is in the Standby orOn status.
Anynet+ supports up to 12AV devices in total. Note that you can connect up to 3 devices of the same type.
Page 65

Setting Up Anynet +
_-_ Press the TOOLS button to display the Tools menu. You canalso display Anynet+ menu
by selecting Tools _ Anynet + (HDMI=CEC).
[]
Setup
Anynet + (HDMI-CEC) _ Off / On
To use the Anynet+ Function, Anynet + (HDMI=CEC) must be set to On.
When the Anynet +(HDMI-CEC) function is disabled, all theAnynet+ related operations
are deactivated.
Auto Turn Off _ No / Yes
Setting anAnynet+ Device to turn Off automatically when the TV isturned Off.
The active source on the TV remote must be set to TV to use the Anynet+ function.
Ifyou set Auto Turn Off to Yes, connected external devices are also turned off when the
TV is turned off. If an external device isstill recording, it may or may not turn off.
Switching between Anynet + Devices
1.
Press the TOOLS button. Press the ENTER[E# button to select Anynet + (HDMI-CEC).
2.
Press the A or T button to selectDevice List, then press the ENTER[E# button.
Anynet+ devices connectedto the TV are listed.
Ifyou cannot find a device you want, press the red button to scan for devices.
3.
Press the A or T button to selecta particular device and press the ENTER_ button. It
isswitched to the selected device.
Only when you set Anynet + (HDMI=CEC)to On in the Application menu, the Device
List menu appears.
%
Switching to the selected devices may take up to 2 minutes. Youcannot cancel the
operation during the switching operation.
%
The time required to scan for devices is determined bythe number of connected devices.
%
When the device scan is complete, the number of devices found are not displayed.
%
Although the TV automatically searches the device list when the TV is turned on via the power button, devices connected to
the TV may not always be automatically displayed inthe device list. Press the red button to search for the connected device.
%
Ifyou have selected external input mode by pressing the SOURCE button, you cannot use the Anynet + function. Makesure to
switch to an Anynet+ device by using the Device List.
Anynet + Menu
The Anynet + menu changes depending
Anynet+ Menu
View TV
Device List
(device_name) MENU
(device_name) INFO
Recording: (*recorder)
Stop Recording: (*recorder)
Receiver
If more than one recording device is connected, they are displayed as (*recorder) and ifonly one recording device is
connected, it will be represented as(*device_name).
onthe type and status ofthe Anynet+ devices connected to the TV.
Description _
Anynet+ mode changes to TV broadcast mode.
Shows the Anynet + device list.
Shows the connected device menus. E.g. Ifa DVD recorder is connected, the disc menu
of the DVD recorder will appear.
Shows the play menu of the connected device. E.g. If a DVD recorder is connected, the
play menu of the DVD recorder will appear.
Starts recording immediately using the recorder. (This is only available for devices that
Stops recording.
Sound is played through the receiver.
Page 66

TV Remote Control Buttons Available in Anynet + Mode
Device Type Operating Status
After switching to the device, when the menu
ofthe corresponding device is displayed on
Anynet+ Device the screen.
After switching to the device, while playing a
file
Device with built-in
Tuner
Audio Device
The Anynet + function only works when the active source on the TV remote control is set to TV.
The _] button works only while inthe recordable state.
You cannot control Anynet+ devices using the buttons on the TV. You can control Anynet+ devices only using the TV remote
control.
The TV remote control may not work under certain conditions. If this occurs, reselect theAnynet + device.
The Anynet + functions do not operate with other manufacturers' products.
The [_, _ operations may differ depending on the device.
After switching to the device, when you are
watching a TV program
When Receiver is activated =VOL+ / MUTE button
AvailableBut[;_s
Numeric buttons
Wheel (A/T/*,I/_.) / ENTER _ buttons
Color buttons / EXIT button
[_(Backward search) / _](Forward search) /
[_(Stop) / [_(Play) / _L](Pause)
v CH A button
Recording
You can make a recording of a TV program using a Samsung recorder.
1. Press the TOOLS button. Press the ENTER[B# button to select Anynet + (HDMI-CE¢).
2. Press the A or T button to select Recording Immediately and press the ENTER_
button. Recording begins.
When there is more than one recording device
When multiple recording devices are connected, the recording devices are listed.
Press the A or T button to selecta recording device and press the ENTER _
button. Recording begins.
When the recording device isnot displayed select Device List and press the Red
button to search devices
3. Press the EXIT button to exit.
You can recordthe source streams by selecting Recording: (device_name).
Pressing the [_ button will record whatever you are currently watching. Ifyou are watching video from another device,
the video from the device is recorded.
Before recording, check whether the antenna jack is properly connected to the recording device. To properly connect an
antenna toa recording device, refer to the recording device's users manual.
Listening through a Receiver (Home Theater)
You can listen to sound through a receiver instead of theTV speaker.
1. Press the TOOLS button. Press the ENTER C# button to select Anynet + (HDMI-CEC).
2. Press the A or T button to select Receiver. Press the _ or _. button to select On or Off.
3. Press the EXIT button to exit.
Ifyour receiver supports audio only, it may not appear in the device list.
The receiver will work when you have properly connected the optical injack of the
receiver to the DIGITAL AUDIO OUT (OPTICAL) jack of the TV.
When the receiver (home theater) is set to On, you can hear sound output from
the TV's Optical jack. When the TV is displaying a DTV(air) signal, the TV will send
out 5.1 channel sound to the Home Theater receiver. When the source is a digital component such as a DVD and is
connected to theTV via HDMI, only 2 channel sound will be heard from the HomeTheater receiver.
Ifthere is a power interruption to the TV when the Receiver is set to On (by disconnecting the power cord ora power
failure), the Speaker Select may be set to External Speaker when you turn the TV on again.
Page 67

Troubleshooting for Anynet +
Problem Possible Solution
Anynet+ does not work. • Check ifthe device is anAnynet + device. The Anynet+ system supports Anynet+ devices only.
• Connect only one receiver (home theater).
• Check ifthe Anynet+ device power cord is properly connected.
• Check the Anynet + device's Video/Audio/HDMI 1.3 cable connections.
• Check whether Anynet + (HDMI-CEC) is set to On in the Anynet+ setup menu.
• Check whether the TV remote control is in TV mode.
• Check whether it isAnynet + exclusive remote control.
• Anynet+ doesn't work in certain situations. (Searching channels, Operating Media Play, Plug &
Play, etc.)
• When connecting or removing the HDMI 1.3cable, please make sure to search devices again or
turn your TV off and on again.
I want to startAnynet+. • Check ifthe Anynet+ device is properly connected to the TV and check ifthe Anynet + (HDMI-
I want to exit Anynet+. • Select View TV inthe Anynet+ menu.
The message 'Connecting to
Anynet+ device...' appears on
the screen.
The Anynet+ device does not
play.
The connected device is not
displayed.
The TV program cannot be •
recorded.
The TV sound is not output • Connect the optical cable between TV and the receiver.
through the receiver.
• Check ifthe Anvnet+ Function ofAnynet + device is set on.
CEC) is set to On inthe Anynet + Setup menu.
• Press the TV buttonon the TV remote control to switchto TV. Then press the TOOLS button to
show theAnynet+ menu and select a menu youwant.
• Press the SOURCE button on the TV remote control and select a device other than Anynet+
devices.
• Press V CH A, CH LIST, PRE-CH, and FAV.CHto change the TV mode. (Note that the
channel button operates only when atuner-embedded Anynet + device is not connected.)
• You cannot usethe remote control when you are configuringAnynet + or switching to a view
mode.
• Use the remote control when theAnynet + setting or switching to view mode is complete.
• You cannot usethe playfunction when Plug & Play is inprogress.
• Check whether or not the device supports Anynet+ functions.
• Check whether or not the HDMI 1.3 cable is properly connected.
• Check whether Anynet + (HDMI=CEC) is set to On in the Anynet+ setup menu.
• SearchAnynet + devices again.
• You can connect an Anynet + device using the HDMI 1.3 cable only. Some HDMI cables may not
support Anynet+ functions.
• If it is terminated by anabnormal situation such as disconnecting the HDMIcable orpower cord
or a power failure, please repeat the device scan.
Check whether the antenna jack on the recording device is properly connected.
Page 68

Using the Content Library
The Content Library allows you to enjoy various content on your TV. Youcan use the default
content stored in the TV memory or you canenjoy new content using a USBdevice or via the
Internet.
Using the Content Library Menu
1. Press the MENU button. Press the A or T button to select Application, then press the
ENTERIB# button.
2. Press the ,L or T button to select Content Library, then press the ENTER_,_ button.
The Content Library main menu is displayed.
3. Press the 4 or _- button to select an icon (Gallery, Cooking, Game, Children, Wellness,
Others, Content Management), then press the ENTER _,_ button.
Using the Remote Control Button in Content Library Menu
Button Oper pns_ ..........................................................................................................................................................................................................................................................................................................................................................................................................
Wheel (A/v'/41/_.)
ENTERIB#
RETURN
EXIT
v CI--IA
Color button
--VOL+ / MUTE
CONTENT LIBRARY CONTAINS TEXT, GRAPHICS, IMAGES, MULTIMEDIA, AND OTHER MATERIALS FOR
INFORMATIONALAND PROMOTIONAL PURPOSES ONLY. MATERIALS IN CONTENT LIBRARY HASBEEN MODIFIED AND
KEEPS BEING REVISED AND UPDATED. THE MATERIALS IN THE CONTENT LIBRARY MAYNOT BE SUITABLE FOR ALL
AUDIENCES.
INFORMATION IN THE CONTENT LIBRARY IS PROVIDED 'AS IS.'ALTHOUGH THE INFORMATION PROVIDED TO YOU
INTHE CONTENT LIBRARY IS OBTAINED OR COMPLIED FROM SOURCES WE BELIEVE TO BE RELIABLE, SAMSUNG
CANNOT AND DOES NOT GUARANTEE THE ACCURACY, VALIDITY,TIMELINESS OR COMPLETENESS
OF ANY INFORMATION OR DATA MADE AVAILABLE TO YOU FOR ANY PARTICULAR PURPOSE. UNDER NO
CIRCUMSTANCES, INCLUDING NEGLIGENCE, SHALL SAMSUNG BE HELD LIABLE, WHETHER IN CONTRACT ORTORT,
FORANY DIRECT, INDIRECT, INCIDENTAL, SPECIAL OR CONSEQUENTIAL DAMAGES, ATTORNEY FEES, EXPENSES,
OR ANY OTHER DAMAGES WHATSOEVER ARISING OUT OF, OR IN CONNECTION WITH, ANY INFORMATION
CONTAINED IN, OR THE USE OF, THE CONTENT LIBRARY, EVEN IFADVISED OF THE POSSIBILITY OF SUCH DAMAGES.
Move the cursor and select an item.
Select the currently selected item.
Return to the previous menu.
Stop the current function and return to the Content Library main menu.
Stop Content Library modeand Returns toTV mode.
Keys that provide functions aredescribed on the corresponding page,
You can control the volume of the played content.
Page 69

Using the TV Memory Contents
You can use enjoy content stored inthe TV memory. You can add/delete content to/from the TV memory. To add/delete content,
select Content Management.
To return to Content Library main menu, press the EXIT button.
[]
Gallery
This function plays a SlideShow with high resolution images and background music and
produces various atmospheres. Using the Gallery function of the TV, you can change your home
atmosphere.
The copyrights of the Gallery contents and all issues related to them are reserved by
TimeBpace, Inc,
Press theENTERIB_ button to pause the SlideShow, and also press the ENTER _ button
to resume the SlideShow.
Press the INFO button to display information on the selected photo. (This is not displayed if
the photohas no information.)
[]
Cooking
You can view various recipes and then easily follow them step by step. Enjoy these contents which will give you great ideas for
meals.
The recipes introduced in the Cooking contents on the Samsung TV are based on recipes published by Anness Publishing.
The copyrights of the Cooking contents and all issues related to them are reserved by Practical Pictures.
[]
Game
This category provides entertainment games for the whole family.
For the buttons used inthe games, referto the directions on the screen.
Color Buttons for Games
Button Operations
Red Press to move to the game home screen
Green Press to me
Yellow Option Key
Blue Press to exit the game
[]
Children
This is educational and interactive content that children can watch repeatedly.
The copyrights of the Children contents and issues relatedto them reserved by UpToTen.
[]
Wellness
This is beneficial health management content that provides stretching and massage exercises that can be enjoyed by the whole
family.
[]
Others
The default content is not saved in the TV memory.
You can copy new content to the TV memory using the Content Management screen.
Page 70

Using the Content Management
[]
Content Management
You can add or delete contents using the Content Management.
You can select multiple content items by selecting content items repeatedly and pressing
the Yellow button.
My Contents
You can check the content saved inthe TV memory for each subitem of the Content Library.
• Select a content item and press the ENTER _,.Jbutton. You can play or delete the selected
content item.
Internet Download
Ifyour TV connect to the internet via a LAN cable, you can directly download the contents
provided by Samsung Electronics.
• Select a content item and press the ENTER _,,Jbutton. You can play the selected content
item or copy it to the TV memory.
USB
You can check the content saved onthe USB devicefor each subitem ofthe Content Library.
• Select a content item and press the ENTERIZ_#button. You can play the selected content item or copy it to the TV memory.
Content Library only supports USB Mass Storage Class devices (MSC). MSC is a Mass Storage Class Bulk-Only
Transport device. Examples of MSC are Thumb drives and FlashCard Readers.
Playing a game using an external USB memory devicewill allow you to save your game (depending on the game). Take
care asremoving the USB memory device while saving data to the USB memory device may cause the data to be lost.
Downloading New Contents
New content other than the built-in content will be provided via the Samsung. com website free of charge. When you
download the paid contents, you need UDN number to download contents. Check the UDN number before downloading a
new content item.
• Downloading Content
1. Visitthe www.samsung.com website.
2. Select a content item in the Contents Download page.
3. Download the contents onto the USB memory device.
4, Go to Content Library main menu by pressing CONTENT button or choosing Content Library (Menu
Application _ Content Library).
& Plug the USB memory into USB port on the side of the TV.
6. You can seethe content sub item which you downloaded.
7. Select a content item and press the ENTERE_,,Jbutton.
8. You can play the selected content item or copy it to the TV memory.
Setup
• Screen Saver Run Time: Select to set the waiting time before the screen saver appears.
• Save UDN: Saves the UDN number to a USB device.
An NTFS format USBstorage device does not support saving UDN. We recommend using a FATformat USB storage device.
Page 71

YoucanenjoythebestoftheInternetinperfectharmonywiththesimplicityandreliabilityofyourtelevision.
Ifyouhavesomeproblemswhileusingawidgetservice,pleasecontactthecontentprovider.Inthewidget,pressthegreenbutton
togetcontactinformationorrefertohelpwebsiteforthewidgetproviderinformation.
Insomeregions,onlyEnglishmaybesupportedforservices.
Getting Started with Intemet@TV
Intemet@TV provides an integrated Internet and television experience powered by the Yahoo!® Widget Engine. Youcan monitor
financial stocks, share photos with friends and family, and track news and weather all through the Internet@TV service onyour
television.
You may experience slow operation or hesitation when using this function due to network conditions.
When running Intemet@TV for the first time, the basic settings proceed automatically.
The first step is to set up your network. For more information on how to configure your network, refer to 'Setting the Network'.
(see pages 31~36)
After your network is operational, the Internet@TV software guides you through a step-by-step setup wizard.
[]
What is a Widget?
ATV Widget is a small web application that allows you to easily access your favorite site using the remote control. You can enjoy
various types of information, such as the latest news, weather information, and stock information, etc. on your TV along with your
friends or family members.
Some widgets may not be supported depending on the regulations of the corresponding country.
Some widgets will only support limited services depending onthe regulations of the corresponding country.
The color buttons may work differently depending on the widget.
The operation maynot be smooth depending on the network condition.
The Snippet is a symbol of Widget.
[]
What is a Snippet?
A snippet shows a part of the Widget contents such as weather and stock information that the user wants to view.
The snippets are automatically updated in realtime.
It maytake a few seconds to loadthe snippet.
1. Press the MENU button. Press the A or T button to selectApplication, then press
the ENTERC# button.
2. Press the A or T button to select Intemet@TV, then press the ENTER C_
button.
Intemet@TV starts.
Press the INTERNET@ button on the remote control to display the Internet@TV menu.
3. The General Disclaimer is displayed on the screen. Select Iaccept or I do not accept.
For more information on the General Disclaimer, refer to the 'Legal Notice'. (seepage 37)
4. The 'welcome screen' is the starting point of the Intemet@TV guided setup.
Ifyou select Exit Setup, this step is resumed when you press the
INTERNET@ button.
Select Let's get started!
6,
Choosing your location allows TV Widgets to uselocalized content.
Select your country from the listprovided.
Page 72

6,
Accepting the Yahoo!® TV Widget Engine Privacy Policy is required to use Internet@TV.
Select OK, I Accept.
7.
Accepting the Yahoo!® TV Widget System Termsof Service is required to use Internet@TV.
Select OK, I Accept.
8.
Enteryour name to setup your profile. Each profile has its own list ofwidgets. Youcan create a profile for each person who
uses Internet@TV.
Enter your name and select Save this name.
For more information, refer to 'Using the ProfileWidget'. (see page 72)
9,
Internet@TV tests the network connection.
Ifthe test fails, configure your network again.
For more information, refer to 'Setting the Network'. (see pages 31~36)
10.
The guided setup is complete. Atutorial on how to use Internet@TV is next.
Select Continue to view the tutorial.
Select Exit setup to start using Intemet@TV now.
To run the tutorial again, select Profile Widget _ System Setting _ Repeat
Tutorial.
11.
Press the INTERNET@ button on the remote control to display the Internet@TV user interface.
[]
Screen display
Dock mode
@ Awelcome banner is shown with your profile name in the top right
corner.
(_ This banner disappears after a short delay.
O The banner highlights two remote control shortcuts.
Ifyou press the blue button (Viewport) on your remote control,
the display is toggled between 'Viewport mode' and 'Overlay
mode'. In Viewport mode, the TV or video plays in a scaled-down
area with graphics outside. In overlay mode, the graphics are
displayed on top of the TV or video.
Ifyou press the yellow button (Edit Snippet) on your remote
control, a help window is displayed and the snippet with focus
can be edited.
O Press the INTERNET@ button onthe remote control to begin.
The horizontal list at the bottom of your TV screen is called 'the dock'.
The items in the list are called 'snippets'.
A snippet is a shortcut which launches a TV Widget.
A TV Widget is an Internet application designed to run on your TV.
Move between snippets by pressing the 4 or i,- buttons on the remote control.
Focus is located inthe left-most region (highlighted in blue).
The dock slides snippets under that focal point.
Launch a TV Widget by pressing the ENTER C_ button on the remote control when its snippet is infocus.
When you add snippets, theyform a stack which you can navigate bypressing the A or T buttons.
Two special TV Widgets appear in the dock: the Profile Widget and the Gallery Widget. These cannot be deleted.
The dock will slide off screen after a timeout period.
Page 73

Sidebarmode
O Focus on a snippet and press the ENTER[B_ button to launch the TV
Widget sidebar. The TV Widget logo and Home_ are at the top of
the sidebar.
O Current menu is displayed under the TV Widget logo.
To return to a previous screen, select itand press the ENTERI[E_J
button.
You can also press the RETURN button on the remote control.
O Current selection is always highlighted in blue and is activated when
you press the ENTER _J button.
O When there is a lotof data, a pagecontrol isused.
Current page andtotal pages aredisplayed.
Move between pages by pressing _1or P buttons.
O The bottom toolbar includes color buttons that correspond to the red, green,
yellow and bluebuttons on the remote control.
• Red button: Close the widget.
• Green button: Change the widget's setting.
• Yellow button: Manage your snippets.
• Blue button: Size video to fit, or make itfull screen.
Some buttons may not be available depending onwidget.
All content and services accessible through this device belong to third parties and are protected by copyright, patent, trademark
and/or other intellectual property laws. Such content and services are provided solely for your personal noncommercial use.You
may not use any content or services ina manner that has not been authorized by the content owner orservice provider. Without
limiting the foregoing, unless expressly authorized by the applicable content owner or service provider, you may not modify,
copy, republish, upload, post, transmit, translate, sell, create derivative works, exploit, or distribute in any manner or medium
any content orservices displayed through this device.
YOU EXPRESSLY ACKNOWLEDGE AND AGREE THAT USE OF THE DEVICE IS AT YOUR SOLE RISK AND THAT THE
ENTIRE RISK AS TO SATISFACTORYQUALITY, PERFORMANCE ANDACCURACY IS WITH YOU. THE DEVICE AND
ALL THIRD PARTY CONTENT AND SERVICESARE PROVIDED "AS IS" WITHOUT WARRANTY OF ANY KIND, EITHER
EXPRESS OR IMPLIED. SAMSUNG EXPRESSLY DISCLAIMS ALL WARRANTIES AND CONDITIONS WITH RESPECT TO
THE DEVICE AND ANY CONTENTAND SERVICES, EITHER EXPRESS OR, IMPLIED, INCLUDING BUT NOT LIMITED
TO, WARRANTIES OF MERCHANTABILITY, OF SATISFACTORY QUALITY, FITNESS FOR A PARTICULAR PURPOSE,
OF ACCURACY, OFQUIET ENJOYMENT,AND NON-INFRINGEMENT OF THIRD PARTY RIGHTS. SAMSUNG DOES
NOT GUARANTEE THE ACCURACY, VALIDITY,TIMELINESS, LEGALITY, ORCOMPLETENESS OFANY CONTENT
OR SERVICE MADEAVAILABLE THROUGH THIS DEVICE AND DOES NOTWARRANT THAT THE DEVICE, CONTENT
OR SERVICES WILL MEET YOUR REQUIREMENTS, OR THAT OPERATION OF THE DEVICE ORSERVICES WILL BE
UNINTERRUPTED OR ERROR-FREE. UNDER NO CIRCUMSTANCES, INCLUDING NEGLIGENCE, SHALL SAMSUNG BE
LIABLE, WHETHER IN CONTRACT ORTORT, FORANY DIRECT, INDIRECT, INCIDENTAL, SPECIAL OR CONSEQUENTIAL
DAMAGES, ATTORNEY FEES, EXPENSES, ORANY OTHER DAMAGES ARISING OUT OF,OR IN CONNECTION WITH,
ANY INFORMATION CONTAINED IN, OR AS A RESULT OF THE USE OF THE DEVICE, ORANY CONTENT OR SERVICE
ACCESSED BYYOU OR ANY THIRD PARTY,EVEN IF ADVISED OFTHE POSSIBILITY OF SUCH DAMAGES.
Third party services may be changed, suspended, removed, terminated orinterrupted, or access may be disabled at any time,
without notice, and Samsung makes no representation or warranty that any content or servicewill remain available forany
)eriod of time. Content and services are transmitted by third parties by means of networks and transmission facilities over which
Samsung has nocontrol. Without limiting the generality of this disclaimer, Samsung expressly disclaims any responsibility or
liability for anychange, interruption, disabling, removal of or suspension of any content or service made available through this
device. Samsung may impose limits on the use of or access to certain services or content, inany case andwithout notice or
liability.
Samsung is neither responsible nor liable for customer service related to the content and services. Any question or request for
service relating to the content or services should be made directly to the respective content and service providers.
Page 74

Editing Snippets in the Dock
1,
Edit a snippet by focusing on it in the dock and pressing theyellow button.
2.
The snippet moves to the Second position and its tile slides up to show the following help text:
• Delete (red button): Remove this TV Widget.
Deleted widgets can be re-installed using the Widget Gallery.
• Move (blue button): Re-order the snippet. Press the *,i or _. button to scroll. Press the yellow button to drop into the new
position.
• Done (yellow button): Exitthe Edit Snippet menu.
Using the Profile Widget
The Profile Widget configures your user profile.
You can set up multiple profiles, and each profile maintains its own list of widgets.
The Switch Profile menu allows you to switch to a different user profile.
At least two profiles must be registered. If you want to add a profile, refer to 'Administrative
Controls'. (see page 73)
The Profile Settings menu allows you to customize and protectyour profile.
• User profiles can be customized with a unique Name and an Avatar (a picture used to
represent your profile).
• Your profile's Name and Avatar are displayed in the profile snippet in the dock.
• Profiles can be protected by Create Profile PIN.
When setting the PINfor the first time, you can set a Security Question.
The Profile Settings menu can limit access to widgets.
• Ifyou forget your Profile PIN you can answer a Security Question that is associated with
your profile.
• A profile that has the Limit Profile indicator turned on will not allow new widgets to be installed.
The Owner PIN must be set to use this function. To set the Owner PIN, refer to
'Administrative Controls'. (see page 73)
Page 75

TheSystem Settings menu allows you to:
• Change your Location and set your Zip Code (US only) to tailor the content to your region.
• Repeat Tutoria! that was shown during guided setup.
• Restore Factory Settings to delete all widget configurations and information..
Inthe Administrative Controls menu you can:
• Set the Screen Saver timeout to avoid screen burn in.
• Create Owner PiN and set a Security Question to control other profiles.
• Create a new Profile which can be configured with a different set ofwidgets.
• Delete an existing profile.
From the Profile Widget you can Sign in to Yahoo!® using your Yahoo! ID.
• Ifyou havea Yahoo! ID, you can access your personalized content using the Yahoo!® TV
Widgets.
• All Yahoo!@TV Widgets that are installed are automatically signed-in with your profile's
Yahoo! ID.
• Ifyou have noYahoo! account, visitwww.yahoo.com and create an account.
• You may fail to log inwith an ID createdon theYahoo website in a country that does not
support Internet@TV.
[]
About Profile widget
Press the green button.
You can view a brief description of the Profile Widget, Copyright Policy, Terms of Service, and
Privacy Policy.
Page 76

Using the Yahoo!® Widget Gallery
Use the Yahoo!®Widget Galleryto add more widgets to your TV.
View available TV Widgets in the following categories:
• Latest Widgets: Displays recently updated widgets.
• Yahoo!® Widgets: Displays widgets provided by Yahoo!®.
• Samsung Widgets: Displays widgets provided by Samsung.
• More Categories: Displays all widgets by category.
To install a widget, navigate to the detail screen and select Add Widget to My Profile and
press the ENTERIC,_ button. The widget is installed and becomes available in the dock.
[]
Widget GallerySettings
PresstheGreenbutton.
About Yahoo! Widget Gallery
You can view brief information for the Widget Gallery, Copyright Policy, Terms of Service, and
Privacy Policy.
in the Developer Settings menu You can make your own widget.
For more information on creating your own widget, visit our developer site at http://connectedtv.
yahoo.com/
Page 77

Using the Yahoo!® Weather Widget
The Yahoo!® Weather Widget provides updates on your local and favorite weather locations. This
content dynamically changes with weather conditions.
• Press the green button on the remote control to display the Yahool@Weather Widget Settings
menu.
• From the Settings menu you can add or remove a city for which you want to view weather
information.
From the Settings menu:
• Add New City by entering the name of the city. Once the search results are displayed, select
the city you want and press the ENTERIB# button.
• Delete City by selecting the city you want to delete from the city list. Press the ENTER_
button and confirm the deletion.
• Changing the Temperature Indication Mode
You can change the temperature indication mode to imperial or Metric. For example, imperial
will show temperatures in Fahrenheit and Metric inCelsius.
[]
Create a snippet for a favorite city
• Select the city from the Yahoo!@Weather Widget's home page and view the detailed weather information.
• Pressthe yellow button.
• Select the Add Snippet menu and press ENTER _ to add the city as a snippet.
[]
Delete a snippet for a city
• Launchthe snippet.
• Pressthe yellow button.
• Select the Delete Snippet menu and press ENTER_ to remove the snippet.
Using the Yahoo!® News Widget
The Yahoo!® News Widget provides the latest headline newsfor business, entertainment, politics,
sports, top stories, and many other categories.
• Select a category, select a headline within the category, and view a dynamically updated
news summary.
Page 78

Using the Yahoo!® Flickr Widget
The Fiickr Widget can provide you access to your favorite photos from friends andfamily while
watching TV. Share your photos withyour family on your bigscreen TV through a slideshow.
• Personalize the Flickr Widget by logging in with your Yahoo! ID.
• For detailed procedures on log in, refer to the 'Using the Profile Widget' instructions.
(see pages 72~73)
• For more information on Flickr, visit http://www.fiickr.com.
Your Photos shows photos you have registered with Flickr website.
To view Ftickr photos in a slideshow:
• Select a thumbnail of a photo and press the ENTER _,_ button to view the photo's
details.
• Select Start Slideshow and press the ENTER _,_ button.
To control the slideshow display:
• Press the ENTERI--;,,Jbutton during a slideshow.
• The thumbnails of photos are displayed on the bottom of the screen.
When the slideshow control is displayed, you can Pause, Play and Stop the
slideshow.
Ifyou select the menu and press ENTERE;,_,you can view information for the selected photo.
• The Your Sets menu allows youto view photos you have classified in Flickr.
• The Explore menu allows you to explore photos featured by the Flickr website. You can view the photos updated daily.
• The Mark as Favorite or Remove From Favorite menu moves photos to your Favorite Photos set or removes photos from it.
• The Favorite Photos menu allows you to see the photos you have classified as favorites.
• The Your Contacts menu allows you to see updates from family and friends.
The Your Groups menu allows you to select your favorite groups from the Flickrwebsite to share and enjoy photos with the Flickr
community of users.
To configure the Yahoo!® Flickr Widget Settings pressthe green button on the remote control.
• The Time Per Slide menu controls the speed of the slideshow.
• The Repeat menu will restart the slideshow at the beginning after the last photo is shown.
Page 79

Using the Yahoo!® Finance Widget
View stock information and the latest stock news with theYahoo[@Finance Widget.
Press the green button to set up your stocks.
Use the Add New Symbol menu to enter the name of a new stock.
• Select the stock you want to add from the search results and select the Add Symbol menu and
press the ENTERIB_ button.
The selected stock is added to the My 8rocks list.
Use the Import Symbols From Yahoo!@)menu to retrieve your Yahoo[@Finance portfolio.
- The Merge Symbols menu merges the symbols inthe Yahool@ Finance Widget with the
symbols from your portfolio.
- The Replace Symbols menu deletes the symbols in the Yahoo[@Finance Widget and
replaces them with the symbols from your portfolio.
• Use the Display Format menu to change the stock-price fluctuation transition to Value or
Percentage.
= Create a snippet for afavorite stock.
- Select the stock symbol from the Yahool@Finance Widget's home page and view the detailed finance information.
- Pressthe yellow button.
- Select theAdd Snippet menu and press ENTER_,_ to add the stock as a snippet.
• Delete a snippet
- Launch the snippet from the dock
- Pressthe yellow button.
- Select the Delete 8nipper menu and press ENTER _ to remove the snippet.
Troubleshooting for internet@TV
Problem Possible Solution
Some widget services do not work. Check with that service provider.
In the widget, press the green button and get contact information orrefer to help
website for widget service provider information.
Refer to Help website page.
Some widget contents only have Widget content language may be different from the widget user interface language. It
English. How can I change the depends on the service provider.
language?
After factory reset, the Yahoo Widget After factory reset, turn your TV on and off. Then restart Internet@TV.
service doesn't work and a warning
message is displayed.
At the Flickr widget, I logged inmy Visit the Yahoo Web site, and activate your Flickr account at your Yahoo! ID.
account. But, Ican't view my picture.
At the Profile widget, I changed the Turn your TV off and on, then access Internet@TV again.
location, but the previous setting still Now, you can enjoy widget services in the changed location.
remains.
Help Website
Country Website
USA www.samsung.com -_ consumer products _ Television _ medi@2.0 _ Intemet@TV
Canada www.samsung.com -_ consumer products _ TV _ medi@2.0 _ Internet@TV
www.samsung.com -_ produits grand public _ t61_viseurs_ medi@2.0 _ Internet@TV
Mexico www.samsung.com _ productos de consumo _ televisores _ medi@2.0 _ Internet@TV
The location of Internet@TV on the website may vary by country and/or change in the future.
Page 80

TheHomeNetworkCenterallowsyourmobilephonetocommunicatewithyourTV.
Home Network Center
About the Home Network Center
The Home Network Center connects theTV and mobile phones through a network. You can view call arrivals, text message
contents, and schedules seton the mobile phone onthe TV using the Home Network Center. Inaddition, you can play the media
contents saved onthe mobile phones such asvideos, photos and music bycontrolling them onto the TV via the network.
Ifthe device supports DLNA DMC (Digital Media Controller) function, Home Network Center function is available.
The Samsung SCH-i910 mobile phone supports the Home Network Center. Other models will be added in the future. The
mobile device may need additional software installation. For details, refer to each user's guide.
Connecting to the Home Network Center
For more information about the network settings, refer to 'Setting the Network'. (see pages 31~36)
• Connecting through a Wi-Fi Ad=hoc Network
1. Connect the 'Samsung Wireless LANAdapter' to the USBI(HDD) or USB2 port of the TV.
TV Rear Panel
Mobile phone
....... AJ'::gW're'eseLAN
2
................................................................................................../
2. For more information on how to configure Ad-hoc network, referto 'Setting the Network'. (see page 36)
For information on configuring the mobile phone's network settings, referto the mobile phone manual.
3. Set up the IPaddress, SSID and password forthe mobile phone in the Ad-hoc Settings of the mobile phone using the
Network Name (SSID) and Security Key (password) displayed on the TV.
Connecting through a wiredlwireless IP sharer
1. Connect the LAN port ofthe TV and the Wired/Wireless IP sharer using the LAN cable or connect the USBI(HDD) orUSB2
port of the TV and the 'Samsung Wireless LAN Adapter'.
For the procedures to set up the wired/wireless sharer andthe mobile phone, referto the manual of the corresponding
device.
Usingthe LAN cable
Mobilephone
LANCable
Using the Samsung Wireless LAN Adapter
TV Rear Panel
Mobile phone ,_ .
Page 81

Setting Up the Home Network Center
[]
Message
Shows a list of mobile phones which havebeen set up with this TV to use the
message function (the call arrivals, text message contents and schedules set on the
mobile phone).
Allowed
Allows the mobile phone.
Denied
Blocks the mobile phone.
Delete
Deletes the mobile phone from the list.
This function just deletes the name from the list. If the deleted mobile device turns onor tries to connect to theTV, it may be
shown on the list.
[]
Media
Shows a list of mobile phones which is available to control media contents (videos,
photos, music) from the phone.
Besides mobile phone, other mobile devices that support DLNA DMC are available.
Allowed
Allows the mobile phone.
Denied
Blocks the mobile phone.
Delete
Deletes the mobile phone from the list.
This function just deletes the corresponding name on the list. If the deleted mobile device turns on or tries to connect to the
TV, it maybe shown on the list.
[]
Setup
Message _ On / Off
You can determine whether to usethe message function (the call arrivals, text message
contents, and schedules seton the mobile phone).
Media -_ On / Off
You can select whether to usethe Media function that plays the contents (videos,
photos, music) from the mobile phone.
TV name
You can set the TV name soas to find it easily on the mobile device.
Ifyou selects User Input, you can type the TV name by OSK(On Screen
Keyboard}.
Page 82

Using the Message Function
Using this function, you can view the callarrivals, text message contents and schedules
set on the mobile phone through the alarm window while watching TV.
To disable this Message alarm window, set Message to Off in Setup of the Home
Network Center.
The alarm window appears for20 seconds. If no key is pressed or if Cancel is
selected, it appears up to three times at5 minute intervals.
If OK is selected, or if OK is not selected while the message is displayed three
times, the message will be deleted. The message is not deleted from the mobile
phone.
The simple alarm window canbe displayed, while using some applications such as
Media Play, Contents Library, etc. In this case, to view the contents of the message,
switch to TV viewing mode.
When the message of an unknown mobile phone is displayed, select the mobile
phone inthe Message itemof the Home Network Center and select Denied to
block the phone.
Message View
Ifa new text message (SMS) arrives while you are watching TV,the alarm window
appears. Ifyou click the OK button, the contents of the message are displayed.
• Ifyou select the OK button, the contents of the message are displayed.
• Ifyou select the Cancel button,the alarmwindow appears up to three times at 5
minute intervals.
You can configure the viewing settings for the text message (SMS) contents on the
mobile phone. Forthe procedures, refer to the mobile phone manual.
Some special characters may be displayed as blank or broken characters.
Call Arrival Alarm
Ifa call arrives while you are watching TV, the alarmwindow appears.
• Ifyou select the OK button, the call arrival alarm is confirmed and the alarm
window is closed.
• Ifyou select the Cancel button,the alarmwindow appears up to three times at 5
minute intervals.
Schedule Alarm
While you are watching TV, the alarm window appears to display the registered
schedule.
• Ifyou select the OK button, you can view the contents ofthe schedule registered
on the mobile phone.
• Ifyou select the Cancel button, the alarmwindow appears up to three times at 5
minute intervals.
You can configure the viewing settings for the schedule contents on the mobile
phone. For the procedures, refer to the mobile phone manual.
Some special characters may be displayed as blank or broken characters.
Page 83

Using the Media Function
An alarm window appears informing the user that the media contents (videos,
photos, music) sent from the mobile phone will be displayed onthe TV.
The contents are played automatically 3 seconds after the alarm window appears.
Ifyou press the RETURNor EXtT button when the alarm window appears, the Media
Contents are not played.
To turn off the media contents transmission from the mobile phone, set Media to
Off in Setup of the Home Network Center.
The contents may not be played on the TV depending ontheir resolution and
format.
Media play control buttons
Button--: Operations
Move the cursor and select an item.
Wheel (_/_.) While playing a moviefile: skipforwards or backwards through the
ENTERC_ Pressing the ENTERI:Z;_button during play pauses the play.
RETURN Return to the previous menu.
TOOLS Run various functions from the Photo, Music and Movie menus.
INFO Show file information.
EXiT Stop Media Play mode and Returns to TV mode.
The ENTER _,_ and _/_. buttons may notwork depending on the type of media content.
Using the mobile device, youcan control playing media. For details, refer to each user's guide.
movie file.
Pressing the ENTERI:B# button during pause resumes the play.
Page 84

Troubleshooting
Ifthe TV seems to have a problem, first try this list of possible problems and solutions. Ifnone of these troubleshooting tips apply,
call Samsung customer service at 1-800-SAMSUNG.
Problem PossibJeSolution
Poor picture. Try another channel./Adjust the antenna. / Check all wire connections.
Poor sound quality. Tryanother channel. /Adjust the antenna.
No picture or sound. Try another channel. / Press the 8OURCE button.
Make sure the TV isplugged in. / Check the antenna connections.
No sound or sound istoo lowat
maximum volume.
Picture rolls vertically.
There is a problem with the picture
There is a problem with the sound
The TV operates erratically.
The TV won't turn on.
Remote control malfunctions.
'Check signal cable' message. Ensurethat the signal cable isfirmly connected to the PC source.
'Not Supported Mode' message. Check the maximum resolution and connected device's Video frequency.
Digital broadcasting screen
problem.
The Emageistoo light ortoo dark.
Black bars on the screen.
Picture hasa Red Green orPink
t_nt.
Closed Captioning not working.
Snowy picture.
Ghosting on picture.
Horizontal bars appear to flicker.
jitter or shimmer on the image.
Vertical bars appear to flicker, jitter
or shimmer on the image
Screen is blackand power indicator
light blinks steadily.
First checkthe volume of units connected to your TV (digital broadcasting receiver, DVD,
cable broadcasting receiver, VCR, etc.). Then, adjust the TV volume accordingly.
Check all wire connections.
Run the Picture test in the Self diagnostic menu.
Run the Sound test in the Self diagnostic menu.
Unplug the TV for 30 seconds, then try operating it again.
Make sure the wall outlet is working.
Replace the remote control batteries.
Clean the upper edge of the remote control (transmission window).
Check the battery terminals.
Compare these values with the data in the Display Modes.
Please check the digital signal strength and input antenna.
Adjust the Brightness and Contrast./Adjust the Finetuning.
Make sure the broadcast you're receiving is High Definition (HD).
HD channels sometimes broadcast Standard Definition (SD) programming, which can
cause black bars.
Set your cable/satellite box to stretch or widescreen mode to eliminate the bars.
Make sure the Component cables are connected to the correct jacks.
If youare using a Cable/Satellite box, you must set Closed Captioning on the box,not
yourTV.
Yourcable box may need a firmware upgrade. Please contact your Cable company.
This is sometimes caused by compatibility issues with your cable box.
Try connecting Component cables instead.
Adjust the Coarse tuning and then adjust the Fine tuning.
Adjust the Coarse tuning and then adjust the Fine tuning.
On your computer check: Power, Signal Cable.
The TV is using its power management system.
Move the computer's mouse or press any key on the keyboard.
Page 85

Problem
Image is not stable and may
appear tovibrate when you have
a computer connected to the PC
input.
Image is not centered on the
screen.
The picture appears distorted inthe
corner of the screen
The 'Resets all settings to the This appears when you press and hold the EXIT button for a while. The product settings
default values.' message appears, are reset to the factory defaults.
This TFT LED panel uses a panel consisting of sub pixels (6220 800) which require sophisticated technology to produce.
However,there may befew bright or dark pixels on the screen. These pixels will have no impact on the performance of the
product.
Possible Solution
If the setting is not correct, use your computer utility program to change the display
settings,
YourTV supports multiscan display functions within the following frequency domain:
- Horizontal frequency (KHz): 30_-60
- Vertical frequency (Hz): 60~75
- PC Maximum refresh rate (at 60 Hz): 1920x 1080
Adjust the horizontal and vertical position.
The screen position must be adjusted on the output source (i.e. STB) with a digital signal.
If Screen Fit is selected with some external devices, the picture mayappear distorted in
the corner of the screen. This symptom iscaused by the external devices, not TV.
Installing the Stand
1. Attach your LED TV to the stand.
Two or more people should carry the TV.
Make sure to distinguish between the front and back of the stand when
attaching it.
To make sure the TV is installed on the stand at a proper level, do not apply
excess downward pressure to the upper left of right sides ofthe TV.
2. Fasten screws at position O and then fasten screws at position O.
Stand the product up and fasten the screws. If you fasten the screws with the
LEDTV placed down, it may lean to one side.
Disconnecting the Stand
1. Remove screws from the back of the TV.
2. Separate the stand from the TV.
Two or more people should carry the TV.
3. Cover the bottom hole with the cover.
Page 86

Assembling the Cables
[]
Stand Type
Enclosethecablesinthe Holder-WireCablesothatthecablesarenotvisiblethroughthetransparentstand.
_:._ ,(_
0
0
®
[]
Wall-Mount Type
o ..... !:: _ ......
Page 87

Wall Mount Kit Specifications (VESA)
Install your wall mount on a solid wall perpendicular to the floor. When attaching to
other building materials, please contact your nearest dealer. If installed on a ceiling or A
slanted wall, it may fall and result in severe personal injury.
Standard dimensions for wall mount kits are shown in the table above.
When purchasing our wall mount kit, a detailed installation manual and all parts
necessary for assembly are provided.
Do not use screws longer than the standard dimension, as they may cause
damage to the inside of the TV set.
For wall mounts that do not comply with the VESA standard screw specifications,
the length of the screws may differ depending on their specifications.
Do not use screws that do not complywith the VESA standard screw
specifications.
Do not fasten the screws too strongly,this maydamage the product or cause the product to fall, leading to personal injury.
Samsung is not liable for these kinds of accidents.
Samsung is not liable for product damage or personal injurywhen a non-VESA or non-specified wall mount is used or the
consumer fails tofollow the product installation instructions.
Our57" and 63" models do not comply with VESA Specifications. Therefore, you should use our dedicated wall mount kit for
this model.
Do not exceed 15 degrees tilt when mounting this TV.
Product inches VESA Spec. (A* B) _'
19~22 100X 100
LED-TV
57~70
PDP-TV M8
LFD 4
55~70 M8
200 X 200
400 X 400
800 X 400
1400X 800
4
M4
M6
M8
M6
70: i 0o ;oo
_:_ Donot install your Wall Mount Kit while your TV is turned on. It may result in personal injurydue to electric shock.
cy
Page 88

Preparing before installing Wall-Mount
To install a wall-mount from another manufacturer, usethe Holder-Ring O.
Anti-Theft Kensington Lock
The Kensington Lock is a device used to physically fix the system when using it in
a public place. The appearance and locking method may differ from the illustration
depending on the manufacturer.
Refer to the manual provided with the Kensington Lock for proper use.
{Z_ The locking device has to be purchased separately.
{Z_ The location ofthe Kensington Lock may bedifferent depending on its model.
1. Insert the locking device into the Kensington slot onthe LED TV (0) and turn it in
the locking direction (0).
2. Connect the Kensington Lock cable (0).
3. Fix the Kensington Lock to a desk or a heavy stationary object.
Securing the installation Space
Keep the required distances between the product and other objects (e.g. walls) to ensure proper ventilation.
Failingto do so may result infire or a problem with the product due to an increase in the internal temperature of the product.
Install the product so the required distances shown in the figure are kept.
{Z_ When using a stand or wall-mount, use parts provided by Samsung Electronics only.
• Ifyou use parts provided by another manufacturer, it may result in a problem withthe product or an injury due to the
product falling.
• Ifyou use parts provided by another manufacturer, it may result in a problem with the product or fire due to an increase in
the internal temperature of the product due to poor ventilation.
{Z_ The appearance may differ depending on the product.
When installingthe product with astand When installing the product with a wall=mount
i
i
I
i
i
i
i
I
i
i
I
i
i
I
I" 10 cm
i
i
i
i
i
i
i
i
i
i
i
i
i
f lOcm
J 10cm
10 cm
Page 89

Securing the TV to a Wall or Cabinet
,_, Cautian; Pulling, pushing, o[ climbing on the TVmay cause the Tv to fa!l,In particular, ensure your children do
not hang over ordestabilize the Tv; doing so maY cause theTV to tip over,causing sedous injuries ordeath:
Fol!owal! safety precautions provided on the included Safety Flyer, For added stability, install the anti:fa!! device
for safety purposesl as follows,
Components (Depending on the model):
TV-Holder Screw O (M8xL19)
iiiii_
To prevent the TV from failing:
1. Remove the screw from the top rightof the rearcover of the TV. Fastenthe TV-Holder to the TV by fastening Screw O (for
fixing the TV) into the screw hole.
Make sure to only use the supplied screws.
......................i ....® '\
cabinet
2,
Firmly fasten the screws to the wall or cabinet where the TV is to be installed. Tie the TV-Holder attached to the TV and the
screws fastened on the wall or cabinet so that the TV is fixed.
Purchase the screws to be used on the wall or cabinet separately.
install the TV close to the wall so that it does not fall.
When attaching theTV tothe wall, tie the cord level with the ground or slanted downwards for safety purposes.
Confirm that the cord or link does not come loose.
Before moving the TV,separate the connected cordfirst.
::::::::!"......................./
3,
Verify all connections are properly secured. Periodically check connections for any sign of fatigue orfailure. If you have any
doubt about the security of your connections, contact a professional installer.
Page 90

Specifications
UN4_88000..........
Screen Size 46 inches
(Diagonal) (46,0 inches measured diagonally)
PC Reso ution
(Optimum) 1920x 1080 @ 60 Hz
(output) i 10Wx2
oimensions(wxoxa)
BOdy 44.5 x 1.2 x27.1 (inch) / 1130.9x 31 x 687.5 (ram)
Withstand 44.5 x 10.9 x29.8 (inch) / 1130.9x 277.2 x 757 (mm)
Weight
Without stand
With Stand
39.5 Ibs / 17.9 Kg
53.4 Ibs / 24.2 Kg
Operatin
Operating Humidity
Storage Temperature
Storage Humidity
Stand Swivel :
(Left / Right)
Model Name
Screen Size
tOiagonal)
PC Resolution
_Optimum)
Sound
_Output)
Dimensions (W×DxH)
Body
With stand
Weight
Without Stand
With Stand
Environmental Considerations
Operating Temperature
Operating Humidity
Storage Temperature
Storage Humidity
Stand Swive!
_Left/ Right)
50°F to 104°F (I0°C to 40°C)
10% to 80%, non-condensing
-4°F to 113°F(-20°C to 45°C)
5% to 95%, non-condensing
-20°~ 20
UN5588000
55inches
(54.7inches measured diagonally)
1920x 1080@60 Hz
15Wx2
52.1 x 1.2x 31.4 (inch) / 1322.2x 29.9 x 797 (ram)
52.1 x 12.1 x33.9 (inch) / 1322.2x 307.2 x 860 (ram)
51.5 Ibs ! 23.2 Kg
64.0 Ibs / 29 Kg
50°F to 104°F (I0°C to 40°C)
10% to 80%, non-condensing
-4°F to 113°F(-20°C to 45°C)
5% to 95%, non-condensing
-20°~ 20
Design and specifications are subject to change without prior notice.
This device is a Class Bdigital apparatus.
_) For the power supply and Power Consumption, refer to the label attached to the product.
Page 91

Dimensions
UN46BBO00
I I
TOP ViEW
JACK PANEL DETAIL
44.5
40.1
22.6
FRONT VIEW / SIDE VIEW
I_ 15.7 _1 /
_"; (200 mm) ':':'T
15.7(200 mm)
REAR ViEW
1.2
¢
[
/
NOTE: All drawings are not necessarily to scale. Some
dimensions are subject to change without prior notice. Refer to
the dimensions prior to performing installation of yourTV. Not
responsible for typographical or printed errors.
© 2009 Samsung Electronics America, Inc
Page 92

UNBSB8000
I I
TOP ViEW
JACK PANEL DETAIL
52.1
47.6
L
I_ 217
FRONT VIEW / SIDE VIEW
1
26.8
.,_, 15.7 _
t,0o_/_T
157<41i,_)
REAR VIEW
1.2
.4
33.9
NOTE: All drawings are not necessarily to scale. Some
dimensions are subject to change without prior notice. Refer to
the dimensions prior to performing installation of yourTV. Not
responsible for typographical or printed errors.
© 2009 Samsung Electronics America, Inc
Page 93

o
This product uses parts of the software from the Independent JPEG Group.
o
This product uses parts of the software owned by the Freetype Project (www.freetype.org).
o
This product uses some software programs which are distributed under the GPL/LGPL license. Accordingly, the following
GPL and LGPL software source codes that have been used inthis product can be provided after asking to vdswmanager@
sarnsung.com.
GPL software: Linux Kernel, Busybox, Binutils
LGPLsoftware: Glibc, ffmpeg, smpeg, libgphoto, libusb, SDL
GNU GENERAL PUBLIC LICENSE
Version 3, 29 June 2007
Copyright (C) 2007 Free Software Foundation, Inc. <http://fsf.org/>
Everyone is permitted to copy and distribute verbatim copies of this license document, but changing it is not allowed.
Preamble
The GNU General Public License is a free, copyleft license for software and other kindsof works.
The licenses for most software and other practical works are designed to take away your freedom to share and change the
works. By contrast, the GNU General Public License is intended to guarantee your freedom to share and change all versions
of a program--to make sure it remains free software for all its users. We, the Free Software Foundation, use the GNU General
Public License for most of our software; it applies also to any other work released this way by its authors. You canapply itto your
programs, too.
When we speak of free software, we are referringto freedom, not price. Our General Public Licenses are designed to make sure
that you have the freedom to distribute copies of free software (and charge for them ifyou wish), that you receive source code or
can get it if you want it,that you can change the software or use pieces of it in new free programs, and that you know you can do
these things.
To protect your rights, we need to prevent others from denying you these rights or asking you to surrender the rights. Therefore,
you have certain responsibilities if you distribute copiesof the software, or if you modify it: responsibilities to respect the freedom of
others.
For example, if you distribute copies of such a program, whether gratis or for a fee, you must pass on to the recipients the same
freedoms that you received. You must make sure that they, too, receive or can get the source code. And you must show them
these terms so they know their rights.
Developers that usethe GNU GPL protect your rights with two steps: (1) assert copyright on the software, and (2) offer you this
License giving you legal permission to copy, distribute and/or modify it.
For the developers' and authors' protection, the GPL clearly explains that there is nowarranty forthis free software. For both users'
and authors' sake, the GPL requires that modified versions be marked as changed, so that their problems will not beattributed
erroneously to authors of previous versions.
Some devices are designed to deny users access to install or run modified versions of the software inside them, although the
manufacturer can do so. This is fundamentally incompatiblewith the aim of protecting users' freedom to change the software.
The systematic pattern of such abuse occurs in the area of products for individuals to use, which is precisely where it is most
unacceptable. Therefore, we have designed this version of the GPL to prohibit the practice for those products. If such problems
arise substantially in other domains, we stand ready to extend this provision to those domains in future versions of the GPL, as
needed to protect the freedom of users.
Finally,every program is threatened constantly by software patents. States should not allow patents to restrict development and
use of software on general-purpose computers, but inthose that do, we wish to avoid the special danger that patents applied to
a free program could make it effectively proprietary.To prevent this, the GPL assures that patents cannot be used to render the
program non-free.
The precise terms and conditions for copying, distribution and modification follow.
TERMS AND CONDITIONS
0. Definitions.
"This License" refers to version 3 of the GNU General Public License.
"Copyright" also means copyright-like laws that apply to other kinds of works, such as semiconductor masks.
"The Program" refers to any copyrightable work licensed under this License. Each licensee is addressed as"you". "Licensees"
and "recipients" may be individuals or organizations.
To "modify" a work means to copy from or adapt all or part of the work in afashion requiring copyright permission, other than
the makingof anexact copy.The resulting work is called a "modified version" of the earlier work or a work "based on" the
earlier work.
A "covered work" means either the unmodified Program or a work based on the Program.
To "propagate" a work means to do anything with it that, without permission, would make you directly or secondarily liable
for infringement under applicable copyright law,except executing iton a computer or modifying a private copy. Propagation
includes copying, distribution (with or without modification), making available to the public, and in some countries other
activities as well.
Page 94

To"convey"aworkmeansanykindofpropagationthatenablesotherpartiestomakeorreceivecopies.Mereinteractionwith
auserthroughacomputernetwork,withnotransferofacopy,isnotconveying.
Aninteractiveuserinterfacedisplays"AppropriateLegalNotices"totheextentthatitincludesaconvenientandprominently
visiblefeaturethat(1)displaysanappropriatecopyrightnotice,and(2)tellstheuserthatthereisnowarrantyforthework
(excepttotheextentthatwarrantiesareprovided),thatlicenseesmayconveytheworkunderthisLicense,andhowtoviewa
copyofthisLicense.Iftheinterfacepresentsalistofusercommandsoroptions,suchasamenu,aprominentiteminthelist
meetsthiscriterion.
1. SourceCode.
The"sourcecode"foraworkmeansthepreferredformoftheworkformakingmodificationstoit."Objectcode"meansany
non-source
formofawork.
A"StandardInterface"meansaninterfacethateitherisanofficialstandarddefinedbyarecognizedstandardsbody,or,inthe
caseofinterfacesspecifiedforaparticularprogramminglanguage,onethatiswidelyusedamongdevelopersworkinginthat
language.
The"SystemLibraries"ofanexecutableworkincludeanything,otherthantheworkasawhole,that(a)isincludedinthe
normalformofpackagingaMajorComponent,butwhichisnotpartofthatMajorComponent,and(b)servesonlytoenable
useoftheworkwiththatMajorComponent,ortoimplementaStandardInterfaceforwhichanimplementationisavailableto
thepublicinsourcecodeform.A"MajorComponent",inthiscontext,meansamajoressentialcomponent(kernel,window
system,andsoon)ofthespecificoperatingsystem(ifany)onwhichtheexecutableworkruns,oracompilerusedtoproduce
thework,oranobjectcodeinterpreterusedtorunit.
The"CorrespondingSource"foraworkinobjectcodeformmeansallthesourcecodeneededtogenerate,install,and(foran
executablework)runtheobjectcodeandtomodifythework,includingscriptstocontrolthoseactivities.However,itdoesnot
includethework'sSystemLibraries,orgeneral-purposetoolsorgenerallyavailablefreeprogramswhichareusedunmodified
inperformingthoseactivitiesbutwhicharenotpartofthework.Forexample,CorrespondingSourceincludesinterface
definitionfilesassociatedwithsourcefilesforthework,andthesourcecodeforsharedlibrariesanddynamicallylinked
subprogramsthattheworkisspecificallydesignedtorequire,suchasbyintimatedatacommunicationorcontrolflowbetween
thosesubprogramsandotherpartsofthework.
TheCorrespondingSourceneednotincludeanythingthatuserscanregenerateautomaticallyfromotherpartsofthe
CorrespondingSource.
TheCorrespondingSourceforaworkinsourcecodeformisthatsamework.
2. BasicPermissions.
AllrightsgrantedunderthisLicensearegrantedforthetermofcopyrightontheProgram,andareirrevocableprovidedthe
statedconditionsaremet.ThisLicenseexplicitlyaffirmsyourunlimitedpermissiontoruntheunmodifiedProgram.Theoutput
fromrunningacoveredworkiscoveredbythisLicenseonlyiftheoutput,givenitscontent,constitutesacoveredwork.
ThisLicenseacknowledgesyourrightsoffairuseorotherequivalent,asprovidedbycopyrightlaw.Youmaymake,runand
propagatecoveredworksthatyoudonotconvey,withoutconditionssolongasyourlicenseotherwiseremainsinforce.You
mayconveycoveredworkstoothersforthesolepurposeofhavingthemmakemodificationsexclusivelyforyou,orprovide
youwithfacilitiesforrunningthoseworks,providedthatyoucomplywiththetermsofthisLicenseinconveyingallmaterial
forwhichyoudonotcontrolcopyright.Thosethusmakingorrunningthecoveredworksforyoumustdosoexclusivelyon
yourbehalf,underyourdirectionandcontrol,ontermsthatprohibitthemfrommakinganycopiesofyourcopyrightedmaterial
outsidetheirrelationshipwithyou.
Conveyingunderanyothercircumstancesispermittedsolelyundertheconditionsstatedbelow.Sublicensingisnotallowed;
section10makesitunnecessary.
3. Protecting Users' Legal Rights From Anti-Circumvention Law.
No covered work shall be deemed part of an effective technological measure under any applicable lawfulfilling obligations
under article 11of the WlPO copyright treaty adopted on 20 December 1996,or similarlaws prohibiting orrestricting
circumvention of such measures.
When you convey a covered work, you waive any legal power to forbid circumvention of technological measures to the extent
such circumvention is effected byexercising rights under this License with respect to the covered work, and you disclaimany
intention to limitoperation or modification of the work as a means of enforcing, against the work's users, your or third parties'
legal rights to forbid circumvention of technological measures.
4. Conveying Verbatim Copies.
You may convey verbatim copies of the Program's source code as you receive it,in any medium, provided that you
conspicuously and appropriately publish on each copy an appropriate copyright notice; keep intact all notices stating that this
License and any non-permissive terms added in accord with section 7 apply to the code; keep intact all notices of the absence
of any warranty; and give all recipients a copy of this License along with the Program.
You may charge any priceor no price for each copy that you convey, and you may offer support or warranty protection for a
fee.
6. Conveying Modified Source Versions.
You may convey a work based on the Program, or the modifications to produce itfrom the Program, in the form of source code
under the terms of section 4, provided that you also meet all of these conditions:
- a) The work must carry prominent notices stating that you modified it, and giving a relevant date.
- b) The work mustcarry prominent notices stating that it is released under this License and any conditions added under
section 7. This requirement modifies the requirement in section 4 to "keep intact all notices".
Page 95

- c)Youmustlicensetheentirework,asawhole,underthisLicensetoanyonewhocomesintopossessionofacopy.This
Licensewillthereforeapply,alongwithanyapplicablesection7additionalterms,tothewholeofthework,andallits
parts,regardlessofhowtheyarepackaged.ThisLicensegivesnopermissiontolicensetheworkinanyotherway,butit
doesnotinvalidatesuchpermissionifyouhaveseparatelyreceivedit.
- d)Iftheworkhasinteractiveuserinterfaces,eachmustdisplayAppropriateLegalNotices;however,iftheProgramhas
interactiveinterfacesthatdonotdisplayAppropriateLegalNotices,yourworkneednotmakethemdoso.
Acompilationofacoveredworkwithotherseparateandindependentworks,whicharenotbytheirnatureextensionsof
thecoveredwork,andwhicharenotcombinedwithitsuchastoformalargerprogram,inoronavolumeofastorageor
distributionmedium,iscalledan"aggregate"ifthecompilationanditsresultingcopyrightarenotusedtolimittheaccessor
legalrightsofthecompilation'susersbeyondwhattheindividualworkspermit.Inclusionofacoveredworkinanaggregate
doesnotcausethisLicensetoapplytotheotherpartsoftheaggregate.
6. ConveyingNon-SourceForms.
Youmayconveyacoveredworkinobjectcodeformunderthetermsofsections4and5,providedthatyoualsoconveythe
machine-readableCorrespondingSourceunderthetermsofthisLicense,inoneoftheseways:
- a)Conveytheobjectcodein,orembodiedin,aphysicalproduct(includingaphysicaldistributionmedium),accompanied
bytheCorrespondingSourcefixedonadurablephysicalmediumcustomarilyusedforsoftwareinterchange.
- b)Conveytheobjectcodein,orembodiedin,aphysicalproduct(includingaphysicaldistributionmedium),accompanied
byawrittenoffer,validforatleastthreeyearsandvalidforaslongasyouoffersparepartsorcustomersupportforthat
productmodel,togiveanyonewhopossessestheobjectcodeeither(1)acopyoftheCorrespondingSourceforallthe
softwareintheproductthatiscoveredbythisLicense,onadurablephysicalmediumcustomarilyusedforsoftware
interchange,forapricenomorethanyourreasonablecostofphysicallyperformingthisconveyingofsource,or(2)
accesstocopytheCorrespondingSourcefromanetworkserveratnocharge.
- c)ConveyindividualcopiesoftheobjectcodewithacopyofthewrittenoffertoprovidetheCorrespondingSource.This
alternativeisallowedonlyoccasionallyandnoncommercially,andonlyifyoureceivedtheobjectcodewithsuchanoffer,
inaccordwithsubsection6b.
- d)Conveytheobjectcodebyofferingaccessfromadesignatedplace(gratisorforacharge),andofferequivalent
accesstotheCorrespondingSourceinthesamewaythroughthesameplaceatnofurthercharge.Youneednotrequire
recipientstocopytheCorrespondingSourcealongwiththeobjectcode.Iftheplacetocopytheobjectcodeisanetwork
server,theCorrespondingSourcemaybeonadifferentserver(operatedbyyouorathirdparty)thatsupportsequivalent
copyingfacilities,providedyoumaintaincleardirectionsnexttotheobjectcodesayingwheretofindtheCorresponding
Source.RegardlessofwhatserverhoststheCorrespondingSource,youremainobligatedtoensurethatitisavailablefor
aslongasneededtosatisfytheserequirements.
- e)Conveytheobjectcodeusingpeer-to-peertransmission,providedyouinformotherpeerswheretheobjectcodeand
CorrespondingSourceoftheworkarebeingofferedtothegeneralpublicatnochargeundersubsection6d.Aseparable
portionoftheobjectcode,whosesourcecodeisexcludedfromtheCorrespondingSourceasaSystemLibrary,neednot
beincludedinconveyingtheobjectcodework.
A"UserProduct"iseither(1)a"consumerproduct",whichmeansanytangiblepersonalpropertywhichisnormallyusedfor
personal,family,orhouseholdpurposes,or(2)anythingdesignedorsoldforincorporationintoadwelling.Indetermining
whetheraproductisaconsumerproduct,doubtfulcasesshallberesolvedinfavorofcoverage.Foraparticularproduct
receivedbyaparticularuser,"normallyused"referstoatypicalorcommonuseofthatclassofproduct,regardlessofthe
statusoftheparticularuserorofthewayinwhichtheparticularuseractuallyuses,orexpectsorisexpectedtouse,the
product.Aproductisaconsumerproductregardlessofwhethertheproducthassubstantialcommercial,industrialornon-
consumeruses,unlesssuchusesrepresenttheonlysignificantmodeofuseoftheproduct.
"InstallationInformation"foraUserProductmeansanymethods,procedures,authorizationkeys,orotherinformationrequired
toinstallandexecutemodifiedversionsofacoveredworkinthatUserProductfromamodifiedversionofitsCorresponding
Source.Theinformationmustsufficetoensurethatthecontinuedfunctioningofthemodifiedobjectcodeisinnocase
preventedorinterferedwithsolelybecausemodificationhasbeenmade.
Ifyouconveyanobjectcodeworkunderthissectionin,orwith,orspecificallyforusein,aUserProduct,andtheconveying
occursaspartofatransactioninwhichtherightofpossessionanduseoftheUserProductistransferredtotherecipientin
perpetuityorforafixedterm(regardlessofhowthetransactionischaracterized),theCorrespondingSourceconveyedunder
thissectionmustbeaccompaniedbytheInstallationInformation.Butthisrequirementdoesnotapplyifneitheryounorany
thirdpartyretainstheabilitytoinstallmodifiedobjectcodeontheUserProduct(forexample,theworkhasbeeninstalledin
ROM).
TherequirementtoprovideInstallationInformationdoesnotincludearequirementtocontinuetoprovidesupportservice,
warranty,orupdatesforaworkthathasbeenmodifiedorinstalledbytherecipient,orfortheUserProductinwhichithas
beenmodifiedorinstalled.Accesstoanetworkmaybedeniedwhenthemodificationitselfmateriallyandadverselyaffectsthe
operationofthenetworkorviolatestherulesandprotocolsforcommunicationacrossthenetwork.
CorrespondingSourceconveyed,andInstallationInformationprovided,inaccordwiththissectionmustbeinaformatthatis
publiclydocumented(andwithanimplementationavailabletothepublicinsourcecodeform),andmustrequirenospecial
passwordorkeyforunpacking,readingorcopying.
7.AdditionalTerms.
"Additionalpermissions"aretermsthatsupplementthetermsofthisLicensebymakingexceptionsfromoneormoreofits
conditions.AdditionalpermissionsthatareapplicabletotheentireProgramshallbetreatedasthoughtheywereincludedin
thisLicense,totheextentthattheyarevalidunderapplicablelaw.IfadditionalpermissionsapplyonlytopartoftheProgram,
thatpartmaybeusedseparatelyunderthosepermissions,buttheentireProgramremainsgovernedbythisLicensewithout
regardtotheadditionalpermissions.
Page 96

Whenyouconveyacopyofacoveredwork,youmayatyouroptionremoveanyadditionalpermissionsfromthatcopy,or
fromanypartofit.(Additionalpermissionsmaybewrittentorequiretheirownremovalincertaincaseswhenyoumodifythe
work.)Youmayplaceadditionalpermissionsonmaterial,addedbyyoutoacoveredwork,forwhichyouhaveorcangive
appropriatecopyrightpermission.
NotwithstandinganyotherprovisionofthisLicense,formaterialyouaddtoacoveredwork,youmay(ifauthorizedbythe
copyrightholdersofthatmaterial)supplementthetermsofthisLicensewithterms:
- a)Disclaimingwarrantyorlimitingliabilitydifferentlyfromthetermsofsections15and16ofthisLicense;or
- b)RequiringpreservationofspecifiedreasonablelegalnoticesorauthorattributionsinthatmaterialorintheAppropriate
LegalNoticesdisplayedbyworkscontainingit;or
- c)Prohibitingmisrepresentationoftheoriginofthatmaterial,orrequiringthatmodifiedversionsofsuchmaterialbe
markedinreasonablewaysasdifferentfromtheoriginalversion;or
- d)Limitingtheuseforpublicitypurposesofnamesoflicensorsorauthorsofthematerial;or
- e)Decliningtograntrightsundertrademarklawforuseofsometradenames,trademarks,orservicemarks;or
- f)Requiringindemnificationoflicensorsandauthorsofthatmaterialbyanyonewhoconveysthematerial(ormodified
versionsofit)withcontractualassumptionsofliabilitytotherecipient,foranyliabilitythatthesecontractualassumptions
directlyimposeonthoselicensorsandauthors.
Allothernon-permissiveadditionaltermsareconsidered"furtherrestrictions"withinthemeaningofsectionI0.IftheProgram
asyoureceivedit,oranypartofit,containsanoticestatingthatitisgovernedbythisLicensealongwithatermthatisa
furtherrestriction,youmayremovethatterm.Ifalicensedocumentcontainsafurtherrestrictionbutpermitsrelicensingor
conveyingunderthisLicense,youmayaddtoacoveredworkmaterialgovernedbythetermsofthatlicensedocument,
providedthatthefurtherrestrictiondoesnotsurvivesuchrelicensingorconveying.
Ifyouaddtermstoacoveredworkinaccordwiththissection,youmustplace,intherelevantsourcefiles,astatementofthe
additionaltermsthatapplytothosefiles,oranoticeindicatingwheretofindtheapplicableterms.
Additionalterms,permissiveornon-permissive,maybestatedintheformofaseparatelywrittenlicense,orstatedas
exceptions;theaboverequirementsapplyeitherway.
8.Termination.
YoumaynotpropagateormodifyacoveredworkexceptasexpresslyprovidedunderthisLicense.Anyattemptotherwiseto
propagateormodifyitisvoid,andwillautomaticallyterminateyourrightsunderthisLicense(includinganypatentlicenses
grantedunderthethirdparagraphofsection11).
However,ifyouceaseallviolationofthisLicense,thenyourlicensefromaparticularcopyrightholderisreinstated(a)
provisionally,unlessanduntilthecopyrightholderexplicitlyandfinallyterminatesyourlicense,and(b)permanently,ifthe
copyrightholderfailstonotifyyouoftheviolationbysomereasonablemeanspriorto60daysafterthecessation.
Moreover,yourlicensefromaparticularcopyrightholderisreinstatedpermanentlyifthecopyrightholdernotifiesyouofthe
violationbysomereasonablemeans,thisisthefirsttimeyouhavereceivednoticeofviolationofthisLicense(foranywork)
fromthatcopyrightholder,andyoucuretheviolationpriorto30daysafteryourreceiptofthenotice.
Terminationofyourrightsunderthissectiondoesnotterminatethelicensesofpartieswhohavereceivedcopiesorrightsfrom
youunderthisLicense.Ifyourrightshavebeenterminatedandnotpermanentlyreinstated,youdonotqualifytoreceivenew
licensesforthesamematerialundersection10.
9. Acceptance Not Required for Having Copies.
You are not required to accept this License in order to receive or run a copy of the Program.Ancillary propagation of a covered
work occurring solely asa consequence of using peer-to-peer transmission to receive a copy likewise does not require
acceptance. However, nothing other than this License grants you permission to propagate or modify any covered work. These
actions infringe copyright ifyou do not accept this License. Therefore, by modifying or propagating a covered work, you
indicate your acceptance of this License to do so.
10. Automatic Licensing of Downstream Recipients.
Each time you convey a covered work, the recipient automatically receives a license from the original licensors, to run, modify
and propagate thatwork, subject to this License. Youare not responsible for enforcing compliance by third parties with this
License.
An "entity transaction" isa transaction transferring control of an organization, or substantially all assets of one, or subdividing
an organization, or merging organizations. If propagation of a covered work results from an entity transaction, each party
to that transaction who receives a copy of the work also receives whatever licenses to the work the party's predecessor in
interest had or could give under the previous paragraph, plus a right to possession ofthe Corresponding Source of thework
from the predecessor in interest, ifthe predecessor has it or can get it with reasonable efforts.
You may not impose any further restrictions on the exercise of the rights granted or affirmed under this License. Forexample,
you may not impose a license fee, royalty, or other charge for exercise of rights granted under this License, and you may not
initiate litigation (including a cross-claim or counterclaim in a lawsuit) alleging that any patent claim is infringed by making,
using, selling, offering forsale, or importing the Program or any portion of it.
11. Patents.
A "contributor" is a copyright holder who authorizes use under this Licenseof the Program or a work on which the Program is
based. The work thus licensed is called the contributor's "contributor version".
A contributor's "essential patent claims" are all patentclaims owned or controlled by the contributor, whether already acquired
or hereafter acquired, that would be infringed bysome manner, permitted bythis License, of making, using, or selling its
contributor version, but do not include claims that would be infringed only as a consequence of further modification of the
contributor version. For purposes of this definition, "control" includes the right to grant patent sublicenses in a manner
consistent withthe requirements of this License.
Page 97

Eachcontributorgrantsyouanon-exclusive,worldwide,royalty-freepatentlicenseunderthecontributor'sessentialpatent
claims,tomake,use,sell,offerforsale,importandotherwiserun,modifyandpropagatethecontentsofitscontributorversion.
Inthefollowingthreeparagraphs,a"patentlicense"isanyexpressagreementorcommitment,howeverdenominated,not
toenforceapatent(suchasanexpresspermissiontopracticeapatentorcovenantnottosueforpatentinfringement).To
"grant"suchapatentlicensetoapartymeanstomakesuchanagreementorcommitmentnottoenforceapatentagainstthe
party.
Ifyouconveyacoveredwork,knowinglyrelyingonapatentlicense,andtheCorrespondingSourceoftheworkisnot
availableforanyonetocopy,freeofchargeandunderthetermsofthisLicense,throughapubliclyavailablenetworkserveror
otherreadilyaccessiblemeans,thenyoumusteither(I)causetheCorrespondingSourcetobesoavailable,or(2)arrange
todepriveyourselfofthebenefitofthepatentlicenseforthisparticularwork,or(3)arrange,inamannerconsistentwiththe
requirementsofthisLicense,toextendthepatentlicensetodownstreamrecipients."Knowinglyrelying"meansyouhave
actualknowledgethat,butforthepatentlicense,yourconveyingthecoveredworkinacountry,oryourrecipient'suseofthe
coveredworkinacountry,wouldinfringeoneormoreidentifiablepatentsinthatcountrythatyouhavereasontobelieveare
valid.
If,pursuanttoorinconnectionwithasingletransactionorarrangement,youconvey,orpropagatebyprocuringconveyance
of,acoveredwork,andgrantapatentlicensetosomeofthepartiesreceivingthecoveredworkauthorizingthemtouse,
propagate,modifyorconveyaspecificcopyofthecoveredwork,thenthepatentlicenseyougrantisautomaticallyextended
toallrecipientsofthecoveredworkandworksbasedonit.
Apatentlicenseis"discriminatory"ifitdoesnotincludewithinthescopeofitscoverage,prohibitstheexerciseof,oris
conditionedonthenon-exerciseofoneormoreoftherightsthatarespecificallygrantedunderthisLicense.Youmaynot
conveyacoveredworkifyouareapartytoanarrangementwithathirdpartythatisinthebusinessofdistributingsoftware,
underwhichyoumakepaymenttothethirdpartybasedontheextentofyouractivityofconveyingthework,andunderwhich
thethirdpartygrants,toanyofthepartieswhowouldreceivethecoveredworkfromyou,adiscriminatorypatentlicense(a)
inconnectionwithcopiesofthecoveredworkconveyedbyyou(orcopiesmadefromthosecopies),or(b)primarilyforandin
connectionwithspecificproductsorcompilationsthatcontainthecoveredwork,unlessyouenteredintothatarrangement,or
thatpatentlicensewasgranted,priorto28March2007.
NothinginthisLicenseshallbeconstruedasexcludingorlimitinganyimpliedlicenseorotherdefensestoinfringementthat
mayotherwisebeavailabletoyouunderapplicablepatentlaw.
12.NoSurrenderofOthers'Freedom.
Ifconditionsareimposedonyou(whetherbycourtorder,agreementorotherwise)thatcontradicttheconditionsofthis
License,theydonotexcuseyoufromtheconditionsofthisLicense.Ifyoucannotconveyacoveredworksoastosatisfy
simultaneouslyyourobligationsunderthisLicenseandanyotherpertinentobligations,thenasaconsequenceyoumaynot
conveyitatall.Forexample,ifyouagreetotermsthatobligateyoutocollectaroyaltyforfurtherconveyingfromthoseto
whomyouconveytheProgram,theonlywayyoucouldsatisfyboththosetermsandthisLicensewouldbetorefrainentirely
fromconveyingtheProgram.
13.UsewiththeGNUAfferoGeneralPublicLicense.
NotwithstandinganyotherprovisionofthisLicense,youhavepermissiontolinkorcombineanycoveredworkwithawork
licensedunderversion3oftheGNUAfferoGeneralPublicLicenseintoasinglecombinedwork,andtoconveytheresulting
work.ThetermsofthisLicensewillcontinuetoapplytothepartwhichisthecoveredwork,butthespecialrequirementsof
theGNUAfferoGeneralPublicLicense,section13,concerninginteractionthroughanetworkwillapplytothecombinationas
such.
14.RevisedVersionsofthisLicense.
TheFreeSoftwareFoundationmaypublishrevisedand/ornewversionsoftheGNUGeneralPublicLicensefromtimetotime.
Suchnewversionswillbesimilarinspirittothepresentversion,butmaydifferindetailtoaddressnewproblemsorconcerns.
Eachversionisgivenadistinguishingversionnumber.IftheProgramspecifiesthatacertainnumberedversionoftheGNU
GeneralPublicLicense"oranylaterversion"appliestoit,youhavetheoptionoffollowingthetermsandconditionseitherof
thatnumberedversionorofanylaterversionpublishedbytheFreeSoftwareFoundation.IftheProgramdoesnotspecify
aversionnumberoftheGNUGeneralPublicLicense,youmaychooseanyversioneverpublishedbytheFreeSoftware
Foundation.
IftheProgramspecifiesthataproxycandecidewhichfutureversionsoftheGNUGeneralPublicLicensecanbeused,that
proxy'spublicstatementofacceptanceofaversionpermanentlyauthorizesyoutochoosethatversionfortheProgram.
Laterlicenseversionsmaygiveyouadditionalordifferentpermissions.However,noadditionalobligationsareimposedonany
authororcopyrightholderasaresultofyourchoosingtofollowalaterversion.
15.DisclaimerofWarranty.
THEREISNOWARRANTYFORTHEPROGRAM,TOTHEEXTENTPERMITTEDBYAPPLICABLELAW.EXCEPTWHEN
OTHERWISESTATEDINWRITINGTHECOPYRIGHTHOLDERSAND/OROTHERPARTIESPROVIDETHEPROGRAM
"ASIS"WITHOUTWARRANTYOFANYKIND,EITHEREXPRESSEDORIMPLIED,INCLUDING,BUTNOTLIMITEDTO,
THEIMPLIEDWARRANTIESOFMERCHANTABILITYANDFITNESSFORAPARTICULARPURPOSE.THEENTIRE
RISKASTOTHEQUALITYANDPERFORMANCEOFTHEPROGRAMISWITHYOU.SHOULDTHEPROGRAMPROVE
DEFECTIVE,YOUASSUMETHECOSTOFALLNECESSARYSERVICING,REPAIRORCORRECTION.
16.LimitationofLiability.
INNOEVENTUNLESSREQUIREDBYAPPLICABLELAWORAGREEDTOINWRITINGWlLLANYCOPYRIGHT
HOLDER,ORANYOTHERPARTYWHOMODIFIESAND/ORCONVEYSTHEPROGRAMASPERMITTEDABOVE,BE
LIABLETOYOUFORDAMAGES,INCLUDINGANYGENERAL,SPECIAL,INCIDENTALORCONSEQUENTIALDAMAGES
ARISINGOUTOFTHEUSEORINABILITYTOUSETHEPROGRAM(INCLUDINGBUTNOTLIMITEDTOLOSSOFDATA
ORDATABEINGRENDEREDINACCURATEORLOSSESSUSTAINEDBYYOUORTHIRDPARTIESORAFAILUREOF
THEPROGRAMTOOPERATEWITHANYOTHERPROGRAMS),EVENIFSUCHHOLDEROROTHERPARTYHASBEEN
ADVISEDOFTHEPOSSIBILITYOFSUCHDAMAGES.
Page 98

17.InterpretationofSections15and16.
Ifthedisclaimerofwarrantyandlimitationofliabilityprovidedabovecannotbegivenlocallegaleffectaccordingtotheirterms,
reviewingcourtsshallapplylocallawthatmostcloselyapproximatesanabsolutewaiverofallcivilliabilityinconnectionwith
theProgram,unlessawarrantyorassumptionofliabilityaccompaniesacopyofthePrograminreturnforafee.
END OF TERMS AND CONDiTiONS
How to Apply These Terms to Your New Programs
Ifyou develop a new program, and you want it to beof the greatest possible use to the public, the best way to achieve this is to
make it free software which everyone can redistribute and change under these terms.
To do so, attach the following notices to the program. It is safest to attach them to the start of each source file to most effectively
state the exclusion of warranty; and each file should have at least the "copyright" line and a pointerto where the full notice is found.
<one line to give the program's name and a brief idea ofwhat itdoes.> Copyright (C) <year> <name of author>
This program isfree software: you can redistribute itand/or modify itunder the terms of the GNU General Public License as
published by the Free Software Foundation, either version 3 of the License, or (at your option) any later version.
This program isdistributed in the hope that itwill be useful, but WITHOUTANY WARRANTY; without even the implied
warranty of MERCHANTABILITY or FITNESS FORA PARTICULAR PURPOSE. See the GNU General Public License for
more details.
You should have received a copy of the GNU General Public License along with this program. Ifnot, see <http://www.gnu.
org/licenses/>.
Also add information on how to contact you byelectronic and paper mail.
Ifthe program does terminal interaction, make it output a short notice like this when it starts in an interactive mode:
<program> Copyright (C) <year> <name of author> This program comes withABSOLUTELY NO WARRANTY; for details type
'show w'. This is free software, and you are welcome to redistribute it under certain conditions; type 'show c'for details.
The hypothetical commands "show w' and 'show c' should show the appropriate parts ofthe General Public License. Of course,
your program's commands might be different; for a GUI interface, you would use an "about box".
You should also get your employer (if you work as a programmer) or school, ifany, to sign a "copyright disclaimer" for the program,
if necessary.
For more information on this, and how to apply and follow the GNU GPL, see <http://www.gnu.org/licenses/>.
The GNU General Public License doesnot permit incorporating your program into proprietary programs. If your program is a
subroutine library, you may consider it more useful to permit linking proprietary applications with the library. Ifthis iswhat youwant
to do, use the GNU Lesser General Public License instead ofthis License. But first, please read <http://www.gnu.org/philosophy/
why-not-lgpl.html>.
Page 99

GNU Lesser General Public License (LGPL)
Version 3, 29 June 2007
Copyright (C) 2007 Free Software Foundation, Inc. <http://fsf.org/>
Everyone is permitted to copy and distribute verbatim copies of this license document, but changing it is not allowed.
Prearnbie
The GNU General Public License is a free, copyleft license for software and other kindsof works.
The licenses for most software and other practical works are designed to take away your freedom to share and change the
works. By contrast, the GNU General Public License is intended to guarantee your freedom to share and change all versions
of a program--to make sure it remains free software for all its users. We, the Free Software Foundation, use the GNU General
Public License for most of our software; it applies also to any other work released this way by its authors. You canapply itto your
programs, too.
When we speak of free software, we are referringto freedom, not price. Our General Public Licenses are designed to make sure
that you have the freedom to distribute copies of free software (and charge for them ifyou wish), that you receive source code or
can get it if you want it,that you can change the software or use pieces of it in new free programs, and that you know you can do
these things.
To protect your rights, we need to prevent others from denying you these rights or asking you to surrender the rights. Therefore,
you have certain responsibilities if you distribute copiesof the software, or if you modify it: responsibilities to respect the freedom of
others.
For example, if you distribute copies of such a program, whether gratis or for a fee, you must pass on to the recipients the same
freedoms that you received. You must make sure that they, too, receive or can get the source code. And you must show them
these terms so they know their rights.
Developers that usethe GNU GPL protect your rights with two steps: (1) assert copyright on the software, and (2) offer you this
License giving you legal permission to copy, distribute and/or modify it.
For the developers' and authors' protection, the GPL clearly explains that there is nowarranty forthis free software. For both users'
and authors' sake, the GPL requires that modified versions be marked as changed, so that their problems will not beattributed
erroneously to authors of previous versions.
Some devices are designed to deny users access to install or run modified versions of the software inside them, although the
manufacturer can do so. This is fundamentally incompatiblewith the aim of protecting users' freedom to change the software.
The systematic pattern of such abuse occurs in the area of products for individuals to use, which is precisely where it is most
unacceptable. Therefore, we have designed this version of the GPL to prohibit the practice for those products. If such problems
arise substantially in other domains, we stand ready to extend this provision to those domains in future versions of the GPL, as
needed to protect the freedom of users.
Finally,every program is threatened constantly by software patents. States should not allow patents to restrict development and
use of software on general-purpose computers, but inthose that do, we wish to avoid the special danger that patents applied to
a free program could make it effectively proprietary.To prevent this, the GPL assures that patents cannot be used to render the
program non-free.
The precise terms and conditions for copying, distribution and modification follow.
TERMS AND CONDITIONS
0. Definitions.
"This License" refers to version 3 of the GNU General Public License.
"Copyright" also means copyright-like laws that apply to other kinds of works, such as semiconductor masks.
"The Program" refers to any copyrightable work licensed under this License. Each licensee is addressed as"you". "Licensees"
and "recipients" may be individuals or organizations.
To "modify" a work means to copy from or adapt all or part of the work in afashion requiring copyright permission, other than
the makingof anexact copy.The resulting work is called a "modified version" of the earlier work or a work "based on" the
earlier work.
A "covered work" means either the unmodified Program or a work based on the Program.
To "propagate" a work means to do anything with it that, without permission, would make you directly or secondarily liable
for infringement under applicable copyright law,except executing iton a computer or modifying a private copy. Propagation
includes copying, distribution (with or without modification), making available to the public, and in some countries other
activities as well.
To "convey" awork meansany kind of propagation that enables other parties to make or receive copies. Mere interaction with
a user through a computer network, with no transfer of a copy, is not conveying.
An interactive user interface displays "Appropriate Legal Notices" to the extent that it includes a convenient and prominently
visible feature that (1) displays an appropriate copyright notice, and (2) tells the user that there is nowarranty for the work
(except to the extent that warranties are provided), that licensees may convey thework under this License, and how to view a
copy ofthis License. If the interface presents a list of user commands or options, such as a menu, a prominent item in the list
meets this criterion.
Page 100

1. SourceCode.
The"sourcecode"foraworkmeansthepreferredformoftheworkformakingmodificationstoit."Objectcode"meansany
non-source
formofawork.
A"StandardInterface"meansan interface that either is an official standard defined by a recognized standards body, or, inthe
case of interfaces specified for a particular programming language, one that is widely used among developers working inthat
language.
The "System Libraries" of an executable work include anything, other thanthe work as awhole, that (a) is included in the
normal form of packaging a Major Component, but which is not part of that Major Component, and (b) serves only to enable
use of the work with that Major Component, or to implement a Standard Interface forwhich an implementation is available to
the publicin source code form. A"Major Component", inthis context, means a major essential component (kernel, window
system, and so on) of the specific operating system (if any) on which the executable work runs, ora compiler used to produce
the work, or an object code interpreter used to run it.
The "Corresponding Source" for a work in object code form means all the source code needed to generate, install, and (for an
executable work) run the object code and to modify the work, including scripts to control those activities. However, it does not
include the work's System Libraries, or general-purpose tools or generally available free programs which are used unmodified
in performing those activities butwhich are not part of the work. For example, Corresponding Source includes interface
definition flies associated with source filesfor the work, and the source code for shared libraries and dynamically linked
subprograms that the work is specifically designed to require, such as by intimate data communication or control flow between
those subprograms and other parts ofthe work.
The Corresponding Source need not include anything that users can regenerate automatically from other parts of the
Corresponding Source.
The Corresponding Source for a work insource code form isthat same work.
2. Basic Permissions.
All rights granted under this License are granted for the term of copyright onthe Program, and are irrevocable provided the
stated conditions are met. This License explicitly affirms your unlimited permission to run the unmodified Program. The output
from running a covered work is covered by this License only if the output, given its content, constitutes a covered work.
This License acknowledges your rights of fair use or other equivalent, as provided bycopyright law. Youmay make, run and
propagate covered works that you do not convey, without conditions so long as your license otherwise remains in force. You
may convey covered works to others for the sole purpose of having them make modifications exclusively for you, orprovide
you with facilities for running those works, provided that you comply with the terms of this License in conveying all material
for which you do not control copyright. Those thus making or running the covered works for you must do so exclusively on
your behalf, under your direction and control, on terms that prohibit them from making any copies of your copyrighted material
outside their relationship with you.
Conveying under any other circumstances is permitted solely under the conditions stated below. Sublicensing is not allowed;
section 10makes it unnecessary.
3. Protecting Users' Legal Rights From Anti-Circumvention Law.
No covered work shall be deemed part of an effective technological measure under any applicable lawfulfilling obligations
under article 11of the WIPO copyright treaty adopted on 20 December 1996, or similarlaws prohibiting orrestricting
circumvention of such measures.
When you convey a covered work, you waive any legal power to forbid circumvention of technological measures to the extent
such circumvention is effected byexercising rights under this License with respect to the covered work, and you disclaimany
intention to limitoperation or modification of the work as a means of enforcing, against the work's users, your or third parties'
legal rights to forbid circumvention of technological measures.
4. Conveying Verbatim Copies.
You may convey verbatim copies of the Program's source code as you receive it,in any medium, provided that you
conspicuously and appropriately publish on each copy an appropriate copyright notice; keep intact all notices stating that this
License and any non-permissive terms added in accord with section 7 apply to the code; keep intact all notices of the absence
of any warranty; and give all recipients a copy of this License along with the Program.
You may charge any priceor no price for each copy that you convey, and you may offer support or warranty protection for a
fee.
6. Conveying Modified Source Versions.
You may convey a work based on the Program, or the modifications to produce itfrom the Program, in the form of source code
under the terms of section 4, provided that you also meet all of these conditions:
- a) The work must carry prominent notices stating that you modified it, and giving a relevant date.
- b) The work mustcarry prominent notices stating that it is released under this License and any conditions added under
section 7. This requirement modifies the requirement in section 4 to "keep intact all notices".
- c) You must license the entirework, as a whole, under this License to anyone who comes into possession of a copy. This
License will therefore apply, along with any applicable section 7 additional terms, to the whole of the work, and all its
parts, regardless of how they are packaged. This License gives no permission to license the work in any other way,but it
does not invalidate such permission if you have separately received it.
- d) If the work has interactive user interfaces, each must display Appropriate Legal Notices; however, ifthe Program has
interactive interfaces that do not displayAppropriate Legal Notices, your work need not make them do so.
 Loading...