

Samsung UN40B6000VF, UN46B6000VF, UN55B6000VF User Manual
Quick Setup Guide
1-800-SAMSUNG (7267864)
Samsung Electronics America, Inc.
105 Challenger Road Ridgefi eld Park, NJ 07660-0511
Samsung Electronics Canada Inc., Customer Service
55 Standish Court Mississauga, Ontario L5R 4B2
Call center hours of operation (Mon-Sun 9AM-12AM EST).
To register this product please visit
www.samsung.com/global/register.
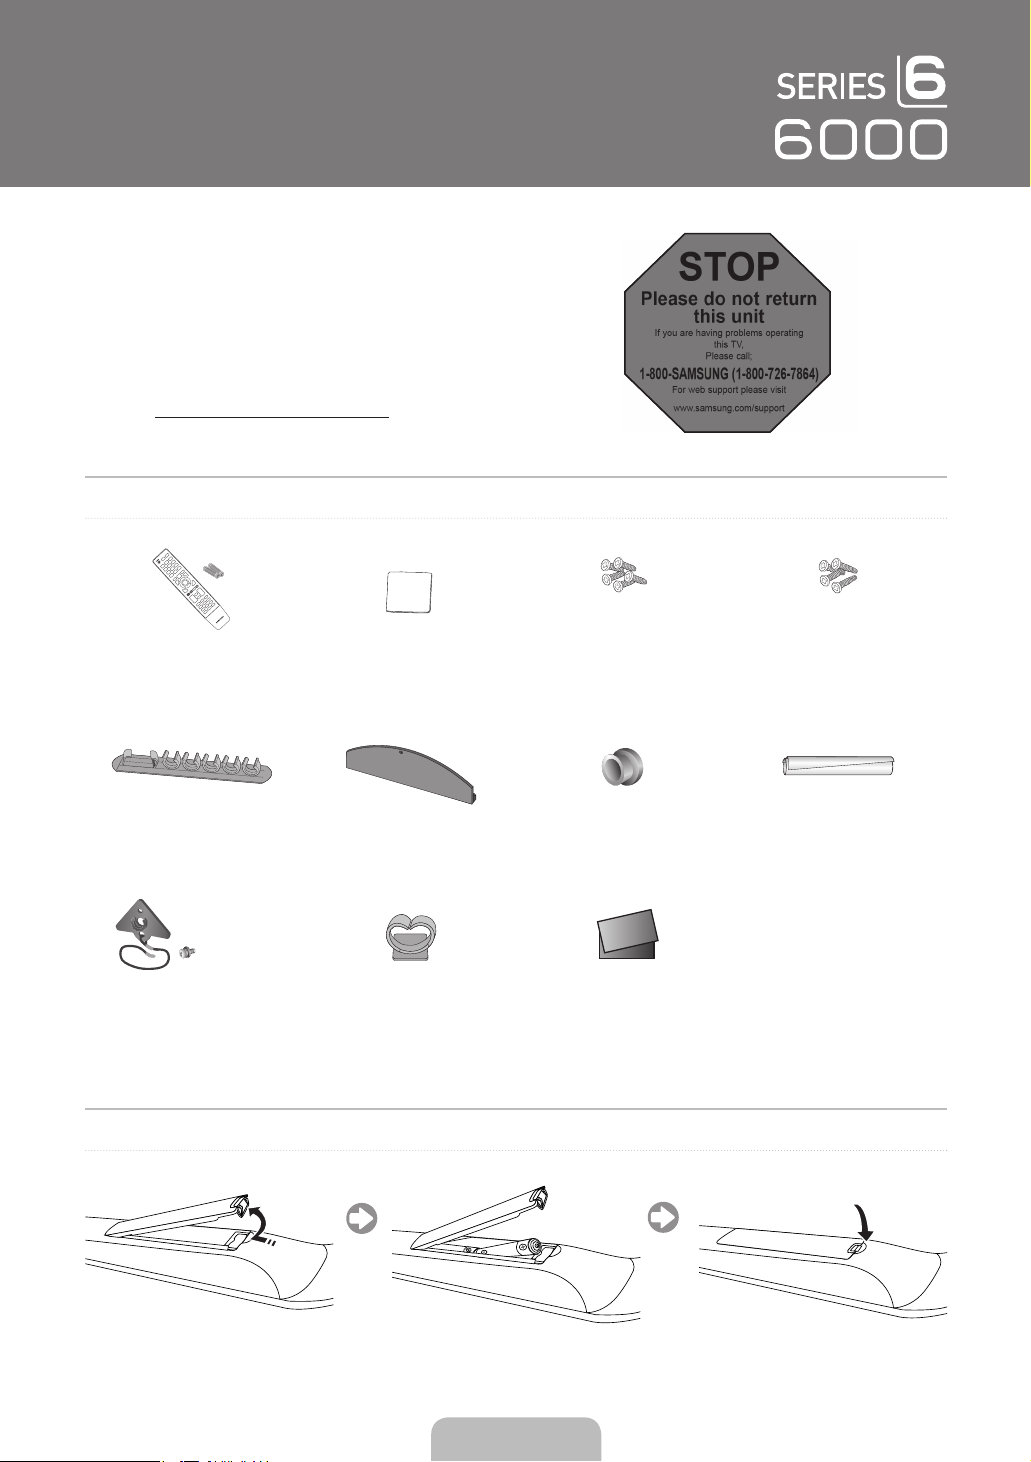
The Supplied Accessoris
(M4xL10) (M4xL12)
STOP
Please do not return
this unit
If you are having problems operating
1-800-SAMSUNG (1-800-726-7864)
For web support please visit
www.samsung.com/support
this TV,
Please call;
Remote Control &
Batteries (AAA x 2)
Holder-Wire (3ea) Cover-Bottom Holder-Ring (4ea) Holder-Wire Cable
(M8xL19)
TV-Holder & Screw (X1)
(Depending on the model)
Cleaning Cloth Stand Screw (X5)
UN32B6000, UN40B6000,
UN46B6000
Holder-Wire stand Warranty Card /
Safety Guide
Stand Screw (X4)
(Depending on the model)
Installing Batteries in the Remote Control
UN32B6000
English - 1
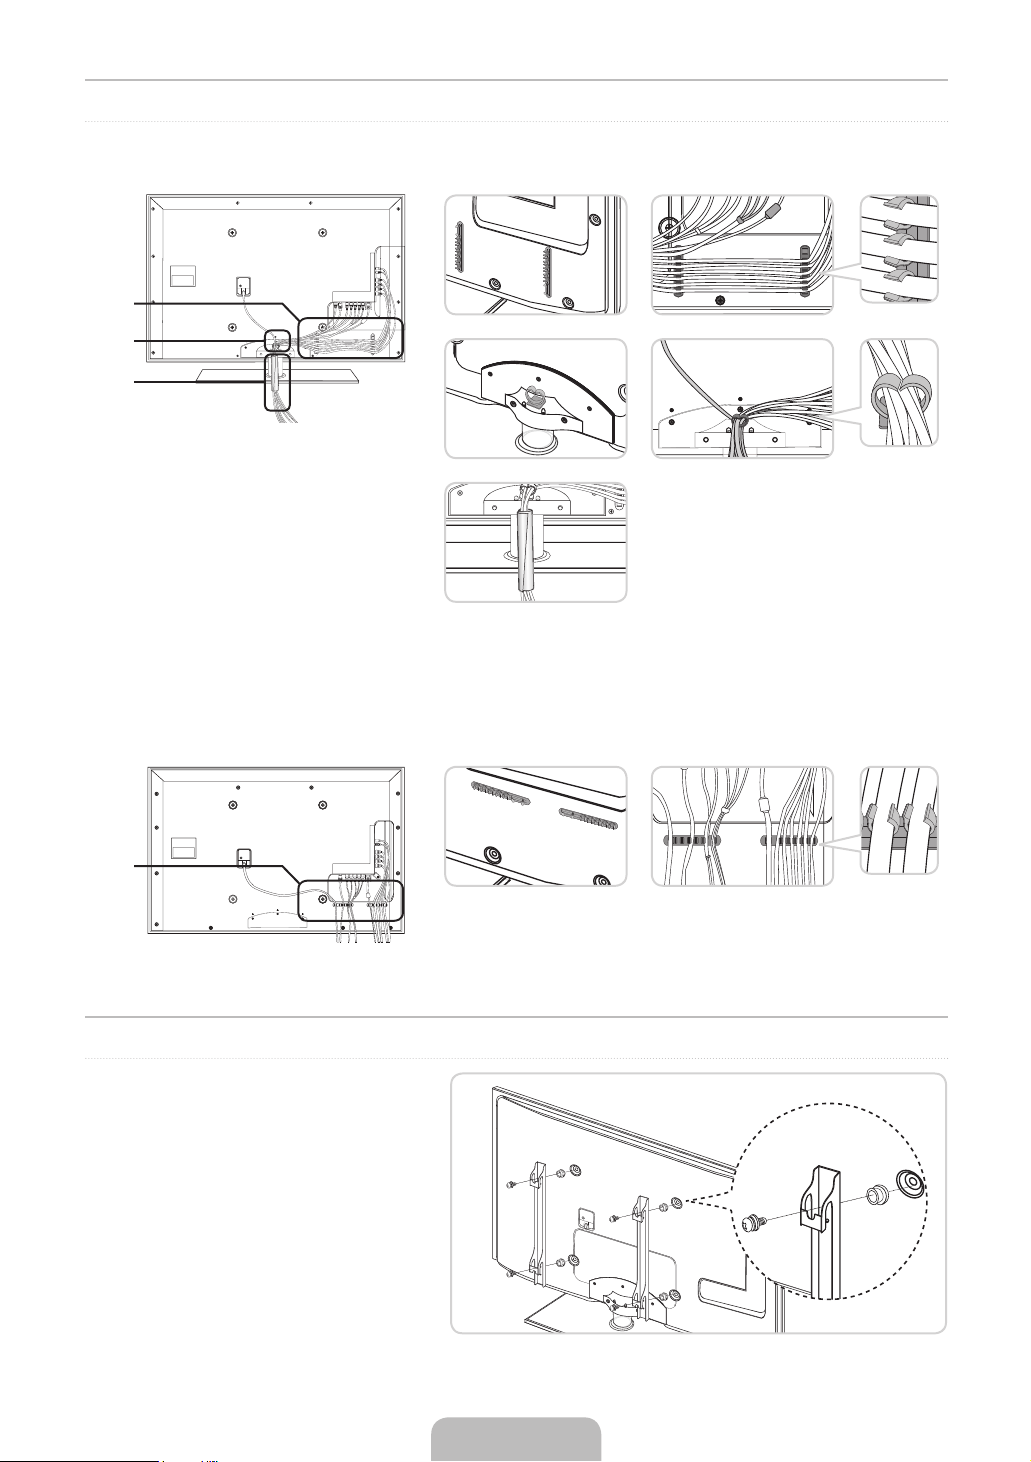
Assembling the Cables
❑
Stand Type
1
1
2
3
2
3
Enclose the cables in the Holder-Wire Cable so that the cables are not visible through the transparent stand.
N
❑
Wall-Mount Type
1
1
Preparing before installing Wall-Mount
To install a wall-mount from another manufacturer, use the
Holder-Ring 1.
English - 2
1
English - 3
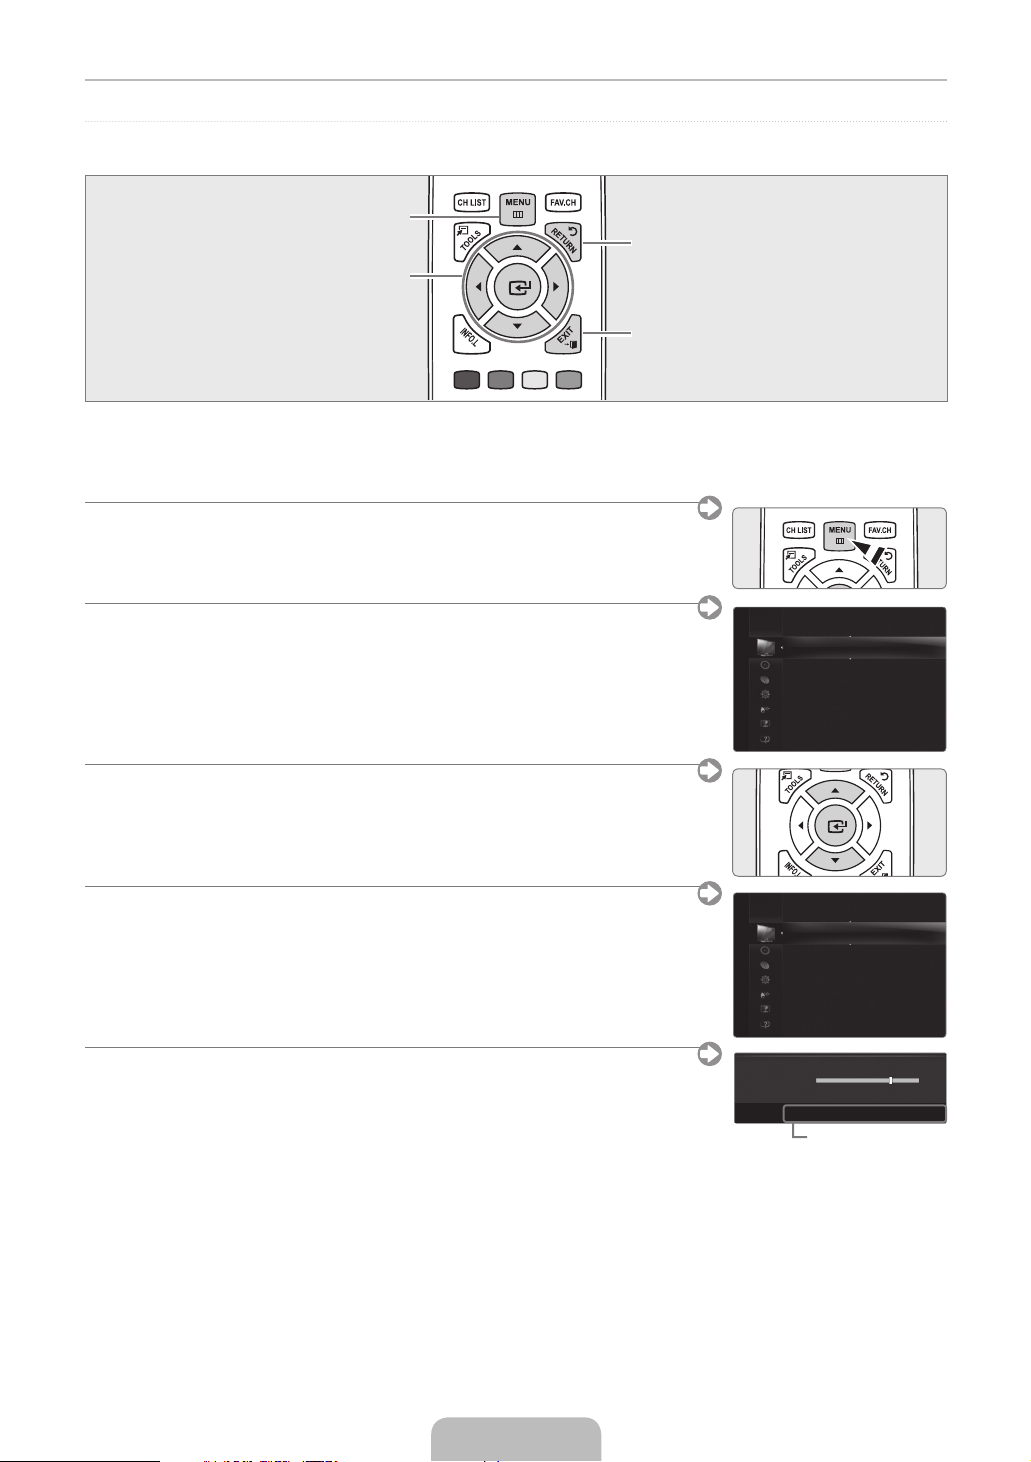
Viewing the Menus
Before using the TV, follow the steps below to learn how to navigate the menu in order to select and adjust different functions.
Display the main on-screen menu.
ENTERE / DIRECTION Button
Move the cursor and select an
item. Select the currently selected
item. Confi rm the setting.
Operation the OSD (On Screen Display)
❑
The access step may differ depending on the selected menu.
1. Press the MENU button.
MENU Button
RETURN Button
Return to the previous menu.
EXIT
Exit the on-screen menu.
2. The main menu appears on the screen. The menu’s left side has icons : Picture, Sound,
Channel, Setup, Input, Application, Support.
3. Press the ▲ or ▼ button to select one of the icons.
4. Then press the ENTERE button to access the icon’s sub-menu.
5. Press the ▲ or ▼ button to select the icon’s submenu.
6. Press the ◄ or ► button to decrease or increase the value of a particular item. The
adjustment OSD may differ depending on the selected menu.
7. Press the ENTERE button to complete the confi guration.
8. Press the EXIT button to exit.
Picture
Mode : Standard ▶
Backlight : 7
Contrast : 95
Brightness : 45
Sharpness : 50
Colour : 50
Tint (G/R) : G50/R50
Advanced Settings
Mode : Standard
Picture
Backlight : 7 ▶
Contrast : 95
Brightness : 45
Sharpness : 50
Colour : 50
Tint (G/R) : G50/R50
Advanced Settings
Picture Options
▲
Backlight
▼
U
Move L Adjust E Enter R Return
Help icon
7
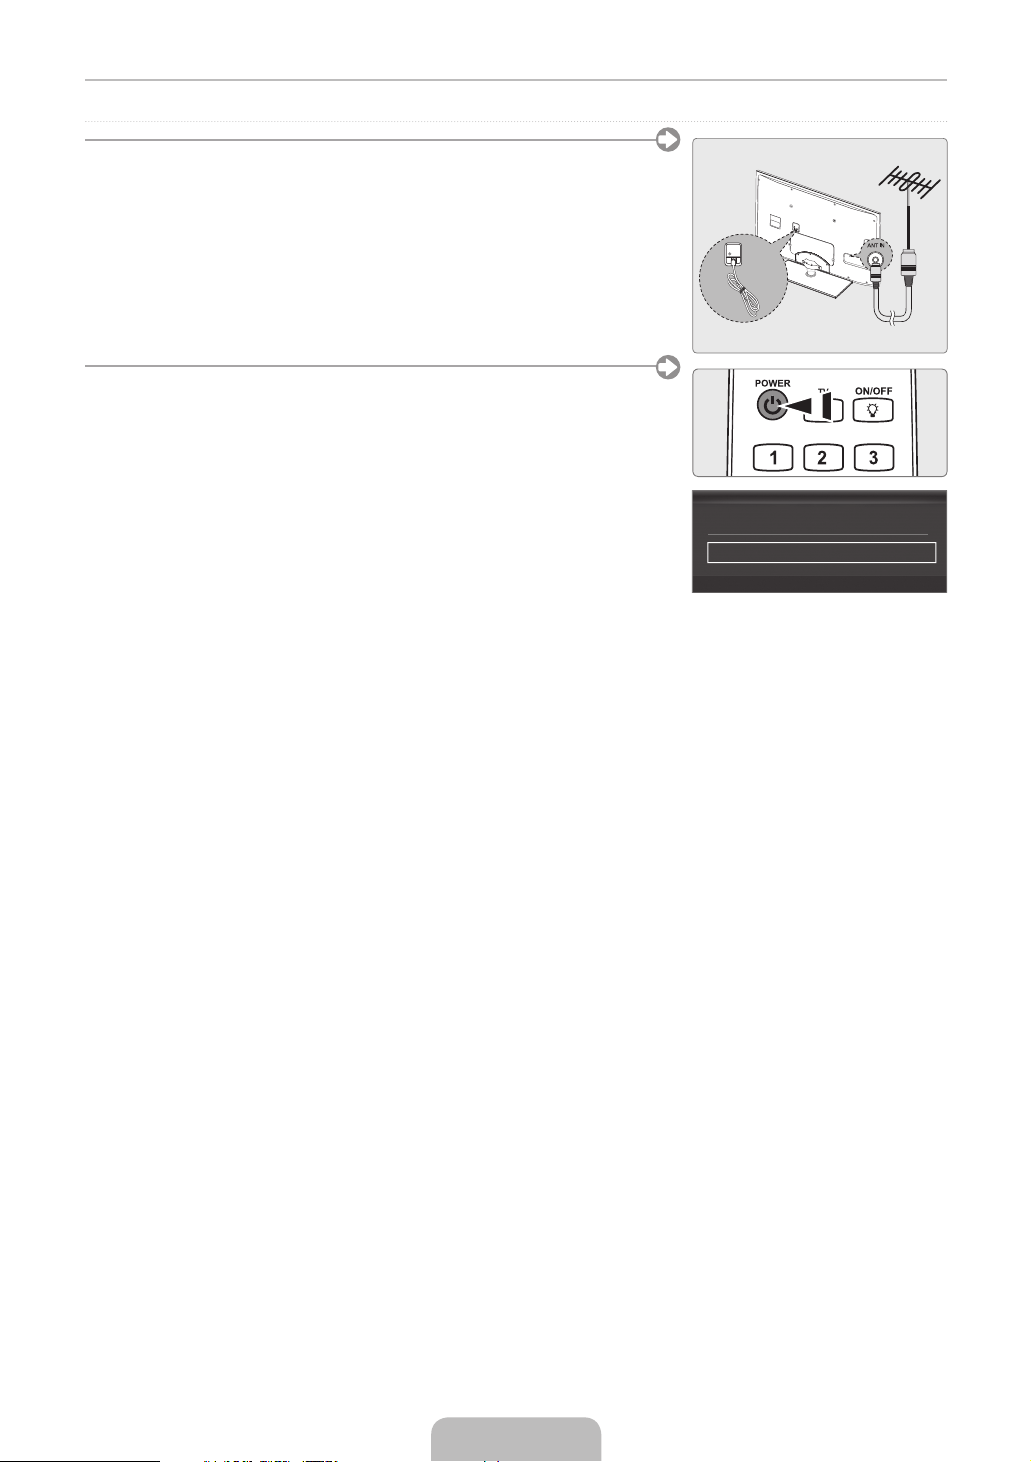
Plug & Play
When the TV is initially powered on, basic settings proceed automatically and
subsequently.
Preset: Connecting the mains and antenna.
N
1. Press the POWERP button on the remote control.
You can also use the POWERP button on the TV.
N
The message Select Language of the OSD. is displayed.
N
2. Press the ENTERE button. Press the ▲ or ▼ button to select the language, then
press the ENTERE button. The message Select ‘Home Use’ when installing this
TV in your home. is displayed.
3. Press the ◄ or ► button to select Store Demo or Home Use, then press the
ENTERE button. The message Select the Antenna source to memorize. is
displayed.
We recommend setting the TV to Home Use mode for the best picture in your
N
Select Language of the OSD.
Menu Language : English ▶�
home environment.
Store Demo mode is only intended for use in retail environments.
N
If the unit is accidentally set to Store Demo mode and you want to return to
N
Home Use (Standard): Press the volume button on the TV. When the volume
OSD is displayed, press and hold the MENU button on the TV for 5 seconds.
4. Press the ▲ or ▼ button to memorize the channels of the selected connection. Press the ENTERE button to select Start.
N
Air: Air antenna signal. / Cable: Cable antenna signal. / Auto: Air and Cable antenna signals.
N
In Cable mode, you can select the correct signal source among STD, HRC, and IRC by pressing the ▲, ▼, ◄ or ► button,
then press the ENTERE button. If you have Digital cable, select the cable system signal source for both Analog and
Digital. Contact your local cable company to identify the type of cable system that exists in your particular area.
5. Press the ENTERE button to select Start. The TV will begin memorizing all of the available channels.
To stop the search before it has fi nished, press the ENTERE button with Stop selected.
N
N
After all the available channels are stored, it starts to remove scrambled channels. The Auto program menu then reappears.
Press the ENTERE button when channel memorization is complete. The message Set the Clock Mode. is displayed.
6. Press the ENTERE button. Press the ▲ or ▼ button to select Auto, then Press the ENTERE button. The message Set to
daylight saving time. is displayed. If you select Manual, Set current date and time. is displayed.
7. Press the ▲ or ▼ button to select Off, On or Auto, then press the ENTERE button.
8. Press the ▲ or ▼ button to highlight the time zone for your local area. Press the ENTERE button. If you have received a
digital signal, the time will be set automatically. If not, refer to the ‘Setting the Time’ instructions to set the clock.
9. The description for the connection method providing the best HD screen quality is displayed. Check the description and press
the ENTERE button.
10. The message Enjoy your TV. is displayed. When you have fi nished, press the ENTERE button.
Plug & Play
E
Enter
If you want to reset this feature...
❑
1. Press the MENU button to display the menu. Press the ▲ or ▼ button to select Setup, then press the ENTERE button.
3. Press the ENTERE button again to select Plug & Play.
The Plug & Play feature is only available in the TV mode.
N
English - 4

English - 5
Connecting a AV device
WY R
W YR
W R
WR
B
G
R
WR
W R
WY R
W YR
B
G
R
W R
WR
Best
/
HDMI/DVI
/
PC/COMPONENT
HD connection
Using an HDMI Cable
DVD / Blu-Ray player / HD Cable
Box / HD Satellite receiver (STB)
HDMI OUT
Normal
VIDEO
HD connection
Using a DVI Cable
DVD / Blu-Ray player / Cable Box
/ Satellite receiver (STB)
AUDIO OUTDVI OUT
or
AUDIO OUTDVI OUT
Component connection
Using a Component Cable
DVD / Blu-Ray player /
Cable Box / Satellite receiver
AUDIO OUT COMPONENT OUT
Audio/Video connection
Using an Audio/Video Cable
VCR
AUDIO OUTVIDEO OUT
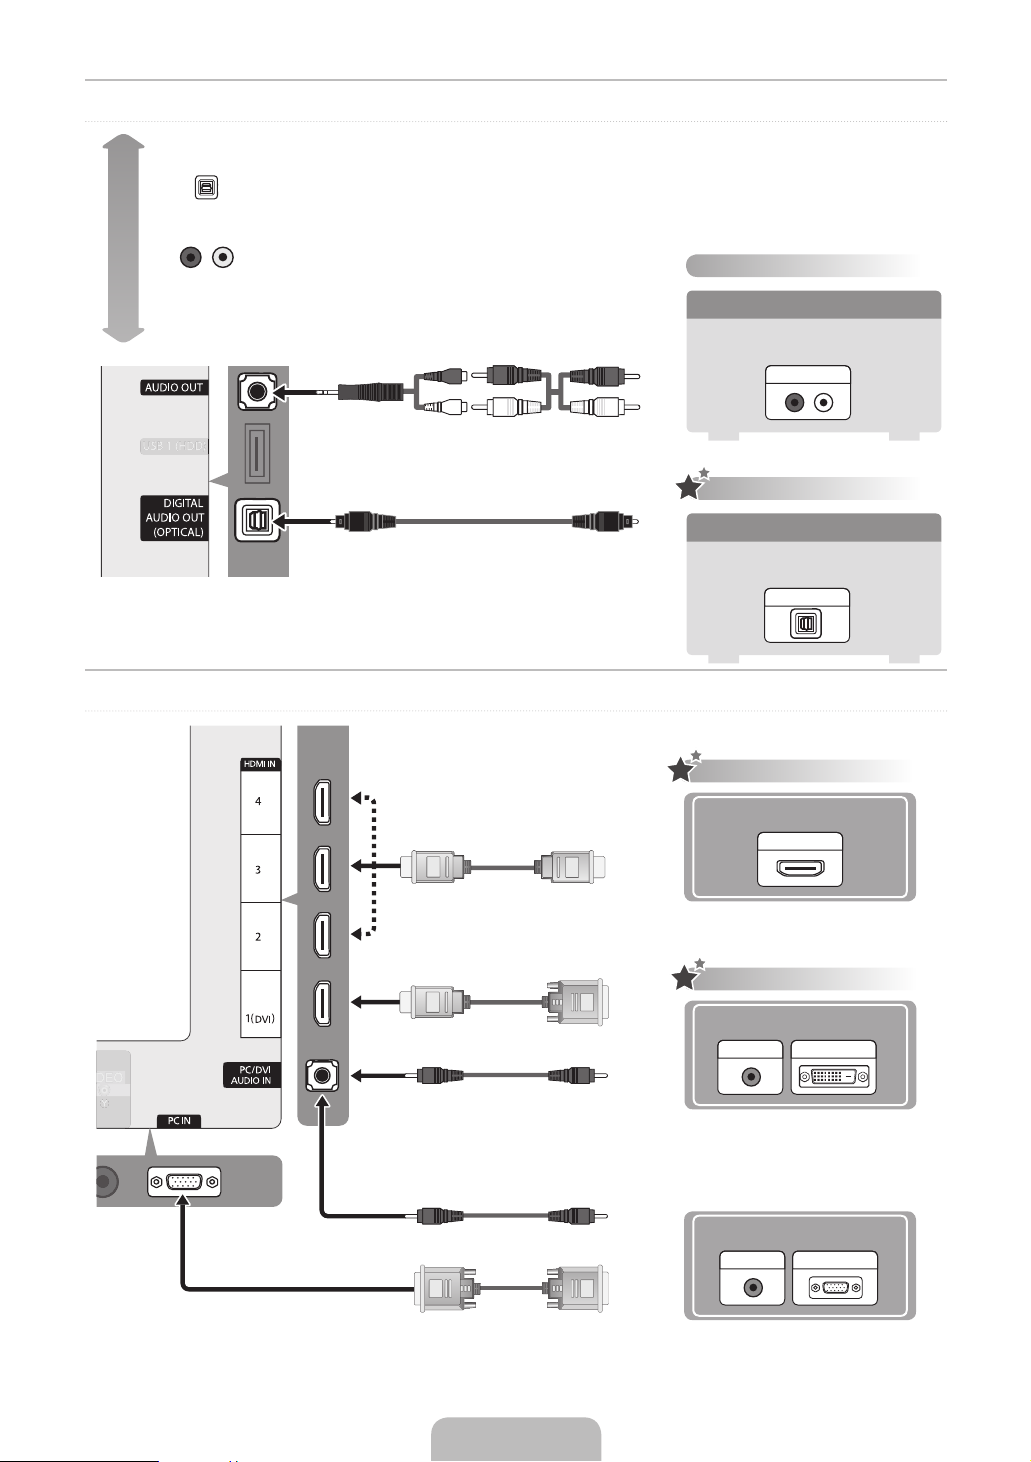
Connecting an audio device
W R
WR
Best
OPTICAL (Digital)
AUDIO (Analog)
Normal
Connecting a PC
Analog Audio connection
Using a Audio Cable
Amplifi er / DVD Home Theater
AUDIO IN
Digital Audio connection
Using an Optical Cable
Digital Audio System
OPTICAL
HD connection
Using an HDMI Cable
HDMI OUT
English - 6
HD connection
Using an HDMI/DVI Cable
AUDIO OUT
DVI OUT
Using a D-Sub Cable
PC OUTAUDIO OUT
 Loading...