

Page 1
E-MANUAL
Contact SAMSUNG WORLDWIDE
If you have any questions or comments relating to Samsung products, please contact the SAMSUNG customer care center.
Country
CANADA 1-800-SAMSUNG (726-7864) www.samsung.com Samsung Electronics Canada Inc., Customer Service
U.S.A 1-800-SAMSUNG (726-7864) www.samsung.com Samsung Electronics America, Inc. 85 Challenger
Customer Care Center
Web Site Address
55 Standish Court Mississauga, Ontario L5R 4B2
Canada
Road Ridge eld Park, NJ 07660-2112
LED TV
user manual
© 2011 Samsung Electronics Co., Ltd. All rights reserved.
imagine the possibilities
Thank you for purchasing this Samsung product.
To receive more complete service, please register
your product at
www.samsung.com/register
Model _____________ Serial No. _____________
BN68-03372A-00
Page 2
Figures and illustrations in this User Manual are provided for reference only and may differ from actual product appearance.
Product design and specifications may be changed without notice.
Important Warranty Information Regarding Television Format Viewing
See the warranty card for more information on warranty terms.
✎
Wide screen format LED Displays (with 16:9 aspect ratios, the ratio of the screen width to height) are primarily designed to view wide screen format fullmotion video. The images displayed on them should primarily be in the wide screen 16:9 ratio format, or expanded to fill the screen if your model offers
this feature, with the images constantly in motion. Displaying stationary graphics and images on the screen, such as the dark sidebars on non-expanded
standard format television video and programming, should be limited to no more than 5% of the total television viewing per week.
Additionally, viewing other stationary images and text such as stock market crawls, video game displays, station logos, web sites or computer graphics
and patterns, should be limited as described above for all televisions. Displaying stationary images that for more than 5% of total viewing time can cause
uneven aging of your PDP display and leave subtle, but permanent burned-in ghost images in the LED picture. To avoid this, vary the programming and
images, and primarily display full screen moving images, not stationary patterns or dark bars. On LED models that offer picture sizing features, use these
controls to view different formats as a full screen picture.
Be careful about the television formats you select and the length of time you view them. Uneven LED aging as a result of format selection and use, as well
as burned in images, are not covered by your Samsung limited warranty.
• SAMSUNG ELECTRONICS NORTH AMERICAN LIMITED WARRANTY STATEMENT
Subject to the requirements, conditions, exclusions and limitations of the original Limited Warranty supplied with Samsung Electronics (SAMSUNG)
products, and the requirements, conditions, exclusions and limitations contained herein, SAMSUNG will additionally provide Warranty Repair Service
in the United States on SAMSUNG products purchased in Canada, and in Canada on SAMSUNG products purchased in the United States, for the
warranty period originally specified, and to the Original Purchaser only.
The above described warranty repairs must be performed by a SAMSUNG Authorized Service Center. Along with this Statement, the Original Limited
Warranty Statement and a dated Bill of Sale as Proof of Purchase must be presented to the Service Center. Transportation to and from the Service
Center is the responsibility of the purchaser. Conditions covered are limited only to manufacturing defects in material or workmanship, and only those
encountered in normal use of the product.
Excluded, but not limited to, are any originally specified provisions for, in-home or on-site services, minimum or maximum repair times, exchanges or
replacements, accessories, options, upgrades, or consumables.
For the location of a SAMSUNG Authorized Service Center, please call toll-free:
– In the United States : 1-800-SAMSUNG (1-800-726-7864)
– In Canada : 1-800-SAMSUNG
Still image warning
Avoid displaying still images (such as jpeg picture files), still image elements (such as TV channel logos, stock or news bars at the screen bottom etc.), or
programs in panorama or 4:3 image format on the screen. Constantly displaying still pictures can cause image burn-in on the LED screen, which will affect
image quality. To reduce risk of this effect, please follow the recommendations below:
• Avoid displaying the same TV channel for long periods.
• Always try to display any image in full screen. Use the TV set’s picture format menu for the best possible match.
• Reduce brightness and contrast to avoid the appearance of after-images.
• Use all TV features designed to reduce image retention and screen burn. Refer to the e-Manual for details.
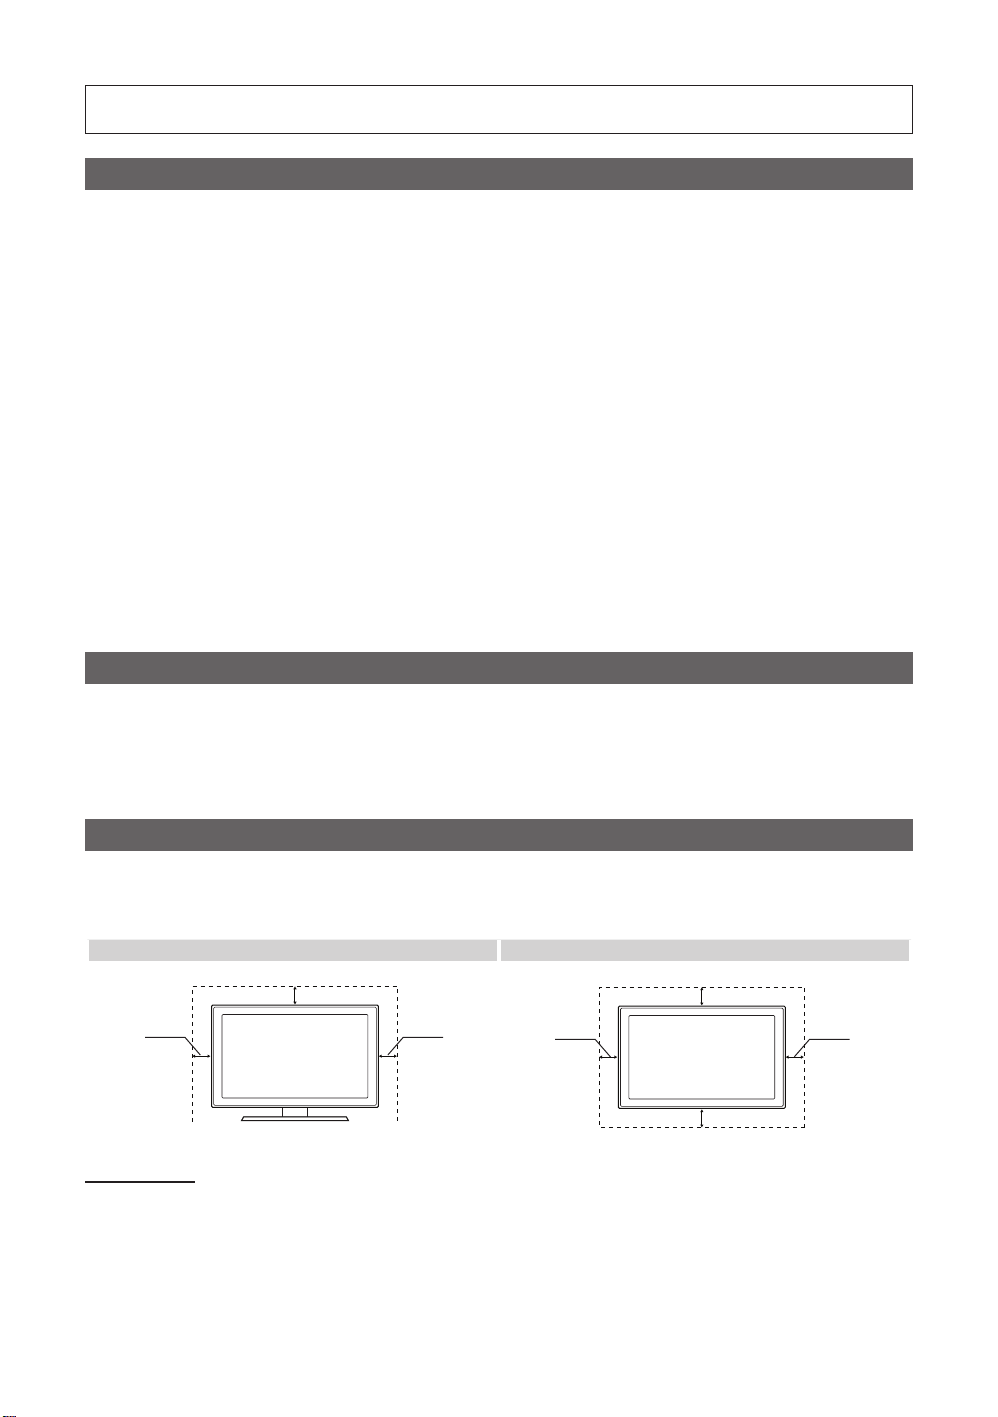
Securing the Installation Space
Keep the required distances between the TV, the wall, and other objects to ensure proper ventilation. Failing to do so may result in a fire or a problem with
the TV caused by an increase in its internal temperature.
When using a stand or wall-mount, use parts provided by Samsung Electronics only.
✎
• If you use parts provided by another manufacturer, it may result in a problem with the product or an injury due to the product falling.
Installation with a stand. Installation with a wall-mount.
4 inches
4 inches
4 inches
4 inches
Other Warnings
The actual appearance of the TV may differ from the images in this manual, depending on the model.
✎
Be careful when you touch the TV. Some parts can be somewhat hot.
✎
4 inches
4 inches
4 inches
Page 3

Accessories
✎
Please make sure the following items are included with your T V. If any items are missing, contact your dealer.
✎
The items’ colors and shapes may vary depending on the model.
✎
Check that there are no accessories hidden behind or under packing materials when you open the box.
y Remote Control (AA59-00520A) & Batteries (AAA x 2) y Power Cord
y Owner’s Instructions y Cleaning-Cloth
y Warranty Card (Not available in some locations) / Safety Guide
Component Adapter Holder-Wire stand Holder-Ring (4EA)
(BN39-01154W) (BN61-05491A) (BN96-18153A)
Assembling the Holder-Wire stand
Input Cables (Sold Separately)
To purchase the RS232 cable, contact www.SamsungParts.com.
RS232 (AA39-00311A) HDMI HDMI-DVI Audio Cable
Component Composite (AV) Coaxial (RF) VGA
English - 3
Page 4
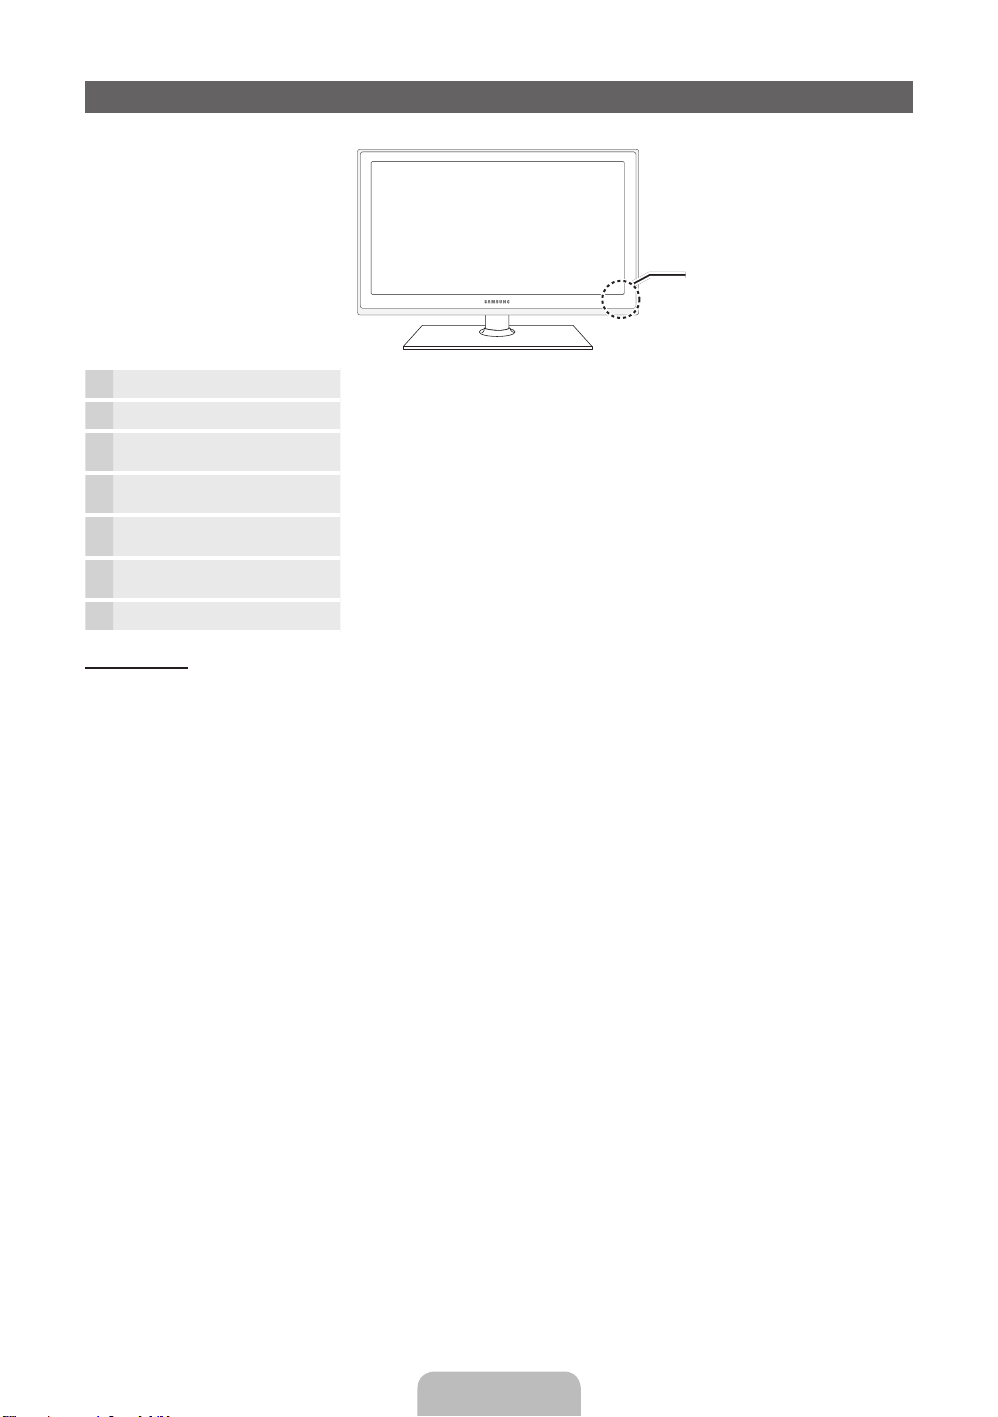
Viewing the Control Panel
✎
The product color and shape may vary depending on the model.
Control Panel
Remote control sensor Aim the remote control towards this spot on the TV.
Power Indicator Blinks and turns off when the power is on and lights up in standby mode.
SOURCE
MENU Displays an on-screen menu, the OSD (on screen display), which contains controls for
y
z
P
Standby mode
Your TV enters Standby mode when you turn it off and continues to consume a small amount of electric power. To be safe and
to decrease power consumption, do not leave your TV in standby mode for long periods of time (when you are away on
vacation, for example). It is best to unplug the power cord.
E
(Power)
Toggles between all the available input sources. In the on-screen menu, use this
button as you would use the ENTERE button on the remote control.
your TV’s features.
Adjusts the volume. In the OSD, use the
and ► buttons on the remote control.
Changes the channels. In the OSD, use the
▼ and ▲ buttons on the remote control.
Turns the TV on or off.
y
z
buttons as you would use the ◄
buttons as you would use the
English - 4
Page 5
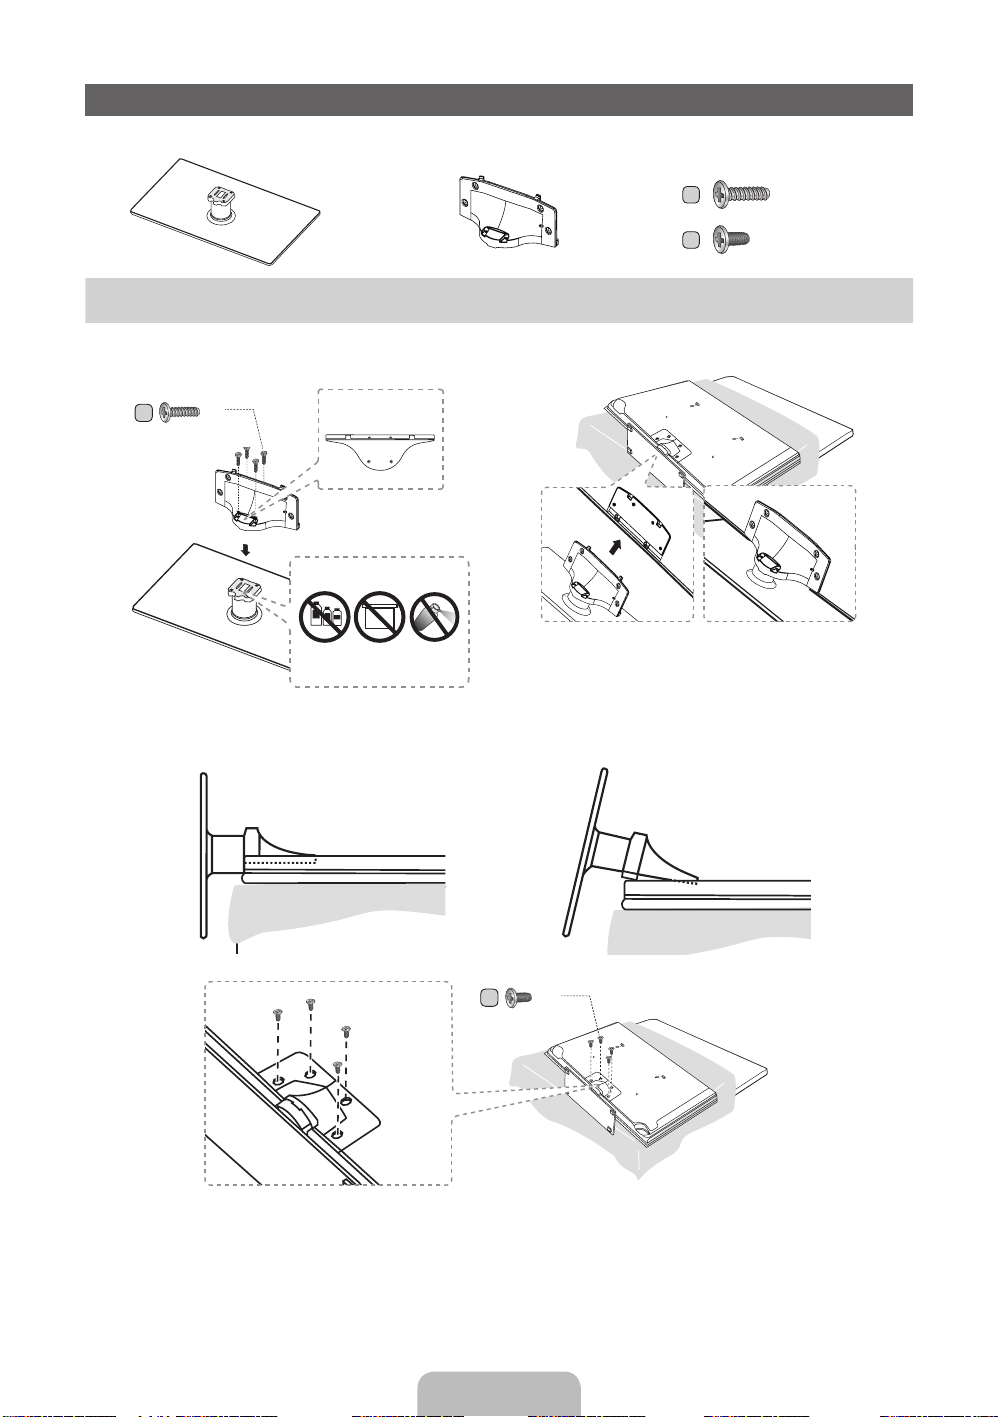
Install the Stand
See the separate stand installation guide for more detailed instructions.
Stand (1EA)
Guide Stand (1EA) Screws (9EA)
(depending on the model)
Follow the steps below to connect the TV to the stand.
1 2
(M4 X L12)
x 4
DO NOT USE
CHEMICALS
Top view
ATTENTION
DO NOT USE
GREASE
DO NOT
USE OIL
C
3 Side View
C
D
✎
Place a soft cloth over the table to protect the TV, and
x 4 (M4 X L12)
x 4 (M4 X L8)
then place the TV on the cloth screen side down.
✎
Place a soft cloth over the table to protect the TV, and
then place the TV on the cloth screen side down.
(Correct assembly)
(Incorret assembly)
4
x 4
D
(M4 X L8)
✎
NOTE
y Make sure to distinguish between the front and back of each component when assembling them.
y Make sure that at least two persons lift and move the TV.
English - 5
Page 6

Installing the Wall Mount
Preparing before installing Wall-Mount
To install a wall-mount from another manufacturer, use the Holder-Ring.
1
Installing the Wall Mount Kit
The wall mount kit (sold separately) allows you to mount the TV on the wall.
For detailed information on installing the wall mount, see the instructions provided with the wall mount. We recommend you
contact a technician for assistance when installing the wall mount bracket. Samsung Electronics is not responsible for any
damage to the product or injury to yourself or others if you elect to install the wall mount on your own.
Wall Mount Kit Specifications (VESA)
Install your wall mount on a solid wall perpendicular to the floor. Before attaching the wall mount to surfaces other than plaster
board, please contact your nearest dealer for additional information. If you install the TV on a ceiling or slanted wall, it may fall
and result in severe personal injury.
✎
NOTE
Standard dimensions for wall mount kits are shown in the table below.
x
Samsung wall mount kits contain a detailed installation manual and all parts necessary for assembly are provided.
x
Do not use screws that do not comply with the VESA standard screw specifications.
x
Do not use screws that are longer than the standard length or do not comply with the VESA standard screw
x
specifications. Screws that are too long may cause damage to the inside of the TV set.
For wall mounts that do not comply with the VESA standard screw specifications, the length of the screws may differ
x
depending on the wall mount specifications.
Do not fasten the screws too firmly. This may damage the product or cause the product to fall, leading to personal
x
injury. Samsung is not liable for these kinds of accidents.
Samsung is not liable for product damage or personal injury when a non-VESA or non-specified wall mount is used or
x
the consumer fails to follow the product installation instructions.
Do not mount the TV at more than a 15 degree tilt.
x
Always have two people mount the TV on a wall.
x
Product Family
LED-TV
TV size in
inches
19~22 75 X 75
23~27 200 X 100
32~40 200 X 200
60~65 600 X 400
Do not install your Wall Mount Kit while your TV is turned on. It may result in personal injury due to
electric shock.
VESA scew hole
specs (A * B) in
millimeters
Standard Screw Quantity
M4
4
M846~55 400 X 400
English - 6
Page 7
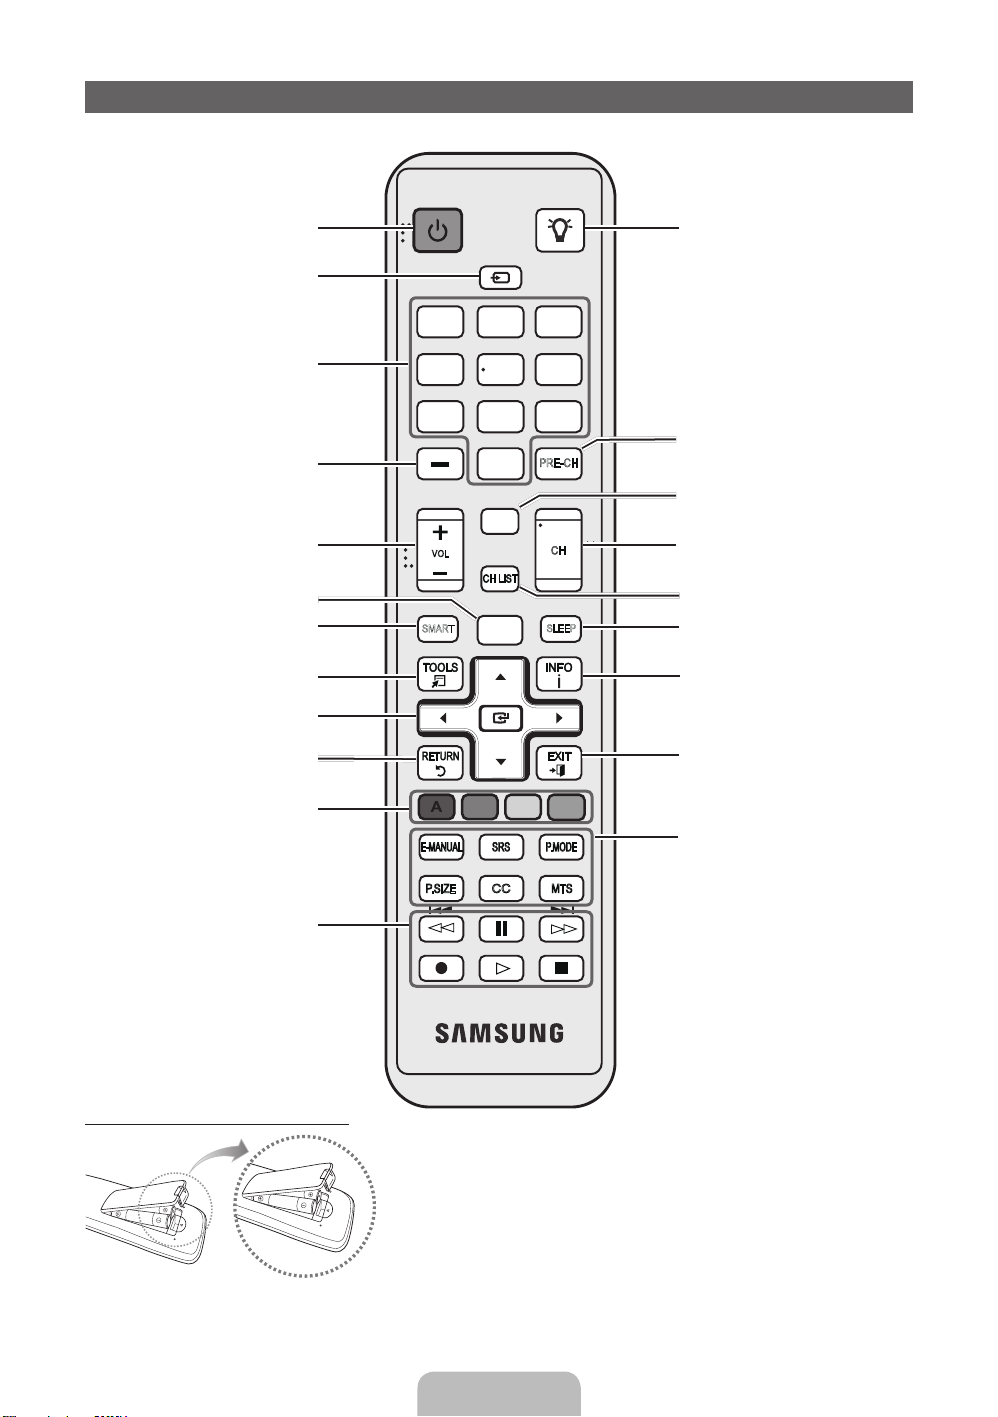
Remote Control Buttons
PRE-CH
CH LIST
POWER ON/OFF
1
4
2 3
5 6
7 8 9
0
MUTE
M
MENU
m
B C D
l
SOURCE
SMART
HUB
E-MANUAL
SRS
l
l
l
l
l
l
l
l
VOL
<
<
CH
SLEEP
MTS
CC
P.SIZE
P.MODE
This remote control has Braille points on the Power, Channel, and Volume buttons and can be used by visually impaired
persons.
Turns the TV on and off.
Displays and selects the available video
Gives direct access to channels.
Press to select additional digital channels
being broadcast by the same station. For
example, to select channel ‘54-3’, press
Quickly select frequently used functions.
Selects the on-screen menu items and
changes the values seen on the menu.
Use these buttons in SMART HUB and
‘54’, then press ‘-’ and ‘3’.
Link to various application services.
Returns to the previous menu.
Buttons used in the Channel and
SMART HUB menu, etc.
Anynet+ (HDMI-CEC) modes.
sources.
Adjusts the volume.
Opens the OSD.
Turns the remote control light on or
off. When on, the buttons become
illuminated for a moment when pressed.
(Using the remote control with this button
set to On will reduce the battery usage
time.)
Returns to the previous channel.
Cuts off the sound temporarily.
Changes channels.
Displays channel lists on the screen.
Automatically shuts off the TV at
a preset time.
Displays information on the TV screen.
Exits the menu.
E-MANUAL: Displays the e-Manual.
SRS: Turns the SRS TruSurround HD
on or off.
P.MODE: Lets you select the Picture
Mode.
MTS: Press to choose stereo, mono,
or Separate Audio Program (SAP
broadcast).
CC: Displays digital subtitles.
P.SIZE: Lets you select the Picture Size.
Installing batteries (Battery size: AAA)
✎
NOTE
Use the remote control within 23 feet of the TV.
x
Bright light may affect the per formance of the remote control.
x
Avoid using when near special fluorescent lights or neon signs.
The color and shape may vary depending on the model.
x
English - 7
Page 8
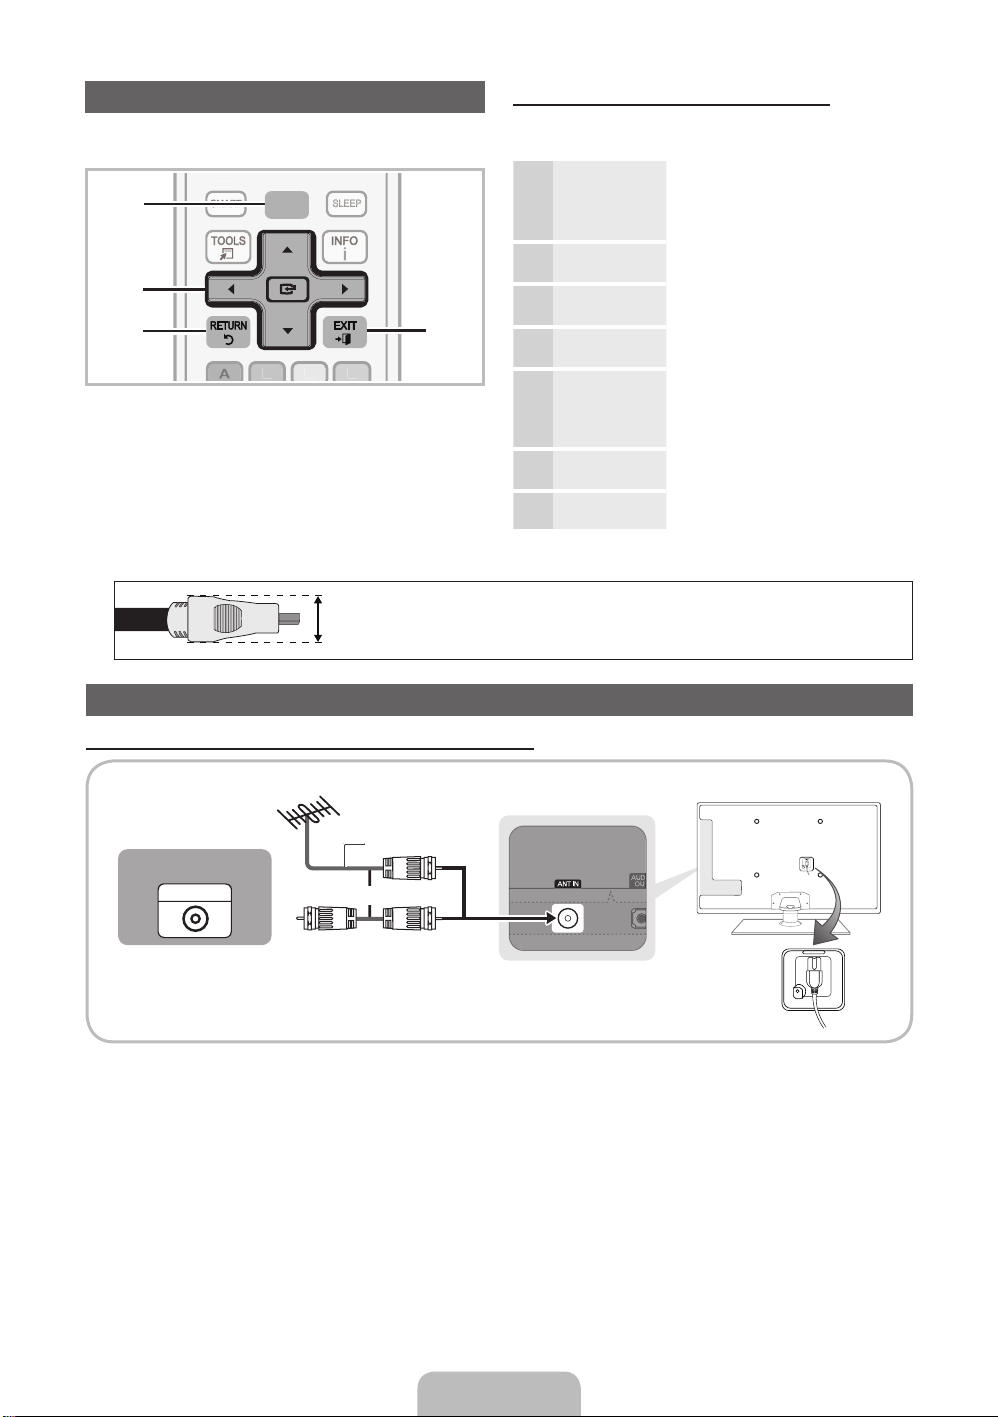
How to Navigate Menus
PRE-CH
CH LIST
POWER
ON/OFF
1
4
3
5
6
8
9
0
MUTE
D
R
CE
VOL
<
Before using the TV, follow the steps below to learn how to
navigate the menu and select and adjust different functions.
B
MENU
1
2
3
1 MENU button: Displays the main on-screen menu.
2 ENTER
3 RETURN button: Returns to the previous menu.
4 EXIT button: Exits the on-screen menu.
E
select an item. Confirm the setting.
/ Direction button: Move the cursor and
m
4
How to Operate the OSD (On Screen Display)
The access steps may differ depending on the selected
menu.
MENU The main menu options appear on
1
▲ / ▼ Select an icon or option with the ▲
2
ENTER
E
3
▲ / ▼
4
◄ / ►
5
ENTER
E
6
EXIT
e
the screen:
Picture, Sound, Channel,
Network, System, Support.
or ▼ button.
Press ENTERE to access the
sub-menus.
Select the desired submenu with
the ▲ or ▼ button.
Adjust the value of an item with the
◄ or ► button. The adjustment in
the OSD may differ depending on
the selected menu.
Press ENTERE to confirm the
selection.
Press EXIT.
7
✎
For the best cable connections to this product, be sure to use cables no thicker than 0.55 inches (14mm.)
y Maximum thickness - 0.55 inches (14mm)
Connecting to an Antenna or Cable Connection
Connecting the power cord and an antenna or cable connection
VHF/UHF Antenna
Cable
ANT OUT
Antenna Cable (Not Supplied)
or
Power Input
English - 8
Page 9
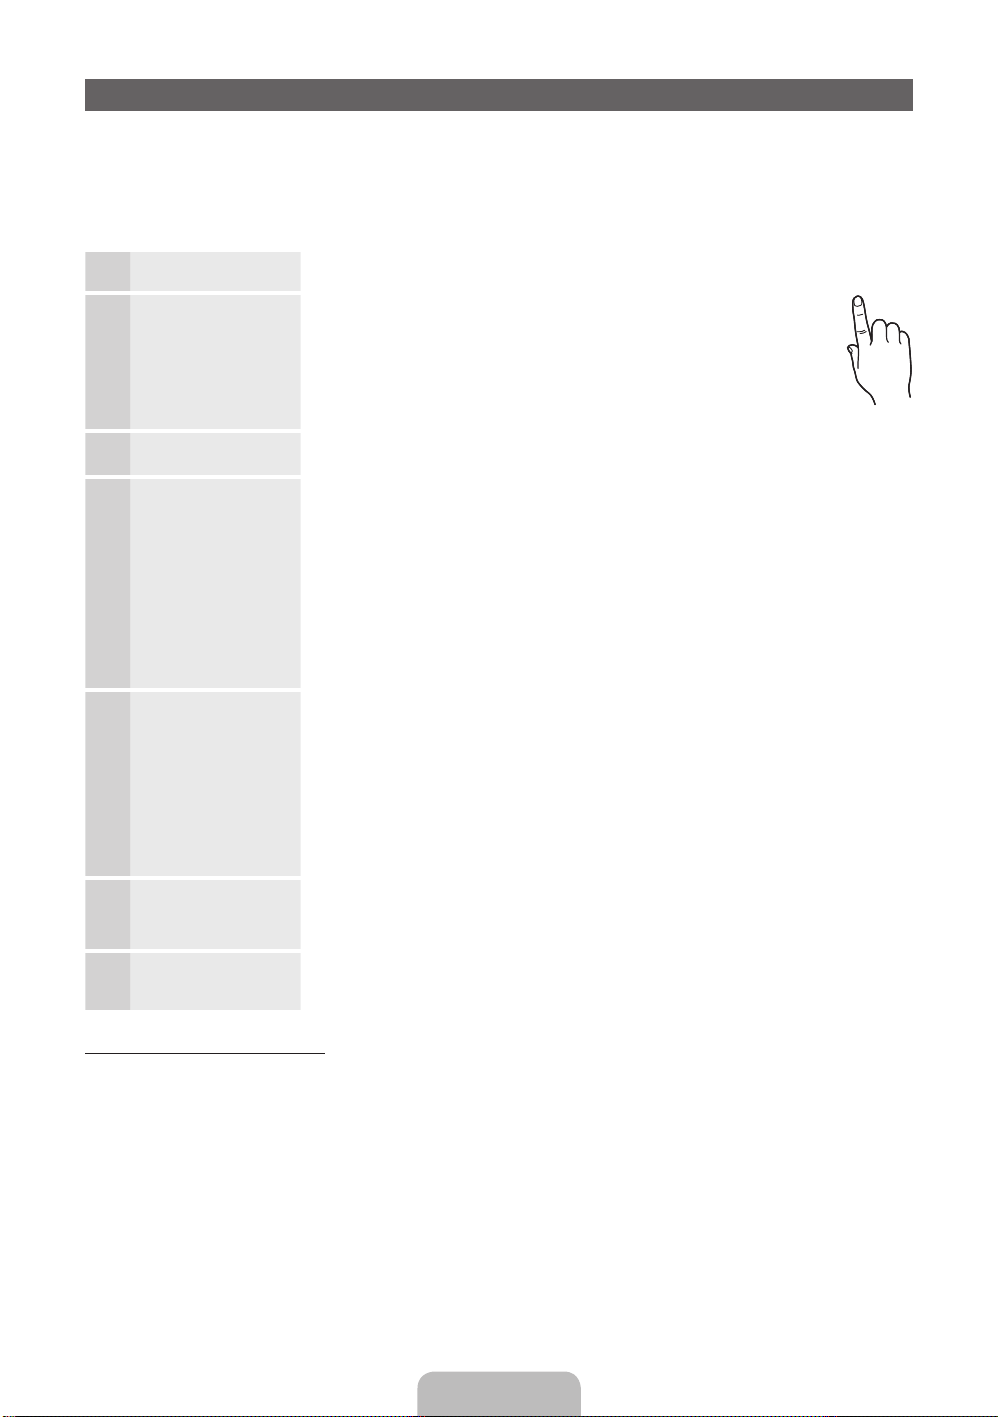
Plug & Play (Initial Setup)
POWER
INFO GUIDE
When you turn the TV on for the first time, a sequence of on-screen prompts will assist in configuring basic settings. To turn on
the TV, press the POWERP button.
✎✎
Plug & Play is available only when the Source is set to TV.
✎
To return to the previous step in the Plug & Play sequence, select Previous, and then press ENTERE.
✎
Before turning on the TV, make sure you have connected the TV to an antenna or cable connection (p. 8).
Selecting the OSD
1
Language
Setting up the Network
2
Selecting the usage
3
mode
Setting the Clock
4
Mode
Selecting search
5
options for auto tuning
Selecting and
6
memorizing channels
Enjoy your TV. If you want to watch a broadcast program, select Close. If you want to enjoy Smart Hub,
7
Press the ▲ or ▼ button to select a language. Press ENTER
when done.
Set up your network connection. Press the ENTER
you do not know your network set up information or want to set to it later,
select Skip. We suggest you skip network connection setup now and
refer to “Wired/Wireless Network Connection” in the e-Manual for set up
requirements and instructions, and the Network Connection section of this
manual (Page 15). You can set up the network connection later using the
Network menu.
Press the ▲ or ▼ button to select Home Use, and then press the ENTERE button twice.
Select the Home Use mode. Store Demo mode is for retail environments.
Press the ▲ or ▼ button to select Auto or Manual, and then press ENTER
✎
If you selected Auto, you’ll go to the Time Zone and DST screen. Select Time Zone
or DST, and then press ENTERE. On the Time Zone screen, use the ▲ or ▼
button to select your zone, and then press ENTERE. On the DST screen, press,
ENTERE, then select whether to turn DST (Daylight Savings Time) on or off. When
done, press ENTERE.
✎
If you selected Manual, you’ll go to the Date and Time screen. Select Date or Time,
and then press ENTERE. Then, use the number buttons or the ▲ or ▼ button to
set the date or time. Use the ◄ or ► button to move between entry fields. When
done setting the Date and Time, select Next, and then press ENTERE.
Press the ▲ or ▼ button to select Air or Cable, and then press ENTER
appears on your selection. Select Next, and then press the ENTERE button. You can
check both if you have both connected.
✎
If you selected Cable, you’ll go to the Cable System screen. Use the ▲ or ▼ button
to select Digital or Analog, and then press. ENTERE. Use the ▲ or ▼ button
to select the correct cable signal format - STD, HRC, or IRC - and then press
ENTERE. Most cable systems use STD. Select the correct cable signal format for
both the Digital and Analog systems.
When done, select Search, and the press ENTER
The channel search will start automatically. This can take up to 30 minutes.
For more information, refer to Channel → Auto Program in the e-Manual.
✎
Press the ENTERE button at any time to interrupt the memorization process.
select Smart Hub. Smart Hub will start. For more detailed information, refer to “Smart Hub”
in the e-Manual.
E
E
twice
button to start. If
E
.
E
E
. A check
twice.
If You Want to Rerun Plug & Play...
O
MENU → System → Plug & Play → ENTER
✎✎
NOTE
y To change the TV’s setting from Store Demo to Home Use when not in Plug & Play, press the volume button on the TV.
When you see the volume in the OSD, press and hold MENU for 5 sec.
E
English - 9
Page 10
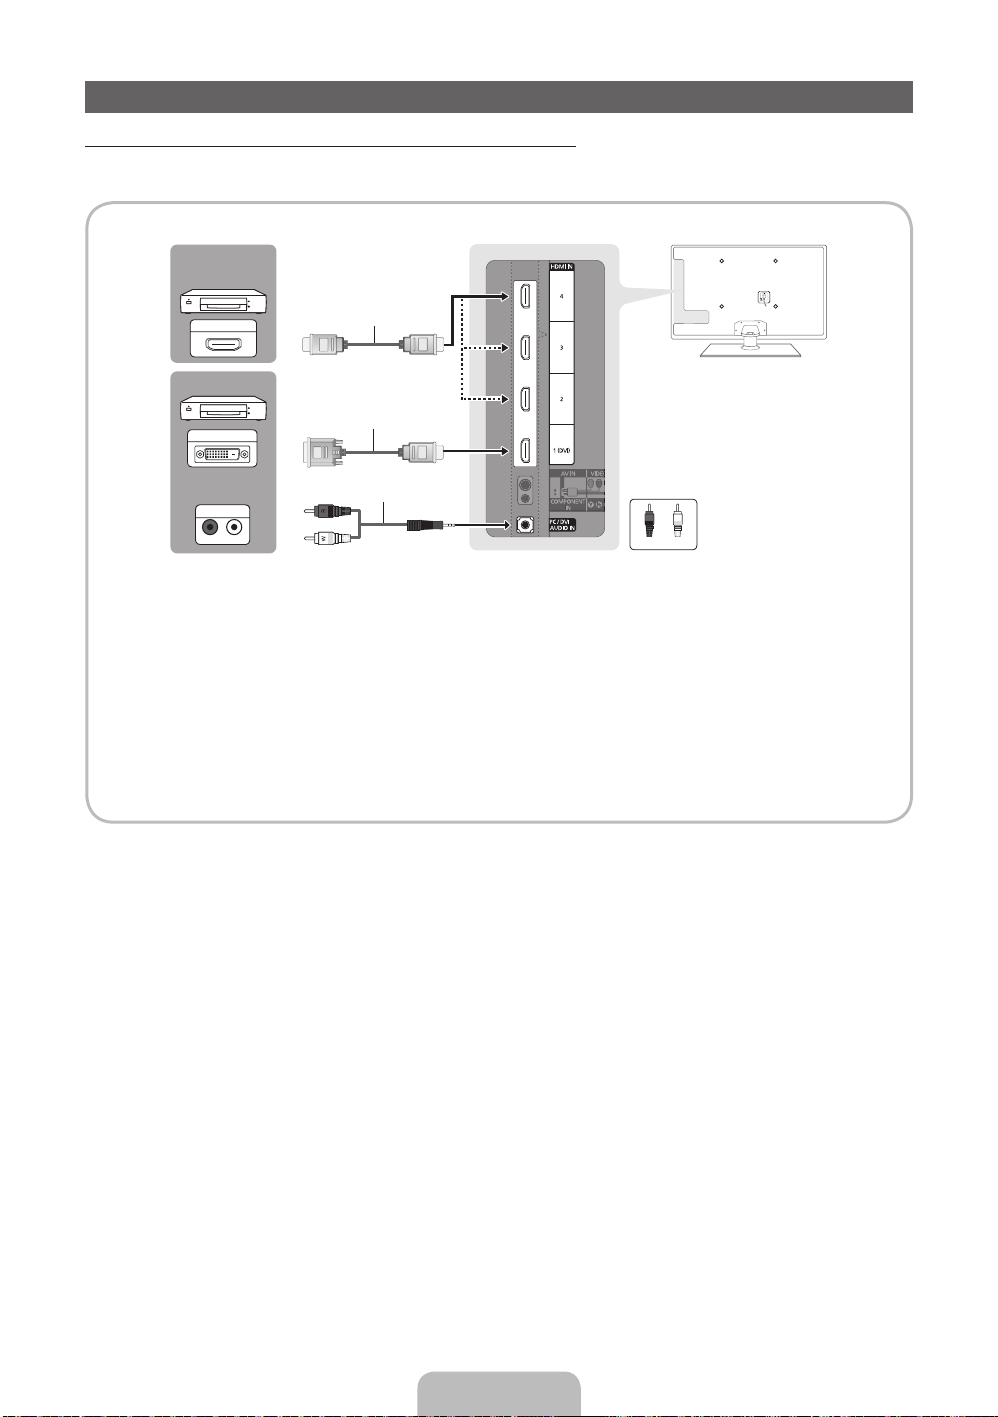
Connecting to an AV Device
R-AUDIO-L
Using an HDMI or an HDMI to DVI Cable: HD connection (up to 1080p)
We recommend using the HDMI connection for the best quality HD picture.
Available devices: DVD player, Blu-ray player, HD cable box, HD STB (Set-Top-Box) satellite receiver
Device
HDMI OUT
Device
DVI OUT
AUDIO OUT
✎
HDMI IN 1 (DVI), 2, 3, 4 / PC/DVI AUDIO IN
When using an HDMI/DVI cable connection, you must use the HDMI IN 1 (DVI) jack for video. A DVD player,
x
Blu-ray player, HD cable box, or HD STB satellite receiver may require a DVI-HDMI (DVI to HDMI) cable or DVIHDMI (DVI to HDMI) adapter. You must use the PC/DVI AUDIO IN jack for audio.
Be sure to use an HDMI cable with a thickness of 14 mm or less.
x
The picture may not display normally (if at all) or the audio may not work if you connect an external device that
x
uses an older version of HDMI mode is connected to the TV. If such a problem occurs, ask the manufacturer
of the external device about the HDMI version and, if out of date, request an upgrade.
Be sure to purchase a certified HDMI cable. Otherwise, the picture may not display or a connection error may
x
occur.
HDMI Cable (Not Supplied)
HDMI to DVI Cable (Not Supplied)
Audio Cable (Not Supplied)
WR
WhiteRed
English - 10
Page 11
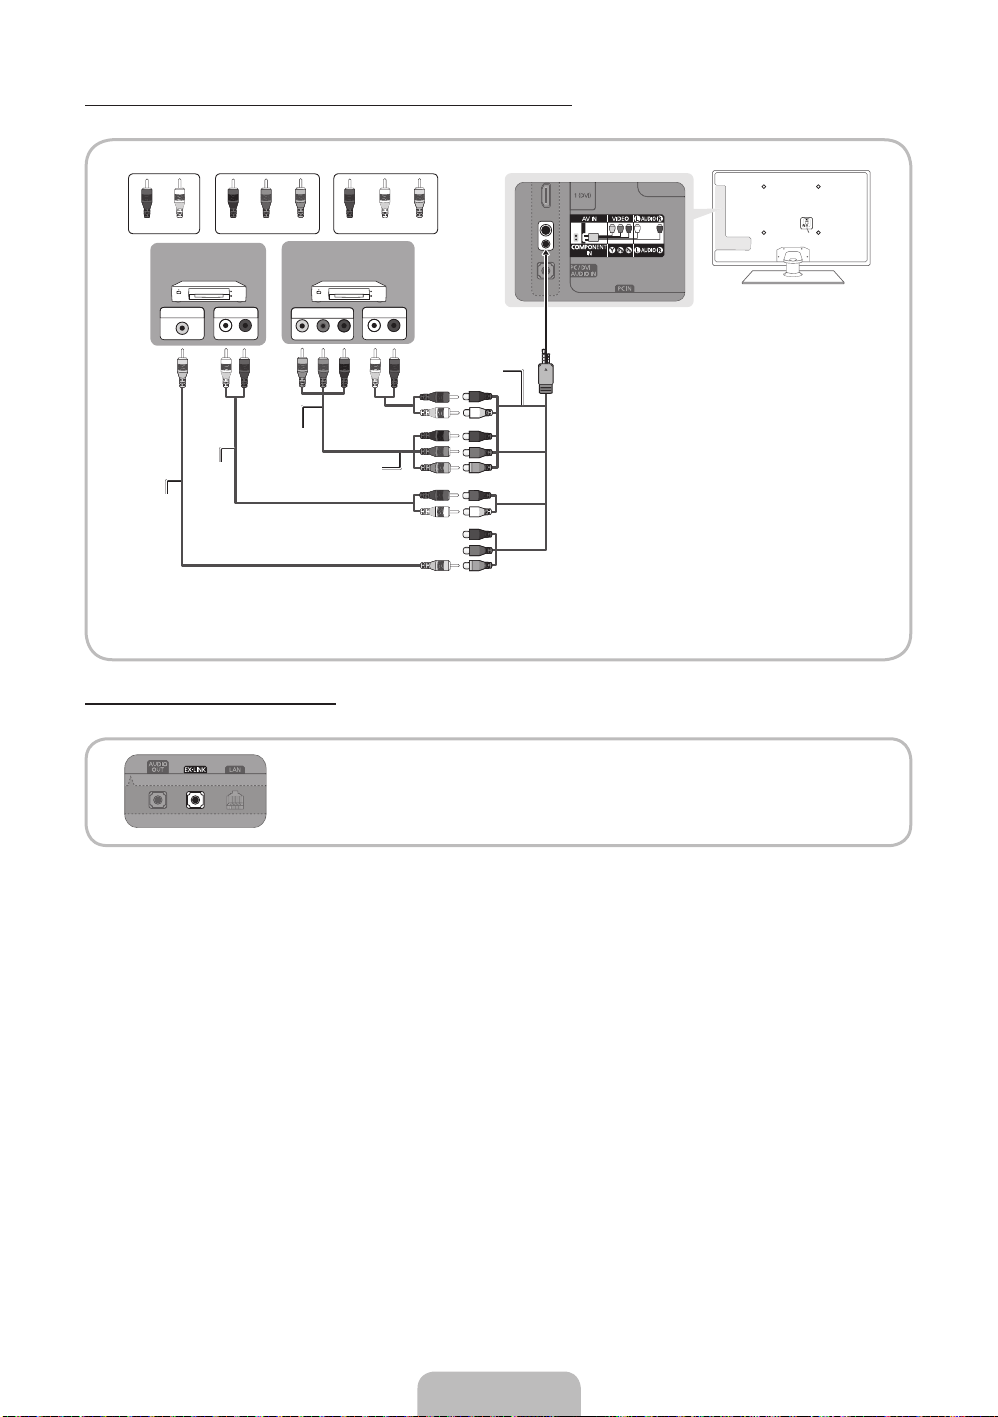
Using a Component (up to 1080p) or an Audio/Video (480i only) Cable
Available devices: DVD player, Blu-ray player, cable box, STB satellite receiver, VCR
R W R
R
G
B
R
Y
W
Y
W
Red White Red RedBlue WhiteGreen Yellow
DeviceDevice
VIDEO OUT AUDIO OUT
R-AUDIO-L
W
Y
Audio Cable
(Not Supplied)
Video Cable
(Not Supplied)
✎
For better picture quality, we recommend the Component connection over the A/V connection.
✎
When connecting to AV IN, the color of the AV IN [VIDEO] jack (green) will not match the video cable (yellow).
R
COMPONENT OUT
G
G
Component Cable
(Not Supplied)
PRPB
B
(Not Supplied)
AUDIO OUT
R
Audio Cable
R-AUDIO-L
RRW
Component Adapter
(Supplied)
W
R
B
G
R
W
Y
Using an EX-Link Cable Connection
Available Devices: External devices that support EX-Link.
EX-LINK: Connector for service only.
English - 11
Page 12
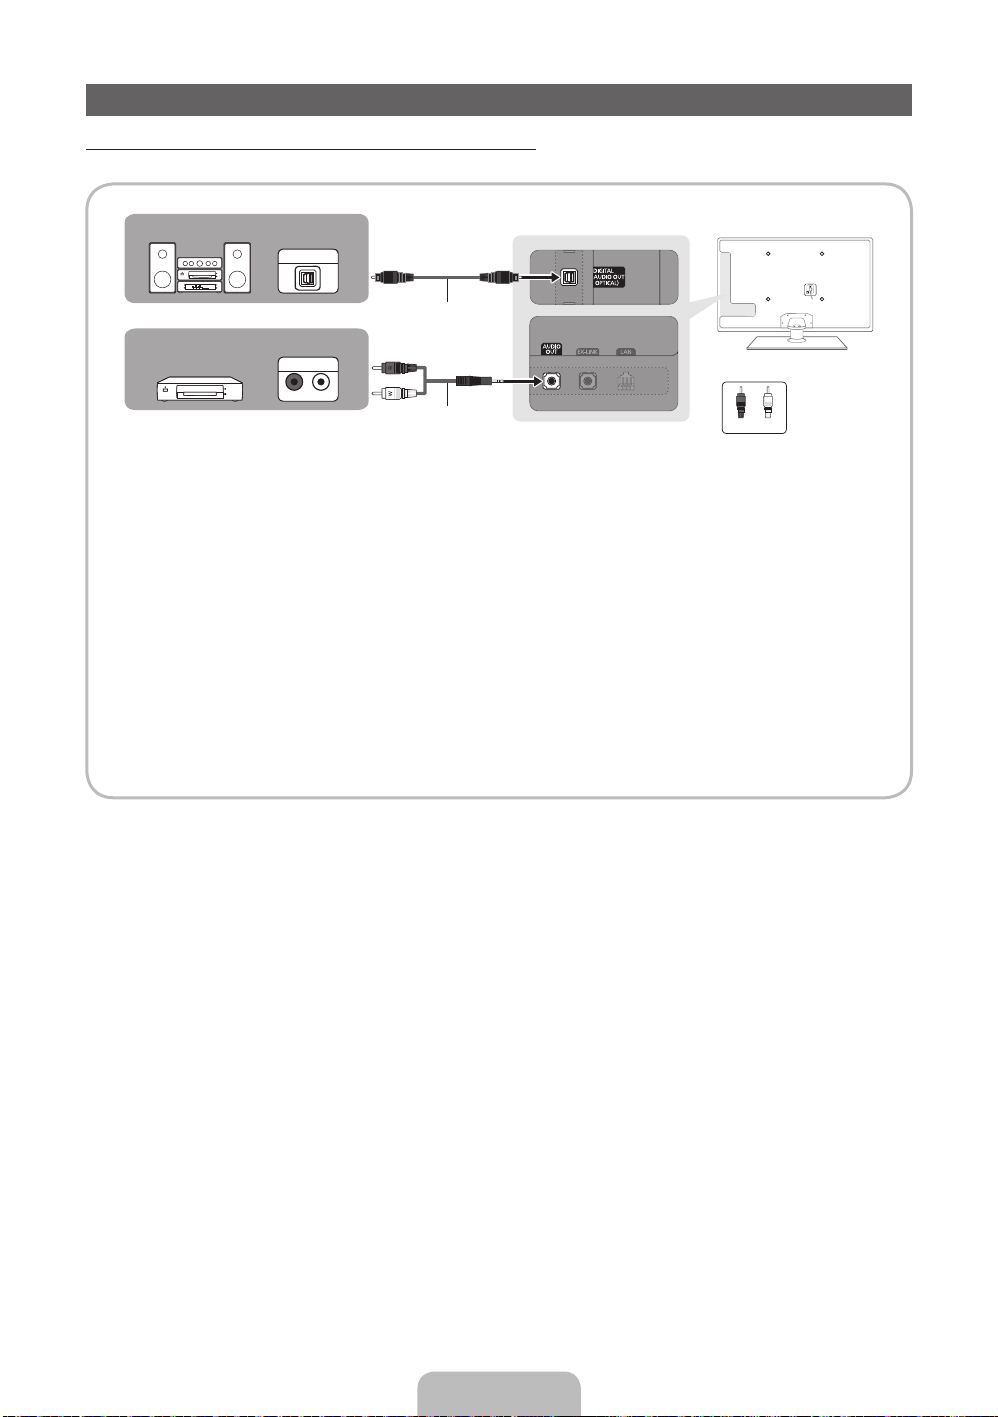
Connecting to an Audio Device
R-AUDIO-L
Using an Optical (Digital) or an Audio (Analog) Cable Connection
Available devices: Digital Audio System, Amplifier, DVD home theater
Digital Audio System
OPTICAL
Optical Cable (Not Supplied)
Amplifier /
DVD home theater
✎
DIGITAL AUDIO OUT (OPTICAL)
When you connect a Digital Audio System to the DIGITAL AUDIO OUT (OPTICAL) jack, decrease the volume
x
of both the TV and the system.
5.1 CH (channel) audio is available when you connect the TV to an external device supporting 5.1 CH.
x
When the receiver (home theater) is set to on, you can hear sound output from the TV’s optical jack. When the
x
TV is receiving a DTV signal, the TV will send 5.1 CH sound to the home theater receiver. When the source is
a digital component such as a DVD player / Blu-ray player / cable box / STB (Set-Top-Box) satellite receiver
and you connected it to the T V via HDMI, you will only hear 2 CH audio from the home theater receiver. If you
want to hear 5.1 CH audio, connect the digital audio out jack from your DVD / Blu-ray player / cable box / STB
satellite receiver directly to an amplifier or home theater.
✎
AUDIO OUT: Connects to the audio input jacks on your amplifier/DVD home theater.
When connecting, use the appropriate connector.
x
When you connect an audio amplifier to the AUDIO OUT jacks, decrease the volume of the TV and adjust the
x
volume level with the amplifier’s volume control.
AUDIO IN
Audio Cable (Not Supplied)
WR
Red White
English - 12
Page 13
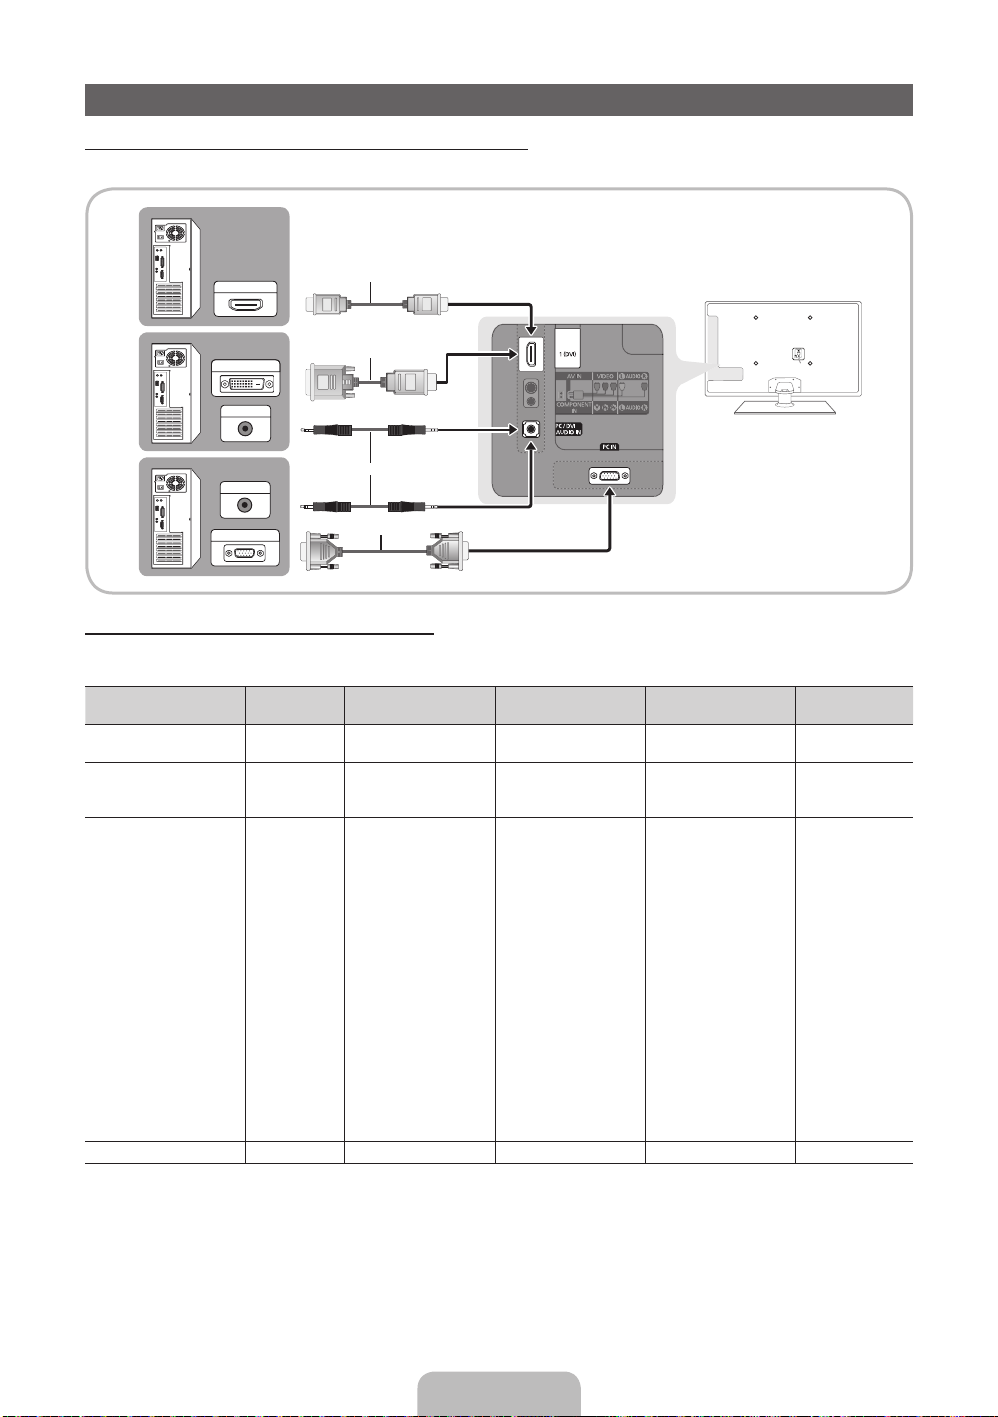
Connecting to a PC
Using an HDMI cable or an HDMI to DVI cable or a D-sub cable
✎
Your PC may not support an HDMI connection.
HDMI OUT
DVI OUT
AUDIO OUT
AUDIO OUT
PC OUT
HDMI Cable (Not Supplied)
HDMI to DVI Cable (Not Supplied)
Audio Cable (Not Supplied)
D-Sub Cable (Not Supplied)
PC Display Modes (D-Sub and HDMI to DVI Input)
Optimal PC resolution is 1920 X 1080 @ 60 Hz. You can also select one of the standard resolutions listed in the Resolution
column. The TV will automatically adjust to the resolution you choose.
Mode Resolution
IBM
MAC
VESA DMT
VESA DMT / DTV CEA
✎
NOTE
For HDMI/DVI cable connection, you must use the HDMI IN 1 (DVI) jack.
x
The interlaced mode is not supported.
x
The set may operate abnormally if you select a non-standard video format.
x
Separate and Composite modes are supported. SOG (Sync On Green) is not supported.
x
640 x 350
720 x 400
640 x 480
832 x 624
1152 x 870
640 x 480
640 x 480
640 x 480
800 x 600
800 x 600
800 x 600
1024 x 768
1024 x 768
1024 x 768
1152 x 864
1280 x 1024
1280 x 1024
1280 x 800
1280 x 800
1280 x 960
1360 x 768
1440 x 900
1440 x 900
1680 x 1050
1920 x 1080p 67.500 60.000 148.500 +/+
Horizontal Frequency
(KHz)
31.469
31.469
35.000
49.726
68.681
31.469
37.861
37.500
37.879
48.077
46.875
48.363
56.476
60.023
67.500
63.981
79.976
49.702
62.795
60.000
47.712
55.935
70.635
65.290
Vertical Frequency
(Hz)
70.086
70.087
66.667
74.551
75.062
59.940
72.809
75.000
60.317
72.188
75.000
60.004
70.069
75.029
75.000
60.020
75.025
59.810
74.934
60.000
60.015
59.887
74.984
59.954
Pixel Clock Frequency
(MHz)
25.175
28.322
30.240
57.284
100.000
25.175
31.500
31.500
40.000
50.000
49.500
65.000
75.000
78.750
108.000
108.000
135.000
83.500
106.500
108.000
85.500
106.500
136.750
146.250
Sync Polarity
(H / V)
+/-
-/+
-/-
-/-
-/-
-/-
-/-
-/+/+
+/+
+/+
-/-
-/+/+
+/+
+/+
+/+
-/+
-/+
+/+
+/+
-/+
-/+
-/+
English - 13
Page 14
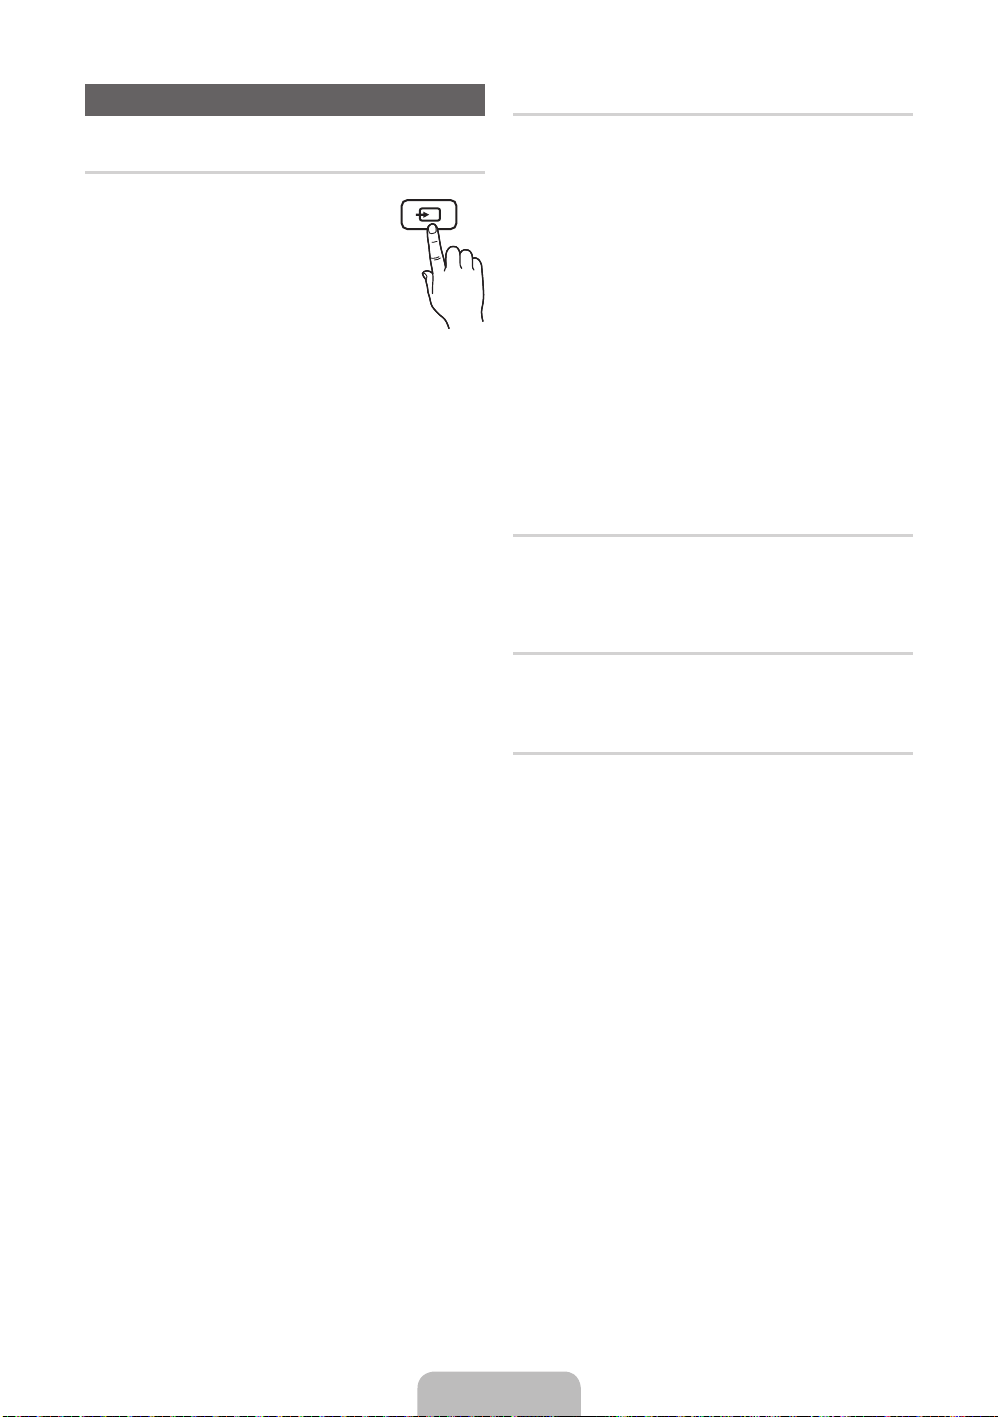
Changing the Input Source
SOURCE
Source
Use to select TV or an external input source
such as a DVD player / Blu-ray player / cable
box / STB satellite receiver.
✎■ TV / PC / AV / Component /
HDMI1/DVI / HDMI2 / HDMI3 / HDMI4 /
USB / AllShare
1. Press the SOURCE button on your
remote.
2. Select a desired external input source.
✎
You can only choose external devices that are
connected to the TV. In Source, connected inputs will
be highlighted.
✎
In Source, PC always stays activated.
Edit Name
Edit Name lets you associate a device name to an input
source. To access Edit Name, press the TOOLS button In
Source. The following selections appear under Edit Name:
■ VCR / DVD / Cable STB / Satellite STB / PVR STB /
AV Receiver / Game / Camcorder / PC / DVI PC / DVI
Devices / TV / IPTV / Blu-ray / HD DVD / DMA: Name
the device connected to the input jacks to make your
input source selection easier.
✎
If you have connected a PC to the HDMI IN 1 (DVI)
port with an HDMI cable, select PC under Edit Name
to enter a device name.
✎
If you have connected a PC to the HDMI IN 1 (DVI)
port with an HDMI to DVI cable, select DVI PC under
Edit Name to enter a device name.
✎
If you connected an AV device to the HDMI IN 1 (DVI)
port with an HDMI to DVI cable, select DVI Devices
under Edit Name to enter a device name.
Edit Favorites
In Source, press the TOOLS button to select Edit
Favorites. You can set an external input source as a
Favorites.
Information
You can see detailed information about the selected external
device.
Refresh
In Source, If the external devices are not displayed, press
the TOOLS button to select Refresh, then search for the
connected devices.
English - 14
Page 15
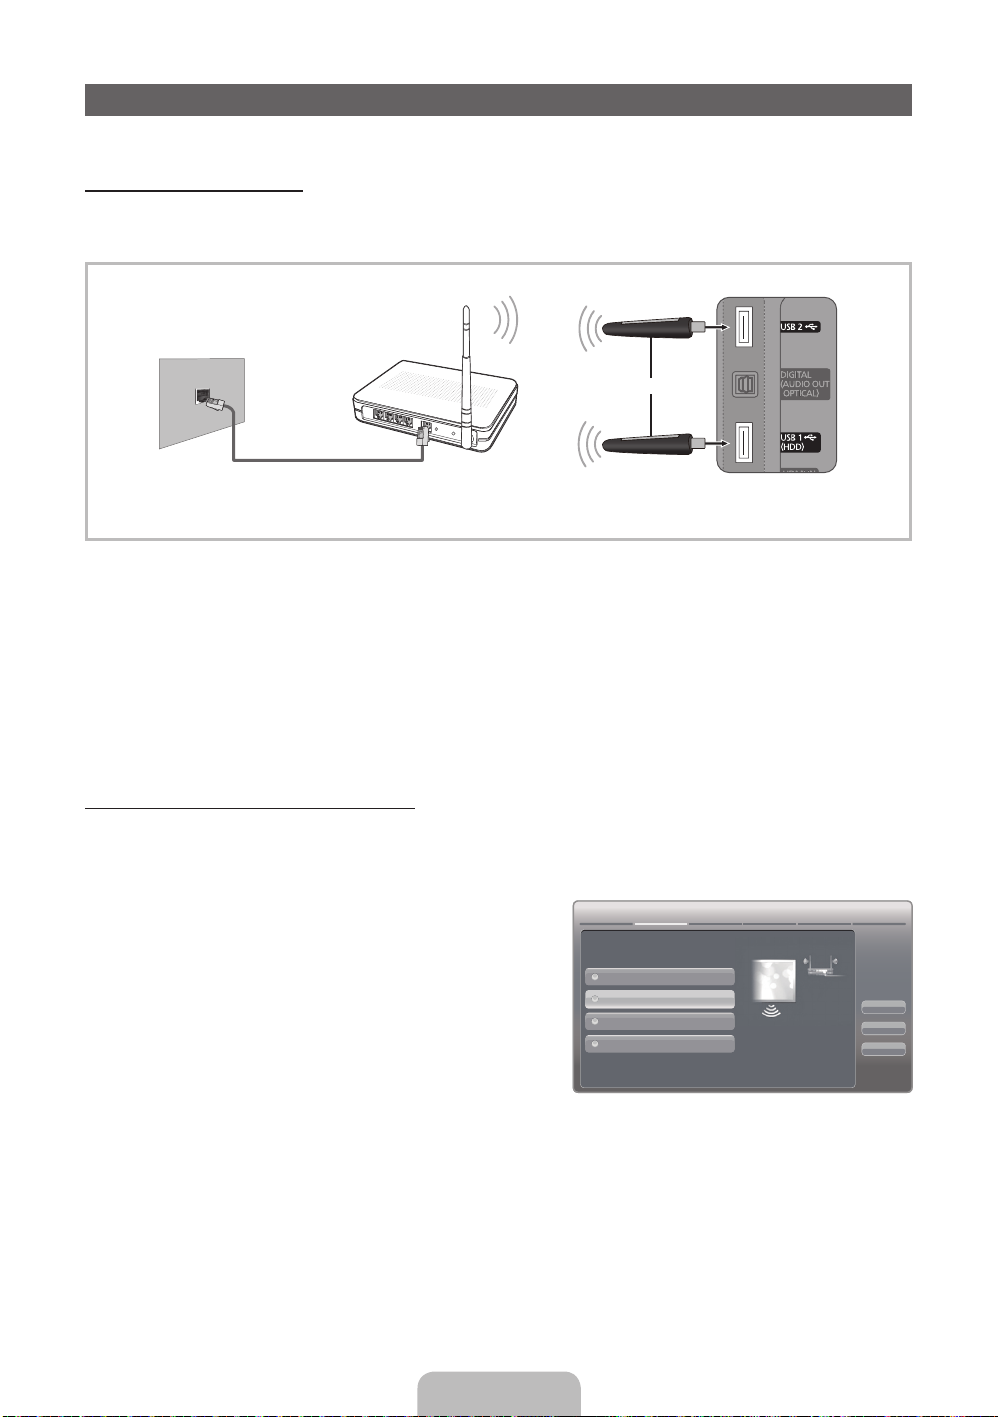
Network Connection
You can set up your TV so that it can access the Internet through your local area network (LAN) using a wired or wireless
connection.
Network Connection - Wireless
You can connect your TV to your LAN through a standard wireless router or modem. To connect wirelessly, you must first
attach a “Samsung Wireless LAN Adapter” (WIS09ABGN, WIS09ABGN2, or WIS10ABGN - sold seperately) to either the USB
1 (HDD) or USB 2 port on the back of your TV. See the illustration below.
Wireless IP sharer
The LAN Port on the Wall
(AP having DHCP server)
or
LAN Cable
Samsung
Wireless LAN Adapter
TV Rear Panel
Samsung’s Wireless LAN adapter is sold separately and is offered by select retailers, Ecommerce sites and Samsungparts.
com. Samsung’s Wireless LAN adapter supports the IEEE 802.11a/b/g and n communication protocols. Samsung
recommends using IEEE 802.11n. When you play the video over a IEEE 802.11b/g connection, the video may not play
smoothly.
Most wireless network systems incorporate a security system that requires devices that access the network through an access
point or AP (typically a wireless IP Sharer - router or modem) to transmit an encrypted security code called an access key.
Your TV is compatible with the following security protocols:
y Authentication Mode: OPEN, SHARED, WPAPSK, WPA2PSK
y Encryption Type: WEP, TKIP, AES
If you select Pure High-throughput (Greenfield) 802.11n mode and the Encryption type is set to WEP, TKIP or TKIP AES
(WPS2Mixed) on your AP, Samsung TVs will not support a connection in compliance with new Wi-Fi certification specifications.
Configuring the Network Connection - Wireless
The instructions below are for networks that use the Dynamic Host Configuration Protocol (DHCP) to configure network
connections automatically. If your have a Static IP network, see your user’s manual for configuration instructions.
To configure your network connection for a network that uses DHCP, follow these steps:
1. Connect your TV to your network as shown in the illustrations above.
2. Turn on your TV, press the MENU button on your remote, and
Network Settings
then select Network → Network Settings.
3. Select the Wireless (General), press ENTER
E
, and then
press ENTERE again.
4. The Network function searches for available wireless networks.
When done, it displays a list of the available networks.
5. In the list of networks, press the ▲ or ▼ button to select a
network, select Next, and then press ENTER
E
.
Select a network connection type.
Wired
Wireless(General)
WPS(PBC)
One Foot Connection
Set up wireless network by
selecting your Wireless Router.
you may need to enter security
key depending on the setting of
the Wireless Router.
Previous
Next
Cancel
6. If you have selected a wireless router that has security, the
Security Key screen appears. Enter the Security key (Security
key or PIN), select Next, and then press ENTER
✎
When you enter the Security Key (Security key or PIN), use the ▲ / ▼ / ◄ / ► buttons on your remote to select
E
.
numbers and characters.
7. The Network Connection screen appears and verifies the network connection. When the connection has been verified, the
“Internet connection successful.” message appears. Network set up is complete.
✎
For more detailed information, see “Wireless Network Connection” in the e-Manual.
English - 15
Page 16
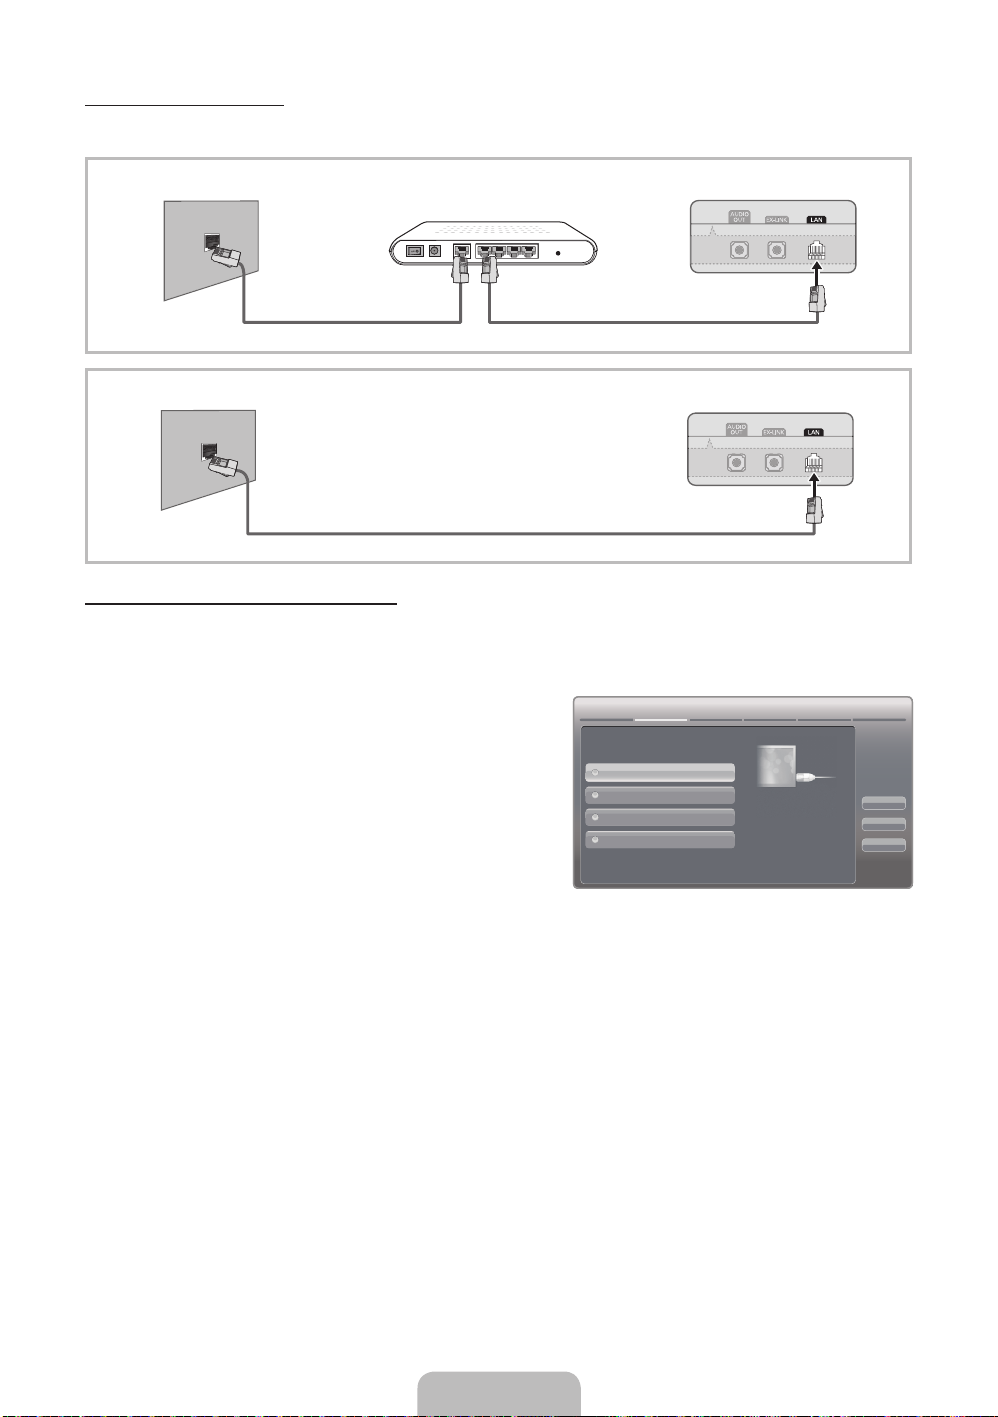
Network Connection - Wired
There are two main ways to connect your TV to your network using cable, depending on your network setup. They are
illustrated below:
The Modem Port on the Wall
The LAN Port on the Wall TV Rear Panel
Extternal Modem
(ADSL / VDSL / Cable TV)
LAN CableModem Cable
LAN Cable
TV Rear Panel
Configuring the Network Connection - Wired
Most home networks use the Dynamic Host Configuration Protocol (DHCP) to configure network connections. Home networks
that support DHCP automatically provide the IP address, subnet mask, gateway, and DNS values your TV needs to access the
Internet so you don’t have to enter them manually.
To configure your network connection for a network that uses DHCP, follow these steps:
1. Connect your TV to your network as shown in one of the
illustrations above.
2. Turn on your TV, press the MENU button on your remote, and
then select Network → Network Settings. The Network
Settings screen will appear.
3. Select Wired, press ENTER
E
, and then press ENTERE
again.
4. The Network Connection screen appears, and verifies the
Network Settings
Select a network connection type.
Wired
Wireless(General)
WPS(PBC)
One Foot Connection
Connect to the network using LAN
cable. Please make sure that the
LAN cable is connected.
Previous
Next
Cancel
network connection. When the connection has been verified,
the “Internet connection successful.” message appears.
Network set up is completed.
✎
If your TV cannot acquire network the connection values
automatically or if you want to set the connection manually, select IP Settings on the network test screen. Set Internet
Protocol Setup to Manual. You must enter the IP Address, Subnet Mask, Gateway, and DNS Server manually.
✎
For more detailed information, see “Wired Network Connection” in the e-Manual.
English - 16
Page 17
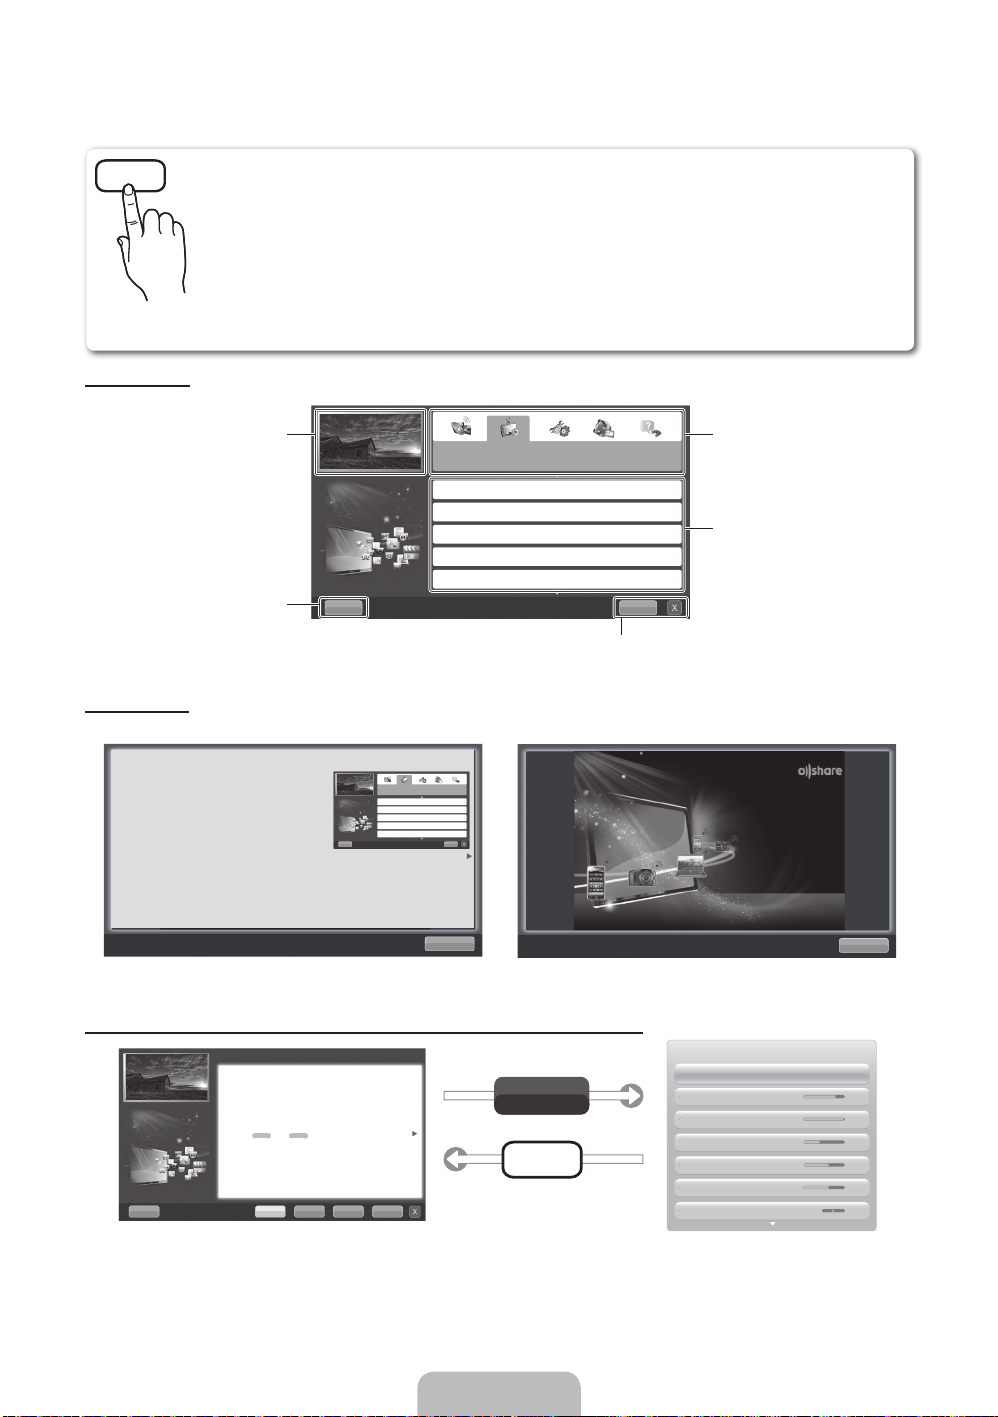
How to view the e-Manual
E-MANUAL
You can fi nd instructions for your TV’s features in the e-Manual in your TV. To use the e-Manual, press
the E-MANUAL button on your remote. Move the cursor using the u / d / l / r buttons to highlight a
category, then a topic, and then press the ENTERE button. The e-Manual displays the page you want to
see.
You can also access it through the menu:
O
MENUm → Support → e-Manual → ENTER
✎
If you want to return to the e-Manual, press the E-MANUAL button on your remote.
✎
You cannot use Try Now function if the menu is not activated.
Screen Display
TV Screen: Displays the program,
movie, video, etc. you are currently
watching.
Basic Features
Changing the Preset Picture Mode
Adjusting Picture Settings
Changing the Picture Size
Changing the Picture Options
Setting up the TV with Your PC
Help: Displays the e-Manual
Guide or Product Guide. Press
ENTER
E
button.
Using the Help
Display the e-Manual Guide & the Product Guide by pressing Help.
E
IndexHelp
Index: Displays the Index screen.
X: Exit the e-Manual.
The category list. Press
l
or r
button to select the category you
want.
Displays the sub-menu list. Use
the arrow buttons on your remote
to move the cursor. Press the
ENTER
E
button to select the sub-
menu you want.
How to view the e-Manual
You can fi nd instructions about your TV’s features
in the e-Manual in your TV. To use, press the
E-MANUAL button on your remote. Move the cursor
using the
u
/ d / l / r buttons to highlight a
category, then a topic, and then press the ENTERE
button. The e-Manual displays page you want to see.
You can also access it through the menu:
m
→ Support → e-Manual → ENTER
O MENU
N If you want to return to the e-Manual, press the E-MANUAL button on your remote.
N You cannot use Try Now function if the menu is not activated.
Basic Features
Changing the Preset Picture Mode
Adjusting Picture Settings
Changing the Picture Size
Changing the Picture Options
Setting up the TV with Your PC
E
IndexHelp
Return
<e-Manual Guide>
The e-Manual guide appears as above.
The product guide appears as above.
How to toggle between an e-Manual topic and the corresponding OSD menu(s).
Basic Features > Changing the Preset Picture Mode (1/1)
Changing the Preset Picture Mode
■
Picture Mode t
Select your preferred picture type.
N In PC mode, you can only select Entertain and Standard.
• Dynamic: Suitable for a bright room.
• Standard: Suitable for a normal environment.
for LED TV
for PDP TV
/ Relax
• Natural
• Movie: Suitable for watching movies in a dark room.
• Entertain: Suitable for watching movies and games.
Help Try Now Home Zoom Index
✎
This function is not enabled in some menus.
: Suitable for reducing eye strain.
Try Now
E-MANUAL
Sync media from multiple devices with AllShare
AllShare™ syncs your digital devices so you can
enjoy music, movies and photos from your PC,
camera and mobile devices, on your larger TV
screen. Connects you to multiple PCs, as well.
<Product Guide>
Picture
Picture Mode Standard
Backlight 14
Contrast 100
Brightness 45
Sharpness 50
Color 50
Tint (G/R) G 50 R 50
Return
English - 17
Page 18
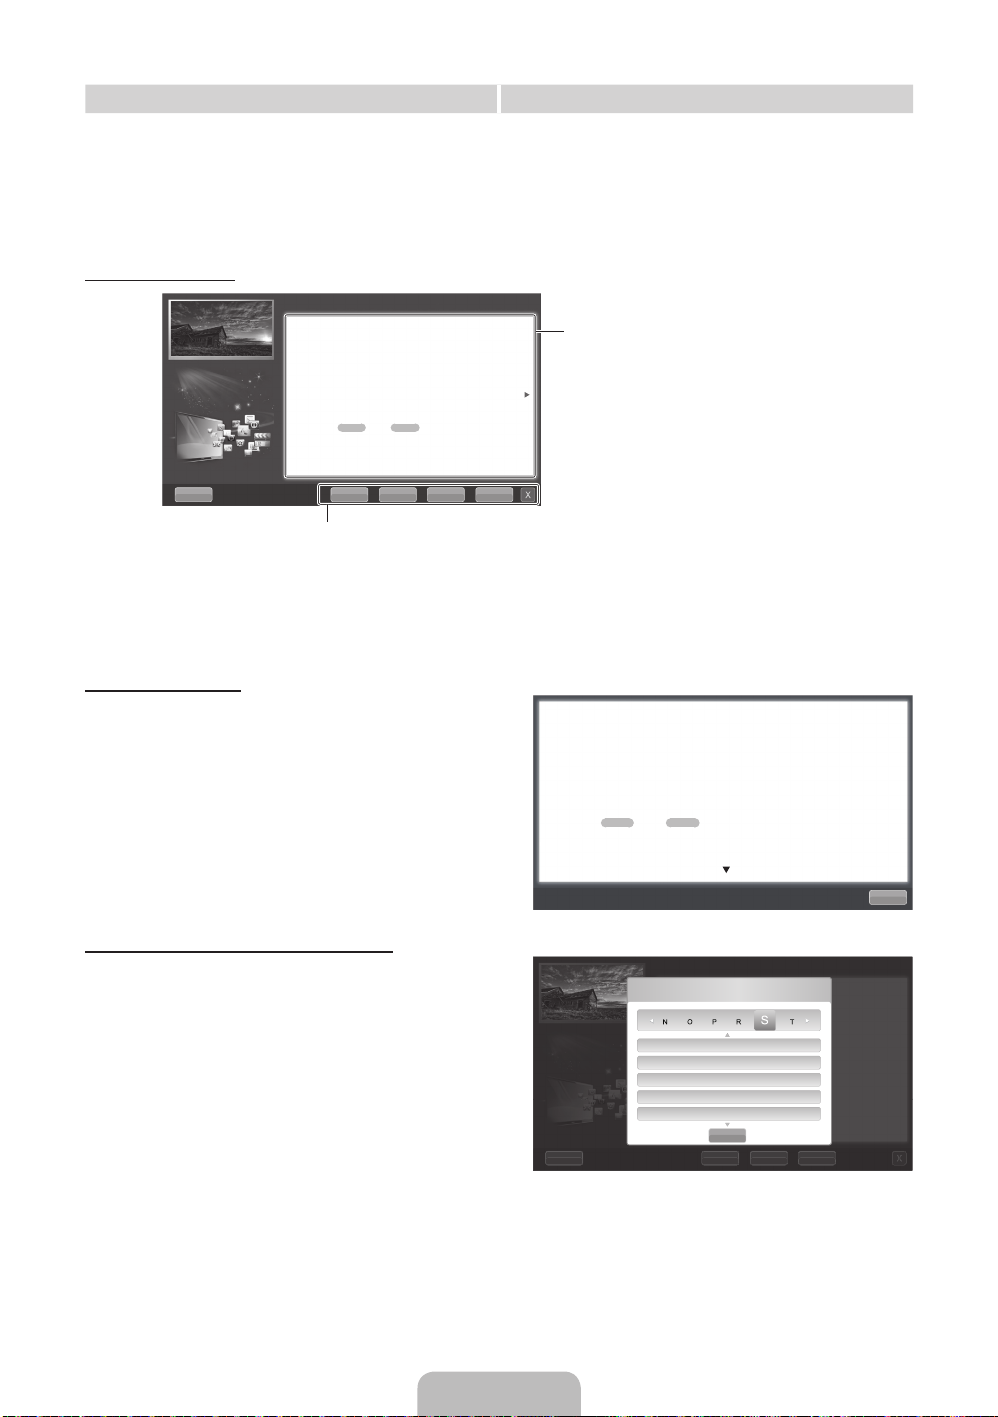
Method 1 Method 2
1. If you want to use the menu that corresponds to an
e-Manual topic, press the red button to select Try Now.
2. To return to the e-Manual screen, press the E-MANUAL
button.
Viewing the Contents
Basic Features > Changing the Preset Picture Mode (1/1)
Changing the Preset Picture Mode
O MENUm → Picture → Picture Mode → ENTER
■
Picture Mode t
Select your preferred picture type.
N When an input source is set to PC, the Picture Mode is only available
the Standard and Entertain.
• Dynamic: Suitable for a bright room.
• Standard: Suitable for a normal environment.
for LED TV
for PDP TV
• Natural
• Movie: Suitable for watching movies in a dark room.
• Entertain: Suitable for watching movies and games.
Help Try Now Home Zoom Index
/ Relax
E
: Suitable for reducing eye strain.
Try Now: Displays the OSD menu that corresponds to the topic. To return
to the e-Manual screen, press the E-MANUAL button.
Home: Moves to the e-Manual home screen.
Zoom: Magnifies a screen.
Index: Displays index screen.
Using the Zoom mode
Select Zoom, and then press ENTER
E
to magnify the
screen. You can scroll through the magnified screen by using
the u or d buttons.
✎
To return to the screen to normal size, press the
RETURN button.
1. Press the ENTER
E
button when a topic is displayed.
“Do you want to execute this?” appears. Select Yes,
and then press the ENTERE button. The OSD window
appears.
2. To return to the e-Manual screen, press the E-MANUAL
button.
Contents Area: Contains the topic contents
if you selected a sub-menu. To move to the
previous or next page, press the
Changing the Preset Picture Mode
O MENUm → Picture → Picture Mode → ENTER
■
Picture Mode t
Select your preferred picture type.
N In PC mode, you can only select Entertain and Standard.
• Dynamic: Suitable for a bright room.
• Standard: Suitable for a normal environment.
for LED TV
• Natural
• Movie: Suitable for watching movies in a dark room.
• Entertain: Suitable for watching movies and games.
/ Relax
for PDP TV
l
or r button.
E
: Suitable for reducing eye strain.
How to search for a topic on the index page
1. To search for a topic, press the l or r button to select
a letter, and then press ENTERE. The Index displays a
list of topics and keywords that begin with the letter you
selected.
2. Press the
u
or d button to select a topic or keyword
you want, and then press the ENTERE button to select
a topic you want to see.
3. The e-Manual page with the topic appears.
✎
To close the Index screen, press the Close button.
English - 18
Return
Basic Features > Changing the Preset Picture Mode (1/1)
Index
Source
Speaker Select
Specications
Standby mode
Subtitle
Close
Help Try Now Home Zoom
Page 19
Troubleshooting
If the TV seems to have a problem, first review this list of possible problems and solutions. Also review the Troubleshooting
section in the e-Manual. If none of the troubleshooting tips apply, visit “www.samsung.com,” and then click on Support, or call
Samsung customer service at 1-800-SAMSUNG.
Issues Solutions and Explanations
The TV won’t turn on. • Make sure the AC power cord is securely plugged in to the wall outlet and the TV.
There is no picture/video. • Check the cable connections. Remove and reconnect all cables connected to the TV and external
The remote control does not work. • Replace the remote control batteries. Make sure the batteries are installed with their poles (+/–) in the
The cable/set top box remote control
doesn’t turn the TV on or off, or adjust the
volume.
✎
This TFT LED panel uses a panel consisting of sub pixels which require sophisticated technology to produce. However,
there may be a few bright or dark pixels on the screen. These pixels will have no impact on the performance of the
product.
✎
To keep your TV in optimum condition, upgrade to the latest firmware on the Samsung web site by USB (samsung.com →
Support → Downloads).
• Make sure the wall outlet is working.
• Try pressing the POWER button on the TV to make sure the problem is not the remote. If the TV turns
on, refer to “Remote control does not work” below.
devices.
• Set the video outputs of your external devices (Cable/Sat Box, DVD, Blu-ray etc) to match the TV
input connections. For example, if an external device’s output is HDMI, it should be connected to an
HDMI input on the TV.
• Make sure your connected devices are powered on.
• Be sure to select the correct input source by pressing the SOURCE button on the remote control.
• Reboot the connected device by unplugging and then reconnecting the device’s power cable.
correct direction.
• Clean the sensor’s transmission window on the remote.
• Try pointing the remote directly at the TV from 5~6 feet away.
• Program the Cable/Set remote control to operate the TV. Refer to the Cable/Set user manual for the
SAMSUNG TV code.
License
List of Features
Excellent Digital Interface & Networking: With a built-in HD digital tuner, your TV lets you watch non-subscription HD
broadcasts without a cable box or STB (Set-Top-Box) satellite receiver.
3D
This exciting new feature enables you to view 3D content.
SMART HUB
Your Gateway to all your content, integrated in one place.
y Provides diverse entertainment choices.
y Lets you control your entertainment life with an easy-to-use, user friendly UI.
y Gives you easy access to diverse Apps, with more being added every day.
y Lets you customize your TV by grouping and sorting Apps to your taste.
AllShare™
AllShare™ connects your TV and compatible Samsung mobile phones/devices through a network.
Anynet+(HDMI-CEC)
Allows you to control all connected Samsung devices that support anynet+ with your Samsung TV’s remote.
English - 19
Page 20
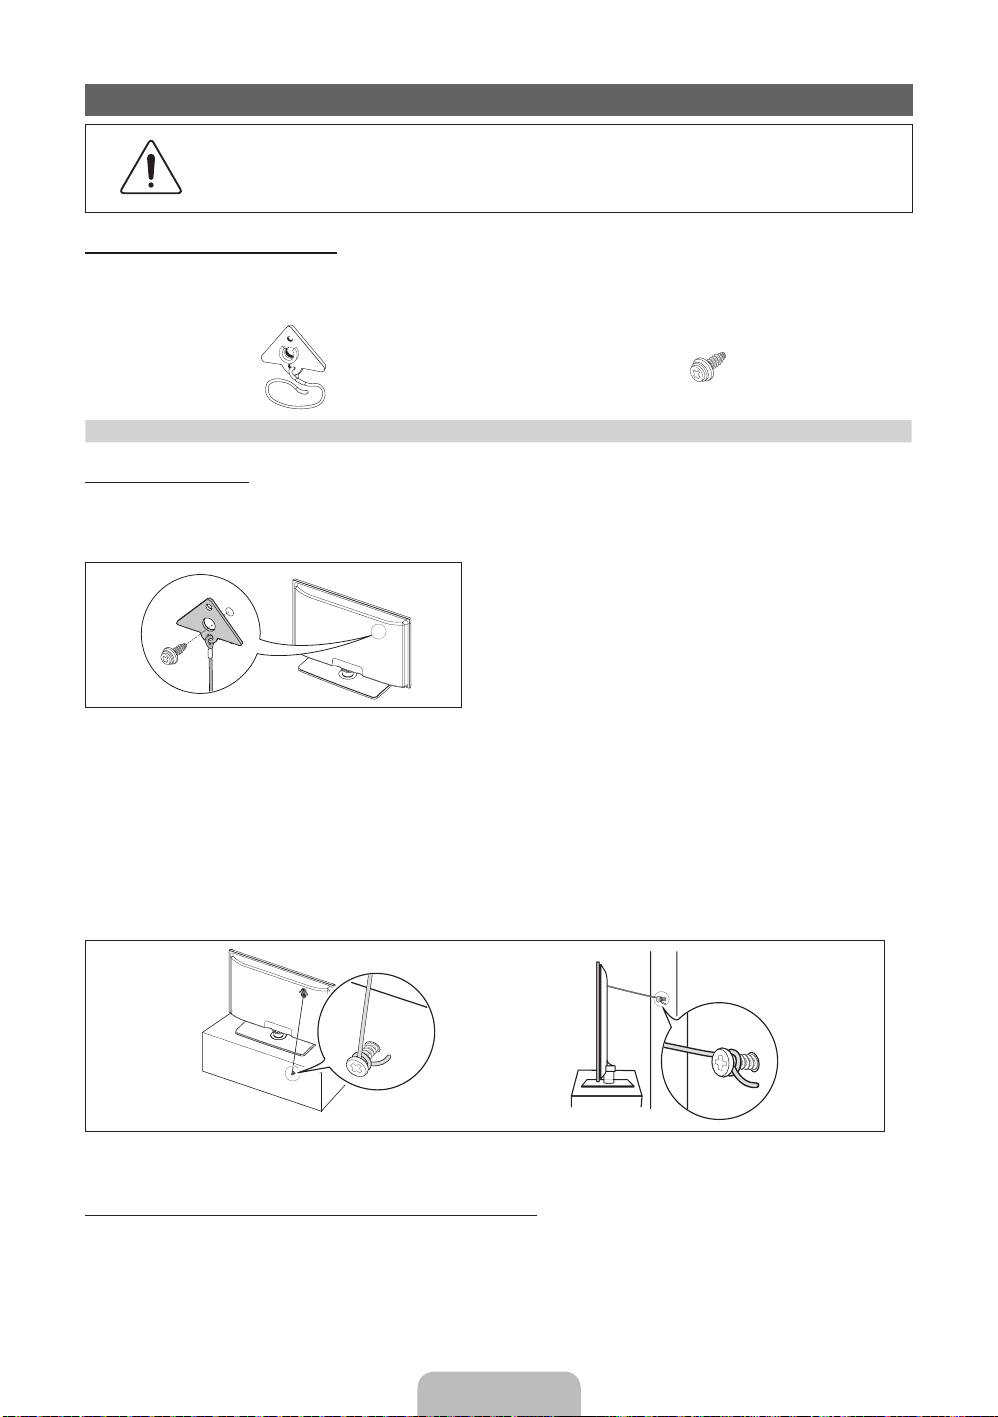
Securing the TV to the Wall
Caution: Pulling, pushing, or climbing on the TV may cause the TV to fall. In particular, ensure your
children do not hang over or destabilize the TV. Doing so may cause the TV to tip over, causing serious
injuries or death. Follow all safety precautions provided in the included Safety Flyer with your TV. For
added stability and safety, you can purchase and install the anti fall device as described below.
The TV-Holder Kit (Sold Separately):
The parts below are included in the TV Holder kit. In addition, you need to provide a wood screw, screw and molly, or other
screw appropriate for the wall or cabinet you intend to secure the TV-Holder string to. We recommend a size M4xL20 wood
screw.
TV-Holder (BN96-15753A) Screw (M8 X L19)
Installing the TV-Holder
1. Remove the screw attached to the back of your TV, and then connect the TV-Holder to the TV with the screw included in
the TV-Holder Kit that is designated for your TV.
✎
Make sure to use only the appropriate supplied screw. If you use a different screw, you can damage your TV.
2. Firmly fasten the screw you provided (size M4xL20 or similar) to the wall or cabinet where the TV is to be installed.
✎
If you fasten the screw to the wall, we recommend you drive the screw into a stud. If that is not possible, use a
molly to anchor the screw.
3. Tie the TV-Holder cord to the screw fastened on the wall or cabinet so that the TV is fixed. See the illustrations below.
✎
Install the TV close to the wall so that it does not fall.
✎
When attaching the TV-Holder cord to the wall, tie the cord level with the ground or slanted downwards for safety
purposes.
✎
Check the cord occasionally to make sure it is secure.
✎
Before moving the TV, separate the connected cord first.
4. Verify all connections are properly secured. Periodically check the connections for any sign of fatigue or failure. If you have
any doubt about the security of your connections, contact a professional installer.
To purchase the TV-Holder Kit, contact Samsung Customer Care
In the United States: 1-800-SAMSUNG (1-800-726-7864)
–
In Canada: 1-800-SAMSUNG (1-800-726-7864)
–
English - 20
Page 21
Storage and Maintenance
✎
If you attched some stickers on the TV screen, it remains some debris after removing the sticker. Please clean it to
watch TV.
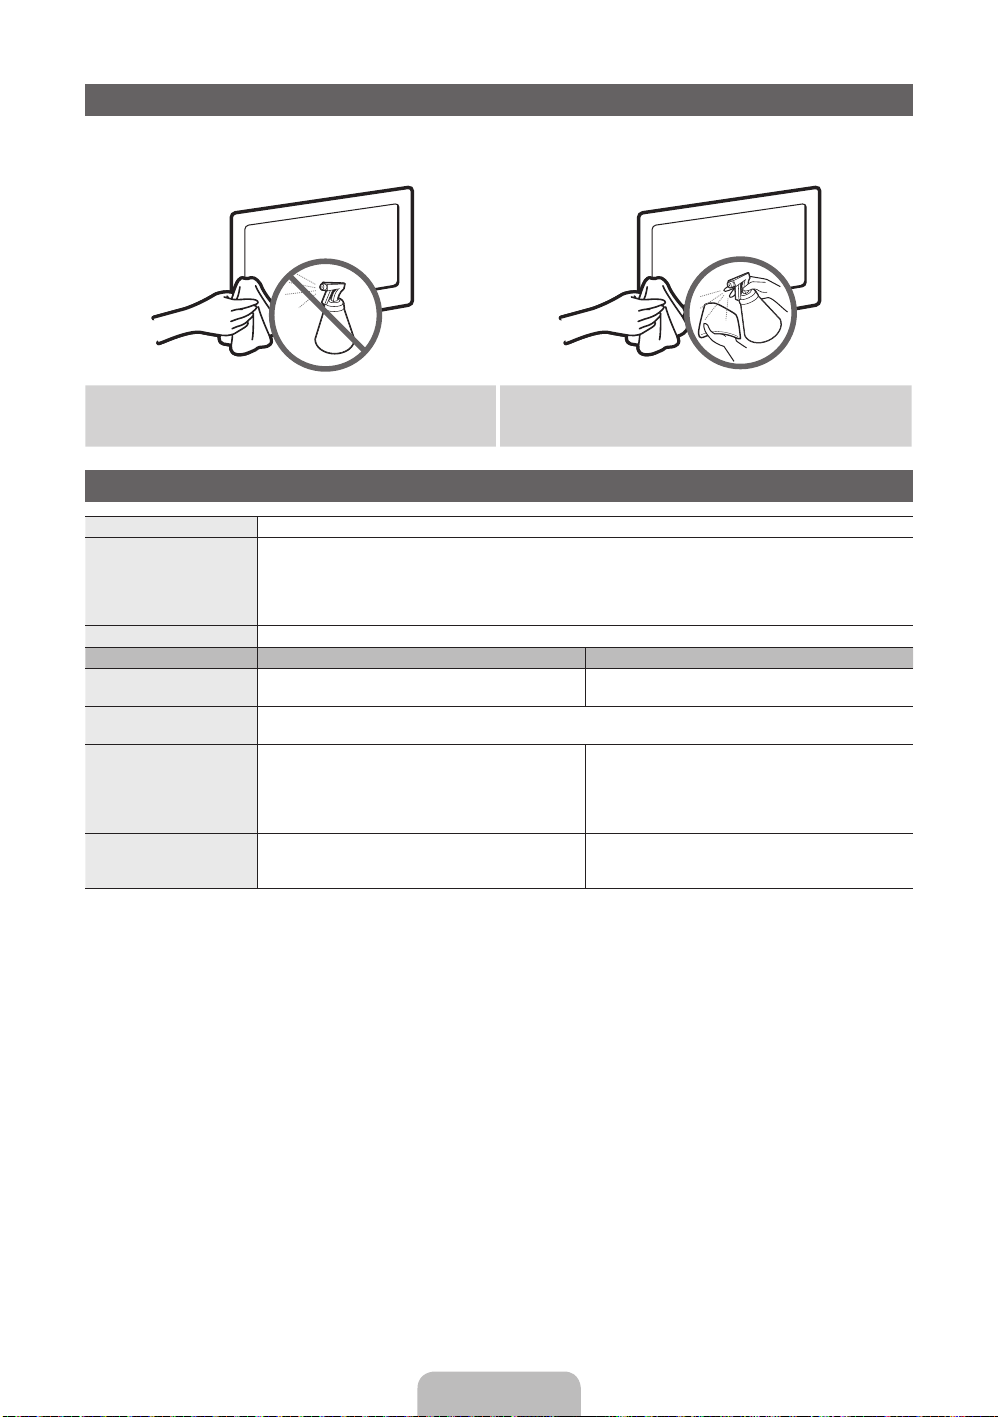
Do not spray water or a cleaning agent directly onto the
product. Any liquid that goes into the product may cause a
Clean the product with a soft cloth dampened with amount
of water.
failure, fire, or electric shock.
Specifications
Display Resolution 1920 x 1080
Environmental Considerations
Operating Temperature
Operating Humidity
Storage Temperature
Storage Humidity
Stand Swivel (Left / Right) -20˚ ~ 20˚
Model Name UN32D5550 UN40D5550
Screen Size
(Diagonal)
Sound
(Output) 10 W X 2
Dimensions (WxDxH)
Body
With stand
Weight
Without Stand
With Stand
✎
Design and specifications are subject to change without prior notice.
✎
This device is a Class B digital apparatus.
✎
For information about the power supply, and more about power consumption, refer to the label attached to the product.
32˝ Class
(31.4˝ measured diagonally)
37.6 x 1.2 x 22.6 inches
(955.8 x 29.9 x 574.0 mm)
37.6 x 10.0 x 25.1 inches
(955.8 x 255.0 x 638.5 mm)
15.9 lbs (7.2 kg)
22.0 lbs (10.0 kg)
50°F to 104°F (10°C to 40°C)
10% to 80%, non-condensing
-4°F to 113°F (-20°C to 45°C)
5% to 95%, non-condensing
40˝ Class
(39.7˝ measured diagonally)
30.2 x 1.2 x 18.4 inches
(768.0x 29.9 x 468.2 mm)
30.2 x 9.4 x 20.9 inches
(768.0 x 240.0 x 532.1 mm)
24.5 lbs (11.1 kg)
31.7 lbs (14.4 kg)
English - 21
Page 22
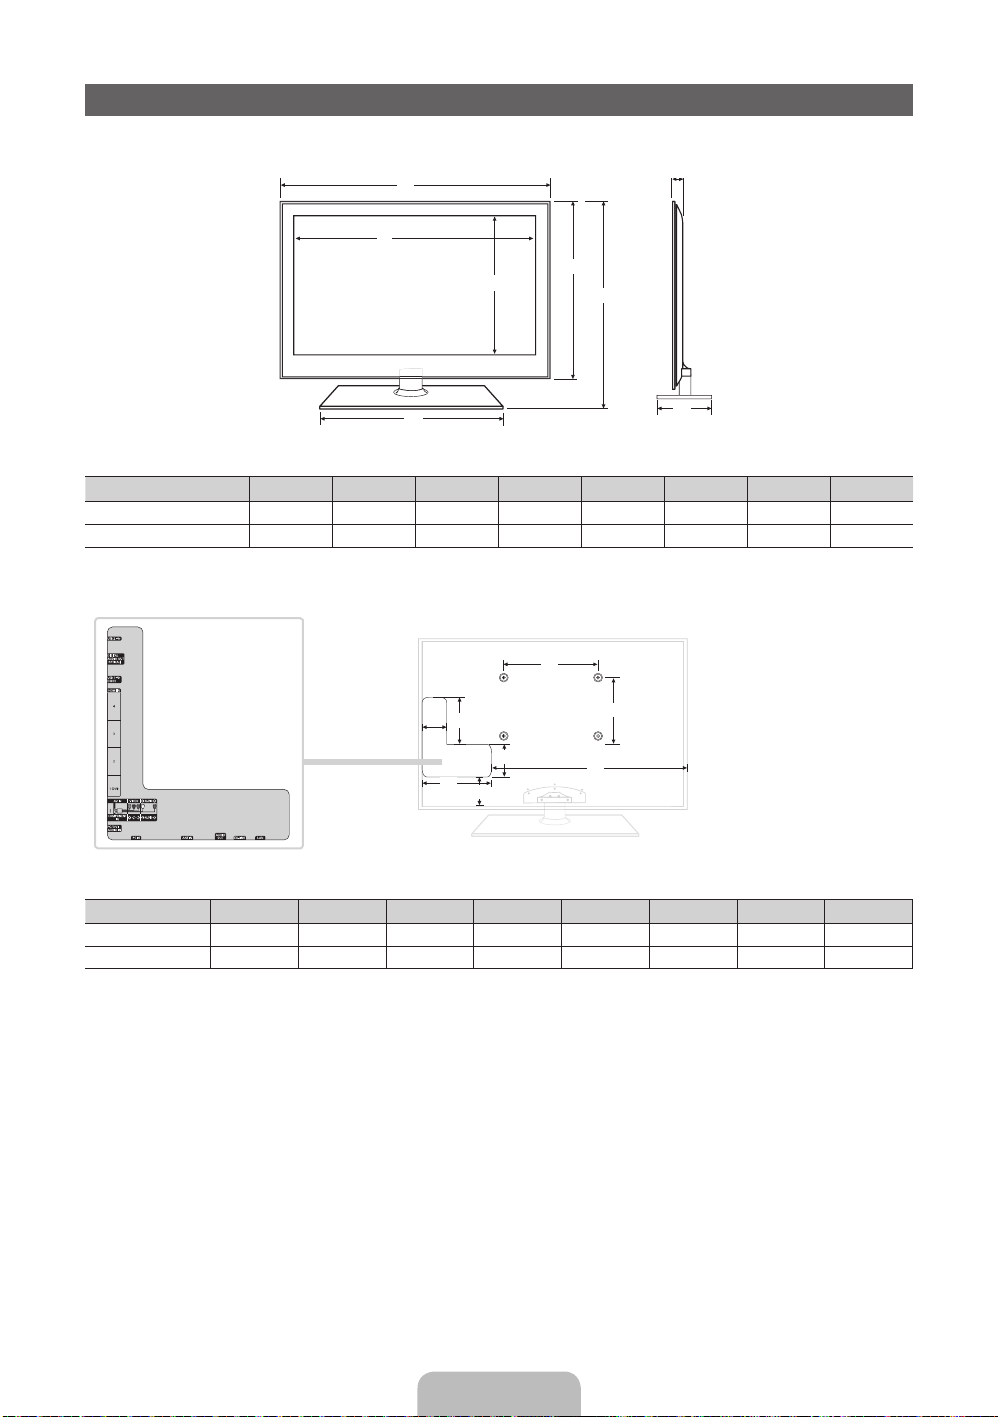
■ Front view / Side view
Dimensions
1
2
3
5
6
7
4
8
(Unit: inches)
Model name
1 2 3 4 5 6 7 8
UN32D5550 30.2 27.5 15.5 17.5 18.4 20.9 1.2 9.4
UN40D5550 37.6 34.9 19.7 18.9 22.6 25.1 1.2 10.0
■ Jack panel detail / Rear view
1
5
8
6
4
7
2
3
(Unit: inches)
Model name
1 2 3 4 5 6 7 8
UN32D5550 7.9 7.9 18.6 3.4 2.8 10.0 2.3 10.6
UN40D5550 7.9 7.9 22.3 3.5 5.9 10.7 4.4 13.8
NOTE: All drawings are not necessarily to scale. Some dimensions are subject to change without prior notice. Refer to the
dimensions prior to performing installation of your TV. Not responsible for typographical or printed errors.
© 2011 Samsung Electronics America, Inc
English - 22
 Loading...