

Samsung UH052EAMC, UH070EAM1C, UH070EAMC, UH094EAM1C, UH105EAMC Installation Manual
INSTALLATION
MAN
UAL
UH052EAMC
UH070EAM(1)C
UH094EAM1C
UH105EAMC
ENGLISH
ESPAÑOL
FRANÇAIS
ITALIANO
System Air Conditioner(Cooling and Heating)
PORTUGUÊS
DEUTSCH
E§§HNIKA
RUSSIAN
E S F I P D G R DB98-27159A(4)
Safety Precautions
The following safety precautions must be taken when using your air conditioner.
◆ The unit should not be installed by the user. Ask the dealer or authorized
company to install the units except room air conditioners for the U.S.A and
Canada area.
◆ If the unit is installed improperly, water leakage, electric shock or fire may
result.
◆ Mount with the lowest moving parts at least 2.5 m above the floor or grade
level. (If applicable)
◆ The manufacturer does not assume responsibility for accidents or injury
caused by an incorrectly installed air conditioner. If you are unsure about
installation, contact an installation specialist.
◆ When installing the built-in type air conditioner, keep all electrical cables
such as the power cable and the connection cord in pipe, ducts, cable
channels e.t.c to protect them against liquids, outside impacts and so on.
WARNING
INSTALLING THE UNIT
◆ If the power cord of this air conditioner is damaged, it must be replaced by
the manufacturer, its service agent or similarly qualified persons in order to
avoid a hazard.
◆ The unit must be plugged into an independent circuit if applicable or
connect the power cable to the auxiliary circuit breaker. An all pole
disconnection from the power supply must be incorporated in the fixed
wiring with a contact opening of >3mm.
◆ Do not use an extension cord with this product.
◆ If the unit is equipped with a power supply cord and a plug, the plug must
be accessible after installation.
◆ The air conditioner must be installed in accordance with national wiring
regulations and safety regulations wherever applicable.
P
OWER SUPPLY LINE
,
FUSE OR CIRCUIT
BREAKER
Risk of electric shock. • Can cause injury or death. • Disconnect all
remote electric power supplies before servicing, installing or cleaning.
• This must be done by the manufacturer or its service agent or a similar
qualified person in order to avoid a hazard.
E-2

■
Preparation for outdoor unit installation ............................................................... 5
■
Air Conditioner and Accessories .......................................................................... 5
■
Deciding where to install the outdoor unit 6
■
Outdoor unit installation ...................................................................................... 9
■
Connecting the cable ........................................................................................... 10
■
Connecting the refrigerant pipe ............................................................................ 13
■
Connecting up and removing air in the circuit ..................................................... 14
■
Cutting / Flaring the pipes .................................................................................... 15
■
Performing leak tests ........................................................................................... 16
■
Connecting the drain hose to the outdoor unit ..................................................... 16
■
Insulation .............................................................................................................. 16
■
Using stop valve ................................................................................................... 17
■
Adding refrigerant ................................................................................................. 18
■
Checking correct grounding ................................................................................. 20
■
Setting up option switches ................................................................................... 21
■
Testing operations ................................................................................................ 23
■
Troubleshooting .................................................................................................... 25
■
Optional parts list ................................................................................................. 26
Contents
...........................................................
E-3
ENGLISH
E-4
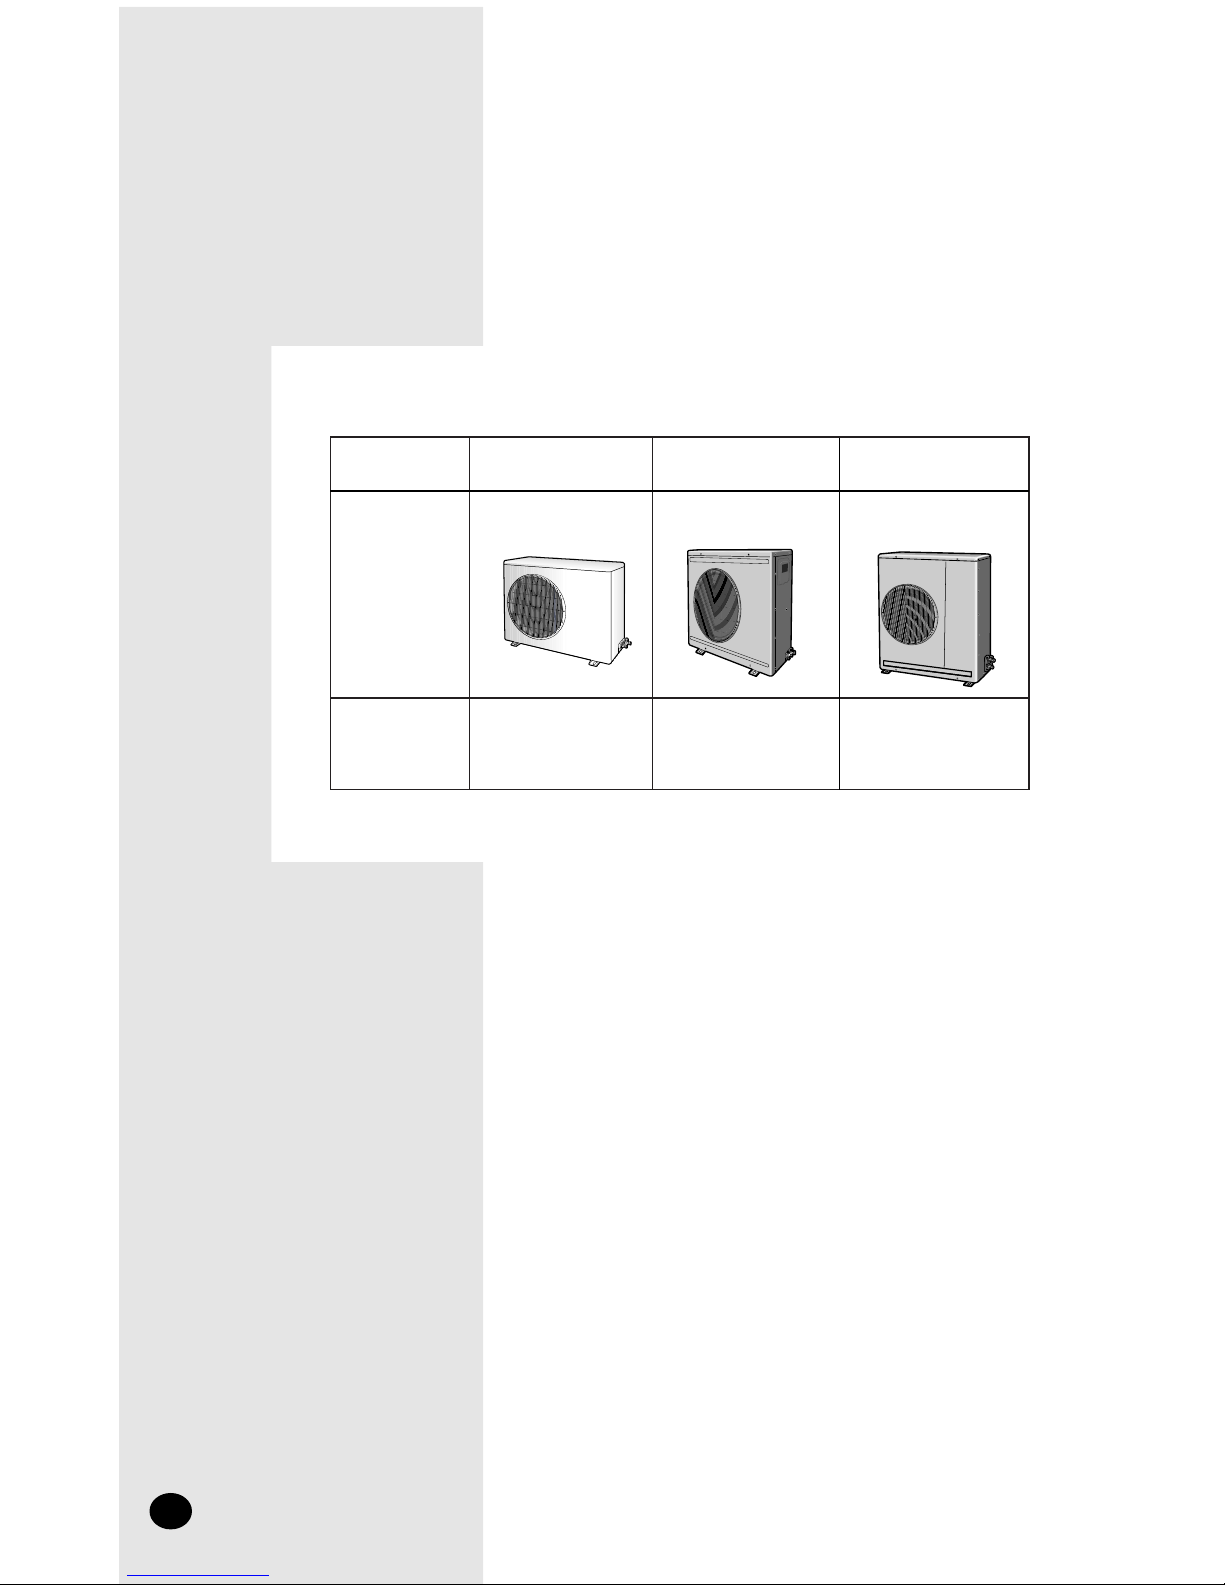
Model
UH052EAMC
UH070EAM(1)C
Type of
outdoor unit
A
Design
UH094EAM1C
B C
UH105EAMC
ENGLISH
Air Conditioner and Accessories
The following accessories are supplied with the air conditioner.
The type and quantity may differ depending on the specifications.
NNNNoooottttee
ee
◆ UH052EAMC
Installation manual
Rubber legs
◆
Refrigeration pipes and their insulating materials,
power cables are not supplied.
◆
UH070EAM(1)C & UH094EAM1C
Drain Plug
Drain Plug
Installation
manual
Installation manual
Rubber legs
Flare Nuts 3/8"
Rubber Bracket Wire
Cap Drain A
UH105EAMC
Preparation for outdoor unit installation
E-5
Moving the Outdoor Unit by Wire Rope
Fasten the outdoor unit by two 8m or longer wire ropes as
shown at the figure. To prevent from damage or scratches,
insert a piece of cloth between the outdoor unit and rope,
then move the unit.
Plate protection cloth
Wire rope
HSILGNE
Deciding where to install the outdoor unit
E-6
Outdoor Unit
◆ The outdoor unit must not be placed on its side or upside down, as the
compressor lubrication oil will run into the cooling circuit and seriously
damage the unit.
◆ Choose a location that is dry and sunny, but not exposed to direct sunlight or
strong winds.
◆ Do not block any passageways or thoroughfares.
◆ Choose a location where the noise of the air conditioner when running and
the discharged air do not disturb any neighbours.
◆ Choose a position that enables the pipes and cables to be easily connected
to the indoor unit.
◆ Install the outdoor unit on a flat, stable surface that can support its weight
and does not generate any unnecessary noise and vibration.
◆ Position the outdoor unit so that the air flow is directed towards the open
area.
◆ Maintain sufficient clearance around the outdoor unit, especially from a radio,
computer, stereo system, etc.
◆ If the outdoor unit is installed at a height, ensure that its base is firmly fixed in
position.
◆ Make sure that the water dripping from the drain hose runs away correctly
and safely.
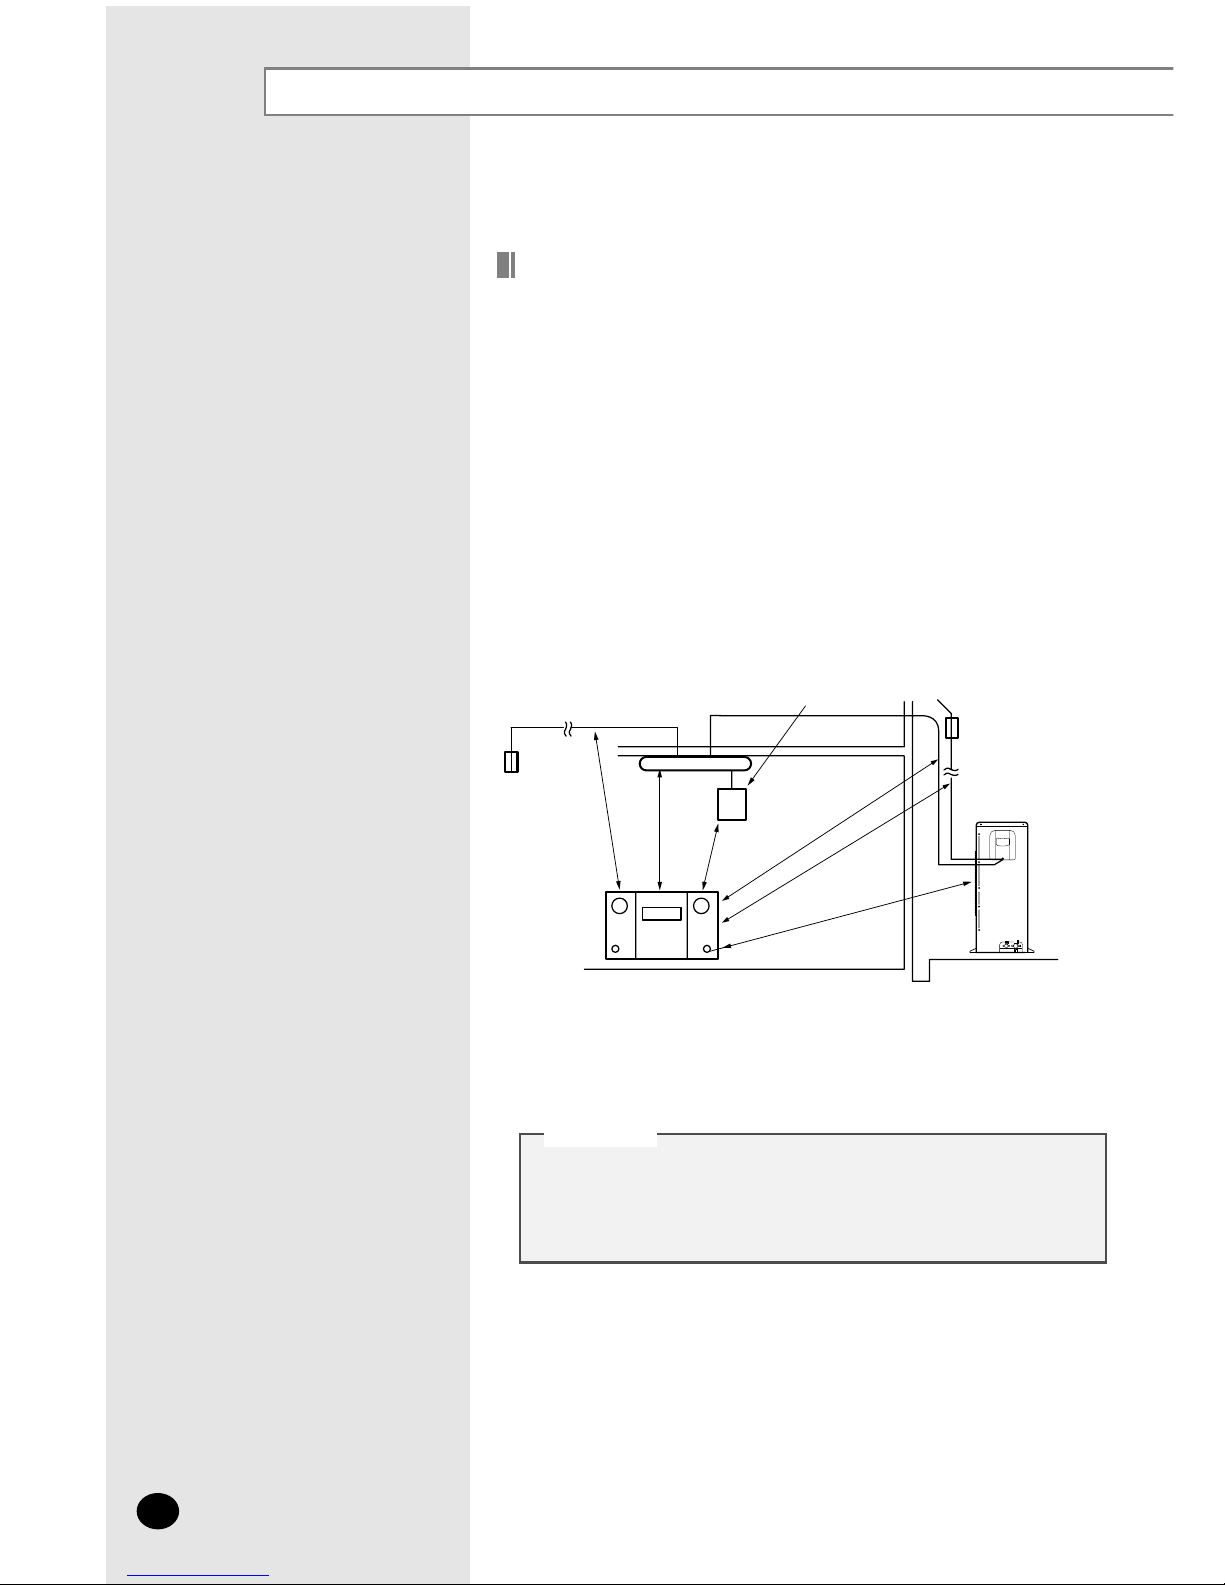
1.5m or more
Indoor Unit
Fuse
Outdoor
Unit
Remote Controller
1m or more
1m or more
1.5m or more
1.5m or more
1.5m or more
Fuse
Stereo
◆ You have just purchased a system air conditioner and it
has been installed by your installation specialist.
◆ This device must be installed according to the national
electrical rules.
CCCCAAAAUUUUTTTTIIIIOOOONN
NN
E-7
ENGLISH
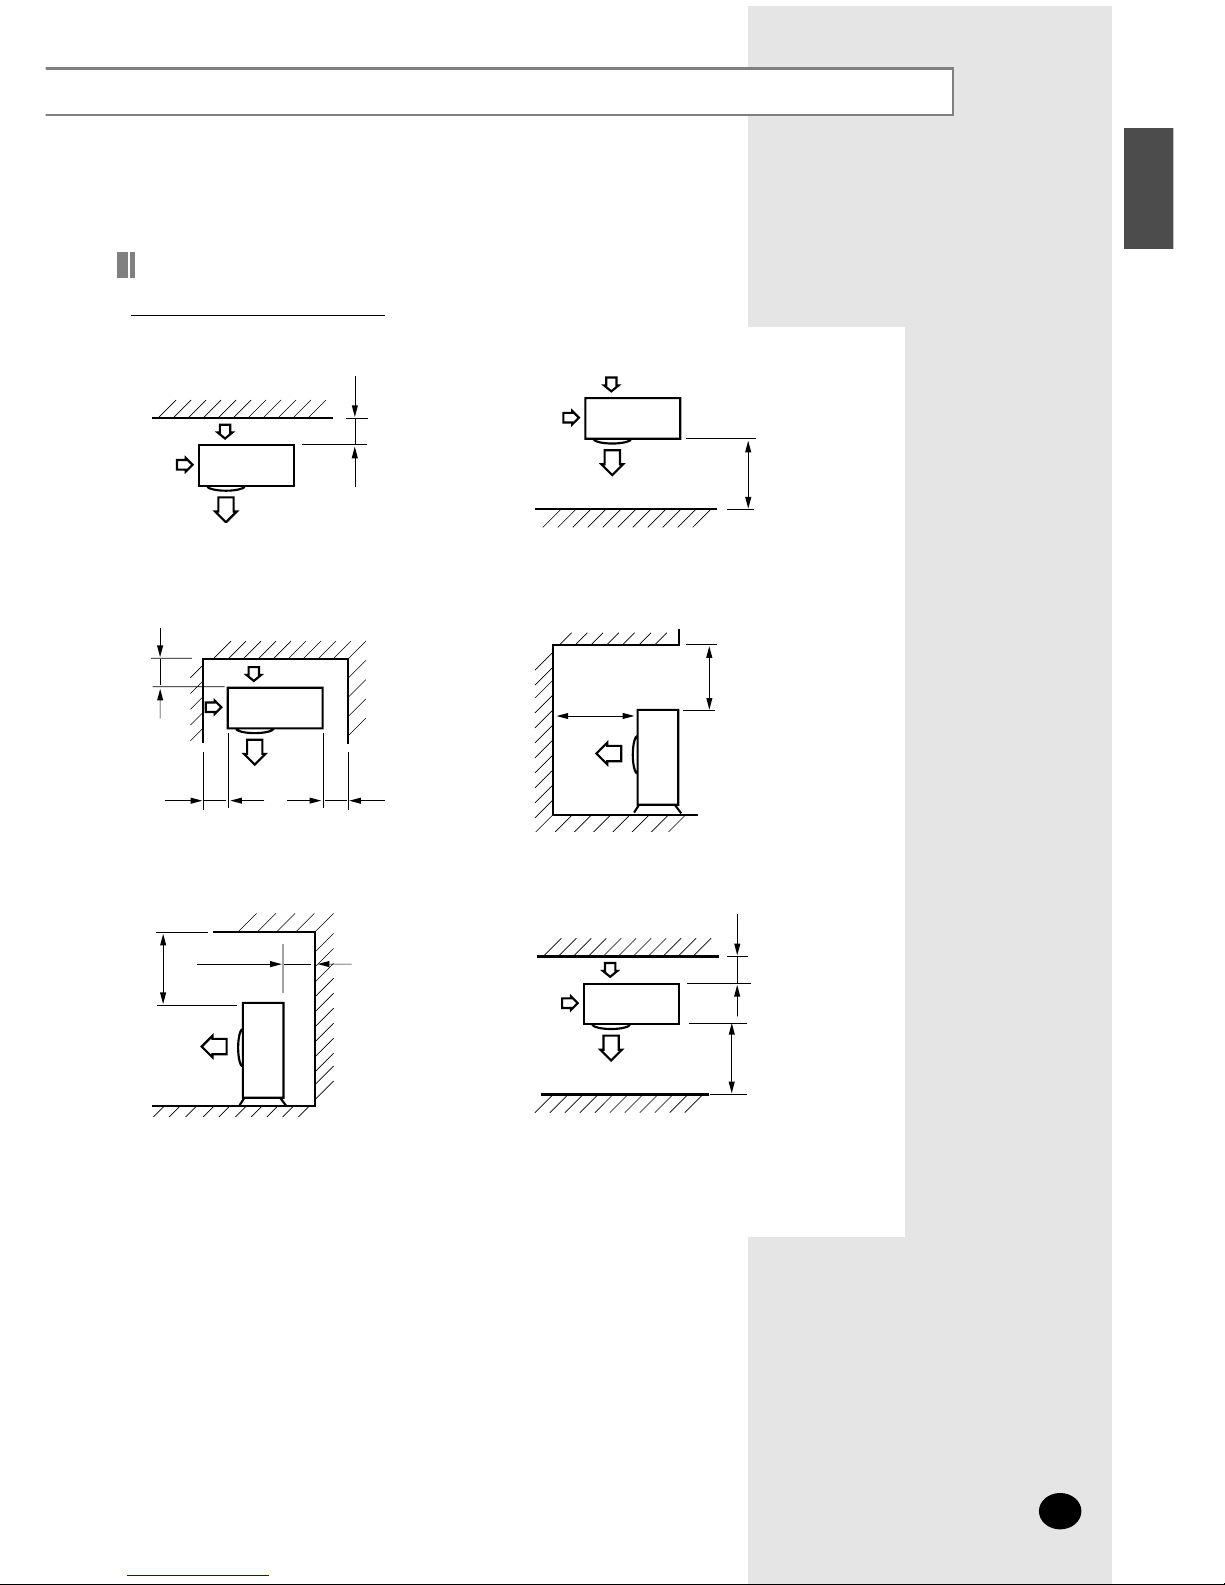
150 or more
❋ When the air outlet is opposite the wall
1500 or more
❋ When the air outlet is towards the wall
200 or more
150 or more
600 or more
❋ When 3 sides of the outdoor unit are
blocked by the wall
1500 or more
2000 or more
❋ The upper part of the outdoor unit and
the air outlet is towards the wall
500 or more
300 or more
❋ The upper part of the outdoor unit
and the air outlet is opposite the wall
300 or more1500 or more
❋ When front and rear side of the outdoor
unit is towards the wall
Unit : mm
Space Requirements for Outdoor Unit
When installing 1 outdoor unit
Deciding where to install the outdoor unit (Continued)
E-8
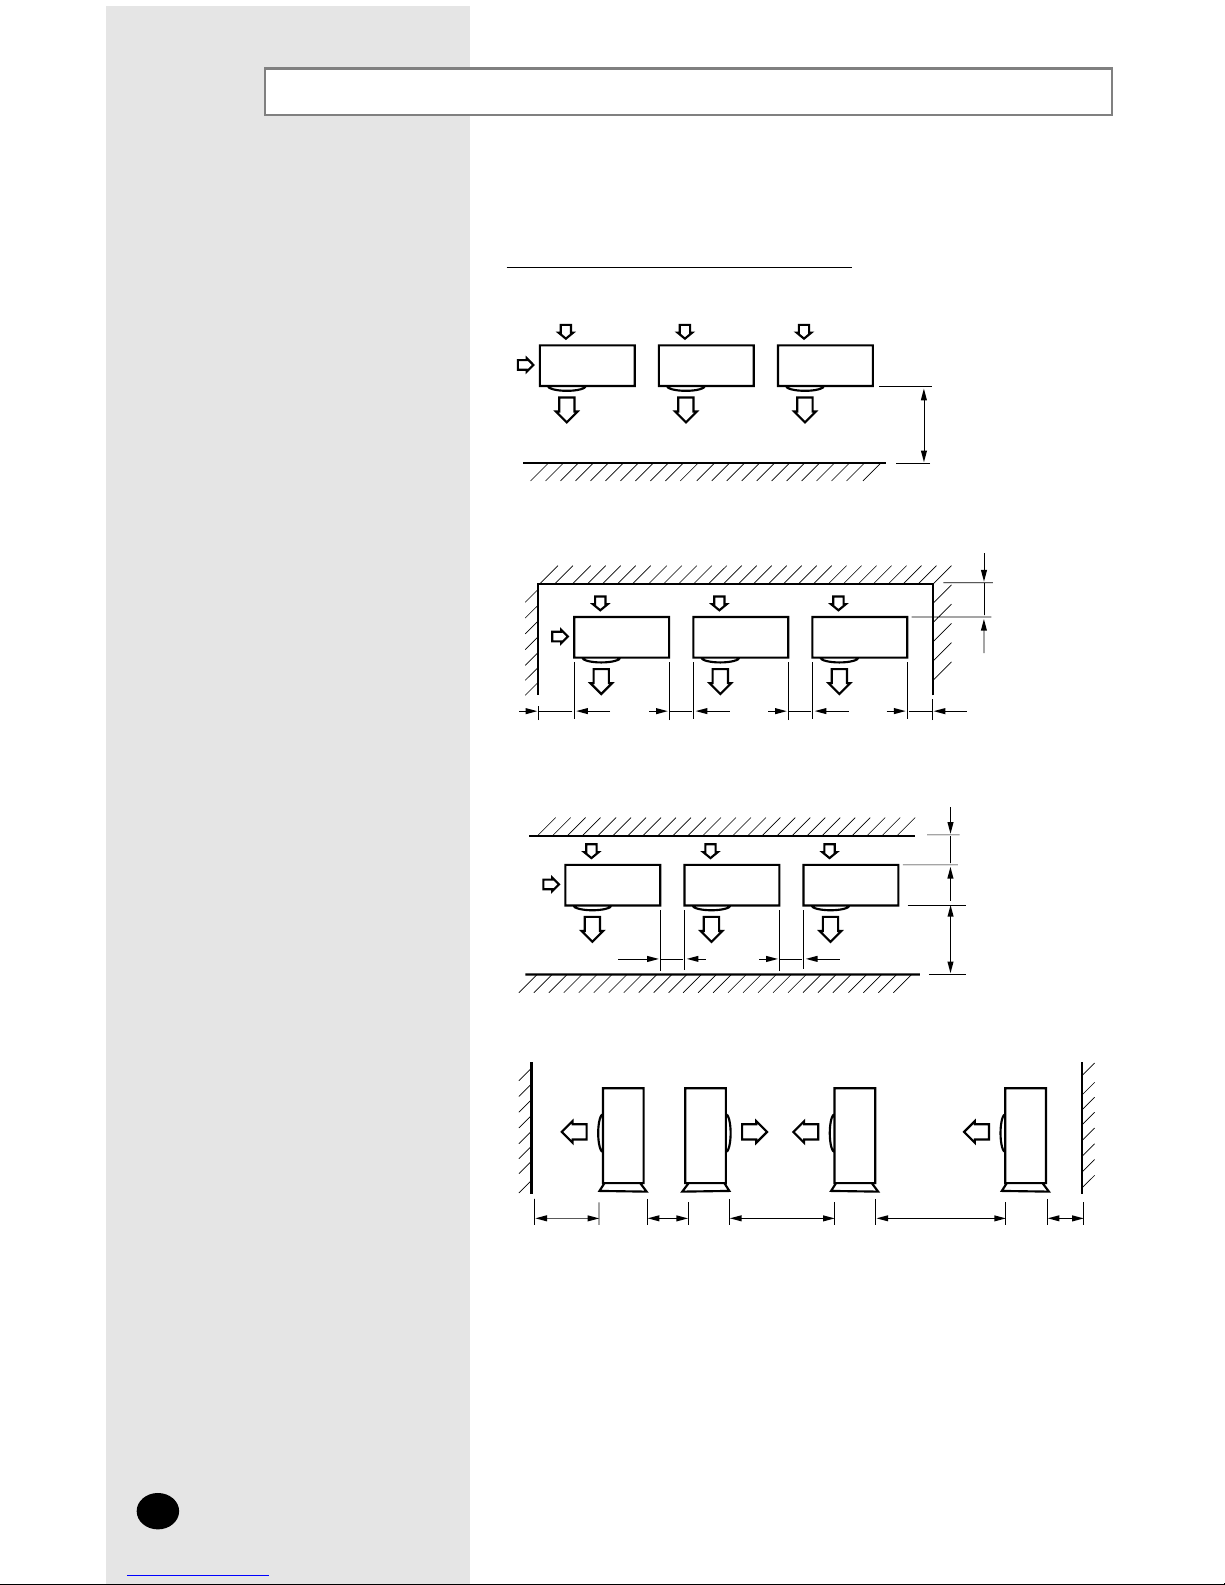
Unit : mm
1500 or more
❋ When the air outlet is towards the wall
200 or more
300 or more
1500 or more 600 or more 3000 or more 200 or more3000 or more
600 or more 600 or more
200 or more
1500 or more
600 or more 600 or more
600 or more
❋ When 3 sides of the outdoor unit are blocked by the wall
❋ When front and rear side of the outdoor unit is towards the wall
❋ When front and rear side of the outdoor unit is towards the wall
When installing more than 1 outdoor unit
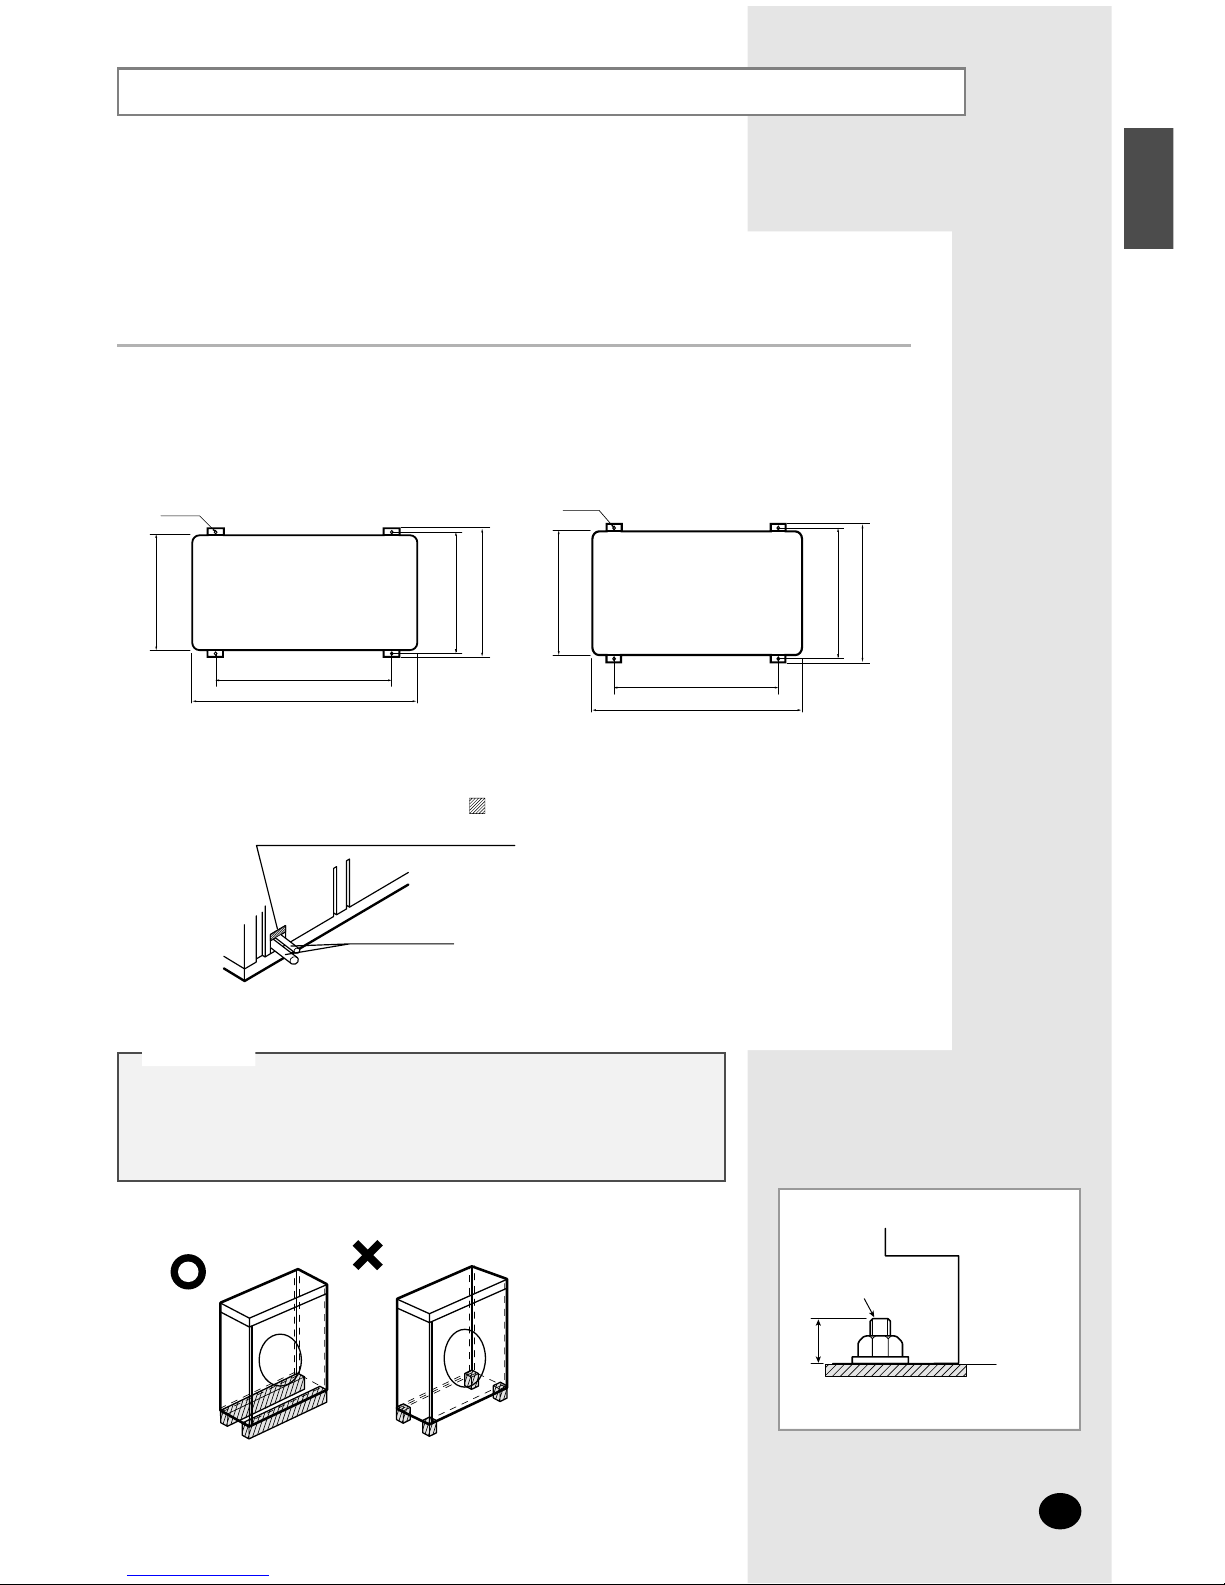
Fix the outdoor unit with anchor bolts.
◆
The anchor bolt must be 20mm or higher from the base
surface.
NNNNoooottttee
ee
660
880
013
043
463
Anchor bolt hole
Unit : mm
The outdoor unit must be installed on a rigid and stable base to avoid any increase in the
noise
level and vibration, particularly if the outdoor unit is to be installed in a location
exposed
to strong winds or at a height, the unit must be fixed to an appropriate
support(wall
or ground).
Type C
Type A,B
Anchor bolt hole
645
878
813
043
4
63
m
m02
Anchor bolt
Outdoor-->
Unit
O
<--
utdoor Unit
Support
Base
Surface
Outdoor unit installation
E-9
◆ Make a drain outlet around the base for outdoor unit
drainage.
◆ If the outdoor unit is installed on the roof, you have to check
the ceiling strength and waterproof the unit.
CCCCAAAAUUUUTTTTIIIIOOOONN
NN
Piping
To prevent the unit against a wild
animal
or something, cover part
after
connecting the pipe.
Outdoor Unit Support
ENGLISH
 Loading...