


E-MANUAL
Thank you for purchasing this Samsung product.
To receive more complete service, please register
your product at
www.samsung.com/register
Model______________ Serial No.______________

Contents
Quick Guide
28 Connecting Mobile Devices without a Wireless Router
(Wi-Fi Direct)
28 Connecting via Samsung Link
Using the Smart TV
Using Voice Control
Using Motion Control
Using the Samsung Smart Control
Using the Football Mode
Using the Multi-Link Screen
Editing channels
Connecting Antenna and External
devices
Aerial Connection
Video Device Connection
13 HDMI Connection
14 Component Connection
15 External Input Connection
29 Connecting via Home Network (DLNA)
29 Connecting via Smart View 2.0
30 Name of TV on Network
Input Signal Selection
Using Remote and Peripheral
Devices
Inserting Batteries into Samsung Smart Control
31 When you see this alarm icon on the screen...
Pairing Samsung Smart Control
32 Reconnecting Samsung Smart Control
Using Samsung Smart Control
33 Button Functions
35 Using the TV by Moving the Samsung Smart Control
36 Using the TV with the Touchpad
38 Displaying the Remote Control on the Screen (virtual
remote control)
16 SCART Connection
TV Audio through the External Speakers
17 HDMI (ARC) Connection
18 Digital Audio (Optical) Connection
19 Headphone Connection
20 Audio Output Connection
Connecting to a Computer
22 Connecting via HDMI Port
23 Connecting with the HDMI (DVI) Port
24 Connecting via Samsung Link
24 Connecting via Home Network (DLNA)
Connecting with a Mobile Device
26 Connecting with MHL-to-HDMI Cable
27 Mobile Device Screen on TV (Screen Mirroring)
Controlling External Devices with the TV Remote
(Universal Remote Setup)
40 Setting Up the Universal Remote Control
41 Controlling External Devices with the TV Remote
42 Universal Remote Features
Controlling the TV with a Keyboard
43 Connecting a Keyboard
44 Using the Keyboard
Controlling the TV with a Mouse
45 Connecting a Mouse
45 Using the Mouse
Entering Text Using QWERTY
47 Using Additional Functions

Internet Connection
Using the Games Panel
68 Using Pop-Up Menu Functions
Establishing a Wired Internet Connection
48 Connecting a LAN Cable
49 Connecting to a Wired Internet Network Automatically
49 Connecting to a Wired Internet Network Manually
Establishing a Wireless Internet Connection
51 Connecting to a Wireless Internet Network Automatically
52 Connecting to a Wireless Internet Network Manually
53 Connecting to a Wireless Internet Network with WPS
Troubleshooting Internet Connectivity Issues
54 Troubleshooting Wired Internet Connectivity Issues
55 Troubleshooting Wireless Internet Connectivity Issues
Mobile Network
56 Supported Telecom and Model Name
Checking the Internet Connection Status
Smart Features
69 Installing and Running a Game
70 Managing Downloaded or Purchased Games
Using SAMSUNG APPS Panel
72 Using Pop-Up Menu Functions
73 Installing an App
74 Default Apps
74 Rearranging Apps on the SAMSUNG APPS Screen
75 Removing an App from the TV
75 Rating/Reviewing an App
76 Updating an App
76 SAMSUNG APPS Features
Using On TV Panel
80 Using Pop-Up Menu Functions
80 Viewing Detailed Programme Information
81 Configuring On TV Settings
Using FILMS AND TV SHOWS Panel
83 Using Pop-Up Menu Functions
84 Watching a Movie/TV Programme
Multiple Functions on a Single Screen
58 Launching Multi-Link Screen
58 Using Multi-Link Screen
58 Selecting a Feature
58 Changing the Channel/Volume
59 Pairing Bluetooth Headphones
59 Selecting the Audio-Source Screen
Smart Hub
60 Testing Smart Hub connections
61 Opening the Home Screen
62 Moving to the Panel Screen
62 Using the Smart Hub Tutorial
62 Resetting Smart Hub
Using Smart Hub with Samsung Account
63 Creating a Samsung Account
65 Signing into Samsung Account
66 Linking My Samsung and App Accounts
67 Changing and Adding Information to Samsung Account
67 Deleting All Samsung Accounts from the TV
84 Restricting Purchased Content Viewing
84 Registering Content to Favourites
85 Rating and Sharing a Purchased Content
Playing Photos, Videos, and Music (MULTIMEDIA)
86 Playing Media Content from a USB Device
87 Playing Multimedia Content Saved in a Computer/Mobile
Device
89 Playing Media Content from a Storage Service
90 Buttons and Functions Available while Viewing Photos
91 Buttons and Functions Available while Watching Video
93 Buttons and Functions Available while Playing Music
94 Functions on the Media Content List Screen
TV Control using your Voice
95 Enabling Voice Control
97 Using the Voice Interaction function Interactively
TV Control using Motions
98 Testing Ambient Illumination Using the TV Camera
99 Activating Motion Control
102 Motion Control Screen Layout

Signing in with Face Recognition
105 Registering Your Face to Your Samsung Account
106 Changing Login Method to Face Recognition
106 Singing into Samsung Account with Your Face
TV Viewing and Recording Features
Digital Broadcast Information at a Glance
107 Using the Guide
108 Checking the Current Programme Info
108 Change the Broadcast Signal
108 Digital Signal Info and Strength
Recording Programmes
109 Creating a USB Recording Device
111 Recording Programmes
112 Buttons and Functions Available While Recording a
Programme
113 Managing the Schedule Recording List
132 Subtitle Options
133 Changing Teletext Language
133 Digital Text
134 PIP Broadcast Viewing
135 Scanning for Available Channels
135 Aerial Connection Type
136 Selecting the Broadcast Audio Options
136 Audio Description
136 Genre Selection
136 Adult genre enabling
Using the Channel Settings
137 Country (Area)
137 Manual Tuning
138 Fine-Tuning the Screen
139 Transfer Channel List
139 Delete CAM Operator Profile
139 Satellite System
141 Common Interface
114 Viewing Recorded Programmes
117 Managing Recorded Files
Setting Up a Schedule Viewing
118 Setting Up Schedule Viewing
119 Managing the Schedule Viewing List
Using Timeshift
Using the Channel List
Registering, Removing, and Editing Channels
122 Registering and Removing Channels
123 Editing Registered Channels
123 Enabling/Disabling Password Protection on Channels
123 Locking/ Unlocking Channels
Creating a Personal Favourites List
124 Registering a Channel as Favourites
125 Viewing Favourites List Channels Only
125 Editing a Favourites List
Adding Realism to Sports
128 Enabling Football Mode
Picture and Sound Settings
Changing the Picture Mode and Adjusting the Picture
Quality
142 Choosing the Right Picture Mode for the Viewing
Environment
143 Adjusting the Picture Quality for Each Picture Mode
144 Fine-Tuning Each Picture Mode (Advanced Settings)
146 Adjusting the Picture for Easier Viewing (Picture Options)
Viewing in 3D
148 Starting 3D
149 Changing the 3D Mode
150 Adjusting the 3D Effect
Picture Support Functions
151 PIP Broadcast Viewing
152 Changing the Picture Size and Position
153 Listening to Audio Only with the Screen Turned Off
(Picture Off)
153 Resetting the Picture Mode Settings
128 Extracting Highlights Automatically
129 Functions Available in Football Mode
131 Viewing a Sports Event Recorded in Football Mode
TV-Viewing Support Features
132 Showing Subtitles
Changing the Sound Mode and Using Sound Effects
154 Choosing the Right Sound Mode for the Environment
155 Using Sound Effects
Customising Sound (Sound Customiser)

156 Customising Sound
173 Enabling the High Contrast
156 Using a Custom Sound Profile
157 Renaming and Deleting Custom Sound Profiles
157 Modifying a Custom Sound
Sound Support Functions
158 Selecting Speakers
158 Designating the TV's Installation Type
158 Listening to TV Sound through Samsung Bluetooth Audio
159 Enabling the Sound (Additional Settings)
160 Listening to 3D Audio in 3D Mode
160 Resetting All Sound Settings
General
Setting the Time and Using the Timer
161 Setting the Current Time
162 Using the Timers
Using the Screen Burn Protection and Energy Saving
Features
164 Preventing Screen Burn
164 Using Energy Saving Features
173 Adjusting the Menu Transparency
174 Expanding the Smart Hub's Focus Area
174 Changing the Menu Language
174 Checking Notifications
174 Setting Up a Password
175 Programme Rating Lock
175 Enabling Game Mode
175 Enjoying Rich Colours and Superior Picture Quality (BD
Wise)
176 Enabling/Disabling Sound Feedback
176 Locking/Unlocking the Panel Keys
176 Showing/Hiding the Samsung Logo while Booting
176 Enabling the TV to Boot Faster
176 Enabling/Disabling the Front Indicators
177 Registering the TV as a DivX-Certified Device (Watching
Paid DivX Movies)
178 Restoring the TV to the Factory Settings
178 Turning the TV into a Display Model (for retail stores)
Data Service
179 Auto Run Data Service
179 Using Data Service
Using Anynet+ (HDMI-CEC)
165 Setting Up Anynet+ (HDMI-CEC)
166 Using Anynet+ (HDMI-CEC)
Using the e-Manual
167 Launching the e-Manual
167 Additional e-Manual Features
168 Updating the e-Manual to the Latest Version
Updating the Software
169 Updating Software over the Internet
169 Updating Software using a USB connection
170 Enabling Automatic Software Updates
170 Software update via satellite channel
Protecting the TV from Hacking and malicious code
170 Checking the TV and Connected Storage Media
171 Automatically Scanning when the TV is Powered On
171 Automatically Adding malicious code to the Blocked List
HbbTV
Connecting to a TV Viewing Card slot
181 To connect the CI CARD, follow these steps:
182 To connect the CI CARD Adapter, follow these steps:
Teletext Feature
Troubleshooting
Getting Support
186 Support through Remote Management
188 Finding the Information You Need for Service
There is a problem with the screen
188 Testing the Picture
Using Other Functions
172 Enabling Voice Guide for the Visually Impaired

I can't hear the sound clearly
191 Testing the Sound
Read Before Using Voice, Motion, or Face Recognition
208 Precautions for Voice, Motion and Face Recognition
I can't see 3D images clearly.
192 Testing 3D Picture Quality
There is a problem with the broadcast.
The computer won't connect.
I can't connect to the Internet.
Data Service
The Schedule Recording/Timeshift function isn't
working.
Anynet+ (HDMI-CEC) isn't working.
I am having trouble launching/using apps.
My file won't play.
I want to reset the TV.
Other Issues
210 Requirements for Using Voice, Motion, or Face
Recognition
Read Before Using SAMSUNG APPS
Web Browser Restrictions
Photo, Video, and Music File Limitations
215 Storage Device File Transfers
216 Supported External Subtitles
216 Supported Internal Subtitles
217 Supported Image Formats and Resolutions
217 Supported Music Formats and Codecs
218 Supported Video Codecs
Restrictions
220 Restrictions to PIP (Picture-in-Picture)
220 Flexible CI
Read After Installing the TV
221 Picture Sizes and Input Signals
Notes and Precautions
Before Using the Recording and Timeshift Functions
200 Before Using the Recording and Schedule Recording
Functions
201 Before the Using Timeshift Function
S-Recommendation Disclaimer
202 S Recommendation with Voice Interaction
202 S Recommendation
Before Using 3D Viewing Mode
203 3D Precautions
206 Supported Resolutions for each 3D Mode
221 Installing an Anti-Theft Kensington Lock
222 Read Before Setting Up a Wireless Internet Connection
Computer Connection Precautions
223 IBM
223 MAC
224 VESA DMT
Supported Video Resolutions
Licence
Glossary
Using the Smart TV
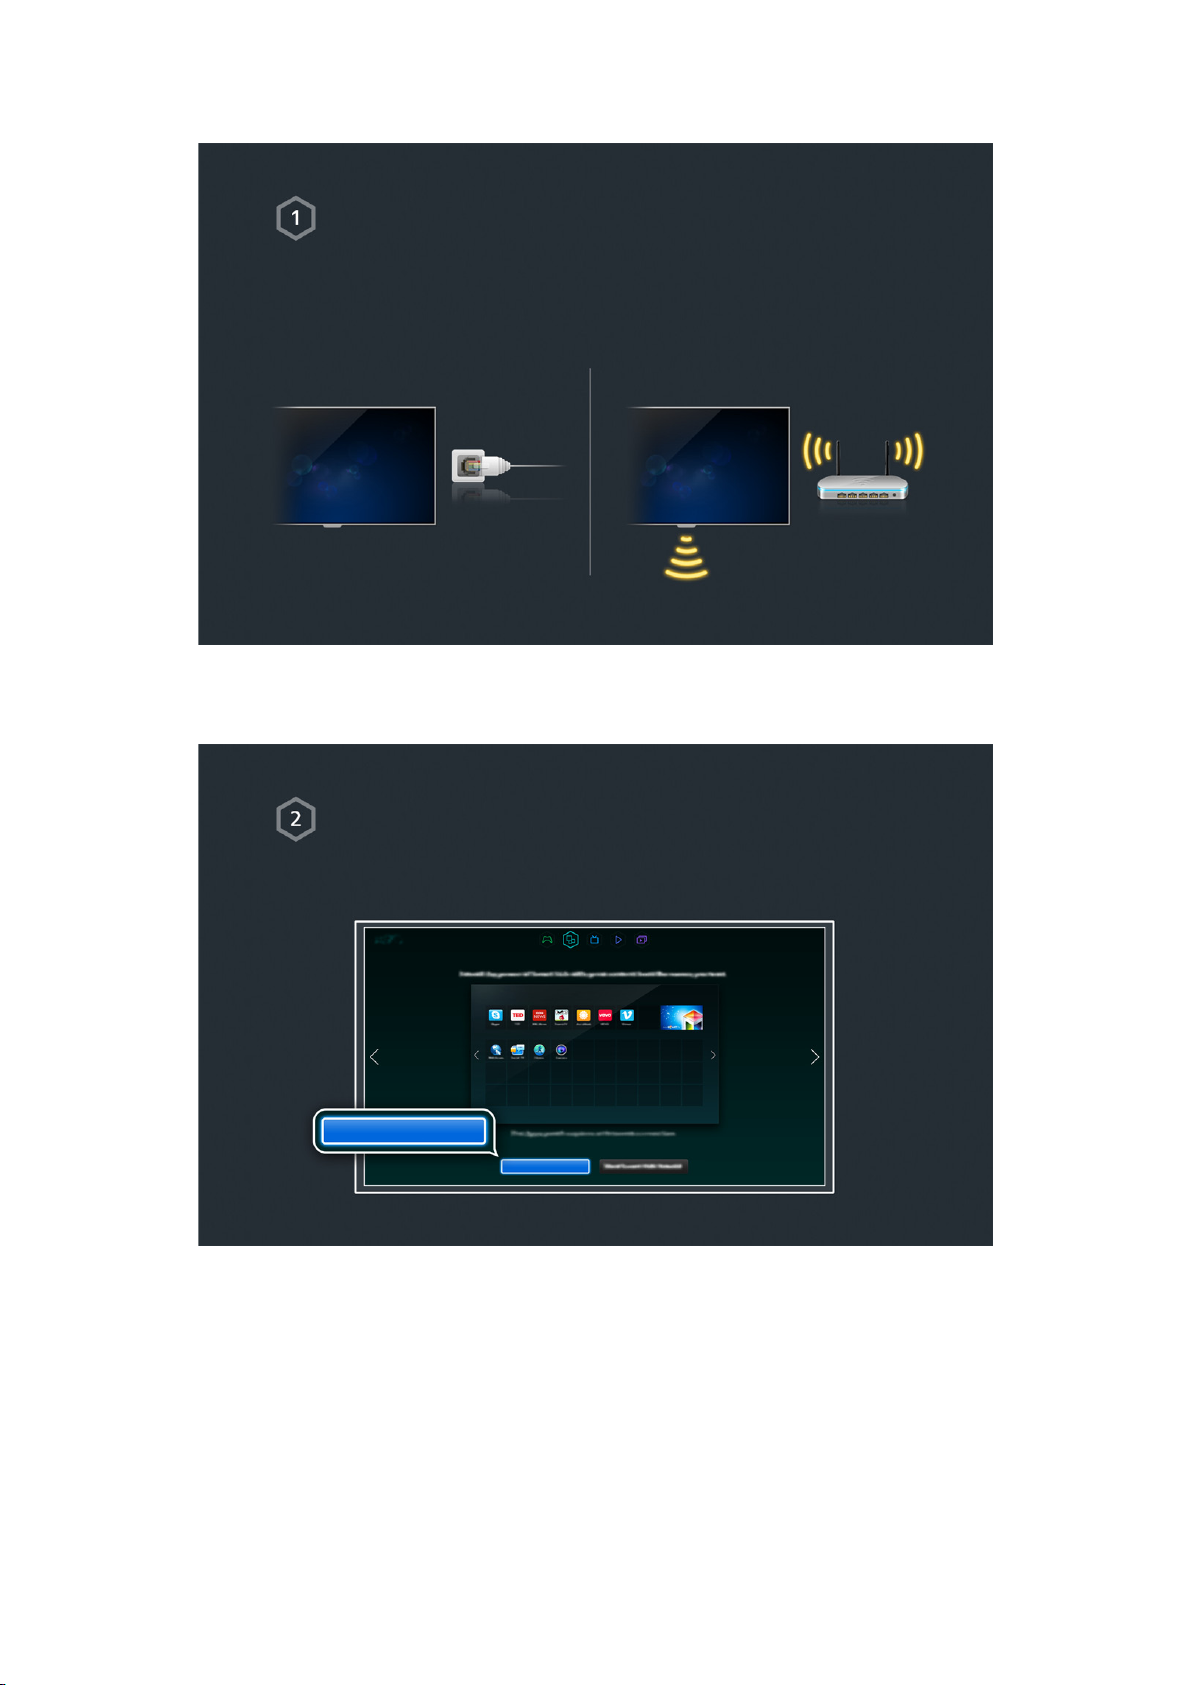
Connecting the TV to the internet
1. Connect the TV to the internet via wired or wireless connection.
Set up Network Settings via Network > Network Settings.
2.
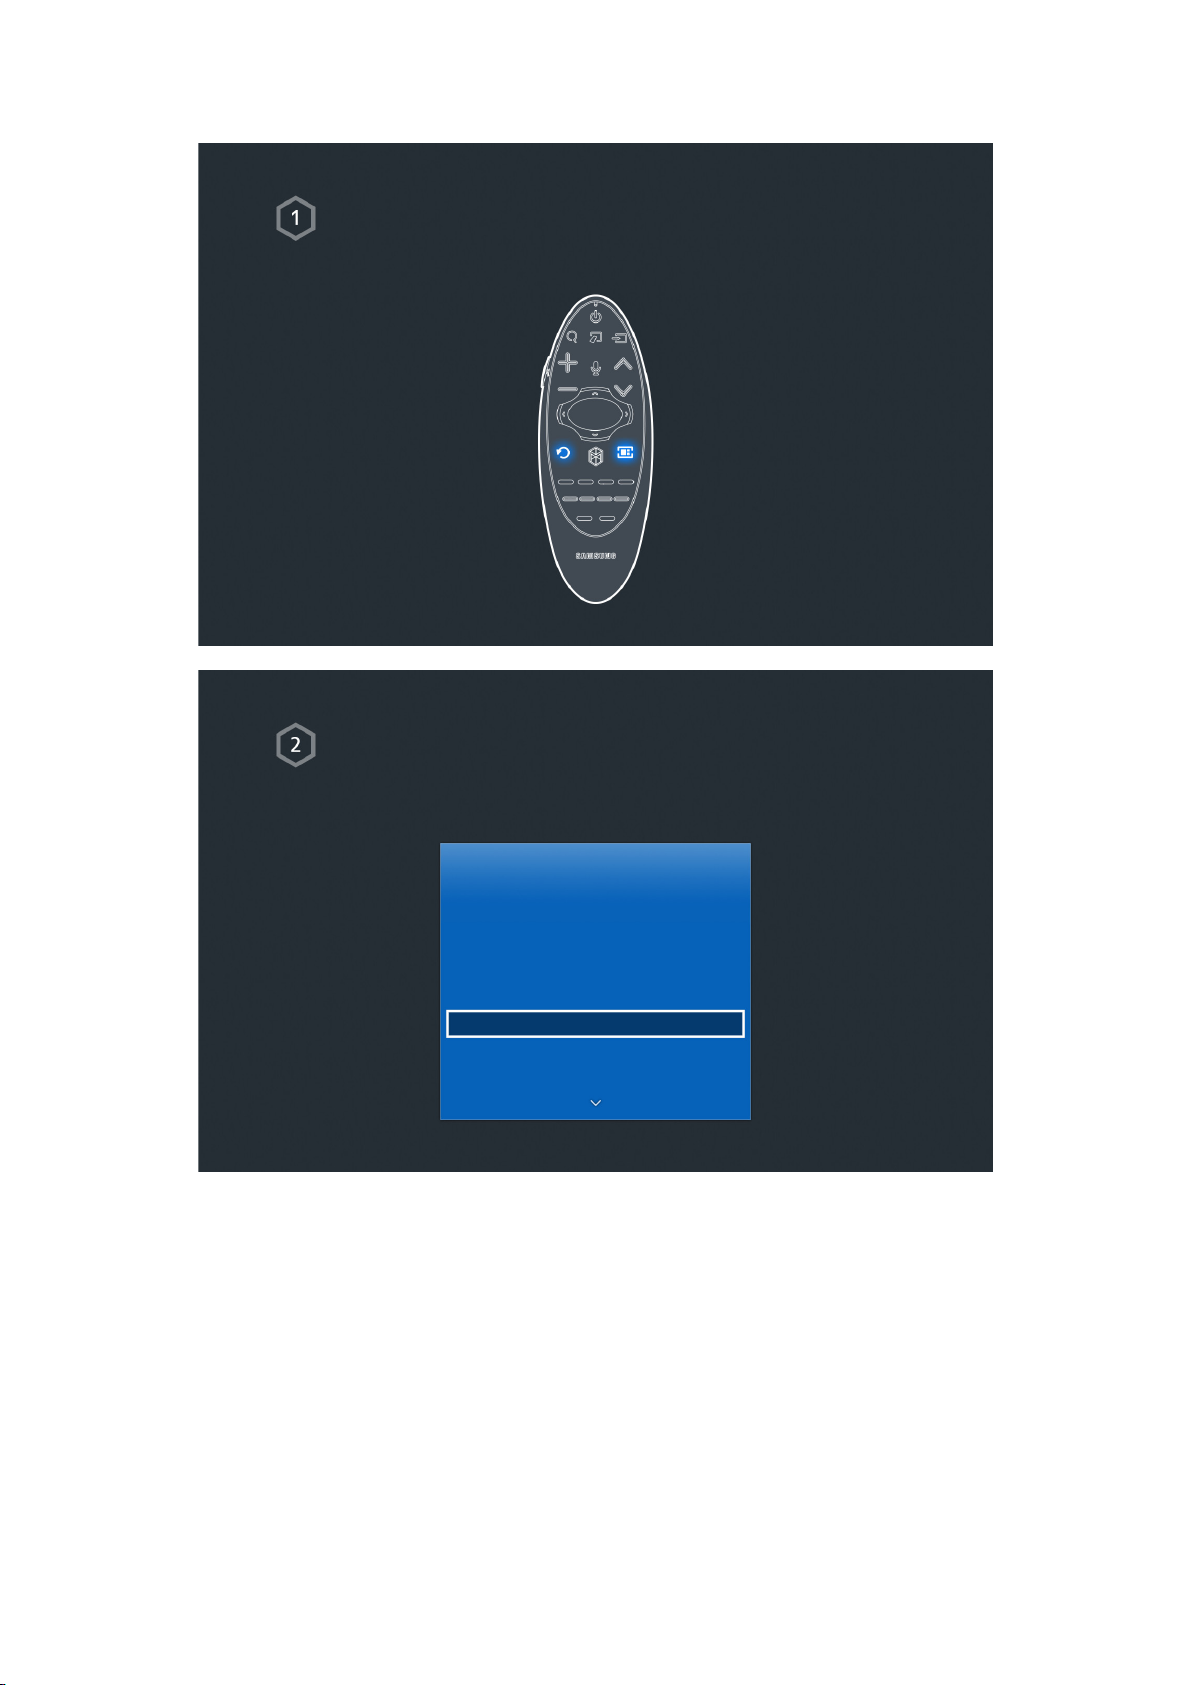
Setting up Smart Hub
The first time you start Smart Hub, you need to set it up. Follow the directions on the
screen.
Set Up Smart Hub
Set Up Smart Hub
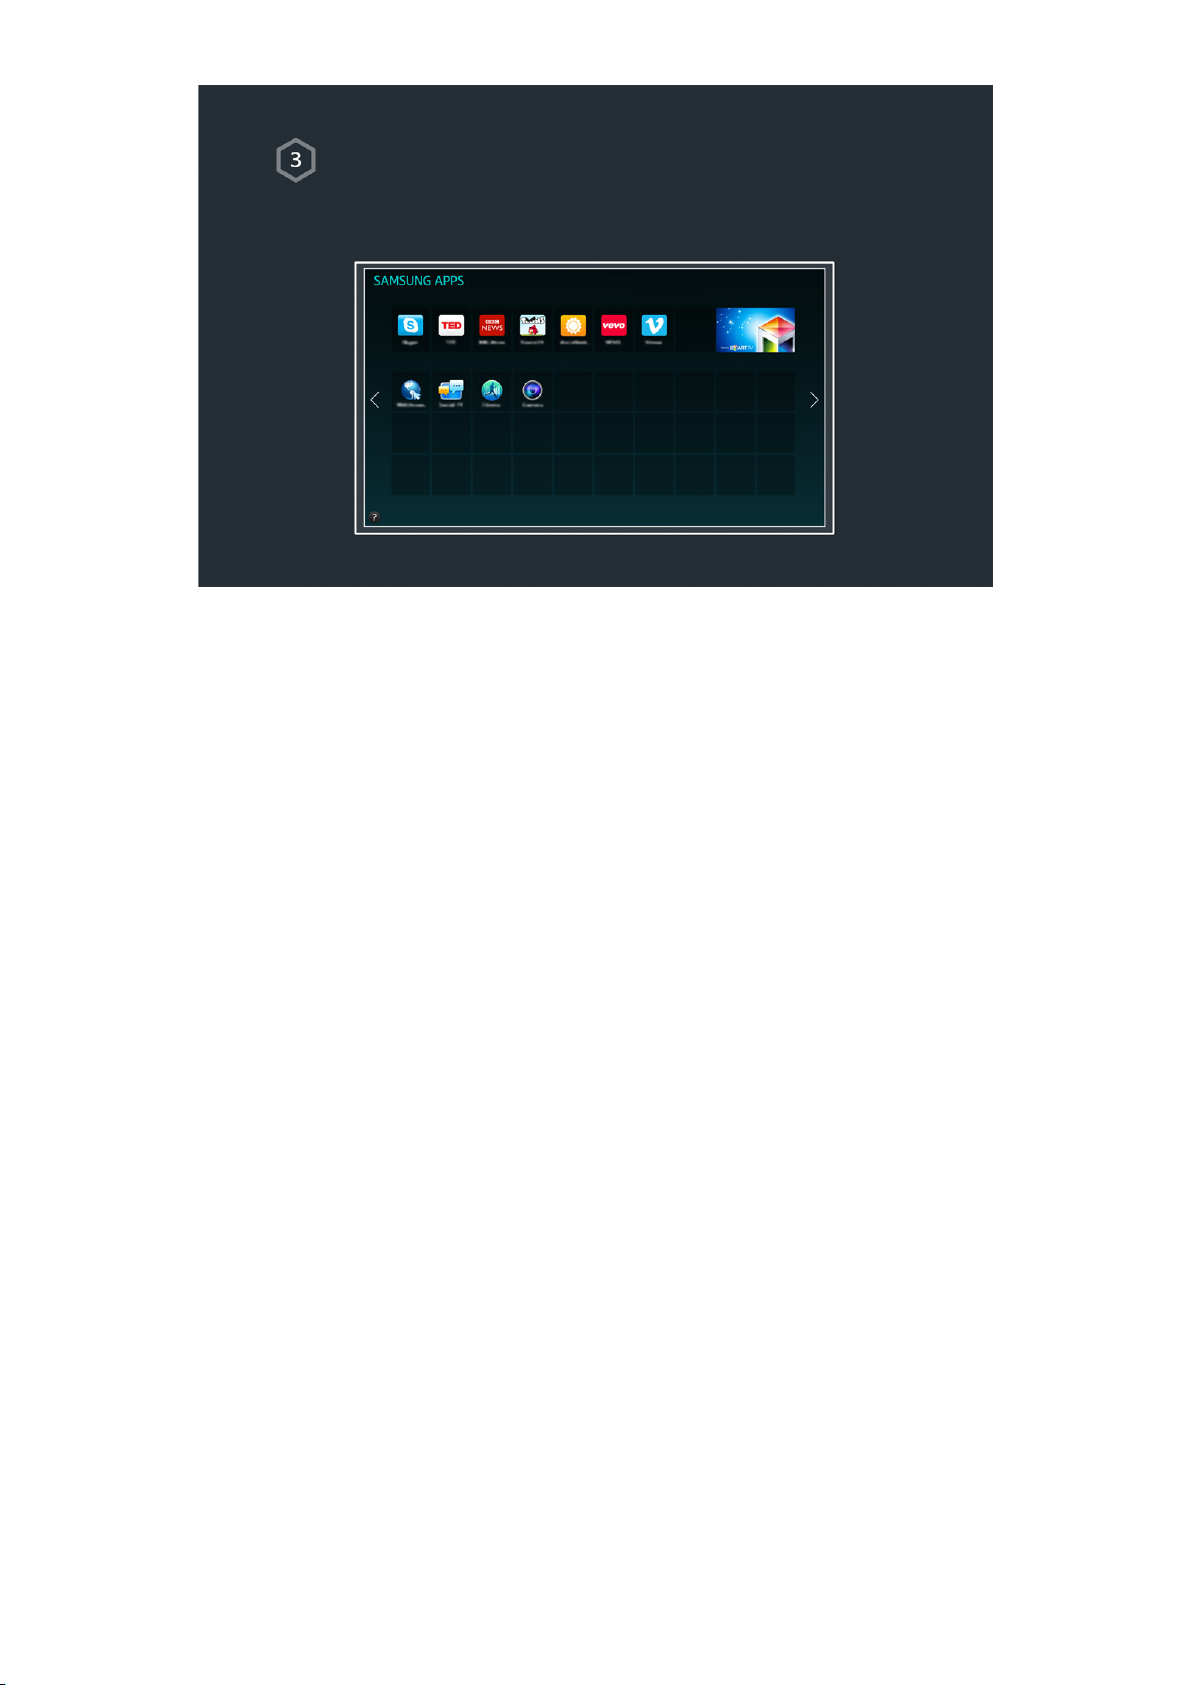
Using Smart Hub
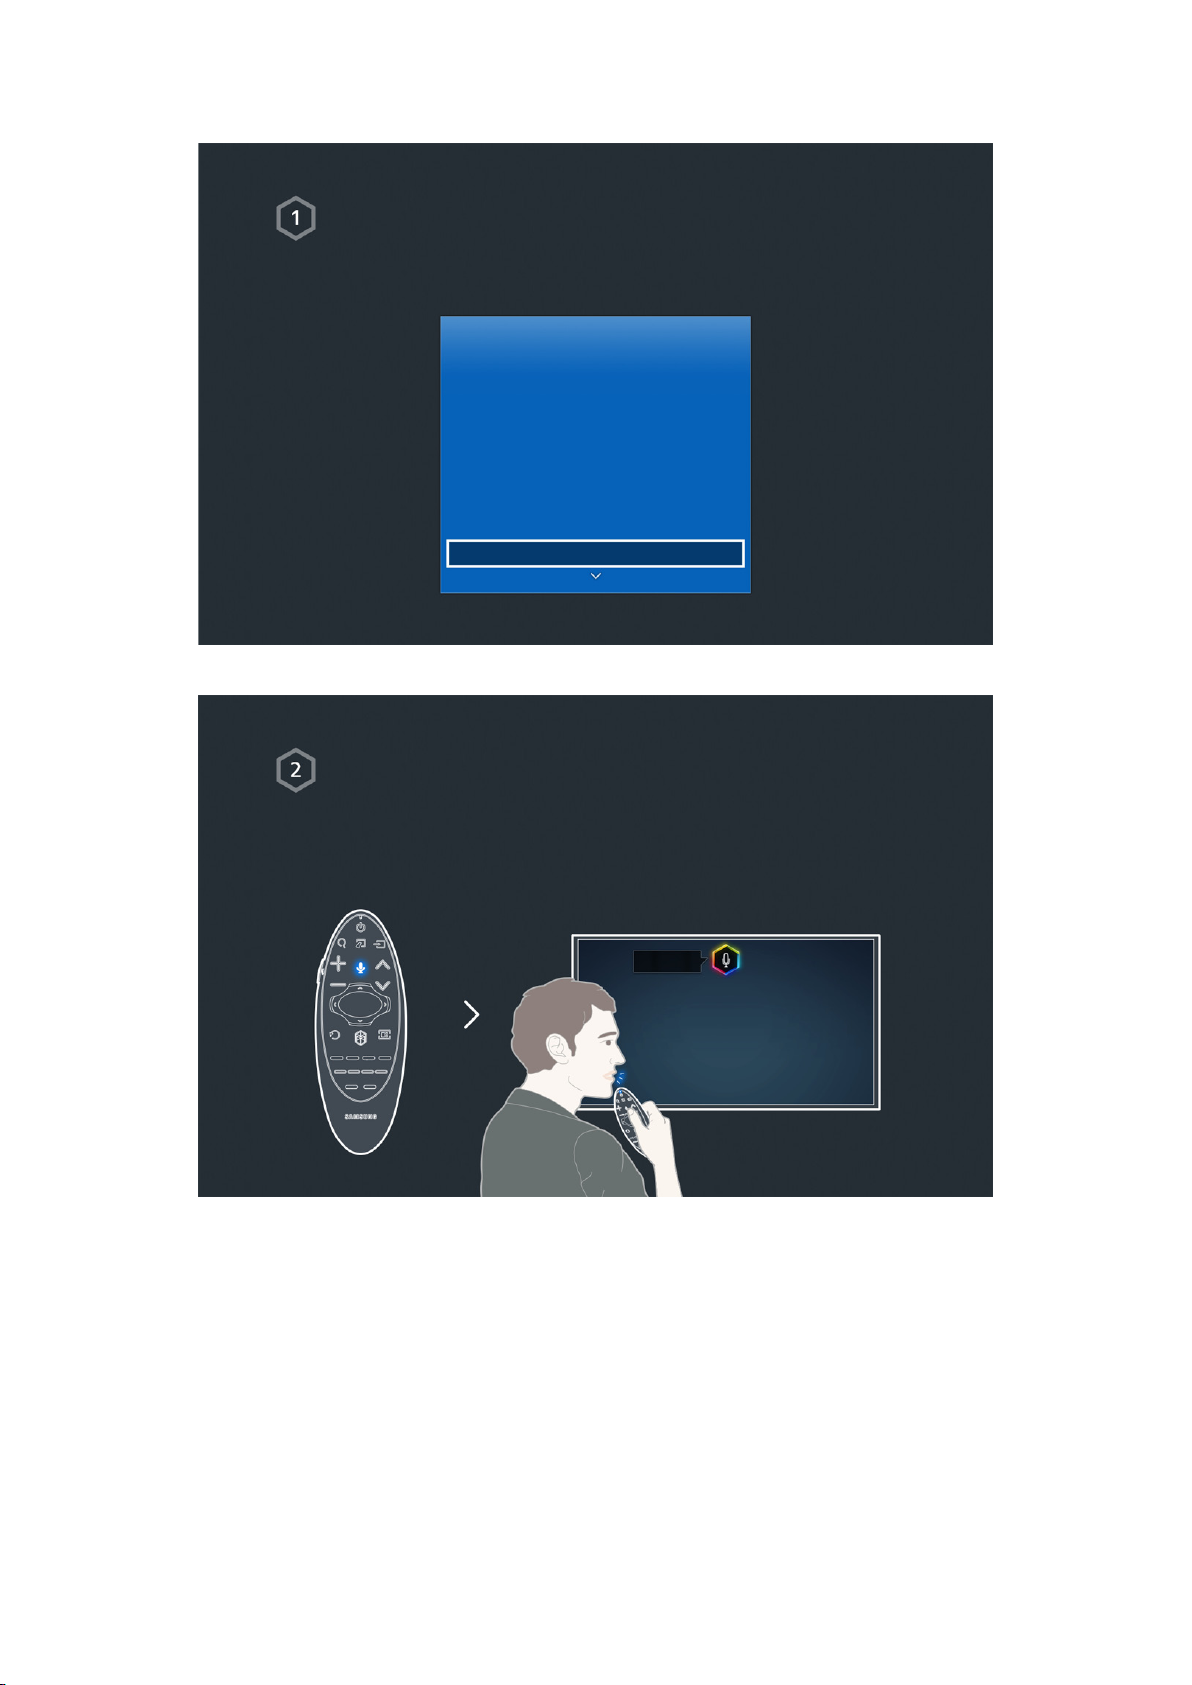
Go to Smart Hub > Apps and download applications from Samsung Smart TV.
"
For more information, refer to "Smart Hub?".
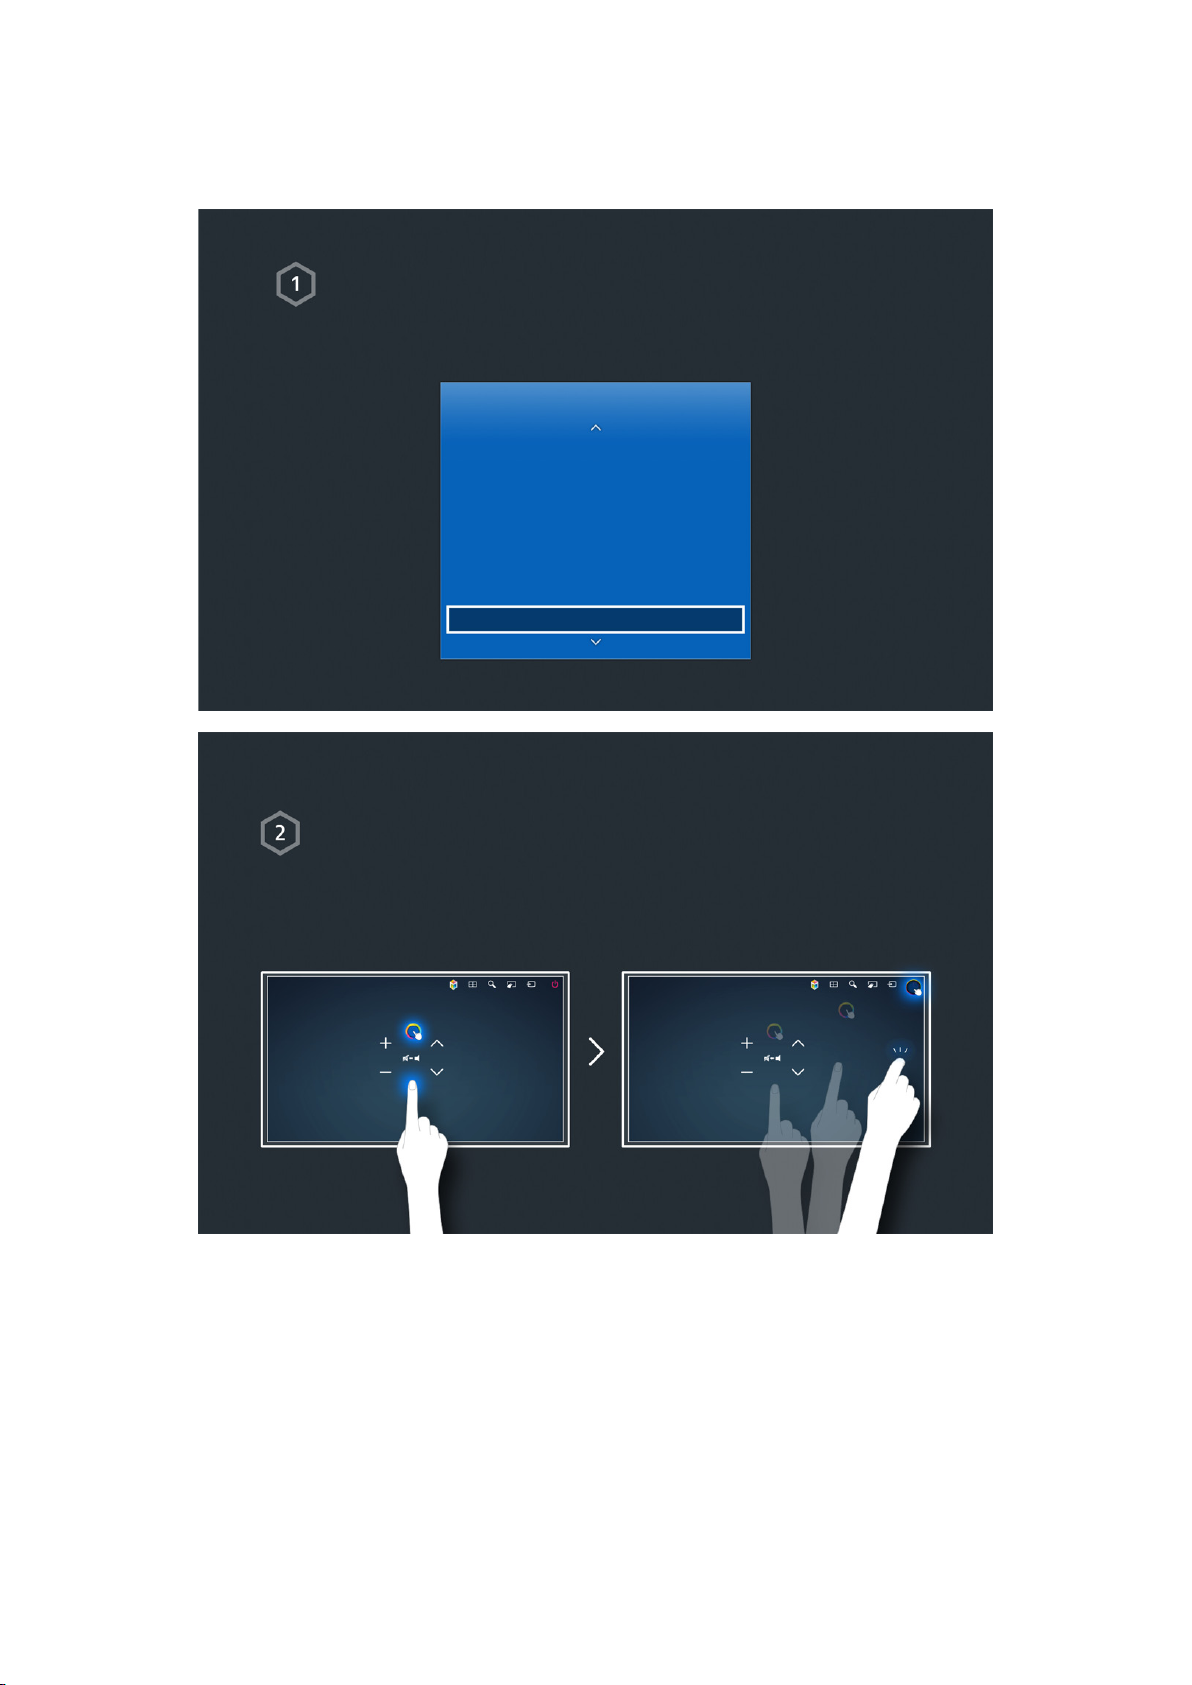
Using Voice Control
Setting up Voice Control
Set up the desired value via System > Voice Control.
System
Accessibility
Setup
Football Mode
Menu Language English
Smart Control Settings
Universal Remote Setup
Voice Control
Using Voice Control
Press the VOICE button on the Samsung Smart Control, and then say the desired
commands.
"
For more information, refer to "TV Control using your Voice".
Using Motion Control
"
Availability depends on the specific model and area.
Setting up Motion Control
Enter required values via System > Motion Control.
System
Setup
Football Mode
Menu Language English
Smart Control Settings
Universal Remote Setup
Voice Control
Motion Control On
Using Motion Control
1. Raise a hand with stretching an index finger, until an arrow cursor appears on the
screen.
2. Move the hand to move the pointer on the screen, and then gesture like clicking a
mouse to click a button.
"
A TV camera (sold separately) needs to be connected in order to use Motion Control.
"
For more information, refer to "TV Control using Motions".
Using the Samsung Smart Control
Connecting the TV
Press RETURN button and GUIDE button simultaneously for 3 seconds.
Setting the Samsung Smart Control
Set the Smart Control Settings via System > Smart Control Settings.
System
Accessibility
Setup
Football Mode
Menu Language English
Smart Control Settings
Universal Remote Setup
Voice Control
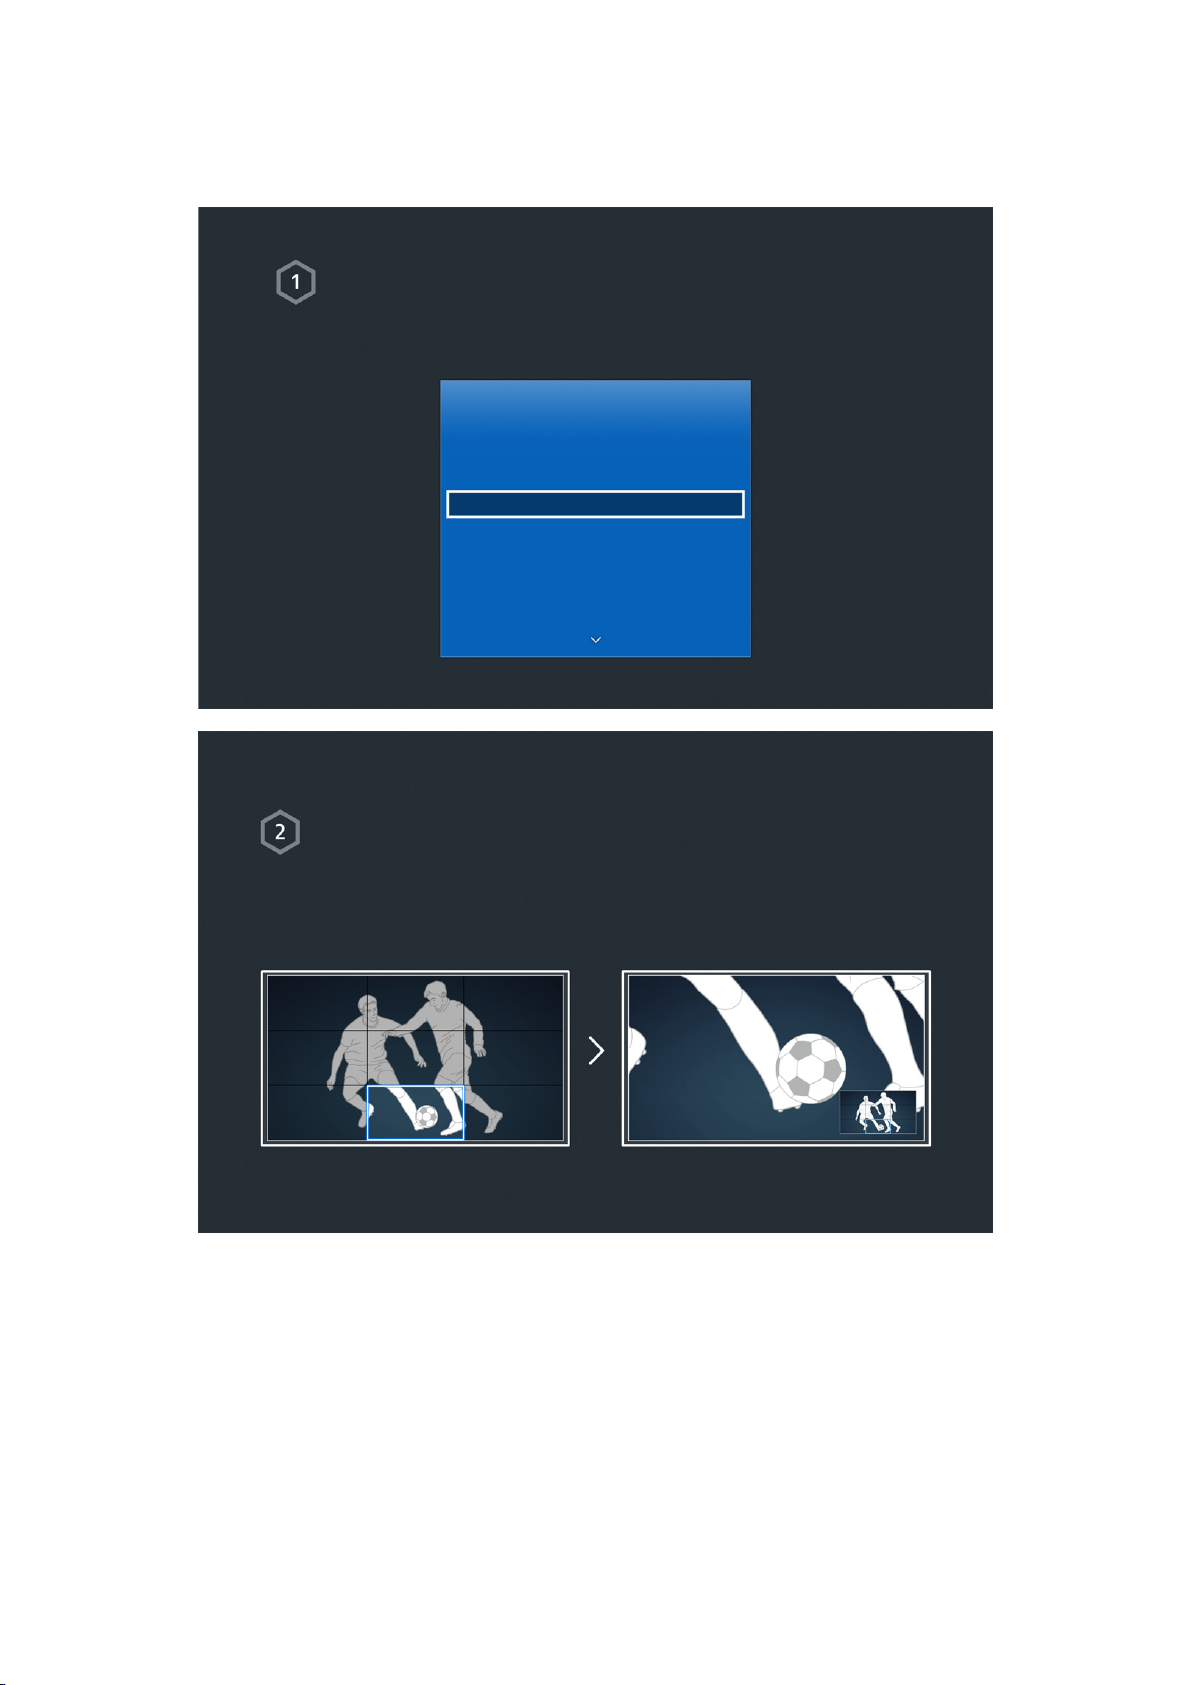
Using the Samsung Smart Control
Use the buttons to perform actions. Move the Samsung Smart Control while
"
For more information, refer to "Using Samsung Smart Control".
touching the touchpad to move the focus.
Using the Football Mode
"
Availability depends on the specific model and area.
Activating Football Mode
To record the sports game, connect the USB device to the TV and go to System > Football
Mode. Set Football Mode to On.
System
Accessibility
Setup
Football Mode
Menu Language English
Smart Control Settings
Universal Remote Setup
Voice Control
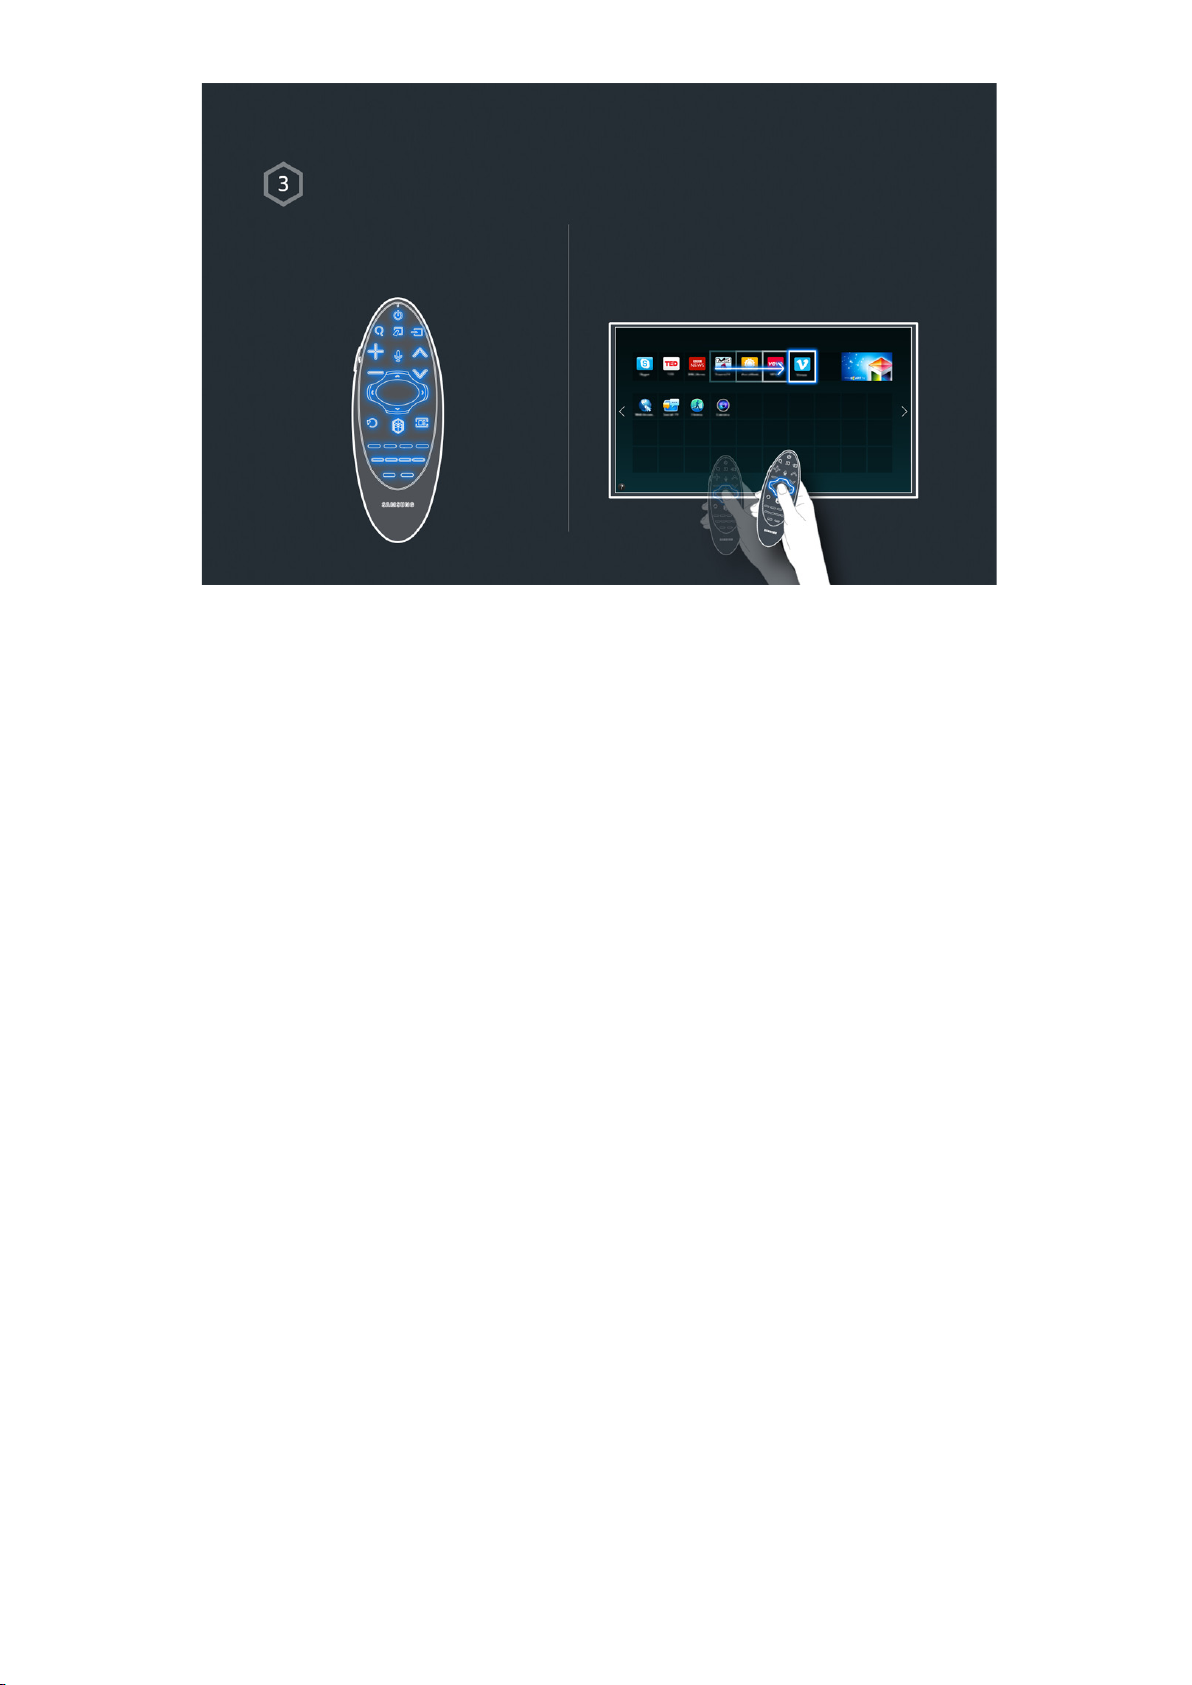
Using Football Mode
Press enter while watching a sports game and then press the desired button on the
screen. Record, use social media, zoom, and save and view highlights.
"
For more information, refer to "Adding Realism to Sports".
Using the Multi-Link Screen
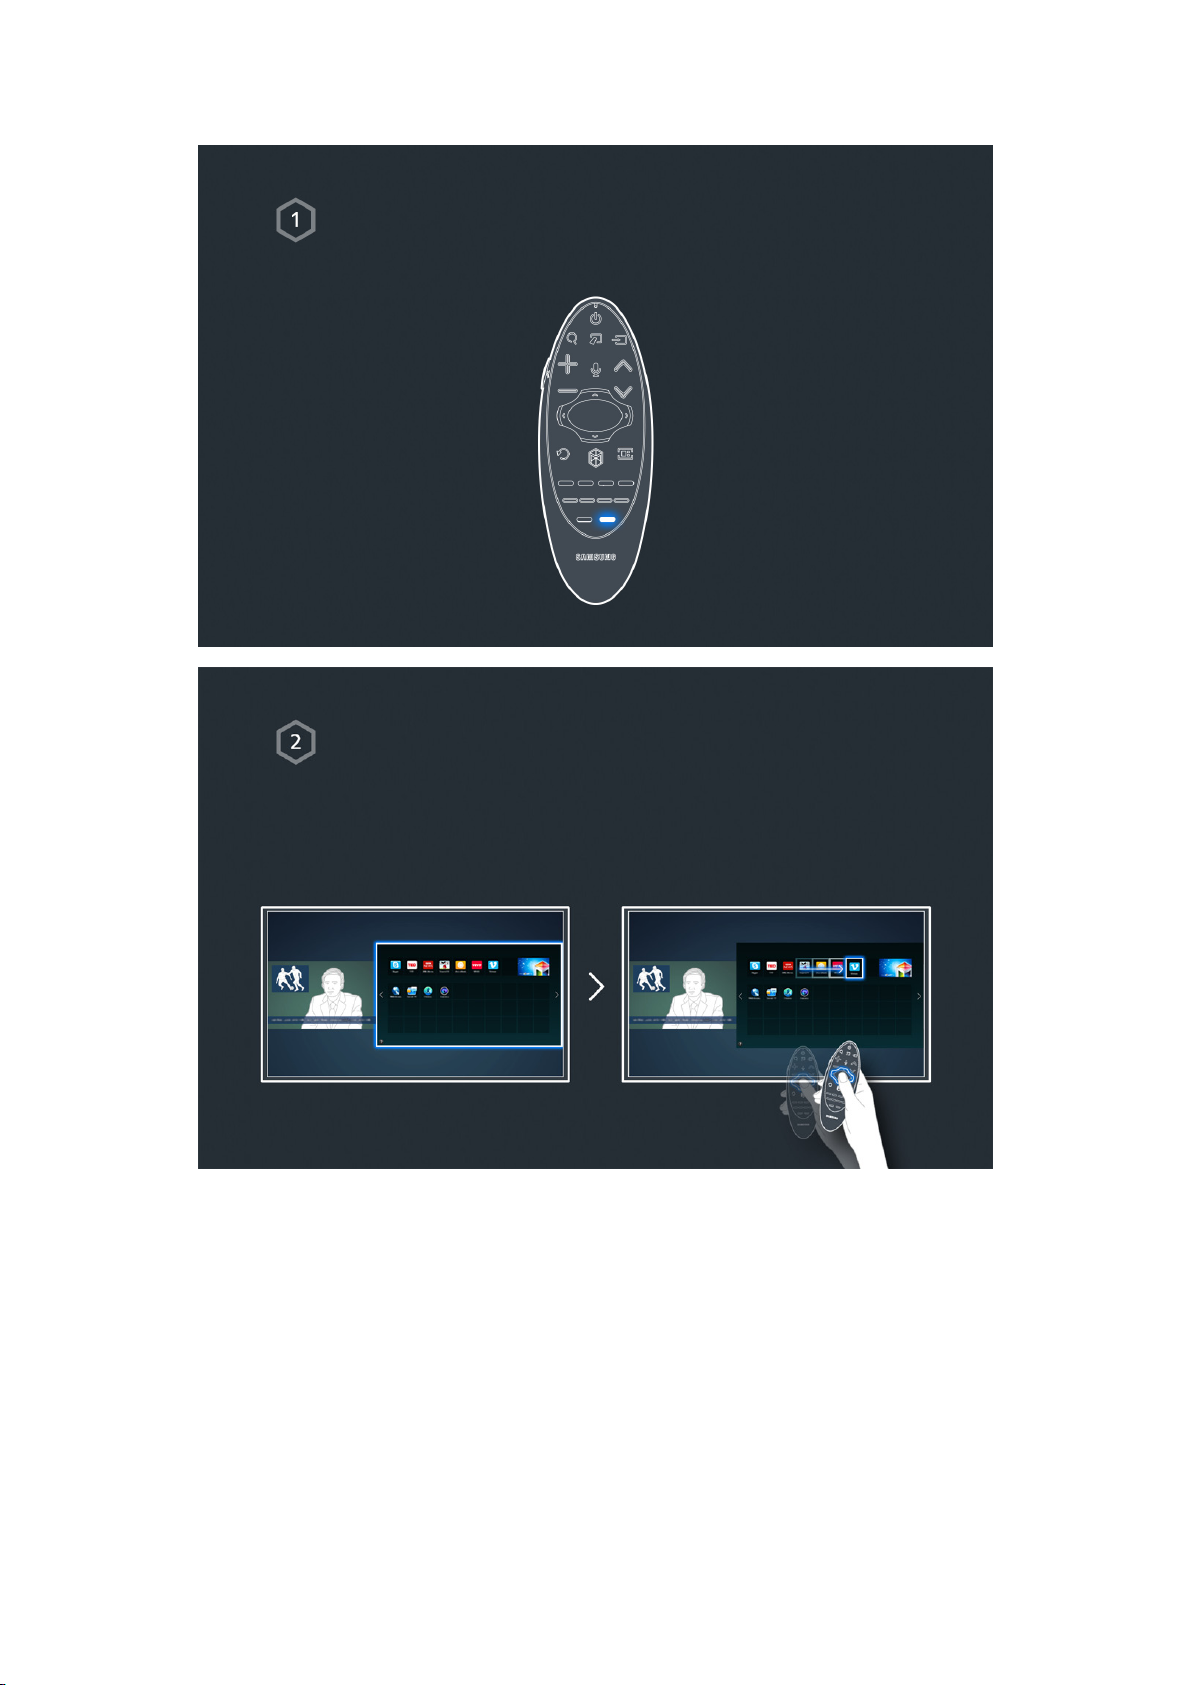
Running Multi-Link Screen
Press the M.SCREEN button.
Using the Multi-Link Screen
Search the internet or use apps while watching TV.
"
For more information, refer to "Multiple Functions on a Single Screen".
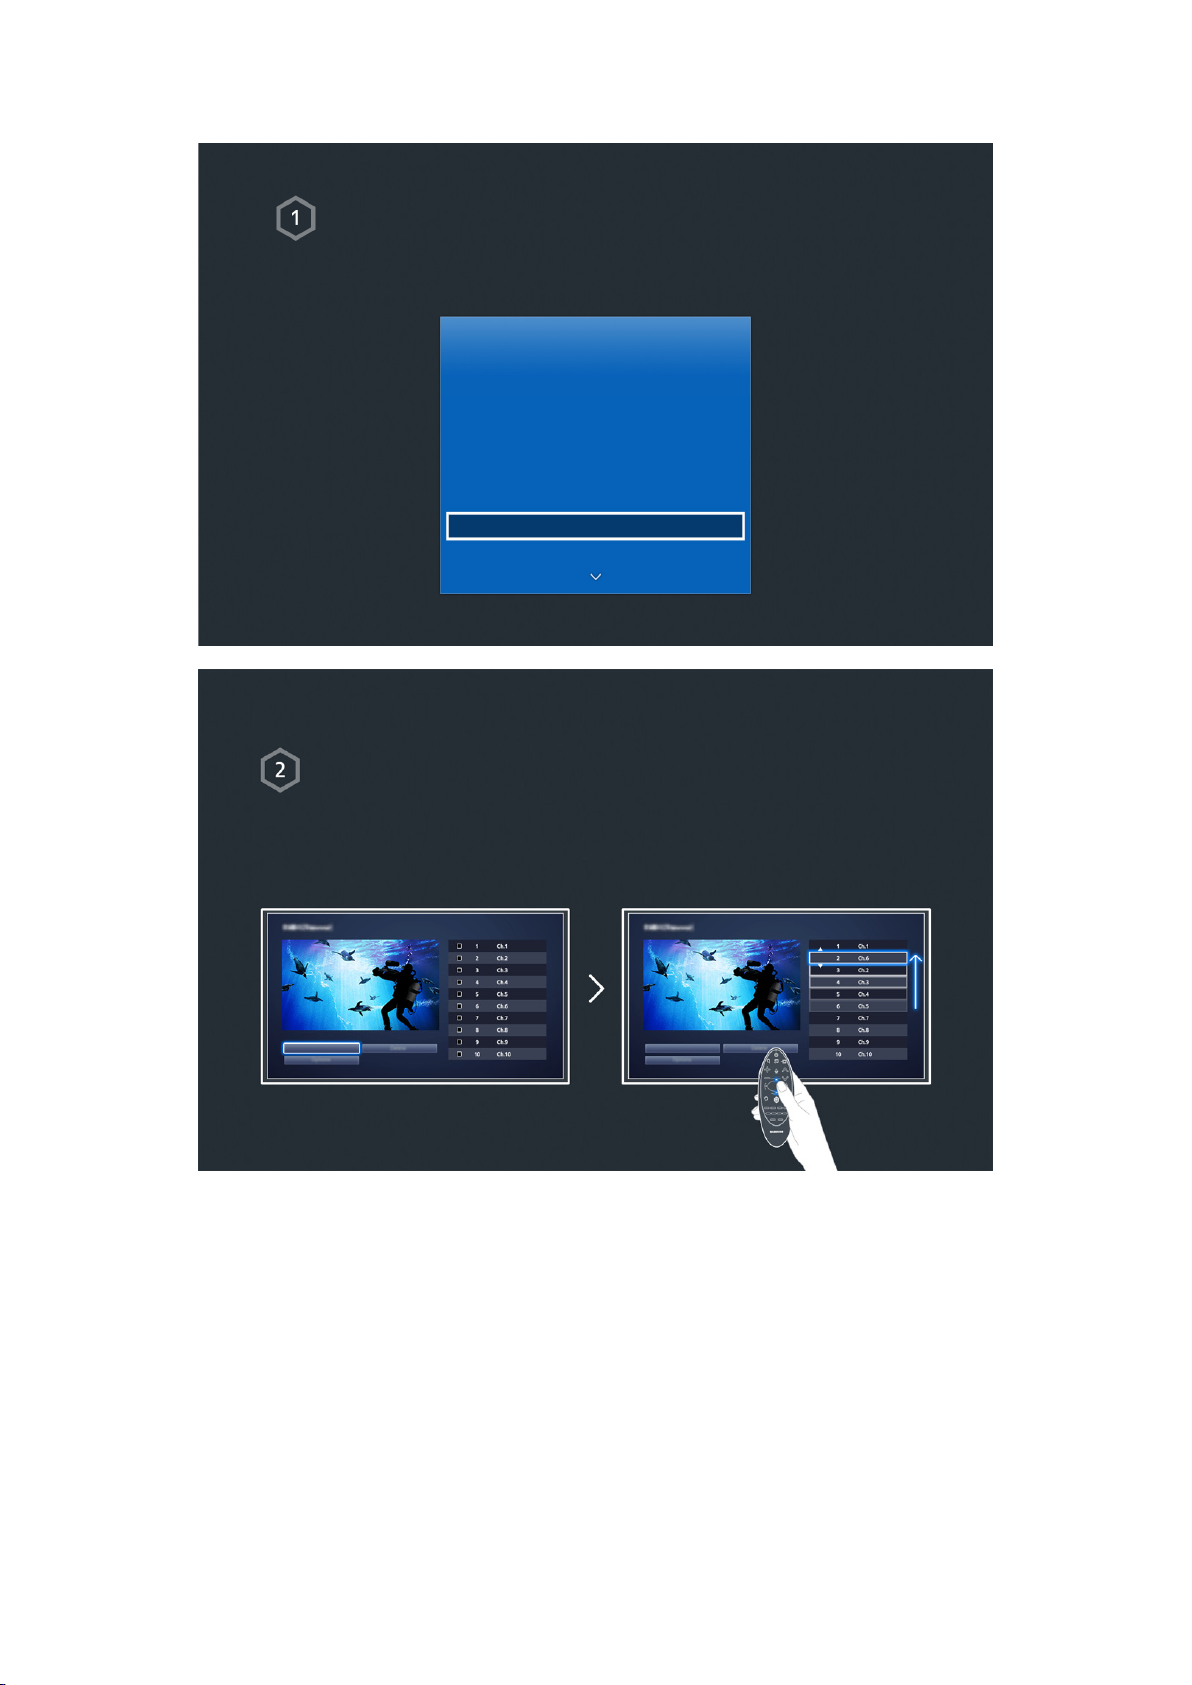
Editing channels
Running Editing Channel
Run Edit Channel and go to Broadcasting > Edit Channel.
Broadcasting
Auto Tuning
Aerial Cable
Channel List
Guide
Schedule Manager
Edit Channel
Edit Favourites
Change the channel number or name
Select Change Number, and then change the channel's order in the list.
Change Number Change Number

Sorting the channel list
1. Select a digital channel in the list and then select Options > Sorting.
2. Select a desired method for sorting the list.
Options Options
Sorting
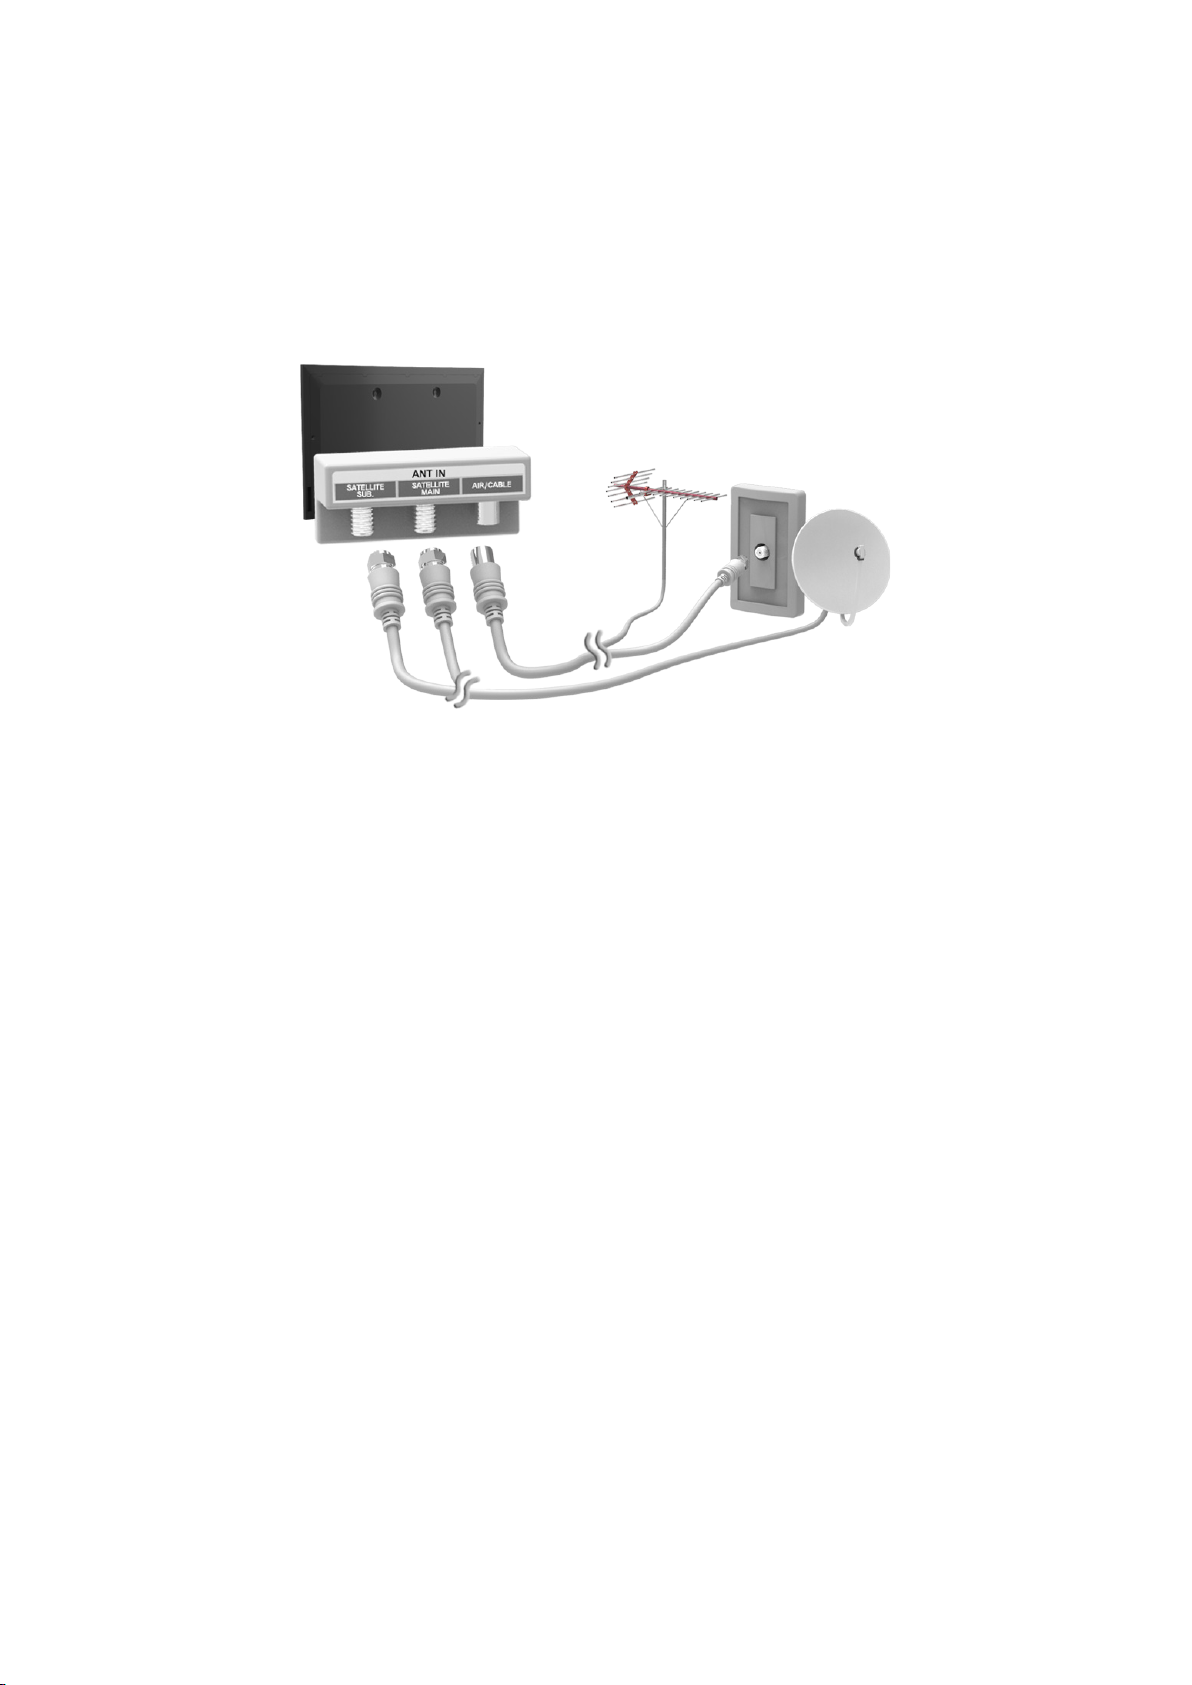
Aerial Connection
"
Availability depends on the specific model and area.
An aerial must be connected to the TV in order to receive broadcast signals.
"
An aerial connection is not necessary when a cable box or satellite receiver is used.
Connect the correct aerial cable according to your viewing environment to the TV's aerial connector, as
shown in the diagram.
It is best to connect the both connectors using a Multi-Switch or Diseqc. Switch, etc and to set Aerial
Connection Type to Dual.

Video Device Connection
"
Availability depends on the specific model and area.
Your TV has a variety of connectors for video input from external devices such as cable boxes, satellite
receivers, Blu-ray players, DVD players, camcorders, and gaming consoles. Below is a list of featured
connectors shown in descending order of picture quality.
HDMI
●
Component
●
External Input
●
Connect a video device to the TV via an HDMI connector for the best picture quality. If the device does
not have an HDMI connector, try a component connector to get the next best picture quality.
"
The number of connectors and their names and locations may vary depending on the model.
"
Refer to the external device's operating manual when connecting it to the TV. The number of external device
connectors and their names and locations may vary depending on the manufacturer.
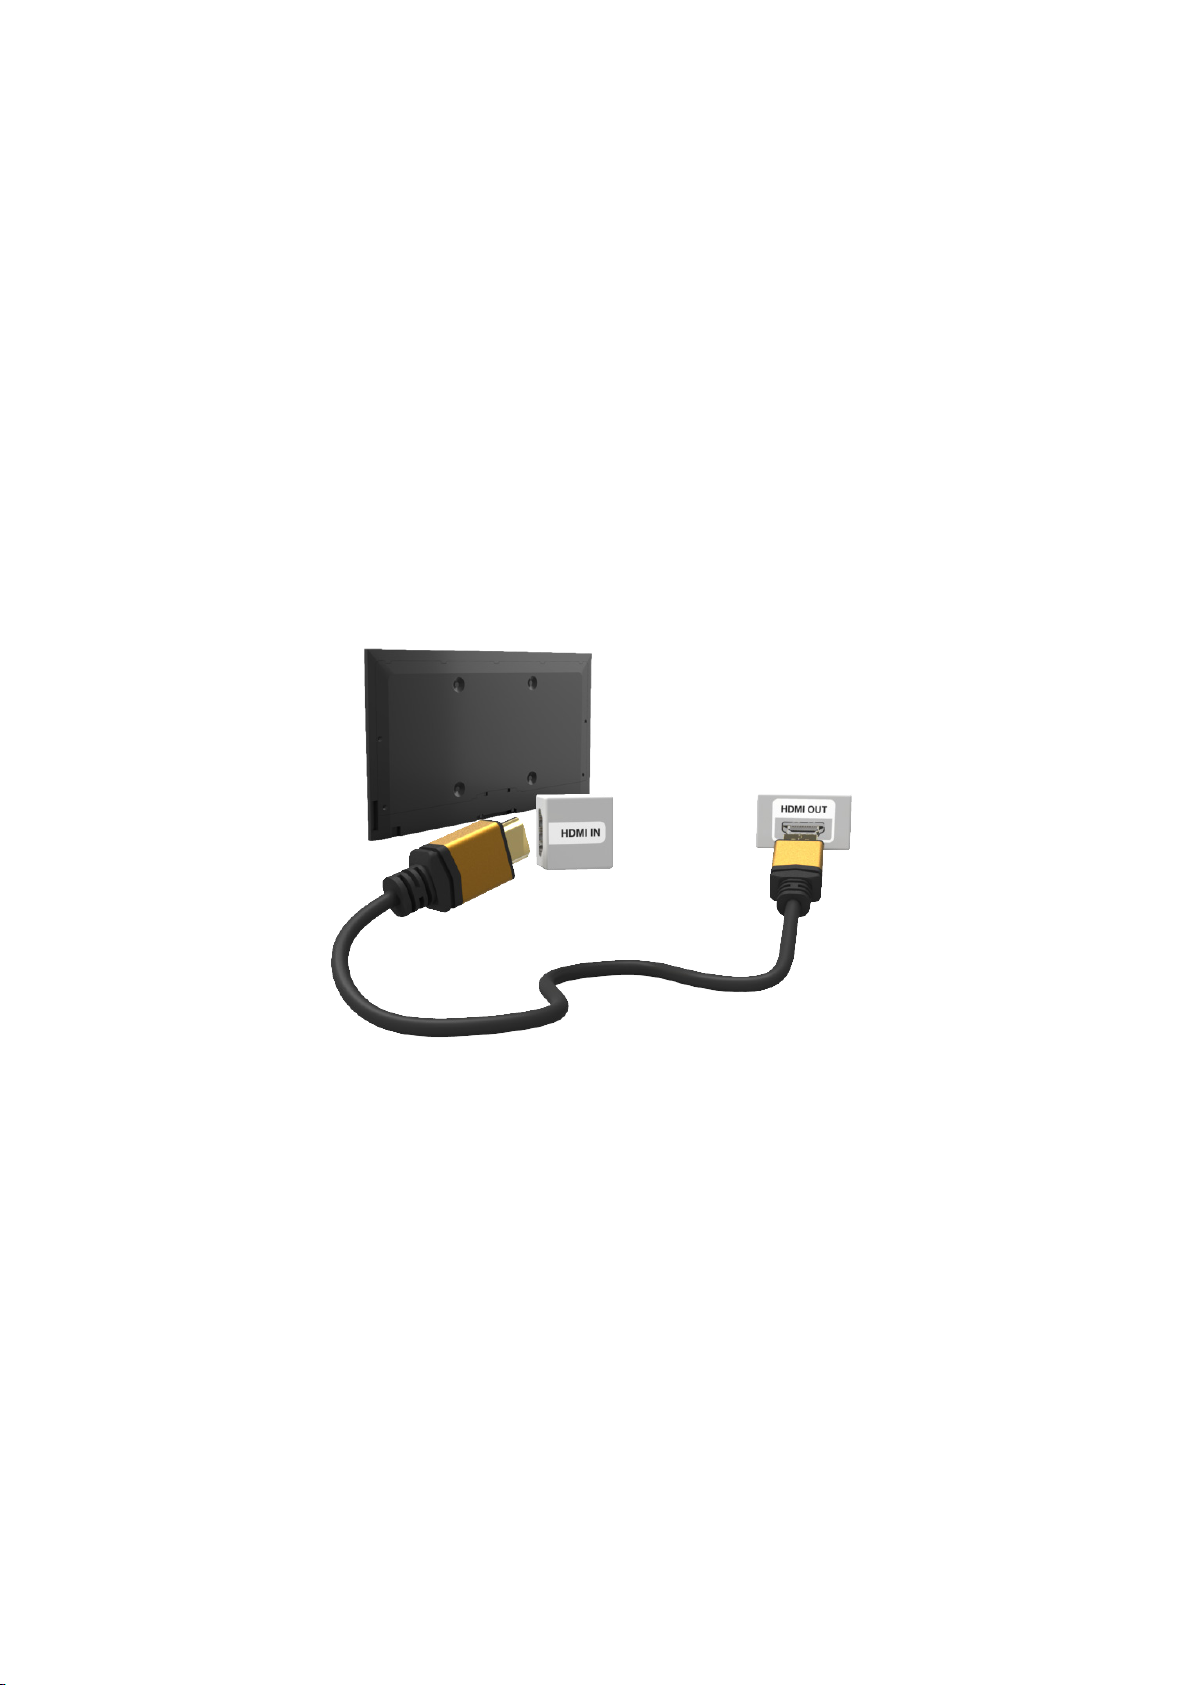
HDMI Connection
The following types of HDMI cables are recommended:
High-Speed HDMI Cable
●
High-Speed HDMI Cable with Ethernet
●
HDMI cables have certain requirements:
"
Use an HDMI cable with a thickness of 14 mm or less.
"
Using a non-certified HDMI cable may result in a blank screen or a connection error.
"
Some HDMI cables and devices may not be compatible with the TV due to different HDMI specifications.
"
This TV does not support HDMI Ethernet Channel. Ethernet is a LAN (Local Area Network) built with coaxial
cables standardised by the IEEE.
Refer to the diagram and connect the HDMI cable to the video device's HDMI output connector and the
TV's HDMI input connector.
"
The number of connectors and their names and locations may vary depending on the model.
Once the connection has been made, you will be able to select the connected external device using
the SOURCE button.
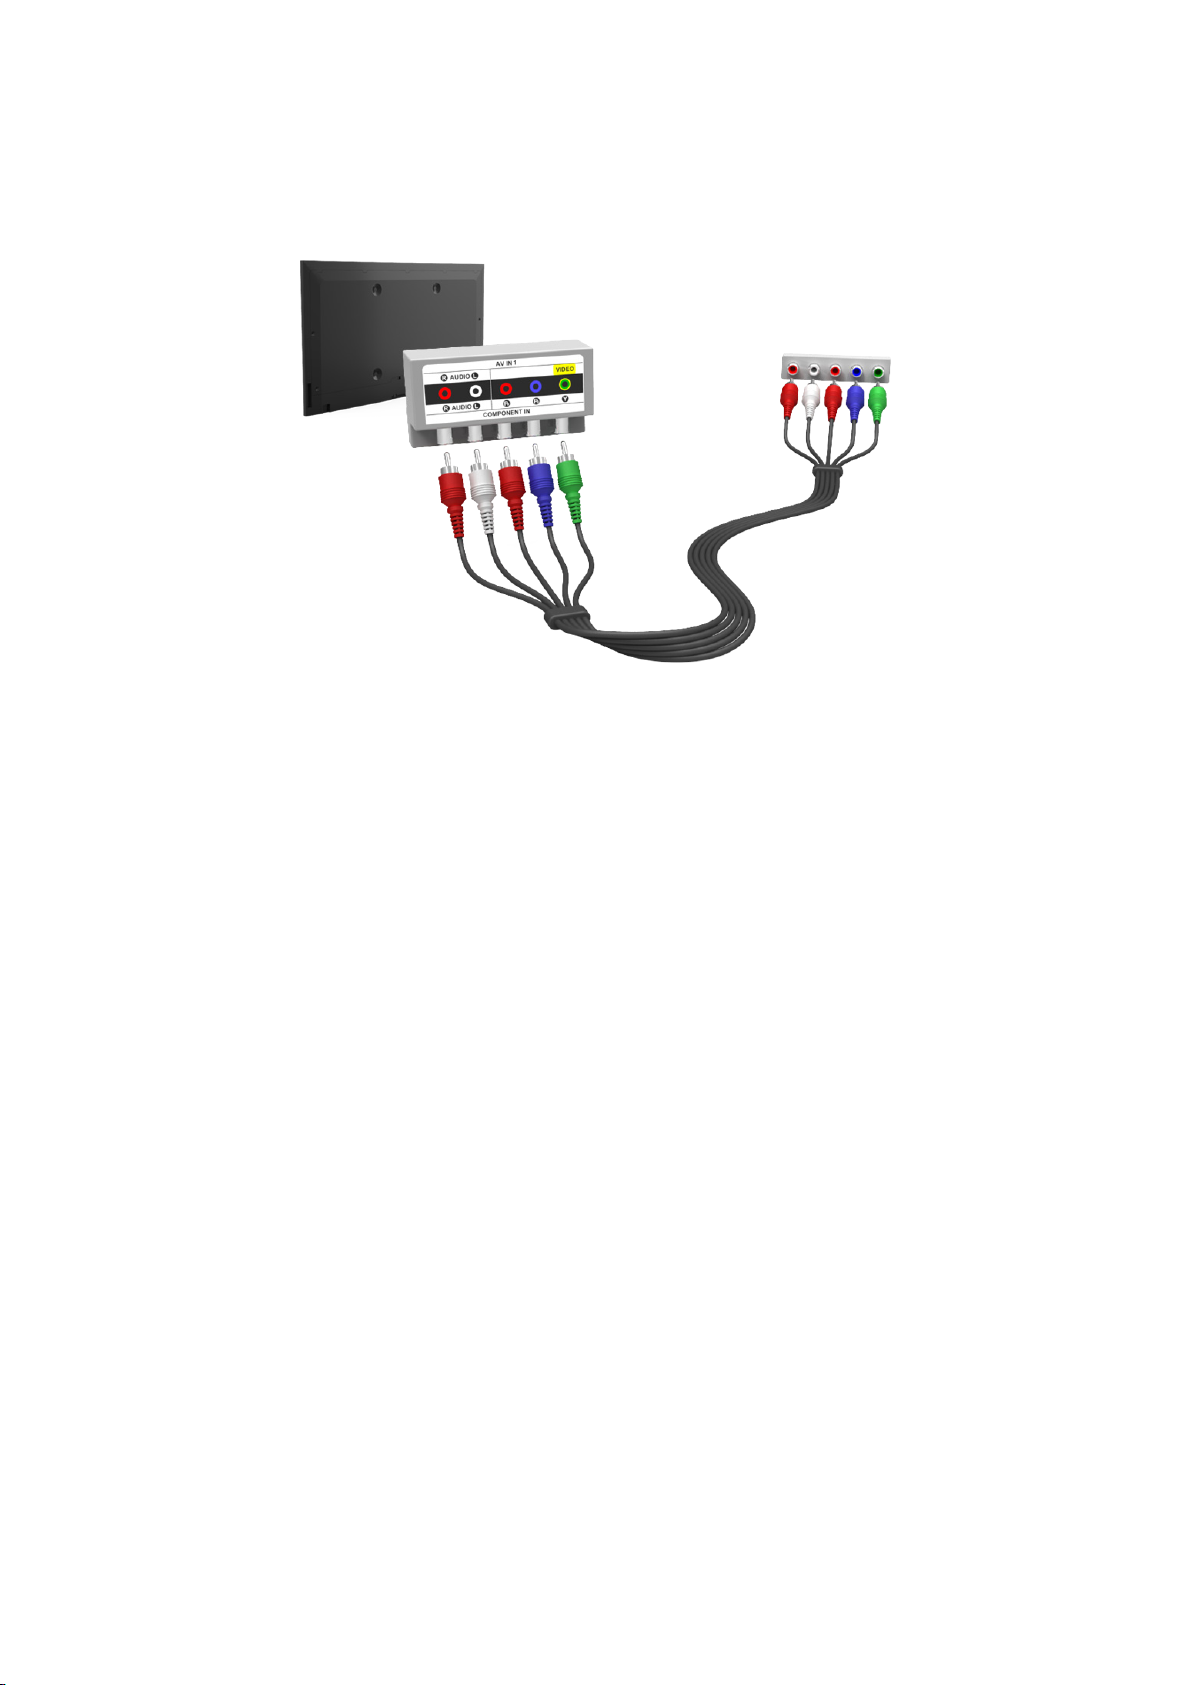
Component Connection
Refer to the diagram and connect the Component cable to the TV's component input connectors and
the device’s component output connectors.
Make sure the cable colours match the connector colours.
Once the connection has been made, you will be able to select the connected external device using
the SOURCE button.
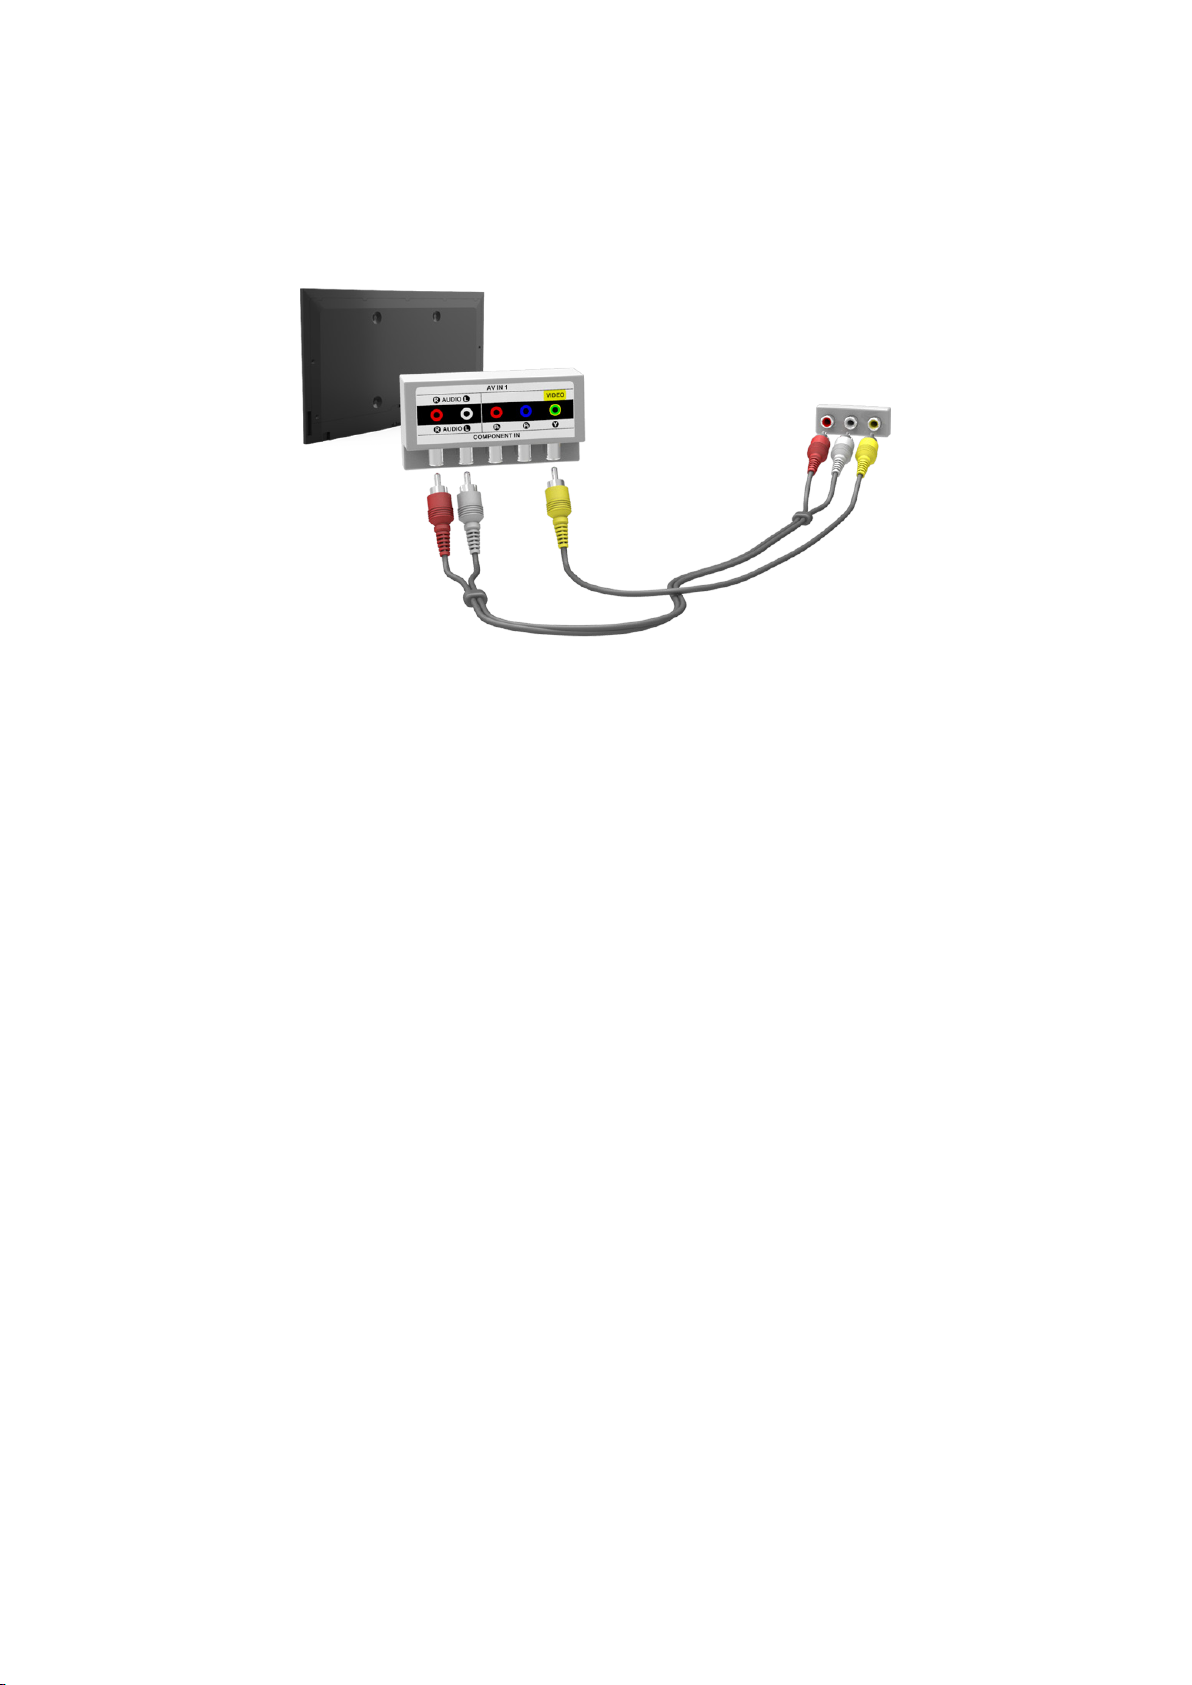
External Input Connection
Refer to the diagram and connect the AV cable to the TV's AV input connectors and the device's AV
output connectors.
If you are using the TV's AV input connectors, connect the video cable to the Y connector. Some
models feature a video connector as well. In this case, connect the cable to the video connector.
Once the connection has been made, you will be able to select the connected external device using
the SOURCE button.
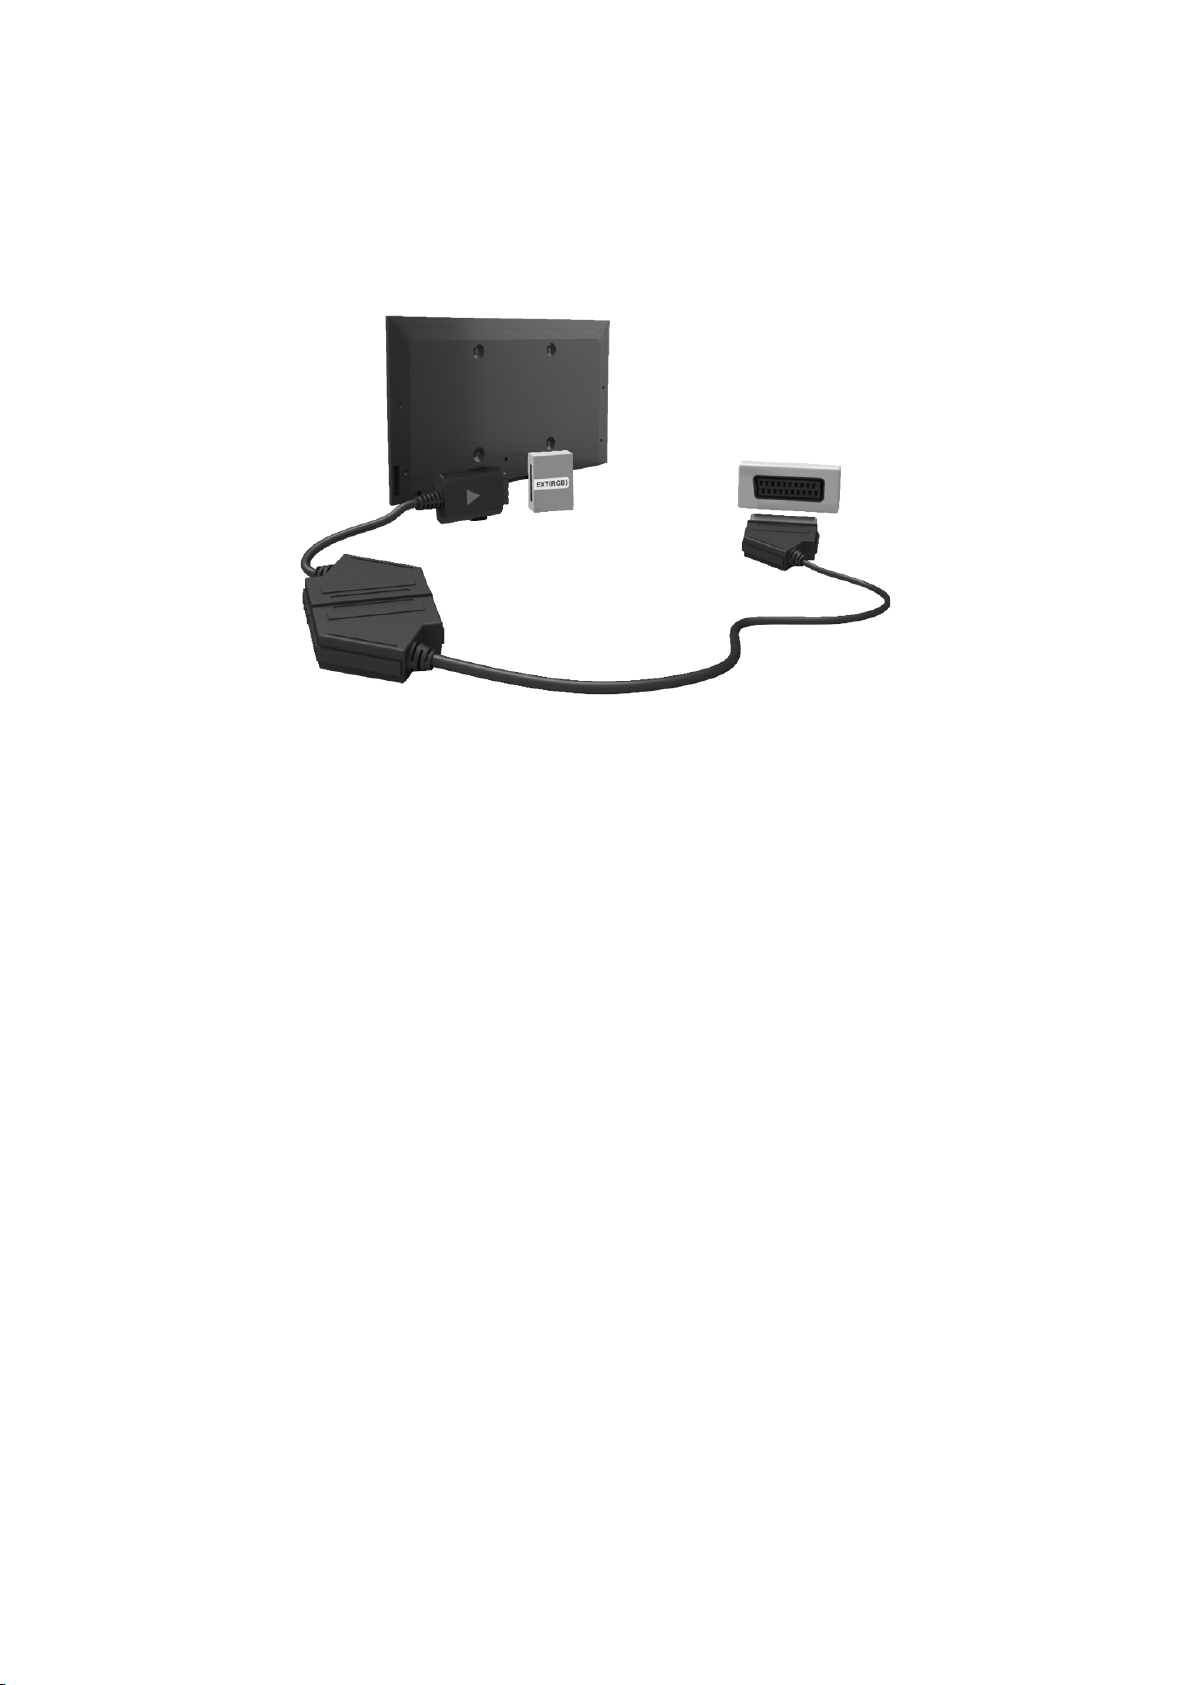
SCART Connection
"
Availability depends on the specific model and area.
Connect the TV’s SCART input connector to the device’s SCART output connector using a SCART
cable. An extra audio connection is not needed because SCART also carries audio.
"
SCART can only carry standard-definition video.
TV Audio through the External Speakers
Your TV has a variety of connectors for audio input from devices such as Blu-ray players and DVD
players and for audio output to such devices as amplifiers. The connectors are listed below.
ARC (Audio Return Channel)
●
Digital Audio (Optical)
●
There are several issues to bear in mind when using audio input:
For better audio quality, it is a good idea to use an AV receiver.
●
The number of connectors and their names and locations may vary depending on the model.
●
Refer to the external device's operating manual when connecting it to the TV. The number
●
of external device connectors and their names and locations may vary depending on the
manufacturer.
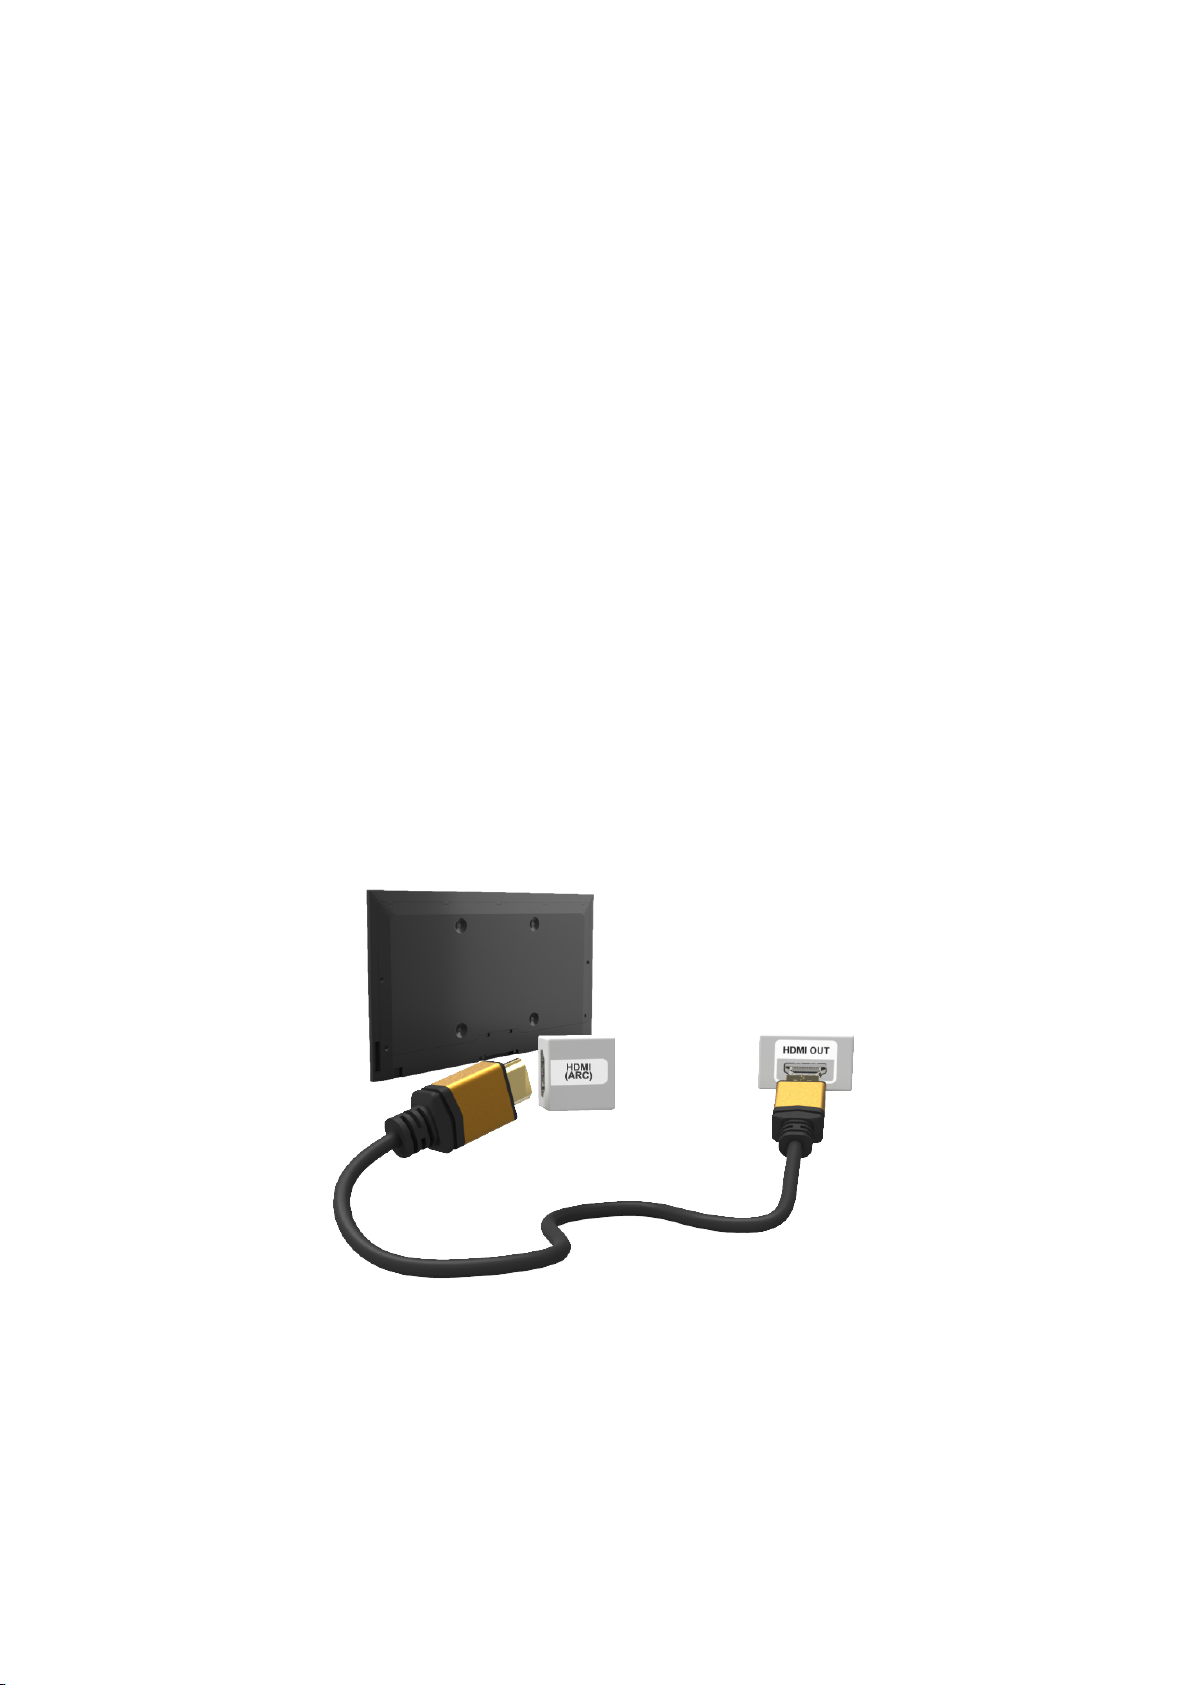
HDMI (ARC) Connection
"
Some models may not support ARC.
ARC (Audio Return Channel) enables digital sound output using just an HDMI cable. However, ARC is
only available through the HDMI (ARC) port and only when the TV is connected to an ARC-enabled AV
receiver.
"
The number of connectors and their names and locations may vary depending on the model.
Connect an HDMI cable to the TV's HDMI (ARC) connector and the device's HDMI output connector.
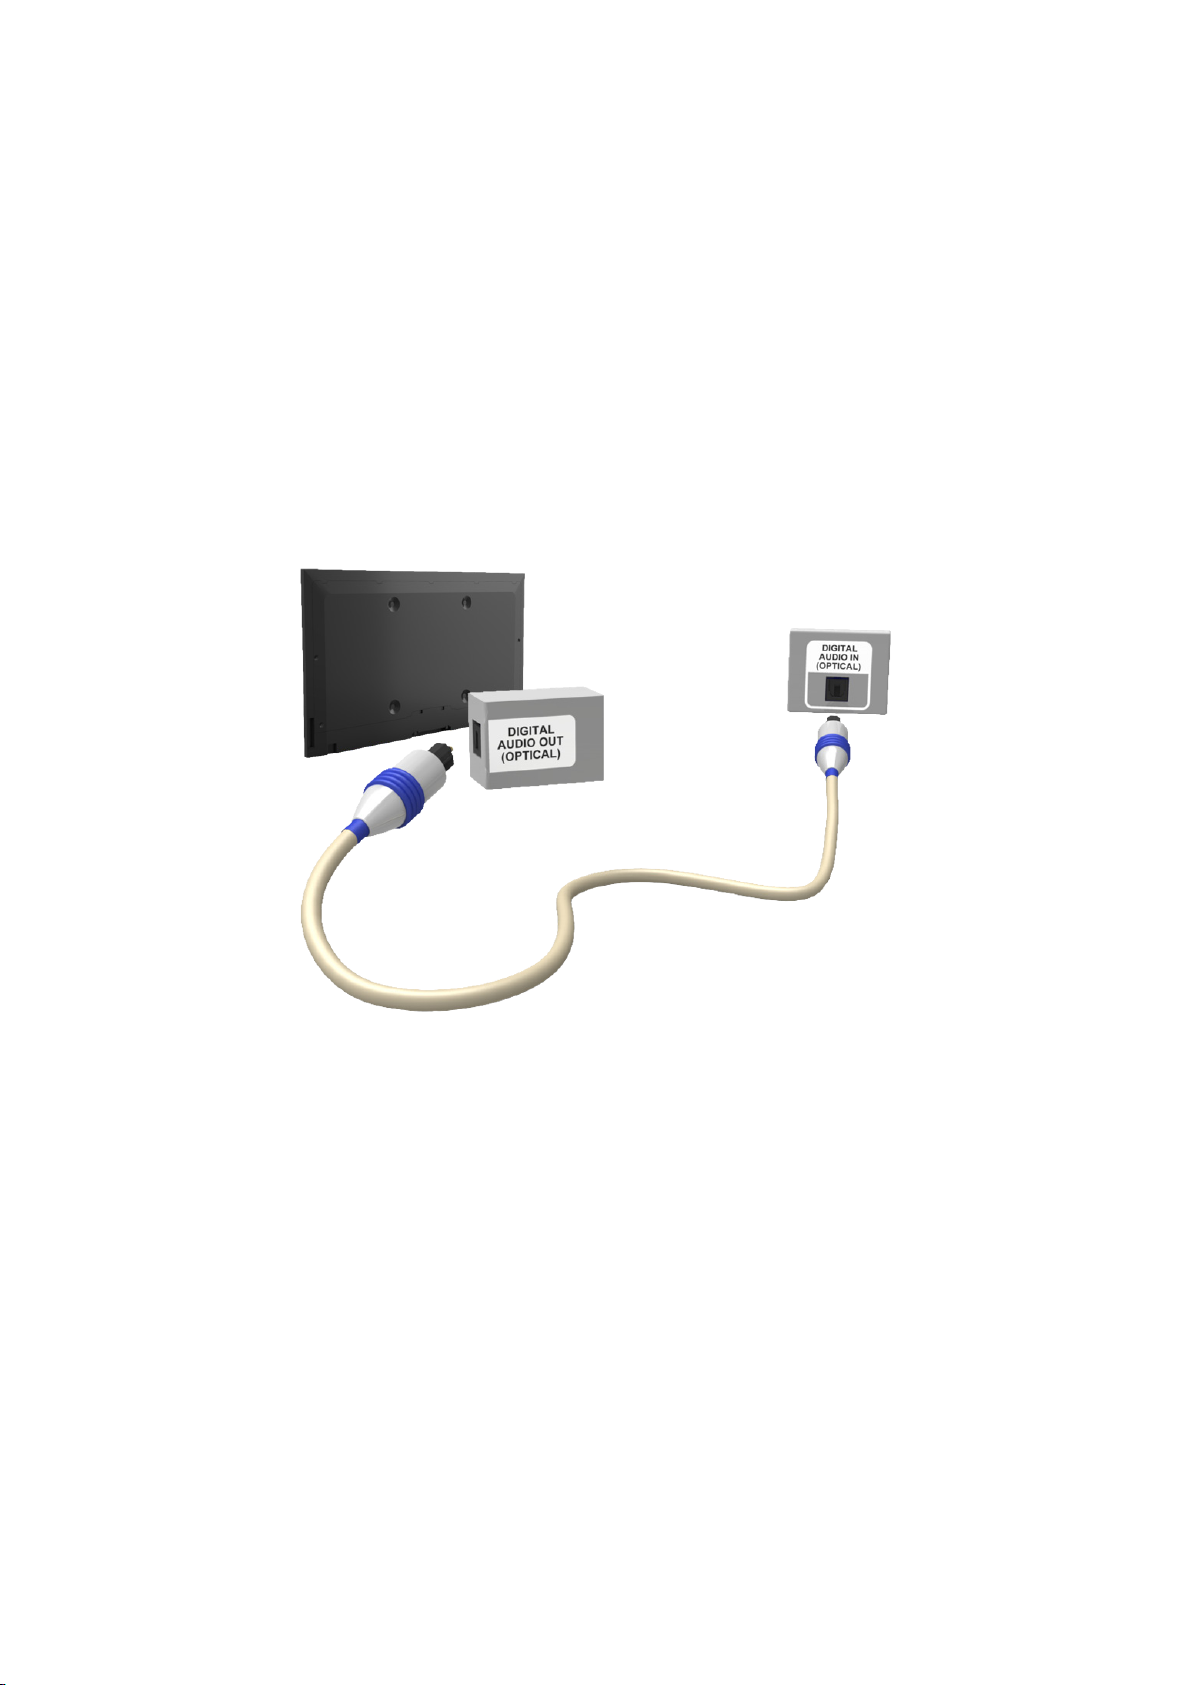
Digital Audio (Optical) Connection
"
Availability depends on the specific model and area.
Connecting an AV receiver to the TV via a digital audio (optical) connector lets you listen to digital
audio.
Connecting a device using an optical cable does not automatically turn off the TV speakers. To turn off
the TV's speakers, set TV Sound Output (Sound > Speaker Settings > TV Sound Output) to something
other than TV Speaker.
Adjust the audio device's volume using its remote control.
"
An unusual noise coming from the audio device while you are using it may indicate a problem with the
audio device itself. If this occurs, ask for assistance from the audio device manufacturer.
"
Digital audio is only available with 5.1-channel broadcasts.
Refer to the diagram and connect the optical cable to the TV's digital audio output connector and the
device's digital audio input connector.

Headphone Connection
"
Availability depends on the specific model and area.
Refer to the diagram and connect the headphones to the headphone output connector. Only use
headphones with a 3-conductor TRS type jack. The headphone volume and the TV volume are
adjusted independently of each other. While the headphone is connected, the TV speakers are muted
and certain Sound options are deactivated.
"
The connectors may not be supported depending on the model.
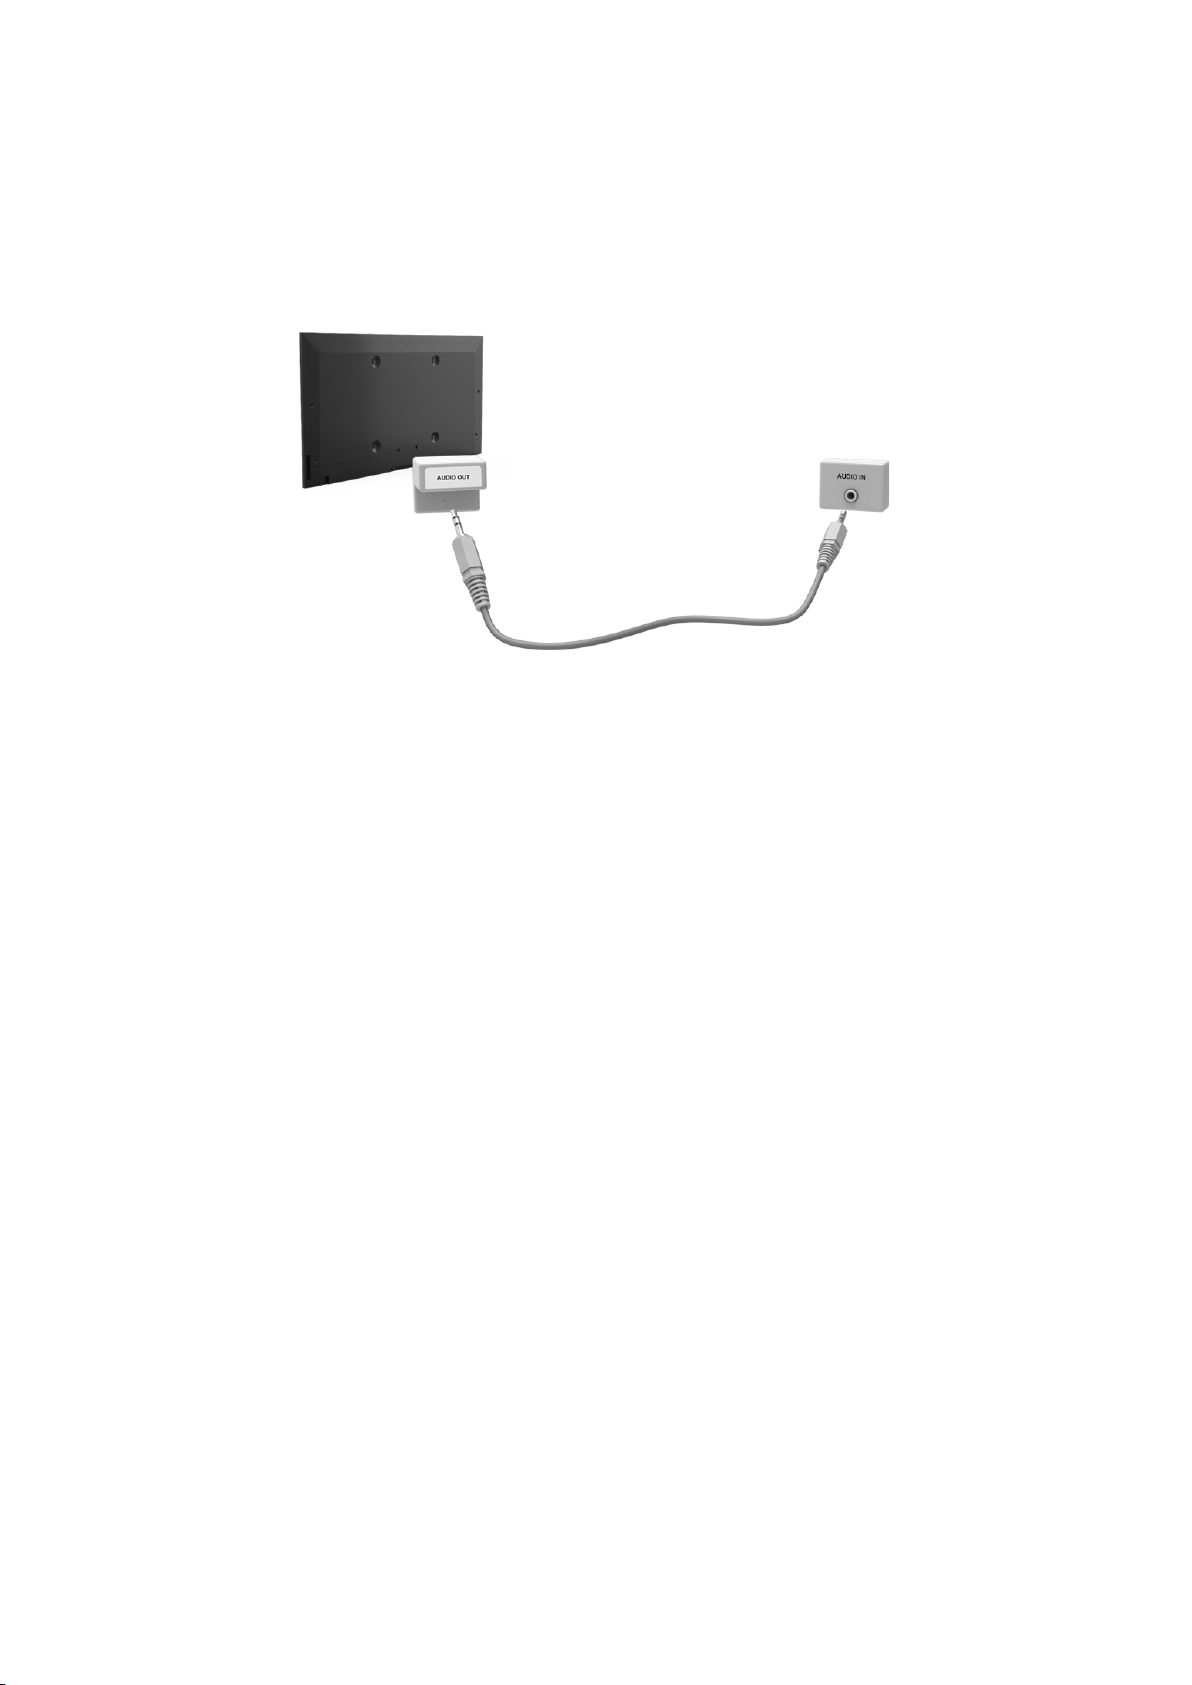
Audio Output Connection
"
Availability depends on the specific model and area.
"
The connectors names and locations may vary depending on the model.
Refer to the diagram and connect the audio cable to the TV's audio output connector and the device's
audio input connector.

Connecting to a Computer
You can directly connect a computer to the TV or to the network to view the computer screen or
content on the TV. Connect the computer to the TV as follows.
Connecting via HDMI Port
●
You can connect the computer to the TV using the HDMI cable to display the computer screen on
the TV.
Connecting with the HDMI (DVI) Port
●
You can connect a computer to the TV by connecting the computer's DVI port to the TV's HDMI
port with the DVI to HDMI cable to display the computer screen on the TV.
Connecting via Samsung Link
●
Quickly access the photo, video and music files saved on a computer on which Samsung Link
software is installed, even if you do not connect the TV directly to the computer.
Connecting via Home Network (DLNA)
●
Quickly access the photo, video and music files saved on a computer by connecting the TV and
the computer to the same router or AP.
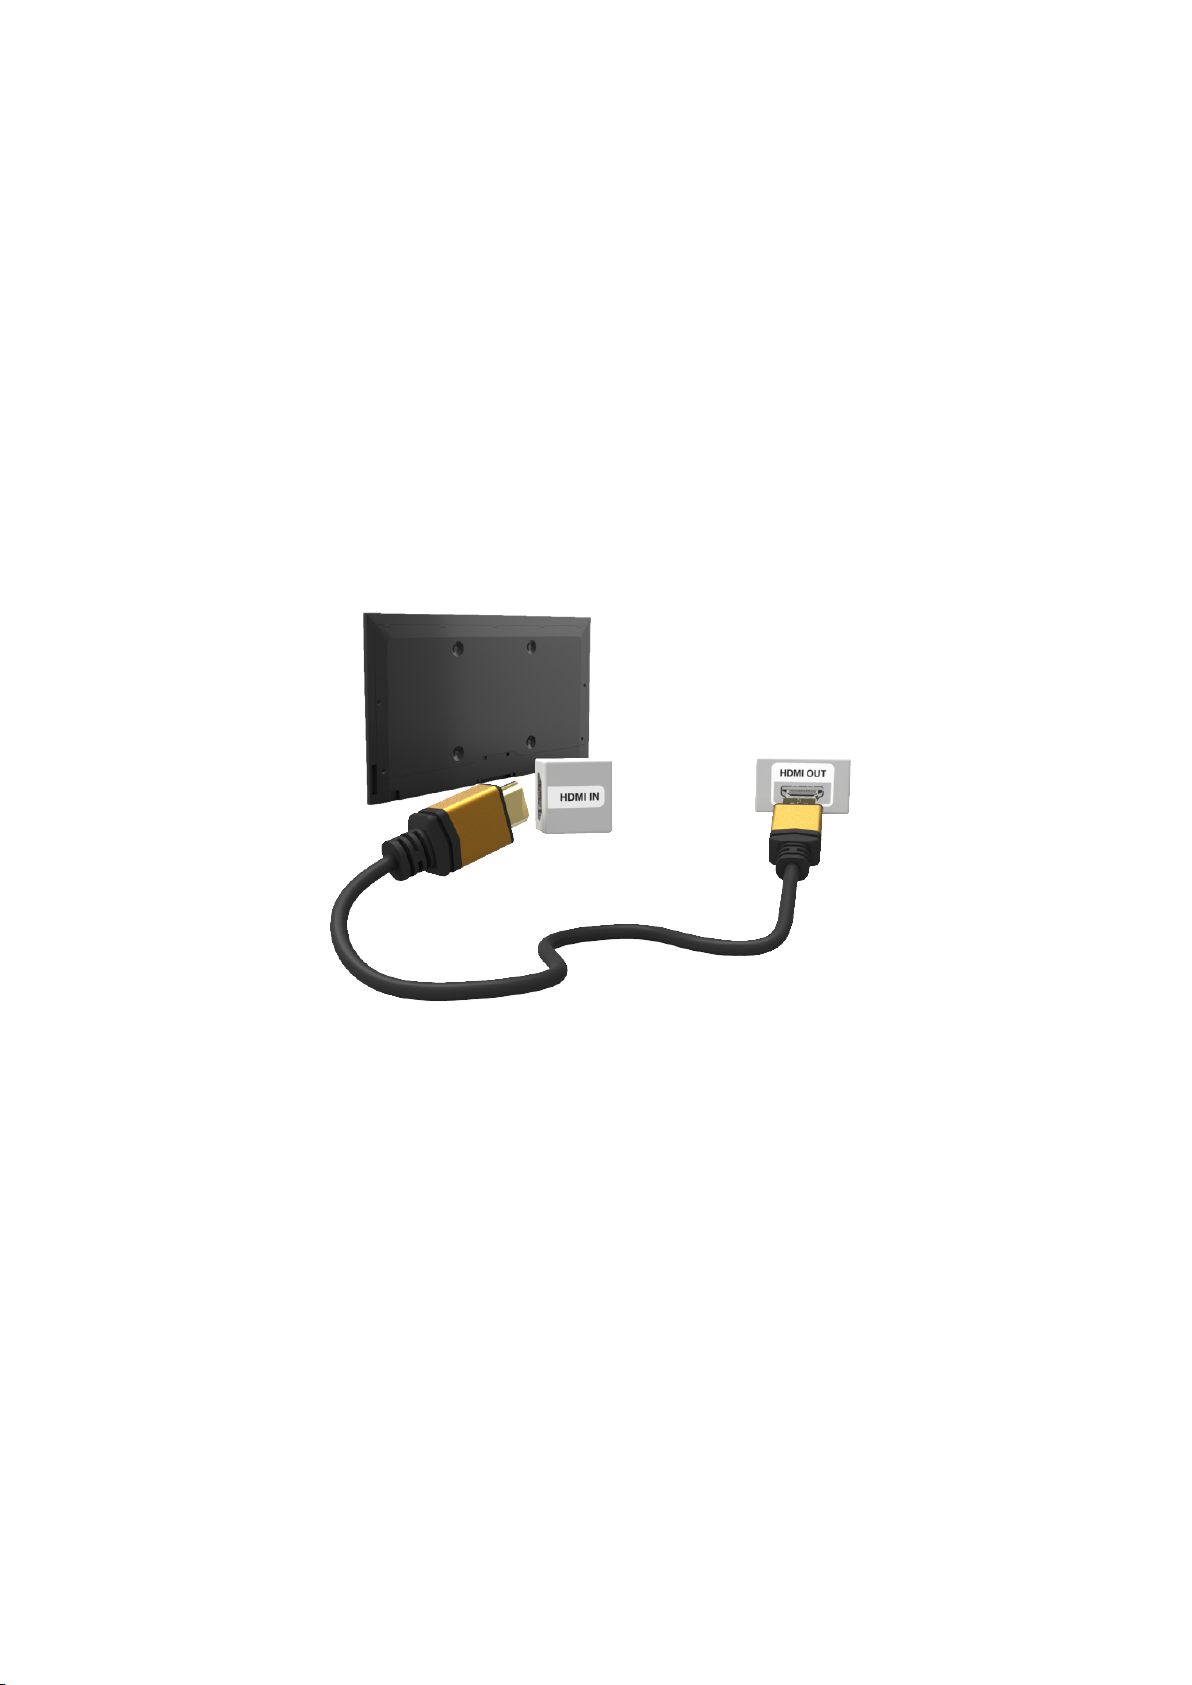
Connecting via HDMI Port
For HDMI connection, one of the following HDMI cable types is recommended:
High-Speed HDMI Cable
●
High-Speed HDMI Cable with Ethernet
●
"
Use an HDMI cable with a thickness of 14 mm or less. Using a non-certified HDMI cable may result in a
blank screen or a connection error.
"
Some HDMI cables and devices may not be compatible with the TV due to different HDMI specifications.
"
This TV does not support HDMI Ethernet Channel. Ethernet is a LAN (Local Area Network) built on coaxial
cables standardised by the IEEE.
"
Some computers do not support HDMI interface, depending on its graphics adapter specifications. In this
case, use a DVI-to-HDMI cable to connect the computer to the TV.
Refer to the diagram and connect the HDMI cable to the external video device's HDMI output
connector and the TV's HDMI input connector.
Once the connection has been made, you will be able to select the connected external device using
the SOURCE button.
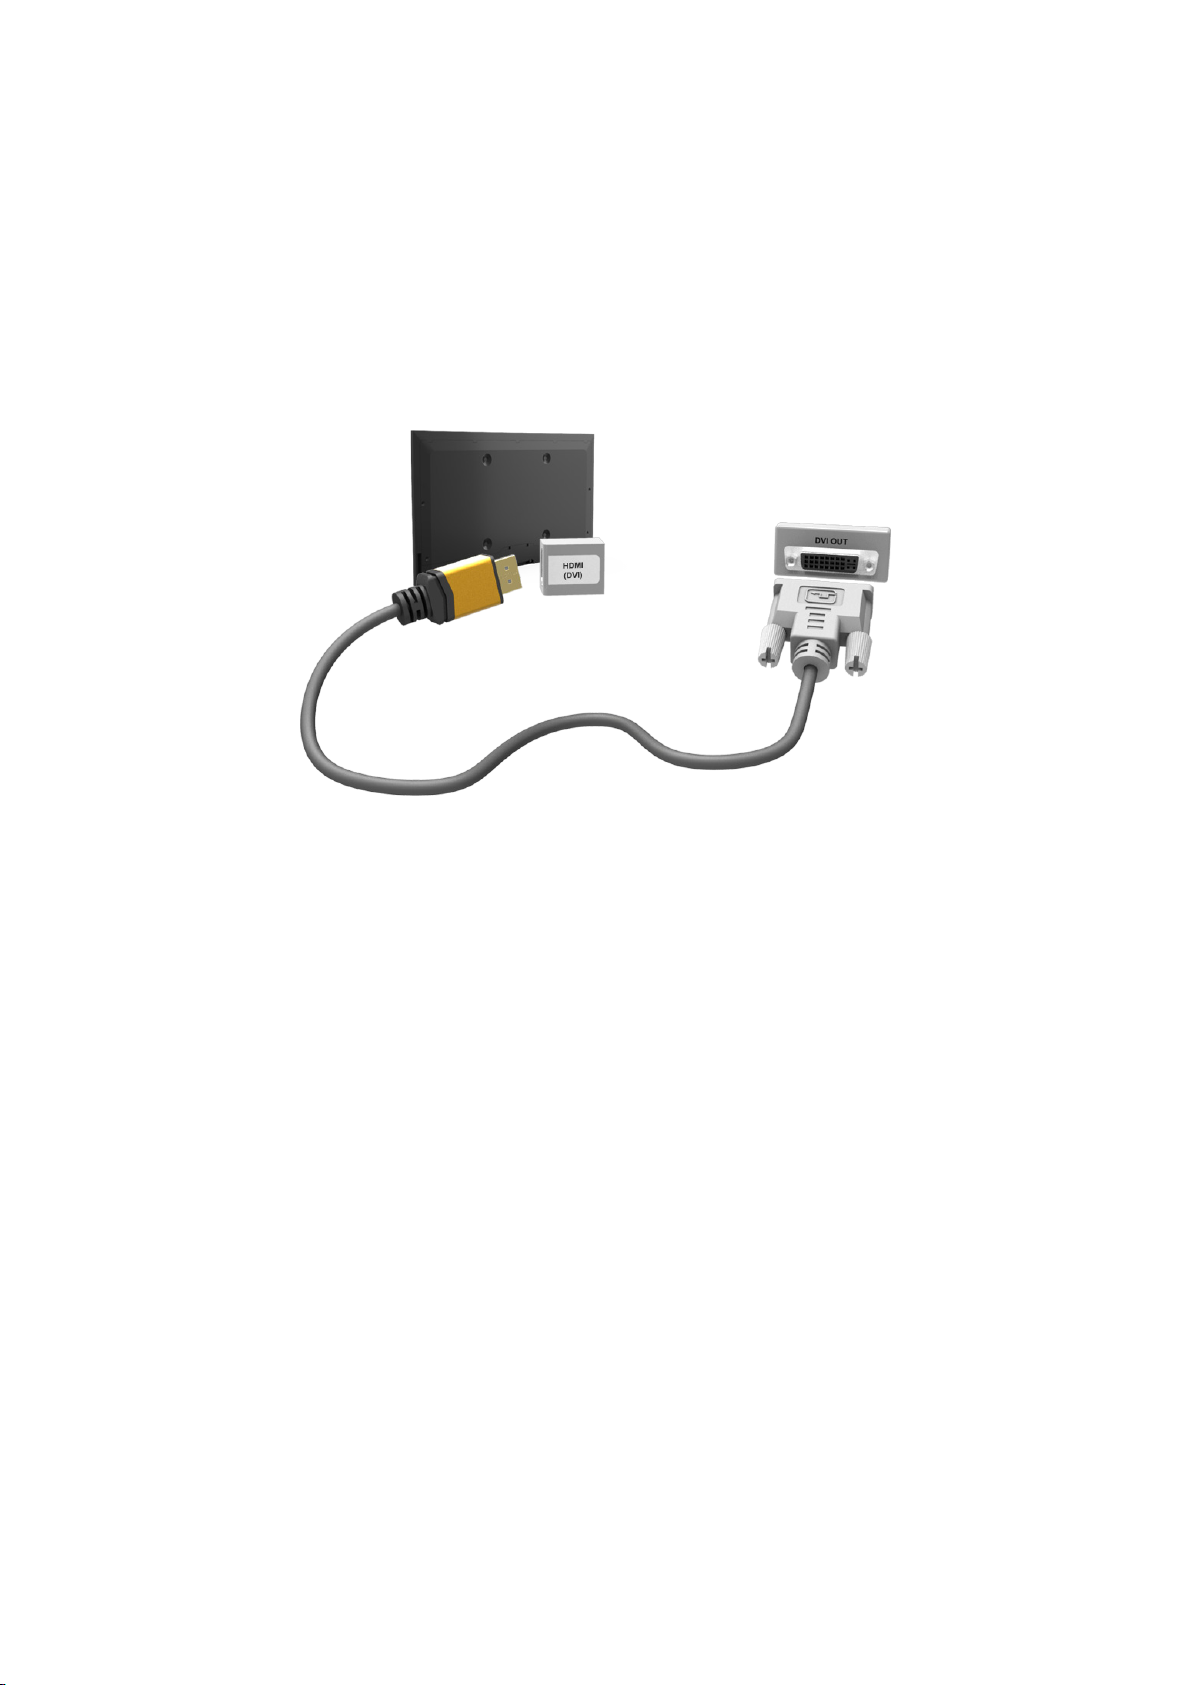
Connecting with the HDMI (DVI) Port
If the graphics adapter of your computer does not support HDMI interface, connect the computer to
the TV with the DVI (Digital Visual Interactive) to HDMI cable. However, DVI-to-HDMI connection is
supported by the HDMI port for DVI only and does not support audio signal transmission. To listen to
the computer sound, connect the external speaker to the computer’s audio output connector.
"
For information on resolutions supported by the TV, refer to "Computer Connection Precautions".
Refer to the diagram and connect the DVI-to-HDMI cable to the TV's HDMI (DVI) port and the
computer's DVI output port.
Once the connection has been made, you will be able to select the connected external device using
the SOURCE button.

Connecting via Samsung Link
Quickly access photo, video and music files saved on a computer with Samsung Link software
installed. Also, use Samsung Link to play and view the content of a computer that has been registered
to Samsung Link under your Samsung account, even if the computer and the TV are not connected to
the same router or AP.
Visit the Samsung content and service portal (http://link.samsung.com) on a computer and sign
1.
into your Samsung account.
"
To install Samsung Link desktop software, you will need to first sign into your Samsung account. If
you don't have a Samsung account, create one first.
Install Samsung Link desktop software. When the installation is complete, the computer will be
2.
registered to Samsung Link.
Specify the folder you wish to link to the TV. You can view and play photo, video and music files
3.
contained in the specified folder on the TV screen.
"
For more information on using Samsung Link desktop software, refer to the software's Help section.
Connecting via Home Network (DLNA)
Quickly access and view/play photo, video and music files from a computer on the TV screen.
Connect the TV and the computer to the same router or AP. A home network will be configured
1.
once the two connections are established.
"
Home Network (DLNA) enables content-sharing between the TV, computers and mobile devices
connected to the same wired or wireless router.
From the computer, select [Control Panel] > [Network and Internet] > [Network and Sharing
2.
Centre] > [Change advanced sharing settings] and select [Choose media streaming options...] to
activate media streaming.
From the list, set TV to [Allowed].
3.
Launch Windows Media Player from the computer, select [Settings] > [Library Management] and
4.
then add the location where the photo, video and music files are saved to view/play the files on
the TV screen.
"
It will be possible to view/play on the screen files moved to Windows Media Player's default folder.
"
As long as File Sharing is activated, unauthorised access may be allowed. Disable File Sharing if data
access is not required.

Connecting with a Mobile Device
Connect mobile device such as a smartphone or tablet to the TV directly or indirectly over a shared
network and display the mobile device screen or content on the TV screen. Connect the mobile device
to the TV as follows.
Connecting with MHL-to-HDMI Cable
●
Connect the mobile device's USB port to the TV's HDMI port with the MHL-to-HDMI cable to
view the mobile device screen on the TV.
Mobile Device Screen on TV (Screen Mirroring)
●
Wirelessly connect the TV to the mobile device with the mirroring function to view the mobile
device's screen on the TV.
"
This option is available only with mobile devices that support mirroring.
Connecting Mobile Devices without a Wireless Router (Wi-Fi Direct)
●
Wi-Fi Direct enables you to connect the TV to a mobile device without a router or AP. Quickly
access and play photo, video and music files from a connected mobile device on the TV screen.
"
This option is available only with mobile devices that support Wi-Fi Direct.
Connecting via Samsung Link
●
Samsung Link enables you to play photo, video and music files from a Samsung Link-enabled
mobile device without having to manually connect the device to the TV.
Connecting via Home Network (DLNA)
●
View/play on the TV photo, video and music files from a mobile device connected to the same
router or AP as the TV.
Connecting via Smart View 2.0
●
Install and run the Smart View 2.0 app on your mobile device, and connect it to the TV in the
same network.

Connecting with MHL-to-HDMI Cable
Your TV supports MHL (Mobile High-definition Link) via an MHL cable. MHL enables viewing and
playing video, image, and audio files from mobile devices on the TV. However, MHL is only available
through the TV's HDMI (MHL) port and only when used in conjunction with an MHL-enabled mobile
device.
For information on configuring MHL on your mobile device, refer to the device's User Manual.
"
Connecting an MHL-to-HDMI cable automatically switches Picture Size to Screen Fit. This setting will not
change automatically if you are using an HDMI adapter. In this case, change the setting manually in the
menu.
"
If you are using an HDMI cable, the TV recognises the signal as an HDMI signal and may respond differently
than it would to an MHL-to-HDMI cable connection.
Refer to the diagram and connect an MHL-to-HDMI cable to the TV's HDMI (MHL) port and the mobile
device's USB port.
Once the connection has been made, you will be able to select the connected external device using
the SOURCE button.

Mobile Device Screen on TV (Screen Mirroring)
Network > Screen Mirroring
Wirelessly connect a mirroring-enabled mobile device to the TV and play the video and audio files
stored on the device on the TV. Mirroring refers to the function that plays the video and audio files
located on a mobile device on a TV and on the mobile device simultaneously.
"
To use the Screen Mirroring function, the mobile device must support a mirroring function such as AllShare
Cast or Screen Mirroring. To check whether your mobile device supports the mirroring function, please visit
the mobile device manufacturer's website.
"
The video or audio may intermittently stop depending on network conditions.
Try Now
Connecting via a mobile device…
On the mobile device, run Screen Mirroring. The mobile device searches for available devices to
1.
connect to.
From the search result list, select TV. The TV displays a pop-up window.
2.
In the pop-up window, select Allow to connect the mobile device.
3.
"
All previously allowed mobile devices will automatically connect without needing approval.
"
If you select Deny, the device won't appear and can't be activated in this way. Navigate to Network >
Screen Mirroring > Device Manager to allow the previously denied mobile device.
Not searching for the TV on mobile devices….
Navigate to Network > Screen Mirroring to run Screen Mirroring. Also, you can select Screen
1.
Mirroring on a list by pressing SOURCE.
Run mirroring on the mobile device. Display a list while automatically searching for mobile
2.
devices.
Select the TV and it connects automatically.
3.
"
When the mobile devices cannot connect, try turning the TV off and on.
Allow/Reject the connection via mobile devices
"
This is only available for watching when mobile devices allow the connection.
Navigate to Network > Screen Mirroring > Device Manager to activate Device Manager. This
1.
displays a list of required mobile devices connection.
You can allow access or deny connections with mobile devices.
2.

Connecting Mobile Devices without a Wireless Router (Wi-Fi
Direct)
Network > Wi-Fi Direct
Wi-Fi Direct lets you connect mobile devices directly to your TV using wireless technology. After
connecting a device to the TV using Wi-Fi Direct, it will be possible to view/play video, photo, and
music files from the device on the TV.
"
The mobile device must support Wi-Fi Direct. Make sure the mobile device you intend to use supports Wi-Fi
Direct.
Enable Wi-Fi Direct on the mobile device and then launch Wi-Fi Direct. The TV automatically
1.
scans for and displays a list of available devices. The TV's name also appears on the mobile
device.
Select the device from the list to initiate a connection. If a connection request is made by the TV,
2.
a permission message appears on the mobile device and vice versa.
Allow the connection. This completes the connection process.
3.
Try Now
Connecting via Samsung Link
Samsung Link enables you to view/play photo, video and music files from a Samsung Link-enabled
mobile device with ease. Also use Samsung Link to play and view the content of a mobile device that
has been registered to Samsung Link under your Samsung account, even if the mobile device and the
TV are not connected to the same router or AP.
Run the Samsung Link app on the mobile device and then sign in with your Samsung account.
1.
"
To use Samsung Link, you have to sign in with a Samsung account. If you don't have a Samsung
account, create one first.
Quickly access and play photo, video and music files from the mobile device running Samsung
2.
Link app under your Samsung account.
"
For more information on using the Samsung Link app, refer to the Help section of the manual.

Connecting via Home Network (DLNA)
View/play photo, video and music files from a mobile device on the TV.
Connect both the TV and the mobile device to the same router or AP. A home network will be
1.
configured once the connections are established.
"
Home Network (DLNA) enables content-sharing between the TV, computers and mobile devices
connected to the same wired or wireless router.
Enable File Sharing on the mobile device. The mobile device's shared content can be viewed/
2.
played on the TV.
"
As long as File Sharing is activated, unauthorised access may be allowed. Disable File Sharing if data
access is not required.
Connecting via Smart View 2.0
By installing and running the Smart View 2.0 app on the mobile device, you can view the device
screen on the TV, or play the device's multimedia content (videos, photos, and music) on the TV.
"
Go to Google Play, and search for and install Smart View 2.0 on your mobile device. Smart View 2.0
is a cross-platform multi-screen app that enables you to load the TV screen on a mobile device, share
multimedia contents between two devices, and control the TV remotely. For more information, refer to the
Smart View 2.0 manual.

Name of TV on Network
Network > Device Name
Choose or enter a TV name to be displayed on the network.
Select Device Name from the Network menu. A list will appear.
1.
Choose a name from the list. Alternatively, select User Input to enter a name manually. You can
2.
view the specified TV name on the network.
Try Now
Input Signal Selection
You can select a connected external device using the SOURCE button.
For example, to switch to a gaming console connected to the second HDMI connector, press SOURCE.
From the Source list, select HDMI2 to change the input signal to HDMI mode. Connector names may
vary depending on the model.
The following options are available in the Source screen:
TOOLS Button
●
Select a port connected to an external device, and press and hold the Enter button. The following
functions are available:
"
Available options for each connector may vary.
Edit Name: Rename devices connected to the TV for easier identification of external sources.
–
For example, you can designate a computer connected to the TV via an HDMI-DVI cable as
DVI PC. Alternatively, simply designate a computer connected to the TV via an HDMI cable as
PC. You can also designate an AV device connected to the TV via an HDMI-DVI cable as DVI
Devices.
Information: View detailed information about the connected devices.
–
Anynet+ (HDMI-CEC): Displays a list of Anynet+ (HDMI-CEC)-compliant devices that are
–
connected to the TV.
"
This option is only available with Anynet+ (HDMI-CEC) set to On.
Device Format: Formats USB recording devices connected to the TV.
–
"
This option is only available when a USB device has been selected.
Disconnect USB Device: Used to safely remove a USB device connected to the TV.
–
"
This option is only available when a USB device has been selected.
Universal remote setup
●
Select Universal remote setup on the screen to configure the universal remote function. By
configuring a universal remote control, you can control cable boxes, Blu-ray players, home
theatres, and other external devices using a single remote control.

Inserting Batteries into Samsung Smart Control
To use Samsung Smart Control, first refer to the figure below and insert batteries into the unit.
Gently pull on the battery cover's notch and then remove the cover completely once it comes
1.
loose.
Insert 2 AA alkaline batteries, making sure to align the positive and negative polarities correctly.
2.
Place the battery cover on the remote control and insert the top part of the cover into the remote
3.
control.
Press the catches on both sides of the battery cover in the order shown so that the cover is
4.
completely attached to the remote control.
When you see this alarm icon on the screen...
Following alarm icon indicates Samsung Smart Control's batteries are low. If the alarm icon pops up,
replace the batteries. Samsung recommends using alkaline batteries for a longer operating life.
<Low Battery Alarm Icon>

Pairing Samsung Smart Control
To control the TV with Samsung Smart Control, you need to pair Samsung Smart Control to the TV via
Bluetooth. Pair Samsung Smart Control to the TV.
"
Samsung Smart Control can only be paired to a single TV.
Point Samsung Smart Control at the remote control sensor of the TV and press the TV button to turn
the TV on.
"
Remote control receiver’s location may vary depending on the model.
Reconnecting Samsung Smart Control
If the Samsung Smart Control stops operating or works abnormally, replace the batteries as this may
be due to insufficient battery power.
If the problem persists, the Samsung Smart Control restore pairing with the TV.
Press RETURN button and GUIDE button simultaneously for 3 seconds.
1.
"
You must place the Samsung Smart Control approximately 30cm ~ 40cm away from the TV and ensure
it is pointing towards the remote control receiver.
Connection image is appeared on the screen. And then, Samsung Smart Control is connecting to
2.
TV automatically.

Using Samsung Smart Control
Samsung Smart Control makes it even easier and more convenient to use the TV. Pressing the KEYPAD
button displays a virtual remote control that allows you to easily enter digits, control content, and
activate functions on the screen.
"
We recommend using Samsung Smart Control at a distance of less than 6m. A usable distance may differ
depending on the wireless environmental conditions.
Button Functions
"
Colours and shape may vary depending on the model.

Button Description
TV
SEARCH
KEYPAD
SOURCE
w = v
VOICE
/ AD
¢
< P >
<, >, ¡, £
Turns the TV on/off.
Press this button to use the search window.
With the virtual remote control on the screen, you can easily enter digits, control
content, and use functions.
Changes the source.
Changes the volume.
Starts voice recognition. When the microphone icon appears on the screen, say
a voice command into the microphone. Say "Help" to learn about basic usage
and voice commands.
"
Say a voice command 10cm to 15cm from the microphone and at an
appropriate volume.
Turns the sound on/off.
Changes the channel.
Moves the pointer or focus.
Touchpad
†, ∂, ∑, …
a, b, {, }
RETURN / EXIT
SMART HUB
GUIDE / CH.LIST
INFO
Place a finger on the touch pad and move the Samsung Smart Control. The
pointer on the screen moves in the direction and as much as the Samsung Smart
Control is moved. Press the touchpad to run the focused item.
Controls for when viewing/playing a video, photo or music file or watching a
recorded programme. You can also use the buttons to control content from an
external device.
Use these colour buttons to access additional options specific to the feature in
use.
Returns to the previous menu. Additionally, when you press this button while
watching TV, you can return to the previous channel.
Launches the Home Screen. From the Home Screen, you can search through
favourite apps, channels or sources and quickly access previously run or
frequently used functions. Also, when you move to the panel screen, you can use
various service provided each service panel.
Displays the digital channel broadcasting schedule.
Shows the information about the current digital broadcast programme or content.
¥
M.SCREEN
Enable Football Mode for an optimal sports viewing experience.
You can split the TV screen and use various functions such as watching TV,
surfing the web, watching video, and so on.

Additional Functions
Press and hold the following buttons for 1 second to use additional functions.
Button Description
GUIDE / CH.LIST
RETURN / EXIT
/ AD
¢
b
{
}
Press and hold to launch the CH.LIST.
Press and hold this button to exit all currently running applications
Press and hold this button to bring up the Accessibility Shortcuts panel. Select
the options to turn them on or off.
Displays a menu on the screen.
Press and hold to record the broadcast.
"
Availability depends on the specific model and area.
Press and hold to view information about the current digital channel or media
file.
Using the TV by Moving the Samsung Smart Control
The Samsung Smart Control has a motion sensor (gyro sensor) that allows you to easily control the
TV by holding and moving the Samsung Smart Control.
After placing a finger on the touchpad, a pointer appears on the screen. Hold and move the Samsung
Smart Control. The pointer moves the same way the Samsung Smart Control is moved. It's also
possible to scroll up and down on scrollable screens.
"
If you remove the finger from touchpad, the screen pointer disappears.
"
If the Voice Guide is set to On, the Samsung Smart Control's motion sensor(gyro sensor) does not work. To
use the Samsung Smart Control's motion sensor, set the Voice Guide to Off.

Using the TV with the Touchpad
"
Navigate to the Support menu and select the Smart Control Tutorial option to learn how to use the
touchpad, following the on screen instructions. Try Now
Moving the Focus/Pointer
Press the directional buttons (up, down, left, and right) to move the pointer or focus in the direction.
Menu Access & Item Selection
Press the touchpad. This lets you access a TV menu or select an item.

Displaying the Context-sensitive Menu on Smart Hub
Press and hold on the touch pad from the Smart Hub screen. The Options menu available to the
selected item appears.
"
The Options menu depends on the context.
Moving to the Smart Hub panel
On the Smart Hub screen, drag left or right on the touchpad. This will move the Smart Hub panels left
or right.
Scrolling on the Web Browser
Drag up/down on the touchpad in the web browser screen. This scrolls through the web screen.

Displaying the Remote Control on the Screen (virtual remote
control)
Press the KEYPAD button to display the virtual remote control on the screen. You can easily enter
digits, control content, and use TV buttons with the virtual remote control.
"
The virtual remote control buttons may vary depending on the TV's current status.
Button Description
●You can directly enter the channel number to switch to that channel. Select Pre-
CH to return to the previous channel.
●TTX/MIX: Alternately selects Teletext ON Double, Mix or OFF.
Controls the item when you are playing a video, photo or music file or watching
a recorded programme. You can also use the buttons to control the content on an
external device.
TOOLS
INFO
MENU
Speaker Settings
Use frequently used functions while watching TV. In addition, you can use
additional functions that may vary depending on the currently running function.
Shows the information about the current digital broadcast programme or content.
Displays the menu on the screen.
Select the speakers which you want to use to listen to the TV's sound. To set this
option, external speakers must be connected to the TV.
PIP
3D
Multi-Link Screen
AD/SUBT
Display the video from an external device or computer on the main screen and the
TV as a picture-in-picture.
Turn the 3D effect on or off.
You can split the TV screen and use various functions such as watching TV, surfing
the web, watching video, and so on.
Turns the audio description on and off (not available in some locations). / Displays
digital subtitles.

Button Description
P.SIZE
DUAL
Web Browser
e-Manual
Sign In
Change the picture size.
When you press the Dual I II button the first time, the current dual mode is
displayed on the screen.
Press the Dual I II button again to change the dual mode.
Launch the Web Browser.
Launch the e-Manual.
Log in or out of your Samsung account.
Move to the right / Move to the left: You can move the virtual remote control on
the screen.
Large size / Standard size: You can resize the virtual remote control on the screen.
"
Alternatively, navigate to the System > Smart Control Settings menu and select
and set the Onscreen Remote Size option.
Touch Sensitivity: You can change the touchpad sensitivity.
"
Alternatively, navigate to the System > Smart Control Settings menu and select
and set the Touch Sensitivity option.
Motion Sensitivity: Put a finger on the touchpad and move it to adjust the speed of
the pointer on the screen.
"
Navigate to System > Smart Control Settings, and select Motion Sensitivity to
enable this option.
Universal Remote Setup: Moves to the Universal Remote Setup screen.
Cancel: Close the pop-up menu.

Controlling External Devices with the TV Remote
(Universal Remote Setup)
System > Universal Remote Setup
"
Availability depends on the specific model and area.
The universal remote control feature lets you control cable boxes, Blu-ray players, home theatres, and
other external devices connected to the TV using the TV's remote control. In order to use the TV's
remote control as a universal remote, you must first connect the IR extender cable (included).
"
You can also use the Anynet+ (HDMI-CEC) function to operate some external Samsung devices with your
TV's remote control without any additional setup. Refer to the "Using Anynet+ (HDMI-CEC)" section for
more information.
"
Certain external devices connected to the TV may not support the universal remote feature.
Try Now
Setting Up the Universal Remote Control
Before connecting any external devices and cables to the TV, first verify the model number of
the purchased TV. A sticker containing the model number is attached to the back of the TV. The
connection method varies depending on the model.
To use the TV remote as a universal remote, connect the IR extender cable (included) to the TV and
position it within 10 cm of the external device's remote control receiver.
"
The colour and design of the IR extender cable may vary depending on the model.
"
When you connect the cable, you have to match the cable’s colour and socket’s colour.
Connect the IR extender cable to the TV's IR output connector as shown in the diagram and place the
transmitter end within 10 cm of the external device's receiver pointing in the direction of the remote
receiver. However, there must be no obstacles between the IR extender cable and the external device.
The presence of obstacles interferes with the transmission of the remote control signal.
"
When you use an external device registered with the Universal Remote Control on the Samsung Smart
Control, you can use the external device without connecting an IR extender cable. However, if you want to
use an external device using Motion Control or Voice Control, be sure to connect an IR extender cable.

Controlling External Devices with the TV Remote
External Device Registration
Turn on the external device to set up the universal remote function for, and bring up the Source
1.
screen.
Select Universal remote setup from the top of the screen. This initiates the universal remote
2.
setup process.
Follow the on-screen instructions and register the external device.
3.
Using the TV Remote
Registering an external device to the TV remote also registers the connector through which the device
is connected. Accordingly, simply selecting the external device using the SOURCE button makes it
possible to control the device using the TV's remote.

Universal Remote Features
Press SOURCE to go to the Source screeen.
1.
Select Universal remote setup from the top of the screen. This initiates the universal remote
2.
setup process.
Select an external registered device on the Universal remote setup screen. The following options
3.
are available:
Use External Speakers
●
Listen to the audio from the external device through the connected home theater.
"
This is available only on the set-top box or Blu-ray player.
Link Set-top Box
●
Listen to the audio from the set-top box through the home theater that is connected to the TV.
"
This is available only on the home theater system.
Link Blu-ray Player
●
Listen to the audio from the Blu-ray player through the home theater that is connected to the TV.
"
This is available only on the home theater system.
Source Setup
●
Change the TV's input source to your selected external device.
Sync with TV power
●
Configure the set-top box to turn off when the TV is turned off
"
This is available only on the set-top box.
Rename
●
Rename the registered external device (up to 15 characters long)
Delete
●
Remove the registered external device.

Controlling the TV with a Keyboard
System > Device Manager > Keyboard Settings
You can use a keyboard to control the TV.
"
Certain models do not support USB HID class keyboards.
Try Now
Connecting a Keyboard
Connecting a USB Keyboard
Plug the keyboard cable into the TV's USB port. A connection message appears on the screen.
Connecting a Bluetooth Keyboard
"
Availability depends on the specific model and area.
Place the Bluetooth keyboard into the standby status.
1.
"
Refer to the keyboard manual for information on putting the keyboard into the standby status.
Select System > Device Manager > Keyboard Settings > Add Bluetooth Keyboard. The Add
2.
Bluetooth Keyboard screen will appear and automatically scan for available keyboards.
"
If your keyboard was not detected, position the keyboard close to the TV and then select Refresh. This
initiates a scan for available keyboards again.
Select the Bluetooth keyboard from the scan list and then select Pair and connect. A number
3.
appears on the screen.
Enter the number on the Bluetooth keyboard.
4.
"
Select Yes to change the keyboard's options or No to leave them as they are.

Using the Keyboard
Use the following remote features with the USB or Bluetooth keyboard connected to the TV.
Arrow Keys (moving the focus), Windows Key (MENU Button), Menu List Key (TOOLS Button),
●
Enter Key (Select/run item), ESC (RETURN Button), Number Keys (Number Buttons)
F1 (a), F2 (b), F3 ({), F4 (}), F5 ( ), F6 (SOURCE Button), F7 (CH.LIST Button), F8 (MUTE
●
Button), F9/F10 (Volume Buttons), F11 / F12 (Channel Buttons)
Page Up/Page Down: Scroll web browser pages up/down.
●
Holding down the Enter key: On the Smart Hub screen, navigate to an item and hold down the
●
Enter key to display the Options menu.
"
The Options menu depends on the context.
Changing Keyboards
"
Availability depends on the specific model and area.
Try Now
Select System > Device Manager > Keyboard Settings > Select Keyboard. Designate which keyboard
to use.
"
Only one keyboard can be used at a time.
Input Languages, Keyboard Type, and Switch Language Key
Try Now
Select System > Device Manager > Keyboard Settings > Keyboard Options. The following options are
available:
Keyboard Language
●
If the keyboard supports multiple languages, choose which language you want to use from the
list.
Keyboard type
●
Specify the type of language selected under Keyboard Language.
"
The Keyboard type list varies depending on which language was selected under Keyboard Language.
Switch Input Language
●
If the keyboard supports multiple languages, choose from the list which key to use to switch
between languages.

Controlling the TV with a Mouse
System > Device Manager > Mouse Settings
This TV can be operated with ease using a mouse instead of a remote control.
"
Certain models do not support USB HID class mice.
Try Now
Connecting a Mouse
Connecting a USB Mouse
Plug the mouse cable into the TV's USB port. A connection message appears on the screen.
Connecting a Bluetooth Mouse
"
Availability depends on the specific model and area.
Place the Bluetooth mouse in standby status.
1.
"
Refer to the mouse manual for information on putting the mouse in standby status.
Select System > Device Manager > Mouse Settings > Add Bluetooth Mouse. The Add Bluetooth
2.
Mouse screen will appear and automatically scan for available mice.
Select the Bluetooth mouse from the scanned list, and then select Pair and connect. This pairs
3.
the Bluetooth mouse with the TV.
Using the Mouse
Once a USB or Bluetooth mouse is connected to the TV, a pointer will appear on the TV's screen. You
can use this pointer to control the TV as you would a computer.
Selecting and Running an Item
●
Left-click on the mouse.
Displaying the Volume, Mute, and Channel Buttons
●
Select the volume/channel icon on the screen while watching TV. Use the onscreen buttons to
adjust the volume or switch the channel.
"
Select the volume/channel icon again to hide the buttons.

Showing Tools Buttons
●
Right-clicking shows the Tools buttons on the screen so that you can easily use the TV
functions.
"
The Tools buttons may vary depending on the function.
Displaying the Context-sensitive Menu on Smart Hub
●
On the Smart Hub screen, navigate to an item, and hold down the left mouse button for 1 second.
The Options menu available to the selected item appears.
"
The Options menu depends on the context.
Scrolling the TV Menu or Screen
●
Move the mouse wheel up or down. This scrolls the TV menu or screen up/down.
Exiting the TV Menu or Feature
●
Click on the X button. This closes the menu.
"
The X button appears when a mouse is being used. Left-clicking once while using a feature displays
the X button.
Changing Mice
Try Now
Select System > Device Manager > Mouse Settings > Select Mouse. Designate which mouse to use.
"
Only one mouse may be used at a time.
Changing Mouse Buttons and Pointer Speed
Try Now
Select System > Device Manager > Mouse Settings > Mouse Options. The following options are
available:
Primary Button
●
Choose which (left or right) button to use to select and run items.
Pointer Speed
●
Adjust the movement speed of the pointer that appears on the screen.

Entering Text Using QWERTY
A QWERTY keypad appears when you need to enter text (entering the network password, logging into
your Samsung account, etc.), allowing you to enter text using your remote control.
Using Additional Functions
Select on the QWERTY keyboard screen. The following options are available:
Recommend text
●
Enable/disable the Recommended Text feature. Enabling the Recommend text feature allows you
to quickly enter text starting with the characters you typed in by displaying recommended words.
To enter the word "Internet," for example, all you have to do is enter "In" and select the word
"Internet" from the list of recommended words. The word is memorised so that you can enter the
same text again more easily.
Reset recommended text data
●
Delete both the recommended words and the memorised words to clear the list.
Predict Next Letter
●
Enable/disable the Text Prediction feature. Enabling the Text Prediction feature eliminates the
need to find and select individual character keys. To enter the word "Internet," for example, select
"I". A predicted word will then appear next to the I key. Simply select the predicted word to enter
"Internet".
"
This feature is limited to words that have previously been added to the dictionary.
Accented Character Preview
●
Enable/disable the Show Accented Letters feature. An accented letter is a letter such as Ё or Й
with a diacritical mark above it. Enable the Show Accented Letters feature to enter these kinds of
letters.
"
This is available only with a language that uses diacritical letters.

Establishing a Wired Internet Connection
Connecting the TV to the Internet gives you access to online services and SMART features, and lets
you update the TV's software quickly and easily through the Internet.
Connecting a LAN Cable
Use a LAN cable.
"
The TV will not be able to connect to the Internet if the network speed is below 10Mbps.
"
Use Cat 7 LAN cables to link your TV to the Internet Access Points.
There are three ways to connect the TV to the Internet. Refer to the diagrams and connect the LAN
cable to the LAN connector on the back of the TV.
External Modem
●
① IP Router + ② External Modem
●
Wall-mounted LAN Outlet
●

Connecting to a Wired Internet Network Automatically
Network > Network Settings
Try Now
Automatically connect to an available network.
Set the Network Type to Wired, and then select Connect.
1.
The TV attempts to connect to an available network. Once successful, you will see a confirmation
2.
message. Select OK. If the attempt fails, try again, or connect manually.
Connecting to a Wired Internet Network Manually
Network > Network Settings
With networks that require a static IP address, you will need to enter the IP address, subnet mask,
gateway, and DNS values manually to connect to the network. To get these values, contact your
Internet Service Provider (ISP).
"
Refer to the "Dynamic versus Static IP Addresses" section for more information on dynamic IP and static IP
addresses.
Set the Network Type to Wired, and then select Connect.
1.
Network Settings
Select your network type.
Network Type Wired
Connect
You can connect your TV
to the internet.

Select Stop when the TV attempts to connect to the network. Once the network connection has
2.
been interrupted, select IP Settings.
Network Settings
Connection verification cancelled.
Wired network connection test stopped.
Change Network IP Settings Retry Close
In the IP Settings screen, set the IP setting to Enter manually, enter the IP Address, Subnet
3.
Mask, Gateway, and DNS Server values, and then select OK.
Use one of the following methods to enter the numerical values.
●
Set the numbers using the u and d buttons.
Press KEYPAD button and enter the numbers directly.
IP Settings
IP setting Enter manually
IP Address 0.0.0.0
Subnet Mask 0.0.0.0
Gateway 0.0.0.0
DNS setting Enter manually
DNS Server 0.0.0.0
OK Cancel
The TV attempts to connect to the network again using the specified settings. A confirmation
4.
message appears once a connection is established. Select OK.
"
The network connection speed may differ depending on the DNS server settings.
"
For details on the DNS server settings, contact your Internet service provider (ISP).

Establishing a Wireless Internet Connection
Connecting the TV to the Internet gives you access to online services and SMART features, and lets
you update the TV's software quickly and easily through the Internet.
Connecting to a Wireless Internet Network Automatically
Network > Network Settings
Connect the TV to the Internet via a wireless router. Make sure you have the wireless router's SSID
(name) and security key settings before attempting to connect. The security key can be found on the
wireless router's configuration screen.
On the Network Settings screen, set Network Type to Wireless. The TV automatically displays a
1.
list of available wireless networks.
Select a network (SSID). If the network you want doesn't appear in the list, select Add Network,
2.
and enter the network's SSID manually.
Enter the security key and select Done. If the selected network is not security-enabled, the TV
3.
attempts to connect right away.
A network connection will be attempted. Once a connection is established, the TV displays a
4.
confirmation message. Select OK. If the attempt fails, try again, or connect manually.

Connecting to a Wireless Internet Network Manually
Network > Network Settings
With networks that require a static IP address, you will need to enter the IP address, subnet mask,
gateway and DNS values manually to connect to the network. To get the IP address, subnet mask,
gateway and DNS values, contact your Internet Service Provider (ISP).
"
Refer to the "Dynamic versus Static IP Addresses" section for more information on dynamic IP and static IP
addresses.
Setting the Network Type to Wireless automatically displays a list of available wireless networks.
1.
Network Settings
Select your network type.
Network Type Wireless
Wireless network
AP0000
AP0001
Add Network
You can connect your TV to the
internet. Please select which
wireless network to use.
Refresh WPS(PBC)
Select the network (SSID) you want to connect to. If the wireless router doesn't appear in the list,
2.
select Add Network, and enter the network's SSID manually.
Enter the security key and select OK. If the selected network is not security-enabled, the TV
3.
attempts to connect right away.
Select Stop when the TV attempts to connect to the network. Once the network connection has
4.
been interrupted, select IP Settings.
Network Settings
Connection verification cancelled.
Wireless network connection test stopped.
Change Network IP Settings Retry Close

In the IP Settings screen, set the IP setting to Enter manually, enter the IP Address, Subnet
5.
Mask, Gateway, and DNS Server values, and then select OK.
Use one of the following methods to enter the numerical values.
●
Set the numbers using the u and d buttons.
Press KEYPAD button and enter the numbers directly.
IP Settings
IP setting Enter manually
IP Address 0.0.0.0
Subnet Mask 0.0.0.0
Gateway 0.0.0.0
DNS setting Enter manually
DNS Server 0.0.0.0
OK Cancel
The TV attempts to connect to the network again using the specified settings. A confirmation
6.
message appears once a connection is established. Select OK.
"
The network connection speed may differ depending on the DNS server settings.
"
For details on the DNS server settings, contact the Internet service provider (ISP).
Connecting to a Wireless Internet Network with WPS
Network > Network Settings
With wireless routers that support WPS (Wi-Fi Protected Setup) or PBC (Push Button Configuration),
it's possible to press a button on the router to connect the TV to the Internet.
"
This functionality is not available with wireless routers that do not support WPS. Check to see if your
wireless router supports WPS.
Setting the Network Type to Wireless automatically displays a list of available wireless networks.
1.
Select WPS(PBC) and then press the WPS or PBC button located on the wireless router within two
2.
minutes.
The TV exchanges the network name (SSID) and security key automatically and then attempts to
3.
connect to the Internet. A confirmation message appears once a connection is established. Select
OK.

Troubleshooting Internet Connectivity Issues
If you are not able to connect the TV to the Internet, read the information below.
Troubleshooting Wired Internet Connectivity Issues
No network cable found
Make sure the network cable is plugged in. If it is connected, make sure the router is turned on. If it is
on, try turning it off and on again.
IP auto setting failed
Do the following or configure the IP Settings manually.
Ensure that the DHCP server is enabled on the router and reset the router.
1.
If this does not work, contact your Internet Service Provider for more information.
2.
Unable to connect to the network
Do the following:
Check all IP Settings.
1.
Ensure that the DHCP server is enabled on the router. Then, unplug the router and plug it back in.
2.
If this does not work, contact your Internet Service Provider for more information.
3.
Try Now Try Now
Try Now
Try Now
Connected to a local network, but not to the Internet
Make sure that the Internet LAN cable is connected to the router's external LAN port.
1.
Check the DNS values in the IP Settings.
2.
If the problem persists, contact your Internet Service Provider.
3.
Try Now
Network setup is complete, but unable to connect to the Internet
If the problem persists, contact your Internet Service Provider.
Try Now

Troubleshooting Wireless Internet Connectivity Issues
Wireless network connection failed,
Selected wireless router not found. Go to Network Settings and select the correct router.
Unable to connect to a wireless router
Check the following:
Check if the router is turned on. If it is, turn it off and on again.
1.
Enter the correct security key if required.
2.
IP auto setting failed
Do the following or configure the IP Settings manually.
Make sure that the DHCP server is enabled on the router. Then, unplug the router and plug it back
1.
in.
Enter the correct security key if required.
2.
If this does not work, contact your Internet Service Provider for more information.
3.
Try Now
Try Now Try Now
Try Now Try Now
Unable to connect to the network
Do the following:
Check all IP Settings.
1.
Enter the correct security key if required.
2.
If this does not work, contact your Internet Service Provider for more information.
3.
Connected to a local network, but not to the Internet
Make sure that the Internet LAN cable is connected to the router's external LAN port.
1.
Check the DNS values in the IP Settings.
2.
If the problem persists, contact your Internet Service Provider.
3.
Try Now
Try Now
Network setup is complete, but unable to connect to the Internet
If the problem persists, contact your Internet Service Provider.
Try Now

Mobile Network
"
Availability depends on the specific model and area.
While connecting to the mobile network, some functions might be unavailable.
Refer to the diagram and insert the Mobile Dongle (sold separately) into the USB port. The Mobile
Dongle must be connected to the TV in order to connect to the mobile network. However, the Mobile
Dongle is sold separately and is not available from Samsung.
"
If you have any problems using online services, please contact your Internet service provider.
Supported Telecom and Model Name
Vodacom (Model No: K4605)
●
MTN (Model No: E3131S, E3251)
●
Safaricom (Model No: E303)
●

Checking the Internet Connection Status
Network > Network Status
Try Now
Network
Network Status
Network Settings
Wi-Fi Direct
Multimedia Device Settings
Screen Mirroring
Device Name [TV]Samsung LE...
"
Actual menu screen may differ depending on the TV model.
View the current network and Internet status.

Multiple Functions on a Single Screen
This allows you to search the Web, use apps, and much more while watching TV.
"
Before using Multi-Link Screen, make sure the TV is connected to the Internet. Using Multi-Link Screen
requires an Internet connection.
"
Before using Smart Hub with Multi-Link Screen, go to the On TV Settings (Smart Hub > On TV Settings >
On TV Setup) and finish configuring Smart Hub.
"
If the Multi-Link Screen launches while the TV did not configure the Smart Hub, a pop-up window appears.
To use the Multi-Link Screen, you need to configure the Smart Hub first. On the pop-up window, select the
Set Up Smart Hub to finish configuring the Smart Hub.
Launching Multi-Link Screen
Picture > Open Multi-Link Screen
From the Picture menu, select Open Multi-Link Screen.
"
Press M.SCREEN on the Samsung Smart Control to launch Multi-Link Screen.
Using Multi-Link Screen
"
UHD and FHD contents and channels cannot be viewed simultaneously.
"
Launching Smart Hub while using Multi-Link Screen automatically terminates Multi-Link Screen.
"
Certain TV features and apps may not be supported by Multi-Link Screen. If this is the case, exit from
Multi-Link Screen and then use the feature.
Selecting a Feature
Press the Samsung Smart Control's M.SCREEN button while Multi-Link Screen is running. The
1.
Options menu appears.
Select a feature from the Options menu. This initialises the selected feature.
2.
"
Features supported by Multi-Link Screen vary depending on the country.
Changing the Channel/Volume
Place the pointer or focus over the screen for which you want to change the channel or adjust
1.
the volume.
Use the channel buttons to change the channel or the volume buttons to adjust the volume. This
2.
changes the selected screen's channel/volume.

Pairing Bluetooth Headphones
Pairing Bluetooth Headphones to the TV makes it possible to hear the audio from a different screen
through the headphones.
"
Compatibility issues may arise. The mobile phone may not work.
"
Depending on the device, there may be audio and video sync problems.
"
The devices may disconnect depending on the distance between the TV and headphones.
"
You can't use Bluetooth headphones and SoundShare Settings (Sound > Speaker Settings > SoundShare
Settings) features simultaneously.
Put the Bluetooth Headphones in the pairing-ready status.
1.
"
Refer to the headphones' manual for instructions on enabling the pairing-ready status.
Press the Samsung Smart Control's M.SCREEN button while Multi-Link Screen is running. The
2.
Options menu appears.
Select Settings from the Options menu.
3.
Select pair Connect Bluetooth Headphones from the Settings menu. The TV will display the
4.
Bluetoothpairing window and then automatically scan for available headphones.
"
If the scan fails to locate your headphones, try placing the headphones closer to the TV and then select
Refresh. This will scan for the headphones again.
Select your headphones from the list of scanned headphones and then select Pair and connect.
5.
This pairs the headphones to the TV.
Selecting the Audio-Source Screen
It's possible to listen to audio from one screen through the speakers and audio from a different screen
through the Bluetooth headphones.
Press the Samsung Smart Control's M.SCREEN button while Multi-Link Screen is running. The
1.
Options menu appears.
Select Settings from the Options.
2.
Select Speaker Settings from the Settings menu.
3.
Select a screen for TV Speaker and another for Bluetooth Headphone.
4.
"
The same screen cannot be selected for both TV Speaker and Bluetooth Headphone.
"
Auto is only supported by the TV speaker. Bluetooth headphones are not supported.

Smart Hub
Smart Hub > Open Smart Hub
With Smart Hub, you can surf the web, download apps, and stay in touch with family and friends
through social networking services. In addition, you can use photo, video, and music files stored on
external storage devices.
"
Some Smart Hub services are paid services. To purchase such a service, the service provider account or
Samsung Apps TV account (Samsung account) is required.
"
Make sure the TV is connected to the Internet. The TV must be connected to the Internet in order to use
Smart Hub.
"
Some features of Smart Hub require an Internet connection and may not be available depending on the
service provider, language, or region.
"
To use Smart Hub, you must agree to the end user agreement and privacy policy. Otherwise, you will not
be able to access the features and services related to them. You can view the entire content of the Terms &
Policy by navigating to Smart Hub > Terms & Policy. If you don't wish to use Smart Hub anymore, you can
withdraw the agreement.
Try Now
Testing Smart Hub connections
Support > Self Diagnosis > Smart Hub Connection Test
If Smart Hub is not functioning, navigate to Support > Self Diagnosis > Smart Hub Connection Test.
Diagnose the problem by checking the internet connection, your ISP, the Samsung server and the
Samsung Apps panels.
"
After completing the test, if Smart Hub continues to have problems, contact your Internet Service Provider
or a Samsung Contact Centre.

Opening the Home Screen
Press the button while watching TV to open the Home Screen.
On the Home Screen, search through favourite apps, channels or sources and access previously run or
frequently used functions.
"
You can configure the TV to automatically open the Home Screen when it turns on. Navigate to Smart Hub
> Home Screen Settings, and set Auto Start to On.
Setting your favourite item
Press the button to open the Home Screen, and move to a desired item.
1.
Press and hold the touchpad. The Options menu appears.
2.
In the Options menu, select Add to Favourites to add the selected item to the favourite list, which
3.
will move top of the list.
"
To delete a favourite item, select it and tap and hold the touchpad to display the context menu. Then,
select Remove from Favourites.
Deleting browsing history
Press the button to open the Home Screen, and select Clear All. You will be asked to confirm
1.
your selection.
Select Yes on the screen. Your browsing history is deleted completely.
2.
"
However, the Favorites list items will not be deleted.
"
You can also delete your browsing history by selecting Clear All in the Smart Hub > Home Screen
Settings menu.

Moving to the Panel Screen
Press the button to open the Home Screen, and select the Panel icon. On the Panel screen for each
service panel, the following are available:
"
Usability depends on the specific model and local region.
Games
●
Navigate to Smart Hub > Games to confirm the optimising game apps for Smart TV and detailed
information on Smart hub. This makes it easier to download and play games. In addition, you
can manage games that you have downloaded or purchased with your Samsung Account.
SAMSUNG APPS
●
You can enjoy variety of free and paid news, sports, weather, and gaming apps on the TV as you
would on a smart phone or tablet.
On TV
●
You can view the current programmes on TV at a glance and view the Programme
Recommendations by Channel and Programme Recommendations by Time from the programmes
that will be broadcasted. In addition, you can watch recorded videos.
FILMS AND TV SHOWS
●
You can directly purchase and view a movie or TV programme through the app provided by Smart
Hub without connecting an external video source such as a DVD or Blu-ray player.
MULTIMEDIA
●
You can play back photo, video, and music files from an external storage device or watch
recorded videos.
Using the Smart Hub Tutorial
Support > Smart Hub Tutorial
From the Support menu, select Smart Hub Tutorial. This will familiarise yourself with the basics of
Smart Hub and panels.
Resetting Smart Hub
Smart Hub > Reset Smart Hub
Reset all saved information relating to Samsung accounts and linked service accounts, as well as
Smart Hub service agreements and applications.
Try Now

Using Smart Hub with Samsung Account
Samsung Account
Log In
Edit profile
Link Service Accounts
Remove Accounts from TV
Create Account
Terms and Conditions, Privacy Policy
"
Actual menu screen may differ depending on the TV model.
Creating a Samsung Account
Smart Hub > Samsung Account
Try Now
Some Smart Hub services are paid services. To purchase such a service, the service provider account
or Samsung Apps TV account (Samsung account) is required.
You can create a Samsung Account using your email address.
"
To create a Samsung Account, you must agree to the Samsung Account end user agreement and privacy
policy. Otherwise, you cannot create a Samsung Account. You can view the entire content of the agreement
by navigating to Smart Hub > Samsung Account > Terms and Conditions, Privacy Policy.
"
Alternatively, you can create a Samsung Account at http://content.samsung.com. You can use one ID for
both the TV and the website.

Creating a Samsung Account using Sign Up Samsung Account Menu
Navigate to Smart Hub > Samsung Account > Create Account and select Create a Samsung
1.
account.
Agree to use a Samsung Account and select Next.
2.
Create a Samsung Account according to the instructions on the Create Account screen.
3.
Once a Samsung Account is created, you will be automatically logged in to Smart Hub.
Creating a Samsung Account using a Facebook Account
A Facebook user can easily obtain necessary information from Facebook and create a Samsung
Account.
Navigate to Smart Hub > Samsung Account and select Log In.
1.
Select + and select the Create with Facebook.
2.
Enter your Facebook ID and password and select Sign In.
3.
Agree to use a Samsung Account and select Next.
4.
Create a Samsung Account according to the instructions on the Create Account screen. Once a
5.
Samsung Account is created, you will be automatically signed in.
"
If you create a Samsung Account using your Facebook account, they are automatically linked.

Signing into Samsung Account
Smart Hub > Samsung Account > Log In
Logging into and Saving a Samsung Account
If you haven't logged into your Samsung Account on the TV, you must save your Samsung Account on
the TV.
Navigate to Smart Hub > Samsung Account and select Log In.
1.
Select + and select Sign In.
2.
Enter your ID and password and then select Sign In.
3.
"
Check the Sign me in automatically option if you wish to log into Smart Hub automatically.
"
If you forgot your password, select Reset password to receive password reset instructions via email.
Select an image to be used as the profile picture. The Samsung Account has been saved on the
4.
TV.
Select Done to log into your Samsung Account.
5.
Easily Logging Into Your Samsung Account Saved on the TV
Navigate to Smart Hub > Samsung Account and select Log In.
1.
Choose your Samsung Account and select Sign In.
2.
Using the login method configured for the selected Samsung Account, log into your Samsung
3.
Account.

Linking My Samsung and App Accounts
Smart Hub > Samsung Account > Link Service Accounts
Linking your Samsung Account to accounts of apps installed on the TV lets you automatically log into
your linked app accounts when you log into your Samsung Account. For example, you can download
the Facebook app and link your Facebook account to your Samsung Account. In this case, logging into
your Samsung Account then automatically logs you into your Facebook account as well.
"
To use Link Service Accounts, you must first log into your Samsung Account.
Linking an App Account
Navigate to Smart Hub > Samsung Account and select Link Service Accounts. A list of apps that
1.
can be linked to your Samsung Account is shown.
Select an app from the list. The Link to other accounts window appears on the screen.
2.
Enter the current ID and password of the app to log in. When the login is complete, the app
3.
account is linked to the Samsung Account.
Disconnecting a Linked Account
Navigate to Smart Hub > Samsung Account, select Link Service Accounts. Select an app to
1.
unlink.
A confirmation dialog box appears. Select Yes to unlink the app.
2.

Changing and Adding Information to Samsung Account
Smart Hub > Samsung Account
Using the Samsung Account menu, you can manage your Samsung Account.
"
To change the account information, you must be logged into your Samsung Account.
Navigate to Smart Hub > Samsung Account and select Edit profile.
1.
Enter the password and then select Done. The edit profile screen appears.
2.
The profile editing screen provides the following features.
Changing Profile Image
●
If you select Edit Profile Picture on the login screen, you can change the profile image.
Registering Your Face to Samsung Account
●
If you select Register face on the login screen, you can register your face to your Samsung
Account. The registered face is used by the Sign-in Method.
"
This is available only if the optional TV camera is connected to the TV.
Choosing a Samsung Account Login Method for TV
●
Select Sign-in Method on the login screen and choose a login method. You can determine how
to log into the TV with the saved Samsung Account.
Setting Auto Login
●
Check the Sign me in automatically option if you wish to log into Smart Hub automatically.
Entering Basic User Information
●
You can enter your given name, surname, and date of birth.
Receiving e-mail about Samsung services
●
You can determine whether to receive e-mail about Samsung services. Containing the latest
information.
Deleting All Samsung Accounts from the TV
Smart Hub > Samsung Account > Remove Accounts from TV
Navigate to Smart Hub > Samsung Account and select Remove Accounts from TV. The account and
password information saved on the TV is deleted, and the account information of any linked apps are
also deleted.
"
To delete your account information, you must be signed in with your Samsung Account.

Using the Games Panel
Games
Recommended
My Page All Games
"
Actual menu screen may differ depending on the TV model.
"
This service or some of functions of it may be not available in some countries or region.
Navigate to Smart Hub > Games to confirm the optimising game apps for Smart TV and detailed
information on Smart hub. This makes it easier to download and play games. In addition, you can
manage games that you have downloaded or purchased with your Samsung Account.
"
Before you use the Games panel, check if the TV is connected to the Internet. The TV must be connected to
the Internet in order to use the Games panel.
"
To use the Games panel, you must log into your Samsung Account.
Using Pop-Up Menu Functions
In the Games panel, move the focus to a desired game and press and hold the Enter button. The
following functions are available:
Installing/Removing a Game
●
Installs or removes the game from the TV.
Viewing Detail Information of the Game
●
Displays detailed information of the selected game.

Installing and Running a Game
"
When the TV's internal memory is insufficient, you can install a game on a USB device.
"
You can play a game installed on a USB device only when the USB device is connected to the TV. If the
USB device is disconnected during a game playing, the game is terminated.
"
The game installed on the USB device cannot be played on a different TV, or a PC.
Quickly Installing Games
Select All Games from the Games panel, navigate to a game from the list and press and hold the
1.
Enter button.
"
On the All Games screen, select the button to view the guide about the game controller.
"
On the All Games screen, select the button and select a desired sorting criterion. Then, the items in
the list are accordingly rearranged.
In the pop-up menu, select Download.
2.
The selected game is installed on the TV.
Installing an App in the Detailed Game Information Screen
On the Games panel screen, select a game you wish to install. If you cannot find a desired game,
1.
select All Games at the bottom of the screen.
"
On the All Games screen, select the button to view the guide about the game controller.
"
On the All Games screen, select the button and select a sorting criteria. The games are sorted
according to the criteria.
On the detailed information page of the selected game, select Download.
2.
When installation is complete, the installation complete window appears.
Launching a Game
To run an installed game, select Play on the detailed game information screen.

Managing Downloaded or Purchased Games
In Smart Hub, move to the Games panel and select My Page at the bottom of the screen.
"
On the My Page screen, select the button to view the game controller guide.
"
On the My Page screen, select the button and select a desired sorting criterion. This rearranges the list
accordingly.
Updating a Game
Select Update Games at top of the My Page screen to update games installed on the TV.
"
The Update Games appears only when there is a game that needs to be updated.
"
To update games automatically, select the button at top of the My Page and set the Auto Update games
to On. Games will then be updated automatically when an update becomes available.
Removing a Game
Press the button at top of the My Page screen and select Delete.
1.
Select all of the games you wish to remove. To select all games, select Select All.
2.
When the selection is complete, select Delete.
3.
"
Navigate the game you wish to remove and press and hold the Enter button. Then you can easily
remove the game.
Rating/Sharing/Reviewing a Game
You can rate or share the game through a social network service or send a review to the developer on
the detailed information screen.
"
You can rate / share / review a game only when the game has installed on the TV.

Using SAMSUNG APPS Panel
SAMSUNG APPS
RECOMMENDED
MY APPS
Most Popular What's New Categories
"
Actual menu screen may differ depending on the TV model.
"
This service or some of functions of it may be not available in some countries or region.
Smart Hub offers a variety of free news, sports, weather, and gaming content you can install directly
on your TV the same way as you would on a smartphone or tablet.
"
Before you use SAMSUNG APPS, make sure the TV is connected to the Internet. Your TV must be
connected to the Internet in order to use SAMSUNG APPS.
"
Launching Smart Hub for the first time installs the default apps automatically. The default apps may differ
depending on the region.

Using Pop-Up Menu Functions
Move the focus to an app and press and hold the Enter button. You can use the following functions:
Move
●
Relocates the selected app.
Delete
●
Removes the selected app.
Delete Multiple
●
Removes multiple apps at once.
View Details
●
Move to the detailed information of the selected app.
Change view
●
You can change view mode sort by Custom view or Most Played.
Lock/Unlock
●
You can lock or unlock a selected app from the screen.
Update Apps
●
You can update the selected app.

Installing an App
"
When the TV's internal memory is insufficient, you can install an app on a USB device.
"
Only when the USB device is connected are the app icons installed on the USB viewable on the SAMSUNG
APPS screen. You can use an app installed on a USB device only when the USB device is connected to the
TV. If the USB device is disconnected while the app is running, the app is terminated.
"
The app installed on the USB device is not available on a different TV, or a PC.
Quick Installation
On the SAMSUNG APPS screen, select Most Popular, What's New, or Categories.
1.
"
The Most Popular and What's New show the most popular and newest Samsung Apps. To view the
entire app list, select Categories. You can view all Samsung Apps classified by genre.
Move the focus to an app and press and hold the Enter button. A pop-up menu appears.
2.
On the pop-up menu on the screen, select Download.
3.
"
While an app is being installed, the progress bar appears at the bottom of the app icon so that you can
easily figure out the installation progress.
The selected app is installed on the TV.
4.
"
You can view installed apps on the SAMSUNG APPS screen.
Installing an App from the Detailed App Information Screen
On the SAMSUNG APPS screen, select Most Popular, What's New, or Categories.
1.
"
The Most Popular and What's New show the most popular and the newest Samsung apps. To view the
entire app list, select Categories. You can view all Samsung Apps by category.
Select an app from the list. Detailed information about your selection appears on the screen.
2.
Select Download on the detailed information screen to install the selected app on the TV.
3.
"
When an app is being installed, a progress bar appears underneath the app icon.
When the installation is complete, the Download button turns to Open.
4.
"
You can view installed apps on the SAMSUNG APPS screen.

Launching an App
Select an app on the SAMSUNG APPS screen to launch it.
The icons indicate the following:
●
●
: The app supports motion control.
: The app supports voice control.
●
●
: The app is installed on a USB device.
: The app supports a pointer that can move by the Samsung Smart Control.
Default Apps
e-Manual
The embedded e-Manual contains information.
Web Browser
Web Browser is an Internet browsing app. Using Web Browser, you can surf the Internet on the TV
in the same manner as you would using a PC even while watching a TV programme on PIP. Use a
keyboard and mouse for a more convenient web browsing experience.
"
The browsing page may differ from that on a PC.
Rearranging Apps on the SAMSUNG APPS Screen
On the SAMSUNG APPS screen, move to the app you wish to change the order.
1.
Press and hold the Enter button. A pop-up menu appears.
2.
On the pop-up menu, select Move.
3.
Move an app to a desired location and select the app again.
4.

Removing an App from the TV
"
Note that if an app is removed, the data related to the app is also deleted.
Removing an App
On the SAMSUNG APPS screen, move to the app you wish to remove.
1.
Press and hold the Enter button. A pop-up menu appears.
2.
On the pop-up menu on the screen, select Delete. A removal confirmation window appears.
3.
Select Yes . The selected app is removed.
Removing Multiple Apps
On the SAMSUNG APPS screen, move to the app you wish to remove.
1.
Press and hold the Enter button. A pop-up menu appears.
2.
On the pop-up menu on the screen, select Delete Multiple. A check box appears on the app
3.
icons.
Select all the apps you wish to remove and then select Delete. A removal confirmation window
4.
appears. Select Yes. Selected apps are removed.
Rating/Reviewing an App
On the detailed app information screen, you can rate the app or send a review to the app developer.
"
To rate or review an app, you must log into your Samsung Account. You can only rate or review with a TV
purchasing apps and games.

Updating an App
On the SAMSUNG APPS screen, move to the app you wish to update.
1.
Press and hold the Enter button. A pop-up menu appears.
2.
On the pop-up menu on the screen, select Update Apps. A pop-up window appears.
3.
Select all the apps you wish to update and then select Update. All the selected apps are updated
4.
to the latest versions.
Setting Auto App Update
Smart Hub > Apps Settings
To update apps automatically, navigate to Smart Hub > Apps Settings and set Auto update to On.
The apps installed on the TV are automatically updated as updates become available.
SAMSUNG APPS Features
Smart Hub > Apps Settings
You can configure the features related to the apps installed on your TV.
Try Now
Enabling Automatic Tickers
You can configure selected tickers to display automatically when the TV is turned on. Ticker Service
enables you to use other services while watching TV. You can receive news, stock, and weather
information and more in real-time while watching TV.
"
To use this feature, make sure that an app supporting the Auto Ticker function is installed on the TV.
Navigate to Smart Hub > Apps Settings and select Auto Ticker. A list of installed apps that
1.
support Ticker Autorun appears.
From the list, select apps you wish to run automatically when the TV is turned on.
2.

Setting Push Notification
Push notification function enables apps installed on the TV to send alerts and messages to the user.
Navigate to Smart Hub > Apps Settings > Push Notification Settings and set the Push
1.
Notification to On.
Set the Push Notification setting of apps you wish to receive push notifications from to On. Push
2.
notification function of the selected apps is activated.
"
The Push Notification app list only shows installed apps that support Push Notification Settings.
Using an App while Watching TV
If an app linked to a channel is installed on the TV, you can view programme information and use
related services offered by the app while watching TV.
Navigate to Smart Hub > Apps Settings and set Channel-Bound Apps to On.
"
This feature is only available with apps supporting Channel-Bound Apps installed on the TV.

Using On TV Panel
On TV
FOR YOU
Guide Timeline View Trending Recorded TV
"
Actual menu screen may differ depending on the TV model.
"
This service or some of functions of it may be not available in some countries or region.
"
Availability of recommended content depends on the specific model and area.
Smart Hub's On TV panel lets you view programme lists for recommended channels while watching
TV. You can then switch to a programme in the recommendation list or set up Schedule Viewing/
Schedule Recording for an upcoming programme.
"
Before you use On TV, check if the TV is connected to the Internet. The TV must be connected to the
Internet in order to use On TV.
"
The channels or programmes recommended by On TV may differ from the actual ones depending on the
broadcast information provider.
Select a desired programme from the recommendation list. You can watch the selected programme
immediately if it is currently on air or move to the detailed programme information screen if it hasn't
aired yet.
"
Select from the screen to change the recommended content list.
"
For a programme being broadcasted, a progress bar appears. For an upcoming programme, the remaining
time to broadcast appears.

Move to the navigation bar at the bottom of the screen to access the following options:
Viewing the Programme Schedule of Digital Channels
●
Select Guide at the bottom of the screen to view the programme schedule of each digital channel
at a glance. You can check the programme schedule and even set up a Schedule Viewing or
Schedule Recording.
"
The Guide provides information only about digital channels. Analogue channels are not supported.
Programme Recommendations by Time
●
Select Timeline View at the bottom of the screen to view programme recommendations for
different times of the day.
Popular Videos
●
Select Trending at the bottom of the screen to view the most trendy or popular content in Twitter
and set up a Schedule Viewing or Schedule Recording.
Watching a Recorded Programme
●
Select Recorded TV at the bottom of the screen to watch a recorded programme.

Using Pop-Up Menu Functions
Move the focus to a desired programme and press and hold the Enter button. The following options
are available:
"
Available functions may differ depending on the selected programme.
Recording the Current Programme
●
You can instantly record a programme that is being broadcast on a different channel.
Viewing Detailed Information
●
You can move to the detail information screen about the selected programme.
Reserving
●
You can set up a Schedule Viewing or Schedule Recording for the programme.
Viewing Detailed Programme Information
Move the focus to a desired programme and press and hold the Enter button. The Options menu
1.
appears.
From the Options menu on the screen, select Detailed Information. The detailed information
2.
about the selected programme screen appears.
You can find more information about the selected programme in the detailed information screen and
you can easily use the following functions:
Moving to a Channel
●
Jump to the selected programme's channel.
Record
●
You can record the programme.
"
This function is only available for programmes that is being broadcasted.
Reserving
●
Set up a Schedule Viewing or Schedule Recording for the programme.
"
This function is only available for programmes that is being broadcasted.

Viewing Related Content
●
View a list of content related to the programme. If you select an item from the list, the detailed
screen of the selected item appears.
Rate
●
You can rate the programme.
Sharing
●
You can share detailed information about the programme on social networking services.
Configuring On TV Settings
"
Availability depends on the specific model and area.
Smart Hub > On TV Settings
You can set up the signal reception method, cable company, and other broadcast viewing environment
settings for On TV.
Navigate to Smart Hub > On TV Settings, select On TV Setup settings and set up the broadcast
viewing environment settings according to the onscreen instructions.
Receiving Automatic Notifications
You can configure the TV to display a notification when a frequently watched programme is broadcast.
Navigate to Smart Hub > On TV Settings and set Automatic Notifications to On.
Changing Recommendation Type
You can choose between personally preferred programmes and programmes preferred by the general
public as the type of recommendations you wish to receive.
Navigate to Smart Hub > On TV Settings, select Recommendation Type and set it to a desired type.
Removing Adult Content from the Recommended List
You can configure this setting so that recommended programmes that are rated for adults are blocked
automatically.
Navigate to Smart Hub > On TV Settings and set Block Adult Content to On.

Using FILMS AND TV SHOWS Panel
FILMS AND TV SHOWS
NEWLY ADDED
Favourites Featured Movies TV Shows Trending
"
Actual menu screen may differ depending on the TV model.
"
This service or some of functions of it may be not available in some countries or region.
Use this feature to purchase and view movies and TV programmes recommended by FILMS AND TV
SHOWS without having to use an external device such as a DVD player or a Blu-ray player. FILMS
AND TV SHOWS provides an easy access to a collection of movies and TV programmes available in
Smart Hub.
"
Not all the FILMS AND TV SHOWS options may be available depending on the content you are trying to
access or your region.
"
Before you use FILMS AND TV SHOWS, make sure the TV is connected to the Internet. The TV must be
connected to the Internet in order to use FILMS AND TV SHOWS.
"
Select from the screen to change the recommended content list.

Move to the navigation bar at the bottom of the screen to access the following options:
"
To sort the content items in each menu, select the button at top of the screen and choose a sorting
criteria. However, depending on the selected menu, the
"
Press in each menu's contents list screen to display only movies or TV programmes in the list. The button
may not be shown, depending on the selected menu.
"
Pressing in the Featured, Movies, or TV Shows menu's contents list screen allows you to add content to
the bookmarks. Added contents can be removed from the bookmarks using the Favourites menu list. The
button may not be shown, depending on the selected menu.
Viewing Configured Favourites at a Glance
●
button may not appear.
Select Favourites to view the movies and TV shows that users have set as Favourites at a glance.
Enjoying Featured Movies and TV Programmes
●
Select Featured to view movies or TV programmes selected according to various themes such as
movies featuring an actor who went to Hollywood, completed TV series, and so on.
Viewing a Movie
●
Select Movies to view a movie from among the movies listed by new arrival, popularity, and
genre.
Viewing a TV Programme
●
Select TV Shows to view a TV show from among the TV shows listed by new arrival, popularity,
and genre.
Viewing Hot Movies and TV Shows at a Glance in Real-time
●
Select Trending to view movies and TV programmes that are the most trendy or popular.
Using Pop-Up Menu Functions
Move the focus to a desired movie or TV programme and press and hold the Enter button. The
following options are available:
"
Available options may differ depending on the selected programme.
Instant Content Playing
●
Select an app for the selected content to play it right away.
If the selected app is not installed, a pop-up window will appear. From the pop-up window, move
to the detailed app information page or install the app.
Adding to/Removing from Favourites
●
Register the selected content to Favourites.

Watching a Movie/TV Programme
"
If you are using FILMS AND TV SHOWS for the first time or have not logged into your Samsung Account,
new and popular movies and TV shows will be shown in the FILMS AND TV SHOWS list. To view a
customised recommendation list in FILMS AND TV SHOWS, first log into your Samsung Account. You
can view a list of frequently played content on FILMS AND TV SHOWS screen in addition to the default
recommended content list.
On FILMS AND TV SHOWS screen, select a movie or TV programme you wish to watch. Detailed
1.
information about your selection appears on the screen.
On the detailed information screen, select an app to play the content. This launches the selected
2.
app and displays detailed information about the content.
"
If the selected app is not installed, a pop-up window will appear. From the pop-up window, move to
the detailed app information page or install the app.
You can play the content in the detailed information of the content.
3.
"
If the selected content is free, you can instantly watch the content. If the content is a paid content, you
must first purchase the content in the app (In-App Purchase).
"
The purchasing procedures on the app may differ depending on the app. You may need to log into the
app or enter payment information.
Restricting Purchased Content Viewing
Smart Hub > VOD Rating Lock
You can lock content rated as adult content so that children cannot access the content.
Navigate to Smart Hub and set VOD Rating Lock to On.
"
To turn on or off the VOD Rating Lock, the password is required.
Registering Content to Favourites
On FILMS AND TV SHOWS screen, select a movie or TV programme that you wish to register to
1.
Favourites. Detailed information about your selection appears on the screen.
Select button on the detailed information screen. The content is added to the Favourites.
2.
"
Select Favourites at the lower part of the FILMS AND TV SHOWS screen to view your favourites
content list.
"
Select the button at the top of the content list in each menu to register multiple items to Favourites
at once.

Rating and Sharing a Purchased Content
Rating Content
Select content in FILMS AND TV SHOWS. Detailed information about your selection appears on
1.
the screen.
Select button on the detailed information screen. A pop-up window appears.
2.
You can rate the item using the ¡ and £ buttons in the pop-up window.
3.
Sharing With SNS
Select content in the FILMS AND TV SHOWS. Detailed information about your selection appears
1.
on the screen.
Select either or button in the detailed information screen. The login page of the selected
2.
SNS appears.
"
If you have linked your Samsung Account to the SNS account, you were automatically logged into the
SNS account when you logged into your Samsung Account.
On the SNS login screen, enter your SNS ID and password to log into the SNS.
3.
"
If you have linked your Samsung Account to the SNS account, you can skip this step.
In the pop-up window, type the article you wish to post to the SNS and select Post. The article is
4.
posted to the SNS.

Playing Photos, Videos, and Music (MULTIMEDIA)
MULTIMEDIA
Most Popular
My Devices
Connect a USB
storage device
"
Actual menu screen may differ depending on the TV model.
"
This service or some of functions of it may be not available in some countries or region.
You can play media content saved on a USB device, smartphone, camera, computer, or Storage Service
on the TV.
Connect a
Smartphone
USB Drive Network Device Storage Service
Connect a PC Connect to an
online storage
account
"
You cannot play media content if the content or the storage device are not supported by the TV. For more
information, refer to "Photo, Video, and Music File Limitations".
"
Backup important files before connecting a USB device. Samsung shall not be held responsible for damaged
or lost files.
Playing Media Content from a USB Device
Press the button and select USB Drive in the MULTIMEDIA panel. USB devices connected to
1.
the TV are listed.
Select the device you wish to access. Folders and files of the selected USB device are listed.
2.
Select the media content you wish to play. This plays the selected content.
3.
"
Alternatively, move to the media content to play and press the ∂ button to play the content.
"
If you connect a USB device to the TV while watching the TV, a pop-up window appears on the screen so
that you can easily navigate the folders and files of the USB device.
"
Alternatively, if you select a USB device on the Source screen, a pop-up window appears on the screen so
that you can easily navigate the folders and files of the USB device.

Safely Removing a USB Device
Press the SOURCE button. The Source screen appears.
1.
Navigate the USB device you wish to remove, and press and hold the Enter button. An options
2.
window appears.
Select Disconnect USB Device from the list.
3.
Playing Multimedia Content Saved in a Computer/Mobile Device
"
To view a guide about the PC connection, select Connecting to PC under Network Device.
"
To view a guide about a Smartphone or tablet connection, select Connect a Smartphone under Network
Device.
Allowing Connection with a Computer/Mobile Device
To play multimedia content in a computer or mobile device on the TV, you need to allow the
connection with the computer on the TV.
"
You can connect to a computer or mobile device on any DLNA DMC device. DLNA DMC function enables
users to connect a mobile device to the TV, search for multimedia content and control play operations on
the TV.
Press the button and select Network Device in the MULTIMEDIA panel. Devices connected to
1.
the TV are listed.
Select Options and then Multimedia device settings. Devices connected to the TV are listed.
2.
"
Alternatively, select Multimedia Device Settings from the Network menu to see the list of the devices
connected to the TV. Try Now
Allow connection with the desired device you wish to connect to the TV. You can only play
3.
media files from devices that have been allowed to connect to the TV.
"
If a computer or mobile device requests the multimedia content play, the connection allowance
confirmation window appears on the TV so that you can easily connect the computer or mobile device.

When Connected through Home Network (DLNA)
"
To connect a computer through home network (DLNA).
"
To connect a mobile device through home network (DLNA).
"
You may experience compatibility issues when attempting to play media files via a third-party DLNA server.
"
However, the content shared by a computer of a mobile device may not play depending on the encoding
type and file format of the content. In addition, some functions may not be available.
"
The multimedia content may not smoothly play depending on the network status. If this is the case, use a
USB storage device.
Press the button and select Network Device in the MULTIMEDIA panel. Devices connected to
1.
the TV are listed.
Select a device connected via the home network (DLNA). Folders and files shared by the selected
2.
device will be listed.
Select a media content you wish to play from the list. This plays the selected content.
3.
"
Alternatively, move to the media content and press ∂ to play.
When Connected through Samsung Link
"
To connect a computer through Samsung Link.
"
To connect a mobile device through Samsung Link.
"
However, the content shared by a computer of a mobile device may not play depending on the encoding
type and file format of the content. In addition, some functions may not be available.
"
The multimedia content may not smoothly play depending on the network status. If this is the case, use a
USB storage device.
Navigate to Smart Hub > Samsung Account menu and select Log In
1.
Samsung Account.
Press the button and select Network Device in the MULTIMEDIA panel. Devices connected to
2.
the TV are listed.
Select a device connected via Samsung Link. Folders and files shared by the selected device will
3.
be listed.
Select a media content you wish to play from the list. This plays the selected content.
4.
"
Alternatively, move to the media content and press ∂ to play.
to sign in with your the

Playing Media Content from a Storage Service
Storage Services store user content such as photo, video, and music files on a server so that they can
be viewed/played on the TV over the Internet. It's also possible to view your media content saved on
Storage Services such as Dropbox and SkyDrive from the TV.
"
To play content from a Storage Service, you must log into your Samsung Account and link it to the Storage
Service account.
Navigate to Smart Hub > Samsung Account menu and select Log In
1.
Account
Press the button and select Storage Service in the MULTIMEDIA panel. Storage Services linked
2.
to your Samsung Account appears.
Select a Storage Service. Folders and files found in the selected Storage Service are listed.
3.
Select the media content you wish to play from the list. This plays the selected content.
4.
"
.
Alternatively, move to the media content and press ∂ to play.
to sign into your
Samsung

Buttons and Functions Available while Viewing Photos
Press enter to access the following buttons. Pressing RETURN hides the playback buttons.
Pause / Play
●
Start or stop the slide show. The slide show feature displays all the photos contained in the
selected folder, one photo at a time.
Previous / Next
●
View the previous/next photo in the queue.
Settings
●
Function Description
Slideshow Settings
Rotate
Zoom
Picture Mode
Background Music
Sound Mode
Select Speakers
Send
Speed: Set the slide show speed.
Effects: Apply transition effects to the slide show.
Rotate the photo.
Zoom in by up to a factor of 4.
Change Picture Mode.
Listen to background music while viewing photos.
"
The music file must be located on the same device as the photo files.
"
A mini player appears on the screen when background music is played. Use the
mini player to pause the music or play a different music file.
Change Sound Mode.
"
This option is supported only when background music is playing.
Choose speakers for the background music.
This function is the same as the "Copy" function of a computer. Use this function to
send the current photo to another storage device.
"
For information on storage devices supported by this feature, refer to "Storage
Device File Transfers".
Information
View detailed information about the current photo.

Buttons and Functions Available while Watching Video
Press enter to access the following buttons. Pressing RETURN hides the playback buttons.
Pause / Play
●
Pause or play the video.
When the video is paused, you can use the following functions. However, audio will not be heard
while the video is paused.
Step: Press ∑ to scan the paused video one frame at a time.
–
Slow Motion: Select the … button to play the video at reduced speed (1/8, 1/4, 1/2).
–
Rewind / Fast Forward
●
Rewind or Fast Forward the video. Repeatedly select the button to make the rewind/fast forward
speed faster by up to 3 times. To restore normal playback speed, select ∂.
Previous / Next
●
Select € twice to play the previous video. Selecting € once reloads the current video from the
beginning.
To play the next video, select the ‚ button.

Settings
●
Function Description
Thumbnails: Select a scene and play the video from the scene.
"
Thumbnails is not available when 1) the thumbnail of the video is not extracted
yet, 2) the video contains audio only or 3) the video play time is shorter than 60
Select Scene
Subtitles
seconds.
Chapter Titles: Select and play another video in the same folder.
Time Bar: You can use the ¡, £ buttons to scan through the video in 10 seconds
intervals or enter a specific time value to jump to that point in the video.
Control the subtitle of the video.
Language: Turn the subtitles on or off.
Sync: When the video and the subtitles are not synchronised, you can adjust the
synchronisation.
Reset Sync: Reset the subtitle synchronization adjustment to 0.
Size: Choose the font size for the subtitles.
Encoding: If the subtitles are broken, you can change the encoding language.
Repeat
Rotate
Picture Size
Picture Mode
Sound Mode
Select Speakers
Audio Language
Information
Set the repeat mode. Repeat One repeats the current programme only. Repeat All
repeats all programmes contained in the folder.
Rotate the video.
Change the picture size. However, the supported picture size is determined by the
video content.
Change the Picture Mode setting.
Change the Sound Mode setting.
Choose a speaker to play the audio.
Choose a desired audio language. This option works only when the video supports
multi-track sound.
View detailed information about the video.

Buttons and Functions Available while Playing Music
Press enter to access the following buttons. Pressing RETURN hides the playback buttons.
Pause / Play
●
Pause or resume the music.
Rewind / Fast Forward
●
Rewind or fast forward the music. Repeatedly select the button to rewind/fast forward faster by
up to a factor of 3. To restore normal playback speed, select ∂.
Previous / Next
●
Select € twice to play the previous music file. Selecting
once reloads the current music file
€
from the beginning.
To play the next music file, select the ‚ button.
Repeat
●
Set the repeat mode. Repeat One repeats the current music file only. Repeat All repeats all music
files contained in the folder.
Shuffle
●
Play the music files in order or randomly.
Select Speakers
●
Choose a speaker to play the audio.
Sound Mode
●
Change the Sound Mode setting.

Functions on the Media Content List Screen
The media content screen for the selected storage device includes the following functions.
Filter
●
Use this option to filter the list to see only the photo, video, or music files contained in the
storage device.
Sort by
●
Sort the list by content type.
"
This function is not available when Filter is set to All.
Options
●
"
This function is not available when Filter is set to All.
Function Description
Start the slide show.
"
Slide Show
This option is available for photo files. This option is not available with Sort by set
to Folder.
Play Selected
Send
Encoding
Rename Playlist
Delete Playlist
Add to Playlist
Index
Play only the selected content.
This function is the same as the "Copy" function of a computer. Use this function to
send the media content to another storage device.
"
For information on storage devices supported by this feature, refer to "Storage
Device File Transfers".
If the media content's title is being displayed incorrectly, you can change the encoding
method.
"
This function is available only for music files.
Rename your playlist.
"
This function is available only when the media content is music.
Delete a playlist that you have created.
"
This function is available only for music files.
Add a file to an existing playlist or create a new playlist.
"
This function is available only for music files.
If the content list is too long to navigate efficiently, select a letter to quickly skip to
that section of the list.
"
This is not available when Sort by is set to Folder.
 Loading...