

Page 1
Связывайтесь с SAMSUNG по всему миру
Если у вас есть предложения или вопросы по продукции Samsung, обращайтесь, пожалуйста, в информационный центр
компании Samsung.
Страна
RUSSIA 8-800-555-55-55 www.samsung.com
GEORGIA 0-800-555-555 www.samsung.com
ARMENIA 0-800-05-555 www.samsung.com
AZERBAIJAN 088-55-55-555 www.samsung.com
KAZAKHSTAN 8-10-800-500-55-500 (GSM: 7799) www.samsung.com
UZBEKISTAN 8-10-800-500-55-500 www.samsung.com
KYRGYZSTAN 00-800-500-55-500 www.samsung.com
TADJIKISTAN 8-10-800-500-55-500 www.samsung.com
MONGOLIA +7-800-555-55-55 www.samsung.com
UKRAINE 0-800-502-000 www.samsung.com/ua (Ukrainian)
BELARUS 810-800-500-55-500 www.samsung.com
MOLDOVA 0-800-614-40 www.samsung.com
Производитель:
ООО «Самсунг Электроникс Рус Калуга»,
249002, Калужская обл., Боровский р-н, д. Коряково, Первый Северный проезд, владение 1
Центр поддержки покупателей
Веб-узел
www.samsung.com/ua_ru (Russian)
UE40F6500A UE46F6500A UE50F6500A UE55F6500A UE40F6500S UE46F6500S UE50F6500S UE55F6500S UE32F6510A
UE40F6510A UE46F6510A UE55F6510A UE32F6510S UE40F6510S UE46F6510S UE55F6510S UE32F6540A UE40F6540A
UE46F6540A UE55F6540A UE40F6650A UE46F6650A UE50F6650A UE55F6650A UE32F6800A UE40F6800A UE46F6800A
UE50F6800A UE55F6800A UE32F6800S UE40F6800S UE46F6800S UE50F6800S UE55F6800S
LED-ТЕЛЕВИЗОР
руководство пользователя
© 2013 Samsung Electronics Co., Ltd. All rights reserved.
MORE
e-Manual
Благодарим за приобретение продукта компании.
Для получения более полного обслуживания
зарегистрируйте свое устройство по адресу
www.samsung.com/register
Модель____ Серийный номер. _____________
BN68-04779H-00
[UF6470-RU]BN68-04779H-X0L4.indb 1 2013-03-09 10:19:02
Page 2

Important Safety Instructions
Warning! Important Safety Instructions
(Please read the appropriate section that corresponds to the marking on your Samsung product before attempting to install the product.)
CAUTION
RISK OF ELECTRIC SHOCK DO NOT OPEN
CAUTION: TO REDUCE THE RISK OF ELECTRIC SHOCK, DO
NOT REMOVE COVER (OR BACK). THERE ARE NO USER
SERVICEABLE PARTS INSIDE. REFER ALL SERVICING TO
QUALIFIED PERSONNEL.
• The slots and openings in the cabinet and in the back or bottom are provided for necessary ventilation. To ensure reliable operation of this apparatus,
and to protect it from overheating, these slots and openings must never be blocked or covered.
− Do not cover this apparatus in a confined space, such as a bookcase, or built-in cabinet, unless proper ventilation is provided.
− Do not place this apparatus near or over a radiator or heat resistor, or where it is exposed to direct sunlight.
− Do not place a water containing vessel(vases etc.) on this apparatus, as this can result in a risk of fire or electric shock.
• Do not expose this apparatus to rain or place it near water(near a bathtub, washbowl, kitchen sink, or laundry tub, in a wet basement, or near a
swimming pool etc.). If this apparatus accidentally gets wet, unplug it and contact an authorized dealer immediately. Make sure to pull out the power
cord from the outlet before cleaning.
• This apparatus use batteries. In your community there might be regulations that require you to dispose of these batteries properly under
environmental considerations. Please contact your local authorities for disposal or recycling information.
• Do not overload wall outlets, extension cords or adaptors beyond their capacity, since this can result in fire or electric shock.
• Power-supply cords should be routed so that they are not likely to be walked on or pinched by items placed upon or against them, paying particular
attention to cords at plug end, adaptors and the point where they exit from the appliance.
• To protect this apparatus from a lightning storm, or when it is left unattended and unused for long periods of time, unplug it from the wall outlet and
disconnect the antenna or cable system. This will prevent damage to the set due to lightning and power line surges.
• Before connecting the AC power cord to the DC adaptor outlet, make sure the voltage designation of the DC adaptor corresponds to the local
electrical supply.
• Never insert anything metallic into the open parts of this apparatus. Doing so many create a danger of electric shock.
• To avoid electric shock, never touch the inside of this apparatus. Only a qualified technician should open this apparatus.
• Make sure to plug the power cord in until it is firmly inserted. When removing the power cord, make sure to hold the power plug when pulling the
plug from the outlet. Do not touch the power cord with wet hands.
• If this apparatus does not operate normally - in particular, if there are any unusual sounds or smells coming from it - unplug it immediately and
contact an authorized dealer or service centre.
• Be sure to pull the power plug out of the outlet if the TV is to remain unused or if you are to leave the house for an extended period of time (especially
when children, elderly or disabled people will be left alone in the house).
− Accumulated dust can cause an electric shock, an electric leakage or a fire by causing the power cord to generate sparks and heat or the
insulation to deteriorate.
• Be sure to contact an authorized service centre, when installing your set in a location with heavy dust, high or low temperatures, high humidity,
chemical substances and where it operates for 24 hours such as the aerial port, the train station etc.
• Failure to do so may cause serious damage to your set.
• Use only a properly grounded plug and receptacle.
− An improper ground may cause electric shock or equipment damage. (Class l Equipment only.)
• To disconnect the apparatus from the mains, the plug must be pulled out from the mains socket, therefore the mains plug shall be readily operable.
• Do not allow children to hang onto the product.
• Store the accessories (battery, etc.) in a location safely out of the reach of children.
• Do not install the product in an unstable location such as a shaky self, a slanted floor or a location exposed to vibration.
• Do not drop or impart any shock to the product. If the product is damaged, disconnect the power cord and contact a service centre.
• Unplug the power cord from the power outlet and wipe the product using a soft, dry cloth. Do not use any chemicals such as wax, benzene, alcohol,
thinners, insecticide, aerial freshener, lubricant or detergent. This may damage the appearance or erase the printing on the product.
• Apparatus shall not be exposed to dripping or splashing.
• Do not dispose of batteries in a fire.
• Do not short circuit, disassemble or overheat the batteries.
• Danger of explosion if battery is incorrectly replaced. Replace only with the same or equivalent type.
• WARNING - TO PREVENT THE SPREAD OF FIRE, KEEP CANDLES OR OTHER OPEN FLAMES AWAY FROM THIS PRODUCT AT ALL TIMES.
This symbol indicates that high voltage is
present inside. It is dangerous to make any kind
of contact with any internal part of this product.
This symbol alerts you that important literature
concerning operation and maintenance has
been included with this product.
English - 2
[UF6470-RU]BN68-04779H-X0L4.indb 2 2013-03-09 10:19:02
Page 3
Figures and illustrations in this User Manual are provided for reference only and may differ from the actual product
appearance. Product design and specifications may change without notice.
Features for your new TV
• 3D: This new feature enables you to view 3D content.
• SMART HUB:
This TV features Smart Hub, a multi-purpose entertainment and family centre. With Smart Hub, users can surf
the web, download applications, and stay in touch with family and friends through social networking services. In
addition, you can enjoy photo, video, and music files stored on external storage devices.
™ Press to launch Smart Hub. Choose a service using the icons displayed in the top part of the screen.
Social: Watch the latest YouTube videos and you and your friends' video posts on Facebook and Twitter. You can
also make video calls to friends by connecting the TV to a camera (sold separately).
Apps: Download and install applications such as WebBrowser.
Films and TV Shows: Purchase and watch movies and series without a separate external device.
(Depending on the country)
Photos, Videos & Music: Play back photo, video, and music files from an external storage device.
• Anynet+ (HDMI-CEC): This allows you to control all connected Samsung devices that support Anynet+ with your
Samsung TV’s remote.
• e-Manual: Provides a detailed, on-screen user's manual built into your TV. (page 12)
EnglishEnglish
• SMART Interaction: Using this function, you can access and control menu options and functions using motions. To
use Smart Interaction Feature, TV camera (sold separately) should be connected the TV. (Depending on the country)
• Device Manager: Use the TV features with a USB or Bluetooth keyboard and mouse.
• Screen Mirroring: Displays mobile device screens on your TV wirelessly.
Correct Disposal of This Product (Waste Electrical & Electronic Equipment)
(Applicable in countries with separate collection systems)
This marking on the product, accessories or literature indicates that the product and its electronic accessories (e.g. charger, headset,
USB cable) should not be disposed of with other household waste at the end of their working life. To prevent possible harm to the
environment or human health from uncontrolled waste disposal, please separate these items from other types of waste and recycle
them responsibly to promote the sustainable reuse of material resources.
Household users should contact either the retailer where they purchased this product, or their local government office, for details of
where and how they can take these items for environmentally safe recycling.
Business users should contact their supplier and check the terms and conditions of the purchase contract. This product and its
electronic accessories should not be mixed with other commercial wastes for disposal.
Correct disposal of batteries in this product
(Applicable in countries with separate collection systems)
This marking on the battery, manual or packaging indicates that the batteries in this product should not be disposed of with other
household waste at the end of their working life. Where marked, the chemical symbols Hg, Cd or Pb indicate that the battery contains
mercury, cadmium or lead above the reference levels in EC Directive 2006/66. If batteries are not properly disposed of, these
substances can cause harm to human health or the environment.
To protect natural resources and to promote material reuse, please separate batteries from other types of waste and recycle them
through your local, free battery return system.
English - 3
[UF6470-RU]BN68-04779H-X0L4.indb 3 2013-03-09 10:19:03
Page 4
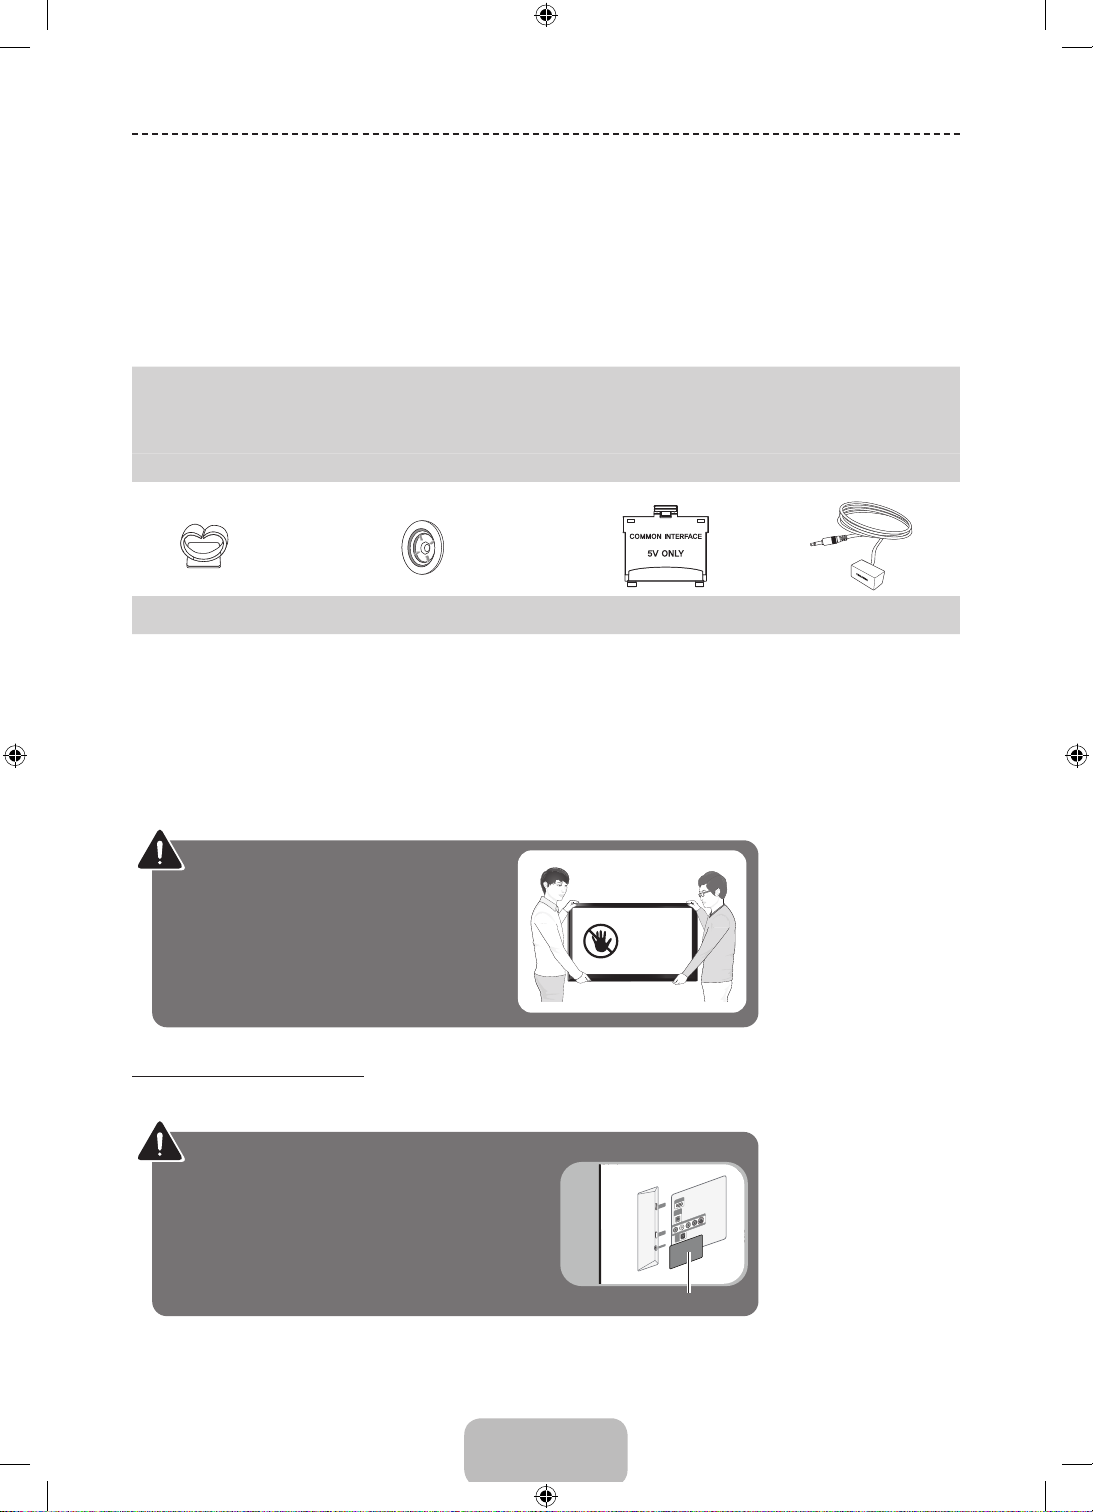
Accessories
Please make sure the following items are included with your TV. If any items are missing, contact your dealer.
✎
The items’ colours and shapes may vary depending on the models.
✎
Cables not included in the package contents can be purchased separately.
✎
Check that there is no accessory hidden behind packing materials when you open the box.
✎
CAUTION: INSERT SECURELY LEST SHOULD BE DETACHED IN SET
[
• Smart Touch Control & Batteries (AAA x 2) • Power Cord
• User Manual • Cleaning-Cloth
• Warranty Card (Not available in some locations) • Samsung 3D Active Glasses (40 inch model and above)
• Regulatory Guide
Holder-Wire stand
• An administration fee may be charged if either
− (a) an engineer is called out at your request and there is no defect in the product
(i.e. where you have failed to read this user manual)
− (b) you bring the unit to a repair centre and there is no defect in the product
(i.e. where you have failed to read this user manual).
• The amount of such administration charge will be advised to you before any work or home visit is carried out.
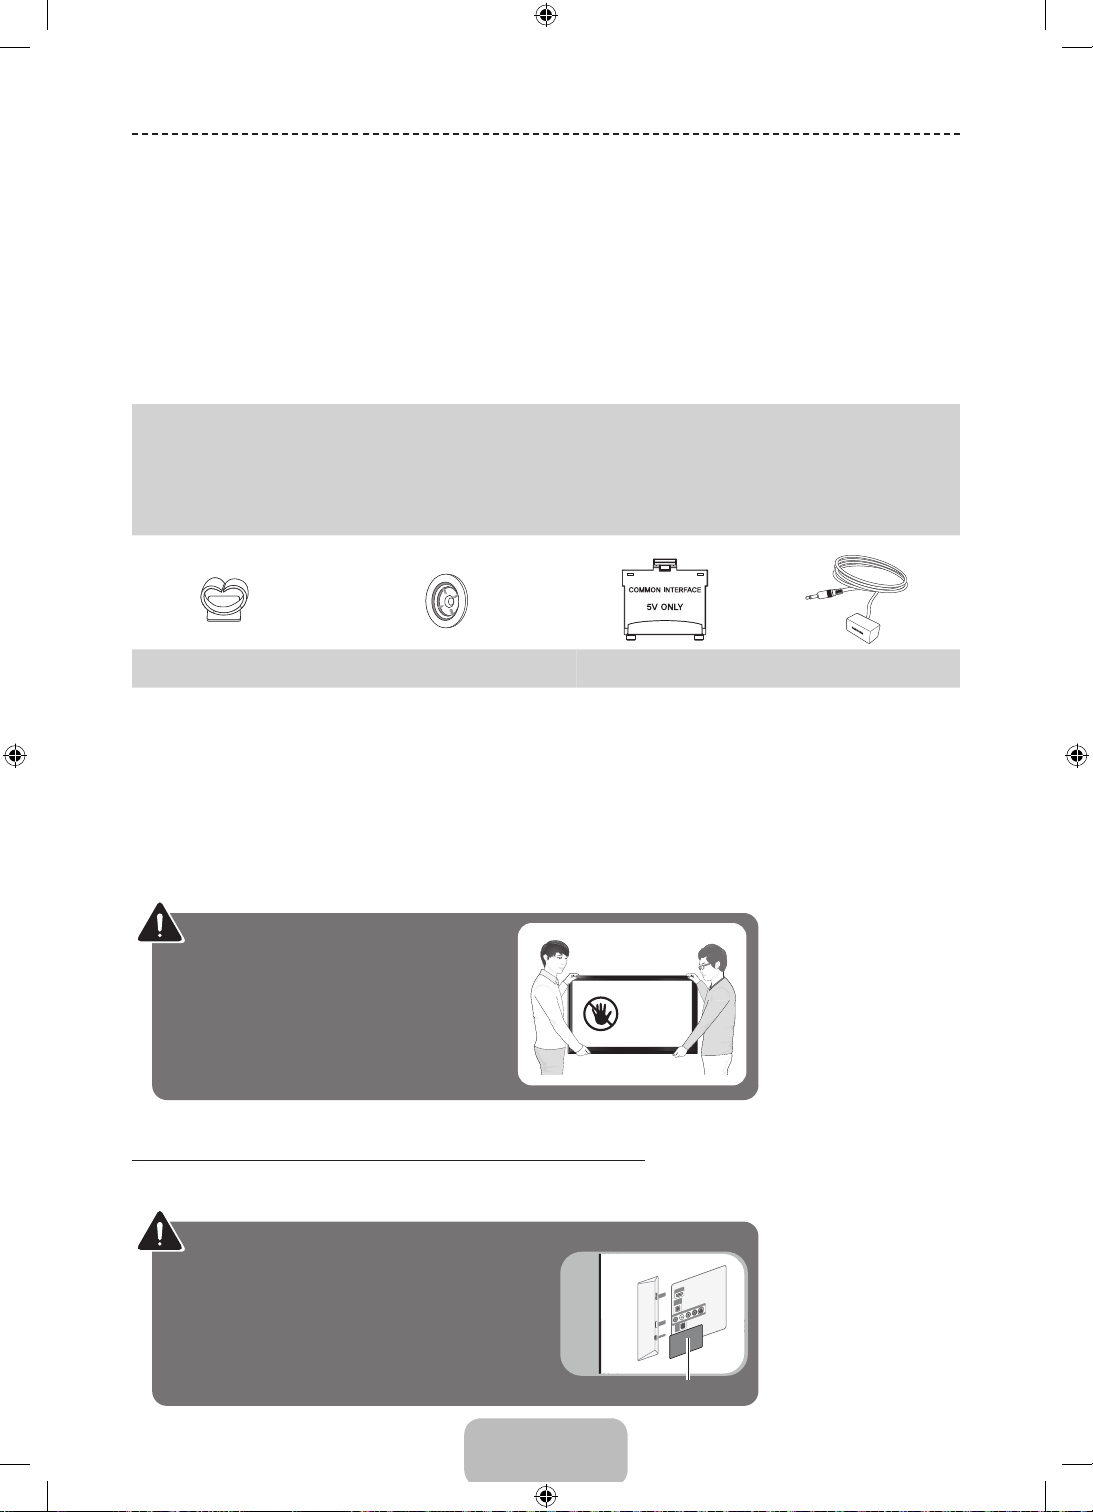
Warning: Screens can be damaged from
direct pressure when handled incorrectly.
We recommend lifting the TV by the edges,
as shown.
Holder-Ring
(Depending on the Model)
CI Card Adapter IR Extension Cable
Don't Touch
This Screen!
Caution of the cover-jack
The rear panel may differ depending on the model.
✎
TV Rear Panel
CAUTION: The cover-jack is for use by qualified
service personnel only. To reduce the risk of electric
shock or fire hazard, do not use the cover jack,
unless you are qualified to do so.
Cover-jack
English - 4
[UF6470-RU]BN68-04779H-X0L4.indb 4 2013-03-09 10:19:04
Page 5

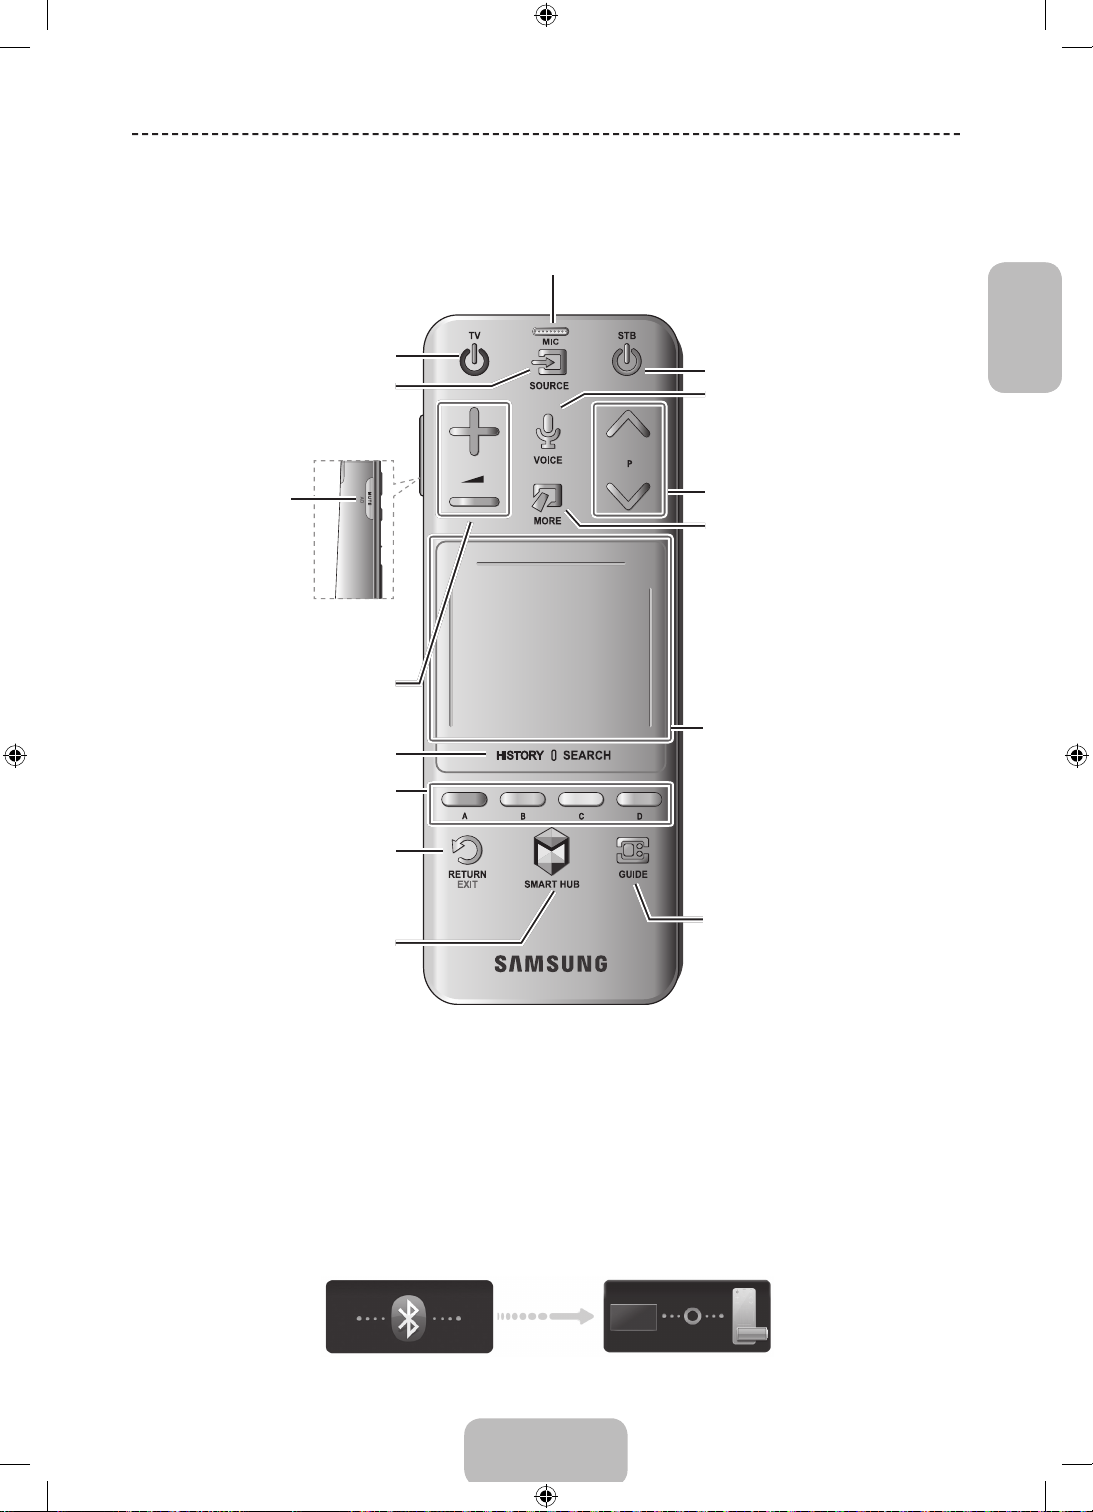
Basic Features
Using the Smart Touch Control
Using the Smart Touch Control
Depending on the model.
Depending on the model.
✎
✎
You can use the MIC to give Voice Recognition commands. Simply press the VOICE
Voice Recognition function can be affected by unclear pronunciation, voice level, or surrounding noise.
✎
Turns the TV on and off.
Displays and selects the available video
Turns the TV sound on/off.
Press and hold this
button to select Audio
Description and Subtitle.
(Depending on the country
Toggles this button between History and
The colour buttons work differently, depending
on the function that the TV is currently
Returns to the previous menu. Press and
hold this button to exit all currently running
Brings up Smart Hub applications. See the
e-Manual chapter, Smart TV Features >
To exit an application that is running,
✎
MUTE
or region.)
Adjusts the volume.
press the
sources.
Search.
performing.
applications.
Smart Hub.
™
button.
˜
button.
Turn on and off the satellite or cable set-top
box connected to the TV. For this, the Smart
Touch Control must be confi gured as a
universal remote control.
VOICE
˜
Take your voice command and enter a text
using your voice.
Changes channels.
Displays a virtual remote control on
the screen. See the e-Manual chapter,
Controlling TV > Using the Virtual Remote
Control.
Press and hold this button. A quick access
panel of virtual remote panel appears. You
can select screen buttons easily.
Touch Pad
• Drag on the Touch Pad to move the
focus on the screen.
• Press the Touch Pad to run, activate, or
select the highlighted item.
• Press and hold the touch pad to display
the Channel List.
View each digital channel's programming
schedule, including showtimes. In addition,
sets a Schedule Viewing or Schedule
Recording to press the touch pad on the
programme entry scheduled to air later.
EnglishEnglish
Connecting to the TV
In order to operate the TV using a Smart Touch Control , you must fi rst pair it to the TV via Bluetooth. However, the Smart Touch
Control is only available for the paired Samsung TV.
1. When the TV is off, point the Smart Touch Control at the remote control receiver of the TV and press the TV button for the fi rst
pairing. Only this buttons sends an IR signal. The remote control receiver's location may vary depending on the model.
2. A Bluetooth icon will appear at the bottom left of the screen as shown below. The TV will then attempt to connect to the Smart Touch
Control automatically.
<Attempting to connect and completion icons>
English - 5
[UF6470-RU]BN68-04779H-X0L4.indb 5 2013-03-09 10:19:04
Page 6
Reconnecting the Smart Touch Control
<The Smart Touch Control pairing button>
If you need to reestablish the connection between the TV and the Smart Touch Control, press the pairing button
at the back of the Smart Touch Control toward the Remote receiver of the TV. The pairing button can be accessed
by removing the Smart Touch Control's battery cover. Pressing the pairing button automatically reestablishes the
connection between the control and the TV.
Battery Low Alarm
If the battery becomes and blanks low while using the Smart Touch Control, the following alarm window blinks and appears
at the bottom left of the screen. If the alarm window pops up, replace the batteries of the Smart Touch Control. Use alkaline
batteries for longer usage.
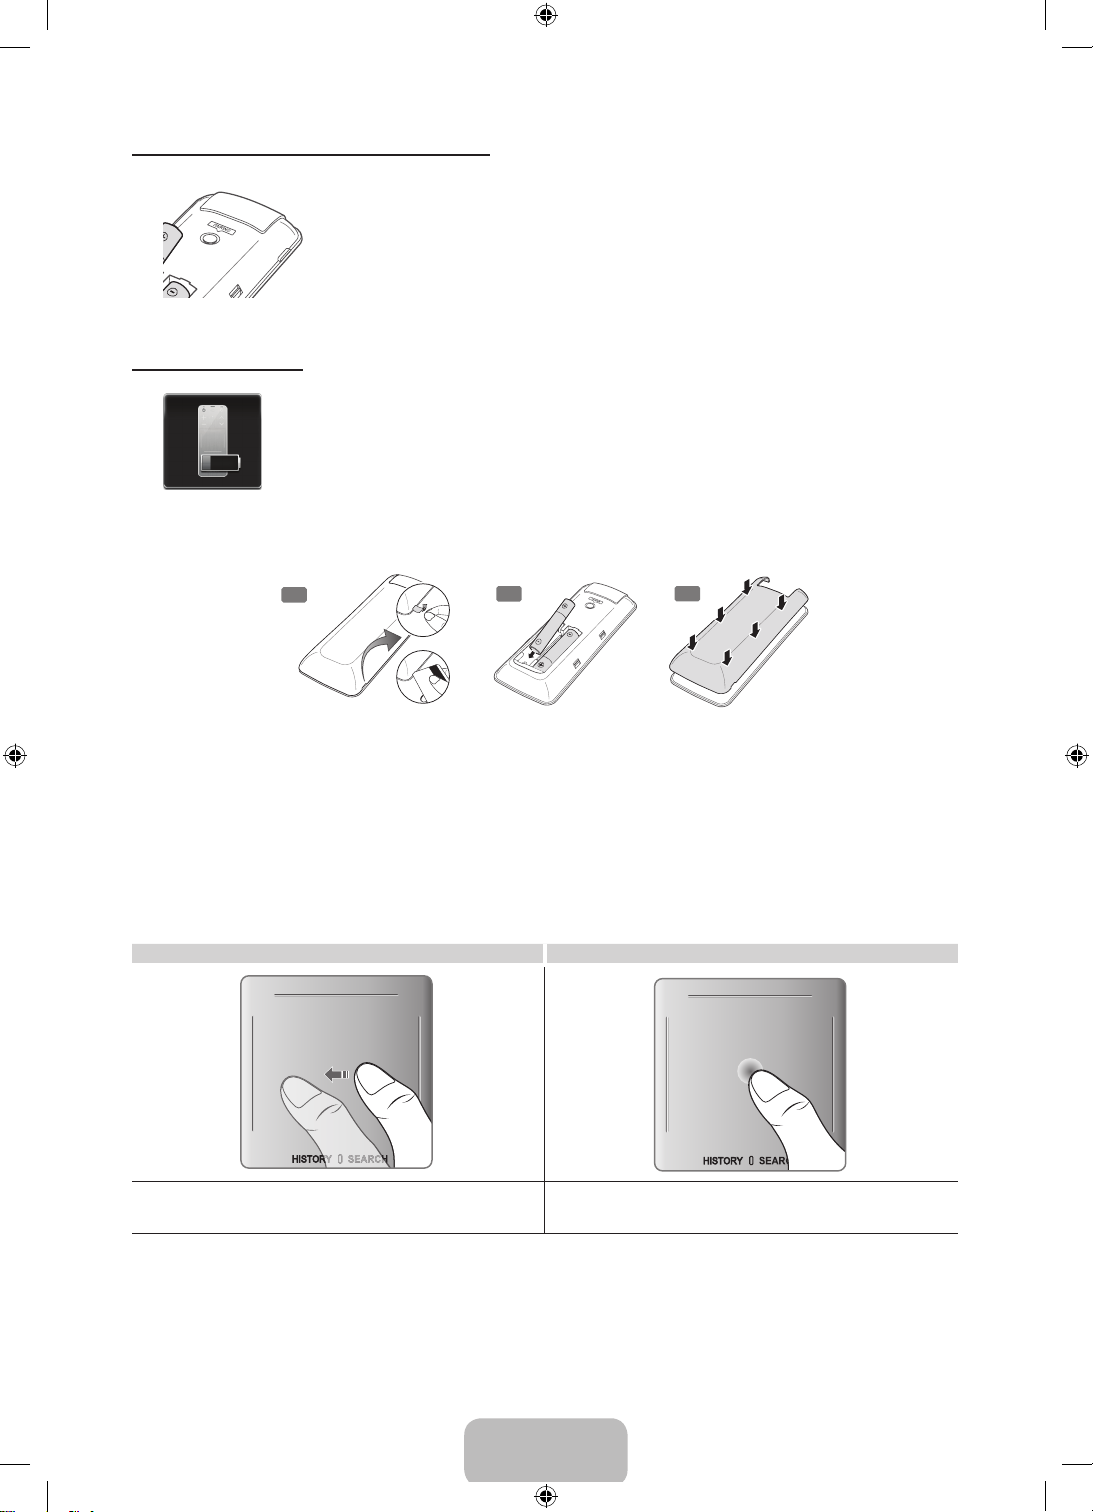
Inserting the Batteries (AAA X 2)
1
2
3
1. Slightly lift the battery cover by pulling the strap or using a plastic card. Next, pull on the cover’s notch with a
fingernail to remove the cover completely.
2. Insert 2 AAA batteries, making sure to align the positive and negative ends correctly.
3. Align the battery cover with the back of the remote control and press down along the edges until it is cleanly
attached to the remote control.
Using the touchpad
Use the touchpad to perform various commands. Navigate to Tutorial (Screen Menu > System > Device Manager >
Smart Touch Control Settings > Tutorial) to view an on-screen guide to using the Smart Touch Control.
Dragging Press
Drag on the touchpad in the desired direction.
Move the focus or the pointer in the direction the finger is dragging.
Press the touchpad. This selects the focused item.
English - 6
[UF6470-RU]BN68-04779H-X0L4.indb 6 2013-03-09 10:19:05
Page 7
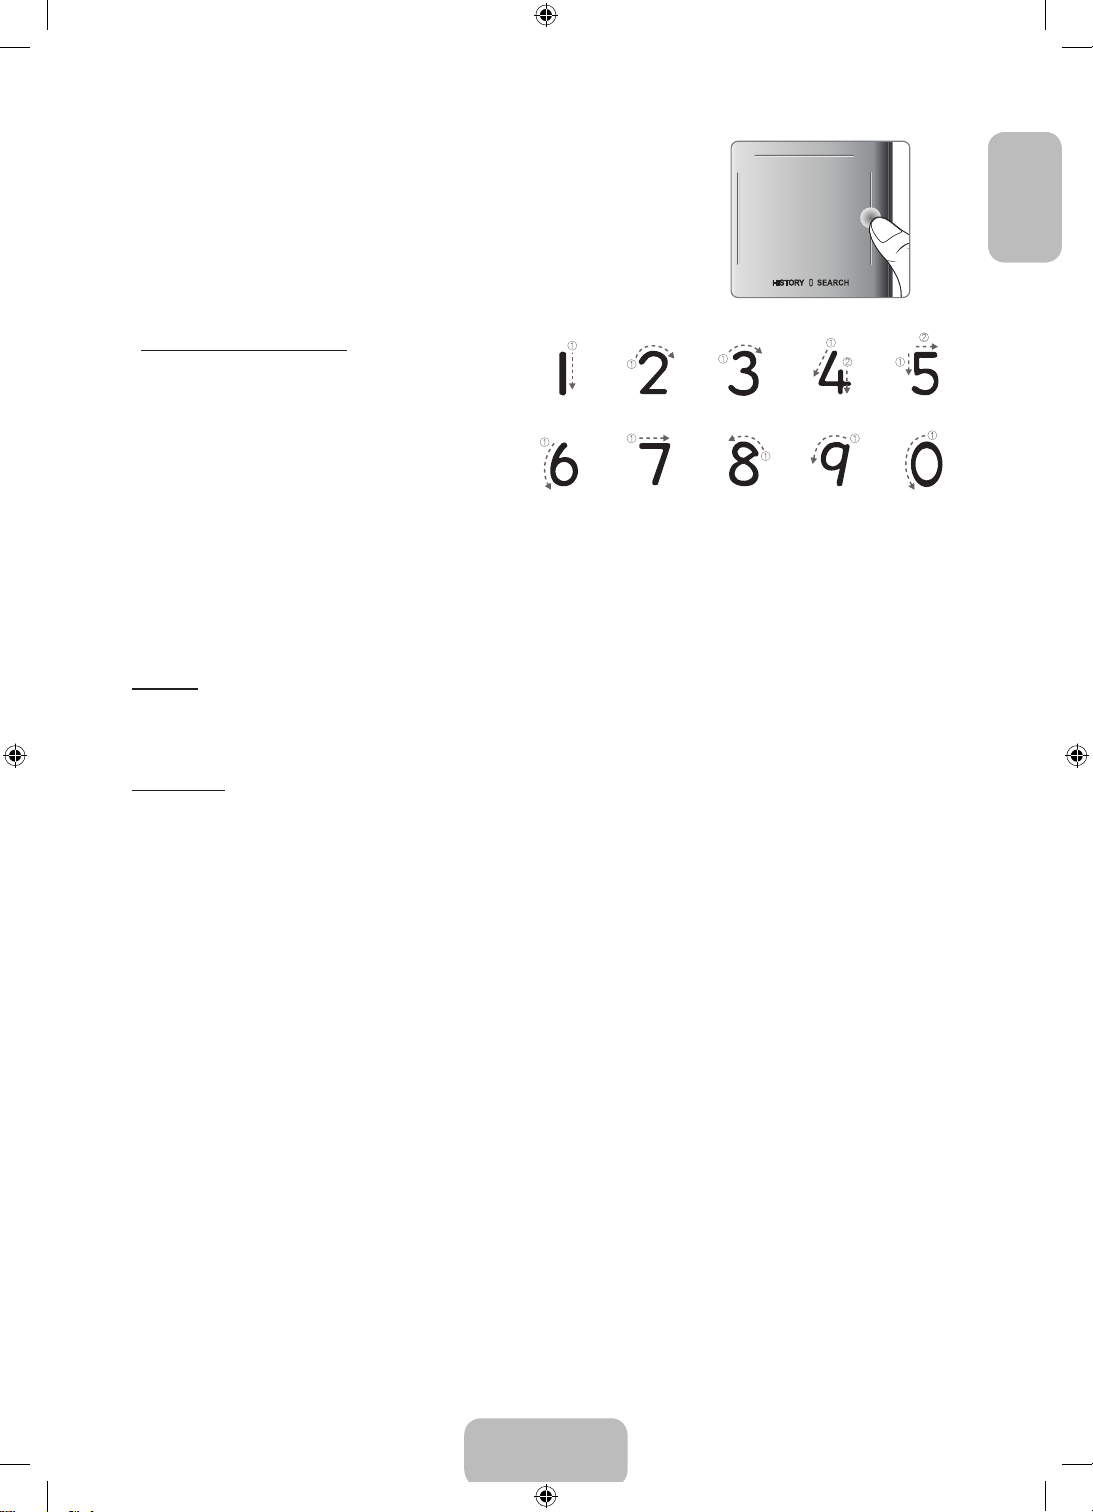
Changing Channels by Entering Numbers
While watching TV, tap on the protruding line on the left or right edge of the touchpad
to bring up the numerical input window on the screen. Use your finger to enter the
number for the channel you want to watch. The recognised number is displayed on
the screen and the TV switches to the corresponding channel. However, the number
you have entered may not be recognised properly by the TV. Refer to the guide below
to ensure that your numerical entries are recognised accurately.
Numerical Input Guide
Refer to the diagrams below when entering numerical
values. The TV may not recognise your entries if you
do not follow the sequences shown below.
Show Status and Notification Banner
Press the MORE button on the Smart Touch Control and then select STATUS on the virtual control panel to display the
status and notification banner at the top of the screen.
History and Searching
History
Press the HISTORY / SEARCH button and then select History from the list displayed at the bottom of the screen. This
displays an interactive list of recently accessed channels, media content and applications.
EnglishEnglish
Searching
Press the HISTORY / SEARCH button twice. Enter search criteria to search not only many apps and their contents on
the TV but also the Web.
Adjusting the Touchpad
Screen Menu > System > Device Manager > Smart Touch Control Settings > Touch Sensitivity
Users can adjust the sensitivity of the Smart Touch Control’s touchpad. Set Touch Sensitivity to adjust sensitivity and
make it more convenient to use.
English - 7
[UF6470-RU]BN68-04779H-X0L4.indb 7 2013-03-09 10:19:06
Page 8
Using the Virtual Remote Control
Press MORE button to display the virtual remote panel on the screen. The virtual remote panel consists of a number
panel, a playback control panel, and a quick access panel. Use the Touch Pad to select numbers and buttons. Press
and hold the MORE button. A quick access panel of virtual remote panel appears. You can select screen buttons easily.
Changing the Virtual Remote Control Panel
Choose the number panel, playback control panel, or quick access panel as the panel to be shown on the screen.
Use the touchpad to keep moving the focus left or right. The panel changes when the focus is moved beyond the
leftmost or rightmost edge.
Use left/right scroll function on the touchpad to change the panel easily.
Using the Number Panel
Use the number panel to enter numbers on a keypad screen or webpage or to change the channel while watching TV.
Changing the channel using the number pad leaves a record, allowing you to easily return to previous channels.
Using the Playback Control Panel
Use the playback control panel to pause, rewind, fast forward, skip to the next file, and much more while enjoying media
content.
Using the Quick Access Panel
Quickly access the INFO, MENU and e-Manual buttons. However, the availability of buttons vary depending on the
operating mode of the Smart Touch Control (with the TV only, as a universal remote, etc.).
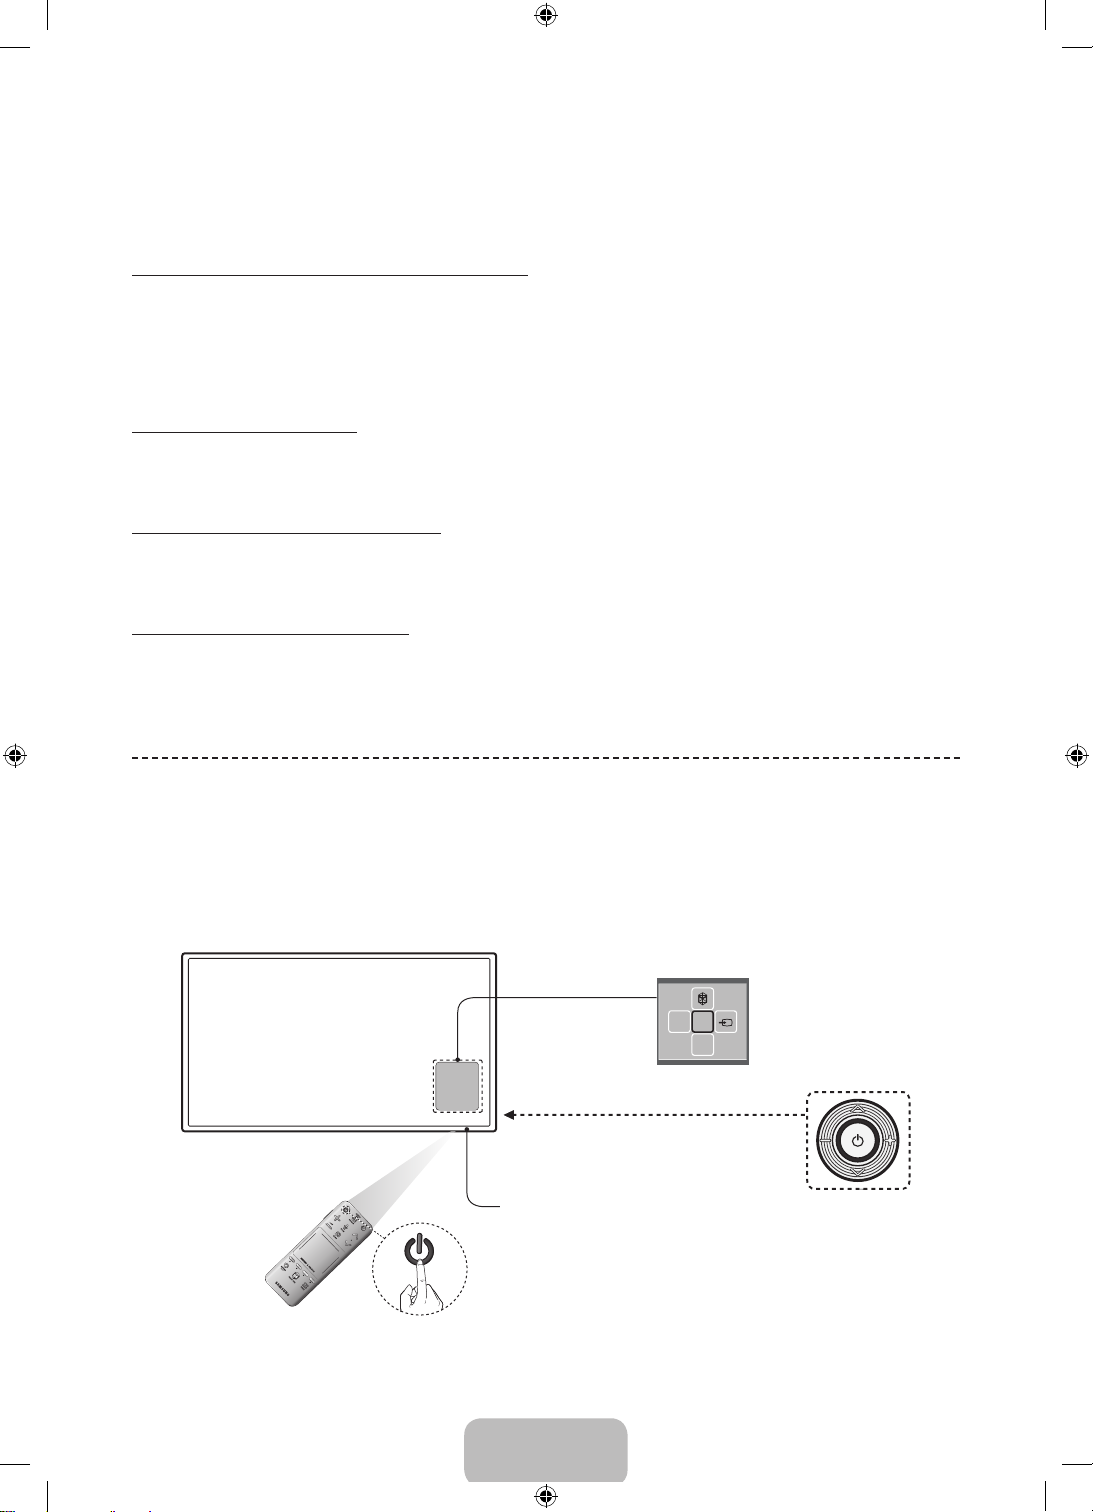
Turning on the TV
Turn on the TV using the P button on the remote control or TV panel.
The product Colour and shape may vary depending on the model.
✎
The TV’s Controller, a small joy stick like button on the rear right side of the TV, lets you control the TV without the
✎
remote control.
Function menu
Remote control sensor
When you use the Smart Touch Control, a standby
LED does not work (except
mR
P
The image is drawn by facing
TV Controller
the front side of the TV.
P
button).
English - 8
[UF6470-RU]BN68-04779H-X0L4.indb 8 2013-03-09 10:19:06
Page 9
SETUP
The initial setup dialog appears when the TV is first activated. Follow the on-screen instructions to finish the initial setup
process, including menu language choice, channel scan, network connection, and more. At each step, either make a
choice or skip the step. Users can manually perform this process at a later time under the Screen Menu > System >
Setup menu.
If you connect any device to HDMI1 before starting the installation, the Channel Source will be changed to
✎
Settop box automatically.
If you do not want to select Set-top box, please select Aerial.
✎
Switching Between Video Sources
Press SOURCE button to switch between devices connected to the TV.
For example, to switch to a game console connected to the second HDMI connector, press SOURCE button. From the
Source list, select HDMI2. The connector names may vary depending on the product. Select Tools button at the upperright corner of the screen to access the following functions.
• Information
View detailed information about the connected devices.
• Edit Name
You can rename devices connected to the TV to more easily identify external sources.
With a computer connected to the TV's HDMI (DVI) port via an HDMI cable, for example, you can change Edit
Name to PC.
With a computer connected to the TV's HDMI (DVI) port via an HDMI-to-DVI cable, for example, you can change
Edit Name to DVI PC.
With an AV device connected to the TV's HDMI (DVI) port via an HDMI-to-DVI cable, for example, you can change
Edit Name to DVI Devices.
EnglishEnglish
• Refresh
Select this if a connected device does not appear in the list. If the list does not show the device after selecting
Refresh, check the status of the TV-to-device connection.
• Disconnect USB Device
Remove the USB device from the list safely. This function is only available when the USB device selected.
• Universal remote setup
To add a new external device to control it with the Touch Remote Control, press the SOURCE button and select
Universal remote setup on the top right of the screen. Using the universal remote control, users can control
external devices connected to the TV, such as a settop box, Blu-ray player, and AV receiver.
English - 9
[UF6470-RU]BN68-04779H-X0L4.indb 9 2013-03-09 10:19:06
Page 10
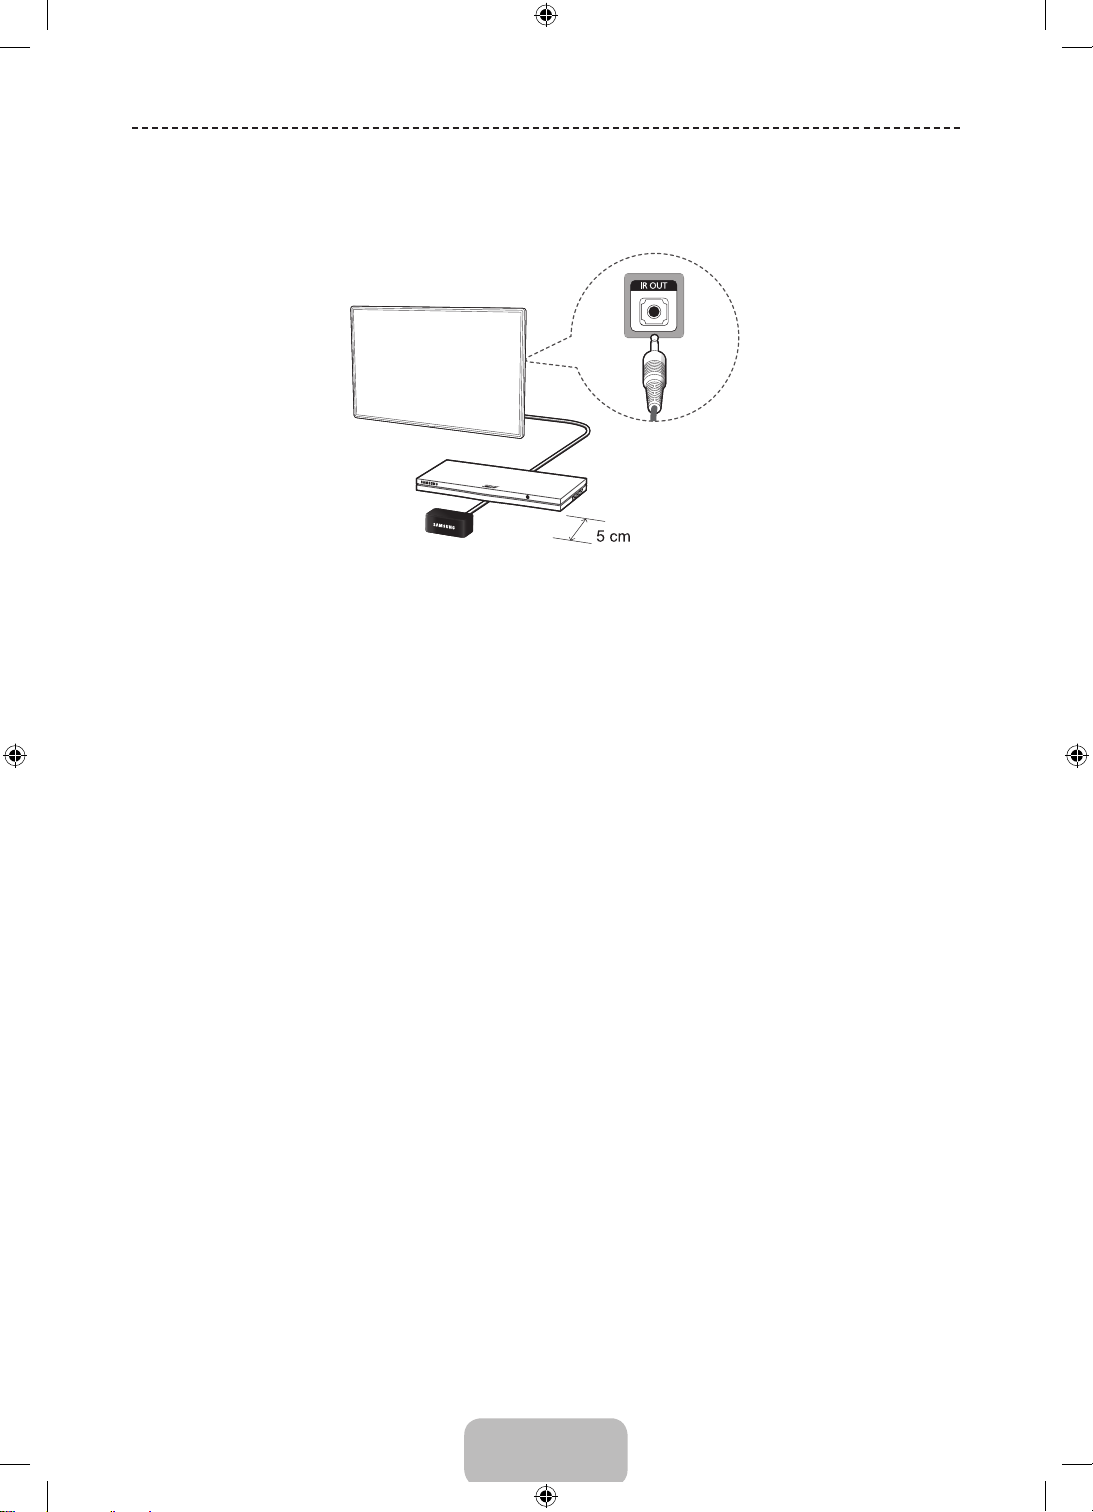
Universal Remote Control Setup
This TV has a universal remote control feature that lets you control cable boxes, Blu-ray players, home theatres, and
other third-party external devices connected to the TV using the TV's remote control.
Keep a distance of 5 cm at least between the IR Extender and the external device, as the illustration shows. Face the
IR Extender toward the external device’s remote control signal receiver. Note that it should be no obstacle between
IR Extender and external device. The presence of an obstacle will interfere with the transmission of the remote control
signal.
Add the External Device
1. Turn on the external device you wish to set up universal remote function for and then press SOURCE to bring up the
Source screen.
2. Select Universal remote setup from the top of the screen. This initiates the universal remote setup process.
3. Follow the on-screen instruction and set up the universal remote control. If it does not work, set up the remote
control by entering the model number manually.
English - 10
[UF6470-RU]BN68-04779H-X0L4.indb 10 2013-03-09 10:19:06
Page 11

Connecting to a COMMON INTERFACE slot (Your TV
viewing Card Slot)
Turn the TV off to connect or disconnect a CI card or CI card adapter.
✎
Attaching the CI Card Adapter
Attach the adapter as shown side.
To install the CI CARD Adapter, please remove the sticker
✎
attached to the TV.
To connect the CI CARD Adapter, follow these steps.
We recommend attaching the adapter before installing the
✎
wall mount, or inserting the “CI or CI+ CARD”.
1. Insert the CI CARD Adapter into the two holes on the product 1.
Please find two holes on the rear of the TV, beside the COMMON INTERFACE port.
✎
2. Connect the CI CARD Adapter into the COMMON INTERFACE port on the product 2.
3. Insert the “CI or CI+ CARD”.
We recommend that you insert the CI card before you mount the TV on a wall. It may be difficult to
insert after mounting. Insert the card after attaching the CI Card Adapter on TV. It is difficult to attach
the module if you insert the card before attaching.
Using the “CI or CI+ CARD”
TV Rear
EnglishEnglish
To watch paid channels, the “CI or CI+ CARD” must be inserted.
• If you don’t insert the “CI or CI+ CARD”, some channels will display the
message “Scrambled Signal”.
• The pairing information containing a telephone number, the “CI or CI+
CARD” ID the Host ID and other information will be displayed in about
2~3 minutes. If an error message is displayed, please contact your service
provider.
• When the configuration of channel information has finished, the message
“Updating Completed” is displayed, indicating the channel list is updated.
NOTE
✎
• You must obtain a “CI or CI+ CARD” from a local cable service provider.
• When removing the “CI or CI+ CARD”, carefully pull it out with your hands since dropping the “CI or CI+ CARD”
may cause damage to it.
• Insert the “CI or CI+ CARD” in the direction marked on the card.
• The location of the COMMON INTERFACE slot may be different depending on the model.
• “CI or CI+ CARD” is not supported in some countries and regions; check with your authorized dealer.
• If you have any problems, please contact a service provider.
• Insert the “CI or CI+ CARD” that supports the current aerial settings. The screen will be distorted or will not be
seen.
English - 11
[UF6470-RU]BN68-04779H-X0L4.indb 11 2013-03-09 10:19:07
Page 12
Viewing the e-Manual
The embedded e-Manual contains information about your TV's key features.
This TV has a built-in user guide. To read it, use one of the following methods:
• Open the Support menu and choose e-Manual (Troubleshooting).
• Press the MORE button on the Smart Touch Control to display control buttons on the screen. Flick the Touch Pad
until e-Manual appears and select it.
Words in blue refer to screen menu options and words in light blue refer to remote control buttons.
✎
A printable version of this guide is also available at www.samsung.com/support.
✎
Scrolling a Page
To scroll a page, use of one of the following methods:
• Press the
• Drag or flick up or down the line on either the left or right edge of the touchpad.
or button on the scroll bar at the right edge of the screen.
• Place the focus on the
or button at the right edge of the screen, drag or flick up or down on the touchpad.
Using the Top Icons.
Use the Back, Forward, and Opened pages icons on the top left of the screen to navigate through pages. These icons
are available when two or more pages are passed.
Returning to the Home Page
To return to the home page, press the a button or select on the top right of the screen.
Searching the Index
Press the b button or select on the top right of the screen to display the index. Select a term to display the page
containing the term.
Searching Pages
Press the { button or select on the top of the screen to access the search screen. Enter a search phrase and select
Done. Select an item from the search results list to navigate to the relevant page.
Closing the e-Manual
To close the e-Manual, press and hold the RETURN button or select at the upper-right corner of the screen.
Jumping to a Menu Item
To directly jump to the menu item that is described in the current section, select . It is possible to jump from a
menu item directly to the related section in the e-Manual. If you want to read an e-Manual entry on a specific screen
menu feature, press the Virtual Remote panel's e-Manual to load the corresponding e-Manual page.
This feature may not be available, depending on the menu.
✎
English - 12
[UF6470-RU]BN68-04779H-X0L4.indb 12 2013-03-09 10:19:08
Page 13
Network Configuration
Updating the e-Manual
Open the Smart Hub and select Apps, and then select More Apps. The e-manual can be updated in the same way
with an application update.
On the More Apps screen, select Apps to update. Select e-Manual from the list. The e-Manual starts updating to the
latest version. However, Apps to update appears on the screen only when the update is required.
Connecting to a Network
Connecting the Smart TV to a network gives you access to online services such as the Smart Hub, as well as software
updates.
Network Connection - Wireless
Connect the TV to the Internet using a standard router or modem.
Wireless IP Router or Modem
that has a DHCP Server
The LAN Port on the Wall
EnglishEnglish
LAN Cable (Not Supplied)
Wireless Network Precautions
• This Smart TV supports the IEEE 802.11a/b/g /n communication protocols. Samsung recommends using IEEE
802.11n. Otherwise when you play video over a network connection, the video may not play smoothly.
• To use a wireless network, the TV must be connected to a wireless router or modem. If the wireless router supports
DHCP, the TV can use a DHCP or static IP address to connect to the wireless network.
• Select a channel that is not currently in use for the wireless router. If the channel set for the wireless router is
currently being used by another device, the result is usually interference and/or a communications failure.
• Most wireless networks have an optional security system. To enable a wireless network's security system, you need
to create a security key using characters and numbers. This security key is then needed to connect to the wireless
network.
English - 13
[UF6470-RU]BN68-04779H-X0L4.indb 13 2013-03-09 10:19:09
Page 14
Network Security Protocols
The TV only supports the following wireless network security protocols and is unable to connect to non-certified wireless
routers:
• Authentication Modes: WEP, WPAPSK, WPA2PSK
• Encryption Types: WEP, TKIP, AES
If the wireless router has been set to Pure High-throughput (Greenfield) 802.11n mode and the Encryption Type to
WEP or TKIP, Samsung Smart TVs will not support the connection in compliance with the new Wi-Fi certification
specifications.
If the wireless router supports WPS (Wi-Fi Protected Setup), it is possible to connect to the network using PBC (Push
Button Configuration) or a PIN (Personal Identification Number). WPS automatically configures the SSID and WPA key
settings.
Network Connection - Wired
There are three main ways to connect your TV to your network using cable, depending on your network setup. They are
illustrated starting below:
TV Rear Panel
The Modem Port on the Wall
Modem Cable (Not Supplied) LAN Cable (Not Supplied)
External Modem
(ADSL / VDSL / Cable TV)
The Modem Port on the Wall
Modem Cable
(Not Supplied)
The LAN Port on the Wall
The TV does not support network speeds less than or equal to 10Mbps.
✎
Use Cat 7 cable for the connection.
✎
External Modem
(ADSL / VDSL / Cable TV)
LAN Cable
(Not Supplied)
LAN Cable (Not Supplied)
IP Router that has a
DHCP Server
TV Rear Panel
LAN Cable
(Not Supplied)
TV Rear Panel
English - 14
[UF6470-RU]BN68-04779H-X0L4.indb 14 2013-03-09 10:19:09
Page 15

3D Basics
3D Active Glasses
This feature is only available on 40 inch model and
✎
higher.
Features
Samsung's SSG-5100GB 3D glasses enable you to view
3D images on your 3D TV. The Samsung 3D glasses
communicate with Samsung 3D TVs via the 2.4GHz RF
band.
The Samsung 3D glasses are only compatible with
✎
Samsung D, E, and F series 3D TV's that were
released in 2011, 2012, and 2013. These 3D glasses
cannot be connected to other Bluetooth devices.
Parts
LED Indicator & Power Button
Battery Cover
For details on how to attach the glass temples and how
to pair the glasses with the TV, refer to the separate 3D
glasses manual.
Liquid crystal shutter
Pairing 3D Active Glasses
What is Pairing? Pairing is the process of connecting
✎
3D glasses and a 3D TV so that the two devices can
exchange data.
Ensure your Samsung TV and 3D glasses are no
✎
farther than 19.5 in (50 cm) apart from each other
while pairing is in progress.
• Turning the glasses on
Press the power
button briefly. The
green LED is turned
on for 3 seconds.
(Make sure that 3D is
activated on the TV
before using the 3D
glasses.)
• Turning the glasses off
Press the power button briefly. The red LED is turned
on for 3 seconds.
• Performing the pairing process
Turn the TV on and let it power up completely. Press
and hold the Power button on the glasses. The green
and the red LEDs blink alternately for 2 seconds.
• Operating range
EnglishEnglish
Replacing the Battery
If the red LED blinks every two seconds continually,
replace the battery with a new one.
Insert the "+" side of the battery into the side marked
✎
with "+" in the battery compartment.
To check the remaining battery capacity, refer to the
✎
pairing section in this manual.
Pull the battery cover
downward
Replace the battery Push the battery cover
Open the battery cover Remove the battery
Close the battery cover
downward
Recommended pairing distance
Recommended viewing distance
Recommended viewing distance
Recommended pairing distance
Once the 3D glasses are paired, the remaining
✎
battery capacity is displayed on the TV screen. (This
feature only applies to Samsung F series 3D TVs and
3D glasses that have been available since 2013.)
If you keep trying to pair the glasses and the TV, the
✎
battery level will decrease significantly. However, the
battery level will recover to a certain degree in about
a minute.
2~6m (6.5 to 19.5 ft)
50 cm or less (19.5 in)
English - 15
[UF6470-RU]BN68-04779H-X0L4.indb 15 2013-03-09 10:19:10
Page 16
The working distance depends on the existence of
✎
obstacles (a person, metal, walls, etc.) between the
glasses and the TV and the strength the Bluetooth
signal.
Turn off the 3D glasses while they are not in use. If
✎
you leave the 3D glasses on, the battery lifespan
decreases.
Pairing steps
Pairing is needed again in the following situations:
• If the 3D glasses do not function, even when the
power button is pressed, especially with a 3D TV
after a repair.
• If you want to play 3D content on another
Samsung 3D TV model that belongs to the D, E,
or F series released in 2011 through 2013. You
must pair the glasses with the other TV.
1. Turn on the TV, and then move the glasses within
19.5 inches of the TV.
2. Press the power button on the 3D glasses briefly. The
3D glasses will power on and pairing will start.
3. The message “3D glasses are connected to TV.” will
be displayed on the TV screen when the pairing is
successfully completed.
• If pairing fails, the 3D glasses will power off.
• If the first attempt to pair fails, power the TV off
and on again and perform step 2.
• How to pair again: Press the power button on the
3D glasses for more than 1 second.
Watching 3D Video
Some 3D modes may not be available depending on the
format of the image source.
To watch in 3D, you must wear 3D Active Glasses and
turn the glasses on by pressing the power button.
1. Go to the 3D screen. (Picture > 3D)
2. Select the 3D Mode. The 3D Mode screen appears.
3. Set the 3D Mode of the image you want to view.
Troubleshooting
If you encounter... Try this...
Replace the battery.
My 3D glasses do not work.
The LED keeps blinking The battery is dead. Replace the battery.
The 3D glasses should be close to the TV. Make sure that the distance between
the TV and your 3D glasses is less than 19.5 feet (6m) in a straight line.
Check the 3D function settings of your TV.
Specifications (Model Number: SSG-5100GB )
Shutters Liquid crystal Transmittance 36±2%
Optics
Weight Glasses 21.5 g/.76 oz. (including the battery: 24.0±0.5 g/.85.±.018oz. )
Power Glasses One 3 V lithium/manganese dioxide battery 3 V(CR2025)
Power
consumption
Operating
conditions
Product specifications may be changed without notice in order to enhance product performance.
✎
The continuous operating time may differ depending on the wireless communication environment and
✎
Recommended
operating
distance
Glasses 0.85 mA (Average)
Battery
Operating
temperature
Custody
temperature
2 ~ 6 m (6.5 to 19.5 ft) Field Rate 120 fields/second
Type 165mAh, 3.0 V (CR2025)
Operating time 150 hours
50 °F ~ 104 °F (10°C ~ 40°C)
-4 °F ~ 113 °F (-20°C ~ 45°C)
usage conditions.
English - 16
[UF6470-RU]BN68-04779H-X0L4.indb 16 2013-03-09 10:19:10
Page 17
Recommendation - EU Only
Hereby, Samsung Electronics, declares that this 3D Active Glasses is in compliance with the essential requirements and
other relevant provisions of Directive 1999/5/EC.
This equipment may be operated in all EU countries.
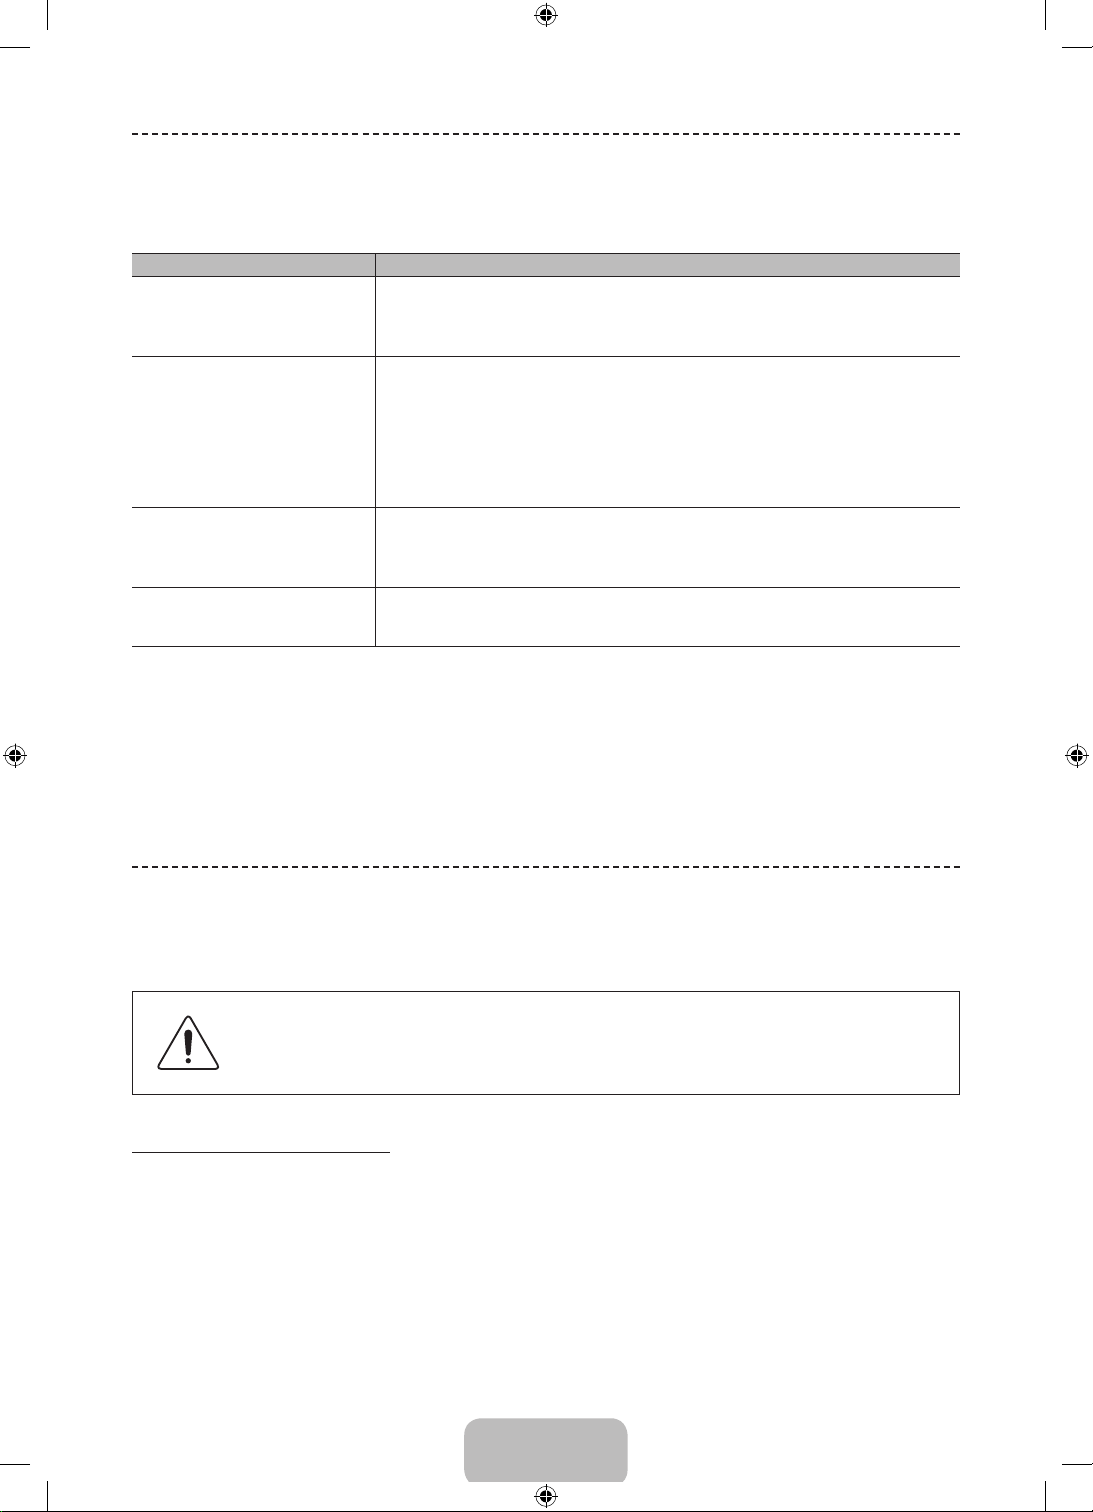
What is Remote Support?
Samsung Remote Support service offers you one-on-one support with a Samsung Technician who can remotely.
• Diagnose your TV
• Adjust the TV settings for you
• Perform a factory reset your TV
• Install recommended firmware updates
How Does it Work?
Having a Samsung Tech remotely service your TV is really pretty simple
EnglishEnglish
1. Call Samsung
Contact Centre and
ask for remote support.
2. Open the menu on
your TV and go to the
Support section.
3. Select Remote
Management and
Provide the Pin# to
the agent.
4. The agent will then
access your TV.
That's it!
Password Change
Screen Menu > System > Change PIN
Change the TV's password.
1. Run Change PIN and then enter the current password in the password field. The default password is 0000.
2. Enter a new password and then enter it again to confirm it. The password change is complete.
If you forget the PIN code, press the buttons in the following sequence which resets the PIN to “0-0-0-0”:
✎
When the T V turnes on: MUTE → Volume up → RETURN → Volume down → RETURN → Volume up →
✎
RETURN.
English - 17
[UF6470-RU]BN68-04779H-X0L4.indb 17 2013-03-09 10:19:10
Page 18
Troubleshooting and Other Information
Troubleshooting
If you have any questions about the TV, first refer to this list. If none of these troubleshooting tips apply, please visit
“www.samsung.com,” then click on Support, or contact the call centre listed on the back-cover of this manual.
Issues Solutions and Explanations
The TV won’t turn on. • Make sure the AC power cord is securely plugged in to the wall outlet and the TV.
There is no picture/video. • Check the cable connections. Remove and reconnect all cables connected to the TV and external
The remote control does not work. • Replace the remote control batteries. Make sure the batteries are installed with their poles (+/–) in the
The cable/set top box remote control
doesn’t turn the TV on or off or adjust the
volume.
• Make sure the wall outlet is working.
• Try pressing the
refer to “Remote control does not work” below.
devices.
• Set the video outputs of your external devices (Cable/Sat Box, DVD, Blu-ray etc) to match the TV's
input connections. For example, if an external device’s output is HDMI, it should be connected to an
HDMI input on the TV.
• Make sure your connected devices are powered on.
• Be sure to select the correct input source.
• Reboot the connected device by unplugging it, and then reconnecting the device’s power cable.
correct direction.
• Clean the sensor’s transmission window on the remote.
• Try pointing the remote directly at the TV from 5~6 feet away.
• Programme the Cable/Set remote control to operate the TV. Refer to the Cable/Set-Top-Box user
manual for the SAMSUNG TV code.
P
button on the TV to make sure the problem is not the remote. If the TV turns on,
This TFT LED panel uses a panel consisting of sub pixels which require sophisticated technology to produce.
✎
There may be, however, be a few bright or dark pixels on the screen. These pixels will have no impact on the
performance of the product.
To keep your TV in optimum condition, upgrade to the latest firmware on the Samsung web site by USB
✎
(Samsung.com > Support > Downloads).
Some of above pictures and functions are available at specific models only.
✎
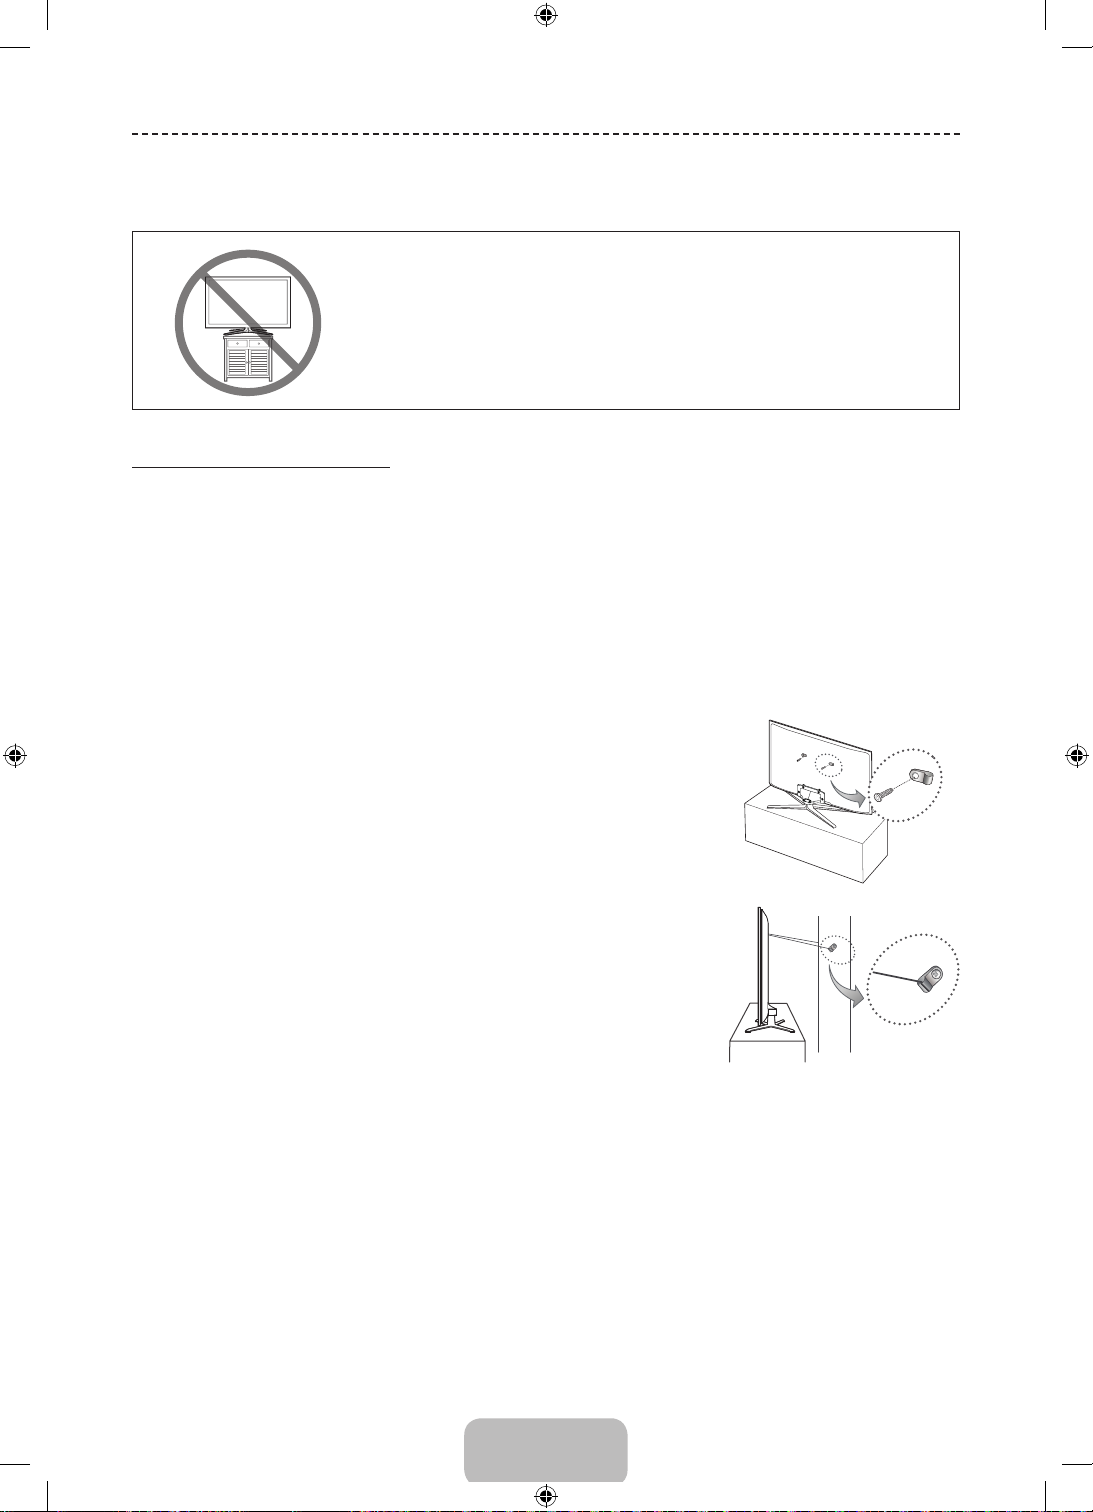
Mounting the TV on the Wall Using the Wall Mount Kit
(Optional)
Wall or Ceiling Mounting
If you mount this product on a wall, it should be mounted only as recommended by the manufacturer.
Unless it is correctly mounted, the product may slide or fall, causing serious injury to a child or adult,
and serious damage to the product.
Installing the Wall Mount Kit
The wall mount kit (sold separately) lets you mount the TV on the wall.
For detailed information about installing the wall mount, see the instructions provided with the wall mount. We
recommend you contact a technician for assistance when installing the wall mount bracket. We do not advise you to do
it yourself. Samsung Electronics is not responsible for any damage to the product or injury to yourself or others if you
elect to install the wall mount on your own.
English - 18
[UF6470-RU]BN68-04779H-X0L4.indb 18 2013-03-09 10:19:11
Page 19
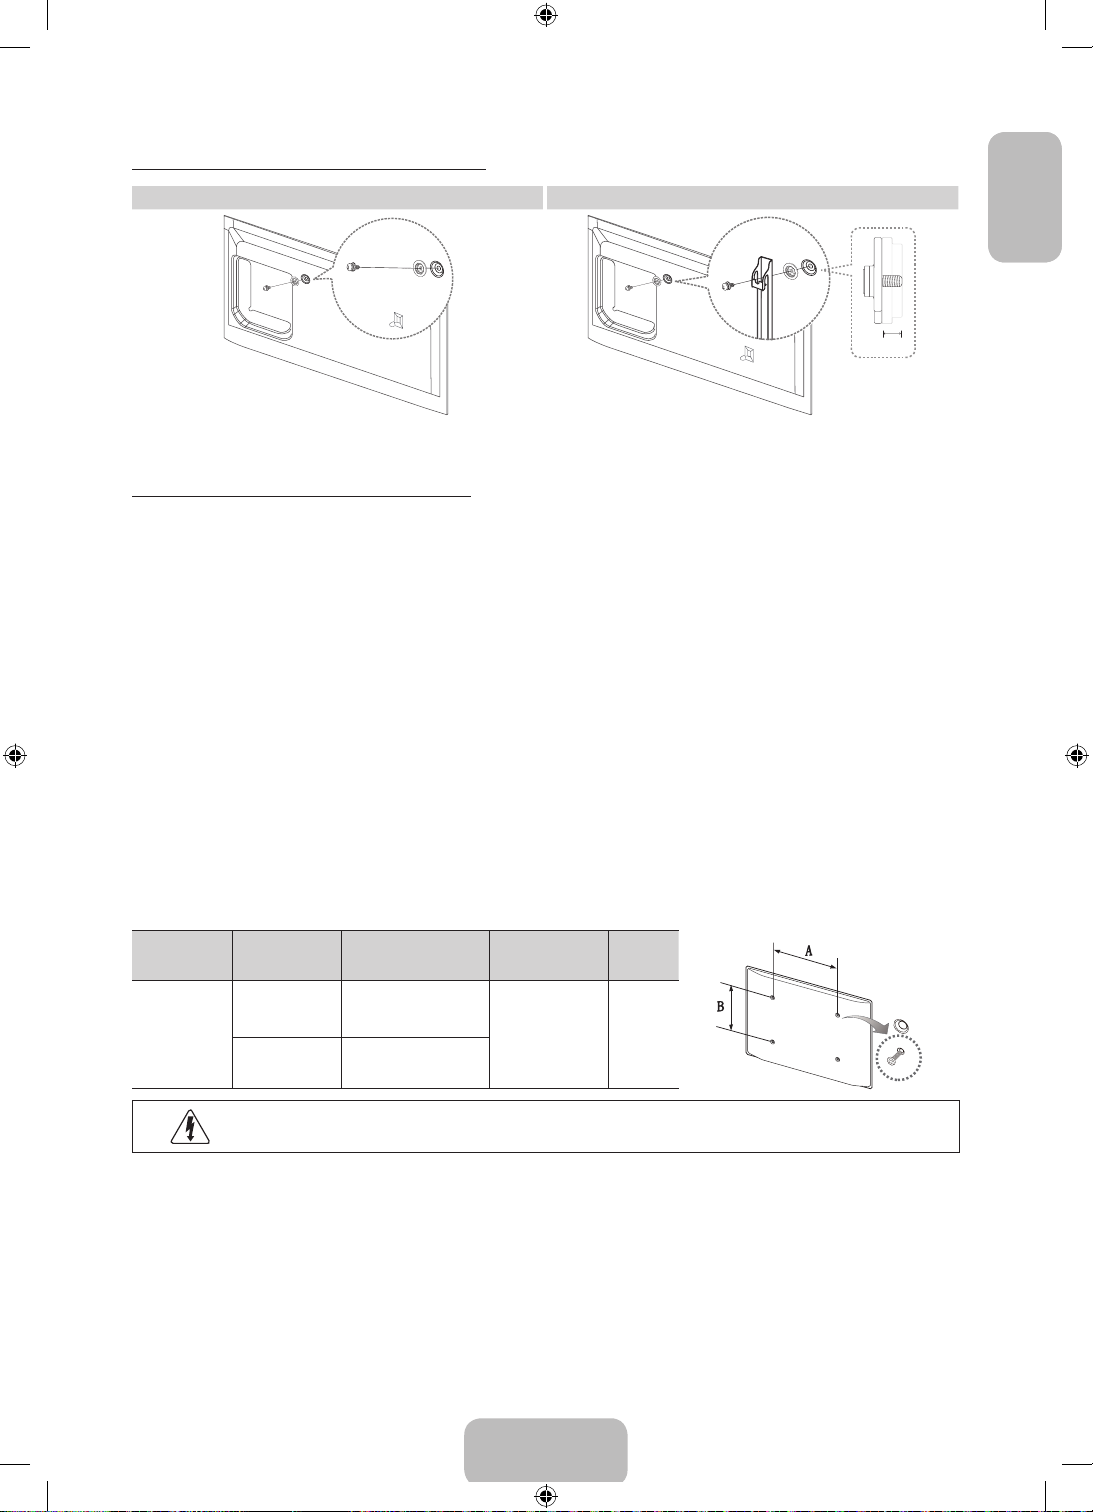
Preparing before installing Wall-Mount
Case A. Installing the SAMSUNG Wall-Mount Case B. Installing another company’s Wall-Mount
EnglishEnglish
1
1
8.6 mm
To install a wall-mount, use the Holder-Ring 1.
Wall Mount Kit Specifications (VESA)
The wall mount kit is not supplied, but sold separately. Install your wall mount on a solid wall perpendicular to the
✎
floor. When attaching to other building materials, please contact your nearest dealer. If installed on a ceiling or
slanted wall, it may fall and result in severe personal injury.
NOTE
✎
− Standard dimensions for wall mount kits are shown in the table below.
− When purchasing our wall mount kit, a detailed installation manual and all parts necessary for assembly are
provided.
− Do not use screws that do not comply with the VESA standard screw specifications.
− Do not use screws that are longer than the standard dimension or do not comply with the VESA standard screw
specifications. Screws that are too long may cause damage to the inside of the TV set.
− For wall mounts that do not comply with the VESA standard screw specifications, the length of the screws may
differ depending on the wall mount specifications.
− Do not fasten the screws that are too strongly; this may damage the product or cause the product to fall,
leading to personal injury. Samsung is not liable for these kinds of accidents.
− Samsung is not liable for product damage or personal injury when a non-VESA or non-specified wall mount is
used or the consumer fails to follow the product installation instructions.
− Do not mount the TV at more than a 15 degree tilt.
Product
Family
LED-TV
Inch VESA Spec.(A * B) Standard Screw Quantity
32 ~ 40 200 x 200
M8 4
46 ~ 55 400 x 400
Do not install your Wall Mount Kit while your TV is turned on. It may result in personal injury due to
electric shock.
English - 19
[UF6470-RU]BN68-04779H-X0L4.indb 19 2013-03-09 10:19:11
Page 20
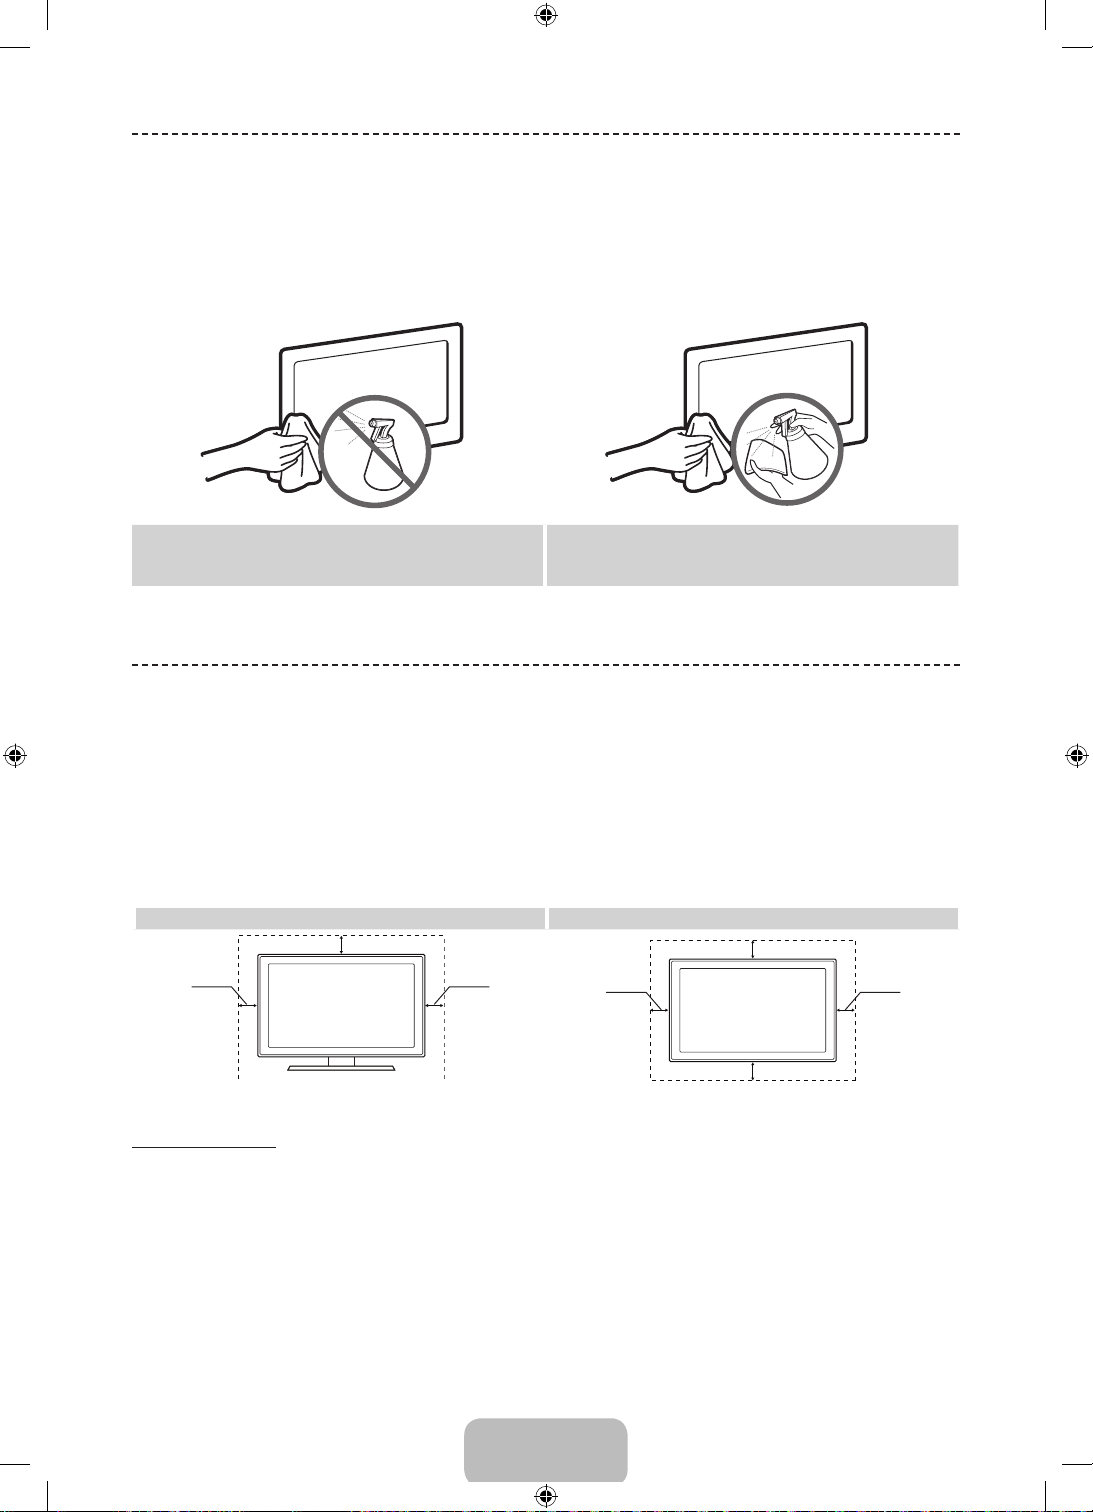
Storage and Maintenance
If a sticker was attached to the TV screen, some debris can remain after you remove the sticker. Please clean the
✎
debris of f before watching TV.
The exterior and screen of the product can get scratched during cleaning. Be sure to wipe the exterior and screen
✎
carefully using the cloth provided or a soft cloth to prevent scratches.
Do not spray water directly onto the product. Any liquid
that goes into the product may cause a failure, fire, or
electric shock.
Clean the product with a soft cloth dampened with a
small amount of water. Do not use a flammable liquid (e.g.
benzene, thinners) or a cleaning agent.
Providing Proper Ventilation for Your TV
When you install your TV, maintain a distance of at least 4 inches between the TV and other objects (walls, cabinet sides,
etc.) to ensure proper ventilation. Failing to maintain proper ventilation may result in a fire or a problem with the product
caused by an increase in its internal temperature.
Whether you install your TV using a stand or a wall-mount, we strongly recommend you use parts provided by
✎
Samsung Electronics only.
• If you use parts provided by another manufacturer, it may cause difficulties with the product or result in injury
caused by the product falling.
Installation with a stand. Installation with a wall-mount.
10 cm
10 cm
10 cm
10 cm
10 cm
10 cm
10 cm
Other Warnings
The actual appearance of the TV may differ from the images in this manual, depending on the model.
✎
Be careful when you touch the TV. Some parts can be somewhat hot.
✎
English - 20
[UF6470-RU]BN68-04779H-X0L4.indb 20 2013-03-09 10:19:12
Page 21
Assembling the Holder-Wire stand
Eco Sensor and Screen Brightness
EnglishEnglish
Eco Sensor measures the light in your room and optimizes the brightness of the TV automatically to reduce power
consumption. This causes the TV to brighten and dim automatically. If you want to turn this function off, go to Screen
Menu > System > Eco Solution > Eco Sensor
Do not block the sensor with any material. It can decrease picture brightness.
1. Eco Sensor: This power-saving feature automatically adjusts the screen brightness of the TV according to the
ambient light intensity detected by the Light Sensor.
2. To enable or disable Eco Sensor, go to Screen Menu > System > Eco Solution > Eco Sensor and select On or
Off.
3. Precaution: If you find the screen too dark while watching the TV in a dark area, this may be caused by the Eco
Sensor.
English - 21
[UF6470-RU]BN68-04779H-X0L4.indb 21 2013-03-09 10:19:13
Page 22
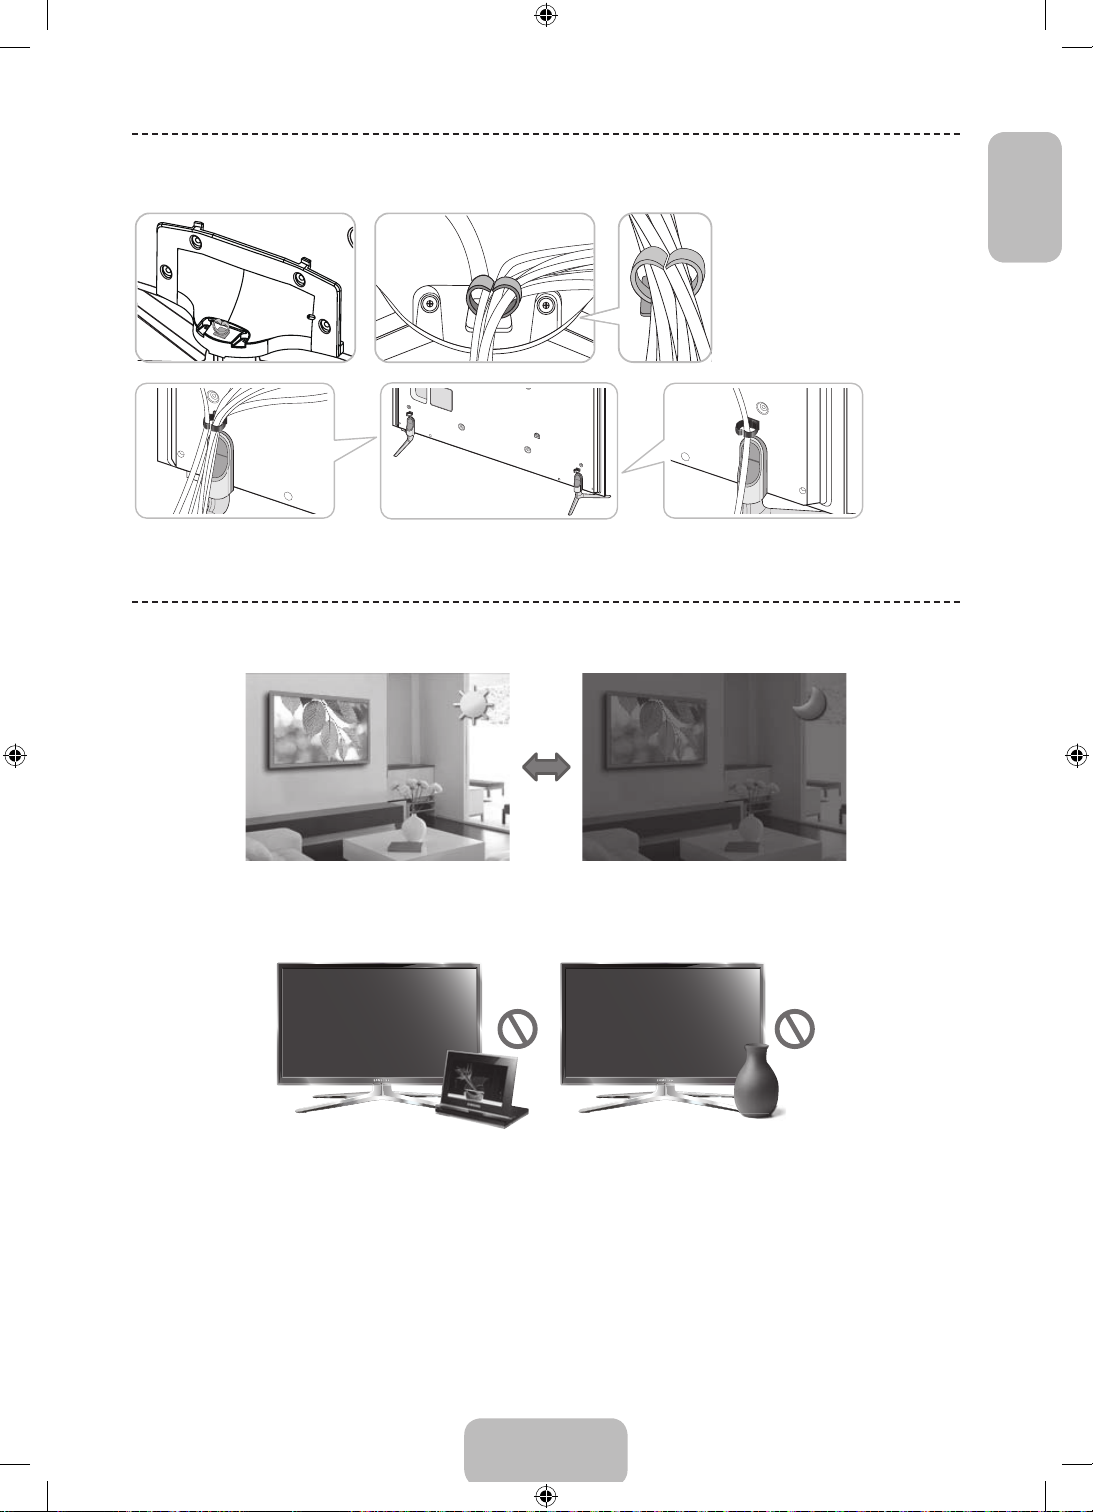
Tip Prevention – Securing the TV to the Wall
Caution: Pulling, pushing, or climbing on the TV may cause the TV to fall. In
particular, ensure your children do not hang on or destabilize the TV. Doing so
may cause the TV to tip over, causing serious injuries or death. Follow all safety
precautions provided in the Safety Flyer included with your TV. For added stability
and safety, you can purchase and install the anti-fall device as described below.
To Avoid the TV from Falling
1. Put the screws into the clamps and firmly fasten them onto the wall. Confirm that the screws have been firmly
installed onto the wall.
You may need additional material such as an anchor depending on the type of wall.
✎
Since the necessary clamps, screws, and string are not supplied, please purchase these additionally.
✎
2. Remove the screws from the back centre of the TV, put the screws into the clamps, and then fasten the screws onto
the TV again.
Screws may not be supplied with the product. In this case, please purchase the screws of the following
✎
specifications.
Screw Specifications
✎
• For a 32 ~ 55 inches: M8
3. Connect the clamps fixed onto the TV and the clamps fixed onto the wall with
a strong cable and then tie the string tightly.
NOTE
✎
− Install the TV near to the wall so that it does not fall backwards.
− It is safe to connect the string so that the clamps fixed on the wall are
equal to or lower than the clamps fixed on the TV.
− Untie the string before moving the TV.
4. Verify all connections are properly secured. Periodically check the connections
for any sign of fatigue or failure. If you have any doubt about the security of
your connections, contact a professional installer.
Wall
English - 22
[UF6470-RU]BN68-04779H-X0L4.indb 22 2013-03-09 10:19:13
Page 23

Specifications
Specifications - TV
Display Resolution 1920 x 1080
Environmental Considerations
Operating Temperature
Operating Humidity
Storage Temperature
Storage Humidity
Stand Swivel (Left / Right) -20˚ ~ 20˚
Sound
(Output)
Model Name UE32F6510A / UE32F6510S UE40F6510A / UE40F6510S
Screen Size
(Diagonal)
Dimensions (W x H x D)
Body
With stand
Weight
Without Stand
With Stand
Model Name UE46F6510A / UE46F6510S UE55F6510A / UE55F6510S
Screen Size
(Diagonal)
Dimensions (W x H x D)
Body
With stand
Weight
Without Stand
With Stand
Model Name UE32F6540A UE40F6500A / UE40F6500S / UE40F6540A /
Screen Size
(Diagonal)
Dimensions (W x H x D)
Body
With stand
Weight
Without Stand
With Stand
Model Name UE46F6500A / UE46F6500S /
Screen Size
(Diagonal)
Dimensions (W x H x D)
Body
With stand
Weight
Without Stand
With Stand
UE46F6540A / UE46F6650A
1042.4 x 608.5 x 47.0 mm
1042.4 x 682.4 x 307.2 mm
32 inches 40 inches
742.0 x 442.3 x 49.5 mm
742.0 x 512.1 x 265.0 mm
5.7 kg
6.7 kg
46 inches 55 inches
1043.6 x 606.8 x 47.0 mm
1043.6 x 682.2 x 307.3 mm
11.3 kg
12.9 kg
32 inches 40 inches
742.0 x 442.3 x 49.5 mm
742.0 x 512.1 x 265.0 mm
5.7 kg
6.7 kg
46 inches 50 inches 55 inches
11.1 kg
12.7 kg
10°C to 40°C (50°F to 104°F)
10% to 80%, non-condensing
-20°C to 45°C (-4°F to 113°F)
5% to 95%, non-condensing
10 W X 2
1235.2 x 791.2 x 307.3 mm
UE50F6500A / UE46F6500S /
UE50F6650A
1120.2 x 651.5 x 47.2 mm
1120.2 x 726.2 x 307.2 mm
13.55 kg
15.15 kg
911.2 x 532.4 x 47.0 mm
911.2 x 597.9 x 265.0 mm
8.9 kg
10.0 kg
1235.2 x 714.6 x 47.4 mm
16.5 kg
18.1 kg
UE40F6650A
910.0 x 534.1 x 47.0 mm
910.0 x 597.3 x 265.0 mm
8.7 kg
9.8 kg
UE55F6500A / UE55F6500S /
UE55F6540A / UE55F6650A
1234.0 x 716.3 x 47.2 mm
1234.0 x 790.9 x 307.2 mm
16.4 kg
18.0 kg
EnglishEnglish
English - 23
[UF6470-RU]BN68-04779H-X0L4.indb 23 2013-03-09 10:19:13
Page 24

Display Resolution 1920 x 1080
Environmental Considerations
Operating Temperature
Operating Humidity
Storage Temperature
Storage Humidity
Stand Swivel (Left / Right) 0°
Sound
(Output)
Model Name UE32F6800A / UE32F6800S UE40F6800A / UE40F6800S
Screen Size
(Diagonal)
Dimensions (W x H x D)
Body
With stand
Weight
Without Stand
With Stand
Model Name UE46F6800A / UE46F6800S UE50F6800A / UE50F6800S UE40F6800A / UE40F6800S
Screen Size
(Diagonal)
Dimensions (W x H x D)
Body
With stand
Weight
Without Stand
With Stand
Design and specifications are subject to change without prior notice.
✎
For information about the power supply, and more about power consumption, refer to the label attached to the
✎
1083.6 x 618.7 x 47.0 mm
1092.4 x 680.2 x 265.6 mm
32 inches 40 inches
754.8 x 443.7 x 49.5 mm
754.8 x 492.4 x 186.1 mm
5.7 kg
5.9 kg
46 inches 50 inches 55 inches
11.6 kg
11.9 kg
10°C to 40°C (50°F to 104°F)
10% to 80%, non-condensing
-20°C to 45°C (-4°F to 113°F)
5% to 95%, non-condensing
10 W X 2
950.8 x 594.6 x 201.4 mm
1165.4 x 664.5 x 47.2 mm
1165.4 x 725.0 x 265.6 mm
13.9 kg
14.2 kg
950.8 x 543.9 x 47.0 mm
9.1 kg
9.3 kg
1279.2 x 728.5 x 47.2 mm
1279.2 x 789.0 x 265.6 mm
16.3 kg
16.6 kg
product.
Standby mode
To decrease power consumptionunplug the power cord when you don't use the TV for a long time.
English - 24
[UF6470-RU]BN68-04779H-X0L4.indb 24 2013-03-09 10:19:14
Page 25
Guides
Licences
Recommendation - EU Only
• Hereby, Samsung Electronics, declares that this LED TV is in compliance with the essential requirements and other
relevant provisions of Directive 1999/5/EC.
• The official Declaration of Conformity may be found at http://www.samsung.com, go to Support > Search Product
Support and enter the model name.
• This equipment may only be used indoors.
EnglishEnglish
• This equipment may be operated in all EU countries.
Still image warning
Avoid displaying still images (such as jpeg picture files), still image elements (such as TV channel logos, stock or news
bars at the screen bottom etc.), or programmes in panorama or 4:3 image format on the screen. Constantly displaying
still pictures can cause image burn-in on the LED screen, which will affect image quality. To reduce risk of this effect,
please follow the recommendations below:
• Avoid displaying the same TV channel for long periods.
• Always try to display any image in full screen. Use the TV set’s picture format menu for the best possible match.
• Reduce brightness and contrast to avoid the appearance of after-images.
• Use all TV features designed to reduce image retention and screen burn. Refer to the e-Manual for details.
English - 25
[UF6470-RU]BN68-04779H-X0L4.indb 25 2013-03-09 10:19:14
Page 26
Важные указания по безопасности
Предупреждение! Важные указания по безопасности
(Перед установкой устройства прочтите раздел, соответствующий
имеющейся модели устройства Samsung.)
ВНИМАНИЕ!
ОПАСНОСТЬ ПОРАЖЕНИЯ ЭЛЕКТРИЧЕСКИМ ТОКОМ! НЕ ОТКРЫВАТЬ!
ВНИМАНИЕ! ВО ИЗБЕЖАНИЕ ПОРАЖЕНИЯ ЭЛЕКТРИЧЕСКИМ
ТОКОМ НЕ ОТКРЫВАЙТЕ КРЫШКУ (ИЛИ ЗАДНЮЮ ПАНЕЛЬ)
ИЗДЕЛИЯ. ВНУТРИ ИЗДЕЛИЯ ОТСУТСТВУЮТ ДЕТАЛИ, РЕМОНТ
КОТОРЫХ МОЖЕТ ВЫПОЛНЯТЬ ПОЛЬЗОВАТЕЛЬ. ОБРАТИТЕСЬ К
КВАЛИФИЦИРОВАННОМУ СПЕЦИАЛИСТУ.
• Щели и отверстия в корпусе, а также в задней и нижней части предназначены для обеспечения необходимой вентиляции. Чтобы обеспечить надежную работу
данного аппарата, а также защитить его от перегрева, не перекрывайте эти щели и отверстия.
− Не устанавливайте этот аппарат в изолированном пространстве, например, в книжном шкафу или во встроенной мебели, если не обеспечивается
надлежащая вентиляция.
− Не устанавливайте это устройство вблизи или поверх радиатора, нагревателя или в местах, подверженных воздействию прямых солнечных лучей.
− Не устанавливайте на устройство сосуды с водой (вазы и т.д.), поскольку это может быть связано с риском возгорания или поражения электрическим током.
• Не подвергайте данное устройство воздействию воды и влаги (не размещайте возле ванной, раковины, кухонной мойки или стирального бака, на влажной
поверхности, около бассейна и т.п.). При попадании воды в устройство, отсоедините его от электросети и немедленно обратитесь к авторизованному дилеру.
Перед очисткой убедитесь в том, что шнур питания отключен от розетки.
• В данном устройстве установлены батарейки. В вашей местности могут действовать предписания по надлежащей утилизации батареек с учетом экологических
требований. Для получения информации по утилизации или переработке обратитесь в местные органы власти.
• Не допускайте перегрузки сетевых розеток, адаптеров и удлинительных шнуров, поскольку это может привести к возгоранию или поражению электрическим
током.
• Кабели питания необходимо проложить таким образом, чтобы на них нельзя было случайно наступить или зажать предметами, помещенными на них или рядом с
ними. Следует уделить особое внимание тем местам, в которых шнур соединяется с вилками, электрическими розетками или выходит из устройства.
• Для обеспечения защиты данного устройства от удара молнии или в период длительного хранения в отключенном состоянии отсоединяйте его от сетевой
розетки, а также отсоединяйте кабельную систему. Это обеспечит защиту устройства от удара молнии и скачков напряжения в электросети.
• Прежде чем подсоединять кабель питания переменного тока к разъему адаптера переменного тока, убедитесь в том, что значение напряжения, указанное на
адаптере постоянного тока, соответствует напряжению в местной электросети.
• Ни в коем случае не вставляйте металлические предметы в открытые части на данном устройстве. При этом возникает опасность поражения электрическим
током.
• Во избежание поражения электрическим током не прикасайтесь к внутренним компонентам устройства. Вскрывать устройство разрешается только
квалифицированному специалисту.
• Убедитесь, что шнур питания надежно зафиксирован в розетке. При отключении кабеля питания из электрической розетки тяните за вилку. Не прикасайтесь к
кабелю питания мокрыми руками.
• Если устройство работает неправильно – в особенности, если появились необычные звуки или запах, немедленно отключите его от розетки и обратитесь к
официальному дилеру или в сервисный центр.
• Обязательно отключайте кабель питания от электророзетки, когда телевизор длительное время не используется или Вы уезжаете из дома на продолжительное
время (особенно если в это время дома остаются дети, пожилые люди или лица с ограниченными возможностями).
− Накопившаяся пыль может привести к поражению электрическим током, утечке тока или возгоранию вследствие искрения, нагревания кабеля питания или
нарушения изоляции на нем.
• При установке телевизора в сильно запыленных помещениях, а также в помещениях, подверженных резким колебаниям температуры, воздействию высокой
влажности, химических веществ и в тех случаях, когда планируется круглосуточная эксплуатация устройства (например, в аэропортах, на железнодорожных
вокзалах и т.д.), обязательно обратитесь в авторизованный сервисный центр. В противном случае возможно серьезное повреждение телевизора.
• Используйте только правильно заземленную вилку и розетку.
− Неправильное заземление может привести к поражению электрическим током или повреждению оборудования. (Только для оборудования класса 1.)
• Чтобы отключить устройство от электросети, необходимо извлечь вилку кабеля питания из розетки, соответственно, к ней должен быть обеспечен постоянный
свободный доступ.
• Не позволяйте детям висеть на устройстве.
• Храните принадлежности (батарейки и т.д.) в недоступном для детей месте.
• Не устанавливайте устройство на неустойчивую поверхность, например, непрочную полку, наклонный пол или поверхность, подверженную вибрации.
• Не бросайте устройство и не подвергайте его ударам. При повреждении устройства отсоедините кабель питания и обратитесь в сервисный центр.
• Отсоедините кабель питания от электрической розетки и протрите устройство мягкой сухой тканью. Не используйте какие-либо химические вещества, такие как
воск, бензол, спирт, разбавители, инсектициды, освежители воздуха, смазочные или моющие вещества. Это может привести к повреждению устройства или
стиранию надписей на устройстве.
• Не подвергайте устройство воздействию воды.
• Не бросайте батареи в огонь.
• Не допускайте короткого замыкания или нагревания батарей, не разбирайте их.
• При неправильной замене батареи существует опасность взрыва. Для замены используйте только аналогичные батареи.
• ПРЕДУПРЕЖДЕНИЕ. ВО ИЗБЕЖАНИЕ ВОЗГОРАНИЯ НИКОГДА НЕ РАСПОЛАГАЙТЕ СВЕЧИ ИЛИ ДРУГИЕ ИСТОЧНИКИ ОТКРЫТОГО ОГНЯ
РЯДОМ С ДАННЫМ ИЗДЕЛИЕМ.
Этот символ свидетельствует о том,
что внутри изделия имеется высокое
напряжение. Любой контакт с деталями
внутри изделия представляет опасность.
Этот символ обозначает, что к устройству
прилагается важный документ, касающийся
основных операций и технического
обслуживания.
Русский - 2
[UF6470-RU]BN68-04779H-X0L4.indb 2 2013-03-09 10:19:15
Page 27
Рисунки и иллюстрации в данном руководстве пользователя представлены только для справки. Они могут
отличаться от реального внешнего вида устройства. Конструкция и характеристики изделия могут быть
изменены без предварительного уведомления.
Функции телевизора
• 3D: благодаря этой новой функции изображения можно просматривать в режиме 3D.
• SMART HUB:
Телевизор обеспечивает доступ к службе Smart Hub, превращающей его в универсальный развлекательный
центр для всей семьи. Благодаря Smart Hub пользователи могут просматривать страницы в сети Интернет,
загружать приложения и поддерживать связь с семьей и друзьями через службы социальных сетей. Кроме
того, Вы сможете просматривать фото, видео и прослушивать музыку с внешних устройств хранения.
™ Нажмите для запуска Smart Hub. Выберите службу с помощью значков, отображаемых в верхней части
экрана.
Социальные сети: просматривайте последние видеоролики с YouTube, а также видеоролики друзей и
свои видеоролики в Facebook или Twitter. Вы также можете совершать видеозвонки друзьям, подключив к
телевизору камеру (приобретается отдельно).
Приложения: загружайте и устанавливайте приложения, например, WebBrowser.
Фильмы и телепередачи: приобретите и просматривайте фильмы и телесериалы без использования
отдельного внешнего устройства (зависит от страны).
Фото, видео и музыка: воспроизводите фото, видео и музыкальные файлы с внешнего устройства
хранения.
Русский
• Anynet+ (HDMI-CEC): данная функция позволяет с помощью пульта дистанционного управления для
телевизора управлять всеми подключенными устройствами Samsung, поддерживающими функцию Anynet+.
• e-Manual: подробное руководство пользователя в памяти телевизора, которое можно просматривать на
экране (страница 12).
• Функция SMART Interaction: благодаря этой функции можно получить доступ к параметрам и функциям
меню и управлять ими с помощью жестов. Чтобы воспользоваться функцией Smart Interaction, необходимо
подключить к телевизору ТВ-камеру (продается отдельно).
• Дисп. устройств: управление функциями телевизора при помощи клавиатуры или мышки с поддержкой
USB или Bluetooth.
• Зеркальное отображение экрана: беспроводное отображение содержимого экранов мобильных
устройств на экране телевизора.
Правильная утилизация данного изделия (утилизация электрического и электронного оборудования)
(действует в странах, в которых существует система разделения отходов)
Подобная маркировка на изделии, принадлежностях или в руководстве предупреждает, что по истечении срока службы
изделие или электронные принадлежности (например, зарядное устройство, наушники, кабель USB) не следует выбрасывать
вместе с другим бытовым мусором. Чтобы избежать вредного воздействия на окружающую среду или на здоровье человека
от неконтролируемой утилизации отходов, следует отделять маркированные подобным образом изделия от другого мусора
для соответствующей переработки и повторного использования в качестве сырья.
За подробной информацией о месте и способе экологически безопасной утилизации бытовым потребителям следует
обращаться к продавцу изделия или в органы местного самоуправления.
Промышленным потребителям необходимо обратиться к поставщику и проверить условия договора купли-продажи.
Подобные изделия и электронные принадлежности не следует утилизировать вместе с другими производственными отходами.
Правильная утилизация батарей изделия
(действует в странах, в которых существует система разделения отходов)
Подобная маркировка на батарее, руководстве или упаковке свидетельствует о том, что батареи изделия в конце срока
его использования нельзя утилизировать с другими бытовыми отходами. Символы химических элементов Hg, Cd или Pb в
маркировке указывают на то, что в батарее содержится ртуть, кадмий или свинец в концентрации, превышающей уровни,
установленные директивой EC 2006/66. В случае нарушения требований по утилизации эти вещества могут нанести вред
здоровью людей или окружающей среде.
Для защиты природных ресурсов и в целях повторного использования материалов не выбрасывайте батареи с другими
бытовыми отходами, а утилизируйте их в соответствии с правилами местной системы возврата батарей.
Русский - 3
[UF6470-RU]BN68-04779H-X0L4.indb 3 2013-03-09 10:19:15
Page 28
Принадлежности
Убедитесь, что следующие принадлежности входят в комплект поставки телевизора. Если какой-либо
✎
элемент комплекта отсутствует, обратитесь к своему дилеру.
Цвет и форма устройств могут различаться в зависимости от модели.
✎
Кабели, не входящие в комплект поставки, можно приобрести дополнительно.
✎
Открывая коробку, убедитесь, что все принадлежности на месте (некоторые из них могут быть скрыты
✎
под упаковочным материалом).
ВНИМАНИЕ! ВСТАВЬТЕ НАДЕЖНО, ЧТОБЫ ИСКЛЮЧИТЬ ВЕРОЯТНОСТЬ
[
ОТСОЕДИНЕНИЯ
• Smart Touch Control и батареи (AAA x 2) • Кабель питания
• Руководство пользователя • Чистящая салфетка
• Гарантийный талон (предоставляется не во всех странах)
• Нормативная информация
• Трехмерные очки Samsung 3D Active Glasses (модели
диагональю не менее 40 дюймов)
Подставка-держатель
проводов
• Плата за обслуживание может взиматься в следующих случаях:
− а) если Вы вызовете специалиста, и он не обнаружит неисправности устройства
(т.е. если проблему можно было решить, ознакомившись с настоящим руководством);
− б) если Вы передадите устройство в ремонтный центр, и специалисты центра не обнаружат
неисправности устройства (т.е. если проблему можно было решить, ознакомившись с настоящим
руководством).
• Размер этой платы Вам сообщат перед выполнением работ или выездом сотрудника компании на место.
Предупреждение. Существует опасность
повреждения экрана при неправильном
обращении с ним. Рекомендуем
поднимать телевизор, держась за углы,
как показано на рисунке.
Держатель в форме кольца
(Зависит от модели)
Адаптер карты CI Card Инфракрасный переходник
К экрану
не прикасаться!
Предостережение относительно разъема на крышке
Задняя панель может отличаться в зависимости от модели устройства.
✎
ВНИМАНИЕ: Разъем на задней крышке
предназначен для использования только
квалифицированным персоналом. Во
избежание риска поражения электрическим
током и возгорания не используйте разъем на
задней крышке, если вы не компетентны в этом
вопросе.
Задняя панель телевизора
Разъем на крышке
Русский - 4
[UF6470-RU]BN68-04779H-X0L4.indb 4 2013-03-09 10:19:16
Page 29
Основные операции
Использование пульта Smart Touch Control
В зависимости от модели.
✎
ля передачи команд функции Распознавание голоса можно использовать микрофон. Просто нажмите кнопку VOICE
Функция Распознавание голоса может неверно выполнить распознавание из-за нечеткого произношения, тихого голоса или
✎
окружающего шума.
Включение и выключение телевизора.
Просмотр и выбор доступных источников
видеосигнала.
Включите и выключите приемник
спутникового или кабельного
телевидения, подключенный к телевизору.
При этом необходимо настроить пульт
Smart Touch Control для использования в
качестве универсального пульта ДУ.
VOICE
˜
Ввод команд и текста с помощью голоса.
˜
.
Русский
Вкл. / Выкл. звука
Нажмите и удерживайте
эту кнопку, чтобы
отобразить Описание
аудио и Субтитры.
(доступно не во всех
Переключение между функциями кнопки
Назначение цветных кнопок зависит от
функции, выполняемой телевизором в
Возврат к предыдущему меню. Нажмите и
удерживайте данную кнопку для выхода из
всех запущенных приложений. Нажмите и
удерживайте данную кнопку для выхода из
Отображение приложений Smart Hub. См.
главу электронного руководства Функции
Чтобы быстро выйти из запущенного
✎
MUTE
телевизора.
странах).
Регулировка громкости.
"Журнал" и "Поиск".
данный момент.
всех запущенных приложений.
Smart TV > Smart Hub.
приложения, нажмите кнопк у
™
.
Переключение каналов.
Отображение на экране виртуального
пульта ДУ. См. главу Управление
TV > Использование виртуального
пульта дистанционного управления
руководства e-Manual.
Нажмите и удерживайте эту кнопку. На
экране отобразится панель быстрого
доступа — составляющая панели
виртуального пульта ДУ. Таким образом
вы сможете с легкостью управлять
телевизором, нажимая экранные кнопки.
Сенсорная панель
• Проведите по сенсорной панели,
чтобы перейти к элементу на экране.
• Для запуска, активации или выбора
выделенного элемента коснитесь
сенсорной панели.
• Коснитесь сенсорной панели и
удерживайте палец в точке контакта,
чтобы отобразить Список каналов.
Просмотр программы передач по
каждому цифровому каналу, включая
время выхода в эфир. Также можно
включить функцию Просмотр по
расписанию или Запись по расписанию
с автоматическим отображением
сведений о программе, которая будет
транслироваться позже.
Подключение к телевизору
Для управления телевизором при помощи устройства Smart Touch Control сначала необходимо сопрячь между собой пульт и телевизор
при помощи технологии Bluetooth. Однако следует учитывать, что эксплуатация пульта Smart Touch Control возможна только при наличии
сопряженного с ним телевизора Samsung.
1. При выключенном телевизоре направьте пульт Smart Touch Control на приемник сигнала пульта ДУ на телевизоре и
нажмите кнопку "TV" для выполнения первого сопряжения. Инфракрасный сигнал передается только после нажатия этой
кнопки. Положение приемника сигнала пульта ДУ может отличаться в зависимости от модели.
2. В левом нижнем углу экрана появится значок Bluetooth (см. рисунок ниже). После этого телевизор предпримет попытку
связаться с пультом Smart Touch Control автоматически.
<Значки процесса подключения и завершения>
Русский - 5
[UF6470-RU]BN68-04779H-X0L4.indb 5 2013-03-09 10:19:16
Page 30

Повторное соединение телевизора и пульта Smart Touch Control
<Кнопка сопряжения на пульте Smart Touch Control>
Если необходимо возобновить соединение между телевизором и пультом Smart Touch Control, направьте
пульт Smart Touch Control на приемник сигнала дистанционного управления телевизора и нажмите кнопку
сопряжения с обратной стороны пульта. Снимите крышку батарейного отсека пульта Smart Touch Control
для доступа к кнопке сопряжения. Нажатие на кнопку сопряжения автоматически восстанавливает
соединение между пультом ДУ и телевизором.
Сообщение о низком заряде батареи
Если батареи пульта ДУ Smart Touch Control разрядятся в процессе его использования и индикатор заряда
батареи начнет мигать, в нижней левой части экрана телевизора появится соответствующее мигающее окно
сообщения. При появлении окна сообщения замените батареи пульта Smart Touch Control. Используйте
щелочные батареи. Это позволит пользоваться пультом дольше.
Установка батарей (ААА Х 2)
1
2
3
1. Слегка приподнимите крышку батарейного отсека, потянув за ремешок или воспользовавшись пластиковой
картой. Затем подденьте ногтем крышку батарейного отсека и полностью снимите ее.
2. Установите 2 батарейки типа ААА, соблюдая полярность.
3. Совместите крышку батарейного отсека с выемкой в корпусе пульта ДУ и надавливайте на нее по краям до
тех пор, пока она полностью не соединится с поверхностью пульта ДУ.
Использование сенсорной панели
Используйте сенсорную панель для выполнения различных команд. Перейдите в Обучение (Экранное меню >
Система > Дисп. устройств > Настройки Smart Touch Control > Обучение) для просмотра отображаемого на
экране руководства по использованию пульта Smart Touch Control.
Перетягивание Нажмите
Проведите по сенсорной панели в желаемом направлении.
Перемещение изображения на экране или указателя в направлении
движения пальца.
Коснитесь сенсорной панели пальцем. Это приведет к выбору
выделенного курсором пункта.
Русский - 6
[UF6470-RU]BN68-04779H-X0L4.indb 6 2013-03-09 10:19:17
Page 31

Изменение канала путем ввода номера
Во время просмотра телевизора коснитесь выступающей линии у правого или
левого края сенсорной панели для отображения на экране окна для ввода номера.
Введите номер необходимого канала. Введенный номер отображается на экране
и телевизор переключается на соответствующий канал. Однако введенный вами
номер может не всегда правильно распознаваться телевизором. Чтобы введенный
вами номер был распознан надлежащим образом, воспользуйтесь приведенными
ниже инструкциями.
Инструкции для ввода номера
Способы ввода цифровых значений приведены
на рисунках ниже. При несоблюдении данных
инструкций телевизор может неправильно
распознавать введенные цифровые значения.
Показать полосу состояния и уведомлений
Нажмите кнопку MORE на пульте Smart Touch Control и выберите STATUS на панели виртуального пульта ДУ
для отображения баннера состояния и уведомлений в верхней части экрана.
Журнал и Поиск
Журнал
Русский
Нажмите кнопку HISTORY / SEARCH и выберите Журнал из списка в нижней части экрана. Отобразится
интерактивный перечень недавно просмотренных каналов, содержимого мультимедиа и недавно запущенных
приложений.
Поиск
Дважды нажмите кнопку HISTORY / SEARCH. Введите критерий поиска для поиска не только нескольких
приложений и их содержимого на телевизоре, но и поиска в сети Интернет.
Настройка сенсорной панели
Экранное меню > Система > Дисп. устройств > Настройки Smart Touch Control > Чувствительность
касания
Предусмотрена возможность настройки чувствительности сенсорной панели пульта Smart Touch Control.
Установите соответствующее значение для параметра Чувствительность касания, чтобы настроить уровень
чувствительности и обеспечить удобство использования.
Русский - 7
[UF6470-RU]BN68-04779H-X0L4.indb 7 2013-03-09 10:19:17
Page 32

Использование виртуального пульта дистанционного управления
Нажмите кнопку MORE для отображения панели виртуального пульта ДУ на экране. Виртуальный пульт ДУ
состоит из цифровой панели, панели управления воспроизведением и панели быстрого доступа. Используйте
сенсорную панель для выбора цифр или кнопок. Нажмите и удерживайте кнопку MORE. На экране отобразится
панель быстрого доступа — составляющая панели виртуального пульта ДУ. Таким образом Вы сможете с
легкостью управлять телевизором, нажимая экранные кнопки.
Выбор панели управления виртуального пульта ДУ
Выберите панель для отображения на экране: цифровую панель, панель управления воспроизведением или
панель быстрого доступа.
Используйте сенсорную панель для перемещения вправо или влево между элементами на экране.
Переключение отображаемой панели происходит при наведении на крайний правый или крайний левый
элемент.
Используйте функцию прокручивания влево/вправо на сенсорной панели для простого переключения панелей.
Использование цифровой панели
Используйте цифровую панель для ввода цифр на экранной клавиатуре, веб-странице или для переключения
канала во время просмотра телевизора. Переключение канала с помощью цифровой панели фиксируется в
памяти телевизора, что позволяет беспрепятственно вернуться к просмотру предыдущих каналов.
Использование панели управления воспроизведением
Используйте панель управления воспроизведением для приостановки, перемотки назад или вперед, перехода к
следующему файлу и выполнения других действий во время просмотра мультимедийного содержимого.
Использование панели быстрого доступа
Данная панель обеспечивает быстрый доступ к кнопкам INFO, MENU и e-Manual. Наличие этих кнопок зависит
от режима работы пульта Smart Touch Control (только с телевизором, в качестве универсального пульта ДУ и
т. п.)
Включение телевизора
Включите телевизор, нажав кнопку P на пульте дистанционного управления или на панели телевизора.
Цвет и форма изделия могут различаться в зависимости от модели.
✎
С помощью контроллера ТВ в виде небольшого джойстика, похожего на кнопку, на задней стенке
✎
телевизора справа можно управлять функциями телевизора без пульта дистанционного управления.
Меню функций
Изображение соответствует виду
Датчик пульта дистанционного управления
Во время использования пульта Smart Touch
Control индикатор режима ожидания неактивен (за
исключением случаев нажатия кнопки
mR
P
Контроллер ТВ
телевизора спереди.
P
).
Русский - 8
[UF6470-RU]BN68-04779H-X0L4.indb 8 2013-03-09 10:19:17
Page 33

НАСТРОЙКА
При первом включении телевизора на экране появится диалоговое окно исходной настройки. Следуя
инструкциям на экране, выполните исходную настройку, в том числе выбор языка меню, поиск каналов,
подключение к сети, и пр. На каждом этапе можно сделать выбор или пропустить данный шаг. Пользователи
могут выполнить эту процедуру позже в меню Экранное меню > Система > Настройка.
Если перед началом установки подключить ко входу HDMI 1 какое-либо устройство, в качестве Тип
✎
каналов автоматически будет выбрана видеоприставка.
Если Вас не устраивает ТВ-приставка, выберите Антенна.
✎
Переключение между источниками видеосигнала
Нажмите кнопку SOURCE для переключения между устройствами, подсоединенными к телевизору.
Например, для переключения на игровую консоль, подсоединенную ко второму разъему HDMI, нажмите кнопку
SOURCE. Из списка Источник выберите HDMI 2. Обозначения разъемов могут различаться в зависимости от
продукта. Выберите Сервис в правом верхнем углу экрана для получения доступа к следующим функциям:
• Сведения
Просмотр подробной информации о подключенных устройствах.
• Редактир. назв.
Вы можете изменять обозначение подключенных к телевизору устройств для более простой идентификации
внешних источников.
Для компьютера, подключенного к порту HDMI (DVI) телевизора посредством кабеля HDMI, можно,
например, изменить Редактир. назв. на ПК.
Для компьютера, подключенного к порту HDMI (DVI) телевизора посредством кабеля HDMI-DVI, можно,
например, изменить Редактир. назв. на DVI PC.
Для устройства AV, подключенного к порту HDMI (DVI) телевизора посредством кабеля HDMI-DVI, можно,
например, изменить Редактир. назв. на Устройства DVI.
Русский
• Обновить
Выберите данный параметр, если подсоединенное устройство не появляется в списке. Если устройство
не отображается в списке после того, как Вы выбрали Обновить, проверьте состояние подключения
телевизора к устройству.
• Удаление USB
Удалите устройство USB из списка для безопасного отключения. Эта функция доступна только в случае,
если выбрано устройство USB.
• Настр. унив. пульта ДУ
Для добавления нового внешнего устройства и управления им с помощью пульта ДУ Touch Remote
Control нажмите кнопку SOURCE и выберите Настр. унив. пульта ДУ справа вверху экрана. При помощи
универсального пульта дистанционного управления пользователи могут управлять внешними устройствами,
подключенными к телевизору, например, видеоприставкой, проигрывателем дисков Blu-ray и AV-ресивером.
Русский - 9
[UF6470-RU]BN68-04779H-X0L4.indb 9 2013-03-09 10:19:18
Page 34

Настройка универсального пульта ДУ
Данный телевизор оснащен функцией универсального дистанционного управления, которая позволяет
управлять приемниками кабельного телевидения, проигрывателями Blu-ray, домашними кинотеатрами и
другими подключенными к телевизору внешними устройствами сторонних производителей с помощью пульта
ДУ.
Как указано на рисунке выше, расстояние между инфракрасным переходником и внешним устройством
должно составлять не менее 5 см. Инфракрасный переходник следует направить на приемник дистанционного
управления внешнего устройства. При этом следует учитывать, что между инфракрасным переходником и
внешним устройством не должно быть препятствий для передачи сигнала. Наличие препятствий помешает
передаче сигнала пульта ДУ.
Добавление внешнего устройства
1. Включите внешнее устройство, для управления которым Вы хотите настроить функцию универсального
пульта ДУ, и нажмите кнопку SOURCE для перехода к экрану Источник.
2. Выберите Настр. унив. пульта ДУ в верхней части экрана. Будет запущен процесс настройки
универсального пульта ДУ.
3. Настройте универсальный пульт дистанционного управления, следуя инструкциям на экране. Если пульт не
реагирует на управление надлежащим образом, задайте номер модели вручную.
Русский - 10
[UF6470-RU]BN68-04779H-X0L4.indb 10 2013-03-09 10:19:18
Page 35

Подключение к разъему COMMON INTERFACE
(разъем для карты ТВ)
Выключите телевизор для подсоединения или отсоединения CI-карты или адаптера CI-карты.
✎
Подсоединение адаптера карты CI Card
Подсоедините адаптер, как показано на рисунке сбоку.
Для установки адаптера карты CI CARD удалите
✎
защитную наклейку с телевизора.
Для подключения адаптера карты CI CARD выполните
следующие действия:
Рекомендуется подсоединять адаптер до установки
✎
настенного крепления или карты CI или CI+ CARD.
1. Вставьте адаптер карты CI CARD в два отверстия на
изделии 1.
Найдите два отверстия на задней панели
✎
телевизора рядом с разъемом COMMON INTERFACE.
2. Подключите адаптер карты CI CARD к порту COMMON INTERFACE на изделии 2.
3. Вставьте карту CI CARD или CI+ CARD.
Желательно вставить карту CI Card до того, как телевизор будет прикреплен к стене. После
установки вставить карту будет трудно. Вставляйте карту после подключения адаптера
карты CI Card к телевизору. Если вставить карту до подключения модуля, его будет трудно
подключить.
Задняя панель
телевизора
Русский
Использование карты CI CARD или CI+ CARD
Для просмотра платных каналов необходимо установить карту CI CARD или CI+ CARD.
• Если этого не сделать, отобразится сообщение "Закодированный
сигнал".
• Через 2–3 минуты после установки на экране отобразится
информация о сопряжении, содержащая номер телефона,
идентификатор карты CI CARD или CI+ CARD, идентификатор хоста
и другие сведения. Если появится сообщение об ошибке, обратитесь
к поставщику услуги.
• После того, как настройка сведений о каналах будет закончена,
на экране отобразится сообщение "Обновление завершено",
означающее, что список каналов обновлен.
ПРИМЕЧАНИЕ
✎
• Карту CI или CI+ CARD можно приобрести у местного поставщика услуг кабельного телевидения.
• Извлекайте карту CI или CI+ CARD, аккуратно придерживая ее, поскольку падение карты может
привести к ее повреждению.
• Вставляйте карту CI или CI+ CARD в направлении, указанном на ней.
• Гнездо COMMON INTERFACE может располагаться в различных местах в зависимости от модели
устройства.
• В некоторых странах и регионах карты CI или CI+ CARD не поддерживаются. Уточните это у
официального дилера.
• В случае возникновения проблем обратитесь к поставщику услуги.
• Вставьте карту CI или CI+ CARD, поддерживающую текущие настройки антенны. Иначе изображение на
экране будет отсутствовать или будет искажено.
Русский - 11
[UF6470-RU]BN68-04779H-X0L4.indb 11 2013-03-09 10:19:19
Page 36

Просмотр электронного руководства (e-Manual)
Установленное в телевизоре электронное руководство содержит информацию о его основных функциях.
Данный телевизор имеет встроенное руководство пользователя. Чтобы воспользоваться им, сделайте
следующее:
• Откройте меню "Поддержка" и выберите e-Manual (устранение неполадок).
• Нажмите кнопку MORE на пульте Smart Touch Control для отображения кнопок управления на экране.
Проведите пальцем по сенсорной панели, пока не отобразится e-Manual, и выберите его.
Слова, выделенные в руководстве синим цветом, относятся к параметрам экранного меню, а слова,
✎
выделенные голубым,– к кнопкам дистанционного управления.
Пригодная для распечатывания версия данного руководства также доступна на веб-странице www.
✎
samsung.com/support.
Прокрутка страницы
Прокрутка страницы выполняется одним из следующих способов:
• Нажатием кнопки
• Проведите пальцем скользящими или отрывистыми движениями вдоль левого или правого края сенсорной
панели.
• Переместите выделение на кнопку
скользящими или отрывистыми движениями вверх или вниз.
Назначение значков в верхней части экрана
Значки Назад, Вперед и Открытая страница в левой верхней части экрана используются для перехода между
страницами. Значки активны только при наличии нескольких страниц.
или на полосе прокрутки, расположенной вдоль правого края экрана.
или на правой стороне экрана, проведите по сенсорной панели
Возврат на домашнюю страницу
Для возврата на домашнюю страницу нажмите кнопку a на пульте или выберите значок в верхней правой
части экрана.
Поиск по указателю
Чтобы отобразить указатель, нажмите кнопку b на пульте или выберите значок в верхней правой части
экрана. Выберите нужный термин, при этом откроется соответствующая страница.
Поиск на страницах
Нажмите кнопку { или выберите в верхней части экрана, чтобы перейти к экрану поиска. Введите
искомую фразу и выберите Готово. Выбрав из списка результатов поиска нужный пункт, вы перейдете на
соответствующую страницу.
Закрытие электронного руководства
Чтобы закрыть e-Manual, нажмите и удерживайте кнопку RETURN или выберите в верхнем правом углу
экрана.
Переход к пункту меню
Чтобы перейти непосредственно к описываемому в разделе руководства пункту меню, нажмите кнопку .
Также можно перейти от пункта меню непосредственно к соответствующему разделу e-Manual. Если вам нужна
справка e-Manual по отдельной функции экранного меню, нажмите на панели виртуального пульта ДУ кнопку
e-Manual для загрузки соответствующей страницы e-Manual.
Данная функция может не поддерживаться в зависимости от меню.
✎
Русский - 12
[UF6470-RU]BN68-04779H-X0L4.indb 12 2013-03-09 10:19:19
Page 37

Настройка сети
Обновление электронного руководства e-Manual
Откройте Smart Hub и выберите Приложения, а затем выберите Доп. прилож.. Электронное руководство
можно обновить так же, как и любую программу.
На экране Доп. прилож. выберите Обнов. прилож.. В списке выберите электронное руководство e-Manual.
Начнется обновление электронного руководства до последней версии. Однако при этом Обнов. прилож.
отображается на экране только при необходимости обновления приложений.
Подключение к сети
Подключение телевизора Smart TV к сети обеспечивает доступ к онлайновым службам, например, Smart Hub, а
также к обновлениям программного обеспечения.
Беспроводное сетевое соединение
Подсоедините телевизор к сети Интернет с помощью стандартного маршрутизатора или модема.
Беспроводной IP-маршрутизатор
Порт локальной
сети на стене
или модем, оснащенный DHCP-
сервером
Русский
Кабель локальной сети (не входит в комплект)
Меры предосторожности при использовании беспроводной сети
• Данный телевизор Smart TV поддерживает протоколы связи IEEE 802.11a/b/g/n. Компания Samsung
рекомендует использовать протокол IEEE 802.11n. В противном случае при воспроизведении видео через
сетевое соединение возможны задержки.
• Для подключения к беспроводной сети телевизор необходимо подсоединить к беспроводному
маршрутизатору или модему. Если беспроводной маршрутизатор поддерживает протокол DHCP, то для
подсоединения телевизора к беспроводной сети можно использовать протокол DHCP или статический IPадрес.
• Выберите свободный канал для беспроводного маршрутизатора. Если выбранный для беспроводного
маршрутизатора канал занят другим устройством, могут возникнуть помехи или перебои со связью.
• Большинство беспроводных сетей защищены дополнительной системой безопасности. Чтобы включить
систему безопасности беспроводной сети, необходимо создать ключ безопасности с помощью буквенноцифровых символов. Данный ключ безопасности необходим для соединения с беспроводной сетью.
Русский - 13
[UF6470-RU]BN68-04779H-X0L4.indb 13 2013-03-09 10:19:20
Page 38

Протоколы безопасности сети
Телевизор поддерживает только указанные ниже протоколы безопасности беспроводных сетей; его нельзя
подключить к несертифицированным беспроводным маршрутизаторам.
• Режимы проверки подлинности: WEP, WPAPSK, WPA2PSK
• Типы шифрования: WEP, TKIP, AES
Если для беспроводного маршрутизатора выбран режим высокой пропускной способности (Greenfield)
802.11n в "чистом" виде, а в качестве типа шифрования выбран WEP или TKIP, телевизор Samsung не будет
поддерживать подключение в соответствии с новыми спецификациями сертификата Wi-Fi.
Если беспроводной маршрутизатор поддерживает WPS (стандарт безопасной настройки беспроводной сети),
то к сети можно подключиться нажатием одной кнопки (PBC) или с помощью PIN-кода. WPS автоматически
настраивает имя сети (SSID) и ключ WPA.
Проводное сетевое соединение
В зависимости от настроек сети существует три основных способа подключения телевизора к сети с помощью
кабеля. Эти способы показаны ниже.
Порт модема на стене
Кабель модема (не входит в комплект) Кабель локальной сети (не входит в комплект)
Порт модема на стене
(ADSL / VDSL / кабельное ТВ)
Кабель модема
(не входит в комплект)
Порт локальной сети на стене
Внешний модем
(ADSL / VDSL / кабельное ТВ)
Внешний модем
Кабель локальной сети
(не входит в комплект)
Задняя панель телевизора
Задняя панель телевизора
IP-маршрутизатор, оснащенный
DHCP-сервером
Кабель локальной сети
(не входит в комплект)
Задняя панель телевизора
Кабель локальной сети (не входит в комплект)
Телевизор не поддерживает работу сети, если скорость соединения составляет 10 Мбит/с и ниже.
✎
Используйте для подключения кабель Cat 7.
✎
Русский - 14
[UF6470-RU]BN68-04779H-X0L4.indb 14 2013-03-09 10:19:21
Page 39

Основы работы с функцией 3D
Очки 3D Active Glasses
Данная функция предусмотрена только в
✎
телевизорах диагональю не менее 40 дюймов.
Возможности
3D-очки Samsung SSG-5100GB позволяют
просматривать трехмерные изображения на
телевизоре с функцией 3D. 3D-очки Samsung
подключаются к 3D-телевизору Samsung TV на
частоте 2,4 ГГц.
3D-очки Samsung совместимы только с
✎
3D-телевизорами Samsung серий D, E и F
выпуска 2011, 2012 и 2013 гг. Данные 3D-очки
нельзя подключить к другим устройствам
Bluetooth.
Конструкция
Светодиодный индикатор и
кнопка питания
Крышка отсека для
батарей
Подробная информация о прикреплении дужек
и сопряжении очков с телевизором приведена в
отдельном руководстве к 3D-очкам.
Замена батареи
Жидкокристаллический
затвор
Сопряжение очков 3D Active
Glasses
Что такое сопряжение? Сопряжение – это
✎
процесс установления связи между 3D-очками
и 3D-телевизором, выполняемый для обмена
данными между этими двумя устройствами.
Во время выполнения сопряжения расстояние
✎
между телевизором Samsung и 3D-очками не
должно превышать 50 см (19,5 дюймов).
• Включение очков
Быстро нажмите
кнопку питания.
На 3 секунды
загорится зеленый
индикатор (перед
использованием
3D-очков убедитесь,
что они активированы на телевизоре).
• Выключение очков
Быстро нажмите кнопку питания. На 3 секунды
загорится красный индикатор.
• Сопряжение
Нажмите кнопку питания и подождите, пока
телевизор полностью не включится. Нажмите и
удерживайте кнопку питания на очках. Зеленый и
красный индикаторы будут попеременно мигать в
течение 2 секунд.
• Радиус действия
Рекомендуемое расстояние сопряжения
Русский
Если красный индикатор мигает с интервалом в две
секунды, необходимо заменить батарею.
Вставьте батарею в специальный отсек,
✎
совместив сторону батареи со знаком "+" со
стороной отсека с таким же знаком.
Чтобы проверить оставшийся заряд батареи,
✎
обратитесь к разделу о сопряжении в данном
руководстве.
Сдвиньте крышку отсека
для батареи вниз
Замените батарею
Откройте крышку
отсека для батареи
Опустите крышку отсека
для батареи вниз
Извлеките батарею
Закройте крышку
отсека для батареи
Рекомендуемое расстояние просмотра
Рекомендуемое
расстояние просмотра
Рекомендуемое
расстояние сопряжения
После успешного сопряжения 3D-очков на
✎
экране телевизора появится информация
об оставшемся заряде батареи (эта функция
доступна только для 3D-телевизоров Samsung
серии F и 3D-очков модели 2013 г. или более
поздней серии).
Во время сопряжения очков и телевизора
✎
уровень заряда батареи существенно
снижается. Однако примерно через минуту он
восстановится до определенной степени.
2~6 м (6,5 - 19,5 футов)
50 см или меньше
(19,5 дюймов)
Русский - 15
[UF6470-RU]BN68-04779H-X0L4.indb 15 2013-03-09 10:19:21
Page 40

Рабочее расстояние зависит от наличия
✎
препятствий (человека, металлического
предмета, стен и т.д.) между очками и
телевизором, а также от уровня сигнала
Bluetooth.
Выключайте 3D-очки, когда они не
✎
используются. Если оставить 3D-очки
включенными, срок службы батарей
уменьшится.
Этапы сопряжения
1. Включите телевизор и поднесите к нему очки, так
чтобы они находились не далее чем в 50 см от
него.
2. Быстро нажмите кнопку питания на 3D-очках.
3D-очки включатся, и начнется процесс
сопряжения.
3. После успешного выполнения сопряжения на
экране телевизора появится сообщение "3D-очки
подключены к ТВ".
• В случае сбоя сопряжения 3D-очки
выключаются.
• Если первая попытка сопряжения не удалась,
отключите и снова включите телевизор и
выполните действия этапа 2.
Поиск и устранение неисправностей
• Нажмите кнопку питания на 3D-очках и
удерживайте ее нажатой более 1 секунды.
Повторное сопряжение требуется в
следующих случаях:
• Если 3D-очки не работают даже после
нажатия кнопки питания, особенно если
3D-телевизор побывал в ремонте.
• Если требуется воспроизвести содержимое
в режиме 3D на 3D-телевизоре Samsung
серии D, E или F, выпущенном в 2011-2013 гг.,
необходимо выполнить сопряжение очков с
другим телевизором.
Просмотр видео в режиме 3D
Некоторые режимы 3D могут быть недоступны. Это
зависит от формата исходного изображения.
Для просмотра в режиме 3D следует надеть очки 3D
Active Glasses и включить их, нажав кнопку питания.
1. Перейдите в меню 3D-экрана.
(Изображение > 3D )
2. Выберите режим 3D. Появится экран "Режим 3D".
3. Установите режим 3D для изображения, которое
желаете просмотреть.
Замеченная неисправность Способ устранения
Замените батарею.
3D-очки не работают
Индикатор постоянно мигает Батарея разряжена. Замените батарею.
3D-очки должны находиться рядом с телевизором. Убедитесь, что
расстояние между телевизором и 3D-очками не превышает 6 м в пределах
прямой видимости.
Проверьте настройки 3D-функции на телевизоре.
Технические характеристики (номер модели: SSG-5100GB )
Затворы Жидкокристаллические
Оптика
Вес Очки 21,5 г (с батареей: 24,0 ± 0,5 г )
Питание Очки Одна батарея 3 В (литий/диоксид марганца) (CR2025)
Потребление
электроэнергии
Условия
эксплуатации
Рекомендуемое
рабочее
расстояние
Очки 0,85 мА (среднее)
Батарея
Рабочая
температура
Температура
хранения
2-6 м Частота полей 120 полей/с
Тип 165 мА/ч, 3 В (CR2025)
Время работы 150 часов
От 10°C до 40°C (50°F до 104°F)
От-20°C до 45°C (-4°F до 113°F)
Коэффициент
пропускания
36±2%
Характеристики устройства могут быть изменены в целях повышения его производительности без
✎
предварительного уведомления.
Продолжительность непрерывной работы устройства может отличаться в зависимости от характеристик
✎
беспроводной сети и условий использования.
Русский - 16
[UF6470-RU]BN68-04779H-X0L4.indb 16 2013-03-09 10:19:21
Page 41

Рекомендация - только для стран ЕС
Настоящим компания Samsung Electronics заявляет, что данные очки 3D Active Glasses удовлетворяют
основным требованиям и другим положениям директивы 1999/5/EC.
Данное оборудование можно использовать во всех странах ЕС.
Что такое удаленная поддержка?
С новой услугой удаленной поддержки Samsung вы можете обратиться лично к техническому специалисту
компании Samsung, который сможет на расстоянии выполнить следующие операции:
• Диагностика телевизора
• Настройка параметров телевизора в соответствии с Вашими потребностями
• Сброс к заводским настройкам
• Установка рекомендуемых обновлений микропрограммного обеспечения
Принцип действия
Процедура удаленного обслуживания вашего телевизора техническим специалистом Samsung очень проста:
Русский
1. Позвоните в
контактный центр
Samsung и запросите
удаленную поддержку.
2. Откройте меню
телевизора и перейдите
в раздел Поддержка.
3. Выберите "Удаленное
управление" и
сообщите оператору
PIN-код.
4. После этого оператор
получит доступ к
Вашему телевизору.
Вот и все!
Изменение пароля
Экранное меню > Система > Изменение PIN
Измените пароль телевизора.
1. Запустите команду Изменение PIN и введите действующий пароль в поле ввода. Пароль по умолчанию –
0000.
2. Введите новый пароль и подтвердите его повторным вводом. Пароль изменен.
Если вы забыли PIN-код, восстановите PIN-код по умолчанию "0-0-0-0", нажимая кнопки на пульте в такой
✎
последовательности:
При включении телевизора: MUTE → Увел. громкость → RETURN → Умен. громкость → RETURN →
✎
Увел. громкость → RETURN.
Русский - 17
[UF6470-RU]BN68-04779H-X0L4.indb 17 2013-03-09 10:19:22
Page 42

Поиск и устранение неисправностей и прочая информация
Поиск и устранение неисправностей
При возникновении вопросов, связанных с работой телевизора, сначала просмотрите приведенный ниже
список. Если ни один из перечисленных советов не поможет устранить неисправность, посетите веб-сайт www.
samsung.com и выберите пункт "Поддержка" или обратитесь в операторский центр, адрес которого указан на
задней обложке данного руководства.
Проблемы Способы устранения и пояснения
Телевизор не включается. • Проверьте надежность подключения кабеля питания к сетевой розетке и телевизору.
Отсутствует изображение / не
воспроизводится видео.
Пульт дистанционного управления не
работает.
Не получается включить или выключить
телевизор или отрегулировать
громкость с помощью пульта
дистанционного управления приставки
кабельного ТВ или видеоприставки.
• Проверьте исправность сетевой розетки.
• Попробуйте нажать кнопку
пульта дистанционного управления. Если телевизор включится, см. пункт "Пульт
дистанционного управления не работает" ниже.
• Проверьте кабельные соединения. Отсоедините и снова подсоедините все кабели, ведущие к
телевизору и внешним устройствам.
• Согласуйте видеовыходы внешних устройств (приставка кабельной сети/спутникового
телевидения, проигрыватель DVD или Blu-ray и т.д.) с входными разъемами телевизора.
Например, если на внешнем устройстве используется выход HDMI, его следует подключить ко
входу HDMI на телевизоре.
• Убедитесь, что подсоединенные устройства включены.
• Выберите необходимый источник входного сигнала.
• Перезагрузите подключенное устройство, отсоединив и снова подсоединив его кабель
питания.
• Замените батареи в пульте дистанционного управления. Убедитесь, что при установке батарей
соблюдена полярность (+/–).
• Почистите окно передачи сигнала датчика, расположенное на пульте дистанционного
управления.
• Попробуйте направить пульт дистанционного управления непосредственно на телевизор с
расстояния 1,5-2 м.
• Запрограммируйте пульт дистанционного управления кабельного ТВ или видеоприставки,
чтобы использовать его для управления телевизором. Код телевизора SAMSUNG указан в
руководстве для приставки кабельного ТВ или видеоприставки.
P
на телевизоре, чтобы исключить вероятность неисправности
TFT-дисплей со светодиодной подсветкой состоит из множества суб-пикселей, и его изготовление
✎
требует применения наиболее совершенных технологий. Однако на экране может быть несколько
светлых или темных пикселей. Эти отдельные пиксели не влияют на качество работы изделия.
Для обеспечения нормальной работы телевизора необходимо обновлять микропрограммное
✎
обеспечение с веб-сайта Samsung (Samsung.com > Поддержка > Загрузки) через USB.
Некоторые из приведенных изображений и функций соответствуют только определенным моделям.
✎
Установка телевизора на стену с помощью
набора для настенного монтажа (дополнительно)
Установка на стене или потолке
Если Вы решили установить изделие на стене, монтаж следует выполнять в строгом
соответствии с рекомендациями производителя. В случае неправильной установки устройство
может соскользнуть или упасть и нанести серьезные травмы ребенку или взрослому человеку,
а кроме того, возможны серьезные повреждения самого устройства.
Установка настенного крепления
Набор для настенного монтажа (продается отдельно) позволяет установить телевизор на стене.
Подробную информацию об установке настенного крепления см. в прилагаемых к нему в инструкциях.
Рекомендуем поручить установку настенного кронштейна техническому специалисту. Не следует выполнять
установку самостоятельно. Samsung Electronics не несет ответственности за повреждения изделия или травмы,
возникшие в результате самостоятельной установки настенного крепления покупателем.
Русский - 18
[UF6470-RU]BN68-04779H-X0L4.indb 18 2013-03-09 10:19:22
Page 43

Подготовка к установке настенного крепления
Вариант А. Установка
настенного крепления SAMSUNG
1
настенных креплений других производителей
Вариант Б. Установка
1
Для установки настенного крепления используйте держатель в форме кольца 1.
Характеристики набора для настенного монтажа (VESA)
Набор для настенного монтажа не входит в комплект, а продается отдельно. Устанавливайте настенное
✎
крепление на сплошную стену, перпендикулярную полу. Если предполагается установка на другие виды
перегородок, обратитесь за советом к ближайшему дилеру. При установке на потолке или наклонной
стене устройство может упасть и стать причиной травмы.
ПРИМЕЧАНИЕ
✎
− В приведенной ниже таблице представлены стандартные размеры наборов для настенного монтажа.
− В комплект поставки набора для настенного монтажа входит подробное руководство по установке и
все необходимые для сборки детали.
− Для монтажа можно использовать только винты, соответствующие стандарту VESA.
− Не используйте слишком длинные винты или винты, не соответствующие стандарту VESA.
Использование винтов длиннее стандартного размера может привести к повреждению внутренних
элементов телевизора.
− Длина винтов настенных креплений, не соответствующих стандарту VESA, может отличаться в
зависимости от технических характеристик настенного крепления.
− Не затягивайте винты слишком сильно, поскольку это может привести к повреждению устройства
или его падению, что, в свою очередь, может повлечь за собой травму. Компания Samsung не несет
ответственности за подобные несчастные случаи.
− Компания Samsung не несет ответственности за повреждение устройства или получение травм при
использовании настенного крепления, не соответствующего стандартам VESA или не предназначенного
для этих целей, а также в случае несоблюдения инструкций по установке устройства.
− Не устанавливайте телевизор с наклоном более 15 градусов.
Русский
8.6 mm
Семейство
продуктов
Светодиодные
телевизоры
Дюймы
32 ~ 40 200 х 200
46 ~ 55 400 х 400
Характеристики
винтов VESA (A * B)
Стандартный
винт
M8 4
Количество
Не выполняйте установку набора для настенного монтажа при включенном телевизоре. Это
может привести к поражению электрическим током.
Русский - 19
[UF6470-RU]BN68-04779H-X0L4.indb 19 2013-03-09 10:19:22
Page 44

Хранение и обслуживание
Если на экране телевизора имеется наклейка, после ее удаления может остаться небольшое
✎
загрязнение. Удалите загрязнения перед просмотром телевизора.
При чистке внешняя поверхность изделия и экран могут быть поцарапаны. Чтобы предотвратить
✎
появление царапин, осторожно протирайте внешнюю поверхность телевизора и его экран прилагаемой
салфеткой или другой мягкой тканью.
Не распыляйте воду непосредственно на изделие.
Попавшая внутрь изделия жидкость может стать
причиной повреждения, возгорания или поражения
электрическим током.
Для очистки следует использовать только мягкую
ткань, смоченную в небольшом количестве воды.
Не используйте легковоспламеняющиеся жидкости
(например, бензин, растворители) или моющие
средства.
Обеспечение соответствующей вентиляции для
телевизора
При установке телевизора соблюдайте требуемое расстояние между телевизором и другими объектами
(например, стенами, стенками шкафов и т. д.) для обеспечения достаточной вентиляции. Оно должно
составлять не менее 10 см. Несоблюдение правила обеспечения надлежащей вентиляции может привести к
возгоранию или поломке изделия из-за перегрева.
При установке телевизора на подставку или настенное крепление используйте только те детали, которые
✎
поставляются Samsung Electronics.
• При использовании деталей других производителей изделие может упасть и сломаться или нанести
травму.
Установка на подставку Установка на настенное крепление
10 cм
10 cм
10 cм
10 cм
10 cм
10 cм
10 cм
Другие предупреждения
Реальный внешний вид телевизора может отличаться от его изображений в руководстве в зависимости
✎
от модели.
Соблюдайте осторожность, когда прикасаетесь к телевизору. Некоторые части могут нагреваться.
✎
Русский - 20
[UF6470-RU]BN68-04779H-X0L4.indb 20 2013-03-09 10:19:23
Page 45

Сборка подставки-держателя проводов
Датчик экон. реж. и яркость экрана
Русский
При активации функции "Датчик экон. реж." определяется интенсивность освещения в помещении, и с целью
снижения потребления энергии автоматически оптимизируется яркость экрана телевизора. При этом экран
телевизора автоматически становится более ярким или тусклым. Если необходимо выключить эту функцию,
выберите Экранное меню > Система > Экономный режим > Датчик экон. реж.
Не закрывайте датчик посторонними предметами. Это может привести к снижению яркости
изображения.
1. Датчик экон. реж.: данная функция экономии энергии позволяет автоматически настраивать яркость
экрана телевизора в соответствии с уровнем освещения в помещении с помощью датчика освещенности.
2. Чтобы включить или выключить функцию Датчик экон. реж., выберите Экранное меню > Система >
Экономный режим > Датчик экон. реж., а затем выберите Вкл. или Выкл..
3. Предупреждение. Если во время просмотра телевизора в темном помещении экран покажется слишком
затемненным, это может быть вызвано работой функции Датчик экон. реж..
Русский - 21
[UF6470-RU]BN68-04779H-X0L4.indb 21 2013-03-09 10:19:23
Page 46

Предотвращение опрокидывания - крепление
телевизора к стене
Внимание! Нельзя тянуть, толкать телевизор или забираться на него,
поскольку телевизор может упасть. Следите за тем, чтобы дети
не висели на телевизоре и не раскачивали его. Телевизор может
опрокинуться и нанести серьезные и даже смертельные травмы.
Соблюдайте все меры предосторожности, описанные в прилагаемой
к телевизору брошюре по безопасности. Для дополнительной
устойчивости и безопасности приобретите и установите
приспособление против скольжения (см. ниже).
Предотвращение падения телевизора
1. Вставьте винты в зажимы и надежно закрепите их в стене. Убедитесь, что винты надежно закреплены в
стене.
В зависимости от типа стены могут потребоваться дополнительные приспособления, например,
✎
дюбели.
Поскольку необходимые зажимы, винты и трос не входят в комплект поставки, их необходимо
✎
приобретать отдельно.
2. Извлеките винты из центральной части задней панели телевизора, вставьте их в зажимы, затем снова
затяните винты на телевизоре.
Винты не всегда входят в комплект поставки телевизора. В
✎
этом случае необходимо приобрести винты с указанными ниже
характеристиками.
Характеристики винтов
✎
• Для телевизоров с экраном 32-55 дюймов: M8
3. Соедините зажимы, закрепленные на телевизоре и стене, с помощью
крепкого троса, а затем надежно завяжите его.
ПРИМЕЧАНИЕ
✎
− Установите телевизор возле стены, чтобы он не упал назад.
− Крепление троса будет безопасным, если зажимы на стене
находятся на одном уровне с зажимами на телевизоре или ниже них.
− Перед тем как перемещать телевизор, развяжите трос.
4. Убедитесь, что все соединения надежно зафиксированы. Периодически
проверяйте, не ослабли или не нарушены ли соединения. Если у Вас
возникают сомнения по поводу безопасности соединений, обратитесь к
квалифицированному специалисту по установке.
Стена
Русский - 22
[UF6470-RU]BN68-04779H-X0L4.indb 22 2013-03-09 10:19:24
Page 47

Технические характеристики
Технические характеристики ТВ
Разрешение экрана 1920 x 1080
Условия окружающей среды
Рабочая температура
Рабочая влажность
Температура хранения
Влажность при хранении
Шарнирная подставка
(влево/вправо)
Звук
(выход)
Название модели UE32F6510A / UE32F6510S UE40F6510A / UE40F6510S
Размер экрана
(диагональ)
Размеры (Ш x В x Г)
Корпус
С подставкой
Вес
Без подставки
С подставкой
Название модели UE46F6510A / UE46F6510S UE55F6510A / UE55F6510S
Размер экрана
(диагональ)
Размеры (Ш x В x Г)
Корпус
С подставкой
Вес
Без подставки
С подставкой
Название модели
Размер экрана
(диагональ)
Размеры (Ш x В x Г)
Корпус
С подставкой
Вес
Без подставки
С подставкой
Название модели
Размер экрана
(диагональ)
Размеры (Ш x В x Г)
Корпус
С подставкой
Вес
Без подставки
С подставкой
UE46F6500A / UE46F6500S /
UE46F6540A / UE46F6650A
1042,4 x 608,5 x 47,0 мм
1042,4 x 682,4 x 307,2 мм
32 дюйма 40 дюймов
742,0 x 442,3 x 49,5 мм
742,0 x 512,1 x 265,0 мм
5,7 кг
6,7 кг
46 дюймов 55 дюймов
1043,6 x 606,8 x 47,0 мм
1043,6 x 682,2 x 307,3 мм
11,3 кг
12,9 кг
UE32F6540A UE40F6500A / UE40F6500S / UE40F6540A /
32 дюйма 40 дюймов
742,0 x 442,3 x 49,5 мм
742,0 x 512,1 x 265,0 мм
5,7 кг
6,7 кг
46 дюймов 50 дюймов 55 дюймов
11,1 кг
12,7 кг
От 10°C до 40°C (50°F до 104°F)
От 10% до 80%, без конденсации
От -20°C до 45°C (-4°F до 113°F)
От 5% до 95%, без конденсации
-20° ~ 20°
10 W X 2
911,2 x 532,4 x 47,0 мм
911,2 x 597,9 x 265,0 мм
1235,2 x 714,6 x 47,4 мм
1235,2 x 791,2 x 307,3 мм
910,0 x 534,1 x 47,0 мм
910,0 x 597,3 x 265,0 мм
UE50F6500A / UE46F6500S /
UE50F6650A
1120,2 x 651,5 x 47,2 мм
1120,2 x 726,2 x 307,2 мм
13,55 кг
15,15 кг
8,9 кг
10,0 кг
16,5 кг
18,1 кг
UE40F6650A
8,7 кг
9,8 кг
UE55F6500A / UE55F6500S /
UE55F6540A / UE55F6650A
1234,0 x 716,3 x 47,2 мм
1234,0 x 790,9 x 307,2 мм
Русский
16,4 кг
18,0 кг
Русский - 23
[UF6470-RU]BN68-04779H-X0L4.indb 23 2013-03-09 10:19:24
Page 48

Разрешение экрана 1920 x 1080
Условия окружающей среды
Рабочая температура
Рабочая влажность
Температура хранения
Влажность при хранении
Шарнирная подставка (влево/вправо)
Звук
(выход)
Название модели UE32F6800A / UE32F6800S UE40F6800A / UE40F6800S
Размер экрана
(диагональ)
Размеры (Ш x В x Г)
Корпус
С подставкой
Вес
Без подставки
С подставкой
Название модели UE46F6800A / UE46F6800S UE50F6800A / UE50F6800S UE40F6800A / UE40F6800S
Размер экрана
(диагональ)
Размеры (Ш x В x Г)
Корпус
С подставкой
Вес
Без подставки
С подставкой
1083,6 x 618,7 x 47,0 мм
1092,4 x 680,2 x 265,6 мм
32 дюйма 40 дюймов
754,8 x 443,7 x 49,5 мм
754,8 x 492,4 x 186,1 мм
5,7 кг
5,9 кг
46 дюймов 50 дюймов 55 дюймов
11,6 кг
11,9 кг
От 10°C до 40°C (50°F до 104°F)
От 10% до 80%, без конденсации
От -20°C до 45°C (-4°F до 113°F)
От 5% до 95%, без конденсации
0°
10 W X 2
950,8 x 543,9 x 47,0 мм
950,8 x 594,6 x 201,4 мм
1165,4 x 664,5 x 47,2 мм
1165,4 x 725,0 x 265,6 мм
13,9 кг
14,2 кг
9,1 кг
9,3 кг
1279,2 x 728,5 x 47,2 мм
1279,2 x 789,0 x 265,6 мм
16,3 кг
16,6 кг
Номер сертификата POCC KR. AB57. B06795
Срок действия сертификата
Орган сертификации OOO “АЛЬТТЕСТ”
IP(степень защиты от попадания твердых
частиц и влаги)
Класс защиты прибора от поражения
электрическим током
Напряжение питания переменного тока Переменный ток: 100-240 В
Конструкция и характеристики изделия могут быть изменены без предварительного уведомления.
✎
Характеристики электропитания и более подробные сведения о потреблении электроэнергии указаны на
✎
с 01.11.2012 по 31.10.2015
117418, Москва, ул. Цюрупы, д.14
IP 20
оборудование класса II
наклейке на корпусе устройства.
AB57
Режим ожидания
Для уменьшения потребления энергии отсоединяйте кабель питания, если не собираетесь использовать
телевизор в течение длительного периода времени.
Символ «не для пищевой продукции» применяется в соответствии с техническим регламентом
Таможенного союза «О безопасности упаковки» 005/2011 и указывает на то, что упаковка
данного продукта не предназначена для повторного использования и подлежит утилизации.
Упаковку данного продукта запрещается использовать для хранения пищевой продукции.
Символ «петля Мебиуса» указывает на возможность утилизации упаковки. Символ может быть
дополнен обозначением материала упаковки в виде цифрового и/или буквенного обозначения.
Русский - 24
[UF6470-RU]BN68-04779H-X0L4.indb 24 2013-03-09 10:19:24
Page 49

Разрешительная и нормативная документация
Лицензии
Рекомендация – только для стран ЕС
• Настоящим компания Samsung Electronics заявляет, что данный светодиодный телевизор удовлетворяет
основным требованиям и другим положениям директивы 1999/5/EC.
Русский
• Официальное заявление о соответствии можно найти по адресу: http://www.samsung.com, выбрав
"Поддержка" > "Поиск данных по категориям продуктов" и указав название модели.
• Данное оборудование можно использовать только в помещении.
• Данное оборудование можно использовать во всех странах ЕС.
Предупреждение относительно неподвижных изображений
Старайтесь избегать длительного воспроизведения на экране неподвижных изображений (например, файлов
изображений .jpeg), неподвижных объектов (например, логотипов телеканалов, биржевых или новостных лент в
нижней части экрана и т.д.), а также программ с панорамными изображениями или изображениями в формате
4:3. Длительное отображение неподвижного изображения может привести к выгоранию изображения на
светодиодном экране, что может снизить качество изображения. Чтобы снизить риск возникновения подобной
проблемы, выполняйте следующие рекомендации:
• Старайтесь не смотреть очень долго один и тот же телевизионный канал.
• Старайтесь всегда использовать полноэкранный режим. Используйте меню настройки формата
изображения на телевизоре для его оптимального соответствия размеру экрана.
• Чтобы избежать появления остаточных изображений, уменьшите уровень яркости и контрастности.
• Используйте все возможности изделия, предназначенные для сокращения эффекта остаточного
изображения и выгорания экрана. Подробную информацию см. в электронном руководстве.
Русский - 25
[UF6470-RU]BN68-04779H-X0L4.indb 25 2013-03-09 10:19:25
Page 50

Важливі інструкції з техніки безпеки
Попередження! Важливі інструкції з техніки безпеки
(Перед встановленням прочитайте розділ, що відповідає маркуванню на цьому виробі компанії Samsung).
НЕБЕЗПЕКА УРАЖЕННЯ ЕЛЕКТРИЧНИМ СТРУМОМ! НЕ ВІДКРИВАТИ!
УВАГА
УВАГА: ЩОБ УНИКНУТИ РИЗИКУ УРАЖЕННЯ ЕЛЕКТРИЧНИМ СТРУМОМ, НЕ ЗНІМАЙТЕ
КРИШКУ (АБО ЗАДНЮ ПАНЕЛЬ) ВИРОБУ. ВСЕРЕДИНІ ВИРОБУ НЕМАЄ КОМПОНЕНТІВ,
ОБСЛУГОВУВАННЯ ЯКИХ МОЖЕ БУТИ ЗДІЙСНЕНО КОРИСТУВАЧЕМ. ВСІ РОБОТИ З
ОБСЛУГОВУВАННЯ ПОВИННІ ВИКОНУВАТИСЯ КВАЛІФІКОВАНИМИ СПЕЦІАЛІСТАМИ.
• В корпусі виробу, а також ззаду чи знизу зроблені спеціальні отвори та щілини для забезпечення належної вентиляції. Для забезпечення надійної роботи
цього пристрою та уникнення його перегріву, ніколи не перекривайте та не накривайте цих отворів та щілин.
− Не встановлюйте пристрій у замкненому просторі – наприклад, на книжковому стелажі чи у стінній шафі, якщо при цьому не
забезпечується належна вентиляція.
− Не встановлюйте пристрій поблизу обігрівача або датчика температури, а також в місцях, відкритих для прямого сонячного світла.
− Не ставте на пристрій посуд з водою (зокрема вази з квітами), оскільки це може спричинити пожежу або ураження електричним струмом.
• Бережіть пристрій від дощу та не встановлюйте його поблизу води (біля ванни, унітазу, рукомийника чи пральної машини, у вогкому
підвалі чи біля басейну тощо). Якщо на пристрій випадково потрапить волога, негайно від’єднайте його від електромережі та зверніться до
уповноваженого дилера. Перед чищенням виробу обов’язково від’єднуйте його від електромережі.
• У цьому пристрої використовуються батареї. Правила, чинні у вашій місцевості, можуть зобов’язувати користувачів утилізувати батареї
належним чином з міркувань екології.
• Не навантажуйте стінні розетки, подовжувачі або перехідники з перевищенням їх номінальної потужності, оскільки це може спричинити пожежу або
ураження електричним струмом.
• Кабелі живлення слід розташовувати таким чином, щоб на них не можна було наступити або пошкодити їх, притиснувши якимись іншими предметами;
особливу увагу слід звертати на місце приєднання штепселя чи перехідника та місце входження кабелю живлення у пристрій.
• Щоби захистити пристрій під час грози, а також коли він не використовується протягом тривалого часу, вимикайте його з електромережі та від’єднуйте від
антени чи кабельної системи. Таким чином можна уникнути пошкодження пристрою від удару блискавки чи стрибка напруги в електромережі.
• Перш ніж під’єднувати кабель живлення змінного струму до гнізда адаптера постійного струму, перевірте, чи напруга в електромережі відповідає
номінальній напрузі адаптера постійного струму.
• За жодних обставин не вставляйте металеві предмети в будь-які отвори на пристрої. Це створює небезпеку ураження електричним струмом.
• Для уникнення небезпеки ураження струмом за жодних обставин не торкайтеся внутрішніх деталей пристрою. Відкривати пристрій дозволяється лише
кваліфікованим технічним працівникам.
• Завжди надійно під’єднуйте кабель живлення. Від’єднуючи пристрій від електромережі, тягніть за штепсель, а не за кабель живлення. Не торкайтеся кабелю
живлення мокрими руками.
• Якщо пристрій не працює належним чином – зокрема, якщо він видає будь-які незвичні звуки або запахи – негайно від’єднайте його від
електромережі та зверніться до уповноваженого дилера чи центру обслуговування.
• Обов’язково виймайте кабель живлення з розетки, якщо телевізор залишатиметься вимкненим або якщо Ви будете відсутні протягом тривалого часу
(особливо, якщо вдома без догляду залишається дитина, людина похилого віку або інвалід).
− Накопичення пилу може спричинити ураження струмом, витік електроенергії або пожежу внаслідок утворення іскор чи нагріву кабелю живлення або
погіршення його ізоляції.
• Обов’язково зверніться до уповноваженого центру з обслуговування, якщо обладнання потрібно встановити у місцях з високою концентрацією пилу, дуже
високою або дуже низькою температурою чи високою вологістю, в місцях, де працюють із хімічними реактивами, або в місцях із цілодобовою експлуатацією
обладнання, наприклад, в аеропортах чи на вокзалах.
• Нехтування цією вимогою може призвести до значних ушкоджень обладнання.
• Використовуйте лише належним чином заземлену штепсельну вилку та розетку.
− Неправильне заземлення може призвести до ураження електричним струмом або пошкодження пристрою. (Лише обладнання класу 1).
• Від’єднуючи пристрій від електромережі, слід витягнути штепсель із розетки, отже розетка має знаходитися в легко досяжному місці.
• Не дозволяйте дітям виснути на виробі.
• Зберігайте приладді до пристрою (батареї та ін.) у безпечному місці, недоступному для дітей.
• Не встановлюйте пристрій на нестійкій поверхні, такій як підвісна поличка, похила підлога або поверхня, що зазнає частих вібрацій.
• Оберігайте виріб від ударів та поштовхів. У разі пошкодження виробу від’єднайте кабель живлення та зверніться у центр обслуговування.
• Від’єднайте кабель живлення від мережі та витріть пристрій м’якою, сухою ганчіркою. Не використовуйте хімічні речовини, наприклад віск, бензин, спирт,
розчинники, інсектициди, освіжувач повітря, мастило або миючі засоби. Це може призвести до пошкодження вигляду або стирання позначок на виробі.
• Уникайте потрапляння бризок води на пристрій.
• Не кидайте батареї у вогонь.
• Не замикайте полюси батарей, не розбирайте і не перегрівайте батареї.
• У разі неналежного встановлення батарей може статися вибух. Заміняйте батареї лише на батареї такого самого чи еквівалентного типу.
• ПОПЕРЕДЖЕННЯ! ДЛЯ ЗАПОБІГАННЯ ПОЖЕЖІ ЗАВЖДИ ТРИМАЙТЕ СВІЧКИ ТА ІНШІ ДЖЕРЕЛА ВІДКРИТОГО ПОЛУМ’Я
ВИРОБУ.
Для отримання інформації щодо утилізації чи переробки батарей зверніться у відповідні місцеві установи.
Це позначення вказує на високу напругу
всередині виробу. Будь-який контакт із будьякою внутрішньою деталлю виробу може
бути небезпечним.
Це позначення вказує, що до виробу
додаються важливі довідкові матеріали,
які стосуються його експлуатації та
обслуговування.
ПОДАЛІ ВІД
Українська - 2
[UF6470-RU]BN68-04779H-X0L4.indb 2 2013-03-09 10:19:25
Page 51

Ілюстрації у цьому посібнику користувача подані лише для довідки і можуть відрізнятися від дійсного вигляду
виробу. Вигляд і технічні характеристики виробу можуть бути змінені без повідомлення.
Функції нового телевізора
• 3D: За допомогою цієї нової дивовижної функції можна переглядати тривимірний вміст.
• SMART HUB:
Телевизор обеспечивает доступ к службе Smart Hub, превращающей его в универсальный развлекательный
центр для всей семьи. Благодаря Smart Hub пользователи могут просматривать страницы в сети Интернет,
загружать приложения и поддерживать связь с семьей и друзьями через службы социальных сетей. Кроме
того, Вы сможете просматривать фото, видео и прослушивать музыку с внешних устройств хранения.
™ Нажмите для запуска Smart Hub. Выберите службу с помощью значков, отображаемых в верхней части
экрана.
Соціальне Соціальне: просматривайте последние видеоролики с YouTube, а также видеоролики друзей и
свои видеоролики в Facebook или Twitter. Вы также можете совершать видеозвонки друзьям, подключив к
телевизору камеру (приобретается отдельно).
Програми: загружайте и устанавливайте приложения, например, WebBrowser.
Кіно та телешоу: приобретите и просматривайте фильмы и телесериалы без использования отдельного
внешнего устройства (зависит от страны).
Фото, відео та музика: воспроизводите фото, видео и музыкальные файлы с внешнего устройства
хранения.
• Anynet+ (HDMI-CEC): данная функция позволяет с помощью пульта дистанционного управления для
телевизора управлять всеми подключенными устройствами Samsung, поддерживающими функцию Anynet+.
• e-Manual: подробное руководство пользователя в памяти телевизора, которое можно просматривать на
экране (страница 12).
• Функция SMART Interaction: благодаря этой функции можно получить доступ к параметрам и функциям
меню и управлять ими с помощью жестов. Чтобы воспользоваться функцией Smart Interaction, необходимо
подключить к телевизору ТВ-камеру (продается отдельно).(зависит от страны).
• Дисп. пристроїв: Користування функціями телевізора за допомогою клавіатури та миші USB або Bluetooth.
• Віддзеркалення екрана: Відображення екрана мобільного пристрою на телевізорі через бездротове
з’єднання.
Українська
Правила утилізації виробу (відходи електронного та електричного обладнання)
(застосовуються у країнах, де діє система роздільного збору відходів)
Це позначення на виробі, приладді або документації вказує на те, що після закінчення терміну експлуатації виріб і його
електронне приладдя (наприклад, зарядний пристрій, навушники, кабель USB) не можна утилізувати разом з іншими
побутовими відходами. Щоб уникнути потенційного негативного впливу на навколишнє середовище або здоров’я людей
внаслідок неправильної утилізації, а також для раціональнішого використання матеріальних ресурсів, відокремте цей виріб від
інших відходів та здайте його на утилізацію у встановленому порядку.
Для отримання детальної інформації про місце та спосіб здачі виробів для екологічно безпечної переробки індивідуальним
користувачам слід звернутись до торгового представника, у якого вони придбали виріб, або у місцеві органи влади.
Компаніям слід звертатися до постачальників для уточнення умов договору придбання. Цей виріб і його електронне приладдя
не можна утилізувати разом з іншими комерційними відходами.
Правила утилізації батарей виробу
(застосовуються у країнах, де діє система роздільного збору відходів)
Це позначення на батареї, посібнику або упаковці вказує на те, що після закінчення терміну експлуатації батареї її не можна
утилізувати разом з іншими побутовими відходами. Позначення хімічних символів Hg, Cd або Pb вказує на те, що батарея
містить ртуть, кадмій або свинець у кількості понад рівень, визначений Директивою ЄС 2006/66. Якщо батареї належним
чином не утилізувати, ці речовини можуть завдати шкоди здоров’ю людей або навколишньому середовищу.
Для захисту природних ресурсів і для повторного використання матеріалів відділіть батареї від інших відходів і утилізуйте їх
через місцевий пункт безкоштовного прийому використаних батарей.
Українська - 3
[UF6470-RU]BN68-04779H-X0L4.indb 3 2013-03-09 10:19:26
Page 52

Приладдя
Перевірте наявність усіх перелічених елементів, які постачаються з телевізором. Якщо якогось елемента
✎
бракує, зверніться за місцем придбання виробу.
Форма і колір елементів можуть бути дещо іншими залежно від моделі.
✎
Кабелі, які не входять у комплект, можна придбати окремо.
✎
Відкривши коробку, перевірте, чи окремі елементи не застрягли за матеріалами упаковки.
✎
УВАГА: ВСТАВЛЯЙТЕ КАБЕЛЬ НАДІЙНО, ЩОБ ВИКЛЮЧИТИ САМОВІЛЬНЕ ВІД’ЄДНАННЯ
[
• Пульт Smart Touch Control і батареї (AAA x 2) • Кабель живлення
• Посібник користувача • Ганчірка для протирання
• Гарантійний талон (додається не у всіх країнах)
• Нормативна інформація
• Окуляри Samsung 3D Active (модель з екраном 40 дюймів
і більше)
Тримач для кабелів на
підставці
• У перелічених далі випадках може стягуватися плата за обслуговування:
− (а) якщо викликаний на прохання користувача спеціаліст не виявить дефекту виробу
(тобто, якщо користувач не ознайомився з цим посібником);
− (б) якщо у зданому до центру обслуговування виробі не буде виявлено жодного дефекту
(тобто, якщо користувач не ознайомився з цим посібником).
• Про розмір цієї плати користувача буде повідомлено перед виконанням будь-яких робіт чи виїздом
спеціаліста.
Попередження: У разі неправильного
поводження від прямого тиску
екран може зазнати пошкоджень.
Рекомендовано підіймати телевізор за
краї, як показано на малюнку.
Держатель в форме кольца
(Зависит от модели)
Адаптер для картки
стандартного інтерфейсу
Не торкайтеся
екрана!
кабель-продовжувач ІЧ
Застереження щодо роз’єму на кришці
Задня панель може відрізнятися залежно від моделі.
✎
Задня панель телевізора
УВАГА: Кришка панелі роз’ємів призначена
для використання виключно кваліфікованими
спеціалістами. Щоб зменшити ризик ураження
електричним струмом, не знімайте кришку, якщо у
вас немає відповідних навиків.
Роз’єм на кришці
Українська - 4
[UF6470-RU]BN68-04779H-X0L4.indb 4 2013-03-09 10:19:26
Page 53

Основні функції
Користування пультом керування Smart Touch
Залежно від моделі.
✎
Мікрофон використовується для введення команд у режимі Розпізнавання голосу. Просто натисніть кнопку VOICE
Розпізнавання голосу – на роботу цієї функції можуть впливати такі чинники: нечітка вимова, рівень голосу або
✎
оточуючі шуми.
Увімкнення і вимкнення телевізора.
Відображення та вибір доступного джерела
відеосигналу
Увімкнення і вимкнення приймача
супутникового мовлення і декодера
кабельног о мовлення, підключених до
телевізора. Для цього пульт Smart Touch
Control слід налаштувати як універсальний
пульт дистанційного керування.
˜
VOICE
Введення команди за допомогою режиму
керування голосом.
˜
.
Українська
Увімкнення/вимкнення
звуку телевізора.
Натисніть і утримуйте
цю кнопку, щоб вибрати
пункт Аудіоопис або
Субтитри. (залежно від
країни чи регіону).
Перемикання між режимами журналу та
Кольорові кнопки можуть працювати
по-різному залежно від функцій, які
виконуються телевізором у певний момент.
Повернення до попереднього меню.
Натисніть і утримуйте цю кнопку, щоб
Відображення програм Smart Hub. Дивіться
розділ електронного посібника Функції
телевізора SMART TV > «Smart Hub».
виконується, натисніть кнопку
MUTE
Регулювання гучності.
пошуку.
закрити усі відкриті програми.
Щоб вийти з програми, яка
✎
™
.
Зміна каналів.
відображення на екрані віртуального
пульта дистанційного керування.
Дивіться в електронному посібнику
розділ, Управління телевізором >
Користування віртуальним пультом
дистанційного керування
Натисніть і утримуйте цю кнопку.
З’явиться панель швидкого доступу
віртуальної панелі керування.
Сенсорна панель
• Проведіть пальцем по сенсорній
панелі, щоб навести фокус на екран.
• Торкніться сенсорної панелі, щоб
виконати, активувати або вибрати
виділений пункт.
• Натисніть і утримуйте палець на
потрібному елементі на сенсорній
панелі, щоб відобразити екран
Список каналів.
Переглядайте розклад програмування
для кожного цифрового каналу, зокрема
відомості про трансляцію. Крім того,
якщо натиснути на майбутню програму
на сенсорній панелі, можна налаштувати
функції Запланувати перегляд або
Запланувати записування.
Під’єднання до телевізора
Щоб керувати телевізором за допомогою пульта Smart Touch Control, спершу потрібно виконати спарення цих двох пристроїв через Bluetooth.
Пульт Smart Touch Control доступний лише для спареного телевізора Samsung.
1. Щоб створити пару вперше, спрямуйте пульт Smart Touch Control на приймач сигналів пульта дистанційного керування на
вимкненому телевізорі та натисніть кнопку «телевізор». ІЧ сигнал передається тільки натисненням цієї кнопки. Розташування
приймача сигналів пульта дистанційного керування може різнитися залежно від моделі телевізора.
2. У лівому нижньому кутку телевізора з’явиться піктограма Bluetooth, як показано нижче. Телевізор виконає спробу
автоматично під’єнатися до пульта Smart Touch Control.
<Піктограми спроби під’єднання і завершення>
Українська - 5
[UF6470-RU]BN68-04779H-X0L4.indb 5 2013-03-09 10:19:27
Page 54

Сигнал про низький ресурс батареї
Коли ресурс батареї пульта Smart Touch Control досягне низького рівня, про що свідчитиме миготіння індикатора,
внизу ліворуч на екрані миготітиме вікно з попередженням. Якщо з’явиться спливне вікно з попередженням, замініть
батареї пульта Smart Touch Control. Використовуйте лужні батареї: вони служитимуть довше.
Вставляння батарей (AAA X 2)
1
2
3
1. Злегка підніміть кришку батарейного відсіку, потягнувши за ремінець, або за допомогою пластикової картки.
Потім нігтем підчепіть паз кришки і повністю зніміть її.
2. Вставте 2 батареї типу AAA, належним чином розташувавши їх плюсові та мінусові контакти.
3. Покладіть кришку на відсік для батарей на задній панелі пульта і натисніть вздовж країв, щоб її зафіксувати.
Використання сенсорної панелі
За допомогою сенсорної панелі можна виконувати різноманітні команди. Виберіть Посібник (Екранне меню >
Система > Дисп. пристроїв > Параметри Smart Touch Control > Посібник), щоб відкрити екранний посібник із
використання пульта Smart Touch Control.
Перетягування Торкніться
Проведіть пальцем по сенсорній панелі в потрібному напрямку.
Переміщення фокусу вказівника в напрямку, в якому рухається
палець.
Торкніться сенсорної панелі. Таким чином вибирається
сфокусований елемент.
Українська - 6
[UF6470-RU]BN68-04779H-X0L4.indb 6 2013-03-09 10:19:28
Page 55

Перемикання каналів шляхом введення цифр
Під час перегляду телебачення натисніть лінію, що виступає, зліва або справа
сенсорної панелі, щоб вивести на екран вікно для введення цифр. Пальцем
напишіть номер потрібного каналу. Розпізнаний номер відобразиться на екрані
телевізора, і телевізор перемкнеться на відповідний канал. Однак введений вами
номер телевізор не завжди може розпізнати належним чином. Дотримуйтеся
поданих нижче вказівок щодо введення цифр для їх точного розпізнавання
телевізором.
Вказівки щодо введення цифр
Дотримуйтеся зображених нижче схем
введення цифр. Якщо схема введення цифри
відрізнятиметься, телевізор може не розпізнати
вказаний вами номер.
Відображення стану і панелі сповіщень
Щоб відобразити панель стану і сповіщень вгорі екрана, натисніть кнопку MORE на пульті Smart Touch Control і
виберіть STATUS на віртуальній панелі керування.
історія і пошук
Журнал
Українська
Натисніть кнопку HISTORY / SEARCH, тоді виберіть Журнал у списку, який з’явиться внизу екрана. На екрані
з’явиться інтерактивний список каналів, мультимедійних файлів та програм, які нещодавно переглядалися.
Пошук
Натисніть кнопку HISTORY / SEARCH два рази. Введіть критерії пошуку програм і їхнього вмісту як на
телевізорі, так і в мережі.
Налаштування сенсорної панелі
Екранне меню > Система > Дисп. пристроїв > Параметри Smart Touch Control > Чутливість дотику
Чутливість сенсорної панелі пульта Smart Touch Control можна налаштувати. Встановіть функцію Чутливість
дотику , щоб налаштувати чутливість панелі для зручності у використанні.
Українська - 7
[UF6470-RU]BN68-04779H-X0L4.indb 7 2013-03-09 10:19:28
Page 56

Користування віртуальним пультом дистанційного керування
Натисніть кнопку MORE , щоб відобразити на екрані віртуальну панель керування. Віртуальна панель керування
складається з цифрової панелі, панелі керування відтворенням та панелі швидкого доступу. Вибирайте цифри і
кнопки на сенсорній панелі. Натисніть і утримуйте кнопку MORE. З’явиться панель швидкого доступу віртуальної
панелі керування. Таким чином можна легко вибрати екранні кнопки.
Зміна панелі керування віртуального пульта.
Можна вибрати панель, яка відображатиметься на екрані, – цифрову панель, панель керування відтвореннями
чи панель швидкого доступу.
За допомогою сенсорної панелі переміщайте фокус вліво чи вправо. Панель керування змінюється, коли фокус
виходить за межі лівого чи правого краю.
Для зміни панелі використовуйте функцію прокручування ліворуч/праворуч на сенсорній панелі.
Як користуватися цифровою панеллю
За допомогою цифрової панелі можна вводити цифри на екранній клавіатурі чи веб-сторінці, або перемикати
канали під час перегляду телевізора. Перемикання каналу за допомогою цифрової панелі фіксується, тому
можна легко повертатися до каналів, які раніше переглядалися.
Як користуватися панеллю керування відтворенням
За допомогою панелі керування відтворенням можна призупинити, швидко прокрутити назад чи вперед, перейти
до наступного файлу, а також виконати багато інших дій під час перегляду мультимедійного вмісту.
Як користуватися панеллю швидкого доступу
Ви отримуєте швидкий доступ до кнопок INFO, MENU та e-Manual. Проте доступність кнопок залежить від
режиму роботи пульта Smart Touch Control (лише з телевізором, як універсальний пульт тощо).
Увімкнення телевізора
Увімкніть телевізор за допомогою кнопки P на пульті дистанційного керування чи панелі телевізора.
Форма і колір виробу можуть бути дещо іншими залежно від моделі.
✎
Контролер – це невеликий джойстик, на кшталт кнопки, ззаду праворуч на телевізорі, що дає змогу
✎
управляти телевізором без пульта дистанційного керування.
Меню функцій
Зображення отримується, якщо повернутися
до передньої панелі телевізора.
Сенсор пульта дистанційного керування
У разі використання пульта керування Smart
Touch Control світлодіодний індикатор режиму
очікування не працює (крім кнопки
mR
P
Телеконтролер
P
).
Українська - 8
[UF6470-RU]BN68-04779H-X0L4.indb 8 2013-03-09 10:19:28
Page 57

НАЛАШТУВАННЯ
Початкове діалогове вікно налаштування з’являється під час увімкнення телевізора вперше. Дотримуйтеся
вказівок на екрані, щоб завершити початкове налаштування, зокрема вибір мови меню, пошук каналів,
під’єднання до мережі тощо. На кожному з етапів робіть вибір або пропускайте етап. Цю процедуру можна
виконати згодом вручну в меню Екранне меню > Система > Настр..
Якщо під'єднати будь-який пристрій до роз'єму HDMI1 перед початком встановлення, параметр Джерело
✎
каналу автоматично буде змінено на «Декодер».
Якщо ви не бажаєте вибирати Декодер, тоді виберіть Антена.
✎
Перемикання джерела відеосигналу
Перемикати між пристроями, підключеними до телевізора, можна за допомогою кнопки SOURCE.
Наприклад, щоб перемкнути на ігрову приставку, яка під’єднана до другого роз’єму HDMI, натисніть кнопку
SOURCE. На екрані Джерело виберіть пункт HDMI2. Назви роз’ємів можуть різнитися залежно від виробу.
Виберіть кнопку Сервіс у верхньому правому кутку екрана, щоб перейти до функцій, перелічених нижче.
• Інформація
Перегляд відомостей про під’єднаний пристрій.
• Змін. назву
Пристрої, під’єднані до телевізора, можна перейменувати, щоб було легше їх ідентифікувати.
До прикладу, для комп’ютера, під’єднаного до роз’єму HDMI (DVI) телевізора за допомогою кабелю HDMI,
для пункту Змін. назву можна встановити значення ПК.
Для комп’ютера, під’єднаного до роз’єму HDMI (DVI) телевізора за допомогою кабелю HDMI-DVI, для пункту
Змін. назву можна встановити значення DVI PC.
Для аудіовідеопристрою, під’єднаного до роз’єму HDMI (DVI) телевізора за допомогою кабелю HDMI-DVI, для
пункту Змін. назву можна встановити значення Пристрої DVI.
Українська
• Оновити
Виберіть цей пункт, якщо під’єднаний пристрій відсутній у списку. Якщо після вибору пункту Оновити
пристрій все ще не відображається у списку, перевірте стан під’єднання цього пристрою до телевізора.
• Видалити USB-пристрій
Видаляйте USB-пристрій зі списку безпечно. Ця функція доступна лише якщо вибрано USB-пристрій.
• Налашт. станд. пульта ДК
Щоб додати новий зовнішній пристрій, яким потрібно керувати за допомогою сенсорного пульта ДК,
натисніть кнопку SOURCE і виберіть елемент Налашт. станд. пульта ДК у правій верхній частині екрана.
За допомогою універсального пульта дистанційного керування можна управляти зовнішніми пристроями,
підключеними до телевізора, наприклад декодером кабельних чи супутникових каналів, Blu-ray-програвачем
чи аудіовідеопристроєм.
Українська - 9
[UF6470-RU]BN68-04779H-X0L4.indb 9 2013-03-09 10:19:28
Page 58

Налаштування універсального пульта
дистанційного керування
Цей телевізор підтримує функцію універсального дистанційного керування, за допомогою якої можна
виконувати управління декодером кабельних каналів, програвачем Blu-ray, домашнім кінотеатром та іншими
зовнішніми пристроями іншого виробника, які під’єднані до телевізора, використовуючи лише один пульт
дистанційного керування від телевізора.
Забезпечте відстань між кабелем-продовжувачем ІЧ сигналів і зовнішнім пристроєм принаймні 5 см, як показано
на малюнку. Поверніть кабель-продовжувач ІЧ сигналів у напрямку приймача сигналу пульта дистанційного
керування зовнішнього пристрою. Візьміть до уваги, що між подовжувачем ІЧ сигналів і зовнішнім пристроєм не
має бути перешкод. Наявність перешкоди завадить передачі сигналів пульта дистанційного керування.
Додавання зовнішнього пристрою
1. Увімкніть зовнішній пристрій, для якого потрібно налаштувати функцію універсального дистанційного
керування, тоді натисніть кнопку SOURCE для відображення екрана Джерело.
2. Виберіть пункт Налашт. станд. пульта ДК вгорі екрана. Розпочнеться процес налаштування універсального
пульта дистанційного керування.
3. Дотримуйтесь вказівок на екрані і налаштуйте функцію універсального дистанційного керування. У разі
невдачі налаштуйте пульт дистанційного керування, ввівши номер моделі вручну.
Українська - 10
[UF6470-RU]BN68-04779H-X0L4.indb 10 2013-03-09 10:19:29
Page 59

Під’єднання до гнізда COMMON INTERFACE
(гніздо для перегляду телепрограм)
Вимкніть телевізор, щоб під’єднати або від’єднати адаптер для картки CI чи вставити або вийняти картку CI.
✎
Під’єднання адаптера для картки стандартного інтерфейсу
Під’єднайте адаптер, як показано поруч.
Щоб встановити адаптер для картки стандартного
✎
інтерфейсу (CI), зніміть наклейку з телевізора.
Щоб під’єднати адаптер для картки стандартного
інтерфейсу, виконайте описані нижче дії.
Перш ніж встановлювати настінний кронштейн чи
✎
встановлювати картку СІ або СІ+, радимо під’єднати
адаптер.
1. Вставте адаптер для картки стандартного інтерфейсу у
два отвори на пристрої 1.
Знайдіть два отвори на задній панелі телевізора
✎
біля роз’єму COMMON INTERFACE.
2. Підключіть адаптер для картки стандартного інтерфейсу до гнізда COMMON INTERFACE на пристрої 2.
3. Вставте картку CI або СI+.
Картку стандартного інтерфейсу краще вставляти перед монтуванням телевізора на стіну.
Після монтування вставити її може бути важко. Вставляйте картку після під’єднання адаптера
для картки CI до телевізора. Якщо спершу вставити картку, під’єднати модуль буде важко.
Задня панель
телевізора
Українська
Використання картки CI або СI+
Щоб переглядати платні канали, слід вставити картку CI або CI+.
• Якщо картку CI або CI+ не вставити, для деяких каналів на екрані
з’являтиметься повідомлення «Кодований сигнал».
• На екрані протягом 2-3 хвилин відображатиметься така інформація:
номер телефону, ідентифікатор картки CI або CI+, ідентифікатор
головного вузла тощо. Якщо з’явиться повідомлення про помилку,
зверніться до постачальника послуг.
• Після завершення конфігурації інформації каналу з’явиться
повідомлення про те, що оновлення завершено. Це означає, що
список каналів оновлено.
ПРИМІТКА
✎
• Картку CI або CI+ можна придбати в місцевого постачальника послуг кабельного телебачення.
• Виймаючи картку CI або CI+, будьте обережні, оскільки від падіння картка може вийти з ладу.
• Вставляйте картку CI або CI+ відповідно до позначок на ній.
• Розташування гнізда COMMON INTERFACE може різнитися залежно від моделі.
• Картка CI або CI+ не підтримується у деяких країнах і регіонах. Докладніші відомості можна отримати в
місцевого уповноваженого дилера.
• У разі виникнення проблем звертайтеся до постачальника послуг.
• Вставте картку CI чи CI+, що відповідає поточному налаштуванню джерела сигналу з антени. Інакше
зображення на екрані може бути спотворене чи не відображатися взагалі.
Українська - 11
[UF6470-RU]BN68-04779H-X0L4.indb 11 2013-03-09 10:19:29
Page 60

Перегляд електронного посібника
Вбудований електронний посібник містить відомості про основні функції телевізора.
На телевізорі є вбудований посібник користувача. Прочитати його можна в один із таких способів:
• Відкрийте меню Підтримка і виберіть пункт Посібник e-Manual (усун. несправностей).
• Натисніть кнопку MORE на пульті Smart Touch Control, щоб відобразити кнопки керування на екрані.
Проведіть пальцем по сенсорній панелі, поки не з’явиться пункт e-Manual, і виберіть його.
Слова синього кольору відповідають параметрам екранного меню, а блакитного – кнопкам пульта
✎
дистанційного керування.
Версію цього посібника для друку можна знайти на веб-сторінці www.samsung.com/support.
✎
Прокручування сторінки
Прокрутити сторінку можна в один з описаних нижче способів.
• Натискайте кнопку
• Проведіть пальцем або протягніть вгору чи вниз рядок із лівого або правого краю сенсорної панелі.
або на смузі прокручування з правого краю екрана.
• Встановіть фокус на кнопках
вгору або вниз по сенсорній панелі.
або з правого краю екрана, тоді протягніть або проведіть пальцем
Використання піктограм у верхній частині екрана
Для навігації сторінками використовуйте піктограми Назад, Уперед і піктограми Відкрита сторінка у верхній
лівій частині екрана. Ці піктограми доступні, якщо пройдено дві чи більше сторінок.
Повернення на головну сторінку
Щоб повернутись на головну сторінку, натисніть кнопку a або виберіть піктограму у верхній правій частині
екрана.
Пошук у покажчику
Щоб вивести покажчик на екран, у верхній правій частині екрана натисніть кнопку b або виберіть піктограму
. Виберіть термін, щоб вивести на екран сторінку, на якій згадується цей термін.
Пошук стор.інок
Натисніть кнопку { або виберіть onу верхній частині екрана, щоб отримати доступ до екрана пошуку.
Введіть фразу, яку потрібно шукати, і виберіть Гот.. Виберіть елемент у списку з результатами пошуку, щоб
перейти на відповідну сторінку.
Як закрити електронний посібник
Щоб закрити документ e-Manual, натисніть і утримуйте кнопку RETURN або виберіть у верхньому правому
кутку екрана.
Перехід до потрібного пункту меню
Щоб безпосередньо перейти до описаних у цьому розділі пунктів меню, виберіть . жна перейти від
пункту меню безпосередньо до відповідного розділу у документі e-Manual. Щоб прочитати запис про певну
функцію меню у документі e-Manual торкніться кнопки e-Manual на віртуальній панелі керування і завантажте
відповідну сторінку документа e-Manual.
Ця функція може бути недоступною залежно від меню.
✎
Українська - 12
[UF6470-RU]BN68-04779H-X0L4.indb 12 2013-03-09 10:19:30
Page 61

Налаштування мережі
Оновлення електро нного посібника
Відкрийте Smart Hub і виберіть Програми, тоді виберіть Інші програми. Електронний посібник можна оновити у
той самий спосіб, що й програми.
На екрані Інші програми виберіть пункт Оновл. Програм. Виберіть у списку електронний посібник.
Розпочнеться оновлення електронного посібника до найновішої версії. Проте Оновл. Програм відображається
на екрані лише тоді, коли необхідне оновлення.
Під’єднання до мережі
Під'єднавши телевізор Smart TV до мережі, можна отримати доступ до таких мережевих послуг, як Smart Hub та
оновлення програмного забезпечення.
Під’єднання до мережі – бездротове з’єднання
Під’єднання телевізора до Інтернету за допомогою стандартного маршрутизатора чи модему.
Бездротовий маршрутизатор
IP-адрес чи модем, що
підтримує сервер DHCP
Роз’єм локальної мережі на стіні
Українська
Кабель локальної мережі (не додається в комплекті)
Застереження щодо бездротової мережі
• Телевізор Smart TV підтримує протоколи зв’язку IEEE 802.11a/b/g і n. Компанія Samsung радить
використовувати протокол IEEE 802.11n. Інакше, відео може не відтворюватись належним чином через
мережу.
• Щоб користуватися бездротовою мережею, потрібно підключити телевізор до бездротового
маршрутизатора або модему. Якщо бездротовий маршрутизатор підтримує протокол DHCP, телевізор може
використовувати для з’єднання із бездротовою мережею як протокол DHCP, так і статичну ІР-адресу.
• Виберіть вільний канал для бездротового маршрутизатора. Якщо канал, передбачений для бездротового
маршрутизатора, використовується іншим пристроєм, це може призвести до виникнення перешкод і/або
розриву з’єднання.
• Більшість бездротових мереж мають додаткову систему безпеки. Щоб увімкнути систему безпеки
бездротової мережі, слід створити ключ безпеки за допомогою символів і чисел. Цей ключ безпеки потрібен
для під’єднання до бездротової мережі.
Українська - 13
[UF6470-RU]BN68-04779H-X0L4.indb 13 2013-03-09 10:19:31
Page 62

Протоколи безпеки мережі
Телевізор підтримує лише описані нижче протоколи безпеки бездротової мережі і не може підключитися до
несертифікованих бездротових маршрутизаторів.
• Режими автентифікації: WEP, WPAPSK, WPA2PSK
• Типи шифрування: WEP, TKIP, AES
Якщо вибрано режим високої пропускної здатності стандарту 802.11n (Greenfield), а для типу шифрування
встановлено значення WEP або TKIP, телевізор Samsung Smart TV не підтримуватиме можливості з’єднання з
огляду на нові технічні характеристики сертифікації Wi-Fi.
Якщо бездротовий маршрутизатор підтримує стандарт WPS (Wi-Fi Protected Setup), до мережі можна
під’єднатись способом PBC (Push Button Configuration – конфігурація одним натисненням кнопки) або за
допомогою PIN-коду (Personal Indentification Number – особистий ідентифікаційний номер). WPS автоматично
налаштує ключі SSID і WPA.
Під’єднання до мережі – дротове з’єднання
Існує три основні способи підключення телевізора до мережі за допомогою кабелю, які залежать від
налаштування мережі. Їх ілюстрації наведено нижче.
Роз’єм для модему на стіні
Кабель модему (не додається в комплекті) Кабель локальної мережі (не додається в комплекті)
Роз’єм для модему на стіні
(ADSL/VDSL/кабельне телебачення)
Кабель модему
(не додається в комплекті)
Роз’єм локальної мережі на стіні
Зовнішній модем
(ADSL/VDSL/кабельне телебачення)
Зовнішній модем
Кабель локальної мережі
(не додається в комплекті)
Задня панель телевізора
Задня панель телевізора
Маршрутизатор ІР-адрес, що
підтримує сервер DHCP
Кабель локальної мережі
(не додається в комплекті)
Задня панель телевізора
Кабель локальної мережі (не додається в комплекті)
Телевізор не підтримує швидкості мережі, яка є нижчою або дорівнює 10 Мбіт/с.
✎
Для такого з’єднання слід використовувати кабель Cat 7.
✎
Українська - 14
[UF6470-RU]BN68-04779H-X0L4.indb 14 2013-03-09 10:19:31
Page 63

3D – Основна інформація
Окуляри 3D Active
Ця функція доступна лише для моделей з
✎
екраном 40 дюйми і більше.
Характеристики
3D-окуляри SSG-5100GB Samsung дозволяють
переглядати тривимірне зображення на телевізорі
3D. Окуляри 3D обмінюються радіосигналами із
3D-телевізором Samsung у діапазоні 2,4 ГГц.
3D-окуляри Samsung сумісні лише з
✎
телевізорами 3D Samsung серій D, E та F 2011,
2012 і 2013 років виробництва. Ці окуляри 3D
неможливо підключити до інших пристроїв
Bluetooth.
Комплектація
Світлодіодний індикатор і
кнопка живлення
Кришка відсіку для
батареї
Докладніше про те, як прикріпити дужки окулярів і
спарення окулярів із телевізором, читайте у посібнику
окулярів 3D.
Заміна батареї
Якщо червоний індикатор блимає постійно з
інтервалом у дві секунди, замініть розряджену
батарею на нову.
Вставте батарею стороною «+» у відсік для
✎
батареї зі сторони «+».
Щоб перевірити залишкову ємність батареї,
✎
дивіться розділ про спарення у цьому посібнику.
Рідкокристалічна шторка
Спарення окулярів 3D Active
Що таке спарення? Спарення це процес
✎
з’єднання 3D-окулярів і телевізора з підтримкою
3D для обміну даними між двома пристроями.
Під час процесу спарення відстань між
✎
телевізором Samsung та 3D-окулярами повинна
бути не більше 50 см.
• Вмикання окулярів
Натисніть
коротко кнопку
живлення. Зелений
світлодіодний
індикатор
увімкнеться на
3 секунди. (Перед тим як використовувати
3D-окуляри, перевірте, чи на телевізорі
активовано режим 3D).
• Вимикання окулярів
Натисніть коротко кнопку живлення. Червоний
світлодіодний індикатор увімкнеться на 3 секунди.
• Створення пари
Увімкніть телевізор і дайте йому час увімкнути
усі робочі процеси. Натисніть і утримуйте кнопку
живлення на окулярах. Зелений і червоний
світлодіодні індикатори блиматимуть поперемінно
упродовж 2 секунд.
• Радіус дії
Рекомендована відстань для спарення
Українська
Рекомендована відстань перегляду
Потягніть кришку відсіку
для батареї донизу
Замініть батарею Потисніть кришку
Відкрийте кришку
відсіку для батареї
відсіку для батареї
донизу
Вийміть батарею
Закрийте кришку
відсіку для батареї
Рекомендована відстань перегляду
Рекомендована відстань для спарення
Після спарення 3D-окулярів на екрані телевізора
✎
відображатиметься залишкова ємність батареї.
(Ця функція застосовується до 3D-телевізорів
Samsung серії F і 3D-окулярів 2013 року
виробництва).
У разі подальших спроб виконати спарення
✎
рівень заряду батареї суттєво знизиться. Проте
приблизно за хвилину рівень заряду відновиться
до певного рівня.
2~6m (6,5 to 19,5 ft)
50 cm or less (19,5 in)
.
Українська - 15
[UF6470-RU]BN68-04779H-X0L4.indb 15 2013-03-09 10:19:32
Page 64

Робоча відстань залежить від наявності
✎
перешкод (людей, металевих предметів,
стін тощо) між окулярами і телевізором або
потужності сигналу Bluetooth.
Вимикайте 3D-окуляри, коли ви ними не
✎
користуєтеся. Якщо залишати 3D-окуляри
увімкненими, ресурс батареї зменшується.
Процедура спарення
1. Увімкніть телевізор і розмістіть окуляри не далі,
ніж за 50 см від телевізора.
2. Коротко натисніть кнопку живлення на
3D-окулярах. Окуляри ввімкнуться, та почнеться
процес спарення.
3. Після успішного завершення спарення на екрані
телевізора з’явиться повідомлення «До ТВ
підключено 3D-окуляри.».
• Якщо спарення не вдасться виконати,
3D-окуляри вимкнуться.
• Якщо не вдасться виконати спарення з першої
спроби, вимкніть телевізор, увімкніть його
знову і повторіть дію 2.
Усунення несправностей
• Для повторного спарення: натисніть кнопку
живлення на 3D-окулярах і утримуйте її довше
1 секунди.
Спарення необхідне за описаних нижче умов
• Якщо 3D-окуляри не працюють, навіть коли
натиснуто кнопку живлення, особливо на
3D-телевізорі після ремонту.
• Щоб відтворити 3D-вміст на екрані
3D-телевізора Samsung серій D, E та F,
випущених у 2011-2013 р.р. Окуляри слід
спарити з іншим телевізором.
Перегляд відео 3D
Залежно від формату вхідного відеосигналу деякі
режими 3D можуть бути недоступними.
Для перегляду вмісту у тривимірному режимі одягніть
окуляри 3D Active та увімкніть їх, натиснувши кнопку
живлення на окулярах.
1. Перейдіть до екрана 3D. (Зображ. > 3D)
2. Виберіть режим 3D. З’явиться екран режиму 3D.
3. Встановіть режим 3D для зображення, яке слід
переглянути.
Проблема Вирішення
Замініть батарею.
3D-окуляри не працюють.
Світлодіодний індикатор
постійно блимає.
3D-окулярами можна користуватися лише поблизу телевізора. Упевніться,
що відстань між телевізором і 3D-окулярами менша за 6 м по прямій лінії.
Перевірте налаштування функції перегляду зображення 3D телевізора.
Батарея розряджена. Замініть батарею.
Технічні характеристики (номер моделі: SSG-5100GB )
Шторки Рідкі кристали Пропускання 36±2%
Оптика
Вага Окуляри 21,5 г (з батареєю – 24,0±0,5g)
Живлення Окуляри Одна літій-діоксидмарганцева батарея 3 В (CR2025)
Споживання
електроенергії
Умови роботи
Технічні характеристики можуть бути змінені без повідомлення задля покращення ефективності роботи
✎
виробу.
Тривалість неперервної роботи може різнитися залежно від бездротового з’єднання і умов використання.
✎
Рекомендована
робоча відстань
Окуляри 0,85 мА (середн.)
Батарея
Робоча
температура
Температура
зберігання
2–6 м Частота полів 120 полів/секунду
Тип 165 мА-год, 3,0 В (CR2025)
Робочий час 150 годин
від 10°C до 40°C (50°F до 104°F)
від-20°C до 45°C (-4°F до 113°F)
Українська - 16
[UF6470-RU]BN68-04779H-X0L4.indb 16 2013-03-09 10:19:32
Page 65

Рекомендації - лише для ЄС
Цим компанія Samsung Electronics стверджує, що ці окуляри 3D Active відповідають усім важливим вимогам та
іншим відповідним положенням Директиви 1999/5/EC.
Цей виріб можна використовувати в усіх країнах ЄС.
Що розуміють під віддаленою підтримкою?
Послуга віддаленої підтримки Samsung забезпечує можливість підтримки спеціаліста Samsung, який віддалено
може
• виконати діагностику телевізора
• налаштувати параметри телевізора
• скинути налаштування телевізора до заводських значень
• встановити рекомендовані оновлення програмного забезпечення
Як працює ця послуга?
Віддалене обслуговування телевізора спеціалістами Samsung доволі простий процес.
1. Зателефонуйте у
центр обслуговування
Samsung і подайте
запит щодо віддаленої
підтримки.
2. Відкрийте меню
на телевізорі і
перейдіть до розділу
підтримки.
3. Виберіть функцію
віддаленого
управління і надайте
номер Pin агентові.
4. Тоді агент отримає
доступ до вашого
телевізора. Ось і все!
Українська
Зміна пароля
Екранне меню > Система > Змінити PIN
Пароль телевізора можна змінити.
1. Виконайте функцію Змінити PIN і введіть поточний пароль у полі для пароля. За замовчуванням вибрано
пароль «0000».
2. Введіть новий пароль, а тоді повторіть його, щоб підтвердити. Пароль змінено.
Якщо ви забудете PIN-код, натисніть кнопки у такій послідовності, щоб скинути PIN-код до «0-0-0-0»:
✎
коли вмикається телевізор: MUTE → збільшити гучність → RETURN → зменшити гучність → RETURN →
✎
збільшити гучність → RETURN.
Українська - 17
[UF6470-RU]BN68-04779H-X0L4.indb 17 2013-03-09 10:19:32
Page 66

Усунення несправностей та інша інформація
Усунення несправностей
Якщо ви маєте будь-які запитання щодо роботи телевізора, спершу перегляньте цей список. Якщо жодна з
поданих порад не допоможе вирішити вашу проблему, перегляньте на веб-сайті www.samsung.com розділ
підтримки або зателефонуйте у центр обслуговування, перелік яких подається на останній сторінці цього
посібника.
Неполадка Вирішення і пояснення
Телевізор не вмикається. • Упевніться, що кабель живлення змінного струму надійно під’єднано до настінної розетки і
Зображення/відео відсутнє. • Перевірте з’єднання кабелів. Вийміть і від’єднайте усі кабелі, під’єднані до телевізора і
Пульт дистанційного керування не
працює.
Пульт дистанційного керування
декодера кабельних чи супутникових
каналів не спрацьовує для увімкнення
або вимкнення телевізора та
регулювання гучності.
телевізора.
• Перевірте, чи працює настінна розетка.
• Щоб перевірити, чи проблема не в самому пульті дистанційного керування, скористайтеся
кнопкою
P
дистанційного керування не працює».
зовнішніх пристроїв.
• Встановіть вихідні відеосигнали зовнішніх пристроїв (декодера кабельного чи супутникового
мовлення, програвача дисків DVD, Blu-ray тощо) відповідно до вхідних роз’ємів телевізора.
Наприклад, якщо зовнішній пристрій передає вихідний сигнал HDMI, його слід під’єднати до
входу HDMI на телевізорі.
• Перевірте, чи під’єднані пристрої увімкнено.
• Перевірте, чи правильно вибрано джерело вхідного сигналу.
• Перезавантажте під’єднаний пристрій, тоді повторно під’єднайте його кабель живлення.
• Замініть батареї у пульті ДК. Упевніться, що батареї вставлено з дотриманням полярності (+/–).
• Почистьте вікно передачі сигналу пульта дистанційного керування.
• Спробуйте спрямувати пульт безпосередньо на телевізор на відстані 1,5 – 1,8 м від нього.
• Запрограмуйте пульт дистанційного керування декодера каналів кабельного/супутникового
телебачення для роботи з телевізором. Код для телевізора SAMSUNG дивіться в посібнику
користувача декодера кабельного чи супутникового телебачення.
на телевізорі. Якщо телевізор увімкнеться, дивіться нижче пункт «Пульт
Телевізор із TFT РК екраном містить підпіксели, і його виготовлення потребує застосування складних
✎
сучасних технологій. Однак на екрані можуть з’являтися декілька світлих чи темних пікселів. Такі поодинокі
піксели не впливають на якість роботи пристрою.
Щоб підтримувати телевізор у найкращому стані, оновлюйте вбудоване програмне забезпечення
✎
виробу до найновішої версії з веб-сайту Samsung через носій USB (samsung.com > Support (Підтримка) >
Downloads (Центр завантажень)).
Деякі з наведених вище зображень і функцій доступні тільки у певних режимах.
✎
Монтування телевізора на стіні за допомогою
настінного кріплення (елемент додаткової
комплектації)
Кріплення до стіни і стелі
Виріб слід кріпити до стіни або стелі тільки у спосіб, вказаний виробником. У разі
неправильного кріплення виріб може зісковзнути або впасти, завдавши серйозної шкоди дітям
або дорослим, та пошкодитися сам.
Монтаж комплекту настінного кріплення
Комплект настінного кріплення (продається окремо) дає змогу встановити телевізор на стіні.
Щоб отримати детальну інформацію про монтаж настінного кріплення, дивіться посібник, який додається
до настінного кріплення. З питаннями щодо монтажу настінного кронштейна звертайтеся до спеціаліста
технічної служби. Ми не радимо робити це самостійно. Компанія Samsung Electronics не несе відповідальності
за ушкодження виробу або травми, отримані користувачами у разі самостійного встановлення настінного
кріплення.
Українська - 18
[UF6470-RU]BN68-04779H-X0L4.indb 18 2013-03-09 10:19:33
Page 67

Підготовка перед встановленням настінного кріплення
Спосіб A. Встановлення настінного кріплення SAMSUNG Спосіб Б. Встановлення настінного кріплення іншого виробникa
1
1
8.6 mm
Щоб встановити настінне кріплення, використовуйте проставку під гвинти 1.
Технічні характеристики комплекту настінного кріплення (VESA)
Комплект настінного кріплення не додається до пристрою, а продається окремо. Встановлюйте настінне
✎
кріплення на твердій стіні, перпендикулярній до підлоги. Якщо потрібно встановити кріплення на інший
матеріал, проконсультуйтеся з місцевим торговим представником. У разі встановлення на стелі або
похилій стіні телевізор може впасти і завдати серйозних травм користувачеві.
ПРИМІТКА
✎
− У таблиці нижче наведено стандартні розміри комплектів настінного кріплення.
− До комплекту настінного кріплення входить детальний посібник зі встановлення і всі необхідні складові.
− Не використовуйте гвинти, які не відповідають стандартним технічним характеристикам гвинтів VESA.
− Не використовуйте гвинти, довші за стандартні розміри або які не відповідають технічним
характеристикам VESA. Надто довгі гвинти можуть завдати пошкоджень внутрішнім деталям виробу.
− Для настінних кріплень, які не відповідають стандартним технічним характеристикам VESA, розмір
гвинтів може відрізнятися залежно від характеристик настінного кріплення.
− Не закручуйте гвинти надто сильно, оскільки так може пошкодити пристрій або спричинити його падіння,
яке може призвести до травмування користувача. Компанія Samsung не несе відповідальності за такі
випадки.
− Компанія Samsung не несе відповідальності за пошкодження виробу або отримання травм користувачем
у разі використання кріплення, іншого аніж VESA, або будь-якого невідповідного кріплення, а також у
випадку недотримання користувачем вказівок щодо встановлення виробу.
− Не монтуйте телевізор із нахилом понад 15 градусів.
Українська
Тип пристрою Дюйми
Телевізор зі
світлодіодною підсвіткою
екрана
Технічні
характеристики
VESA (A * B)
32 ~ 40 200 x 200
46 ~ 55 400 x 400
Стандартний
гвинт
M8 4
Кількість
Не встановлюйте комплект настінного кріплення, коли телевізор увімкнено. Це може
призвести до травмування користувача внаслідок ураження електричним струмом.
Українська - 19
[UF6470-RU]BN68-04779H-X0L4.indb 19 2013-03-09 10:19:33
Page 68

Зберігання та обслуговування
Якщо на екрані телевізора є наклейки і якщо їх видалити, екран буде брудним. Перш ніж використовувати
✎
телевізор, усуньте залишки клею.
Чистячи виріб, будьте обережні, щоб не подряпати корпус та екран. Щоб уникнути подряпин, витирайте
✎
корпус та екран виробу ганчіркою, яка додається, або м’якою ганчіркою.
Не розпилюйте воду безпосередньо на виріб. Будьяка рідина, потрапивши всередину виробу, може
спричинити несправність, пожежу або ураження
електричним струмом.
Витирайте виріб м’якою ганчіркою, злегка змоченою у
воді. Не використовуйте займисту рідину (наприклад,
бензин, розчинники) чи засіб для чищення.
Забезпечення належної вентиляції для телевізора
Встановлюючи телевізор, залиште відстань принаймні 10 см між телевізором та іншими предметами (стінами,
стінками шафок тощо) для забезпечення належної вентиляції. Недотримання цієї вимоги може призвести до
пожежі чи проблем із виробом внаслідок підвищення внутрішньої температури виробу.
Встановлюючи телевізор на підставці чи настінному кріпленні, використовуйте лише деталі, які надаються
✎
компанією Samsung Electronics.
• Використання деталей, наданих іншим виробником, може призвести до проблем із виробом чи
травмування користувача через падіння виробу.
Встановлення на підставці. Встановлення на настінному кріпленні.
10 см
10 см
10 см
10 см
10 см
10 см
10 см
Інші попередження
Залежно від моделі дійсний вигляд виробу може бути дещо іншим, аніж зображено на малюнку.
✎
Будьте уважні, торкаючись телевізора. Деякі частини можуть бути гарячими.
✎
Українська - 20
[UF6470-RU]BN68-04779H-X0L4.indb 20 2013-03-09 10:19:33
Page 69

Встановлення тримача для кабелів
Екодатчик і яскравість зображення
Українська
Екодатчик вимірює рівень освітлення у приміщенні й автоматично оптимізує яскравість зображення телевізора
з метою зменшення споживання електроенергії. Завдяки цьому зображення телевізора стає яскравішим або
тьмянішим автоматично. Щоб вимкнути цю функцію, перейдіть до пункту Екранне меню > Система > Еколог.
рішення > Екодатчик
Не блокуйте нічим датчик. Це може призвести до зменшення яскравості зображення.
1. Екодатчик: ця функція заощадження електроенергії автоматично регулює яскравість екрана телевізора
відповідно до рівня зовнішнього освітлення, зафіксованого світловим датчиком.
2. Щоб увімкнути або вимкнути функцію Екодатчик, перейдіть до пункту Екранне меню > Система > Еколог.
рішення > Екодатчик і виберіть Вмк або Вимк.
3. Застереження: Якщо під час перегляду в темному приміщенні екран телевізора надто темний, причиною
цьому може бути функція Екодатчик.
Українська - 21
[UF6470-RU]BN68-04779H-X0L4.indb 21 2013-03-09 10:19:34
Page 70

Попередження – Кріплення телевізора на
настінному кронштейні
УВАГА: Не тягніть, не штовхайте і не залазьте на телевізор, інакше він може
впасти. Особливо зверніть увагу на те, щоб діти не виснули на телевізорі і не
розхитували його. В іншому разі телевізор може перевернутись і призвести до
серйозної травми чи смерті. Дотримуйтесь усіх заходів безпеки, зазначених
на вкладеній листівці з правилами техніки безпеки. З міркувань безпеки для
додаткової стабільності пристрою скористайтесь засобом проти падіння, як
вказано нижче.
Вказівки щодо запобігання падінню телевізора
1. Вставте гвинти у скоби та надійно зафіксуйте їх на стіні. Перевірте, чи гвинти надійно зафіксовані на стіні.
Залежно від типу стіни можуть знадобитися додаткові засоби, наприклад анкери.
✎
Оскільки скоби, гвинти і шнурок не додаються, придбайте їх додатково.
✎
2. Викрутіть гвинти посередині на задній панелі телевізора, вставте гвинти у затискачі і знову вкрутіть гвинти.
Гвинти можуть не постачатися разом із виробом. У такому разі придбайте гвинти, які відповідають
✎
поданим далі технічним характеристикам.
Технічні характеристики гвинтів
✎
• Для моделей з екраном 32-55 дюймів: M8
3. З’єднайте затискачі на телевізорі із затискачами на стіні за допомогою
міцного шнурка, після чого надійно зав’яжіть шнурок.
ПРИМІТКА
✎
− Встановлюйте телевізор близько до стіни, щоб він не перевернувся
назад.
− Задля безпеки протягніть шнурок так, щоб скоби на стіні були на рівні
або нижче скоб на телевізорі.
− Перш ніж пересувати телевізор, розв’яжіть шнурок.
4. Перевірте, чи усі з’єднання виконано належним чином. Час від часу
перевіряйте з’єднання на наявність пошкодження чи послаблення. Якщо у
вас виникли сумніви щодо надійності з’єднань, зверніться до професійного
монтажника.
Стіна
Українська - 22
[UF6470-RU]BN68-04779H-X0L4.indb 22 2013-03-09 10:19:34
Page 71

Технічні характеристики
Технічні характеристики – Телевізор
Роздільна здатність екрана 1920 x 1080
Вимоги щодо навколишнього середовища
Робоча температура
Робоча вологість
Температура зберігання
Вологість зберігання
Поворот підставки (вліво/вправо) -20° ~ 20°
Звук
(вихідний)
Модель UE32F6510A / UE32F6510S UE40F6510A / UE40F6510S
Розмір екрана
(за діагоналлю)
Розміри (Ш x В x Г)
Корпус
З підставкою
Вага
Без підставки
З підставкою
Модель UE46F6510A / UE46F6510S UE55F6510A / UE55F6510S
Розмір екрана
(за діагоналлю)
Розміри (Ш x В x Г)
Корпус
З підставкою
Вага
Без підставки
З підставкою
Модель UE32F6540A UE40F6500A / UE40F6500S / UE40F6540A /
Розмір екрана
(за діагоналлю)
Розміри (Ш x В x Г)
Корпус
З підставкою
Вага
Без підставки
З підставкою
Модель UE46F6500A / UE46F6500S /
Розмір екрана
(за діагоналлю)
Розміри (Ш x В x Г)
Корпус
З підставкою
Вага
Без підставки
З підставкою
UE46F6540A / UE46F6650A
1042,4 x 608,5 x 47,0 мм
1042,4 x 682,4 x 307,2 мм
32 дюймів 40 дюймів
742,0 x 442,3 x 49,5 мм
742,0 x 512,1 x 265,0 мм
5,7 кг
6,7 кг
46 дюймів 55 дюймів
1043,6 x 606,8 x 47,0 мм
1043,6 x 682,2 x 307,3 мм
11,3 кг
12,9 кг
32 дюймів 40 дюймів
742,0 x 442,3 x 49,5 мм
742,0 x 512,1 x 265,0 мм
5,7 кг
6,7 кг
46 дюймів 50 дюймів 55 дюймів
11,1 кг
12,7 кг
від 10°C до 40°C (50°F до 104°F)
від 10% до 80%, без конденсації
від-20°C до 45°C (-4°F до 113°F)
від 5% до 95%, без конденсації
10 W X 2
911,2 x 532,4 x 47,0 мм
911,2 x 597,9 x 265,0 мм
1235,2 x 714,6 x 47,4 мм
1235,2 x 791,2 x 307,3 мм
910,0 x 534,1 x 47,0 мм
910,0 x 597,3 x 265,0 мм
UE50F6500A / UE46F6500S /
UE50F6650A
1120,2 x 651,5 x 47,2 мм
1120,2 x 726,2 x 307,2 мм
13,55 кг
15,15 кг
8,9 кг
10,0 кг
16,5 кг
18,1 кг
UE40F6650A
8,7 кг
9,8 кг
UE55F6500A / UE55F6500S /
UE55F6540A / UE55F6650A
1234,0 x 716,3 x 47,2 мм
1234,0 x 790,9 x 307,2 мм
16,4 кг
18,0 кг
Українська
Українська - 23
[UF6470-RU]BN68-04779H-X0L4.indb 23 2013-03-09 10:19:35
Page 72

Роздільна здатність екрана 1920 x 1080
Вимоги щодо навколишнього середовища
Робоча температура
Робоча вологість
Температура зберігання
Вологість зберігання
Поворот підставки (вліво/вправо) 0°
Звук
(вихідний)
Модель UE32F6800A / UE32F6800S UE40F6800A / UE40F6800S
Розмір екрана
(за діагоналлю)
Розміри (Ш x В x Г)
Корпус
З підставкою
Вага
Без підставки
З підставкою
Модель UE46F6800A / UE46F6800S UE50F6800A / UE50F6800S UE40F6800A / UE40F6800S
Розмір екрана
(за діагоналлю)
Розміри (Ш x В x Г)
Корпус
З підставкою
Вага
Без підставки
З підставкою
Дизайн і технічні характеристики може бути змінено без повідомлення.
✎
Номінальні параметри живлення та відомості про енергоспоживання для цього виробу вказано на
✎
1083,6 x 618,7 x 47,0 мм
1092,4 x 680,2 x 265,6 мм
32 дюймів 40 дюймів
754,8 x 443,7 x 49,5 мм
754,8 x 492,4 x 186,1 мм
5,7 кг
5,9 кг
46 дюймів 50 дюймів 55 дюймів
11,6 кг
11,9 кг
від 10°C до 40°C (50°F до 104°F)
від 10% до 80%, без конденсації
від-20°C до 45°C (-4°F до 113°F)
від 5% до 95%, без конденсації
10 W X 2
950,8 x 543,9 x 47,0 мм
950,8 x 594,6 x 201,4 мм
1165,4 x 664,5 x 47,2 мм
1165,4 x 725,0 x 265,6 мм
13,9 кг
14,2 кг
9,1 кг
9,3 кг
1279,2 x 728,5 x 47,2 мм
1279,2 x 789,0 x 265,6 мм
16,3 кг
16,6 кг
наклейці.
Режим очікування
Щоб зменшити споживання електроенергії, від’єднуйте кабель живлення, якщо не використовуватимете
телевізор упродовж тривалого часу.
Українська - 24
[UF6470-RU]BN68-04779H-X0L4.indb 24 2013-03-09 10:19:35
Page 73

Посібники
Ліцензії
Українська
Рекомендації – лише для ЄС
• Цим компанія Samsung Electronics стверджує, що цей телевізор зі світлодіодною підсвіткою екрана
відповідає усім важливим вимогам та іншим відповідним положенням Директиви 1999/5/EC.
• Офіційну Декларацію сумісності шукайте за адресою http://www.samsung.com, перейдіть до розділу «Support
(Підтримка) > Search Product Support (Пошук з підтримки продукту)» і введіть номер моделі.
• Цей виріб можна використовувати лише у приміщенні.
• Цей виріб можна використовувати в усіх країнах ЄС.
Попередження щодо нерухомого зображення
Уникайте відображення на екрані нерухомих зображень (наприклад, фотографій у форматі jpeg) або нерухомих
елементів (наприклад, логотипу телеканалу, рядка біржових котувань або новин внизу екрана тощо) чи
зображень у панорамному форматі або у форматі 4:3. Тривале відображення нерухомого зображення може
спричинити вигоряння екрана зі світлодіодною підсвіткою, що вплине на якість зображення. Щоб зменшити
ризик виникнення такого ефекту, дотримуйтеся викладених нижче рекомендацій.
• Уникайте перегляду того самого телевізійного каналу протягом тривалого часу.
• Намагайтеся завжди вибирати формат зображення таким чином, щоб воно займало весь екран.
Оптимальний формат можна вибрати в меню налаштування формату зображення на телевізорі.
• Зменште рівень яскравості і контрастності, щоб уникнути появи залишкових зображень.
• Використовуйте усі функції, які розроблені для зменшення ефекту залишкового зображення і вигоряння
екрана. Детальну інформацію читайте в електронному посібнику.
Українська - 25
[UF6470-RU]BN68-04779H-X0L4.indb 25 2013-03-09 10:19:35
Page 74

Қауіпсіздік туралы маңызды нұсқаулар
Ескерту! Қауіпсіздік туралы маңызды нұсқаулар
(Осы құрылғыны орнатпай тұрып, Samsung құрылғыңызда көрсетілген
таңбаларға сай келетін тиісті тарауларды оқыңыз.)
АШПАҢЫЗ, ЭЛЕКТР ҚАТЕРІНЕ ҰШЫРАЙСЫЗ.
АБАЙ БОЛЫҢЫЗ
АБАЙ БОЛЫҢЫЗ: ЭЛЕКТР ҚАТЕРІН АЗАЙТУ ҮШІН ҚАҚПАҒЫН
(НЕМЕСЕ АРТҚЫ ҚАҚПАҒЫН) АЛМАҢЫЗ. ҚҰРЫЛҒЫНЫҢ ІШІНДЕ,
ПАЙДАЛАНУШЫ ЖӨНДЕЙ АЛАТЫН ЕШБІР БӨЛШЕК ЖОҚ. ЖӨНДЕУ
ЖҰМЫСТАРЫНЫҢ БАРЛЫҒЫН БІЛІКТІ МАМАНҒА ТАПСЫРЫҢЫЗ.
• Корпустың ішіндегі, артқы жағы мен астыңғы жағындағы ұяшықтар мен саңылаулар желдету үшін қажет. Осы құрылғының тиімді
жұмыс жасауын қамтамасыз ету үшін және оны қатты қызып кетуден сақтандыру үшін, аталмыш ұяшықтар мен саңылаулар ешқашан
бітелмеуге немесе жабық тұрмауға тиіс.
− Осы құрылғыны кітап сөре немесе кіріктірілген шкаф тәрізді тар жерге, егер ауа айналымы жоқ болса орнатпаңыз.
− Осы құрылғыны батарея немесе қызу резисторының қасына немесе үстіне не күн сәулесі тура түсетін жерге қоймаңыз.
− Осы құрылғының үстіне су құйылған сауыттарды (құмыра т.с.с.) қоймаңыз, себебі өрт немесе электр қатері орын алуы мүмкін.
• Осы құрылғыны жаңбыр немесе суға жақын жерге (ванна, леген, ас үй раковинасының немесе кір жуатын шылапшынның қасына,
ылғалды жертөле немесе бассейн т.с.с. қасына қоймаңыз). Егер бұл құрылғы кездейсоқ су болып қалса, электр желісінен ағытыңыз да,
дереу уәкілетті дилерге хабарласыңыз. Тазалардың алдында құрылғының ашасын розеткадан алып қоюды ұмытпаңыз.
• Бұл құрылғы батареямен жұмыс істейді. Сіз тұрған жерде, осы батареяларды қоршаған ортаға зиян келтірмеу үшін тиісті түрде тастауды
қажет ететін ережелер болуы мүмкін.
• Ескірген батареяны тастау немесе өңдеуден өткізу туралы ақпаратты жергілікті мекемеге хабарласып алыңыз.
• Розетка, қорек сымы немесе адаптерді көрсетілген жүктемесінен асыра жүктемеңіз, себебі өрт немесе электр қатеріне ұшырауыңыз
мүмкін.
• Қорек сымдарын аяққа басылмайтын немесе үстіне не қарсы қойылған заттар жаншып тастамайтын етіп, әсіресе қорек сымының ашаға,
адаптерге жақын ұшына және құрылғыдан шыққан жеріне мұқият назар аудара отырып төсеу керек.
• Құрылғыны найзағай жарқылынан қорғау немесе қасында болмаған не ұзақ уақыт қолданбаған кезде, ашасынан суырып, антенна
немесе кабельдік телевизия жүйесінен ағытыңыз. Бұл найзағай жарқылдаған кезде немесе электр қуаты артқан кезде құрылғыны
бүлінуден сақтайды.
• АТ қорек сымын ТТ адаптеріне жалғау үшін, ТТ кернеу мәнінің, жергілікті электр желісінің техникалық параметрлеріне сай келетініне көз
жеткізіңіз.
• Осы құрылғының ашық жерлеріне ешқашан басқа темір зат сұқпаңыз. Бұлай істегенде, электр қатері орын алуы мүмкін.
• Электр қатеріне ұшырамау үшін, осы құрылғының ішкі жағын ешқашан қолмен ұстамаңыз. Осы құрылғыны тек уәкілетті техник ғана
ашуға тиіс.
• Қорек сымының ашасын мықтап сұғыңыз. Қорек сымын розеткадан ағытқан кезде, міндетті түрде ашасынан ұстап суырыңыз. Қорек
сымын су қолмен ұстамаңыз.
• Егер құрылғы дұрыс жұмыс істемесе - әсіресе, одан әдеттен тыс шу немесе түтін шықса - дереу ашасынан суырыңыз да, уәкілетті
дилерге немесе қызмет көрсету орталығына хабарласыңыз.
• Теледидарды қолданбасаңыз немесе ұзақ уақыт үйде болмасаңыз (әсіресе, балалар, қарт адамдар немесе мүгедек адамдар үйде
жалғыз қалса) ашасын розеткадан суырып ағытып қойыңыз.
− Шаң жиналып қалса, электр қатері, электр ағысы пайда болуы немесе өрт шығып, жарқыл немесе қызу пайда болуы немесе қорек
сымының қаптамасы бүлінуі мүмкін.
• Құрылғыны шаңы көп, температурасы жоғары немесе төмен, аса ылғалды, химиялық заттар сақталатын және 24 сағат жұмыс істейтін
әуежай, вокзал, т.с.с. тәрізді жерлерге орнату үшін міндетті түрде уәкілетті қызмет көрсету орталығына хабарласыңыз.
• Бұлай істемегенде, құрылғыға елеулі нұқсан келеді.
• Тиісті түрде жерге қосылған аша мен розетканы қолданыңыз.
− Жерге дұрыс қосылмаса, электр қатері орын алуы немесе құрылғыға зақым келуі мүмкін. (l-ші топқа жататын құрылғыға ғана
қатысты.)
• Құрылғыны электр желісінен ағыту үшін, ашаны розеткадан ағыту керек, сондықтан да, аша қайта қолдануға дайын тұруға тиіс.
• Балаларға осы құрылғыға тартылуға жол бермеңіз.
• Керек-жарақтарын (батарея т.с.с.) балалардың қолы жетпейтін жерге сақтаңыз.
• Құрылғыны орнықсыз тұрған сөре, көлбеу еден немесе дірілдейтін жерге орнатпаңыз.
• Құрылғыны құлатып алмаңыз немесе оған күш салмаңыз. Құрылғы бүлініп қалса, қорек сымын ағытыңыз да, қызмет көрсету орталығына
хабарласыңыз.
• Қорек сымын розеткадан ағытыңыз да, құрылғыны жұмсақ, құрғақ матамен сүртіңіз. Балауыз, бензол, спирт, сұйылтқыш, құртқұмырысқаға қарсы құрал, ауа тазартқыш, лубрикант немесе жуғыш зат тәрізді химиялық құралдардың ешбірін қолданбаңыз. Бұл
құрылғының сынын бұзуы немесе өнімге басылған жазуларды өшіруі мүмкін.
• Құрылғыға сұйық шашыратуға немесе оған батыруға болмайды.
• Батареяларды отқа тастамаңыз.
• Батареяларды қысқа тұйықтауға, бөлшектеуге немесе қатты қыздыруға болмайды.
• Батареяны дұрыс салмаған кезде жарылыс шығу қаупі бар. Батареяның орнына, дәл осындай батареяны салыңыз.
• ЕСКЕРТУ - ӨРТ ШЫҒУДЫҢ АЛДЫН АЛУ ҮШІН, ОСЫ ҚҰРЫЛҒЫНЫ МАЙ ШАМ НЕМЕСЕ БАСҚА АШЫҚ ОТ КӨЗДЕРІНЕН
АЛЫС ҰСТАҢЫЗ.
Бұл белгіше құрылғының ішінде жоғары
кернеу бар екенін көрсетеді. Осы өнімнің
ішкі бөлшектеріне қол тигізу қауіпті.
Бұл белгі осы өнімді іске қосу және күтіп
ұстауға қатысты маңызды нұсқаулар
көрсетілген кітапшаның өніммен бірге
жеткізілетінін ескертеді.
Казақ - 2
[UF6470-RU]BN68-04779H-X0L4.indb 2 2013-03-09 10:19:36
Page 75

Осы пайдаланушы нұсқаулығындағы суреттер мен сызбалар жалпылама ақпарат ретінде ғана берілген
және олар құрылғының нақты көрінісінен өзгеше болуы мүмкін. Құрылғының дизайны мен техникалық
сипаттамасы алдын ала ескертусіз өзгертілуі мүмкін.
Жаңа ТД-дың функциялары
• 3D: Бұл жаңа функция 3D мазмұнды көруге мүмкіндік береді.
• SMART HUB:
Бұл ТД-дың көп мақсатта қолданылатын және отбасына арналған Smart Hub функциясы бар.
Пайдаланушы Smart Hub функциясымен ғаламторды шарлап, бағдарламаларды қотарып, әлеуметтік
қызметтердің көмегімен отбасымен және достарымен байланыста бола алады. Сонымен қатар, сыртқы
жады құрылғыларында сақталған фотосуреттерді, видео және саз файлдарын тамашалай алады.
™ Smart Hub қызметін бастау үшін басыңыз. Экранның үстіңгі жағында көрсетілген белгілерді пайдаланып
қызметті таңдаңыз.
Әлеуметтік: Ең соңғы YouTube видеоларын тамашалап, Facebook және Twitter сайттарындағы өзіңіздің
және достарыңыздың видео жарияланымдарын қараңыз. ТД-ға камераны (жеке сатылады) қосып,
достарыңызға видео қоңырау шалуыңызға да болады.
Қолданбалар: WebBrowser тәрізді бағдарламаларды қотарыңыз және орнатыңыз.
Фильмдер мен тв-шоулар: Бейнефильмдер мен сериялдарды сыртқы құрылғыны пайдаланбай сатып
алып көріңіз. (Елге байланысты)
Фотосур-р, бейне-р және музыка: Сыртқы жады құралындағы фотосуретті, видео және саз файлдарын
ойнатыңыз.
• Anynet+ (HDMI-CEC): Бұл Anynet+ функциясын қолдайтын, барлық жалғаулы тұрған Samsung
құрылғыларын Samsung ТД-ның қашықтан басқару пультімен басқаруға мүмкіндік береді.
• e-Manual: ТД-ға кіріктірілген егжей-тегжейлі, бейнебеттегі пайдаланушы нұсқаулығымен қамтамасыз етеді.
(ші бет 12)
• SMART байланыс: Осы функцияны қолданып, мәзір параметрлері мен функцияларына қимылдың
көмегімен баруға және басқаруға болады. Smart байланыс функциясын пайдалану үшін ТД камерасы
(жеке сатылады) ТД-ға қосылып тұруға тиіс.(Елге байланысты)
• Құрылғы менедж.: ТД функцияларын USB немесе блютус пернетақтасын және тінтуірді қолданып
пайдаланыңыз.
• Экранның айналық көшірмесі: Сымсыз қосылымды пайдаланып ТД-ға ұялы құрылғылардың экрандарын
шығарады.
Осы өнімді дұрыс тастау (Қолданыстан шыққан электр & және электроника бөлшектері)
(Жеке қоқыс тастау жүйесін қолданатын елдерге қатысты)
Өнімдегі, оның керек-жарақтары немесе ілеспе кітапшасындағы белгі, осы өнім мен оның электроникалық керек-жарақтарын (мысалы,
зарядтағыш құралы, құлақаспабы, USB сымы), қолданыс мерзімі аяқталғаннан кейін басқа тұрмыстық қалдықтармен бірге тастамау керек
дегенді білдіреді. Қалдық дұрыс тасталмаған жағдайда қоршаған ортаға немесе адамдардың денсаулығына келетін зиянның алдын алуға
және материалдық ресурстарды қайтадан қажетке жаратуға өз үлесіңізді қосу үшін бұндай заттарды басқа қоқыс түрлерінен бөлектеп, қалдық
өнімдерді қайта өңдеуден өткізетін жерге апарып тапсырыңыз.
Тұрмыстық құрылғыны қолданушылар, осы заттарды қоршаған ортаға залалсыз түрде қайта өңдеуден өткізу үшін осы құрылғыны қайда
апарып тапсыру, қалай тапсыру туралы егжей-тегжейлі ақпаратты, осы өнімді сатып алған бөлшек сауда орталығына немесе жергілікті
мекемеге хабарласып алуына болады.
Коммерциялық мақсатта қолданушылар, өз жабдықтаушыларына хабарласып, сатып алу келісім-шартының талаптарымен танысуы керек.
Осы өнім мен оның электроникалық керек-жарақтарын басқа да коммерциялық өнімдердің қалдықтарымен араластырып тастауға болмайды.
Осы өнімнің батареяларын дұрыс тастау
(Жеке қоқыс тастау жүйесін қолданатын елдерге қатысты)
Батареядағы, нұсқаулық немесе орамдағы мына белгі, осы өнімнің батареяларын, қолданыстан шыққаннан кейін басқа да тұрмыстық
қалдықтармен бірге тастауға болмайды дегенді көрсетеді. Егер батареяда Hg, Cd немесе Pb тәрізді химиялық элементтердің белгілері
көрсетілсе, онда аталмыш батареядағы сынап, кадмий немесе қорғасынның мөлшері, Еуропалық Одақтың 2006/66 ережесінде ұсынылған
деңгейден артық екендігін білдіреді. Батареяларды дұрыс тастамаған жағдайда, бұл элементтер адам денсаулығына немесе қоршаған ортаға
зиян келтіруі мүмкін.
Табиғи ресурстарды қорғап, материалдарды қайта қолдануға өз үлесіңізді тигізу үшін, батареяларды басқа қоқыстардан бөліп, таусылған
батареяларды қабылдайтын жергілікті мекемеге тапсырыңыз.
Казақ
Казақ - 3
[UF6470-RU]BN68-04779H-X0L4.indb 3 2013-03-09 10:19:36
Page 76

Керек-жарақтар
Төмендегі бөлшектердің ТД-мен бірге жеткізілгенін тексеріңіз. Керек-жарақтардың бірі жетіспесе,
✎
дилерге хабарласыңыз.
Элементтердің түсі мен пішімі үлгі түріне қарай әр түрлі болуы мүмкін.
✎
Жинақтың ішіне кірмеген сымдарды жеке сатып алуға болады.
✎
Қорапты ашқанда орам материалдарының арт жағында ешбір керек-жарақтың қалып қоймағанына көз
✎
жеткізіңіз.
АБАЙ БОЛЫҢЫЗ: ЖИНАҚТАН ШЫҒЫП КЕТПЕС ҮШІН МЫҚТАП СҰҒЫҢЫЗ
[
• Smart Touch Control & батареялары (AAA x 2) • Қорек сымы
• Пайдаланушы нұсқаулығы • Тазалағыш шүберек
• Кепілдік түбіртегі (Кей жерлерде берілмейді)
• Реттеу нұсқаулығы
• Samsung 3D Active көзілдірігі (40 дюймдік және бұдан үлкен үлгі)
Ұстағыш-Сымдарға
арналған тұрғы
• Келесі жағдайларда әкімшілік төлемақы төлеу қажет болуы мүмкін:
− (a) техникті үйге шақырсаңыз, бірақ құрылғыдан ешбір ақау табылмаса,
(яғни, осы пайдаланушы нұсқаулығының тиісті тұстарын оқымасаңыз)
− (ә) құрылғыны жөндеу орталығына әкелсеңіз, бірақ құрылғыда
ешбір ақау болмаса (яғни, осы пайдаланушы нұсқаулығының тиісті тұстарын оқымасаңыз).
• Бұндай әкімшілік төлемақының мөлшері, қандай да бір жұмысты орындау немесе үйіңізге барар алдында
алдын ала хабарланады.
Ескерту: Дұрыс ұстамаған кезде түскен
салмақтың әсерінен экранға зақым келуі
мүмкін. ТД-ды суретте көрсетілгендей
шетінен ұстап көтеруді ұсынамыз.
Ұстағыш-Шығырық
(Үлгілерге байланысты)
CI Card адаптері IR ұзартқыш сымын
Бұл экранды
Ұстамаңыз!
Қақпаққа қатысты сақтық шарасы
Үлгі түріне қарай артқы панель әр түрлі болуы мүмкін.
✎
TД-дың артқы панелі
АБАЙ БОЛЫҢЫЗ: Қақпақтың тетігі білікті
қызмет көрсету мамандарына ғана арналған.
Электр немесе өрт қатерін азайту үшін, егер
білікті маман болмасаңыз, қақпақтың тетігін
пайдаланбаңыз.
Қақпағы
Казақ - 4
[UF6470-RU]BN68-04779H-X0L4.indb 4 2013-03-09 10:19:37
Page 77

Негізгі функциялары
Smart Touch Control пультін пайдалану
Үлгі түріне байланысты.
✎
˜
Дауысты тану пәрмендерін беру үшін MIC (микрофон) пайдалануға болады. VOICE
Дауысты тану функциясына нұсқаудың нақты айтылмауы, дыбыс деңгейі немесе қоршаған ортаның шуылы әсер етуі мүмкін.
✎
ТД-ды қосуға және сөндіруге арналған.
Қолжетімді видео сигнал көздерін
бейнелеуге және таңдауға арналған.
түймешігін бассаңыз болды.
ТД-ға қосылған жерсерік немесе кабель
қорапшасын қосыңыз және сөндіріңіз. Ол
үшін Smart Touch Control пультін әмбебап
қашықтан басқару пульті ретінде теңшеу
керек.
VOICE
Нұсқау мәтінін дауыстап айту арқылы
енгізіңіз.
˜
ТД-дың дыбысын қосуға/
сөндіруге арналған.
Аудио сипаттамасы
функциясын таңдау
үшін осы түймешікті
басып ұстап тұрыңыз.
(Елге немесе аймаққа
Осы түймешікті Журнал және Іздеу
функцияларының арасында ауыстырады.
Түрлі-түсті түймешіктер ТД-дың ағымдық
орындап тұрған функциясына байланысты
Алдыңғы мәзірге қайтуға арналған.
бағдарламалардың барлығынан шығу үшін
осы түймешікті басып ұстап тұрыңыз.
Smart Hub бағдарламаларын көрсетеді.
Эл. нұсқаулық тарауын, SMART ТД
функциялары > Smart Hub бөлімін
Орындалып тұрған бағдарламадан
✎
MUTE
жәнеСубтитр
байланысты.)
Дыбысты реттейді.
әр түрлі жұмыс істейді.
Ағымдық жұмыс істеп тұрған
қараңыз.
™
оңай шығу үшін
түймешігін
басыңыз.
Арналарды ауыстырады.
Виртуальды қашықтан басқару құралын
бейнебетке шығарады. Эл. нұсқаулық
тарауын, ТД-ды басқару > Виртуальды
қашықтан басқару функциясын
пайдалану функциясын қараңыз.
Осы түймешікті басып ұстап тұрыңыз.
Виртуальды қашықтан басқару тақтасына
жылдам қатынау панелі пайда болады.
Бейнебет түймешіктерін оңай таңдауға
болады.
Сенсорлық тақта
• Бейнебеттегі кезелімді жылжыту
үшін оны Сенсорлық тақта үстімен
жылжыту керек.
• Орындау, қосу немесе бөлектелген
элементті таңдау үшін Сенсорлық
тақтаны басыңыз.
• Бейнебетке Арналар тізімі -н шығару
үшін сенсорлық тақтаны басып ұстап
тұрыңыз.
Әр сандық арнаның бағдарлама кестесін,
соның ішінде шоу-бағдарламаларды
да қараңыз. Сонымен қатар, Қарауды
жоспарлау немесе Жазуды
жоспарлау функциясын орнату үшін,
сенсорлық тақта арқылы жоспарланған
бағдарламаны басыңыз.
Казақ
ТД-ға қосу
ТД-ды Smart Touch Control құралымен іске қосу үшін әуелі оны ТД-мен блютус арқылы жұптастыру керек. Дегенмен, Smart
Touch Control тек жұптастырылған Samsung ТД-да ғана жұмыс істейді.
1. ТД сөніп тұрғанда, алғаш рет жұптастыру үшін Smart Touch Control пультін ТД-дың қашықтан басқару сигналын
қабылдағышқа бағыттап, ТД-дың түймешігін басыңыз. Тек осы түймешік ғана IR сигналын жібереді. Қашықтан басқару
ресиверінің орналасатын орны үлгіге байланысты әр түрлі болуы мүмкін.
2. Экранның астыңғы сол жағында блютус белгісі төменде көрсетілгендей пайда болады. Содан кейін ТД Smart Touch
Control құралына автоматты түрде қосылуға әрекет жасайды.
[UF6470-RU]BN68-04779H-X0L4.indb 5 2013-03-09 10:19:37
<Қосылуға әрекет ету және аяқтау белгілері>
Казақ - 5
Page 78

Smart Touch Control пультін қайта жалғау
<Smart Touch Control жұптастыру түймешігі >
ТД және Smart Touch Control құралының арасындағы байланысты қайта орнату қажет болса, Smart
Touch Control құралының арт жағындағы жұптастыру түймешігін, ТД-дың Қашықтан басқару ресиверіне
бағыттап басыңыз. Smart Touch Control батареясының қақпағын алып, жұптастыру түймешігін табуға
болады. Жұптастыру түймешігін басқанда, басқару құралы мен ТД арасында автоматты түрде байланыс
қайта орнайды.
Батарея қуатының төмендегенін ескерту
Smart Touch Control құралын пайдаланып тұрған кезде батареяның қуаты азайып, индикаторы жыпылықтаса,
бейнебеттің астыңғы сол жағында келесі ескерту терезесі пайда болады. Егер ескерту терезесі пайда болса,
Smart Touch Control батареясын ауыстырыңыз. Ұзақ пайдалану үшін сілті батареяларын пайдаланыңыз.
Батареяларды салу (AAA X 2)
1
2
3
1. Батареяның қақпағын таспаны немесе пластик картаны пайдаланып шамалы көтеріңіз. Содан кейін,
қақпақтың кертігін тырнағыңызбен көтеріп, қақпақты әбден алыңыз.
2. 2 AAA батареяларының оң және теріс полюстарын дұрыс келтіріп салыңыз.
3. Батареяның қақпағын қашықтан басқару пультінің арт жағына келтіріп, шеткі жақтары қашықтан басқару
пультіне әбден кіріккенше басыңыз.
Сенсорлық тақтаны пайдалану
Сенсорлық тақтаны әр түрлі функцияларды орындау үшін пайдаланыңыз. Smart Touch Control құралын
пайдалануға қатысты бейнебеттегі нұсқаулықты қарау үшін Оқулық (Бейнебет мәзірі > Жүйе > Құрылғы
менедж. > Smart Touch Control параметрлері > Оқулық) функциясына барыңыз.
Сүйрету Сенсорлық
Сенсорлық тақта үстімен қалаған бағытқа жылжыңыз.
Кезелімді немесе меңзерді саусағыңыз жылжыған бағытпен
жылжытады.
Сенсорлық тақтаны басыңыз. Сонда кезелімдегі элемент
таңдалады.
Казақ - 6
[UF6470-RU]BN68-04779H-X0L4.indb 6 2013-03-09 10:19:38
Page 79

Арналарды нөмірлерін енгізіп өзгерту
ТД қарап отырып, сандарды енгізетін терезені экранға шығару үшін сенсорлық
тақтаның сол немесе оң жағынан шығып тұрған сызықты түртіңіз. Қарағыңыз
келген арнаның нөмірін саусағыңызбен түртіп енгізіңіз. Арнаның нөмірі
танылған кезде, экраннан көрінеді де, ТД тиісті арнаға ауысады. Дегенмен,
ТД енгізілген нөмірді дұрыс тани алмауы мүмкін. Енгізілген нөмірлер дұрыс
танылу үшін келесі нұсқаулықты қараңыз.
Нөмірлерді енгізу нұсқаулығы
Нөмірлерді енгізген кезде келесі сызбаларға
қараңыз. Төменде көрсетілген ретті
сақтамасаңыз, ТД енгізілген нөмірді дұрыс тани
алмауы мүмкін.
Қалып-күй мен Хабарландыру баннерін көрсету
Қалып-күй және хабарландыру баннерін бейнебеттің үстіңгі жағынан көрсету үшін Smart Touch Control
құралының MORE түймешігін басып, содан кейін виртуальды қашықтан басқару панелінің STATUS түймешігін
таңдаңыз.
жазба және іздеу
Журнал
HISTORY / SEARCH түймешігін басып, содан кейін бейнебеттің астыңғы жағында көрсетілген тізімнен Журнал
параметрін таңдаңыз. Сонда жақында барған арналар, медиа мазмұн және бағдарламалардан тұратын
интерактивті тізім көрсетіледі.
іздеу
HISTORY / SEARCH түймешігін екі рет басыңыз. Көптеген бағдарламалар мен олардың мазмұндарын ТД-дан
ғана емес, интернеттен іздеу үшін іздеу критерийлерін енгізіңіз.
Сенсорлық тақтаны реттеу
Бейнебет мәзірі > Жүйе > Құрылғы менедж. > Smart Touch Control параметрлері > Сенсорлық сезгіштік
Пайдаланушылар Smart Touch Control сенсорлық тақтасының сезімталдығын реттей алады. Сезгіштік деңгейін
реттеп, барынша ыңғайлы пайдалану үшін Сенсорлық сезгіштік параметрін орнатыңыз.
Казақ
Казақ - 7
[UF6470-RU]BN68-04779H-X0L4.indb 7 2013-03-09 10:19:38
Page 80

Виртуальды қашықтан басқару функциясын пайдалану
Виртуальды қашықтан басқару панелін бейнебетке шығару үшін MORE түймешігін басыңыз. Виртуальды
қашықтан басқару тақтасы сандық панельден, ойнатуды басқаратын панельден және жылдам қатынау
панелінен тұрады. Сандар мен түймешіктерді таңдау үшін Сенсорлық тақтаны пайдаланыңыз. MORE
түймешігін басып ұстап тұрыңыз. Виртуальды қашықтан басқару тақтасына жылдам қатынау панелі пайда
болады. Бейнебет түймешіктерін оңай таңдауға болады.
Виртуальды қашықтан басқару панелін өзгерту.
Экранда көрсетілетін панель ретінде сандық панельді, ойнатуды басқаратын панельді немесе жылдам
қатынау панелін таңдаңыз.
Кезелімді солға немесе оңға жылжыту үшін сенсорлық тақтаны пайдаланыңыз. Кезелім сол жақ немесе оң жақ
ең шеткі жиектен асқан кезде панель өзгереді.
Панельді оңай өзгерту үшін сенсорлық тақтаның солға/оңға айналдыру функциясын пайдаланыңыз.
Сандық панельді пайдалану
ТД қарап отырып, пернетақта бейнебетіне немесе веб-бетке сандарды енгізу үшін немесе арналарды өзгерту
үшін сандық панельді пайдаланыңыз. Сандық пернетақтаны пайдаланып арнаны өзгерткен кезде арна
жазбасы сақталады да, алдыңғы арналарға оңай оралуға болады.
Ойнатуды басқаратын панельді пайдалану
Ойнатуды басқаратын панельмен файлды кідіртуге, артқа, алға жылдам айналдыруға, келесі файлға өтуге
және медиа мазмұнды тамашалағанда бұдан да көп функцияларын пайдалануға болады.
Жылдам қатынау панелін пайдалану
INFO, MENU және e-Manual түймешіктеріне жылдам барыңыз. Дегенмен, түймешіктердің қолжетімділігі Smart
Touch Control құрылғысының жұмыс режиміне (тек ТД-мен ғана, әмбебап қашықтан басқару пульті ретінде,
т.с.с.) байланысты әр түрлі болады.
ТД-ды қосу
ТД-ды қашықтан басқару пультінің P түймешігін немесе ТД панелін пайдаланып қосыңыз.
Құрылғының Түсі мен пішімі үлгі түріне қарай әр түрлі болуы мүмкін.
✎
ТД басқарушысы дегеніміз, ТД-дың артқы оң жағында орналасқан, ТД-ды қашықтан басқару пультін
✎
пайдаланбай басқаруға мүмкіндік беретін кішкене джойстик-түймешік.
Функция мәзірі
Қашықтан басқару пультінің сенсоры
Smart Touch Control пультін пайдаланғанда күту
режимінің LED шамы жұмыс істемейді (
басқа).
Казақ - 8
mR
P
ТД басқару құралы
Сурет ТД-дың алдыңғы
жағына қарап салынған.
P
түймешігінен
[UF6470-RU]BN68-04779H-X0L4.indb 8 2013-03-09 10:19:39
Page 81

ПАРАМЕТРЛЕРДІ ОРНАТУ
ТД алғаш рет қосылғанда бастапқы параметр орнататын тілқатысу терезесі пайда болады. Бастапқы параметр
орнату үдерісін, соның ішінде мәзір тілін, арнаны іздеу, желіге қосылу және басқа функцияларды баптауды
аяқтау үшін бейнебеттегі нұсқауларды орындаңыз. Әр қадам сайын, параметрді таңдаңыз немесе қадамнан
өтіп кетіңіз. Пайдаланушылар осы әрекетті кейін Бейнебет мәзірі > Жүйе > Орнату мәзірінен қолдан қоса
алады.
Егер кез келген құрылғыны орнатпай тұрып HDMI1 ұяшығына жалғасаңыз, Арна ресурсы режимі
✎
автоматты түрде Декодер қалпына қойылады.
Егер STB декодері режимін таңдағыңыз келмесе,Aнтенна параметрін таңдаңыз.
✎
Видео құрылғыларды ауыстыру
ТД-ға қосылған құрылғыларды ауыстыру үшін SOURCE түймешігін басыңыз.
Мысалы, екінші HDMI ұяшығына қосылған ойын құрылғысына қосылу үшін SOURCE түймешігін басыңыз.
Сигнал көзі тізімінен HDMI2 ұяшығын таңдаңыз. Құрылғыға байланысты ұяшық атаулары әр түрлі болуы
мүмкін.Келесі функцияларға бару үшін бейнебетінің үстіңгі оң жақ бұрышынан Құралд. түймешігін қараңыз.
• Ақпарат
Қосылған құрылғылар туралы толық ақпаратты қараңыз.
• Атын өзгерту
Сыртқы сигнал көздерін оңай анықтау үшін ТД-ға қосылған құрылғылардың атауларын өзгертуге болады.
ТД-дың HDMI (DVI) ұяшығына HDMI сымымен қосылған компьютер арқылы, мысалы, Атын өзгерту
функциясын ДК режиміне өзгертуге болады.
ТД-дың HDMI (DVI) ұяшығына HDMI-DVI сымымен қосылған компьютер арқылы, мысалы, Атын өзгерту
функциясын DVI PC режиміне өзгертуге болады.
ТД-дың HDMI (DVI) ұяшығына HDMI-DVI сымымен қосылған АВ құрылғысы арқылы, мысалы, Атын
өзгерту функциясын DVI құрылғы-ры режиміне өзгертуге болады.
Казақ
• Жаңарту
Егер қосылған құрылғыны тізімнен көре алмасаңыз осы функцияны таңдаңыз. Жаңарту функциясын
таңдағаннан кейін тізімде құрылғы көрсетілмесе, ТД-құрылғы қосылымының қалып-күйін тексеріңіз.
• USB құрылғысын алып тастау
USB құралын тізімнен қауіпсіз түрде алыңыз. Бұл функция USB құралы таңдалып тұрса ғана жұмыс
істейді.
• Әмбебап қашық-тан басқ. жиынтығы
Жаңа сыртқы құрылғыны Touch Remote Control көмегімен басқару үшін қосқыңыз келсе, SOURCE
түймешігін басып, бейнебеттің үстіңгі оң жақ бұрышынан Әмбебап қашық-тан басқ. жиынтығы
параметрін таңдаңыз. Пайдаланушылар әмбебап қашықтан басқару пультін қолданып, ТД-ға қосылған
жерсерік ресивері, блю-рей ойнатқышы және АВ ресивері тәрізді сыртқы құрылғыларды басқара алады.
Казақ - 9
[UF6470-RU]BN68-04779H-X0L4.indb 9 2013-03-09 10:19:39
Page 82

Әмбебап қашықтан басқару функциясын баптау
Бұл ТД-дың ТД-ға қосылған жерсерік ресивері, блю-рей ойнатқыштары, үй театрлары және басқа сыртқы
үшінші тарап құрылғыларын ТД-дың қашықтан басқару пультімен басқаруға мүмкіндік беретін әмбебап
қашықтан басқару функциясы бар.
IR ҰЗАРТҚЫШ СЫМЫ мен сыртқы құрылғының арасында, суретте көрсетілгендей кем дегенде 5 см орын
қалдырыңыз. IR ҰЗАРТҚЫШ СЫМЫН сыртқы құрылғының қашықтан басқару пультінің сигнал қабылдағышына
бағыттаңыз. IR ұзартқышы мен сыртқы құрылғы арасында ешбір кедергі болмауға тиіс. Кедергі болған
жағдайда қашықтан басқару сигналын тасымалдауға бөгет болады.
Сыртқы құрылғыны қосыңыз
1. Әмбебап қашықтан басқару функциясын орнатқыңыз келген сыртқы құрылғыны таңдаңыз да, SOURCE
түймешігін басып Сигнал көзі бейнебетін шығарыңыз.
2. Бейнебеттің үстіңгі жағынан Әмбебап қашық-тан басқ. жиынтығы параметрін таңдаңыз. Сонда әмбебап
қашықтан басқару параметрін орнату үдерісі басталады.
3. Бейнебеттегі нұсқауларды орындап, әмбебап қашықтан басқару пультін баптаңыз. Егер іске аспаса,
қашықтан басқару пультін үлгі нөмірін қолдан енгізіп баптаңыз.
Казақ - 10
[UF6470-RU]BN68-04779H-X0L4.indb 10 2013-03-09 10:19:39
Page 83

ЖАЛПЫ ИНТЕРФЕЙС ұяшығына (ТД қарау
картасының ұяшығы) қосылу
CI картасын немесе CI картасының адаптерін қосу немесе ағыту үшін ТД-ды сөндіріңіз.
✎
CI Card адаптерін жалғау
Адаптерді мына жерде көрсетілгендей жалғаңыз.
CI CARD адаптерін орнату үшін ТД-ға жапсырылған
✎
жапсырманы алыңыз.
CI CARD адаптерін жалғау үшін мына қадамдарды
орындаңыз.
Адаптерді қабырғалық жинақты орнатпай немесе
✎
“CI немесе CI+ CARD" картасын салмай тұрып
орнатуды ұсынамыз.
1. CI CARD адаптерін 1-ші құрылғыдағы екі саңылауға салыңыз.
ТД-дың арт жағында, COMMON INTERFACE ұяшығының қасында орналасқан екі саңылауды
✎
табыңыз.
2. CI CARD адаптерін 2-ші құрылғының COMMON INTERFACE ұяшығына жалғаңыз.
3. "CI немесе CI+ CARD" картасын салыңыз.
CI картасын ТД-ды қабырғаға орнатпай тұрып салуды ұсынамыз. Орнатып болғаннан кейін
салу қиын болуы ықтимал. Картаны CI Card адаптерін ТД-ға орнатып болғаннан кейін
салыңыз. Егер модульді орнатпай тұрып картаны салсаңыз, модульді орнату қиынға соғады.
ТД-дың
артқы панелі
Казақ
"CI немесе CI+ CARD" картасын қолдану
Ақылы арналарды көру үшін “CI немесе CI+ CARD” картасын салу керек.
• Егер “CI немесе CI+ CARD” картасын салмасаңыз, кей
арналарда “Scrambled Signal” жазуы көрсетіледі.
• 2-3 минуттан кейін бейнебетте телефон нөмірі, “CI немесе
CI+ CARD” анықтағышы, хост анықтағышы және басқа да
деректерді қамтыған жұптастыру ақпараты көрсетіледі. Егер
ақаулық туралы ақпарат пайда болса, қызмет провайдеріне
хабарласыңыз.
• Арна деректерін теңшеу жұмысы аяқталған кезде, арна
тізімінің жаңартылғанын білдіретін "Жаңарту аяқталды" хабары
көрсетіледі.
ЕСКЕРІМ
✎
• “CI немесе CI+ CARD” картасын жергілікті кабельдік телевидение провайдерінен алу керек.
• “CI немесе CI+ CARD” картасын еппен қолмен тартып шығарыңыз, себебі “CI немесе CI+ CARD” жерге
түсіп кетсе, оған нұқсан келуі мүмкін.
• “CI немесе CI+ CARD” картасын онда көрсетілген бағытта орнатыңыз.
• COMMON INTERFACE ұяшығының орналасатын жері оның үлгісіне байланысты әр түрлі болуы мүмкін.
• Кей елдер мен аймақтарда “CI немесе CI+ CARD” модуліне қолдау көрсетілмеуі мүмкін, уәкілетті
дилерге хабарласыңыз.
• Мәселе туындаған жағдайда, қызмет провайдеріне хабарласыңыз.
• Ағымдық антенна параметрлеріне қолдау көрсететін “CI немесе CI+ CARD” картасын салыңыз.
Бейнебет бұрмалануы немесе көрсетілмеуі мүмкін.
Казақ - 11
[UF6470-RU]BN68-04779H-X0L4.indb 11 2013-03-09 10:19:40
Page 84

e-Manual қарау
Кіріктірілген эл. нұсқаулықта ТД-дың негізгі функциялары туралы ақпарат қамтылған.
Бұл ТД-дың кіріктірілген пайдаланушы нұсқаулығы бар. Оны оқу үшін келесі тәсілдердің бірін пайдаланыңыз:
• Қолдау мәзірін ашып, e-Manual (Ақауларды жою) параметрін таңдаңыз.
• Басқару түймешіктерін экранға шығару үшін Smart Touch Control пультінің MORE түймешігін басыңыз.
Сенсорлық тақтаны e-Manual пайда болғанша түртіңіз және оны таңдаңыз.
Көк сөздер бейнебет мәзірінің функцияларын көрсетеді және ақ көк сөздер қашықтан басқару
✎
түймешіктерін көрсетеді.
Осы нұсқаулықтың қағазға басып шығаруға болатын нұсқасын www.samsung.com/support сайтынан
✎
алуға болады.
Бетті айналдыру
Бетті айналдыру үшін келесі тәсілдердің бірін пайдаланыңыз:
• Экранның оң жақ шетіндегі сырғыма жолақтың
• Сенсорлық тақтаның сол немесе оң жақ шетіндегі сызық бойымен сырғытыңыз немесе жоғары не төмен
түртіңіз.
• Кезелімді экранның оң жақ шетіндегі
немесе төмен сүйрету немесе шерту әрекеттерін орындаңыз.
немесе түймешікке қойып, сенсорлық тақта үстінде жоғары
Үстіңгі белгілерді пайдалану.
Беттерді шарлау үшін бейнебеттің үстіңгі сол жағындағы Артқа, Алға, және Ашық бет белгілерін
пайдаланыңыз. Бұл белгілерге екі немесе одан да көп беттен өткеннен кейін қолжетімді.
немесе түймешігін басыңыз.
Негізгі бетке қайта оралу
Негізгі бетке оралу үшін a түймешігін басыңыз немесе бейнебеттің үстіңгі оң жағынан белгісін таңдаңыз.
Индексті іздеу
Индексті экранға шығару үшін b түймешігін басыңыз немесе бейнебеттің оң жақ үстіндегі белгісін
таңдаңыз. Термин жазылған бетті бейнебетке шығару үшін терминді таңдаңыз.
Беттерді іздеу
Іздеу бейнебетіне бару үшін { түймешігін басыңыз немесе бейнебеттің оң жақ үстіңгі жағынан белгісін
таңдаңыз. Ізделетін сөз тіркесін енгізіп, Дайын параметрін таңдаңыз. Тиісті бетке бару үшін іздеу нәтижелері
тізімінен элементті таңдаңыз.
Эл. нұсқаулықты жабу
e-Manual жабыңыз да, RETURN түймешігін басып ұстап тұрыңыз немесе бейнебеттің үстіңгі оң жақ
бұрышындағы
параметрін таңдаңыз.
Мәзір элементіне өту
Ағымдық бөлімде сипатталған мәзір элементіне тура өту үшін параметрін таңдаңыз. Мәзір
элементінен e-Manual ішіндегі тиісті бөлімге тура өтуге болады. Егер нақты мәзір функциясына қатысты
e-Manual жазбасын оқығыңыз келсе, виртуальды қашықтан басқару панелінің e-Manual түймешігін басып,
тиісті e-Manual бетін жүктеңіз.
Мәзірге байланысты функцияға қолжетімсіз болуы мүмкін.
✎
Казақ - 12
[UF6470-RU]BN68-04779H-X0L4.indb 12 2013-03-09 10:19:41
Page 85

Желіні теңшеу
Жаңартылған эл. нұсқаулықты пайдалану
Smart Hub функциясын ашып,Қолданбалар, содан кейін Қос-ша бағ-лар параметрін таңдаңыз. Эл.
нұсқаулықты жаңарту тәсілі, бағдарламаны жаңартатын тәсілмен бірдей.
Қос-ша бағ-лар бейнебетінен Бағ-ды жаңарту параметрін таңдаңыз. Тізімнен эл. нұсқаулықты таңдаңыз.
Эл. нұсқаулық соңғы нұсқаға дейін жаңара бастайды. Дегенмен, бейнебетте Бағ-ды жаңарту бағдарламаны
жаңарту қажет болған кезде ғана көрсетіледі.
Желіге қосылу
Smart ТД-ды желілік қауымдастыққа қосқан кезде Smart Hub тәрізді желідегі қызметтерге қосылуға, сондай-ақ
бағдарлама жаңартылымдарын алуға мүмкіндік туады.
Желілік байланыс - Сымсыз
ТД-ды интернетке стандартты роутерді немесе модемді пайдаланып қосыңыз.
DHCP сервері бар сымсыз
IP роутері немесе модемі
Қабырғадағы LAN ұяшығы
LAN сымы (жинаққа кірмейді)
Сымсыз желіге қатысты сақтық шаралары
• Бұл Smart ТД IEEE 802.11a/b/g /n тілқатысу протоколдарына қолдау көрсетеді. Samsung компаниясы
IEEE 802.11n протоколын қолдануды ұсынады. Себебі желіден видео ойнатқан кезде, видео бірқалыпты
көрсетілмеуі мүмкін.
• Сымсыз желіні пайдалану үшін ТД сымсыз роутерге немесе модемге қосылып тұруға тиіс. Егер сымсыз
роутер DHCP функциясына қолдау көрсетсе, ТД желіге DHCP немесе тұрақты IP мекенжайын пайдаланып
сымсыз қосыла алады.
• Сымсыз роутер үшін ағымдық қолданылмай тұрған арнаны таңдаңыз. Сымсыз роутер үшін таңдалған
арнаны басқа құрылғы қолданып тұрса, әдетте бөгеуіл пайда болады және/немесе қосылым іске аспауы
мүмкін.
• Көпшілік сымсыз желілердің балама қауіпсіздік жүйесі бар. Сымсыз желінің қауіпсіздік жүйесін қосу үшін
таңбалар мен сандарды пайдаланып қауіпсіздік кілтін жасау керек. Содан кейін сымсыз желіге қосылу үшін
қауіпсіздік кілті қолданылады.
Казақ
Казақ - 13
[UF6470-RU]BN68-04779H-X0L4.indb 13 2013-03-09 10:19:41
Page 86

Желінің қауіпсіздік протоколдары
ТД келесі сымсыз желінің қауіпсіздік протоколдарына ғана қолдау көрсетеді және сертификатталмаған сымсыз
роутерлерге қосыла алмайды:
• Түпнұсқалықты растау режимдері: WEP, WPAPSK, WPA2PSK
• Кодтау тәсілдері: WEP, TKIP, AES
Егер сымсыз роутерде Pure High-throughput (Greeneld) 802.11n режимі таңдалып, кодтау тәсілі ретінде
WEP немесе TKIP таңдалса, Samsung Smart ТД-ы жаңа Wi-Fi сертификаттау стандарттары бойынша желіге
қосылуға қолдау көрсетпейді.
Егер сымсыз роутер WPS (қорғалған Wi-Fi бапталымы) жүйесін қолдаса, желіге PBC (батырма түймешікті
теңшеу) немесе PIN (Жеке айғақтауыш нөмір) арқылы қосылуға болады. WPS функциясы SSID және WPA
пернесінің параметрлерін автоматты түрде теңшейді.
Желілік байланыс - Сым арқылы
Теледидарды желіге, желінің параметрлеріне қарай, сымды қолданып үш негізгі тәсілмен қосуға болады. Бұл
тәсілдер төменде сипатталған:
TД-дың артқы
Қабырғадағы Модем ұяшығы
Сыртқы Модем
(ADSL/VDSL/Кабель ТД)
панелі
Модем сымы (жинаққа кірмейді) LAN сымы (жинаққа кірмейді)
TД-дың артқы
Қабырғадағы Модем ұяшығы
Модем сымы
(жинаққа кірмейді)
Қабырғадағы LAN ұяшығы
ТД 10мбит/с мәнінен аз немесе осыған тең жылдамдығы бар желілерге қолдау көрсетпейді.
✎
Cat 7 сымын қолданып қосылымды жүзеге асырыңыз.
✎
Сыртқы Модем
(ADSL/VDSL/Кабель ТД)
LAN сымы
(жинаққа кірмейді)
LAN сымы (жинаққа кірмейді)
IP роутерінің DHCP
сервері бар
LAN сымы
(жинаққа кірмейді)
TД-дың артқы
панелі
панелі
Казақ - 14
[UF6470-RU]BN68-04779H-X0L4.indb 14 2013-03-09 10:19:42
Page 87

3D негізгі функциялары
3D Active көзілдірігі
Бұл функция 40 дюймдік және бұдан үлкен
✎
үлгілерде ғана жұмыс істейді.
Функциялары
Samsung компаниясының SSG-5100GB 3D көзілдірігі
3D суреттерін 3D ТД-да көруге мүмкіндік береді.
Samsung 3D көзілдірігі Samsung 3D ТД-мен 2.4ГГц
RF жиілігі бойынша жұмыс істейді.
Samsung 3D көзілдіріктері 2011, 2012 және 2013-
✎
ші жылдары шығарылған Samsung 3D ТД-ның
D, E және F серияларымен сыйысымды. Бұл
3D көзілдіріктерін басқа блютус құралдарына
қосуға болмайды.
Бөлшектері
LED индикаторы & Қуат түймешігі
3D Active көзілдіріктерін
жұптастыру
Жұптастыру деген не? Жұптастыру дегеніміз,
✎
3D көзілдірігі мен 3D ТД-ын өзара қосып, екі
құрылғының өзара дерек алмасуын білдіреді.
Жұптастыру үдерісі барысында Samsung ТД
✎
мен 3D көзілдірігінің арасы 19,5 дюймнен (50
см) қашық болмауын қамтамасыз етіңіз.
• Көзілдірікті қосу
Қуат түймешігін
шамалы басыңыз.
Жасыл LED
индикаторы 3
секундқа жанады.
(3D көзілдірігін
қолданар алдында, ТД-да 3D функциясының
қосылғанына көз жеткізіңіз.)
Казақ
Батарея қақпағы
Сұйық кристалл
қақпақ
Көзілдіріктің таққыштарын тағу және көзілдірікті ТДмен жұптастыру тәсілі туралы ақпаратты, жеке 3D
көзілдірігінің пайдаланушы нұсқаулығынан қараңыз.
Батареяны ауыстыру
Егер қызыл LED индикаторы екі секунд сайын
үздіксіз жыпылықтаса, жаңа батарея салыңыз.
Батареяның "+" белгісі салынған жағын,
✎
батарея ұяшығының "+" белгісі салынған
жағына салыңыз.
Батареяның қалған қуатын тексеру үшін осы
✎
нұсқаулықтың жұптастыру тарауын қараңыз.
Батареяның қақпағын
төмен тартыңыз
Батареяны
ауыстырыңыз
Батареяның қақпағын
ашыңыз
Батареяның қақпағын
төмен итеріңіз
Батареяны алыңыз
Батарея қақпағын
жабыңыз
• Көзілдірікті сөндіру
Қуат түймешігін шамалы басыңыз. Қызыл LED
индикаторы 3 секундқа жанады.
• Жұптастыру әрекетін орындау үстінде.
ТД-ды қосыңыз да, әбден тоққа қосылғанша
күтіңіз.Көзілдіріктің Қуат түймешігін басып ұстап
тұрыңыз.Жасыл және қызыл LED индикаторлары
2 секунд кезек-кезек жыпылықтайды.
• Жұмыс ауқымы
Ұсынылатын жұптастыру қашықтығ
Ұсынылатын қарау қашықтығы
Ұсынылатын қарау
қашықтығы
Ұсынылатын жұптастыру
қашықтығы
3D көзілдіріктерін жұптастырып болғаннан
✎
кейін батареяның қалған қуаты ТД экранынан
көрсетіледі. (Бұл функция 2013-тен
бастап шығарылған Samsung 3D ТД-ның F
серияларында және 3D көзілдіріктерінде
жұмыс істейді.)
Егер көзілдірік пен ТД-ды жұптастыру әрекетін
✎
жалғастыра берсеңіз, батарея қуаты әжептәуір
төмендейді. Дегенмен, минутқа жуық уақыт
ішінде батареяның қуаты белгілі деңгейге
келеді.
2~6м (6,5-19,5 фут)
50 см не бұдан аз (19,5 дюйм)
Казақ - 15
[UF6470-RU]BN68-04779H-X0L4.indb 15 2013-03-09 10:19:42
Page 88

Жұмыс жасау қашықтығы көзілдірік пен ТД
✎
арасында кедергілердің (адам, темір, қабырға,
т.с.с.) бар-жоғына және блютус сигналының
қуатына байланысты.
3D көзілдірігін қолданбаған кезде сөндіріп
✎
қойыңыз. Егер 3D көзілдірігін іске қосулы қалпы
қалдырсаңыз, батареяның қолданыс мерзімі
азаяды.
Жұптастыру қадамдары
1. ТД-ды қосыңыз да, көзілдірікті ТД-дан 19,5
дюймге дейін жылжытыңыз.
2. 3D көзілдірігінің қуат түймешігін шамалы
басыңыз. 3D көзілдірігі тоққа қосылады да,
жұптастыру әрекеті басталады.
3. Жұптастыру сәтті аяқталған кезде, ТД
бейнебетінде “3D көзілдірігі қосылды.” деген жазу
көрсетіледі.
• Егер жұптастыру сәтсіз аяқталса, 3D
көзілдірігі сөнеді.
• Егер алғашқы жұптастыру қадамы сәтсіз
аяқталса, ТД-ды сөндіріңіз де, қайта қосып,
2-ші қадамды орындаңыз.
Ақаулықтарды жою
• 3D көзілдірігінің қуат түймешігін 1 секундтан
ұзақ басыңыз.
Келесі жағдайларда қайта жұптастыру қажет:
• 3D ТД-ын жөндегеннен кейін қуат түймешігін
басқанда 3D көзілдірігі жұмыс істемесе.
• Егер басқа Samsung 3D ТД-ның 2011-2013-
ші жылдары шығарылған, D, E немесе
F серияларына жататын үлгілерінде 3D
мазмұнын ойнатқыңыз келсе. Көзілдірікті
басқа ТД-пен жұптастыру керек.
3D видеосын қарау
Бейне алынатын кіріс сигналының пішіміне қарай,
кей 3D режимдеріне қолдау көрсетілмеуі мүмкін.
3D режимінде қарау үшін 3D Active көзілдірігін киіп,
көзілдіріктің қуат түймешігін басып оны іске қосу
керек.
1. 3D бейнебетіне барыңыз. (Сурет > 3D)
2. 3D режимін таңдаңыз. 3D режимі бейнебеті
пайда болады.
3. Қарағыңыз келген суреттің 3D режимін
орнатыңыз.
Келесі жағдай орын алса... Мына әрекетті орындап көріңіз...
Батареяны ауыстырыңыз.
3D көзілдірігім жұмыс
істемейді.
LED индикаторы
жыпылықтай береді
3D көзілдіріктері теледидарға жақын тұруға тиіс. ТД мен 3D көзілдірігінің
арасындағы қашықтықтың, тура сызық бойымен қарағанда, 19,5 футтан
(6м) аз болуын қамтамасыз етіңіз.
Теледидардағы 3D функциясының параметрлерін тексеріңіз.
Батарея отырып қалған. Батареяны ауыстырыңыз.
техникалық параметрі (Үлгі атауы : SSG-5100GB )
Қақпақтары Сұйық кристалл Өткізгіштігі 36±2%
Оптика
Салмағы Көзілдірік 21,5г (батареясымен қоса: 24,0±0,5г)
Қуат Көзілдірік Бір 3В литий/марганец диоксиді бар батарея, 3В(CR2025).
Қуат тұтыну
Жұмыс жасау
жағдайлары
Ұсынылатын
жұмыс жасау
қашықтығы
Көзілдірік 0,85мА (орташа)
Батарея
Жұмыс
температурасы
Қауіпсіз
температура
2~6м (6,5-19,5 фут)
Түрі 165мА/сағ, 3,0В (CR2025)
Жұмыс істеу
уақыты
10°C бастап 40°C дейін (50°F бастап 104°F дейін)
-20°C бастап 45°C дейін (-4°F бастап 113°F дейін)
Алаң
диапазоны
150 сағат
120 алаң/секунд
Өнімнің жұмысын жетілдіре түсу үшін оның параметрлеріне ешбір ескертусіз өзгеріс енгізілуі мүмкін.
✎
Өнімді үздіксіз іске қосу уақыты сымсыз байланыс ортасына және қолдану жағдайларына байланысты
✎
әр түрлі болуы мүмкін.
Казақ - 16
[UF6470-RU]BN68-04779H-X0L4.indb 16 2013-03-09 10:19:43
Page 89

Ұсыныс - тек ЕО ғана
Samsung Electronics осы мәлімдеме арқылы, осы 3D Active көзілдірігінің 1999/5/EC ережесінің маңызды
талаптары мен басқа да тиісті шарттарына сай келетінін мәлімдейді.
Бұл құрылғыны барлық ЕО елдерінде қолдануға болады.
]Қашықтан қолдау көрсету деген не?
Samsung қашықтан қолдау көрсету қызметі Samsung технигінің қашықтан қолдау көрсету мүмкіндігін ұсынады.
• ТД-ға диагностика жасайды
• ТД параметрлерін реттейді
• ТД-дың зауыттық параметрлерін қалпына келтіреді
• Ұсынылған бағдарлама жаңартылымдарын орнатады
Қалай жұмыс істейді?
Samsung технигінің қашықтан қосылып қызмет көрсетуі өте оңай
Казақ
1. Samsung байланыс
орталығына қоңырау
шалып, қашықтан көмек
көрсетуін сұраңыз.
2. ТД мәзірін ашып,
Қолдау көрсету
бөліміне барыңыз.
3. Қашықтан басқару
функциясын таңдап,
қызметкерге пин-код
№ беріңіз.
4. Содан кейін қызметкер
сіздің ТД-ға қосылады.
Бар болғаны осы!
Құпиясөзді ауыстыру
Бейнебет мәзірі > Жүйе > PIN кодын өзг
ТД құпиясөзін өзгертіңіз.
1. PIN кодын өзг функциясын қосып, содан кейін құпиясөз жолағына ағымдық құпиясөзді енгізіңіз. Әдепкі
құпиясөз: 0000.
2. Жаңа құпиясөзді енгізіп, содан кейін растау үшін оны қайта енгізіңіз. Құпиясөзді өзгерту аяқталды.
Егер PIN кодты ұмытып қалсаңыз, түймешіктерді төмендегі ретпен басыңыз, сонда PIN код "0-0-0-0"
✎
болып орнайды:
ТД қосылған кезде: MUTE → Дыбысты күшейту → RETURN → Дыбысты азайту → RETURN → Дыбысты
✎
күшейту → RETURN.
Казақ - 17
[UF6470-RU]BN68-04779H-X0L4.indb 17 2013-03-09 10:19:43
Page 90

Ақаулықты түзету және басқа ақпарат
Ақаулықтарды жою
ТД-ға қатысты қандай да бір сұрағыңыз болса, алдымен осы тізімді қараңыз. Егер ақаулықты түзетуге қатысты
кеңестердің біреуі де көмектеспесе, “www.samsung.com” торабының қолдау көрсету бөліміне барыңыз немесе
осы нұсқаулықтың артқы мұқабасында көрсетілген тізімдегі байланыс орталығына хабарласыңыз.
Ақаулық Шешімі және түсіндірмесі
Теледидар іске қосылмайды. • АТ сымының қабырғадағы розеткаға және ТД-ға мықтап жалғанғанын тексеріңіз.
Ешбір сурет/видео жоқ. • Сымдардың қосылымдарын тексеріңіз. ТД-ға және сыртқы құрылғыларға қосылған барлық
Қашықтан басқару пульті жұмыс
істемейді.
Кабель/жерсерік ресиверінің қашықтан
басқару пульті, ТД-ы іске қоспайды
не сөндірмейді немесе дыбысын
реттемейді.
• Қабырғадағы розетканың жұмыс істеп тұрғанына көз жеткізіңіз.
• ТД-дың
• Сыртқы құрылғылардың (Кабель/Жерсерік ресивері, DVD, Блю-рей т.с.с.) видео шығысын,
• Жалғанған құрылғылардың электр желісіне қосулы тұрғанын тексеріңіз.
• Дұрыс сигнал көзін таңдауды ұмытпаңыз.
• Қосымған құрылғыны ағытып, содан кейін қорек сымын қайта жалғап, қайта іске қосып
• Қашықтан басқару пультінің батареяларын ауыстырыңыз. Батареялардың полюстерінің (+/–)
• Пульт сенсорының сигнал шығатын терезесін тазалаңыз.
• Қашықтан басқару пультін ТД-ға 5~6 фут қашықтықтан тура бағыттап көріңіз.
• Кабель/жерсерік ресиверінің қашықтан басқаратын пультін, теледидарды басқаратын
P
екеніне көз жеткізіңіз. Егер теледидар қосылса, төмендегі “Қашықтан басқару пульті жұмыс
істемейді” тармағын қараңыз.
сымдарды ағытып, қайта жалғаңыз.
ТД-дың кіріс ұяшықтарына сәйкес келтіріп жалғаңыз. Мысалы, сыртқы құрылғының шығыс
ұяшығы HDMI болса, оны теледидардың HDMI кіріс ұяшығына жалғау керек.
жүктеңіз.
дұрыс орнатылуын қамтамасыз етіңіз.
етіп бағдарламалаңыз. SAMSUNG ТД кодын Кабель/жерсерік ресиверінің пайдаланушы
нұсқаулығынан қараңыз.
түймешігін басып, ақаулықтың қашықтан басқару пультіне байланысты емес
Осы TFT LED панелін жасап шығару үшін күрделі кіші пикселдер технологиясы қолданылады.
✎
Дегенмен, бейнебетте шамалы жарық немесе күңгірт пикселдер пайда болуы мүмкін. Бұл пикселдер
құрылғы жұмысына еш әсер етпейді.
ТД-ды ең оңтайлы күйде ұстау үшін бағдарламаның соңғы нұсқасын Samsung веб-сайтынан (Samsung.
✎
com >Қолдау > Қотару) USB арқылы жаңартыңыз.
Жоғарыдағы суреттер мен функциялардың кейбірі, құрылғының арнайы үлгілерінде ғана бар.
✎
ТД-ды қабырғалық аспа жинақты (опция)
пайдаланып қабырғаға орнату
Қабырғаға немесе төбеге орнату
Егер құрылғыны қабырғаға орнатсаңыз, өндіруші ұсынған жолмен орнату керек. Егер дұрыс
орнатылмаса, құрылғы жылжып немесе құлап қалып, баланы немесе ересек адамды қатты
жарақаттауы, құрылғыға елеулі зақым келтіруі мүмкін.
Қабырғалық аспа жинағын орнату
Қабырғалық аспа жинақ (бөлек сатылады) ТД-ды қабырғаға орнатуға мүмкіндік береді.
Қабырғалық аспа жинақты орнатуға қатысты толық ақпаратты, қабырғалық аспа жинақтың нұсқаулығынан
оқыңыз. Қабырғаға орнатылатын құрсауды орнына қондыру үшін техник маманға хабарласуды ұсынамыз.
Өз бетіңізбен орнатуды ұсынбаймыз. Samsung Electronics компаниясы құрылғыны өз бетіңізбен орнату
нәтижесінде жарақат алсаңыз не басқа адамдар зардап шексе немесе мүлікке нұқсан келсе, жауапкершілік
көтермейді.
Казақ - 18
[UF6470-RU]BN68-04779H-X0L4.indb 18 2013-03-09 10:19:43
Page 91

Қабырғалық аспа жинақты орнатпай тұрып дайындау
A жағдайы. SAMSUNG қабырғалық аспасын орнату
1
B жағдайы. Басқа компания
шығарған қабырғалық аспа жинақты орнату
1
8.6 mm
Қабырғалық аспаны орнату үшін Ұстағыш-Шығырықты 1 қолданыңыз.
Қабырғалық аспа жинақ параметрлері (VESA)
Қабырғалық аспа жинақ теледидармен бірге жеткізілмейді, бірақ жеке сатылады. Қабырғалық аспа
✎
жинақты қатты қабырғаға, еденге перпендикуляр бағытта орнатыңыз. Басқа құрылыс материалдарына
орнату үшін, жақын жердегі дилерге хабарласыңыз. Төбеге немесе қисық қабырғаға орнатса құлап,
адам қатты жарақат алуы мүмкін.
ЕСКЕРІМ
✎
− Қабырғалық аспа жинақтың стандартты өлшемдері төмендегі кестеде көрсетілген.
− Қабырғалық аспа жинақ сатып аларда, оны орнатуға қатысты толық нұсқаулық пен керек - жарақтар
беріледі.
− VESA стандартты бұрандалар спецификациясына сай келмейтін бұрандаларды қолданбаңыз.
− Стандартты өлшемнен ұзын немесе VESA бұрандалар стандартына сай келмейтін бұрандаларды
қолданбаңыз. Тым ұзын бұрандалар теледидардың ішкі бөлшектеріне зиян келтіруі мүмкін.
− VESA стандартты бұрандалар спецификациясына сай келмейтін қабырғалық аспа жинақ қолданылса,
бұрандаларының ұзындықтары қабырғалық аспа жинақ спецификациясына байланысты басқаша
болуы мүмкін.
− Бұрандаларды тым қатайтпаңыз; себебі өнімге нұқсан келуі немесе құлап қалып, адам жарақат алуы
мүмкін. Samsung бұндай қатерлі оқиғалар үшін жауапкершілік көтермейді.
− VESA стандартына сай емес немесе өндіруші ұсынбаған қабырғалық аспа жинақ қолданылса немесе
сатып алушы өнімді орнату туралы нұсқауларды орындамағандықтан өнімге зақым келсе немесе адам
жарақат алса, Samsung компаниясы жауапкершілік көтермейді.
− Теледидарды 15 градустан асыра қисайтпаңыз.
Казақ
Өнім тобы Дюйм VESA Spec.(A * B)
LED
жарықтамасы
бар теледидар
32 ~ 40 200 x 200
46 ~ 55 400 x 400
Стандартты
бұранда
M8 4
Саны
Қабырғалық аспа жинақты теледидар қосулы тұрғанда орнатпаңыз. Себебі электр тоғы
соғып, адам жарақат алуы мүмкін.
Казақ - 19
[UF6470-RU]BN68-04779H-X0L4.indb 19 2013-03-09 10:19:44
Page 92

Сақтау және күтім көрсету
Егер ТД экранына жапсырма жабысып тұрса, жапсырманы алғаннан кейін орны сәл ластанып қалуы
✎
мүмкін. ТД қарауға кіріспей тұрып осы қоқысты тазалаңыз.
Құрылғы корпусының сыртына және бейнебетіне тазалау барысында сызат түсуі мүмкін. Құрылғы
✎
корпусының сыртын және бейнебетін тазалаған кезде сызат түспес үшін, жинақпен берілген шүберекті
немесе жұмсақ шүберекті қолдануды ұмытпаңыз.
Құрылғыға су шашуға болмайды. Құрылғыға кірген
кез келген сұйық зат оны бүлдіруі, өртке себеп болуы
немесе электр қатерін тудыруы мүмкін.
Құрылғыны аз ғана су сіңірілген жұмсақ шүберекпен
тазалаңыз. Тұтанғыш сұйықтарды (мысалы, бензин,
сұйылтқыш) немесе тазалағыш затты қолданбаңыз.
ТД-ды дұрыс желдету
ТД-дың жақсы желдетілуін қамтамасыз ету үшін оны орнатқан кезде ТД мен басқа заттардың (қабырғалар,
жиһаздың қабырғалары т.с.с.) арасында кем дегенде 4 дюйм орын қалуын қамтамасыз етіңіз. Дұрыс
желдетпеген кезде, құрылғының ішкі температурасы артып, өрт шығуы немесе оған зақым келуі мүмкін.
ТД-ды тұрғыға қою немесе қабырғалық аспа жинаққа орнату үшін Samsung Electronics бөлшектерін
✎
ғана қолдануды ұсынамыз.
• Егер басқа өндіруші шығарған бөлшектерді қолдансаңыз, өнімге зақым келуі немесе ол құлап, адам
жарақат алуы мүмкін.
Тұрғыға орнату. Қабырғалық аспа жинаққа орнату.
10 cм
10 cм
10 cм
10 cм
10 cм
10 cм
10 cм
Басқа ескертулер
ТД-дың нақты сыртқы көрінісі, үлгі түріне байланысты осы нұсқаулықтағы суреттерден өзгеше болуы
✎
мүмкін.
ТД-ды ұстаған кезде абай болыңыз. Кей бөліктері ыстық болуы мүмкін.
✎
Казақ - 20
[UF6470-RU]BN68-04779H-X0L4.indb 20 2013-03-09 10:19:44
Page 93

Ұстағыш-Сымның тұрғысын құрастыру
Эко сенсоры және экранның жарықтылығы
Казақ
Үнемдеу сенсоры бөлменің ішіндегі жарықты өлшейді және қуатты аз тұтыну үшін ТД жарықтылығын
автоматты түрде оңтайлы етеді. Бұл ТД-ды автоматты түрде жарық және күңгірт етеді. Егер осы функцияны
сөндіргіңіз келсе, Бейнебет мәзірі > Жүйе > Үнемдеу шешімі > Үнем. сенсор параметріне барыңыз.
Сенсорды ешбір материалмен бүркемеңіз. Себебі суреттің жарықтылығын азайтуы мүмкін.
1. Үнем. сенсор: Бұл қуатты үнемдейтін функция ТД бейнебетінің жарықтылығын жарық сенсоры анықтаған
қоршаған орта жарығының деңгейіне сай автоматты түрде реттейді.
2. Үнем. сенсор функциясын қосу немесе сөндіру үшін, Бейнебет мәзірі > Жүйе > Үнемдеу шешімі > Үнем.
сенсор функциясына барып, Қосу немесе Сөндіру қалпына қойыңыз.
3. Сақтық шара: ТД-ды қараңғы жерде қарап отырған кезде экран тым күңгірттенсе, оған Үнем. сенсор себеп
болуы мүмкін.
Казақ - 21
[UF6470-RU]BN68-04779H-X0L4.indb 21 2013-03-09 10:19:44
Page 94

Аударылып кетуден сақтау - ТД-ды қабырғаға
бекіту
Абайлаңыз: Теледидарды тартса, итерсе немесе үстіне шықса, ол құлап
кетуі мүмкін. Сондай-ақ, балалардың ТД-ға артылып тұрмауына немесе оны
қозғамауына көз жеткізіңіз. Әйтпесе ТД аударылып кетіп, адам қатты жарақат
алуы немесе мерт болуы мүмкін. ТД жинағымен қоса берілген қауіпсіздік
парағындағы сақтық шараларының барлығын орындаңыз. Қосымша
тұрақтылық пен қауіпсіздікті қамтамасыз ету үшін төменде сипатталған,
аударылып қалуға қарсы құралды сатып алып орнатыңыз.
Теледидар құлап қалуға жол бермес үшін
1. Бұрандаларды қапсырмаларға салыңыз да, қабырғаға мықтап бекітіңіз. Бұрандалардың қабырғаға мықтап
бекігеніне көз жеткізіңіз.
Қабырғаның түріне байланысты анкер шегесі тәрізді қосымша зат қажет болуы мүмкін.
✎
Бұранда қапсырмасы, бұрандалар мен бау құрылғымен бірге жеткізілмейтіндіктен оларды жеке
✎
сатып алу қажет.
2. Бұрандаларды теледидардың артқы орта жағынан алыңыз да, қапсырмаға салыңыз, содан соң
бұрандаларды қайтадан теледидарға бекітіңіз.
Бұрандалар құрылғымен бірге жеткізілмеуі мүмкін. Мұндай жағдайда, келесі техникалық
✎
сипаттамаға ие бұрандаларды сатып алуды сұраймыз.
Бұранданың техникалық сипаттамасы
✎
• 32 ~ 55 дюйм үшін: M8
3. Теледидарға бекітілген қапсырмалар мен қабырғаға бекітілген
қапсырмаларды берік сым арқылы жалғап, содан соң мықтап байлаңыз.
ЕСКЕРІМ
✎
− ТД артқа қарай құлап кетпес үшін қабырғаға таяу орнатыңыз.
− Сақтық мақсатында қабырғаға бекітілген қапсырма мен теледидарға
бекітілген қапсырма бір деңгейде не одан төменірек тұру үшін
оларды сыммен қосып байлаған дұрыс.
− Сымды ТД-ды жылжытпай тұрып шешіңіз.
4. Барлық қосылымдардың мықтап жалғанғанына көз жеткізіңіз.
Қосылымдардың босап не ескіріп қалмағанын мезгіл-мезгіл тексеріп
отырыңыз. Қосылымдардың берік екендігіне күмәндансаңыз, білікті
маманға хабарласыңыз.
Қабырға
Казақ - 22
[UF6470-RU]BN68-04779H-X0L4.indb 22 2013-03-09 10:19:45
Page 95

Техникалық параметрлері
Техникалық параметрлері - ТД
Бейнебеттің ажыратымдылығы 1920 x 1080
Жұмыс ортасының жағдайлары
Жұмыс температурасы
Орта ылғалдылығы
Сақталатын ортаның температурасы
Сақталатын ортаның ылғалдылығы
Айналмалы тұрғы (Сол / Оң) -20˚ ~ 20˚
Дыбыс
(Шығыс)
Үлгі атауы UE32F6510A / UE32F6510S UE40F6510A / UE40F6510S
Бейнебет өлшемі
(Диагональ)
Өлшемдері (Е x Б x Т)
Корпус
Тұрғымен бірге
Салмағы
Тұрғыны қоспағанда
Тұрғыны қоса алғанда
Үлгі атауы UE46F6510A / UE46F6510S UE55F6510A / UE55F6510S
Бейнебет өлшемі
(Диагональ)
Өлшемдері (Е x Б x Т)
Корпус
Тұрғымен бірге
Салмағы
Тұрғыны қоспағанда
Тұрғыны қоса алғанда
Үлгі атауы UE32F6540A UE40F6500A / UE40F6500S / UE40F6540A /
Бейнебет өлшемі
(Диагональ)
Өлшемдері (Е x Б x Т)
Корпус
Тұрғымен бірге
Салмағы
Тұрғыны қоспағанда
Тұрғыны қоса алғанда
Үлгі атауы UE46F6500A / UE46F6500S /
Бейнебет өлшемі
(Диагональ)
Өлшемдері (Е x Б x Т)
Корпус
Тұрғымен бірге
Салмағы
Тұрғыны қоспағанда
Тұрғыны қоса алғанда
742,0 x 442,3 x 49,5 мм
742,0 x 512,1 x 265,0 мм
1043,6 x 606,8 x 47,0 мм
1043,6 x 682,2 x 307,3 мм
742,0 x 442,3 x 49,5 мм
742,0 x 512,1 x 265,0 мм
UE46F6540A / UE46F6650A
46 дюйм 50 дюйм 55 дюйм
1042,4 x 608,5 x 47,0 мм
1042,4 x 682,4 x 307,2 мм
11,1 кг
12,7 кг
10°C бастап 40°C дейін (50°F бастап 104°F дейін)
-20°C бастап 45°C дейін (-4°F бастап 113°F дейін)
32 дюйм 40 дюйм
5,7 кг
6,7 кг
46 дюйм 55 дюйм
11,3 кг
12,9 кг
32 дюйм 40 дюйм
5,7 кг
6,7 кг
10% - 80%, конденсатсыз
5% - 95%, конденсатсыз
10 W X 2
911,2 x 597,9 x 265,0 мм
1235,2 x 714,6 x 47,4 мм
1235,2 x 791,2 x 307,3 мм
910,0 x 597,3 x 265,0 мм
UE50F6500A / UE46F6500S
/ UE50F6650A
1120,2 x 651,5 x 47,2 мм
1120,2 x 726,2 x 307,2 мм
13,55 кг
15,15 кг
911,2 x 532,4 x 47,0 мм
8,9 кг
10,0 кг
16,5 кг
18,1 кг
UE40F6650A
910,0 x 534,1 x 47,0 мм
8,7 кг
9,8 кг
UE55F6500A / UE55F6500S /
UE55F6540A / UE55F6650A
1234,0 x 716,3 x 47,2 мм
1234,0 x 790,9 x 307,2 мм
Казақ
16,4 кг
18,0 кг
Казақ - 23
[UF6470-RU]BN68-04779H-X0L4.indb 23 2013-03-09 10:19:45
Page 96

Бейнебеттің ажыратымдылығы 1920 x 1080
Жұмыс ортасының жағдайлары
Жұмыс температурасы
Орта ылғалдылығы
Сақталатын ортаның температурасы
Сақталатын ортаның ылғалдылығы
Айналмалы тұрғы (Сол / Оң) 0°
Дыбыс
(Шығыс)
Үлгі атауы UE32F6800A / UE32F6800S UE40F6800A / UE40F6800S
Бейнебет өлшемі
(Диагональ)
Өлшемдері (Е x Б x Т)
Корпус
Тұрғымен бірге
Салмағы
Тұрғыны қоспағанда
Тұрғыны қоса алғанда
Үлгі атауы UE46F6800A / UE46F6800S UE50F6800A / UE50F6800S UE40F6800A / UE40F6800S
Бейнебет өлшемі
(Диагональ)
Өлшемдері (Е x Б x Т)
Корпус
Тұрғымен бірге
Салмағы
Тұрғыны қоспағанда
Тұрғыны қоса алғанда
Өндіруші құрылғының дизайны мен техникалық сипаттамаларын алдын ала ескертусіз өзгерте алады.
✎
Қуатпен жабдықтау және пайдаланылатын қуат туралы қосымша ақпаратты өнімге жапсырылған
✎
1092,4 x 680,2 x 265,6 мм
754,8 x 443,7 x 49,5 мм
754,8 x 492,4 x 186,1 мм
46 дюйм 50 дюйм 55 дюйм
1083,6 x 618,7 x 47,0 мм
11,6 кг
11,9 кг
10°C бастап 40°C дейін (50°F бастап 104°F дейін)
-20°C бастап 45°C дейін (-4°F бастап 113°F дейін)
32 дюйм 40 дюйм
5,7 кг
5,9 кг
10% - 80%, конденсатсыз
5% - 95%, конденсатсыз
10 W X 2
1165,4 x 664,5 x 47,2 мм
1165,4 x 725,0 x 265,6 мм
13,9 кг
14,2 кг
950,8 x 543,9 x 47,0 мм
950,8 x 594,6 x 201,4 мм
9,1 кг
9,3 кг
1279,2 x 728,5 x 47,2 мм
1279,2 x 789,0 x 265,6 мм
16,3 кг
16,6 кг
жапсырмадан қараңыз.
Күту режимі
Пайдаланылатын қуат мөлшерін азайту үшін ТД-ды ұзақ уақыт пайдаланбаған кезде тоқ көзінен ағытыңыз.
Символ Кедендік одақтың 005/2011 техникалық регламентіне сәйкес қолданылады және осы
өнімнің қаптамасын екінші рет пайдалануға арналмағанын және жоюға жататынын көрсетеді.
Осы өнімнің қаптамасын азық-түлік өнімдерін сақтау үшін пайдалануға тыйым салынады.
Символ қаптаманы жою мүмкіндігін көрсетеді. Символ сандық код және/немесе әріп белгілері
түріндегі қаптама материалының белгісімен толықтырылуы мүмкін.
Казақ - 24
[UF6470-RU]BN68-04779H-X0L4.indb 24 2013-03-09 10:19:46
Page 97

Нұсқаулар
Лицензиялар
Ұсыныс - тек ЕО ғана
• Samsung Electronics осы мәлімдеме арқылы, осы LED ТД-ның 1999/5/EC ережесінің маңызды талаптары
мен басқа да тиісті шарттарына сай келетінін мәлімдейді.
• Ресми Сәйкестік декларациясына http://www.samsung.com, Қолдау > Өнімге қолдау көрсету мәзіріне
барып, үлгінің атауын енгізу арқылы қол жеткізуге болады.
Казақ
• Бұл құрылғы тек үй ішінде ғана қолдануға болады.
• Бұл құрылғыны барлық ЕО елдерінде қолдануға болады.
Қимылсыз бейнеге қатысты ескерту
Бейнебетте қимылсыз суреттерді (мысалы, jpeg сурет файлдары), қимылсыз сурет элементтерін (мысалы, ТД
арнасының логотипі, экранның астыңғы жағындағы биржа және жаңалықтар жолағы, т.с.с.) немесе панорама
немесе 4:3 пішіміндегі бағдарламаларды көрсетпеуге тырысыңыз. Қимылсыз суреттерді үздіксіз көрсеткенде
LED экранда суреттің сапасына әсер ететін, қосарлы суреттер пайда болуы мүмкін. Бұндай әсердің салдарын
азайту үшін төмендегі ұсыныстарды орындаңыз:
• Теледидардан бір арнаны ұзақ уақыт көрмеңіз.
• Кез келген суретті әрқашан экранға толық шығарып көріңіз. Пішімдерді барынша сәйкестіру үшін ТД-дың
сурет пішімі мәзірін қолданыңыз.
• Сурет қалып қоймас үшін жарықтылық пен контраст мәндерін азайтыңыз.
• ТД-дың суреттің басылуын немесе бейнебеттің жануын болдырмайтын функцияларының барлығын
пайдаланыңыз. Толық ақпаратты эл. нұсқаулықтан алыңыз.
Казақ - 25
[UF6470-RU]BN68-04779H-X0L4.indb 25 2013-03-09 10:19:46
 Loading...