

Page 1

E-MANUAL
Thank you for purchasing this Samsung product.
To receive more complete service, please register your
product at
www.samsung.com
Model Serial No.
To directly go to the page that provides instructions on
how to use the manual for visually impaired users, select
the Menu Learning Screen link below.
"Menu Learning Screen
" Link
Page 2

Contents
Guide
Connections
Connection Guide
5
6 Connecting an Antenna (Aerial)
Connecting to the Internet
7
11 Screen Sharing (Smart View) with your Mobile Device
12 Connection Cables for External Devices
14 Switching between external devices connected to the TV
16 Connection Notes
Peripherals
Controlling External Devices with a Samsung Remote
18
Control - Using the Universal Remote
19 Using Anynet+ (HDMI-CEC)
20 Controlling the TV with a Keyboard, Mouse or Gamepad
Entering Text using the On-Screen Virtual Keyboard
22
66 TV-Viewing Support Functions
Picture and Sound
73 Adjusting the Picture Quality
Setting the Viewing Environment for External Devices
75
77 Picture Support Functions
79 Conguring a Sound Mode and Expert Settings
81 Using the Sound Support Functions
System and Support
Using the Time Functions and the Timers
83
Using the Auto Protection Time and Energy Saving
86
Functions
87
Updating the TV's Software
Audio and Video Functions for the Visually or Hearing
88
Impaired
Using Voice Assistants on TV
93
Using Other Functions
94
Smart Features
Using Smart Hub
24
32 Using a Samsung account
34 Using Remote Access
40 Using the Apps Service
44 Using the Gallery App
Using the SmartThings App
46
Using the e-Manual
47
Using the Internet
50
Playing pictures/video/music
51
Using Bixby
56
TV Viewing
Using the Guide
60
62 Setting Up a Schedule Viewing
63 Using the Channel List
96 HbbTV
97 Using a TV Viewing Card (“CI or CI+ Card”)
100 Teletext Feature
Precautions and Notes
Supported broadcasting audio options
104
Read Before Using Apps
105
Read Before Using the Internet Function
106
108 Read Before Playing Photo, Video or Music Files
117 Read After Installing the TV
118 Supported Resolutions for UHD Input Signals
119 Read Before Connecting a Computer (Supported
Resolutions)
122 Supported Resolutions for Video Signals
124 Read Before Using Bluetooth Devices
125 Licences & Other Information
64 Editing channels
65 Using a Personal Favourites List
Page 3

Troubleshooting
FAQ
Picture Issues
Testing the picture
127
Sound and Noise Issues
132 Testing the sound
Channel and Broadcast Issues
External Device Connectivity Issues
Network Issues
Anynet+ (HDMI-CEC) Issues
Remote Control Issues
Apps
Media Files
Voice Assistant Issues
Other issues
The TV Screen does not Display Properly
When the TV screen does not display properly
148
The TV does not Turn On
155 When your TV does not turn on
The Picture is Distorted, or No Sound Comes Out of the
Sound Bar
161 When the TV does not connect with an external device
properly
Internet Access is not Available
When the TV can't connect to the Internet
166
There is No Sound or the Speakers are Making an Odd Sound
When no sound comes out of the TV, or the sound is
171
breaking up
The Remote Control does not Work
178 When the remote control does not work
Diagnosing TV operational issues
Getting Support
Getting support through Remote Management
147
Finding the contact information for service
147
Requesting service
147
Updating the Software
Updating the latest TV's software
183
Page 4

Accessibility Guidance
Menu Learning Screen
Using the accessibility menu
190
194 Using the TV with Voice Guide on
Using the guide
196
198 Using Schedule Viewing
199 Using the Channel List
201 Using Smart Hub
204 Launching the e-Manual
Using Bixby
205
Page 5

Guide
Connection Guide
Audio Device
Video Device
Smartphone
PC
Input Device
Game Console
External Storage
HDMI (ARC)
Optical
Bluetooth
Wi-Fi
Wi-Fi Speaker Surround Setup
HDMI Troubleshooting
Connect audio devices, such as speakers, sound bars,
headphones, or home theatres, to your TV.
Learn how to use various features.
Connections
You can watch live broadcasts by connecting an antenna cable to your TV and can get access to the Internet by
using a LAN cable or wireless access point. Using various connectors, you can also connect external devices.
Connection Guide
You can view detailed information about external devices that can be connected to the TV.
Source Connection Guide Try Now
It shows you how to connect various external devices such as video devices, game consoles and PCs using pictures.
If you select the connection method and an external device, the connection details appear.
• Audio Device: HDMI (ARC), Optical, Bluetooth, Wi-Fi, Wi-Fi Speaker Surround Setup
HDMI (ARC) is supported by some models. Check the HDMI port name of the purchased product's model.
• Video Device: HDMI
• Smartphone: Screen Sharing (Smart View), SmartThings, Apple AirPlay, Tap View
• PC: HDMI, Screen Sharing (Wireless), Apple AirPlay
• Input Device: Keyboard, Mouse, USB Gamepad, Bluetooth Device
• Game Console: HDMI
• External Storage: USB Flash Drive, Hard Disk Drive (HDD)
Using HDMI Troubleshooting, you can check the connection to HDMI cable and external devices (takes approximately 2
minutes).
The connection method and available external devices may differ depending on the model.
The image on your TV may differ from the image above depending on the model and geographical area.
- 5 -
Page 6
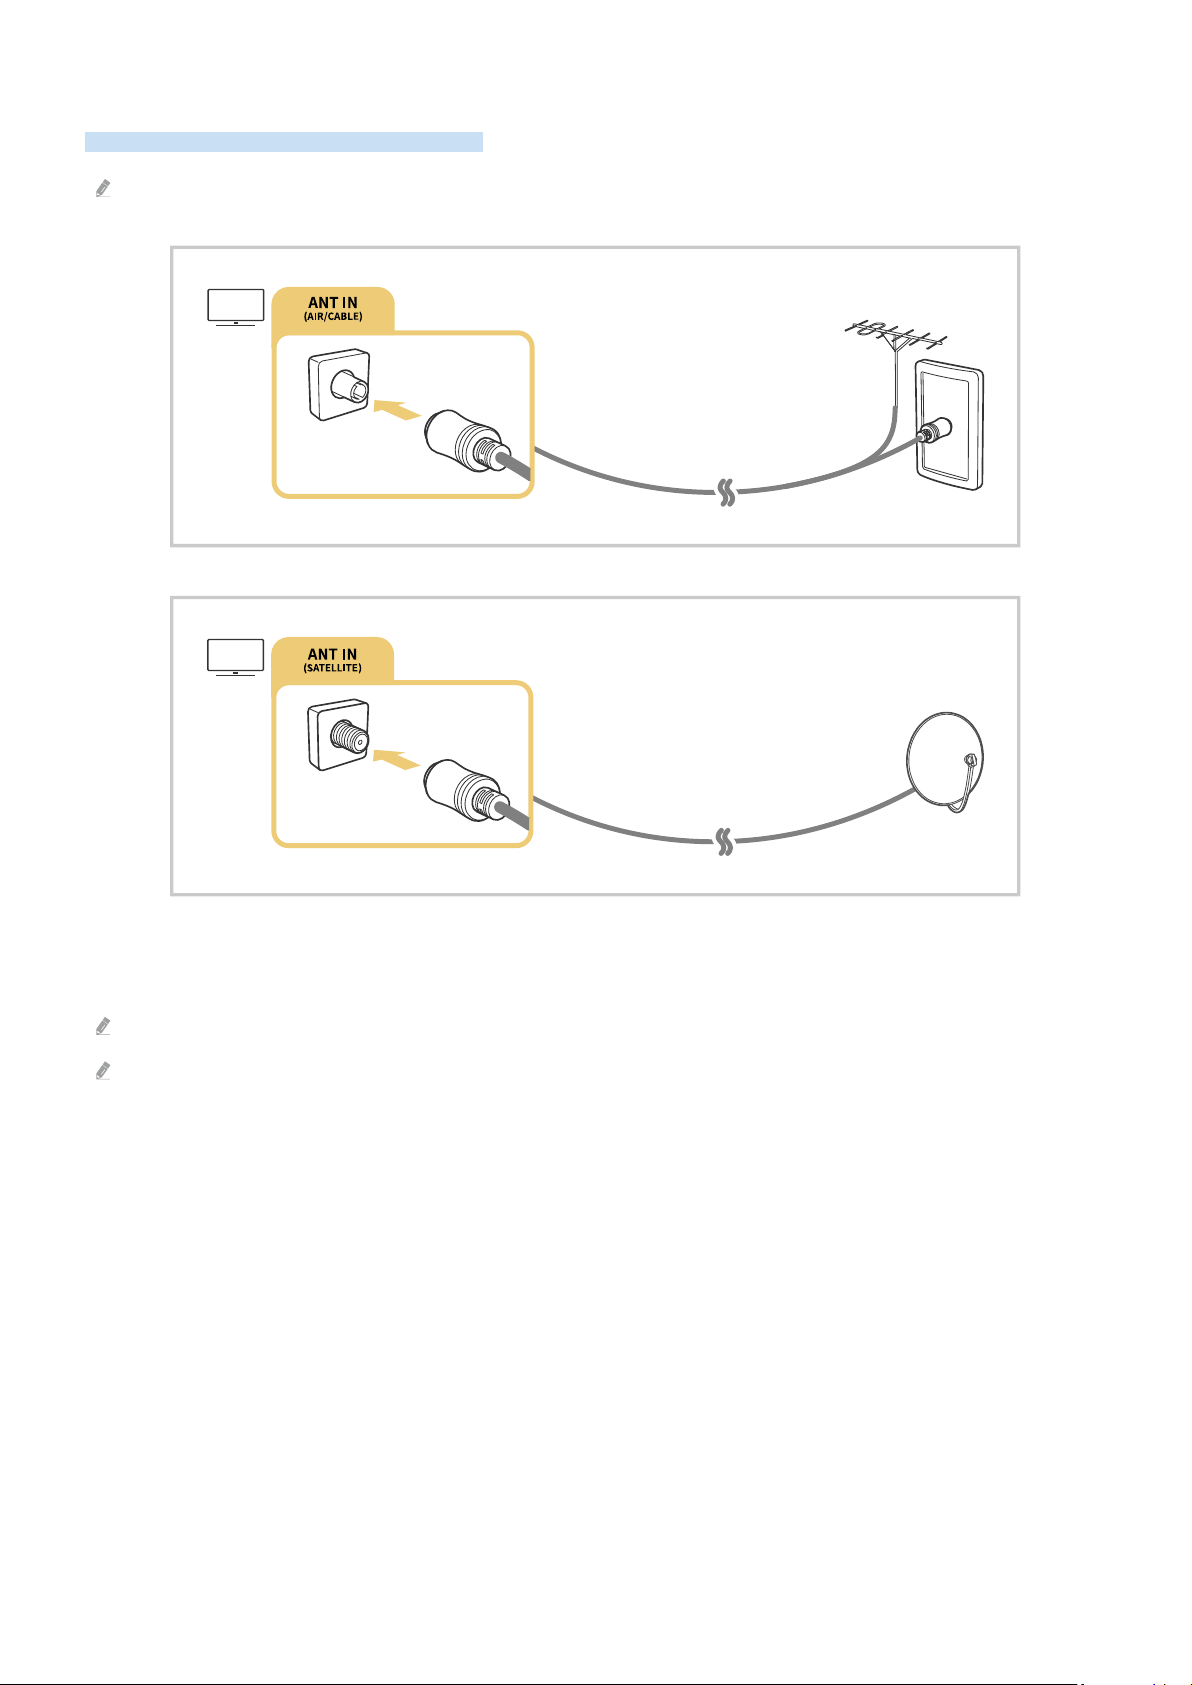
Connecting an Antenna (Aerial)
You can connect an antenna cable to your TV.
An antenna connection is not necessary if you connect a cable box or satellite box.
It is best to connect the both connectors using a Multi-Switch or DiSEqC Switch, etc and to set Aerial Connection
Type to Dual.
A connection method may differ depending on the model or geographical area.
The DVB-T2 system may not be supported depending on the geographical area.
- 6 -
Page 7
Connecting to the Internet
You can get access to the Internet through your TV.
Settings General Network Open Network Settings Try Now
Congure network settings to connect to an available network.
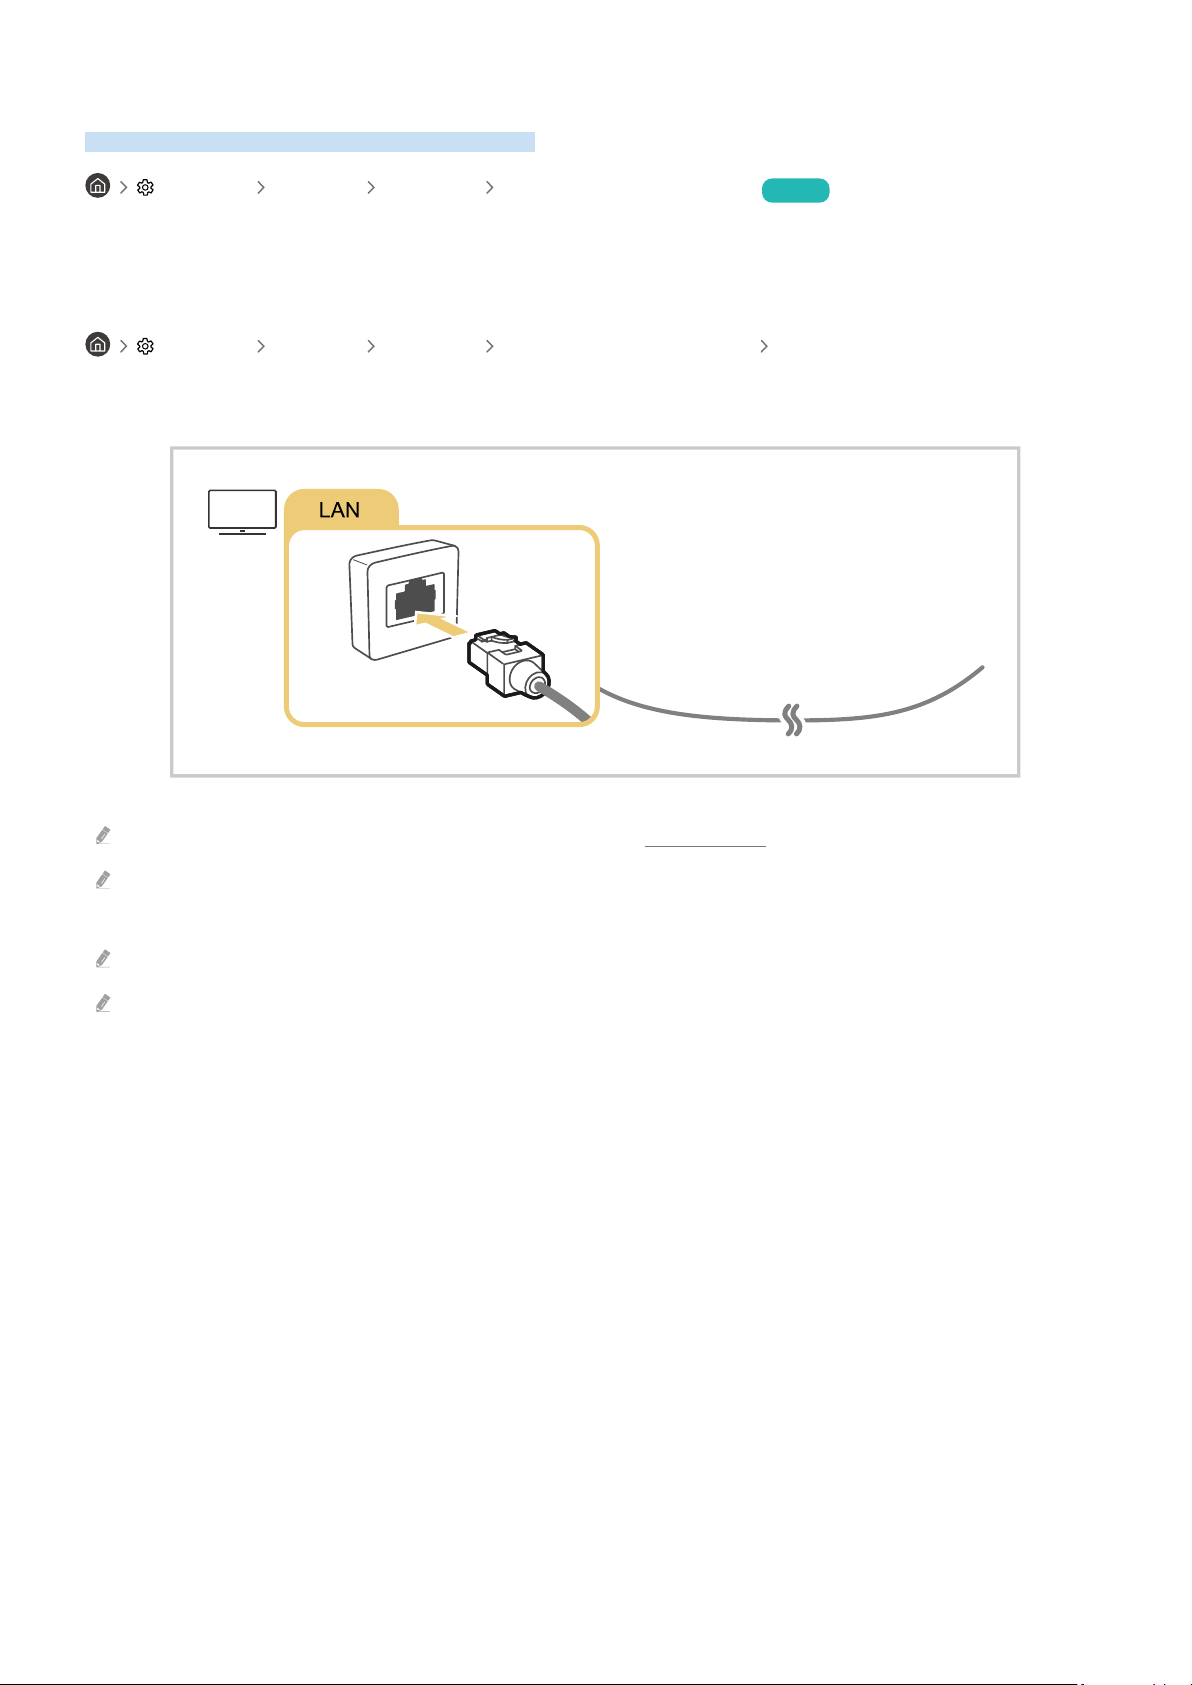
Establishing a wired Internet connection
Settings General Network Open Network Settings Wired
If you connect a LAN cable, the TV automatically accesses the Internet.
If the TV does not automatically connect to the network, refer to "Network Issues" in "Troubleshooting".
Use a CAT 7 (*STP type) cable for the connection.
* Shielded Twisted Pair
The TV will not be able to connect to the Internet if your network speed is below 10 Mbps.
This function may not be supported depending on the model.
- 7 -
Page 8
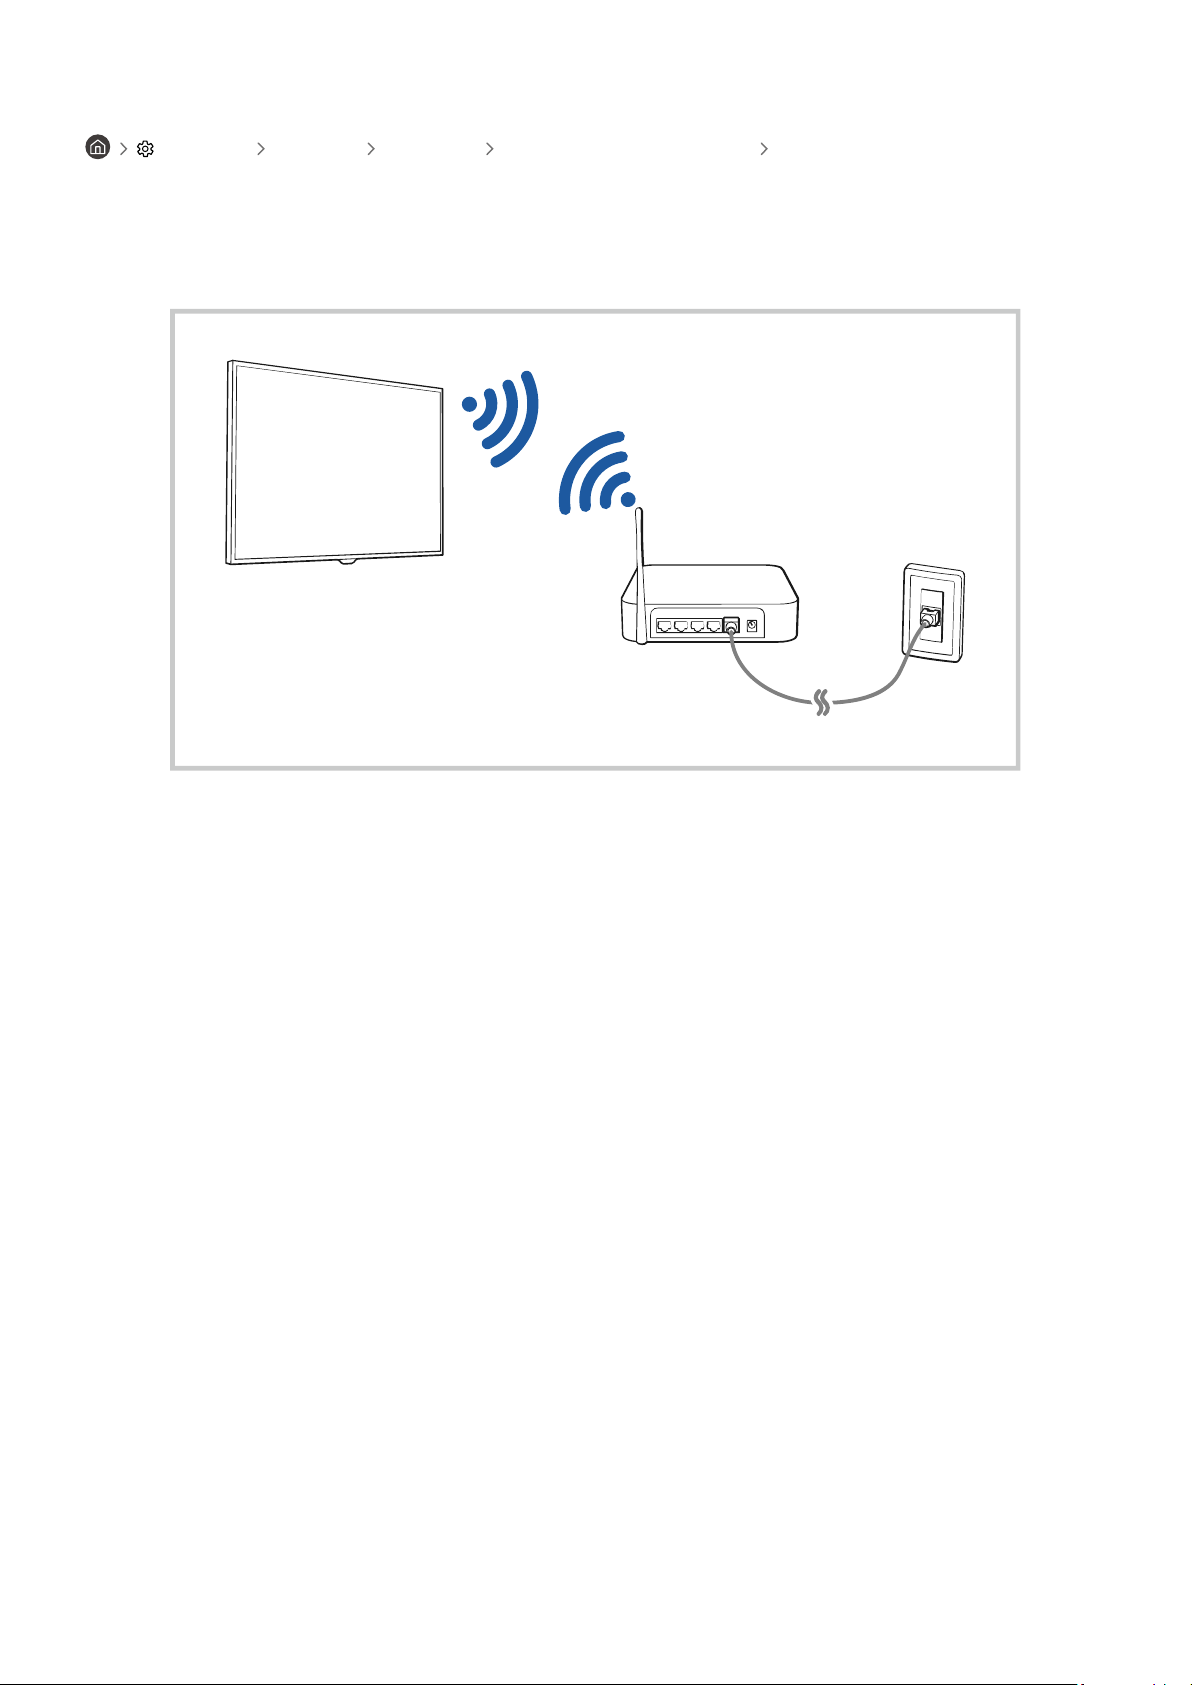
Establishing a wireless Internet connection
Settings General Network Open Network Settings Wireless
Make sure that you have the wireless access point's SSID (name) and password settings before attempting to
connect. The network name (SSID) and security key are available on the wireless access point's conguration
screen. See the wireless access point's user manual for more information.
- 8 -
Page 9

Wireless Connection
Select your wireless network.
Refresh
Manage Saved Networks
The image on your TV may differ from the image above depending on the model and geographical area.
If no wireless access point is found, select Add Network at the bottom of the list and enter the network name (SSID).
If your wireless access point has a WPS or PBC button, select Use WPS at the bottom of the list, and then push the WPS or
PBC button on your access point within 2 minutes. The TV will connect automatically.
To view or delete previously connected network names (SSIDs), move the focus to Manage Saved Networks, and then press
the Select button.
To disconnect Wi-Fi, select Disconnect in Settings General Network Network Status.
- 9 -
Page 10

Checking the Internet connection status
Settings General Network Network Status Try Now
View the current network and Internet status.
Resetting Your Network
Settings General Network Reset Network Try Now
Restore the network settings to the factory default.
Turning on the TV with a mobile device
Settings General Network Expert Settings Power On with Mobile
You can turn on the TV using a mobile device connected to the same network as the TV.
This function is available with a mobile device connected to the TV through the SmartThings app or the Apple AirPlay
function.
Connecting an IP control device to the TV
Settings General Network Expert Settings IP Remote
You can connect an IP control device to the TV remotely to manage your IP device.
To use this function, Power On with Mobile must be turned on.
Turning this feature on may allow other IP control devices to control your TV. We recommend turning this feature on only
if an authorised third-party custom controller is installed and congured specically for a Samsung TV and if your Wi-Fi
network is password protected.
This function may not be supported depending on the model or geographical area.
Changing the name of the TV
Settings General System Manager Device Name Try Now
You can change the name of the TV on the network. Select User Input at the bottom of the list and change the
name.
- 10 -
Page 11

Screen Sharing (Smart View) with your Mobile Device
You can watch the screen of your mobile device on the TV screen through Smart View or Tap View.
For information on how to share the screen with your mobile device, refer to
Smartphone Screen Sharing (Smart View).
• To turn off Screen Sharing (Smart View), disconnect the mobile device or press the button on the remote
control.
• Using the Smart View menu on your mobile device, you can change the settings such as aspect ratio.
• Use AirPlay if you are an iPhone or iPad user. For more information, refer to Source Connection Guide
Smartphone Apple AirPlay.
This function may not be supported depending on the model.
Source Connection Guide
Using the Tap View
Tap your mobile device on the TV, you can watch the mobile device's screen through the TV screen.
This function may not be supported depending on the model.
This function is available in Samsung mobile devices with Android 8.1 or higher.
1.
Enable Tap View on your mobile device.
For more information about conguration, refer to 'Enabling the Tap View' below for how to set.
2.
Turn on the screen of your mobile device.
3.
Tap your mobile device on the TV. The TV screen switches to mobile device's screen.
4.
Watch the mobile device's screen on the TV screen.
This function enables mirroring (Smart View) by detecting vibrations generated when you tap the mobile device on the TV.
Be sure to tap away from the TV screen and bezel corners. It may be scratched or broken to the TV or mobile device screen.
We recommend using your mobile device with the cover in place and lightly tap it on any external edge of the TV.
Enabling the Tap View
Enable Tap View in the SmartThings app.
Depending on the SmartThings app version, you may need to register the TV with your mobile device.
1.
Launch the SmartThings app on your mobile device.
2.
Select Settings ( ) in SmartThings app on your mobile device.
3.
Set the Tap View to on.
Upon connection for the rst time, select Allow on a pop-up window of the TV.
- 11 -
Page 12
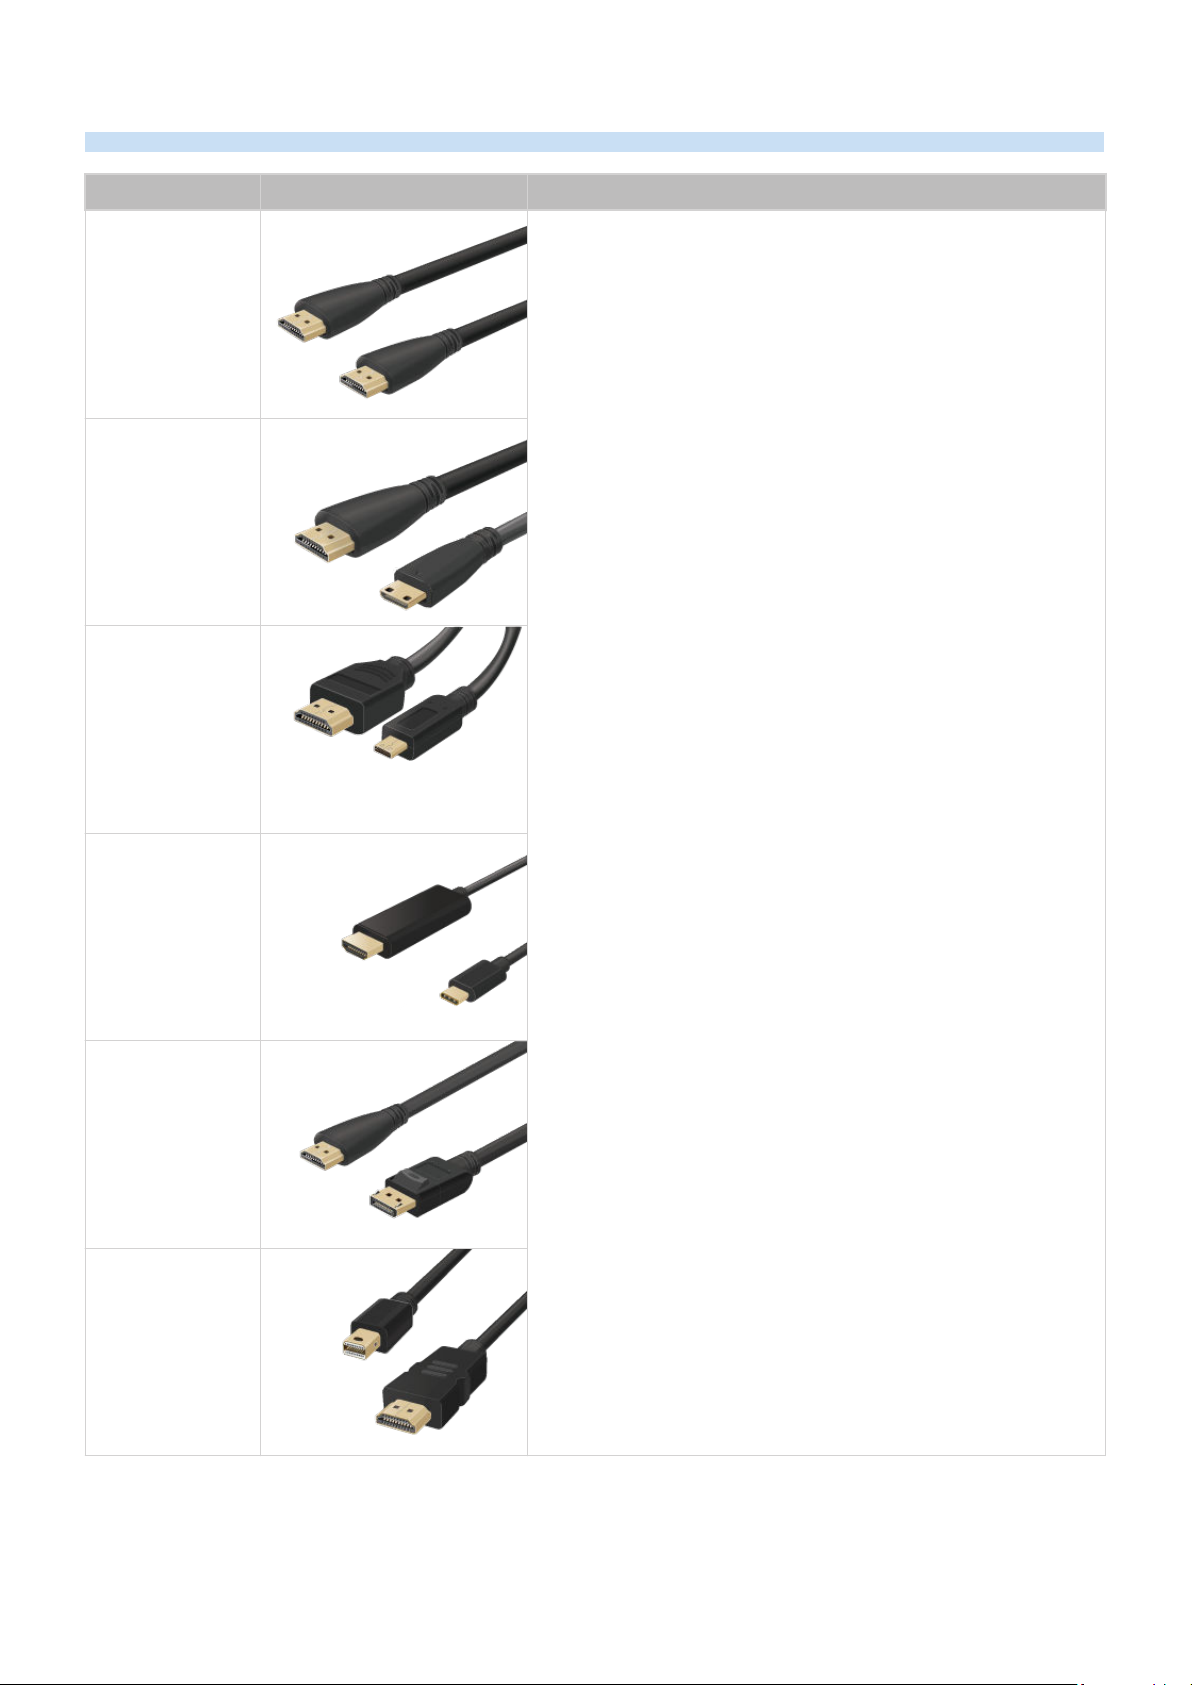
Connection Cables for External Devices
You can view detailed information about the connection cables for external devices that can be connected to the TV.
Cable name Image Description
Each cable simultaneously transmits digital video and audio signals
from an external device to the HDMI port on the TV.
HDMI
to
HDMI
HDMI
to
MINI HDMI
Cables are divided into various types according to the types of input/
output ports on external devices.
HDMI
to
Micro HDMI
HDMI
to
USB Type-C
HDMI
to
DisplayPort
Mini DisplayPort
to
HDMI
- 12 -
Page 13
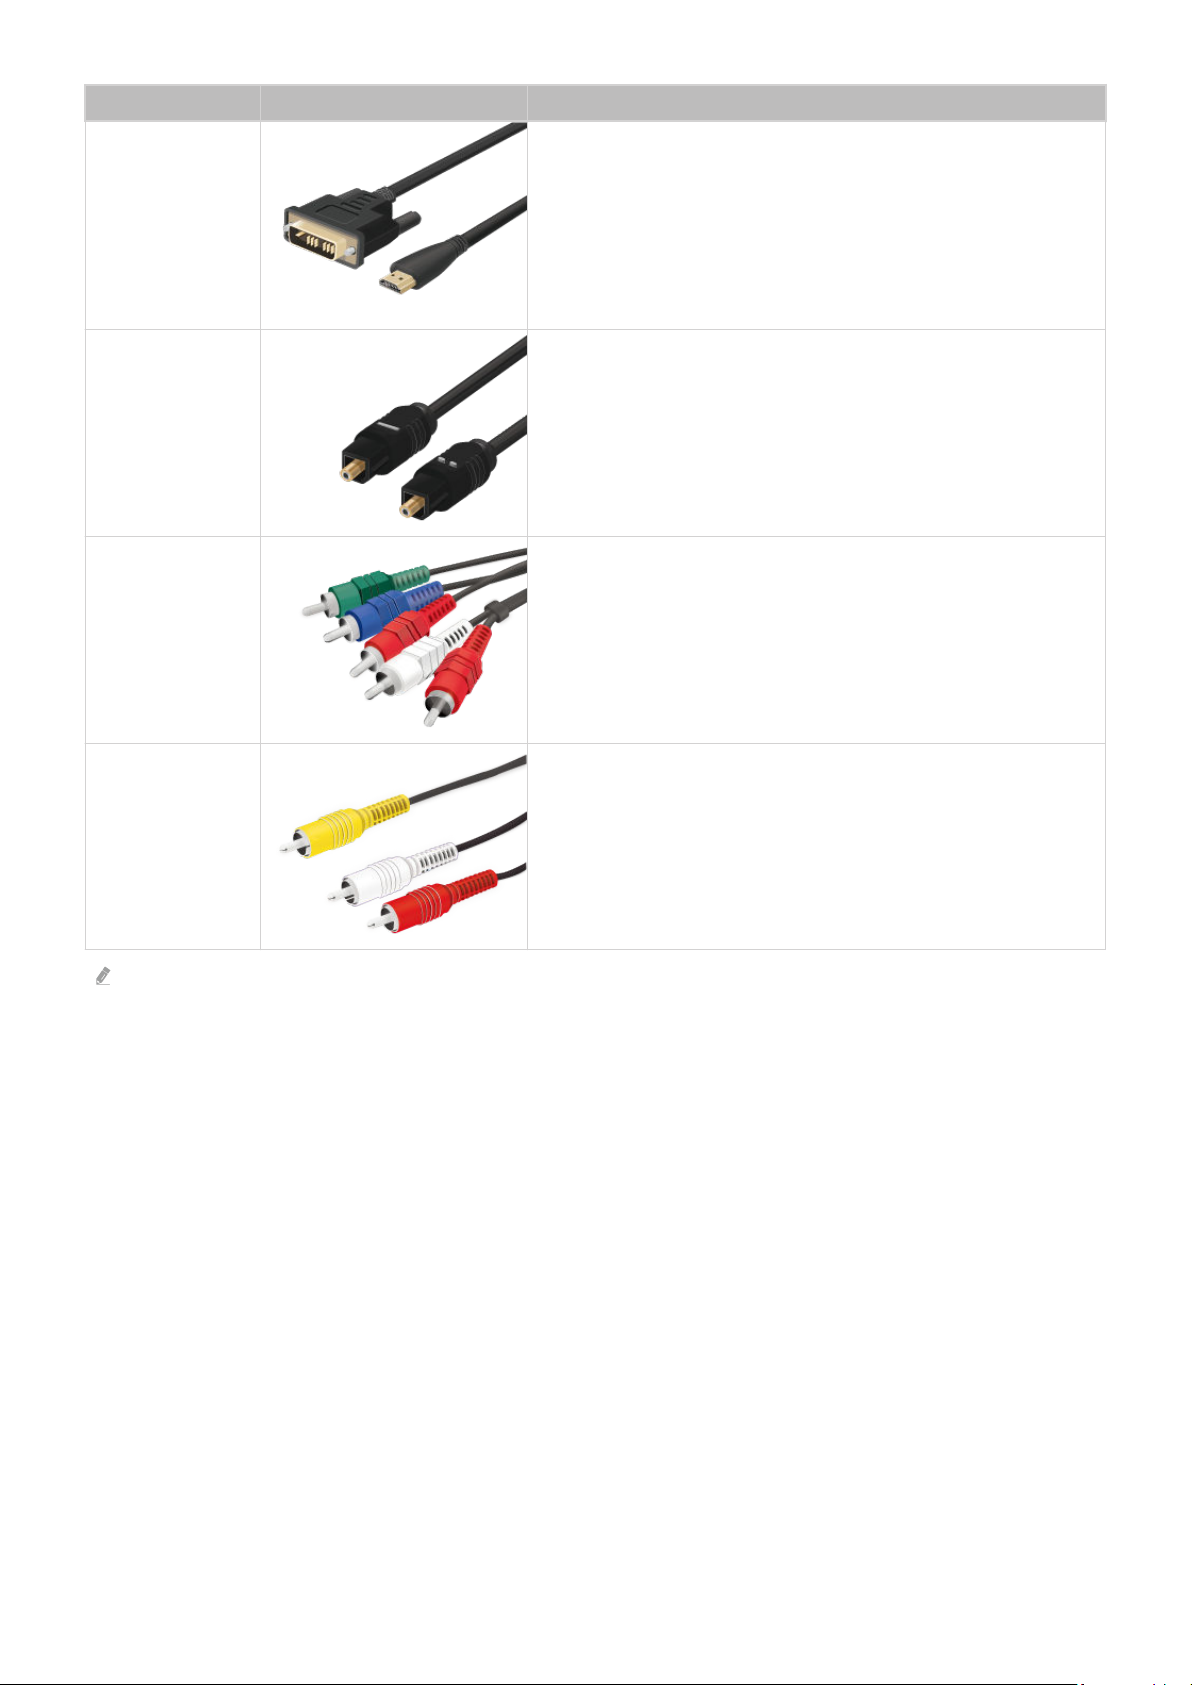
Cable name Image Description
DVI
to
HDMI
Optical
Component
DVI to HDMI cables can transmit only digital video signals and not
audio signals. We recommend that you use HDMI to HDMI cables.
Optical cables are used to transmit audio signals to external
speakers with low signal loss.
Optical cables do not transmit video signals.
Component cables transmit analogue signals.
The video signal is separated and transmitted to the red, green and
blue terminals to provide HD (1080i) pictures. The audio signal is
transmitted to the red and white terminals.
Composite cables transmit analogue signals.
Composite
Available connection cables may differ depending on the model or geographical area.
The video signal is transmitted to the yellow terminal and the audio
signal is transmitted to the red and white terminals.
- 13 -
Page 14
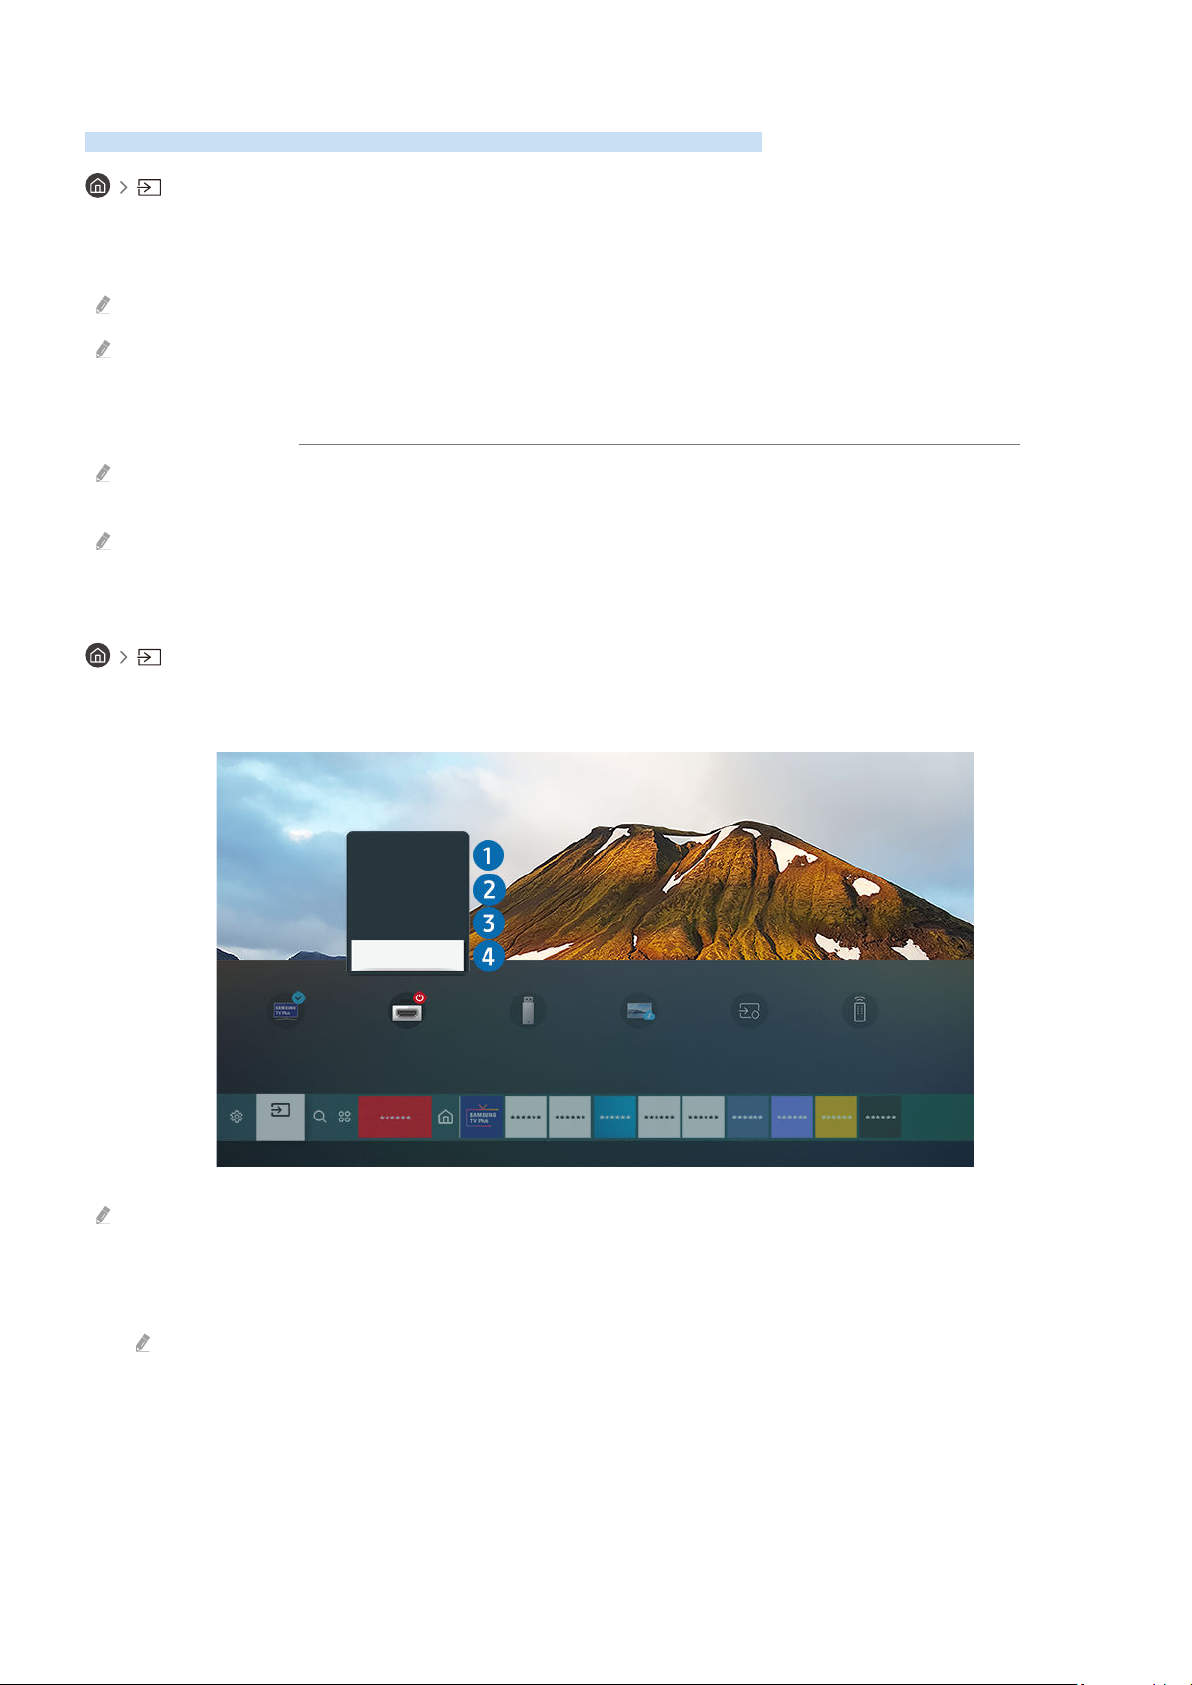
Switching between external devices connected to the TV
Universal Remote
Edit
Information
Add to Home
Source
You can switch between TV programmes and the content of external devices.
Source
When you select a connected external device on the Source screen, the output of the selected device is displayed on
the TV's screen.
On the standard remote control, press the SOURCE button.
To control a device (Blu-ray player, game console, etc.) that supports universal remote control with the TV's remote control,
connect the device to an HDMI port on the TV, and then turn on the device. The output displayed on the TV is automatically
switched to the output of the device or you can congure universal remote control for the device automatically. For more
information, refer to "Controlling External Devices with a Samsung Remote Control - Using the Universal Remote".
When a USB device is connected to the USB port, a pop-up message appears that lets you switch easily to the media
content listed on the device.
This function may not be supported depending on the device and geographical area.
Editing the name and icon of an external device
Source
You can change the port name for a connected external device or add it to the Home Screen.
Sources
The image on your TV may differ from the image above depending on the model and geographical area.
1.
Move the focus to a connected external device.
2.
Press the up directional button. The following functions become available.
Available functions may differ depending on the port type.
- 14 -
Page 15

1.Universal Remote
You can control external devices connected to the TV using a Samsung remote control. To control external devices,
register them by following the instructions on the screen.
This function may not be supported depending on the model or geographical area.
For more information, refer to "Controlling External Devices with a Samsung Remote Control - Using the Universal
Remote".
2.Edit
You can rename the input ports and change the device icons.
3.Information
You can view detailed information about an external device.
4.Add to Home
You can add the port of an external device to the Home Screen for quick switching.
Using additional functions
You can use the following features on the Source screen.
• Remote Access
Use the TV to access your PC via remote PC or Screen Sharing (Wireless).
For more information, refer to "Using Remote Access".
• Connection Guide
Displays device connection instructions.
For more information about the Connection Guide, refer to "Connection Guide".
• Universal Remote
Lets you register external devices to your Samsung remote control and control them using the Remote.
This function may not be supported depending on the model or geographical area.
For more information, refer to "Controlling External Devices with a Samsung Remote Control - Using the Universal
Remote".
- 15 -
Page 16

Connection Notes
When connecting an external device, note the following.
The number of connectors and their names and locations may differ with the model.
Refer to the external device's operating manual when connecting it to the TV. The number of external device connectors
and their names and locations may differ with the manufacturer.
Connection notes for HDMI
• The following types of HDMI cables are recommended:
– High Speed HDMI Cable
– High Speed HDMI Cable with Ethernet
– Premium High Speed HDMI Cable
– Premium High Speed HDMI Cable with Ethernet
– Ultra High Speed HDMI Cable
• Use an HDMI cable with a thickness of 17 mm or less.
• Using a non-certified HDMI cable may result in a blank screen or a connection error.
• Some HDMI cables and devices may not be compatible with the TV due to different HDMI specifications.
• This TV does not support HDMI Ethernet Channel. Ethernet is a Local Area Network (LAN) built with coaxial
cables standardised by the IEEE.
• Use a cable shorter than 3 m to get the best UHD viewing quality.
• Many computer graphics adaptors do not have HDMI ports, but have DVI or DisplayPort ports instead. If your PC
does not support HDMI video out, connect your PC with a DVI to HDMI or HDMI to DisplayPort cable.
• When the TV is connected to an external device such as a DVD/BD player or a set-top box via HDMI, power sync
mode will be automatically activated. In the power sync mode, the TV continues to detect and connect external
devices via HDMI cable. This function can be deactivated by removing the HDMI cable of the connected device.
This function may not be supported depending on the model.
- 16 -
Page 17

Connection notes for computers
• For the resolutions supported by the TV, refer to "
• If you want to connect your PC and TV wirelessly, both of them must be connected to each other on the same
network.
• When sharing content with other network-based devices such as those in an IP (Internet Protocol) storage
system, sharing may not be supported due to the network’s configuration, quality or functionality, for example, if
the network has an NAS (Network-Attached Storage) device.
Read Before Connecting a Computer (Supported Resolutions)".
Connection notes for mobile devices
• To use the Smart View function, the mobile device must support a mirroring function such as Screen Mirroring or
Smart View. To check whether your mobile device supports the mirroring function, refer to the mobile device's
user manual.
• The Screen Sharing (Smart View) feature may not operate smoothly in a 2.4 GHz environment. For better
experience, 5.0 GHz is recommended. 5 GHz may be available depending on the model.
• To use Wi-Fi Direct, the mobile device must support the Wi-Fi Direct function. To check whether your mobile
device supports Wi-Fi Direct function, refer to the mobile device's user manual.
• The mobile device and your Smart TV must be connected to each other on the same network.
• Use AirPlay if you are an iPhone or iPad user. For more information, refer to
Smartphone Apple AirPlay.
This function may not be supported depending on the model.
• The video or audio may stop intermittently, depending on network conditions.
• When sharing content with other network-based devices such as those in an IP (Internet Protocol) storage
system, sharing may not be supported due to the network’s configuration, quality or functionality, for example, if
the network has an NAS (Network-Attached Storage) device.
Source Connection Guide
- 17 -
Page 18

Peripherals
Connect external devices such as a keyboard for ease of use.
Controlling External Devices with a Samsung Remote Control - Using the Universal Remote
Control the TV and connected external devices with a Samsung remote control.
Source Universal Remote
You can control external devices connected to the TV using a Samsung remote control. To control external devices,
register them by following the instructions on the screen.
This function may not be supported depending on the model or geographical area.
You can also use the Anynet+ (HDMI-CEC) function to operate external Samsung devices with your TV's remote control
without any additional setup. For more information, refer to "Using Anynet+ (HDMI-CEC)".
Specic external devices connected to the TV may not support the universal remote feature.
Do not place any obstacles in front of an external device and TV's logo. It may cause signals from the remote control to be
transmitted improperly.
The TV memorises both the external device and its connection port (HDMI 1, HDMI 2, etc.).
If you have difculty controlling external devices with the Universal Remote, try adjusting the positions of the external
devices.
This function may not operate properly depending on the TV installation environment and the features of external devices.
- 18 -
Page 19

Using Anynet+ (HDMI-CEC)
Control an external device connected via Anynet+ (HDMI-CEC) with the remote control.
You can use the TV's remote control to control external devices that are connected to the TV by an HDMI cable and
that support Anynet+ (HDMI-CEC). Note that you can only set up and operate Anynet+ (HDMI-CEC) with the remote
control.
Connecting an external device through Anynet+ and using their menus
Settings General External Device Manager Anynet+ (HDMI-CEC) Try Now
1.
Set Anynet+ (HDMI-CEC) to On.
2.
Connect an HDMI-CEC-compliant device to the TV.
3.
Turn on the connected external device.
The device is automatically connected to the TV. After the connection process is nished, you can access the menu
of the connected device using your TV remote and control the device.
The connecting process can take up to 2 minutes to complete.
Read before connecting an Anynet+ (HDMI-CEC) device
Anynet+ (HDMI-CEC)-enabled devices must be connected to the TV with an HDMI cable. Note that some HDMI cables may
not support Anynet+ (HDMI-CEC).
You can congure the TV's Universal Remote to control third-party cable boxes, Blu-ray players and home theatres that
do not support HDMI-CEC. For more information, refer to "Controlling External Devices with a Samsung Remote Control -
Using the Universal Remote".
Anynet+ cannot be used to control external devices that do not support HDMI-CEC.
The TV remote control may not work under certain circumstances. If this occurs, set up the device as an Anynet+ (HDMI-
CEC)-enabled device again.
Anynet+ (HDMI-CEC) works only with external devices that support HDMI-CEC and only when those devices are either in
standby mode or turned on.
Anynet+ (HDMI-CEC) can control up to 12 compliant external devices (up to 3 of the same type) except for home theatres.
Anynet+ (HDMI-CEC) can control only one home theatre system.
To listen to 5.1 channel audio from an external device, connect the device to the TV via an HDMI cable and connect a 5.1
home theatre system directly to the external device's digital audio output connector.
If an external device has been set up for both Anynet+ and a universal remote control, the device can be controlled only
with the universal remote control.
- 19 -
Page 20

Controlling the TV with a Keyboard, Mouse or Gamepad
Connecting a keyboard, mouse or gamepad to make it easier to control the TV.
Settings General External Device Manager Input Device Manager Try Now
You can connect a keyboard, mouse or gamepad to make it easier to control the TV.
Connecting a USB keyboard, mouse or gamepad
Plug the keyboard, mouse or gamepad cable into the USB port.
If you connect a mouse, it is available only in the Internet app and Remote Access function.
XInput USB gamepads are supported.
For more information, refer to Input Device in Connection Guide ( Source Connection Guide Input Device).
Connecting a Bluetooth keyboard, mouse or gamepad
Settings General External Device Manager Input Device Manager Bluetooth
Device List
If your device was not detected, position the keyboard close to the TV, and then select Refresh. The TV scans for available
devices again.
If you connect a mouse, it is available only in the Internet app.
For more information about how to connect a Bluetooth device, refer to the Bluetooth device's user manual.
This function may not be supported depending on the model or geographical area.
- 20 -
Page 21

Using the keyboard and mouse
Button Description
Directional keys Moves the focus
Windows key Displays the TV settings
Enter key Selects or runs a focused item
ESC key Returns to the previous screen
F1 / F2 / F3 / F4 key Colour buttons ― / / /
F5 key Displays the Home Screen
F6 key Displays the Source screen
F7 key Displays the Channel List
F8 key Mutes the sound
F9 / F10 key Adjusts the volume
F11 / F12 key Changes the channel
Page Up / Page Down Scrolls a web page displayed by the Internet app.
Left-click
Available only in the Internet app. You can click a menu or link to start a function as you do
on a PC.
Available only in the Internet app. You can use the following functions:
The options displayed in the menu may differ depending on the selected item.
Right-click
The key operation may differ depending on some apps or the keyboard.
• Open
• Open Link in New Tab
• Enable Scroll Mode
- 21 -
Page 22
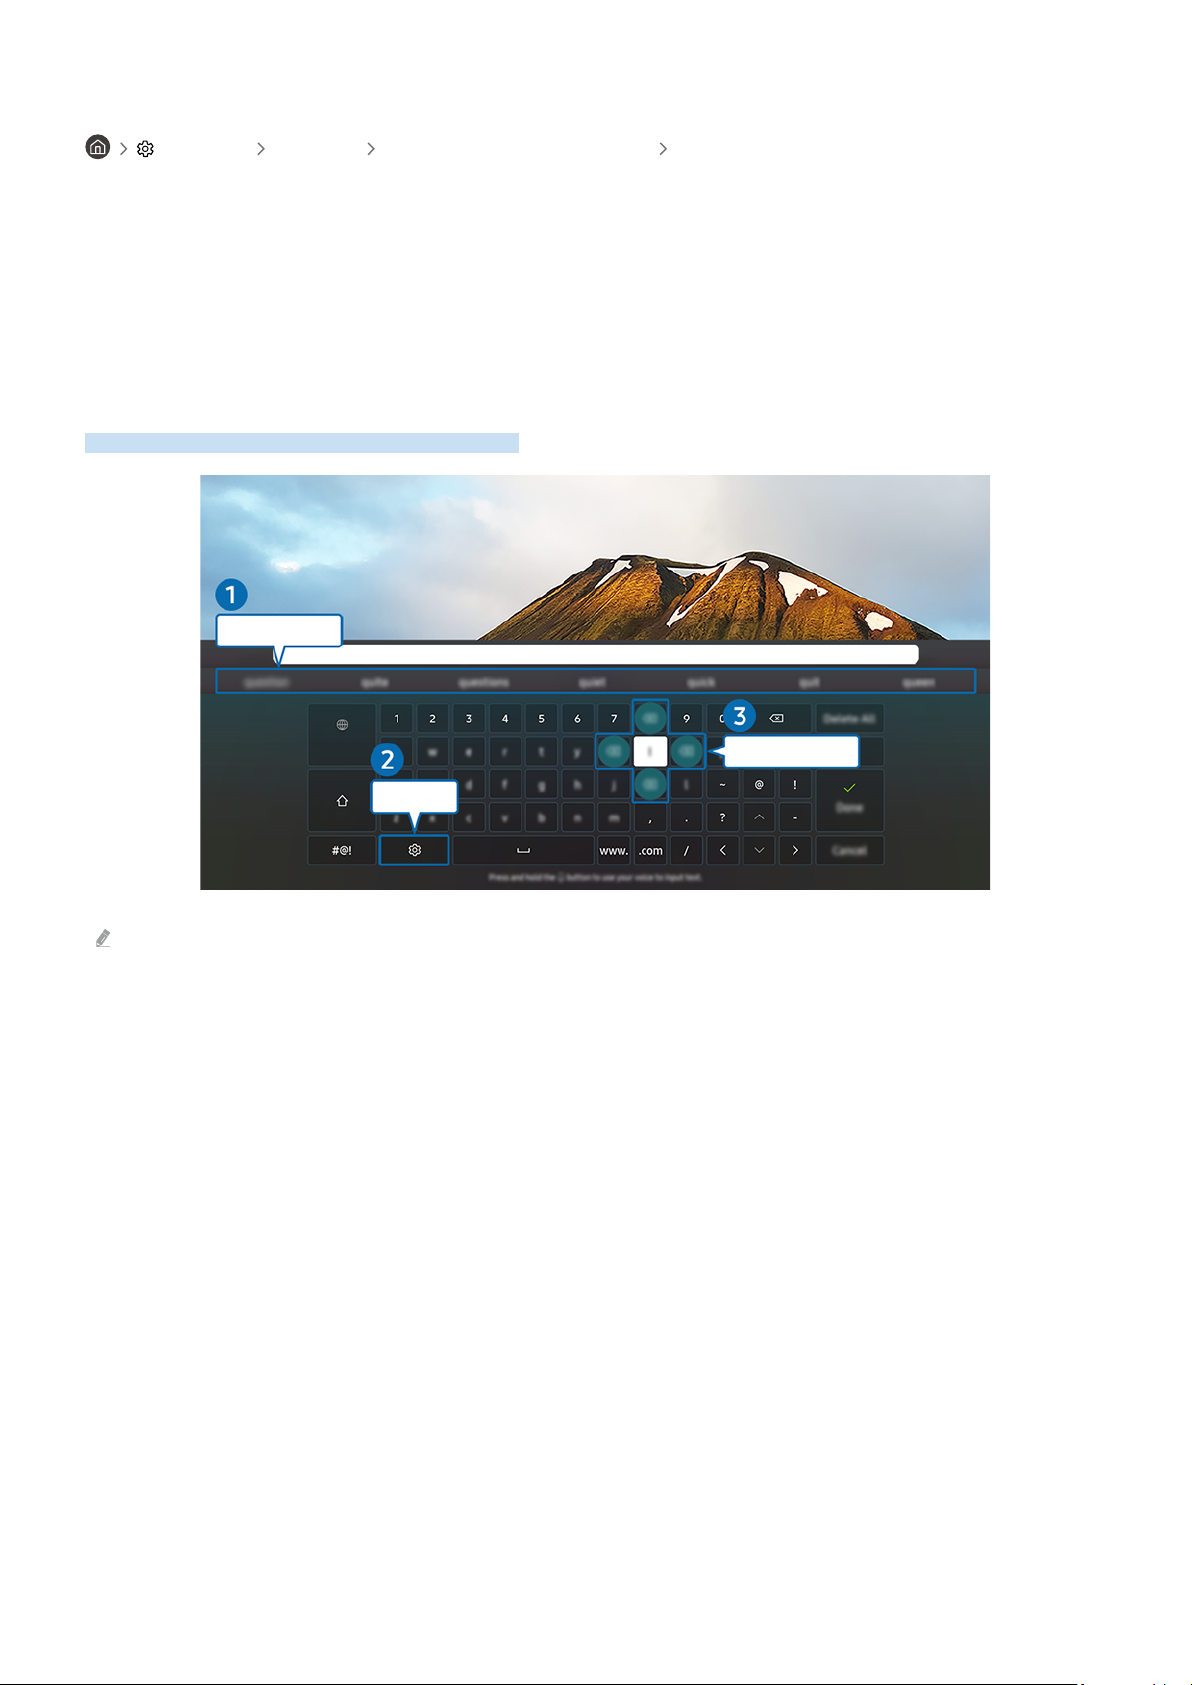
Setting up the input devices
Recommend text
Options
Predict Next Character
Settings General External Device Manager Input Device Manager
• Keyboard Settings
You can set up the keyboard with the Keyboard Language and Keyboard type functions.
• Mouse Settings
You can set up the mouse with the Primary Button and Pointer Speed functions.
Entering Text using the On-Screen Virtual Keyboard
Use the virtual keyboard to enter text on your TV.
The image on your TV may differ from the image above depending on the model and geographical area.
1.Recommend text
When you type a word you want to use as a search term, this function displays related suggestions from which you
can choose one.
- 22 -
Page 23

2.Options
Select on the virtual keyboard screen. The following options are available:
The options available may differ depending on the function running currently.
• Recommend text
• Reset Recommended Text Memory
• Accented Character Preview
• Predict Next Character (when using direction buttons)
• Language
3.Predict Next Character
Each time you type a character on the virtual keyboard, the next characters predicted to be typed are displayed. You
can use the directional buttons on the remote control to select one.
- 23 -
Page 24

Smart Features
You can enjoy various apps with Smart Hub.
Using Smart Hub
View descriptions of Smart Hub's basic functions.
From Smart Hub, you can use the Internet search function, install and use various apps, view photos and videos or
listen to music stored on external storage devices, and perform more functions.
Some Smart Hub services are paid services.
To use Smart Hub, the TV must be connected to the Internet.
Some Smart Hub features may not be supported depending on the service provider, language or geographical area.
Smart Hub service outages can be caused by disruptions in your Internet service.
To use Smart Hub, you must agree to the Smart Hub service agreement and the collection and use of personal information.
Without giving consent, you cannot use the additional features and services. You can view the entire text of the Terms &
Privacy by navigating to Settings Terms & Privacy. Try Now
If you want to stop using Smart Hub, you can cancel the agreement. To cancel the Smart Hub service agreement, select
Reset Smart Hub ( Settings Support Device Care Self Diagnosis Reset Smart Hub).
- 24 -
Page 25
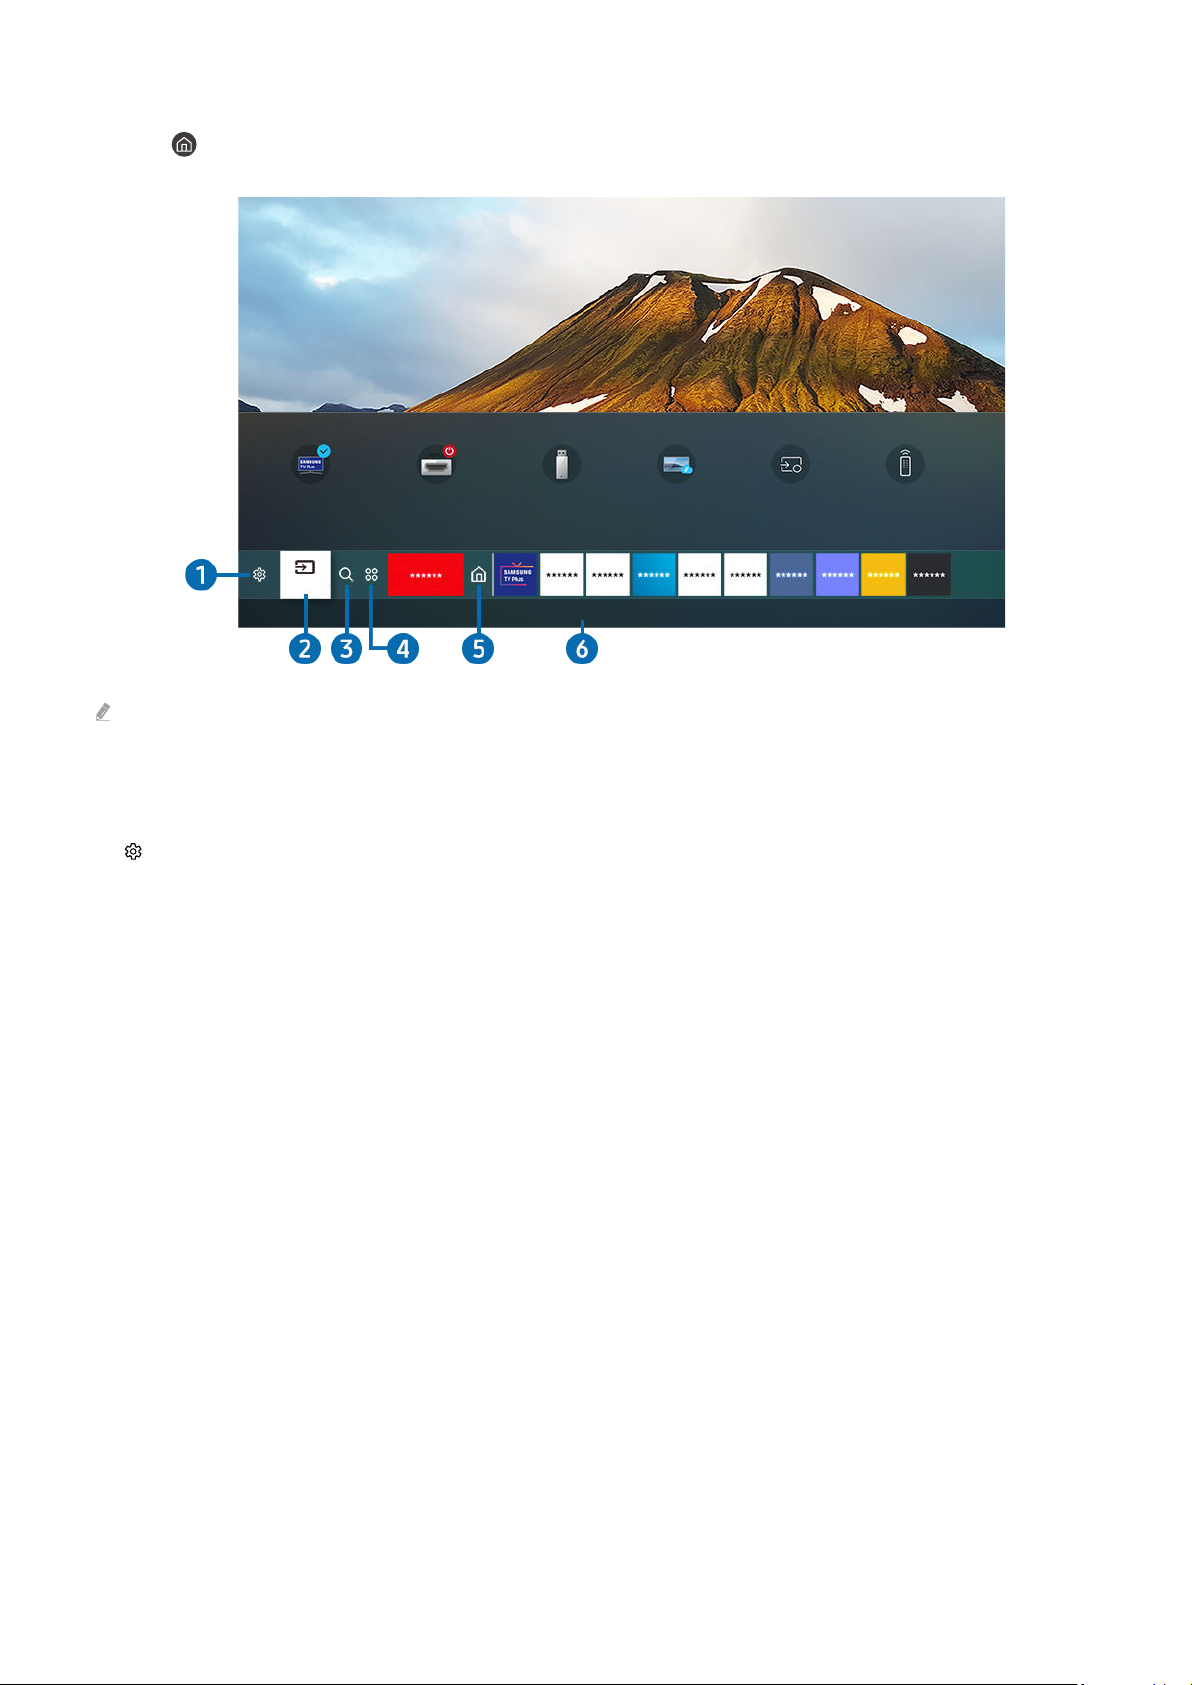
Displaying the Home Screen
Remote Access
Connection Guide
Universal Remote
Source
Press the button.
Sources
TV HDMI 1 USB
The image on your TV may differ from the image above depending on the model and geographical area.
On the Home Screen, you can easily run the apps you have used previously or frequently. The apps can also be
moved or deleted from the screen.
1. Settings
When the focus is moved to Settings, a list of quick settings icons appears above the top of the menu. You can
quickly set frequently used functions by clicking the icons.
• e-Manual
You can open the user manual embedded in your TV.
- 25 -
Page 26

• Picture Mode
You can select the picture mode that provides the best viewing experience. To change the picture mode, press
the Select button. To make ne adjustments, press the up directional button, and then select Picture Setup.
• Sound Mode
You can select a sound mode to optimise your listening experience. To change the sound mode, press the Select
button. To make ne adjustments, press the up directional button, and then select Equaliser Setup.
• Sound Output
You can select which speakers the TV uses for audio output. To change the audio output, press the Select
button. To connect to a Bluetooth speaker, press the up directional button, and then select Bluetooth Speaker
List.
Connecting Bluetooth speaker may not be supported depending on the model or geographical area.
• Game Mode
You can enable game mode to optimise the TV's settings for playing video games with a gaming console, such
as a PlayStation™, Xbox™ or Nintendo Switch™. To turn Game Mode on or off, press the Select button.
For more information about Game Mode, refer to "Setting the Viewing Environment for External Devices".
This function is only available when an external input source is being used.
This function may not be supported depending on the model or geographical area.
• Subtitle
You can watch TV broadcasts with subtitles. To activate/deactivate the Subtitle function, press the Select
button. To run Accessibility Shortcuts, press the up directional button, and then select Accessibility Shortcuts.
• Audio Language
You can change to the audio language you want to hear. To make ne adjustments, press the up directional
button, and then select Go to Audio Options.
• PIP
While using a connected external device, you can watch a TV broadcast in a small picture-in-picture (PIP)
window. To make ne adjustments, press the up directional button, and then select PIP Setup.
This function may not be supported depending on the model or geographical area.
• Network
You can view the current network and Internet status. Press the up directional button, and then select Network
Status or Network Settings.
- 26 -
Page 27

• Picture Size
You can change to the picture size you want to view. To make ne adjustments, press the up directional button,
and then select Go to Picture Size.
• Colour Tone
You can select a colour tone suitable for your viewing preferences. To change to a colour tone that you want,
press the Select button.
• Picture Clarity
You can optimise pictures that contain a lot of motions. To turn this function on or off, press the Select button.
To set the detailed options, press the up directional button, and then select Picture Clarity Settings.
This function may not be supported depending on the model or geographical area.
• Contrast Enhancer
You can prevent excessive differences between bright and dark areas on the TV screen. To change the Contrast
Enhancer setting, press the Select button.
• Digital Output Audio Format
You can select an output format for digital audio. Note that the Dolby Digital+ option is only available via HDMI
(eARC) for external devices that support the Dolby Digital+ format.
HDMI (ARC) is supported by some models. Check the HDMI port name of the purchased product's model.
• Colour Space
You can set the spectrum of colours on the TV screen. To change to a colour space that you want, press
the Select button. To set the detailed options, press the up directional button, and then select Colour Space
Settings.
• Device Care
You can run Device Care to diagnose and optimise your TV. Device Care can also check and optimise the TV's
storage. If any trouble found, it can call for technical support.
• All Settings
Display the Settings menu.
These functions may not be supported depending on the model or geographical area.
- 27 -
Page 28

2. Source
You can select an external device connected to the TV.
For more information, refer to "Switching between external devices connected to the TV".
3. Search
You can search for channels, programmes, movie titles and apps from Smart Hub.
To use this feature, the TV must be connected to the Internet.
4. Apps
You can enjoy a wide range of content including news, sports, weather and games by installing the corresponding
apps on your TV.
To use this feature, the TV must be connected to the Internet.
For more information, refer to "Using the Apps Service".
5.Home
This menu appears rst when you press the button. Then you can quickly use any of Samsung Account,
Notication or Privacy Choices.
• Samsung Account
Go to the Samsung Account screen to create a new account or sign out of your account.
For more information about the Samsung Account, refer to "Using a Samsung account".
• Notication
You can view a list of notications for all events that occur on your TV. A notication appears on the screen
when it is time to broadcast a scheduled programme or when an event occurs on a registered device.
If you move the focus to Notication, and then press the Select button, a notication window appears on the
right and the following functions are available:
– Delete All
You can delete all your notifications.
– Settings
You can select services you want to be notified about.
When you select Allow sound, notifications are displayed with a notification sound.
• Privacy Choices
You can view and set the privacy policy for Smart Hub and various other services.
- 28 -
Page 29

6.Universal Guide
Universal Guide is an app that allows you to search for and enjoy various content such as TV shows, dramas and
movies in one place. Universal Guide can recommend content tailored to your preferences.
You can use this feature on your mobile device with the Samsung SmartThings app.
To enjoy the content from these apps on your TV, they must be installed on the TV.
When you watch some paid content, you may need to make a payment using their associated app.
Some content may be restricted depending on your network conditions and your subscriptions to paid channels.
Parental control is necessary when children use this service.
Images may look blurry depending on the service provider's circumstances.
This function may not be supported depending on the model or geographical area.
. Art
When you are not watching TV or when the TV is turned off, you can use the Art mode function to edit image
content such as artworks or photos or to display the content.
This function is supported only in The Frame.
For more information, refer to the provided user manual.
- 29 -
Page 30

Move
Remove
The image on your TV may differ from the image above depending on the model and geographical area.
7.Moving an item on the Home Screen
Move the focus to the app you want to move, press and hold the Select button on the remote control, and then
select Move in option menu. Move the app to the desired position by pressing the left or right directional button,
and then press the Select button. The selected app is moved on the Home screen.
In the region that does not support the Universal Guide, press the down directional button on the remote control.
8.Removing an item on the Home Screen
Move the focus to the app you want to delete, press and hold the Select button on the remote control, and then
select Remove in option menu. The selected app is deleted.
You can add the apps you want to use often to the Home Screen using Apps. To add your favourite apps to the Home Screen,
refer to "Managing installed apps".
- 30 -
Page 31

Launching Smart Hub automatically
Settings General Smart Features Autorun Smart Hub Try Now
When you set Autorun Smart Hub to On, the TV displays the Home Screen automatically when you turn the TV on.
You can also turn this function on or off. Press the Select button at the current menu.
Launching the last used app automatically
Settings General Smart Features Autorun Last App Try Now
If Autorun Last App is set to On, the last used app is automatically run when you turn on the TV. You can also turn
this function on or off. Press the Select button at the current menu.
This function may not be supported depending on the app.
This function may not be supported depending on the model.
Testing Smart Hub connections
Settings Support Device Care Self Diagnosis Smart Hub Connection Test Try Now
Resetting Smart Hub
Settings Support Device Care Self Diagnosis Reset Smart Hub Try Now
You can reset the Smart Hub settings. To reset Smart Hub, enter the PIN. The default PIN is "0000" (for France and Italy:
"1111"). You can set the PIN in Settings General System Manager Change PIN.
- 31 -
Page 32

Using a Samsung account
Create and manage your own Samsung account.
Settings General System Manager Samsung Account Try Now
You can view the entire text of the Terms & Policy in Settings General System Manager Samsung Account
My Account Terms & Conditions, Privacy Policy after logging in to your Samsung account.
You can create a Samsung account at https://account.samsung.com. Once you have an account, you can use the same ID on
both the TV and the Samsung website.
Signing in to a Samsung account
Settings General System Manager Samsung Account Sign In
Creating a new account
Settings General System Manager Samsung Account Create Account
Sign up for a Samsung account on your mobile or PC. Visit : https://account.samsung.com
- 32 -
Page 33

Managing your Samsung account
Settings General System Manager Samsung Account My Account
When you sign in to your Samsung account, you can use the following functions:
• Sign out
When multiple people share the TV, you can sign out of your account to prevent others from seeing it.
To sign out of your Samsung Account ( Settings General System Manager Samsung Account), move
the focus to your account's icon, and then press the Select button. When a pop-up window appears, select Sign out.
• Edit profile
You can edit your account information.
To protect personal information, enter Edit profile and then Sign-in Method is set to Profile image selection and
password entry (High security).
If you want the TV to log you into your account automatically whenever you turn on the TV, click Stay Signed In.
• Payment Info
You can view or manage your payment information.
• Back up
You can back up the TV settings to your Samsung Cloud storage. When resetting or replacing the TV, you can
also restore its settings with the backed-up settings.
• Sync Internet
Once you sign in to your Samsung account and configure the Sync Internet settings, you can share the favourites
and website bookmarks that you registered on other devices.
• Remove Account
You can delete an account from the TV. Although you have deleted your Samsung account from the TV, you
are not unsubscribed. To unsubscribe from your Samsung Account, visit the Samsung Accounts website (https://
account.samsung.com).
• Terms & Conditions, Privacy Policy
You can view the user agreement and privacy policy.
For more information about the terms and conditions, privacy policy, select View Details.
- 33 -
Page 34
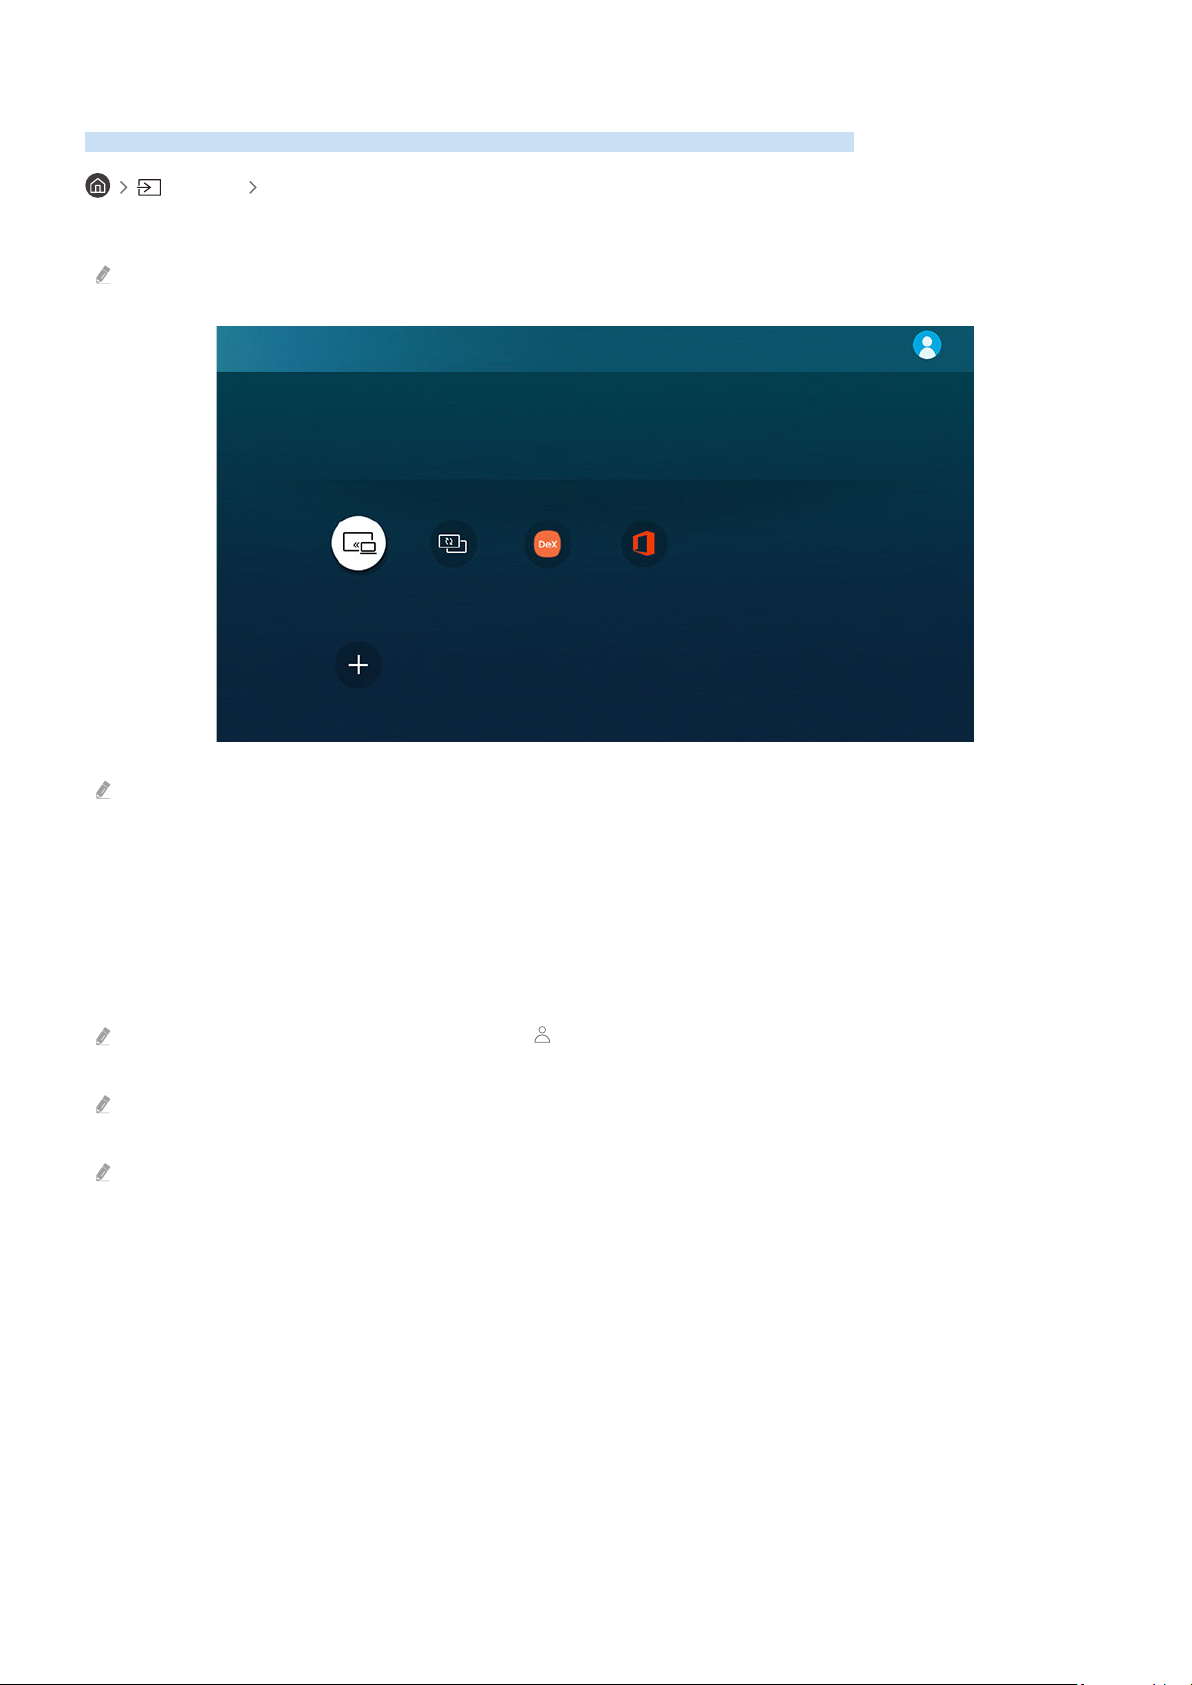
Using Remote Access
Use the TV to access your PC via Remote PC, Screen Sharing (Wireless) or Cloud Service.
Source Remote Access
You can use the TV to access your PC via Remote PC, Screen Sharing (Wireless) or Cloud Service.
For smooth use as in a computer, connect a keyboard and a mouse to your TV in advance.
Remote Access secured by Knox
Access remote PC and your work resources with this function.
Featured Functions
Remote PC
Added Cloud Services
Add Cloud Service
Connect a keyboard and mouse to this TV before starting.
Screen Sharing
(Wireless)
Samsung DeX Ofce 365
The image on your TV may differ from the image above depending on the model and geographical area.
Connecting a Remote PC
Provides Remote Desktop Connection (RDP) for remotely connecting to a PC running on Windows and Virtual
Network Computing (VNC) for a PC running on Mac. To remotely connect to a PC, you must enter the IP address
of the remote PC or select a saved prole. Enter a correct username and password and select a correct protocol. If
there is any computer that can be accessed via the same network, the found IP and protocol are displayed.
To register a frequently used PC, move the focus to Manage User Proles, and then press the Select button. When a
pop-up window appears, select Add, and then enter the PC information.
When your PC enters in power saving mode, connection is not available. It is recommended to cancel the power saving
mode.
It is recommended to connect the wired network because the screen or sound may be interrupted depending on the
network condition.
- 34 -
Page 35

1.
Congure your computer’s settings to use the Remote Access function.
Remote connection to a PC running on Windows via the RDP protocol is only supported for Windows 7 or later. And the
operating system must be a Professional or higher edition.
Remote connection to a PC running on Mac via the VNC protocol is only supported for Mac OS X 10.5 or later.
• Windows OS:
1)
Right-click the My Computer icon on Desktop or Windows Explorer and then click Properties.
2)
Click Advanced System Settings. The System Properties window appears.
3)
Click the Remote tab and then select the Allow Remote Assistance connections to this computer.
• Mac OS:
1)
Select Menu System Preferences and then click Sharing.
2)
Select the Screen Sharing and Remote Login check box.
3)
Run the resolution changing app downloaded from App Store and then change the resolution to 1440 x
900 or lower.
If you do not change the resolution in Mac OS, the previous image may appear while connecting a remote
computer.
- 35 -
Page 36
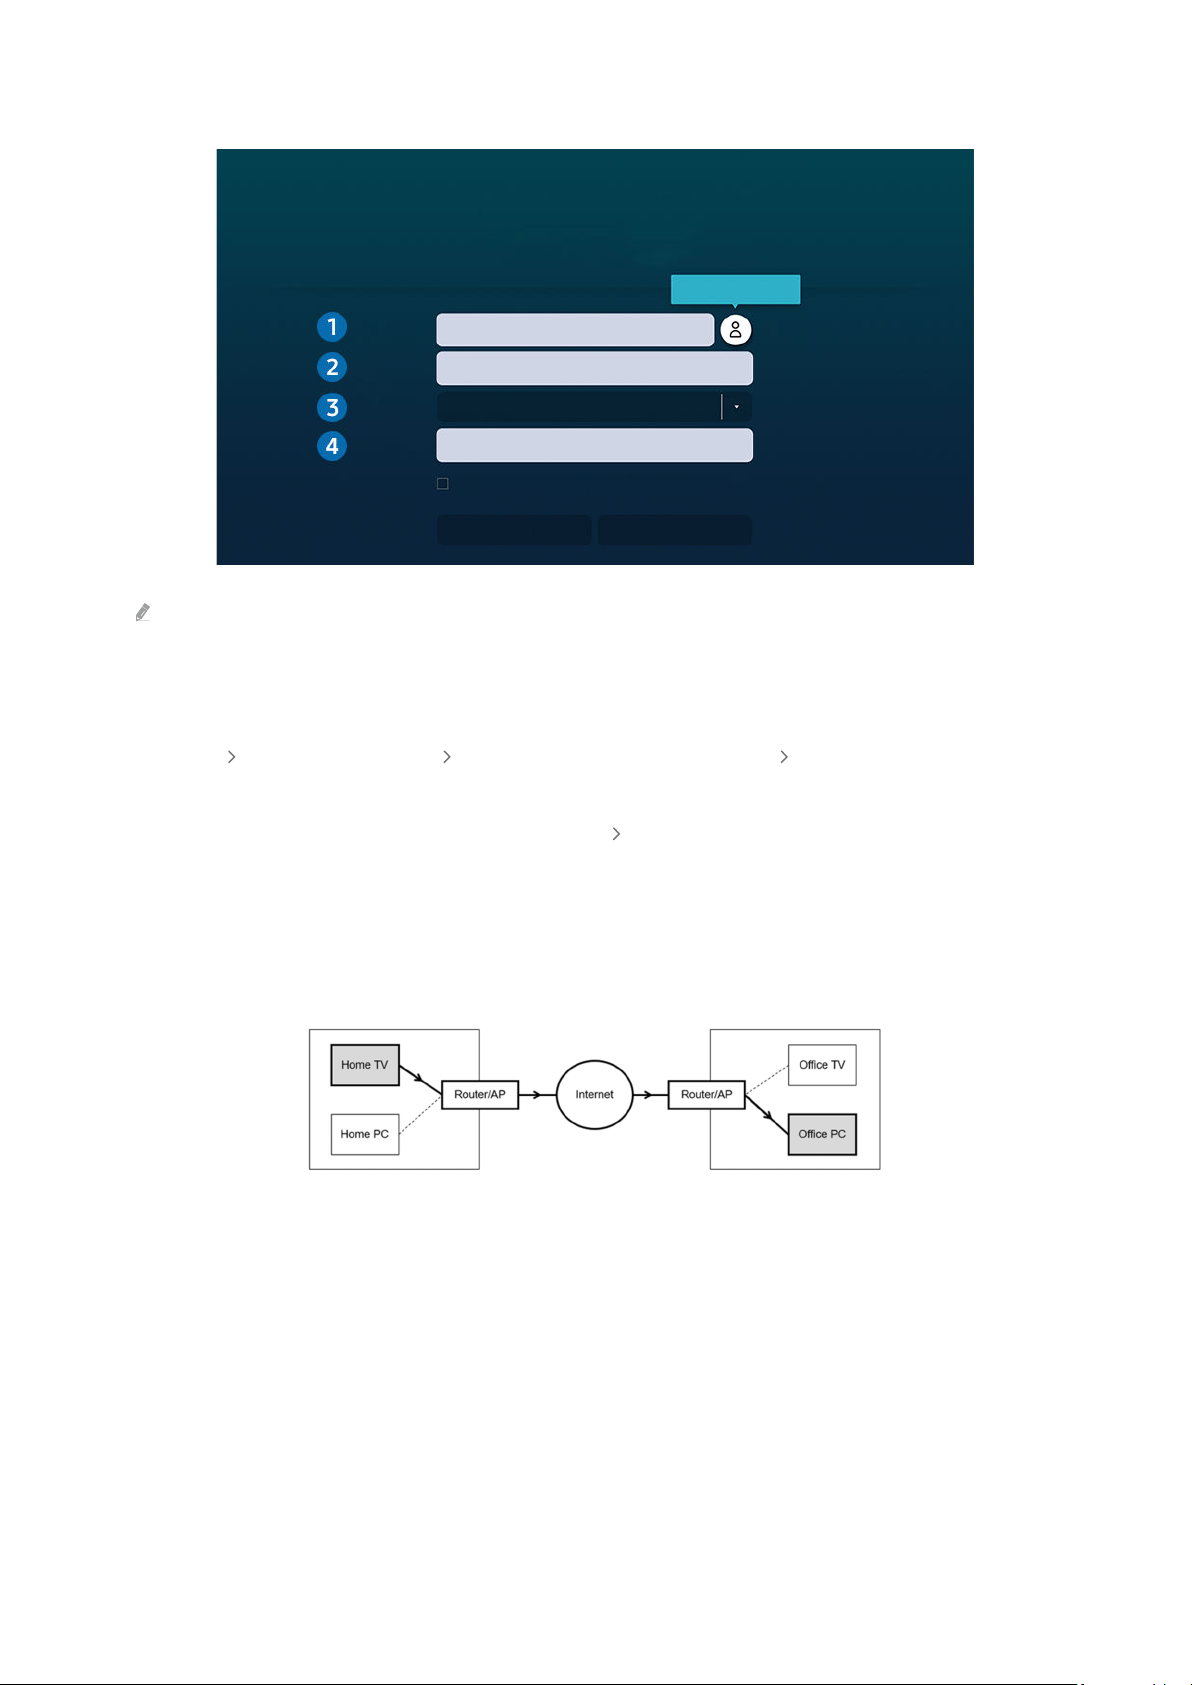
2.
PC/Prole
IP address or prole
Username
Enter a username.
Protocol
RDP (for Windows users)
Password
Enter a password.
Remember my credentials (PC/Prole, Username, Protocol and Password)
Connect
Cancel
Manage User Proles
Enter the required settings for connecting the computer remotely.
Connect to Remote PC
Make sure the PC is on and remote access is set to "Allow".
The image on your TV may differ from the image above depending on the model and geographical area.
1.Enter the IP address of the PC you want to connect to.
• In case of Windows, when the computer to connect is within the same network (router/AP), run “cmd" command
in Settings Network and Internet View Network properties or in Start Run, and then run “ipconfig” to
check the IPv4 address of the computer.
• In case of Mac, you can check the IP address in Settings Remote Access.
• When the TV and computer are not within the same network, it is required to know the public IP and configure
the router and AP. Check whether the router connected to the computer supports port forwarding. When the
company provides additional security features such as firewall, seek help from a security officer.
Home
Ofce
- 36 -
Page 37

2.Enter the Username of the computer.
How to check the Username: Control Panel User Account Control in Windows, System Preferences Users &
Groups in Mac.
3.Select the Protocol for the computer’s OS. (Windows: RDP, Mac: VNC)
4.Enter the password for the login account.
For use of PIN, do not enter PIN but the specied password of the computer.
Playing Multimedia Content on a Remote PC
When you move the mouse cursor to the top of the screen after accessing a remote computer, the top bar appears.
When the sharing folder icon is clicked in the top bar, the folders shared on Windows or Mac OS appear. You can
play back any media content in a folder.
For more information about playing multimedia content, refer to "Playing pictures/video/music".
To use this function, the folder sharing option on the computer to access must have been enabled as shown below:
• Windows OS:
1.
Run Windows Explorer and then move to the folder to share.
2.
Right-click the folder and then click Properties.
3.
After the Properties window appears, click the Sharing tab and then click Advanced Sharing.
4.
After the Advanced Sharing window appears, select the Share this folder check box.
• Mac OS:
1.
Select Menu System Preferences and then click Sharing.
2.
Select the File Sharing check box.
3.
To add a folder to share, click the Add+ button at the bottom.
4.
Select a folder and then click Add+.
It is recommended to connect the wired network because the screen or sound may be interrupted depending on the
network condition.
When playing a video le via a remote computer, the screen or sound breaking may be encountered.
- 37 -
Page 38

Using Screen Sharing (Wireless)
Follow the instructions on the screen to adjust the PC settings and wirelessly connect the TV to the PC.
This function is only available for PCs that support wireless screen sharing.
This function is supported by Windows 10.
You can connect AirPlay in Mac.
Using Samsung DeX
Samsung DeX can be connected from the TV via wireless network.
When the mobile device does not appear on the screen, select Mobile Connection Guide and then follow the screen
instructions.
This function is available only on mobile devices that support the wireless Samsung DeX.
Using Ofce 365
You can read or create a document after accessing the Ofce 365 website.
Run the browser in full screen mode.
URL modication is impossible in the Ofce 365 page.
Adding the Cloud Service
Select the Add Cloud Service icon. Use the bookmarking function of the browser, you can add or delete the cloud
service link to or from Remote Access.
To add the cloud service, you must be signed in to your Samsung account.
The number of cloud services that can be added to Remote Access is limited.
- 38 -
Page 39

Using Cloud Service
You can access the cloud service by selecting the cloud service icon added to Remote Access.
The screen on the web page may differ from that of a computer.
You can copy or paste any text. Some image formats are supported.
For easy and secured login in Cloud Service, Remote Access Pass is additionally supported as well as Samsung Pass.
Setting Samsung Pass or Remote Access Pass.
Set Samsung Pass or Remote Access Pass to Use in Source Remote Access Run the Remote Access browser
(Additionally select Ofce 365 or Add Cloud Service) Internet Menu Settings.
Remote Access Pass allows you to easily manage the cloud service ID and password without biometric authentication on
mobile devices. For this purpose, you must be signed in to your Samsung account. The password is encrypted to be safely
stored on your TV.
However, the log in to Remote Access Pass may not work depending on the site policy.
To securely access the cloud service, you can use the browser's automatic shutdown or clear the history logs.
Before accessing the cloud service, refer to "Read Before Using the Internet Function".
The cloud service supports the following keyboard shortcuts:
• F1: Returns to Remote Access's Home screen.
• F8: Mutes the sound.
• F9/F10: Adjusts the volume.
• F11: Switches between full screen or default screen.
- 39 -
Page 40
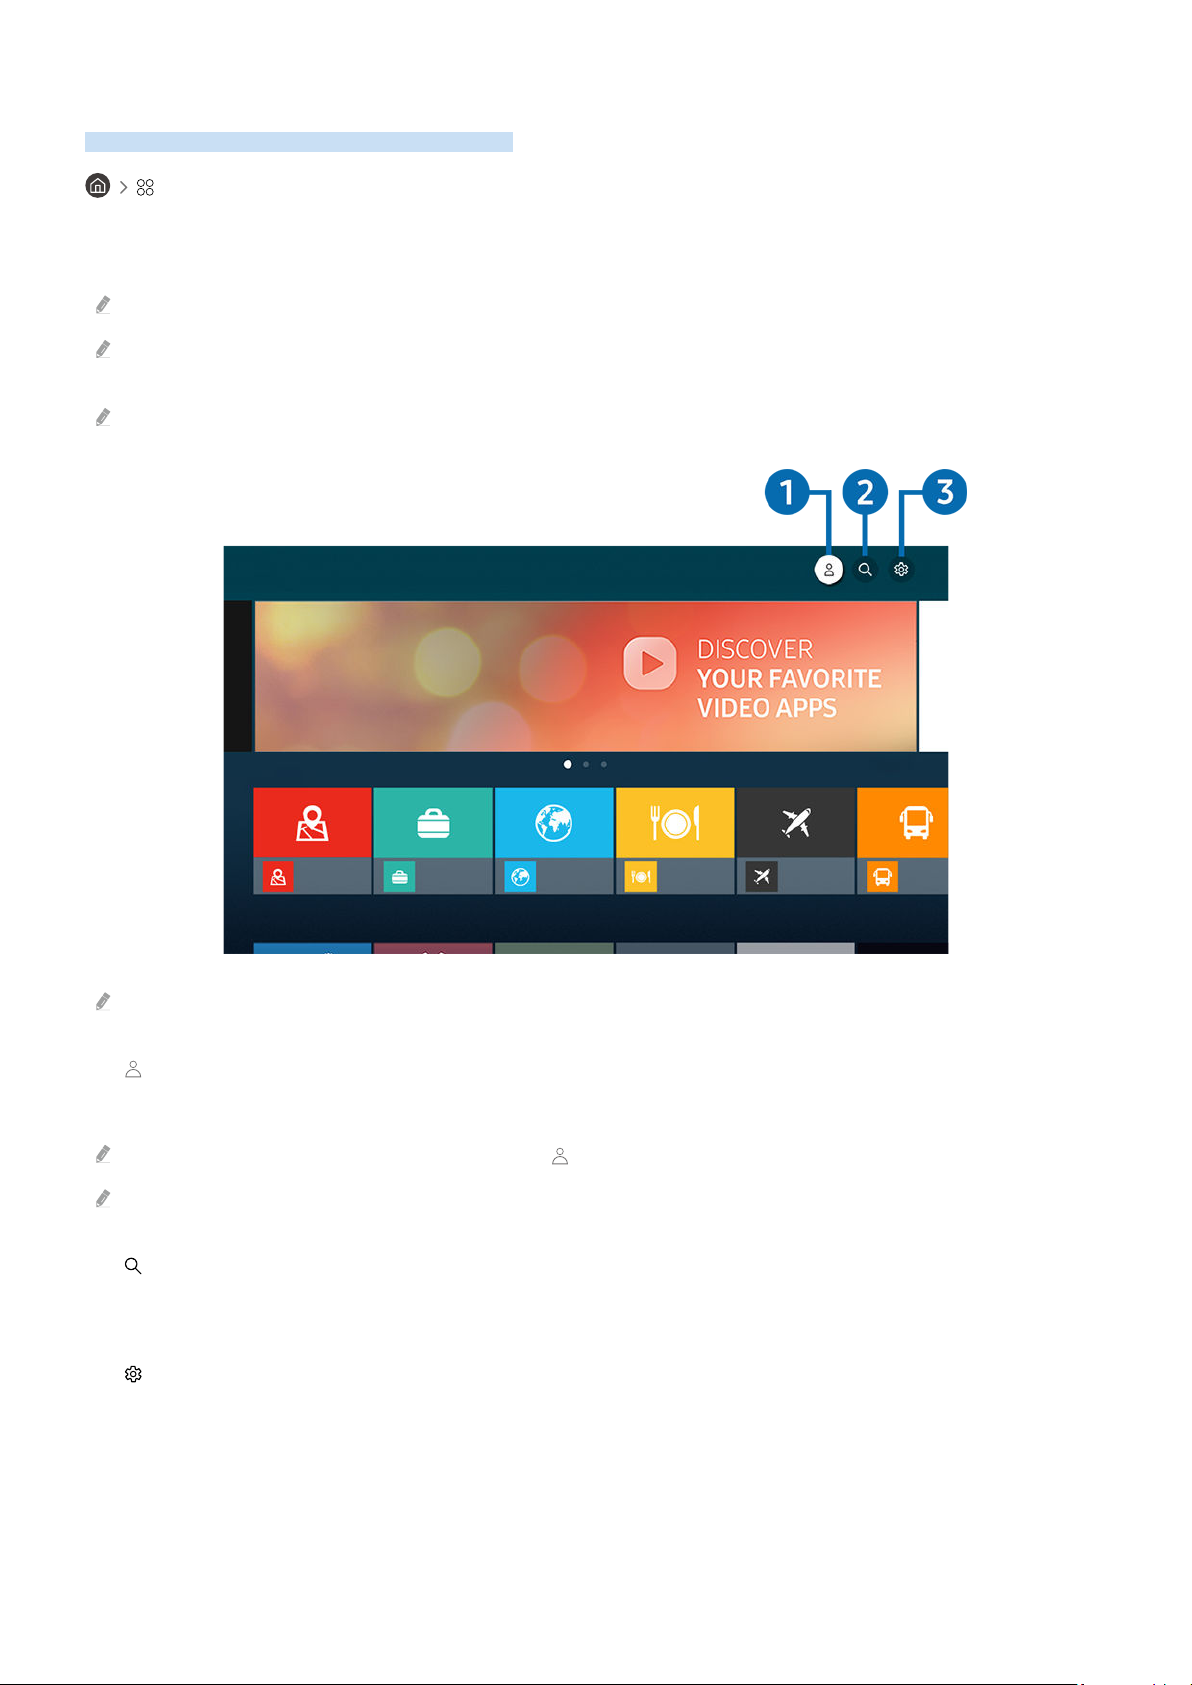
Using the Apps Service
Download and run various apps from Smart Hub.
Apps
You can enjoy a wide range of content including news, sports, weather and games by installing the corresponding
apps on your TV.
To use this feature, the TV must be connected to the Internet.
When Smart Hub is launched for the rst time, the default apps are automatically installed. The default apps may differ
depending on the geographical area.
It is recommended to use the landscape mode in some apps for The Frame.
Apps
Editor's Choice
Most Popular
The image on your TV may differ from the image above depending on the model and geographical area.
1. Samsung Account
Go to the Samsung Account screen to create a new account or sign out of your account.
If you are signed out of your Samsung account, select Sign In to sign in.
If you want to download new apps using Apps, rst sign in to your Samsung account.
2. App Search
You can search for available apps.
3. Settings
You can manage the installed apps.
- 40 -
Page 41

Installing an app
1.
Move to the app you want to install, and then press the Select button. The detailed information screen appears.
2.
Select Install. When the installation is complete, the Open menu appears.
3.
Select Open to run the app immediately.
You can view installed apps on the Settings screen.
If the TV's internal memory is insufcient, you can install some specic apps on a USB device.
You can run an app installed on a USB device only when the USB device is connected to the TV. If the USB device is
disconnected while an app is running, the app is terminated.
You cannot run an app installed on a USB device on a PC or another TV.
Launching an app
You can run the app desired from Downloaded App.
The icons below appear within the selected app's icon and indicate the following:
– : The app is installed on a USB device.
– : The app has a password.
: The app needs to be updated.
–
– : The app supports the mirroring function.
- 41 -
Page 42
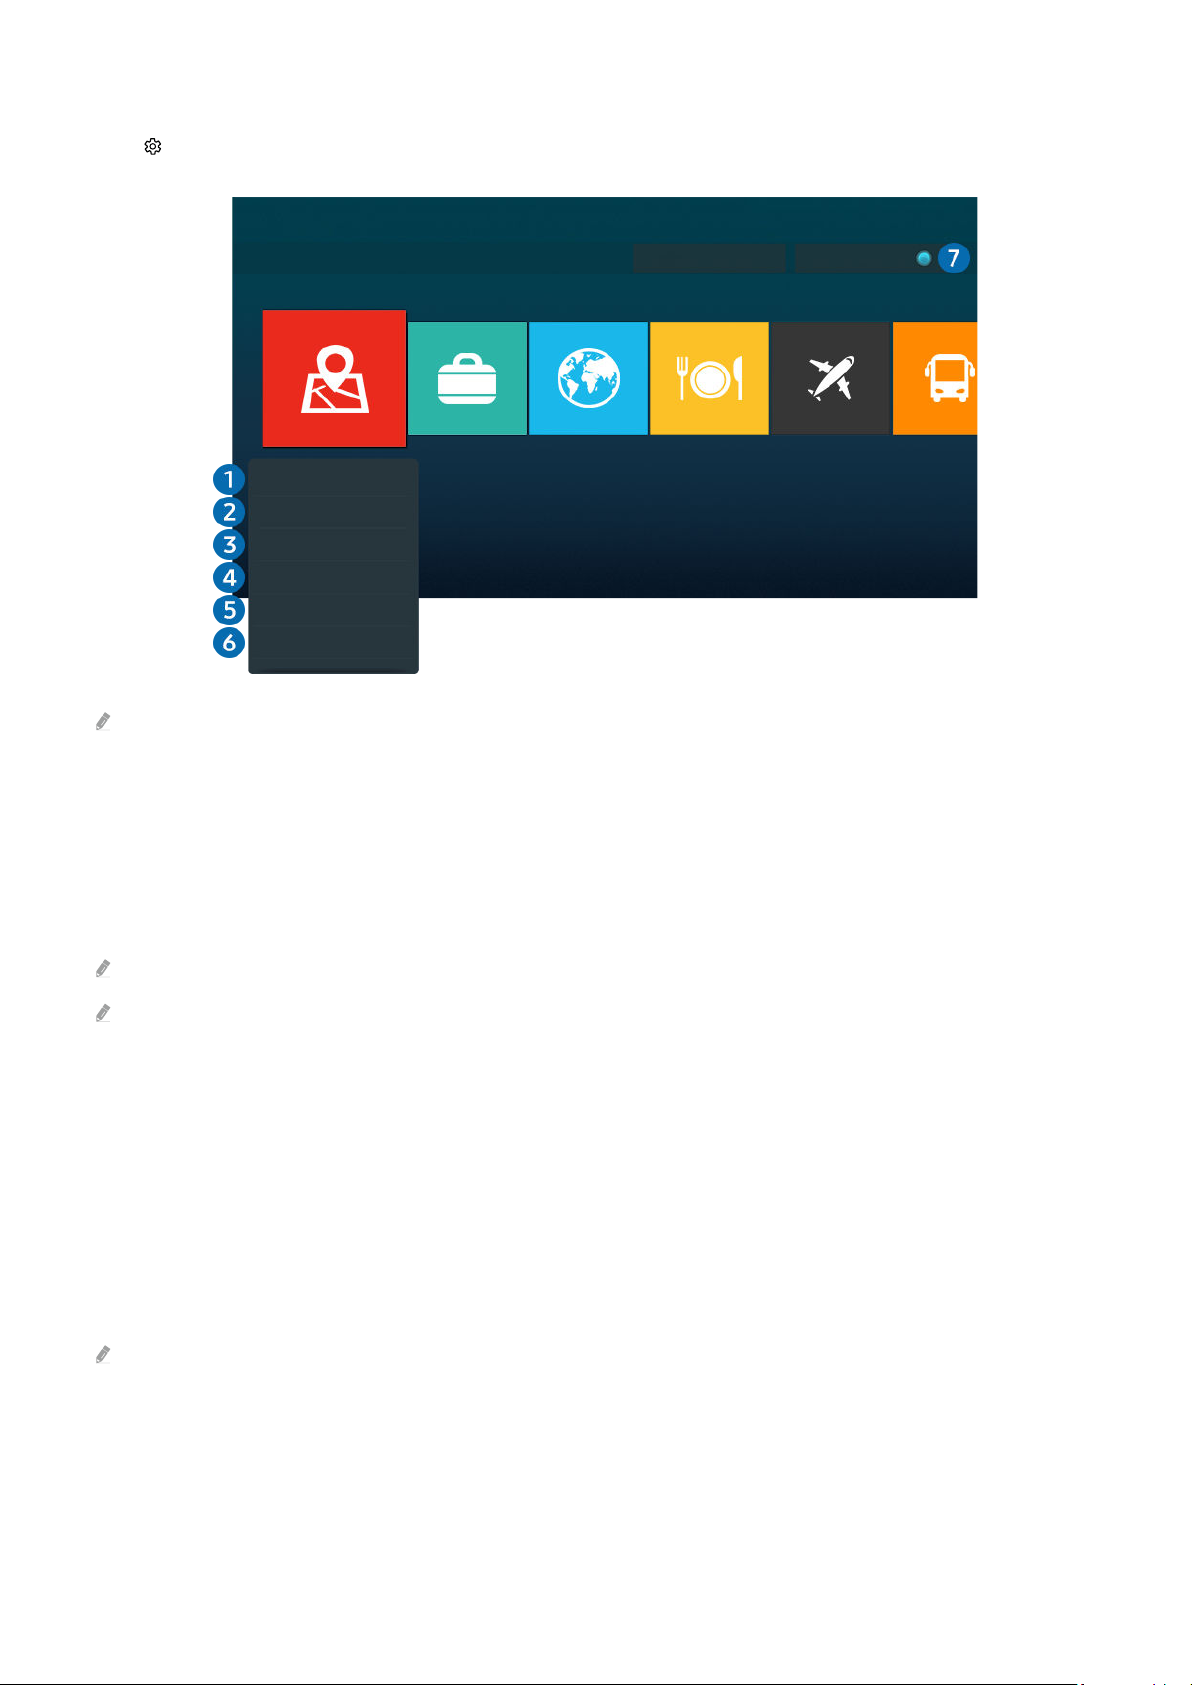
Managing installed apps
Auto update : ON
Copyright
Delete
Add to Home
Lock
Move
Reinstall
View Details
Select Settings on Apps. You can manage installed apps.
Settings
The image on your TV may differ from the image above depending on the model and geographical area.
1.Removing an app
1.
Select an app to delete.
2.
Select Delete.
The selected app is deleted.
Ensure that the related app data is also removed when you remove an app.
Standard apps cannot be uninstalled.
2.Adding apps to the Home Screen
1.
Select an app to add.
2.
Select Add to Home.
3.
After the Home screen appears, move the selected app to the desired location.
4.
Press the Select button.
The selected app is added to the Home Screen.
If the selected app is already added to the Home Screen, this function is disabled.
- 42 -
Page 43

3.Locking and unlocking apps
1.
Select an app to lock or unlock.
2.
Select Lock/Unlock.
The selected app is locked or unlocked.
To lock or unlock an app, enter the PIN. The default PIN is "0000" (for France and Italy: "1111"). You can set the PIN in
Settings General System Manager Change PIN.
4.Moving apps
1.
Select an app to move.
2.
Select Move.
3.
Move the app to the desired location.
4.
Press the Select button.
The selected app is moved.
This function may not be supported depending on the model or geographical area.
5.Reinstalling an app
1.
Select the app to install again.
2.
Select Reinstall.
Reinstallation starts.
6.Checking the app information details
1.
Select the app to check.
2.
Select View Details.
The app information screen appears.
You can rate an app on the View Details screen.
7.Automatically updating apps
To automatically update the installed apps, set Auto update to ON.
Automatic update is enabled only when the TV is connected to the Internet.
- 43 -
Page 44
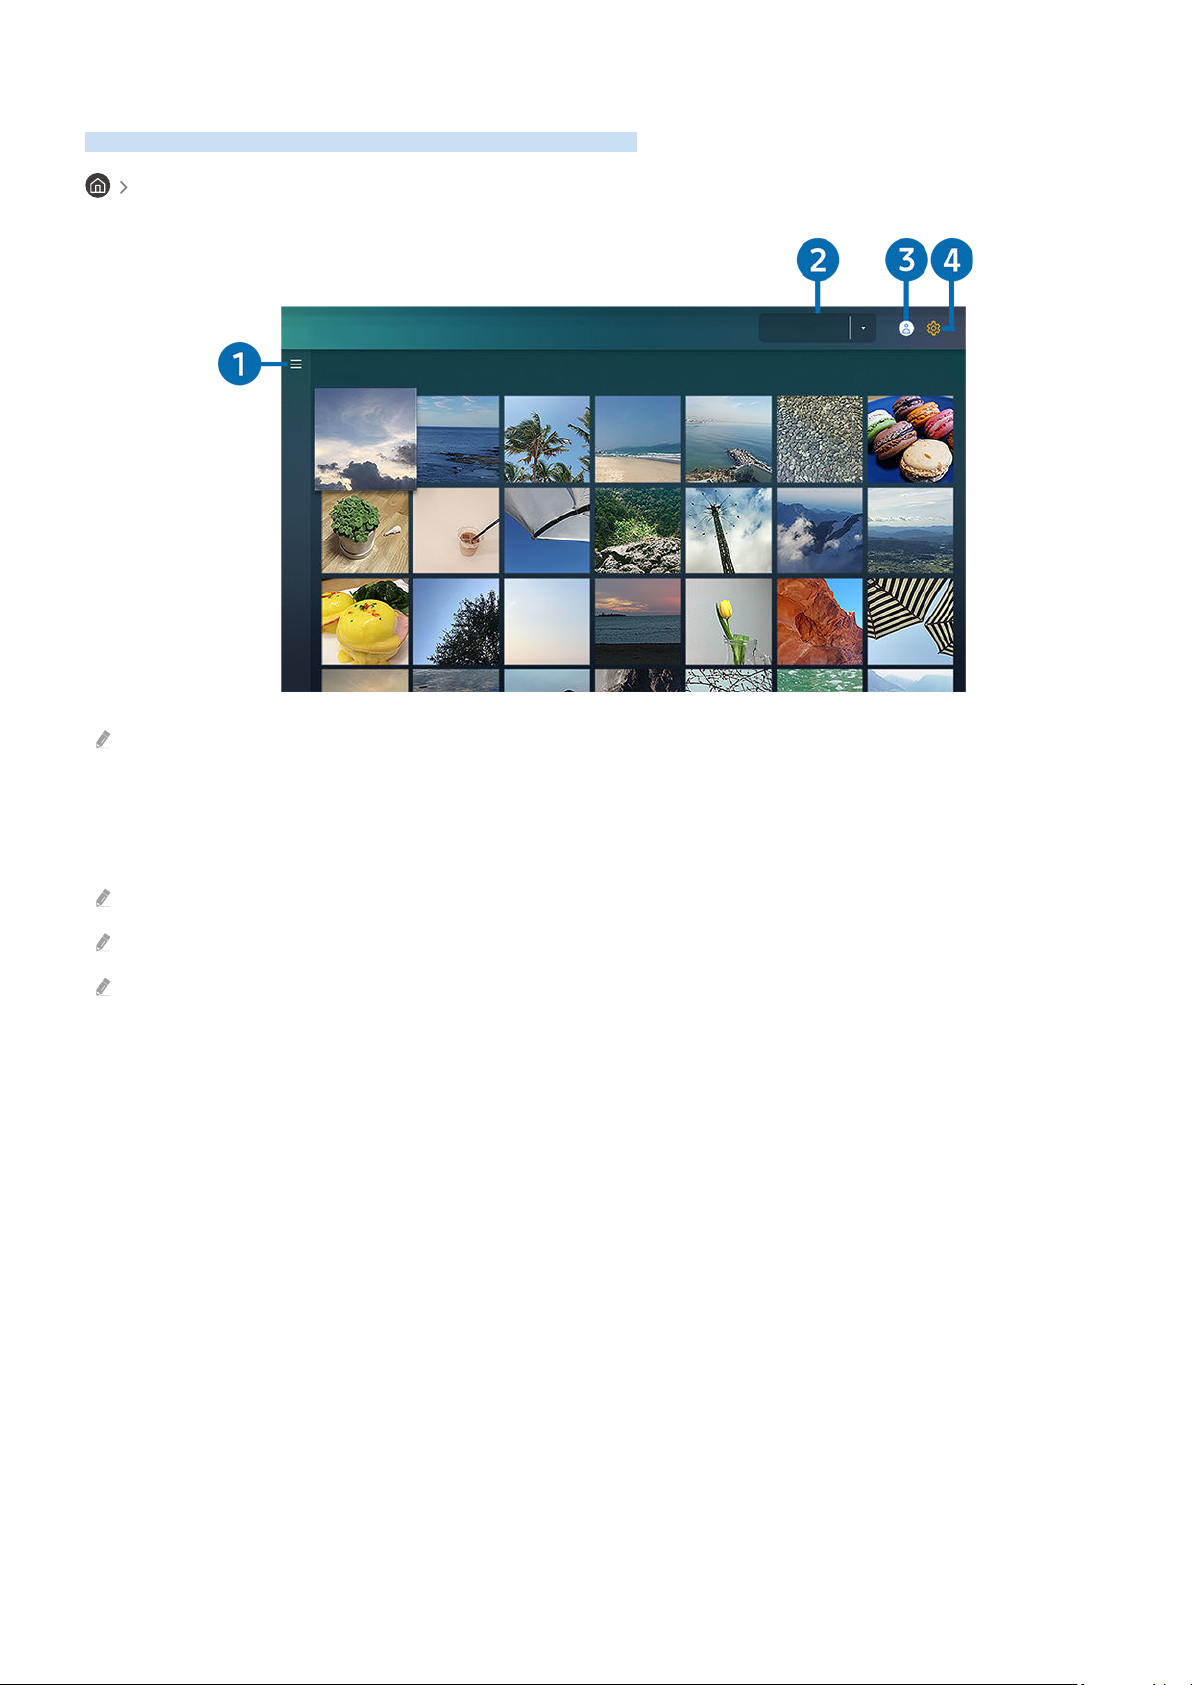
Using the Gallery App
View: Daily
View photos and videos synchronised with the Samsung Cloud.
Gallery
Gallery
The image on your TV may differ from the image above depending on the model and geographical area.
You can enjoy various content synchronised with a mobile device that supports the Samsung Cloud. The available
content types are photos, videos, stories and other content shared through your groups.
If you have shared content from your groups, you can access them in notications.
To use the Gallery app, you must be signed in to your Samsung account that uses the Samsung Cloud.
To use this function, the PIN number is required.
This function may not be supported depending on the model.
- 44 -
Page 45

1. Open category
Move to at the top left of the screen using the directional buttons on the remote control to view by category the
content synchronised with the Samsung Cloud.
2.View: Daily / View: Monthly
Sort the content by day or month.
3.
Samsung Account
Go to the Samsung Account screen to create a new account or sign out of your account.
If you are signed out of your Samsung account, select Sign In to sign in.
4. Gallery Settings
Set a PIN for screen lock to restrict access to the Gallery app or view the terms and condition.
- 45 -
Page 46
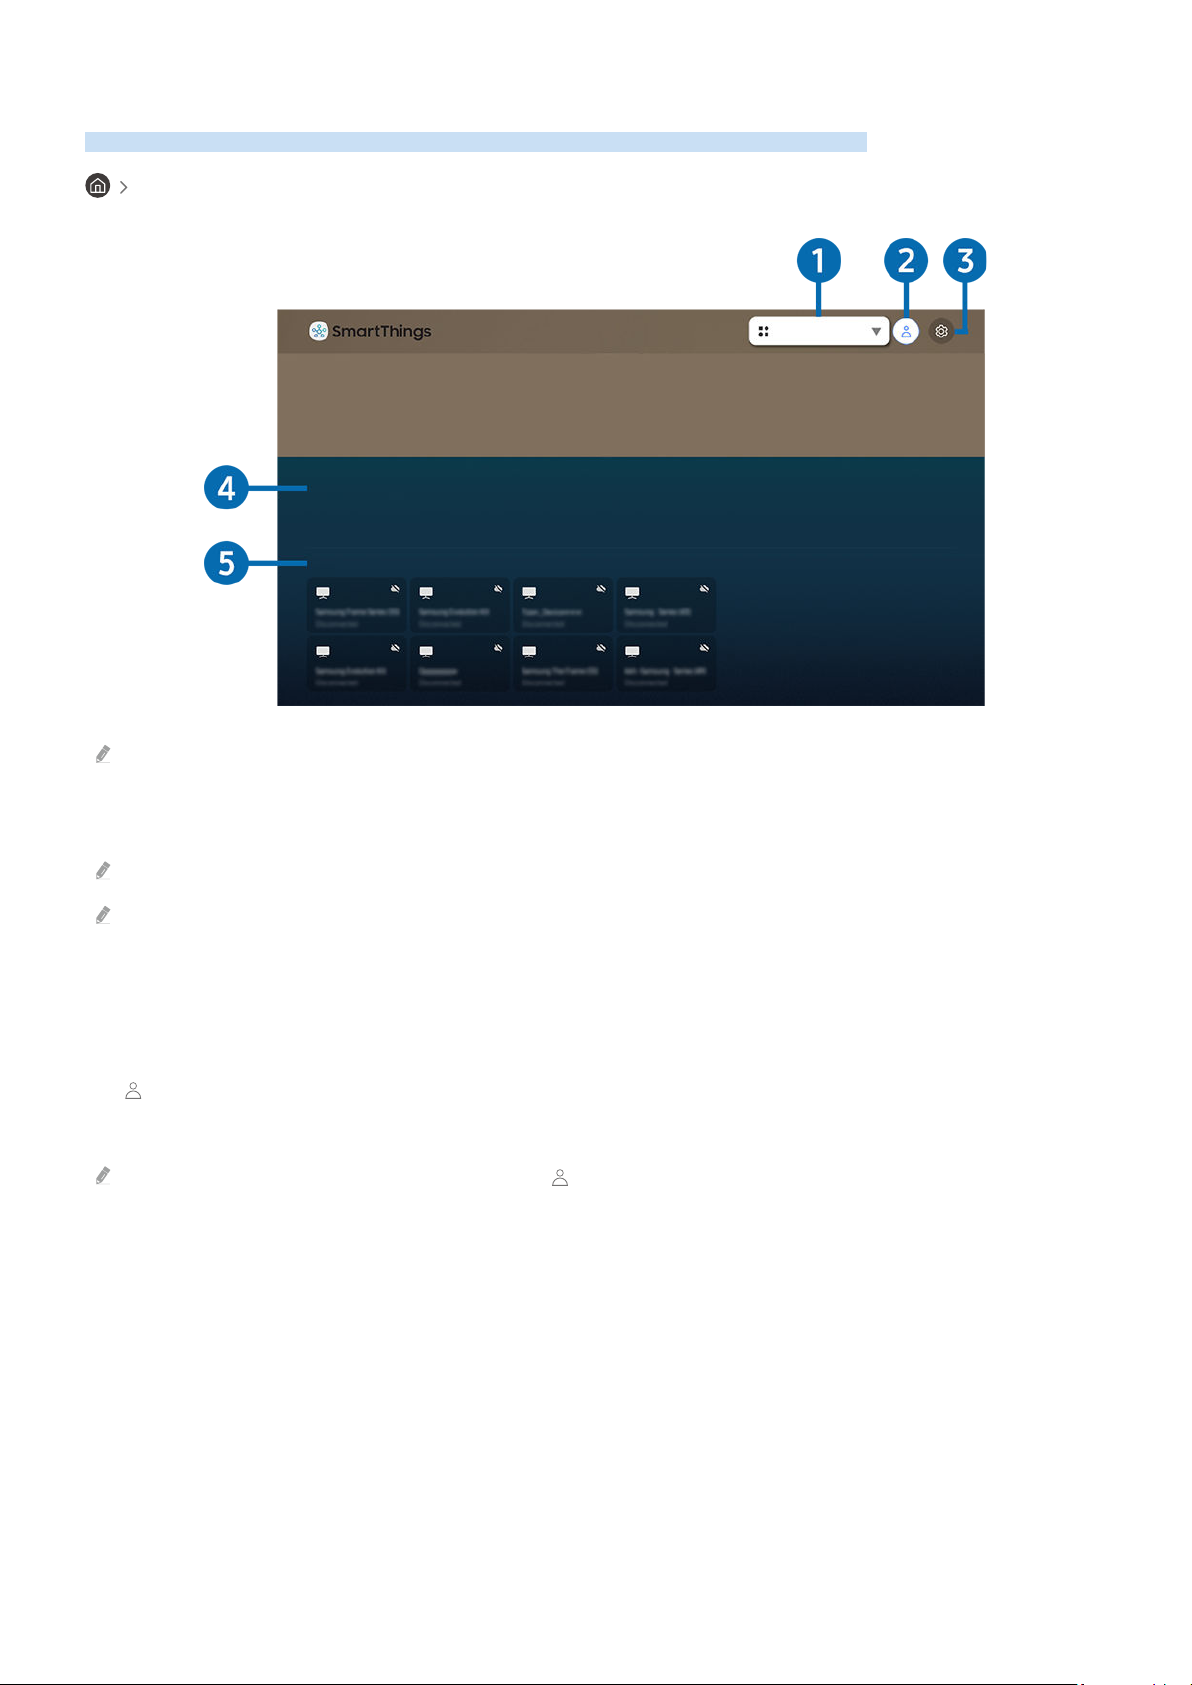
Using the SmartThings App
All Devices
Monitor and congure the smart devices you have connected to the SmartThings service.
SmartThings
Scenes
Device List
The image on your TV may differ from the image above depending on the model and geographical area.
From your TV, you can monitor and congure smart devices you connected to the SmartThings service via the
SmartThings app installed on them. You can receive notications about the statuses of your connected devices.
To use this function, you must be logged in to your Samsung account.
This function may not be supported depending on the model or geographical area.
1.Location selection list
Press the Select button to identify all connected devices or the devices specic to a location.
2. Samsung Account
Go to the Samsung Account screen to create a new account or sign out of your account.
If you are signed out of your Samsung account, select Sign In to sign in.
- 46 -
Page 47

3. Settings
Turn notications on or off for the connected smart devices.
4.Scenes
Control multiple devices with one command after setting scenes via the SmartThings app on your mobile device.
5.Device list
View a list of the connected smart devices and their statuses.
You can add and control new devices through the SmartThings app on your mobile device. You can check and
control various devices such as speakers, smart devices (IoT devices) and home appliances registered on the server.
Please refer to the user guide of the SmartThings app on your mobile device for more details.
Controlling your TV with the mobile SmartThings app
You can register your TV and use some features of the TV through the SmartThings app on your mobile device.
Using the e-Manual
Control and read the manual embedded in your TV.
Launching the e-Manual
Settings Support Open e-Manual
You can view the embedded e-Manual that contains information about your TV's key features.
You can download a copy of the e-Manual from Samsung's website to view or print on your PC or mobile device (https://
www.samsung.com).
Some menu screens cannot be accessed from the e-Manual.
- 47 -
Page 48
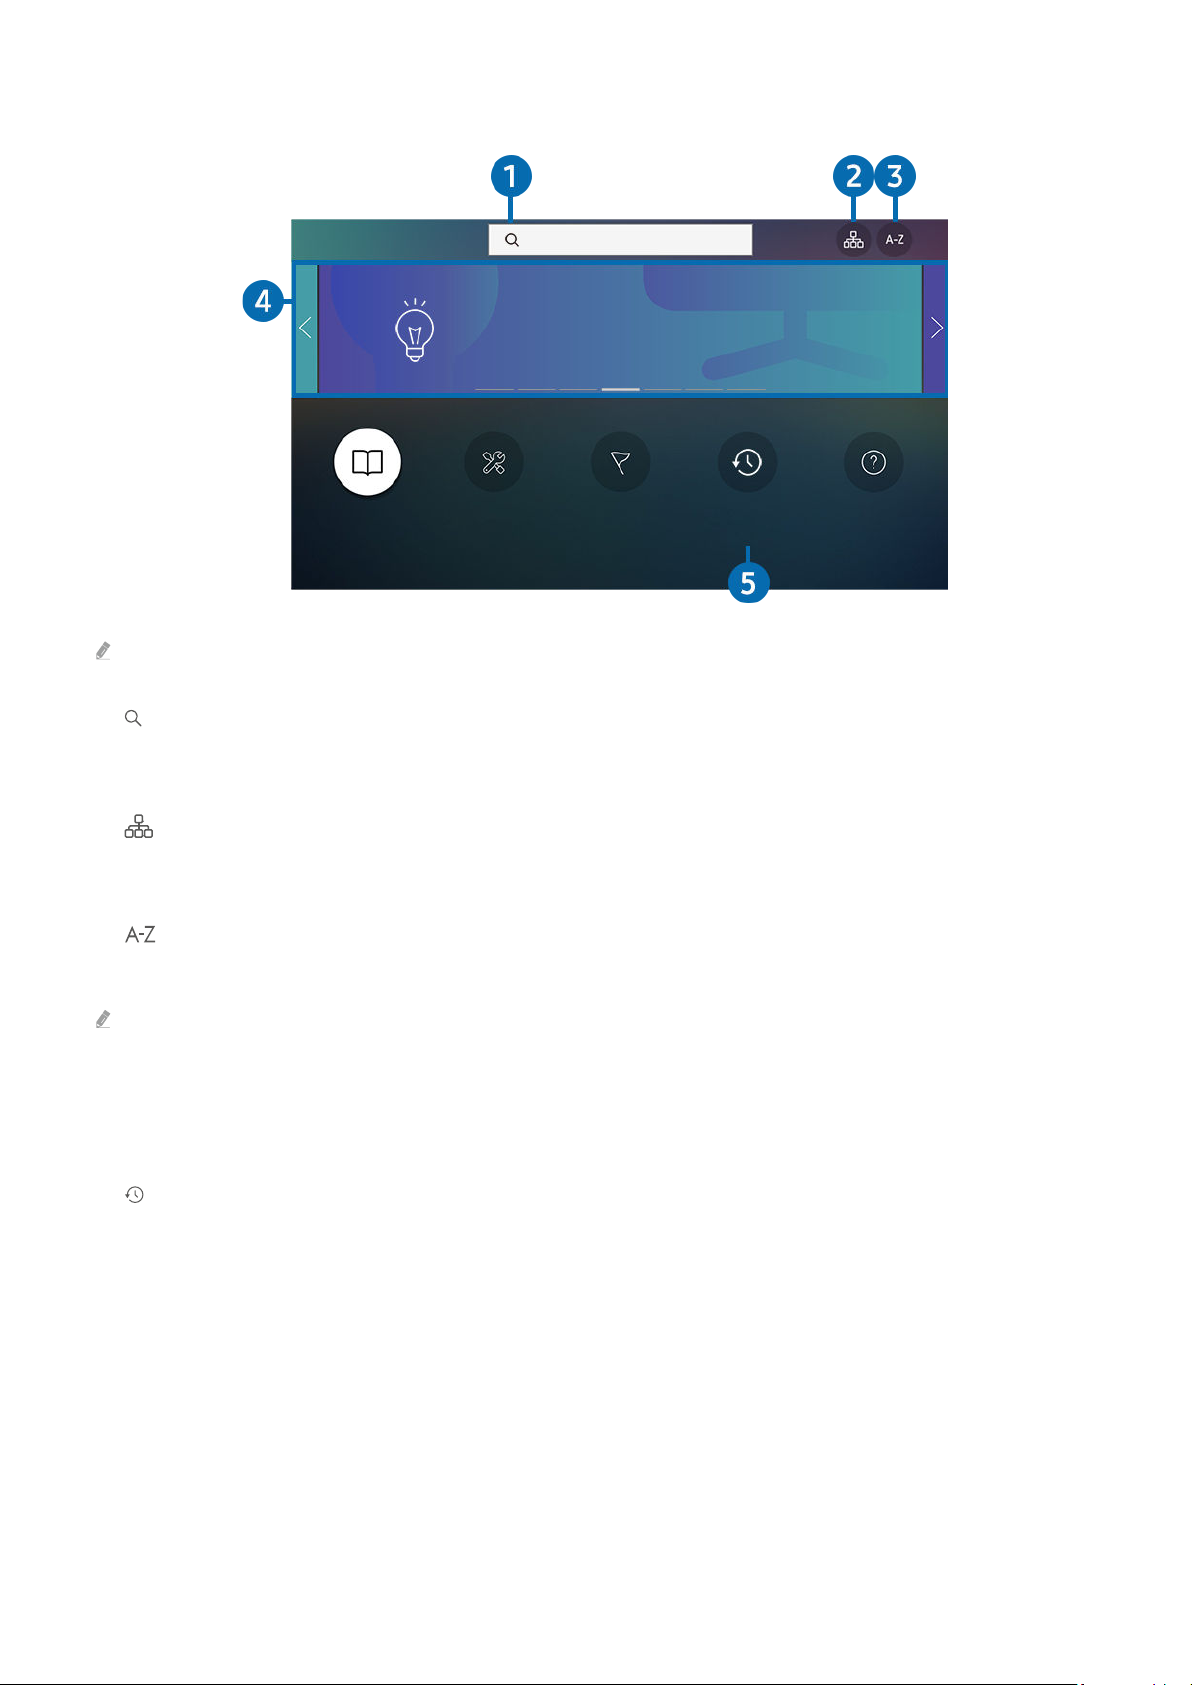
Using the buttons in the e-Manual
e-Manual
Guide
Troubleshooting
First Time Use
Recently Viewed
Topics
FAQ
The image on your TV may differ from the image above depending on the model and geographical area.
1. (Search)
Select an item from the search results to load the corresponding page.
2.
(Site Map)
It displays the lists for each item in e-Manual.
3. (Index)
Select a keyword to navigate to the relevant page.
This function may not be supported depending on the model or geographical area.
4.Moving to FAQ
You can nd the troubleshooting of the selected symptom.
5. (Recently Viewed Topics)
Select a topic from the list of recently viewed topics.
- 48 -
Page 49

e-Manual
Internet
Surf the Internet on your TV.
Before using the Internet, refer to "Read Before Using the Internet Function".
Words in blue (e.g., Internet) indicate a menu item.
The image on your TV may differ from the image above depending on the model and geographical area.
6. (Try Now)
Allows you to access the corresponding menu item and try out the feature right away.
7.
(Link)
Access an underlined topic referred to on an e-Manual page immediately.
- 49 -
Page 50

Using the Internet
Surf the Internet on your TV.
Internet
When you run Internet, you can see recently viewed web sites or featured recommendations. When you select a
desired web site, you can get immediate access to it.
You can use the Internet function more easily after connecting a keyboard and mouse.
The web pages may differ from those on a PC.
Before using the Internet, refer to "Read Before Using the Internet Function".
The Internet app has an embedded Samsung Pass ( Internet Internet Menu Samsung Pass Settings). With
Samsung Pass, you can log into the website easily and securely. When you visit the website again, you can log in with
Samsung Pass Biometrics Authentication on your mobile device without entering your ID and password. However, this
Samsung Pass login may not work depending on the website policy. For this purpose, you must have been logged in the
mobile device with a Samsung account registered in Samsung Pass.
- 50 -
Page 51
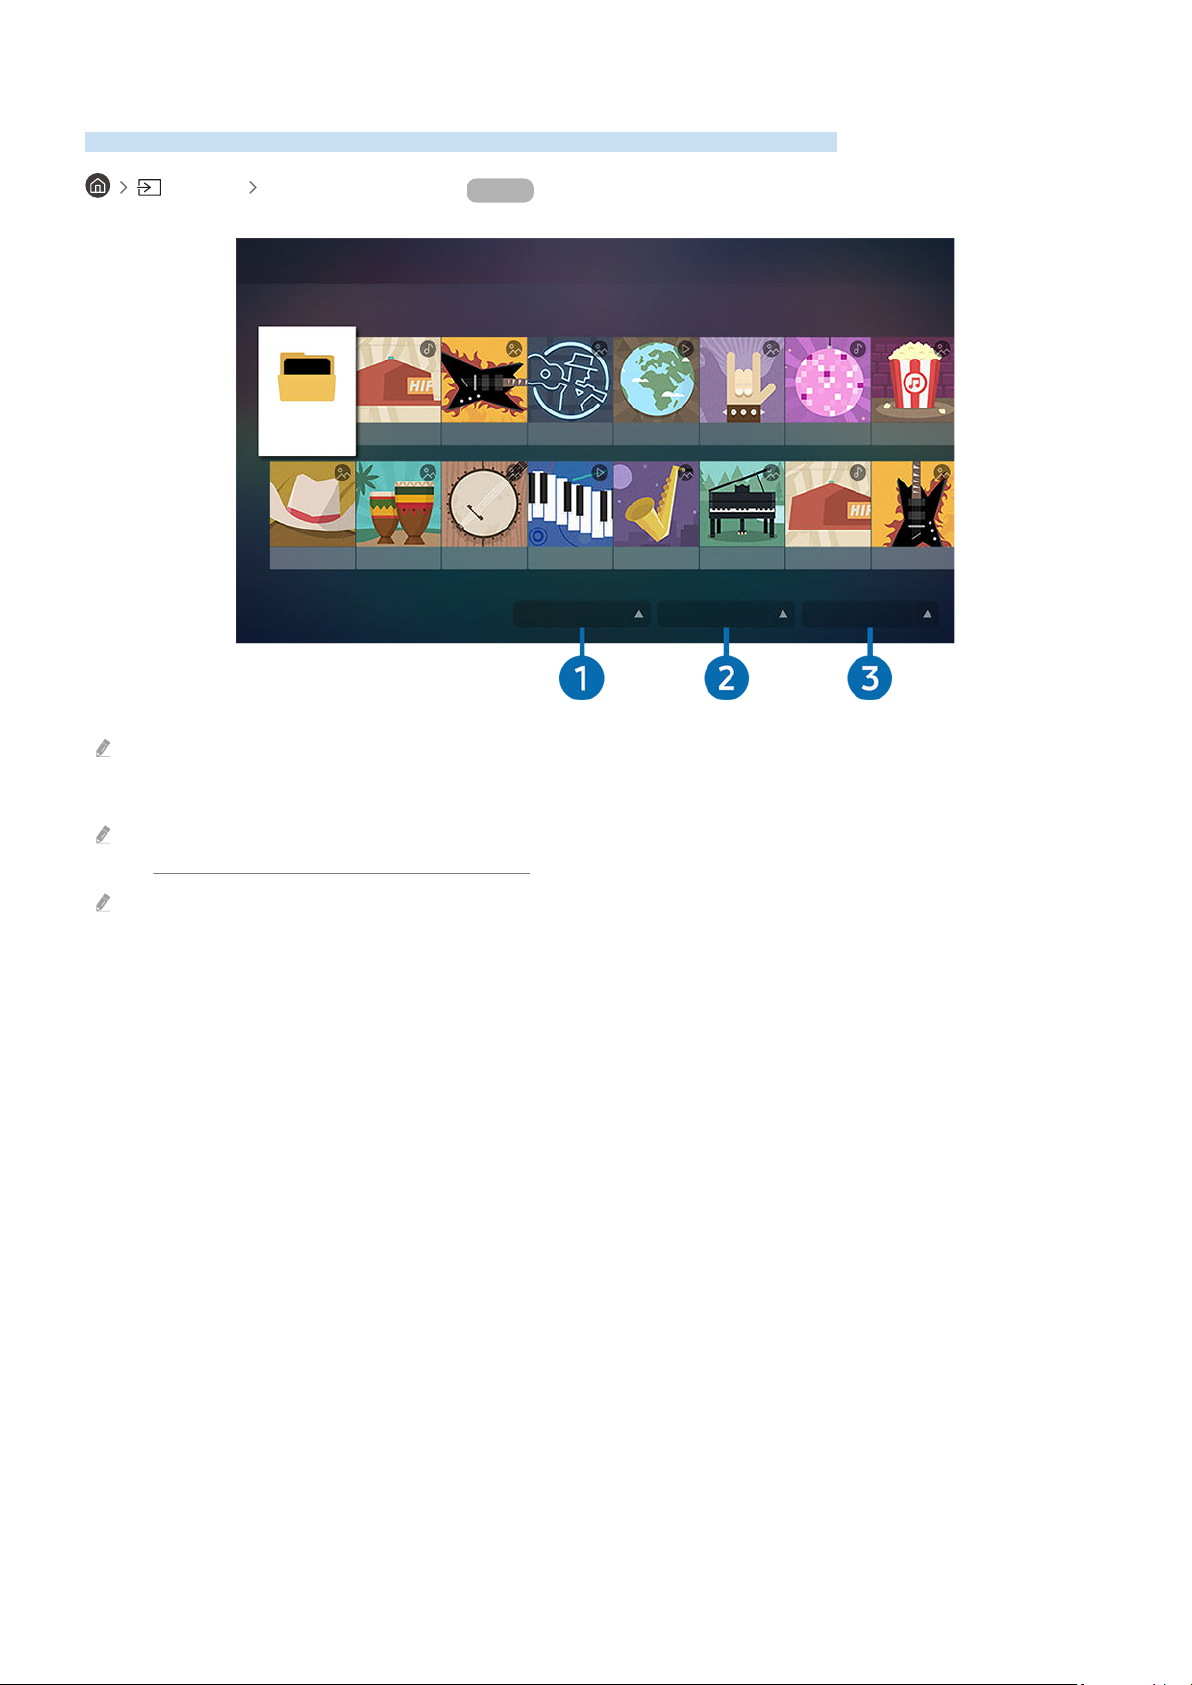
Playing pictures/video/music
Filter By : All
Sort By : Title
Options
Play media content stored on your TV, USB devices, mobile devices, cameras, PCs, etc.
Source Connected Device Try Now
Samsung USB
Samsung USB
The image on your TV may differ from the image above depending on the model and geographical area.
You can play media content saved on storage devices, such as USB devices, mobile devices and cameras on the TV.
You cannot play media content if the content or the storage device is not supported by the TV. For more information, refer
to "Read Before Playing Photo, Video or Music Files".
Backup important les before connecting a USB device. Samsung is not responsible for damaged or lost les.
You can use the following functions on the media content list screen of a storage device.
1.Filter By
Filters the media content by type of media.
- 51 -
Page 52

2.Sort By
Sorts the content list by Title, Date or Channel.
This function may not be supported depending on the type of external device.
3.Options
Deletes or plays the selected media content in the media content list. When you select Refresh, the content list is
reloaded.
Playing multimedia content on a PC or mobile device
1.
Select a device with media content in Source. The media content list in the device appears.
2.
Select a media content item from the list.
The selected content is played.
The content may not be played depending on the encoding method or le format. Furthermore, several functions may be
restricted.
Content on devices connected to the TV via your network may not play smoothly due to network communication problems.
If this occurs, use a USB device.
Playing multimedia content on a USB device
1.
Connect a USB device to the USB port.
2.
When a pop up message appears on the screen, select Browse to easily move to the list of multimedia content
stored on the device.
If a USB device that contains the content you want to play is already connected to the TV, select the USB device in the
Source screen.
3.
Select a content item to play from the list.
The selected content is played.
- 52 -
Page 53

Listening to your mobile device sound through the TV speaker using Sound Mirroring
1.
Search for and connect to your TV from the (Bluetooth) device list on your mobile device.
2.
Select media content to play on your mobile device.
The selected media is played through the TV speaker.
If the TV and the sound bar are connected wirelessly, the operation may be restricted.
This function may not be supported depending on the model or geographical area.
Buttons and functions available while playing multimedia content
Press the Select button while playing any video or photo contents. The following buttons appear.
The provided buttons and functions may not be supported depending on the model or geographical area.
The available buttons and functions may differ with the content you are viewing or playing.
• Pause / Play
Pauses or plays the multimedia content. You can use the following functions when the video is paused. Note that
with the video paused, the TV does not play audio.
– Slow Rewind or Slow Forward: Allows you to play a video slowly backward or forward by selecting the
option. There are 3 playback speeds. To change the playback speed, press the option repeatedly. To
return to normal speed, select the option or press the button.
• Jump Backward / Jump Forward
Press the up directional button to move the focus to the playback control bar, and then select the left or right
directional button in the playback control bar to move backward or forward by 10 seconds in the video.
or
- 53 -
Page 54

• Move to a specific playback section, move up the focus on the playback bar, and then select one of the five
thumbnails.
This function may not be supported depending on the file format.
• Stop
Stop the contents being played.
• Previous / Next
Displays the previous or the next multimedia content file.
• Rewind / Fast Forward
Rewinds or fast forwards the multimedia content. To increase the rewind or fast forward speed up to 3 times
faster than normal, select the button repeatedly. To return to normal speed, select the
option or press the
button.
• Repeat
Plays the current multimedia content repeatedly or all multimedia content files in the same folder repeatedly.
• Shuffle
Plays music files in random order.
- 54 -
Page 55

• Picture Off
Plays music files with the screen off.
• Fit to Screen
Fits a photo to the screen.
• Rotate left / Rotate right
Rotates a photo left or right.
• Zoom
Zooms in a photo.
• Background Music
Pauses or resumes the background music while the TV displays photos.
This function is available after enabling the Background Music option.
• Options
The available options may differ with the model and content.
Function Description
Sets the slideshow speed.
Slideshow Speed
Slideshow Effect
Background Music
Subtitles
Rotate Rotates the video.
Audio Language
Information Displays detailed information about the current multimedia content.
If there is only one image le in the USB device, the slide show is not played.
Applies transition effects to the slide show.
If there is only one image le in the USB device, the slide show is not played.
Plays background music as you set in the pop-up window while the TV displays photos.
The music les must be saved in the same USB device as the photo les.
To pause the background music, select Background Music on the playback screen bottom.
You can set the detailed subtitle options such as the language, sync, size and colour.
If subtitles are not displayed correctly, check the encoding setting.
Changes the audio language.
This function is only available if the video supports multi-track sound.
- 55 -
Page 56
Using Bixby
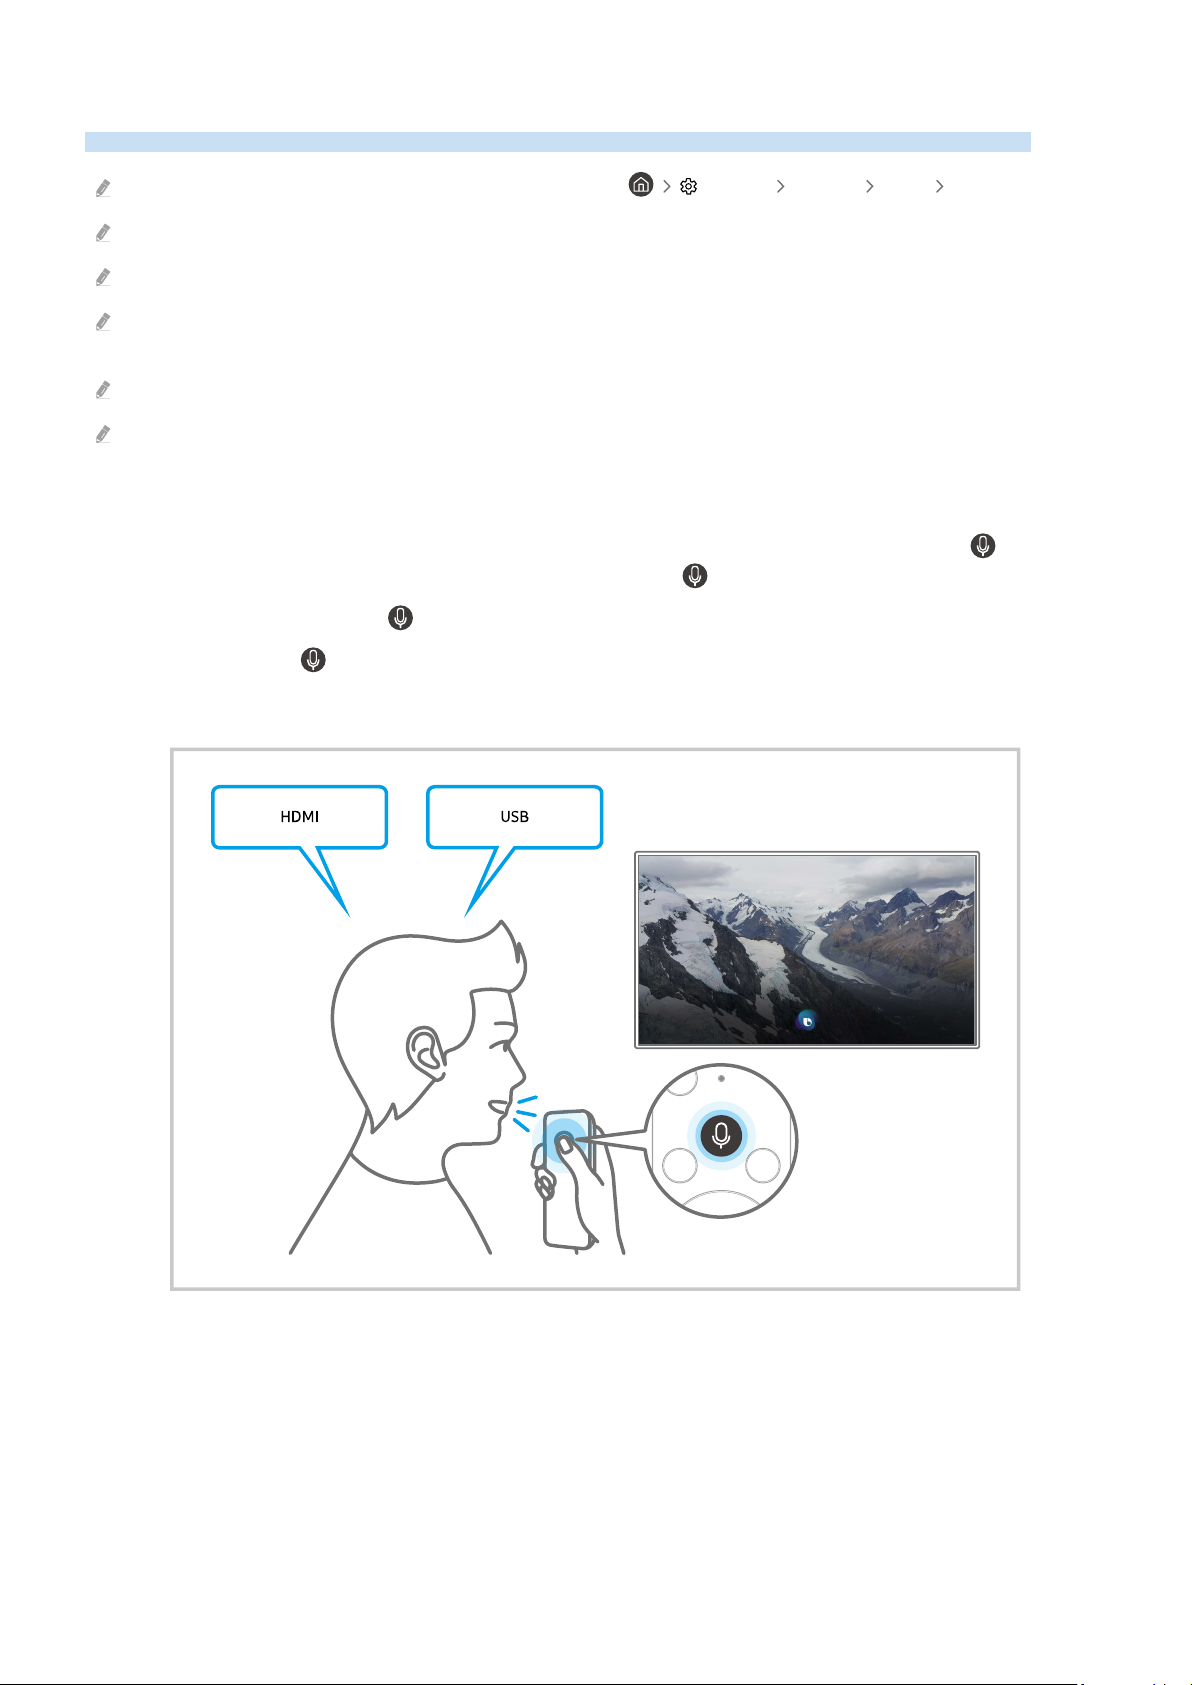
Set Voice Assistant to Bixby. Speak into the microphone on your Samsung Smart Remote to control your TV.
This function is available only if Voice Assistant is set to Bixby. ( Settings General Voice Voice Assistant)
This function is supported only in The Frame.
Bixby is available only when the TV is connected to the Internet.
To use Bixby, you must register and sign in to your Samsung account. Some functions may not be supported if you are not
signed in to your Samsung account.
Bixby only supports some languages and the supported functions may differ depending on the geographical area.
Bixby may not be supported depending on the geographical area.
Starting Bixby using buttons on the Samsung Smart Remote
You can have conversation with Bixby using the Samsung Smart Remote buttons. Press and hold the button on
your Samsung Smart Remote, say a command, and then release the button.
To view the Bixby guide, press the button once:
• When you press the button, the Explore Now button appears at the bottom of the screen. Press the Select
button to go to the Explore Bixby screen.
- 56 -
Page 57
Learning about the Explore Bixby Screen
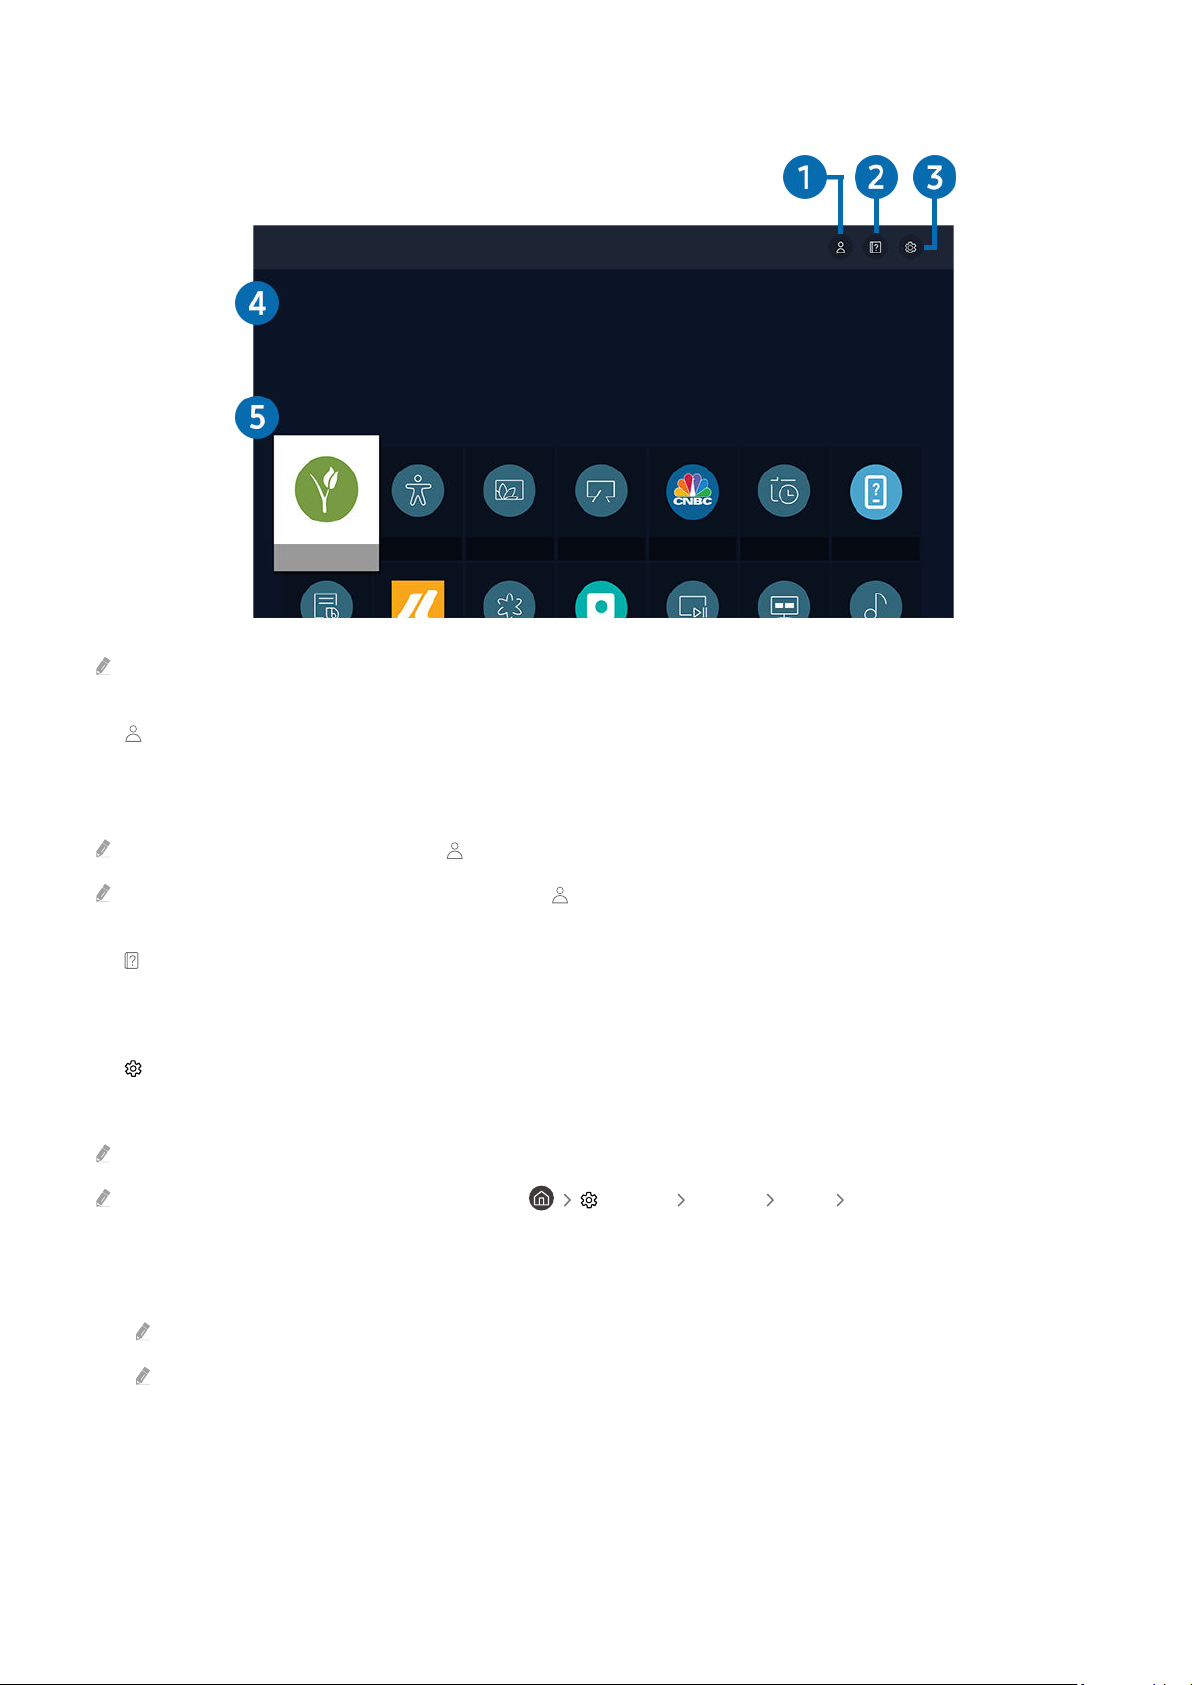
Explore Bixby
You can say something like:
All Services
The image on your TV may differ from the image above depending on the model and geographical area.
1. My Prole
Go to the My Prole screen to create a new account or register a voice ID. When a voice ID is registered, you can log
in with your voice and see the icon that Bixby generated for your voice.
You can delete a voice ID after selecting My Prole. When the voice ID is deleted, its icon also disappears.
If you are signed out of your Samsung account, select My Prole to sign in.
2. Tutorials
The popup window on using Bixby appears.
3. Settings
You can change the settings for using Bixby.
These functions may not be supported depending on the model or geographical area.
These functions can be set in Bixby Voice settings ( Settings General Voice Bixby Voice settings).
• Language
You can change Bixby's language.
The languages of the TV and other apps will not change.
Bixby only supports some languages.
- 57 -
Page 58

• Voice response
You can change or turn off Bixby's voice.
This function may not be supported depending on the language selected for Bixby.
• Sound feedback
Play a sound when Bixby starts and stops listening.
This function may not be supported depending on the model or geographical area.
• Privacy
You can permit or prohibit Bixby from utilising your personal information when you are using Bixby services.
4.Recommended commands
Displays recommended commands you can use to control the TV with Bixby given the current context.
If you do not want to see the recommended commands, set Voice Hint to Off. ( Settings General Voice
Voice Hint)
5.All Services
You can learn the voice commands that let you use Bixby in various situations. Use the directional buttons to move
to the desired command, and then press the Select button. You can operate the TV with various voice commands.
Read Before Using Bixby
• The supported voice interaction languages and features may differ depending on the geographical area.
• If the language set differs from the language of your country, some features are not available.
• Bixby is available only when the TV is connected to the Internet.
• Even if the TV is connected to the Internet, there may be no response due to a Bixby server error.
- 58 -
Page 59

• The existing functional specifications may be changed if Bixby is updated.
• Bixby is available only on TVs that support it and come with remote controls that have a microphone.
• Symbols including "-" and special characters are not supported. Consequently, if a word or sentence contains
numeric values or symbols, the function may not operate properly.
• Searched results may not provide complete results.
• You may be required to pay for some apps. Consequently, you may encounter a service application or contract.
• To change the current channel by saying channel names as voice commands, you must finish Set Up Your Service
Provider. If Set Up Your Service Provider is not completed, you can complete it using Reset (
General Reset). Try Now
Service provider settings in initial setup may not be supported on geographical area.
• To use the voice text input function and the search function, you must consent to provisions allowing third
parties to collect and use your voice data.
• To use the Bixby function, you must:
– Agree to Smart Hub's Terms of Use.
Settings
– Agree to a guidance regarding the collection and use of personal information for the Smart Hub service.
– Consent to the collection and use of personal information for the voice interaction-based service.
Provisions for using Bixby
• The voice interaction rate differs with the volume/tone, pronunciation and ambient sound environment (TV
sound and ambient noise).
• The optimal volume for voice commands is between 75 dB and 80 dB.
- 59 -
Page 60
TV Viewing
Recommended
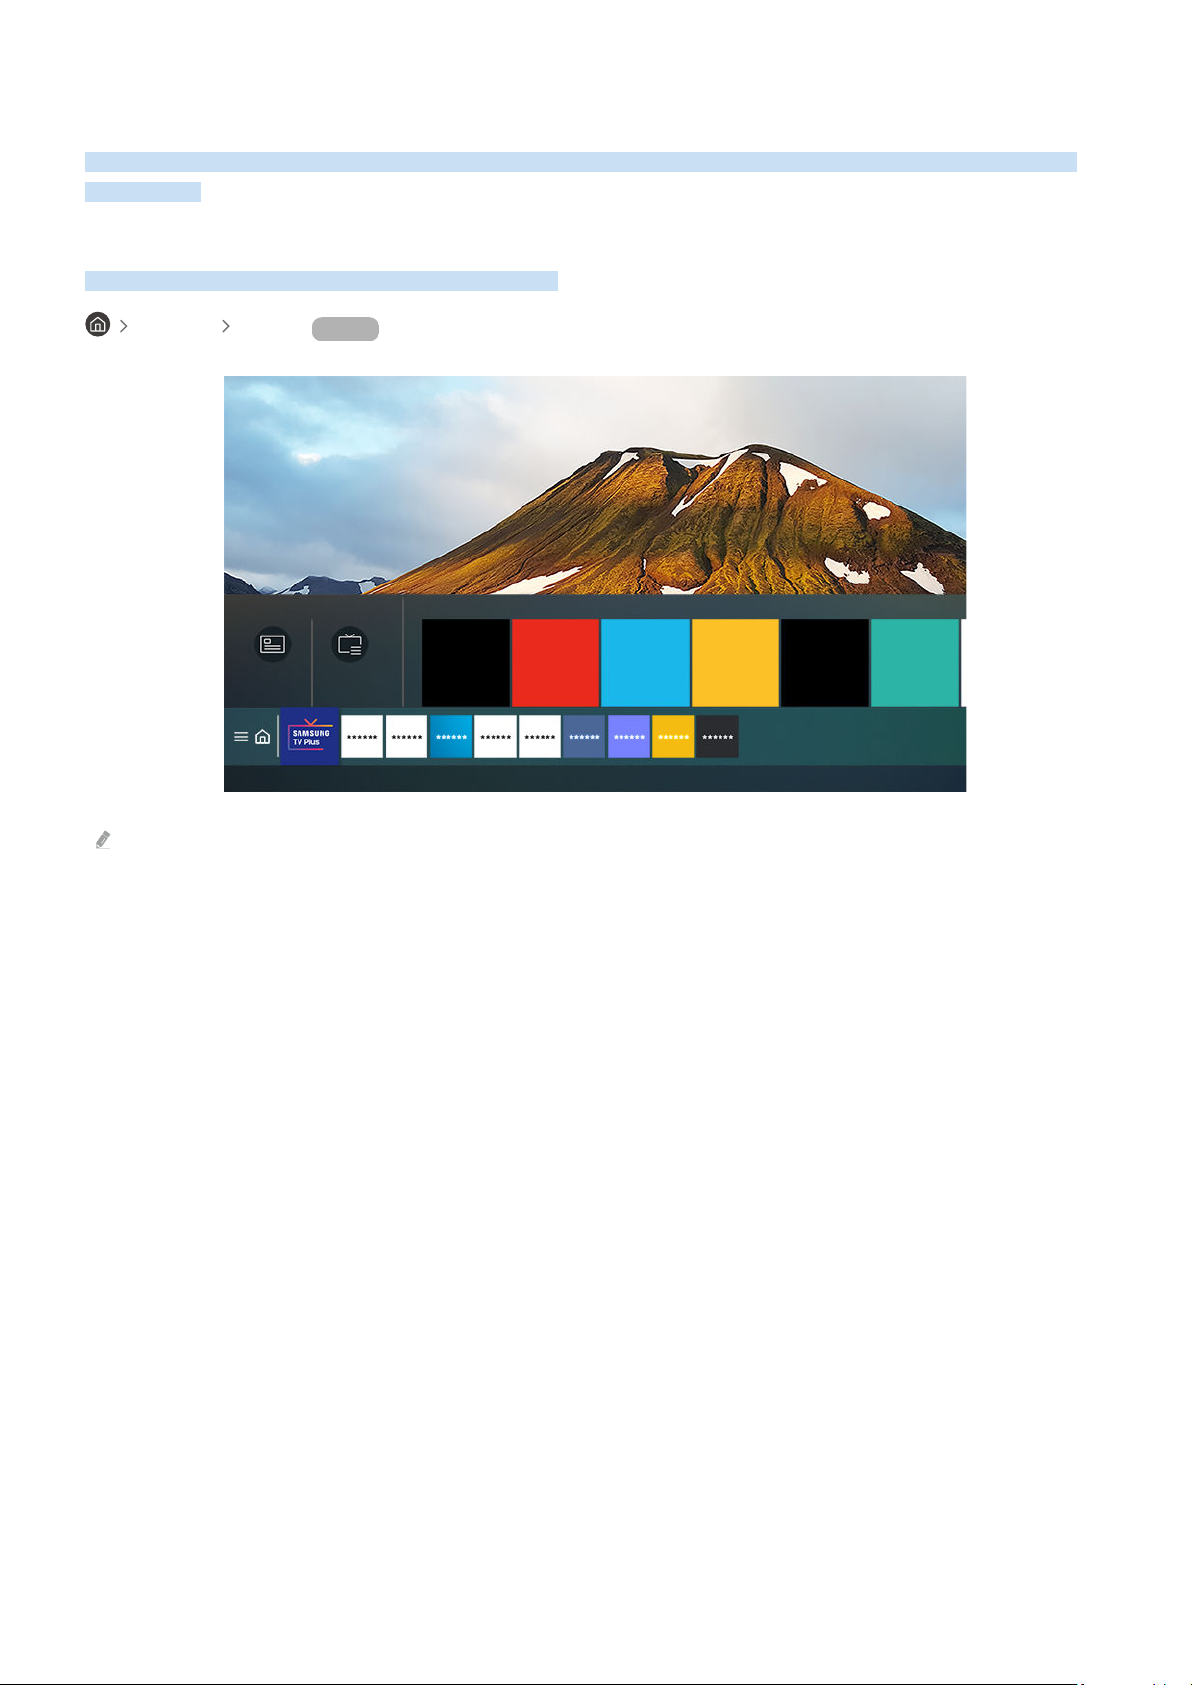
You can use convenient features while watching TV. Additionally, you can edit the channel list or create favourite
channel lists.
Using the Guide
See an overview of each channel's programme lineup.
Live TV Guide Try Now
Guide Channel List
The image on your TV may differ from the image above depending on the model and geographical area.
- 60 -
Page 61

In the Guide, you can see the daily programme schedules for each broadcaster, see programme information, choose
a programme to watch and set up a schedule viewing.
To view the Guide while watching TV, press the (Channel) button on the Samsung Smart Remote or press the GUIDE
button on the standard remote control.
To see information about analogue channels and use the analogue channel functions of the Guide, you must nish the
service provider settings in initial setup.
To view the Guide, you must rst set the TV's clock ( Settings General System Manager Time Clock).
Service provider settings in initial setup may not be supported on geographical area.
Move the focus to the programme you want in the Guide, and then press and hold the Select button. You can use the
following functions:
• Schedule Viewing
You can schedule the viewing of a broadcast scheduled programme.
• Cancel Scheduled Viewing
You can cancel scheduled viewings.
• View Details
You can see detailed information about the selected programme. The information may differ or may not be
provided depending on the broadcast signal.
- 61 -
Page 62

Setting Up a Schedule Viewing
Congure the TV to show a specic channel or programme at a specic time and date.
The appears next to programmes that have been congured for a scheduled viewing.
To set up a schedule viewing, you must rst set the TV's clock ( Settings General System Manager Time
Clock).
Using the schedule viewing options from the guide screen
On the Guide screen, select a programme you would like to view, press and hold the Select button, and then select
Schedule Viewing in the pop-up menu that appears.
Using the schedule viewing options while watching a programme
Press the Select button while watching TV. The Programme Info window appears. Select a programme that will be
broadcast using the left or right directional buttons. Press the Select button, and then select Schedule Viewing to
schedule viewing of that programme.
Using schedule viewing to view programmes at a specied time on a specied date
Live TV Schedule Manager Add Viewing
To schedule a viewing, set the values for Aerial, Channel, Repeat, Date and Start Time of the broadcast programme
to view, and then select Save.
Check the current time in Settings General System Manager Time Clock.
Setting the schedule Viewing Time
Live TV Schedule Manager
You can change scheduled viewing information or cancel scheduled viewings.
You can set up a maximum total of 30 Schedule Viewing entries.
The menus may not appear depending on the model or geographical area.
• Edit
You can set the start time of a scheduled viewing. If you choose a programme from the Guide, the Start Time can
be set to up to 10 minutes before the programme.
• Delete
You can delete scheduled viewings.
• View Details
You can view detailed information about scheduled viewings.
- 62 -
Page 63

Using the Channel List
Change the channel or check programmes on other digital channels.
Live TV Channel List
Using the Channel List, you can change the channel or check programmes on other digital channels while watching
TV. On standard remote control, press the CH LIST button.
The Channel List screen contains the following icons:
– : A favourite channel.
: A locked channel.
–
– : CI card required channel.
If you press the left directional button when viewing the Channel List screen, you can use the following functions:
• Terrestrial, Cable or Satellite
Allows you to choose between Terrestrial, Cable and Satellite.
This function may not be supported depending on the incoming broadcast signal.
This function may not be supported depending on the model or geographical area.
• All
Displays the channels that have been automatically searched.
The channels received to the currently selected Terrestrial, Cable or Satellite are displayed.
• Samsung TV Plus
While the TV is connected to the Internet, you can watch popular programmes or highlights for each theme
through a virtual channel at any time. As with regular channels, the TV provides the daily programme schedules
for Samsung TV Plus.
This function may not be supported depending on the model or geographical area.
• Favourites
Displays Favourites 1 to Favourites 5.
It displays only the favourites list that includes the favourites channel.
• Channel Type
Sorts the list so that it includes channels of a selected type. However, Channel Type can only be used channels
contain the type information.
This function may not be supported depending on the incoming broadcast signal.
• Sort
Sorts the list by Number or by Name.
This option is only available on digital channels and may not always be available.
- 63 -
Page 64

Editing channels
Edit the channels stored on your TV.
Live TV Channel List Edit Channels
The Edit Channels screen icons indicate the following:
– : A favourite channel.
: A locked channel.
–
– : CI card required channel.
On the Edit Channels screen, you can select channels and use the following functions:
• Delete
After selecting a target channel to remove in Edit Channels, select Delete. Removed channels are not displayed
in the Channel List.
• Lock / Unlock
After selecting a target channel in Edit Channels, select Lock or Unlock. Then the channel is locked or unlocked.
A locked channel cannot be viewed.
If you want to use this function or set the password, set Settings Broadcasting Apply Channel Lock to On.
For more information about how to set your password, refer to "Setting up a password".
• Rename channel
After selecting a channel to change in Edit Channels, select Rename channel to change the channel name.
You can rename only one channel at a time.
This function is only available for analogue broadcasts.
• Change Number
After selecting a channel to change in Edit Channels, select Change Number to change the channel number.
This function may not be supported depending on the model or geographical area.
When a channel number is changed, its channel information is not updated automatically.
• Restore Samsung TV Plus
You can restore the deleted Samsung TV Plus channels.
This function may not be supported depending on the model or geographical area.
• Save and Exit
Saves and closes the Edit Channels screen.
- 64 -
Page 65

Using a Personal Favourites List
Designate frequently watched channels as favourite channels.
Favourite channels are highlighted in the Edit Channels and Channel List screens with the
up to ve favourites lists so that your family members can create their own personal favourites list.
symbol. You can create
Create a favourites list
Live TV Channel List Edit Channels
1.
Press the left directional button on the remote control to select the desired Favourites list.
2.
Press the right directional button to select Add Channels.
3.
Select the desired channel in the list on the screen.
4.
Press Add Channels to add the selected channel in the Favourites list.
Select Favourites 1 - Favourites 5 on the Edit Channels screen and the following functions are available:
• Add Channels
In the channel list, select one or more channels to add in the favourites list and then select Add Channels.
• Remove
Removes one or more channels from a favourites list.
• Change order
Changes the order of one or more channels selected in a favourites list.
• Rename Favourites
Renames a favourites list.
• Save and Exit
Saves and closes the Edit Channels screen.
- 65 -
Page 66

TV-Viewing Support Functions
Use the functions that are available while watching TV.
Changing the broadcast signal
Live TV Channel List
Press the directional button on your remote control, move the focus to Terrestrial, Cable, Satellite or Service
Provider, and then press the Select button.
You do not need to use this function if your TV is connected to a cable box or satellite box.
The displayed Channel List may vary depending on the incoming broadcast signals.
Scanning for available channels
Settings Broadcasting (Auto Tuning Settings) Auto Tuning
This function may not be supported depending on the model or geographical area.
If the TV is connected to a cable box or satellite box, you do not need to do this.
The DVB-T2 system may not be supported depending on the geographical area.
The Auto Tuning Settings may not appear depending on the model or geographical area.
Selecting the cable network search option
Settings Broadcasting (Auto Tuning Settings) Cable Search Option
Sets additional search options such as the frequency and symbol rate for a cable network search.
This function may not be supported depending on the model or geographical area.
The Auto Tuning Settings may not appear depending on the model or geographical area.
- 66 -
Page 67

Scanning for available channels on standby mode
Settings Broadcasting (Auto Tuning Settings) Standby Auto Tuning
Automatically scan for channels while your TV is in standby mode.
This function may not be supported depending on the model or geographical area.
The Auto Tuning Settings may not appear depending on the model or geographical area.
Setting the Wake-up time
Settings Broadcasting (Auto Tuning Settings) Wake-up Timer
Schedule timer to turn the TV on and scan channels automatically.
This function may not be supported depending on the model or geographical area.
The Auto Tuning Settings may not appear depending on the model or geographical area.
Checking digital channel signal info and strength
Settings Support Device Care Self Diagnosis Signal Information Try Now
If your TV is attached to a separate, over-the-air antenna, you can use the signal strength information to adjust the antenna
for increased signal strength and improved HD channel reception.
Signal Information is only available for digital channels.
This function may not be supported depending on the model or geographical area.
Restricting Viewing to Specic Channels
Settings Broadcasting Apply Channel Lock Try Now
By selecting the menu, you can turn on or off the Apply Channel Lock function.
Lock specic channels to prevent children from watching adult content.
To use this function, the PIN number is required.
- 67 -
Page 68

Using Mark Adult Channels
Settings Broadcasting Mark Adult Channels
Enables or disables all adult services. When disabled, adult services will not be available.
This function may not be supported depending on the model or geographical area.
Selecting the broadcasting audio option
Settings Broadcasting Dual Sound Try Now
Set audio options for stereo or bilingual broadcasts. For more information, refer to "Supported broadcasting audio
options".
This function may not be supported depending on the model or geographical area.
Using Programme Rating Lock
Settings Broadcasting Programme Rating Lock Try Now
This function may not be supported depending on the model or geographical area.
This function is useful for controlling what programmes children can watch on the TV based on their ratings.
Programme Rating Lock does not, however, block programmes originating from external sources, such as Blu-ray
players, DVD players or USB les.
Every time you access Programme Rating Lock, you must enter the security PIN. You must also enter this PIN
to watch a blocked programme. The default PIN is "0000" (for France and Italy: "1111"). To change the PIN, go to
Settings General System Manager Change PIN.
For more information about how to set your password, refer to "Setting up a password".
The Broadcasting is not available in HDMI or Component mode.
Programme Rating Lock may not be supported depending on your input signal.
- 68 -
Page 69

Showing common interface menu
Settings Broadcasting Common Interface
You can view information about common interfaces.
This function may not be supported depending on the model or geographical area.
• CI Menu
Show information and settings of CICAM.
• Application Info
Show the manufacturer of CICAM and information of CAS (Conditional Access System).
• CICAM PIN Manager
Manage Common Interface Common Access Module (CICAM) PIN. Save PIN or change stored PIN, and then set
other PIN options.
This function may not be supported depending on the model or geographical area.
• Descramble Mode
• CAM video transcoding
Configures the setting to transcode the video codec from the CAM automatically. Turn it Off if you do not want to
use it.
You must use a CAM that supports video codec transcoding.
- 69 -
Page 70

Conguring advanced broadcasting settings
Settings Broadcasting Expert Settings Try Now
Tuning broadcast signals manually
Settings Broadcasting Expert Settings Manual Tuning Try Now
You can scan for all the channels manually and store the scanned channels in the TV.
This function may not be supported depending on the model or geographical area.
Tuning digital channels
Settings Broadcasting Expert Settings Manual Tuning Digital Channel Tuning
Select New, and then congure Channel, Frequency and Bandwidth, and then select Search to automatically scan
and store a list of digital channels in the TV.
Tuning analogue channels
Settings Broadcasting Expert Settings Manual Tuning Analogue Channel Tuning
Select New and congure Programme, Colour System, Sound System, Channel and Search to scan for analogue
channels. Then, select Store to store the scanned channels in the TV.
This function is only available for analogue broadcasts.
Fine-tuning analogue broadcasts
Settings Broadcasting Expert Settings Fine Tune Try Now
This function is only available for analogue broadcasts.
Transferring channel list
Settings Broadcasting Expert Settings Transfer Channel List
You can import or export the channel list to a USB storage. To use this function, the PIN number is required.
• Import from USB: Imports channel list from a USB storage.
• Export to USB: Exports channel list saved in the TV to a USB storage.
This function is available when USB is connected.
This function may not be supported depending on the model or geographical area.
- 70 -
Page 71

Enabling/Disabling Edit Channel Numbers
Settings Broadcasting Expert Settings Edit Channel Numbers
Use this to change channel number. When channel number is changed, channel information is not updated
automatically.
This function may not be supported depending on the model or geographical area.
Deleting CAM operator prole
Settings Broadcasting Expert Settings Delete CAM Operator Prole
This function may not be supported depending on the model or geographical area.
Setting satellite system
Settings Broadcasting Expert Settings Satellite System
You can congure a set of satellite dish settings before performing a channel scan.
This function may not be supported depending on the model or geographical area.
Changing teletext language
Settings Broadcasting Expert Settings Teletext Language Settings Teletext
Language
You can set or change the teletext language. To watch the teletext broadcast in your preferred language, select
a language to use in Primary Teletext Language. If this language is not supported, you can watch the teletext
broadcast in your secondary preferred language set in Secondary Teletext Language.
This function may not be supported depending on the model, channel or geographical area.
- 71 -
Page 72

Selecting the broadcast audio language
Settings Broadcasting Expert Settings Audio Options Try Now
This is the language you will hear while watching TV if the language is included in the broadcast signal. Audio
Options functions differently for analogue and digital channels.
This function may not be supported depending on the model or geographical area.
• Audio Language Settings
You can change the audio language you want to hear.
The available language may differ with the broadcast.
• Audio Format
You can change the audio format you want to hear.
The supported audio format may differ with the broadcast programme.
This option is only available on digital channels.
Showing TVkey Interface menu
Settings Broadcasting Expert Settings TVkey Interface
You can use the following functions:
• TVkey Menu: Show TVkey Interface menu.
• Delete TVkey Operator Profile: Show the TVkey operator list to delete.
This function may not be supported depending on the model or geographical area.
Reading digital text
Settings Broadcasting Expert Settings Digital Text (MHEG)
You can use this function when you watch a broadcast that includes both text and multimedia content.
This function is only available in Ireland.
Multimedia and Hypermedia Information Coding Experts Group (MHEG) is an International standard for data encoding
systems used in multimedia and hypermedia. This is at a higher level than the MPEG system which includes data-linking
hypermedia such as still images, character service, animation, graphic and video les as well as multimedia data. MHEG is
user runtime interaction technology and is being applied to various elds including Video-On-Demand (VOD), Interactive
TV (ITV), Electronic Commerce (EC), tele education, teleconferencing, digital libraries and network games.
- 72 -
Page 73

Picture and Sound
You can change the settings for the picture and the sound according to your preference.
Adjusting the Picture Quality
Change the Picture Mode and adjust Expert Settings.
Choosing a picture mode
Settings Picture Picture Mode Try Now
You can select the Picture Mode that provides the best viewing experience.
• Dynamic
Makes the picture brighter and clearer in bright viewing environments.
• Standard
Is the default mode suitable for general viewing environments.
• Natural
Reduces eye strain for a comfortable viewing experience.
• Movie
Is suitable for watching TV or movies in a dark room.
• FILMMAKER MODE
You can watch the source content (e.g. movie) as it is. The image defined as FILMMAKER MODE automatically
switches to FILMMAKER MODE while watching.
This function may not be supported depending on the model or geographical area.
FILMMAKER MODE may look darker than other picture modes.
You can change FILMMAKER MODE to a different Picture Mode. However, the changed Picture Mode will be maintained
even after watching the picture defined by FILMMAKER MODE.
FILMMAKER MODE™ logo is a trademark of UHD Alliance, Inc.
- 73 -
Page 74

Conguring advanced picture settings
Settings Picture Expert Settings Try Now
Congure the screen settings to your taste by using the following functions:
• Brightness Try Now
• Contrast
Try Now
• Sharpness Try Now
• Colour Try Now
• Tint (G/R) Try Now
• Apply Picture Settings
Try Now
• Picture Clarity Settings Try Now
When LED Clear Motion is set to On, the screen appears darker than when it is Off.
This function may not be supported depending on the model.
• Contrast Enhancer Try Now
• Film Mode
This function is only available when the input signal is TV, AV, Component (480i, 576i, 1080i), or HDMI (1080i).
Try Now
• Colour Tone Try Now
• White Balance Try Now
• Gamma Try Now
• Shadow Detail
Try Now
• RGB Only Mode Try Now
This function may not be supported depending on the model.
• Colour Space Settings Try Now
• Reset Picture Try Now
- 74 -
Page 75

Setting the Viewing Environment for External Devices
You can optimise the TV for viewing specic video formats.
Playing games on an optimised screen
Settings General External Device Manager Game Mode
You can enable game mode to optimise the TV's settings for playing video games with a gaming console, such as a
PlayStation™, Xbox™ or Nintendo Switch™.
This function may not be supported depending on the model or geographical area.
The game mode is not available for normal TV viewing.
The screen may shake somewhat.
When Game Mode is enabled, Picture Mode and Sound Mode are switched to Game automatically. Sound Mode may not be
automatically switched depending on the selected audio device on the Sound Output menu.
When Game Mode is set to On, some functions are not available.
To use a different external device on the same port, remove the game console connection, set Game Mode to Off, and then
connect the external device to the port.
The Game Mode functions used for Nintendo Switch™ are subject to change without prior notice.
Adjusting the image quality of HDR game
Settings General External Device Manager HGiG
Set the optimal resolution based on the brightness for HDR game content.
When HDR sources are input in Game Mode, this menu is activated.
This function may not be supported depending on the model.
- 75 -
Page 76

Using Input Signal Plus
Settings General External Device Manager Input Signal Plus Try Now
Expands the input signal range for HDMI connections.
When you select the HDMI connector you want to use for Input Signal Plus, and then press the Select button to set the
Input Signal Plus function to On, the TV screen may icker.
When you connect the TV to an external device that supports only the UHD 24 Hz or UHD 30 Hz frequency or any FHD
frequency, the Input Signal Plus function may not be available. In this case, turn off the Input Signal Plus function.
For more information about the supported UHD resolutions, refer to "Supported Resolutions for UHD Input Signals".
This function may not be supported depending on the model or geographical area.
Using HDMI black level
Settings General External Device Manager HDMI Black Level Try Now
Use HDMI Black Level to adjust the black level to compensate for low black levels, low contrast or dull colours
generated by external devices connected to the TV via an HDMI cable.
This function is only available when the input signal connected to the TV via an HDMI connector is set to RGB444.
- 76 -
Page 77

Picture Support Functions
Congure the picture settings for your TV.
Viewing a picture-in-picture (PIP)
Settings Picture PIP
While viewing video from an external device such as a Blu-ray player on the main screen, you can watch a TV
broadcast in a picture-in-picture (PIP) window.
This function may not be supported depending on the model or geographical area.
PIP is not available while Smart Hub is active.
Playing a game or using the karaoke function on the main screen can result in lower PIP picture quality.
The PIP function is only available under the following conditions: 1) The main screen's source is a Component or HDMI
connection. 2) The input resolution is less than FHD (Full HD).
The PIP window supports digital channels only and does not support UHD channels.
- 77 -
Page 78

Changing the picture size settings
Settings Picture Picture Size Settings Try Now
• Picture Size Try Now
You can change the size of the picture displayed on the TV screen to 16:9 Standard, Custom or 4:3.
Supported picture sizes differ with the input signal. For more information about supported picture sizes, refer to
"Picture sizes and input signals".
• Auto Wide Try Now
Changing the picture size automatically.
This function may not be supported depending on the model or geographical area.
• 4:3 Screen Size Try Now
You can select a picture size suitable for your geographical area while you are watching TV in the 4:3 or Fit
to screen mode. The supported screen sizes differ with the country and this function allows you to adjust the
picture size in this case.
The 4:3 mode is not available when an external device is connected to the TV via a Component connector or an HDMI
connector.
This function may not be supported depending on the model or geographical area.
• Fit to screen Try Now
Fitting the picture to the screen.
This function may not be supported depending on the Picture Size setting.
This function may not be supported depending on the broadcast signals.
• Zoom and Position Try Now
Adjusting the picture size and/or position.
This function is available only if Picture Size is set to Custom.
To change the picture position on analogue channels, first enlarge the picture and then change the position.
These functions may not be available on Samsung TV Plus and some applications.
- 78 -
Page 79

Conguring a Sound Mode and Expert Settings
Change the Sound Mode and adjust Expert Settings.
Choosing a sound mode
Settings Sound Sound Mode Try Now
You can select the available sound mode that you prefer for a content type or your listening environment.
When an external device is connected, Sound Mode may change accordingly.
This function may not be supported depending on the model.
Conguring advanced sound settings
Settings Sound Expert Settings Try Now
You can personalise the sound quality by adjusting the following settings.
• Balance
• Equaliser Try Now
• HDMI-eARC Mode
You can connect an audio device that supports eARC via HDMI-eARC. Muting occurs temporarily during device
connection.
• Digital Output Audio Format Try Now
Select the digital audio output format. If you select the Auto option, the audio device automatically outputs in a
supported format.
If you select the Pass-through option, audio data is output with no processing.
Try Now
This function is not available when the Sound Mode function is set to Adaptive Sound or Amplify.
The name and properties of this function may appear differently depending on the connected external device.
This function may not be supported depending on the model.
HDMI (ARC) is supported by some models. Check the HDMI port name of the purchased product's model.
- 79 -
Page 80

Digital Output Audio Delay Try Now
•
This feature is only available when the external device is connected via HDMI (eARC) and SPDIF (Sony Philips Digital
Interface).
HDMI (ARC) is supported by some models. Check the HDMI port name of the purchased product's model.
• Dolby Atmos Compatibility Try Now
You can set the TV to allow Dolby Digital+ with Atmos streams that are inputted from external devices.
Set to On if the audio device connected via HDMI (eARC) supports Dolby Atmos. The TV screen may flicker when
this function is turned on or off.
If this function is on, set Digital Output Audio Format to Auto.
HDMI (ARC) is supported by some models. Check the HDMI port name of the purchased product's model.
• Auto Volume Try Now
Automatically adjusts the sound to a certain level when changing channels or switching to another external
input.
• Sound Feedback
Try Now
• Reset Sound Try Now
Standard audio signals are sampled at 48 kHz while HD audio signals are sampled at 96 kHz.
Some SPDIF receivers may not be compatible with HD audio format.
- 80 -
Page 81

Using the Sound Support Functions
Congure the sound settings for your TV.
Selecting speakers
Settings Sound Sound Output Try Now
You can select which speakers the TV uses for audio output.
External speakers may not be controlled with the remote control. When an external speaker is enabled, some sound menus
are not supported.
Refer to the sound bar's user manual when connecting it to the TV.
Listening to the TV through Bluetooth devices
Settings Sound Sound Output Bluetooth Speaker List
You can connect Bluetooth audio devices to the TV. They must be paired using the TV's Bluetooth function. Refer
to the user manual for your audio device such as Bluetooth speaker, sound bar and headphones for detailed
connection and usage.
If the TV fails to nd a Bluetooth audio device, place the device closer to the TV, and then select Refresh.
When you turn on a paired Bluetooth audio device, the TV detects it automatically, and then displays a pop-up window. Use
this pop-up window to activate/deactivate the Bluetooth audio device.
The sound quality may be affected by the condition of the Bluetooth connection.
Before using a Bluetooth audio device, refer to "Read Before Using Bluetooth Devices".
This function may not be supported depending on the model.
- 81 -
Page 82

Listening to the TV through a Samsung audio device that supports the Wi-Fi function
For more information about how to connect and use a Samsung audio device that supports the Wi-Fi function, refer
to its user manual.
Settings Sound Wi-Fi Speaker Surround Setup Try Now
If you've connected one or more Samsung wireless audio devices that support the Wi-Fi function to the TV, you
can create an optimal sound set up by conguring the surround effect settings. You can select any of the surround
sound congurations, with or without a sound bar.
A surround sound conguration can be used if all of the following conditions are met:
• Two or more Samsung wireless speakers of the same type must be connected to the same wireless network.
• The Samsung audio devices that support the Wi-Fi function must be connected to the same wireless network as
the TV.
Surround sound congurations with a sound bar may not be supported depending on the product.
If you activate the Screen Mirroring function while using Samsung audio devices that support the Wi-Fi function, the Wi-Fi
connection is disconnected.
Mismatched video and audio lip-syncing may occur depending on the device type.
- 82 -
Page 83

System and Support
You can congure system and support settings such as clock, timers, energy usage and software updates.
Using the Time Functions and the Timers
Set the current time and use the timer function.
Settings General System Manager Time Try Now
You can set the Clock manually or automatically. Once the Clock is set, you can view the current time on the TV
anytime.
You must set the clock in the following cases:
• The power cable is disconnected and then connected.
• The Clock Mode is changed from Auto to Manual.
• The TV is not connected to the Internet.
• No broadcast signals are received.
Setting the clock automatically
Settings General System Manager Time Clock Clock Mode Auto
This function works only when the TV is connected to the Internet or is receiving digital broadcasts through a connected
antenna.
The accuracy of the time information received may differ with the channel and signal.
If you get your TV signal from a cable broadcast receiver/set-top box or a satellite receiver/satellite set-top box connected
to an HDMI or Component port, you must set the current time manually.
- 83 -
Page 84

Adjusting the clock for DST and time zone
Settings General System Manager Time Clock Time Zone
Sets the right time by setting Daylight Savings Time (DST) and your local time zone.
This function is only available when the Clock Mode is set to Auto.
This function may not be supported depending on the model or geographical area.
• GMT
Set Greenwich Mean Time (GMT).
• DST
Automatically adjusts for Daylight Saving Time (DST).
Changing the current time
Settings General System Manager Time Clock Time Offset
Time Offset adjusts the time through a network connection.
This function is available only when Clock Mode is set to Auto, the TV fails to receive time information through normal
broadcast signals, and the TV is connected to the Internet through a local area network.
- 84 -
Page 85

Setting the clock manually
Settings General System Manager Time Clock Clock Mode Manual
When Clock Mode is set to Manual, you can directly enter the current date and time. Select the Date and Time by
using the directional buttons on the remote control.
Using the sleep timer
Settings General System Manager Time Sleep Timer
You can use this function to automatically shut off the TV after a pre-set period of time. You can set the sleep timer
for up to 180 minutes after which it will turn off the TV.
This function may not be supported in some viewing modes.
This function may not be supported depending on the model or geographical area.
Turning off the TV using the off timer
Settings General System Manager Time Off Timer
You can set Off Timer to shut off the TV automatically at a specic time. Off Timer is only available if the Clock has
been set.
To use this function, rst set the Clock ( Settings General System Manager Time Clock).
This function may not be supported in some viewing modes.
- 85 -
Page 86

Using the Auto Protection Time and Energy Saving Functions
Set the Auto Protection Time and reduce the TV's energy consumption.
Setting the Auto Protection Time
Settings General System Manager Auto Protection Time Try Now
Activate a screensaver when your TV displays a still image for two hours or more.
This function may not be supported in some viewing modes.
This function may not be supported depending on the model or geographical area.
Reducing the energy consumption of the TV
Settings General Eco Solution Try Now
You can adjust the brightness level of the TV, reduce overall power consumption and prevent overheating.
This function may not be supported depending on the model.
• Ambient Light Detection Try Now
Automatically adjusts the brightness level of the TV, according to the ambient light level, to reduce power
consumption. If Ambient Light Detection has adjusted the screen brightness to a too bright or dark level, you
can select Minimum Brightness to manually adjust the minimum screen brightness.
• Minimum Brightness
When Ambient Light Detection is turned on, you can manually adjust the minimum brightness of the TV screen.
This function acts only when the value is less than the setting in Settings Picture Expert Settings
Brightness.
• Energy Saving Mode Try Now
Adjust the brightness settings to reduce the TV's power consumption.
• Motion Lighting Try Now
Adjusts the brightness in response to on-screen movements to reduce power consumption.
• Auto Power Off
Automatically turns off the TV to reduce unnecessary power consumption if the TV Controller and the remote
control are not used for the set period of time.
Try Now
Try Now
- 86 -
Page 87

Updating the TV's Software
View your TV's software version and update it if necessary.
DO NOT turn off the TV's power until the update is complete. The TV will turn off and on automatically after
completing the software update. Video and audio settings will be reset to their defaults after a software
update.
Settings Support Software Update Try Now
Updating through the Internet
Settings Support Software Update Update Now Try Now
Updating from the Internet requires an active Internet connection.
Updating through a USB device
Settings Support Software Update Update Now
After downloading the update le from the Samsung website and storing it on a USB device, connect the USB
device to the TV to update.
To update using a USB device, download the update package from Samsung.com to your computer. Then, save the update
package in the USB device's top-level folder. Otherwise, the TV will not be able to locate the update package.
Updating the TV automatically
Settings Support Software Update Auto update Try Now
If the TV is connected to the Internet, you can have the TV's software update itself automatically while you are
watching the TV. When the background update is completed, it is applied the next time the TV is turned on.
If you agree to the Smart Hub terms and conditions, Auto update is set to On automatically. If you want this function
disabled, use the Select button to turn it off.
This function may take a longer time if another network function is running concurrently.
This function requires an Internet connection.
- 87 -
Page 88

Audio and Video Functions for the Visually or Hearing Impaired
You can congure the functions for the visually or hearing impaired.
Running the accessibility functions
Settings General Accessibility Try Now
Running Accessibility Shortcuts
The Accessibility Shortcuts provide easy access to the accessibility functions. To display the Accessibility Shortcuts,
press the AD/SUBT. button or press and hold the MUTE button for 1 second or more. You can easily turn on or turn
off the functions such as Voice Guide, Picture Off, Audio Description, Subtitle, High Contrast, Enlarge, Learn TV
Remote, Menu Learning Screen, Multi-output Audio, Slow Button Repeat, Accessibility Settings, etc.
Even if the Voice Guide is set to Off or muted, the voice guide for Accessibility Shortcuts is enabled.
The shortcut menus may not appear depending on the model or geographical area.
On the Samsung Smart Remote, press and hold the Volume button for 1 second or more.
- 88 -
Page 89

Enabling voice guides for the visually impaired
Settings General Accessibility Voice Guide Settings Try Now
You can activate voice guides that describe the menu options aloud to aid the visually impaired. To activate this
function, set Voice Guide to On. With Voice Guide on, the TV provides voice guides for channel change, volume
adjust, information on current and upcoming programmes, schedule viewing, other TV functions and various
content in the Internet and in Search.
You can go to Voice Guide, and then press the Select button to turn the function on or off.
The Voice Guide is provided in the language that is specied on the TV Language. However, some languages are not
supported by Voice Guide even though they are listed in the TV Language. English is always supported.
For more information about the TV Language settings, refer to "Changing the menu language".
Changing the volume, speed, pitch and the TV background volume of the Voice Guide
You can congure the volume, speed, pitch and the TV background volume of the voice guide.
Audio Description
Settings General Accessibility Audio Description Settings
You can activate an audio guide that provides an audio description of video scenes for the visually impaired. This
function is only available with broadcasts that provide this service.
This function is only available on digital channels.
• Audio Description
Turns the audio description function on or off.
• Audio Description Volume
Adjusts the audio description volume.
- 89 -
Page 90

The TV screen is turned off but audio continues
Settings General Accessibility Picture Off
Turn off the TV screen and provide only sound to reduce overall power consumption. When you press a button on
the remote control other than Volume and Power while the screen is off, the TV screen turns back on.
This function may not be supported depending on the geographical area.
White text on black background (high contrast)
Settings General Accessibility High Contrast Try Now
You can change Smart Hub and setting menu screens to white text on a black background and change the
transparent TV menus to opaque automatically so that text can be more easily read.
If High Contrast is on, some Accessibility menus are not available.
Enlarging the font (for the visually impaired)
Settings General Accessibility Enlarge Try Now
You can enlarge the size of the font on the screen. To activate, set Enlarge to On.
Learning about the remote control (for the visually impaired)
Settings General Accessibility Learn TV Remote Try Now
This function helps individuals with a visual impairment to learn the positions of the buttons on the remote control.
When this function is activated, you can press a button on the remote control and the TV will tell you its name. Press
the RETURN button twice to exit Learn TV Remote.
This function is only available when Voice Guide is enabled.
Learning about the TV menu
Settings General Accessibility Menu Learning Screen Try Now
Learn the menus on the TV screen. Once enabled, your TV will tell you the structure and features of the menus you
select.
This function is only available when Voice Guide is enabled.
- 90 -
Page 91

Watching TV broadcasts with subtitles
Settings General Accessibility Subtitle Settings Try Now
Set Subtitle to On. Then you can watch the programme with the subtitle displayed.
This function may not be supported depending on the model or geographical area.
This function has no relationship with the features for controlling sub-titles of DVD or Blu-ray players. To control DVD or
Blu-ray subtitles, use the sub-title feature of the DVD or Blu-ray player and the player's remote control.
• Subtitle
Turns on or off the subtitle.
• Subtitle Mode
Sets the subtitle mode.
• Subtitle Language
Sets the subtitle language.
• Spoken Subtitles
Listen to an audio version of the subtitles. Only available with broadcasts that provide this service.
This function may not be supported depending on the model or geographical area.
Selecting the broadcasting subtitle language
You can select the default subtitle language. The list may vary depending on the broadcast.
• Primary Subtitle Language
Sets the primary subtitle language.
• Secondary Subtitle Language
Sets the secondary subtitle language.
- 91 -
Page 92

Listening to the TV through Bluetooth devices (for the hearing impaired)
Settings General Accessibility Multi-output Audio
You can turn on both the TV speaker and Bluetooth headphone at the same time. When this function is active, you
can set the volume of the Bluetooth headphone higher than the volume of the TV speaker.
This function may not be supported depending on the model or geographical area.
When you connect the Bluetooth headphone to the TV, Multi-output Audio is activated. For more information about
connecting Bluetooth devices to the TV, refer to "Listening to the TV through Bluetooth devices".
Conguring the repeat settings for remote control buttons
Settings General Accessibility Remote Button Repeat Settings Try Now
You can congure the operation speed of the remote control buttons so that they slow down when you continually
press and hold them. First, set Slow Button Repeat to On, and then adjust the operation speed in Repeat Interval.
- 92 -
Page 93

Using Voice Assistants on TV
You can change the settings of a Voice Assistant after selecting it.
Select the Voice Assistant
Settings General Voice Voice Assistant
Select which Voice Assistant you would like to help control your TV.
To use this function, the TV must be connected to the Internet.
This function may not be supported depending on the model or geographical area.
• Bixby / Amazon Alexa / Google Assistant
To use the Voice Assistant, follow the instructions on the TV screen to enable the selected Voice Assistant.
To change the settings for Voice Assistant, run the Settings menu under each Voice Assistant ( Settings
General Voice Voice Assistant).
To enable the Settings menus for each Voice Assistant, log in each Voice Assistant.
For an example of Voice command, see the Settings menus for each Voice Assistant.
- 93 -
Page 94

Using Other Functions
You can view other functions.
Changing the menu language
Settings General System Manager Language Try Now
Setting up a password
Settings General System Manager Change PIN Try Now
The PIN input window appears. Enter a PIN. Enter it again to conrm it. The default PIN is "0000" (for France and
Italy: "1111").
If you forget your PIN, you can reset it with your remote control. With the TV turned on, press the following buttons on the
remote control in the order shown to reset the PIN to "0000" (for France and Italy: "1111").
On the Samsung Smart Remote: Press (Volume) button. Volume Up Volume Down Volume Up
.
On the standard remote control: Press button. ( ) (Volume Up) Press RETURN button. ( ) (Volume Down)
Press RETURN button. ( ) (Volume Up) Press RETURN button.
Selecting Usage or Retail Mode
Settings General System Manager Usage Mode Try Now
You can set the TV for retail environments by setting Usage Mode to Retail Mode.
For all other uses, select Home Mode.
Use Retail Mode only in a store. With Retail Mode, some functions are disabled and the TV settings automatically reset after
a preset amount of time.
This function may not be supported depending on the model.
- 94 -
Page 95

Managing External Devices
Settings General External Device Manager Device Connection Manager Try Now
When you connect external devices such as mobile devices or tablets connected to the same network as the TV so
you can share content, you can view the list of allowed devices and connected devices.
• Access Notification
Set whether to display a notification when an external device such as a mobile device or tablet attempts to
connect to the TV.
• Device List
Manage a list of external devices registered to the TV.
Using AirPlay
Settings General Apple AirPlay Settings
You can use AirPlay to view content from your iPhone, iPad or Mac on the TV screen.
This function may not be supported depending on the model or geographical area.
Restoring the TV to the factory settings
Settings General Reset Try Now
You can restore all TV settings to the factory defaults.
1.
Select Reset. The security PIN entry window appears.
2.
Enter the security PIN, and then select Reset. All settings are then reset. The TV turns off and on again
automatically and displays the Initial Setup screen.
For more information on Reset, refer to the user manual that came with the TV.
If you skipped some steps in the initial setup, run Set Up TV ( Source up directional button TV up
directional button
Set Up TV), and then congure the settings in the steps you skipped.
- 95 -
Page 96

HbbTV
Access services from entertainment providers, online providers and CE manufactures through HbbTV.
This function may not be supported depending on the model or geographical area.
Some channels may not include the HbbTV service.
In some countries, HbbTV is disabled by default. In this case, HbbTV can be used by installing the HbbTV application
(the HbbTV Installer Application) in Apps.
To set the HbbTV automatic start to on or off, access Settings Broadcasting Expert Settings HbbTV
Settings and set HbbTV to on or off. (Depending on the geographical area.)
You can use the following functions:
• HbbTV: Enable or disable data services.
• Do Not Track: Ask apps and services not to track your browsing activity.
• Private Browsing: Enable Private Browsing to stop the browser from saving your Internet history.
• Delete Browsing Data: Delete all saved Cookies.
If you want this function enabled or disabled, use the Select button to turn it on or off.
• HbbTV is not available when a recorded video is being played back.
• An application on broadcast channel may malfunction temporarily depending on the circumstances of the
broadcast station or application provider.
• An application on HbbTV usually operates only when the TV is connected to an external network. The application
may malfunction depending on the network conditions.
• When the HbbTV application is installed and the broadcasting programme supports HbbTV, a red button appears
on the screen.
• It is possible to use both Digital Teletext mode and Traditional Teletext mode in several limited channels by
pressing the TTX/MIX button on the remote control in a toggling manner.
• When you press the TTX/MIX button once in HbbTV mode, Digital Teletext mode of HbbTV is activated.
• When you press the TTX/MIX button twice in HbbTV mode, Traditional Teletext mode is activated.
- 96 -
Page 97
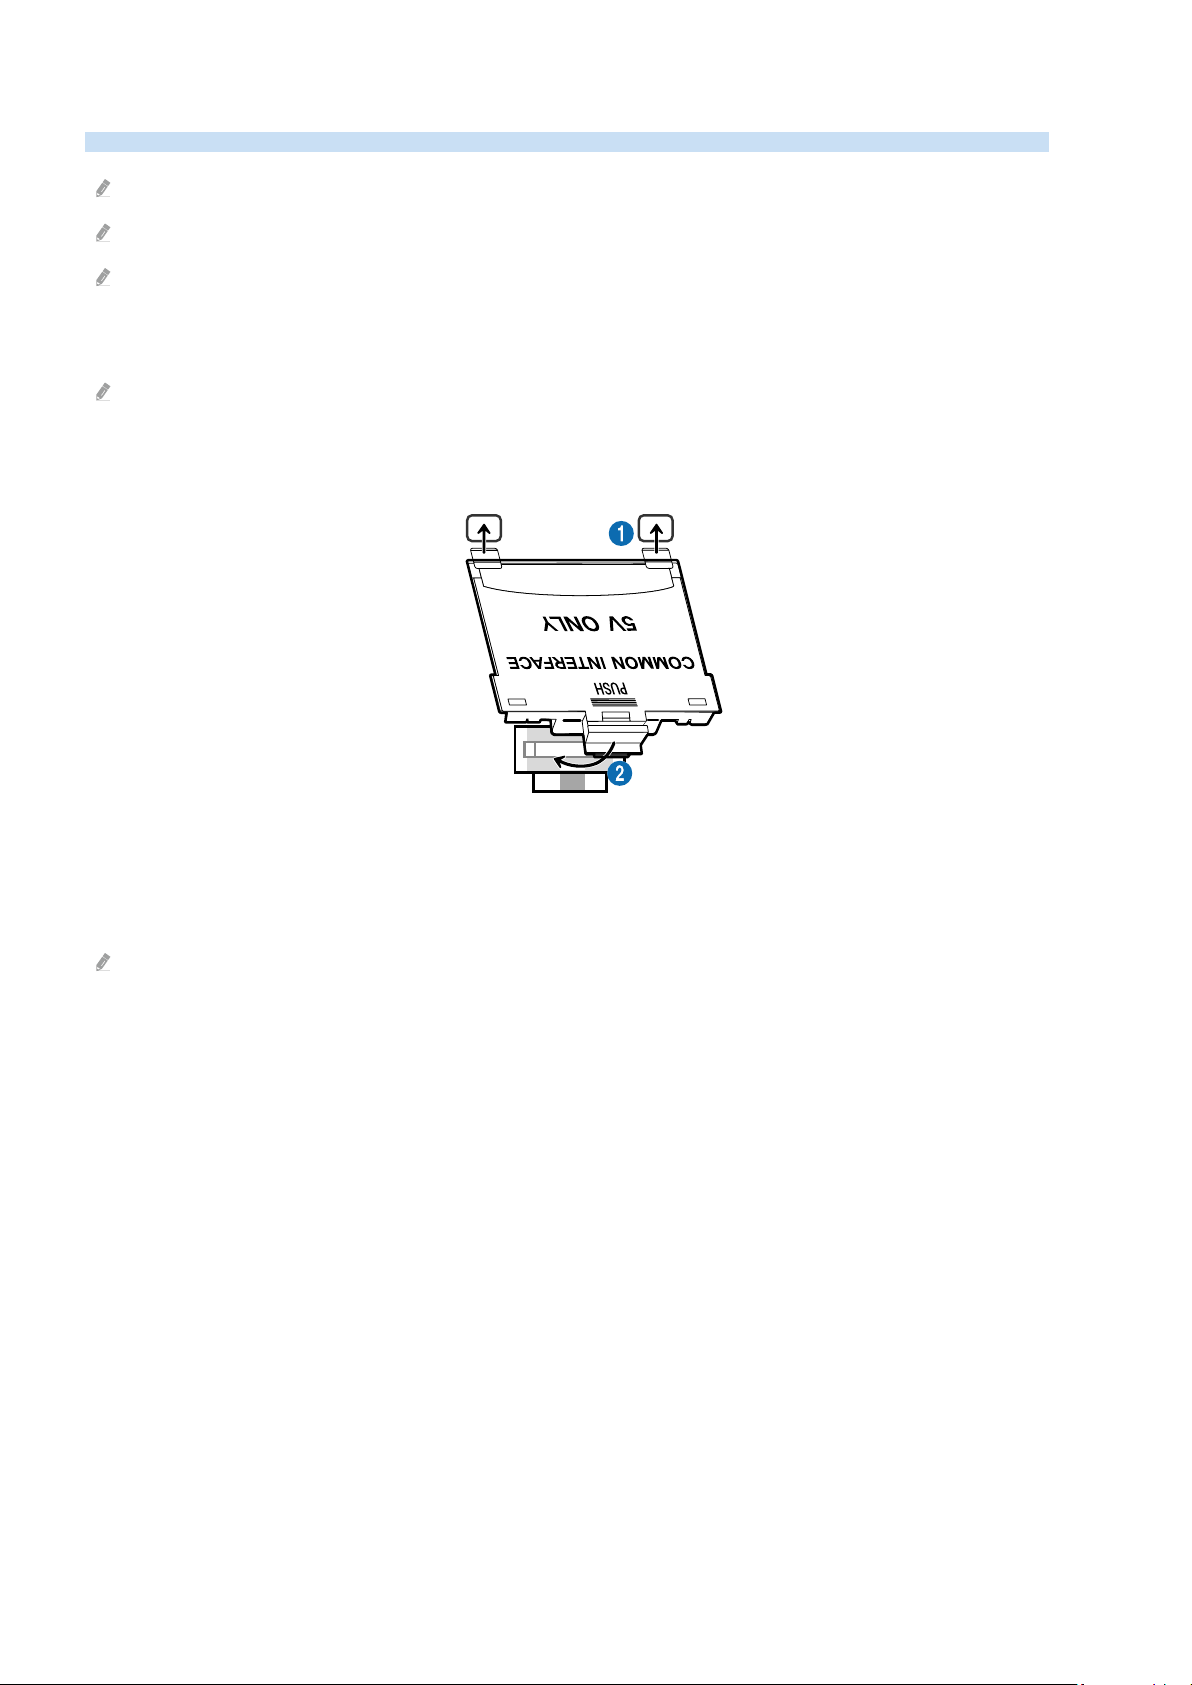
Using a TV Viewing Card (“CI or CI+ Card”)
Watches paid channels by inserting your TV Viewing Card (“CI or CI+ Card”) into the COMMON INTERFACE slot.
The 2 CI card slots may not be supported depending on the model.
Turn the TV off to connect or disconnect a “CI or CI+ Card”.
The “CI or CI+ Card” may not supported depending on the model.
Connecting the “CI or CI+ Card” via COMMON INTERFACE slot with the CI CARD Adapter
Only for models with Common interface slot.
Attaching the CI CARD Adapter via COMMON INTERFACE slot
To attach the CI CARD Adapter to the TV, follow these steps:
1.Insert the CI CARD Adapter into the two holes on the back of TV.
Please locate the two holes at the back of the TV above the COMMON INTERFACE slot.
2.Connect the CI CARD Adapter to the COMMON INTERFACE slot on the back of TV.
- 97 -
Page 98
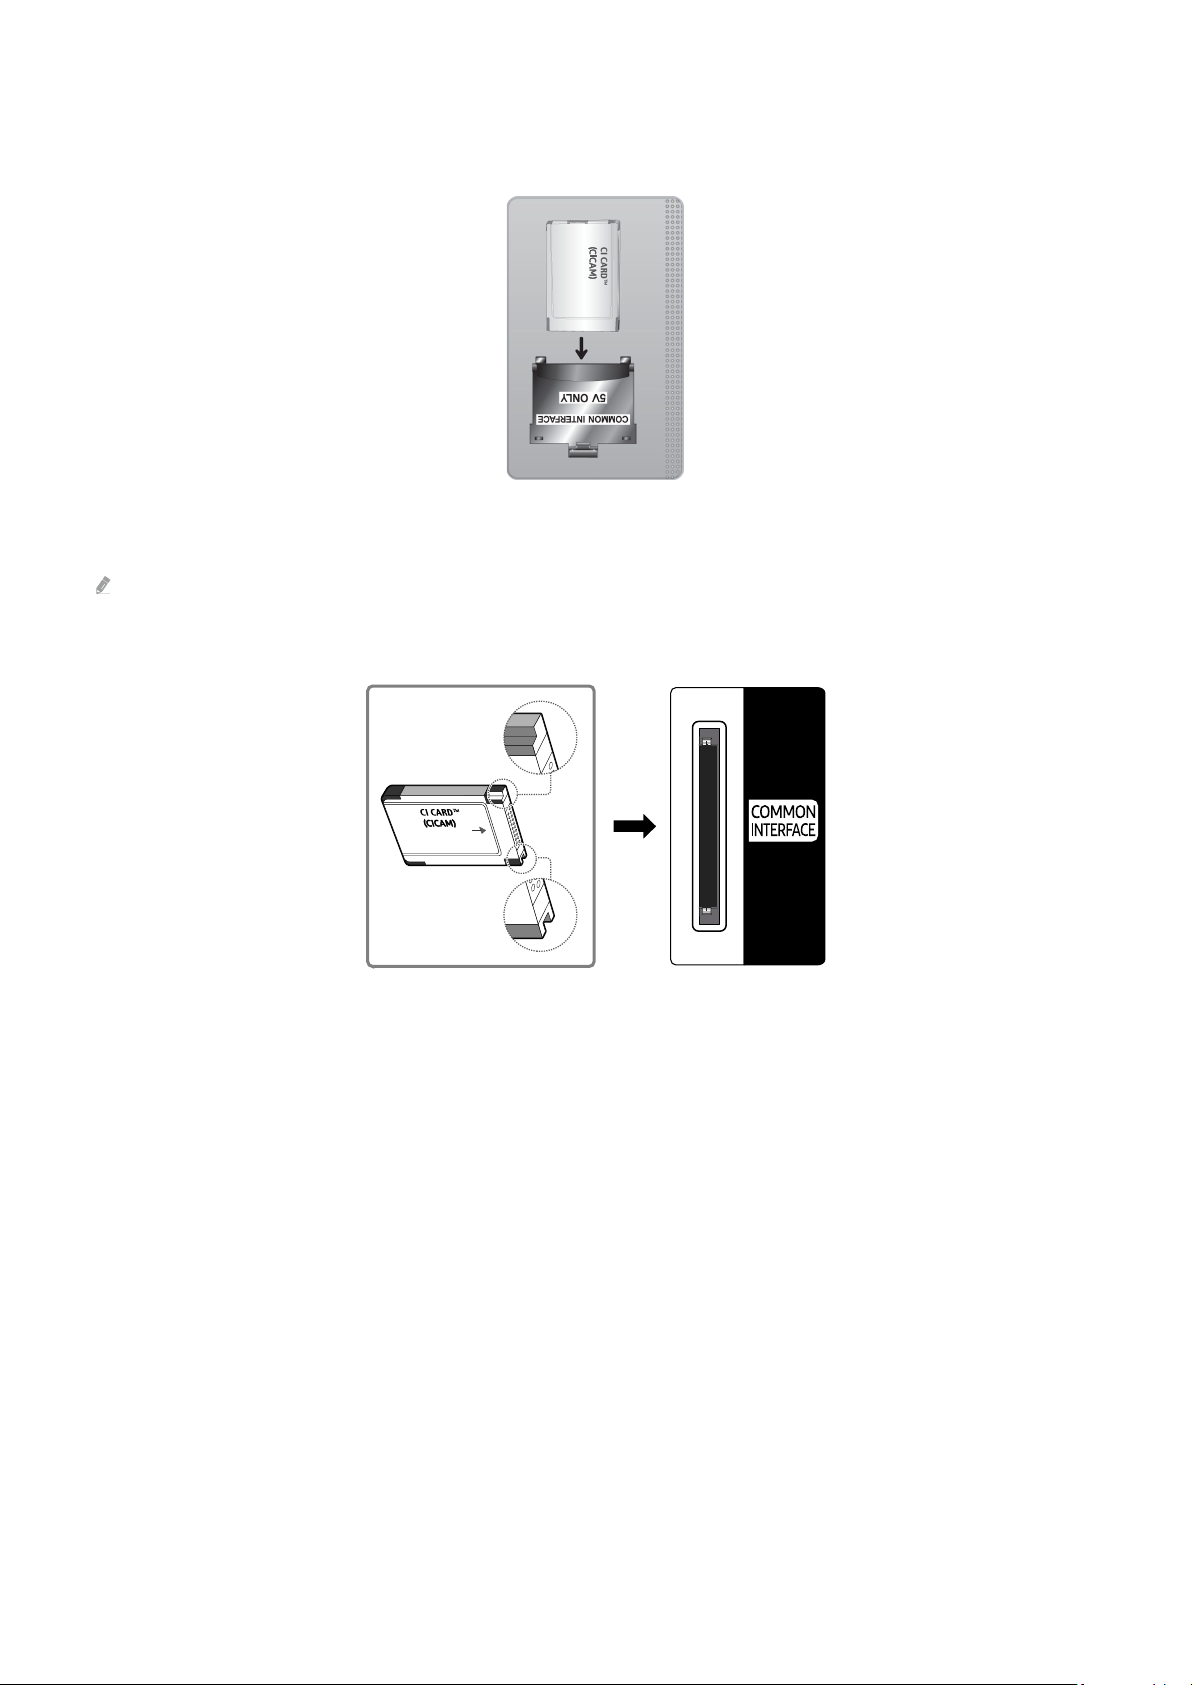
Connecting the “CI or CI+ Card”
Connect the “CI or CI+ Card” to the COMMON INTERFACE slot as shown in the image below.
Connecting the “CI or CI+ Card” via COMMON INTERFACE slot
Only for models with Common interface slot.
Connect the “CI or CI+ Card” to the COMMON INTERFACE slot as shown in the image below.
- 98 -
Page 99

Using the “CI or CI+ Card”
To watch paid channels, the “CI or CI+ CARD” must be inserted.
• Samsung TV follow up CI+ 1.4 standard. When Samsung TV display the pop-up message, it may happen due to
CI+ 1.4 Version inconsistency. If you have a problem, please contact Samsung Call Centre.
Your Samsung TV conforms to the CI+ 1.4 standards.
Where a CI+ Common Interface module is incompatible with Samsung TV then please remove the module and contact
the CI+ operator for assistance.
• If you don’t insert the “CI or CI+ CARD”, some channels will display the pop-up message.
• The pairing information will be displayed in about 2-3 minutes. If an error message is displayed, please contact
your service provider.
• When the configuration of channel information has finished, the message “Updating Completed” is displayed,
indicating the channel list is updated.
You must obtain a “CI or CI+ CARD” from a local cable service provider.
When removing the “CI or CI+ CARD”, carefully pull it out with your hands since dropping the “CI or CI+ CARD” may cause
damage to it.
Insert the “CI or CI+ CARD” in the direction marked on the card.
The location of the COMMON INTERFACE slot may be different depending on the model.
“CI or CI+ CARD” is not supported in some countries and regions. Check with an authorised dealer to nd out if “CI or CI+
CARD” is supported in your locality.
If you have any problems, please contact a service provider.
Insert the “CI or CI+ CARD” that supports the current aerial settings. If not, the screen may not look normal.
- 99 -
Page 100

Teletext Feature
Learn how to use Teletext and run the functions provided by Teletext Service.
This function is available only in the channel that supports the teletext service.
This function may not be supported depending on the model or geographical area.
To enter the Teletext feature,
On the Samsung Smart Remote: Press the button for over 1 second. Then the TTX menu appears.
On the standard remote control: Press the / TTX/MIX button.
To exit from the Teletext feature,
On the Samsung Smart Remote: Press the TTX/MIX button on the pop-up list until a live TV programme appears.
On the standard remote control: Press the / TTX/MIX button on the remote control until live TV appears.
The index page of the Teletext service gives you information on how to use the Service. For Teletext information
to be displayed correctly, channel reception must be stable. Otherwise, information may be missing or some pages
may not be displayed.
To change the Teletext page,
On the Samsung Smart Remote: Press the numeric button on the virtual numeric pad.
On the standard remote control: Press the numeric button.
On the Samsung Smart Remote
TTX/MIX (Full TTX / Double TTX / Mix / Live TV): The teletext mode is activated in the channel that is being watched.
Each time you press the TTX/MIX button, the teletext mode changes in the order of Full TTX → Double TTX → Mix →
Live TV.
• Full TTX: The teletext mode appears on the full screen.
• Double TTX: The teletext mode appears on the half screen along with the currently viewed channel on the other
half.
• Mix: The teletext mode appears transparently on the currently viewed channel.
• Live TV: It returns to the live TV screen.
Colour buttons (red, green, yellow, blue): If the FASTEXT system is used by the broadcasting company, the different
topics on a Teletext page are colour-coded and can be selected by coloured buttons. Press the colour corresponding
to the topic of your choice. A new colour coded page appears. Items can be selected in the same way. To display the
previous or next page, select corresponding coloured button.
- 100 -
 Loading...