

Page 1
E-MANUAL
Contact SAMSUNG WORLDWIDE
If you have any questions or comments relating to Samsung products, please contact the SAMSUNG customer care centre.
Country
AUSTRIA 0810 - SAMSUNG (7267864, € 0.07/min) www.samsung.com/at
BELGIUM 02-201-24-18 www.samsung.com/be (Dutch)
CZECH 800 - SAMSUNG (800-726786) www.samsung.com/cz
DENMARK 70 70 19 70 www.samsung.com/dk
FINLAND 030 - 6227 515 www.samsung.com/fi
FRANCE 01 48 63 00 00 www.samsung.com/fr
GERMANY 01805 - SAMSUNG (726-7864 € 0,14/Min) www.samsung.de
HUNGARY 06-80-SAMSUNG (726-7864) www.samsung.com/hu
ITALIA 800-SAMSUNG (726-7864) www.samsung.com/it
LUXEMBURG 261 03 710 www.samsung.com/lu
NETHERLANDS 0900-SAMSUNG (0900-7267864) (€ 0,10/Min) www.samsung.com/nl
NORWAY 815-56 480 www.samsung.com/no
POLAND 0 801 1SAMSUNG (172678)
PORTUGAL 80820-SAMSUNG (726-7864) www.samsung.com/pt
SLOVAKIA 0800-SAMSUNG (726-7864) www.samsung.com/sk
SPAIN 902 - 1 - SAMSUNG (902 172 678) www.samsung.com/es
SWEDEN 0771 726 7864 (SAMSUNG) www.samsung.com/se
TURKEY 444 77 11 www.samsung.com/tr
U.K 0845 SAMSUNG (7267864) www.samsung.com/uk
EIRE 0818 717100 www.samsung.com/ie
SWITZERLAND 0848 - SAMSUNG (7267864, CHF 0.08/min) www.samsung.com/ch
LITHUANIA 8-800-77777 www.samsung.com/lt
LATVIA 8000-7267 www.samsung.com/lv
ESTONIA 800-7267 www.samsung.com/ee
Customer Care Centre
Samsung Zrt., česká organizační složka, Oasis Florenc, Sokolovská394/17, 180 00, Praha 8
022-607-93-33
Web Site
www.samsung.com/be_fr (French)
www.samsung.com/pl
www.samsung.com/ch_fr/(French)
LED TV
user manual
© 2011 Samsung Electronics Co., Ltd. All rights reserved.
imagine the possibilities
Thank you for purchasing this Samsung product.
To receive more complete service, please register
your product at
www.samsung.com/register
Model _____________ Serial No. _____________
BN68-03438H-02
Page 2
For more information on how to use e-Manual (p. 14)
Figures and illustrations in this User Manual are provided for reference only and may differ from actual product
appearance. Product design and specifications may be changed without notice.
Digital TV notice
1. Functionalities related to Digital TV (DVB) are only available in countries/areas where DVB-T (MPEG2 and MPEG4 AVC) digital terrestrial signals are
broadcasted or where you are able to access to a compatible DVB-C (MPEG2 and MPEG4 AAC) cable-TV service. Please check with your local
dealer the possibility to receive DVB-T or DVB-C signal.
2. DVB-T is the DVB European consortium standard for the broadcast transmission of digital terrestrial television and DVB-C is that for the broadcast
transmission of digital TV over cable. However, some differentiated features like EPG (Electric Programme Guide), VOD (Video On Demand) and so
on, are not included in this specification. So, they cannot be workable at this moment.
3. Although this TV set meets the latest DVB-T and DVB-C standards, as of [August, 2008], the compatibility with future DVB-T digital terrestrial and
DVB-C digital cable broadcasts cannot be guaranteed.
4. Depending on the countries/areas where this TV set is used some cable-TV providers may charge an additional fee for such a service and you may
be required to agree to terms and conditions of their business.
5. Some Digital TV functions might be unavailable in some countries or regions and DVB-C might not work correctly with some cable service providers.
6. For more information, please contact your local Samsung customer care centre.
The reception quality of TV may be affected due to differences in broadcasting method between the countries. Please check the TV
✎
performance in the local SAMSUNG Authorized Dealer, or the Samsung Call Centre whether it can be improved by reconfiguring TV setting or
not.
Still image warning
Avoid displaying still images (like jpeg picture files) or still image element (like TV programme logo, panorama or 4:3 image format, stock or news bar at
screen bottom etc.) on the screen. Constant displaying of still picture can cause ghosting of LED screen, which will affect image quality. To reduce risk of
this effect, please follow below recommendations:
• Avoid displaying the same TV channel for long periods.
• Always try do display any image on full screen, use TV set picture format menu for best possible match.
• Reduce brightness and contrast values to minimum required to achieve desired picture quality, exceeded values may speed up the burnout process.
• Frequently use all TV features designed to reduce image retention and screen burnout, refer to e-Manual for details.
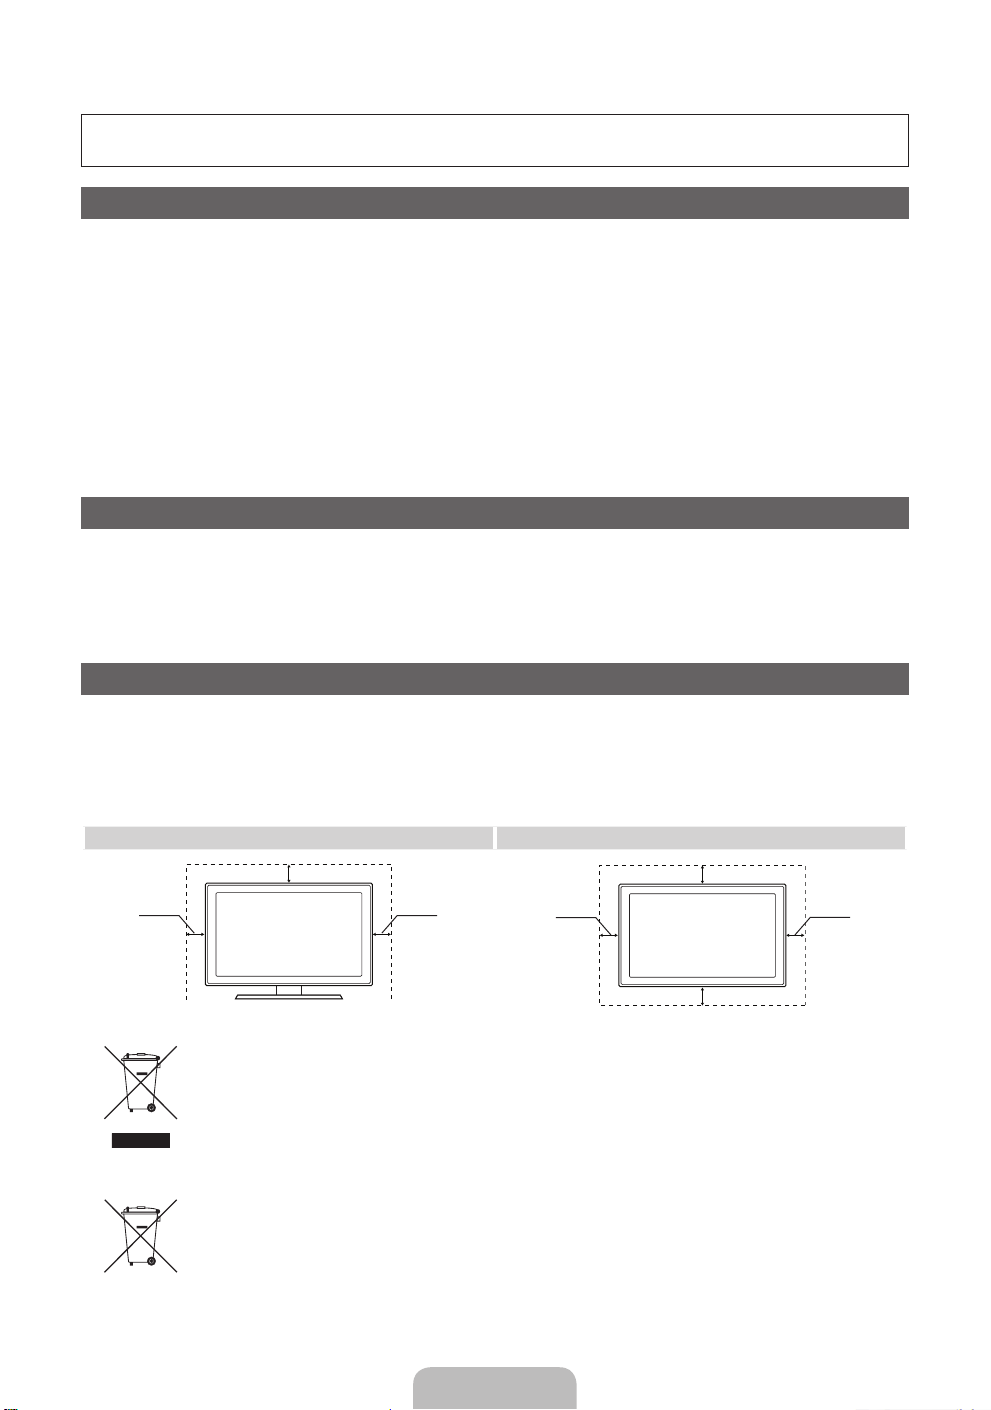
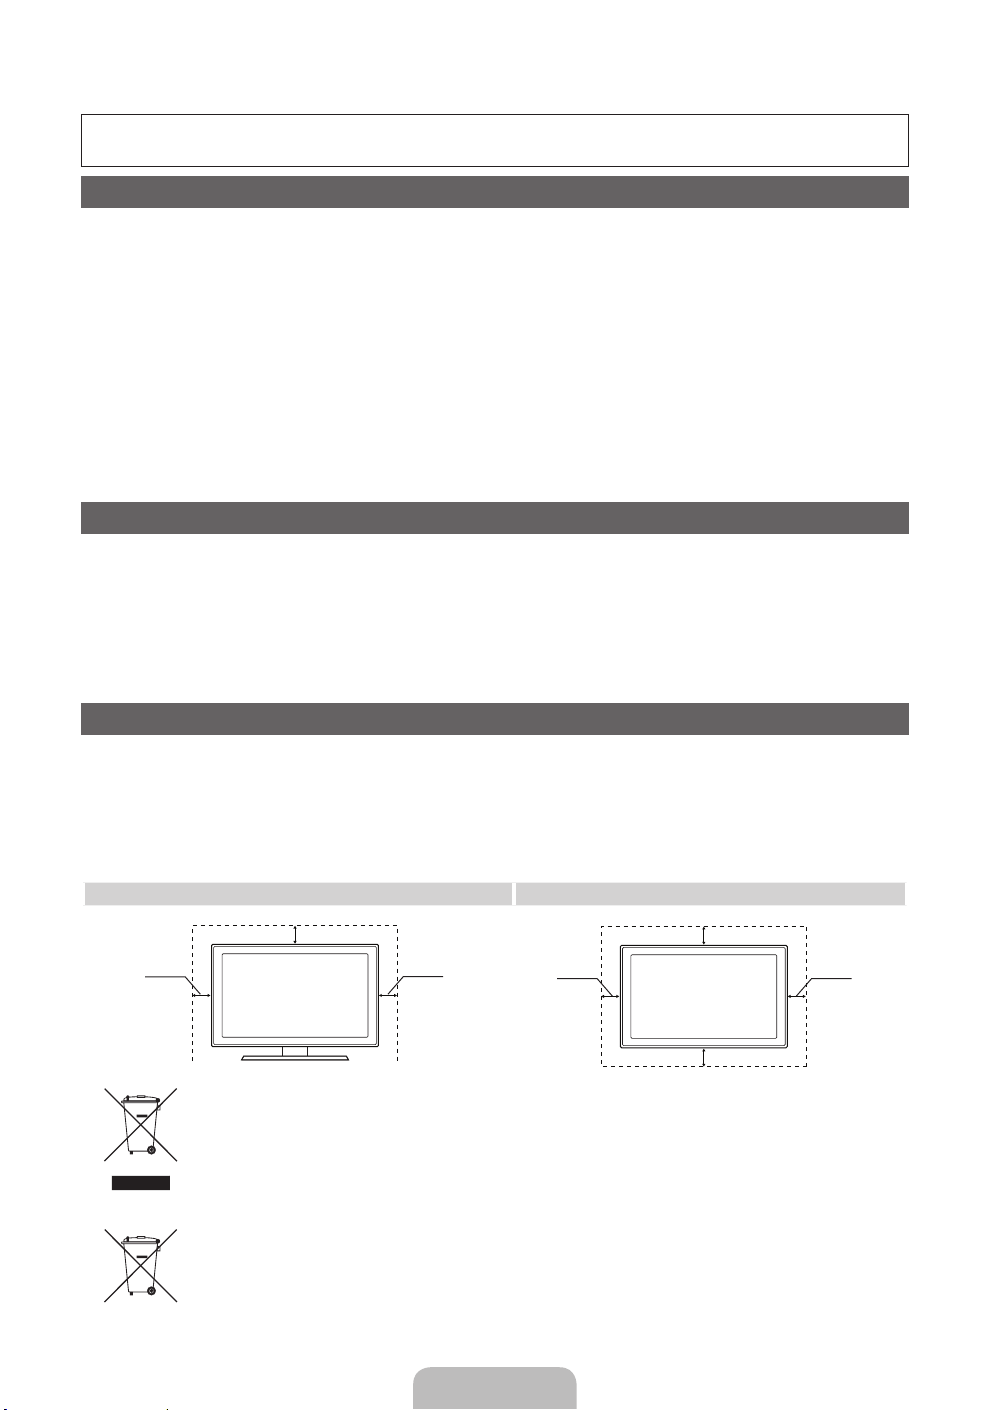
Securing the Installation Space
Keep the required distances between the product and other objects (e.g. walls) to ensure proper ventilation.
Failing to do so may result in fire or a problem with the product due to an increase in the internal temperature of the product.
When using a stand or wall-mount, use parts provided by Samsung Electronics only.
✎
• If you use parts provided by another manufacturer, it may result in a problem with the product or an injury due to the product falling.
The appearance may differ depending on the product.
✎
• Be careful when you contact the TV because some parts can be somewhat hot.
Installation with a stand. Installation with a wall-mount.
10 cm
10 cm10 cm
Correct Disposal of This Product (Waste Electrical & Electronic Equipment)
(Applicable in the European Union and other European countries with separate collection systems)
This marking on the product, accessories or literature indicates that the product and its electronic accessories (e.g. charger,
headset, USB cable) should not be disposed of with other household waste at the end of their working life. To prevent possible
harm to the environment or human health from uncontrolled waste disposal, please separate these items from other types of waste
and recycle them responsibly to promote the sustainable reuse of material resources. Household users should contact either the
retailer where they purchased this product, or their local government office, for details of where and how they can take these items
for environmentally safe recycling. Business users should contact their supplier and check the terms and conditions of the purchase
contract. This product and its electronic accessories should not be mixed with other commercial wastes for disposal.
Correct disposal of batteries in this product
(Applicable in the European Union and other European countries with separate battery return systems)
This marking on the battery, manual or packaging indicates that the batteries in this product should not be disposed of with other
household waste at the end of their working life. Where marked, the chemical symbols Hg, Cd or Pb indicate that the battery
contains mercury, cadmium or lead above the reference levels in EC Directive 2006/66. If batteries are not properly disposed of,
these substances can cause harm to human health or the environment. To protect natural resources and to promote material
reuse, please separate batteries from other types of waste and recycle them through your local, free battery return system.
10 cm
10 cm
10 cm
10 cm
English - 2
Page 3
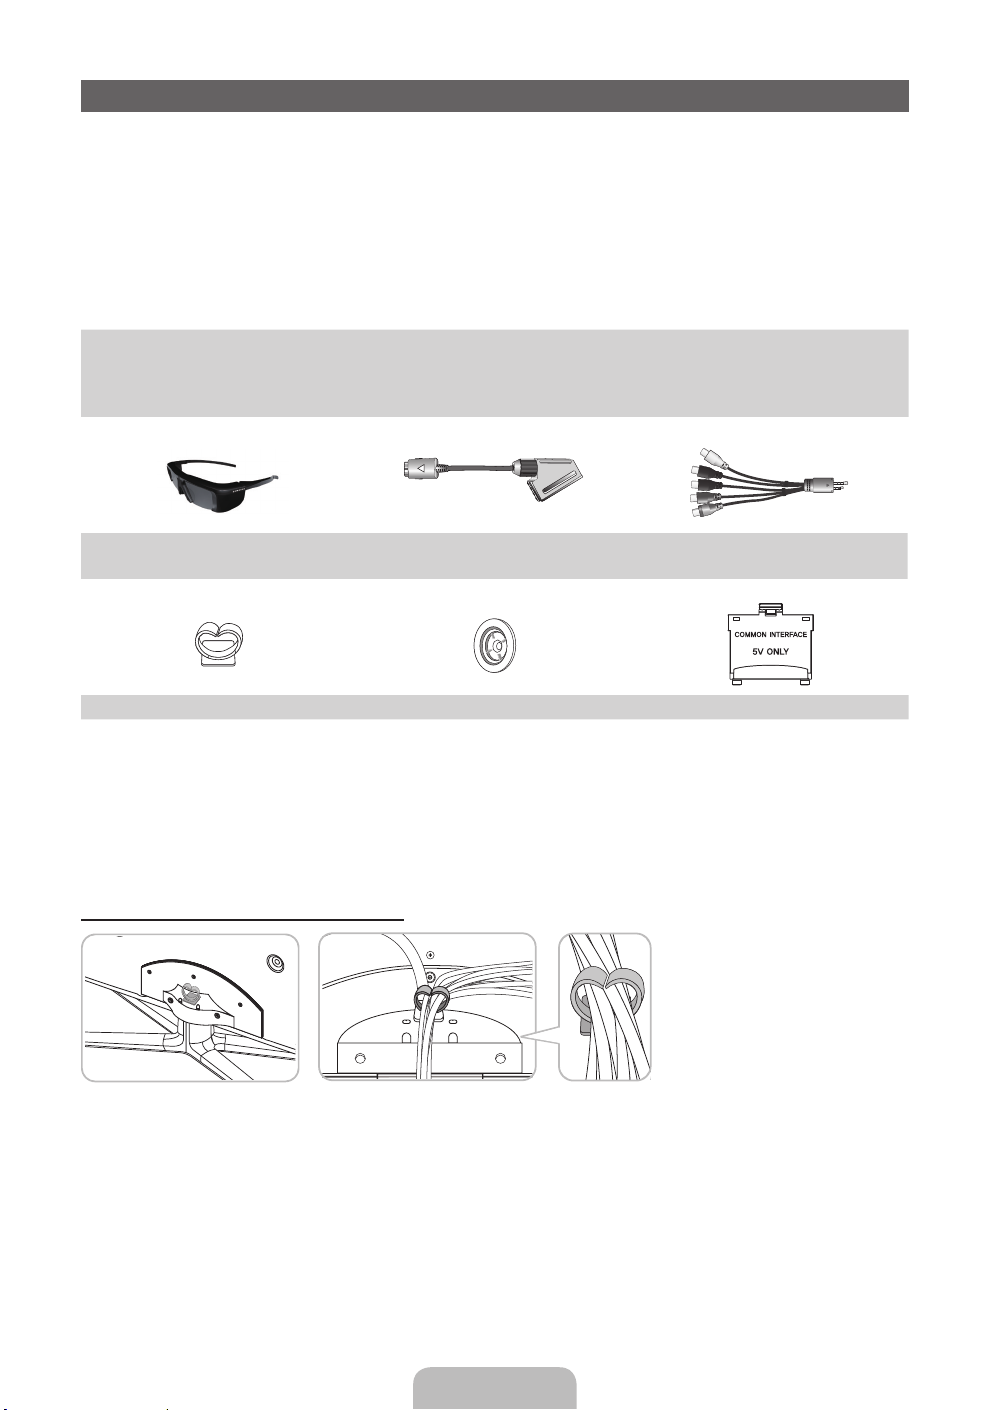
Accessories
✎
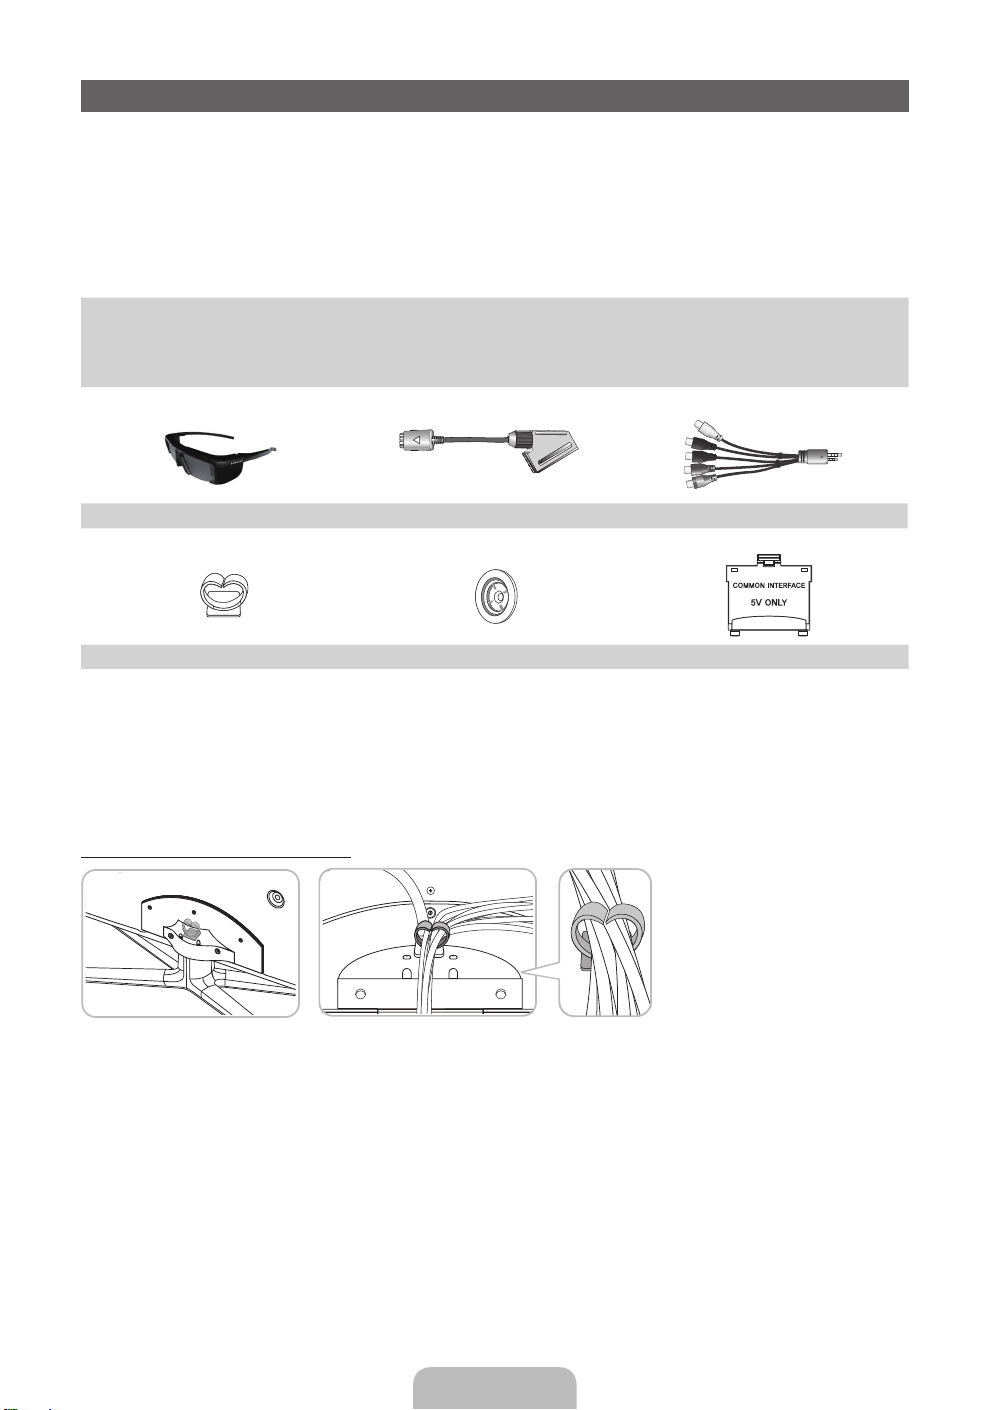
Please make sure the following items are included with your TV. If any items are missing, contact your
dealer.
✎
The items’ colours and shapes may vary depending on the models.
✎
Cables not included in the package contents can be purchased separately.
✎
Check that there is no accessory hidden behind packing materials when you open the box.
CAUTION: INSERT SECURELY LEST SHOULD BE DETACHED IN SET
[
• Remote Control & Batteries (AAA x 2) • Power Cord
• Owner’s Instructions • Cleaning-Cloth
• Warranty Card (Not available in some locations) / Safety Guide
Samsung 3D Active Glasses
Holder-Wire stand Holder Ring (4 EA) CI Card Adapter
• An administration fee may be charged if either
– (a) an engineer is called out at your request and there is no defect in the product
(i.e. where you have failed to read this user manual)
– (b) you bring the unit to a repair centre and there is no defect in the product
(i.e. where you have failed to read this user manual).
• The amount of such administration charge will be advised to you before any work or home visit is carried out.
Assembling the Holder-Wire stand
Scart Adapter (2 EA) AV/Component Adapter
English - 3
Page 4
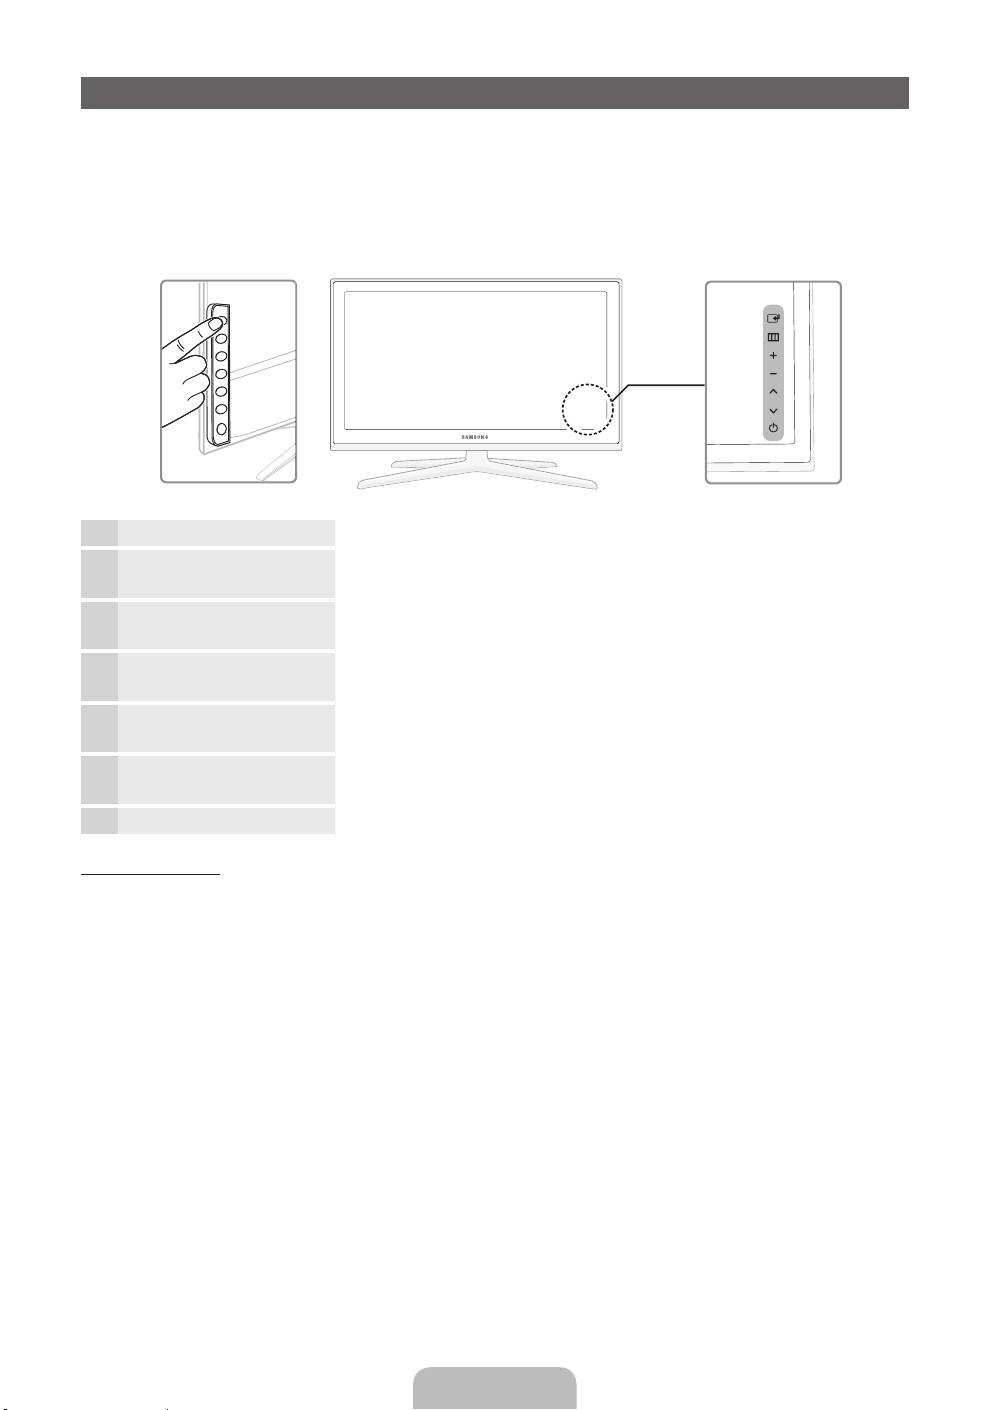
Viewing the Control Panel
✎
The product colour and shape may vary depending on the model.
✎
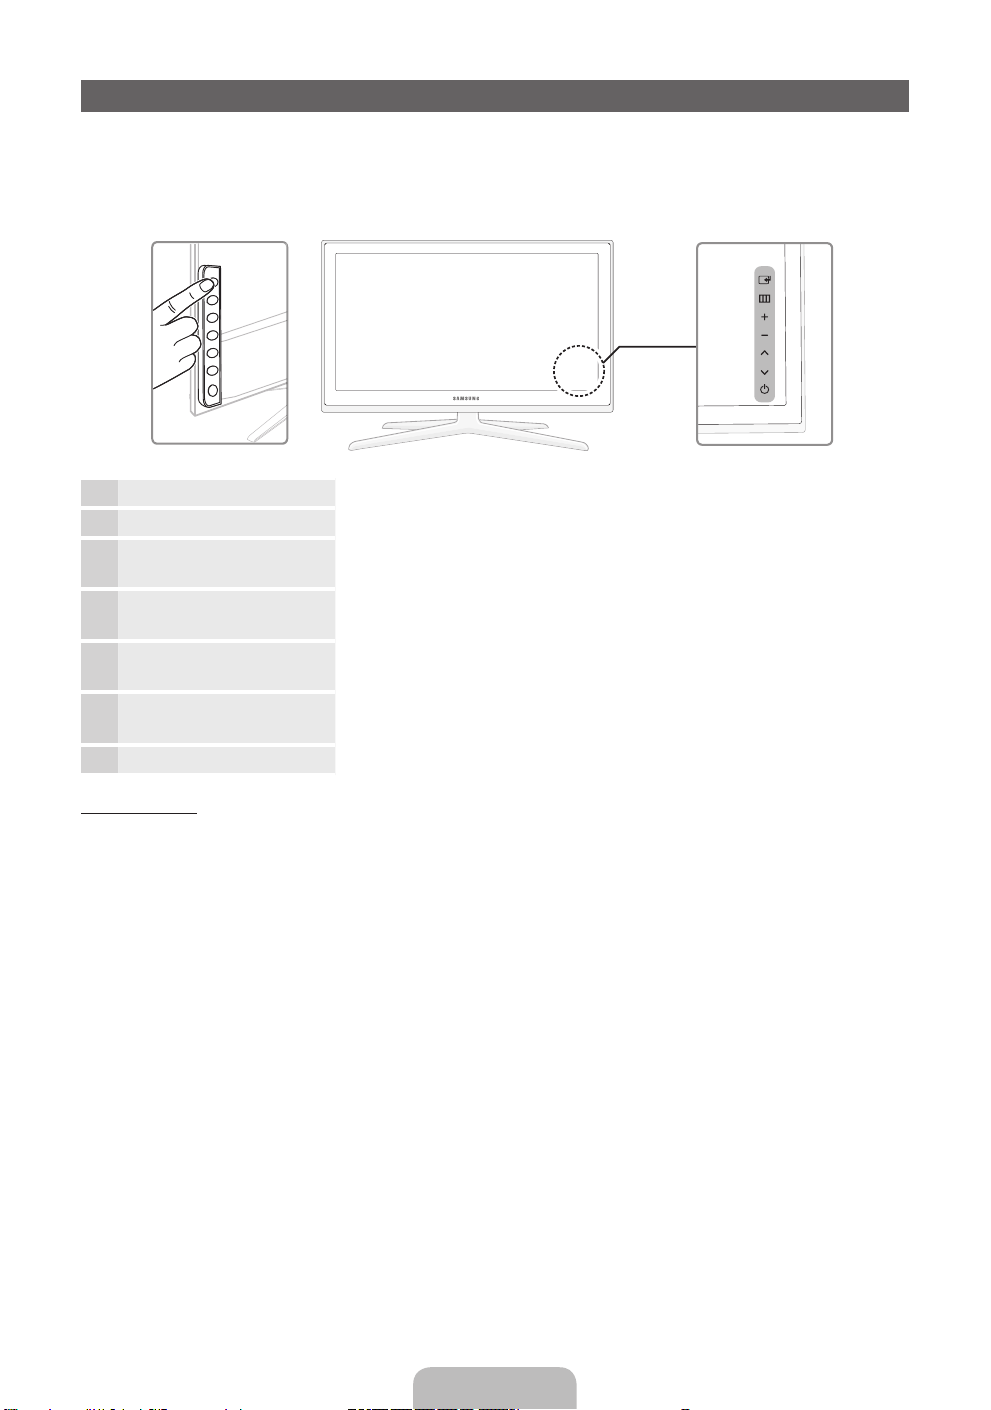
There are control buttons in rear of TV. When you touch the button, control icons appears.
✎
Any object (an electric wire, etc.) near the control panel may cause unintended activation of the OSD.
TV Rear
Remote control sensor Aim the remote control towards this spot on the TV.
Power Indicator Blinks and turns off when the power is on and lights up in standby mode.
E
(Source)
m
(Menu)
o
(Volume)
k
(Channel) Changes the channels. In the OSD, use the
P
(Power)
Toggles between all the available input sources. In the on-screen menu, use
E
this button as you would use the ENTER
Displays an on-screen menu, the OSD (on screen display) of your TV’s
features.
Adjusts the volume. In the OSD, use the
◄ and ► buttons on the remote control.
use the ▼ and ▲ buttons on the remote control.
Turns the TV on or off.
button on the remote control.
wv
buttons as you would use the
<>
buttons as you would
Standby mode
Do not leave your TV in standby mode for long periods of time (when you are away on a holiday, for example).
A small amount of electric power is still consumed even when the power button is turned off. It is best to unplug
the power cord.
English - 4
Page 5
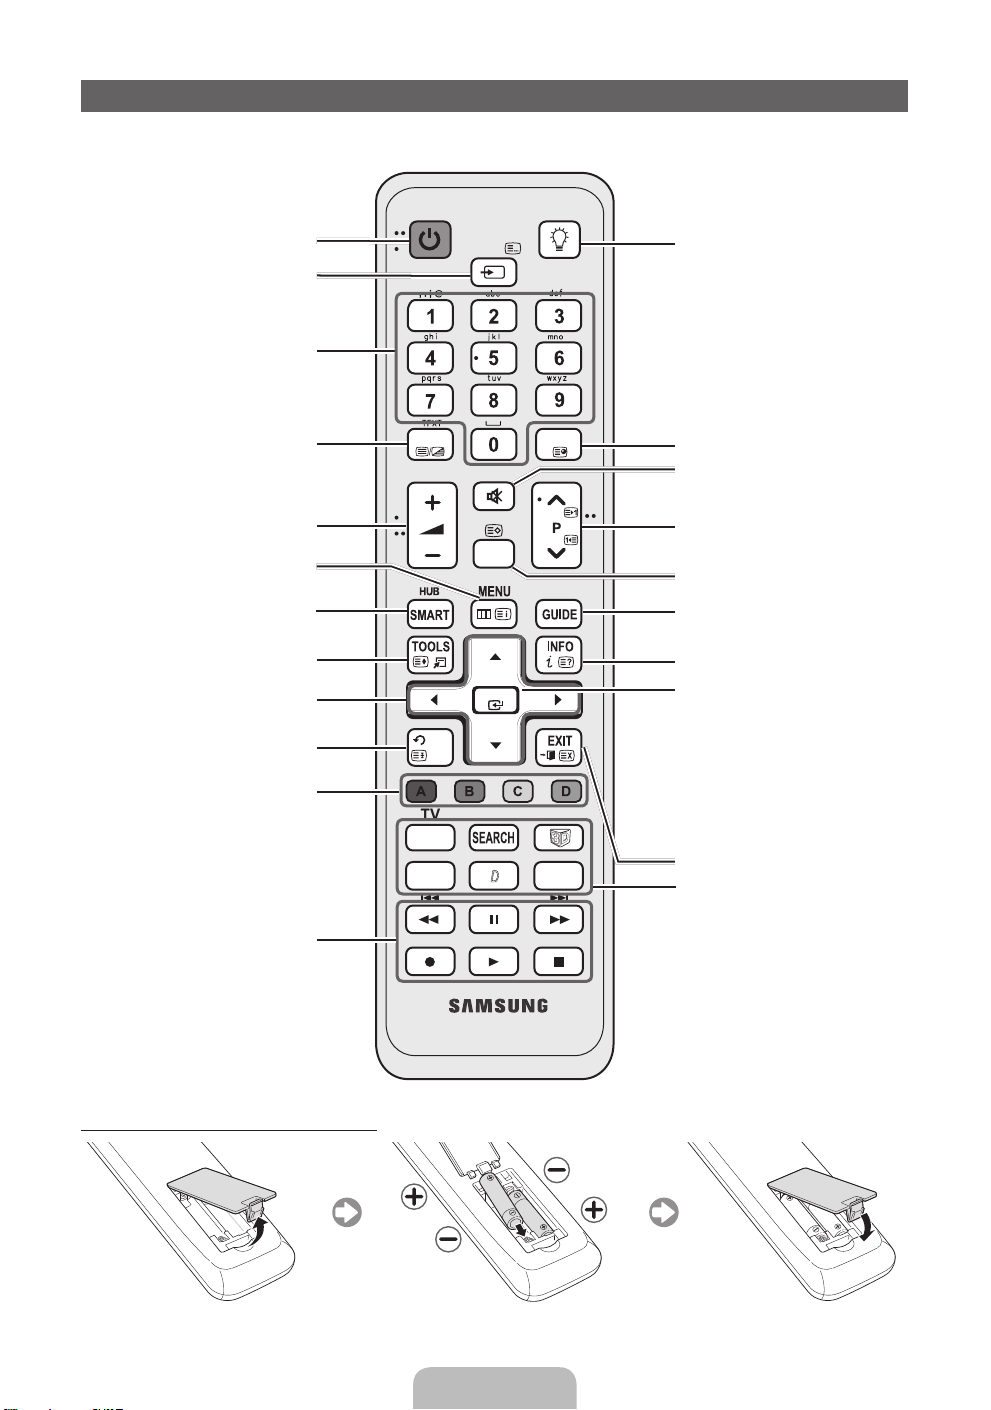
Viewing the Remote Control
✎
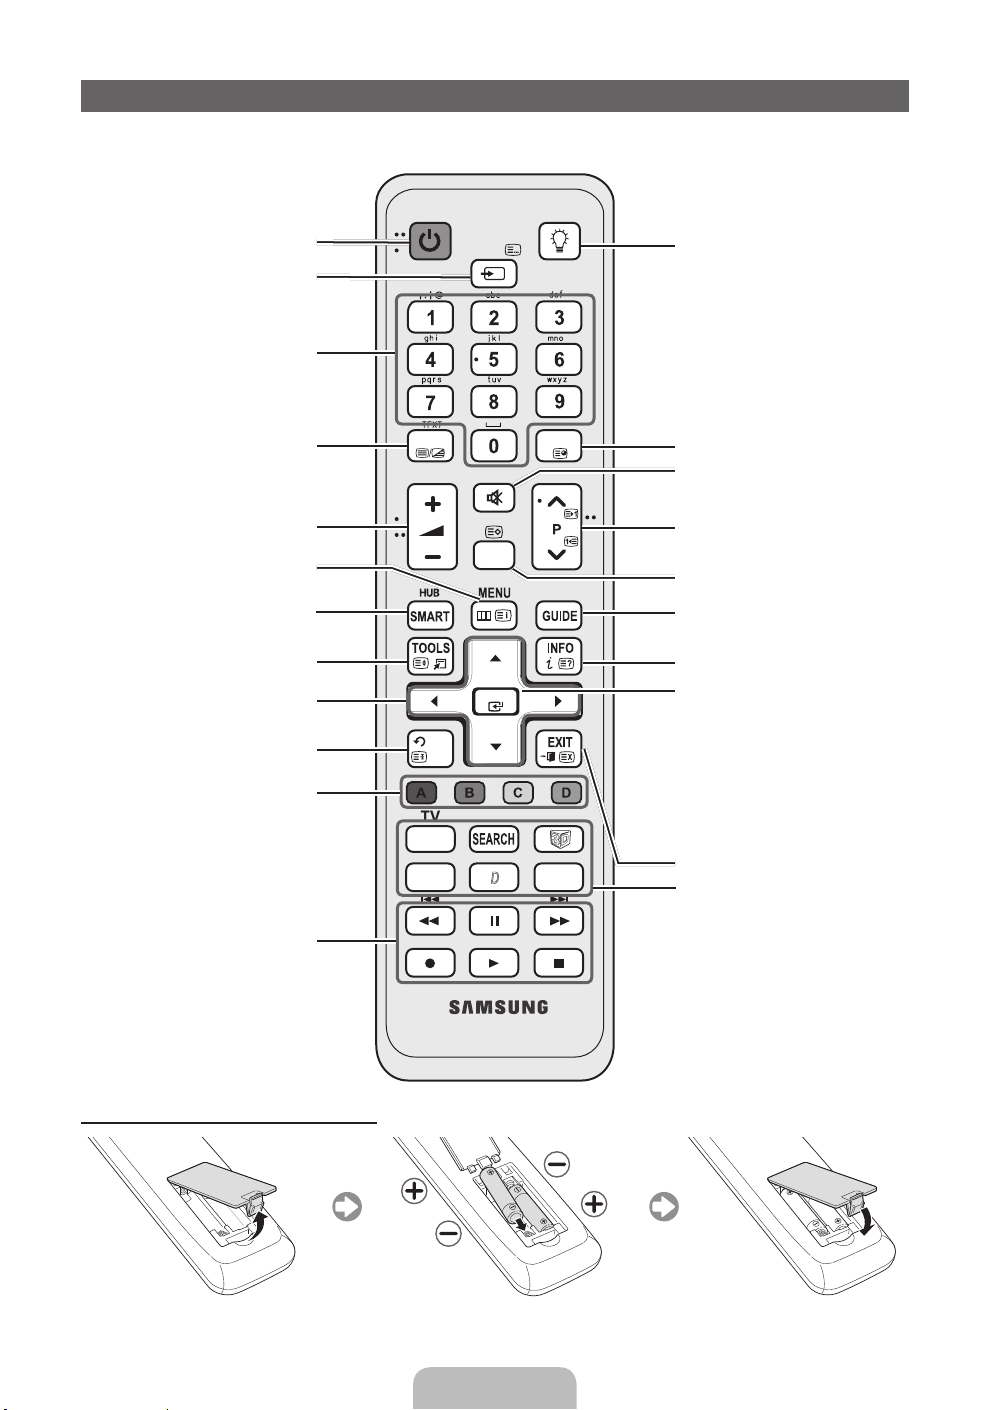
This is a special remote control for the visually impaired persons and has Braille points on the Power,
Channel and Volume buttons.
Turns the TV on and off.
Displays and selects the available video
sources.
Have direct access to channels.
Alternately select Teletext ON, Double,
Mix or OFF.
Adjusts the volume.
Opens the OSD.
Link to various application services.
Quickly select frequently used functions.
Selects the on-screen menu items and
changes the values seen on the menu.
Returns to the previous menu.
These buttons are for the Channel
Manager, SMART HUB menu, etc.
Use these buttons in a specific feature.
For details, refer to e-Manual.
Installing batteries (Battery size: AAA)
POWER
SOURCE
TTX/MIX
CH LIST
RETURN
BACK
TV
SOCIAL
E-MANUAL
MUTE
OK
D
ON/OFF
PRE-CH
AD/SUBT.
Turns the remote control light on or off.
When on, the buttons become illuminated
for a moment when pressed. (Using the
remote control with this button set to On
will reduce the battery usage time.)
Returns to the previous channel.
Cuts off the sound temporarily.
Changes channels.
Displays channel lists on the screen.
Displays the EPG (Electronic Programme
Guide).
Displays information on the TV screen.
OFN (Optical Finger Navigation) Sensor
can be used as a pointer only in Web
Browser application.
If you don’t press any buttons within
30 seconds, the sensor will turn off
automatically. To wake up the sensor,
press ENTER, Navigation, Colour, REW,
FF, Return buttons.
While you use this sensor, the backlight
will not be operated.
Exits the menu.
SOCIAL TV: Displays the Social TV
screen.
SEARCH: Support to recommendation
search word and search function.
W
: Sets the video, which provided with
3D signal.
E-MANUAL: Displays the e-Manual.
A : Use this button when using data
broadcast service.
when Auto RunData Service is set to Off.
AD/SUBT.: Turns the audio description on
and off (not available in some locations). /
Displays digital subtitles.
This function is available
English - 5
Page 6

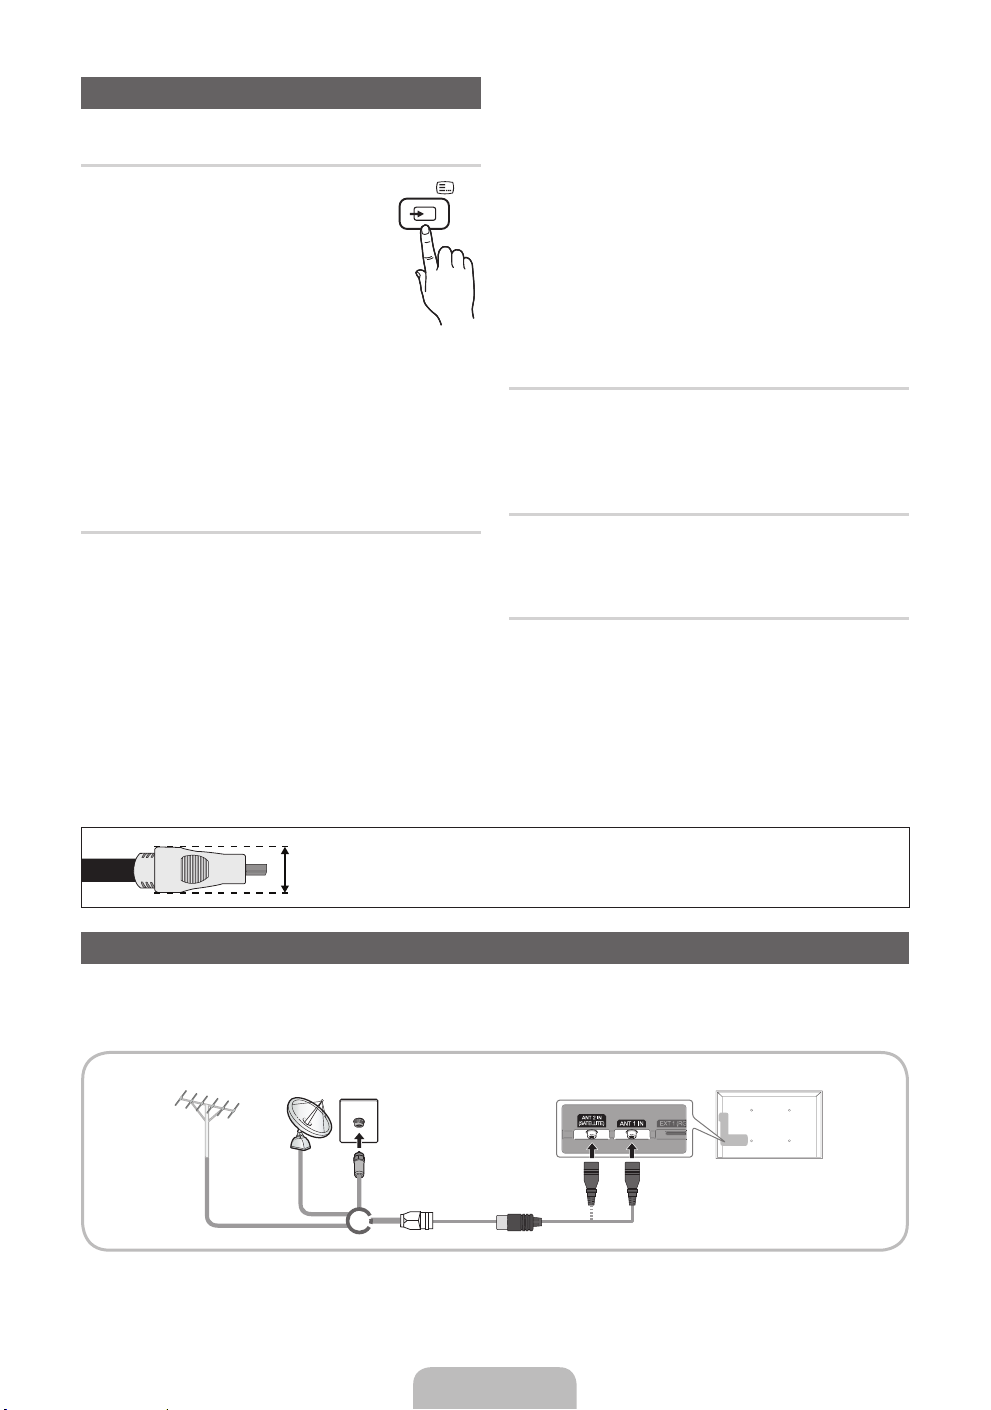
Changing the Input Source
Source
Use to select TV or an external input
sources such as a DVD / Blu-ray player
/ cable box / STB satellite receiver.
■ TV / Ext.1 / Ext.2 / PC / HDMI1/
DVI / HDMI2 / HDMI3 / HDMI4 /
AV / Component / USB / AllShare
✎
In the Source, connected inputs will
be highlighted.
✎
Ext.1, Ext.2 and PC always stay activated.
SOURCE
Edit Name
In the Source, press the TOOLS button, and then you
can set an external input sources name you want.
■ VCR / DVD / Cable STB / Satellite STB / PVR
STB / AV Receiver / Game / Camcorder / PC
/ DVI PC / DVI Devices / TV / IPTV / Blu-ray
/ HD DVD / DMA: Name the device connected
to the input jacks to make your input source
selection easier.
✎
When connecting a PC to the HDMI IN 1(DVI)
port with HDMI cable, you should set the TV
to PC mode under Edit Name.
✎
When connecting a PC to the HDMI IN 1(DVI)
port with HDMI to DVI cable, you should set
the TV to DVI PC mode under Edit Name.
✎
When connecting an AV devices to the HDMI
IN 1(DVI) port with HDMI to DVI cable, you
should set the TV to DVI Devices mode
under Edit Name.
Edit Favourites
In the Source, press the TOOLS button to select Edit
Favourites. You can set an external input source to
Favourites.
Information
You can see detailed information about the selected
external device.
Refresh
In the Source, If the external devices is not displayed,
press the TOOLS button to select Refresh. Searching
for connected devices.
✎
For best cable connection to this product, be sure to use cables with a maximum thickness as below:
• Maximum thickness - 0.55 inches (14mm)
Connecting to an Antenna
When the TV is initially powered on, basic settings proceed automatically.
✎
Preset: Connecting the mains and antenna.
VHF/UHF Antenna CableSatellite
or
English - 6
Page 7

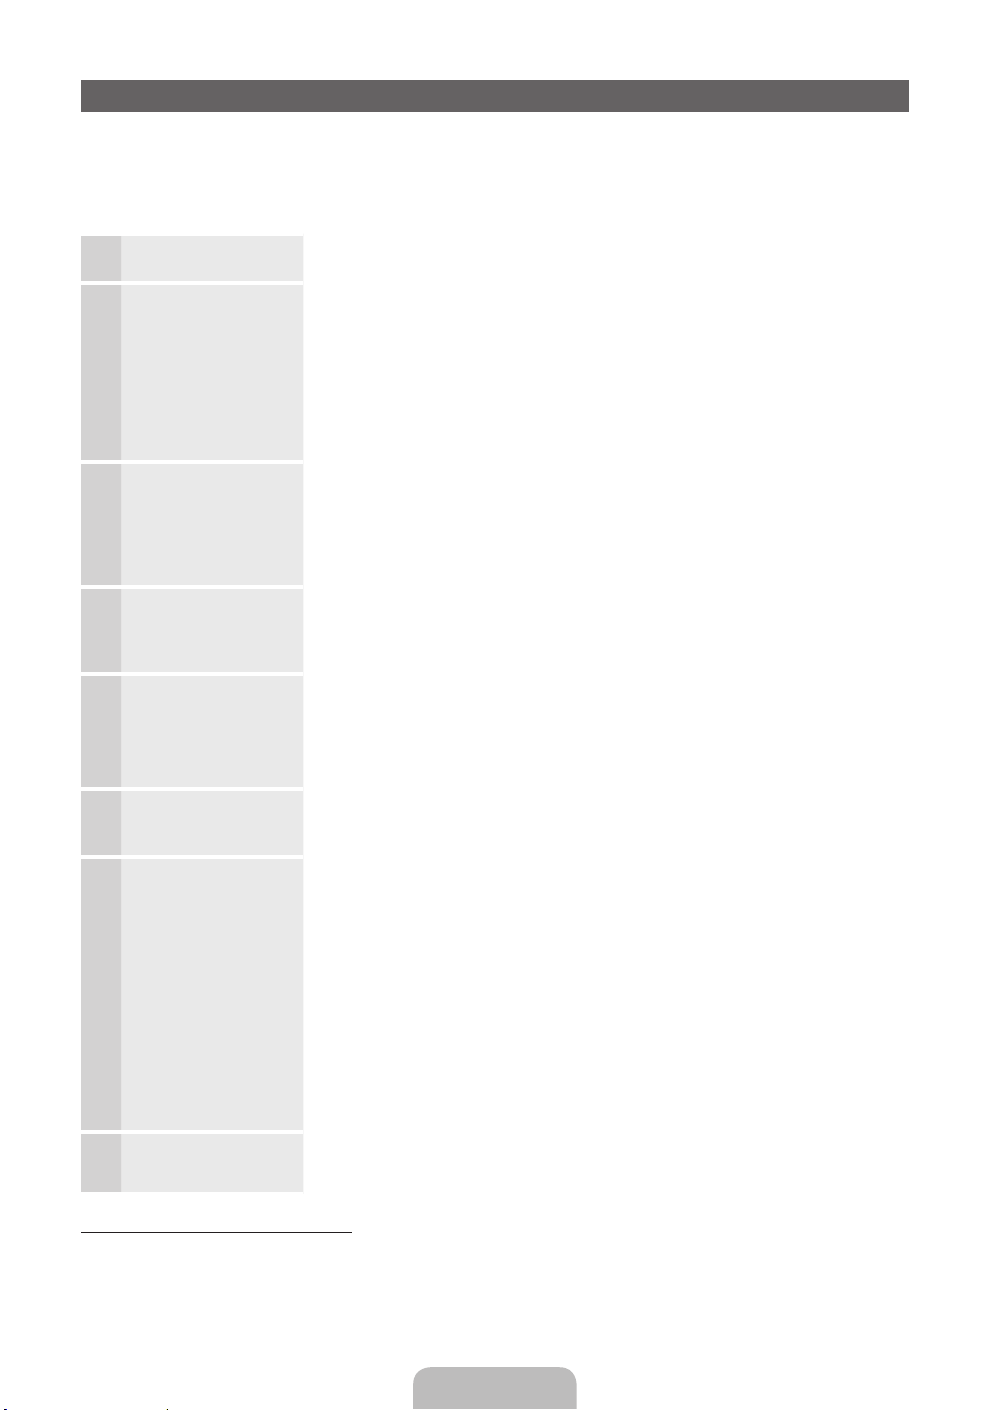
Plug & Play (Initial Setup)
When the TV is initially powered on, a sequence of on-screen prompts will assist in configuring basic settings.
Press the POWERP button. Plug & Play is available only when the Source is set to TV.
✎
Before turning on the TV, make sure the antenna cable is connected (p. 6).
Selecting the OSD
1
Language
Setting up the Network
2
Software Upgrade Select Next to upgrade TV software. Your TV will automatically upgrade, if your
3
Selecting the usage
4
mode
Select Country
5
(Depending on the
country)
Setting the Clock
6
Mode
Selecting search
7
options for auto tuning
Enjoy your TV. If you want to watch a broadcast Programme, select Close. If you want to enjoy
8
Press the ▲ or ▼ button, then press the ENTER
Select the desired OSD (On Screen Display) language.
Set up your network connection. Press the ENTER
not know your network set up information or want to set to it later, select Skip.
We suggest you skip network connection setup now and refer to “Network
menu” in the e-Manual for set up requirements and instructions, and the
Network Connection section of this manual (p. 13).
You can set up the network connection later using the Network menu.
TV need a software upgrade. If you want to upgrade later, select the Skip. For
more information, refer to “Software Upgrade” (Preference Features → Support
Menu) in the e-Manual.
✎
This may take some time, depending on network status.
Press the ▲ or ▼ button to select Home Use, and then press the ENTER
button twice.
✎
Select the Home Use mode. Store Demo mode is for retail environments.
Press the ▲ or ▼ button, then press the ENTER
appropriate country.
✎
After selecting the country in the Country menu, some models may
proceed with an additional option to setup the pin number.
✎
When you input the PIN number, 0-0-0-0 is not available.
Set the Clock Mode automatically or manually.
Auto: Select the time zone where you are located.
Manual: Allows you to manually set the current date and time.
Press the ▲ or ▼ button, then press the ENTER
source to memorise. When setting the antenna source to Cable, a step appears
allowing you to assign numerical values (channel frequencies) to the channels.
For more information, refer to Channel → Auto Tuning.
✎
When Air or Cable is selected first: After all Air or Cable channels are
stored, the step for storing Satellite channels is displayed.
✎
When Satellite is selected first: After all Satellite channels are stored, the
step for storing Air or Cable channels is displayed.
✎
Press the ENTERE button at any time to interrupt the memorisation
process.
the Smart Hub, select the Smart Hub. The Smart Hub will start. For more
detailed information, refer to “Smart Hub” in the e-Manual.
E
button.
E
button to start. If you do
E
button. Select the
E
button. Select the channel
E
If You Want to Reset This Feature...
Select System - Plug & Play (Initial Setup). Enter your 4 digit PIN number. The default PIN number is “0-0-0-0”.
If you want to change the PIN number, use the Change PIN function.
You should do Plug & Play (MENU → System) again at home although you did in shop.
✎
If you forget the PIN code, press the remote control buttons in the following sequence in Standby mode,
which resets the PIN to “0-0-0-0”: MUTE → 8 → 2 → 4 → POWER (on).
English - 7
Page 8
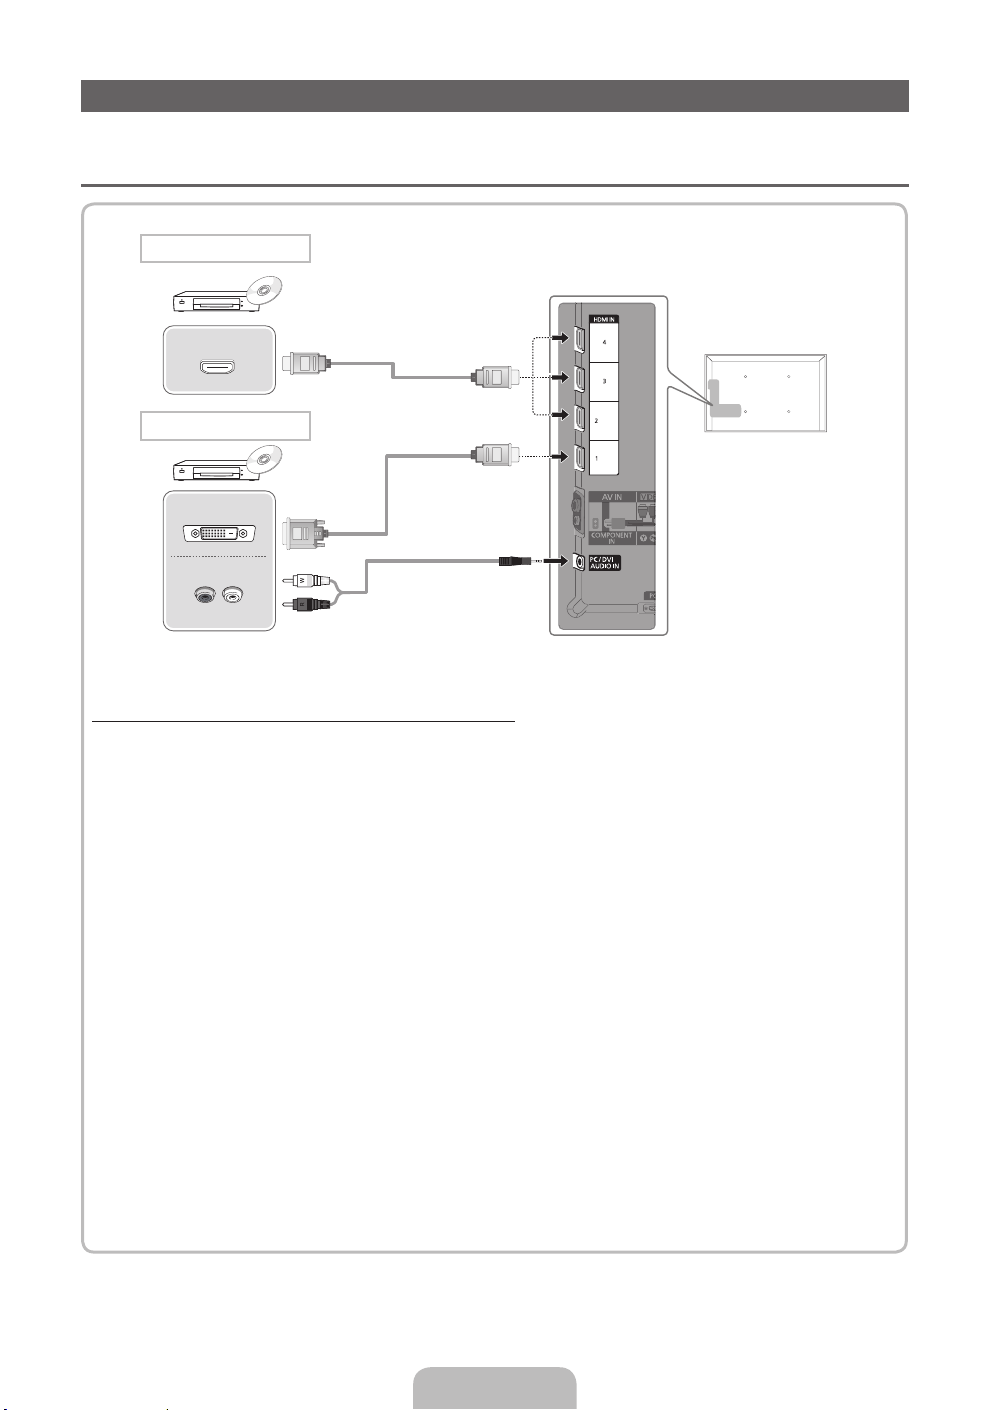
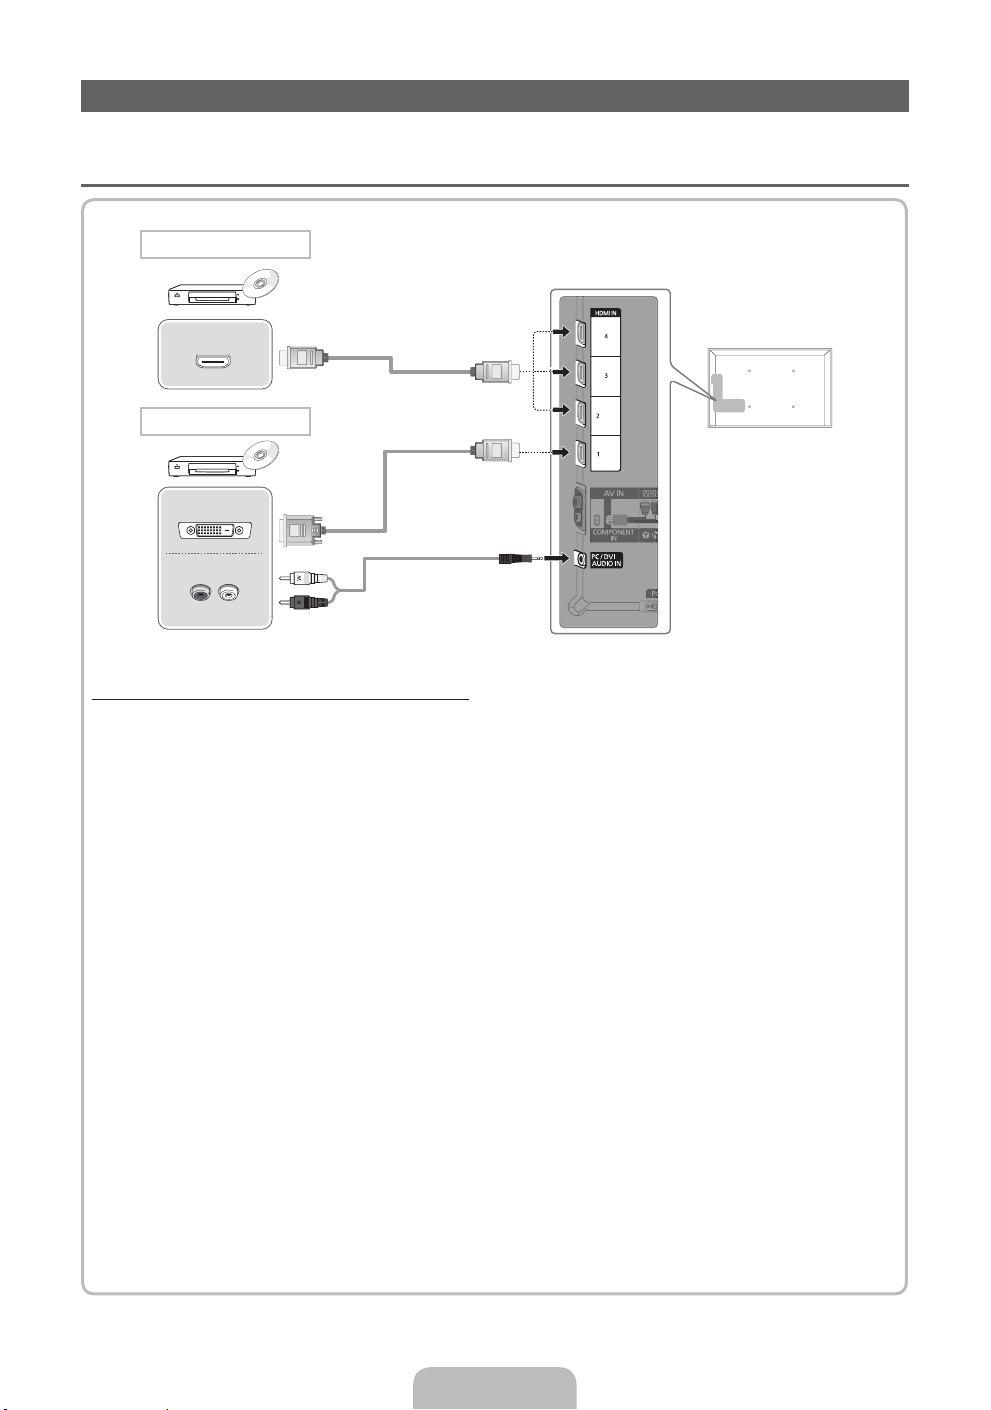
Connecting to AV devices
Available devices: DVD, Blu-ray player, HD cable box, HD STB (Set-Top-Box) satellite
¦
receiver, VCR, Digital Audio System, Amplifier, DVD home Theatre, PC
HDMI connection
HDMI OUT
HDMI to DVI connection
DVI OUT
AUDIO OUT
R-AUDIO-L
Using an HDMI or an HDMI to DVI cable (up to 1080p)
✎
HDMI IN 1(DVI), 2(ARC), 3, 4 / PC/DVI AUDIO IN
For better picture and audio quality, connect to a digital device using an HDMI cable.
x
An HDMI cable supports digital video and audio signals, and does not require an audio cable.
x
– To connect the TV to a digital device that does not support HDMI output, use an HDMI/DVI and
audio cables.
The picture may not display normally (if at all) or the audio may not work if an external device that
x
uses an older version of HDMI mode is connected to the TV. If such a problem occurs, ask the
manufacturer of the external device about the HDMI version and, if out of date, request an upgrade.
Be sure to use an HDMI cable with a thickness of 14 mm or less.
x
Be sure to purchase a certified HDMI cable. Otherwise, the picture may not display or a connection
x
error may occur.
A basic high-speed HDMI cable or one with ethernet is recommended. This product does not support
x
the ethernet function via HDMI.
This product supports the 3D and ARC (Audio Return Channel) functions via an HDMI cable. Note
x
that the ARC function is supported by the HDMI IN 2(ARC) port only.
– If 3D Auto View is set to On, some functions such as SMART HUB may be disabled. In this case,
set 3D Auto View or 3D Mode to Off.
The ARC function allows digital audio to output via the HDMI IN 2(ARC) port. It can be enabled only
x
when the TV is connected with an audio receiver that supports the ARC function.
(ARC)
(DVI)
English - 8
Page 9
AUDIO OUT
R-AUDIO-L
VIDEO OUT
AUDIO OUT
R-AUDIO-L
PRPBY
COMPONENT OUT
G
B
B
W
W
R
R
Y
Y
W
W
R
R
R
R
G
EXT
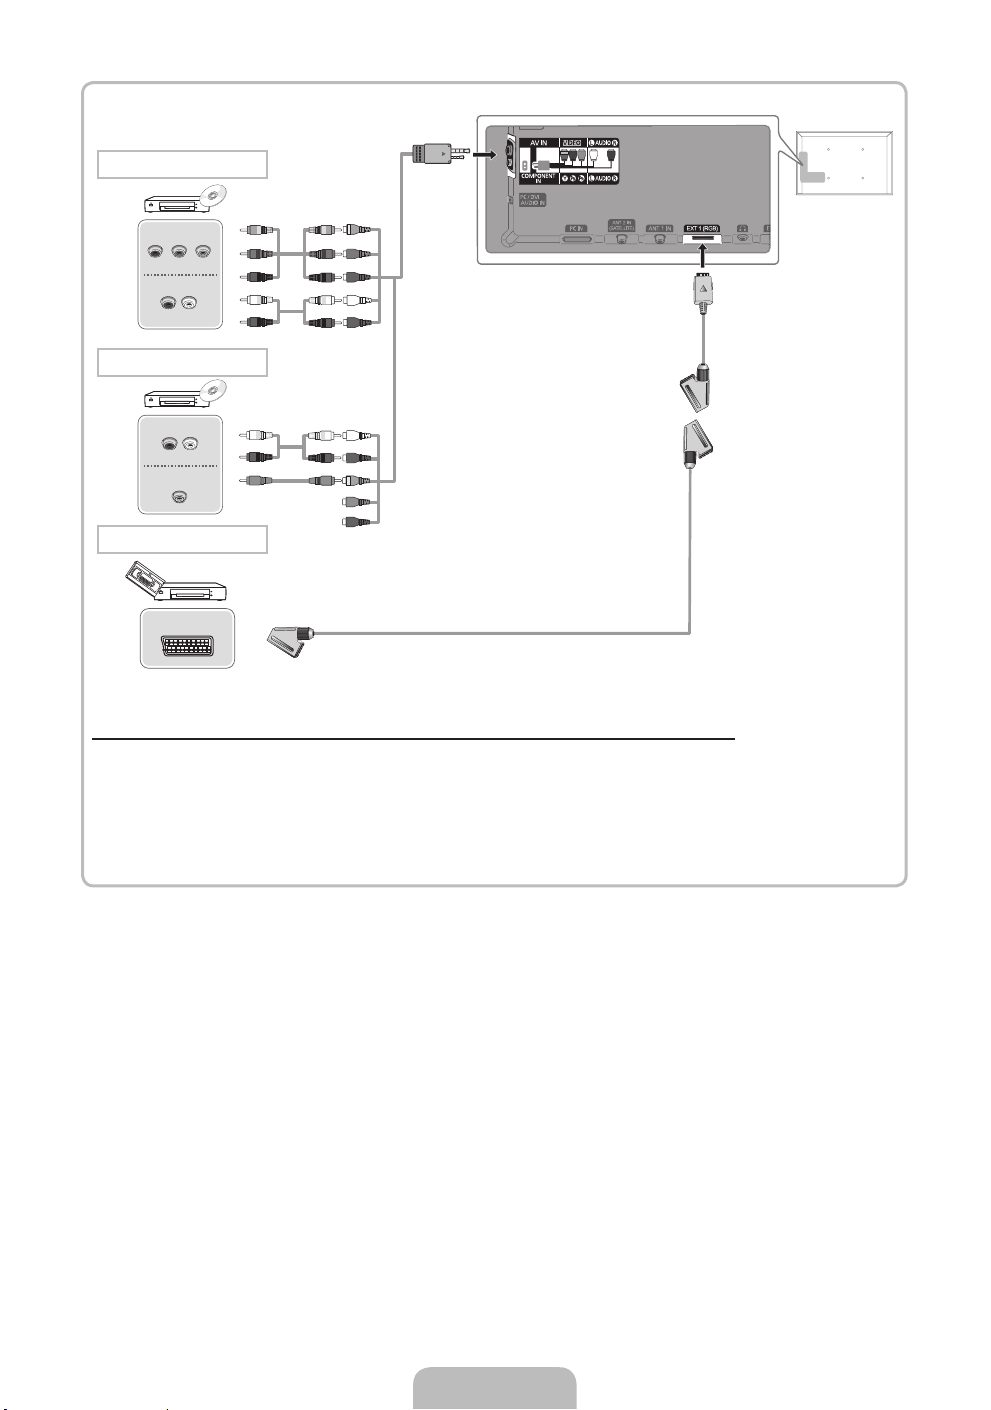
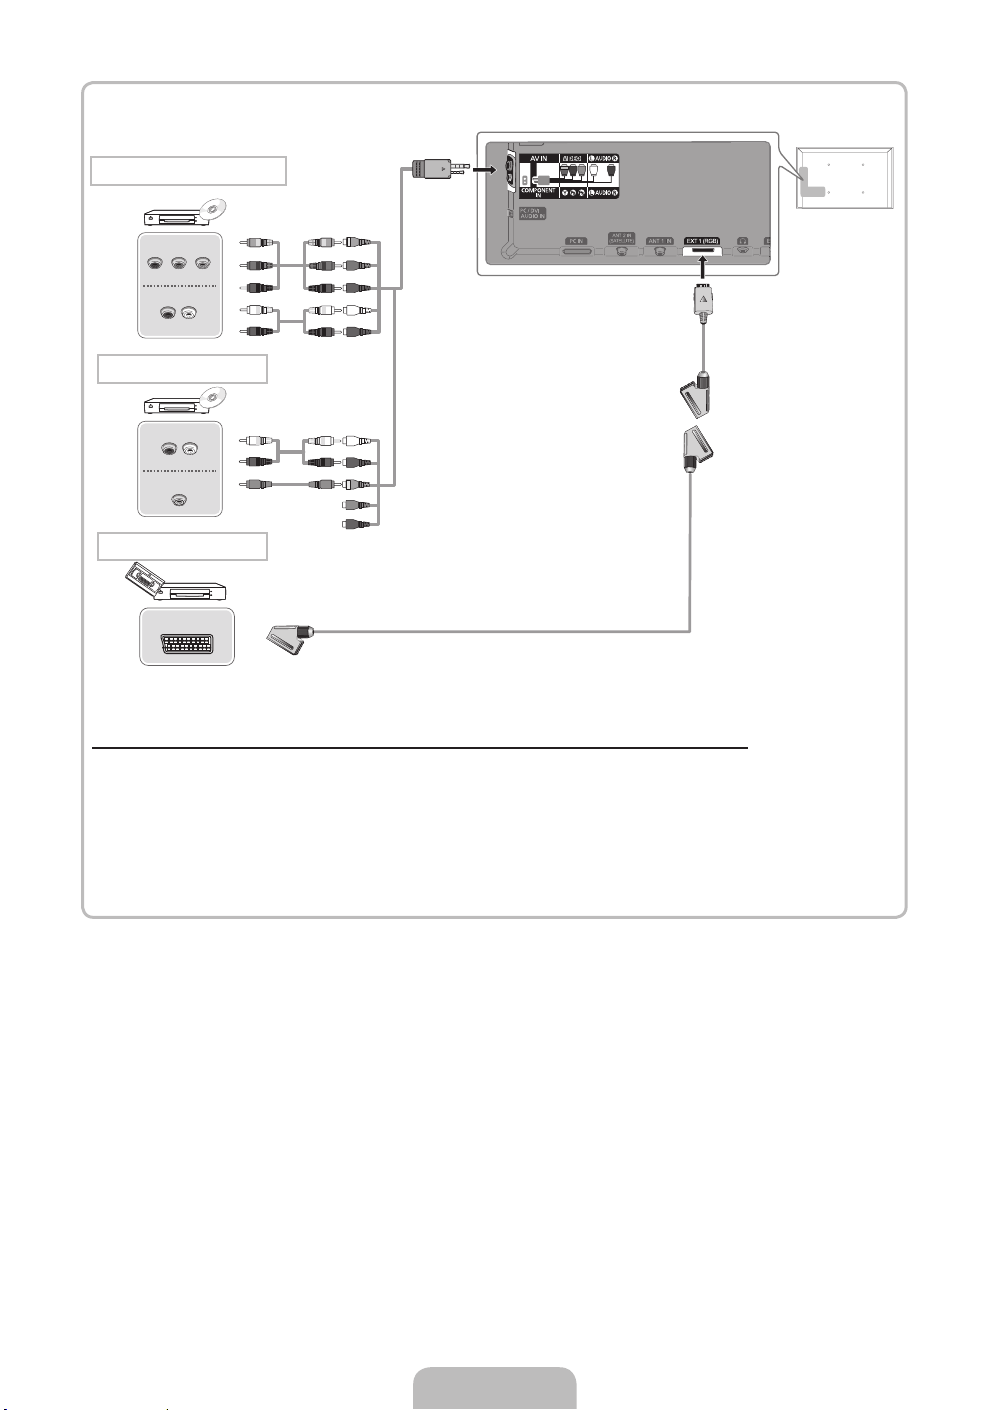
Component connection
AV connection
SCART connection
Using a Component (up to 1080p) or an Audio/Video (480i only) and a Scart Cable
✎
In Ext. mode, DTV Out supports MPEG SD Video and Audio only.
✎
When connecting to AV IN, connect the AV connector(yellow) to the TV jack(Green).
✎
To obtain the best picture quality, the Component connection is recommended over the A/V
connection.
English - 9
Page 10
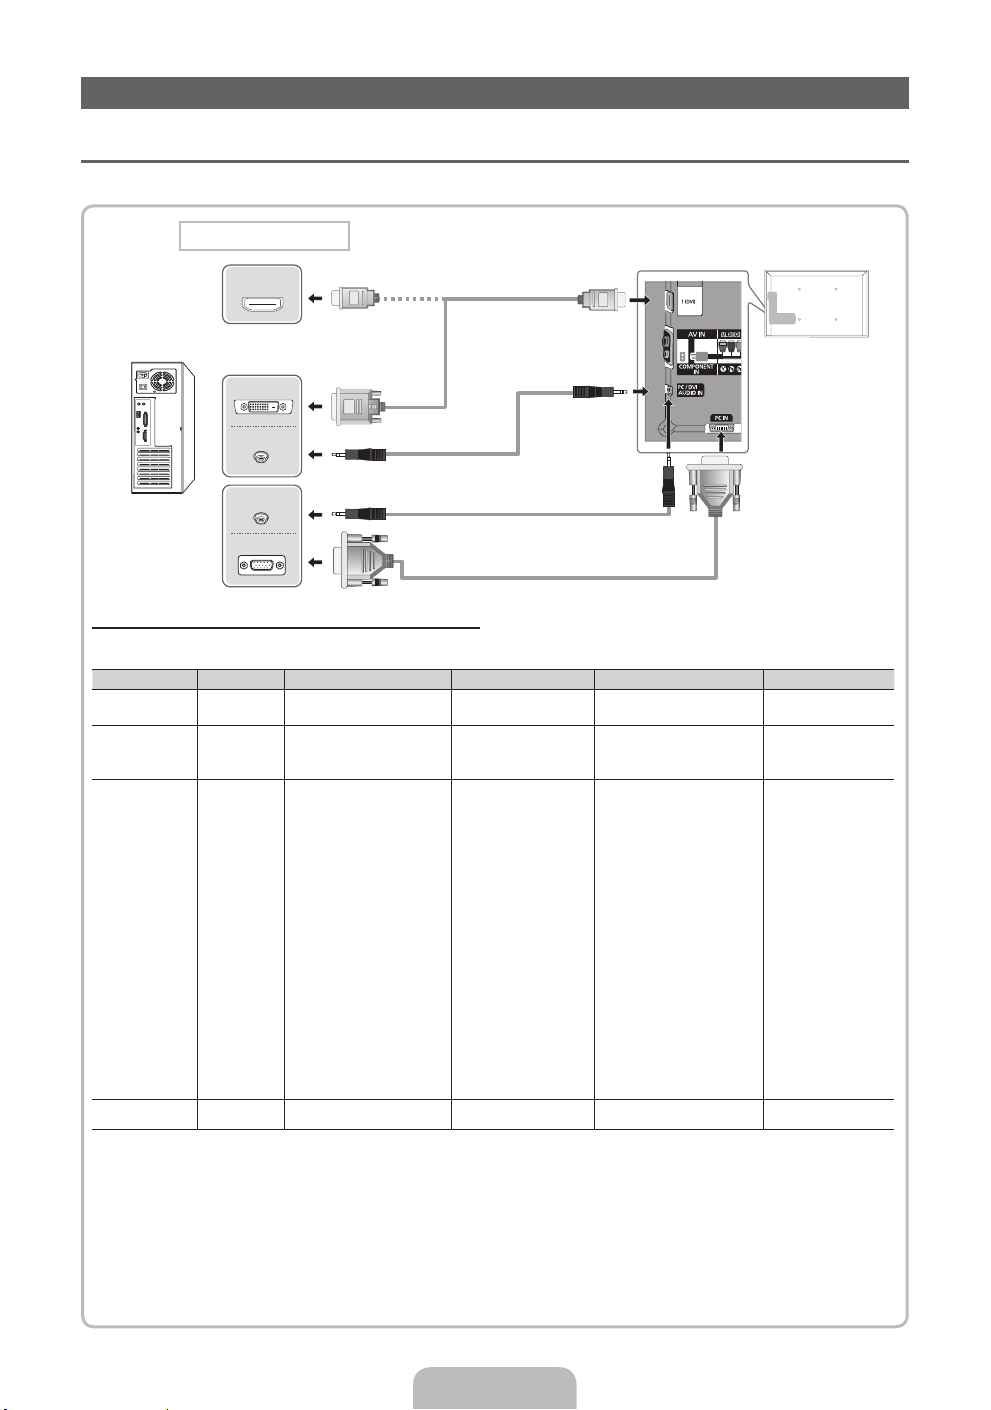
Connecting to a PC and Audio device
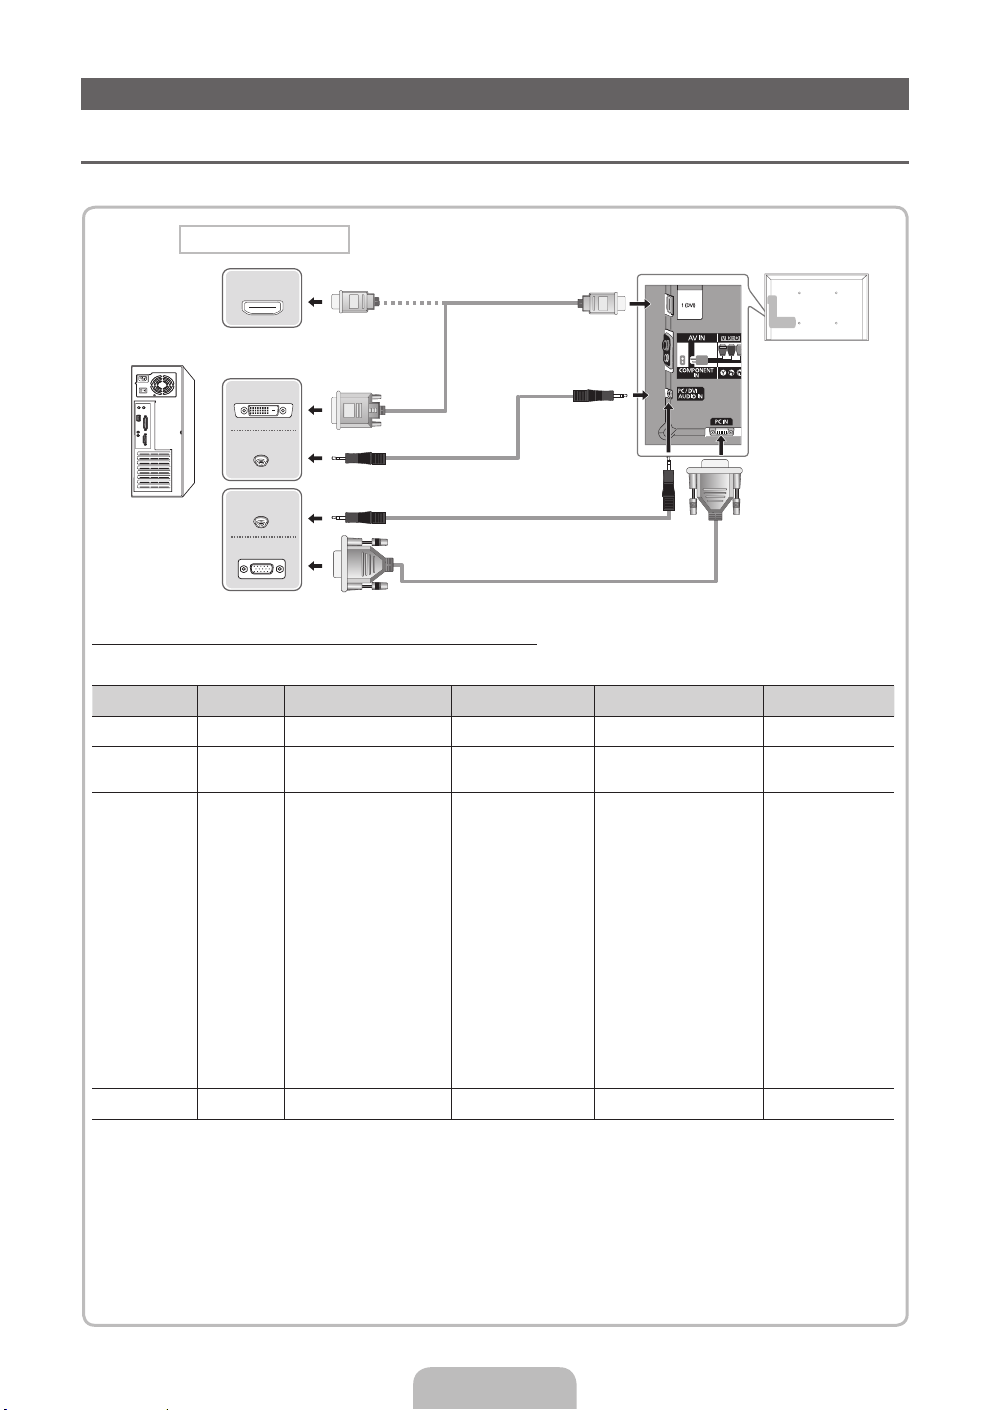
¦ Using an HDMI cable or an HDMI to DVI cable or a D-sub cable
✎
Connecting through the HDMI cable may not be supported depending on the PC.
PC connection
HDMI OUT
DVI OUT
AUDIO OUT
AUDIO OUT
PC OUT
Display Modes (D-Sub and an HDMI to DVI Input)
Optimal resolution is 1920 X 1080 @ 60 Hz.
Mode Resolution Horizontal Frequency (KHz) Vertical Frequency (Hz) Pixel Clock Frequency (MHz) Sync Polarity (H / V)
IBM
MAC
VESA DMT
VESA DMT /
DTV CEA
640 x 350
720 x 400
640 x 480
832 x 624
1152 x 870
640 x 480
640 x 480
640 x 480
800 x 600
800 x 600
800 x 600
1024 x 768
1024 x 768
1024 x 768
1152 x 864
1280 x 1024
1280 x 1024
1280 x 800
1280 x 800
1280 x 960
1360 x 768
1440 x 900
1440 x 900
1680 x 1050
1920 x 1080p 67.500 60.000 148.500 +/+
31.469
31.469
35.000
49.726
68.681
31.469
37.861
37.500
37.879
48.077
46.875
48.363
56.476
60.023
67.500
63.981
79.976
49.702
62.795
60.000
47.712
55.935
70.635
65.290
70.086
70.087
66.667
74.551
75.062
59.940
72.809
75.000
60.317
72.188
75.000
60.004
70.069
75.029
75.000
60.020
75.025
59.810
74.934
60.000
60.015
59.887
74.984
59.954
25.175
28.322
30.240
57.284
100.000
25.175
31.500
31.500
40.000
50.000
49.500
65.000
75.000
78.750
108.000
108.000
135.000
83.500
106.500
108.000
85.500
106.500
136.750
146.250
+/-
-/+
-/-
-/-
-/-
-/-
-/-
-/+/+
+/+
+/+
-/-
-/+/+
+/+
+/+
+/+
-/+
-/+
+/+
+/+
-/+
-/+
-/+
✎
NOTE
For HDMI/DVI cable connection, you must use the HDMI IN 1(DVI) jack.
x
The interlace mode is not supported.
x
The set might operate abnormally if a non-standard video format is selected.
x
Separate and Composite modes are supported. SOG(Sync On Green) is not supported.
x
English - 10
Page 11
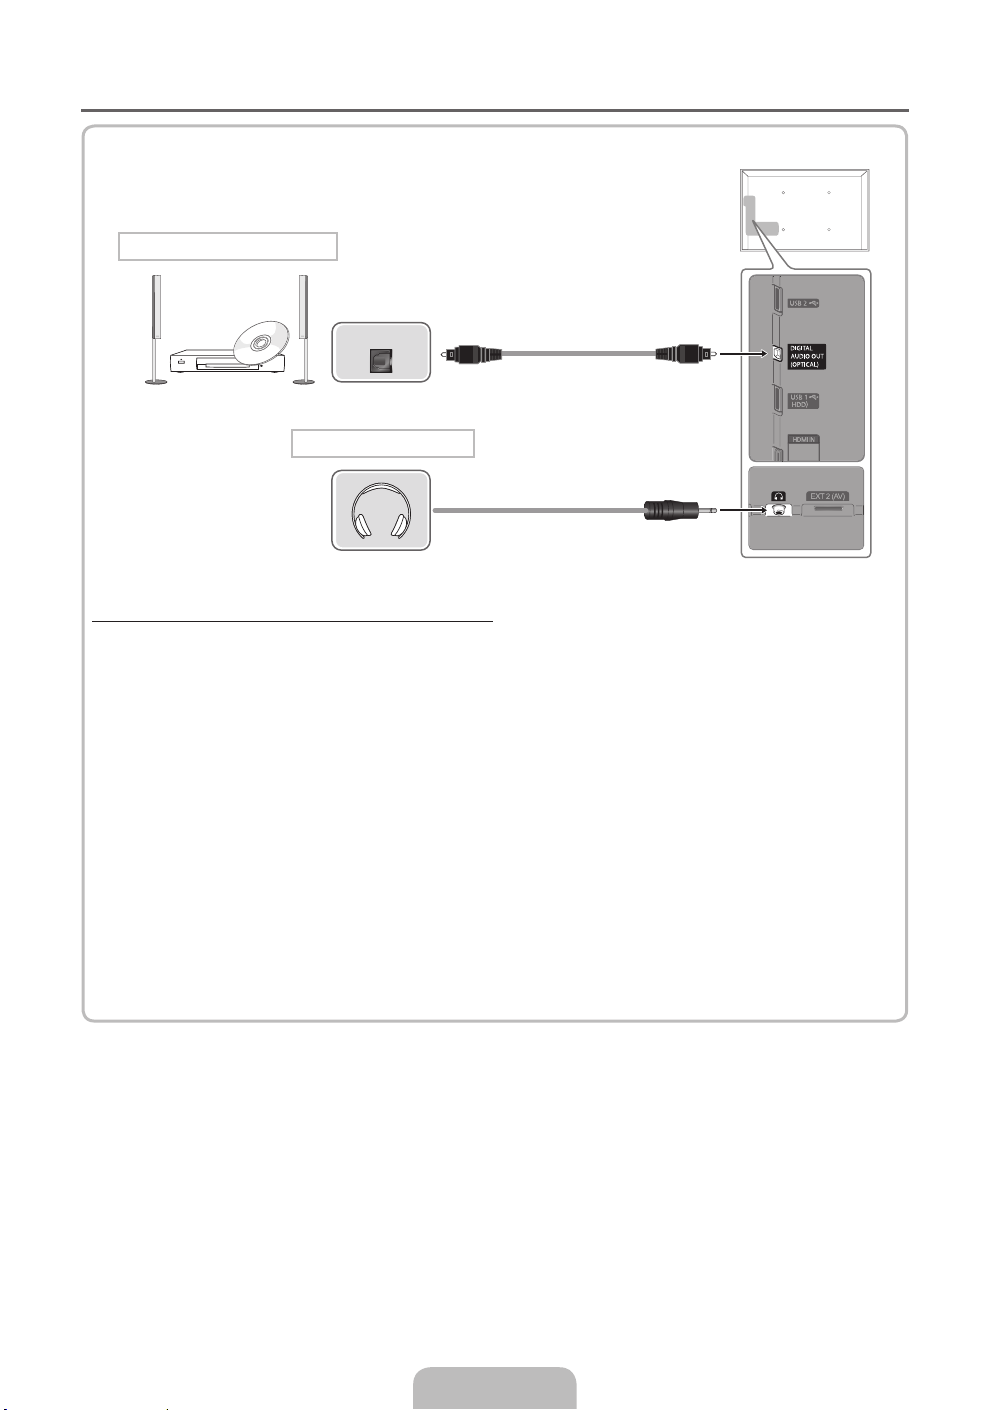
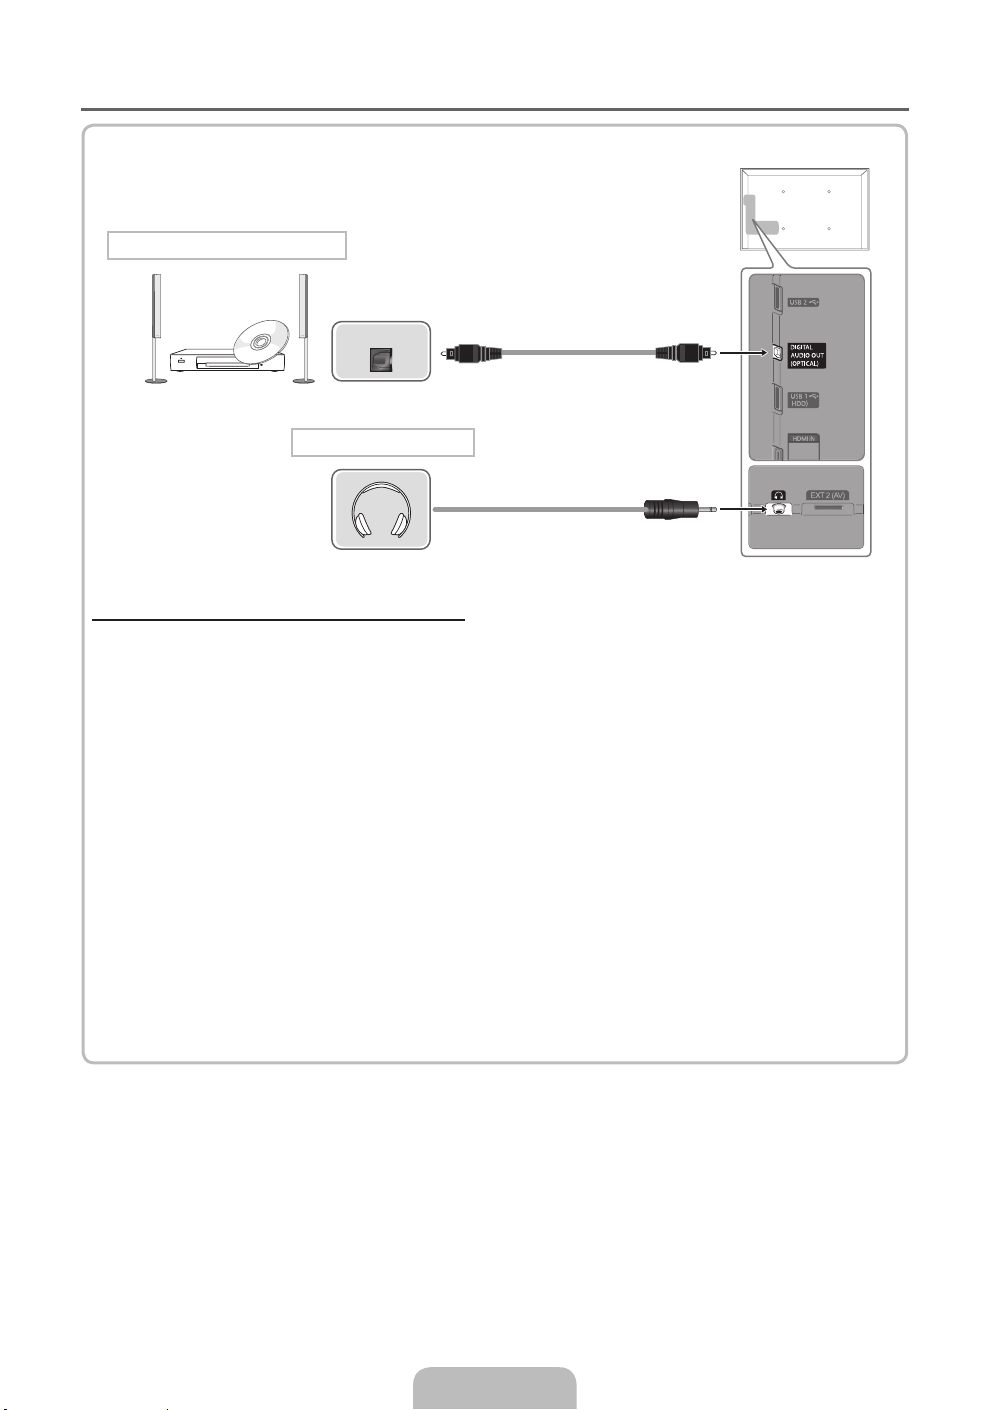
¦ Available devices: digital audio system, amplifier, DVD home theatre
DVD home theatre connection
OPTICAL
Headphones connection
Using an Optical (Digital) a Headphone Connection
✎
DIGITAL AUDIO OUT (OPTICAL)
When a digital audio system is connected to the DIGITAL AUDIO OUT (OPTICAL) jack, decrease the
x
volume of both the TV and the system.
5.1 CH (channel) audio is available when the TV is connected to an external device supporting 5.1 CH.
x
When the receiver (home theatre) is set to on, you can hear sound output from the TV’s optical jack.
x
When the TV is receiving a DTV signal, the TV will send 5.1 CH sound to the home theatre receiver.
When the source is a digital component such as a DVD / Blu-ray player / cable box / STB (Set-TopBox) satellite receiver and is connected to the TV via HDMI, only 2 CH audio will be heard from the
home theatre receiver. If you want to hear 5.1 CH audio, connect the digital audio out jack from your
DVD / Blu-ray player / cable box / STB satellite receiver directly to an amplifier or home theatre.
✎
Headphones H: You can connect your headphones to the headphones output on your set. While the
headphones are connected, the sound from the built-in speakers will be disabled.
Sound function may be restricted when connecting headphones to the TV.
x
Headphone volume and TV volume are adjusted separately.
x
English - 11
Page 12
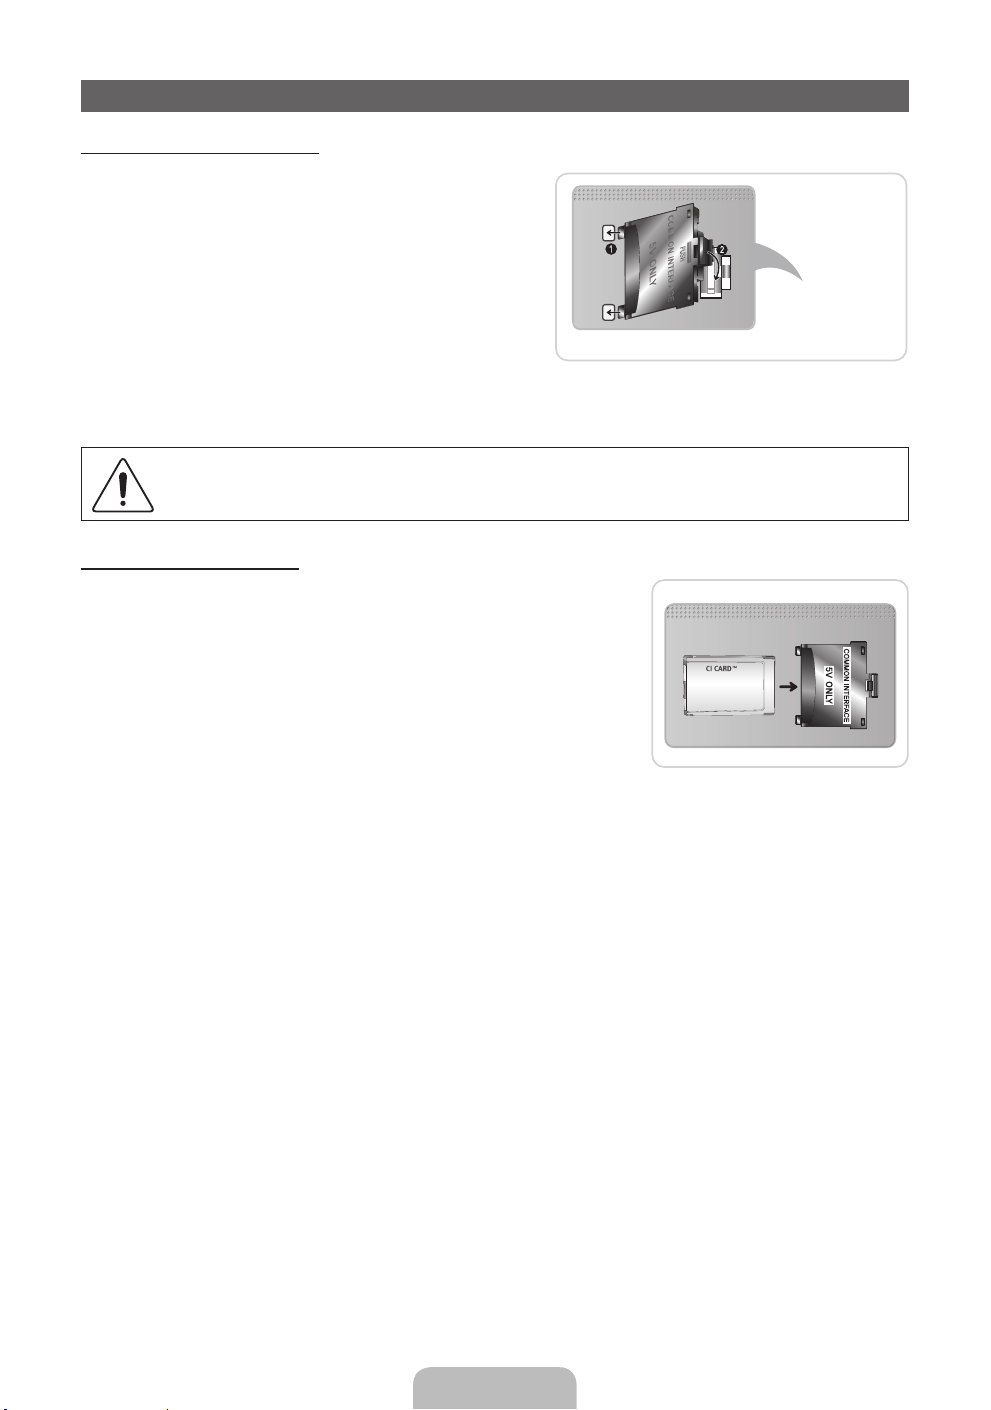
Connecting to a COMMON INTERFACE slot
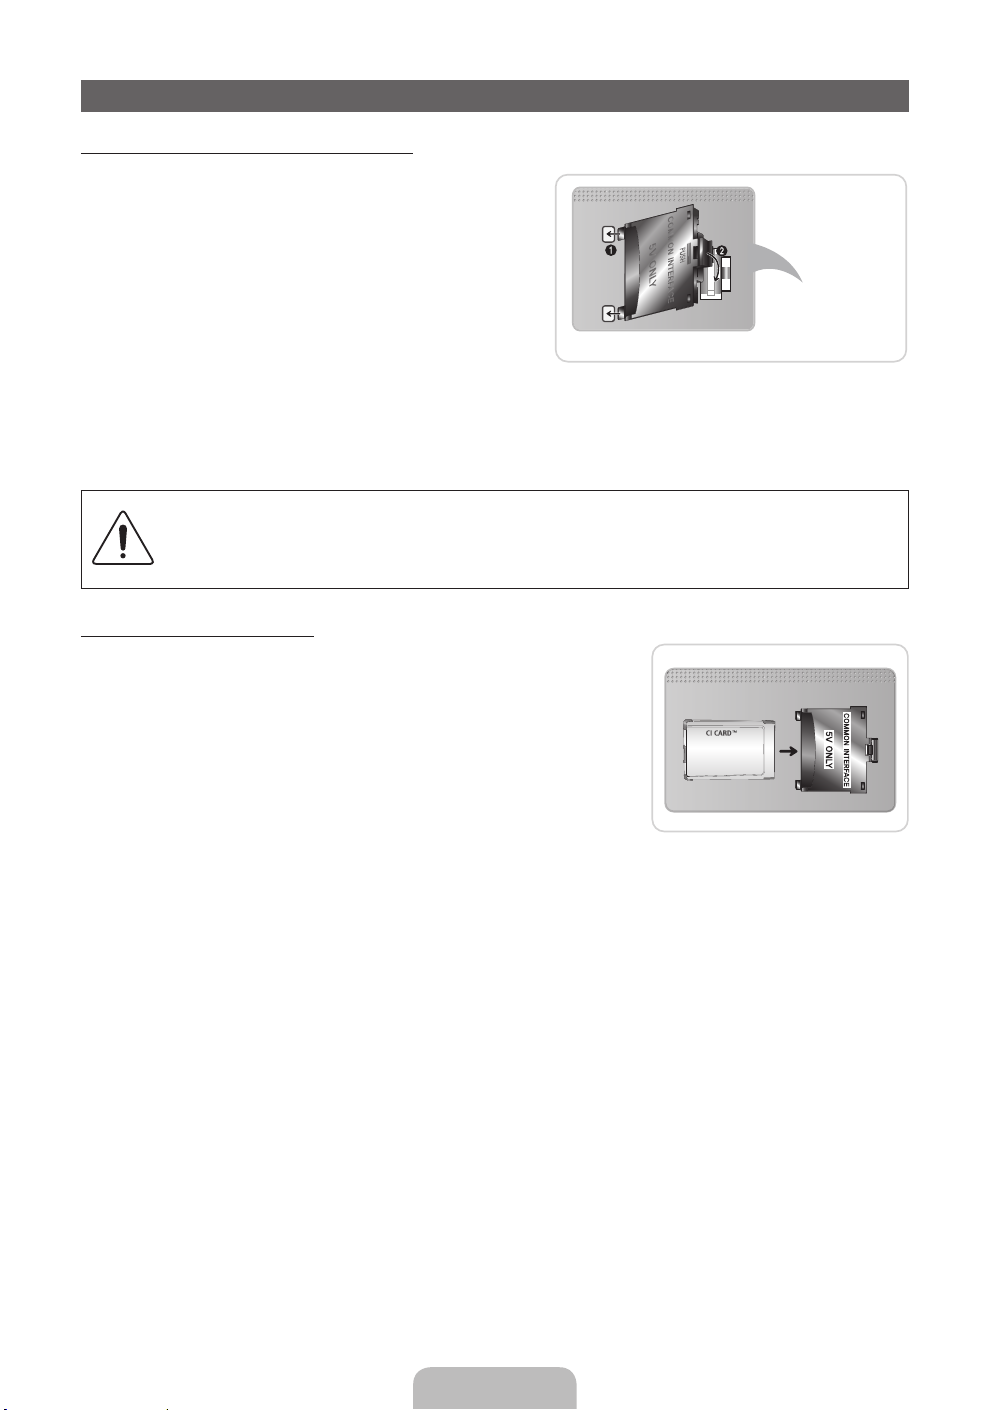
Attaching the CI Card Adapter
Attach the adapter as shown below.
To connect the CI CARD Adapter, follow these steps.
✎
We recommend attaching the adapter before installing
the wall mount, or inserting the “CI or CI+ CARD”.
1. Insert the CI CARD Adapter into the two holes on the
product 1.
✎
Please find a two holes on the rear of the TV. A two
holes is beside the COMMON INTERFACE port.
2. Connect the CI CARD Adapter into the COMMON
INTERFACE port on the product 2.
3. Insert the “CI or CI+ CARD”.
We recommand that you insert the CI card before you mount the TV on a wall. It may be difficult to
insert after the mounting. Insert the card after attaching the CI Card Adapter on TV. It is difficult to
attach the module if you insert the card before attaching.
Using the “CI or CI+ CARD”
To watch paid channels, the “CI or CI+ CARD” must be inserted.
• If you don’t insert the “CI or CI+ CARD”, some channels will display
the message “Scrambled Signal”.
• The pairing information containing a telephone number, the “CI or CI+
CARD” ID the Host ID and other information will be displayed in about
2~3 minutes. If an error message is displayed, please contact your
service provider.
• When the configuration of channel information has finished, the
message “Updating Completed” is displayed, indicating the channel
list is updated.
✎
NOTE
You must obtain a “CI or CI+ CARD” from a local cable service provider.
x
When removing the “CI or CI+ CARD”, carefully pull it out with your hands since dropping the “CI or CI+
x
CARD” may cause damage to it.
Insert the “CI or CI+ CARD” in the direction marked on the card.
x
The location of the COMMON INTERFACE slot may be different depending on the model.
x
“CI or CI+ CARD” is not supported in some countries and regions; check with your authorized dealer.
x
If you have any problems, please contact a service provider.
x
Insert the “CI or CI+ CARD” that supports the current antenna settings. The screen will be distorted or
x
will not be seen.
TV Rear
English - 12
Page 13
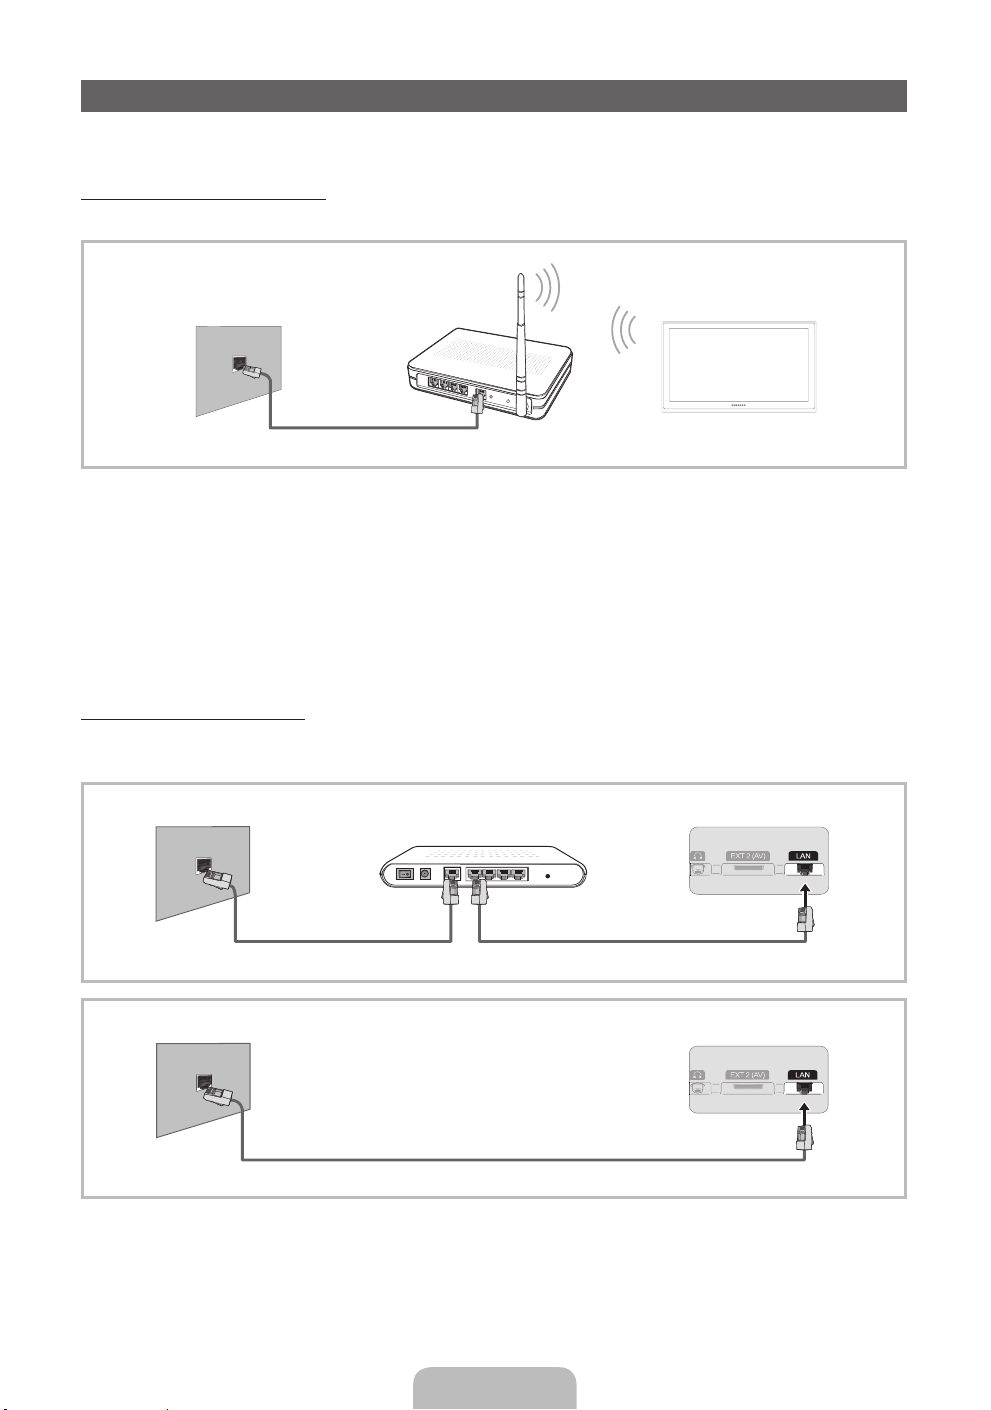
Network Connection
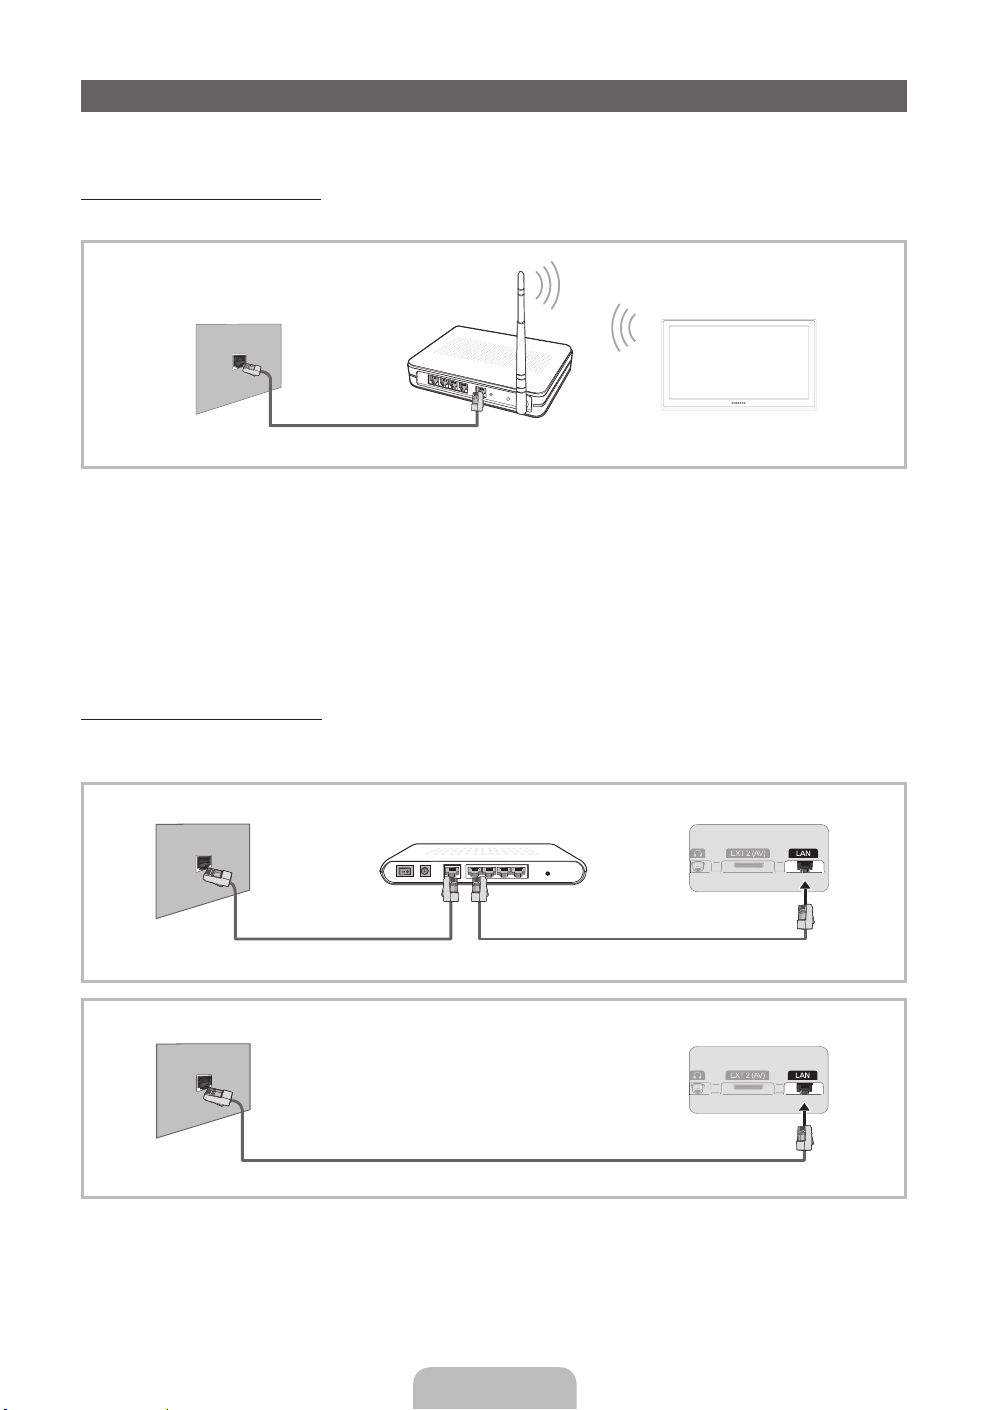
You can set up your TV so that it can access the Internet through your local area network (LAN) using a wired or
wireless connection.
Network Connection - Wireless
You can connect your TV to your LAN through a standard wireless router or modem.
The LAN Port on
the Wall
Wireless IP sharer
(Router having DHCP server)
LAN Cable
TV
Samsung’s Wireless LAN adapter supports the IEEE 802.11a/b/g and n communication protocols. Samsung
recommends using IEEE 802.11n. When you play the video over a IEEE 802.11b/g connection, the video may
not play smoothly.
Most wireless network systems incorporate a security system that requires devices that access the network
through an access point or wireless router (typically a wireless IP Sharer) to transmit an encrypted security code
called an access key.
If Pure High-throughput (Greenfield) 802.11n mode is selected and the Encryption type is set to WEP, TKIP or
TKIP AES (WPS2Mixed) for your wireless router, Samsung TVs will not support a connection in compliance with
new Wi-Fi certification specifications.
Network Connection - Wired
There are two main ways to connect your TV to your network using cable, depending on your network setup.
They are illustrated below:
The Modem Port on the Wall
External Modem
(ADSL / VDSL / Cable TV)
TV Rear Panel
The LAN Port on the Wall
LAN Cable
✎
It is not supported when the network speed is under 10 Mbps.
✎
Use Cat 5 cable for the connection.
English - 13
LAN CableModem Cable
TV Rear Panel
Page 14
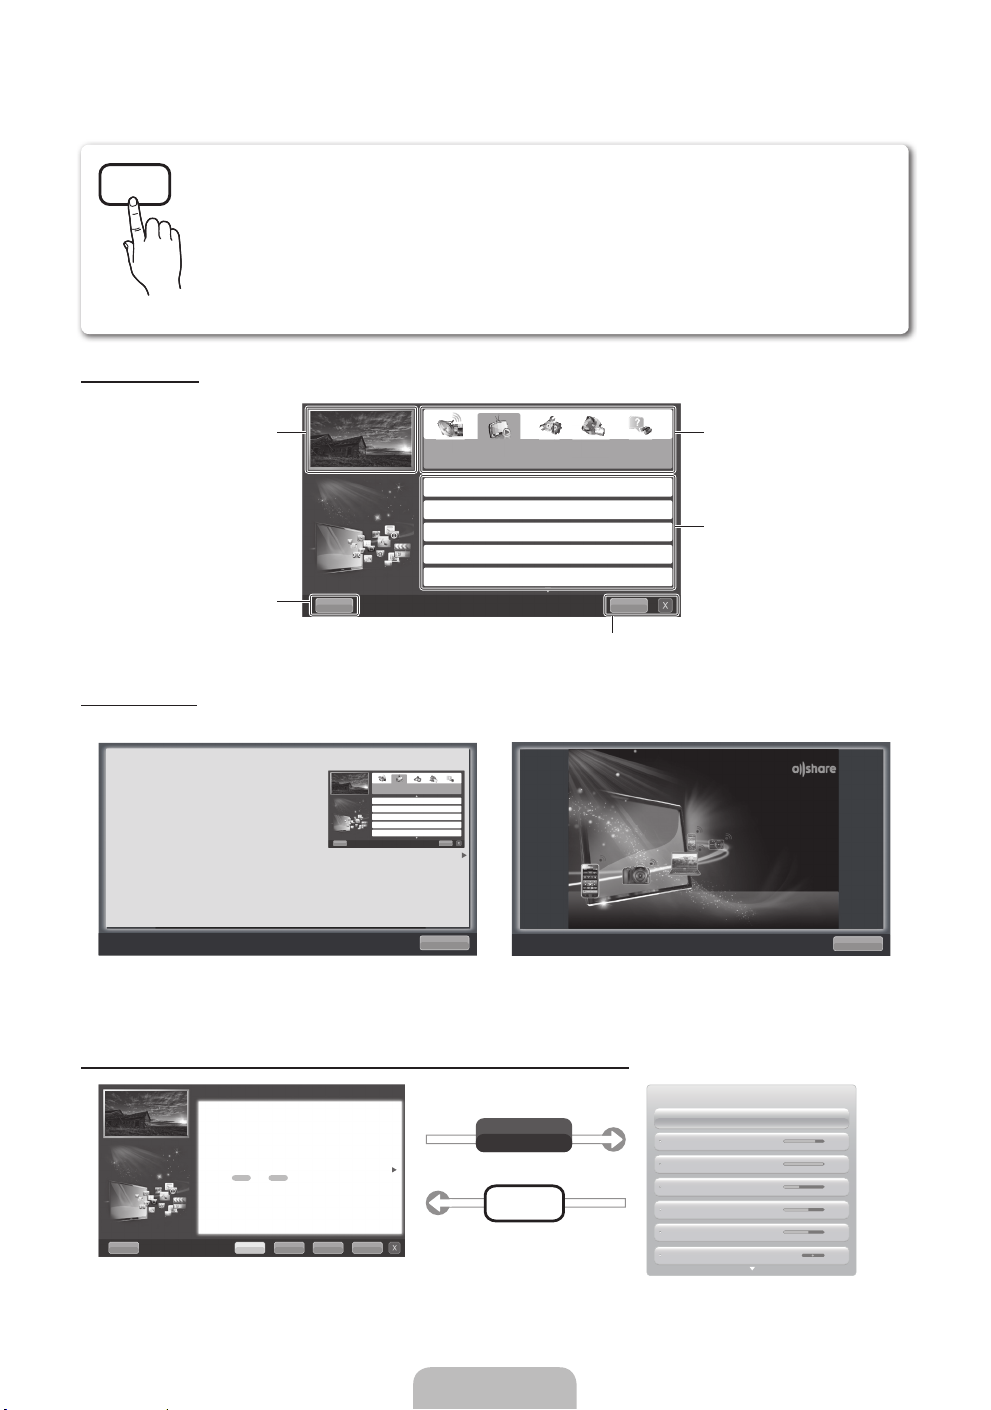
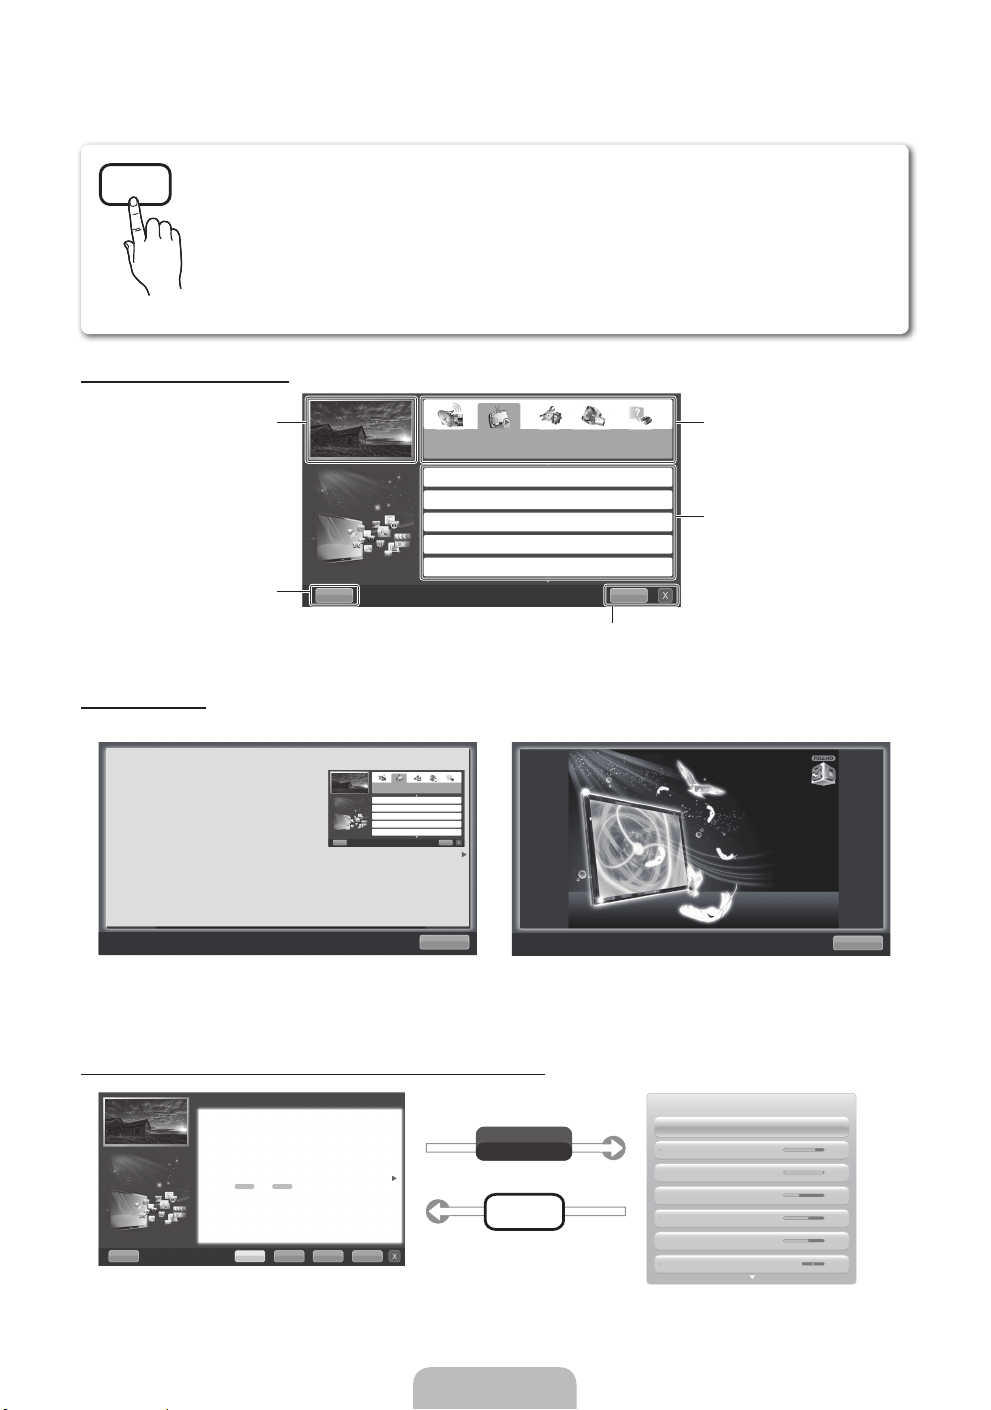
How to view the e-Manual
E-MANUAL
You can read the introduction and instructions about the TV features stored in
your TV.
O
MENUm → Support → e-Manual → ENTER
✎
If you want to return to e-Manual, press E-MANUAL button on remote.
✎
You can’t use the Try Now function, if the menu is not activated.
Screen Display
TV Screen: Displays the current
Guide or Product guide. Press
input source screen.
Help: Displays the e-Manual
ENTER
E
button.
Basic Features
Changing the Preset Picture Mode
Adjusting Picture Settings
Changing the Picture Size
Changing the Picture Options
Setting up the TV with Your PC
Using the Help
Display the e-Manual Guide & the Product Guide by pressing Help.
How to view the e-Manual
You can read the introduction and instructions about
the TV features stored in your TV.
m
→ Support → e-Manual → ENTER
O MENU
E
Basic Features
Changing the Preset Picture Mode
Adjusting Picture Settings
Changing the Picture Size
Changing the Picture Options
Setting up the TV with Your PC
IndexHelp
E
Change the category. Press
button to select category you want.
Displays the sub-menu list. Press
ENTER
menu you want.
IndexHelp
Index: Displays index screen.
X: Exit the e-Manual.
E
button to select sub-
Sync media from multiple devices with AllShare
AllShare™ syncs your digital devices so you can
enjoy music, movies and photos from your PC,
camera and mobile devices, on your larger TV
screen. Connects you to multiple PCs, as well.
l
or r
Return
<E-manual Guide>
The e-Manual guide appears as above.
The product guide appears as above.
How to toggle between the e-Manual and the corresponding menu(s).
Basic Features > Changing the Preset Picture Mode (5/10)
Changing the Preset Picture Mode
■
Picture Mode t
Select your preferred picture type.
N When an input source is set to PC, the Picture Mode is only available the
Standard and Entertain.
• Dynamic: Suitable for a bright room.
• Standard: Suitable for a normal environment.
for LED TV
for PDP TV
/ Relax
• Natural
• Movie: Suitable for watching movies in a dark room.
• Entertain (In PC mode only): Suitable for watching movies and games.
Help Try Now Home Zoom Index
✎
This function is not enabled in some menus.
: Suitable for reducing eye strain.
Try Now
E-MANUAL
English - 14
Return
<Product Guide>
Picture
Picture Mode Standard
Backlight 14
Contrast 100
Brightness 45
Sharpness 50
Colour 50
Tint (G/R) G 50 R 50
Page 15

Method 1 Method 2
1. Select Try Now, if you want to execute the
corresponding menu(s).
2. To return to the e-Manual screen, press the
E-MANUAL button.
Viewing the Contents
Basic Features > Changing the Preset Picture Mode (5/10)
Changing the Preset Picture Mode
O MENUm → Picture → Picture Mode → ENTER
■
Picture Mode t
Select your preferred picture type.
N When an input source is set to PC, the Picture Mode is only avalable
the Standard and Entertain.
• Dynamic: Suitable for a bright room.
• Standard: Suitable for a normal environment.
for LED TV
for PDP TV
/ Relax
• Natural
• Movie: Suitable for watching movies in a dark room.
• Entertain(In PC mode only): Suitable for watching movies and games.
Help Try Now Home Zoom Index
: Suitable for reducing eye strain.
Try Now: Displays the corresponding menu(s).
Home: Moves to the e-Manual home screen.
Zoom: Magnifies a screen.
Index: Displays index screen.
Using the Zoom mode
E
1. Press the ENTER
button when selecting
Contents Area. The “Are you sure?” is displayed.
Select Yes and then press the ENTERE
button. The OSD window will be displayed.
2. To return to the e-Manual screen, press the
E-MANUAL button.
E
Contents Area: You can view the corresponding
contents, if you selected a sub-menu. To move
previous or next page, press the l or r button.
When you view the e-Manual instruction, select the
Zoom to magnify the screen. You can scroll through
u
the magnified screen by using the
✎
To return to the previous screen, press the
or d buttons.
RETURN button.
How to search a keyword by using index page
✎
This function may not supported depending on the language.
u
1. If you want to search a keyword, press the
l
2. Press the
3. Press the
or r button to select a character order you want, and then press the ENTERE button.
u
or d button to select a keyword you want to see, and then press the ENTERE button.
/ d / l / r button to select Index.
4. You can view the corresponding e-Manual instruction screen.
✎
To close the Index screen, press the RETURN button.
Changing the Preset Picture Mode
O MENUm → Picture → Picture Mode → ENTER
■
Picture Mode t
Select your preferred picture type.
N When an input source is set to PC, the Picture Mode is only avalable the Standard
and Entertain.
• Dynamic: Suitable for a bright room.
• Standard: Suitable for a normal environment.
for LED TV
• Natural
• Movie: Suitable for watching movies in a dark room.
• Entertain (In PC mode only): Suitable for watching movies and games.
/ Relax
for PDP TV
E
: Suitable for reducing eye strain.
Return
English - 15
Page 16
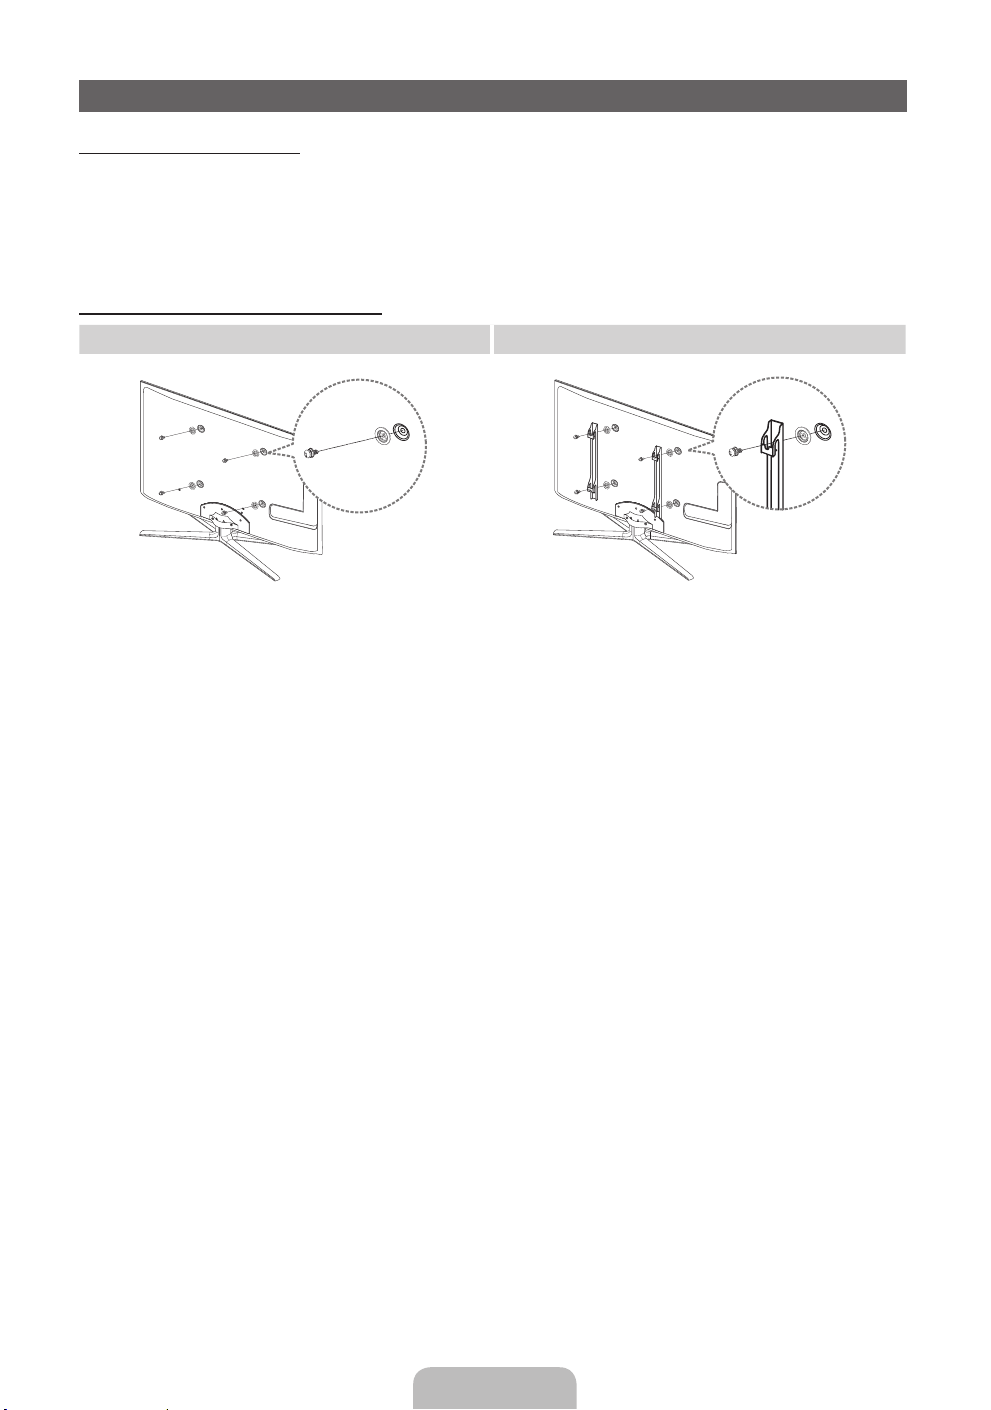
Installing the Wall Mount
Installing the Wall Mount Kit
The wall mount kit (sold separately) allows you to mount the TV on the wall.
For detailed information on installing the wall mount, see the instructions provided with the wall mount. Contact a
technician for assistance when installing the wall mount bracket.
Samsung Electronics is not responsible for any damage to the product or injury to yourself or others if you elect
to install the TV on your own.
Preparing before installing Wall-Mount
Case A. Installing the SAMSUNG Wall-Mount Case B. Installing another company’s Wall-Mount
1
To install a wall-mount, use the Holder-Ring 1.
1
English - 16
Page 17
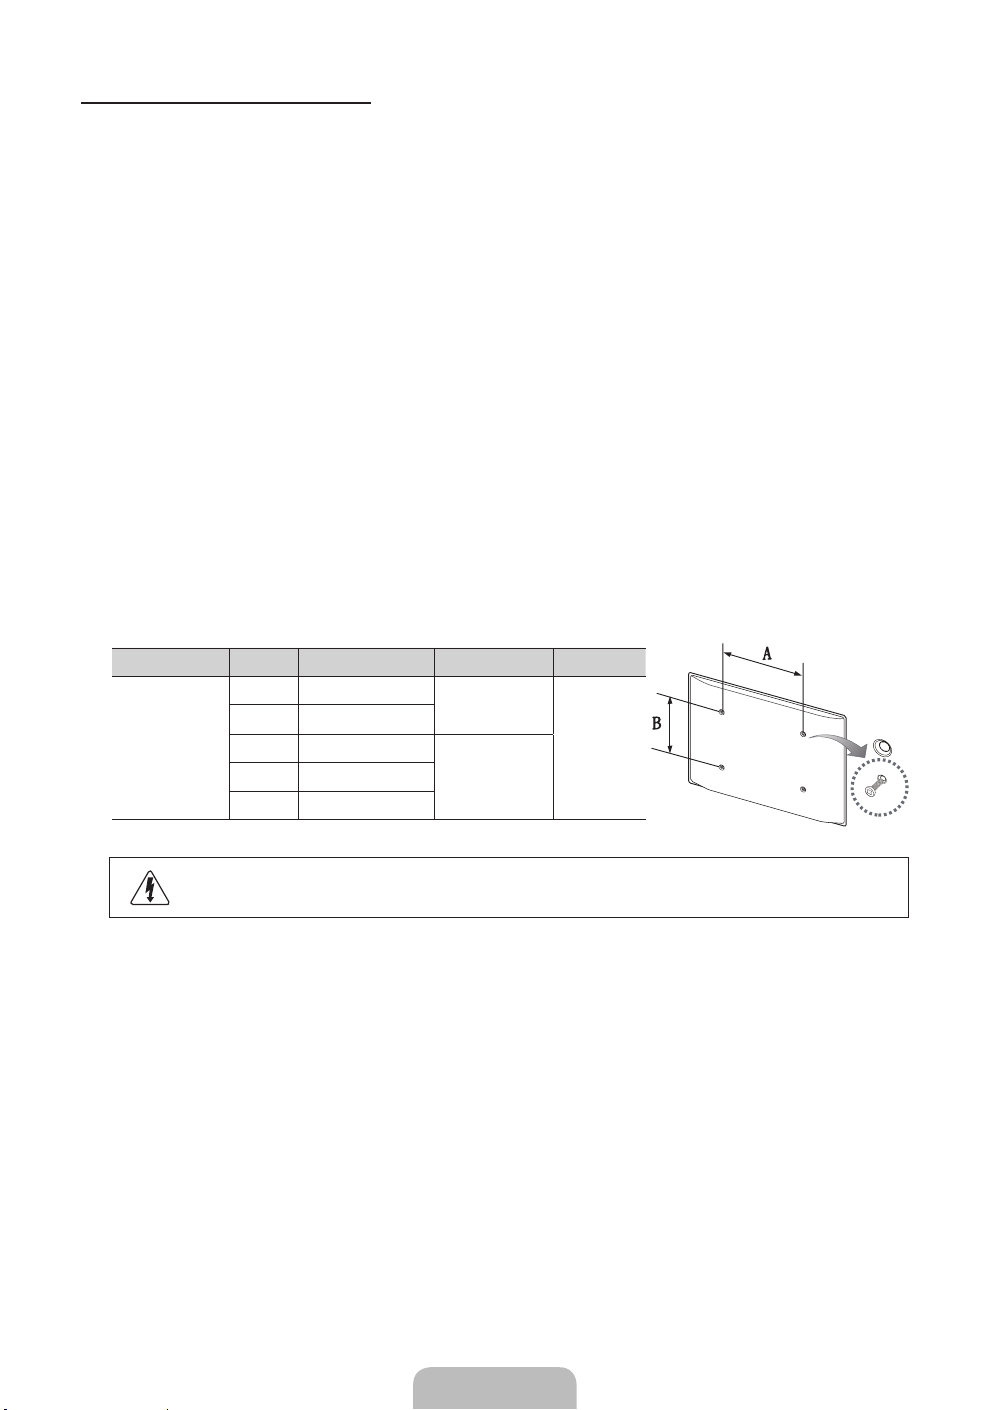
Wall Mount Kit Specifications (VESA)
✎
The wall mount kit is not supplied, but sold separately.
Install your wall mount on a solid wall perpendicular to the floor. When attaching to other building materials,
please contact your nearest dealer. If installed on a ceiling or slanted wall, it may fall and result in severe personal
injury.
✎
NOTE
Standard dimensions for wall mount kits are shown in the table below.
x
When purchasing our wall mount kit, a detailed installation manual and all parts necessary for assembly
x
are provided.
Do not use screws that do not comply with the VESA standard screw specifications.
x
Do not use screws that are longer than the standard dimension or do not comply with the VESA standard
x
screw specifications. Screws that are too long may cause damage to the inside of the TV set.
For wall mounts that do not comply with the VESA standard screw specifications, the length of the
x
screws may differ depending on the wall mount specifications.
Do not fasten the screws that are too strongly; this may damage the product or cause the product to fall,
x
leading to personal injury. Samsung is not liable for these kinds of accidents.
Samsung is not liable for product damage or personal injury when a non-VESA or non-specified wall
x
mount is used or the consumer fails to follow the product installation instructions.
Our 55” model do not comply with VESA Specifications. Therefore, you should use our dedicated wall
x
mount kit for this model.
Do not mount the TV at more than a 15 degree tilt.
x
Product Family inches VESA Spec. (A * B) Standard Screw Quantity
LED-TV
19~22 75 X 75
23~27 200 X 100
32~40 200 X 200
60~65 600 X 400
M4
4
M846~55 400 X 400
Do not install your Wall Mount Kit while your TV is turned on. It may result in personal injury
due to electric shock.
English - 17
Page 18

Securing the TV to the wall
Caution: Pulling, pushing, or climbing onto the TV may cause the TV to fall. In particular, ensure
that your children do not hang over or destabilize the TV; doing so may cause the TV to tip over,
resulting in serious injuries or death. Follow all safety precautions provided in the included Safety
Flyer. For added stability and safety, install the anti-fall device as follows.
To Avoid the TV from Falling
1. Put the screws into the clamps and firmly fasten them onto the wall.
Confirm that the screws have been firmly installed onto the wal
✎
You may need additional material such as an anchor depending on
the type of wall.
✎
Since the necessary clamps, screws, and string are not supplied,
please purchase these additionally.
2. Remove the screws from the back centre of the TV, put the screws into
the clamps, and then fasten the screws onto the TV agai
✎
Screws may not be supplied with the product. In this case, please
purchase the screws of the following specifications.
✎
Screw Specifications
For a 19 ~ 27 inch: M4
x
For a 32 ~ 65 inch: M8
x
3. Connect the clamps fixed onto the TV and the clamps fixed onto the wall with a strong cable and then tie the
string tightly.
✎✎
NOTE
Install the TV near to the wall so that it does not fall backwards.
x
It is safe to connect the string so that the clamps fixed on the wall are equal to or lower than the
x
clamps fixed on the TV.
Untie the string before moving the TV.
x
4. Verify all connections are properly secured. Periodically check connections for any sign of fatigue for failure. If
you have any doubt about the security of your connections, contact a professional installer.
l.
n.
Wall
English - 18
Page 19
Troubleshooting
If you have any questions about the TV, first refer to this list. If none of these troubleshooting tips apply, please
visit “www.samsung.com,” then click on Support, or contact the call centre listed on the back-cover of this
manual.
Issues Solutions and Explanations
The TV won’t turn on. • Make sure the AC power cord is securely plugged in to the wall outlet and the TV.
There is no picture/video. • Check cable connections (remove and reconnect all cables connected to the TV and external
The remote control does not work. • Replace the remote control batteries with the poles (+/–) in the right direction.
The cable/set top box remote control
doesn’t turn the TV on or off, or adjust the
volume.
✎
This TFT LED panel uses a panel consisting of sub pixels which require sophisticated technology to
produce. However, there may be a few bright or dark pixels on the screen. These pixels will have no impact
on the performance of the product.
✎
You can keep your TV as optimum condition to upgrade the latest firmware on web site (samsung.com →
Support → Downloads) by USB.
• Make sure the wall outlet is working.
• Try pressing the POWER button on the TV to make sure the problem is not the remote. If the TV turns
on, refer to “Remote control does not work” below.
devices).
• Set your external device’s (Cable/Sat Box, DVD, Blu-ray etc) video outputs to match the connections
to the TV input. For example, if an external device’s output is HDMI, it should be connected to an
HDMI input on the TV.
• Make sure your connected devices are powered on.
• Be sure to select the TV’s correct source by pressing the SOURCE button on the remote control.
• Reboot the connected device by reconnecting the device’s power cable.
• Clean the sensor’s transmission window on the remote.
• Try pointing the remote directly at the TV from 5~6 feet away.
• Programme the Cable/Set remote control to operate the TV. Refer to the Cable/Set user manual for
the SAMSUNG TV code.
Licence
English - 19
Page 20
List of Features
Excellent Digital Interface & Networking: With a built-in HD digital tuner, nonsubscription HD broadcasts can be
viewed without a cable box / STB (Set-Top-Box) satellite receiver.
3D
This exciting new feature enables you to view 3D content.
SMART HUB
The Gateway to all content integrated in one place
• It’s all integrated to guide you to easier and diverse entertainment choices
• Control your entertainment life with easy and simple user friendly UI
• Access to diverse Apps that are adding up every day
• Customize your TV, by App grouping & sorting to your taste
AllShare™
AllShare™ connects your TV and compatible Samsung mobile phones/devices through a network.
Anynet+(HDMI-CEC)
Allows you to control all connected Samsung devices that support Anynet+ with your Samsung TV’s remote.
Skype
With Skype you can say hello or share a laugh with anyone, anywhere. Communicate with people around the
world!
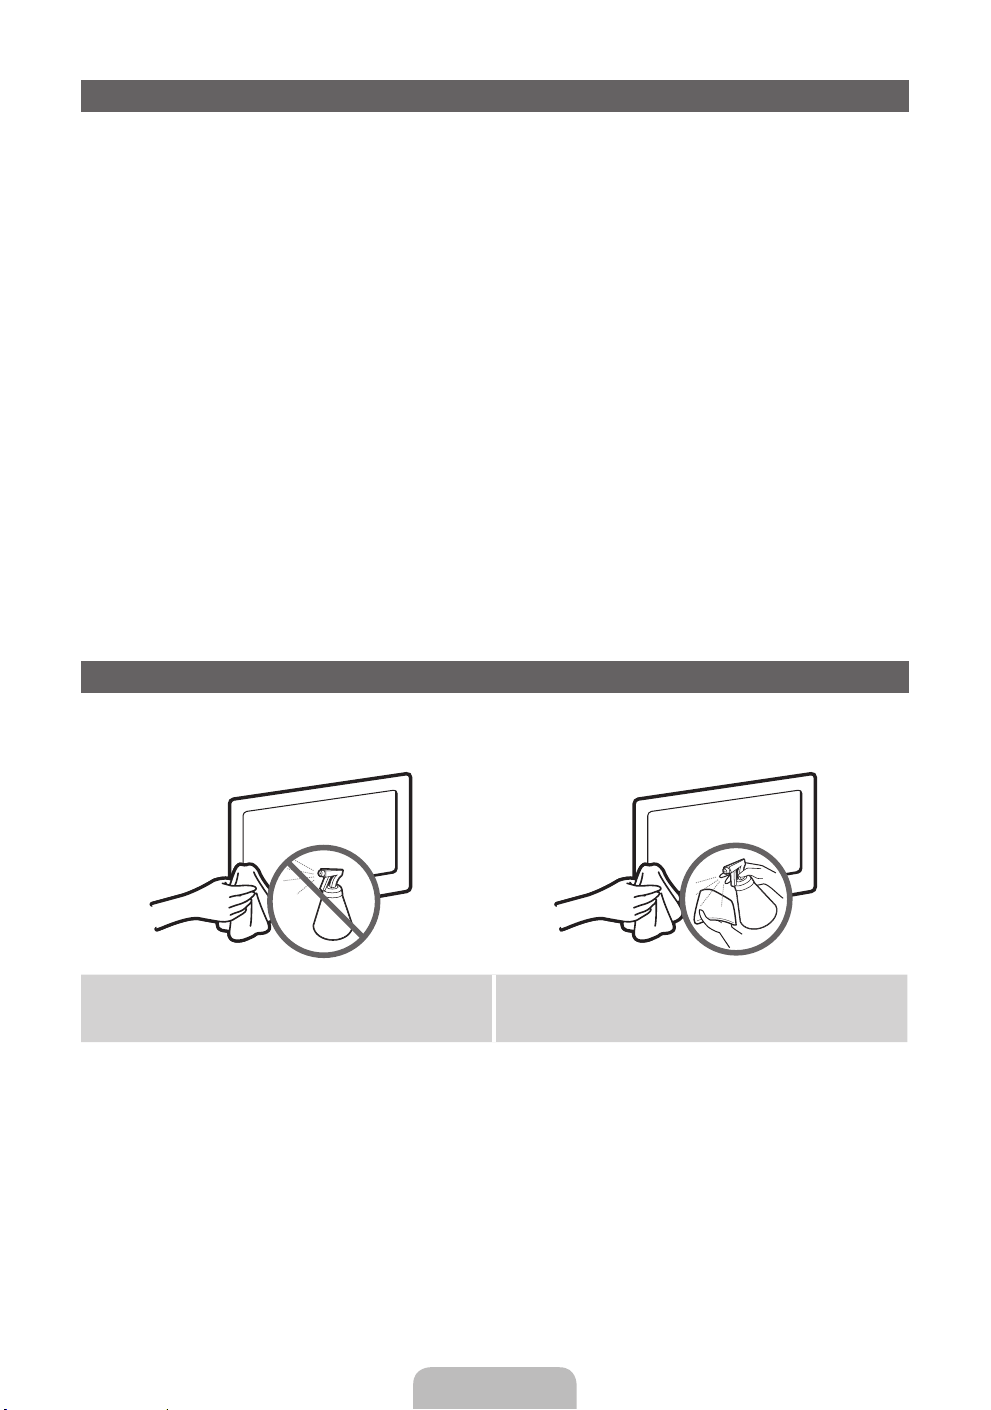
Storage and Maintenance
✎
If you attached some stickers on the TV screen, it remains some debris after removing the sticker. Please
clean it to watch TV.
Do not spray water or a cleaning agent directly onto
the product. Any liquid that goes into the product may
cause a failure, fire, or electric shock.
Clean the product with a soft cloth dapped in a small
amount of water.
English - 20
Page 21
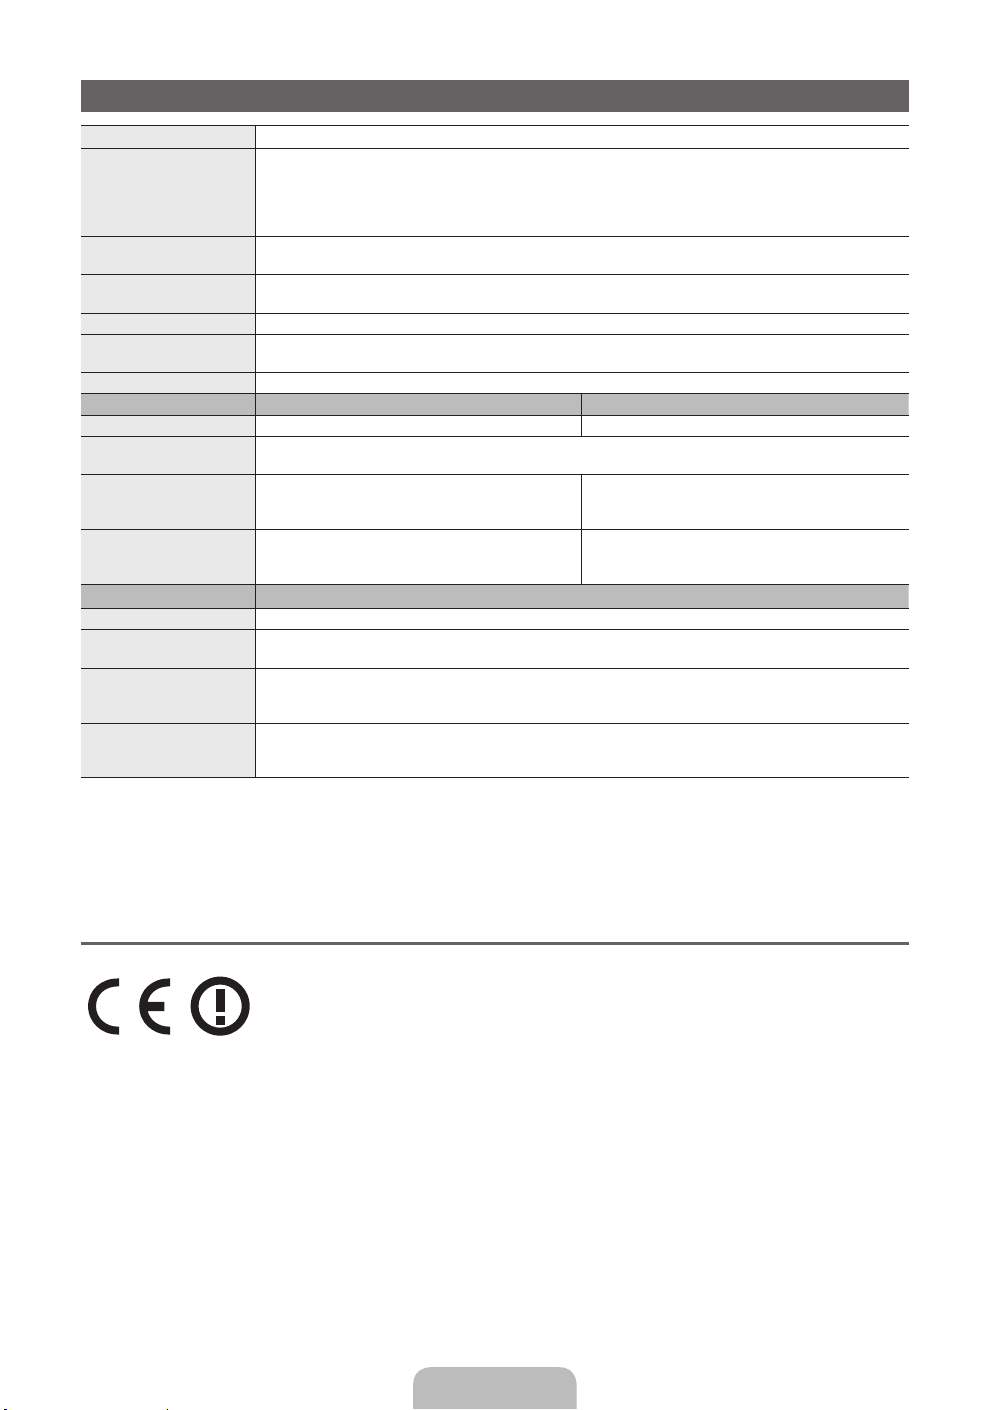
Specifications
Display Resolution 1920 x 1080
Environmental Considerations
Operating Temperature
Operating Humidity
Storage Temperature
Storage Humidity
TV System Analogue: B/G, D/K, L, I (Depending on your country selection)
Colour/Video System Analogue: PAL, SECAM, NTSC-4.43, NTSC-3.58, PAL60
Sound System BG, DK, L, NICAM, MPEG1, DD, DD+, HEAAC.
HDMI IN Video: 1080 24p, 1080p, 1080i, 720p, 576p, 480p
Stand Swivel (Left / Right) -20˚ ~ 20˚
Model Name UE40D7000 UE46D7000
Screen Size 40 inches 46 inches
Sound
(Output) 10 W X 2
Dimensions (WxDxH)
Body
With stand
Weight
Without Stand
With Stand
Model Name
Screen Size 55 inches
Sound
(Output) 15 W X 2
Dimensions (WxDxH)
Body
With stand
Weight
Without Stand
With Stand
Digital: MPEG-2 MP@ML, MPEG-4, H.264/AVC MP@L3, [email protected], [email protected]
Audio: 2Ch Linear PCM 32/44.1/48kHz, 16/20/24bits.
916.0 X 29.7 X 531.8 mm
916.0 X 241.3 X 603.6 mm
10.1 kg
11.5 kg
10°C to 40°C (50°F to 104°F)
10% to 80%, non-condensing
-20°C to 45°C (-4°F to 113°F)
5% to 95%, non-condensing
Digital: DVB-T/DVB-C/DVB-S2
1048.5 X 29.7 X 606.3 mm
1048.5 X 276.7 X 683.1 mm
12.5 kg
14.4 kg
UE55D7000
1240.0 X 29.7 X 714.1 mm
1240.0 X 309.8 X 790.9 mm
16.1 kg
18.6 kg
✎
Design and specifications are subject to change without prior notice.
✎
For information about power supply, and more about power consumption, refer to the label attached to the
product.
¦ Recommendation - EU Only
• Hereby, Samsung Electronics, declares that this LED TV is in compliance with the essential requirements and
other relevant provisions of Directive 1999/5/EC.
• The official Declaration of Conformity may be found at http://www.samsung.com, go to Support > Search
Product Support and enter the model name.
• This equipment may only be used indoors.
• This equipment may be operated in all EU countries.
English - 21
Page 22
Ulteriori informazioni sull’uso del Manuale elettronico (p. 14)
Le figure e le illustrazioni presenti in questo Manuale dell’utente sono fornite unicamente a titolo di riferimento e
possono differire da quelle del prodotto attuale. Le specifiche e il design del prodotto possono variare senza preavviso.
Avviso relativo alla trasmissione TV digita
1. Le funzioni relative alla trasmissione televisiva digitale (DVB) sono disponibili solo nei paesi o nelle aree in cui vengono trasmessi segnali digitali
terrestri DVB-T (MPEG2 E MPEG4 AVC) o laddove l’utente abbia la possibilità di accedere a un servizio TV via cavo DVB-C (MPEG2 e MPEG4 AAC)
compatibile. Verificare con il rivenditore locale la possibilitàdi ricevere segnali DVB-T o DVB-C.
2. DVB-T è lo standard del consorzio europeo DVB per la trasmissione della televisione digitale terrestre mentre DVB-C è lo standard per la trasmissione
della televisione digitale via cavo. Tuttavia, alcune funzioni quali EPG (Electronic Program Guide), VOD (Video on Demand) e altre non sono incluse in
queste specifiche. Per questo motivo, al momento non sono disponibili.
3. Sebbene questo apparecchio TV soddisfi i più recenti standard DVB-T e DVB-C, [Agosto 2008], la compatibilità con future trasmissioni digitali via
cavo DVB-C e terrestri DVB-T non può essere garantita.
4. In base alla nazione o all’area in cui viene utilizzato questo televisore, alcuni fornitori di trasmissioni TV via cavo potrebbero applicare una tariffa
aggiuntiva per tali servizi e richiedere all’utente di accettare i termini e le condizioni della loro offerta.
5. Alcune funzioni della TV digitale potrebbero non essere disponibili in alcuni paesi o regioni e DVB-C potrebbe non funzionare correttamente con alcuni
fornitori di servizi via cavo.
6. Per ulteriori informazioni, contattare il centro di assistenza clienti Samsung locale.
La qualità di ricezione del televisore può essere influenzata dai diversi metodi di trasmissione esistenti nei vari paesi. Verificare le prestazioni
✎
del televisore presso un Rivenditore autorizzato SAMSUNG o presso un Call Centre Samsung per sapere se la qualità di ricezione può essere
migliorata o meno riconfigurando le impostazioni dell’apparecchio.
Avvertenza per la visualizzazione di immagini fisse
Evitare la visualizzazione di immagini fisse (per es. file jpeg) o di elementi grafici fissi (come ad esempio il logo di un programma TV, il formato panorama o
4:3, la barra dei titoli di borsa o delle notizie nella parte inferiore dello schermo). La visualizzazione continua di una immagine fissa può causare immagini
residue sullo schermo LED e influenzare la qualità della riproduzione. Per ridurre questo rischio, seguire questi consigli:
• Evitare di visualizzare lo stesso canale televisivo per un lungo periodo di tempo.
• Visualizzare sempre le immagini a schermo pieno, usando il menu del formato immagini per impostarlo al valore più appropriato.
• Ridurre la luminosità e il contrasto al valore minimo necessario per ottenere la qualità visiva desiderata; valori troppo elevati possono accelerare il
processo di bruciatura dello schermo.
• Usare frequentemente tutte le funzioni TV progettate per ridurre la ritenzione delle immagini e la bruciatura dello schermo. Per maggiori informazioni,
consultare la relativa sezione del manuale elettronico.
Messa in sicurezza della posizione di installazione
Mantenere le distanze indicate tra il prodotto e gli altri elementi presenti (per esempio le pareti) per garantire un’adeguata ventilazione.
Il mancato rispetto di questa precauzione può comportare un incendio o un malfunzionamento provocato dall’aumento della temperatura interna del
prodotto.
Se si usa un piedistallo o un sistema di montaggio a parete, utilizzare solo componenti forniti da Samsung Electronics.
✎
• L’uso di componenti di altri produttori può causare problemi di funzionamento del prodotto o lesioni provocate dalla caduta del prodotto.
L’aspetto del prodotto può differire in base al modello.
✎
• Prestare attenzione quando si tocca il televisore poiché alcune parti potrebbero essere calde.
Installazione con piedistallo. Installazione con supporto a parete.
10 cm
10 cm10 cm
Corretto smaltimento del prodotto (rifiuti elettrici ed elettronici)
(Applicabile nell’Unione Europea e in altri paesi europei con sistema di raccolta differenziata)
Il marchio riportato sul prodotto, sugli accessori o sulla documentazione indica che il prodotto e i relativi accessori elettronici (quali caricabatterie, cuffia
e cavo USB) non devono essere smaltiti con altri rifiuti domestici al termine del ciclo di vita. Per evitare eventuali danni all’ambiente o alla salute causati
dall’inopportuno smaltimento dei rifiuti, si invita l’utente a separare il prodotto e i suddetti accessori da altri tipi di rifiuti e di riciclarli in maniera responsabile
per favorire il riutilizzo sostenibile delle risorse materiali. Gli utenti domestici sono invitati a contattare il rivenditore presso il quale è stato acquistato il
prodotto o l’ufficio locale preposto per tutte le informazioni relative alla raccolta differenziata e al riciclaggio per questo tipo di materiali. Gli utenti aziendali
sono invitati a contattare il proprio fornitore e verificare i termini e le condizioni del contratto di acquisto. Questo prodotto e i relativi accessori elettronici
non devono essere smaltiti unitamente ad altri rifiuti commerciali.
Corretto smaltimento delle batterie del prodotto
(Applicabile nei paesi dell’Unione Europea e in altri paesi europei con sistemi di conferimento differenziato delle batterie.)
Il marchio riportato sulla batteria o sulla sua documentazione o confezione indica che le batterie di questo prodotto non devono essere smaltite con altri
rifiuti domestici al termine del ciclo di vita. Dove raffigurati, i simboli chimici Hg, Cd o Pb indicano che la batteria contiene mercurio, cadmio o piombo in
quantità superiori ai livelli di riferimento della direttiva UE 2006/66. Se le batterie non vengono smaltite correttamente, queste sostanze possono causare
danni alla salute umana o all’ambiente. Per proteggere le risorse naturali e favorire il riutilizzo dei materiali, separare le batterie dagli altri tipi di rifiuti e
riciclarle utilizzando il sistema di conferimento gratuito previsto nella propria area di residenza.
10 cm
10 cm
10 cm
10 cm
Italiano - 2
Page 23
Accessori
✎
Controllare che nell’imballaggio siano contenuti i seguenti componenti. Se eventuali componenti
risultassero mancanti, contattare il rivenditore.
✎
La forma e il colore dei componenti possono variare in base al modello.
✎
Eventuali cavi non forniti in dotazione possono essere acquistati separatamente.
✎
Una volta aperta la confezione, verificare che non vi siano accessori nascosti dietro i materiali di
imballaggio.
ATTENZIONE: INSERIRE SALDAMENTE PER EVITARE UNO SCOLLEGAMENTO ACCIDENTALE
[
DALL’APPARECCHIO
• Telecomando e batterie (2 tipo AAA) • Cavo di alimentazione
• Istruzioni per l’utente • Panno per la pulizia
• Scheda di garanzia (non disponibile in tutti i paesi)
Occhiali 3D Active AGlasses
Samsung
Piedistallo con fermacavo Anello di ritenuta (4EA) Adattatore scheda CI
• Può essere richiesto un rimborso se
– (a) l’uscita del tecnico in seguito a una chiamata non rileva difetti nel prodotto
(per es. nel caso l’utente abbia omesso di leggere il presente manuale)
– (b) l’utente ha portato l’unità presso un centro di riparazione che non rileva difetti nel prodotto
(per es. nel caso l’utente abbia omesso di leggere il presente manuale).
• L’importo di tale rimborso verrà comunicato all’utente prima di eseguire una visita a domicilio o un eventuale
intervento di manutenzione.
Montaggio del Piedistallo con fermacavo
Adattatore Scart (2 EA) Adattatore AV/component
Italiano - 3
Page 24
Vista del Pannello di controllo
✎
La forma e il colore del prodotto possono variare in base al modello.
✎
Sul pannello posteriore del televisore sono presenti alcuni tasti di regolazione. Toccando il tasto, vengono
visualizzate le icone di regolazione.
✎
Qualsiasi oggetto (elettrico, ecc...) posizionato nei pressi del pannello di controllo può causare
inavvertitamente l’attivazione dei menu OSD.
Pannello posteriore del televisore
Sensore del telecomando Puntare il telecomando in direzione di questo punto sul televisore.
Indicatore di alimentazione Lampeggia e si spegne quando l’alimentazione è attiva, si accende in
modalità standby.
E
(Sorgente)
m
(Menu)
o
(Volume) Regola il volume. Nel menu OSD, utilizzare i tast wv così come si usano i
k
(Canale) Cambia i canali. Nel menu OSD, utilizzare i tasti
P
(Alimentazione)
Alterna tutte le sorgenti d’ingresso disponibili. Nel menu a video, utilizzare
E
questo tasto come si usa il tasto ENTER
Visualizza attraverso un menu OSD (on screen display) le funzioni del
televisore.
tasti ◄ e ► del telecomando.
tasti ▼ e ▲ del telecomando.
Spegne e accende il televisore.
del telecomando.
<>
così come si usano i
Modalità Standby
Non lasciare il televisore in modalità standby per un lungo periodo di tempo (quando si parte per le vacanze,
ad esempio). Anche quando il tasto di accensione è disattivo, l’apparecchio consuma una piccola quantità di
energia elettrica. Si consiglia quindi di scollegare il cavo di alimentazione.
Italiano - 4
Page 25
Viewing the Remote Control
✎
Questo speciale telecomando, progettato per aiutare chi ha problemi di vista, presenta punti in braille sui
tasti Power, Channel e Volume.
Spegne e accende il televisore.
Visualizza e seleziona le sorgenti video
disponibili.
Accesso diretto ai canali.
Seleziona alternativamente le modalità
Teletext ON, Doppia, Mista o OFF.
Regola il volume.
Apre il menu OSD.
Link a vari servizi e applicazioni.
Scelta rapida delle funzioni usate più
frequentemente.
Seleziona le voci del menu OSD e cambia
i valori visualizzati sul menu.
Ritorna al menu precedente.
Usare questi tasti per i menu Gestione
canali, SMART HUB, ecc.
Utilizzare quesi tasti per funzioni
specifiche. Per maggiori informazioni,
vedere il manuale elettronico.
POWER
SOURCE
TTX/MIX
CH LIST
RETURN
BACK
TV
SOCIAL
E-MANUAL
MUTE
OK
D
ON/OFF
PRE-CH
AD/SUBT.
Accende/Spegne la luce del telecomando.
Questa funzione attiva l’illuminazione
momentanea dei tasti quando questi
vengono premuti. (L’uso del telecomando
con questo tasto impostato su On riduce
l’uso della batteria.)
Ritorna al canale precedente.
Esclude temporaneamente l’audio.
Cambia i canali.
Visualizza l’elenco canali sullo schermo.
Visualizza la EPG (Electronic Programme
Guide).
Visualizza le informazioni sullo schermo TV.
Sensore OFN (Optical Finger Navigation)
In funzione full browser, può essere
utilizzato il puntatore.
Non premendo alcun tasto per 30
secondi, il sensore si spegnerà
automaticamente. Per riattivare il sensore,
premere i tasti ENTER, Navigation,
Colour, REW, FF, Return.
Durante l’uso di questo sensore, la
retroilluminazione non funziona.
Esce dal menu.
SOCIAL TV: Visualizza la schermata Social TV.
SEARCH: Supporto alla funzione di
ricerca e alle parole di ricerca consigliate.
W
: Imposta il video con segnale 3D.
E-MANUAL: Visualizza e-Manual.
A : Utilizzare questo tasto quando si
usa il servizio di trasmissione dati. Questa
funzione è disponibile quando Esec. auto
Serv. dati è impostata su Off.
AD/SUBT.: Attiva e disattiva la descrizione
audio (non disponibile in alcuni paesi) /
Visualizza i sottotitoli digitali.
Installing batteries (Battery size: AAA)
Italiano - 5
Page 26
Modifica della sorgente di ingresso
Sorgente
Questa funzione viene usata per
selezionare il televisore o un’altra
sorgente di ingresso esterna come un
lettore DVD / Blu-Ray / ricevitore via
cavo / ricevitore satellitare STB collegato
al televisore.
■ TV / Est.1 / Est.2 / PC / HDMI1/
DVI / HDMI2 / HDMI3 / HDMI4 /
USB / AV / Comp. / AllShare
✎
IIn Sorgente, gli ingressi collegati vengono
evidenziati.
✎
Le voci Est.1, Est.2 e PC rimangono sempre
attive.
SOURCE
✎
Quando si collega un PC alla porta HDMI
IN 1(DVI) tramite cavo HDMI, impostare il
televisore in modalità PC in Modifica Nome.
✎
Quando si collega un PC alla porta HDMI
IN 1(DVI) tramite cavo HDMI-DVI, impostare
il televisore in modalità DVI PC in Modifica
Nome.
✎
Quando si collega un dispositivo AV alla porta
HDMI IN 1(DVI) tramite cavo HDMI-DVI,
impostare il televisore in modalità Dispositivi
DVI in Modifica Nome.
Modifica pref
In Sorgente, premere TOOLS per selezionare
Modifica pref. E’ possibile impostare tra i Preferiti
una sorgente di ingresso esterna.
Modifica Nome
In Sorgente, premere TOOLS, quindi impostare il
nome della sorgente di ingresso esterna desiderata.
■ VCR / DVD / STB cavo / STB satellite / STB
PVR / Ricevitore AV / Giochi / Videocamera
/ PC / DVI PC / Dispositivi DVI / TV / IPTV /
Blu-ray / HD DVD / DMA: Assegnare un nome
al dispositivo collegato alle porte di ingresso
per semplificare la selezione della sorgente di
ingresso.
✎
Per la migliore connessione via cavo a questo prodotto, utilizzare cavi del diametro massimo indicato di
seguito:
• Diametro massimo - 0,55 pollici (14 mm)
E’ possibile visualizzare informazioni dettagliate sul
dispositivo esterno selezionato.
Aggiorna
In Sorgente, se i dispositivi esterni non vengono
visualizzati, premere TOOLS per selezionare
Aggiorna. Ricerca dispositivi connessi.
Collegamento all’antenna
Quando il televisore viene acceso per la prima volta, le impostazioni di base vengono visualizzate
automaticamente.
✎
Preset: Collegare l’alimentazione e l’antenna.
Antenna VHF/UHF CavoSatellite
informazioni
o
Italiano - 6
Page 27
Plug & Play (Impostazione iniziale)
Alla prima accensione del televisore, vengono visualizzate alcune schermate che aiutano l’utente a configurare le
impostazioni di base. Premere POWERP. Plug & Play è disponibile solo quando l’opzion Sorgente è impostata su TV.
✎
Prima di accendere il televisore, verificare che il cavo dell’antenna sia collegato
✎
.
Seleziona della lingua
1
OSD.
Configurazione di rete
2
Aggiornamento
3
software
Selezione della modalità
4
d’uso
Selezionare il Paese
5
(in base alla nazione)
Impostazione della
6
Modalità orologio
Selezione delle
7
opzioni di ricerca per
la sintonizzazione
automatica
Buona visione. Per guardare un programma in onda, selezionare Chiudi. Per utilizzare la funzione
8
Premere il tasto ▲ o ▼, quindi premere ENTERE.
Selezionare la lingua OSD (On Screen Display) desiderata.
Configurazione della connessione di rete. Premere il tasto ENTERE per iniziare.
Se non si conoscono le informazioni per la configurazione della rete o si preferisce
eseguire l’impostazione in un momento successivo, selezionare Salta. Si consiglia
di saltare momentaneamente la configurazione della rete e di consultare la sezione
“Menu di rete” sul manuale elettronico per reperire le istruzioni e i requisiti di
configurazione richiesti, e la sezione Connessione di rete riportata su questo manuale
(p. 13).
E’ possibile configurare la connessione di rete in un momento successivo utilizzando
il Menu di rete.
Selezionare Successivo per aggiornare il software del televisore. Il televisore si
aggiornerà automaticamente, qualora necessario. Per aggiornare l’apparecchio
in un momento successivo, selezionare Salta. Per ulteriori informazioni, vedere la
sezione “Aggiornamento software” (Funzioni preferite → Menu Supporto) sul manuale
elettronico.
✎
Ciò potrebbe richiedere alcuni istanti, a seconda dello stato della rete.
Premere ▲ o ▼ per selezionare Uso dom., quindi premere due volte il tasto
ENTERE.
✎
Selezionare la modalità Uso dom.. La modalità Demo Negozio è dedicata a un
uso commerciale.
Premere il tasto ▲ o ▼, quindi premere ENTERE. Selezionare la nazione
appropriata. (in base alla nazione)
✎
Dopo aver selezionato il paese nel menu Nazione, alcuni modelli
potrebbero richiedere un’opzione aggiuntiva per l’impostazione del pin.
✎
All’inserimento del codice PIN, 0-0-0-0 non è disponibile.
Impostare la Modalità orologio automaticamente o manualmente.
Auto: Scegliere il fuso orario corretto.
Manuale: Consente di impostare manualmente la data e l’ora corrente.
Premere il tasto ▲ o ▼, quindi premere ENTERE. Selezionare la sorgente del
canale da memorizzare. Quando si imposta la sorgente antenna su Cavo, viene
visualizzata una procedura che consente di assegnare valori numerici ai canali
(frequenze canale). Per ulteriori informazioni, vedere Canale→ Sintonizzazione
autom.
✎
Nel caso siano state selezionate per prime le opzioni Antenna o Cavo: Dopo
la memorizzazione di tutti i canali trasmessi via Antenna o Cavo, viene
visualizzata la procedura per la memorizzazione dei canali via Satellite.
✎
Nel caso sia stata selezionata per prima l’opzione Satellite: Dopo la
memorizzazione di tutti i canali trasmessi via Antenna o Cavo, viene
visualizzata la procedura per la memorizzazione dei canali via Satellite.
✎
Premere il tasto ENTERE in qualsiasi momento per interrompere il processo di
memorizzazione.
Smart Hub, selezionare Smart Hub. Verrà avviata la funzione Smart Hub. Per
maggiori dettagli, vedere la sezione “Smart Hub” sul manuale elettronico.
Per reimpostare questa funzione...
Selezionare Sistema - Plug & Play (impostazione iniziale). Digitare il PIN a 4 cifre. Il PIN predefinito è “0-0-0-0”.
Per cambiare il codice PIN, utilizzare la funzione Cambia PIN.
Eseguire nuovamente Plug & Play (MENU → Sistema) per uso domestico sebbene in modalità negozio.
✎
Nel caso si sia dimenticato il PIN, in modalità Standby premere la seguente sequenza di tasti sul telecomando
per ripristinare il PIN all’impostazione predefinita “0-0-0-0”: MUTE → 8 → 2 → 4 → POWER (on).
Italiano - 7
Page 28
Collegamento a un dispositivo AV
Dispositivi disponibili: DVD, Blu-ray player, HD cable box, HD STB (Set-Top-Box) satellite
¦
receiver, VCR, Digital Audio System, Amplifier, DVD home Theater, PC
Connessione HDMI
HDMI OUT
Connessione HDMI-DVI
DVI OUT
AUDIO OUT
R-AUDIO-L
Uso di un cavo HDMI o HDMI-DVI (fino a 1080p)
✎
HDMI IN 1(DVI), 2(ARC), 3, 4, PC/DVI AUDIO IN
Per una migliore qualità audio e immagine, effettuare il collegamento a un dispositivo digitale
x
mediante un cavo HDMI.
I cavi HDMI supportano i segnali video e audio e non richiedono un canale audio.
x
– Per collegare il televisore a un dispositivo digitale che non supporta una uscita HDMI, utilizzare cavi
HDMI/DVI e audio.
Se viene collegato al televisore un dispositivo esterno che supporta una versione HDMI precedente,
x
l’immagine a schermo potrebbe essere disturbata (o non essere visualizzata del tutto), oppure l’audio
potrebbe non essere riprodotto. In questo caso, chiedere al produttore del dispositivo esterno
informazioni sulla versione HDMI supportata e, se obsoleta, richiedere un aggiornamento.
Usare un cavo HDMI di max. 14 mm di spessore.
x
Acquistare un cavo HDMI certificato. In caso contrario, l’immagine potrebbe non apparire sullo
x
schermo oppure potrebbe verificarsi un errore di connessione.
Si consiglia l’uso di un cavo base HDMI ad alta velocità o ethernet. Questo prodotto non supporta la
x
funzione ethernet via HDMI.
Questo prodotto supporta le funzioni 3D e ARC (Audio Return Channel) attraverso cavo HDMI. Notare
x
che la funzione ARC è supportata solo dalla porta HDMI IN 2(ARC).
– Se Visualizz auto 3D è impostata su On, alcune funzioni quali SMART HUB non sono selezionabili.
Per renderle nuovamente disponibili, impostare Visualizz auto 3D o Modalità 3D su Off.
La funzione ARC consente l’uscita audio digitale attraverso la porta HDMI IN 2(ARC). Può essere
x
attivata solo quando il televisore è collegato a un ricevitore audio in grado di supportare la funzione
ARC.
(ARC)
(DVI)
Italiano - 8
Page 29
Connessione Component
COMPONENT OUT
PRPBY
AUDIO OUT
R-AUDIO-L
G
B
R
W
R
G
B
R
W
R
Connessione AV
AUDIO OUT
R-AUDIO-L
VIDEO OUT
W
R
Y
W
R
Y
Connessione SCART
EXT
Uso di un cavo Component (fino a 1080p) o Audio/Video (solo 480i) e un cavo Scart
✎
In modalità Est., l’uscita DTV supporta solo video e audio SD MPEG.
✎
Durante il collegamento ad AV IN, collegare il connettore AV (giallo) al jack TV (verde).
✎
Per ottenere la migliore qualità delle immagini, si consiglia l’uso della connessione Component rispetto
alla connessione A/V.
Italiano - 9
Page 30
Connessione a un PC e a un dispositivo audio
¦ Uso di un cavo HDMI, HDMI-DVI o D-sub
✎
La connessione mediante cavo HDMI potrebbe non essere supportata a seconda del modello di PC in uso.
Connessione PC
HDMI OUT
DVI OUT
AUDIO OUT
AUDIO OUT
PC OUT
Modalità di visualizzazione (ingresso D-Sub e HDMI/DVI)
La risoluzione ottimale è 1920 X 1080 a 60 Hz.
Modalità Risoluzione Frequenza orizzontale (kHz) Frequenza verticale (Hz)
IBM
MAC
VESA DMT
VESA DMT / DTV
CEA
640 x 350
720 x 400
640 x 480
832 x 624
1152 x 870
640 x 480
640 x 480
640 x 480
800 x 600
800 x 600
800 x 600
1024 x 768
1024 x 768
1024 x 768
1152 x 864
1280 x 1024
1280 x 1024
1280 x 800
1280 x 800
1280 x 960
1360 x 768
1440 x 900
1440 x 900
1680 x 1050
1920 x 1080p 67,500 60,000 148,500 +/+
31,469
31,469
35,000
49,726
68,681
31,469
37,861
37,500
37,879
48,077
46,875
48,363
56,476
60,023
67,500
63,981
79,976
49,702
62,795
60,000
47,712
55,935
70,635
65,290
70,086
70,087
66,667
74,551
75,062
59,940
72,809
75,000
60,317
72,188
75,000
60,004
70,069
75,029
75,000
60,020
75,025
59,810
74,934
60,000
60,015
59,887
74,984
59,954
Frequenza di clock dei pixel
(MHz)
25,175
28,322
30,240
57,284
100,000
25,175
31,500
31,500
40,000
50,000
49,500
65,000
75,000
78,750
108,000
108,000
135,000
83,500
106,500
108,000
85,500
106,500
136,750
146,250
Polarità sync (O/V)
+/-
-/+
-/-
-/-
-/-
-/-
-/-
-/+/+
+/+
+/+
-/-
-/+/+
+/+
+/+
+/+
-/+
-/+
+/+
+/+
-/+
-/+
-/+
✎
NOTA
Quando si effettua una connessione mediante cavo HDMI/DVI, è necessario utilizzare il jack HDMI IN
x
1(DVI).
La modalità interlacciata non è supportata.
x
Questo dispositivo potrebbe non funzionare correttamente se si seleziona un formato video non
x
standard.
Le modalitàSeparata e Comp. sono supportate. La modalità SOG (Sync On Green) non è supportata.
x
Italiano - 10
Page 31
¦ Dispositivi disponibili: digital audio system, amplifier, DVD home theatre
Connessione DVD Home Theater
OPTICAL
Connessione cuffie
Uso di un collegamento ottico (digitale) o cuffie
✎
DIGITAL AUDIO OUT (OPTICAL)
Quando un sistema audio digitale è collegato alla porta DIGITAL AUDIO OUT (OPTICAL), ridurre il
x
volume sia del televisore sia del sistema.
L’audio 5.1 CH (canali) è disponibile quando il televisore è collegato a un dispositivo esterno che
x
supporta lo standard 5.1 CH.
Quando il ricevitore (home theatre) è impostato su On, è possibile udire l’audio proveniente dall’uscita
x
ottica del televisore. Quando il televisore visualizza un segnale DTV, invia l’audio a 5.1 canali al
ricevitore Home Theater. Se la sorgente è un componente digitale, come per es. un lettore DVD /
Blu-ray / ricevitore via cavo / ricevitore satellitare (STB) ed è collegata al televisore mediante HDMI,
saranno udibili solo 2 canali audio dal ricevitore Home Theater. Per un audio a 5.1 canali, collegare il
jack dell’uscita audio digitale del lettore DVD / Blu-ray / ricevitore via cavo / ricevitore satellitare STB
direttamente a un amplificatore o un home theatre.
✎
Cuffie H: E’ possibile collegare le cuffie all’uscita cuffie del televisore. Quando le cuffie sono collegate,
l’audio proveniente dagli altoparlanti interni viene disabilitato.
Collegando le cuffie al televisore, l’uso della funzione audio non è disponibile.
x
E’ possibile regolare in modo indipendente il volume delle cuffie e quello del televisore.
x
Italiano - 11
Page 32
Connessione a un alloggiamento COMMON INTERFACE
Collegamento dell’adattatore di schede CI
Collegare l’adattatore come mostrato sotto.
Per collegare l’adattatore di schede CI, seguire questi
passaggi.
✎
Si consiglia di collegare l’adattatore prima di eseguire
l’installazione del sistema di montaggio a parete o di
inserire la “SCHEDA CI o CI+”.
1. Inserire l’adattatore della SCHEDA CI nelle due aperture
sul prodotto 1.
✎
Cercare le due aperture sul retro del televisore. Le
due aperture sono posizionate lateralmente alla
porta COMMON INTERFACE.
2. Inserire l’adattatore della SCHEDA CI nella porta COMMON INTERFACE sul prodotto 2.
3. Inserire la “SCHEDA CI o CI+”
Si consiglia di inserire la scheda CI prima di montare il televisore a parete. Una volta fissato il
televisore alla parete, l’inserimento della scheda potrebbe risultare difficoltoso.
Inserire la scheda solo dopo aver collegato l’adattatore della SCHEDA CI al televisore. Inserendo la
scheda prima, potrebbe risultare difficile collegare il modulo.
Uso della “SCHEDA CI o CI+”
Per la visione di canali a pagamento è necessario inserire una “SCHEDA
CI o CI+”.
• Non inserendo una “SCHEDA CI o CI+”, alcuni canali visualizzeranno
il messaggio “Segnale criptato”.
• Le informazioni di pairing che contengono un numero telefonico, l’ID
della “SCHEDA CI o CI+”, l’ID host e altri dati verranno visualizzatI
entro 2~3 minuti. Se viene visualizzato un messaggio di errore,
contattare il fornitore del servizio.
• Una volta completata la configurazione delle informazioni relative
al canale viene visualizzato il messaggio “Updating Completed”, a
indicare che l’elenco dei canali è stato aggiornato.
✎
NOTA
E’ necessario richiedere una “SCHEDA CI o CI+” al fornitore del servizio via cavo locale.
x
Estrarre delicatamente la “SCHEDA CI o CI+” tirandola con le dita prestando attenzione a non farla
x
cadere poiché potrebbe subire danni.
Inserire la “SCHEDA CI o CI+” nella direzione indicata sulla scheda stessa.
x
La posizione dell’alloggiamento COMMON INTERFACE può variare a seconda del modello.
x
La “SCHEDA CI o CI+” non è supportata in alcune nazioni e regioni; controllare con il rivenditore
x
autorizzato di zona.
In caso di problemi, contattare il fornitore del servizio.
x
Inserire una “SCHEDA CI o CI+” in grado di supportare le impostazioni dell’antenna. Lo schermo non
x
visualizzeràle immagini oppure queste saranno distorte.
Pannello posteriore
del televisore
Italiano - 12
Page 33
Connessione di rete
E’ possibile impostare il televisore in modo da poter accedere a Internet attraverso una LAN con un
collegamento via cavo o wireless.
Connessione di rete - Wireless
E’ possibile collegare il televisore alla LAN utilizzando un modem o un router wireless standard.
Porta LAN a
parete
Router IP wireless
(Router having DHCP server)
Cavo LAN
TV
L’adattatore LAN wireless Samsung supporta i protocolli di comunicazione IEEE 802,11a/b/g e n. Samsung
consiglia di utilizzare il protocollo IEEE 802,11n. La riproduzione di un video mediante connessione IEEE
802,11b/g potrebbe non essere fluida.
La maggior parte dei sistemi di rete wireless dispone di un sistema di sicurezza che implica l’uso di dispositivi
che accedano alla rete attraverso un AP o un router wireless (tipicamente un router IP wireless) per la
trasmissione di un codice di sicurezza crittografato denominato chiave di accesso.
Selezionando la modalità Pure High-throughput (Greenfield) 802,11n con crittografia di tipo WEP, TKIP o TKIP
AES (WPS2Mixed) per il proprio router wireless, i televisori Samsung non supporteranno una connessione
conforme alle nuove specifiche di certificazione Wi-Fi.
Connessione di rete - Via cavo
Esistono principalmente due modi per collegare il televisore alla rete via cavo, a seconda dell’impostazione di
rete. Di seguito vengono descritti più in dettaglio:
Porta Modem a parete
Modem esterno
(ADSL / VDSL / TV via cavo)
Pannello posteriore del televisore
Porta LAN a parete
Cavo LAN
✎
Non supportato quando la velocità di rete è inferiore a 10 Mbps.
✎
Usare un cavo Cat 5 per la connessione.
Italiano - 13
Cavo LANCavo modem
Pannello posteriore del televisore
Page 34
Come visualizzare il manuale elettronico
E-MANUAL
E’ possibile leggere l’introduzione e le istruzioni riguardanti le funzioni
memorizzate nel televisore.
O
MENUm → Supporto → e-Manual → ENTER
✎
Per tornare al manuale elettronico, premere E-MANUAL sul telecomando.
✎
Se il menu non è attivo, la funzione Prova ora non è disponibile.
E
Visualizzazione a schermo
Schermo TV: Visualizza la
schermata della sorgente di
ingresso corrente.
Guida: Visualizza la Guida
e-Manual o la Guida Prodotto.
Premere ENTER
E
.
Funzioni base
Cambiare la Modalità immagine preimpostata
Regolazione delle impostazioni delle immagini
Modifi ca del Formato immagine
Modifi ca delle Opzioni immagine
Confi gurazione del televisore con il PC
IndexGuida
Indice: Visualizza la schermata dell’indice.
X: Esce dal manuale elettronico.
Uso della Guida
Visualizzare la Guida del manuale elettronico e la Guida del prodotto premendo Guida.
Come visualizzare il manuale
elettronico
E’ possibile leggere l’introduzione e le istruzioni
riguardanti le funzioni memorizzate nel televisore.
m
→ Supporto → e-Manual →
O MENU
ENTER
E
Funzioni base
Cambiare la Modalità immagine preimpostata
Regolazione delle impostazioni delle immagini
Modifi ca del Formato immagine
Modifi ca delle Opzioni immagine
Confi gurazione del televisore con il PC
IndexGuida
Cambia categoria. Premere
l
o r per selezionare la categoria
desiderata.
Visualizza l’elenco dei menu
secondari. Premere ENTER
E
per selezionare il menu secondario
desiderato.
Cinema - quality 3D experience
3-Dimensional TVs add new depth and dimen-
sion to create larger-than life experiences. 3D
Active Glasses sync up with the 3D TV to produce
3D images that virtually leap off the screen. In
3D, i vostri programmi preferiti si trasformano
in un “reality” TV.
Ritorna
<Guida e-Manual>
Viene visualizzata la Guida del manuale elettronico
Viene visualizzata la Guida del prodotto come mostrato
come mostrato sopra.
Passaggio dal manuale elettronico ai menu corrispondenti.
Funzioni base > Cambiare la Modalità immagine preimpostata (5/10)
Cambiare la Modalità immagine preimpostata
■
Modalità immagine t
Selezionare il tipo di immagine preferita.
N Quando la sorgente di ingresso è impostata su PC, la Modalità immagine è
disponibile solo nelle opzioni Standard e Entertainment.
• Dinamica: Adatta per un ambiente illuminato.
• Standard: Adatta per condizioni di luce normali.
per TV LED
per TV PDP
/ Relax
• Naturale
• Film: Adatta per la visione di fi lm in un ambiente poco illuminato.
• Entertainment: (Solo in modalità PC): Adatta per la visione di fi lm e giochi.
Guida Prova ora Home Zoom Index
✎
Questa funzione non è disponibile in alcuni menu.
: Adatta per ridurre l’affaticamento della vista.
Prova ora
E-MANUAL
Italiano - 14
Ritorna
<Guida Prodotto>
sopra.
Immagine
Modalitàimmagine Standard
Luce cella 14
Contrasto 100
Luminosità 45
Nitidezza 50
Colore 50
Tint ( G/R ) G 50 R 50
Page 35
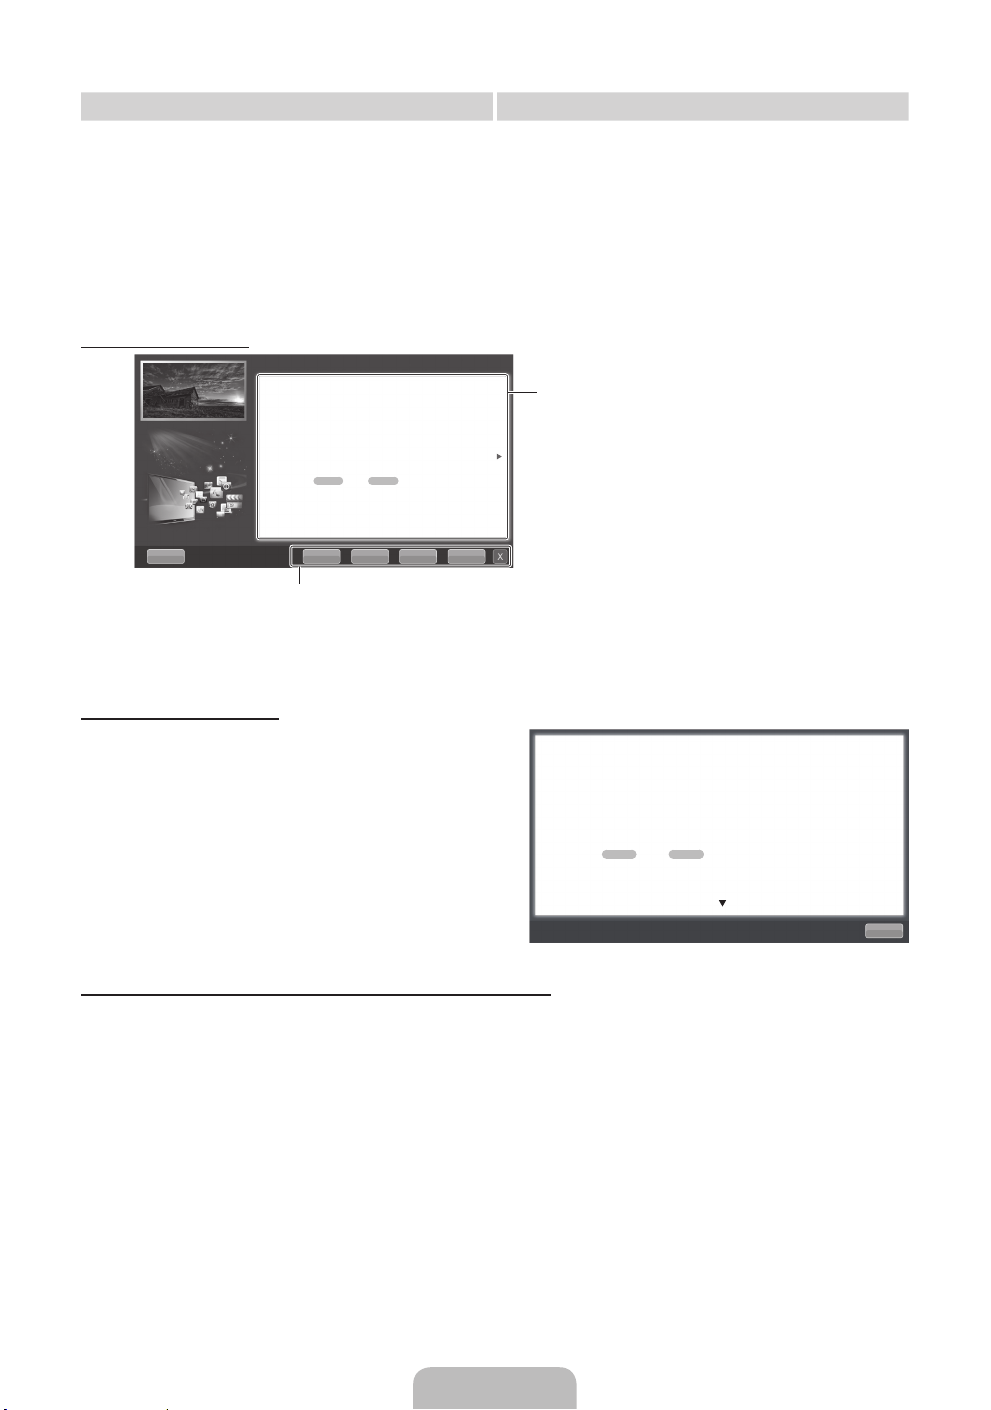
Metodo 1 Metodo 2
1. Selezionare Prova ora per eseguire il menu
corrispondente.
2. Per tornare alla schermata del manuale, premere
E-MANUAL.
Visione dei Contenuti
Funzioni base > Cambiare la Modalità immagine preimpostata (5/10)
Cambiare la Modalità immagine preimpostata
O MENUm → Immagine → Modalità immagine → ENTER
■
Modalità immagine t
Selezionare il tipo di immagine preferita.
N Quando la sorgente di ingresso è impostata su PC, la Modalità
immagine è disponibile solo nelle opzioni Standard e Entertainment.
• Dinamica: Adatta per un ambiente illuminato.
• Standard: Adatta per condizioni di luce normali.
per TV LED
per TV PDP
/ Relax
• Naturale
l’affaticamento della vista.
• Film: Adatta per la visione di film in un ambiente poco illuminato.
• Entertainment: (Solo in modalità PC): Adatta per la visione di
film e giochi.
Guida Prova ora Home Zoom Index
Prova ora: Visualizza i menu corrispondenti.
Home: Passa alla pagina home del manuale elettronico.
Zoom: Ingrandisce la schermata.
Indice: Visualizza la schermata dell’indice.
: Adatta per ridurre
E
1. Premere ENTER
alla selezione dell’Area
contenuti. Il messaggio “Eseguire?” verrà
visualizzato a schermo. Selezionare Sì quindi
E
premere ENTER
. Viene visualizzata la finestra
dei menu OSD.
2. Per tornare alla schermata del manuale, premere
E-MANUAL.
E
Area contenuti: Se è stato selezionato un
menu secondario, è possibile visualizzarne i
contenuti. Per passare alla pagina precedente o
successiva premere l o r.
Uso della modalità Zoom
Durante la visione delle istruzioni contenute nel
manuale elettronico, selezionare Zoom per ingrandire
lo schermo. E’ possibile scorrere la pagina ingrandita
u
utilizzando i tasti
✎
Per tornare alla schermata precedente, premere
o d.
RETURN.
Cambiare la Modalità immagine preimpostata
O MENUm → Immagine → Modalità immagine → ENTER
■
Modalità immagine t
Selezionare il tipo di immagine preferita.
N Quando la sorgente di ingresso è impostata su PC, la Modalità immagine è
disponibile solo nelle opzioni Standard e Entertainment.
• Dinamica: Adatta per un ambiente illuminato.
• Standard: Adatta per condizioni di luce normali.
per TV LED
• Naturale
• Film: Adatta per la visione di film in un ambiente poco illuminato.
• Entertainment: (Solo in modalità PC): Adatta per la visione di film e giochi.
/ Relax
per TV PDP
: Adatta per ridurre l’affaticamento della vista.
Ricerca di una parola chiave attraverso la pagina dell’indice
✎
Questa funzione potrebbe non essere supportata a seconda della lingua.
u
1. Per cercare una parola chiave, premere
l
2. Premere
3. Premere
o r per selezionare l’ordine desiderato, quindi premere ENTERE.
u
o d per selezionare una parola chiave da visualizzare, quindi premere ENTERE.
/ d / l / r per selezionare Indice.
4. E’ possibile visualizzare la schermata di istruzioni corrispondente del manuale elettronico.
✎
Per chiudere la schermata Index, premere RETURN.
E
Ritorna
Italiano - 15
Page 36
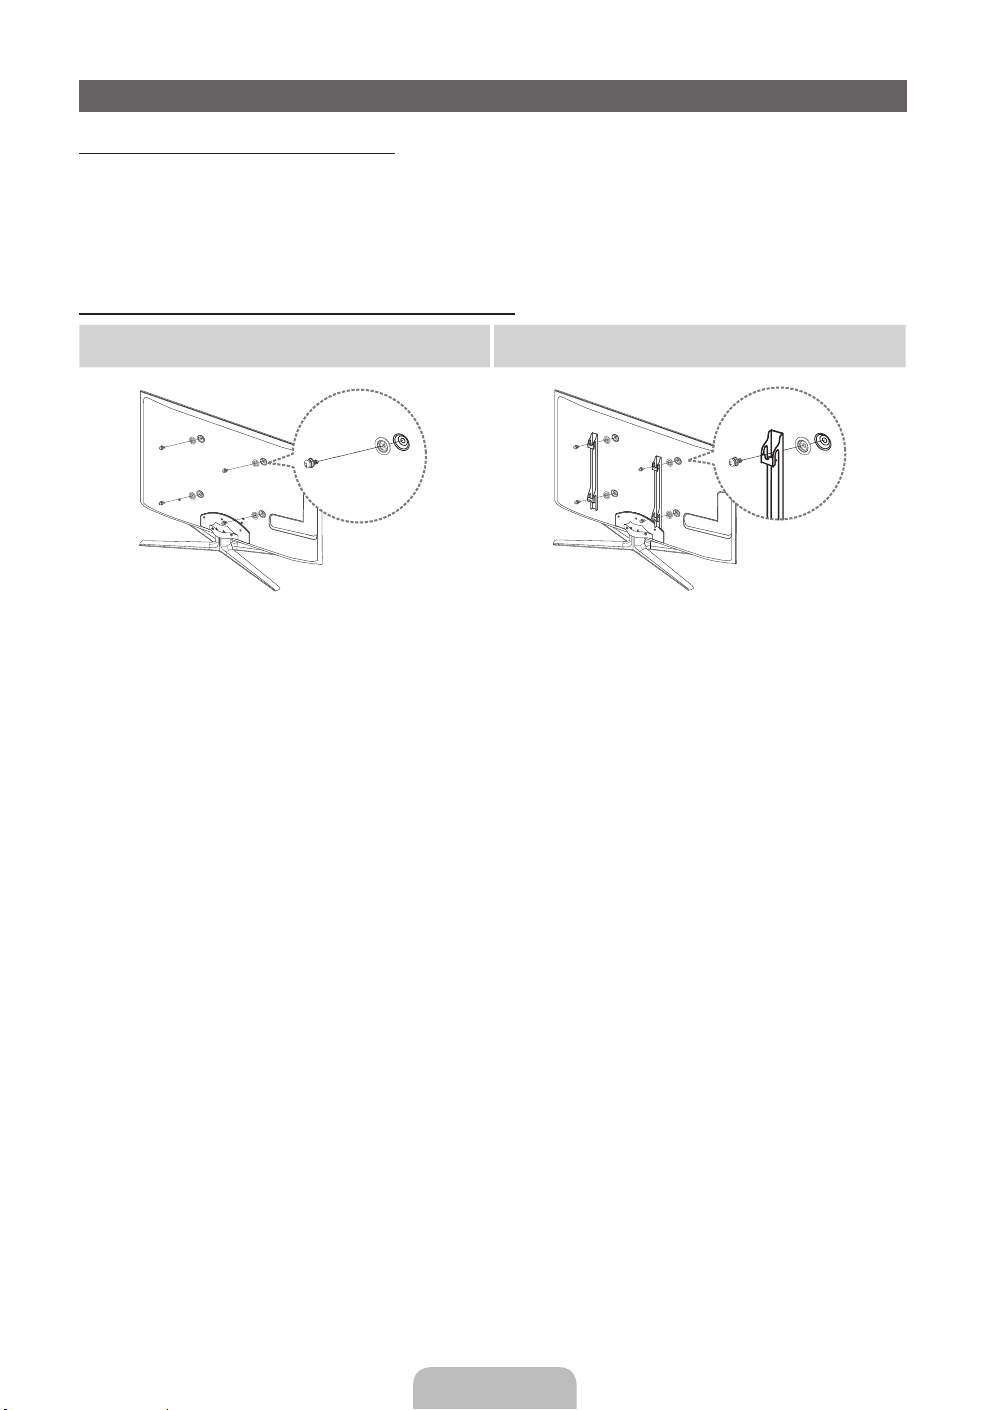
Installazione del supporto a parete
Installazione del kit di supporto a parete
Il kit di supporto a parete (venduto separatamente) consente di montare il televisore direttamente a una parete.
Per informazioni dettagliate sull’installazione a parete, consultare le istruzioni fornite insieme al kit. Rivolgersi a un
tecnico per il montaggio della staffa a parete.
Samsung Electronics non può essere ritenuta responsabile per eventuali danni al prodotto o infortuni causati da
una installazione autonoma del televisore da parte dell’utente.
Preparazione per l’installazione di un supporto a parete
Esempio A. Installazione del supporto a parete
SAMSUNG
1
Per installare un supporto a parete, utilizzare un anello
di ritenuta 1.
Esempio B. Installazione di un supporto a parete di
altra marca.
1
Italiano - 16
Page 37
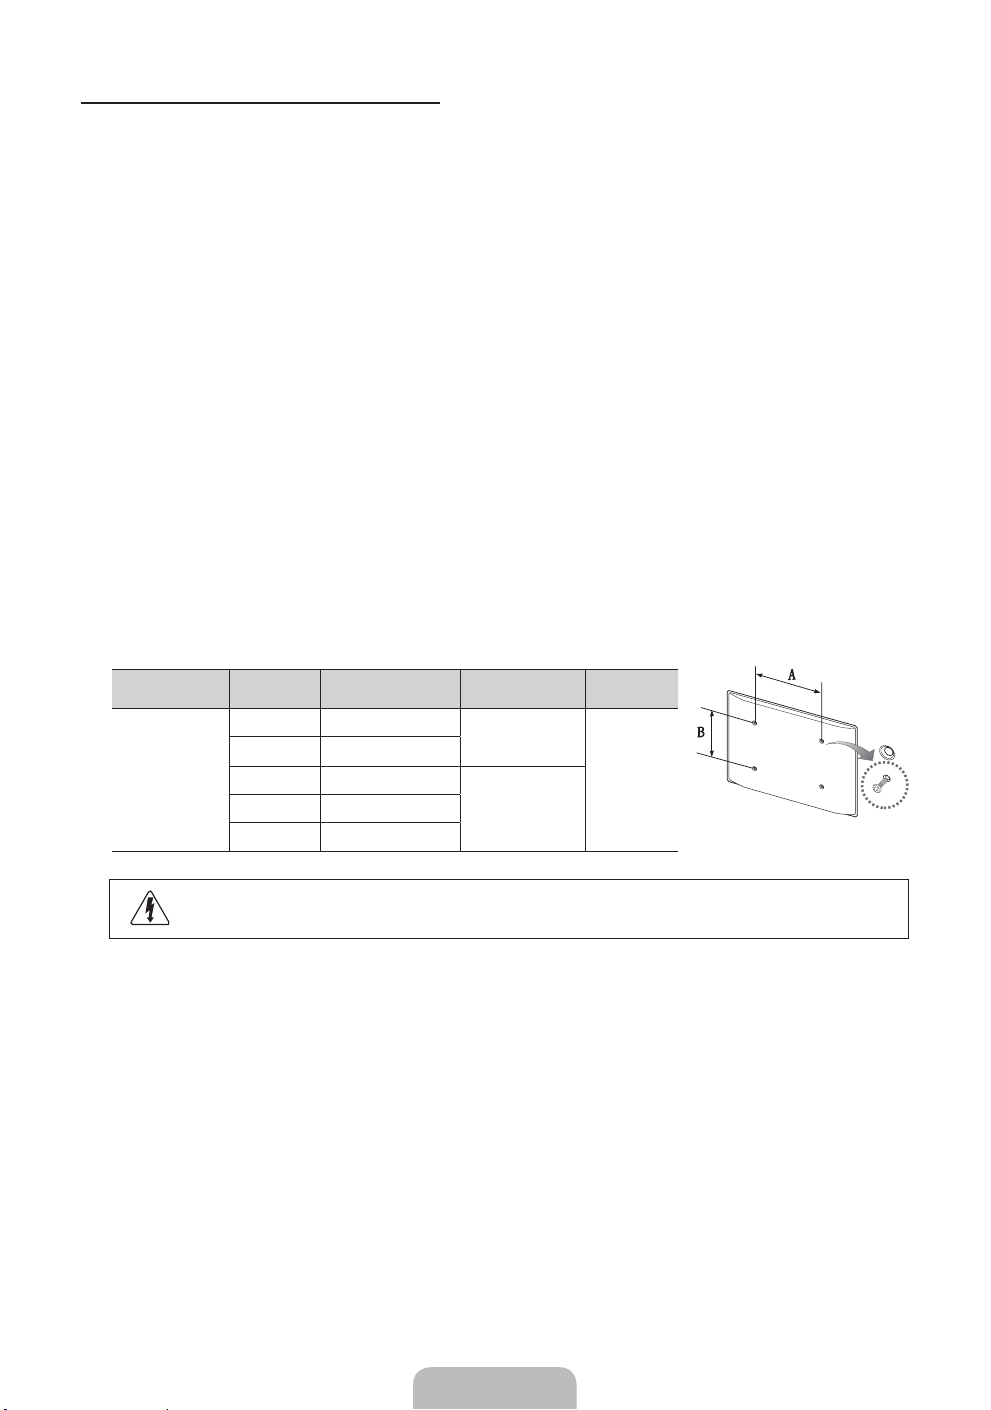
Specifiche del kit di supporto a parete (VESA)
✎
Il kit di montaggio a parete non è fornito in dotazione ma è venduto separatamente.
Installare il supporto su una parete solida perpendicolare al pavimento. Se il supporto deve essere fissato ad altri
tipi di materiale, consultare il rivenditore di zona. Una installazione a soffitto o su pareti inclinate può provocare la
caduta dell’unità e lesioni personali.
✎
NOTA
Nella tabella sotto riportata vengono indicate le dimensioni standard dei kit di supporto a parete.
x
All’acquisto di un kit di supporto a parete, verrà fornita la guida all’installazione e tutte le parti necessarie
x
per il montaggio.
Non utilizzare viti non conformi agli standard VESA.
x
Non utilizzare viti più lunghe delle dimensioni standard o non conformi alle specifiche dello standard
x
VESA. Viti troppo lunghe possono danneggiare i componenti interni del televisore.
Per montaggi a parete non conformi alle specifiche delle viti standard VESA, la lunghezza delle viti
x
potrebbe differire in base alle loro specifiche.
Non serrare le viti con eccessiva forza poiché ciò potrebbe danneggiare il prodotto o causarne la caduta
x
provocando lesioni personali. Samsung non può essere ritenuta responsabile per tali incidenti.
Samsung non può essere ritenuta responsabile per eventuali danni o lesioni personali qualora vengano
x
usati kit di supporto a parete non conformi allo standard VESA o l’utente non segua le istruzioni di
installazione fornite.
Il nostro modello da 55” non è conforme alle specifiche VESA. Di conseguenza, per questo modello è
x
necessario utilizzare l’apposito kit di supporto a parete Samsung.
Non montare il televisore con una inclinazione superiore ai 15 gradi.
x
Famiglia di
prodotti
TV LED
pollici Spec. VESA (A * B) Vite standard Quantità
19~22 75 X 75
23~27 200 X 100
32~40 200 X 200
60~65 600 X 400
M4
4
M846~55 400 X 400
Non installare il kit di supporto a parete mentre il televisore è acceso. In caso contrario,
potrebbero verificarsi incidenti con lesioni personali causate da scosse elettriche
Italiano - 17
Page 38
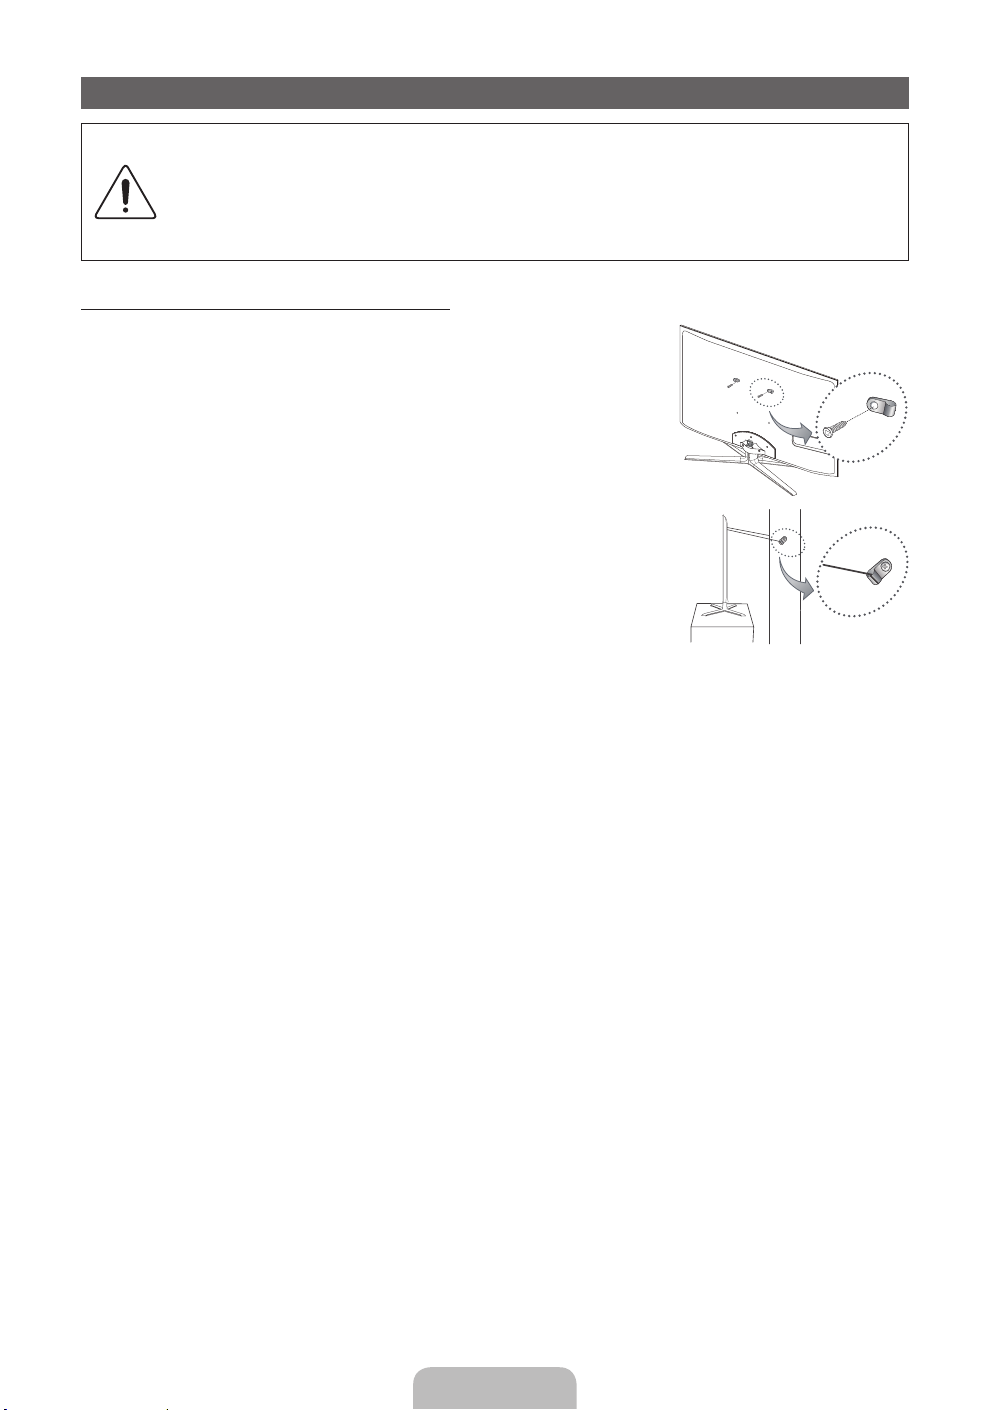
Fissaggio del televisore alla parete
Attenzione: Tirare, spingere o arrampicarsi sul televisore sono azioni che possono provocarne la
caduta. Si raccomanda di non far giocare i bambini con il televisore poiché potrebbero appendersi
ad esso destabilizzandolo; se ciò dovesse verificarsi, il televisore potrebbe cadere provocando
lesioni personali gravi e perfino mortali. Seguire tutte le precauzioni di sicurezza descritte nella
documentazione allegata. Per una maggiore stabilità e sicurezza del prodotto, installare il
dispositivo anticaduta come segue.
Per evitare una eventuale caduta del televisore
1. Avvitare saldamente i ganci alla parete. Verificare che le viti siano state
fissate saldamente alla parete.
✎
A seconda del tipo di parete, potrebbe essere necessario utilizzare
anche un fisher.
✎
Poiché i ganci, le viti e il cavo di sicurezza non sono forniti in
dotazione, è necessario acquistare tali materiali separatamente.
2. Rimuovere le viti dal centro del pannello posteriore del televisore, inserirle
nei ganci, quindi avvitarle nuovamente al televisore.
✎
Le viti potrebbero non essere fornite insieme al prodotto. In questo
caso, acquistare le viti separatamente in base alle specifiche qui
riportate.
✎
Specifiche delle viti
Per i modelli da 19 ~ 27 pollici: M4
x
Per i modelli da 32 ~ 65 pollici: M8
x
3. Collegare i ganci fissati al televisore a quelli fissati alla parete utilizzando un cavo resistente, quindi legarlo
strettamente.
✎
NOTA
Installare il televisore il più possibile vicino alla parete in modo che non possa cadere all’indietro.
x
Collegare il cavo in modo che i ganci fissati alla parete si trovino allineati o leggermente più in basso
x
di quelli fissati al televisore.
Slegare il cavo prima di spostare il televisore.
x
4. Accertarsi che tutte le connessioni siano adeguatamente fissate. Controllare periodicamente le connessioni
per verificarne l’eventuale usura o rottura. Per qualsiasi dubbio relativo alla sicurezza delle connessioni
effettuate, contattare un installatore specializzato.
Parete
Italiano - 18
Page 39
Risoluzione dei problemi
In caso di domande sul funzionamento del televisore, consultare per prima cosa l’elenco sottostante. Se
nessuno dei consigli si dimostra utile per risolvere il problema, visitare il sito “www.samsung.com”, quindi fare clic
sulla voce Supporto, oppure chiamare il numero del Call Center riportato in ultima pagina del manuale.
Problemi Soluzioni e spiegazioni
Il televisore non si accende. • Verificare che la spina del cavo di alimentazione CA sia correttamente collegata a una presa a muro e
Nessuna immagine/video. • Verificare le connessioni dei cavi (scollegare e ricollegare tutti i cavi del televisore e dei dispositivi
Il telecomando non funziona. • Sostituire le batterie prestando attenzione a rispettare le polarità (+/–).
Il telecomando del ricevitore via cavo/
satellitare non riesce ad accendere o
spegnere il televisore o a regolare il volume.
✎
Lo schermo LED TFT utilizza un pannello composto da sotto pixel la cui produzione richiede una speciale
tecnologia. Tuttavia, sullo schermo alcuni pixel potrebbero risultare più luminosi o più scuri. Questo
fenomeno non ha alcun impatto sulle prestazioni del prodotto.
✎
E’ possibile mantenere il televisore nelle condizioni ottimali eseguendo regolarmente tramite USB
l’aggiornamento del firmware all’ultima versione disponibile sul sito (samsung.com → Supporto →
Download).
il televisore sia acceso.
• Accertarsi che la presa a muro sia funzionante.
• Premere il tasto POWER sul televisore per verificare che il problema non sia il telecomando. Se il
televisore si accende, vedere la sezione “Il telecomando non funziona” riportata sotto.
esterni).
• Impostare l’uscita video del dispositivo esterno (ricevitore via cavo/STB, lettore DVD, Blu-ray, ecc)
in modo che le connessioni corrispondano all’ingresso del televisore. Ad esempio, se l’uscita di un
dispositivo esterno è HDMI, deve essere collegata a un ingresso HDMI sul televisore.
• Verificare che i dispositivi collegati siano accesi.
• Selezionare la corretta sorgente del televisore premendo il tasto SOURCE sul telecomando.
• Riavviare il dispositivo dopo aver scollegato e ricollegato la spina di alimentazione.
• Pulire la finestra di trasmissione del sensore sul telecomando.
• Puntare il telecomando direttamente verso il televisore a una distanza di 1,5~2 metri.
• Programmare il telecomando del ricevitore via cavo/satellitare in modo che possa controllare le
funzioni del televisore. Consultare il manuale dell’utente del ricevitore via cavo/satellitare per il codice
TV SAMSUNG.
Licenza
Italiano - 19
Page 40
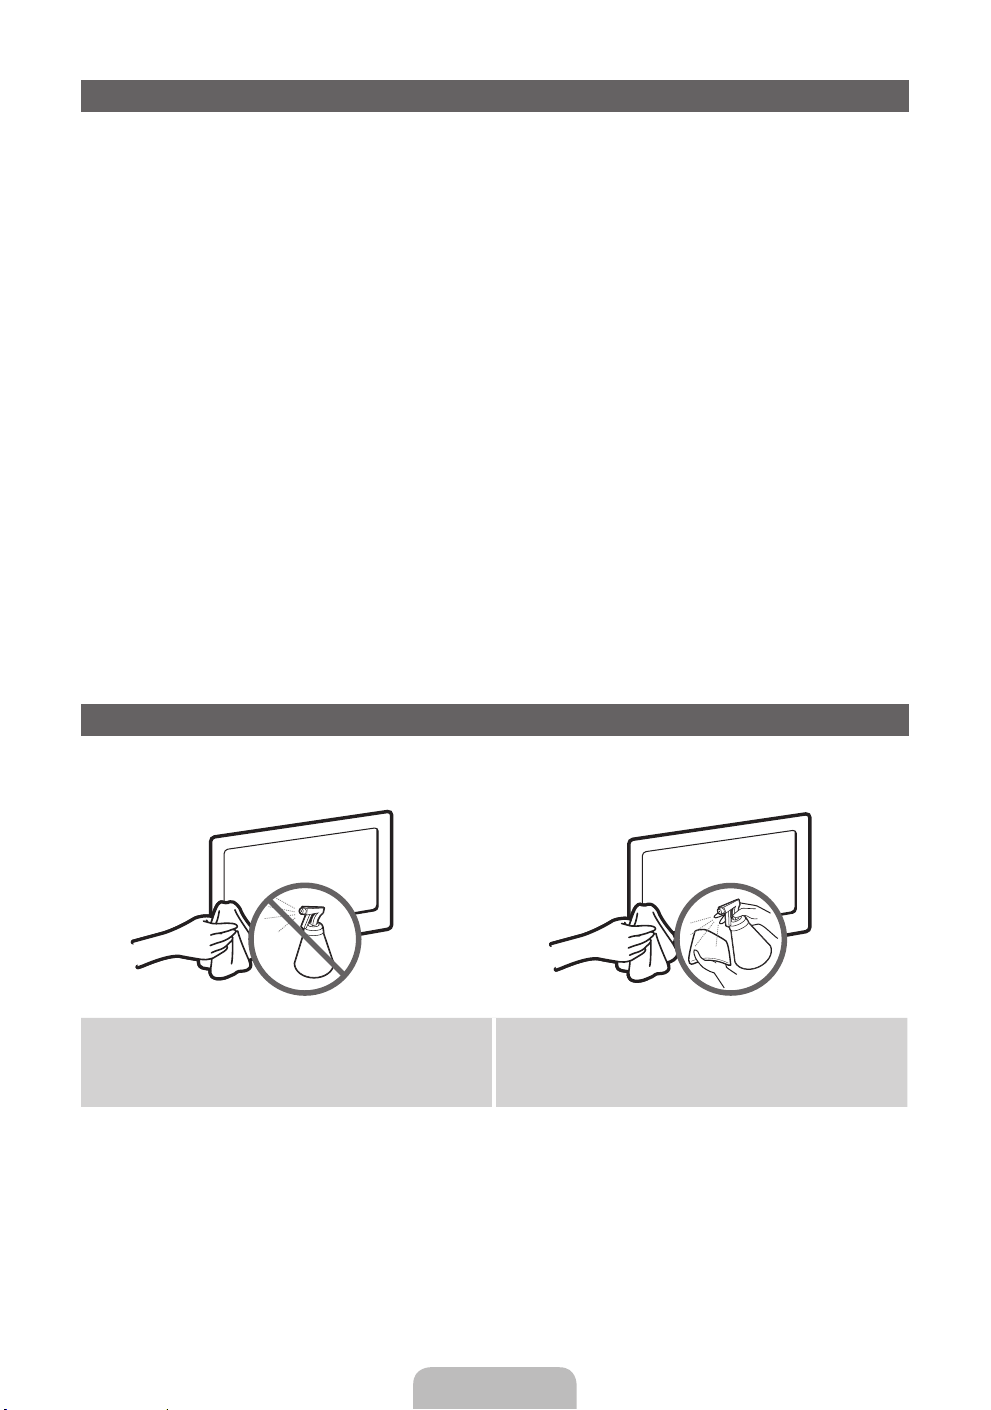
Elenco delle funzioni disponibili
Eccellente networking e interfaccia digitale: Con un sintonizzatore digitale HD incorporato, le trasmissioni HD
senza abbonamento possono essere visualizzate senza ricevitore via cavo / ricevitore STB (Set-Top-Box)
satellitare.
3D
Questa entusiasmante nuova funzione consente la visione tridimensionale dei contenuti 3D.
SMART HUB
Il Gateway a tutti i contenuti integrati in un’unica posizione
• Una guida semplice alle varie opzioni di intrattenimento
• La UI consente un controllo semplice e intuitivo delle opzioni di intrattenimento
• Accesso a diverse Apps, il cui numero cresce giorno per giorno
• Personalizzazione del televisore, raggruppando e ordinando le Apps in base ai propri gusti
AllShare™
AllShare™ collega televisore e cellulare Samsung / dispositivi compatibili attraverso una rete.
Anynet+ (HDMI-CEC)
Anynet+ è una funzione che permette di controllare mediante il telecomando del televisore Samsung tutti i
dispositivi Samsung collegati che supportano Anynet+.
Skype
Con Skype è possibile salutare o condividere una risata con chiunque, ovunque. Comunicate con chiunque in
tutto il mondo!
Conservazione e manutenzione
✎
Eventuali adesivi applicati allo schermo TV potrebbero lasciare residui una volta rimossi. Pulire lo schermo
prima di guardare i programmi TV.
Non spruzzare acqua o soluzioni detergenti
direttamente sul prodotto. Qualsiasi liquido che riesca
a penetrare all’interno del prodotto può provocare
guasti, incendio o una scossa elettrica.
Pulire il prodotto con un panno morbido appena
inumidito.
Italiano - 20
Page 41
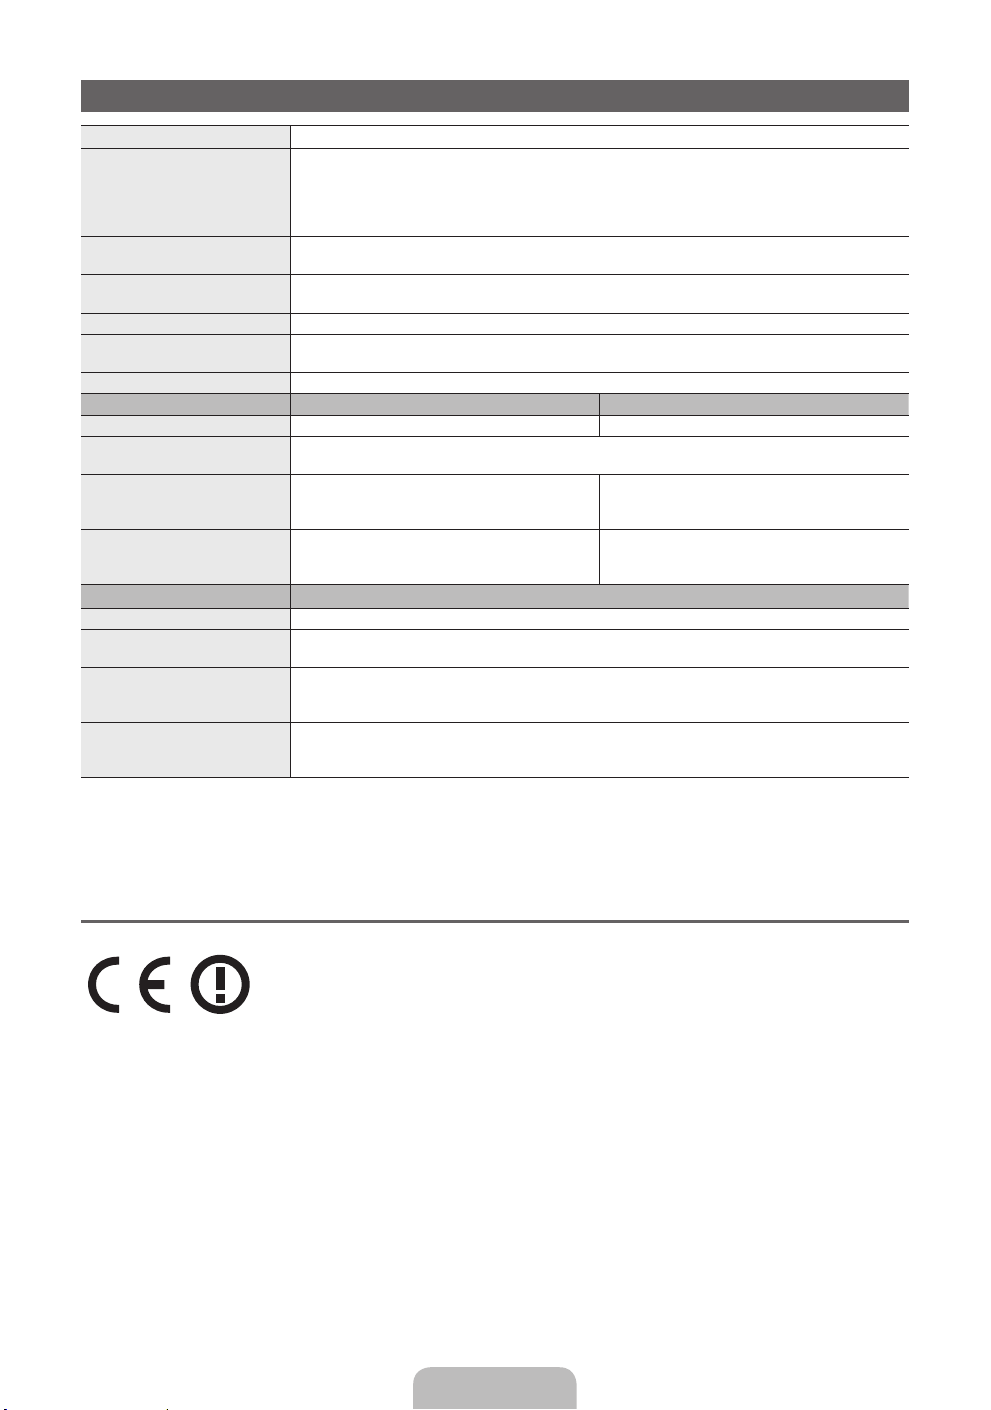
Specifiche
Risoluzione del display 1920 x 1080
Caratteristiche ambientali
Temperatura di esercizio
Umidità di esercizio
Temperatura di stoccaggio
Umidità di stoccaggio
Sistema TV Analogico: B/G, D/K, L, I (in base alla nazione selezionata)
Sistema colore/video Analogico: PAL, SECAM, NTSC-4.43, NTSC-3.58, PAL60
Sistema audio BG, DK, L, NICAM, MPEG1, DD, DD+, HEAAC.
HDMI IN Video: 1080 24p, 1080p, 1080i, 720p, 576p, 480p
Piedistallo ruotabile (Sinistra / Destra) -20˚ ~ 20˚
Nome modello UE40D7000 UE46D7000
Dimensione schermo 40 pollici 46 pollici
Audio
(Uscita) 2 x 10 W
Dimensioni (Lar x Pro x Alt)
Corpo
Con piedistallo
Peso
Senza piedistallo
Con piedistallo
Nome modello
Dimensione schermo 55 pollici
Audio
(Uscita) 2 x 15 W
Dimensioni (Lar x Pro x Alt)
Corpo
Con piedistallo
Peso
Senza piedistallo
Con piedistallo
Digitale: MPEG-2 MP@ML, MPEG-4, H.264/AVC MP@L3, [email protected], [email protected]
916,0 X 29,7 X 531,8 mm
916,0 X 241,3 X 603,6 mm
10,1 kg
11,5 kg
Da 10°C a 40°C (Da 50°F a 104°F)
Dal 10% al 80%, senza condensa
Da -20°C a 45°C (Da -4°F a 113°F)
Dal 5% al 95%, senza condensa
Digitale: DVB-T/DVB-C/DVB-S2
Audio: 2Ch Linear PCM 32/44.1/48kHz, 16/20/24bits.
1048,5 X 29,7 X 606,3 mm
1048,5 X 276,7 X 683,1 mm
12,5 kg
14,4 kg
UE55D7000
1240,0 X 29,7 X 714,1 mm
1240,0 X 309,8 X 790,9 mm
16,1 kg
18,6 kg
✎
Design e specifiche sono soggetti a modifiche senza preavviso.
✎
Per l’alimentazione elettrica e il consumo di corrente, consultare l’etichetta apposta al prodotto.
¦ Raccomandazioni - Solo UE
• Con la presente, Samsung Electronics dichiara che questo TV LED è conforme ai requisiti essenziali e alle
altre clausole pertinenti indicate nella Direttiva 1999/5/CE.
• La Dichiarazione di conformità ufficiale è reperibile all’indirizzo http://www.samsung.com, accendendo alla
pagina Supporto > Certificati CE, e immettendo i dati richiesti per l’identificazione del prodotto.
• Questa apparecchiatura può essere utilizzata solo in interno.
• L’uso di questa apparecchiatura è consentito in tutti i paesi europei.
Italiano - 21
Page 42
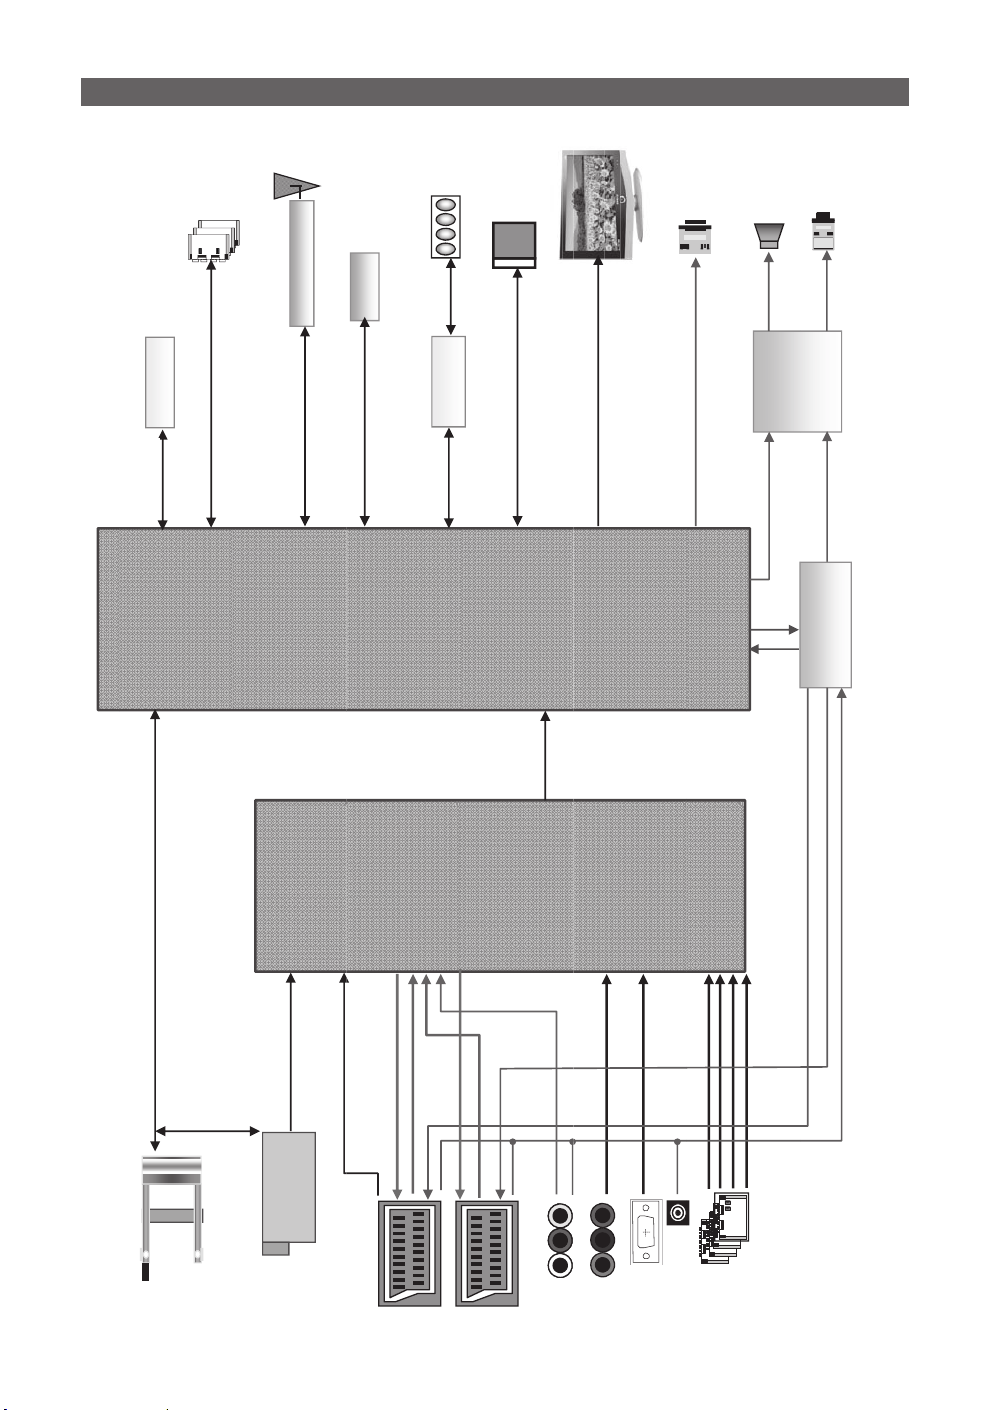
Diagrammi a blocchi
USB1/2/3
Wireless
Module_11n
Bluetooth
Memory
USB 2.0
Memory I/F
IR/Key
Sub Micom
LAN
Optical
Head Phone
SPK
Audio ADC/ DAC
Main chipset
TTL Out
TS I/F
CVBS
TS I/F
SCART1 RGB
SCART1 LR
SCART1 CVBS
SCART1 CVBS
SCART2 CVBS
• S/W
• ADC
• HDMI Rx
(SCART2 LR OUT)
YPbPr
RGB HV
SCART2 LR
SCART2 CVBS
AV CVBS
Tuner
AV In
CI
AV In
Component
PC
(4ea)
HDMI
PC/DVI Audio
Page 43

This page is intentionally
left blank.
Page 44
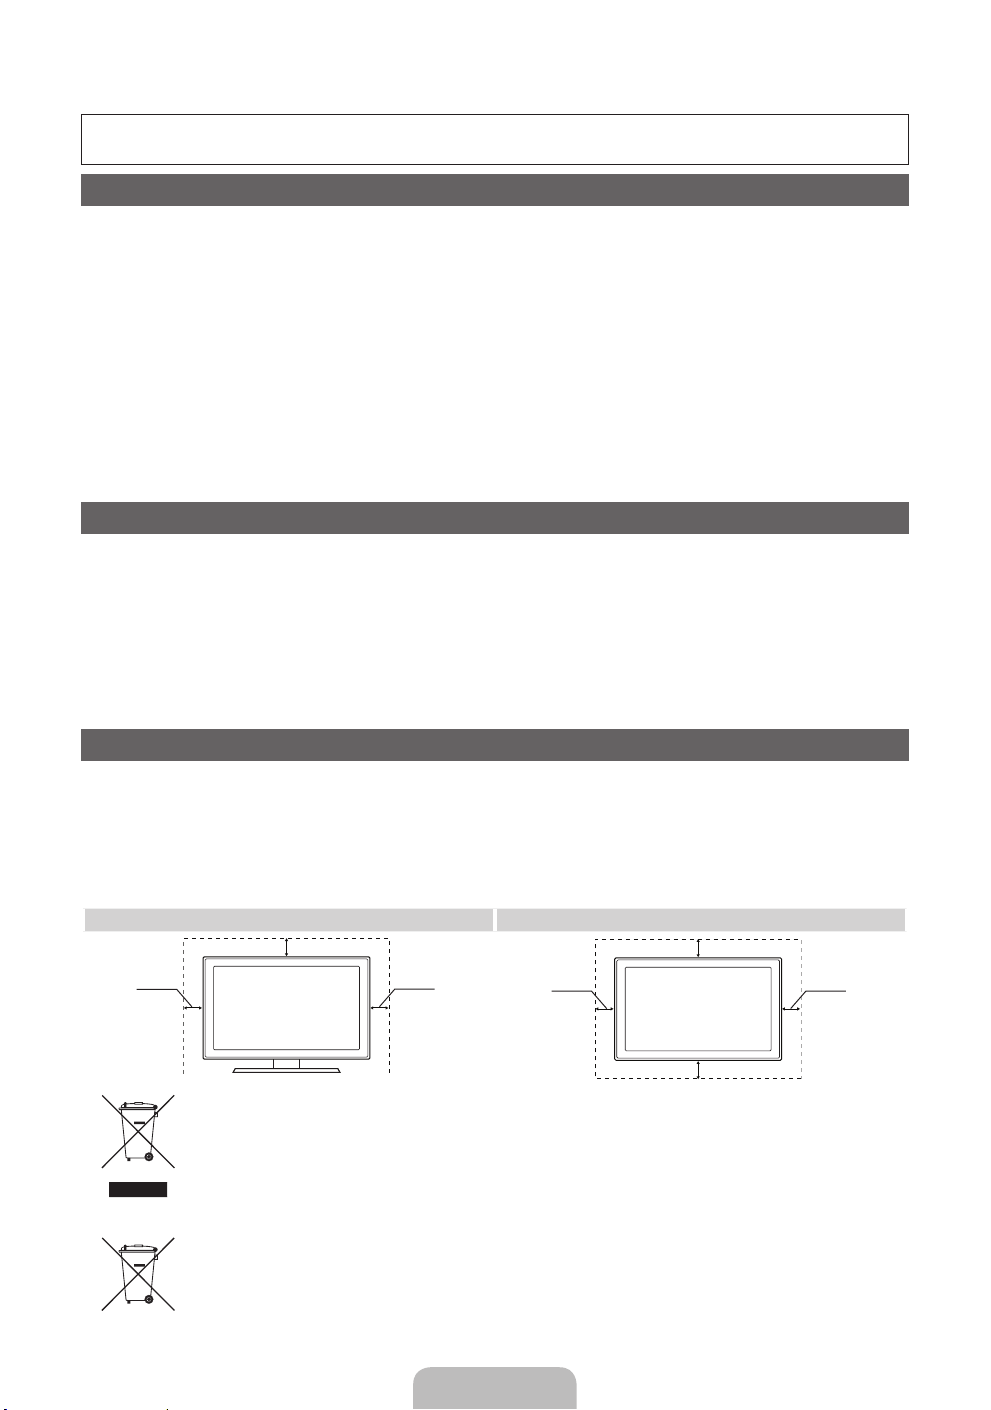
Weitere Informationen zur Verwendung des e-Manuals (S. 14)
Die Abbildungen und Illustrationen in diesem Handbuch dienen nur zur Information und können vom
tatsächlichen Aussehen des Geräts abweichen. Änderungen an Ausführung und technischen Daten vorbehalten.
Hinweis zu Digitalfernsehen
1. Die Funktionalitäten für Digital TV (DVB) stehen nur in Ländern/Regionen zur Verfügung, in denen digitale terrestrische DVB-T-Signale (MPEG2 und
MPEG4 AVC) gesendet werden oder in denen Sie Zugang zu einem kompatiblen Kabelfernsehdienst mit DVB-C (MPEG2 und MPEG4 AAC) haben.
Fragen Sie Ihren örtlichen Händler, wenn Sie Informationen über die Verfügbarkeit von DVB-T oder DVB-C in Ihrer Gegend benötigen.
2. DVB-T ist der Standard des europäischen DVB-Konsortiums für die terrestrische Versorgung mit digitalem Fernsehen, und DVB-C ist der Standard
des Konsortiums für die Versorgung mit digitalem Kabelfernsehen. Allerdings werden manche Unterscheidungsmerkmale wie EPG (elektrische
Programmzeitschrift), VOD (Video on Demand) usw. in dieser Spezifikation nicht berücksichtigt. Deshalb können sie zum jetzigen Zeitpunkt noch nicht
eingesetzt werden.
3. Zwar hält dieses Fernsehgerät die aktuellen Standards der DVB-T- und DVB-C-Spezifikationen [Version August 2008] ein, aber es kann nicht
garantiert werden, dass die Kompatibilität mit zukünftigen digitalen terrestrischen DVB-T und DBV-C-Signalen gewahrt bleibt.
4. In Abhängigkeit von den Ländern/Regionen, in denen dieses Fernsehgerät eingesetzt wird, verlangen manche Kabelfernsehanbieter zusätzliche
Gebühren für solch einen Dienst, und möglicherweise wird verlangt, dass Sie den Vertragsbedingungen des Unternehmens zustimmen.
5. Manche Digitalfernsehfunktionen sind in einigen Ländern oder Regionen möglicherweise nicht verfügbar, und DVB-C-Signale kann das Gerät bei
manchen Kabelfernsehanbietern möglicherweise nicht fehlerfrei verarbeiten.
6. Für weitere Informationen setzen Sie sich bitte mit dem Samsung-Kundendienstzentrum in Verbindung.
Die Empfangsqualität des Fernsehgeräts kann durch Unterschiede bei den Sendeverfahren in verschiedenen Ländern beeinträchtigt werden.
✎
Kontrollieren Sie die Leistung des Fernsehgeräts bei Ihrem örtlichen SAMSUNG-Händler oder wenden Sie sich an das Samsung-Callcenter um
festzustellen, ob sich die Empfangsqualität durch Ändern der Fernseheinstellungen verbessern lässt.
Warnung bei Standbildern
Vermeiden Sie die Anzeige von Standbildern (wie z.B. JPEG-Bilddateien) oder Standbildelementen (wie z.B. Senderlogos, Panorama- oder 4:3-Bilder,
Aktien- oder Laufschriften mit Nachrichten am unteren Bildschirmrand usw.) auf dem Bildschirm. Durch lang anhaltende Anzeige von Standbildern kann es
zu Schattenbildern auf dem LED-Bildschirm kommen, wodurch die Bildqualität beeinträchtigt wird. Um die Gefahr dieses Effekts zu vermindern, befolgen
Sie bitte die nachfolgenden Empfehlungen:
• Vermeiden Sie es, für lange Zeit denselben Fernsehsender anzuzeigen.
• Versuchen Sie, Abbildungen immer als Vollbild anzuzeigen. Verwenden Sie das Bildformatmenü des Fernsehgeräts, um die beste Anzeigemöglichkeit
zu finden.
• Reduzieren Sie die Helligkeits- und Kontrastwerte soweit wie möglich, um immer noch die gewünschte Bildqualität zu erreichen. Zu hohe Werte
können das Ausbrennen beschleunigen.
• Verwenden Sie regelmäßig alle Funktionen Ihres Fernsehgeräts, die dazu dienen, das Einbrennen von Bildern und das Ausbrennen des Bildschirms zu
reduzieren. Weitere Informationen hierzu finden Sie im e-Manual.
Absichern des Aufstellbereichs
Halten Sie die erforderlichen Abstände zwischen dem Gerät und anderen Objekten (z.B. Wänden) ein, um ausreichende Lüftung sicherzustellen.
Wenn Sie dies nicht tun, besteht die Gefahr, dass aufgrund eines Anstiegs der Temperatur im Innern des Geräts ein Brand ausbricht oder andere Probleme
mit dem Gerät auftreten.
Wenn Sie einen Standfuß oder eine Wandhalterung einsetzen, verwenden Sie ausschließlich Teile von Samsung Electronics.
✎
• Wenn Sie Teile eines anderen Herstellers verwenden, kann es zu Problemen mit dem Gerät oder zu Verletzungen kommen, weil das Gerät
herunterfällt.
Das Aussehen kann sich je nach Gerät unterscheiden.
✎
• Gehen Sie beim Anschließen des Fernsehgeräts vorsichtig vor, da einige Teile warm werden können.
Aufstellen des Geräts mit dem Standfuß Installation des Geräts mit der Wandhalterung
10 cm
10 cm10 cm
Korrekte Entsorgung von Altgeräten (Elektroschrott)
(In den Ländern der Europäischen Union und anderen europäischen Ländern mit einem separaten Sammelsystem)
Die Kennzeichnung auf dem Produkt, Zubehörteilen bzw. auf der dazugehörigen Dokumentation gibt an, dass das Produkt und Zubehörteile (z. B. Ladegerät,
Kopfhörer, USB-Kabel) nach ihrer Lebensdauer nicht zusammen mit dem normalen Haushaltsmüll entsorgt werden dürfen. Entsorgen Sie dieses Gerät und
Zubehörteile bitte getrennt von anderen Abfällen, um der Umwelt bzw. der menschlichen Gesundheit nicht durch unkontrollierte Müllbeseitigung zu schaden.
Helfen Sie mit, das Altgerät und Zubehörteile fachgerecht zu entsorgen, um die nachhaltige Wiederverwertung von stofflichen Ressourcen zu fördern. Private
Nutzer wenden sich an den Händler, bei dem das Produkt gekauft wurde, oder kontaktieren die zuständigen Behörden, um in Erfahrung zu bringen, wo Sie das
Altgerät bzw. Zubehörteile für eine umweltfreundliche Entsorgung abgeben können. Gewerbliche Nutzer wenden sich an ihren Lieferanten und gehen nach den
Bedingungen des Verkaufsvertrags vor. Dieses Produkt und elektronische Zubehörteile dürfen nicht zusammen mit anderem Gewerbemüll entsorgt werden.
Korrekte Entsorgung der Batterien dieses Produkts
(In den Ländern der Europäischen Union und anderen europäischen Ländern mit einem separaten Altbatterie-Rücknahmesystem)
Die Kennzeichnung auf der Batterie bzw. auf der dazugehörigen Dokumentation oder Verpackung gibt an, dass die Batterie zu diesem Produkt nach seiner
Lebensdauer nicht zusammen mit dem normalen Haushaltsmüll entsorgt werden darf. Wenn die Batterie mit den chemischen Symbolen Hg, Cd oder Pb
gekennzeichnet ist, liegt der Quecksilber-, Cadmium- oder Blei-Gehalt der Batterie über den in der EG-Richtlinie 2006/66 festgelegten Referenzwerten.
Wenn Batterien nicht ordnungsgemäß entsorgt werden, können sie der menschlichen Gesundheit bzw. der Umwelt schaden. Bitte helfen Sie, die natürlichen
Ressourcen zu schützen und die nachhaltige Wiederverwertung von stofflichen Ressourcen zu fördern, indem Sie die Batterien von anderen Abfällen getrennt
über Ihr örtliches kostenloses Altbatterie- Rücknahmesystem entsorgen.
10 cm
10 cm
10 cm
10 cm
Deutsch - 2
Page 45
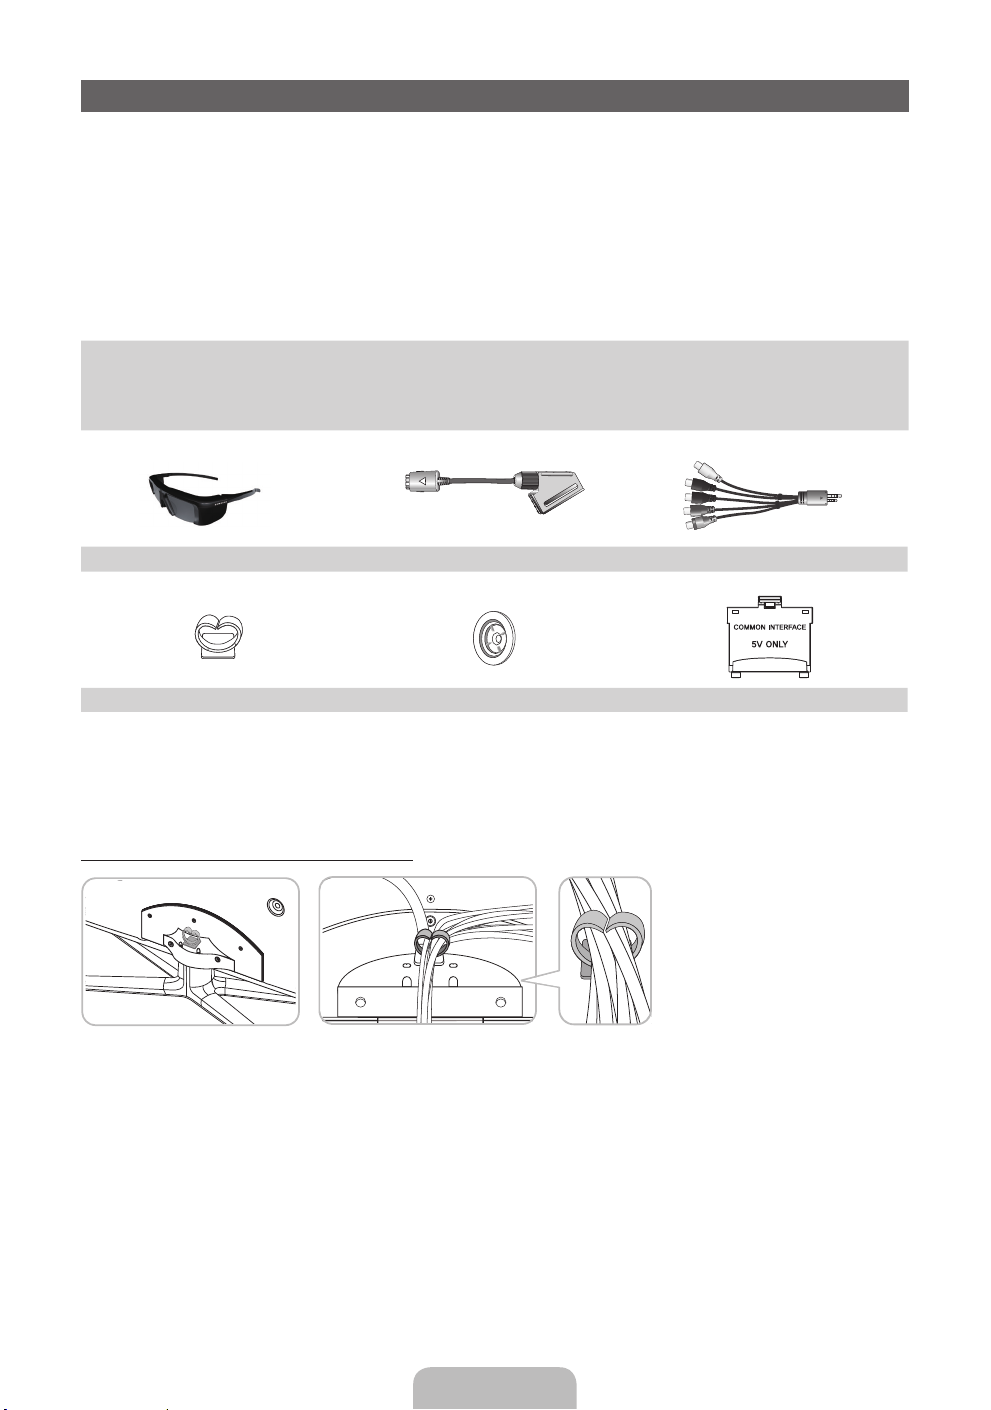
Zubehör
✎
Vergewissern Sie sich, dass im Lieferumfang des Fernsehgeräts folgende Komponenten enthalten sind.
Falls irgendwelche Teile fehlen sollten, setzen Sie sich bitte mit Ihrem Händler in Verbindung.
✎
Farbe und Form der Teile können sich je nach Modell unterscheiden.
✎
Kabel, die nicht zum Paketinhalt gehören, können gesondert erworben werden.
✎
Achten Sie darauf, dass Sie beim Auspacken keine Zubehörteile übersehen, die durch
Verpackungsmaterialien verdeckt werden.
VORSICHT: STELLEN SIE DIE VERBINDUNG DAUERHAFT HER, DAMIT DAS NETZTEIL NICHT VOM
[
GERÄT GETRENNT WERDEN KANN
• Fernbedienung und 2 Batterien (Typ AAA) • Netzkabel
• Bedienungsanleitung • Reinigungstuch
• Garantiekarte (nicht überall verfügbar) / Sicherheitshinweise
Samsung-3D-Aktivbrille
Standfuß mit Kabelhalter Haltering (4 Stück) CI Card Adapter
• Verwaltungskosten werden abgerechnet, wenn:
– (a) auf Ihren Wunsch ein Ingenieur zu Ihnen geschickt wird, und es liegt kein Defekt des Geräts vor
(d.h. wenn Sie dieses Benutzerhandbuch nicht gelesen haben)
– (b) Sie das Gerät in eine Reparaturwerkstatt bringen, und es liegt kein Defekt des Geräts vor
(d.h. wenn Sie dieses Benutzerhandbuch nicht gelesen haben)
• Der abgerechnete Betrag wird Ihnen mitgeteilt, ehe irgendwelche Arbeiten oder Kundenbesuche ausgeführt werden.
Montieren des Standfußes mit Kabelhalter
SCART-Adapte (2 EA) AV/Komponentenadapter
Deutsch - 3
Page 46
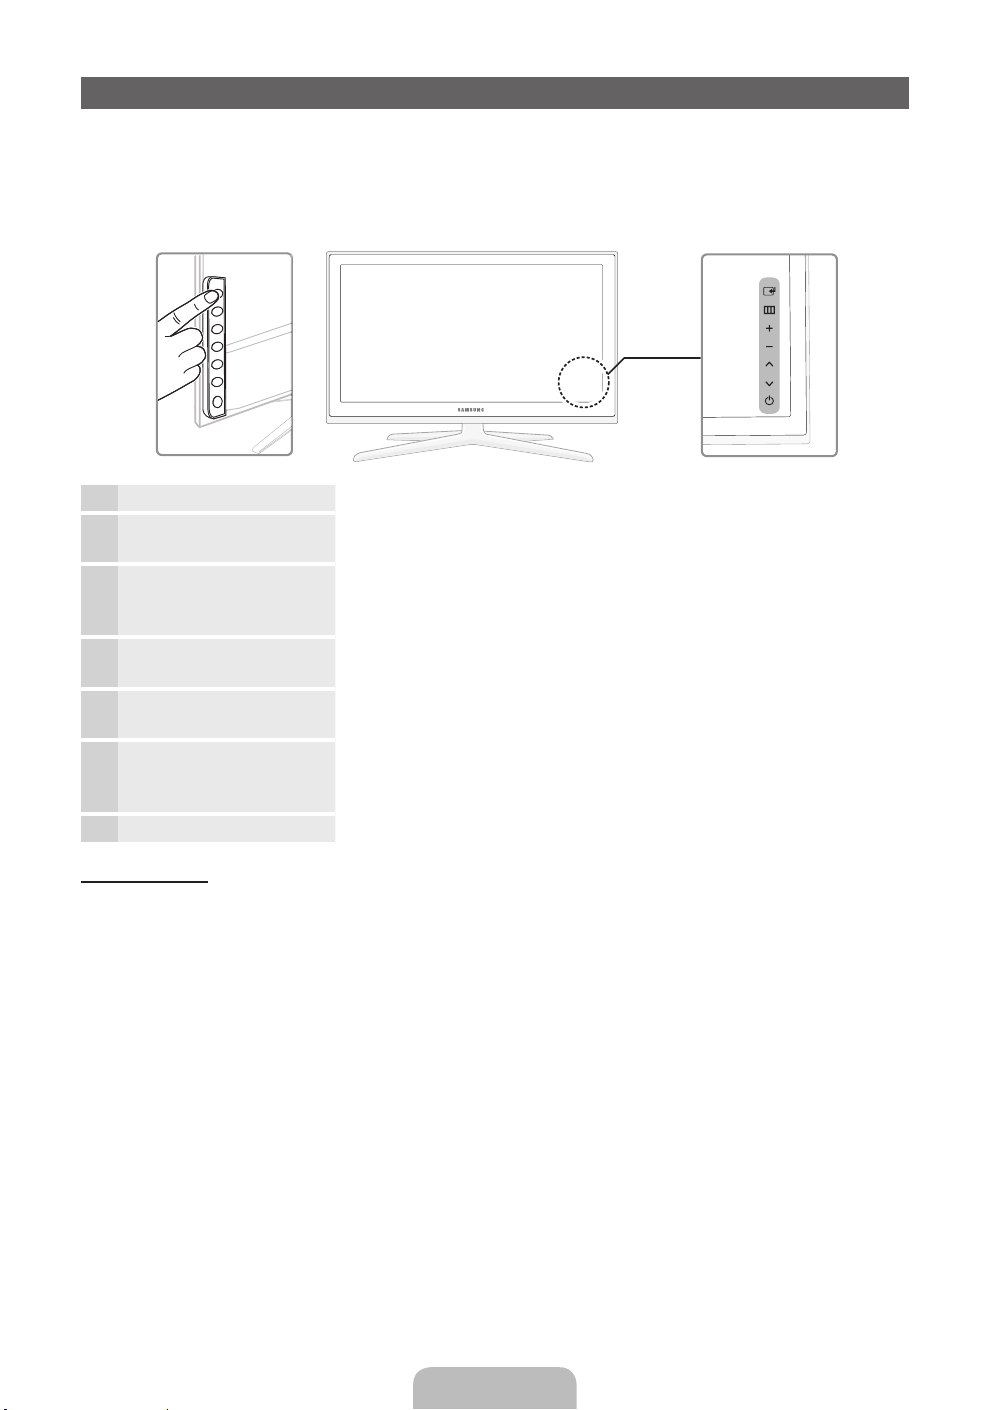
Bedienfeld
✎
Form und Farbe des Geräts können sich je nach Modell unterscheiden.
✎
Es gibt Bedienelemente auf der Rückseite des Fernsehgeräts. Wenn Sie die Taste berühren, wird das
Bedienungssymbol angezeigt.
✎
Jedes Objekt (z. B. ein Stromkabel), das sich in der Nähe der Systemsteuerung befindet kann zu einer
Rückseite des Fernsehgeräts
Fernbedienungssensor Richten Sie die Fernbedienung auf diesen Sensor am Fernsehgerät.
Netzanzeige Beim Einschalten des Fernsehgeräts blinkt die Netzleuchte kurz und erlischt
anschließend. Im Standby-Modus leuchtet die Anzeige permanent.
E
(Quelle)
m
(Menu)
o
(Lautstärke) Einstellen der Lautstärke. Im Bildschirmmenü können Sie die wv
k
(Kanal)
P
(Netz)
Umschalten zwischen allen verfügbaren Signalquellen. Im Bildschirmmenü
E
können Sie diese Taste wie die Eingabetaste ENTER
Fernbedienung verwenden.
Hiermit zeigen Sie die Funktionen des Fernsehgeräts in einem
Bildschirmmenü an.
-Schaltflächen wie die Tasten ◄ und ► auf der Fernbedienung verwenden.
Wechseln des Senders. Im Bildschirmmenü können Sie die
<>
-Schaltflächen wie die Tasten ▼ und ▲ auf der Fernbedienung
verwenden.
Ein- oder Ausschalten des Fernsehgeräts.
auf der
Standby-Modus
Der Standby-Modus ist nicht für längere Phasen der Abwesenheit gedacht (z.B. wenn Sie verreist sind). Eine
kleine Menge Strom wird auch dann noch verbraucht, wenn das Gerät mit dem Netzschalter ausgeschaltet
wurde. Es ist am besten, das Netzkabel aus der Steckdose zu ziehen.
Deutsch - 4
Page 47
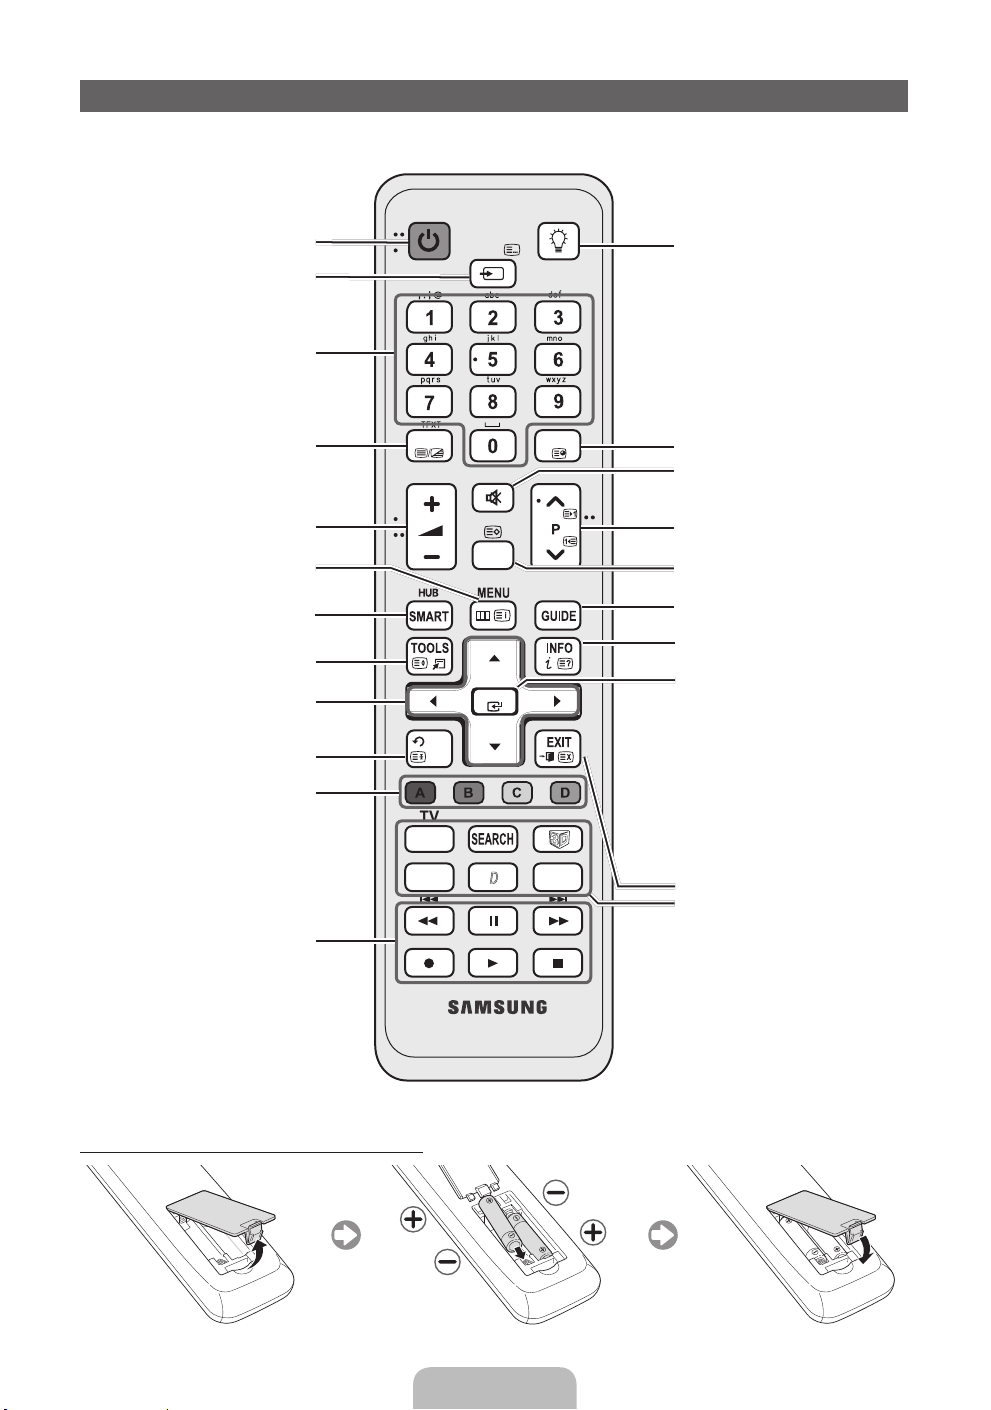
Fernbedienung
✎
Dies ist eine spezielle Fernbedienung für Personen mit eingeschränktem Sehvermögen. Die Netztaste
sowie die Tasten zum Einstellen des Senders und der Lautstärke sind in Braille beschriftet.
Ein- und Ausschalten des Fernsehgeräts.
Anzeigen und Auswählen der verfügbaren
Videosignalquellen.
Direkter Zugriff auf die Sender.
Alternativ wählen Sie „Videotext ein“,
„Doppel“, „Mix“ oder „Aus“
Einstellen der Lautstärke.
Das Bildschirmmenü wird geöffnet.
Verbindung zu verschiedenen
Anwendungsdiensten.
Hiermit können Sie häufig verwendete
Funktionen schnell auswählen.
Auswählen von Optionen im
Bildschirmmenü und Ändern von
Menüwerten.
Zurück zum vorherigen Menü.
Verwenden Sie diese Tasten bei der Arbeit
in den Menüs Kanal-Manager, SMART
HUB usw.
Verwenden Sie diese Tasten innerhalb
einer bestimmten Funktion. Einzelheiten
entnehmen Sie dem e-Manual.
POWER
SOURCE
TTX/MIX
RETURN
BACK
TV
SOCIAL
E-MANUAL
MUTE
CH LIST
OK
D
ON/OFF
PRE-CH
AD/SUBT.
Ein-/Ausschalten der Beleuchtung der
Fernbedienung. Wenn sie eingeschaltet
ist, werden die Tasten beim Drücken
kurz beleuchtet. (Wenn Sie die
Fernbedienung mit angeschalteter
Hintergrundbeleuchtung verwenden,
verkürzt dies die Lebensdauer der
Batterie.)
Zurück zum vorherigen Sender.
Drücken Sie diese Taste, um den Ton
vorübergehend auszuschalten.
Wechseln des Senders.
Anzeigen der Senderlisten auf dem
Bildschirm.
Anzeigen des elektronischen
Programmführers.
Anzeigen von Informationen auf dem
Bildschirm.
OFN-Sensor (Optical Finger Navigation)
Bei Vollbildanzeige des Browsers kann
der Sensor als Mauszeiger verwendet
werden.
Wenn Sie 30 Sekunden lang keine Taste
drücken, wird der Sensor automatisch
deaktiviert. Drücken Sie zum Aktivieren
des Sensors auf ENTER, eine
Navigationstaste, Colour, REW, FF
oder RETURN.
Wenn Sie diesen Sensor verwenden, wird
die Hintergrundbeleuchtung deaktiviert.
Schließen des Menüs
SOCIAL TV:
SEARCH: Unterstützung für empfohlene
Suchbegriffe und die Suchfunktion.
W
3D-Signal zur Verfügung gestellt wird.
E-MANUAL: Anzeigen des e-Manuals.
A :
Datensendung. Diese Funktion ist verfügbar, wenn
Datendienst Autostart deaktiviert Aus ist.
AD/SUBT.: Aktivieren/Deaktivieren des
Audiokommentars für Sehgeschädigte (in
manchen Gegenden nicht verfügbar). /
Anzeigen digitaler Untertitel.
Anzeigen des Fensters Social TV.
: Einstellen des Videos, das mit dem
Verwenden Sie diese Taste für eine
Einlegen von Batterien (Batteriegröße: AAA)
Deutsch - 5
Page 48
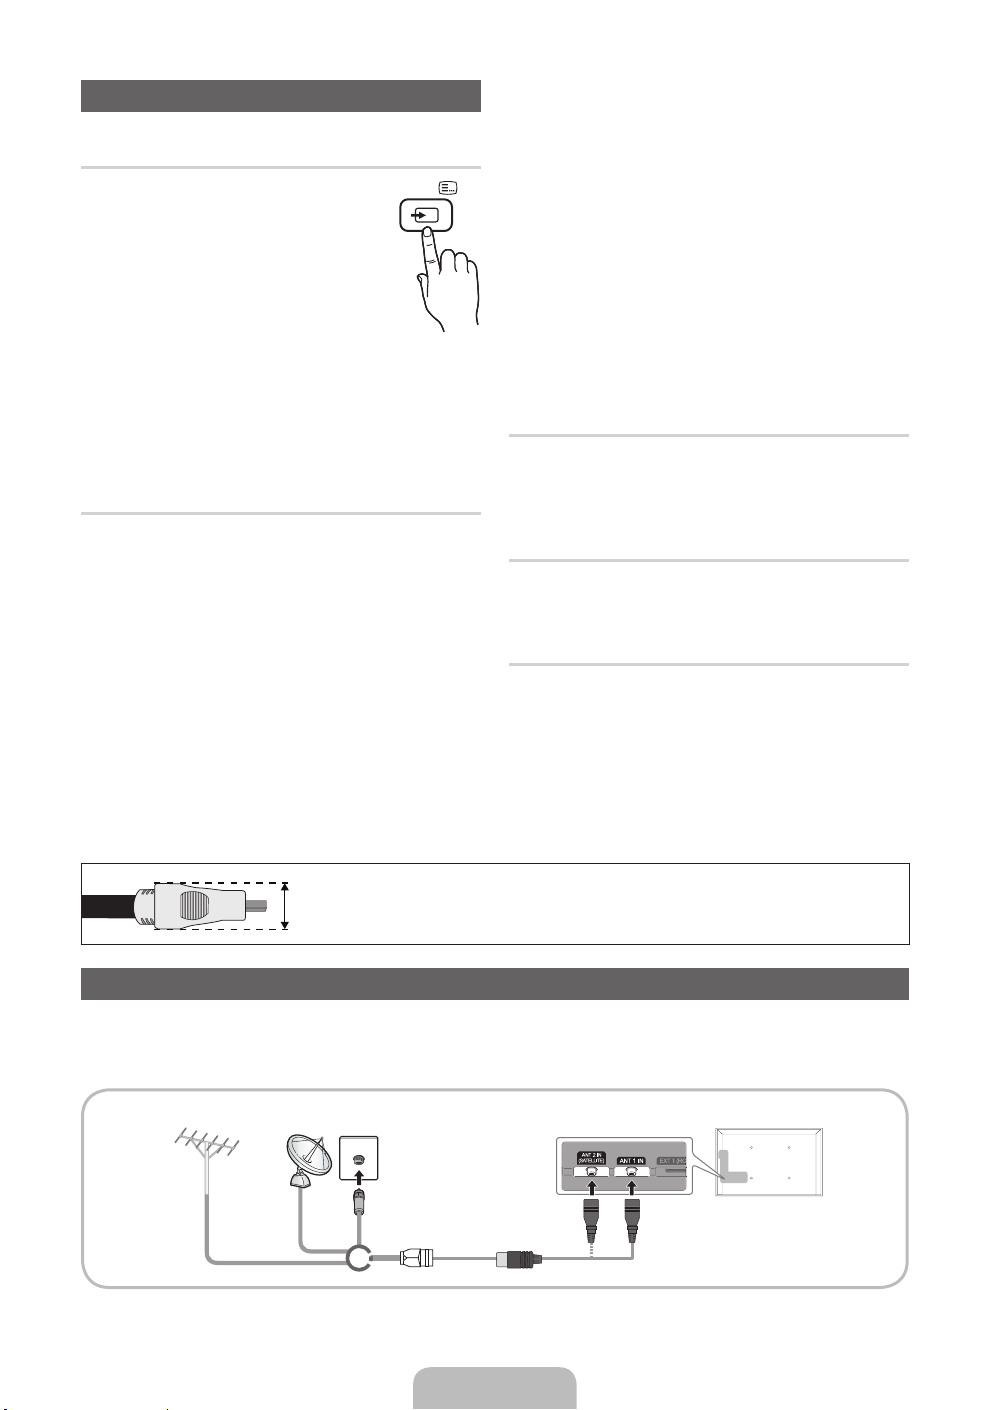
Ändern der Eingangsquelle
SOURCE
Quelle
Hiermit wählen Sie, ob das Fernsehgerät
mit einem Fernsehsignal versorgt wird
oder an externe Signaleingänge wie z.B.
DVD- / Blu-Ray-Player / Kabelreceiver
/ Satellitenreceiver (Set-Top Box)
angeschlossen ist.
■ TV / Ext.1 / Ext.2 / PC / HDMI1/DVI
/ HDMI2 / HDMI3 / HDMI4 / AV /
Component / USB / AllShare
✎
Im Fenster Quelle werden die angeschlossenen
Signalquellen hervorgehoben.
✎
Ext.1, Ext.2 und PC bleiben immer aktiviert.
Name bearb
Drücken Sie im Fenster Quelle die Taste TOOLS,
um die gewünschten externen Eingangsquellen
einzustellen.
■ VCR / DVD / Kabelreceiver / Satellitenreceiver
/ PVR-Receiver / AV-Receiver / Spiele /
Camcorder / PC / DVI PC / DVI-Geräte / TV
/ IPTV / Blu-ray / HD DVD / DMA: Vergeben
Sie Namen für die an die Eingangsbuchsen
angeschlossenen Geräte, um die Auswahl der
Signalquelle zu vereinfachen.
✎
Beim Anschließen eines PCs an den HDMI
IN 1(DVI)-Anschluss über ein HDMI-Kabel,
müssen Sie unter Name bearb. den PCModus des Fernsehgeräts aktivieren.
✎
Beim Anschließen eines PCs an den HDMI IN
1(DVI)-Anschluss über ein HDMI/DVI-Kabel,
müssen Sie unter Name bearb. den DVI PCModus des Fernsehgeräts aktivieren.
✎
Beim Anschließen von AV-Geräten an den
HDMI IN 1(DVI)-Anschluss über ein HDMI/
DVI-Kabel, müssen Sie unter Name bearb.
den Modus DVI-Geräte des Fernsehgeräts
aktivieren.
Favorit bearb
Wählen Sie im Fenster Quelle mit der Taste TOOLS
die Option Favorit bearb. Sie können Favoriten als
externe Eingangsquelle festlegen.
Information
Sie können Detailinformationen zum ausgewählten
externen Gerät anzeigen.
Aktual
Wenn die externen Geräte nicht angezeigt werden,
wählen Sie im Fenster Quelle mit der Taste TOOLS
die Option Aktual. Suchen nach angeschlossenen
Geräten.
✎
Die optimale Kabelverbindung ist bei diesem Gerät gewährleistet, wenn Sie Kabel mit den nachfolgend
angegebenen Maßen verwenden.
• Maximaler Durchmesser - 14mm
Anschließen an eine Antenne
Wenn das Fernsehgerät zum ersten Mal eingeschaltet wird, werden automatisch die Grundeinstellungen
vorgenommen.
✎
Voreinstellung: Anschließen ans Stromnetz und an die Fernsehantenne.
VHF/UHF-Antenne KabelSatellit
oder
Deutsch - 6
Page 49
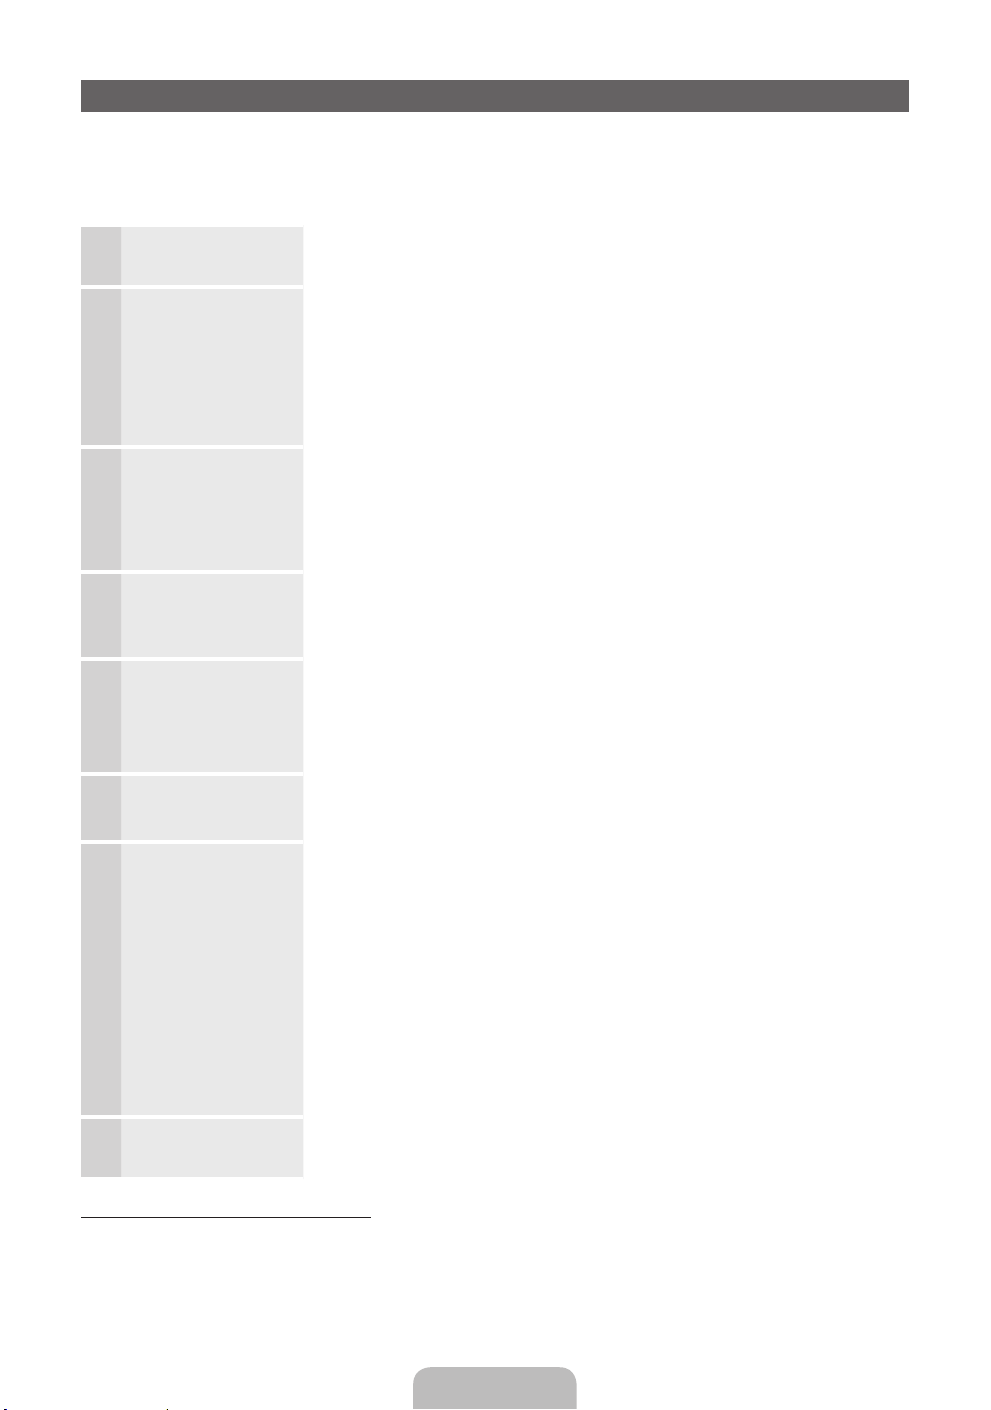
Plug & Play (Anfangseinstellung)
Wenn das Fernsehgerät erstmals eingeschaltet wird, helfen eine Reihe aufeinanderfolgender Abfragen beim
Durchführen der Grundeinstellungen. Drücken Sie die Taste POWERP. Plug & Play ist nur verfügbar, wenn die
Quelle auf TV eingestellt ist.
✎
Stellen Sie vor dem Einschalten des Fernsehgeräts sicher, dass das Antennenkabel angeschlossen ist (S. 6).
Auswählen der
1
Sprache des
Bildschirmmenüs
Konfigurieren des
2
Netzwerks
Software-Update Wählen Sie „Weiter“, um die Software des Fernsehgeräts zu aktualisieren. Das
3
Auswählen des
4
Nutzungsmodus.
Wählen Sie das Land
5
(je nach Land)
Einstellen des
6
Uhrmodus
Auswählen von
7
Suchoptionen für
die automatische
Sendersuche
Gute
8
Fernsehunterhaltung!
Drücken Sie die Taste ▲ oder ▼, und drücken Sie dann die Eingabetaste ENTERE.
Wählen Sie die gewünschte Sprache des Bildschirmmenüs(OSD) aus.
Set up your network connection. Zum Beenden drücken Sie die Taste
E
ENTER
später einrichten möchten, wählen Sie Überspr. Wir empfehlen, dass Sie die
Konfiguration der Netzwerkverbindung nun beenden und im e-Manual unter
„Netzwerkmenü“ nachschlagen, um die Konfigurationsanforderungen zu
erfahren, und im Abschnitt zur Netzwerkverbindung in diesem Handbuch (S.13)
nachschlagen.
Sie können die Netzwerkverbindung später mithilfe des Netzwerkmenüs einrichten.
Software-Update wird automatisch durchgeführt, wenn Ihr Fernsehgerät eine
ältere Version verwendet. Wenn Sie das Update später durchführen möchten,
wählen Sie „Überspr.“. Weitere Informationen finden Sie im e-Manual unter
„Software-Update“ (Voreinstellungen → Menü „Unterstützung“).
Wählen Sie durch Drücken der Tasten ▲ oder ▼ die Option Privatgebrauch
und drücken Sie dann zweimal auf die Taste ENTER
Drücken Sie die Taste ▲ oder ▼, und drücken Sie dann die Taste ENTER
Wählen Sie das gewünschte Land aus. (je nach Land)
Stellen Sie den Uhrmodus automatisch oder manuell ein.
Auto: Wählen Sie Ihre Zeitzone.
Manuell: Hiermit können Sie das Datum und die Uhrzeit manuell einstellen.
Drücken Sie die Taste ▲ oder ▼, und drücken Sie dann die Taste ENTER
Sendertyp für den Suchlauf auswählen. Wenn Sie den Antennentyp auf Kabel
einstellen, können Sie den Sendern im nächsten Schritt einen Zahlenwert
(Senderfrequenzen) zuweisen. Weitere Informationen hierzu finden Sie unter
Sender →Autom. Sendersuchlauf.
Wenn Sie eine Sendung sehen möchten, wählen Sie Schließen. Wenn Sie die
Möglichkeiten von Smart Hub nutzen möchten, wählen Sie Smart Hub. Smart
Hub wird gestartet.
. Wenn Sie Ihre Netzwerkinformationen nicht kennen oder sie
✎
Dies kann je nach Netzwerkstatus einige Zeit dauern.
E
.
✎
Wählen Sie den Modus Privatgebrauch aus. Der Modus Shop-Demo ist
für den Betrieb in Einzelhandelsgeschäften bestimmt.
✎
Nachdem Sie das Land im Menü Land eingestellt haben, werden Sie bei
manchen Modellen aufgefordert, die PIN-Nummer einzurichten.
✎
Die Ziffernkombination 0-0-0-0 dürfen Sie als PIN-Nummer nicht eingeben.
✎
Wenn zuerst Terrestrisch oder Kabel gewählt wird: Nachdem alle Sender
Terrestrisch oder Kabel gespeichert wurden, wird der Schritt zum
Speichern der Satelliten-Sender angezeigt.
✎
Wenn zuerst Satellit gewählt wird: Nachdem alle Sender Satellit
gespeichert wurden, wird der Schritt zum Speichern der anderen Sender
Terrestrisch oder Kabel angezeigt.
✎
Zum Unterbrechen des Speichervorgangs zu einem beliebigen Zeitpunkt
drücken Sie die Taste ENTER
Genauere Informationen finden Sie im e-Manual unter „Smart Hub“.
E
.
E
E
.
.
So setzen Sie diese Funktion zurück:
Wählen Sie System - Plug & Play (Anfangseinstellung). Geben Sie Ihre vierstellige PIN ein. Die Standard-PIN lautet „00-0-0“ (Frankreich: „1-1-1-1“). Wenn Sie die PIN ändern möchten, verwenden Sie die Funktion PIN ändern.
Sie sollten das Plug & Play-Verfahren (MENU → System) zuhause erneut durchführen, selbst wenn Sie es
bereits im Geschäft durchgeführt haben.
✎
Wenn Sie den PIN-Code vergessen haben, drücken Sie die Tasten auf der Fernbedienung im Standby-Modus in der
angegebenen Reihenfolge, um die PIN auf „0-0-0-0“ zurückzusetzen: MUTE → 8 → 2 → 4 → Netztaste (ein).
Deutsch - 7
Page 50
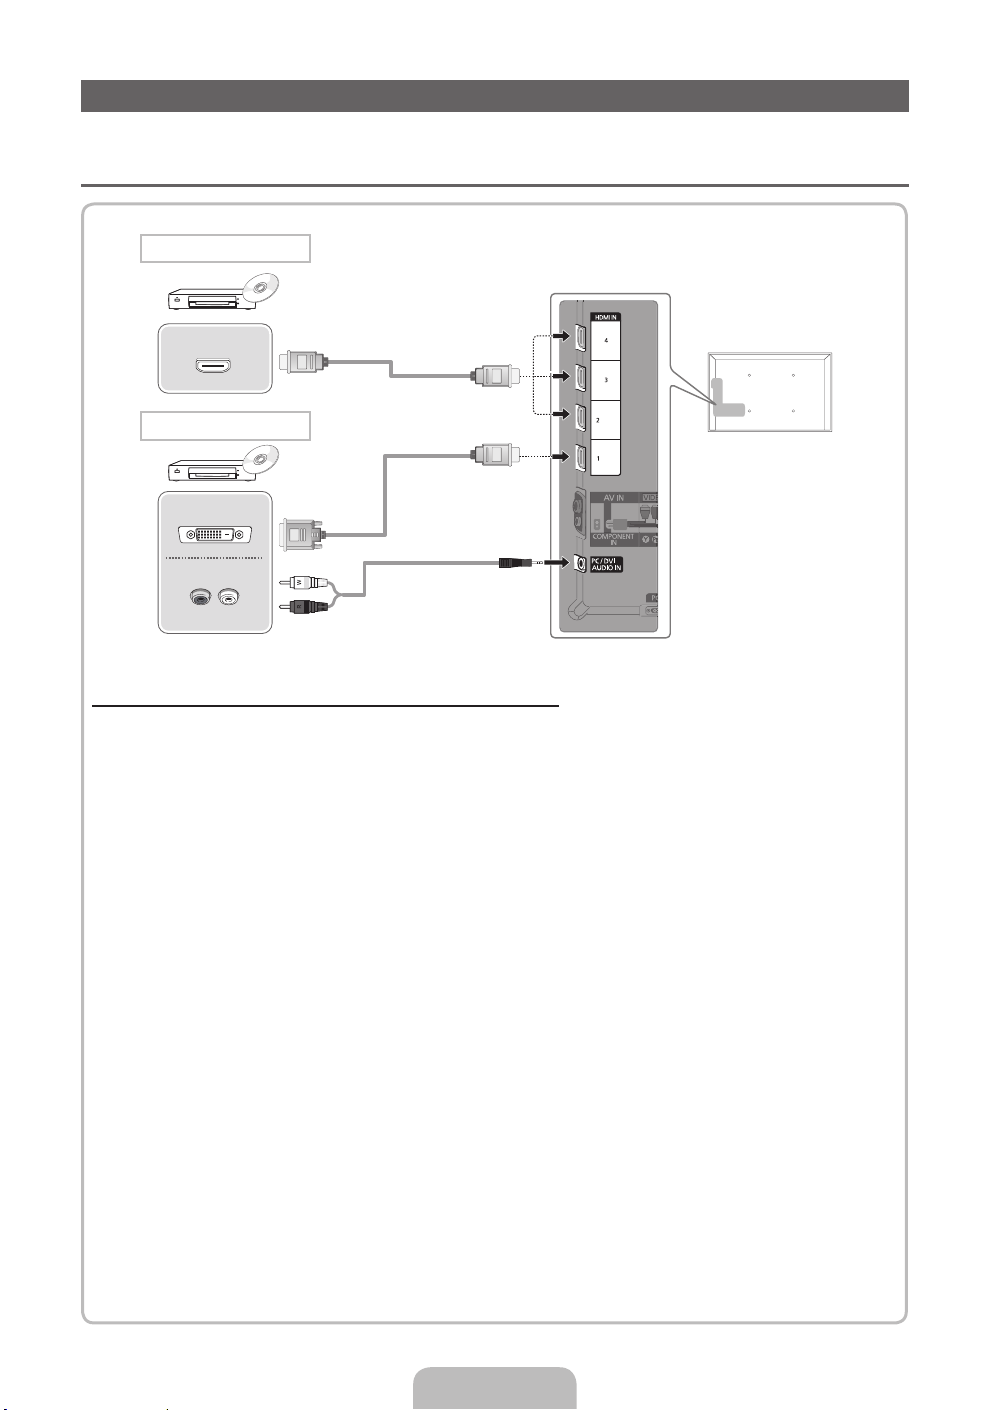
Anschließen an ein AV-Gerät
Verfügbare Geräte: DVD, Blu-ray player, HD cable box, HD STB (Set-Top-Box) satellite
¦
receiver, VCR, Digital Audio System, Amplifier, DVD home Theatre, PC
HDMI-Anschluss
HDMI OUT
HDMI/DVI-Anschluss
DVI OUT
AUDIO OUT
R-AUDIO-L
Mit Hilfe eines HDMI- oder HDMI/DVI-Kabels (bis zu 1080p)
✎
HDMI IN 1(DVI), 2(ARC), 3, 4, PC/DVI AUDIO IN
Für bessere Bild- und Tonqualität stellen Sie die Verbindung zu digitalen Geräten mit Hilfe eines
x
HDMI-Kabels her.
HDMI-Kabel unterstützen digitale Video- und Audiosignale, und Sie benötigen dann kein Audiokabel
x
mehr.
– Um das Fernsehgerät mit einem digitalen Gerät zu verbinden, das keine HDMI-Ausgabe unterstützt,
verwenden Sie ein HDMI/DVI- und ein Audiokabel.
Das Bild wird möglicherweise nicht normal (wenn überhaupt) angezeigt oder es erfolgt keine
x
Tonausgabe, wenn ein externes Gerät an den Fernseher angeschlossen wird, das eine ältere HDMIVersion verwendet. Wenn solch ein Problem auftritt, erfragen Sie die HDMI-Version beim Hersteller
des externen Geräts und bitten Sie, wenn veraltet, um ein Upgrade.
Verwenden Sie auf jeden Fall ein HDMI-Kabel mit einer Dicke von maximal 14 mm.
x
Achten Sie darauf, nur ein zertifiziertes HDMI-Kabel zu kaufen. Andernfalls kann es passieren, dass
x
kein Bild angezeigt wird oder ein Verbindungsfehler auftritt.
Es wird ein einfaches Hochgeschwindigkeits-HDMI-Kabel oder eines mit Ethernet-Anschluss
x
empfohlen. Dieses Gerät unterstützt die Netzwerkfunktion nicht über HDMI.
Dieses Gerät unterstützt die 3D- und ARC-Funktionen (ARC = Audio-Rückkanal) über das HDMI-
x
Kabel. Allerdings werden die ARC-Funktionen nur vom Anschluss HDMI IN 2(ARC) unterstützt.
– Wenn 3D-Autoansicht aktiviert Ein ist, werden manche Funktionen, wie z.B. SMART HUB
möglicherweise deaktiviert. In diesem Fall deaktivieren Aus Sie 3D-Autoansicht oder 3D-Modus.
Die ARC-Funktion ermöglicht digitale Audioausgabe über den HDMI IN 2(ARC)-Anschluss. Sie kann
x
nur aktiviert werden, wenn das Fernsehgerät an einen Audioreceiver angeschlossen ist, der die ARCFunktion unterstützt.
(ARC)
(DVI)
Deutsch - 8
Page 51
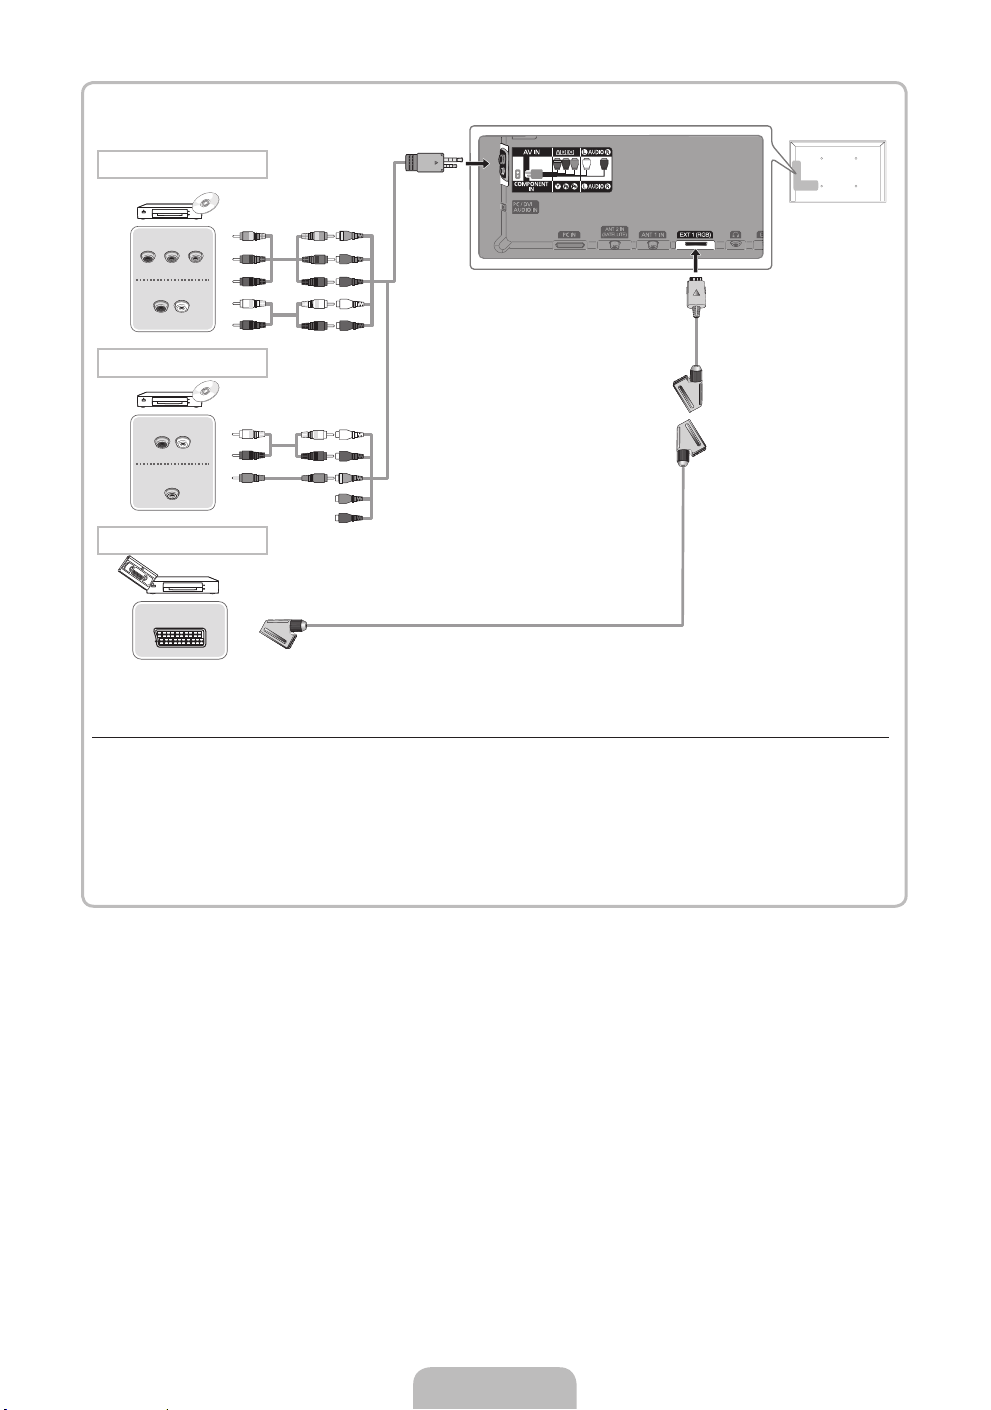
Component-Anschluss
COMPONENT OUT
PRPBY
AUDIO OUT
R-AUDIO-L
G
B
R
W
R
G
B
R
W
R
AV-Anschluss
AUDIO OUT
R-AUDIO-L
VIDEO OUT
W
R
Y
W
R
Y
SCART-Anschluss
EXT
Mit Hilfe eines Komponentenkabels (bis 1080p) oder eines Audio/Video-Kabels (nur 480i) und eines Scartkabels
✎
Im Modus Ext. unterstützt DTV Out nur MPEG SD-Video und -Audio.
✎
Bei Anschluss an den AV IN-Eingang müssen Sie den AV-Stecker (gelb) mit der TV-Buchse (grün)
verbinden.
✎
Um die beste Bildqualität zu erhalten, wird eine Komponentenverbindung über den A/V-Anschluss
empfohlen.
Deutsch - 9
Page 52
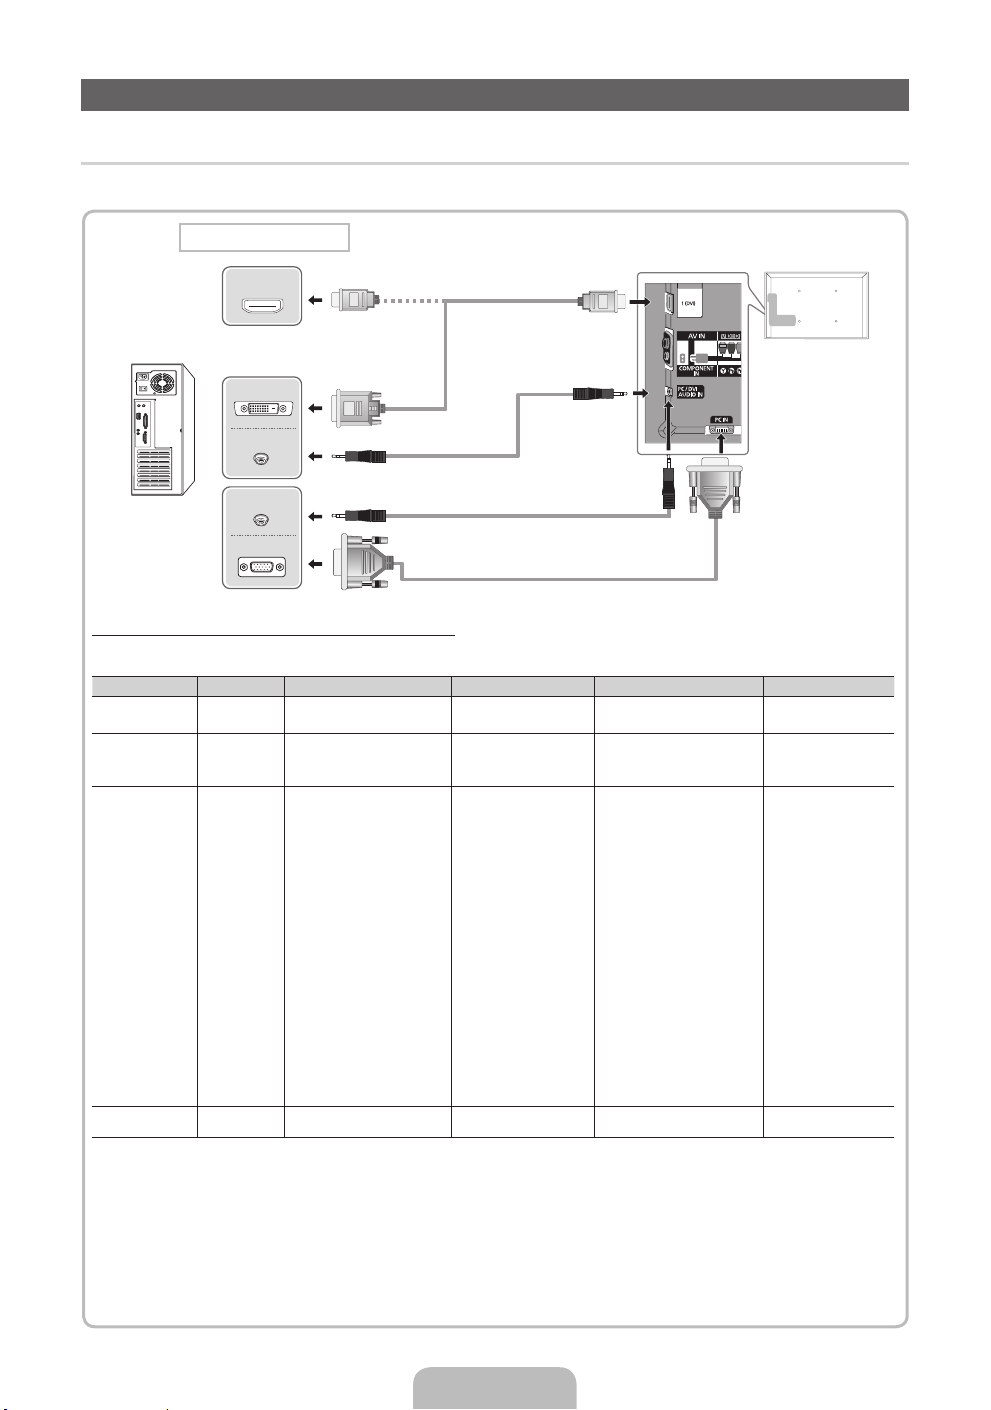
Anschließen an einen PC und ein Audiogerät
¦ Mit Hilfe eines HDMI-, HDMI/DVI- oder D-Sub-Kabels
✎
Der Anschluss über ein HDMI-Kabel wird je nach PC möglicherweise nicht unterstützt.
PC-Anschluss
HDMI OUT
DVI OUT
AUDIO OUT
AUDIO OUT
PC OUT
Anzeigemodi (D-Sub- und HDMI/DVI-Eingang)
Die optimale Auflösung beträgt 1920 x 1080 bei 60 Hz.
Modus Auflösung Horizontalfrequenz (kHz) Vertikalfrequenz (Hz) Pixeltakt (MHz) Polarità sync (O / V)
IBM
MAC
VESA DMT
VESA DMT / DTV
CEA
640 x 350
720 x 400
640 x 480
832 x 624
1152 x 870
640 x 480
640 x 480
640 x 480
800 x 600
800 x 600
800 x 600
1024 x 768
1024 x 768
1024 x 768
1152 x 864
1280 x 1024
1280 x 1024
1280 x 800
1280 x 800
1280 x 960
1360 x 768
1440 x 900
1440 x 900
1680 x 1050
1920 x 1080p 67,500 60,000 148,500 +/+
31,469
31,469
35,000
49,726
68,681
31,469
37,861
37,500
37,879
48,077
46,875
48,363
56,476
60,023
67,500
63,981
79,976
49,702
62,795
60,000
47,712
55,935
70,635
65,290
70,086
70,087
66,667
74,551
75,062
59,940
72,809
75,000
60,317
72,188
75,000
60,004
70,069
75,029
75,000
60,020
75,025
59,810
74,934
60,000
60,015
59,887
74,984
59,954
25,175
28,322
30,240
57,284
100,000
25,175
31500
31,500
40,000
50,000
49,500
65,000
75,000
78,750
108000
108,000
135,000
83,500
106,500
108,000
85,500
106,500
136,750
146,250
+/-
-/+
-/-
-/-
-/-
-/-
-/-
-/+/+
+/+
+/+
-/-
-/+/+
+/+
+/+
+/+
-/+
-/+
+/+
+/+
-/+
-/+
-/+
✎
HINWEIS
Bei Anschluss über ein HDMI/DVI-Kabel müssen Sie den HDMI IN 1(DVI)-Anschluss verwenden.
x
Das Zeilensprungverfahren wird nicht unterstützt.
x
Das Fernsehgerät funktioniert möglicherweise nicht ordnungsgemäß, wenn kein Standardmodus
x
ausgewählt wird.
Separate- und Composite-Modus werden unterstützt. SOG (Sync On Green) wird nicht unterstützt.
x
Deutsch - 10
Page 53
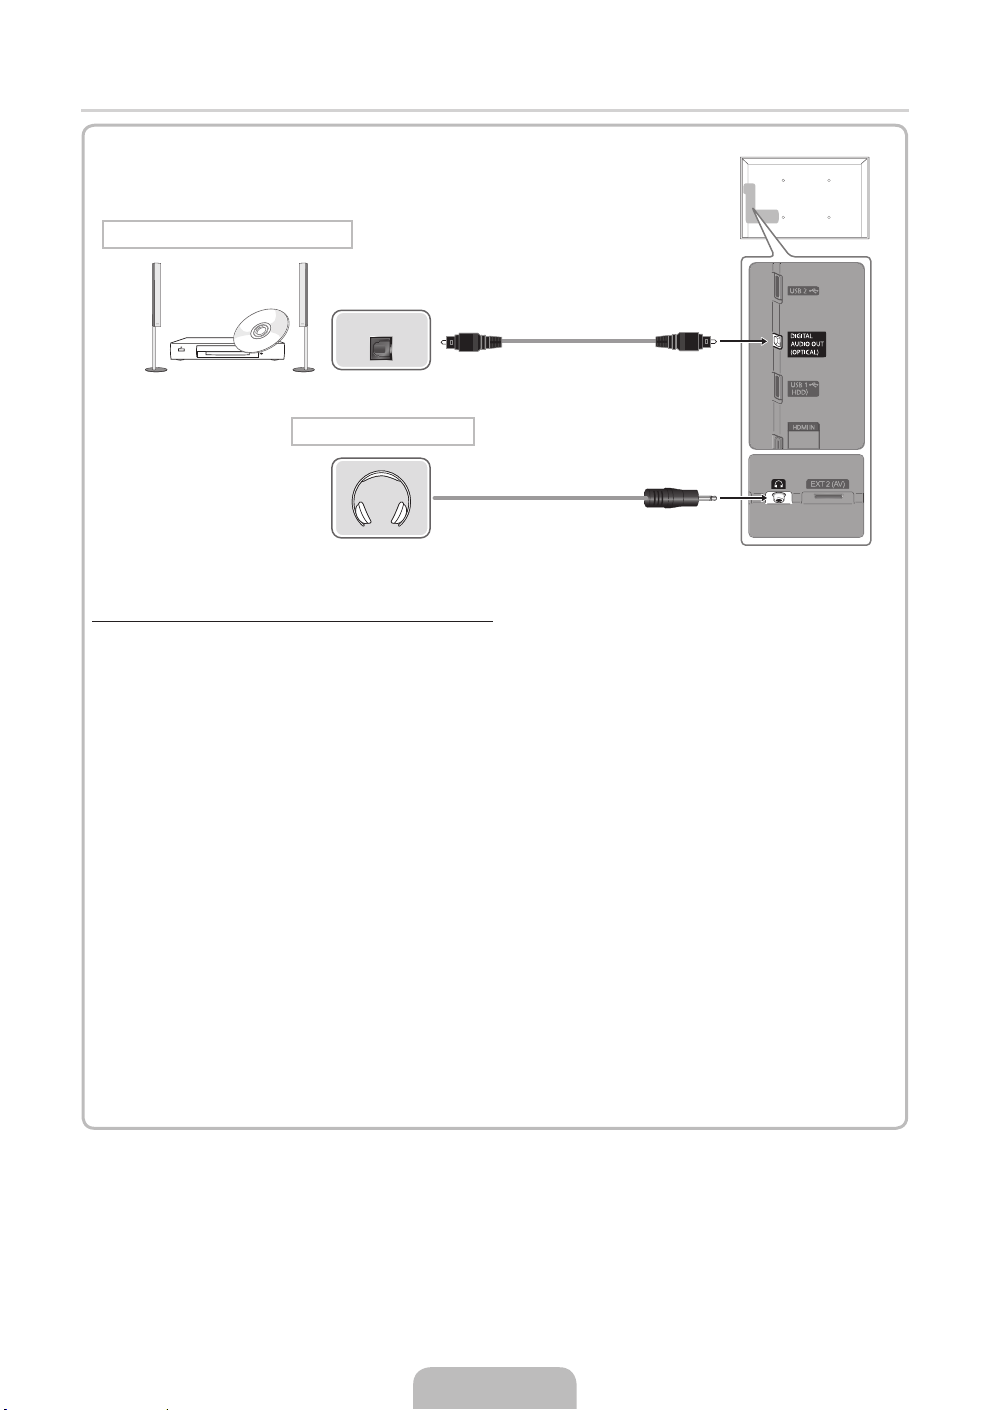
¦ Verfügbare Geräte: Digital-Audiosystem, Verstärker, DVD-Heimkino
Anschluss für DVD-Heimkinosystem
OPTICAL
Kopfhöreranschluss
Using an Optical (Digital) a Headphone Connection
✎
DIGITAL AUDIO OUT (OPTICAL)
Wenn ein Digital-Audiosystem mit dem DIGITAL AUDIO OUT (OPTICAL)-Anschluss verbunden ist,
x
reduzieren Sie die Lautstärke von Fernsehgerät und System.
5.1-Kanalton ist möglich, wenn das Fernsehgerät an ein externes Gerät angeschlossen ist, das
x
5.1-Kanalton unterstützt.
Wenn der Receiver (Heimkinosystem) angeschaltet ist, können Sie den Ton hören, der vom
x
optischen Ausgang des Fernsehgeräts zur Verfügung gestellt wird. Wenn das Fernsehgerät ein
(terrestrisches) DTV-Signal empfängt, überträgt das Fernsehgerät 5.1-Kanalton an den Receiver des
Heimkinosystems. Wenn es sich bei der Signalquelle um eine digitale Komponente wie beispielsweise
einen DVD-Player/Blu-Ray-Player/Kabel- /Satellitenreceiver (Set-Top-Box) handelt, der über HDMI
an das Fernsehgerät angeschlossen ist, kann der Receiver des Heimkinosystems nur Zweikanalton
wiedergeben. Wenn Sie 5.1-Kanalton wünschen, müssen Sie den digitalen Ausdioausgang am
DVD-/Blu-Ray-Player / Kabel- / Satellitenreceiver (Set-Top-Box) direkt an einen Verstärker oder ein
Heimkinosystem anschließen.
✎
Kopfhörer H: Sie können Ihre Kopfhörer an den Kopfhörer-Ausgang Ihres Fernsehgeräts anschließen.
Wenn Kopfhörer angeschlossen sind, ist die Tonwiedergabe über die eingebauten Lautsprecher
ausgeschaltet.
Wenn Sie Kopfhörer an das Fernsehgerät anschließen, ist die Tonfunktion eingeschränkt.
x
Die Lautstärke der Kopfhörer und des Fernsehgeräts werden getrennt geregelt.
x
Deutsch - 11
Page 54
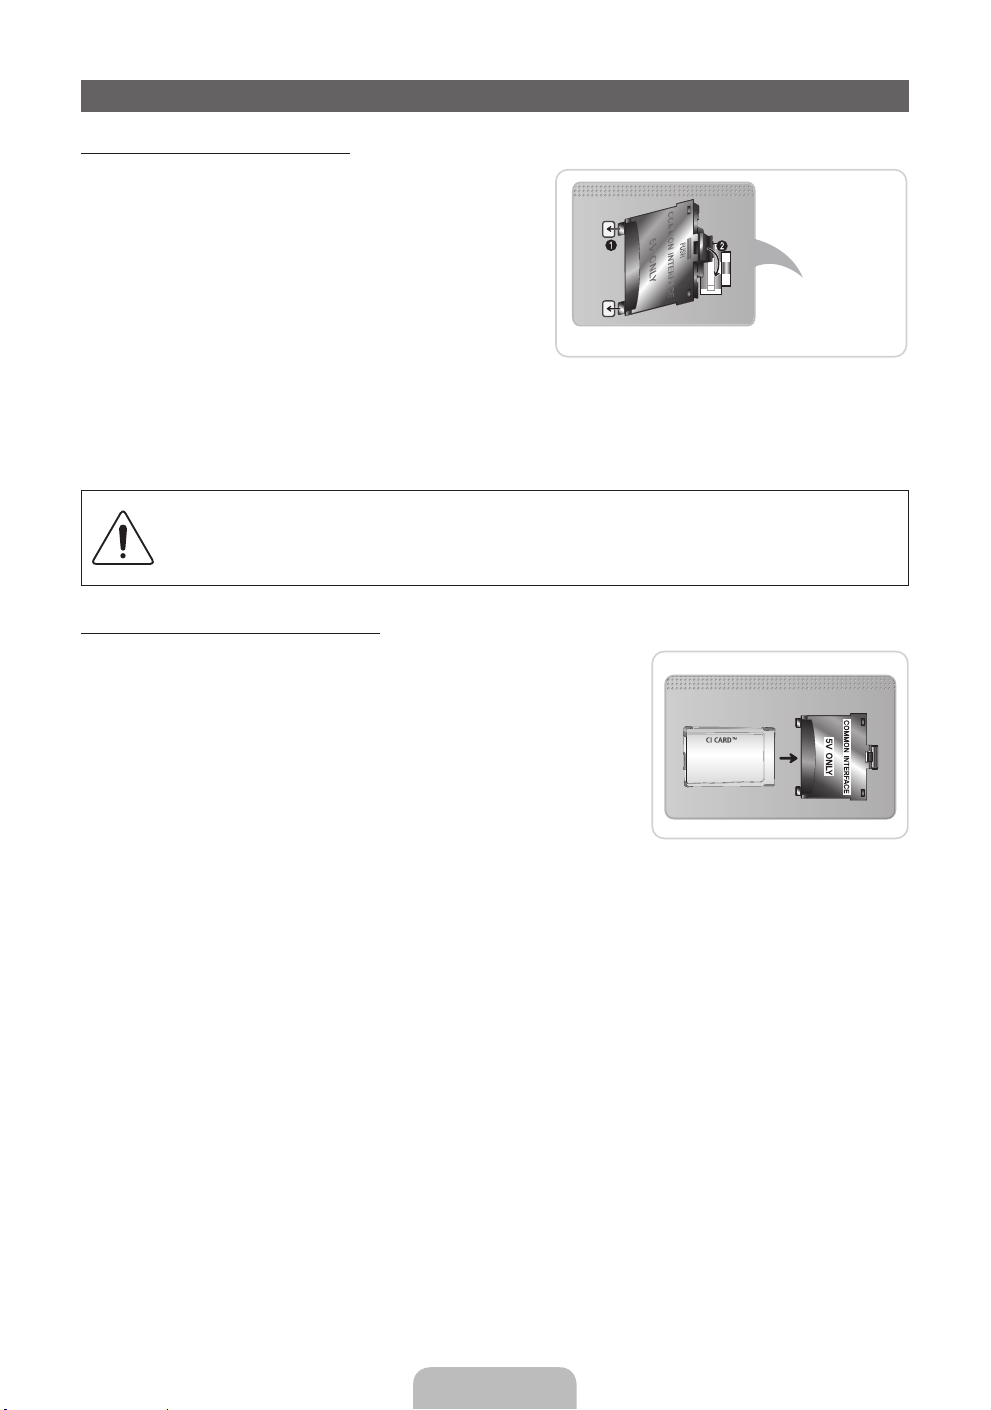
Anschließen an den COMMON INTERFACE-Steckplatz
Befestigen des CI-Kartenadapters
Befestigen Sie den Adapter wie unten gezeigt.
Gehen Sie folgendermaßen vor, um den CI-Kartenadapter
anzuschließen.
✎
Wir empfehlen, den Adapter anzuschließen, bevor Sie
die Wandhalterung befestigen oder die „CI“- oder „CI+“Karte einstecken.
1. 1 Setzen Sie den CI-Kartenadapter in die beiden
Bohrungen am Gerät ein.
✎
Suchen Sie die beiden Bohrungen auf der
Rückseite des Fernsehgeräts. Die Bohrungen
befinden sich neben dem COMMON INTERFACE-Anschluss.
2. 2 Schließen Sie den CI-Kartenadapter an den COMMON INTERFACE-Anschluss des Geräts an.
3. In der Sie die „CI“- oder „CI+“-Karte.
Wir empfehlen, die CI-Karte einzustecken, bevor Sie das Fernsehgerät an der Wand befestigen.
Es könnte schwierig sein, sie erst nach der Montage einzustecken. Stecken Sie die Karte ein,
nachdem Sie den CI-Kartenadapter am Fernsehgerät befestigt haben. Es ist schwierig, das Modul
zu befestigen, wenn Sie die Karte bereits eingesteckt haben.
Verwenden der „CI“- oder „CI+“-Karte
Um Bezahlsender zu sehen, müssen Sie eine „CI“ oder „CI+“-Karte
einsetzen.
• Wenn Sie keine „CI“ oder „CI+“-Karte einsetzen, wird bei einigen
Kanälen die Meldung „Gestörtes Signal“ angezeigt.
• Die Verbindungsinformationen mit Telefonnummer, Kennung der
„CI“ oder „CI+“-Karte, Hostkennung und anderen Angaben wird
nach ungefähr 2 bis 3 Minuten angezeigt. Wenn eine Fehlermeldung
angezeigt wird, wenden Sie sich bitte an Ihren Dienstanbieter.
• Wenn die Kanalinformationskonfiguration abgeschlossen ist, wird
die Meldung „Udating Completed“ Aktualisierung abgeschlossen)
angezeigt. Dies bedeutet, dass die Kanalliste aktualisiert ist.
✎
HINWEIS
Sie können die „CI“ oder „CI+“-Karte bei einem der örtlichen Kabelnetzbetreiber erwerben.
x
Ziehen Sie die „CI“- oder „CI+“-Karte vorsichtig mit den Händen heraus. Sie könnte beim Herunterfallen
x
ansonsten beschädigt werden.
Die Richtung, in der Sie die „CI“ oder „CI+“-Karte einsetzen müssen, ist auf der Karte markiert.
x
Die Position des COMMON INTERFACE-Steckplatzes ist modellabhängig.
x
„CI“ oder „CI+“-Karten werden in einigen Ländern und Regionen nicht unterstützt. Fragen Sie
x
diesbezüglich Ihren offiziellen Händler.
Wenden Sie sich bei Problemen an den Dienstanbieter.
x
Setzen Sie eine „CI“ oder „CI+“-Karte ein, die für die aktuellen Antenneneinstellungen geeignet ist.
x
Andernfalls ist das Bild gestört oder es fällt aus.
Rückseite des
Fernsehgeräts
Deutsch - 12
Page 55
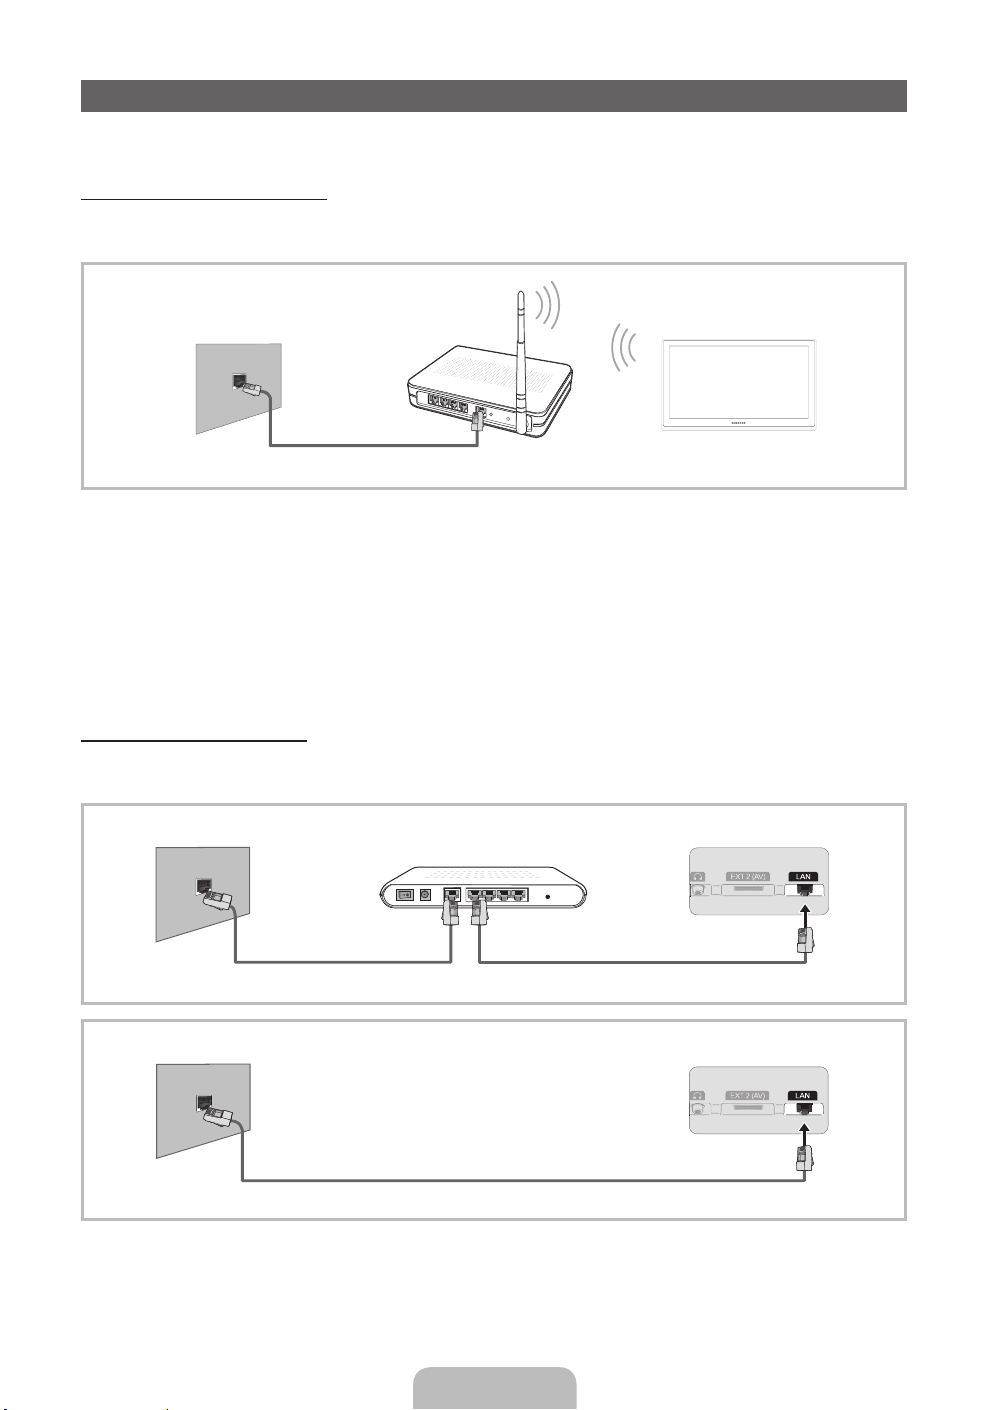
Netzwerkverbindung
Sie können Ihr Fernsehgerät so einrichten, dass es über Ihr lokales Netzwerk (LAN) und eine Kabel- oder WLANVerbindung auf das Internet zugreifen kann.
Netzwerkverbindung - Drahtlos
Sie können können Ihr Fernsehgerät über einen standardmäßigen WLAN-Router oder ein Moden mit Ihrem LAN
verbinden.
LAN-Anschluss an
der Wand
Drahtloser IP-Sharer
(Router having DHCP server)
LAN-Kabel
TV
Der Samsung WLAN-Adapter unterstützt die Kommunikationsprotokolle IEE 802,11a/b/g und n. Samsung
empfiehlt, IEEE 802,11 n zu verwenden. Wenn Sie Video über die IEEE 802,11b/g-Verbindung anzeigen, wird
das Videobild möglicherweise nicht ohne Unterbrechungen angezeigt.
Die meisten Drahtlosnetzwerke verfügen über ein Sicherheitssystem, mit dem alle Geräte, die über einen
Zugangspunkt oder einen drahtlosen Router (in der Regel ein drahtloser IP-Sharer) auf das Netzwerk zugreifen
wollen, einen verschlüsselten Sicherheitscode (den so genannten Zugriffsschlüssel) übertragen müssen.
Wenn Sie im 802,11n-Modus Pure High-throughput (Greenfield) wählen und als Verschlüsselungstyp ist für Ihren
Funkrouter WEP, TKIP oder TKIP AES (WPS2Mixed) eingestellt, so unterstützt das Samsung-Fernsehgerät eine
Verbindung gemäß der Spezifikation für die neue Wi-Fi-Zertifizierung nicht.
Netzwerkverbindung – Kabel
Je nach der Konfiguration Ihres Netzwerks können Sie Ihr Fernsehgerät auf zwei Arten über ein Kabel mit Ihrem
Netzwerk verbinden. Diese sind im Folgenden abgebildet:
Modemanschluss an der Wand
Externes Modem
(ADSL/VDSL/Kabelfernsehen)
Rückseite des Fernsehgeräts
LAN-KabelModem-Kabel
LAN-Anschluss an der Wand
LAN-Kabel
✎
Diese Option wird nicht unterstützt, wenn die Netzwerkgeschwindigkeit weniger als 10 Mbit/s beträgt.
✎
Verwenden Sie ein CAT5-Kabel für den Anschluss.
Rückseite des Fernsehgeräts
Deutsch - 13
Page 56
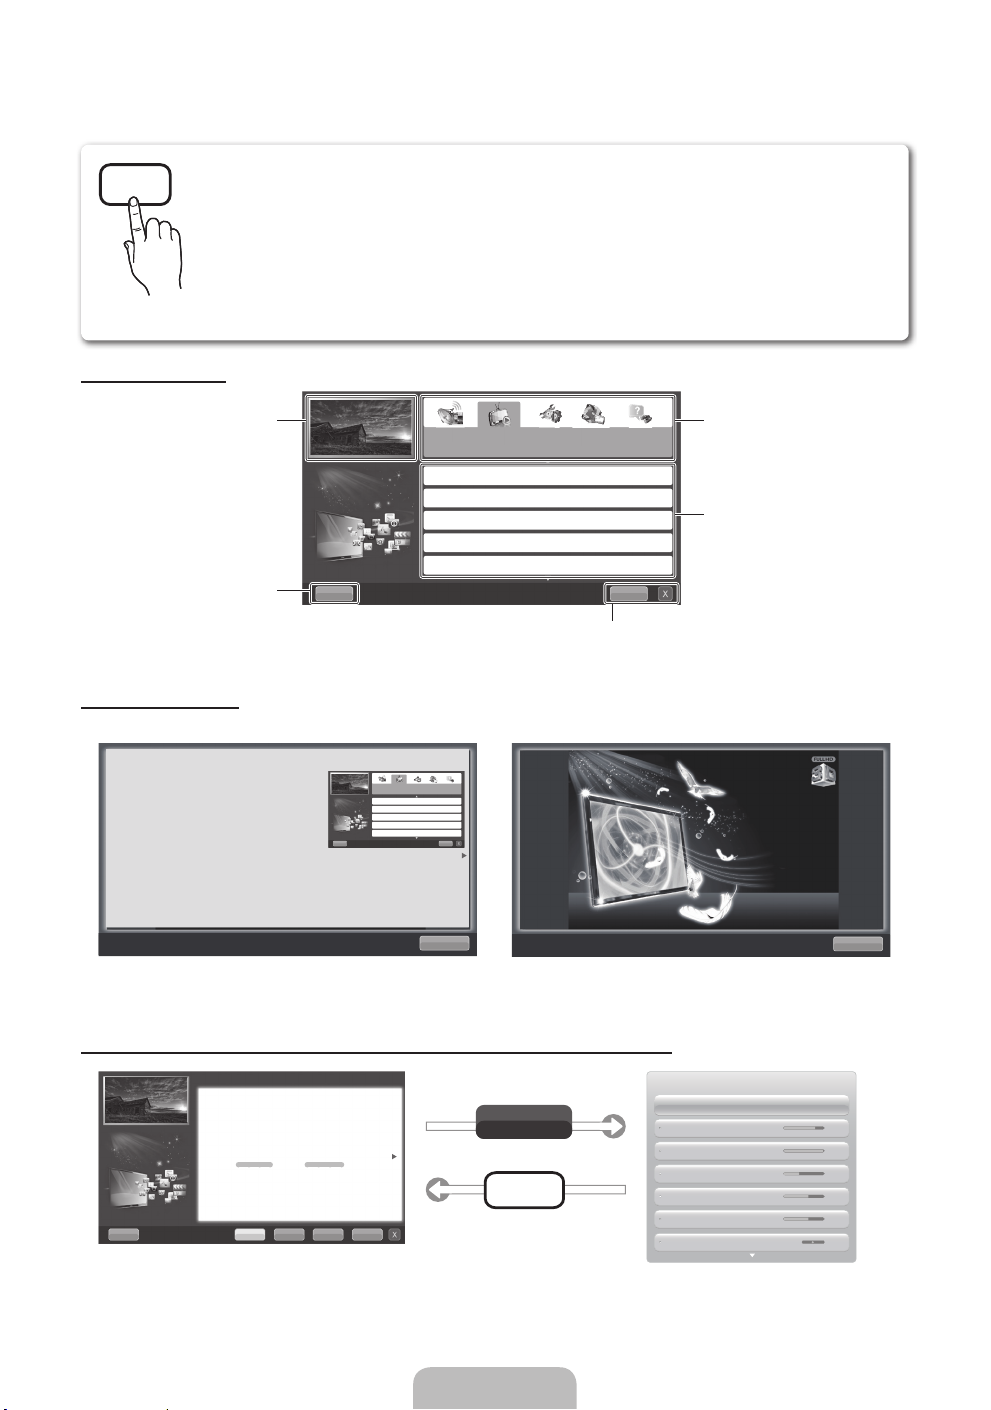
So zeigen Sie das e-Manual an
E-MANUAL
Hier erhalten Sie eine Einführung sowie Anweisungen zur Verwendung der
TV-Funktionen Ihres Fernsehgeräts.
O
MENU m → Unterstützung → e-Manual → ENTER
✎
Drücken Sie die Taste E-MANUAL auf der Fernbedienung, um zum e-Manual
E
zurückzukehren.
✎
Wenn das Menü deaktiviert ist, können Sie die Funktion Jetzt test. nicht verwenden.
Bildschirmanzeige
Fernsehbildschirm: Anzeigen des
Bilds der aktuellen Eingangsquelle.
Hilfe: Anzeigen der e-Manual-Anl
oder der Produktdemo. Drücken
Sie auf ENTER
E
Grundfunktionen
Ändern des voreingestellten Bildmodus
Anpassen der Bildeinstellungen
Ändern des Bildformats
Ändern der Bildoptionen
Einstellen des Fernsehgeräts mithilfe Ihres PCs
IndexHilfe
.
Index: Anzeigen des Index-Fensters.
X: Schließen des e-Manuals.
Ändern Sie die Kategorie. Drücken
l
Sie die Taste
oder r, um die
gewünschte Kategorie auszuwählen.
Anzeigen der Untermenüliste
Drücken Sie die Taste ENTER
um das gewünschte Untermenü
auszuwählen.
Verwenden der Hilfe
Klicken Sie auf die Schaltfl äche Hilfe, um das e-Manual-Anleitung und die Produktdemo anzuzeigen.
So zeigen Sie das e-Manual an
Sie können die Einleitung und die Anweisungen zu
den TV-Funktionen auch in elektronischer Form auf
Ihrem Fernsehgerät lesen.
m
→ Unterstützung → e-Manual →
O MENU
ENTER
E
Grundfunktionen
Ändern des voreingestellten Bildmodus
Anpassen der Bildeinstellungen
Ändern des Bildformats
Ändern der Bildoptionen
Einstellen des Fernsehgeräts mithilfe Ihres PCs
IndexHilfe
3D-Erlebnis in KinoqualitätDurch das Mehr
an Tiefe bieten
3D-Fernseher Ihnen eine weiteren Dimension
und ein realtitätsnäheres Fernseherlebnis.
Zusammen mit den 3D-Aktivbrillen erzeugen die
3D-Fernsehgeräte dreidimensionale Bilder, die aus
dem Bildschirm herauszuspringen scheinen. Selbst
Ihre Lieblingssendungen können in Echtzeit in 3D
umgewandelt werden: ultimatives Reality-TV.
E
,
Return (Zurück)
<e-Manual-Anleitung>
Die e-Manual-Anleitung wird wie oben abgebildet angezeigt.
Die Produktdemo wird wie oben abgebildet angezeigt.
<Produktdemo>
So wechseln Sie zwischen dem e-Manual und den entsprechenden Menüs.
Grundfunktionen > Ändern des voreingestellten Bildmodus (5/10)
Ändern des voreingestellten Bildmodus
■
Bildmodus t
Wählen Sie Ihren bevorzugten Bildtyp aus.
N Wenn als Signalquelle PC eingestellt ist, können Sie im Bildmodus nur zwischen
Standard und Unterhalt. wählen.
• Dynamisch: Für helle Zimmer geeignet.
• Standard: Für normale Umgebungen geeignet.
für LED-Fernsehgeräte
• Natürlich
Augenbelastung geeignet.
• Film: Zum Anzeigen von Filmen in einem abgedunkelten Zimmer geeignet.
• Unterhalt. (Nur im PC-Modus verfügbar): Zum Anzeigen von Filmen und
Spielen geeignet.
Hilfe Jetzt test. Start Zoom Index
✎
Diese Funktion ist in manchen Menüs nicht verfügbar.
/ Entspannen
für Plasmafernsehgeräte
: Für geringe
Jetzt test.
E-MANUAL
Bild
Bildmodus Standard
Zellhelligkeit 14
Kontrast 100
Helligkeit 45
Schärfe 50
Farbe 50
Farbton (G/R) G 50 R 50
Deutsch - 14
Return (Zurück)
Page 57
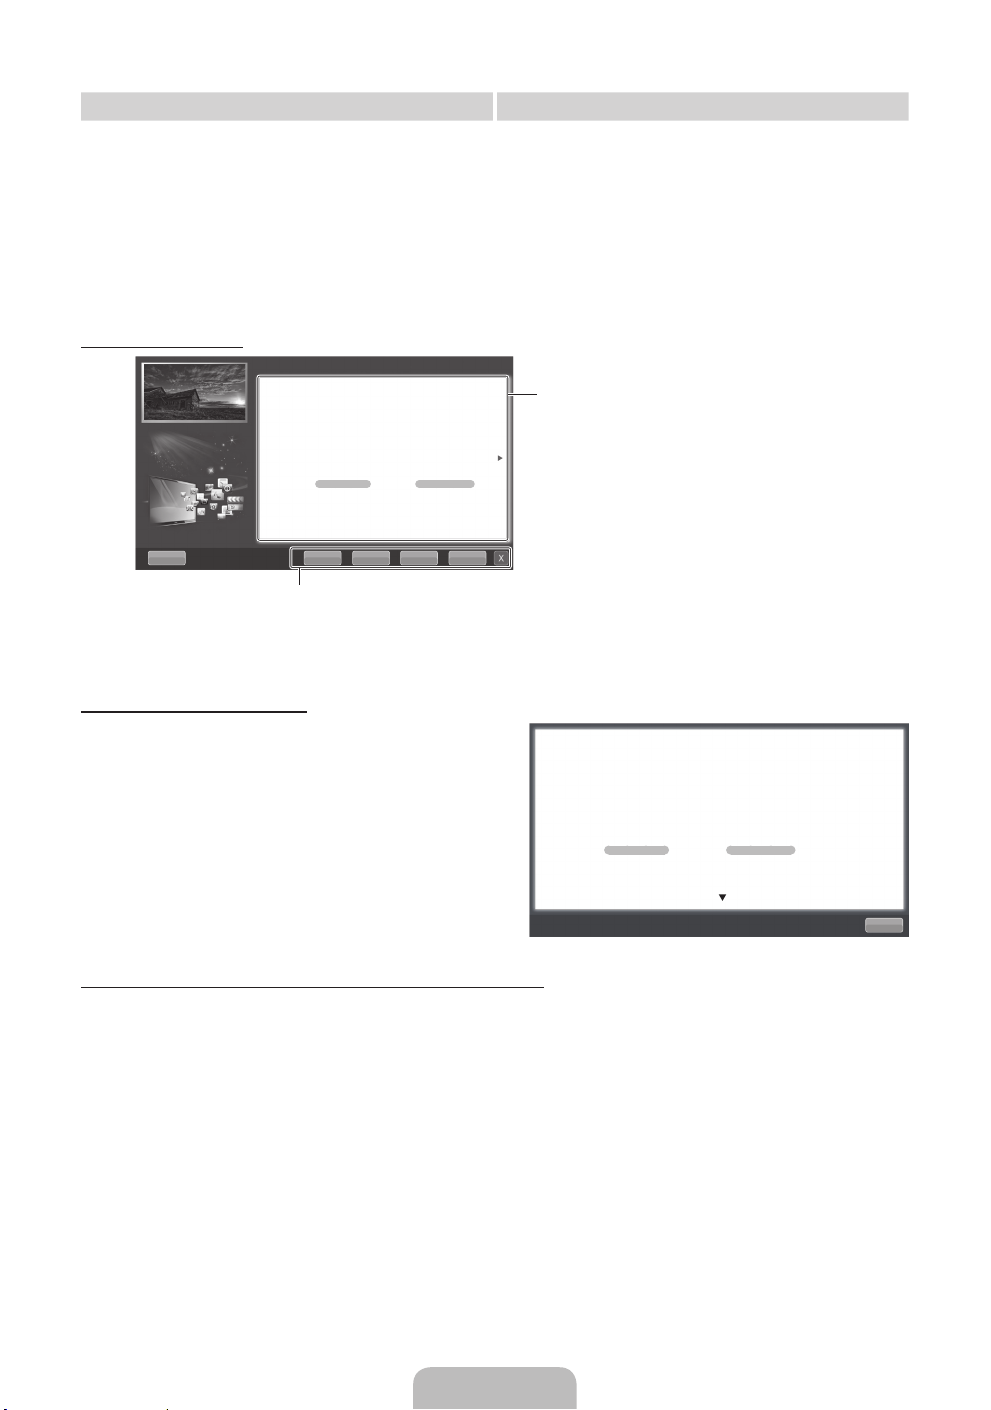
Methode 1 Methode 2
1. Wählen Sie Jetzt test., wenn Sie die
entsprechenden Menüs ausführen möchten.
2. Drücken Sie die Taste E-MANUAL, um zum
Fenster des e-Manuals zurückzukehren.
Anzeigen der Inhalte
Grundfunktionen > Ändern des voreingestellten Bildmodus (5/10)
Ändern des voreingestellten Bildmodus
O MENUm → Bild → Bildmodus → ENTER
■
Bildmodus t
Wählen Sie Ihren bevorzugten Bildtyp aus.
N Wenn als Signalquelle PC eingestellt ist, können Sie im Bildmodus nur
zwischen Standard und Unterhalt. wählen.
• Dynamisch: Für helle Zimmer geeignet.
• Standard: Für normale Umgebungen geeignet.
für LED-Fernsehgeräte
• Natürlich
geringe Augenbelastung geeignet.
• Film: Zum Anzeigen von Filmen in einem abgedunkelten Zimmer
geeignet.
• Unterhalt. (Nur im PC-Modus verfügbar): Zum Anzeigen von Filmen
und Spielen geeignet.
Hilfe Jetzt test. Start Zoom Index
Jetzt test.: Anzeigen der entsprechenden Menüs.
Start: Wechseln zum Startfenster des e-Manuals.
Zoom: Vergrößern des Fensters.
Index: Anzeigen des Index-Fensters.
E
/ Entspannen
für Plasmafernsehgeräte
1. Wählen Sie mit der Taste ENTER
E
Inhaltsfenster aus. Die Meldung „Möchten Sie
dies ausführen?“ wird angezeigt. Wählen Sie Ja
aus, und drücken Sie die Taste ENTER
Bildschirmmenü wird angezeigt.
2. Drücken Sie die Taste E-MANUAL, um zum
Fenster des e-Manuals zurückzukehren.
Inhaltsfenster: Wenn Sie ein Untermenü
auswählen, können Sie die entsprechenden
Inhalte anzeigen. Mit der Taste l oder r
wechseln Sie zur vorherigen oder zur nächsten
Seite.
: Für
das
E
. Das
Verwenden des Zoommodus
Wenn Sie das e-Manual anzeigen, können Sie mit der
Option Zoom das Fenster vergrößern.
Mit der Taste
u
oder d können Sie durch das
vergrößerte Fenster blättern.
✎
Um zum vorherigen Menü zurückzukehren,
drücken Sie die Taste RETURN.
Ändern des voreingestellten Bildmodus
O MENUm → Bild → Bildmodus → ENTER
■
Bildmodus t
Wählen Sie Ihren bevorzugten Bildtyp aus.
N Wenn als Signalquelle PC eingestellt ist, können Sie im Bildmodus nur zwischen
Standard und Unterhalt. wählen.
• Dynamisch: Für helle Zimmer geeignet.
• Standard: Für normale Umgebungen geeignet.
für LED-Fernsehgeräte
• Natürlich
Augenbelastung geeignet.
• Film: Zum Anzeigen von Filmen in einem abgedunkelten Zimmer geeignet.
• Unterhalt. (Nur im PC-Modus verfügbar): Zum Anzeigen von Filmen und Spielen geeignet.
/ Entspannen
So suchen Sie mithilfe der Indexseite nach einen Stichwort
✎
Diese Funktion wird, je nach Sprache, möglicherweise nicht unterstützt.
u
1. Wenn Sie nach einem Stichwort suchen möchten, wählen Sie mit der
l
2. Wählen Sie mit der Taste
oder r den Anfangsbuchstaben des gewünschten Stichworts aus, und drücken
/ d / l / r Taste Index.
Sie dann die Taste ENTERE.
u
3. Wählen Sie mit der Taste
oder d das gewünschte Stichwort aus, und drücken Sie dann die Taste
ENTERE.
4. Sie können das Fenster der entsprechenden Anweisung im e-Manual anzeigen.
✎
Drücken Sie die Taste RETURN, um das Index-Fenster zu schließen.
E
für Plasmafernsehgeräte
: Für geringe
Zurück
Deutsch - 15
Page 58
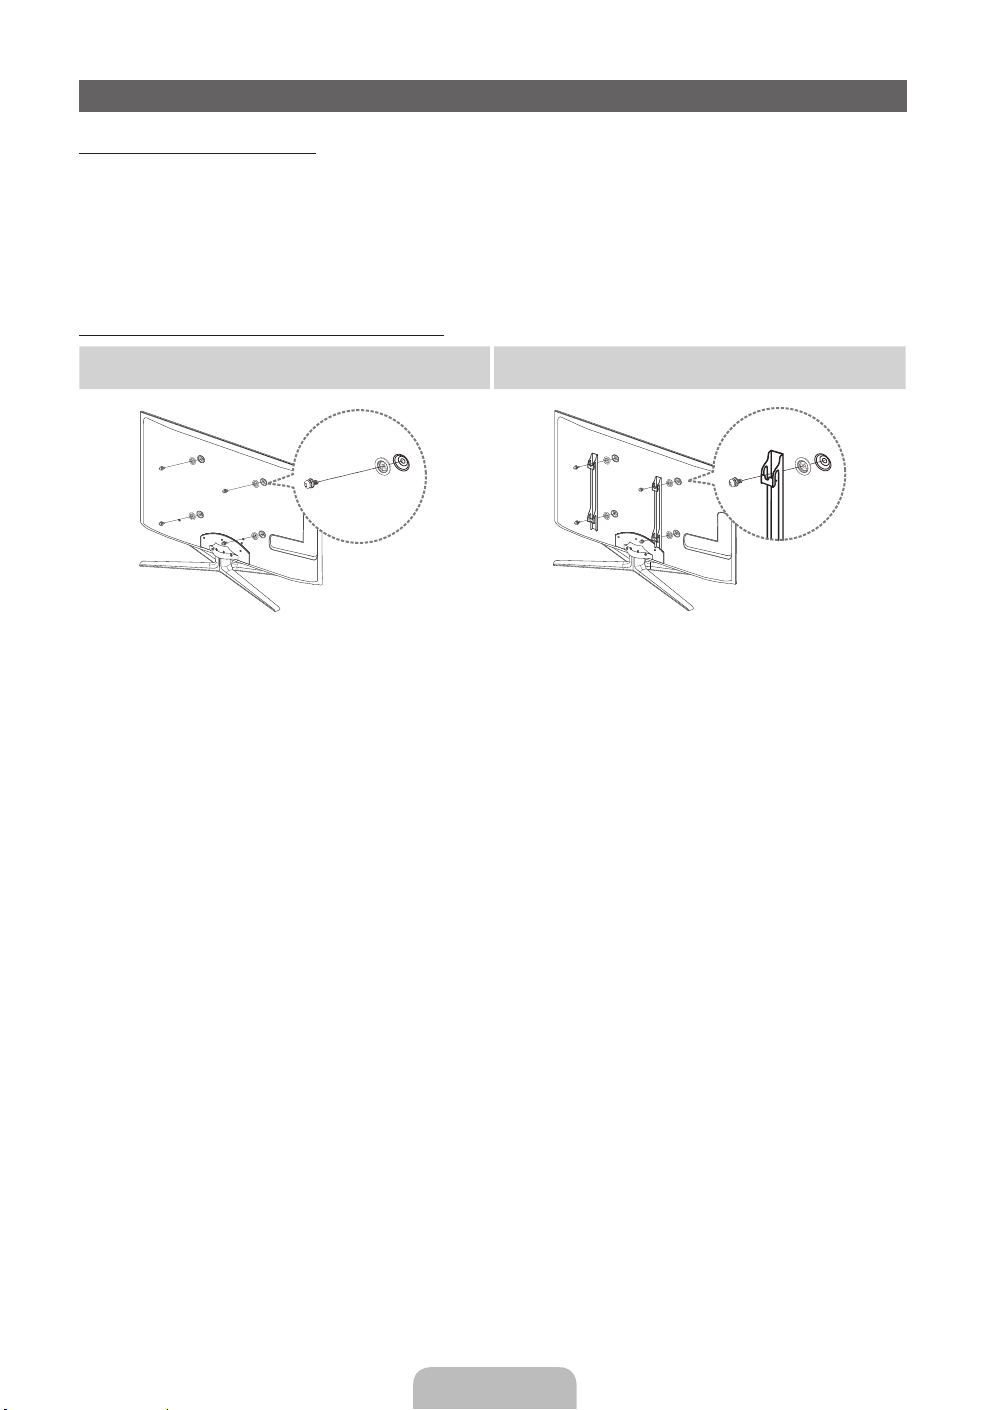
Anbringen der Wandhalterung
Anbringen der Wandhalterung
Mit der (separat erhältlichen) Wandhalterung können Sie das Fernsehgerät an einer Wand befestigen.
Detaillierte Informationen zum Montieren der Wandhalterung finden Sie in den Anweisungen, die im Lieferumfang
der Wandhalterung enthalten sind. Lassen Sie sich beim Anbringen der Wandhalterung von einem Techniker
helfen.
Samsung Electronics haftet nicht für Schäden an Gerät oder Personen, wenn die Montage vom Kunden selbst
durchgeführt wird.
Vorbereiten für den Einbau der Wandhalterung
Fall A. Anbringen der SAMSUNG-Wandhalterung Fall B. Anbringen der Wandhalterung eines anderen
Unternehmens
1
Beim Einbau einer Wandhalterung, verwenden Sie den
Haltering . 1.
1
Deutsch - 16
Page 59
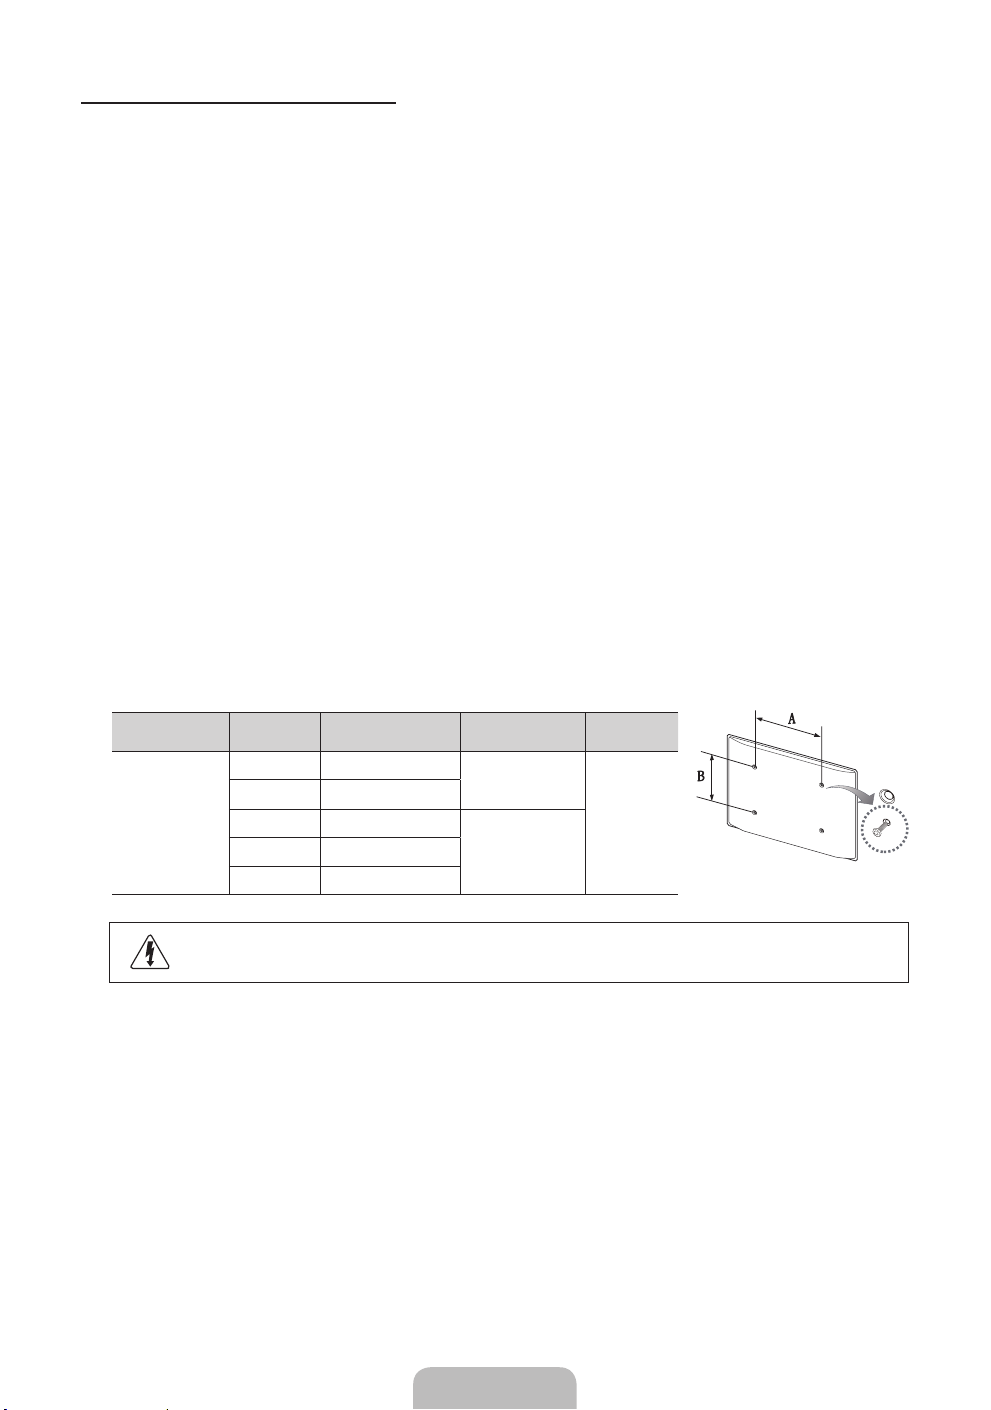
Spezifikation (VESA) der Wandhalterung
✎
Die Wandhalterung wird nicht mitgeliefert, ist aber gesondert erhältlich.
Montieren Sie die Wandhalterung an einer soliden Wand, die senkrecht zum Boden steht. Bei Installation auf
anderen Trägermaterialien wenden Sie sich bitte an Ihren Fachhändler. Bei Montage an einer Decke oder
schrägen Wand kann das Fernsehgerät herunterfallen und zu Verletzungen führen.
✎
HINWEIS
Die Standardabmessungen der Wandhalterung finden Sie in der nachfolgenden Tabelle.
x
Beim Kauf unserer Wandhalterung erhalten Sie ein detailliertes Installationshandbuch sowie alle für die
x
Montage erforderlichen Teile.
Verwenden Sie keine Schrauben, die nicht der VESA-Standardspezifikation für Schrauben entsprechen.
x
Verwenden Sie keine Schrauben, die länger sind als in der VESA-Standardspezifikation für Schrauben
x
angegeben. Zu lange Schrauben können Schäden an den inneren Bauteilen des Fernsehgeräts
verursachen.
Bei Wandhalterungen, die nicht der VESA-Standardspezifikation für Schrauben entsprechen, hängt die
x
Länge der Schrauben von der Spezifikation der Wandhalterung ab.
Ziehen Sie die Schrauben nicht zu fest an, weil Sie auf diese Weise das Gerät beschädigen könnten oder
x
weil das Gerät dadurch herunterfallen und damit Verletzungen verursachen könnte. Samsung haftet nicht
bei derartigen Unfällen.
Samsung haftet nicht für Geräteschäden oder Verletzungen, wenn eine Wandhalterung verwendet
x
wird, die nicht dem VESA-Standard entspricht oder nicht spezifiziert ist, oder wenn der Verbraucher die
Installationsanleitung für das Produkt nicht befolgt.
Unser 55-Zoll-Modell entspricht nicht der VESA-Spezifikation. Verwenden Sie für diese Modelle deshalb
x
unseren speziellen Wandmontagesatz.
Montieren Sie das Fernsehgerät nicht in einem Winkel von mehr als 15 Grad.
x
Produktfamilie Zoll
19~22 75 X 75
23~27 200 X 100
LED-Fernseher
32~40 200 X 200
60~65 600 X 400
VESA-Spezifikation
(A * B)
Standardschraube Menge
M4
4
M846~55 400 X 400
Installieren Sie die Wandhalterung nicht bei eingeschaltetem Fernsehgerät. Sie könnten dabei
einen Stromschlag erhalten und sich verletzen.
Deutsch - 17
Page 60
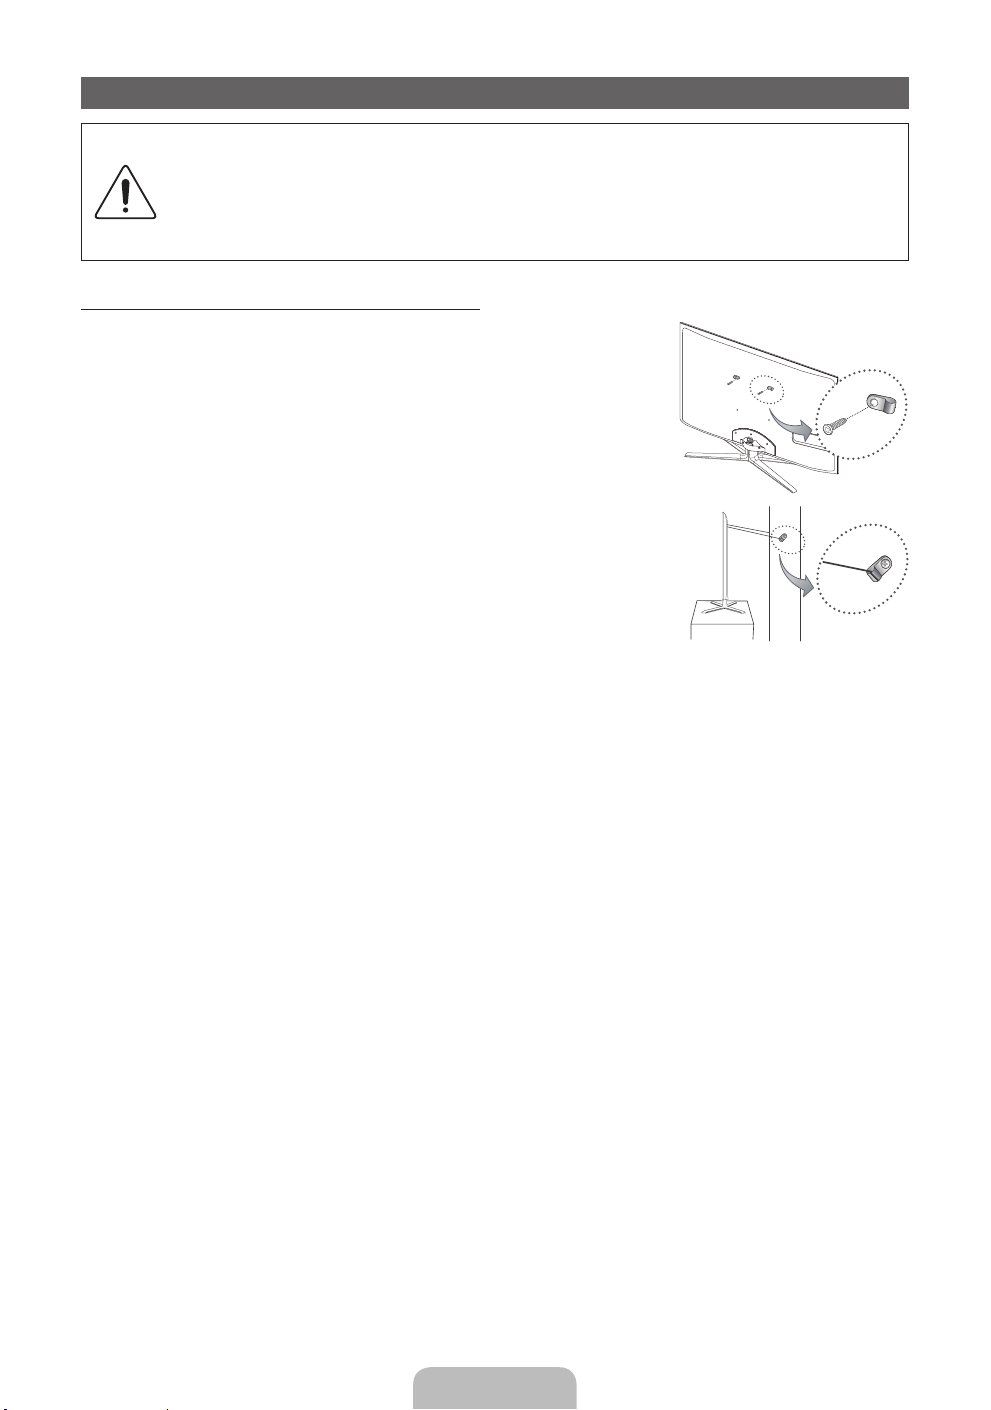
Befestigen des Fernsehgeräts an der Wand
Achtung: Das Fernsehgerät kann hinfallen, wenn Sie daran ziehen, es schieben oder darauf
klettern. Stellen Sie insbesondere sicher, dass sich keine Kinder an das Gerät hängen
oder es aus dem Gleichgewicht bringen. Anderenfalls könnte das Gerät umkippen und zu
schweren Verletzungen oder dem Tod führen. Beachten Sie alle Anweisungen der beigefügten
Sicherheitshinweise. Noch mehr Stabilität und Sicherheit erreichen Sie, wenn Sie den Kippschutz
installieren. Gehen Sie dazu folgendermaßen vor.
So verhindern Sie, dass das Fernsehgerät umkippt
1. Stecken Sie die Schrauben durch die Halterungen und befestigen Sie sie
fest an der Wand. Vergewissern Sie sich, dass die Schrauben gut halten.
✎
Je nach Ausführung der Wand benötigen Sie zum Befestigen weiteres
Material, wie z.B. Dübel.
✎
Da die benötigten Halterungen, Schrauben und das Band nicht zum
Lieferumfang gehören, müssen Sie diese Teile gesondert erwerben.
2. Entfernen Sie die Schrauben in der Mitte auf der Rückseite des
Fernsehgeräts. Setzen Sie diese Schrauben in die Halterungen ein, und
befestigen Sie die Schrauben dann wieder am Fernsehgerät.
✎
Die Schrauben werden möglicherweise nicht zusammen mit dem
Gerät geliefert. Kaufen Sie in diesem Fall Schrauben entsprechend
den folgenden Angaben.
✎
Daten der Schrauben
Bei einem 19–27-Zoll-Gerät: M4
x
Bei einem 32–65-Zoll-Gerät: M8
x
3. Verbinden Sie die Halterungen an der Wand und die Halterung am Fernsehgerät mit einem festen Kabel
miteinander, und ziehen Sie es dann fest.
✎
HINWEIS
Stellen Sie das Fernsehgerät in der Nähe der Wand auf, damit es nicht nach hinten kippen kann.
x
Es ist noch sicherer, wenn die Halterungen an der Wand niedriger als die Halterungen am
x
Fernsehgerät sind.
Lösen Sie das Band, ehe Sie den Fernseher bewegen.
x
4. Kontrollieren Sie, ob alle Befestigungen ordnungsgemäß gesichert sind. Prüfen Sie regelmäßig die
Verbindungen auf Zeichen von Ermüdung oder Versagen. Bei Zweifeln hinsichtlich der Sicherheit Ihrer
Halterungen wenden Sie sich an einen professionellen Installationsbetrieb.
Wand
Deutsch - 18
Page 61
Fehlerbehebung
Bei Fragen zum Fernsehgerät schauen Sie zuerst in dieser Liste nach. Wenn keiner dieser Tipps zur
Fehlerbehebung weiterhilft, öffnen Sie die Website „www.samsung.com“ und klicken Sie dort auf „Support“ oder
wenden Sie sich an das in der Liste auf der letzten Seite angegebene Callcenter.
Probleme Lösungen und Erklärungen
Der Fernseher kann nicht eingeschaltet
werden.
Kein Bild/Video. • Überprüfen Sie die Kabelverbindungen. Unterbrechen Sie kurzzeitig alle Kabelverbindungen zwischen
Die Fernbedienung funktioniert nicht. • Ersetzen Sie die Batterien der Fernbedienung, und achten Sie dabei auf die richtige Polung (+/-).
Die Fernbedienung des Kabel-/
Satellitenreceivers schaltet das
Fernsehgerät nicht ein/aus oder regelt
auch nicht die Lautstärke.
✎
Der TFT-LED-Bildschirm enthält Unterpixel. Hierfür ist eine ausgefeilte Fertigungstechnologie erforderlich
ist. Allerdings können ein paar zu helle oder zu dunkle Pixel auf der Bildfläche zu sehen sein. Diese
Pixelfehler haben keinen Einfluss auf die Geräteleistung.
✎
Sie können den optimalen Zustand Ihres Fernsehgeräts erhalten, indem Sie die aktuelle Firmware per USB
von der Website (samsung.com → Unterstützung → Downloads) herunterladen.
• Vergewissern Sie sich, dass das Netzkabel sicher mit der Wandsteckdose und dem Fernsehgerät
verbunden ist.
• Vergewissern Sie sich, dass die Netzsteckdose Strom liefert.
• Drücken Sie die Taste POWER am Fernsehgerät, um zu prüfen, ob die Fernbedienung richtig
funktioniert. Wenn das Fernsehgerät angeht, lesen Sie den Abschnitt „Die Fernbedienung funktioniert
nicht“ weiter unten.
dem Fernsehgerät und den externen Geräten.
• Stellen Sie den Videoausgang Ihres externen Geräts (Kabel-/Satellitenreceiver, DVD-/Blu-ray-Player
usw.) so ein, dass er zur Verbindung mit dem Fernsehgerät passt. Zum Beispiel: Wenn der HDMIAusgang des externen Geräts verwendet wird, schließen Sie es an den HDMI-Eingangs Ihres
Fernsehers an.
• Stellen Sie sicher, dass die angeschlossenen Geräte eingeschaltet sind.
• Vergewissern Sie sich, dass die richtige Signalquelle für den Fernseher eingestellt ist. Drücken Sie
dazu die Taste SOURCE auf der Fernbedienung.
• Schießen Sie das Netzkabel an, um das angeschlossene Gerät neu zu starten.
• Reinigen Sie das Sendefeld der Fernbedienung.
• Zeigen Sie mit der Fernbedienung aus 1,5 bis 2 m Entfernung direkt auf das Fernsehgerät.
• Programmieren Sie die Fernbedienung des Kabel-/Satellitenreceivers so, dass sie das Fernsehgerät
anspricht. Den Code für SAMSUNG TV finden Sie in der Bedienungsanleitung für Ihren Kabel-/
Satellitenreceiver.
Lizenz
Deutsch - 19
Page 62
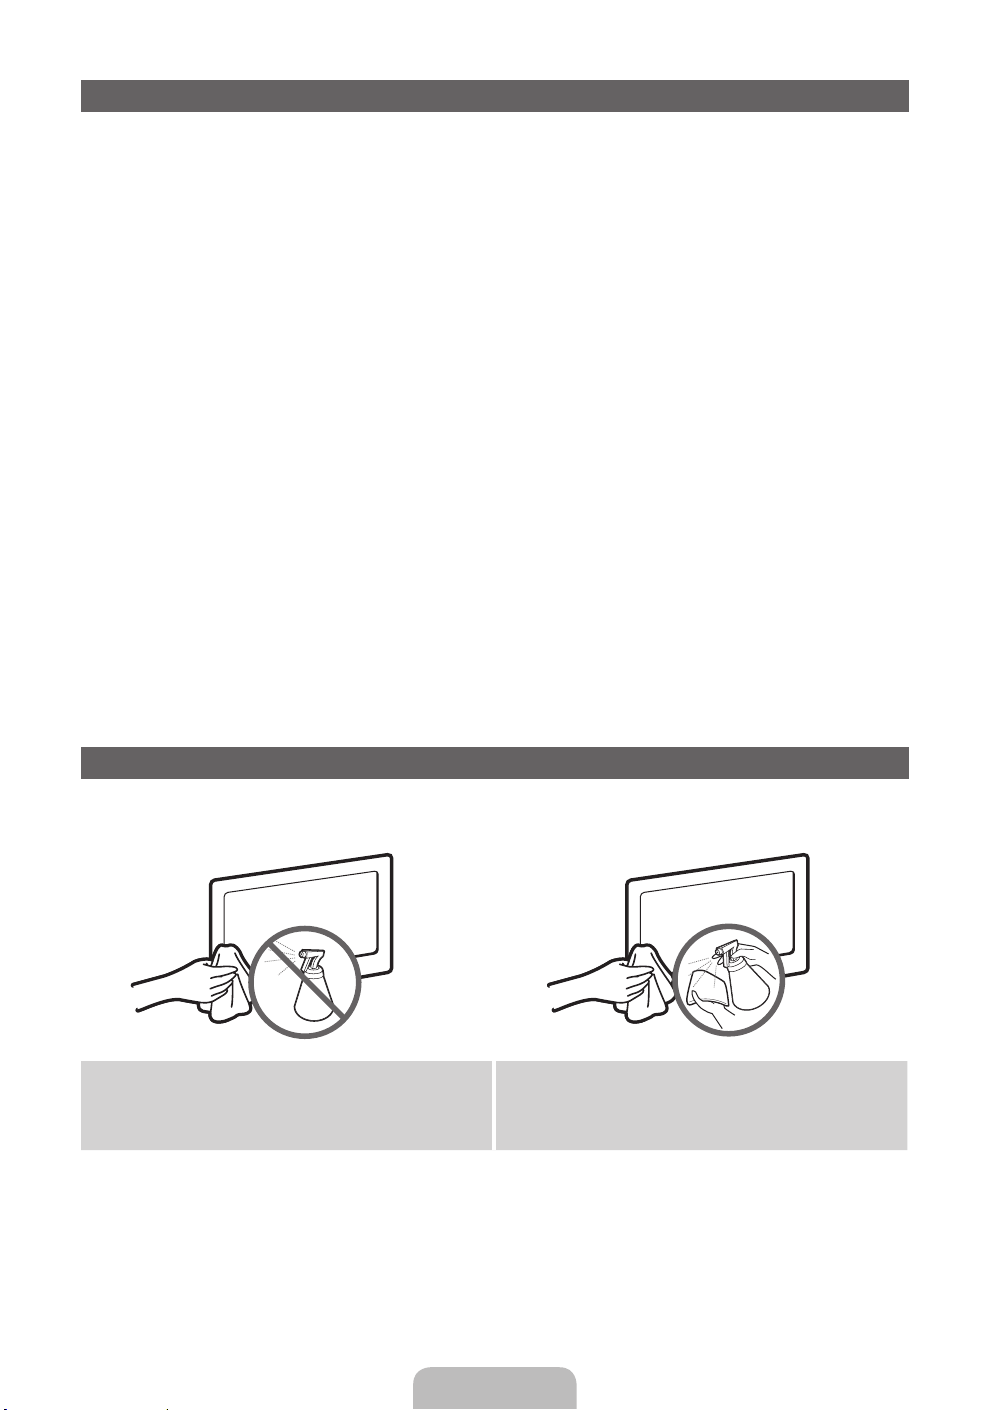
Liste der Funktionen
Hervorragende digitale Schnittstelle und Netzwerkverbindung: Mit dem eingebauten digitalen HDTV-Tuner
können Sie unverschlüsselte HDTV-Sendungen ohne zusätzlichen Kabel-/Satellitenreceiver empfangen.
3D
Mit dieser aufregenden neuen Funktion können Sie Inhalte räumlich anzeigen.
SMART HUB
Der Gateway zu allen integrierte Inhalten
• Smart Hub hilft Ihnen bei der Auswahl Ihres vielfältigen Unterhaltungsprogramms
• So können Sie Ihre Unterhaltung schnell und einfach über eine benutzerfreundliche Benutzeroberfläche
steuern
• Greifen Sie auf zahlreiche Anwendungen zu, die täglich neu hinzugefügt werden
• Richten Sie Ihre Fernsehgerät nach Ihren Wünschen ein, und gruppieren bzw. sortieren Sie Anwendungen
gemäß Ihren Vorlieben
AllShare™
AllShare™ verbindet Ihr Fernsehgerät und Ihre Samsung-Mobiltelefone bzw. -Geräte über ein Netzwerk
miteinander.
Anynet+ (HDMI-CEC)
Dabei handelt es sich um eine Funktion, mit der Sie alle angeschlossenen Samsung-Geräte, die Anynet+
unterstützen, mit der Fernbedienung für Ihr Samsung-Fernsehgerät steuern können.
Skype
Mit Skype können Sie andere Menschen grüßen und gemeinsam mit ihnen lachen. Kommunizieren Sie mit
Menschen rund um die Welt!
Lagerung und Wartung
✎
Wenn Sie Aufkleber auf dem Bildschirm des Fernsehgeräts anbringen, bleiben nach dem Entfernen
Kleberückstände zurück. Entfernen Sie diese, bevor Sie fernsehen.
Sprühen Sie kein Wasser oder Reinigungsmittel direkt
auf das Gerät. Jede Flüssigkeit, die in das Gerät
eindringt, kann zu einer Funktionsstörung, einem
Brand oder einem Stromschlag führen.
Reinigen Sie das Gerät mit einem weichen Tuch,
das Sie vorher mit einer kleinen Menge Wasser
anfeuchten.
Deutsch - 20
Page 63
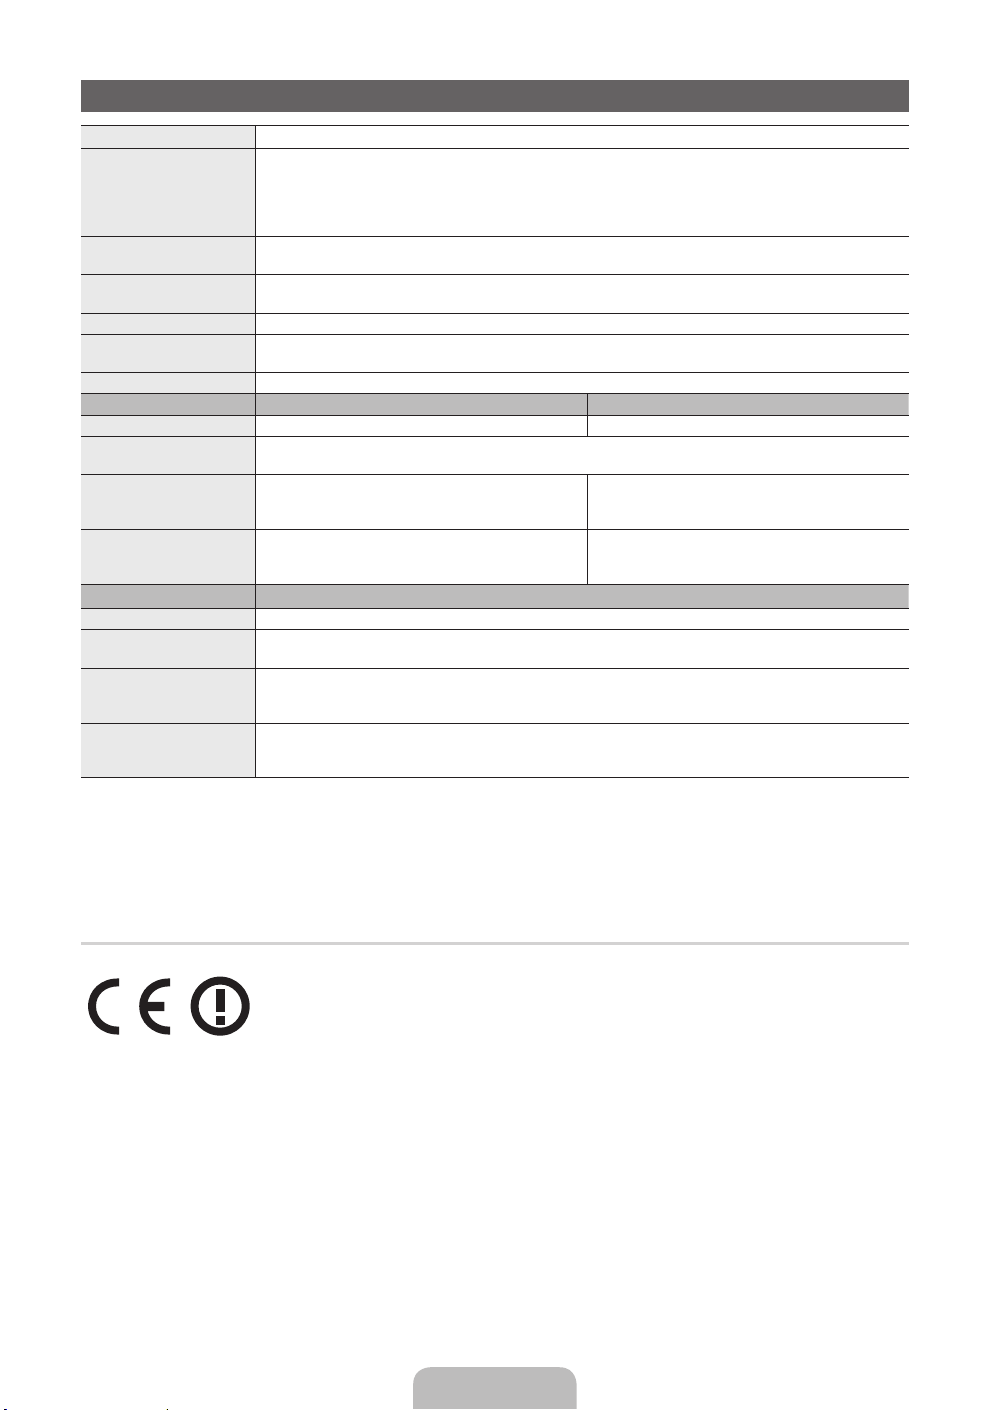
Technische Daten
Anzeigeauflösung 1920 x 1080
Umgebungsbedingungen
Betriebstemperatur
Luftfeuchtigkeit (bei Betrieb)
Lagerungstemperatur
Luftfeuchtigkeit (Lagerung)
TV-System Analog: B/G, D/K, L, I (je nach eingestelltem Land)
Fernsehnorm/Videosystem: Analog: PAL, SECAM, NTSC-4.43, NTSC-3.58, PAL60
Audiosystem BG, DK, L, NICAM, MPEG1, DD, DD+, HEAAC.
HDMI IN Video: 1080 24p, 1080p, 1080i, 720p, 576p, 480p
Drehbarer Fuß (Links / rechts) -20˚ ~ 20˚
Modellname UE40D7000 UE46D7000
Bildschirmgröße 40 Zoll 46 Zoll
Ton
(Ausgang) 10 W x 2
Abmessungen (BxTxH)
Gehäuse
Mit Fuß
Gewicht
Ohne Fuß
Mit Fuß
Modellname
Bildschirmgröße 55 Zoll
Ton
(Ausgang) 15 W x 2
Abmessungen (BxTxH)
Gehäuse
Mit Fuß
Gewicht
Ohne Fuß
Mit Fuß
Digital: MPEG-2 MP@ML, MPEG-4, H.264/AVC MP@L3, [email protected], [email protected]
Audio: 2-Kanal-Linear-PCM 32/44.1/48 kHz, 16/20/24 Bit.
916,0 X 29,7 X 531,8 mm
916,0 X 241,3 X 603,6 mm
10,1 kg
11,5 kg
10° C bis 40° C (50°F bis 104°F)
10% bis 80%, nicht kondensierend
-20° C bis 45° C (-4°F bis 113°F)
5% bis 95%, nicht kondensierend
Digital: DVB-T/DVB-C/DVB-S2
1048,5 X 29,7 X 606,3 mm
1048,5 X 276,7 X 683,1 mm
12,5 kg
14,4 kg
UE55D7000
1240,0 X 29,7 X 714,1 mm
1240,0 X 309,8 X 790,9 mm
16,1 kg
18,6 kg
✎
Änderungen der technischen Daten und des Geräte-Designs vorbehalten.
✎
Die technischen Daten zur benötigten Netzspannung und zum Energieverbrauch finden Sie auf dem Etikett
am Produkt.
¦ Empfehlung - Nur EU
• Hiermit erklärt Samsung Electronics, dass dieses LED-Fernseher zu allen wesentlichen Anforderungen und
sonstigen relevanten Bestimmungen der Direktive 1999/5/EC konform ist.
• Die offizielle Konformitätserklärung finden Sie unter http://www.samsung.com. Wechseln Sie zu Support >
Produktsuche, und geben Sie den Modellnamen ein.
• Dieses Gerät ist ausschließlich für die Verwendung in geschlossenen Räumen geeignet.
• Dieses Gerät kann in allen Ländern in der EU verwendet werden.
Deutsch - 21
Page 64

This page is intentionally
left blank.
 Loading...