

Samsung UE60ES6305U, UE55ES6800S, UE50ES6990S, UE50ES6305U, UE50ES5500W Operating Instructions
...
E-MANUAL
Thank you for purchasing this Samsung product.
To receive more complete service, please register
your product at
www.samsung.com/register
Model______________ Serial No.______________

Contents
Channel Menu
• Connecting the TV 1
• Using the INFO button
(Now & Next guide) 24
• Using the Channel Menu 26
• Memorising Channels 67
• Other Features 82
Basic Feature
• Changing the Preset Picture Mode 99
• Adjusting Picture Settings 104
• Changing the Picture Size 109
• Changing the Picture Options 123
• Using the TV with Your PC 141
• Changing the Preset Sound Mode 145
• Adjusting Sound Settings 147
Preference Features
• Connecting to the Network 163
• Setting up a Wired Network 180
• Setting up the Wireless Network 193
• Managing the Network Connected
Devices 220
• Setting the Time 233
• Blocking Programmes 250
• Economical Solutions 255
• Picture In Picture (PIP) 260
• Connecting to the TV with a
Samsung Audio Device 265
• Other Features 269
• Support Menu 299

Advanced Features
• Using the AllShare Play 572
• Using the 3D function 325
• Smart Hub 340
• Customizing the Home Screen 367
• Using Samsung Apps 397
• Search 408
• Your Video 416
• Family Story 433
• Fitness 488
• Kids 500
• Web Browser 515
• Skype 545
• AllShare Play 549
• My list (In AllShare Play) 576
• Videos (In AllShare Play) 595
• Photos (In AllShare Play) 614
• Music (In AllShare Play) 631
• Recorded TV (In AllShare Play) 640
• Timeshift 653
• Using the DLNA Function 663
• Anynet+ (HDMI-CEC) 674

Other Information
• AllShare Play (Troubleshooting) 747
• Troubleshooting 692
• Picture Quality (Troubleshooting) 693
• Sound Quality (Troubleshooting) 701
• No Picture, No Video (Troubleshooting) 706
• Aerial (Air / Cable) Connection
(Troubleshooting) 710
• PC Connection (Troubleshooting) 713
• Network Connection (Troubleshooting) 714
• Recording / Timeshift (Troubleshooting) 715
• Others (Troubleshooting) 724
• Anynet+ (HDMI-CEC) (Troubleshooting) 739
• Smart Hub (Troubleshooting) 748
• Web Browser (Troubleshooting) 750
• Supported Subtitle and
AllShare Play file formats 759
• Data Service 768
• HbbTV 776
• Connecting to a TV Viewing Card slot 780
• Teletext Feature 790
• Anti-theft Kensington Lock 797
• Licence 802
Connecting the TV
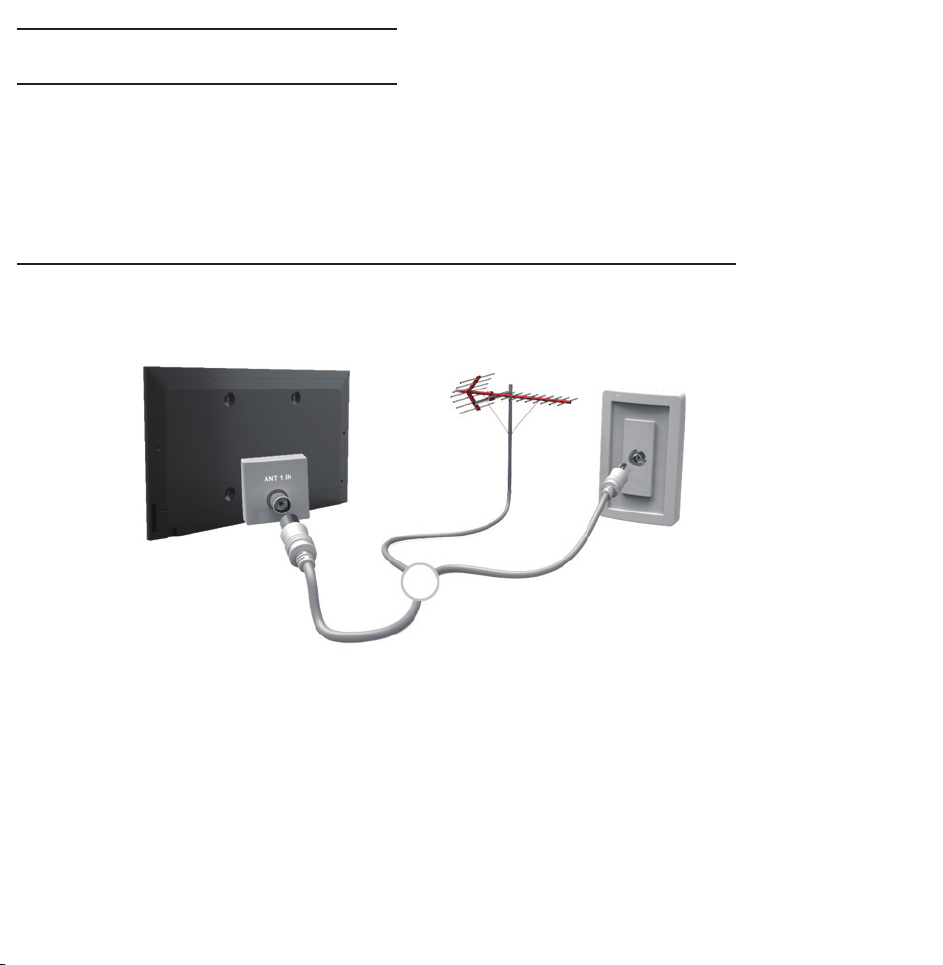
Connecting to an Aerial or Satellite
TV rear panel
or
The displayed image may differ depending on the model.
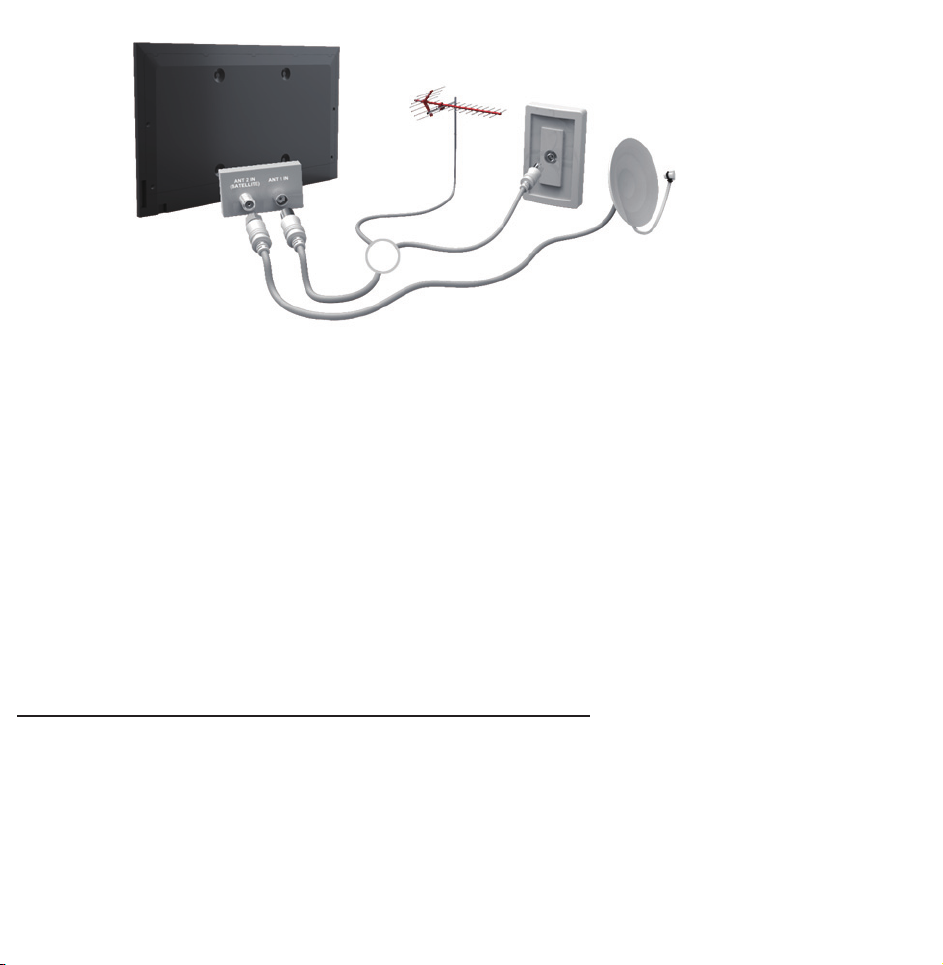
TV rear panel
The displayed image may differ depending on the model.
or
Connecting to an AV Device
Using a HDMI (up to 1080p)

TV rear panel
The displayed image may differ depending on the model.

TV side panel
The displayed image may differ depending on the model.
Using an HDMI cable (up to 1080p)
N
HDMI IN 1(DVI), HDMI IN 2(ARC),
HDMI IN 3
●
For better picture and audio quality,

connect to a digital device using an
HDMI cable.
●
An HDMI cable supports digital video
and audio signals, and does not require
an audio cable.
–To connect the TV to a digital device
that does not support HDMI output,
use an HDMI/DVI and audio cables.
●
The picture may not display normally
(if at all) or the audio may not work if
an external device that uses an older

version of HDMI mode is connected to
the TV. If such a problem occurs, ask
the manufacturer of the external device
about the HDMI version and, if out of
date, request an upgrade.
●
for LED 6500 Series and above
Be sure to
use an HDMI cable with a thickness of
14 mm or less.
●
Be sure to purchase a certified HDMI
cable. Otherwise, the picture may not
display or a connection error may

occur.
●
A basic high-speed HDMI cable or one
with Ethernet is recommended. This
product does not support the Ethernet
function via HDMI.
●
This product supports the 3D and ARC
(Audio Return Channel) functions via an
HDMI cable. Note that the ARC function
is supported by the HDMI IN 2(ARC)
port only.
●
The ARC function allows digital audio
to output via the HDMI IN 2(ARC) port.
It can be enabled only when the TV is
connected with an audio receiver that
supports the ARC function.
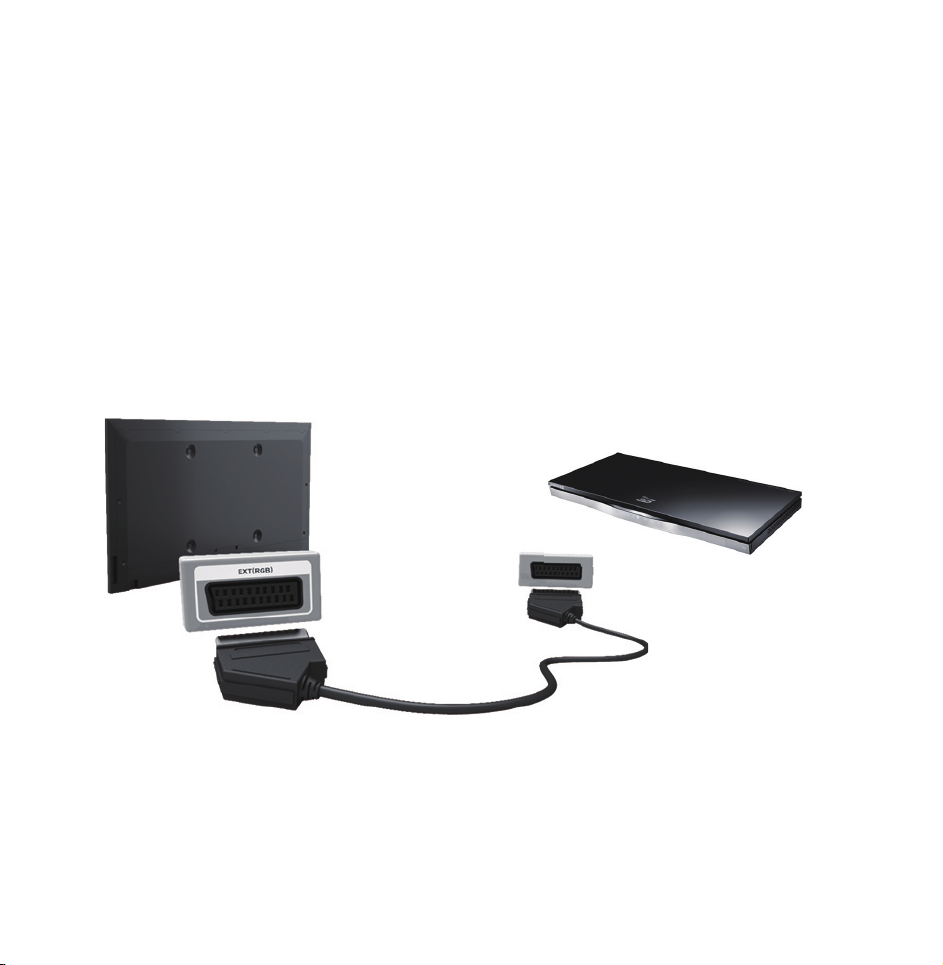
Using a Scart Cable
TV rear panel
The displayed image may differ depending on the model.

The displayed image may differ depending on the model.
TV side panel
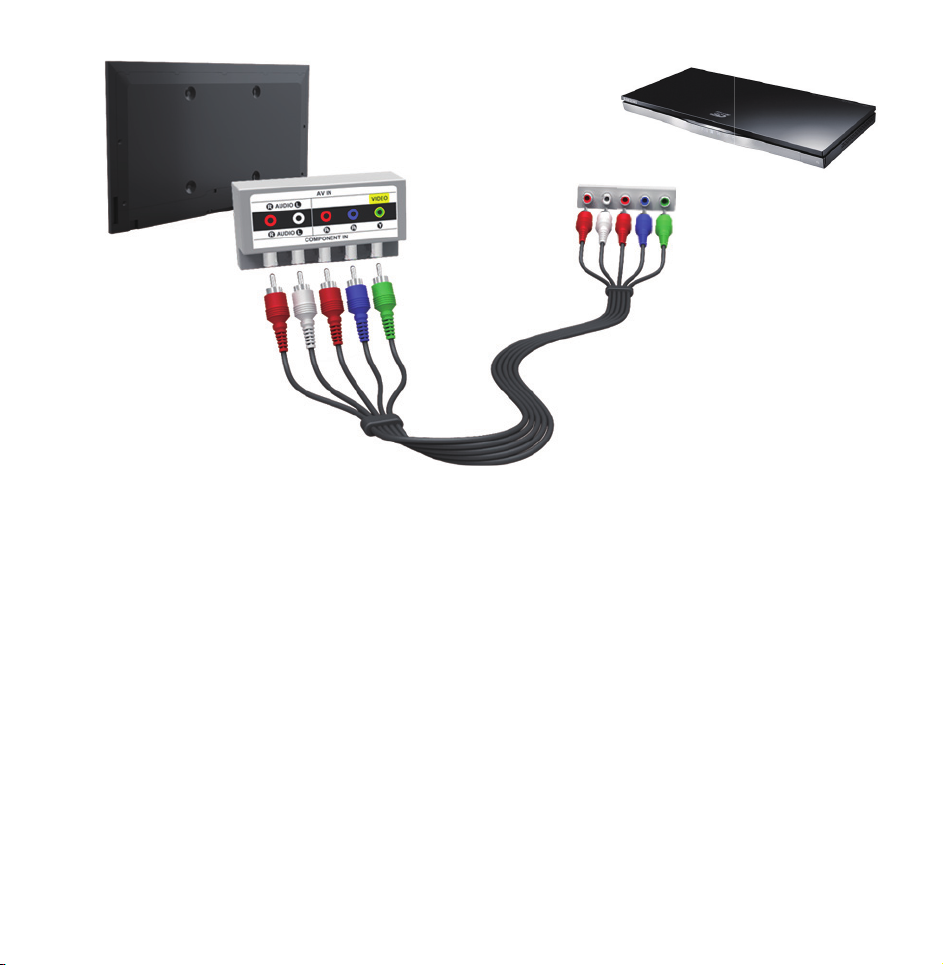
Using a Component (up to 1080i)

TV rear panel
The displayed image may differ depending on the model.
TV rear panel
The displayed image may differ depending on the model.
Using a Component (up to 1080i) or an
Audio/Video (480i only) and a Scart Cable
N
In Ext. mode, DTV Out supports
MPEG SD Video and Audio only.

N
When connecting to AV IN or
COMPONENT/AV IN connect the AV
connector (yellow) to the TV jack
(Green). (Depending on the model)
N
To obtain the better picture quality,
the Component connection or Scart
connection are recommended over
the A/V connection.
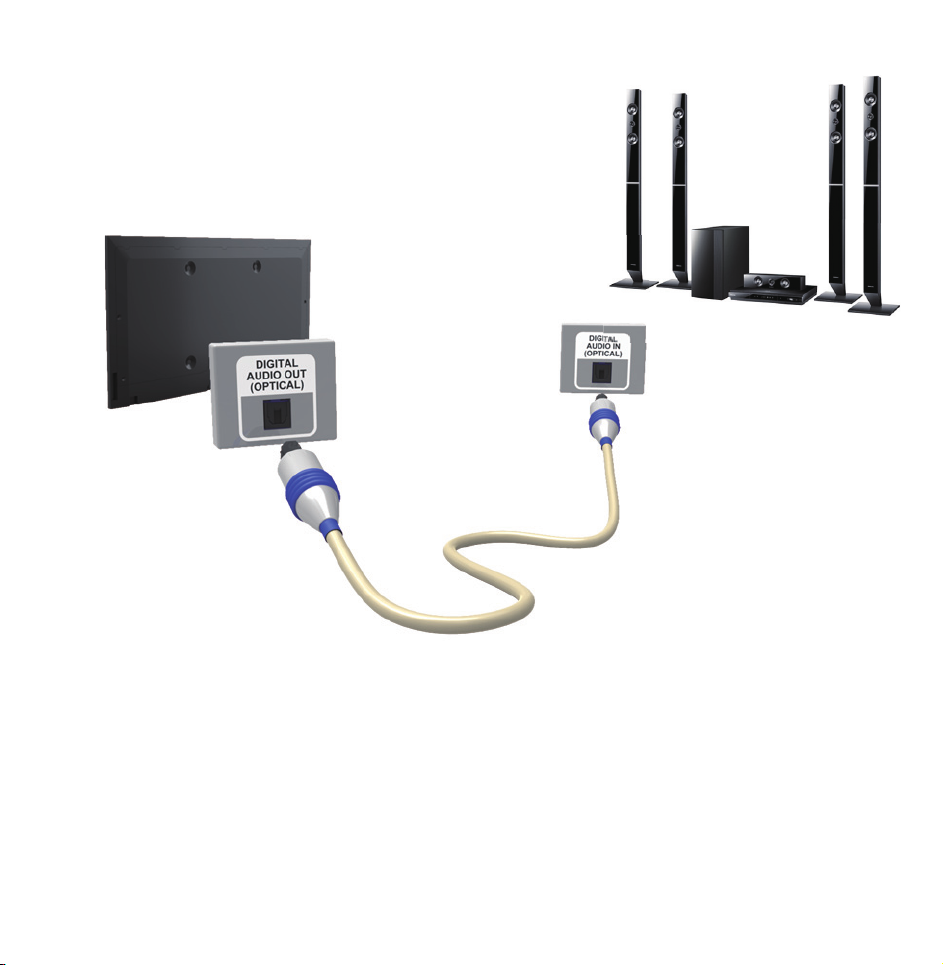
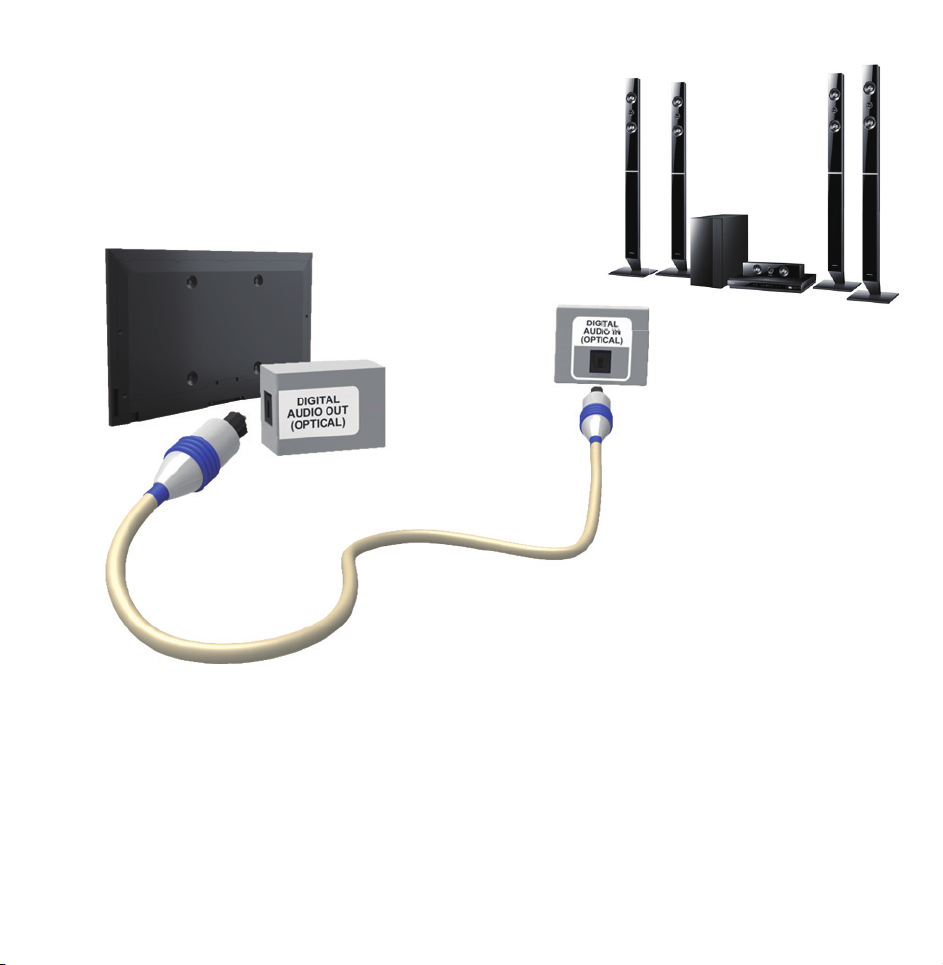
Connecting to an Audio device
Using an Optical (Digital) Connection
TV rear panel
The displayed image may differ depending on the model.
TV side panel
The displayed image may differ depending on the model.
DIGITAL AUDIO OUT (OPTICAL)

●
When you connect a Digital Audio
System to the DIGITAL AUDIO OUT
(OPTICAL) jack, decrease the volume
of both the TV and the system.
●
Use the System speakers for audio.
●
5.1 CH (channel) audio is available when
the TV is connected to an external
device supporting 5.1 CH.
●
When the receiver (home theatre) is set
to on, you can hear sound output from
the TV’s optical jack. When the TV

is receiving a DTV signal, the TV will
send 5.1 CH sound to the home theatre
receiver. When the source is a digital
component such as a DVD / Bluray
player / cable box / STB (Set-Top-Box)
satellite receiver and is connected to the
TV via HDMI, only 2 CH audio will be
heard from the home theatre receiver. If
you want to hear 5.1 CH audio, connect
the digital audio out jack from your
DVD / Blu-ray player / cable box / STB

satellite receiver directly to an amplifier
or home theatre.
Using a Headphone Connection
for LED TV
TV rear panel
The displayed image may differ depending on the model.

TV rear panel
The displayed image may differ depending on the model.
Headphones
H
You can connect your headphones to
the headphones output on your set.
While the headphones are connected,
the sound from the built-in speakers

will be disabled.
●
Sound function may be restricted
when connecting headphones to the
TV.
●
Headphone volume and TV volume
are adjusted separately.
●
The headphones jack supports only
the 3 conductor tip-ring-sleeve (TRS)
type.
Connecting to a PC

Using an HDMI/DVI Cable
TV rear panel
The displayed image may differ depending on the model.

TV side panel
The displayed image may differ depending on the model.
Using an HDMI cable or an HDMI to DVI
cable
Connecting through the HDMI cable

may not be supported depending on
the PC.
Optimal resolution is 1920 X 1080 @ 60
Hz.
N
For HDMI/DVI cable connection, you
must use the HDMI IN 1(DVI) jack.
N
The interlace mode is not supported.
N
The set might operate abnormally
if a non-standard video format is
selected.
N
Separate and Composite modes are

supported. SOG (Sync On Green) is
not supported.
N
PC (D-Sub) input is not supported.

Using the INFO button (Now & Next guide)
The display identifies the current
channel and the status of certain audio-
video settings.
The Now & Next guide shows daily
TV programme information for each
channel according to the broadcasting
time.
●
Scroll l, r to view information for a
desired programme while watching the
current channel.

●
Scroll
u, d
to view information for
other channels. If you want to move to
the currently selected channel, select
using your remote.
E

Using the Channel Menu
Press the ™ button to select the menu
you want to use. Each screen will be
displayed.
Guide
Guide
→
™
The EPG (Electronic Programme Guide)
information is provided by broadcasters.
Using programme schedules provided
by broadcasters, you can specify
 Loading...