

Samsung 7 SERIES, UA60ES8000, UA65ES8000, UA46ES8000, UA55ES800 User Manual
© 2012 Samsung Electronics Co., Ltd. All rights reserved.
BN68-04035A-07
Contact SAMSUNG WORLDWIDE
If you have any questions or comments relating to Samsung products, please contact the SAMSUNG customer care centre.
Country
Customer Care Centre
Web Site
AUSTRALIA 1300 362 603 www.samsung.com
NEW ZEALAND 0800 SAMSUNG (0800 726 786) www.samsung.com
CHINA 400-810-5858 www.samsung.com
HONG KONG (852) 3698 4698 www.samsung.com/hk (Chinese)
www.samsung.com/hk_en (English)
INDIA 1800 1100 11
3030 8282
1800 3000 8282
1800 266 8282
www.samsung.com
INDONESIA 0800-112-8888
021-5699-7777
www.samsung.com
JAPAN 0120-327-527 www.samsung.com
MALAYSIA 1800-88-9999 www.samsung.com
PHILIPPINES 1-800-10-SAMSUNG(726-7864) for PLDT
1-800-3-SAMSUNG(726-7864) for Digitel
1-800-8-SAMSUNG(726-7864) for Globe
02-5805777
www.samsung.com
SINGAPORE 1800-SAMSUNG(726-7864) www.samsung.com
THAILAND 1800-29-3232
02-689-3232
www.samsung.com
TAIWAN 0800-329-999
0266-026-066
www.samsung.com
VIETNAM 1 800 588 889 www.samsung.com
GEORGIA 0-800-555-555 www.samsung.com
ARMENIA 0-800-05-555 www.samsung.com
AZERBAIJAN 088-55-55-555 www.samsung.com
UZBEKISTAN 8-10-800-500-55-500 www.samsung.com
KYRGYZSTAN 00-800-500-55-500 www.samsung.com
TADJIKISTAN 8-10-800-500-55-500 www.samsung.com
MONGOLIA +7-800-555-55-55 www.samsung.com
BELARUS 810-800-500-55-500 www.samsung.com
MOLDOVA 0-800-614-40 www.samsung.com
LED TV
user manual
SUPPORT
Thank you for purchasing this Samsung product.
To receive more complete service, please register
your product at
www.samsung.com/register
Model _____________ Serial No. _____________
[UE7500_AR]BN68-04035AEng.indb 1 2012-07-26 �� 12:55:32
English - 2
For more information on how to view the e-Manual (p. 36)
Figures and illustrations in this User Manual are provided for reference only and may differ from actual
product appearance. Product design and specifications may be changed without notice.
Still image warning
Avoid displaying still images (such as jpeg picture files), still image elements (such as TV channel logos,
stock or news bars at the screen bottom etc.), or programmes in panorama or 4:3 image format on the
screen. Constantly displaying still pictures can cause image burn-in on the LED screen, which will affect
image quality. To reduce risk of this effect, please follow the recommendations below:
• Avoid displaying the same TV channel for long periods.
• Always try to display any image in full screen. Use the TV set’s picture format menu for the best
possible match.
• Reduce brightness and contrast values to minimum required level to achieve desired picture quality,
exceeded values may speed up the burnout process.
• Frequently use all TV features designed to reduce image retention and screen burnout, refer to proper
user manual section for details.
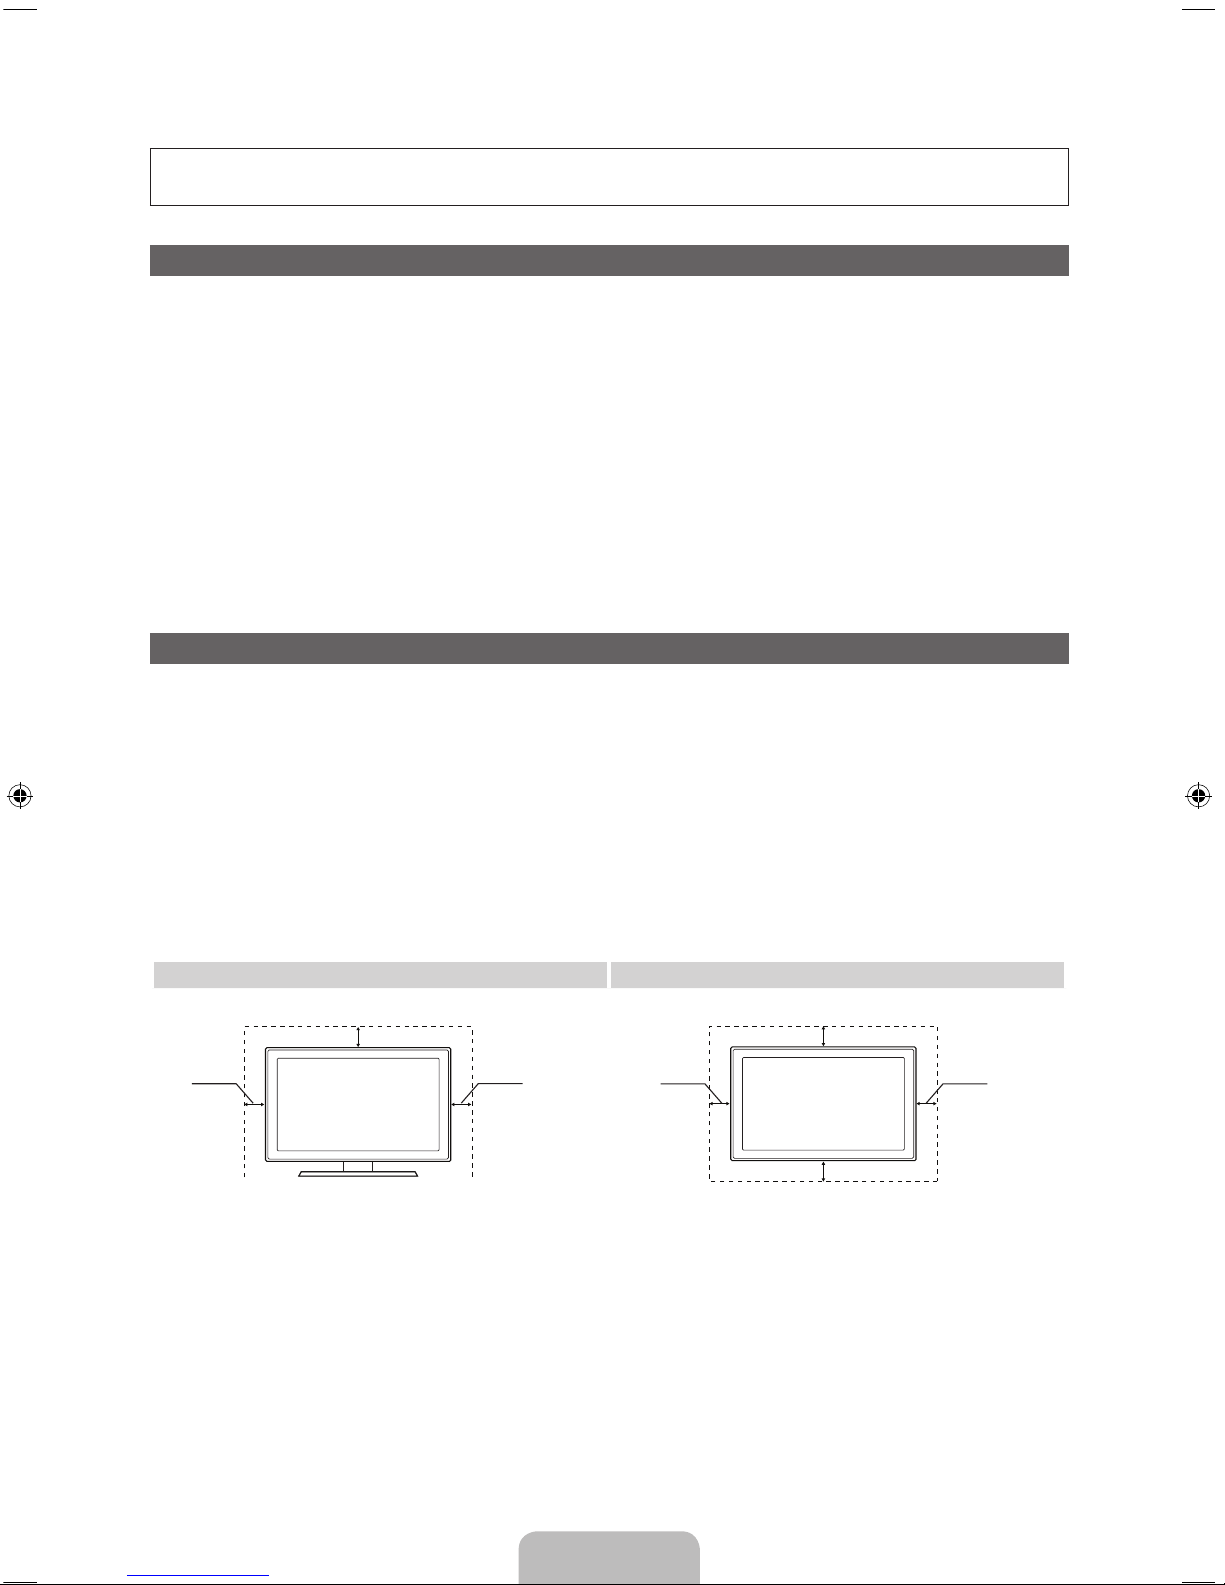
Securing the Installation Space
Keep the required distances between the product and other objects (e.g. walls) to ensure proper
ventilation.
Failing to do so may result in fire or a problem with the product due to an increase in the internal
temperature of the product.
✎
When using a stand or wall-mount, use parts provided by Samsung Electronics only.
• If you use parts provided by another manufacturer, it may result in a problem with the product or an
injury due to the product falling.
✎
The appearance may differ depending on the product.
✎
Be careful when you contact the TV because some parts can be somewhat hot.
Installation with a stand. Installation with a wall-mount.
10 cm10 cm
10 cm
10 cm
10 cm
10 cm
10 cm

English - 3
List of Features
• 3D: This exciting new feature enables you to view 3D content.
• SMART HUB: Your Gateway to all your content, integrated in one place.
− Provides diverse entertainment choices.
− Lets you control your entertainment life with an easy-to-use, user friendly UI.
− Gives you easy access to diverse Apps, with more being added every day.
− Lets you customize your TV by grouping and sorting Apps to your taste.
• AllShare Play: AllShare Play connects your TV and compatible Samsung mobile phones/devices
through a network.
• Anynet+ (HDMI-CEC): Allows you to control all connected Samsung devices that support Anynet+
with your Samsung TV’s remote.
• e-Manual: Allows you to read on screen full manual. (p. 36)
Accessories
✎
Please make sure the following items are included with your TV. If any items are missing, contact your
dealer.
✎
The items’ colours and shapes may vary depending on the model.
✎
Cables not included in the package contents can be purchased separately.
✎
Check that there are no accessories hidden behind or under packing materials when you open the
box.
[
CAUTION: INSERT SECURELY LEST SHOULD BE DETACHED IN SET
• Smart Touch Control & Batteries (AA x 2)
• IR Blaster & Batteries (AA x 4)
• Warranty Card / Safety Guide
• Power Cord
• Cleaning Cloth
• Remote Control & Batteries (AAA x 2)
• User Manual
• Samsung 3D Active Glasses
AV Adapter Holder-Wire stand Holder-Ring x 4
Assembling the Holder-Wire stand
Standby mode
Your TV enters Standby mode when you turn it off and continues to consume a small amount of electric
power. To be safe and to decrease power consumption, do not leave your TV in standby mode for long
periods of time (when you are away on vacation, for example). It is best to unplug the power cord.
English - 4
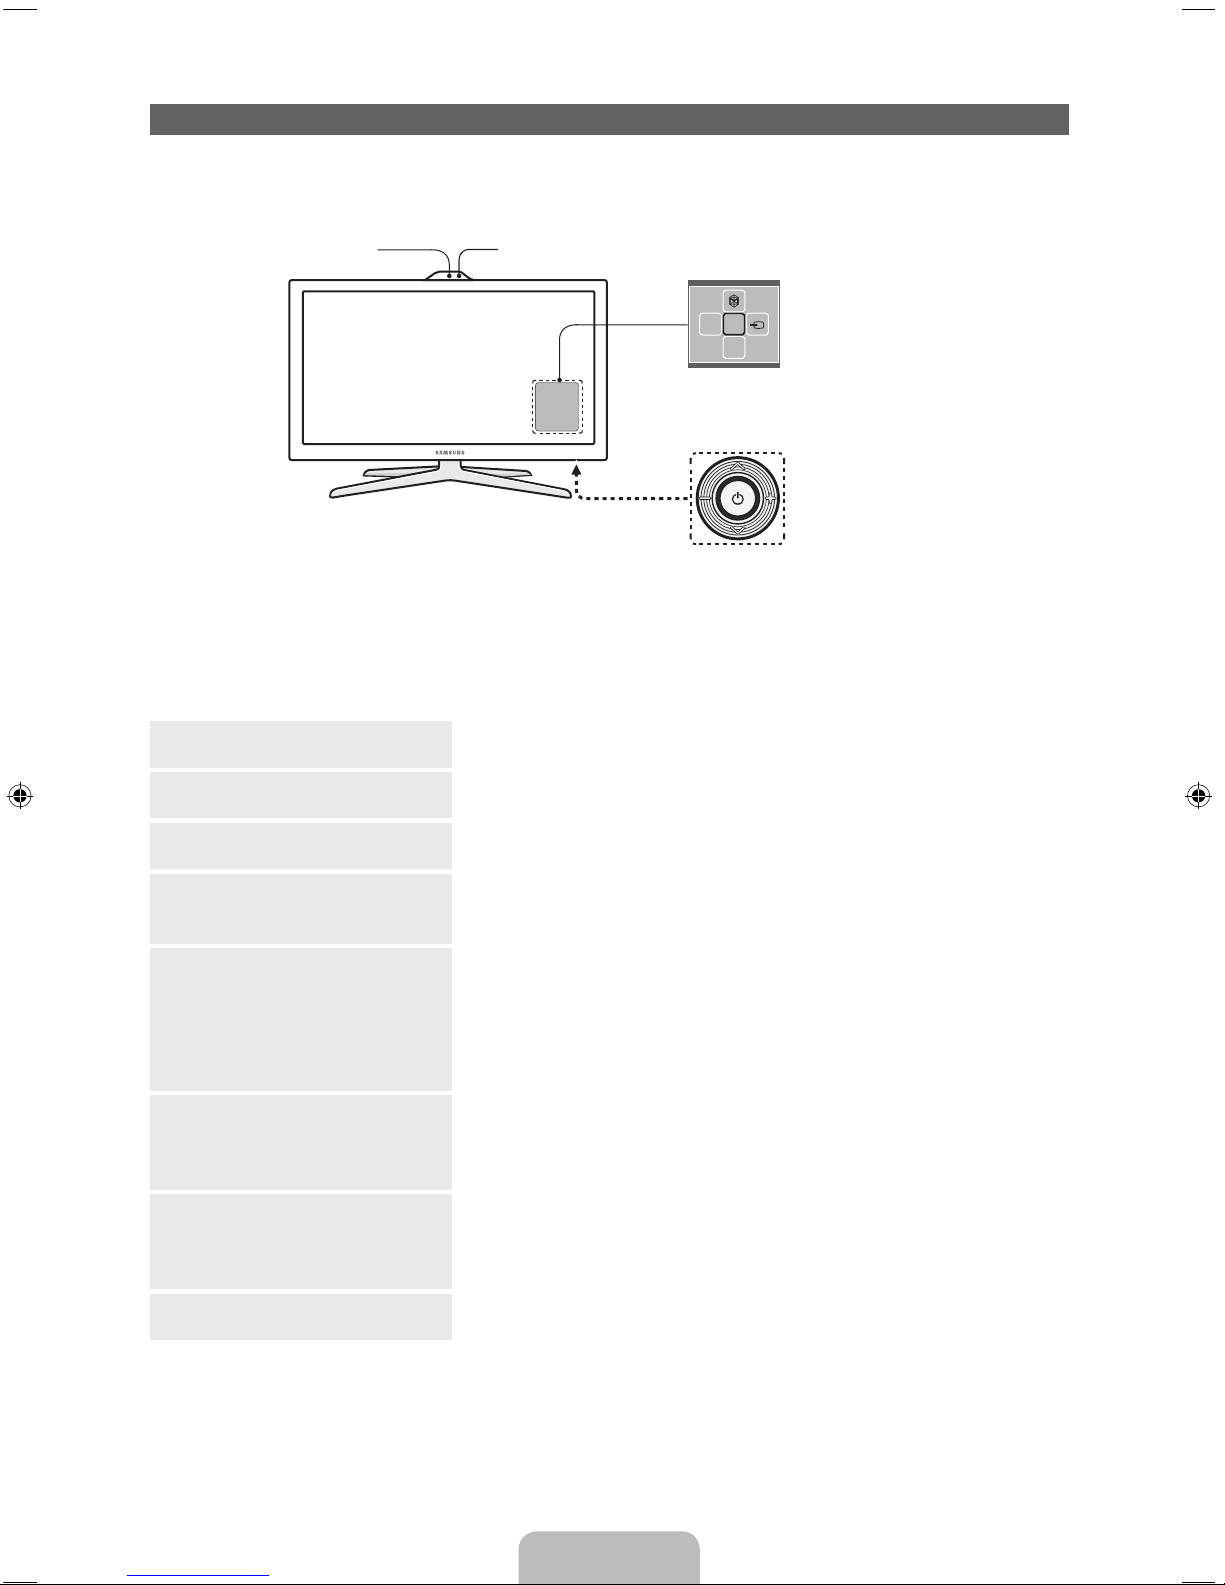
Viewing the Control Panel (Panel Key)
✎
The product colour and shape may vary depending on the model.
✎
The TV's Controller, a small joy stick like button on the rear right side of the TV, lets you control the TV
without the remote control.
mR
P
The image is drawn by facing
the front side of the TV.
Function menu
TV Controller
Camera
Remote control sensor
✎
Follow these instructions facing the front of your TV
✎
When you use a TV camera, you should check whether a tape attached or not in rear of the TV
camera, and then you can use a TV camera after adjust a camera angle. When you don't use a TV
camera, we recommend to use after a camera lens fixes to upwards. In this case, Face recognition
and Motion control functions is not available.
Power on Turn the TV on by pressing the Controller when the TV is in standby
mode.
Adjusting the volume Adjusts the volume by moving the controller from side to side when
the power is on.
Selecting a channel Select a channel by moving the Controller downwards and upwards
when the power is on.
Using the function menu To view and use the Function menu, press and release the Controller
when the power is on. To close the Function menu, press and release
the Controller again.
Selecting the MENU (m) With the Function menu visible, select the MENU (m) by moving the
Controller to the left. The OSD (On Screen Display) Menu appears.
Select an option by moving the Controller to the right. Move the
Controller to the right or left, or downwards and upwards to make
additional selections. To change a parameter, select it, and then press
the Controller.
Selecting the SMART HUB (™) With the Function menu visible, select SMART HUB (™) by moving
the Controller upwards. The SMART HUB main screen appears.
Select an application by moving the Controller, and then pressing the
Controller.
Selecting the Source (s) With the Function menu visible, open the Source (s) list by pushing
the Controller to the right. The Source list screen appears. To select a
source, move the Controller down and up. When the source you want
is highlighted, press the Controller.
Power off (P) With the Function menu visible, select Power off (P) by pulling the
Controller downwards, and then press the Controller.
✎
To close the Menu, Smart Hub, or Source, press the Controller for more than 1 second.
✎
When selecting the function by moving the controller to the upwards/downwards/left/right directions,
be sure not to press the controller. If you press it first, you cannot operate it to move the upwards/
downwards/left/right directions.

English - 5
Smart Touch Control
✎
For more detailed information about Smart Touch Control, see "Using the Smart Touch Control" in
e-Manual.
TV STB BD
RETURN VOICE NUMBER
Š
: Displays a list of recently used
functions.
Turns the TV on and off.
Touch Pad:
• Drag on the Touch Pad to move the
focus on the screen.
• Click on the touch pad to run the
focused item.
• If you don't press any button within
20 seconds, the Smart Touch
Control is set to Sleep mode
automatically.
• To wake up the Smart Touch
Control, press the Touch Pad.
• If you press and hold the Touch Pad,
it has the same effect as pressing
the MUTE
M
button on your remote.
However, this action scrolls the page
on a Web Browser.
• Press the Touch Pad or RETURN
R
button to return to the general
mode.
Displays the shortcut functions list. You
can select a function using the Touch
Pad.
<
P >: Changes channels.
RETURN: Returns to the previous
menu.
VOICE: Lets you access the Voice
Control function. When you press and
hold the button, the TV displays the
command list. You can speak using the
microphone embedded in your remote.
✎
For more detailed information
about the Voice Control function,
see the "SMART Interaction" in the
e-manual or see page 28.
NUMBER: Displays the Number button
screen. You can select a number using
the Touch Pad.
LED to show the active device.
Displays colour and playing control
functions. You can select a function
using the Touch Pad.
You can speak a voice command that
displayed to the TV using MIC. To use
MIC, press the VOICE
˜
button on your
remote.
✎
Voice Control function can be
affected recognition by unclear
pronunciation, voice level, or
surrounding noise.
Y
: Adjusts the Volume
Brings up the Smart Hub applications.
See e-Manual chapter Advanced
Features → Smart Hub.
T
: Quickly select frequently used
functions.

English - 6
Installing batteries (Battery size : AA)
1. Press the back of the remote at the very bottom with both thumbs, and then slide the battery cover up
in the direction of the arrow.
2. Install two batteries so that the polarity of the batteries (+/-) matches the illustration in the battery
compartment.
3. Slide the cover down in the direction of the arrow to close the battery cover.
IR Blaster
When you connect an IR Blaster with your TV, you can control connected external devices with your TV
using the Smart Touch Control.
✎
If you control an external device by using the Smart Touch Control, the IR Blaster sends an IR signal
into a corresponding external device.
✎
Install the IR Blaster within 50 cm and 45 degrees of the up, down, left and right directions of the IR
sensor of the external device.
Power Switch
Pairing Button
Device Indicator LED
IR Blaster shows the
pairing state.
OPEN
ON
OFF
PAIRING
OPEN
1
2
1
Installing batteries (Battery size : AA)
1
OPEN
OPEN
OPEN
OPEN
1
2
1
121
1
2
1
1
1
2
1. Hold the both sides of the battery holder and pull it out.
2. Install four batteries so that the polarity of the batteries (+/-) matches the illustration in the battery
compartment.
3. Push it back.

English - 7
Using the Smart Touch Control with an IR Blaster
When you connect an IR Blaster to your TV, you can control connected external devices through your TV
using the Smart Touch Control.
✎
The product colour and shape may vary depending on the model.
Initial Pairing for Smart Touch Control
After you run the Initial Setup, you should connect your Smart Touch Control to your TV.
1. Point the Smart Touch Control toward the IR sensor of the TV and then press any button on the Smart
Touch Control.
2. The connection icon appears at the bottom left of the screen and the Smart Touch Control is
automatically connected to the TV.
✎
If you want to perform the pairing process again, use a pin or the tip of an unbent paper clip to press
the tiny reset button in the centre of the back cover. The Smart Touch Control will be initialized.
• Smart Touch Control PAIRING Reset button.
Calibrating the Touch Pad
To calibrate the touch pad on the Smart Touch Control, follow these steps:
1. Press the NUMBERš button for 3 seconds. The calibration starts.
2. When done, all the LEDs on the top of the Smart Touch Control blink twice simultaneously.
✎
While calibrating, don't touch the touch pad.
✎
If the touch pad looses accuracy, re-calibrate the touch pad by repeating Steps 1 and 2.

English - 8
IR Blaster Pairing
OPEN
OPEN
ON
OFF
PAIRING
PAIRING
button
1. When you turn the IR Blaster on, the LED blinks.
2. Briefly point the IR Blaster toward the IR sensor of the TV and press
the PAIRING button at the bottom.
3. The connection icons appear on the bottom left of the screen, and
the TV connects to IR Blaster automatically.
✎
If the connection process fails, please turn off and on the IR Blaster,
try again from step 2.
✎
To set an Universal Remote Control after pairing
an IR Blaster, select Ye s.
To use IR Blaster, universal remote control
setup needs to be complete. Do you want to
continue with setup?
Yes No
[
Precautions for Using an IR Blaster
To use an IR Blaster, the IR Blaster must be located nearby with external devices connected to the TV.
Note that it should be no obstacle between the external device's IR receiver and an IR Blaster.

English - 9
Using the Touch Pad
To display the shortcut functions list on the bottom of the screen, press the ‹ button at the bottom of the
touch pad. This list includes Menu, Source, CH List, 3D, and other functions.
To display the colour and playing control functions on the top of the screen, press the button on the
top of the touch pad.
RETURN VOICE NUMBER
To Move the Highlight: Rest your finger on the touch pad, and then slide it from
one side to the other, from top to bottom, or bottom to top.
✎
To move the Highlight continuously, flick your finger across the touch pad
from right to left, left to right, top to bottom, or bottom to top.
MENU
SOURCE
RETURN VOICE NUMBER
To Select an item: Press the Touch Pad.
Open the History screen.: Press the Š button in the left of the Touch Pad.
Displays a list of recently used functions. You can select a function again using
the Touch Pad easily and quickly.
Open the Tools menu.: Press the T button in the right of the Touch Pad.
Quickly select frequently used functions.

English - 10
Open the colours and playcontrol functions screen.: To display the colour,
exit and play control buttons at the top of the screen, press the button at
the top of the touch pad.
e: Close all menus shown on the screen.
RETURN VOICE NUMBER
Open the shortcut functions screen.: Press the ‹ button in the bottom
centre of the Touch Pad.
You can select a desired function (e.g. Menu (m), Source (s), Info (`), etc.)
easily.
Using the Mute function
− If you press and hold the Touch Pad, it has same effect as pressing the MUTEM button on your
remote.
− However, if you press and hold the touch pad when using Web Browser, the Touch Pad switches to
the Scroll mode. When you press the Touch Pad again, the Scroll mode switches general mode.
− Press the Touch Pad or RETURNR button to return to the general mode.
To Enter a channel number using the Smart Touch Control
1. While watching a broadcast, press the NUMBERš button on the Smart Touch Control. The TV
displays the number button screen.
2. Using the touch pad, highlight a number, and then press the touch pad. The TV displays a list of
channels that start with the number you selected.
3. Using the touch pad, highlight the channel in the list you want, and then press the touch pad.
✎
When you enter a channel number, the TV displays an Auto Complete list with channels that begin
with the first number you entered. If you see the channel you want on the list, move the highlight to the
channel number, and then press the touch pad.
✎
You can also change the channel by touching the up or down channel icon on the touch pad. If
you touch the touch pad immediately after, the TV displays the list of memorised channels. Select a
channel by moving or flicking your finger up or down, and then pressing the touch pad.
To Display the Tools Menu
Press the T button on the right side of the touch pad.
To Display a History of the Channels You Watched
Press the
Š button on the left side of the touch pad.
English - 11
Setting up the Universal Remote Control
Lets you control a Set-Top-Box (STB) or a BD player or both connected to the TV using your Smart Touch
Control. After you connect the device to the TV, the Smart Touch Control can control the navigation,
number, and other keys needed to operate and control the device.
✎
The Universal Remote Control can adjust TV's volume, but STB's volume cannot be adjusted. Watch
STB after adjusting STB's volume to appropriate level.
✎
Depending on the version of an application, the Universal remote setup instructions may differ. In
this case, please follow the instructions on the screen.
✎
The displayed image may differ depending application version.
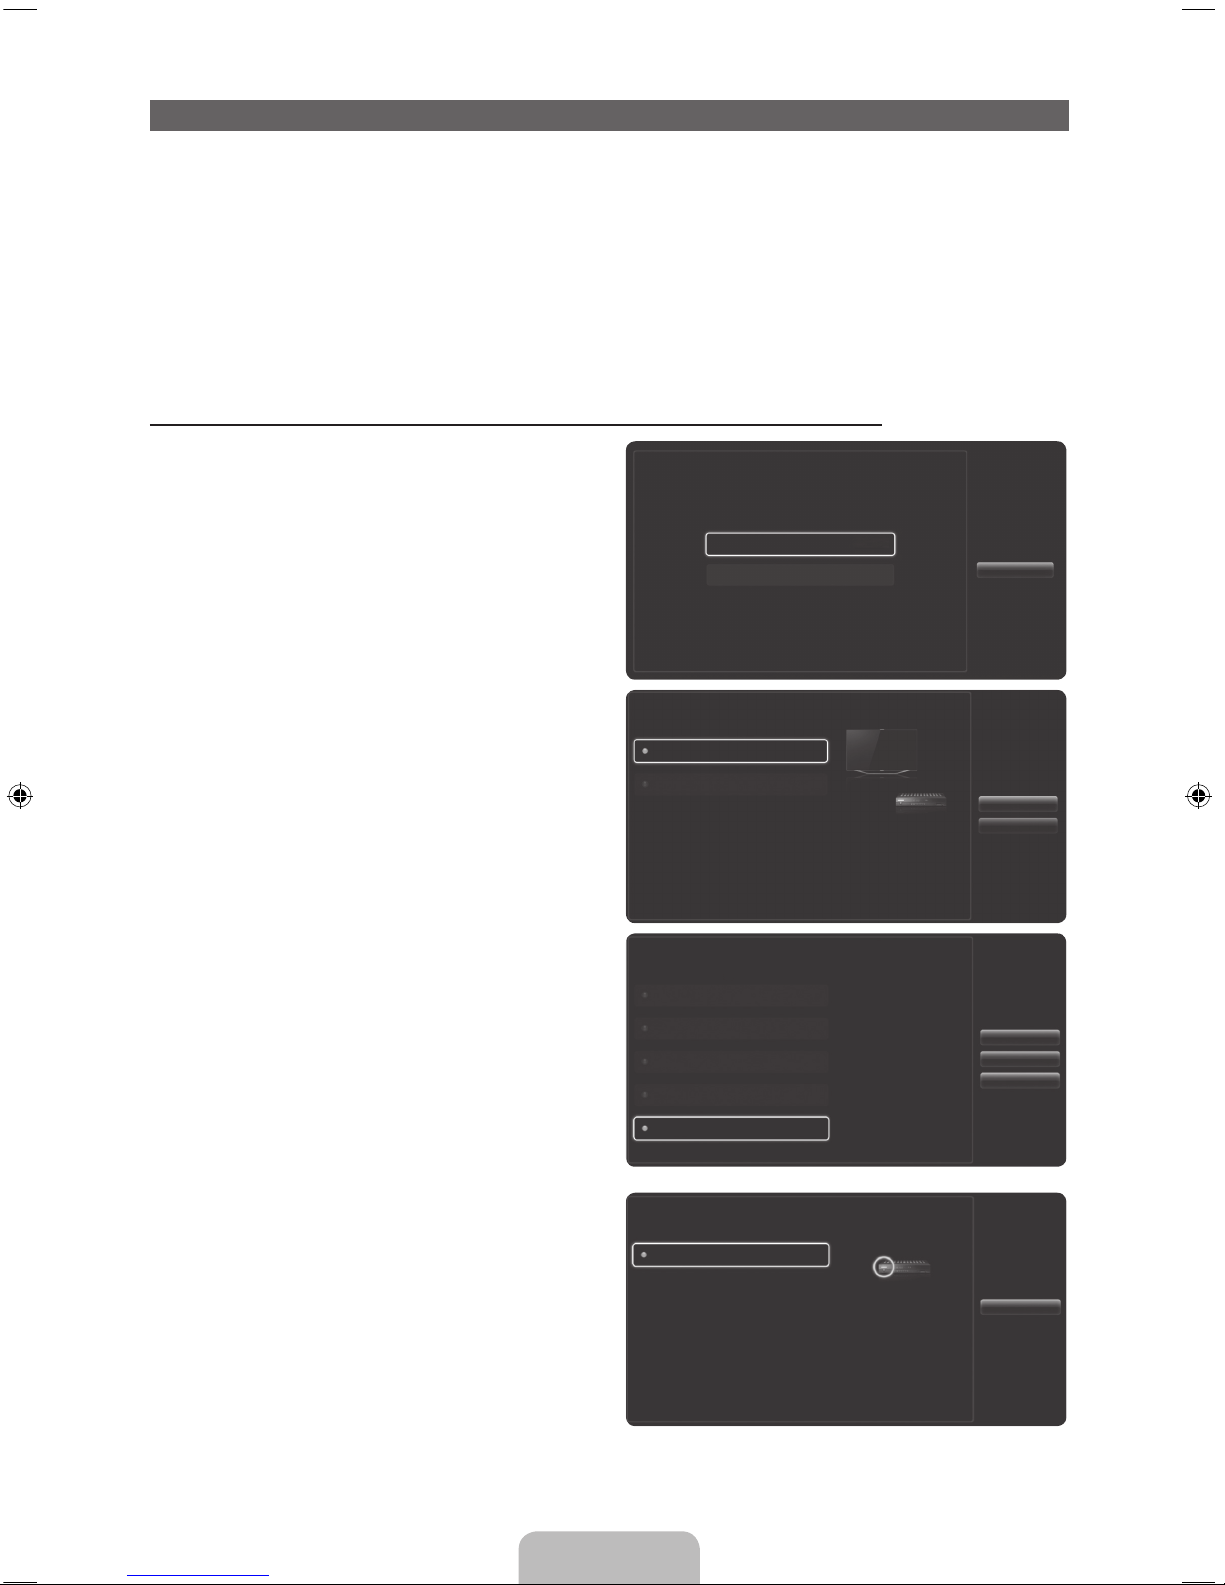
To connect the external device to your Smart Touch Control, follow these steps:
1. Select Add a device to control, and then press
the Touch Pad.
What do you want to do?
Add a device to control
View remote control settings
Previous
2. Select an external device from the connected
devices, and then press the Touch Pad.
Set-top box
Select a device to
control. The device
you select must be
powered on and
connected to your TV.
Blu-ray/DVD player
Which device do you want to control?
Previous
Next
3. Select the port used to connect the external
device, and then press the Touch Pad.
✎
Make sure that the selected device is on. If
it is turned off, turn the power on and press
Refresh.
Which port is your Set-top box plugged in to?
Select the port that the
Set-top box is connected
to.
If the port you want to
select is deactivated,
please power on Set-top
box you want to connect
and press the refresh
button.
HDMI2
HDMI3
AV1
AV2
Component
Refresh
Previous
Next
4. Select Search brands/TV service providers,
and then press the Touch Pad. A keyboard and
an entry field appear. Enter the first few letters of
the brand name of your device using the Smart
Touch Control, and then select Done at the
bottom of the keyboard. In the list that appears
below the entry field, select the brand name of
your device, and then press the Touch Pad.
✎
If you want to search the brand of STB (SetTop box), you can search the STB by using
the brand name or a cable provider.
Search brands/TV service provide
Select 'Search brands
/ TV service provider'
then enter the brand
name/service provider
of your Set-top box.
What is the brand/TV service provider of Set-top box?
Previous

English - 12
5. Select Search Model, and then press the Touch
Pad. A keyboard and an entry fi eld appear. Enter
the fi rst few letters and numbers of the model
name of your device using the Touch Control,
and then select Done at the bottom of the
keyboard. In the list that appears below the entry
fi eld, select the model name of your device, and
then press the Touch Pad.
✎
If the search for model name does not work
properly, search with a part of the model
name or use the search for recommended
model code.
✎
For more information on the search for
recommended model code function, refer to
page 13.
Search Model
Recommended model
Check the model
number of your
Set-top box. Then
select 'Search Model'
and enter the correct
model number for your
Set-top box.
What is the model number of your Set-top box?
Previous
Next
6. Select Download, and then press the Touch
Pad. Download the confi guration data for the IR
Blaster in the same way.
Setup data for your device will now be downloaded to your
Smart Touch Control.
Select Download on the TV screen using your Smart Touch Control.
Previous
Download
7. When all the settings are complete, select the
Complete button and press the touch pad.
Universal remote setup complete.
Congratulations! Your
Set-top box-Samsung
connected via Component
is now ready to use.
Now you can use the Watch
TV(set-top box) option to
control your set-top box
Previous
Set up another
Complete
✎
To reset IR Blaster and Smart Touch Control,
press the ‹ button on Smart Touch Control,
and then select Universal remote setup
.
Universal remote setup
1/26
Skipped Complete

English - 13
Using the Search for Recommended Model Code
1. In the Search Model name step in the integrated
remote control setup, select the Recommended
model and press the touch pad.
Search Model
Recommended model
If you can't find your
exact model, select
Recommended
model. The model
code recommended
by the brand/TV
service provider will be
downloaded.
What is the model number of your Set-top box?
Previous
Next
2. Select Download to download the
recommended model code.
Setup data for your device will now be downloaded to your
Smart Touch Control.
Select Download on the TV screen using your Smart Touch Control.
Previous
Download
3. Point the Smart Touch Control forward to the IR
sensor of the external device and then press the
Touch Pad to test if the device works.
Point your remote towards the Set-top box, then press the button
below until the power is turned off and on on your Set-top box.
Is it working?
Yes, go to the next step.
No, try the test with a different code set.
Previous
Test
Next
4. If the downloaded recommended model code
does not work, repeat the steps from step 3.
Point your remote towards the Set-top box, then press the button
below until the power is turned off and on on your Set-top box.
Is it working?
Yes, go to the next step.
No, try the test with a different code set.
Previous
Test
Next
✎
When you use the BD home theatre by using Universal Remote, some buttons may not be supported.
In this case, we recommend to use Anynet+ (HDMI-CEC) function.
1/26
English - 14
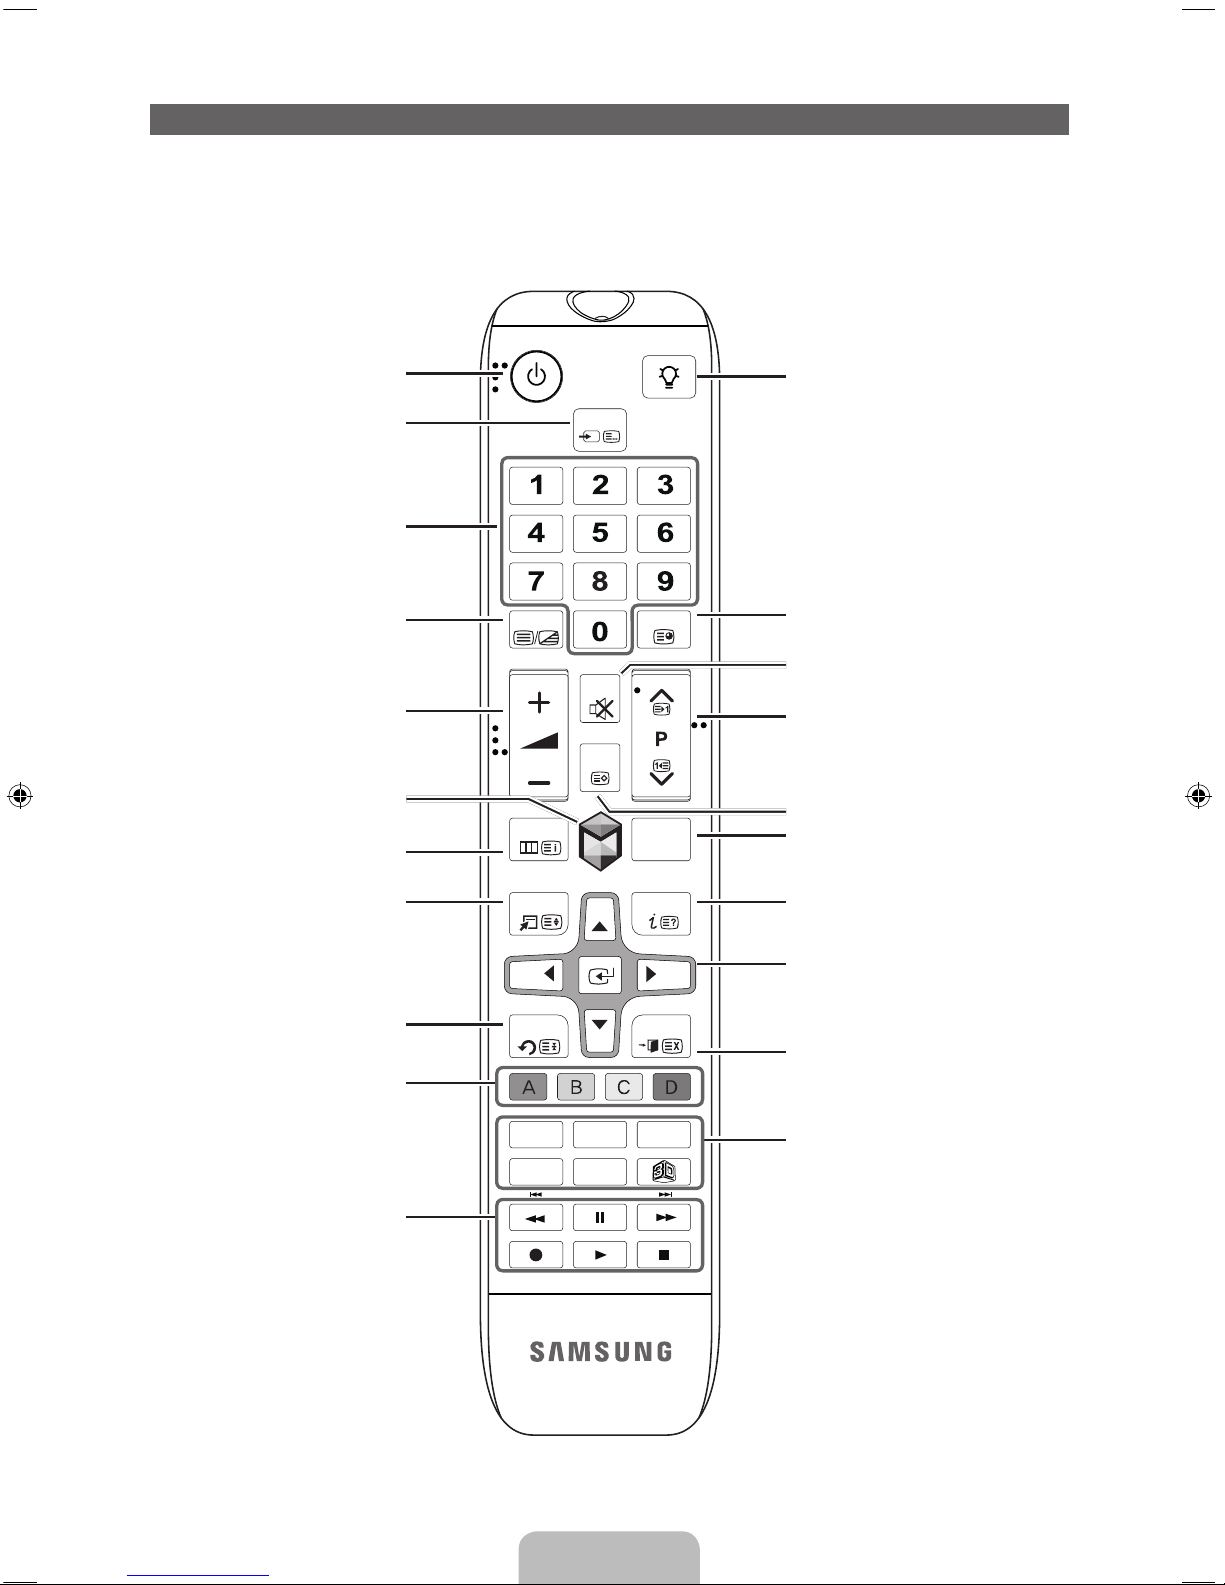
Remote Control Buttons
✎
Learn where the function buttons are on your remote. Especially note SOURCE, MUTE, Y,
< P >, MENU, TOOLS, E, INFO, CH LIST, RETURN, and EXIT.
✎
This remote control has Braille points on the Power, Channel, and Volume buttons and can be used
by visually impaired persons.
SOURCE
MENU
INFOTOOLS
RETURN
CAMERA
P.SIZESUPPORT
Family Story
SEARCH
EXIT
PRE-CH
TTX/MIX
MUTE
CH LIST
HISTORY
Turns the TV on and off.
Displays and selects the available video
sources. (p. 24)
Alternately select Teletext ON, Double,
Mix or OFF.
Adjusts the volume.
Opens the OSD.
Displays channel lists on the screen.
Quickly select frequently used functions.
Use this button in a specific feature.
Returns to the previous menu.
Use these buttons according to the
direction on screen.
Use these buttons in a specific feature.
For details, refer to e-Manual.
Turns the remote control light on or
off. When on, the buttons become
illuminated for a moment when pressed.
(Using the remote control with this
button set to On will reduce the battery
usage time.)
Returns to the previous channel.
Changes channels.
Displays a list of recently used functions.
You can select a function again easily
and quickly.
Displays information on the TV screen.
u/d/l/r
: Move the cursor on-screen
menu item.
E
: Selects the menu and changes the
corresponding item value.
Exits the menu.
Family Story: Connect to Family Story
application. See e-Manual chapter
Advanced Features → Family Story.
SEARCH: Support to recommendation
search word and search function. See
e-Manual chapter Advanced Features
→ Search.
CAMERA: Connect to Camera
application.
SUPPORT: Lets you use various
support functions including e-Manual.
(p. 36)
P.SIZE: Lets you select the Picture
Size. See e-Manual chapter Basic
Feature → Changing the Picture Size.
X
: Turns the 3D image on or off. See
e-Manual chapter Advanced Features →
Using the 3D function.
Cuts off the sound temporarily.
Brings up the Smart Hub applications.
See e-Manual chapter Advanced
Features → Smart Hub.
Have direct access to channels.

English - 15
Installing batteries (Battery size: AAA)
Install two batteries so that the polarity of the batteries (+/-) matches the illustration in the battery
compartment.
✎
Your TV also comes with a Smart Touch Control. For information about the Smart Touch Control, see
page 5.
✎
NOTE
• Install the batteries so that the polarity of the batteries (+/-) matches the illustration in the battery
compartment.
• Use the remote control within 7 m of the TV.
• Bright light may affect the performance of the remote control. Avoid using when near fluorescent
lights or neon signs.
• The colour and shape may vary depending on the model.
Connecting to an Antenna or Cable Connection
✎
Plug the power cord into a wall outlet only after you have made all other connections.
✎
If you are connecting your TV to a cable or satellite box using HDMI, Component, or Composite
connections, you do not need to connect the ANT IN jack to an antenna or a cable connection.
✎
Use caution when you move or swivel the TV if the antenna cable is tightly connected. You could
break the antenna jack off the TV.
ANT OUT
VHF/UHF Antenna
Power Input
or
✎
For the best cable connections to this product, be sure to use cables no thicker than 1.4 cm (14mm).
• Maximum thickness - 1.4 cm (14mm)
Cable
Antenna Cable
(Not Supplied)
 Loading...