

Samsung UA55HU9000, UA65HU9000 User Manual

BN68-06778C-02
© 2014 Samsung Electronics Co., Ltd. All rights reserved.
user manual
Thank you for purchasing this Samsung
product.
To receive more complete service, please
register your product at
www.samsung.com/register
Model ________ Serial No. ___________
Contact SAMSUNG WORLD WIDE
If you have any questions or comments relating to Samsung products, please contact the SAMSUNG customer care centre.
Country
Customer Care Centre
Web Site
NIGERIA 0800-726-7864
www.samsung.com/africa_en/
support
GHANA 0800-10077
0302-200077
COTE D’ IVOIRE 8000 0077
www.samsung.com/africa_fr/supportSENEGAL 800-00-0077
CAMEROON 7095- 0077
KENYA 0800 545 545
www.samsung.com/support
UGANDA 0800 300 300
TANZANIA 0800 755 755
RWANDA 9999
BURUNDI 200
DRC 499999
SUDAN 1969
SOUTH AFRICA 0860-SAMSUNG (726-7864)
www.samsung.com/support
BOTSWANA 8007260000
NAMIBIA 08 197 267 864
ZAMBIA 0211 350370
MOZAMBIQUE 847267864 / 827267864
ALGERIA 021 36 11 00 www.samsung.com/n_africa/support
TUNISIA 80-1000-12 www.samsung.com/n_africa/support
[HU9000-XA-KE]BN68-06778C-02ENG.indb 1 2014-11-10 오후 1:06:01

English - 2
Warning! Important Safety Instructions
(Please read the appropriate section that corresponds to the marking on your Samsung
product before attempting to install the product.)
CAUTION
RISK OF ELECTRIC SHOCK DO NOT OPEN
CAUTION: TO REDUCE THE RISK OF ELECTRIC SHOCK, DO
NOT REMOVE COVER (OR BACK). THERE ARE NO USER
SERVICEABLE PARTS INSIDE. REFER ALL SERVICING TO
QUALIFIED PERSONNEL.
This symbol indicates that high voltage is present
inside. It is dangerous to make any kind of contact
with any internal part of this product.
This symbol alerts you that important literature
concerning operation and maintenance has been
included with this product.
The slots and openings in the cabinet and in the back or bottom are provided for necessary ventilation. To ensure reliable operation of this
apparatus, and to protect it from overheating, these slots and openings must never be blocked or covered.
- Do not cover this apparatus in a confined space, such as a bookcase or built-in cabinet, unless proper ventilation is provided.
- Do not place this apparatus near or over a radiator or heat resistor, or where it is exposed to direct sunlight.
- Do not place a vessel containing water (vases etc.) on this apparatus, as this can result in a risk of fire or electric shock.
Do not expose this apparatus to rain or place it near water (near a bathtub, washbowl, kitchen sink, or laundry tub, in a wet basement, or near
a swimming pool etc.). If this apparatus accidentally gets wet, unplug it and contact an authorised dealer immediately. Make sure to pull out the
power cord from the outlet before cleaning.
This apparatus use batteries. In your community there might be regulations that require you to dispose of these batteries properly under
environmental considerations. Please contact your local authorities for disposal or recycling information.
Do not overload wall outlets, extension cords or adaptors beyond their capacity, since this can result in fire or electric shock.
Power-supply cords should be routed so that they are not likely to be walked on or pinched by items placed upon or against them, paying
particular attention to cords at plug end, adaptors and the point where they exit from the appliance.
To protect this apparatus from a lightning storm, or when it is left unattended and unused for long periods of time, unplug it from the wall outlet
and disconnect the antenna or cable system. This will prevent damage to the set due to lightning and power line surges.
Before connecting the AC power cord to the DC adaptor outlet, make sure the voltage designation of the DC adaptor corresponds to the local
electrical supply.
Never insert anything metallic into the open parts of this apparatus. Doing so may create a danger of electric shock.
To avoid electric shock, never touch the inside of this apparatus. Only a qualified technician should open this apparatus.
Make sure to plug the power cord in until it is firmly inserted. When removing the power cord, make sure to hold the power plug when pulling the
plug from the outlet. Do not touch the power cord with wet hands.
If this apparatus does not operate normally - in particular, if there are any unusual sounds or smells coming from it - unplug it immediately and
contact an authorised dealer or service centre.
Be sure to pull the power plug out of the outlet if the TV is to remain unused or if you are to leave the house for an extended period of time
(especially when children, elderly or disabled people will be left alone in the house).
- Accumulated dust can cause an electric shock, an electric leakage or a fire by causing the power cord to generate sparks and heat or
the insulation to deteriorate.
Be sure to contact an authorised service centre, when installing your set in a location with heavy dust, high or low temperatures, high humidity,
chemical substances and where it operates for 24 hours such as the airport, the train station etc. Failure to do so may cause serious damage to
your set.
Use only a properly grounded plug and receptacle.
- An improper ground may cause electric shock or equipment damage. (Class l Equipment only.)
To disconnect the apparatus from the mains, the plug must be pulled out from the mains socket, therefore the mains plug shall be readily
operable.
Do not allow children to hang onto the product.
Store the accessories (battery, etc.) in a location safely out of the reach of children.
Do not install the product in an unstable location such as a shaky self, a slanted floor or a location exposed to vibration.
Do not drop or impart any shock to the product. If the product is damaged, disconnect the power cord and contact a service centre.
Unplug the power cord from the power outlet and wipe the product using a soft, dry cloth. Do not use any chemicals such as wax, benzene,
alcohol, thinners, insecticide, aerial freshener, lubricant or detergent. This may damage the appearance or erase the printing on the product.
Apparatus shall not be exposed to dripping or splashing.
Do not dispose of batteries in a fire.
Do not short circuit, disassemble or overheat the batteries.
Danger of explosion if battery is incorrectly replaced. Replace only with the same or equivalent type.
WARNING - TO PREVENT THE SPREAD OF FIRE, KEEP CANDLES OR OTHER OPEN FLAMES AWAY FROM THIS PRODUCT AT ALL TIMES.
* The figures and illustrations in this User Manual are provided for reference only and may differ from the actual product
appearance. The product design and specifications may change without notice.
English - 3
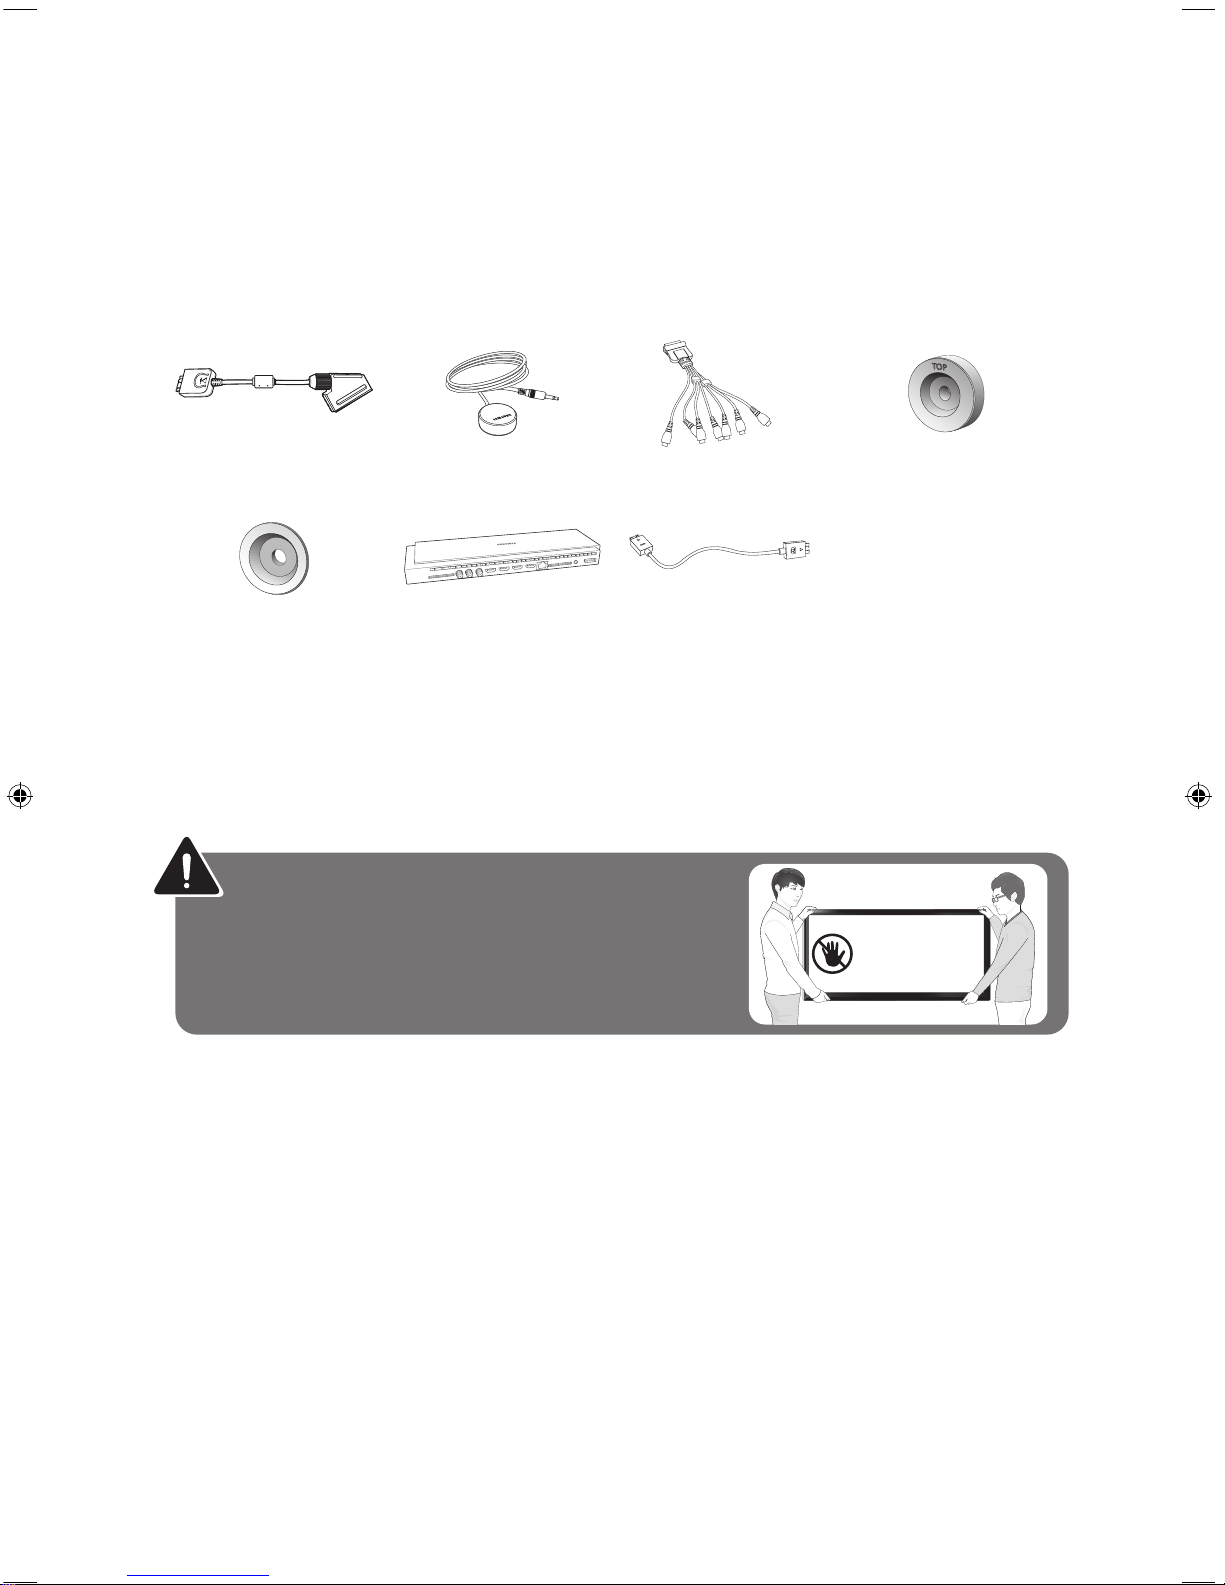
What's in the Box?
Samsung Smart Control & Batteries (AA x 2) Regulatory Guide
User Manual Power Cord
Warranty Card (Not available in some locations) Samsung 3D Active Glasses
Scart Adapter IR Extender Cable
COMPONENT IN/AV IN/
AUDIO OUT Adapter
COVER-WALL TOP
(Depending on the Model)
Wall mount Adapter
(Depending on the Model)
One Connect One Connect Cable
- Please make sure the following items are included with your TV. If any items are missing, contact your dealer.
- The items’ colours and shapes may vary depending on the models.
- Cables not included can be purchased separately.
- Check for any accessories hidden behind or in the packing materials when opening the box.
Warning: Screens can be damaged from direct pressure when
handled incorrectly. We recommend lifting the TV at the edges, as
shown.
Don't Touch
This Screen!

English - 4
Attaching the TV to the Stand
Make sure you have all the accessories shown, and that you assemble the stand following the provided assembly instructions.
Mounting the TV on the Wall Using the Wall
Mount Kit (Optional)
If you mount this product on a wall, it should be mounted only as recommended by the manufacturer.
Unless it is correctly mounted, the product may slide or fall, causing serious injury to a child or adult,
and serious damage to the product.
Installing the Wall Mount Kit
The wall mount kit (sold separately) lets you mount the TV on the wall.
To assemble the wall mount, use the styrofoam that came with the TV's packaging to protect it. Lay the TV down and attach
the screws.
To mount both of a soundbar and the TV using the wall mount, make sure to mount the soundbar onto the TV first, then mount
the TV. For detailed information, see the instructions provided with the soundbar.
- The soundbar installation with the wall mount may not be supported for the specific region or model.
For detailed information about installing the wall mount, refer to the instructions provided with the wall mount. We recommend
that you contact a technician for assistance when installing the wall mount bracket. We do not advise you to do it yourself.
Samsung Electronics is not responsible for any damage to the product or injury to yourself or others if you select to install the
wall mount on your own.
55" - COVER-WALL TOP 2EA,
Wall mount Adapter 2EA
65" - Wall mount Adapter 4EA
x2
x2
TV
Wall
mount
Bracket
C-1
COVERWALL
TOP
TV
Wall
mount
Bracket
C-2
Wall
mount
Adapter
x2
x2
TV
Wall
mount
Bracket
C-2
Wall
mount
Adapter
TV
Wall
mount
Bracket
C-1
Wall
mount
Adapter
Before installing any other wall mounting kit, assemble the wall mount adapter provided separately with the TV.
- Refer to "Install manual" included in our wall mounting kit.
Wall Mount Kit Specifications (VESA)
The wall mount kit is not supplied, but is sold separately. Install your wall mount on a solid wall perpendicular to the floor. When
attaching the wall mount to other building materials, please contact your nearest dealer. If the product is installed on a ceiling
or slanted wall, it may fall and result in severe personal injury.
- Standard dimensions for wall mount kits are shown in the table below.
- When purchasing our wall mount kit, a detailed installation manual and all parts necessary for assembly are provided.
- Do not use screws that do not comply with the VESA standard screw specifications.
English - 5
- Do not use screws that are longer than the standard dimension or do not comply with the VESA standard screw
specifications. Screws that are too long may cause damage to the inside of the TV set.
- For wall mounts that do not comply with the VESA standard screw specifications, the length of the screws may differ
depending on the wall mount specifications.
- Do not fasten the screws that are too strongly; this may damage the product or cause the product to fall, leading to
personal injur y. Samsung is not liable for these kinds of accidents.
- Samsung is not liable for product damage or personal injury when a non-VESA or non-specified wall mount is used or
the consumer fails to follow the product installation instructions.
- Do not mount the TV at more than a 15 degree tilt.
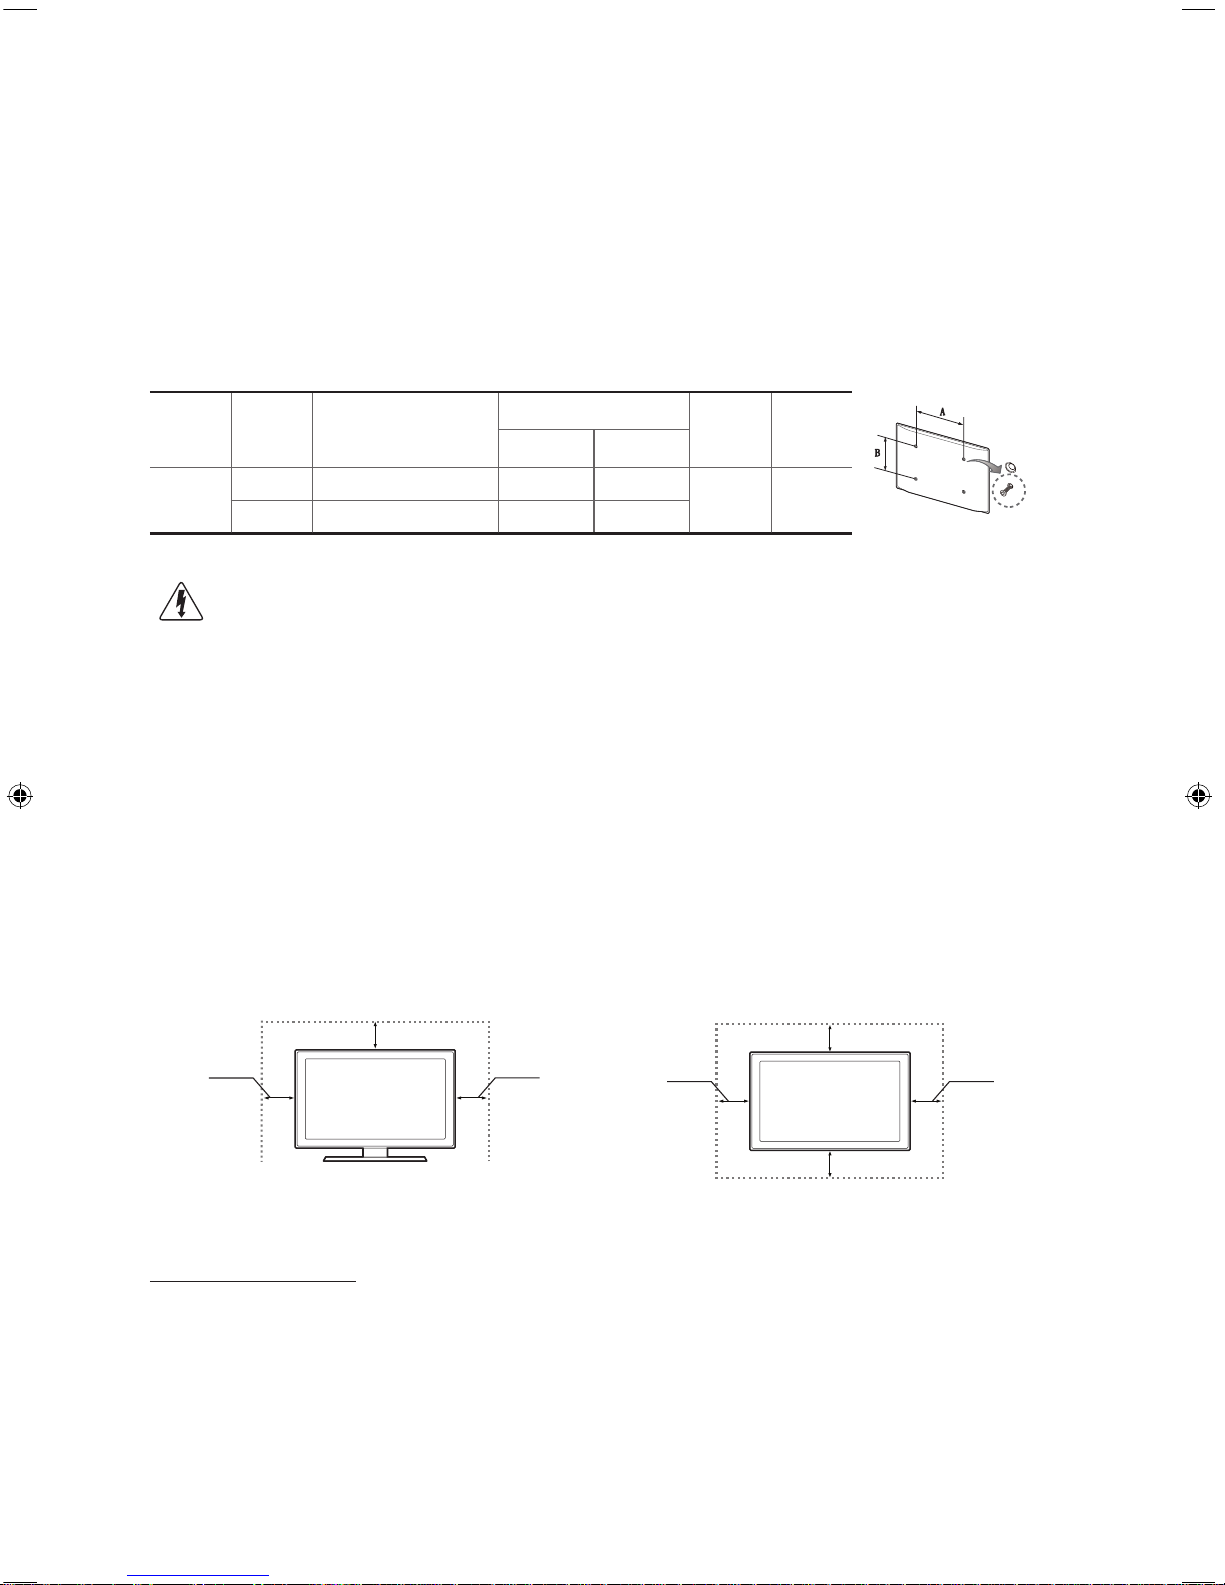
When using a third-party wall mount, note that the assembling screw length(C) is shown below.
Product
Family
Inches VESA Spec.(A * B)
C (mm)
Standard
Screw
Quantity
C-1 C-2
UHD-TV
55 400 X 400 25.4 ~ 31.3 23.3 ~ 27.8
M8 4
65 400 X 400 22.1 ~ 34.1 22.1 ~ 26.5
Do not install your Wall Mount Kit while your TV is turned on. It may result in personal injury due to
electric shock.
Providing Proper Ventilation for Your TV
When you install your TV, maintain a distance of at least 10 cm between the TV and other objects (walls, cabinet sides, etc.) to
ensure proper ventilation. Failing to maintain proper ventilation may result in a fire or a problem with the product caused by an
increase in its internal temperature.
If you use parts provided by another manufacturer, it may cause difficulties with the product or result in injury caused by the
product falling.
- Whether you install your TV using a stand or a wall-mount, we strongly recommend you use parts provided by Samsung
Electronics only.
Installation with a stand. Installation with a wall-mount.
10 cm
10 cm
10 cm
10 cm
10 cm
10 cm
10 cm
Other Cautions
- The actual appearance of the TV may differ from the images in this manual, depending on the model.
- Be careful when you touch the TV. Some parts can be somewhat hot.

English - 6
Securing the TV to the Wall
Caution: Pulling, pushing, or climbing on the TV may cause the TV to fall. In particular,
ensure that your children do not hang on to or destabilize the TV. Doing so may cause
the TV to tip over, resulting in serious injuries or death. Follow all safety precautions
provided in the Safety Flyer included with your TV. For added stability and safety, you
can purchase and install the anti-fall device as described below.
To Avoid the TV from Falling
1. Put the screws into the clamps and firmly fasten them into the wall. Confirm that
the screws have been firmly installed into the wall.
- You may need additional material such as anchors depending on the type of
wall.
- Since the necessary clamps, screws, and string are not supplied, please
purchase these additionally.
2. Remove the screws from the centre back of the TV, put the screws into the clamps,
and then fasten the screws into the TV again.
- Screws may not be supplied with the product. In this case, please purchase
screws of the following specifications.
- Screw Specifications : For a 55 ~ 65 inches: M8
3. Connect the clamps fixed into the TV and the clamps fixed onto the wall with a
strong cable and then tie the string tightly.
- Install the TV close to the wall so that it does not fall backwards.
- It is safe connecting the string so that the clamps fixed onto the wall are equal
to or lower than the clamps fixed on the TV.
- Untie the string before moving the TV.
4. Verify that all connections are properly secured. Periodically check connections for any sign of damage. If you have any
doubt about the security of your connections, contact a professional installer.
Arrange the cables using the Cable Holder
wall
English - 7
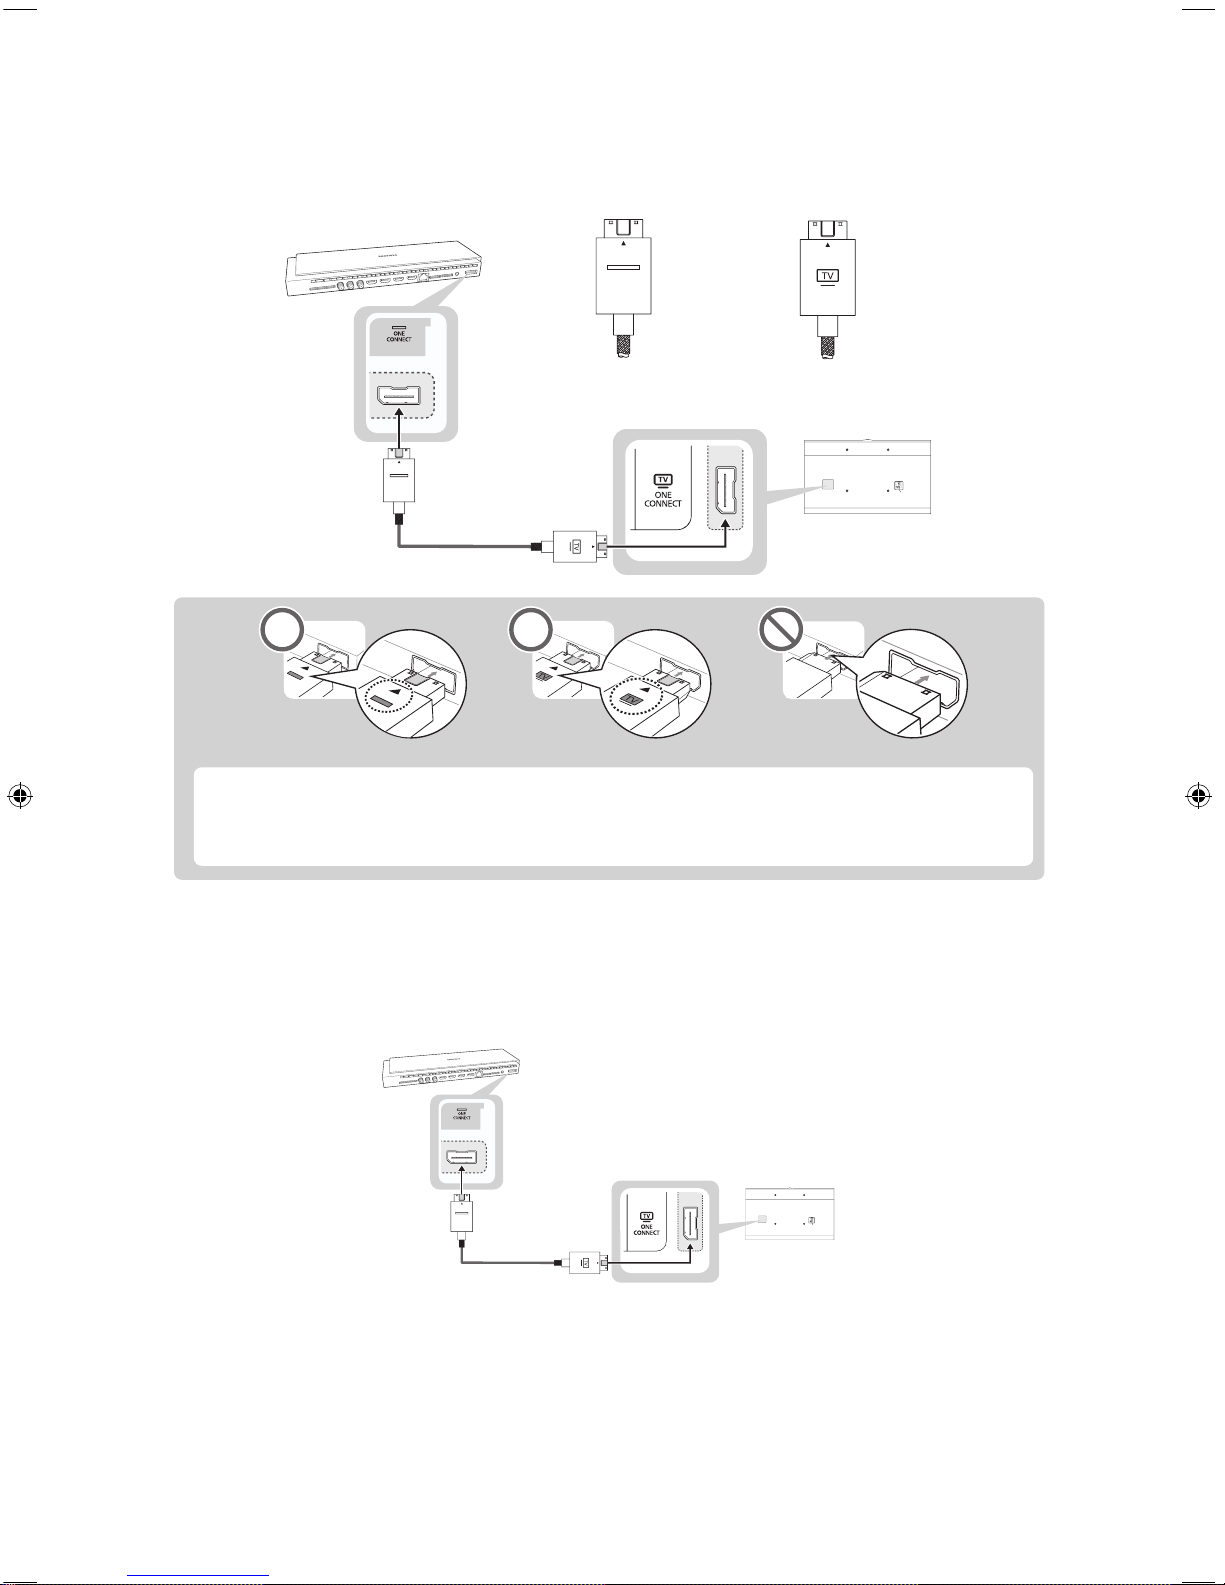
Connecting the TV to One Connect
One Connect must be connected to the TV via the One Connect cable before connecting an external device. The One
Connect cable has two different ends, Connect the TV to One Connect referring to the diagram.
<One Connect-end Connector>
<TV-end Connector>
TV
[
The connectors at both ends of the One Connect cable are different from each other in shape. When
connecting the One Connect cable to the TV, make sure that the right connector is plugged into the TV.
Otherwise, it may cause product failure.
<One Connect-end Connector>
<TV-end Connector>
TV Upgrade using UHD Evolution Kit
(sold separately)
Connecting UHD Evolution Kit (sold separately) to a Samsung TV will allow you to enjoy the latest features and content without
having to purchase a new TV. Experience the latest features and services offered by Samsung Electronics via UHD Evolution
Kit.
- UHD Evolution Kit is sold separately. Purchasing UHD Evolution Kit will allow you to upgrade the software to the version
from the year in which your UHD Evolution Kit was released. However, an UHD Evolution Kit may not be available,
depending on the product.

English - 8
Connecting devices to your TV
You can connect various external devices using the connectors located at the back of the product. Check the connectors and
then refer to the assembly instructions provided for more information on supported external devices.
Connecting to a COMMON INTERFACE slot (Your
TV viewing Card Slot)
- Turn the TV off to connect or disconnect a CI card.
- 2 CI card slots are available, depending on the model.
Using the “CI or CI+ CARD”
To watch paid channels, the “CI or CI+ CARD” must be inserted.
- If you don’t insert the “CI or CI+ CARD”, some channels will display the
message “Scrambled Signal”.
- The pairing information containing a telephone number, the “CI or CI+ CARD”
ID the Host ID and other information will be displayed in about 2~3 minutes. If
an error message is displayed, please contact your service provider.
- When the configuration of channel information has finished, the message
“Updating Completed” is displayed, indicating the channel list is updated.
NOTE
- You must obtain a “CI or CI+ CARD” from a local cable service provider.
- When removing the “CI or CI+ CARD”, carefully pull it out with your hands
since dropping the “CI or CI+ CARD” may cause damage to it.
- Insert the “CI or CI+ CARD” in the direction marked on the card.
- The location of the COMMON INTERFACE slot may be different depending on the model.
- “CI or CI+ CARD” is not supported in some countries and regions; check with your authorized dealer.
- If you have any problems, please contact a service provider.
- Insert the “CI or CI+ CARD” that supports the current aerial settings. The screen will be distorted or will not be seen.
 Loading...