

Page 1

LCD Monitor
User Manual
SyncMaster U70
Page 2

Safety Instructions
Notational
Note
These safety instructions must be followed to ensure your safety and prevent property damage.
Make sure to read the instructions carefully and use the product in the correct manner.
Warning / Caution
Otherwise, it may result in death or personal injury.
Otherwise, it may result in personal injury or property damage.
Installation
Be sure to contact an authorized Service Center when installing your
monitor in a location with heavy dust, high or low temperatures, high humidity, and exposed to chemical substances and where it operates for 24
hours such as at airports, train stations etc.
Failure to do so may cause serious damage to your monitor.
Others
When installing the product in a cabinet or rack, make sure that
the front end of the bottom of the product does not project out.
• Otherwise, it may fall or cause personal injury.
• Use a cabinet or rack of a size appropriate to the product.
Do not use a humidifier or kitchen table near the product.
• Otherwise, this may result in electric shock or fire.
Put down the monitor carefully.
• Failing to do so may damage the monitor.
Do not drop the monitor when moving it.
• This may cause damage to the product or the person carrying
it.
Do not install the product in a location low enough for children
to reach.
• Otherwise, it may fall and result in personal injury.
Do not insert any metal, such as chopsticks, coins, pins and
steel, or flammable objects, such as matches or paper, inside the
product (input and output terminals, etc).
• Otherwise, this may result in electric shock or fire.
Page 3

Safety Instructions
The product is a high voltage product. Ensure that users do not
disassemble, repair or modify the product themselves.
• Otherwise, this may result in electric shock or fire. If the product
needs to be repaired, contact a Service Center.
Page 4
Introduction
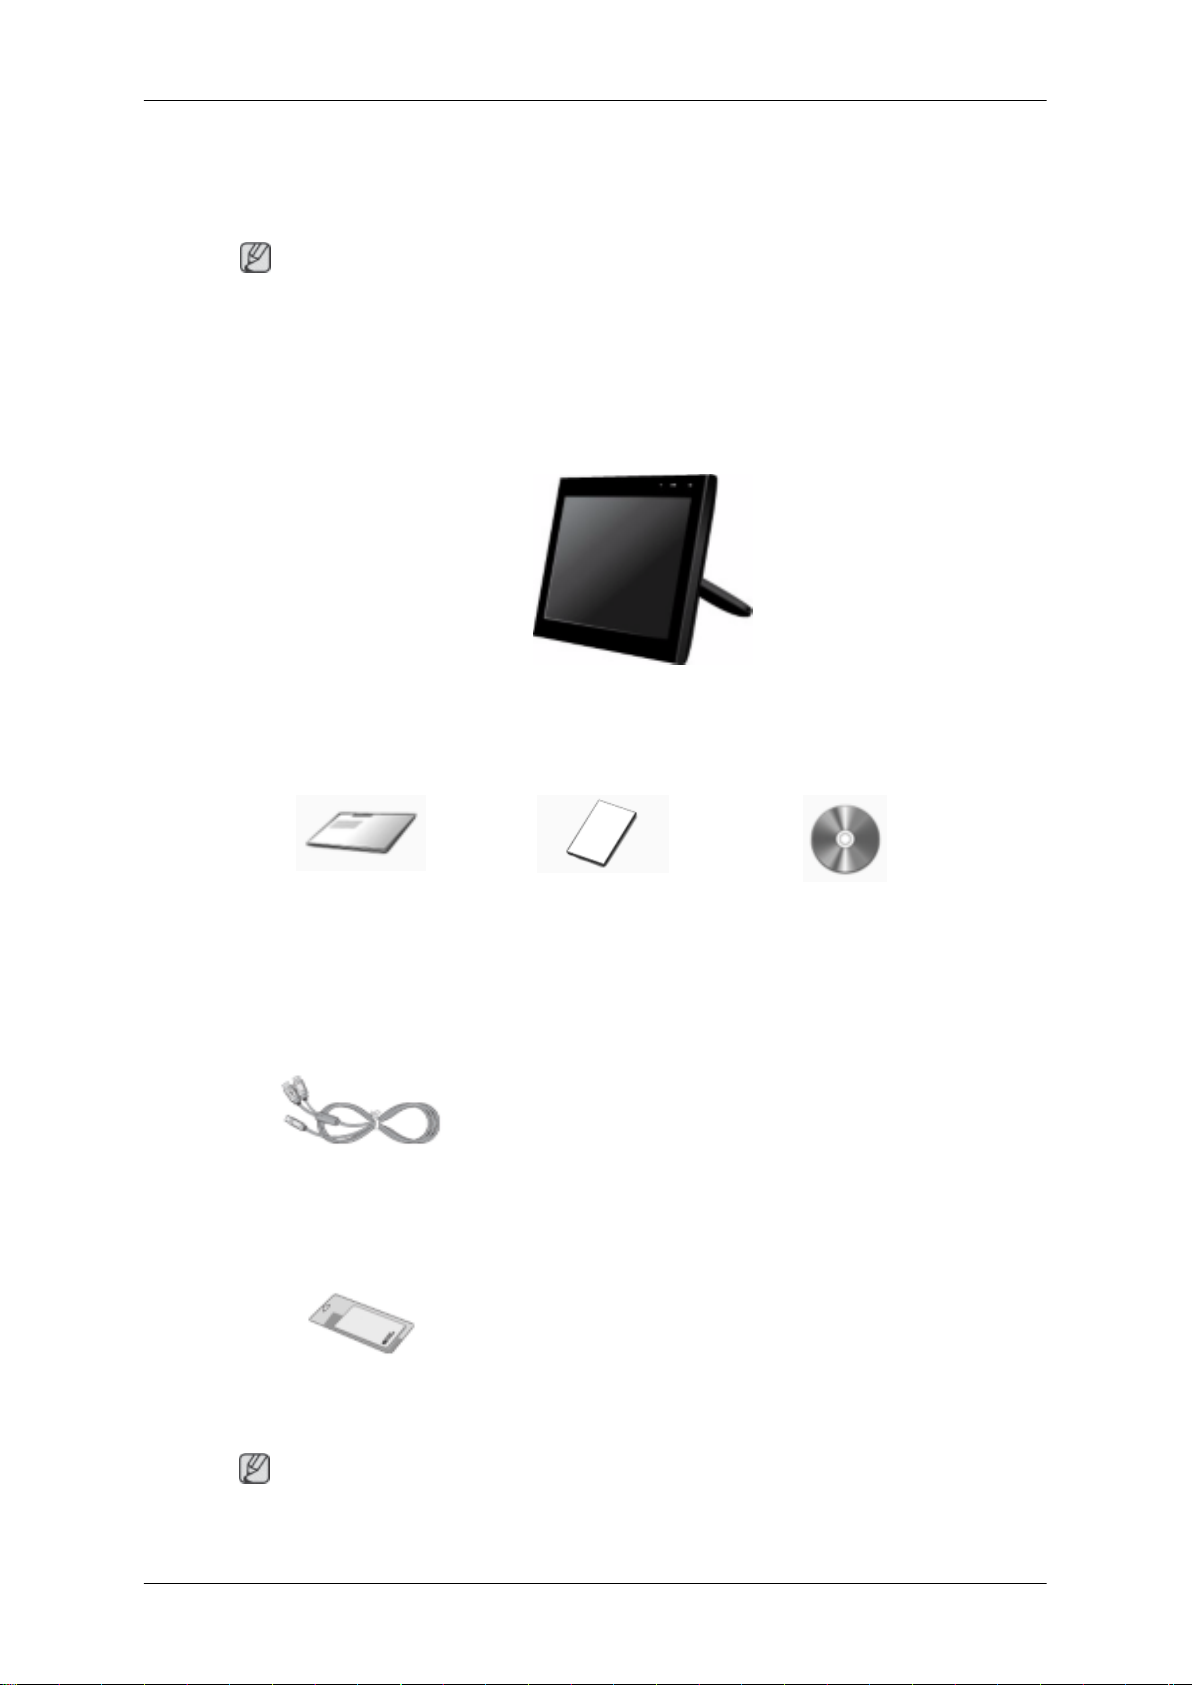
Package Contents
Note
Please make sure the following items are included with your monitor.
If any items are missing, contact your dealer.
Contact a local dealer to buy optional items.
Unpacking
USB Monitor
Manuals
Quick Setup Guide Warranty Card
(Not available in all loca-
tions)
Cables
USB Cable
Others
User's Guide
Cleaning Cloth
Note
Cleaning Cloth is only provided for highly polished black products as a product feature.
Page 5
Your Monitor
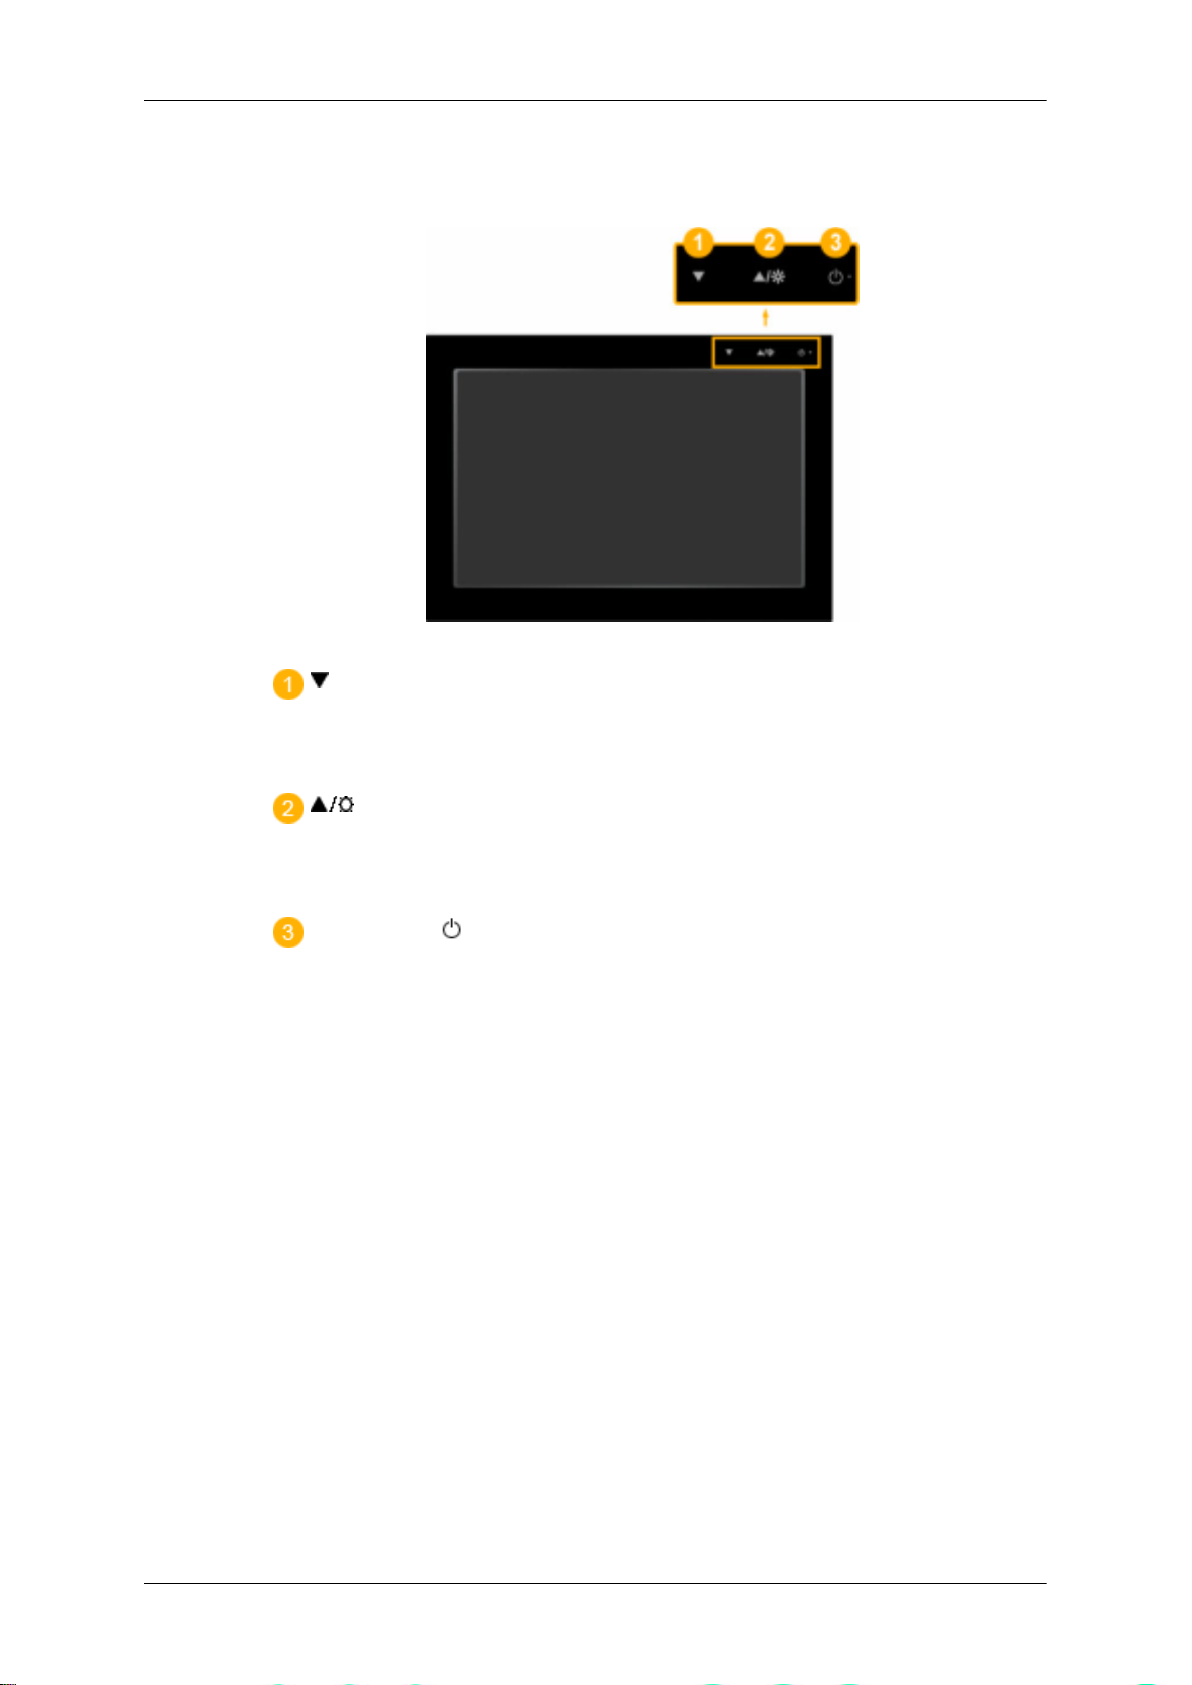
Front
Introduction
Use this button to decrease the screen brightness for the 7" USB monitor.
The LED blinks when the screen brightness is decreased to the minimum
or when a screen brightness adjustment is completed.
Use this button to increase the screen brightness for the 7" USB monitor.
The LED blinks when the screen brightness is increased to the maximum
or when a screen brightness adjustment is completed.
Power button [ ] / Power indicator
Press the Power button to turn the 7" USB monitor on or off. The Power
indicator is displayed in blue when operating normally.
• Please activate the afterimage prevention function before using the 7"
USB auxiliary monitor.
• Activating the function
Turn off the USB monitor and hold down the Power button for five (5)
seconds. The monitor is turned on again and the afterimage prevention
program is activated while the LED blinks twice.
• Deactivating the function
Turn off the USB monitor and hold down the Power button for five (5)
seconds. The monitor is turned on again and the afterimage prevention
program is deactivated while the LED blinks once.
• What is the afterimage prevention function?
If you use the USB auxiliary monitor with the same image remaining on
the screen for a long period of time, an afterimage may develop on the
panel. The afterimage prevention function reduces afterimages on the
panel by turning the USB auxiliary monitor on and off automatically for
a short time (about 0.1 seconds) every thirty (30) minutes.
Page 6
Rear
Introduction
Note
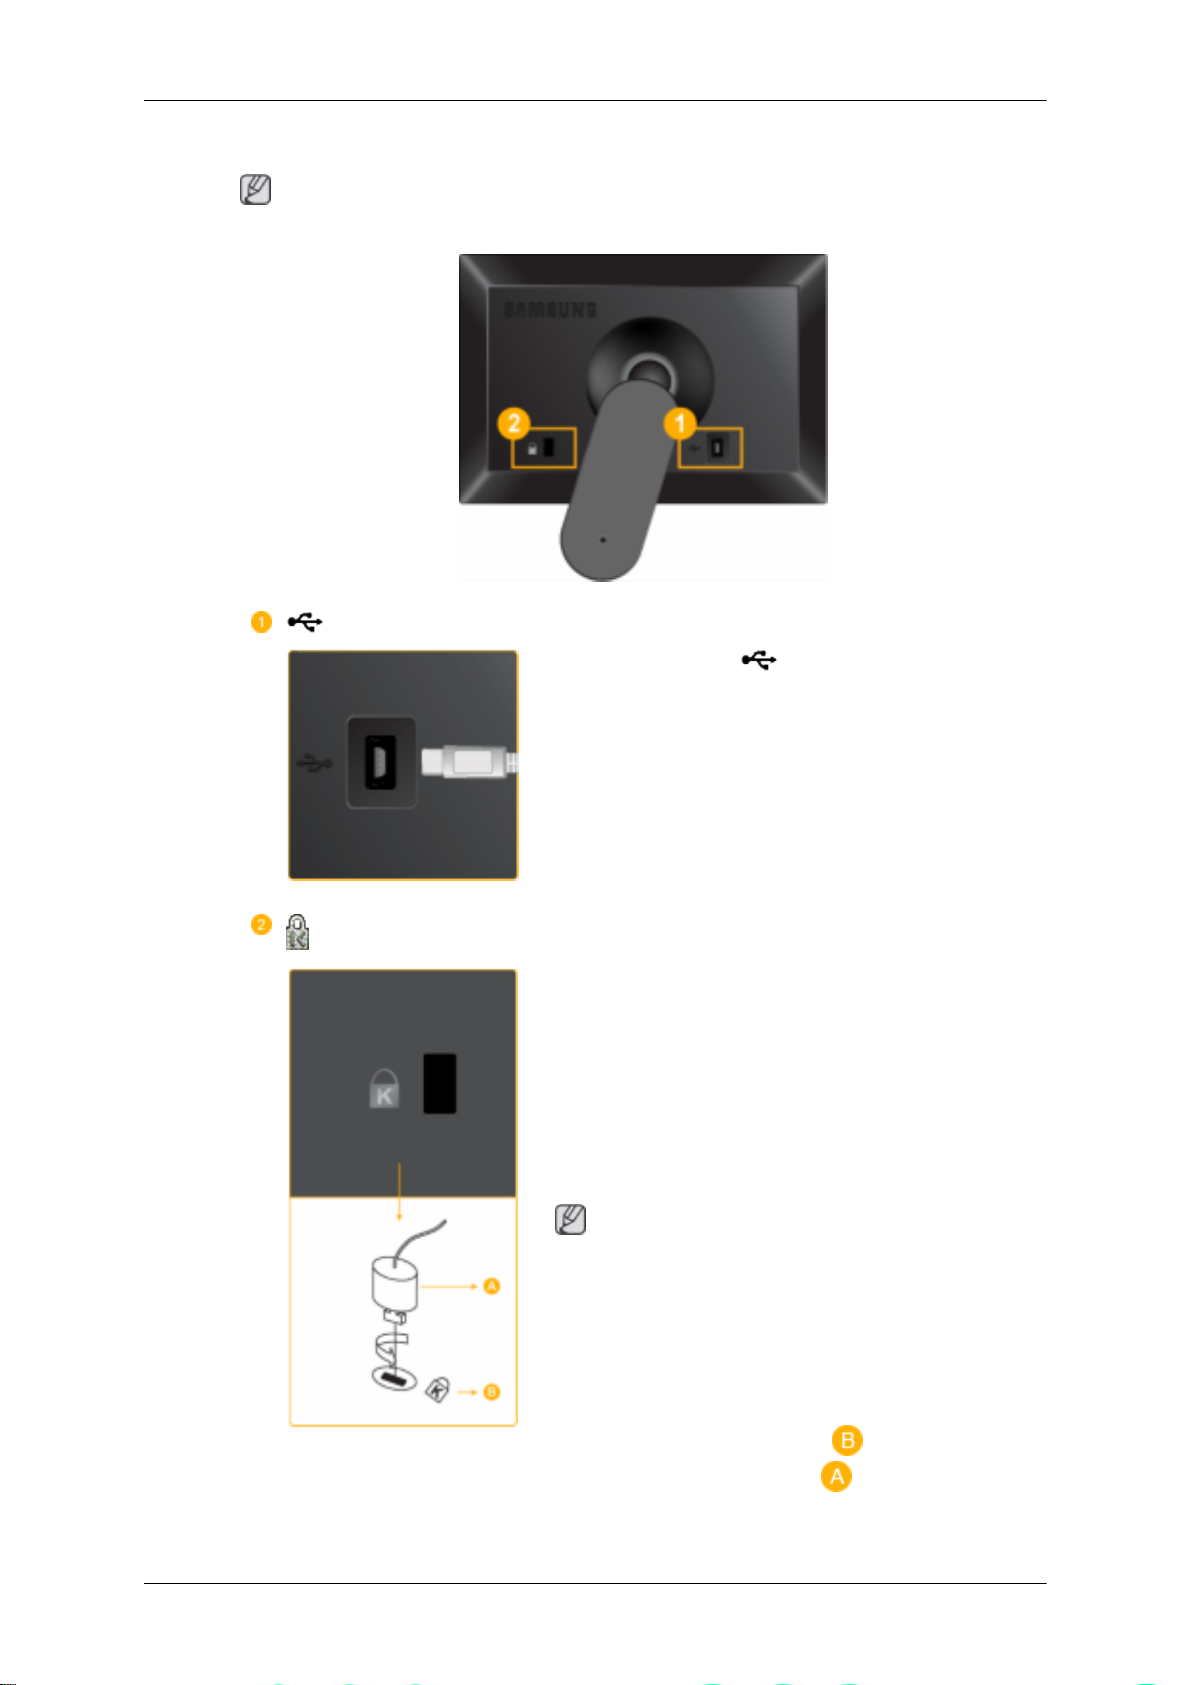
The configuration at the back of the product may vary from product to product.
Kensington Lock
Connect the terminal of the USB monitor
to the USB terminal of the PC using a USB
cable.
The Kensington Lock is a device used to
physically fix the system when using it in a
public place. The locking device has to be
purchased separately. The appearance and
locking method may differ from the illustration depending on the manufacturer. Refer to
the manual provided with the Kensington
Lock for proper use. The locking device has
to be purchased separately.
Note
The location of the Kensington Lock may be
different depending on its model.
Using the Anti-Theft Kensington Lock
1. Insert the locking device into the Ken-
sington slot on the Monitor ( ) and turn
it in the locking direction ( ).
2. Connect the Kensington Lock cable.
Page 7

Introduction
3. Fix the Kensington Lock to a desk or a
heavy stationary object.
Page 8
Connections
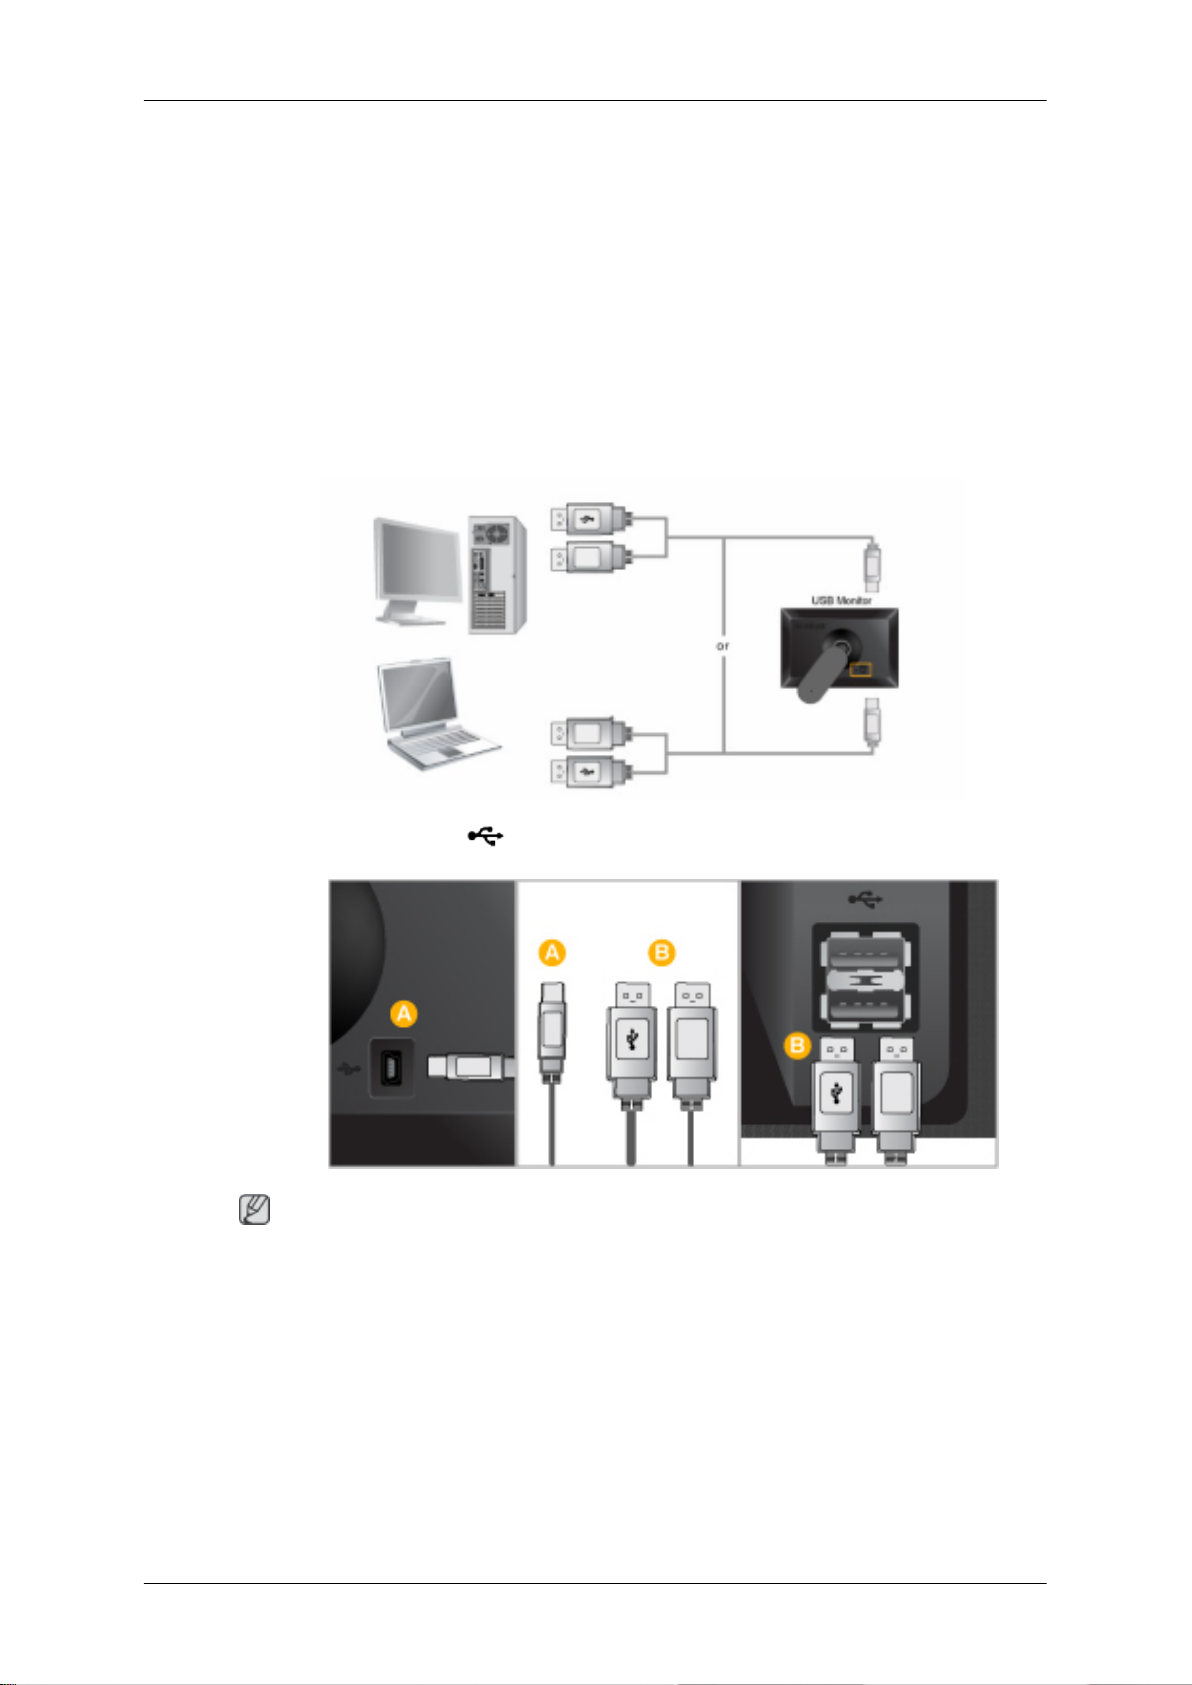
Connecting the USB Monitor
• System Requirements
CPU : 1.73GHz or Later
OS : Windows XP Service Pack2 or later.
RAM : 512 MB RAM or more
USB : 1.1 or higher (USB 2.0 recommended)
1.
Connect the terminal of the USB monitor to the USB terminal of the PC using a USB
cable.
Note
As power is supplied through a USB port, two (2) USB ports are used.
For more information on the driver installation and usage of the USB monitor, refer to Installing
the 7” USB Monitor Driver.
Page 9
Connections
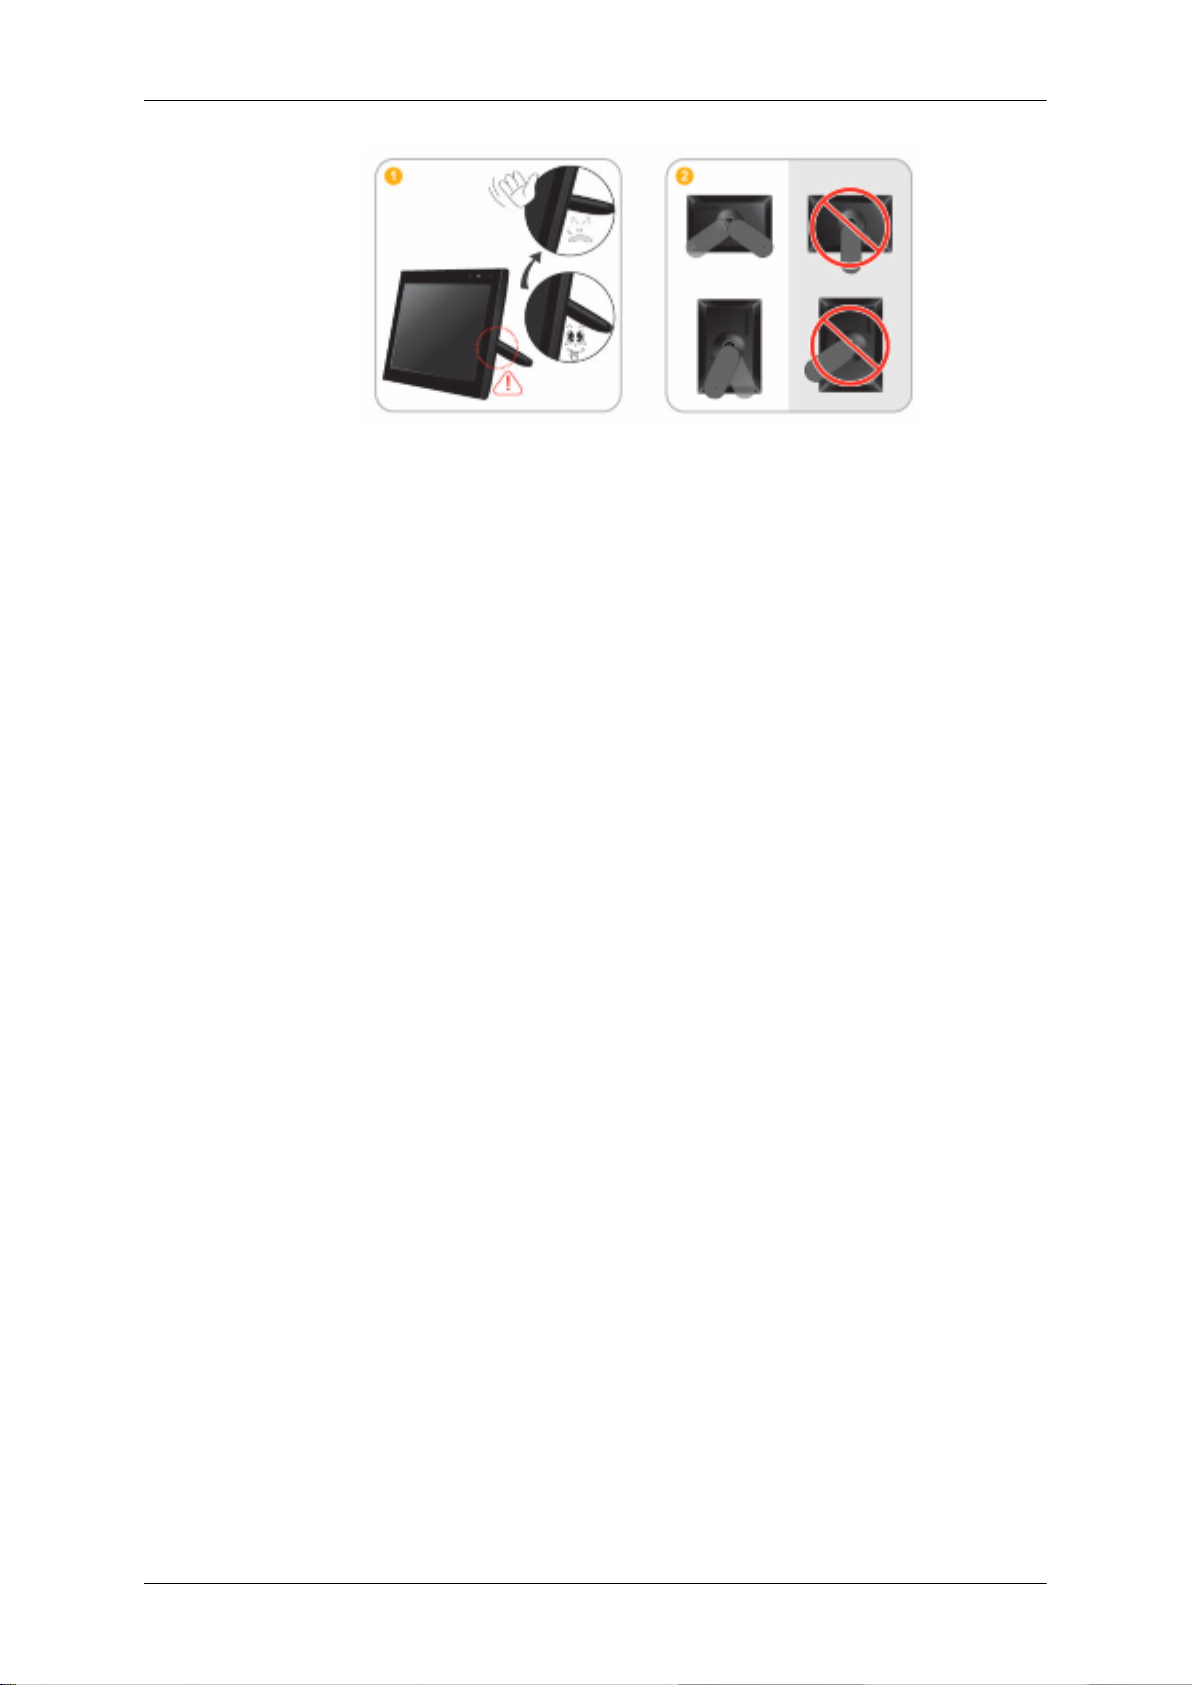
1. When adjusting the angle of the USB auxiliary monitor stand, do not use too much force.
This may cause the stand to break.
2. Make sure to use the 7” USB monitor after properly adjusting the angle of its stand.
This may cause the center of gravity of the product to change, leading causing the product to fall resulting in damage or a malfunction.
Page 10
Using the Software
Installing the 7” USB Monitor Driver
• System Requirements
CPU : 1.73GHz or Later
OS : Windows XP Service Pack2 or later.
RAM : 512 MB RAM or more
USB : 1.1 or higher (USB 2.0 recommended)
Installing Your USB Monitor
• Make sure to connect the USB cable and begin the installation after your
PC has booted.
• The Setup program requires about one minute for the installation. If you
turn the power off or remove the USB cable while the Setup program is
running, it may cause an error with the PC or the Windows operating system.
• The optimal resolution for this USB monitor is 800x480.
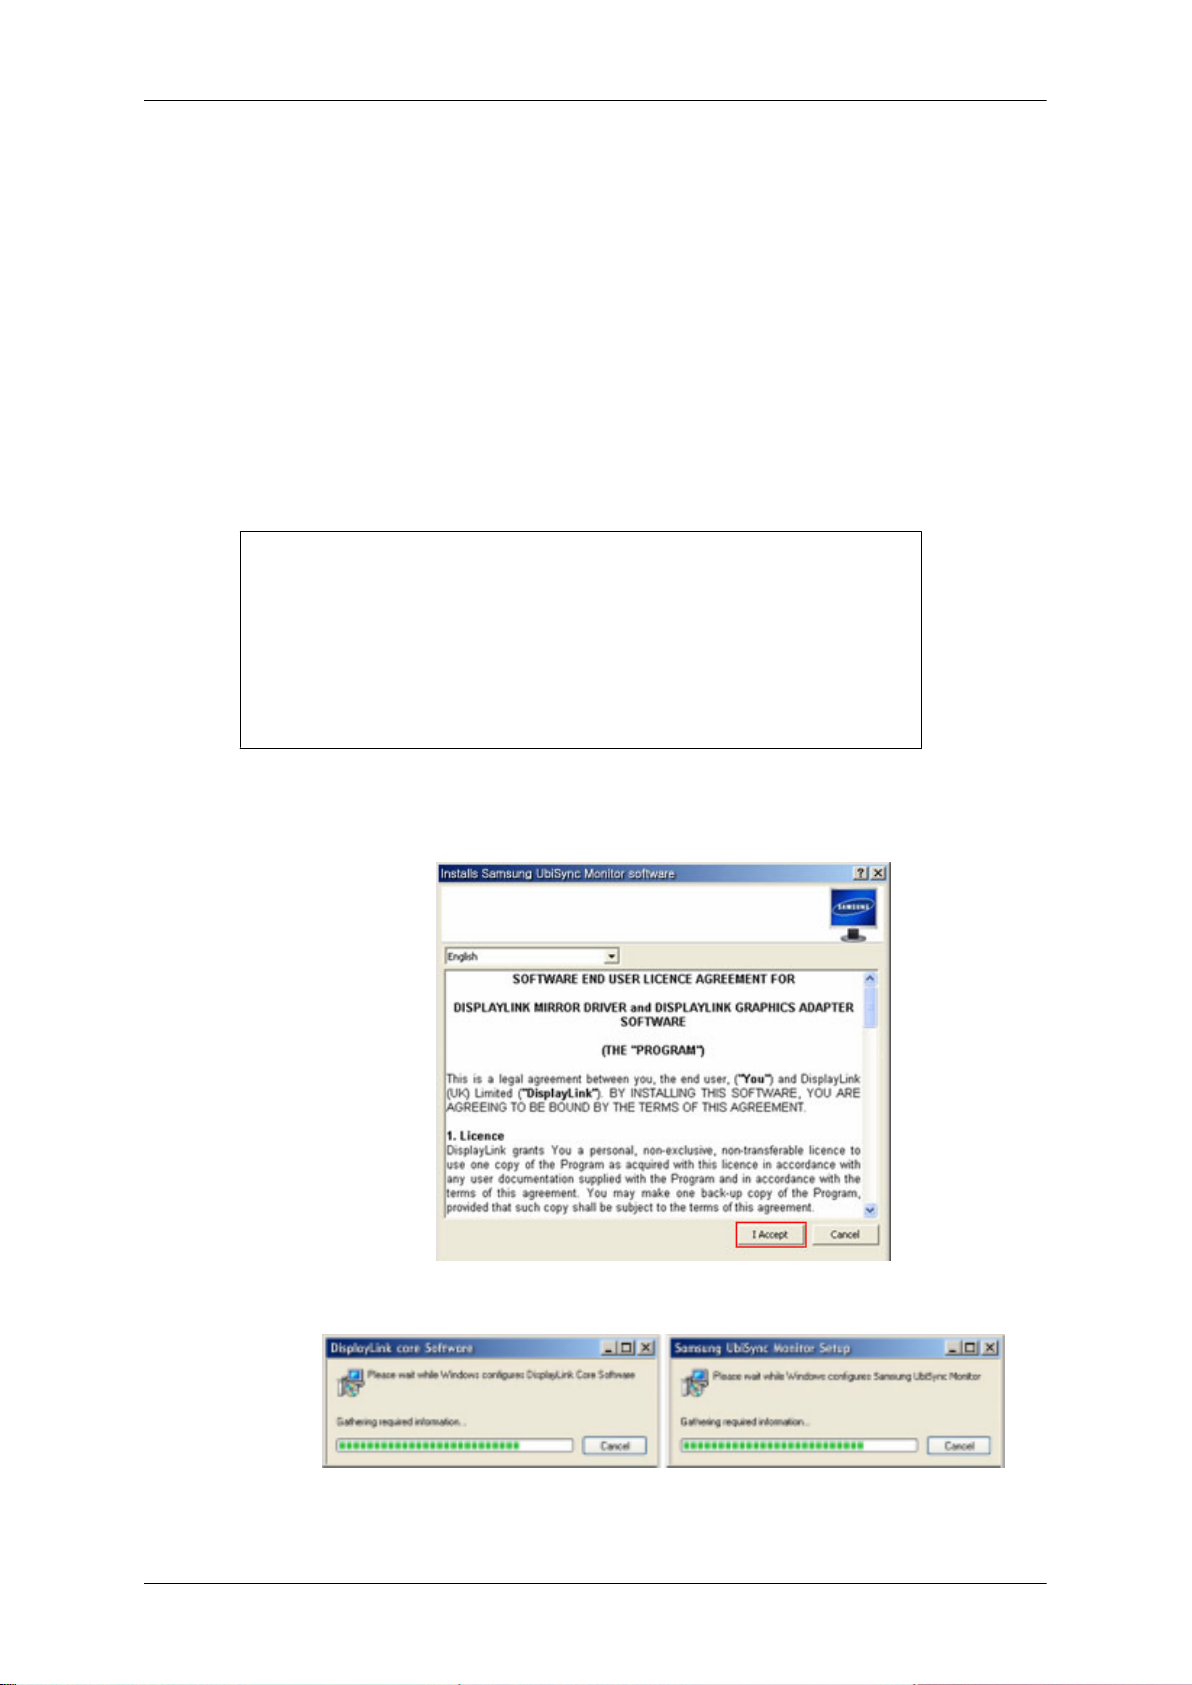
1. Insert CD into the CD-ROM drive. Click "USB Monitor Driver"
2. Click "I Accept".
3. The progress window appears, as shown in the figure below.
4. If you connect your USB monitor to your PC, it recognizes the monitor and the "Found
New Hardware" wizard is displayed, as shown in the figure below.
Page 11
Using the Software
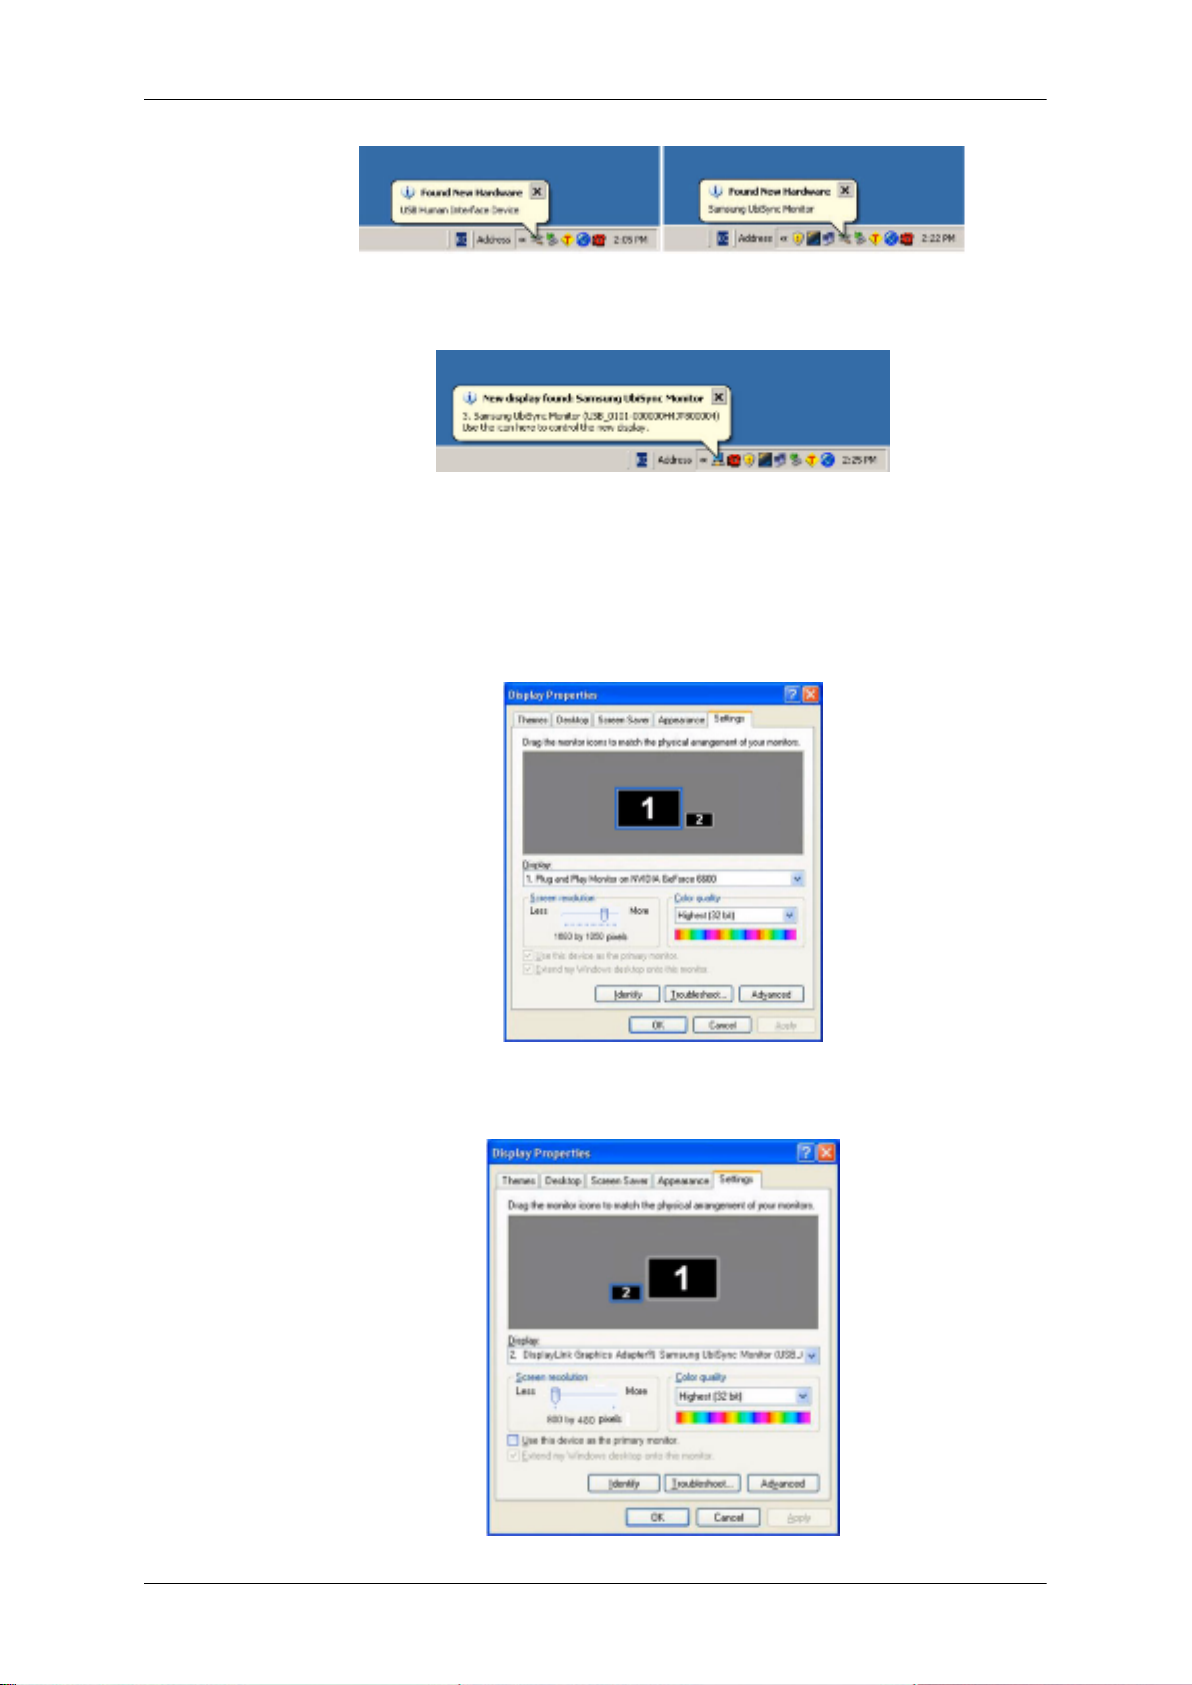
When setup is finished, a monitor icon is created in the system tray at the bottom of the
monitor screen, and the information for the installed USB monitor is displayed.
5. When the installation is completed, configure the following settings to use multiple monitors.
1. Right-click on the “Windows Desktop” and select “Properties” from the displayed menu.
The “Display Properties” window appears.
2. Select the “Settings” tab. A list of connected USB monitors is displayed.
3. Arrange the monitors displayed in the 'Display Properties' window in the order they are
actually used.
Page 12
Using the Software
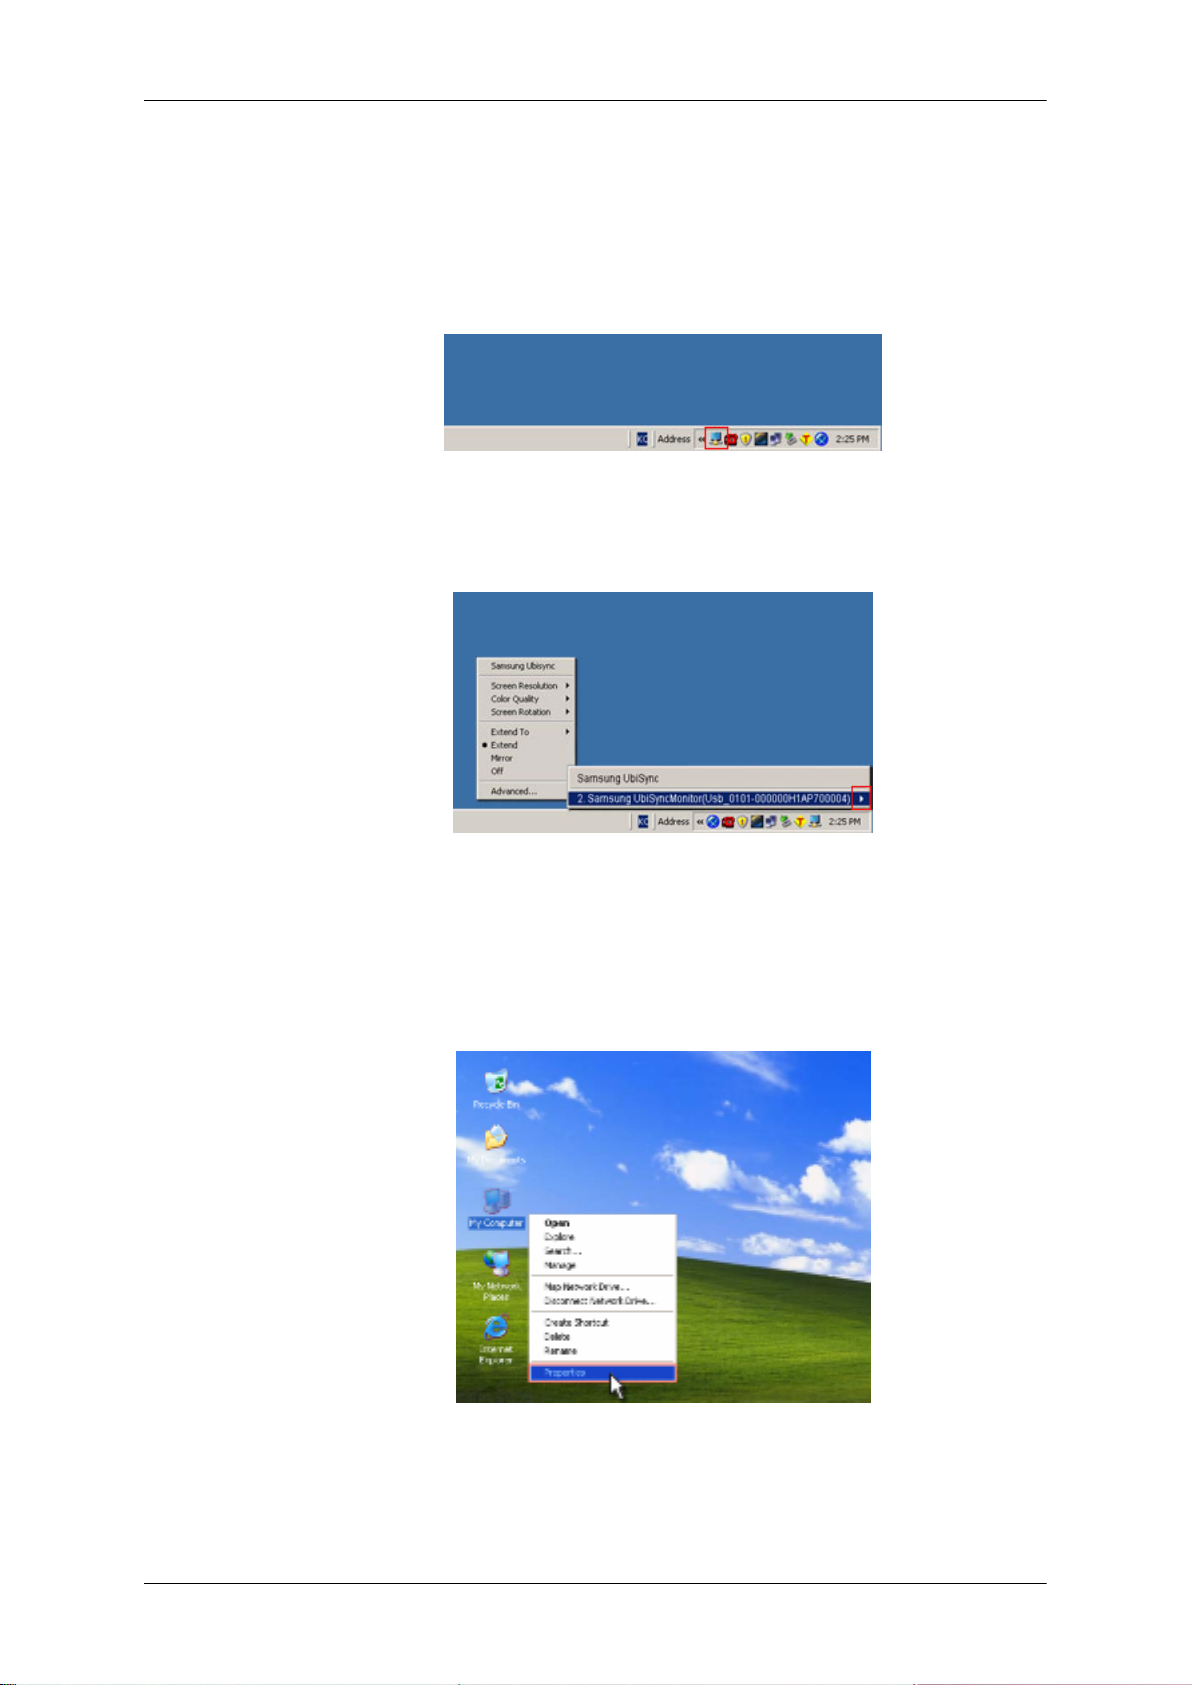
4. Then click "OK" button.
Configuring the 7" USB Monitor Display Information
1. When the driver setup for the USB monitor is finished, a monitor icon is created in the
system tray at the bottom of the monitor screen.
2. Click the monitor icon to display a list of connected USB monitors. Select the monitor for
which you want to configure the display settings. You can configure the "Screen Resolution" , "Color Quality" and "Screen Rotation" settings for your monitor.
Checking the configuration
After the installation, you can check the configuration by following these steps.
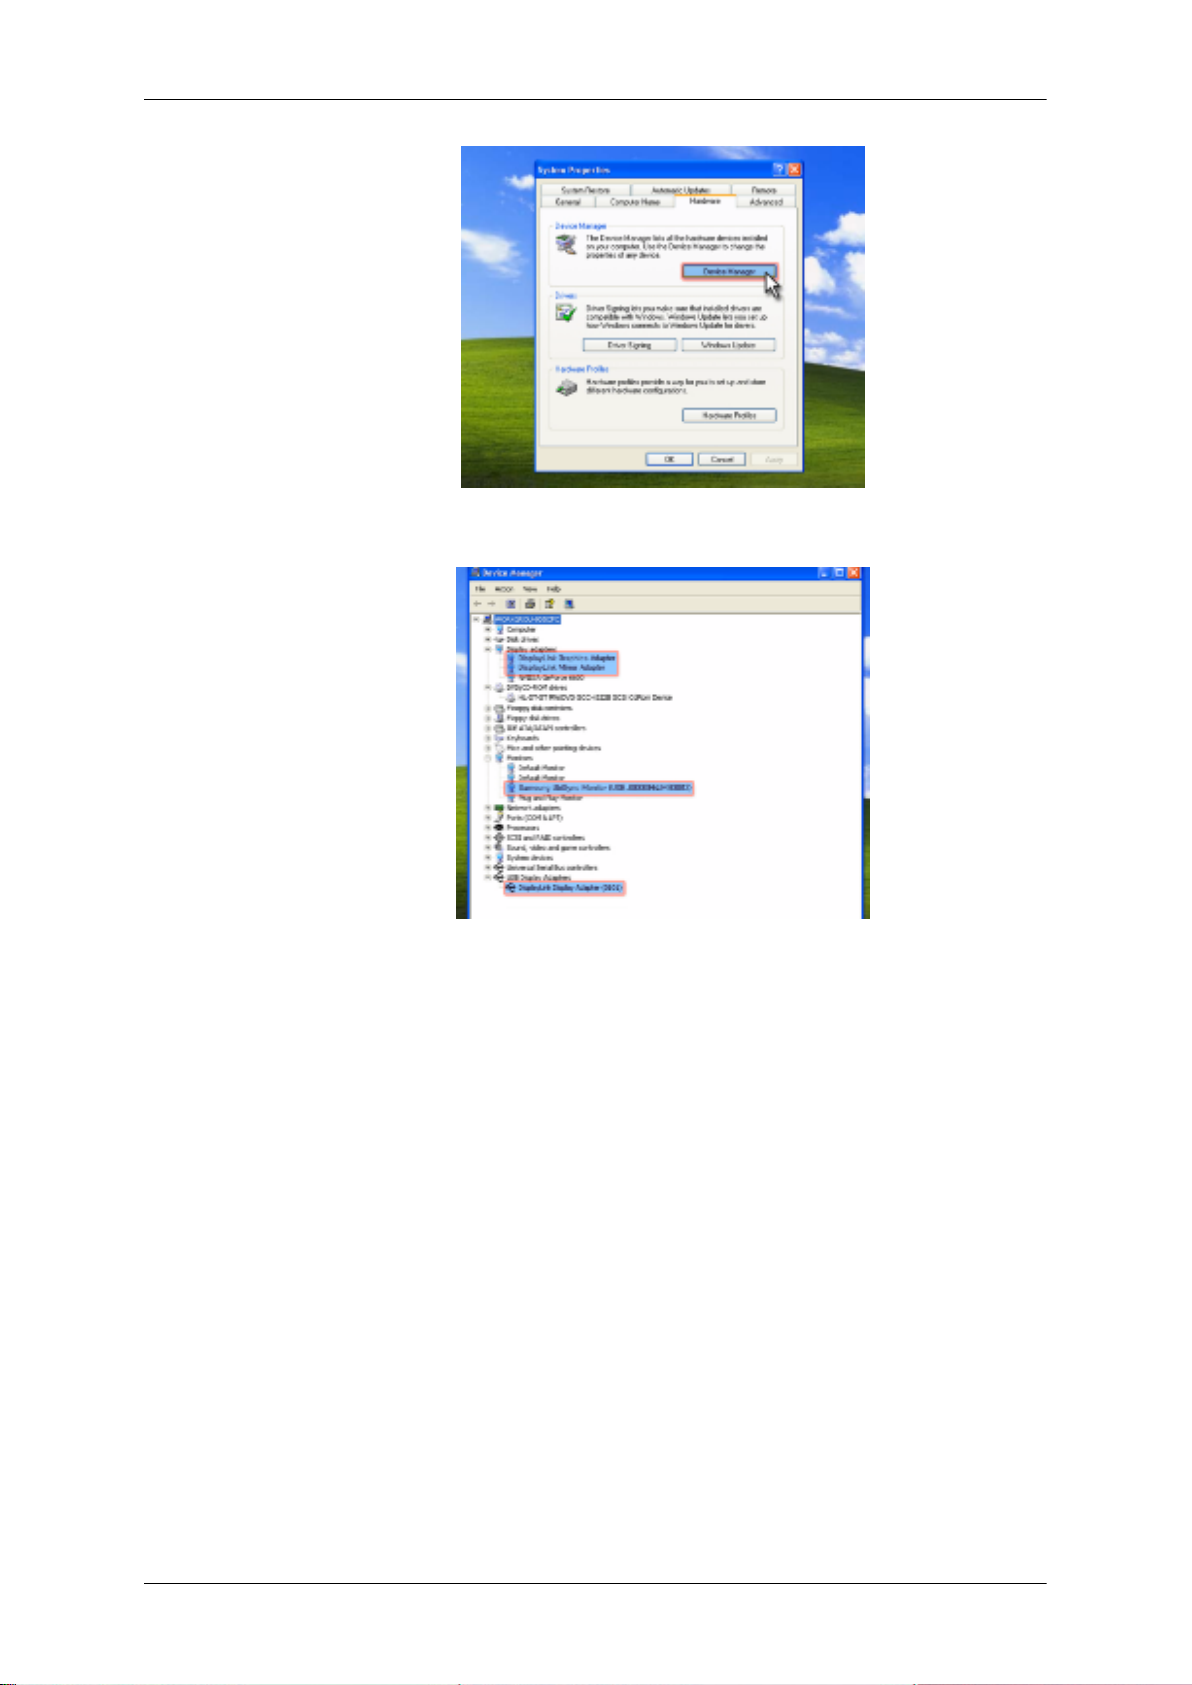
1. Right-click “My Computer”, and select “Properties” - “System Properties” - the “Hardware
tab”.
2. Click “Device Manager”.
Page 13
Using the Software
3. A list of the installed device will be displayed, as shown in the figure below.
- The Initial Screen Settings after Installing the Program
• Applicable mode: Extend mode
• Mode position: To the right of the primary screen
• Mode rotation: 0°
Restrictions on the 7” USB Monitor
Supported OS (Operating Systems)
• Windows XP
- Service Pack 1 or earlier: Unsupported
- Service Pack 2 or later: Supported
• Windows 2000
- Service Pack 3 or earlier: Not Supported
- Service Pack 4 or later: Supported
• Windows Server 2003: Not Supported
Page 14

Using the Software
• Windows Vista: Supported.
To check the information on the operating system of your PC, right-click “My Computer” on
the “Windows Desktop” and select “Properties” from the displayed menu. Check the information in the “General” tab of the “Computer Properties” window.
1. Because this USB monitor is recognized as a USB device, the DOS screen that appears
for general monitors when a PC is booting up is not displayed.
2. You cannot use the USB monitor for software using 3D hardware acceleration.
- Real Player (Expansion mode is not supported.)
- For most 3D games
- Programs running on the base of Direct X
3. Supported movie programs
- Power DVD
- Win DVD(Version 5 onwards)
- Windows Media Player (Version 10 or later is supported.)
- VLC
4. This monitor does not support the MagicTune program.
- The MagicRotation function may not function normally.
- If the MagicTune program is installed on your PC, it may not be compatible with this
monitor.
5. The USB monitor may not work normally with USB 1.0.
6. If the graphics card of your PC does not support WDDM, the extended mode may not
be available in Windows Vista.
Example) Some versions of the Matrox Card
Page 15

Troubleshooting
Check List
Note
Before calling for assistance, check the information in this section to see if you can remedy
any problems yourself. If you do need assistance, please call the phone number on the Information section or contact your dealer.
There is no image on the screen. I cannot turn on the monitor.
Q: Check whether the USB cable is connected correctly. Check whether the USB driver is
installed.
A: The USB monitor is recognized as a general USB device on a PC. If you turn the monitor
on or off quickly and repeatedly, a USB device problem may occur. Refer to the USB
device Troubleshooting section on the Microsoft customer support website.
1. Right-click the “My Computer” and click on “Properties”
2. The Device Manager is displayed.
3. From the “Action” menu, click ”Scan for hardware changes”. Reboot your PC.
The screen of the USB monitor freezes.
Q: Check the “Hardware acceleration” setting for your USB monitor in the “Display Prop-
erties” window.
A: Set the “Hardware acceleration” value to “Full”.
For more information on how to configure the settings, click here.
1. Right-click the “Windows Desktop” and click on “Properties”.
2. The “Display Properties” window appears.
Select the “Settings” tab and click on “Advanced”.
3. If the “Properties” window for your monitor is displayed, select the “Troubleshoot”
tab. Move the “Hardware acceleration” slide to “Full”.
My USB monitor is connected but the screen is blank.
Q: Does the Auto Installation program run when your USB monitor is connected?
A: Install the "USB Monitor Driver" from the provided CD. For more information on how to
install the driver, refer to "Installing and Using the Software".
I have connected the USB monitor but it does not boot up...
Q: For the One-Board Type computer which uses an i815 chipset motherboard, change
the Legacy USB support option to [Disabled] in the BIOS Setup menu and reboot the
computer.
A: (Example) Phoenix BIOS
If you turn on the computer, the ”Press F2 to enter SETUP” message is displayed on
the bottom of the screen. Press [F2] to display the BIOS Setup menu.
Page 16

Q & A
Troubleshooting
A: - Configuring the Settings
Set the Advanced -> Peripheral Configuration (Integrated Peripherals) -> Legacy USB
Support item to [Enabled]. Save the settings and reboot the computer.
A: - Entering the BIOS Setup screen may differ for each BIOS company. Refer to the user
manual for your PC.
For more information, visit the Microsoft website.
Q: How I can clone or extend screen mode?
A: Open the”Display Properties” window and select the “Settings” tab,
Q: How can I remove the “USB Monitor Installation Program” completely?
A: Click “Add/Remove Programs” in the “Control Panel”. A list of “currently installed pro-
grams” is displayed.
Select “Samsung UbiSync Monitor” from the list and click “Remove”.
Q: The screen size of the USB monitor is larger than the actual monitor size.
A: If the primary monitor has a high resolution, screens are expanded beyond the recom-
mended resolution in Clone mode (USB monitor).
Q: The screen size of the USB monitor is smaller than the actual monitor size. The screen
is centered on the monitor.
A: If the primary monitor has a high resolution, screens are smaller than the recommended
resolution in Clone mode (USB monitor).
Q: I disconnected or turned off my USB monitor but my PC still displays the old monitor
information in the Display Properties window.
A: The deactivated USB monitors are such that the power to them is turned off or their
USB cables are disconnected. To remove this information, you have to remove the
“Samsung Ubisync Monitor” program from “Add/Remove Programs” in the “Control
Panel”.
If you remove the program you cannot use all the connected USB monitors.
If you want to use the USB monitor again, you have to setup the installation program
again.
Q: Icons and photos are broken or jagged in Clone mode (USB monitor).
A: This occurs because Windows does not send the screen updating information to Clone
mode if Extended mode is active on a single PC.
We recommend using the monitor in Extend mode.
Note
Before calling for assistance, check the information in this section to see if you can remedy
any problems yourself. If you do need assistance, please call the phone number on the Information section or contact your dealer.
Page 17
Specifications
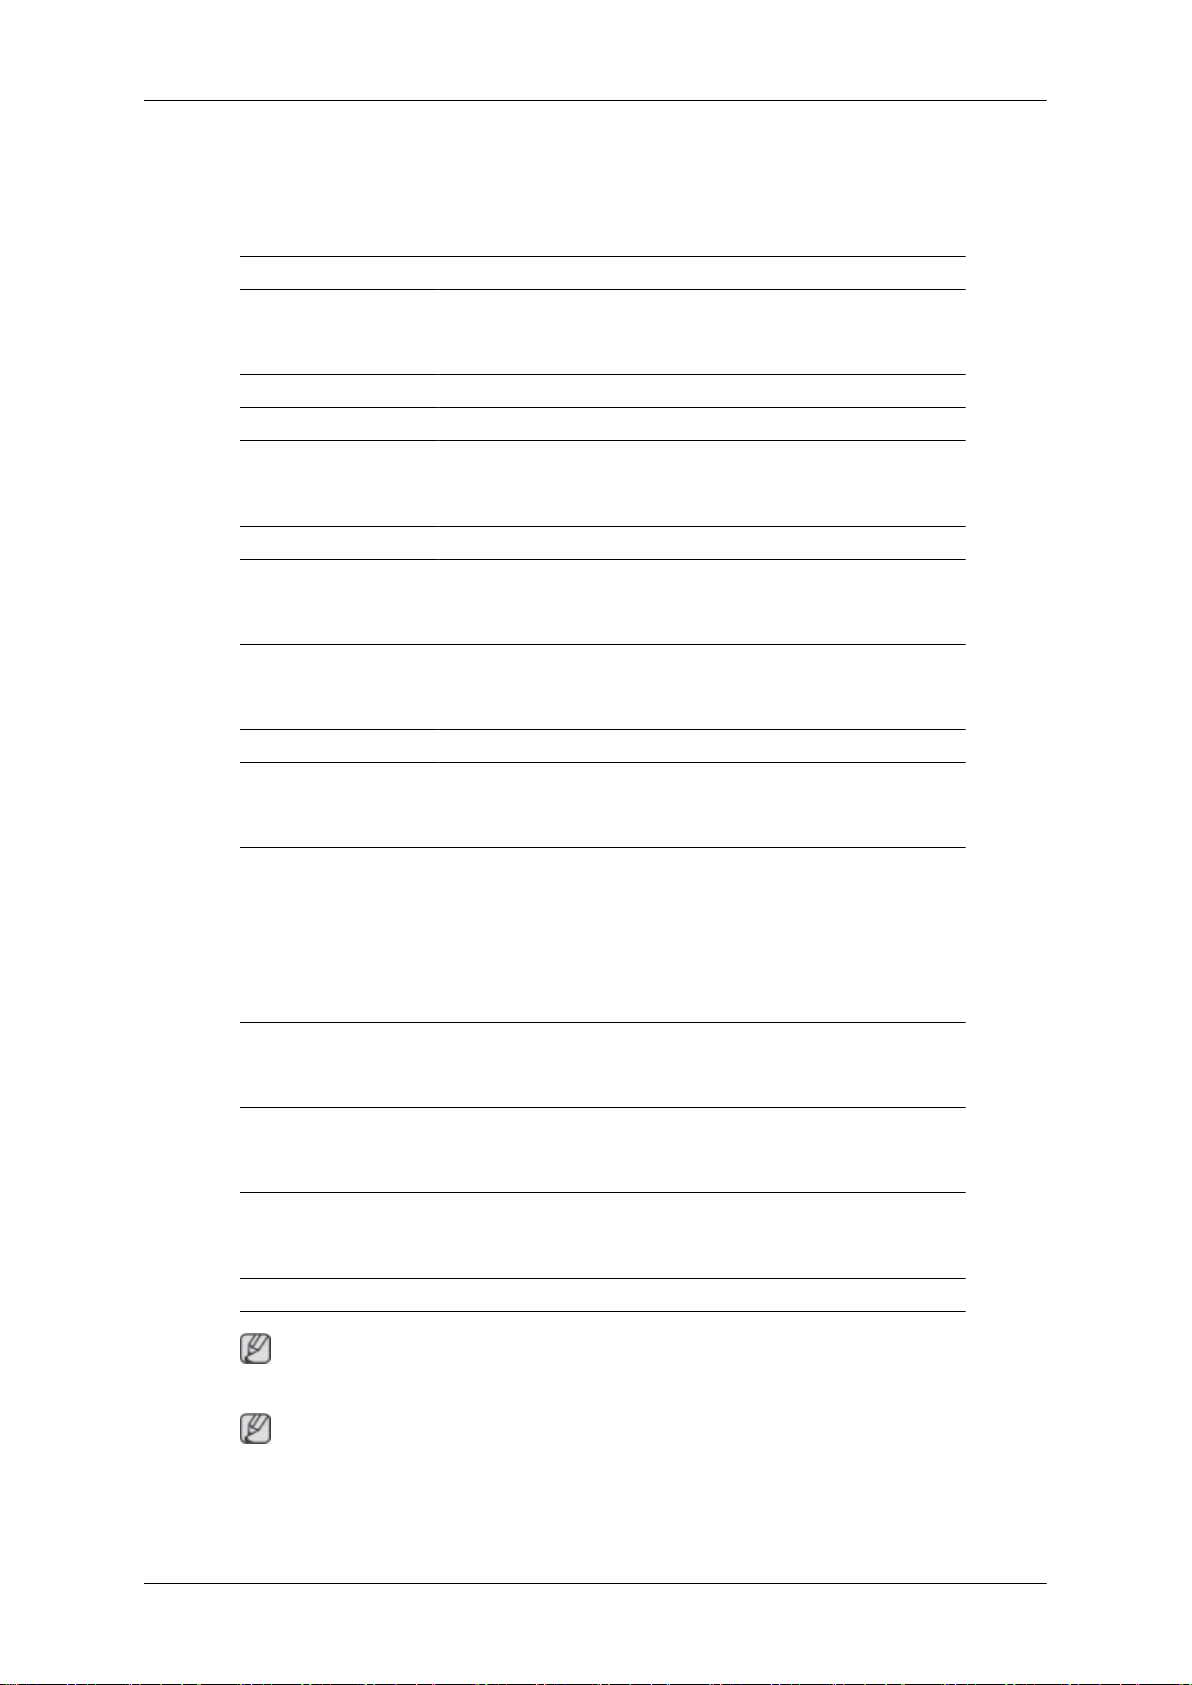
General
General
Model Name SyncMaster U70
LCD Panel
Size 7" diagonal ( 17 cm)
Display area 152.4 mm(H) x 91.4 mm(V)
Pixel Pitch 0.1905 mm(H) x 0.1905 mm(V)
Synchronization
Horizontal 30 ~ 35 kHz
Vertical 59 ~ 62 Hz
Display Color
16.7M
Resolution
Optimum resolution 800x480@60Hz
Maximum resolution 800x480@60Hz
Input Signal, Terminated
USB interface (Compliant Digital RGB)
USB Format
TTL level (V high ≥ 2.0 V, V low ≤ 0.8 V)
Maximum Pixel Clock
40 MHz (USB Mode)
Power Supply
DC 5V (USB Power) (+/- 10 %)
Signal Cable
USB Cable (1 up to 2 down), Detachable
Dimensions (W x H x D) / Weight (Simple Stand)
184.0 x 124.0 x 43.6 mm (7.2 x 4.9 x 1.7 inch) / 0.37kg (0.81 Ibs)
Note
Design and specifications are subject to change without prior notice.
Class B Equipment (Information Communication equipment for residential use)
This product complies with the Electromagnetic Compatibility Directives for residential use
and can be used in all areas including common residential areas. (Class B equipment emits
less electromagnetic waves than Class A equipment.)
Page 18
Preset Timing Modes
If the signal transferred from the computer is the same as the following Preset Timing Modes,
the screen will be adjusted automatically. However, if the signal differs, the screen may go
blank while the power LED is on. Refer to the video card manual and adjusts the screen as
follows.
Specifications
Display Mode Horizontal
Frequency
(kHz)
IBM, 800 x 480 29.738 59.476 29.500 +/+
Horizontal Frequency
The time to scan one line connecting the right edge
to the left edge of the screen horizontally is called the
Horizontal Cycle and the inverse number of the Horizontal Cycle is called the Horizontal Frequency.
Unit: kHz
Vertical Frequency
Like a fluorescent lamp, the screen has to repeat the
same image many times per second to display an
image to the user. The frequency of this repetition is
called the Vertical Frequency or Refresh Rate. Unit:
Hz
Vertical Frequency (Hz)
Pixel Clock
(MHz)
Sync Polarity
(H/V)
Page 19

Information
PRODUCT INFORMATION (Image Retention Free)
LCD Monitors and TVs may have image retention when switching from one image to another
especially after displaying a stationary image for a long time.
This guide is to demonstrate correct usage of LCD products in order to protect them from
Image retention.
Warranty
Warranty does not cover any damage caused by image retention.
Burn-in is not covered by the warranty.
What is Image retention ?
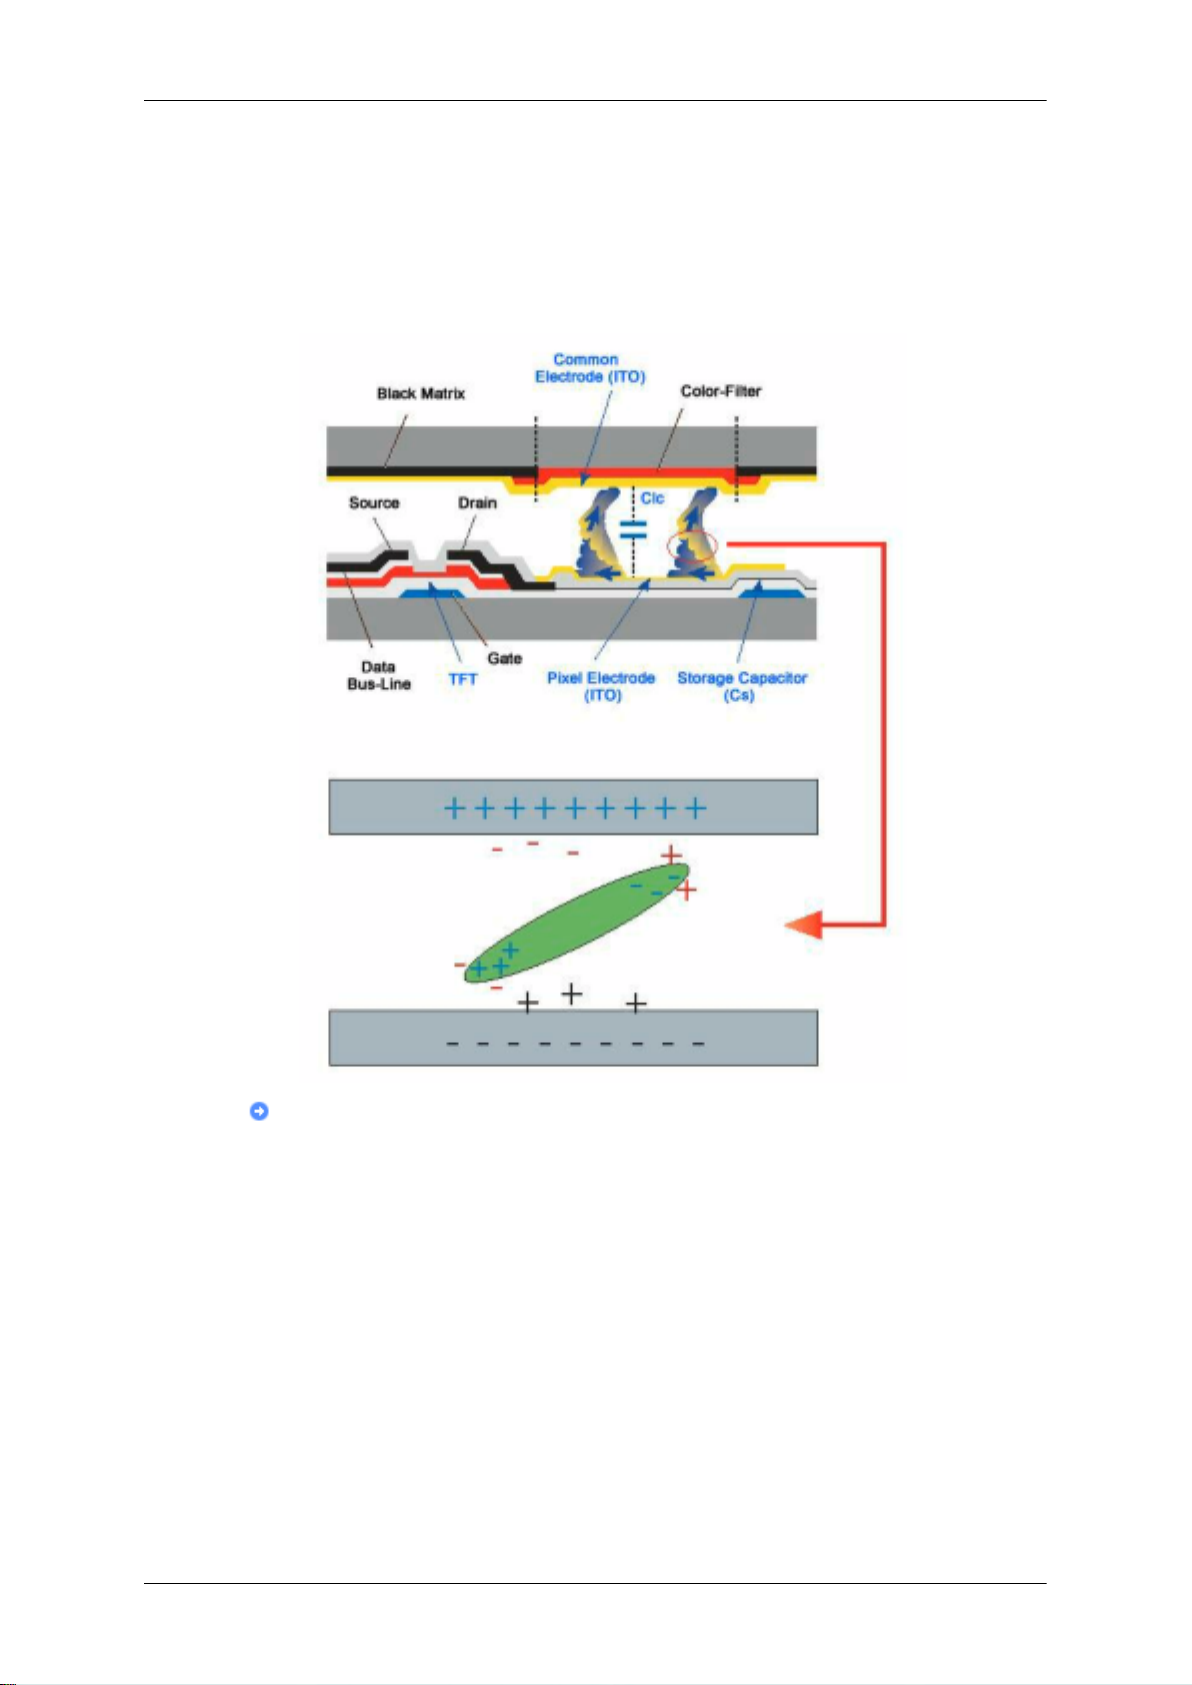
During normal operation of a LCD panel, pixel image retention doesn't occur. However, if the same image is displayed for a long time, a slight difference in electric
charge accumulates between the two electrodes which encase the liquid crystal.
This may cause the liquid crystal to build up in a certain areas of the display. Thus,
the previous image is retained when switching to a new video image. All display
products, including LCD, are subject to image retention. This is not a product defect.
Please follow the suggestions below to protect your LCD from image retention.
Power Off, Screen Saver, or Power Save Mode
Ex)
• Turn the power off when using a stationary pattern.
• Turn the power off for 4 hours after 20 hours in use
• Turn the power off for 2 hours after 12 hours in use
• Use a Screen saver if possible
• Screen saver in one color or a moving image is recommended.
• Set the Monitor to power off with the PC Display Properties Power Scheme.
Suggestions for specific applications
Ex) Airports, Transit Stations, Stock Markets, Banks, and Controlling Systems We
recommend that you follow set up of your display system program as below:
Display Information together with Logo or Moving image cycle.
Ex) Cycle : Display Information for 1 hour followed by a Display Logo or moving
image for 1 minute.
Change the Color Information periodically (Use 2 different colors).
Ex) Rotate the Color Information with 2 colors every 30 minutes.
Page 20
Information
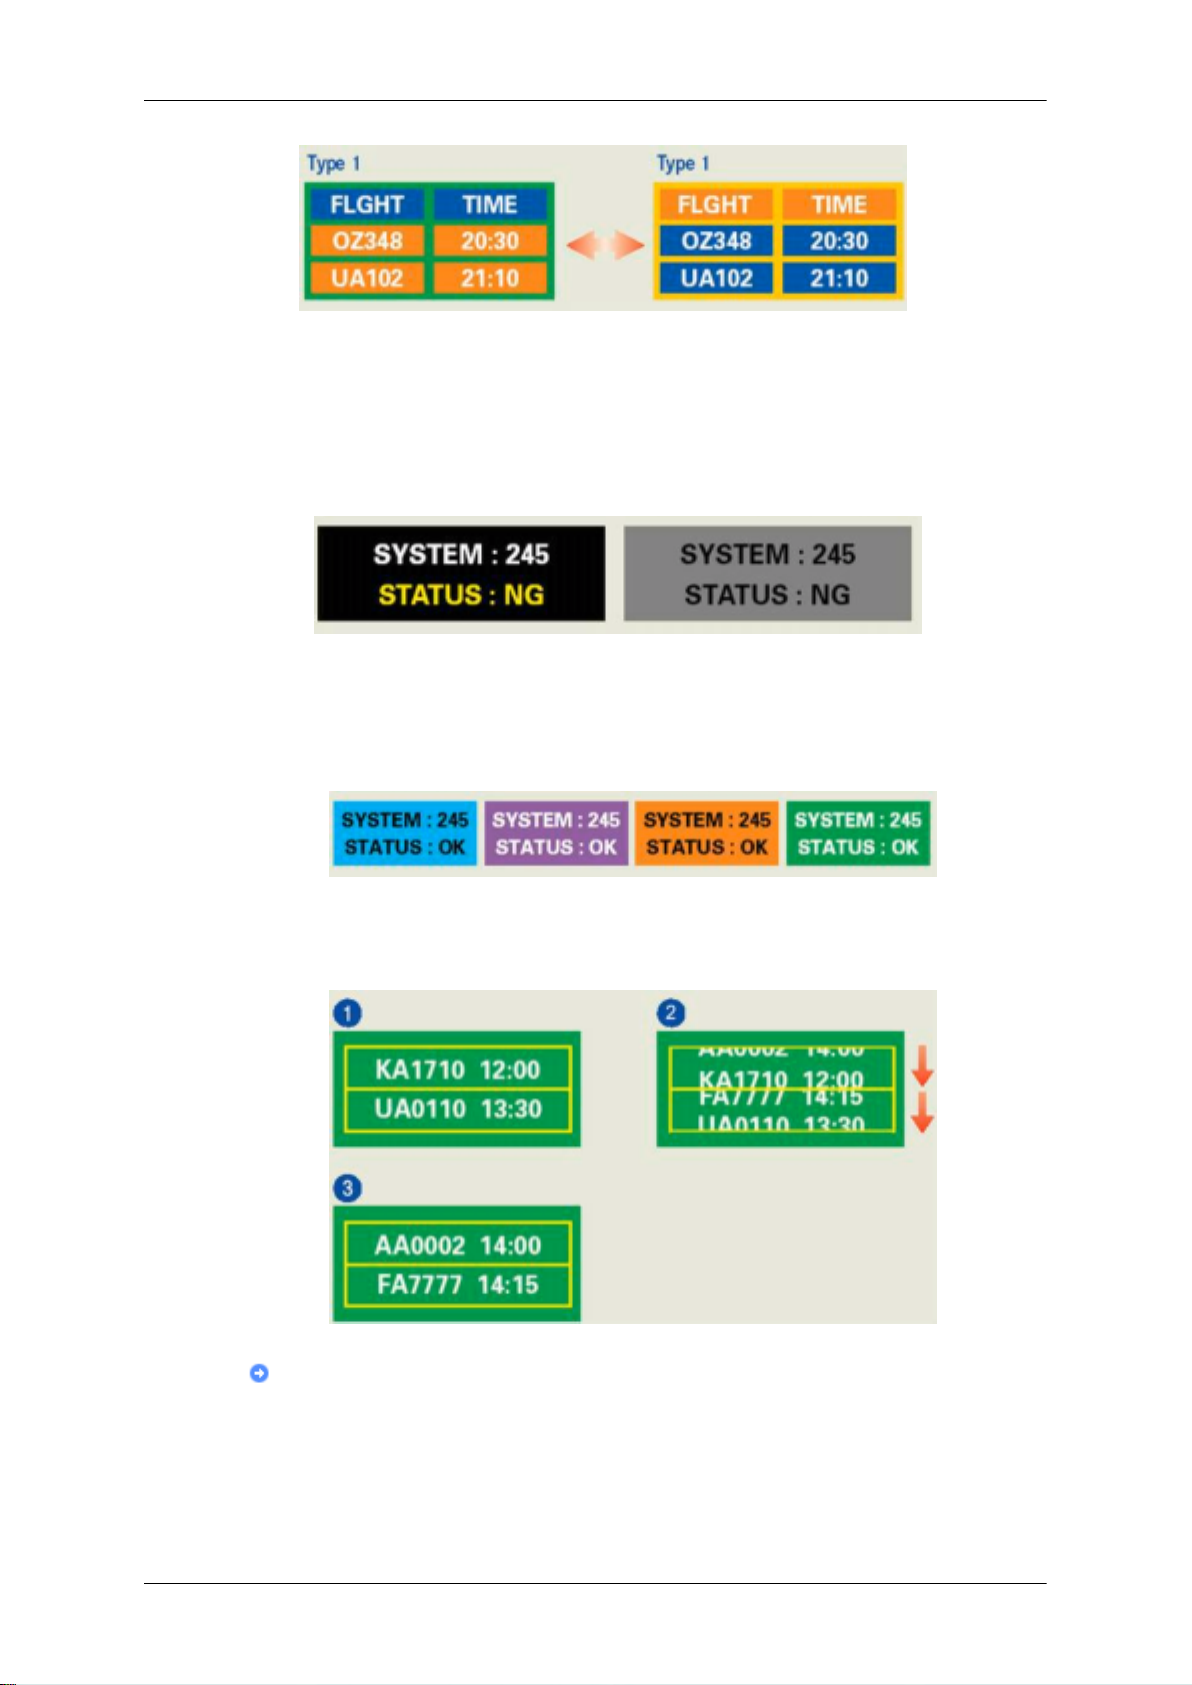
Avoid using a combination of characters and background color with large difference
in luminance.
Avoid using Grey colors, which can cause Image retention easily.
• Avoid: Colors with big difference in luminance (Black & White, Grey)
Ex)
• Recommended settings: Bright colors with little difference in luminance
• Change the characters color and background color every 30 minutes
Ex)
• Every 30 minutes, change the characters with movement.
Ex)
The best way to protect your monitor from Image retention is to set your PC or
System to operate a Screen Saver program when you are not using it.
Image retention may not occur when a LCD panel is operated under normal conditions.
Page 21
Information
Normal conditions are defined as continuously changing video patterns. When the
LCD panel is operated for a long time with a fixed pattern (-over 12 hours-), there
may be slight difference in voltage between electrodes that work the liquid crystal
(LC) in a pixel. The voltage difference between electrodes increases with time,
forcing the liquid crystal to lean. When this occurs, the previous image may be seen
when the pattern is changed.
To prevent this, the accumulated voltage difference must be decreased.
Our LCD Monitor satisfies ISO13406-2 Pixel fault Class II
Page 22

Appendix
Contact SAMSUNG WORLDWIDE
Note
If you have any questions or comments relating to Samsung products, please contact the
SAMSUNG customer care center.
U.S.A 1-800-SAMSUNG(726-7864) http://www.samsung.com/us
CANADA 1-800-SAMSUNG(726-7864) http://www.samsung.com/ca
MEXICO 01-800-SAMSUNG
(726-7864)
ARGENTINE 0800-333-3733 http://www.samsung.com/ar
BRAZIL 0800-124-421
4004-0000
CHILE 800-SAMSUNG(726-7864) http://www.samsung.com/cl
COLOMBIA 01-8000112112 http://www.samsung.com/co
COSTA RICA 0-800-507-7267 http://www.samsung.com/lat-
ECUADOR 1-800-10-7267 http://www.samsung.com/lat-
EL SALVADOR 800-6225 http://www.samsung.com/lat-
GUATEMALA 1-800-299-0013 http://www.samsung.com/lat-
HONDURAS 800-7919267 http://www.samsung.com/lat-
JAMAICA 1-800-234-7267 http://www.samsung.com/lat-
NICARAGUA 00-1800-5077267 http://www.samsung.com/lat-
PANAMA 800-7267 http://www.samsung.com/lat-
PUERTO RICO 1-800-682-3180 http://www.samsung.com/lat-
REP. DOMINICA 1-800-751-2676 http://www.samsung.com/lat-
TRINIDAD & TOBAGO
VENEZUELA 0-800-100-5303 http://www.samsung.com/lat-
1-800-SAMSUNG(726-7864) http://www.samsung.com/lat-
North America
http://www.samsung.com/mx
Latin America
http://www.samsung.com/br
in
in
in
in
in
in
in
in
in
in
in
in
Europe
AUSTRIA 0810 - SAMSUNG (7267864,
€ 0.07/min)
http://www.samsung.com/at
Page 23

Appendix
Europe
BELGIUM 02 201 2418 http://www.samsung.com/be
(Dutch)
http://www.samsung.com/
be_fr (French)
CZECH REPUBLIC 800 - SAMSUNG
(800-726786)
DENMARK 8 - SAMSUNG (7267864) http://www.samsung.com/dk
EIRE 0818 717 100 http://www.samsung.com/ie
FINLAND 30 - 6227 515 http://www.samsung.com/fi
FRANCE 01 4863 0000 http://www.samsung.com/fr
GERMANY 01805 - SAMSUNG
(7267864, € 0.14/Min)
HUNGARY 06-80-SAMSUNG (726-7864) http://www.samsung.com/hu
ITALIA 800-SAMSUNG (726-7864) http://www.samsung.com/it
LUXEMBURG 02 261 03 710 http://www.samsung.com/lu
NETHERLANDS 0900-SAMSUNG
(0900-7267864) (€ 0,10/Min)
NORWAY 3 - SAMSUNG (7267864) http://www.samsung.com/no
POLAND 0 801 1SAMSUNG (172678)
http://www.samsung.com/cz
http://www.samsung.de
http://www.samsung.com/nl
http://www.samsung.com/pl
022 - 607 - 93 - 33
PORTUGAL 808 20 - SAMSUNG
(7267864)
SLOVAKIA 0800 - SAMSUNG (726-7864) http://www.samsung.com/sk
SPAIN 902 - 1 - SAMSUNG (902 172
678)
SWEDEN 075 - SAMSUNG (726 78 64) http://www.samsung.com/se
SWITZERLAND 0848 - SAMSUNG (7267864,
CHF 0.08/min)
U.K 0845 SAMSUNG (7267864) http://www.samsung.com/uk
CIS
ESTONIA 800-7267 http://www.samsung.com/ee
LATVIA 8000-7267 http://www.samsung.com/lv
LITHUANIA 8-800-77777 http://www.samsung.com/lt
KAZAKHSTAN 8-10-800-500-55-500 http://www.samsung.com/
KYRGYZSTAN 00-800-500-55-500
RUSSIA 8-800-555-55-55 http://www.samsung.ru
TADJIKISTAN 8-10-800-500-55-500
UKRAINE 8-800-502-0000 http://www.samsung.ua
UZBEKISTAN 8-10-800-500-55-500 http://www.samsung.com/
http://www.samsung.com/pt
http://www.samsung.com/es
http://www.samsung.com/ch
kz_ru
kz_ru
Page 24

Appendix
Asia Pacific
AUSTRALIA 1300 362 603 http://www.samsung.com/au
CHINA 800-810-5858
400-810-5858
010-6475 1880
HONG KONG:3698 - 4698 http://www.samsung.com/hk
INDIA 3030 8282
1-800-3000-8282
1800 110011
INDONESIA 0800-112-8888 http://www.samsung.com/id
JAPAN 0120-327-527 http://www.samsung.com/jp
MALAYSIA 1800-88-9999 http://www.samsung.com/my
NEW ZEALAND 0800 SAMSUNG (0800 726
786)
PHILIPPINES 1-800-10-SAMSUNG
(726-7864)
http://www.samsung.com/cn
http://www.samsung.com/in
http://www.samsung.com/nz
http://www.samsung.com/ph
1-800-3-SAMSUNG
(726-7864)
02-5805777
SINGAPORE 1800-SAMSUNG(726-7864) http://www.samsung.com/sg
THAILAND 1800-29-3232, 02-689-3232 http://www.samsung.com/th
TAIWAN 0800-329-999 http://www.samsung.com/tw
VIETNAM 1 800 588 889 http://www.samsung.com/vn
Middle East & Africa
SOUTH AFRICA 0860-SAMSUNG(726-7864) http://www.samsung.com/za
TURKEY 444 77 11 http://www.samsung.com/tr
U.A.E 800-SAMSUNG(726-7864)
8000-4726
http://www.samsung.com/ae
Page 25

Correct Disposal
Correct Disposal of This Product (Waste Electrical & Electronic Equipment) Europe only
Appendix
(Applicable in the European Union and other European countries with separate collection systems)
This marking on the product, accessories or literature
indicates that the product and its electronic accessories (e.g. charger, headset, USB cable) should not
be disposed of with other household waste at the end
of their working life. To prevent possible harm to the
environment or human health from uncontrolled
waste disposal, please separate these items from
other types of waste and recycle them responsibly to
promote the sustainable reuse of material resources.
Household users should contact either the retailer
where they purchased this product, or their local government office, for details of where and how they can
take this item for environmentally safe recycling.
Authority
Business users should contact their supplier and
check the terms and conditions of the purchase contract. This product and its electronic accessories
should not be mixed with other commercial wastes
for disposal.
Information in this document is subject to change without notice.
© 2008 Samsung Electronics Co., Ltd. All rights reserved.
Reproduction in any manner whatsoever without the written permission of Samsung Electronics Co., Ltd. is strictly forbidden.
Samsung Electronics Co., Ltd. shall not be liable for errors contained herein or for incidental
or consequential damages in connection with the furnishing, performance, or use of this material.
Samsung is the registered trademark of Samsung Electronics Co., Ltd.; Microsoft, Windows
and Windows NT are registered trademarks of Microsoft Corporation; VESA, DPM and DDC
are registered trademarks of Video Electronics Standard Association; the ENERGY STAR
name and logo are registered trademarks of the U.S. Environmental Protection Agency
(EPA). All other product names mentioned herein may be the trademarks or registered trademarks of their respective owners.
®
 Loading...