

ol=ggtlo,leegt_
Ow er's
instructions
Register your product at www.samsung.com/globa!/register
important Warranty Information
Regarding Television Format
Viewing
Standard screen format tclevis[ons (4:3, the aspect ratio of the screen width to height) are
primarily dcsigned to vicw standard fomlat full-motion video. The images displa),cd on
them should primarily be in the standard 4:3 ratio foi-mat and constantly moving.
Displaying stationary graphics and images on screen, such as the dark top and bottom
lettcrbox bars (wide screcn picturcs), should be limitcd to no morc than 15% of the total
tclev[sion viewing pcr weck.
Widc scrcen format tclcvisions (16:9, the aspect ratio of the screen width to hdght) are
primarily &'signed to vicw widc screcn format full-motion vidco. The imagcs displaycd on
them should pmnarily be in the wide screen 16:9 ratio fommt, or expanded to fill the
screcn if your model offers this feature, and constantly moving. Displaying stationary
graphics and images on scrccn, such as the dark sidc-bars on non-expanded standard
fommt tclevision video and programming, should be lmfitcd to no more than 15% of the
total tclevision viewing per week.
Additionally, vicwing othcr stationary images and text such as stock market reports, video
game displays, station logos, web sitcs or computer graphics and patterns, should be
lmfitcd as described above for all tclevisions. Displaying any stationary images that e.weed
the above guidelines can cause uneven aging qf picture tubes (CRTs) that leave subtle, but
permanent burned-in Ghost images in the television picture. To avoid this, vary the
programming and images, and primarily display full screen moving images, not
stationa O, patterns or dark bars. On television models that oftcr picture sizing features,
use these controls to view the different fommts as a full scn'en picture.
Be careful in the selection and duration of television formats used for viewing. Uneven CRT
aging as a resuh of format selection and use, as well as other burned-in images, is not
covered by your Samsung lmfited warrant):
English- 2
A Guide to Digital TV
What is Digital Television?
Digital television (DTV) is a new wa), of transnfitting high quality video and audio to
vourj TV set. Using DTV,broadcasters can transmit high defnition TV (HDTV) images,
Dolby Digital surround audio, and new services such as multicasting (transmitting more
than one program on the same TV channel) and datacasting (providing electronic
program guides and interactive television). Several of these services can be combined into
a single digital broadcast.
Digita| Television Services
Digital Picture Quality
DTV programs are transnfitted in hvo clillcrent formats. The frst is Standanl Dcfnition
Television (SDTV) and the second is High Defimtion Television (HDTV).
SDTV program tormats include 480-fne interlaced (480i) and 480-fne progressive
(480p) video. 480i programs are essentially a digital version of ocwcurrent analog TV
programs, while the 480p tormat otters improved image detail over 480i. Some 480p
programs are broadcast in widescreen and are comparable to progressive-scan DVD
movies in image qualit>
HDTV program tormats include 1080-fne interlaced (10801) and 720-fne progressive
(720p). Both HDTV tormats are always broadcast in widescreen, and otter nluch higher
picture ¢luality than SDTV
Dolby Surround Sound
With DTV,you can listen to a variety of Dolby Digital audio fommts front Dolby
Surround 2.0 to Dolby Digital 5.1 surround, using your home audio system. Many
HDTV programs are now broadcast with Dolby Digital 5.1 soundtracks.
interactive Communications and Datacasting
DTV will allow you to interact with your television; choosing programs from a detailed
program guide, ordering products on-line while watching TV, and accessing ancillary
data about a program.
English- 3
How to View Digita| Television
There are three ways to watch DT_Z The first is to use an integrated digital TV; one with
a bui|t-in digital te|evision tuner. The second is to connect an external DTV set-top
receiver to a DT_Uready television or monitor. This type of TV or monitor will have
wideband component video and stcrco audio inputs. _km can also watch DTV signals
with personal computer (PC) tuner cards and computer monitors.
integrated TVs versus DTV-ready TVs and monitors
The advantage of an integrated DTV set is that it can tune both analog and digital TV
channels at the same time. All you need to do is add an external antenna and you an"
ready to watch DT_
However, integrated DTV sets are not as common as DT_Uready TVs and monitors.
If you already own a DTV-ready TV with component video inputs, you can er\ioy DTV
broadcasts by simply adding a low-cost DTV set-top receiver and antenna.
NOTE
This television receiver supports the copy protection system regulated by DTLA (Digital
Transmission Licensing Administrator). It should be noted that copy protected content may
not be viewable depending on your particular connections.
English- 4

Q&A
3. is the antenna I use for existing TV reception good enough for DTV?
Over-the-air (OTA) digital TV broadcasOng uses the same channels as analog TV and
works well with many existing TV antennas. However, DTV broadcast channel
assignments are different than analog channels. Ybu should find outt whether your
local DTV broadcasts are on _ff-iF(channels 2-13) or UHF (channels 14-69) to see if
you need a different antenna.
If your DTV channels are on UHF and you already get good UHF reception, your
present antenna ma)" work fine. The same holds true for VHF DTV reception. Note
that in some markets, both VHF and UHF channels are used for DTV broadcasts.
k\)u can find out the latest DTV channel assignments for your area by browsing selected
Internet web sites such as wwx<titantxcom, and ww_,<fcc.gov
2. How difficult is it to receive DTV signals indoors?
Thisdepends on whether your local DTV stations are runmng full power or not and
how close your location is to the transmission tower. DTV receivers do not recluire as
much signal as analog TV receivers to produce high-quality images and sound.
Once the DTV signal level exceeds a certain threshold at the receiver, the digital video
and audio data is decoded at the same ¢luality it was originally encoded tor broadcast.
This is a big advantage tor DTV over analog TV - there is no noise, ghosting, static, or
scratchy audio.
3. How can IIconnect an antenna in my townhouse, co-operative
apartment, condominium, or apartment?
The Federal Comnlunications Commission's OTARD Rule (part of the
Tcleconmmnications Act of 1996) allows residents of condonliniums, townhouse, or
members of neighborhood associations to putt up outtside antennas for reception of
broadcast TV signals as long as those antennas are not located in common areas and
are no more than 12" in height.
Residents of rental units (apartments, etc) an" not covered by the OTARD rules and
will have to use indoor antennas to receive DTV broadcasts. It is possible that the
landlord of an apartment complex can provide broadcast DTV signals via a master TV
antenna system to each apartment.
4. Can I connect my DTV set-top receiver to my cable TV service?
Cable TV systems use a different method for transmitOng digital TV programs that is
currently incompaoble with broadcast DTV set-top receivers. So you will soil need to
use an outtdoor or indoor antenna to receive OTA broadcast DTV programs.
The good news is that you won't have to pay a monthly or pe>program charge to
watch OTA DTV and HDTV programs. They're in'e, unlike subscription satellite TV or
prenlium cable T_,_All you need is an antenna and a DTV set-top receiver to et'\joy
clear, sharp widescreen images and high-quality audio.
English - 5
I CONTENTS I
Chapter 1- Your New TV ................................ 8
List of Foatures .......................................................................................... S
Checking Accessories ................................................................................ 8
Familiarizing Yourself with the TV............................................................. 9
Control Buttons .............................................................................. 9
Connection Jacks (Side) ................................................................ 10
Connection Jacks (Rear) ............................................................... 11
Remote Control ............................................................................ 12
Chapter 2: |nsta||ation ................................. 13
Connecting VHF and UHF Antcnnas ....................................................... 13
Antennas with 300-ohm Flat Win Leads ...................................... 13
Antennas with 75-ohm Round Leads ............................................ 14
Separate VHF and UHF Antennas ................................................. 14
Connecting Cable TV .............................................................................. 15
Cable without a Cable Box ........................................................... 15
Connecting to a Cable Box that Descrambles All Channels ........... 15
Connecting to a Cable Box that Descrambles Some Channels ....... 16
Connecting a VCR ................................................................................... 17
Connecting a Second VCR to Record from the TV ........................ 18
Connecting a CamcoMer ......................................................................... 18
Connecting a DVD Player ........................................................................ 19
Connecting to Y, PB,PR................................................................. 19
Connecting to Regular Audio and Video Jacks .............................. 19
Connecting a Digital kudio System ......................................................... 20
Connecting to an Analog Amplifier .......................................................... 20
Installing Batteries in the Remote Control ................................................ 21
Chapter 3: Operation .................................... 22
Turning the TV On and Off ..................................................................... 22
Plug & Play Feature ................................................................................. 22
Viewing the Menus and On-Screen Displays ............................................ 25
Viewing the Menus ....................................................................... 25
Viewing the Display ...................................................................... 25
Selecting a Menu Language ...................................................................... 26
Selecting the Antenna Input .................................................................... 26
Memorizing the Channels ........................................................................ 27
Selecting the Video Signal Soun'e ................................................. 27
Storing Channels in Memory ........................................................ 28
Adding and Erasing Channels .................................................................. 30
Changing Channels ................................................................................. 31
Using the Channel Buttons ........................................................... 31
Using the Number Buttons ........................................................... 31
Using the -" Button in DTV mode ............................................... 31
Using the PRE-CH Button to Select the Previous Channel ............ 31
Labelling the Channels ............................................................................ 32
Picture Control ........................................................................................ 33
Using Automatic Picture Settings .................................................. 33
Customizing the Picture ............................................................... 34
Resetting the Picture Settings to the Factory Detauhs .................... 35
contintiM...
English- 6
CONTENTS I
Chapter 3: Operation .................................... 36
Sound (2ontrol ......................................................................................... 36
Adjusting the Volume ................................................................... 36
Using the MUTE Button ............................................................... 36
Using Automatic Sound Settings ................................................... 37
Custonfizing the Sound ................................................................ 38
Setting the Clock ..................................................................................... 39
Viewing an External Signal SOUl'Ce........................................................... 40
SetOng the Signal Soun'e .............................................................. 40
Assigning Names to External Input Mode ..................................... 41
Chapter 4: Special Features ......................... 42
Free Tuning (2hannels .................................................................... 42
Checking the Digital-Signal Strength ............................................. 43
Changing the Screen Size ........................................................................ 44
Digital Noise Reduction ........................................................................... 45
Tilt .......................................................................................................... 46
Using the R.Surf Feature .......................................................................... 47
Choosing a Multi-Channel Sound (MTS) track .............................. 48
Choosing a Multi-Channel Sound (MTS) track .............................. 49
Extra Sound Settings (auto Volume, Pseudo Stereo, or TLu'boPlus) ......... 50
SetOng the On/Off Timer ......................................................................... 51
SetOng the Pref('rred Opoon ......................................................... 52
Setting the Sleep Timer ............................................................................ 53
Viewing Closed Captions (On-Screen Text Message) ..................... 54
Viewing Closed Captions (On-Screen Text Message) ..................... 56
Setting the Blue Screen Mode .................................................................. 58
Setting the On/Off Melody ....................................................................... 59
Using the V-Chip ..................................................................................... 60
How to Enable/Disable the RaOng Controls .................................. 60
How to Change Your Password ..................................................... 61
How to Set up Restrictions Using the 'TV Parental Guidelines"... 62
How to Set up Restrictions using the Movie Ratings:
G, PG, PG-13, R, NC-17, X .......................................................... 63
Important Notes About Parental Locks ......................................... 64
How to Set up RestricOons Using Canadian English". ................ 65
How to Set up Restrictions Using Canadian French". .................. 66
Using the V-Chq_ for Digital channel ....................................................... 67
Chapter 5: Troubleshooting ......................... 6g
Identifying Problems ............................................................................... 69
Appendix ....................................................... 70
Cleaning and Maintaining Your TV.......................................................... 70
Using Your TV in Another Country ......................................................... 70
Specifications .......................................................................................... 70
English - 7
Your NEW TV
List of Features
Y\+ur TV is designed wRh the latest technolog}t This TV is a high-performance umt that
includes the following special features:
• Easy-to-use remote control
• Easy-to-use on-screen menu system
• Automatic timer to turn the TV on and off
• Ac!)ustable picture and sound settings that can be stored in the TV_ memory
° Automatic channel tuning %1"up to 181 channels
• A special filter to reduce or eliminate reception problems
° A built-in multi-channel sound decoder tot stereo and bilingual listening
• Built-in, dual channel speakers
° A special sleep timer
• V-Chip tunction
° Capable of receiving Analog and Digital TV broadcasts
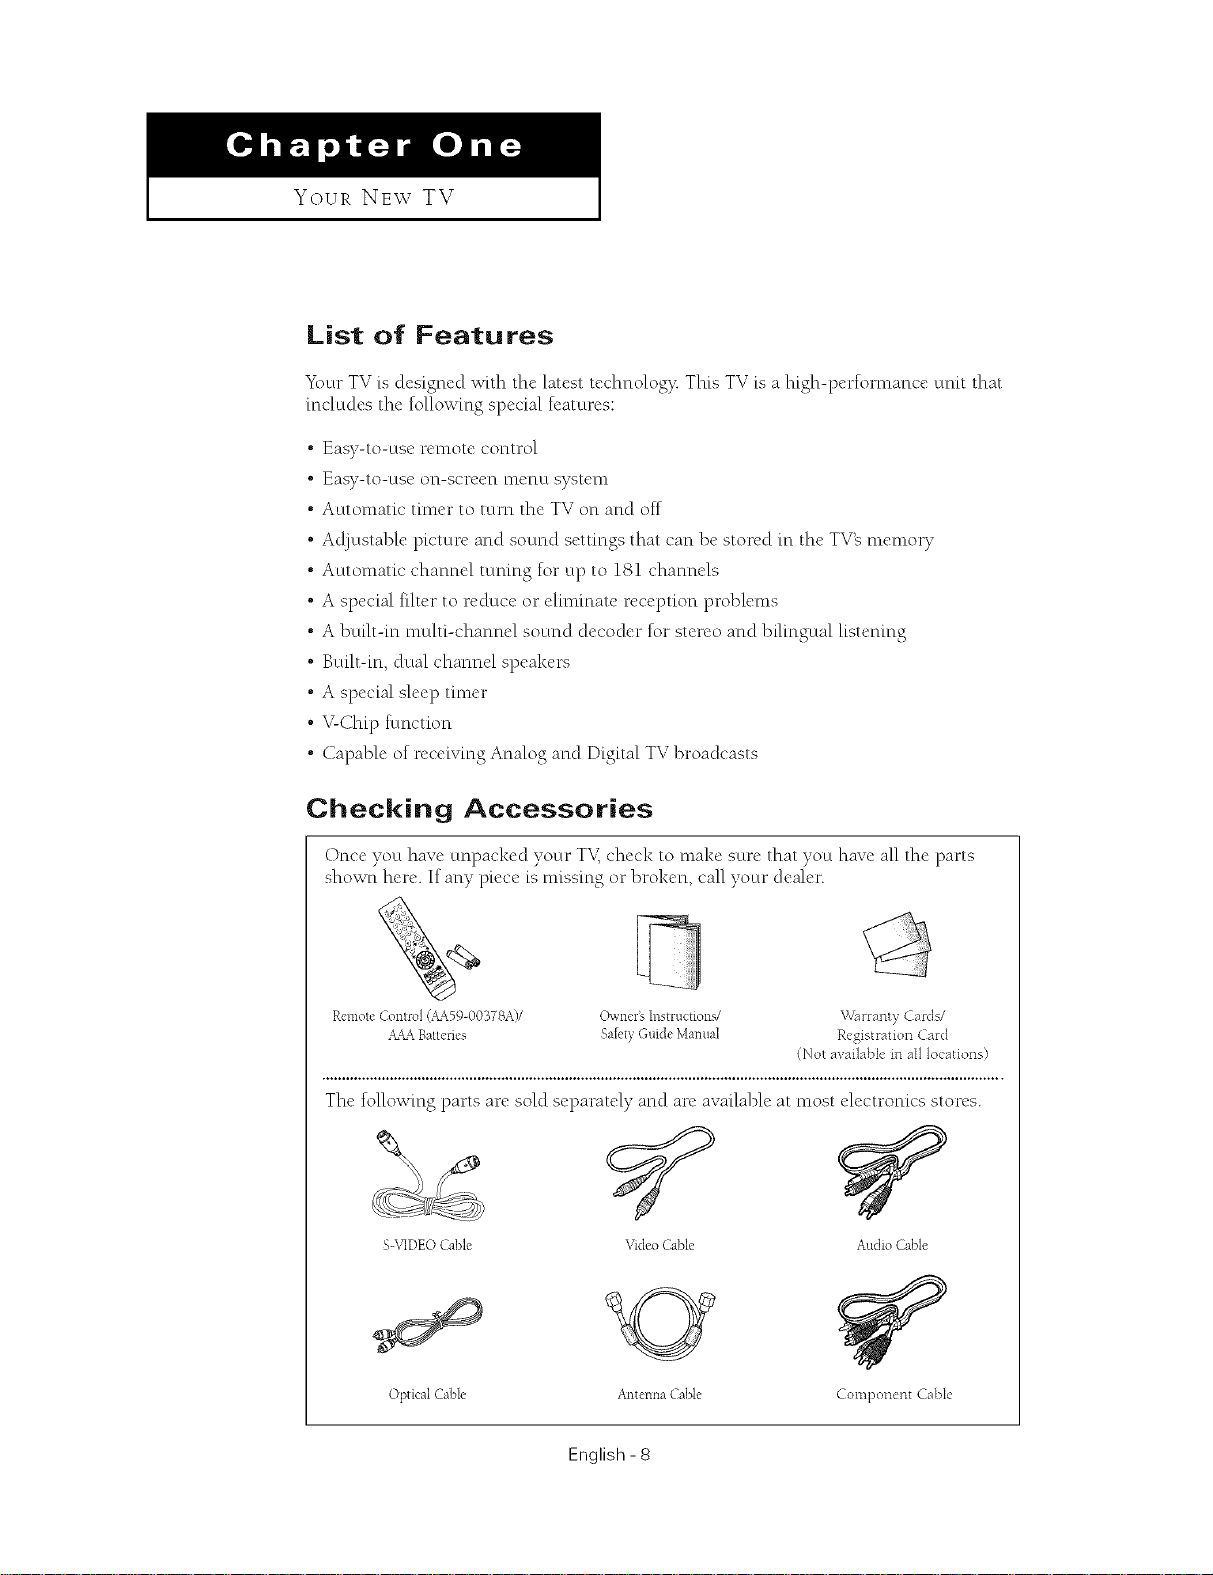
Checking Accessories
Once you have unpacked your TV,check to make sure that you have all the parts
shown here. If any piece is missing or broken, call your dealer.
Remote Control (+_59-00378A)/ Owners Instructions/
_&&_Battenes Sa[{,tyGuide Mamlal
The tollowing parts are sold separately and are available at most electronics stores.
S\qDEO Cable Video Cable Audio Cable
Warranty Cards/
Registration Car([
(Not avai]abIe in aI1locations)
Optical Cable Antenna Cable Component Cable
English- 8
Your NE\V TV I
Familiarizing Yourself with the TV
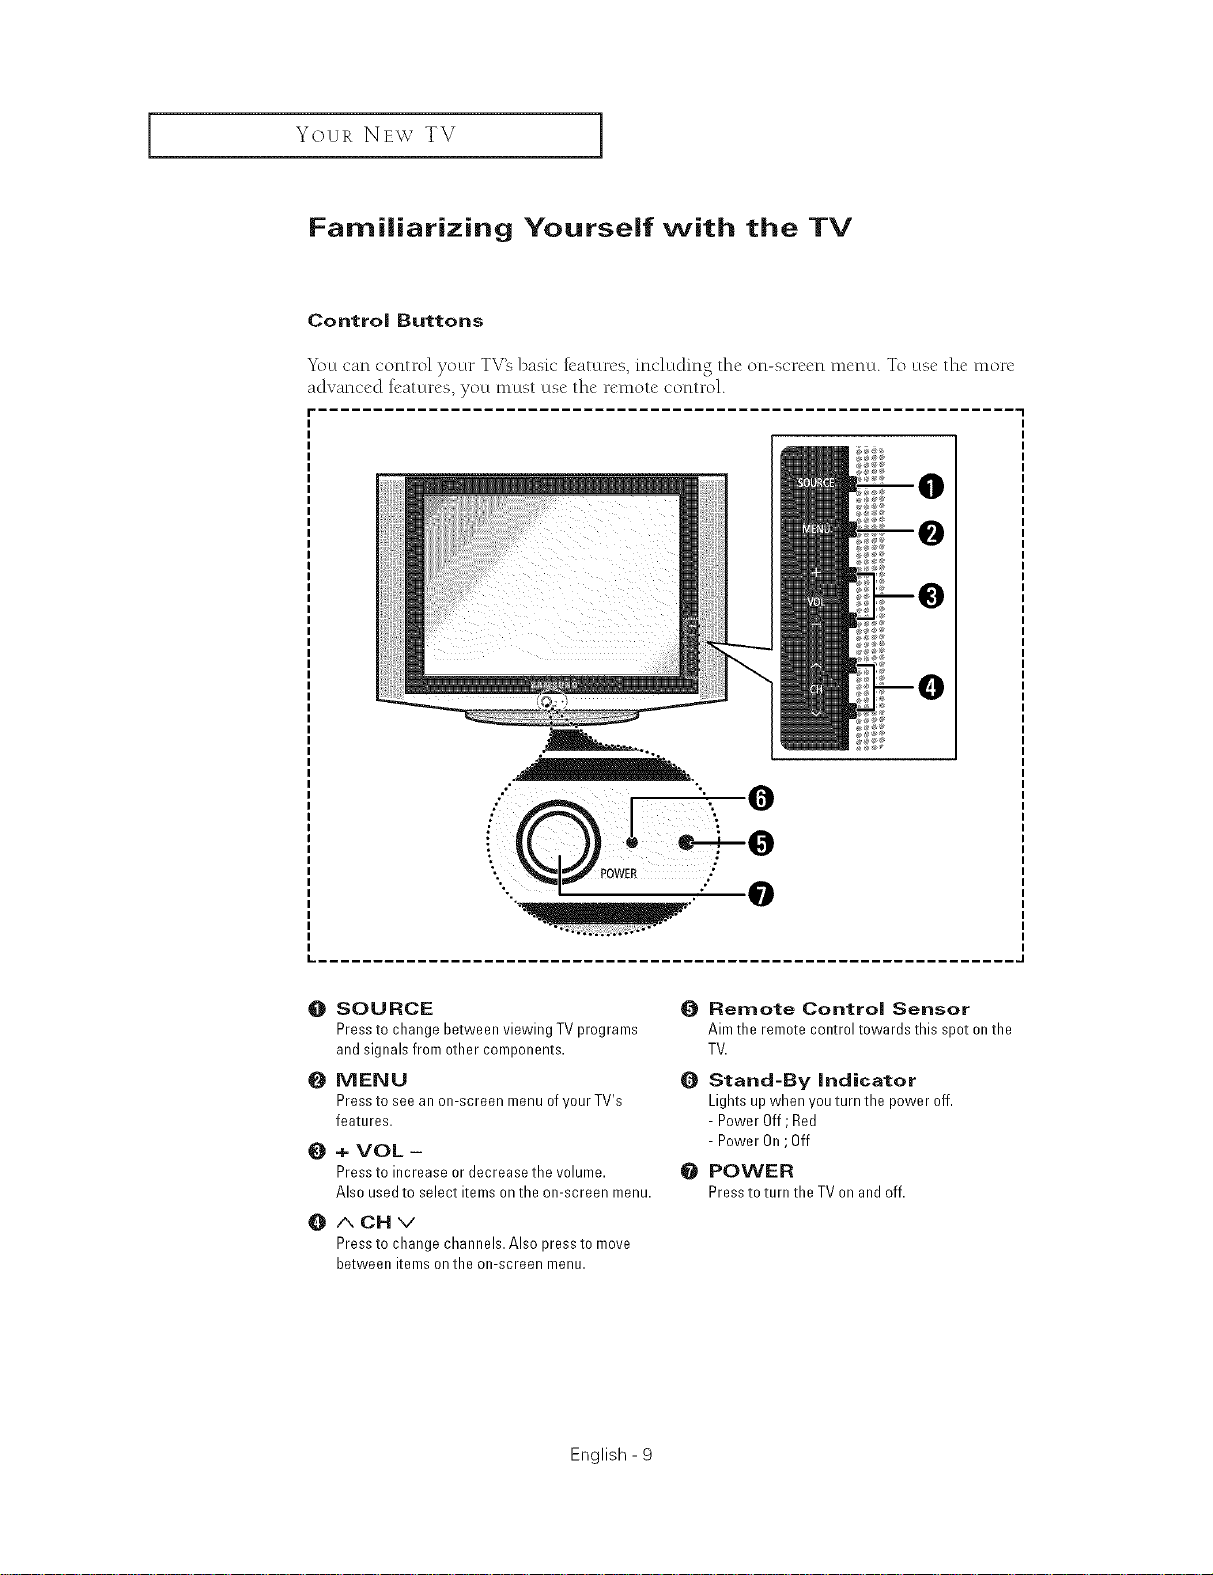
Control Buttons
_2)u can control your TV_ bask" k'aturcs, including thc on-scrccn mcnu. To use thc morc
advanced R'aturcs, you must usc thc rcmotc control.
f
O SOURCE
Pressto change between viewing TV programs
and signals from other components.
O MENU
Pressto see an on-screen menu ofyourTV's
features.
+ VOL -
0
Pressto increase or decrease the volume.
Also used to select itemson the on-screen menu.
O
ACHv
Pressto change channels. Also press to move
between items onthe on-screen menu.
English - 9
Remote Control Sensor
Aim the remote control towards this spot on the
TV.
Stand-By indicator
Lights upwhen you turn the power off.
- Power Off; Red
- Power On;Off
e POWER
Pressto turn the TV on and off.
Your NEw TV ]
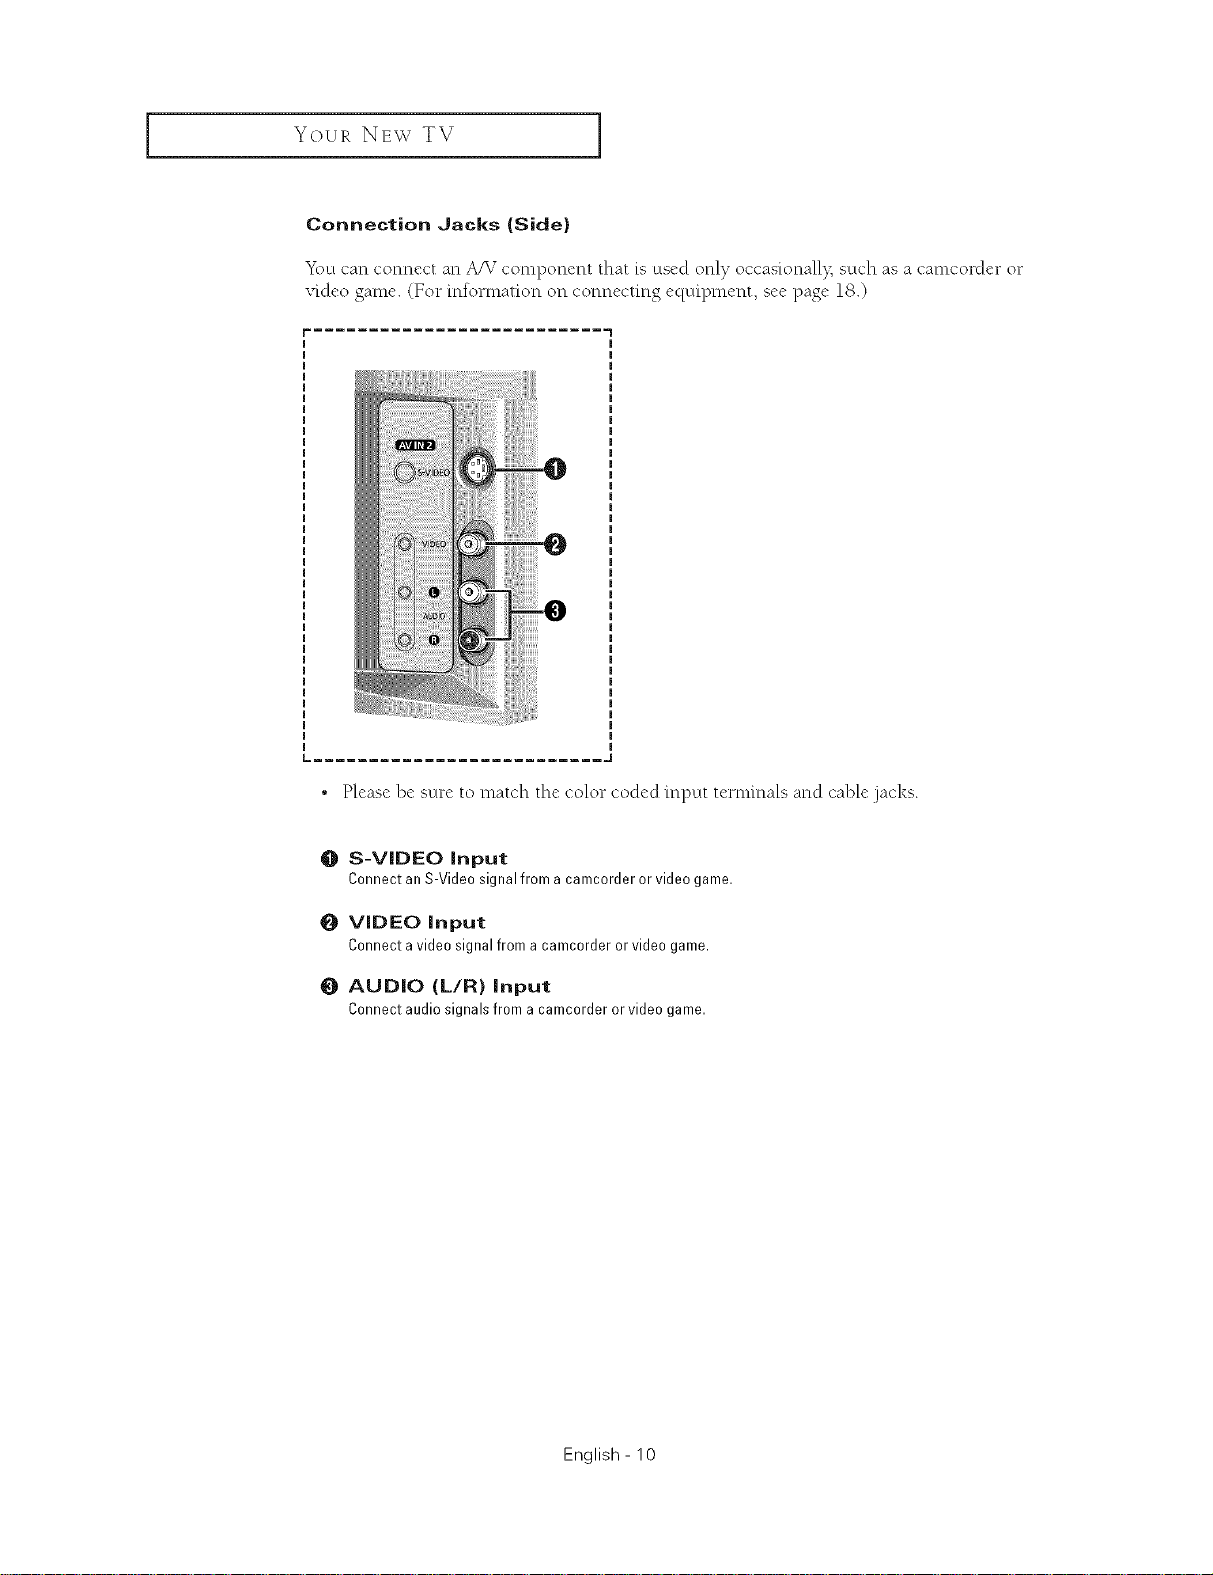
Connection Jacks (Side)
_\_u can connect an A/V component that is used only occas[onall% such as a camcorder or
video game. (For information on connecting equipment, see page 18.)
[= .......................... ,,J
, Please be sure to match the color coded input terminals and cable .jacks.
O S-VIDEO Input
Connect an S-Video signal from a camcorder or video game.
O VIDEO Input
Connect a video signal from a camcorder or video game.
0 AUDIO (L/R} Input
Connectaudiosignalsfroma camcorderorvideogame.
English - 10
Your NEW TV I
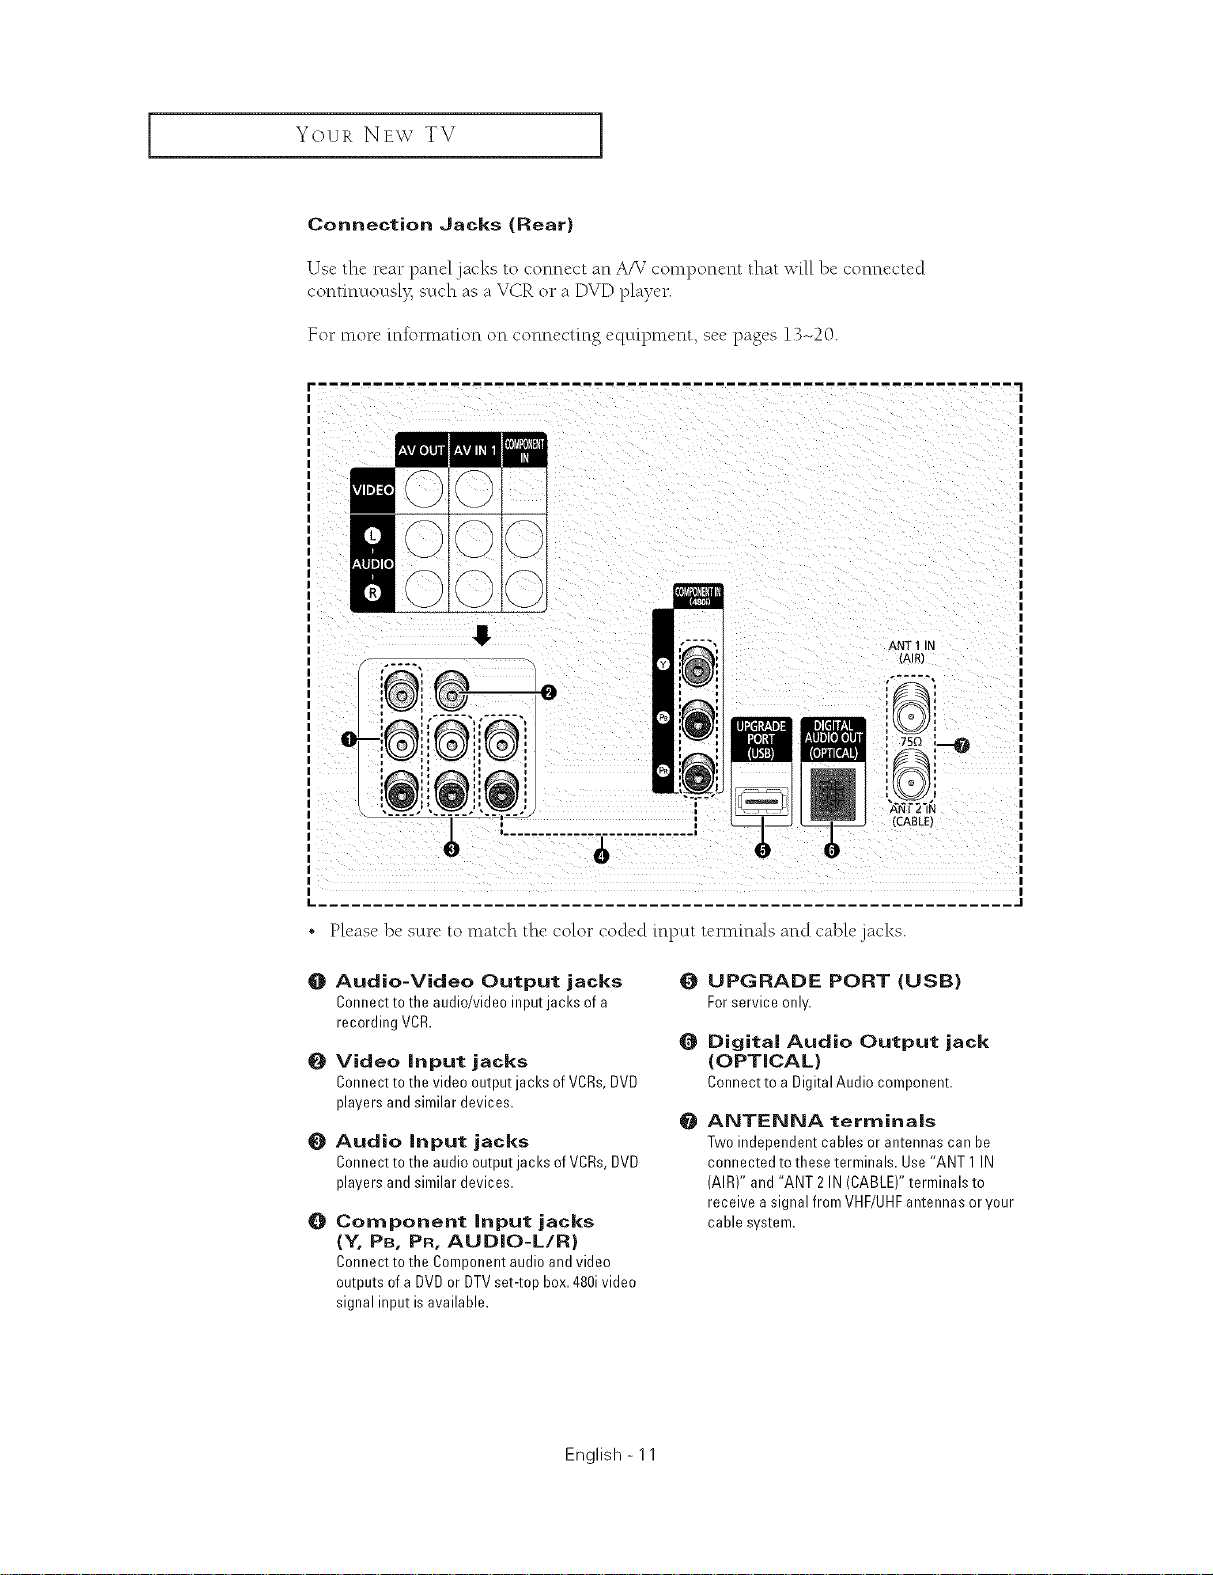
Connection Jacks (Rear)
Us("the rear panel jacks to connect an A_ 7component that will be connectcd
continuousl> such as a VCR or a DVD player.
For more information on connecting equipment, see pages 13-20.
0
ANT 1 IN
{AIR)
I 1
i
i
i
, I
i ........................... i
f
• Please be sure to match the color coded input te*-mmals and cable.jacks.
O
Audio-Video Output jacks
Connect to the audio/video input jacks of a
recording VCR.
O
Video input jacks
Connect to the video output jacks of VCRs,DVD
players and similar devices.
O
Audio input jacks
Connect to the audio output jacks of VCRs,DVD
players and similar devices.
O
Component input jacks
(Y, PB, PR, AUDIO-L/R)
Connect to the Component audio and video
outputs ofa DVD or DTVset-top box. 480ivideo
signal input isavailable.
O
UPGRADE PORT (USB)
Forserviceonly.
Q
Digital Audio Output jack
(OPTICAL)
Connectto aDigitalAudiocomponent.
ANTENNA terminals
@
Two independent cables or antennas can be
connected to these terminals. Use"ANT 1IN
(AIR)" and "ANT 2 IN (CABLE)" terminals to
receive a signal from VHF/UHFantennas or your
cable system.
{CABLE}
English - 11
Your NEw TV ]
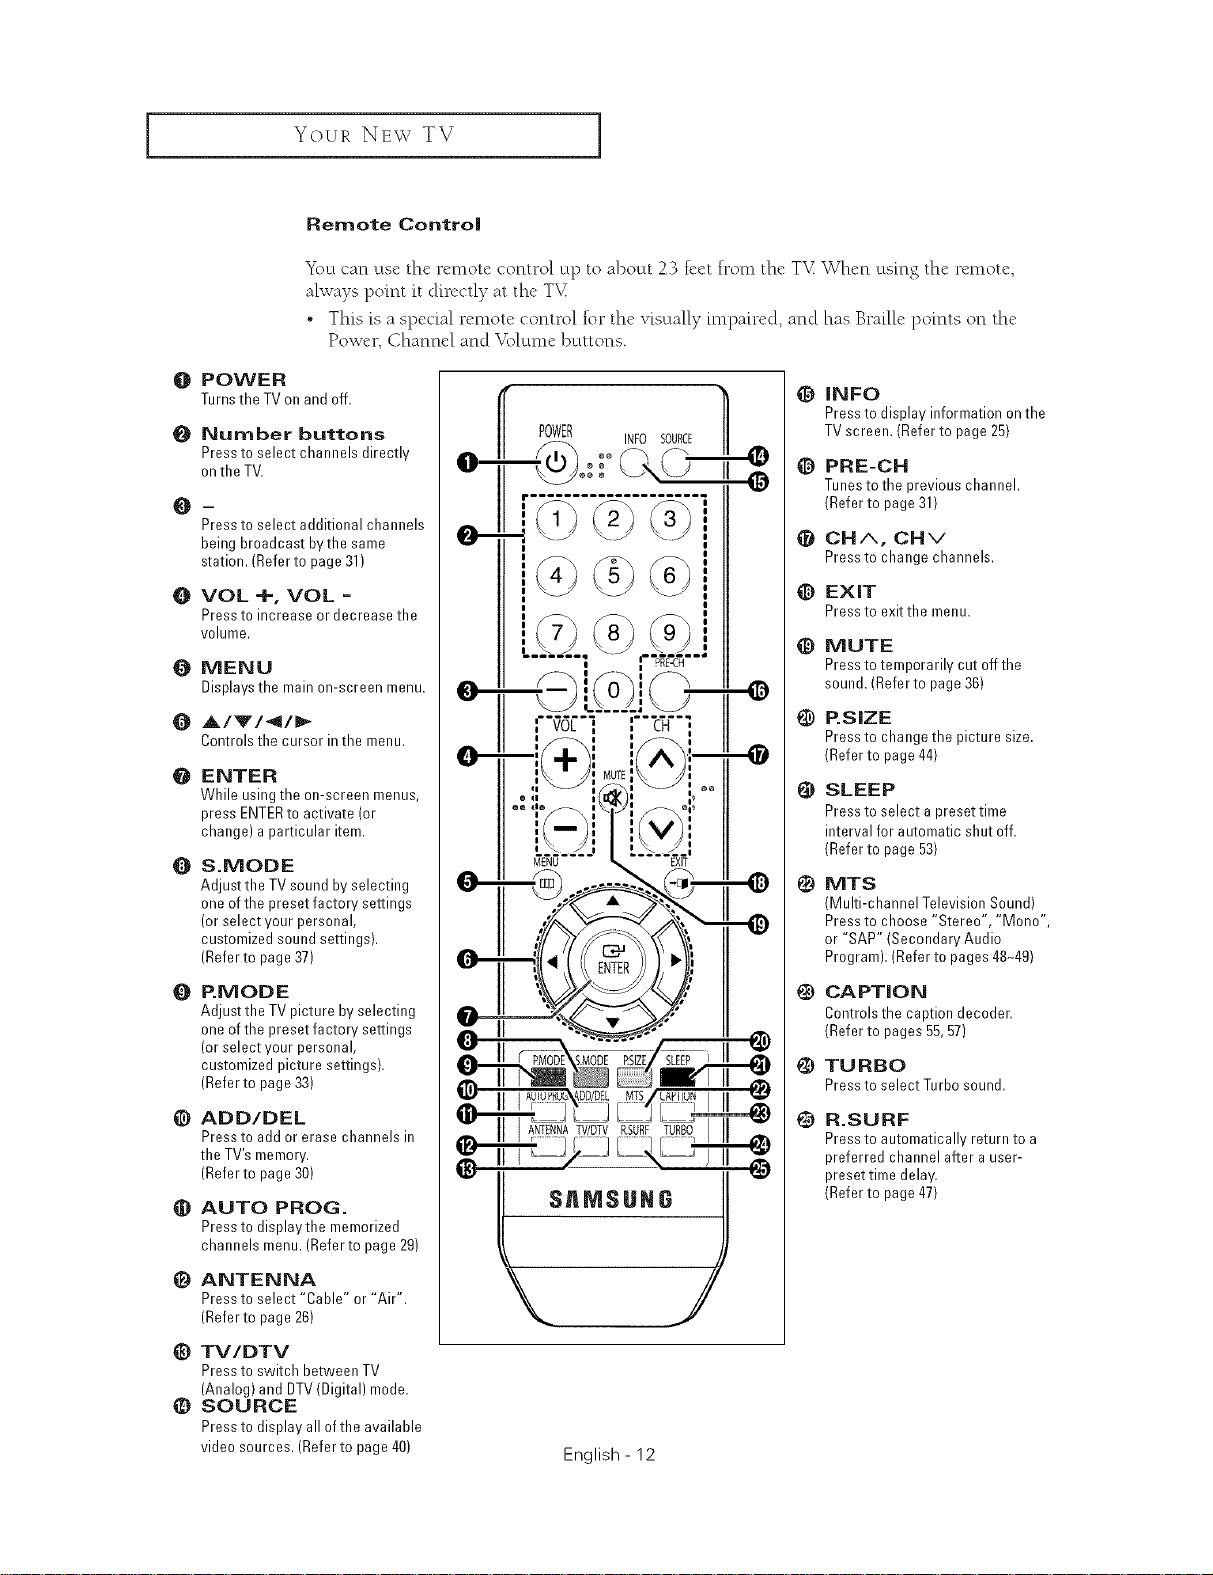
Remote Control
_\_ctcan use the remote control up to about 23 feet from the T_£When using the remote,
always point it directly at the TX£
• This is a special remote control for the visually impaired, and has Braille points on the
Power, Channel and V{>lun,ebuttons.
O POWER
TurnstheTVon andoff.
{} Number buttons
Pressto select channels directly
on the TV.
m
Pressto select additional channels
being broadcast bvthe same
station. (Referto page31)
O VOL+,VOL=
Pressto increase or decrease the
volume.
O MENU
Displays the main on-screen menu.
{) A/'V'/4/_
Controlsthe cursorinthe menu.
ENTER
@
While using the on-screen menus,
press ENTERto activate (or
change) a particular item.
&MODE
O
Adjust the TV sound by selecting
one of the preset factory settings
(or select your personal,
customized sound settings).
(Refer to page 37)
EMODE
O
Adjust the TV picture by selecting
one of the preset factory settings
(or select your personal,
customized picture settings).
(Refer to page 33)
@ ADD/DEL
Pressto add or erase channels in
the TV'smemory.
(Refer to page 30)
_) AUTO PROG.
Pressto displaythe memorized
channels menu. (Referto page 29)
ANTENNA
e
Pressto select "Cable" or "Air".
(Refer to page 26)
_) TV/DTV
Pressto switch between TV
(Analog} and DTV (Digital) mode.
_) SOURCE
Pressto display all of the available
video sources. (Referto page 40)
POWER _ INF0 SOURCE
-@o:: II
English - 12
_]) INFO
Pressto display information onthe
TVscreen. (Refer to page 25)
@ PRE-CH
Tunesto the previous channeh
(Refer to page 31)
CHA, CHv
Pressto change channels.
_) EXIT
Pressto exit the menu.
_) MUTE
Pressto temporarily cut off the
sound. (Refer to page 36)
P.SIZE
G
Pressto change the picture size.
(Refer to page 44)
SLEEP
@
Pressto select a preset time
interval for automatic shut off.
(Refer to page 53)
MTS
@
(Multi-channel Television Sound)
Pressto choose "Stereo", "Mono",
or "SAP" (Secondary Audio
Program). (Refer to pages 48q9)
CAPTION
@
Controls the caption decoder.
(Refer to pages 55,57)
TURBO
PresstoselectTurbosound.
R.SURF
@
Pressto automatically return to a
preferred channel after auser-
preset time delay.
(Refer to page 47)

INSTALLATION
Connecting VHF and UHF Antennas
If your antenna has a set of leads that look like this,
see Antennas with 300-ohm Flat "FwmLeads"
below.
If your antenna has one lead that looks like this,
see 'Antennas with 7%ohm Round Leads" on page
14.
If you have two antennas, see Separate VHF and
UHF Antennas" on page 14.
Antennas with 300-ohm Fiat Twin Leads
If you are using an oil-air antenna (such as a roof antenna or rabblt ears") that has
300-ohm twin fiat leads, follow the directions belov<
1
Placethe wires from the
twin leads under tne screws
onfl-e 300-75oha- aaau_er
mot supplied). Use a
screwdriver to tighten the
screws.
2
Plugthe adapter into the
"ANT I IN (AIR}" terminal on
the rear eaneL
ANT 1 IN
(AIR)
English - 13
INSTALLATION ]
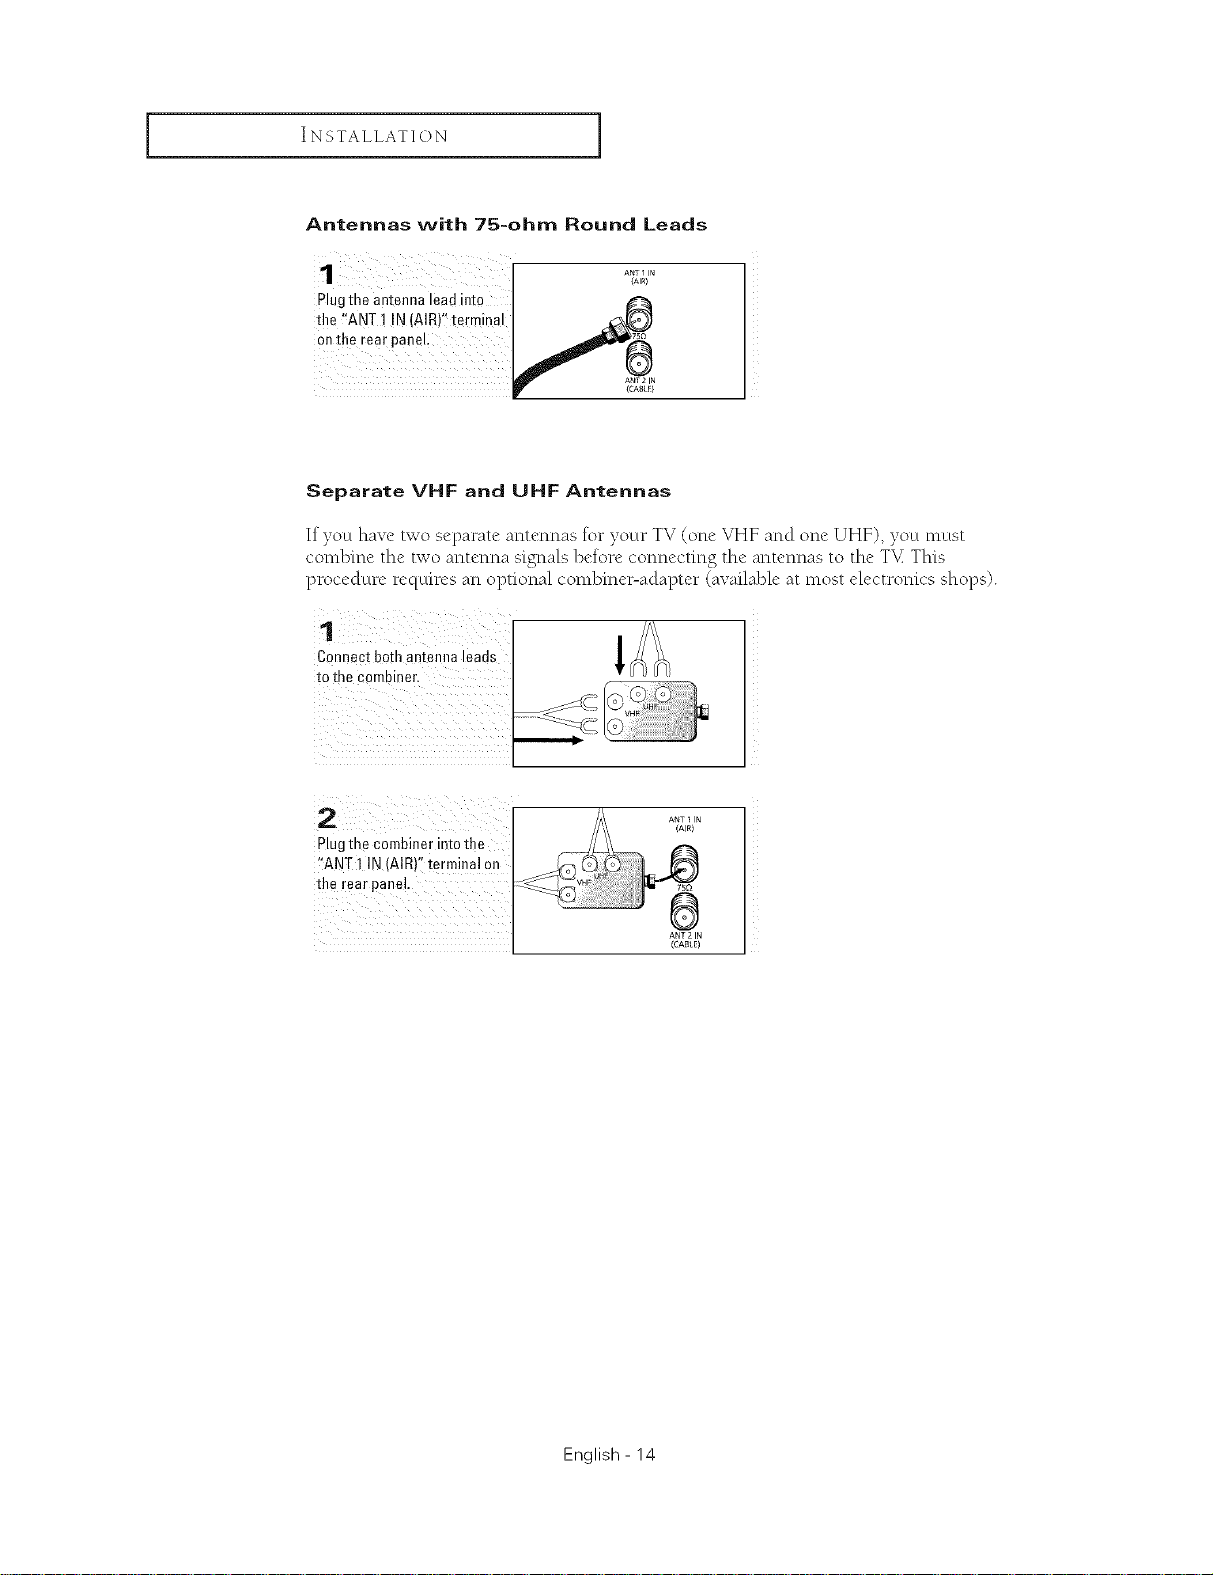
Antennas with 75-ohm Round Leads
1 A/'Z,a_'N ]
Plugthe antenna lead into
the I"ANT ! !N (AIR)'I terminal
on the rear panel
1
(CABLQ
Separate VHF and UHF Antennas
If you have two separate antennas for your TV (one VHF and one UHF), you must
combine the two antenna signals before connecting the antennas to the T_ This
procedure requires an optional combine>adapter (available at most electronics shops).
Connect both antenna leads
to the combiner.
2
Plugthe Combiner into the
"ANT I IN (AIR}Ifterminal on
the rear #aneL
ANT 2 IN
(CASLn
English - 14
INSTALLATION [
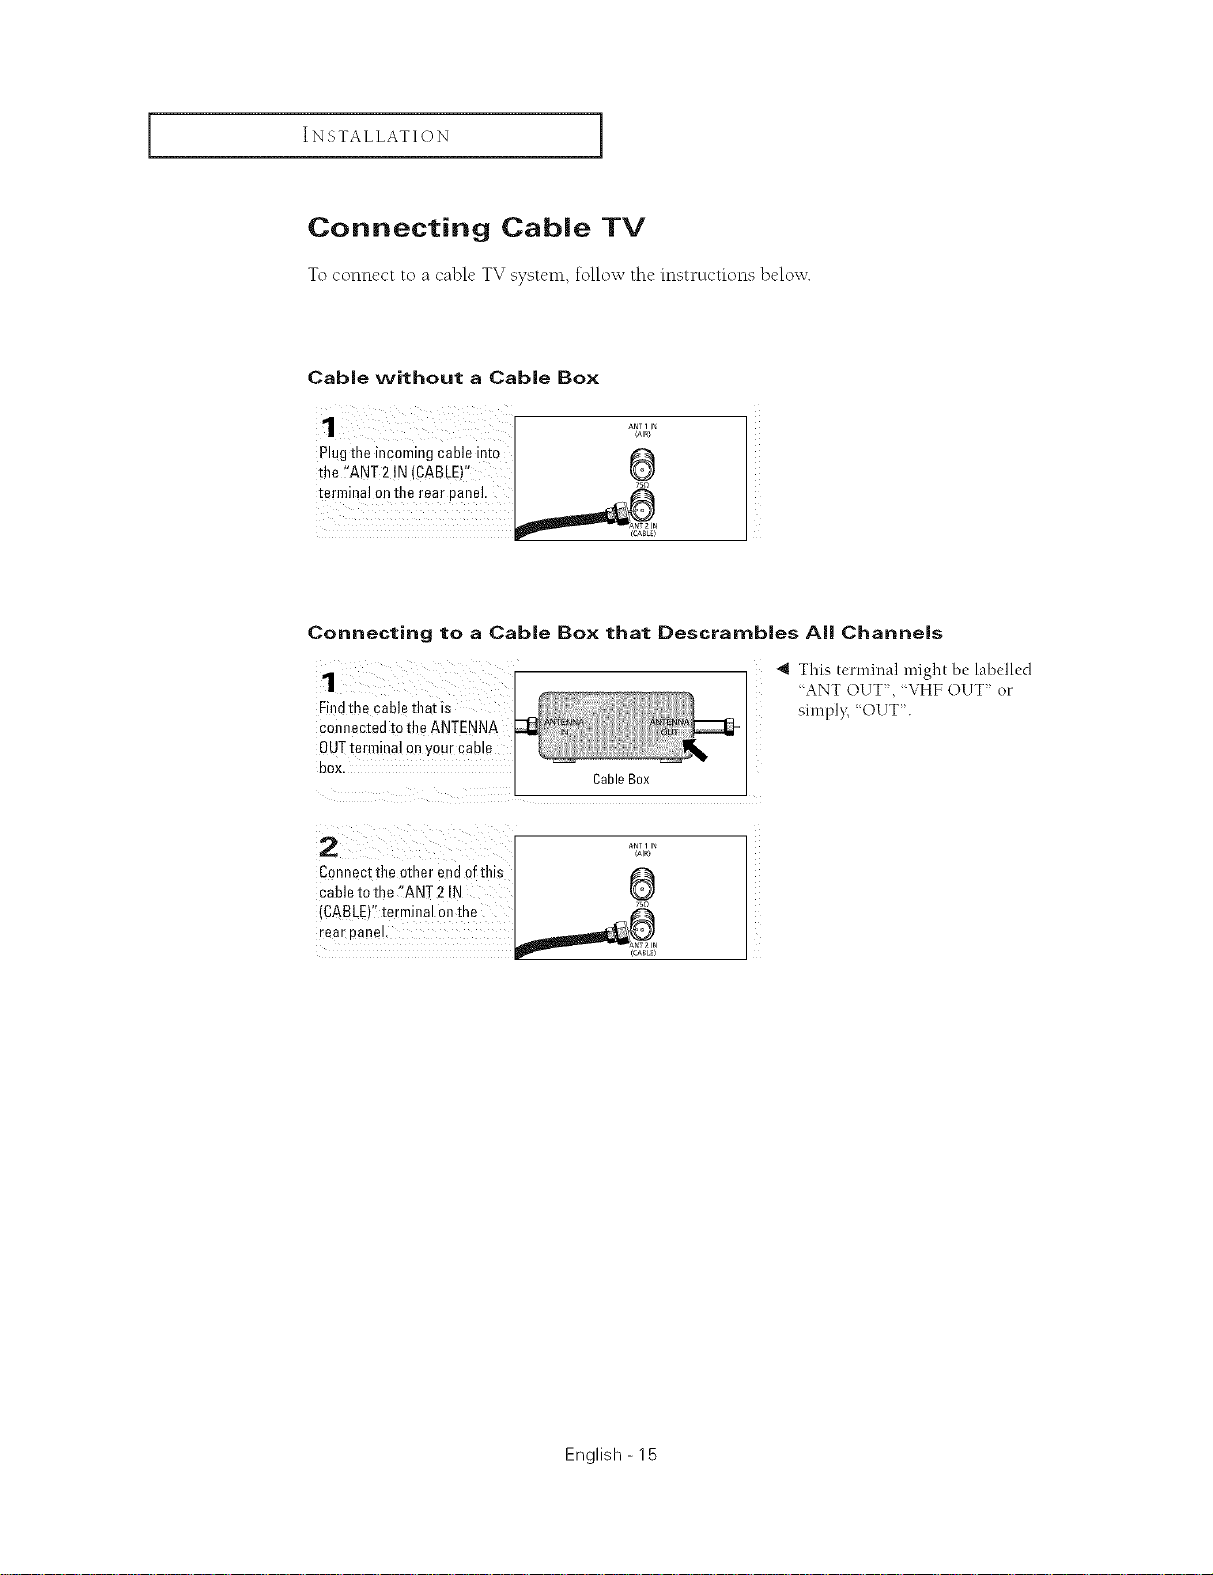
Connecting Cable TV
To connect to a cable TV system, follow thc instructions below.
Cable without a Cable Box
Plug the incoming cable into
the _!ANT2!N (CABLE)"
terminal onthe rear panel,
Connecting to a Cable Box that Descramb|es Alll Channels
1
Findthe cabl_ that is
connected to the ANTENNA
0UTterminal or your came
BOX
Connect the other end ofthis
cable to the "ANT 2 IN
{CABLE)" [ermmal on me _°
rear eanel. _1_1_1_ _
Cable Box
_MI
4 This terminal might be labelled
"ANT OUT", 'VHF ()(.IT" or
simply, 'OUT.
English - 15
INSTALLATION ]
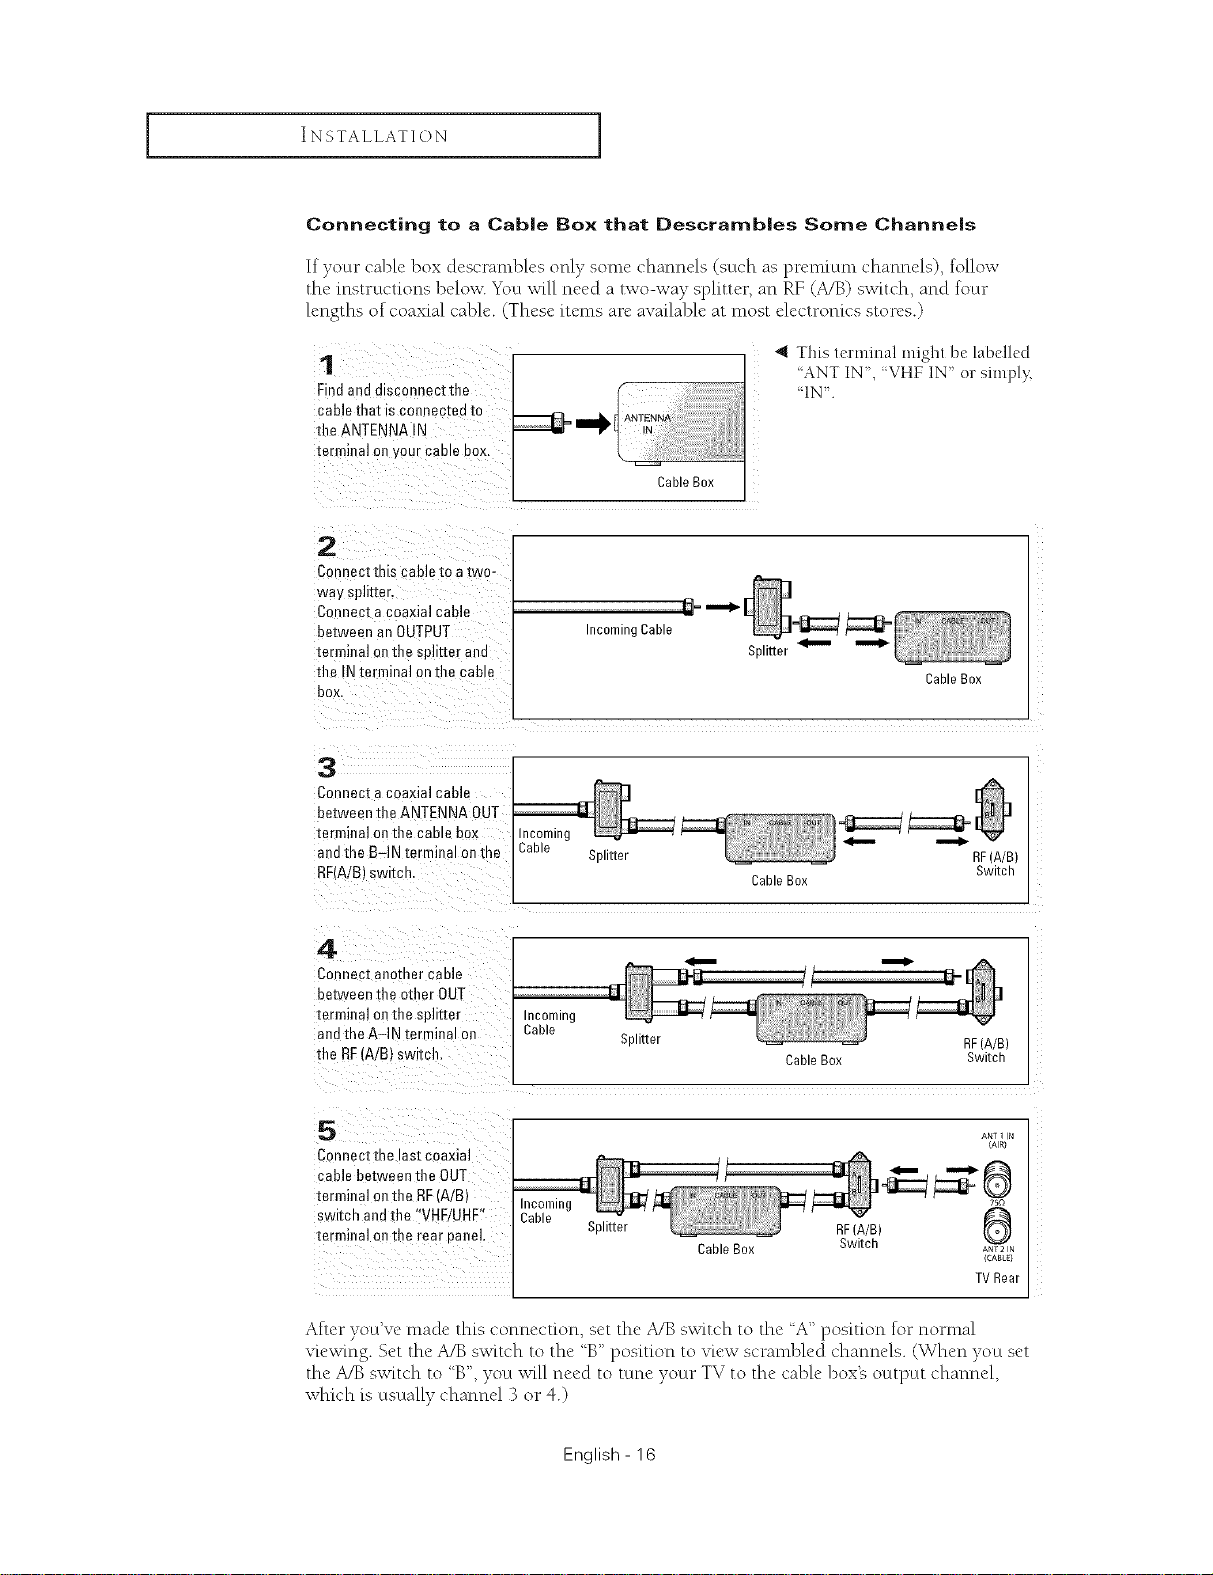
Connecting to a Cab|e Box that Descramb|es Some Channels
If your cable box descrambles only some channels (such as premium channels), follow
the instructions below. You will need a two-way splitter, an RF (A/B) switch, and four
lengths of coaxial cable. (These items are available at most electronics stores.)
1
Findand disconnectthe
cable that is connec_ea to
the ANTENNA IN
terminal on your came BOX.
2
Connect this cable to a two-
way splitter.
Connect acoaxial cable
between an OUTPUT
terminal onthe splitter and
the INterminal on the cable
box
3
Connect acoaxial cable
between the ANTENNA OUT
terminal ontbe cable box
anethe B-IN tE"minal onthe
RRA!B) ewltcn.
_1_ ANTENNA
;able
,N
Incoming Cable
Splitter
CableBox
4 This terminal might be labelled
'ANT IN,'VHF1N orsimply,
'IN.
Splitter
Cable Box
,,_
Cable Box
RF(A/B)
Switch
4
Connec] aeomer cable
be.tweenthe other OUT
terminal onthe el: tter
andthe A-IN terminal oe
the RF(A/B} sw tch.
ConnectthE ast coaxial
cable between the OUT
terminal onthe RF'A/B} incoming
switch andthe 'VHF/UHF" Cable
terminal onthe rear panel Splitter RF(A/B)
After you've made this connection, set the A/B switch to the A" position lotnomml
viewing. Set the A/B switch to the 'B" position to view scrambled channels. (When you set
the A/B switch to 'B", you will need to tune your TV to the cable box% octtput channel,
which is usually channel 3 or 4.)
incoming
Cable
Splitter
English - 16
Cable Box Switch
CableBox Switch A_2N
RF(A/B)
ANT 1 N
(CABLe}
TVRear
INSTALLATION [
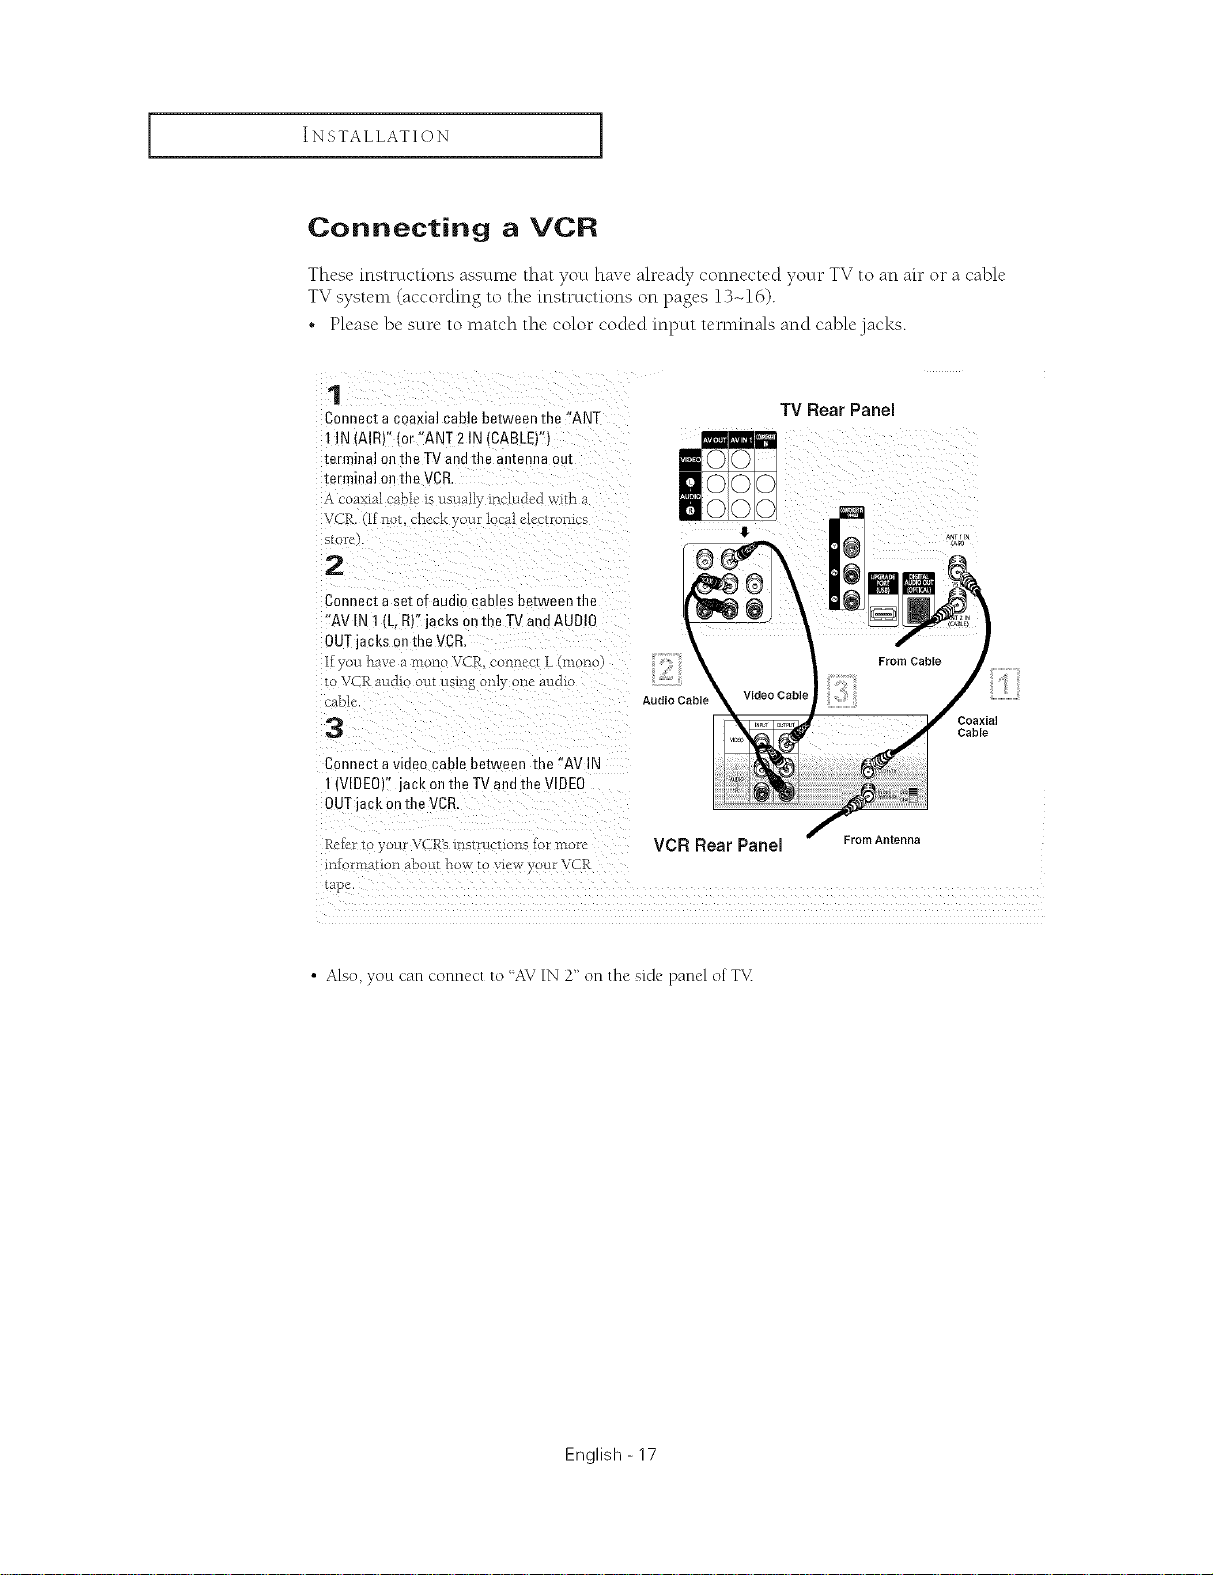
Connecting a VCR
These instructions assume that you have already connected your TV to an ah" or a cable
TV system (according to the instructions on pages 13-16).
• Please be sure to match the color coded input tet-minals and cable jacks.
1
Connect a coaxial cable between the "ANT
1IN (AIRV lor "ANT 2 IN (CABLE)")
terminal ell the TV and the antenna out
terminal on the VCR
,_ _oa>ual cable' is usually inc-lu&,d wid_
V( R [1 llot, cl_eckyour I cai ele 2[foillus
s[ofo
TV Rear Panel
2
Connect a set of audm cames between the
"AV IN t (L. R)"jacks on the T_/and AUDIO
OUTjacks on the VCR.
fyou haw, a molto VCR. col_nc,ct L (mono
1oVCR attdio out using only one audk
-able
Audio Cable
From Cable
3
Connect a video cable between the "AV IN
I {VIDEO)" jack on the TVand the VIDEO
OUTjack on the VCR,
Rcler t your VCR'< lns/ruclLons 1or i',aore VCR Rear Panel FromAntenna
i*_f rmafion abou_ how m wew, our VCR
lap_,
Coaxia
Cable
• Also, yoLtcan connect to "AV IN 2" on the side panel of T_<
English - 17
INSTALLATION ]
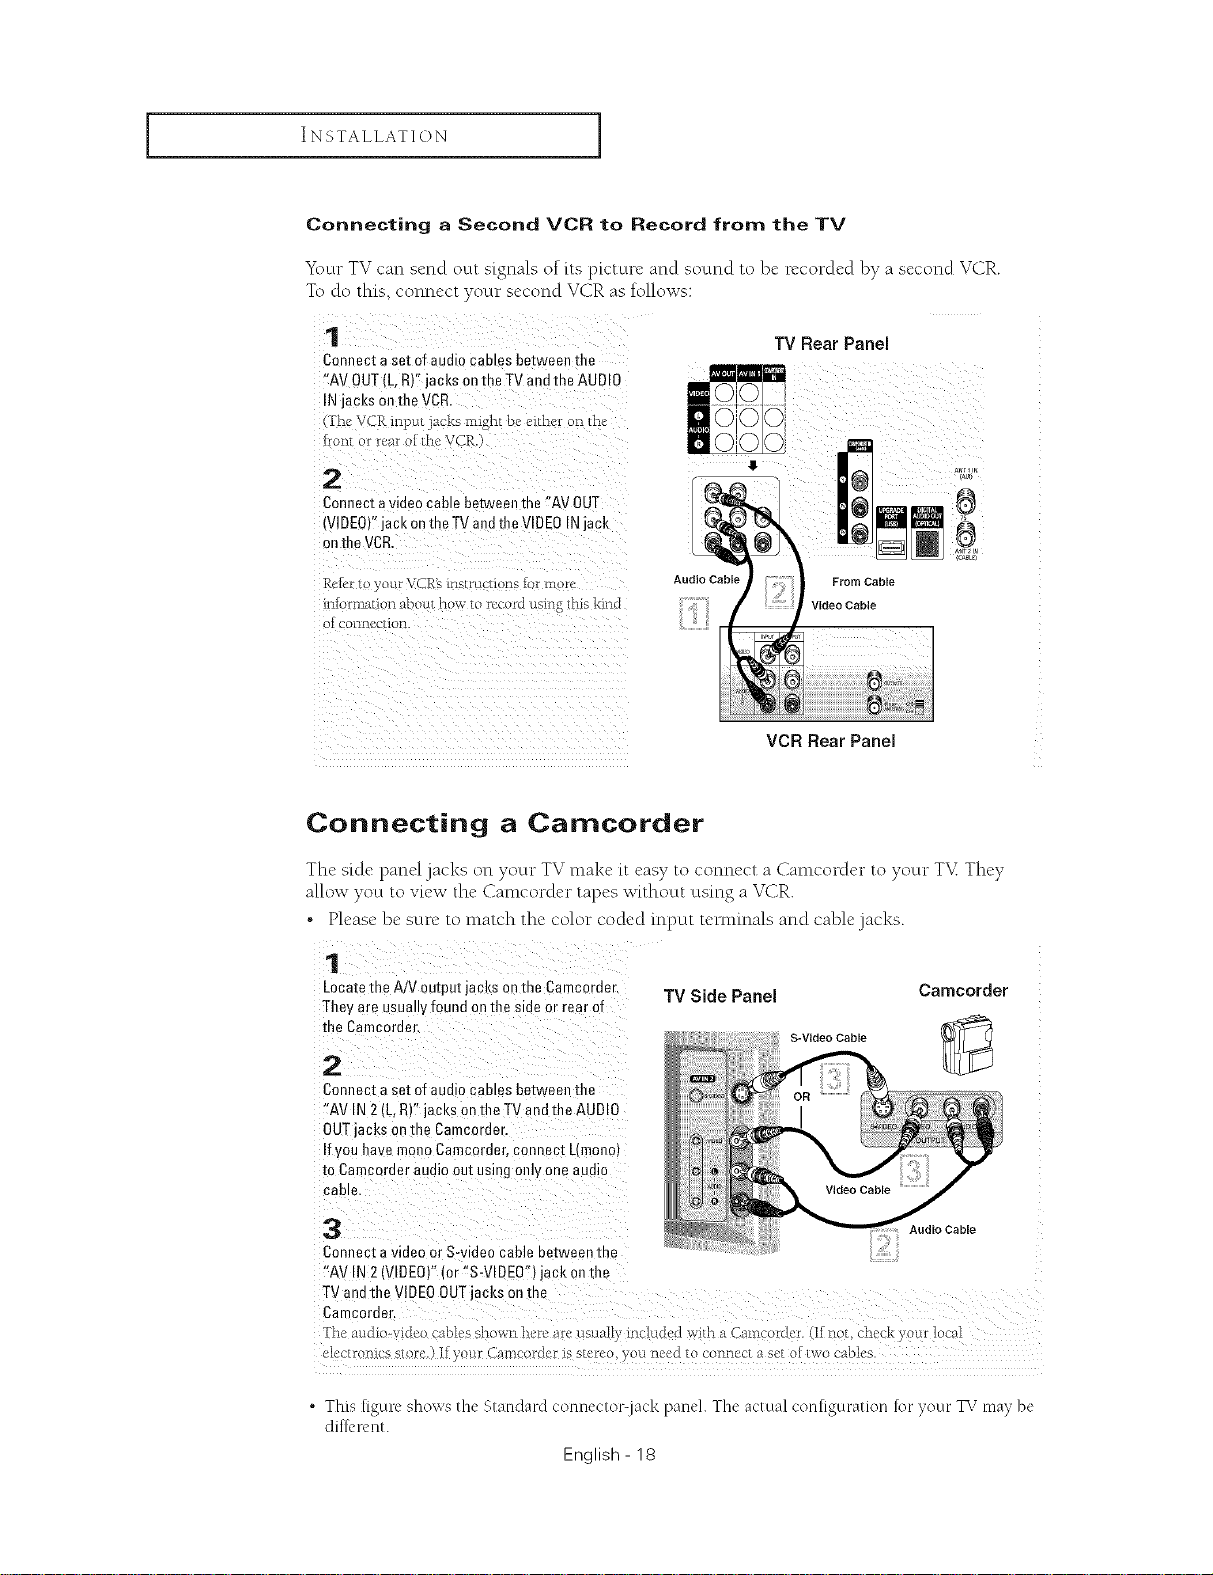
Connecting a Second VCR to Record from the TV
Y\ ur T_ can send octt signals of its picture and sound to be recorded by a second VCR.
7
To do this, connect your second VCR as follows:
1
Connect aset of audio cames between the
"AV OUT(L,R)" jacks onthe TV and the AUDIO
IN jacks onthe VCR.
The VCR inpu_ a ks might be, c.ither on t[_"
front or rear ot 1he Vale
2
Connect a video cable betwee" the "AV OUT
(VIDEO)"jack on the TV andthe VIDEO INjack
onthe VCR
Rel_,rto your VCR'sinstru uons 1ormoru
iniormati_n about how to record usil_g this kind
OI COI_[]CU/IOll.
Fr
Audio Cable
TV Rear Panel
ii
Video Cable
VCR Rear Panel
From Cable
a_, i la
8
aN_
,C_LE
Connecting a Camcorder
The"skle panel jacks on your TV make {teasy to connect a Camcorder to your T%%They
allow you to view the Camcorder tapes without using a VCR.
• Please be sure to match the color coded input tet-minals and cable jacks.
Locatethe AiV output jacks on the Camcordec
They are usually found on the side or rear of
Connect aset of audio cables between the
"AV IN 2(L,R)" jacks ontile TV endthe AUD!O
OUTjacks o0the Camcerder.
If you have men0 Camcorder, connect L(mono)
to Camcerder audio outusing only one audio
Cable.
Connect a video or S-video cable between the
"AV IN 2(VIDEO)" (or %-VlDEW) jack onthe
electronl{e store.) !.Fyour Cameorder is stereo, )ou need to connect a set or two cables.
• This [igure shows the Standard connector lack paneh The actual con[iguration rot your TV ma) be
dil:l_'renl.
English - 18
TV Side Panel
S-Video Cable
Camoorder
Audio Cable
INSTALLATION [
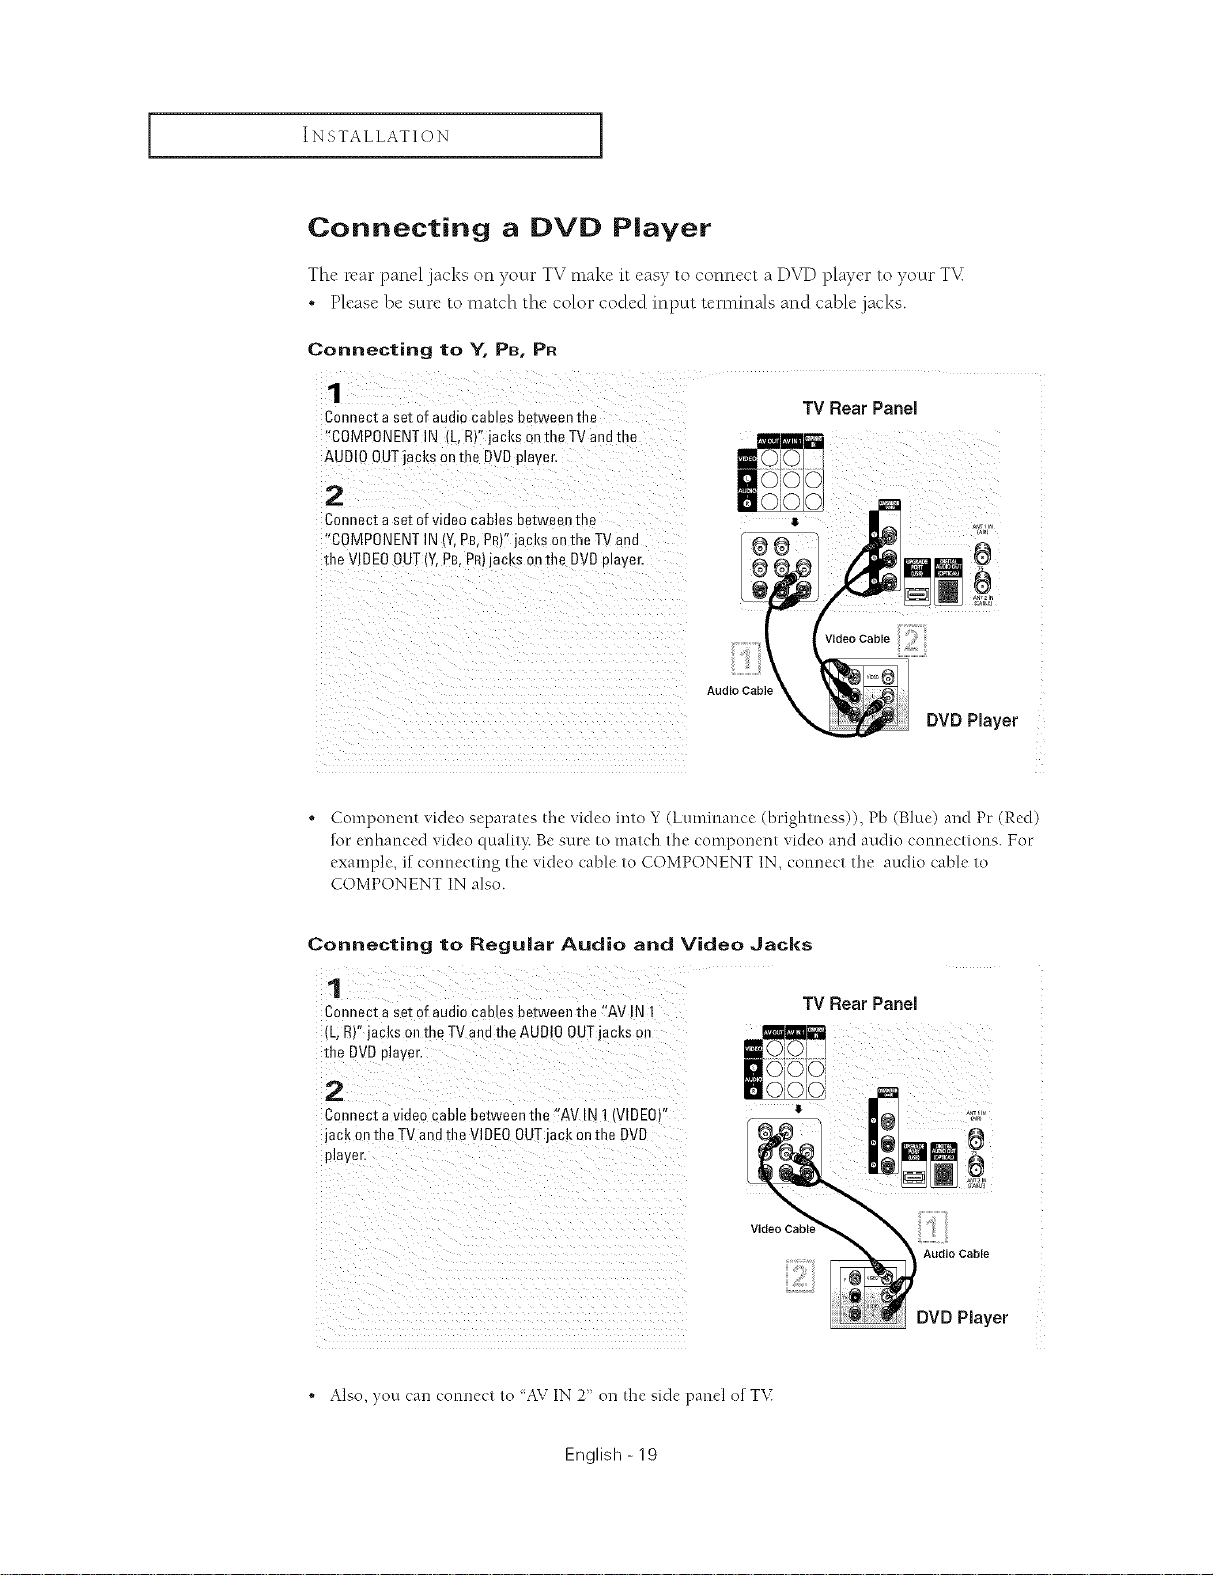
Connecting a DVD Player
The rear panel jacks on your TV make it easy to connect a D_vq)player to your T_<
• Please be sure to match the color coded input terminals and cable .jacks.
Connecting to Y, PB, PR
1
Connectaset of audiocablesbetweenthe
"COMPONENTIN (L,R)"jacksonthe TVandthe
AUDIOOUTjacksonme DVDplayer,
TV Rear Panel
2
Connectaset ofvideocanes betweenme
"COMPONENTIN IY.P£,PR'"jacksonthe TVand
the VIDEOOUT(Y,PB,PR)jacksonthe E)VDplayer,
V,de0CableCi
Audio CabR
DVD Player
. Component video separates the video into Y (Luminance (bdghmess)), Pb (Blue) and Pc (Red)
fur enhanced video quali_}: Be sure to match the component video and audio connections. For
example, if connecting the video cable to COMPONENT IN, connect It_e audio cable to
COMPONENT IN also.
Connecting to Regular Audio and Video Jacks
Connect a set of audio cables between the eAV !N 1
(L;R)" jacks 0nthe TV andthe AUD!O OUT acks on
the DVD player,
Connect a video cable between the !!AVIN 1 (VIDEO)"
jack on the TV and file V!DEOOUTjack on the DVD
_ _i i ii_ ii_i_i_iiii_i_i_i_i_i_i_i_i_i_i_i_i_i_i_i_i_
1711ii i iili _ _ ___ _ _ __ _ _ ___ _ _ ___ _ _ __
• Also, you can connect to 'AV IN 2' on the side panel of T\(
English - 19
Video CabLe
TV Rear Panel
Audio Cable
DVD Player
INSTALLATION ]
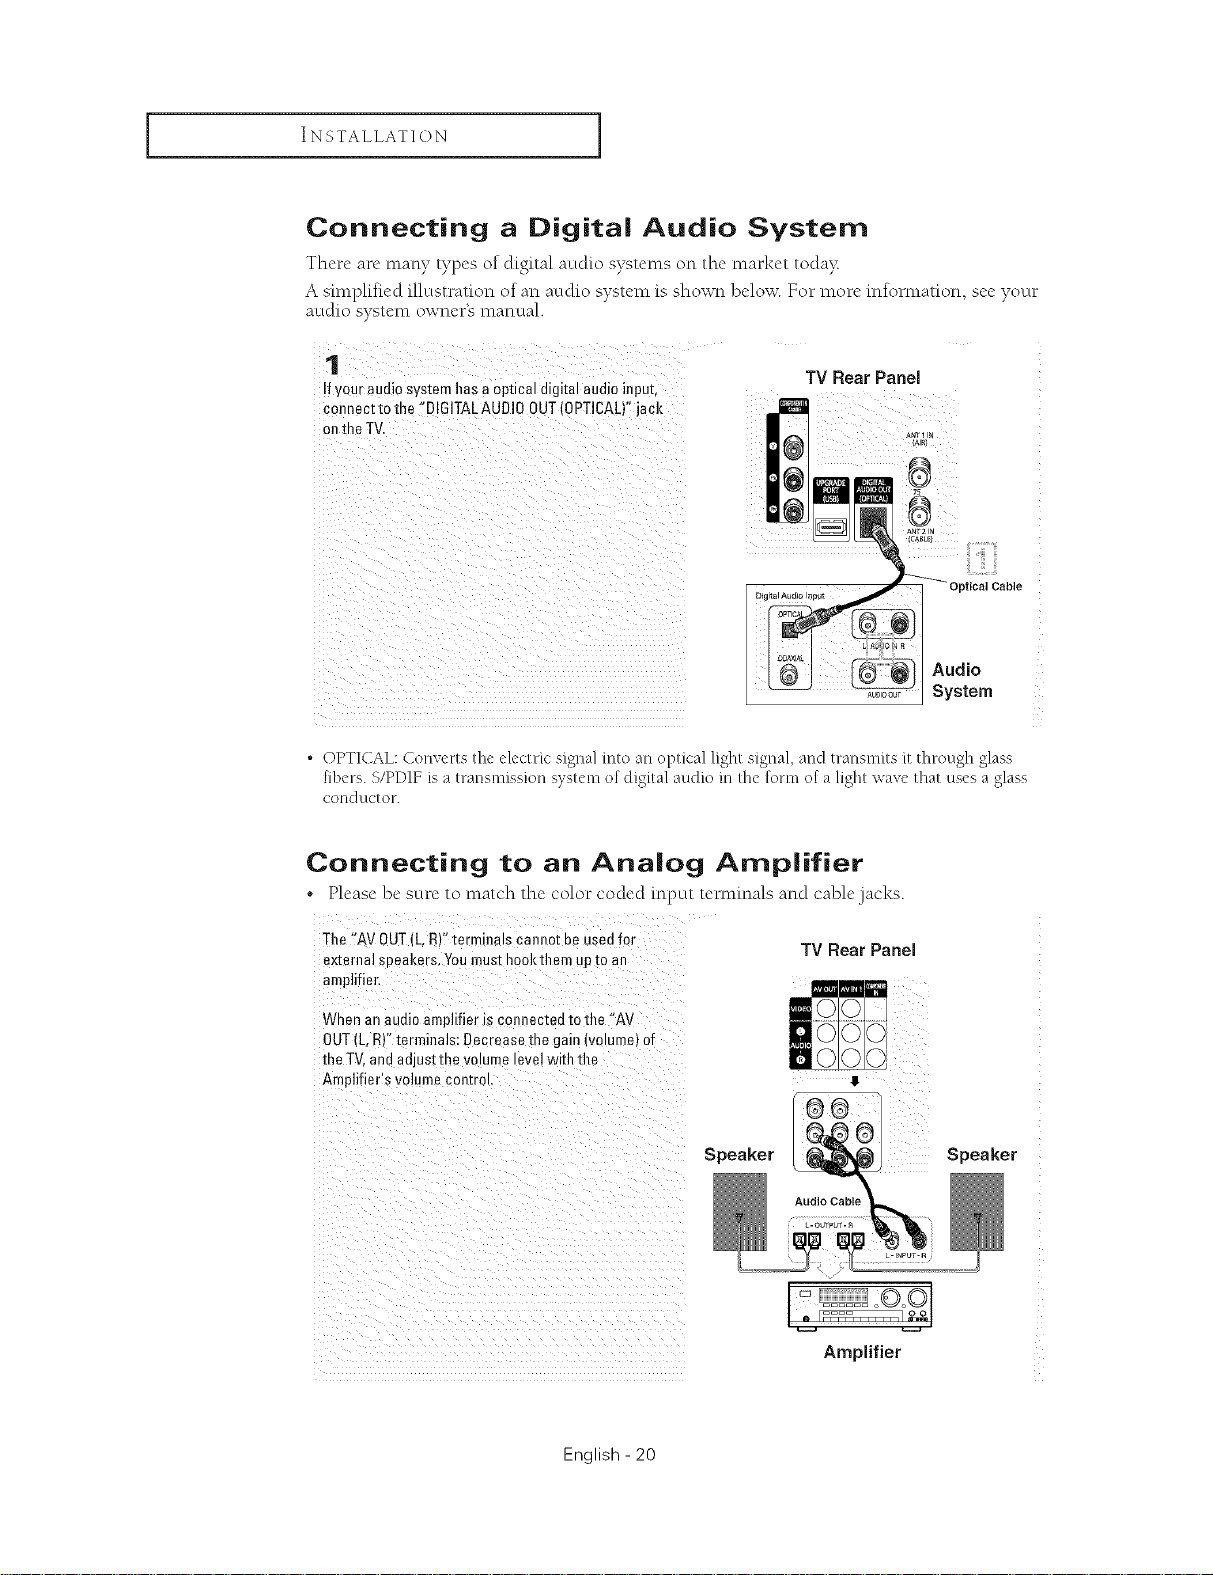
Connecting a Digital Audio System
Thcre arc many types/)f digital audh) systems/m the market t/)da)_
A sm_plifk.d illustrati/m/)f an audio system is shown below. For more infomlation, see your
audio system owner's manual.
!fyouraudiosystemhasaopticaldigitalaudioinput,
TV Rear Panel
¢0nnect to the ::BI61TALAUDI00UT(0PT!CAL)"jack
ICABLF}
Digital Audao In_u_ Optical Cable
_ System
. OPTICAL: Converts the electric signal into an optical light signal, and transmits g:through glass
fibers. S/PDIF is a transmission system o[ digital aucl[o in lhe 1:o1"1llof a light wave lhat uses a glass
COLIC] gtC[ O1".
Connecting to an Analog Amplifier
* Please be sure to match the color coded input tet-minals and cable jacks.
The "AV OUT (L,R)" terminals cannot be usedfor
external seeakers. Youmust hookthem up [o an
amplifier,
TV Rear Panel
When an audio amplifier is comlectea to the "AV
OUT[L. RY'terminals: Decrease the gain (volume] of
the TV.and adjust the volume level with the
Amplifier's volume control
English - 20
Speaker Speaker
i i
Amplifier
INSTALLATION [
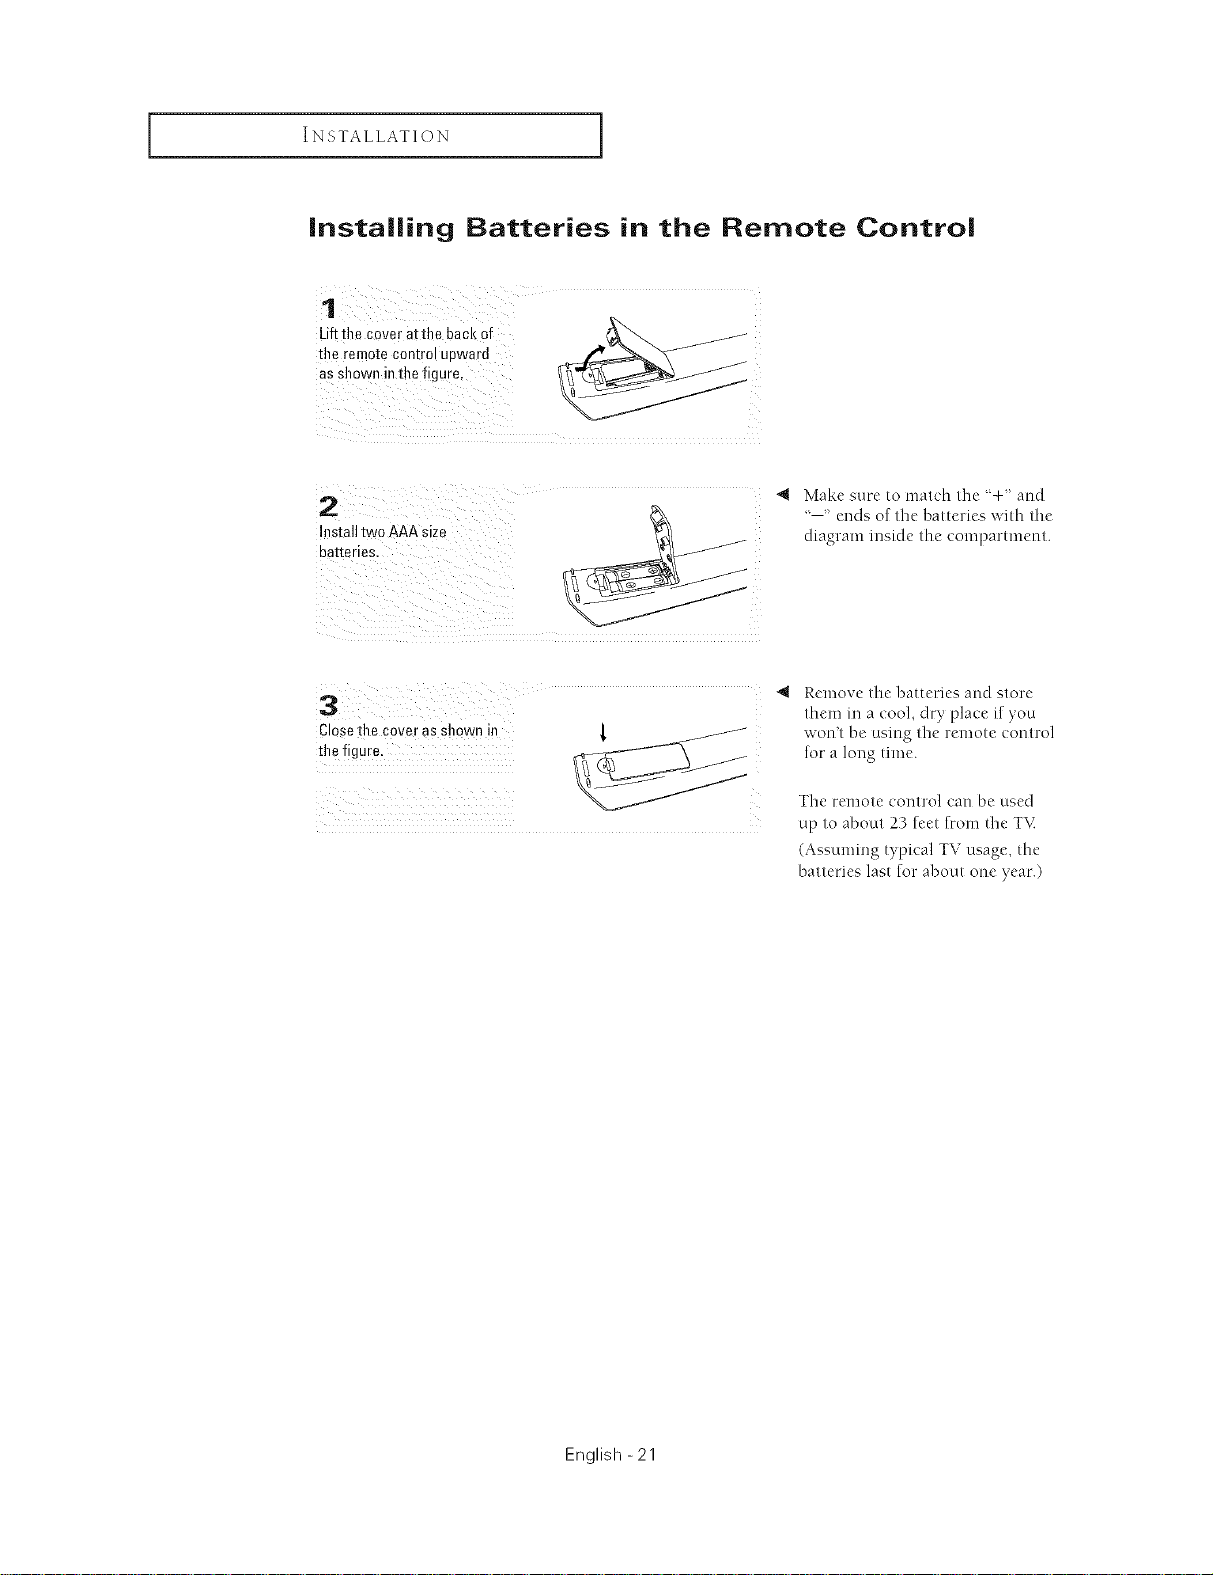
installing Batteries in the Remote Control
1
*heremotecontrolupward
asshowninthefigure,
Uf**hecoveratth0backof
2 , Makesur_'tomat,'ht'l_:÷'aud
InstalltwoAAAsize diagram inside finecompartment.
batteries,
'--' ends of tile batteries with tile
4 Remove tile batteries auclstore
them in a _ool, dry place ifyou
Closetile cover as shown in { /
the figure,
won't be using tile ]'emote control
for a long time.
Tile remote control can be used
up to about 23 feet from tile TV
(Assuming typical TV usage, the
batteries last for about one year.)
English -21
OPERATION
Turning the TV On and Off
Pressthe POWER button onthe remote control.
You can a!s0 use the POWER button on the front pane!.
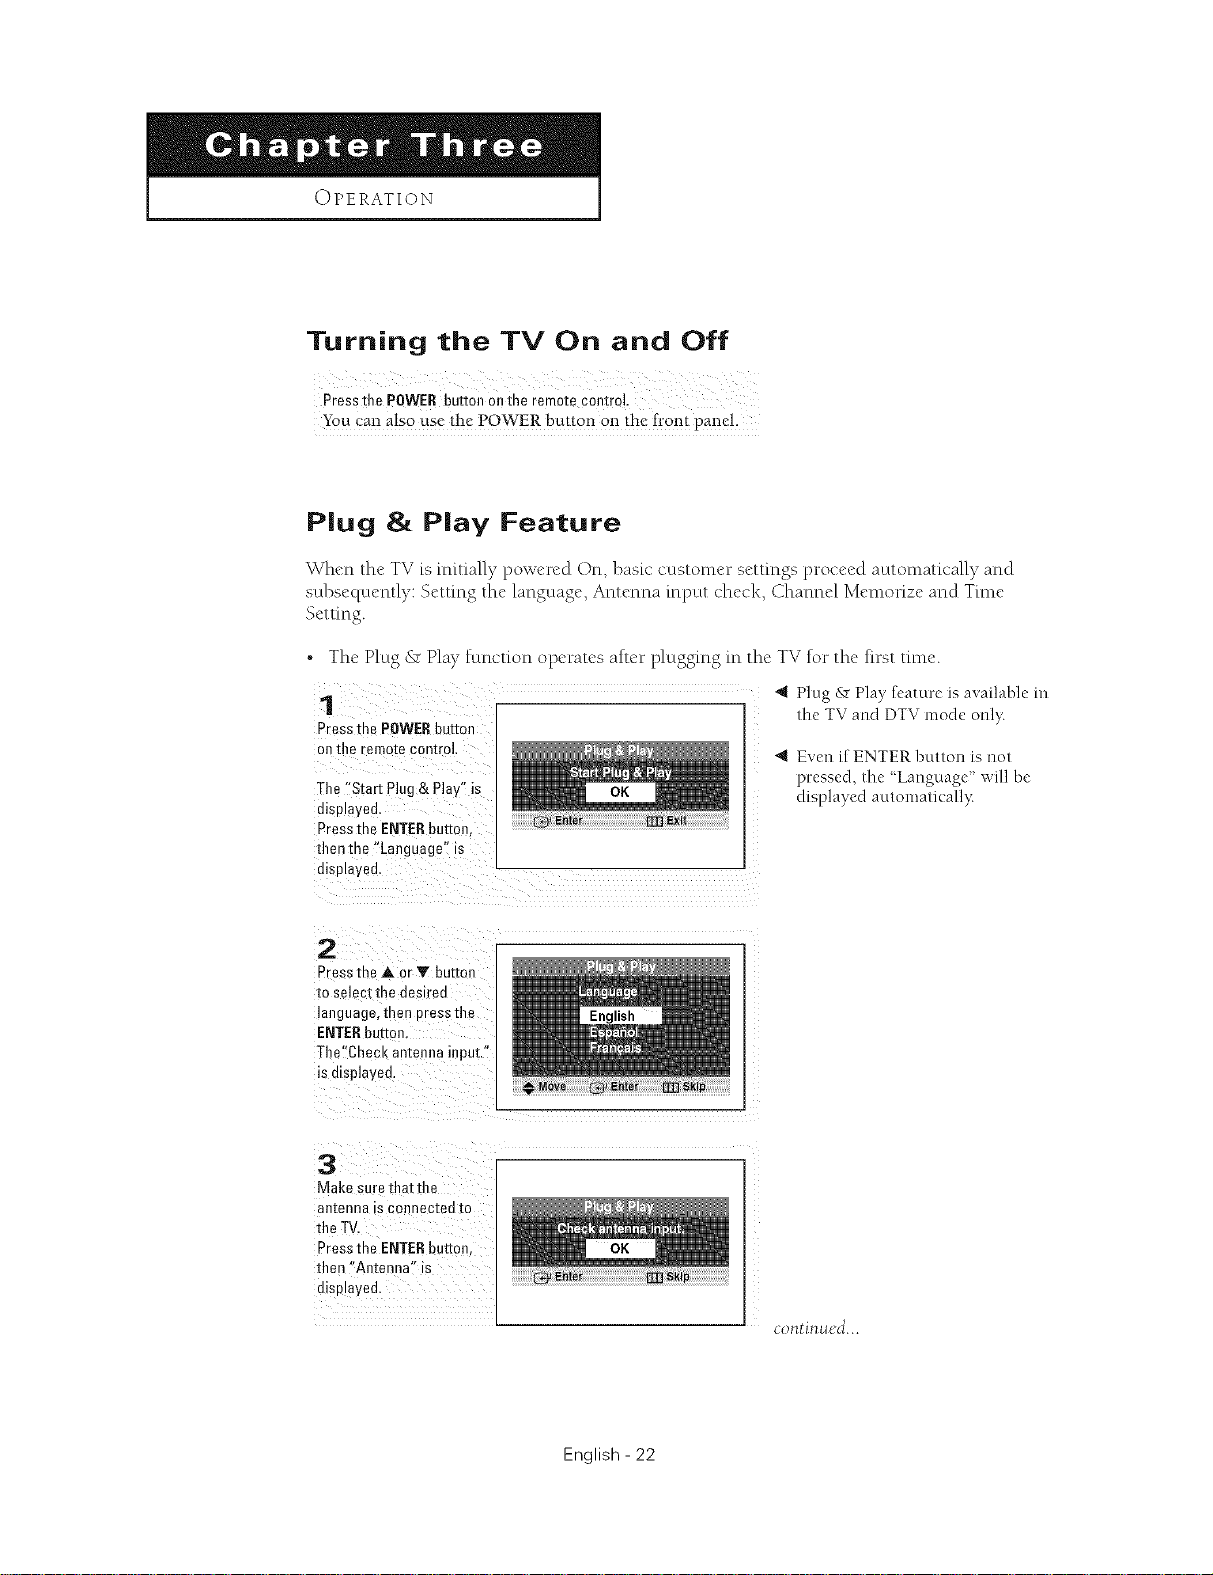
P|ug & P|ay Feature
When the TV is initially powered On, basiccustomer settings proceed automatically and
subsequently: Setting the language, Antenna input check, Channel Memorize and Tm_e
Setting.
• The Plug & Play function operates alter plugging in the TV for the first time.
1
Pressme POWERbutton
on the remote control
The "Start Plug & Play" is
disulayed.
Pressthe ENTERbutton.
thenthe "Language" is
displayed.
4 Plug & Play feature is available in
the TV and DTV mode only.
"_ Even if ENTER button is not
p_:essed, the _Language" will be
displayed automatk ally:
2
Pressthe A or Y button
to select the desired
language, then Dressthe
ENTERbutton
The'Chec _ antenna input."
is c splayed.
3
Make sure that the
an[enna is connecl:ed to
the TV.
Pressthe ENTERbutton.
then "Antenna" is
displayed.
continued...
English - 22
 Loading...