

Samsung TX-R3265, TX-R2765 Owner’s Manual
I I
Register your product at www.samsung.com/global/register
important Warranty information
Regatdintj Television Format
Viewing
Standard screen ku_mat televisions (4:3 the aspect ratio of the screen width to heisht) are
pmnari[y dcsigm, d to view standard [ormat f_dl-motion video. The images displayed on then1
shol:dd primaril) bc in the stan(tard 4:3 ratio [ormat an(t constantly moving. Displaying
stationary graphics and images on screen sL:tc'has the dark top and bottom lcttcrbox bars (_,'[de
screen pictures) shodd be [imiu'd to no more than 15% of the total television viewing per
VvX'Ck.
Wide screen ku_mat televisions (16:9 the aspect ratio of the screen width to height) are
pmnarily (tesisnc(t to view wide screen [ormat fcdLmotion video. The images _tispla)cd on
them shoctl_t pmnarfl) be in the wi_k" screen 16:9 ratio fommL or cxpan&xt to fiH the screen if
yot:u_ model off_'rs this k'atuu_c find constantly moving. Displaying stationary graphics and
images on screen sl:Lch as the dark side-bars on non<'xpandcd standard fbmmt u,lcvision video
find prosrammin S shoudd bc lmfitcd to no more than 15% of the total television vk, win S per
\v(x'k.
AdditionaH}t viewing other stationary images find text s_Lch as stock market reports video
same _lisplays, station lo_os_ web sites or compl:Lter sraphics find pattcrns_ shouM be limited as
(h'scribcd above for all teh'visions. Dfspld),in_ _uV st_tfon_ll), im_us thdt uxucJ tl'a' al_ov_'
SufJt'lfm's ctln ctlusu unt'vt'n t_SfnS q[ gf turu tul_'s ((/RTs) their Iut_v_"stlbtlu, but purmtlnunt burm'_[-h_
_host imd_cs in thd t_'l_q'is_ol_ p_CtUld. TO _vOid thiS, vd_}; thd pTo_yc_nll_lin_ dn_t imdj¢_'s, cznJ pl_malilV
Jisplt_y _ull scrcun movfn S imt_sus, not stt_tf/_l_t_[yg_tturns/>r J_rl'¢ l_ars. On television models that
off_'r picu:uv sizin S [eat_:wcs_ l:_sc these controls to view tM" diff_'mnt [ormats as a fl:d[ screen
pitt uu_c.
Be carcfi:d in the selection and d_:_ration of television [ommts l:_sed [or viewing. Um'w'n CRT
aging as a resudt of fommt sck'ction and u_se as wcH as other buwm'd-in images is not covered
by y0_u _Sams_:m S hmiu'd warrant}t
English - 2
C o ix!TENT _
Chapter 1: Your New TV ................ 5
List of Featlu_cs ........................................... 5
Acc_'sso_i_'s .............................................. 5
YaL_lflfa_izing YoLu_self _vith The TV ............................ 6
( fontl_ol Bl:[t tons ................................... 6
(fonnection jacks (Side) ............................. 7
(fonn{'¢tion jacks (R{'ar) ............................. 8
Rcnlotc <fontl_ol .................................... 9
Chapter 2: |nsta||ation ................. 1 1
Conn{'cting VHF and UHF Antennas ......................... 11
Ant_'nnas with B00-ohm Flat Twin Leads ............... 11
Antennas with 75-ohm Round Leads .................. 12
Sepal_atc VHF and UHF Ant{'nnas ..................... 12
(fonn_'cting Cfal)h. TV ..................................... 12
(fM-£e wtthoc[t a (faUlt. Box .......................... 12
(fonnecting to a (fa}-J_" Box that DescmmI-£cs All Channels.. 13
(2onnc('ting to a (fable Box that Dcscl_ambh's Some Channels 13
(fonnccting a V(fR ........................................ 15
(2onnccting a Second V(fR to Rcc'ol_d h_om the TV ......... 16
(fonn_'cting a DVD Pla) ci_ .................................. 17
(fonnecting to Y PB, PR ............................. 17
(2onnccting to Regulai _A_[dio and V[d_.o jacks ........... 17
(fonnccting a Digital TV Set-Top Box ......................... 18
(2onnccting to Y, PB PR ............................. 18
Connecting a <2anlcol_dci _................................... 19
(fonn{'('ting to an Analog Anlplifici _........................... 20
Installfng Batt_ui_'s fn the R_'Lllot_" (fontl_ol ...................... 21
Chapter 3: Operation .................. 22
Ttu_ning th{' TV On and Off ................................. 22
Pl_tg & Play F{'at _tn" ...................................... 22
Vh'_vmg the _1enl:[s and On-Sc_een Displays .................... 24
Vie_,ving the Menus ................................ 24
Vi_'_,ving the' Display ............................... 24
Sch'cting a Menu Language ................................. 25
Mct_lohzing the (_hanncls .................................. 26
Selecting th{" Vi(h'o Signal-soun'e ..................... 26
Sto_ing (ihann{'ls in Mcnloi T" (Acttonmtic Metho(I) ........ 27
Adding and Erasing (fhannds (MancLal Method) .......... 28
Changing (_hannels ....................................... 29
Using the' <fhannd Buttons .......................... 29
Using the Nunl])ei _Buttons .......................... 29
Using the" PRE-(fH Button to S_'h'ct the Pn'vfoc[s (3hanncl... 29
Labeling th{' (fhannds ..................................... 30
S_'tting the" (-flock ......................................... 31
Option 1: Setting the <flock Manually .................. 31
Option 2: Setting the <flock Automatically .............. 32
English - 3
CONTENTS
Chapter 8: Operation (Cont.} ............ 84
]-)ic tuu_c Control .......................................... 34
Using Auttonmd(" Pi('tutrc Settings..................... 34
Cu[stomizing the Pk't uu'c ............................ 35
Socmd Conu_ol .......................................... 35
Adju[stmg the \'ohmm .............................. 36
Using the Mu@" Button ............................. 36
Using Autonmti(" Sound Settings ...................... 37
(k[stomizing the Sou[nd ............................. 38
Viewing an External Signal Sou[R'c ........................... 39
Setting the Signal Sou[R'c ............................ 39
Assigning Names to External inpm mode ............... 40
Chapter 4: Speci8| Features ............. 41
Fine Turning Channds ..................................... 41
Changing theColorTone .................................. 42
Changing the Scrc{'n Size .................................. 43
Digital Noise R{'duwtion ................................... 44
Tilt ................................................... 45
Using the R.Su[rf Fcatu[m ................................... 46
Freezing the Pictulrc ...................................... 46
Choosing a Mudti-Channd Sound (MTS) track .................. 47
Auto _\bh:tnm ............................................ 48
Setting the SuuTound ...................................... 49
Setting the TLtrbo Soured ................................... 50
Setting the On/Off Tmmr ................................... 51
Setting the Sh'cp Tmmr .................................... 52
Setting the Prch'rrcd \bluLnm kcvd and Channd ................. 53
Viewing Closed Captions .................................. 54
Setting Th{'On/Off Melody ................................. 55
Using the \UChip ......................................... 56
How to Change You[r Passv¢ord ....................... 56
How to Enal)b/Disabh" the Rating Controls .............. 57
Hov to Set up Resuqctk)hs Using the 'TV FaK'nta] (kddel[nes" 58
Ho;xtoS{:tup R{¢strictionsusing thv,i\1ovmRatings:G,PC, PC-13,R, NC-17,X. 59
hnpormnt Notes Abol[t Parental Locks ................ 60
How to Set up Restrictions Using the 'Canadian English"... 61
How to Set u[p Rcstrk'tions Using the %2anadmn French' . . . 62
How to R{'s{'ttim TVat_'l: tile \<C]'Iip Blocks ("Emcrgc,nc)' Escape') 6_
Custonizing Your Remote Control ........................... 64
1 o )
Chapter 5: Troubleshooting ............. 66
Identif_'ing Problems ...................................... 66
ADDendi× ............................ 67
Cleaning and Maintaining Youtr TV ........................... 67
Using Youtr TV in Another (butntr) ........................... 67
Specifications ........................................... 67
English -4
YOUR NEw TV
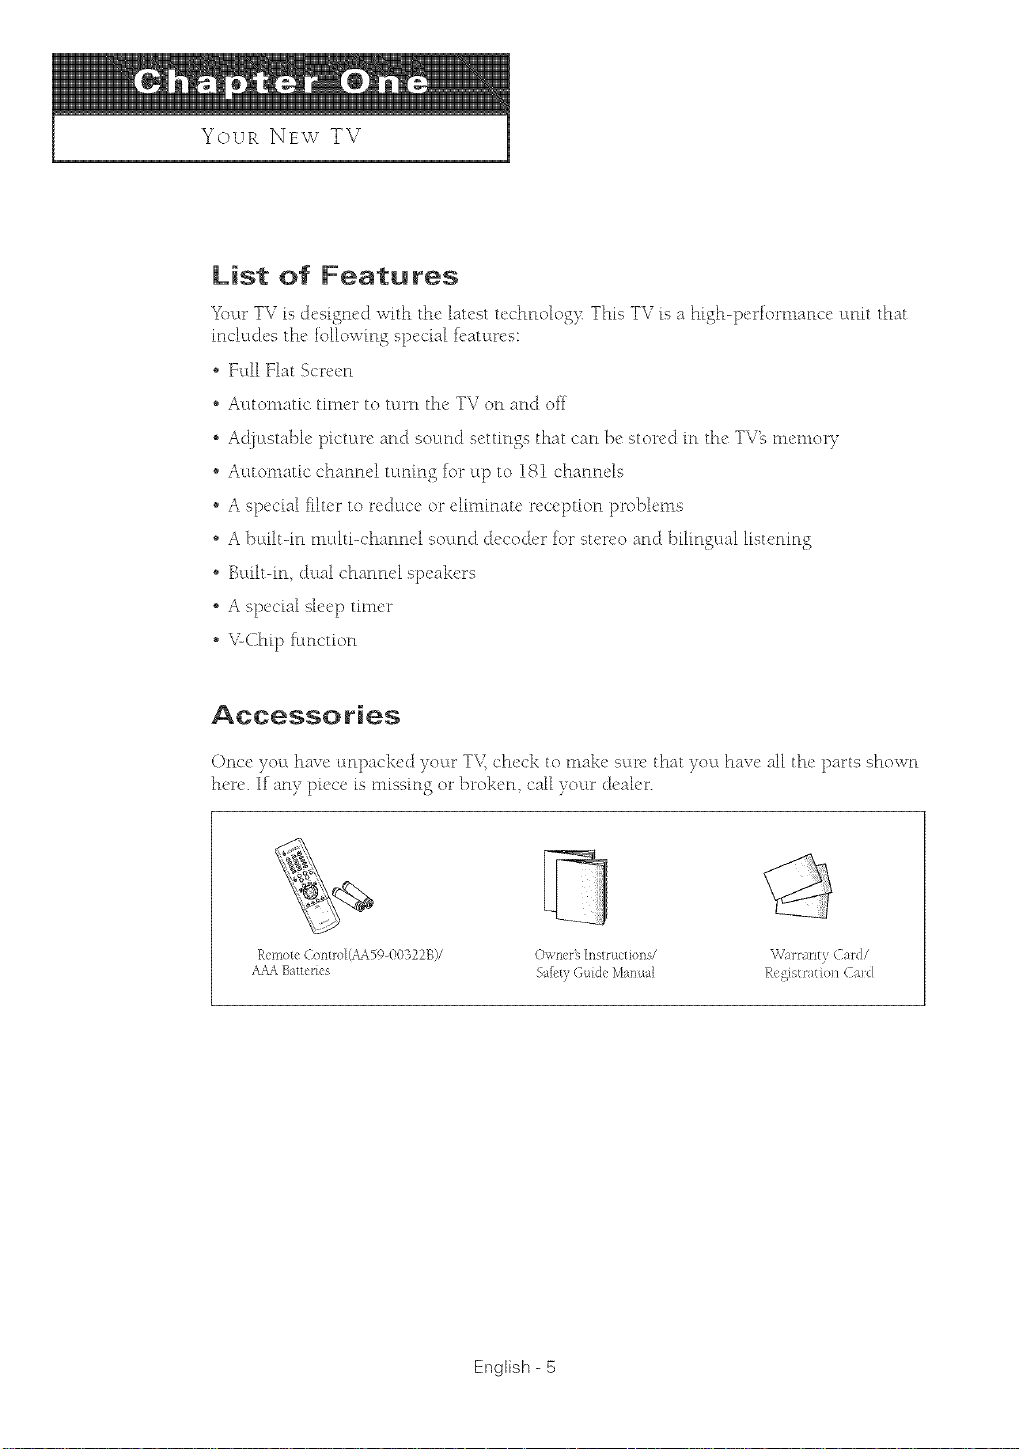
List of Features
_our TV is{Ic'_ig_icdwith thelau'stuwh_1o[og}_ThisTV isa high-pcrforma_ic_'u_litthat
includes the following special _catures:
• Full Iqat Screetl
" Automatic timer to turt'_ the TV ot'_at'<J oft
, Adjustabh' pk'turc and sound settings that can be stor_'d in the' TV2_m_'mory
" Automatic channel tuning for up to 181 channels
• A special filter to re&co or elimfnau" r_'ccption problems
" A built-in multi-channel sound (tccodcr [or stereo and bilingual listening
" Built-in dual channel spc_k<_s
, A special sh'vp timer
• \%(2hip Rtnction
Accessories
O_lce you h_we l:mpacked your T\_ check to make sure that you have all the parts sho_vrl
here. If any pi{'<'{"is missing or brok_'n call )our (t_,_dcr.
Remote Contro](,&%59-00322B)/ Owners hlstructi£)]ls/
,&Z_Batteries Sail"b GuideManua]
\V}J_*uHEyCard/
Rc_stmtX_lq Ca/d
English - 5
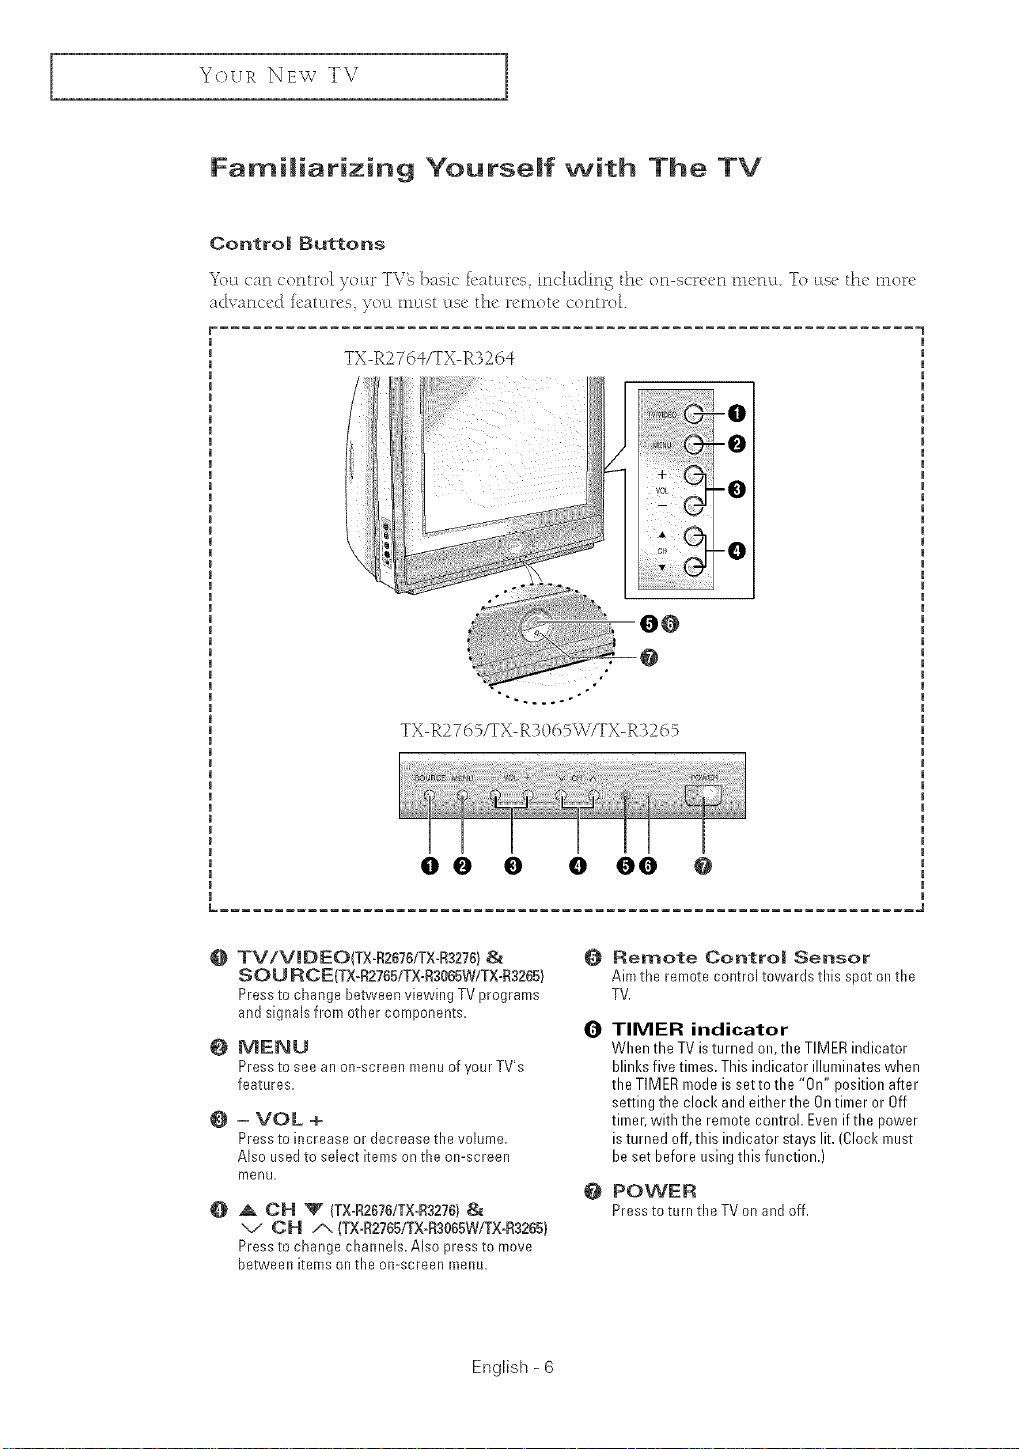
YOURNEWTV
Familiarizing Yourself with The TV
TX-R276_/TX-R3264
TX-R2765/TX-R3065W/TX-R3265
O TV/VJDEO(TX-R2676/TX-R3276} &
S O U R C E(TX-R2765/TX-R3065W/TX-R3265}
Pressto change between viewing TV programs
and signalsfrom other components.
@ MENU
Pressto see an on-screen menuofyourTV's
features.
O - VOL +
Pressto increase or decrease the volume.
Also used to select items onthe on-screen
merlu.
_ OH "V (TX-R2676/TX-R3276) &
"v OH A (TX-R2765tTX-R3065W/q%R3265)
Press to change channels. Also press to move
between items on the on-screen raenu.
Remote Control Sensor
@
Aim the remote control towards this spot onthe
TV.
TIMER indicator
0
When the TV isturned on,the TIMER indicator
blinks five times. This indicator illuminates when
the TIMER mode is setto the "On" position after
setting the clock and either the Ontimer or Off
timer, with the remote control. Evenif the power
is turned off,this indicator stays lit, (Clock must
beset before usingthis function.)
POWER
Pressto turntheTVonandoff.
English - 6
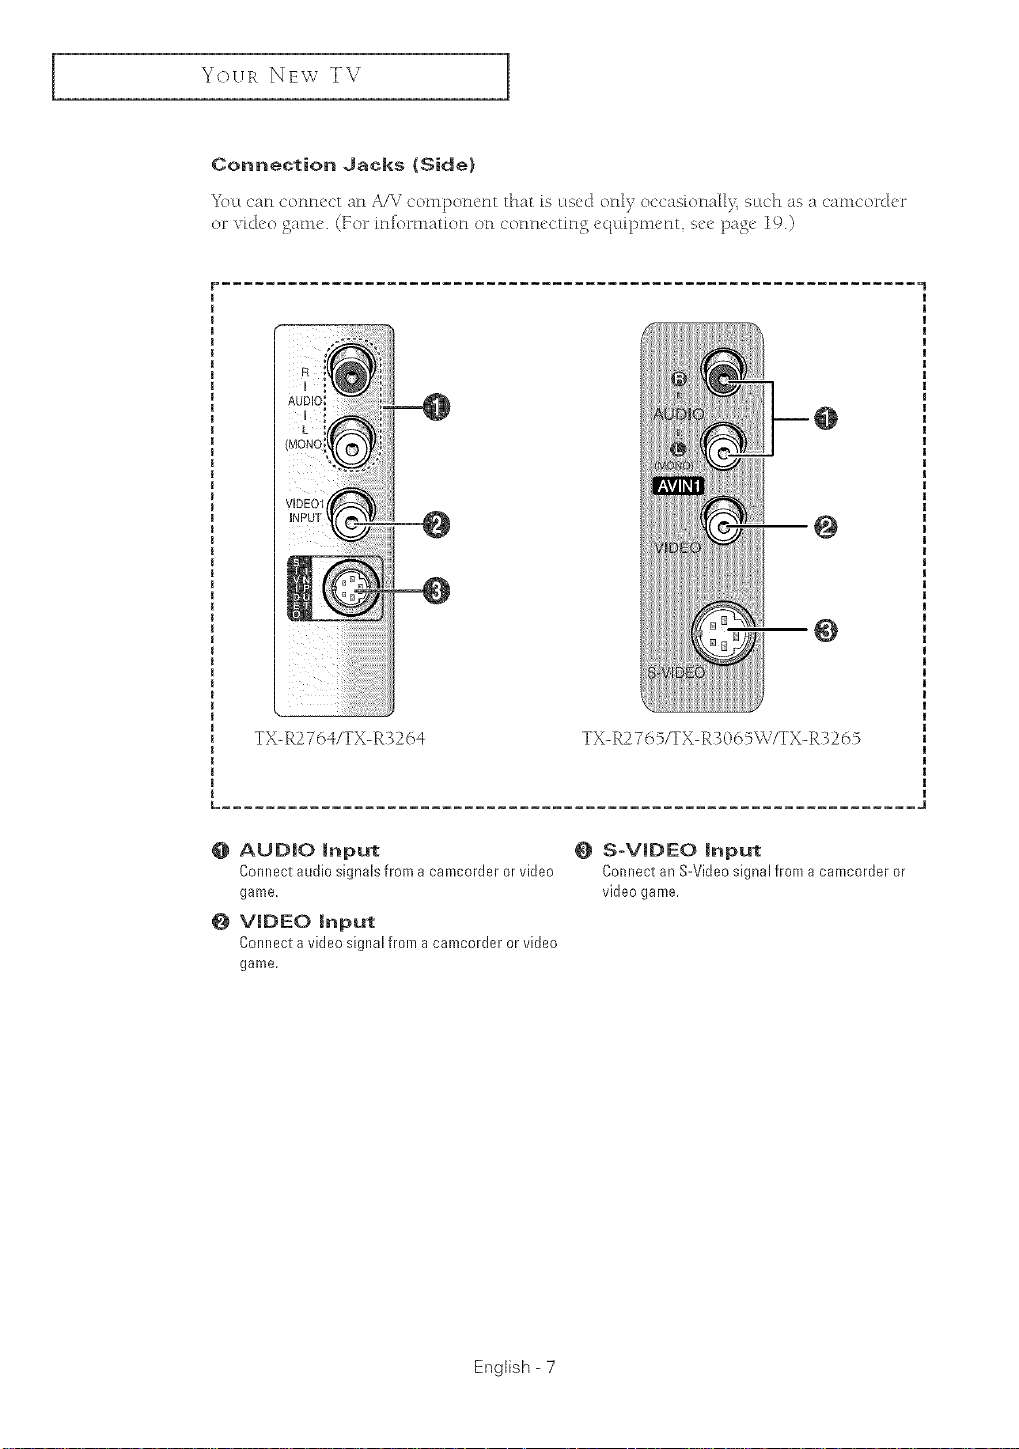
YOUR NEW TV
Connection Jacks (Side}
You can conmwt an AA7 compom,nt tha_ is lLs_'d only occasion_ll[}:, slLch as a camcord_w
or video _%me. (Yor ktfommfion on connecfin 8 equipmen[ see paSe 19.)
@
@
TX-R276=}/TX-R326 _} TX-R2765/TX-R3065%7/TX-R3265
0 AUDIO input
Connect audio signals from a camcorder or video
game,
VIDEO input
Co[mect a video signal from a camcorder or video
game,
S-VIDEO input
Connect anS-Video signal from acamcorder or
video game,
English - 7
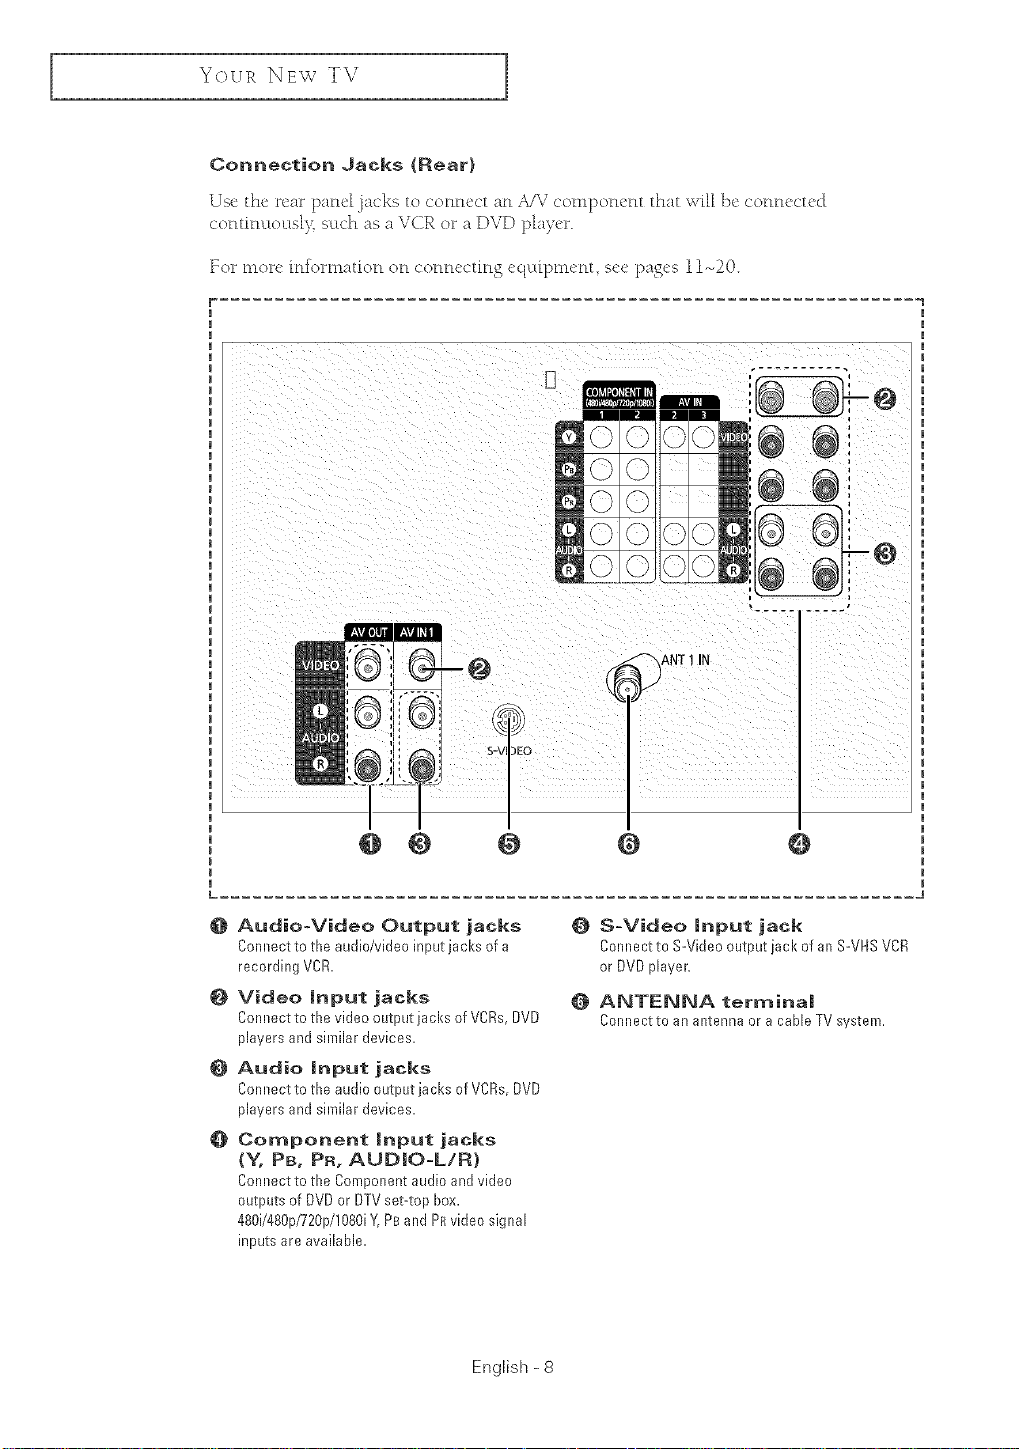
YOUR NEw TV
Connection Jacks (Rear}
Usc_the rear l>ami .jack'_to co_m_'ct a_lA/?7 coml>o_m_lt that will b_'co_m_'cu'd
CO_mm:LOL:LS[):suLch _s _ VCR or _ E)VD pl_yer
For mor_" fnformation on conn_'cting _,q@pmcnt s_,c pagt's 11-_20.
oI; e
, .......... ,
@ @ @ @ @
O Audio-Video Output jacks
Connect to the audio/video input jacks of a
recording VCR.
@ Video input jacks
Connect to the video output jacks of VCRs,DVD
players and similar devices.
@ Audio input jacks
Connect to the audio output jacks ofVCRs,DVD
players and similar devices.
@ Component input jacks
{Y, PB, PR, AUDIO-L/R)
Connect to the Component audio and video
outputs of DVDor DTVset-top box.
480i/480p/720p/1080iY,PBandPRvideo signal
inputs are available.
ANT 1 IN I
S-Video input jack
Connect to S-Video output jack of an S-VHSVCR
or DVDplayer.
0 ANTENNA terminal
Connect to an antenna or a cable TV system.
English -8
YOURNEWTV
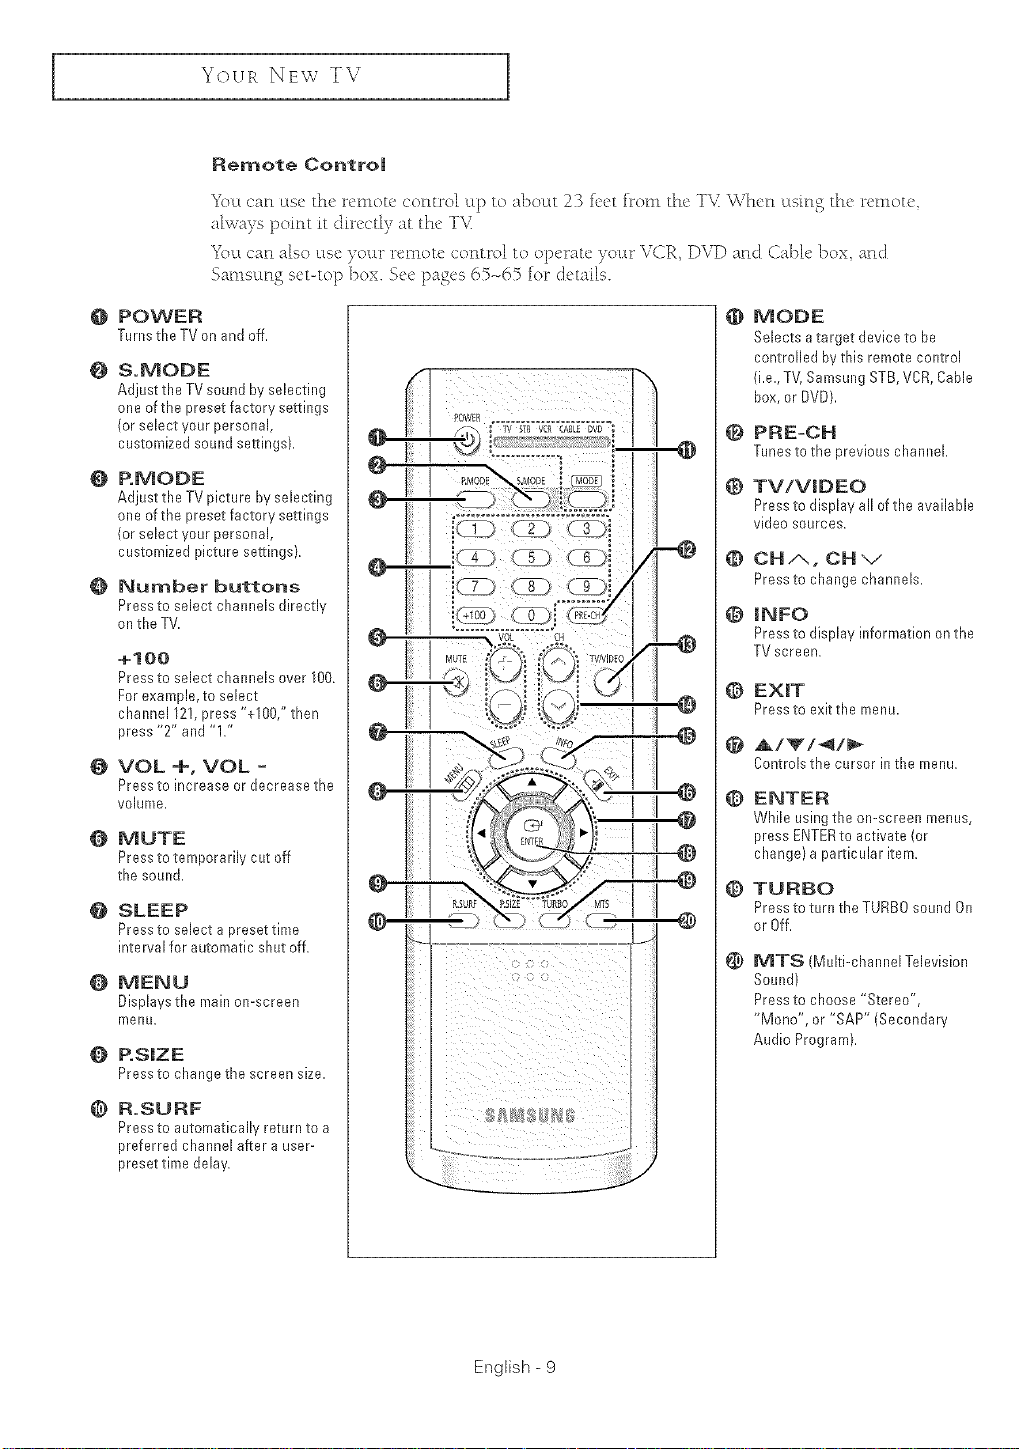
Remote Control
7b •
_c l:t can l:tse the remote control it1) to al)octt 23 [_'et [rom the T\_ When cts[ng the remote,
alwa) s point it directly at the T\,_
Yo_L can also ltse your, remote" control to olx'ratc yottr VLIR, DVD and Qd)[_' ])ox and
SamsuLn S set-top }nox. %c pasts 65-65 for details.
O POWER
Turnsthe TVon and off.
&MODE
Adjust the TV soundby selecting
oneof the presetfactory settings
(orselect your personal,
customized sound settings),
O P.MODE
Adjust the TV picture by selecting
oneof the presetfactory settings
(orselect your personal,
customized picture settings},
O Number buttons
Pressto select channeb directly
onthe TV.
+100
Pressto select channeb over 100.
For example,to select
channel 12%press "+100," then
press "2" and "1/'
O VOL+,VOL-
Pressto increase or decrease the
volume,
O MUTE
Pressto temporarily cut off
the sound.
0 SLEEP
Pressto select a preset time
interval for automatic shut off.
O MENU
Displays the main on-screen
menu.
O P.SmZE
Pressto changethescreensize.
MODE
@
SeJectsa target device to be
controlled by this remote control
(i.e.,TV, SamsungSTB, VCR,CaNe
box, orDVD).
O PRE-CH
Tunestothepreviouschannel,
@ TV/VmDEO
Pressto display all of the available
video sources,
O CHA, CHV
Pressto changechannels.
@ INFO
Pressto display information onthe
TV screen,
@ EXiT
Pressto exitthe menu.
O ,l_/Y/4/_
Controlsthe cursorinthernenu,
@ ENTER
While using the on-screen menus,
press ENTERto activate (or
change} a particular item.
@ TURBO
Pressto turn the TURBOsound On
or Off,
@ MTS (Multi-channel Television
Sound}
Pressto choose "Stereo",
"Mono", or "SAP" (Secondary
Audio Program),
@ R.SURF
Pressto automatically return to a
preferred channel after a user-
preset time delay,
English - 9
YOUR NEW TV
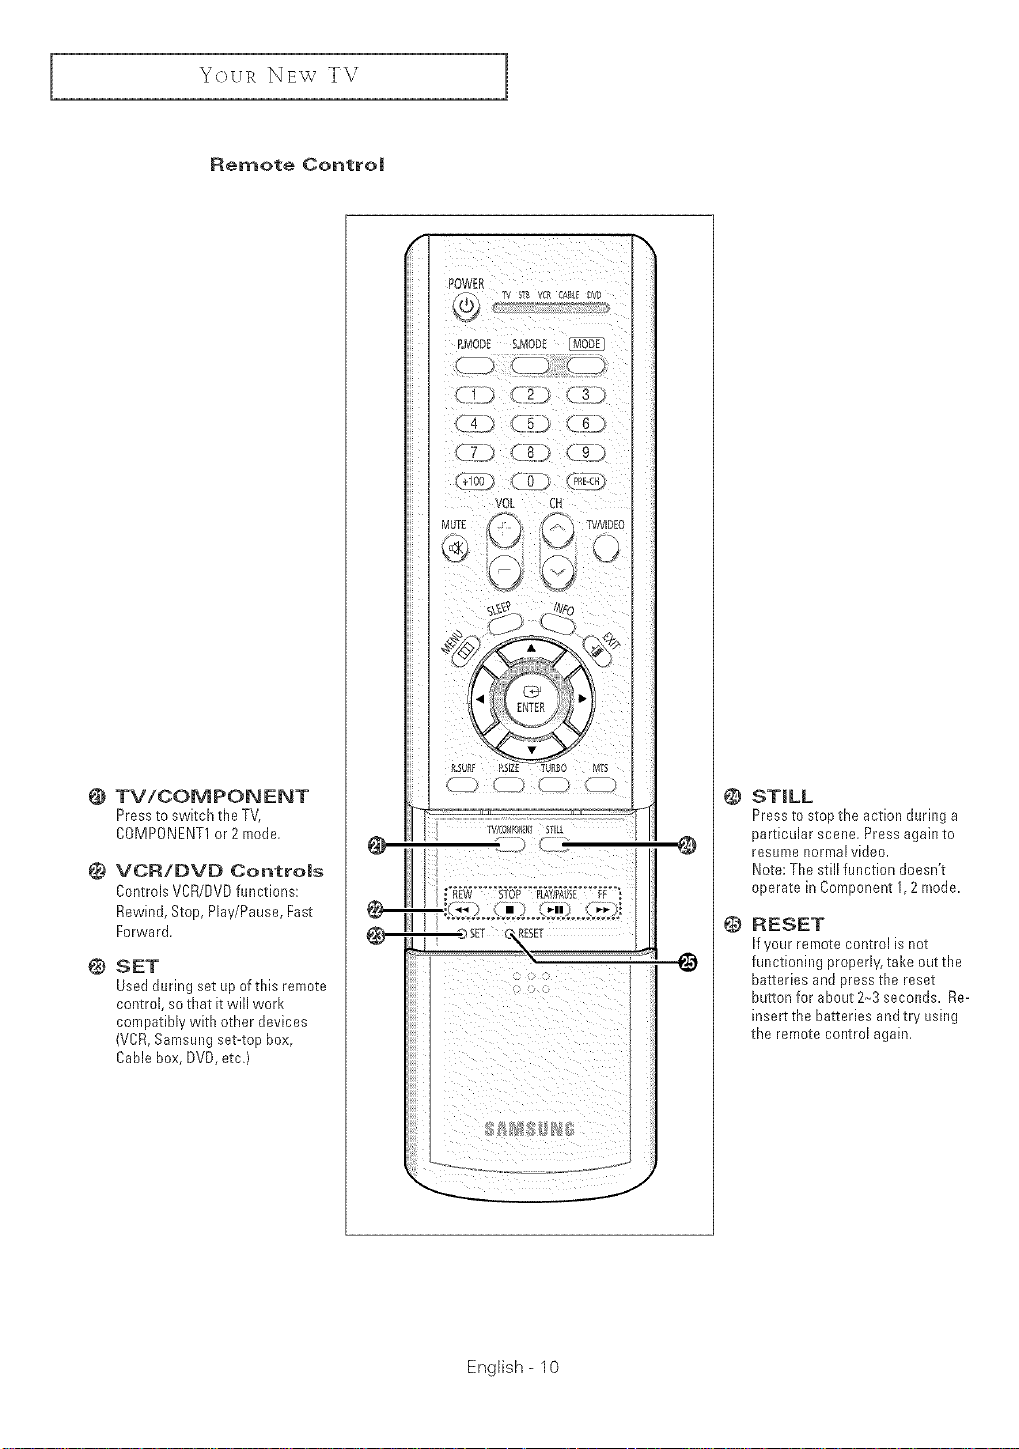
Remote Contro|
TV/COMPONENT
Pressto switch the TV,
COMPONENT1or 2rhode.
VCR/DVD Controls
Controls VCR/DVDfunctions:
Rewind, Stop, Play/Pause, Fast
Forward,
SET
Used daring set Lipofthis remote
control, so that it will work
compatibly with other devices
(VCR,Samsungset-top box,
Cable box,DVD, etc.)
English- 10
@
@
@
STILL
Pressto stop the action during a
particular scene, Press again to
resume normal video,
Note:The still function doesn't
operate in Component 1,2 mode.
@
RESET
Ifyour rernote control is not
functioning properly, take out the
batteries and press the reset
button for about 2-3 seconds. Re-
insert the batteries andtry using
the remote control again,
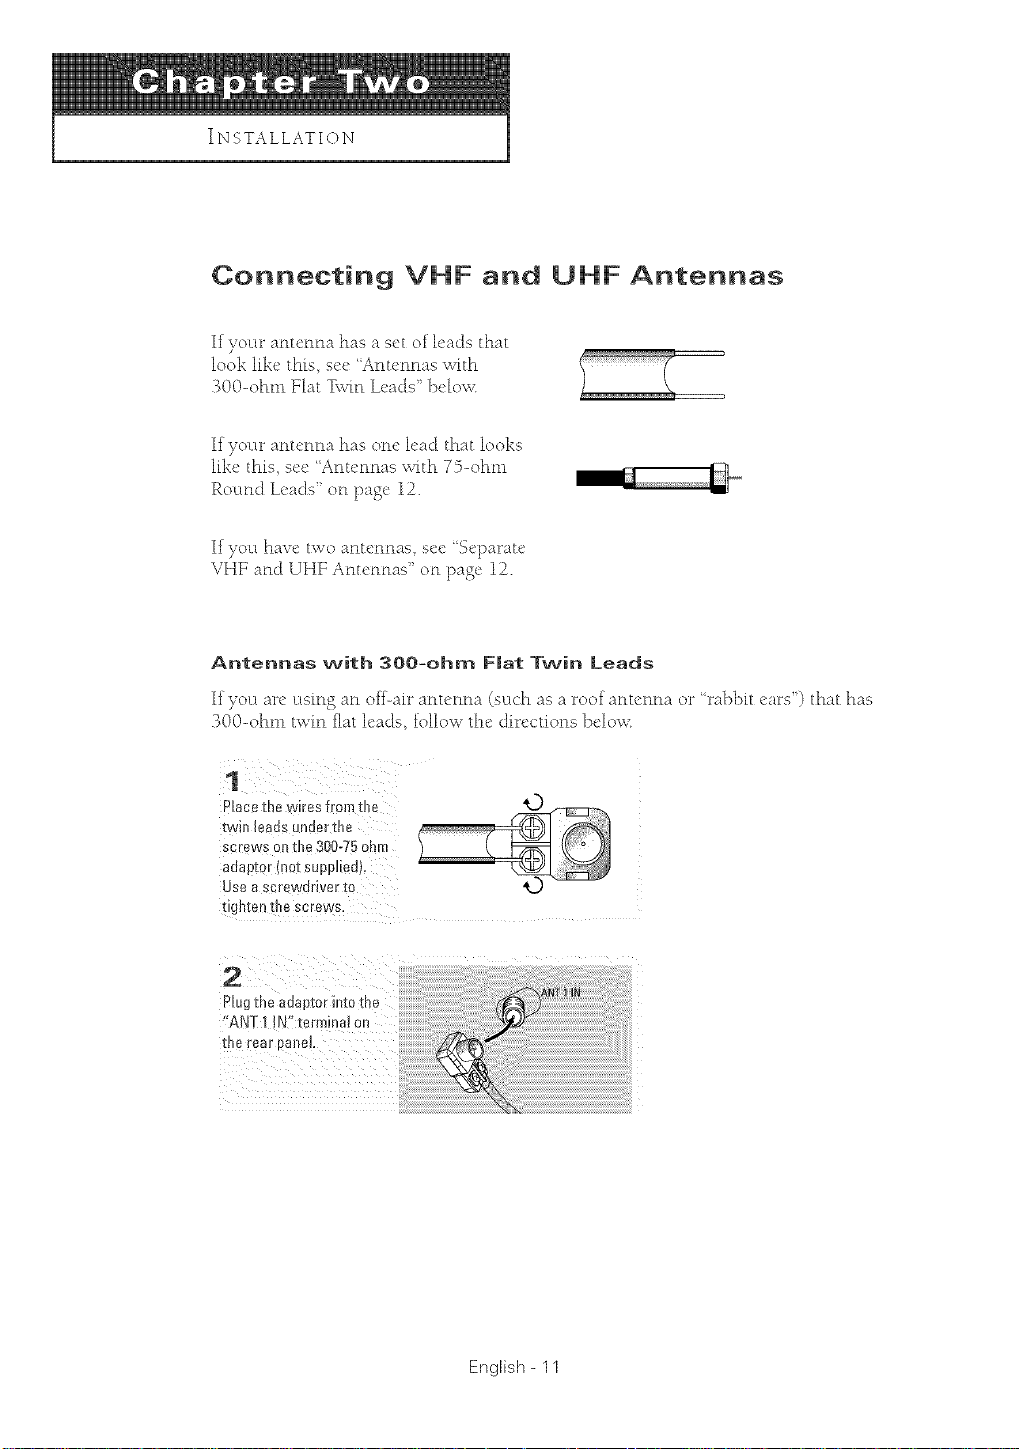
Connecting VHF and UHF Antennas
If your antenna has a s_'t of l_'ads that
look like' this s_'c "Antennas with
"_O()-ohm Flat T_;vmL_,ads' ]-_c[o_:
If your _nt_'nFl_ h_s ore' l_'_d th;_t looks
[tkc this see 'Anu'nnas with 7%ohtn
Routld L_'ads' oil page" 12.
If you have two antennas see 'Separate
VHE ar_(:] UHF Antcr_r_as '_ or_ page 12.
Antennas with 3OO-ohm F|at Twin Leads
If you are usmo._ atl off-air atlu'tma (such as a roofatltetma or ' ral')bit ears) that has
"_00-ohm twin flat leads, follow the dm:ctions 1)_:1o_.:
Place the wkes from the _,D
ScEewa0n the 300-75Ohm
adaptor(nut supplied}.
twin leads Underthe
Use a screwdriver to
%hten d_escrews.
2
Plugme aaapror m[o me
"ANT 1 ,N"termina] on
[na r_ar Belie!
English- 11
IN_;TALLATIO N
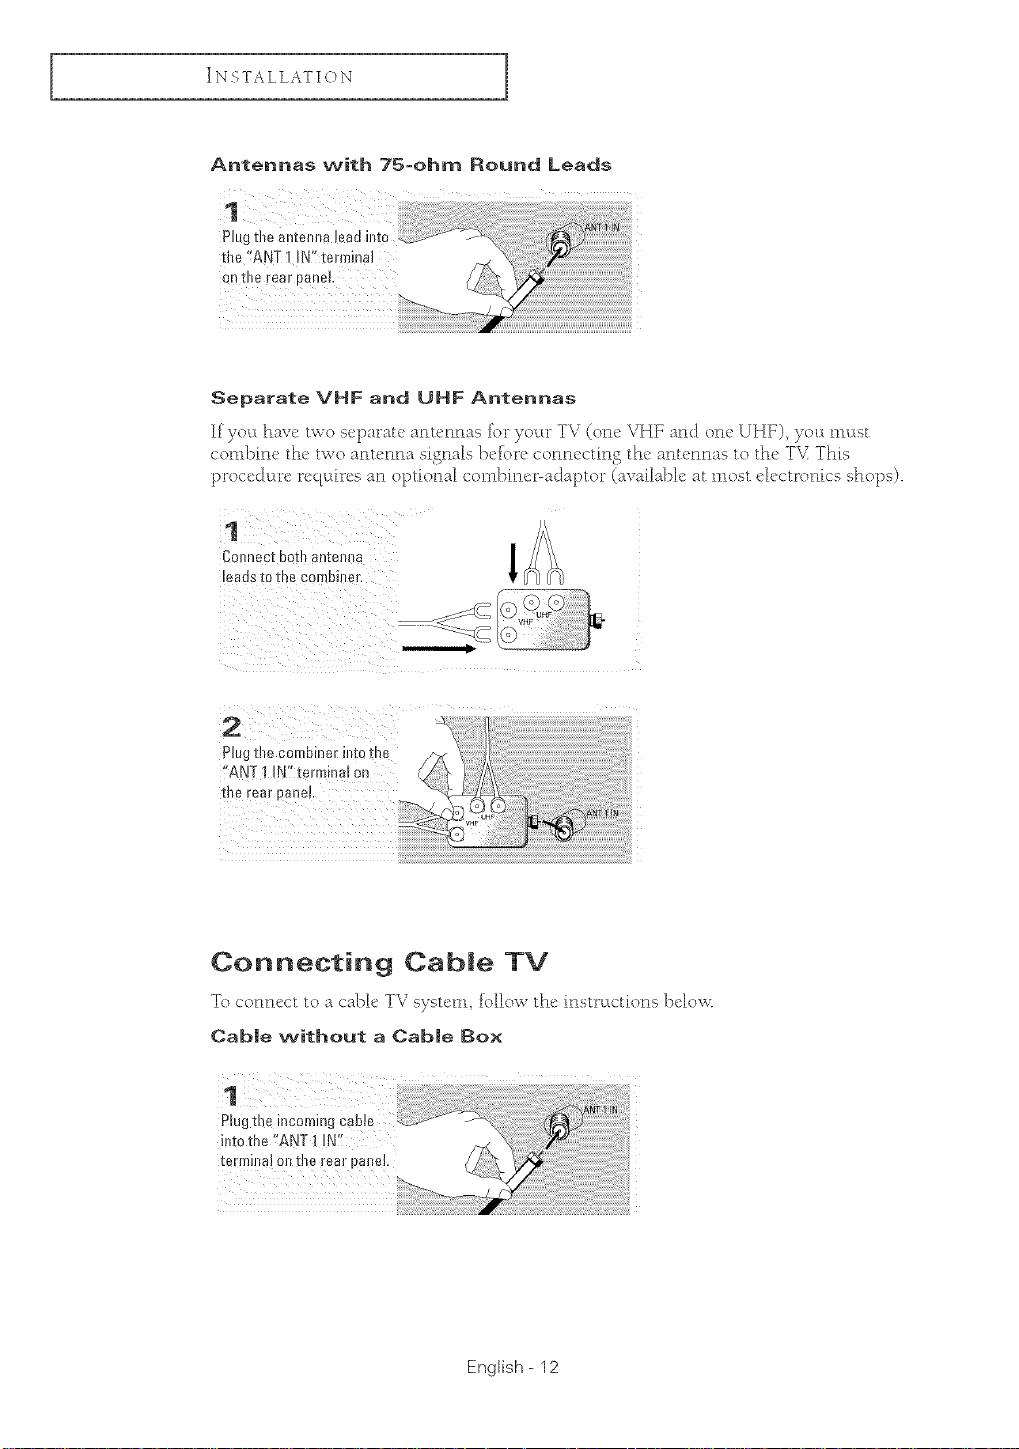
Antennas with 75-ohm Round Leads
Separate VHF and UHF Antennas
If you have two separate antennas tiu _yo_u_TV (one VHF and one UHY) you nn:[st
combine the t_o antenna a_nals betiu_e connectm_ the antennas to the T\,: This
proced m_e requdres an optDnal combiner-adaptor (available at most e[ecu_omcs shops).
Connect both antenna
leadsto the combh_er.
Hogthe Corobinerintothe
Connecting CabJe TV
To cotmect to a cable TV system follow the itlSQ_CtC[iOtlS}>elO_C
Cab|e without a Cab|e Box
Plugthe incoming
intothe "ANTI INff
terminalo1_the wearpanel
English- 12

I N%TALLATION
Connecting to a CabJe Bo× that |)esGrambJes AJ| ChanneJs
_ This/ermit_a! mighl be labded
ANT OUT'. VHF OUT" or:
Findthe cane that is
connected to the
ANTENNA 0UTterminal
onYour cab!e box.
Connect the other end
this cable _othe '!ANT 1
!N" termij]al ont!}e [ear
panel
sit3tp!}_"OUT".
Connecting to a OabJe Box that DescrambJes Some ChanneJs
II yocwcabh' box dcscrambh's oMy some channels (suLchas prcnm:ml channels), toHow the
inst>tctions below. Yourwill need a two-way splitter an EF (A/B) switch, and [ottr [engths of
coaxml cable. (These itenls are available at nlost electronics stores.)
1
cal}ie 1:t_al: IS COl_J_ec][e{] ro ANTENNA
the ANTENNAIN i. /
terminalonyourcable
{Jox
4{ This let:initial ntighl be labeled
ANT IN', %_HF IN' or simp_%
' IN".
2
{}or !)ec{ [Rig cable 1:o a
1:wo-way sp]l[[er.
/corn _('able
SpJitter
3
Coanec1: a coaxial CaDJe
ca[weananOUTPUT
1:e_mlRal or :lift sol_[ie_"
andtheINtent laJo_11:ne
ca]]l£ D0X
;om _ Cable
SplitieJ
W
Cable Box
English - 13
CO/lti/l glcJ...
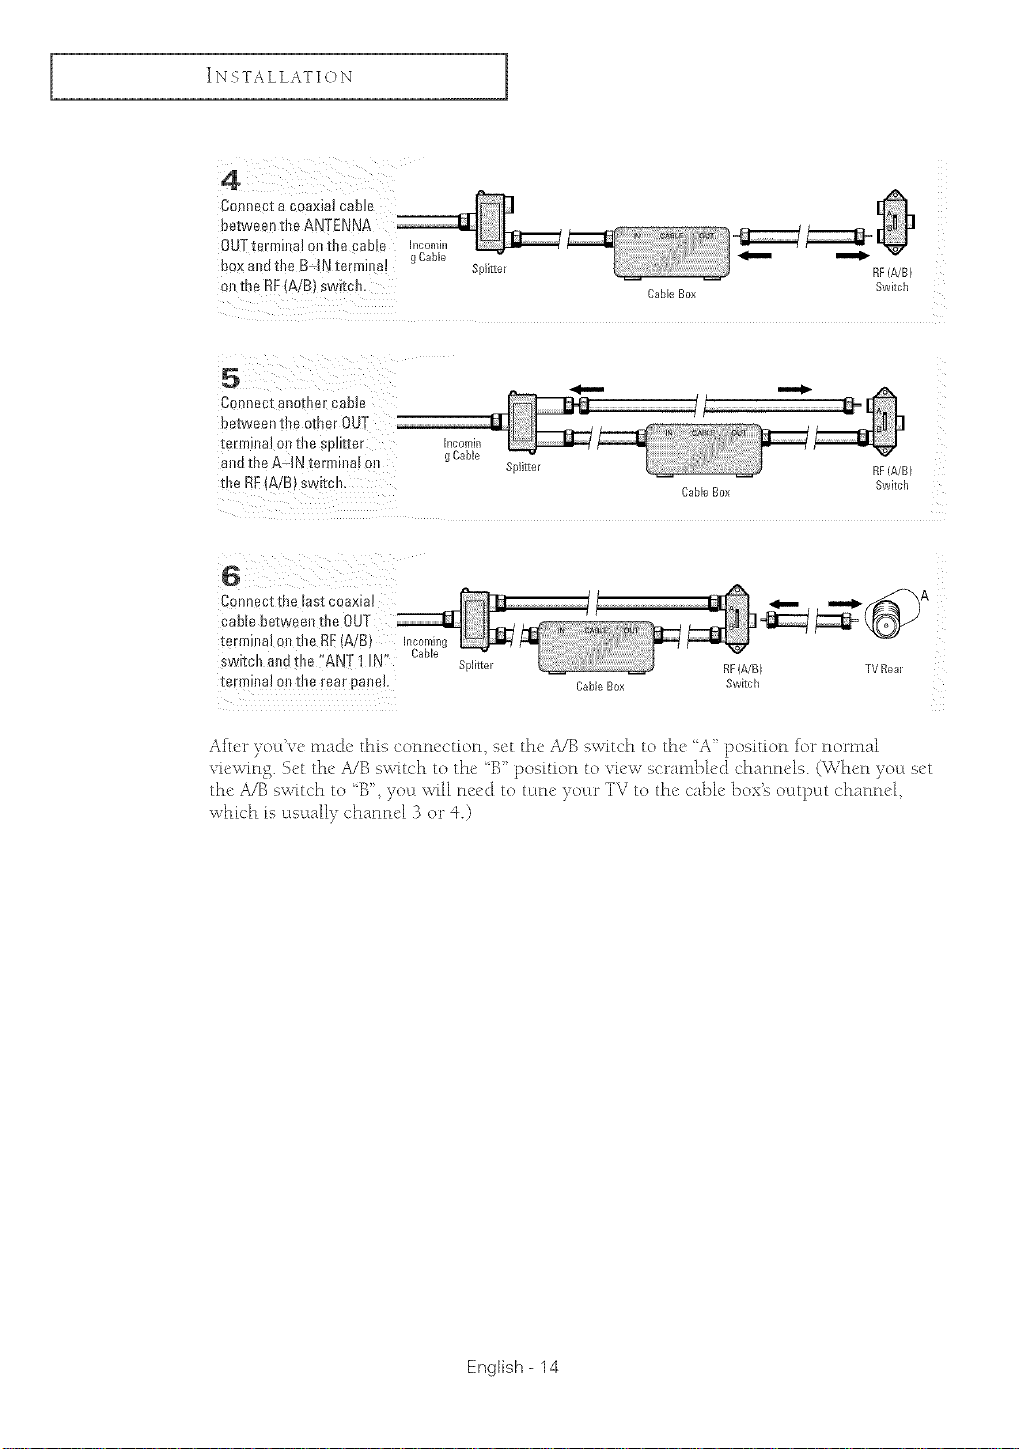
IN_;TALLATIO N
ConnecI acoaxia! cane
between the ANTENNA
OUTterminaJ onthe cable Incomin
box a_d the BdN terminaJ gCable
_nthe RF(A!B) switch,
Connect the last caaxia!
Splitter
Cable Box
RF(A/B)
Switch
cane between
terminalontheRE(A/B) Inco_ning
switch andthe "ANTI IN:' Cable
Cable Box
After yocL've made this connection_ set the A/B switch to the _A _position Dr normal
viewing. Set the A/B switch to the _B_l_osition to vh, w scrambled chanm'ls. (When yoct sct
the AiB switch to "B', youL will need to turn" )ocu _TV to the cabh" box'e octtput channel
whh'h fs usually chann4 "5or 40
x
English - 14
I N_;TALLATIO N
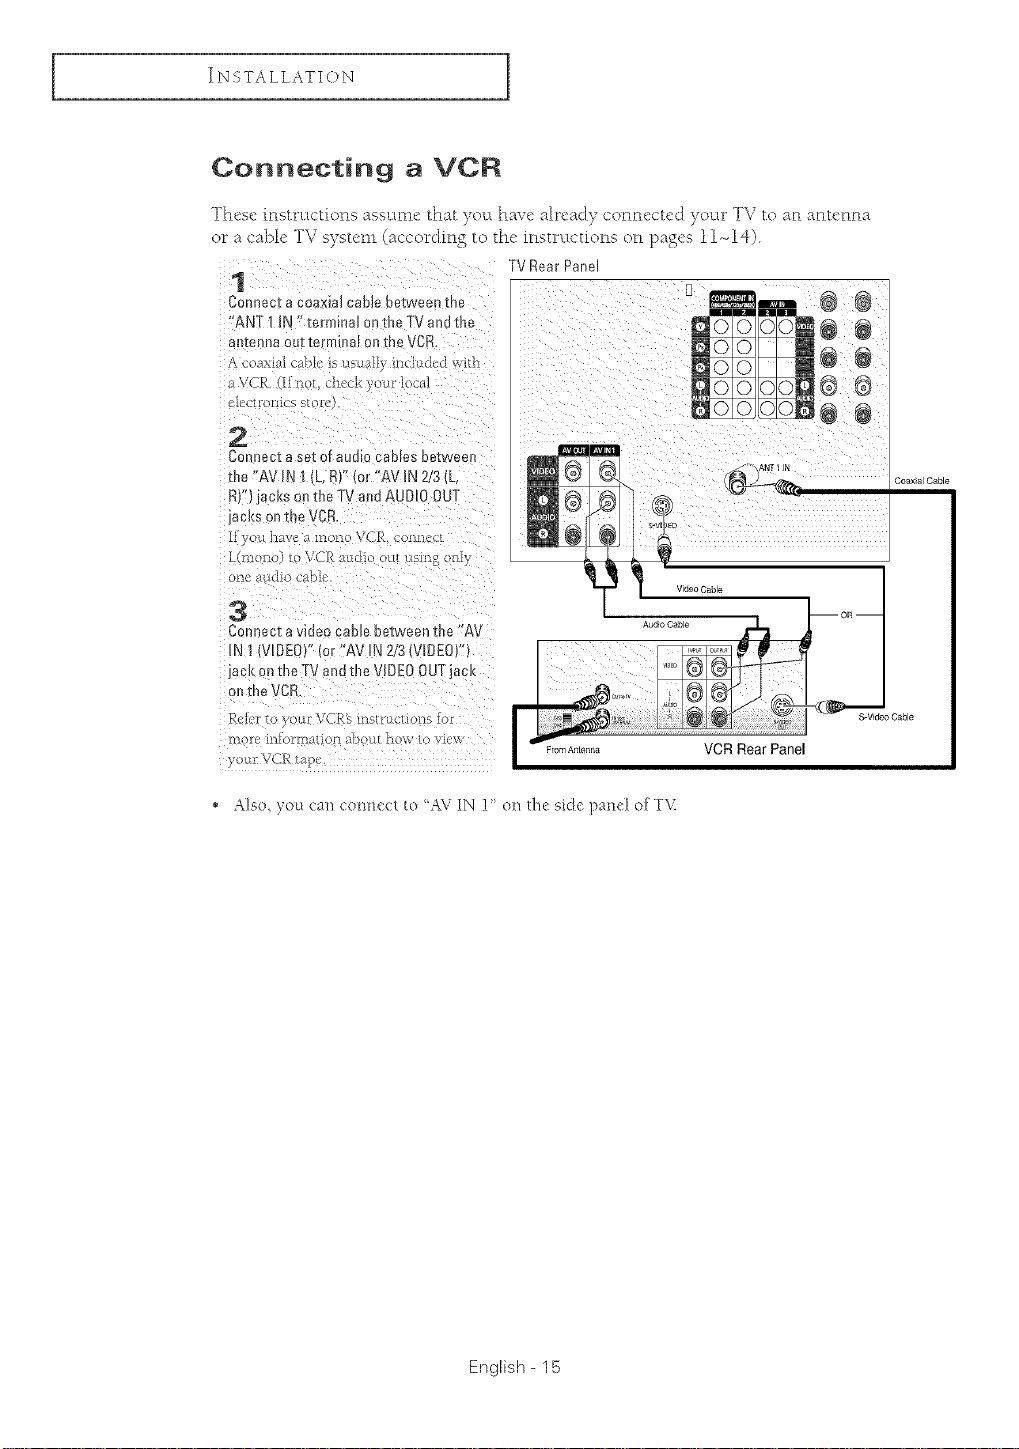
Connecting a VCR
These instructions assume that yoa have already conm'cu'd your TV to aa amcaaa
or a cab[c TV system (according to tM" instructions oa pages 11-_14).
Rear Pane
1
Connect a coaxta_came oerween me
"ANT 1 iN "terminal ont[o TVand the
arl_enla out[ermmal onm_ VCR,
_oaxmi c,qbh' is//sually il3cltlc[_d \_[th
a \ JR _ no_ _nccK yomloo_d
"leg[fOllieS S[ /f_'
®®
2
CoYm_'ta set of audio caoles oe-tween
the "A / IN ! IL,R/" (or "AV iN 2/3 L
RI' lacks on the TV andAUDIO OUT
jacl(s onme _C[
li v( u l-mv_a mona VCR _onn{_E
](Yllt 1_0) 10 VCf_ _LttCliO 011I ItS 11_ Oill}
u> a dio cabh
3
Connect a wdeo came between the "AV
IN 1[VIDEO/" (or*'AV IN 2/3IVIDEOF
jack on the TV andthe VIDEO OUT,ac_<
ol the VCR
Ruler ro your VCR_sin_t_uc_ions [or
ill fl' lili01[ll_{iOJ'l ;IDOL [ IJO_V tO vii'\%
yom VCR t_
Coax[alCable
'_ Also, you can com_ec/ {o 'A\ IN 1" on tile sk[e pand of TV.
English - 15
IN_;TALLATIO N
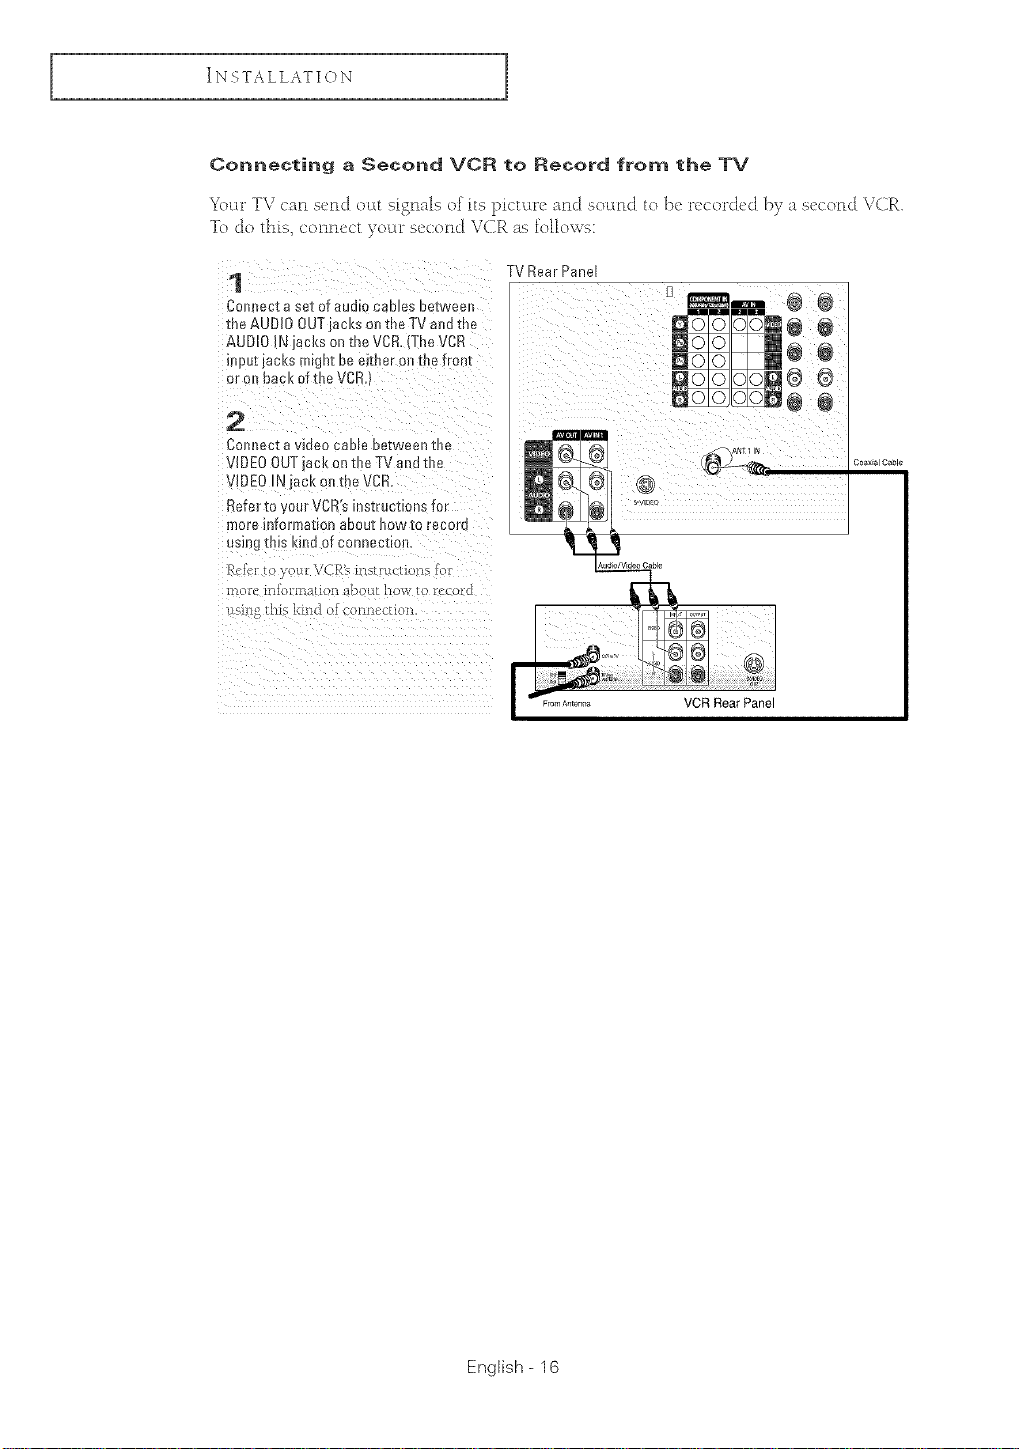
Connecting a Second VCR to Record from the TV
7 b •
_cl:trT'v can send ol:tt signals of its pictctre and socmd to be recorded by a secoFld VCR
To do _his, connect youtr second \TCRas follows:
1
Con act a set of audm caeJeaaetwee_
the AUDIO OUT acks on tbe TVand tb_
AUDIO f\ acks on the VCR -he VCR
HlpuI JACKS mW aI De eraser 3o me Tronz
or ol back of the VCR,
2
Connect a waeo cao_eDe[wean[ne
iIDEOOUT ack on the TV anJthe
ilDEO IN aCKoo[he VCR
Referto y JutVCR'sms[rucuons 'o
more information about howtc recorc
using _t_s K a of COnBect[orL
[{cJc'_[( _ui"VCR%h's,trEtc/ion's lo_
ii!orc ii_II}i[l]fi[[oll aoooL } OW [ fc o1"cl
oqiJlg ]ills kiP*O OJ eOllllOC[ii}ll
TVRear Pane
_m
@@
@@
80
@@
Coaxial Cable
@
_._o
VCRRearPanel
Englbh - 16
I N _;TALLATI(_i N
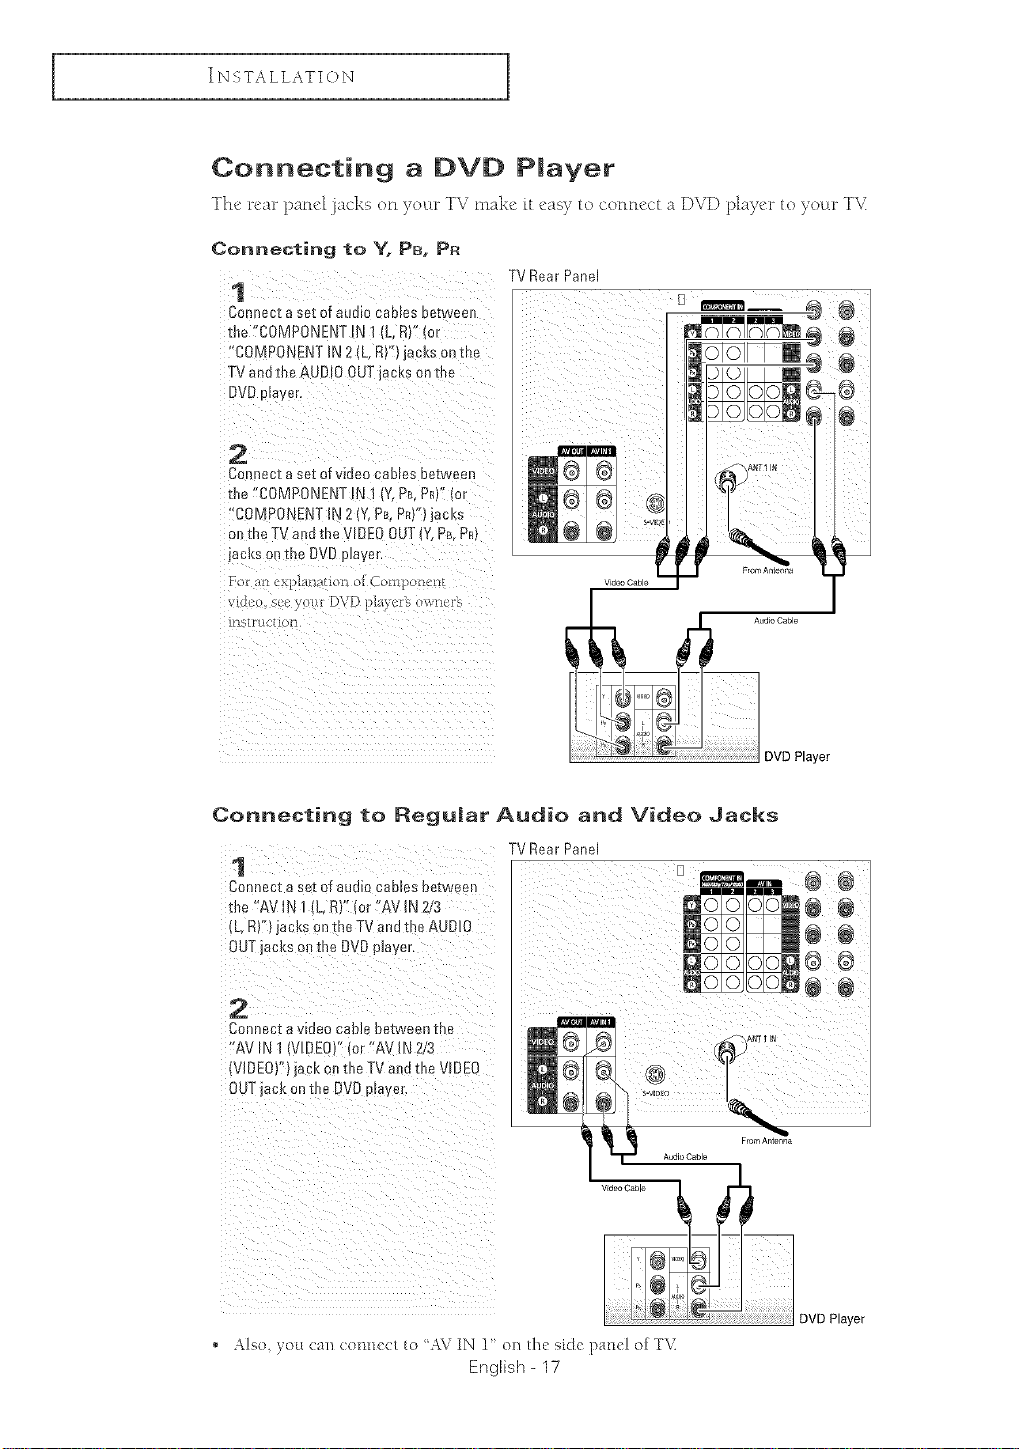
Connecting a DVD Player
T[u' n'ar pam'l jacks on your TV m_d,u: it _'asy to coFm_'ct a DVD p[ay_u _ to your Tk:
ConneGting to Y, PB, PR
1 TVRearPano
ConnactasotofaL, d[ocab[esbotween [3 _1 _ @
Connect a sotof video canes between
tbe "C0MPONENT !N ! (Y,P_,PR)':(oF
ICOMPONENT! N2 (Y,PB,PR)'r) jacks
oJ_the TV and tbe VIDEOOUT(Y, Pe,PR}
For a[? exRlanx_!ion oi Component
llkSLTUC[IOll
ii i i i
Conriecting to £egu|ar
1
Connect aset of audk cables oo_weeu
the "AV IN 1(L R)"(or "AV IN 2/3
(L. R)') lact(s on_hoTV and the AUDIO
OUTjacl(s o_ [ne DVDprover.
2
Connect awueo cane oe.tweenthe
"A\ N I (VIDEO" Ior "AV IN 2/3
IVIDE0}' lack o tbe TV and tbe VIDEO
OUT ackontbo DVDprover.
Video Cable
Aud|o and V|deo Jacks
RearParle
DVD Player
IN_;TALLATIO N
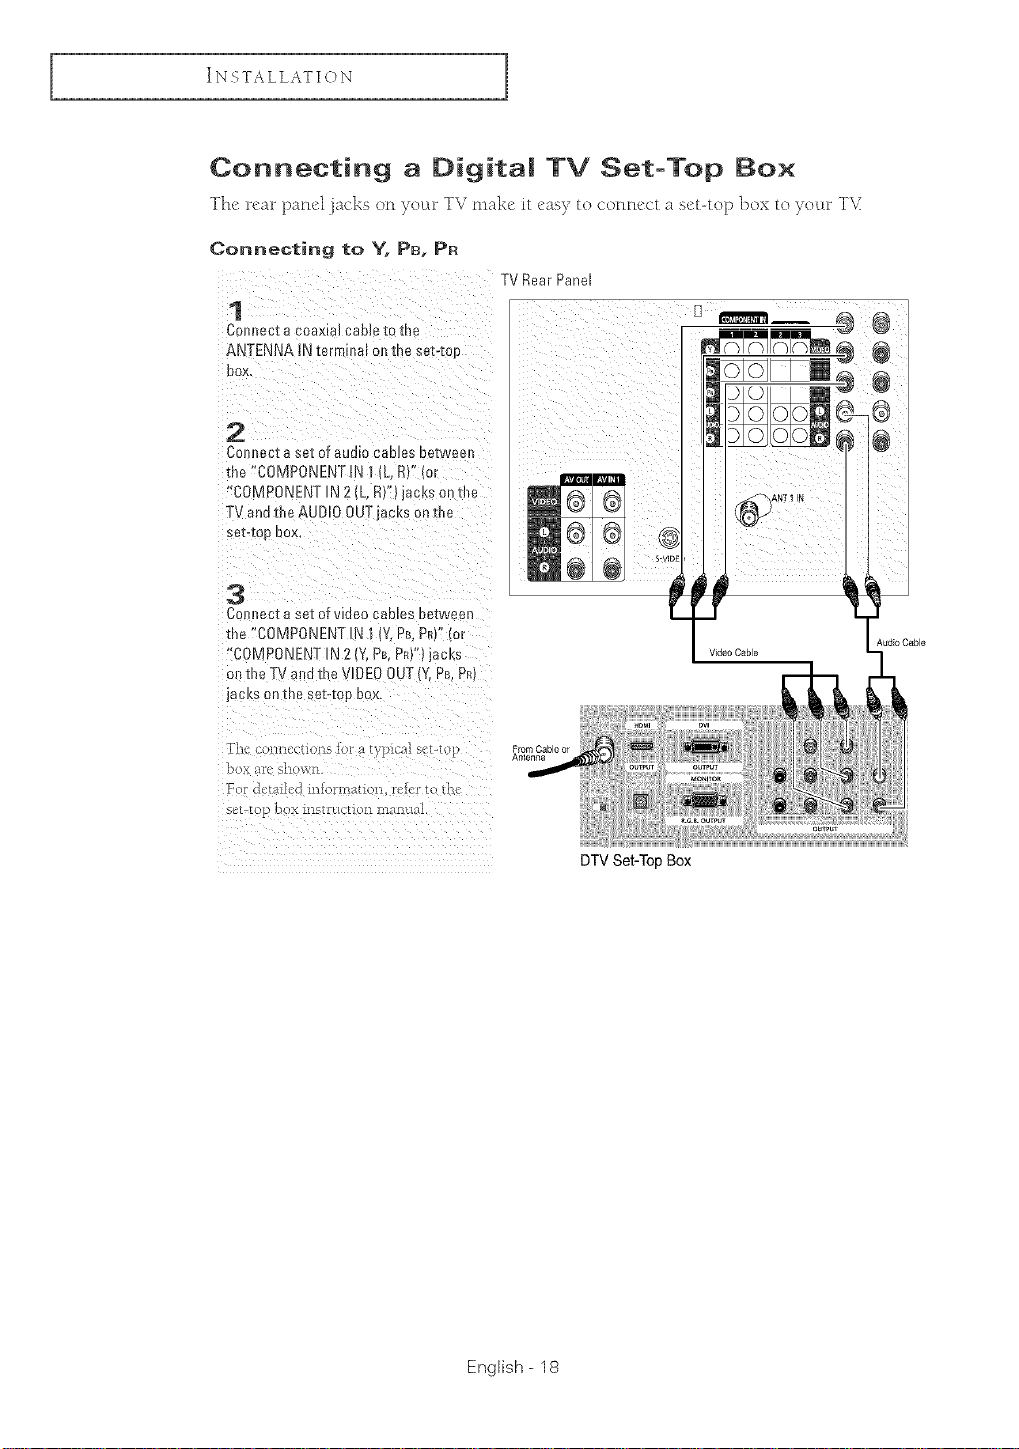
Connecting a Digital TV Set-Top Box
The n'ar pane[ iacks on your TV mare it c_sy to c'ormcc't a s_'t-top box to your T_\T
Connecting to Y, PB. PR
TVRear Parlel
1
C@mecta coaxi 31cadre [o me
ANTENNA INtar °" _alonme se-[-zoe
oox
2
Cc nec[ a sa[ OTaualo capias eezwee!
the "COMPONENT IN 1 L.RY'(or
"COMPONENT IN2 _L,RY'I acKs onme
TV a id the AUDIO OUTiaeks onme
se[-IO0 BOX
3
Connect a sat of vidao canes _)a[wee
the "COMPONENT N 1 Y.Pe.PR or
"COMPONENT IN2 l¥. PB.PRI" ,acKs
anme TV and the V_OE0OUT(Y Pc.Po,
JacKsOnme seMo!: I_ox.
Th, UiEllcC[J011S 101 a lyl)ic3] SC[-LO_
bO_ _IK S[IO\%I&.
S_L L£ • DOX _ISL[RCEJOll ln_LIL[_L
DTV Set-Toe Box
English - 18
INSTALLATION
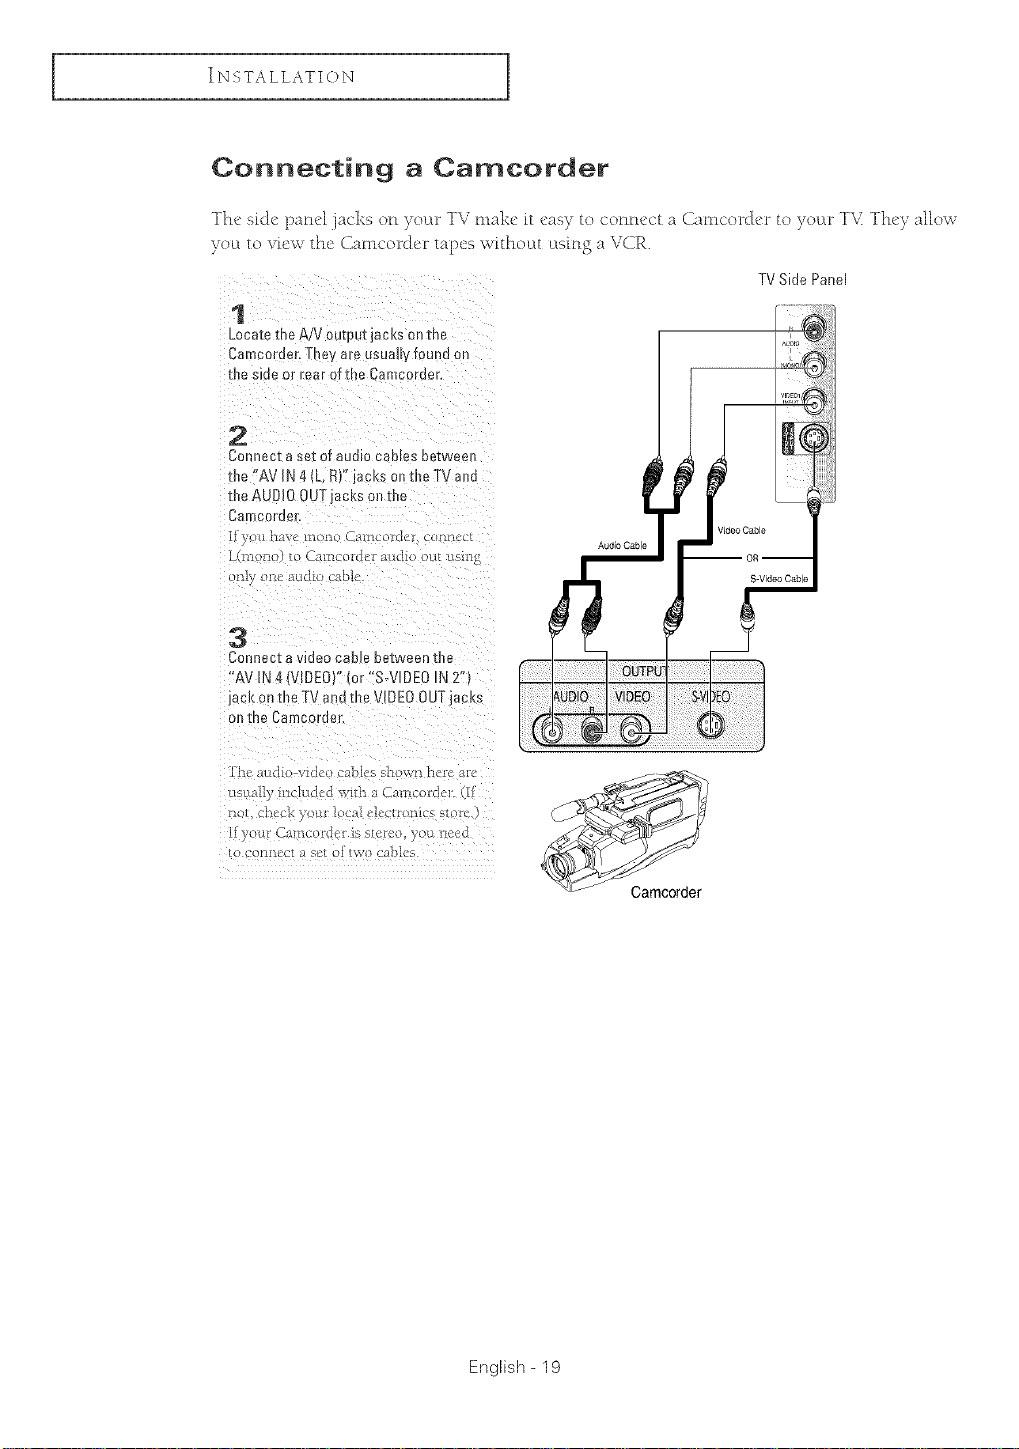
Connecting a Carncorder
The side panel jacks on your TV make it easy to conne( t a Camcorder to your T\_ They allow
you to viess the Camcorder t_pes without l:Lsin$a VCR
TVSide Panel
1
Locale me A/V output jack,son me
Cameorder.They are usuallyfo JNaon
me slae or rear of the Camcorder.
2
Connect a sat of audio caules oe_weeJq
the "AV IN 4 (L.RF locks onths TV and
me AUDIO OUTjacks onTue
CBRIeo_Je
I_ _ U hav4 illofio _Jl_co_0f COill!I'ut
L(m no to Camcon[cr at 4io out _bin_
)ll_ iI_' _Iii[lO C,qOii
Audio Cable
3
Connect a video c_.a oetween Hie
'AV IN4 VIDEOP'(c r"S-VIDEO N 2"
ja( ontile TV and the VIDEOOUTjacks
O0 IRe Caslco!"deK
tsua[1 included wnfi _ Camconfc_
iioI_ cht oIL Iu[bc_ I[ud[oniuf S/olT
11 }'OL CS!III_Of(ICf iS fi q'('_] }'OH [ff/'CL[
)lliiCu[ ;t SI_ oi /W_) ( _tb_cs
English- 19
IN_;TALLATIO N
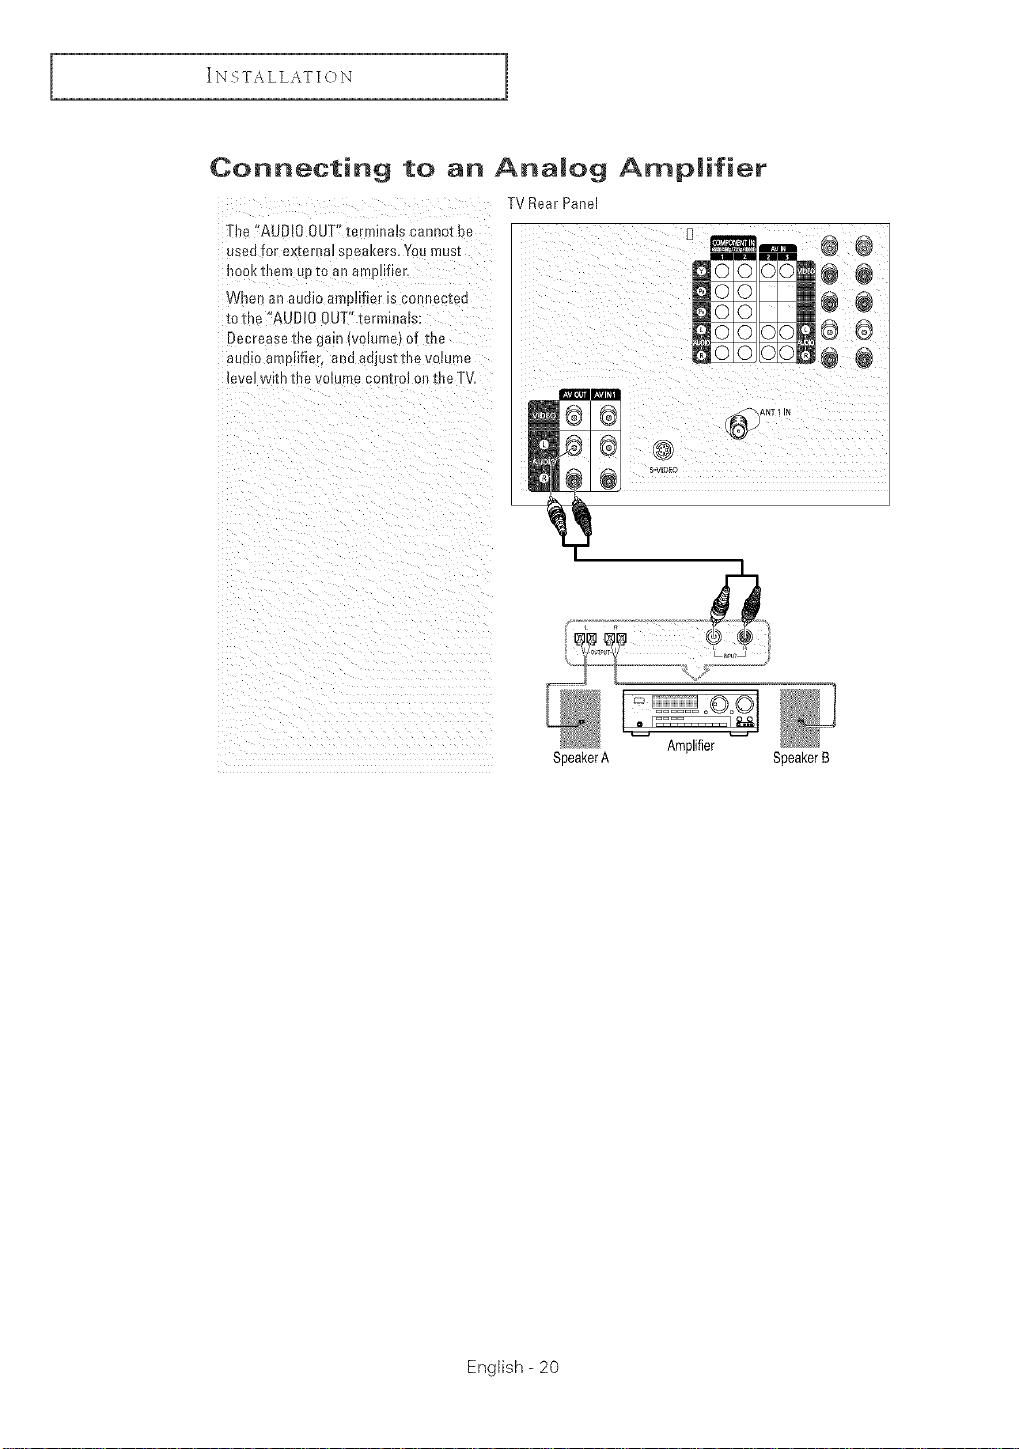
Connecting to an Anamog Ampmifier
TV Rear Panel
The "AUDIO OUT"terminaJs cannot be
used for axterJ al saeakers, You must
nOOKtnen Dt_ anamm fief
Whel an auo_oamplifier is corn ec_ec
lethe '*AUDI{ 3UT'terminals:
Decrease the gain {volume} of th_
at a_oartDlifiel and adjustthe volume
eveJ wl[n [!]e vc Jme controJ on the T_
!_ ©©1
SpeakerA SpeakerB
Amplifier
English - 20
]
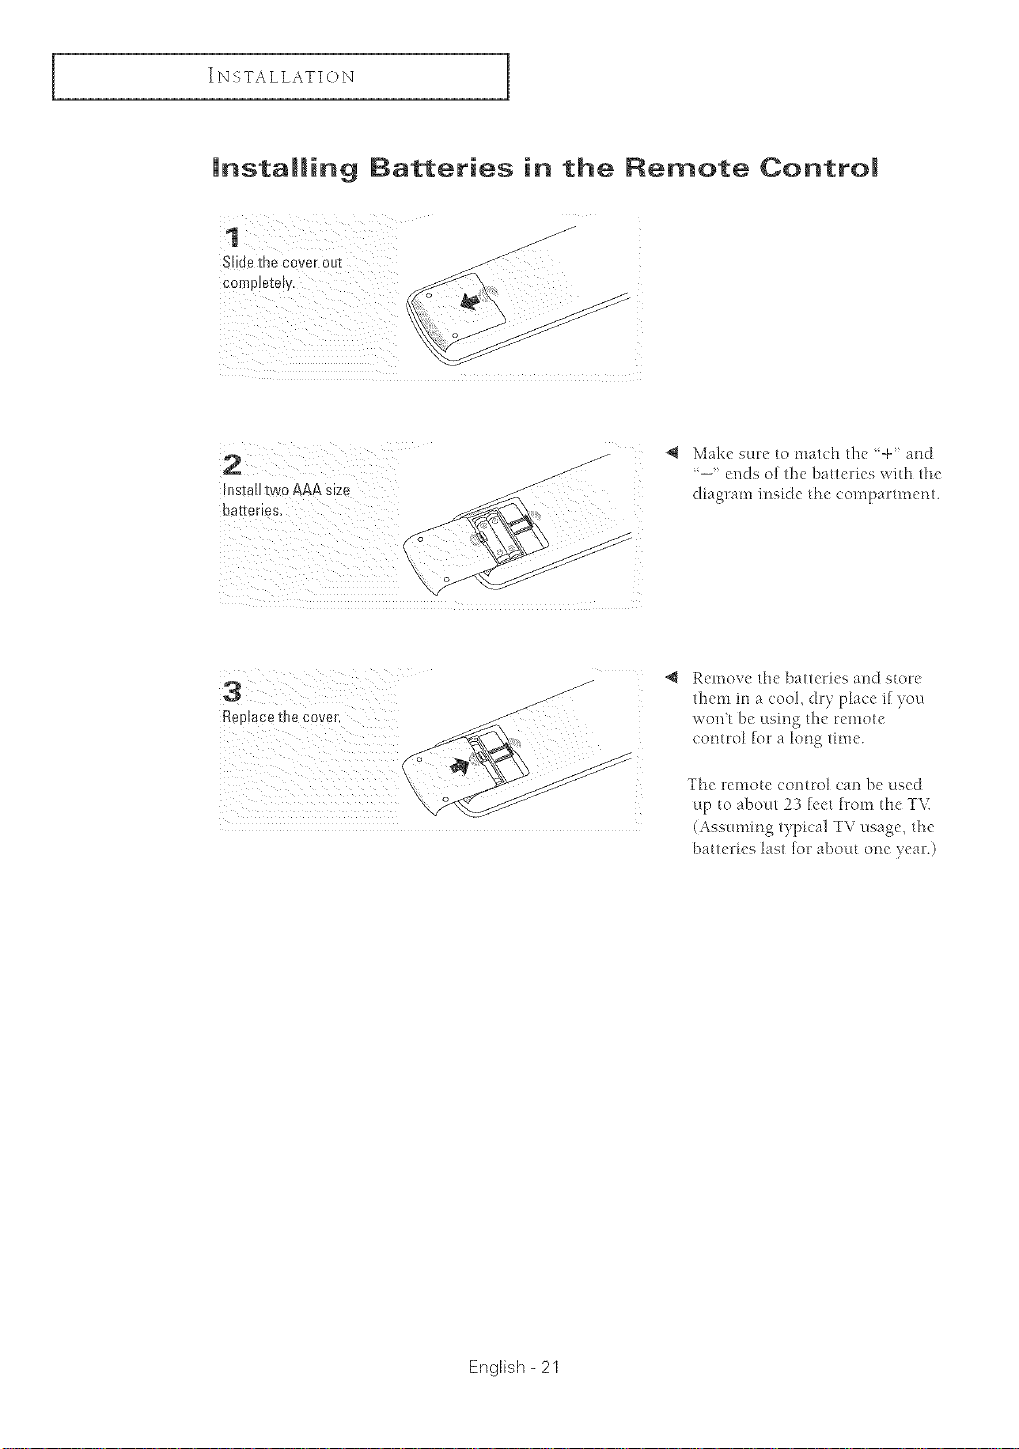
Installing Batteries in the Remote Contro|
Slidethecoverout
oomp,ete,y,
:iI
@ Make sut:e to maich tl_e '%" and
ends of the Ioaqeries with lhe
diaglali1 ills}de the (olt/pal{it/e[ll,
Re _
PlacetheC°ver' .--_A""
j/
_J Remove lhe ballcFies awl slore
them in a cool, ally place if you
won't be using tl_e remote
coim:ol to/7a long til:'ae.
The remote contro[ ca_ be used
up to abom 23 feet from _he TV.
(Assuming L_pica1TV usage, the
baueTies last ]oF about one yeaT.)
English - 21
 Loading...