

Samsung Tantus HCJ555W, Tantus HCJ655W Instruction Manual
HDTV
INSTRUCTION MANUAL
Tantus Digital HCJ555W/HCJ655W
HDTVInstruction Manual
59

HDTV
WELCOME TO A NEW WORLD! The world of Samsung
is newer, brighter and more exciting than ever thanks to
the new wave of video technology you have just pur-
chased. It’s a window into a new world of dazzling color
and unlimited possibilities.•What is HDTV? HDTV is
high definition television. Unlike ordinary TV, which
relies on analog signals, HDTV receives and displays a
sharp digital signal. This translates into brighter, clear-
er pictures than have ever been possible. Look closely
at a conventional television and you will see a series
of horizontal lines, each made up of tiny dots called
pixels. Most televisions use a maximum of 432 lines
of pixels to create television pictures. HDTV shows up
to 1080 horizontal lines, providing an image with
clear and dramatic detail. In addition, HDTV is dis-
played in widescreen format, a 16:9 aspect ratio.
Instead of the standard, square aspect ratio of ordi-
nary TV, an HDTV image is spread horizontally, creat-
ing sweeping panoramas.•What about the sound?
HDTV comes with up to six channels of Dolby surround
sound and the capability of connecting a subwoofer.
This means that while viewing HDTV you will literally be
surrounded on all sides with a deep, rich soundtrack that
makes your home theater viewing experience come alive.
Welcome to the World of Samsung!
Trademarks
Manufactured under license from Dolby Laboratories. Dolby®, AC-3®, ProLogic®and the
double-D symbol are trademarks of Dolby Laboratories.
Dss is a trademark of DIRECTV, Inc., a unit of GM Hughes Electronics.
TM
I-Point
All brand product service names and logos are trademarks and/or registered trademarks of
their respective manufacturers and companies.
is a trademark of Varatouch Technology Inc.

Quick Start . . . . . . . . . . . . . . . . . . . . . . . . . . . . . . . . . . . . . . . . . . . . . . . . . . . . . . . . . . . . . . .1
HDTV
Connecting Your Equipment
Overview of the Front Panel . . . . . . . . . . . . . . . . . . . . . . . . . . . . . . . . . . . . . . . . . . . . . . .2
Overview of the Rear Panel . . . . . . . . . . . . . . . . . . . . . . . . . . . . . . . . . . . . . . . . . . . . . . . .3
Selecting the Cables You Will Need . . . . . . . . . . . . . . . . . . . . . . . . . . . . . . . . . . . . . . . . . .4
Connecting Antennas . . . . . . . . . . . . . . . . . . . . . . . . . . . . . . . . . . . . . . . . . . . . . . . . . . . . .5
Cable TV without a Cable Box . . . . . . . . . . . . . . . . . . . . . . . . . . . . . . . . . . . . . . . . . . .5
Cable TV with a Cable Box . . . . . . . . . . . . . . . . . . . . . . . . . . . . . . . . . . . . . . . . . . . . . .5
Indoor/Outdoor Antenna . . . . . . . . . . . . . . . . . . . . . . . . . . . . . . . . . . . . . . . . . . . . . . .5
Connecting Video Equipment . . . . . . . . . . . . . . . . . . . . . . . . . . . . . . . . . . . . . . . . . . . . . .6
VCR without a Cable Box . . . . . . . . . . . . . . . . . . . . . . . . . . . . . . . . . . . . . . . . . . . . . . .6
VCR with a Cable Box . . . . . . . . . . . . . . . . . . . . . . . . . . . . . . . . . . . . . . . . . . . . . . . . . .6
VCR with Monitor Out Outputs . . . . . . . . . . . . . . . . . . . . . . . . . . . . . . . . . . . . . . . . . .7
Digital Satellite System (DSS) . . . . . . . . . . . . . . . . . . . . . . . . . . . . . . . . . . . . . . . . . . .7
Digital Video Disc (DVD) Player . . . . . . . . . . . . . . . . . . . . . . . . . . . . . . . . . . . . . . . . .8
DTV Settop Box . . . . . . . . . . . . . . . . . . . . . . . . . . . . . . . . . . . . . . . . . . . . . . . . . . . . . .8
Laser Disc Player . . . . . . . . . . . . . . . . . . . . . . . . . . . . . . . . . . . . . . . . . . . . . . . . . . . . .9
Camcorder . . . . . . . . . . . . . . . . . . . . . . . . . . . . . . . . . . . . . . . . . . . . . . . . . . . . . . . . . .9
Connecting Audio Equipment . . . . . . . . . . . . . . . . . . . . . . . . . . . . . . . . . . . . . . . . . . . . .10
Front Speakers, Rear Speakers and a Subwoofer . . . . . . . . . . . . . . . . . . . . . . . . . . .10
Audio System . . . . . . . . . . . . . . . . . . . . . . . . . . . . . . . . . . . . . . . . . . . . . . . . . . . . . . .11
. . . . . . . . . . . . . . . . . . . . . . . . . . . . . . . . . . . . . . . . . . . .2
Understanding the Remote Control . . . . . . . . . . . . . . . . . . . . . . . . . . . . . . . .12
Reviewing the Remote Control . . . . . . . . . . . . . . . . . . . . . . . . . . . . . . . . . . . . . . . . . . . .12
Installing the Remote Control Batteries . . . . . . . . . . . . . . . . . . . . . . . . . . . . . . . . . .14
Programming the Remote Control . . . . . . . . . . . . . . . . . . . . . . . . . . . . . . . . . . . . . . .14
Understanding the On-screen Menu System . . . . . . . . . . . . . . . . . . . . . . . . . . . . . . . . . .15
Using the Menu Controls . . . . . . . . . . . . . . . . . . . . . . . . . . . . . . . . . . . . . . . . . . . . . .15
Using the On-screen Help . . . . . . . . . . . . . . . . . . . . . . . . . . . . . . . . . . . . . . . . . . . . . .16
Viewing the Display . . . . . . . . . . . . . . . . . . . . . . . . . . . . . . . . . . . . . . . . . . . . . . . . . .17
Setting Up Your HDTV . . . . . . . . . . . . . . . . . . . . . . . . . . . . . . . . . . . . . . . . . . . . . . . . .18
Selecting the Menu Language . . . . . . . . . . . . . . . . . . . . . . . . . . . . . . . . . . . . . . . . . . . . .18
Memorizing Channels . . . . . . . . . . . . . . . . . . . . . . . . . . . . . . . . . . . . . . . . . . . . . . . . . . . .18
Adding and Deleting Channels . . . . . . . . . . . . . . . . . . . . . . . . . . . . . . . . . . . . . . . . . . . .19
Setting the Time and Date . . . . . . . . . . . . . . . . . . . . . . . . . . . . . . . . . . . . . . . . . . . . . . . .20
Changing Channels . . . . . . . . . . . . . . . . . . . . . . . . . . . . . . . . . . . . . . . . . . . . . . . . . . . . . .20
Selecting Your Favorite Channels . . . . . . . . . . . . . . . . . . . . . . . . . . . . . . . . . . . . . . . . . .21
Fine Tuning Analog Channels . . . . . . . . . . . . . . . . . . . . . . . . . . . . . . . . . . . . . . . . . . . . . .22
Checking Digital Channel Signal Strength . . . . . . . . . . . . . . . . . . . . . . . . . . . . . . . . . . . .22
Adjusting the Convergence . . . . . . . . . . . . . . . . . . . . . . . . . . . . . . . . . . . . . . . . . . . . . . .23
Viewing the Guides and Displays . . . . . . . . . . . . . . . . . . . . . . . . . . . . . . . . . . .24
Viewing the Program Guide . . . . . . . . . . . . . . . . . . . . . . . . . . . . . . . . . . . . . . . . . . . . . . .24
Viewing the Channel Guide . . . . . . . . . . . . . . . . . . . . . . . . . . . . . . . . . . . . . . . . . . . . . . .26
Viewing the Minor Channel Display . . . . . . . . . . . . . . . . . . . . . . . . . . . . . . . . . . . . . . . .27

Using Special Picture Features . . . . . . . . . . . . . . . . . . . . . . . . . . . . . . . . . . . . . .28
Adjusting Picture Options Manually . . . . . . . . . . . . . . . . . . . . . . . . . . . . . . . . . . . . . . . .28
Using Preset Picture Options . . . . . . . . . . . . . . . . . . . . . . . . . . . . . . . . . . . . . . . . . . . . . .28
Selecting the Picture Size . . . . . . . . . . . . . . . . . . . . . . . . . . . . . . . . . . . . . . . . . . . . . . . . .29
Using Special Sound Features . . . . . . . . . . . . . . . . . . . . . . . . . . . . . . . . . . . . . . .30
Adjusting Sound Options Manually . . . . . . . . . . . . . . . . . . . . . . . . . . . . . . . . . . . . . . . . .30
Using Preset Sound Options . . . . . . . . . . . . . . . . . . . . . . . . . . . . . . . . . . . . . . . . . . . . . . .30
Setting up Speakers . . . . . . . . . . . . . . . . . . . . . . . . . . . . . . . . . . . . . . . . . . . . . . . . . . . . .31
Adjusting the Speaker Settings . . . . . . . . . . . . . . . . . . . . . . . . . . . . . . . . . . . . . . . . . . . .32
Selecting Listening Modes . . . . . . . . . . . . . . . . . . . . . . . . . . . . . . . . . . . . . . . . . . . . . . . .32
Adjusting Multitrack . . . . . . . . . . . . . . . . . . . . . . . . . . . . . . . . . . . . . . . . . . . . . . . . . . . .33
Using Special Time Features . . . . . . . . . . . . . . . . . . . . . . . . . . . . . . . . . . . . . . . . .34
Using the Sleep Timer . . . . . . . . . . . . . . . . . . . . . . . . . . . . . . . . . . . . . . . . . . . . . . . . . . .34
Turning On the HDTV Automatically . . . . . . . . . . . . . . . . . . . . . . . . . . . . . . . . . . . . . . . .35
Turning Off the HDTV Automatically . . . . . . . . . . . . . . . . . . . . . . . . . . . . . . . . . . . . . . . .36
Setting Parental Locks . . . . . . . . . . . . . . . . . . . . . . . . . . . . . . . . . . . . . . . . . . . . . . . .38
Locking All Channels . . . . . . . . . . . . . . . . . . . . . . . . . . . . . . . . . . . . . . . . . . . . . . . . . . . .38
Locking Programs by Ratings . . . . . . . . . . . . . . . . . . . . . . . . . . . . . . . . . . . . . . . . . . . . . .39
MPAA Ratings . . . . . . . . . . . . . . . . . . . . . . . . . . . . . . . . . . . . . . . . . . . . . . . . . . . . . . .39
TV Parental Guidelines . . . . . . . . . . . . . . . . . . . . . . . . . . . . . . . . . . . . . . . . . . . . . . .39
Changing Your Secret Code . . . . . . . . . . . . . . . . . . . . . . . . . . . . . . . . . . . . . . . . . . . . . . .41
Using Other Special Features . . . . . . . . . . . . . . . . . . . . . . . . . . . . . . . . . . . . . . . .42
Using Closed Captions . . . . . . . . . . . . . . . . . . . . . . . . . . . . . . . . . . . . . . . . . . . . . . . . . . .42
Watching a Demonstration of the Menu System . . . . . . . . . . . . . . . . . . . . . . . . . . . . . .43
Appendix . . . . . . . . . . . . . . . . . . . . . . . . . . . . . . . . . . . . . . . . . . . . . . . . . . . . . . . . . . . . . . .44
Troubleshooting . . . . . . . . . . . . . . . . . . . . . . . . . . . . . . . . . . . . . . . . . . . . . . . . . . . . . . . .44
Understanding On-screen Messages . . . . . . . . . . . . . . . . . . . . . . . . . . . . . . . . . . . . . . . . .45
Programming the Remote Control to Operate Other Components . . . . . . . . . . . . . . . . .46
CATV Remote Control Codes . . . . . . . . . . . . . . . . . . . . . . . . . . . . . . . . . . . . . . . . . . .46
DSS Remote Control Codes . . . . . . . . . . . . . . . . . . . . . . . . . . . . . . . . . . . . . . . . . . . .46
DVD Remote Control Codes . . . . . . . . . . . . . . . . . . . . . . . . . . . . . . . . . . . . . . . . . . . .47
VCR Remote Control Codes . . . . . . . . . . . . . . . . . . . . . . . . . . . . . . . . . . . . . . . . . . . .47
Navigating Menus with Front Panel Buttons . . . . . . . . . . . . . . . . . . . . . . . . . . . . . . . . . .48
Using the Front Panel Buttons . . . . . . . . . . . . . . . . . . . . . . . . . . . . . . . . . . . . . . . . . .48
Glossary . . . . . . . . . . . . . . . . . . . . . . . . . . . . . . . . . . . . . . . . . . . . . . . . . . . . . . . . . . . . . .50
Specifications . . . . . . . . . . . . . . . . . . . . . . . . . . . . . . . . . . . . . . . . . . . . . . . . . . . . . . . . . .53
Index . . . . . . . . . . . . . . . . . . . . . . . . . . . . . . . . . . . . . . . . . . . . . . . . . . . . . . . . . . . . . . . . .54

HDTV
Quick Star t
Follow these steps to get your HDTV connected and working as quickly as
possible. For more detailed instructions, please see the appropriate sections
in this manual.
Samsung encourages you to explore your new system. You can’t make a
mistake. At any time you can return to the factory settings by unplugging
your HDTV for a few minutes and then plugging it in again.
Unpack the HDTV and accessories.
1
Packed with your HDTV are one remote control,
two AAA batteries and a warranty card. Place the
batteries in the remote control. See page 14.
HDTV
Connect a cable TV antenna or an indoor/outdoor
2
antenna. To receive digital signals, you must connect
an indoor/outdoor antenna. See page 4.
3
Plug the HDTV power cord into a wall outlet.
Read “Understanding the Remote Control.”
4
See page 12.
Memorize the channels. See page 18.
5
Set the time and date. See page 20.
6
Adjust the convergence. See page 23.
7
After completing these basic steps, your HDTV will be ready for use.
NOTE
Do not plug the
HDTV power
cord into the
back of another
component.
HDTVInstruction Manual
HDTVInstruction Manual
1
1
TV/VIDEO
ENTER
S-VHS VIDEO AUDIO
MENU
– VOLUME
+
CHANNEL
OPEN/CLOSE
1324567
LR
VIDEO 3
INPUT
HDTV
HDTV
Understanding the Remote Control
Connecting Your Equipment
Overview of the Front Panel
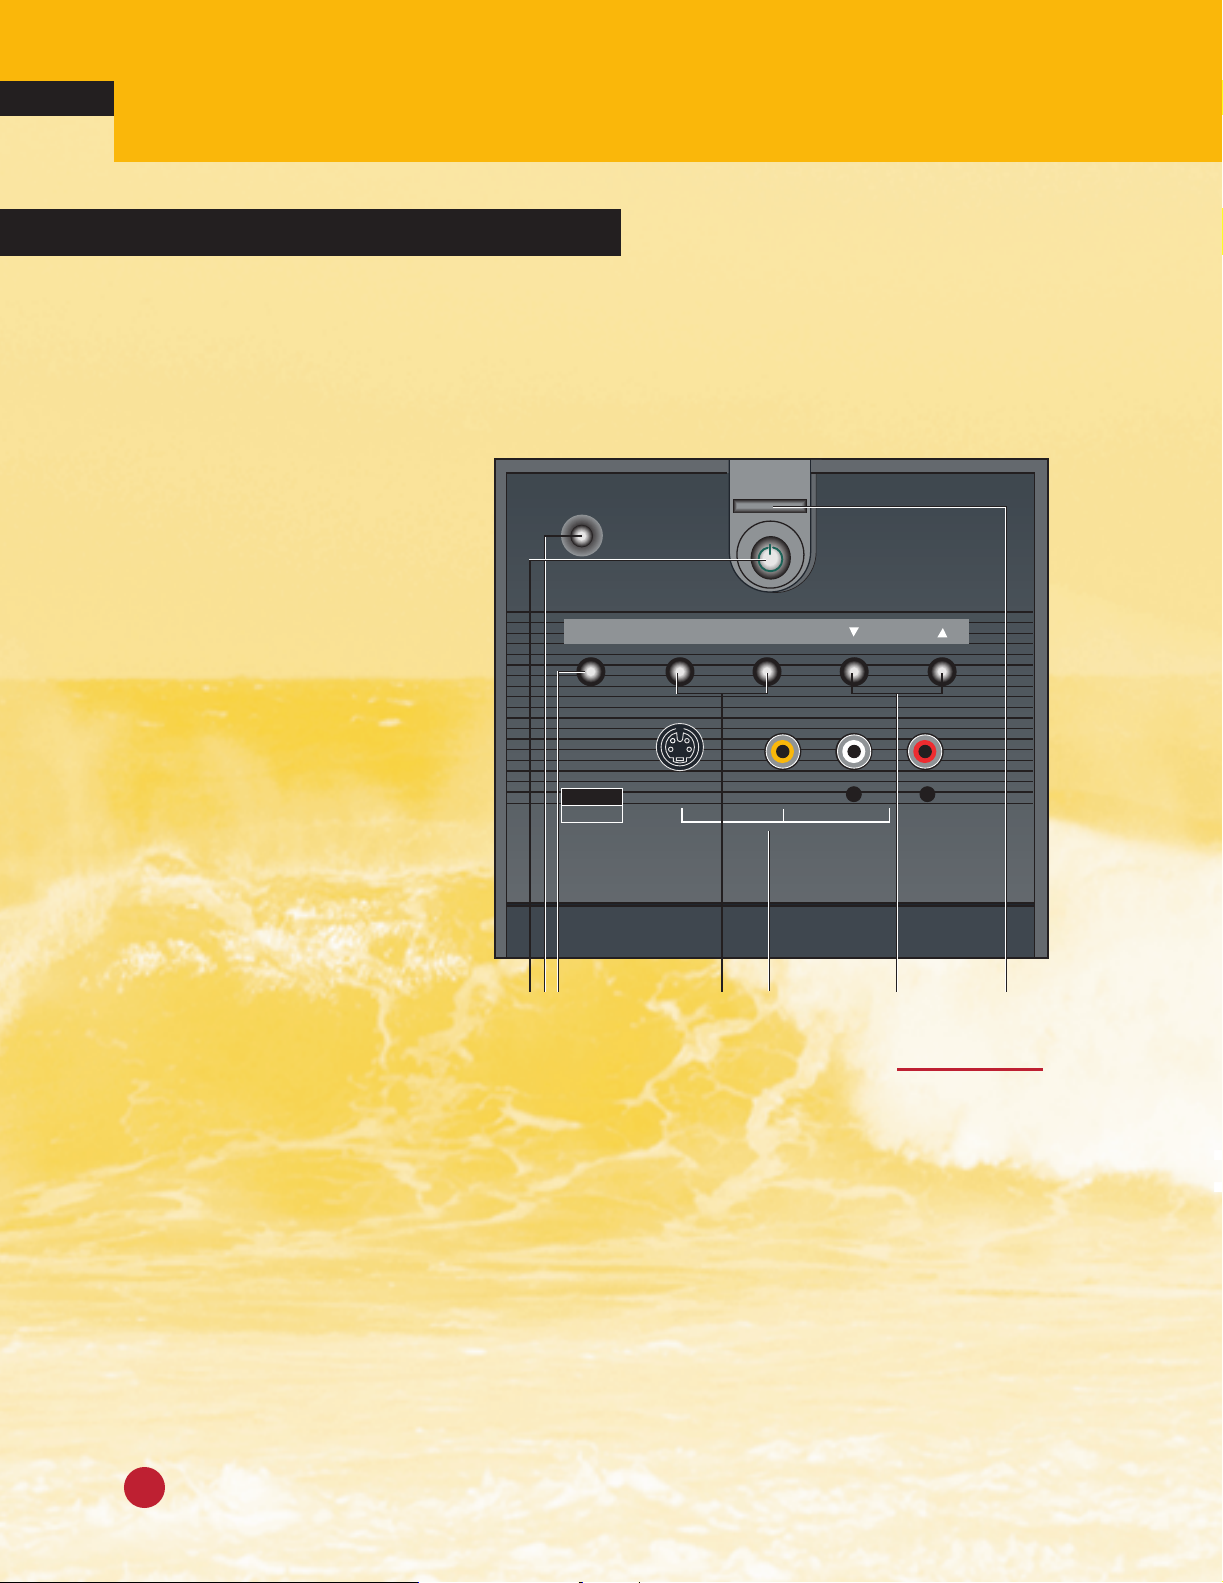
With the HDTV front panel door closed, there are two buttons visible: OPEN/CLOSE
and POWER. Open the door to view the other buttons and connectors.
1 POWER button
Press to turn the HDTV power on and off.
2 TV/VIDEO ENTER button
•If the on-screen menus are
displayed, press to select high-
lighted icons or menu options.
See “Navigating Menus with
Front Panel Buttons,” page 48.
•If the on-screen menus are
not displayed, press to select
external components connected
to your HDTV, such as a VCR
or a DVD player.
3 MENU button
Press to display the on-screen
menus.
4 VOLUME –/+ buttons
Press to raise and lower the volume of the HDTV. Also use with
on-screen menus.
5 VIDEO 3 inputs
Use to connect components to
your HDTV.
6 CHANNEL yz buttons
Use to change channels on the HDTV. Also use with on-screen menus.
7 OPEN/CLOSE button
Press to open and close the front panel door.
NOTE
The power must
be on before the
door will open
or close.
HDTVInstruction Manual
2
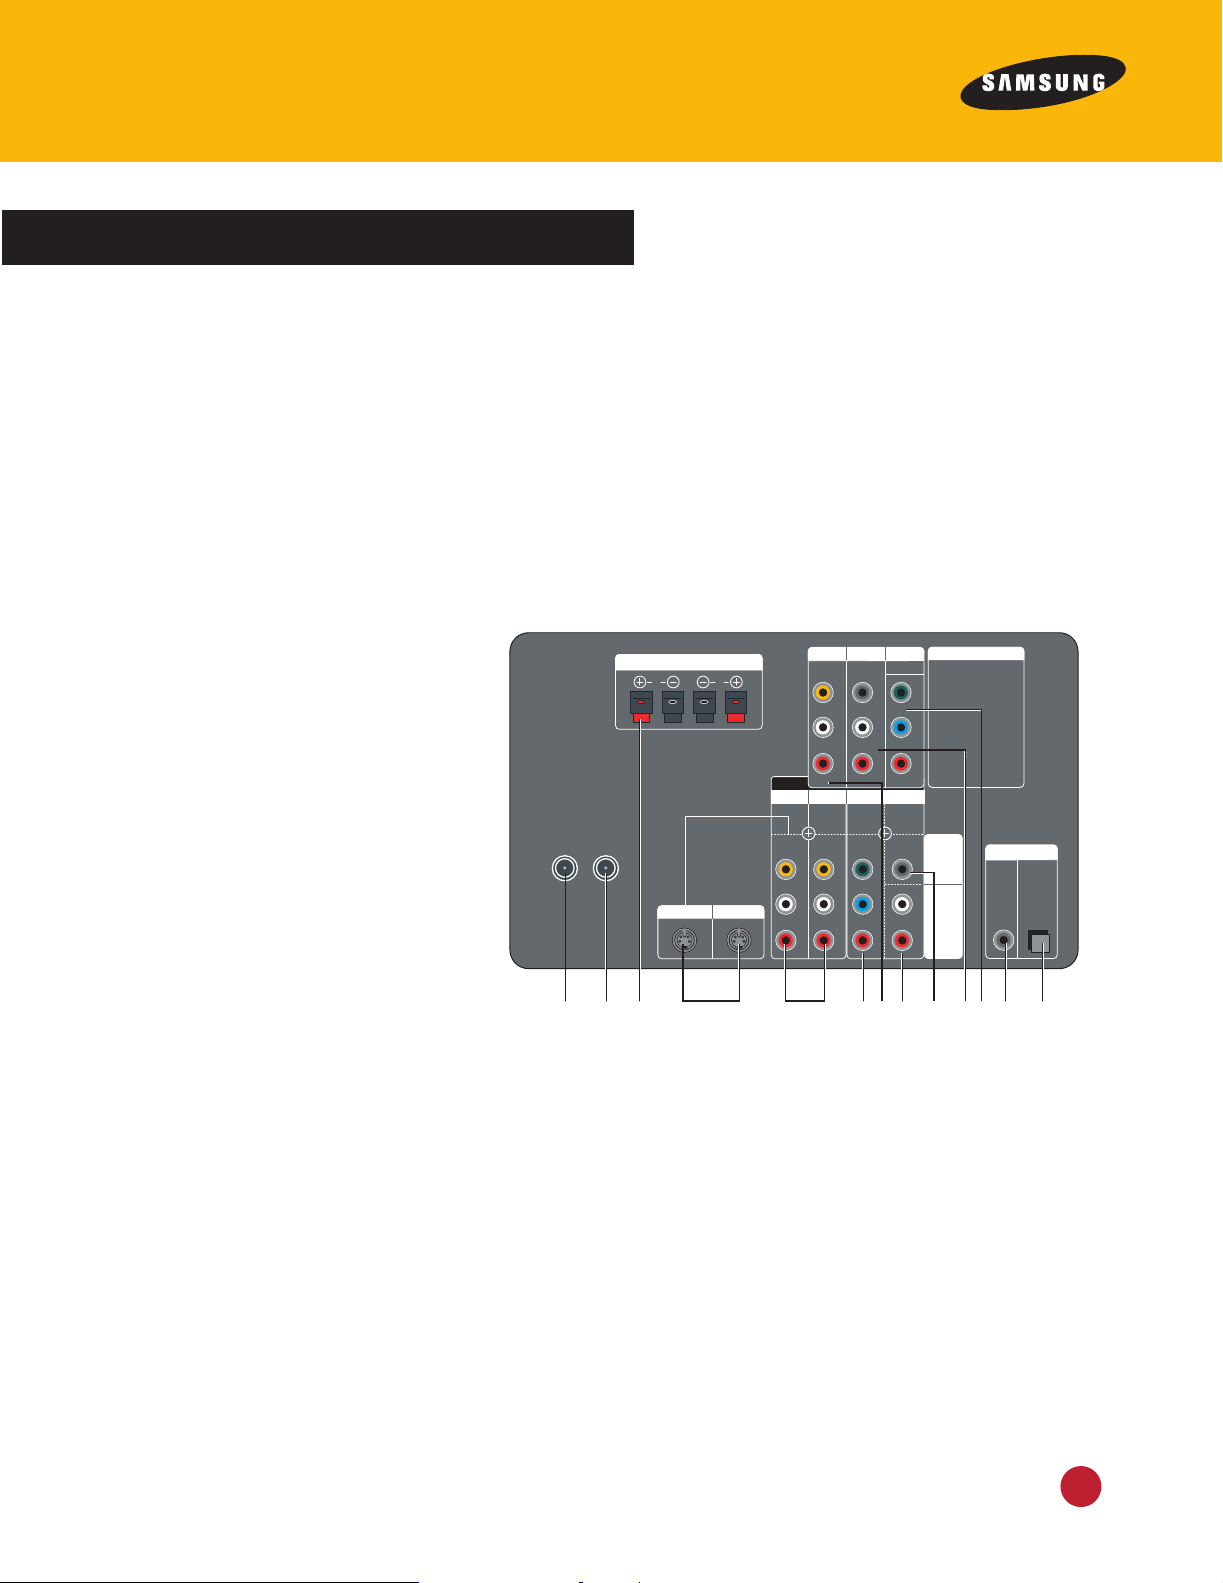
Overview of the Rear Panel
NOTICES:
Manufactured under
license from Dolby
Laboratories. "Dolby",
"AC-3", "ProLogic" and
the double-D symbol are
trademarks of Dolby
Laboratories. Confidential
unpublished works.
Copyright 1992-1997 Dolby
Laboratories. All rights
reserved.
V1
L1
R1
V2
L2
R2
DIGITAL AUDIO OUT
Y
COAXIAL OPTICAL
P
B
P
R
L4
R4
EXTERNAL SPEAKER (8Ω 15W)
R L
DIGITAL
AUDIO
ANALOG
AUDIO
S-VHS 2S-VHS 1
CABLE VHF/UHF
1 2 3 4 5 6 8 12
1011
97 13
75Ω 75Ω
VIDEO 1 VIDEO 2 COMPONENT
INPUT
480i
V
L
R
Y
P
B
P
R
WF
LS
RS
MONITOR OUT
AUDIO OUT
HD COMPONENT
1080i
The rear panel consists of the following inputs, outputs and connectors:
1 CABLE antenna input
Use to connect cable TV.
2 VHF/UHF antenna input
Use to connect an indoor/outdoor antenna.
3 SPEAKER connectors
Use to connect front right and left speakers.
4 S-VHS 1 and S-VHS 2 inputs
Use to connect components with Super Video capability.
5 VIDEO 1 and VIDEO 2 inputs
Use to connect video
and audio from components.
6 COMPONENT inputs
Use to connect DVD players
and other digital equipment.
(480i input only)
7 MONITOR OUT output
Use to connect VCRs and
other video equipment to
record exactly what appears
on the screen.
8 ANALOG AUDIO inputs
Use to connect audio equip-
ment with analog audio capability.
9 DIGITAL AUDIO input
Use to connect DVD players and other equipment with digital audio capability.
10 AUDIO OUT outputs
Use to connect a subwoofer and powered rear surround speakers.
11 HD COMPONENT inputs
Use to connect DTV settop box and other digital equipment.(1080i input only)
12 COAXIAL DIGITAL AUDIO OUT output
Use to connect audio receivers and other equipment with coaxial digital inputs.
13 OPTICAL DIGITAL AUDIO OUT output
Use to connect audio receivers and other equipment with optical digital inputs.
HDTVInstruction Manual
3
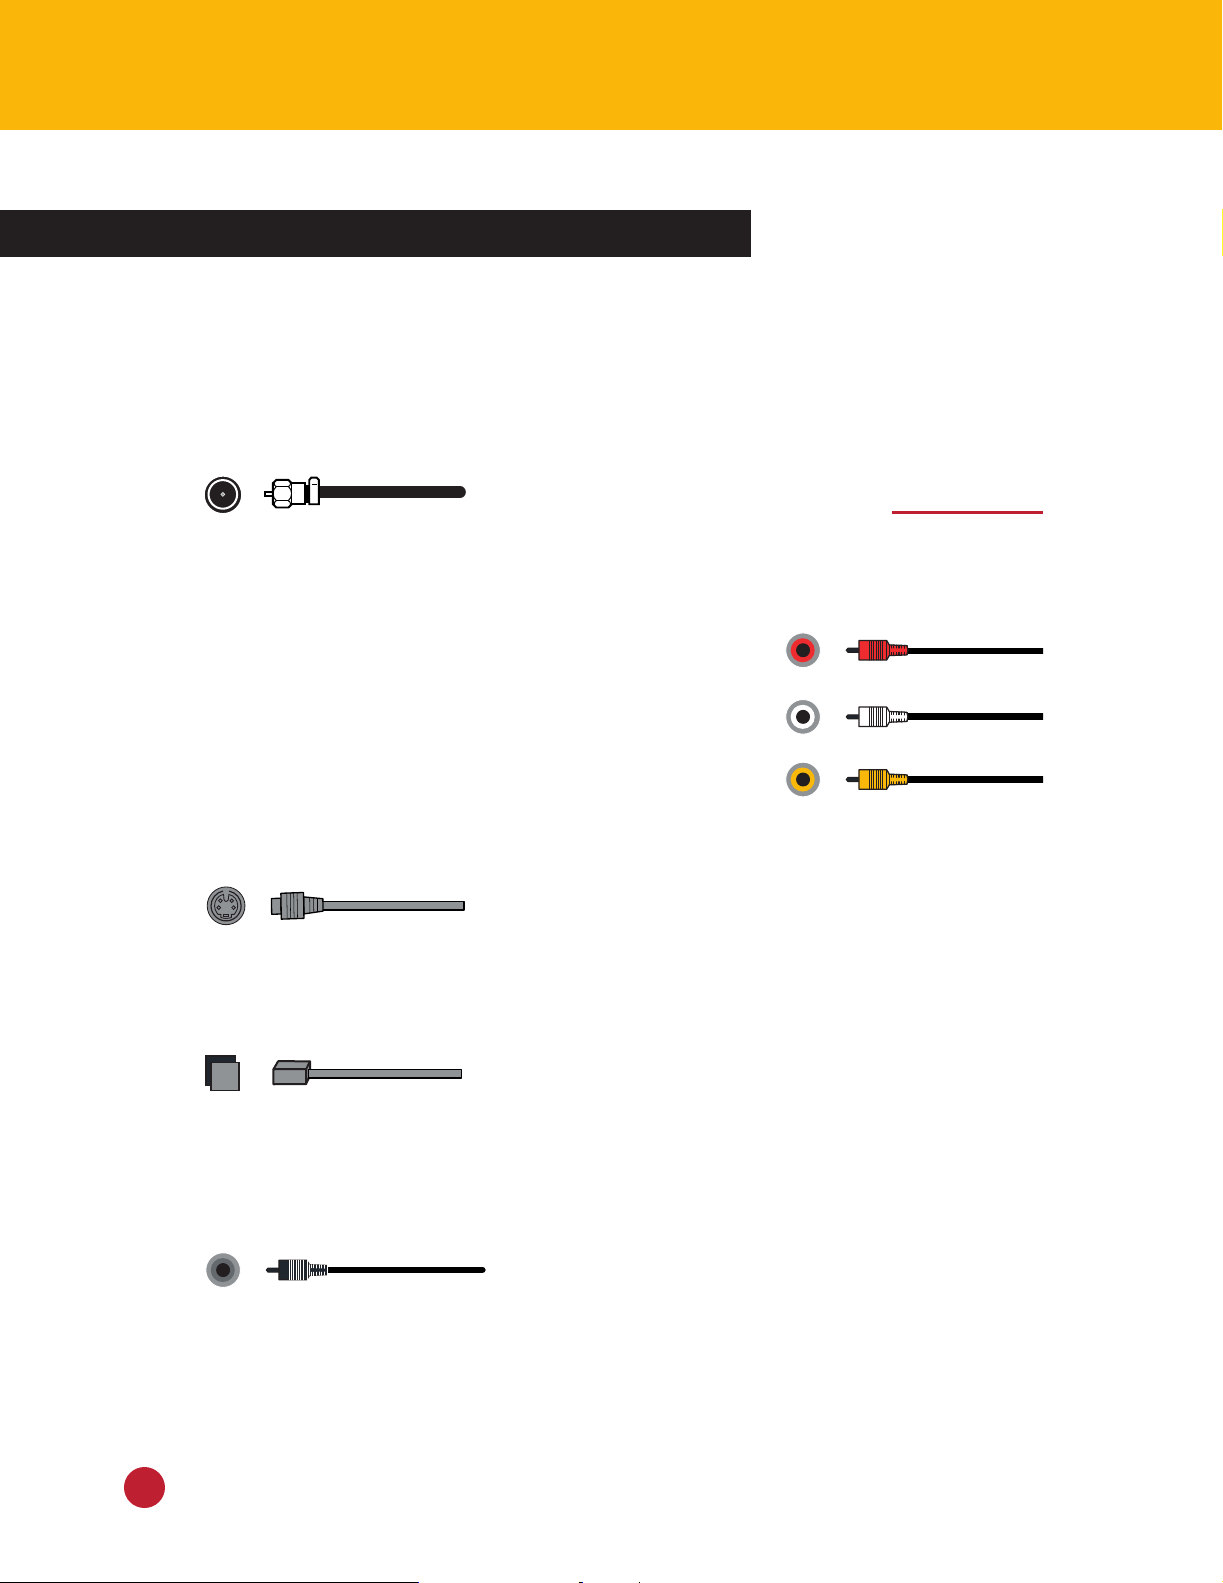
Selecting the Cables You Will Need
The cables you will need for connecting components to your HDTV are not supplied with
the HDTV, but they are readily available from your local electronics store.
The following is a list of cables you may need. The specific cables you will need
depend upon the components you would like to connect.
Coaxial cable
CAUTION
Use to connect cable TV or an indoor/outdoor antenna.
Audio/Video cables
Use to connect VCRs, digital satellite systems, digital video disc
players, laser disc players and camcorders. Audio/video cables
are usually color-coded:
red is for right audio, white is for left
audio; yellow is for video.
You can connect some of the components listed above with
S-Video cables (see the description below) instead, but do not
connect the components using both video cables and S-Video
cables. You must select one type of video cable per component.
Make sure the power
is off before connecting equipment.
S-Video (Super Video) cables
Use to connect VCRs, digital satellite systems, laser disc players and
camcorders. S-Video connections provide superior video performance.
Optical digital cable
Use to connect an audio system and DVD players. You can connect some audio
systems and DVD players with a coaxial digital cable instead, but do not use
both an optical digital cable and a coaxial cable. An optical digital connection
provides superior performance when compared to a coaxial digital connection.
Coaxial digital cable
Use to connect an audio system and DVD players. You can connect some audio
systems and DVD players with an optical cable instead, but do not use both a
coaxial cable and an optical cable. An optical digital connection provides
superior performance when compared to a coaxial digital connection.
HDTVInstruction Manual
4
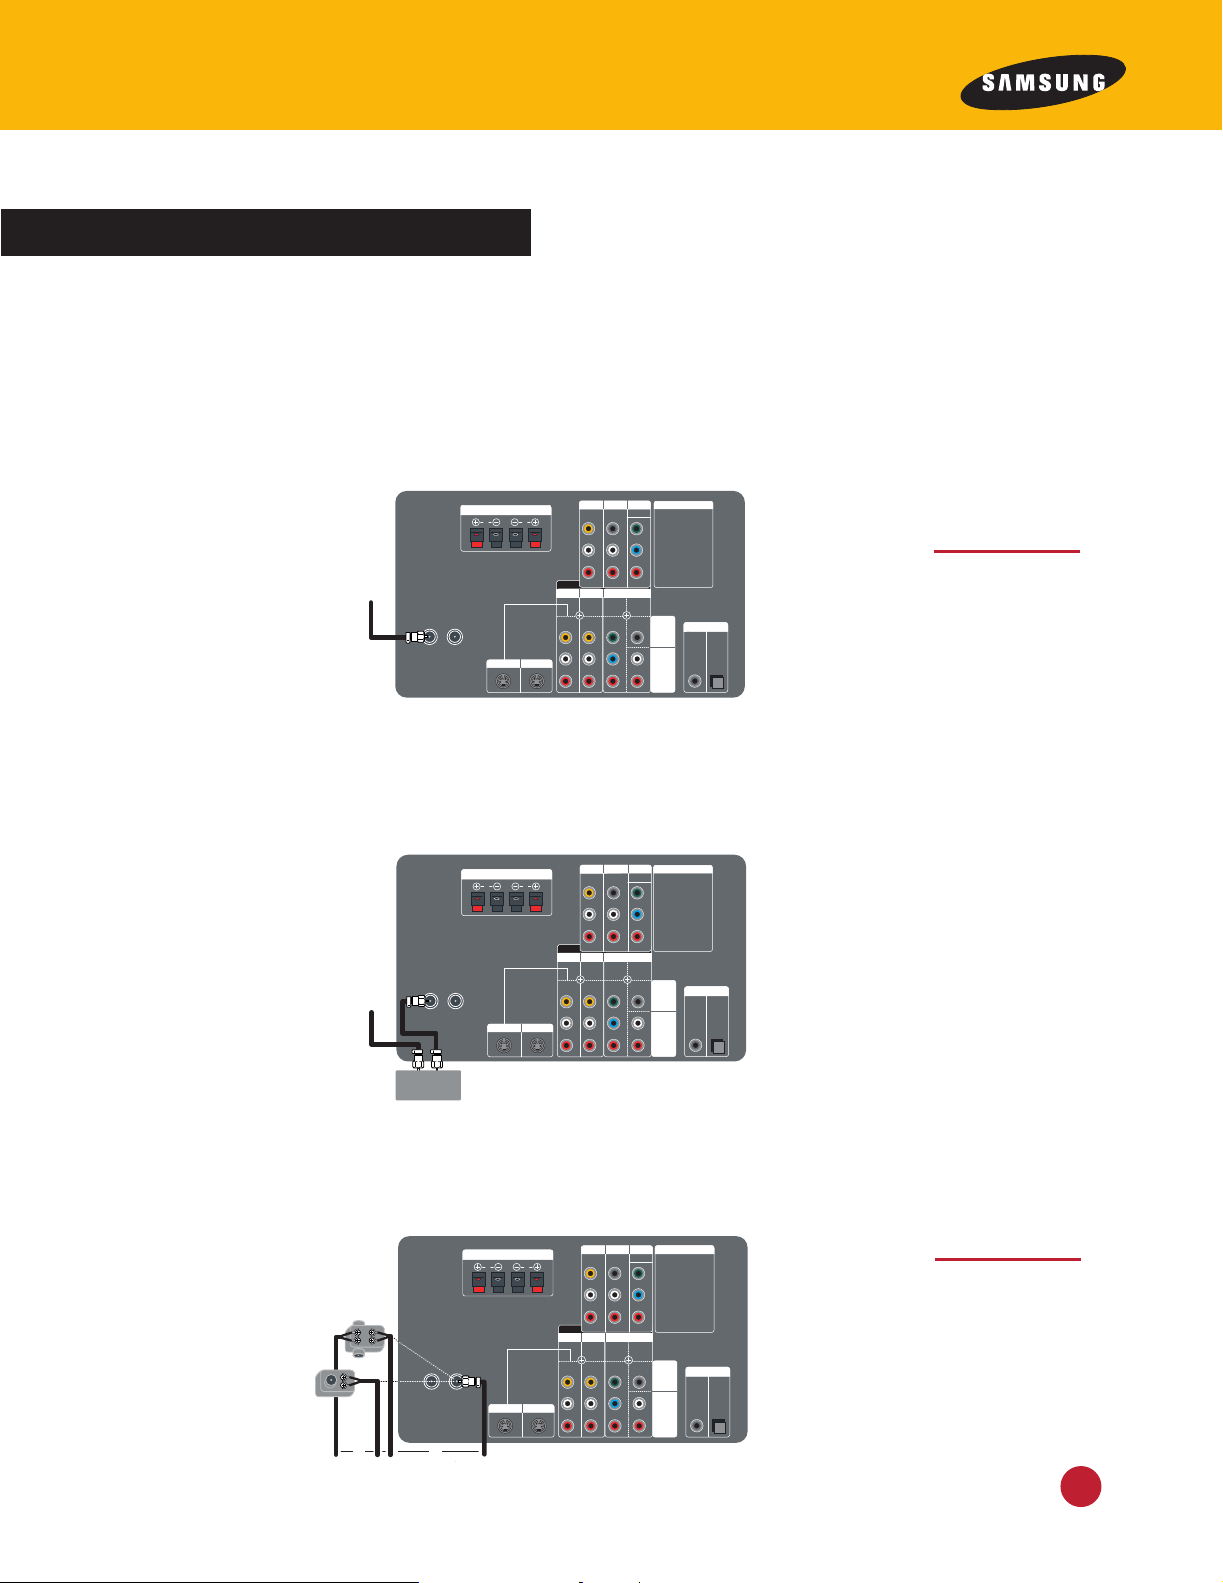
Connecting Antennas
V1
L1
R1
V2
L2
R2
DIGITAL AUDIO OUT
Y
COAXIAL OPTICAL
P
B
P
R
L4
R4
EXTERNAL SPEAKER (8Ω 15W)
R L
DIGITAL
AUDIO
ANALOG
AUDIO
S-VHS 2S-VHS 1
CABLE VHF/UHF
NOTICES:
Manufactured under
license from Dolby
Laboratories. "Dolby",
"AC-3", "ProLogic" and
the double-D symbol are
trademarks of Dolby
Laboratories. Confidential
unpublished works.
Copyright 1992-1997 Dolby
Laboratories. All rights
reserved.
combiner
75Ω 75Ω
adapter
oror
From Antenna Source
VIDEO 1 VIDEO 2 COMPONENT
INPUT
480i
V
L
R
Y
P
B
P
R
WF
LS
RS
MONITOR OUT
AUDIO OUT
HD COMPONENT
1080i
V1
L1
R1
V2
L2
R2
DIGITAL AUDIO OUT
Y
COAXIAL OPTICAL
P
B
P
R
L4
R4
EXTERNAL SPEAKER (8Ω 15W)
R L
DIGITAL
AUDIO
ANALOG
AUDIO
S-VHS 2S-VHS 1
CABLE VHF/UHF
NOTICES:
Manufactured under
license from Dolby
Laboratories. "Dolby",
"AC-3", "ProLogic" and
the double-D symbol are
trademarks of Dolby
Laboratories. Confidential
unpublished works.
Copyright 1992-1997 Dolby
Laboratories. All rights
reserved.
75Ω 75Ω
From Cable
Source
cable boxcable box
IN OUT
VIDEO 1 VIDEO 2 COMPONENT
INPUT
480i
V
L
R
Y
P
B
P
R
WF
LS
RS
MONITOR OUT
AUDIO OUT
HD COMPONENT
1080i
V1
L1
R1
V2
L2
R2
DIGITAL AUDIO OUT
Y
COAXIAL OPTICAL
P
B
P
R
L4
R4
EXTERNAL SPEAKER (8Ω 15W)
R L
DIGITAL
AUDIO
ANALOG
AUDIO
S-VHS 2S-VHS 1
CABLE VHF/UHF
NOTICES:
Manufactured under
license from Dolby
Laboratories. "Dolby",
"AC-3", "ProLogic" and
the double-D symbol are
trademarks of Dolby
Laboratories. Confidential
unpublished works.
Copyright 1992-1997 Dolby
Laboratories. All rights
reserved.
75Ω 75Ω
From Cable
Source
VIDEO 1 VIDEO 2 COMPONENT
INPUT
480i
V
L
R
Y
P
B
P
R
WF
LS
RS
MONITOR OUT
AUDIO OUT
HD COMPONENT
1080i
This section shows how to connect cable TV with and without a cable box, and how to connect an indoor/outdoor antenna. If you have cable TV with a cable box, and also plan on connecting a VCR, please see the section on how to connect a VCR with a cable box (page 7).
Cable TV without a Cable Box
If you have cable TV and do not use a cable box, plug and screw the cable into the
rear cable antenna input as shown in the following illustration.
NOTE
To receive digital
channels, you must
connect an
indoor/outdoor
antenna.
Cable TV with a Cable Box
If you have a cable box, please follow the connection illustration below. If you also
plan to connect a VCR with your cable box, see the section on how to connect a
VCR with a cable box (page 7).
Indoor/Outdoor Antenna
To connect an indoor/outdoor antenna, follow the illustration below. You may need
a 75-ohm adapter or a combiner, as shown.
NOTE
If your antenna has
separate leads for
VHF/UHF signals,
you will need to
purchase a combiner
and connect it as
shown.
HDTVInstruction Manual
5
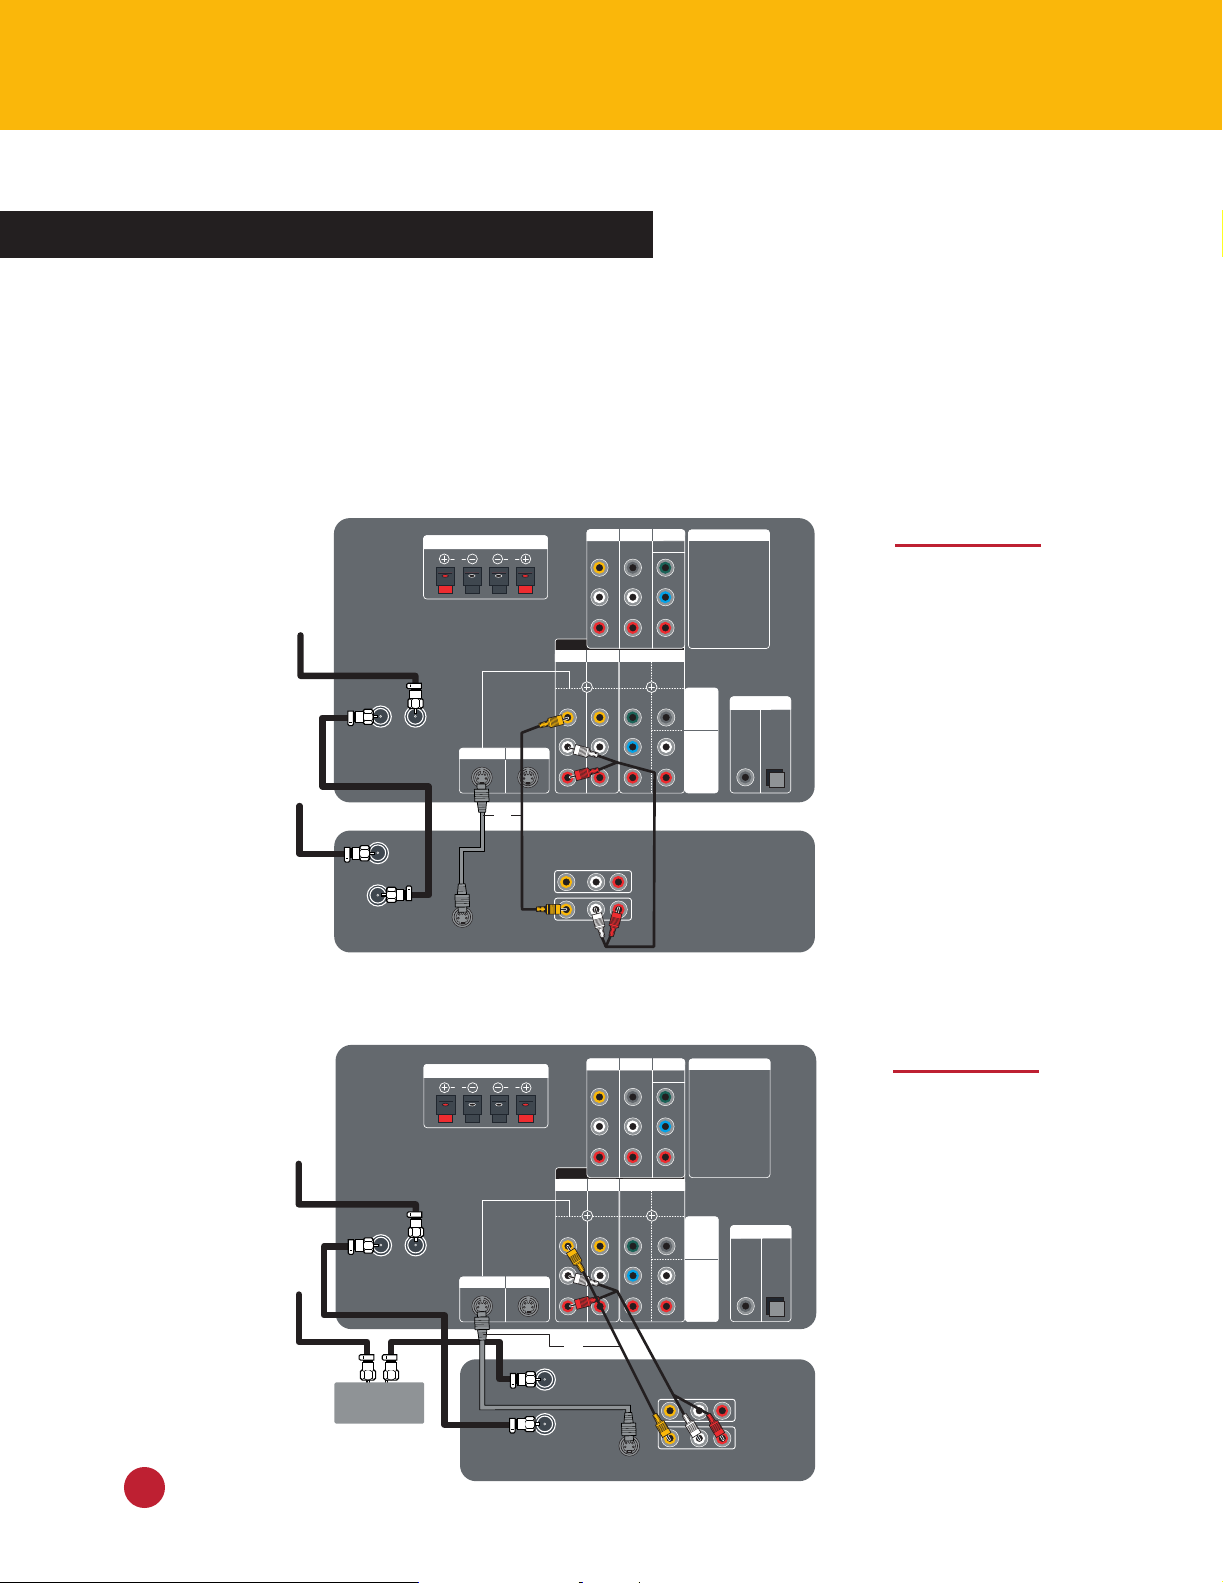
Connecting Video Equipment
NOTICES:
Manufactured under
license from Dolby
Laboratories. "Dolby",
"AC-3", "ProLogic" and
the double-D symbol are
trademarks of Dolby
Laboratories. Confidential
unpublished works.
Copyright 1992-1997 Dolby
Laboratories. All rights
reserved.
V1
L1
R1
V2
L2
R2
DIGITAL AUDIO OUT
Y
COAXIAL OPTICAL
P
B
P
R
L4
R4
EXTERNAL SPEAKER (8Ω 15W)
R L
DIGITAL
AUDIO
ANALOG
AUDIO
S-VHS 2S-VHS 1
CABLE
IN from ANTENNA
OUT to TV
S-VHS
VHF/UHF
AUDIO
OUT
IN
VIDEO
L R
IN OUT
cable boxcable box
VCRVCR
or
From Antenna
Source
From Cable
Source
75Ω
VIDEO 1 VIDEO 2 COMPONENT
INPUT
480i
V
L
R
Y
P
B
P
R
WF
LS
RS
MONITOR OUT
AUDIO OUT
HD COMPONENT
1080i
V1
L1
R1
V2
L2
R2
DIGITAL AUDIO OUT
Y
COAXIAL OPTICAL
P
B
P
R
L4
R4
EXTERNAL SPEAKER (8Ω 15W)
R L
DIGITAL
AUDIO
ANALOG
AUDIO
S-VHS 2S-VHS 1
CABLE
IN from ANTENNA
OUT to TV
S-VHS
From Cable
VHF/UHF
AUDIO
OUT
IN
VIDEO
L R
or
VCRVCR
NOTICES:
Manufactured under
license from Dolby
Laboratories. "Dolby",
"AC-3", "ProLogic" and
the double-D symbol are
trademarks of Dolby
Laboratories. Confidential
unpublished works.
Copyright 1992-1997 Dolby
Laboratories. All rights
reserved.
75Ω
Source
From Antenna
Source
VIDEO 1 VIDEO 2 COMPONENT
INPUT
480i
V
L
R
Y
P
B
P
R
WF
LS
RS
MONITOR OUT
AUDIO OUT
HD COMPONENT
1080i
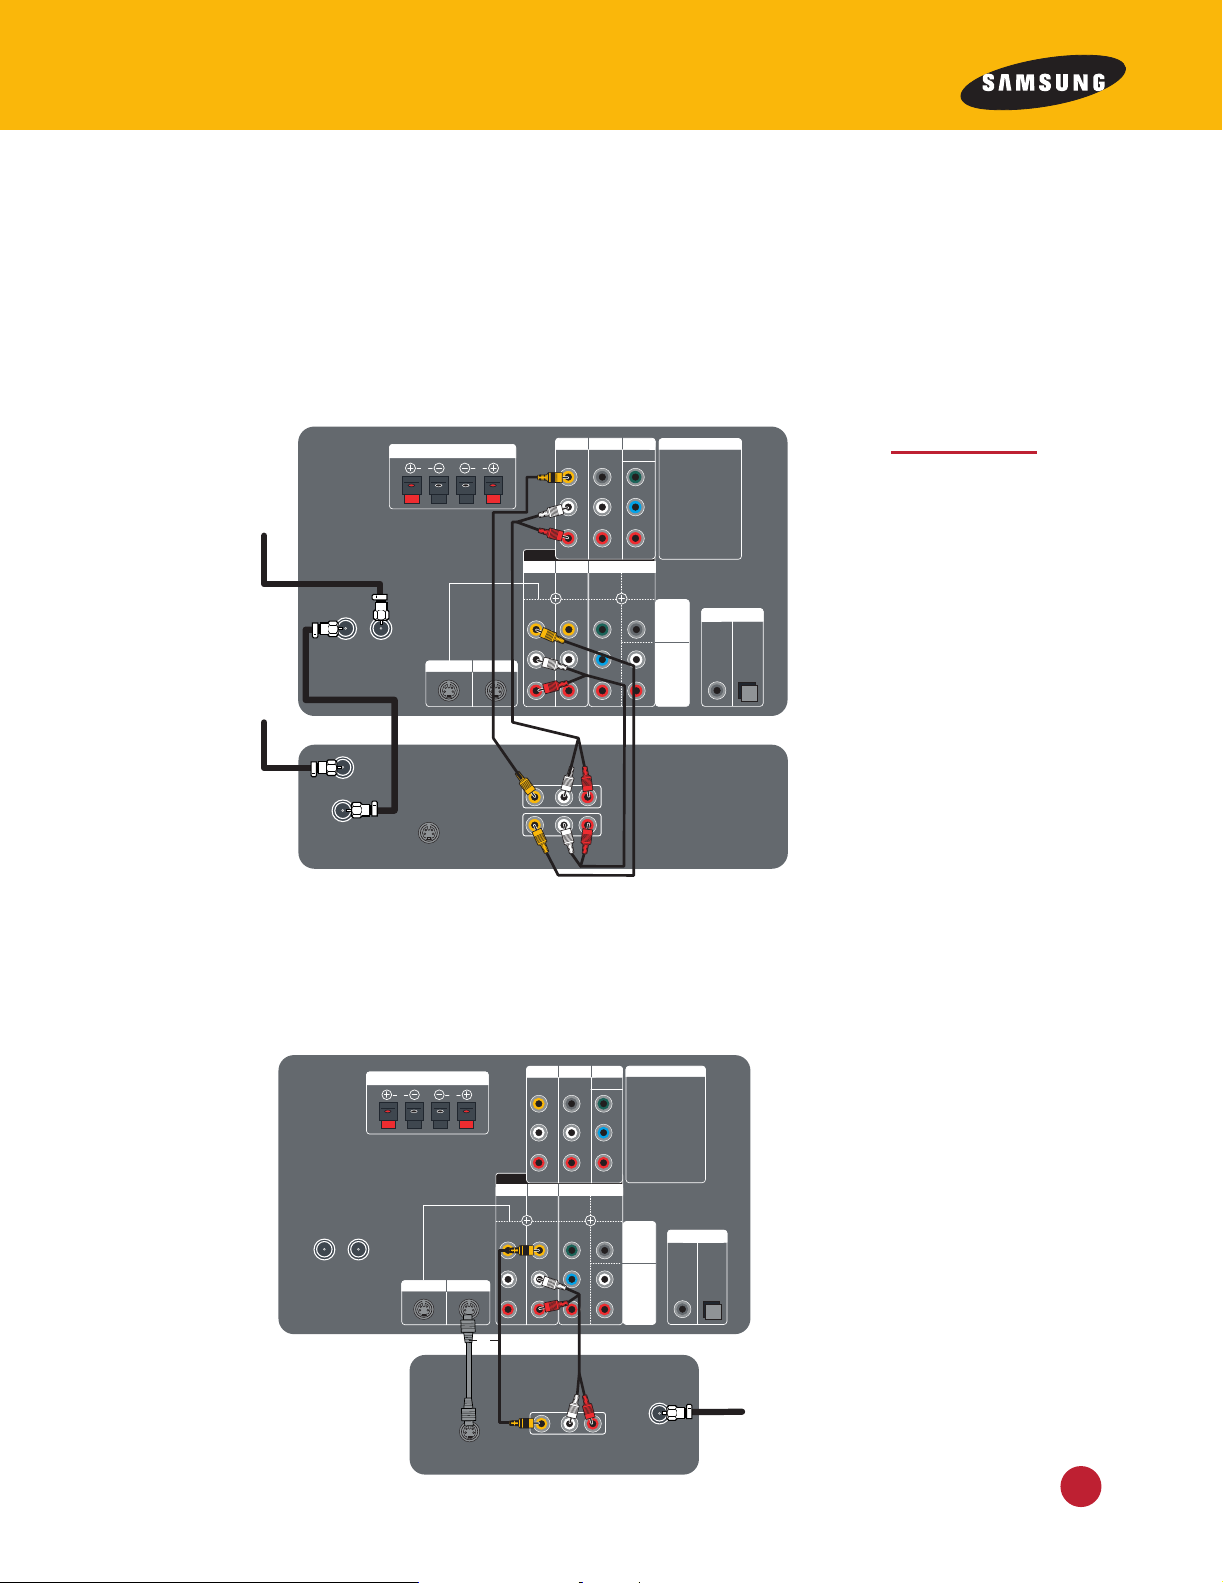
This section shows how to connect the following video equipment to your HDTV: a VCR
without a cable box, a VCR with a cable box, a VCR using Monitor Out, a Digital Satellite
System (DSS), a Digital Video Disc (DVD) player with standard or advanced video outputs,
a laser disc player and a camcorder.
VCR without a Cable Box
To connect a VCR to your HDTV without using a cable box, follow the
illustration below.
NOTE
If you are connecting a mono VCR,
connect only
AUDIO L (left).
VCR with a Cable Box
To connect a VCR with a cable box, follow the illustration below.
HDTVInstruction Manual
6
NOTE
If you are connecting a mono VCR,
connect only
AUDIO L (left).
VCR with Monitor Out Outputs
V1
L1
R1
V2
L2
R2
DIGITAL AUDIO OUT
Y
COAXIAL OPTICAL
P
B
P
R
L4
R4
EXTERNAL SPEAKER (8Ω 15W)
R L
DIGITAL
AUDIO
ANALOG
AUDIO
S-VHS 2S-VHS 1
CABLE
S-VHS OUT
From Satellite
Source
VHF/UHF
Satellite
IN
AUDIO
OUT
VIDEO
L R
NOTICES:
Manufactured under
license from Dolby
Laboratories. "Dolby",
"AC-3", "ProLogic" and
the double-D symbol are
trademarks of Dolby
Laboratories. Confidential
unpublished works.
Copyright 1992-1997 Dolby
Laboratories. All rights
reserved.
DSS PlayerDSS Player
or
75Ω 75Ω
VIDEO 1 VIDEO 2 COMPONENT
INPUT
480i
V
L
R
Y
P
B
P
R
WF
LS
RS
MONITOR OUT
AUDIO OUT
HD COMPONENT
1080i
V1
L1
R1
V2
L2
R2
DIGITAL AUDIO OUT
Y
COAXIAL OPTICAL
P
B
P
R
L4
R4
EXTERNAL SPEAKER (8Ω 15W)
R L
DIGITAL
AUDIO
ANALOG
AUDIO
S-VHS 2S-VHS 1
CABLE
IN from ANTENNA
OUT to TV
S-VHS
VHF/UHF
AUDIO
OUT
IN
VIDEO
L R
VCRVCR
NOTICES:
Manufactured under
license from Dolby
Laboratories. "Dolby",
"AC-3", "ProLogic" and
the double-D symbol are
trademarks of Dolby
Laboratories. Confidential
unpublished works.
Copyright 1992-1997 Dolby
Laboratories. All rights
reserved.
75Ω
From Antenna
Source
From Cable
Source
VIDEO 1 VIDEO 2 COMPONENT
INPUT
480i
V
L
R
Y
P
B
P
R
WF
LS
RS
MONITOR OUT
AUDIO OUT
HD COMPONENT
1080i
If you connect a VCR with the MONITOR OUT outputs on the rear panel of
the HDTV, the VCR will record exactly what you are viewing on the HDTV.
For example, if you want to record from your camcorder, connect the camcorder to
the HDTV front panel inputs (VIDEO 3) and the VCR to the HDTV rear panel
MONITOR OUT outputs. Then you can view the camcorder picture on the HDTV
while recording it to videocassette.
NOTE
When using MONITOR OUT outputs,
the VCR will record
whatever is being
shown on the HDTV,
therefore, if you are
watching a cable TV
program and
change the channel,
the VCR will record
you changing
channels.
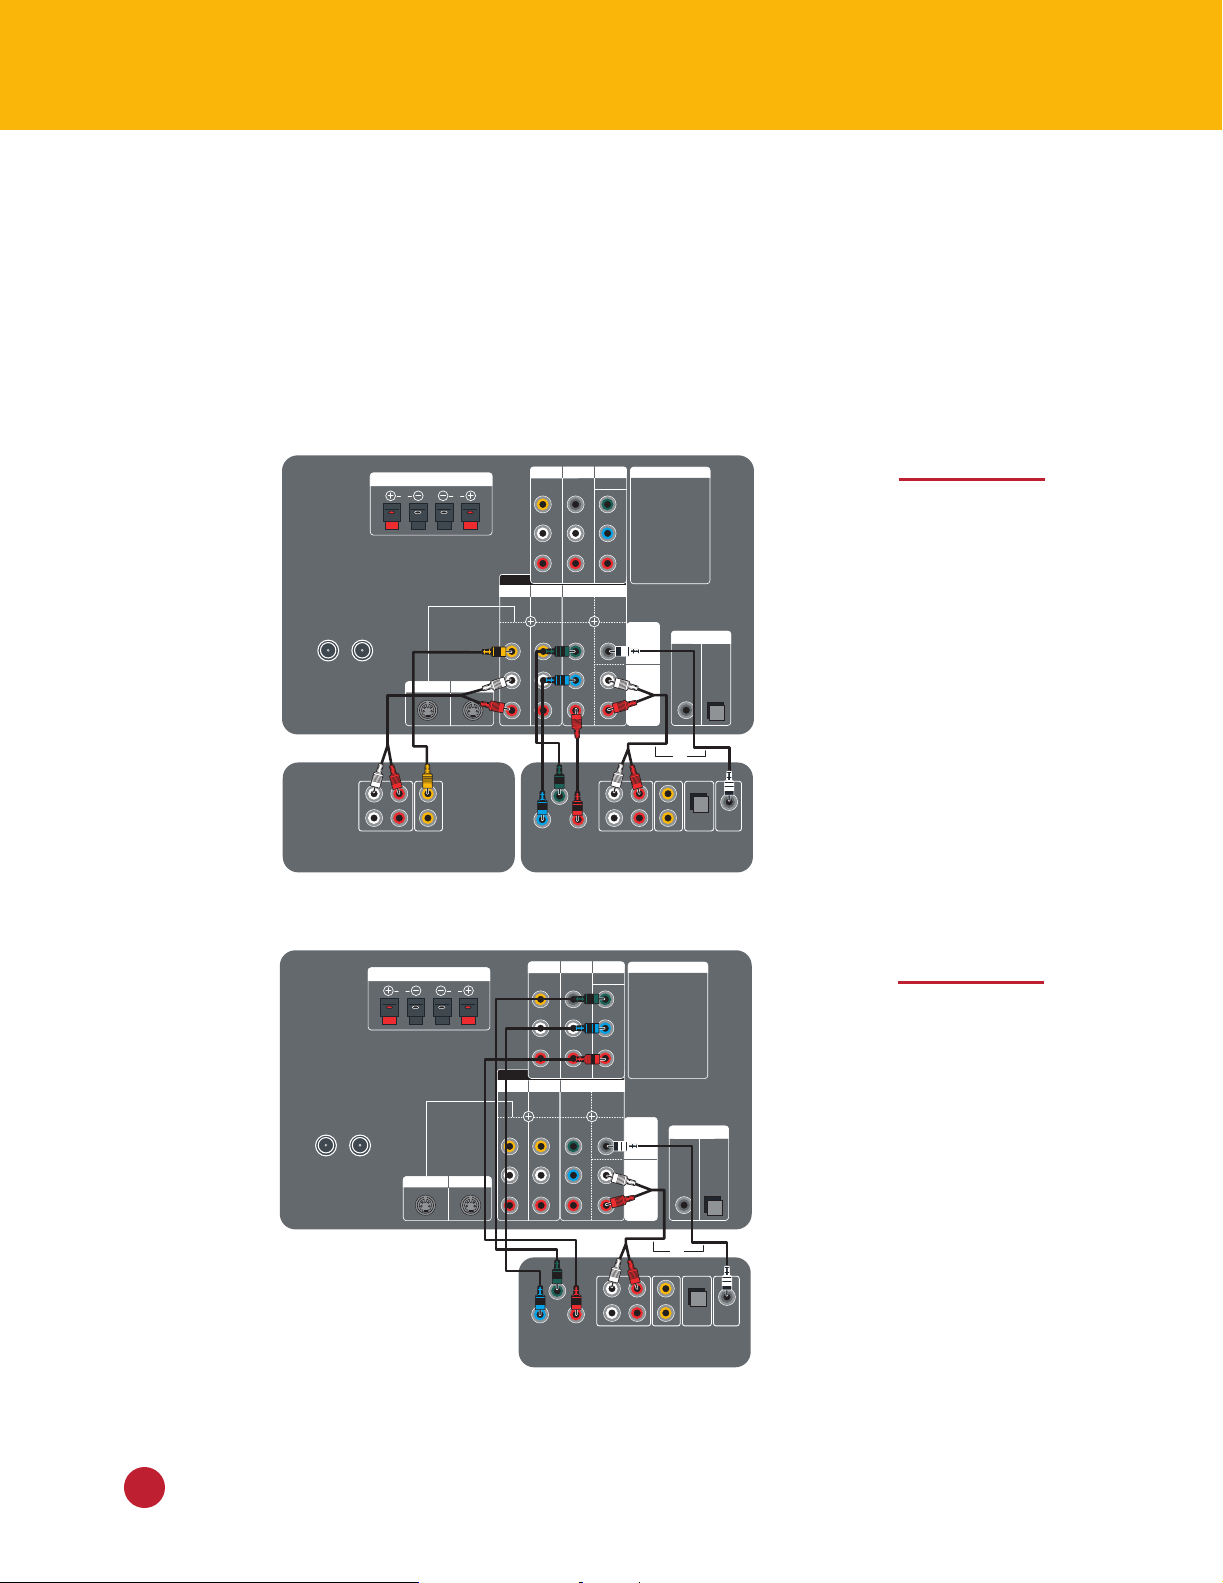
Digital Satellite System (DSS)
To connect a Digital Satellite System, follow the illustration below. For additional
connection possibilities with DSS, such as connecting a VCR and other antennas,
consult your satellite system instruction manual.
HDTVInstruction Manual
7
Digital Video Disc (DVD) Player with
V1
L1
R1
V2
L2
R2
DIGITAL AUDIO OUT
Y
COAXIAL OPTICAL
P
B
P
R
L
4
R4
EXTERNAL SPEAKER (8Ω 15W)
R L
DIGITAL
AUDIO
ANALOG
AUDIO
S-VHS 2S-VHS 1
CABLE VHF/UHF
AUDIO OUT VIDEO OUT DIGITAL
OPTICAL
Audio OUT
DIGITAL
Audio OUT
L R
Y
P
B
P
R
DTV SETTOP BOXDTV SETTOP BOX
NOTICES:
Manufactured under
license from Dolby
Laboratories. "Dolby",
"AC-3", "ProLogic" and
the double-D symbol are
trademarks of Dolby
Laboratories. Confidential
unpublished works.
Copyright 1992-1997 Dolby
Laboratories. All rights
reserved.
or
75Ω 75Ω
VIDEO 1 VIDEO 2 COMPONENT
INPUT
480i
V
L
R
Y
P
B
P
R
WF
LS
RS
MONITOR OUT
AUDIO OUT
HD COMPONENT
1080i
V1
L1
R1
V2
L2
R2
DIGITAL AUDIO OUT
Y
COAXIAL OPTICAL
P
B
P
R
L
4
R4
EXTERNAL SPEAKER (8Ω 15W)
R L
DIGITAL
AUDIO
ANALOG
AUDIO
S-VHS 2S-VHS 1
CABLE VHF/UHF
AUDIO OUT VIDEO OUT DIGITAL
OPTICAL
Audio OUT
DIGITAL
Audio OUT
L R
Y
P
B
P
R
AUDIO OUT VIDEO OUT
L R
DVD Player - StandardDVD Player - Standard DVD Player - AdvancedDVD Player - Advanced
NOTICES:
Manufactured under
license from Dolby
Laboratories. "Dolby",
"AC-3", "ProLogic" and
the double-D symbol are
trademarks of Dolby
Laboratories. Confidential
unpublished works.
Copyright 1992-1997 Dolby
Laboratories. All rights
reserved.
or
75Ω 75Ω
VIDEO 1 VIDEO 2 COMPONENT
INPUT
480i
V
L
R
Y
P
B
P
R
WF
LS
RS
MONITOR OUT
AUDIO OUT
HD COMPONENT
1080i
Standard or Advanced Video Outputs
To connect a DVD player with:
•standard video outputs, connect it to the VIDEO 1 inputs on the HDTV.
•advanced video outputs, connect it to the COMPONENT inputs on the
HDTV using special connectors. Consult your DVD player instruction manual for additional information on advanced video connections.
CAUTION
480i format is
available only for an
Advanced Video
Output Signal.
DTV Settop Box
HDTVInstruction Manual
8
CAUTION
1080i format is
available only for
DTV Settop Box
Output Signal.
Connect DTV Settop
Box Audio Input to
Audio Input of
COMPONENT.
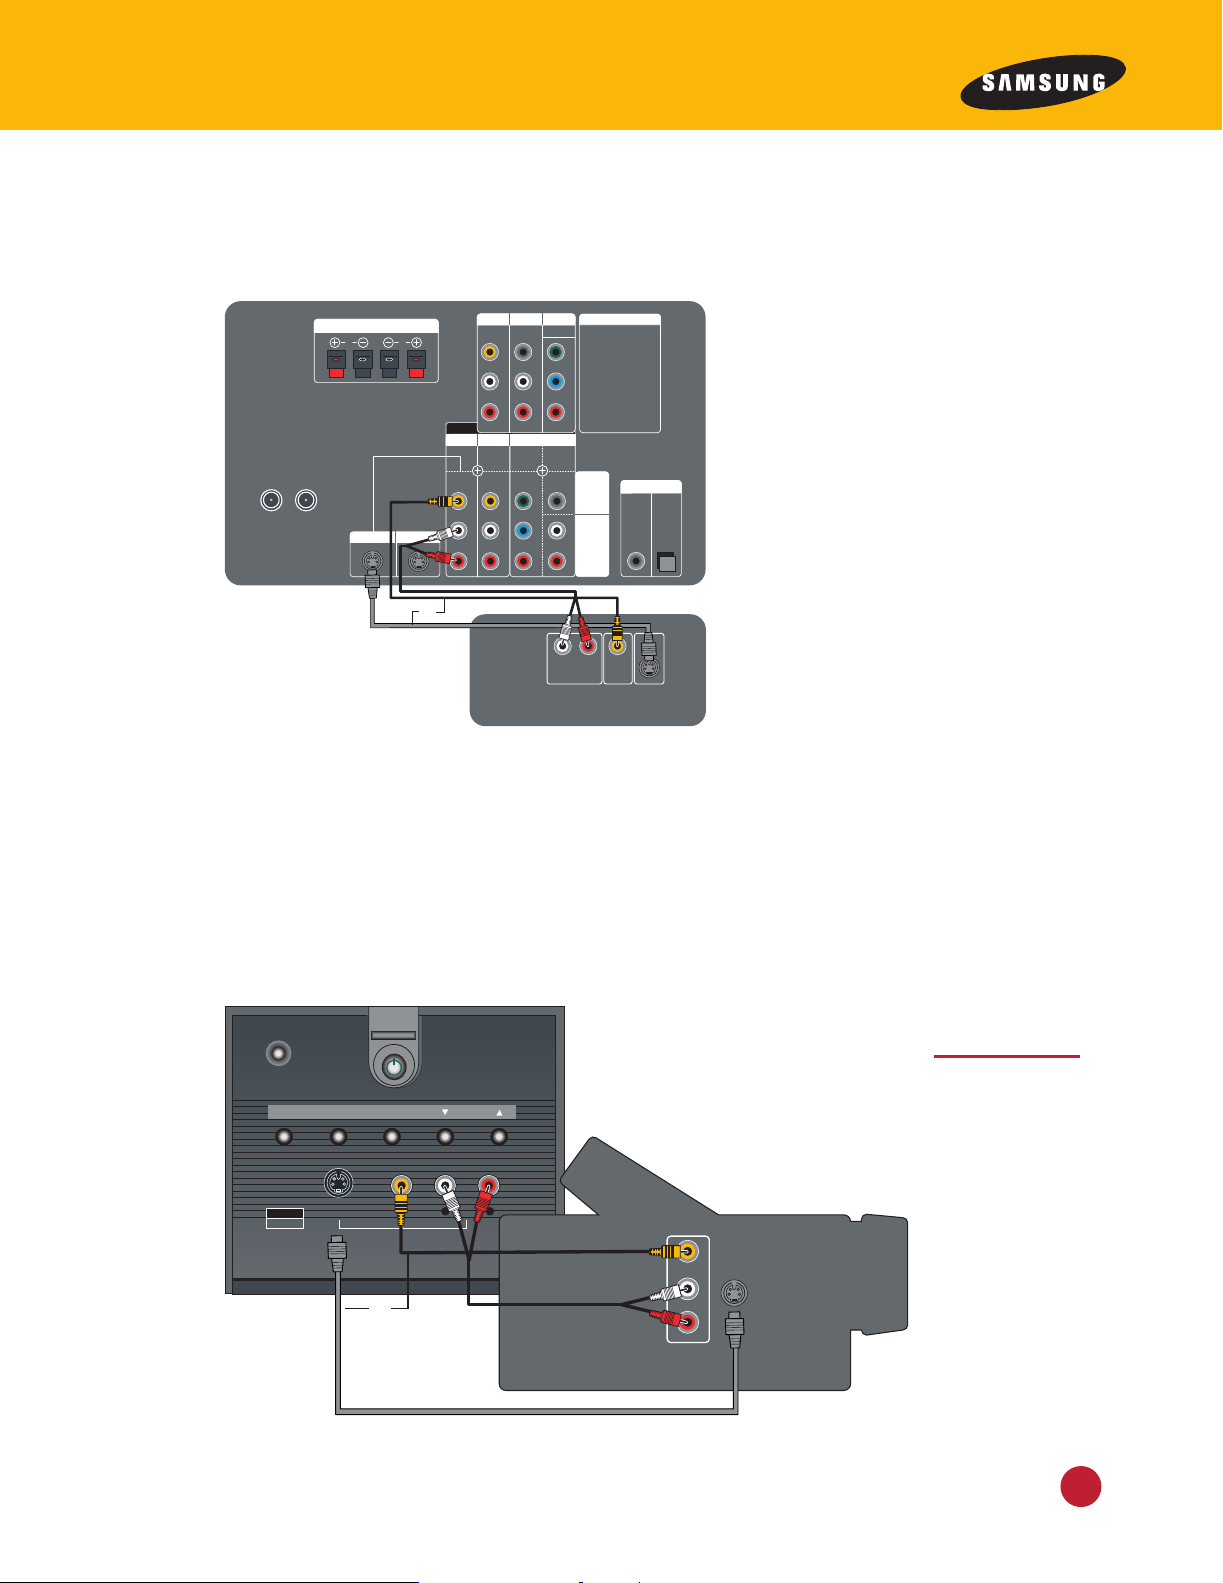
Laser Disc Player
V1
L1
R1
V2
L2
R2
DIGITAL AUDIO OUT
Y
COAXIAL OPTICAL
P
B
P
R
L4
R4
EXTERNAL SPEAKER (8Ω 15W)
R L
DIGITAL
AUDIO
ANALOG
AUDIO
S-VHS 2S-VHS 1
CABLE VHF/UHF
AUDIO OUT VIDEO OUT S-VHS
L R
or
NOTICES:
Manufactured under
license from Dolby
Laboratories. "Dolby",
"AC-3", "ProLogic" and
the double-D symbol are
trademarks of Dolby
Laboratories. Confidential
unpublished works.
Copyright 1992-1997 Dolby
Laboratories. All rights
reserved.
Laser Disc PlayerLaser Disc Player
75Ω 75Ω
VIDEO 1 VIDEO 2 COMPONENT
INPUT
480i
V
L
R
Y
P
B
P
R
WF
LS
RS
MONITOR OUT
AUDIO OUT
HD COMPONENT
1080i
TV/VIDEO
ENTER
S-VHS VIDEO AUDIO
MENU
– VOLUME
+
CHANNEL
OPEN/CLOSE
VIDEO 3
L
AUDIO OUT
VIDEO OUT
S-VHS
R
CamcorderCamcorder
INPUT
or
L R
To connect a laser disc player, follow the illustration below.
Camcorder
Inputs on the HDTV front panel make it easy to connect a camcorder.
Follow the illustration below.
To connect the camcorder:
1 Press POWER on the front panel of the HDTV or the remote control.
2 Press OPEN/CLOSE on the front panel of the HDTV or DOOR on the remote control.
3 Connect Audio/Video or S-Video cables from the HDTV’s front panel jacks, as shown.
CAUTION
Do not try to close
the front panel door
when cables are
connected.
HDTVInstruction Manual
9
Connecting Audio Equipment
INPUT
480i
NOTICES:
Manufactured under
license from Dolby
Laboratories. "Dolby",
"AC-3", "ProLogic" and
the double-D symbol are
trademarks of Dolby
Laboratories. Confidential
unpublished works.
Copyright 1992-1997 Dolby
Laboratories. All rights
reserved.
V1
L1
R1
V2
L2
R2
DIGITAL AUDIO OUT
Y
COAXIAL OPTICAL
P
B
P
R
L4
R4
DIGITAL
AUDIO
ANALOG
AUDIO
S-VHS 2S-VHS 1
75Ω 75Ω
VIDEO 1 VIDEO 2 COMPONENT
V
L
R
Y
P
B
P
R
WF
LS
RS
MONITOR OUT
AUDIO OUT
HD COMPONENT
1080i
Right Rear SpeakerRight Rear Speaker
Audio IN
Left Rear SpeakerLeft Rear Speaker
Audio IN
R L
CABLE VHF/UHF
Right Front SpeakerRight Front Speaker Left Front SpeakerLeft Front Speaker SubwooferSubwoofer
R
L
Audio IN
EXTERNAL SPEAKER (8Ω 15W)
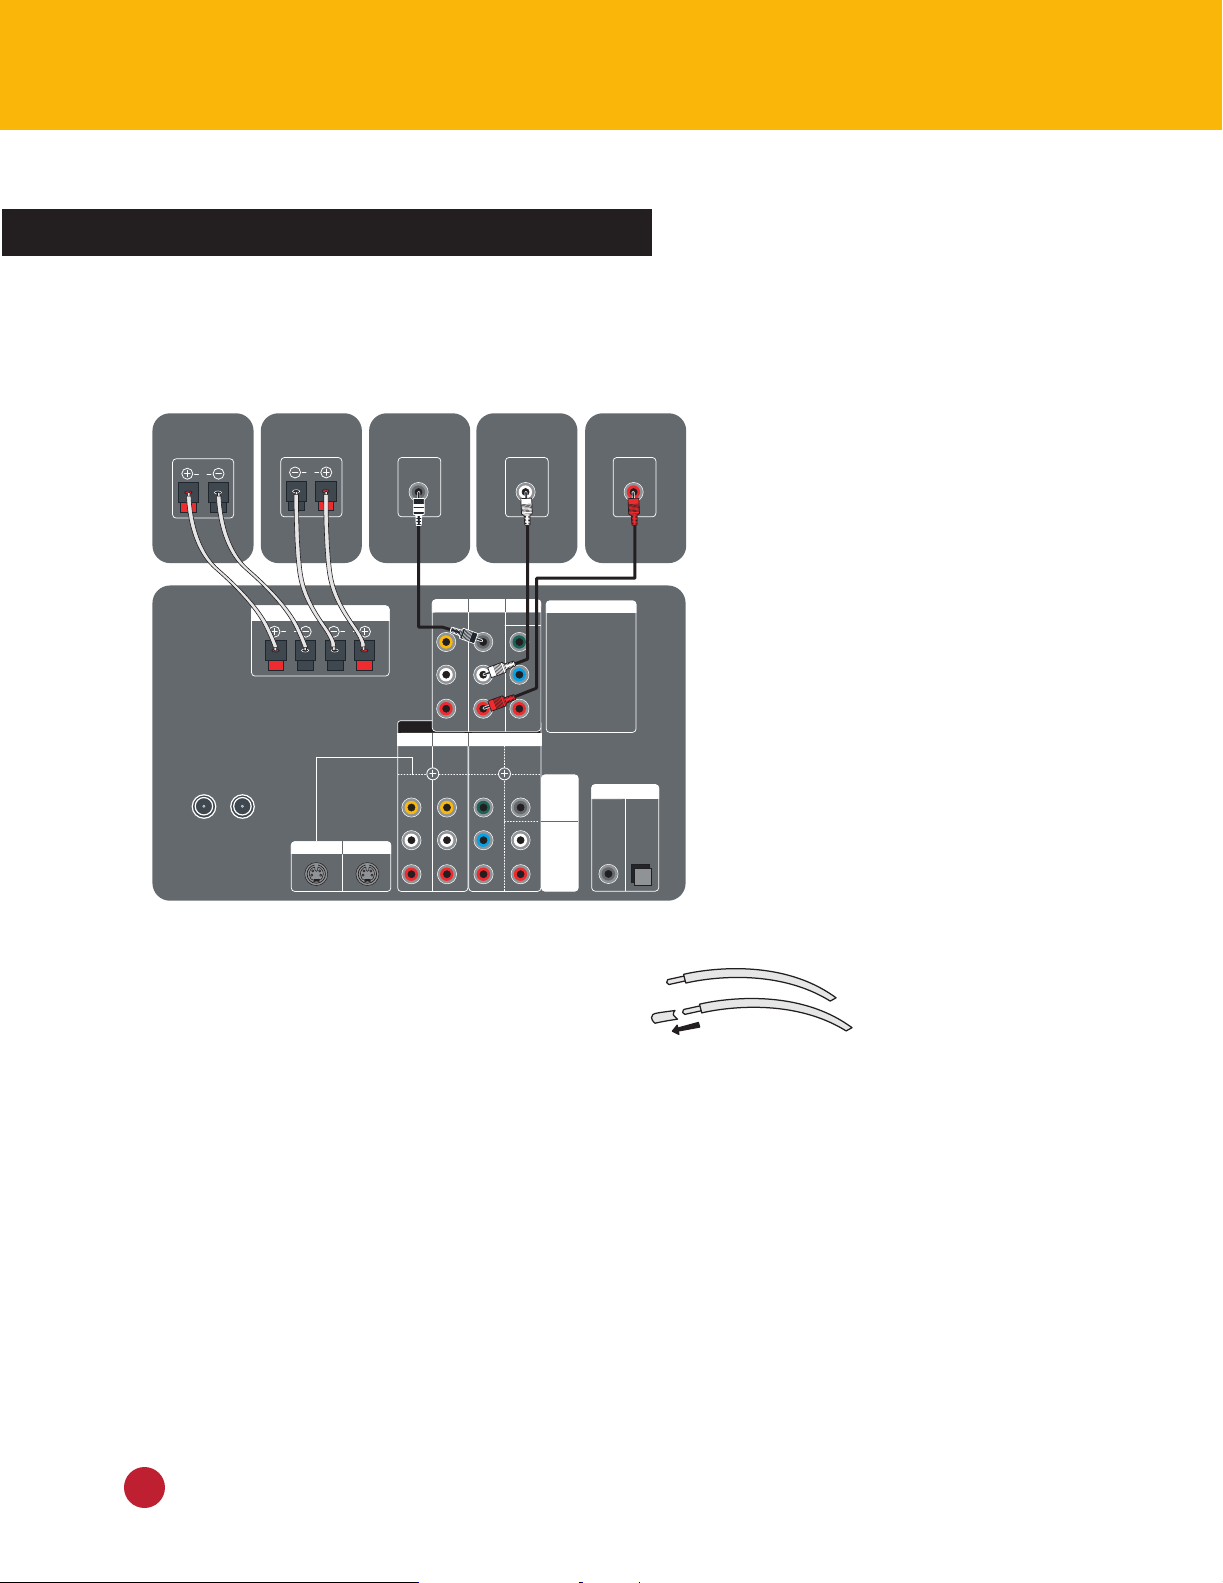
This section will show how to connect the following audio equipment to your HDTV:
front speakers, rear speakers, a subwoofer and an audio system.
Front Speakers, Rear Speakers and a Subwoofer
1 Place the front speakers where you want them.
2 Cut two lengths of speaker wire long enough to
reach between the speakers and the HDTV. With a
knife, strip off 1/2 inch of insulation from each of
the ends.
3 Connect the positive wire to the positive (+) terminal and the negative wire (–)
to the negative terminal on the back of the speakers. (Sometimes the positive
wire will be colored red. Other times it will be marked on the side by a white
stripe.)
4 Connect the other ends of the speaker wires to the rear panel of the HDTV.
5 Place the powered rear speakers where you want them. Make sure the audio
cables are long enough to reach from the HDTV to the rear speakers.
6 Connect the rear speakers with two audio cables.
7 Place the powered subwoofer where you want it. Make sure the audio cable is
long enough to reach from the HDTV to the subwoofer.
8 Connect the subwoofer with an audio cable.
HDTVInstruction Manual
10
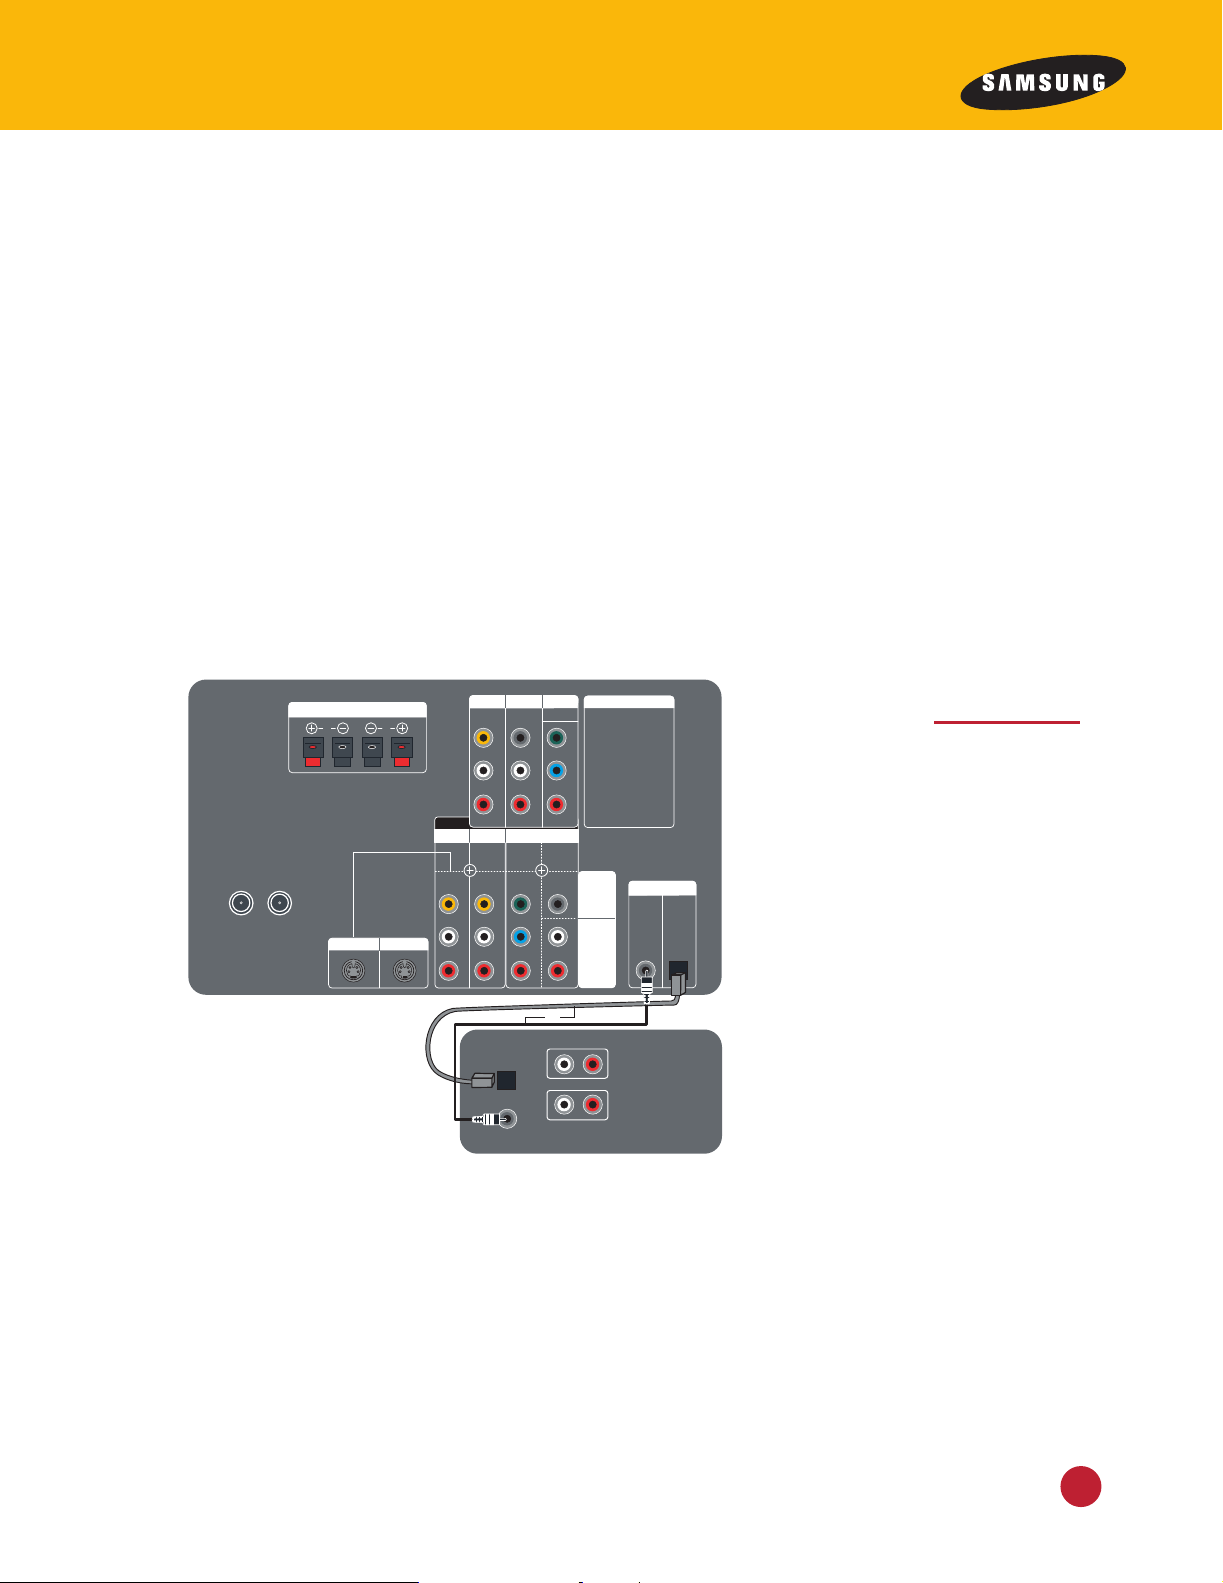
Audio System
V1
L1
R1
V2
L2
R2
DIGITAL AUDIO OUT
Y
COAXIAL OPTICAL
P
B
P
R
L4
R4
COAXIAL
OPTICAL
EXTERNAL SPEAKER (8Ω 15W)
R L
DIGITAL
AUDIO
ANALOG
AUDIO
S-VHS 2S-VHS 1
CABLE VHF/UHF
AUDIO OUT
L R
AUDIO IN
or
NOTICES:
Manufactured under
license from Dolby
Laboratories. "Dolby",
"AC-3", "ProLogic" and
the double-D symbol are
trademarks of Dolby
Laboratories. Confidential
unpublished works.
Copyright 1992-1997 Dolby
Laboratories. All rights
reserved.
Audio SystemAudio System
Digital Audio Input
Digital Audio Input
75Ω 75Ω
VIDEO 1 VIDEO 2 COMPONENT
INPUT
480i
V
L
R
Y
P
B
P
R
WF
LS
RS
MONITOR OUT
AUDIO OUT
HD COMPONENT
1080i
There are many types of audio systems on the market today. Many of these systems
serve as the “nerve center” of a home theater, to which you connect speakers, subwoofers and other devices.
A simplified illustration of an audio system follows. Make sure to check the instruction manual of your audio system for more detailed connection information.
If your audio system has:
•a coaxial digital audio input, connect the audio system to the HDTV via
COAXIAL DIGITAL AUDIO OUT output.
the
•an optical digital audio input, connect the audio system to the HDTV via
OPTICAL DIGITAL AUDIO OUT output. Be certain to remove the black
the
cover from the optical output before inserting the cable.
•both coaxial and optical digital audio inputs, Samsung recommends you
use the optical digital output. Do not connect both coaxial and optical cables.
This may damage your equipment.
NOTE
If you connect an
external amplifier to
the coaxial or optical digital output,
select Stereo on the
Listening Mode
menu.
HDTVInstruction Manual
11
HDTV
TV/VIDEO
1 2 3
4 5 6
7 809
ANTENNA
FAV-CH
DISPLAY
TV VCRCATV
+100 PRE-CH
DSS DVD
POWER SELECT
MTS
VOL
+
-
MUTE
CH
G
U
I
D
E
M
E
N
U
ENTER
EXIT
DOOR
SLEEP
PAUSE
REW
P.MODE
V.CHIP
STOP
PLAY
S.MODE
CAPTION
FF
SET
1
2
3
4
5
6
7
8
9
10
11
12
13
14
15
16
17
18
19
20
21
22
23
24
25
26
27
28
29
30
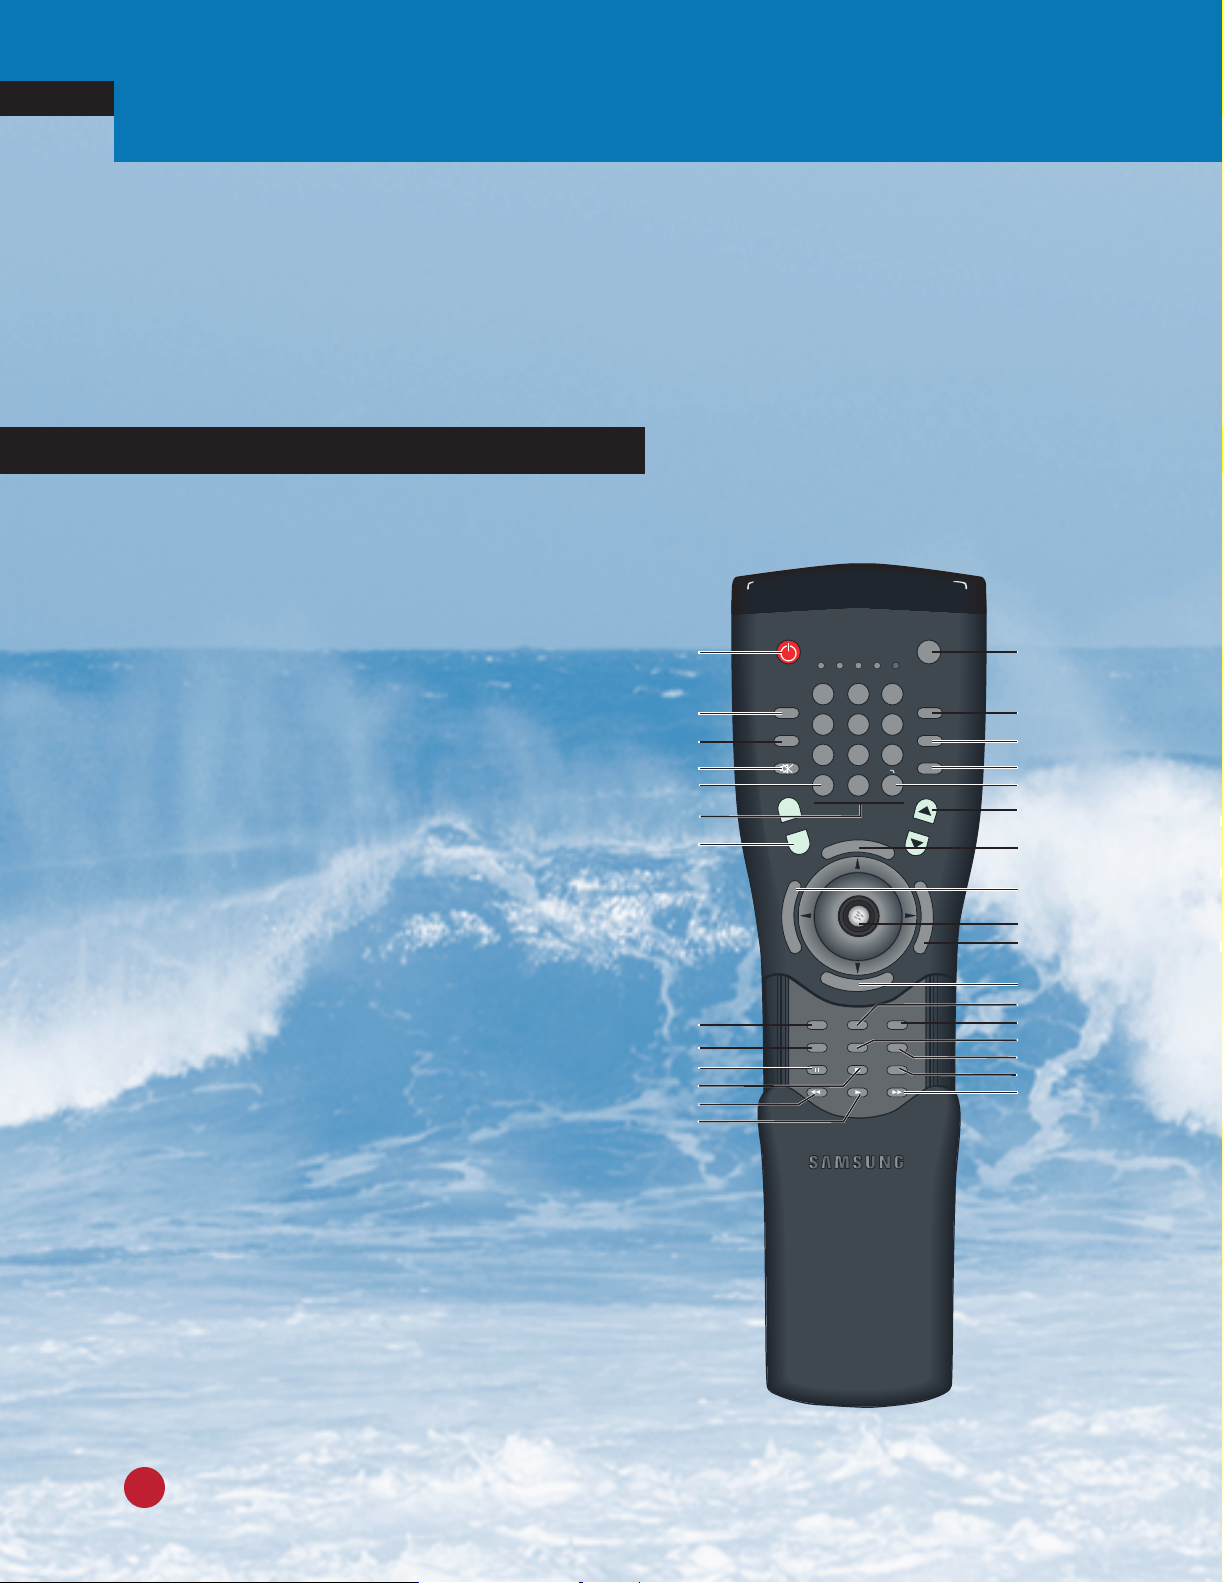
Understanding the Remote Control
The HDTV remote control and on-screen menu system work together to make operating the
HDTV as simple as possible. Understanding the relationship between the remote control’s
unique I-Point “joystick” and the menus allows you to operate the HDTV with ease.
If you need some assistance while using the remote control and the menus, Samsung has
provided an on-screen help feature. See “Using the On-screen Help” on page 16.
First, however, take some time to review the remote control’s buttons and I-Point control.
Reviewing the Remote Control
1 POWER button
Press to turn the HDTV power on and off.
2 DISPLAY button (see page 17)
Press to display information on the TV screen.
3 MTS (Multichannel TV Sound) button
•When watching analog channels, press to select either
Stereo, Mono or Secondary Audio Programming
sound options.
•When watching digital channels, press to select the
audio track language you desire.
4 MUTE button
5 +100 button (see page 20)
Press to mute the HDTV’s sound.
Press to select cable channels over 100 on TV or
DSS broadcasts.
6 Number buttons (see page 20)
Press to enter channel numbers on your HDTV.
7 VOL (Volume) +/– buttons
Press to increase or decrease the HDTV’s volume.
8 DOOR button (see page 2)
Press to raise and lower the door on the HDTV’s
front panel.
9 SLEEP button (see page 34)
Press repeatedly to set the HDTV’s sleep timer.
10 PAUSE button
Press to pause a VCR or DVD player.
11 STOP button
Press to stop a VCR or DVD player.
HDTVInstruction Manual
12

12 REW (Rewind) button
Press to rewind a videocassette.
13 PLAY button
Press to play a videocassette or digital video disc.
14 SELECT button
Press to choose the component you wish the remote control to operate. As you
press SELECT, a green light will blink on the remote control under the compo-
nent name: TV, VCR, CATV, DSS and DVD. To program the remote control to
operate various brands of components, see page 46.
15 TV/VIDEO button
Press to view components you have connected to the HDTV. For example, if
you connected a VCR to the rear inputs, pressing this button will switch the
HDTV picture between the TV and the VCR.
16 ANTENNA button
Press to view the video source from the antennas you have connected. For
example, if you connected both cable TV and an indoor/outdoor antenna, press-
ing this button will switch the HDTV between displaying channels received by
the cable TV antenna and those from the indoor/outdoor antenna.
17 FAV-CH (Favorite Channel) button (see page 21)
Press to switch between your favorite channels.
18 PRE-CH (Previous Channel) button (see page 20)
Press to switch between the channel you are currently watching and the last
channel you viewed.
19 CH yz (Channel Up and Down) buttons (see page 20)
Press to change channels on your HDTV.
20 ENTER button (see page 15)
Press to select highlighted items while using the on-screen menus.
21 MENU button (see page 15)
Press to display the on-screen menus and to exit from previous menu screens.
22 I-Point control (see page 15)
Use to highlight on-screen menu items and change menu values.
23 GUIDE button (see page 15)
Press to bring up the HDTV’s on-screen Program Guide.
24 EXIT button (see page 15)
Press at any time to exit the on-screen menus.
25 P.MODE (Picture Mode) button (see page 28)
Press to select different picture options for your HDTV.
HDTVInstruction Manual
13
26 S.MODE (Sound Mode) button (see page 30)
Press to select different sound options for your HDTV.
27 V.CHIP button (see page 38)
Press to select the Parental Locks menu. This menu allows you to lock
out channels or programs you do not wish the HDTV to display.
28 CAPTION button (see page 42)
Press to turn closed captioning on or off.
29 SET button (see page 46)
Press to program remote control codes for other components
connected to your HDTV.
30 FF (Fast Forward) button
Press to fast forward a videocassette.
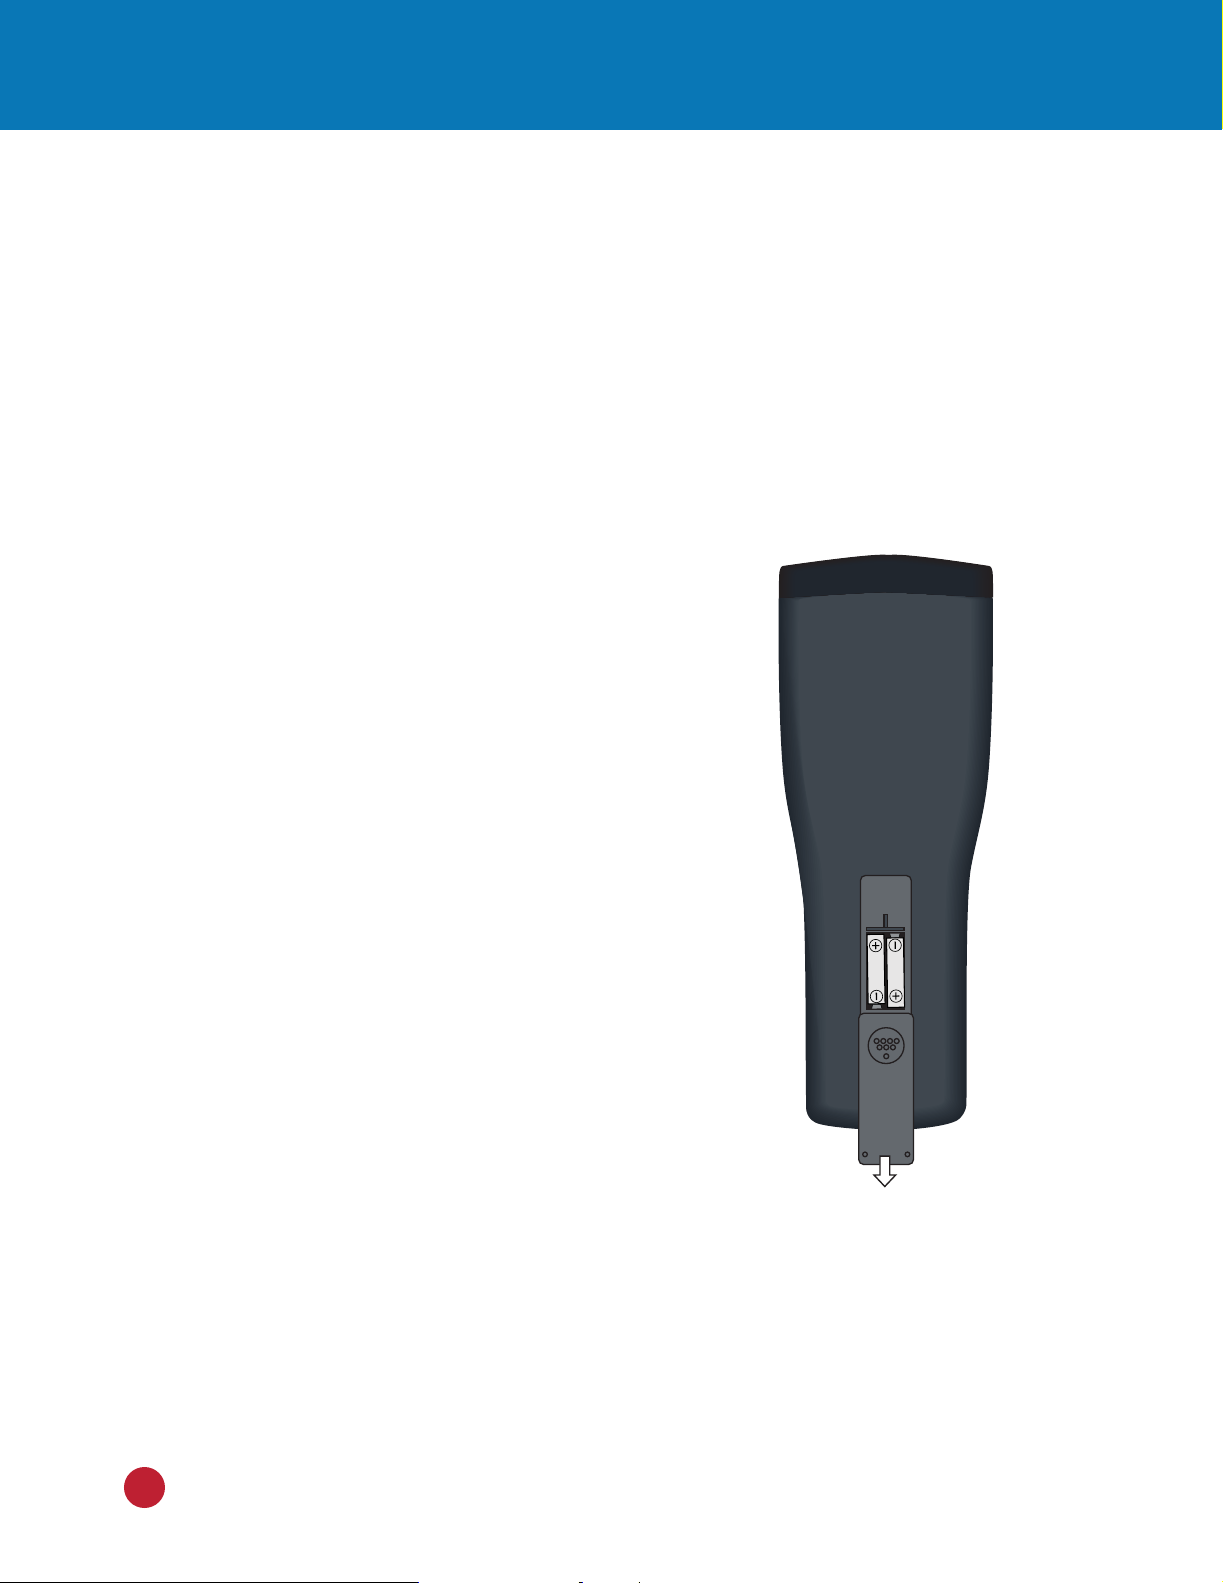
Installing the Remote Control Batteries
Press and remove the battery cover on the back of the remote
control. Put two AAAbatteries into the compartment and replace
the battery cover.
Programming the Remote Control
The HDTV remote control is pre-programmed to operate your
HDTV. However, you can also program the HDTV remote control
to operate other components, such as a cable TV box, a DSS,
a VCR or a DVD. To program the HDTV remote control,
see“Programming the Remote Control to Operate Other
Components” on page 46.
HDTVInstruction Manual
14
 Loading...