

Page 1

PORTABLE Quad-BAND
MOBILE PHONE
User Manual
Please read this manual before operating your
phone, and keep it for future reference.
Page 2

Intellectual Property
All Intellectual Property, as defined below, owned by or which is otherwise the property of Samsung or its respective
suppliers relating to the SAMSUNG Phone, including but not limited to, accessories, parts, or software relating there
to (the “Phone System”), is proprietary to Samsung and protected under federal laws, state laws, and international
treaty provisions. Intellectual Property includes, but is not limited to, inventions (patentable or unpatentable),
patents, trade secrets, copyrights, software, computer programs, and related documentation and other works of
authorship. You may not infringe or otherwise violate the rights secured by the Intellectual Property. Moreover, you
agree that you will not (and will not attempt to) modify, prepare derivative works of, reverse engineer, decompile,
disassemble, or otherwise attempt to create source code from the software. No title to or ownership in the
Intellectual Property is transferred to you. All applicable rights of the Intellectual Property shall remain with
SAMSUNG and its suppliers.
Samsung Telecommunications America (STA), LLC
Headquarters: Customer Care Center:
1301 E. Lookout Drive 1000 Klein Rd.
Richardson, TX 75082 Plano, TX 75074
Toll Free Tel: 1.888.987.HELP (4357)
Internet Address: http://www.samsungusa.com
©
2009 Samsung Telecommunications America, LLC is a registered trademark of Samsung Electronics America, Inc.
and its related entities.
Do you have questions about your Samsung Mobile Phone?
For 24 hour information and assistance, we offer a new FAQ/ARS System (Automated Response System) at:
www.samsungwireless.com/support
GH68-25503A
Printed in USA
T939_UVIJ6_CH_102309_F14
Page 3

T9 Text Input is licensed by Tegic Communications and is covered by U.S. Pat. 5,818,437; U.S. Pat. 5,953,541; U.S.
Pat. 6,011,554 and other patents pending.
The Bluetooth® word mark, figure mark (stylized “B Design”), and combination mark (Bluetooth word mark and “B
Design”) are registered trademarks and are wholly owned by the Bluetooth SIG.
Google, the Google logo, Android, the Android logo, Android Market, Gmail, Google Mail, Google Apps, Google
Calendar, Google Checkout, Google Earth, Google Latitude, Google Maps, Google Talk, Picasa, and YouTube are
trademarks of Google Inc.
Wi-Fi is a registered trademark of the Wireless Fidelity Alliance, Inc.
Open Source Software
Some software components of this product incorporate source code covered under GNU General Public License
(GPL), GNU Lesser General Public License (LGPL), OpenSSL License, BSD License and other open source licenses.
To obtain the source code covered under the open source licenses, please visit:
http://www.samsungnetwork.com/Home/opensource
.
Disclaimer of Warranties; Exclusion of Liability
EXCEPT AS SET FORTH IN THE EXPRESS WARRANTY CONTAINED ON THE WARRANTY PAGE ENCLOSED WITH THE
PRODUCT, THE PURCHASER TAKES THE PRODUCT "AS IS", AND SAMSUNG MAKES NO EXPRESS OR IMPLIED
WARRANTY OF ANY KIND WHATSOEVER WITH RESPECT TO THE PRODUCT, INCLUDING BUT NOT LIMITED TO THE
MERCHANTABILITY OF THE PRODUCT OR ITS FITNESS FOR ANY PARTICULAR PURPOSE OR USE; THE DESIGN,
CONDITION OR QUALITY OF THE PRODUCT; THE PERFORMANCE OF THE PRODUCT; THE WORKMANSHIP OF THE
PRODUCT OR THE COMPONENTS CONTAINED THEREIN; OR COMPLIANCE OF THE PRODUCT WITH THE
REQUIREMENTS OF ANY LAW, RULE, SPECIFICATION OR CONTRACT PERTAINING THERETO. NOTHING CONTAINED
IN THE INSTRUCTION MANUAL SHALL BE CONSTRUED TO CREATE AN EXPRESS OR IMPLIED WARRANTY OF ANY
KIND WHATSOEVER WITH RESPECT TO THE PRODUCT. IN ADDITION, SAMSUNG SHALL NOT BE LIABLE FOR ANY
DAMAGES OF ANY KIND RESULTING FROM THE PURCHASE OR USE OF THE PRODUCT OR ARISING FROM THE
BREACH OF THE EXPRESS WARRANTY, INCLUDING INCIDENTAL, SPECIAL OR CONSEQUENTIAL DAMAGES, OR LOSS
OF ANTICIPATED PROFITS OR BENEFITS.
Page 4

Table of Contents
Section 1: Getting Started ........................................................................... 7
Battery Cover . . . . . . . . . . . . . . . . . . . . . . . . . . . . . . . . . . . . . . . . . . . . . . . . . . . . . . . . . . . . . . . .7
Battery . . . . . . . . . . . . . . . . . . . . . . . . . . . . . . . . . . . . . . . . . . . . . . . . . . . . . . . . . . . . . . . . . . . . .8
Switching the Phone On or Off . . . . . . . . . . . . . . . . . . . . . . . . . . . . . . . . . . . . . . . . . . . . . . . . . .13
Phone Options . . . . . . . . . . . . . . . . . . . . . . . . . . . . . . . . . . . . . . . . . . . . . . . . . . . . . . . . . . . . . .14
Locking and Unlocking the Phone . . . . . . . . . . . . . . . . . . . . . . . . . . . . . . . . . . . . . . . . . . . . . . .15
Voice Mail . . . . . . . . . . . . . . . . . . . . . . . . . . . . . . . . . . . . . . . . . . . . . . . . . . . . . . . . . . . . . . . . .15
Retrieving your Google Account Password . . . . . . . . . . . . . . . . . . . . . . . . . . . . . . . . . . . . . . . . .16
Section 2: Understanding Your Phone ...................................................... 17
Features of Your Phone . . . . . . . . . . . . . . . . . . . . . . . . . . . . . . . . . . . . . . . . . . . . . . . . . . . . . . .17
Front View . . . . . . . . . . . . . . . . . . . . . . . . . . . . . . . . . . . . . . . . . . . . . . . . . . . . . . . . . . . . . . . . .18
Back View of Your Phone . . . . . . . . . . . . . . . . . . . . . . . . . . . . . . . . . . . . . . . . . . . . . . . . . . . . . .20
Display . . . . . . . . . . . . . . . . . . . . . . . . . . . . . . . . . . . . . . . . . . . . . . . . . . . . . . . . . . . . . . . . . . . .21
Home . . . . . . . . . . . . . . . . . . . . . . . . . . . . . . . . . . . . . . . . . . . . . . . . . . . . . . . . . . . . . . . . . . . . .27
Widget Bar . . . . . . . . . . . . . . . . . . . . . . . . . . . . . . . . . . . . . . . . . . . . . . . . . . . . . . . . . . . . . . . . .30
Quick List . . . . . . . . . . . . . . . . . . . . . . . . . . . . . . . . . . . . . . . . . . . . . . . . . . . . . . . . . . . . . . . . . .33
Status Bar . . . . . . . . . . . . . . . . . . . . . . . . . . . . . . . . . . . . . . . . . . . . . . . . . . . . . . . . . . . . . . . . .34
3D Cube Navigation . . . . . . . . . . . . . . . . . . . . . . . . . . . . . . . . . . . . . . . . . . . . . . . . . . . . . . . . . .38
Tips . . . . . . . . . . . . . . . . . . . . . . . . . . . . . . . . . . . . . . . . . . . . . . . . . . . . . . . . . . . . . . . . . . . . . . 39
Section 3: Memory Card ............................................................................ 40
Using the SD Card . . . . . . . . . . . . . . . . . . . . . . . . . . . . . . . . . . . . . . . . . . . . . . . . . . . . . . . . . . .40
SD card Overview . . . . . . . . . . . . . . . . . . . . . . . . . . . . . . . . . . . . . . . . . . . . . . . . . . . . . . . . . . .40
Section 4: Call Functions and Contacts List ............................................. 43
Making a Call . . . . . . . . . . . . . . . . . . . . . . . . . . . . . . . . . . . . . . . . . . . . . . . . . . . . . . . . . . . . . . .43
Using the Voice Dialer . . . . . . . . . . . . . . . . . . . . . . . . . . . . . . . . . . . . . . . . . . . . . . . . . . . . . . . .45
Ending a Call . . . . . . . . . . . . . . . . . . . . . . . . . . . . . . . . . . . . . . . . . . . . . . . . . . . . . . . . . . . . . . .45
Answering a Call . . . . . . . . . . . . . . . . . . . . . . . . . . . . . . . . . . . . . . . . . . . . . . . . . . . . . . . . . . . .45
During a Call . . . . . . . . . . . . . . . . . . . . . . . . . . . . . . . . . . . . . . . . . . . . . . . . . . . . . . . . . . . . . . .46
Accessing the Contacts List . . . . . . . . . . . . . . . . . . . . . . . . . . . . . . . . . . . . . . . . . . . . . . . . . . . .49
Call Log . . . . . . . . . . . . . . . . . . . . . . . . . . . . . . . . . . . . . . . . . . . . . . . . . . . . . . . . . . . . . . . . . . .51
Contacts List . . . . . . . . . . . . . . . . . . . . . . . . . . . . . . . . . . . . . . . . . . . . . . . . . . . . . . . . . . . . . . .52
1
Page 5

Finding a Contact . . . . . . . . . . . . . . . . . . . . . . . . . . . . . . . . . . . . . . . . . . . . . . . . . . . . . . . . . . . 54
Speed Dialing . . . . . . . . . . . . . . . . . . . . . . . . . . . . . . . . . . . . . . . . . . . . . . . . . . . . . . . . . . . . . . 59
Section 5: Entering Text ............................................................................60
Changing the Text Input Mode . . . . . . . . . . . . . . . . . . . . . . . . . . . . . . . . . . . . . . . . . . . . . . . . . 61
Using T9 Mode . . . . . . . . . . . . . . . . . . . . . . . . . . . . . . . . . . . . . . . . . . . . . . . . . . . . . . . . . . . . . 62
Using SYM (symbols) or 123 (numeric) . . . . . . . . . . . . . . . . . . . . . . . . . . . . . . . . . . . . . . . . . . . 63
Using ABC Mode . . . . . . . . . . . . . . . . . . . . . . . . . . . . . . . . . . . . . . . . . . . . . . . . . . . . . . . . . . . . 64
Section 6: Messages ..................................................................................65
Types of Messages . . . . . . . . . . . . . . . . . . . . . . . . . . . . . . . . . . . . . . . . . . . . . . . . . . . . . . . . . . 65
Text Messages . . . . . . . . . . . . . . . . . . . . . . . . . . . . . . . . . . . . . . . . . . . . . . . . . . . . . . . . . . . . . 66
Picture Messages . . . . . . . . . . . . . . . . . . . . . . . . . . . . . . . . . . . . . . . . . . . . . . . . . . . . . . . . . . . 69
Voice Notes . . . . . . . . . . . . . . . . . . . . . . . . . . . . . . . . . . . . . . . . . . . . . . . . . . . . . . . . . . . . . . . 72
Audio Postcard . . . . . . . . . . . . . . . . . . . . . . . . . . . . . . . . . . . . . . . . . . . . . . . . . . . . . . . . . . . . . 72
Messaging . . . . . . . . . . . . . . . . . . . . . . . . . . . . . . . . . . . . . . . . . . . . . . . . . . . . . . . . . . . . . . . . 74
Email . . . . . . . . . . . . . . . . . . . . . . . . . . . . . . . . . . . . . . . . . . . . . . . . . . . . . . . . . . . . . . . . . . . . 77
Gmail . . . . . . . . . . . . . . . . . . . . . . . . . . . . . . . . . . . . . . . . . . . . . . . . . . . . . . . . . . . . . . . . . . . . 78
Google Talk . . . . . . . . . . . . . . . . . . . . . . . . . . . . . . . . . . . . . . . . . . . . . . . . . . . . . . . . . . . . . . . 80
Instant Messaging (IM) . . . . . . . . . . . . . . . . . . . . . . . . . . . . . . . . . . . . . . . . . . . . . . . . . . . . . . . 80
Templates . . . . . . . . . . . . . . . . . . . . . . . . . . . . . . . . . . . . . . . . . . . . . . . . . . . . . . . . . . . . . . . . 82
Voicemail . . . . . . . . . . . . . . . . . . . . . . . . . . . . . . . . . . . . . . . . . . . . . . . . . . . . . . . . . . . . . . . . . 82
Visual Voicemail . . . . . . . . . . . . . . . . . . . . . . . . . . . . . . . . . . . . . . . . . . . . . . . . . . . . . . . . . . . . 83
Messages Settings . . . . . . . . . . . . . . . . . . . . . . . . . . . . . . . . . . . . . . . . . . . . . . . . . . . . . . . . . . 83
Section 7: Time Management ....................................................................86
Calendar . . . . . . . . . . . . . . . . . . . . . . . . . . . . . . . . . . . . . . . . . . . . . . . . . . . . . . . . . . . . . . . . . 86
Alarm Clock . . . . . . . . . . . . . . . . . . . . . . . . . . . . . . . . . . . . . . . . . . . . . . . . . . . . . . . . . . . . . . . 89
Digital Clock . . . . . . . . . . . . . . . . . . . . . . . . . . . . . . . . . . . . . . . . . . . . . . . . . . . . . . . . . . . . . . . 90
World Clock . . . . . . . . . . . . . . . . . . . . . . . . . . . . . . . . . . . . . . . . . . . . . . . . . . . . . . . . . . . . . . . 90
Section 8: Connections ..............................................................................91
Google Talk . . . . . . . . . . . . . . . . . . . . . . . . . . . . . . . . . . . . . . . . . . . . . . . . . . . . . . . . . . . . . . . 91
Web Browsing . . . . . . . . . . . . . . . . . . . . . . . . . . . . . . . . . . . . . . . . . . . . . . . . . . . . . . . . . . . . . 91
Enable Downloading for Web Applications . . . . . . . . . . . . . . . . . . . . . . . . . . . . . . . . . . . . . . . . 95
How Wi-Fi Works . . . . . . . . . . . . . . . . . . . . . . . . . . . . . . . . . . . . . . . . . . . . . . . . . . . . . . . . . . . 96
T-Mobile HotSpot Connections . . . . . . . . . . . . . . . . . . . . . . . . . . . . . . . . . . . . . . . . . . . . . . . . . 98
2
Page 6

Section 9: Multimedia ...............................................................................99
Camera . . . . . . . . . . . . . . . . . . . . . . . . . . . . . . . . . . . . . . . . . . . . . . . . . . . . . . . . . . . . . . . . . . .99
Photos . . . . . . . . . . . . . . . . . . . . . . . . . . . . . . . . . . . . . . . . . . . . . . . . . . . . . . . . . . . . . . . . . . .103
Recording a Video . . . . . . . . . . . . . . . . . . . . . . . . . . . . . . . . . . . . . . . . . . . . . . . . . . . . . . . . . .108
Videos . . . . . . . . . . . . . . . . . . . . . . . . . . . . . . . . . . . . . . . . . . . . . . . . . . . . . . . . . . . . . . . . . . .110
The Gallery . . . . . . . . . . . . . . . . . . . . . . . . . . . . . . . . . . . . . . . . . . . . . . . . . . . . . . . . . . . . . . .111
Using the Video Player . . . . . . . . . . . . . . . . . . . . . . . . . . . . . . . . . . . . . . . . . . . . . . . . . . . . . . .112
YouTube . . . . . . . . . . . . . . . . . . . . . . . . . . . . . . . . . . . . . . . . . . . . . . . . . . . . . . . . . . . . . . . . .112
Files . . . . . . . . . . . . . . . . . . . . . . . . . . . . . . . . . . . . . . . . . . . . . . . . . . . . . . . . . . . . . . . . . . . . .113
Amazon MP3 . . . . . . . . . . . . . . . . . . . . . . . . . . . . . . . . . . . . . . . . . . . . . . . . . . . . . . . . . . . . . .119
Music Player . . . . . . . . . . . . . . . . . . . . . . . . . . . . . . . . . . . . . . . . . . . . . . . . . . . . . . . . . . . . . .120
Music Player Settings . . . . . . . . . . . . . . . . . . . . . . . . . . . . . . . . . . . . . . . . . . . . . . . . . . . . . . . .120
Creating a Playlist . . . . . . . . . . . . . . . . . . . . . . . . . . . . . . . . . . . . . . . . . . . . . . . . . . . . . . . . . .121
Playing Music Files . . . . . . . . . . . . . . . . . . . . . . . . . . . . . . . . . . . . . . . . . . . . . . . . . . . . . . . . .123
Transferring Music Files . . . . . . . . . . . . . . . . . . . . . . . . . . . . . . . . . . . . . . . . . . . . . . . . . . . . . .124
Removing Music Files . . . . . . . . . . . . . . . . . . . . . . . . . . . . . . . . . . . . . . . . . . . . . . . . . . . . . . . 124
Assigning Music Files . . . . . . . . . . . . . . . . . . . . . . . . . . . . . . . . . . . . . . . . . . . . . . . . . . . . . . . .125
Section 10: Applications and Development ............................................ 127
Widgets . . . . . . . . . . . . . . . . . . . . . . . . . . . . . . . . . . . . . . . . . . . . . . . . . . . . . . . . . . . . . . . . . .127
Alarm Clock . . . . . . . . . . . . . . . . . . . . . . . . . . . . . . . . . . . . . . . . . . . . . . . . . . . . . . . . . . . . . . . 127
Amazon MP3 . . . . . . . . . . . . . . . . . . . . . . . . . . . . . . . . . . . . . . . . . . . . . . . . . . . . . . . . . . . . . .128
Audio Postcard . . . . . . . . . . . . . . . . . . . . . . . . . . . . . . . . . . . . . . . . . . . . . . . . . . . . . . . . . . . . .128
Bluetooth . . . . . . . . . . . . . . . . . . . . . . . . . . . . . . . . . . . . . . . . . . . . . . . . . . . . . . . . . . . . . . . . . 128
Browser . . . . . . . . . . . . . . . . . . . . . . . . . . . . . . . . . . . . . . . . . . . . . . . . . . . . . . . . . . . . . . . . . .128
Calculator . . . . . . . . . . . . . . . . . . . . . . . . . . . . . . . . . . . . . . . . . . . . . . . . . . . . . . . . . . . . . . . . 129
Calendar . . . . . . . . . . . . . . . . . . . . . . . . . . . . . . . . . . . . . . . . . . . . . . . . . . . . . . . . . . . . . . . . .129
Call log . . . . . . . . . . . . . . . . . . . . . . . . . . . . . . . . . . . . . . . . . . . . . . . . . . . . . . . . . . . . . . . . . .129
Camcorder . . . . . . . . . . . . . . . . . . . . . . . . . . . . . . . . . . . . . . . . . . . . . . . . . . . . . . . . . . . . . . . . 130
Camera . . . . . . . . . . . . . . . . . . . . . . . . . . . . . . . . . . . . . . . . . . . . . . . . . . . . . . . . . . . . . . . . . .130
Contacts . . . . . . . . . . . . . . . . . . . . . . . . . . . . . . . . . . . . . . . . . . . . . . . . . . . . . . . . . . . . . . . . . 130
3D Cube Menu . . . . . . . . . . . . . . . . . . . . . . . . . . . . . . . . . . . . . . . . . . . . . . . . . . . . . . . . . . . . . 131
Dialer . . . . . . . . . . . . . . . . . . . . . . . . . . . . . . . . . . . . . . . . . . . . . . . . . . . . . . . . . . . . . . . . . . . .131
Digital Clock . . . . . . . . . . . . . . . . . . . . . . . . . . . . . . . . . . . . . . . . . . . . . . . . . . . . . . . . . . . . . . .131
Diner Dash 2 . . . . . . . . . . . . . . . . . . . . . . . . . . . . . . . . . . . . . . . . . . . . . . . . . . . . . . . . . . . . . .131
3
Page 7

Email . . . . . . . . . . . . . . . . . . . . . . . . . . . . . . . . . . . . . . . . . . . . . . . . . . . . . . . . . . . . . . . . . . . 132
Files . . . . . . . . . . . . . . . . . . . . . . . . . . . . . . . . . . . . . . . . . . . . . . . . . . . . . . . . . . . . . . . . . . . . 132
Gmail . . . . . . . . . . . . . . . . . . . . . . . . . . . . . . . . . . . . . . . . . . . . . . . . . . . . . . . . . . . . . . . . . . . 132
Google Maps . . . . . . . . . . . . . . . . . . . . . . . . . . . . . . . . . . . . . . . . . . . . . . . . . . . . . . . . . . . . . 133
Google Talk . . . . . . . . . . . . . . . . . . . . . . . . . . . . . . . . . . . . . . . . . . . . . . . . . . . . . . . . . . . . . . 133
HotSpot Connect . . . . . . . . . . . . . . . . . . . . . . . . . . . . . . . . . . . . . . . . . . . . . . . . . . . . . . . . . . 133
IM . . . . . . . . . . . . . . . . . . . . . . . . . . . . . . . . . . . . . . . . . . . . . . . . . . . . . . . . . . . . . . . . . . . . . 133
Imaging Tool . . . . . . . . . . . . . . . . . . . . . . . . . . . . . . . . . . . . . . . . . . . . . . . . . . . . . . . . . . . . . 134
Market . . . . . . . . . . . . . . . . . . . . . . . . . . . . . . . . . . . . . . . . . . . . . . . . . . . . . . . . . . . . . . . . . . 134
Memo . . . . . . . . . . . . . . . . . . . . . . . . . . . . . . . . . . . . . . . . . . . . . . . . . . . . . . . . . . . . . . . . . . . 134
Messaging . . . . . . . . . . . . . . . . . . . . . . . . . . . . . . . . . . . . . . . . . . . . . . . . . . . . . . . . . . . . . . . 135
Music Player . . . . . . . . . . . . . . . . . . . . . . . . . . . . . . . . . . . . . . . . . . . . . . . . . . . . . . . . . . . . . 136
My Account . . . . . . . . . . . . . . . . . . . . . . . . . . . . . . . . . . . . . . . . . . . . . . . . . . . . . . . . . . . . . . 136
myFaves . . . . . . . . . . . . . . . . . . . . . . . . . . . . . . . . . . . . . . . . . . . . . . . . . . . . . . . . . . . . . . . . . 136
Photo Gallery . . . . . . . . . . . . . . . . . . . . . . . . . . . . . . . . . . . . . . . . . . . . . . . . . . . . . . . . . . . . . 137
Settings . . . . . . . . . . . . . . . . . . . . . . . . . . . . . . . . . . . . . . . . . . . . . . . . . . . . . . . . . . . . . . . . . 137
Smart Converter . . . . . . . . . . . . . . . . . . . . . . . . . . . . . . . . . . . . . . . . . . . . . . . . . . . . . . . . . . . 137
Stopwatch . . . . . . . . . . . . . . . . . . . . . . . . . . . . . . . . . . . . . . . . . . . . . . . . . . . . . . . . . . . . . . . 138
Task . . . . . . . . . . . . . . . . . . . . . . . . . . . . . . . . . . . . . . . . . . . . . . . . . . . . . . . . . . . . . . . . . . . . 138
TeleNav GPS Navigator . . . . . . . . . . . . . . . . . . . . . . . . . . . . . . . . . . . . . . . . . . . . . . . . . . . . . . 139
Timer . . . . . . . . . . . . . . . . . . . . . . . . . . . . . . . . . . . . . . . . . . . . . . . . . . . . . . . . . . . . . . . . . . . 139
Tips . . . . . . . . . . . . . . . . . . . . . . . . . . . . . . . . . . . . . . . . . . . . . . . . . . . . . . . . . . . . . . . . . . . . 139
Video Player . . . . . . . . . . . . . . . . . . . . . . . . . . . . . . . . . . . . . . . . . . . . . . . . . . . . . . . . . . . . . . 140
Voice Dialer . . . . . . . . . . . . . . . . . . . . . . . . . . . . . . . . . . . . . . . . . . . . . . . . . . . . . . . . . . . . . . 140
Voice recorder . . . . . . . . . . . . . . . . . . . . . . . . . . . . . . . . . . . . . . . . . . . . . . . . . . . . . . . . . . . . 141
Voice Search . . . . . . . . . . . . . . . . . . . . . . . . . . . . . . . . . . . . . . . . . . . . . . . . . . . . . . . . . . . . . 141
Voicemail . . . . . . . . . . . . . . . . . . . . . . . . . . . . . . . . . . . . . . . . . . . . . . . . . . . . . . . . . . . . . . . . 141
Wi-Fi . . . . . . . . . . . . . . . . . . . . . . . . . . . . . . . . . . . . . . . . . . . . . . . . . . . . . . . . . . . . . . . . . . . 141
World Clock . . . . . . . . . . . . . . . . . . . . . . . . . . . . . . . . . . . . . . . . . . . . . . . . . . . . . . . . . . . . . . 142
YouTube . . . . . . . . . . . . . . . . . . . . . . . . . . . . . . . . . . . . . . . . . . . . . . . . . . . . . . . . . . . . . . . . . 142
Recently Used Applications . . . . . . . . . . . . . . . . . . . . . . . . . . . . . . . . . . . . . . . . . . . . . . . . . . . 142
Downloading a New Application (widget) . . . . . . . . . . . . . . . . . . . . . . . . . . . . . . . . . . . . . . . . 143
Uninstalling an Application (widget) . . . . . . . . . . . . . . . . . . . . . . . . . . . . . . . . . . . . . . . . . . . . 144
My Account . . . . . . . . . . . . . . . . . . . . . . . . . . . . . . . . . . . . . . . . . . . . . . . . . . . . . . . . . . . . . . 144
Files . . . . . . . . . . . . . . . . . . . . . . . . . . . . . . . . . . . . . . . . . . . . . . . . . . . . . . . . . . . . . . . . . . . . 145
4
Page 8

Alarm Clock . . . . . . . . . . . . . . . . . . . . . . . . . . . . . . . . . . . . . . . . . . . . . . . . . . . . . . . . . . . . . . . 152
Tasks . . . . . . . . . . . . . . . . . . . . . . . . . . . . . . . . . . . . . . . . . . . . . . . . . . . . . . . . . . . . . . . . . . . .153
Memo . . . . . . . . . . . . . . . . . . . . . . . . . . . . . . . . . . . . . . . . . . . . . . . . . . . . . . . . . . . . . . . . . . .154
Calculator . . . . . . . . . . . . . . . . . . . . . . . . . . . . . . . . . . . . . . . . . . . . . . . . . . . . . . . . . . . . . . . . 155
Google Maps . . . . . . . . . . . . . . . . . . . . . . . . . . . . . . . . . . . . . . . . . . . . . . . . . . . . . . . . . . . . . .155
SmartConverter . . . . . . . . . . . . . . . . . . . . . . . . . . . . . . . . . . . . . . . . . . . . . . . . . . . . . . . . . . . .157
Android Development . . . . . . . . . . . . . . . . . . . . . . . . . . . . . . . . . . . . . . . . . . . . . . . . . . . . . . . .158
Section 11: Changing Your Settings ....................................................... 160
Widgets . . . . . . . . . . . . . . . . . . . . . . . . . . . . . . . . . . . . . . . . . . . . . . . . . . . . . . . . . . . . . . . . . .160
myFaves Settings . . . . . . . . . . . . . . . . . . . . . . . . . . . . . . . . . . . . . . . . . . . . . . . . . . . . . . . . . . .160
Sound profiles . . . . . . . . . . . . . . . . . . . . . . . . . . . . . . . . . . . . . . . . . . . . . . . . . . . . . . . . . . . . .161
Display Settings . . . . . . . . . . . . . . . . . . . . . . . . . . . . . . . . . . . . . . . . . . . . . . . . . . . . . . . . . . . .167
Manage Online Album . . . . . . . . . . . . . . . . . . . . . . . . . . . . . . . . . . . . . . . . . . . . . . . . . . . . . . . 169
Time & date . . . . . . . . . . . . . . . . . . . . . . . . . . . . . . . . . . . . . . . . . . . . . . . . . . . . . . . . . . . . . . .169
Language and Keyboard settings . . . . . . . . . . . . . . . . . . . . . . . . . . . . . . . . . . . . . . . . . . . . . . .169
Phone settings . . . . . . . . . . . . . . . . . . . . . . . . . . . . . . . . . . . . . . . . . . . . . . . . . . . . . . . . . . . . .171
Bluetooth . . . . . . . . . . . . . . . . . . . . . . . . . . . . . . . . . . . . . . . . . . . . . . . . . . . . . . . . . . . . . . . . . 176
Bluetooth Settings . . . . . . . . . . . . . . . . . . . . . . . . . . . . . . . . . . . . . . . . . . . . . . . . . . . . . . . . . .177
Call settings . . . . . . . . . . . . . . . . . . . . . . . . . . . . . . . . . . . . . . . . . . . . . . . . . . . . . . . . . . . . . . .178
Application settings . . . . . . . . . . . . . . . . . . . . . . . . . . . . . . . . . . . . . . . . . . . . . . . . . . . . . . . . .179
Network selection . . . . . . . . . . . . . . . . . . . . . . . . . . . . . . . . . . . . . . . . . . . . . . . . . . . . . . . . . .181
Data synchronization . . . . . . . . . . . . . . . . . . . . . . . . . . . . . . . . . . . . . . . . . . . . . . . . . . . . . . . .181
Memory Settings . . . . . . . . . . . . . . . . . . . . . . . . . . . . . . . . . . . . . . . . . . . . . . . . . . . . . . . . . . .182
Memory Status . . . . . . . . . . . . . . . . . . . . . . . . . . . . . . . . . . . . . . . . . . . . . . . . . . . . . . . . . . . .183
Reset Settings . . . . . . . . . . . . . . . . . . . . . . . . . . . . . . . . . . . . . . . . . . . . . . . . . . . . . . . . . . . . .183
Legal Information . . . . . . . . . . . . . . . . . . . . . . . . . . . . . . . . . . . . . . . . . . . . . . . . . . . . . . . . . . . 183
Software Update . . . . . . . . . . . . . . . . . . . . . . . . . . . . . . . . . . . . . . . . . . . . . . . . . . . . . . . . . . . 184
Section 12: Health and Safety Information ............................................. 185
Health and Safety Information . . . . . . . . . . . . . . . . . . . . . . . . . . . . . . . . . . . . . . . . . . . . . . . . .185
Warning Regarding Display . . . . . . . . . . . . . . . . . . . . . . . . . . . . . . . . . . . . . . . . . . . . . . . . . . . 186
Samsung Mobile Products and Recycling . . . . . . . . . . . . . . . . . . . . . . . . . . . . . . . . . . . . . . . . .186
UL Certified Travel Adapter . . . . . . . . . . . . . . . . . . . . . . . . . . . . . . . . . . . . . . . . . . . . . . . . . . . .186
Consumer Information on Wireless Phones . . . . . . . . . . . . . . . . . . . . . . . . . . . . . . . . . . . . . . . .187
Road Safety . . . . . . . . . . . . . . . . . . . . . . . . . . . . . . . . . . . . . . . . . . . . . . . . . . . . . . . . . . . . . . .192
5
Page 9

Responsible Listening . . . . . . . . . . . . . . . . . . . . . . . . . . . . . . . . . . . . . . . . . . . . . . . . . . . . . . . 193
Operating Environment . . . . . . . . . . . . . . . . . . . . . . . . . . . . . . . . . . . . . . . . . . . . . . . . . . . . . . 196
Using Your Phone Near Other Electronic Devices . . . . . . . . . . . . . . . . . . . . . . . . . . . . . . . . . . 196
Potentially Explosive Environments . . . . . . . . . . . . . . . . . . . . . . . . . . . . . . . . . . . . . . . . . . . . . 197
Emergency Calls . . . . . . . . . . . . . . . . . . . . . . . . . . . . . . . . . . . . . . . . . . . . . . . . . . . . . . . . . . . 197
FCC Notice and Cautions . . . . . . . . . . . . . . . . . . . . . . . . . . . . . . . . . . . . . . . . . . . . . . . . . . . . 198
Other Important Safety Information . . . . . . . . . . . . . . . . . . . . . . . . . . . . . . . . . . . . . . . . . . . . . 199
Product Performance . . . . . . . . . . . . . . . . . . . . . . . . . . . . . . . . . . . . . . . . . . . . . . . . . . . . . . . 199
Availability of Various Features/Ring Tones . . . . . . . . . . . . . . . . . . . . . . . . . . . . . . . . . . . . . . . 200
Battery Standby and Talk Time . . . . . . . . . . . . . . . . . . . . . . . . . . . . . . . . . . . . . . . . . . . . . . . . 200
Battery Precautions . . . . . . . . . . . . . . . . . . . . . . . . . . . . . . . . . . . . . . . . . . . . . . . . . . . . . . . . 201
Care and Maintenance . . . . . . . . . . . . . . . . . . . . . . . . . . . . . . . . . . . . . . . . . . . . . . . . . . . . . . 202
Section 13: Warranty Information ...........................................................203
Standard Limited Warranty . . . . . . . . . . . . . . . . . . . . . . . . . . . . . . . . . . . . . . . . . . . . . . . . . . . 203
End User License Agreement for Software . . . . . . . . . . . . . . . . . . . . . . . . . . . . . . . . . . . . . . . 205
Index ........................................................................................................................ 210
6
Page 10
Section 1: Getting Started
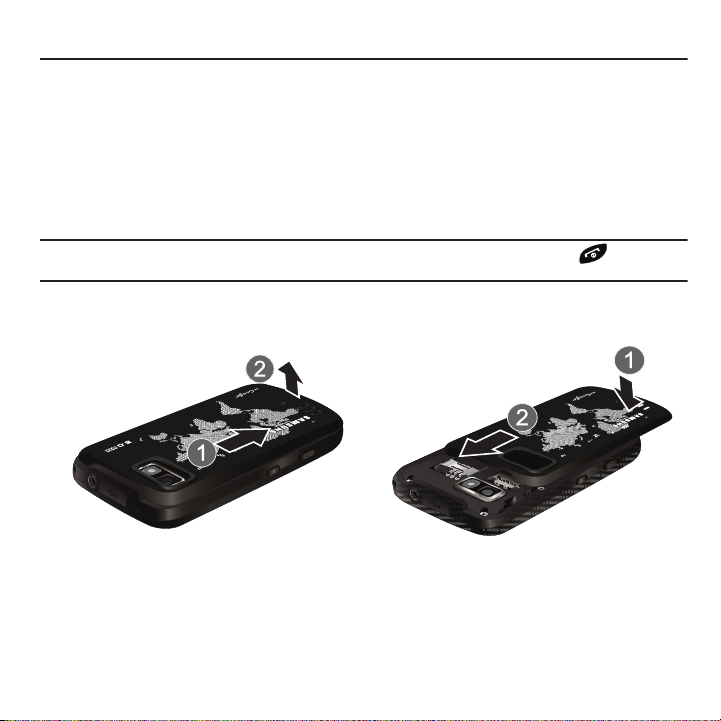
Remove the Back Cover Replace the Back Cover
This section explains how to get started with your phone by installing and charging the battery, installing the SIM
card and optional memory card, and setting up your voice mail.
Before using your phone for the first time, you’ll need to install and charge the battery and install the SIM card. The
SIM card is loaded with your subscription details, such as your PIN, available optional services, and many other
features. If desired, you can also install an SD card to store media for use with your phone.
Battery Cover
The battery, SIM card and SD card are installed under the battery cover.
Important!:
Before removing or replacing the battery cover, make sure the phone is switched off: hold down the key until the
power-off image displays, then press
䊳
To
remove the cover
, press and slide the cover forward in the direction of the arrow on the cover to release it from
the phone, then slide the cover off and away from the back of the phone (as shown).
䊳
To
replace the cover
, slide the cover forward (1), then press down gently until it snaps into place (2).
Power off
.
7
Page 11
Battery
Before using your phone for the first time, install the battery and charge it fully.
Important!:
Before removing or replacing the battery, make sure the phone is switched off; hold down the key until the power-
off image displays, then press
Power o ff
.
Installing the Battery
䊳
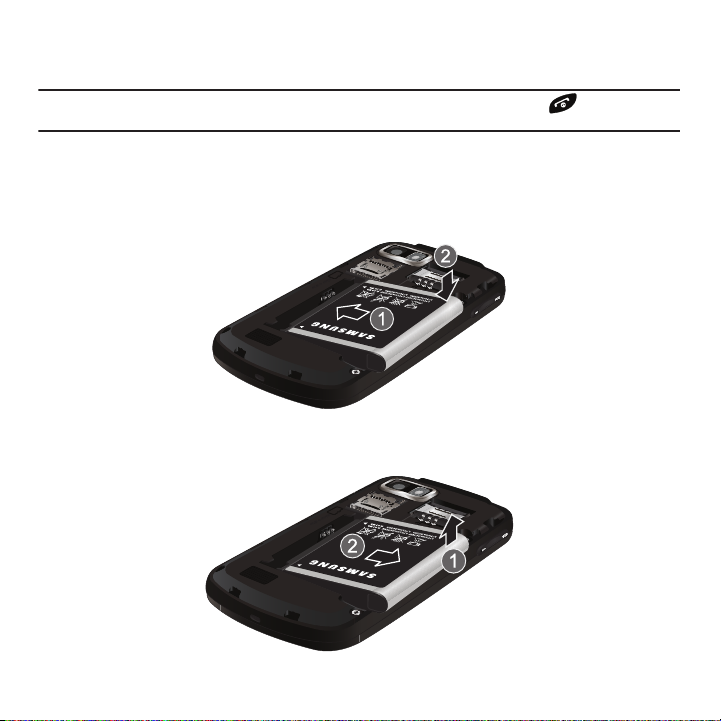
Slide the battery into the compartment (1) so that the tabs on the end align with the slots at the bottom of the
phone, and the gold contacts on the battery line up with those on the phone. Lightly press down on the battery
(2) until it slips into place.
Removing the Battery
䊳
Grip the battery at the top end (1) and lift it up and out (2).
Getting Started 8
Page 12

Charging the Battery
Your phone is powered by a rechargeable Li-ion battery. A wall charger, which is used for charging the battery, is
included with your phone. Use only approved batteries and chargers. Ask your local Samsung dealer for further
details.
Before using your phone for the first time, you must fully charge the battery. A discharged battery recharges fully in
approximately 4 hours.
Note:
Verify that the battery is installed prior to connecting the wall charger. If the battery is not installed and the wall charger is
connected, the handset power cycles continuously preventing proper operation. Failure to unplug the wall charger before you
remove the battery, can cause the phone to become damaged.
1. With the battery installed, temporarily remove the plastic cover on the top of the phone and plug in the USB
wall charger into the jack.
Correct
Incorrect
Note:
This illustration displays both the
connected, damage to the accessory port will occur therefore voiding the phone’s warranty.
Your touch screen responds best to a light touch from the pad of your finger or a non-metallic stylus. Using excessive force or a
metallic object when pressing on the touch screen may damage the tempered glass surface and void the warranty see “Health
and Safety Information” on page 185.
correct
and incorrect orientation for connecting the charger. If the charger is incorrectly
2. Plug the charger’s power plug into a standard AC wall outlet.
9
Page 13
3.
When charging is finished, first unplug the charger’s power plug from the AC wall outlet, then disconnect the
charger’s connector from the phone.
Important!:
If your handset has a touch screen display, please note that a touch screen responds best to a light touch from the pad of
your finger or a non-metallic stylus. Using excessive force or a metallic object when pressing on the touch screen may
damage the tempered glass surface and void the warranty. For more information, please refer to the "Standard Limited
Warranty."
Low Battery Indicator
When the battery level is low and only a few minutes of talk time remain, a warning tone sounds and the “Low
battery” message repeats at regular intervals on the display. In this condition, your phone conserves its remaining
battery power, by dimming the backlight.
When the battery level becomes too low, the phone automatically turns off.
SIM Card
The SIM card is loaded with your subscription details such as your telephone number, PIN, available optional
services, and many other features.
Important!:
Before removing or replacing the SIM card, make sure the phone is switched off; hold down the key until the poweroff image displays, then press
Important!:
The SIM card and its information can be easily damaged by scratching or bending, so be careful when handling, inserting,
or removing the card. Keep all SIM cards out of reach of small children.
Power o ff
.
Getting Started 10
Page 14

1.
Install the SIM Card
Remove the SIM Card
To
install the SIM card
, carefully slide the SIM card into the SIM card socket until the card clicks into place.
Make sure that the card’s gold contacts face into the phone and that the upper-left angled corner of the card
is positioned as shown.
2. To
remove the SIM Card
Note:
If the card is not inserted correctly, the phone will not detect it. If this happens, remove the card and reinstall the card in the
correct orientation.
, carefully slide the SIM card out of the SIM card socket.
SD Card
Your phone supports an optional (external) microSD™ (SD) card for storage of media such as music, pictures, video
and other files. The SD card is designed for use with this mobile phone and other devices.
Note:
This device supports up to a 16 Gigabyte memory card.
1. To unlock the memory card cover (1), use your thumb nail or other object to slide the edge of the memory card
cover to the Unlock position (as indicated on the phone) until you hear a slight clicking sound.
11
Page 15

2.
Gently lift the edge of the memory card cover up (as shown) (2).
Install the memory card
by sliding it into the
the slot (3), being sure to align the gold contact pins on the card with the phone’s contacts.
3. Gently push the memory card cover (4) down to close, and slide the cover back into the lock position.
4. For more information on how to use the SD card see “Using the SD Card” on page 40.
Removing the Memory Card
1. Remove the phone’s bac k c ove r.
2. Use your thumb nail or other object to slide the edge of the memory card cover to the Unlock position (as
indicated on the phone) until you hear a slight clicking sound.
3. Gently lift the edge of the memory card cover up (as shown in the previous graphic [2]).
Getting Started 12
Page 16
Switching the Phone On or Off
1. Press and hold the key until the phone switches on.
2. If the phone asks you to enter the phone password, use the keypad to enter this password and press
3. If the phone asks for a PIN, use the keypad to enter the PIN and press
OK
. For more information, refer to
“Check PIN code” on page 172.
The phone searches for your network and after finding it, you can make or receive calls.
Note:
The display language is preset to English at the factory. To change the language, use the Language menu.
For more information, refer to “Language settings” on page 170.
4. When you wish to switch off the phone, touch and hold the key until the Power-off image displays.
OK
.
5. Touch
13
Power off
.
Page 17

Phone Options
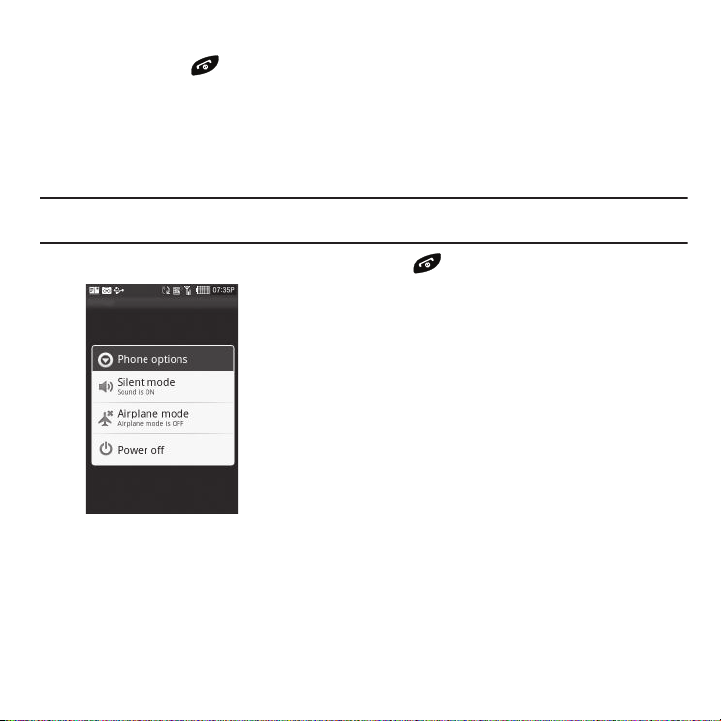
Phone options is a shortcut method for putting the phone in Silent mode, Airplane mode, or turning the phone
power off.
1. Press and hold the key until the Phone options screen displays on the Home page.
2. Touch one of the following options:
• Silent mode
: turns off all the phone sounds. Silent mode is convenient when you wish to stop the phone from making noise, in
a theater for example.
• Airplane mode
: allows you to use many of your phone’s features, such as Games, Voice note, etc., when you are in an
airplane or in any other area where making or receiving calls or data is prohibited.
Important!:
When your phone is in Airplane Mode, it cannot send or receive any calls or access online information.
•Power off
: turns the phone off.
Silent Mode
In Silent Mode the speaker is muted and the phone only vibrates to notify you of incoming calls, or other functions
that normally have a defined tone or sound as an alert.
1. From Idle mode, press the key.
2. Touch
3. Repeat steps 1 and 2 to deactivate this mode.
Silent Mode
to activate this mode.
Airplane Mode
Airplane Mode allows you to use many of your phone’s features, such as Games, Voice notes, etc., when you are in
an airplane or in any other area where making or receiving calls or data is prohibited. When your phone is in
Airplane Mode, it cannot send or receive any calls or access online information.
1. From Idle mode, press the key.
2. Touch
3. Repeat steps 1 and 2 to deactivate this mode.
Airplane Mode
to activate this mode.
Getting Started 14
Page 18
Locking and Unlocking the Phone
By default, the phone locks when the backlight turns off. When the device is locked, press the
Lock
button (on the
right side of the phone) to unlock the phone. You can choose to configure lock settings to prevent unauthorized use
of your phone.
Voice Mail
Setting Up Your Voice Mail
For new users, follow the instructions below to set up voice mail:
Note:
Voice mail setup may be different depending on your network.
1. From the Home screen, touch the
Dialer
icon and touch and hold the key until the phone dials voice
mail.
You may be prompted to enter a password.
2. Follow the tutorial to create a password, a greeting, and a display name.
Accessing Your Voice Mail
You can access your Voice Mail by either pressing and holding the key on the keypad, by using the phone’s
menu, or by touching the Voice Mail icon in the Widget bar. To access Voice Mail using the menu:
1. From the Home screen, press the
Dialer
icon and touch and hold the key until the phone dials
voice mail.
Note:
If Visual Voicemail is enabled it displays when you press the key.
2. When connected, follow the voice prompts from the voice mail center.
15
Page 19

Retrieving your Google Account Password
A GoogleTM account password is required for Google applications. If you misplace or forget your Google Account
password, follow these instructions to retrieve it:
1. From your computer, use an Internet browser to navigate to http://google.com/accounts.
2. Once the URL loads, click on
3. From the
4. Click
Please select your issue
Reset your password now
I cannot access my account
section, select
.
I forgot my password
.
, then follow the password recovery procedure.
Getting Started 16
Page 20

Section 2: Understanding Your Phone
This section outlines key features of your phone. It also describes the phone’s keys, screen and the icons that
display when the phone is in use.
Features of Your Phone
Your phone is lightweight, easy-to-use and offers many significant features. The following list outlines a few of the
features included in your phone.
•
Touch screen with virtual QWERTY keyboard
•
Solid Android platform
•
Wi-Fi Capability
•
Bluetooth enabled
•
Full integration with Google applications (Gmail, YouTube, Google Maps)
•
Multiple Messaging Options: Email, Audio Postcard, Instant Messaging, Picture Messaging, Google Talk, Google Search, Video
Messaging, Text Messaging, Predictive Text
•
Supports synchronizing with a corporate email account
•
5 Megapixel camera and video with autofocus, flash, multi shot & 8x digital zoom
•
Brilliant widescreen AMOLED display
•
MP3 player with Multitasking features
•
Assisted GPS (TeleNav GPS Navigation)
•
Webkit-based browser (3G speed)
•
Downloadable applications from the Android Market
•
Up to 16GB expandable memory slot
17
Page 21

Front View
6
7
8
9
10
12
11
5
4
3
2
1
13
14
15
16
17
18
The following illustrations show the main elements of your phone:
The following list correlates to the illustrations.
1.
USB Power/Accessory connector
data cable.
2.
Headset jack
3.
Strap holder
allows you to connect a hands-free headset so you can listen to music.
is used to connect a carrying strap to the phone.
allows you to connect a power cable or optional accessories such as a USB/
Understanding Your Phone 18
Page 22

4.
Volume key
volume during a call.
5.
Menu key
allows you to adjust the ringer volume in standby mode (with the phone open) or adjust the voice
When receiving an incoming call, pressing the volume key mutes the ring tone.
displays a list of options available for the current screen. From the Home screen it displays
Wallpaper, Search, Notifications, and Settings options.
6.
Home
key displays the Home screen when pressed.
7.
Send key
allows you to make or answer a call. Press and hold to launch the voice dialer.
8.
Microphone
during phone calls and allows other callers to hear you clearly when you are speaking to
is used
them. It is also used to make voice note recordings.
9.
Power/End key
ends a call or switches the phone off and on. Press and hold for seconds to turn off Silent or
Airplane mode, or to turn the phone on or off.
10.
Cube key
launches Cube menu mode.
11.
Back key
redisplays the previous screen or clears entries.
12.
Camera button
allows you to take pictures when you are in camera mode. Launches the camera with a press
and hold.
13.
Lock button
14.
OK button
15.
Navigation key
16.
Display
Locks and unlocks the phone.
selects items from menus or accepts entries.
scrolls menus or lists.
shows all the information needed to operate your phone, such as the connection status, received
signal strength, phone battery level, and time.
17.
Receiver
allows you to hear the other caller and the different ring tones or sounds offered by
your phone.
18.
Microphone
allows you to talk on the speakerphone.
19
Page 23
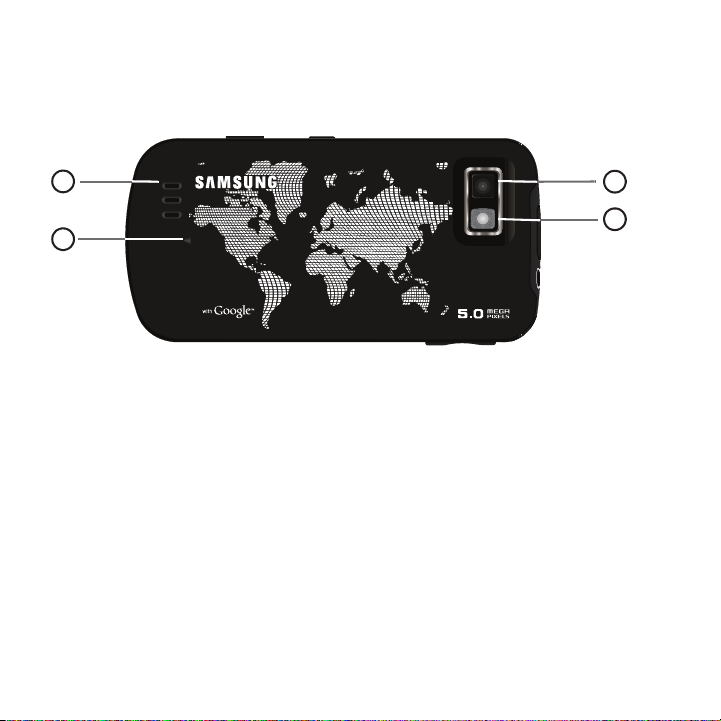
Back View of Your Phone
3
2
1
4
The following illustration shows the external elements of your phone:
1.
External speaker
2.
Cover Release indicator
3.
Camera lens
4.
Flash
allows you to hear ringers, music, and other sounds offered by your phone.
is used to remove the cover from the phone.
is used to take photos.
is used to provide light for taking photos.
Understanding Your Phone 20
Page 24
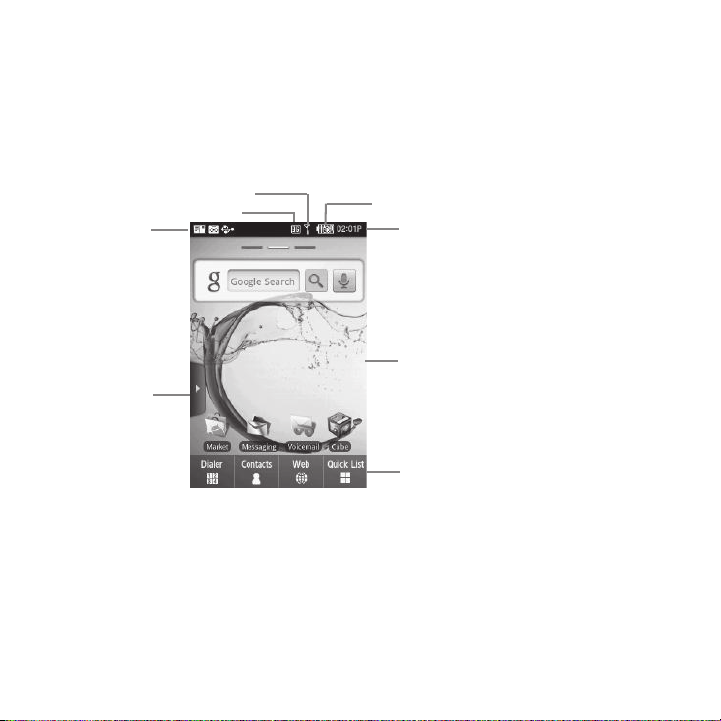
Display
Battery status
Home Screen
Quick List
Widget bar
Connection status
Signal strength
Time
Notifications
Your phone’s display provides information about the phone’s status, and is the interface to the features of your
phone. The display indicates your connection status, signal strength, battery status and time. It also displays
notifications, the Widget bar and a Quick List (or shortcut) bar. Icons display at the top of the phone when an
incoming call or message is received and will also alert you at a specified time when an alarm was set by turning on
the backlight as well as displaying a corresponding icon on the screen.
Navigation
Using the touch screen display and the keys, you can navigate the features of your phone and enter characters. The
following conventions are used in this manual to describe the navigation action in the procedures.
21
Page 25
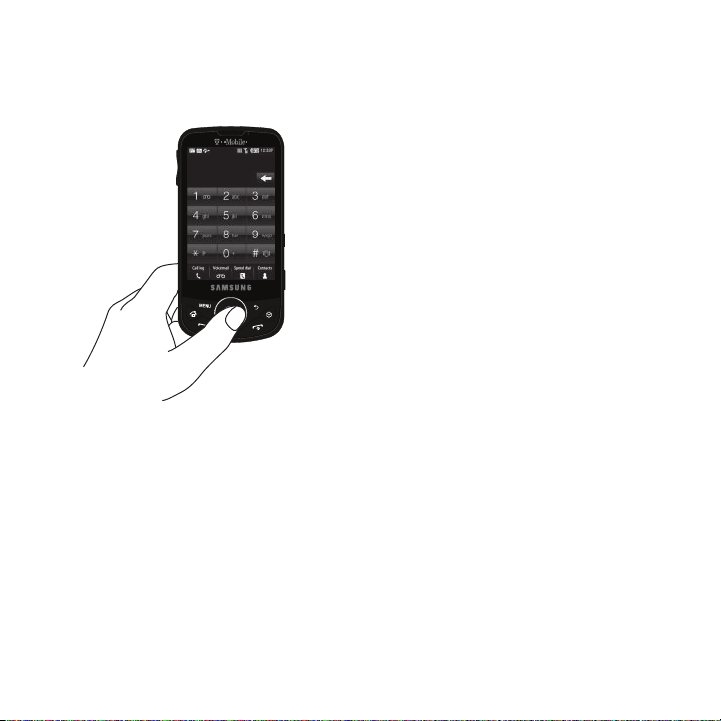
Press
Press phone keys and buttons to select or activate an item. For example: press the Navigation key to scroll through
a menu.
Understanding Your Phone 22
Page 26
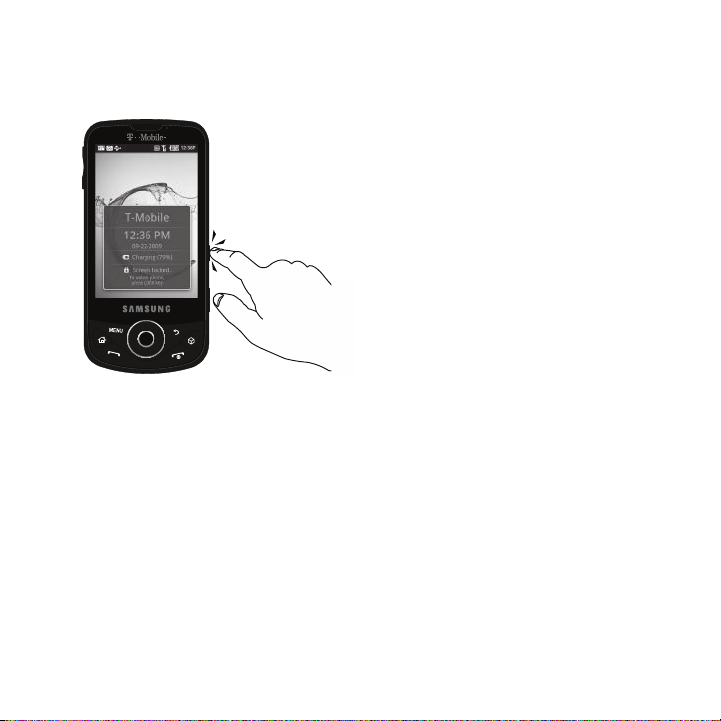
Press and Hold
Some buttons and keys require you to press and hold them to activate a feature, for example, you press the Lock
key to lock and unlock the phone.
23
Page 27

Touch
Use a brief touch to select items on the display or to enter text on the virtual QWERTY keyboard. For example: touch
a widget to open the application.
Understanding Your Phone 24
Page 28

Touch and Hold
Touch and hold an icon or key to open the available options, or to access a pop-up menu. For example: press and
hold on a Home screen to access a menu of customization options.
Note:
When you touch and hold the widget it transfers and to the Home screen and launches the application.
Scroll
Scroll refers to navigating through lists or menus. You can scroll by pressing the Navigation key up, down, left or
right, or by sliding.
25
Page 29

Slide
Slide your finger
Left or Right to
Select the next panel
Slide means to quickly drag your finger vertically or horizontally on the screen to move the area of focus or to scroll
through a list. For example: slide your finger left or right on the Home screen to scroll among the three screens.
Drag and Drop
Drag and drop allows you to move items from one area of the screen to another. Touch and hold an item, then drag
the item to a new location, before lifting your finger to drop it in the new location. For example: drag a widget from
the Widget bar and drop it onto a Home screen.
Tip:
You can drag widgets from one panel of the Home screen panel to another.
Rotate
The screen can be rotated to change the orientation from portrait (default) to landscape. For example: rotate to
landscape orientation when entering text, to provide a larger keyboard, or when viewing web content to minimize
scrolling.
Understanding Your Phone 26
Page 30
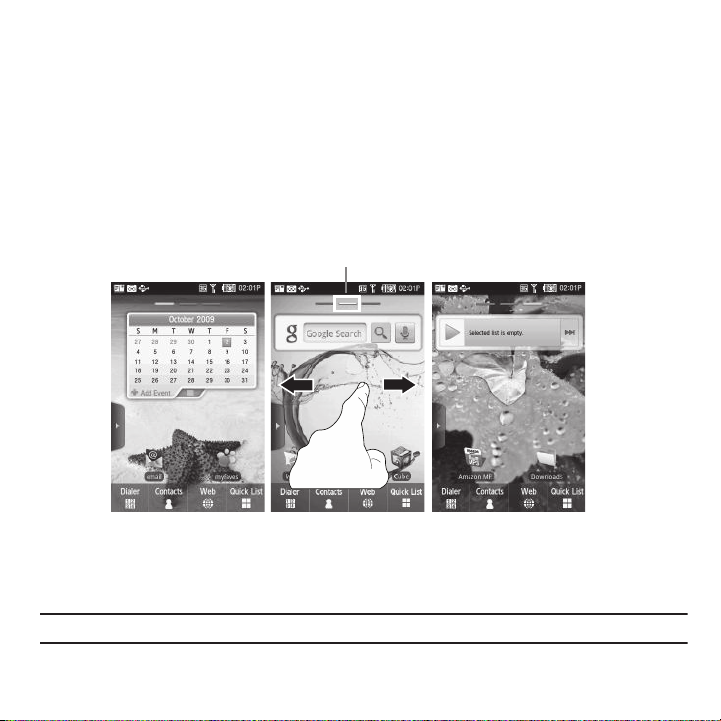
Display settings
Home ScreenHome Screen
Panel 1 Panel 2
Home Screen
Panel 3
Indicates which panel
is displayed
In this menu, you can change various settings for the for the wallpaper, cube, brightness or backlight.
䊳
From Idle mode, touch
Quick List
➔
Settings
➔
Display settings
. For more information, refer to “Display Settings”
on page 167.
Home
Home is the starting point for using the applications or widgets on your phone. Home consists of three workspaces
which extend to the right and left beyond the initial display width to provide three workspaces for docking widgets,
folders, shortcuts or applications. Each Home screen displays a different wallpaper to aid you in navigation.
䊳
Slide your finger horizontally to the left and right on the screen to view the Home screens.
Note:
A three-part indicator at the top of the workspace shows you which workspace is displayed.
27
Page 31
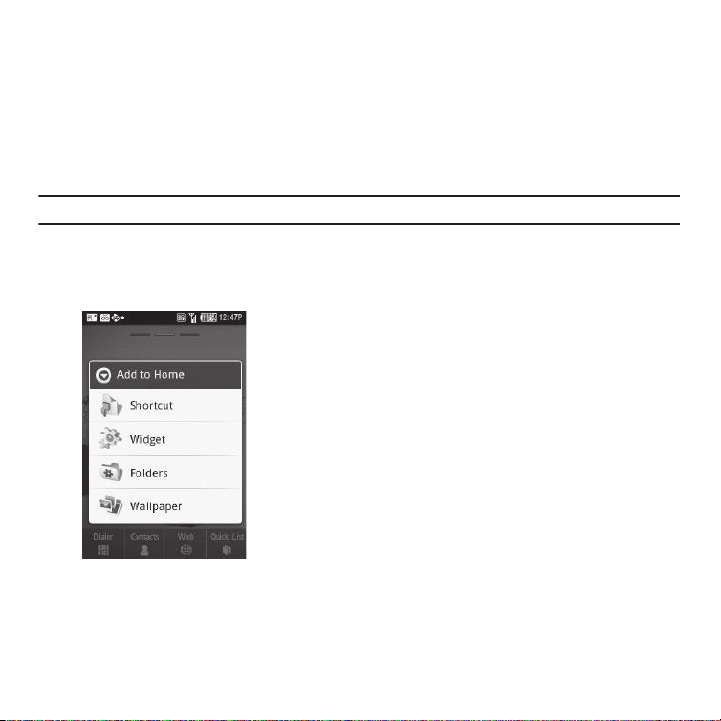
Customizing the Home Screens
You can customize the Home screens to display the application icons, shortcuts, folders, and widgets that you
frequently use. For example, one Home screen could contain the Music Player widget and other forms of media,
while another workspace might contain communication widgets such as Gmail and IM, and the third workspace
might contain Maps and other travel-related widgets.
Adding a Shortcut
Using this feature you can add shortcuts such as applications, a bookmarked web page, a contact, or a Gmail label.
Important!:
A Google account password is required for Google applications.
To add a shortcut:
1. On a Home screen, touch and hold an empty area until the
Add to Home
menu displays.
2. Touch
3. Touch a shortcut option:
Shortcut
.
Application, Bookmark, Contacts
, or
Gmail label
.
Understanding Your Phone 28
Page 32

4.
Touch the shortcut object.
The selected object is added to the workspace as a shortcut.
Adding a Widget to the workspace
1. On a Home screen, touch and hold on an empty area until the
2. Touch
Widget
to add the Analog clock, Calendar, Digital Clock, Imaging Tool, MiniPlayer, Picture frame, or
Add to Home
menu displays.
Search to the Home screen.
Removing a widget from the workspace
1. On a Home screen, touch and hold the item you want to remove.
2. Drag the widget and drop it onto the Widget bar.
The Widget bar label turns red and displays the word Trash.
Adding a Folder
Folders hold items that you want to organize and store together on the workspace.
1. On a Home screen, touch and hold an empty area until the
2. Touch
Folders
to add a New folder, All contacts, Contacts with phone numbers, or Speed dial to the
Add to Home
pop-up menu displays.
workspace.
Renaming a folder
1. On a Home screen, tap the folder you want to rename to open the folder.
2. With the folder open, touch and hold the Folder title bar until the Rename folder pop-up displays.
3. Touch the Folder name field and enter a new title for this folder.
Deleting a folder
䊳
On a Home screen, touch, drag, and drop the folder you want to delete onto the Widget bar.
The Widget bar tab changes into a trash can symbol.
29
Page 33

Changing the Wallpaper
1. On a Home screen, touch and hold an empty area until the
2. Touch
3. Select a panel to change.
Wallpaper
.
Add to Home
menu displays.
Each panel can have a different wallpaper.
4. Touch
5. If you selected
Photos
or
Samsung Wallpaper Gallery
Samsung Wallpaper Gallery
and select a wallpaper image.
slide to scroll through the wallpaper thumbnails at the bottom of
the screen and tap a thumbnail to display your selection.
6. Touch the image on the screen to select it as your new workspace wallpaper.
Widget Bar
The Widget bar provides quick access to frequently-used features via Widgets, which act as shortcuts to launch the
features.
By default, 44 widgets display. Some of these widgets are Samsung specific widgets (widgets created just for
Samsung phones), and others are Android widgets. You can also download other applications (widgets), which
automatically save to the Widget bar after downloading.
For more information about Widgets, see “Widgets” on page 127. Also, see “Downloading a New Application
(widget)” on page 143.
To display or hide the Widget bar:
1. Tap the Widget bar tab to display the Widget bar.
2. Tap the Widget bar tab again to close it.
Understanding Your Phone 30
Page 34
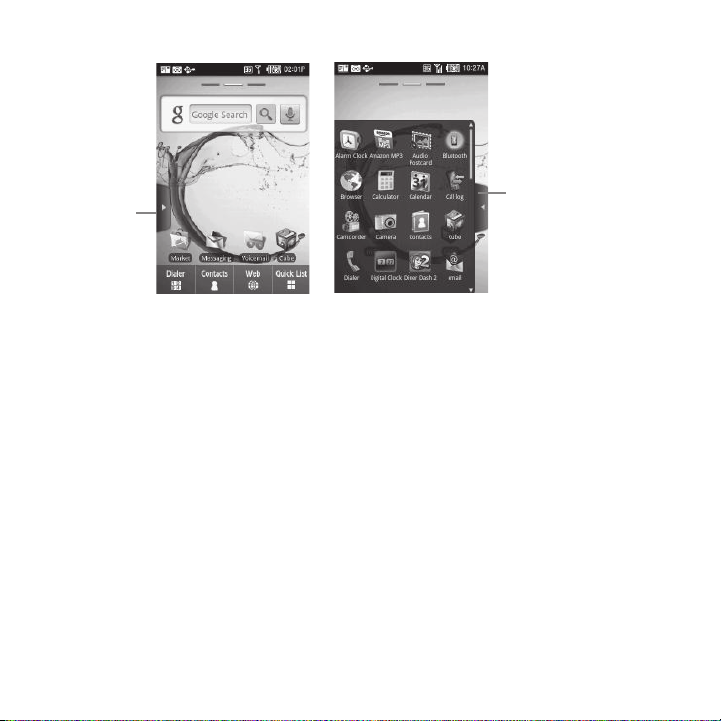
Tap the
Tap the widget
bar again to
close the tray
widget bar
tab to open
the tray
31
Page 35
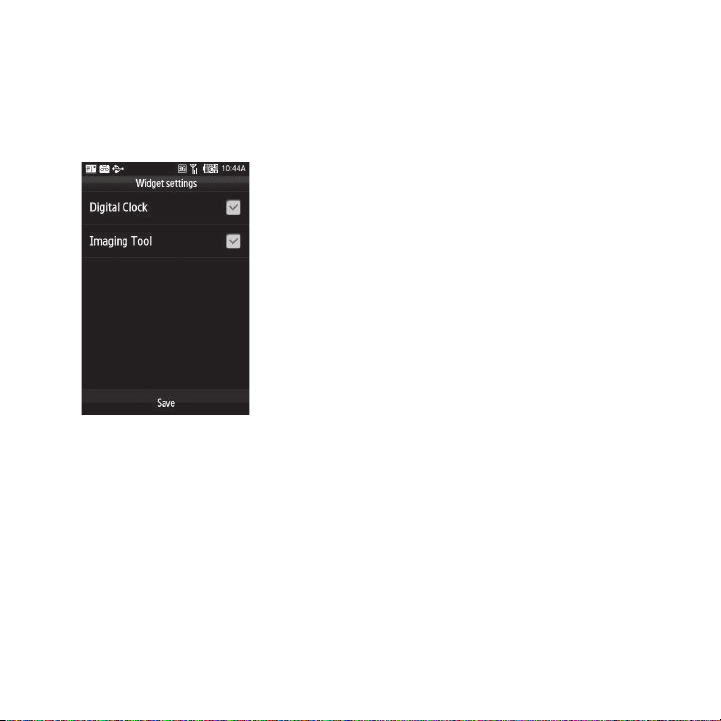
Configure the Widget Bar
To select items to display or hide in the Widget bar:
1. From the Home screen, touch
2. Touch the check box to place a check mark next to the Widget you want to display.
Quick List
➔
Settings
➔
Widgets
.
Understanding Your Phone 32
Page 36
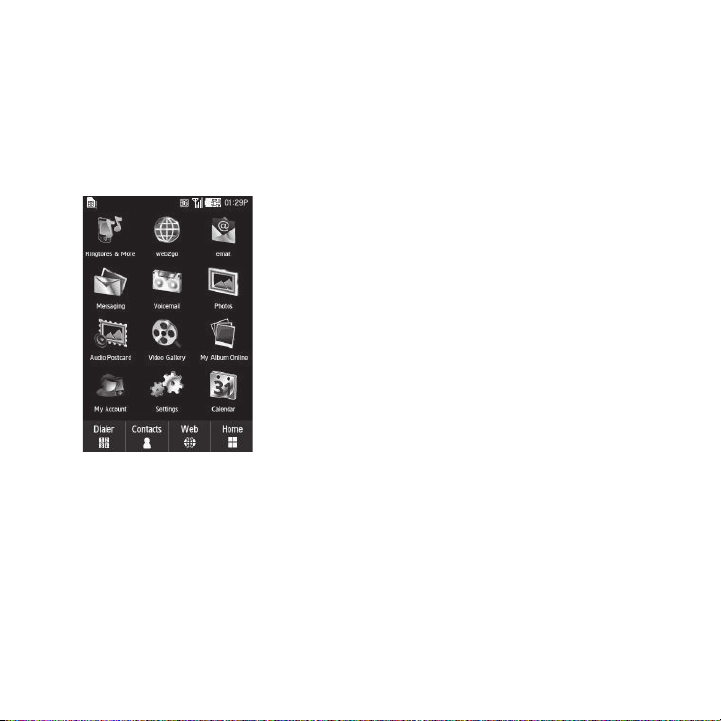
Quick List
The Quick List provides access to commonly used items, such as Dialer (for making a phone call), Contacts
(accessing the Contacts list), Web (opening a browser via web2go), and Quick List (for application access).
Some items on the Quick List are context-sensitive. For example, while viewing a Home screen, the Quick list item
is available to provide access to Menu items. When the Menu is displayed, the Widget item is available to allow you
to switch back to the current widget.
33
Page 37
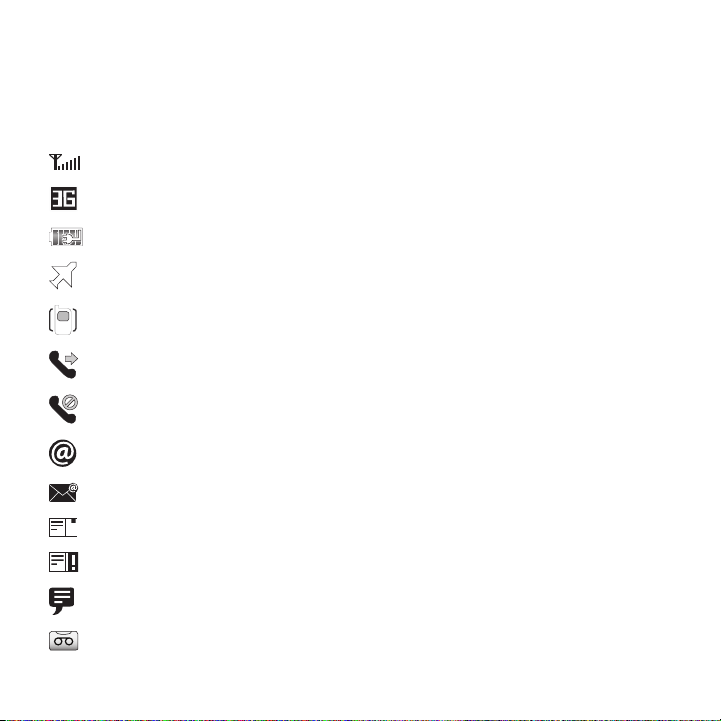
Status Bar
The Status Bar shows information about the connection status, signal strength, phone battery level, and time, and
displays notifications about incoming messages and calls and other actions.
This list identifies the icons you’ll see on your phone’s display screen:
Displays the signal strength.
Displays when the phone is using the 3G network.
Displays when the phone is connected to the computer via USB cable.
Displays when Airplane mode is activated.
Displays when the sound profile is set to Vibration.
Displays when Call forwarding is set to Always.
Displays when there are missed calls.
Displays when a New Email message is received.
Displays when a new corporate email message is received.
Displays when a new SMS/MMS is received.
Displays when there is a problem with an SMS/MMS delivery.
Displays when a new Instant Message is received.
Displays when a new Voicemail is received.
Understanding Your Phone 34
Page 38
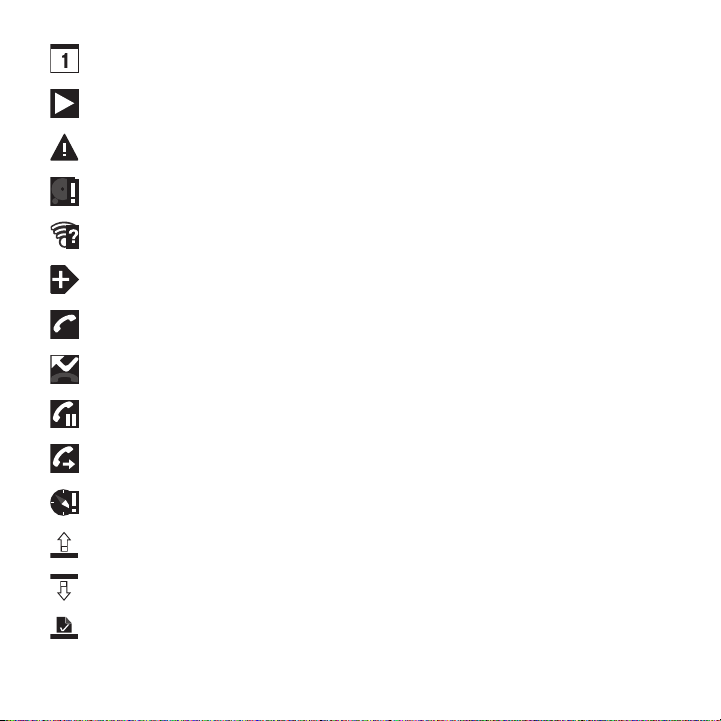
Displays when there is an Upcoming event.
Displays when a song is playing.timer
Displays when there is a problem with sign in/sync.
Displays when the storage card is full.
Displays when Wi-Fi is on and wireless networks are available.
Displays when there are More (not displayed) notifications.
Displays when a call is in progress.
Displays when a Missed Call is received.
Displays when a call is on hold.
Displays when Call forwarding is activated.
Displays when the compass needs orientation.
Displays when data is uploading.
Displays when data is downloading.
Displays when content is downloaded.
35
Page 39
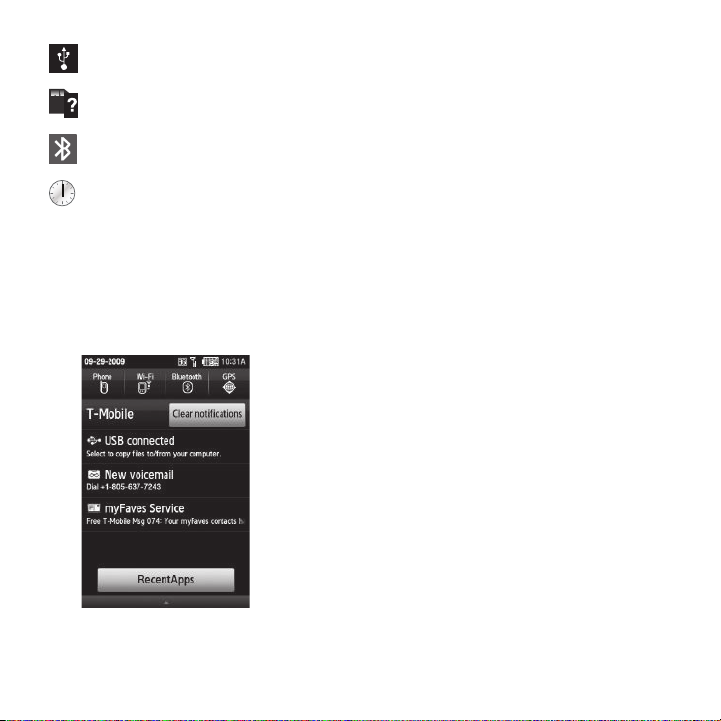
Displays when the phone is connected to a computer via USB cable.
Displays when no storage card is mounted on the phone.
Displays when Bluetooth is activated.
Displays when an alarm is set for the Alarm Clock.
Notification Bar
The Notification Bar includes a pull-down list to show information about processes that are running, recent
notifications, etc. To display the Status indicator:
䊳
On the Home screen, touch the Notification Bar until the pull-down displays, then drag down vertically.
Understanding Your Phone 36
Page 40

Clearing Notifications
To clear all notifications from the Notification panel:
1. From the Home screen, touch the Notification Bar until the pull-down displays, then drag down vertically.
2. Touch
Clear notifications
.
The notifications are cleared from the panel.
37
Page 41
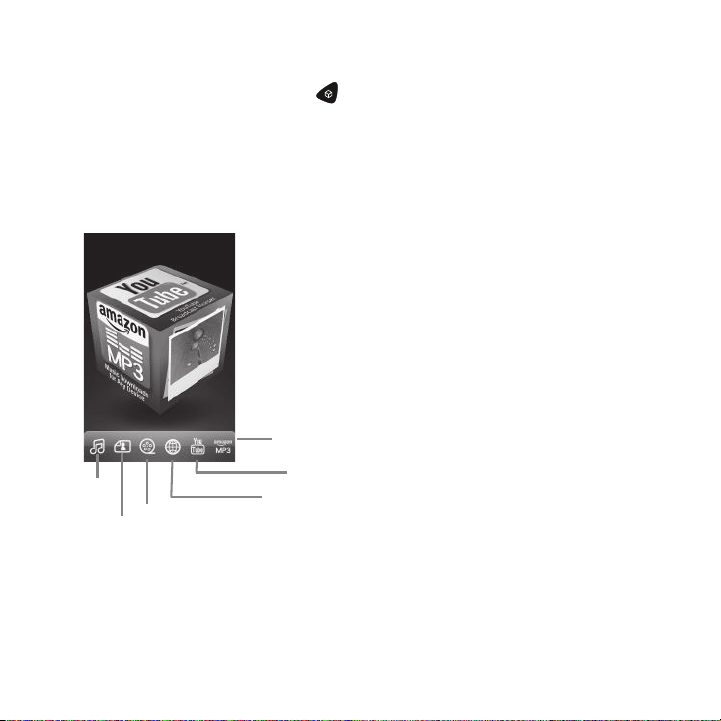
3D Cube Navigation
Music
Player
Photo
Gallery
Video
Gallery
web2go
Browser
amazon MP3
YouTube
The 3D Cube navigation is another way to quickly navigate a few of the most visited menus or applications.
When you first launch the Cube (by pressing the key) both a 3D cube and a quick launch menu display. The
quick launch menu contains icons that match the panels on the cube.
There are two ways to navigate the menus and applications offered on the cube. You can touch one of the quick
launch icons, the matching Cube panel displays and the menu or application launches. Or, you can touch and
rotate the cube until the panel with the matching application displays. Touching a panel on the Cube launches that
application.
Understanding Your Phone 38
Page 42

Applications offered on the Cube are:
web2go Browser
to “Connections” on page 91.
Amazon MP3
and operated by Amazon.com. For more
For more information, refer
is a digital music store owned
Photo Gallery
For more information, refer to
“The Gallery” on page 111.
Video Gallery
For more information, refer to
“Videos” on page 110.
information, refer to “Amazon MP3” on
page 119.
The
Music Player
stored on the phone. For more information,
refer to “Music Player” on page 120.
allows you to play music files
YouTube
is a video sharing website on which
users can upload and share videos, and view
them in MPEG-4 format. For more information,
refer to “YouTube” on page 112.
Tips
Tips was designed to work with the web to show you some of the unique features of your phone.
Tips contains user help about the following subjects:
• Physical keys • Camera
• Widget tray • Photos
• Volume • Music player
• Making a call • Bluetooth
• Contacts
1. Open the Widget bar and tap the
Note:
Tips displays in landscape mode only.
2. Touch one of the topics and read the information.
Tips
widget.
Navigation instructions are provided in each of the applicable tips.
39
Page 43

Section 3: Memory Card
Your device lets you use a microSD™ (SD) card to expand available memory space. This secure digital card enables
you to exchange images, music, and data between SD-compatible devices. This section addresses the features
and options of your device’s SD functionality. The device has a USB SD card mode.
Using the SD Card
There are several methods for using the SD card:
1. Connecting to your PC to store files (such as music, videos, or other types of files and media).
2. To activate the camera, video, music player, and other dependant media or applications.
Important!:
The Camera, Audio Postcard, Music Player, and Video functionality is all dependant on a mounted SD card. Your device can
support SD cards up to 16GB capacity.
SD card Overview
After mounting an SD card in the device you can use your computer to access and manage the SD card.
Important!:
If access to the external SD card is not available, download and install the USB drivers. For more information contact your
T-Mobile service representative.
Mounting the SD Card
To store photos, music, videos, and other applications, or use the SD card as a modem, you must mount (install)
the SD card. Mounting the SD card establishes a USB connection with your computer.
Important!:
You must disable USB storage to mount the SD card.
To mount the SD card:
1. Insert the SD card into the external, SD card slot (For more information, refer to “SD Card” on page 11.)
2. Press and hold the key to turn on the phone.
Memory Card 40
Page 44

3.
Connect the USB cable to the phone and connect the cable to the computer.
As soon as the connection is established a drive letter is assigned to the flash storage and the “
connected
” message displays at the top of the phone.
4. From the Home screen, pull down the
5. Touch
USB connected
.
Notification
window.
Both the phone and computer display icons to show that the device is mounted.
6. From the USB connected pop-up, touch
touch
Don't mount
to cancel.
Mount
to mount the SD card and establish a computer connection, or
Mounting the SD card makes the data available. You can now drag and drop files and folders to the SD card.
Unmounting the SD card
Unmounting the SD card prevents corruption and damage to the SD card while removing it from the slot.
1. From the Home screen, touch
2. Touch
3. When the “
Unmount
.
External SD card safe to remove
Quick List
➔
Settings
➔
Memory Settings
➔
Memory Card Details
” message displays, open the phone and remove the SD card. For
more information, refer to “SD Card” on page 11.
SD card Memory Status
To view the memory allocation for your external SD card:
1. From the Home screen, touch Quick List ➔ Settings ➔ Memory settings.
2. Touch
Memory status
.
The available memory displays under the Total space and Available space headings.
USB
41
Page 45

Erasing Files from the SD card
You can erase files from the SD card using the phone.
1. Ensure the SD card is mounted. For more information, refer to “Mounting the SD Card” on page 40.
2. From the Home screen, touch
3. Touch
4. At the
Format
.
Formatting will erase all data. Continue?
Quick List
➔
Settings
➔
Memory settings
prompt, touch
➔
Memory card details
Yes
to format or No to cancel.
The SD card formats and erases all the data stored on it.
Factory Data Reset
From this menu you can reset your phone and sound settings to the factory default settings.
1. From the Home screen, touch
2. Enter the password and touch
Note:
The default password is 0000.
Quick List
Confirm
.
➔
Settings
➔
Reset settings
➔
Master reset
.
.
3. At the
Reset setting?
prompt, touch
Yes
to perform the reset, or No to cancel.
Memory Card 42
Page 46
Section 4: Call Functions and Contacts List
This section describes features and functionality associated with making or answering calls, and the Contacts list,
which is used to store contact information. For more information, refer to “Call settings” on page 178.
Making a Call
Using the Dialer
䊳
On the Quick Access bar, touch
Tip:
You can also open the
•
To correct the number before dialing, touch
.
Note:
When you activate the Auto redial option in the Call settings menu, the phone automatically redials up to 10 times when the
person does not answer the call or is already on the phone, provided your call is not sent to voice mail. For more information, refer
to “Call settings” on page 178.
Widget bar
Making a Call from the Contacts List
Once you have stored phone numbers in the Contacts list, you can dial them easily and quickly by using the location
numbers that were assigned to them.
Note:
If you cannot remember a location number, you must search the Contacts list to find an entry by name. For more information,
refer to “Finding a Contact” on page 54.
Dialing a Number from the SIM Card
1. Touch
Tip:
2. Enter the location number for the phone number you want to dial and press the key.
Dialer
.
You can also open the
Widget bar
The entry associated with the location number displays.
Dialer
. Enter the number you wish to dial and press the key.
and tap the
Dialer
widget to dial a number.
to clear the last digit. To clear the entire sequence, touch and hold
and tap the
Dialer
widget to dial a number.
43
Page 47
3.
#
If you don’t know the location number, press a location number (for example, the number 2), then
press .
The number assigned to this location displays.
4. Touch the right arrow (to the right of the number).
5. Select one of the following:
•Call
: dials the selected number.
• Send message
• Send audio postcard
: sends a text, video, audio, or picture message.
: sends an audio postcard to the selected number.
Redialing the Last Number
The phone stores the numbers of the calls you’ve dialed, received, or missed if the caller is identified.
To recall any of these numbers:
1. Open the Widget bar and touch the
use the drop down list to select
Call log
widget to display the
All, Missed calls, Outgoing calls
Call log
. All calls is the default but you can
or
Incoming calls
(a list of the most recently
used numbers in the order you dialed or received them).
Tip:
You can also navigate to the call log from the home screen by touching
2. Touch the number to view details.
3. Touch the
Dialer
icon or press to dial the number.
Dialer
, then touching the
Call log
icon.
International Calls
1. From the Home screen, touch
2. Enter the country code, area code, and phone number.
3. Press the key to make the call.
Dialer
, then touch and hold the key. The + character displays.
Call Functions and Contacts List 44
Page 48

Using the Voice Dialer
Voice dialer is a voice recognition software used to activate a wide variety of functions on your phone.
1. From the Home screen, open the Widget bar and touch the
Voice Dialer
widget.
– or –
Long press the key.
2. When the Voice Dialer displays the “Listening” prompt, say one of the following commands:
•
“Call John Doe”
•
“Call John Doe at home,...”
•
“Call vicennial”
•
“Dial (866) 555 0123”
•
“Dial 911, 811,...”
•
“Dial +44 7833 444 555”
•
“Redial”
•
“Open Calendar”
3. A menu prompts you to confirm your selection.
If you said a name with more than one match in Contacts, or if you stored more than one number for the
contact, you are prompted to select from multiple options.
Ending a Call
1. Briefly press the key to end the call.
Answering a Call
When somebody calls you, the phone rings and displays the incoming call image.
The caller's phone number, picture, or name if stored in Contacts List, displays.
1. Press the key to answer the incoming call.
If the Any key option in the Answering mode menu is activated, you can press any key to answer a call
except for the key. For more information, refer to “Call settings” on page 178.
45
Page 49
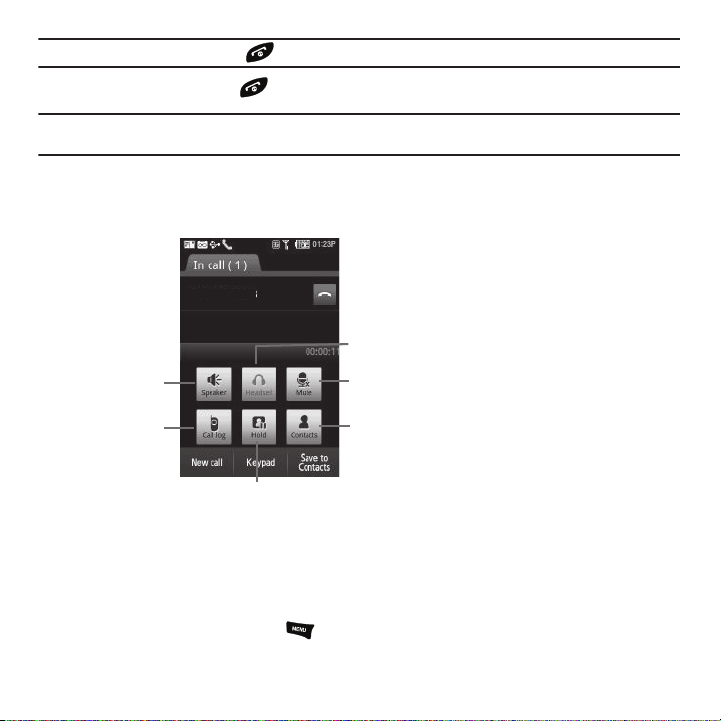
Note:
555-555-5555
Turns Speakerphone
On and Off
Displays the
Call log
Places a
call on Hold
Displays the
Contacts list
Recipient cannot
hear the caller talking
Activates the headset
To reject an incoming call, press the key.
2. End the call by pressing the key.
Note:
You can answer a call while using the Contacts List or menu features. After ending the call, the phone returns to the function
screen you were previously using.
During a Call
Your phone provides a number of features that are available for use during a call.
Adjusting the Call Volume
During a call, use the Volume keys on the left side of the phone, to adjust the earpiece volume.
1. Touch the
Up
volume key to increase the volume level and the
– or –
From the screen during a call, press ➔ Amplify voice
.
Down
volume key to decrease the level.
Call Functions and Contacts List 46
Page 50
From the Home screen, you can also adjust the ring volume using these keys.
Turning the Speakerphone on and off
While on a call, you can use your Speakerphone by following these steps:
1. Touch the
2. Touch the
Tip:
When the speaker is turned On, the color of the speaker is teal. When the speaker is turned
Speaker
icon to turn the speakerphone on.
Speaker
Speaker
icon again to turn the speakerphone off.
Speaker
Off
, the color of the speaker is gray.
Switch to Bluetooth Headset
While on a call, switch to the Bluetooth headset instead of speaker by touching the
Headset
icon.
Muting a Call
During a call you can activate the Mute feature. This feature is used, for example, during a multiparty call when you
want to listen to the call but do not want to interrupt with background noise, or talking.
1. Touch the
2. Touch the
Mute
icon so the other caller cannot hear you speaking.
Unmute
icon to turn mute off and resume your conversation.
Viewing the Call log
During a call you can touch the
Call log
icon to view All calls, Missed calls, Outgoing calls, or Incoming calls. This
feature might be useful if during a call you want to join another contact to a multiparty call.
1. Touch the
2. Press the key to return to the
Call log
icon to view the call history.
In call
screen.
Placing a Call on Hold
You can place the current call on hold whenever you want. If your network supports this service, you can also make
another call while a call is in progress.
To place a call on hold:
1. Touch
2. Touch
Hold
to place the current call on hold.
Retrieve
to activate the call that is on hold.
47
Page 51

To make a new call while a call is in progress:
1. Enter the new phone number that you wish to dial or look it up in Call history.
2. Touch
3. Touch
4. Dial the new phone number and press .
Hold
to place the first caller on hold.
New call
to dial the second call.
To switch between the two calls:
1. Touch
Swap
.
The In call number is now on hold and displays on the
on the
In call
tab.
On hold
tab, while the On hold number displays
More In-call Options
During a call you can save the current caller’s information to the Contacts list, Send a message, check your
message Inbox, amplify your voice, view the Web, activate Automatic screen lock, or create a memo.
Save to Contacts
To save the caller information to the Contacts list:
1. Touch
2. Select the phone number type: Mobile, Home, Work, or Other and touch
3. Enter the information for this caller.
Send message
Save to Contacts
.
Select
.
During the call you can send a text or picture message. For more information, see “Text Messages” on page 66. Or
see “Picture Messages” on page 69.
Message Inbox
During a call when you select this option you can view the messages stored in your Inbox.
䊳
Press ➔ Message Inbox
. The Messaging screen displays a composing screen with the in-call contact as
the default. For more information about the Message Inbox, see “Messaging” on page 74.
Call Functions and Contacts List 48
Page 52

Amplify voice
䊳
Press ➔ Amplify voice
.
Your voice amplifies during the call.
Web
During a call if you select this option you connect to the Web.
䊳
Press ➔ Web
Automatic screen lock
.
If you configured your phone with the Automatic screen lock option, during a call your screen locks to prevent
accidental screen presses. To temporarily unlock the screen press the lock key (on the right side of the phone).
Touch More Automatic screen lock off to deactivate this feature.
Memo
To create a memo during a call:
䊳
Press ➔ Memo
. For more information, refer to “Memo” on page 154.
Swapping Calls
䊳
Touch the
Swap
icon to place the current call on hold and then activate the previous call when you have two lines
in use.
Accessing the Contacts List
You can search for a number in Contacts during a call.
䊳
Touch the
Contacts
icon to access the Contact lists.
Multi-Party calls
Making a Multi-Party Call
A multi-party call is a network service that allows up to six people to participate in a multi-party or conference call.
For further details about subscribing to this service, contact T-Mobile customer service.
Setting up a Multi-Party Call
1. Call the first participant in the normal way.
49
Page 53

2.
Touch
New call
, enter the second phone number and press the key.
3. Touch
Join
.
The two calls are now joined into a multi-party call and display in the order in which they were called.
Important!:
A maximum of two callers can be joined to a single multi-party line. Additional callers participate in a new Multiparty
session and held in conjunction with the previous multiparty call. You can swap or place each multi-party call on hold.
Having a Private Conversation With One Participant
When you have two participants in a multi-party session, you might be necessary to place one of those participants
on hold so that a private conversation can be held with a single caller. While you are in a multi-party call:
1. Touch
Split
.
The short list of call participants displays the callers in the order they were dialed.
2. Touch the number for the participant in which you want to speak privately.
You can now talk privately to that person while the other participants can continue to converse with each
other. If there is only one other participant, that person is placed on hold.
3. To return to the multi-party call, touch the Join icon. All of the multi-party call participants can now hear
each other.
Dropping One Participant
1. Touch the tab for the participant you want to drop.
2. Touch the
END
icon to the right of the number to drop.
The participant is disconnected and you can continue the call with the other participant.
3. When you want to end the multi-party call, press the key.
Call Waiting
You can answer an incoming call while you have a call in progress, if this service is supported by the network and
you must have previously set the Call waiting option to Activate. For more information, refer to “Call settings” on
page 178.
You are then notified of an incoming call by a call waiting tone.
Call Functions and Contacts List 50
Page 54

To answer a new call while you have a call in progress:
1. Press the key to answer the incoming call. The first call is automatically put on hold.
2. To switch between the two calls, touch either the
3. To end a call on hold, touch the
4. To return to the call screen, pull down the Notification bar and touch
5. To end the current/remaining call, touch the key.
On hold
In call
tab or the
On hold
tab, then touch the End call icon.
In call
call tab, then touch the swap icon.
.
Call Log
Incoming, outgoing and missed calls are listed in the Call Log. You can also view Call time records or Reset all the
call time records. If the caller’s name and number is stored in your Contacts list, the info will display in the log.
䊳
From the Home screen, open the Widget bar and touch the
Call log
widget.
– or –
䊳
Touch
Dialer
and touch
Call log
.
Touch the pull-down list at the top left to choose one of the following Call Logs:
All calls
This menu lets you view the most recent calls you received, dialed, and missed.
Missed calls
This menu lets you view the most recent calls you received, but did not answer.
Viewing Missed Calls
When you are unable to answer a call for any reason, you can find out who is calling you, if this service is available,
so that you can call the person back.
The number of calls you missed displays on the home screen immediately after a call is missed.
51
Page 55

To view a missed call immediately:
1. If the display is off, press the lock key to turn the display on. The missed calls display on the screen on the
Missed Calls
2. Touch the key to call the displayed number.
tab.
You can press the key at any time to exit the Missed Call feature.
Outgoing calls
This menu lets you view the most recent calls you dialed.
Incoming calls
This menu lets you view the most recent calls you received.
Delete
Touching this allows you to delete the records in each Call Log separately, or you can delete all of your call records
at one time.
1. Touch the check box beside the number in the
touch the
Delete
. The selected number or all the numbers are deleted and the list redisplays.
Note:
If
Select all
is selected, the list does not redisplay.
Delete
list to delete or select the
Select all
check box and
Contacts List
This section explains how to use and manage your Contacts List. You can save phone numbers to your phone’s
memory.
Creating a Contact
The default storage location for saving phone numbers to your Contacts List is your phone’s built-in memory.
Note:
Before you can save a contact to the Phone, Contact settings must be set to
refer to “Contacts setting” on page 57.
Save new contacts to Phone
. For more information,
Note:
When storing an entry into your SIM card, note that only the Name, and Number are saved. To save additional information for a
particular contact, such as notes, email, dates, etc., it is important to save that Contact into your phone’s onboard memory.
Call Functions and Contacts List 52
Page 56
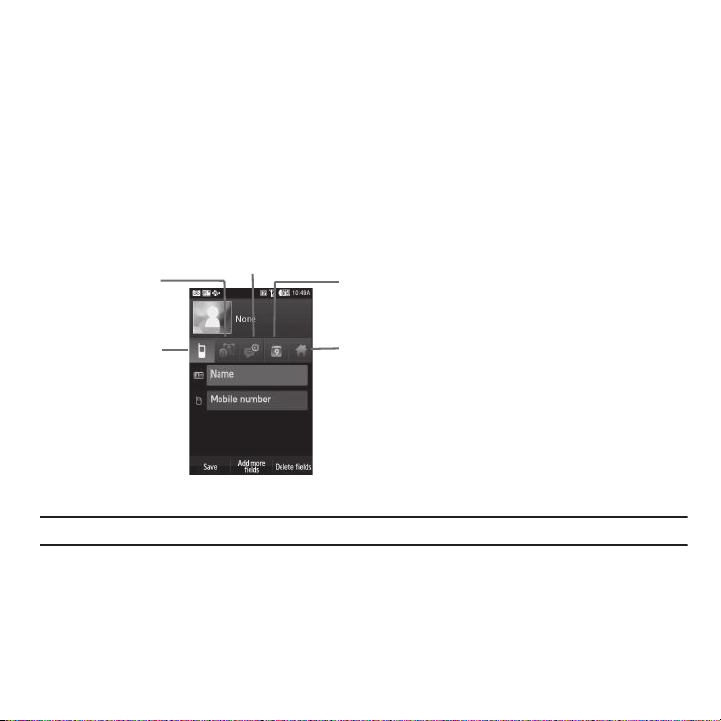
1.
Contact
Information
Add pictures
Ringtone
or a URL
Add Home Email
or Google Talk information
Add Birthday
and Anniversary
dates
Add Home address
Company information
Position or notes
From the Home screen, touch
2. Touch
3. Touch the
4. Touch the
5. Touch
Create contact
Name
field, enter a name for this contact using the displayed keypad and touch
Mobile number
Add More Fields
Contacts
.
.
field and enter a number using the displayed keypad then touch OK.
, then touch
Home, Mobile, Work, Work Fax, Home Fax, Pager
one of these numbers.
6. Refer to the following screen to add additional contact information for this contact.
, or
Other
Next
.
number to add
7. Touch
Note:
For further details about how to enter characters, see “Using ABC Mode” on page 64.
View Speed Dial
1. From the Home screen, touch Contacts.
2. Press
Save
when you are finished.
View speed dial
.
The Speed Dial screen displays with the numbers and names of each slot assignment.
53
Page 57

Storing a Number on the SIM Card
The default storage location for saving phone numbers to your Contacts list is your phone’s built-in memory. To
save a number to your SIM card, you need to change the
Save new contacts to
option first. For more information,
refer to “Contacts setting” on page 57.
Note:
When you copy a phone number from your SIM card to your phone, the number displays twice in your Contact list.
1. From the Home screen, touch
2. Press
Menu
➔ Copy contacts
3. From the Copy contacts screen, touch
4. Touch a contact name to copy to the SIM or touch
5. Touch
Note:
Copy to SIM
When you copy information from the phone to the SIM card, only the name and phone number copy. The rest of the information
is discarded.
.
Contacts
.
.
Phone to SIM
.
Select All
to copy all the contacts to the SIM card.
Finding a Contact
You can store phone numbers and their corresponding names onto either your SIM card or phone’s built-in
memory. They are physically separate but are used as a single entity, called Contacts.
Depending on the storage size of the particular SIM card, the maximum number of phone numbers the card can
store may differ.
1. From the Home screen, touch
Contacts
.
– or –
Touch and drag the Search tab (on the right side of the phone) to the letter of the alphabet that matches the
desired name (for example, A for Adam) and release. If any contacts are listed under that letter, the list of
contacts associated with that letter displays. Touch the contact entry.
Call Functions and Contacts List 54
Page 58
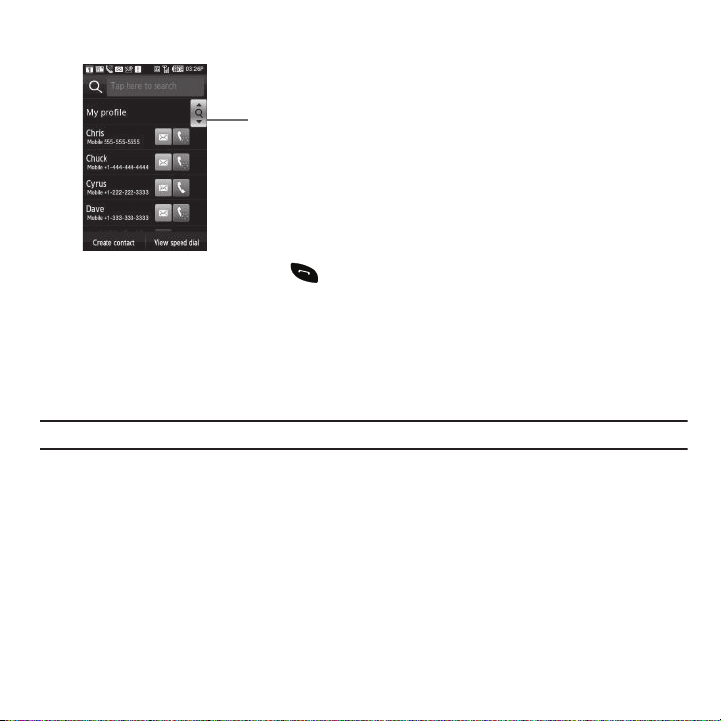
When you locate the entry, press the key to dial the number.
Touch and drag
up or down to
search the Contacts list
2.
My Profile
My Profile contains your contact information, and can be sent to recipients as a Virtual Business Card (V-card)
attachment. My Profile is the first Contact listed in the Contacts list. To create My Profile:
䊳
From the Home screen, touch
For more information about creating contacts,
Note:
As with any profile, your profile can be associated with a group.
Contacts
, then touch
My Profile
see
“Creating a Contact” on page 52.
and enter contact information for yourself.
55
Page 59

Deleting Contacts
Important!:
Once contact entries are deleted, they cannot be recovered.
This option allows you to delete your contacts. For more information, refer to “Delete” on page 52. You can delete
all your entries from your phone’s memory, your SIM card, FDN, or All.
Important!:
Once Contacts List entries are deleted, they cannot be recovered.
1. From the Home screen, touch
2. Touch a contact name from the list and touch Delete.
Contacts
.
Move Contacts
The Move Contacts option allows you to move all contacts from your SIM card to your Phone or from you Phone
back onto the SIM card.
1. From the Home screen, touch Contacts and press the key.
2. Touch
3. Touch
4. Touch the
to SIM
Move contacts
Phone to SIM
Select All
or
Move to phone
.
or
SIM to Phone
.
check box or touch the check box next to each contact you want to move and touch
.
The selected contact(s) is moved from Phone memory to SIM memory or from the SIM memory to the Phone
memory.
Send a namecard via BT
You must create a Contact prior to sending a namecard to a recipient. For more information, refer to “Creating a
Contact” on page 52.
1. From the Home screen, touch Contacts and press the key.
Call Functions and Contacts List 56
Move
Page 60

2.
Touch
Send namecard via BT
Important!:
You must activate Bluetooth to use this feature. For more information, refer to “Turning Bluetooth On or Off” on page 176.
3. For more information about creating contacts, see “Creating a Contact” on page 52.
4. Touch the contact from the list in which you want to send a namecard.
.
Bluetooth forwards the namecard to the recipient.
View Groups
1. From the Home screen, touch Contacts and press the key.
2. Touch
View Groups
. A list of the created groups displays.
Service Numbers
You can view the list of Service Dialing Numbers (SDN) assigned by your service provider. These numbers include
emergency numbers, customer service numbers and directory inquiries.
1. From the Home screen, touch Contacts.
2. Press ➔
Service numbers
.
The Service numbers list displays all of the service numbers for your provider.
Contacts setting
The Contacts setting menu allows you to allows you to choose where your contacts are saved. You can also set up
One hand operation from this menu. The following options are available:
Save new contacts to
1. From the Home screen, touch Contacts.
2. Press the key and touch
3. Touch
View contacts from
Phone, SIM
, or
Always ask
Contacts settings
and touch Ok.
➔
Save new contacts to
.
This option allows you to view all the contacts stored on the Phone, SIM, or the Phone and SIM.
1. From the Home screen, touch Contacts.
57
Page 61

2.
Press the key and touch
3. Touch
Own number
All, Phone
, or
SIM
Contacts settings
and touch Ok.
➔
View contacts from
.
This function is a memory aid, which you can use to check your own phone number if you need to do so.
You can assign a name to each of your own phone numbers registered on your SIM card. You can also edit the
names and numbers. Any changes made here do not in any way affect the actual subscriber numbers on your SIM
card.
To edit your number information:
1. From the Home screen, touch Contacts.
2. Press the key and touch
3. Touch
4. Touch the
5. Touch the
6. Touch
7. Touch
One hand operation
Own number
Save
Remove
. Your own number displays.
Name
field and enter a name for your own number.
Number
field and enter your phone number.
to confirm your entries.
to remove the number.
Contacts settings
➔
Own number
.
Many cell phone users access features using only their left or right hand. This feature allows you to set the
Contacts list access feature for left-hand or right-hand use. When you access the Contacts list, the quick access,
search tab displays on the left (if you selected left-hand) or on the right (if you selected right-hand).
1. From the Home screen, touch Contacts.
2. Press the key and touch
3. Touch the
Right handed
or
Left handed
Contacts settings
➔
radio button and touch OK.
One hand operation
.
Call Functions and Contacts List 58
Page 62

Speed Dialing
Once you have stored phone numbers from your Contacts List, you can set up to 8 speed dial entries and then dial
them easily whenever you want, simply by touching the associated numeric key. From the Home screen, to speed
dial the numbers assigned to keys (2 to 9), touch and hold the appropriate key.
Note:
Memory location 1 is reserved for your Voice mail server number and this speed dial location can not be changed.
Setting Up Speed Dial Entries
1. From the Home screen, touch
2. Touch
3. Touch the keypad number key to where you wish to assign the new speed-dialing number (keys 2 through 9).
View speed dial
Contacts
.
.
The contact list displays.
4. Touch a contact entry or search for a contact entry. The selected contact is now assigned to the number key
you touched.
Note:
Memory location 1 is reserved for your Voice mail server number and this speed dial location can not be changed.
59
Page 63
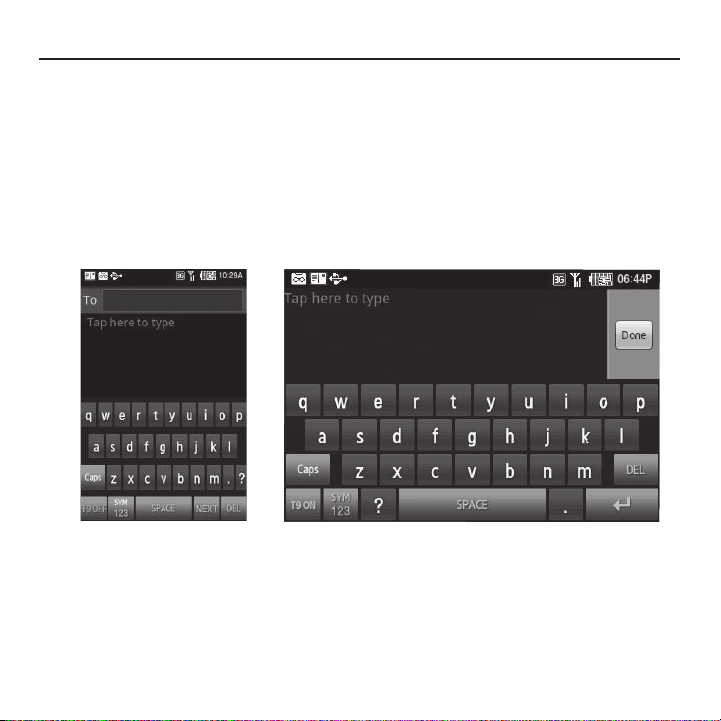
Section 5: Entering Text
Portrait Keyboard Landscape Keyboard
This section outlines how to select the desired text input mode when entering characters into yo ur phone. This section
also describes how to use the T9 predictive text entry system to reduce the number of key strokes associated with
entering text.
Portrait Keypad and QWERTY Keyboard
The keyboard displays in two formats: Portrait (upright) is a keypad, and Landscape (sideways) is a QWERTY
keyboard. Depending on which format you are using (portrait or QWERTY), the keys are associated with different
letters and/or characters. Refer to the following layouts to determine which keys are associated with letters,
characters, or symbols.
Entering Text 60
Page 64
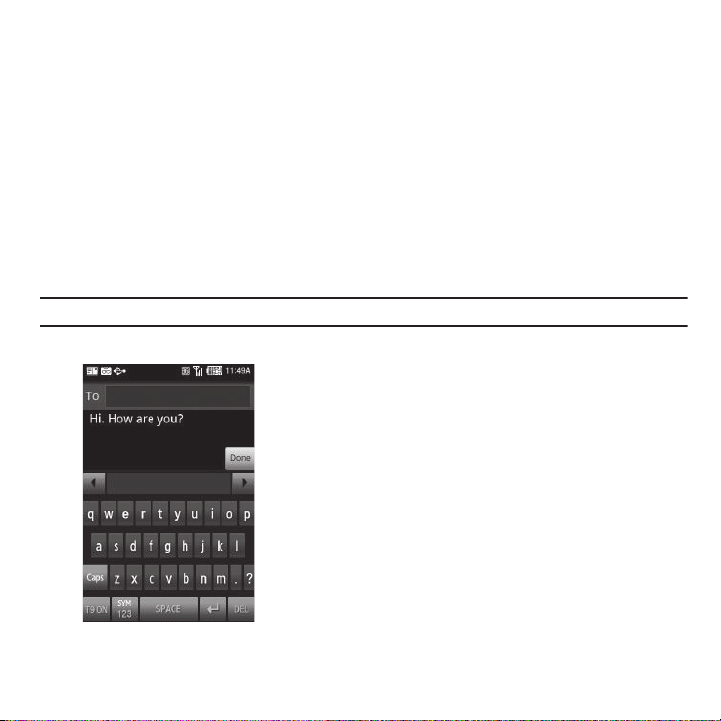
Changing the Text Input Mode
When using your phone, you often need to enter text, such as when storing a name in your Contacts List, creating
your personal greeting or scheduling events on your calendar. You can enter alphanumeric characters by using your
phone’s keypad.
Your phone has the following text input modes:
•
T9
: this mode allows you to enter words with only one keystroke per letter. T9® mode automatically compares the series of
keystrokes you make with an internal linguistic dictionary to determine the most likely word, thus requiring far fewer
keystrokes than the traditional ABC mode.
•
SYM/123
: this mode allows you to enter symbols, such as punctuation marks. You can also enter numbers using this mode.
•
ABC
: this mode allows you to enter letters by touching the key labeled with the letter you want.
When you are in a field that allows character entry, the text input mode indicator displays on the lower portion of the
screen (second icon from the left).
Example:
Writing a text message.
䊳
To change the text input mode, touch the screen, then touch T9 (to toggled T9 Off or On). Or touch
61
SYM/123
to
Page 65
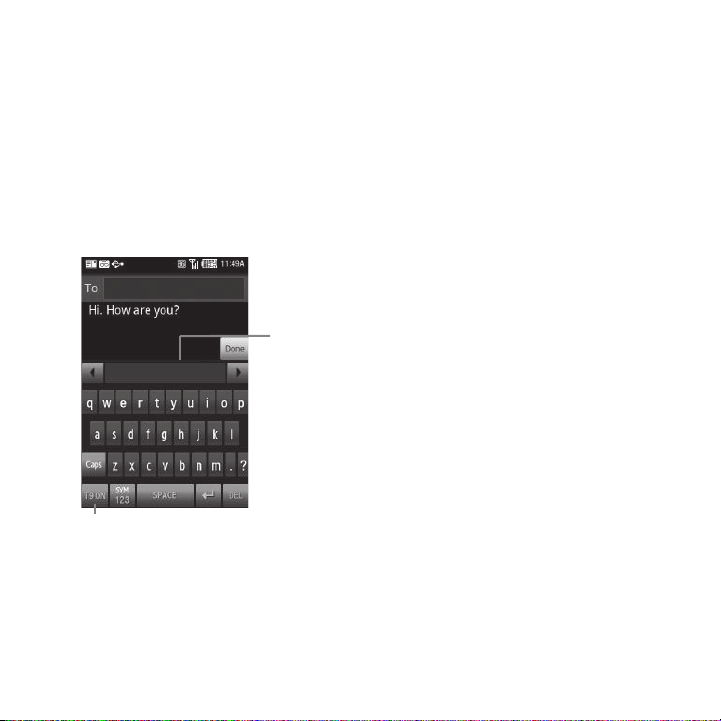
toggle between Symbol/Numeric, or ABC mode.
Words display here
T9 mode on
Using T9 Mode
T9 is a predictive text input mode that allows you to key in any character using single keystrokes. This text input
mode is based on a built-in dictionary.
To enter a word in T9 mode:
1. When you are in T9 mode, start entering a word by touching the QWERTY keypad. Touch each key only once
for each letter.
Word choices display on the screen just below the workspace.
The word that you are typing displays on the screen. It may change with each consecutive key that you
touch.
2. Enter the whole word before editing or deleting the keystrokes.
3. When the word correctly displays, go to step 4.
Entering Text 62
Page 66
If the word doesn’t display correctly, other word choices display on the screen from which to choose. If these
choices do not include the word you want to use, add a new word to the T9 dictionary.
4. Insert a space by touching
Space
and start entering the next word.
To add a new word into the T9 dictionary:
1. Touch the
2. Enter the word you want to add using ABC mode then touch Done. For more information, refer to “Changing
T9 My Words
field, then touch
Add Word
then touch the workspace to display the QWERTY keyboard.
the Text Input Mode” on page 61.
The word is added to the T9 dictionary and becomes a word for the associated key touch series.
Note:
This feature may not be available for some languages.
•
To enter periods, hyphens, and other special characters, touch
SYM
and then touch the corresponding key. If the symbol does
not display on the initial screen, touch the left or right key to display the next set of symbols.
•
To shift case in T9 mode, touch
•
You can move the cursor by using the Navigation keys. To delete letters, touch the
Caps
and then touch the desired letter on the keypad.
DEL
key. touch and hold the
DEL
key to clear
the display.
Using SYM (symbols) or 123 (numeric)
Symbol mode enables you to insert symbols and punctuation marks into text. To display a list of symbols touch
123
.
1. To select a symbol, touch the desired symbol key.
2. To display more symbols, touch the left or right
3. To clear the symbol(s), touch the key.
keys.
SYM/
63
Page 67

The 123 mode enables you to enter numbers into a text message.
䊳
Touch
SYM/123
then press the numeric keys you want to enter.
Using ABC Mode
To use ABC mode:
1. Touch
2. Touch the key labeled with the letter you want. Once for the first letter, twice for the second letter, and so on.
ABC
until the keypad displays.
Entering Text 64
Page 68

Section 6: Messages
This section describes how to send or receive different types of messages. It also explains the features and
functionality associated with messaging.
Types of Messages
Your phone provides the following message types:
•
Text Messages
•
Picture Messages
•
Voice notes
•
Email
•
Gmail
•
Google Talk
•
Audio postcards
•
Instant Messaging
•
Voicemail messages
•
Visual Voicemail
•
Push Messages
Message Icons on the Status Bar
Icons are displayed on the Status Bar at the top of the display when new messages are received. For more
information, refer to “Status Bar” on page 34.
65
Page 69

Text Messages
Short Message Service (SMS) allows you to send and receive short text messages to and from other mobile
phones.
The Message icon ( ) displays when you receive a new text message. When the memory is full, the message
icon flashes on your phone and you cannot receive any new messages. You must delete a message before you can
receive additional messages.
䊳
Use the
Delete
option in each message box to erase obsolete messages.
Create new message
In this menu, you can write and send a text message.
Creating a Simple Text Message
1. From the Home screen, open the Widget tray and tap the
Tip:
Tilting the phone to a horizontal position displays a QWERTY keyboard.
Messaging
widget, then tap
New message
.
– or –
From the Home screen, touch
2. Touch the
3. Tap the screen to display the keyboard and create your message.
To
field and select one of the following:
• Recent recipients
•Contacts
• Email address
: select a number or an address from the last 10 destinations you entered.
: select the phone number you want from the Contacts list.
: enter an email address.
Quick List
➔
Messaging
➔
New message
.
– or –
Press and hold the T9 key until the Keypad settings screen displays, then select the type of keyboard and
orientation you want. Options are: Qwerty Keypad, 3x4 Keypad, 5x3 Keypad.
Tip:
You can also change the Language by touching Writing language, then selecting the language.
Messages 66
Page 70
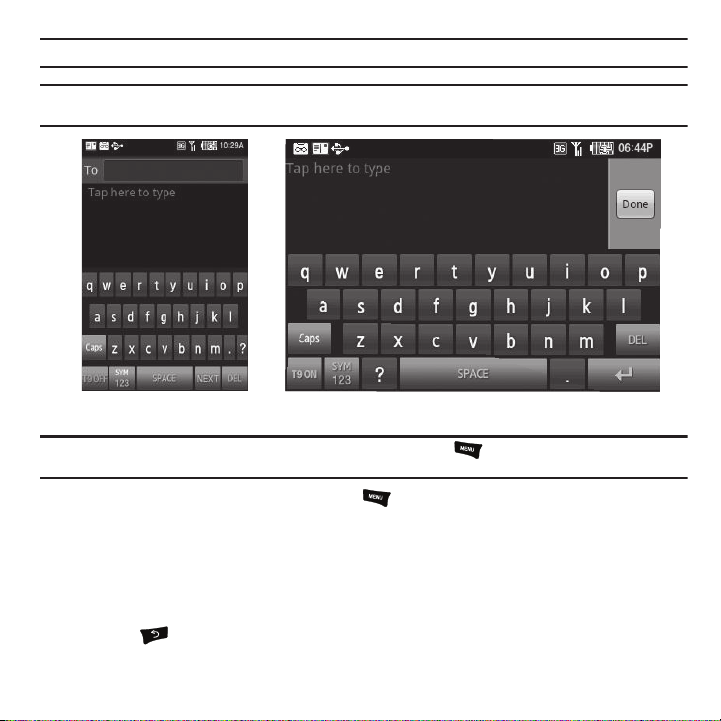
Tip:
Regular Keypad QWERTY Keyboard
Tilting the phone to a horizontal position displays a
Note:
For further details about entering characters, see “Using T9 Mode” on page 62. Text messages are one page long with a total of
640 characters. When your message exceeds 640 characters, the message type automatically changes to Picture message.
Important!:
When your message exceeds 640 characters or you add a page using the ➔
automatically changes to a Picture message.
QWERTY keyboard
.
Add Page
feature, the message type
4. When you finish entering your message, touch
•Insert
: allows you to select and insert one of the Text templates, insert from phonebook, or insert Bookmarks.
• Add subject
• Add Page
• Delete
• Insert smiley
5. Press the key and touch
67
: adds a Subject field to the text message.
: inserts a blank page for you to compose a multi-page text message.
: deletes the message you are composing.
: displays a list of selectable Smiley icons.
Send
when you are finished composing your message.
the
key and select one of the following options:
Page 71

Saving a Message as a Draft
1. From the Home screen, open the Widget tray and tap the
Messaging
widget, then tap
New message
– or –
From the Home screen, touch
Quick List
➔
Messaging
➔
New message
.
– or –
Touch
Add
and select one of the following options:
• Recent recipients
•Contacts
• Email address
2. Tap the screen to display the keyboard and create your message.
3. Press and hold the T9 key until the Keypad settings screen displays, then select the type of keyboard and
: select a number or an address from the last 10 destinations you entered.
: select the phone number you want from the Contacts list.
: enter an email address.
orientation you want. Options are: Qwerty Keypad, 3x4 Keypad, 5x3 Keypad.
Tip:
Tilting the phone to a horizontal position displays the
the
numeric keypad
Touch
Writing language
4. Press the key twice to save the message as a draft.
.
, then select the language to change the input language.
QWERTY keyboard
, while holding the phone in the vertical position displays
.
Messages 68
Page 72

Picture Messages
This menu allows you to use the Multimedia Message Service (MMS).
Picture messaging is a messaging service that provides delivery of personal multimedia messages from phone to
phone or from phone to email.
In addition to the familiar text content available via traditional text messages, multimedia messages can contain
images, graphics, voice, and audio clips. A Picture Messaging message is a picture presentation contained in a
single file.
The Message icon ( ) displays when you receive a new picture message.
Using the Picture Message feature, your phone can receive and send messages that contain multimedia files, such
as photos, sounds and images that you downloaded from the Internet and voice notes you recorded. This function is
available only if it is supported by T-Mobile. Only phones that offer multimedia messaging features can receive and
display picture messages.
Creating and Sending a Picture Message
1. From the Home screen, open the Widget tray and tap the
Messaging
widget, then tap
New message
.
– or –
From the Home screen, touch
2. Touch the
To
field and enter a phone number.
Quick List
➔
Messaging
➔
New message
.
– or –
Touch
Add
and select one of the following options:
• Recent recipients
•Contacts
• Email address
3. Tap the screen to display the keyboard and create your message.
4. Press and hold the T9 key until the Keypad settings screen displays, then select the type of keyboard and
: select a number or an address from the last 10 destinations you entered.
: select the phone number you want from the Contacts list.
: enter an email address.
orientation you want. Options are: Qwerty Keypad, 3x4 Keypad, 5x3 Keypad.
69
Page 73
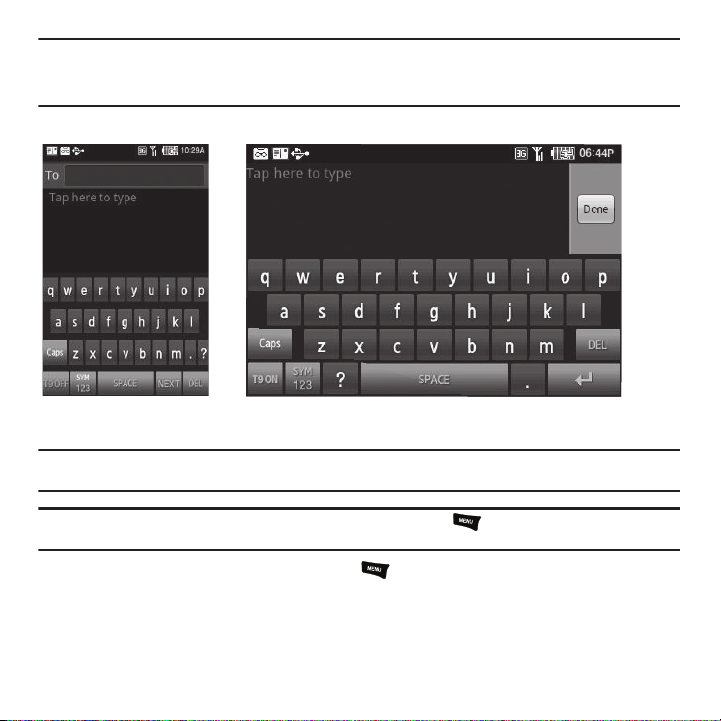
Tip:
Regular Keyboard QWERTY Keyboard
Tilting the phone to a horizontal position displays the QWERTY keyboard, while holding the phone in the vertical position displays
the numeric keypad.
Touch Writing language, then select the language to change the input language.
Note:
For further details about entering characters, see “Using T9 Mode” on page 62. You can enter up to 640 standard Alphabet
characters per page in your message.
Important!:
When your message exceeds 640 characters or you add a page using the ➔
automatically changes to a Picture message.
Add Page
feature, the message type
5. When you finish entering your message, touch
•Insert
: allows you to select and insert one of the Text templates, insert from phonebook, or insert Bookmarks.
• Add subject
• Add Page
: adds a Subject line to the message.
: inserts a blank page for you to compose a multi-page text message.
the
key and select one of the following options:
Messages 70
Page 74

•Preview
: allows you to preview the message prior to sending.
•Page timing
: allows you to set the duration in seconds that the page displays on the recipient's screen. Selections are: 2
seconds, 5 seconds, 10 seconds, or a custom number of seconds (up to 999).
•More
–
–
–
6. Touch
•Photos
• Take photo
•Video
• Record video
• Audio
• Record audio
• Files
• NameCard
• Calendar
•Task
•Memo
7. Touch
Remove page
Delete
Insert smiley
: deletes the selected page from the message.
: deletes the message you are composing.
: displays a list of selectable Smiley icons.
Attach
to attach one of the following:
: displays the Select picture screen and a list of selectable photos.
: activates the camera to take a photo.
: displays the Select video screen and a list of selectable videos.
: activates the camcorder to take a video.
: allows you to attach a sound, voice file, ringtone, or music file to this message.
: activates the recorder so you can record audio.
: displays a list of folders from which to select: Images, Icons, Videos, Sounds, or Other files to attach to this message.
: displays a list of contacts. When you select a contact the namecard attaches to this message.
: allows you to attach a calendar event to this message.
: allows you to attach a task to this message.
: allows you to attach a memo to this message.
Send
when you are finished composing your message.
Message Threads
Sent and received Text and pictures messages are grouped into message threads. Threaded text or picture
messages allow you to see all the messages exchanged (similar to a chat program) and displays a contact on the
screen. Message threads are listed in the order in which they were received, with the latest message displayed at
the top.
To open a Threaded Message
1. Press the key.
71
Page 75

2.
Pull down the
Notification
window (from the top of the phone).
– or –
Touch
Quick List
➔
Messaging
and touch and hold the message thread you want to view.
3. Touch and hold the message thread to display the following options:
•View thread
• Add to Contacts
•Delete
: displays the threaded message.
: displays the Contacts information screen.
: displays a confirmation dialog box that when pressed, deletes the entire thread.
-orPress the key and touch
Delete threads
.
Voice Notes
In this menu, you can record a voice note of up to five minutes long. You can later attach this voice note to a picture
email.
Important!:
You must insert an SD card to record a Voice note.
When you access this menu, a timer displays on the screen.
1. From the Home screen, open the Widget tray and tap the
2. Touch the
3. Touch the
4. Create a message and attach the newly created Voice note. For more information, refer to “Creating and
Record
icon to begin recording.
Stop
icon to stop recording and save the sound to the Voice list.
Voice recorder
widget.
Sending a Picture Message” on page 69.
Audio Postcard
In this menu you can select a frame, take a picture and then record a voice message up to one minute long and
send it as an Audio Postcard.
1. From the Home screen, touch Quick List ➔ Audio postcard. The screen displays a default postcard in
landscape mode.
– or –
Messages 72
Page 76
2.
From the Home screen, touch the
Widget tray
, and tap the
Audio Postcard
The screen displays a default postcard in landscape mode.
Important!:
You must insert an SD card in order to activate the camera for the Audio Postcard application.
widget.
3. Touch the
Left
or
Right
key to display more postcard frames.
– or –
Touch the
Choose Frame
4. To configure the camera for this Audio postcard, select one of the following options:
• SCN (Scene Mode)
icon to choose one of the 16 available frames.
: takes a photo in various modes. Once you change the mode, the corresponding indicator displays at the
top left of the display.
–
NONE
: does not add a frame.
–
Portrait
: take a single, portrait picture of a person.
–
Landscape
: takes a landscape, distant scenery shot with auto focus.
–
Sports
: takes a shot of fast-moving object such as sports scenes.
–
Party/Indoor
–
Beach/Snow
–
Sunset
–
Dawn
–
Fall
–
Night
–
Fire
–
Tex t
–
Candle
–
Back Light
•Set up
–
White balance
–
Effects
: takes indoor scenes.
: used for bright scenery such as a beach or snowscape.
: used for a sunset scene. Uses Daylight white balance.
: used for daybreak scenes. Uses daylight white balance, and a slow shutter speed.
: used for trees and autumn leaves. Emphasizes red and green colors.
: used for night shots. Keep the camera still when taking this shot.
: used to catch flames. Uses a slow shutter speed. Keep the camera still when taking this shot.
: used to take shots of text or a document. Emphasizes sharpness and contrast.
: used to take scenes under candlelight.
: used to take scenes against light. Uses spot exposure metering.
: allows you to configure the following:
: allows you to set this option from the following choices: Auto, Cloudy, Daylight, Fluorescent, or Incandescent.
: allows you to change the color tone or apply special effects to the photo. Options include: Normal, BW, Sepia, Violet, Green, Aqua,
Negative, Emboss, Outline, or Watercolor.
73
Page 77

–
ISO
: allows you to adjust the ISO sensitivity of the camera imaging sensor. Selections are: ISO Auto, ISO 50, ISO 100, ISO 200,
ISO 400, or ISO 800 speed.
–
Image Quality
–
Metering
–
Anti-Shake
–
WDR
–
Adjust
•Flash
•Timer
: allows you to set the image quality to: Normal, Fine, or Super Fine.
: allows you to set how the camera measures or meters the light source: Center, Spot, or Matrix.
: allows you to touch On to activate Anti-Shake, or Off to deactivate it.
: allows you to set the Wide Dynamic Range. Touch On to activate WDR, or Off to deactivate it.
: allows you to adjust the Contrast, Saturation and Sharpness for this photo.
: allows you to determine if you want an Automatic flash, Manual (to self-adjust it), or Off.
: allows you to set a time delay before the camera takes the photo. Select the length of delay you want and touch the Off,
2 Seconds, 5 Seconds, and 10 Seconds. When you press the Camera key, the camera takes the photo after the specified time
elapses.
• Brightness
5. Touch the
•GPS
• Shutter sound
: allows you to increase or decrease the brightness levels.
Settings
tab and select one of the following:
: allows you to activate (turn On) or deactivate (turn Off) the GPS tracking feature.
: allows you to select a tone to play when the camera’s shutter opens and closes. Sound selections are Off,
Sound3, Sound2, or Sound1.
6. Adjust the image by aiming the camera at the subject.
7. Press the
8. Touch the screen and select
9. Touch
Camera
key to take a picture.
Record
to add a voice message to the postcard.
Send to
when you are finished recording your message and select one of the following options:
•Contacts
: allows you to enter the phone number you want from your Contacts List.
• New phone number
• New E-mail address
• Recent recipients
• Online Album
: allows you to enter a phone number not already listed in the Contacts list.
: allows you to send this Audio Postcard to an email address. Enter the email address and touch Add.
: allows you to select a number or an address from the last 20 destinations you entered.
: allows you to send the Audio Postcard to an online album.
Messaging
The Messaging folder stores received messages, drafts, push messages, and all other types of messages. An
identifier in the form of red text displays next to the recipient name (for example, the word Draft).
Messages 74
Page 78

When you enter the folder, the list of messages displays with the sender’s phone numbers, or names, if available in
your Contacts list as well as the time the message was received.
If the folder is full when a new message is received or sent, or the SIM card is full, the message saves to the phone.
You can also sort messages or delete message threads.
Viewing a Message from the Messaging Folder
1. From the Home screen, touch
Quick List
➔
Messaging
.
– or –
Open the Widget tray and tap the
2. Touch a message type to view the text or other information contained in the message.
Messaging
widget.
Replying to a Message from the Messaging Folder
1. From the Home screen, touch
Quick List
➔
Messaging
.
– or –
Open the Widget tray and tap the
2. Touch a message type to view the text or other information contained in the message.
3. Touch the
4. Touch
75
Tex t
field and enter your reply.
Attach
to attach one of the following to your reply:
•Photos
: displays the Select picture screen and a list of selectable photos.
• Take photo
•Video
• Record video
• Audio
• Record audio
• Files
• NameCard
• Calendar
•Task
: activates the camera to take a photo.
: displays the Select video screen and a list of selectable videos.
: activates the camcorder to take a video.
: displays the Sounds folder where you can select an audio file from the Voice list folder.
: activates the recorder so you can record audio
: displays a list of folders from which to select: Images, Icons, Videos, Sounds, or Other files to attach to this message.
: displays My Profile and allows attachment of the NameCard to this message.
: allows you to attach a calendar event to this message.
: allows you to attach a task to this message.
Messaging
widget.
Page 79
•Memo
: allows you to attach a memo to this message.
Note:
When your message exceeds 160 characters, a page is automatically added. If you add a page using the ➔ Add Page
feature, or you Attach an item or modify the message in any way using the key, then the message type automatically
changes to Picture message.
5. Press the key and select one of the following options:
•Insert
: allows you to select and insert one of the Text templates, insert from the Contacts list, or insert a Bookmark.
• Add subject
• Add Page
•Delete
• Insert smiley
6. Press the key and touch
: adds a Subject field to the text message.
: inserts a blank page for you to compose a multi-page text message.
: displays a confirmation dialog box that when pressed, deletes the entire thread.
: displays a list of selectable Smiley icons.
Send
when you are finished composing your reply.
Sorting Messages Stored in the Messaging Folder
1. From the Home screen, touch Quick List ➔
Messaging
.
– or –
Open the Widget tray and tap the
2. Touch
Sort by
and select
Messaging
widget.
Date, Name, Read/Unread
, or
Frequency
.
Deleting Message Threads
1. From the Home screen, touch Quick List ➔
Messaging
.
– or –
Open the Widget tray and tap the
2. Touch
Delete threads
and touch the thread name to delete the threads.
Messaging
widget.
Messages 76
Page 80

Email enables you to review and create email using AIM®, AOL®, Yahoo!® Mail, Comcast, Compuserve, Earthlink,
Gmail, HotPOP, Juno, Mac, NetZero, SBC Yahoo!, Verizon and several other email services. You can also receive text
message alerts when you receive an important email.
1. From the Home screen, Touch Quick List ➔
email
.
– or –
Open the Widget tray and tap the
Email
widget.
Your accounts screen displays with an Email setup screen displayed.
2. Touch
3. Touch
4. Enter you email address in the
5. Enter your password in the
6. Touch
7. Input your
8. Select a security type from the
9. Press
Important!:
Next
at the
Your accounts
Exchange email
Next
several times to go through the ActiveSync tutorial.
Server URL
Next
.
Only some “Plus” accounts include POP access allowing this program to connect. If you are not able to sign in with your
correct email address and password, you may not have a paid “Plus” account. Launch the Web browser to access your
account.
or
Other email
and
screen.
.
Email
address field.
Password
field, press OK then press
Domain
information.
Security type
drop-down list.
Next
.
Synchronizing a Corporate Email Account
Use the following procedure to configure your phone to synchronize with a corporate email account.
1. From the Home screen, Touch Quick List ➔
email
.
– or –
Open the Widget tray and tap the
email
widget.
Your accounts screen displays with an Email setup screen displayed.
77
Page 81

2.
Press
Next
.
3. From the Set up email screen, touch the
4. Touch the
Important!:
Password
field and enter your password.
Only some “Plus” accounts include POP access allowing this program to connect. If you are not able to sign in with your
correct email address and password, you may not have a paid “Plus” account. Launch the Web browser to access your
account.
Exchange email
field and enter your corporate email address.
5. Touch
6. Enter all the Exchange server information, Username and Password, then touch
7. At the Certificate prompt touch
8. Enter your Account name.
Skip
to manually set up the account, or touch
Yes
.
Next
to read the tutorial.
Next
.
Wait for the Inbox to synchronize before use.
9. Touch ➔
Advanced Settings
to change the synchronization timing, frequency, and other options.
Gmail
Gmail is Google’s web-based email. When you first setup the phone, Gmail is configured. Depending on the
synchronization settings, Gmail is automatically synchronized with your Gmail account.
1. From the Home Screen, open the Widget tray then touch the
2. Tap t he
Note:
3. Sign in if you have a Google account, or touch
Gmail
widget.
You must sign in to your Gmail account in order to access Gmail.
Create an account
Gmail
widget.
and touch OK.
The Inbox loads conversations and email.
Refreshing Gmail
䊳
Press the key and touch
Refresh
to send and receive new emails and synchronize your email with the
Gmail account.
Messages 78
Page 82
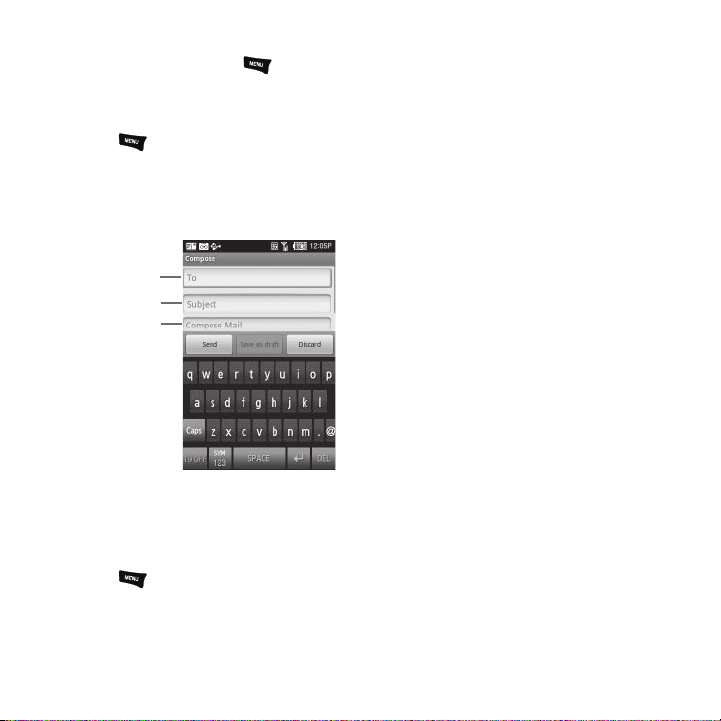
Creating a Gmail Message
Recipient
Subject
Compose the
message here
1. From the Gmail Inbox, press ➔
2. Enter the recipients email address in the
Compose
To
Separate multiple recipient email addresses with a comma.
3. Press and select
4. Enter the subject of this message in the
5. Touch the
Compose Mail
Add Cc/Bcc
to add a carbon or blind copy.
Subject
field and begin composing your message.
.
field.
field.
6. Touch
Viewing an Email Message
1. From the Gmail Inbox, touch a message to view it.
2. Press and select one of the following options:
79
Send
•Archive
• Add/Remove star
• Mark unread
when you are done.
: archives the selected message.
: click a message's star to add or remove the star (just like clicking flags in Outlook).
: Unread messages or threads with unread messages display in boldface text in the Inbox.
Page 83

• Change labels
•Delete
•More
–
–
–
: changes the label on the email or conversation.
: deletes the selected email or conversation.
:
Back to Inbox
Mute
Report spam
: navigates to the Inbox.
: mutes the conversation.
: reports the Email message as spam.
Google Talk
Google Talk is a free Windows and web-based application for instant messaging offered by Google. Conversation
logs are automatically saved to a Chats area in your Gmail account. This allows you to search a chat log and store
them in your Gmail accounts.
1. From the Home screen, touch the
2. Tap
Google Talk
3. Press
4. Touch
.
Next
to set up a Google account or to Sign in.
Create
to create a new Google account.
Widget tray
to open the tray.
– or –
Touch
Sign in
if you have an existing Google account.
5. After entering your user name and password, press the
6. Touch
7. Begin using Google Talk.
Note:
Sign in
.
The Network confirms your login and processes. This could take up to 5 minutes to complete.
Down
Navigation key.
Instant Messaging (IM)
Instant Messaging (IM) is a way of sending short, simple messages that are delivered immediately to users online
at that moment.
Before using this feature, you need to subscribe to a messenger service. For further details, contact your service
provider.
Messages 80
Page 84

Starting your Instant Messenger
1. From the Home screen, open the Widget tray and tap the
IM
widget
.
The IM communities display.
2. Touch the messenger service to which you are subscribed.
3. Enter the required sign in information such as Screen name, AIM, Windows Live Messenger, Yahoo!
Messenger ID and Password, then touch
Note:
The information required for sign in varies depending on the Instant Messaging provider you use.
Sign In
.
4. If you use Windows Live, agree to the terms and conditions of use for this service and touch
5. Follow the on-screen instructions to read, reply to, compose, send, and manage your Instant Messaging
I Accept
account.
Using the Instant Messenger Options
Use the following procedure to access the Instant Messenger options.
1. Open the Widget tray and tap the
IM
widget.
The IM communities display.
2. Touch the messenger service to which you have previously subscribed.
After selecting an Instant Messaging service, or signing in, you can choose from the following options:
• Refresh List
• Add Contact
•More
– Settings
– Send Msg to
– Saved Conversations
– Minimize
– Sign Out
3. Press the key to return to Idle mode.
81
: updates and displays the IM contact information.
: allows you to add an IM contact to the list.
:
: allows you to change your Community settings.
: allows you to send a message to a selected contact.
: shows permanent records of your Instant Messaging conversations.
: minimizes the IM window.
: allows you to logoff or disconnect from this IM session.
.
Page 85

Templ at es
Besides entering message text using the keypad keys, you can speed message composition by including copies of
stored text (Templates) in your message.
Creating a Text template
1. From the Home screen, touch Quick List ➔
2. Press ➔
3. Touch
4. Touch
5. Tap the screen and enter the text for the text template, then press and touch
Tem pl at es
Tex t tem pla tes
Create
.
.
.
Messaging
.
Save
. For more
information, refer to “Using ABC Mode” on page 64.
Deleting a Text template
1. From the Home screen, touch Quick List ➔
2. Press ➔
3. Touch
4. Touch
5. Touch the check box to the right of the template(s) you wish to delete and touch
Tem pl at es
Tex t tem pla tes
Delete
.
.
.
Messaging
.
Delete
.
Voicemail
This menu helps you access your voice mailbox, if provided by your network.
1. Enter the voice server number obtained from T-Mobile customer service in the Voice server number field.
2. From the Home screen, touch Dialer.
3. Touch the icon.
Voice mail
– or –
Touch and hold the key to connect to voicemail.
4. Follow the voicemail prompts.
Messages 82
Page 86

Note:
Voice mail is a network feature. Please contact T-Mobile’s customer service for further details.
Visual Voicemail
Visual Voicemail enables users to view a list of people who left a voicemail message, and listen to the any message
they want without being limited to chronological order.
Important!:
You must download and install Visual Voice Mail in order to activate the Voice Mail application. Refer to T-Mobile Visual
Voicemail in the Widgets section for installation information.
1. From the Home screen, open the Widget bar and touch the Voicemail widget.
A list of the voicemail messages displays.
2. Touch a voicemail message to play it back.
Messages Settings
In this menu, you can set up defaults for text, or picture messages, configure Push messaging receiving or service
loading options, or manage SMS messages stored on the SIM card. The last setting you accessed is automatically
activated for sending subsequent messages.
1. From the Home screen, touch Quick List ➔
2. Press ➔
3. Touch one of the listed options:
Settings
.
Messaging
.
Text message settings
The following options are available:
Sending options
• Reply path
: allows the recipient of your message to send you a reply message using your message center, if your network
supports this service.
• Delivery report
Text Message center
: when this function is activated, the network informs you whether or not your message was delivered.
: allows you to identify your Text Message Center.
83
Page 87

Picture message settings
Use the following options to set Send and Receive settings for Picture messages:
Sending options
•Priority
: you can select the priority level of your messages.
• Expiration
• Delivery time
• Message size
• Delivery report
• Request read report
• Keep a copy
• Add my namecard
Receiving options
• Send read report
• Send delivery report
• Reject anonymous
• Reject advertisement
Creation mode
: set the length of time your messages are stored in the message center while the network attempts to deliver them.
: you can set a delay time before the phone sends your messages.
: set the size limit for the message.
: when enabled, the network informs you whether or not your message was delivered.
: when enabled, your phone sends a request for a reply along with your message to the recipient.
: your phone maintains a copy of all the sent picture messages.
: automatically attaches My Name Card when you send a picture message.
: you can set the option to receive a Read report.
: you can set the option to receive a Delivery report.
: you can set your phone to automatically reject anonymous messages.
: you can set your phone to automatically reject advertisements.
Allows you to select the creation mode, Free, Restricted, or Warning.
•Free
: you may add any content to the message.
• Restricted
•Warning
: you can only create and submit messages with content belonging to the Core MM Content Domain.
: the phone will warn you via pop up messages that you are creating a multimedia message which does not fit the
Core MM Content Domain.
Push message settings
Push message settings allow you to configure the receiving and service loading options.
The following options are available:
• Receiving Options
• Service options
: specify whether to turn push message reception On or Off.
: (Receiving Options must be set to On to use this option). Specify whether to load this service Always, Never,
or Prompt.
Messages 84
Page 88

Managing SIM card messages
When you access this menu all of the SMS messages stored on the SIM card display on the screen. From here you
can copy the messages to the phone, or delete the messages.
1. From the Home screen, touch Quick List ➔
2. Press ➔
3. Touch
Settings
.
Manage SIM card messages
Messaging
.
.
All the SMS messages stored on the SIM card display.
4. Touch and hold one of the SMS messages, then select one of the following options:
• Copy to phone memory
• Delete
: deletes the selected SMS message.
: copies the selected SMS message to the phone’s memory.
Notification settings
This option allows you to determine if you want to receive notification in the status bar when you receive a Gmail
text or picture message.
1. From the Home screen, open the Widget tray and tap the Gmail widget.
2. Press ➔
3. Touch the check box next to one of the following options to activate that option:
• Email notifications
Settings
.
: selecting this option displays message notification in the status bar and activates the Select ringtone and
Vibrate options.
• Select ringtone
•Vibrate
: selects a Default ringtone, Silent, or other ringtones to use as notification of received messages.
: the phone vibrates as notification of received messages.
85
Page 89

Section 7: Time Management
This section describes how you can manage time using time-related applications such as the Calendar, Alarm
Clock, Analog or Digital clock, and the World clock.
Calendar
With the Calendar feature, you can:
•
Consult the calendar by day, week, or month.
•
Create events.
•
Set an alarm to act as a reminder, if necessary.
•
Track Missed Alarm Events.
•
Check your memory status.
To access the Calendar:
1. From the Home screen, touch
– or –
Open the Widget tray and tap the
When you select the Calendar menu, the following options are available:
View by Month
When you select this option, the calendar displays the selected month with today’s date highlighted.
At the bottom of the calendar, scheduled events display in the order that they occur.
The following options are available:
•
Create event
•
Event list
•
Go to
: allows you to create an event.
: displays a list of all the events.
: displays Today’s date or another touched date.
Press the key to access the following options:
• View b y day
• View by week
•
Delete
: displays the calendar in day view.
: displays the calendar in week view.
: allows you to delete scheduled events for Today, This month, All data before today, or all data.
Quick List
Calendar
➔
widget.
Calendar
.
Time Management 86
Page 90

•
Settings
: allows you to select the Starting day for this calendar as well as whether you view the calendar by Month, Week,
or day.
•
My calendars
• Missed alarm events
View by Week
: displays the created calendars in a list.
: displays a list of missed alarm events.
When you select this option, the calendar displays the selected week with today’s date and time Touched. The
following options are available:
•
Create event
•
Event list
•
Go to
: allows you to create a new appointment.
: displays a list of the scheduled events.
: displays Today’s date or another
selected
date.
Press the key to access the following options:
• View by day
• View by month
• Delete
• Settings
: displays the calendar in day view.
: displays the calendar in month view.
: allows you to delete scheduled events for Today, This month, All data before today, or All data.
: allows you to select the Starting day for this calendar as well as whether you view the calendar by Month, Week, or
day.
•
My calendars
• Missed alarm events
View by Day
: displays the created calendars in a list.
: displays a list of missed alarm events.
When you select this option, you are taken to the Day view of the selected day with any events listed. The following
options are available:
•
Create event
•
Event list
•
Go to
: allows you to create an event.
: displays a list of the scheduled events.
: displays Today’s date or another touched date.
87
Page 91

Press the key to access the following options:
• View by week
• View by month
• Delete
• Settings
: displays the calendar in week view.
: displays the calendar in month view.
: allows you to delete all events for a selected date.
: allows you to select the Starting day for this calendar as well as whether you view the calendar by Month, Week,
or day.
•
My calendars
• Missed alarm events
: displays the created calendars in a list.
: displays a list of missed alarm events.
Calendar Settings
Using the Calendar settings you can select the day with which you want the calendar to begin. You also select how
you want to view the calendar, by Month, Week, or Day or determine how to manage events, notifications, sounds,
and defaults reminders.
1. From the Home screen, touch
2. Press ➔
3. Touch the
4. Touch the
touch
5. Touch
6. Touch the
7. Touch the
8. Touch
9. Touch the
Settings
Starting Day
View By
pull down and select how you want to view the calendar, by Month, Week, or Day then
Save
.
On
(activate) or
Set alerts & notifications
Select ringtone
On
or
Off
from the
Set default reminder
Quick List
➔
Calendar
.
.
pull down menu and select the day in which you want the calendar to start.
Off
(deactivate) from the
field, then select
field, select from a list of ringtones, then touch
Vibrate
field.
field and select a time from the list, then touch
Hide declined events
Alert, Status bar notification
field.
Select
, or
.
Save
Off
.
.
Time Management 88
Page 92

Missed Alarm Events
You can view all of the alarmed events.
1. From the Home screen, touch
2. Press ➔
Missed Alarm Events
Quick List
.
➔
Calendar
The missed alarm events display.
Alarm Clock
This feature allows you to:
•
Set up multiple alarms to ring at specified times.
To set the alarm:
1. From the Home screen, open the Widget tray and tap the
2. Touch one of the predefined alarms, or press ➔
3. Touch the Turn on alarm check box to activate the alarm.
A check mark displays in this field.
4. Touch
5. Touch
6. Touch
Time
and use the plus or minus symbols to enter the hour, and minutes.
AM
or PM (toggles depending on which was last selected), then touch
Ringtone
and select a ringtone from the list, then touch OK to activate the ringtone, or touch
to cancel.
7. Touch
Vibrate
if you want the alarm to vibrate.
A check mark displays in this field.
8. Touch
9. Touch
Repeat
and touch each day you want the alarm to repeat, then touch OK.
Label
, then touch the
Label
field. Touch
DEL
keyboard, enter a new label for this alarm and touch OK.
.
Alarm clock
Add alarm
widget.
to add a new alarm.
Set
.
Cancel
to delete the current label name, then using the QWERTY
89
Page 93

Customizing the Alarm Clock
You can change the alarm clock type that displays.
1. Touch the Alarm clock displayed on the screen.
2. Slide left or right to view the alarm clock choices.
3. Touch an alarm clock display.
The screen displays the newly selected alarm clock.
Tip:
Press ➔
Hide clock
to hide the clock.
Digital Clock
The display shows the current time on a digital clock.
䊳
Touch the Digital clock widget to view the time in a digital format.
World Clock
This feature allows you to find out what time it is another part of world.
To access the World Clock:
1. From the Home screen, open the Widget tray and tap the
2. Touch the screen and scroll the displayed map to the right or the left until the location displays on the screen,
World Clock
widget.
then touch the desired region.
The time for this zone displays on the World clock screen.
3. Touch the
Daylight Savings
icon (sun) to turn it On or
Off
.
Time Management 90
Page 94

Section 8: Connections
Your phone is equipped with features that allow you to quickly connect to the web.
Google Talk
Google Talk is a free Windows and web-based application for instant messaging offered by Google. Conversation
logs are automatically saved to a Chats area in your Gmail account. This allows you to search a chat log and store
them in your Gmail accounts.
1. From the Home screen, touch the
2. Press
Next
to set up a Google account or to Sign in.
3. Touch
Create
to create a new, Google account.
– or –
Touch
Sign in
if you have an existing Google account.
4. After entering your user name and password, press the
5. Touch
Sign in
.
The Network confirms your login and processes. This could take up to 5 minutes to complete.
Note:
Visit www.google.com for further instructions and information about how to use Google Talk.
Web Browsing
Open the browser to start surfing the web. The browser is fully optimized and comes with advanced functionality to
enhance the Internet browsing feature on your phone.
To access the web via the menu, follow these steps:
1. From the Home screen, touch the
– or –
2. From the Home screen, touch
The web2go home screen displays and you can search the Web, check the weather, get the latest news,
and more.
Widget tray
Web
Quick List
icon.
➔
and tap the
web2go
.
Google Talk
Down
Navigation key.
widget.
91
Page 95

3.
Press the key to select one of the following options:
•Go
: allows you to enter a URL address to go to a certain page.
• Bookmarks
: displays a collection of up to 100 URL direct links (URL addresses) to predefined web pages stored in your
web browser.
–
Most visited (tab)
–
History (tab)
• New window
•Refresh
•Forward
• Find on page
• Select text
: this tab displays the URLs most frequently visited.
: this tab displays the browser history.
: displays a new window so you can browse multiple URLs.
: reloads the current web page.
: forwards the browser to another web page.
: displays a “Find on page” field where you can enter text to locate on this page.
: touch and slide your finger across text you want to copy and paste to the clipboard. The text highlights as you
select it).
• Downloads
• Share page
•Page Info
• Settings
• Set text size • Accept cookies
• Set text encoding • Clear all cookie data
• Block pop-up windows • Remember form data
• Load images • Clear form data
• Auto-fit pages • Remember passwords
• Enable JavaScript • Clear passwords
• Open in background • Show security warnings
• Set home page • Enable Gears
• Enable power save • Gears settings
: displays the download history.
: allows you to share the page using Gmail or as a message.
: displays information about the selected page such as the URL.
: allows you to configure the following items:
Connections 92
Page 96

• Clear cache • Reset to default
• Clear history
Go to a web page
1. From the Browser, press , then touch
2. Enter the web page URL using the keyboard.
3. Touch the URL in which to connect.
4. Touch
Entering Text in the Web
Go
.
Go
.
You can enter alphanumeric characters by using your phone’s keypad. For more information, refer to “Entering Text”
on page 60.
93
Page 97
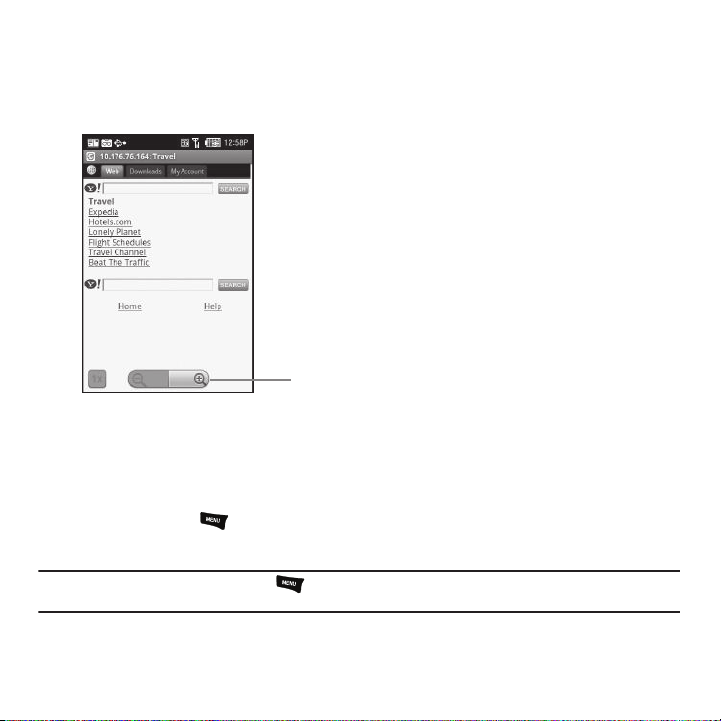
Viewing web pages
Zoom Tool
Zoom In or Out
1. On a web page, touch and hold a section of the screen until the page sizing tool displays
2. Touch the minus symbol to reduce the size of the page, or touch the plus symbol to increase the size
of the page.
Opening a new window
Opening multiple browser windows makes it easy to switch from one URL to another.
䊳
From the Browser, press , then touch
New window
.
The new window opens and the other window is hidden behind the new window.
Tip:
When more than one window is open, press ➔
additional windows.
Windows
. this displays all the open windows and allows you to open
Connections 94
Page 98
Switching between multiple browser windows
䊳
From the Browser, press , then touch
Window
.
The new window opens and the other window is hidden behind the new window.
Note:
If more than two windows are open, you will see thumbnails of the multiple windows open and are able to select which window
to view.
Closing browser windows
䊳
From the Browser, press , then touch
Window
.
The new window opens and the other window is hidden behind the new window.
Note:
If more than two windows are open, you will see thumbnails of the multiple windows open and are able to touch the X mark on the
bottom right of the thumbnail which will close the respective window.
Enable Downloading for Web Applications
Important!:
Before you can download a web application you must insert an SD into the phone and enable the
(enables downloading). For more information, refer to “SD Card” on page 11. Also, see “Mounting the SD Card” on
page 40.
Unknown sources
feature
1. From the Home screen, touch
2. Touch the
3. Touch
Unknown sources
On
under Unknown sources to allow install of non-Market applications. Touch
Quick List ➔ Settings
check box.
➔
Application settings
.
Off
of non-market applications.
Warning!:
Not all web applications are safe to download. In order to protect your phone and data, use Android Market to install web
applications. For more information, refer to “Downloading a New Application (widget)” on page 143.
95
to disable installation
Page 99

How Wi-Fi Works
Wi-Fi provides wireless Internet access over distances of up to 300 feet. To use Wi-Fi you need access to a
wireless access point (hotspot).
What This Means to You
When you are not in range of a Wi-Fi connection, your normal cellular network takes over and keeps you
connected. Your phone switches automatically from Wi-Fi to cellular whenever it's necessary to maintain your
connection, whether your phone is displaying the Home screen or in the middle of an active call. The switching
process is virtually unnoticeable.
Activating for the First Time and connecting to a Wireless Network
To use Wi-Fi on your phone, you need access to a wireless access point or hotspot. For more information, refer to
“T-Mobile HotSpot Connections” on page 98.
1. From the Home screen, open the
2. Tap t he
Wi-Fi
widget.
Widget tray
.
The phone scans for a wireless network and when discovered, Wi-Fi activates.
By default your phone automatically connects to the preconfigured, T-Mobile Wi-Fi network, however, you can
select another network access point.
To connect to a different access point:
1. From the Home screen, open the Widget tray and tap the
Wi-Fi
widget.
The phone scans for a wireless network and when discovered, Wi-Fi activates.
– or –
Pull down the Navigation bar and touch the
2. Touch
3. Touch the name of the Network in which you want to operate.
Settings
.
Wi-Fi
icon then tap the
Wi-Fi
widget.
If your SIM is configured to allow this connection you connect and begin operating under that network.
4. If you selected a network that is secured with a Wireless Entry Point (WEP), enter the security key and then
touch
Connect
.
Connections 96
Page 100

Note:
The next time the phone connects to a previously accessed secured wireless network, you are not prompted to enter the security
key again, unless you reset your phone to the factory default settings.
Wi-Fi settings
Once set up for Wi-Fi connectivity, your phone automatically uses Wi-Fi, when available, for all your mobile phone
services.
1. From the Home screen, open the
Widget tray
and touch the Wi-Fi widget.
– or –
Pull down the Navigation bar and touch the
2. Touch
Settings
.
Wi-Fi
icon.
The available connection types display with an Edit icon displayed to the right of each connection.
3. Touch
Edit
, then configure the settings as desired.
97
 Loading...