

Page 1

T679M_UG_EN_11082011_D4
Samsung Galaxy W
PORTABLE DUAL-BAND
MOBILE PHONE
User Manual
Please read this manual before operating your
phone, and keep it for future reference.
Page 2

Intellectual Property
All Intellectual Property, as defined below, owned by or which is otherwise the property of Samsung or its respective
suppliers relating to the SAMSUNG Phone, including but not limited to, accessories, parts, or software relating
thereto (the “Phone System”), is proprietary to Samsung and protected under federal laws, provincial laws, and
international treaty provisions. Intellectual Property includes, but is not limited to, inventions (patentable or
unpatentable), patents, trade secrets, copyrights, software, computer programs, and related documentation and other
works of authorship. You may not infringe or otherwise violate the rig hts secured by the Intellectual Property.
Moreover, you agree that you will not (and will not attempt to) modify, prepare derivative works of, reverse engineer,
decompile, disassemble, or otherwise attempt to create source code from the software. No title to or ownership in the
Intellectual Property is transferred to you. All applicable rights of the Intellectual Property shall remain with
SAMSUNG and its suppliers.
Copyright
© 2011 Samsung Electronics Canada, Inc. SAMSUNG is a registered trademark of Samsung Electronics Co., Ltd.
and its related entities.
Openwave® is a registered Trademark of Openwave, Inc.
RSA® is a registered Trademark of RSA Security, Inc.
Post-it® is a registered Trademark of Minnesota Mining and Manufacturing Company aka 3M CORPORATION
DELAWARE.
The Bluetooth® word mark and logos are owned by the Bluetooth SIG, Inc. and any use of such marks by Samsung
Electronics Canada, Inc. is under license. Other trademarks and trade names are those of their respective owners.
This product has an Android platform based on Linux, which can be expanded by a variety of JavaScript-based
software.
Page 3

GoogleTM, Android MarketTM, Google TakTM, Google MailTM, Google MapsTM, and YouTubeTM are trademarks of
Google, Inc.
JavaTM is a trademark of Sun Microsystems, Inc.
Windows Media Player® is a registered trademark of Microsoft Corporation.
and are trademarks of SRS Labs, Inc. CS Headphone and WOW HD technologies are
incorporated under licence from SRS La bs , Inc .
Wi-Fi, the Wi-Fi CERTIFIED logo, and the Wi-F i log o ar e re gis tered trademarks of the Wi-Fi Alliance.
Covered by one or more of the follow ing U.S. patents:
7,295,673; 7,460,668; 7,515,710; 7,519,274
Disclaimer of Warranties; Exclusion of Liability
Except as set forth in the express warranty contained on the warranty page enclosed with the product, the purchaser
takes the product "as is", and Samsung makes no express or implied warranty of any kind whatsoever with respect to
the product, including but not limited to the merchantability of the prod uct or its fitness for any particular purpose o r
use; the design, condition or qu ality of the product; the performance of the product; the workmanship of t he product
or the components contained therein; or compliance of the product with the requirements of any law, rule,
specification or contract pertaining thereto. Nothing contained in the instruction manual shall be construed to create
an express or implied warranty of any kind whatsoever with respect to the product. In addition, Samsung shall not be
Page 4

liable for any damages of any kind resultin g from the purch ase or use of th e prod uct or arisin g from t he breac h of the
express warranty, including incidental, special or consequent ial damages, or loss of anticipated profits or benefits.
Privacy
The privacy and copyright laws of Canada govern the disclosure, reproduction and distribution of data, media and
other content, including music and video content. Certain activities, including downloads or transfer by any means
(including, via cable, Bluetooth® or otherwise) of such content ma y be an infringement of privacy or copyright law.
Neither Samsung Electronics Canada Inc. nor any of its affiliates shall be liable or respons ble for any data or content
disclosed, reproduced, downloaded or distributed by the user of this equipment.
Warning
Depending on the user interface used in the handset, you may experience sl ow keypad response when performing
tasks in the background. This can impact making phone calls. When there is no activity or change in the icons at the
top of the main LCD display, the handset will resume normal operations.
Page 5

Table of Contents
Section 1: Getting Started ................................................ 5
Understanding this User Manual . . . . . . . . . . . . . . . . . . . . . . . . . 5
Battery Cover . . . . . . . . . . . . . . . . . . . . . . . . . . . . . . . . . . . . . . . . 6
Battery . . . . . . . . . . . . . . . . . . . . . . . . . . . . . . . . . . . . . . . . . . . . 10
Extending Your Battery Life . . . . . . . . . . . . . . . . . . . . . . . . . . . . 12
Power Savings . . . . . . . . . . . . . . . . . . . . . . . . . . . . . . . . . . . . . . 12
Initial Phone Configuration . . . . . . . . . . . . . . . . . . . . . . . . . . . . . 13
Switching the Phone On or Off . . . . . . . . . . . . . . . . . . . . . . . . . 13
Locking and Unlocking the Phone . . . . . . . . . . . . . . . . . . . . . . . 14
Creating a New Google Account . . . . . . . . . . . . . . . . . . . . . . . . 15
Signing into Your Google Account . . . . . . . . . . . . . . . . . . . . . . . 15
Retrieving your Google Account Password . . . . . . . . . . . . . . . . 16
Voicemail . . . . . . . . . . . . . . . . . . . . . . . . . . . . . . . . . . . . . . . . . . 16
Task Manager . . . . . . . . . . . . . . . . . . . . . . . . . . . . . . . . . . . . . . 17
Section 2: Understanding Your Phone .......................... 18
Features of Your Phone . . . . . . . . . . . . . . . . . . . . . . . . . . . . . . . 18
Front View . . . . . . . . . . . . . . . . . . . . . . . . . . . . . . . . . . . . . . . . . 19
Back View of Your Phone . . . . . . . . . . . . . . . . . . . . . . . . . . . . . 20
Phone Display . . . . . . . . . . . . . . . . . . . . . . . . . . . . . . . . . . . . . . 21
Status Bar . . . . . . . . . . . . . . . . . . . . . . . . . . . . . . . . . . . . . . . . . 21
Function Keys . . . . . . . . . . . . . . . . . . . . . . . . . . . . . . . . . . . . . . 26
Home Screen . . . . . . . . . . . . . . . . . . . . . . . . . . . . . . . . . . . . . . . 28
Screen Navigation . . . . . . . . . . . . . . . . . . . . . . . . . . . . . . . . . . . 31
Menu Navigation . . . . . . . . . . . . . . . . . . . . . . . . . . . . . . . . . . . . 33
Applications . . . . . . . . . . . . . . . . . . . . . . . . . . . . . . . . . . . . . . . . .34
Customizing the Screens . . . . . . . . . . . . . . . . . . . . . . . . . . . . . .37
Section 3: Memory Card .................................................. 42
Using the SD Card . . . . . . . . . . . . . . . . . . . . . . . . . . . . . . . . . . .42
SD card Overview . . . . . . . . . . . . . . . . . . . . . . . . . . . . . . . . . . . .42
Section 4: Call Functions and Contacts List ................. 45
Displaying Your Phone Number . . . . . . . . . . . . . . . . . . . . . . . . .45
Making a Call . . . . . . . . . . . . . . . . . . . . . . . . . . . . . . . . . . . . . . .45
Ending a Call . . . . . . . . . . . . . . . . . . . . . . . . . . . . . . . . . . . . . . . .45
Making Emergency Calls . . . . . . . . . . . . . . . . . . . . . . . . . . . . . .46
Dialing Options . . . . . . . . . . . . . . . . . . . . . . . . . . . . . . . . . . . . . .47
Answering a Call . . . . . . . . . . . . . . . . . . . . . . . . . . . . . . . . . . . . .47
Managing Reject Calls . . . . . . . . . . . . . . . . . . . . . . . . . . . . . . . .48
International Calls . . . . . . . . . . . . . . . . . . . . . . . . . . . . . . . . . . . .49
Pause Dialing . . . . . . . . . . . . . . . . . . . . . . . . . . . . . . . . . . . . . . .49
Wait Dialing . . . . . . . . . . . . . . . . . . . . . . . . . . . . . . . . . . . . . . . . .50
Redialing the Last Number . . . . . . . . . . . . . . . . . . . . . . . . . . . . .50
Speed Dialing . . . . . . . . . . . . . . . . . . . . . . . . . . . . . . . . . . . . . . .50
In Call Options . . . . . . . . . . . . . . . . . . . . . . . . . . . . . . . . . . . . . .51
Logs Tab . . . . . . . . . . . . . . . . . . . . . . . . . . . . . . . . . . . . . . . . . . .55
Section 5: Entering Text .................................................. 59
Text Input Methods . . . . . . . . . . . . . . . . . . . . . . . . . . . . . . . . . . .59
Selecting the Text Input Method . . . . . . . . . . . . . . . . . . . . . . . . .59
Entering Text Using Swype . . . . . . . . . . . . . . . . . . . . . . . . . . . . .60
1
Page 6

Using the Samsung Keypad . . . . . . . . . . . . . . . . . . . . . . . . . . . . 64
Using XT9 Predictive Text . . . . . . . . . . . . . . . . . . . . . . . . . . . . . 67
Section 6: Contacts ..........................................................69
Accounts . . . . . . . . . . . . . . . . . . . . . . . . . . . . . . . . . . . . . . . . . . 69
Contacts List . . . . . . . . . . . . . . . . . . . . . . . . . . . . . . . . . . . . . . . 69
Finding a Contact . . . . . . . . . . . . . . . . . . . . . . . . . . . . . . . . . . . . 72
Contact List Options . . . . . . . . . . . . . . . . . . . . . . . . . . . . . . . . . . 73
Contact Menu Options . . . . . . . . . . . . . . . . . . . . . . . . . . . . . . . . 74
Contact Entry Options . . . . . . . . . . . . . . . . . . . . . . . . . . . . . . . . 75
Joining Contact Information . . . . . . . . . . . . . . . . . . . . . . . . . . . . 75
Sending a Namecard . . . . . . . . . . . . . . . . . . . . . . . . . . . . . . . . . 77
Copying Contact Information . . . . . . . . . . . . . . . . . . . . . . . . . . . 78
Synchronizing Contacts . . . . . . . . . . . . . . . . . . . . . . . . . . . . . . . 78
Display Options . . . . . . . . . . . . . . . . . . . . . . . . . . . . . . . . . . . . . 79
Adding more Contacts via Accounts and Sync . . . . . . . . . . . . . 79
My Pro ile . . . . . . . . . . . . . . . . . . . . . . . . . . . . . . . . . . . . . . . . . . 81
Additional Contact Options . . . . . . . . . . . . . . . . . . . . . . . . . . . . . 81
Groups . . . . . . . . . . . . . . . . . . . . . . . . . . . . . . . . . . . . . . . . . . . . 82
Favorites Tab . . . . . . . . . . . . . . . . . . . . . . . . . . . . . . . . . . . . . . . 83
Section 7: Messaging .......................................................85
Types of Messages . . . . . . . . . . . . . . . . . . . . . . . . . . . . . . . . . . 85
Creating and Sending Messages . . . . . . . . . . . . . . . . . . . . . . . . 85
Message Options . . . . . . . . . . . . . . . . . . . . . . . . . . . . . . . . . . . . 86
Viewing Newly Received Messages . . . . . . . . . . . . . . . . . . . . . 86
Deleting Messages . . . . . . . . . . . . . . . . . . . . . . . . . . . . . . . . . . . 88
Message Search . . . . . . . . . . . . . . . . . . . . . . . . . . . . . . . . . . . . 88
Messaging Settings . . . . . . . . . . . . . . . . . . . . . . . . . . . . . . . . . . 89
2
Email . . . . . . . . . . . . . . . . . . . . . . . . . . . . . . . . . . . . . . . . . . . . . 90
Microsoft Exchange Email (Outlook) . . . . . . . . . . . . . . . . . . . . . 93
Using Google Mail . . . . . . . . . . . . . . . . . . . . . . . . . . . . . . . . . . . 97
Google Talk . . . . . . . . . . . . . . . . . . . . . . . . . . . . . . . . . . . . . . . . 99
Section 8: Multimedia .................................................... 100
Using the Camera . . . . . . . . . . . . . . . . . . . . . . . . . . . . . . . . . . 100
Camera and Camcorder Options . . . . . . . . . . . . . . . . . . . . . . 101
Using the Camcorder . . . . . . . . . . . . . . . . . . . . . . . . . . . . . . . 105
Files . . . . . . . . . . . . . . . . . . . . . . . . . . . . . . . . . . . . . . . . . . . . . 108
Gallery . . . . . . . . . . . . . . . . . . . . . . . . . . . . . . . . . . . . . . . . . . . 109
Using the Video Player . . . . . . . . . . . . . . . . . . . . . . . . . . . . . . 109
Music . . . . . . . . . . . . . . . . . . . . . . . . . . . . . . . . . . . . . . . . . . . . 110
Using Playlists . . . . . . . . . . . . . . . . . . . . . . . . . . . . . . . . . . . . . 111
Creating a Playlist . . . . . . . . . . . . . . . . . . . . . . . . . . . . . . . . . . 111
Transferring Music Files . . . . . . . . . . . . . . . . . . . . . . . . . . . . . 112
Removing Music Files . . . . . . . . . . . . . . . . . . . . . . . . . . . . . . . 112
YouTube . . . . . . . . . . . . . . . . . . . . . . . . . . . . . . . . . . . . . . . . . 113
Section 9: Applications and Development .................. 114
Applications . . . . . . . . . . . . . . . . . . . . . . . . . . . . . . . . . . . . . . . 114
AllShare . . . . . . . . . . . . . . . . . . . . . . . . . . . . . . . . . . . . . . . . . . 114
Calculator . . . . . . . . . . . . . . . . . . . . . . . . . . . . . . . . . . . . . . . . 115
Calendar . . . . . . . . . . . . . . . . . . . . . . . . . . . . . . . . . . . . . . . . . 116
Camera . . . . . . . . . . . . . . . . . . . . . . . . . . . . . . . . . . . . . . . . . . 117
Clock . . . . . . . . . . . . . . . . . . . . . . . . . . . . . . . . . . . . . . . . . . . . 117
Downloads . . . . . . . . . . . . . . . . . . . . . . . . . . . . . . . . . . . . . . . . 117
Email . . . . . . . . . . . . . . . . . . . . . . . . . . . . . . . . . . . . . . . . . . . . 117
Gallery . . . . . . . . . . . . . . . . . . . . . . . . . . . . . . . . . . . . . . . . . . . 117
Page 7

Game Hub . . . . . . . . . . . . . . . . . . . . . . . . . . . . . . . . . . . . . . . . 118
Gmail . . . . . . . . . . . . . . . . . . . . . . . . . . . . . . . . . . . . . . . . . . . . 118
Google Search . . . . . . . . . . . . . . . . . . . . . . . . . . . . . . . . . . . . . 118
GPS Navigator . . . . . . . . . . . . . . . . . . . . . . . . . . . . . . . . . . . . . 118
Internet . . . . . . . . . . . . . . . . . . . . . . . . . . . . . . . . . . . . . . . . . . . 119
Kies air . . . . . . . . . . . . . . . . . . . . . . . . . . . . . . . . . . . . . . . . . . . 119
Latitude . . . . . . . . . . . . . . . . . . . . . . . . . . . . . . . . . . . . . . . . . . 119
Maps . . . . . . . . . . . . . . . . . . . . . . . . . . . . . . . . . . . . . . . . . . . . 120
Market . . . . . . . . . . . . . . . . . . . . . . . . . . . . . . . . . . . . . . . . . . . 122
Memo . . . . . . . . . . . . . . . . . . . . . . . . . . . . . . . . . . . . . . . . . . . . 125
Mini Diary . . . . . . . . . . . . . . . . . . . . . . . . . . . . . . . . . . . . . . . . . 125
Music . . . . . . . . . . . . . . . . . . . . . . . . . . . . . . . . . . . . . . . . . . . . 126
Music Hub . . . . . . . . . . . . . . . . . . . . . . . . . . . . . . . . . . . . . . . . 127
My Files . . . . . . . . . . . . . . . . . . . . . . . . . . . . . . . . . . . . . . . . . . 127
Navigation . . . . . . . . . . . . . . . . . . . . . . . . . . . . . . . . . . . . . . . . 127
News & Weather . . . . . . . . . . . . . . . . . . . . . . . . . . . . . . . . . . . 129
Places . . . . . . . . . . . . . . . . . . . . . . . . . . . . . . . . . . . . . . . . . . . 129
QuickOffice . . . . . . . . . . . . . . . . . . . . . . . . . . . . . . . . . . . . . . . 130
Remote PVR . . . . . . . . . . . . . . . . . . . . . . . . . . . . . . . . . . . . . . 131
Samsung Apps . . . . . . . . . . . . . . . . . . . . . . . . . . . . . . . . . . . . 131
Self Serve . . . . . . . . . . . . . . . . . . . . . . . . . . . . . . . . . . . . . . . . 131
Settings . . . . . . . . . . . . . . . . . . . . . . . . . . . . . . . . . . . . . . . . . . 131
Social Hub . . . . . . . . . . . . . . . . . . . . . . . . . . . . . . . . . . . . . . . . 132
Talk . . . . . . . . . . . . . . . . . . . . . . . . . . . . . . . . . . . . . . . . . . . . . 132
Task . . . . . . . . . . . . . . . . . . . . . . . . . . . . . . . . . . . . . . . . . . . . . 132
Task Manager . . . . . . . . . . . . . . . . . . . . . . . . . . . . . . . . . . . . . 133
Tunes & Apps . . . . . . . . . . . . . . . . . . . . . . . . . . . . . . . . . . . . . 134
TV & Radio . . . . . . . . . . . . . . . . . . . . . . . . . . . . . . . . . . . . . . . .134
Videos . . . . . . . . . . . . . . . . . . . . . . . . . . . . . . . . . . . . . . . . . . . .134
Voice Recorder . . . . . . . . . . . . . . . . . . . . . . . . . . . . . . . . . . . . .134
Voice Search . . . . . . . . . . . . . . . . . . . . . . . . . . . . . . . . . . . . . . . 134
YouTube . . . . . . . . . . . . . . . . . . . . . . . . . . . . . . . . . . . . . . . . . .135
Section 10: Connections ............................................... 136
Internet . . . . . . . . . . . . . . . . . . . . . . . . . . . . . . . . . . . . . . . . . . .136
Bluetooth . . . . . . . . . . . . . . . . . . . . . . . . . . . . . . . . . . . . . . . . . .141
Enable Downloading for Web Applications . . . . . . . . . . . . . . . .144
PC Connections . . . . . . . . . . . . . . . . . . . . . . . . . . . . . . . . . . . .145
Kies Air . . . . . . . . . . . . . . . . . . . . . . . . . . . . . . . . . . . . . . . . . . .146
Wi-Fi . . . . . . . . . . . . . . . . . . . . . . . . . . . . . . . . . . . . . . . . . . . . .147
Tethering . . . . . . . . . . . . . . . . . . . . . . . . . . . . . . . . . . . . . . . . . .149
Portable Wi-Fi Hotspot . . . . . . . . . . . . . . . . . . . . . . . . . . . . . . .149
Section 11: Time Management ..................................... 152
Calendar . . . . . . . . . . . . . . . . . . . . . . . . . . . . . . . . . . . . . . . . . .152
Clock . . . . . . . . . . . . . . . . . . . . . . . . . . . . . . . . . . . . . . . . . . . . .153
World Clock . . . . . . . . . . . . . . . . . . . . . . . . . . . . . . . . . . . . . . . .155
Stopwatch . . . . . . . . . . . . . . . . . . . . . . . . . . . . . . . . . . . . . . . . .155
Setting a Timer . . . . . . . . . . . . . . . . . . . . . . . . . . . . . . . . . . . . .155
Configuring a Desk Clock . . . . . . . . . . . . . . . . . . . . . . . . . . . . .155
Section 12: Changing Your Settings ............................ 156
Wireless and Networks . . . . . . . . . . . . . . . . . . . . . . . . . . . . . . .156
USB Utilities . . . . . . . . . . . . . . . . . . . . . . . . . . . . . . . . . . . . . . .158
Tethering . . . . . . . . . . . . . . . . . . . . . . . . . . . . . . . . . . . . . . . . . .158
VPN settings . . . . . . . . . . . . . . . . . . . . . . . . . . . . . . . . . . . . . . .159
3
Page 8

Call Settings . . . . . . . . . . . . . . . . . . . . . . . . . . . . . . . . . . . . . . . 162
Sound Settings . . . . . . . . . . . . . . . . . . . . . . . . . . . . . . . . . . . . . 164
Display Settings . . . . . . . . . . . . . . . . . . . . . . . . . . . . . . . . . . . . 165
Power Saving Mode . . . . . . . . . . . . . . . . . . . . . . . . . . . . . . . . . 167
Location and Security . . . . . . . . . . . . . . . . . . . . . . . . . . . . . . . . 167
Screen Unlock Pattern Settings . . . . . . . . . . . . . . . . . . . . . . . . 168
Applications . . . . . . . . . . . . . . . . . . . . . . . . . . . . . . . . . . . . . . . 171
Android Development . . . . . . . . . . . . . . . . . . . . . . . . . . . . . . . . 173
Accounts and Synchronization . . . . . . . . . . . . . . . . . . . . . . . . . 174
Motion Settings . . . . . . . . . . . . . . . . . . . . . . . . . . . . . . . . . . . . 175
Privacy Settings . . . . . . . . . . . . . . . . . . . . . . . . . . . . . . . . . . . . 176
SD Card & Phone Storage . . . . . . . . . . . . . . . . . . . . . . . . . . . . 177
Search Settings . . . . . . . . . . . . . . . . . . . . . . . . . . . . . . . . . . . . 177
Language & Keyboard Settings . . . . . . . . . . . . . . . . . . . . . . . . 177
Voice Input and Out Settings . . . . . . . . . . . . . . . . . . . . . . . . . . 180
Accessibility Settings . . . . . . . . . . . . . . . . . . . . . . . . . . . . . . . . 181
Date and Time . . . . . . . . . . . . . . . . . . . . . . . . . . . . . . . . . . . . . 182
About Phone . . . . . . . . . . . . . . . . . . . . . . . . . . . . . . . . . . . . . . 182
Troubleshooting . . . . . . . . . . . . . . . . . . . . . . . . . . . . . . . . . . . . 183
Section 13: Health and Safety Information ..................184
Getting the Most Out of Your Reception . . . . . . . . . . . . . . . . . 184
Maintaining Safe Use of and Access to Your Phone . . . . . . . . 185
Caring for the Battery . . . . . . . . . . . . . . . . . . . . . . . . . . . . . . . . 187
Acknowledging Special Precautio
Notice . . . . . . . . . . . . . . . . . . . . . . . . . . . . . . . . . . . . . . . . . . . . 188
Specific Absorption Rates (SAR) for Wireless Phones . . . . . . 188
Owner’s Record . . . . . . . . . . . . . . . . . . . . . . . . . . . . . . . . . . . . 189
4
ns and Industry Canada
Section 14: Warranty Information ................................ 190
Index ................................................................................ 194
Page 9

Section 1: Getting Started
This section explains how to get started with your phone by
installing and charging the battery, installing the SIM card and
optional memory card, and setting up your voice mail.
Before using your phone for the first time, you’ll need to install and
charge the battery and install the SIM card. The SIM card is
loaded with your subscription details, such as your PIN, available
optional services, and many other features. If desired, you can
also install an SD card to store media for use with your phone.
Understanding this User Manual
The sections of this manual generally follow the features of your
phone. A robust index for features begins on page 194.
Also included is important safety information that you should know
before using your phone. This information is available near the
back of the guide, beginning on page 184.
This manual provides navigation instructions according to the
default display settings. If you select other settings, navigation
may be different.
Unless otherwise specified, all instructions in this manual assume
you are starting from the Home screen and using the available
keys.
Note:
Instructions in this manual are based on def aul t settings, and may vary
from your phone, depending on the software version on your phone, and
any changes to the phone’s Settings.
Unless stated otherwise, instructions in this User Manual start with the
phone unlocked, at the Home screen.
All screen images in this manual are simulated. Actual displays may
vary, depending on the software version of your phone and any changes
to the phone’s Settings.
Special Text
Throughout this manual, you’ll find text that is set apart from the
rest. These are intended to point out important information, share
quick methods for activating features, to define terms, and more.
The definitions for these methods are as follows:
•
Notes -
Presents alternative options for the current feature, me nu, or
sub-menu.
•
Tips -
Provides quick or innovative methods, or useful shortcuts.
•
Important -
Points out important information about the current feature
that could affect performance.
•
Warning -
Brings to your attention important information to prevent loss
of data or functionality, or even prevent damage to your phone.
Getting Started 5
Page 10
Text Conventions
Release Latch
This manual provides condensed information about how to use
your phone. To make this possible, the following text conventions
are used to represent often-used steps:
➔ Arrows are used to represent the sequence of selecting
successive options in longer, or repetitive, procedures.
Example:
From the Home screen, press (
and network ➔ Bluetooth settings
Menu
) ➔
.
Settings ➔ Wireless
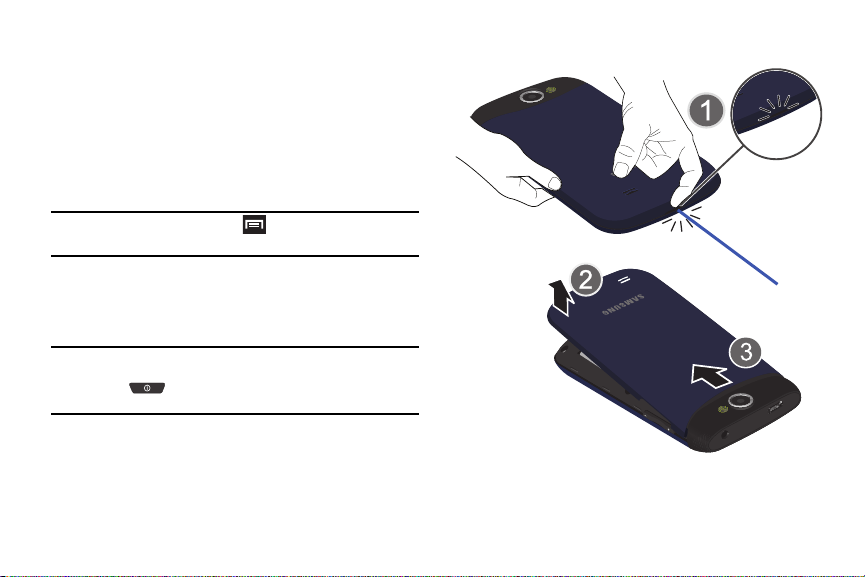
Battery Cover
The battery, SIM card and SD card are installed under the
battery cover.
Important!:
Before removing or replacing the battery cove r, make sure
the phone is switched off. To turn the phone off, hold down
the key until the power-off image displays, then tap
Power off
.
To remove the battery cover:
1. Hold the device firmly and locate the cover release latch.
2. Place your fingernail in the opening (1) and firmly “pop” the
cover off the device (2).
6
3. Carefully remove the cover (3).
Page 11
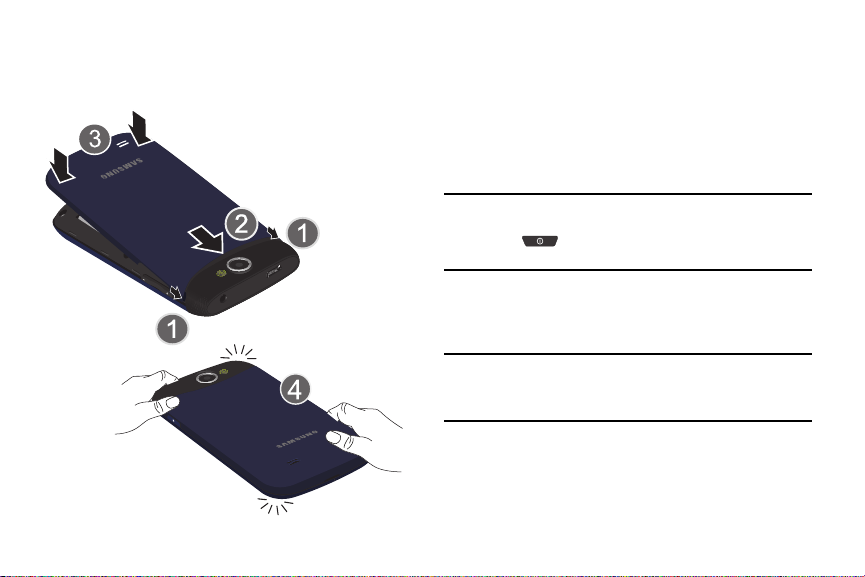
To replace the battery cover:
1. Align the cover tabs into their respective slots along the top
of the battery compartment (1).
2. Carefully slide the cover into the top of the phone (2).
3. Press down on the back of the battery cover until you hear a
click (3).
4. Squeeze along the edges of the cover to guarantee a
secure fit.
SIM Card Overview
Important!:
Before removing or replacing the SIM card, make sure the
phone is switched off. To turn the phone off, hold down
the key until the power-off image displays, then tap
Power off
.
The SIM card is loaded with your subscription details such as your
telephone number, PIN, available optional services, and many
other features.
Important!:
The SIM card and its information can be easily damaged by
scratching or bending, so be careful when handling, inserting, or
removing the card. Keep all SIM cards out of reach of small
children.
Getting Started 7
Page 12
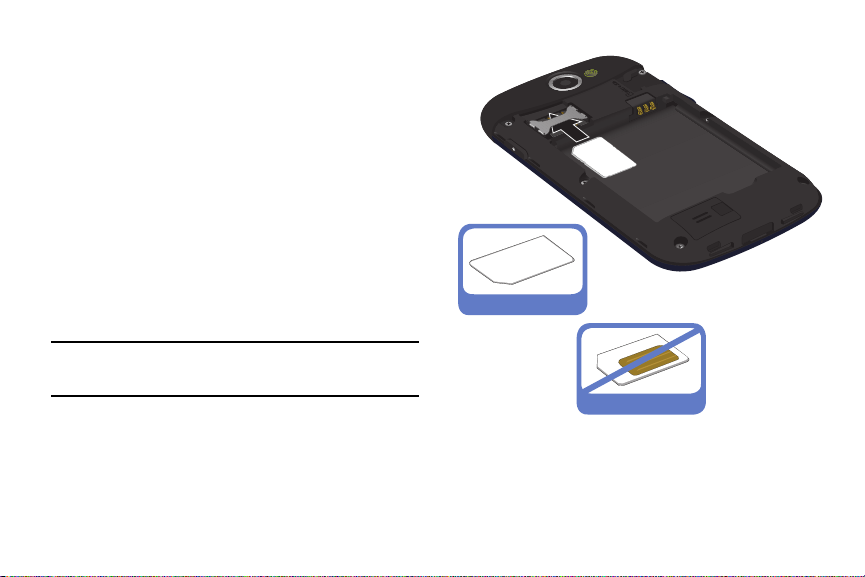
Installing and Removing the SIM card
Correct
Incorrect
To install the SIM card:
1. Carefully slide the SIM card into the SIM card socket until
the card clicks into place.
2. Make sure that the card’s gold contacts face into the phone
and that the upper-left angled corner of the card is
positioned as shown.
To remove the SIM card:
1. Remove the battery cover.
2. Carefully place your fingernail into the end of the SIM slot
and push the card slightly out.
3. Carefully slide the SIM card out of the SIM card socket.
Note:
If the card is not inserted correctly, the phone will not detect it and no
service will be available. If this happens, turn off the phone, remove the
card, and reinstall the card in the correct or i e ntation.
8
Page 13
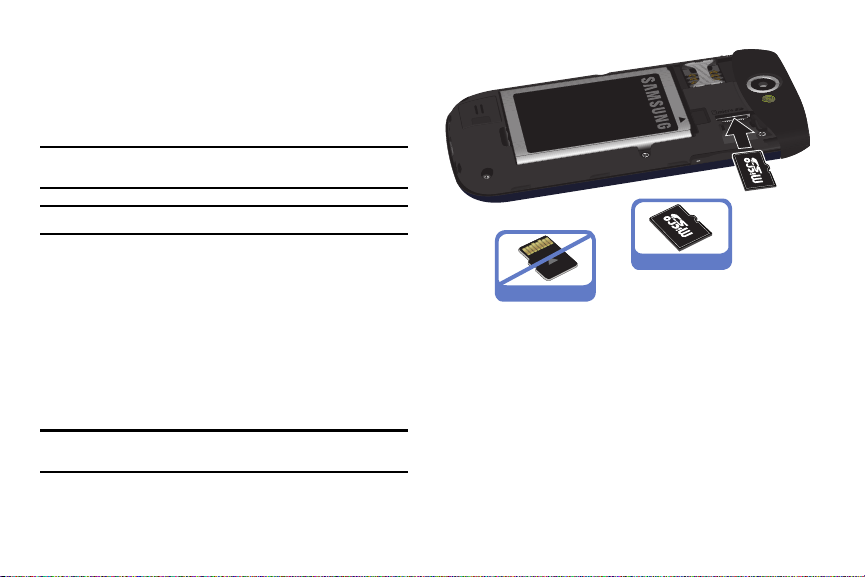
Installing the microSD Memory Card
Your phone supports an optional (external) microSD™ or
microSDHC™ memory card for storage of media such as music,
pictures, video and other files. The SD card is designed for use
with this mobile phone and other devices.
Note:
The microSD memory cards include capacities of up to 2GB.
microSDHC™ memory card types can range from 4GB to up to 32GB.
Note:
This device supports up to a 32GB microSDHC memory card.
1. Remove the battery cover.
2. Locate the microSD card slot on the inside of the phone.
3. Orient the card with the gold strips facing down.
4. Firmly press the card into the slot and make sure that it
catches with the push-click insertion. For more information
on how to use the SD card see “Using the SD Card” on
page 42.
Important!:
Be sure to align the gold contact pins on the card with the phone’s
contacts.
Correct
Incorrect
Removing the microSD Memory Card
1. Remove the battery cover.
2. Firmly press the card into the slot and release it. The card
should pop partially out of the slot.
3. Remove the card from the slot.
4. Replace the battery cover.
Getting Started 9
Page 14

Battery
Installing Battery
Removing Battery
Before using your phone for the first time, install the battery and
charge it fully.
Important!:
Before removing or replacing the battery, make sure the
phone is switched off. To turn the phone off, hold down
the key until the power-off image displays, then tap
Power off
.
Installing the Battery
1. Slide the battery into the compartment (1) so that the tabs
on the end align with the slots at the bottom of the phone,
making sure the connectors align.
2. Gently press down to secure the battery (2).
10
Removing the Battery
䊳
Grip the battery at the top end (3) and lift it up and out of the
battery compartment (4).
Page 15
Charging the Battery
Correct
Incorrect
Your phone is powered by a rechargeable Li-ion battery. A wall
charger, which is used for charging the battery, is included with
your phone. Use only approved batteries and chargers. Ask your
local Samsung dealer for further details.
Before using your phone for the first time, you must fully charge
the battery. A discharged battery recharges fully in approximately
4 hours.
Note:
Verify that the battery is installed prior to connecting the wall charger. If
both the wall charger is connected and the battery is not installed, the
handset will power cycle continuously and preven t proper operation.
Failure to unplug the wall charger before you remove the batt ery, can
cause the phone to become damaged.
Important!:
It is recommended you fully charge the battery before using your
device for the first time.
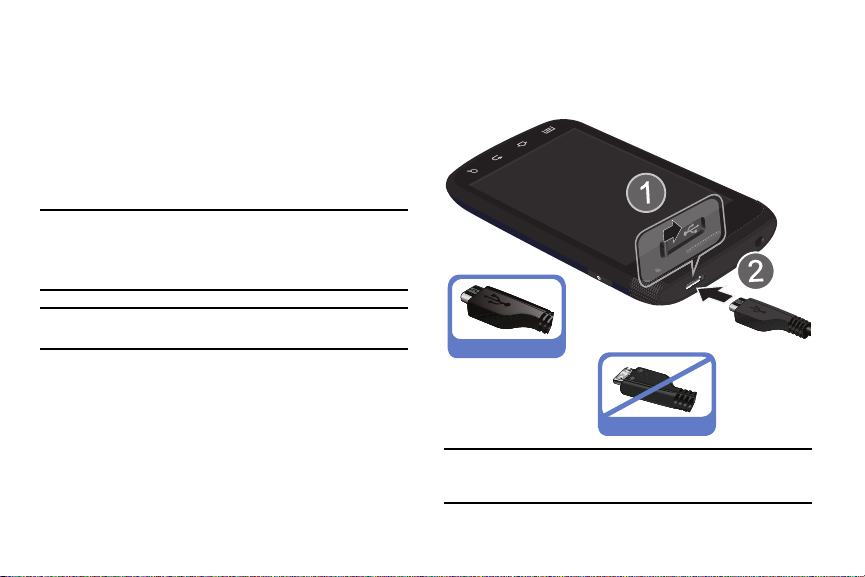
1. Locate the Charger/Accessory jack and slide open the
cover (1).
2. Insert the USB cable into the device’s Charger/Accessory
jack (2).
3. Plug the charging head into a standard AC power outlet.
The device turns on with the screen locked and indicates
both its charge state and percent of charge.
Note:
This illustration displays both the
connecting the charger. If the charger is incorrectly connected , damage
to the accessory port will occur therefore voidi ng the phone’s warranty.
correct
and incorrect orientation for
Getting Started 11
Page 16

When charging is finished, first unplug the charger’s power
4.
plug from the AC wall outlet, then disconnect the charger’s
connector from the phone.
Important!:
If your handset has a touch screen display, please note that a
touch screen responds best to a light touch from the pad of your
finger or a non-metallic stylus. Using excessive force or a metal l ic
object when pressing on the touch screen may damage the
tempered glass surface and void the warranty. For more
information, refer to “Warranty Information” on page 190.
Low Battery Indicator
When the battery level is low and only a few minutes of talk time
remain, a warning tone sounds and the “Low battery” message
repeats at regular intervals on the display. In this condition, your
phone conserves its remaining battery power, by dimming the
backlight.
When the battery level becomes too low, the phone automatically
turns off.
Extending Your Battery Life
Active applications, light levels, Bluetooth usage, and GPS
functionality all act to drain your battery. The following is a list of
helpful tips that can help conserve your battery power:
•
Reduce your backlight on time.
•
Turn Bluetooth off when not in use.
12
•
Turn Wi-Fi off when not in use.
•
Deactivate the GPS when not needed. Most applications using this
function will periodically query the GPS satellites for your current
location; each query drains your battery.
•
Do not wait until your battery is completely depleted before charging
your device. Repeating this process of a complete discharge and
recharge can over time reduce the storage capacity of any battery.
•
Turn off Automatic application sync.
•
Use the Power Savings Widget to deactivate hardware functions such as
Wi-Fi, Bluetooth, GPS, Synchronization, or LCD brightness setti ng.
•
Check the Battery use screen to review what features or functions have
been consuming your battery resources.
•
Check the Running Services and close any unnecessary applications.
•
Use the Task Manager feature to end/shutdown background applications
that are still running. These minimized applications can, over time,
cause your device to “slow down”.
•
Turn off any streaming services after use.
•
Animated wallpapers use processing power, memory, and more power.
Change your Live wallpaper to a non-animated Wallpaper gallery or
Gallery image.
Power Savings
Active applications, Wi-Fi, Bluetooth, GPS, Synchronization,
Location consent, or the LCD Brightness functionality all act to
drain your battery.
Page 17

The Power Savings application was designed to quickly activate
(turn on), or deactivate (turn off) those functions or applications
that use the most battery power.
1. From the Home screen,
touch and hold an empty
area until the
screen
2. Tap
savings
Add to Home
menu displays.
Widgets ➔ Power
. The Power Control
shortcut is added to the
current screen.
3. Tap any of the icons on the
Power Savings shortcut bar
to activate/deactivate the
feature.
Note:
A green bar displayed beneath the icon means the applicat i on is active
(turned on). The green bar is removed from beneat h the icon when the
feature is deactivated (turned off).
Initial Phone Configuration
1. Tap Change language and select
English
or
French
to set
the language that will be used by the phone.
2. Tap the on-screen Android icon to begin the setup process.
3. Set up your Google Account. T ap
Create
(to create a Google
account), Sign In (to sign in to an existing Google account),
or Skip (to skip the Google account set up process).➔
Google location
4. T o sign in to your Google account, enter your username and
.
password and tap Sign In.
5. Select/deselect the desired Google location services and
tap
Next
.
Note:
Enabling Google location services can drain battery power. For more
information, refer to “Power Savings” on page 12.
6. Configure the Backup and restore settings and tap
7. Tap
Finish setup
.
Next
Switching the Phone On or Off
If you have not already configured your phone after an initial
firmware update, you will be prompted with a series of
configuration screens.
Once the phone has been configured, you will not be prompted
with these screens again.
Getting Started 13
Use
.
Page 18
Important!:
Before the initial configuration, you quic kl y a ccess emergency
services by tapping
Emergency call
and using the on-scre e n di al er.
1. Press and hold until the phone switches on.
The phone searches for your network and after finding it,
you can make or receive calls.
Note:
The display language is preset to English at the factory. To change the
language, use the Language menu. For more information, refer to
“Language & Keyboard Settings” on page 177.
2. Press and hold until the Phone options screen
appears.
3. Tap
Power Off
().
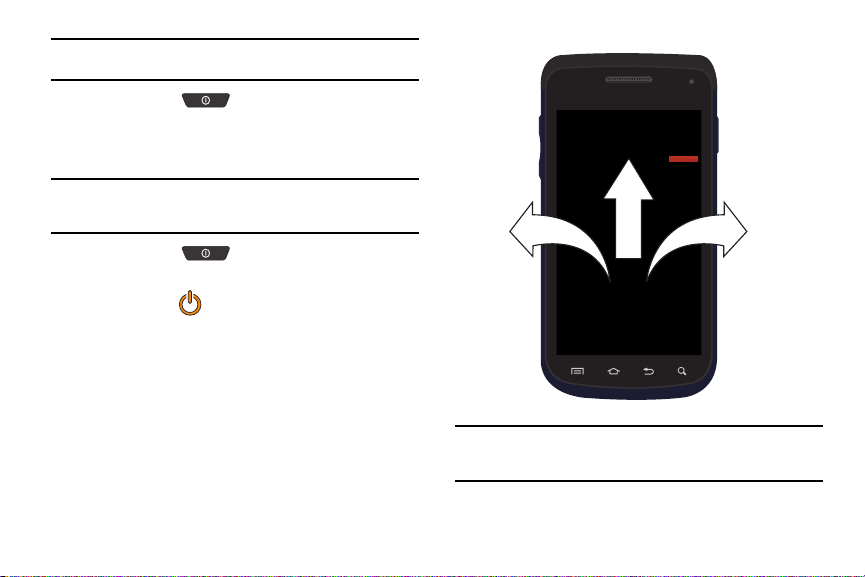
Locking and Unlocking the Phone
By default, the phone screen locks when the backlight turns off.
䊳
Place your finger on the screen and swipe the glass in any
of the directions shown to unlock the phone.
14
Note:
You can choose to configure lock settings to prevent unauthorized use
of your phone. For more information, refer t o “Setting up SIM Card
Lock” on page 170.
Page 19
Creating a New Google Account
You should create a Google™ Account when you first use your
device in order to fully utilize the functionality. This account
provides access to several device features such as Gmail, Google
Maps, Google Search, and the Android Market applications.
Before you are able to access Google applications, you must enter
your account information. These applications sync between your
device and your online Google account.
To create a new Google Account from your phone:
1. From the Home screen, tap (
2. Read the introduction and tap
3. Follow the on-screen instructions to create a Google
Market
).
Next ➔ Create
to begin.
Account.
– or –
If this is not the first time you are starting the phone, tap
➔ (
Gmail
).
Note:
If you already have a Google account, you only need to sign in.
To create a new Google Account from the Web:
1. From a computer, launch a Web browser and navigate to
www.google.com
.
2. On the main page, click
free
.
3. Follow the on-screen prompts to create your free account.
4. Look for an email from Google in the email box you
Sign-in ➔ Create an account for
provided, and respond to the email to confirm and activate
your new account.
Signing into Your Google Account
1. Launch an application that requires a Google account (such
as Android Market or Gmail).
2. Click
3. Tap the
Next ➔ Sign in
Username
and
.
Password
fields and enter your
information.
4. Tap
Sign in
. Your device communicates with the Google
servers to confirm your information.
5. If prompted, create a new Gmail username by entering a
prefix for your
@gmail.com
email address.
Getting Started 15
Page 20

Retrieving your Google Account Password
1
1
A Google account password is required for Google applications. If
you misplace or forget your Google Account password, follow
these instructions to retrieve it:
1. From your computer, use an Internet browser and navigate
to
http://google.com/accounts.
2. Click on the
3. Enter your full Gmail address and click
Can’t access your account?
password recovery procedure.
Voicemail
Setting Up Your Voicemail
Your device automatically transfers all unanswered calls to
voicemail, even if your device is in use or turned off. As soon as
your battery is charged and the SIM card inserted, activate your
voicemail account.
Important!:
Always use a password to protect against unauthorized access.
For new users, follow the instructions below to set up voicemail:
Note:
Voicemail setup may be different depending on your network.
16
link.
Submit
. Follow the
1. From the Home screen, tap and then touch and hold
the key until the phone dials voicemail.
1
You may be prompted to enter a password.
2. Follow the tutorial to create a password, a greeting, and a
display name.
Accessing Your Voicemail
You can access your Voice mail by either pressing and holding
on the keypad. To access Voicemail using the menu:
1. From the Home screen, tap and then touch and hold
until the phone dials voicemail.
2. When connected, follow the voice prompts from the
voicemail center.
Accessing Your Voice Mail From Another Phone
1. Dial your wireless phone number.
2. When you hear your voicemail greeting, press the asterisk
key on the phone you are using.
3. Enter your passcode.
Page 21

Task Manager
Your phone can run applications simultaneously, with some
applications running in the background.
Sometimes your device might seem to slow down over time, and
the biggest reason for this are background applications. These are
applications that were not properly closed or shutdown and are still
active but minimized. The Task Manager not only lets you see
which of these applications are still active in the background but
also easily lets you choose which applications are left running and
which are closed.
Note:
The larger the number of applications running on your phone, the larger
the energy drain on your battery.
Task Manager Overview
䊳
From the Home screen, tap (
Task manager
().
Applications
) ➔
– or –
Press and hold then tap
Task manager
. This screen
contains the following tabs:
• Active applications -
Display those currently active applications
running on your phone.
• Downloaded -
Displays any installed packages or applications
from the Market that are taking up memory space. Tap
to remove them from your phone.
• RAM -
Displays the amount of current RAM (Random Access
Memory) currently being used and allow you to
•Storage -
Displays a visual graph indicating the available and
Clear Memory
used space within the Random Access Memory (RAM), Program,
and External SD card.
•Help -
Provides additional battery saving techniques.
Shutting Down an Currently Active Application
1. From the Home screen, tap ➔
2. From the
Active applications
applications or tap
Exit all
to close all background running
tab, tap
Task manager
Exit
to close selected
applications.
Getting Started 17
Uninstall
.
().
Page 22

Section 2: Understanding Your Phone
This section outlines key features of your phone. It also describes
the phone’s keys, screen and the icons that display when the
phone is in use.
Features of Your Phone
Your phone is lightweight, easy-to-use and offers many significant
features. The following list outlines a few of the features included
in your phone.
•
T ouch screen with virtual (on-screen) QWERTY keyboard
•
High Speed Packet Access Plus (HSPA+) delivering data speeds faster
than the current 3G network technology.
•
Android 2.3, Gingerbread Platform
•
Compatible with Adobe® Flash® technology
•
Wi-Fi ® Capability
•
USB Tethering-capable
•
Bluetooth enabled
•
Full Integration of Google Mobile™ Services (Gmail, YouTube, Google
Maps, and Google Voice Search)
•
Multiple Messaging Options: Text/Picture/Video Messaging, Google T alk,
and SWYPE™
•
Corporate and Personal Email
18
•
3.2 Megapixel Camera and Camcorder with autofocus and multi-shot
•
MP3 Player with multitasking features
•
Games Hub allowing you to play social and premium games
•
Music Hub allowing you access an online music store and play songs
•
Social Hub allowing you to manage all of your social networking in one
place
•
Over 250,000 Apps available to download from the Android Market™
•
Social Networking capabilities
•
Quickoffice for document viewing and editing
•
Assisted GPS (TeleNav GPS Navigator)
•
Webkit-based browser
•
Downloadable applications from Android Market
•
Up to 32GB expandable memory slot
•
Front Facing camera for Video Chat
•
Mobile Hotspot Capability
•
Lookout® Security (Security, Backup, Missing Device capabilities)
•
Bell Remote PVR
•
Radio
Page 23
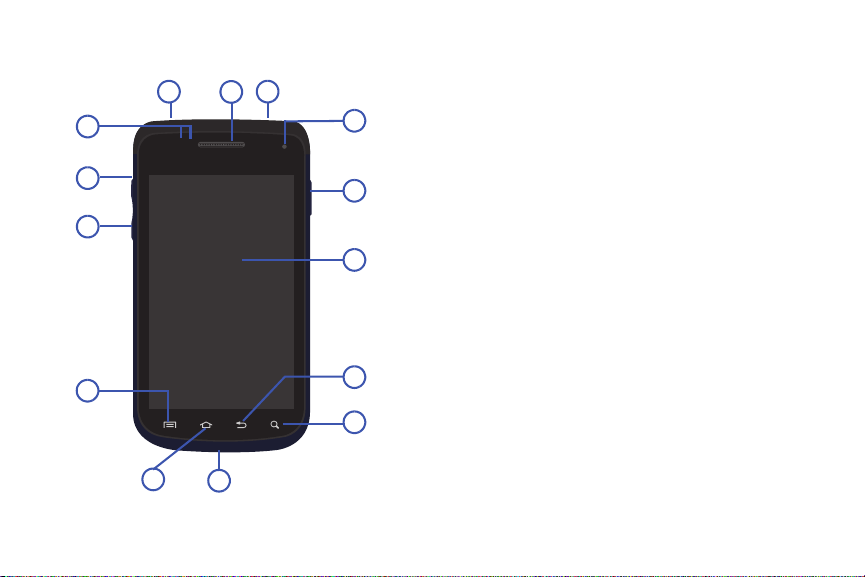
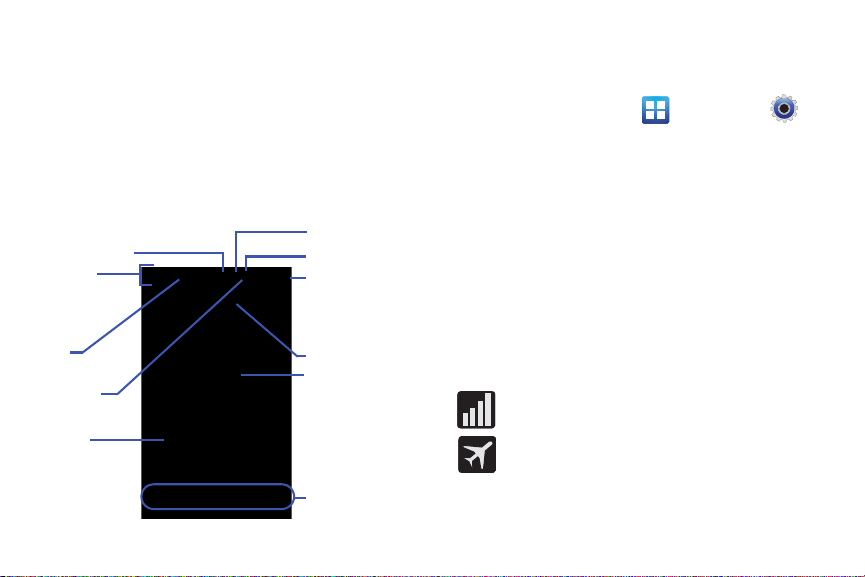
Front View
7
8
9
10
11
12
5
4
1
14
13
6
2
3
The following illustrations show the main elements of your phone:
The following list correlates to the illustrations.
1.
Proximity Sensor -
Detects how close an object is to the
surface of the screen. This is typically used to detect when
your face is pressed up against the screen, such as during a
phone call.
•
While talking on the phone, the sensor detects talk activity and
locks the keypad to prevent accidental key presses.
2.
microSD Card Slot -
(Internal) Allows you use a microSD
card to expand the memory of your phone.
3.
Volume Key -
Allows you to adjust the ringer volume in
standby mode (with the phone open) or adjust the voice
volume during a call.
•
Pressing the volume key down mutes the ring tone.
4.
Menu Key -
When receiving an incoming call:
Displays a list of options available for the current
screen. From the Home screen it displays the Add,
Wall paper, Search, Notifications, Edit, and Settings
options.
5.
Home
Key - Displays the Home screen when pressed.
Touch and hold to display the Task Manager.
Understanding Your Phone 19
Page 24

6.
1 2 3
Microphone -
during phone calls and allows other
Is used
callers to hear you clearly when you are speaking to them. It
is also used to make voice note recordings.
7.
Quick Search -
Is used to search the device for applications,
or contact information or to search the internet for
information.
8.
Back Key -
Redisplays the previous screen or clears entries.
9.
Display -
Shows all of the information needed to operate
your phone, such as the connection status, received signal
strength, phone battery level, and time.
10.
Power/End Key -
Ends a call or switches the phone off and
on. Press and hold for two seconds to turn off Silent mode
or Flight mode, or to turn the phone on or off.
11.
Front Facing Camera -
Allows you to take pictures while
facing the screen and allows you to video conference.
Note:
Video recorded in Portrait mode is reversed during playback.
12.
USB Power/Accessory Connector -
Allows you to connect a
power cable or optional accessories, such as a USB/data
cable.
20
13.
Receiver -
Allows you to hear the other caller and the
different ring tones or sounds offered by your phone.
14.
Headset Jack -
Allows you to connect a hands-free headset
so you can listen to music.
Back View of Your Phone
The following illustration shows the external elements of your
phone:
1.
External Speaker -
Allows you to hear ringers, music, and
other sounds offered by your phone.
2.
Flash -
Is used to take photos in low light conditions.
3.
Camera Lens -
Is used to take photos.
Page 25
Phone Display
Connection Status
Status Bar
Status Area
Notification
Area
Shortcuts
Signal Strength
Battery Status
Time
Google Search
Primary Shortcuts
Home Screen
Your phone’s display provides information about the phone’s
status, and is the interface to the features of your phone. The
display indicates your connection status, signal strength, battery
status and time. Icons display at the top of the phone when an
incoming call or message is received and also alerts you at a
specified time when an alarm was set. The screen also displays
notifications, and Application (or shortcut) bar with four icons:
Phone, Contacts, Messaging, and Applications.
Display settings
In this menu, you can change various settings for the for the
wallpaper, cube, brightness or backlight.
䊳
From the Home screen, tap (
(
Settings
) ➔
Display
. For more information, refer to
Applications
) ➔
“Display Settings” on page 165.
Status Bar
The Status Bar shows information about the connection status,
signal strength, phone battery level, and time, and displays
notifications about incoming messages, calls and other actions.
This list identifies the icons you see on your phone’s display
screen:
Indicator Icons
This list identifies the symbols you’ll see on your phone’s display
and Indicator area:
Displays your current signal strength. The greater the
number of bars, the stronger the signal.
Indicates that the Flight mode is active. Y ou cannot send
or receive any calls or access online information.
Understanding Your Phone 21
Page 26
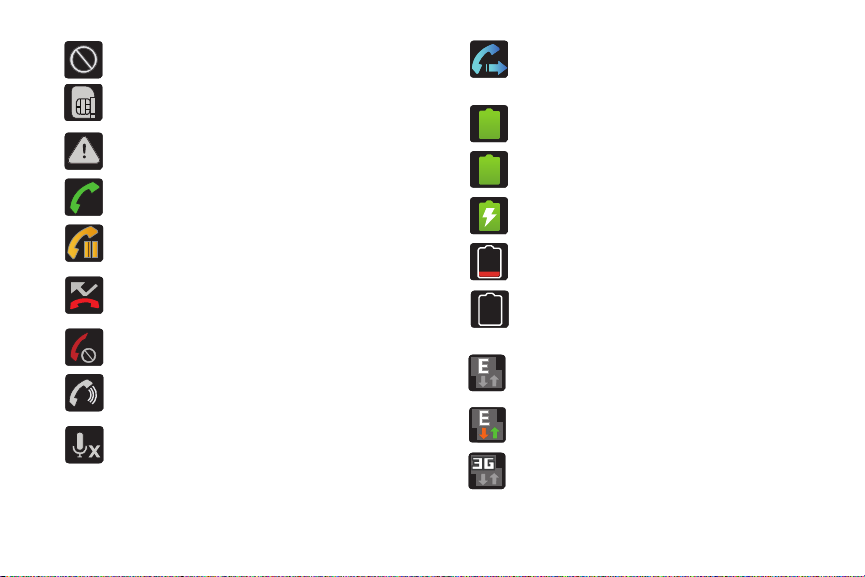
A
100%
Indicates there is no signal available.
Displays when there is no SIM card in the phone.
Displays when there is a system error or alert.
Displays when a call is in progress.
Displays when a call is on hold.
Displays when you have missed an incoming call.
Displays when the Auto reject mode feature is enabled
and set to All numbers.
Displays when the speakerphone is on.
Displays when the microphone is muted.
22
Displays when Call forwarding is set to Always
forward. For more information, refer to “Configuring
Additional Voice Call Settings” on page 163.
Displays your current battery charge level. Icon
shown is fully charged.
Displays your current battery is 100 percent charged.
This icon is followed by an audible beep.
Displays your battery is currently charging.
Displays your current battery charge level is
very low.
Shows your current battery only has three percent
power remaining and will immediately shutdown.
Represented as a blinking icon.
Displays when connected to the EDGE network.
Displays when your phone is communicating with
the EDGE network.
Displays when connected to the 3G network.
Page 27

Displays when your phone is communicating with
the 3G network.
Displays when connected to the HSPA+ network.
Displays when your phone is communicating with the
HSPA+ network.
Displays when the phone is connected to a computer
using a supported USB cable connection.
Displays when there is a new text message.
Displays when an outgoing text message has failed to
be delivered.
Displays when there is a new voicemail message.
Displays in the notifications window when there is
a new Email message.
Displays in the notifications window when there is
a new Gmail message.
Displays when the time and date for a Calendar Event has
arrived. For more information, refer to “Calendar” on
page 152.
Displays when an alarm is set. For more information, refer
to “Setting an Alarm” on page 153.
Displays when the phone is in Silent mode.
All sounds except media and alarms are silenced, and
Vibrate mode is set to
mode
. For more information, refer to “Silent mode” on
Never
or
Only when not in silent
page 164.
Displays when the Sound profile is set to Silent mode
and Vibrate is set to Always or Only in silent mode.
Displays when data synchronization and application
sync is active and synchronization is in progress
for Gmail, Calendar, and Contacts.
Displays when Bluetooth technology is active and
enabled.
Displays when the Bluetooth technology is active
and communicating with an external device.
Displays when the an outbound file transfer is in
progress.
Displays when Wi-Fi is connected, active, and
communicating with a Wireless Access Point (WAP).
Understanding Your Phone 23
Page 28
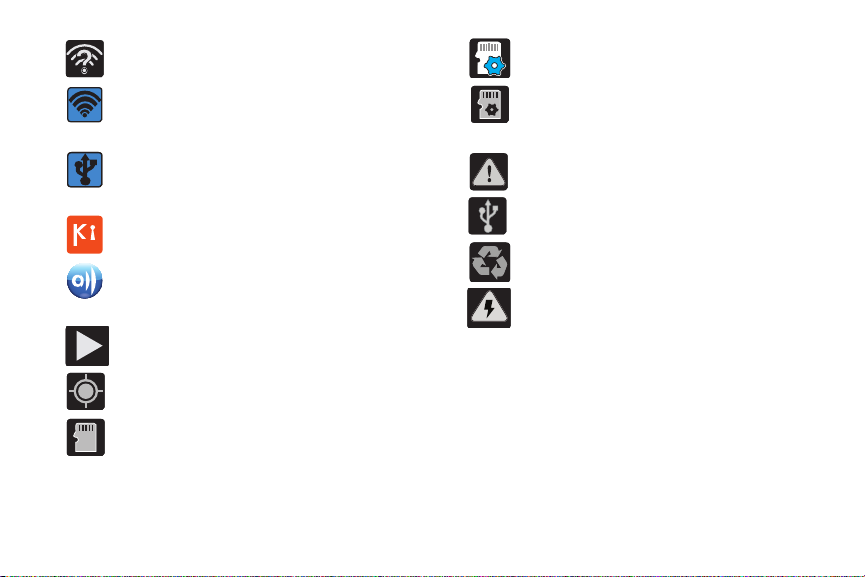
Displays when Wi-Fi is active and there is an available
open wireless network.
Displays when the Portable Wi-Fi Hotspot feature is
active and communicating. For more information, refer
to “Portable Wi-Fi Hot spot” on page 149.
Displays when the USB T ethering feature is active and
communicating. For more information, refer to
“Tethering” on page 158.
Displays when your phone is connected to a PC using
Kies air.
Displays when the contents of the microSD card are
being scanned.
Displays when the External SD card is being prepared
for mounting to the device. This is required for
communication with the External SD card.
Displays when the phone’s microSD card has been
improperly removed.
Displays when the phone has detected an active USB
connection and is in a USB Debugging mode.
Displays when Power saving mode is enabled.
Displays when your phone is connected to a Digital
Living Network Alliance (DLNA) certified device using
the AllShare application.
Displays in the notifications window when a song is
Displays when the Power saving alert notification has
been activated. You are then prompted to view your
current battery level.
currently playing.
Displays when your phone’s GPS is on and
communicating.
Displays when the external SD card (internal
microSD) has been disconnected (unmounted) from the
phone and is now ready for either removal or formatting.
For more details on configuring your phone’s settings, see
“Changing Your Settings” on page 156.
Notification Bar
The Notification area indicates new message events (data sync
status, new messages, calendar events, call status, etc). You can
expand this area to provide more detailed information about the
current on-screen notification icons.
24
Page 29
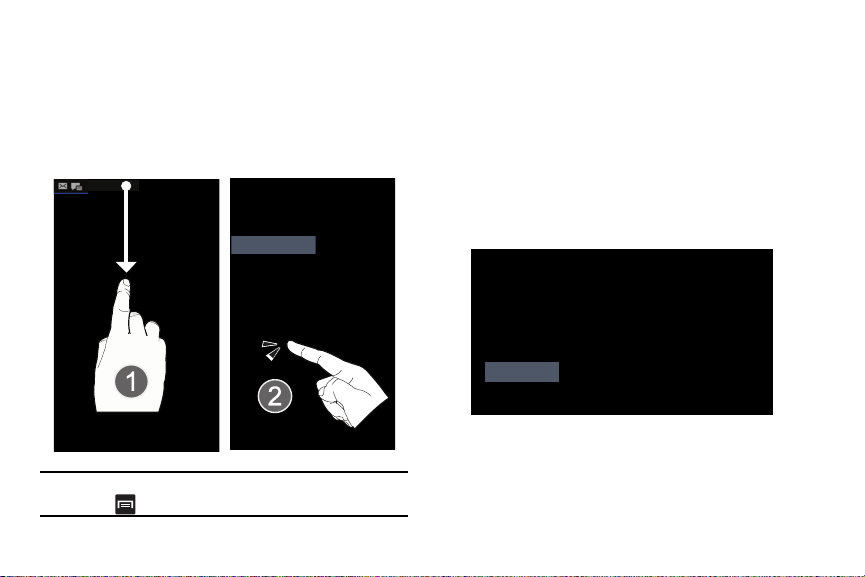
Tap the Status bar to reveal the Notifications tab, and then
Bell
1.
drag the tab to the bottom of the screen to open the
Notifications panel (1).
2. Tap a notification entry to open the associated
application (2).
Note:
The Notifications panel can also be opened on the Home screen by
pressing and then tapping
Notifications
Clearing Notifications
1. Tap the status bar to reveal the Notifications tab, and then
drag the tab to the bottom of the screen to open the
Notifications panel
2. Tap
Clear
. The notifications are cleared from the panel.
Accessing Additional Panel Functions
In addition to notifications, this panel also provides quick and
ready access to five device functions. These can be quickly
activated or deactivated.
The following functions can either be activated (green) or
deactivated (white):
Auto rotation
.
Wi-Fi, BT
(Bluetooth),
GPS, Sound/Vibrate
, or
.
Understanding Your Phone 25
Page 30

Note:
Vibration mode is available after pressing the Volume key down.
Silent mode (no vibration) is only available if the
(
Settings
>
mode
.
Sound settings
>
Vibration
) is set to
Vibrat ion
setting
Only when not in Silent
Function Keys
Your phone comes equipped with four main function keys th at can
be used on any screen:
Home, Menu, Back
and
Search
.
Home Key
The
Home
key ( ) takes you back to your Home screen
(#4 of the 7 available screens).
䊳
Press and hold to launch the Recent apps/Task manager
screen. For more information, refer to “Accessing
Recently-Used Applications” on page 34.
Menu Key
The
Menu
key ( ) activates an available menu function for the
current screen or application. When on the Home screen, the
following menu options are available:
•
Add ( ) -
Widgets, Shortcuts, Folders
26
Adds one of the following functions to a selected screen:
, or
Wallpapers
.
•
Wallpaper ( ) -
wallpaper image by choosing from either
Wallpaper gallery
–
You can obtain images from either your Pictures folder, from any of the
available images within the device’s Wallpaper gallery, or from the
animated Live wallpapers.
•
Search ( ) -
Lets you to customize the current screen’s
Gallery, Live wallpapers
.
Displays the Google Search box that you can use to
search for a key term on the phone and online.
•
Notifications ( ) -
Allows you to expand popup notifications area to
provide more detailed information about the current on-screen
notification icons.
•
Edit ( ) -
Allows you to add or remove extended screens from your
device. You can have up to six extended screens (one Home screen
and six Extended screens).
•
Settings ( ) -
–
The Settings menu can also be accessed by pressing and then
tapping
Provides quick access to the device’s settings menu.
➔
Settings
.
Back Key
The
Back
key ( ) returns you to the previously active screen. If
the on-screen keyboard is currently open, this key closes the
keyboard.
or
Page 31

Search Key
Search
Field
Search
Options
Go To
Settings
Search Results
The
Search
key ( ) displays the Google Search box that can
be used to search for either a key term both on the phone and
online. In some instances, this key opens a search box specific
only to the current application.
1. Press to launch the Google Search box.
– or –
Press and tap ➔ .
2. From the on-screen keyboard, tap (top of screen) to
launch the Google
Voice Search
function.
Using Google Search
Use the Google Search box to manually search for a term on both
your device and on the Web.
1. Press to launch the Google Search box.
2. Tap to select a search area:
• All -
Searches your device, the Web, and the Android Market for
your search term.
•Web -
Searches for your term only on the Web using the Google
search engine.
• Apps -
Searches for your term only within the Android Market.
• Contacts -
Searches for your term only within your current
Contacts entries.
• Settings -
Configures the items that are searched against.
Example: Web, Apps, Memo, etc.
3. Enter a search term and tap a match from the list of
suggestions, phone search results, or previously chosen
search matches. Once touched, the item opens in the
appropriate application.
– or –
From the on-screen keyboard, tapping
Voice Search
( )
lets you speak into your device's microphone to enter a
search term.
Understanding Your Phone 27
Page 32

Using Additional Voice Search Functions
Connection Status
Status Bar
Notification
Area
Status Area
Shortcuts
Signal Strength
Battery Status
Time
Google Search
Home Screen
Primary Shortcuts
For more information, refer to:
http://www.google.com/mobile/voice-actions/
.
From an open Voice Search dialog, speak the following words to
access additional features:
•
Voice Actions -
(Such as: [your query].) Allows you to search the web
by speaking the search parameters.
•
Listen To [artist/song/album] -
Allows you to begin listening to the
selected song on the radio.
•
Send Text To [recipient] [message] -
Allows you to open the
Messaging screen.
•
Navigate To [address/city/business name] -
directions via Google maps™. Use either an Address name, Business
name, business type, or other navigation information to get the required
directions.
•
Call [name] -
•
Send Email To [recipient] [subject] -
account and compose a new email message.
•
Map of [location] -
maps. Use either an Address name, Business name, zip code, or other
navigation information.
•
Go To [website] -
device.
28
Allows you to open the phone and dial automatically.
Allows you to view a map of an area using Google
Allows you to navigate to any component of your
Allows you to open your email
Allows you to receive
•
Note to Self [message] -
Allows you to search for a note save to your
Memo Pad.
•
Directions to [location] -
Using your current location, allows you to
receive directions to a selected destination.
Home Screen
The Home screen is the starting point for using the applications on
your phone. There are initially five available panels, each
populated with default shortcuts or applications. You can
customize each of these panels.
Page 33

Notification Area -
•
Displays icons associated with end-user notifications
such as: email messages, calls (missed, call in progress), new
voicemail, upcoming event, USB connection, emails, and Text/MMS
messages.
–
These notifications appear at the top-left of the screen (within the Status
Bar area) and display important user information.
–
This information can be accessed by either swiping down from the Status
bar (page 24) or by accessing the Notifications panel [ >
Notifications
•
Status Area -
( )].
Displays icons associated with the status of the device
such as communication, coverage, Bluetooth, 4G/3G, Wi-Fi
communication, battery levels, GPS, etc.
•
Home Screen -
Is a customizable screen that provides information
about notifications and device status, and allows access to application
Widgets.
•
Extended Home Screens -
Extend beyond the current visible screen
width to provide more space for adding icons, widgets, and other
customization features.
–
There are six available extended screens (panels) each of which may be
populated with its own shortcuts or widgets. These screens share the
use of the three Primary Shortcuts.
–
The current screen is indicated at the bottom by a larger circle. Up to
seven (7) total screens are available.
Note:
Both the status bar and primary shortcuts are visible across all screens.
•
Google Search -
Is an on-screen Internet search engine powered by
Google™. Touch to access the Voice Search feature where you can
verbally enter a search term and initiate an online search.
–
Tap
Voice Search
within this Google widget.
•
Widgets -
( ) to launch the Voice Search function from
Are self-contained on-screen applications (not shortcut s).
These can be placed onto any of the available screens (Home or
extended).
•
Shortcuts -
Are icons that launch available device applications, such as
Camera, YouTube, Voice Recorder, Contacts, Phone, Email, Market
etc. These function the same as shortcuts on your computer.
–
Although some may already be found on the Extended Home screens,
the majority can also be found within the Applications screens.
–
The Application screens can be accessed by tapping
Applications
(
–
Shortcuts can be removed from a screen and added again any number
of times.
•
Primary Shortcuts -
) in the Primary shortcuts area.
Are four shortcuts that are present throughout all of
the available screens and can be used to both navigate within the
device or launch any of the following functions:
–
Phone ( ) Logs, Contacts, Favourites
–
Contacts ( ) Logs, Contacts, Favourites
Launches the phone-related screen functions (
, and
Groups
Launches the Contacts-related screens (
, and
).
Groups
).
Understanding Your Phone 29
Keypad
Keypad
,
,
,
Page 34

–
Widget
Counter displays
the currently
active screen.
Messaging ( ) -
Launches the Messaging menu (create new
messages or open an existing message string).
–
Applications/Home -
Toggles functionality between the Home and
Application screens.
•
Tap (
Applications
) to access the Application screens
loaded with every available local application.
•
While in the Applications screens, tap (
return to the Home screen.
As you transition from screen to screen, the screen counter
(located at the bottom) displays the current panel number in a
circle.
30
Home
) to easily
Page 35

Screen Navigation
Bell
Press and Hold Tap Touch and Hold
Using the touch screen display and the keys, you can navigate the
features of your phone and enter characters. The following
conventions are used in this manual to describe the navigation
action in the procedures.
Navigating Through the Screens
The following terms describe the most common hardware and onscreen actions.
•
Press and Hold -
Pressing relates to use of the hardware keys and
buttons to select or activate an item. For example: press the Navigation
key to scroll through a menu. Some buttons and keys require you to
press and hold them to activate a feature, for example, you press the
Lock key to lock and unlock the phone.
•
Tap -
Use a brief touch to select items on the display or to enter text on
the virtual QWERTY keyboard. For example: touch an Application icon
to open the application. A light touch works best.
•
Touch and Hold -
T ouch and hold an icon or key to open the available
options, or to access a pop-up menu. For example: press and hold from
the Home screen to access a menu of customization options.
•
Flick -
Move your finger in lighter, quicker strokes than swiping. This
finger gesture is always used in a vertical motion, such as when flicking
through contacts or a message list.
•
Swipe or Slide -
Quickly drag your finger vertically or horizontally across
the screen. This allows you to move the area of focus or to scroll
through a list. For example: slide your finger left or right on the Home
screen to scroll among the seven panels.
•
Drag -
Press and hold your finger with some pressure before you start to
move it. Do not release your finger until you have reached the target
position.
Understanding Your Phone 31
Page 36

Flick Swipe or
Slide and Drag
Rotate
Pinch (Zoom Out)
Spread (Zoom In)
•
Pinch -
“Pinch” the screen using your thumb and forefinger to zoom out
when viewing a picture or a Web page. (Move fingers inward to zoom
out.)
•
Spread -
“Spread” the screen using your thumb and forefinger to zoom
in when viewing a picture or a Web page. (Move fingers outward to
zoom in.)
•
Rotate -
Automatically change the screen orientation from portrait to
landscape by turning the device sideways. For example: rotate to
landscape orientation when entering text, to provide a larger keyboard,
or when viewing web content to minimize scrolling.
32
Note:
These screens can be re-arranged in any desired order. For more
information, refer to “Customizing the Screens” on page 37.
Page 37

Motion Navigation and Activation -
Sub-Menu Items
The phone comes equipped with
the ability to assign specific functions to certain phone actions that
are detected by the accelerometer.
Note:
Motion must be enabled for this feature to be active. For more
information, refer to “Motion Settings” on page 175.
Menu Navigation
You can tailor the phone’s range of functions to fit your needs
using both menus and applications. Menus, sub-menus, and
features are accessed by scrolling through the available on-screen
menus. Your phone defaults with seven home screens.
Navigating Through the Application Menus
There are four default Application Menus available. As you add
more applications from the Android Marketplace, more screens
are created to house these new apps.
1. Press and then tap (
Applications
). The first
Application Menu displays.
•
To close the A pplications screen, tap or press
2. Sweep the screen to access the other menus.
3. Tap any of the on-screen icons to launch the associated
application.
Using Sub-Menus
Sub-menus are available from within most screen and
applications.
1. Press . A sub-menu displays at the bottom of the
phone screen.
2. Tap an option.
Understanding Your Phone 33
Page 38

Using Context Menus
Context
Menu
Context menus (also called pop-up menus) contain options that
apply to a specific item on the screen. They function similarly to
menu options that appear when you right-click with your mouse on
your desktop computer.
䊳
T ouch and hold an item on-screen to open its context menu.
Accessing Recently-Used Applications
1. Press and hold to open the recently-used applications
window.
34
Note:
This recent applications screen also provid es access to the
manager
.
2. A pop-up displays the six most recently used applications.
3. Tap an icon to open the recent application.
Task
Applications
The Application menu provides quick access to the most
frequently used applications. Applications display on each of the
three panels on the Applications screens.
The following table contains a description of each application
available via both the Primary shortcuts area and via the
Applications screens. If the application is already described in
another section of this user manual, then a cross reference to that
particular section is provided. For information on navigating
through the Applications icons, see “Navigating Through the
Application Menus” on page 33.
•
AllShare -
Allows you to share your on-device media content
with other external devices using DLNA (Digital Living Network Alliance)
and built-in AllShare™ technology. Samsung’s AllShare makes staying
connected easy. For more information, refer to
“AllShare”
on
page 114.
•
Calculator -
Launches the on-screen calculator application. The
calculator provides the basic arithmetic functions; addition, subtraction,
Page 39

multiplication, and division. You can also use this as a scientific
calculator. For more information, refer to
•
Calendar -
Launches a calendar application that syncs to your
“Calculator”
on page 115.
Facebook™, Google™, or Microsoft Exchange work calendars. For
more information, refer to
•
Camera -
Launches the built-in 3.2 megapixel camera application from
“Calendar”
on page 152.
where you can take a picture with either the front or rear facing
cameras.
Note:
An SD card must be inserted before the camera will take and store
photos.
–
In addition to taking photos, the built-in camera also doubles as a
camcorder that also allows you to record, view, and send high
definition videos. For more information, refer to
Camera”
on page 100. For more information, refer to
the Camcorder”
•
Clock -
Allows you to set an alarm, configure and view the
on page 105.
“Using the
“Using
World clock, use a stopwatch, or set a timer. The applications display in
a tabular format and quickly accessed with the touch of a finger. For
more information, refer to
•
Downloads -
Provides quick access to tabs containing a list of your
“Clock”
on page 117.
current downloaded files (Internet and Other). For more information,
refer to
“Downloads”
on page 117.
•
Email -
Provides access to both your Outlook (Exchange Server-based)
work email and Internet email accounts (such as Gmail and Yahoo!
Mail). For more informa ti o n, re fe r to
•
Gallery -
Displays a Gallery of camera images and video stored in the
microSD card. For more inf ormatio n, refe r to
•
Game Hub -
information, refer to
•
Gmail -
Allows you to play social and premium games. For more
“Game Hub”
Provides access to your Gmail account. Google Mail (Gmail) is a
“Email”
“Gallery”
on page 118.
on page 90.
on page 109.
web-based email service. Gmail is configured when you first set up your
phone. For more information, refer to
“Using Google Mail”
page 97.
•
Google Search -
powered by Google™. For more information, refer to
Search”
•
GPS Navigator -
Provides an on-screen Internet search engine
“Using Google
on page 27.
Allows you to use the GPS navigation system to find
and show your destination with voice guidance. For more information,
refer to
“GPS Navigator”
•
Internet -
Open the browser to start surfing the web. The browser is fully
on page 118.
optimized and comes with advanced functionality to enhance the
Internet browsing feature on your phone. For more information, refer to
“Internet”
•
Kies air -
on page 136.
Allows you to sync your Windows PC wirelessly with
your phone (as long as both are on the same Wi-Fi network). You can
now have real-time access of your phone through your PC to view call
logs, videos, photos, bookmarks, Ms, and even send SMS messages
Understanding Your Phone 35
on
Page 40

directly from your home computer. For more information, refer to
“Kies Air”
•
Latitude -
on page 146.
Lets you see your friends’ locations and share yours
with them. The application also lets you see your friends’ locations on a
map or in a list. It also lets you send instant messages and emails, make
phone calls, and get directions to your friends’ locations. For more
information, refer to
•
Maps -
Launches a Web-based dynamic map that helps you find local
“Latitude”
on page 119.
businesses, locate friends, view maps and get driving directions. For
more information, refer to
•
Market -
Allows you to find and download free and for-purchase
“Maps”
on page 120.
applications on Android Market. For more information, refer to
“Downloading a New Google Application”
•
Memo -
Creates new text memos. For more information, refer to
“Memo”
on page 125.
•
Mini Diary -
Allows you to create a mini diary where you can add a
on page 123.
photo, and text to describe an event or other memorable life event. For
more information, refer to
•
Music -
Launches the built-in Music Player that allows you to play music
“Mini Diary”
on page 125.
files that you have stored on your microSD card. You can also create
playlists. For more information, refer to
•
Music Hub -
Allows you to access the online music store and search for
and but your favourite songs. For more information, refer to
Hub”
on page 127.
36
“Music”
on page 110.
“Music
•
My Files -
Allows you to quickly and easily access all of your images,
videos, music, sound clips, and other types of files stored in your phone
and on a memory card. For more information, refer to
“My Files”
page 127.
•
Navigation -
information, refer to
Caution!:
•
News & Weather -
based on your current location. For more information, refer to
& We ather”
•
Places -
Launches a Web-based navigation application. For more
“Navigation”
Traffic data is not real-time and directions may be wrong, dangerous,
prohibited, or involve ferries.
on page 127.
Launches a Web-based news and weather feed
“News
on page 129.
Displays company logos on a layer of Google Maps.
When viewing an area you can quickly locate a business or person, find
out more information about the business, see coupons, public
responses, and more. For more information, refer to
“Places”
page 129.
•
QuickOffice -
documents. For more information, refer to
Allows you to create and modify Microsoft Office
“QuickOffice”
on
page 130.
•
Remote PVR -
Allows you to schedule and manage recordings on your
HD PVR Plus TV system using your phone. For more information, refer
to
“Remote PVR”
on page 131.
on
on
Page 41

Samsung Apps -
•
your phone. For more information, refer to
Allows you to easily download applications directly to
“Samsung Apps”
page 131.
•
Self Serve -
Allows you to get your account balance, top up your
balance, and add features to your service plan. For more information,
refer to
“Self Serve”
•
Settings -
Accesses the device’s built-in Settings menu. For more
information, refer to
•
Social Hub -
on page 131.
“Changing Your Settings”
on page 156.
Allows you to easily and intuitively satisfy all of your
communication needs from within a single-user interface. E-mails,
instant messaging, social network contents, and calendar contents from
all major service providers are available. For more information, refer to
“Social Hub”
•
Tal k -
on page 132.
Launches a Web-based Google Talk application that
lets you chat with family and friends over the Internet for free. For more
information, refer to
•
Task -
Allows you to keep track of both your current and upcoming
“Google Talk”
on page 99.
tasks. You can also sync these tasks with different accounts. For more
information, refer to
•
Task manager -
“Task”
on page 132.
Use Task Manager to see which applications are
running on your phone, and to end running applications to extend
battery life. For more information, refer to
“Task Manager”
on
page 133.
on
•
Tunes & Apps -
Allows you to download music and applications to your
phone from the Tools & Apps website. For more information, refer to
“Tunes & Apps”
•
TV & Radio -
phone. For more information, refer to
•
Videos -
Launches your device’s built-in video application
on page 134.
Allows you to watch tv and listen to the radio using your
“TV & Radio”
on page 134.
that plays video files stored on your microSD card. For more
information, refer to
•
Voice Recorder -
“Using the Video Player”
on page 109.
Allows you to record an audio file up to one minute
long and then immediately send it as a message. For more information,
refer to
“Voice Recorder”
•
Voice Search -
Launches your phone’s built-in voice recognition
on page 134.
software and initiates a Google search based on the recognized text.
For more information, refer to
•
YouTube -
Launches the YouTube webpage via the browser.
For more information, refer to
“Voice Search”
“YouTube”
on page 113.
on page 134.
Customizing the Screens
You can customize the Home screens (panels) to display the
Widgets, Shortcuts, Folders, or Wallpapers. For example, one
screen could contain the YouTube shortcut and other forms of
media, while another screen might contain communication apps
such as Gmail.
You can customize your Home screen by doing the following:
•
Adding, Deleting, and Rearranging screens
Understanding Your Phone 37
Page 42

Adding and Removing Shortcuts
•
•
Adding and Removing Widgets
•
Creating Folders
•
Changing the Background (Wallpapers)
Adding and Deleting Screens
Your phone comes with seven screens. You can delete these
screens and then add them back later.
Note:
These screens can be deleted and re-arranged.
Important!:
Your phone can only contain at most seven screens and at least
one screen.
To delete a screen:
1. Press ➔ and then tap
2. T ouch and hold, then drag the undesired screen down to the
Remove
tab ( ).
3. Press to return to the main Home screen.
(Edit
).
To add a screen:
1. Press ➔ and then tap
2. T ap the
Add
icon ( ). The newly added screen appears
(Edit
).
as the last page.
38
3. Press to return to the main Home screen.
Rearranging the Screens
1. Press ➔ and then tap
2. Touch and hold a screen and then drag it into its new
(Edit
).
location. Upper-left is screen position #1 and bottom-right is
screen last screen.
Adding and Removing Primary Shortcuts
The device comes with four Primary shortcuts: Phone, Contacts,
Messaging, and Applications/Home. As long as the menu is
displayed in a
Customizable grid
, you can replace the Phone,
Contacts, and Messaging shortcuts with other applications so you
access the shortcuts that are most frequently used.
1. Press and then tap
2. Press and then tap
3. Press and then tap
(Applications
).
View type ➔ Customizable grid
Edit ➔ OK
. The application pages
then appear at the top of the screen, the primary shortcuts
appear at the bottom, and you have the option to also
generate a new folder or page to house these application
shortcuts.
.
Page 43

Scroll through the application pages at the top and locate
4.
the desired application.
5. Touch and hold the on-screen icon, then drag it over one of
the four primary shortcuts to replace it.
•
The new primary shortcut displays at the bottom of the screen.
The previous primary shortcuts switches places with your
selected icon.
6. Press and then tap
7. Tap to return to the Home screen.
Save
.
Managing Shortcuts
Note:
To move a shortcut from one screen to another, you must carefully touch
and hold the shortcut and slowly drag it to the edge of the screen. As the
shortcut turns light blue, you can begin to move it to the adjacent screen.
If this does not work, delete it from its current screen. Activate the new
screen and then add the selected shortcut.
To add a shortcut from the Applications screen:
1. Press to go to the Home screen.
2. Select a location (screen) for your new shortcut by scrolling
across your available screens until you reach the desired
one.
3. Tap
Applications
( ) to reveal all your current available
applications. By default, applications are displayed as an
Alphabetical grid.
4. Scroll across the screens and locate your desired
application.
5. Touch and hold the on-screen icon. The new shortcut then
appears to hover over the current screen.
6. While still holding the on-screen icon, position it on the
current screen. Once complete, release the screen to lock
the shortcut into its new position.
To add a shortcut via the Add to Home screen:
1. Press to go to the Home screen.
2. Navigate to a screen with an empty area.
3. Touch and hold an empty area of the screen.
4. From the
5. Scroll up or down the list and tap a selection.
Add to Home screen
window, tap
Understanding Your Phone 39
Shortcuts
.
Page 44

To delete a shortcut:
1. Press to go to the Home screen.
2. T ouch and hold the desired shortcut. This unlocks it from its
location on the current screen.
3. Drag the shortcut over the
Remove
tab ( ) and release.
Adding and Removing Widgets
Widgets are self-contained applications that can be placed on any
screen. Unlike shortcuts, widgets appear as applications.
To add a Widget:
1. Press to go to the Home screen.
2. Navigate to a screen with an empty area.
3. Touch and hold an empty area of the screen.
4. From the
Add to Home screen
window, tap
Widgets
. The
available widgets appear within a scrollable area across the
bottom of the screen.
5. Scroll left or right across the bottom of the screen and then
tap an available Widget to place it on your current screen.
40
To remove a Widget:
1. Touch and hold a Widget until it unlocks from the current
screen.
2. Drag the widget over the
•
As you place the Widget into the Trash, both items turn red.
•
This action does not delete the Widget, it just removes it from the
Remove
tab ( ) and release it.
current screen.
To place a widget onto a different screen:
1. Touch and hold the widget until it becomes transparent.
2. Slowly drag it past the edge of the screen until the adjacent
page appears highlighted and it then snaps onto the new
page.
3. Drag the widget to its desired position on the new screen.
4. Repeat these steps to continue moving it to other screens.
Creating and Managing a Folder
Folders hold items that you want to organize and store together on
the workspace.
To create a new on-screen folder:
1. Press to go to the Home screen.
2. Touch and hold an empty area of the screen.
Page 45

From the
3.
4. Tap an available folder type and place it on the current
Add to Home screen
window, tap
Folders
.
screen.
Renaming a folder
1. Tap the desired folder you want to rename. This opens its
contents on an on-screen popup window.
2. With the folder open, touch and hold the grey Folder title bar
(top of the Folder window) until the
Rename folder
pop-up
displays.
3. Enter a new title for this folder and tap
Yes
.
Deleting a folder
1. Touch and hold a desired folder. This unlocks it from its
location on the current screen.
2. Drag the folder over the
Remove
tab ( ) and release it.
Managing Wallpapers
Wallpapers consist of either Gallery images (user taken), Live
wallpapers (animated backgrounds), or Wallpaper gallery (default
phone wallpapers).
Note:
Selecting animated Liv e w allpapers will require additional ba ttery power.
To change the current wallpaper:
1. Press to go to the Home screen.
2. Touch and hold an empty area of the screen.
3. From the
4. Select a Wallpaper:
•
T ap
Gallery
Add to Home screen
to select from a user image stored in the camera
window, tap
image gallery, crop the image, and tap
•
T ap
Live wallpapers
backgrounds, once done tap
•
T ap
Wallpaper gallery,
image, then tap
to select from a list of animated
Set wallpaper
scroll through the images, tap a wallpaper
Set wallpaper
.
Understanding Your Phone 41
Save
Wallpapers
.
.
.
Page 46

Section 3: Memory Card
Your phone lets you use a microSD™ (SD) or microSDHC™ card
(also referred to as a memory card) to expand available memory
space. This secure digital card enables you to exchange images,
music, and data between SD-compatible devices. This section
addresses the features and options of your device’s SD
functionality. The device has a USB SD card mode.
•
microSD card storage: up to 2GB in size
•
SDHC card storage: up to 32GB in size
Using the SD Card
There are several methods for using the SD card:
1. Connecting to your PC to store files (such as music, videos,
or other types of files and media).
2. To activate the camera, video, music player, and other
dependant media or applications.
Important!:
The Camera, Music Player, and Video functionality is all
dependant on a mounted SD card. Your device can support SDHC
cards up to 32GB capacity.
Note:
Since the device comes with 16GB of built-in memory, its maximum total
storage capacity is 48GB.
42
SD card Overview
After mounting an SD card in the device you can use your
computer to access and manage the SD card.
Important!:
If access to the external SD card is not available, down load and
install the USB drivers.
microSD Icon Indicators
The following icons show your microSD card connection status at
a glance:
• The contents of the microSD card are being
scanned.
• The card is being prepared for use and for
mounting.
• The card has been improperly removed.
Page 47

Important!: DO NOT
remove a microSD card while the device is accessing or
transferring files. Doing so will result in loss or damage of data.
Make sure your battery is fully charged before using the microSD
card. Your data may become damaged or lost if the battery runs
out while you are using the microSD card.
Mounting the SD Card
To store photos, music, videos, and other applications. You must
mount (install) the SD card prior to use. Mounting the SD card
establishes a USB connection with your computer.
Important!:
You must enable USB storage to mount the SD card.
1. Press ➔ and then tap (
Settings
) ➔
Storage.
2. Tap
Mount SD card
.
Connecting to the SD card
1. Insert the SD card into the external, SD card slot (For more
information, refer to “Installing the micr oSD Memory
Card” on page 9.)
2. Verify the card is properly mounted.
3. Verify the phone is not in a USB Debugging Mode. This
mode is used by developers and prevents access to the
phone’s storage capabilities. For more information, refer to
“USB Debugging” on page 173.
4. Connect the USB cable to the phone and connect the cable
to the computer.
Unmounting the SD card
Unmounting the SD card prevents corruption and damage to the
SD card while removing it from the slot.
1. Press ➔ and then tap (
Settings
) ➔
Storage.
2. Tap
Unmount SD card
3. When the “
and the
Mount SD card
.
SD card will be unmounted
now appears in the menu list,
” message displays
remove the SD card. For more information, refer to
“Removing the microSD Memory Card” on page 9.
SD card Memory Status
To view the memory allocation for your external SD card:
䊳
Press ➔ and then tap (
Settings
) ➔
Storage. The available memory displays under the Total
space and Available space headings.
Memory Card 43
Page 48

Erasing Files from the SD card
You can erase files from the SD card using the phone.
1. Ensure the SD card is mounted. For more information, refer
to “Unmounting the SD card” on page 43.
2. Press ➔ and then tap (
Storage ➔
3. Tap
Unmount SD card
Format SD card
➔
Format SD card
.
Settings
➔
Erase everything
) ➔
to format the SD card. The SD card formats and erases all
the data stored on it.
Factory Data Reset
From this menu you can reset your phone and sound settings to
the factory default settings.
1. Press ➔ and then tap (
Privacy
.
2. Tap
Factory data reset
. This action erases all data from your
Settings
) ➔
phone except current system software and bundled
applications, or SD card files such as music or photos.
3. Tap
Format USB storage
to erase all data stored on the
device’s microSD storage area.
4. Tap
Reset phone ➔ Erase everything
44
.
Page 49

Section 4: Call Functions and Contacts List
In Call Notification
This section describes features and functionality associated with
making or answering calls, and the Contacts list, which is used to
store contact information.
Displaying Your Phone Number
䊳
Press ➔ and then tap (
phone ➔ Status
phone number
Note:
The phone’s
and then tapping (
. Your phone number displays in the
field.
Settings
menu can also be activated by pressing
Applications
) ➔ (
Settings
Settings
) ➔
About
My
).
Making a Call
You can store phone numbers that are regularly used to the SIM
card or to the phone’s memory. These entries are referred to as
the
Contacts list
1. Press and then tap .
2. Enter the phone number and then tap .
䊳
.
If you make a mistake while dialing, tap to clear the
last digit. Touch and hold to clear the entire
sequence.
Note:
When you activate the Auto redial (
option in the Call settings menu, the phone automatically redials up to
10 times when the person does not answer the call or is already on the
phone, provided your call is not sent to voice mail.
Settings > Call > Additional settings
Ending a Call
䊳
Briefly tap key to end the call.
Note:
To redial a recent number, tap at the end of the call or locate the
number from the Logs list, tap the entry and tap
Call
.
If you exit the current call screen and return to the Home screen,
You are visually notified that you are still on an active call by the
green phone icon within the Status Bar (highlighted in green).
Call Functions and Contacts List 45
)
Page 50

Ending a Call from the Status Bar
1. Tap the Status Bar to reveal the Notifications tab, and then
drag the tab to the bottom of the screen to open the
Notifications panel (1).
2. Tap
End
to end the currently active call (2).
Bell
46
Making Emergency Calls
If you do not have a SIM card installed the first time you turn on
the phone, the
Insert SIM card to make calls
message displays and
an animated tutorial shows you how to install the SIM card.
Without a SIM card, you can only make an emergency call with the
phone; normal cell phone service is not available.
Making an Emergency Call Without a SIM card installed
1. Tap
Emergency call
from the on-screen display to make an
emergency call.
2. Complete your call. During this type of call, you will have
access to the Speaker mode, Keypad, and End Call
features.
Note:
Selecting Location consent may drain battery power. For more
information, refer to “Power Saving Mode” on page 167.
3. Tap to exit this calling mode.
Making an Emergency Call With a SIM card installed
1. Swipe the Lock screen and access the Home screen.
2. Press and then tap .
3. Enter the emergency number (ex: 911) and then tap .
Page 51

Complete your call. During this type of call, you will have
4.
access to the Speaker mode, Keypad, and End Call
features.
Note:
Selecting Location consent may drain battery power. For more
information, refer to “Power Saving Mode” on page 167.
5. Tap to exit this calling mode.
Dialing Options
When you enter numbers on the
Keypad, you will see three
on-screen options.
From the keypad screen, use
one of the following options:
•
Call ( ) -
T o call the entered
number.
•
Delete ( ) -
To delete digits
from the current number.
•
Text Message ( ) -
T o send
the current number a new text
message.
To view additional dialing options:
䊳
Tap :
• Add to Contacts -
T o add the current number to either a new or
existing Contacts entry.
• Speed dial setting -
To a ccess the Speed Dialing menu where
you can assign a speed dial location to a current Contacts entry .
• Add 2 sec pause -
T o insert a two-second pause to enter a
2-second delay within a number string (the phone continues
dialing after 2 seconds without any additional keys being
pressed).
• Add wait -
T o insert a hard pause within the number string (the
phone waits for your input). A wait requires that any consecutive
numbers be manually sent by tapping
Send
.
Answering a Call
When somebody calls you, the phone rings and displays the
incoming call image.
The caller's phone number, picture, or name if stored in Contacts
List, displays.
䊳
At the incoming call screen:
•
T ouch and slide
•
T ouch and slide
to the right to answer the call.
to the left to reject the call.
Call Functions and Contacts List 47
Page 52

•
Touch and slide
right to answer
the call.
Touch and drag
upward to reject
with a message.
Touch and slide
left to reject the
call.
T ouch and drag the
a predefined rejection message or tap
Reject call with message
Create new message
create a new custom outgoing response.
Pressing the Volume down button mutes the ringer.
If the incoming call is from a number stored in your Contacts, the
entry’s name is displayed. You may also see the caller’s phone
number, if available.
Managing Reject Calls
This feature allows you to categorize both known and unknown
callers as rejected contacts. These Contacts are then added to
you Rejection list which can be managed for individual entries from
within the Contacts list or as a whole from the Call rejection scree.
48
tab upward and tap
to
1. From the Home screen, press and then tap
(
Settings
) ➔
Call
➔
2. Tap
Auto reject mode
Call rejection
to configure your automatic rejection
.
settings. Rejected calls are routed automatically to your
voicemail. Choose from:
•Off -
Disables the automatic rejection feature. Y ou must th en
manually reject incoming phone calls.
• All numbers -
Enables the features for all known and unknown
number, including those contacts that are not assigned to the
rejection list.
• Auto reject numbers -
Automatically rejects all entries assigned to
the Reject list.
Adding numbers to the rejection list
Entries can be added to the list via either the Contacts menu or via
the Auto reject list menu. The Contacts menu option assigns all
numbers for an individual as rejected. The Auto reject list allows to
assign individual numbers.
To assign multiple numbers as rejected via Contacts:
1. From the Home screen, tap (
2. Locate an entry and tap it to open the Contact Overview
Contacts
).
Screen (page 75).
Page 53

Press and then tap
3.
Add to black list
. All phone
numbers associated with this entry are then added to the
reject list.
To assign single numbers as rejected via Auto reject list:
1. From the Home screen, press and then tap
(
Settings
) ➔
Call
➔
2. Tap (
Call rejection ➔ Black list
Add
) and either enter the phone number or
.
select a Contact from your Logs or Contacts list.
3. Tap
Save
to complete the assignment.
International Calls
1. From the Home screen, tap , then touch and hold
. The + symbol displays.
2. Use the on-screen keypad to enter the country code, area
code, and phone number.
•
If you make a mistake, tap once to delete a single digit.
•
Touch and hold to delete all digits.
3. Tap .
Pause Dialing
You can dial or save phone numbers with pauses for use with
automated systems, such as voicemail or financial phone
numbers.
•
2-Second Pause -
Automatically sends the next set of numbers after
a two-second pause. This is indicated in the number string as a
comma (,).
•
Wait -
Sends the next set of numbers only after tapping . This is
Send
indicated in the number string as a semicolon (;).
1. From the Home screen, tap and use the on-screen
keypad to enter the phone number.
2. Press and then tap
Add 2 sec pause
. This feature adds
an automatic two-second pause.
3. Use the keypad to enter the additional numbers that will be
dialed automatically after the second pause.
Tip:
You can create pauses longer than three seconds by entering multiple
3-sec pauses.
4. Tap .
Call Functions and Contacts List 49
Page 54

Wait Dialing
Send
Inserting a Wait into your dialing sequence means that the phone
waits until it hears a dial tone before proceeding with the next
sequence of numbers.
1. From the Home screen, tap and use the
on-screen keypad to enter the phone number.
2. Press and then tap
Add wait
. This feature causes the
phone to require your acceptance before sending the next
set of entered digits.
3. Tap
4. Once prompted, tap to dial the remaining digits.
Redialing the Last Number
The phone stores the numbers of the calls you’ve dialed, received,
or missed if the caller is identified.
To recall any of these numbers:
1. From the Home screen, tap .
2. Tap the
3. Tap the name/number and tap .
50
Logs
tab to display the list of recent calls.
Speed Dialing
Once you have stored phone numbers from your Contacts List,
you can set up to 8 speed dial entries and then dial them easily
whenever you want, simply by touching the associated numeric
key.
Setting Up Speed Dial Entries
Important!:
Speed dial location #1 is reserved for Voicemail. No other number
can be assigned to this slot.
1. From the Home screen, tap .
2. Press
and then tap
Speed dial setting
. The
Speed dial
screen displays a virtual keypad with the numbers 1 through
9.
3. Tap an unassigned number. The
4. Tap a contact and select a number to assign to the speed
Contacts
screen displays.
dial location. The selected contact number/image is
displayed in the speed dial number box.
Changing a Speed Dial Entry Order
1. From the Home screen, tap .
2. Press
and then tap
Speed dial setting
.
Page 55

Important!:
Place a call
on hold.
Adds a new call.
Activates or
Deactivates
speakerphones.
Dials the number.
Call duration.
Ends the call.
Mutes or Unmutes
the call.
Activates and
Deactivates
Bluetooth Headset.
The number 1 is reserved for Voicemail and another number
cannot be assigned to this slot.
3. Press
4. In a single motion, touch and drag an entry over another
and then tap
Change order
location on the virtual keypad.
5. Tap
Save
to store the new assignment.
6. Press to return to the previous screen.
Removing a Speed Dial Entry
1. From the Home screen, tap .
2. Press
3. Touch an d hold a existing on-screen speed dial location and
select
and then tap
Remove
from the context menu.
Speed dial setting
– or –
Press and then tap
Remove
.
4. Press to return to the previous screen.
Making a Call Using Speed Dial
Remove
. Tap an entry and select
You can assign a short cut number to a phone number in the
Contacts List for speed dialing.
1. From the Home screen, tap .
2. Touch and hold a speed dial location (numbers 2-9, or 1 if
.
you are dialing voice mail) until the number begins to dial.
3. If you are not certain of the speed dial location, tap
➔ ➔
Speed dial setting
and touch a speed dial
number to view the assigned phone number.
In Call Options
Your phone provides a number of features that are available for
use during a call.
.
Call Functions and Contacts List 51
Page 56

Adjusting the Call Volume
Speaker
Speaker
Mute
Mute
During a call, use the Volume keys on the left side of the phone, to
adjust the earpiece volume.
䊳
Press the Up volume key to increase the volume level and
the
Down
volume key to decrease the level.
– or –
From the screen during a call, press the Up Volume key.
From the Home screen, you can also adjust the ring volume using
these keys.
Placing a Call on Hold
You can place the current call on hold whenever you want. If your
network supports this service, you can also make another call
while a call is in progress.
To place a call on hold:
1. Tap
Hold
to place the current call on hold.
2. Tap
Unhold
to activate the call that is on hold.
To make a new call while a call is in progress:
1. Enter the new phone number that you wish to dial or look it
up in Call history.
2. Tap
Add call
to dial the second call.
52
3. Dial the new phone number and tap .
To switch between the two calls:
䊳
Once the caller answers, tap
Swap
.
The In call number turns gray and displays On hold. The
active call displays a green background behind the number.
Turning the Speakerphone on and off
While on a call, you can use your Speakerphone by following
these steps:
1. Tap (
2. Tap (
Tip:
When the speaker is turned On, the color of the speaker is green. When
the speaker is turned
Speaker off
) to turn the speakerphone on.
Speaker on
) to turn the speakerphone off.
Off
, the color of the speaker is gray.
Muting a Call
1. Tap (
Mute off
) to turn mute on so the other caller
cannot hear you speaking.
2. Tap (
Mute on
) to turn mute off and resume your
conversation.
Page 57

Switching to Bluetooth Headset
1. While on a call, switch to the Bluetooth headset instead of
speaker by tapping
2. At the prompt, tap
Headset
.
Yes
to enable Bluetooth if it is not already
activated.
More In-call Options
During a call you can save the current caller’s information to the
Contacts list, or create a Memo.
Viewing the Contacts List
During a call you can look up a number in the Contacts list.
1. Press and then tap
2. Browse the Contacts list for the information you need.
3. Press to return to the active call.
Creating a Memo During a Call
Contacts
.
During a call it may be necessary to record information (a Note).
1. Press and then tap
2. Use the keyboard to enter the note then tap
•
If desired, press and select a new memo background color
Memo
.
Save
.
before saving.
Multi-Party calls
Making a Multi-Party Call
A multi-party call is a network service that allows up to six people
to participate in a multi-party or conference call.
Setting up a Multi-Party Call
1. From the Home screen, tap .
2. Dial the number for the first participant and tap
3. Tap
Add call
, enter the second phone number and
tap The first caller is placed on hold.
4. Wait for the second caller to answer the incoming call and
tap
Merge
. The two calls are now joined into a multi-party
call and display in the order in which they were called.
Important!:
A maximum of two callers can b e join ed to a sing le mult i-par ty line .
Additional callers participate in a new Multipa rty session and are
held in conjunction with the previous multiparty call. You can swap
or place each multi-party call on hold.
Call Functions and Contacts List 53
Page 58

Having a Private Conversation With One Participant
Manage Conference Call
Split Caller End Call
When you have two participants
in a multi-party
session, it might
be necessary to place one of
those participants on hold so
that a private conversation can
be held with a single caller.
While you are in a multi-party
call:
1. Press and then tap
Manage conference call
.
– or –
image shown on page 54.
2. T ap adjacent to the
Conference Call
Tap the
participants you would like to split from the current multi-line
call. The list displays the callers in the order they were
dialed.
54
3. Tap the participant to which you want to speak privately.
You can now talk privately to that person while the other
participants can continue to converse with each other. If
there is only one other participant, that person is placed on
hold.
4. To return to the multi-party call, tap the Merge icon. All of
the multi-party call participants can now hear each other.
Dropping One Participant
1. Press and then tap
2. Tap to the right of the number to drop.
End
Manage conference call
The participant is disconnected and you can continue the
call with the other participant.
.
Page 59

Tap to end your conversation with the remaining
Logs
Logs
3.
caller.
Call Waiting
You can answer an incoming call whi le you have a call in progress,
if this service is supported by the network and you have previously
set the Call waiting option to Activate.
You are notified of an incoming call by a call waiting tone. For
more information, refer to “Configuring Additional Voice Call
Settings” on page 163.
To answer a new call while you have a call in progress:
1. In a single motion, touch and slide to the right to
answer the new incoming call.
2. Tap an opti on from the on-screen menu:
• Putting XX on hold
to place the previous caller on hold while you
answer the new incoming call.
• Ending call with XXX
to end the previous call and answer the new
call.
Note:
The new caller appears at the top of the list. The previ ous caller is
placed on hold and appears at the bottom of th e list.
3. Tap Swap to switch between the two calls. This places the
new caller on hold and activates the previous call.
Important!:
The currently active call is displayed with a green background.
4. Tap
Swap
again to switch back.
Logs Tab
The Logs tab is a list of the phone numbers (or Contacts entries)
for calls you placed, accepted, or missed. The Logs tab makes
redialing a number fast and easy. It is continually updated as your
device automatically adds new numbers to the beginning of the list
and removes the oldest entries from the bottom of the list.
The Notification area of the Home screen (upper-left) displays
phone notifications, status, or alerts such as:
Displays when a call is in progress.
Displays when a call was missed.
Accessing the Logs Tab
1. From the Home screen, tap
2. Tap an entry to view available options.
Call Functions and Contacts List 55
➔
(
Logs
tab).
Page 60

Note:
The Logs tab only records calls that occur while the phone is turned on.
If a call is received while it is turned off, it will not be included in your
calling history.
Each entry contains the phone number (if it is available) and
Contacts entry name (if the number is in your Contacts).
Indicates all outgoing calls made from your device.
Indicates any received calls that were answered.
Indicates a missed call.
Indicates a rejected call.
Accessing Logs from The Notifications Area
1. Locate from the Notifications area of the Status bar.
2. Tap the Status bar to reveal the Notifications tab, and then
drag the tab to the bottom of the screen to open the
Notifications panel (1).
56
3. Tap the Missed call entry to open the Logs screen (2).
Bell
Tip:
Press and tap
Notifications
to open the panel.
This list provides easy access to redial an entry, or you can also
choose to access two types of history entry lists depending on how
they are touched.
Page 61

1 option (tap)
Call Log screen
Entry-specific
context menu
(touch and hold)
Call Logs - Caller Overview
•
Tap a contact entry name or number to reveal the
•Call -
Allows you to redial the entry by name or number.
• Send message -
Allows you to create a new text message to the
Call options
selected entry.
•Time -
Provides the time and date of the call and its duration.
• Create contact -
T o save the number if it is not already in your
Contacts.
• Update existing -
To ad d the number to an existing Contacts
entry.
•
Touch and hold an entry to display the entry-specif ic context menu:
• Call [Number] -
• Send message -
T o redial the current phone number .
Allows you to create a new text message to the
selected entry.
• Edit number before call -
T o make alterations to the current
phone number prior to redial.
• Add to Contacts -
T o save the number if it is not already in your
Contacts.
• Send log info -
To send the Log entry information via text
message.
• View contact -
T o view the inform ation for the currently stored
Contacts entry.
• Add to black list -
T o add the current phone number to a n
automatic rejection list. Similar to a block list, the selected caller
will be blocked from making an incoming calls to your phone.
Call Functions and Contacts List 57
screen:
Page 62

• Delete -
Logs
Logs
Logs
Logs
To delete the entry from the Logs list.
Altering Numbers from the Logs List
If you need to make a call from the Logs screen and you need to
alter the number prior to dialing, you can add the appropriate prefix
by prepending the number.
1. From the Home screen, tap
2. T ouch and hold an entry to access the entry-specific context
➔
.
menu.
3. Tap
Edit number before call
4. Edit the number using the on-screen keypad or delete digits
.
by pressing to erase the numbers.
5. Tap once the number has been changed.
Erasing the Logs List
You can delete either an individual call log entry or all current
entries from the Logs list.
To clear a single entry from the list:
1. From the Home screen, tap
2. Touch and hold an entry and select
58
➔
.
Delete
To clear all entries from the list:
1. From the Home screen, tap
2. Press
3. Tap
Select all
➔
➔
Delete.
Delete
➔
OK
➔
.
.
Viewing Missed Calls from Lock Screen
When you are unable to answer
a call for any reason and your
screen is locked, the number of
missed calls are displayed on
the Lock screen immediately
after a call is missed.
To view a missed call
immediately:
1. Press to
reactive the screen.
2. Touch and drag the
button (with the number
of missed calls on it) to
.
the right.The Logs tab is then displayed.
Page 63

Section 5: Entering Text
Default Text
Input Method
This section describes how to select the desired text input method
when entering characters into your phone. This section also
describes the predictive text entry system that reduces the amount
of key strokes associated with entering text.
Your phone comes equipped with an orientation detector that can
tell if the phone is being held in an upright (Portrait) or sideways
(Landscape) orientation. This is useful when entering text.
Your phone also provides several on-screen keypad text entry
options to make the task of text entry that much easier.
Text Input Methods
There are two text input methods available:
•
Samsung keypad -
An on-screen QWERTY keypad that can be
used in both portrait and landscape orientation.
•
Swype -
(default) A new way to enter text on touch screens.
Instead of tapping each key, use your finger to trace over each
letter of a word.
The on-screen QWERTY keypad works the same in both portrait
and landscape mode.
Selecting the Text Input Method
The Text Input Method can be assigned from within one of two
locations:
Settings Menu:
䊳
Press ➔ and then tap (
Language and keyboard ➔ Select input method
Settings
.
) ➔
Text Input field:
1. From a screen where you can enter text, touch and hold the
text input field to open the context-menu.
2. Select the input method (
Samsung keypad
or
Swype
Enabling Accessibility settings
1. Press ➔ and then tap (
(
Accessibility
).
Settings
) ➔
Entering Text 59
).
Page 64

Tap
2.
Accessibility
to activate or deactivate accessibility
services. When activated, a check mark appears in the box.
3. If prompted, tap
OK
to download accessibility applications
from the Android Market.
4. Follow the on-screen instructions.
For more information, refer to “Accessibility Settings” on
page 181.
Entering Text Using Swype
Swype™ is the default text input method that allows you to enter a
word by sliding your finger or stylus from letter to letter, lifting your
finger between words. SWYPE uses error correcting algorithms
and a language model to predict the next word. SWYPE also
includes a touch predictive text system.
The on-screen keyboard options are different between the Android
keyboard and Swype on-screen input methods.
Enabling and Configuring SWYPE
If you configure another text input method (Samsung keypad) you
must re-enable SWYPE before using the SWYPE keyboard.
When SWYPE is enabled there can also be normal keyboard
functionality.
1. Press ➔ and then tap (
60
Settings
) ➔
Language and keyboard
2. Tap
Select input method
.
➔
Swype
.
SWYPE Settings
To configure Swype settings:
1. Press ➔ and then tap ➔
keyboard ➔ Swype
2. Locate the
• Language -
Default language is
• Audio feedback -
.
Preferences
section to alter these settings:
Allows you to select the current text input language.
US English
.
Turns on sounds generated by the Swype
application.
• Show tips -
3. Locate the
Turns on helpful on-screen tips from Swype.
Swype Advanced Settings
settings:
• Word suggestion -
• Auto-spacing -
Suggests words as you are typing.
Automatically inserts a space between words.
When you finish a word, just lift your finger or stylus and start the
next word.
• Auto-capitalization
- Automatically capitalizes the first letter of a
sentence.
• Show complete trace -
Once enabled, sets wether or not to
display the complete Swype path.
Language and
section to alter these
Page 65

• Speed vs. accuracy -
ABC
123
on-screen input. Move the slider between
or
Error Tolerant
• Personal dictionary -
Sets how quickly Swype responds to
Fast Response
(accuracy) and tap OK.
Allows you to add or remove words from
your personal dictionary.
• Reset Swype’s dictionary -
Alllows you to delete all words that
have been added to Swype’s dictionary .
4. Locate the
• Swype help -
Help
section to alter these settings:
Allows you to view the on-line user manual for
Swype.
• Tutorial -
A short tutorial that helps you to get started using
Swype.
5. Locate the
About
section to review the Swype application
information:
• Version -
Lists the Swype version number.
Swype Text Entry Tips
You can access the SwypeTips application and watch a video or
tutorial on using Swype. You can also use the following Swype text
entry tips.
(speed)
•
Create a squiggle (like an S
shape) to create a double
letter (such as pp in apple).
•
T ouch and hold a key to view
the punctuation menu then
make a selection.
•
Move your finger or stylus over
the apostrophe to enter
contractions.
•
Double-touch on the word you
want to change to correct a
misspelled word, then touch
the delete key to erase one
character. Touch and hold the
delete key to erase an entire
word.
Selecting a Text Input Mode in Swype
1. From a screen where you can enter text, tap the text input
field to reveal the on-screen keyboard.
2. With Swype as your text entry method, select one of the
following text mode options:
• 123 ABC
to use Swype with alphanumeric characters
from the on-screen keyboard.
Entering Text 61
Page 66

• SYM
SYM
123
SYM
123
Current Mode
Delete
Voice actionsText input mode
Recipients
Text input field
Predictive text
CAPS/ALT key
SWYPE tips
on-screen keyboard.
Note:
After typing an initial uppercase charac ter, the key changes to
and all letters that follow are in lower case.
Swype Keyboard Overview
• Recipients -
current message. You can choose from
or
Favourites
• Text Input field -
can be entered.
• CAPS/ALT key -
capitalization of the subsequent entered characters. When in
SYM mode, this key can show additional symbol characters.
• Text Input mode SYM.
–
123ABC mode contains alphanumeric characters and a few
common punctuation marks. Text mode button indicates
–
SYM mode contains only symbols and numbers. T ext mode button
indicates
• SWYPE tips -
tutorial screen.
62
(Symbol) to enter numbers and symbols from the
A field where you can enter the recipients of the
Contacts, Recent, Group
.
A field where text, number, or other characters
When in 123ABC mode, this key changes the
There are two available modes:
123ABC
.
T apping this button displays the Swype tips and
123ABC
SYM
and
Using 123ABC Mode in SWYPE
.
In
123ABC
mode, you can enter only letters and a few common
punctuation marks from the onscreen keyboard. The text mode
key shows
1. From a screen where you can enter text, tap the text input
field to reveal the on-screen keyboard.
.
Page 67

Tap to configure the keyboard for 123ABC mode
ABC
123
ABC
123
SYM
123
2.
(showing letters and numbers on the onscreen keys). Once
in this mode, the text input type shows .
Note:
After typing an initial uppercase charact er, the key changes to
and all letters that follow are in lower case.
3. Swipe your finger continuously over the letters to form a
word.
–
If you make a mistake, tap to erase a single character.
T ouch and hold to erase an entire word.
4. Tap to send the message.
Send
All lowercase
Displays when the next character is entered in lowercase.
Pressing this while in 123SYM mode, reveals additional
numeric-symbols keys.
Initial Uppercase
Displays when the next character is entered as uppercase but
all subsequent characters are lowercase.
All Uppercase
Displays when all characters will be entered as uppercase
characters.
By default, the first letter of an entry is capitalized and the following
letters are lower case. After a word is entered and you lift your
finger, the cursor automatically adds a space after the word.
To enter text via Swype:
This example shows a user entering the word “there”. Put your
finger down on the “t”, and without lifting, glide it to the “h”, and
then to the “e”, and then over to the “r”, and back to the “e”. When
complete, lift your finger off the screen to allow the device to
determine the closest word match.
Note:
If multiple word choices exis t fo r your Swype entry, an on- sc re e n popup
appears to provide additional word choices.
Entering Numbers and Symbols in SWYPE
By using the on-screen keyboard in portrait mode, some symbols
are not available (such as Emoticons or Smileys). In SYM mode
using Swype, you can only enter symbols and numbers from
the on-screen keyboard. Once in SYM mode, the text mode key
shows
.
Entering Text 63
Page 68

From a screen where you can enter text, tap the text input
SYM
123
ABC
123
1.
field to reveal the on-screen keyboard.
2. Tap to configure the keyboard for SYM mode. Once
in this mode, the text input type shows .
3. T ap the on-screen key for the number or symbol you want to
enter.
4. Touch and hold an on-screen key to enter the secondary
symbol (above the main one on the same key).
5. Tap to choose from additional symbols.
For example:
•
T o enter &: tap
•
T o enter ~: tap
123SYM
and select the & key.
123SYM
and draw a small circle over the & key. or
touch and hold.
Using the Samsung Keypad
This QWERTY keypad can be used to enter text in either a Portrait
or landscape orientation. The only difference between the two
orientations are the sizes of the keys.
From a screen where you enter text, rotate your phone
counterclockwise to a landscape orientation. The on-screen
QWERTY keypad displays.
64
The Samsung Keypad
This phone has a built-in, QWERTY keypad (portrait mode) or
keyboard (landscape mode). Using the QWERTY keypad/
keyboard, you can type letter, numbers, punctuation, and other
characters.
To use the Samsung keypad you must first configure the settings
to default to the Samsung keypad.
1. Press ➔ and then tap (
Language and keyboard ➔ Select input method
keypad
.
Settings
➔
) ➔
Samsung
– or –
Page 69

From a screen where you can enter text, tap and hold the
Shift Key Recipients Text Input Field
DeleteCurrent ModeSettingsInput Mode
Indicator
ABC
?123
?123
ABC
1/3
text input field and tap
2. The virtual keyboard is then assigned to the Samsung
Input method
➔
keypad configuration for all subsequent text input.
Samsung keypad
Changing the Text Input Mode in Keypad
.
1. From a screen where you can enter text, tap the text input
field to reveal the on-screen keyboard.
2. With Samsung keypad as your text entry method, select one
of the following text mode options:
•Abc
-
T o use alphabetic characters from the on-screen
keyboard. In this mode, the text mode button displays .
• Symbol/Numeric
numbers selecting them on the on-screen keyboard. In this mode,
the text mode button displays .
There are up to 3 available pages of numeric symbols available
by tapping .
Note:
After typing an initial uppercase character, tap to toggle
capitalization.
All lowercase
Displays when the next character is entered in lowercase.
-
To en ter numbers by pressing the
Entering Text 65
Page 70

ABC
1/3
Initial Uppercase
ABC
?123
Send
?123
ABC
ABC
?123
Displays when the next character is entered as uppercase but
all subsequent characters are lowercase.
All Uppercase
Displays when all characters will be entered as uppercase
characters.
By default, the first letter of a new entry is capitalized and the
following letters are lowercased. After a character is entered, the
cursor automatically advances to the next space.
Using ABC Mode in Samsung Keypad
1. From a screen where you can enter text, tap the text input
field to reveal the on-screen keyboard.
2. Tap to configure the keyboard for ABC mode. Once
in this mode, the text input type shows .
Note:
After typing an initial uppercase charac ter, the key changes to
and all letters that follow are in lower case.
3. Enter your text using the on-screen keyboard.
66
–
If you make a mistake, tap to erase a single character.
T ouch and hold to erase an entire word.
4. Tap to send the message.
Using Symbol/Numeric Mode
Use the Symbol/Numeric mode to add numbers, symbols, or
emoticons. While in this mode, the text mode key displays
1. From a screen where you can enter text, tap the text input
field to reveal the on-screen keyboard. Rotate the phone
counterclockwise to a landscape orientation, if desired.
2. Tap to configure the keyboard for Symbol mode.
Once in this mode, the text input type shows . The
following screen displays:
3. Tap a number, symbol, or emoticon character.
4. Tap to return to ABC mode.
To enter symbols:
1. Tap to configure the keyboard for Symbol mode.
2. Tap the appropriate symbol key.
– or –
Tap
button to cycle through additional pages.
.
Page 71

•
The first number on this key indicates which page (1, 2, or 3) of
additional characters is active.
Using XT9 Predictive Text
XT9 is a predictive text system that has next-letter prediction and
regional error correction, which compensates for users pressing
the wrong keys on QWERTY keyboards.
Note:
XT9 is only available when ABC mode is selected. XT9 adva nced
settings are available only if the XT9 field has been selected.
1. Press ➔ and then tap ➔
Language and
keyboard ➔ Samsung keypad.
– or –
From within an active text entry screen, tap from the
bottom of the screen to reveal the
Samsung keypad settings
screen.
2. Set any of the following options:
• Portrait keypad types -
configuration (
• Input languages -
Allows you to choose a keypad
Qwerty Keypad
[default] or
3x4 Keypad
Sets the input language. Tap a language from
).
the available list. The keyboard is updated to the selected
language.
•XT9 -
Enables predictive text entry mode. This must be enabled to
gain access to the advanced settings.
• XT9 advanced settings -
features. For more information, refer to
Predictive Text”
• Keypad sweeping -
Configuration of more advanced XT9
“Using XT9
on page 67.
Automatically moves the screen in the
direction your finger moves along the screen.
• Auto-capitalization -
Automatically capitalizes the first letter of the
first word in each sentence (standard English style).
• Voice input -
Activates the Voice input feature. This is an
experimental feature that uses Google’s networked speech
recognition application.
• Auto full stop -
Automatically inserts a full stop by tapping the
space bar twice.
• Tutorial -
Launches a brief onscreen tutorial covering the main
concepts related to the Samsung keypad.
Using XT9 Predictive Text
XT9 is a predictive text system that has next-letter prediction and
regional error correction, which compensates for users pressing
the wrong keys on QWERTY keyboards.
1. Press ➔ and then tap ➔
keyboard ➔ Samsung keypad.
2. Tap the
3. Tap the
XT9
field. A checkmark indicates activation.
XT9 advanced settings
and configure any of the
following advanced options:
Language and
Entering Text 67
Page 72

• Word completion -
T ells your device to attempt to predict how to
complete the word you have started. (A green check mark
indicates the feature is enabled.)
• Word completion point -
Sets how many letters should be
entered before a word prediction is made. Choose from 2 letters,
3 letters, 4 letters, or 5 letters.
• Spell correction -
Enables the automatic correction of
typographical errors by selecting from a list of possible words that
reflect both the characters of the keys you touched, and those of
nearby characters. (A green check mark indicates the feature is
enabled.)
• Next word prediction -
Predicts the next word you are like to
enter. (A green check mark indicates the feature is enabled.)
• Auto-append -
Automatically adds predictions to the word you are
typing. (A green check mark indicates the feature is enabled.)
• Auto-substitution -
Allows the device to automatically replace
misspelled or miskeyed words. This option reduce “typos.” (A
green check mark indicates the feature is enabled.)
• Regional correction -
Automatically tries to correct errors caused
when you tap keys adjacent to the correct keys. (A green check
mark indicates the feature is enabled.
• Recapture -
Sets the device to redisplay the word suggestion list
after selecting the wrong word from the list.
•XT9 my words -
Allows you to add new words to the built-in XT9
dictionary.
–
T ap
Add word
.
68
–
Use the
Register to XT9 my words
–
T ap
Done
to store the new word.
• XT9 auto-substitution -
Allows you create a word rule by adding
field to enter the new word.
words for automatic substitution during text entry (for example
youve becomes you’ve).
–
T ap the XT9 auto-substitution field. Flick up or down to review the
current list of word substitutions.
–
Press and tap
–
Enter the original word that will be replaced in the
Add
.
(for example, youve).
–
Enter the substitute word that will be used in the
(for example, you?fve).
–
T ap
Done
to save the substitution rule.
4. Press to return to the previous screen.
Shortcut
Substitution
field
field
Page 73

Section 6: Contacts
This section explains how to use and manage your Contacts List.
You can save phone numbers to your phone’s memory.
Accounts
From the Accounts menu you decide if you want applications to
synchronize, send, and receive data at any given time, or if you
want the applications to synchronize automatically. After
determining how you want the accounts to synchronize, indicate
which account to synchronize with your Contacts list.
1. Sign in to your Google account.
2. Press ➔ and then tap (
Accounts and sync
.
Settings
) ➔
– or –
From the Home screen, tap (
(
Settings) ➔ Accounts and sync
3. From the
General sync settings
following options:
• Background data -
background.
• Auto-sync -
Automatically synchronizes your data with the phone.
Allows your phone to use data in the
Applications
section, tap one of the
) ➔
.
4. From the Manage accounts area, tap next to the
account you want to synchronize.
– or –
Tap
Add account
5. T ap an account type to add.
6. Follow the on-screen instructions. The selected account
type synchronizes with your Contacts list.
to create a new account.
Contacts List
Creating a Contact
The default storage location for saving phone numbers to your
Contacts List is your phone’s built-in memory.
If existing Google and Corporate email accounts have been
synchronized to your phone, these will be made available to your
device during the creation of new entries. These new Contacts
entries can be assigned or saved to synced accounts such as
Phone, SIM, Google, or Corporate.
Your pho ne automatically sorts the Contacts entries alphabetically.
You can create either a
ActiveSync
contact.
Phone, SIM, Google
, or
Microsoft Exchange
Contacts 69
Page 74

Note:
Before you can save a contact to the Phone, Con ta ct se ttings must be
set to
Save new contacts to Phone
Important!:
The Google and Microsoft Exchange ActiveSync acc ount types
are only visible after cr e ating an email account of those types on
your phone.
•
Phone
contacts are stored locally on the device.
Note:
If the phone is ever reset to its factory d e fault parameters, contacts
stored on the phone can be lost.
•
SIM
contacts are stored within the S M Card.
Note:
SIM contacts only store the Name and Phone number for an entry.
•
Google -
Contacts are shared with your existing Google account and
.
can also be imported to your phone after you have created a Google
Mail account.
•
Microsoft Exchange ActiveSync -
(also known as Work or Outlook)
Contacts are those contacts that are intended to be shared with either
an Exchange Server or from within Microsoft® Outlook®.
•
Remember this choice -
Assigns the desired default account storage
location for new Contact entries.
70
Note:
When storing an entry into your S IM card, note that only the Name, and
Number are saved. To save additional information for a particular
contact, such as notes, email, date s, etc., it is important to save that
Contact into your phone’s onboard memory.
1. From the Home screen, tap (
2. Tap
Note:
You can also add a new contact by entering a number from the keypad
and pressing and then tap
Continue with Step 3.
3. Tap a destination type (
Exchange ActiveSync
(Create contact
Phone, SIM, Google
) (depending on where you want to
Contacts
) to create a contact.
Add to Contacts
➔
).
Create contact
, or
Microsoft
save the new contact information).
4. Tap the
Given name
and
Family name
fields, and enter a
name for this contact using the displayed keypad.
5. Tap the image icon and select a photo for this contact.
Selections are:
6. Tap the label button (to the left of the
select a category such as
Other
Album
, or
Take photo
.
Phone number
Mobile
(default),
Home, Work
.
.
field) to
, or
Page 75

Note:
These label entries can change and are depend ant on the selected
destination type (e.g.,: Callback might not appear with a Google
account destination type).
7. Tap a phone number field and enter a phone number.
•
Tap on the QWERTY keyboard to remove a previously
entered phone number.
•
Tap to enter an additional phone number
•
Tap to remove a previously entered phone number.
8. Enter additional information such as:
Internet call, Email, IM
Groups, Ringtone, Postal address, Organization
fields to input additional category information.
•
The
More
field contains the following options:
Websit e, Birthday
•
Use your finger to slide the page up or down to see additional
, and
Anniversary
Notes, Nickname
.
fields and categories.
9. Tap
Save
to complete and store the new entry.
To save a Number from your Keypad:
1. From the Home screen, tap (
2. Enter a phone number using the on-screen keypad.
Phone
).
or
More
3. Tap
Add to Contacts ➔ Create contact
or
Update existing
(select the Contact entry from the on-screen list).
– or –
Press and then tap
or
Update existing
Add to Contacts ➔ Create contact
(select the Contact entry from the on-
screen list).
•
If you're updating an existing contact, tap the entry from the list
and proceed to Step 5.
,
,
4. Tap a destination type (
Exchange ActiveSync
save the new contact information).
5. Tap the
Given name
name for this contact.
6. T ap the lab el button (to the left of the
select a category such as
Other
.
Note:
These label entries can change and are depend ant on the selected
destination type (e.g., Callback might not appear with a Google account
destination type).
7. Tap
Save
to complete and store the new entry.
Phone, SIM, Google
, or
Microsoft
) (depending on where you want to
and
Family name
Mobile
fields, and enter a
Phone number
(default),
field) to
Home, Work
Contacts 71
, or
Page 76

Note:
Tabs
Create
Contact
Contacts
Search
Contacts Field
Tabbed
Navigation
For further details about how to enter characters, see “Text Input
Methods” on page 59.
Finding a Contact
You can store phone numbers and their corresponding names
onto either your SIM card, your phone’s built-in memory, or an
external location (such as Google or Exchange). They are all
physically separate but are used as a single entity, called
Contacts.
Depending on the storage size of the particular SIM card, the
maximum number of phone numbers the card can store may differ.
1. From the Home screen, tap (
2. Swipe up or down until you see the contact displayed.
Contacts
– or –
Tap the
Search contacts
field and begin entering the entry’s
name. Matching entries are then displayed. This process
filters through all of your current account Contact entries to
only show you the matching entries.
– or –
72
In a single motion, touch and hold the letter tab area (on the
right) until on-screen letters appear, then scroll through the
list. You are then taken to that section of the Contacts list.
Touch the contact entry.
).
Page 77

Editing Contact Information
1. From the Home screen, tap .
2. Tap a contact name from the list.
3. Press and select
Note:
You can also access an entry’s context menu by touching and holding
an entry then tapping
4. Edit the contact information then tap
Edit
Edit
.
.
Save
.
Adding a Number to an Existing Contact
1. From the Home screen, tap .
2. Touch and hold an entry and select
Edit
to reveal the
Contact entry’s details screen (page 75).
3. Tap a phone number field and enter a phone number.
•
Tap on the QWERTY keyboard to remove a previously
entered phone number.
•
Tap to enter an additional phone number
•
Tap to remove a previously entered phone number.
4. Enter additional information such as:
Internet call, Email, IM
Groups, Ringtone, Postal address, Organization
fields to input additional category information.
or
More
•
The
More
field contains the following options:
Websi te, Birthday
•
Use your finger to slide the page up or down to see additional
, and
Anniversary
.
Notes, Nickname
,
fields and categories.
5. Tap
Save
to complete and store the new entry.
Deleting Contacts
This option allows you to delete your contacts. You can delete all
your entries from your phone’s memory, your SIM card, or All.
Important!:
Once Contacts List entries are deleted, they cannot be recovered.
1. From the Home screen, tap .
2. Touch and hold a contact name from the list and select
Delete ➔ OK.
Contact List Options
1. From the Home screen, tap .
2. Press The following options display:
• Delete -
Allows you to delete 1 or more of your contacts.
• My profile -
,
• Merge with Google -
Allows you to set up a profile for yourself. The information
will be the same that you can add for a new contact.
Press and tap
Edit
to alter this profile information.
Allows you to merge all of your current
Contact entries with your active Google/Gmail account. If several
Contacts 73
Page 78

of your contacts are from other sources, such as Corporate email,
Internet email, Facebook, etc.., this allows you to “back them up”
or copy them to your Gmail account. T ap
Cancel
to exit.
• Import/Export -
Imports or exports contacts to or from the SM
card or SD card, you can also send namecards via methods such
as Bluetooth, Email, Gmail, or Messaging.
• View Friends -
Allows you to view only those Contact entries that
have been added from Social Networking Sites (SNS), such as
Facebook.
•More
:
–
Accounts -
Allows you to add and manage mobile accounts on
Facebook, Twitter, or MySpace. You can also add Corporate or
Google accounts.
–
Speed dial setting -
–
Send email -
Allows you to set up speed-dialing.
Allows you to send an email using your Google
account.
–
Send message -
–
Display options -
Allows you to send a text or picture message.
Allows you to choose to only display contacts
that have phone numbers, sort by Given or Family name, display
contacts Given (first) name first or Family (last) name first, display
contacts stored to your S M card, display contacts stored on your
phone, and/or display contacts stored to other accounts. For more
information, refer to
74
“Display Options”
Merge
to continue or
on page 79.
–
Settings -
Allows you to configure where you save new contacts,
or view your Own numbers, or Service numbers.
Contact Menu Options
1. From the Home screen, tap .
2. Touch and hold an entry to reveal the context menu. The
following options display:
•Edit -
Allows you to edit the currently selected Contacts entry.
• Delete -
Allows you to delete the currently selected Contacts entry .
• Join contact -
Allows you to link the current contact to another
current contact. Similar to a “see also” feature. If you can’t
remember a contact’s information, linking entries can help you
find the person you are looking for.
• Add to Favourites -
Allows you to copy the current Contacts entry
to the list within the Favorites tab.
• Add to group -
Allows you to add the current Contacts entry to an
existing group.
• Add to black list/ Remove from black list -
Allows you to add or
remove the current Contacts entry to a list of automatically
rejected incoming phone numbers.
• Send namecard via -
Allows you to send the current Contact
entry’s information to an external recipient via either
Email
(Exchange or Internet),
Gmail
, or
Messaging
.
Bluetooth
,
Page 79

Contact Entry Options
1. From the Home screen, tap .
2. Tap an entry to reveal the
Contact entry’s Overview Screen
This screen contains Name, contact numbers, email, and
linked contact information.
3. Press to reveal the context menu specific to this entry.
4. Tap an available option.
Joining Contact Information
Most people now maintain multiple email accounts, social
networking logins, and other similar account information. For
example, a Facebook account login name might differ from a
corporate email account login because they are maintained
separately and for different groups of people.
This device can synchronize with multiple accounts (such as
Facebook, Twitter, Linkedin, Microsoft Exchange ActiveSync, or
Google). When you synchronize your phone with those accounts,
each account creates a separate contact entry in the Contacts list.
If one of your contacts (Amy Smith) has a regular email account
that you maintain in Gmail, but also has a Facebook account
under her maiden and married name, as well as a Video! chat
account, when you merge those accounts into your Contacts list
you can join all of her entries and view the information in one
record.
Joining contact information makes sending messages easy. You
.
can select any account email address or information all from one
screen, versus searching multiple, individual screens to locate the
desired account information.
Next time you synchronize your phone with your accounts, any
updates contacts make to email account names, email addresses,
etc. automatically update in your contacts list.
1. From the Home screen, tap .
2. Tap a contact name (the name you want to link to another
entry) to reveal the
Note:
Typically this is the same contact with a different name or account
information.
3. Press and then tap
4. T ap the second contact entry (the entry in which to link). The
Contact entry’s Overview Screen
Join contact
second contact is now linked with the first and the account
information is merged into one screen.
Note:
The information is still maintained in bot h entries, but displays in one
record for easier viewing when you link the contacts.
.
.
Contacts 75
Page 80

Important!:
It is the second contact image that is display ed for both, but the
first contact’s name that is used. For example: If Amy (origin a l
entry) is joined with Julie (second en tr y). Julie appears to
disappear and only Amy remains. Tap the Amy entry (showing the
Julie image) to view both.
5. Tap the main linked contact to view the contact information
you linked. The contacts and information displays with an
icon next to the contact name to indicate what type of
account information is contained in the entry.
Unjoining a Contact
1. From the Home screen, tap .
2. T ap a contact name (the account name from which you want
to unjoin an entry). This reveals the details for entry.
Note:
Typically this is the same contact with a different name or account
information.
3. Tap the
Joined contacts
area.
– or –
Press and then tap
76
Separate contact
.
4. Tap next to the entry you want to unjoin. The contacts
are separated and no longer display in the merged record
screen. Both contacts now go back to being separately
displayed.
Marking a Contact as Default
When you use applications such as the Voice Dialer or other
messaging type applications, the application needs to know which
information is primary (default) in a contact entry list. For example,
when you say “Call John Smith”, if you have three phone records
for John Smith, the Voice dialer is looking for the “default” number
or entry.
The
Mark as default
option marks one entry in a contact record to
use as the default. This comes in handy when you have multiple
entries for the same person.
1. From the Home screen, tap .
2. Tap a Contact entry.
3. Press and then tap
Mark as default
. The Mark as
default screen displays radio buttons next to the contact
name, phone number, or other contact information.
Page 81

Tap the radio button next to the entry information you want
4.
to be the primary information (such as name, phone
number, or email) and select
Note:
If there are multiple phone numbers assigned to an entry, assigning one
as the default will automatically dial that number when the contact is
selected for dialing.
Save
.
Sending a Namecard
A Namecard contains contact information, and can be sent to
recipients as a Virtual Business Card (V-card) attachment using
Bluetooth, Google Mail, or as a message.
1. From the Home screen, tap .
2. Tap a Contact entry.
3. Press and then tap
delivery method:
Send namecard via
Bluetooth, Email, Gmail
and select a
, or
Messaging
The Namecard attaches to the selected message type and
is delivered when you send the message.
Note:
Email appears as an option only after an Internet or Exchange emai l
account has been created.
Sending All Current Namecards
Rather than selecting once Contact entry at a time, you can send
all of your current entries at once.
1. From the Home screen, tap .
2. Press and then tap
via
.
3. Tap
Select all
to place a check mark alongside all currently
Import/Export
➔
Send namecard
displayed Contact entries.
4. Tap
Send
and select a delivery method:
• Bluetooth -
To transmit this contact to anoth er bluetooth-
compatible device.
• Email -
To attach the contact card to a new outgoing email
(Exchange or Internet).
• Gmail -
.
To at tach the contact card to a n ew outgoing Internet-
based email.
• Messaging -
T o attach the contac t card to a new outgoin g text
message.
Sending a namecard using Bluetooth
You must create a Contact prior to sending a namecard to a
recipient. For more information, refer to “Creating a Contact”
on page 69.
1. From the Home screen, tap .
Contacts 77
Page 82

Touch and hold the entry to reveal the on-screen context
2.
menu.
3. Tap
Send namecard via
Important!:
You must activate Bluetooth to use this feature.
4. Tap the Bluetooth device in which to send this name card.
➔
Bluetooth
.
Bluetooth forwards the namecard to the recipient.
Copying Contact Information
Copying Contact Information to the SIM Card
The default storage location for saving phone numbers to your
Contacts list is your phone’s built-in memory. This procedure
allows you to copy numbers saved to the phone’s memory, onto
the SIM card.
1. From the Home screen, tap .
2. From the Contacts List, press and then tap
Import/Export
3. Tap
➔
Export to SIM card
Select all
to choose all current phone contact entries.
.
– or –
Select a specific entry by touching an entry. A check mark
indicates a selection.
78
4. Tap
Export
. The name and phone number for the selected
contact is then copied to the SIM.
Copying Contact Information to the microSD Card
This procedure allows you to copy entry information saved on the
phone’s memory, onto the SIM card.
Note:
These must be contacts stored on the phone. Ex ternal entries (Google,
Exchange, etc...) can not be transfe rred in this manner.
1. From the Home screen, tap .
2. From the Contacts List, press and then tap
Import/Export
3. Tap
➔
Export to SD card
OK
to choose all current phone contact entries.
.
Synchronizing Contacts
Syncing data from your managed accounts allows you to add and
manage a new or existing contact from your online or remote
accounts to your phone. Prior to syncing, you must first have an
active Google or Microsoft Exchange account with current Contact
entries, and be signed into your account via the phone.
With syncing, any Contacts entries (with phone numbers, email
addresses, pictures, etc.) are updated and synced with your
phone. For more information about syncing existing managed
accounts, see “Accounts and Synchronization” on page 174.
Page 83

Press ➔ and then tap ➔
1.
sync
.
2. Locate the email account containing the contacts you wish
Accounts and
to synchronize.
3. Tap within the adjacent account field to reveal the
account’s synchronization settings screen.
4. To synchronize Contacts, tap
Sync Contacts
. A green
checkmark indicates the feature is enabled.
Note:
The process of updating your Contacts tab can take several minutes. If
after 10-20 minutes, your list has not been updated, repeat step 2-3.
5. Your
Contacts
tab then reflects any updated Contact
information.
Note:
Syncing of contacts requires you are logged into your Gmail and
Corporate accounts via the device.
Display Options
The Display options menu allows you to allows you to choose
whether to display contacts saved from the Phone, SIM, external
source, or all. You can also choose to display only contacts that
have phone numbers.
1. From the Home screen, tap .
2. Press and then tap
More ➔ Display options
. Configure
any of the following options:
• Only contacts with phones -
Allows you to display only those
contacts containing phone numbers.
• Sort by -
Defines how the current list of Contacts are sorted:
Given name
or
Family name
• Display contacts by -
listed:
Given name first
.
Defines how the current list of Contacts are
(ex: Steve Smith) or
Family name first
(Smith, Steve).
• Select contacts to display -
category entries from within the locations such as:
Google
, and
Microsoft Exchange ActiveSync
3. Tap
Done
.
Allows you to filter Contacts based on
Phone, SIM,
.
Adding more Contacts via Accounts and Sync
When you synchronize applications such as Facebook, Twitter,
Linkedin, a corporate email account, or Google, using the
Accounts and sync option synchronizes the data from the selected
account type with your Contacts list.
1. Press ➔ and then tap ➔
sync ➔ Add account
.
Accounts and
Contacts 79
Page 84

Determine which type of account information you want to
2.
synchronize with your Contact list. Selections are:
Facebook, Twitter, Linkedin, Microsoft Exchange ActiveSync,
Google,
or
Samsung account
3. Tap an account type to add.
4. Follow the prompts. The selected account type
.
synchronizes with your Contacts list.
5. After synchronizing accounts you may want to link contact
information. For more information, refer to “Joining
Contact Information” on page 75.
To add Facebook content to your Contacts list:
You can now add your Facebook contact information, such as
pictures, email, and phone numbers directly to your Contacts list.
All of their current contact information is then migrated over to your
phone. If a Contacts entry already exists with a slightly different
name, separate entries are created and can later be linked (joined)
together into a single entry.
Important!:
This process not only synchronizes your contac t information but
also your status, events, and more.
1. Press ➔ and then tap ➔
80
Accounts and
sync ➔ Add account ➔ Facebook.
2. Accept the terms of the Social Hub, tap the
above
field, then select
3. Read the on-screen descriptions and tap
4. Log into your Facebook account:
•
Enter your account’s access
and tap
Log in
5. Tap those contact settings you wish to synchronize (all are
Agree
.
Email
.
and
Password
I accept all terms
Next
.
information
enabled by default). A green circle indicates the feature is
enabled.
•
Choose from:
6. Tap
7. Tap to confirm your Facebook contacts are now
Sync Contacts, Sync Message
Done
to complete the login and sync process.
, or
Sync Calendar
synchronized and appear in your Contacts list.
To resync Social Network Contacts:
1. Press ➔ and then tap ➔
Accounts and
sync.
2. T ap within the adjacent SNS account field to reveal the
account’s synchronization settings screen.
3. Tap
Sync Contacts
.
.
Page 85

My Profile
You can send this Virtual Business Card (V-card) to other contacts
as an attachment. My Profile is the first Contact listed in the
Contacts list.
Note:
As with any profile, your profile can be associated wit h a group.
To create My Profile:
1. From the Home screen, tap .
2. Press and then tap
My profile
.
To edit My Profile:
1. With My profile displayed, press and then tap
2. Modify any of the information contained in My Profile, then
tap
Save
.
Edit
Additional Contact Options
Sending an Email to a Contact
Note:
Contacts must contain and email account and addr ess before you can
use the Send email feature.
1. From the Home screen, tap .
Note:
Export/Impor t
.
For more information, refer to “Copying Contact Informat ion”
on page 78.
Contact List Settings
From this menu you can determine the default storage location for
Contacts, display your phone’s primary number, and view service
numbers listed in your Contact list.
2. Press and then tap
More
➔
Send email
. Contacts that
contain an email address display.
3. Tap the contact(s) to which you want to send an email. A
check mark displays next to the selection.
The select contact must have an email as part of their details screen.
4. Tap
Send
.
5. Select an email account type.
6. Compose the email and tap
1. From the Home screen, tap .
2. Press and then tap
More
Send
➔
.
Settings
.
Contacts 81
Page 86

Important!:
G s
Groups
G
Groups
Groups
Groups
The Google and Microsoft Exchange ActiveSync acc ount types
are only visible after cr e ating an email account of those types on
your phone.
3. Select one of the following options:
• Save new contacts to -
new Contacts. Choose from:
Microsoft Exchange ActiveSync
• Own numbers -
• Service numbers -
• Send contact -
Defines the default storage location of
Always ask, Phone, SIM, Google
.
Displays the device’s phone number.
Displays the available service numbers.
Allows you to define what set of namecards are
sent when you choose to send namecards to other sources.
–
Read the on-screen description of this feature and tap
–
Select either
namecards
Send all namecards
.
or
Groups
This feature allows you to add a new or existing contact to a call
group. This group can be one of the already present groups
(Family, Friends, or Work) or a user-created group.
Creating a New Caller Group
1. From the Home screen, tap ➔ (
2. Press and then tap
82
Create
.
Send individual
Groups
Next
.
tab).
3. Tap the
Group name
field and use the on-screen keypad to
enter a new group name. For more information, refer to
“Text Input Methods” on page 59.
4. Tap
Ringtone
and select a ringtone for the group. Selections
are:
, or
Note:
Default ringtone, Select sound from My files
ringtone
.
5. Tap
Save
to store the newly created group.
Some externally maintained group types (such as Google) can only be
managed or updated remotely online vs via the phone. These external
types will not allow editing or deleting members locally via the phone.
Adding an Existing Entry to a Current Caller Group
1. From the Home screen, tap ➔ .
2. Tap a group entry ➔ (
3. From the available list of contacts, tap the contact(s) you
Add group member
want to add. A check mark displays next to contact entry.
4. Tap
Add
. The selected contacts are added to the group.
Removing an Entry From a Caller Group
1. From the Home screen, tap ➔ .
2. Tap a group entry.
, or
).
Phone
Page 87

Press and then tap
Favorites
3.
4. Tap all of the contacts you want to remove from this group.
Remove member
A checkmark displays next to contact entry.
5. Tap
Remove
.The contacts are removed from the group.
Editing a Caller Group
To edit a Group entry, there must be at least one member as part
of the selected group.
1. From the Home screen, tap ➔ .
2. Touch and hold a group entry then select
3. Make modifications to the
Group name
Groups
or
For more information, refer to “Creating a New Caller
Group” on page 82.
4. Tap
Save
.
Deleting a Caller Group
1. From the Home screen, tap ➔ .
2. Press and then tap
3. Select either
4. Tap
5. Tap
Select all
Delete
.
Delete
, Group only, or Group and group members.
Delete
or tap the desired group.
Groups
.
.
Edit group
Ringtone
.
fields.
Sending a Message to a Group
1. From the Home screen, tap ➔ .
2. Tap an existing group, and press and then tap
message
.
u
Groups
– or –
Touch and hold a group entry and select
3. Select the recipients of the new message (indicated by a
Send message
green checkmark). If an entry contains multiple phone
numbers, each must be selected individually.
4. Tap
Send
.
5. Type your message, and tap
Send
.
Favorites Tab
The Favorites tab is a list of the phone numbers that have been
designated as favorite contacts. For more information, refer to
“Logs Tab” on page 55.
1. From the Home screen, tap .
2. Tap (
Favorites
tab).
Adding a contact to your favorites list:
3. From within the Favorites tab, press and select
Add to Favourites
.
Contacts 83
Send
.
Page 88

Place a check mark alongside those current Contacts
4.
entries you wish to assign as favorites.
5. Tap
Add
to complete the process.
84
Page 89

Section 7: Messaging
This section describes how to send or receive different types of
messages. It also explains the features and functionality
associated with messaging.
Types of Messages
Your phone provides the following message types:
•
Text Messages
•
Multimedia (Picture, Video, and Audio) Messages
•
Email and Gmail Messages
•
Google Talk
Message Icons on the Status Bar
Icons are displayed on the Status Bar at the top of the display
when new messages are received. For more information, refer to
“Status Bar” on page 21.
Creating and Sending Messages
The Short Message Service (SMS) lets you send and receive text
messages to and from other mobile phones or email addresses. To
use this feature, you may need to subscribe to your service
provider’s message service.
The Multimedia Messaging Service (MMS) lets you send and
receive multimedia messages (such as picture, video, and audio
messages) to and from other mobile phones or email addresses.
T o use this feature, you may need to subscribe to your service
provider’s multimedia message service.
Important!:
When creating a message, adding an image, a sound file, or a
video clip to a text message changes the message from a text
message to a multimedia message.
Messaging icons are displayed at the top of the screen and
indicate when messages are received and their type. For more
information, refer to “Indicator Icons” on page 21.
1. From the Home screen, tap
(
New message
2. Tap the
).
Enter recipient
field to manually enter a recipient.
(Messaging
) ➔
– or –
3. Tap to select from one of the following:
• Contacts -
T o select a recipient from your Contacts list (valid
entries must have a wireless phone number or email address).
• Recent -
To select a recipient from a list of recently sent
messages.
• Groups -
T o select a recipient from the Group list.
• Favorites -
To select a recipient from the Favorites list .
Messaging 85
Page 90

If adding a recipient from either Recent, Contacts, or
4.
Group, tap the contact to place a checkmark then tap
The contact displays in the recipient field.
Note:
For the Group option, if the number of recipients is less than 10, all
members in the group are added. Delete any unnecessary member s in
the list by selecting the trash can icon and de leting unwanted entries.
5. Tap the
Tap to enter message
field and use the on-screen
keypad to enter a message. For more information, refer to
“Text Input Methods” on page 59.
6. Add more recipients by tapping either the
Enter recipient
field or and selecting recipients.
7. Review your message and tap
Note:
If you exit a message before you tap send the message automatically
saves as a draft.
Send.
Message Options
1. From the Home screen, tap
2. From within an open message, press to display
(Messaging
additional messaging options:
86
Add
• Insert smiley
.
(emoticons).
•Call -
• Add text -
: allows you to add insert smiley icons images
Places an outgoing call to the sender.
Allows you to add text items from sources such
as: Location, Contacts, Calendar, Memo, and Text.
• Add to Contacts -
Allows you to add the new recipient to your
current Contacts list as a new entry.
• Add/Remove slide -
Converts an SMS message into an MMS
(Multimedia) message and allows you to attach an existing
slideshow.
–
Once the message has been converted into in an MMS message,
press and tap
slide/Remove slide, Add subject, Duration (5sec), Layout
(bottom)
•More -
(when in an SMS message - plain text) Provides additional
options such as:
, or
Delete message
Add subject
More
to choose from these options:
.
and
Delete messages
Add
.
Viewing Newly Received Messages
When you receive a message, your phone notifies you by
displaying within the Notification area at the top left of your
).
Home screen.
Page 91

To read a message:
Text Message
Thread
Reply
Bubble
Current Recipient My Text
1. Open the Notification Bar and select the message. For more
information, refer to “Notification Bar” on page 24.
– or –
From the Home screen, tap and then tap the new
message to view its contents. The selected message
displays on the screen.
2. Tap to play a multimedia message.
3. In a single motion, touch and scroll up or down the page to
scroll through the message (if additional pages were
added).
Message Threads
Sent and received text and picture messages are grouped into
message threads. Threaded messages allow you to see all the
messages exchanged (similar to a chat program) and displays a
contact on the screen.
Message threads are listed in the order in which they were
received, with the latest message displayed at the top.
To reply to a text message:
1. From the Home screen,
tap .
2. While the message is
open, tap the
compose
Typ e to
field and then
type your reply message.
3. Compose your reply.
Your texts are displayed in
Blue and your caller’s
replies are displayed in
Yel low.
4. Tap
Send
to review your
reply.
– or –
Press and then select one of the available message
options (page 86).
To access message thread options:
䊳
From the main Messaging screen, touch and hold the
message to display the following options:
Messaging 87
Page 92

• Add to Contacts -
Begins the process of adding the new number
to your Contacts list.
• View contact -
• Delete thread -
Displays the contact’s details.
Deletes the currently selected message thread.
To access additional Bubble options:
䊳
From within the message string screen, touch and hold the
message bubble to display the following options:
• Delete message -
Deletes the currently selected message bubble
from the thread.
• Add to Contacts
• Copy message text -
- Adds the current caller to your Contacts list.
Copies the currently selected message
bubble from the thread.
• Lock/Unlock message -
Locks or unlocks the currently selected
message bubble from being accidentally deleted.
• Forward -
Allows you to forward the currently selected message
bubble to an external recipient.
• Copy to SIM -
Copies the currently selected message bubble as a
single text message within the SIM card.
• View message details -
Displays details for the currently selected
message bubble.
Deleting Messages
Deleting a single message
1. From the Home screen, tap .
88
2. Touch and hold a message from the Messages list, then
select
Delete thread
3. At the prompt, tap
.
OK
to delete or
Cancel
to exit.
Deleting multiple messages
1. From the Home screen, tap .
2. Press and then tap
3. Tap each message thread you want to delete. A checkmark
Delete threads
.
displays beside each selected message.
4. Tap
Delete
.
5. At the prompt, tap
OK
to delete or
Cancel
to end the
process.
Message Search
You can search through your messages by using the Message
Search feature.
1. From the Home screen, tap .
2. Press and then tap
3. Use the on-screen keypad to enter a word or phrase in
Search
.
which to search, then tap .
4. All messages that contain the entered search string display.
Page 93

Messaging Settings
To configure the settings for text messages, multimedia messages,
Voice mails, and Push messages.
1. From the Home screen, tap
2. Press and then tap
Settings
.
The following Messaging settings are available:
Settings
• Message font size -
for the on-screen front. Choose from:
• Background color -
Enables the phone to change the display size
Normal, Small
, or
Tiny
Enables the phone to display the messages
using different contrasting colors schemes. The background color
options are:
Black
or
White
.
Storage settings
• Delete old messages -
Deletes old messages when the limit is
reached, rather than overwriting them.
• Text message limit -
Allows you to set a limit on how many text
messages are allowed in one conversation.
• Multimedia message limit -
Allows you to set a limit on how many
multimedia messages are allowed in one conversation.
Text message (SMS) settings
• Delivery reports -
When this option is activated, the network
informs you whether or not your message was delivered.
• Manage SIM card messages -
messages stored on the SM card.
• Message centre -
centre.
• Input mode -
messages. Choose from:
Automatic
Multimedia message (MMS) settings
• Delivery reports -
.
informs you whether or not your message was delivered.
• Read reports -
a request for a read reply along with your message to the
recipient.
• Auto-retrieve -
retrieve messages.
• Roaming auto-retrieve -
automatically retrieve while roaming.
• Creation mode Restricted
–
Restricted -
content belonging to the Core MM Content Domain.
–
Warning -
are creating a multimedia message which does not fit the Core MM
Content Domain.
Allows you to manage the
Sets the phone number for the message
Allows you to set the input mode for your text
GSM Alphabet, Unicode
, or
.
When this option is activated, the network
When this option is activated, your phone receives
Allows the message system to automatically
Allows the message system to
Allows you to select the creation mode:
, or
Warn ing
.
Free
You can only create and submit messages with
The phone will warn you via pop up messages that you
Messaging 89
,
Page 94

Free -
You may add any content to the message.
–
Push message settings
• Push message -
Allows you to receive push messages from the
network.
• Service loading -
notification. Choose from:
Cell broadcast (CB) settings
• CB activation -
• Channel configuration -
• Language -
Allows you to set the type of service loading
Always, Prompt
, or
Never
.
Allows you to activate cell broadcasting.
Allows you configure the channels.
Allows you to set the language used by cell
broadcast.
Notification settings
• Notifications -
Allows you to see message notifications on your
status bar.
• Select ringtone -
Allows you to set the ringtone for your message
notifications.
Email (or Internet Email) enables you to review and create email
using several email services. You can also receive text message
alerts when you receive an important email. Your phone’s Email
application lets you access and manage multiple email accounts
simultaneously in one convenient location.
90
There are currently three main types of email accounts on your
phone: Gmail, Internet-based email (Gmail, Yahoo, etc..), and
Microsoft Exchange (Corporate email or Outlook®).
To send and receive email messages through an ISP (Internet
Service Provider) account, or if you wish to use your device to
access your corporate email through a VPN (Virtual Private
Network), you will first need to set up an IMAP or POP account.
•
IMAP -
(Internet Message Access Protocol) This protocol is frequently
used in large networks and commercial settings. MAP4 is the current
standard.
•
POP3 -
(Post Office Protocol) This protocol is supported by most ISPs
(Internet service providers) and common among consumer applications.
POP3 is the current standard.
•
Microsoft Exchange ActiveSync -
This protocol is frequently used with
a large corporate email server system and provides access to email,
contact, and calendar synchronization.
Creating an Inter net Email Account
1. From the Home screen, tap (
(
Email
).
2. If you already have other email account setup:
•
Tap the account name field (upper-right) to open the
Applications)
➔
complete email account list page.
Page 95

•
Account name
Press and then tap
Add account.
– or –
Enter your
Tap
Email address
Show password
and
Password
information.
to view the password string as you
enter it.
• Email address -
• Password -
Your Out look work email address.
Typically your network access password
(case-sensitive).
3. Tap
Send email from this account by default
only your default email account, but also link it to your Social
to make this not
Hub (page 132).
4. Tap
Next.
If prompted to sign up to Social Hub, tap OK.
•
T ap
Manual setup
to configure your connection settings manually
(POP3 or MAP). Follow the on-screen prompts and enter the
information specific to your email provider.
•
The unique account name is used to differentiate this account
from other email accounts accessed by your device.
5. At the
Set up email
screen, name the account and enter a
screen name to identify yourself on this account. If you have
already setup this account, skip to Step 7.
6. Messages for this account display on the Inbox tab. You can
also view Personal information for this account, Receipts (if
you setup the account to return receipts), Travel
information, and more (if available).
7. Tap
Done
to store the new account.
Opening an Email
1. From the Home screen, tap ➔ (
2. Tap the account name field (upper-right) to open the
Email
).
complete email account list page.
3. Select an email account and tap an email message.
Messaging 91
Page 96

Refreshing Email messages
1. From the Home screen, tap ➔ (
2. Select an email account.
•
If you are already in an email account, tap the account name field
(upper-right) to open the complete email account list page.
•
Select an available email account.
3. Press and then tap
Refresh
.
Composing Email
1. From the Home screen, tap ➔ (
2. Tap the account name field (upper-right) to open the
complete email account list page.
3. Tap
Inbox
➔ (
4. Enter the recipient’s email address in the
•
If you are sending the email message to several recipients,
Compose
).
To
separate the email addresses with a comma. You can add as
many message recipients as you want.
5. Press and then tap
Add Cc/Bcc
to add additional
carbon copy recipients.
•
Use the Cc field to carbon copy additional recipients.
•
Use the
Bcc
field to blind copy additional recipients.
6. Tap the
92
Subject
field and enter the email subject.
Email
Email
field.
7. Tap the email text field and compose your email message.
).
•
T o add a picture attach ment, tap
Attach
(from the bottom of the
screen) and make a category selection.
•
T ap the file you wish to attach. If selecting an image, you can
choose to select a variation of the image size.
•
T ap to delete the attached file.
Note:
If you attach an image to your email, you ha ve the option to resize it
prior to delivery. Choose from: Original, Large (70%), Medium (30%),
or Small (10%) and tap OK.
).
8. Once complete, tap
Send
.
Configuring Email Settings
1. From the Home screen, tap ➔ (
2. Select an account.
3. From the email list screen, press and then tap
Account settings
4. Alter any of the following settings:
• Account name -
.
Displays your uniquely created account display
Email
).
More
➔
name.
• Your name -
Displays the name used in the From field of your
outgoing email messages.
Page 97

• Add signature -
Account name
Allows you to attach a customized signature to
the bottom of all outgoing emails.
• Signature -
Allows you to create an email signature for your
outgoing Gmail email messages.
• Email check frequency -
Adjusts the time interval used by your
device to check your email account for new email messages.
• Default account -
Assign this account as the default email
account used for outgoing messages.
• Always Cc/Bcc myself -
Allows you to include your own email
address in either the CC, Bcc, or None fields. Allows you to
always receive a copy of outgoing emails.
• Email notifications -
Activates the email notification icon to
appear within the Notifications area of the status bar when a new
Internet mail (Gmail, etc..) is received.
• Select ringtone -
Plays a selected ringtone when a new email
message is received.
• Vibration -
Activates a vibration when a new email message is
received.
• Incoming settings -
such as
Port
, and
• Outgoing settings -
such as
User name
• Forward with files -
Allows you to specify incoming email settings,
User name, Password, IMAP server, Security type
IMAP path prefix
.
Allows you to specify incoming email settings,
SMTP server, Security type, Port, Require sign-in
, and
Password
.
Allows you to include attachments when
forwarding an email.
Microsoft Exchange Email (Outlook)
Your phone also provides access to your company’s Outlook
Exchange server. If your company uses either Microsoft Exchange
Server 2003 or 2007, you can use this email application to
wirelessly synchronize your email, Contacts, and Calendar
information directly with your company’s Exchange server.
Setting Up a Microsoft Exchange Email account
1. From the Home screen, tap ➔ (
2. If you already have other email account setup:
•
Tap the account name field (upper-right) to open the
complete email account list page.
•
Press and then tap
,
,
– or –
Add account.
Email
).
Messaging 93
Page 98

Enter your
Tap
Show password
Email address
and
Password
information.
to view the password string as you
enter it.
• Email address -
• Password -
Your Outlook work email address.
Typically your network access password
(case-sensitive).
3. Tap
Send email from this account by default
, to make this not
only your default email account, but also link it to your Social
Hub (page 132).
4. Tap
Done ➔ Next
. Consult your Network or IT Administrator
for further details and support.
5. Tap
Microsoft Exchange ActiveSync
(from the add new email
account screen).
6. When prompted to provide additional detailed information,
enter an updated
Password
Important!:
It will be necessary for you to enter your domain infor mation befo re
the “\” in front of your user name.
•
If your network requires SSL encryption, tap the
connection (SSL)
94
Domain
, and confirm your
information.
field to place a check mark in the box and
User name
Use secure
and
activate this additional level. Most often, this option should be
enabled.
•
If your network requires you accept SSL certificates, tap the
Accept all SSL certificates
field to place a check mark in the box
and activate this additional level. Most often, this option is not
required. Confirm this information with your IT Administrator .
Important!:
If your exchange server requires this feat ure, leaving this field
unchecked can prevent connection.
7. Manually updated or re-enter your
Exchange server
information within the appropriate field. This field can often
be populated with incorrect or out of date information.
• Exchange Server -
Typically starts with
Your exchange server remot e email address.
mail.XXX.com
. Obtain this information from
your company network administrator. Do not accept the default
entry as this is a guess based on returned information.
Important!:
The Exchange server field may not reflect the desired server
information. It is recommended that you confirm this information
and re-enter if necessary.
8. With the new server information entered, tap
9. Read the on-screen activation disclaimer and, if prompted,
Next
.
tap OK.
Page 99

Adjust the various on-screen configuration fields and tap
10.
Next
.
11. Identify your new work email account with a unique name
(Ex: Work), then tap
Done
.
Opening an Exchange Email
1. From the Home screen, tap ➔ (
2. Tap the account name field (upper-right) to open the
Email
complete email account list page.
3. Select an exchange email account and tap an email
message.
Refreshing Exchange Email
1. From the Home screen, tap ➔ (
2. Select an exchange email account.
3. Press and then tap
Refresh
.
Email
Composing Exchange Email
1. From the Home screen, tap ➔ (
2. Tap the account name field (upper-right) to open the
Email
complete email account list page.
3. Select an exchange email account.
4. Tap
Inbox
and tap (
5. Enter the recipient’s email address in the
•
If you are sending the email message to several recipients,
Compose
).
To
field.
separate the email addresses with a comma. Y ou can add as
many message recipients as you want.
).
).
6. Press and then tap
carbon copy recipients.
•
Use the Cc field to carbon copy additional recipients.
•
Use the
Bcc
field to blind copy additional recipients.
7. Tap the
8. Tap the email text field and compose your email message.
Subject
•
T o add a picture attachment, tap
screen) and make a category selection.
•
T ap the file you wish to attach. If selecting an image, you can
Add Cc/Bcc
to add additional
field and enter the email subject.
Attach
(from the bottom of the
choose to select a variation of the image size.
•
T ap to delete the attached file.
Note:
If you attach an image to your email, you have the option t o resize it
).
prior to delivery . Ch oo s e fr om: Original, Large (70%), Medium (30%),
or Small (10%) and tap OK.
9. Once complete, tap
Send
.
Messaging 95
Page 100

Deleting an Exchange Email Message
䊳
Touch and hold an email (from your inbox list) and select
Delete
from the on-screen context menu.
– or –
With the email message displayed, tap (
Delete
Configuring Microsoft Exchange Email Settings
1. Press ➔ and then tap ➔
Accounts and
sync.
2. Tap adjacent to the Microsoft Exchange account field
to reveal the account’s synchronization settings screen.
3. Toggle either the
Sync Contacts
or
Sync Calendar
fields to
force the device to manually resync either the exchange
Contacts or Calendar entries.
– or –
Tap
Account settings
and specify any other email settings
you wish to synchronize:
• Account name -
Displays the name used by the device to track
the account.
• Add signature -
96
Activates the email signature feature.
• Signature -
Allows you to create an outgoing email signature
attached to new email messages sent from your phone.
• Default account -
Assigns this account as the default used when
sending out new email messages.
• Always Cc/Bcc myself -
).
address in either the CC, Bcc, or None fields. Lets you always
receive a copy of outgoing emails.
• Period to sync email -
Allows you to include your own email
To assign the sync range for you r incoming
and outgoing email messages between your phone and your
external exchange server. How many days worth of email
messages should the phone and server synchronize. Choose
from:
1 day, 3 days, 1 week, 2 weeks
• Empty server trash -
Allows you to delete your email account’s
, or
1 month
.
trash bin remotely.
• Sync schedule -
Allows you to configure your email sync
schedule.
• Out of office settings -
Allows you to configure your email’s out of
office notification settings.
• Period to sync Calendar -
Assigns a period for your phone to sync
calendar events.
• Size to retrieve emails -
Configures the incoming email size
allowed to pass through to your phone automatically without user
interaction. Emails with attachments larger than configured will
have to be retrieved manually.
• Security options -
such as:
Allows you to enable several security options
Encryption, Encryption algorithm, Sign, Sign
 Loading...