

Page 1

SGH-Beat Series
PORTABLE Quad-BAND
MOBILE PHONE
User Guide
Please read this manual before operating your
phone, and keep it for future reference.
Page 2

Intellectual Property
All Intellectual Property, as defined below, owned by or which is otherwise the
property of Samsung or its respective suppliers relating to the SAMSUNG Phone,
including but not limited to, accessories, parts, or software relating there to (the
“Phone System”), is proprietary to Samsung and protected under federal laws, state
laws, and international treaty provisions. Intellectual Property includes, but is not
limited to, inventions (patentable or unpatentable), patents, trade secrets,
copyrights, software, computer programs, and related documentation and other
works of authorship. You may not infringe or otherwise violate the rights secured by
the Intellectual Property. Moreover, you agree that you will not (and will not attempt
to) modify, prepare derivative works of, reverse engineer, decompile, disassemble,
or otherwise attempt to create source code from the software. No title to or
ownership in the Intellectual Property is transferred to you. All applicable rights of
the Intellectual Property shall remain with SAMSUNG and its suppliers.
Samsung Telecommunications America (STA), LLC
Headquarters: Customer Care Center:
1301 E. Lookout Drive 1000 Klein St.
Richardson, TX 75082 Plano, TX 75074
Toll Free Tel: 1.888.987.HELP (4357)
Internet Address: http://www.samsungusa.com
©
2007 Samsung Telecommunications America, LLC is a registered trademark of
Samsung Electronics America, Inc. and its related entities.
Do you have questions about your Samsung Mobile Phone?
For 24 hour information and assistance, we offer a new FAQ/ARS System
(Automated Response System) at:
www.samsungwireless.com/support
GHXX-XXXXX
Printed in XXXXXX (Korea or China) ????
Openwave® is a registered Trademark of Openwave, Inc.
RSA® is a registered Trademark RSA Security, Inc.
Page 3

Disclaimer of Warranties; Exclusion of Liability
EXCEPT AS SET FORTH IN THE EXPRESS WARRANTY CONTAINED ON THE
WARRANTY PAGE ENCLOSED WITH THE PRODUCT, THE PURCHASER TAKES THE
PRODUCT "AS IS", AND SAMSUNG MAKES NO EXPRESS OR IMPLIED WARRANTY OF
ANY KIND WHATSOEVER WITH RESPECT TO THE PRODUCT, INCLUDING BUT NOT
LIMITED TO THE MERCHANTABILITY OF THE PRODUCT OR ITS FITNESS FOR ANY
PARTICULAR PURPOSE OR USE; THE DESIGN, CONDITION OR QUALITY OF THE
PRODUCT; THE PERFORMANCE OF THE PRODUCT; THE WORKMANSHIP OF THE
PRODUCT OR THE COMPONENTS CONTAINED THEREIN; OR COMPLIANCE OF THE
PRODUCT WITH THE REQUIREMENTS OF ANY LAW, RULE, SPECIFICATION OR
CONTRACT PERTAINING THERETO. NOTHING CONTAINED IN THE INSTRUCTION
MANUAL SHALL BE CONSTRUED TO CREATE AN EXPRESS OR IMPLIED WARRANTY
OF ANY KIND WHATSOEVER WITH RESPECT TO THE PRODUCT. IN ADDITION,
SAMSUNG SHALL NOT BE LIABLE FOR ANY DAMAGES OF ANY KIND RESULTING
FROM THE PURCHASE OR USE OF THE PRODUCT OR ARISING FROM THE BREACH OF
THE EXPRESS WARRANTY, INCLUDING INCIDENTAL, SPECIAL OR CONSEQUENTIAL
DAMAGES, OR LOSS OF ANTICIPATED PROFITS OR BENEFITS.
T539_UVGF2_PS_062707_D2
Page 4

Table of Contents
Section 1: Getting Started ..........................................................................4
Activating Your Phone ............................................................................................... 4
Switching the Phone On or Off ................................................................................11
Setting Up Your Voice mail ...................................................................................... 11
Section 2: Understanding Your Phone .....................................................13
Features of Your Phone ...........................................................................................13
View of Your Phone .................................................................................................14
Keys .......................................................................................................................14
Closed View of Your Phone .....................................................................................16
Display Layout ........................................................................................................17
Get More Help .........................................................................................................19
Section 3: Call Functions ..........................................................................20
Making a Call ..........................................................................................................20
Adjusting the Call Volume ....................................................................................... 22
Answering a Call .....................................................................................................22
Call records ............................................................................................................ 23
Silent Mode ............................................................................................................ 25
Selecting Functions and Options .............................................................................26
Section 4: Menu Navigation .....................................................................33
Menu Navigation .....................................................................................................33
Menu Outline ..........................................................................................................34
Section 5: Entering Text ...........................................................................44
Changing the Text Input Mode ................................................................................ 44
Using ABC Mode .....................................................................................................45
Using T9 Mode .......................................................................................................46
Using Number Mode ...............................................................................................47
Using Symbol Mode ................................................................................................48
Section 6: Understanding Your Phonebook .............................................49
Storing a Number in the Phone’s Memory ............................................................... 49
Storing a Number in the SIM Card ...........................................................................51
Finding a Phonebook Entry .....................................................................................52
Speed Dialing .........................................................................................................53
Editing a Caller Group .............................................................................................54
Copying all SIM Phonebook Entries .........................................................................55
Deleting all of the Phonebook Entries ...................................................................... 55
Own Numbers .........................................................................................................56
FDN list ...................................................................................................................56
Management ..........................................................................................................57
1
Page 5

Section 7: Messages ................................................................................ 58
Types of Messages .................................................................................................58
Voice Note ..............................................................................................................59
Text Messages ........................................................................................................59
Picture Messages (Share Picture) ............................................................................60
Inbox ......................................................................................................................63
Outbox ....................................................................................................................66
Drafts .....................................................................................................................66
Templates ...............................................................................................................67
Voice Mail ...............................................................................................................68
Delete All ................................................................................................................69
Settings ..................................................................................................................69
Memory Status .......................................................................................................70
Broadcast Messages (SIM Dependent) ....................................................................70
Instant Messaging ...................................................................................................71
Section 8: Fun & Apps ............................................................................. 72
Files ........................................................................................................................72
Games ....................................................................................................................79
Voice Note ..............................................................................................................80
Camera ...................................................................................................................81
Voice Commands ....................................................................................................82
Mega Search ..........................................................................................................89
Section 9: Music Player ........................................................................... 91
Music Player ...........................................................................................................91
Supported File Types ..............................................................................................91
Music Player Library ...............................................................................................92
Player Settings ........................................................................................................93
Playing Music Files .................................................................................................94
Creating a Music Playlist .........................................................................................95
Adding Music to a Playlist .......................................................................................96
Transferring Music Files to the Memory Card ..........................................................96
Deleting Music Files From the Memory Card ...........................................................96
Assigning Music Files .............................................................................................97
Section 10: Camera and Camcorder ....................................................... 98
Using the Camera and Camcorder ...........................................................................98
Taking and Sending Photos .....................................................................................98
Recording Video ....................................................................................................102
Viewing a Photo ....................................................................................................104
Deleting a Photo ...................................................................................................105
Viewing Videos ......................................................................................................105
Deleting a Video Clip .............................................................................................106
My Album .............................................................................................................106
My Journal ............................................................................................................107
Table of Contents 2
Page 6

Section 11: Organizer .............................................................................108
Alarm ...................................................................................................................108
Calendar ...............................................................................................................109
Tasks ...................................................................................................................113
Calculator .............................................................................................................114
Tip Calculator .......................................................................................................114
World time ............................................................................................................ 115
Synchronization ....................................................................................................115
Unit conversion ..................................................................................................... 117
Timer ....................................................................................................................117
Stopwatch ............................................................................................................118
Section 12: Changing Your Settings ......................................................119
Time & Date .........................................................................................................119
Phone Settings .....................................................................................................120
Shortcut Key .........................................................................................................121
Display Settings .................................................................................................... 122
Bluetooth ..............................................................................................................124
Sound Settings ..................................................................................................... 126
Synchronization ....................................................................................................127
Network Services ..................................................................................................128
Security ................................................................................................................130
Software Update ...................................................................................................132
Memory status ......................................................................................................133
Reset settings .......................................................................................................133
Help ......................................................................................................................133
Section 13: t-zones .................................................................................134
t-zones .................................................................................................................134
Section 14: Health and Safety Information ............................................138
Health and Safety Information ............................................................................... 138
Samsung Mobile Products and Recycling ..............................................................140
UL Certified Travel Adapter ................................................................................... 140
Consumer Information on Wireless Phones ........................................................... 140
Road Safety ..........................................................................................................147
Responsible Listening ........................................................................................... 148
Operating Environment ......................................................................................... 150
Using Your Phone Near Other Electronic Devices ...................................................150
Potentially Explosive Environments .......................................................................152
Emergency Calls ................................................................................................... 152
FCC Notice and Cautions .......................................................................................153
Other Important Safety Information .......................................................................153
Product Performance ............................................................................................154
Availability of Various Features/Ring Tones ...........................................................155
3
Page 7

Battery Standby and Talk Time .............................................................................155
Battery Precautions ...............................................................................................155
Care and Maintenance ..........................................................................................157
Section 15: Warranty Information ......................................................... 158
Standard Limited Warranty ...................................................................................158
Index ........................................................................................................ 163
Table of Contents 4
Page 8

Activating Your Phone
Section 1: Getting Started
Topics Covered
• Activating Your Phone
• Switching the Phone On or Off
• Setting Up Your Voice mail
This section describes how to start using your phone by activating your service and
setting up your Voice mail.
Activating Your Phone
When you subscribe to a cellular network, you are provided with a plug-in SIM card
loaded with your subscription details, such as your PIN, any optional services
available, and many others.
Installing the SIM Card
Important!: The plug-in SIM card and its contacts can be easil y damaged by scratching or bending, so b e
careful when handling, inserting, or removing the ca rd.
Keep all SIM cards out of reach of small chil dren.
1. If necessary, switch off the phone by holding down the key until the
power-off image displays.
2. If necessary, disconnect the Travel Adapter from the phone. For more
information, refer to "Charging a Battery" on page 9.
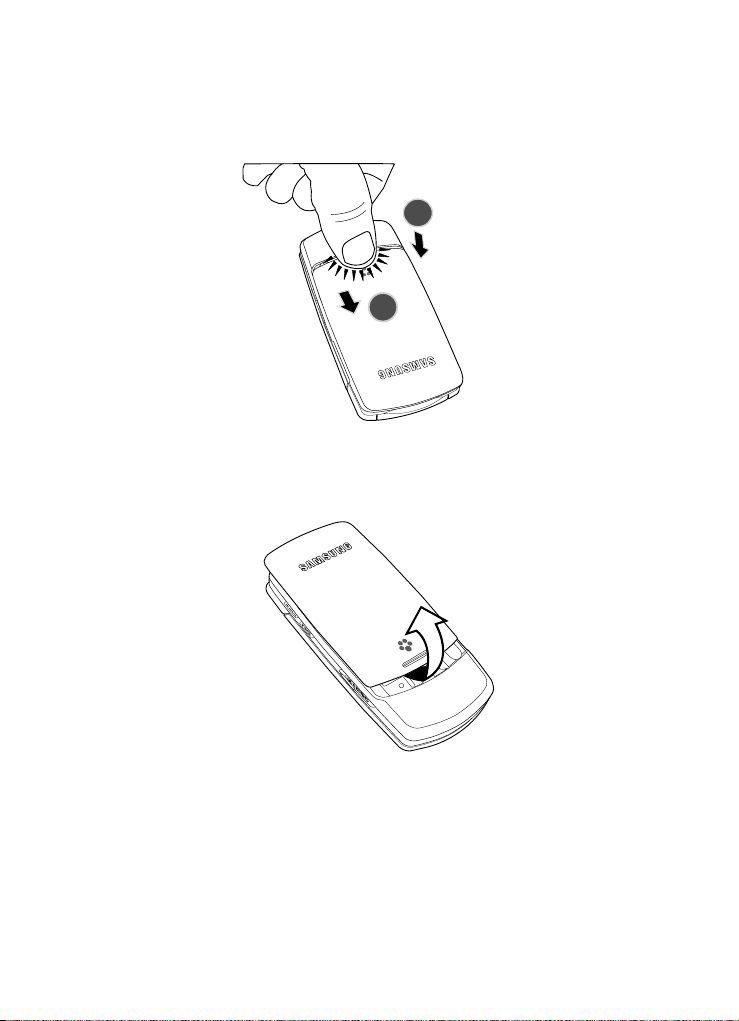
3. To remove the battery cover, press down the ridged area on the battery
cover using your thumb (1) and gently slide it in the direction of the arrow
(2). Remove the battery cover.
Getting Started 4
Page 9
4.
Grasp the top of the battery cover with your finger and lift up in the
direction of the arrow. Remove the battery.
5
Page 10
Activating Your Phone
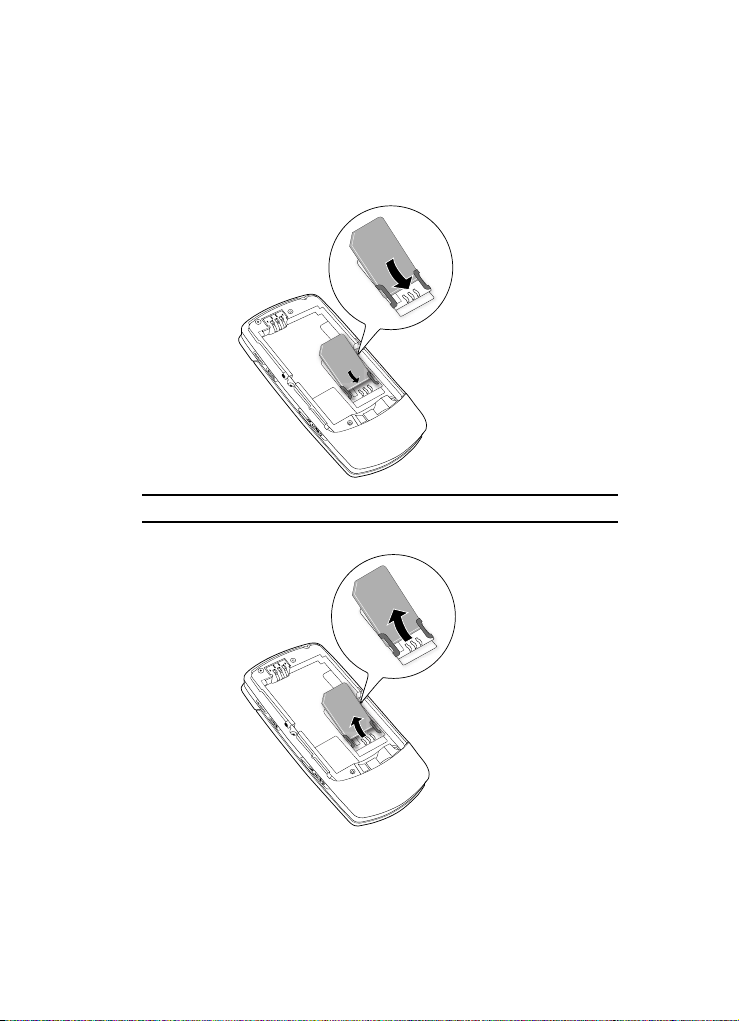
5. Slide the SIM card into the SIM card socket until the card locks into place.
Make sure the card’s gold contacts face into the phone.
Note: When you need to remove the SIM card, slide it out, as shown below, and remove it from the socket.
Getting Started 6
Page 11
Installing the Battery
1. With the cover removed, verify the SIM card is securely inserted.
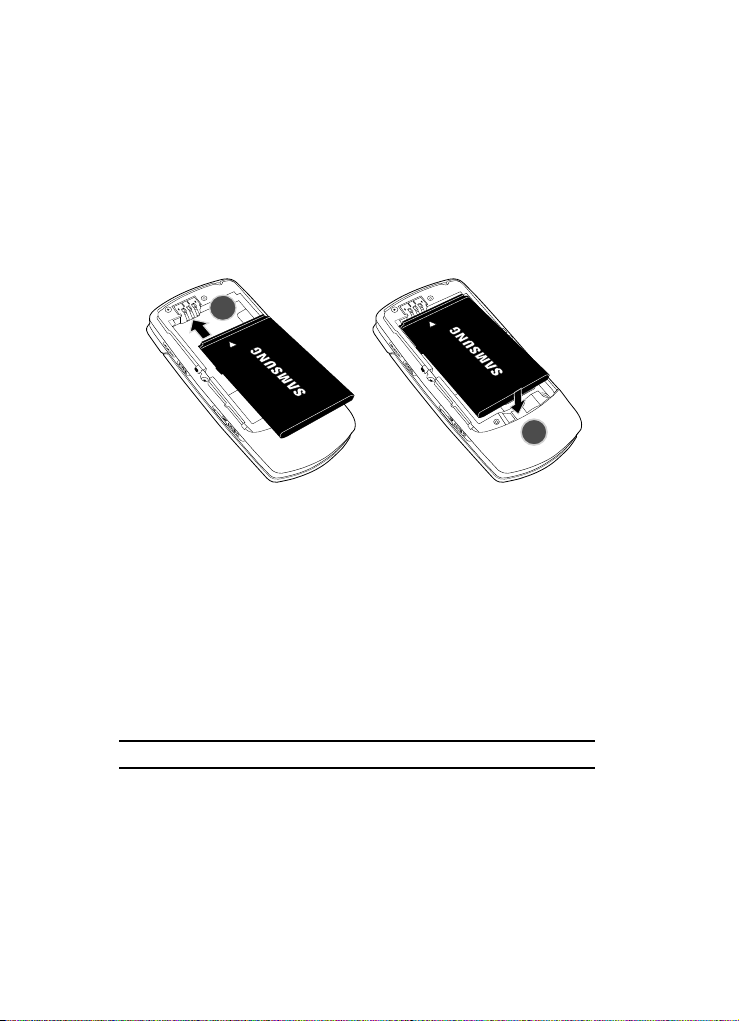
2. Install the battery by aligning its 3 brass tabs to those located at the bottom
of the battery compartment (1). The arrow on the battery should be
pointing towards the prongs.
3. Press the battery down until it clicks into place (2).
4. Replace the battery cover. Make sure that the battery is properly installed
before switching on the phone.
Inserting the Memor y Card
Your phone supports an optional memory card (microSD™) for data storage of such
things as music, pictures, video or other files. This type of memory card is designed
for use with this mobile phone and other devices.
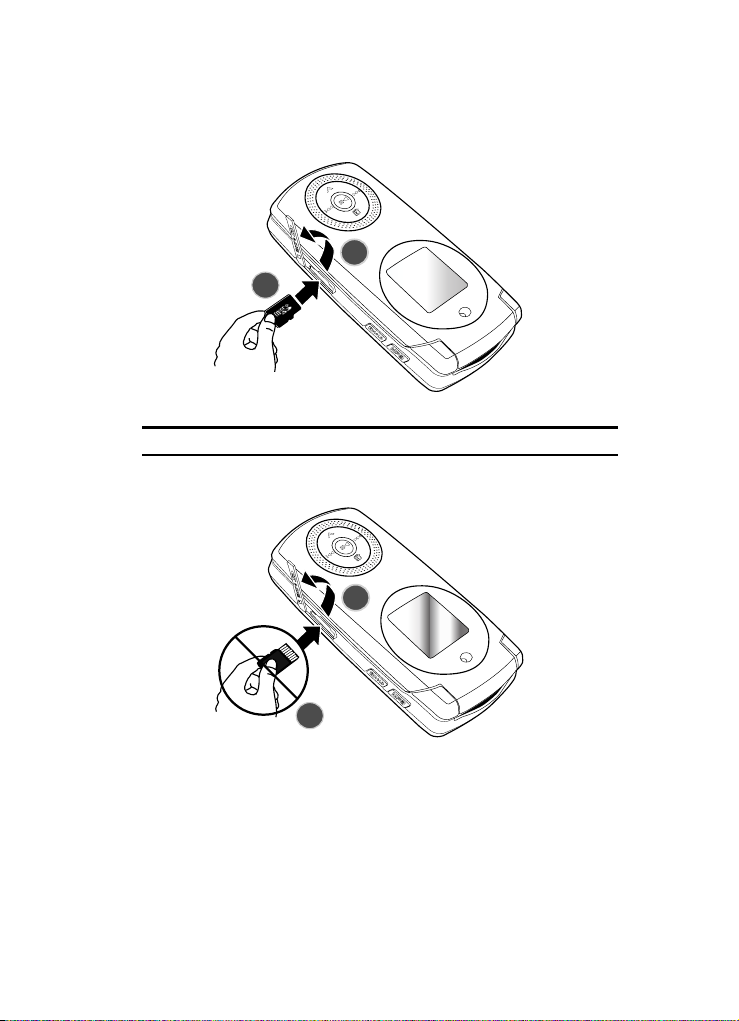
1. Lift up the memory card cover, located on the right side of the phone as
shown.
2. Gently push the microSD card into the slot until you hear a click sound.
Make sure the microSD’s gold contact pins face downward.
Note: The click indicates that the card is secured in the slot.
7
Page 12
2
Note: The following is the incorrect method for inserting the Memory Card.
.
Activating Your Phone
2
3. To remove the memory card, push the card further into the slot and then
release. The card ejects itself from the slot. You hear the click sound when
the card releases.
Getting Started 8
Page 13
Charging a Battery
Your phone is powered by a rechargeable Li-ion battery. A Travel Adapter comes
with your phone for charging the battery. Use only approved batteries and chargers.
Ask your local Samsung dealer for further details. You can use the phone while the
battery is charging, but doing so requires additional charging time.
Note: You must fully c harge the battery before using your phone for the first time. A discharged battery
recharges fully in approximatel y 2 hours.
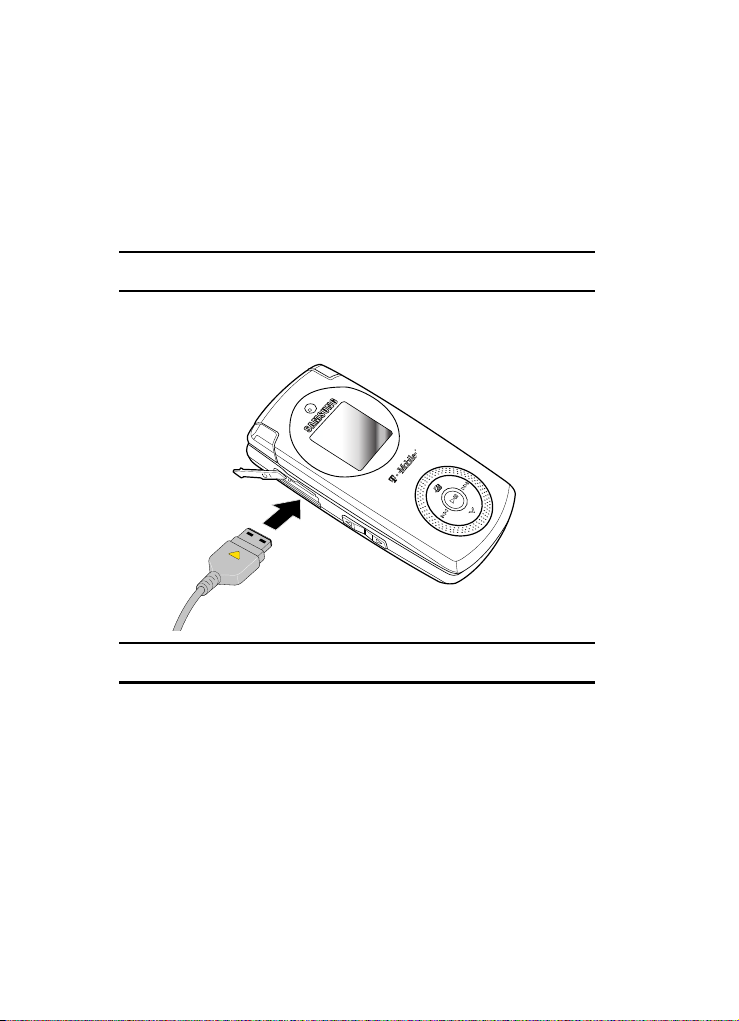
1. With the battery securely inserted within the phone, plug the connector of
the Travel Adapter into the jack on the side of the phone.
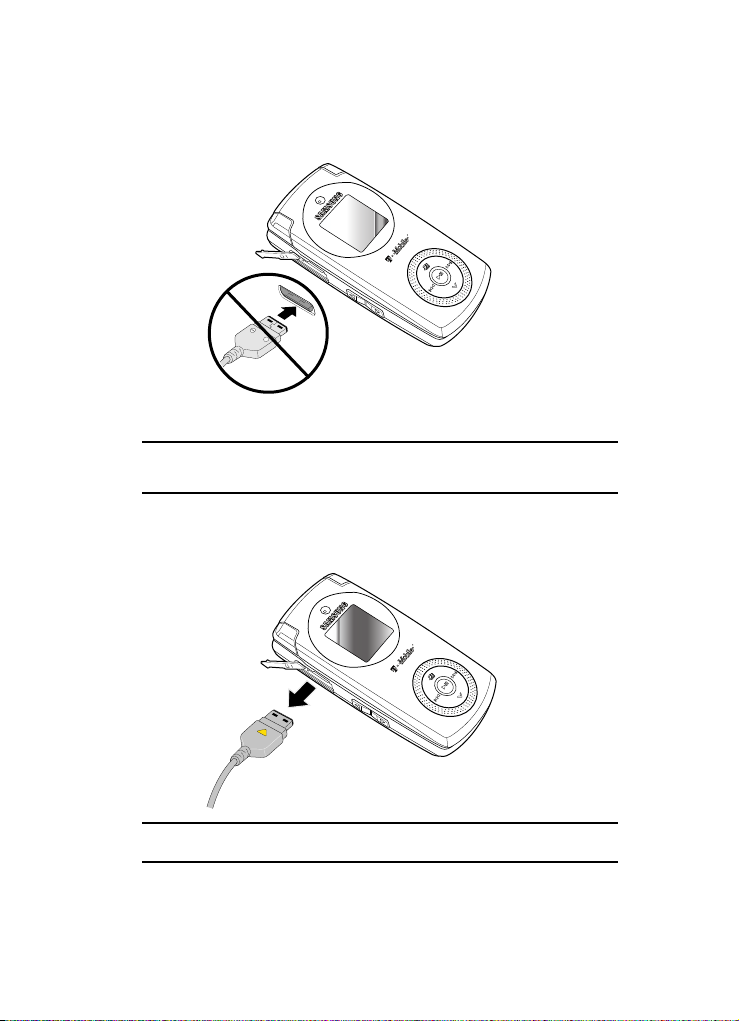
Note: The following illustration is the incorrect method for connecting the charger. If attempted, damage to
the accessory port occurs therefore void ing the phone’s warranty.
9
Page 14
Activating Your Phone
+
Incorrect
2. Plug the adapter into a standard AC wall outlet.
Note: For connection to an electrical supply not located in the U.S., you must use an adaptor of the proper
configuration for the power outlet. Use of the wrong adapter could damage your phone and void your
warranty.
3. When charging is finished, unplug the Travel Adapter from the power outlet
and then disconnect it from the phone.
Important!: You must unplug the Travel Adapter befor e you remove the battery from the phone during
charging; otherwise, the phone could be damaged.
Getting Started 10
Page 15

Low Battery Indicator
When the battery is weak and only a few minutes of talk time remain, a warning tone
sounds and the “Warning low battery” message repeats at regular intervals on the
display. When this happens, your phone turns off the backlight to conserve the
remaining battery power.
When the battery level becomes too low, the phone automatically turns off.
Switching the Phone On or Off
1. Flip the phone open.
2. Press and hold the key until the phone switches on.
3. If the phone asks for a PIN, enter the PIN and press the OK soft key or the
key. For further details, see “PIN check” on page 130.
The phone searches for your network and after finding it, the name of your
service provider displays on your screen. Now, you can make or receive
calls.
Note: The display language is preset to English a t the factory. To change the language, use the Language
menu. For further details, see "Langua ge" on page 120.
4. When you wish to switch off the phone, press and hold the key until
the power-off image displays.
Setting Up Your Voice mail
For new users, follow the instructions below to set up Voice mail:
1. Flip your phone open to access the keypad.
2. In Idle mode, press and hold the key on the keypad.
3. Follow the tutorial to create a password, a greeting, and your name.
Note: These steps may be different depending on your network.
Accessing Your Voice mail
You can access your Voice mail by pressing and holding the key on the keypad
or by going to the menu. To access Voice Mail using the menu:
1. In Idle mode, press the Menu soft key to access Menu mode.
2. Highlight Messages and press the Select soft key or the key.
3. Highlight Voice mail and press the Select soft key or the key.
11
Page 16

Setting Up Your Voice mail
4. Highlight Connect to voice server and press the OK soft key or the
key.
5. Highlight MBN and press the OK soft key or the key. Your phone dials
the specified voice mail number. When connected, follow the voice
prompts from the Voice mail center.
Changing the Voice mail Number
Your SIM card gives you the default service number of
the Voice mail center. However, should you need to change the number or add a
second Voice server number, use the following procedures:
1. In Idle mode, press the Menu soft key to access the Menu mode.
2. Highlight Messages and press the Select soft key or the key.
3. Highlight Voice mail and press the Select soft key or the key.
4. Highlight Voice server number and press the OK soft key or the key.
5. Highlight either MBN or Voice server 2 and press either the OK soft key or
the key.
6. Edit the number, then press the OK soft key or the key. The number is
saved.
7. Press the key to return to Idle mode.
Getting Started 12
Page 17

Section 2: Understanding Your Phone
Topics Covered
• Features of Your Phone
• View of Your Phone
•Keys
• Display Layout
•Get More Help
This section outlines some key features of your phone. It also describes the screen and
the icons that are displayed when the phone is in use.
Features of Your Phone
Your phone is lightweight, easy-to-use and offers many significant features. The
following list outlines a few of the features included in your phone.
• 1.3 Megapixel Camera and Camcorder
• Bluetooth
• Instant Messaging capability
• Voice Commands capability
• Multimedia capability
• Fun & Apps feature provides my file, music player, games, alarms, calendar, task
®
Wireless Technology
list, calculator, world time, unit conversion, timer, and stopwatch.
13
Page 18
View of Your Phone
View of Your Phone
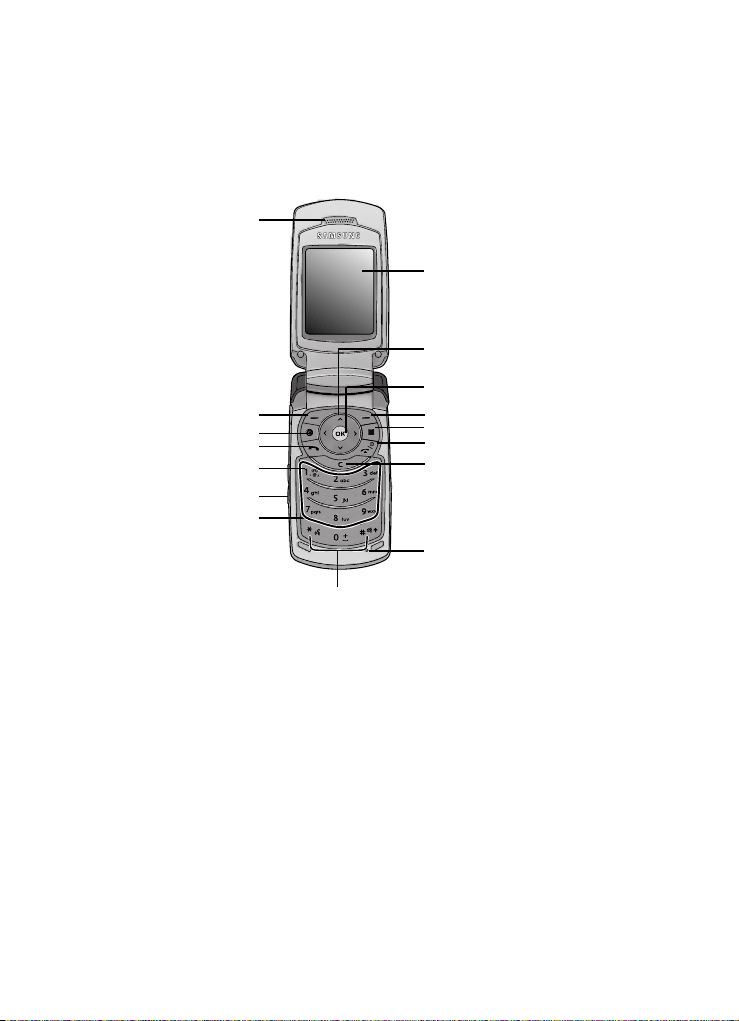
The following illustrations show the main elements of your phone:
1. Earpiece
16. Display
15. Navigation
(Up/Down/Left/Right) keys
14. OK (Select) key
2. Left Soft key
3. T-Zonekey
4. Send key
5. Voice mail key
6. Volume keys
7. Alphanumeric
keys
8. Special function keys
13. Right Soft key
12. Shortcut key
11. Power On/Off
(Exit) key
10. Cancel/Clear key
9. Microphone
Keys
The following list correlates to the illustrations.
1. Earpiece allows you to hear the other caller and the different ring tones or
sounds offered by your phone.
2. Left Soft key allows you to select soft key actions or menu items
corresponding to the bottom left line on the display screen.
3. t-zone key acts as a shortcut key to navigate to the t-zone.
4. Send key allows you to make or answer a call. In Idle mode, recalls the
last number dialed or received when held down.
5. Voice mail key allows you to quickly access your voice mail. Press and
hold this key for two seconds to automatically dial your voice mail’s phone
number.
Understanding Your Phone 14
Page 19

6.
Volume keys allow you to adjust the Ring volume in standby mode (with
the phone open) or adjust the Speaker volume during a call.
In Idle mode with the phone open, adjusts the ring volume. With the phone
closed, turns on the external display when held down.
When receiving a call with the phone open or closed, mutes the ringer and
can reject the call to Voice mail. If you press and hold the volume key, you
can reject the call.
7. Alphanumeric keys allow you to enter numbers, letters, and some special
characters.
8. Special Function keys allow you activate unique features while in Idle
mode. In Idle mode, if you press and hold the # key, you can turn on the
Silent Mode.
9.
Microphone is used
during phone calls and allows other callers to hear
you clearly when you are speaking to them. It is also used in making voice
note recordings.
10. Cancel/Clear key deletes characters from the display. In Menu mode, this
key returns you to the previous menu level.
11. Power On/Off (Exit) key ends a call. Press and hold this key for two
seconds to turn your phone on or off. While in the Menu mode, it returns
the phone to Idle mode and then cancels your input.
12. Shortcut key opens the application switch window which allows you to
select from a group of different applications without having to exit from the
currently active application.
13. Right Soft key allows you to select soft key actions or menu items
corresponding to the bottom right line on the display screen. It also
provides quick access to your t-zones.
14. OK (Select) key allows you to accept the choices offered when navigating
through a menu.
15. Navigation keys scrolls through the phone’s menu options and acts as a
shortcut key from standby mode.
In Menu mode, scrolls through the phone’s menus and Phonebook.
In Idle mode:
• Down key: allows you to directly access your Contact list.
• Up key: allows you to directly access your Call records.
• Left key: allows you to directly access Text messaging (New Message).
• Right key: allows you to directly access Voice notes.
15
Page 20
Closed View of Your Phone
Tip: When entering text, use the Left or Right Navigation key to mark the position of the cursor.
16. Display shows all the information needed to operate your phone, such as
the received signal strength, phone battery level, and time.
Closed View of Your Phone
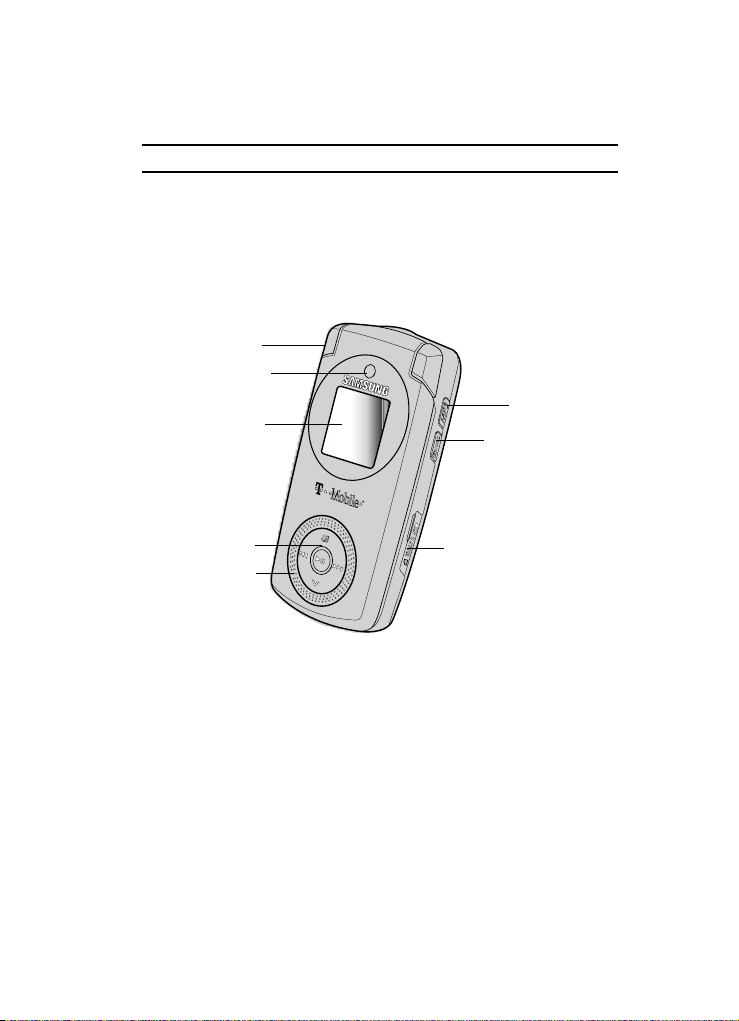
The following illustrations show the external elements of your phone
1. Headset jack/
Adapter jack
2. Camera lens
3. External display
8. MP3 key
7. Camera key
4. Multimedia pad
5. External speaker
6. microSD Memory slot
1. Headset jack/Adapter jack allows you to plug in the travel adapter
(power), PC connection cable (data transfer), and optional headset for safe,
convenient, hands-free conversations.
2. Camera lens is used to take photos and record video.
3. External display shows the received signal strength, phone battery level,
and the time.
4. Multimedia pad these touch sensitive push buttons control the progress of
the media displayed on the front LCD.
5. External speaker allows you to hear the different ring tones/sounds, work
with the speakerphone, and to hear audio during a video playback.
Understanding Your Phone 16
Page 21
6.
microSD Memory slot expansion slot allows you to insert a microSD™
memory card to add additional memory and storage capacity.
7. Camera key allows you to take pictures when you are in camera mode.
Launches the camera with a press.
8. MP3 key holding down this key while in Idle mode allows you to access an
on screen Media Player menu. This button must be held down to activate
the feature.
Display Layout
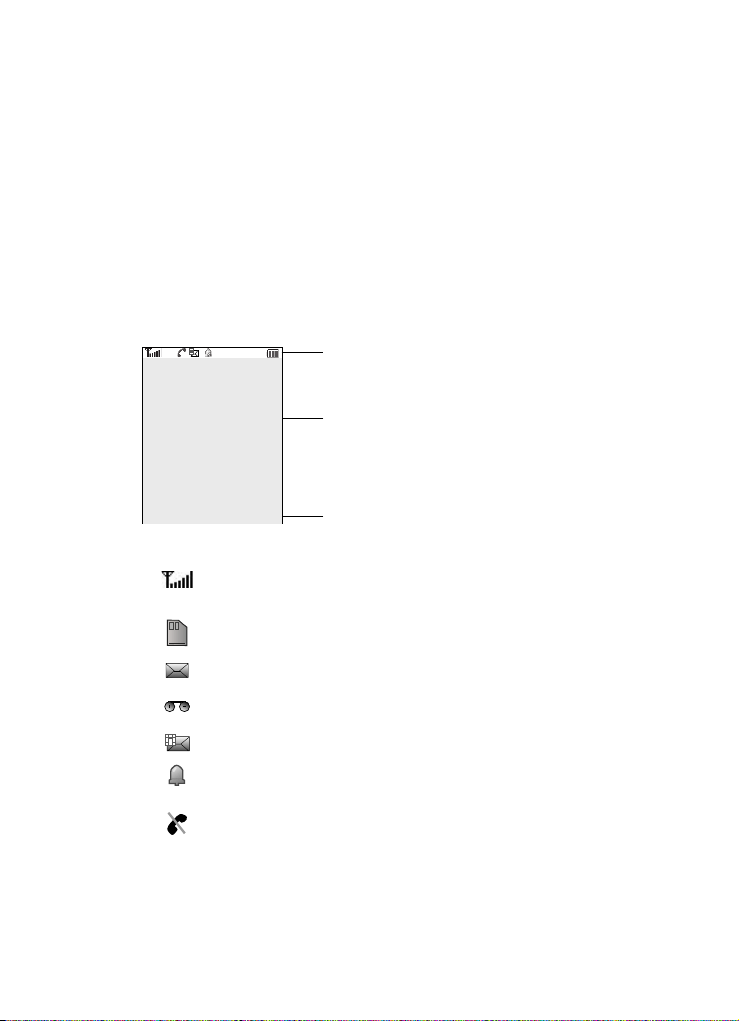
The display has 4 areas:
T-Mobile
T-Mobile
10:58
AM
Icons
Text and graphics area
Menu
Menu
Icons
17
Ph.book.
Ph.book
Soft key function indicators
Shows the received signal strength. The greater the number of
bars, the stronger the signal.
Displays when a micro SD memory card is inserted.
Displays when a new text message is received.
Displays when a new Voice mail is received.
Displays when a new multimedia message is received.
Displays when you set an alarm to ring at a specified time. For
details, see page 108.
Displays when you are out of your service area.
Page 22

Display Layout
Displays when a call is in progress.
Displays when the Call Forwarding feature is active. For more
information, refer to "Call forwarding" on page 128.
Displays when Alert type is vibration or you set the phone to
vibrate when you receive a call.
When setting up from silent mode to vibration.
When setting up from silent mode to mute.
Shows the level of your battery. The more bars you see, the
more power you have remaining.
Displays when a Bluetooth wireless headset is active and in
use.
Displays when Bluetooth wireless technology is active.
Backlight
The backlight illuminates the display and the keypad. When you press any key or
open the phone, the backlight turns on. It goes off when no keys have been pressed
within a given period of time, depending on the setting in the Backlight menu.
The On setting is how long the keypad backlight is on. You can select 15 seconds,
30 seconds, 1 minute, 3 minutes, or 10 minutes.
The Dim option is how much longer after the keypad backlight goes off that the
display remains lit. You can select Off, 15 seconds, 30 seconds, 1 minute, or 3
minutes.
To specify your Backlight settings:
1. In Idle mode, press the Menu soft key to access Menu mode.
2. Using the Navigation keys, scroll to the Settings icon. Press the Select soft
key or the key to enter the menu.
3. Highlight the Display settings option and press the Select soft key or the
key.
4. Highlight the Backlight option and press the Select soft key or the
key.
Understanding Your Phone 18
Page 23

5.
Highlight the On option. Use the Left or Right Navigation key to select the
time that the backlight is on. You may choose between 15 seconds,
30 seconds, 1 minute, 3 minutes, or 10 minutes.
6. Highlight the Dim option. Use the Left or Right Navigation key to select the
time that Dimming mode is on. You may choose between Off, 15 seconds,
30 seconds, 1 minute, or 3 minutes.
7. Press the Save soft key to save your settings.
Get More Help
Get More Help is designed to show you some of the features of your phone using tzones. You can search help files on the fly while traveling, at home or anywhere,
using help.wap.t-mobile.com.
1. In Idle mode, press the Menu soft key to access Menu mode.
2. Using the Navigation keys, scroll to the Help icon. Press the Select soft key
or the key to enter the t-zones area and display the Get More Help
menu.
The following options are available:
• Browse Help Topics: this option gives you a list of different topics that you can
select.
• Enter a Search: this option allows you to enter a keyword to search on.
• About: this option offers general information about Get More Help including
concept and site design, copyright information, and contact email address.
To access the browser options menu:
1. Press the Menu soft key to see the Browser Options.
2. Make a selection and press the Select soft key or the key.
Note: The menus may vary, depending on your t-zones subscription.
For more information on browser options, see "Selecting and Using Menu Options"
on page 135.
19
Page 24

Making a Call
Section 3: Call Functions
Topics Covered
• Making a Call
• Adjusting the Call Volume
• Answering a Call
• Call records
• Silent Mode
• Selecting Functions and Options
This section describes how to make or answer a call. It also includes information on
the features and functionality associated with making or answering a call.
Making a Call
When the Idle screen displays, enter the number you wish to dial and press the
key.
Note: When you activate the Auto redial option in the Extra settings menu, the phone automatically redials
up to 10 times when the person does not answer the cal l or is already on the phone, provided your
call is not sent to Voice mail. For more info rmation, refer to "Extr a settings" on page 121.
Making an International Call
1. Press and hold the key. The + character displays.
2. Enter the country code, area code, and phone number and press the
key.
Correcting the Number
1. To clear the last digit displayed, press the key.
2. To clear any other digit in the number, press the Left or Right navigation
key until the cursor is immediately to the right of the digit to be cleared.
Press the key. You can also enter a missing digit.
3. To clear the whole display, press and hold the key.
Call Functions 20
Page 25

Voice Dialing a Call
Your phone includes VoiceSignal advanced speech recognition software that can
be used to activate a wide-variety of functions on your phone. You can use
VoiceSignal to make calls by speaking a number (digit dialing) or by speaking
the name of a contact in your Phonebook. For more information, refer to "Voice
Commands" on page 82.
Ending a Call
When you want to finish your call, briefly press the key.
Redialing the Last Number
The phone stores the numbers of the calls you’ve dialed, received, or missed if the
caller is identified.
To recall any of these numbers:
1. In Idle mode, press the Menu soft key to access Menu mode.
2. Using the Navigation keys, scroll to the Call records icon. Press the Select
soft key or the key to enter the menu.
Note: You can also access the call records of All calls, Missed calls, Incoming calls, and Outgoing calls by
pressing the key in Idle mode.
3. Select All calls and press the Select soft key or the key.
4. Use the Up and Down keys to scroll through the numbers and highlight the
number you want.
5. To dial the number, press the key.
Before you dial the number, you may press the Options soft key for the
following options:
• Details: Displays details of the number including name, number, and dates and
times of calls.
• Call back: Places a call back to the number.
• Send message: Allows you to send a Text message, Picture message, or
Voice note to the number.
• Save to Phonebook: Stores the number in your phonebook. Choose from
New contact or Existing contact.
• Delete: Allows you to delete the Selected call record or All call records.
• Add to Block list: Allows you to add the selected number to the Block list.
21
Page 26

Adjusting the Call Volume
Making a Call from the Phonebook
You can store phone numbers that you use regularly on the SIM card or in the
phone’s memory. These entries are collectively called the Phonebook.
Once you have stored a number in the Phonebook, you can dial it by pressing a few
keys. You can also assign your most frequently-used numbers to number keys using
the Speed Dial feature.
For further details about the Phonebook feature, see "Understanding Your
Phonebook" on page 49.
Adjusting the Call Volume
During a call, if you want to adjust the earpiece volume, use the Volume keys on the
left side of the phone.
Press the key to increase the volume level and the key to decrease the level.
Muting Ringer and Rejecting Calls
When receiving a call, if you want to mute the ringer without answering the call,
press the Up or Down button on the volume key.
To reject an incoming call press the Reject soft key, press the key, or press
and hold the Volume key.
Adjusting Ringer Volume
In Idle mode, you can also adjust the ring volume using these keys while the phone
is open.
Answering a Call
When somebody calls you, the phone rings and displays the incoming call image.
The caller’s phone number, or name if stored in Phonebook, displays.
1. If necessary, flip open the phone. Press the key or the Accept soft
key to answer the incoming call.
If the Anykey answer option (Settings > Phone Settings > Extra
settings) menu is activated, you can press any key to answer a call except
for the key and the Reject soft key.
Note: To reject an incoming c all, press the Reject soft key or key.
Note: You can reject a call w ith your phone closed by pressing the volume key on the side of the phone.
Call Functions 22
Page 27

2.
End the call by closing the phone or pressing the key.
Note: You can answer a call while using the Phonebook or menu features. After an swering the call, the
phone returns to the function screen you were using.
Call records
All incoming, outgoing and missed calls are listed in the Call records. You can also
view Call time.
1. In Idle mode, press the Menu soft key to access Menu mode.
2. Using the Navigation keys, scroll to the Call records icon. Press the Select
soft key or the key to enter the menu.
Note: You can also access the call records of All calls, Missed calls, Incoming calls, and Outgoing calls by
pressing the key in Idle mode.
The following Call records options are available:
All calls
This menu lets you view the 90 most recent calls you received, sent, and missed.
The number or name, if already stored in your Phonebook, displays with the number
of occurrences of each number.
Note: At any time while you are in Call records, you may use the Left or Right Navigation key to scroll
between All calls, Missed calls, Incoming c alls, and Outgoing calls.
Missed calls
This menu lets you view the 30 most recent calls you received, but did not answer.
The number and name, if already stored in your Phonebook, displays with the
number of occurrences of each number.
Viewing Missed calls without Using the Menu
When you are unable to answer a call for any reason, you can find out who is calling
you, if this service is available, so that you can call the person back.
The number of calls you have missed displays on the idle screen immediately after a
call is missed.
To view a missed call immediately:
1. If the phone is closed, flip the phone open.
2. Press the View soft key.
23
Page 28

Call records
The number corresponding to the most recent missed call displays, if available.
3. To scroll through the missed calls, press the Up or Down Navigation key.
4. To call the number displayed, press the key.
5. Press the Options soft key for the following options:
• Details: Displays details of the number including name, number, and dates and
times of calls.
• Call back: Places a call back to the number.
•Send: Allows you to send a Text message, Picture message, or Voice note to the
number.
• Save to phonebook: Stores the number in your phonebook. Choose from
New contact or Existing contact.
• Delete: Allows you to delete the Selected call record or All call records.
• Add to Block list: Allows you to add the selected number to the Block list.
Tip: You can press the key at any time to exit the Missed calls feature.
Incoming calls
This menu lets you view the 30 most recent calls you received.
The number and name, if already stored in your Phonebook, displays with the
number of occurrences of each number.
Outgoing calls
This menu lets you view the 30 most recent calls you dialed.
The number and name, if already stored in your Phonebook, displays with the
number of occurrences of each number.
Delete all
This menu allows you to delete all of the records in each call record separately, or
you can delete all of your call records at one time.
1. Highlight the type of calls you want to delete and press the key to
make a check mark.
2. Press the Delete soft key to delete the calls.
3. When a confirmation message displays, press the Ye s soft key or key
to confirm.
Call Functions 24
Page 29

Call time
This menu lets you view the time log for calls made and received.
Note: The actual time invoiced by your ser vice provider may differ from times di splayed due to network
features and service plan.
1. In Idle mode, press the Menu soft key to access Menu mode.
2. Using the Navigation keys, scroll to the Call records icon. Press the Select
soft key or the key to enter the menu.
The following time logs are available:
• Last call time: shows the length of your last call.
• Total incoming: shows the total length of all calls you have received since the
timer was last reset.
• Total outgoing: shows the total length of all calls you have made since the timer
was last reset.
• Life time: shows the total length of time for incoming and outgoing calls. The
length of call time must be at least 1 minute to increment this field. This
information cannot be cleared.
To reset a call timer:
1. Use the Up or Down navigation key to highlight the timer you want to
reset.
2. Press the Reset soft key. Enter the phone password and then press the OK
soft key or key.
Note: The password is preset to “00000000” at the factory. To change this password, see "Change
password" on page 131.
Silent Mode
Silent mode is convenient when you wish to stop the phone from making noise, in a
theater for example.
In Idle mode, press and hold the key until the “Silent mode” message and the
Silent mode icon is displayed.
In Silent mode, instead of sounds, your phone vibrates. You can set how the phone
acts to alert you to a specific event while in Silent mode. For more information, refer
to "Silent mode" on page 127.
25
Page 30

Selecting Functions and Options
To exit and reactivate the previous sound settings, press and hold the key
again until “Exit silent mode” message displays. The Silent mode icon no longer
displays.
Selecting Functions and Options
Your phone offers a set of customizable functions. These functions are arranged in
menus and sub-menus, and accessed using the two soft keys. Each menu and
submenu allows you to view and alter the settings of a particular function.
Soft Keys
The roles of the soft keys vary depending on the function you are currently using.
The labels on the bottom line of the display just above each key indicate their
current role.
Press the Left
soft key for
Menu
mode.
Press the Right soft
key to access the
Ph.book
menu.
Call Functions 26
Page 31

Selecting Options
To view the various functions and options available and to select the one you want:
1. Press the appropriate soft key.
2. To select the function displayed or the option highlighted, press the Select
soft key or the key.
3. To view the next function or highlight the next option on a list, press the
Down Navigation key.
4. To move back to the previous function or option on a list, press the Up key.
5. To move back up one level in the menu structure, press the Back soft key.
6. To exit the menu structure without changing the settings, press the
key.
When you access a list of options, your phone highlights the currently active option.
If, however, there are only two options, such as On/Off or Enable/Disable, your
phone highlights the option that is not currently active, so that you can select it
directly.
Options During a Call
Your phone provides a number of control functions that you can use during a call.
Switch to phone/Switch to headset (Bluetooth only)
You can use this option to switch between using your Bluetooth headset and using
your phone’s earpiece and microphone without interrupting the call in progress.
Tip: This option is handy if your Bluetooth headset batter y is running low on talk power or is exp eriencing
interference.
Note: This option does not appear when you are not using your Bluetooth headset.
To switch from using your Bluetooth headset while on an active call:
1. While in a call, press the Options soft key and highlight the Switch to
phone option.
2. Press the Select soft key or the key. A message displays. You can
now talk with the other person using your phone’s microphone and
earpiece.
27
Page 32

Selecting Functions and Options
To switch to using your Bluetooth headset:
1. While in a call, press the Options soft key and highlight the Switch to
headset option.
2. Press the Select soft key or the key. A message displays. You can
now talk with the other person using your Bluetooth headset.
Switching off the Microphone (Mute)
You can temporarily switch your phone’s microphone off, so that the other person
cannot hear you.
Example: You wish to say something to a person in the room but do not want the person on the phone to
hear you.
To switch the microphone off temporarily:
1. Press the Options soft key and highlight the Mute option.
2. Press the Select soft key or the key.
The other person can no longer hear you. The Mute icon displays.
To switch the microphone back on:
1. Press the Options soft key and highlight the Unmute option.
2. Press the Select soft key or the key.
The other person can hear you again.
Putting a Call on Hold
You can place the current call on hold whenever you want. You can make another
call while you have a call in progress if your network supports this service.
To place a call on hold, simply press the Options soft key, highlight the Hold call
option, then press the Select soft key or the key. You can reactivate the call
whenever you want, by pressing the Resume soft key.
To make a call while you have a call in progress:
1. Enter the phone number that you wish to dial or look it up in the
Phonebook.
2. Press the key to dial the second call.
The first call is automatically put on hold.
-OR-
1. Press the Options soft key and select Hold call.
2. Make the second call in the normal way.
Call Functions 28
Page 33

When you have an active call and a call on hold, you may switch between the two
calls, changing the one on hold to active and placing the other on hold.
To switch between the two calls, simply press the Options soft key and select
Swap.
The current call is placed on hold and the call on hold is reactivated so that you can
continue conversing with that person.
When you want to finish, end each call normally by pressing the key.
Muting or Sending Key Tones
These options allow you to turn the key tones off or on. If the Keypad tone is set to
Off, your phone does not transmit the DTMF (Dual Tone Multi-Frequency) tones of
the keys, which allows you to press keys without hearing annoying key tones during
a call.
Note: To communicate with answering machines or computerized telephone systems, the Keypad tone
must be turned On.
Making a Multi-Party Call
A multi-party call is a network service that allows up to six people to take part
simultaneously in a multi-party or conference call.
Note: The number of callers is Network Dependent, so this numbe r may vary.
For further details about subscribing to this service, contact your service provider.
Setting up a Multi-Party Call
1.
Call the first participant in the normal way.
2. Press the Options soft key and select Hold call.
3. Make the second call in the normal way.
4. To join the first participant to the multi-party call, press the Options soft
key or the key and select Join. Press the Select soft key or the
key.
You can add incoming callers by answering the call and pressing the Options soft
key or the key, and selecting Join. Repeat as required.
Note: A multiparty call can only consist of up to three callers (in cluding yourself). Any additional callers
would be added to a separate multiparty call.
29
Page 34

Selecting Functions and Options
Having a Private Conversation With One Participant
Press the Options soft key or the key and highlight the Split option.
1.
The list of call participants displays.
2. Highlight a person you wish to talk privately with by pressing the Up or
Down Navigation key, and press the Select soft key or the key.
Now you can talk only to that person. The other participants can continue
to converse with each other.
3. To return to the multi-party call, press the Options soft key or the key
and select Join. Press the Select soft key or the key.
All of the multi-party call participants can now hear each other.
Dropping One Participant
Press the Options soft key and highlight Split or Remove.
1.
The list of call participants is then displayed.
2. Highlight the person you want to remove or separate from the call and
press the Select soft key or the key.
Searching for a Number in Phonebook
You can search for a number in the Phonebook during a call.
1. Press the Options soft key.
2. Press the Down key to highlight the Phonebook option and press the
Select soft key or the key. The Phonebook menu displays on the
screen.
3. Enter the name that you wish to find in the textbox located above the
entries. If you enter the first few letters of the name, the Phonebook entries
are listed starting with the first entry matching your input.
-OR-
Use the Up or Down Navigation key to highlight the contact that you
desire.
4. To view the highlighted entry, press the Options soft key.
5. Highlight the View option and press the Select soft key or the key.
The Contact displays.
6. Press the key to dial the call.
For further details about the Phonebook feature, see "Finding a Phonebook Entry"
on page 52.
Call Functions 30
Page 35

Send DTMF
You can use the Send DTMF option to send a key string or number during a phone
call. For example, you can send a calling card number by DTMF while on a call.
1. Press the Options soft key.
2. Highlight the Send DTMF option and press the Select soft key or the
key.
3. Enter a number and press the OK soft key. The number sends.
Message
This option causes the Messages menu to display on the screen. You can use this
option to send, receive, and review text and picture messages. For more information,
refer to "Messages" on page 58.
Menu
This option places your phone in main menu mode without interrupting the call in
progress. You can use this option to access many of your phone’s features during a
call.
Using the Speakerphone
While on a call, you can use your Speakerphone by following these steps:
Note: The Speaker on soft key option is not available if the headset is currently enabled.
1. Press the Spkr on soft key to turn the Speakerphone on.
2. To turn the Speakerphone off, press the Spkr off soft key.
Important!: For safety information related to speakerphone use, see "Responsible Listening" on page 148.
Call Waiting
You can answer an incoming call while you have a call in progress, if this service is
supported by the network and you have set the Call waiting menu to Activate. You
are notified of an incoming call by a call waiting tone. For more information on
setting up Call waiting, see "Call waiting" on page 129.
To answer a call while you have a call in progress:
1. Press the Accept soft key or the key to answer the incoming call.
The first call is automatically put on hold.
2. To switch between the two calls, press the Options soft key, highlight
Swap and press the Select soft key or the key.
31
Page 36

Selecting Functions and Options
To end a call on hold:
䊳 Press the Options soft key and select the End held call option. Then press
the Select soft key or the key.
To end the current call:
䊳 Press the key.
Call Functions 32
Page 37

Section 4: Menu Navigation
Topics Covered
• Menu Navigation
• Menu Outline
This section explains the menu navigation for your phone. It also includes an outline
of all the available menus associated with your phone.
Menu Navigation
You can tailor the phone’s range of functions to your needs using menus and submenus. Menus and sub-menus can be accessed by scrolling using the Navigation
keys or by using the shortcuts.
Accessing a Menu Function by Scrolling
1. In Idle mode, press the Menu soft key to access Menu mode.
2. Scroll using the Navigation keys to reach a main menu option, Settings for
example.
3. Press the Select soft key or the key to enter the menu.
4. If the menu contains sub-menus, Security for example, you can access
them by pressing the Select soft key or the key after highlighting the
sub-menu.
If the menu you have selected contains further options, repeat this step.
5. To scroll through the menus, press the Up or Down Navigation keys.
6. To confirm the chosen setting, press the Select soft key, or the key.
7. To return to the previous menu level, press the Back soft key, or the
key.
8. To exit the menu without changing the settings, press the key.
33
Page 38

Menu Outline
Using Shortcuts
The menu items, such as menus, sub-menus, and options, are numbered and can
be accessed quickly by using their shortcut numbers. For the main menus, you can
access any one of them by pressing the number keys (1 to *) corresponding to their
location on the screen.
Example: Accessing the Security menu.
1. Press the Menu soft key.
2. Press the key for Settings.
3. Press the key for Security.
Menu Outline
The following list shows the menu structure and indicates the number assigned to
each option.
Note: If you use a SIM-AT card that provides additional services, the Fun & Apps menu displays when you
press Menu 6 for Applications. For further details, see your SIM card instructions.
1: Music player
1.1: Play via
1.2: Set as
1.3: Send via bluetooth
1.4: Rate track
1.5: Add to playlist
1.6: Skip marked
1.7: eDetails
1.8: Settings
2: Call records
2.1: All calls
2.2: Missed calls
2.3: Incoming calls
2.4: Outgoing calls
2.5: Delete all
2.6: Call time
3: t-zones
3.1: Home
Menu Navigation 34
Page 39

3.2: Go to URL
3.3: Bookmarks
3.4: Saved pages
3.5: History
3.6: Clear cache
4: IM
4.1: AIM
4.1.1: Sign On
4.1.2: Saved conversations
4.1.3: Offline conversations
4.1.4: Settings
4.1.4.1: Favorite IDs
4.1.4.2: Power On Sign On
4.1.4.3: Community settings
4.1.5: Help
4.2: ICQ
4.2.1: Connect
4.2.2: Saved conversations
4.2.3: Offline Conversations
4.2.4: Settings
4.2.4.1: Favorite IDs
4.2.4.2: Power On Connect
4.2.4.3: Community settings
4.2.5: Help
4.3: Windows Live
4.3.1: Sign in
4.3.2: Saved conversations
4.3.3: Preferences
4.3.3.1: Favorite IDs
4.3.3.2: Power on sign in
4.3.3.3: Community settings
4.3.4: Help
4.4: Yahoo!
4.4.1: Sign in
35
Page 40

4.4.2: Saved conversations
4.4.3: Offline conversations
4.4.4: Settings
4.4.4.1: Favorite IDs
4.4.4.2: Power on sign in
4.4.4.3: Community settings
4.4.5: Help
5: Messages
5.1: Create message
5.1.1: Message
5.1.2: Share picture
5.1.2.1: Take picture
5.1.2.2: Photos
5.1.2.3: myFaves icons
5.1.2.4: Downloaded images
5.1.3: Voice note
5.2: Inbox
5.3: Outbox
5.4: Drafts
5.5: Templates
5.5.1: Text message templates
5.5.2: Picture message templates
5.6: Voice mail
5.6.1: Connect to voice service
5.6.1.1: MBN
5.6.1.2: Voice server 2
5.6.2: Voice server number
5.6.2.1: MBN
5.6.2.2: Voice server 2
5.7: Delete all
5.8: Settings
5.8.1: Text messages
5.8.2: Picture message
5.8.2.1: Sending options
5.8.2.2: Retrieving options
Menu Outline
Menu Navigation 36
Page 41

5.9: Memory status
5.0: Broadcast messages*
6: Fun & Apps
6.1: Files
6.1.1: Sounds
6.1.1.1: Browse MegaTones
6.1.1.2: Browse HiFi Ringers
6.1.1.3: Sounds
6.1.1.4: Voice list
6.1.2: Images
6.1.2.1: Browse Wallpapers
6.1.2.2: Photos
6.1.2.3: My Album
6.1.2.4: My Journal
6.1.2.5: Downloaded images
6.1.3: Videos
6.1.3.1: Downloaded videos
6.1.3.2: Videos
6.1.4: Music
6.1.4.1: Music
6.1.5: Other files
6.1.5.1: Other files
6.1.6: Memory status
6.1.6.1: Phone
6.1.6.2: Memory card
6.2: Games
6.2.1: Browse games
6.2.1.1: Connect
6.2.2: My games
6.2.2.1: Open
6.2.2.2: Add folder
6.2.2.3: Delete
6.2.2.4: Rename
6.3: Voice note
6.4: Camera
6.4.1: Take and Send
37
Page 42

6.4.2: Record video
6.4.3: Photos
6.4.4: Videos
6.4.5: My Album
6.4.6: My Journal
6.5: Voice commands
6.5.1: Choice lists
6.5.2: Sensitivity
6.5.3: Sound
6.5.4: Active contacts
6.5.5: Active menus
6.6: Mega Search
6.6.1: View
6.6.2: View Favorites
6.6.3: Add to Favorites
7: Help
8: Organizer
8.1: Alarm
8.2: Calendar
8.2.1: Month view
8.2.2: Week view
8.2.3: Day view
8.2.4: Schedule
8.2.5: Anniversary
8.2.6: Miscellaneous
8.2.7: Missed alarm events
8.2.8: Memory status
8.3: Tasks
8.4: Calculator
8.5: Tip Calculator
8.6: World time
8.6.1: Save
8.6.2: Daylight Savings Time
Menu Outline
Menu Navigation 38
Page 43

8.7: Synchronization
8.7.1: Sync now
8.7.2: Data to Sync
8.7.3: View log
8.7.4: About sync
8.8: Unit conversion
8.8.1: Currency
8.8.2: Length
8.8.3: Weight
8.8.4: Volume
8.8.5: Area
8.8.6: Temperature
8.9: Timer
8.10: Stopwatch
9: Settings
9.1: Time & Date
9.2: Phone settings
9.2.1: Language
9.2.2: Greeting message
9.2.3: USB mode
9.2.4: Extra settings
9.2.5: Airplane mode
9.3: Shortcut key
9.3.1: Messages
9.3.1.1: Create message
9.3.1.2: Inbox
9.3.1.3: Outbox
9.3.1.4: Drafts
9.3.1.5: Templates
9.3.1.6: Voice mail
9.3.1.7: Delete all
9.3.1.8: Settings
9.3.2: IM
9.3.3: Voice commands
39
Page 44

9.3.4: Call log
9.3.4.1: All calls
9.3.4.2: Missed calls
9.3.4.3: Incoming calls
9.3.4.4: Outgoing calls
9.3.4.5: Delete all
9.3.4.6: Call time
9.3.5: Music player
9.3.6: Bluetooth
9.3.6.1: Turn Bluetooth On/Off
9.3.6.2: My devices
9.3.6.3: My visibility
9.3.6.4: My phone name
9.3.6.5: Security modes
9.3.6.6: Features
9.3.7: Calendar
9.3.7.1: Month view
9.3.7.2: Week view
9.3.7.3: Day view
9.3.7.4: Schedule
9.3.7.5: Anniversary
9.3.7.6: Miscellaneous
9.3.7.7: Missed alarm events
9.3.7.8: Memory status
9.3.8: Menu
9.3.8.1: Music player
9.3.8.2: Call records
9.3.8.3: t-zones
9.3.8.4: IM
9.3.8.5: Messages
9.3.8.6: Fun & Apps
9.3.8.7: Help
9.3.8.8: Organizer
9.3.8.9: Settings
9.4: Display settings
9.4.1: Wallpaper
9.4.1.1: Browse Wallpapers
Menu Outline
Menu Navigation 40
Page 45

9.4.1.2: Default wallpapers
9.4.1.3: Downloaded image
9.4.1.4: Photos
9.4.2: Info display
9.4.3: Interior display
9.4.4: Brightness
9.4.5: Backlight
9.4.6: Dialling display
9.4.6.1: Font size
9.4.6.2: Font color
9.4.6.3: Background color
9.4.7: Calendar
9.4.8: Show caller information
9.5: Bluetooth
9.5.1: Turn Bluetooth On/Off
9.5.2: My devices
9.5.3: My visibility
9.5.4: My phone name
9.5.5: Security modes
9.5.6: Features
9.5.6.1: Headset
9.5.6.2: Handsfree
9.5.6.3: Bluetooth stereo
9.5.6.4: File transfer
9.5.6.5: Object push
9.5.6.6: Basic printing
9.5.6.7: Dial-up networking
9.5.6.8: Serial port
9.6: Sound settings
9.6.1: Incoming call
9.6.2: Keypad tone
9.6.3: Message tone
9.6.3.1: Text message
9.6.3.2: Picture message
9.6.3.3: Broadcast message*
41
Page 46

9.6.4: Power on/off
9.6.5: Flip tone
9.6.6: Silent mode
9.6.7: Extra tones
9.7: Synchronization
9.7.1: Sync now
9.7.2: Data to Sync
9.7.3: View log
9.7.4: About sync
9.8: Network services
9.8.1: Call forwarding
9.8.1.1: Forward always
9.8.1.2: Busy
9.8.1.3: No reply
9.8.1.4: Unreachable
9.8.1.5: Cancel all
9.8.2: Call barring*
9.8.3: Call waiting
9.8.4: Network selection*
9.8.4.1: Search now
9.8.4.2: Default setup
9.8.5: Caller ID
9.9: Security
9.9.1: PIN check
9.9.2: Change PIN
9.9.3: Phone lock
9.9.4: Change password
9.9.5: Lock applications
9.9.6: FDN mode
9.9.7: Change PIN2
9.0: Software update
9.* Memory status
9.# Reset settings
* Shows only if supported by your SIM card.
Menu Outline
Menu Navigation 42
Page 47

** Shows only if a memory card is inserted into the phone.
43
Page 48

Changing the Text Input Mode
Section 5: Entering Text
Topics Covered
• Changing the Text Input Mode
• Using ABC Mode
• Using T9 Mode
• Using Number Mode
• Using Symbol Mode
This section outlines how to select the desired text input mode when entering
characters into your phone. This section also describes how to use the T9 predictive
text entry system to reduce the number of key strokes associated with entering text.
Changing the Text Input Mode
When using your phone, you often need to enter text, such as when storing a name
in your Phonebook, creating your personal greeting or scheduling events on your
calendar. You can enter alphanumeric characters by using your phone’s keypad.
Your phone has the following text input modes:
• ABC mode: this mode allows you to enter letters by pressing the key labeled with
the letter you want. How many times you press the key determines which letter or
number displays.
• T9 mode: this mode allows you to enter words with only one keystroke per letter.
Each key on the keypad has more than one letter; for example, pressing can
enter J, K, or L. However, the T9 mode automatically compares the series of
keystrokes you make with an internal linguistic dictionary to determine the most
likely word, thus requiring far fewer keystrokes than the traditional ABC mode.
• Number mode: this mode allows you to enter numbers.
• Symbol mode: this mode allows you to enter symbols, such as punctuation
marks.
When you are in a field that allows characters to be entered, the text input mode
indicator displays on the screen.
Example: Writing a text message.
Entering Text 44
Page 49
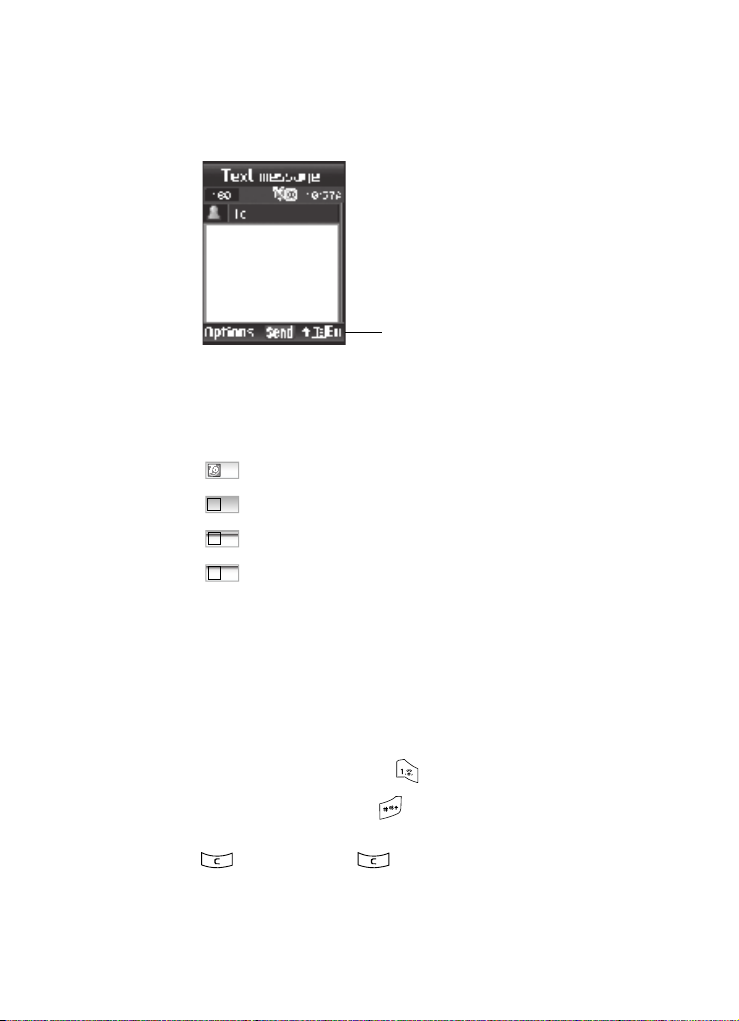
Text Input Mode
Indicator
To change the text input mode, press the Right soft key.
1.
2. Each time you press the Right soft key, a different Text input mode
indicator displays in the lower right corner of your display.
The following options are available:
En
: T9 mode
A
En
: ABC mode
1
En
: Number mode
#
En
: Symbol mode
3. When the text input mode indicator that you desire displays, you may enter
text in the text message box using the selected text input mode.
Using ABC Mode
To use ABC mode, use the number keys to enter your text.
1. Press the key labeled with the letter you want:
• Once for the first letter
• Twice for the second letter, and so on
2. Select the other letters in the same way.
• To enter periods or hyphens, press the key. ABC mode applies grammar
rules to ensure that you use correct punctuation.
• To shift case in ABC mode, use the key. There are 3 cases: Initial capital,
Capital lock, and Lower case.
• Use the Navigation keys to move the cursor. To delete letters, press the
key. Press and hold the key to clear the display.
45
Page 50

Using T9 Mode
A
ç
j
Note: The cursor moves to the right when you press a different key. When entering the same letter twic e or
a different letter on the same key, just wait for a few seconds for the cursor to move to the right
automatically, and then select the next letter.
Keys
. @ , ? ! ‘ - : ) ( ; / _ + & 1
B C 2 À Ä Å Æ Ç Γ
a b c 2 à ä å æ
D E F 3 É Δ Φ
d e f 3 è é Φ
Γ
P Q R S 7 Π Σ Ξ
p q r s 7 β Σ Ξ
T U V 8 Ü ü
t u v 8 ù ü
W X Y Z 9 Ω
w x y z 9 Ω
0 (inserts space when held)
G H I 4 Θ Ψ
g h I 4 ì Ψ
Symbol (press and hold to switch
J K L 5 Λ
k l 5 Λ
to Symbol mode)
Shift (Toggles Lower/Uppercase)
M N O 6 Ñ Ø Ö ö
m n o 6 ñ ø ò ö
Using T9 Mode
T9 is a predictive text input mode that allows you to key in any character using
single keystrokes. This text input mode is based on a built-in dictionary.
To enter a word in T9 mode:
1. When you are in T9 mode, start entering a word by pressing the 2 to 9
keys. Press each key only once for each letter.
Example: To enter “Hello” in T9 mode, press the 4, 3, 5, 5, and 6 keys.
Entering Text 46
Page 51

The word that you are typing displays on the screen. It may change with
each key that you press.
2. Enter the whole word before editing or deleting the keystrokes.
3. When the word displays correctly, go to step 4.
If the word doesn’t display correctly, press the key to display
alternative word choices for the keys that you have pressed.
Example: Both “Of” and “Me” use the 6 and 3 keys. The phone di splays the most commonly used choice
first.
4. Insert a space by pressing the key and start entering the next word.
To add a new word into the T9 dictionary:
1. After pressing the keys corresponding to the word you want to add, press
the key to display the alternative words.
2. When you press the key at the last alternative word, the display
shows Add on the bottom line. Press the Add soft key or the key.
3. Enter the word you want to add using ABC mode.
4. Press the OK soft key or the key.
The word is added to the T9 dictionary and becomes a word for the
associated keypress series.
Note: This feature may not be available for so me languages.
• To enter periods, hyphens, or apostrophes, press the key. T9 mode
applies grammar rules to ensure that correct punctuation is used.
• To shift case in T9 mode, use the key. There are 3 cases: Initial capital,
Capital lock, and Lower case.
• You can move the cursor by using the Navigation keys. To delete letters, press
the key. Press and hold the key to clear the display.
Using Number Mode
Number mode enables you to enter numbers into a text message. Press the keys
corresponding to the digits you want to enter.
47
Page 52

Using Symbol Mode
Using Symbol Mode
Symbol mode enables you to insert symbols and punctuation marks into text.
1. To select a symbol, press the corresponding number key.
2. To display more symbols, press the Up or Down Navigation key.
3. To clear the symbol(s), press the key. When the input field is empty,
this key returns the display to the previous mode.
4. To insert the symbol(s) into your message, press the OK soft key or the
key.
Entering Text 48
Page 53

Section 6: Understanding Your Phonebook
Topics Covered
• Storing a Number in the Phone’s Memory
• Storing a Number in the SIM Card
• Finding a Phonebook Entry
• Speed Dialing
• Editing a Caller Group
• Copying all SIM Phonebook Entries
• Deleting all of the Phonebook Entries
•Own Numbers
•FDN list
• Management
This section describes how to manage your contacts by storing their name and number
in your Phonebook. You can save phone numbers to your phone’s memory or to your
SIM card.
Storing a Number in the Phone’s Memory
The default location for saving phone numbers is to your phone’s internal phonebook
(phone memory). You can also save it to your SIM card.
Also, numbers that were stored on your SIM card can be copied to your phone’s
memory.
Note: When you copy a phone number from your SIM card to yo ur phone, the number displays twice in your
Contact list.
1. In Idle mode, press the Ph.book soft key to enter the Phonebook menu.
2. Highlight the Add new contact option and press the Select soft key or the
key.
3. Enter a first name in the Name text box. Tab to the next text box by
pressing the Down key.
49
Page 54

Storing a Number in the Phone’s Memory
For further details about how to enter characters, see "Using ABC Mode"
on page 45.
4. Enter a last name in the text box. Tab to the next text box by pressing the
Down key.
5. Highlight a number Type by pressing the Up or Down Navigation key, then
enter a number in the corresponding box. The following types are
available:
• Mobile: assigns the number entered to the Mobile entry.
• Home: assigns the number entered to the Home entry.
• Office: assigns the number entered to the Office entry.
•Fax: assigns the number entered to the Fax entry.
•Other: allows you to enter more detailed information for the entry.
•Email: assigns the address to the email entry.
6. Continue to scroll down using the Down Navigation key to enter a Picture
ID, Ringtone, Group, and Memo if desired.
7. When you are finished, press the Save soft key or the key. The
number is saved to your phone and the new contact information displays.
After storing, the phone displays the Phonebook entry you just created.
8. Press the Options soft key for the following options:
•Edit: allows you to edit the name and number fields in the entry.
•Send message: allows you to send a message to the selected number. You
may choose between Message, Share picture (Picture message), or Voice note.
• Call: allows you to call the number.
• Copy to SIM card: allows you to copy the number to your SIM card.
• Assign speed dial: allows you to assign a speed dial key number to the
selected Phonebook entry.
• Send name card via: allows you to send your name card via Text message,
Picture message, or Bluetooth.
• Delete: allows you to delete the name and number from Phonebook. You are
asked to confirm that you wish to delete the name and number by pressing the
Ye s soft key. To cancel, press the No soft key.
• Add to Block list: Allows you to add the selected number to the Block list.
9. To return to the Idle screen, press the key.
Understanding Your Phonebook 50
Page 55

Storing a Number in the SIM Card
The default for saving phone numbers to your phonebook is your phone’s memory.
To store a number in your SIM card:
1. In Idle mode, press the Ph.book soft key to enter the Phonebook menu.
2. Scroll to Management by pressing the Up or Down Navigation key and
press the Select soft key or the key.
3. Highlight Copy all to and press the Select soft key or the key.
4. Highlight SIM card and press the Select soft key or the key.
Now that your phone is set up to store numbers to your SIM card, follow this
procedure to store a number.
1. In Idle mode, press the Ph.book soft key to enter the Phonebook menu.
2. Highlight the Add new contact option and press the Select soft key or the
key.
3. Enter a name in the Name text box. Move to the next text box by pressing
the Down key.
For further details about how to enter characters, see "Using ABC Mode"
on page 45.
Note: Contacts stored to your SIM card do not have first and last names a s separate fields. You must enter
first and last name in the name field if so desired.
4. Enter the phone number you want to store.
5. Continue to scroll down using the Down Navigation key to enter a Picture
ID, Ringtone, Group, and Notes if desired. To select one of these options,
press the key.
6. When you are finished, press the Save soft key or the key. The
number is saved in your SIM card. After storing, the phone displays the
Phonebook entry you just created.
7. Press the Options soft key for the following options:
•Edit: allows you to edit the name and number fields in the entry.
• Send message: allows you to send a message to the selected number. You
may choose between Text message, Picture message, or Voice note.
• Call: allows you to call the number.
• Copy to phone: allows you to copy the number to your phone’s memory.
• Send name card via: allows you to send your name card via Text message,
Picture message, or Bluetooth.
51
Page 56

Finding a Phonebook Entry
• Assign speed dial: allows you to assign a speed dial key number to the
selected Phonebook entry.
• Delete: allows you to delete the name and number from Phonebook. You are
asked to confirm that you wish to delete the name and number by pressing the
Ye s soft key. To cancel, press the No soft key.
• Add to Block list: Allows you to add the selected number to the Block list.
8. To return to the Idle screen, press the key.
Finding a Phonebook Entry
You can store phone numbers and their corresponding names in your SIM card and
phone’s memories. They are physically separate but are used as a single entity,
called Phonebook.
Depending on your particular SIM card, the maximum number of phone numbers the
SIM card can store may differ.
1. In Idle mode, press the Ph.book soft key to enter the Phonebook menu.
2. Highlight Contact list and press the Select soft key or the key.
Note: Note: Steps 1 & 2 can be bypassed by pressing the Down navigation key while in Idle mo de.
3. Enter the first few letters of the name in the text box.
The Phonebook entries are listed, starting with the first entry matching
your input.
4. If needed, press the Up or Down Navigation key until the entry you want
highlights.
5. Once you have found the entry, press the key to dial the number, or
press the Options soft key to access the following Phonebook entry
options:
•Edit: allows you to edit the contents of your contact entry.
•Send message: allows you to send a message to the selected number. You
may choose between sending a text message, sharing a picture, or a Voice note.
• New contact: takes you to the New Contact menu.
• Call: places a call to the number.
• Copy to (phone or SIM card): allows you to copy the contact to your Phone
or SIM card.
• Copy all to (phone or SIM card): allows you to copy all numbers stored on
your SIM card to your phone, or on your phone to your SIM card.
• Assign speed dial: allows you to assign a speed dial key number to the
selected Phonebook entry.
Understanding Your Phonebook 52
Page 57

• Send name card via: allows you to send your name card via Text message,
Picture message, or Bluetooth.
• Delete: allows you to delete the selected name and number from your
Phonebook or delete all numbers. You are asked to confirm that you wish to
delete the name and number by pressing the Ye s soft key. To cancel, press the
No soft key.
• Add to Block list: allows you to add the selected contact to your Block list.
• Select language: allows you to select between English, Français, or Español.
6. If you press the View soft key, press the Options soft key after the contact
information is displayed to provide these options:
•Edit: allows you to edit the name and number fields of the current entry. You can
also add email address and notes.
• Send message: allows you to send a message to the selected number. You
may choose between text messages, picture message, or Voice notes.
• Call: places a call to the number.
• Copy to (phone or SIM card): allows you to copy the number to your Phone
or SIM card.
• Send name card via: allows you to send your name card via Text message,
Picture message, or Bluetooth.
• Assign speed dial: allows you to assign a speed dial key number to the
selected Phonebook entry.
• Delete: allows you to delete the name and number from Phonebook. You are
asked to confirm that you wish to delete the name and number by pressing the
Yes soft key. To cancel, press the No soft key.
• Add to Block list: allows you to add the selected contact to your Block list.
After viewing one Phonebook entry, you can scroll through all Phonebook
entries by pressing the Right or Left Navigation keys.
Speed Dialing
Once you have stored phone numbers from your Phonebook list, you can set up to
8 speed dial entries and then dial them easily whenever you want, simply by
pressing and holding the associated numeric key.
In Idle mode, to speed dial the numbers assigned to keys (2 to 9), press and hold the
appropriate key.
Setting Up Speed Dial Entries
1. In Idle mode, press the Ph.book soft key to enter the Phonebook menu.
2. Scroll to Speed dial by pressing the Up or Down Navigation key and press
the Select soft key or the key.
53
Page 58

Editing a Caller Group
3. Use the Up or Down Navigation key to select the number key to which you
wish to assign the speed-dialing number.
4. Select from the 2 to 9 keys, and press the Add soft key or the key.
5. Select from either the Contact list or the FDN list to choose a number for
assignment.
6. Highlight the number you wish to assign the speed dial to and press the
Select soft key or the key. The number is then assigned to speed dial
location.
Note: Memory location 1 is reserved for your Voice mail ser ver number and cannot be changed.
Editing a Caller Group
1. In Idle mode, press the Ph.book soft key to enter the Phonebook menu.
2. Highlight the Groups option and press the Select soft key or the key.
3. Highlight the group you want to edit by pressing the Up or Down
Navigation key and press the Options soft key.
4. Highlight the Edit option and press the Select soft key or the key.
5. To edit the Caller group name, modify the text in the Name text box.
6. To change the image associated with the Caller group, press the Down key
to highlight the Picture ID icon. Press the key.
The following options are available:
• Take photo: allows you to take a picture with your camera.
• Record video: allows you to record a video with your camcorder.
• Photos: allows you to choose from a list of photos assigned to the Caller ID
photos folder.
• Downloaded images: allows you to choose from a list of images assigned to
the Caller ID Downloaded images folder.
•Videos: allows you to choose from a list of video clips assigned to the Caller ID
Videos folder.
• Downloaded videos: allows you to choose from a list of downloaded video
clips assigned to the Caller ID Downloaded videos folder.
• Default images: allows you to choose from pre-defined icons.
7. To change the ringtone associated with the Caller group, press the Down
key to highlight the Ringtone icon. Press the key.
Understanding Your Phonebook 54
Page 59

The following options are available:
• Default ringtones: allows you to choose between 16 different melodies.
• Voice list: allows you to choose a previously stored voice note from the Voice
list folder. This voice note would have previously been assigned as a ringtone or
caller ringtone.
• Sounds: allows you to choose a sound from your Sounds folder.
•Music: allows you to assign a Ringtone from your Music list folder.
8. When you are finished, press the Save soft key. Your Caller group settings
are saved.
9. Press the key to return to Idle mode.
Copying all SIM Phonebook Entries
You can copy all SIM entries to the Phone using this option. When you copy entries to
the phone, duplicate entries are created in your Phonebook.
1. In Idle mode, press the Ph.book soft key to enter the Phonebook menu.
2. Highlight Management and press the Select soft key or the key.
3. Highlight Copy all to and press the Select soft key or the key.
4. Highlight SIM card and press the Select soft key.
5. After receiving the Copy all to SIM? confirmation message, press the Yes
soft key.
Note: Options are available for entries stored to your phone that are not availabl e when stored to the SIM
card. For more information, refer to "Storing a Number in the Phone’s Memory" on page 49.
Deleting all of the Phonebook Entries
You can delete all your entries from your phone’s memory, your SIM card, or both.
Important!: Once Phonebook entries are deleted, they cannot be recovered.
1. In Idle mode, press the Ph.book soft key to enter the Phonebook menu.
2. Highlight Management and press the Select soft key or the key.
3. Scroll to Delete all by pressing the Up or Down Navigation key and press
the Select soft key or the key.
4. Press the key to place a check mark by the memory location you
want to empty; All, Phone, SIM card, or SIM card(FDN).
You can remove the check mark by pressing the key again.
55
Page 60

Own Numbers
5. Press the Delete soft key. Enter your password and press the OK soft key
or the key.
Note: The password is preset to “00000000” at the factory. To change this password, see "Change
password" on page 131.
6. When the Delete all? confirmation message displays, press the Ye s soft
key or the key.
7. To cancel the deletion, press the No soft key.
8. When you are finished, press the key to return to Idle mode.
Own Numbers
This function is a memory aid, which you can use to check your own phone number
if you need to do so.
You can assign a name to each of your own phone numbers registered on your SIM
card. You can also edit the names and numbers. Any changes made here do not in
any way affect the actual subscriber numbers on your SIM card.
1. In Idle mode, press the Ph.book soft key to enter the Phonebook menu.
2. Select the Own number option by pressing the Up or Down Navigation key
and press the Select soft key or the key.
3. Highlight the Number 1 option and
To edit your number information:
1. Highlight your number and press the Options soft key or the key.
2. Highlight the Edit option and press the Select soft key or the key.
3. Your phone number displays. You may edit the name and number if you
wish. Press the Save soft key or the key.
FDN list
1. In Idle mode, press the Ph.book soft key to enter the Phonebook menu.
2. Select the FDN list option by pressing the Up or Down Navigation key and
press the Select soft key or the key.
3. Enter the Contact Name, Number, Picture ID, Ringtone, and Group name.
4. Press the Add soft key and enter your 4-digit factory PIN2 and press the
OK soft key.
5. Press the Save soft key.
Understanding Your Phonebook 56
Page 61

Management
The Management menu allows you to select where your contacts are saved, copy
your SIM contacts to your phone, sort your contacts, delete your contacts, or check
your memory status.
View contacts
This option allows you to view all the contacts stored on the Phone or the Phone and
SIM.
Save new contacts to
This option allows you to save new contacts to your Phone or SIM card. You can also
select the Always ask option before saving the new contact and the phone will
prompt you for the location. For more information, refer to "Copy all to" on page 57.
Copy all to
This option allows you to copy all contacts from your SIM card to your phone, or all
your phone entries to your SIM card. For more information, refer to "Copying all SIM
Phonebook Entries" on page 55.
Sort by contacts
This options allows you to have your contacts sorted by first name or last name.
Note: Contacts stored to your SIM card do not have first and last names as separate fields. Therefore, they
are sorted on the first letter of the name entered in the Name field.
Delete all
This option allows you to delete your contacts. You may delete from Phone, SIM card,
or SIM card (FDN). For more information, refer to "Deleting all of the Phonebook
Entries" on page 55.
Important!: Once contact entries are deleted, they cannot be recovered.
Memory status
You can check how many names and numbers are stored in the Phonebook, in both
SIM card and the phone memory. You can also see the capacity of both memories.
Your phone memory can hold up to 1000 contacts.
57
Page 62

Types of Messages
Section 7: Messages
Topics Covered
• Types of Messages
• Voice Note
• Text Messages
• Picture Messages (Share Picture)
• Inbox
• Outbox
• Drafts
• Templates
•Voice Mail
• Delete All
• Settings
• Memory Status
• Broadcast Messages (SIM Dependent)
• Instant Messaging
This section describes how to send or receive different types of messages. It also
includes the features and functionality associated with messaging.
Types of Messages
Your phone provides the following message types:
• Voice note
• Text messages
• Picture messages
• Multimedia messages
• Voice mail messages
• Broadcast messages (SIM Dependent)
• Instant messaging
Messages 58
Page 63

Voice Note
In this menu, you can record a Voice note up to one minute in length and then
immediately send an attachment to a Picture message. For more information, refer
to "Voice Note" on page 80.
Text Messages
Short Message Service (SMS) allows you to send and receive short text messages to
and from other mobile phones. In addition, your phone supports the Enhanced
Messaging Service (EMS), which enables you to include simple pictures, melodies,
and animated images in your messages. To use this feature, you must subscribe to
your service provider’s message service.
When the Message icon ( ) displays, new text messages were received. When the
memory is full, the message icon flashes on your phone and you cannot receive any
new messages. You must delete a message before you can receive additional
messages.
Use the Delete option in each message box to delete obsolete messages.
Create new Text Message
In this menu, you can write and send a text message.
Creating a Text message
In Idle mode, press the Menu soft key to access Menu mode.
1.
2. Highlight the Messages menu and press the Select soft key or the
key.
3. Highlight the Create message option and press the Select soft key or the
key.
4. Select the Message option and press the Select soft key or the key.
Note: Steps 1–4 can be bypassed by pressing the Left navigation key while in Idle mode.
5. Enter the recipient phone number in the To field and press the key.
Note: For further details about entering characters, see "Enter ing Text" on page 44.
-Or-
6. Press the Options soft key, highlight Add recipient, and press the Right
Navigation key. The following options display:
59
Page 64

Picture Messages (Share Picture)
7. If you choose Recent contacts or Phonebook, use the key to place
check marks next to the entry or entries you want your message sent to
and press the Select soft key.
Note: When entering multiple destinations, you can also choose Group and Save to Drafts options in
addition to the other send options.
8. Repeat from step 6. You can enter up to 20 destinations.
9. When you finish entering the destinations, press the key.
10. Press the Down Navigation key and create your message in the text field.
11. When you finish typing your message, press the Options soft key.
The following options are available:
• Add item: allows you to add an image, sound, video, new picture, new recorded
video, or new recorded audio.
• Add organizer: allows you to add an organizer entry to your message such as:
Namecard, Schedule, Anniversary, Task, or Miscellaneous.
•Insert: allows you to insert Text templates, Emoticon, Clip Art, Namecard, an
Appointment or Anniversary event, Task, Memo, or Bookmark in your message.
The Template option allows you to apply one of the preset message templates
to the text. Select one of the 10 items stored in the Text messages template
menu. Bookmark allows you to add Internet (web) addresses to your message.
•Edit text: allows to enable the text editing option.
• Select language: allows you to set the language to English, Français, or
Español.
• Input method: allows you to set the text input method, T9 upper or lower case,
Text upper or lower case, Numeric or Symbols.
•More: allows you to Add an Attachment, Add a subject, Edit the text style, and
set the Sending options.
•Save to: allows you to save this text message to the Drafts folder.
12. Once you are ready to send the message, press the Send soft key or the
key.
Picture Messages (Share Picture)
This menu allows you to use the Multimedia Message Service (MMS).
Picture Messaging (Sharing a Picture) is a messaging service that provides delivery
of personal multimedia messages from phone to phone or from phone to email.
In addition to the familiar text content of text messages, multimedia messages can
contain images, graphics, voice, and audio clips. A Picture Messaging message is a
multimedia presentation in a single file. It is not a text file with attachments.
Messages 60
Page 65

Using the Multimedia Messaging feature, your phone can receive and send
messages that contain multimedia files, such as photos, videos, sounds and images
you downloaded from the Internet and Voice notes you recorded. This function is
available only if it is supported by your service provider. Only phones that offer
multimedia messaging features can receive and display multimedia messages.
Create new Multimedia Message
This menu allows you to create a new multimedia message and send to one or
multiple destinations.
Creating and Sending a Picture or Video Message
In Idle mode, press the Menu soft key to access Menu mode.
1.
2. Highlight the Messages menu and press the Select soft key or the
key.
3. Highlight the Create message option and press the Select soft key or the
key.
4. Highlight Share picture and press the Select soft key or the key. The
following options are then available:
• Tak e pic tur e
• Photos
• myFaves icons
• Downloaded images
Take a picture
Select Take picture and press the Select soft key or the key.
1.
2. Adjust the image by aiming the camera at the subject then press the
key.
3. Press the Send soft key and select from the following options:
• Recent recipients: displays a selectable list of recently dialed recipients.
• Phonebook: allows you to select a number from the Contact list.
• New recipient: allows you to manually enter a phone number or email
address.
• My Album: allows you to send the picture message to My Album online.
• My Journal: allows you to send the picture message to My Journal.
Note: For further details about entering characters, see "Enter ing Text" on page 44.
61
Page 66

Picture Messages (Share Picture)
4. If you choose Recent recent recipients or Phonebook, use the key
to place check marks next to the entry or entries you want your message
sent to and press the Select soft key.
5. Press the Send soft key when are you finished creating the message. Your
phone then sends the message.
Send a photo
1.
Select Photos and press the Select soft key or the key.
2. Press the Up and Down Navigation keys to select your picture and press
the Select soft key to attach your picture to the message.
3. Press the Send soft key when are you finished creating the message. Your
phone then sends the message.
Send a myFaves icon
Select myFaves icons and press the Select soft key or the key.
1.
2. Press the Up and Down Navigation keys to select the desired icon and
press the Select soft key to attach your icon image to the message.
3. Press the Send soft key when are you finished creating the message. Your
phone then sends the message.
Send a downloaded image
Select Downloaded images and press the Select soft key or the
1.
key.
2. Press the Up and Down Navigation keys to select a previously downloaded
image and press the Select soft key to attach your image to the message.
3. Press the Send soft key when are you finished creating the message. Your
phone then sends the message.
Create new Voice Note Message
This menu allows you to create a new multimedia message and send to one or
multiple destinations. For more information, refer to "Voice Note" on page 80.
Messages 62
Page 67

Inbox
The Inbox stores received messages. You can tell what kind of message was
received by the icon displayed. An open envelope indicates a read message,
otherwise the envelope displays closed.
The following types of messages may display in your inbox:
Text messages
Picture and Multimedia messages
Push messages
When you enter the Inbox, the list of messages displays with the sender’s phone
numbers, or names, if available in your Phonebook. After you read the message, the
envelope in the icon displays opened.
Note: By pressing the Left or Right Navigation keys, you may scroll betwee n Inbox, Sentbox, Outbox, and
Drafts.
1. In Idle mode, press the Menu soft key to access Menu mode.
2. Press the Select soft key or the key to enter the Messages menu.
3. Highlight the Inbox option and press the Select soft key or the key.
Viewing a Text Message in Inbox
1. Select a text message from the list and press the View soft key or the
key to read the message contents.
2. While you are reviewing the message, press the Options soft key to view
the following message options:
•Reply: allows you to send a reply to the sender by sending a Text, Picture or
Multimedia message.
• Call back: places a call to the selected number.
• Forward: allows you to forward the message to another number.
• Save address: allows you to extract the sender’s number and URL, email
addresses or phone numbers from the message text, so that you can save them
in your phone’s memory.
•Save media: allows you to store any attached media to a desired folder.
• Delete: allows you to delete the message.
• Move to phone/SIM: allows you to move the message from the phone/SIM
card to the phone’s memory or SIM.
•Lock: allows you to lock the message to protect it from deletion.
63
Page 68

While you are in the main Inbox folder, you may choose from the following Inbox
message options by pressing the Options soft key:
• Reply via: allows you to send a reply to the sender by sending a Text message,
Picture message, or Voice note.
• Call back: places a call to the selected number.
• Forward: allows you to forward a reply message to the sender.
• Save address: allows you to extract the sender’s number and URL, email
addresses or phone numbers from the message text, so that you can save them in
your phone’s memory.
• Save media: allows you to store any attached media to a desired folder.
• Delete: deletes the selected text message or all messages.
• Move to phone or SIM card: allows you to move the from the phone to SIM, or
from the SIM to phone.
• Sort by: allows you to sort messages by Read/Unread, Date, Name, Type, Size, or
Subject.
• Lock: allows you to lock the message to protect it from deletion.
Viewing a Picture Message in Inbox
1. Select a picture message from the list and press the View soft key or the
key to view the multimedia message contents.
2. While you are reviewing the message, press the Options soft key. The
following options display:
• Reply via: allows you to send a reply to the sender by sending a picture or text
message or a Voice note.
• Reply all via: allows you to send a reply to All by sending a picture message or
Voice note.
• Call back: places a call to the selected number.
• Forward: allows you to forward the message to another number.
•Replay: allows you to view the message again.
• Save address: allows you to extract the sender’s number and URL, email
addresses or phone numbers from the message text, so that you can save them
in your phone’s memory.
•Save media: allows you to save the picture or video to your My downloads
folder.
•Delete: allows you to delete the message.
•Lock: allows you to lock the message to protect it from deletion.
• Properties: shows you information about the message, such as Subject, who
the message was From, Message size, Transaction ID, Msg class, MMS version,
who the message was To, Priority, and Date and time message was received.
Inbox
Messages 64
Page 69

While you are in the main Inbox folder, you may choose from the following Inbox
message options by pressing the Options soft key:
• Reply via: allows you to send a reply to the sender by sending a picture
message or Voice note.
• Reply all via: allows you to send a reply to All by sending a picture message or
Voice note.
• Call back: places a call to the selected number.
• Forward: allows you to forward the picture message to another recipient.
• Delete: deletes the selected picture message or all messages.
• Sort by: allows you to sort messages by Read/Unread, Date, Name, Type, Size,
or Subject.
•Lock: allows you to lock the message to protect it from deletion.
• Properties: shows you information about the message, such as Subject, who
the message was From, Message size, Transaction ID, Message class, MMS
version, who the message was To, Priority, and Date and time message was
received.
Viewing a Push Message in Inbox
A Push message is a way of delivering content (e.g. images, ringtones, etc.) to
mobile phones that are WAP enabled. With a Push message you don't actually send
the content in the text message, you direct the mobile phone where to get it from.
1. Select a Push message from the list and press the Options soft key.
The following options display:
• View: listen to the Voice note and view message details.
• Delete: allows you to delete the selected message or all messages.
• Sort by: allows you to sort messages by Read/Unread, Date, Name, Type, Size,
or Subject.
• Protection: allows you to lock the message to protect it from deletion.
2. Press the key to view the message contents.
3. Press the key when you are finished.
While reading the message, you may choose the following options by pressing the
Options soft key:
• Go to URL: allows you to go to the website on your WAP browser.
• Save address: allows you to extract the sender’s number and URL, email
addresses or phone numbers from the message text, so that you can save them in
your phone’s memory.
• Delete: allows you to delete the message.
• Protection: allows you to lock the message to protect it from deletion.
65
Page 70

Outbox
Viewing a Message When You Receive It
When a new message arrives, the screen displays the Received Messaging icon with
a description of whether the message is a Text or Multimedia message type.
1. Press the View soft key to view the message.
Press the Exit soft key if you want to view the message later in the Inbox.
2. Press the Options soft key to access the various options described above.
3. Press the key when you are finished.
Outbox
This message box stores messages that you have attempted to send but have not
actually sent yet.
When you enter this menu, the list of messages in the box displays with the
recipients’ phone numbers or names, if available in your Phonebook.
Tip: You may scroll between Inbox, Sentbox, Outbox, and Drafts by pressing the Up or Down Navigation
keys.
1. In Idle mode, press the Menu soft key to access Menu mode.
2. Highlight the Messages menu and press the Select soft key or the
key.
3. Highlight the Outbox option and press the Select soft key or the key.
4. Select a message from the list and press the key to view the
message contents.
5. Press the Up or Down Navigation key to scroll through the contents.
Tip: While reading a message, you can choose diffe rent options by pressing the Options soft key.
Drafts
This message box stores messages that you may want to edit or send at a later time.
When you enter this menu, the list of messages in the box displays.
Tip: You may scroll between Inbox, Sentbox, Outbox, and Drafts by pressing the Up or Down Navigation
keys.
1. In Idle mode, press the Menu soft key to access Menu mode.
2. Highlight the Messages menu and press the Select soft key or the
key.
Messages 66
Page 71

3.
Highlight the Drafts option and press the Select soft key or the key.
4. Select a message from the list and press the View soft key to review the
selected message.
5. Press the Options soft key, highlight the Edit option and press the Select
soft key or the key to edit the message contents.
6. Press the Options soft key and select Send then press the Select soft key
or the key.
Note: While viewing a draft message, press the Options soft key to choose differen t options, depending on
the type of message.
Templates
Besides entering message text using the keypad keys, you can speed message
composition by including copies of stored text (Templates) in your message.
Text message templates
1. In Idle mode, press the Menu soft key to access Menu mode.
2. Highlight the Messages menu and press the Select soft key or the
key.
3. Highlight Templates and press the Select soft key or the key.
4. Scroll to Text message templates and press the Select soft key or the
key to view the current list of available text message templates.
5. Highlight the sentence you wish to insert into a message and then press
the Options soft key.
You can choose from ten predefined sentences that you can add to your
text message to save time.
6. Enter a recipient phone number or press the Options soft key and select
Add recipient message, then press the Select soft key or the key
and assign a recipient from either the: Recent contacts, Phonebook, My
Album, or My Journal lists.
7. Highlight the text field and either modify the current text or add it to using
the phone’s keyboard.
8. Press Send soft key to send the template.
67
Page 72

Voice Mail
Picture message Templates
1. In Idle mode, press the Menu soft key to access Menu mode.
2. Highlight the Messages menu and press the Select soft key or the
key.
3. Highlight Templates and press the Select soft key or the key.
4. Highlight Picture message templates and press the Select soft key or the
key.
5. Highlight a template type from the list (Birthday, Christmas, Congratulation,
Enjoy, or Love) and press the key. The picture template displays on
the screen.
6. Press the Send soft key and enter a recipient phone number or press the
Options soft key and select Add recipient message. Press the Select soft
key or the key and assign a recipient from either the: Recent
contacts, Phonebook, My Album, or My Journal lists.
7. Press the Send soft key to send the picture template.
Note: For more information, refer to "Picture message" on pa ge 70.
Voice Mail
This menu provides you with a way of accessing your voice mailbox, if provided by
your network.
1. In Idle mode, press the Menu soft key to access Menu mode.
2. Press the Select soft key or the key to enter the Messages menu.
3. Highlight the Voice mail option and press the Select soft key or the
key.
Tip: Quick connect to voice mail by pressing and holding the number 1 key in Idle mode.
The following options are available:
• Connect to voice mail: provides access to your voice mail and displays your Voice
mail number received from your service provider. Press the OK soft key to listen to
your messages.
Tip: You can launch Voice mail from the Idle mode by pressing and holding the key.
• Voice server number: allows you to change the Voice mail server number, if
necessary.
Messages 68
Page 73

Note: Voice mail is a network feature. Please contact your service provider for further details.
Delete All
This menu allows you to delete all of the messages in each message box. Or, you
can also delete all of your messages in all message boxes at one time.
1. In Idle mode, press the Menu soft key to access Menu mode.
2. Highlight the Messages menu and press the Select soft key or the
key.
3. Highlight Delete all and press the Select soft key or the key.
4. To select a message box to clear, press the Up or Down Navigation key. To
delete all of your messages, select the Delete all option.
5. To place or remove a check mark, press the key.
6. Press the Delete soft key to delete the marked objects.
7. After you receive a confirmation message, press the Ye s soft key to delete
the selected message box contents. Otherwise, press the No soft key.
Settings
In this menu, you can set up default text message and picture message information.
The last setting you accessed is automatically activated for sending subsequent
messages.
Text messages
• Service center: allows you to store or change the number of your message center,
which is required when sending messages. You must obtain this number from your
service provider.
• Destination address: allows you to enter a number that you would like to which
you would like to send all messages. You can still message others, but this number
always displays in the Send list.
• Validity period: allows you to set the length of time your text messages are stored
at the message center while attempts are made to deliver them.
• Reply path: when this option is check marked it allows the recipient of your
message to send you a reply message using your message center, if your network
supports this service.
• Delivery report: when this option is check marked, the network informs you
whether or not your message was delivered.
69
Page 74

Memory Status
Picture message
The following options are used to set Send and Receive settings for Picture
messages.
Sending options
Delivery report: when this option is enabled, the network informs you whether or
•
not your message was delivered.
• Read reply: when this option is enabled, your phone sends a request for a reply
along with your message to the recipient.
• Priority: you can select the priority level of your messages.
• Expiry date: The expiration date is how long the message receiver has to retrieve
the message.
• Delivery time: you can set a delay time before the phone sends your messages.
Retrieving options
•
Anonymous reject: you can set your phone to automatically reject anonymous
messages.
• Ads allowed: allows you to receive advertisements.
• Report allowed: you can set the option to receive a delivery report.
Memory Status
You can check the amount of the memory used and the memory remaining for
messages in your Inbox, Drafts, and Outbox. The display shows the total space
including the used and free space. You can also view how much space is currently
occupied by each message box.
Broadcast Messages (SIM Dependent)
This network service allows you to receive text messages on various topics, such as
the weather or traffic.
Note: For further details please contact your service provide r.
Messages 70
Page 75

Instant Messaging
Instant Messaging (IM) is a way of sending short, simple messages that are
delivered immediately to users online at that moment.
Before using this feature, you need to subscribe to a messenger service. For further
details, contact your service provider.
Starting your Instant Messaging
1. In Idle mode, press the Menu soft key to access Menu mode.
2. Using the Navigation keys, scroll to the IM icon. Press the Select soft key
or the key to enter the menu.
3. Highlight the messenger service to which you have previously subscribed
by using the Up or Down Navigation key and press the Select soft key or
the key.
4. Highlight the Sign on, Connect, or Sign in option, depending on your
messenger service and press the Select soft key or the key.
5. Enter the required sign on information such as ID and password and press
the OK soft key.
Note: The information required for sign on va ries depending on the instant messaging pr ovider you use.
6. Follow the on-screen instructions to read, reply to, compose, send, and
manage your IM account.
Using the Instant Messenger Menu
The user can look at next menu after select "IM application"
On the sign-on screen of the messenger, press the Options soft key to access the
following options:
• Sign on/Connect/Sign in: allows you to login to your IM account.
• Saved conversations: The preserved content of the conversation is seen.
• Offline conversations: Displays a listing of any conversations made while you
were offline (this option applies only to AIM and ICQ messenger).
• Settings: allows you to change your Default community and Community settings.
• Help: provides various help information depending on the community you have
selected.
71
Page 76

Section 8: Fun & Apps
Topics Covered
• Files
•Games
• Voice Note
• Camera
• Voice Commands
• Mega Search
This section outlines the various applications that are available on your phone.
Files
Files allows you to manage your sounds, images, music, videos and other files all in
one convenient location.
Sounds
In this menu, you can view the list of sounds downloaded from the web server,
received in multimedia messages, or recorded as voice memos. You can set a
downloaded sound as the current ring tone or use a voice clip.
Note: Charges may apply when downloading MegaTones® or HiFi Ringers TM.
The following options are available:
Browse More MegaTones
Using the Browse MegaTones option on the sounds list, you can access the website
preset by T-Mobile and download new sounds.
Browse HiFi Ringers
Using the Browse HiFi Ringers option on the sounds list, you can access the
website preset by T-Mobile and download new HiFi Ringers.
Files
Fun & Apps 72
Page 77

Sounds
Highlight an item in the Sounds menu and press the Options soft key. The following
options are available:
• Download new: takes you to t-zones where you can download new sounds.
• Send via: allows you to send the sound via Picture message or Bluetooth.
• Set as: allows you to set the sound as your Ringtone, a Caller ringtone, or an Alarm
tone.
• Delete: allows you to delete the selected sound or delete Multiple sounds.
• Move to memory card: allows you to move the sound to your micro SD memory
card.
• Copy to memory card: allows you to copy the sound to your micro SD memory
card.
• Rename: allows you to change the name of the sound.
• Bluetooth visibility: allows the selected sound or multiple sounds to be shared or
released for the use of another Bluetooth device.
• Lock/Unlock: allows you to lock the sound to protect it from deletion.
• Properties: displays the sound Name, Date, Format, Size, and Protection.
Voice list
Voice list contains your recorded audio messages. Highlight an item in the Voice list
list menu and press the Options soft key. The following options are available:
• Send via: allows you to send the audio message via Picture message or Bluetooth.
• Set as: allows you to set the voice memo as a Ringtone, Caller ringtone, or Alarm
tone.
• Delete: allows you to delete the selected audio message or delete Multiple audio
messages.
• Move to memory card: allows you to move the audio message to your micro SD
memory card.
• Copy to memory card: allows you to copy the audio message to your micro SD
memory card.
• Rename: allows you to change the name of the audio message.
• Bluetooth visibility: allows the selected audio message or multiple messages to
be shared or released for the use of another Bluetooth device.
73
Page 78

• Lock/Unlock: allows you to lock the audio message to protect it from deletion.
• Properties: displays the audio message Name, Date, Format, Length, Size, and
Protection.
Assigning Music Files
You can choose to assign music files as the default ringtone, Caller ringtone or as an
Alarm tone.
1. In Idle mode, you can access the Music player by either:
• Pressing and holding the key.
• Press the Menu soft key, select Music player and then press the Select soft
key or the key.
2. Press the Library soft key and select the All category.
3. Highlight the song you want to assign as the default ringtone.
4. Press the Options soft key and select the Set as option.
5. Select one of the following options:
• Ringtone: allows you to use the selected music file as a Ringtone.
Note: Protected file types cannot be assigned as a Ringtone.
• Caller ringtone: allows you to use the selected music file as a Caller ringtone.
• Alarm tone: allows you to use the selected music file as an Alarm tone.
6. At the Copy to phone? prompt, press the Yes soft key.
The music file copies from the phone to the memory card. The music
player temporary pauses and then redisplays the category listing.
Images
In this menu, you can view the list of images downloaded from the web server,
received in messages, or created/taken images. You can set a downloaded image as
the current background image.
The following options are available:
Browse Wallpapers
Using the Browse Wallpapers option, you can access the website preset by
T-Mobile and download new images.
Photos
In this menu you can review the photos you’ve taken. Highlight a photo and press the
Options soft key to choose from the following options:
• View: displays the photo.
Fun & Apps 74
Files
Page 79

•
Send to My Album: sends the photo to My Album.
• Send via: allows you to send the image via Picture message or Bluetooth.
• Set as: allows you to set the photo as Wallpaper or as a Caller ID.
• Delete: allows you to delete the Selected photo or to delete Multiple photos.
• Default destination: allows you to remove or replace the default destination.
• Move to memory card: allows you to move the photo to the micro SD memory
card.
• Copy to memory card: allows you to copy the photo to the micro SD memory
card.
• Rename: allows you to change the name of the photo.
• Display mode: allows you to see your images displayed in a Line view or in
Thumbnail view.
• Slide Show: allows you to see all of your photos in a slide show presentation.
Choose 1 second or 3 seconds for slide show interval.
• Bluetooth visibility: allows the selected photo or multiple photos to be shared or
released for use by another Bluetooth device.
• Print via Bluetooth: sends the selected photo to a Bluetooth compatible printer.
• Lock/Unlock: allows you to lock/unlock the image to protect it from deletion.
• Properties: displays the image Name, Date, Format, Resolution, Size, and
Protection.
My Album
My Album is a private online picture album that you can use to store and share
pictures, videos, voice messages, and text.
Use the following procedure to access My Album:
Note: Charges may apply when accessing My Album.
1. In Idle mode, press the Menu soft key to access Menu mode.
2. Select Fun & Apps and press the Select soft key or the
key.
3. Highlight Files and press the Select soft key or the key.
4. Select Images and press the Select soft key or the key.
5. Scroll to My Album and press the Select soft key or the key.
6. Photos sent to this folder are stored in the Inbox Album. Use the
Navigation keys to browse through the remotely stored images.
75
Page 80

7. Press the key to exit t-zones and press the Ye s soft key to return to
the Idle screen.
My Journal
Make notes in My Journal, your online diary and weblog. Keep it private to store your
personal memories, or send e-mails to invite people to view and comment on your
album. See your service provider for more information.
Note: Charges may apply when accessing My Jour nal.
Downloaded images
This menu allows you to access your downloaded images.
Scroll to the image you want to view. By pressing the Options soft key you can
access the following options:
• Download new: takes you to t-zones where you can download new images.
• View: displays the image.
• Send via: allows you to send the image via Picture message or Bluetooth.
• Set as: allows you to set the image as Wallpaper or as a Caller ID.
• Delete: allows you to delete the Selected image or to delete Multiple image.
• Move to memory card: allows you to move the item to the micro SD memory
card.
• Copy to memory card: allows you to copy the item to the micro SD memory card.
• Rename: allows you to change the name of the item.
• Display mode: allows you to see your images displayed in a Line view or in
Thumbnail view.
• Slide show: allows you to see all of your photos in a slide show presentation.
• Bluetooth visibility: allows the selected image or multiple images to be shared or
released for the use of another Bluetooth device.
• Lock/Unlock: allows you to lock/unlock the image to protect it from deletion.
• Properties: displays the image Name, Date, Format, Resolution, Size, and
Protection.
Videos
In this menu, you can view a list of videos downloaded from the web server, received
in multimedia messages, or recorded via the phone. The following options are
available:
Files
Fun & Apps 76
Page 81

Downloaded videos
This menu allows you to access your downloaded video clips.
Scroll to the video you want to view. By pressing the Options soft key you can
access the following options:
• Play: plays the video.
• Send via: allows you to send the video via Picture message or Bluetooth.
• Delete: allows you to delete the Selected video clip or to delete Multiple video
clips.
• Move to memory card: allows you to move the video to the micro SD memory
card.
• Copy to memory card: allows you to copy the video to the micro SD memory card.
• Rename: allows you to change the name of the video.
• Display mode: allows you to see your videos displayed in a Line view or in
Thumbnail view.
• Bluetooth visibility: allows the selected video or multiple videos to be shared or
released for the use of another Bluetooth device.
• Lock/Unlock: allows you to lock/unlock the video to protect it from deletion.
• Properties: displays the video Name, Date, Format, Size, and Protection.
Videos
In this menu you can review the photos you’ve taken. Highlight a video and press the
Options soft key to choose from the following options:
• Play: plays the video.
• Send to My Album: allows you to send the selected video to the My Album folder.
• Send via: allows you to send the video via Picture message or Bluetooth.
• Set as Caller ID: allows you to set the selected video clip as a Caller ID.
• Delete: allows you to delete the selected video or delete Multiple videos.
• Default destination: allows you to remove or replace the default destination.
• Move to memory card: allows you to move the video to the micro SD memory
card.
• Copy to memory card: allows you to copy the video to the micro SD memory card.
• Rename: allows you to change the name of the video.
• Display mode: allows you to see your videos displayed in a Line view or in
Thumbnail view.
• Bluetooth visibility: allows the selected video or multiple videos to be shared or
released for the use of another Bluetooth device.
77
Page 82

Files
• Lock/Unlock: allows you to lock the video to protect it from deletion.
• Properties: displays the video Name, Date, Format, Size, Resolution and
Protection.
Memory card
Select this option to see the video files that you saved to your memory card.
Note: The Memory card option only displays if a micro SD memory card was inserted in your phone.
Music
This options allows you to access your MP3 files in your Music list. Highlight a music
file and press the Options soft key to choose from the following options:
• Play via: allows you to play the selected MP3 file on the Phone, Bluetooth stereo
single headset, or Bluetooth stereo headset.
• Send via Bluetooth: allows you to send the selected MP3 file via a Bluetooth
device.
• Set as: allows you to set the selected MP3 as a Ringtone or Caller ringtone.
• Delete: allows you to delete the selected MP3 file.
• Move to memory card: moves the selected MP3 file to the memory card.
• Copy to memory card: copies the selected MP3 file to the memory card.
• Rename: allows you to rename the selected MP3 file.
• Bluetooth visibility: allows the selected MP3 to be shared or released for the use
of another Bluetooth device.
• Lock/Unlock: allows you to lock the MP3 to protect it from deletion.
• Properties: displays the Name, Date, Format, Bit rate, Length, Size, and Protection
mode of the selected MP3.
Note: MP3 bit rate is limited to 192Kbps. If a file has embedded copy-protection enabled (DRM), it will not
be playable on the phone.
Memory card
Select this option to see the music files that you have saved to your memory card.
Note: The Memory card option only displays if a micro SD memory card was inserted in your phone.
Other files
This option allows you to view other types of files that you have stored on your
phone. This includes Excel spreadsheets, text files, wmf files, PowerPoint
Fun & Apps 78
Page 83

presentations, PDFs, MHTML and Word documents. You can send these files by
Bluetooth. You can also move or copy the files to your memory card.
Memory card
You can check the contents of your micro SD memory card and see what was saved
there. Press the Up or Down navigation keys to scroll between Images, Videos,
Music, Sounds, and Other files.
Note: The Memory card option only disp lays if a micro SD memory card was i nserted in your phone.
After selecting a folder, press the Options soft key for the following options:
• Open: allows you to open the folder so you can access its contents.
• Create folder: allows you to create a new folder.
• Bluetooth visibility: allows the selected file or multiple files to be shared or
released for the use of another Bluetooth device.
• Properties: lists the folder Name, Date, Format, Size, and Protection.
• Memory card settings: allows you to view the settings for Maximum memory,
Used memory, and Free memory.
Caution!: Pressing the key while viewing this option prompts “Formatting will erase all data.
Continue?” and if confirmed, reformats the memor y card and erases all data on the card.
For more information on downloading files from your PC to your Memory card,
contact your service provider.
Memory status
You can check the amount of memory used and memory remaining for sounds,
music, images, videos, and other files. The Count also displays the number of
images, icons, music files, or Other files.
䊳 You can select Phone or Memory card. Press the Left or Right navigation
keys to scroll between Size, and Count.
Games
You can download MIDlets (Java applications that run on mobile phones) from
various sources using t-zones and store them in your phone.
When you access the Games menu, the Browse games and My games options
displays. Once you have downloaded games, they are added to the My games folder.
Note: Java services may not be available, depending on your servic e provider.
79
Page 84

Voice Note
Browse games
You can download more games from the website preset by your service provider
using the Browse games option.
Note: Charges may apply when downloading games. For more information, contact your service provider.
My games
This folder contains the default downloaded games and any other games you
downloaded. After selecting a game, press the Options soft key for the following
options:
Note: Some options are greyed out and not editable (Move to, Delete, and Unlock).
• Start: launches the application.
• Properties: displays some of the game development information such as: name,
supplier/vendor, software version, file size, etc...
• Permissions: allows you to restrict the game’s network access and adjust the
subscriber’s privacy information.
• Memory status: displays the memory status such as: total available memory,
Used memory, game allocation, and folder memory used.
Voice Note
In this menu, you can record a Voice note of up to one minute long and then
immediately send it within a Picture message. These voice notes are listed within
the voice list folder.
When you access this menu, a timer displays on the screen.
1. In Idle mode, press the Menu soft key to access Menu mode.
2. Select Fun & Apps and press the Select soft key or the key.
3. Highlight Voice Note and press the Select soft key or the key.
Note: Steps 1 and 2 can be bypassed by pressing the Right navigation key w hile in Idle mode.
4. Press the Record soft key to start recording.
5. Record a memo by speaking into the microphone.
The display shows the elapsed time and the remaining time at one time.
6. When you are finished, press the Stop soft key the key. Or, when the
recording time expires, the display advances to the next screen.
Fun & Apps 80
Page 85

• The Voice note is then saved to your Voice list.
7. Press the Options soft key for the following options:
• Send to: allows you to send the Voice note.
•Play: plays back your Voice note.
• Re-record: discards the Voice note and enables you to record another one.
• Set default destination: allows you to remove or edit the default destination.
•Set as: allows you to set the voice memo as a Ringtone, Caller ringtone, or
Alarm tone.
•Save: saves the Voice note.
8. Press the Send soft key to attach the file to an multimedia message and
then select a recipient.
9. From the Send screen, highlight one the following options and press the
Select soft key or the key:
• Recent recipients: allows you to select a phone number or an email address
from the last 30 destinations to which you sent messages.
• Phonebook: allows you to select the phone number or email address you want
from your Phonebook. Use the key to check the selected entries.
• New recipient: allows you to enter a new entry.
• My Album: allows you to send the Voice note to My Album.
• My Journal: allows you to send the Voice note to My Journal.
10. Select where you would like to send your Voice note by entering the
information in the Send menu and press the OK soft key.
The number automatically enters into the To field on the Recipients list.
11. To add another destination, select an empty To field and press the Options
soft key.
Note: When entering multiple destinations, you can also choose Change recipient type in addition to the
other send options.
12. Repeat from step 9 and enter up to 10 destinations.
13. When you are finished entering the destinations, press the Options soft
key, highlight Send and press the Select soft key or the key
Your phone then sends the message and saves it in the Sentbox.
Camera
For more information, refer to "Camera and Camcorder" on page 98.
81
Page 86

Voice Commands
Voice Commands
VoiceSignal is advanced speech recognition software used to activate a wide-variety
of functions on your phone. VoiceSignal software automatically voice activates all
contacts for voice dialing and searching, no pre-recording or training needed. Speak
phone numbers naturally to dial, and use voice commands to launch applications
and navigate phone menus.
Using the VoiceSignal, voice recognition software you can dial phone numbers,
lookup contacts, and open other applications with voice commands.
1. In Idle mode, press the Menu soft key to access Menu mode.
2. Select Fun & Apps and press the Select soft key or the
key.
3. Highlight Voice commands and press the Select soft key or the key.
4. At the voice prompt, say a command. The list of available commands is
listed below.
Note: A list of voice commands briefly displays.
Voice Recognition Commands
• Call <Name or #>: dials a name from your contact list, or dials a number, even if
the number is not stored in the contact list. For more information, refer to
"Contacts List Voice Activation" on page 83.
• Send Text <Name>: displays the Create Text Message screen. For more
information, refer to "Create new Text Message" on page 59.
• Lookup <Name>: allows you use a voice command to locate and display contact
information stored in the Contacts list. For more information, refer to "Finding a
Phonebook Entry" on page 52.
• Go to <App>: accesses the Voice Memo, Calendar, and Contacts List features of
your phone. (See ‘Voice Memo” on page 38, ‘Calendar” on page 126, and ‘Your
Contacts List” on page 53 for more information.)
• Check <Item>: Lets you check your phone's status (that is, network coverage,
signal strength, and battery in the same report), network coverage, signal
strength, battery, and phone number.
Speak clearly when giving your command. If, after a few seconds, the handset does
not recognize your command, a voice prompt asks you to repeat the command. If the
software does not recognize your command the following message displays “Sorry,
no match found,” and voice recognition turns off.
Fun & Apps 82
Page 87

Important!: You must end your current VoiceSignal call before you can make another call.
Voice Recognition Tips
•
Wait for the tone before you speak.
• Speak clearly and at a normal volume.
Contacts List Voice Activation
On startup VoiceSignal reads your Contacts list and voice-activates all the names.
When you have add or change contacts, VoiceSignal automatically reloads and
voice-activates the list when you add or modify a contact.
Call Digit Dialing
Digit Dial allows you to dial any phone number by simply speaking the digits into the
phone. No training is necessary, and Digit Dial is programmed to understand natural
speech.
1. Access VoiceSignal by doing one of the following:
• Press and hold the key.
• Press and hold the Multi-Function button on a plug-in headset or a Bluetooth
headset.
• In the Fun & Apps menu, select Voice commands and press the Select
soft key or the key.
After a brief pause, a list of optional commands displays on the screen
(and the “Say a command” message displays on the external screen) and
the audio prompt “Say a command” plays through the earpiece.
2. To use Digit Dialing, say “Call” and the area code and number that you
want to dial at a distance of 3-12 inches from the phone in a natural voice.
3. The number that you said is repeated through the earpiece and your phone
dials the number.
4. If VoiceSignal is not sure of the number that you said, a list of possible
matches displays on the screen.
5. You’re asked to confirm the correct number as VoiceSignal displays the
results. Say “Yes ” or “No” to confirm or reject the number when
prompted.
Call Name Dialing
To use Name Dial, you’ll need to have entries stored in your Phonebook. For
information on creating Phonebook entries, see "Understanding Your Phonebook"
on page 49.
83
Page 88

1. Access VoiceSignal by doing one of the following:
• Press and hold the key.
• Press and hold the Multi-Function button on a plug-in headset or a Bluetooth
headset.
• In the Fun & Apps menu, select Voice commands and press the Select
soft key or the key.
After a brief pause, a list of optional commands displays on the screen
(and the “Say a command” message displays on the external screen) and
the audio prompt “Say a command” plays through the earpiece.
2. To use Name Dialing, say “Call” and the name of the contact that you want
to dial.
3. The name that you said is repeated through the earpiece and your phone
dials the number.
4. If VoiceSignal is not sure of the name that you said, a list of possible
matches displays on the screen.
5. You’re asked to confirm the correct number as VoiceSignal displays the
results. Say “Yes ” or “No” to confirm or reject the number when
prompted.
6. The location is repeated through the earpiece and your phone dials the
number.
Send Text Message
Access VoiceSignal by doing one of the following:
1.
• Press and hold the key.
• Press and hold the Multi-Function button on a plug-in headset or a Bluetooth
headset.
• In the Fun & Apps menu, select Voice commands and press the Select
soft key or the key.
2. After a brief pause, a list of optional commands displays on the screen (and
the “Say a command” message displays on the external screen) and the
audio prompt “Say a command” plays through the earpiece.
3. Say “Send Text” at a distance of 3-12 inches from the microphone. “Say
the Name or Number” plays through the earpiece.
4. After you say a name or number, you might be prompted, “Did you say?”
To confirm a name or number, wait for the beep and then say “Yes.”
5. You can also choose the correct name or number from the choice list using
the phone’s arrow keys.
Voice Commands
Fun & Apps 84
Page 89

6.
When the Text Message client launches, enter your text message.
Name Lookup
To perform a name lookup, you’ll need to have some entries in your Contact list.
1. Access VoiceSignal by doing one of the following:
• Press and hold the key.
• Press and hold the Multi-Function button on a plug-in headset or a Bluetooth
headset.
• In the Fun & Apps menu, select Voice commands and press the Select
soft key or the key.
After a brief pause, a list of optional commands displays on the screen
(and the “Say a command” message displays on the external screen) and
the audio prompt “Say a command” plays through the earpiece.
2. Say “Lookup” at a distance of 3-12 inches from the microphone. “Say the
name” plays through the earpiece.
3. Say the name exactly as it displays in your Contact list, first name followed
by last name.
4. The contact name displays on the screen with other information that
you’ve entered for that contact.
Opening Applications
You can open an application or access a menu on your phone using VoiceSignal.
1. Access VoiceSignal by doing one of the following:
• Press and hold the key.
• Press and hold the Multi-Function button on a plug-in headset or a Bluetooth
headset.
• In the Fun & Apps menu, select Voice commands and press the Select
soft key or the key.
After a brief pause, a list of optional commands displays on the screen
(and the “Say a command” message displays on the external screen) and
the audio prompt “Say a command” plays through the earpiece.
2. Say “Go To” at a distance of 3-12 inches from the microphone. A list of
options displays and a prompt of “Please choose” plays through the
earpiece. If the option you desire is not listed, say “Next Menu” to scroll to
the next page.
3. The spoken application menu option is then activated.
85
Page 90

Voice Commands
Checking Phone Status
Use the Check command to see and hear status information from your phone,
including its phone number, status, current signal strength, network coverage, and
battery level.
To check phone status:
1. Access VoiceSignal by doing one of the following:
• Press and hold the key.
• Press and hold the Multi-Function button on a plug-in headset or a Bluetooth
headset.
• In the Fun & Apps menu, select Voice commands and press the Select
soft key or the key.
After a brief pause, a list of optional commands displays on the screen
(and the “Say a command” message displays on the external screen) and
the audio prompt “Say a command” plays through the earpiece.
2. Say “Check” at a distance of 3-12 inches from the microphone. A list of
options displays and a prompt of “Please choose” plays through the
earpiece.
3. The spoken phone status menu option is then displayed.
Voice Recognition Settings
Choice lists
VoiceSignal uses choice lists when a name or number is not clearly recognized. The
software displays three choices and prompts you to select a choice.
You can modify the way VoiceSignal uses the choice lists in the settings. Each time
VoiceSignal activates you can choose to view the choice list even if there is only one
choice. Additionally, you can choose never to view a choice list, even if there are
multiple choices. When the name or number you speak is not recognized, the
Automatic setting displays the choice list.
1. In Idle mode, press the Menu soft key to access Menu mode.
2. Select Fun & Apps and press the Select soft key or the key.
3. Highlight Voice commands and press the Select soft key or the key.
4. At the voice prompt, press the Settings soft key and select one of the
following:
• Choice lists
- Automatic: VoiceSignal displays a choice list only when it is not sure if it has
correctly recognized the name or number.
Fun & Apps 86
Page 91

Always On: VoiceSignal always displays a choice list, even when there is only
-
one choice.
- Always Off: VoiceSignal never displays a choice list.
5. Press the OK soft key or the key to confirm the selection.
Sensitivity
This option allows you to adjust the sensitivity monitoring of voice tones.
1. In Idle mode, press the Menu soft key to access Menu mode.
2. Select Fun & Apps and press the Select soft key or the key.
3. Highlight Voice commands and press the Select soft key or the key.
4. At the voice prompt, press the Settings soft key, select Sensitivity and
press the Select soft key or the key.
5. Use the Up or Down Navigation keys to adjust the selected Sensitivity
setting to Reject More spoken commands or names or to Reject Less
spoken commands or names.
6. Press the OK soft key or the key to accept the new setting.
Sound
This options allows you to determine which text, names or numbers are spoken
through the speaker or headset.
1. In Idle mode, press the Menu soft key to access Menu mode.
2. Select Fun & Apps and press the Select soft key or the key.
3. Highlight Voice commands and press the Select soft key or the key.
4. At the voice prompt, press the Settings soft key, select Sound and press
the Select soft key or the key.
5. Select one of the following options:
•Prompts: enables or disables audio prompts.
• Digits: enables or disables audio digit playback.
•Names: enables or disables audio name playback.
• Name settings: Lets you adjust the speed and volume of your phone’s audio
name playback.
• Speakerphone: enables or disables voice recognition through the
speakerphone.
6. Use the navigation keys to highlight the desired setting.
7. Press the OK soft key, Select key or key to accept the new setting.
87
Page 92

Voice Commands
Active contacts
This options allows you to activate selected contacts as accessible via the voice
command feature.
1. In Idle mode, press the Menu soft key to access Menu mode.
2. Select Fun & Apps and press the Select soft key or the key.
3. Highlight Voice commands and press the Select soft key or the key.
4. At the voice prompt, press the Settings soft key, select Active Contacts
and press the Select soft key or the key.
5. Mark selected contacts and voice command accessible by using your
Navigation keys to highlight an entry and then pressing the Options soft
key.
6. Select either Mark (to tag an individual contact entry) or Add all (to tag
every contact entry) and press the Select soft key or the key.
7. Press to access the Save screen and press the Yes soft key to store
your selection.
Active menus
This options allows you to activate selected menu items as accessible via the voice
command feature.
1. In Idle mode, press the Menu soft key to access Menu mode.
2. Select Fun & Apps and press the Select soft key or the key.
3. Highlight Voice commands and press the Select soft key or the key.
4. At the voice prompt, press the Settings soft key, select Active Menus and
press the Select soft key or the key.
5. Mark selected menu and submenu items as accessible by using your
Navigation keys to highlight a function.
6. Select either Mark (to tag an individual contact entry) or Mark all (to tag
every function) and press the Select soft key or the key.
7. Press to access the Save screen and press the Yes soft key to store
your selection.
Fun & Apps 88
Page 93

Mega Search
Mega Search is an easy way to locate contacts, menu items, applications, or other
file or folder information.
1. In Idle mode, press the Menu soft key to access Menu mode.
2. Select Fun & Apps and press the Select soft key or the key.
3. Highlight Mega Search and press the Select soft key or the key.
4. Use the Left and Right Navigation keys to select from the following
searchable tabs:
•All: allows you to simultaneously search from all of the following categories.
- Enter the first few letters or numbers of your search criteria in the text box.
Matches are then listed, starting with the first entry matching your search criteria.
•Menu: allows you to reveal menu functions which match your search criteria.
- Enter the first few letters of the desired menu option in the text box. Matches are
then listed, starting with the first entry matching your search criteria.
• Files: allows you to reveal files which match your search criteria.
- Enter the first few letters of the desired file name in the text box. Matches are
then listed, starting with the first entry matching your search criteria.
• Messages: allows you to reveal messages which match your search criteria.
- Enter the first few numbers of the desired sender in the text box. Matches are
then listed, starting with the first entry matching your search criteria.
• Calendar: allows you to reveal calendar entries which match your search
criteria.
- Enter the first few letters or numbers of the desired calendar entry in the text box.
Matches are then listed, starting with the first entry matching your search criteria.
•Games: allows you to reveal games which match your search criteria.
- Enter the first few letters of the desired game entry in the text box. Matches are
then listed, starting with the first entry matching your search criteria.
• Phonebook: allows you to reveal contacts which match your search criteria.
- Enter the first few letters of the desired phonebook entry in the text box. Matches
are then listed, starting with the first entry matching your search criteria.
• Call log: allows you to reveal call log entries which match your search criteria.
- Enter the first few numbers of the call entry in the text box. Matches are then
listed, starting with the first entry matching your search criteria.
5. Use the Up and Down Navigation keys to select an entry and press the
key to access the selection.
89
Page 94

Mega Search
Fun & Apps 90
Page 95

Section 9: Music Player
Topics Covered
•Music Player
• Supported File Types
• Player Settings
• Playing Music Files
• Creating a Music Playlist
• Adding Music to a Playlist
• Transferring Music Files to the Memory Card
• Deleting Music Files From the Memory Card
• Assigning Music Files
This section describes how to use the Music Player to play downloaded music files.
There are also instructions on how to use the Music Setup Wizard.
Music Player
The Music Player allows you to play music files stored on the phone.
Note: Note: The following characters cannot be used in the filename:
< > “ ? / \ : * |
Supported File Types
The Music player supports the following audio file types:
• MP3
• WMA (non DRM)
Note: DRM is a copyright protection method used on some music fi les. These protected files will not play
on the phone.
For information on assigning audio files as the default ringtone, Caller ringtone or as
an Alarm tone, see "Assigning Music Files" on page 74.
91
Page 96

Music Player Library
Music Player Library
The Library soft key allows you to quickly access music files categorized by Now
playing, All, Artists, Albums or Playlists.
1. In Idle mode, you can access the Music player by either:
• Pressing and holding the key.
• Press the Menu soft key, select Music player and then press the Select soft
key or the key.
2. Press the Library soft key and select one of the following options then
press the key.
• Now playing: displays the music file that is currently playing.
•All: lists all music files stored on the memory card and allows you to play
individual music files or play multiple files by creating a temporary music playlist.
• Artists: displays artists names for music files on the memory card and allows
you to play one or more files from a selected artist.
• Albums: displays album titles for music files stored on the memory card and
allows you to play one or more music files from a selected album.
• Playlists: displays any playlist you saved and allows you to create, save and
manage playlists.
3. Highlight a music file from the list, press the Options soft key and select
one of the following options:
• Play via: plays the music files within the selected category on the Phone,
Bluetooth stereo single headset or Bluetooth stereo dual headset.
• Add to playlist: adds the selected music file to the playlist. For more
information, refer to "Creating a Music Playlist" on page 95.
• Delete: deletes the selected music file or multiple music files from the playlist.
•Set as: sets the selected music file as a Ringtone, Caller ringtone, or Alarm
tone. For more information, refer to "Assigning Music Files" on page 74.
• Send via bluetooth: allows you to send the selected music file to another
Bluetooth enabled device.
• List by: sorts the music files in this playlist by the following categories: Recently
Added, My rating, or by Title.
• Rate track: allows you to rate the selected music track using 5 stars (best) to
No rating.
•Skip marked: allows you to mark and skip the selected music file or multiple
music files.
• Lock: locks the selected music file to protect it from deletion.
• Details: displays the details about the selected music file such as Artist, Title,
album, Track length, Genre, Author, Track number, and Format.
• Player settings: allows you to set preferences for the selected music file such
as the Equalizer, 3D sound or Music menu.
Music Player 92
Page 97

Player Settings
The Player settings menu configures your phone’s music playing options such as the
Equalizer, 3D sound, or Music menu. Settings for the Music menu determine the
order in which music is presented for the selected music category.
1. From within the Music Player menu, press the Options soft key, select
Settings, then press either the Select soft key or the key.
2. Highlight the Equalizer option and press the Select soft key or the
key.
3. Highlight one of the following audio equalizer presets and press the Select
soft key:
•Normal
• Classical
•Jazz
•Rock
4. Highlight the 3D sound option and press the Select soft key or the
key. 3D sound tries to simulate stereo playback through the phone’s
speaker.
5. Select Off or On for the 3D sound option and press the Save soft key.
6. Highlight the Music menu option and press the Select soft key or the
key.
7. Activate any of the following Music menu categories by highlighting the
entry, and then pressing key to place a checkmark beside your
selection(s):
•Artists
•Albums
•Composers
•Years
• Recently played
• Most played
• Playlists
8. Press the Save soft key to store the category selections and return to the
previous Settings menu.
9. Press the Back soft key or the key when you are finished.
93
Page 98

Playing Music Files
Music Player Shortcut Keys
Volum e k ey
Press the Volume Up key to increase the volume.
•
• Press the Volume Down key to decrease the volume.
Navigation keys
Up/Down
•
• Displays a list of player modes:
- Normal: song are played in the order they appear in the current list.
- Shuffle: the current list of songs are randomly shuffled for playback.
- Repeat one: repeats the currently active song.
- Repeat all: replays each song in the current list and as the last song in the list
ends, the player begins replaying all of the songs in the order the appear within
the current list.
- Shuffle repeat: the current randomly shuffled playlist is continuously repeated.
• Left
• Plays the previous song title
• Right
• Advances to the next song title
Play key (OK key)
Press once toggle the play state of the current song (Play/Pause).
•
MP3 key
While in Idle mode, press and hold the key to access the Media Player
•
menu.
• During song playback, press the key once to return to the idle screen while
still listening to the current song.
Playing Music Files
1. In Idle mode, you can access the Music player by either:
• Pressing and holding the key.
• Press the Menu soft key, select Music player and then press the Select soft
key or the key.
2. Press the Library soft key and select one of the following options then
press the key.
3. Select All and press the Select soft key or the key. All stored music
files are displayed.
4. Press the Up or Down navigation keys to highlight the song or songs you
want to listen to.
Music Player 94
Page 99

5.
Highlight the song to play and press the Play soft key.
Note: The Navigation keys can be used to play, pause, shuffle, and select ei ther the next or previous songs
from the current list.
6. While listening to an MP3, press the Options soft key for the following
options:
•Pause: allows you to pause the song you are listening to. Press the
to
resume the song.
• Transfer to: plays the selected song via a Bluetooth stereo single headset or a
Bluetooth dual headset.
• Stop: stops playing the selected song. Also activated by pressing the Down
Navigation key.
•Set as: allows you to set the song as your Ringtone, a Caller ringtone, or an
Alarm tone.
• Send via bluetooth: allows you to send the song to a Bluetooth device such
as a stereo Bluetooth headset.
• Rate track: allows you to assign a rating to the currently played song. This
rating is from No rating to 5 stars and is stored with the song.
• Add to playlist: adds the selected song to the current playlist.
•Skip marked: marks and skips the currently selected song.
• Details: displays details for the selected song such as Artist, Title, Album, Track
length, Genre, Author, Track number, and Format.
• Settings: allows you to set preferences for the selected music file such as the
Equalizer, 3D sound or Music menu.
Creating a Music Playlist
1. In Idle mode, you can access the Music player by either:
• Pressing and holding the key.
• Press the Menu soft key, select Music player and then press the Select soft
key or the key.
2. Press the Library soft key and select one of the following options then
press the key.
3. Select Playlists and press the key. All current playlist are displayed.
Initially, there are no playlists stored on the phone.
4. Highlight Create playlist and press the Options soft key.
5. Select the Create playlist option and press the Select soft key or the
key.
6. Use the keypad to enter a name for the new playlist and press the Save
soft key to store the new name and return to the Playlists screen.
95
Page 100

Adding Music to a Playlist
Adding Music to a Playlist
1. In Idle mode, you can access the Music player by either:
• Pressing and holding the key.
• Press the Menu soft key, select Music player and then press the Select soft
key or the key.
2. Press the Library soft key and select one of the following options then
press the key.
3. Select All and press the Select soft key or the key. All stored music
files are displayed.
4. Press the Up or Down navigation keys to highlight the song or songs you
want to add to an existing playlist.
5. Press the Options soft key, highlight Add to playlist, and press the Right
Navigation key.
6. Select either Selected (to add a single song to a playlist) or Multiple (to
add several songs to a desired playlist).
• If you selected Multiple, you select a song by first highlighting it and then
pressing the Add soft key or the
key. Selecting All places a checkmark
next to all detected songs.
7. From the Playlist screen, highlight the desired playlist and press the Select
soft key or the key. This action assigns the selected song to the
desired playlist entry.
Transferring Music Files to the Memory Card
Music files can be downloaded to the phone via one of two methods:
• Downloaded to the phone from tzones >Downloads.
- Music files can be directly stored on your phone from this site.
- For more information, refer to "t-zones" on page 134.
• Downloaded to the phone via a direct USB connection
- Music files are stored into a MEDIA folder on the microSD card.
- For more information, refer to "USB mode" on page 120.
Deleting Music Files From the Memory Card
1. In Idle mode, you can access the Music player by either:
• Pressing and holding the key.
• Press the Menu soft key, select Music player and then press the Select soft
key or the key.
2. Press the Library soft key and select one of the following options then
press the key.
Music Player 96
 Loading...