

Page 1
LCD MONITOR
quick start guide
T200MD/T220MD
ii
Page 2
Introduction
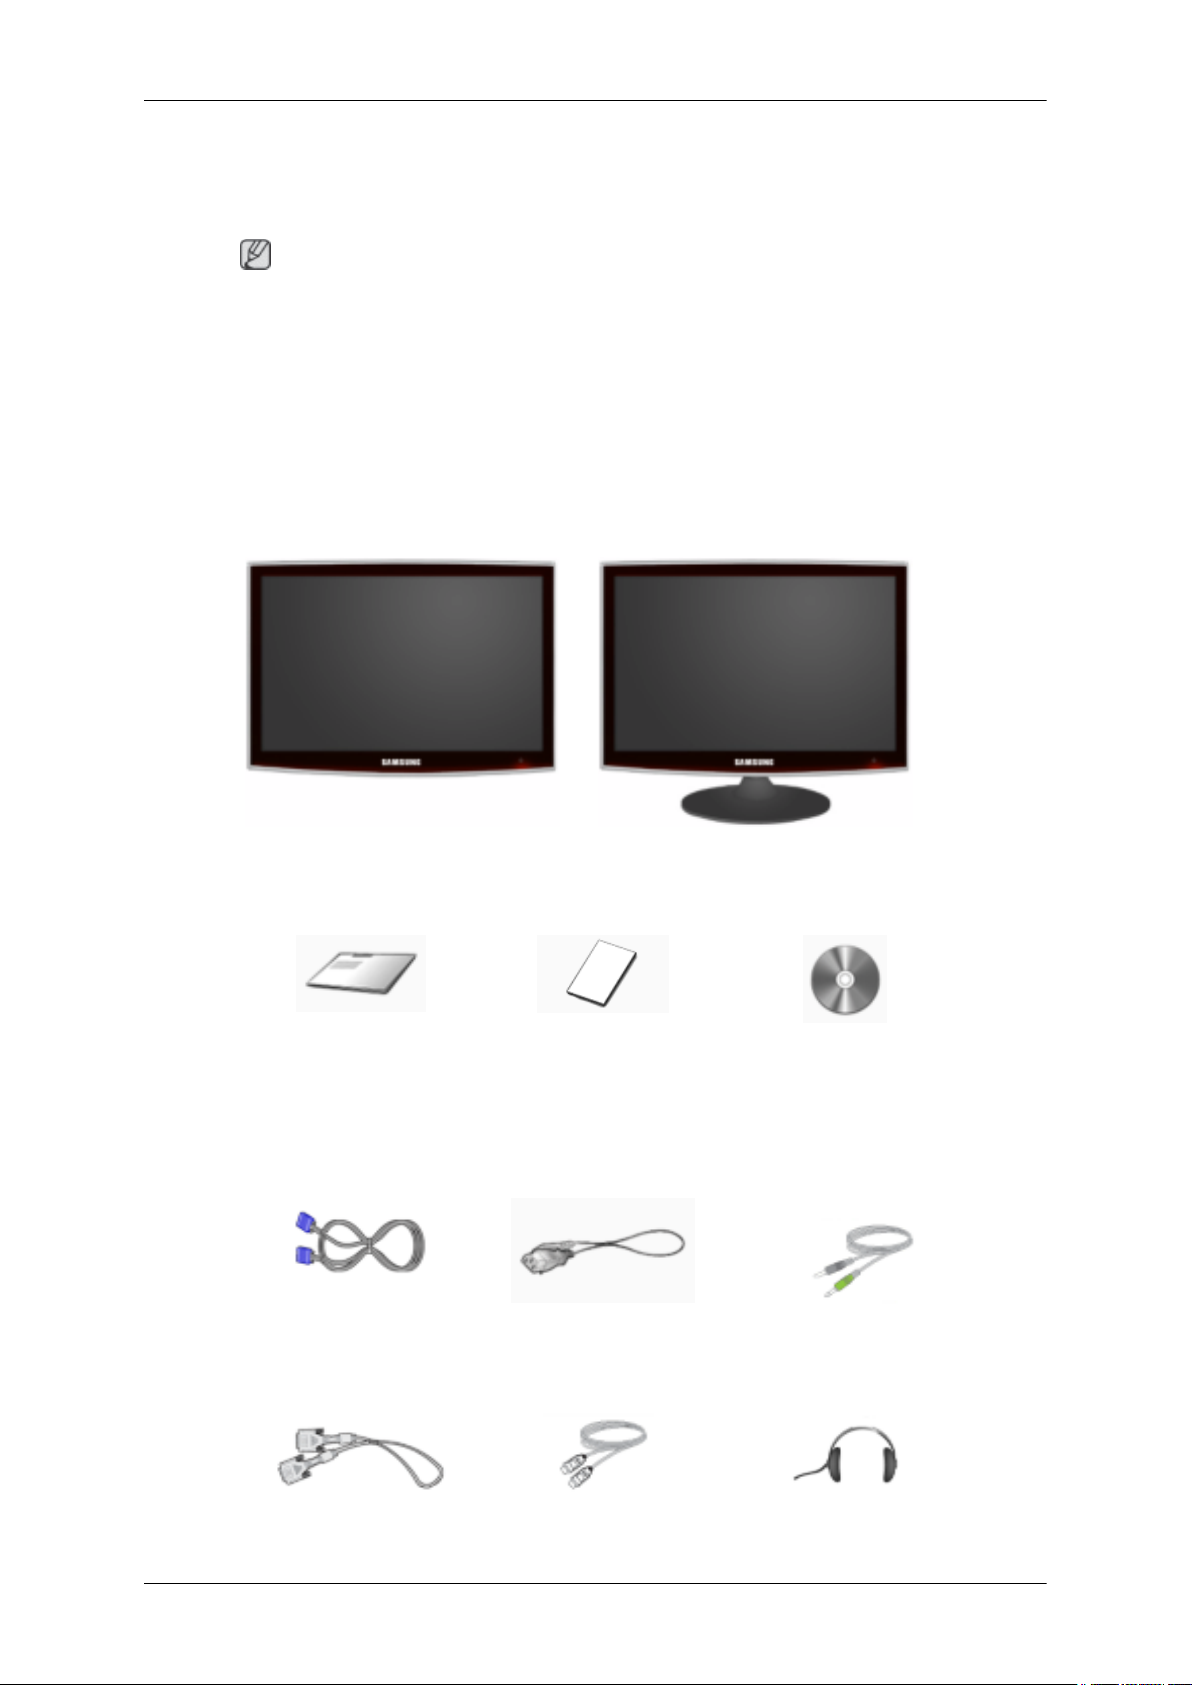
Package Contents
Note
Please make sure the following items are included with your monitor.
If any items are missing, contact your dealer.
Contact a local dealer to buy optional items.
Unpacking
Without stand With stand
Monitor Monitor
Manuals
Quick Setup Guide Warranty Card
(Not available in all loca-
Cables
D-Sub Cable Power Cord
Sold separately
User's Guide
tions)
Stereo Cable
DVI Cable HDMI Cable Headphones
Page 3
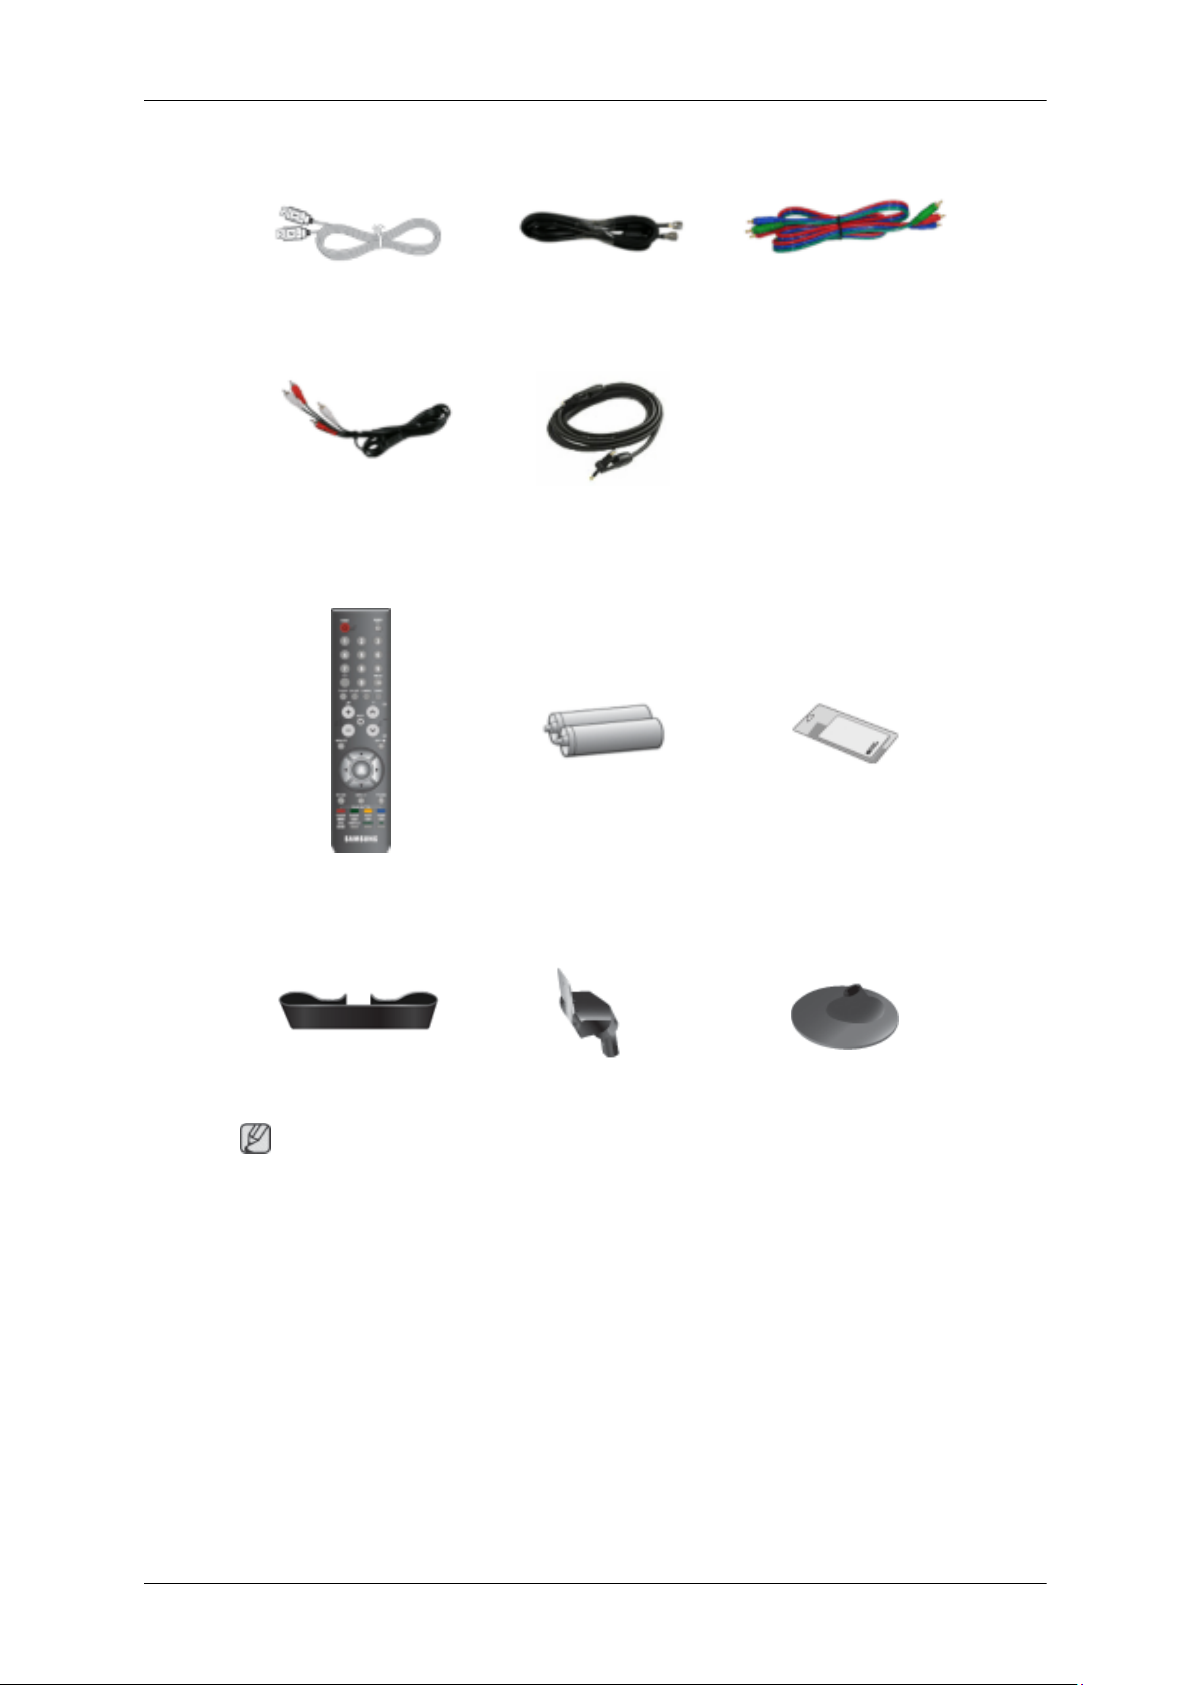
Sold separately
Introduction
Others
Remote Control
TV Antenna Cable
USB Cable
(Coaxial Cable)
Audio cable Digital audio optic output ca-
ble
Batteries (AAA X 2)
Component(PR, PB, Y) Cable
Cleaning Cloth
BN59-00624A
Cable holding ring Stand Body Stand Base
Note
Cleaning Cloth is only provided for highly polished black products as a product feature.
(Not available in all loca-
tions)
Page 4
Your Monitor
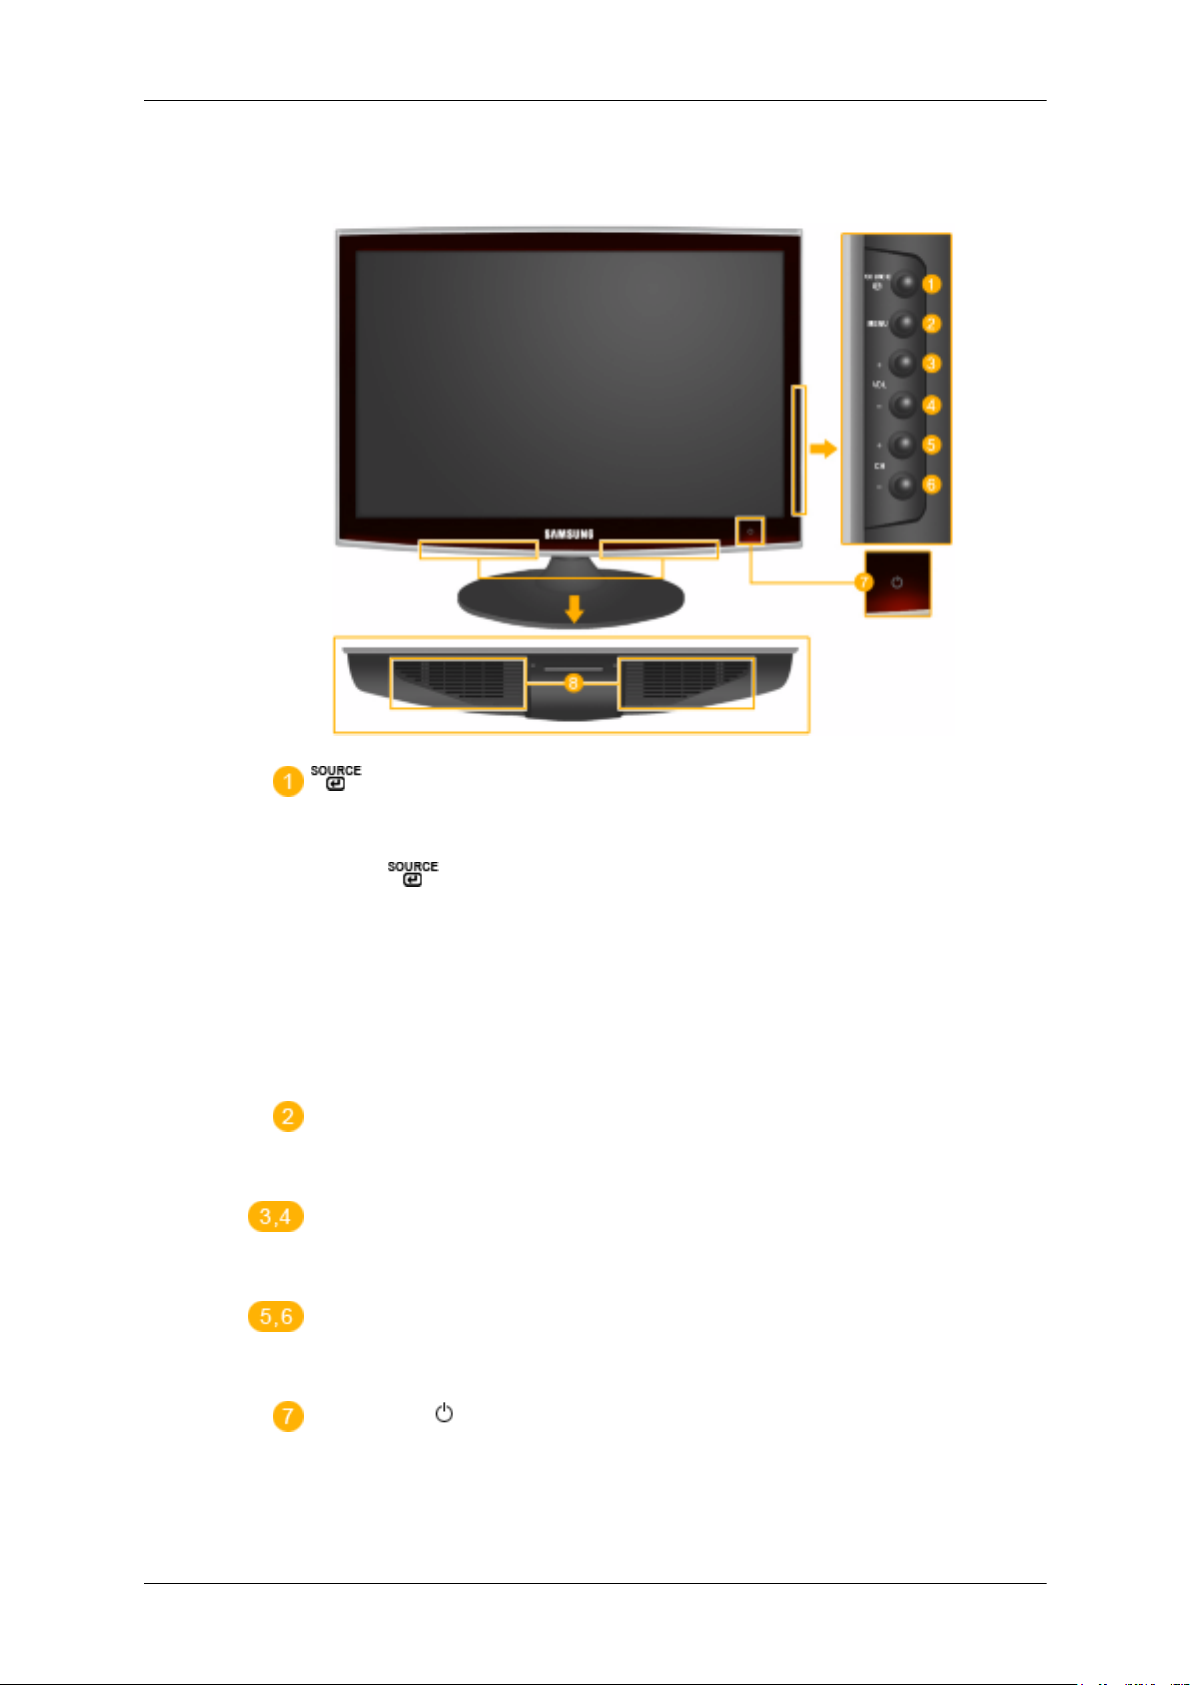
Front
Introduction
Activates a highlighted menu item.
Push the ' ', button to change the input signal source.
this
the
button
from
one
Changing
at the time.
To switch Screen modes:
[PC] →[Ext.] → [DVI] → [TV] → [Component] → [HDMI1] → [HDMI2]
>> Click here to see an animation clip
MENU
Use
or to close the screen adjustment menu.
- VOL+
Moves from one menu item to another horizontally or adjusts selected menu values. Adjusts the audio volume.
- CH +
Moves
In TV/DTV mode, selects TV/DTV channels.
source
to
open
menu
is
allowed for external devices connected to the product
only
the on-screen menu and to exit from the on-screen menu
to another vertically or adjusts selected menu values.
item
Power button [ ]
Use this button for turning the product on and off.
Page 5
Introduction
Note
The button to the right of the monitor are touch-sensitive buttons.
Touch a button lightly with your finger.
Power indicator
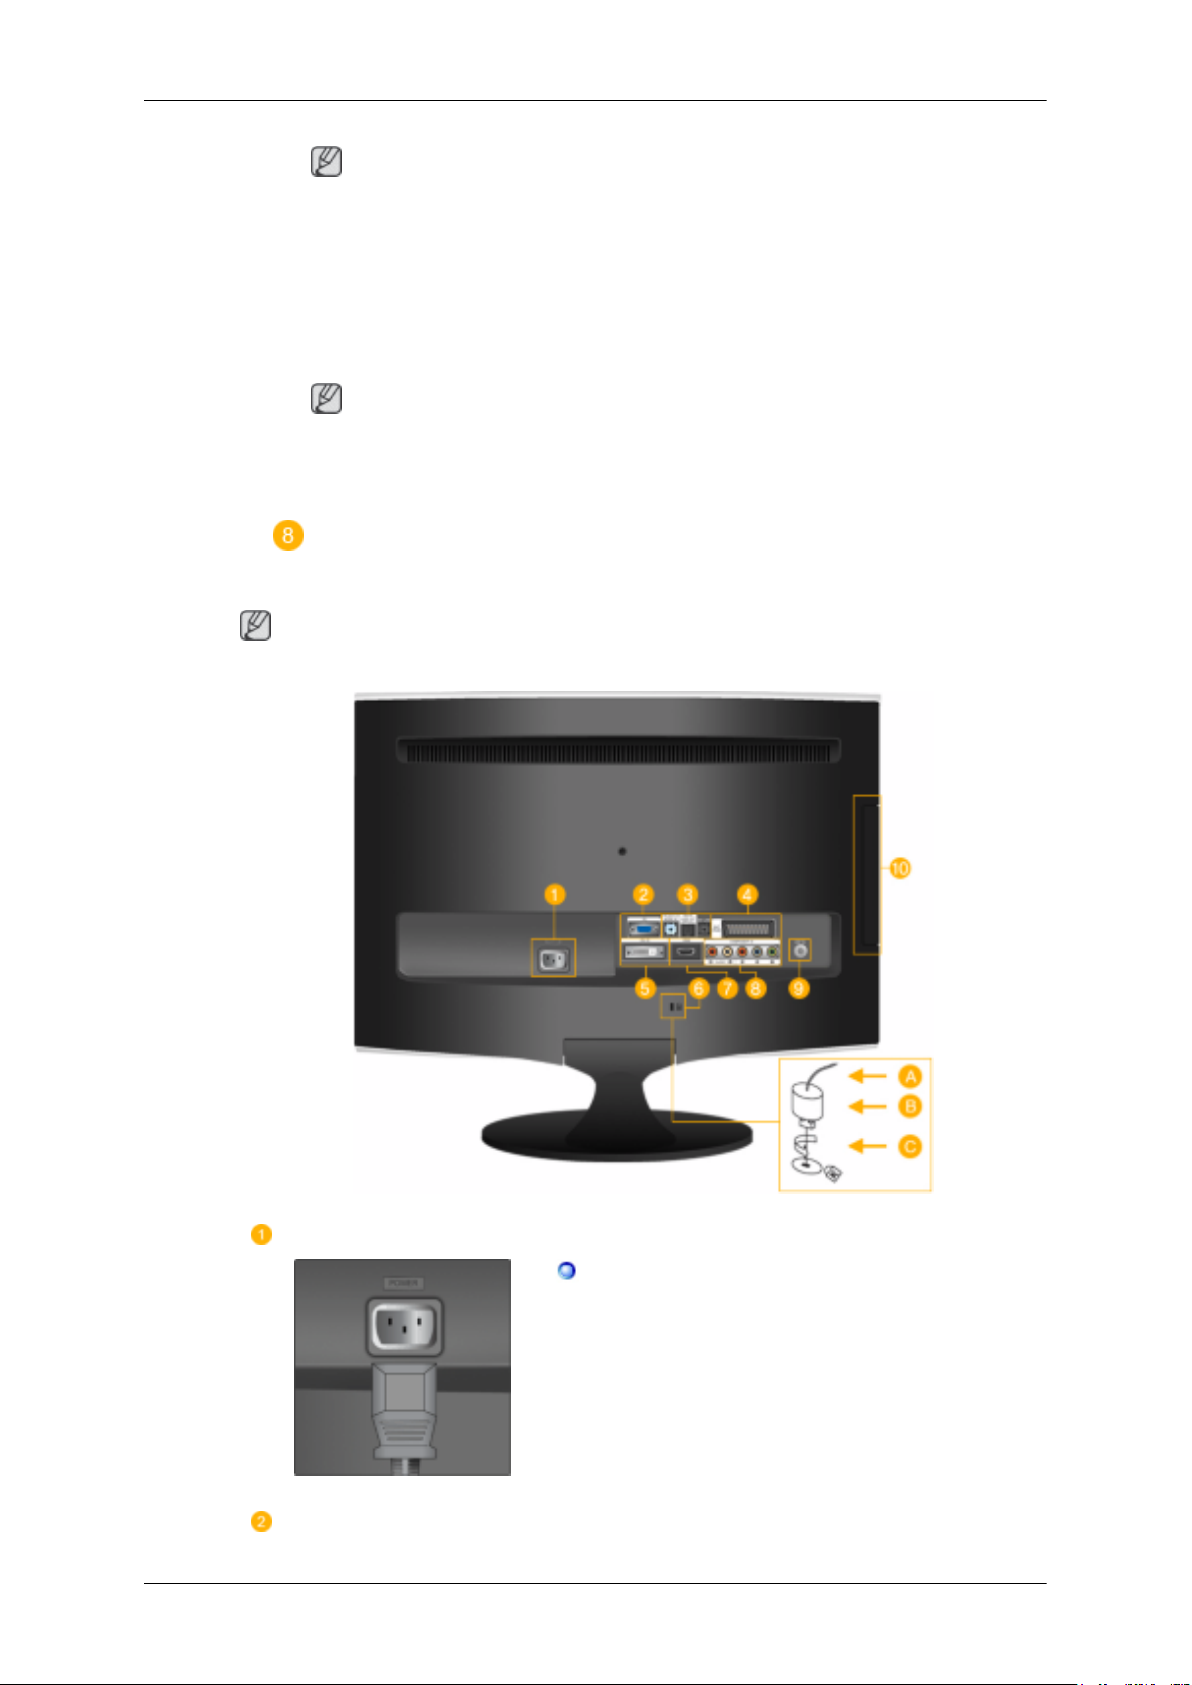
Rear
This light is lit when
are saved.
Note
See PowerSaver described in the
saving functions. For energy conservation, turn your monitor OFF when it is not
needed or when leaving it unattended for long periods.
Speaker
Note
The configuration at the back of the product may vary from product to product.
operating normally, and blinks once when your adjustments
manual for further information regarding power
POWER
PC
POWER
Connect the power cord for
POWER port on the back of the product.
your monitor to the
Page 6
Introduction
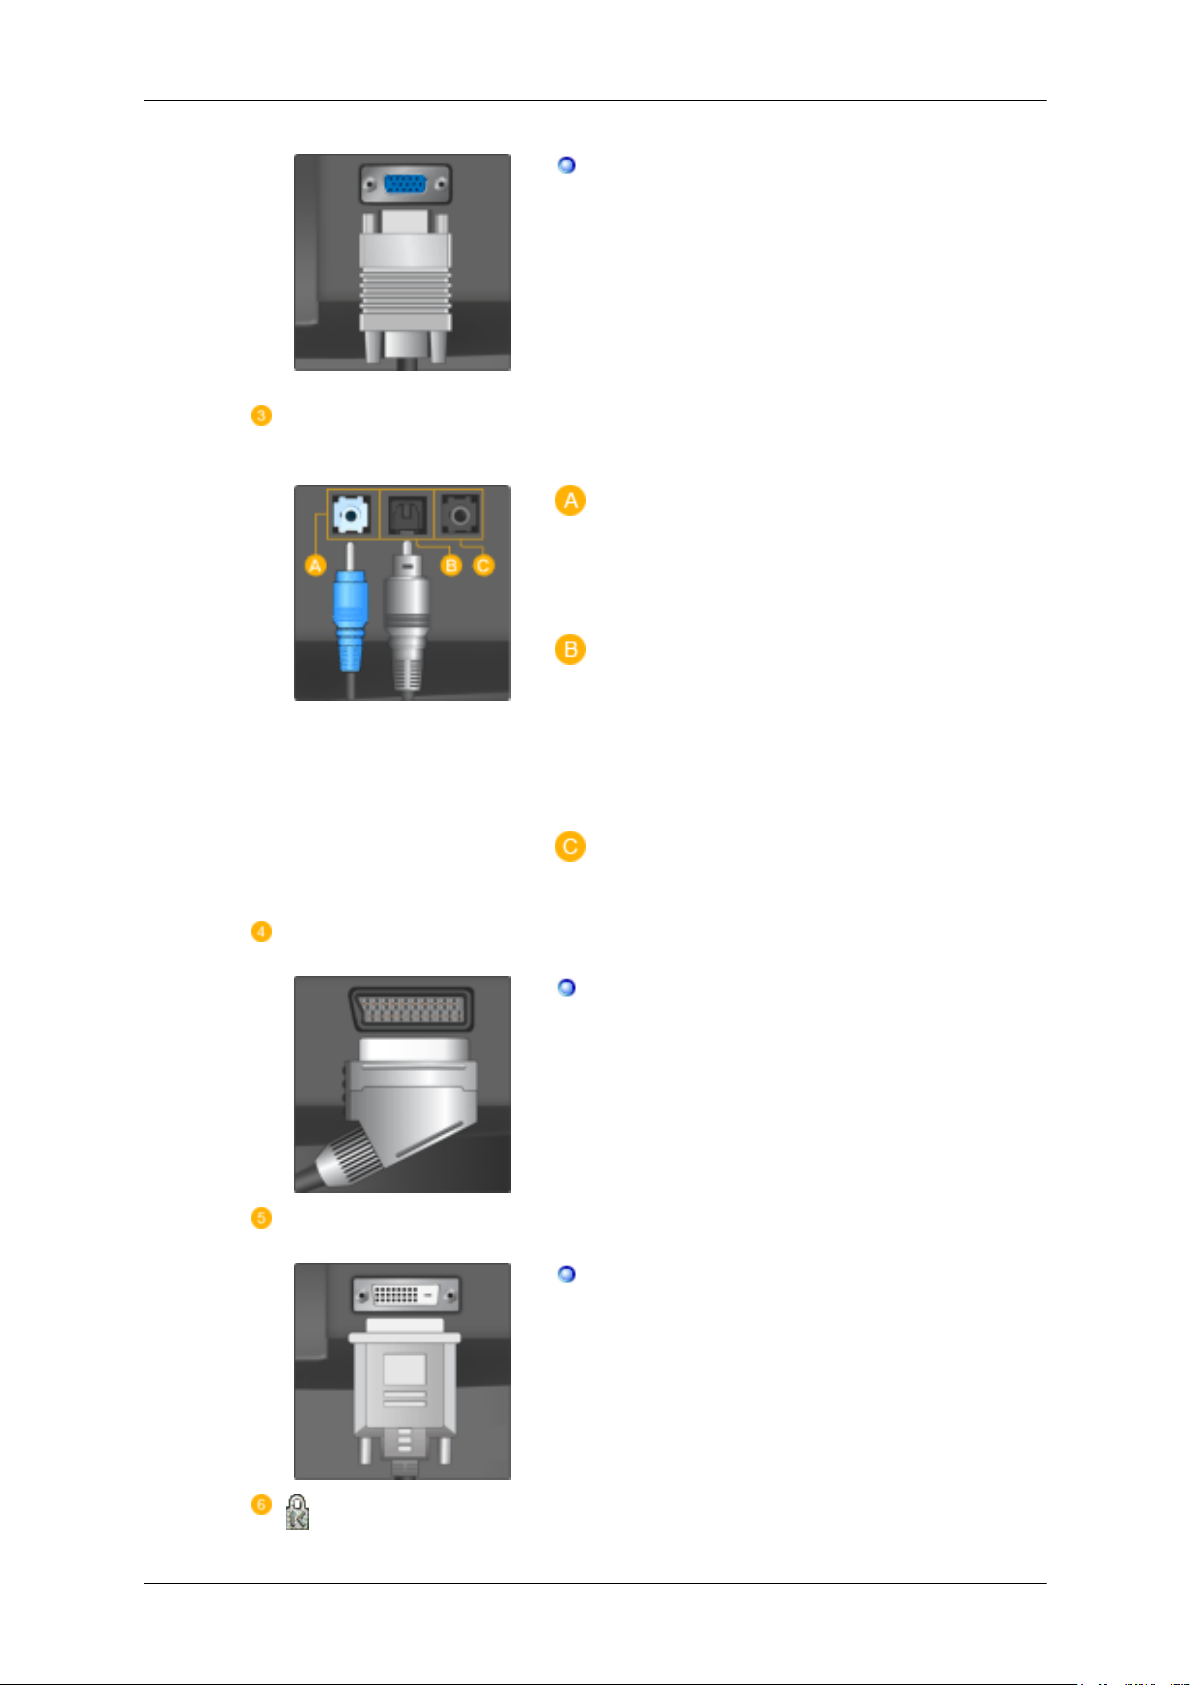
PC
HDMI/PC/DVI-D AUDIO
IN / DIGITAL AUDIO OUT
(OPTICAL) / EX-LINK
Connect the PC terminal at
monitor to your computer.
HDMI/PC/DVI-D AUDIO IN
Connect the [ HDMI/PC/DVI-D AUDIO
minal at the back of your product to your computer’s sound card.
DIGITAL AUDIO OUT(OPTICAL)
Connect the [DIGITAL AUDIO OUT(OPTICAL)]
terminal of your product to the digital
sound output or standard sound output terminal
of the DVD home theater (or amplifier) using a
digital audio optical output cable.
the back of your
IN ] ter-
EXT(RGB)
DVI-D
EX-LINK
This is a reserved terminal used for servicing.
Connect the EXT(RGB) port of the monitor to
the DVD Player using a SCART jack.
As for EXT(RGB) port of
TV or Video signal input and output.
DVI-D
Connect the DVI cable to
back of your product.
the monitor, it makes
the DVI-D port on the
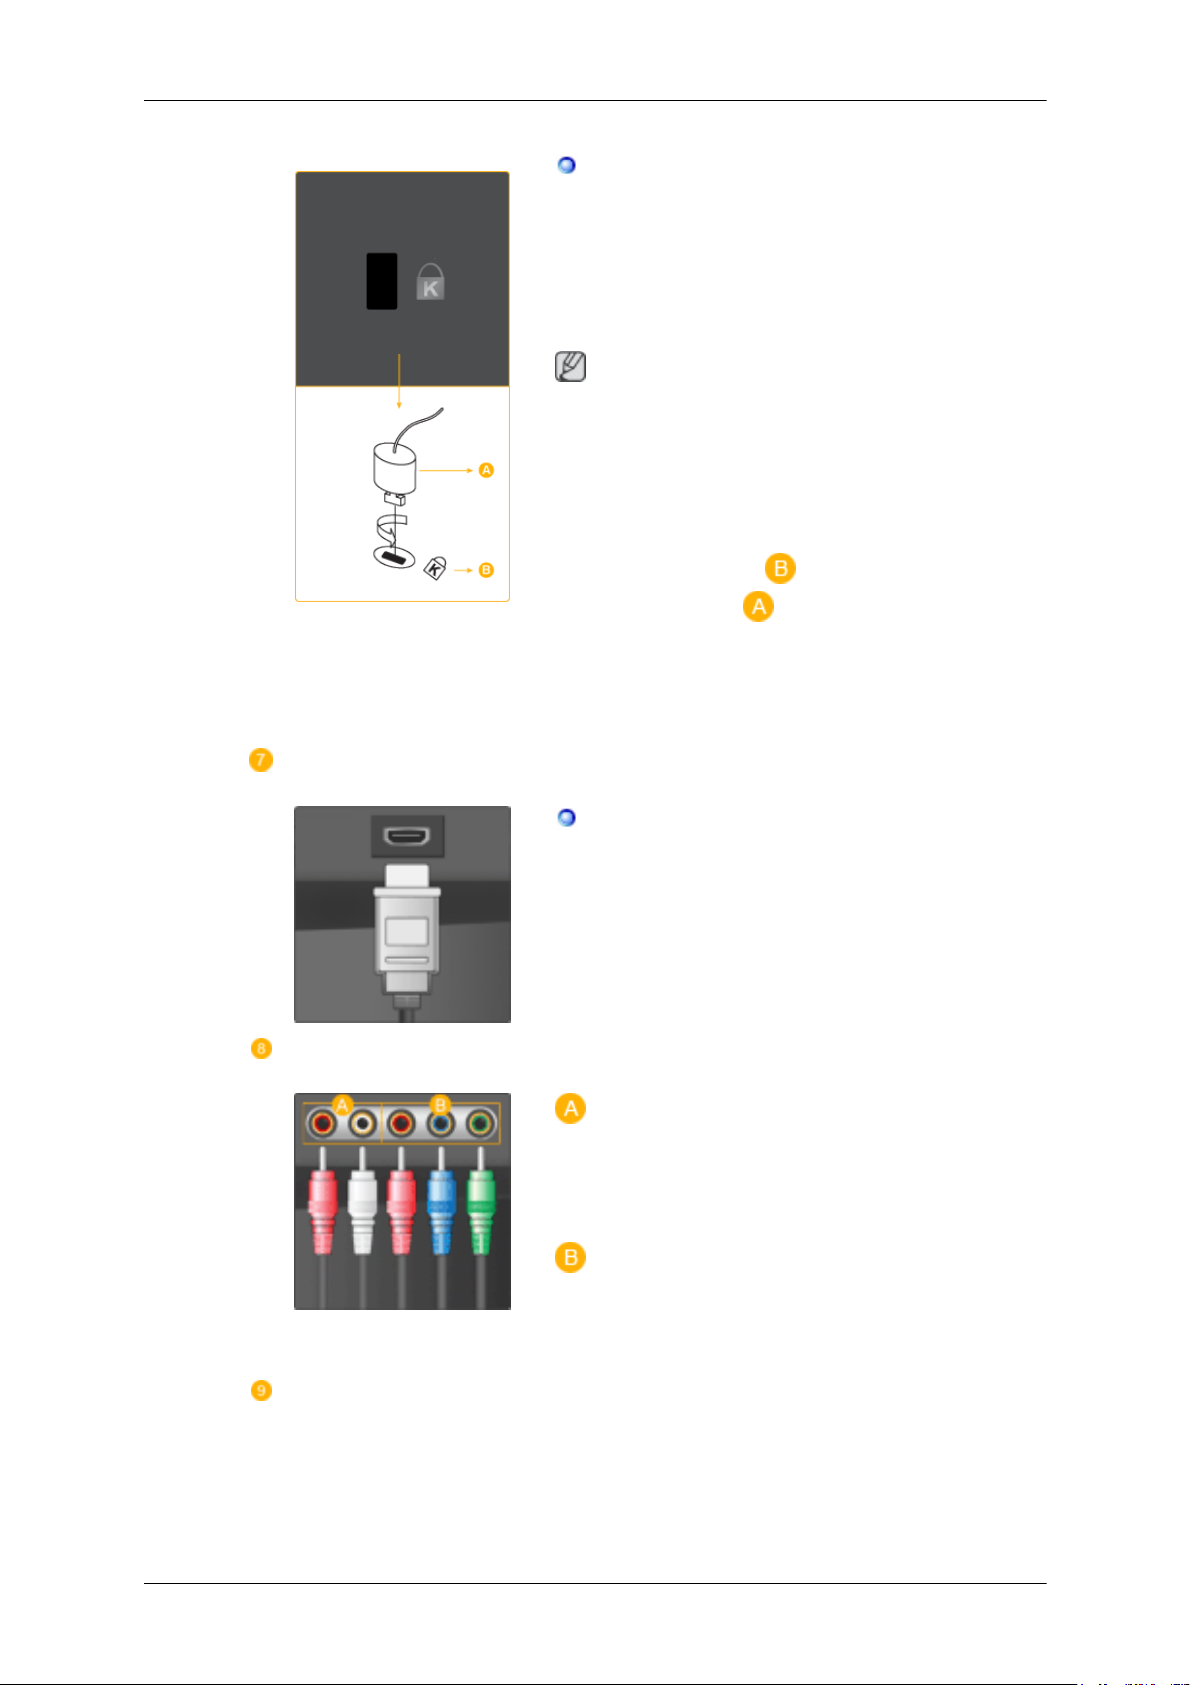
Kensington Lock
Page 7
Introduction
The Kensington Lock is a device used to physically fix the system when using
place. The locking device has to be purchased
separately. The appearance and locking method
may differ from the illustration depending on the
manufacturer. Refer to the manual provided with
the Kensington Lock for proper use. The locking
device has to be purchased separately.
Note
it in a public
HDMI IN 1
The location of the Kensington Lock
ferent depending on its model.
may be dif-
Using the Anti-Theft Kensington Lock
1. Insert the locking device into the Kensington
slot on the Monitor (
locking direction ( ).
2. Connect the Kensington Lock cable.
3. Fix the Kensington Lock
stationary object.
HDMI IN 1
Connect the [HDMI IN 1] terminal
your monitor to the HDMI terminal of your digital
output device using a HDMI cable.
) and turn it in the
to a desk or a heavy
at the back of
COMPONENT IN
ANT IN
R - AUDIO - L
Connect the port of the DVD,
Set-Top Box) to the [ R - AUDIO - L] port of the
product.
PR, PB,Y
Connect the VIDEO OUT port of
Set-Top Box to the [ PR, PB,Y ] input ports using
a component video cable ( PR, PB,Y ).
VCR (DVD / DTV
the DVD / DTV
Page 8
COMMON INTERFACE
Introduction
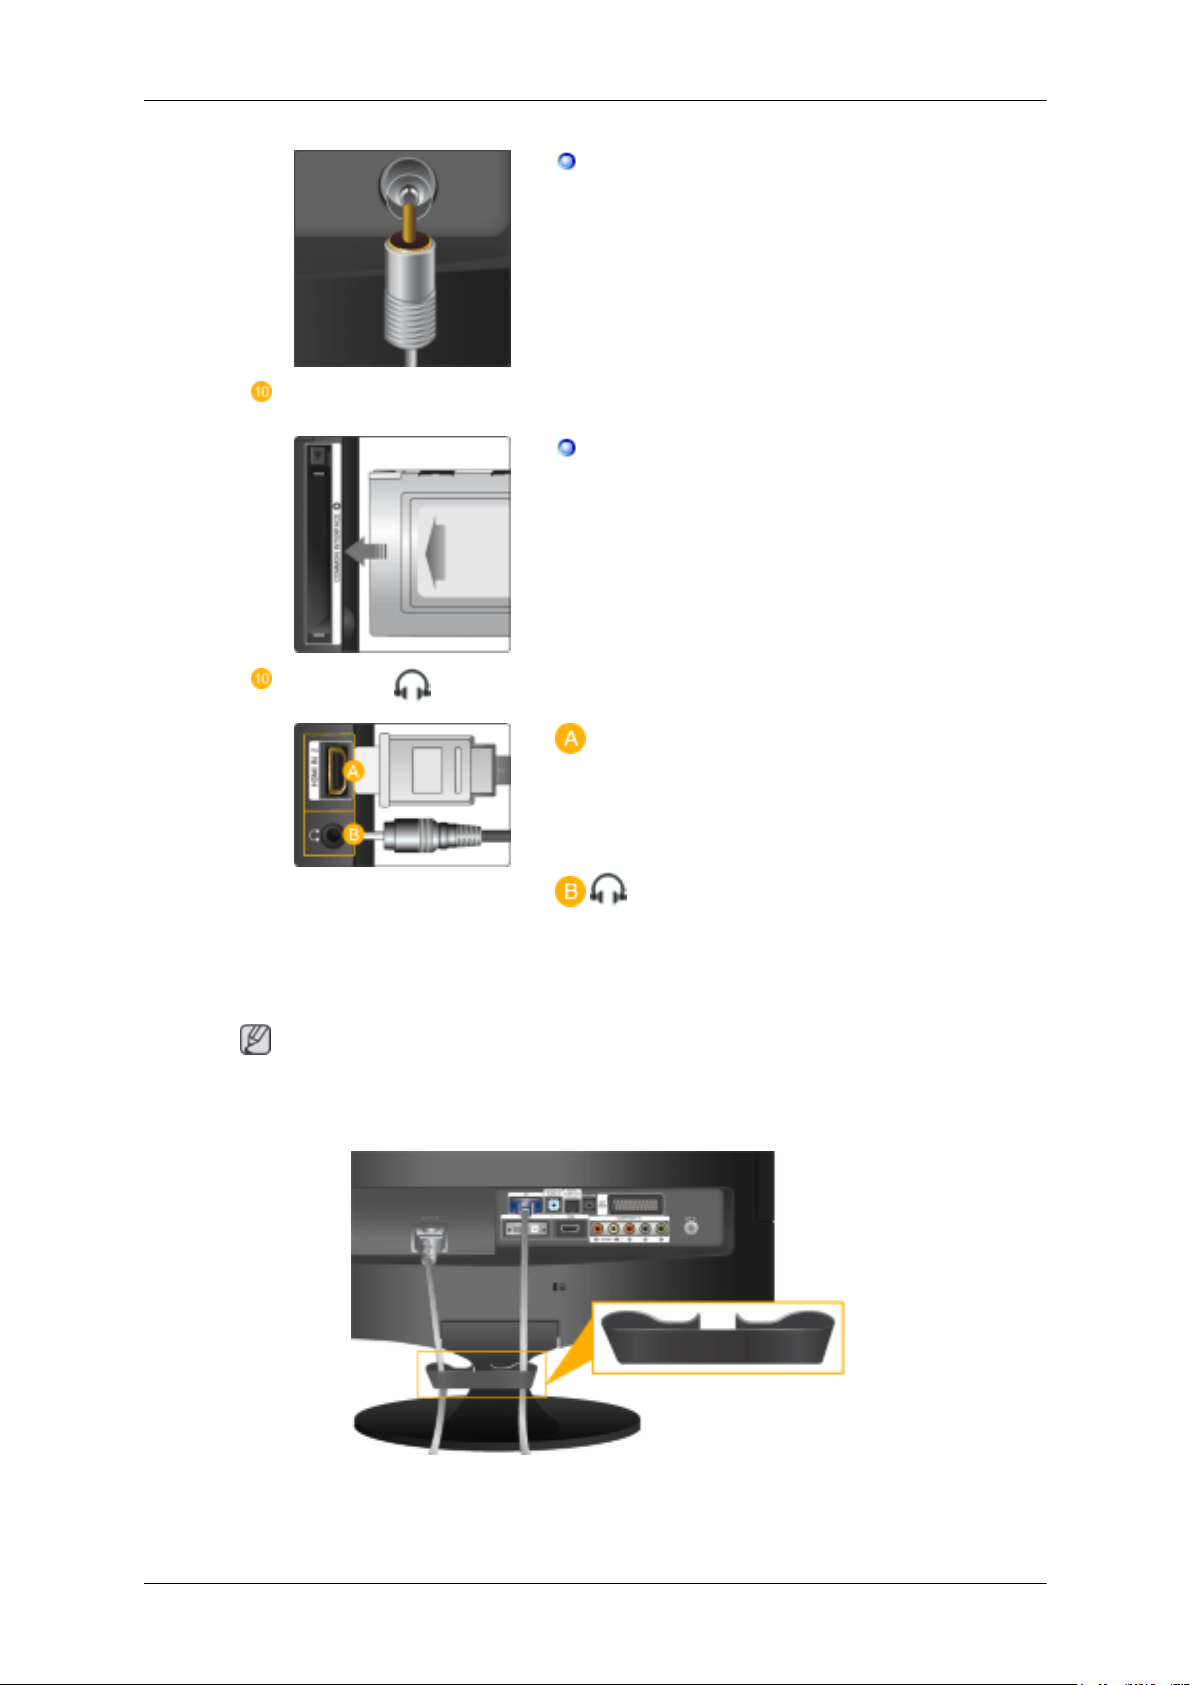
Connect the CATV cable or TV antenna cable
to the "ANT IN" port
uct. Make sure to use a TV antenna cable (sold
separately) as the antenna cable.
This contains information on CAM inserted in
the CI slot and displays it.
on the rear side of the prod-
The Application Info inserting is
CARD.
You can install the CAM anytime whether the TV
is ON or OFF.
HDMI IN 2 /
HDMI IN 2
Connect the [HDMI IN 2]
your product to the HDMI terminal of your digital
output device using a HDMI cable.
Connect your headphones to the Headphone connection terminal.
Note
See Connecting Cables for further information regarding cable connections.
terminal at the back of
about the CI
Cable holding ring
• Fix the cables using the holding ring, as shown in the figure.
Page 9
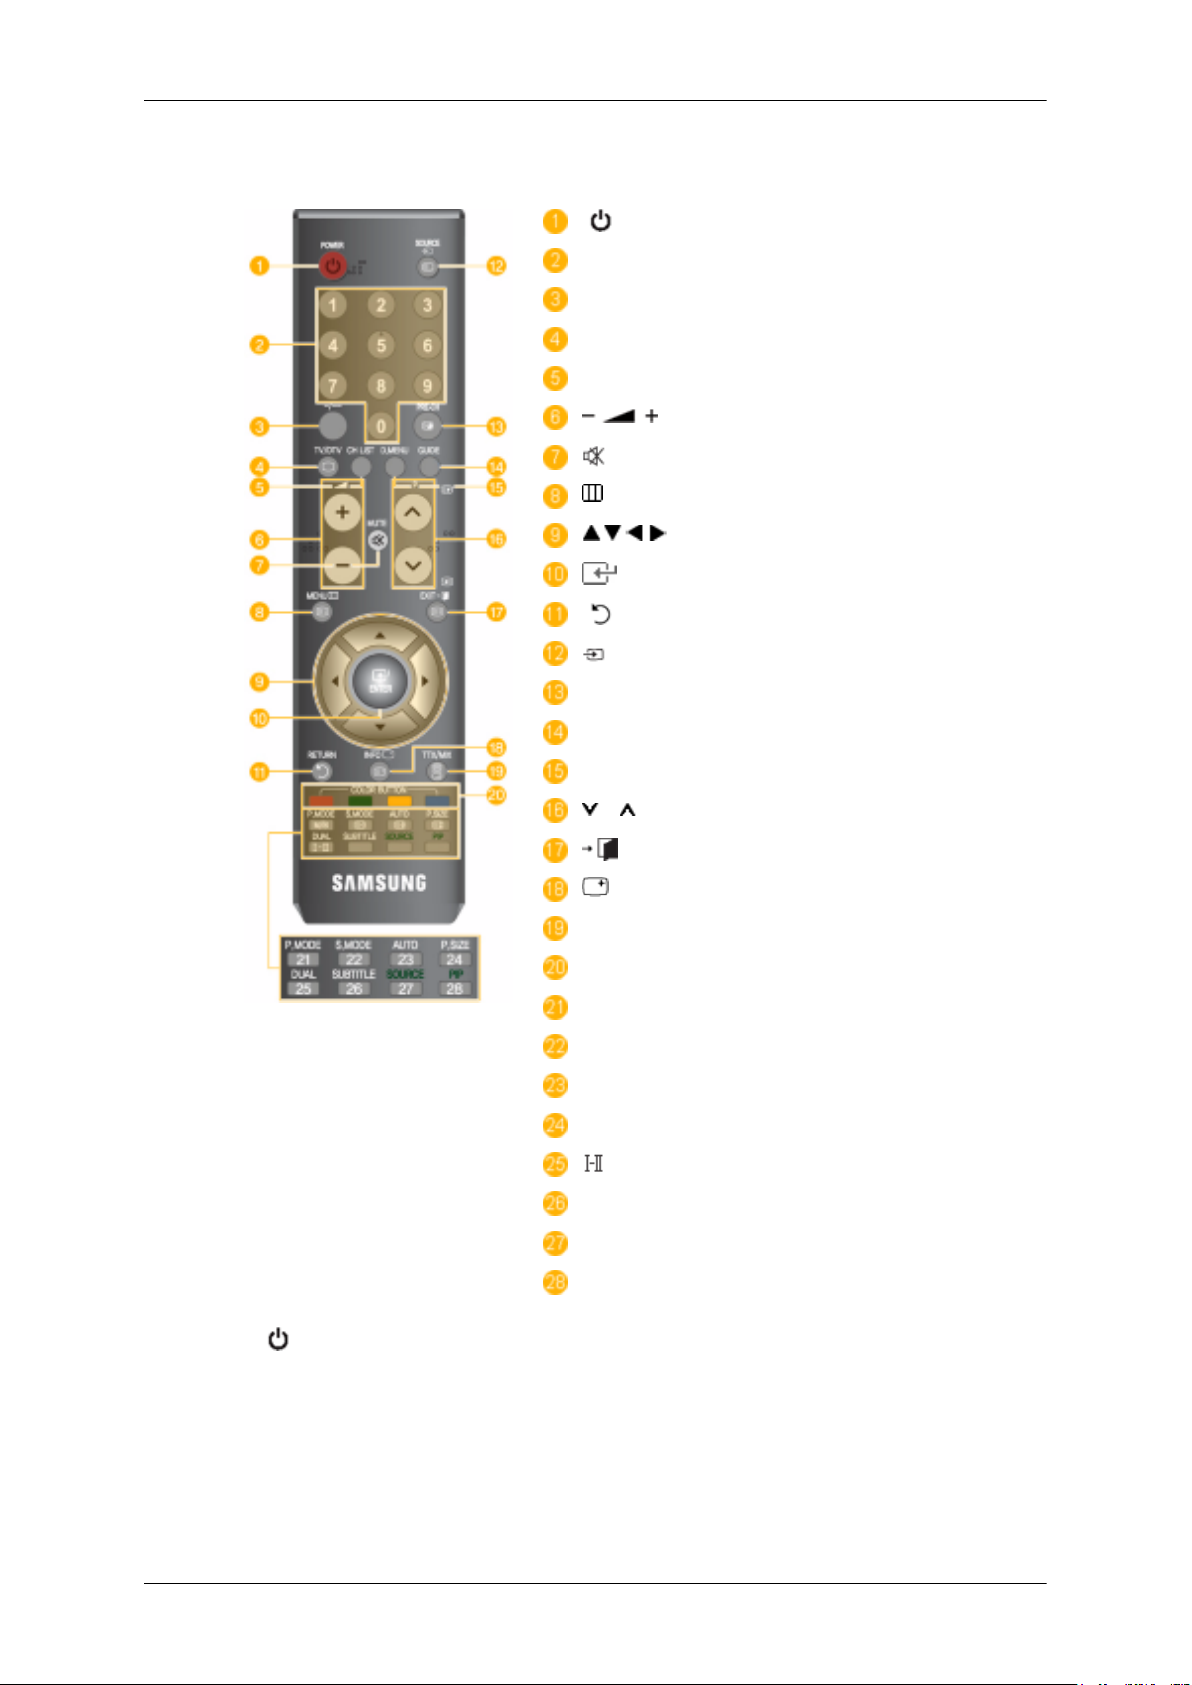
Remote Control
Introduction
POWER
Number Button
-/--
TV/DTV
CH LIST
MUTE
MENU
Up-Down Left-Right buttons
ENTER
RETURN
SOURCE
PRE-CH
GUIDE
D.MENU
P
EXIT
INFO
TTX/MIX
COLOR BUTTON
P.MODE, M/B (MagicBright)
S.MODE
AUTO
P.SIZE
DUAL
SUBTITLE
SOURCE
PIP
1. POWER
2. Number button Press to change the channel.
3. -/-- (One/Two-Digit channel selection)
Turns the product On/Off.
Use to select a channel numbered ten or over.
Press this button, and the "--" symbol is displayed.
Page 10
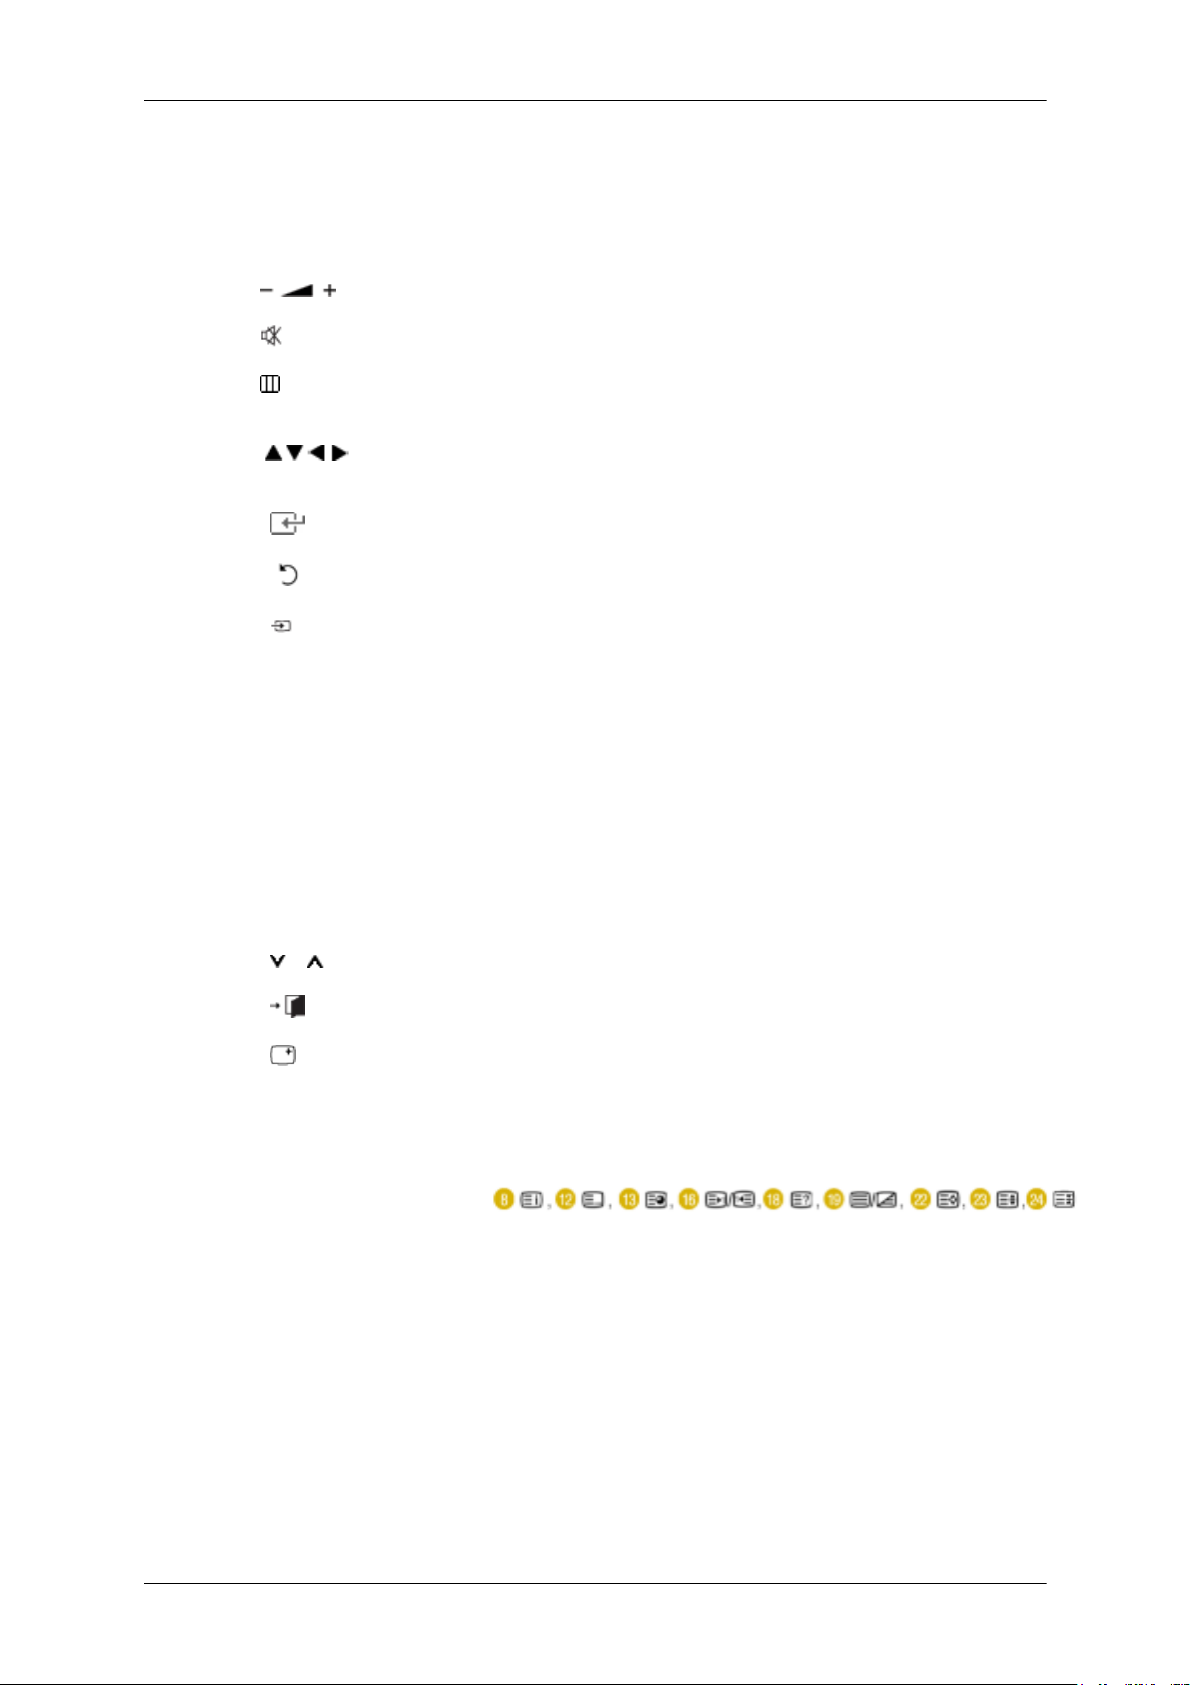
Introduction
Enter the two-digit channel number.
4. TV/DTV Selects the TV and DTV mode directly.
5. CH LIST It display "Channel List" on the screen.
6.
7. MUTE
8. MENU Opens the on-screen menu and
9.
Right buttons
10.
11. RETURN
12. SOURCE
13. PRE-CH This button is used to return to the immediately previous channel.
Up-Down Left-
ENTER
Adjusts the audio volume.
Adjusts the audio volume.
exits from the menu or closes the
adjustment menu.
Moves
adjusts selected menu values.
Activates a highlighted menu item.
Returns to the previous menu.
Press the button to change the input signal SOURCE.
Changing the SOURCE is only allowed for external devices that
are connected to the monitor at the time.
- You cannot watch TV or DTV using the SOURCE button
- You can only watch TV using the TV or DTV button.
from
one
menu
item
to another horizontally, vertically or
14. GUIDE Electronic Program Guide (EPG) display.
15. D.MENU DTV menu display
16.
P In TV mode, selects TV channels.
17.
18. INFO
19. TTX/MIX TV channels provide written information services via teletext.
20. COLOR BUTTON Press to add or delete
21. P.MODE, M/B (MagicBright)
EXIT
Exits from the menu screen.
Current picture information is displayed
of the screen.
- Teletext Buttons
For more information > TTX / MIX
channels and to store channels to the favorite
channel list in the “Channel List” menu.
Press to select a pre-defined Picture Mode of the monitor or to
change the picture atmosphere as required.
When you press this button, current mode is displayed on the lower
center of the screen.
on the upper left corner
TV / DTV / Ext. / Component / HDMI: P.MODE
Page 11
Introduction
The monitor has three automatic picture settings that are preset at
the factory.
Then press the button again
ured modes.
(Dynamic > Standard > Movie)
PC / DVI Mode : M/B ( MagicBright )
MagicBright is a feature providing the optimum viewing environment depending on the contents of the image you are watching.
Then press the button again to circle through available preconfigured modes.
(Entertain > Internet > Text > Dynamic Contrast > Custom)
22. S.MODE When you press this button, current mode is displayed on the lower
center of the screen.
The monitor has a built-in high fidelity stereo amplifier.
Then press the button again to circle through available preconfigured modes.
(Standard > Music > Movie > Speech > Custom)
to circle through available preconfig-
23. AUTO - Available In PC
mode Only
24. P.SIZE Press to change the screen size.
DUAL
25.
26. SUBTITLE Dgital subtitle display
27. SOURCE - Not Available
28. PIP-Not Available
Adjusts the screen display automatically.
PC/ DVI mode : Wide / 4:3
TV/DTV /Ext. mode: Auto Wide / Wide / 16:9 / Wide Zoom /
Zoom / 4:3
Component mode: Wide / 16:9 / Wide Zoom / Zoom / 4:3
HDMI mode: Wide / 16:9 / Wide Zoom / Zoom / 4:3 / Just Scan
STEREO/MONO, DUAL l / DUAL ll
MONO/NICAM STEREO can be operated depending on broad-
casting type by using DUAL button on the remote control while
watching TV.
and MONO/NICAM
Page 12
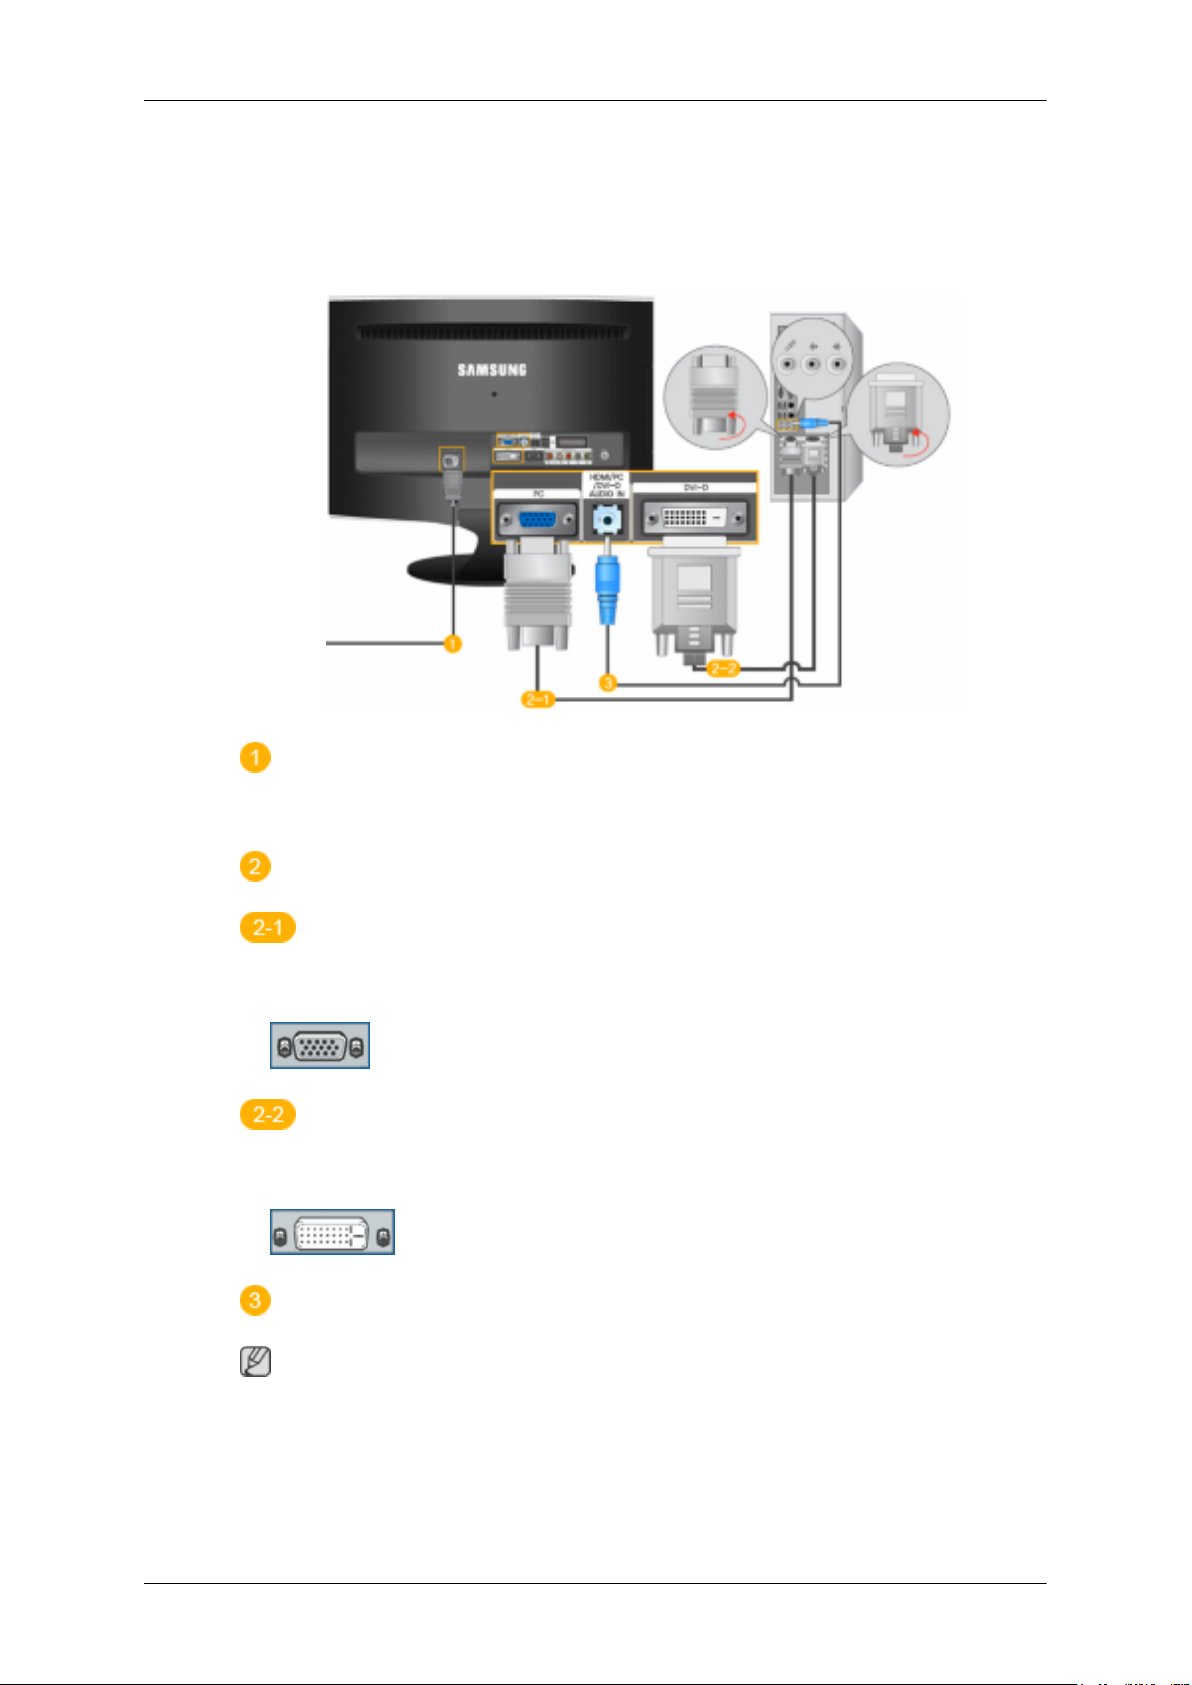
Connections
Connecting Cables
Connecting to a Computer
Connect the power cord for your monitor to the POWER port on the back of the monitor.
Plug the power cord for the monitor into a nearby outlet.
Use a connection appropriate for your computer.
Using the D-sub (Analog) connector on the video card.
• Connect the signal cable to the [PC] port on the back of your monitor.
[PC]
Using the DVI (Digital) connector on the video card.
• Connect the DVI Cable to the [DVI-D] Port on the back of your Monitor.
[DVI-D]
Connect the [HDMI / PC / DVI-D AUDIO IN] port on the rear side of the monitor to the sound
card of the PC.
Note
• You may enjoy clear and
(You don't need to install any separate speakers for your computer.)
• You may get a blank screen depending on the type of video card you are using, if you connect
simultaneously both the D-sub and DVI cables to one computer.
quality sound from the computer sound card using the monitor speakers.
Page 13
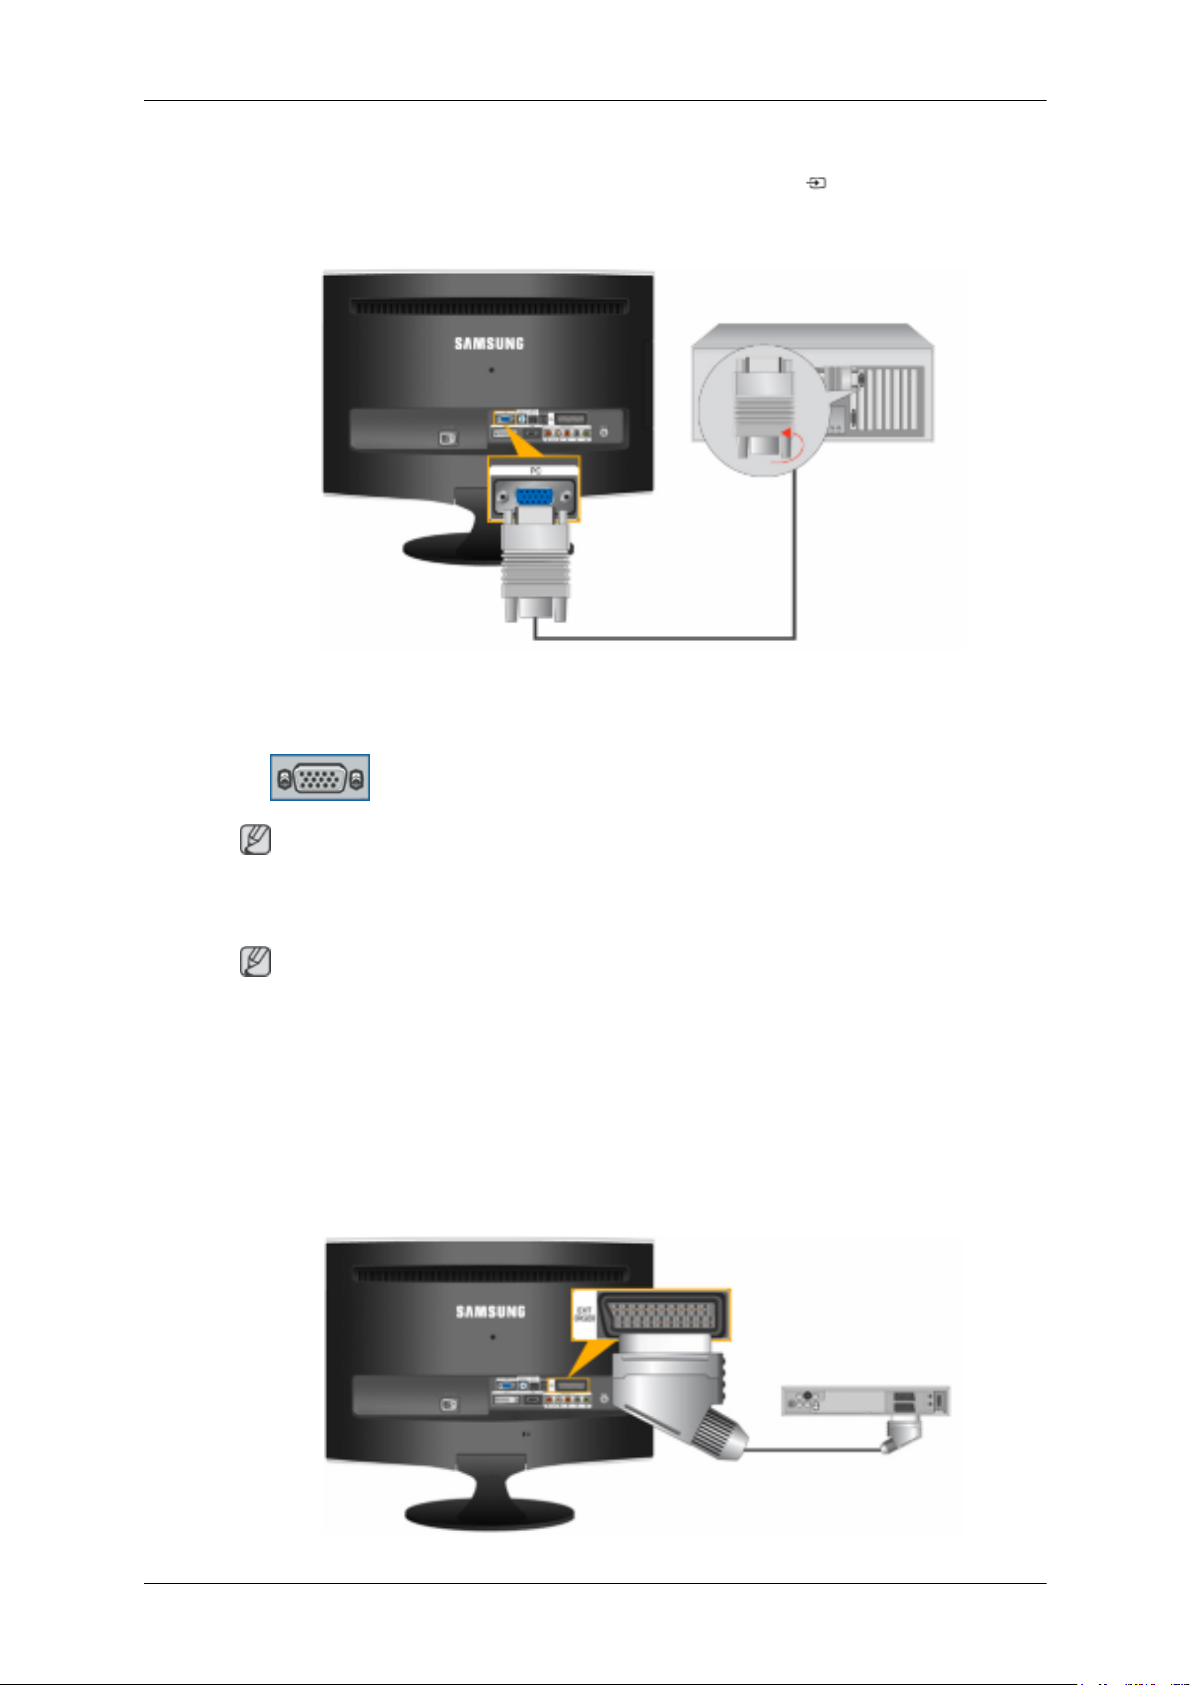
• If you connect properly your monitor using the DVI connector but get a blank or fuzzy screen,
check to see if
double-check the input signal source.
the monitor status is set to analogue. Press 'SOURCE [
Connecting to a Macintosh
Connections
]' button to have the monitor
1. Using the D-sub (Analog) connector on the video card.
Connect the signal cable to the D-SUB port on the back of your monitor.
•
[PC]
Note
Turn on the monitor and Macintosh.
Connecting to Other devices
Note
• This monitor allows the user to connect it to such input devices as a DVD player, a VCR or cam-
corder, or a DTV or TV without disconnecting the PC.
• The configuration at the back of the monitor may vary from product to product.
• The DVI
sold separately.
Contact a Service Center to purchase any products sold separately.
to HDMI cable, digital audio optic output cable, and RCA to stereo (for PC) cable are all
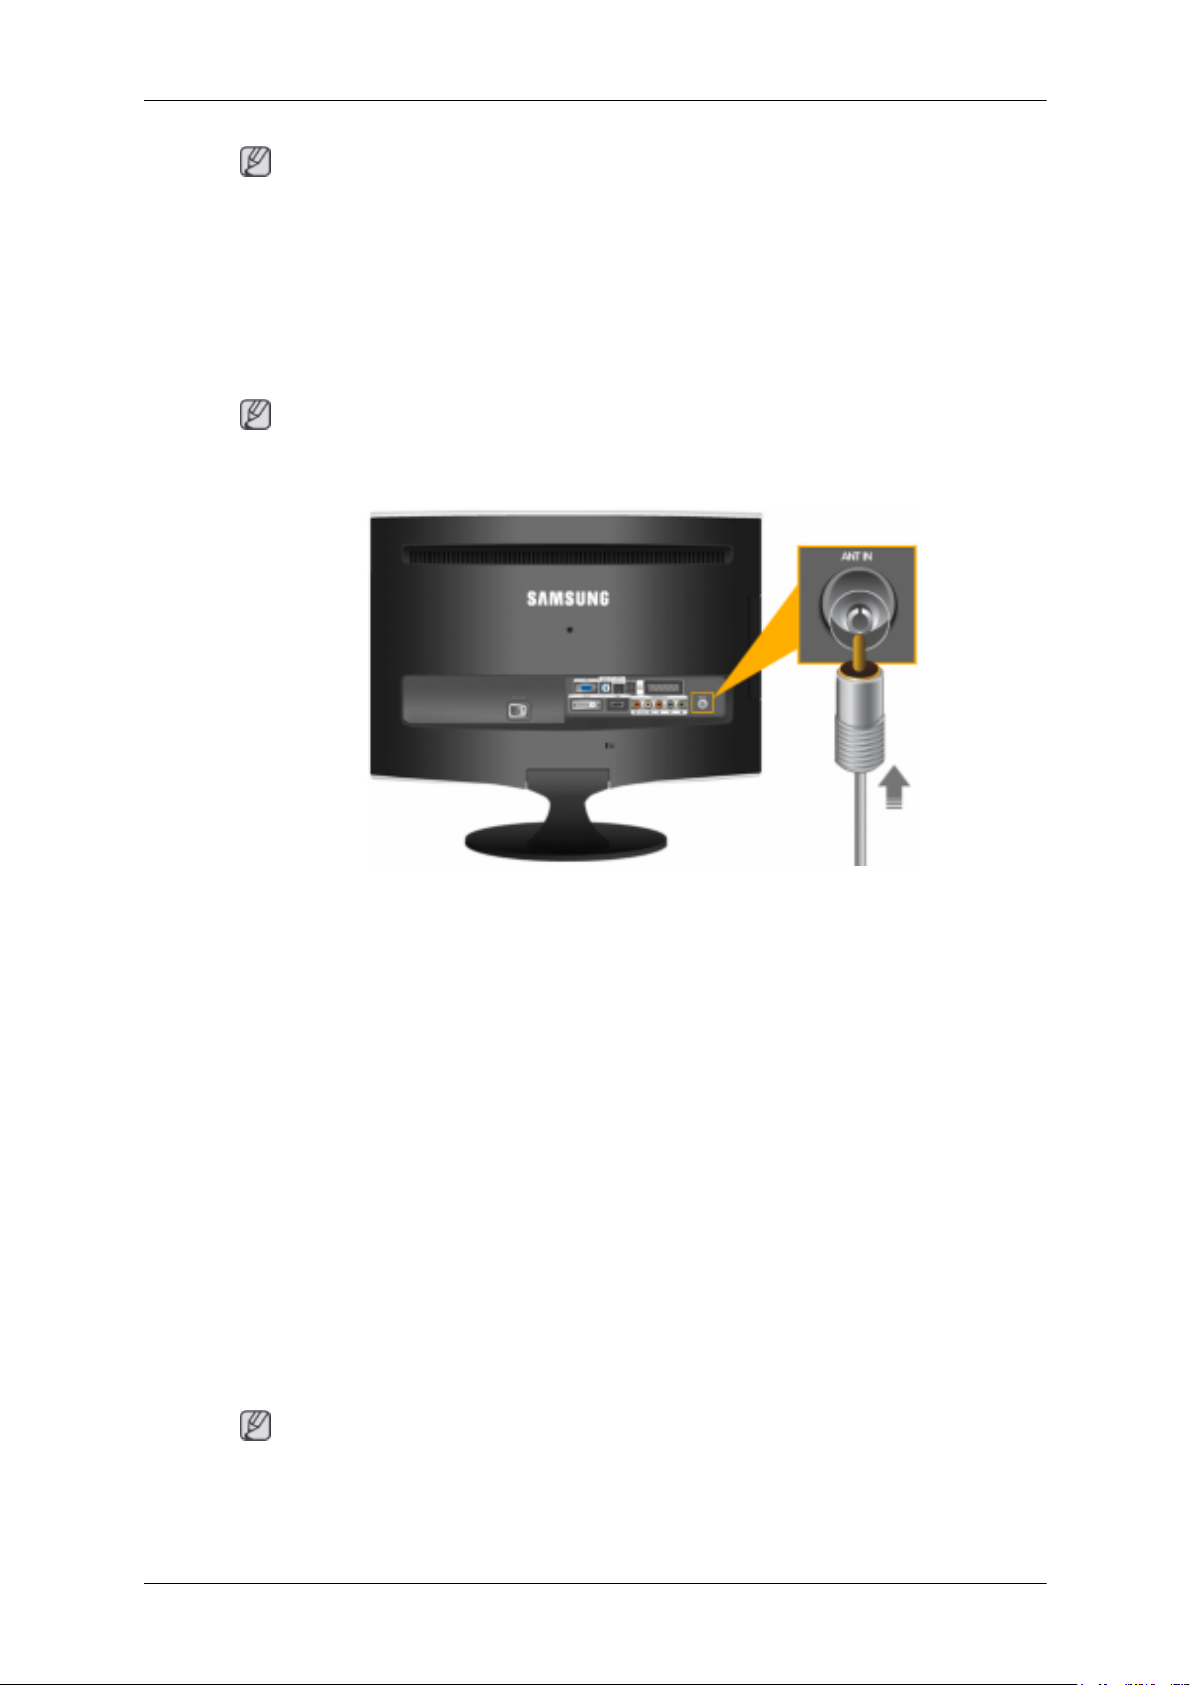
Connecting EXT.(RGB) - It only applies to AV DEVICE that supports SCART.
Page 14
Note
Connections
Connect to the DVD Devices
by hooking up the DVD player with the monitor as long as the power is on.
1. Connect the EXT (RGB) port of the monitor to the DVD Player using a SCART jack.
2. When a Scart device is connected to your monitor, the Source automatically changes to Ext.
Connecting TV
Note
You may view television programs
without installing any separate TV reception hardware or software on your computer.
input if the device has a EXT (RGB) jack. You can watch DVD simply
on the monitor if it is connected to an antenna or CATV cable
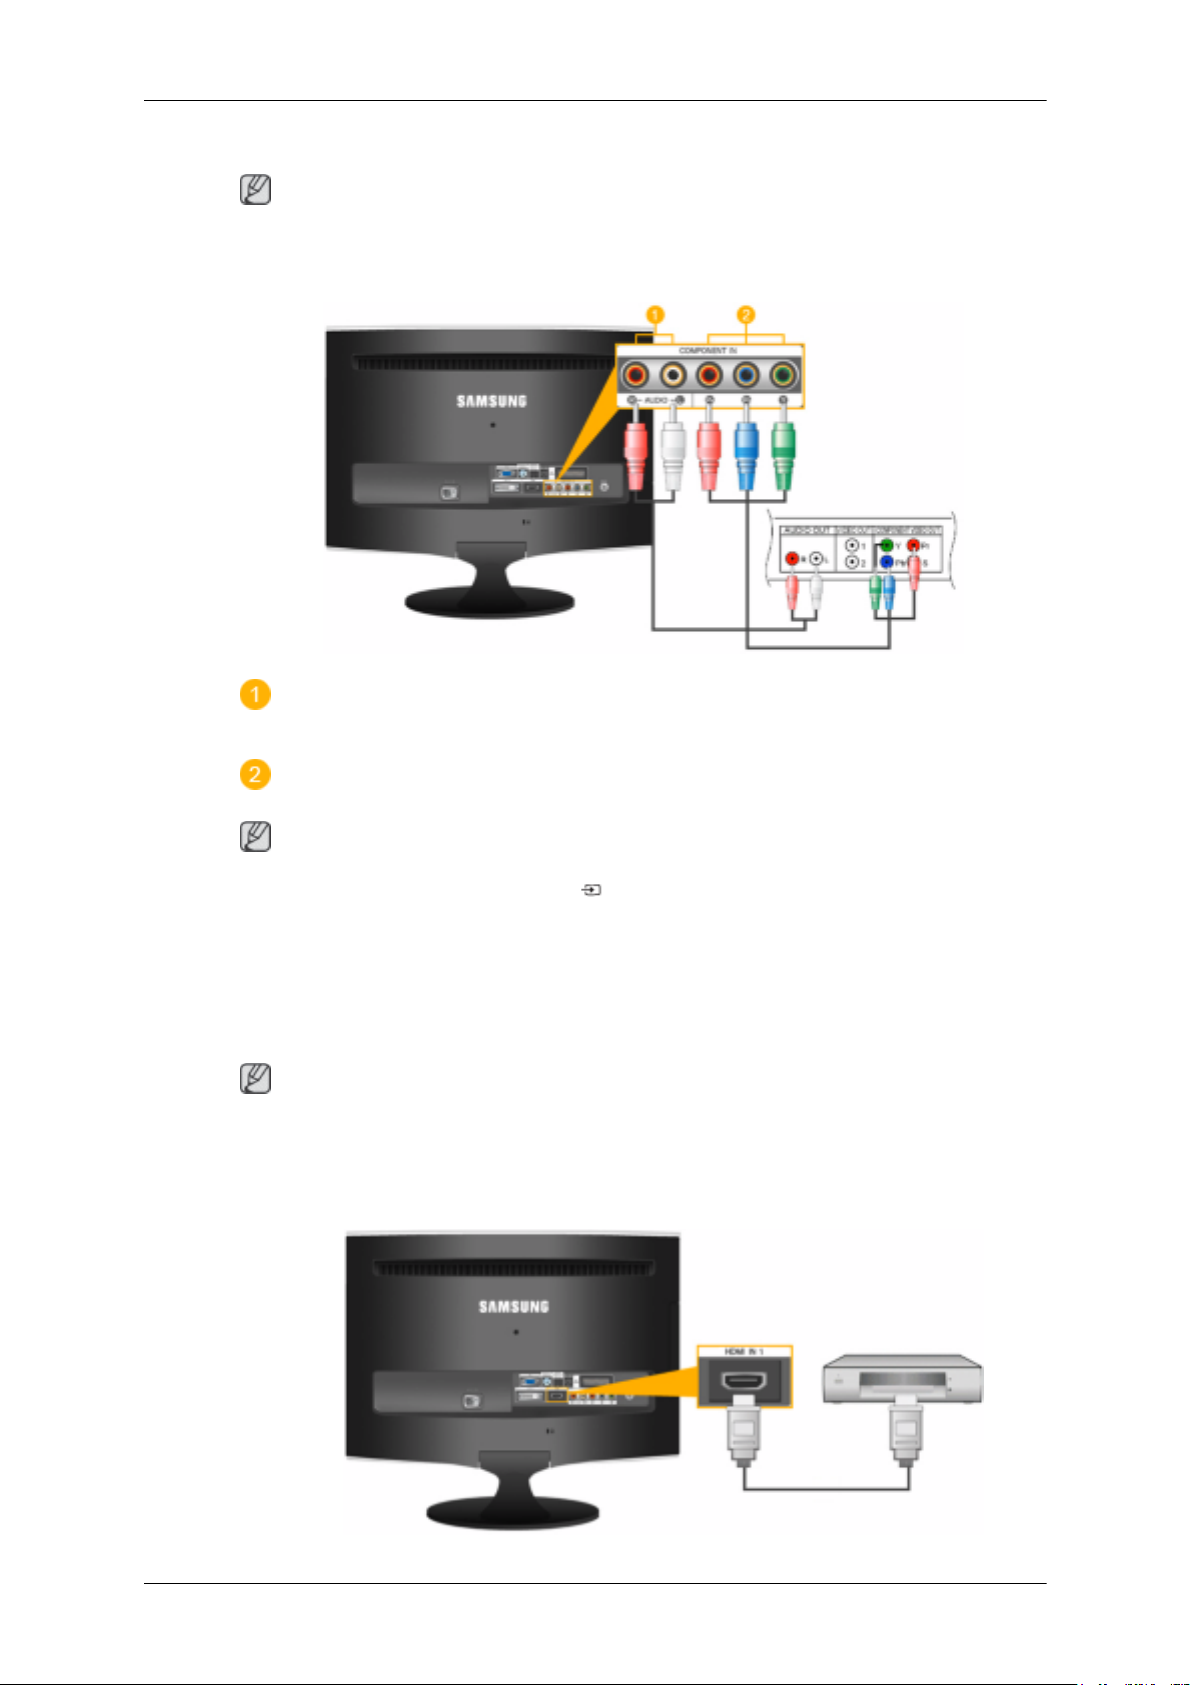
1. Connect the CATV cable or
Make sure to use a TV antenna cable (sold separately) as the antenna cable.
• When using an interior antenna terminal:
Check the antenna terminal on the wall first and connect the antenna cable.
• When using an outdoor antenna:
If you are using an outdoor antenna, use a professional for installation if possible.
• To connect the RF cable to the antenna input terminal:
Keep the copper wire portion of the RF cable straight.
2. Turn on the monitor.
3. Select TV using the TV / DTV.
4. Select a desired TV channel.
Note
Is weak signal causing poor reception?
TV antenna cable to the "ANT IN" port on the rear side of the monitor.
Purchase and install a signal amplifier for better reception.
Page 15
Connecting DVD / DTV Set Top Box
Note
Connections
Connect to the DVD /
can watch Component simply by hooking up the Component with the monitor as long as the power is
on.
Connect the port of the DVD, VCR (DVD / DTV Set-Top Box) to the [R-AUDIO-L] port of the
monitor.
Connect the VIDEO OUT port of the DVD / DTV Set-Top Box to the [PR, PB,Y] input
a component video cable (PR, PB,Y).
DTV Set Top Box input if the device has a [COMPONENT IN] connector. You
ports using
Note
Select "Component" using the 'SOURCE [ ]'
If you connect the PR,
displayed in red or blue.
For single-family houses, install an UHF antenna to receive digital broadcasting.
Connecting HDMI
Note
You can connect digital output devices to your monitor.
You can enjoy better screen and sound quality.
1.
Connecting Using a HDMI Cable
PB, and Y component cables to the incorrect terminals, the screen will be
Page 16
Connections
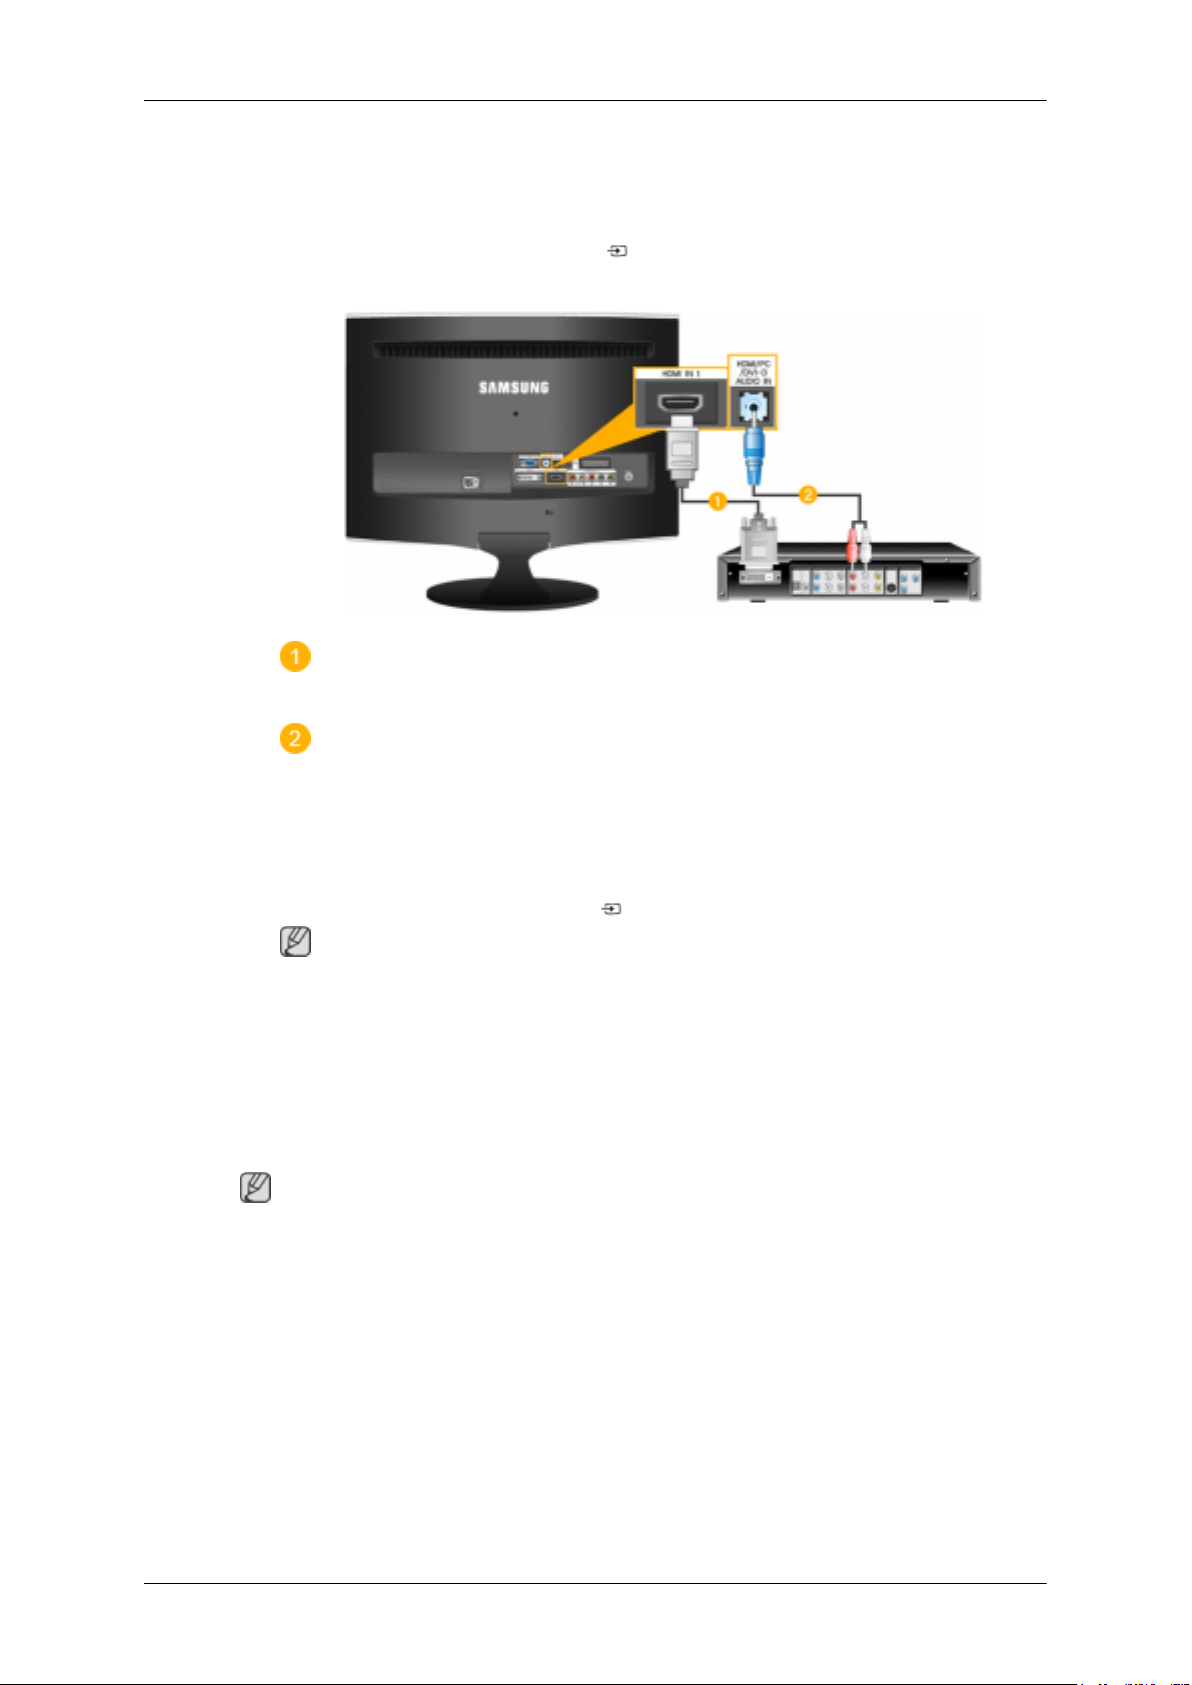
a. Input devices such as digital DVD are connected to the HDMI IN terminal of the
using the HDMI cable. When all the connections are completed, connect the power cords
for the monitor and DVD(or the device connected to the digital output terminal).
Select HDMI using the ‘SOURCE [
2. Connecting Using a DVI to HDMI Cable
Connect the DVI output terminal of a digital output device to the [HDMI IN] terminal of the
monitor using a DVI to HDMI cable.
]‘ button.
monitor
Connect the red and white jacks of an RCA to stereo (for PC) cable to the same colored audio
output terminals of the digital
DVI-D AUDIO IN]terminal of the monitor.
3. When all the connections are completed, connect the power cords for the monitor and DVD
(or the device connected to the digital output terminal).
4. Select "HDMI" using the 'SOURCE [
Note
If you just connect using
cannot hear sound.
Connecting the audio output terminal of a digital device to the [R-AUDIO-L] of [COMPONENT
IN] of the monitor using an audio cable will not give you sound. Make sure to connect to the
[HDMI / PC/DVI-D AUDIO IN] terminal of the monitor.
output device, and connect the opposite jack to the [HDMI/PC/
the DVI to HDMI cable without connecting to the sound source, you
Connecting and Using an Amplifier
Note
You can connect the digital
to your monitor using the correct cable.
sound input (optical) or standard sound input terminal of your amplifier
]' button.
Page 17
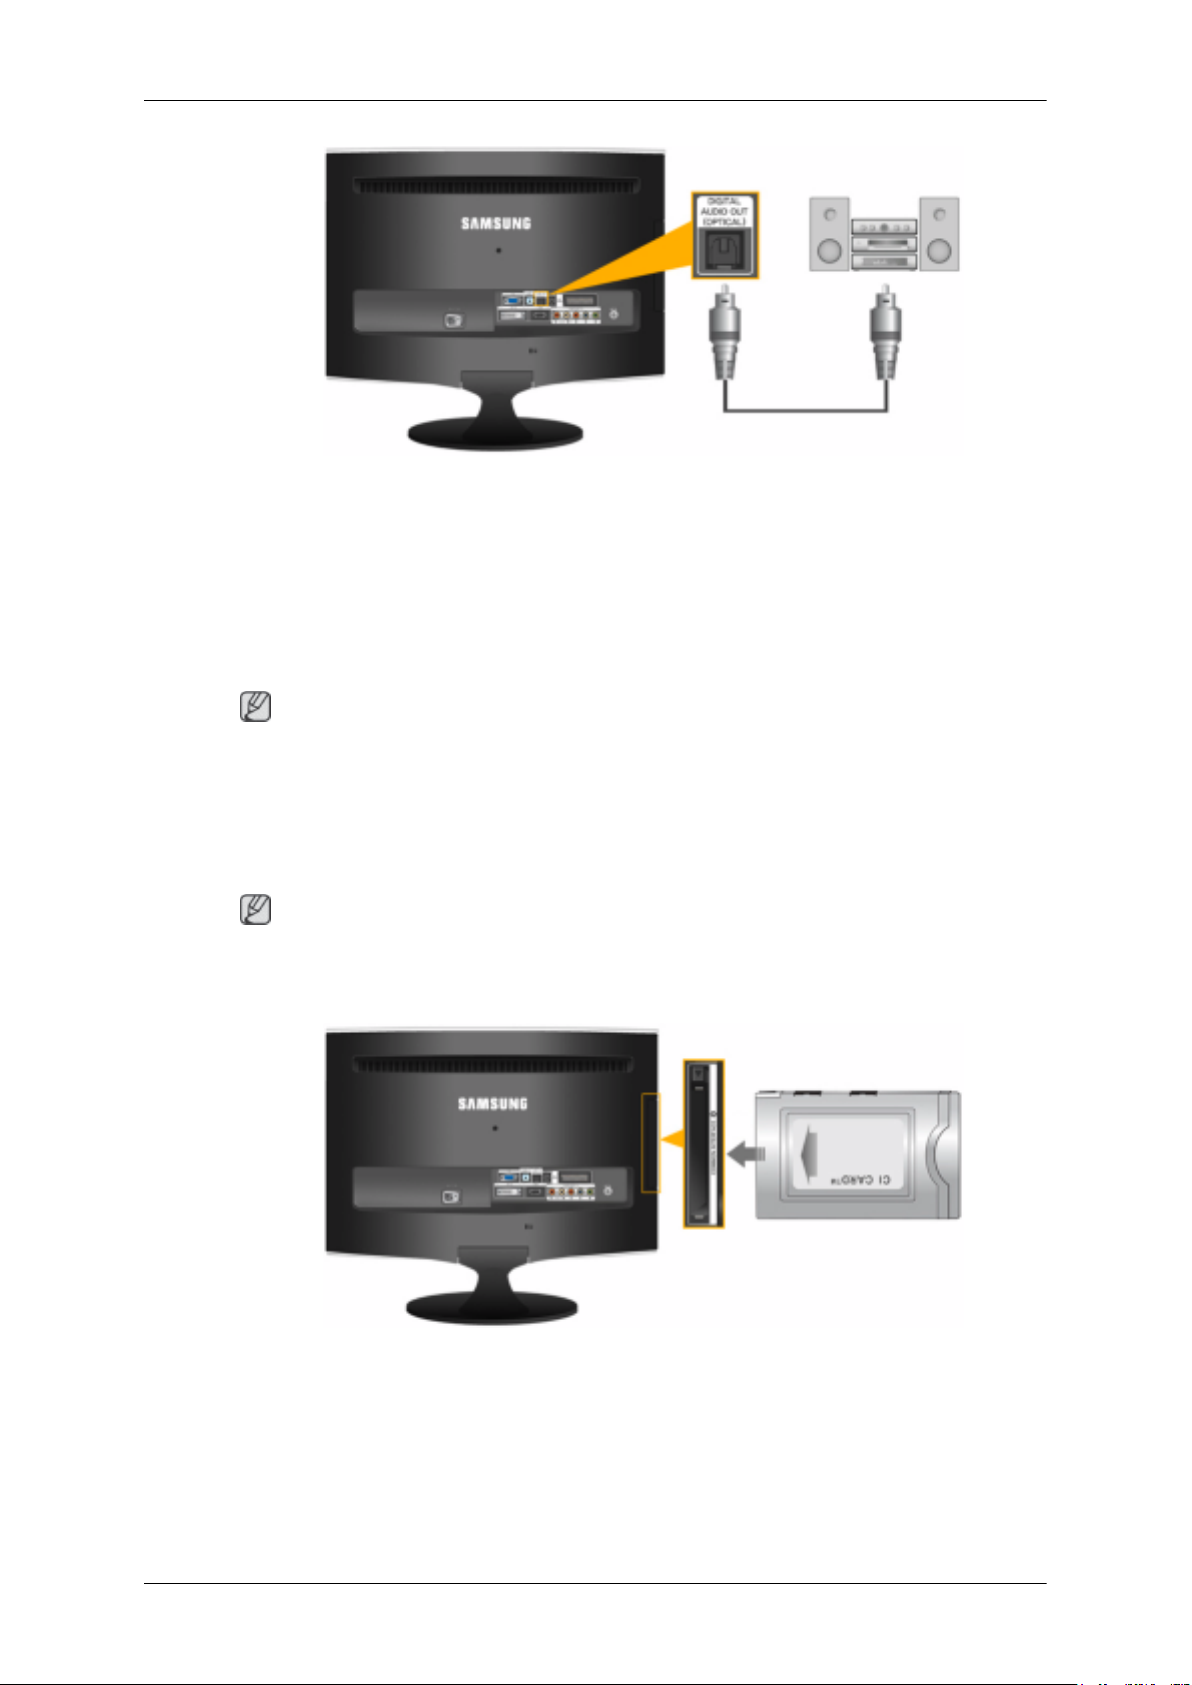
Connections
1. Connect the [DIGITAL AUDIO OUT (OPTICAL)] terminal of your monitor to the digital sound
input terminal of your digital amplifier using an optical cable.
Set the Internal Mute On in the Sound menu using the MENU button.
2.
3.
Adjust the sound volume using the Volume button of your amplifier
If the connections are set up, power up your monitor and amplifier.
4.
Note
• Because no sound is emitted from the monitor, you need to use an amplifier.
• For information on how to connect a speaker and amplifier, refer to the respective user manuals
provided by their manufacturers.
Connecting COMMON INTERFACE
Note
You can install the CAM anytime whether the TV is ON or OFF.
Purchase the CI CAM module by visiting your nearest dealer or by phone.
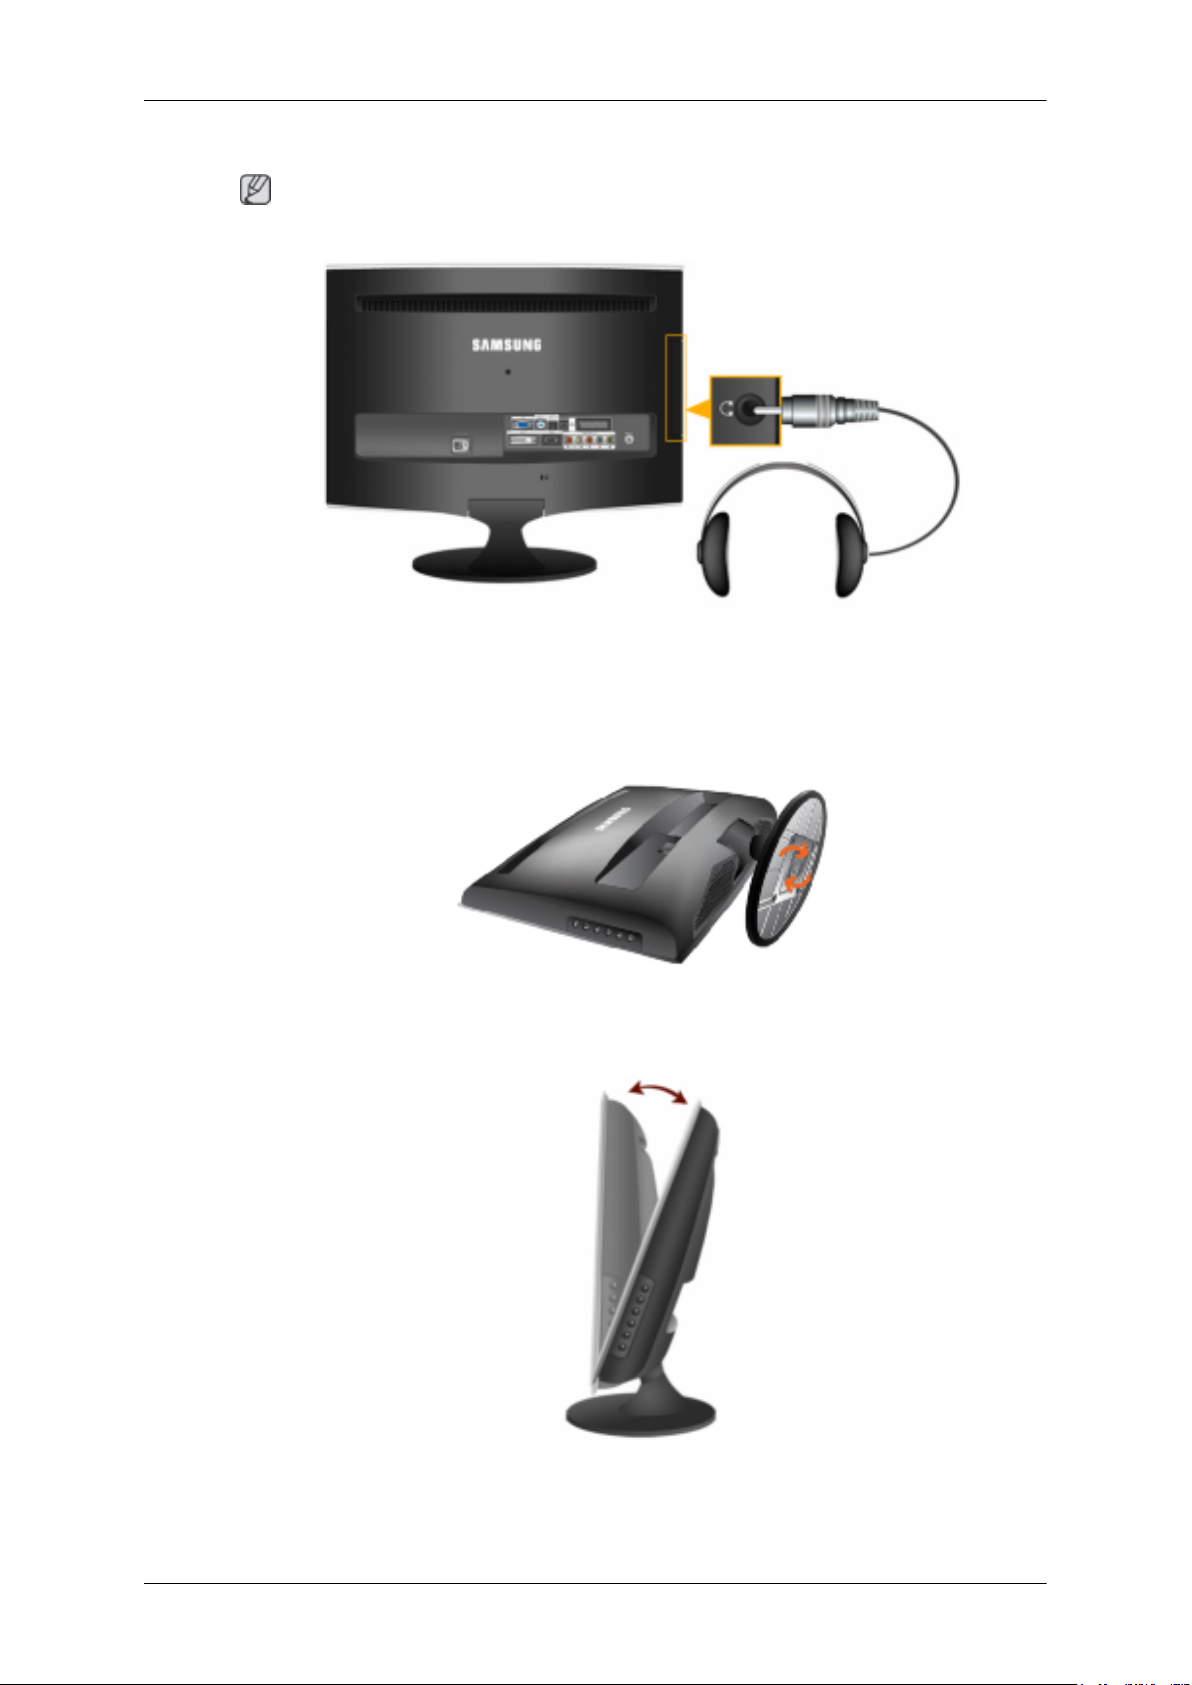
1. Insert the CI CARD into the CAM in the direction of the arrow until it fits.
2. Insert the CAM with the CI CARD installed into the common interface slot.
(Insert the CAM in
slot.)
3. Check if you can see a picture on a scrambled signal channel.
the direction of the arrow, right up to the end so that it is parallel with the
Page 18
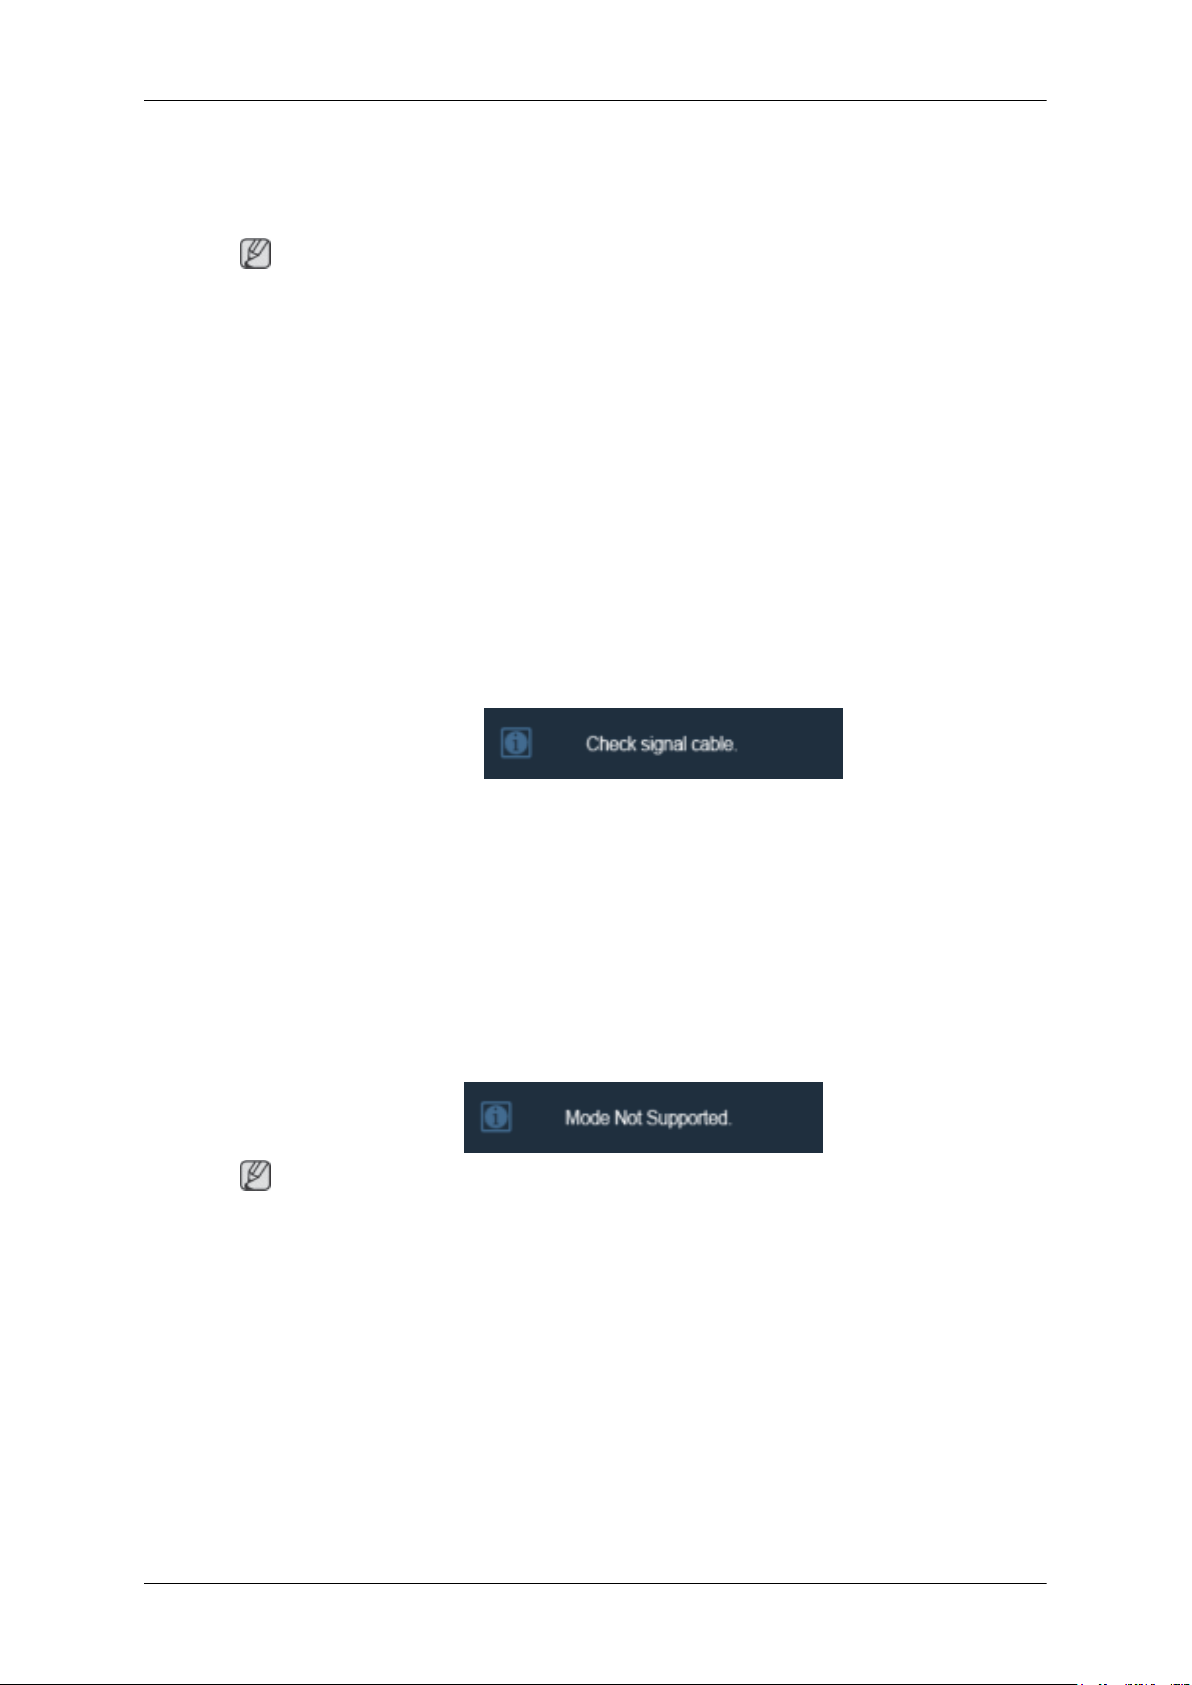
Connecting Headphone
Note
You may connect your headphones to the monitor.
1. Connect your headphones to the Headphone connection terminal.
Connections
Using the Stand
Monitor Assembly
Tilt angle
Monitor and Bottom
You can adjust the tilt angle within a range of 5° forward to 25° backward for the most comfortable
viewing angle.
Page 19
Troubleshooting
Self-Test Feature Check
Note
• Check the following items yourself
lems that you cannot solve by yourself.
• Your monitor provides a self test feature that allows you to check whether your monitor is func-
tioning properly.
Self-Test Feature Check
1. Turn off both your computer and the monitor.
2. Unplug the video cable from the back of the computer.
3. Turn on the monitor.
The figure shown below ("Check Signal Cable") appears on a black background when the monitor is in its normal working condition though it does not sense any video signal: While in the
Self-Test mode, the LED power indicator remains green and the figure moves around on the
screen.
4. Turn off your monitor and reconnect the video cable; then turn on both your computer and the
monitor.
If your monitor screen
and computer system; your monitor is functioning properly.
before calling for service. Contact the service center for prob-
remains blank after using the previous procedure, check your video controller
Not Optimum Mode
If the vertical resolution is not optimum mode, you can still see the display but the warning message
below appears and disappears after one minute.
The user must adjust the frequency within that one minute.
Note
to
Refer
by the monitor.
Specifications > Preset
Maintenance and Cleaning
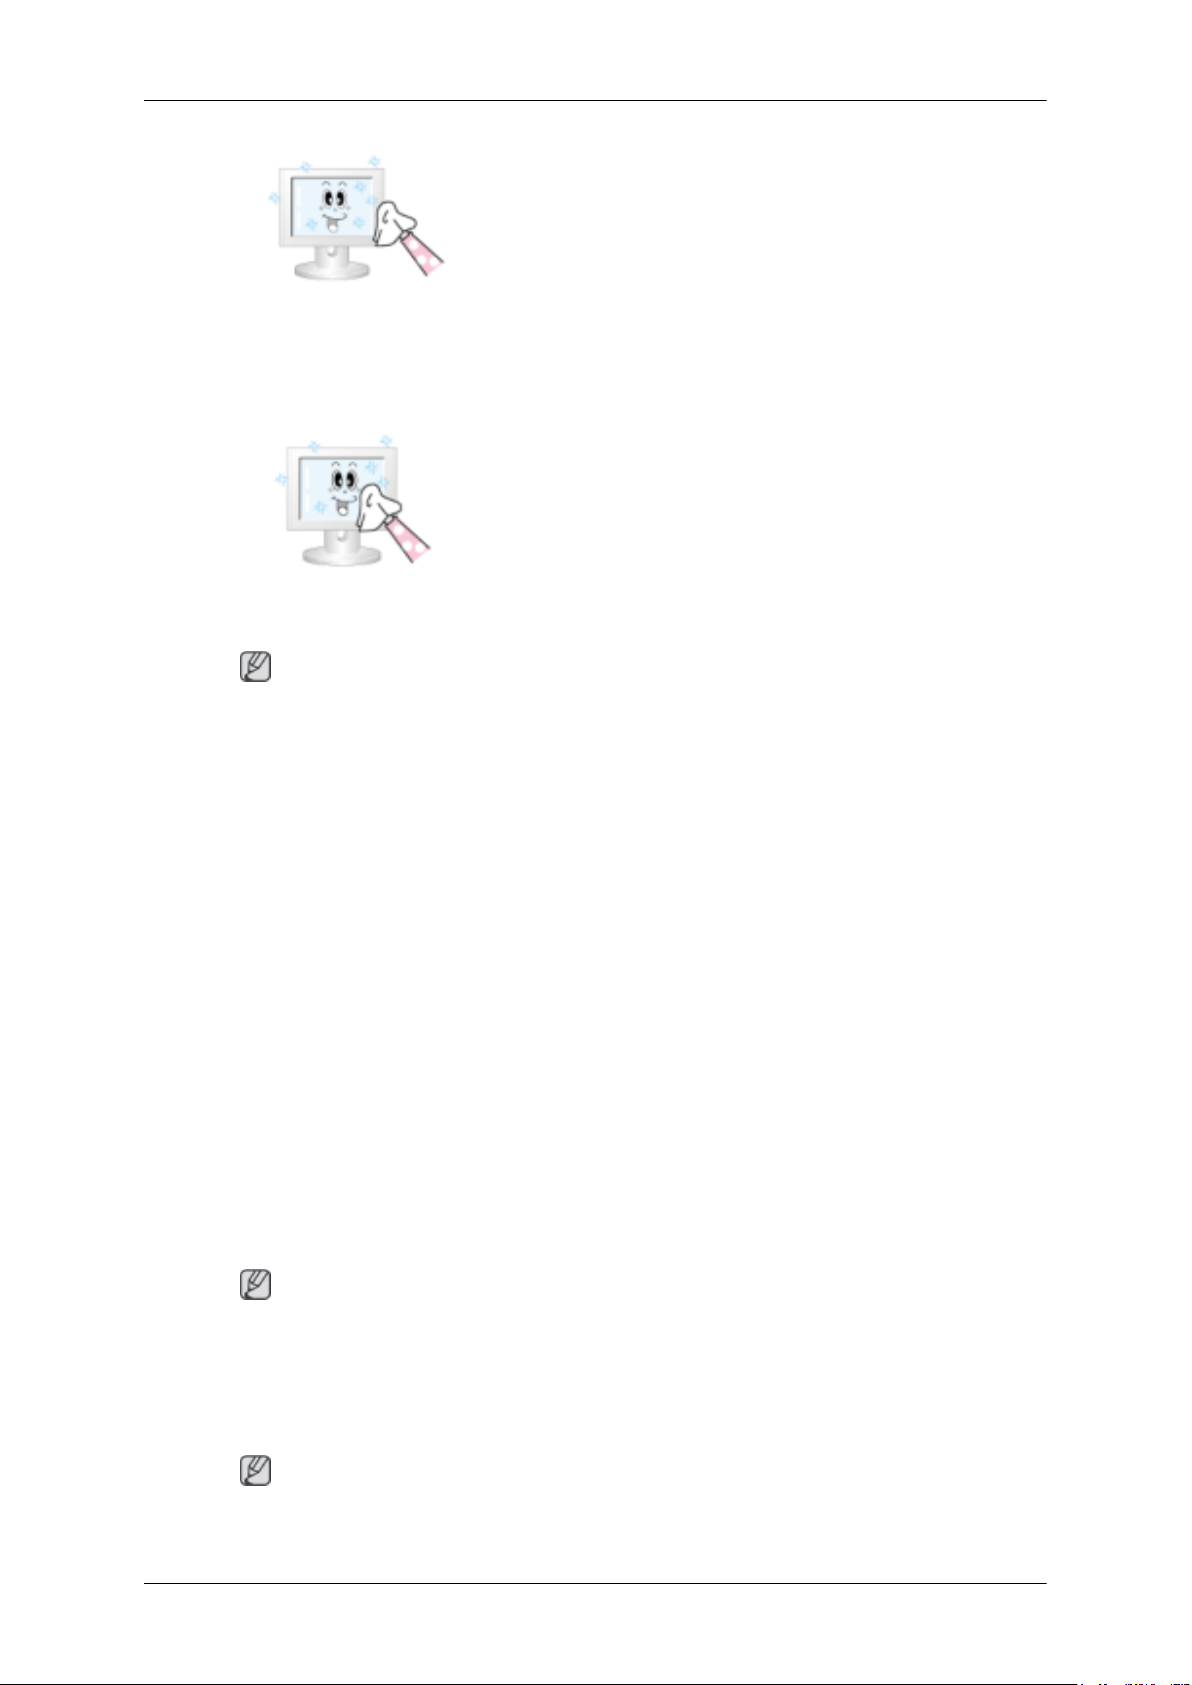
1. Maintaining the Monitor Case.
Clean with a soft cloth after disconnecting the power cord.
Timing Modes for the resolutions or frequencies that are supported
Page 20
Troubleshooting
• Do not use benzene, thinner or other flammable substances, or a wet cloth.
• We recommend a
vent damage to the screen.
2. Maintaining the Flat Panel Display Screen.
Clean with a soft cloth (cotton flannel) smoothly.
• Never use acetone, benzene or thinner.
(They may cause flaws or deformation of the screen surface.)
• The user will be required to pay costs and related expenses
for repair of damages caused by him/her.
Symptoms and Recommended Actions
Note
A monitor recreates visual signals received from the computer. Therefore, if there is trouble with the
computer or the video card, this can cause the monitor to become blank, have poor coloring, noise,
Video mode not supported, etc. In this case, first check the SOURCE of the problem, and then contact
a service center or your dealer.
Samsung cleansing agent is used to pre-
1. Check if the power cord and the video cables are properly connected to the computer.
2. Check if the computer beeps more than 3 times when booting.
(If it does, request an after-service for the main board of the computer.)
3. If you installed a new video card or if you assembled the PC, check if you installed the adapter
(video) driver and the monitor driver.
4.Check if the scanning ratio of the video screen is set at 56 Hz ~ 75 Hz.
(Do not exceed 60 Hz when using the maximum resolution.)
5. If you have problems in installing the adapter (video) driver, boot the computer in Safe Mode, remove
the Display Adapter at the "Control Panel, System, Device Administrator" and then reboot the computer
to reinstall the adapter (video) driver.
Check List
Before calling for assistance, check the information in this section to see if you can remedy any problems yourself. If you do need assistance, please call the phone number on the Information section or
contact your dealer.
Note
1. Problems related to Installation
Note
Problems related to the monitor installation and their solutions are listed.
Page 21
Troubleshooting
PC Mode
Q: It appears the PC does not function normally.
A: Check if the
Driver)
Q: The monitor screen flickers.
A: Check if the signal cable between the computer and the monitor is securely connected and tight-
ened.(Refer to Connecting the monitor)
Display Adapter Driver (VGA Driver) is properly installed. (Refer to Installing
TV Mode
Q: TV screen is blurred or shows noise signals.
A: Check if the TV antenna connector is securely connected to the external antenna.(Refer to
Connecting TV)
2. Problems related to Screen
Note
Problems related to the monitor screen and their solutions are listed.
Q:
Screen is blank and power indicator is off
Ensure
A:
necting the monitor)
that
the
power cord is firmly connected and the LCD monitor is on.(Refer to the Con-
Q: "Check Signal Cable" message
A: Ensure that the signal cable is firmly connected to the PC or video SOURCEs.(Refer to the
Connecting the monitor)
A: Ensure that the PC or video SOURCEs are turned on.
Q: "Not Optimum Mode" message
A: Check the maximum resolution and the frequency of the video adapter.
A: Compare these values with the data in the Preset Timing Modes Chart.
Q: Picture rolls vertically.
A: Check if the signal cable is securely connected.Connect it again securely. (Refer to Connecting
the monitor)
Q: Image is not clear. Picture is blurred.
A: Run Frequency Coarse and Fine tuning.
A: Turn on again after removing all accessories (video extension cable, etc.)
A: Set resolution and frequency to the recommended ranges.
Q: Picture image is unstable and vibrates.
Ghost images are shown in the picture.
Page 22
Troubleshooting
A: Check if the resolution and
by the monitor. If not, reset them referring to the current Information under the monitor menu
and Preset Timing Modes.
Q: The image is too light or too dark
A: Adjust the Brightness and Contrast.(Refer to the Brightness, Contrast)
Q: Power Indicator blinks green.
A: The monitor is currently saving the changes made in settings to the OSD memory.
Q: Screen is blank and power indicator light is steady green or blinks every 0.5 or 1 seconds
A: The monitor is using its power management system
A: press a key on the keyboard
Q: The screen is blank and is blinking.
A: If you see the "TEST GOOD" message on the screen when you press the MENU button, check
the cable connection between the monitor and the computer to ensure that the connector is
properly connected.
3. Problems related to Audio
frequency set for the computer video card falls in the range supported
Note
Problems related to audio signals and their solutions are listed below.
Q:
No sound
A: Ensure that the
the audio-out port on your sound card.(Refer to the Connecting the monitor)
A: Check the volume level.(Refer to the Volume)
Q: The sound level is too low.
A: Check the volume level.(Refer to the Volume)
A: If the volume is still too low after turning the control to its maximum, check the volume control
on the computer sound card or software program.
audio cable is firmly connected to both the audio-in port on your monitor and
4. Problems related to Remote Control
Note
Problems related to the remote control and their solutions are listed.
The remote control buttons do not respond.
Q:
A: Check the battery polarities (+/-).
A: Check if the batteries have been exhausted.
A: Check if the power is on.
A:
Check if the power cord is securely connected.
A: Check if a special fluorescent or neon lamp is on in the vicinity
Page 23

Troubleshooting
5. You may see small particles if you look closely at the edge of the bezel surrounding the screen.
This is part of the product’s design and is not a defect.
Q & A
How can I change the frequency?
Q:
A: The frequency can be changed by reconfiguring the video card.
A: Note that
computer or the video card manual for details.)
Q: How can I adjusts the resolution?
A: Windows XP:
Set the resolution in the Control Panel → Appearance and Themes → Display → Settings.
A: Windows ME/2000:
Set the resolution in the Control Panel → Display → Settings.
* Contact the video card manufacturer for details.
Q: How can I set the Power Saving function?
A: Windows XP:
Set the resolution in the Control Panel → Appearance and Themes → Display → Screen Saver.
Set the function in the BIOS-SETUP of the computer. (Refer to the Windows / Computer Manual).
A: Windows ME/2000:
video card support can vary, depending on the version of the driver used. (Refer to the
Set the resolution at the Control Panel → Display → Screen Saver.
Set the function in the BIOS-SETUP of the computer. (Refer to the Windows / Computer Manual).
Q: How can I clean the outer case/LCD Panel?
A: Disconnect the power cord and then clean the monitor with a soft cloth, using either a cleaning
solution or plain water.
Do not leave any detergent or scratches on the case. Do not let any water enter the monitor.
Q: What are the benefits of digital broadcasting?
A: Digital TV broadcasting generates less noise and provides clearer visuals and sound than analog
TV broadcasting does. As services develop, you can also enjoy various information services
because various kinds of data besides video and audio can be sent.
A: For example, while watching a sports game, you can view various data on your favorite player
or you can view all or selected screens which have been captured from different angles for a
specific scene. In addition, you can retrive information on a previous story or drama or you can
buy home shopping products such as an accessory currently on TV.
Page 24

Digital TV broadcasting allows you to easily access various information services in your home
creating a more information-oriented home.
Q: Can I watch digital TV broadcasting with an analog TV?
A: No.
A: The analog TV cannot interpret digital signals. Therefore, a digital TV is required to watch digital
TV broadcasting.
Q: Can I use my present antenna to receive digital broadcasting?
A: As for existing analog TV, digital TV is designed so that digital broadcasting signals are received
via both indoor and outdoor antennas.
A: If signal reception is very good in your environment, you can watch digital broadcasts with your
existing indoor antenna. If not, it is better to install an outdoor UHF antenna.
Q: How do I connect an antenna for an apartment or tenement house?
A: Consult the superintendent's office or broadcasting facility administrator for your apartment or
tenement house to check whether UHF reception is available.
A: Even if digital TV broadcasting is available in your area, if you cannot watch it because the
superintendent's office or common broadcasting facility does not rebroadcast the signal, you
have to install an indoor or outdoor antenna.
A: Alternatively, your local cable broadcasting company provides a digital TV service, and you can
subscribe to it.
A: If a cable broadcasting company is sharing a common broadcasting facility for your apartment
or tenement house, it has to adjust and send digital TV signals so that they are compatible to
shared viewing which is the original purpose of the common broadcasting facility.
 Loading...