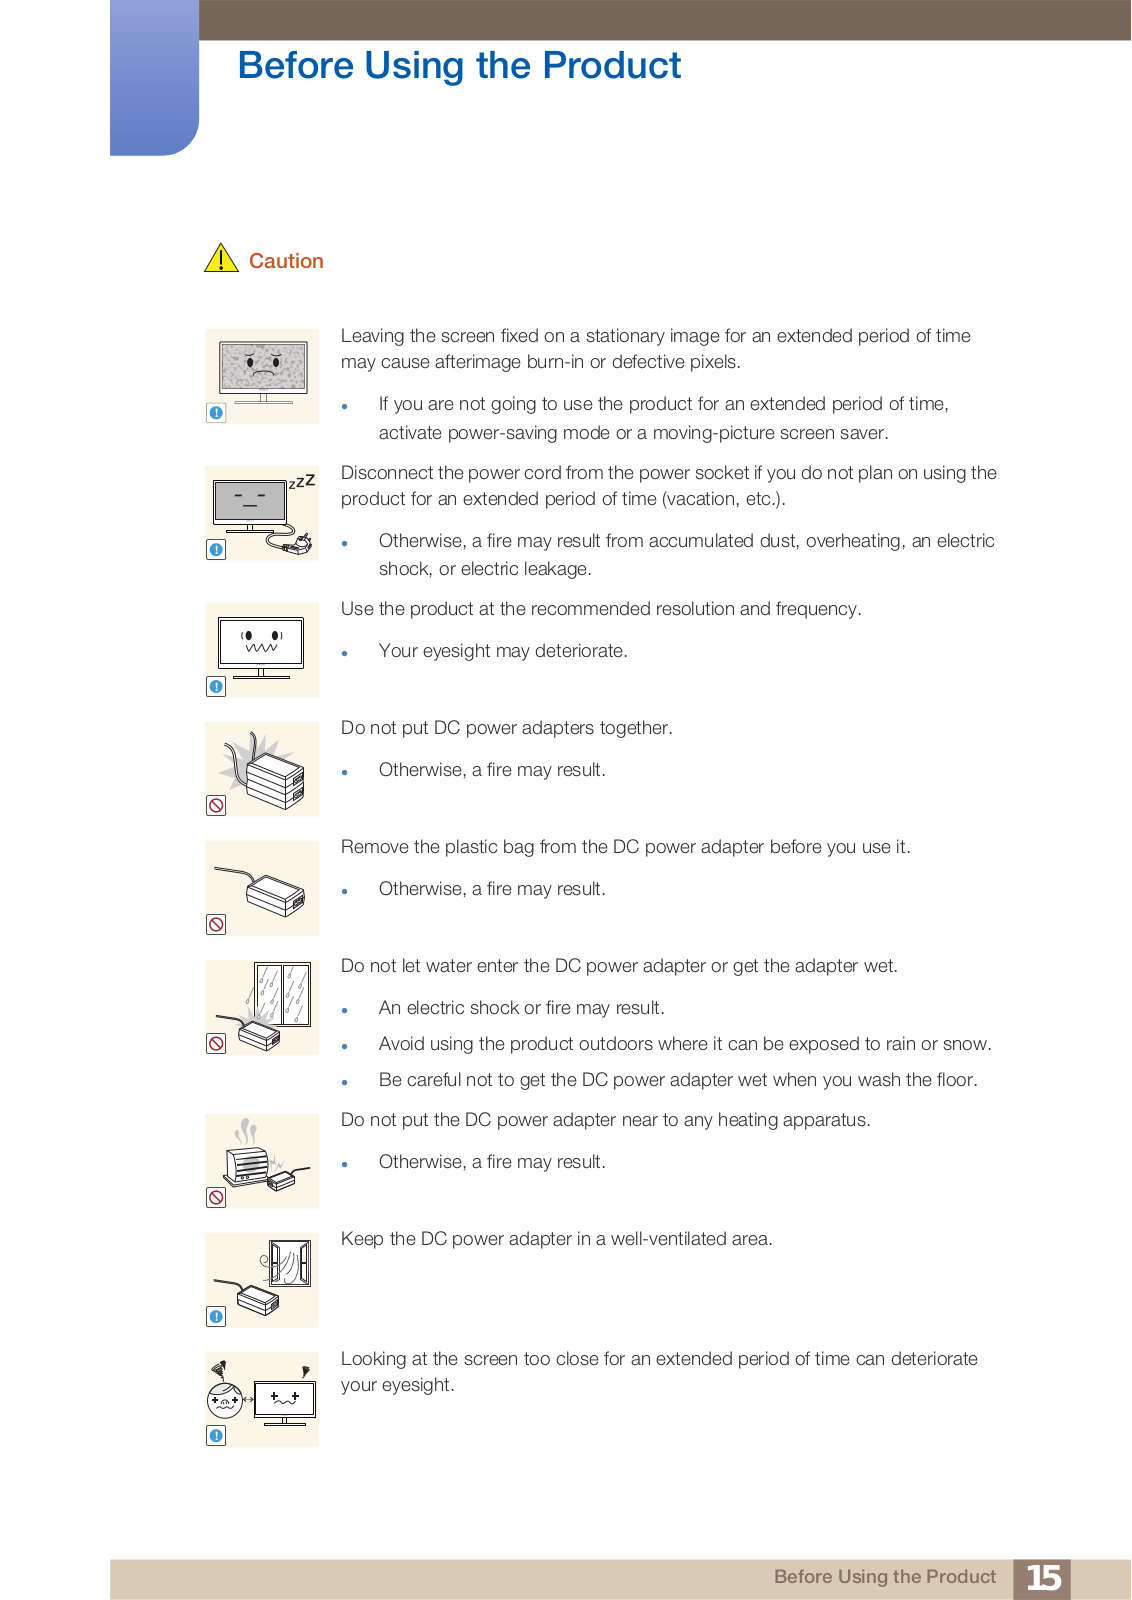
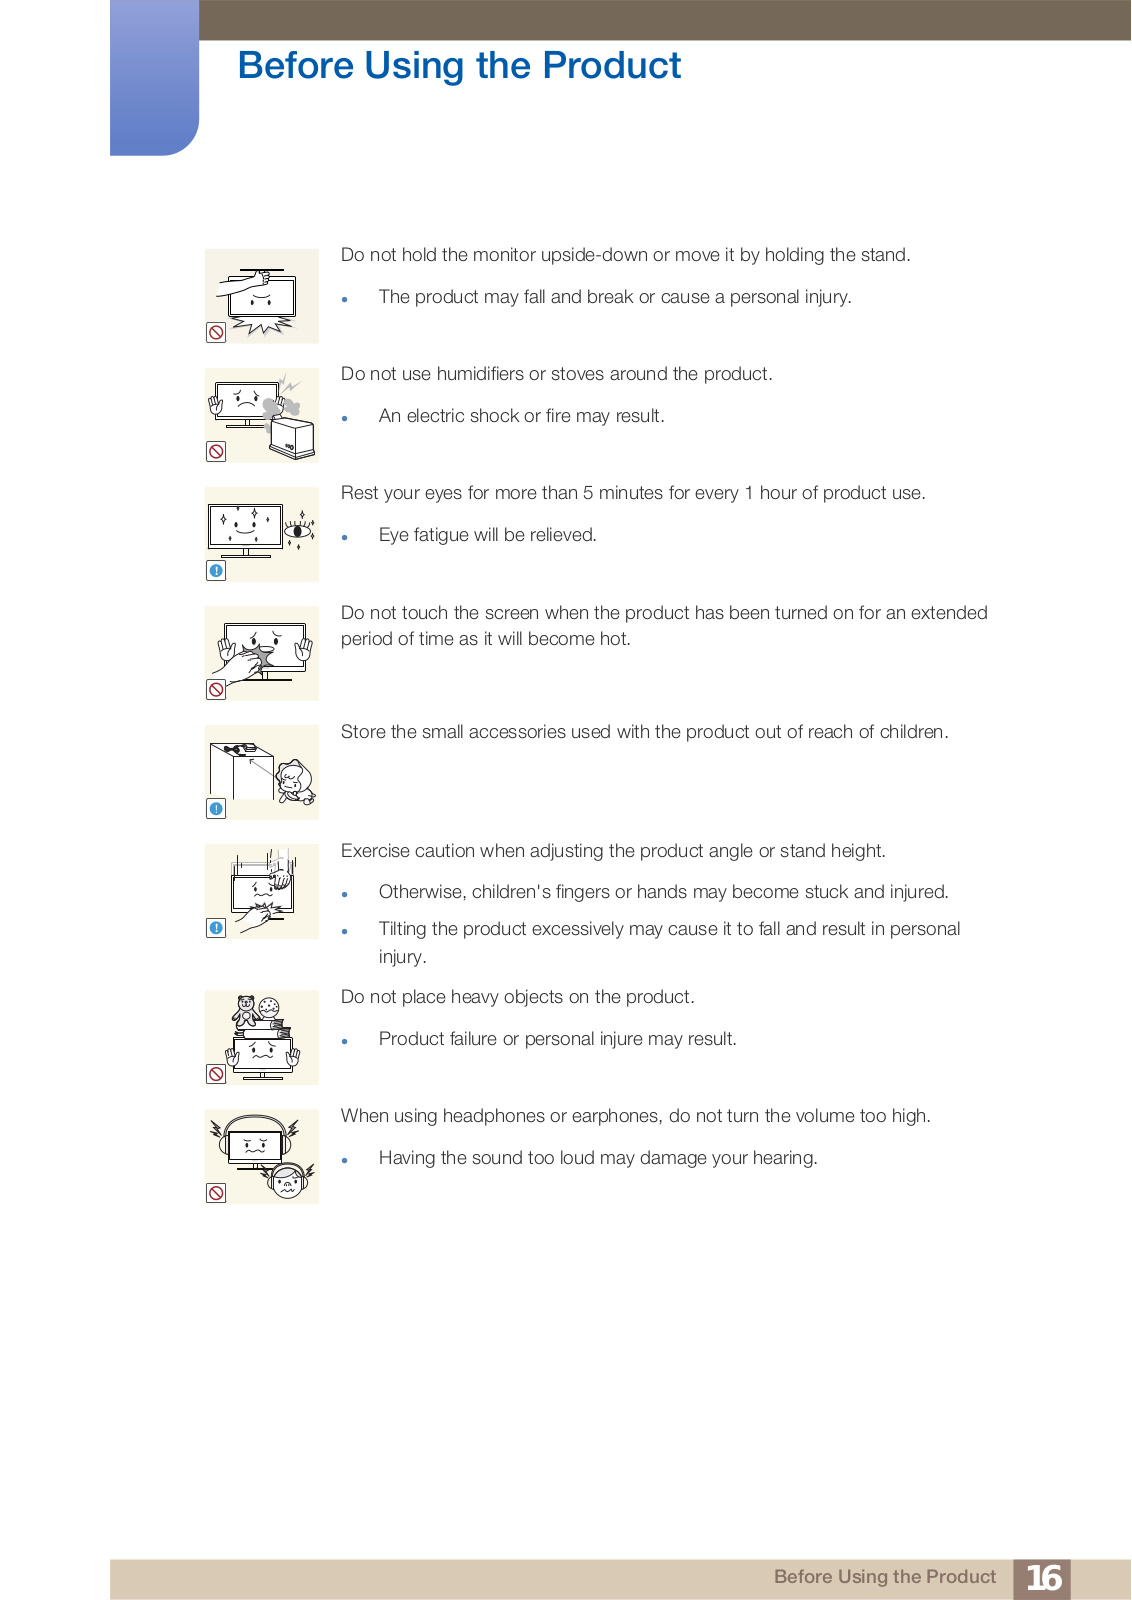
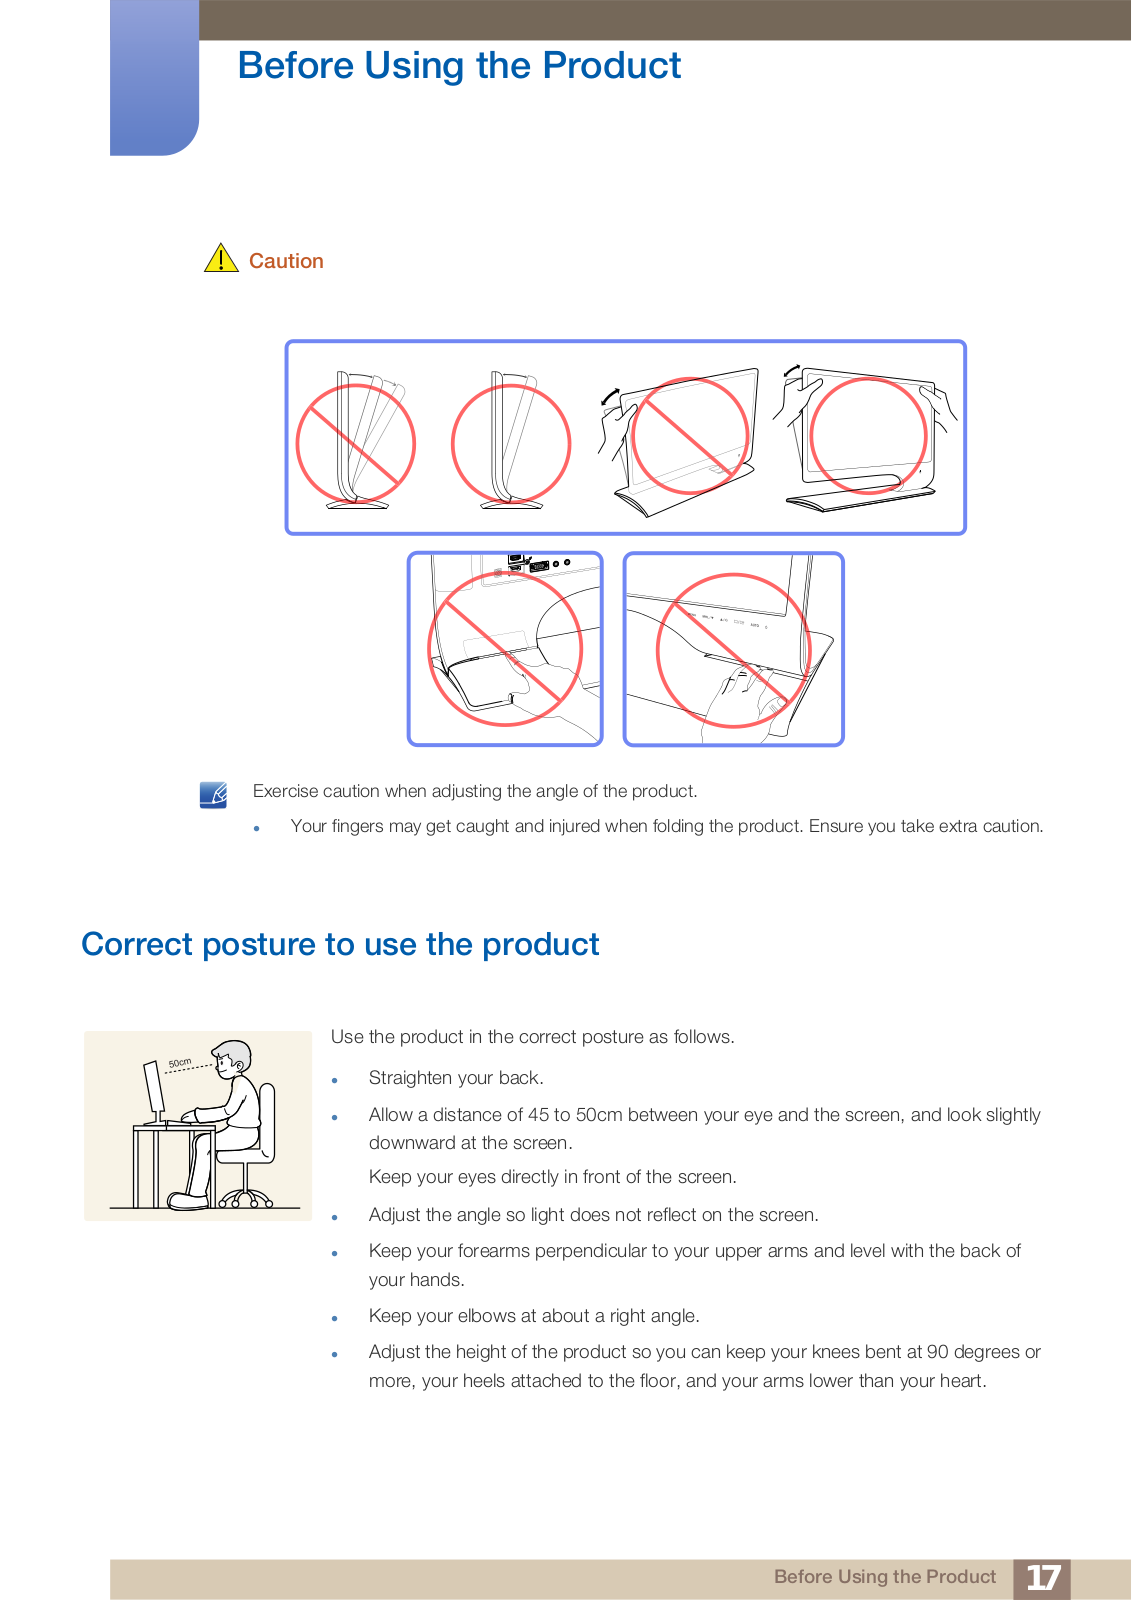
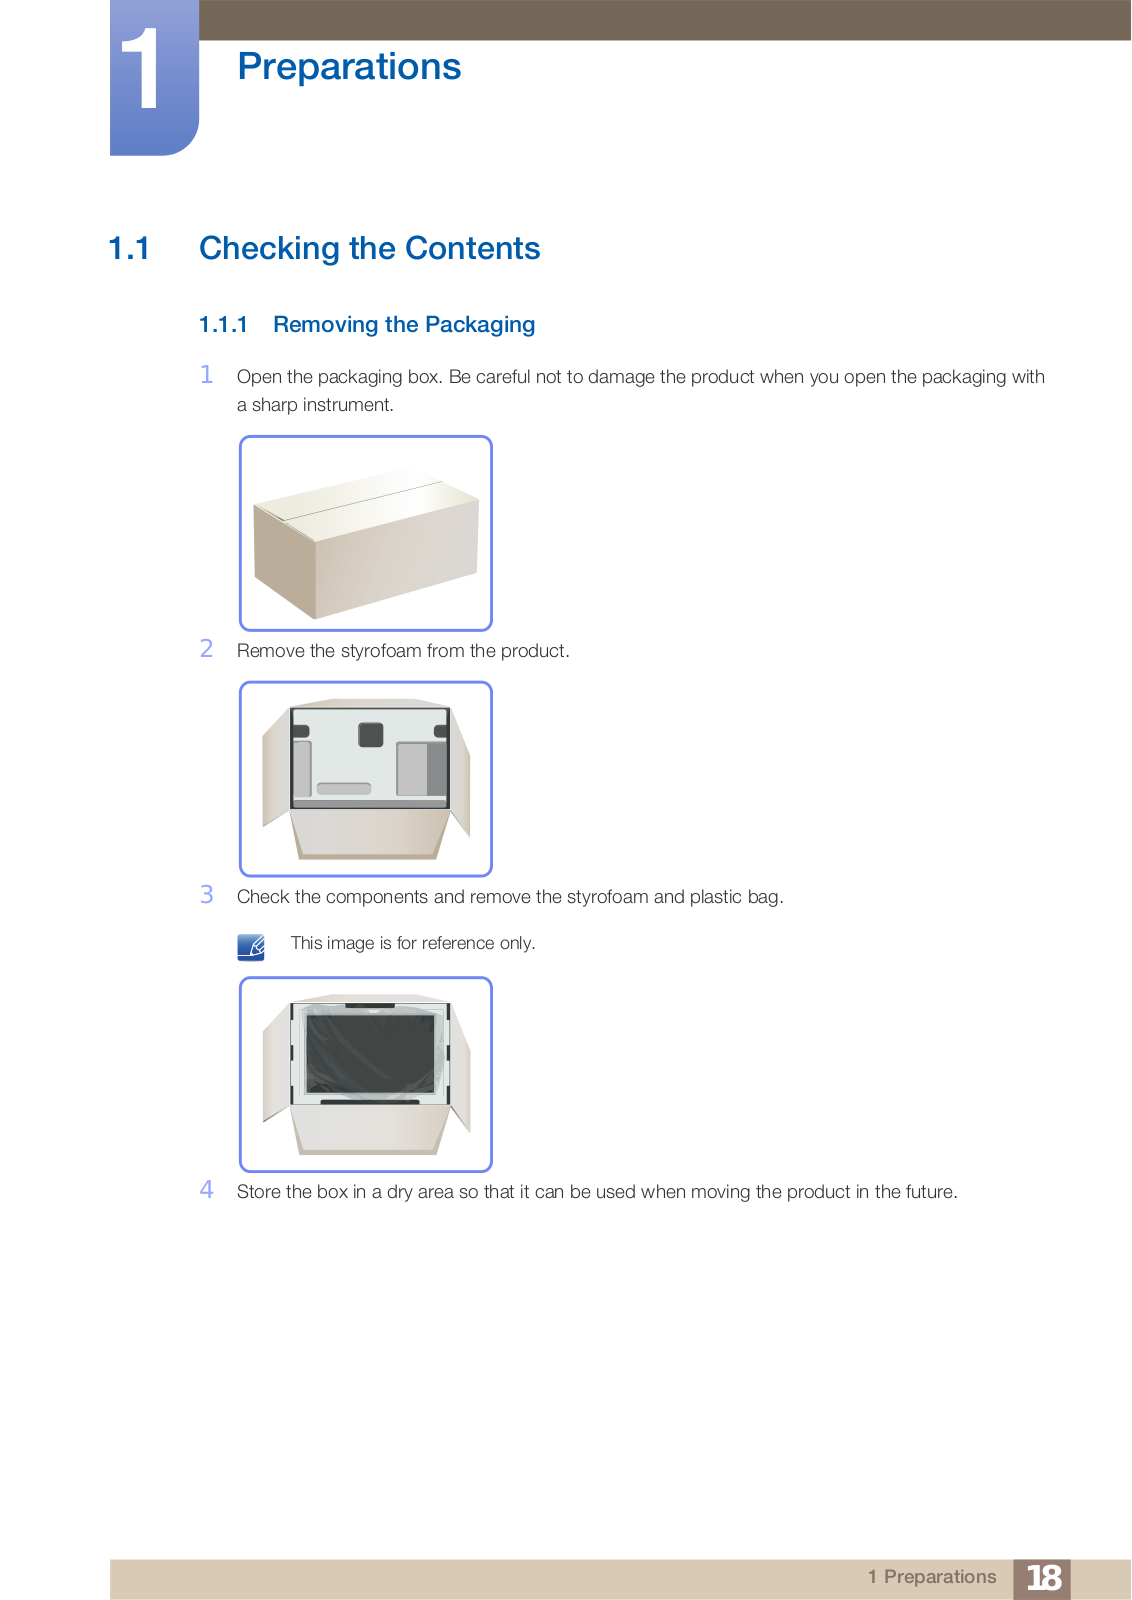
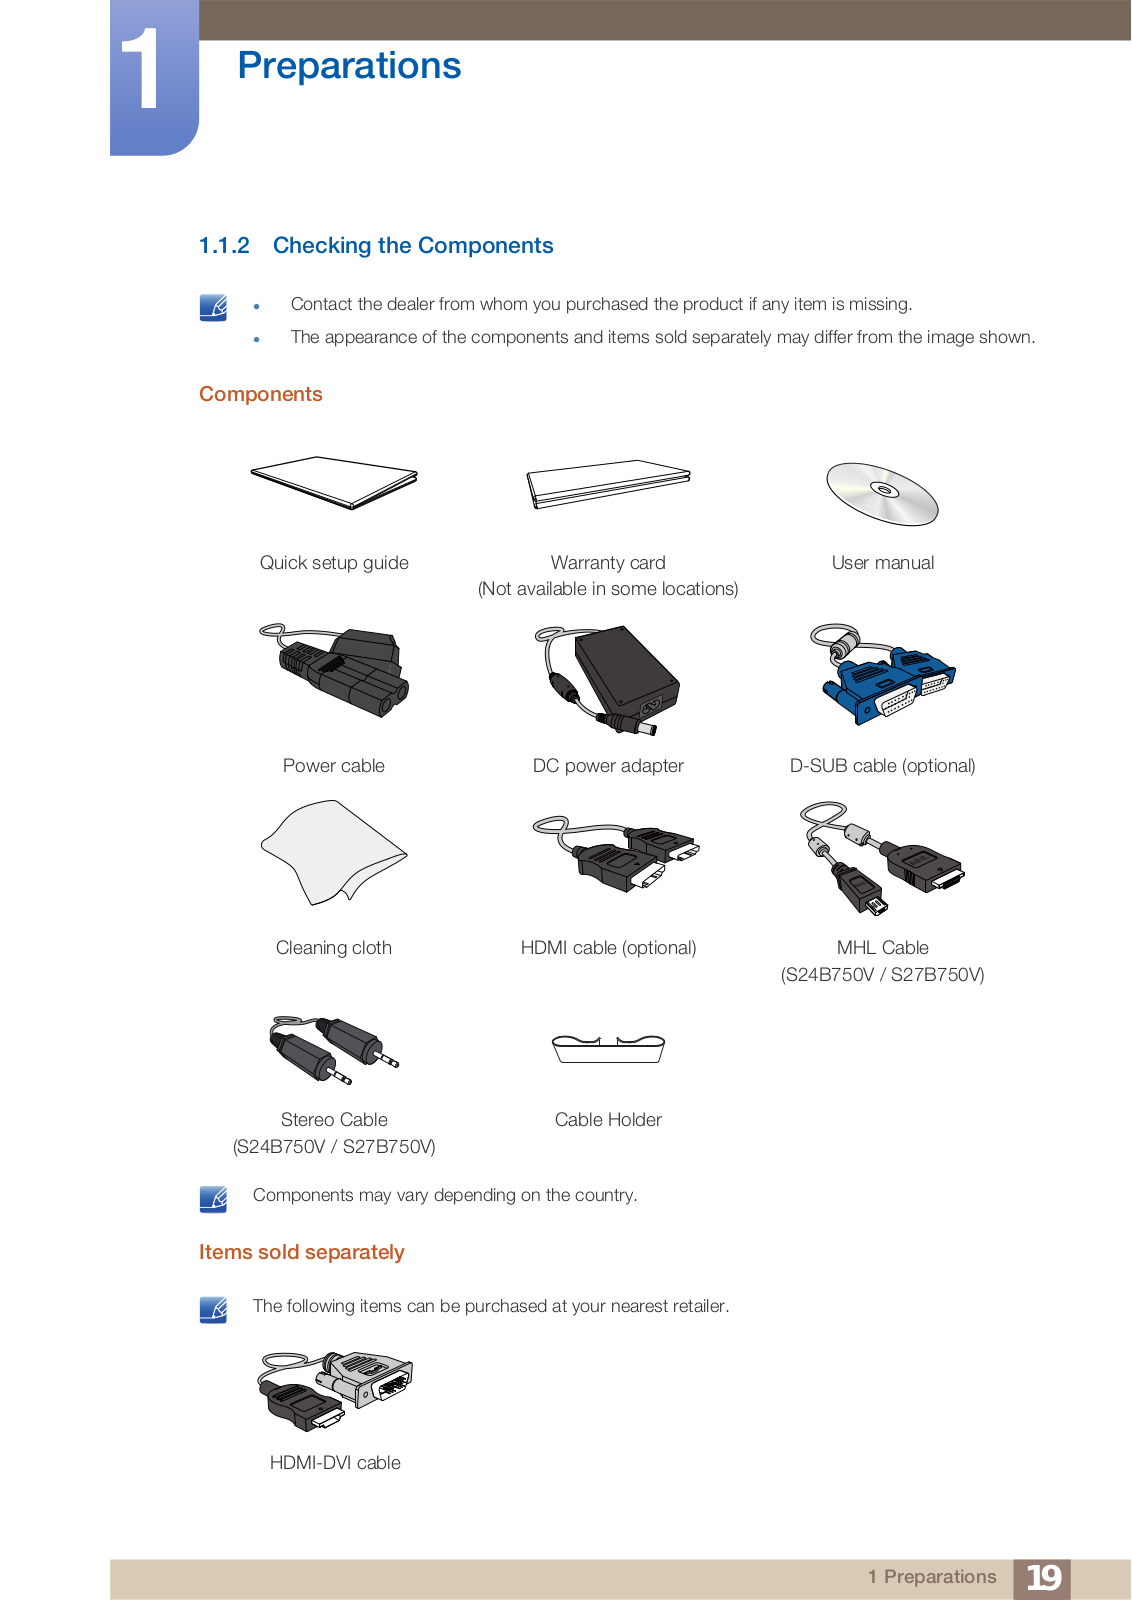
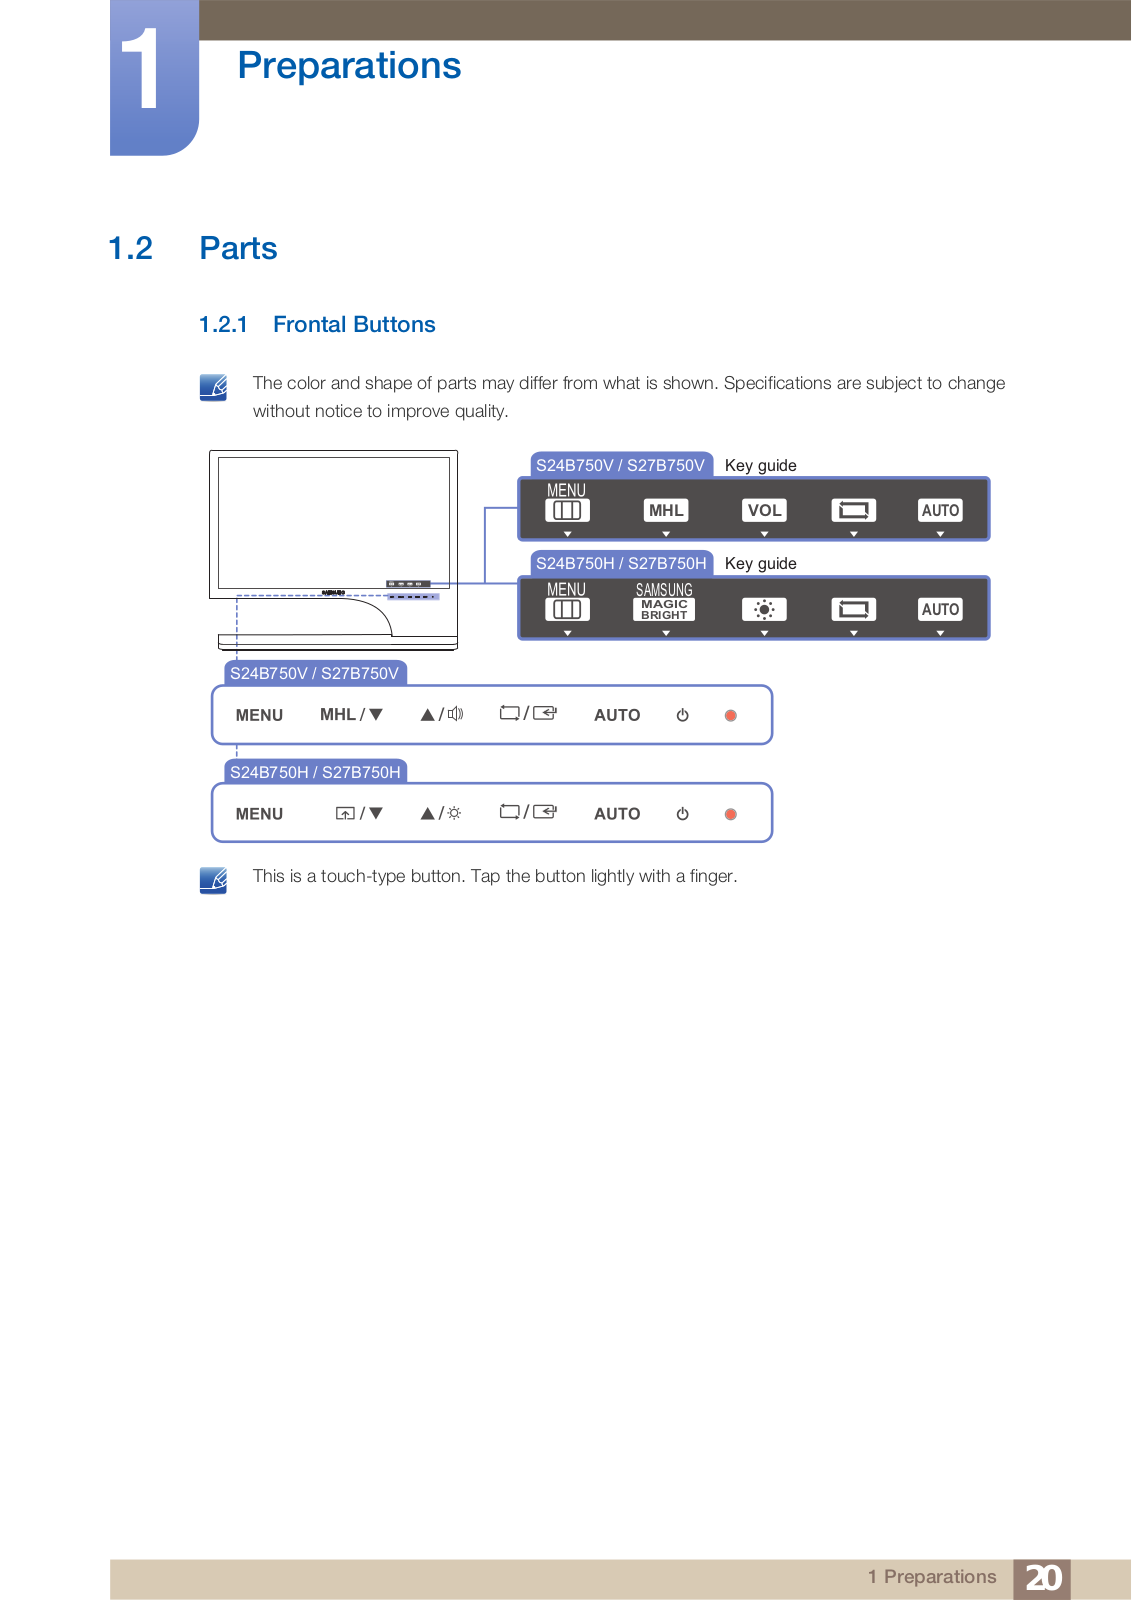
User manual
SyncMaster
S24B750V
S24B750H
S27B750V
S27B750H
The color and the appearance may differ depending on the product, and the specifications are subject to change without prior notice to improve the performance.
BN46-00203A-08
BEFORE USING THE PRODUCT
PREPARATIONS
USING "MHL(MOBILE HIGH-DEFINITION LINK)"
CONNECTING AND USING A SOURCE DEVICE
7Copyright
7Icons used in this manual
7Symbols for safety precautions
8Cleaning
8Cleaning
9Securing the Installation Space
9Precautions for storage
10 Safety Precautions
10Electricity and Safety
11Installation and Safety
13Operation and Safety
17Correct posture to use the product
18Checking the Contents
18Removing the Packaging
19Checking the Components
20 Parts
20 Frontal Buttons
23Reverse Side
24Adjusting the Product Tilt
24Anti-theft Lock
25 "MHL" (Mobile High-Definition Link)
26 Using "MHL"
28 Disabling "MHL"
29 Before Connecting
29 Pre-connection Checkpoints
29 Connecting the Power
|
|
|
Table Of Contents |
2 |
|
|
|
|
|
|
|
Table Of Contents
SCREEN SETUP
CONFIGURING TINT
30 Connecting and Using a PC
30 Connecting to a PC
32Connecting to Headphones or Speakers (S24B750V / S27B750V)
34Driver Installation
35Setting Optimum Resolution
36Changing the Resolution Using a PC
39 Brightness
39 Configuring Brightness
40 Contrast
40 Configuring Contrast
41 Sharpness
41 Configuring Sharpness
42 SAMSUNG MAGIC Bright
42 Configuring SAMSUNG MAGIC Bright
43 SAMSUNG MAGIC Angle
43 Configuring SAMSUNG MAGIC Angle
44 Coarse
44 Adjusting Coarse
45 Fine
45 Adjusting Fine
46 Response Time
46 Configuring Response Time
47 HDMI Black Level
47 Configuring the HDMI Black Level Settings
48 SAMSUNG MAGIC Color
48 Configuring SAMSUNG MAGIC Color
49 Red
49 Configuring Red
|
|
|
Table Of Contents |
3 |
|
|
|
|
|
|
|
Table Of Contents
RESIZING OR RELOCATING THE SCREEN
SETUP AND RESET
50 Green
50 Configuring Green
51 Blue
51 Configuring Blue
52 Color Tone
52 Configuring the Color Tone Settings
53 Gamma
53 Configuring Gamma
54 H-Position & V-Position
54 Configuring H-Position & V-Position
55 Image Size
55 Changing the Image Size
56 Menu H-Position & Menu V-Position
56Configuring Menu H-Position & Menu V- Position
57 Reset
57 Initializing Settings (Reset)
58 Language
58 Changing the Language
59 Eco Saving
59 Configuring Eco Saving
60 Off Timer On/Off
60 Configuring Off Timer On/Off
61 Off Timer Setting
61 Configuring Off Timer Setting
62 PC/AV Mode
62 Configuring PC/AV Mode
63 Key Repeat Time
63 Configuring Key Repeat Time
|
|
|
Table Of Contents |
4 |
|
|
|
|
|
|
|
Table Of Contents
INFORMATION MENU AND OTHERS
INSTALLING THE
SOFTWARE
TROUBLESHOOTING GUIDE
SPECIFICATIONS
64 Customized Key (S24B750H / S27B750H)
64 Configuring Customized Key
65 Auto Source
65 Configuring Auto Source
66 Display Time
66 Configuring Display Time
67 Menu Transparency
67 Changing Menu Transparency
68 INFORMATION
68 Displaying INFORMATION
69Configuring Volume in the Initial Screen (S24B750V / S27B750V)
69 Volume
69 Sound Mode
70Configuring Brightness and Contrast in the Initial Screen
(S24B750H / S27B750H)
71Magic Tune
71What is MagicTune?
71Installing the Software
72Removing the Software
73Requirements Before Contacting Samsung Customer Service Center
73 Testing the Product
73 Checking the Resolution and Frequency
73 Check the following.
76 |
Q & A |
78 General
80 PowerSaver
|
|
|
Table Of Contents |
5 |
|
|
|
|
|
|
|
Table Of Contents
APPENDIX
INDEX
81 Standard Signal Mode Table
83 Contact SAMSUNG WORLDWIDE
88 Correct Disposal
88Correct Disposal of This Product (Waste Electrical & Electronic Equipment)
89 Terminology
|
|
|
Table Of Contents |
6 |
|
|
|
|
|
|
|
The contents of this manual are subject to change without notice to improve quality.
© 2011 Samsung Electronics
Samsung Electronics owns the copyright for this manual.
Use or reproduction of this manual in parts or entirety without the authorization of Samsung Electronics is prohibited.
The SAMSUNG and SyncMaster logos are registered trademarks of Samsung Electronics.
Microsoft and Windows are registered trademarks of Microsoft Corporation.
VESA, DPM and DDC are registered trademarks of the Video Electronics Standards Association.
An administration fee may be charged if either
(a) an engineer is called out at your request and there is no defect in the product (i.e. where you have failed to read this user manual).
(b) you bring the unit to a repair centre and there is no defect in the product (i.e. where you have failed to read this user manual).
The amount of such administration charge will be advised to you before any work or home visit is carried out.
The following images are for reference only. Real-life situations may differ from what is shown in the images.
Warning |
A serious or fatal injury may result if instructions are not followed. |
|
|
||
Caution |
Personal injury or damage to properties may result if instructions are |
|
not followed. |
||
|
Activities marked by this symbol are prohibited.
Instructions marked by this symbol must be followed.
|
|
|
Before Using the Product |
7 |
|
|
|
|
|
|
|
Before Using the Product
Exercise care when cleaning as the panel and exterior of advanced LCDs are easily scratched. Take the following steps when cleaning.
1.Power off the monitor and computer.
2.Disconnect the power cord from the monitor.
Hold the power cable by the plug and do not touch the cable with wet
hands. Otherwise, an electric shock may result.
3. Wipe the monitor screen using a clean, soft and dry cloth.
Do not apply a cleaning agent that contains alcohol, solvent, or surfactant to the monitor.
!
Do not spray water or detergent directly on the product.
4.Wet a soft and dry cloth in water and wring thoroughly to clean the
exterior of the monitor.
5. Connect the power cord to the product after cleaning the product. 6. Power on the monitor and computer.
!
|
|
|
Before Using the Product |
8 |
|
|
|
|
|
|
|
Before Using the Product
Ensure some space around the product for ventilation. An internal temperature rise may cause fire and damage the product. Be sure to allow the amount of space as shown below or greater when installing the product.
The exterior may differ depending on the product.
|
10 cm |
10 cm |
10 cm |
10 cm
10 cm
High-glossy models can develop white stains on the surface if an ultrasonic wave humidifier is used
nearby.
Be sure to contact Samsung Customer Service Center (page 83) if the inside of the monitor needs
cleaning. (Service fee will be charged.)
|
|
|
Before Using the Product |
9 |
|
|
|
|
|
|
|
Before Using the Product
The following images are for reference only. Real-life situations may differ from what is shown in the
images.
Warning
Do not use a damaged power cord or plug, or a loose power socket.
An electric shock or fire may result.
Do not plug many products into the same power socket.
Otherwise, the socket may overheat and cause a fire.
Do not touch the power plug with wet hands.
Otherwise, an electric shock may result.
Insert the power plug all the way in so it is not loose.
An unstable connection may cause a fire.
!
!
!
Ensure you connect the power plug to a grounded power socket. (type 1 insulated devices only).
An electric shock or injury may result.
Do not bend or pull the power cord with force. Do not weigh the power cord down with a heavy object.
A damaged power cord may cause an electric shock or fire.
Do not place the power cord or product near heat sources.
An electric shock or fire may result.
Remove foreign substances such as dust around the plug pins and power socket with a dry cloth.
Otherwise, a fire may result.
Before Using the Product 10
Before Using the Product
Caution
|
Do not unplug the power cord when the product is in use. |
|
The product may become damaged by an electric shock. |
|
Do not use the power cord for products other than authorized products supplied |
|
by Samsung. |
! |
An electric shock or fire may result. |
|
|
|
Keep the power socket where the power cord is connected unobstructed. |
|
If any problem occurs in the product, unplug the power cable to completely |
! |
cut the power to the product. |
|
|
|
Power to the product cannot be completely cut off with the power button. |
|
Hold the plug when disconnecting the power cord from the power socket. |
An electric shock or fire may result.
!
Warning
DO NOT PLACE CANDLES, INSECT REPELLANTS OR CIGARETTES ON TOP OF THE PRODUCT. DO NOT INSTALL THE PRODUCT NEAR HEAT SOURCES.
Otherwise, a fire may result.
Avoid installing the product in a narrow space with bad ventilation, such as a bookshelf or wall closet.
Otherwise, a fire may result due to an increased internal temperature.
Keep the plastic packaging bag for the product in a place that cannot be reached by children.
! |
Children may suffocate. |
Before Using the Product 11
Before Using the Product
! |
Do not install the product on an unstable or vibrating surface (insecure shelf, sloped surface, etc.).
The product may fall and break or cause a personal injury.
Using the product in an area with excess vibration may damage the product or cause a fire.
Do not install the product in a vehicle or a place exposed to dust, moisture (water drips, etc.), oil, or smoke.
An electric shock or fire may result.
Do not expose the product to direct sunlight, heat, or a hot object such as a stove.
Otherwise, the product lifespan may be reduced, or a fire may result.
Do not install the product within the reach of young children.
The product may fall and injure children.
Edible oil, such as soybean oil, can damage or deform the product. Do not install the product in a kitchen or near a kitchen counter.
Caution
Take care not to drop the product when moving it.
Otherwise, product failure or personal injury may result.
!
Do not set down the product on its front.
The screen may become damaged.
When installing the product on a cabinet or shelf, make sure that the bottom edge of the front of the product is not protruding.
The product may fall and break or cause a personal injury.
Install the product only on cabinets or shelves of the right size.
Before Using the Product 12
Before Using the Product
Put down the product carefully.
The product may fall and break or cause a personal injury.
!
SAMSUNG
!
Installing the product in an unusual place (a place exposed to a lot of fine particles, chemical substances or extreme temperatures, or an airport or train station where the product should operate continuously for an extended period of time) may seriously affect its performance.
Be sure to consult Samsung Customer Service Center (page 83) before installation if you want to install the product at such a place.
Warning
!
!
High voltage runs through the product. Do not attempt to disassemble, repair, or modify the product on your own.
An electric shock or fire may result.
Contact Samsung Customer Service Center (page 83) for repair.
Before moving the product, turn off the power switch and disconnect the power cable and all other connected cables.
Otherwise, the power cord may be damaged and a fire or electric shock may result.
If the product generates a strange noise, a burning smell, or smoke, remove the power cord immediately and contact Samsung Customer Service Center (page 83).
An electric shock or fire may result.
Do not let children hang from the product or climb on top of it.
The product may fall, and your child may become injured or seriously harmed.
If the product falls or the exterior is damaged, power off the product, remove the power cord, and contact Samsung Customer Service Center (page 83).
Otherwise, an electric shock or fire may result.
Do not put a heavy object, toy, or sweets on top of the product.
The product or heavy objects may fall as children try to reach for the toy or sweets resulting in a serious injury.
Before Using the Product 13
Before Using the Product
During a lightning or thunderstorm, power off the product and remove the power cable.
! |
An electric shock or fire may result. |
Do not drop objects on the product or apply impact.
An electric shock or fire may result.
!
!
!
GAS
100
Do not move the product by pulling the power cord or any cable.
Otherwise, the cable may be damaged and product failure, an electric shock or fire may result.
If a gas leakage is found, do not touch the product or power plug. Also, ventilate the area immediately.
Sparks can cause an explosion or fire.
Do not lift or move the product by pulling the power cord or any cable.
Otherwise, the cable may be damaged and product failure, an electric shock or fire may result.
Do not use or keep combustible spray or an inflammable substance near the product.
An explosion or fire may result.
Ensure the vents are not blocked by tablecloths or curtains.
Otherwise, a fire may result from an increased internal temperature.
Do not insert a metallic object (a chopstick, coin, hair pin, etc.) or inflammable object (paper, match, etc.) into the vent or ports of the product.
If water or any foreign substance enters the product, be sure to power off the product, remove the power cord, and contact Samsung Customer Service Center (page 83).
Product failure, an electric shock or fire may result.
Do not place objects containing liquid (vases, pots, bottles, etc) or metallic objects on top of the product.
If water or any foreign substance enters the product, be sure to power off the product, remove the power cord, and contact Samsung Customer Service Center (page 83).
Product failure, an electric shock or fire may result.
Before Using the Product 14
Before Using the Product
Caution
-_-
!
!
Leaving the screen fixed on a stationary image for an extended period of time may cause afterimage burn-in or defective pixels.
If you are not going to use the product for an extended period of time, activate power-saving mode or a moving-picture screen saver.
Disconnect the power cord from the power socket if you do not plan on using the product for an extended period of time (vacation, etc.).
Otherwise, a fire may result from accumulated dust, overheating, an electric shock, or electric leakage.
Use the product at the recommended resolution and frequency.
Your eyesight may deteriorate.
Do not put DC power adapters together.
Otherwise, a fire may result.
Remove the plastic bag from the DC power adapter before you use it.
Otherwise, a fire may result.
Do not let water enter the DC power adapter or get the adapter wet.
An electric shock or fire may result.
Avoid using the product outdoors where it can be exposed to rain or snow.
Be careful not to get the DC power adapter wet when you wash the floor.
Do not put the DC power adapter near to any heating apparatus.
Otherwise, a fire may result.
Keep the DC power adapter in a well-ventilated area.
!
Looking at the screen too close for an extended period of time can deteriorate your eyesight.
!
Before Using the Product 15
Before Using the Product
Do not hold the monitor upside-down or move it by holding the stand.
The product may fall and break or cause a personal injury.
Do not use humidifiers or stoves around the product.
An electric shock or fire may result.
Rest your eyes for more than 5 minutes for every 1 hour of product use.
Eye fatigue will be relieved.
!
Do not touch the screen when the product has been turned on for an extended period of time as it will become hot.
Store the small accessories used with the product out of reach of children.
! |
|
|
Exercise caution when adjusting the product angle or stand height. |
|
Otherwise, children's fingers or hands may become stuck and injured. |
! |
Tilting the product excessively may cause it to fall and result in personal |
|
injury. |
|
Do not place heavy objects on the product. |
|
Product failure or personal injure may result. |
When using headphones or earphones, do not turn the volume too high.
Having the sound too loud may damage your hearing.
Before Using the Product 16
Before Using the Product
Caution
Exercise caution when adjusting the angle of the product.
Your fingers may get caught and injured when folding the product. Ensure you take extra caution.
Use the product in the correct posture as follows.
Straighten your back.
Allow a distance of 45 to 50cm between your eye and the screen, and look slightly downward at the screen.
Keep your eyes directly in front of the screen.
Adjust the angle so light does not reflect on the screen.
Keep your forearms perpendicular to your upper arms and level with the back of your hands.
Keep your elbows at about a right angle.
Adjust the height of the product so you can keep your knees bent at 90 degrees or more, your heels attached to the floor, and your arms lower than your heart.
Before Using the Product 17
1Open the packaging box. Be careful not to damage the product when you open the packaging with a sharp instrument.
2 Remove the styrofoam from the product.
3 Check the components and remove the styrofoam and plastic bag.
This image is for reference only.
4 Store the box in a dry area so that it can be used when moving the product in the future.
1 Preparations 18
1Preparations
Contact the dealer from whom you purchased the product if any item is missing.
The appearance of the components and items sold separately may differ from the image shown.
Components
Quick setup guide |
Warranty card |
User manual |
|
(Not available in some locations) |
|
Power cable |
DC power adapter |
D-SUB cable (optional) |
Cleaning cloth |
HDMI cable (optional) |
MHL Cable |
|
|
(S24B750V / S27B750V) |
Stereo Cable |
Cable Holder |
(S24B750V / S27B750V) |
|
Components may vary depending on the country.
Items sold separately
The following items can be purchased at your nearest retailer.
HDMI-DVI cable
1 Preparations 19
1Preparations
The color and shape of parts may differ from what is shown. Specifications are subject to change without notice to improve quality.
S24B750V / S27B750V |
Key guide |
|
MHL |
VOL |
AUTO |
|
|
|
S24B750H / S27B750H |
Key guide |
|
|
|
|
SAMSUNG |
|
|
MAGIC |
|
AUTO |
BRIGHT |
|
|
|
|
|
S24B750V / S27B750V
S24B750H / S27B750H
This is a touch-type button. Tap the button lightly with a finger.
1 Preparations 20
1Preparations
Icons |
Description |
|
|
Open or close the onscreen display (OSD) menu, or return to the parent menu.
OSD control lock: Maintain the current settings, or lock the OSD control to prevent unintended changes to settings.
Enable: To lock the OSD control, press the [MENU] button for 10 seconds.
Disable: To unlock the locked OSD control, press the [MENU] button for more than 10 seconds.
MENU
If the OSD control is locked,
Brightness and Contrast, MAGICSAMSUNGBright can be adjusted, and
INFORMATION can be viewed.
The Customized Key function can be used by pressing the
[](S24B750H / S27B750H) button. (The Customized Key function specified before the OSD control was locked is available
even when the OSD control is locked.)
|
Pressing the [MHL] (S24B750V / S27B750V) button when your |
|
|
smartphone is connected to [HDMI IN 2 / MHL] on the product enables |
|
MHL |
the MHL function, which allows you to import data from the smartphone |
|
to the product. |
||
(S24B750V / S27B750V) |
||
|
||
|
For further details on the MHL function, refer to " Using "MHL(Mobile |
|
|
High-Definition Link)"". |
When the Key guide is displayed, the [ ] button activates the function assigned to Customized Key.
Configure Customized Key and press []. The following options will be enabled.
(S24B750H / S27B750H) SAMSUNGAngle - SAMSUNGBright - Eco Saving - Image Size |
|
MAGIC |
MAGIC |
|
To configure Customized Key, go to SETUP&RESET → |
Customized Key and select the mode you want.
|
Move to the upper or lower menu or adjust the value for an option on the |
|
|
OSD menu. |
|
|
|
|
|
When the Key guide is displayed, the [ |
] button activates the function |
(S24B750V / S27B750V) |
assigned to Volume. |
|
|
|
|
|
When the Key guide is displayed, the [ |
] button activates the function |
(S24B750H / S27B750H) |
assigned to Brightness. |
|
1 Preparations 21
1Preparations
Icons |
Description |
|
|
Confirm a menu selection.
Pressing the [] button when the OSD menu is not displayed will change the input source (Analog/HDMI IN 1(DVI)/HDMI IN 2/MHL) (S24B750V / S27B750V) (Analog/HDMI IN) (S24B750H / S27B750H). If you power on the product or change the input source by pressing the
[] button, a message that shows the changed input source will appear at the top left corner of the screen.
Press the [AUTO] button to automatically adjust the screen settings.
AUTO |
Changing the resolution in Display Properties will activate the Auto |
Adjustment function.
Turn the screen on or off.
The power indicator will be lit when the product is operating normally.
To reduce power consumption, it is best to remove the power cable
(Power lamp)
when you will not be using the product for an extended period of time.
When a control button on the product is pressed, the Key guide will be displayed before the onscreen menu opens. (The guide shows the function of the button pressed.)
Key guide To access the onscreen menu when the guide is displayed, press the corresponding button again.
The Key guide may vary depending on the function or product model.
Refer to the actual product.
1 Preparations 22
1Preparations
The color and shape of parts may differ from what is shown. Specifications are subject to change
without notice to improve quality.
S24B750V / S27B750V |
S24B750H / S27B750H |
||
|
|
|
|
|
|
|
|
(DVI)
HDMI IN 2 / MHL
DC 14V |
HDMI IN |
RGB IN |
DC 14V |
HDMI IN 1(DVI) |
RGB IN |
||
|
|
|
|
|
|
|
Port |
Ports |
||||
|
|
|
|
|
|
|
|
|
|
|
|
|
|
Connect to the DC power adapter. |
|
|
|
|
|
|
|
|
|
|
HDMI IN 1(DVI) |
Connect to a source device using an HDMI cable. |
|||||
|
|
|
|
|
|
||
|
|
|
|
|
|
|
|
|
HDMI IN 2 / MHL |
Connect to a source device that has the MHL function using the |
|||||
|
|
||||||
|
|
|
|
|
|
MHL cable. |
|
(S24B750V / S27B750V) |
|||||||
Connect to a source device using an HDMI cable. |
|||||||
|
|
|
|
|
|
||
|
|
|
|
|
|
|
|
|
|
|
|
|
|
Connect to a PC using the D-SUB cable. |
|
|
|
|
|
|
|
||
|
|
|
|
|
|
|
|
|
|
|
|
|
|
|
|
|
|
|
|
|
|
Connect to an audio-input source using an stereo cable. |
|
|
|
|
|
|
|
||
|
|
|
|
|
|
||
(S24B750V / S27B750V) |
|
||||||
|
|
|
|
|
|
|
|
|
|
|
|
|
|
Connect to an audio output device such as headphones. |
|
(S24B750V / S27B750V) |
|
||||||
|
|
|
|
|
|
|
1 Preparations 23
1Preparations
The color and shape of parts may differ from what is shown. Specifications are subject to change without notice to improve quality.
-1° |
(±1°) |
~ |
|
|
|
||
|
|
21° |
(±1°) |
|
|
|
You can adjust the tilt of your monitor.
Hold the lower part of the product and adjust the tilt carefully.
An anti-theft lock allows you to use the product securely even in public places. The locking device shape and locking method depend on the manufacturer. Refer to the user guide provided with your anti-theft locking device for details. The lock device is sold separately.
The color and shape of parts may differ from what is shown. Specifications are subject to change
without notice to improve quality.
To lock an anti-theft locking device:
1Fix the cable of your anti-theft locking device to a heavy object such as a desk.
2Put one end of the cable through the loop on the other end.
3Insert the locking device into the anti-theft lock slot at the back of the product.
4Lock the locking device.
An anti-theft locking device can be purchased separately.
Refer to the user guide provided with your anti-theft locking device for details. Anti-theft locking devices can be purchased at electronics retailers or online.
1 Preparations 24
2Using "MHL(Mobile High-Definition Link)"
The "MHL" function is available on the S24B750V / S27B750V model only.
2.1"MHL" (Mobile High-Definition Link)
This feature allows you to enjoy videos and photos (imported from a connected mobile device that
supports MHL) on the screen of the product.
S24B750V / S27B750V
MHL
To use the MHL function, you need an MHL-certified mobile device. You can check if your mobile device is MHL certified on the device manufacturer's website. To find a list of MHL-certified devices, visit the official MHL website (http://www.mhlconsortium.org).
To use the MHL function, the latest version of software must be installed on the mobile device.
On some mobile devices, the MHL function may not be available depending on the device's performance or functionality.
Since the display size of the product is larger than those of mobile devices, the picture quality may degrade.
This product is officially MHL-certified. If you encounter any problem when using the MHL function, please contact the manufacturer of the mobile device.
The picture quality may degrade when content (imported from the mobile device) with a low resolution is played on the product.
2Using "MHL(Mobile High-Definition Link)"
1Connect the USB port on the mobile device to the [HDMI IN 2 / MHL] port on the product using the
MHL cable.
HDMI IN 2
When the MHL cable is used, [HDMI IN 2 / MHL] is the only port on the product that supports the MHL function.
A mobile device should be purchased separately.
2Connect the DC power adapter to the product and a power outlet. (For details, refer to "3.2 Connecting the Power".)
3Press the [MHL] button to activate MHL mode.
S24B750V / S27B750V
4If the following message appears, MHL mode is activated. After about 3 seconds, the MHL screen will be displayed.
|
[MHL] |
3 sec later |
DSUB/HDMI1 |
MHL |
MHL |
The indicated time "3 sec later" may vary depending on the mobile device.
2 Using "MHL(Mobile High-Definition Link)" 26
2Using "MHL(Mobile High-Definition Link)"
When the mobile device is in power-saving mode
When the mobile device is in power-saving mode, the following message will appear in place of the MHL screen. To display the MHL screen, deactivate power-saving mode.
MHL device is in sleep mode.
When the mobile device is not connected or does not support MHL
When the mobile device is not connected to the product or does not support the MHL function, the following message will appear.
If MHL mode is not activated, check the connection of the mobile device.
If MHL mode is not activated, check if the mobile device supports MHL.
If MHL mode is not activated even though the mobile device supports MHL, update the firmware of the mobile device to the latest version.
MHL device is not connected or the device doesn't support MHL.
3 sec later
Check Signal Cable
HDMI2/MHL
MHL |
MHL |
The indicated time "3 sec later" may vary depending on the mobile device.
2 Using "MHL(Mobile High-Definition Link)" 27
2Using "MHL(Mobile High-Definition Link)"
Disabling MHL by using the [MHL] button
When MHL is active, press the [MHL] button. The MHL function will be disabled.
DSUB
(or HDMI1)
[MHL]
MHL |
DSUB/HDMI1 |
The input source changes automatically only when a cable is connected to a port other than [HDMI IN 2 / MHL].
Check Signal Cable
HDMI2/MHL
MHL |
MHL |
When the cable is disconnected or the mobile device is powered off
If the MHL cable is disconnected or the mobile device is powered off when MHL is active, the MHL
function will be disabled.
%JTDPOOFDU EFWJDF |
|
PS |
|
1PXFS PGG |
3 sec later |
|
|
|
MHL device disconnected. |
Check Signal Cable
HDMI2/MHL
MHL |
MHL |
If the MHL cable is disconnected, the product will display the message Check Signal Cable and remain in MHL mode.
The indicated time "3 sec later" may vary depending on the mobile device.
2 Using "MHL(Mobile High-Definition Link)" 28