

Page 1
SyncMaster 971P
Page 2

Notational
SyncMaster 971P
Failure to follow directions noted by this symbol could result in bodily harm or damage to
the equipment.
Prohibited Important to read and understand at all times
Do not disassemble Disconnect the plug from the outlet
Do not touch Ground to prevent an electric shock
Power
When not used for an extended period of time, set your computer to DPM.
If using a screen saver, set it to active screen mode.
The images here are for reference only, and are not applicable in all cases (or countries).
Page 3

Do not use a damaged or loose plug.
z This may cause electric shock or fire.
Do not pull the plug out by the wire nor touch the plug with wet hands.
z This may cause electric shock or fire.
Use only a properly grounded plug and receptacle.
z An improper ground may cause electric shock or equipment damage.
(Class l Equipment only.)
Insert the power plug firmly so that it does not come loose.
z A bad connection may cause fire.
Do not excessively bend the plug and wire nor place heavy objects upon
them, which could cause damage.
z This may cause electric shock or fire.
Do not connect too many extension cords or plugs to one outlet.
z This may cause fire.
Do not disconnect the power cord while using the monitor.
z A surge may be caused by the separation and may damage the monitor.
Do not use the power cord when the connector or plug is dusty.
z If the connector or plug of the power cord is dusty, clean it with a dry
cloth.
z Using the power cord with a dusty plug or connector may cause an
electric shock or fire.
To disconnect the apparatus from the mains, the plug must be pulled out
from the mains socket, therefore the mains plug shall be readily
operable.
Page 4

Installation
z This may cause electric shock or fire.
Be sure to contact an authorized Service Center, when installing your monitor in
a location with heavy dust, high or low temperatures, high humidity, and exposed
to chemical substances and where it operates for 24 hours such as at airports,
train stations etc.
Failure to do so may cause serious damage to your monitor.
Place your monitor in a location with low humidity and a minimum of
dust.
z Failure to do so may cause electric shock or fire inside the monitor.
Do not drop the monitor when moving it.
z This may cause damage to the product or the person carrying it.
Install the monitor base in a showcase or shelf so that the end of the
base does not protrude from the showcase or shelf.
z Dropping the product may cause a malfunction or injury to the person
carrying it.
Do not place the product on an unstable or small surface area.
z Place the product on an even and stable surface, as the product may fall
and cause harm to someone walking by, specifically children.
Do not place the product on the floor.
z Take care, as someone, specifically children may trip over it.
TO PREVENT THE SPREAD OF FIRE, KEEP CANDLES OR OTHER OPEN
FLAMES AWAY FROM THIS PRODUCT AT ALL TIMES.
z Otherwise, this may cause fire.
Page 5

Keep any heating devices away from the power cable.
z A melted coating may cause electric shock or fire.
Do not install the product in places with poor ventilation, for instance, a
bookshelf, closet, etc.
z Any increase in the internal temperature may cause fire.
Put down the monitor carefully.
z Failing to do so may damage the monitor.
Do not place the monitor face down.
z This may damage the TFT-LCD surface.
The installation of the bracket must be done by a qualified professional.
z Installing the bracket by unqualified personnel may result in injury.
Always use the mounting device specified in the owner's manual.
z
When installing the product, make sure to keep it away from the wall
(more than 10 cm/4 inches ) for ventilation purposes.
z Poor ventilation may cause an increase in the internal temperature of the
product, resulting in a shortened component life and degraded
performance.
Keep the plastic packaging (bag) out of children's reach.
z The plastic packaging (bag) may cause suffocation if children play with
it.
Clean
When cleaning the monitor case or the surface of the TFT-LCD screen, wipe with
Page 6

a slightly moistened, soft fabric.
Do not spray water or detergent directly onto the monitor.
z This may cause damage, electric shock or fire.
Use the recommended detergent with a smooth cloth.
If the connector between the plug and the pin is dusty or dirty, clean it
properly using a dry cloth.
z A dirty connector may cause electric shock or fire.
Make sure to unplug the power cord before cleaning the product.
Others
z Otherwise, this may cause electric shock or fire.
Unplug the power cord from the power outlet and wipe the product
using a soft, dry cloth.
z Do not use any chemicals such as wax, benzene, alcohol, thinners,
insecticide, air freshener, lubricant or detergent.
Do not remove the cover (or back).
z This may cause electric shock or fire.
z Refer to a qualified servicing company.
If your monitor does not operate normally - in particular, if there is any
unusual sound or smell coming from the monitor - unplug it
immediately and contact an authorized dealer or the Service Center.
z This may cause electric shock or fire.
Keep the product away from places exposed to oil, smoke or moisture;
Page 7

do not install inside a vehicle.
z This may cause a malfunction, electric shock or fire.
z In particular, avoid operating the monitor near water or outdoors where
the monitor could be exposed to snow or rain.
If the monitor is dropped or the casing is damaged, turn the monitor off
and unplug the power cord. Then contact a Service Center .
z The monitor may malfunction, causing electric shock or fire.
Disconnect the plug from the outlet during storms or lightning or if it is
not used for a long period of time.
z Failure to do so may cause electric shock or fire.
Do not try to move the monitor by pulling only the wire or the signal
cable.
z This may cause a breakdown, electric shock or fire due to damage to
the cable.
Do not move the monitor right or left by pulling only the wire or the
signal cable.
z This may cause a breakdown, electric shock or fire due to damage to
the cable.
Do not cover the vents on the monitor cabinet.
z Bad ventilation may cause a breakdown or fire.
Do not place water containers, chemical products or small metal objects
on the monitor.
z This may cause a malfunction, electric shock or fire.
z If a foreign substance enters the monitor, unplug the power cord and
contact the Service Center.
Keep the product away from combustible chemical sprays or
inflammable substances.
z This may cause an explosion or fire.
Never insert anything metallic into the monitor openings.
z This may cause electric shock, fire or injury.
Page 8

Do not insert metal objects such as chopsticks, wire and tools or
inflammable objects such as paper or matches into the vent, headphone
port or AV ports or etc.
z This may cause electric shock or fire. If an alien substances or water
enters the product, turn the product off, unplug the power connector
from the wall outlet and contact the Service Center.
When viewing a fixed screen for an extended period of time, residual
image or blurriness may appear.
z Change the mode to energy saving mode or set a screensaver to a
changing picture when away from the monitor for an extended period of
time.
Adjust the resolution and frequency to the levels appropriate for the
model.
z An inappropriate resolution may cause undesirable picture quality.
19 inch (43 cm) - 1280 X 1024
Be careful that adapter should not be in contact with water and
therefore not be wet.
z This may cause malfunction, an electric shock or fire.
z Do not use adapter by the waterside or outside particularly when it rains
or snows.
z Be careful that adapter should not be wet while cleaning floor with
water.
Keep all power adapters apart.
z Failure to do so may cause fire.
Keep power adapter away from any other heat source.
z Failure to do so may cause fire.
Remove and discard vinyl bag from power adapter before use.
z Failure to do so may cause fire.
Always keep power adapter in well-ventilated area.
Viewing the monitor continuously at a too close angle may result in
Page 9

damage to your eyesight.
To ease eye strain, take at least a five-minute break after every hour of
using the monitor
.
Do not install the product on an unstable, uneven surface or a location
prone to vibrations.
z Dropping the product may cause damage to the product or the person
carrying it. Using the product in a location prone to vibrations may
shorten the lifetime of the product or may cause the product to catch
fire.
When moving the monitor, turn off and unplug the power cord. Make
sure that all cables, including the antenna cable and cables connected
to other devices, are disconnected before moving the monitor.
z Failure to disconnect cables may damage it and cause fire or electric
shock.
Place the product out of children's reach, as they could damage by
hanging onto it.
z A falling product may cause injury to the person or even
fatality.
When not using the product for an extended period of time, keep the
product unplugged.
z Otherwise, this may cause heat emission from the accumulated dirt or
degraded insulation, causing electric shock or fire.
Do not place your children's favorite toys or any other objects of
interest on the product.
z Children may try to climb on the product to retrieve an object. The
product could fall, causing injury or even fatality.
When lifting up or moving the monitor, do not lift the monitor upside
down while holding only the stand.
z This may cause your monitor to fall, and become damaged or cause
personal injury.
Good Postures When Using the Monitor
Try to maintain a good posture when using the monitor.
z Keep your back straight.
Page 10

List of Features
z Magic Contrast: Implements a deep color contrast of 1500:1 ratio.
z Magic Speed: Provides a clear screen without afterimages with fast response speed of
6ms.
z Magic Stand: Provides a high availability to fit your environmental needs with a height
adjustable stand (up to 60mm).
z Magic Rotation: Adjusts screen automatically to fit to monitor angle when it is changed
with the Rotation function.
Model
SyncMaster 971P
Unpacking
Please make sure the following items are included with your monitor.
If any items are missing, contact your dealer.
Contact a local dealerto buy optional items.
Monitor
Page 11

A
(
)
p
y
Manual
Cable
Others
Quick Setup Guide
'DVI to D-SUB' Cable Power Cord DC-Adapter
USB Cable
A-B Type cable
Warranty Card
(Not available in all
locations)
User's Guide,
Monitor Driver,
Natural Color software,
utoRotation software
Front
Cleaning Cloth
Sold se
aratel
DVI Cable
Do not use other cables except the dedicated cables, such as DVI/D-Sub and DVI cables,
for the product.
To purchase DVI/D-Sub or DVI cable additionally, contact your local product distributor.
Page 12

Customized Key
[]
You can customize key assignment for the Custom button according to
your preferences. (Custom Key functionality)
How to Adjust : MagicTune → Optional → Custom Key →
MagicBright, MagicColor, Auto Setup, Source Select, Color Tone
1) MagicBright
MagicBright is a new feature providing optimum viewing environment
depending on the contents of the image you are watching. Currently
seven different modes are available: Custom, Text, Internet, Game,
Sport, Movie and Dynamic Contrast. Each mode has its own preconfigured brightness value. You can easily select one of seven
settings by simply pressing MagicBright control button.
>>Click here to see an animation clip
2) MagicColor
MagicColor is a new technology that Samsung has exclusively
developed to improve digital image and to display natural color more
clearly without disturbing image quality.
>>Click here to see an animation clip
3) Auto Setup
Press this button to self-adjust to the incoming Analog signal.
>>Click here to see an animation clip
4) Source Select
Select the video signal. (Analog/Digital)
>>Click here to see an animation clip
5) Color Tone
The tone of the color can be changed.
>>Click here to see an animation clip
Power indicator /
Power button
[]
The blue light is on in its normal working condition and blinks when setting
the adjustments of the monitor.
Use this button for power the monitor on and off, change the input source,
or perform Auto Adjustment.
1) Power On/Off
Page 13
See PowerSaver described in the manual for further information regarding power saving
functions. For energy conservation, turn your monitor OFF when it is not needed or when
leaving it unattended for long periods.
When you press the power button, the monitor is on/off.
>>Click here to see an animation clip
2) Input Source
When you press the power button, the input source may be changed
to Analog or Digital, blinking once with blue lihgt.
>>Click here to see an animation clip
3) Auto adjustment
When you press the power button, the Auto Adjustment function is
activate, blinking twice with blue light.
(Analog only)
>>Click here to see an animation clip
The buttons to the right of the monitor are touch-sensitive
buttons.
Touch a button lightly with your finger.
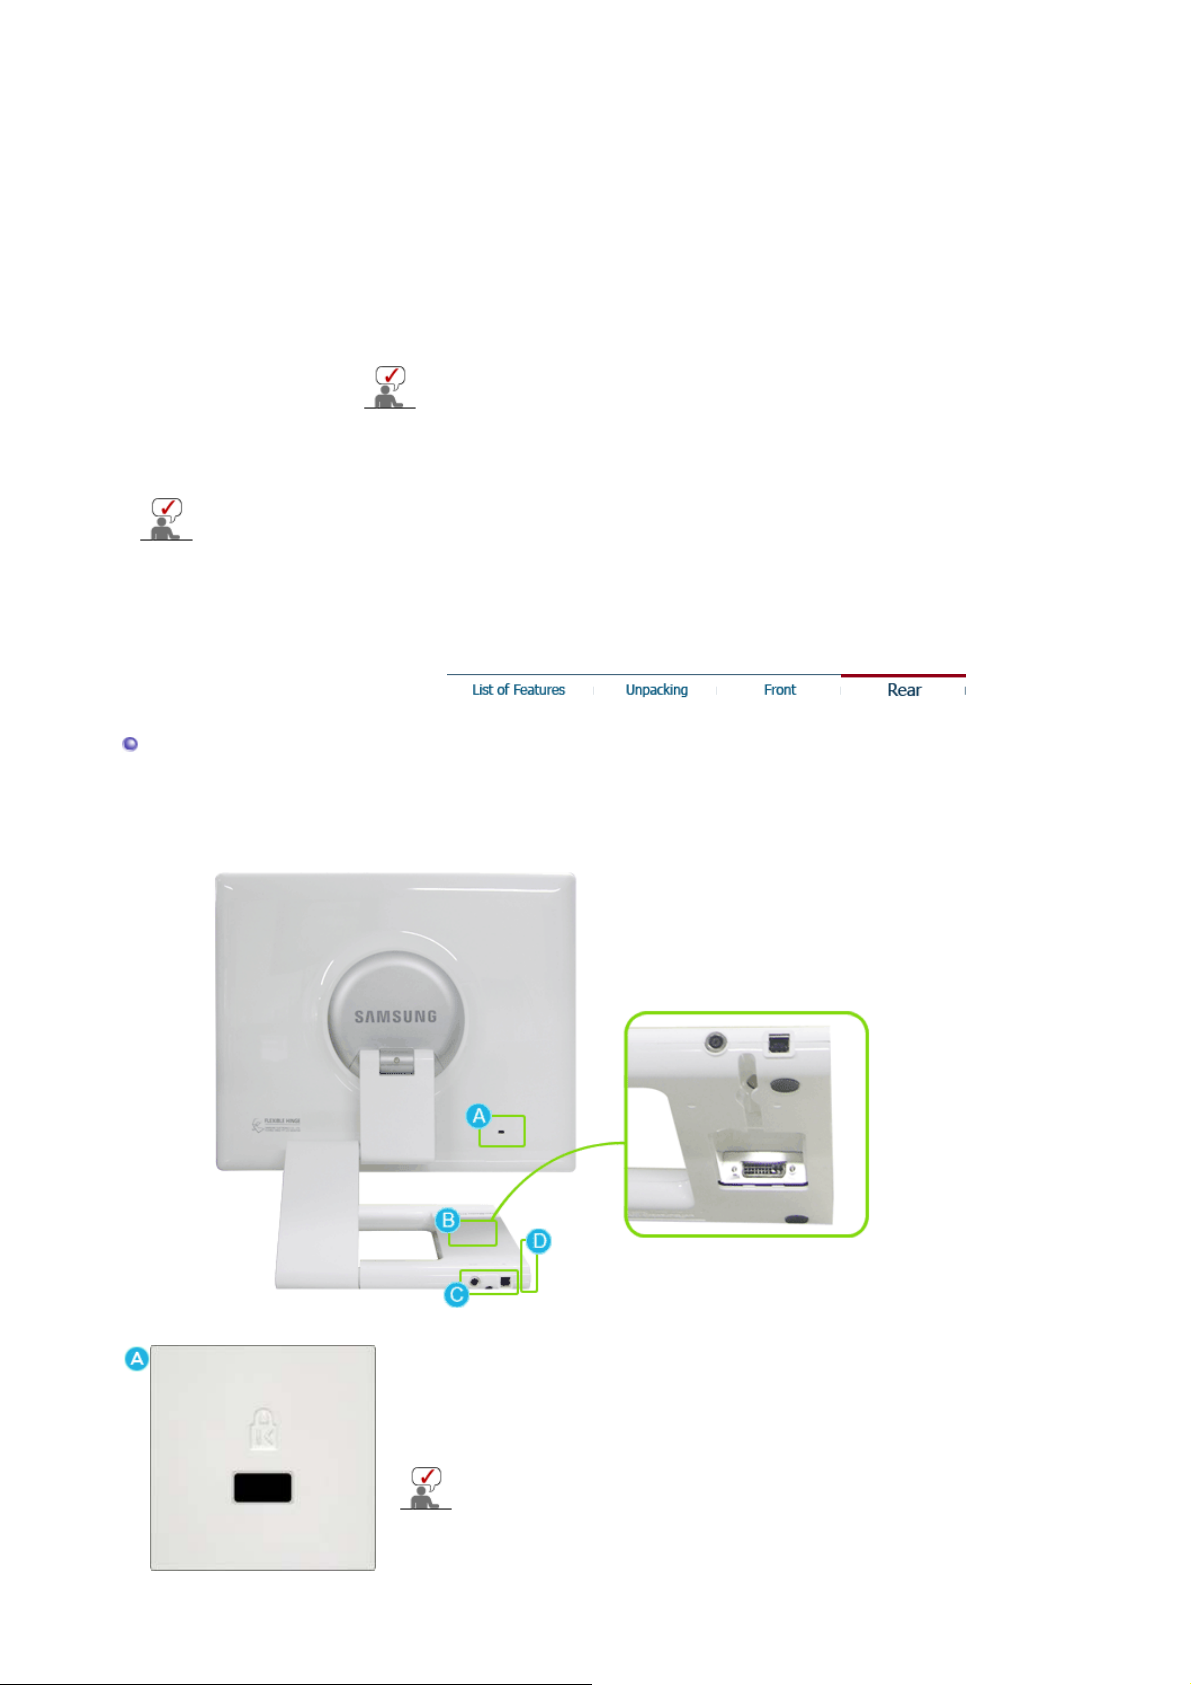
Rear
(The configuration at the back of the monitor may vary from product to product.)
Kensington Lock :
The Kensington lock is a device used to physically fix the system
when using it in a public place.
(The locking device has to be purchased separately.)
For using a locking device, contact where you purchase it.
Page 14

DVI :
Connect the
DVI/D-Sub cable.
DC 12V :
Connect a power line to a direct current power supply and then plug
it into the relevant power port.
UP (USB upstream port):
terminal of your monitor to your computer using a
DVI
Connect the
computer with the USB cable.
DOWN (USB downstream port):
Connect the
with the USB cable.
See Connecting the Monitor for further information regarding cable connections.
port of the monitor and the USB port of the
UP
port of the USB monitor and a USB device
DOWN
z
To use DOWN (Downstream Port), you have
to connect the UP (Upstream Cable ) to the
PC.
z
Make sure to use the USB cable supplied with
this monitor to connect the monitor's UP port
and your computer's USB port.
Page 15

Connecting the Monitor
Model
SyncMaster 971P
Connect a power line to a direct current power supply and then plug it into the relevant power
1.
port.
Use a connection appropriate for your computer.
2.
Using the D-Sub (analog) connector on the video card.
2-1.
Connect the
terminal of your monitor to the D-Sub terminal of your computer using
DVI
a DVI/D-Sub cable.
Connected to a Macintosh.
2-2.
Connect the monitor to the Macintosh computer using the 'DVI to D-SUB' connection
cable.
Turn on your computer and monitor. If your monitor displays an image, installation is
complete.
If you properly connect your monitor using the DVI connector but get a blank screen, check to
see if the monitor status is set to analog. In this case, turn the Power off and on so that your
monitor rechecks the input signals.
Page 16

r
)
Rotating the monitor
Rotating the monito
(When pivoting the monitor, rotation angle is displayed on screen of the monitor.)
0° 90°
When rotating the screen, make sure to tilt the monitor 45 to 65 degrees so that it does not touch
the floor. When tilting the screen backwards, do not tilt it more than 65 degrees.
Installing the Monitor Driver (Automatic
When prompted by the operating system for the monitor driver, insert the CD-ROM
included with this monitor. Driver installation is slightly different from one operating
system to another. Follow the directions appropriate for the operating system you
have.
Prepare a blank disk and download the driver program file at the Internet web site shown
here.
z Internet web site : http://www.samsung.com/ (Worldwide)
http://www.samsung.com/monitor (U.S.A)
http://www.sec.co.kr/monitor (Korea)
http://www.samsungmonitor.com.cn/ (China)
1. Insert CD into the CD-ROM drive.
2. Click
3. Choose your monitor model in the model list, then click the
"Windows"
"OK"
button.
Page 17

)
4. If you can see following message window, then click the "
Then click "OK" button. (Microsoft
®
Windows® XP Operating System)
This monitor driver is under certifying MS logo, and this installation don't
damage your system. The certified driver will be posted on Samsung
Monitor homepage.
http://www.samsung.com/.
5. Monitor driver installation is completed.
Continue Anyway
" button.
Installing the Monitor Driver (Manual
Windows Vista | Windows XP | Windows 2000 |Windows Me |Windows NT | Linux
When prompted by the operating system for the monitor driver, insert the CD-ROM
included with this monitor. Driver installation is slightly different from one operating
system to another. Follow the directions appropriate for the operating system you
have.
Prepare a blank disk and download the driver program file at the Internet web site shown
here.
Internet web site : http://www.samsung.com/ (Worldwide)
z
http://www.samsung.com/monitor (U.S.A)
http://www.sec.co.kr/monitor (Korea)
http://www.samsungmonitor.com.cn/ (China)
Microsoft® Windows Vista™ Operating System
1. Insert your Manual CD into your CD-ROM drive.
2.
Click (Start) and "
Personalization
".
Control Panel
". Then, double-click on "
Appearance and
Page 18
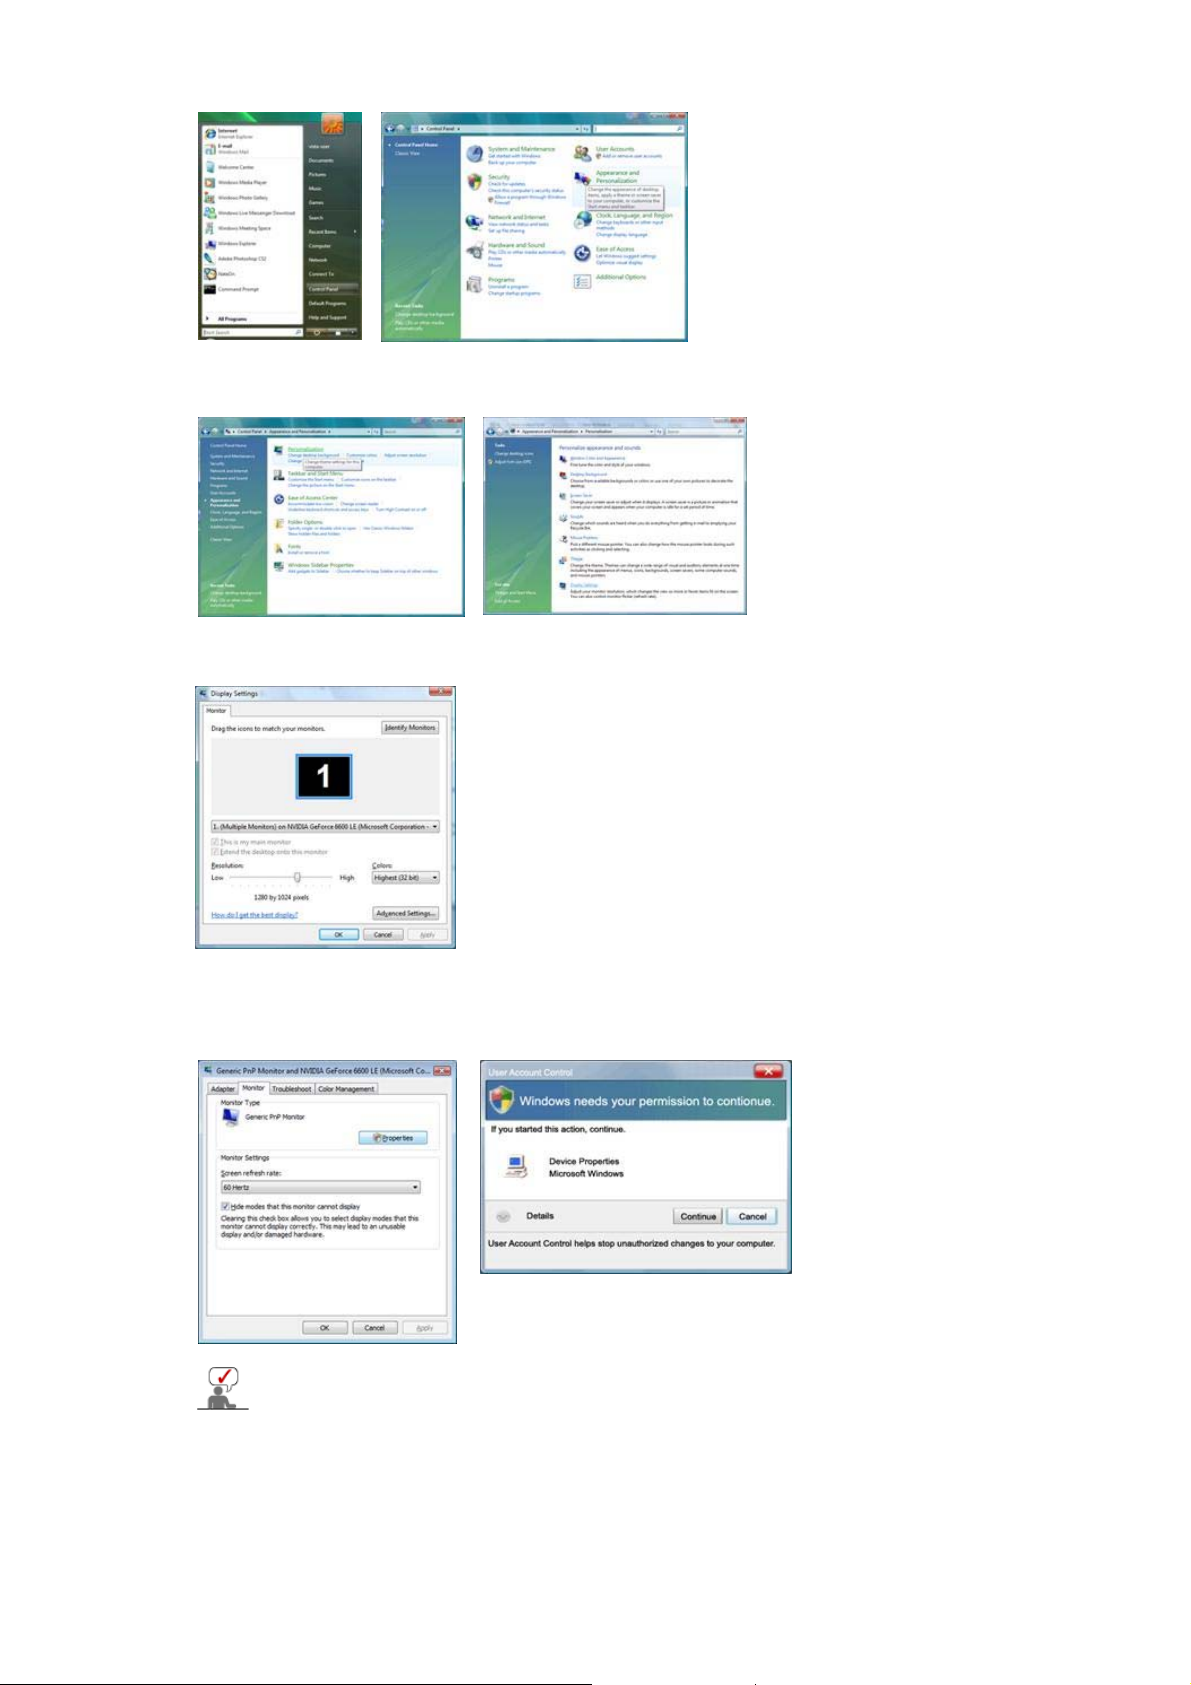
3. Click "
4. Click "
Personalization
Advanced Settings…
" and then "
Display Settings
".
".
5. Click "
6.
Properties
means the configuration for your monitor is completed. The monitor can be used as is.
If the message “
click "
Continue
This monitor driver is under certifying MS logo, and this installation doesn't
damage your system.
The certified driver will be posted on Samsung Monitor homepage
http://www.samsung.com/
Click "
Update Driver…
" in the "
Windows needs…
".
Monitor
" in the "
Driver
" tab. If the "
” is displayed, as shown in the figure below,
" tab.
Properties
" button is deactivated, it
Page 19
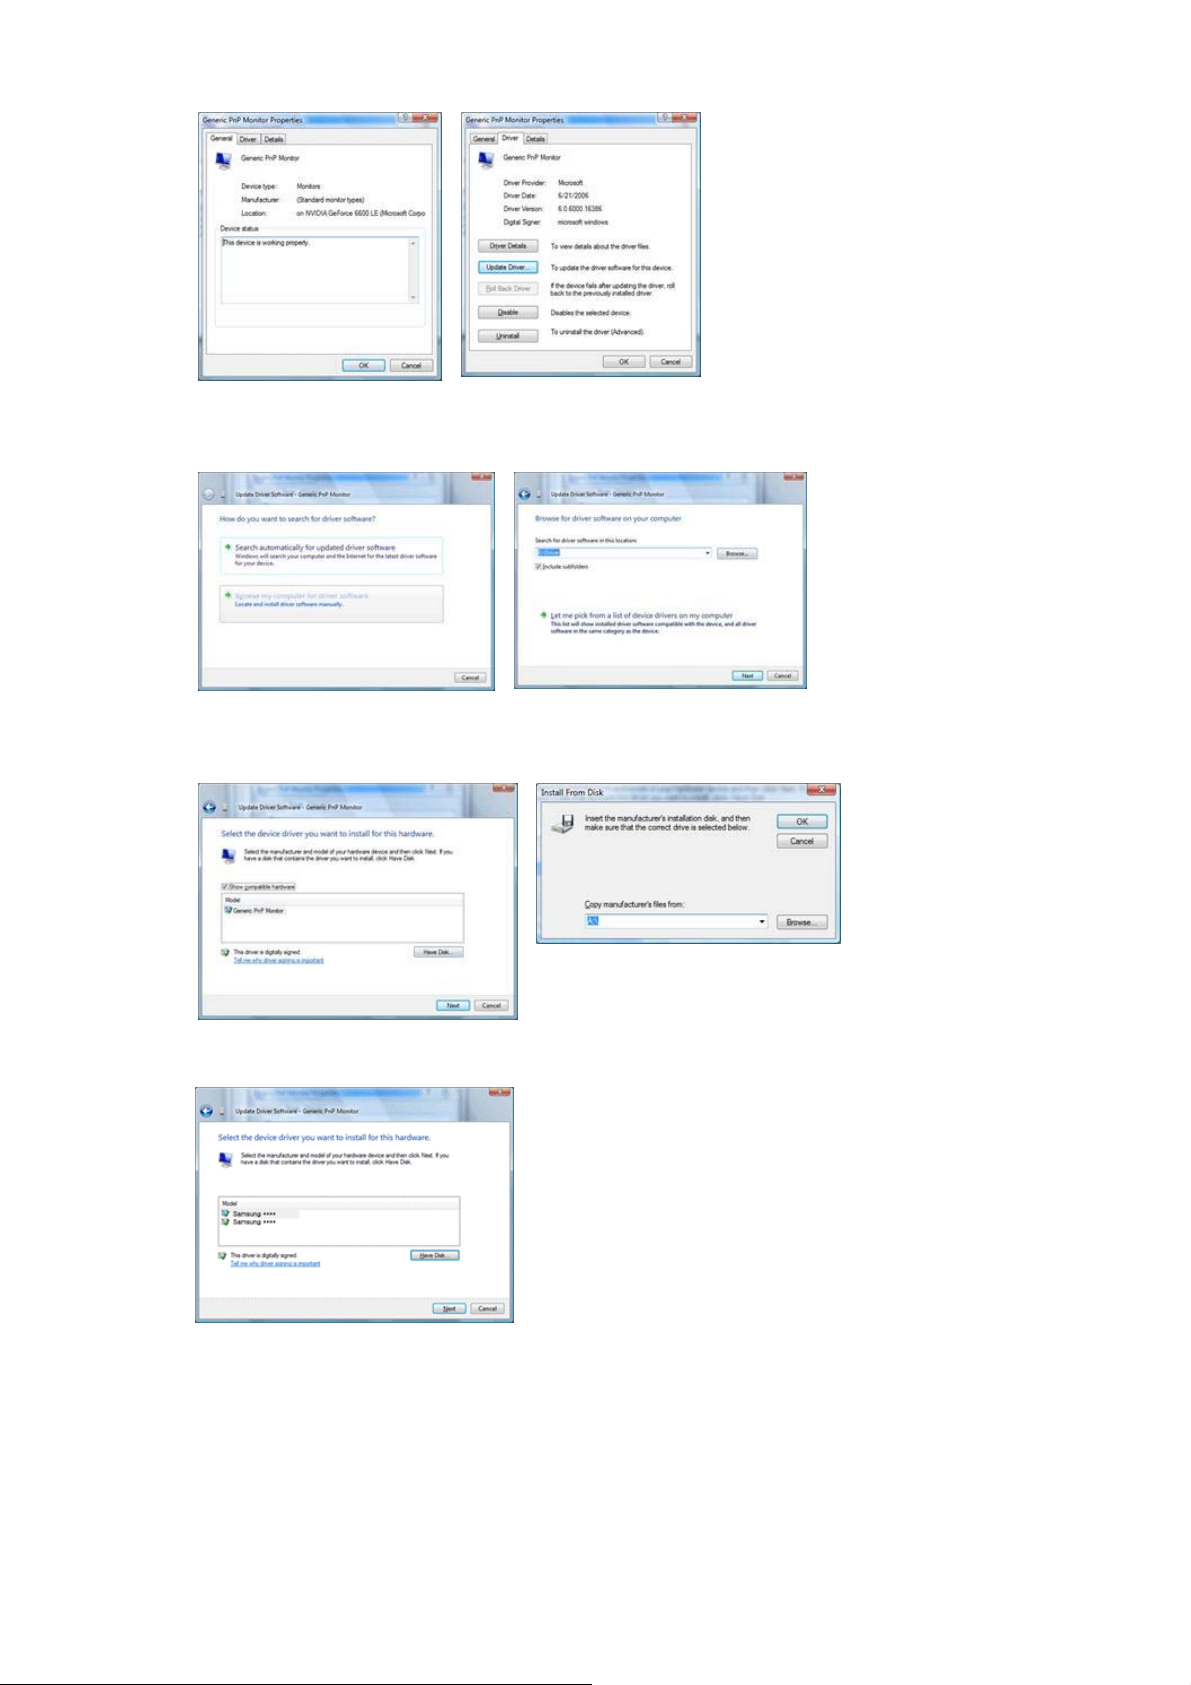
7. Check the "
pick from a list of device drivers on my computer
8. Click "
file is located, and click "OK".
Browse my computer for driver software
Have Disk…
" and select the folder (for example, D:\Drive) where the driver setup
" checkbox and click "
".
Let me
9. Select the model that matches your monitor from the list of monitor models on the
screen, and click "
10.
Click "
Close
sequence.
"→ "
".
Next
" → "OK" → "OK" on the following screens displayed in
Close
Page 20
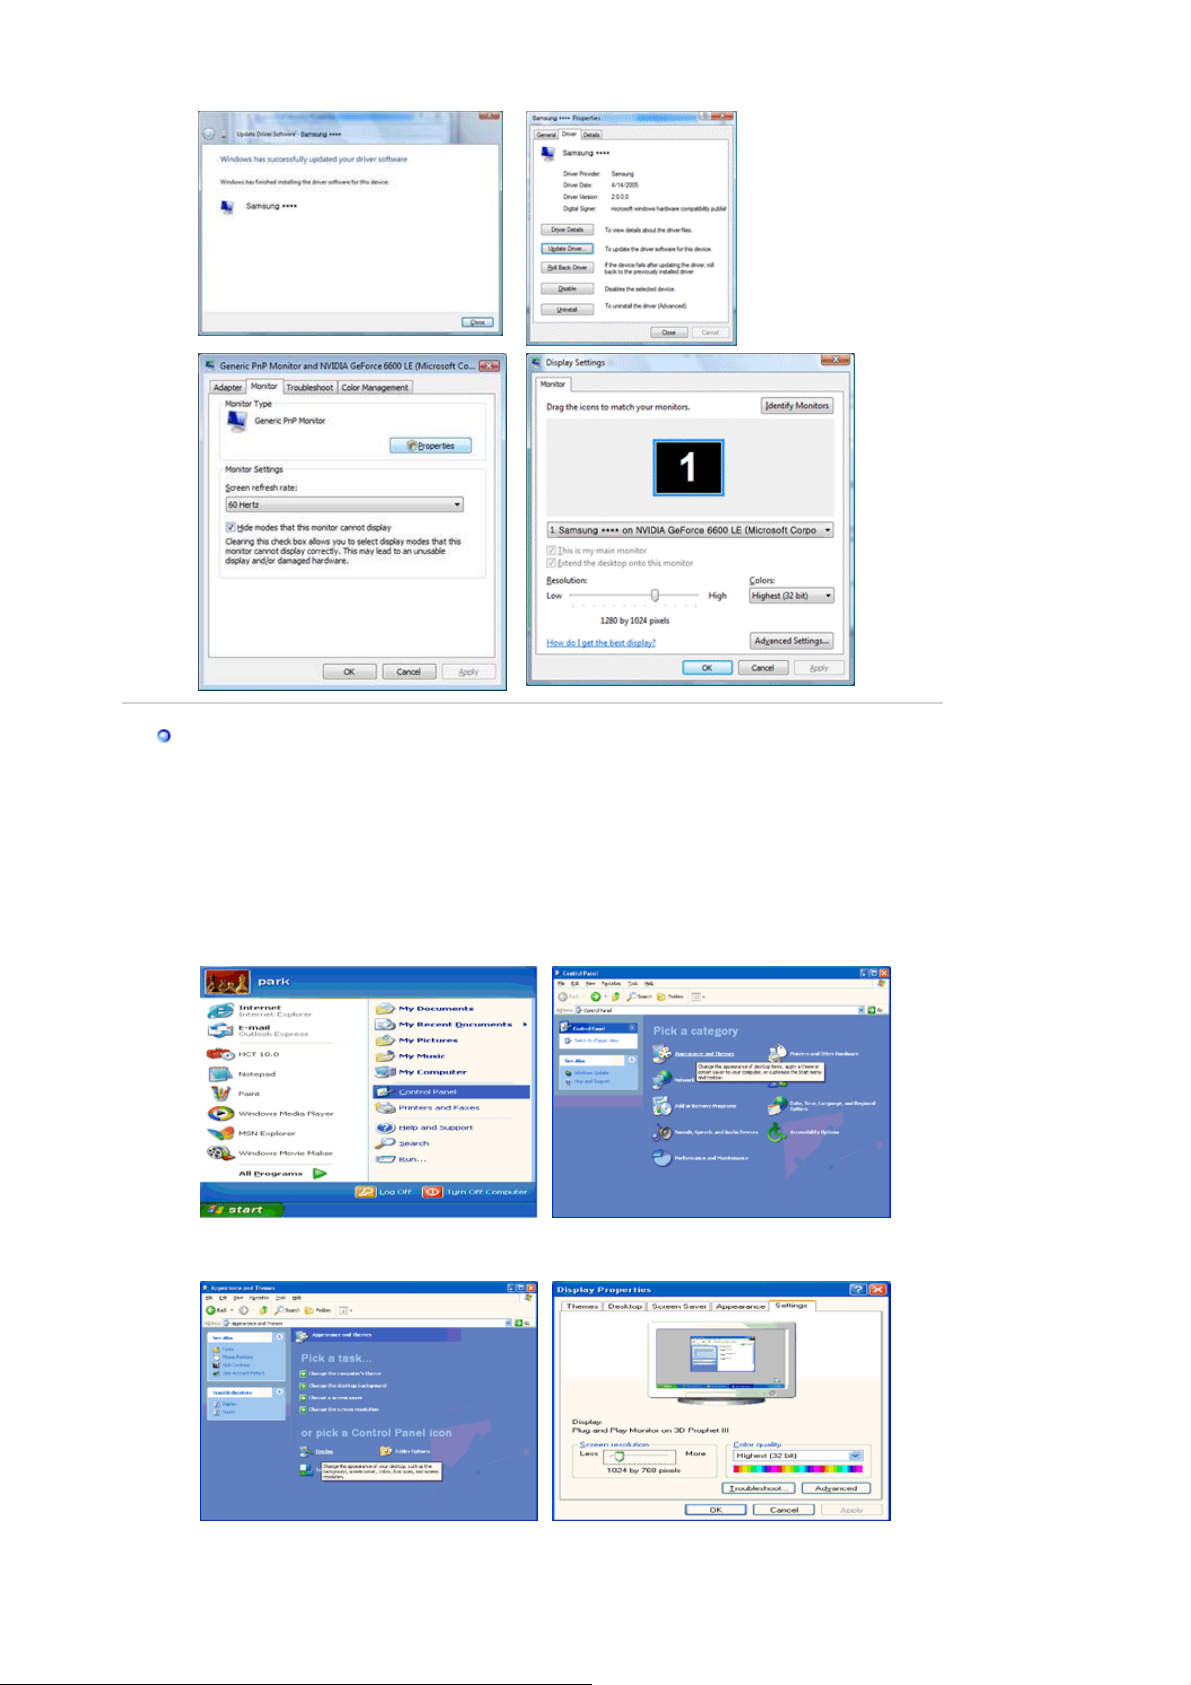
Microsoft® Windows® XP Operating System
1. Insert CD into the CD-ROM driver.
2. Click "
Start
" —> "
Control Panel
" then click the "
Appearance and Themes
" icon.
3. Click "
4. Click the "
Display
" icon and choose the "
Properties
" button on the "
Settings
Monitor
" tab then click "
" tab and select "
Advanced..
Driver
".
" tab.
Page 21
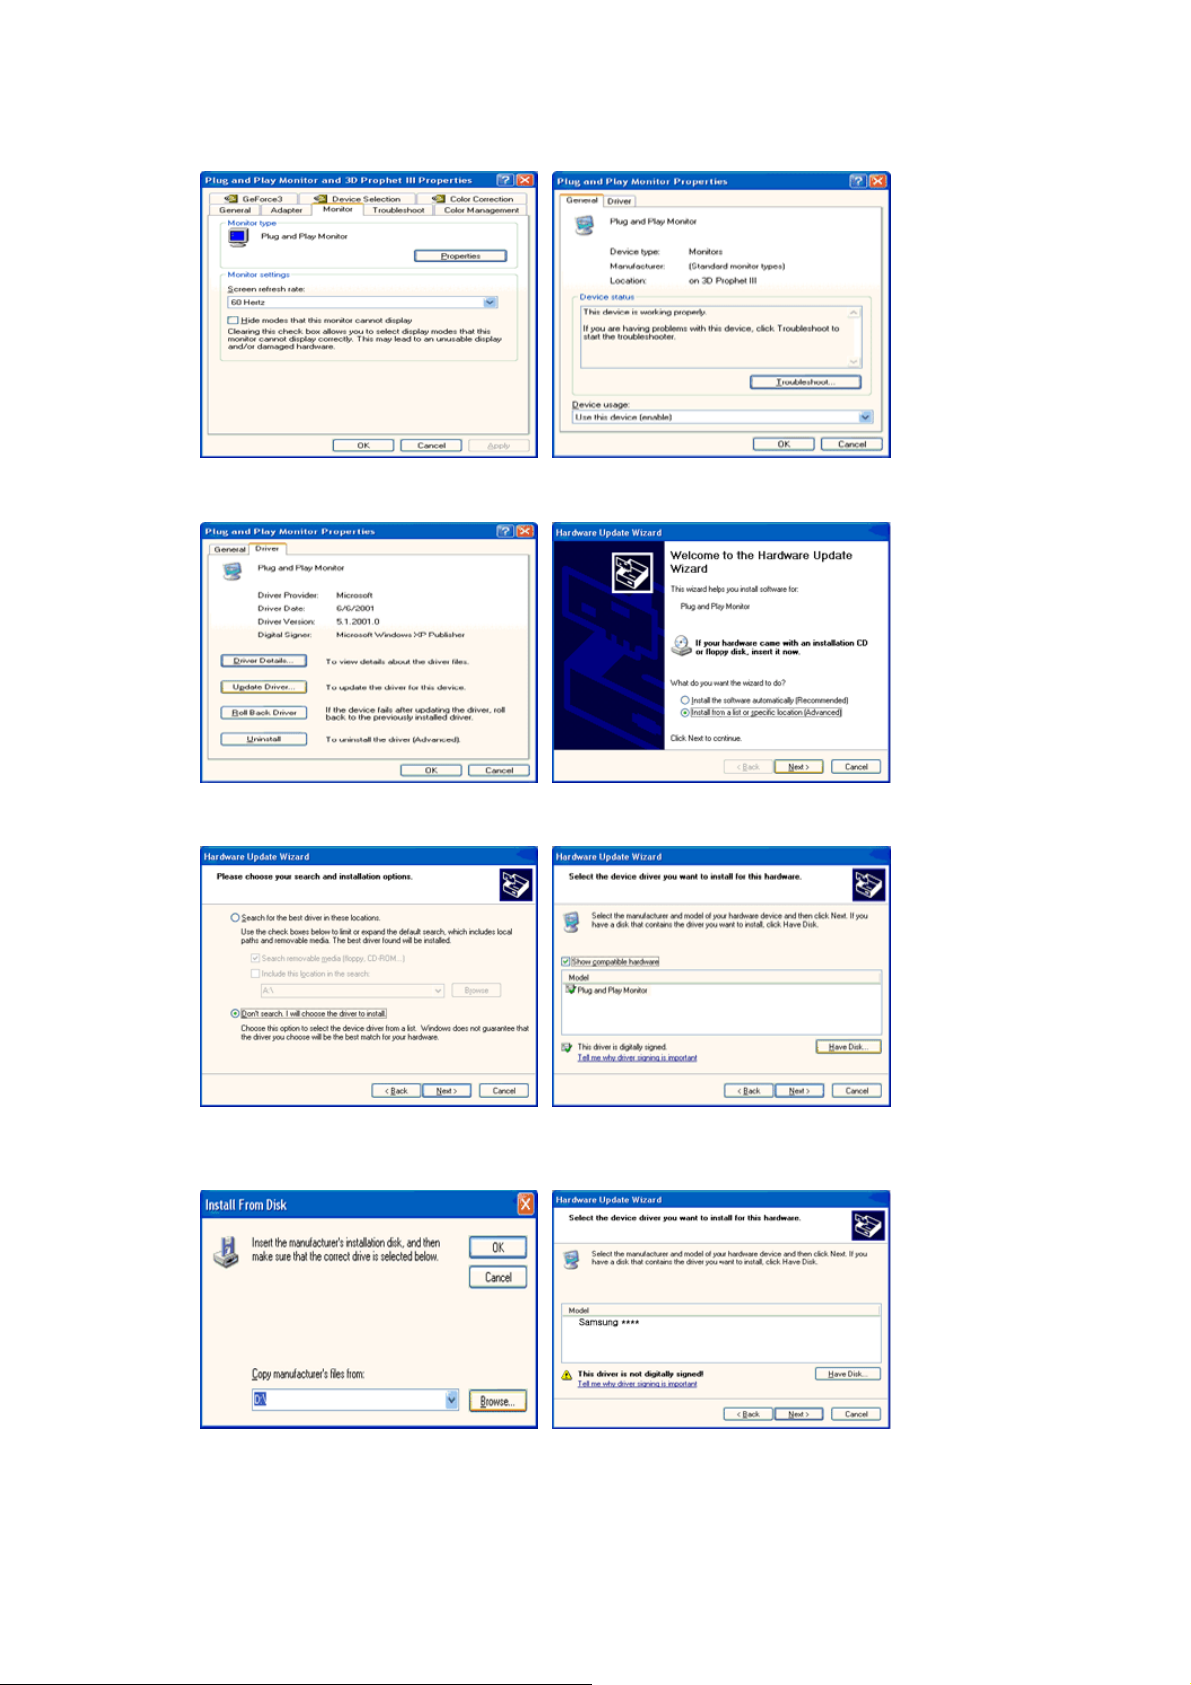
5. Click "
6. Select "
Update Driver..
Don't search ,I will..
" and select "
Install from a list or..
" then click "
Next
" then click "
" and then click "
Have disk
Next
" button.
".
7. Click the "
model list and click the "
8. If you can see following message window, then click the "
click "OK" button.
Browse
" button then choose A:(D:\Driver) and choose your monitor model in the
" button.
Next
Continue Anyway
" button. Then
Page 22
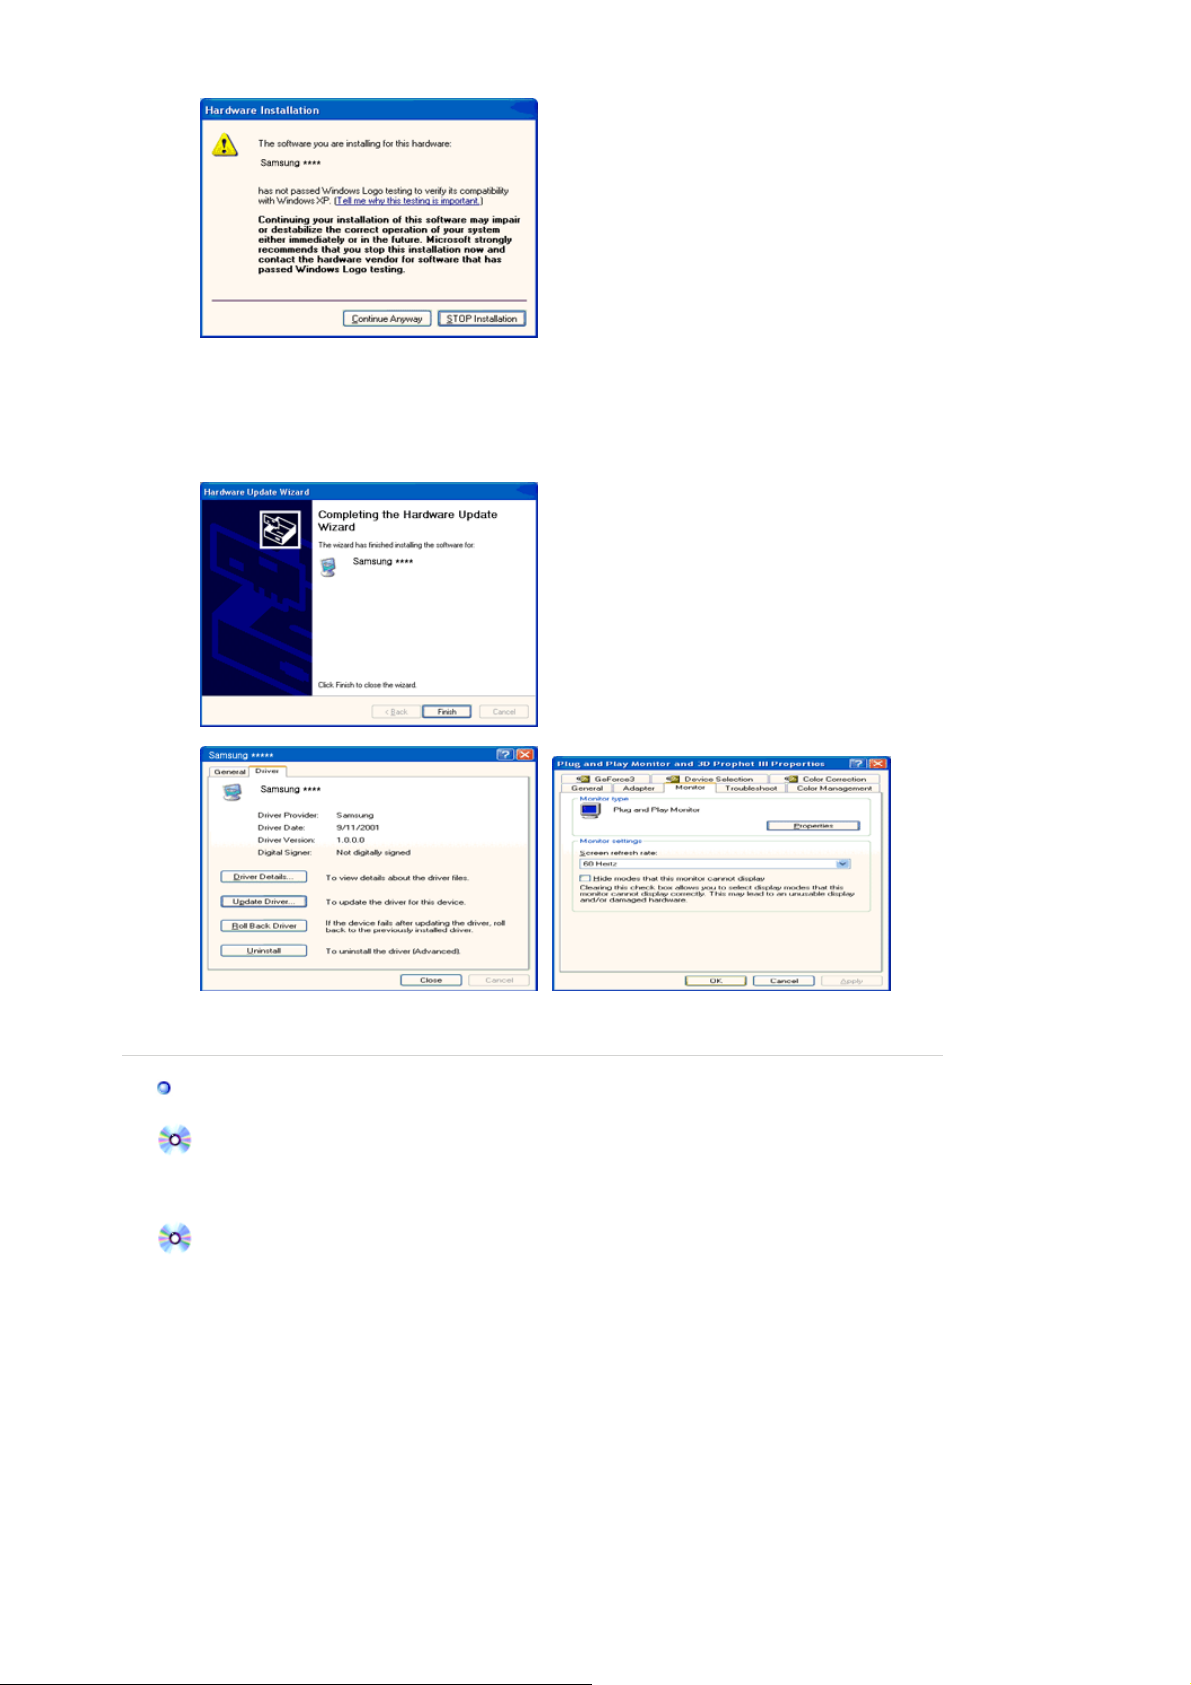
This monitor driver is under certifying MS logo, and this installation don't damage your
system. The certified driver will be posted on Samsung Monitor
homepage.http://www.samsung.com/
9. Click the "
" button then click "OK" button continually.
Close
10. Monitor driver installation is completed.
Microsoft
®
Windows® 2000 Operating System
When you can see "Digital Signature Not Found" on your monitor, follow these steps.
1. Choose "OK" button on the "
2. Click the "
Browse
" button on the "
Insert disk
" window.
File Needed
" window.
3. Choose A:(D:\Driver) then click the "Open" button and then click "OK" button.
How to install
1. Click "
2. Double click the "
3. Choose the "
4. Choose "
Start
Monitor
" , "
Setting
Settings
" , "
Control Panel
Display
" Icon.
" tab and then click "
".
".
Advanced..
".
Case1: If the "Properties" button is inactive, it means your monitor is properly configured.
Please stop installation
Case2: If the "Properties" button is active, click the "Properties" button then follow next steps
continually.
5. Click "
6. Choose "
specific driver
7. Click the "
8. Click the "
9. Choose your monitor model and click the "
10. Click the "
" and then click on "
Driver
Update Driver..
" then click on the "Next" button.
Display a list of the known drivers for this device so that I can choose a
" then click "
Browse
Open
Finish
" button then choose A:(D:\Driver).
" button, then click "OK" button.
" button then the "
" and then click "
Next
Close
Have disk
" button then click "
Next
" button.
".
Next
" button.
Page 23
If you can see the "
And click the "
Finish
Digital Signature Not Found
" button then the "
Close
" window then click the "
" button.
Yes
Microsoft® Windows® Millennium Operating System
1. Click "
2. Double click "
3. Select the "
4. Select the "
5. Click the "
6. Choose "
7. Choose "
8. Click the "
Start
" , "
Setting
Display
Settings
Monitor
Change
" , "
Control Panel
" icon.
" tab and click "
" tab.
" button in the "
Advanced Properties
Monitor Type
Specify the location of the driver
Display a list of all the driver in a specific location..
Have Disk
" button
".
".
" button.
" area.
" then click "
9. Specify A:\(D:\driver) then click "OK" button.
10. Select "
Show all devices
" and choose the monitor that corresponds to the one you
connected to your computer and click "OK".
11. Continue choosing "
" button and "OK" button until you close the Display Properties
Close
dialogue box.
Microsoft
1. Click
®
Windows® NT Operating System
Start, Settings, Control Panel
, and then double-click
Display
icon.
2. In Display Registration Information window, click Settings Tab and then click
.
Modes
3. Select a mode that you wish to use (Resolution, Number of colors and Vertical frequency)
and then click OK.
4. Click
button if you see the screen working normally after clicking
Apply
Test
not normal, change to a different mode (lower mode of resolution, colors or frequency).
If there is no Mode at
All Display Modes
, select the level of resolution and vertical
frequency by referring to the Preset Timing Modes in the user guide.
"button.
" button.
Next
All Display
. If the screen is
Linux Operating System
To execute X-Window, you need to make the X86Config file, which is a type of system setting file.
1. Press Enter at the first and the second screen after executing the X86Config file.
2. The third screen is for
setting your mouse
.
3. Set a mouse for your computer.
4. The next screen is for
selecting a keyboard
.
5. Set a keyboard for your computer.
6. The next screen is for
7. First of all, set a
horizontal frequency
setting your monitor
.
for your monitor. (You can enter the frequency
directly.)
8. Set a
vertical frequency
9. Enter the
model name of your monitor
for your monitor. (You can enter the frequency directly.)
. This information will not affect the actual execution
of X-Window.
10. You have
Execute
Natural Color
finished
X-Window after setting other requested hardware.
setting up your monitor.
Natural Color Software Program
Page 24
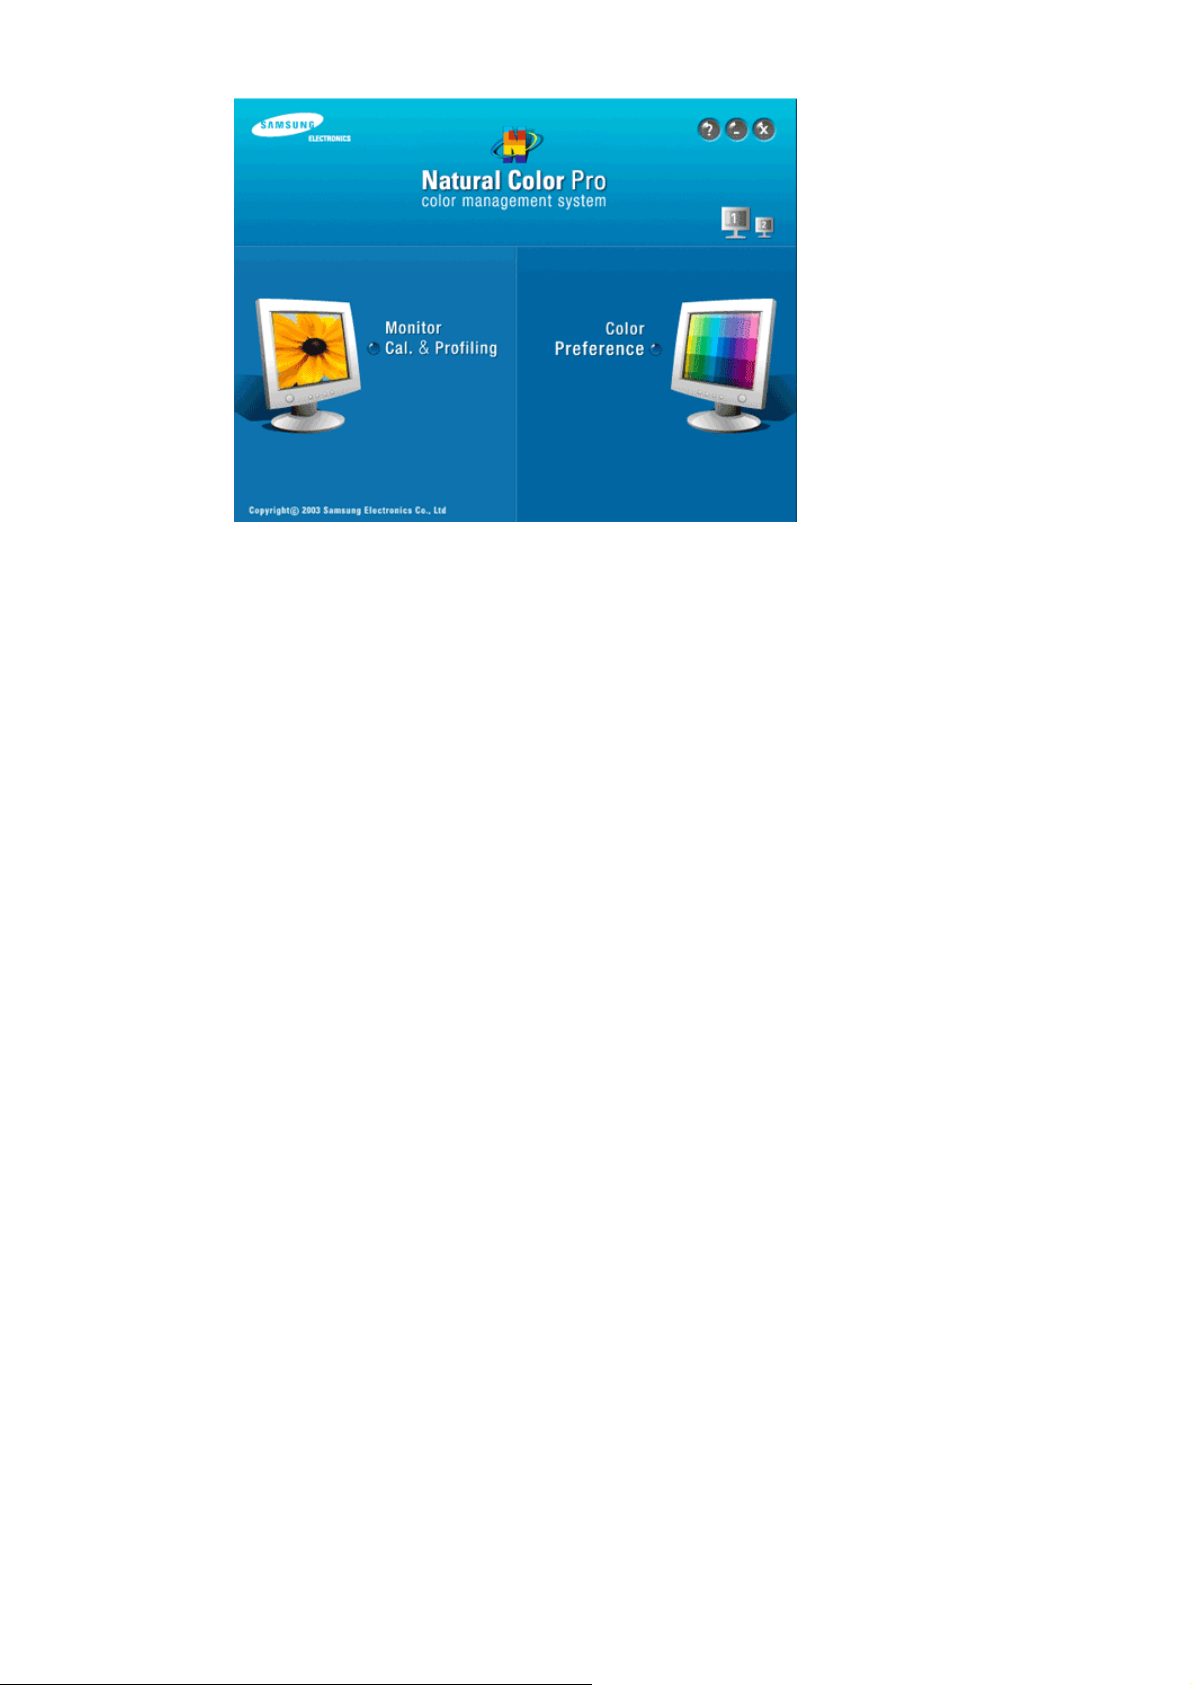
One of the recent problems in using a computer is that the color of the images printed out by a
printer or other images scanned by a scanner or a digital camera are not the same as those
shown on the monitor.
The Natural Color S/W is the very solution for this problem. It is a color administration system
developed by Samsung Electronics in association with Korea Electronics &
Telecommunications Research Institute (ETRI).
This system is available only for Samsung monitors and makes the color of the images on the
monitor the same as the printed or scanned images.
For more information, refer to Help (F1) in the software program.
How to install the Natural Color software
Insert the CD included with the Samsung monitor into the CD-ROM Drive. Then, the initial
screen of the program Natural Color will be executed. Click Natural Color on the initial screen
to install the Natural Color software.
To install the program manually, insert the CD included with the Samsung monitor into the CDROM Drive, click the [Start] button of Windows and then select [Run...].
Enter D:\color\NCProSetup.exe and then press the <Enter> key.
(If the drive where the CD is inserted is not D:\, enter the applicable drive.)
How to delete the Natural Color software program
Select
"Setting/Control Panel"
program"
Select Natural Color from the list and then click the
.
on the
menu and then double-click
"Start"
"Add/Delete"
"Add/Delete a
button.
Page 25
(Mag
)
y
Model
SyncMaster 971P
Installation
1. Insert the installation CD into the CD-ROM drive.
2. Click the AutoRotation installation file.
3. Select installation Language, Click "Next".
4. When the Installation Shield Wizard window appears, click "Next."
5. Select "I agree to the terms of the license agreement" to accept the terms of use.
6. Choose a folder to install the AutoRotation program.
7. Click "Install."
8. The "Installation Status" window appears.
9. Click "Finish."
10. When the installation is complete, the MagicRotation, MagicTune™ executable icon appears on your
desktop.
Double-click the icon to start the program.
MagicTune™ execution icon may not appear depending on
specification of computer system or monitor.
If that happens, press F5 Key.
Installation Problems
icTune™
The installation of MagicTune™ can be affected by such factors as the video card, motherboard
and the network environment.
See "Troubleshooting" if you have trouble during installation.
S
stem Requirements
OS
MAC OS X
z
z Windows 2000
z Windows XP Home Edition
z Windows XP Professional
z Windows Vista™
It is recommended using MagicTune™ in Windows® 2000
Page 26

or later.
(Mag
)
y
Hardware
z 32MB Memory above
z 60MB Hard disk space above
* For more information, visit the MagicTune™ website.
Installation Problems
icRotation
The installation of MagicRotation can be affected by such factors as the video card, motherboard
and the network environment.
See "Troubleshooting" if you have trouble during installation.
Limitation
1. The "Display Driver" should be properly loaded for the MagicRotation to work properly.
The installed "Display Driver" should be the latest driver supplied by the vendor.
2. If some applications like Windows
®
Media Player, Real Player, etc. are not displaying
movie files properly in 90, 180 and 270 orientations then do the following :
{ Close the application.
{ Select the Orientation (90, 180, 270) you want to view the application.
Relaunch the application.
{
In most cases this should fix the problem.
3. User Applications using OpenGL and DirectDraw (3D drawing) will not function as per the
orientation mode selected (90, 180, 270).
e.g. 3D games
4. DOS based applications in Full Screen Mode will not function as per the orientation mode
selected (90, 180, 270).
5. Dual is not supported in Windows
®
98, ME, NT 4.0.
6. MagicRotation does not provide support for 24 bits per pixel (Bit depth/Color Quality).
7. If you are changing your Graphic Card it is recommended that you uninstall the
MagicRotation Software before doing so.
S
stem Requirements
OS
z MAC OS X
Windows 2000
z
z Windows XP Home Edition
z Windows XP Professional
z Windows Vista™
Hardware
Service Packs
z 128MB Memory above(recommended)
z 60MB Free Hard disk space above
z It is recommended that your System has the latest Service Pack installed.
z For Windows
®
NT 4.0, it is recommended to install Internet Explorer 5.0 and above with
Page 27
Active Desktop component.
* For more information, visit the MagicRotation website.
®
* Windows
Uninstall
is registered trademark of Microsoft Corporation,Inc.
The AutoRotation program can be removed only by using the "Add or Remove Programs" option of
the Windows
Perform the following steps remove AutoRotation.
1. Go to [Task Tray] ' [Start] ' [Settings] and select [Control Panel] in the menu. If the program
2. Click the "Add or Remove Programs" icon in Control Panel.
3. In the "Add or Remove Programs" screen, scroll down to find "AutoRotation". Click on it to
4. Click the "Change/Remove" button to remove the program.
5. Click "Yes" to begin the uninstall process.
6. Wait until the "Uninstall Complete" dialog box appears.
Visit the AutoRotation website for technical support for AutoRotation, FAQs (questions and
answers) and software upgrades.
®
Control Panel.
runs on Windows
highlight it.
®
XP, go to [Control Panel] in the [Start] menu.
Overview
Overview
What is MagicTune™?
Monitor performance can vary due to the graphics card, host computer lighting conditions and
other environmental factors. In order to get the best image on a monitor requires you to adjust it
for your unique setting. Unfortunately, the manual controls available to tune the image often
prove to be challenging. Proper adjustment (tuning) requires an easy to use program that goes
through a step-by-step process to obtain the best overall picture quality.
| OSD Mode | Color Calibration | Troubleshooting
Page 28

y
In most cases even simple adjustments to Brightness, or Contrast require navigation of the multilevel, on-screen display (OSD) menus that are not easy to understand. Furthermore, there is no
feedback to assist in correctly setting the controls of the monitor. MagicTune™ is a software
utility that guides you through the tuning process with easy to understand instructions and back
ground patterns designed for each monitor control.
Basic Functionalit
MagicTune™ is a software utility that allows monitor adjustment and color tuning using the
Display Data Channel Command Interface (DDC/CI) protocol. All adjustments to the display are
controlled via software to eliminate the need to use the monitor on-screen display (OSD).
MagicTune™ supports Windows
It is recommended using MagicTune™ in Windows
®
2000, XP Home, and XP Professional.
®
2000 or later.
MagicTune™ allows for quick accurate tuning of the display with the ability to easily save and use
monitor configurations that are best suited for you.
OSD Mode
The OSD mode allows easy adjustment of monitor settings without taking pre-defined steps. You
can access the desired menu item to set with ease.
Overview |
OSD Mode
s | Color Calibration | Troubleshooting
MagicTune™ allows for quick accurate tuning of the display with the ability
to easily save and use monitor configurations that are best suited for you.
z
OSD mode may appear inconsistent with the explanation in
guidance book depending on specification of each monitor.
z
When Pivot is functioning, part of MagicTune™ Program may
not operate normally.
z
AutoRotation : AutoRotation will automatically pivots the
monitor to 0, 90, 180 degrees when you pivots the monitor.
To execute Rotation, it should be done as below.
z
Please install both MagicRotation and MagicTune™
programs in your computer.
z
Launch MagicTune™
z
Option → Preference → Click the small box in the
enable task tray menu.
z
MagicTune™ control mode will be different according to
monitor models.
z
The permitted angle of rotation of the monitor is
determined by the model of the monitor.
OSD Mode
The OSD mode makes the adjustment of settings on all monitors easy. When selected , each tab
on top of the control window displays the general descriptions of the sub-menu items for
adjustment.
When selected, each tab displays a list of menus. For quick adjustment of the monitor settings, the
OSD mode allows easy and convenient access to all tabs and sub-menu items.
Page 29
A
A
Button Tab Definition
OK
Reset
Applies any changes made and exits MagicTune™ .
Restores the display settings to the factory settings.
Picture Tab Definition
llows the user to adjust the screen settings to the desired values.
Makes the entire screen brighter or darker. The detailed data of the
Brightness
Contrast
Resolution
MagicBright™
images in the dark areas can be lost if the brightness is not adjusted
to the proper level. Adjust the brightness for best viewing conditions.
Adjusts the difference in brightness between the bright and dark
areas on screen. Determines the crispness of the images.
Lists all display resolutions supported by the program.
MagicBright™ is a new feature providing the optimum viewing
environment depending on the contents of the image you are
watching.
1. Text: For documentations or works involving heavy text.
2. Internet: For working with a mixture of images such as text and
3. Game : For watching motion pictures such as a Game.
4. Sport : For watching motion pictures such as a Sport.
5. Movie: For watching motion pictures such as a DVD or Video
6. Dynamic Contrast : Dynamic Contrast is to automatically detect
7. Custom: Although the values are carefully chosen by our
graphics.
CD.
distribution of inputted visual signal and adjust to create
optimum contrast.
engineers, the pre-configured values may not be comfortable to
your eyes depending on your taste. If this is the case, adjust
the Brightness and Contrast by using the OSD menu.
MagicBright control mode will be different according to
monitor models.
Some monitor will only support Four modes(Text,
Internet, Entertain, Custom)
Color Tab Definition
djusts the "warmth" of the monitor background or image color.
MagicColor and Gamma will be shown only in the monitor that
supports these functions.
Page 30
ColorTone
Color
Control
Calibration
The tone of the color can be changed.
z Warm2 - Warm1 - Cool 1 - Cool 2 - Cool 3 - Cool 4 - Cool 5 -
Cool 6 - Cool 7
z Off
ColorTone mode will be different according to monitor
models.
Some monitor will only support Four modes( Warm,
Normal, Cool, Custom)
Adjusts of the monitor image color.
You can change the monitor color to your desired color.
z R- G - B
The process through which the colors of your choice are optimized and
maintained. You will find MagicTune™ extremely useful if you are one
of those who wish to view images with their full details accurately
reproduced - including web images and ones produced by a digital
camera or scanner.
MagicColor is a new technology that Samsung has exclusively
developed to improve digital image and to display natural color more
clearly without disturbing image quality.
MagicColor
1. OFF : Returns to the original mode.
2. DEMO : The screen before applying MagicColor appears on the
right and the screen after applying MagicColor appears on the
left.
3. Full : Displays not only vivid natural color but also more realistic
natural skin color with clearness.
4. Intelligent : Displays vivid natural color with clearness.
5. MagicZone
{ The MagicZone ensures the clear and sharp display of
animated multimedia or photo images by enhancing the
brightness, sharpness, saturation, Hue of a certain area on
the screen. This offers an easy-to-use interface that
highlights the video-playing portion of your multimedia
program by automatically detecting and highlight the
desired area by dragging.
{ When the mouse cursor is activated( )and it is necessary
to de-activate it to use it for other tasks, right click your
mouse, or put the activated cursor ( )on the taskbar and
click. When de-activated, the icon on the screen changes
back to the one shown before activation.
{ Especially, MagicZone is appropriate to using the moving
picture.
{
Auto Detect
: If you run the Movie in some players,
MagicZone will automatically get the play screen
highlighted (it will be supported in players of Gom,
Adrenalin, KCP, Window Media, and Power DVD etc., )
Some other players also can be highlighted but could have
some problems.
{ Tusk menu
HUE
Adjust the tint of the color.
Saturation
Brightness
Sharpness
Adjusts the color saturation.
Adjusts the Brightness.
Adjusts the difference between the lightest
Page 31
Zone Off
g
A
Reset
and darkest areas of the display.
Turn off the zone that you have captured.
Returns to the the default setting that vendor
has set.
Color
Innovation
Gamma
z Depending on the monitor models
Sharpness, Contrast, ColorTone
adjustable in MagicColor mode of
Intelligent.
Color Control,
will not be
Full and
z MagicTune™ will be disappear if you excute
MagicZone, and closing the MagicZone after
adjusting, will show the MagicTune™ again.
(System Tray is Unhecked)
MagicTune™ will be disappear if you excute
MagicZone, and closing the MagicZone after
adjusting. will not show MagicTune™ again.
(System Tray is Checked)
z MagicColor mode will be different according to
monitor models.
MagicZone mode will show if the monitor supports
the function.
Color Innovation function provides optimized color for personal favor to
view effectively with WCG-CCFL which was applied to Samsung
Electronics for the first time.
z Brilliant : If you select "Brilliant", you can view a more clear and
vibrant image.
z Mild : If you select "Mild", you can view a more natural and soft
image.
z Custom : The pre-configured values may not be comfortable to
your eyes depending on your taste. If this is the case, adjust the
Picture and Color menu by using the OSD to fit your eyes.
Gamma correction changes the luminance of the colors with
intermediate luminance.
Gamma mode will be different according to monitor
models. Some monitor will only support Three modes.
( Mode1, Mode2, Mode3)
This refers to the process that optimizes the color according to the
user's needs and maintains the optimized color. MagicTune™ will be
helpful for users wishing to view images including web images, as well
as pictures taken by a digital camera or scanner through Windows.
6-Color
z Saturation - To adjust the chroma.
Hue - To adjust the color tone.
z
z Reset - To reset the monitor settings to the factory defaults.
e Tab Definition
Ima
djusts the Fine , Coarse and Position values.
Fine : Removes noise such as horizontal stripes.
z
If the noise persists even after Fine tuning, repeat it after
adjusting the frequency (clock speed).
Page 32

Image Setup
Position
z Coarse : Removes noise such as vertical stripes.
Coarse adjustment may move the screen image area.
You may relocate it to the center using the Horizontal Control
menu.
z Auto Setup : Auto adjustment allows the monitor to self-adjust
to the incoming video signal. The values of fine, coarse and
position are adjusted automatically.
Adjusts the screen location horizontally and vertically.
Sharpness
Changes the clearance of image.
Option Tab Definition
You can configure MagicTune™ using the following options.
Loads the Preferences Dialog Box. Preferences in use will have an
"V" in the check box. To turn on or off any Preference, position the
cursor over the box and click.
Preferences
z Transparency
z Enable task tray menu .
- To access the MagicTune™ menus, click the icon on the [task
tray menu].
The menus are not displayed if the [Enable System Tray] is
deselected in [Options] ' [Basic Settings].
Source
Select
z Analog
z Digital
This refers to the process that optimizes the color and maintains the
optimized color.
Color
Weakness
z Off - To cancel Partial Color Blindness Mode.
z Custom - Partial Color Blindness Test
z Reset - To reset the monitor settings to the factory defaults.
When external A/V devices such as VCRs or DVDs are connected to
the monitor, PIP allows you to watch video from those devices in a
small window super-imposed on the PC Video signal. (Off / On)
PIP
Turn the PIP Screen on or off.
PIP
Source
Select the input source for the PIP.
Size
Change the Size of the PIP window.
Position
Change the Position of the PIP window.
Applied only in specific monitors.
Changing languages in MagicTune™ will be applied to monitor OSD
(On Screen Display) languages.OSD language will be changed to
current language settings of MagicTune™ .
Customized
MagicBright
Set Customized Key to MagicBright.
Page 33
Key
pp
MagicColor
Set Customized Key to MagicColor.
Auto Setup
Source Select
ColorTone
Su
Shows the Asset ID and the version number of the program, and allows you to use
the Help feature.
Help
Asset ID
Version
ort Tab Definition
Visit the MagicTune™ website or click to open the Help files (User
Overview |OSD Mode|
Manual) if you need any help installing or running MagicTune™ .
The User Manual opens within a basic browser window.
you can use the server to control the Client monitor.
(Server program should be installed to use this program as Client)
When selecting the Customize checkbox at the bottom you can
enter your personal information.
User Name
User ID
Server IP
Department
Location
Displays the version of MagicTune™ .
Set Customized Key to Auto Setup.
Set Customized Key to Source Select
Set Customized Key to ColorTone
Shows the user name that is registered in
PC.
Shows the user ID that is register in PC.
Write down the server IP .
Write down the department.
Write down the location.
Color Calibration
| Troubleshooting
Color Calibration
Color Calibration
Color Calibration guides you to get optimal color condition for your monitor.
Proceed following 5steps for getting optimal monitor color condition .
Page 34
1. Control "Brightness control bar" for matching the brightness of control patch and the
brightness of background pattern
2. When you detect specific color tone on "Control patch", move the control cursor toward to
the direction of the color tone referring to "Color reference Circle".
=> Adjustment is finished properly, you won't detect any color tone on Control patch.
3. When you finish adjustment for step1,Click "Next" button .
4. Repeat 1), 2), 3) procedures for remaining step2 ~ step5.
5. You can easily view the calibration effect through clicking "Preview " button!
How multiple users can use adjusted color values
Definition
When monitor is used by multiple users, color values which are adjusted via Color calibration for
each users can be saved and used. Up to 5 users can use the saved color values.
1. How to save adjusted color values:
Press Next to make it change into Apply and then you can save adjusted color values.
As many as 5 values can be saved.
2. How to apply the saved color values:
Press Multi User button on main screen to select and use one of the saved color values.
Preview
Press "Preview" button on the Color Calibration.
The above picture will be shown.
1. Press "View Calibrated" button to see the calibration effect which you adjusted.
2. Press "View Uncalibrated" button to see the original image.
Overview | OSD Mode | Color Calibration |
Troubleshooting
Troubleshooting
The current computing system is not compatible with MagicTune™.
Please press OK and click on the "Shortcut to the MagicTune™ site" to view our
home page for further reference.
An error may occur when your video/graphic card is not in the 'Available' list.
(The latest or oldest video cards may not be compatible.)
Please visit our homepage to see the Troubleshooting section.
An error may occur if the card maker has modified the video card driver or the
graphics chip even when the video card is in the list.
Please visit our homepage to see the Troubleshooting section.
Check if your monitor is manufactured by Samsung.
Products from other manufacturers may cause errors.
Only Samsung products are able to support this feature.
An error may occur even when your monitor is manufactured by Samsung but is
out of date. Check if your monitor is able to support MagicTune™.
This feature is only supported by those monitors that are registered on our
homepage.
Check for the monitor before purchasing it as out-of-date models are not
supported.
Page 35

An error occurs when no information on EDID (Extended Display Identification
Data) exists for the current monitor.
This happens when from your desktop, Start → Setup → Control Panel → System
Hardware → Device Manager → Monitor is selected, the current "Plug-and-play
→
monitor" is removed and new hardware is searched for but the system couldn't find
any "Plug-and-play monitor".
Please visit our homepage to see the Troubleshooting section.
An error occurs when replacing the monitor with a new one when the system
power is off but the system has not been restarted.
Please restart the system each time the monitor is replaced before using
MagicTune™.
An error occurs when the video card driver is not installed properly.
This happens when the current video card list is not displayed normally. You can
check this via Start → Setup → System → Hardware → Device Manager →
Display Adapter.
Visit the video card maker's homepage and download and install the latest
driver.
For more information about the video card, contact the card manufacturer.
To ensure normal operation, please restart your system.
An error occurs when the system is not restarted after installing MagicTune™.
(This is for Win98SE and WinMe only.)
Restart the system before use.
For the best performance of MagicTune™, adjust to the optimal resolution.
Refer to the User Guide for the optimal resolution.
If you do not adjust to the optimal resolution and perform Color Calibration, the
monitor cannot be adjusted to the optimal condition.
Refer to the manual for the optimal resolution.
This video card does not support MagicTune™.
Please install a new video card driver.
An error occurs when the video card driver is not installed properly.
This happens when the current video card list is not displayed normally. You can
check this from Start → Setup → System → Hardware → Device Manager →
Display Adapter.
Visit the video card manufacturer's homepage and download and install the
latest driver.
For more information about the video card, contact the card manufacturer.
As the Highlight program uses the communication lines,
please exit the Highlight program before you can access MagicTune™.
Some of Samsung CDT monitors support the Highlight feature.
When using both the Highlight feature and MagicTune™ simultaneously, conflicts
occur, which cause errors.
Make sure to turn OFF Highlight before using MagicTune™.
Troubleshooting
Page 36
z MagicTune™ may not work in case monitor is replaced or driver of graphic card is updated while
MagicTune™ is operating. If so, please restart the system.
Symptom Check List Solutions
Check when
MagicTune™ does
not function properly.
MagicTune™ doesn't
work properly.
MagicTune™ feature
is found only on PC
(VGA) with Window
OS that supports Plug
and Play.
Have you changed
your PC or video
graphic card?
Did you install the
program?
* To check whether your PC is available for
MagicTune™ feature, follow the
steps below (When Windows® is XP);
Control Panel → Performance and
Maintenance → System → Hardware →
Device Manager → Monitors → After deleting
Plug and Play monitor, find 'Plug and Play
monitor' by searching new Hardware.
MagicTune™ is an additional software for the
monitor. Some graphic cards may not support
your monitor. When you have a problem with
the graphic card, visit our website to check the
compatible graphic card list provided.
http://www.samsung.com/monitor/magicTune
Download the latest program. The
program can be downloaded
http://www.samsung.com/monitor/magictune.
Reboot the computer after installing
the program for the first time. If a
copy of the program is already
installed, remove it, reboot the
computer, and then install the
program again. You need to reboot
the computer for it to operate
normally after installing or removing
the program.
Visit the MagicTune™ website for technical support for MagicTune™, FAQs (questions and
z
answers) and software upgrades.
z Visit the MagicTune™ website and download the installation software for MagicTune™ MAC.
Overview
| Interface | Troubleshooting
Overview
Page 37
g
What is Ma
icRotation?
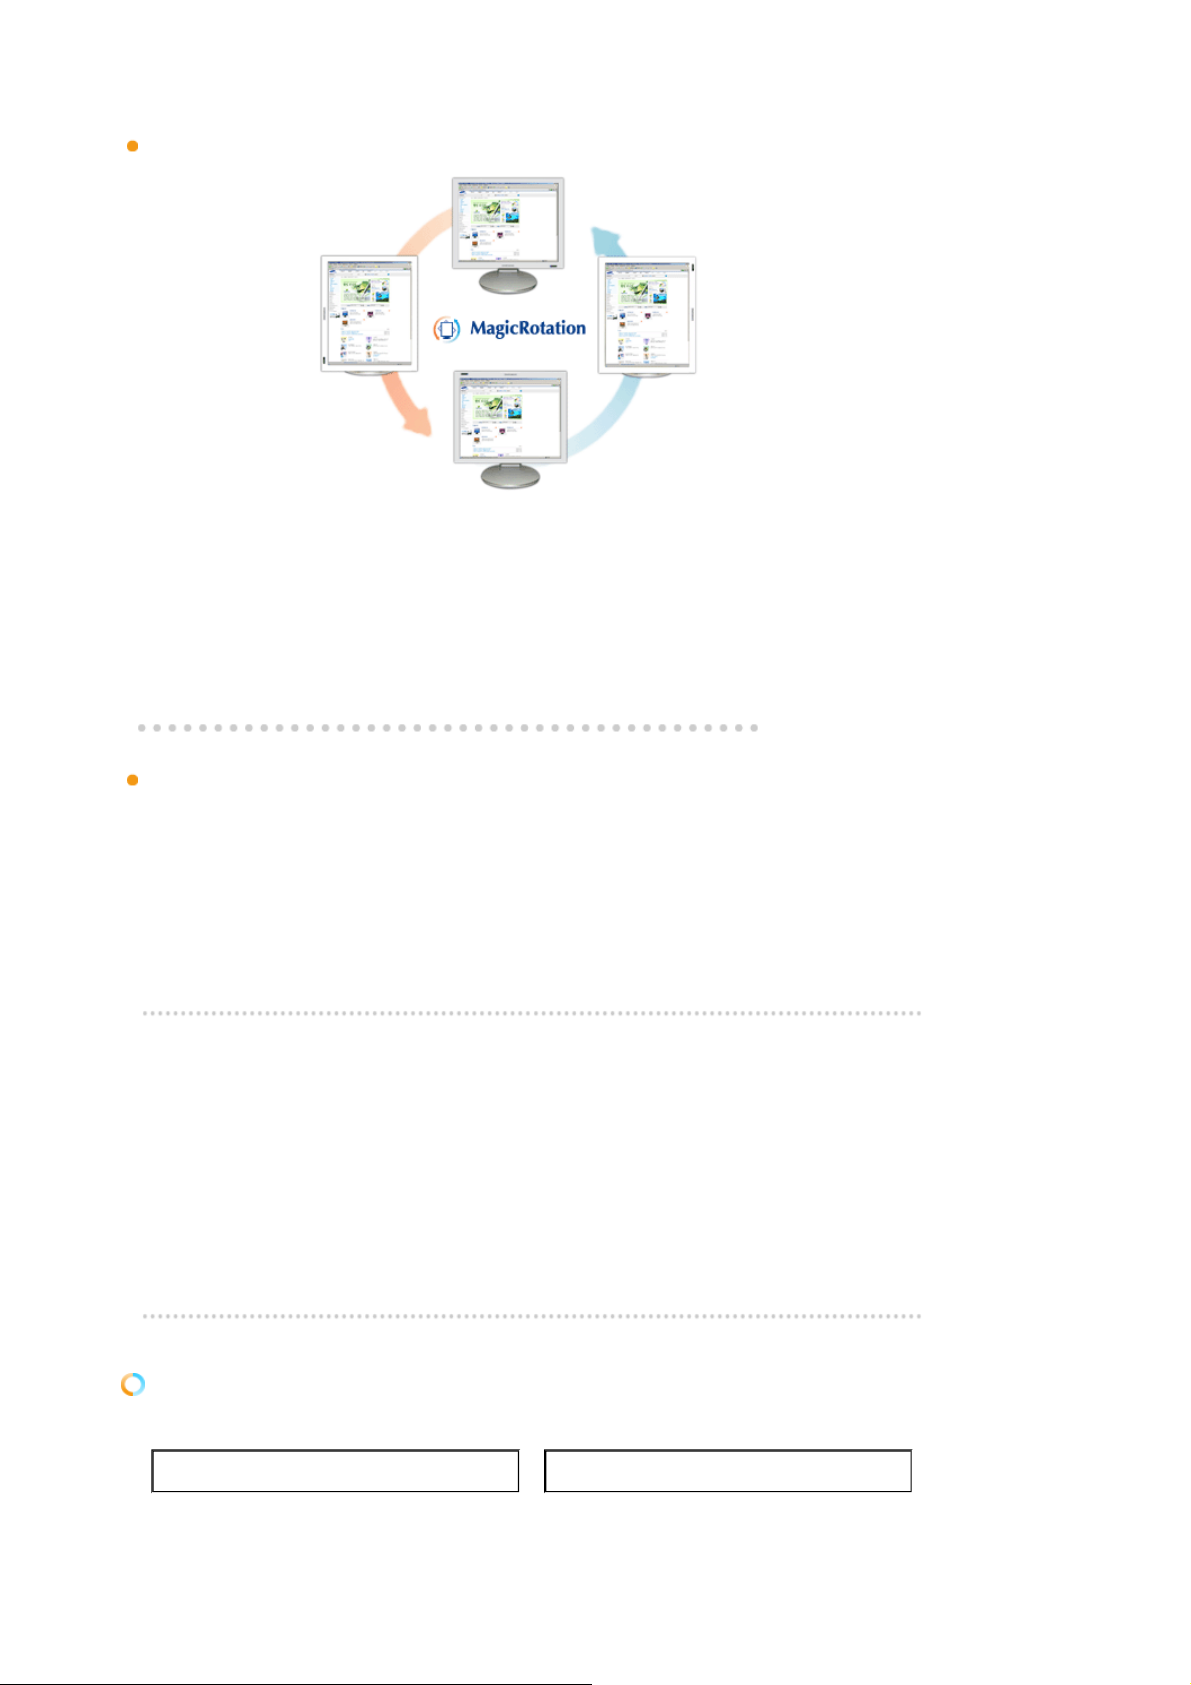
Traditionally, computer displays allowed the user to view only in landscape mode.
In today's information age, more users need to view documents, web pages, emails, etc. in there
day to day life. These types of applications can be better viewed in portrait mode where the entire
contents are available on the screen. This greatly improves the user's productivity allowing him
the flexibility to switch between landscape and portrait modes.
The MagicRotation Software from Samsung Electronics, Inc. provides the user with a rotation
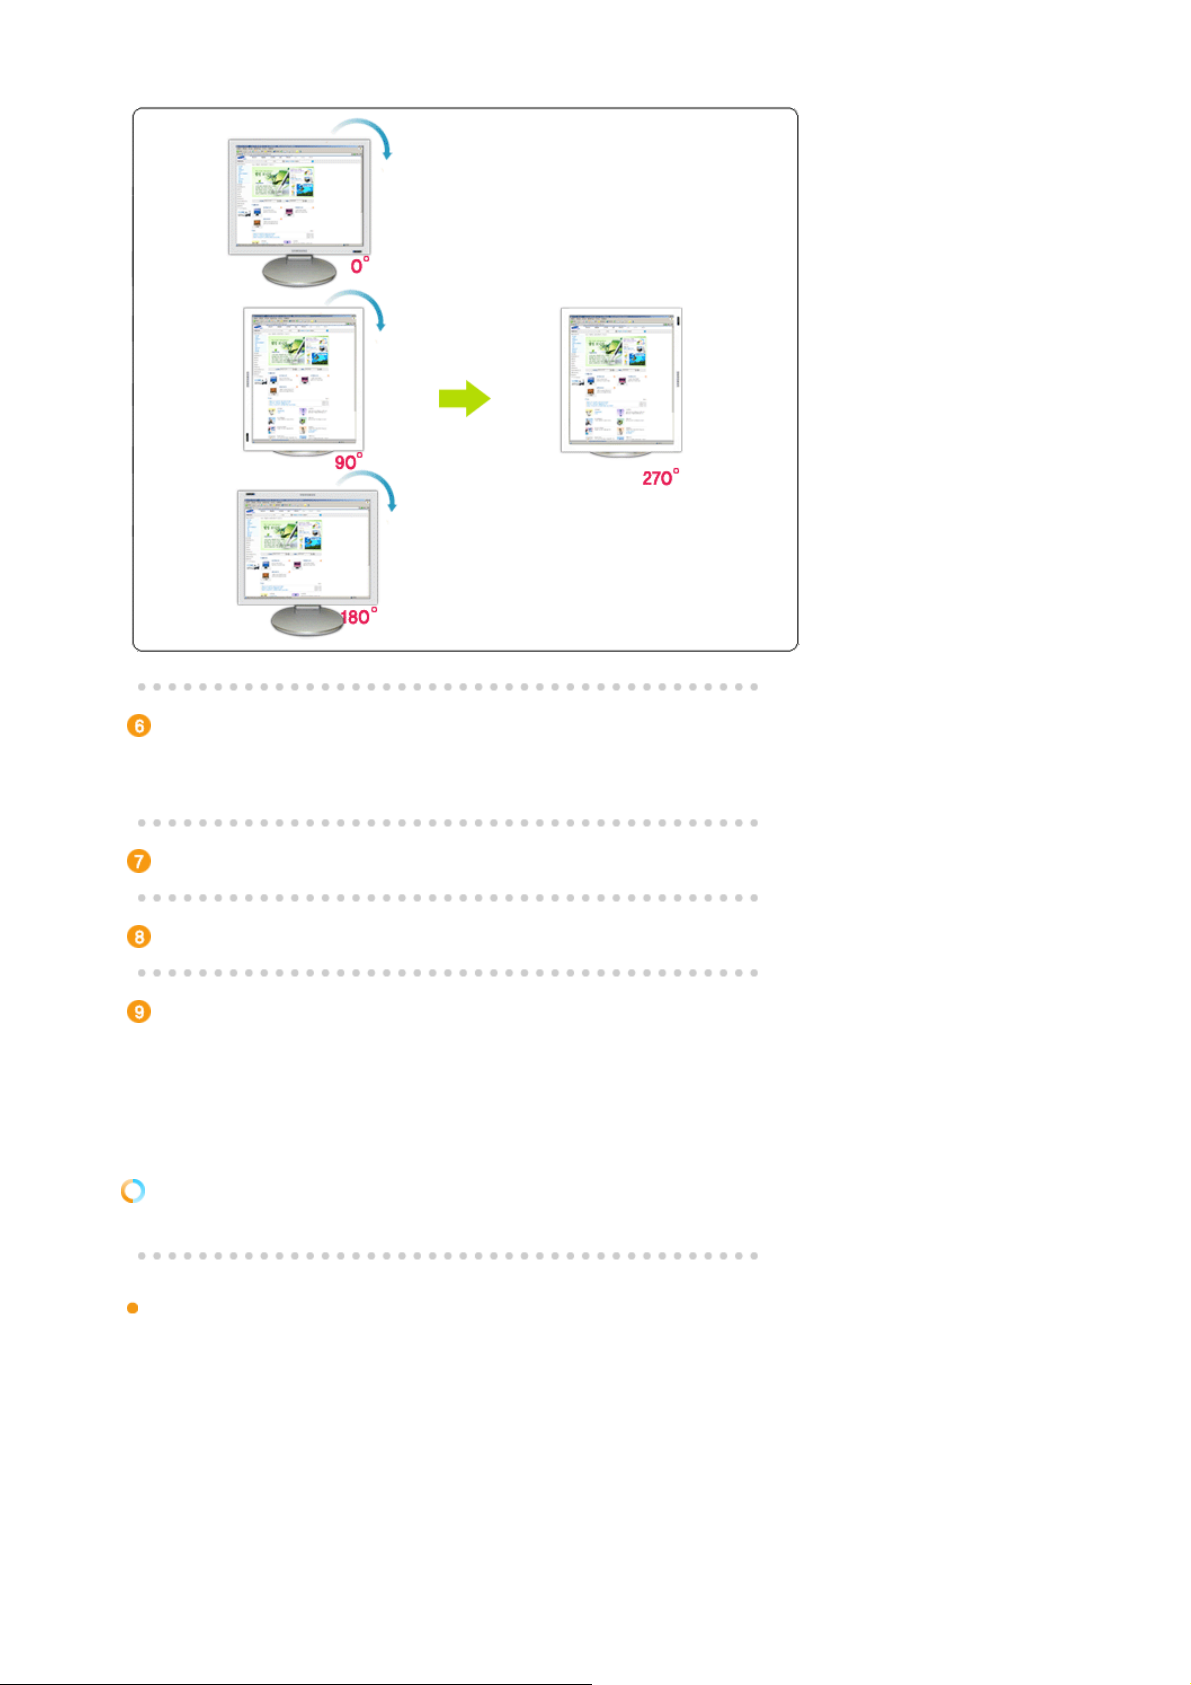
feature (0, 90, 180, 270 orientation) that facilitates the optimum utilization of computer display
screen, better viewing and improved user productivity.
Basic Function
MagicRotation will support Windows
* Windows
®
is registered trademark of Microsoft Corporation,Inc.
Overview |
z
When Rotation is functioning, part of MagicTune™ Program may not operate
normally.
z
AutoRotation : AutoRotation will automatically AutoRotations the monitor to 0, 90,
180degrees when you AutoRotations the monitor.
To execute AutoRotation, it should be done as below.
Please install both of Rotation program and MagicTune™ in your PC.
z
z Launch MagicTune™
z
Option
→
Preference
* The angle of rotatation may vary depending on your monitor spec.
®
2000, XP Home and XP Professional.
Interface
| Troubleshooting
click the small box as "V" in
→
enable task tray menu
.
Interface
The Menu on task bar Menu pop up at the mouse right button click.
Page 38
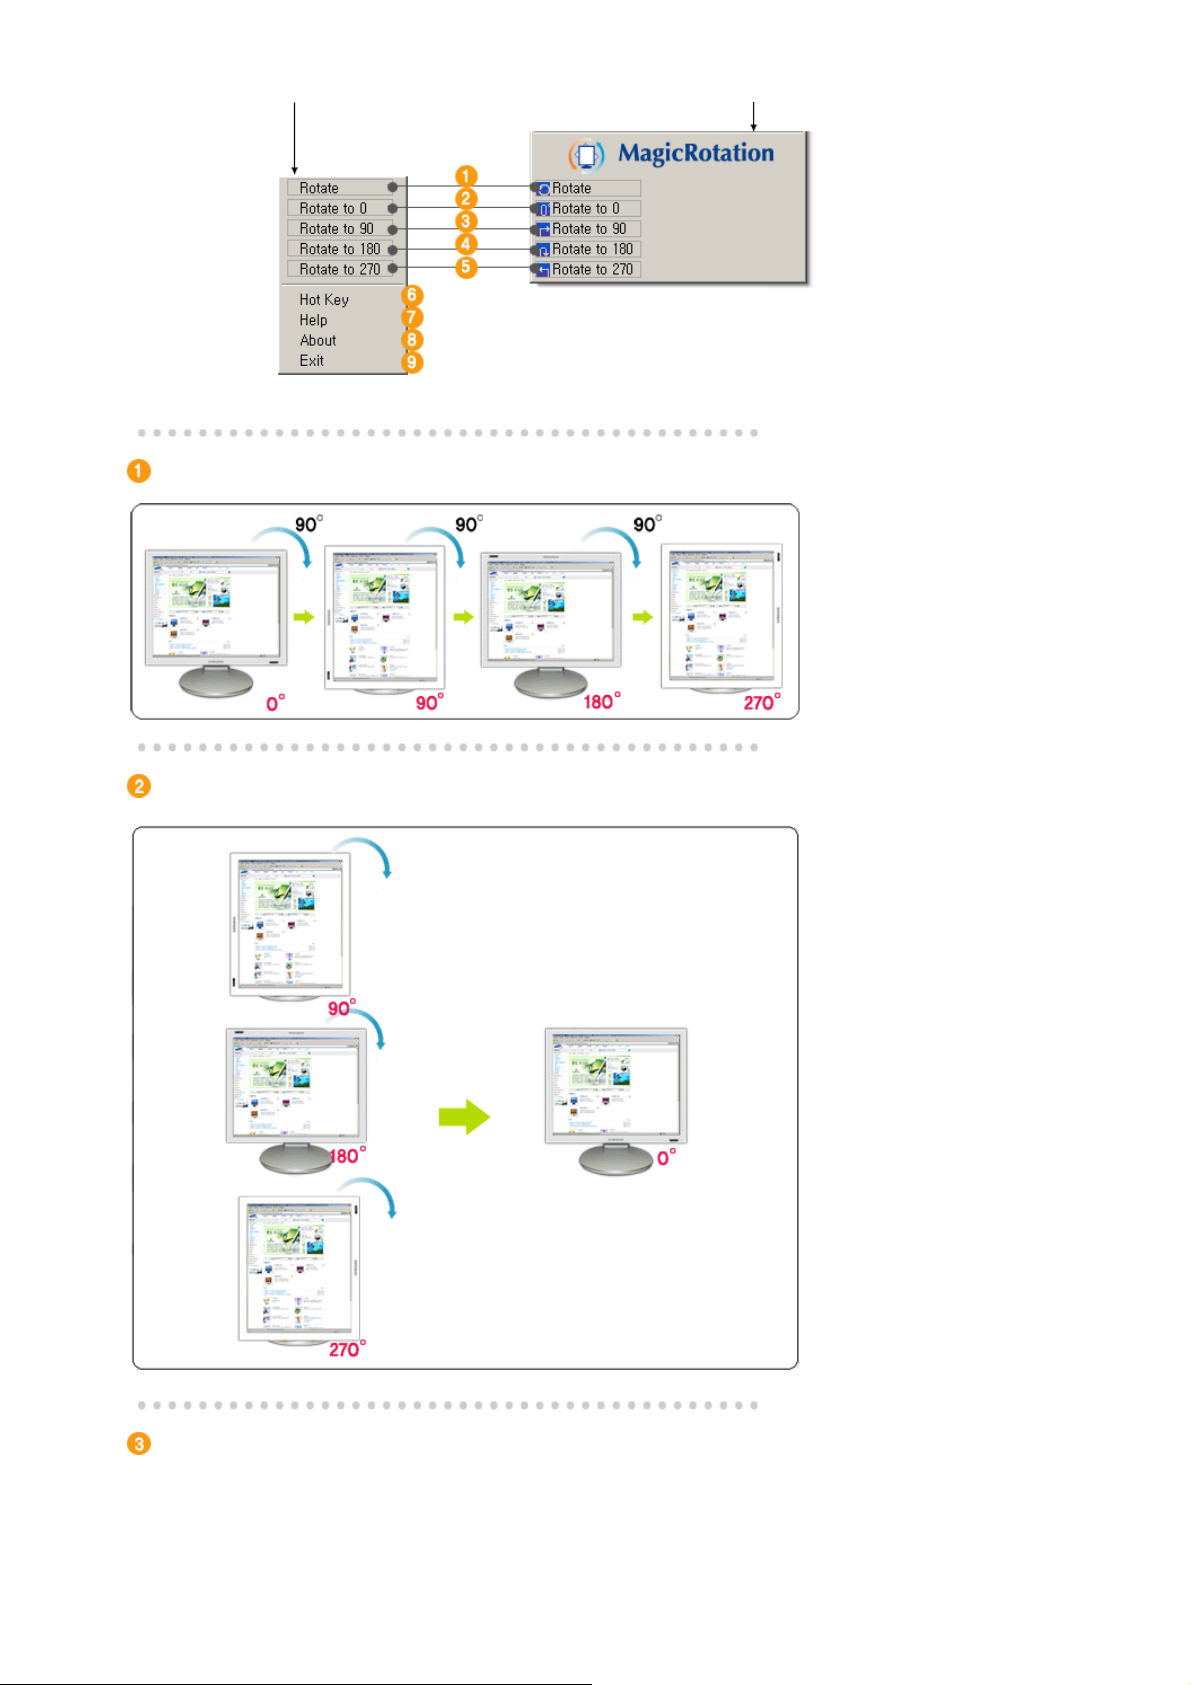
: Display will get rotated by the unit of 90 degree
Rotate
Rotate to 0
: Display will get rotated to 0 degree from the current angle of rotation.
Rotate to 90
: Display will get rotated to 90 degree from the current angle of rotation.
Page 39
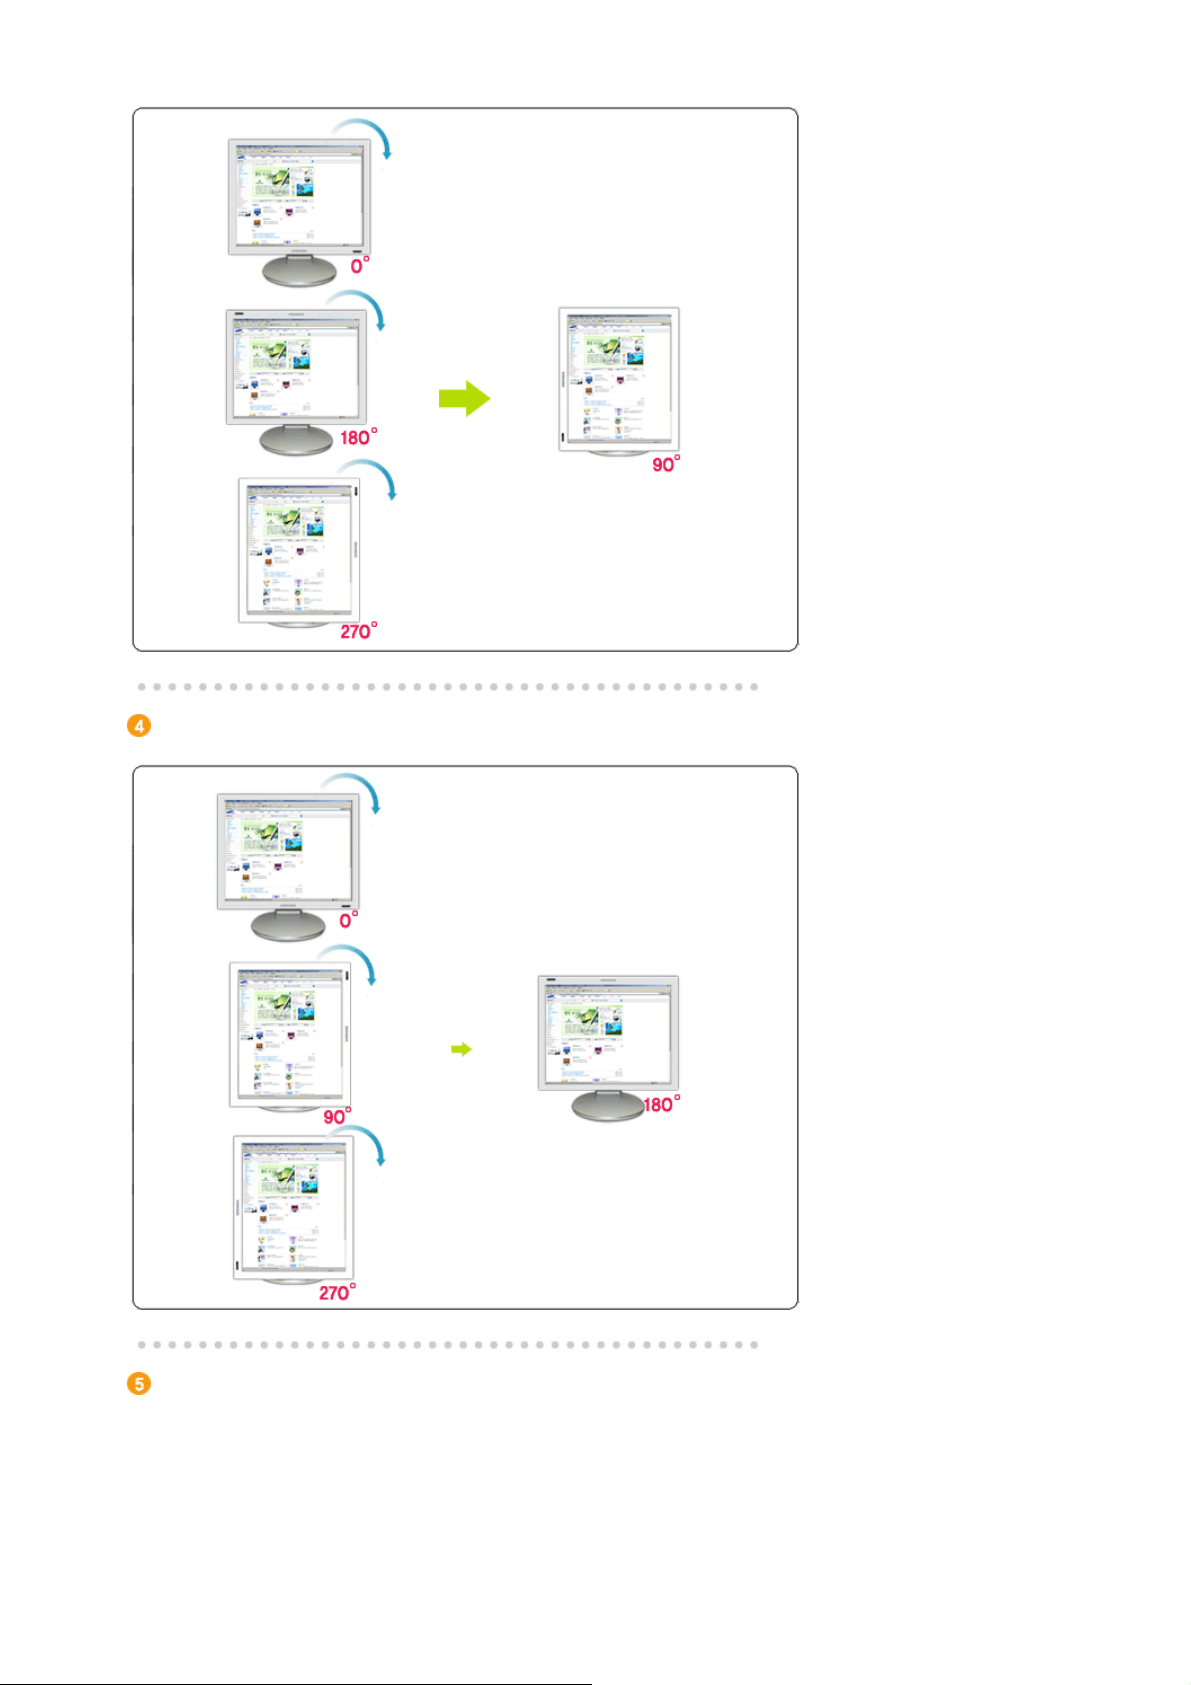
Rotate to 180
: Display will get rotated to 180 degree from the current angle of rotation.
Rotate to 270
: Display will get rotated to 270 degree from the current angle of rotation.
Page 40
Hot key
It can be assigned by user directly with keyboard after changing the existing HotKey.
User can create the hot key with the combination of Shift, Ctrl, Alt and general keys.
In case only general key is pressed, it will be assigned in the form of Alt+general key.
Help
About
Exit
Troubleshooting
: Hot Keys are available by default and can be changed by user.
: It shows the HELP of MagicRotation program.
: It shows the version and copyright of MagicRotation program.
: It exits from MagicRotation program.
Overview | Interface |
Troubleshooting
Before You Call Technical Support
z MagicRotation Software works with the installed "Display Driver" supplied by your Graphic
Card Vendor to provide screen rotation capabilities. If the installed "Display Driver" is
working incorrectly or has bugs in it, then these bugs would still exist even after
MagicRotation Software is installed.
Any incorrect/random behaviour resulting due to problems in the installed "Display Driver"
are not due to MagicRotation Software.
In order to verify if a problem exists in the installed "Display Driver" , you can perform the
following diagonostic steps :
1. Check if the problem is occuring in both 0 orientation (Landscape mode) and 90
orientation (Portarit mode).
Page 41
2. Check if the problem occurs with different color depths (8/16/32 bits per pixel) and
different resolution modes (800 x 600, 1024 x 768).
3. Check if the problem occurs without installing MagicRotation Software.
If the problem is repeating in any/all of the following scenarios then it may be the problem
with your installed "Display Driver" :
In order to correct the problem you need to perform the following steps :
1. Uninstall MagicRotation Software.
2. Obtain the latest "Display Driver" from your Graphic Card Vendor.
The latest "Display Driver" from (ATI, NVIDIA, MATROX, INTEL, etc.) are easily
available for download from their respective websites.
3. Install the latest "Display Driver"
4. Install MagicRotation Software. In most of the cases this should correct the problem.
z MagicRotation may not work in case monitor is replaced or driver of graphic card is updated
while MagicRotation is operating.
If so, please restart the system.
z Visit the MagicRotation website for technical support for MagicRotation, FAQs (questions
and answers) and software upgrades.
Page 42
Check List
Model
SyncMaster 971P
Before calling for service, check the information in this section to see if you can remedy any
problems yourself. If you do need assistance, please call the phone number on the
Information section or contact your dealer.
Symptom Check List Solutions
No images on the
screen. I cannot turn
on the monitor.
Is the power cord
connected properly?
Can you see
"
No Connection
Check Signal Cable
"
on the screen?
If the power is on,
reboot the computer to
see the initial screen
(the login screen),
which can be seen.
Can you see
"Not
Optimum Mode",
"Recommended
Mode 1280 x 1024 60
on the screen?
Hz"
Check the power cord connection and supply.
(When connecting 'DVI-A to D-Sub' Cable)
Check the signal cable connection.
(When connecting DVI cable)
If the message appears on the screen, even
when the cable is properly connected, check the
video source of the monitor by using the Power
button on the front panel of the monitor. This may
happen because the monitor is set to Analog.
If the initial screen (the login screen) appears,
boot the computer in the applicable mode (the
safe mode for Windows ME/XP/2000) and then
change the frequency of the video card.
(Refer to the Preset Timing Modes)
Note: If the initial screen (the login screen) does
not appear, contact the Service Center or your
dealer.
You can see this message when the signal from
the video card exceeds the maximum resolution
and frequency that the monitor can properly
handle.
Adjust the maximum resolution and frequency
that the monitor can properly handle.
There is no image on
the screen.
The monitor is in PowerSaver mode.
Press any key on the keyboard to activate the
monitor and restore the image on the screen.
If the monitor does not respond, activate the
source conversion feature located on the front of
the monitor, or try moving the mouse or pressing
a key on the keyboard again.
Page 43

Is the monitor
connected using the
DVI cable?
You may get a blank screen if you boot the
system before you connect the DVI cable, or
disconnect and then reconnect the DVI cable
while the system is running as certain types of
graphic cards do not send out video signals.
Connect the DVI cable and then reboot the
system.
The screen shows
strange colors or just
black and white.
The screen suddenly
has become
unbalanced.
The screen is out of
focus.
Is the screen displaying
only one color as if
looking at the screen
through a cellophane
paper?
Have the screen colors
become strange after
running a program or
due to a crash between
applications?
Has the video card
been set properly?
Have you changed the
video card or the
driver?
Have you adjusted the
resolution or frequency
to the monitor?
The screen can be unbalanced due to the cycle of the video card signals.
Readjust position by referring to the MagicTune™ program.
Have you adjusted the
resolution or frequency
on the monitor?
Check the signal cable connection. Make sure
the video card is fully inserted in it's slot.
Reboot the computer.
Set the video card by referring to the video card
manual.
Adjust screen image position and size using the
MagicTune™ program.
Adjust the resolution and frequency at the video
card.
(Refer to the Preset Timing Modes).
Adjust the resolution and frequency of the video
card.
(Refer to the Preset Timing Modes).
There are only 16
colors shown on the
screen.
The screen colors
have changed after
changing the video
card.
There is a message
that reads
"Unrecognized
monitor, Plug & Play
(VESA DDC) monitor
found".
Check when
MagicTune™ does not
function properly.
Have the Windows
colors been set
properly?
Has the video card
been set properly?
Have you installed the
monitor driver?
See the video card
manual to see if the
Plug & Play (VESA
DDC) function can be
supported.
MagicTune™ feature is
found only on PC
(VGA) with Window OS
that supports Plug and
Play.
Windows ME/2000/XP:
Set the colors properly at the
Display → Settings
Set the video card by referring to the video card
manual.
Install the monitor driver according to the Driver
Installation Instructions.
* To check whether your PC is available for
MagicTune™ feature, follow the steps below
(When Windows™ is XP);
Control Panel → Performance and Maintenance
System → Hardware → Device Manager →
→
Monitors → After deleting Plug and Play monitor,
find 'Plug and Play monitor' by searching new
Hardware.
MagicTune™ is an additional software for the
monitor. Some graphic cards may not support
your monitor. When you have a problem with the
graphic card, visit our website to check the
compatible graphic card list provided.
http://www.samsung.com/monitor/magictune
.
Control Panel →
MagicTune™ doesn't
work properly.
Have you changed
your PC or video
Download the latest program. The
program can be downloaded
Page 44
graphic card? http://www.samsung.com/monitor/magictune
Y
Did you install the
program?
Visit our website and download the installation software for MagicTune™ MAC.
Check the following items if there is trouble with the monitor.
1. Check if the power cord and the video cables are properly connected to the computer.
2. Check if the computer beeps more than 3 times when booting.
(If it does, request an after-service for the main board of the computer.)
3. If you installed a new video card or if you assembled the PC, check if the installed the adapter
(video) driver and the monitor driver.
4. Check if the scanning ratio of the video screen is set at 56 Hz ~ 75 Hz.
(Do not exceed 60 Hz when using the maximum resolution.)
5. If you have problems in installing the adapter (video) driver, boot the computer in Safe Mode,
remove the Display Adapter at the "
reboot the computer to reinstall the adapter (video) driver.
If problems repeatedly occur, contact an authorized service center.
Control Panel→System→Device Administrator
Reboot the computer after installing
the program for the first time. If a
copy of the program is already
installed, remove it, reboot the
computer, and then install the
program again. You need to reboot
the computer for it to operate
normally after installing or removing
the program.
" and then
Q & A
Question Answer
How can I change the
frequency?
How can I adjust the resolution? Windows ME/XP/2000 : Set the resolution at the
How can I set the Power Saving
function?
How can I clean the outer
case/LCD Panel?
Frequency can be changed by reconfiguring the video card.
Note that video card support can vary, depending on the version
of the driver used. (Refer to the computer or the video card
manual for details.)
Panel→Display→Settings
* Contact the video card manufacturer for details.
Windows ME/XP/2000 : Set the function at BIOS-SETUP of the
computer or the screen saver. (Refer to Windows/Computer
Manual).
Disconnect the power cord and then clean the monitor with a soft
cloth, using either a cleaning solution or plain water.
Do not leave any remains of the detergent nor scratch the case.
Do not allow any water to go inside the monitor.
.
Control
Self-Test Feature Check
Self-Test Feature Check | Warning Messages | Environment | Useful Tips
our monitor provides a self test feature that allows you to check whether your monitor is
Page 45
functioning properly.
Self-Test Feature Check
1. Turn off both your computer and the monitor.
2. Unplug the video cable from the back of the computer.
3. Turn on the monitor.
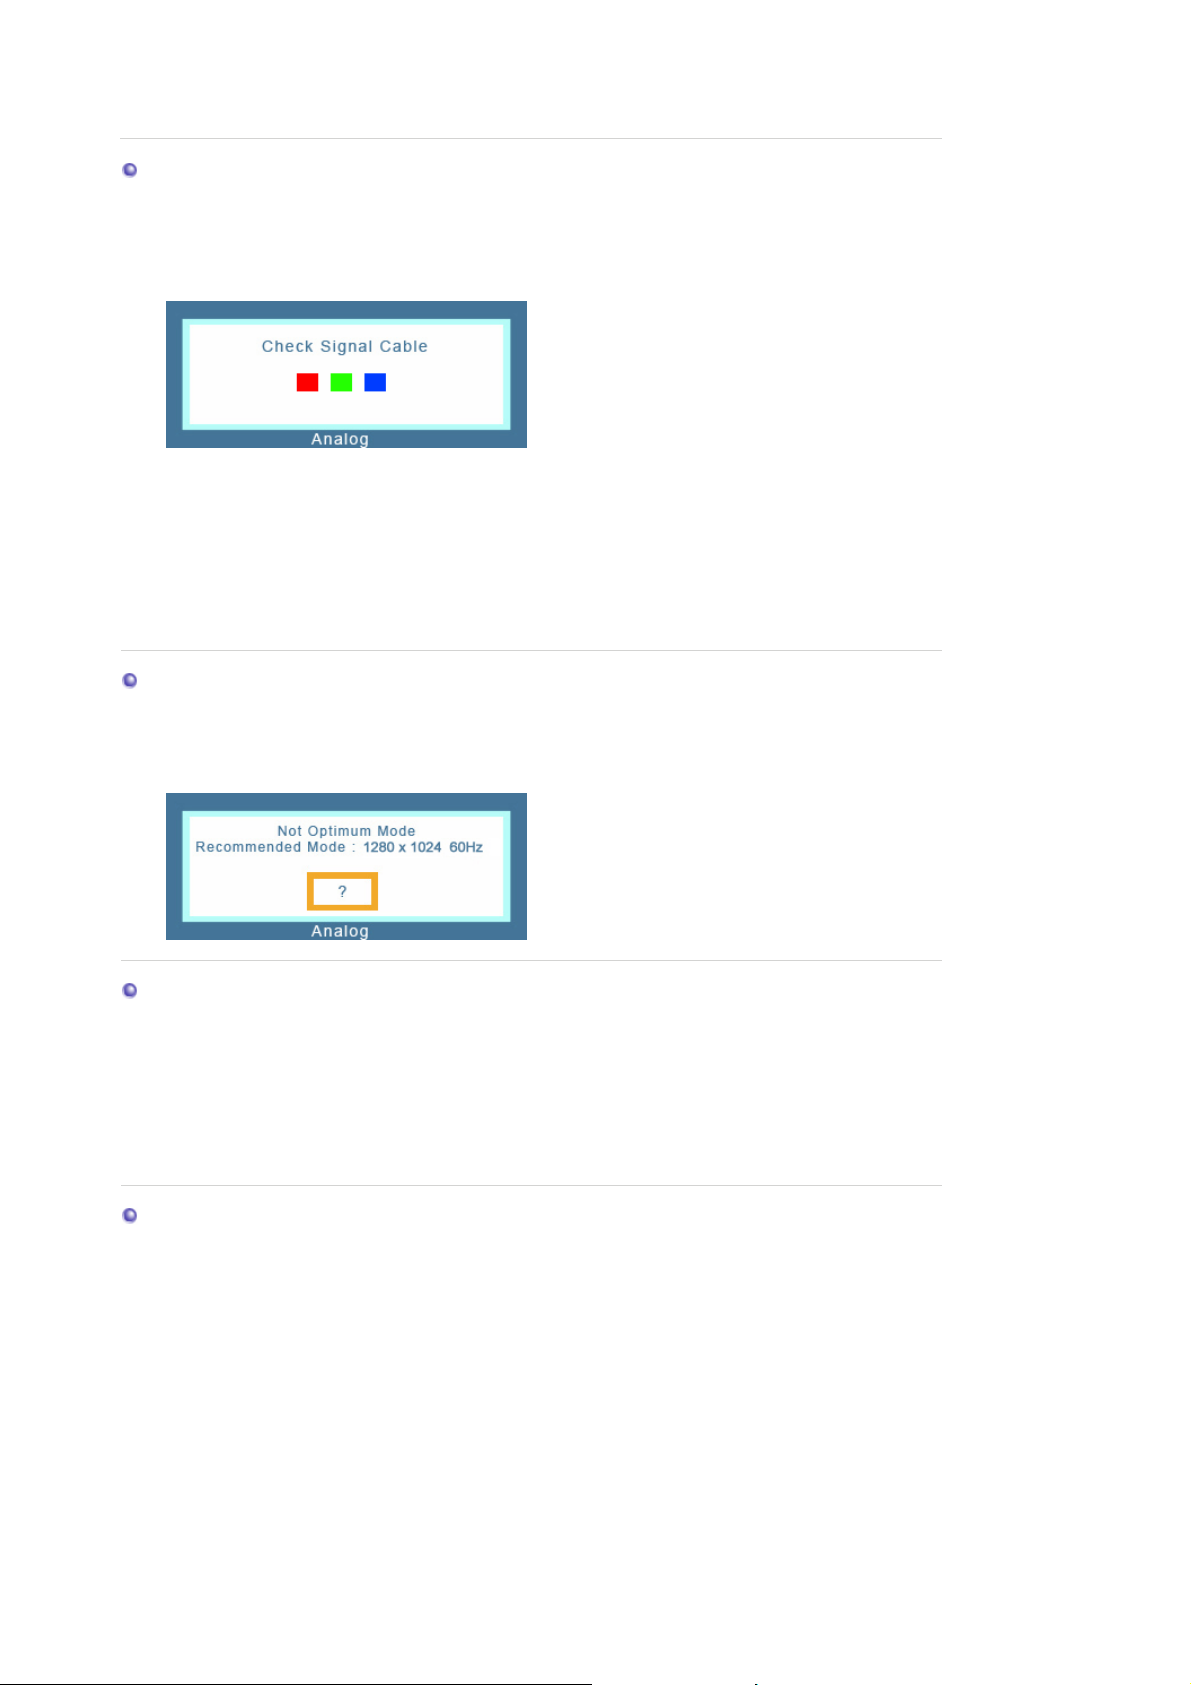
If the monitor is functioning properly, you will see a box in the illustration below.
This box appears during normal operation if the video cable becomes disconnected or
damaged.
4. Turn off your monitor and reconnect the video cable; then turn on both your computer and the
monitor.
If your monitor screen remains blank after using the previous procedure, check your video
controller and computer system; your monitor is functioning properly.
Warning Messages
If there is something wrong with the input signal, the message below appears on the screen
or the screen goes blank although the power indicator LED is still on. The message may
indicate that the monitor is out of scan range or that you need to check the signal cable.
Environment
The location and the position of the monitor may influence the quality and other
features of the monitor.
1. If there are any sub woofer speakers near the monitor, unplug and relocate the woofer
to another room.
2. Remove all electronic devices such as radios, fans, clocks and telephones that are
within 3 feet (one meter) of the monitor.
Useful Tips
z A monitor recreates visual signals received from the computer. Therefore, if there is trouble with
the computer or the video card, this can cause the monitor to become blank, have poor coloring,
noise, video mode not supported, etc. In this case, first check the source of the problem, and
then contact a service center or your dealer.
z
Judging the monitor's working condition
If there is no image on the screen or a
1024 60 Hz"
message comes up, disconnect the cable from the computer while the monitor is
"Not Optimum Mode","Recommended Mode 1280 x
still powered on.
{ If there is a message coming up on the screen or if the screen goes white, this means the
monitor is in working condition.
{ In this case, check the computer for trouble.
Page 46
General
General
Model Name SyncMaster 971P
Model
SyncMaster 971P
LCD Panel
Size 19" Diagonal (48 cm)
Display area 376.32 mm (H) x 301.056 mm (V)
Pixel Pitch 0.294 mm (H) x 0.294 mm (V)
Synchronization
Horizontal 30 ~ 81 kHz
Vertical 56 ~ 75 Hz
Display Color
16.7 M Colors
Resolution
Optimum resolution 1280 x 1024@60 Hz
Maximum resolution 1280 x 1024@75 Hz
Input Signal, Terminated
RGB Analog, DVI(Digital Visual Interface) Compliant Digital RGB
0.7 Vp-p±5 %, positive bright 75 Ω±10 %
Separate H/V sync, Composite, SOG, TTL level, positive or negative
Maximum Pixel Clock
140 MHz
Power Supply
AC 100 - 240 VAC +/-10 %, 60/50 Hz ± 3 Hz
Signal Cable
'DVI-A to D-SUB' Cable , Detachable
DVI-I to DVI-I connector, Detachable (Option)
Dimensions (WxHxD)/ Weight
423 x 433 x 228 mm(16.7 x 17 x 9 inch) / 6 kg / 13.2 lbs
348 x 72 x 425 mm(13.7 x 2.8 x 16.7 inch) / 6 kg / 13.2 lbs (When the stand is foldded)
Page 47
Environmental considerations
Operating Temperature: 50 °F ~ 104 °F(10 °C ~ 40 °C)
Humidity: 10 % ~ 80 %, non-condensing
Storage Temperature: -4 °F ~ 113 °F (-20 °C ~ 45 °C)
Humidity: 5 % ~ 95 %, non-condensing
Plug and Play Capability
This monitor can be installed on any Plug & Play compatible system. Interaction of the monitor and
computer systems will provide the best operating conditions and monitor settings. In most cases,
monitor installation will proceed automatically, unless the user wishes to select alternate settings.
Dot Acceptable
TFT LCD panel manufactured by using advanced semiconductor technology with precision of 1ppm
(one millionth) above is used for this product. But the pixels of RED, GREEN, BLUE and WHITE
color seem to be bright sometimes or some of black pixels could be seen. This is not from bad
quality and you can use it without uneasiness.
For example, the number of TFT LCD sub pixels that is contained in this product are 3,932,160.
z
Note: Design and specifications are subject to change without prior notice.
Class B Equipment (Information Communication equipment for residential use)
This product complies with the Electromagnetic Compatibility Directives for residential use and can
be used in all areas including common residential areas.
(Class B equipment emits less electromagnetic waves than Class A equipment.)
Though their model names (
pet names
) are same, the products may have different
performance or specifications depending on the model code.
PowerSaver
This monitor has a built-in power management system called PowerSaver. This system saves energy
by switching your monitor into a low-power mode when it has not been used for a certain amount of
time. The monitor automatically returns to normal operation when you press a key on the keyboard. For
energy conservation, turn your monitor OFF when it is not needed, or when leaving it unattended for
long periods. The PowerSaver system operates with a VESA DPMS compliant video card installed in
your computer. Use a software utility installed on your computer to set up this feature.
State
Normal Operation
Power saving mode
Power off
EPA/ENERGY 2000
Power Indicator Blue Off Off
Power Consumption Less than 36 W
Less than 1 W
(Off-mode)
Less than 1 W
This monitor is EPA ENERGY STAR® compliant and ENERGY2000
compliant when used with a computer equipped with VESA DPMS
functionality.
As an ENERGY STAR
®
Partner, SAMSUNG has determined that this
product meets the ENERGY STAR
®
guidelines for energy efficiency.
Page 48

Preset Timing Modes
If the signal transferred from the computer is the same as the following Preset Timing Modes, the
screen will be adjusted automatically (Exception : 640 x 480/60 Hz, 720 x 400/70Hz, 800 x 600/60
Hz) However, if the signal differs, the screen may go blank while the power LED is on. Refer to the
video card manual and adjust the screen as follows.
Table 1. Preset Timing Modes
Horizontal
Display Mode
IBM, 640 x 350 31.469 70.086 25.175 +/-
IBM, 640 x 480 31.469 59.940 25.175 -/-
IBM, 720 x 400 31.469 70.087 28.322 -/+
MAC, 640 x 480 35.000 66.667 30.240 -/-
MAC, 832 x 624 49.726 74.551 57.284 -/-
MAC, 1152 x 870 68.681 75.062 100.00 -/-
VESA, 640 x 480 37.861 72.809 31.500 -/-
VESA, 640 x 480 37.500 75.000 31.500 -/-
VESA, 800 x 600 35.156 56.250 36.000 +/+
VESA, 800 x 600 37.879 60.317 40.000 +/+
VESA, 800 x 600 48.077 72.188 50.000 +/+
VESA, 800 x 600 46.875 75.000 49.500 +/+
VESA, 1024 x 768 48.363 60.004 65.000 -/-
VESA, 1024 x 768 56.476 70.069 75.000 -/-
Frequency
(kHz)
Vertical
Frequency
(Hz)
Pixel Clock
(MHz)
Sync Polarity
(H/V)
VESA, 1024 x 768 60.023 75.029 78.750 +/+
VESA, 1152 x 864 67.500 75.000 108.00 +/+
VESA, 1280 x 960 60.000 60.000 108.00 +/+
VESA, 1280 x 1024 63.981 60.020 108.00 +/+
VESA, 1280 x 1024 79.976 75.025 135.00 +/+
Horizontal Frequency
The time to scan one line connecting the right edge to the left edge of
the screen horizontally is called Horizontal Cycle and the inverse
number of the Horizontal Cycle is called Horizontal Frequency. Unit:
kHz
Vertical Frequency
Like a fluorescent lamp, the screen has to repeat the same image
many times per second to display an image to the user. The
frequency of this repetition is called Vertical Frequency or Refresh
Rate. Unit: Hz
Page 49
Contact SAMSUNG WORLDWIDE
Model
SyncMaster 971P
If you have any questions or comments relating to Samsung products, please
contact the SAMSUNG customer care center.
North America
U.S.A 1-800-SAMSUNG (7267864) http://www.samsung.com
CANADA 1-800-SAMSUNG (7267864) http://www.samsung.com/ca
MEXICO 01-800-SAMSUNG (7267864) http://www.samsung.com/mx
Latin America
ARGENTINE 0800-333-3733 http://www.samsung.com/ar
BRAZIL 4004-0000 http://www.samsung.com/br
CHILE 800-726-7864 (SAMSUNG) http://www.samsung.com/cl
COLOMBIA 01-8000112112 http://www.samsung.com.co
COSTA RICA 0-800-507-7267 http://www.samsung.com/latin
ECUADOR 1-800-10-7267 http://www.samsung.com/latin
EL SALVADOR 800-6225 http://www.samsung.com/latin
GUATEMALA 1-800-299-0013 http://www.samsung.com/latin
JAMAICA 1-800-234-7267 http://www.samsung.com/latin
PANAMA 800-7267 http://www.samsung.com/latin
PUERTO RICO 1-800-682-3180 http://www.samsung.com/latin
REP. DOMINICA 1-800-751-2676 http://www.samsung.com/latin
TRINIDAD & TOBAGO 1-800-7267-864 http://www.samsung.com/latin
VENEZUELA 0-800-100-5303 http://www.samsung.com/latin
Europe
Page 50
BELGIUM 02 201 2418 http://www.samsung.com/be
CZECH REPUBLIC 844 000 844 http://www.samsung.com/cz
DENMARK 70 70 19 70 http://www.samsung.com/dk
FINLAND 030-6227 515 http://www.samsung.com/fi
FRANCE
GERMANY
HUNGARY 06-80-SAMSUNG (7267864) http://www.samsung.com/hu
ITALIA 800 SAMSUNG (7267864) http://www.samsung.com/it
LUXEMBURG 0032 (0)2 201 24 18 http://www.samsung.lu
NETHERLANDS
NORWAY 815-56 480 http://www.samsung.com/no
POLAND 0 801 801 881 http://www.samsung.com/pl
PORTUGAL 80 8 200 128 http://www.samsung.com/pt
REPUBLIC OF IRELAND 0818 717 100 http://www.samsung.com/uk
SLOVAKIA 0800-SAMSUNG (7267864) http://www.samsung.com/sk
SPAIN 902 10 11 30 http://www.samsung.com/es
SWEDEN 0771-400 200 http://www.samsung.com/se
SWITZERLAND 0800-7267864 http://www.samsung.com/ch
U.K 0870 SAMSUNG (7267864) http://www.samsung.com/uk
3260 SAMSUNG(7267864)
(€ 0,15/min)
01805-SAMSUNG(726-7864)
(€ 0,14/Min)
0900 SAMSUNG(726-7864)
(€ 0,10/Min)
CIS
http://www.samsung.com/fr
http://www.samsung.de
http://www.samsung.com/nl
ESTONIA 800-7267 http://www.samsung.ee
LATVIA 800-7267 http://www.samsung.com/lv
LITHUANIA 8-800-77777 http://www.samsung.lt
KAZAKHSTAN 8 800 080 1188 http://www.samsung.kz
RUSSIA 8-800-200-0400 http://www.samsung.ru
UKRAINE 8-800-502-0000 http://www.samsung.com/ur
UZBEKISTAN 140-1234 http://www.samsung.uz
Asia Pacific
AUSTRALIA 1300 362 603 http://www.samsung.com/au
CHINA 800-810-5858, 010- 6475 1880 http://www.samsung.com.cn
HONG KONG 3698-4698 http://www.samsung.com/hk
INDIA 3030 8282, 1800 1100 11 http://www.samsung.com/in
INDONESIA 0800-112-8888 http://www.samsung.com/id
JAPAN 0120-327-527 http://www.samsung.com/jp
Page 51
MALAYSIA 1800-88-9999 http://www.samsung.com/my
PHILIPPINES 1800-10-SAMSUNG (7267864) http://www.samsung.com/ph
SINGAPORE 1800-SAMSUNG (7267864) http://www.samsung.com/sg
THAILAND 1800-29-3232, 02-689-3232 http://www.samsung.com/th
TAIWAN 0800-329-999 http://www.samsung.com/tw
VIETNAM 1 800 588 889 http://www.samsung.com/vn
Middle East & Africa
SOUTH AFRICA 0860 7267864 (SAMSUNG) http://www.samsung.com/za
U.A.E 800SAMSUNG (7267864)
8000-4726
Terms
Dot Pitch
The image on a monitor is composed of red, green and blue dots. The closer the dots, the
higher the resolution. The distance between two dots of the same color is called the 'Dot
Pitch'. Unit: mm
Vertical Frequency
The screen must be redrawn several times per second in order to create and display an image
for the user. The frequency of this repetition per second is called Vertical Frequency or
Refresh Rate. Unit: Hz
Example: If the same light repeats itself 60 times per second, this is regarded as 60 Hz.
Horizontal Frequency
The time to scan one line connecting the right edge to the left edge of the screen horizontally
is called Horizontal Cycle. The inverse number of the Horizontal Cycle is called Horizontal
Frequency. Unit: kHz
Interlace and Non-Interlace Methods
Showing the horizontal lines of the screen from the top to the bottom in order is called the
Non-Interlace method while showing odd lines and then even lines in turn is called the
Interlace method. The Non-Interlace method is used for the majority of monitors to ensure a
clear image. The Interlace method is the same as that used in TVs.
Plug & Play
This is a function that provides the best quality screen for the user by allowing the computer
and the monitor to exchange information automatically. This monitor follows the international
standard VESA DDC for the Plug & Play function.
Resolution
The number of horizontal and vertical dots used to compose the screen image is called
'resolution'. This number shows the accuracy of the display. High resolution is good for
performing multiple tasks as more image information can be shown on the screen.
Example: If the resolution is 1280 x 1024 , this means the screen is composed of 1280
horizontal dots (horizontal resolution) and 1024 vertical lines (vertical resolution).
http://www.samsung.com/mea
Page 52
For Better Display
1. Adjust computer resolution and screen injection rate (refresh rate) oncomputer as described
below to enjoy the best quality of picture. You can have an uneven quality of picture in the
screen if the best quality of picture is not provided in TFT-LCD.
{ Resolution: 1280 x 1024
{ Vertical frequency (refresh rate): 60 Hz
2. TFT LCD panel manufactured by using advanced semiconductor technology with precision of
1ppm (one millionth) above is used for this product. But the pixels of RED, GREEN, BLUE
and WHITE color seem to be bright sometimes or some of black pixels could be seen.
This is not from bad quality and you can use it without uneasiness.
{ For example, the number of TFT LCD sub pixels that is contained in this product are
3,932,160.
3. When you clean the monitor and the panel outside, please apply the recommended small
amount of cleaner by using soft and dry cloth and polish it. Let LCD area not to be forced but
to be scrubbed out softly.
If excessive force is applied, you can have a stain on it.
4. If you are not satisfied with the quality of picture, you can get better quality of picture by
executing "auto adjustment function" in display screen that is appeared as window
termination button is pressed.
If there's still noise after automatic adjustment, use FINE/COARSE adjustment function.
5. If you view a fixed screen for an extended period of time, residual image or blurriness may
appear.
Change the mode to energy save or set a screensaver to moving picture when you need to
be away from the monitor for an extended period of time.
Authority
Information in this document is subject to change without notice.
© 2007 Samsung Electronics Co., Ltd. All rights reserved.
Reproduction in any manner whatsoever without the written permission of Samsung Electronics
Co., Ltd. is strictly forbidden.
Samsung Electronics Co., Ltd. shall not be liable for errors contained herein or for incidental or
consequential damages in connection with the furnishing, performance, or use of this material.
Samsung is the registered trademark of Samsung Electronics Co., Ltd.; Microsoft, Windows and
Windows NT are registered trademarks of Microsoft Corporation; VESA, DPMS and DDC are
registered trademarks of Video Electronics Standard Association; the ENERGY STAR® name and
logo are registered trademarks of the U.S. Environmental Protection Agency (EPA). As an
ENERGY STAR® Partner, Samsung Electronics Co., Ltd. has determined that this product meets
the ENERGY STAR® guidelines for energy efficiency. All other product names mentioned herein
may be the trademarks or registered trademarks of their respective owners.
Page 53
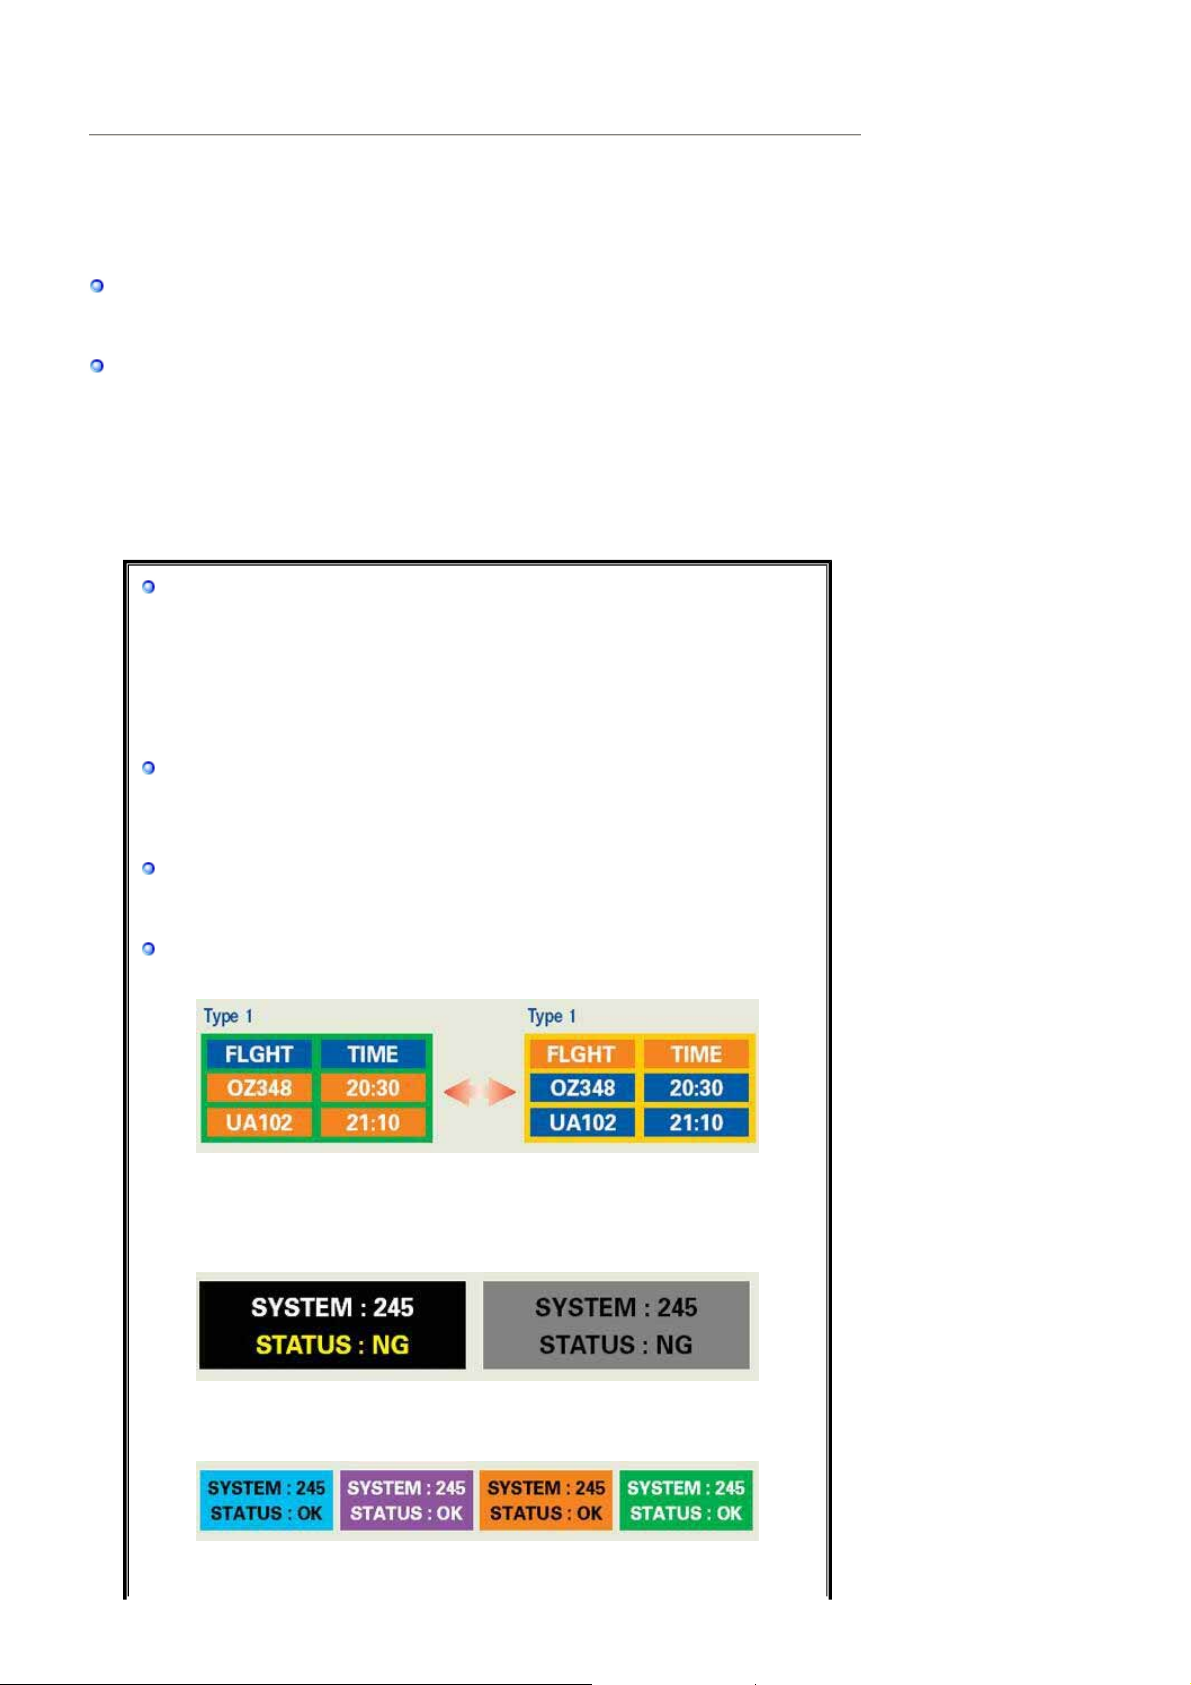
PRODUCT INFORMATION (Image Retention Free)
y
A
A
LCD Monitors and TVs may have image retention when switching from one image to another
especially after displaying a stationary image for a long time.
This guide is to demonstrate correct usage of LCD products in order to protect them from Image
retention.
Warrant
Warranty does not cover any damage caused by image retention.
Burn-in is not covered by the warranty.
What is Image retention ?
During normal operation of a LCD panel, pixel image retention doesn 't occur. However,
if the same image is displayed for a long time, a slight difference in electric charge
accumulates between the two electrodes which encase the liquid crystal. Th is may
cause the liquid crystal to build up in a certain areas of the display. Thus, the previous
image is retained when switching to a new video image. All display products, including
LCD,are subject to image retention. This is not a product defect.
Please follow the suggestions below to protect your LCD from image retention
Power Off, Screen Saver, or Power Save Mode
Ex)
z Turn the power off when using a stationary pattern.
- Turn the power off for 4 hours after 20 hours in use
- Turn the power off for 2 hours after 12 hours in use
z Use a Screen saver if possible
- Screen saver in one color or a moving image is recommended.
z Set the Monitor to power off with the PC Display Properties Power Scheme.
Suggestions for specific applications
Ex) Airports, Transit Stations, Stock Markets, Banks, and Controlling Systems
We recommend that you follow set up of your display system program as below:
Display Information together with Logo or Moving image cycle.
Ex) Cycle : Display Information for 1 hour followed by a
Display Logo or moving image for 1 minute.
Change the Color Information periodically (Use 2 different colors).
Ex) Rotate the Color Information with 2 colors every 30 minutes.
void using a combination of characters and background color with large
difference in luminance.
void using Grey colors, which can cause Image retention easily.
z Avoid: Colors with big difference in luminance (Black & White, Grey)
Ex)
z Recommended settings: Bright colors with little difference in luminance
- Change the characters color and background color every 30 minutes
Ex)
- Every 30 minutes, change the characters with movement.
Page 54
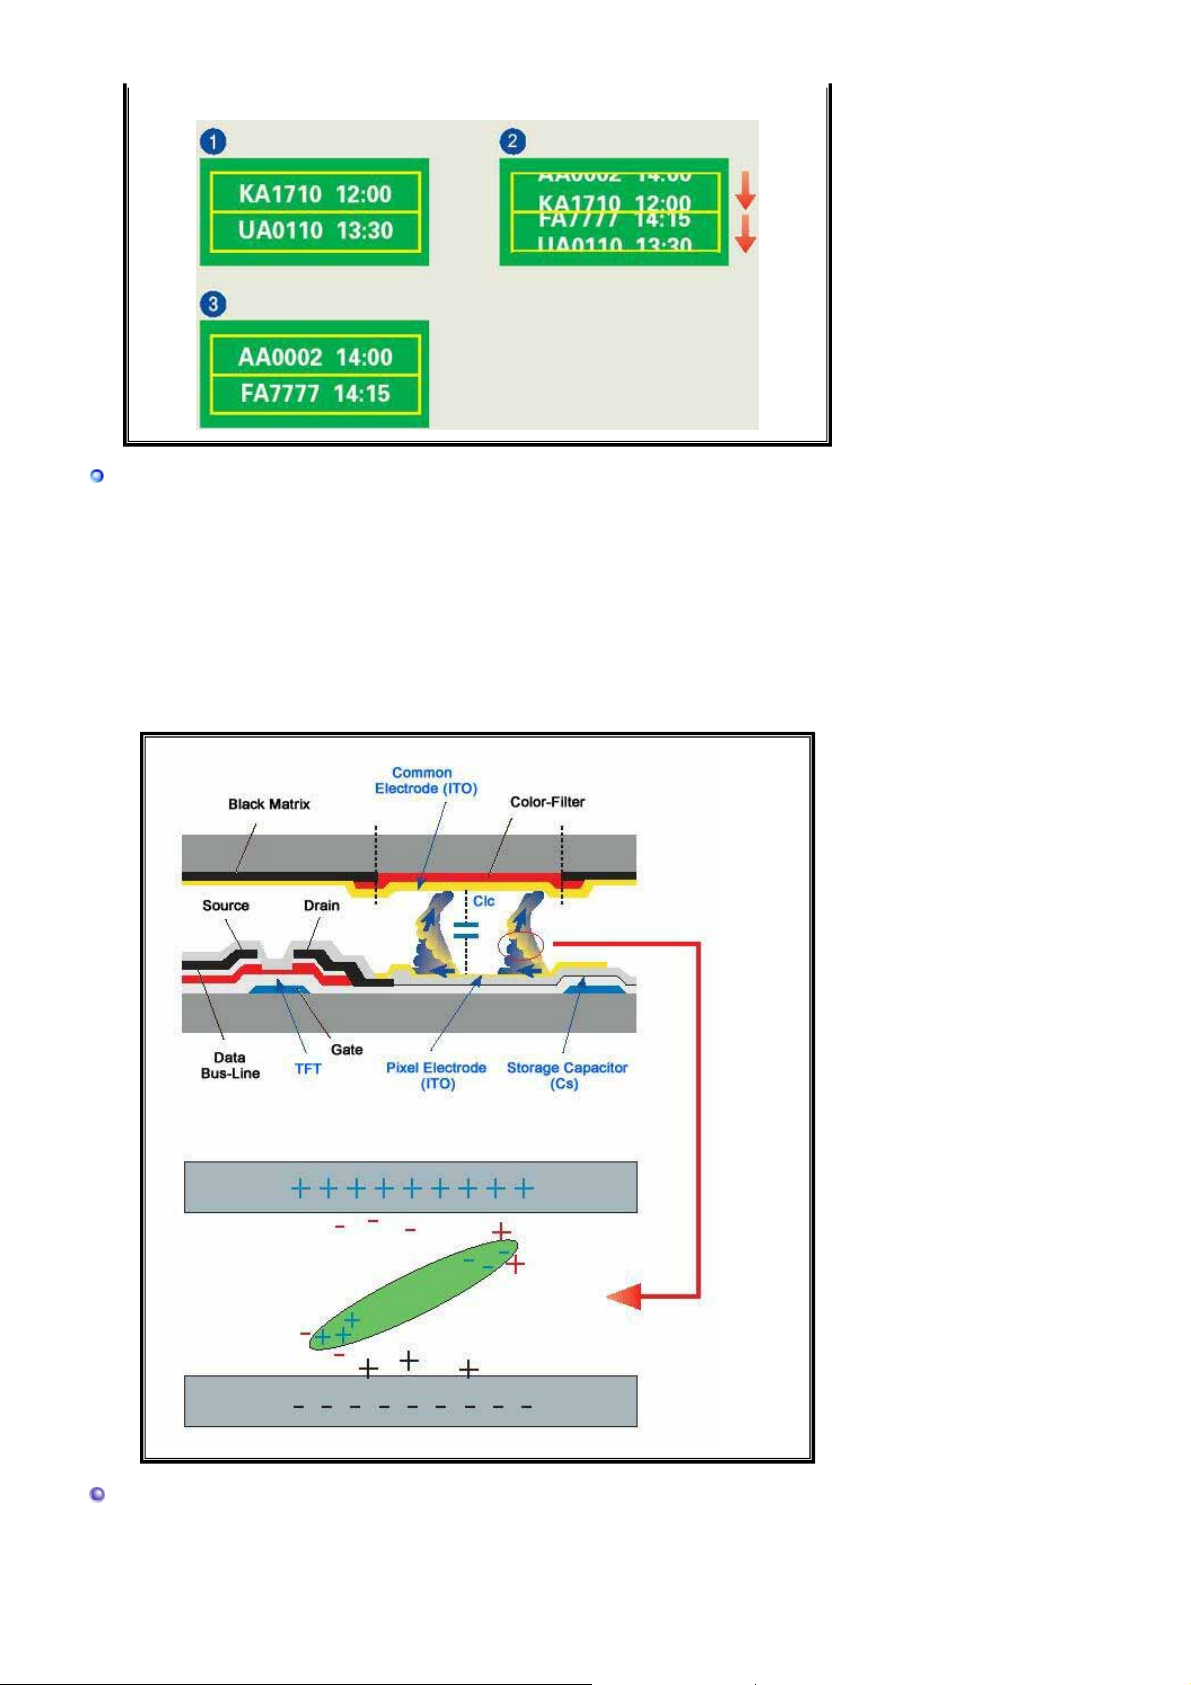
Ex)
The best way to protect your monitor from Image retention is to set your PC or
System to operate a Screen Saver program when you are not using it.
Image retention may not occur when a LCD panel is operated unde r normal c onditions.
Normal conditions are defined as continuously changing video patterns. When the LCD
panel is operated for a long time with a fixed pattern (-over 12 hours-), there may be
slight difference in voltage between electrodes that work the liquid crystal (LC) in a
pixel. The voltage difference between electrodes increases with time, forcing the liquid
crystal to lean. When this occurs, the previous image may be seen when the pattern is
changed.
To prevent this, the accumulated voltage difference must be decreased.
Our LCD Monitor satisfies ISO13406-2 Pixel fault Class II
Page 55

Correct Disposal of This Product
(Waste Electrical & Electronic Equipment) - Europe only
(Applicable in the European Union and other European countries with
separate collection systems)
This marking shown on the product or its literature, indicates that it should not
be disposed with other household wastes at the end of its working life. To
prevent possible harm to the environment or human health from uncontrolled
waste disposal, please separate this from other types of was tes and recycle it
responsibly to promote the sustainable reuse of material resources.
Household users should contact either the retailer where they purchased this
product, or their local government office, for details of where and how they
can take this item for environmentally safe recycling.
Business users should contact their supplier and check the terms and
conditions of the purchase con tract. This product should not be mixed with
other commercial wastes for disposal.
 Loading...