

Page 1

SAMSUNG
MagicLAN
SWL-2210M/P
User Manual
(Rev. 1.4)
1
Page 2

Table of Contents
1. MagicLAN Installation ……………...………..……………………………………...…...9
1.1 Introduction ..………..…………………...……………………………………….…..9
1.2 Technical Background ………………………………………………..……….…..…9
1.3 MagicLAN Overview….…………………...……………….….……….…..……....11
2. Before the Installation ………………………………………………………..……….....13
2.1 What is in your Package …………………………………………………….….…..13
2.2 System Requirement ……………………………………..…………………….…...13
2.3 Preparations For Installation……………………………..…………………….…...13
3. MagicLAN Installation for Windows 98/ME/NT4.0/2000/XP ……….………….14
3.1 Installation Overview ……………………………………….……………….……...14
3.2 Installation Procedure of Windows 98 ………………..….………….…..….14
3.3 Installation Procedure of Windows ME ………………..….………….…..….21
3.4 Installation Procedure of Windows NT4.0 ………….………………………….. 27
3.5 Installation Procedure of Windows 2000 …………………………...……….38
3.6 Installation Procedure of Windows XP …………..………………...………..43
3.7 Update of MagicLAN Wireless LAN Card Driver…………….….…….…….......49
3.8 Re moval o f Magic LAN Wir eless LAN Card Dr iver.….…….…….......49
4. The Program for setting MagicLAN..…….………………………...………..………..…51
4.1 The concept of Profile………………………………………….………..…..……..51
4.2 Installation Procedure…………………………………………………...….….51
5. The main configuration of Program ………………………….…………...……………57
5.1 Profile……………………………………………...……………..……………….…58
5.1.1 The ‘New’ button………….…………………………………..…….……...58
5.1.2 The ‘Apply’ button…………..…………………………………...………...58
5.1.3 The ‘Edit’ button…………..……………………………………………..…58
5.1.4 The ‘Delete’ button………..…………………………………………....…..59
5.2 Status………………………...………………………………….……….…..…..….61
5.2.1 The ‘Current Status’ button……….………………………………...…......62
5.2.2 The ‘AP Status’ button..….…….………….………………………..……..62
5.2.3 The ‘Site Survey’ button…………………….……………………...……..63
5.2.4 Statistics………………...……….………………...…….….…....………..64
2
Page 3

5.3 General Settings……………….………..…………...….……………..…….….……64
5.3.1 The ‘DHCP’ button…….………………………………………….…..….64
5.3.2 The ‘Options’ button…………………….…………………….……….….65
5.4 Version……………………………………………………….……………..…….65
6. Troubleshooting ………………………………………………......…….……….…….67
3
Page 4

Notice 1
This manual cannot be reproduced in any form without the prior written permission of
SAMSUNG Electro-Mechanics Co., Ltd.
The users manual or instruction manual for an intentional or unintentional radiator shall
caution the user that changes or modifications not expressly approved by the party
responsible for compliance could void the user's authority to operate the equipment.
SAMSUNG Electro-Mechanics Co., Ltd. reserves the right to change this manual and the
specifications to improve products without prior notice. So you can get the most recent
software and user documentation for all MagicLAN products on our web site.
All other brand and product names are trademarks of registered trademarks of their
respective holders.
http://www.MagicLAN.com
Service Dept
Young-sik Lyu (youngsik.you@samsung.com
Tel : +82-31-218-2416 Fax : +82-31-218-2413
Sales
America
Europe
.
Eun-Sung Cho(echo65@samsung.com)
Tel : +82-31-218-2407 Fax : +82-31-218-2414
Yong-Il Kim (goodland@samsung.co.kr)
Tel : +82-31-218-2408 Fax : +82-31-218-2414
)
Asia
Seong-Mun Jeong (sungmun.jeong@samsung.com
Tel : +82-31-218-2412 Fax : +82-31-218-2414
Copyright 1999 - 2002 SAMSUNG Electro-Mechanics Co., Ltd.
All rights reserved.
4
)
Page 5

Notice 2
WARNING
While installing and operating this transmitter and antenna combination the radio frequency
2
exposure limit of 1mW/cm
Therefore, the user must maintain a minimum distance of 20 cm from the antenna.
Important Safety Information
zRead these simple guidelines. Breaking the rules may be dangerous or illegal. SAMSUNG will
not be responsible for any damages caused by breaking the rules.
zWLAN Card described in this document is approved for use in a wireless local area network.
zRemember to make backup copies of important data.
zWhen you are transferring data, keep your laptop computer stationary. Roaming between access
points (APs) may break the connection.
may be exceeded at distances close to the antennas installed.
zOnly qualified service personnel must repair the equipment.
zAll wireless devices may get interference, which could affect performance.
zUse approved accessories only. Do not connect incompatible products.
zUse only accessories approved by the WLAN Card manufacturer for use with this particular W
LAN Card. The use of any other types will invalidate any approval or warranty applying to the
WLAN Card, and may be dangerous.
zUse only the region settings appropriate for the area where the WLAN Card is used at the
present time. Using the card in any other region or with an incorrect region setting is prohibited
and may be illegal.
zOperation of any radio transmitting equipment, including a WLAN Card, may cause
interference with the functionality of inadequately protected medical devices.
zDo not use the WLAN Card on aircraft.
Do not use the WLAN Card at a refueling point.
z
zDo not use the WLAN Card near inflammable materials or chemicals.
Do not use the WLAN Card where blasting is in progress.
z
zDo not use the WLAN Card when the use of wireless device may cause interference or danger.
zDo not use the WLAN Card where the use of cellular terminals is prohibited.
zMicrowave oven degrades the performance of wireless LAN drastically. So do not use the
WLAN card in the environment where Microwave oven is being used.
5
Page 6
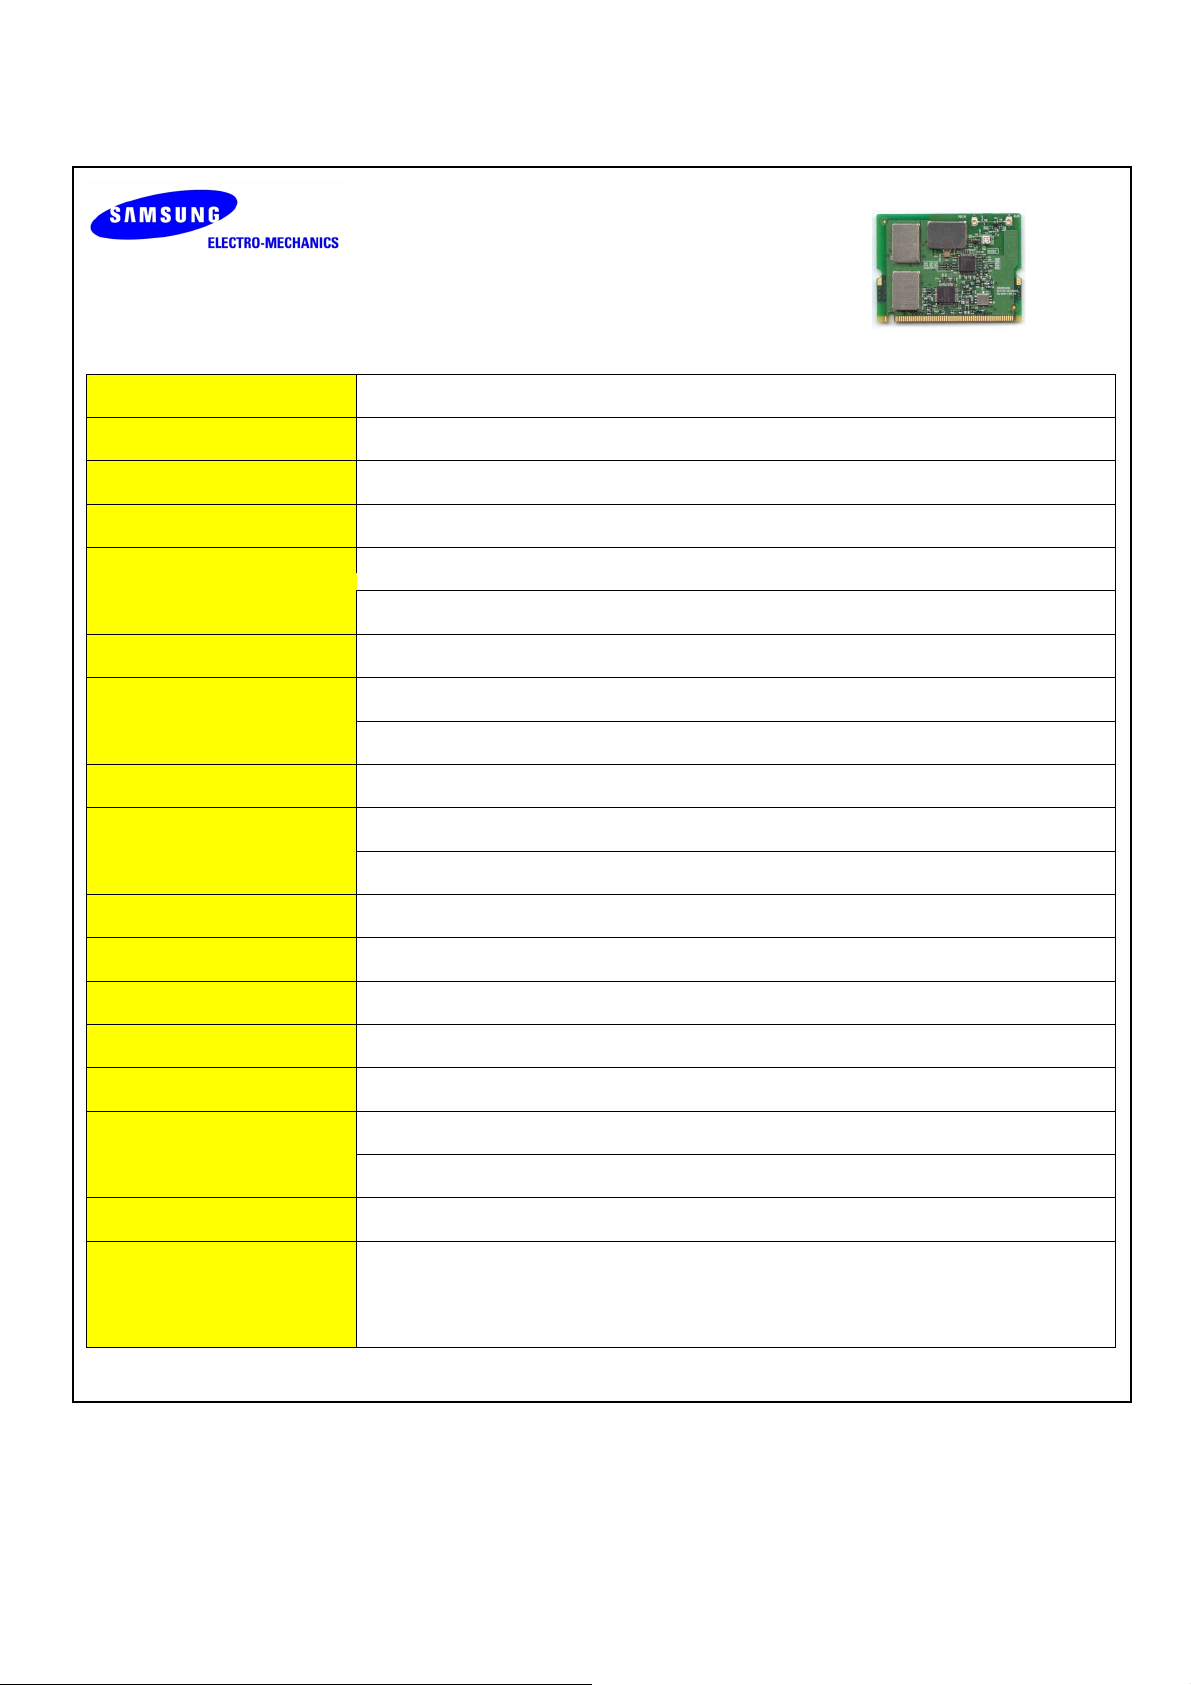
11Mbps High Rate 802.11b Wireless LAN MiniPCI Card
■ Specifications
Model Name SWL- 2210M
System Interface MiniPCI Spec 1.0
Frequency Band 2.400 ~ 2.4835GHz(Subject to local regulations)
Operating Voltage 3.3V±5%
Receive :200mA(Typical)
Current Consumption
Transmit : 370mA(Typical)
Data Rate 1, 2, 5.5 or 11Mbps
Spreading DSSS(Direct Sequence Spread Spectrum)
Output Power 50mW(17dBm) for 22MHz Bandwidth, 7mW/MHz
Receive Sensitivity Typically -84dBm at 11Mbps
Security 40-bit/104(128)-bit WEP Encryption
Antenna Connector SMT Ultra Miniature Coaxial Connector 2 pieces
Available Drivers Linux & Microsoft Windows 98/ME/NT/2000/XP/CE
Standards IEEE 802.11b
Media Access Protocol CSMA/CA
Temperature Range
Humidity 10% to 90% Non-condensing
Operating Range Open Space : 150m(500ft) at 11Mbps, 200m(660ft) at 2Mbps
(1024 bytes file transfer) Closed Office: 30m(100ft) at 11Mbps, 50m(160ft) at 2Mbps
Dimensions
Certifications
&
FCC, R&TTE(Europe), Japan, Korea
Operating : 0~55℃(32~131℉), Storage : -20~70℃(-4~158℉)
59.75㎜×44.60㎜×5.00㎜
Regulatory Approvals
Are in progress
CopyrightⓒSamsung Electro-Mechanics Co., Ltd. All Rights Reserved.
6
Page 7
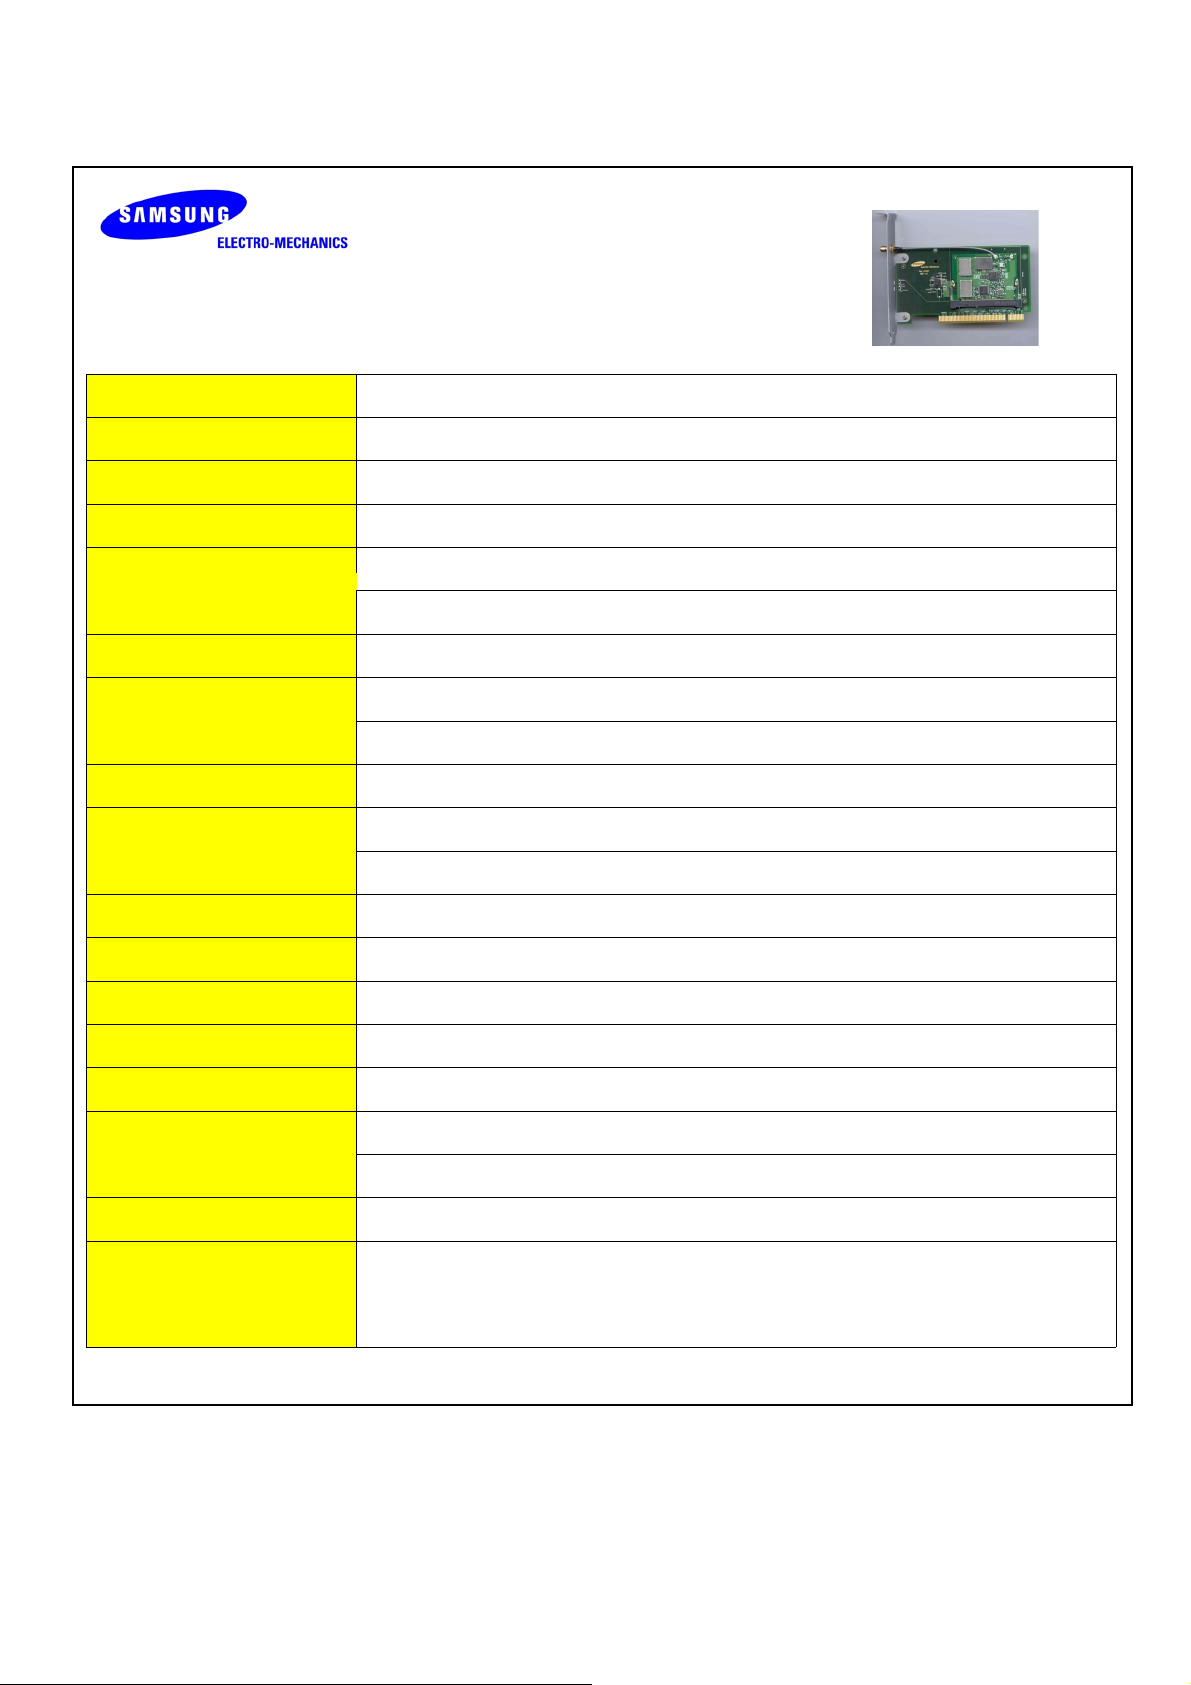
11Mbps High Rate 802.11b Wireless LAN PCI Card
■ Specifications
Model Name SWL- 2210P
System Interface PCI Spec 2.2
Frequency Band 2.400 ~ 2.4835GHz(Subject to local regulations)
Operating Voltage 5V ±5%
Receive :200mA(Typical)
Current Consumption
Transmit : 370mA(Typical)
Data Rate 1, 2, 5.5 or 11Mbps
Spreading DSSS(Direct Sequence Spread Spectrum)
Output Power 50mW(17dBm) for 22MHz Bandwidth, 7mW/MHz
Receive Sensitivity Typically -84dBm at 11Mbps
Security 40-bit/104(128)-bit WEP Encryption
Antenna External 5dBi Patch Antenna with SMA reverse connector and 1.5m cable
Available Drivers Linux & Microsoft Windows 98/ME/NT/2000/XP/CE
Standards IEEE 802.11b
Media Access Protocol CSMA/CA
Temperature Range
Humidity 10% to 90% Non-condensing
Operating Range Open Space : 150m(500ft) at 11Mbps, 200m(660ft) at 2Mbps
(1024 bytes file transfer) Closed Office: 30m(100ft) at 11Mbps, 50m(160ft) at 2Mbps
Dimensions
Certifications
&
Regulatory Approvals
FCC, R&TTE(Europe), Japan, Korea
Are in progress
Operating : 0~55℃(32~131℉), Storage : -20~70℃(-4~158℉)
126.88㎜×70.00㎜×18.00㎜
CopyrightⓒSamsung Electro-Mechanics Co., Ltd. All Rights Reserved.
7
Page 8

**** Table: The Operating Channels
Channel# Frequency FCC Canada ETSI Spain France Japan
1 2412MHz
2 2417MHz
3 2422MHz
4 2427MHz
5 2432MHz
6 2437MHz
7 2442MHz
8 2447MHz
9 2452MHz
10 2457MHz
11 2462MHz
12 2467MHz
13 2472MHz
14 2484MHz
○○○○
○○○○
○○○○
○○○○
○○○○
○○○○
○○○○
○○○○
○○○○
○○○○
○○○○
○○○○
○○○○
○○○○
○○○○
○○○○
○○○○
○○○○
○○○○
○○○○
○○○○
○○○○
○○○○
○○○○
○○○○
○○○○
○○○○
○○○○
○○○○
○○○○
○○○○
○○○○
○○○○
○○○○
○○○○
○○○○
○○○○
○○○○
○○○○
○○○○
○○○○
○○○○
○○○○
○○○○
○○○○
○○○○
○○○○
○○○○
○○○○
○○○○
○○○○
○○○○
○○○○
○○○○
○○○○
○○○○
○○○○
○○○○
○○○○
○○○○
○○○○
○○○○
○○○○
○○○○
○○○○
○○○○
8
Page 9

1. MagicLAN Installation
1.1 Introduction
Thank you for your purchase of SAMSUNG MagicLAN. Installing this cards allow the
computer to join a wireless network based on the IEEE 802.11b (High Data Rate) WLAN
standard. You will be surprised how easy for you are a part of the network with no bother
of twisted cables.
1.2 Technical Background
What is IEEE 802.11?
•
The IEEE 802.11 specification is a wireless LAN standard developed by the IEEE (Institute
of Electrical and Electronic Engineering) committee in order to specify an
interface between a wireless client and a base station or Access Point (AP), as well as
among wireless clients. Like other IEEE 802 families, IEEE 802.11 specification addresses
both Physical (PHY) layer and Media Access Control (MAC) layer.
IEEE 802.11 Physical (PHY) Layer
•
At the PHY layer, IEEE 802.11 defines three physical characteristics for WLAN: diffused
infrared, direct sequence spread spectrum (DSSS), and frequency hopping spread spectrum
(FHSS). While the infrared PHY operates at the baseband, the other two PHYs operate at
the 2.4GHz ISM (Industrial, Scientific, and Medical) band, which can be used for operating
wireless LAN devices without the need of end-user licenses. In order for wireless devices
to be interoperable, they have to be conforming to the same PHY standard.
IEEE 802.11 Media Access Control (MAC) Layer
•
The IEEE 802.11 MAC Layer is mainly concerned with the rules for accessing the wireless
medium. There are two network architectures defined: Ad-hoc Network and Infrastructure
Network.
over an air
Ad-hoc Network
•
Ad-hoc Network is an architecture that supports mutual communication among wireless
clients only. Since Ad-hoc Network does not support access to wired networks, it does not
need an Access Point to be a part of the network. You can use the network immediately
after setting up the operating mode by installing the supplied network driver.
9
Page 10

Infrastructure Network
•
Infrastructure Network is architecture that provides communication between wireless
clients and wired network resources. An Access Point (AP) and the associated wireless
clients define the transition of data. So a wireless client can access all the services that are
available for a regular wired LAN by using an AP.
BSS A
BSS A BSS B
BSS ABSS A
BSS B
BSS BBSS B
Server
Roaming
•
Roaming is a service that allows wireless clients to use the network in motion by
10
Page 11

automatically changing the connection from an old Access Point to a new Access Point
when the clients enter in a new cell. During roaming the clients may observe the loose
connection or delay in accessing the resources of the network.
Scanning, Beaconing & ESS ID
•
When a wireless client is initialized, it is necessary for it to find and communicate with the
correct group of wireless devices, including AP. At this point, it may search for all the
frequency channels and this process is called
scanning
.
There may be multiple APs and networks operating at the same time. It may be necessary
to ensure that the station joins with the correct network during the scanning process. To
achieve this, each AP is assigned to be part of a logical group called the Extended Service
Set (ESS). The name of this logical group is the ESS ID. When roaming is operating, there
may be several Access Points as part of the same ESS.
After the power on, wireless clients will listen on its default frequency channel. It will be
listening for
beacons
sent by another wireless station or AP. Beacon is a short message
containing the ESS ID that will be broadcast roughly ten times a second. When the wireless
station hears a beacon and the ESS ID in the beacon matches its own, the client knows that
it is on the correct channel and can communicate with its group. If no beacons are seen, or
if the ESS ID does not match, the wireless client may move to the next frequency channel
and repeat this listening procedure.
In case of direct sequence spread spectrum (DSSS) physical layer, this scanning process
occurs at start up and may also occur when the client roams between APs.
1.3 MagicLAN Overview
•
The MagicLAN SWL-2210M/P
provide wireless connection between computers.
•
The MagicLAN is designed to operate with IEEE 802.11 (wireless LAN International
Standard) wireless compliant radio cards and uses a CSMA/CA (Collision Sense Multiple
Access with Collision Avoidance) algorithm as the media access scheme, which makes
high speed communication (with minimal collision probability) possible.
•
The MagicLAN supports DSSS (Direct Sequence Spread Spectrum) physical layer. This
is a radio technique, which scrambles the data prior to transmission and uses a correlation
technique on receiver to improve the signal to noise ratio and makes it possible to
(MiniPCI/PCI Card) ar
11
e wireless LAN adapter cards that
Page 12

communicate in the office having a wall and a compartment.
•
The function of the MagicLAN Access Point is to transfer information from a wired LAN
to a wireless LAN and vice versa. When operating, the MagicLAN AP is invisible to most
users (Normally, unless the user is an administrator, the MagicLAN AP cannot be seen or
accessed by users on the network).
•
The SWL-2210M/P both for Laptop PC and Desktop PC is small and portable as a
roaming function is provided for users who need network services while maintaining
mobility.
•
The MagicLAN supports various network software. The network driver is provided to
support network software such as Windows 95(OSR2), Windows 98/98SE,ME, Windows
NT 4.0, Windows 2000, Windows XP, Windows CE.
•
To get further information of Samsung MagicLAN WLAN Card, please visit our website
at http://www.magiclan.com
to download the respective drivers.
12
Page 13

2. Before the Installation
The following section will assist you in installing your WLAN Adapter successfully. You
will install the SWL-2210M/P Card and software(driver & utility), and finally set the
network properties to accommodate resource sharing and select the type of wireless
network that you wish to install. The MagicLAN can easily be installed and used, without
bothering to connect cables for keeping your computer to use network resources, as in case
of a wired LAN.
2.1 What is in Your Package?
Please check the contents of the box to make sure everything is included and ready for use.
Here is the list of what you should have in your package:
•
SWL-2210M/P(MiniPCI/PCI Card)
•
External Antenna
•
Samsung MagicLAN Installation CD
2.2 System Requirement
•
Operating System: Windows 95(OSR2)/98/98SE,ME, Windows NT 4.0, Windows 2000,
Windows XP, Windows CE
•
Computer System (both Laptop and Desktop) with a CD-ROM drive
•
For Desktop PCI Card (SWL-2210P):
The computer system should have extra IRQs and a Memory address.
•
For Laptop MiniPCI Card (SWL-2210M):
The computer system should have MiniPCI Type IIIA, extra IRQs and Memory address.
2.3 Preparations For Installation
◇
You have to prepare Installation CD which is provided by manufacturer.
You can just install SWL-2210M/P cards to use Ad-hoc network.
◇
◇
You need to install Access Poing(AP) to use Infrastructure network.(Refer to the AP
Manual about the installation method of AP)
You may need the original CD of (Windows 95(OSR2), Windows 98SE(98),Windows
◇
ME, Windows NT 4.0, Windows 2000, Windows XP) to set network environment.
13
Page 14
3. MagicLAN Installation For
Windows 98/ME/NT4.0/2000/XP
We will explain the installation method for SWL-2210M/P (MiniPCI/PCI Card) .
3.1 Installation Overview
Here are some steps you will perform in establishing your wireless network connection:
1. Install the Access Point at first. AP is needed in case of Infrastructure network
mode.
2. You should install the Wireless LAN Card (SWL-2210M/P).
3. Install the software using the Installation CD.
4. Install the network protocol(s) required to communicate on your network. Most
likely you will need the TCP/IP protocol.
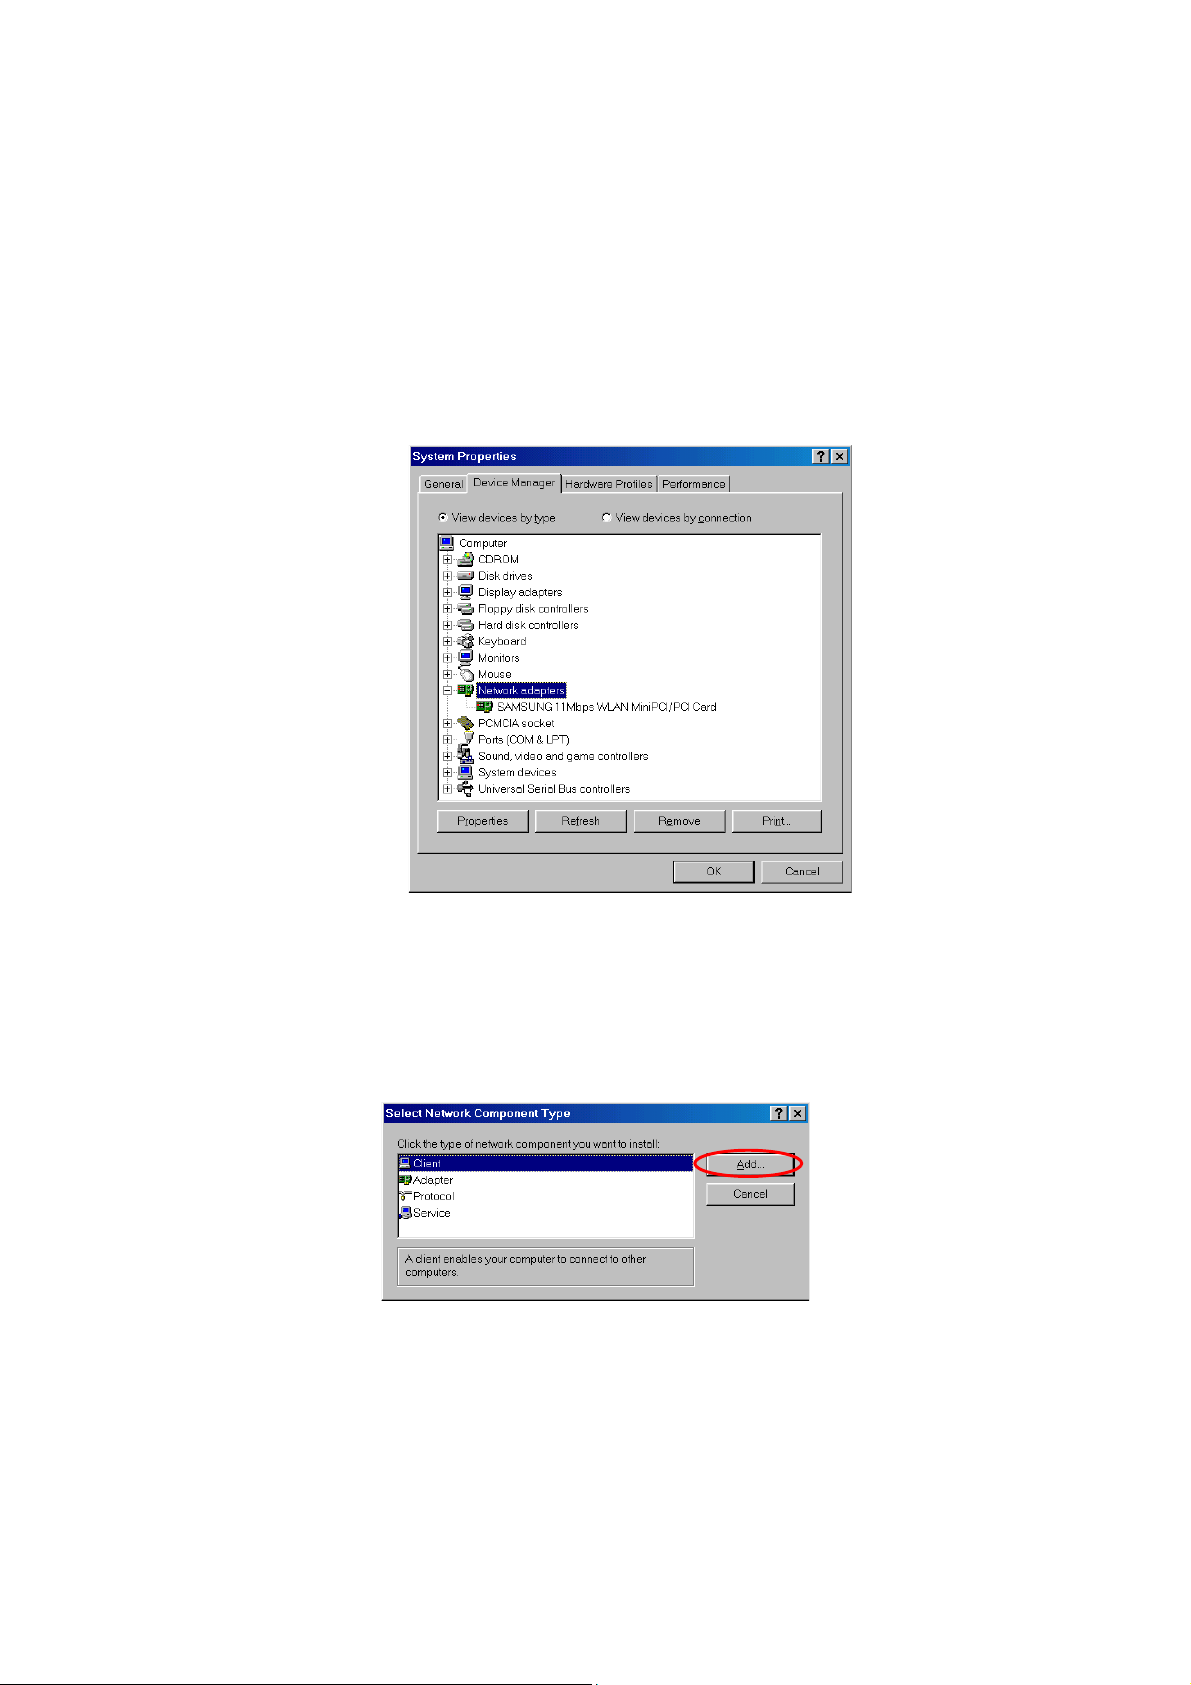
3.2 Installation Procedure of Windows 98
Please follow the following steps one by one to install the MiniPCI/PCI card successfully.
< Method 1 - Inserting card first >
1. Insert the MiniPCI/PCI Card into the slot of your computer.
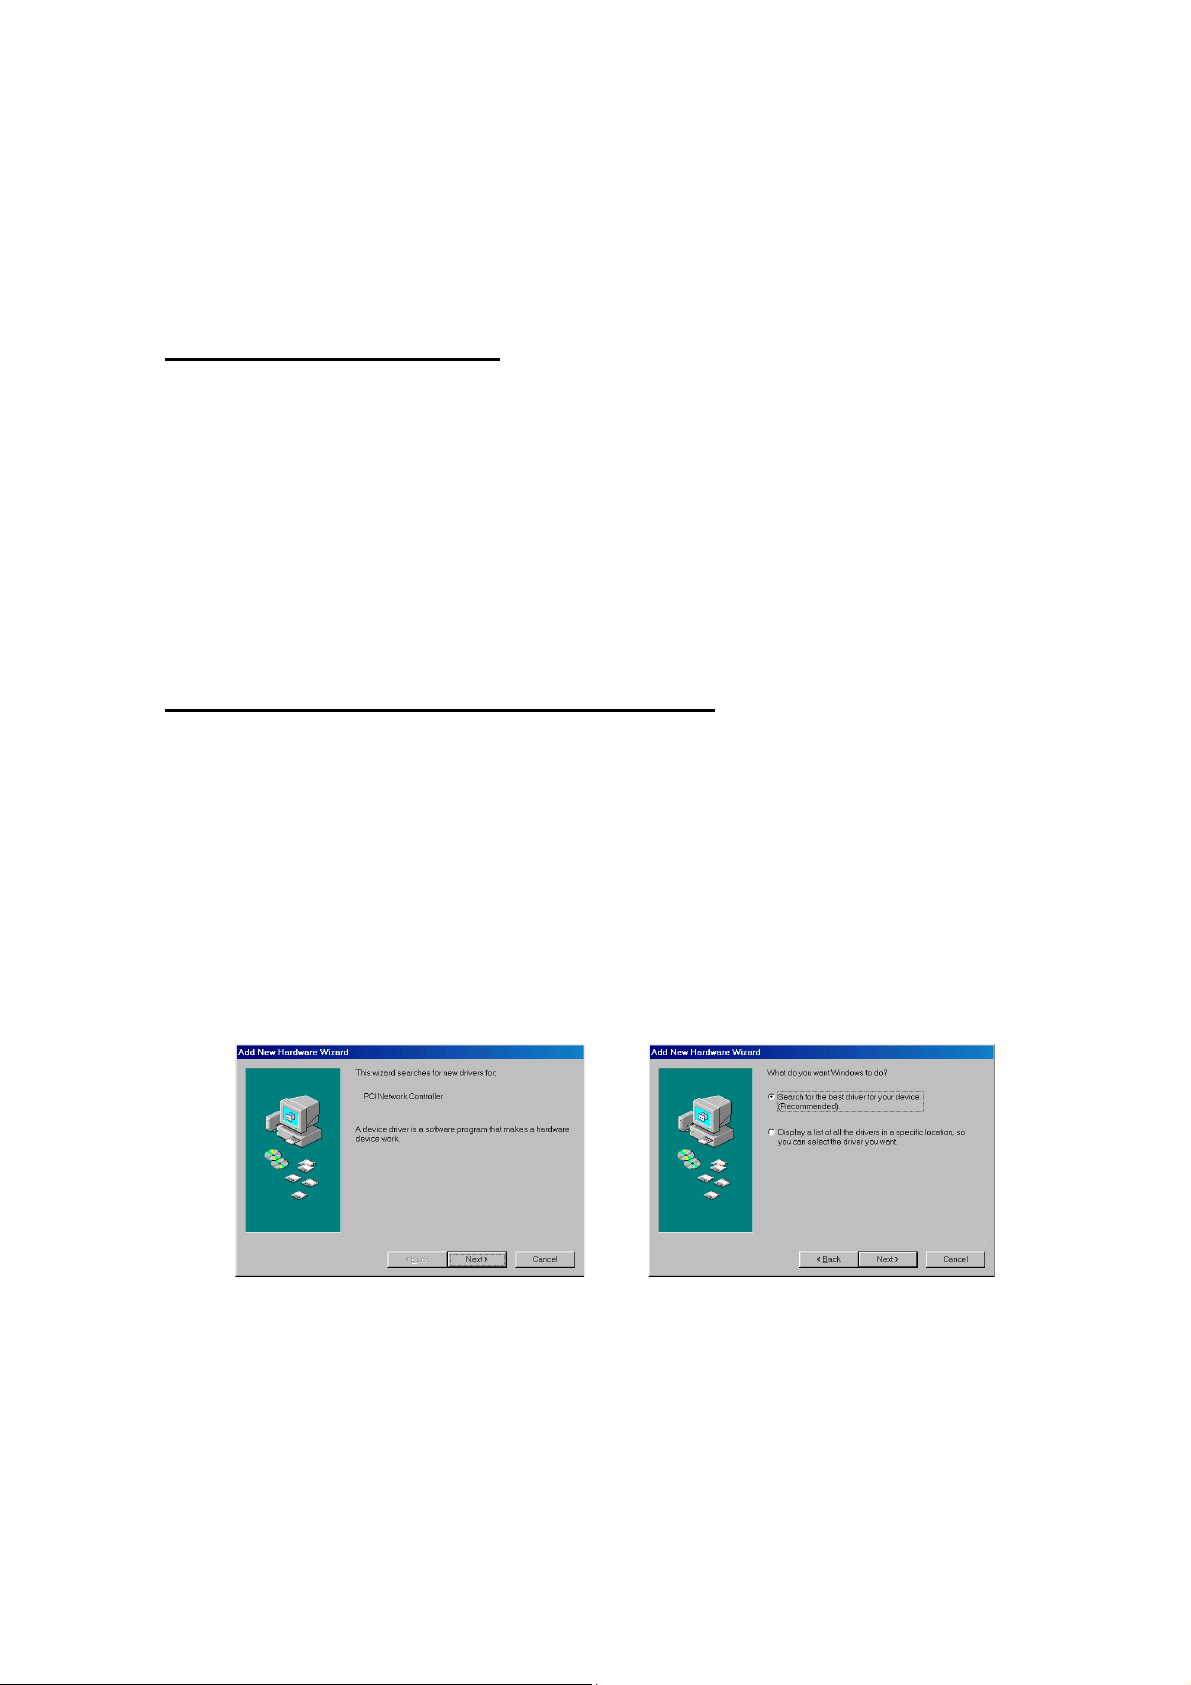
2. Power on your computer and allow
Add New Hardware Wizard
3. “
Network Controller”. Press ‘NEXT’ button and check if “Search for the best
driver for your device(recommended)” is slected and then press ‘NEXT’
button . Insert the MagicLAN Installation CD into the CD-ROM drive.
4. Mark the “Specify a location” tap and type “
tap(Where E is the CD-drive of your PC) and then press ‘NEXT’.
” appeared and the system looks for “PCI
Windows 98
to load fully.
E:\Drivers
” right below in this
14
Page 15
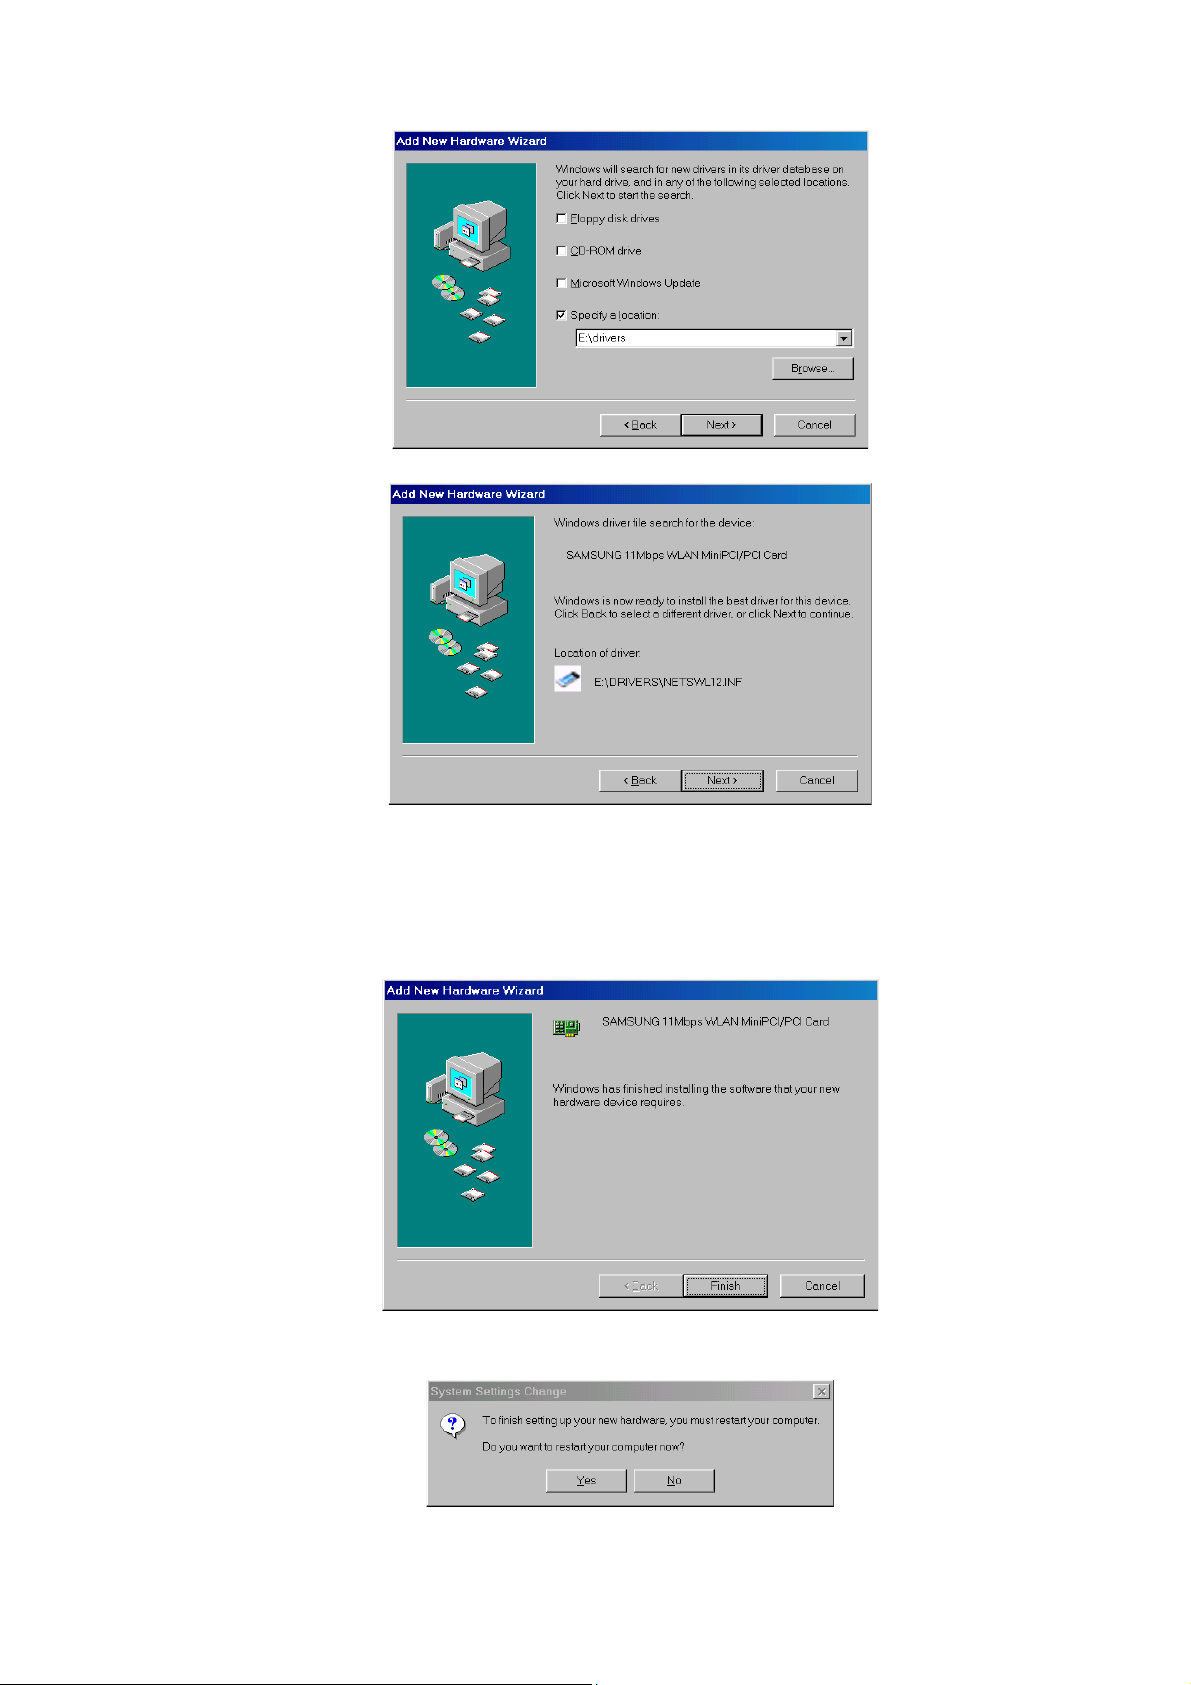
You can find the “SAMSUNG 11Mbps WLAN MiniPCI/PCI Card ” and now it is
ready to install our software.
5. Press ‘NEXT’ and system will copy driver files. You may require Windows 98
CD.
Now driver files are fully installed to start the Wireless LAN Card’s operation.
15
Page 16
If screen message ‘
select No.
Do you want to restart your Computer now’
will pop up,
6. After rebooting your computer, right click on the
mouse and click
7. Check for the
Device Manager
the
Properties
.
SAMSUNG 11Mbps WLAN MiniPCI/PCI Card
. If you find the
Yellow
sign on the adapter, it shows the
My Computer
installation is not successful. Select the Adapter and click on
your computer after uninstalling the driver.
3.8)
(See the Adapter Removal in section
using the
by clicking on
Remove
. Restart
8. Right click on the
Network Neighborhood
using the mouse. Select
Properties
from the pop up menu. The network box appears and you see three main tabs:
Configuration, Identification
Access Control
and
.
9. Click on the configuration tab and then click on the add button. Select Network
Component Type box appears. Click on the
Protocol
then click the
Add
button.
10. Select Network Protocols box appears. From the list of manufactures, click on
Microsoft. From the list of network protocols list, select
then click OK.( If you want, you can install the
NetBEUI
IPX/SPX
protocol.)
TCP/IP
and
,
16
Page 17
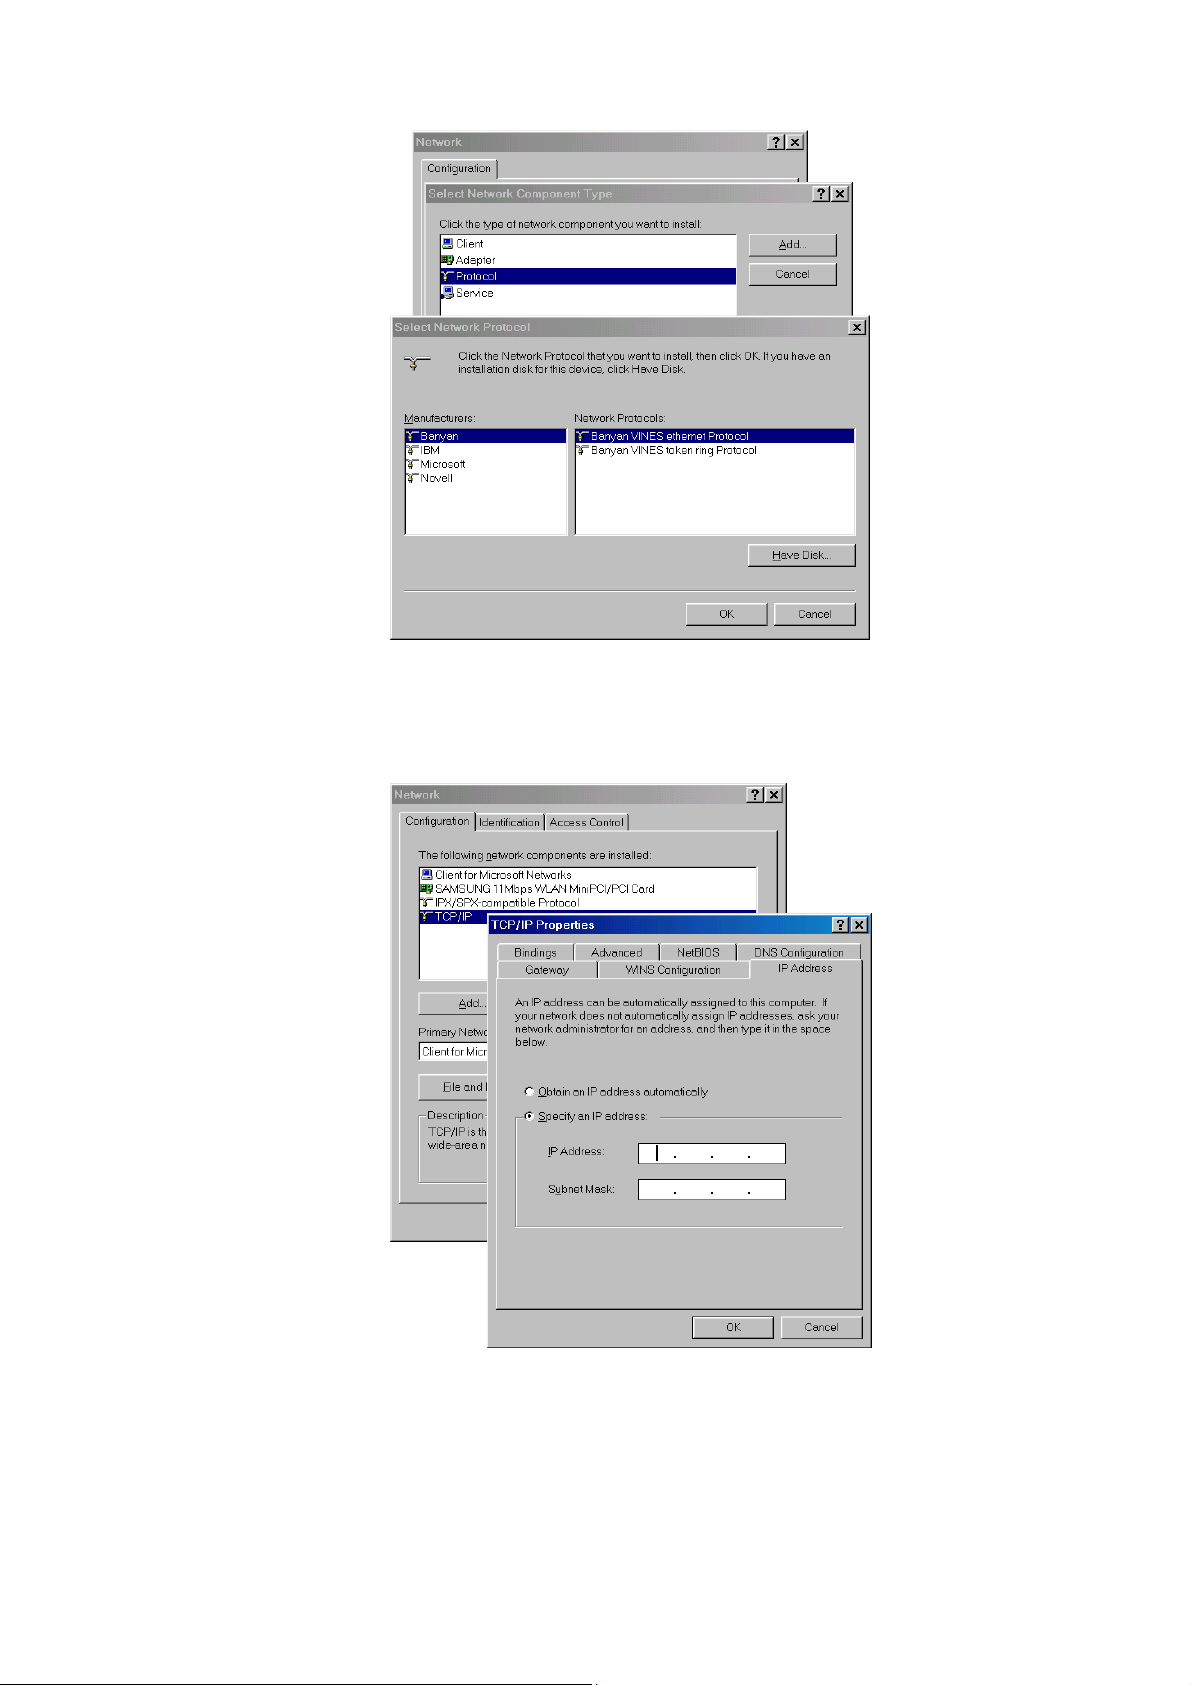
11. Select the
TCP/IP
option for setting the IP address value, Gateway value and
DNS value of your computer. After setting these parameters appropriately, click
OK
to return to Network Component Type.
12. you can select the
File and Printer Sharing
options as well as the access to
your computer by other users connected to that network by setting the
appropriate options.
17
Page 18

13. Screen message ‘
Select
Yes
. It will shut down your computer and will restart.
Do you want to restart your computer now?’
will pop up.
14. After booting the computer, you have to draw out and re-insert the MagicLAN
Installation CD to be automatically installed. You can click ‘
Configuration Utility’
to install our utility. Choose the appropriate language
Install
when a context box appeared to choose utility’s language.
15. You can set up Wireless LAN environment by our utility program provided.
Refer to ‘
Chapter 4’
in this manual.
18
Page 19
< Method 2 – Installing software first >
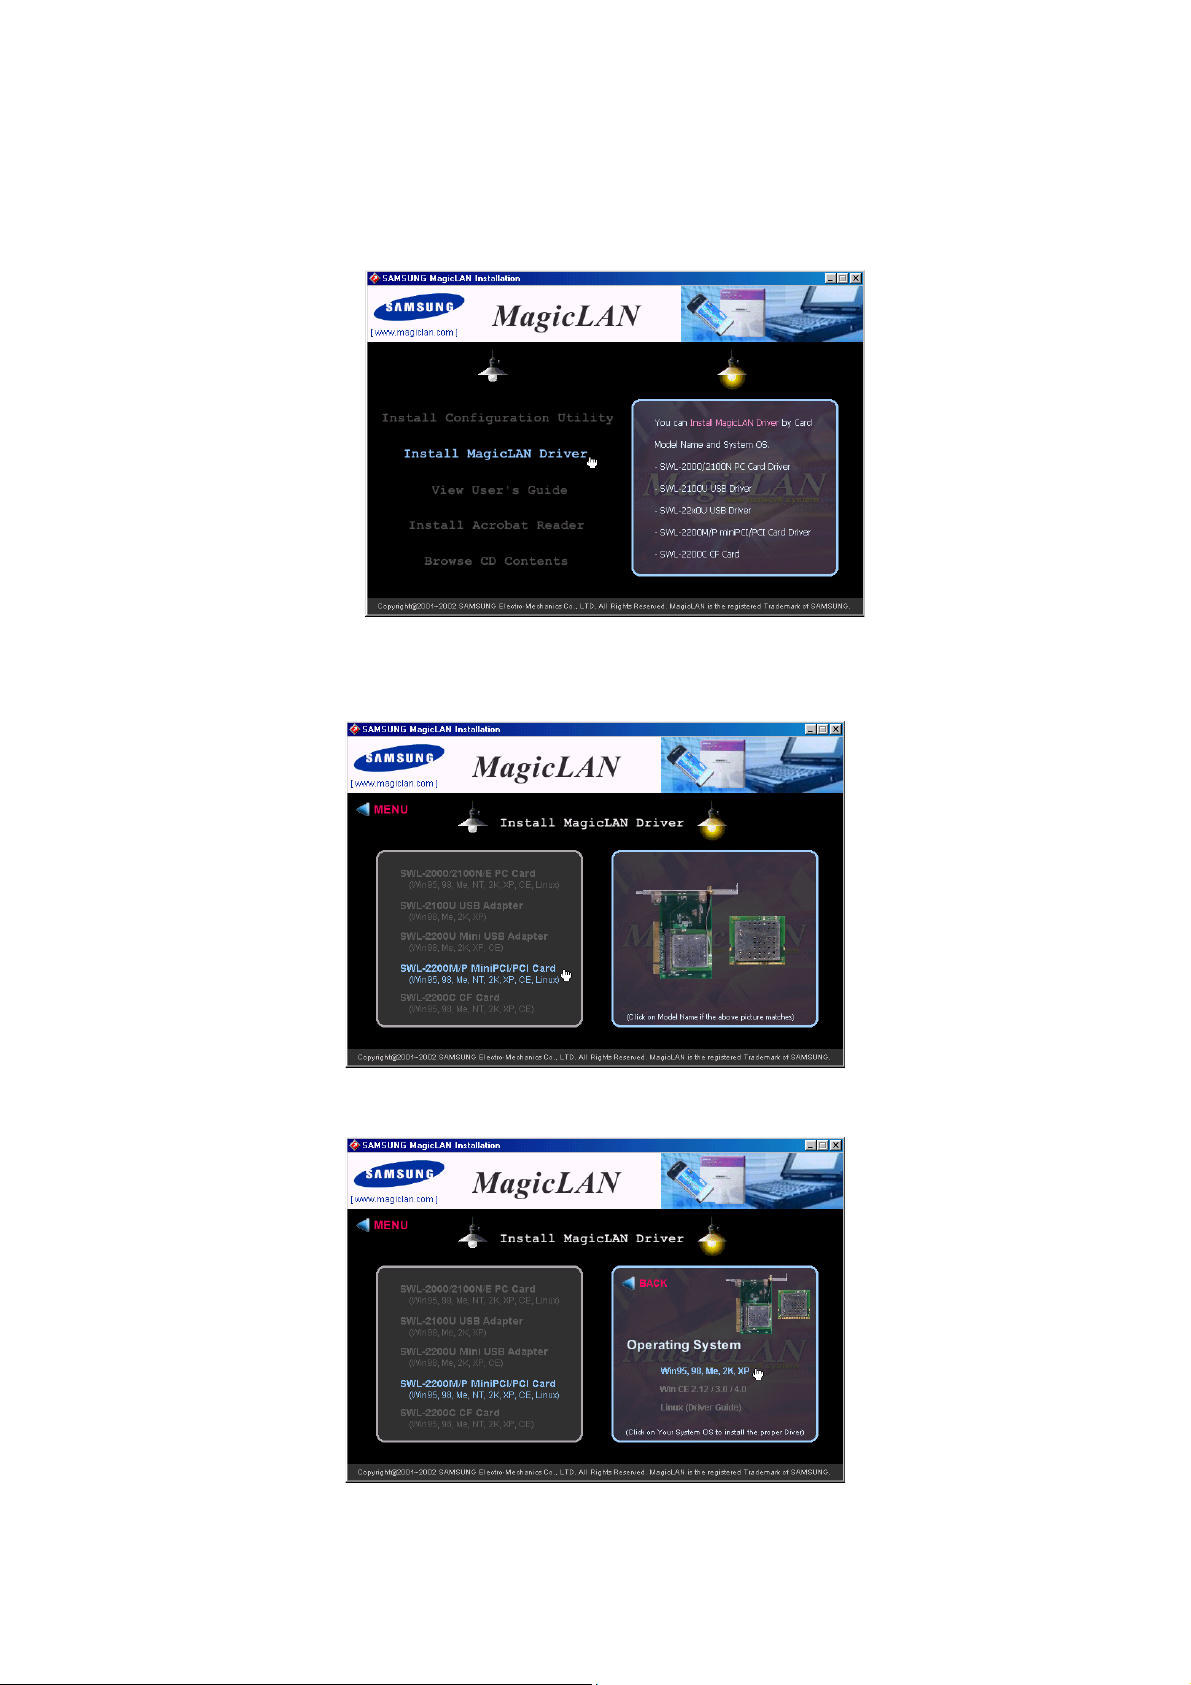
1. If you insert the MagicLAN Installation CD into the CD-ROM drive, software will
launch automatically. Then, click on the ‘
Install MagicLAN Driver’
.
2. You can see the pictures of Wireless LAN Cards by model name.(SWL-2210M/P
MiniPCI/PCI Card). Click on the model name to install it’s driver.
3. Click on Operating System in the right screen in which you want to install driver.
19
Page 20

3. After installing driver, shut down your computer and insert card. And power on the
computer.
4. The system recognize the Wireless LAN Card.
5.
The other procedures are same to 7~15 of
first
>
The third method
Cf.)
You can combine
card
into the computer, you can install driver and utility by
instead, not by the inf file. In case of Windows 2000 and Windows XP, system will
recognize the card automatically during installation .
Notice that if you install a card after removing it in a Device Manager, you have to
mark the check box(“Do you want to scan for hardware changes?”). The function is
same to the “Refresh” in ther Device Manager.
:
‘Method 1’
with
‘Method 2’
< Method 1 - Inserting card
. In other words,
using the installshield
after inserting
3.3 Installation Procedure of Windows ME
Please follow the following steps one by one to install the MiniPCI/PCI Card successfully.
< Method 1 - Inserting card first >
1. Insert the MiniPCI/PCI Card into the slot of your computer.
2. Power on your computer and allow
Add New Hardware Wizard
3. “
Network Controller”. Check if “Search for the best driver for your
device(recommended)” is slected. Insert the MagicLAN Installation CD into the
CD-ROM drive.
” appeared and the system looks for “PCI
Windows ME
to load fully.
20
Page 21
4. Press ‘
NEXT
’ and you can find the “SAMSUNG 11Mbps WLAN MiniPCI/PCI
Card ” . And the system will copy driver files.
Now driver files are fully installed to start the Wireless LAN Card’s operation. If
screen message ‘
No
.
5. After booting the computer, right click on the
Do you want to restart your Computer now?’
My Computer
will pop up, select
using the mouse
and click property.
6. Check for the SAMSUNG 11Mbps WLAN MiniPCI/PCI Card by clicking on
Device manager
the
. If you find the
installation is not successful. Select the Adapter and click on
your computer after uninstalling the driver.
3.8)
21
Yellow
sign on the adapter, it shows the
Remove
(See the Adapter Removal in section
. Restart
Page 22

7. Right click on the
Network Neighborhood
using the mouse. Select
Properties
from the pop up menu. The network box appears and you see three main tabs:
Configuration, Identification
Access Control
and
.
8. Click on the configuration tab and then click on the add button. Select Network
Component Type box appears. Click on the
Protocol
then click the
Add
button.
9. Select Network Protocols box appears. From the list of manufactures, click on
Microsoft. From the list of network protocols list, select
then click OK.( If you want, you can install the
22
NetBEUI
IPX/SPX
protocol.)
TCP/IP
and
,
Page 23

10. Select the
TCP/IP
option for setting the IP address value, gateway value and
DNS value of your computer. After setting these parameters appropriately, click
OK
to return to Network Component Type.
11. you can select the
File and Printer Sharing
options as well as the access to
your computer by other users connected to that network by setting the
appropriate options.
23
Page 24

12.
Screen message ‘
Select
Yes
. It will shut down your computer and will restart.
Do you want to restart your Computer now?’
will pop up.
13. After booting the computer, you have to draw out and re-insert the MagicLAN
Installation CD to be automatically installed. You can click “
Configuration Utility
” to install our utility. Choose the appropriate language
Install
when a context box appeared to choose utility’s language.
14. You can set up Wireless LAN environment by our utility program provided.
Refer to ‘
Chapter 4’
in this manual.
< Method 2 – Installing software first >
1. If you insert the MagicLAN Installation CD into the CD-ROM drive, software will
launch automatically. Then, click on the ‘
Install MagicLAN Driver’
24
.
Page 25

2. You can see the pictures of Wireless LAN Cards by model name.(SWL-2210M/P
MiniPCI/PCI Card). Click on the model name to install it’s driver.
3. Click on Operating System in the right screen in which you want to install driver.
4. After installing driver, shut down your computer and insert card. And power on the
computer.
5. The system recognize the Wireless LAN Card.
25
Page 26

6.
The other procedures are same to 5~14 of
first
>
The third method
Cf.)
:
< Method 1 - Inserting card
You can combine
card
into the computer, you can install driver and utility by
‘Method 1’
with
‘Method 2’
. In other words,
using the installshield
after inserting
instead, not by the inf file. In case of Windows 2000 and Windows XP, system will
recognize the card automatically during installation .
Notice that if you install a card after removing it in a Device Manager, you have to
mark the check box(“Do you want to scan for hardware changes?”). The function is
same to the “Refresh” in ther Device Manager.
26
Page 27

3.4 Installation Procedure of Windows NT4.0
Please follow the following steps one by one to install the MiniPCI/PCI Card successfully.
1. Insert SAMSUNG 11Mbps WLAN MiniPCI/PCI Card into the slot and power on your
computer.
2. Windows NT will start in your computer and follow the below procedures.
Notice that there’s some difference between
installed
When Windows NT networking is already installed .
and
When Windows NT networking is not
<CASE1> When Windows NT networking is not installed:
1. Since there is no Windows NT networking installed yet, you should install your
driver manually. To do so, click on
Control Panel
2. Under
Control Panel
3. Since there is no
.
, double click on
Windows NT
networking installed yet, you maybe asked if you
want to install NT networking first. Click on
will be start. Select ‘
wizard’ box, click on ‘
Wired to the network’
Select from list button’
Start
in task bar, go to
Network
icon.
Yes
and then
and click on ‘Next’. In ‘network setup
.
Settings
and then to
Network Setup Wizard
27
Page 28

4. In
Select Network Adapter
box, click on
Have Disk
button.
5. In
Insert Disk
box, you may be asked to specify the necessary software directory.
Insert the MagicLAN Installation CD into the CD-ROM drive. Type in
(Where D is the CD-drive of your computer) in the blank and click on OK.
D:\nt40
6. In
Select OEM Option
box, you will see SAMSUNG 11Mbps WLAN
MiniPCI/PCI Card and select the correct card type and click on OK. You confirm
the SAMSUNG 11Mbps WLAN MiniPCI/PCI Card on the next message box. Click
NEXT
on
.
7. Select the network protocols by clicking on the check box. And click on
You must select ‘TCP/IP Protocol’ among these network protocols at least.
NEXT.
28
Page 29

8. In the next box to choose network services to use, make sure that all the services
you want to use are checked and click on
Next
.
9. In the next box it is confirmed that necessary NT networking components are
selected. Click on
Next
.
10. When you are asked to specify the directory that the necessary NT files are copied
29
Page 30

from, insert your Windows NT CD and type in
your computer) in the location blank.
D:\i386
(Where D is the CD-drive of
11. Some files from the
D:\i386
directory are copied and you may be prompted the
same box to ask you to specify where NT files are once more. Since it is looking for
some files form the MagicLAN Installation CD, insert your MagicLAN Installation
CD in CD drive and type
D:\nt40
in the blank location and click on continue.
Card Setup
12.
box may appear. Set each parameters (Network mode, ESSID, and Tx
rate etc.) for the proper LAN card configuration.
TCP/IP Setup
13.
DHCP
the
message will pop up. Select NO for not using
option for
TCP/IP
, you do not need to set the values.
DHCP
. If you select
14. If you select the No, enter the
IP Address, Subnet Mask, Gateway
30
, and
DNS
Page 31

values respectively and then click on OK.
15. Binding properties will pop up. Click on
NEXT
16. Now it is ready for starting network. Click on
.
NEXT
.
31
Page 32

17. You can assign
Workgroup/ Domain
name. And click on
NEXT
.
18. Click on the
or not. Click on
Finish
and it will ask you whether you want to restart your computer
NO.
19. You have to insert the MagicLAN Installation CD to be automatically installed.
20. You can click ‘
Install Configuration Utility’
to install our utility. Choose the
appropriate language when a context box appeared to choose utility’s language.
21. You should reboot the computer to use our utility properly in the NT-based
OSs(Windows NT4.0, 2000, XP).
22. You can set up Wireless LAN environment by our utility program provided. Refer to
Chapter 4’
‘
in this manual.
<CASE2> When Windows NT networking is already installed:
1. Since there is no Windows NT networking installed yet, you should install your
driver manually. To do so, click on start in task bar, go to Settings and then to
32
Page 33

Control Panel
.
2. Under
Control Panel
3. Select the
4. In
Select Network Adapter
Adapter
, double click on
. And click on
box click on
Add
Network
.
Have Disk
icon.
button.
5. In
Insert Disk
box, you may be asked to specify the necessary software directory.
Insert the MagicLAN Installation CD into the CD-ROM drive. Type in
(Where D is the CD-drive of your computer) in the blank and click on
OK.
6. In
Select OEM Option
box, you will see SAMSUNG 11Mbps WLAN
MiniPCI/PCI Card and select the correct card type and click on OK. You confirm
33
D:\nt40
Page 34

the SAMSUNG 11Mbps WLAN MiniPCI/PCI Card on the next message box. Click
Next .
on
Card Setup
7.
box may appear. Set each parameters (Network mode, ESSID, and Tx
rate etc) for the proper LAN card configuration.
8. Confirm that “
selected.
SAMSUNG 11Mbps WLAN MiniPCI/PCI Card
” is installed and
9. Click on
10. Click on the
11. You can select either DHCP or Static for the IP address. If you select
Bindings
Protocols
.
. Select ‘
TCP/IP Protocol’
34
and click ‘
Properties’
DHCP
, you
Page 35

do not need to specify the IP address. In case of
Static
, enter
IP Address, Subnet
Mask
and
Gateway
respectively.
12. Select ‘DNS’ tab and enter the appropriate values. Ask your network administrator
about the detailed matter.
13. Select ‘WINS Address’ tab and enter the appropriate values. Ask your network
administrator about the detailed matter.
Select ‘Routing’ tab and enter the appropriate values. Ask your network
14.
administrator about the detailed matter. After you add the
TCP/IP
protocol, click
on the OK once more. System will ask you whether you want to restart your
computer or not. Click on NO. Now your network is established successfully
.
15. You have to insert the MagicLAN Installation CD to be automatically installed.
16. You can click ‘
Install Configuration Utility’
to install our utility. Choose the
appropriate language when a context box appeared to choose utility’s language.
17. You should reboot the computer to use our utility properly in the NT-based
35
Page 36

OSs(Windows NT4.0, 2000, XP).
18. You can set up Wireless LAN environment by our utility program provided. Refer
Chapter 4’
to ‘
in this manual.
36
Page 37

3.5 Installation Procedure of Windows 2000
Please follow the following steps one by one to install the MiniPCI/PCI card successfully.
< Method 1 - Inserting card first >
1. Ins
2.
3.
ert the MiniPCI/PCI Card into slot of your computer.
Power on your computer and allow
Found New Hardware Wizard
Controller”. Press
NEXT
button and check if “Search for the best driver for your
Windows 2000
to load fully.
appeared and the system looks for “Network
device(recommended)” is slected and then press
NEXT
button. Insert the
MagicLAN Installation CD into the CD-ROM drive. You can ignore the MagicLAN
Utility’s screen of the CD-ROM..
4. Mark the “CD-ROM Drive” tap and then press ‘NEXT’. You can find the INF file
and now it is ready to install our software.
5. Press
NEXT
and system will copy driver files. Now driver files are fully installed to
start the Wireless LAN Card’s operation.
37
Page 38

6. Check for the
Manger of a
Computer Management
SAMSUNG 11Mbps WLAN MiniPCI/PCI Card
in the Adminidtrative Tools . If you find the
on the Device
Yellow
sign on the adapter, it shows the installation is not successful. In this case, select the adapter
and click on
changes effective.
Remove
. Restart your computer after uninstalling the driver to make the
(See the Adapter Removal in section 3.8)
7.
Right click on the
Area Connection
Network Places
,and then click on
using the mouse and double-click on the
Properties.
38
Local
Page 39

8. Click on the
value,
TCP/IP
Gateway
option for setting the IP address for your computer. Set the IP
value,
DNS
value. After setting these parameters appropriately,
click OK to return to Network Component Type.
9. You can select the
allow the
Access
File and Printer Sharing for Microsoft Networks
options to
to your computer by other users connected to that network by
setting the computer sharing options. Click on OK.
10. After booting the computer, you have to draw out and re-insert the MagicLAN
Installation CD to be automatically installed. You can click
Utility
to install our utility. Choose the appropriate language when a context box
Install Configuration
appeared to choose utility’s language.
11. You should reboot the computer to use our utility properly in the NT-based
39
Page 40

OSs(Windows NT4.0, 2000, XP).
12. After rebooting your computer, you can set up Wireless LAN environment by our
utility program provided. Refer to ‘
Chapter 4’
in this manual.
< Method 2 – Installing software first >
1. If you insert the MagicLAN Installation CD into the CD-ROM drive, software will
launch automatically. Then, click on the ‘
Install MagicLAN Driver’
.
2. You can see the pictures of Wireless LAN Cards by model name.(SWL-2210M/P
MiniPCI/PCI Card). Click on the model name to install it’s driver.
3. Click on Operating System in the right screen in which you want to install driver.
40
Page 41

After installing driver, shut down your computer and insert Wireless LAN card. And
4.
power on the computer.
The system recognize the Wireless LAN Card.
5.
The other procedures are same to 6~12 of
6.
first
>
The third method
Cf.)
You can combine
card
into the computer, you can install driver and utility by
instead, not by the inf file. In case of Windows 2000 and Windows XP, system will
recognize the card automatically during installation .
Notice that if you install a card after removing it in a Device Manager, you have to mark
the check box(“Do you want to scan for hardware changes?”). The function is same to the
“Refresh” in ther Device Manager.
:
‘Method 1’
with
‘Method 2’
< Method 1 - Inserting card
. In other words,
using the installshield
after inserting
41
Page 42

3.6 Installation Procedure of Windows XP
Please follow the following steps one by one in order to install the MiniPCI/PCI Card
successfully.
< Method 1 - Inserting card first
>
1. Insert the MiniPCI/PCI Card into slot of your computer.
2. Power on your computer and allow
“Found New Hardware Wizard
3.
Windows XP
to load fully.
” appeared and the system looks for “Network
Controller”. Insert the MagicLAN Installation CD into the CD-ROM Drive.
4. You can find the “SAMSUNG 11Mbps WLAN MiniPCI/PCI Card” and system
will copy driver files.
5. Now driver files are fully installed to start the Wireless LAN Card’s operation.
6. Check for the
Management
Yellow
sign on the adapter, it shows the installation is not successful. In this case,
SAMSUNG 11Mbps WLAN MiniPCI/PCI Card
in the
Administrative Tools
of the
Control Panel
Computer
on
. If you find the
42
Page 43

select the adapter and click on
Remove
. Restart your computer after uninstalling
the driver to make the changes effective.
(See the Adapter Removal in section 3.8)
7. Of the icons displayed on the right bottom of desktop, click on icon
Wireless Network Connection
.
stated
When you are using DHCP, just select the AP that you want to connect in the
8.
Connect to Wireless Network
above.
9. To manually set your IP address, WEP and some other configuration, click on
Advanced
Wireless Networks
the
of the above picutre and then click
and then clicking on
Tab . Set the SSID and parameters to be needed to modify
OK.
The AP that you selected will be displayed on the
Configure
Available networks on
Preferred Networks.
43
Page 44

Next, move to the
10.
General
Tab. After the double click the “
Internet
Protocol(TCP/IP)
OK. All will be done by clicking on OK once more.
”, set the IP value, Gateway value and DNS value and click on
44
Page 45

< Method 2 – Installing software first >
1. If you insert the MagicLAN Installation CD into the CD-ROM drive, software will
launch automatically. Then, click on the ‘
Install MagicLAN Driver’
.
2. You can see the pictures of Wireless LAN Cards by model name.(SWL-2210M/P
MiniPCI/PCI Card). Click on the model name to install it’s driver.
45
Page 46

3. Click on Operating System in the right screen in which you want to install driver.
4. After installing driver, shut down your computer and insert Wireless LAN card. And
power on the computer.
5. The system recognize the Wireless LAN Card. If
appears, just click
Next .
6.The other procedures are same to 6~10 of
first
>
Found New Hardware Wizard
< Method 1 - Inserting card
The third method
Cf.)
You can combine
card
into the computer, you can install driver and utility by
:
‘Method 1’
with
‘Method 2’
. In other words, after
using the installshield
inserting
instead, not by the inf file. In case of Windows 2000 and Windows XP, system will
recognize the card automatically during installation .
Notice that if you install a card after removing it in a Device Manager, you have to mark
the check box(“Do you want to scan for hardware changes?”). The function is same to the
46
Page 47

“Refresh” in ther Device Manager.
[ Use of Our company’s Utility in Windows XP ]
You can also set up the Wireless LAN by the our company’s utility program instead of
Windows XP’ utility program.
After booting the computer, you have to draw out and re-insert the MagicLAN
Installation CD to be automatically installed. You can click “
Utility
to choose utility’s language.
” to install our utility. Choose the appropriate language when a context box appeared
Install Configuration
You should reboot the computer to use our utility properly in the NT-based OSs(Win NT,
Win 2000, Win XP).
- If you click the icon
current state of the Wireless LAN.
- Click on
Manage the Wireless Control by this utility under WinXP
“
refer to ‘
- If you want to use Wireless LAN Utility in the system of Windows XP , be
sure that the mark of “
WinXP
on the right bottom of the desktop, you can see the
Option
Chapter 4’
” of the our company’s utility program is removed.
of the
General settings
in this manual.
Manage the Wireless Control by this utility under
on the bottom of the Utility and mark
”. For more details,
47
Page 48

3.7 Update of MagicLAN Wireless LAN Card Driver
1. After inserting the MagicLAN Installation CD, click the Install MagicLAN Driver
and select the Card and Operating System that you want to update in.
2.
If selection box appears, select ‘Reinstall MagicLAN Software’ between ‘Remove’
and ‘Reinstall’.
3.8 Removal of MagicLAN Wireless LAN Card Driver
(Adapter Removal)
Click like followings :
MiniPCI Card adapter.
Select ‘Remove all MagicLAN Software’ and click
-> All Programs -> MagicLAN -> MagicLAN Driver -> Remove
(Utility Removal)
Next.
48
Page 49

Click like followings :
> Remove Utility Uninstall.
-> All Programs -> MagicLAN -> MagicLAN Utility -
Select ‘Remove Configuration Utility Software’ and click
Next .
(cf) If you want to just remove the WLAN Card from the PC, click
SAMSUNG 11Mbps WLAN MiniPCI/PCI Card
icon the right bottom of your computer
and
Stop
screen. Then you remove the WLAN Card after clicking the OK button on the message,
SAMSUNG 11Mbps WLAN MiniPCI/PCI Card can now be safely removed from the
‘
system’
(Notice that you should power off your computer and remove your card in case of
MiniPCI/ PCI card)
**
- ‘Safely remove hardware’ icon (Windows ME , 2000, XP)
In the case of Windows NT4.0, right click on the
mouse and eliminate the ‘
SAMSUNG 11Mbps WLAN MiniPCI/PCI Card
Network Neighborhood
using the
’ on the
Network Component.
49
Page 50

4. The Program For Setting MagicLAN
is found at the right bottom
window will appear. Click
button for yes and the following window will appear. cf) The above message will not be
appeared in the Win XP. Make a Profile with clicking ‘New’ button
.
4.1 The concept of Profile
- TCP/IP settings for the fixed networks/Wired LAN have no problems, as they do
not deal with the mobility. But in case of mobile equipments such as WLAN card,
when WLAN client has moved from home to Office or vice-versa, the difficulty for
using the old TCP/IP settings arises.
- The concept of profile makes it easy to use the same TCP/IP settings for WLAN
cards regardless of the movement.
- Profile can be selected again with ease if it were saved. Saving the settings for
WLAN and TCP/IP as a Profile, it is easy for user to select and use one of the
saved profiles, especially it can be used quickly without rebooting your computer
while the settings for TCP/IP is updated.
4.2 Installation Procedure
First time use of WLAN on your computer needs the following settings.
1. Insert your WLAN card. After clicking on the icon , which
your computer screen, “Please create your first network profile now”
‘Y’
50
Page 51

ile Name and description for your
profile name in Description and click the NEXT button, the following
Select the Operating Mode to use and click the NEXT button.
2. Input a profile name in Prof
window will appear.
3.
Default operating mode is Infrastructure.
51
Page 52

- Infrastructure Network is the structure that the communication between Wired LAN and
ts or Stations (Ad hoc) that are able to connect now.
Wireless LAN is feasible. Wireless client is possible to access to the other Network
(include Internet) via Access Point.
- Ad-hoc/802.11Ad-hoc Network support the communication among Wireless clients. Due
to the support of communication among Wireless equipment, Ad-hoc Network doesn’t
need Access Point. (cf. 802.11 ad-hoc is satisfied with the 802.11 specification)
4. If you clicked on the Survey, the above window will appear showing
you Access Poin
Select the AP that has the highest signal to use as an SSID.
52
Page 53

- WEP Mode
z
z
5. Select the WEP Mode and Click the Next button
.
This is security tool to protect your DATA from unauthorized users.
To use the function of WEP, The WEP key settings for client must be same to that
of AP in the Infrastructure Mode, and the WEP key settings must be same for all
clients in the Ad-hoc/802.11Ad-hoc Mode.
53
Page 54

is limited to users
Manage TCP/IP
in the Profile. This menu does not appear
6. Enter a valid IP address. IP address can be allocated automatically. (cf. it
who use the DHCP server or ADSL connection). As only checked in “
together with Profile”, IP address can be controlled
under MS Windows NT. Click NEXT to see the following window.
7. Showing you the settings selected so far. Click the Finish button.
Check on this box. It will work on the system after clicking the Finish button.
54
Page 55

8. Click the Profile name shown in the above window click the Apply
button. The settings will be over. If the IP address entered in the
than the IP address selected under
profile name, system IP settings will be changed without rebooting
system settings is different
your system.
55
Page 56

5. The main configuration of Program
During the installation of your SAMSUNG WLAN Card, configuration utility is also
installed. You can see the icon at the right bottom of your screen. Double clicking that icon
will show you the screen as shown below.
The following describes the meanings of variables shown in the WLAN configuration.
Profile:
z
Profile. So when you set the Profile, you would better choose the name that can
send the contents it has.
Link Status
z
Infrastructure mode) or with other clients (In 802.11Ad-hoc Mode).
SSID
z
called ESSID.
Operating Mode:
z
among clients through an AP), 802.11Ad-hoc/Ad-hoc Mode (direct connection
among clients)
BSSID
z
Infrastructure Mode and the Random Generation value in the 802.11 Ad-hoc Mode.
Channel
z
client or among clients. When the Network Mode is set to the Infrastructure or
802.11Ad-hoc/Ad-hoc Modes, it searches a channel automatically.
The arbitrary designation by user. It is the profile name to distinguish each
: you Link Status shows a client connection state with AP (In
: It represents the name of a group consisting of WLAN users only. It is also
There are three Modes. Infrastructure Mode (the connection
: It shows the Physical Address of WLAN card inserted in AP in the
: It shows channel number in use for communication between AP and
WEP:
z
z
Security tool to be used for encryption/decryption of data to be exchanged
between clients or between clients and AP. It denies the authorized access to
network if WEP is enabled.
Power Saving:
The Power Saving Mode that prolongs the life of battery.
56
Page 57

Physical Address:
z
This is also the MAC address of the WLAN card.
It is the Physical address of WLAN card being used by user.
IP Address:
z
network of several computers. IP address is unique for every network card installed
on a computer to identify it from other computers.
Subnet Mask:
z
network Address within the LAN of company.
Gateway:
z
DNS:
z
z
The following description is the fundamental installation of WLAN Card.
It is the system that transforms the name of an Internet domain to the
corresponding IP Address. IP Address is actually needed to locate a
computer/server on the Internet.
Adapter Name:
Address used to send data from one computer to another to create the
It is an address that enables along with an IP Address to share a
The network point playing a role as a gateway to enter the other network.
It shows the kind of WLAN card that the user is using now.
5.1Profile
You can modify your wireless environment four buttons on the bottom of Utility.
5.1.1 The ‘New’ button
Clicking the New button, you can add or make a new Profile.
(Refer to ‘The Program For Setting MagicLAN’ in the Chapter 4)
5.1.2 The ‘Apply’ button
Select and click a Profile to be used, then the saved or modified profile settings will be used
for configuring your WLAN card.
5.1.3 The ‘Edit’ button
57
Page 58

Clicking the Edit button or the Profile name that was created previously, you can modify
that Profile.
- Click the WEP button to set the security.
.
1. First of all, select the ‘40 bit’.
2. Input a certain value (ex. test1 etc) in the ‘Passphrase’ and click the Generate button.
58
Page 59

Then it will make four values of keys automatically.
3. Then you set the same value to the WEP of AP. (cf. If you use the WLAN made from
other company, you must set the same values in the four keys)
- You can set the ‘Power Saving’ and ‘Threshold’ with clicking the Advanced button.
1. Power Saving Mode saves the Battery. (cf.. it can give a lowing of
efficiency according to 802.11Specification)
2. RTS/CTS Threshold Mode is better used in the place surrounded with much
59
Page 60

RF interference.
- Click the TCP/IP to input the IP directly or receive IP automatically.
5.1.4 The ‘Delete’ button
Select a profile and click on Delete button to remove that profile.
5.2 Status
60
Page 61

5.2.1 The ‘Current Status’ button
It shows the current state of the WLAN card. (Refer to the ‘ The main configuration of
Program’)
5.2.2 The ‘AP Status’ button
It shows the current state of AP. (You can see the IP address changed by the Get Status
button)
61
Page 62

Model:
z
Version
z
Description:
z
NAT
z
DHCP
z
Clients number
z
Internet connection
z
It shows the name of model.
: It shows the version of AP.
It is the name of AP designated by AP manager during AP setup.
: It shows whether the private IP address (NAT server) is enabled or not.
: It shows whether the DHCP sever is enabled or not.
: It shows the number of users currently connected with the AP.
: It is the connection type with outer network (LAN, ADSL,
ISDN etc.).
IP Address
z
Connected Status
z
: It shows whether the IP address is from DHCP server or NAT server.
: In case the connection type with the outside network is of
ADSL/CABLE type, it shows the connection state between AP and ASP service.
z
IP
: It is the IP address of the AP.
5.2.3 The ‘Site Survey’ button
It finds you the AP/Station that are connected currently. (It takes a few seconds to be done)
62
Page 63

z
z
z
z
Signal
Rate
WEP:
BSSID
: It shows the connection state of Stations with AP or Master Station.
: It shows the Tx Data rates.
It shows security state with the AP.
: It represents the Physical Address of AP in the Infrastructure Mode and
the Random Generation value in the 802.11 Ad-hoc Mode.
z
Channel
: It shows the currently used channel number.
5.2.4 Statistics
It shows the state of the data transmission. (You can regulate the graph to be see clearly
with the settings of the MAX bps on the right side of bottom)
5.3 General Settings
5.3.1 The ‘DHCP’ button
63
Page 64

- It works when it is enabled.
- The Get Status button shows the updated information obtained from the DHCP server.
- The Release DHCP button releases the IP Address that was received from the DHCP
server.
- The Renew DHCP button is for receiving the IP Address from the DHCP server.
5.3.2 The ‘Options’ button
- If you disable the check from the ‘Sound Enable’, you cannot hear the sound whenever
you click.
- If you disable check from the ‘Manage TCP/IP together with profiles’, you cannot control
TCP/IP in the utility. You can just modify TCP/IP in the Network Neighborhood.
- If you check the ‘Do not show the Profile Wizard Welcome message’, ‘Welcome message
does not pop up in case of set or add the Profile.
5.4 Version
64
Page 65

- You can see the Driver and Firmware version for your WLAN card currently in use.
- Click the Website to get more information about WLAN.
65
Page 66

6. Troubleshooting
To make the installation of SAMSUNG WLAN Card more users friendly, we have
suggested following the installation steps one by one as listed in the section 3 and section 4.
Still you encounter some problems while installing the WLAN Card or you want to confirm
whether your card is installed properly or not, we have listed the procedure for checking the
various components after you have installed the card.
Q. Wireless connection icon shows
unavailable
It’s because property setting is wrong. Please check these contents.
A1. Check if there’s right network name in the
Network name should be same in the infrastructure mode(using AP) as well as in the Peer-
to-Peer mode. Wireless LAN’s network name distinguish a uppercase letter frome a
lowercase letter.
A2. Check if you are using the same WEP string. And you must use the same WEP key.
Please ask network manager about the Access Poing’s WEP string and key.
A3. Check if you are in the range of the Access Point.
A4. Reinstall the driver using MagicLAN Software CD if driver dosen’t work.
Q. Samsung’s tray icon in the task bar shows red color .
A. This is same to above question. Please refer to the above A1~A4.
message appeared.
in the Task bar and
Wireless connection
Available networks
in the client PC.
Q. Link Status is excellent, but I can’t connect to the network.
If TCP/IP setting is not properly established , you can’t connect to the network.
A. Check TCP/IP setting.
When you are using DHCP server, if allocated IP is insufficient, you can’t use network.
In a case like this, please ask the network manager.
Q. A system identify the Wireless LAN Card, but I can’t connect the network.
If there’s many network adapter in the system, wireless LAN may not work properly.
A. Open Device Manager and set
clicking right mouse.
Q. I want to use Samsung client utility in the Windows XP. But, we can’t set up correctly.
A. Windows XP provides each configuration utility of LAN and Wireless LAN by OS in
disable
the unused network adapter(PPP adapter ,etc.) by
66
Page 67

itself. In case of this, you must select the “Manage the Wireless Control by this utility
under WinXP” in the Option menu of General Settings in the Samsung client utility.
Please refer to the website: http://www.magiclan.com/product/magiclan/support/faq.htm
about other detailed questions.
67
 Loading...