

Samsung SWA-6000 User Manual
Home
501CHBEuorayTM
EntertainmentSystem
user manual
_Jo_o_biBities
-L l
',Sb,' . }b 1,}, pu_(h_Hh5 thb i3FN_qJP5 pr}cu,Z
[,le__£ r_,}i.]7_, . ,_,ur F,,,c,,__u__t_t
T v: _l_ ],ia _]_t-,:.: 8":__1_- t '_-i. __.,dy_i b,. _l,q .,'r'
CAUTION
• _ • De • ®_
CAUTION:TOREDUCETHERISKOFELECTRICSHOCK,DO
NOTREMOVETHECOVER(OR BACK).THEREARENO
USERSERVICEABLEPARTSINSIDEREFERALLSERVICINGTO
QUALIFIEDPERSONNEL
® The sbts and openings in the cabinet and in the back
or bottom are provided for necessary'ventilation. To
ensure reBiaMeoperation of this apparatus, and to
protect it from overheating, these sbts and openings
must never be Nocked or covered.
Do not pBacethis apparatus in a confined space,
such as a bookcase, or built-in cabinet, unBess
proper ventilation isprovided.
Do not pBacethis apparatus near or over a radiator
or heat register, or where it is exposed to direct
sunBight.
Do not pBacevessels(vasesetc.) containing water
on this apparatus. A water spill can cause a fire or
electric shock.
® Do not expose this apparatus to rain or place it
near water (near a bathtub, washbowl, kitchen
sink, or laundry tub, in a wet basement, or near a
swimming pool, etc.). If this apparatus accidentally
gets wet, unplug it and contact an authorized dealer
immediately.
® This apparatus uses batteries. In your community,
there might be environmental regulations that require
you to dispose of these batteries properly. Please
contact your local authorities for disposal or recycling
information.
® Do not overload wall outlets, extension cords or
adaptors beyond their capacity', since this can result in
fire or electric shock.
® Route powePsupply cords so that they are not likely
to be walked on or pinched by items placed on or
against them. Pay particular attention to cords at the
plug end, at wall outlets, and the point where they
exit from the apparatus.
® Toprotect this apparatus from a lightning storm,
or when it is left unattended and unused for long
periods of time, unplug it from the wall outlet and
disconnect the antenna or cable system. This will
prevent damage to the set due to lightning and
power line surges.
® Before connecting the AC power cord to the DC
adaptor outlet, make sure the voltage designation
of the DC adaptor corresponds to the local electrical
supply.
® Never insert anything metallic into the open parts
of this apparatus. Doing so may create a danger of
electric shock.
This symbol indicates that high voltage
is present inside. It is dangerous to
make any kind of contact with any
internal part of this product.
This symbol indicates that important
literature concerning operation and
maintenance has been included with
this product.
® To avoid electric shock, never touch the inside of this
apparatus. Only a qualified technician should open
this apparatus.
® Make sure to plug the power cord in until it is firmly
seated. When unplugging the power cord from a wall
outlet, always pull on the power cord's plug. Never
unplug by pulling on the power cord. Do not touch
the power cord with wet hands.
® If this apparatus does not operate normally _in
particular, if there are any unusual sounds or smells
coming from it - unplug it immediately and contact an
authorized dealer or service center.
® Maintenance of Cabinet.
- Before connecting other components to this
product, be sure to turn them off.
- If you move your product suddenly from a cold
place to a warm place, condensation may occur on
the operating parts and lens and cause abnormal
disc playback. If this occurs, unplug the product,
wait for lwo hours, and then connect the plug to
the power outlet. Then, insert the disc, and try to
play back again.
® Besure to pull the power plug out of the outlet if
the product is to remain unused or if you are leaving
the house for an extended period of time (especially
when children, elderly, or disabled people will be left
alone in the house).
Accumulated dust can cause an electric shock, an
electric leakage, or a fire by causing the power cord
to generate sparks and heat or the insulation to
deteriorate.
® Contact an authorized service center for information
if you intend to install your product in a location with
heavy dust, high or low temperatures, high humidity,
chemical substances, or where it will operate 24 hours
a day such as in an airport, a train station, etc. Failing
to do so may lead to serious damage of your product.
® Use only a properly grounded plug and wall outlet.
- An improper ground may cause electric shock or
equipment damage. (Class I Equipment only.)
® To turn this apparatus off completely, you must
disconnect it from the wall outlet. Consequently, the
wall outlet and power plug must be readily accessible
at all times.
2 oEnglish
® Do not allow children to hang on the product.
® Store the accessories (battery, etc.) in a Bocation safely
out of the reach of children.
® Do not install the product in an unstaNe Bocation such
as a shaky self, a 9anted floor, or a Bocation exposed
to vibration.
® Do not drop or strike the product, ff the product is
damaged, disconnect the power cord and contact a
service center
® To dean this apparatus, unpBug the power cord from
the wall outlet and wipe the product using a soft,
dry cloth. Do not use any chemicaBssuch aswax,
benzene, alcohol thinners, insecticide, air fresheners,
lubricants, or detergent. These chemicals can damage
the appearance of the product or erase the printing
on the product.
® Do not expose this apparatus to dripping or splashing.
Do not put objects filled with liquids, such asvases on
the apparatus.
® Do not dispose of batteries in a fire.
® Do not plug multiple electric devices into the same
wall socket. Overloading a socket can cause it to
overheat, resulting in a fire.
® There is danger of an explosion if you replace the
batteries used in the remote with the wrong type of
battery. Replace only with the same or equivalent
type.
WARNING : Q
® TO PREVENTTHE SPREADOF FIRE,
KEEPCANDLES AND OTHER ITEMS
WITH OPEN FLAMESAWAY FROM THIS
PRODUCT AT ALL TIMES.
® This product contains chemicals known to the State of
California to cause cancer and reproductive toxicity.
FCCNOTES(for U.S.A)
This equipment has been tested and found to comply
with the limits for a ClassB digital device, pursuant
to Part 15 of the FCC rules. These limits are designed
to provide reasonable protection against harmful
interference in a residential installation. This equipment
generates, uses and can radiate radio frequency energy
and, if not installed and used in accordance with the
instructions, may cause harmful interference to radio
or television reception, which can be determined by
turning the equipment off and on.
If interference ispresent, the user is encouraged to try to
correct the interference by one or more of the following
measures:
® Reorient or relocate the receiving antenna.
® Increase the separation between the equipment and
receiver.
® Connect this equipment to an outlet on a circuit that
the receiver is not connected to.
® Consult the dealer or an experienced radio/TV
technician for help.
This class B digital product meets all requirements
of the Canadian Interference - Causing Equipment
Regulations
CLASS I LASER PRODUCT
This product isclassified as a CLASS1 LASER product.
Use of controls, adjustments or performance of
procedures other than those specified herein may result
in hazardous radiation exposure.
Complies with 21CFR 1040.10 except for deviations
pursuant to LaserNotice No. 50, dated June 24, 2007.
DANGER :
® VISIBLEAND INVISIBLELASERRADIATION WHEN
OPEN. AVOID DIRECTEXPOSURETO BEAM.
(FDA 21 CFR)
CAUTION :
® CLASS3B VISIBLEAND INVISIBLELASER RADIATION
WHEN OPEN. AVOID EXPOSURETO THE BEAM (!EC
60825-1 )
® THIS PRODUCT UTILIZESA LASER.USEOF
CONTROLSOR ADJUSTMENTS OR PERFORMANCE
OF PROCEDURESOTHERTHAN THOSE SPECIFIED
HEREIN MAY RESULTIN HAZARDOUS RADIATION
EXPOSURE.DO NOT OPENTHE COVER. DO NOT
REPAIRTHE PRODUCT YOURSELF.REFERSERV!ONG
TO QUALIFIED PERSONNEL.
Read these operating instructions carefully before using
the unit. Follow all the safety' instructions listed below.
Keep these operating instructions handy for future
reference.
1. Read these instructions.
2. Keep these instructions.
3. Heed a[[ warnings.
4. Follow a[[ instructions.
5. Do not use this apparatus near water.
6. Clean onlywith a dry cloth.
7. Do not block any ventilation openings. Install in
accordance with the manufacturer's instructions.
5"
3•
3 o English
8. Do not install near any heat sources such as
radiators, heat registers, stoves, or other apparatus
(including AV receivers) that produce heal
9. Do not defeat the safety' purpose of the poBarized
or grounding-type pBug_A poBarized pBughas two
Mades with one wider than the other_ A grounding
type plug has two blades and athird grounding
prong_ The wide blade or the third prong are
provided for your safety_ If the provided plug does
not fit into your outlet, consult an electrician for
replacement of the obsolete outlet
1O. Protect the power cord from being walked on
or pinched particularly at plugs, convenience
receptacles, and the point where it exits the
apparatus_
11. Only use attachments/accessories specified by the
manufacturer
12. Use only with the cart, stand,
tripod, bracket, or table
specified by the manufacturer,
or sold with the apparatus.
When a cart is used, use
caution when moving the
cart/apparatus combination to avoid injury from
tip-over
13. Unplug this apparatus during lightning storms or
when unused for long periods of time.
14. Refer all servicing to qualified service personnel
Servicing is required when the apparatus has been
damaged in any way, such as when the power-
supply cord or plug is damaged, liquid has been
spilled or objects have fallen into the apparatus,
the apparatus has been exposed to rain or
moisture, does not operate normally, or has been
droppe&
IMPORTANT HEALTH AND SAFETYINFORMATION FOR
3D PICTURES_
Read and understand the following safety information
before using the 3D function.
® Some viewers may experience discomfort while
viewing 3D TV such as dizziness, nausea, and
headaches.
If you experience any such symptom, stop viewing 3D
TV,remove the 3D Active Glasses, and resL
® Watching 3D images for an extended period of time
may cause eye strain. If you feel eye strain, stop
viewing 3D TV, remove your 3D Active Glasses, and
rest.
® A responsible adult should frequently check on
children who are using the 3D function.
If there are any reports of tired eyes, headaches,
dizziness, or nausea, have the child stop viewing 3D
TV and rest
4o English
® Do not use the 3D Active Glasses for other purposes
(such as general eyeglasses, sunglasses, protective
goggles, etc)
® Do not use the 3D function or 3D Active Glasses while
walking or moving aroun& Using the 3D function or
3D Active Glasses while moving around may cause
you to bump into objects, trip, and/or fall, and cause
serious injury_
® If you want to enjoy 3D content, connect a 3D device
(3D compliant AV receiver or TV) to the product's
HDM! OUT port using a high-speed HDMI cable. Put
on 3D glasses before playing the 3D contenL
® The product outputs 3D signals only through an HDM!
cable connected to the HDMI OUT port.
® The video resolution in 3D play mode is fixed to
the resolution of the original 3D video. You can not
change the resolution.
® Some functions such as BD Wise, screen size
adjustment, and resolution adjustment may not
operate properly in 3D play mode.
® You must use a high-speed HDMI cable for proper
output of the 3D signal
® Stay at least three times the width of the screen from
the TV when watching 3D images. Forexample, if
you have a 46 inch screen, stay 138 inches (11_5 feet)
from the screen.
® Place the 3D video screen at eye level for the best 3D
picture.
® When the product isconnected to some 3D devices,
the 3D effect may not function propedy.
® This product does not convert 2D content into 3D.
® _Blu-ray 3D" and "Blu-ray 3D_logo are trademarks of
the Blu-ray Disc Association.
i:_i_i_i_i_i_i_i_i_i_i_i_i_i_i_i_i_i_i_i_i_i_i_i_i_i_i_i_i_i_i_i_i_i_i_i_i_i_i_i_i_i_i_i_i_i_i_i_i_i_i_i_i_i_i_i_i_i_i_i_i_i_i_i_i_i_!_ii_!i_!i_!i_!i_!_!i__i_iiiiiiii_:i:i_iiiiiiiiiiiiiiiiiiiiiiiiiiiiiiiiiiiiiiiiiiiiiiiiiiiiiiiiiiiiiiiiiiiiiiiiiiiiiii_i_i_i_i_iiiiiiiiiiiiiiiii_ii_!__i_#__i!_i_!_!ii_i¸
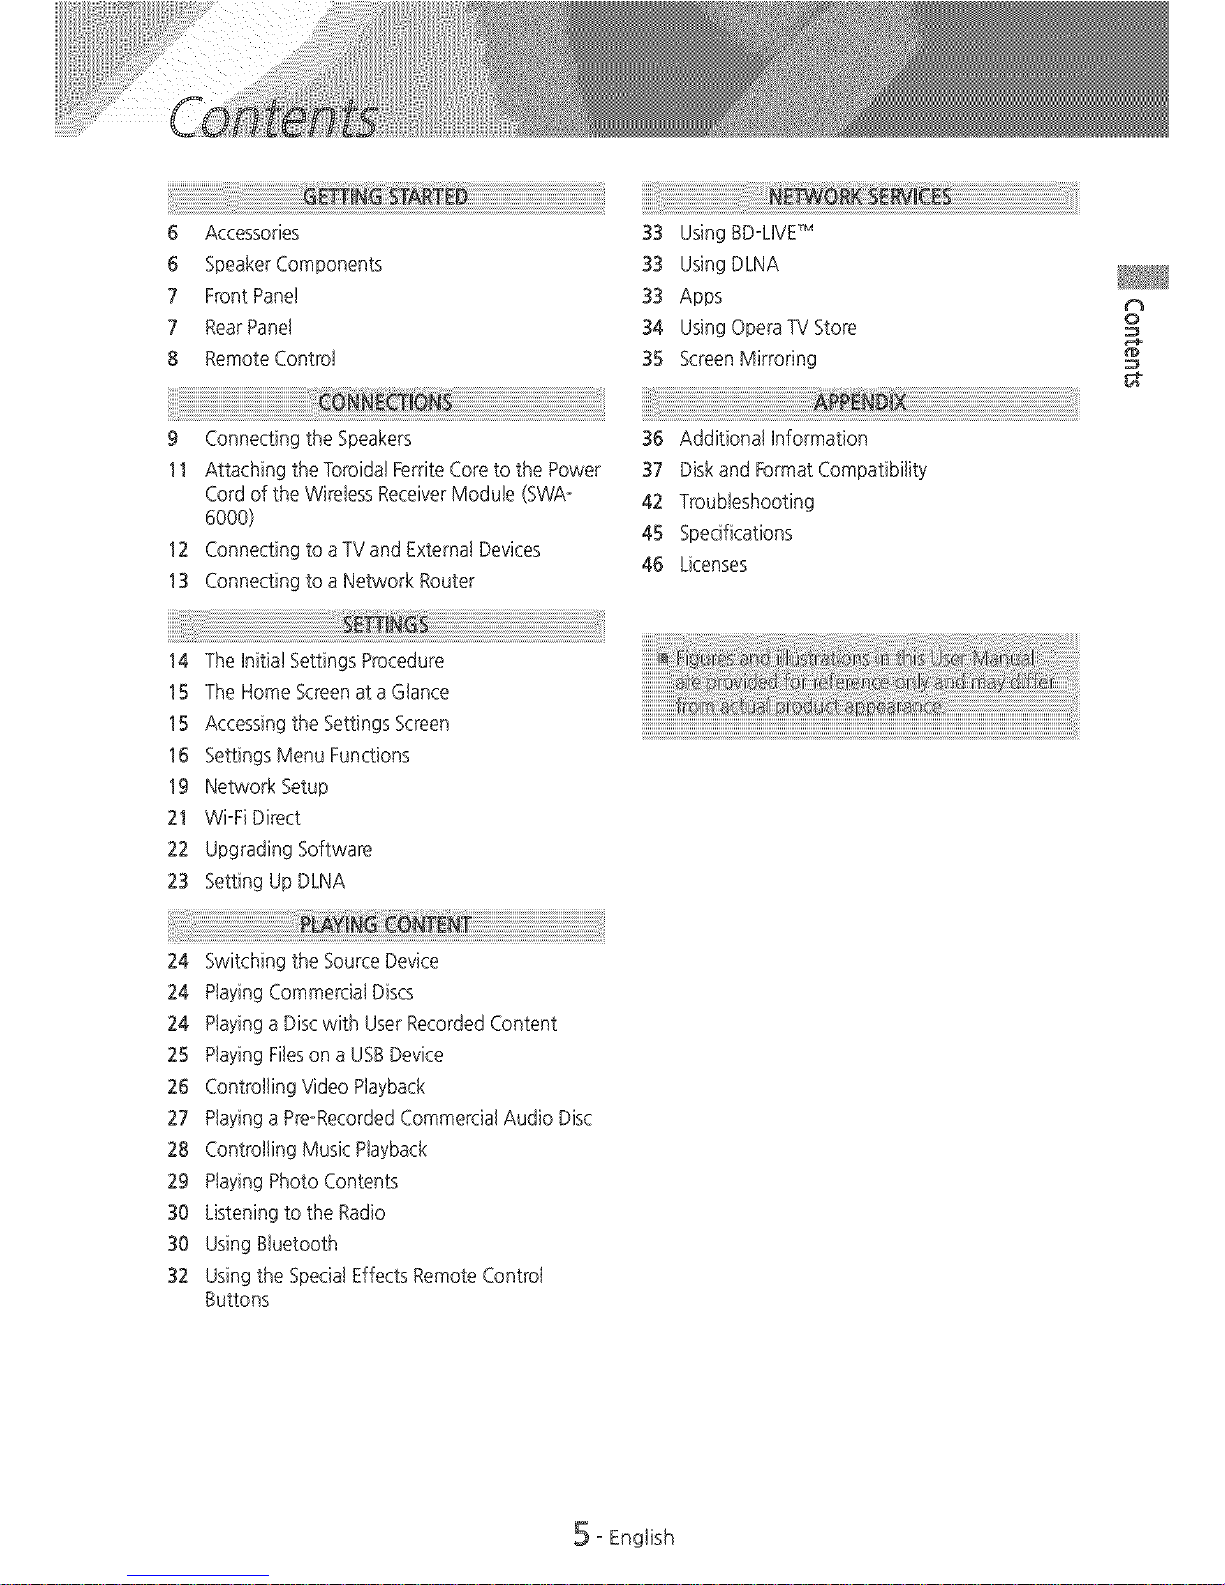
6 Accessories 33 Using BDoLIVETM
6 SpeakerComponents 33 Using DLNA
7 Front Panel 33 Apps
7 RearPanel 34 Using Opera-FVStore
8 RemoteControl 35 ScreenMirroring
9 Connectingthe Speakers 36 Additional Information
11 Attaching the Toroida!Ferrite Coreto the Power 37 Diskand FormatCompatibility
Cordof the Wireless ReceiverModule (SWAo 42 Troubleshooting
6000) 45 Specifications
12 Connecting to aTVand External Devices
46 Licenses
13 Connecting to aNetwork Router
Ch
0
g-
14 The Initial SettingsProcedure
15 The Home Screenata Glance
15 Accessingthe Settings Screen
16 Settings Menu Functions
19 Network Setup
21 WioFiDirect
22 Upgrading Software
23 Setting UpDLNA
24 Switching the SourceDevice
24 PlayingCommercial Discs
24 Playinga Disc with UserRecorded Content
25 PlayingFileson aUSBDevice
26 Controlling Video Playback
27 Playinga PreoRecordedCommercial Audio Disc
28 Controlling Music Playback
29 PlayingPhoto Contents
30 Listeningto the Radio
30 UsingBtuetooth
32 Usingthe SpecialEffectsRemote Control
t_uttons
oEnglish
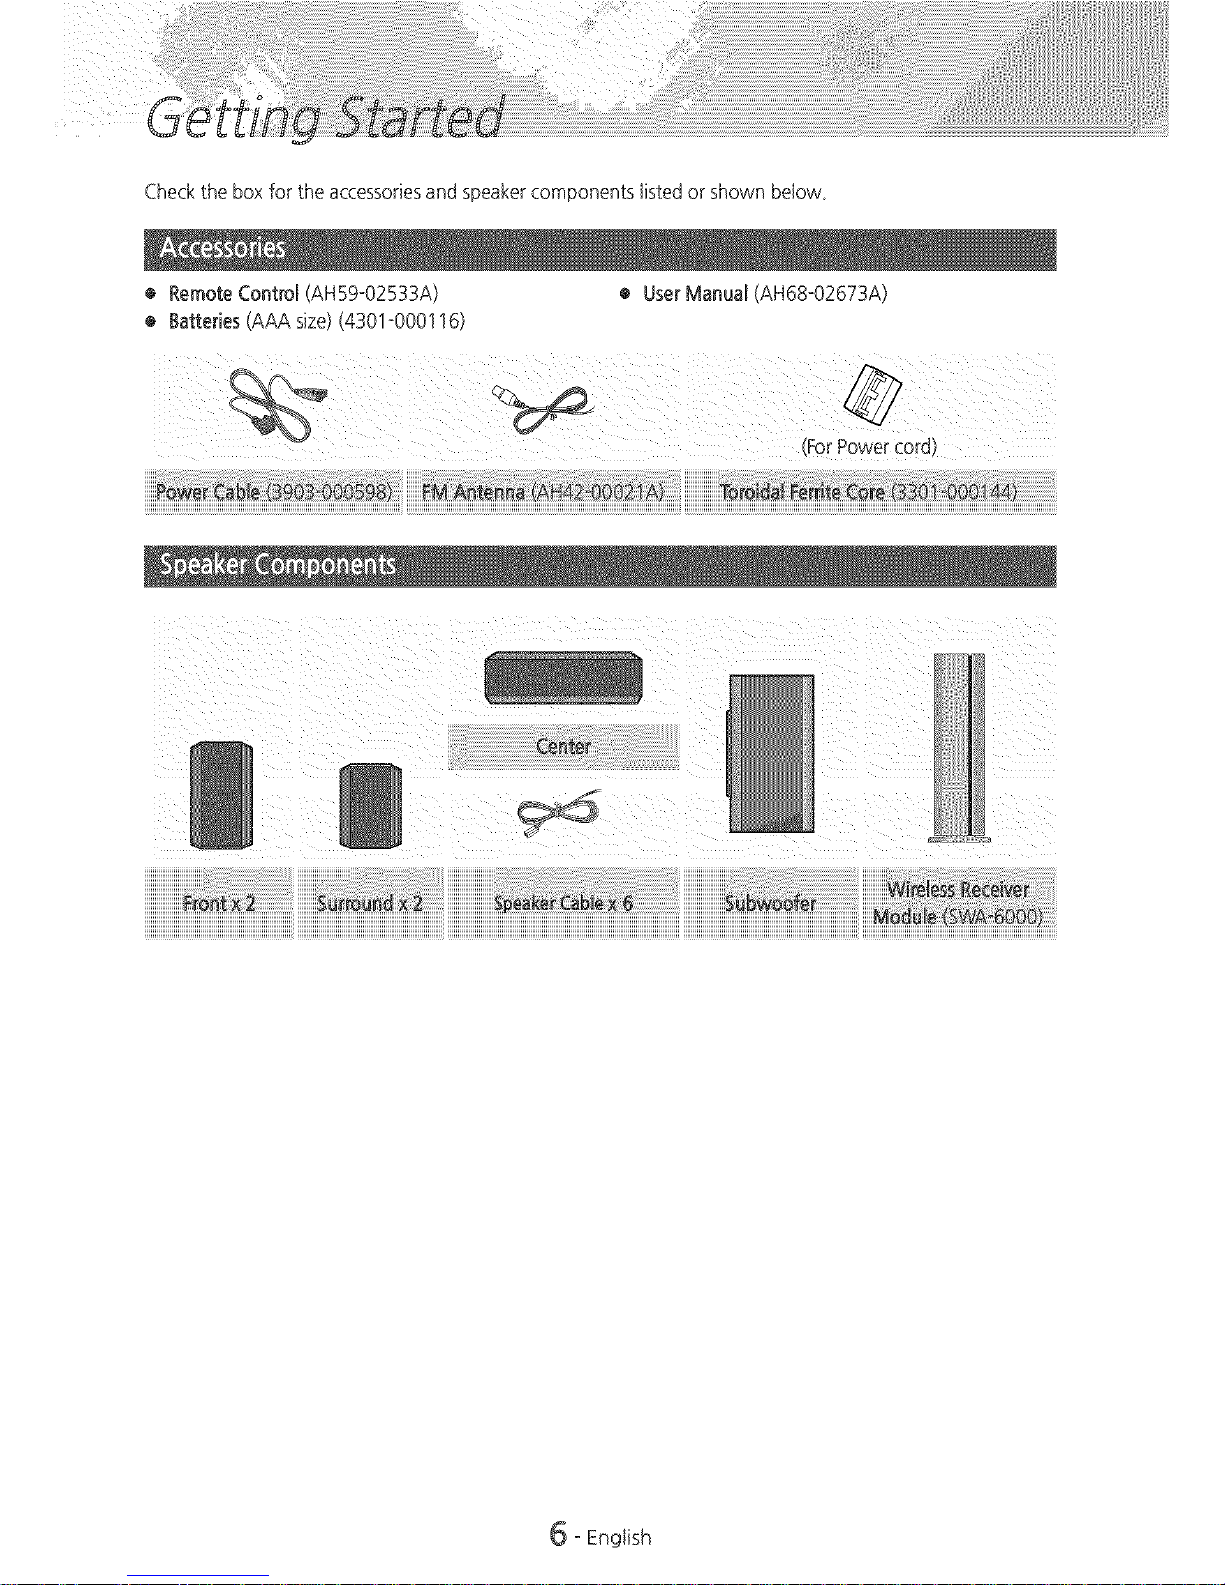
Checktheboxfortheaccessoriesandspeakercomponentslistedorshownbelow.
®RemoteControl(AH59-02533A)
®Batteries(AAAsize)(4301-000116)
• UserManual(AH68-02673A)
Cen_er
6 oEnglish

DISPLAYICONS
OPENICLOSE VOLUME POWER
CONTROL
DISPLAY !
DISCTRAY REMOTECONTROLSENSOR B
J
When the product is on, do not let children touch the p_oduct's surface, It wi]] be hot,
To upgrade the product's software through the USBjack, you must use a USBflash drive_
When the product displays a Blu-ray Disc menu, you cannot start the movie by pressing the HIiI_
button on the product or the remote. To play the movie, you must select Play Movie or Start in the
disc menu, and then pressthe _ button.
If you are using the Internet or are playing content from a USBdevice on your TV through the home
theater, you cannot select the BD/DVD mode with the FUNCTIONbutton. To select the BD/DVD
mode, exit the Internet or stop the content you are playing on the TV,and then select the BD/DVD
mode.
AUX IN * FMANTENNA
COOUNG FAN
NDM_OUT
I I
POWERCORD SPEAKEROUTPUT EXTERNALDIGITAL LANTERMINAL
CONNECTORS AUDIO _N(OPTICAL)
* Connecting the FM Antenna
1. Connect the supplied FM antenna to the FM ANTJack
2. Slowly move the antenna wire around until you find a location where reception isgood, then fasten it to
awalt or other rigid surface.
Maintain a minimum of 4 inches of clear spaceon all sides of the home theater to ensure adequate
ventilation_
Do not obstruct the cooling fan or ventilation holes_
This product does not receive AM broadcasts_
5"
7oEngtish
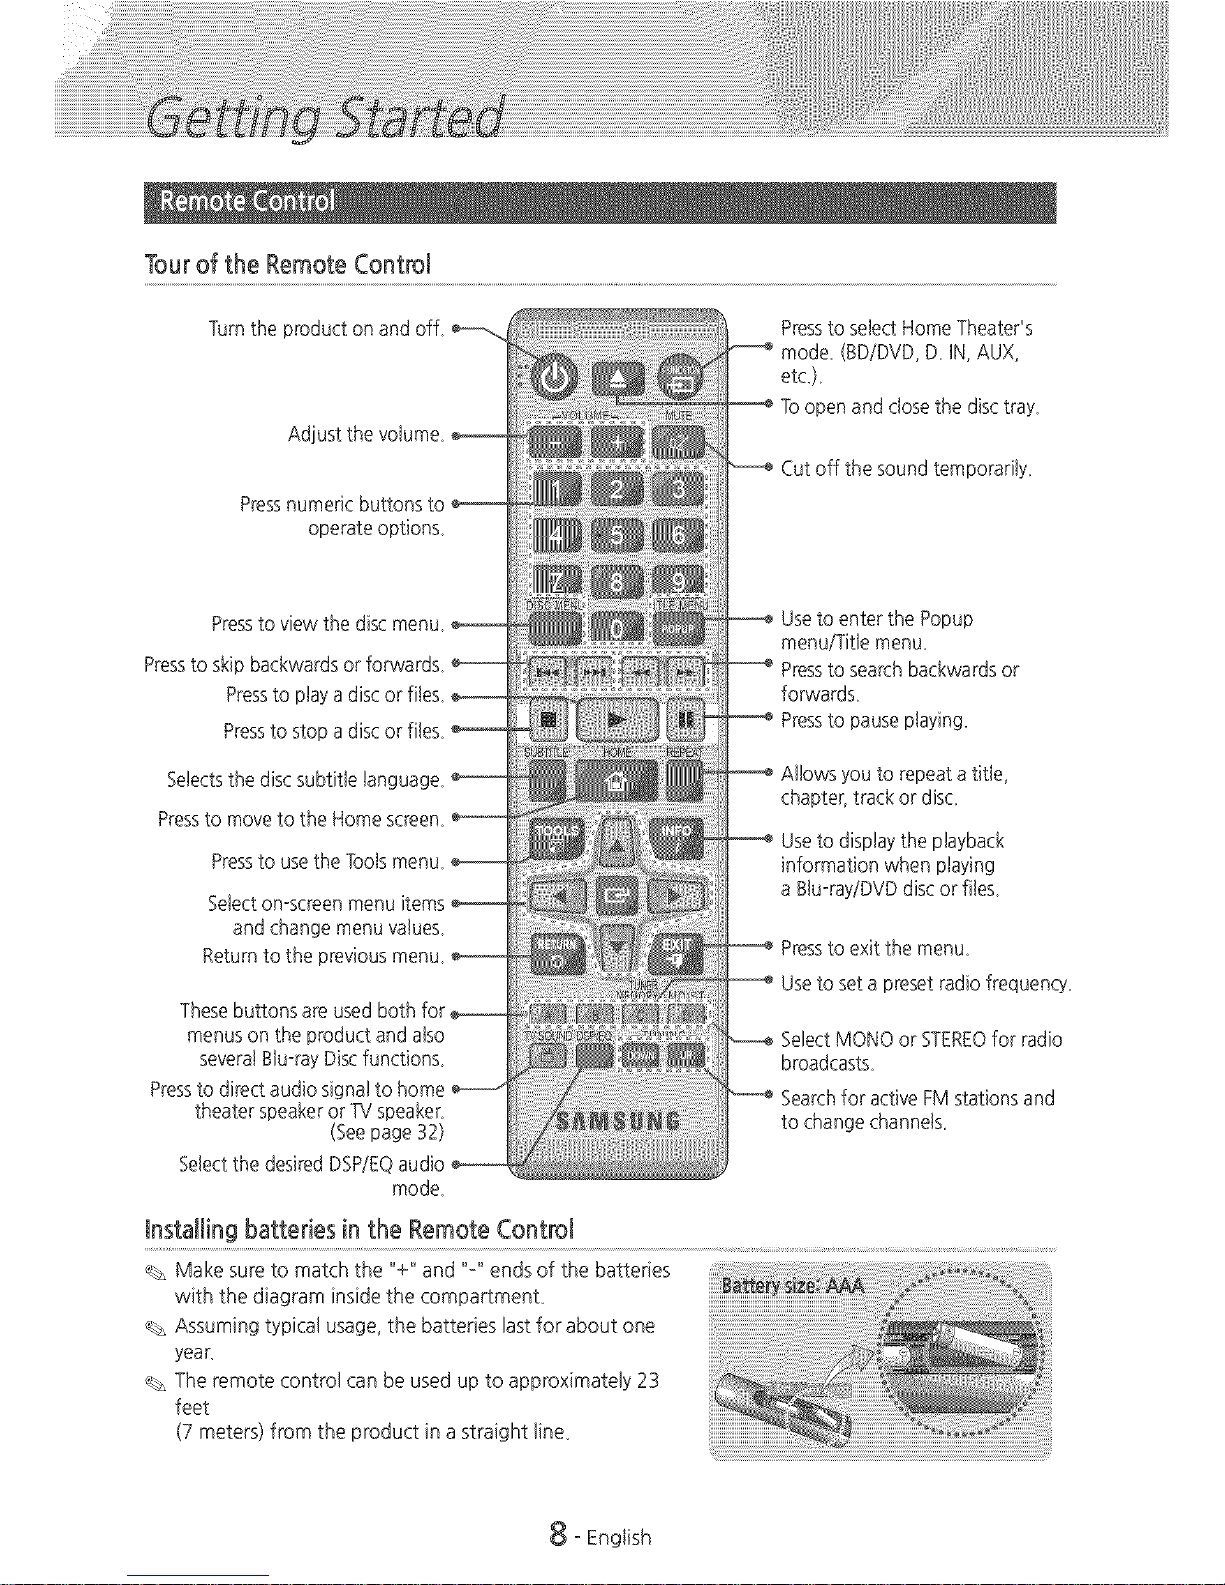
Tourof the RemoteControl
Turnthe product on and off
Adjust the volume
Pressnumeric buttons
operate options_
Pressto view the disc menu
Pressto skip backwards or forwards
Pressto ptay adisc or fibs
Pressto stop adiscor fibs
Sebcts the disc subtWetanc
Pressto move to the Home screen
Pressto usethe Toolsmenu
Sebct on-screenmenu
and change menu values_
Returnto the previous menu
Thesebuttons are usedboth for,
menuson the product and aJso
severa!Blu-rayDiscfunction£
Pressto direct audio sig
theater speakeror TVspeaker_
(Seepage 32)
Sebct the desiredDSP/EQ
mode_
Installing batteries in the RemoteControl
Pressto sebct Home TheateCs
mode_ (BD/DVD, D_iN, AUX,
etc)_
Toopen and closethe disc tray_
Cut off the sound temporar@_
Use to enter the Popup
menu/Title menu_
Pressto searchbackwardsor
forwards_
Pressto pause playing,
Allows you to repeat a title,
chapter, track or disc
Use to display the playback
information when playing
a Btu-ray/DVDdisc or fibs_
Pressto exit the menu_
Use to set a preset radio frequency_
Select MONO or STEREOfor radio
broadcasts_
Searchfor active FMstations and
to changechannel£
% Make sureto match the "+" and "-" ends of the batteries
with the diagram inside the compartmenL
Assuming typical usage, the batteries last for about one
year_
% The remote control can be used up to approximately 23
feet
(7 meters) from the product in a straight line_
8 - English
Thissectiondescribesvariousmethodsofconnectingtheproducttootherexterna!components_
Beforemovingorinstallingtheproduct,besuretoturnoffthepoweranddisconnectthepowercord_
Surround(R)
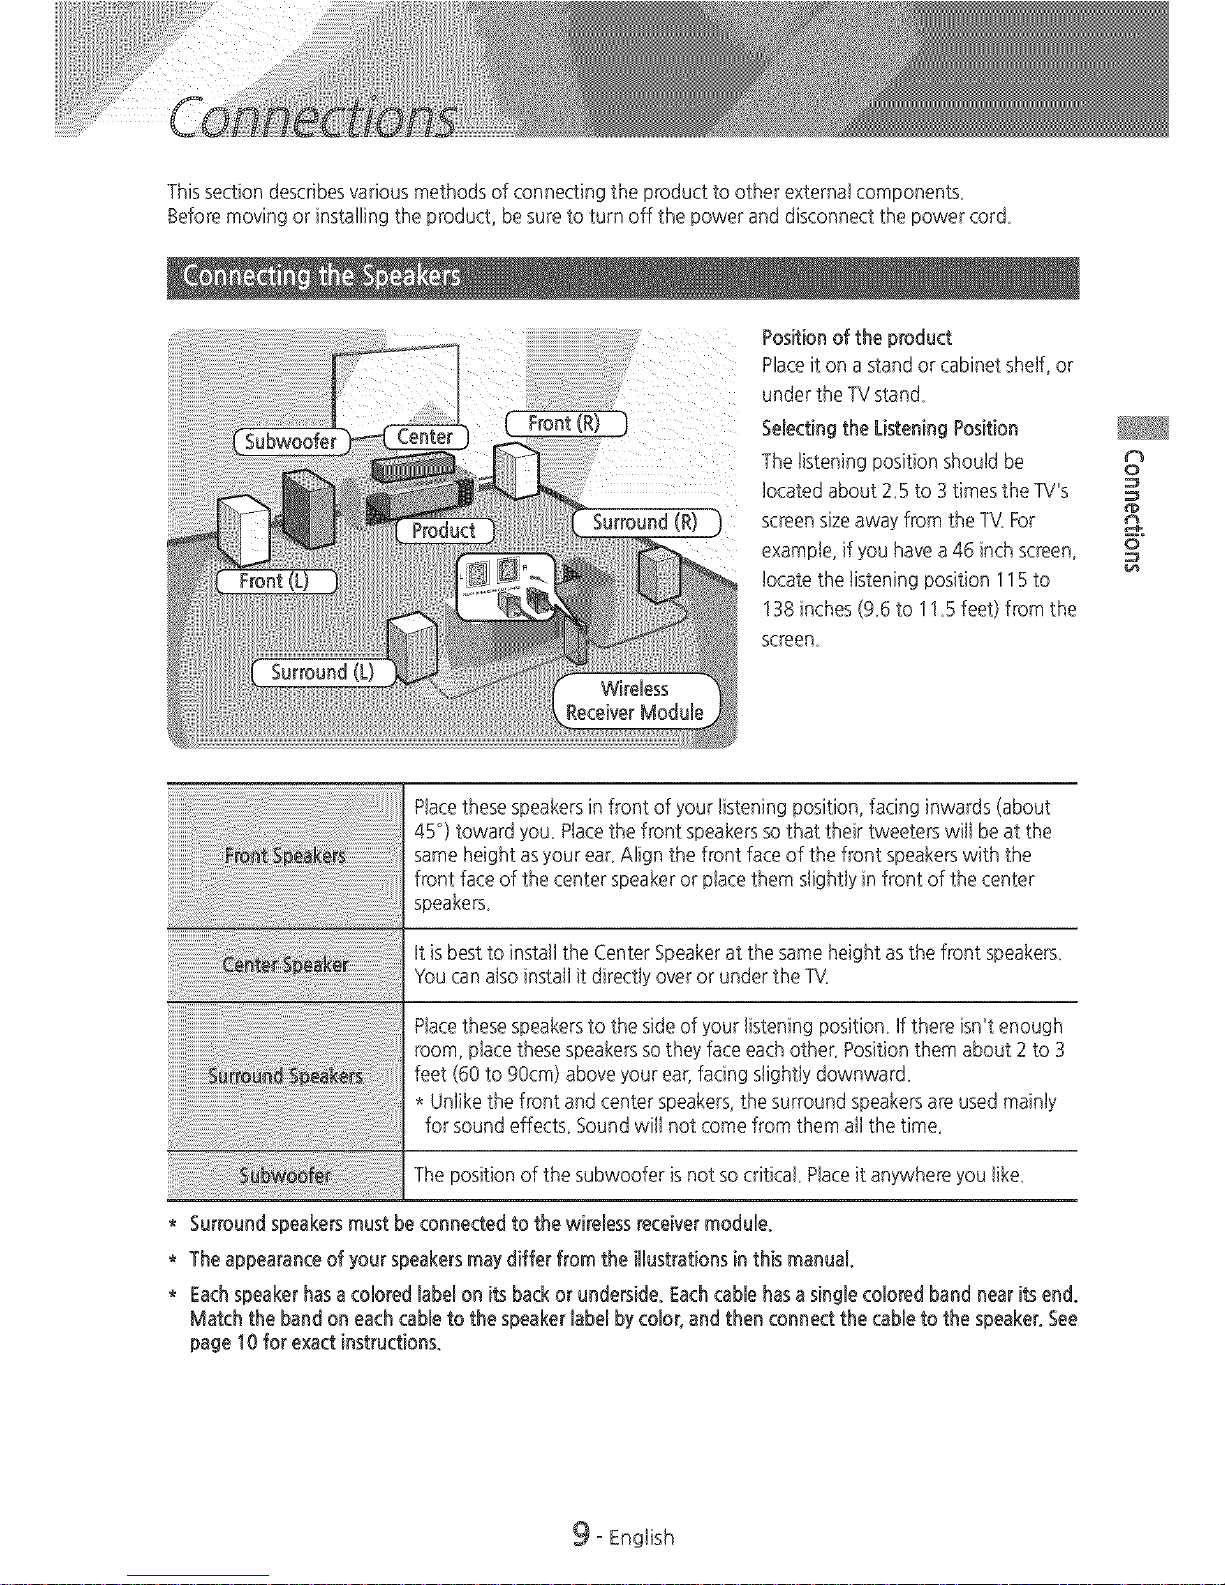
Positionoftheproduct
PlaceitonastandorcabinetsheF,or
undertheTVstand_
SelectingtheListeningPosition
Thelisteningpositionshouldbe
bcatedaboutZ5to3timestheTV's
screensizeawayfromtheTV.For
exampb,ifyouhavea46inchscreen,
tocatethelisteningposition115to
138inches(9_6to11_5feet)fromthe
screen_
t_
0
Ptacethese speakersin front of your listening position, facing inwards (about
45°) toward you_Placethe front speakersso that their tweeters will be at the
same height as yourear_Align the front face of the front speakerswith the
front face of the center speakeror place them slightly in front of the center
speakers_
it is bestto install the Center Speakerat the same height as the front speakers_
YOucan also install it directly overor under the TV_
Placethese speakersto the sideof yourlistening position_Ifthere isn't enough
room, place thesespeakersso they face eachother_Position them about 2 to 3
feet (60 to 90cm) above yourear, facing slightly downwar&
* Unlike the front and center speakers,the surround speakersare used mainly
for sound effects_Sound will not come from them all the time_
The position of the subwoofer isnot so critical Placeit anywhere you tike_
* Surround speakersmust beconnected to the wireless receivermodule.
* The appearanceof your speakersmay differ from the illustrations in this manual.
* Eachspeaker hasacolored label on its back or underside. Eachcablehas asingle colored band nearits end.
Match the bandon eachcable to the speakerlabel by color, and then connect the cableto the speaker.See
page 10 for exact instructions.
9 - English
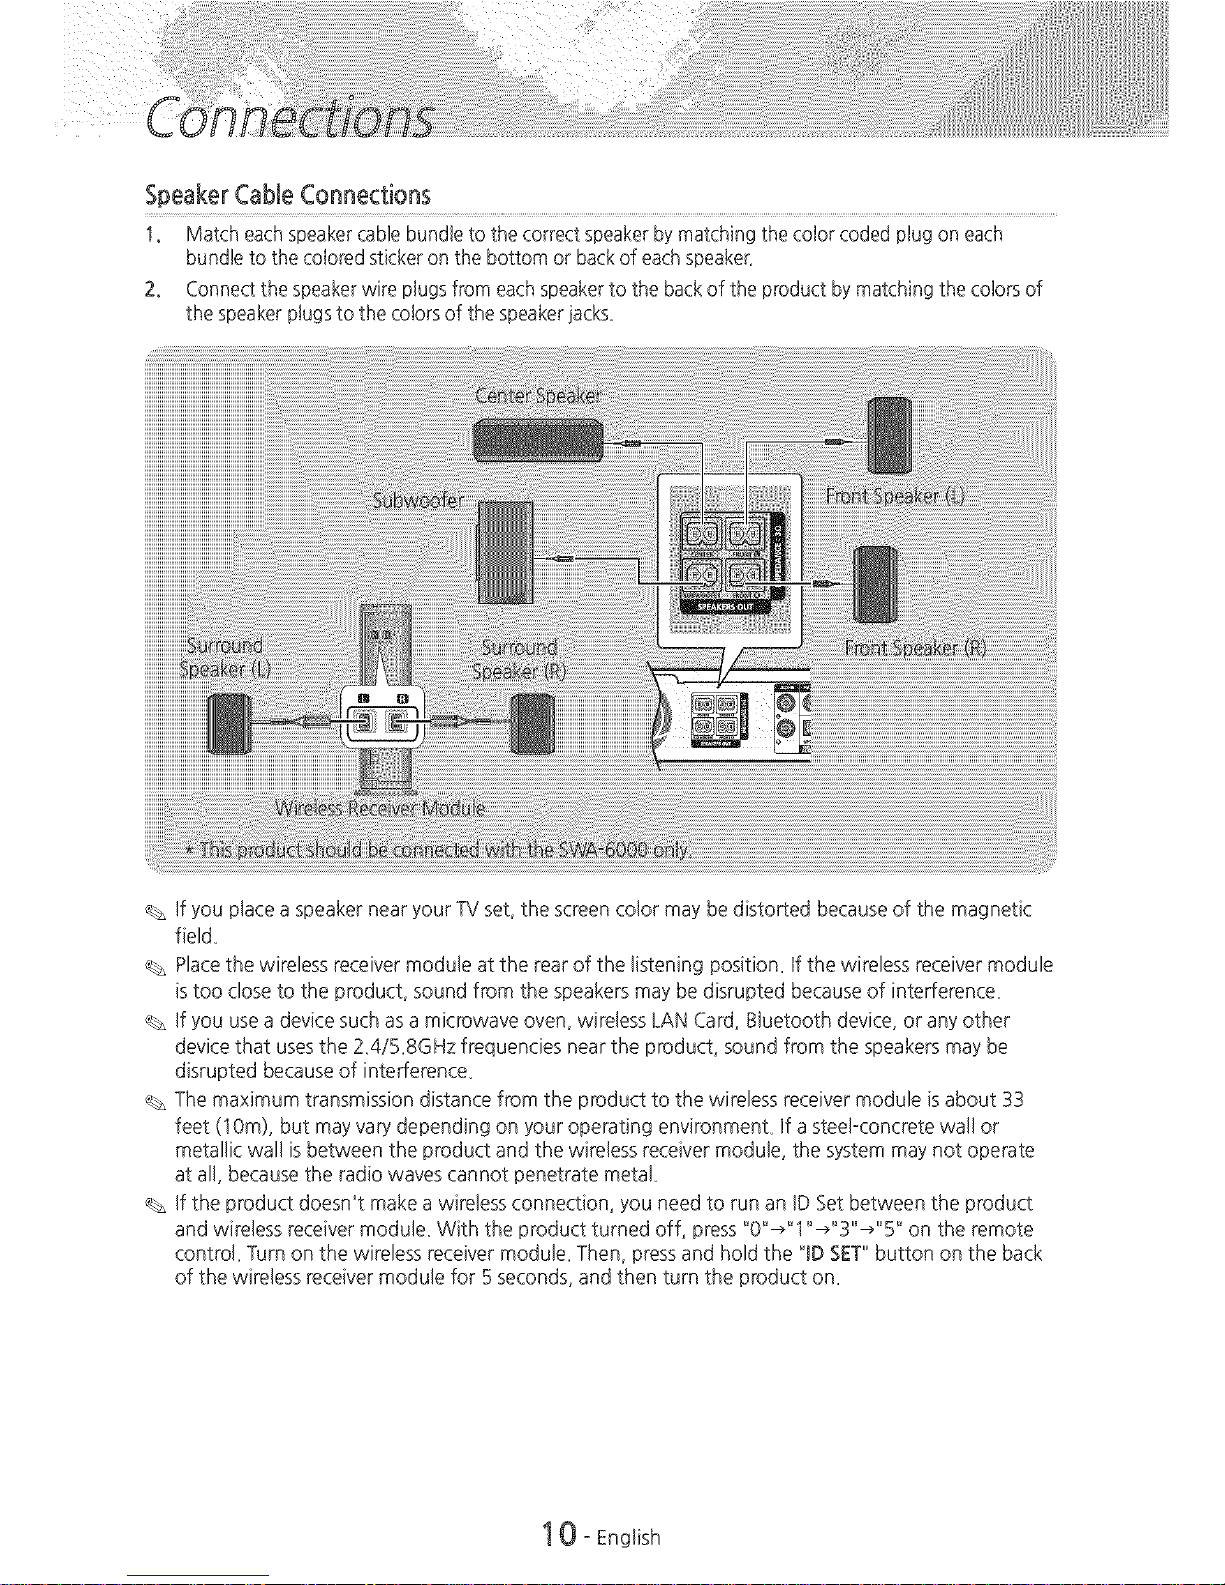
SpeakerCableConnections
I, Match each speakercable bundle to the correct speakerby matching the color coded plug on each
bundle to the colored sticker on the bottom or backof eachspeaker_
2, Connect the speakerwire plugsfrom each speakerto the backof the product by matching the colors of
the speaker pJugsto the colors of the speakerjacks_
If you placea speaker near your TV set, the screen color may be distorted because of the magnetic
field_
Placethe wireless receiver module at the rear of the listening position_ If the wireless receiver module
is too dose to the product, sound from the speakers may be disrupted because of interference_
If you usea device such as a microwave oven, wireless LAN Card, Bluetooth device, or any other
device that uses the 2_4i5_8GHz frequencies near the product, sound from the speakers may be
disrupted because of interference_
The maximum transmission distance from the product to the wireless receiver module is about 33
feet (10m), but may vary depending on your operating environment If a steel-concrete wall or
metallic wall is between the product and the wireless receiver module, the system may not operate
at all, because the radio waves cannot penetrate metal
If the product doesn't make a wireless connection, you need to run an ID Set between the product
and wireless receiver module_ With the product turned off, press "0"_"1" _"3" _" 5" on the remote
control_ Turn on the wireless receiver module_ Then, press and hold the 'ID SET"button on the back
of the wireless receiver module for 5 seconds, and then turn the product on_
IOoEnglish

I CAUT_©N I
if you want to install the speakers on the waJJ,fasten screws or nails (not provided) firmly to the waJJ
wherever you want to hang a speaker, and then, using the hole in the rear of each speaker; carefully
hang each speaker on a screw or nail
Do not let children play with or near the speakers, They could get hurt if a speaker fal&
When connecting the speaker wires to the speakers, make sure that the polarity (+/-) is correct,
Keep the subwoofer speaker out of reach of children to prevent children from inserting their hands
or alien substances into the duct (hole) of the subwoofer speaker,
Do not hang the subwoofer on the wall using the duct (hole),
The wireless receiving antenna is built into the wireless receiver module, Keep it away from water
and moisture,
For optimal listening performance, make sure that the area around the wireless receiver module
location is clear of any obstructions,
In 2-CH mode, you will hear no sound from the wireless surround s3eakers,
¢%
O
If you attach aToroida!ferrite core to the power cord of the wireless receivermodule, it wit! help prevent RF
interference from radio signa&
1.
2.
3.
Puttthe fixing tab of the $oroida!ferrite core to open it,
Make two loops in the wireless receivermodule power cot&
Attach the$oroidat ferrite core to the wireless receivermodule's
power cord asshown in the figure on the right, and then close it
by pressiingit until it clicks_
® Attach the ferrite core asclose to the Wireless ReceiverModule
as possiNe_
11 - English
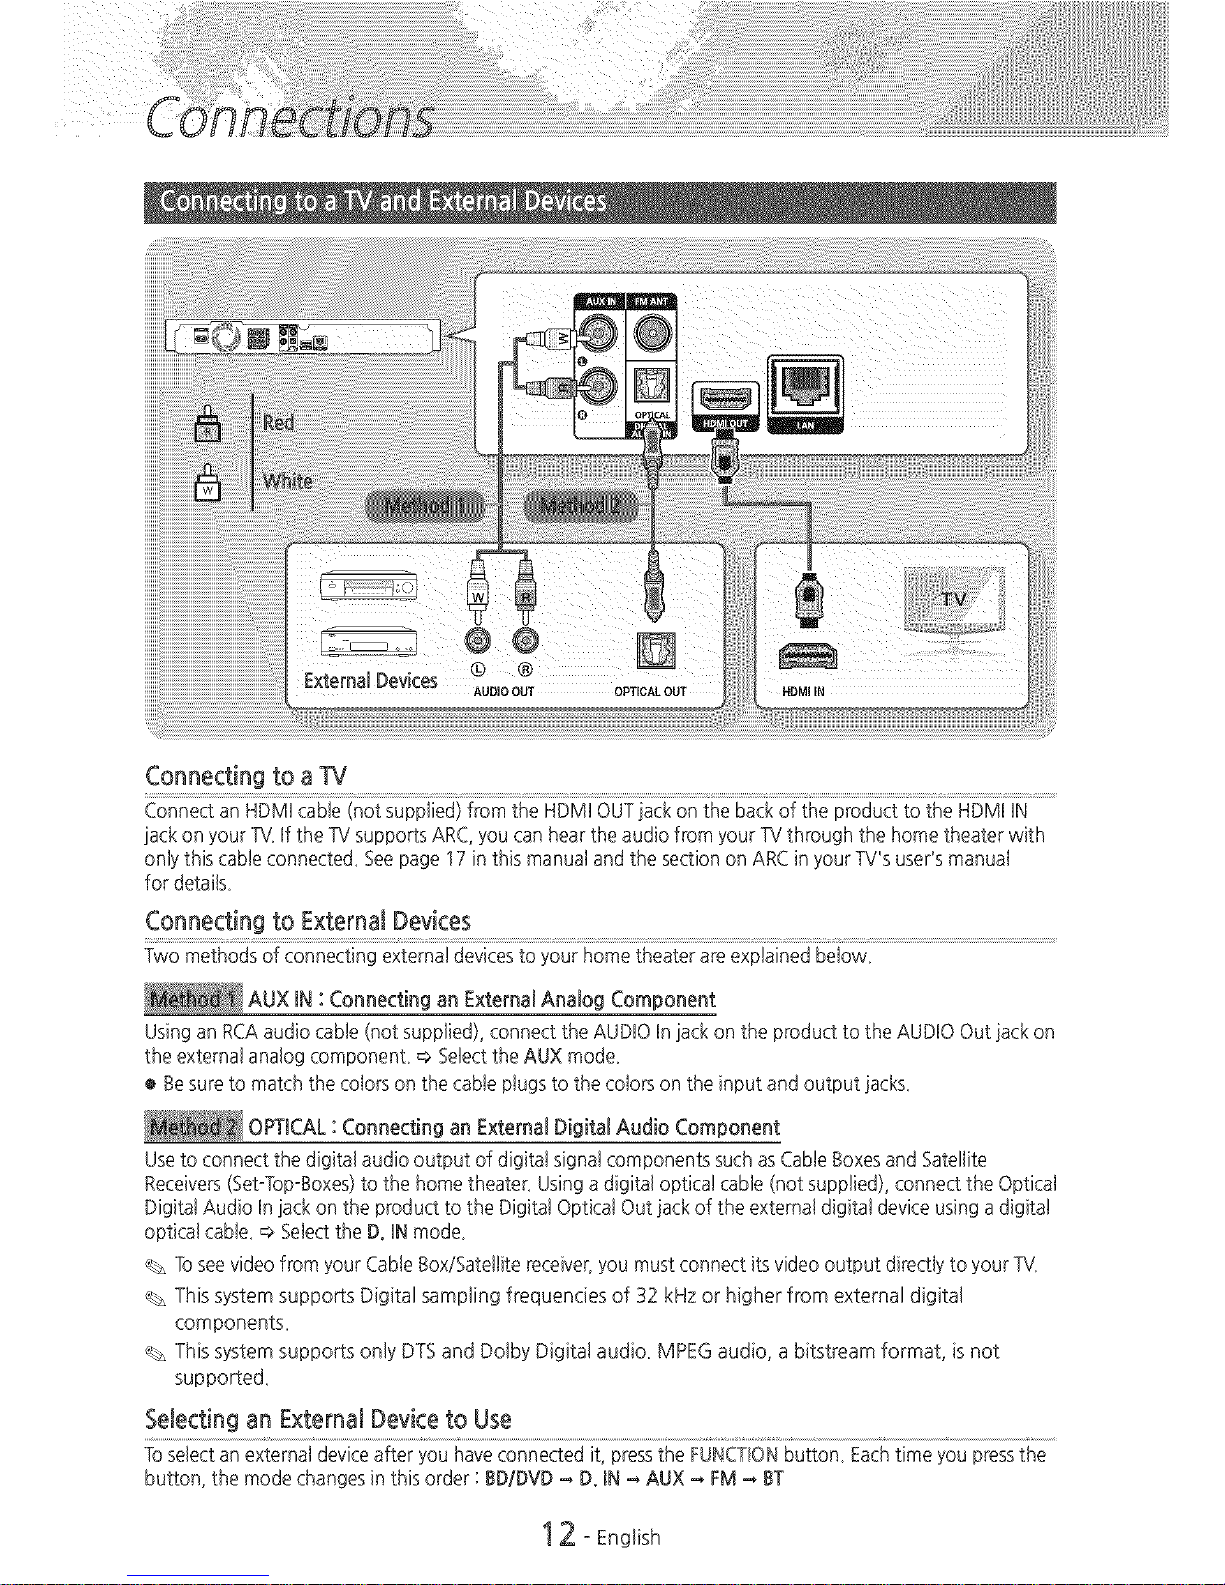
Connecting to a TV
<not pplied> HDM, on bac oftheproducttotG................
jack on your TkLff the TVsupports ARC,you can hearthe audio from your TVthrough the home theater with
onlythis cable connecte& Seepage 17 in this manual and the section on ARCin your TV'suseds manual
for detai&
Connecting to ExternalDevices
Two methods of connecting external devicesto your home theater areexplained below,
AUX IN : Connecting an External Analog Component
Usingan RCAaudio cable (not supplied), connect the AUDIOIn iack on the product to the AUDIO Out iack on
the external analog component, =>Selectthe AUX mode,
® Besure to match the colors on the cable plugs to the colors on the input and output lacks,
OPTICAL: Connecting an External Digital Audio Component
Useto connect the digital audio output of digital signal components suchasCable Boxesand Satellite
Receivers(Set°Top°Boxes)to the home theater_ Usingadigital optical cable (not supplied), connect the Optical
Digital Audio In jack on the product to the Digital Optical Out jack of the external digital device using adigital
optical cabte, =>Selectthe D°IN mode,
% Toseevideofrom your Cable Box!Satellitereceiver,you must connect its video output directly to your TV_
% This system supports Digital sampling frequencies of 32 kHz or higher from external digital
components.
This system supports only DTSand Dolby Digital audio. MPEGaudio, a bitstream format, isnot
supporte&
Selectingan ExternalDeviceto Use
Toselect an external deviceafter you have connected it, pressthe FUNCTIONbutton, Eachtime you pressthe
button, the mode changes in this order : BD/DVD -- D°IN -- AUX -- FM -- BT
12 - Engiish

YOucan connect your product to your network
router using one of the methods illustrated below_
Wired Network
O
Your router or your Internet Service Provider's
policies may prevent the product from
accessing Samsung's software update server,
If this occurs, contact your Internet Service
Provider (ISP)for more information,
DSLusers, please use a router to make a
network connection,
To use the DLNA function, you must connect
your PCto your network as shown in the
illustrations above,
The connection can be wired or wireless,
If your wireless IP router supportsDHCP_this
product can use a DHCPor static IP address to
connect to the wireless network,
Set your wireless IP router to Infrastructure
mode, Ad-hoc mode isnot supporte&
The product supports only the following
wireless security key protocols:
- WEP(OPEN!SHARED),WPAopSK(TKIP/AES),
WPA2opsK(TKIP/AES)
% Select a channel on the wireless IProuter that
is not currently being use& If the channel set
for the wireless IP router is currently being
used by another device nearby, it will result in
interference and communication failure,
% In compliance with the newest Wi-Fi
certification specifications, Samsung home
theaters do not support WEP,TKIP,or TKIP-
AES (WPS2 Mixed) security encryption in
networks running in the 802,11 n mode,
Wireless LAN, by its nature, may cause
interference, depending on the operating
conditions (APperformance, distance,
obstacles, interference by other radio devices,
etc),
13- English
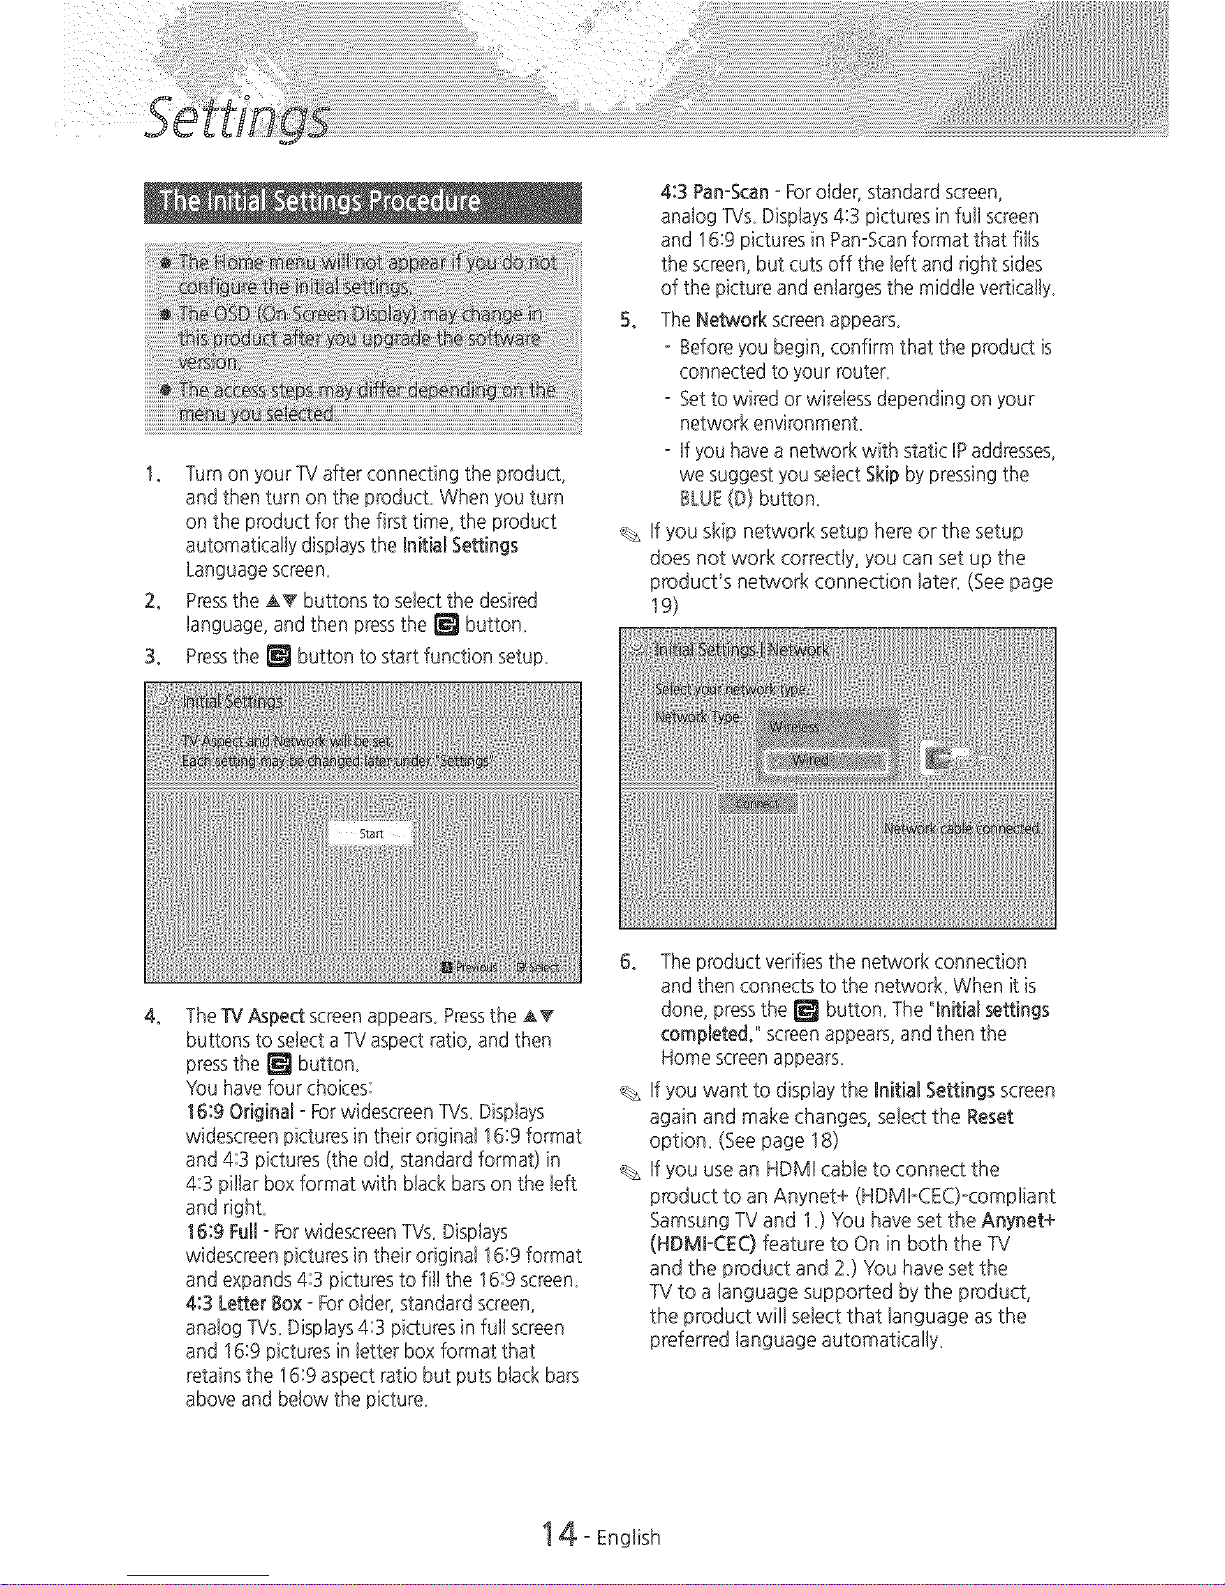
1. TurnonyourTVafterconnectingtheproduct,
andthenturnontheproducLWhenyouturn
ontheproductforthefirsttime,theproduct
automaticallydisplaysthe_nitialSettings
Languagescreen.
2. PresstheATbuttonstoselectthedesired
language,andthenpressthe_ button_
3. Pressthe_ buttontostartfunctionsetup_
43Pan-Scan-Forolder,standardscreen,
analogTVs_Displays4:3picturesinfullscreen
and16:9picturesinPan-Scanformatthatfills
thescreen,butcutsofftheleftandrightsides
ofthepictureandenlargesthemiddleverticalty_
5. TheNetworkscreenappears.
-Beforeyoubegin,confirmthattheproductis
connectedtoyourrouter_
-Settowiredorwirelessdependingonyour
networkenvironment.
-IfyouhaveanetworkwithstaticIPaddresses,
wesuggestyouselectSkipbypressingthe
BLUE(D)button_
Ifyouskipnetworksetuphereorthesetup
doesnotworkcorrectly,youcansetupthe
product'snetworkconnectionlater_(Seepage
19)
4,
TheTVAspect screenappears.Pressthe A_
buttons to selectaTV aspect ratio, and then
pressthe _ button.
YOuhave four choices:
16:90dginal - ForwidescreenTVs_Displays
widescmen picturesin their original 16:9format
and 4:3 pictures (the old, standard format) in
4:3 pillar box format with black barson the left
and righL
16:9 Full- ForwidescreenTVs. Displays
widescreen pictures in their original 16:9 format
and expands 4:3 pictures to fit! the 16:9screen_
4:3 Letter Box-Forolder, standard screen,
analog TVs_Displays4:3 pictures in full screen
and 16:9 pictures in letter box format that
retains the 16:9aspectratio but puts black bars
above and below the picture_
6° Theproduct verifies the network connection
and then connectsto the networL When it is
done, pressthe _ button. The qnitial settings
completed." screenappears,and then the
Home screenappears_
If you want to display the Initial Settings screen
again and make changes, select the Reset
option_ (See page 18)
If you use an HDMI cable to connect the
product to an Anynet+ (HDMFCEC)-comp%nt
Samsung TVand 1_)You have set the Anynet÷
(HDMI-CEO feature to On in both the TV
and the product and 2_)You have set the
TV to a language supported bythe product,
the product will select that language as the
preferred language automatically_
14- Engiish
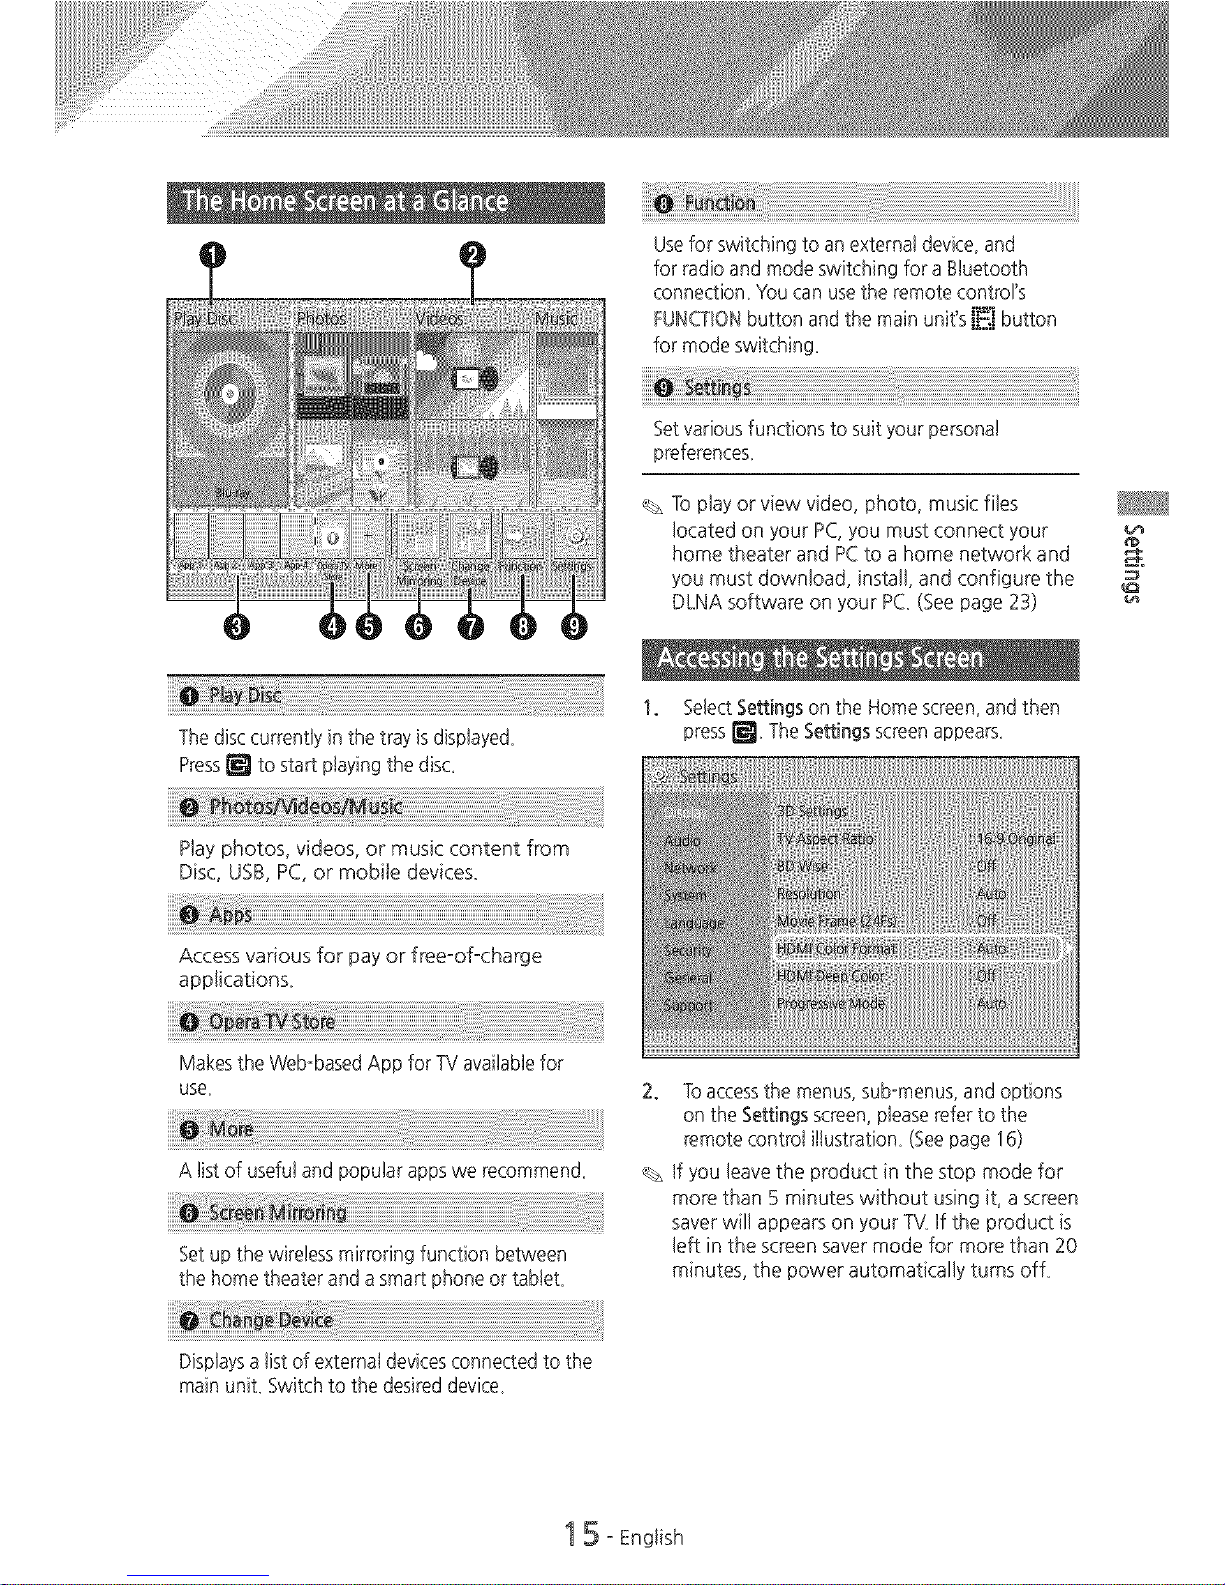
The disccurrently in the tray isdisplaye&
Press_ to start playing the disc.
Play photos, videos, or music content from
Disc, USB, PC,or mobile devices_
........ "" iiiiiiiiiii
Usefor switching to an external device, and
for radio and mode switching for a Btuetooth
connection. Y()ucan usethe remote control's
FUNCTIONbutton and the main unit's I_ button
for mode switching.
Set various functions to suit your personal
preferences_
To play or view video, photo, music files
located on your PC,you must connect your
home theater and PCto a home network and
you must download, install, and configure the
DLNA software on your PC_(See page 23)
1. SelectSettingson the Home screen,and then
press_ The Settings screenappears_
Access various for pay or freeoofocharge
applications.
Makesthe Web-based App for TV availablefor
use.
A list of useful and popular appswe recommen&
Setup the wireless mirroring function between
the home theater and asmart phone or tabteL
2. Toaccessthe menus, sub-menus, and options
on the Settingsscreen,pleaserefer to the
remote control i%stration_(Seepage 16)
If you leavethe product in the stop mode for
more than 5 minutes without using it, ascreen
saver will appears on your TV_If the product is
left in the screen saver mode for more than 20
minutes, the power automatically turns ofL
Displaysa list of external devicesconnected to the
main unit. Switch to the desired device_
15 oEnglish
 Loading...