

SRC-S401 RF/A
M
A
D
E
I
N
K
O
R
E
A
M
A
D
E
I
N
K
O
R
E
A
M
A
D
E
IN
K
O
R
E
A
RF REMOTE CONTROL
USER’S GUIDE
USER INFORMATION
FCC ID : A3LSRCS401RF
This device complies with Part 15 of the FCC
Rules. Operation is subject to the following
two conditions:
(1) this device may not cause harmful
interference, and
(2) this device must accept any interference
received, including interference that may
cause undesired operation.
NOTE: This equipment has been tested and
found to comply with the limits for a Class B
digital device, pursuant to Part 15 of the FCC
Rules. These limits are designed to provide
reasonable protection against harmful
interference in a residential installation.
This equipment generates, uses and can
radiate radio frequency energy and, if not
installed and used in accordance with the
instructions, may cause harmful interference
to radio communications. However, there is
no guarantee that interference will not occur
in a particular installation.
If this equipment does cause harmful
interference to radio or television reception,
which can be determined by turning the
equipment off and on, the user is encouraged
to try to correct the interference by one or
more of the following measures:
-- Reorient or relocate the receiving antenna.
-- Increase the separation between the
equipment and receiver.
-- Connect the equipment into an outlet on a
circuit different from that to which the
receiver is connected.
-- Consult the dealer or an experienced
radio/TV technician for help.
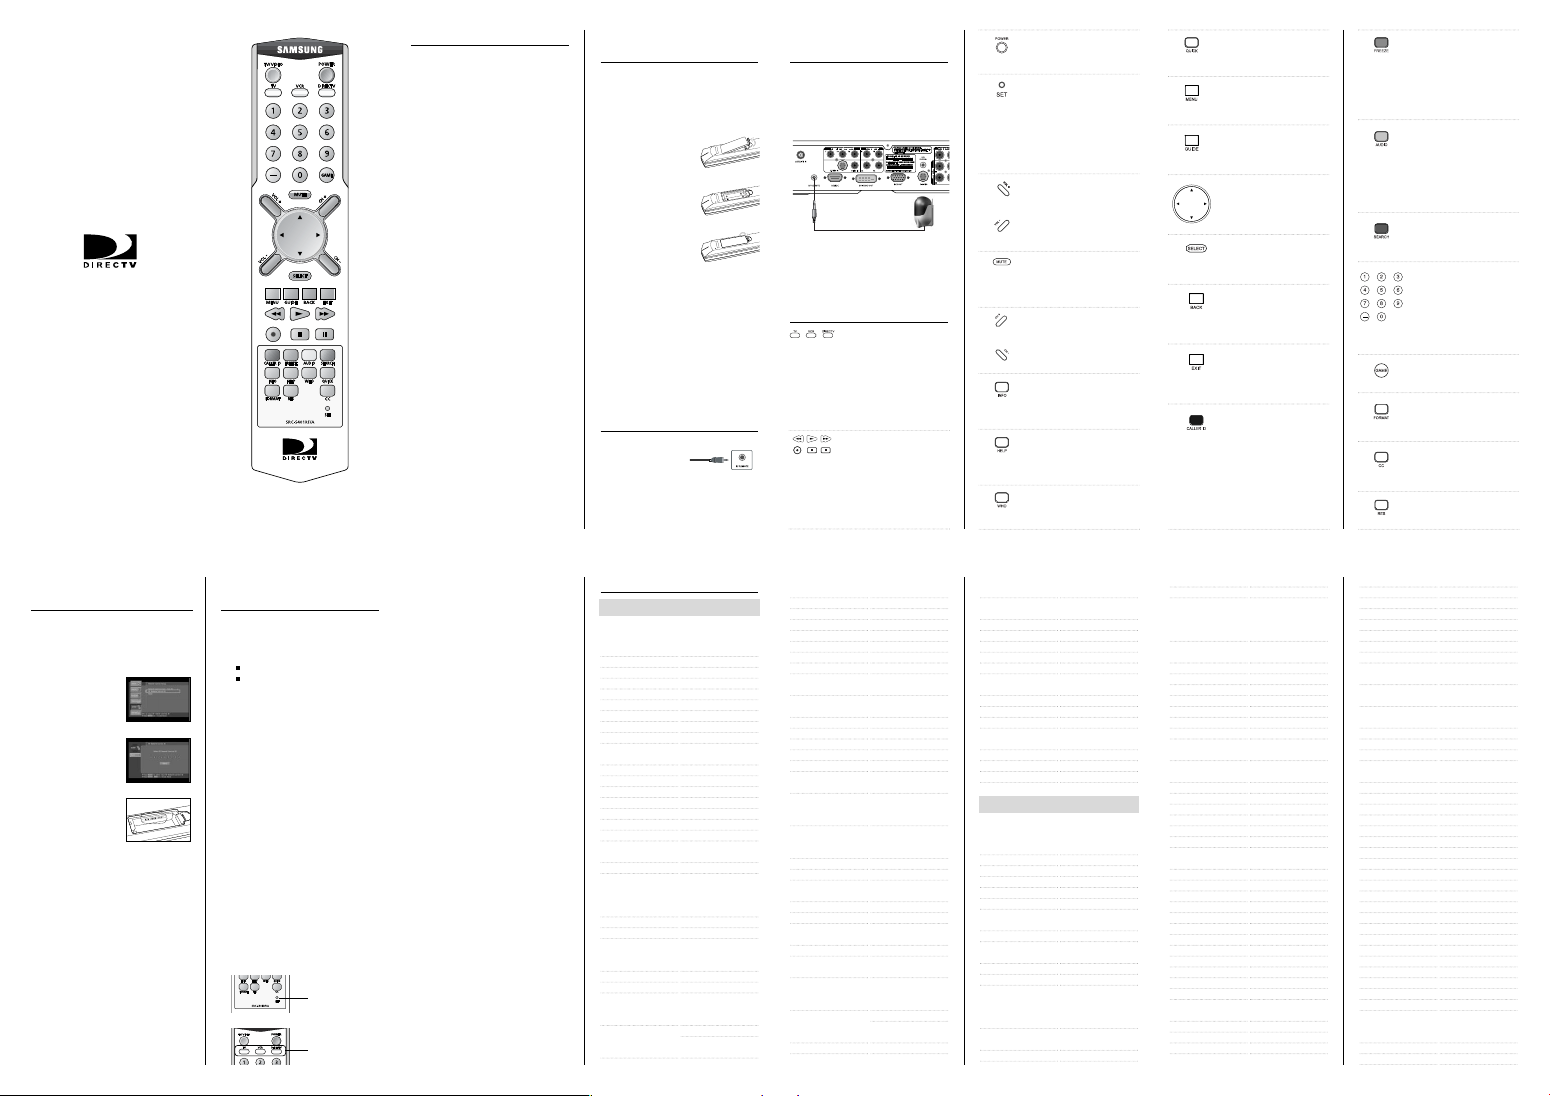
INSTALLING THE BATTERIES
IN THE REMOTE CONTROL
You’ve unpacked the receiver and reviewed its
front and back panels.
Now it’s time to start setting up.
The first step is to install the batteries in your
remote control.
1. Unlatch the battery
compartment cover
on the back of remote
control.
2. Insert 2 AAA batteries
as shown, making sure
the + and – ends of each
battery line up with the
corresponding marks in
the battery compartment.
3. Snap the cover back onto
the remote control.
4. Press the DIRECTV button on the Remote
Control unit and make sure the button
lights up. If it does not light up, check the
orientation of the batteries.
NOTE: Alkaline batteries are strongly recom
mended for this remote control.
Caution: changes or modifications not
expressly approved by the party
responsible for compliance could
void the user’s authority to operate
the equipment.
RF REMOTE JACK AND CABLE
RF REMOTE jack and
cable are used to operate
the Digital Satellite
Receiver when installed
in a cabinet or from another room in your house
using the RF remote control. Use this jack and
cable to connect the RF Receiver to the RF
REMOTE jack of the Digital Satellite Receiver.
CONNECTING THE RF REMOTE
CABLE WITH RF RECEIVER
You can operate the Digital Satellite Receiver
when installed in a cabinet or from another room
in your house using the RF remote control.
1. Connect the RF Receiver to the RFREMOTE
jack of the Digital Satellite Receiver.
< REAR PANEL>
NOTE: The operating range of the remote
SRC-S401RF/B
control is about 75 feet when
connecting the RF receiver.
This may decrease due to ambient
reception conditions, weak batteries,
obstacle, etc....
RF REMOTE CONTROL
Device Button
Makes the remote control operate
®
HD Receiver
your DIRECTV
(e.g. to change channels, access
the Guide, or get information
about a program). Your remote
control does not need to be
programmed to operate your
®
HD Receiver.
DIRECTV
VCR Control Buttons
œœ
Used for rewinding
√
Plays the videotape
√√
Used for fast-forwarding
●
Saves the current channel
to the VCR
■
Used for stopping play
❙❙
To pause or play video.
POWER
Turns the device you are
controlling on or off.
SET
Use this button when
programming your remote
control to operate your TV,
VCR, DVD player, or an auxiliary device (AUX).
See Programming the remote
control on this manual.
VOL+/-
Adjust the volume level of your
TV (once the remote control has
been programmed). You can
control the volume when in TV,
DIRECTV, or VCR mode.
MUTE
Mute or unmute the TV audio
(once the remote control has
been programmed).
CH+/-
Change channels on your
DIRECTV HD Receiver or your
TV (once the remote control has
been programmed).
INFO
Display the Channel Banner and
information about the current
program.
HELP
Display instructions about the
screen or menu currently
displayed.
WHO
Press to change the current user
profile.
QUICK
Press this button to view the
Quick Guide.
MENU
Press this button to display the
on-screen Menu.
GUIDE
Press to view the on-screen
Program Guide.
Up/Down/Left/Right arrows
These buttons move the high
light to any on-screen Guide or
Menu selection.
SELECT
Select highlighted items in the
on-screen Menu or Guide.
BACK
Return to the channel you were
last watching, or return to a
previous Menu.
EXIT
Exit any Guide or Menu screen
and return to the TV program
you were watching.
CALLER ID (red button)
Displays the phone numbers of
callers who called you on the
phone line connected to your
®
HD Receiver
DIRECTV
(works only if you subscribe to
your telephone service’s caller
ID service).
While in the Guide, this button
lets you change the Guide style.
FREEZE (green button)
Takes a still picture of the TV
screen. Press it again to resume
the program you were watching.
In the Guide, this button lets
you see program listings for
different times.
AUDIO (yellow button)
While watching TV, press this
button to select an alternate
audio track.
While in the Guide, this button
lets you view programs in
selected categories.
SEARCH (blue button)
Press this button to search for a
program listing in the Guide.
Number and delimiter
buttons (0-9, – )
Press the number buttons to
tune to a channel or to enter
numbers on Menu screens.
Press the delimiter button (-) to
separate parts of a number.
GAME
Accesses games you can play.
FORMAT
Cycles through the formats
available for your display type.
CC
Displays and hides Closed
Caption text.
RES
Changes the screen resolution.
SETTING RF REMOTE
CONTROL ID
You should set the ID number for your own
RF code transmission to use the RF remote.
To set the RF remote control ID setup, follow
these steps:
1. Press the MENU button
on your remote control.
2. Highlight the Setup
menu item, then press
the SELECT button.
3. Highlight the Installation
menu item, then press
the SELECT button.
4. Highlight the Remote
Control Setup menu
item, then press the
SELECT button.
The Remote Control
Setup menu appears.
5. Highlight the RF Remote Control ID menu
item, then press the SELECT button.
6. Input eight-digit serial number to enter into
the RF remote control ID menu as shown in
the below figure. The eight-digit serial number
is displayed inside the battery box of the RF
remote control unit.
7. Input all of the eight-digit serial number dis
played inside the remote battery box using
the numeric button or the arrow key.
Then, move the highlighted bar to the [Done]
and press the SELECT button.
8. Press the SELECT button to finish setting
when the “Setting complete successfully”
message appears.
9. When you have finished setting the RF
remote control ID screen, select the
on-screen Back button.
eight-digit serial number
PROGRAMMING THE RF
REMOTE CONTROL
This chapter explains how to program your RF
remote control so that you can use it to operate
your TV, VCR. Chapter sections include:
Programming the RF remote control
Operating a device with your
programmed remote control
Programming the RF remote control
Your DIRECTV®HD Receiver’s remote
control can be programmed to operate your
TV, VCR.
You use the code lists provided on this manual
to enter the code for your brand of TV, VCR.
†
Method
To use the manual method to program your
DIRECTV®HD Receiver’s remote control,
follow these steps:
1. Turn on the device you want to control.
2. Aim the DIRECTV
control at the device.
3. After pressing a device button to operate
the remote control in a desired device mode,
press the SET button once again with a
sharp thing, like pen. The device button
lights up.
®
HD Receiver’s remote
The SET button
The device buttons
4. Enter the three-digit code for your device
(see the code lists on the “Remote Control”
manual)
If the entered code is correct, the device
will turn off.
5. Press the device button again.
The button should blink twice and then
turn off.
6. Repeat the procedure for other devices you
wish to operate with your DIRECTV
Receiver’s RF remote control.
Operating a device with your
programmed remote control (RF)
To operate a device using your programmed
RF remote control, you must first press the
corresponding device button (TV, VCR or
DIRECTV).
Then use the RF remote control to operate that
device.
The RF remote control will continue to
operate that device until you press another
device button. Each time you want to button to
a different device with your RF remote control,
you start by pressing a device button.
NOTE: When working with the TV and VCR
device remote control, the IR signal
will be transmitted.
Therefore, you need to at the device to
work with.
®
HD
CODE LISTS
TV
MAKER (BRAND)
NAME
AMARK
ADMIRAL
AKAI
ANAM
AOC
BELL & HOWELL
BROKSONIC
CANDLE
CENTRION
CITIZEN
CLASSIC
CONCERTO
CONTEC
CORONADO
CRAIG
CROSLEX
CROWN
CURTIS MATHES
CXC
DAEWOO
DAYTRON
DYNASTY
EMERSON
FISHER
FUNAI
GENERAL ELECTRIC
LG (GOLDSTAR)
CODE NUMBER
(3 DIGIT) LIST
088 037 090
055
020 006
037 047 064 036 050
006 037 020 056
067
068
006 012 020 046 050
045
020 046 006 050 012
090 045 009 010
050
006
050 078 083 081
088 090
007 049 050
030
050
001 006 020 090 017
031
050
088 001 093 031 032
033 038 052 002 003
092 034 046 050 035
036 004 005 006 008
001 006 020
050
088 001 090 050 083
019 030 081 020 006
025 055 023 036
008 080 061 015
050 019 069 006
001 061 072 050 058
017 018 006 049 019
090
088 027 001 037 010
011 090 039 092 099
HITACHI
INFINITY
JBL
JC PENNEY
JVC
KLOSS
KMC
KTV
MTC
NEC
NIKEI
ONKING
ONWA
OPTONICA
PANASONIC
PENNEY
PHILCO
PHILIPS
PIONEER
PORTLAND
PROTON
QUASAR
RADIO SHACK
RCA
REALISTIC
SAMPO
SAMSUNG
SANYO
SCOTT
088 006 090 071 077
070 021 022 023 025
082
082
091 092 017 020
060 016
092
088 090 013
088 090 050 061 020
026 015 006 049 093
020 008 075
025 075 020 008 006
005 001 004
050
050
050
069
064 072 058 082
061 006 049 066 018
090 050 077 025
001 008 088 061 006
090 050 012 098 092
100 082 020
088 001 061 006 090
012 098 092 082 020
005 057
065 026
088 006 090
001 031 006 090 077
078
072 058
050 092 025 090
061 006 071 066 087
020 090 001 062
008 049 050 025
001 020 090 006 019
026 049
088 001 061 028 043
029 081 048 049 090
092 051
089 080 062 078 013
014
001 050 019 090 006
SEARS
SHARP
SIGNATURE
SONY
SOUNDESIGN
SPECTRICON
SSS
SYLVANIA
SYMPHONIC
TATUNG
TECHWOOD
TEKNIKA
TELEFUNKEN
TELERENT
TMK
VCR
MAKER (BRAND)
NAME
ADMIRAL
AIWA
AKAI
AUDIO DYNAMICS
BELL & HOWELL
BROKSONIC
CANDLE
CANON
CITIZEN
COLORTYME
CRAIG
CURTIS MATHES
DAEWOO
DBX
088 061 006 008 090
091 089 080 015 019
088 090 085 024 025
069
084 006
077 074
001 050 012 006 019
037
006 050
001 061 006 012 098
092 020 100 082
002 006 090 012 020
072 069
006 059
088 046 006 090 050
012 019 094 084
096 097
084
001 006 090
CODE NUMBER
(3 DIGIT) LIST
020
025
027 004 032
007 026
001
003
002 006 003 015 008
055
021 056
002 003 006 008 015
055
007
002 024
002 017 007 008 021
025 056 064 066
003 015 009 011 012
014 016
007 026
DIMENSIA
DYNATECH
EMERSON
FISHER
FUNAI
GENERAL ELECTRIC
GO VIDEO
LG(GOLDSTAR)
HARMAN KARDON
HITACHI
INSTANTREPLAY
JC PENNEY
JVC
KENWOOD
KLH
LIOYD
LOGIK
LXI
MAGNAVOX
MARANTZ
MARTA
MEI
MEMOREX
MGA
MIDLAND
MINOLTA
MITSUBISHI
MONTGOMERYWARD
MTC
MULTITECH
NEC
OPTIMUS
PANASONIC
PENTAX
017
034
001 003 006 021 025
030 032 034 040 047
050 028 060 063 065
066 067 069
001 024 028 029 048
051 061
025
017 002 021 005 056
002
006 007 008 009
007
019 025 041 042
021
002 007 001 019 021
026 037 041 054 056
007 008 001 021 026
037
007 008 001 026 037
070
025
038
025
021 036 056 059
008 007 001 021 026
036 037 062
006
021
006 021 024 025
034
005
019 041
019 034 041 014
020
002 025
002 025 038 005
001 007 026 037 008
062 064
020
021 056 071 070
019 041
PENTEX RESEARCH
PHILCO
PHILIPS
PIONEER
PORTLAND
PROSCAN
QUARTZ
QUASTAR
RADIO SHACK /
REALISTIC
RCA
SAMSUNG
SANSUI
SANYO
SCOTT
SEARS
SHARP
SHIMOM
SIGNATURE
SONY
SYLVANIA
SYMPHONIC
TANDY
TASHIKA
TATUNG
TEAC
TECHNICS
TEKNIKA
TMK
TOSHIBA
TOTEVISION
UNITECH
VECTOR RESEARCH
VICTOR
VIDEO CONCEPTS
VIDCOSONIC
WARDS
YAMAHA
ZENITH
008
021 036 056 059
021 036
019 026 039 053
015 049 055
017
001
021 056
006 001 020 021 024
025 029 034 048 056
017 019 002 021 035
041 043 057 068
074 001 002 003 004
005
026
001 024
003 047 028 067
001 019 006 024 028
029 041 048 051
020 034 014 015
027 032 038 058
025
027 032 014
021 025 036 056 059
025
001 025
006
037
025 037 068
021
021 006 025 031
066
003 019 029 051 028
002 006
002
007 026
026
007 026
002
002 003 006 019 020
021 024 025 034 038
041
007 008 001 026 037
002 027 032 073
 Loading...