

Page 1
SR8F3* SERIES
SR8F4* SERIES
Robotic Vacuum Cleaner
User Manual
This manual is made with 100 % recycled paper.
✻ Before operating this unit, please read the instructions carefully.
✻ For indoor use only.
imagine the possibilities
Thank you for purchasing a Samsung product.
To receive a more complete service,
please register your product at
www.samsung.com/register
English
Page 2
Safety information
SAFETY INFORMATION
• Before operating the appliance, please read this manual thoroughly and retain
WARNING
WARNING
it for your reference.
• Because these following operating instructions cover various models, the
characteristics of your vacuum cleaner may differ slightly from those described
in this manual.
CAUTION/WARNING SYMBOLS USED
WARNING
CAUTION
Indicates that a danger of death or serious injury exists.
Indicates that a risk of personal injury or material damage exists.
OTHER SYMBOLS USED
NOTE
Explains terms to help users understand how use the product properly.
2_ Safety information
Page 3

Safety information
IMPORTANT SAFETY INSTRUCTIONS
When using an electrical appliance, basic precautions should be
observed, including the following:
READ ALL INSTRUCTIONS BEFORE USING YOUR ROBOTIC
VACUUM CLEANER.
Unplug from outlet when not in use and before conducting maintenance.
WARNING: to reduce the risk of fi re, electric shock, or injury:
GENERAL
• Use only as described in this manual.
• Do not operate the robotic vacuum cleaner or charger if it has
been damaged in any way.
• If the cleaner is not working as it should, has been dropped,
damaged, left outdoors, or dropped in water, return it to a
customer care center.
• Do not handle the charger or robotic vacuum cleaner with wet
hands.
• Use only on dry, indoor surfaces.
• This appliance can be used by children aged from 8 years and
above and persons with reduced physical, sensory or mental
capabilities or lack of experience and knowledge if they have
been given supervision or instruction concerning use of the
appliance in a safe way and understand the hazards involved.
• Children shall not play with the appliance. Cleaning and user
maintenance shall not be made by children without supervision.
BATTERY CHARGER
• Do not modify the polarized plug to fi t a non-polarized outlet or
extension cord.
• Do not use outdoors or on wet surfaces.
• Unplug the charger from the outlet when not in use and before
servicing.
• Use only the charger supplied by the manufacturer to recharge.
• Do not use with a damaged cord or plug.
• Do not pull or carry by the cord, use the cord as a handle, close
the door on the cord, or pull the cord around sharp edges or
corners. Keep the cord away from heated surfaces.
Safety information _3
Page 4

Safety information
• Do not use extension cords or outlets with inadequate current
carrying capacity.
• Do not unplug by pulling on the cord. To unplug, grasp the plug,
not the cord.
• Do not mutilate or incinerate batteries as they will explode at high
temperatures.
• Do not attempt to open the charger. Repairs should only be
carried out by a qualifi ed customer care centre.
• Do not expose the charger to high temperatures or allow
moisture or humidity of any kind to come into contact with the
charger.
ROBOTIC VACUUM CLEANER
• Do not pick up hard or sharp objects such as glass, nails,
screws, coins, and etc.
• Do not use without a fi lter in place. When servicing the unit, never
put fi ngers or other objects into the fan chamber in case the unit
accidentally turns on.
• Do not put any objects into openings. Do not use with any
openings blocked; keep openings free of dust, lint, hair, and
anything that may reduce air fl ow.
• Do not pick up toxic materials (chlorine bleach, ammonia, drain
cleaner, etc.).
• Do not pick up anything that is burning or smoking, such as
cigarettes, matches, or hot ashes.
• Do not use to pick up fl ammable or combustible liquids such as
gasoline, nor use on areas where they may be present.
• Do not use robotic vacuum cleaner in an enclosed space fi lled
with vapours given off by oil based paint, paint thinner, moth
proofi ng substances, fl ammable dust, or other explosive or toxic
vapours.
• Leaks from battery cells can occur under extreme usage or
temperature conditions. If the liquid gets on skin, wash quickly
with water. If the liquid gets into the eyes, fl ush them immediately
with clean water for a minimum of 10 minutes. Seek medical
attention.
4_ Safety information
Page 5

Contents
SAFETY INFORMATION
02
PRODUCT FEATURES
13
ASSEMBLING THE CLEANER
15
OPERATING THE CLEANER
20
MAINTAIN TOOLS AND FILTER
34
06 Power related
07 Before use
10 In use
11 Cleaning and maintenance
13 Product Features
15 Components
16 Name of each part
20 Installing robotic vacuum cleaner
20 Installation order
20 Turning the power switch on or off
21 Installing the charger
22 Charging
23 About the battery
24 Installing the VIRTUAL GUARD
25 Installing the air freshener
26 Using robotic vacuum cleaner
26 Starting/stopping cleaning
27 Recharging
28 Auto cleaning
29 Spot cleaning
30 Max cleaning
31 Manual cleaning
32 Edge Cleaning
33 Scheduled Cleaning
34 Cleaning robotic vacuum cleaner
34
Please keep the cleaning and maintenance methods in mind
34 Cleaning the sensor window and the camera
35 Cleaning the Dust bin and the Filter
36 Cleaning the power brush
38 Cleaning the edge-cleaning side rotating brush
39 Cleaning the driving wheel
TROUBLESHOOTING
40
PRODUCT SPECIFICATION
43
40 Checklist before svc calls
42 Troubleshooting for Error Codes
43 Product specifi cation
Contents _5
Page 6
Safety information
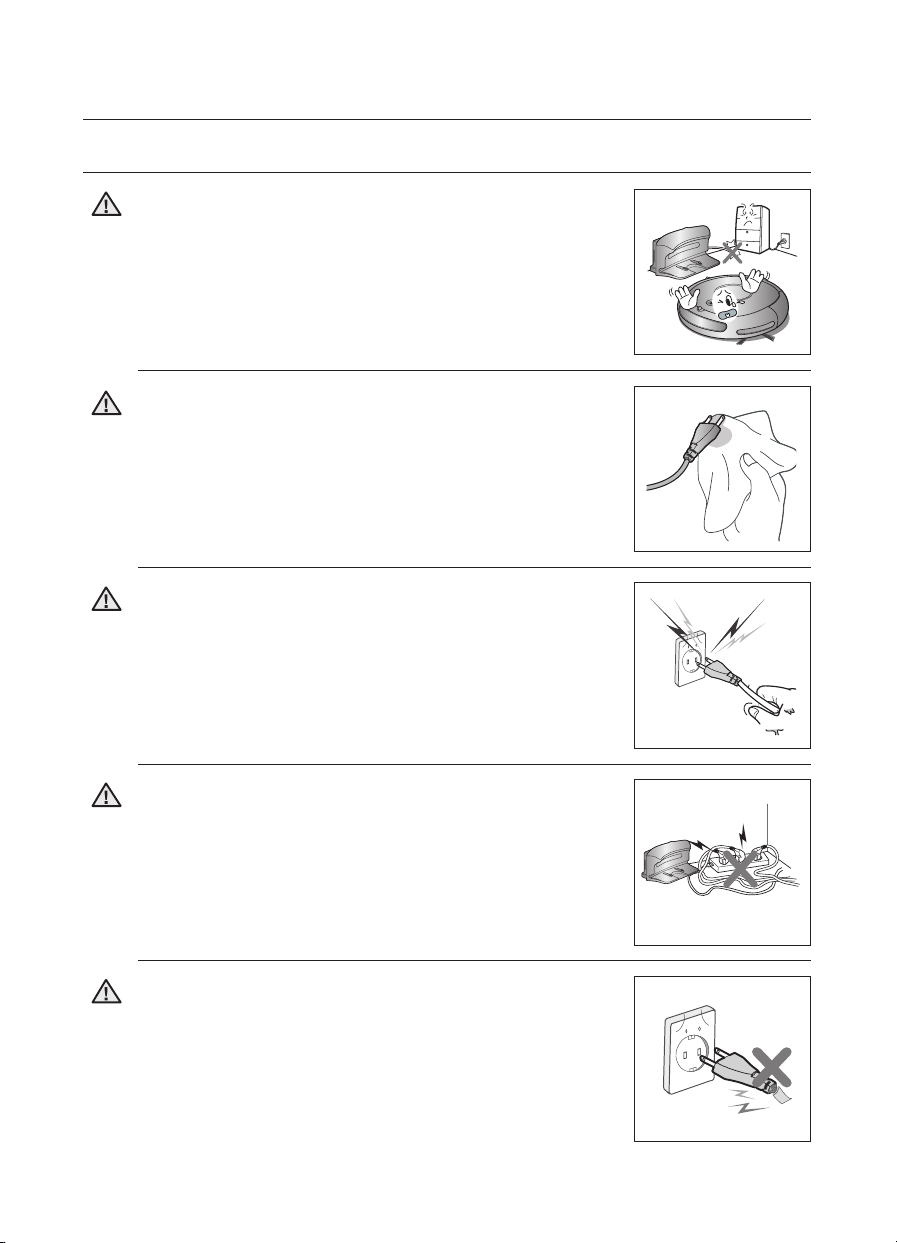
POWER RELATED
Do not bend the power cord forcefully or place a
heavy object on it that could break it.
WARNING
- This may result in fi re or electric shock.
Make sure to remove any dust or water from the
power plug.
WARNING
- Failing to do so may result in a malfunction or electric
shock.
Do not pull the power plug by the cord or touch the
plug with wet hands.
WARNING
- This may result in fi re or electric shock.
Do not use multiple plugs in a single socket.
(Do not leave the cord lying exposed on the fl oor.)
WARNING
- This may result in fi re or electric shock.
Do not use a damaged power cord, plug, or a loose
power outlet.
WARNING
- This may result in fi re or electric shock.
6_ Safety information
Page 7
Safety information
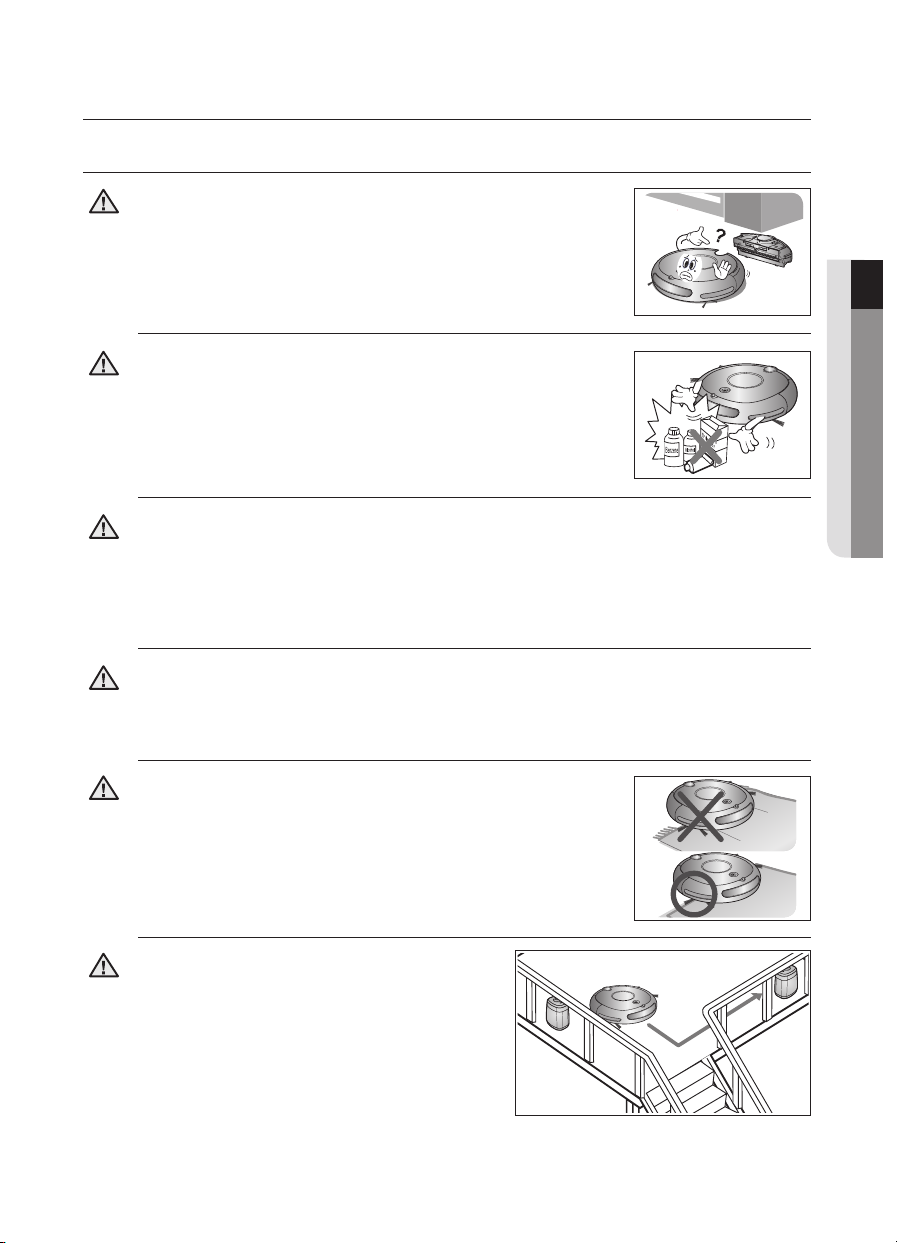
BEFORE USE
Before activating the robotic vacuum cleaner, make sure
that the Dust bin is assembled.
CAUTION
- If the Dust bin is not inserted, robotic vacuum cleaner will not
operate.
Never use robotic vacuum cleaner in locations with
combustible material such as:
CAUTION
- Locations with candles or desk lamps on the fl oor.
- Locations with unattended fi res (fi re or embers).
- Locations with gasoline, distilled alcohol, thinner, ashtrays
with burning cigarettes, etc.
Robotic vacuum cleaner is for domestic use only. Do not use it in the following
locations.
CAUTION
- Attics, basements, warehouses, industrial buildings, separate rooms distant from the
main building, locations exposed to wet or damp conditions such as bathrooms or
wash rooms, and narrow and highly situated locations such as tables or shelves. Critical
damage (abnormal operation and breakage) may occur when used in these locations.
Open all doors to clean all rooms.
CAUTION
- When a door is closed, the robotic vacuum cleaner will not be able to enter that room.
-
However, make sure to close the doors to the main entrance, the veranda and the
bathroom, and any other rooms where the robotic vacuum cleaner may fall to a lower fl oor.
01 SAFETY INFORMATION
For carpets with long tassels, fold the tassels under the
carpet.
CAUTION
- Unfolded tassels may result in critical damage to the carpet
and the machine itself, as they get caught in the driving wheel
or the power brush.
<OPTION>
When the cliff sensor is polluted, the robotic
CAUTION
vacuum cleaner may be in danger of falling
down the stairs.
This may cause personal injury and critical
damage to the product.
To prevent risk, install the VIRTUAL GUARDs
(Fence Mode setting) in front of dagerous
areas. Clean the sensor window and camera.
Safety information _7
Page 8
Safety information
BEFORE USE
Remove small objects or brittle items from the area to be
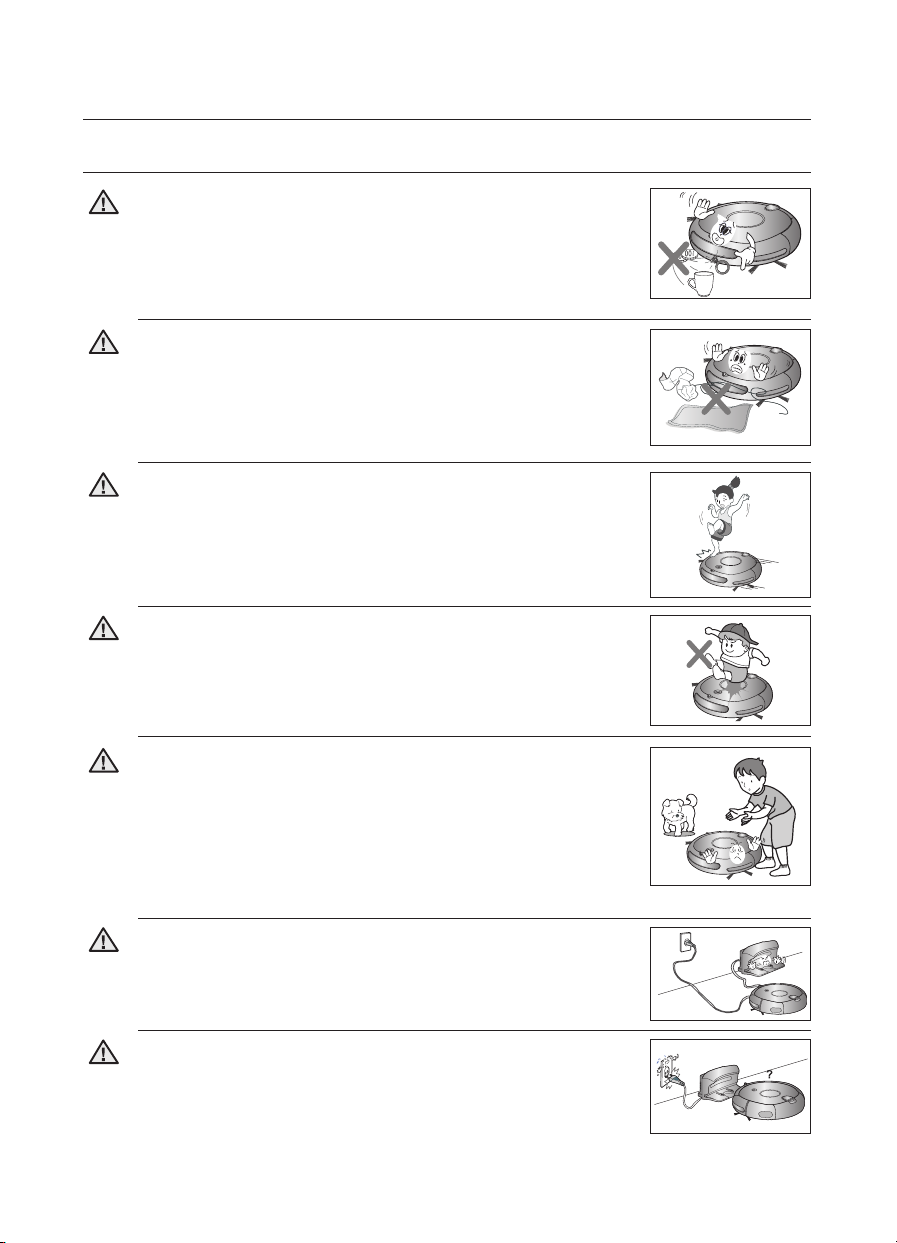
cleaned in advance.
CAUTION
- Make sure to clear any objects before cleaning.
- Make sure to remove fragile items such as china, glass objects,
fl owerpots, etc.
- Robotic vacuum cleaner does not recognize coins, rings or other
valuable items such as jewelry.
Remove objects scattered on the fl oor before cleaning.
Robotic vacuum cleaner is designed to detect obstacles 5cm away
-
CAUTION
CAUTION
CAUTION
from it.
- Bath towels, pads in front of bathrooms and sinks, entrances, utility
rooms, power cords, table cloths or belts can become entangled in
the driving wheel or power brush. This can cause objects to fall from
the table.
Inform all family members (or relevant parties) to be cautious
before cleaning or when using the Scheduled Cleaning Mode.
- Robotic vacuum cleaner may run into children, causing them to fall.
Ensure that children do not step or sit on the robotic vacuum.
- Children may fall and injure themselves or critical damage may occur
to the product.
When a child or pet is left alone, make sure to turn off the
Power Switch of the robotic vacuum cleaner.
CAUTION
- Robotic vacuum cleaner may attract their attention.
- When the rotating wheel or brush catches fi ngers, feet, clothing or hair,
this may result in injury.
- If a child or pet is in the way of the robotic vacuum cleaner, it may be
identifi ed as an obstacle and the area may not cleaned.
- When the Power Switch is turned off, it will cut off the power supply and
deactivate all functions.
When installing the charger station, do not leave the power
cord exposed on the fl oor.
CAUTION
- When the robotic vacuum cleaner automatically recharges or passes
by the charger station, it may drag the power cord around with it.
Always keep the power cord of the charger plugged into the
outlet.
CAUTION
- Although the robotic vacuum cleaner has a self-charging function, if
the power cord of the charger station is unplugged, it cannot charge
its battery automatically.
8_ Safety information
Page 9
Safety information
BEFORE USE
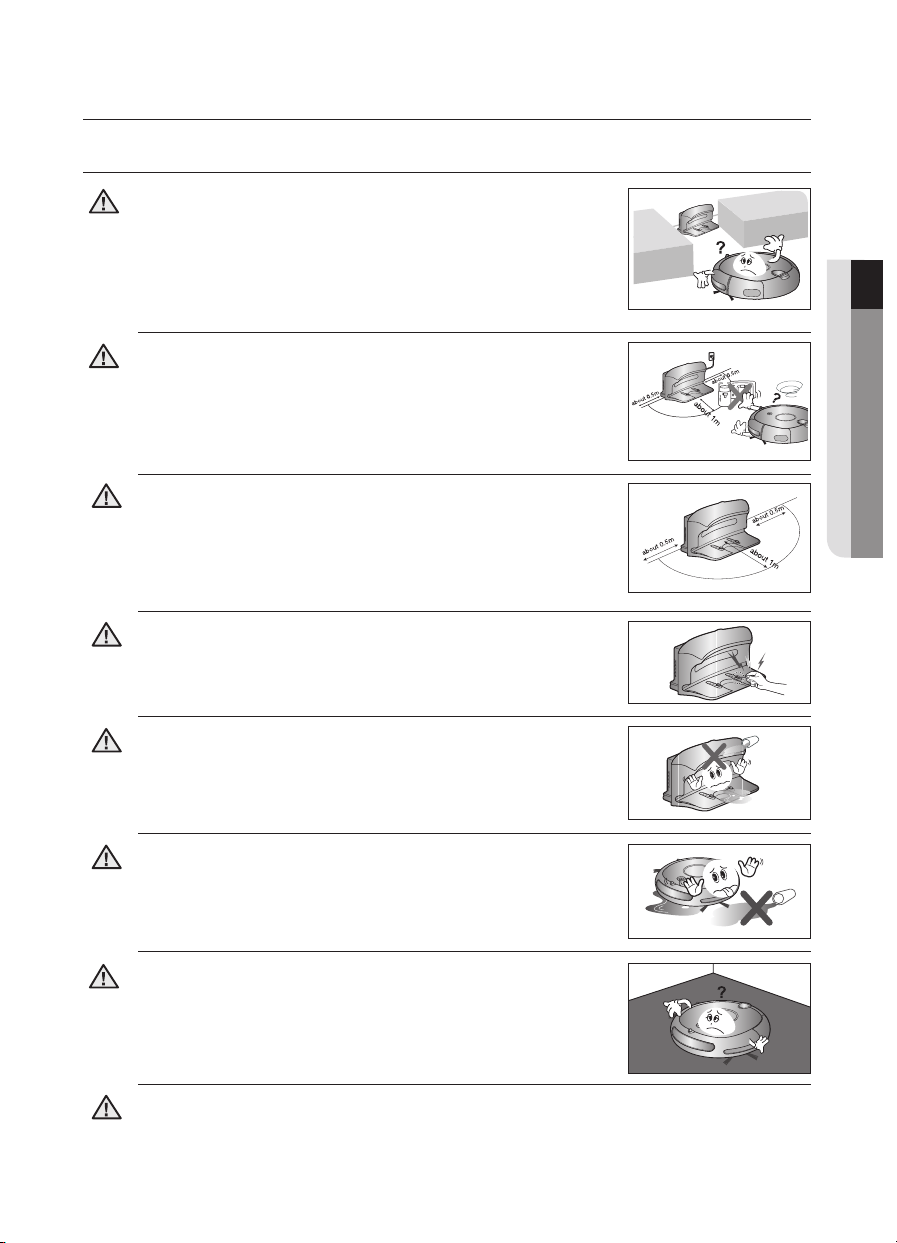
Install the charger in a location that can be easily accessed
by the robotic vacuum cleaner.
CAUTION
- If the charger is installed in a corner, this may cause extra
movements and may disturb the automatic recharging process.
Objects in front of the charger will prevent the robotic
vacuum cleaner from auto-charging itself.
CAUTION
- Clear the area.
There should be no obstacles 0.5 m to the left and right and
within 1 m of the front.
WARNING
Do not short-circuit the charge pins with metal objects such
as chopsticks, screwdrivers, and etc.
WARNING
- This will result in critical damage to the charger.
01 SAFETY INFORMATION
WARNING
WARNING
CAUTION
WARNING
Make sure that there is no trace of liquids on the charger
station.
- Failing to do so may result in fi re or electric shock.
Make sure the robotic vacuum cleaner does not vacuum or
move over liquids such as water, oil or pet litter.
This may result in critical damage to the product.
-
-
Liquids may spread through the wheels resulting in contamination.
Do not use the cleaner on a black fl oor.
- The vacuum cleaning robot may not run normally in this case.
Do not use the charger for other purposes.
- This may result in critical damage to the charger or cause a fi re.
Safety information _9
Page 10
Safety information
IN USE
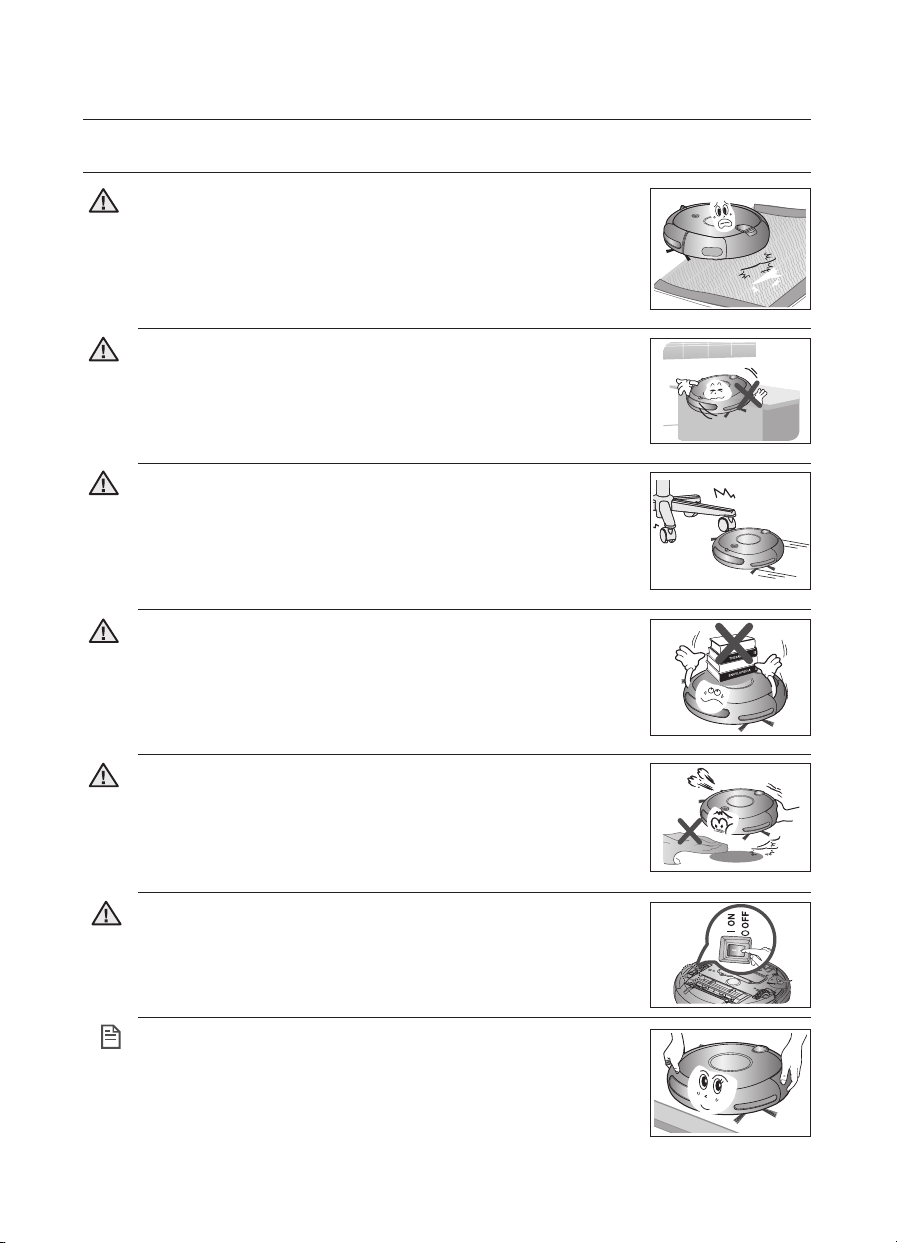
You cannot use the robotic vacuum cleaner on thick carpets.
- This may result in problems with the robotic vacuum cleaner.
CAUTION
- This may result in damage to carpets.
Do not use the robotic vacuum cleaner on a table or other high
locations.
CAUTION
- This may result in damage when the unit accidentally drops.
Robotic vacuum cleaner may bump into furniture such as chair
legs, table legs, thin and long furniture, etc. while operating.
CAUTION
- For a quicker and cleaner performance, place the chairs on top of
the table.
Do not place any objects on top of the robotic vacuum cleaner.
- This may result in malfunction.
CAUTION
Immediately remove any large pieces of
paper or plastic bags from the machine while cleaning.
CAUTION
- Using the machine for an extended period of time with its inlet port
obstructed may result in critical damage to the product.
If an unusual sound, smell or smoke is emitted from the robotic
vacuum cleaner, immediately turn off the Power Switch and call
WARNING
the customer care center.
Robotic vacuum cleaner may not be able to continue its
operation if it is stuck at the entrance or veranda doorsill.
NOTE
- Robotic vacuum cleaner stops operating for safety reasons if it
cannot move for more than 5 minutes.
- To resume operating, turn the Power Switch off and then on again
after moving it to a location where it can continue cleaning.
10_ Safety information
Page 11
Safety information
Obstacle sensor
IN USE
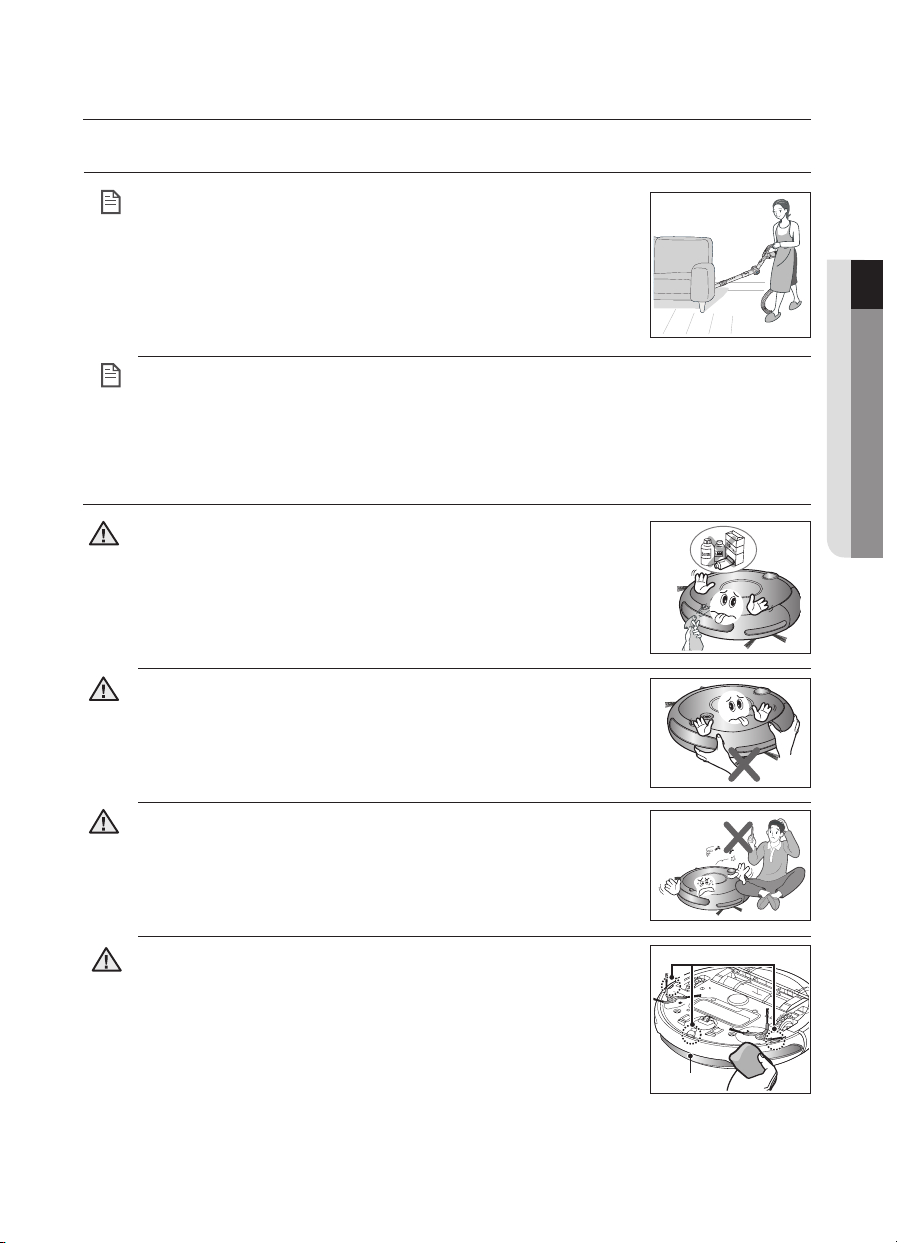
Robotic vacuum cleaner cannot completely clean
locations that it cannot reach, such as corners, and
NOTE
spaces between sofas and walls.
- Please clean these locations occasionally.
Dust clusters may remain after cleaning, when the robotic vacuum cleaner fails to
pick up dust clusters that were formed while cleaning.
NOTE
- In this case, sweep up the dust with another cleaning tool.
CLEANING AND MAINTENANCE
When cleaning the product, do not spray water directly onto the
exterior or wipe it with a volatile material such as benzene,
CAUTION
thinner or alcohol.
- This may result in critical damage to the product.
Do not forcefully press the bumper on the robotic vacuum
cleaner.
CAUTION
- If the bumper sensor gets damaged, the robotic vacuum cleaner may
bump into walls or furniture.
01 SAFETY INFORMATION
The unit must not be disassembled or reconstructed by anyone
other than a qualifi ed service engineer.
CAUTION
- This may result in damage to the product.
Remove any foreign substances accumulated on the Obstacle
and Cliff sensors on a regular basis.
WARNING
- Dirt accumulated on the sensors will result in inaccurate functioning
of the sensors.
Cliff sensor
Obstacle sensor
Safety information _11
Page 12
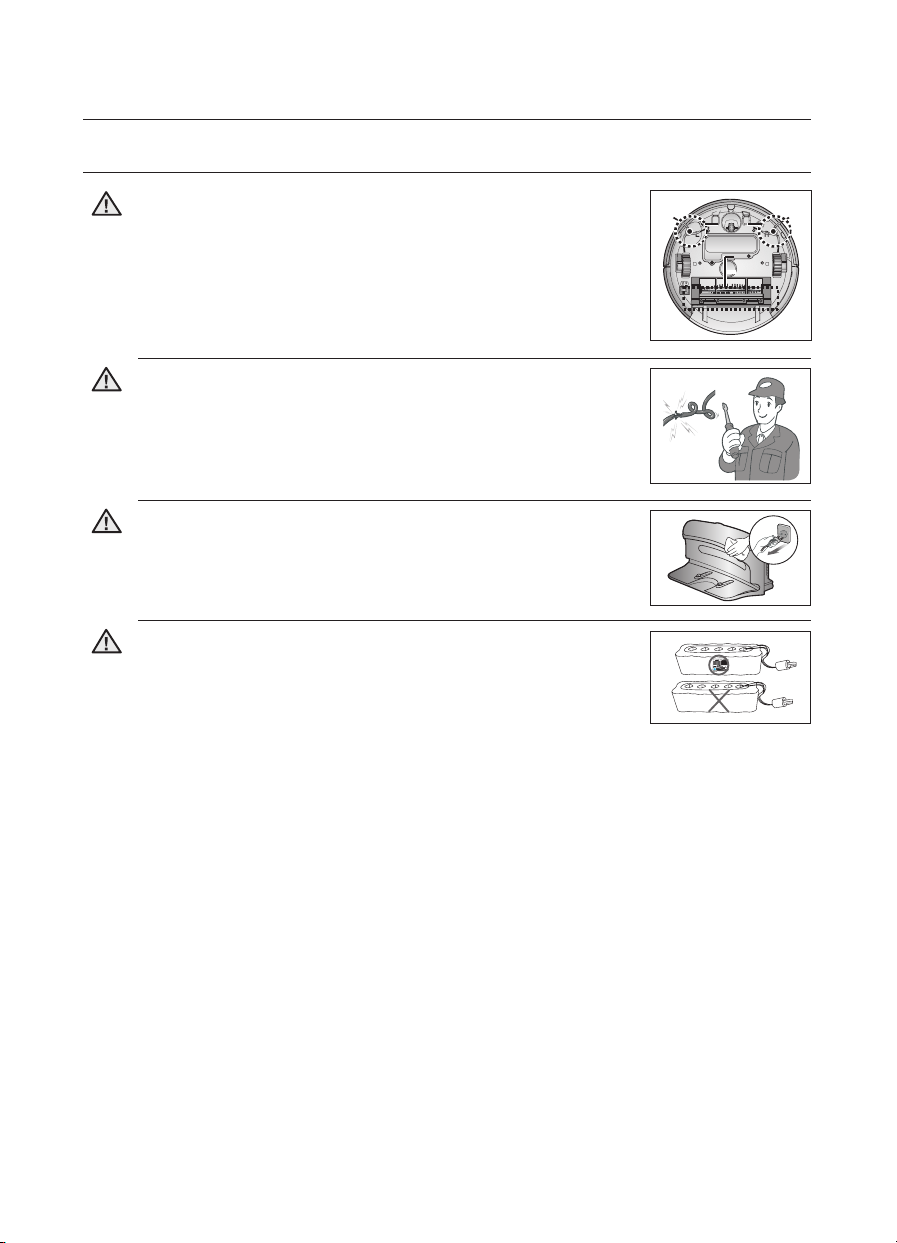
Safety information
Power brush
Edge-
cleaning
side brush
CLEANING AND MAINTENANCE
When removing foreign substances, always use the cleaning
brush after turning the Power Switch off.
WARNING
- Failing to do so may result in sudden operation of the unit and
cause an injury or critical damage to the product.
If the power cord is damaged, have it replaced by a qualifi ed
service engineer from the customer care center.
WARNING
- Failing to do so may result in fi re or electric shock.
Before cleaning the charger, make sure to disconnect the
power cord for safety.
WARNING
Contact the Samsung Electronics customer care center to
replace the battery.
WARNING
- Failing to use original batteries will result in product failure.
Edge-
cleaning
side brush
Power brush
12_ Safety information
Page 13
Product Features
1
3
4
5
6
2
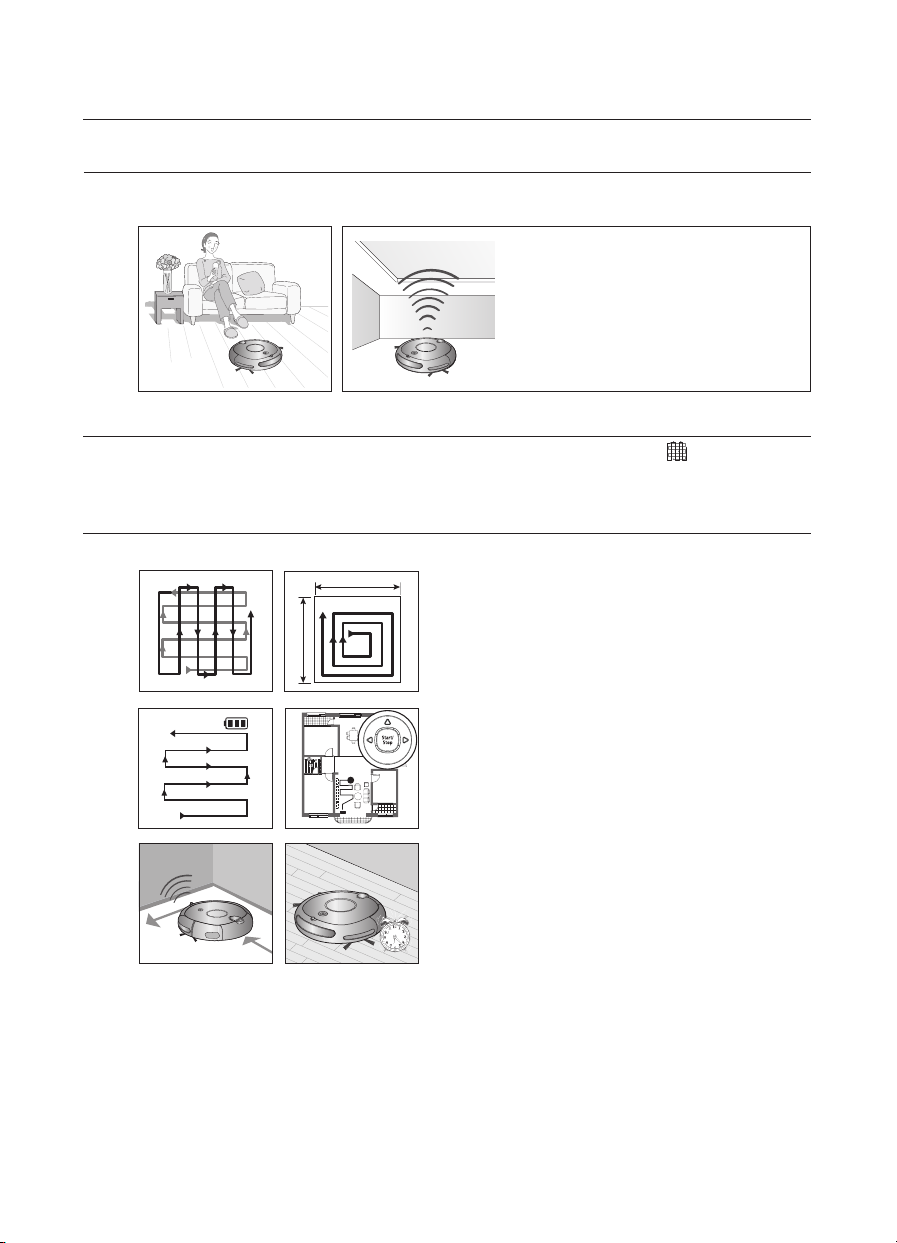
CONVENIENT VIRTUAL GUARD FUNCTION
You can confi ne the robotic vacuum cleaner to a particular section by using Fence (virtual
wall) mode.
• What is ceiling shape recognition
(Visionary mapping
This function recognizes the shape of
the ceiling using the camera on top
to identify the area to be cleaned and
determines the best way to pass over
and clean every section of the fl oor.
TM
DELICATE CLEANING OF EVERY CORNER
Since the robotic vacuum cleaner cleans the fl oor in a sequential way ( ) along the map
determined by the ceiling shape recognition function, it cleans every corner of the fl oor.
VARIOUS CLEANING MODES
Various cleaning modes are provided to meet all your needs.
About 1.5m
1
3
5
2
4
6
About 1.5m
1. Auto Mode
Cleans all rooms automatically.
2. Spot Mode
Cleans a localized area intensely. It can be
used to clean bread or cookie crumbs.
3. Max Mode
Runs until the battery is nearly depleted.
4. Manual Mode
You can clean the fl oor manually by moving the
robotic vacuum cleaner with a remote control.
5. Edge Mode
When the Obstacle Sensor detects an obstacle
during the cleaning, the Robot Cleaner reduces
its speed to minimize the bumping impact and
the Bumper Sensor also helps it lower the
bumping impact. And, it cleans the corners by
reaching to them as close as possible.
6. Scheduled Cleaning Mode
At the specifi ed time, the robotic vacuum
cleaner cleans the fl oor.
)?
Product Features _13
Page 14
Product Features
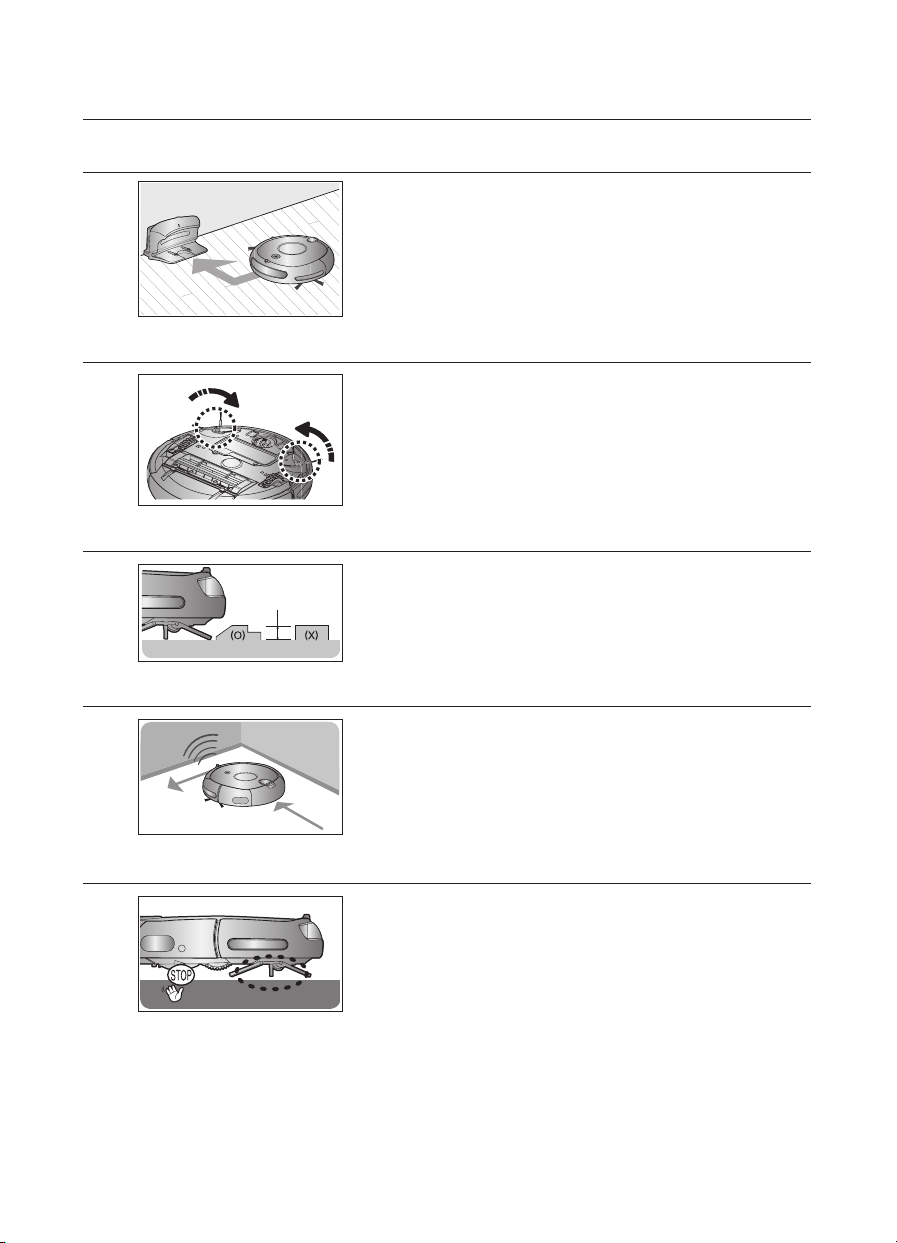
Stair type
Vertical type
AUTO CHARGING
When the battery is low, the robotic vacuum cleaner is
automatically guided to the charger to enable it to perform a
quick auto charge.
EDGE-CLEANING SIDE ROTATING BRUSH
The edge-cleaning side rotating brush cleans dust from the
edges.
DOORSILL CROSSING
The robotic vacuum cleaner’s innovative driving system
Stair type
About 1.5 cm
Vertical type
makes it possible for it to cross over doorsills with a height
of about 1.5cm and clean all rooms. The robotic vacuum
cleaner may not be able to pass a 1.5 cm doorsill depending
on the shape of the doorsill.
ANTI-CRASH
SAFETY DEVICE
14_ Product Features
The robotic vacuum cleaner detects and avoids obstacles
in 2 stages. First, the 7 obstacle sensors detect obstacles in
stage 1 and if the robotic vacuum cleaner does crash into an
obstacle, the 2 bumper sensors absorb the impact.
When robotic vacuum cleaner is lifted up while cleaning,
automatically driving wheels, power brush, suction motor,
side rotating brush are stopped by sensor’s detecting.
Page 15
Assembling the cleaner
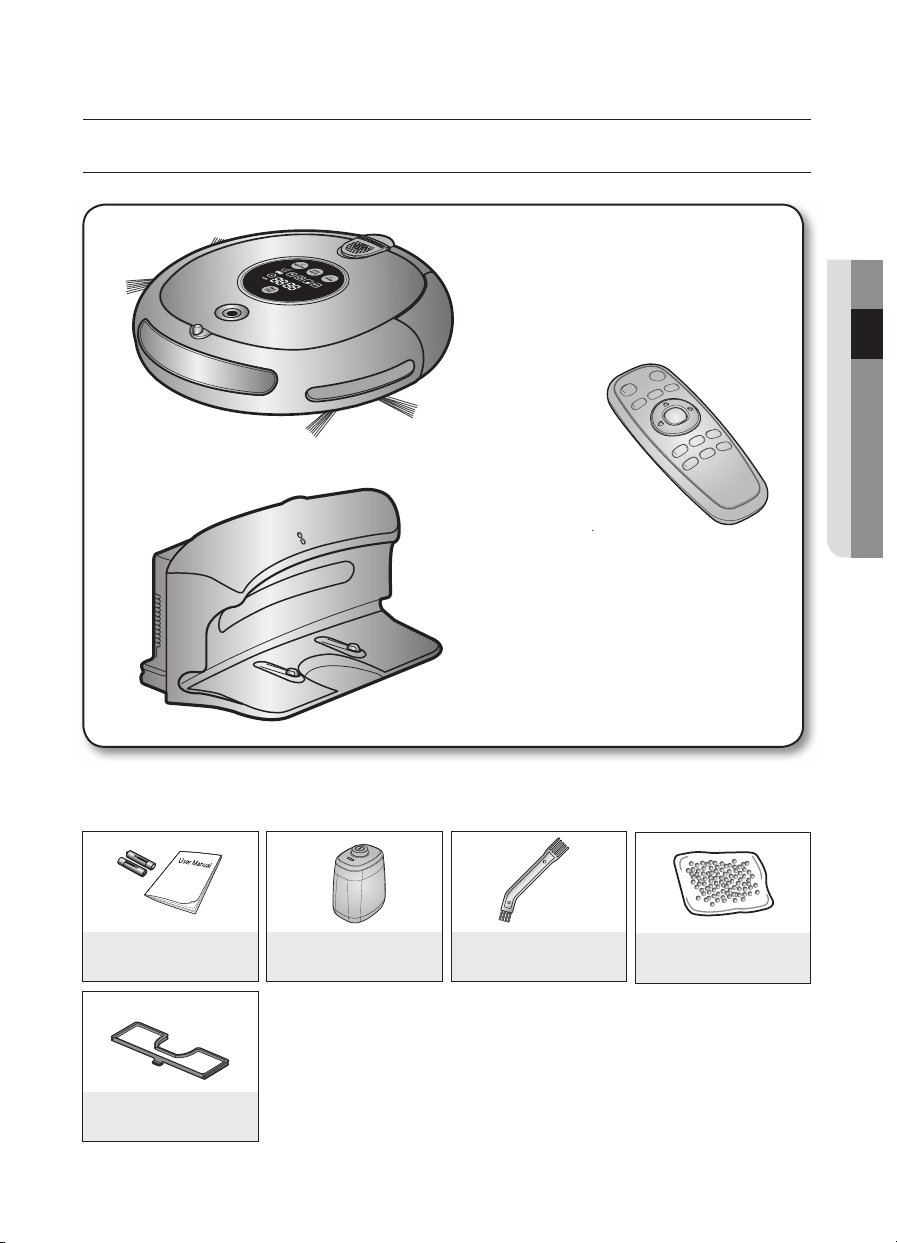
COMPONENTS
■
Others Components
OPTION
■
Main Body
■
Remote Control
■
Charger
02 ASSEMBLING THE CLEANER
User Manual / 2 Batteries
OPTION
Spare Filter
VIRTUAL GUARD
Cleaning Brush
Air Freshener
Assembling the cleaner _15
Page 16
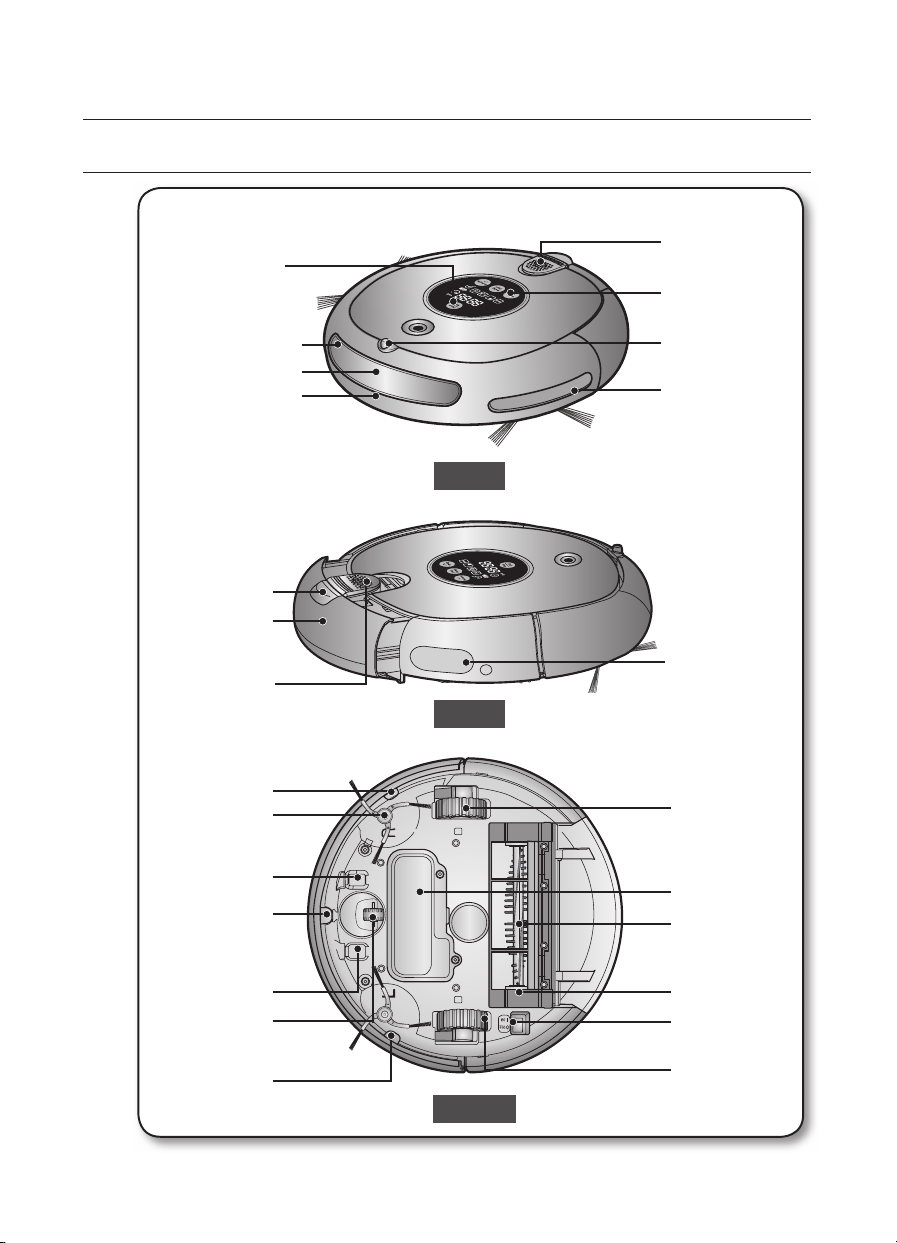
Assembling the cleaner
NAME OF EACH PART
Display Panel
Remote Control Sensor
Obstacle Sensor
Bumper Sensor
Dust bin Eject
Button
Dust bin
Air freshener
compartment
cover
Cliff Sensor
Side Brush
[ Main unit ]
Front
Side
Air freshener
compartment cover
Operating Button
VIRTUAL GUARD
Sensor
Obstacle Sensor
Remote Control
Sensor
Driving Wheel
Charge Pin
Cliff Sensor
Charge Pin
Roller
Cliff Sensor
16_ Assembling the cleaner
Battery Cover
Power Brush
Power Brush Cover
Power Switch
Driving Wheel
Bottom
Page 17
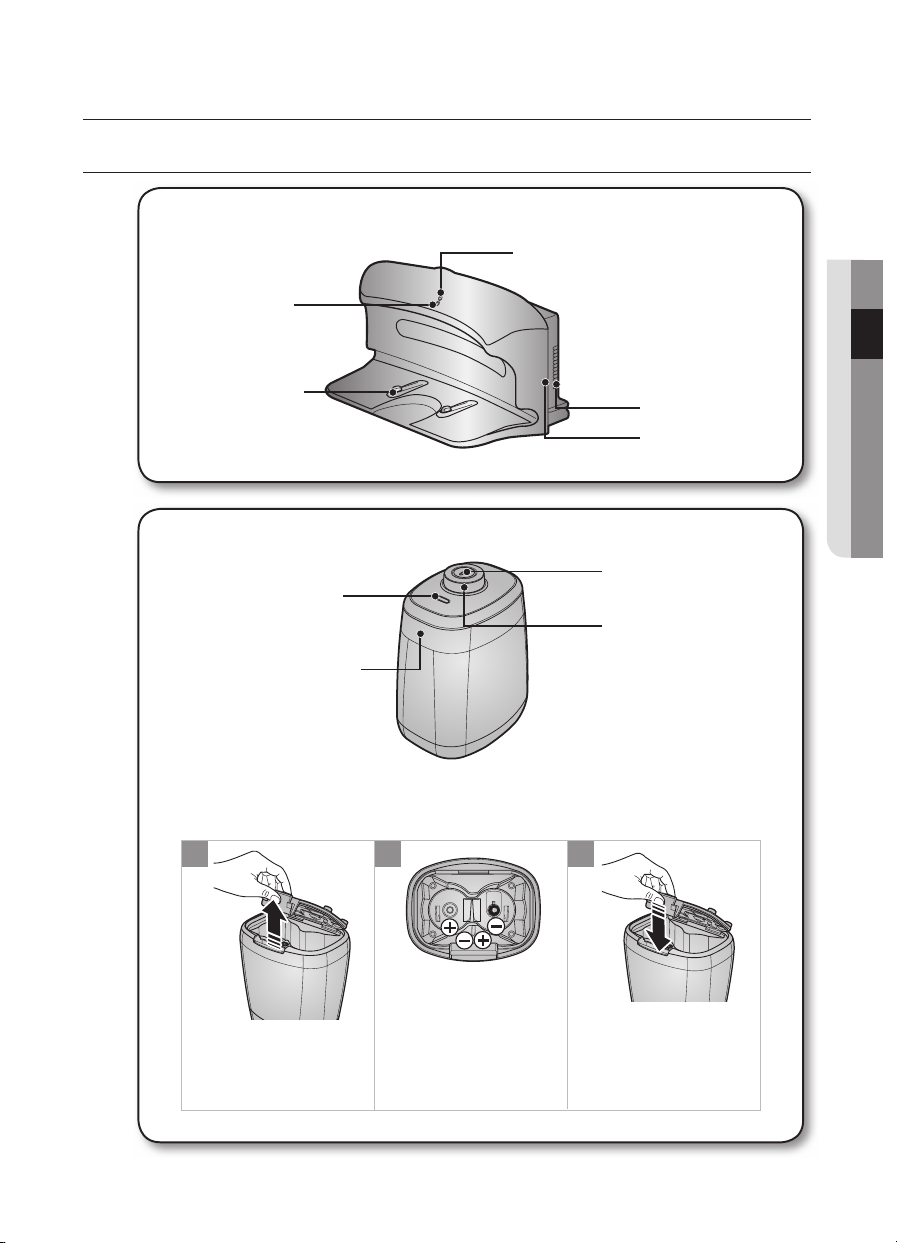
Assembling the cleaner
NAME OF EACH PART
[ Charger (Station) ]
Power Lamp
Charging Lamp
Charge Pin
Vents
Catching Sill
[ VIRTUAL GUARD (OPTION) ]
Power Button
Mode Lamp
Main Body Detection
Sensor
Distance Detection Sensor
■
Installing the batteries
Batteries are not supplied with the product. You have to purchase the batteries separately.
Install the alkaline batteries (type D) before use.
1 2 3
02 ASSEMBLING THE CLEANER
Lift the cover of the
VIRTUAL GUARD while
pressing the locking tab.
Install the batteries into
the VIRTUAL GUARD
as shown by the fi gure
below. (If the batteries are
installed with the incorrect
polarity, the VIRTUAL
GUARD will not work.)
✽ Specifi cation: Alkaline Type D (LR20) batteries
After inserting the tip of
the cover into the slot,
push the other end to
close it until it clicks into
place.
Assembling the cleaner _17
Page 18
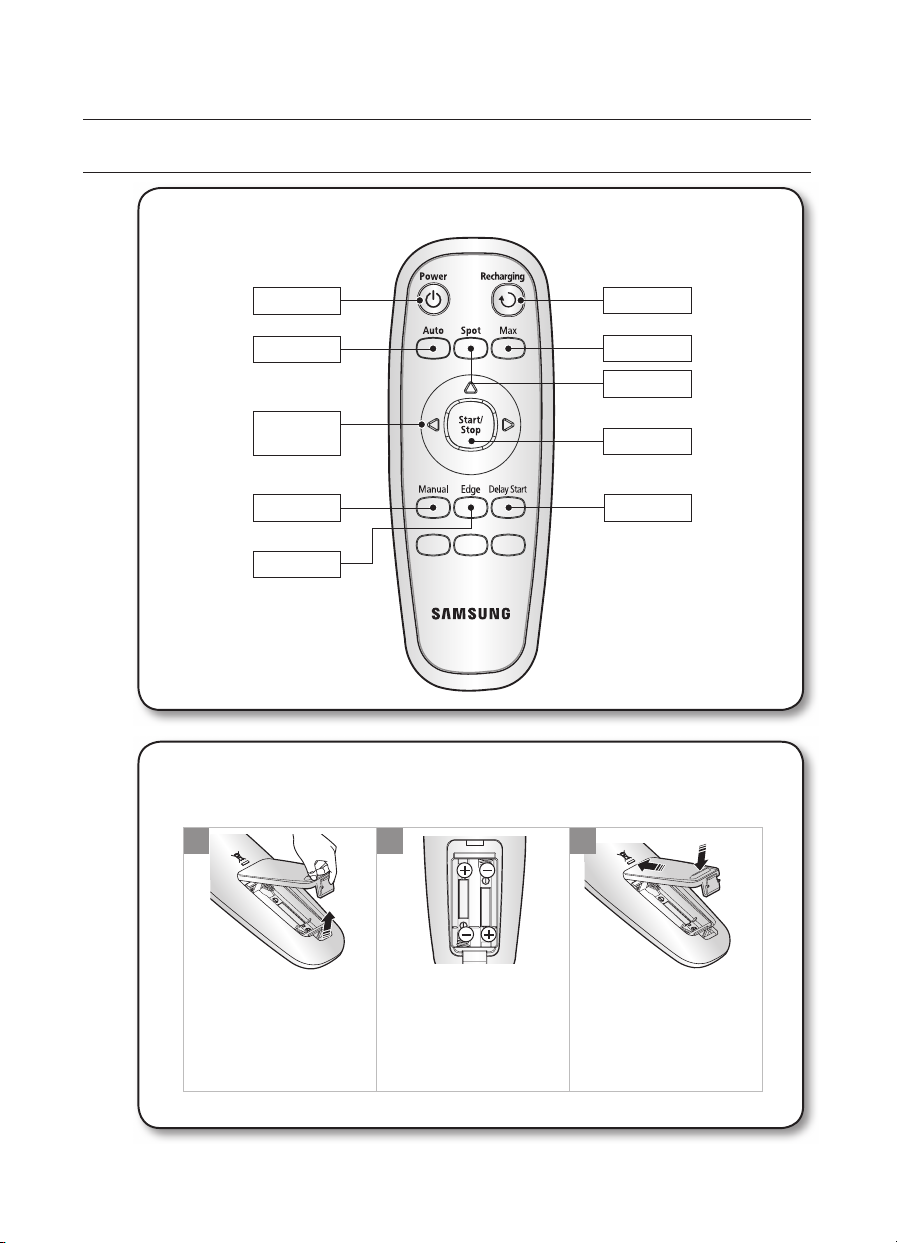
Assembling the cleaner
NAME OF EACH PART
Power
Auto
Directional
Buttons
Manual
Edge
■
Installing the Remote Control Batteries
Batteries are not installed in the remote control when purchasing the product.
Install the alkaline batteries (type AAA) before use.
[ Remote Control ]
Recharging
Max
Spot
Start/Stop
Delay Start
1 2 3
Lift the battery
compartment cover at
the back of the remote
control, while pressing
the locking tab.
18_ Assembling the cleaner
Install the batteries into the
remote control as shown
by the fi gure below. (If the
batteries are installed with
the wrong polarity, the
remote control will not work.)
✽ Specifi cation: Alkaline type AAA batteries
After inserting the tip of
the cover into the slot,
push the other end to
close it until it clicks
into place.
Page 19
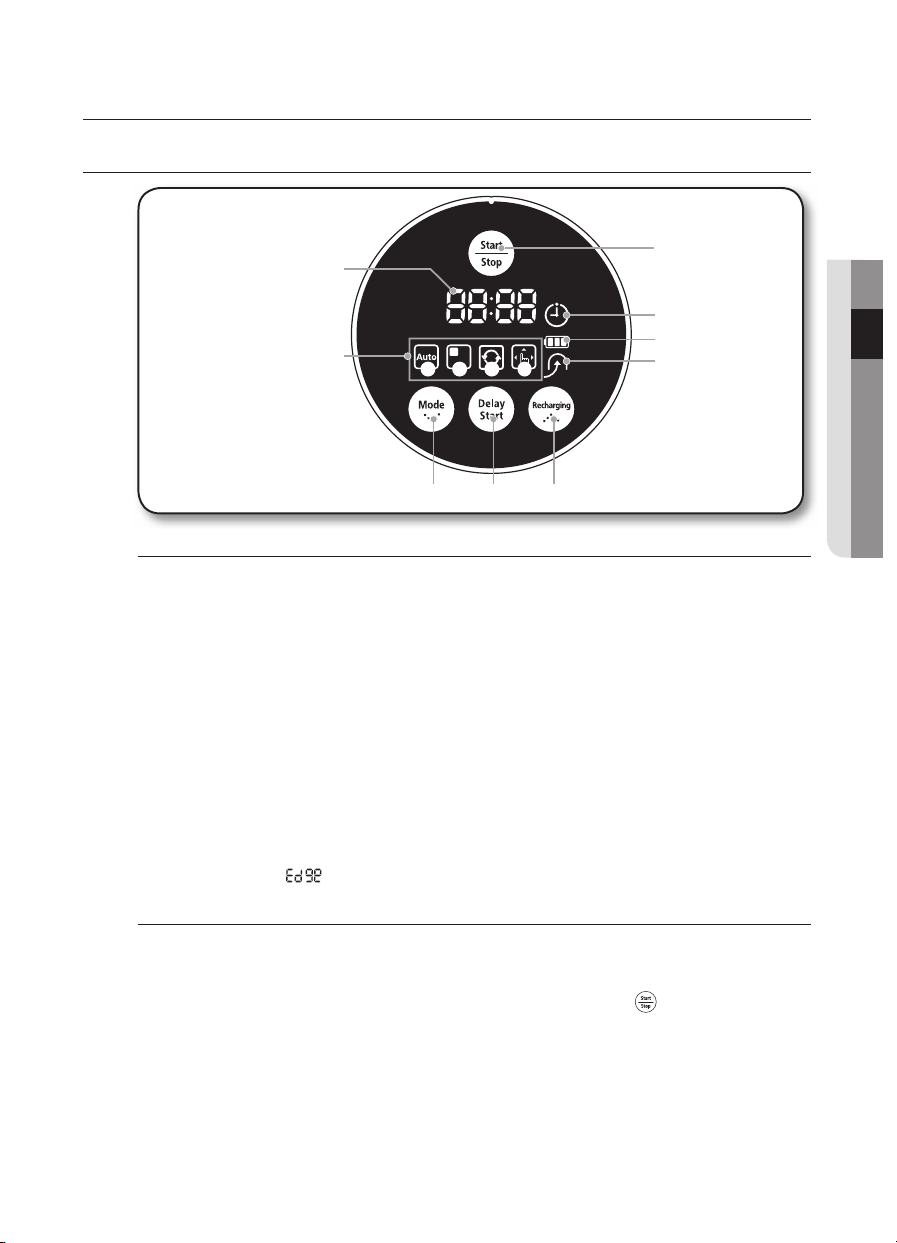
Assembling the cleaner
NAME OF EACH PART
[ Display panel ]
1
5
DISPLAY PART
1. Number Display
- Shows the timer display, progress status, and error codes using numbers, letters and graphics.
2. Battery Level Indicator
- Charging: Shows the charging progress in 3 steps.
- In Use: Shows the battery charge level. The battery charge level is reduced by each level from FULL while
operating. (When the battery is fully discharged, one level will fl ash to display “LO”.)
3. Scheduled Cleaning
- When cleaning is scheduled, the Scheduled Cleaning icon is lit.
4. Recharging
- This icon turns on when the robotic vacuum cleaner returns to the charger station to charge its battery.
5. Cleaning Mode Display
- Each time the cleaning mode button is pressed, the corresponding cleaning mode is displayed.
(a) Auto Mode: This icon turns on when Auto cleaning mode is selected.
(b) Spot Mode: This icon turns on when Spot cleaning mode is selected.
(c) Max Mode: This icon turns on when Max cleaning mode is selected.
(d) Manual Mode: This icon turns on when Manual cleaning mode is selected.
(e) Edge Mode : " " is on when Edge cleaning mode is selected.
Ⓐ Ⓑ Ⓒ Ⓓ
8 97
6
02 ASSEMBLING THE CLEANER
3
2
4
BUTTON PART
6. Start/Stop
- Press to start/stop cleaning.
7. Cleaning Mode
-
Press to select a cleaning mode. After selecting a cleaning mode, press the ( ) button to start cleaning.
8. Delay Start
- Press to schedule a cleaning. You can delay a cleaning up to 23 hours.
9. Recharging
- When this button is pressed, the Recharging icon is turned on and robotic vacuum cleaner will return to
the charger to charge its battery.
Assembling the cleaner _19
Page 20
Operating the cleaner
INSTALLING THE ROBOTIC VACUUM CLEANER
INSTALLATION ORDER
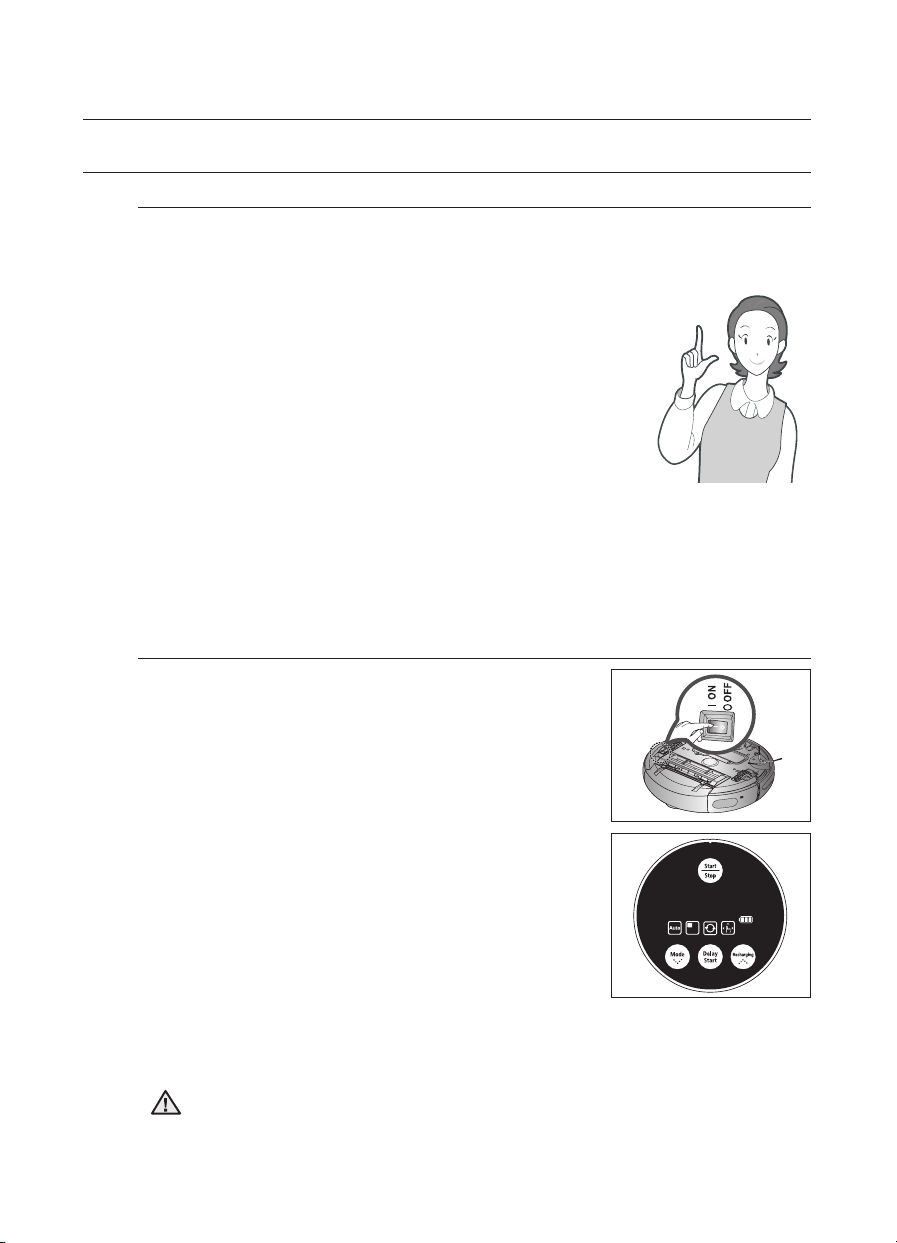
1. Turning the Power Switch on or off
To use the robotic vacuum cleaner, you must turn on the Power Switch at the
bottom of the main unit.
2. Installing the Charger
To charge the robotic vacuum cleaner, you must fi rst install the
charger.
Since the battery is discharged when the product is
purchased, you must fully charge the battery before use.
3. Charging the Battery
You should charge the battery completely before using the
robotic vacuum cleaner.
4. Installing the VIRTUAL GUARD
You can confi ne the robotic vacuum cleaner to a particular
section by using Fence (virtual wall) mode.
5. Installing the air freshener
Please install the air freshener before using the robotic vacuum cleaner.
If the air freshener is installed, the robotic vacuum cleaner will give off a pleasant
fragrance.
TURNING THE POWER SWITCH ON OR OFF
To use the robotic vacuum cleaner, you must turn the
Power Switch on.
If you turn the Power Switch off, all settings will be reset.
1. Turn over the main unit and turn the Power Switch
on.
- If the icons are not turned on, it indicates that the
battery charge is depleted. In this case, dock the
robotic vacuum cleaner to the charger station after
turning the Power Switch on.
- Note that turning the Power Switch off will reset all
settings.
20_ Operating the cleaner
✽ When no key is pressed for approximately 10 minutes when the
power is on, the power is automatically turned off to save battery
power. In this case, to use this robotic vacuum cleaner again, please
push the "Power" button or "Start/Stop" button.
If the Power Switch is turned off, the robotic vacuum cleaner will not be charged
CAUTION
even if it is docked with the charger station.
Page 21
Operating the cleaner
Power Lamp
Charging Lamp
INSTALLING THE ROBOTIC VACUUM CLEANER
INSTALLING THE CHARGER
Power Lamp
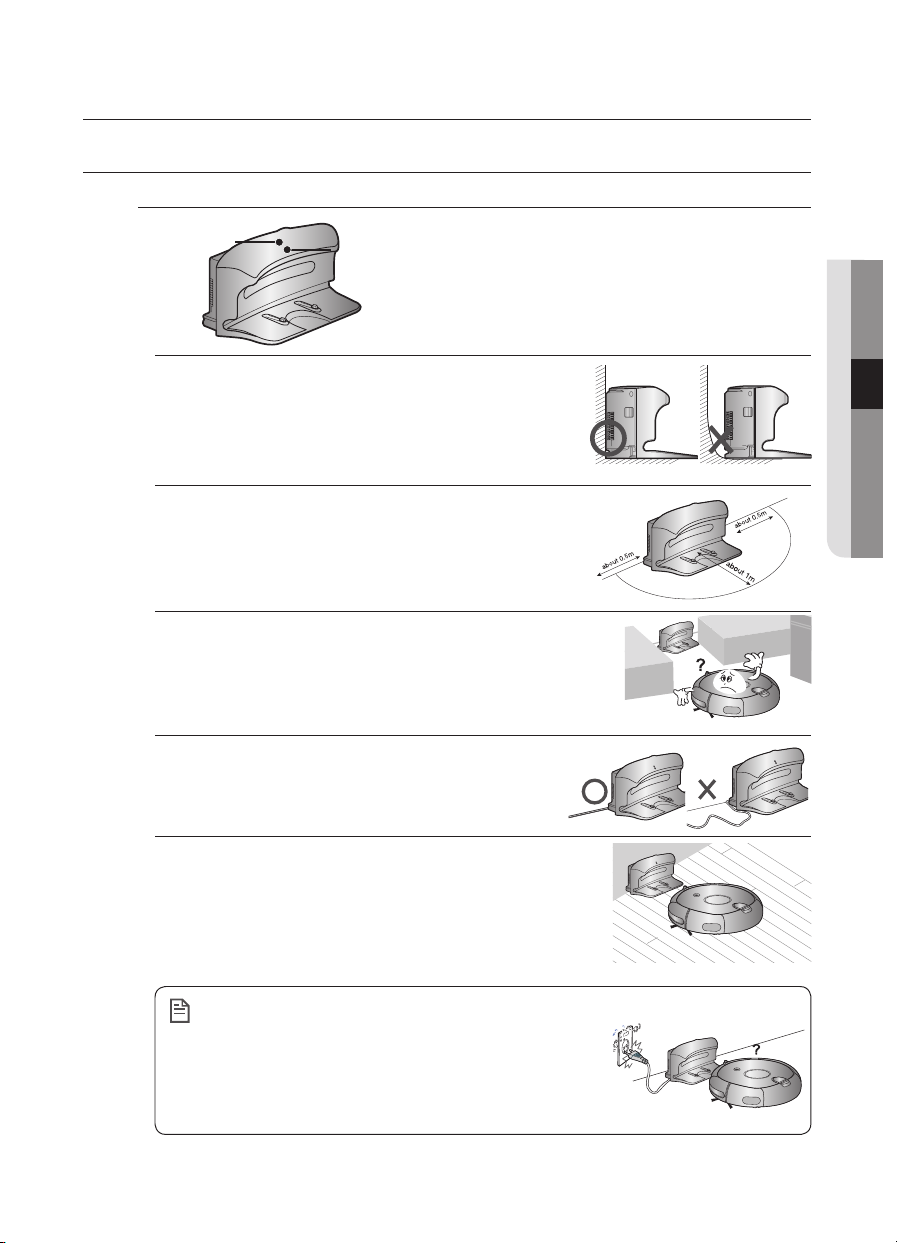
1. Install the charger on a fl at surface.
2. There should be no obstacles 0.5 m to the left and
right and within 1 m of the front.
3. Install the charger in a location where it can be easily
accessed by the robotic vacuum cleaner.
4. Arrange the power cord along the wall.
Charging Lamp
03 OPERATING THE CLEANER
5. When the fl oor is made of wood, install the charger in
the same direction as the grain of the wood.
Always keep the power cord of the charger
plugged into the power outlet.
NOTE
- If no power is supplied to the charger, the robotic
vacuum will not be able to fi nd the charger and will
not be able to charge automatically.
- If the robotic vacuum cleaner is separated from the
charger, the battery is automatically discharged.
Operating the cleaner _21
Page 22
Operating the cleaner
Power Lamp
Charging Lamp
Power
Lamp
Charging Lamp
INSTALLING THE ROBOTIC VACUUM CLEANER
CHARGING
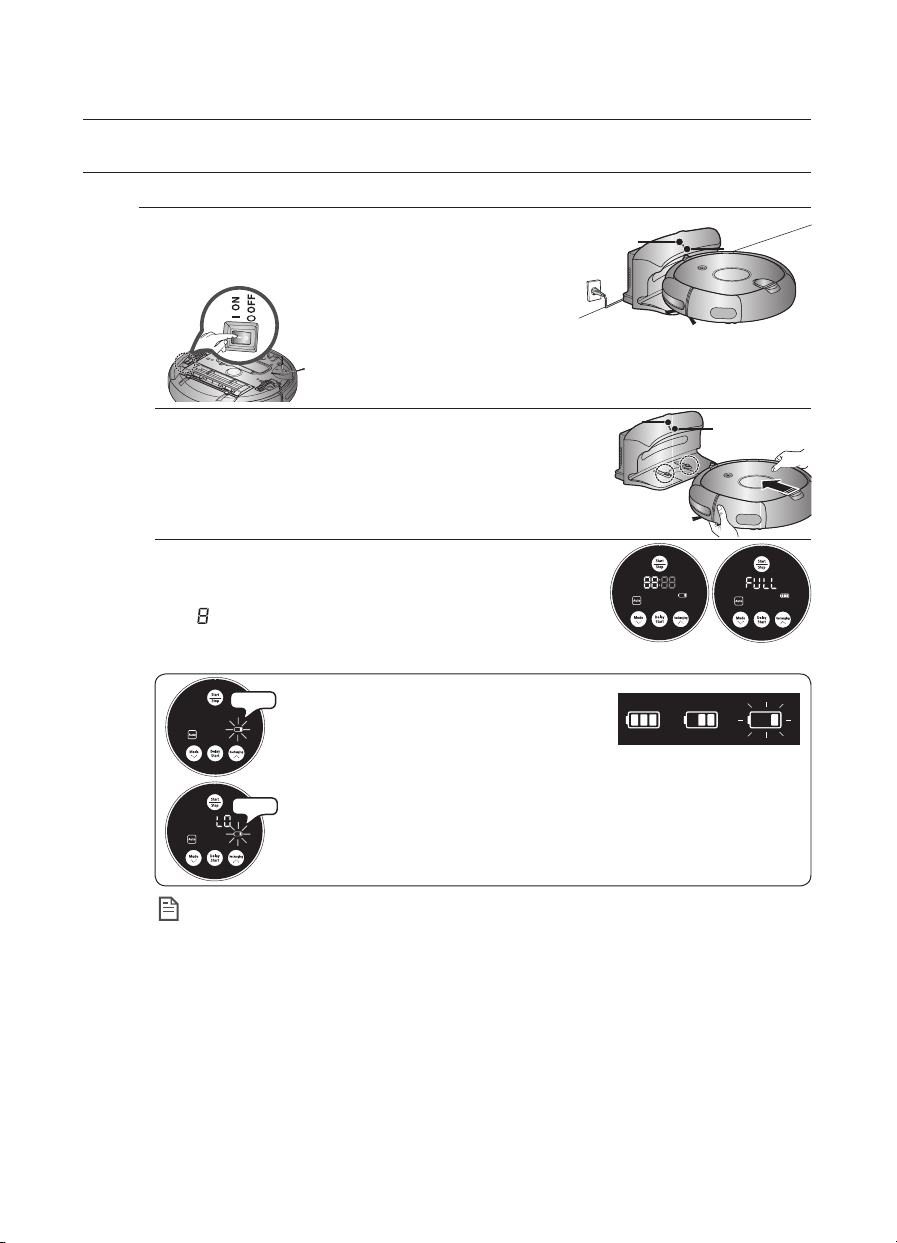
When the product is initially purchased, the battery
is fully discharged, and you must charge the robotic
vacuum cleaner manually.
Turn on the Power Switch at the bottom of the product.
Power Lamp
Charging Lamp
1. After aligning the charge pins of the main unit with
the charge pin of the charger, press the main unit
Power
Lamp
Charging Lamp
until you hear a “Recharging power” sound from the
charger.
- The Charging Lamp turns green.
2. Check the charge status of the robotic vacuum
cleaner.
- When charging starts, the battery level indicator and
“
” will be displayed in sequence in the display panel.
-
When charging is complete, the battery level indicator and
“FULL” will be displayed in the display panel.
■
Flash
When the battery level display fl ashes
while cleaning, the robotic vacuum cleaner
stops vacuuming and automatically
charges itself at the charger.
■
Flash
When the battery level fl ashes and “LO” is displayed while cleaning,
robotic vacuum cleaner cannot be operated by the remote control or
Charging Fully charged
<Charge display>
Charge
Charging Required
complete
the buttons on the main unit. In this case, directly carry the robotic
vacuum cleaner to the charger to charge the battery. (This is when
the battery is completely discharged.)
• When the product is initially purchased, it will take about 120 minutes to fully charge the battery
and will run for about 90 minutes.
NOTE
• When charging the battery while the battery is over-heated, the charging time can increase.
• Measures to take when charging is not smooth.
When the robotic vacuum cleaner cannot be automatically charged, check the following:
- Turn the Power Switch at the bottom of the robotic vacuum cleaner off and on (Reset).
- Re-plug the power of the charger (Reset).
- Check whether there are any foreign substances on the charge connector and wipe the
charge connector on the main unit and the charger with a dry cloth.
- Check whether there are objects near the charger that are strong refl ectors.
• When separating the robotic vacuum cleaner from the charger, it will discharge naturally.
- Charge the robotic vacuum cleaner through the charger, if possible. (When leaving your home
unattended for a long period of time due to a business trip, travelling etc., turn off the Power
Switch of the robotic vacuum cleaner and unplug the power of the charger to store them.)
charging
22_ Operating the cleaner
Page 23
Operating the cleaner
INSTALLING THE ROBOTIC VACUUM CLEANER
ABOUT THE BATTERY
■
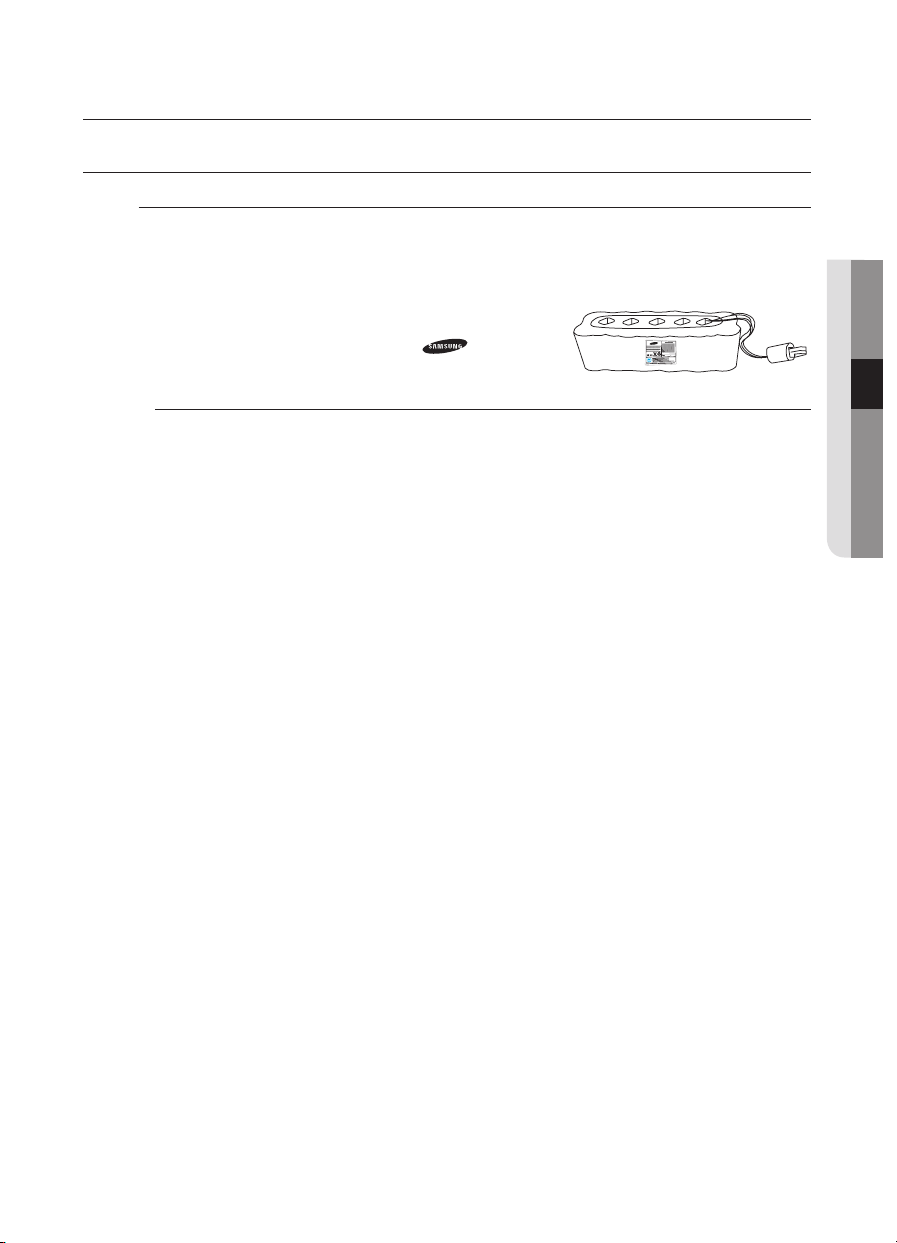
The robotic vacuum cleaner is powered by an environment-friendly Nickel Metal Hydride
(NiMH) rechargeable battery, and an over-charge prevention function guarantees an
extended life time.
■
When purchasing a battery, ask the customer care
center for the genuine part symbol (
model number before purchasing it.
- This battery is only for Samsung robotic vacuums. It is strictly prohibited to use it for other
appliances or for other purposes.
- Do not disassemble or modify the battery.
- Charge it in a location with good ventilation.
- Do not expose the battery to fi re and do not heat it.
- Do not connect any metallic objects to the (+) or (-) terminals of the battery.
- Keep it indoors (0ºC~40ºC).
- Before you discard this product, dispose of batteries in an environmentally safe manner.
- Do not discard batteries with your regular household trash.
- Follow all local regulations when disposing of old batteries.
✽ If the battery is out of order, do not disassemble it. Contact your nearest customer care
center.
✽ An increased charging time and a shorter battery life indicates the near end of the battery
life. Please contact an authorized customer care center to replace your battery.
) and
03 OPERATING THE CLEANER
The rechargeable battery incorporated in this product is not user replaceable.
For information on its replacement, please contact your service provider.
Operating the cleaner _23
Page 24
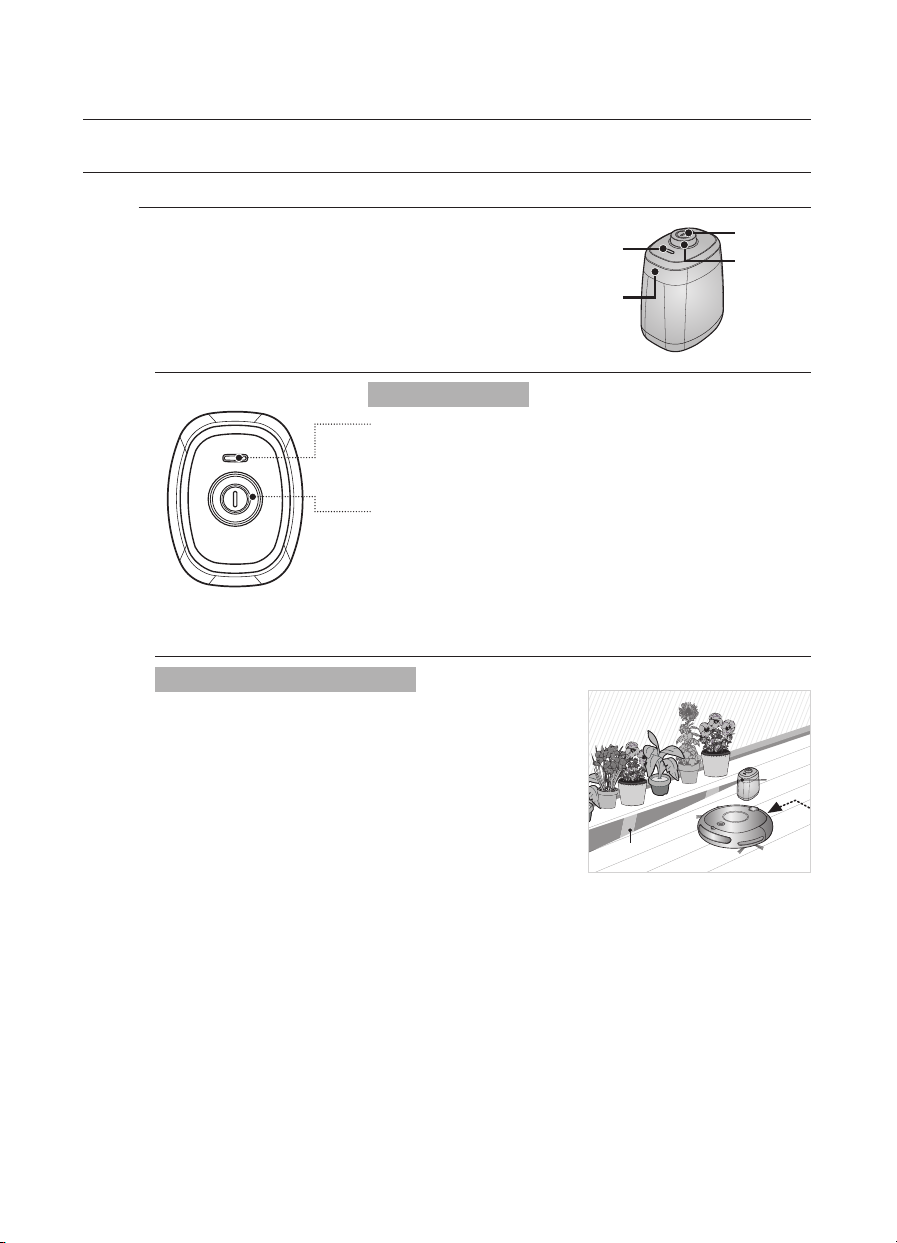
Operating the cleaner
Distance
Detection
Sensor
A fence (virtual wall)
is formed.
INSTALLING THE ROBOTIC VACUUM CLEANER
INSTALLING THE VIRTUAL GUARD (OPTION)
You can confi ne the robotic vacuum cleaner to
a particular section by using Fence (virtual wall)
mode.
Button operations
1. Lamp operations
- Fence (virtual wall) Mode: The red lamp fl ashes.
- Off :The lamp is turned off.
2. Turn the Power Button on
- Whenever you press the Power button, Fence (virtual
wall) mode ➝ Power off is selected in this sequence.
✽
The distance of virtual wall is 2.5M at minimum and
may differ depending on surroundings and movement
status of the robot.
Forming a Fence (virtual wall)
VIRTUAL GUARD creates an invisible barrier that the
robotic vacuum cleaner cannot cross.
E.g. in front of pots, furniture, the front door, and so on.
1. Turn the Fence (virtual wall) mode on using the
Power button.
- The mode lamp fl ashes red.
2. Install the VIRTUAL GUARD in front of the area
you want to block access from the vacuum cleaning robot.
- Install the VIRTUAL GUARD so that the distance detection sensor can form an
invisible barrier that the vacuum cleaning robot cannot cross.
Mode Lamp
Distance Detection
Sensor
A fence (virtual wall)
is formed.
Power Button
Main Unit
Detection
Sensor
Distance
Detection
Sensor
24_ Operating the cleaner
Page 25
Operating the cleaner
About the IrDA sensor.
CAUTION
• The infrared signal transmission may
not be smooth in locations exposed to
halogen lamps or in outdoor locations.
• Robotic vacuum cleaner uses 3 types of
infrared devices and a device may not
work in front of another device with a
higher priority.
•
When controlling the robotic vacuum cleaner with the remote control, the robotic vacuum
cleaner may cross the virtual fence of the VIRTUAL GUARD or run against an obstacle,
because the remote control signal has a higher priority than the VIRTUAL GUARD signal.
• When using the robotic vacuum cleaner in a small location or at a close distance,
it may malfunction due to interference of the infrared signals.
• Install the VIRTUAL GUARD away from the charger as auto charging may be
interrupted if the VIRTUAL GUARD is near the charger.
•
If more than one robotic vacuum is used simultaneously, they may malfunction
due to interference of the infrared signals.
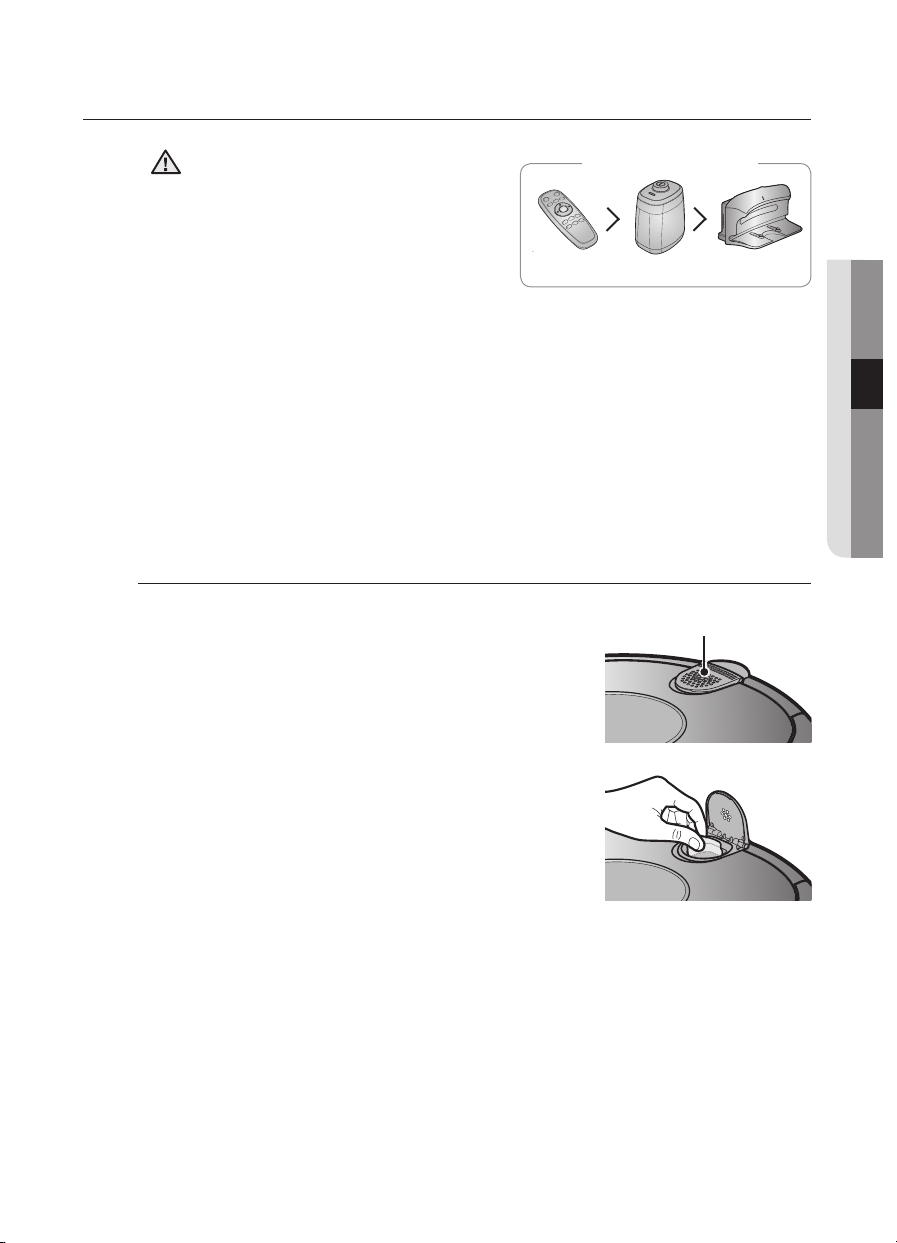
INSTALLING THE AIR FRESHENER
Please install the air freshener before using the robotic
vacuum cleaner.
If the air freshener is installed, the robotic vacuum cleaner
will give off a pleasant fragrance.
1. Remove the plastic bag containing the air freshener.
2. Open the air freshener compartment cover at the
top of the Dust bin and put the air freshener in the
compartment.
3. Close the air freshener compartment cover.
[Infrared Signal Priority]
Remote Control VIRTUAL GUARD
Air freshener compartment
Charger
03 OPERATING THE CLEANER
✽
To purchase the air freshener additionally, please
contact the Samsung Electronics service center.
Operating the cleaner _25
Page 26
Operating the cleaner
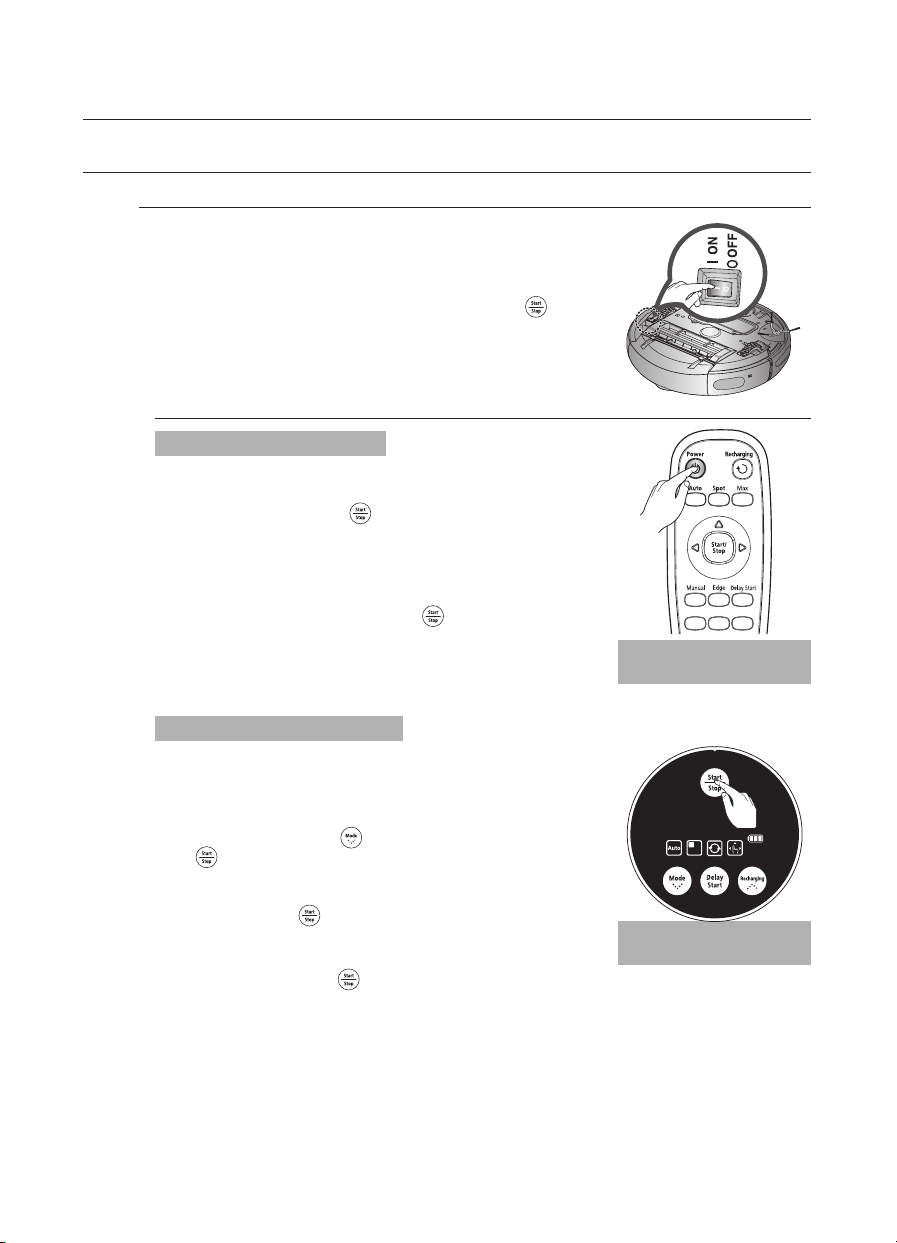
USING THE ROBOTIC VACUUM CLEANER
STARTING/STOPPING CLEANING
You can run or stop all robotic vacuum functions.
■
Each robotic vacuum function only runs when the Power
Switch is turned on.
■
When the robotic vacuum is operating, press the ( ) button
to cancel the operation and select a function.
Turning the power on or off
Turning the power on
- Remote control: Press the [Power] button.
- Main unit: Press the (
- The main unit buttons, battery level indicator and
cleaning mode icons are turned on.
Turning the power off
- Remote control: Press the [Power] button.
- Main unit: Press and hold the (
seconds.
- All icons except for the battery level indicator are
turned off.
) button.
) button down for 3
Using the remote
control
Starting or stopping cleaning
Starting
- Remote control: Press the Auto, Spot, Max, Manual
or Edge button.
- Main unit: Select Auto / Spot / Max / Manual / Edge
mode by using the (
(
- When cleaning begins, the robotic vacuum cleaner
Stopping
- To stop, press the (
- When cleaning is stopped, the robotic vacuum
26_ Operating the cleaner
) button.
starts to move.
✽
Pressing the ( ) button without selecting cleaning
mode starts to perform the Auto mode cleaning.
button.
cleaner stops.
) button and then pressing the
Using the main unit
buttons
) remote control or main unit
Page 27
Operating the cleaner
1.5
m ahe
a
d
USING THE ROBOTIC VACUUM CLEANER
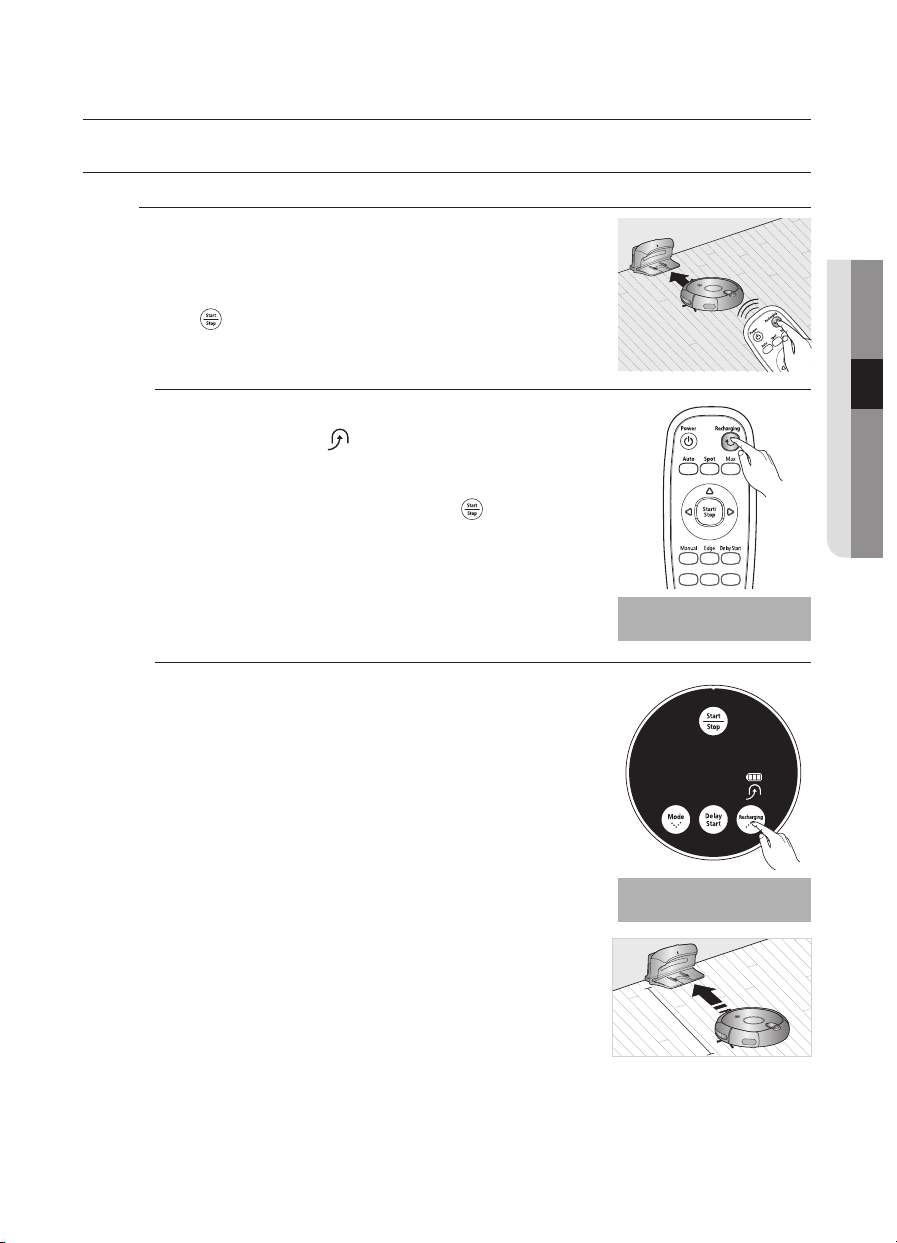
RECHARGING
You can have the robotic vacuum cleaner return
to the charger to charge the battery by using the
Recharging button.
■
When the robotic vacuum cleaner is operating, press
the (
) button to cancel the operation and press the
Recharging button.
1. Press the Recharging button.
- The main unit icon (
vacuum cleaner will return to the charger.
2. To stop the robotic vacuum cleaner while it is
returning to the charger, press the (
3. To test the auto charge function, press the
Recharging button when the robotic vacuum cleaner
is less than 1.5 m from the charger.
Troubleshooting when the robotic vacuum cleaner
does not return to the charger
•
Check the installation of the charger
- When the charger is in a location where the charger
cannot guide the robotic vacuum cleaner to the
charger.
- When the charger is more than 5m away from robotic
vacuum cleaner.
: It may require a longer time for the robotic vacuum
cleaner to return to the charger.
•
Manually charge the robotic vacuum cleaner in the following
cases.
- When the charger is installed in a corner.
- When the battery is fully discharged.
- When the robotic vacuum cleaner is trapped by an
obstacle (furniture etc.)
- When the robotic vacuum cleaner cannot pass over the
doorsill to the location where the charger is installed.
) is turned on and the robotic
) button.
Using the remote
control
Using the main unit
buttons
1.5 m ahead
03 OPERATING THE CLEANER
Operating the cleaner _27
Page 28
Operating the cleaner
USING THE ROBOTIC VACUUM CLEANER
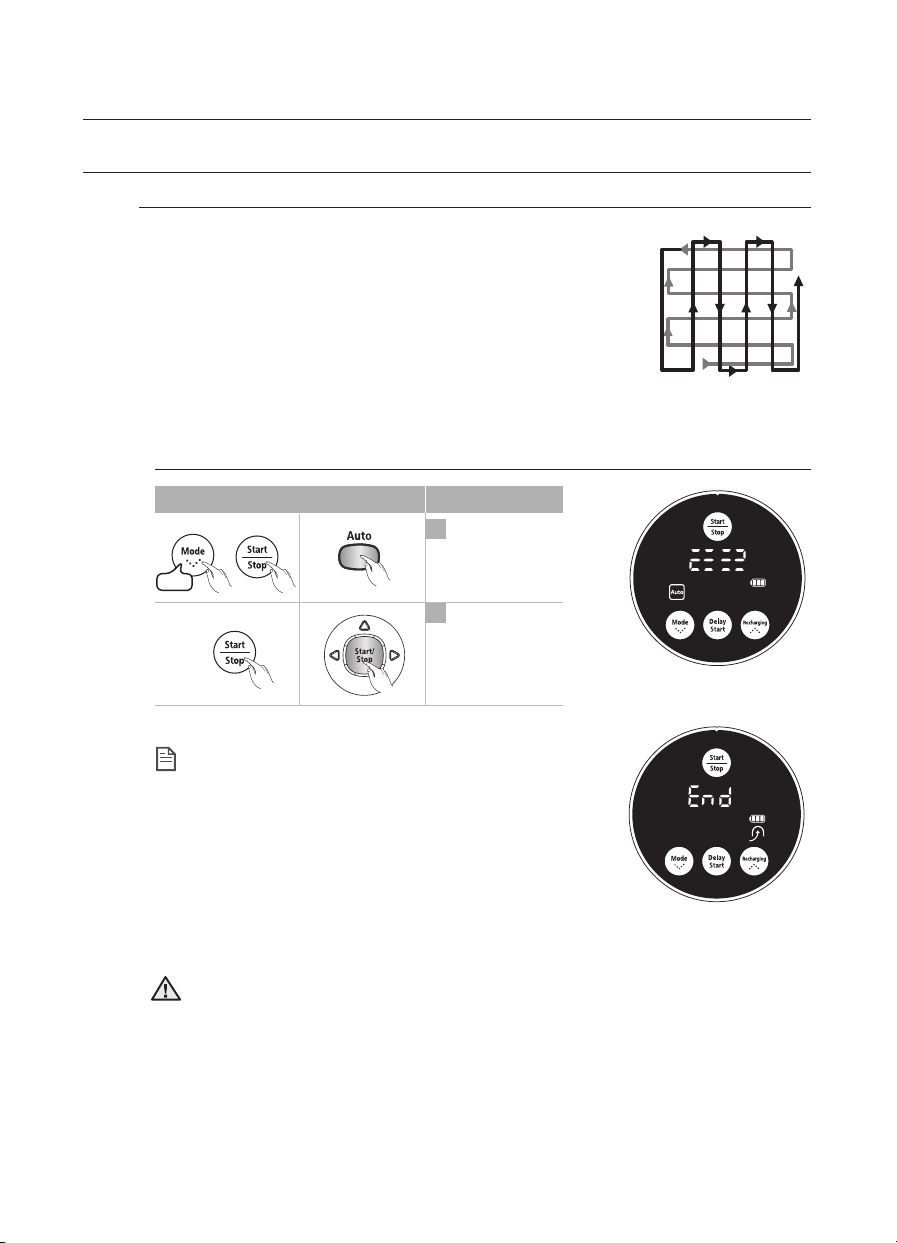
AUTO CLEANING
The robotic vacuum cleaner will move by itself and
automatically clean the house until cleaning is completed
once.
■
If cleaning begins when the robotic vacuum cleaner is docked with
the charger station, the time to return to the charger is decreased
since the robotic vacuum cleaner remembers its original position
while moving.
■
If the battery level becomes too low while cleaning, the robotic
vacuum cleaner will automatically return to the charger station and
resume cleaning after charging its battery. (Number of cleaning
operations resumed: Once)
Main unit button
1times
NOTE
CAUTION
Remote control button Configuration Sequence
1
Set the mode.
▶
2
Cancel the mode.
While cleaning
About the Resume Cleaning function
• If the robotic vacuum cleaner has evaluated that
cleaning is complete, the resume cleaning function
is not performed.
If you move the robotic vacuum cleaner when it
•
is being charged or press a button, the robotic
vacuum cleaner judges cleaning to be complete
and does not resume cleaning.
When cleaning is complete
Do not move the robotic vacuum cleaner when it is cleaning or press a button
while it is cleaning. Otherwise, the robotic vacuum cleaner judges cleaning to be
complete and starts cleaning again from the beginning.
28_ Operating the cleaner
Page 29
Operating the cleaner
USING THE ROBOTIC VACUUM CLEANER
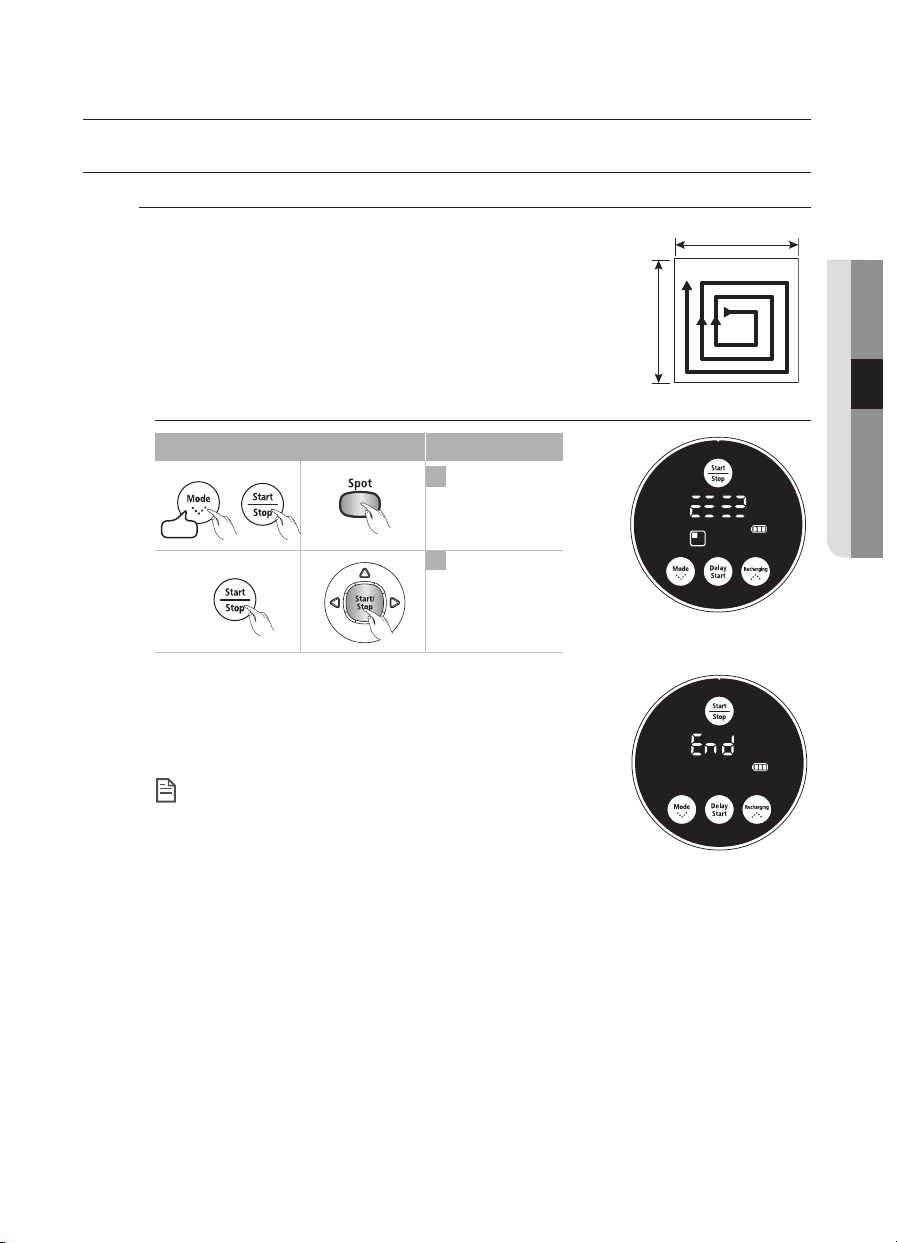
SPOT CLEANING
You can conveniently clean a specifi c area that has a lot
of cookie crumbs, dust, and etc.
■
Move the robotic vacuum cleaner to the location where you
want to perform a spot clean.
About 1.5m
03 OPERATING THE CLEANER
About 1.5m
Main unit button
Remote control button Configuration Sequence
1
Set the mode.
▶
2times
2
Cancel the mode.
- In Spot cleaning mode, the robotic vacuum cleaner cleans
an area with a length of 1.5m and a width of 1.5m.
- When cleaning is completed, the robotic vacuum cleaner
will display End, Stop, and Stand by.
When the robotic vacuum cleaner is docked with the
charger station, spot cleaning is not supported.
NOTE
While cleaning
When cleaning is complete
Operating the cleaner _29
Page 30
Operating the cleaner
3 times
(when the product is not in the
process of charging.)
2 times
(when the product is charging.)
USING THE ROBOTIC VACUUM CLEANER
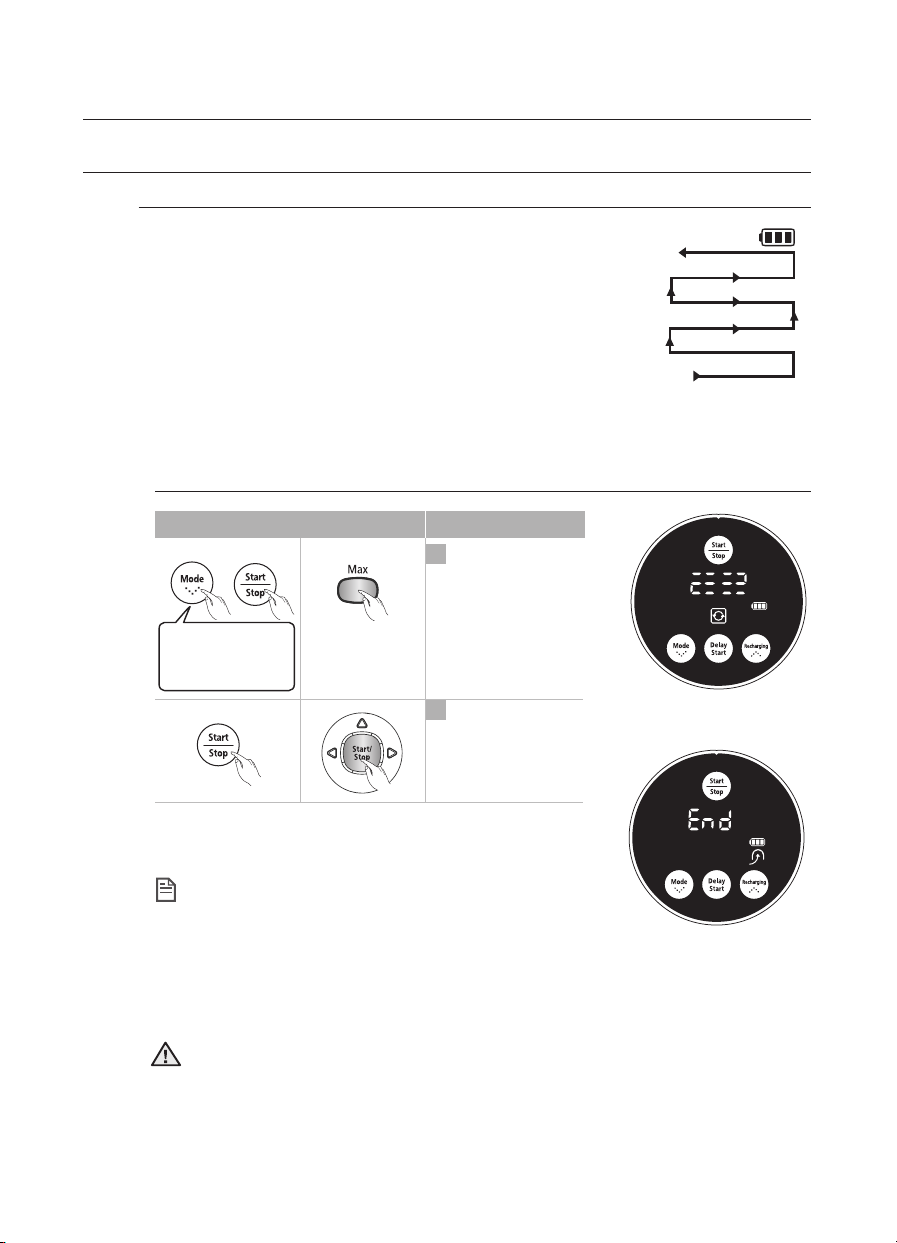
MAX CLEANING
The robotic vacuum cleaner automatically moves and
cleans until the battery runs out and the battery level
fl ashes only one level.
■
If cleaning begins when the robotic vacuum cleaner is
docked with the charger station, the time to return to the
charger is decreased since the robotic vacuum cleaner
remembers its original position while moving.
■
If the battery level becomes low while cleaning, the robotic
vacuum cleaner automatically returns to the charger station
and resumes cleaning after charging the battery. (Number of
resumed cleaning operations: Once)
Main unit button
▶
3 times
(when the product is not in the
process of charging.)
2 times
(when the product is charging.)
About the Resume Cleaning function
NOTE
• If the robotic vacuum cleaner judges cleaning to be
complete, resume cleaning is not performed.
• If you move the robotic vacuum cleaner while it is
being charged or press a button, robotic vacuum
cleaner judges cleaning to be complete (cleaning is
not resumed).
Do not move the robotic vacuum cleaner while it is cleaning or press a button while
CAUTION
cleaning. Otherwise, the robotic vacuum cleaner judges cleaning to be complete and
starts cleaning again from the beginning.
Remote control button
Configuration Sequence
1
Set the mode.
2
Cancel the mode.
While cleaning
When cleaning is complete
30_ Operating the cleaner
Page 31
Operating the cleaner
USING THE ROBOTIC VACUUM CLEANER
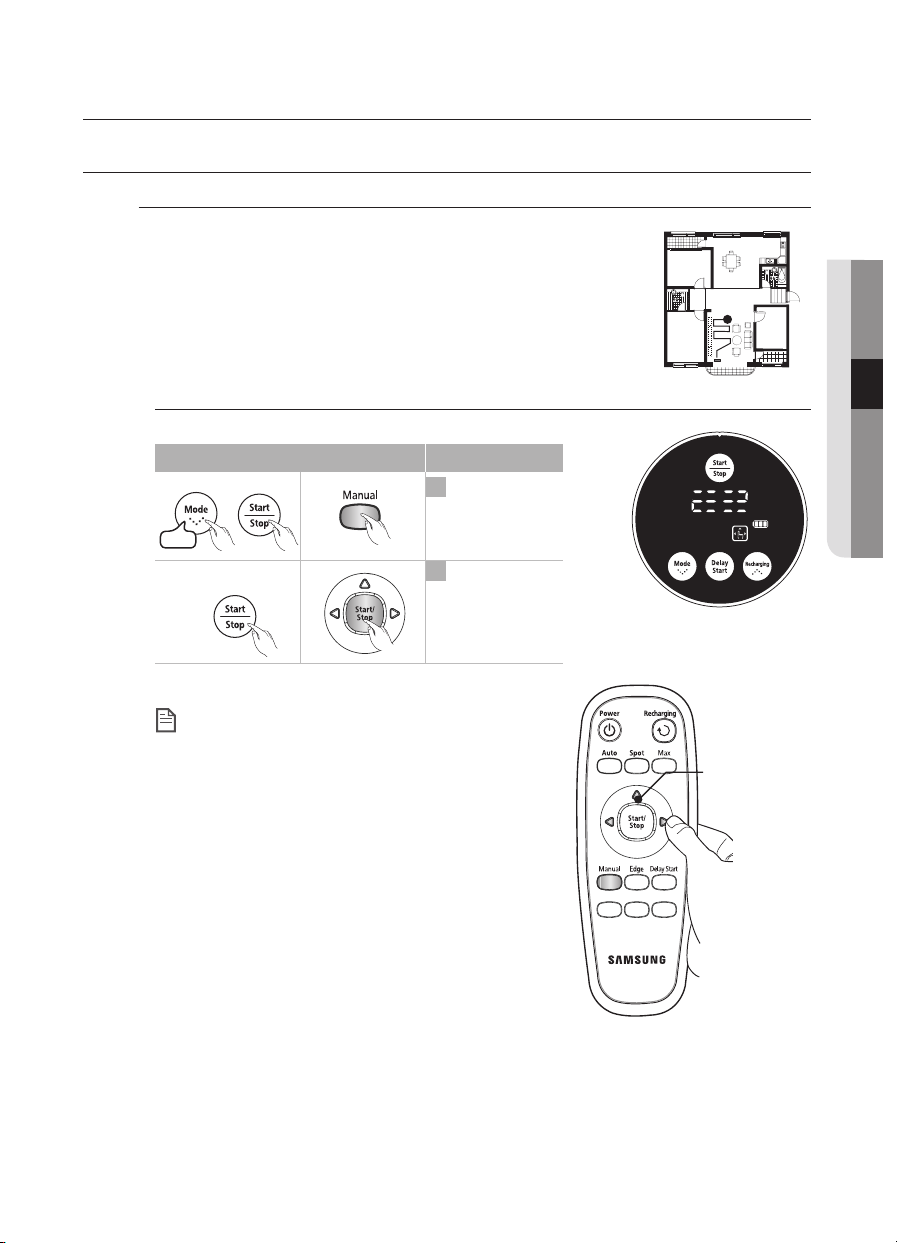
MANUAL CLEANING
You can move the robotic vacuum cleaner to clean
a particular location directly by using the remote
control.
■
Move the robotic vacuum cleaner to the location where you
want to perform manual cleaning.
■
You can manually clean using the remote control only.
03 OPERATING THE CLEANER
Main unit button
Remote control button Configuration Sequence
▶
4times
• When the robotic vacuum cleaner is docked
NOTE
with the charger station, manual cleaning is not
supported.
1
Set the mode.
2
Cancel the mode.
While cleaning
Directional Buttons
(Forwards, Left,
Right)
A backwards
function
is not supported.
Operating the cleaner _31
Page 32
Operating the cleaner
5 times
(when the product is not in the
process of charging.)
3 times
(when the product is charging.)
USING THE ROBOTIC VACUUM CLEANER
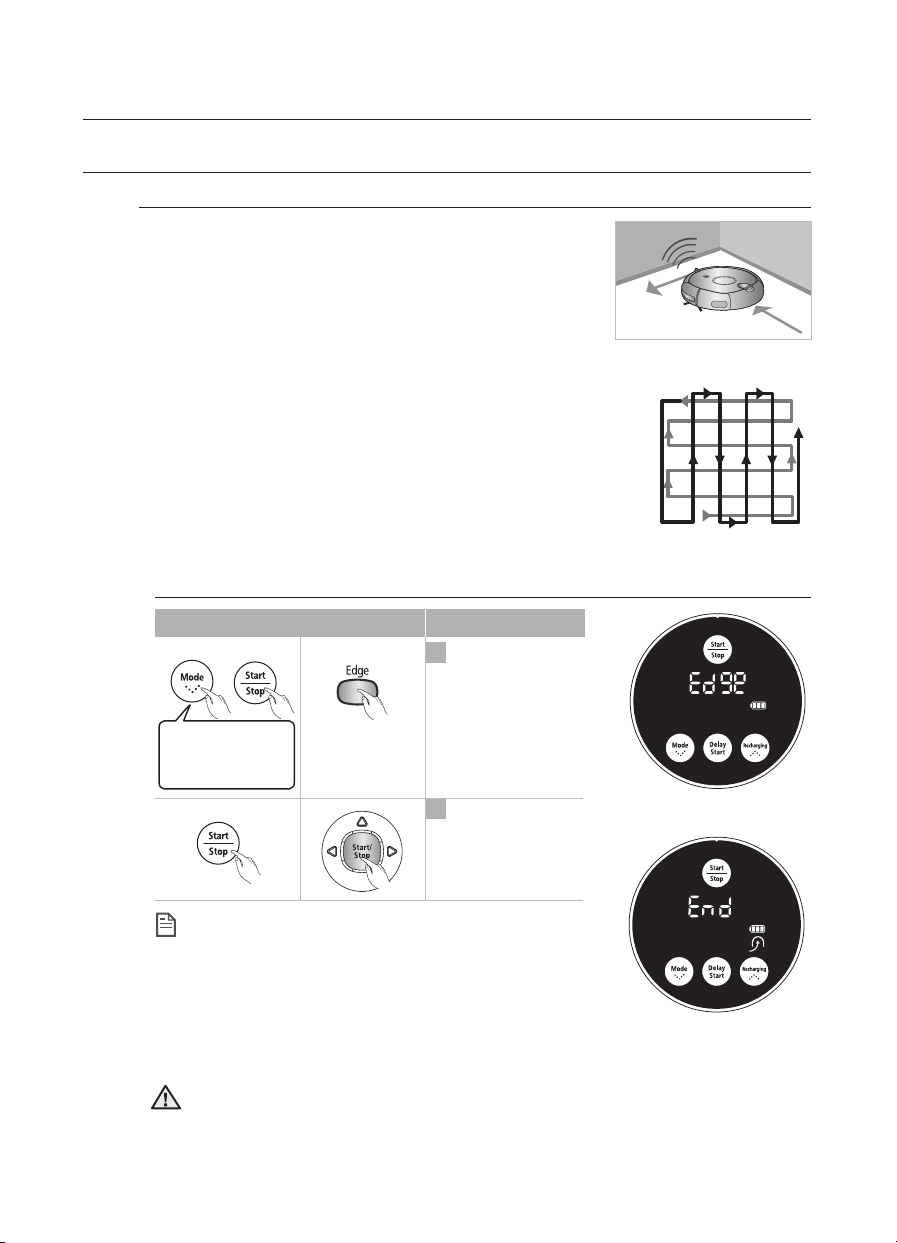
EDGE CLEANING
When the Obstacle Sensor detects an obstacle during
the cleaning, the Robotic vacuum Cleaner reduces its
speed to minimize the bumping impact and the Bumper
Sensor also helps it lower the bumping impact.
It cleans the corners by reaching to them as close as
possible. (This Robotic vacuum Cleaner is a touching
type cleaner.)
The robotic vacuum cleaner will move by itself and
automatically clean the house until cleaning is completed once.
■
If cleaning begins when the robotic vacuum cleaner is docked
with the charger station, the time to return to the charger is
decreased since the robotic vacuum cleaner remembers its
original position while moving.
■
If the battery level becomes too low while cleaning, the robotic
vacuum cleaner will automatically return to the charger station
and resume cleaning after charging its battery. (Number of
cleaning operations resumed: Once)
Main unit button
▶
5 times
(when the product is not in the
process of charging.)
3 times
(when the product is charging.)
About the Resume Cleaning function
NOTE
• If the robotic vacuum cleaner has evaluated that
cleaning is complete, the resume cleaning function is
not performed.
If you move the robotic vacuum cleaner when it is
•
being charged or press a button, the robotic vacuum
cleaner judges cleaning to be complete and does not
resume cleaning.
Do not move the robotic vacuum cleaner when it is cleaning or press a button
CAUTION
32_ Operating the cleaner
while it is cleaning. Otherwise, the robotic vacuum cleaner judges cleaning to be
complete and starts cleaning again from the beginning.
Remote control button
Configuration Sequence
1
Set the mode.
2
Cancel the mode.
While cleaning
When cleaning is
complete
Page 33
Operating the cleaner
USING THE ROBOTIC VACUUM CLEANER
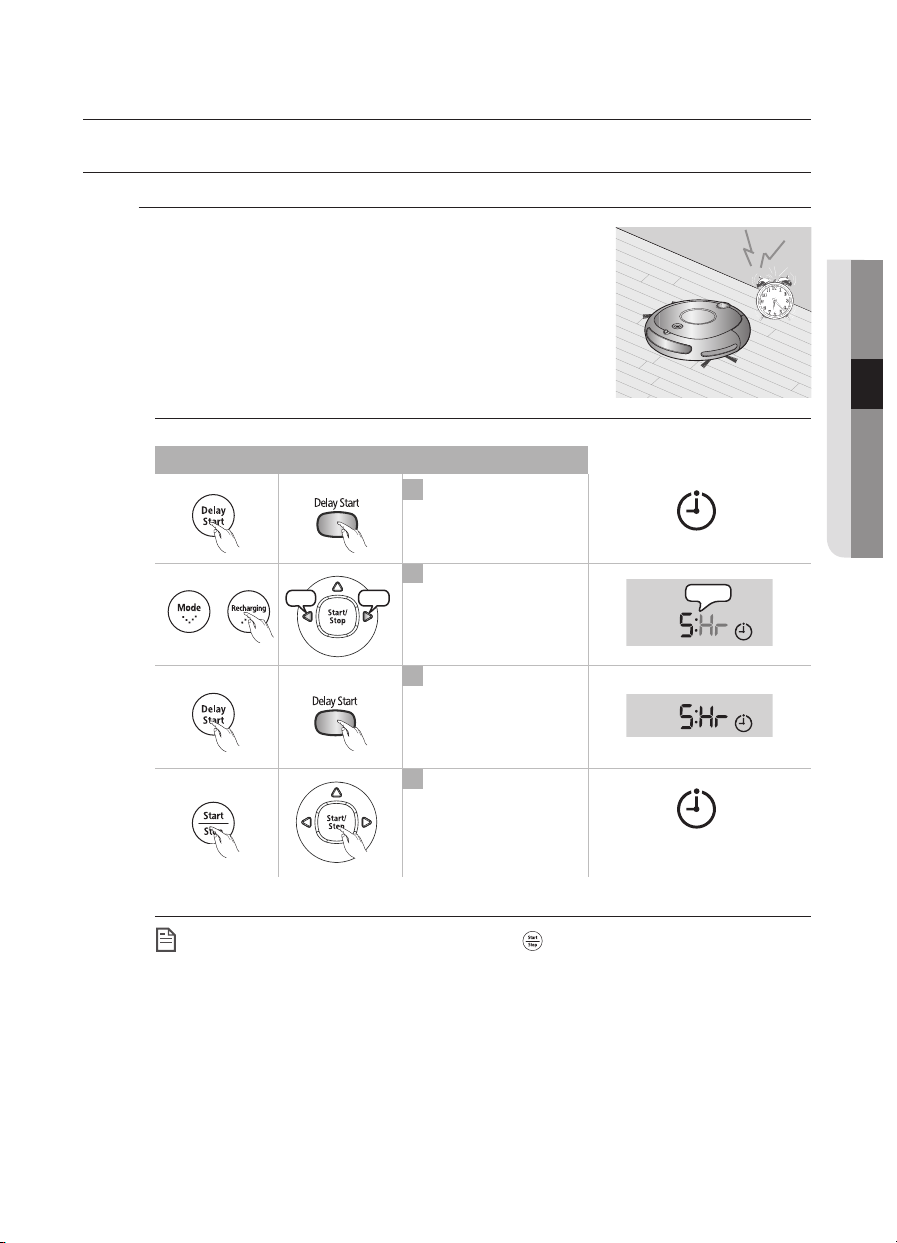
SCHEDULED CLEANING
You can schedule robotic vacuum cleaner to start
cleaning from a particular time. (Time delay: Up to
23 hours)
■
Scheduled cleaning is only performed when robotic
vacuum cleaner is docked with the charger station.
03 OPERATING THE CLEANER
Main unit button
▶
When setting is complete, and you press the ( ) button instead of the Delay Start
NOTE
button, the scheduled cleaning time is canceled.
After completing the setting, if you manually move the robotic vacuum cleaner from
the charger station, the scheduled cleaning time is cancelled.
Remote control button Configuration Sequence
Enter the Scheduled
1
Cleaning mode.
2
Whenever the button is
low up
pressed, the time is
increased or decreased.
3
Finish the setting.
4
Cancel the setting.
(Example) To clean 5 hours
Later from now
The icon is turned on.
Flash
The icon is turned off.
Operating the cleaner _33
Page 34
Maintain tools and fi lter
Camera
Display Panel
CLEANING THE ROBOTIC VACUUM CLEANER
PLEASE KEEP THE CLEANING AND MAINTENANCE METHODS IN MIND
■
When the Power Switch is damaged, please contact the
service agent so that it does not cause any accidents.
■
Do not use any means or mechanical devices not
installed by the manufacturer that could accelerate the
deformation of the robotic vacuum cleaner.
■
Always turn off the power switch at
the bottom of the main unit before
cleaning the robotic vacuum. The
robotic vacuum cleaner could operate
suddenly and cause an injury.
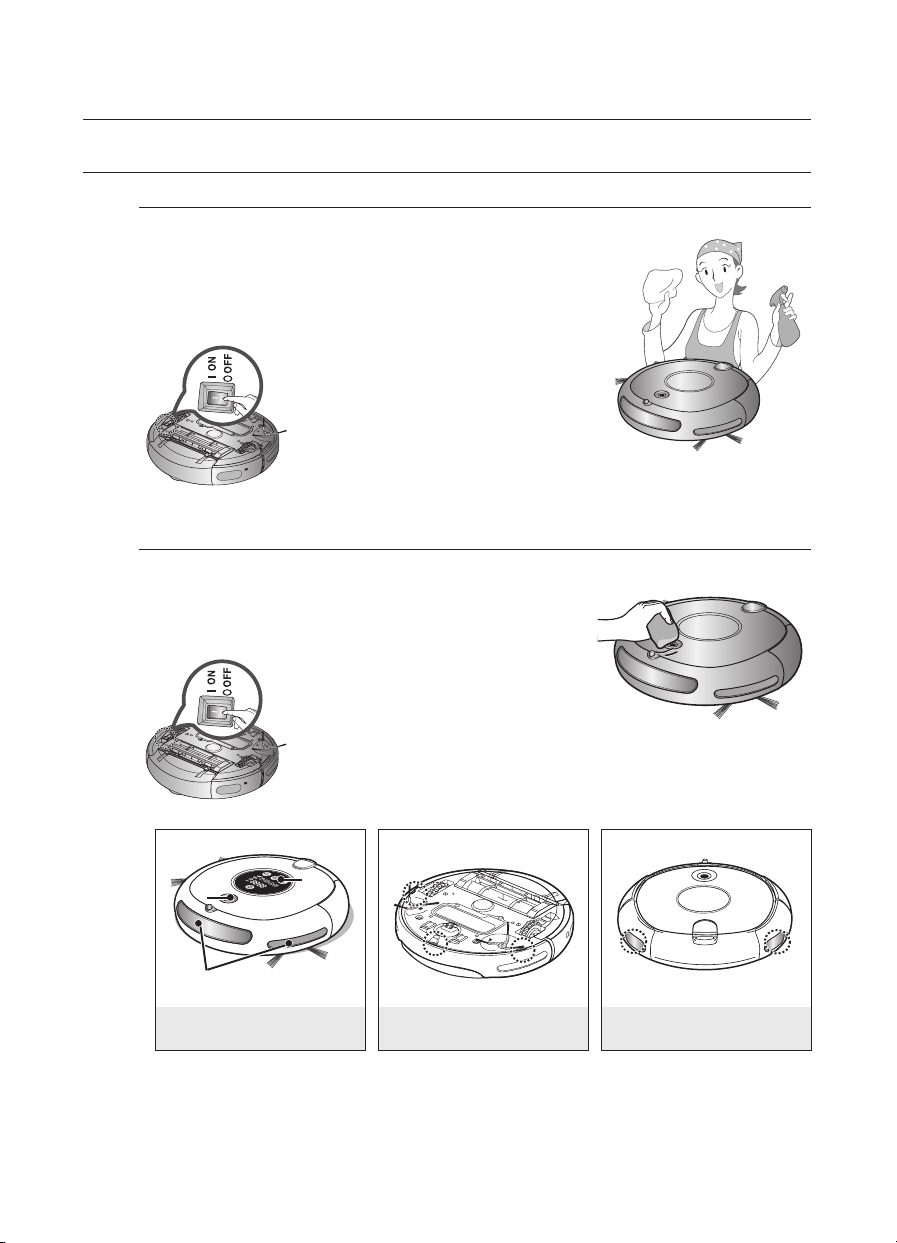
CLEANING THE SENSOR WINDOW AND THE CAMERA
You must turn off the Power Switch at the bottom of
the main unit before cleaning the robotic vacuum.
■
Never spray water, thinner, benzene etc. directly onto the
main unit of robotic vacuum cleaner.
Camera
Front Sensor window
Front Sensor Window and
Camera
34_ Maintain tools and fi lter
■
Lightly wipe the sensor window or
camera using a soft cloth.
Display Panel
Cliff Sensor Window
Rear Sensor Window
Page 35
Maintain tools and fi lter
CLEANING THE ROBOTIC VACUUM CLEANER
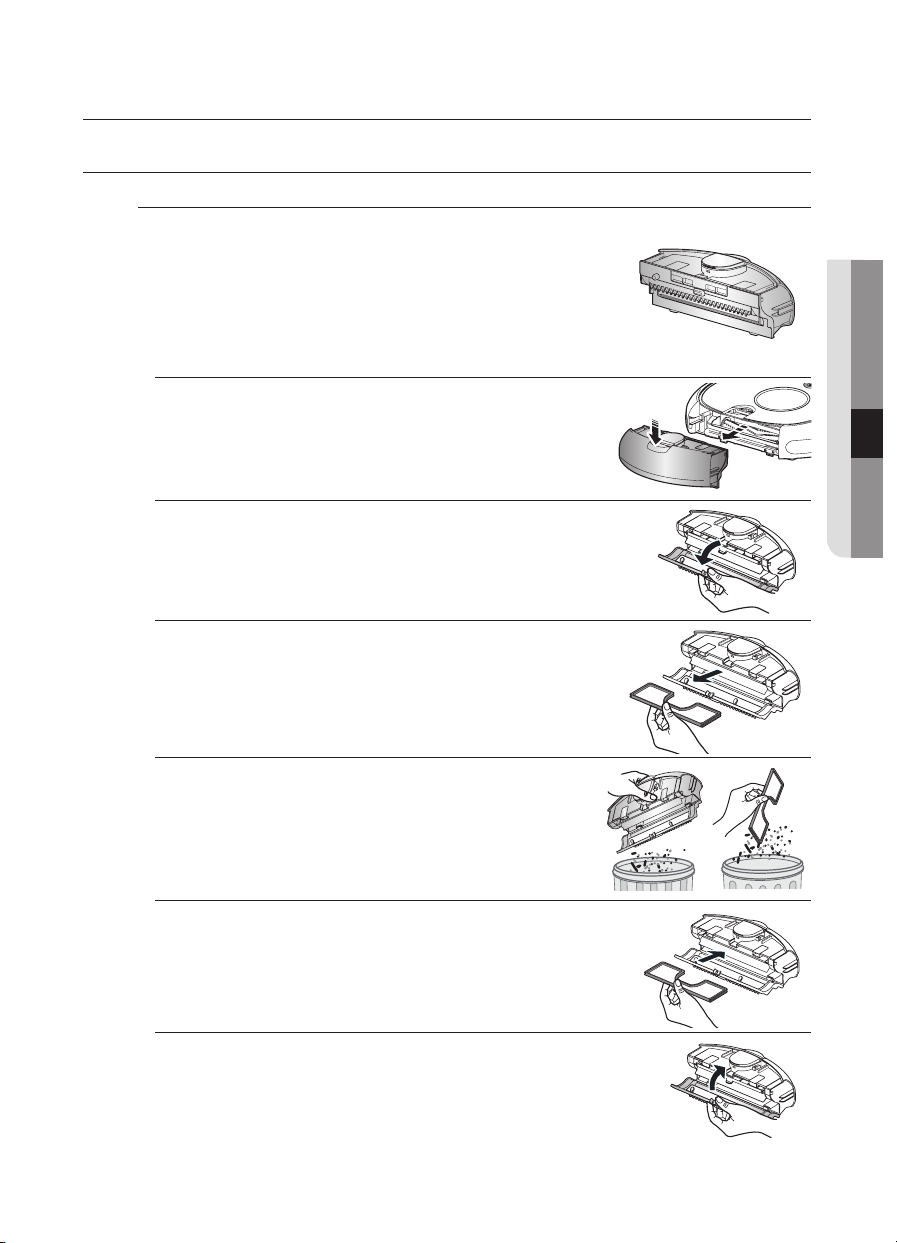
CLEANING THE DUST BIN AND THE FILTER
First, empty the Dust bin before cleaning it.
■
When separating the Dust bin, take care not to spill the
dust out of the Dust bin.
■
Empty the Dust bin in the following cases.
1. When dust has accumulated inside the Dust bin.
2. When the suction power suddenly becomes weak.
3. When the noise suddenly increases.
1. Press the Dust bin Eject (PUSH) button and pull the
Dust bin to separate the Dust bin.
2. Separate the Dust bin cover by pulling it in the direction
of the arrow in the fi gure.
3. Separate the Filter from the Dust bin by pulling it in the
direction of the arrow in the fi gure.
04 MAINTAIN TOOLS AND FILTER
4. Wipe the dust from the Filter and the Dust bin.
✽ You can wash them with water.
5. Install the Filter into the Dust bin.
- Make sure that the grid pattern of the Filter is facing
downwards. It cannot be installed in the wrong direction.
6. Close the Dust bin cover and install it into the main unit.
Maintain tools and fi lter _35
Page 36
Maintain tools and fi lter
CLEANING THE ROBOTIC VACUUM CLEANER
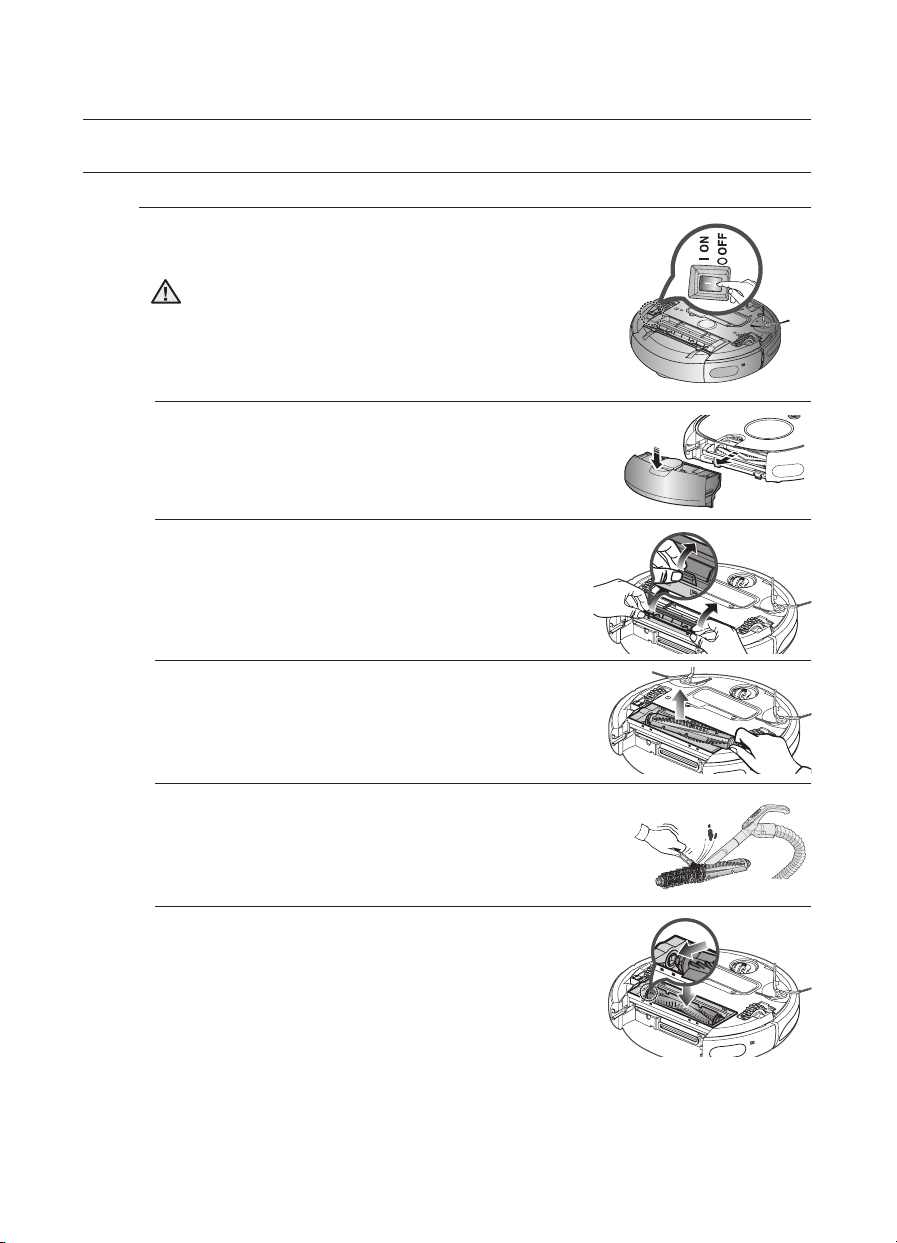
CLEANING THE POWER BRUSH
You must turn off the Power Switch at the bottom of the
main unit before cleaning the robotic vacuum.
• Because the dust in the Dust bin may come out,
CAUTION
1. Separate the Dust bin by pressing the Dust bin Eject
2. After checking whether there are any foreign
3. Lift the power brush up from the main unit.
separate the Dust bin fi rst before cleaning the power
brush.
(PUSH) button.
substances, press the hook that is fi xing the brush
cover to separate it.
4. Remove any foreign substances such as long hairs
or strings wrapped around the power brush using a
cleaning brush or a vacuum cleaner.
5. When cleaning is complete, fi x the Power Switch side
of the power brush fi rst and then fi x the other side of
the brush in the same way.
36_ Maintain tools and fi lter
Page 37
Maintain tools and fi lter
CLEANING THE ROBOTIC VACUUM CLEANER
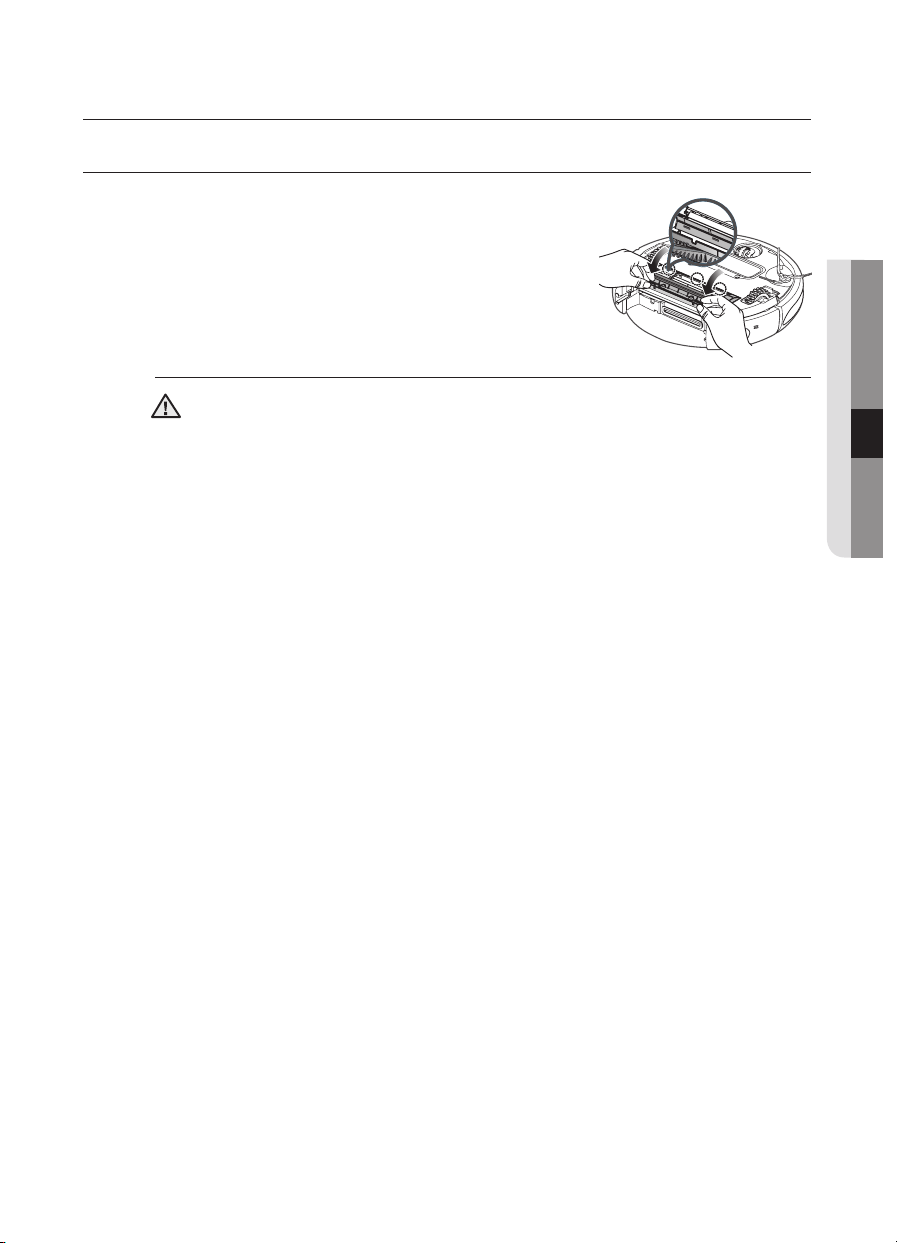
6. After inserting the 3 tips at the top of the cover,
push the other end in until it “clicks” into place.
• To prevent the robotic vacuum cleaner from becoming clogged, be careful not to
CAUTION
vacuum tooth picks or cotton swabs.
W
hen removing foreign substances becomes diffi cult, contact a customer care center.
•
• Because the power brush vacuums the dust on the fl oor, long strings or hair can
become wrapped around the brush. Check and clean the power brush regularly.
04 MAINTAIN TOOLS AND FILTER
Maintain tools and fi lter _37
Page 38
Maintain tools and fi lter
CLEANING THE ROBOTIC VACUUM CLEANER
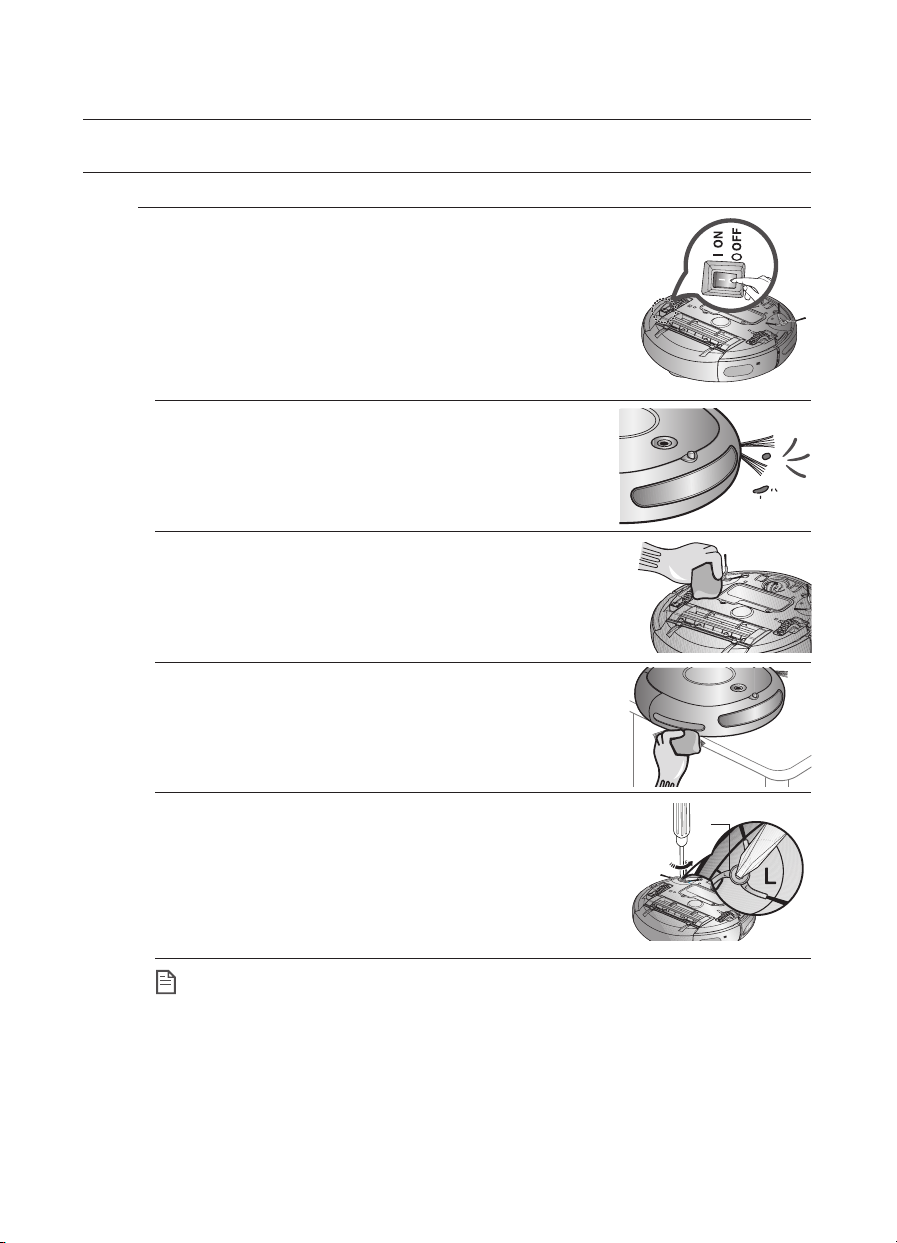
CLEANING THE EDGE-CLEANING SIDE ROTATING BRUSH
You must turn off the Power Switch at the bottom of the
main unit before cleaning the robotic vacuum.
1. Check whether the side rotating brush is bent or
whether there are any foreign substances stuck on the
brush.
2. Wearing rubber gloves, wrap the side rotating brush with
a cloth using hot water for about 10 seconds and wipe it
on the cloth.
3. Turning the side rotating brush, repeat the procedures
in Step 2.
4. If hair or string is wrapped between the main unit and
the side rotating brush, undo the screw of the side
rotating brush using a (+) driver to remove it.
When reassembling the brush, check the “L” mark
on the edge-cleaning side rotating brush and the “L”
mark on the main unit and then reassemble the side
rotating brush.
(Letter “R” is carved at the right side rotating brush.)
Because the side rotating brush easily attracts hair and other foreign substances,
make sure to clean it frequently.
NOTE
Excessive foreign substances on the side rotating brush can damage the brush.
38_ Maintain tools and fi lter
L
Page 39
Maintain tools and fi lter
CLEANING THE ROBOTIC VACUUM CLEANER
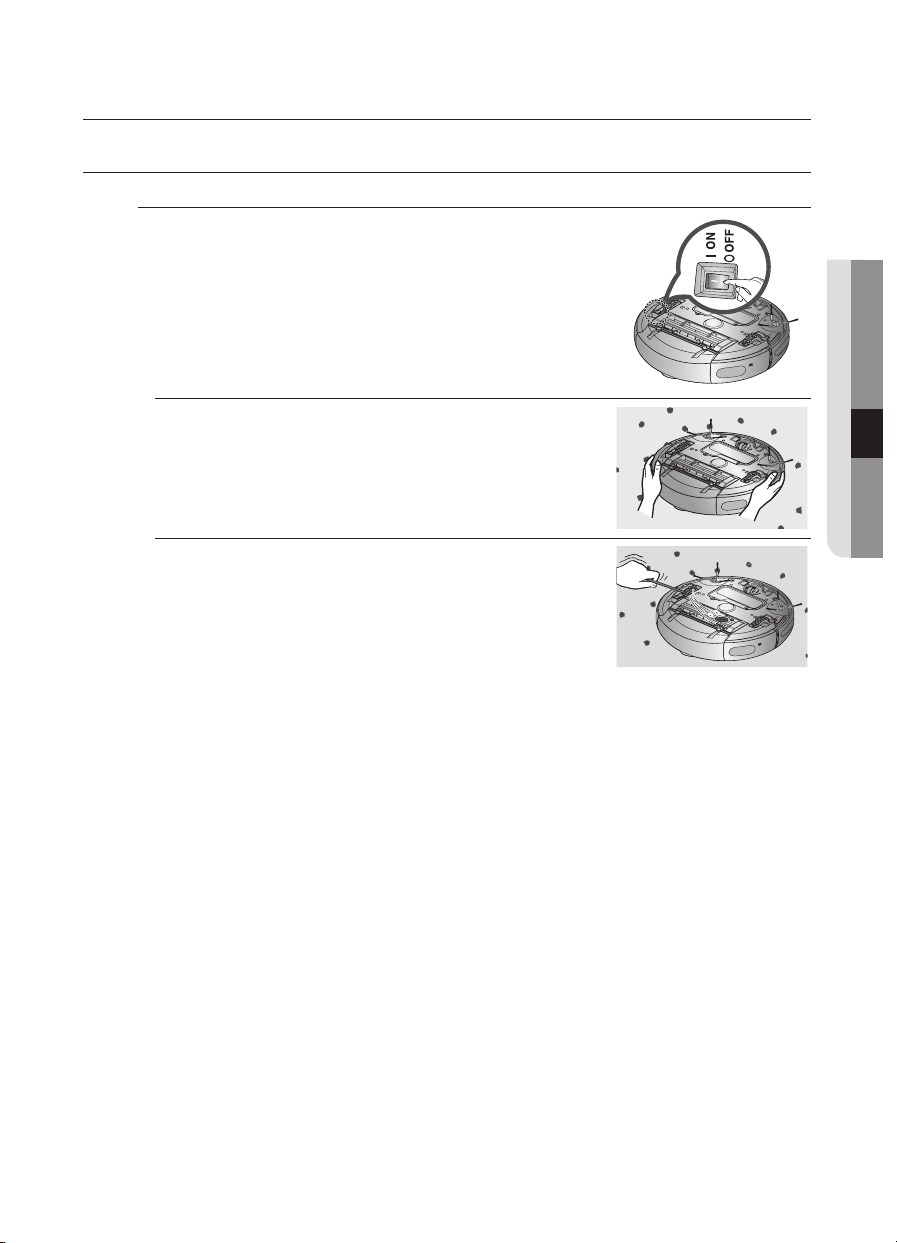
CLEANING THE DRIVING WHEEL
You must turn off the Power Switch at the bottom of the
main unit before cleaning the robotic.
■
If the robotic vacuum cleaner suddenly starts to zigzag, there
may be foreign substances stuck on the driving wheel.
1. When cleaning the driving wheel, place a soft cloth
on the fl oor and fl ip the main unit, placing it down
carefully.
2. Check for foreign substances and remove them
using a stick or a pair of blunt nippers if necessary.
04 MAINTAIN TOOLS AND FILTER
Maintain tools and fi lter _39
Page 40
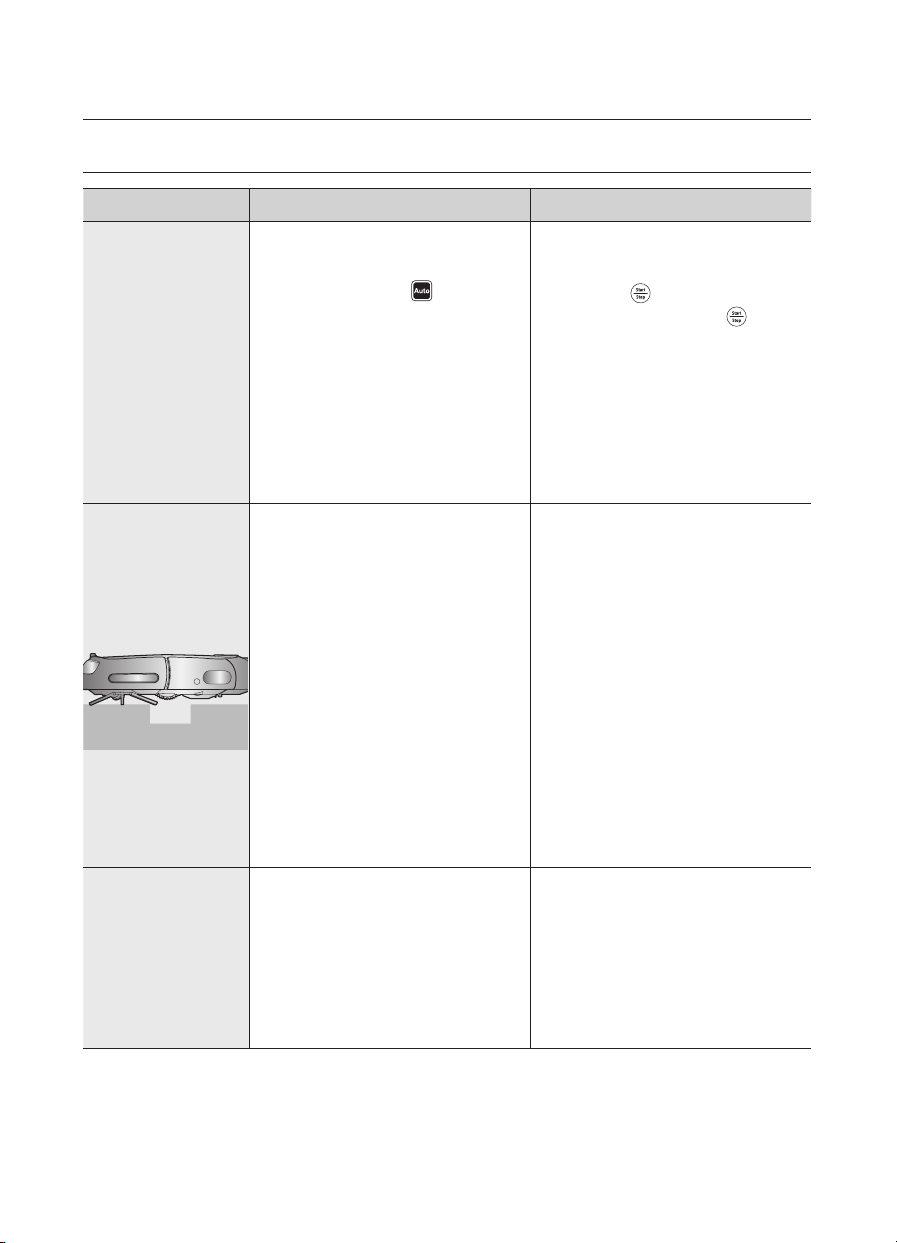
Troubleshooting
CHECKLIST BEFORE SVC CALLS
SYMPTOM CHECKLIST MEASURE TO TAKE
Robotic vacuum
cleaner does not
operate at all
before
cleaning.
Robotic vacuum
cleaner stopped
operating while
cleaning.
The suction
power is weak
while cleaning.
•
Is the Dust bin assembled?
•
Is the Power Switch turned on?
•
Is cleaning mode ( ) in the
display panel turned on?
•
Is the battery level fl ashing only
one level and is ‘LO’ displayed in
the display panel?
•
Robotic vacuum cleaner will not
operate when the battery in the
remote control is depleted.
•
Is the battery level fl ashing only
one level and is ‘LO’ displayed in
the display panel?
•
Has the robotic vacuum cleaner
become hooked on wires on the
fl oor?
•
Is the robotic vacuum cleaner
stuck to the fl oor where there is a
height difference?
- The driving wheel is lifted.
•
Is there a thin towel (cloth)
wrapped around the driving
wheel?
•
Is the robotic vacuum cleaner
stuck on the doorsill?
•
Check whether the Dust bin
is full of dust.
•
Check whether the suction
inlet is clogged by foreign
substances.
•
Install the Dust bin.
•
Turn on the Power Switch.
•
Press the ( ) button. (To turn it
off, press and hold the (
down for 3 seconds or longer.)
•
Lift up the robotic vacuum
cleaner, and manually dock the
robotic vacuum onto the charger
to charge it.
•
Replace the batteries in the
remote control. (AAA type)
•
Lift up the robotic vacuum
cleaner, manually dock the
robotic onto
the charger to charge it.
•
Turn off the Power Switch and
remove the wires.
•
Turn off the Power Switch and
move the cleaning robotic
vacuum to another place to
clean.
•
Turn off the Power Switch and
remove the thin towel.
•
Turn off the Power Switch and
move the robotic vacuum cleaner
to another place to clean.
•
Stop the robotic vacuum cleaner
and empty the Dust bin.
•
Turn off the Power Switch and
remove the foreign substances
on the suction inlet.
) button
40_ Troubleshooting
•
Check whether the Filter is
clogged.
•
Clean the Filter well.
Page 41

Troubleshooting
CHECKLIST BEFORE SVC CALLS
SYMPTOM CHECKLIST MEASURE TO TAKE
•
Robotic vacuum
cleaner cannot
fi nd the charger.
Robotic vacuum
cleaner passes
through the
VIRTUAL GUARD.
(OPTION)
Check whether the power
plug of the charger is plugged
correctly into the outlet.
•
If there are any obstacles within
a range of about 1m in front of
the charger and about 0.5m
range to the left and right of the
charger, you should remove the
obstacles.
•
If there are any foreign
substances on the change pin,
wipe them off with a dry towel.
•
Is the VIRTUAL GUARD installed
near the charger?
•
Are the batteries of the VIRTUAL
GUARD worn out?
•
Is the VIRTUAL GUARD set to
Guard (virtual door) mode?
•
Move the VIRTUAL GUARD to
another place so that the robotic
vacuum cleaner can charge
automatically.
•
Replace the batteries.
(2 type D (LR20) alkaline
batteries)
•
Set the VIRTUAL GUARD to
Fence (virtual wall) mode.
05 TROUBLESHOOTING
The battery
usage time of the
VIRTUAL GUARD
is too short.
(OPTION)
•
Is the Mode lamp turned off?
•
Are you using manganese drycell
batteries?
•
Check if the VIRTUAL GUARD
is turned off and then set the
VIRTUAL GUARD to a desired
mode.
•
Replace the batteries with new
alkaline batteries.
(2 type D (LR20) alkaline
batteries)
Troubleshooting _41
Page 42
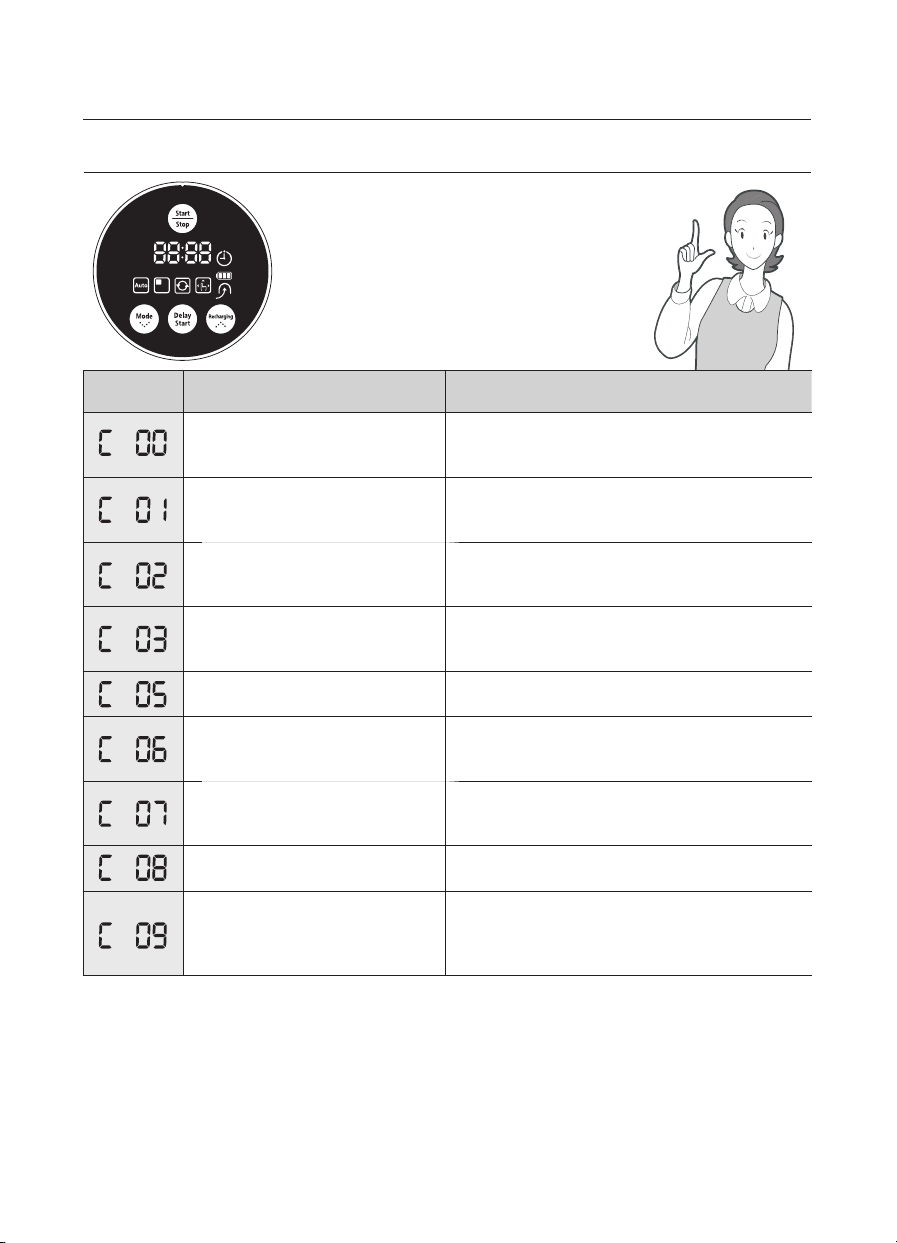
Troubleshooting
TROUBLESHOOTING FOR ERROR CODES
ERROR
CODE
CAUSE SOLUTION
•
Robotic vacuum cleaner is
caught, stuck or trapped while
navigating.
•
A foreign substance (string,
paper, toy etc.) is caught in the
power brush.
•
A foreign substance (string,
paper, toy etc.) is caught in the
left driving wheel.
•
A foreign substance (string,
paper, toy etc.) is caught in the
right driving wheel.
•
Check bumper sensor.
•
A foreign substance (dust,
stain etc.) is on the Obstacle
sensor window.
•
A foreign substance (Dust,
stain etc.) is on the Cliff sensor
window.
•
Dust bin not inserted.
•
A foreign substance (String,
cloth etc.) is caught on the
edge-cleaning side rotating
brush.
•
Turn off the Power Switch at the bottom
and move the robotic vacuum cleaner to a
different location.
•
Turn off the Power Switch at the bottom
and remove the foreign substance from the
power brush.
•
Turn off the Power Switch at the bottom and
remove the foreign substance from the left
driving wheel.
•
Turn off the Power Switch at the
bottom and remove the foreign substance
from the right driving wheel.
•
Slightly pull the stuck bumper outward.
•
Turn off the Power Switch at the bottom and
wipe the foreign substance from the front
and rear sensor windows using a soft cloth.
•
Turn off the Power Switch at the bottom
and wipe the foreign substance on the cilff
sensor window with a soft cloth.
•
Insert the Dust bin until you hear a “Click”
sound.
•
Turn off the Power Switch at the bottom and
wipe the foreign substance from the edgecleaning side rotating brush.
✽ If you press the Start/Stop button or turn off the Power Switch, the error code is cleared.
42_ Troubleshooting
Page 43
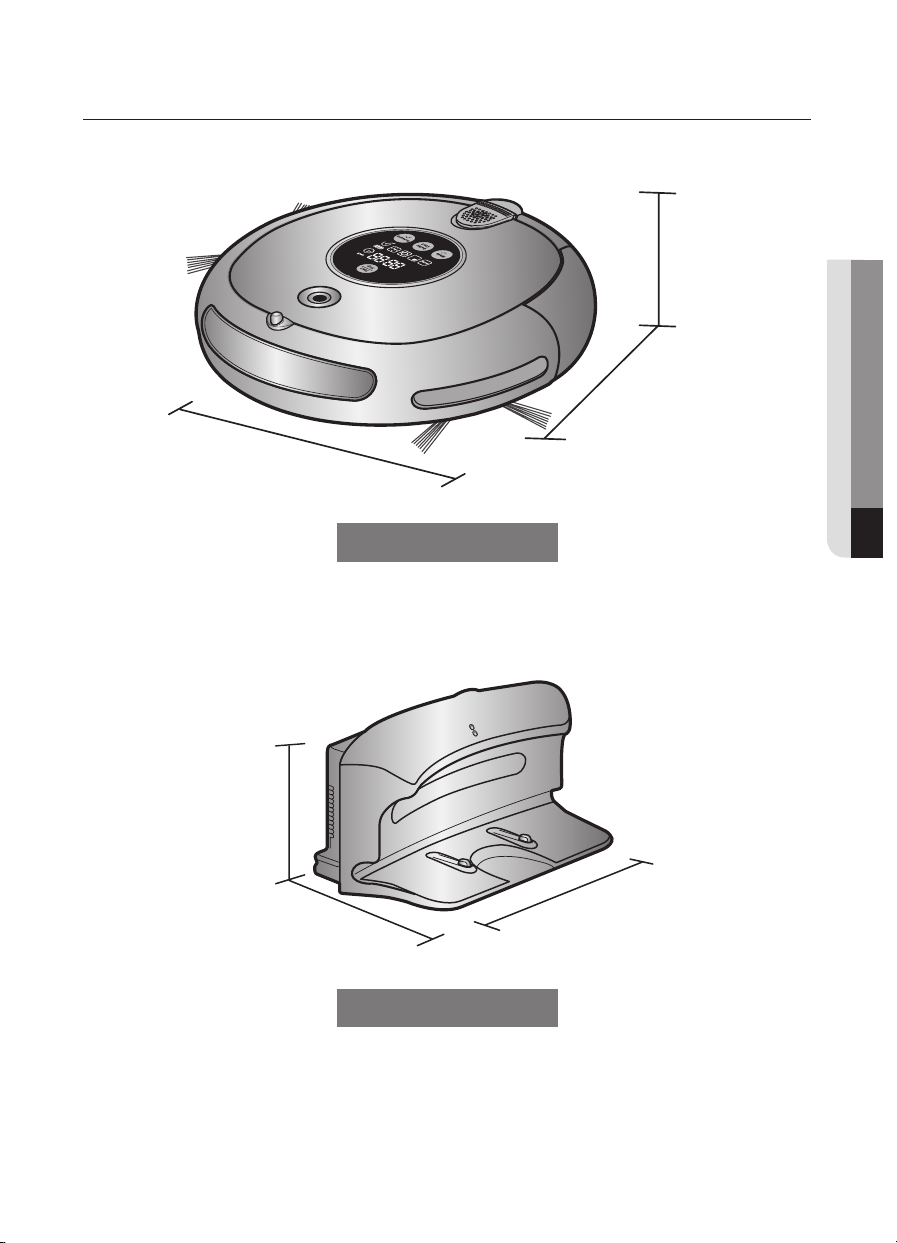
Product specifi cation
355 mm (Width)
122 mm (Height)
Main Body
93 mm (Height)
355 mm (Length)
06 PRODUCT SPECIFICATION
161 mm (Length)
275 mm (Width)
Charger
Product specifi cation _43
Page 44
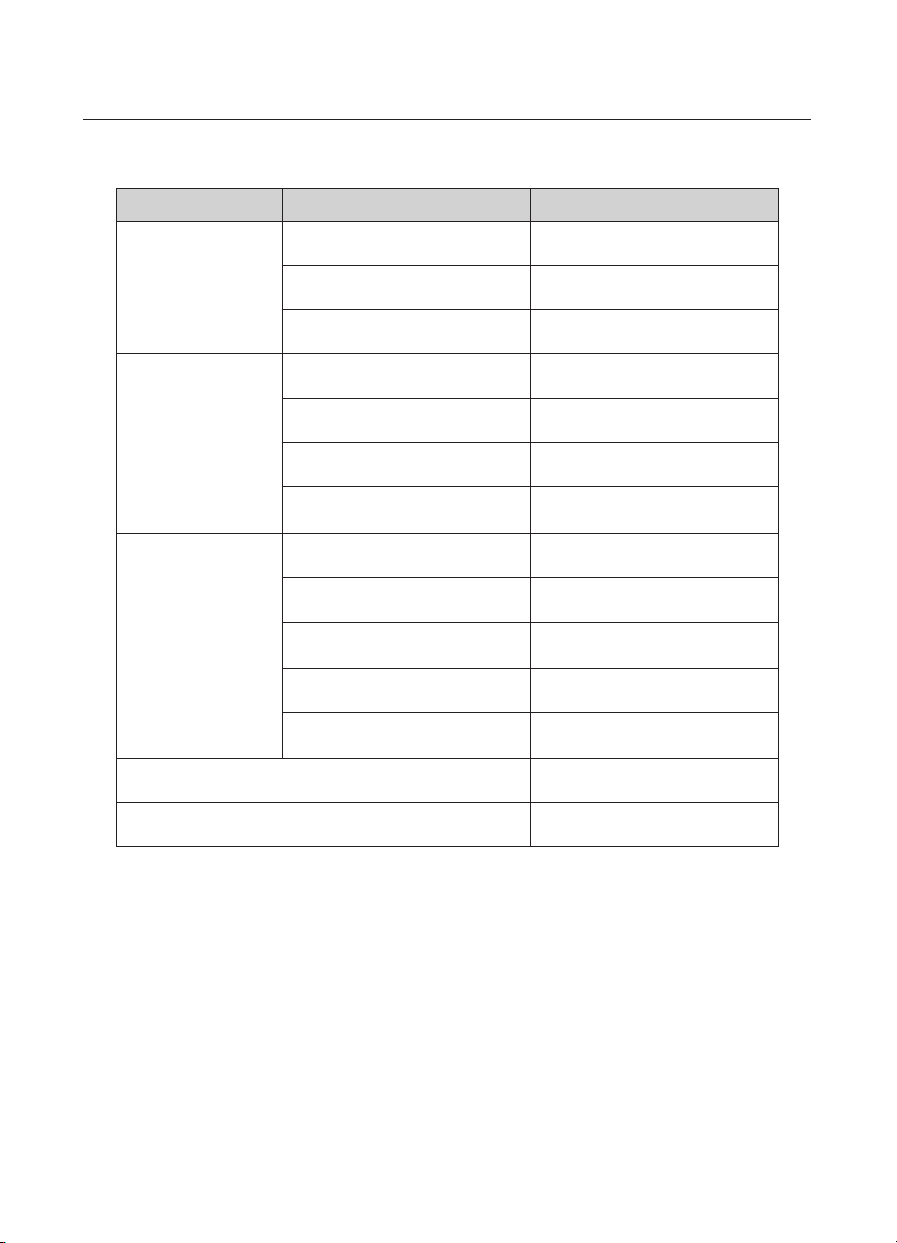
Product specifi cation
CLASSIFICATION ITEM DETAIL
Diameter 355 mm
Mechanical
Specifi cations
Electrical
Specifi cations
Cleaning
Specifi cations
Main unit button type Button type
Height 93 mm
Weight 3.5 kg
Power voltage AC 220-240 V~, 50-60 Hz
Charge power consumption 50 W
Main unit power consumption 40 W
Battery specifi cations 14.4 V / 2,000 mA
Dust bin capacity About 0.6 ℓ
Charging type
Cleaning mode
Charging time About 120 minutes
Cleaning time
(on the basis of hard fl oor)
Cleaning method Ceiling shape recognition
Auto Charging/Manual
Charging
Auto, Spot, Max, Manual,
Edge, Scheduled Cleaning
About 90 minutes
This Vacuum cleaner is approved the following.
Electromagnetic Compatibility Directive : 2004/108/EEC
Low Voltage Directive : 2006/95/EC
44_ Product specifi cation
Page 45

Open Source Announcement
The software included in this product contains copyrighted software that is licensed under the GPL/LGPL.
You may obtain the complete Corresponding Source code from us for a period of three years after our last shipment of this product by
sending email to: [email protected]
If you want to obtain the complete Corresponding Source code in the physical medium such as CD-ROM, the cost of physically
performing source distribution may be charged.
This offer is valid to anyone in receipt of this information.
GPL Software :
Linux kernel, BusyBox
LGPL Software :
uClibc
- GNU GENERAL PUBLIC LICENSE
Version 2, June 1991
Copyright (C) 1989, 1991 Free Software Foundation, Inc.
51 Franklin Street, Fifth Floor, Boston, MA 02110-1301, USA
Everyone is permitted to copy and distribute verbatim copies of this license document, but changing it is not allowed
Preamble
The licenses for most software are designed to take away your freedom to share and change it. By contrast, the GNU General Public
License is intended to guarantee your freedom to share and change free software--to make sure the software is free for all its users.
This General Public License applies to most of the Free Software Foundation’s software and to any other program whose authors
commit to using it. (Some other Free Software Foundation software is covered by the GNU Lesser General Public License instead.)
You can apply it to your programs, too.
When we speak of free software, we are referring to freedom, not price. Our General Public Licenses are designed to make sure that
you have the freedom to distribute copies of free software (and charge for this service if you wish), that you receive source code or can
get it if you want it, that you can change the software or use pieces of it in new free programs; and that you know you can do these
things.
To protect your rights, we need to make restrictions that forbid anyone to deny you these rights or to ask you to surrender the rights.
These restrictions translate to certain responsibilities for you if you distribute copies of the software, or if you modify it.
For example, if you distribute copies of such a program, whether gratis or for a fee, you must give the recipients all the rights that you
have. You must make sure that they, too, receive or can get the source code. And you must show them these terms so they know
their rights.
We protect your rights with two steps: (1) copyright the software, and (2) offer you this license which gives you legal permission to
copy, distribute and/or modify the software.
Also, for each author’s protection and ours, we want to make certain that everyone understands that there is no warranty for this free
software. If the software is modifi ed by someone else and passed on, we want its recipients to know that what they have is not the
original, so that any problems introduced by others will not refl ect on the original authors’ reputations.
Finally, any free program is threatened constantly by software patents. We wish to avoid the danger that redistributors of a free
program will individually obtain patent licenses, in effect making the program proprietary. To prevent this, we have made it clear that
any patent must be licensed for everyone’s free use or not licensed at all.
The precise terms and conditions for copying, distribution and modifi cation follow.
TERMS AND CONDITIONS FOR COPYING, DISTRIBUTION AND MODIFICATION
0. This License applies to any program or other work which contains a notice placed by the copyright holder saying it may be
distributed under the terms of this General Public License. The “Program”, below, refers to any such program or work, and a “work
based on the Program” means either the Program or any derivative work under copyright law: that is to say, a work containing the
Program or a portion of it, either verbatim or with modifi cations and/or translated into another language. (Hereinafter, translation is
included without limitation in the term “modifi cation”.) Each licensee is addressed as “you”.
Activities other than copying, distribution and modifi cation are not covered by this License; they are outside its scope. The act of
running the Program is not restricted, and the output from the Program is covered only if its contents constitute a work based on the
Program (independent of having been made by running the Program). Whether that is true depends on what the Program does.
1. You may copy and distribute verbatim copies of the Program’s source code as you receive it, in any medium, provided that you
conspicuously and appropriately publish on each copy an appropriate copyright notice and disclaimer of warranty; keep intact all
the notices that refer to this License and to the absence of any warranty; and give any other recipients of the Program a copy of this
License along with the Program.
You may charge a fee for the physical act of transferring a copy, and you may at your option offer warranty protection in exchange for
a fee.
2. You may modify your copy or copies of the Program or any portion of it, thus forming a work based on the Program, and copy and
Page 46

distribute such modifi cations or work under the terms of Section 1 above, provided that you also meet all of these conditions:
a) You must cause the modifi ed fi les to carry prominent notices stating that you changed the fi les and the date of any change.
b) You must cause any work that you distribute or publish, that in whole or in part contains or is derived from the Program or
any part thereof, to be licensed as a whole at no charge to all third parties under the terms of this License.
c) If the modifi ed program normally reads commands interactively when run, you must cause it, when started running for such
interactive use in the most ordinary way, to print or display an announcement including an appropriate copyright notice and a
notice that there is no warranty (or else, saying that you provide a warranty) and that users may redistribute the program under
these conditions, and telling the user how to view a copy of this License. (Exception: if the Program itself is interactive but does
not normally print such an announcement, your work based on the Program is not required to print an announcement.)
These requirements apply to the modifi ed work as a whole. If identifi able sections of that work are not derived from the Program, and
can be reasonably considered independent and separate works in themselves, then this License, and its terms, do not apply to those
sections when you distribute them as separate works. But when you distribute the same sections as part of a whole which is a work
based on the Program, the distribution of the whole must be on the terms of this License, whose permissions for other licensees
extend to the entire whole, and thus to each and every part regardless of who wrote it.
Thus, it is not the intent of this section to claim rights or contest your rights to work written entirely by you; rather, the intent is to
exercise the right to control the distribution of derivative or collective works based on the Program.
In addition, mere aggregation of another work not based on the Program with the Program (or with a work based on the Program) on
a volume of a storage or distribution medium does not bring the other work under the scope of this License.
3. You may copy and distribute the Program (or a work based on it, under Section 2) in object code or executable form under the
terms of Sections 1 and 2 above provided that you also do one of the following:
a) Accompany it with the complete corresponding machine-readable source code, which must be distributed under the terms
of Sections 1 and 2 above on a medium customarily used for software interchange; or,
b) Accompany it with a written offer, valid for at least three years, to give any third party, for a charge no more than your cost
of physically performing source distribution, a complete machine-readable copy of the corresponding source code, to be
distributed under the terms of Sections 1 and 2 above on a medium customarily used for software interchange; or,
c) Accompany it with the information you received as to the offer to distribute corresponding source code. (This alternative is
allowed only for noncommercial distribution and only if you received the program in object code or executable form with such
an offer, in accord with Subsection b above.)
The source code for a work means the preferred form of the work for making modifi cations to it. For an executable work, complete
source code means all the source code for all modules it contains, plus any associated interface defi nition fi les, plus the scripts used
to control compilation and installation of the executable. However, as a special exception, the source code distributed need not
include anything that is normally distributed (in either source or binary form) with the major components (compiler, kernel, and so on) of
the operating system on which the executable runs, unless that component itself accompanies the executable.
If distribution of executable or object code is made by offering access to copy from a designated place, then offering equivalent
access to copy the source code from the same place counts as distribution of the source code, even though third parties are not
compelled to copy the source along with the object code.
4. You may not copy, modify, sublicense, or distribute the Program except as expressly provided under this License. Any attempt
otherwise to copy, modify, sublicense or distribute the Program is void, and will automatically terminate your rights under this License.
However, parties who have received copies, or rights, from you under this License will not have their licenses terminated so long as
such parties remain in full compliance.
5. You are not required to accept this License, since you have not signed it. However, nothing else grants you permission to modify
or distribute the Program or its derivative works. These actions are prohibited by law if you do not accept this License. Therefore, by
modifying or distributing the Program (or any work based on the Program), you indicate your acceptance of this License to do so, and
all its terms and conditions for copying, distributing or modifying the Program or works based on it.
6. Each time you redistribute the Program (or any work based on the Program), the recipient automatically receives a license from
the original licensor to copy, distribute or modify the Program subject to these terms and conditions. You may not impose any further
restrictions on the recipients’ exercise of the rights granted herein. You are not responsible for enforcing compliance by third parties to
this License.
7. If, as a consequence of a court judgment or allegation of patent infringement or for any other reason (not limited to patent issues),
conditions are imposed on you (whether by court order, agreement or otherwise) that contradict the conditions of this License, they do
not excuse you from the conditions of this License. If you cannot distribute so as to satisfy simultaneously your obligations under this
License and any other pertinent obligations, then as a consequence you may not distribute the Program at all. For example, if a patent
license would not permit royalty-free redistribution of the Program by all those who receive copies directly or indirectly through you,
then the only way you could satisfy both it and this License would be to refrain entirely from distribution of the Program.
If any portion of this section is held invalid or unenforceable under any particular circumstance, the balance of the section is intended
to apply and the section as a whole is intended to apply in other circumstances.
It is not the purpose of this section to induce you to infringe any patents or other property right claims or to contest validity of any
such claims; this section has the sole purpose of protecting the integrity of the free software distribution system, which is implemented
by public license practices. Many people have made generous contributions to the wide range of software distributed through that
system in reliance on consistent application of that system; it is up to the author/donor to decide if he or she is willing to distribute
software through any other system and a licensee cannot impose that choice.
This section is intended to make thoroughly clear what is believed to be a consequence of the rest of this License.
8. If the distribution and/or use of the Program is restricted in certain countries either by patents or by copyrighted interfaces, the
Page 47

original copyright holder who places the Program under this License may add an explicit geographical distribution limitation excluding
those countries, so that distribution is permitted only in or among countries not thus excluded. In such case, this License incorporates
the limitation as if written in the body of this License.
9. The Free Software Foundation may publish revised and/or new versions of the General Public License from time to time. Such new
versions will be similar in spirit to the present version, but may differ in detail to address new problems or concerns.
Each version is given a distinguishing version number. If the Program specifi es a version number of this License which applies to it and
“any later version”, you have the option of following the terms and conditions either of that version or of any later version published
by the Free Software Foundation. If the Program does not specify a version number of this License, you may choose any version ever
published by the Free Software Foundation.
10. If you wish to incorporate parts of the Program into other free programs whose distribution conditions are different, write to
the author to ask for permission. For software which is copyrighted by the Free Software Foundation, write to the Free Software
Foundation; we sometimes make exceptions for this. Our decision will be guided by the two goals of preserving the free status of all
derivatives of our free software and of promoting the sharing and reuse of software generally.
NO WARRANTY
11. BECAUSE THE PROGRAM IS LICENSED FREE OF CHARGE, THERE IS NO WARRANTY FOR THE PROGRAM, TO THE
EXTENT PERMITTED BY APPLICABLE LAW. EXCEPT WHEN OTHERWISE STATED IN WRITING THE COPYRIGHT HOLDERS AND/
OR OTHER PARTIES PROVIDE THE PROGRAM “AS IS” WITHOUT WARRANTY OF ANY KIND, EITHER EXPRESSED OR IMPLIED,
INCLUDING, BUT NOT LIMITED TO, THE IMPLIED WARRANTIES OF MERCHANTABILITY AND FITNESS FOR A PARTICULAR
PURPOSE. THE ENTIRE RISK AS TO THE QUALITY AND PERFORMANCE OF THE PROGRAM IS WITH YOU. SHOULD THE
PROGRAM PROVE DEFECTIVE, YOU ASSUME THE COST OF ALL NECESSARY SERVICING, REPAIR OR CORRECTION.
12. IN NO EVENT UNLESS REQUIRED BY APPLICABLE LAW OR AGREED TO IN WRITING WILL ANY COPYRIGHT HOLDER, OR
ANY OTHER PARTY WHO MAY MODIFY AND/OR REDISTRIBUTE THE PROGRAM AS PERMITTED ABOVE, BE LIABLE TO YOU
FOR DAMAGES, INCLUDING ANY GENERAL, SPECIAL, INCIDENTAL OR CONSEQUENTIAL DAMAGES ARISING OUT OF THE
USE OR INABILITY TO USE THE PROGRAM (INCLUDING BUT NOT LIMITED TO LOSS OF DATA OR DATA BEING RENDERED
INACCURATE OR LOSSES SUSTAINED BY YOU OR THIRD PARTIES OR A FAILURE OF THE PROGRAM TO OPERATE WITH
ANY OTHER PROGRAMS), EVEN IF SUCH HOLDER OR OTHER PARTY HAS BEEN ADVISED OF THE POSSIBILITY OF SUCH
DAMAGES.
END OF TERMS AND CONDITIONS
How to Apply These Terms to Your New Programs
If you develop a new program, and you want it to be of the greatest possible use to the public, the best way to achieve this is to make
it free software which everyone can redistribute and change under these terms.
To do so, attach the following notices to the program. It is safest to attach them to the start of each source fi le to most effectively
convey the exclusion of warranty; and each fi le should have at least the “copyright” line and a pointer to where the full notice is found.
one line to give the program’s name and an idea of what it does.
Copyright (C) yyyy name of author
This program is free software; you can redistribute it and/or modify it under the terms of the GNU General Public License as published
by the Free Software Foundation; either version 2 of the License, or (at your option) any later version.
This program is distributed in the hope that it will be useful, but WITHOUT ANY WARRANTY; without even the implied warranty of
MERCHANTABILITY or FITNESS FOR A PARTICULAR PURPOSE. See the GNU General Public License for more details.
You should have received a copy of the GNU General Public License along with this program; if not, write to the Free Software
Foundation, Inc., 51 Franklin Street, Fifth Floor, Boston, MA 02110-1301, USA.
Also add information on how to contact you by electronic and paper mail.
If the program is interactive, make it output a short notice like this when it starts in an interactive mode:
Gnomovision version 69, Copyright (C) year name of author
Gnomovision comes with ABSOLUTELY NO WARRANTY; for details
type `show w’. This is free software, and you are welcome
to redistribute it under certain conditions; type `show c’ for details.
The hypothetical commands `show w’ and `show c’ should show the appropriate parts of the General Public License. Of course, the
commands you use may be called something other than `show w’ and `show c’; they could even be mouse-clicks or menu items-whatever suits your program.
You should also get your employer (if you work as a programmer) or your school, if any, to sign a “copyright disclaimer” for the
program, if necessary. Here is a sample; alter the names:
Yoyodyne, Inc., hereby disclaims all copyright
interest in the program `Gnomovision’
Page 48

(which makes passes at compilers) written
by James Hacker.
signature of Ty Coon, 1 April 1989
Ty Coon, President of Vice
This General Public License does not permit incorporating your program into proprietary programs. If your program is a subroutine
library, you may consider it more useful to permit linking proprietary applications with the library. If this is what you want to do, use the
GNU Lesser General Public License instead of this License.
- GNU LESSER GENERAL PUBLIC LICENSE
Version 2.1, February 1999
Copyright (C) 1991, 1999 Free Software Foundation, Inc.
51 Franklin Street, Fifth Floor, Boston, MA 02110-1301 USA
Everyone is permitted to copy and distribute verbatim copies
of this license document, but changing it is not allowed.
[This is the fi rst released version of the Lesser GPL. It also counts as the successor of the GNU Library Public License, version 2,
hence the version number 2.1.]
Preamble
The licenses for most software are designed to take away your freedom to share and change it. By contrast, the GNU General Public
Licenses are intended to guarantee your freedom to share and change free software--to make sure the software is free for all its users.
This license, the Lesser General Public License, applies to some specially designated software packages--typically libraries--of
the Free Software Foundation and other authors who decide to use it. You can use it too, but we suggest you fi rst think carefully
about whether this license or the ordinary General Public License is the better strategy to use in any particular case, based on the
explanations below.
When we speak of free software, we are referring to freedom of use, not price. Our General Public Licenses are designed to make sure
that you have the freedom to distribute copies of free software (and charge for this service if you wish); that you receive source code
or can get it if you want it; that you can change the software and use pieces of it in new free programs; and that you are informed that
you can do these things.
To protect your rights, we need to make restrictions that forbid distributors to deny you these rights or to ask you to surrender these
rights. These restrictions translate to certain responsibilities for you if you distribute copies of the library or if you modify it.
For example, if you distribute copies of the library, whether gratis or for a fee, you must give the recipients all the rights that we gave
you. You must make sure that they, too, receive or can get the source code. If you link other code with the library, you must provide
complete object fi les to the recipients, so that they can relink them with the library after making changes to the library and recompiling
it. And you must show them these terms so they know their rights.
We protect your rights with a two-step method: (1) we copyright the library, and (2) we offer you this license, which gives you legal
permission to copy, distribute and/or modify the library.
To protect each distributor, we want to make it very clear that there is no warranty for the free library. Also, if the library is modifi ed by
someone else and passed on, the recipients should know that what they have is not the original version, so that the original author’s
reputation will not be affected by problems that might be introduced by others.
Finally, software patents pose a constant threat to the existence of any free program. We wish to make sure that a company cannot
effectively restrict the users of a free program by obtaining a restrictive license from a patent holder. Therefore, we insist that any
patent license obtained for a version of the library must be consistent with the full freedom of use specifi ed in this license.
Most GNU software, including some libraries, is covered by the ordinary GNU General Public License. This license, the GNU Lesser
General Public License, applies to certain designated libraries, and is quite different from the ordinary General Public License. We use
this license for certain libraries in order to permit linking those libraries into non-free programs.
When a program is linked with a library, whether statically or using a shared library, the combination of the two is legally speaking a
combined work, a derivative of the original library. The ordinary General Public License therefore permits such linking only if the entire
combination fi ts its criteria of freedom. The Lesser General Public License permits more lax criteria for linking other code with the
library.
We call this license the “Lesser” General Public License because it does Less to protect the user’s freedom than the ordinary General
Public License. It also provides other free software developers Less of an advantage over competing non-free programs. These
disadvantages are the reason we use the ordinary General Public License for many libraries. However, the Lesser license provides
advantages in certain special circumstances.
For example, on rare occasions, there may be a special need to encourage the widest possible use of a certain library, so that it
becomes a de-facto standard. To achieve this, non-free programs must be allowed to use the library. A more frequent case is that
a free library does the same job as widely used non-free libraries. In this case, there is little to gain by limiting the free library to free
software only, so we use the Lesser General Public License.
In other cases, permission to use a particular library in non-free programs enables a greater number of people to use a large body of
free software. For example, permission to use the GNU C Library in non-free programs enables many more people to use the whole
Page 49

GNU operating system, as well as its variant, the GNU/Linux operating system.
Although the Lesser General Public License is Less protective of the users’ freedom, it does ensure that the user of a program that is
linked with the Library has the freedom and the wherewithal to run that program using a modifi ed version of the Library.
The precise terms and conditions for copying, distribution and modifi cation follow. Pay close attention to the difference between a “work
based on the library” and a “work that uses the library”. The former contains code derived from the library, whereas the latter must be
combined with the library in order to run.
TERMS AND CONDITIONS FOR COPYING, DISTRIBUTION AND MODIFICATION
0. This License Agreement applies to any software library or other program which contains a notice placed by the copyright holder or
other authorized party saying it may be distributed under the terms of this Lesser General Public License (also called “this License”).
Each licensee is addressed as “you”.
A “library” means a collection of software functions and/or data prepared so as to be conveniently linked with application programs
(which use some of those functions and data) to form executables.
The “Library”, below, refers to any such software library or work which has been distributed under these terms. A “work based on the
Library” means either the Library or any derivative work under copyright law: that is to say, a work containing the Library or a portion
of it, either verbatim or with modifi cations and/or translated straightforwardly into another language. (Hereinafter, translation is included
without limitation in the term “modifi cation”.)
“Source code” for a work means the preferred form of the work for making modifi cations to it. For a library, complete source code
means all the source code for all modules it contains, plus any associated interface defi nition fi les, plus the scripts used to control
compilation and installation of the library.
Activities other than copying, distribution and modifi cation are not covered by this License; they are outside its scope. The act of
running a program using the Library is not restricted, and output from such a program is covered only if its contents constitute a work
based on the Library (independent of the use of the Library in a tool for writing it). Whether that is true depends on what the Library
does and what the program that uses the Library does.
1. You may copy and distribute verbatim copies of the Library’s complete source code as you receive it, in any medium, provided that
you conspicuously and appropriately publish on each copy an appropriate copyright notice and disclaimer of warranty; keep intact all
the notices that refer to this License and to the absence of any warranty; and distribute a copy of this License along with the Library.
You may charge a fee for the physical act of transferring a copy, and you may at your option offer warranty protection in exchange for
a fee.
2. You may modify your copy or copies of the Library or any portion of it, thus forming a work based on the Library, and copy and
distribute such modifi cations or work under the terms of Section 1 above, provided that you also meet all of these conditions:
• a) The modifi ed work must itself be a software library.
• b) You must cause the fi les modifi ed to carry prominent notices stating that you changed the fi les and the date of any
change.
• c) You must cause the whole of the work to be licensed at no charge to all third parties under the terms of this License.
• d) If a facility in the modifi ed Library refers to a function or a table of data to be supplied by an application program that
uses the facility, other than as an argument passed when the facility is invoked, then you must make a good faith effort
to ensure that, in the event an application does not supply such function or table, the facility still operates, and performs
whatever part of its purpose remains meaningful.
(For example, a function in a library to compute square roots has a purpose that is entirely well-defi ned independent of
the application. Therefore, Subsection 2d requires that any application-supplied function or table used by this function
must be optional: if the application does not supply it, the square root function must still compute square roots.)
These requirements apply to the modifi ed work as a whole. If identifi able sections of that work are not derived from the Library, and
can be reasonably considered independent and separate works in themselves, then this License, and its terms, do not apply to those
sections when you distribute them as separate works. But when you distribute the same sections as part of a whole which is a work
based on the Library, the distribution of the whole must be on the terms of this License, whose permissions for other licensees extend
to the entire whole, and thus to each and every part regardless of who wrote it.
Thus, it is not the intent of this section to claim rights or contest your rights to work written entirely by you; rather, the intent is to
exercise the right to control the distribution of derivative or collective works based on the Library.
In addition, mere aggregation of another work not based on the Library with the Library (or with a work based on the Library) on a
volume of a storage or distribution medium does not bring the other work under the scope of this License.
3. You may opt to apply the terms of the ordinary GNU General Public License instead of this License to a given copy of the Library. To
do this, you must alter all the notices that refer to this License, so that they refer to the ordinary GNU General Public License, version 2,
instead of to this License. (If a newer version than version 2 of the ordinary GNU General Public License has appeared, then you can
specify that version instead if you wish.) Do not make any other change in these notices.
Once this change is made in a given copy, it is irreversible for that copy, so the ordinary GNU General Public License applies to all
subsequent copies and derivative works made from that copy.
This option is useful when you wish to copy part of the code of the Library into a program that is not a library.
4. You may copy and distribute the Library (or a portion or derivative of it, under Section 2) in object code or executable form under
the terms of Sections 1 and 2 above provided that you accompany it with the complete corresponding machine-readable source
code, which must be distributed under the terms of Sections 1 and 2 above on a medium customarily used for software interchange.
Page 50

If distribution of object code is made by offering access to copy from a designated place, then offering equivalent access to copy the
source code from the same place satisfi es the requirement to distribute the source code, even though third parties are not compelled
to copy the source along with the object code.
5. A program that contains no derivative of any portion of the Library, but is designed to work with the Library by being compiled or
linked with it, is called a “work that uses the Library”. Such a work, in isolation, is not a derivative work of the Library, and therefore
falls outside the scope of this License.
However, linking a “work that uses the Library” with the Library creates an executable that is a derivative of the Library (because it
contains portions of the Library), rather than a “work that uses the library”. The executable is therefore covered by this License. Section
6 states terms for distribution of such executables.
When a “work that uses the Library” uses material from a header fi le that is part of the Library, the object code for the work may be a
derivative work of the Library even though the source code is not. Whether this is true is especially signifi cant if the work can be linked
without the Library, or if the work is itself a library. The threshold for this to be true is not precisely defi ned by law.
If such an object file uses only numerical parameters, data structure layouts and accessors, and small macros and small inline
functions (ten lines or less in length), then the use of the object fi le is unrestricted, regardless of whether it is legally a derivative work.
(Executables containing this object code plus portions of the Library will still fall under Section 6.)
Otherwise, if the work is a derivative of the Library, you may distribute the object code for the work under the terms of Section 6. Any
executables containing that work also fall under Section 6, whether or not they are linked directly with the Library itself.
6. As an exception to the Sections above, you may also combine or link a “work that uses the Library” with the Library to produce
a work containing portions of the Library, and distribute that work under terms of your choice, provided that the terms permit
modifi cation of the work for the customer’s own use and reverse engineering for debugging such modifi cations.
You must give prominent notice with each copy of the work that the Library is used in it and that the Library and its use are covered
by this License. You must supply a copy of this License. If the work during execution displays copyright notices, you must include the
copyright notice for the Library among them, as well as a reference directing the user to the copy of this License. Also, you must do
one of these things:
• a) Accompany the work with the complete corresponding machine-readable source code for the Library including
whatever changes were used in the work (which must be distributed under Sections 1 and 2 above); and, if the work is
an executable linked with the Library, with the complete machine-readable “work that uses the Library”, as object code
and/or source code, so that the user can modify the Library and then relink to produce a modifi ed executable containing
the modifi ed Library. (It is understood that the user who changes the contents of defi nitions fi les in the Library will not
necessarily be able to recompile the application to use the modifi ed defi nitions.)
• b) Use a suitable shared library mechanism for linking with the Library. A suitable mechanism is one that (1) uses at
run time a copy of the library already present on the user’s computer system, rather than copying library functions into
the executable, and (2) will operate properly with a modifi ed version of the library, if the user installs one, as long as the
modifi ed version is interface-compatible with the version that the work was made with.
• c) Accompany the work with a written offer, valid for at least three years, to give the same user the materials specifi ed in
Subsection 6a, above, for a charge no more than the cost of performing this distribution.
• d) If distribution of the work is made by offering access to copy from a designated place, offer equivalent access to copy
the above specifi ed materials from the same place.
• e) Verify that the user has already received a copy of these materials or that you have already sent this user a copy.
For an executable, the required form of the “work that uses the Library” must include any data and utility programs needed for
reproducing the executable from it. However, as a special exception, the materials to be distributed need not include anything that is
normally distributed (in either source or binary form) with the major components (compiler, kernel, and so on) of the operating system
on which the executable runs, unless that component itself accompanies the executable.
It may happen that this requirement contradicts the license restrictions of other proprietary libraries that do not normally accompany
the operating system. Such a contradiction means you cannot use both them and the Library together in an executable that you
distribute.
7. You may place library facilities that are a work based on the Library side-by-side in a single library together with other library facilities
not covered by this License, and distribute such a combined library, provided that the separate distribution of the work based on the
Library and of the other library facilities is otherwise permitted, and provided that you do these two things:
• a) Accompany the combined library with a copy of the same work based on the Library, uncombined with any other
library facilities. This must be distributed under the terms of the Sections above.
• b) Give prominent notice with the combined library of the fact that part of it is a work based on the Library, and explaining
where to fi nd the accompanying uncombined form of the same work.
8. You may not copy, modify, sublicense, link with, or distribute the Library except as expressly provided under this License. Any
attempt otherwise to copy, modify, sublicense, link with, or distribute the Library is void, and will automatically terminate your rights
under this License. However, parties who have received copies, or rights, from you under this License will not have their licenses
terminated so long as such parties remain in full compliance.
9. You are not required to accept this License, since you have not signed it. However, nothing else grants you permission to modify
or distribute the Library or its derivative works. These actions are prohibited by law if you do not accept this License. Therefore, by
modifying or distributing the Library (or any work based on the Library), you indicate your acceptance of this License to do so, and all
its terms and conditions for copying, distributing or modifying the Library or works based on it.
10. Each time you redistribute the Library (or any work based on the Library), the recipient automatically receives a license from the
original licensor to copy, distribute, link with or modify the Library subject to these terms and conditions. You may not impos
e any
Page 51

further restrictions on the recipients’ exercise of the rights granted herein. You are not responsible for enforcing compliance by third
parties with this License.
11. If, as a consequence of a court judgment or allegation of patent infringement or for any other reason (not limited to patent issues),
conditions are imposed on you (whether by court order, agreement or otherwise) that contradict the conditions of this License, they do
not excuse you from the conditions of this License. If you cannot distribute so as to satisfy simultaneously your obligations under this
License and any other pertinent obligations, then as a consequence you may not distribute the Library at all. For example, if a patent
license would not permit royalty-free redistribution of the Library by all those who receive copies directly or indirectly through you, then
the only way you could satisfy both it and this License would be to refrain entirely from distribution of the Library.
If any portion of this section is held invalid or unenforceable under any particular circumstance, the balance of the section is intended
to apply, and the section as a whole is intended to apply in other circumstances.
It is not the purpose of this section to induce you to infringe any patents or other property right claims or to contest validity of any
such claims; this section has the sole purpose of protecting the integrity of the free software distribution system which is implemented
by public license practices. Many people have made generous contributions to the wide range of software distributed through that
system in reliance on consistent application of that system; it is up to the author/donor to decide if he or she is willing to distribute
software through any other system and a licensee cannot impose that choice.
This section is intended to make thoroughly clear what is believed to be a consequence of the rest of this License.
12. If the distribution and/or use of the Library is restricted in certain countries either by patents or by copyrighted interfaces, the
original copyright holder who places the Library under this License may add an explicit geographical distribution limitation excluding
those countries, so that distribution is permitted only in or among countries not thus excluded. In such case, this License incorporates
the limitation as if written in the body of this License.
13. The Free Software Foundation may publish revised and/or new versions of the Lesser General Public License from time to time.
Such new versions will be similar in spirit to the present version, but may differ in detail to address new problems or concerns.
Each version is given a distinguishing version number. If the Library specifi es a version number of this License which applies to it and
“any later version”, you have the option of following the terms and conditions either of that version or of any later version published by
the Free Software Foundation. If the Library does not specify a license version number, you may choose any version ever published by
the Free Software Foundation.
14. If you wish to incorporate parts of the Library into other free programs whose distribution conditions are incompatible with these,
write to the author to ask for permission. For software which is copyrighted by the Free Software Foundation, write to the Free
Software Foundation; we sometimes make exceptions for this. Our decision will be guided by the two goals of preserving the free
status of all derivatives of our free software and of promoting the sharing and reuse of software generally.
NO WARRANTY
15. BECAUSE THE LIBRARY IS LICENSED FREE OF CHARGE, THERE IS NO WARRANTY FOR THE LIBRARY, TO THE EXTENT
PERMITTED BY APPLICABLE LAW. EXCEPT WHEN OTHERWISE STATED IN WRITING THE COPYRIGHT HOLDERS AND/OR
OTHER PARTIES PROVIDE THE LIBRARY “AS IS” WITHOUT WARRANTY OF ANY KIND, EITHER EXPRESSED OR IMPLIED,
INCLUDING, BUT NOT LIMITED TO, THE IMPLIED WARRANTIES OF MERCHANTABILITY AND FITNESS FOR A PARTICULAR
PURPOSE. THE ENTIRE RISK AS TO THE QUALITY AND PERFORMANCE OF THE LIBRARY IS WITH YOU. SHOULD THE LIBRARY
PROVE DEFECTIVE, YOU ASSUME THE COST OF ALL NECESSARY SERVICING, REPAIR OR CORRECTION.
16. IN NO EVENT UNLESS REQUIRED BY APPLICABLE LAW OR AGREED TO IN WRITING WILL ANY COPYRIGHT HOLDER, OR
ANY OTHER PARTY WHO MAY MODIFY AND/OR REDISTRIBUTE THE LIBRARY AS PERMITTED ABOVE, BE LIABLE TO YOU FOR
DAMAGES, INCLUDING ANY GENERAL, SPECIAL, INCIDENTAL OR CONSEQUENTIAL DAMAGES ARISING OUT OF THE USE OR
INABILITY TO USE THE LIBRARY (INCLUDING BUT NOT LIMITED TO LOSS OF DATA OR DATA BEING RENDERED INACCURATE
OR LOSSES SUSTAINED BY YOU OR THIRD PARTIES OR A FAILURE OF THE LIBRARY TO OPERATE WITH ANY OTHER
SOFTWARE), EVEN IF SUCH HOLDER OR OTHER PARTY HAS BEEN ADVISED OF THE POSSIBILITY OF SUCH DAMAGES.
END OF TERMS AND CONDITIONS
How to Apply These Terms to Your New Libraries
If you develop a new library, and you want it to be of the greatest possible use to the public, we recommend making it free software
that everyone can redistribute and change. You can do so by permitting redistribution under these terms (or, alternatively, under the
terms of the ordinary General Public License).
To apply these terms, attach the following notices to the library. It is safest to attach them to the start of each source fi le to most
effectively convey the exclusion of warranty; and each fi le should have at least the “copyright” line and a pointer to where the full notice
is found.
one line to give the library’s name and an idea of what it does.
Copyright (C) year name of author
This library is free software; you can redistribute it and/or modify it under the terms of the GNU Lesser General Public License as
published by the Free Software Foundation; either version 2.1 of the License, or (at your option) any later version.
This library is distributed in the hope that it will be useful, but WITHOUT ANY WARRANTY; without even the implied warranty of
MERCHANTABILITY or FITNESS FOR A PARTICULAR PURPOSE. See the GNU Lesser General Public License for more details.
You should have received a copy of the GNU Lesser General Public License along with this library; if not, write to the Free Software
Foundation, Inc., 51 Franklin Street, Fifth Floor, Boston, MA 02110-1301 USA
Also add information on how to contact you by electronic and paper mail.
Page 52

You should also get your employer (if you work as a programmer) or your school, if any, to sign a “copyright disclaimer” for the library,
if necessary. Here is a sample; alter the names:
Yoyodyne, Inc., hereby disclaims all copyright interest in the library `Frob’ (a library for tweaking knobs) written by James Random
Hacker.
signature of Ty Coon, 1 April 1990
Ty Coon, President of Vice
That’s all there is to it!
- JPEG
This software is based in part on the work of the Independent JPEG Group.
- OpenCV :
IMPORTANT: READ BEFORE DOWNLOADING, COPYING, INSTALLING OR USING.
By downloading, copying, installing or using the software you agree to this license.
If you do not agree to this license, do not download, install, copy or use the software.
License Agreement
For Open Source Computer Vision Library
Copyright (C) 2000-2008, Intel Corporation, all rights reserved.
Copyright (C) 2008-2010, Willow Garage Inc., all rights reserved.
Third party copyrights are property of their respective owners.
Redistribution and use in source and binary forms, with or without modifi cation, are permitted provided that the following conditions
are met:
Redistribution’s of source code must retain the above copyright notice, this list of conditions and the following disclaimer.
Redistribution’s in binary form must reproduce the above copyright notice, this list of conditions and the following disclaimer in the
documentation and/or other materials provided with the distribution.
The name of the copyright holders may not be used to endorse or promote products derived from this software without specifi c prior
written permission.
This software is provided by the copyright holders and contributors “as is” and any express or implied warranties, including, but not
limited to, the implied warranties of merchantability and fi tness for a particular purpose are disclaimed. In no event shall the Intel
Corporation or contributors be liable for any direct, indirect, incidental, special, exemplary, or consequential damages (including, but
not limited to, procurement of substitute goods or services; loss of use, data, or profi ts; or business interruption) however caused and
on any theory of liability, whether in contract, strict liability, or tort (including negligence or otherwise) arising in any way out of the use
of this software, even if advised of the possibility of such damage.
Page 53

Memo
Page 54

Memo
Page 55

Memo
Page 56
If you have any questions or comments relating to Samsung products,
please contact the SAMSUNG customer care center.
Country
U.K 0330 SAMSUNG (7267864) www.samsung.com
SOUTH AFRICA 0860 7267864 (SAMSUNG) www.samsung.com
AUSTRALIA 1300 362 603 www.samsung.com
HONG KONG (852) 3698-4698
MALAYSIA 1800-88-9999 www.samsung.com
SINGAPORE 1800-SAMSUNG (7267864) www.samsung.com
Customer Care Center
Web Site
www.samsung.com/hk
www.samsung.com/hk_en/
Code No. DJ68-00695A REV(0.0)
 Loading...