

R E F R I G E R A
Model : SR-608EV
Model :
SR-648EV
SR-688EV
M a n u a l
S E R V I C E
TO R
R E F R I G E R A T O R C O N T E N T S
1. Safety Precautions And Warnings
2. Product Specifications
3. Electrical Part Specifications & Standard
4. Electric Diagram
5. Outer Package Specification
6. Air Circulation Route
7. Functions And Directions
8. Circuit Operating Theory
"A"
9. Failure Diagnosis And Repairment
10. Disassemble & Assemble Drawing And
Part Lists
11. Disassemble & Assemble Method
“A”: WITH DISPENSER
S R - 6 0 8 E V
S R - 6 4 8 E V
S R - 6 8 8 E V
WITHOUT DISPENSER
SR-606EV
SR-646EV
SR-686EV
12. Packing Method
13. PCB Diagram
14. PCB Specifications
15. Main Components Specifacations
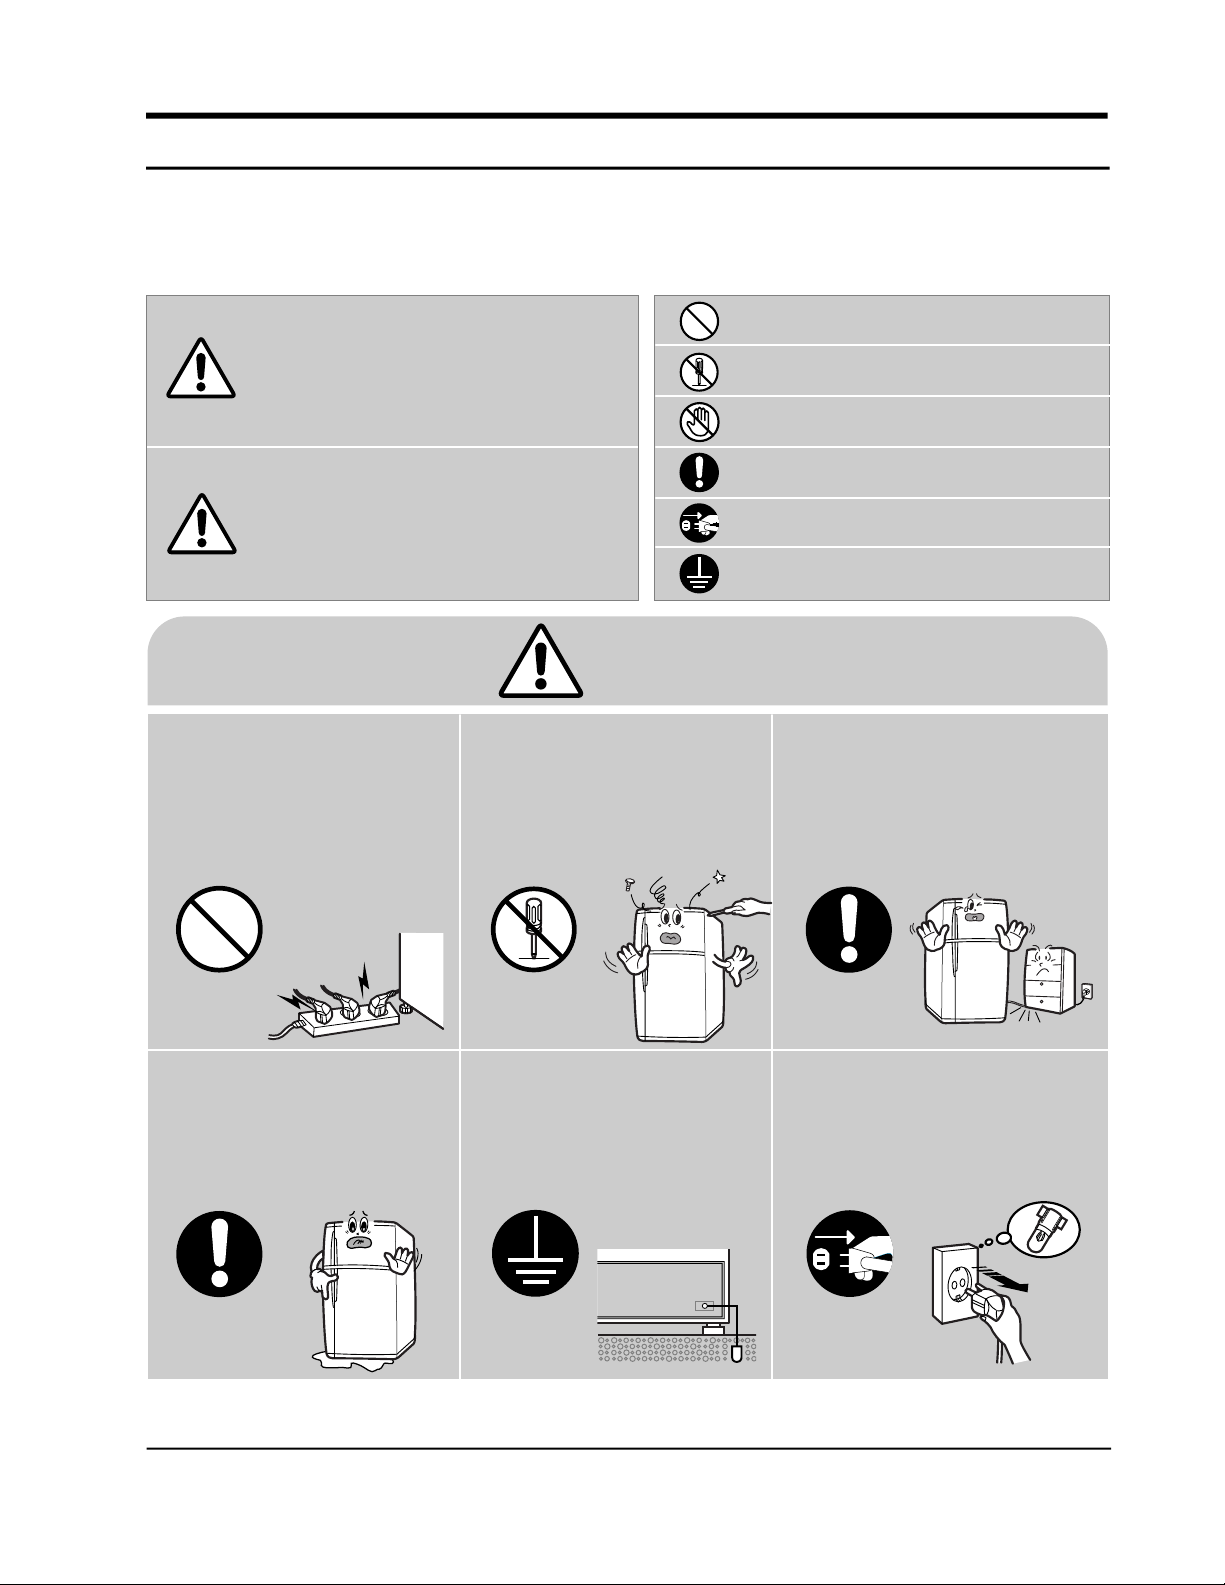
1. Safety precautions and warnings
Read all instructions before using this appliance in order to aboid risk of accident or possible damage.
Warning/Caution Description of symbols
Indicates prohibition
This symbol is intended to
W a r n i n g
C a u t i o n
alert the user to the
possible death or injury.
This symbol is intended to
alart the user to the
possible injury or damage.
Do not disassemble
Do not contant
Adhere the instruction strictly
Unplug from the electrical outlet
Earth the appliance to avoid the
risk of an electric shock
Warning
Do not plug multiple
electrical appliances into
the same outlet.
• This may cause abnormal
heating or a fire hazard.
Prohibition Do not disassemble
Check the operating
environment.
• Do not install the refrigerator in a
hurnid (with condensation) location
or on an unstable surface.
Do not attempt to make
repairs yourself.
•
This could lead to fire hazard or
abnormal operation causing
severe personal injury.
Do not attempt to make
repairs yourself.
•
This could lead to fire hazard or
abnormal operation causing
severe personal injury.
Make sure the power cord is
not crushed or damaged.
•
Repair immediately all power cords or
outlets that have become frayed or
otherwise damaged.
Make sure the power cord is
not crushed or damaged.
• Repair immediately all power cords or
outlets that have become frayed or
otherwise damaged.
Earth Unplug
Samsung Electronics 1
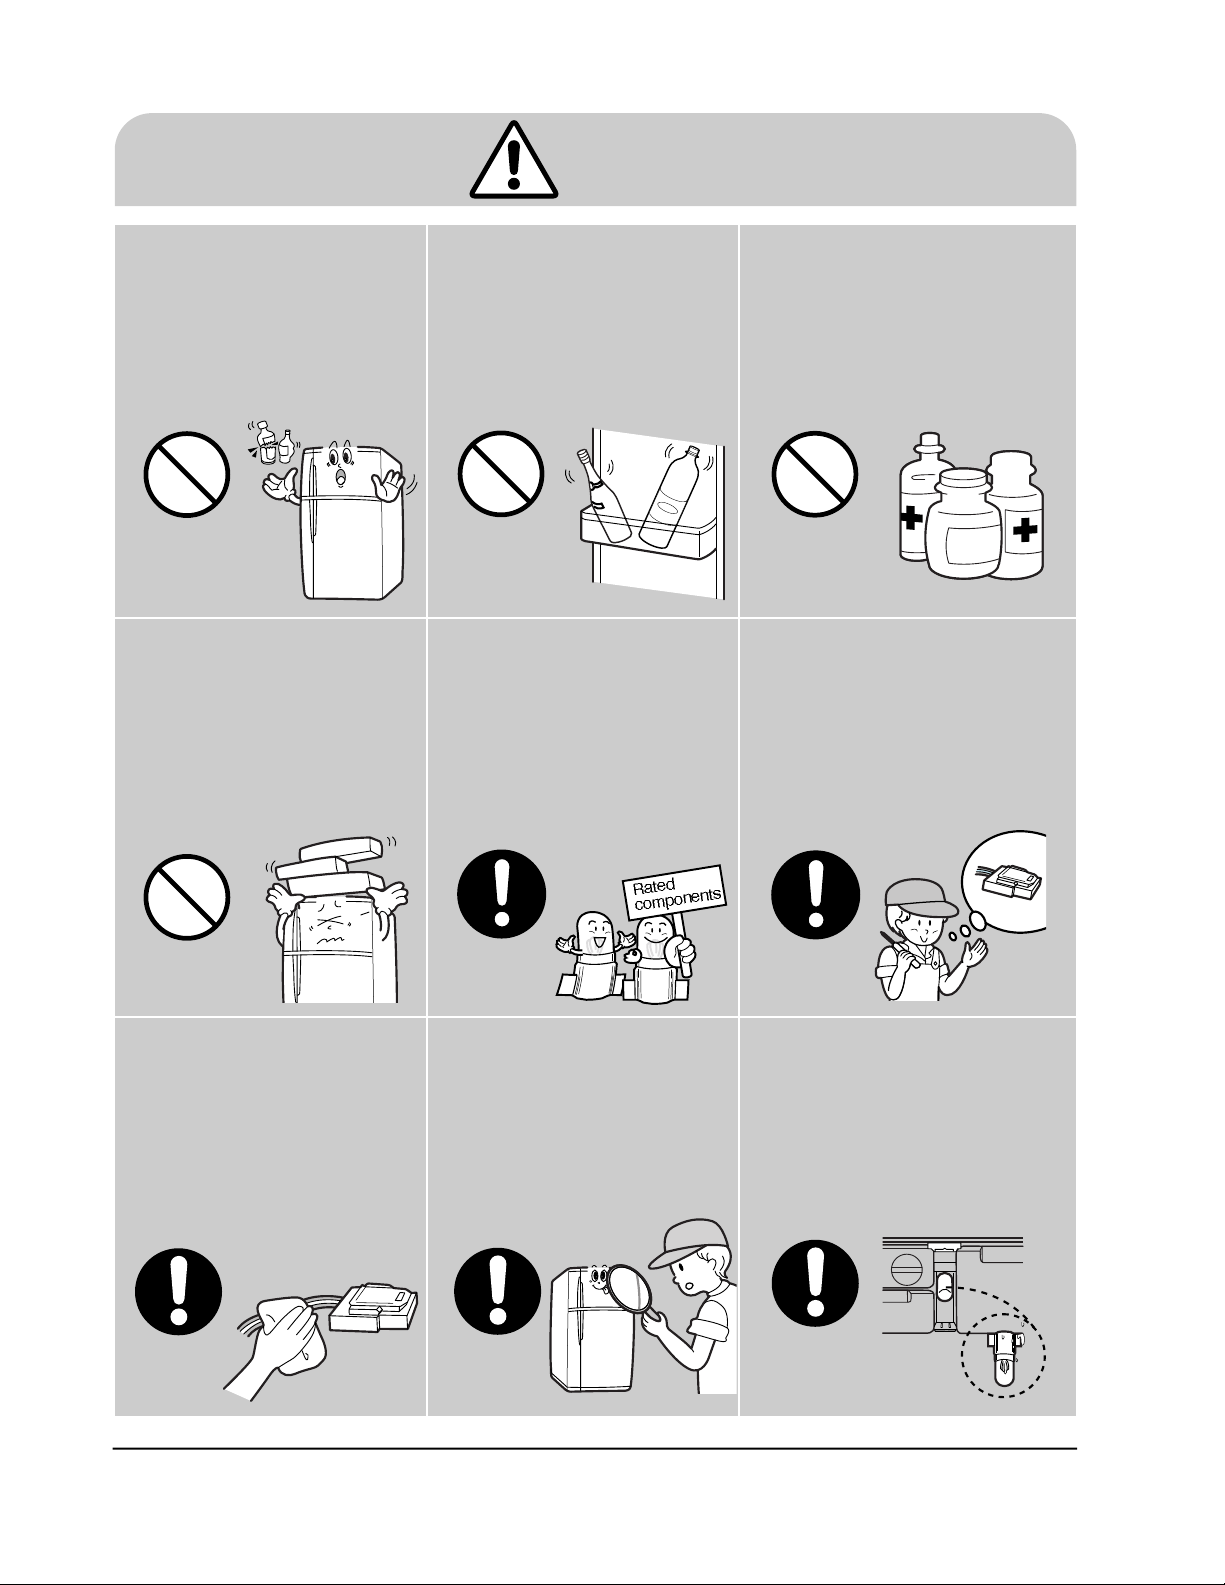
Caution
Do not store bottled food
or drinks in the freezer
compartment.
• Bottles may explode
causing personal injury.
Prohibition
Do not put anything on top
of the refrigerator.
• Opening or closing the door
may trigger loose items to
slip and cause injury.
Do not store food in an
unstable manner.
• Opening the door may
trigger loose items to slip
and cause injury.
Do not store anything other
than food in the refrigerator.
• Medical supplies which need
to be under strict temperature
control should not be stored in
the refrigerator.
Prohibition Prohibition
When replacing electric
components, be sure to
use rated components.
• Check the model, rated
voltage, rated current,
operating temperature etc.
of the component.
When servicing the refrigerator,
completely remove dust or
foreign substances from the
housing, electric connections
and etc.
• This can protect against the risk of fire hazard
caused by tracking and short circuit.
Prohibition
When servicing the refrigerator,
completely remove dust or foreign
substances from the housing,
electric connections and etc.
• This can protect against the risk
of fire hazard caused by
tracking and short circuit.
2 Samsung Electronics
After servicing the refrigerator,
be sure to check the
components are reassembled
in a correct manner.
•
The serviced unit should be
reassembled and returned to its original
assembly state.
Check the electrical parts for the
trace of moisture penetration.
• When the trace of moisture
penetration is detected, replace
the part or try insulation tapping.
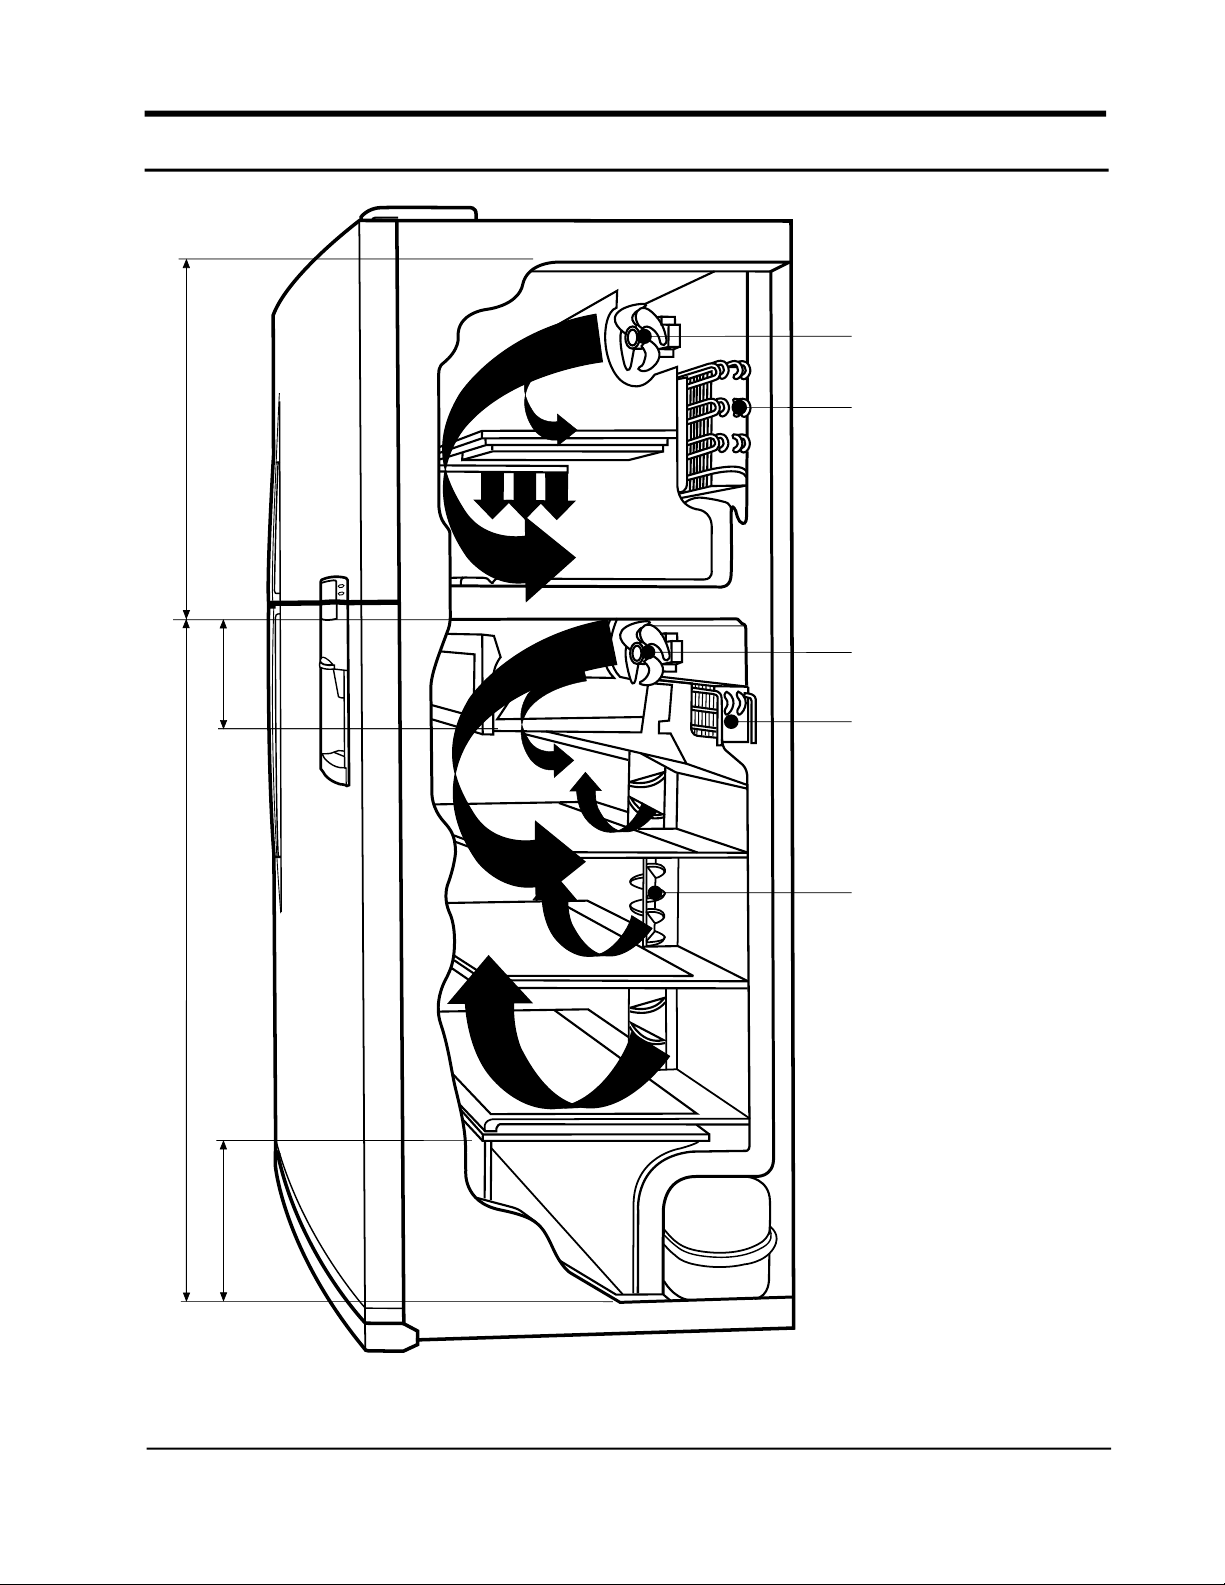
6. Air circulation route
Freezer
Freezer cooling fan
Freezer cooling device
Refrigerator cooling fan
Special
Refrigerator
Vegetable
Refrigerator cooling device
Swing fan
Samsung Electronics 7
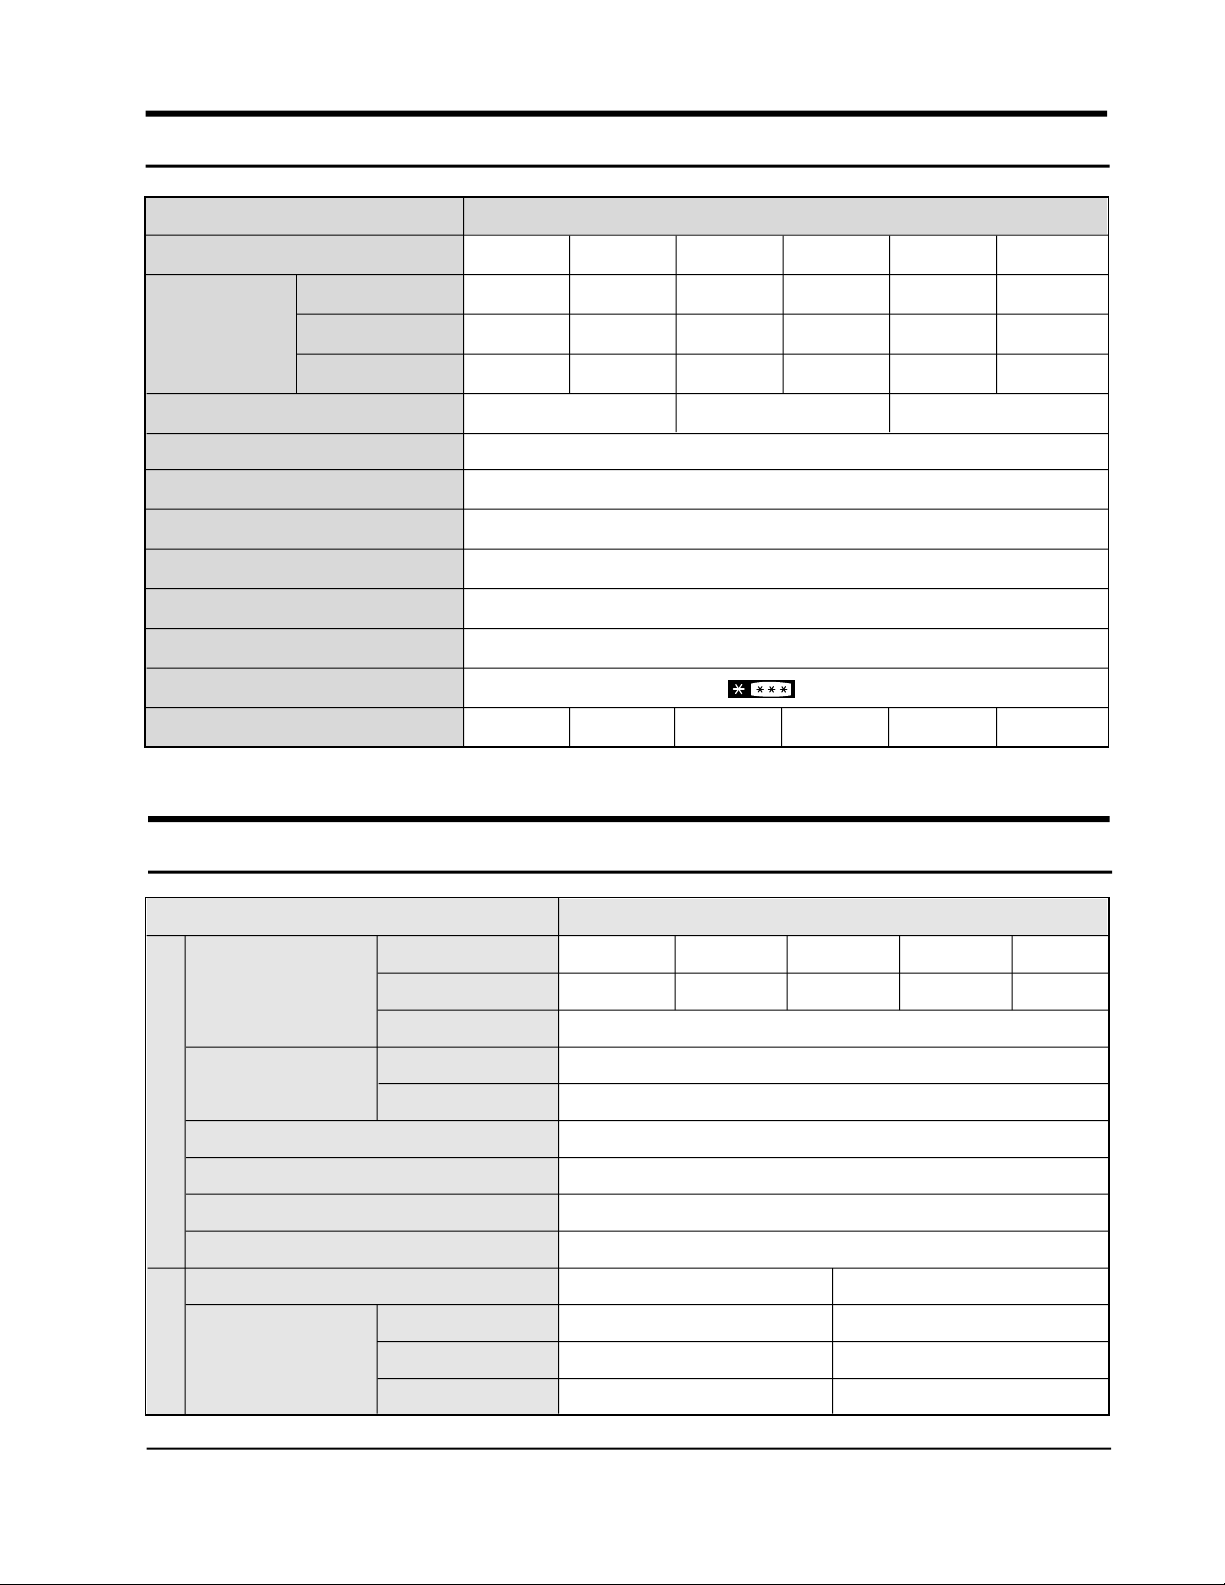
2. Product Specifications
ITEM
Model Name
Total
Net Capacity
Freezer
(l/CU.FT)
Refrigerator
Net dimension (WxHxD )
Regular Frequency
Electric Metor Regular Power
Electric Heating Equipment power
Sort of Refrigerator
Cooling Mass
Cooling Mass Sealed Quanlty
Freezer performance
Net weight
STANDARD
S R - 6 0 6 E V
5 0 4
1 5 3
3 5 1
840X726X1753.5
105kg 106kg 106kg 107kg 108kg 109kg
S R - 6 0 8 E V
4 9 9
1 5 3
3 4 6
115/60, 127/60, 240/50. 220/50,60
Occassional cooling type refrigerator
S R - 6 4 6 E V
5 4 4
1 6 5
3 7 9
840X726X1803.5 840X726X1847.5
S R - 6 4 8 E V
5 3 8
1 6 5
3 7 3
165W
378W
HFC-134a
155gr
(4 STAR)
S R - 6 8 6 E V
5 8 1
1 6 5
4 1 6
S R - 6 8 8 E V
5 7 5
1 6 5
4 1 0
3. Electrical part specifications & standard
ITEM
Compressor
Evaporator
Condenser
Dryer
Capilary tube
Refrigerant
Type
Freezer
Temperature Refrigeration Cycle
Model
Starting type
Oil charge
Freezer
Refrigerator
High
Mid
Low
S K 1 8 2 C - L 2 W
C S R
S K 1 8 2 P - L 2 W
Forced & Natural Convection Type
ON(˚C)
–20˚C
–17˚C
–14˚C
C S R
Freol α-15C(ESTER)/265CC
STANDARD
S K 1 9 0 H - L 2 U
R S C R
Split Fin Type
Split Fin Type
Molecular Sieve XH-9
0.82 X 2500 4.26kg/cm
HFC-134a/155gr
S K 1 9 0 Q - L 2 U
R S C R
2
OFF(˚C)
–22˚C
–19.0˚C
–16˚C
Samsung Electronics 3
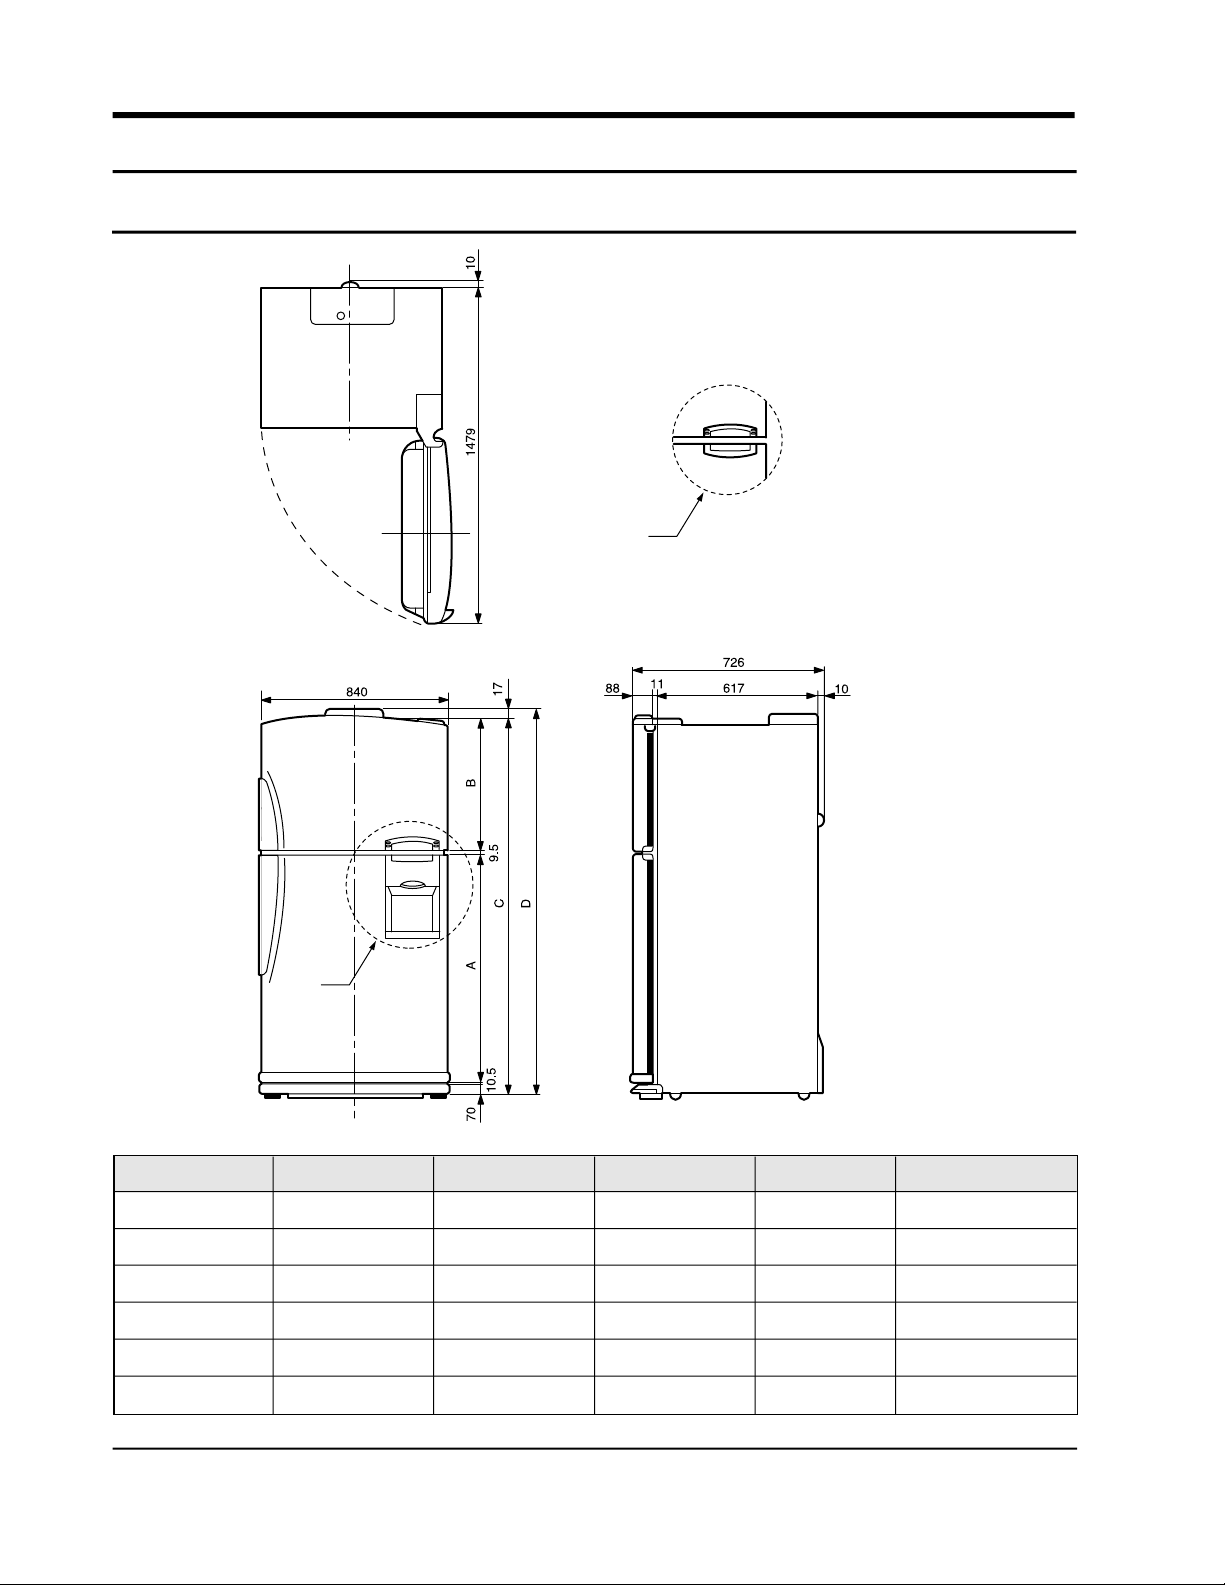
7. Function and Directions
7-1 The outer size
a
b
Model A B C D Remark
SR-606EA 1066.5 580 1736.5 1753.5 ‘a’ applied
SR-608EA 1066.5 580 1736.5 1753.5 ‘b’ applied
SR-646EA 1096.5 600 1766.5 1803.5 ‘a’ applied
SR-648EA 1096.5 600 1766.5 1803.5 ‘b’ applied
SR-686EA 1140.5 600 1810.5 1847.5 ‘a’ applied
SR-688EA 1140.5 600 1810.5 1847.5 ‘b’ applied
8 Samsung Electronics

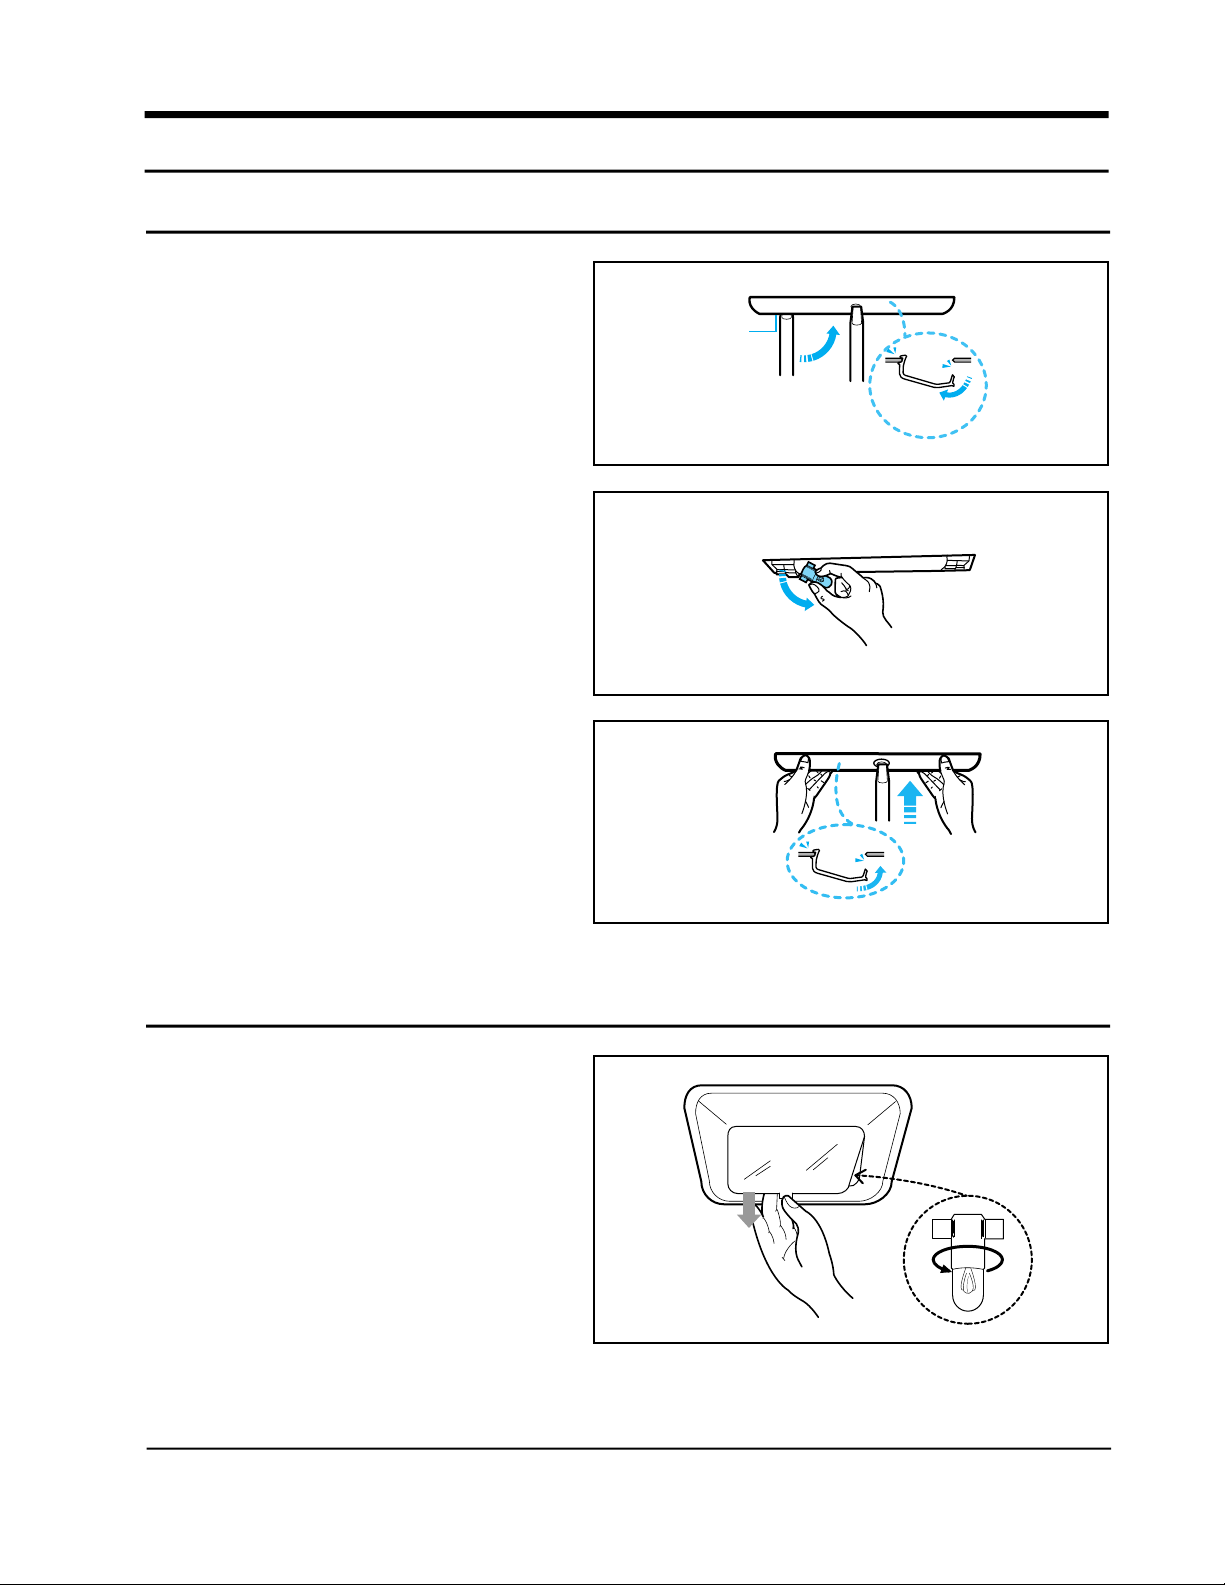
7-2 The name of each parts and disassemble method
Freezer shelf
• Up the front of shelf to direction then
pull and apart to direction .
1
2
1
2
Chilled room shelf
• Pull to the arrow direction
then up and apart at the
locking point.
• Push to direction and apart to direction .
1
2
1
2
• Up and apart as showed.
(concerned model : SR-
5066/5466/5866)
Shelf REF.
• Pull with both hands as showed.
• The height can be adjusted according to the
stored bowls.
Vegetable box and cover
• Up the cover and apart then pull out the
vegetable box at the mid-point and up and
and pull to apart.
Samsung Electronics 9
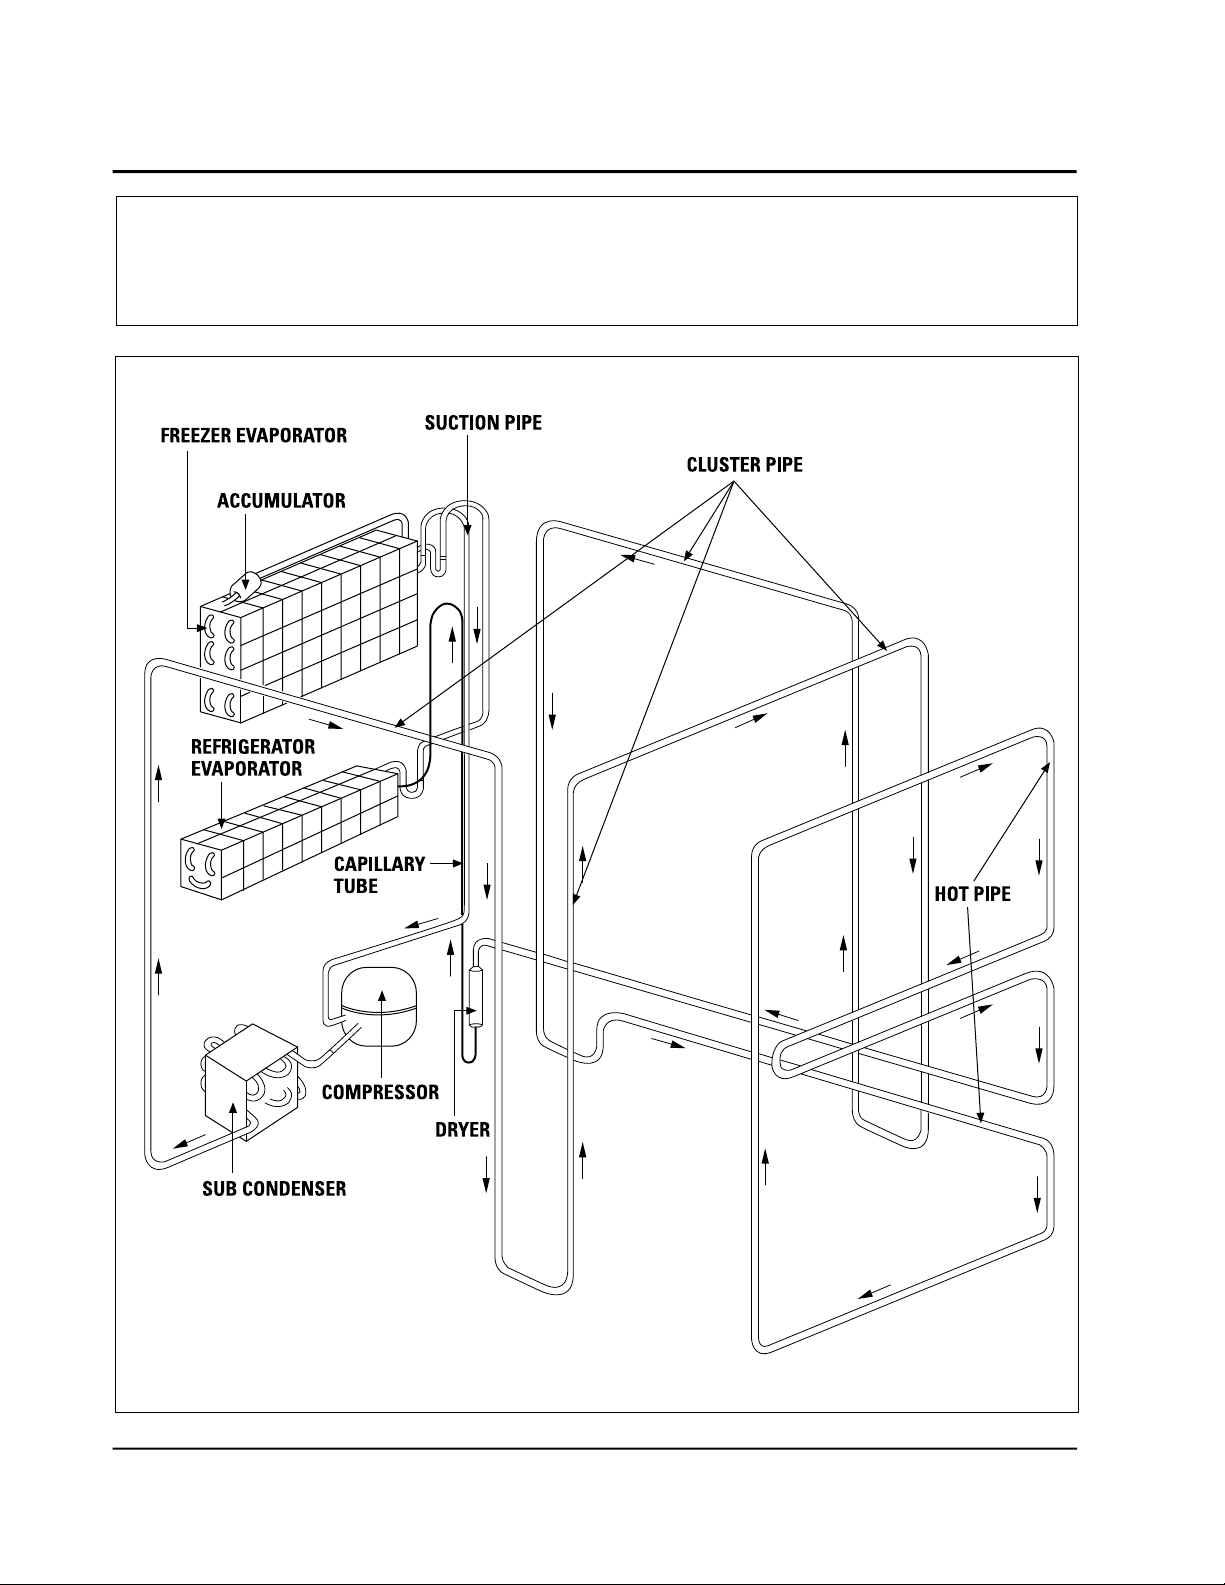
7-3 Freezing cycle
COMPRESSOR → SUB CONDENSER → CLUSTER PIPE → HOT PIPE → DRYER →CAPILLARY
TUBE →REFRIGERATOR EVAPORATOR → FREEZER EVAPORATOR → A C C U M U L A T O R
→SUCTION PIPE → COMPRESSOR
10 Samsung Electronics

7-4 PANEL display
QUICK REF.
FRE
CONTROL
DOOR
ALARM
DOOR
FREE
QUICK
FRE.
FRE, CONTROL
LO
HI
LO
HI
7-5 Temperature control
1) Freezer temperature control
1. It consists of five steps as follows and selected by one button.
Mid Æ Mid.High Æ High Æ Low Æ Low.Mid
2. It is circulated and displayed one by one by pressing the button.
3. At first power on it is selected ”Mid”
Category
Indicator Lamp
Initial power on
Mid
Pressed once
Mid·High
Pressed twice
High
QUICK
FRE.
Pressed 3 times
Low
HI-MOISTURE
Pressed 4 times
Low·Mid
QUICK REF.
REF.
CONTROL
Remark
Reference Temp.
–18˚C –19.5˚C
–21˚C
–15˚C
–16.5˚C
2) Temperature control in the refrigerating compartment
1) Select the 5 stages of ‘Mid’–‘Mid · High’–‘High’–‘Low’–‘Low · Mid’ with a button.
2) Whenever the temperature control button of refrigerator is pressed, it continues of light from
‘Mid’–‘Mid · High’–‘High’–‘Low’–‘Low · Mid’.
3) When power turns on “Mid” is automatically selected.
Category
Indicator Lamp
Reference Temp.
Initial power on
Mid
3˚C 1˚C
Pressed once
Mid·High
Pressed twice
High
–1˚C
Pressed 3 times
Low
6˚C
Pressed 4 times
Low·Mid
4.5˚C
Remark
Samsung Electronics 11

7-6. Power freeze and Power
• Selected by additional quick freeze & refrigeration button.
• The lamp of quick freeze and refrigeration circulated ever ytime it pushed.
• No change of setting temperature occured during quick free ze and refrigeration selected.
• Te m p e r a t u re of freezer and r e f r i g e r a t o r can be re-setted while quick freeze and refrigeration opera tes.
1) Quick freeze
(1)Comp. and F-fan runs continuously for two and a half hour s when quick freeze selected. ( one
minute after selection )
(2) During quick freezing the refrigerator controlled by se tted notch.
2) Quick refrigeration
(1) Comp. and R-fan runs until the temperature of refrigerat or reaches -4 ˚C when quick refrigeration
selected.
(2) After the temperature reaches -4 ˚C the ’HIGH’ notch runs for an hour and finish quick
refrigeration.
(3) Unless the temperature of refrigerator reaches -4 ˚C within two and a half hours quick
refrigeration stopped.
3) When quick freeze and refrigeration selected at the same time
(1) Each function applied at the same time. Quick freeze ru ns Comp. and F-fan for two and a half
hours and quick refrigeration runs Comp. and R-fan for two a nd a half hours with no relation of
each other.
7-7 Alarming
1) Button touch ( ”Ding-Dong ” sound)
(1)Everytime the button pushed, the input confirmation, ”Ding-Dong ”, sounds.
(2) Not sounds, if two keys are pushed at the same time or w rongly handled.
2) Door-Open warning ( ”Ding-Dong ” sound)
(1)Two minutes after door opened, ten times of alarming soun ds.
(2) If door opened continuously, ten times of alarming sound s with one minute cycle.
(3)Alarming stopped just after door closed.
3) Forced operating and defrosting ( ”Beep” sound)
(1) If forced function selected the ”beep” sounds.
(2) Alarming sounds untill the forced operating canceled by automatically ( 24Hr ) or manualy.
(3) Alarming sounds untill the forced defrosting canceled by automatically ( 24Hr ) or manualy.
12 Samsung Electronics

7-8 Defrosting
1) From the first power on, defrosting started after 4 hours of total Comp on time.
2) After that defrosting cycle can be varied from 6 hours to 32hours. (Comp on time)
7-9 Testing
• Testing is for PCB, product, function and service.
• After testing, turn the power on to start self diagnosis.
1) Forced operating
(1) As the button on PCB pushed once, Comp starts immediately without 5 minutes delay.
(2)If forced operating selected the notch of freezer and refrigerator fixed to ”HIGH” and ”MID-
HIGH”. Then Comp and F-fan is controlled to pull-down and R-fan is controlled to ”MID-HIGH”
notch.
(3) Pull-down maintained just for 24 hours during forced operating, after that automatically defrost
freezer and refrigerator and then starts normal operating.
(4) Turn the power off or select test cancel mode to cancel the forced operating.
(5)Alarming (0.25 sec on/0.75 sec off) continues until the forced operating finished. It continues
without any relations to alarming key selection or cancel.
2) Forced defrosting
(1) Push the test button one more time to run the forced defrosting of refrigerator.
(2) One more push in the above status will run defrosting of freezer and refrigerator simultaneously.
(3) Forced operating cancelled automatically by starting foced defrosting and return to normal
operating after completion of defrosting.
3) Test cancel mode
(1) One more push in the status of forced defrosting of F/R will run normal operating.
(2) Alarming stopped in the test cancel mode.
7-10 Self diagnosis
1) Self diagnosis at first power on
(1) As the power applied to the refrigerator first time, all displays show and run the self diagnosis.
(2) If no problems founded display returns to normal model.
(3) If problem is founded, on and off the related display lamp and start alarming.
(4) Lamp displayed until the problem solved or self diagnosis cancelled.
(5) After problem solved the display mode return to normal.
Samsung Electronics 13
(6) When refrigerator repaired, sure to power off and on to run self diagnosis.
(7) Refer to belows for problems and related displays.
No
1
R1-Sensor
2
R2-Sensor
3
RD-Sensor
4
Room-Temp.
Sensor
Item
Display LED
Refrigerator “Low”
Refrigerator
“Low · Mid”
Refrigerator “Mid”
Freezer “Low”
Symptom
• R-room left sensor housing
disconnection.
• Faulty connection.
• Wire open or short.
• Faulty sensor.
• R-room left right sensor
housing disconnection.
• Faulty connection.
• Wire open or short.
• Faulty sensor.
• R-room defrost sensor
housing disconnection.
• Faulty connection.
• Wire open or short.
• Faulty sensor.
• Room-Temp sensor housing
disconnection.
• Faulty connection.
• Wire open or short.
• Faulty sensor.
Remark
R1-Sensor temperature is
over +50˚C or below –50˚C.
R2-Sensor temperature is
over +50˚C or below –50˚C.
RD-Sensor temperature is
over +50˚C or below –50˚C.
Room-Temp Sensor
temperature is over +50˚C
or below –50˚C.
5
F-Sensor
6
FD-Sensor
7
GearedMotor
Freezer “Low”
Freezer “Mid”
Refrigerator “High”
(Self-diagnosis Display Table)
• F-room sensor housing
disconnection.
• Faulty connection
• Wire open or short.
• Faulty sensor.
• R-room defrost sensor
housing disconnection.
• Faulty connection.
• Wire open or short.
• Faulty sensor.
• Faulty geared-motor
• Faulty reed-switch
housing disconnection.
• Faulty connection.
F-Sensor temperature is
over +50˚C or below –50˚C.
F-Sensor temperature is
over +50˚C or below –50˚C.
Square wave not detected
by reed-S/W.
14 Samsung Electronics
7-11 Load status display
1) Press power F/R key for five seconds then press temperature control key in the refrigerator after
temperature display lamps on and off three times.
2) This mode shows which load is being sourced signal from MICOM currently. This doesn’ t mean
the load is operating but just show MICOM signal output. The Compressor may not operate due
to the open wire or relay missing though the display shows the Compressor operating.
3) Load status display return to normal mode after sixty seconds.
4) Follows are load status and related display.
No
Freezer Subordinate
1
COMP
2
F-FAN
3
Freezer defrost Heater
4
Freezer bulb
5
COMP. Cooling Fan
Refrigerator Subordinate
6
R-FAN
Refrigerator defrost
7
Heater
8
Refrigerator bulb
Item
Display LED
Freezer “Low”
Freezer “Low · Mid”
Freezer “Mid”
Freezer “Mid · High”
Freezer “High”
Refrigerator
“Low · Mid”
Refrigerator “Mid”
Refrigerator
“Mid · High”
Display
Relevant LED ON during
Compressor operation
Relevant LED ON during F-FAN
operation
Relevant LED ON during freezer
defrost heater on
Relevant LED ON during freezer
bulb ON
Relevant LED ON during
Compressor Cooling Fan oeration
Relevant LED ON during F-FAN
operation
Relevant LED ON during
refrigerator defrost
Relevant LED ON during
refrigerator bulb ON
Remark
9
GEARED-Motor
Mode Display
10
Initial Mode
11
Overload
12
Low temp.
Samsung Electronics 15
Refrigerator “High”
Quick Freezing
Quick Refrigeration
High humidity
refrigeration
(Load Status Display Table)
Relevant LED ON during
refrigerator brade rotation
Relevant LED ON with initial
power input
Relevant LED ON when ROOM
temperature is over 35˚C
Relevant LED On when ROOM
temperature is below 20˚C
11. Disassemble and assemble method
11-1 Refrigerator inside lamp replacement
1) Remove the screw with (+) driver and
push the cover to the arrow direction and
apart.
2) Remove out the lamp to the arrow direction
and replace with new one. ( Left & Right )
3) Insert the front of the cover first and screw
it.
11-2 Freezer inside lamp replacement
• Grab the the salient part of cover and pull
it down to apart. Replace the 220V/15W
lamp and insert front of cover first and
then fix it.
Samsung Electronics 41
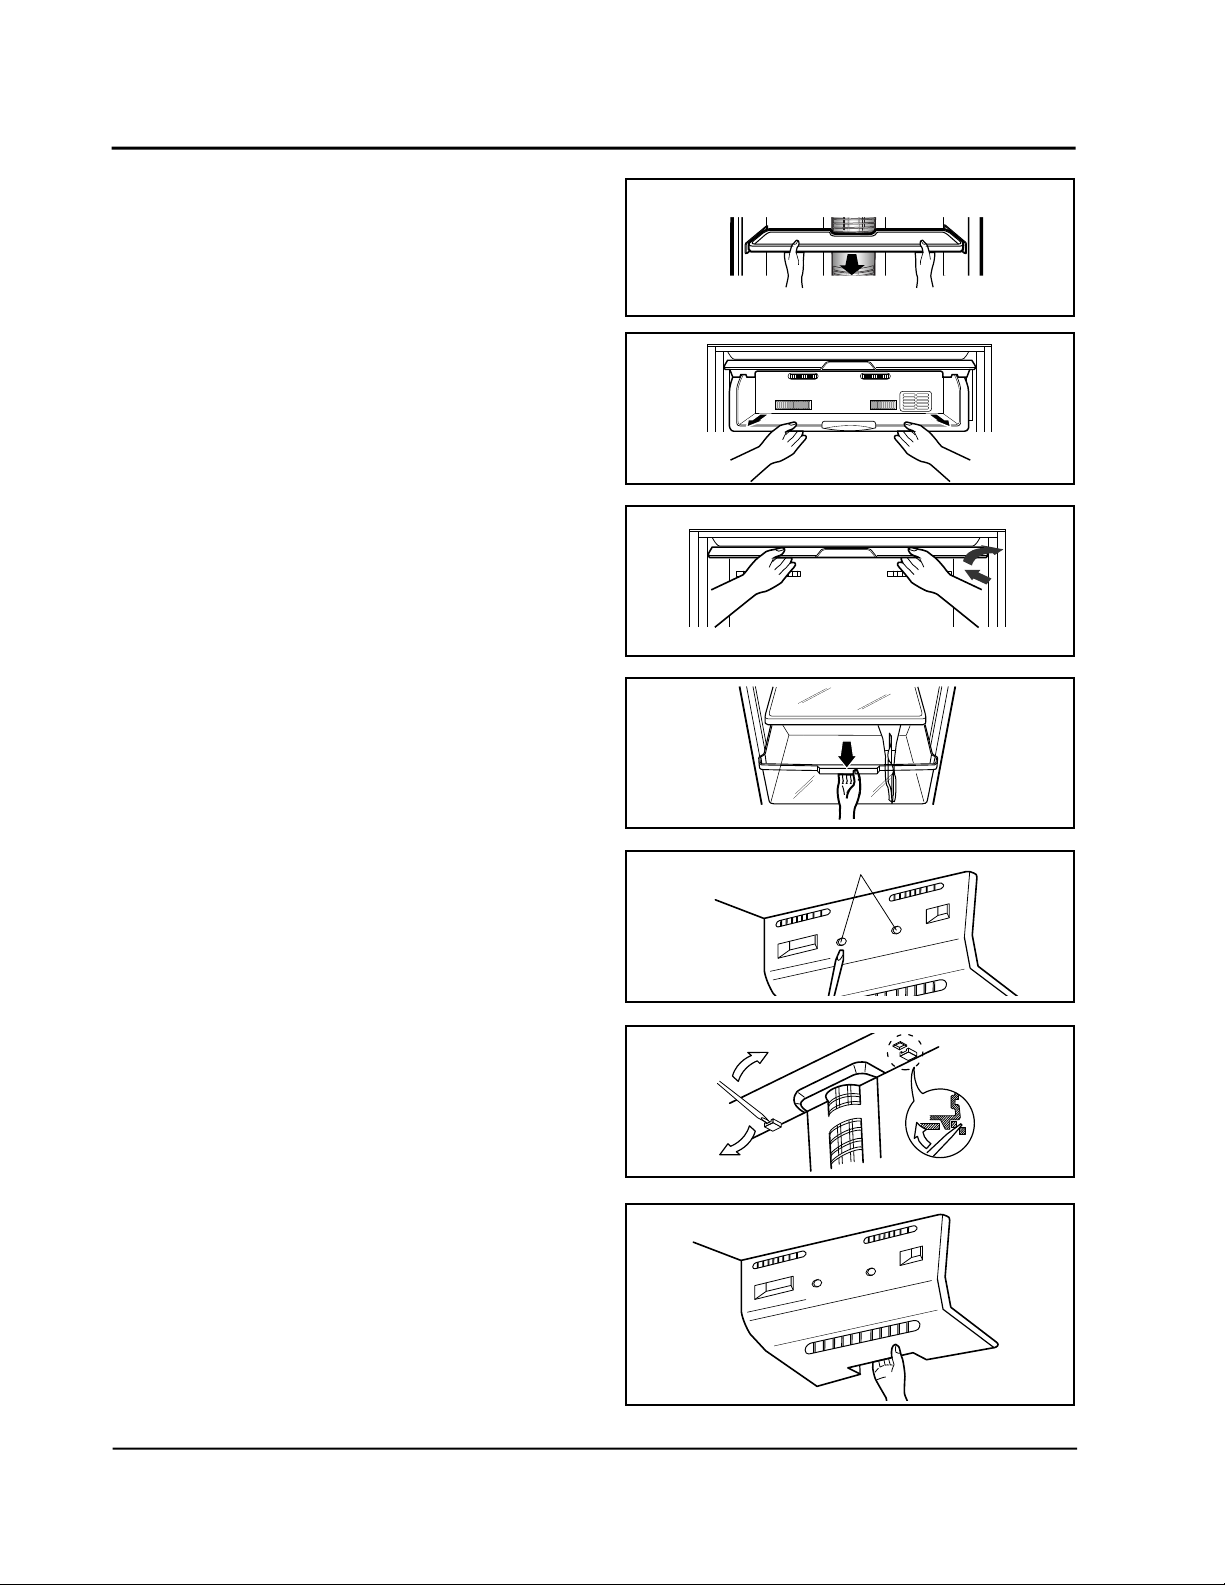
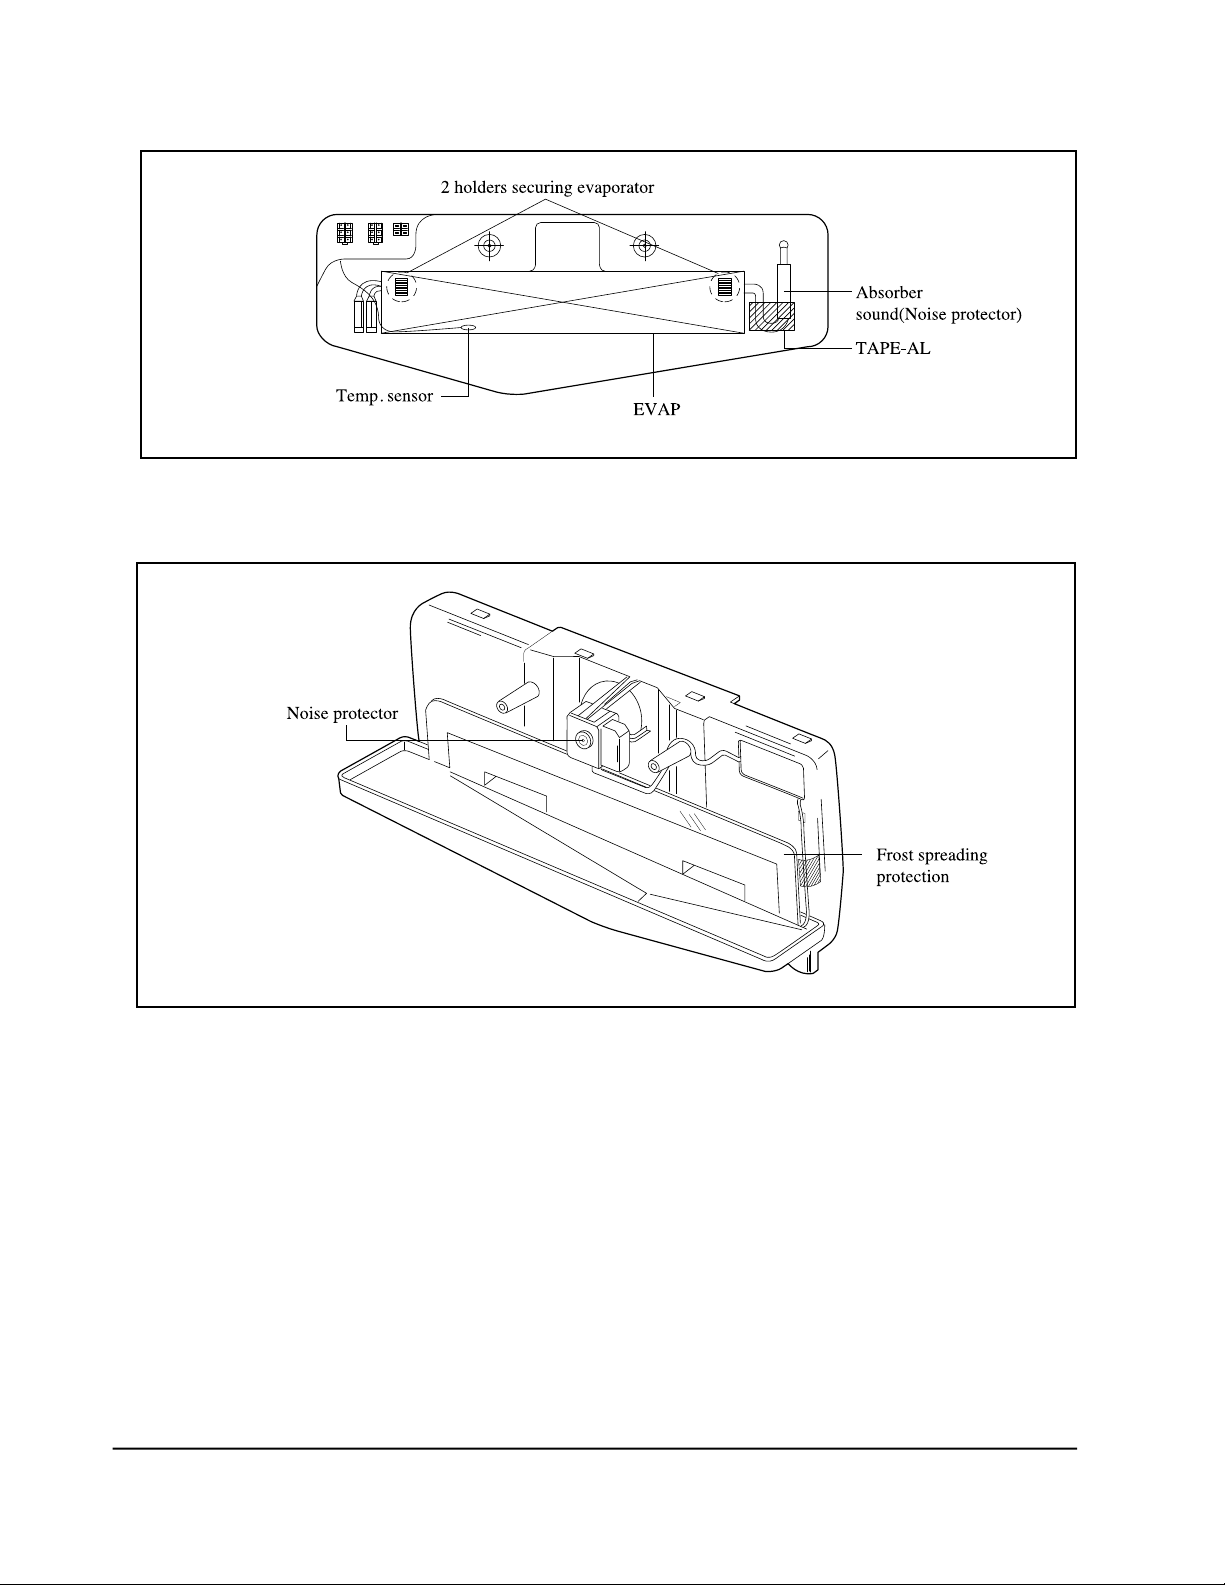
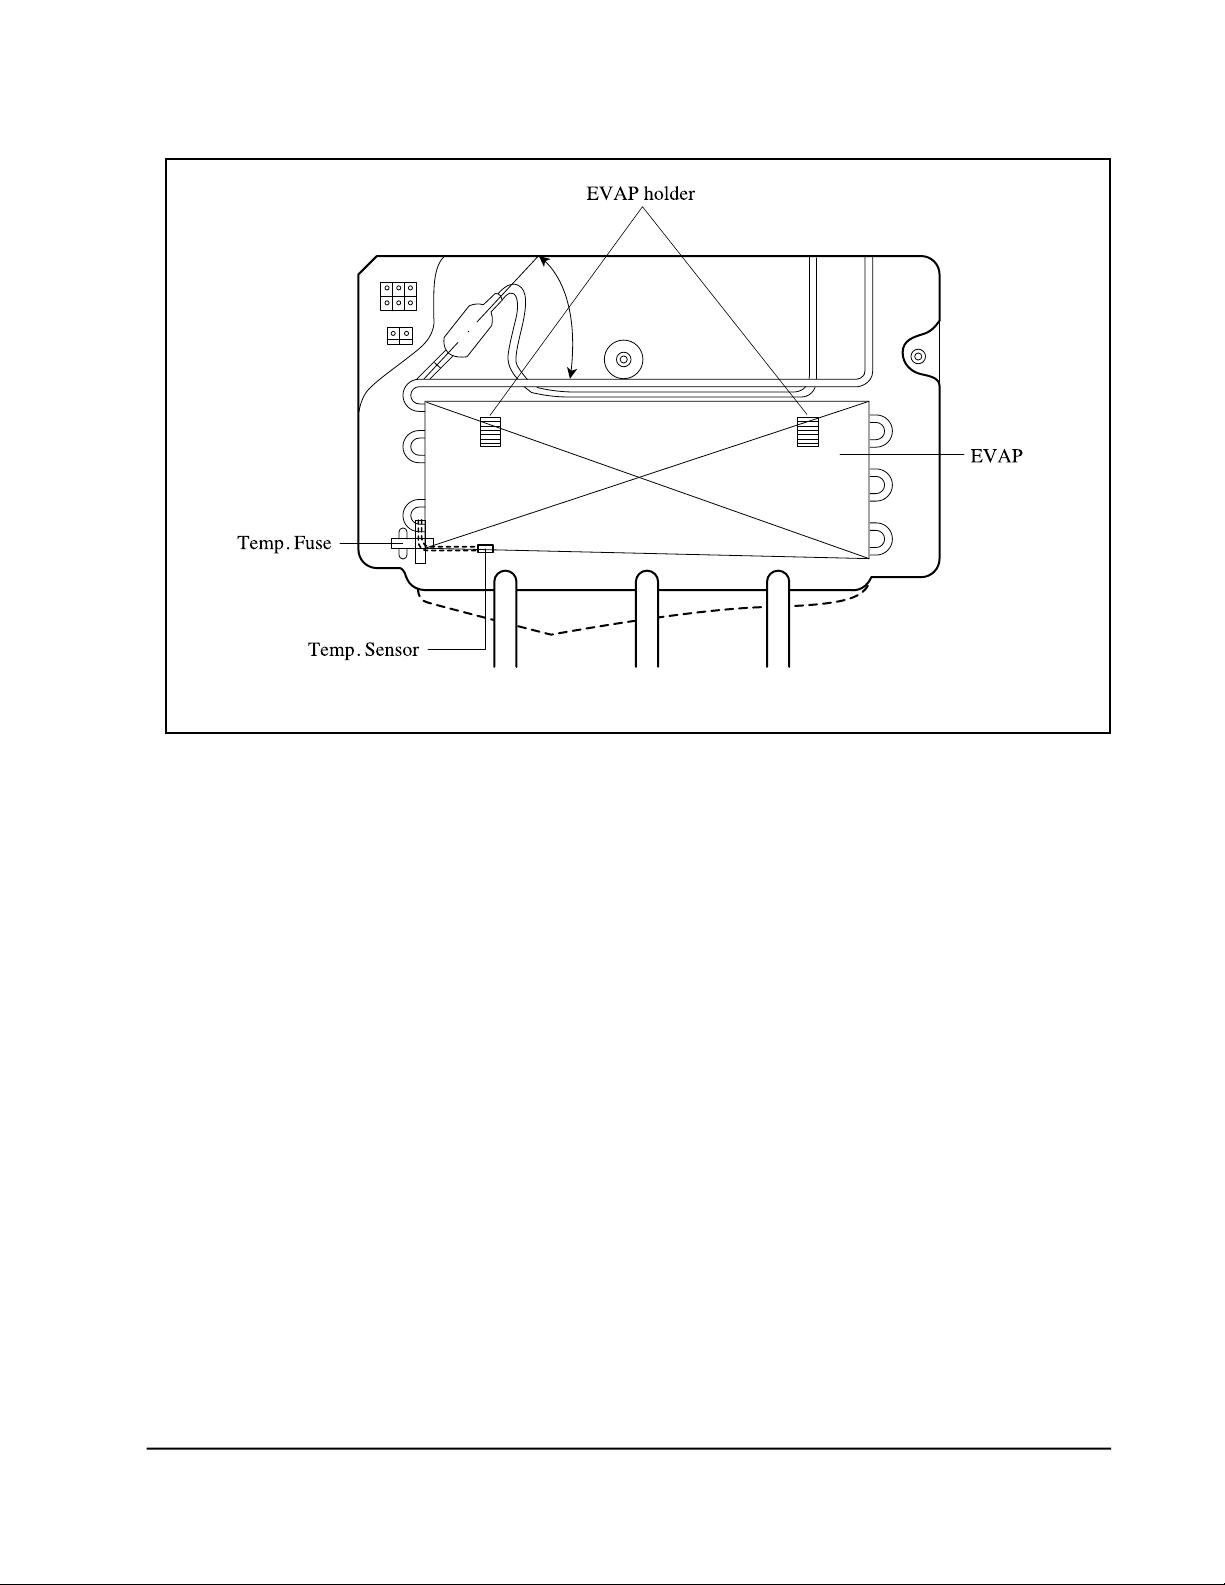
11-3 Disassemble of refrigerator cooling part
1) Remove foods and shelves inside the
refrigerator.
2) Pull out the chilled room box to the arrow
direction and pul it up to apart at the locking
point.
3) Push the right arrow part of the chilled room
inside and apart the chilled room cover.
4) Up the cover of vegetable box and pull apart
then pull it out.
5) Remove the screws with (-) driver.
6) Release the locking part using (-) driver as
shown.
7) Pull out the cover front part.
2 screws
42 Samsung Electronics
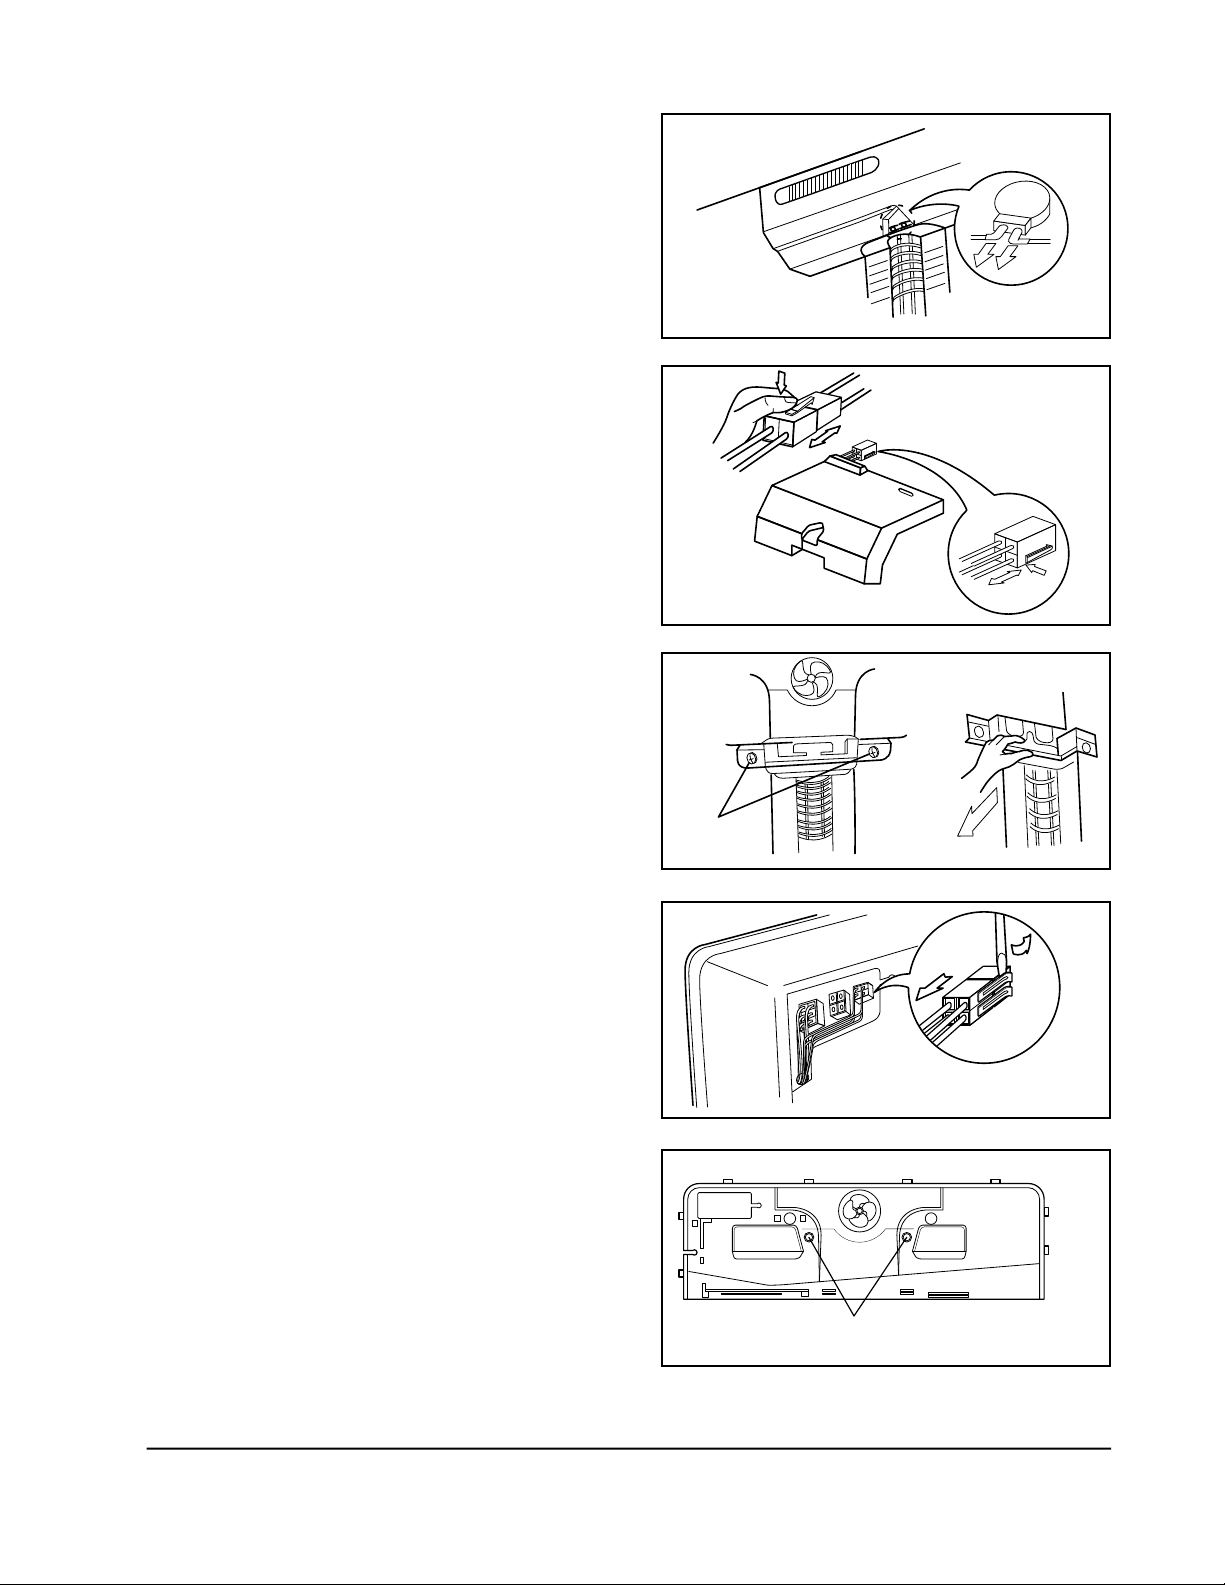
8) Disassemble the wire housing of motor in the
center.
9) Pull the housing part and disassemble the wire
terminal.
10) Remove screws of duct and pull apart.
11) Release wire terminal on top of the left.
12) Remove screws of evap. Cover rear and release
the locking part of both left and right using (-)
driver.
Remove 2
screws
latch
Remove 2 screws
Samsung Electronics 43
♦ Cooling cycle unit assembly in the refrigerating compartment
♦ Cooling cycle unit cover assembly in the refrigerating compartment
(Groove for preventing
small ice when
defrosting)
44 Samsung Electronics
♦ Rotating duct assembly in the refrigerating compartment
Samsung Electronics 45

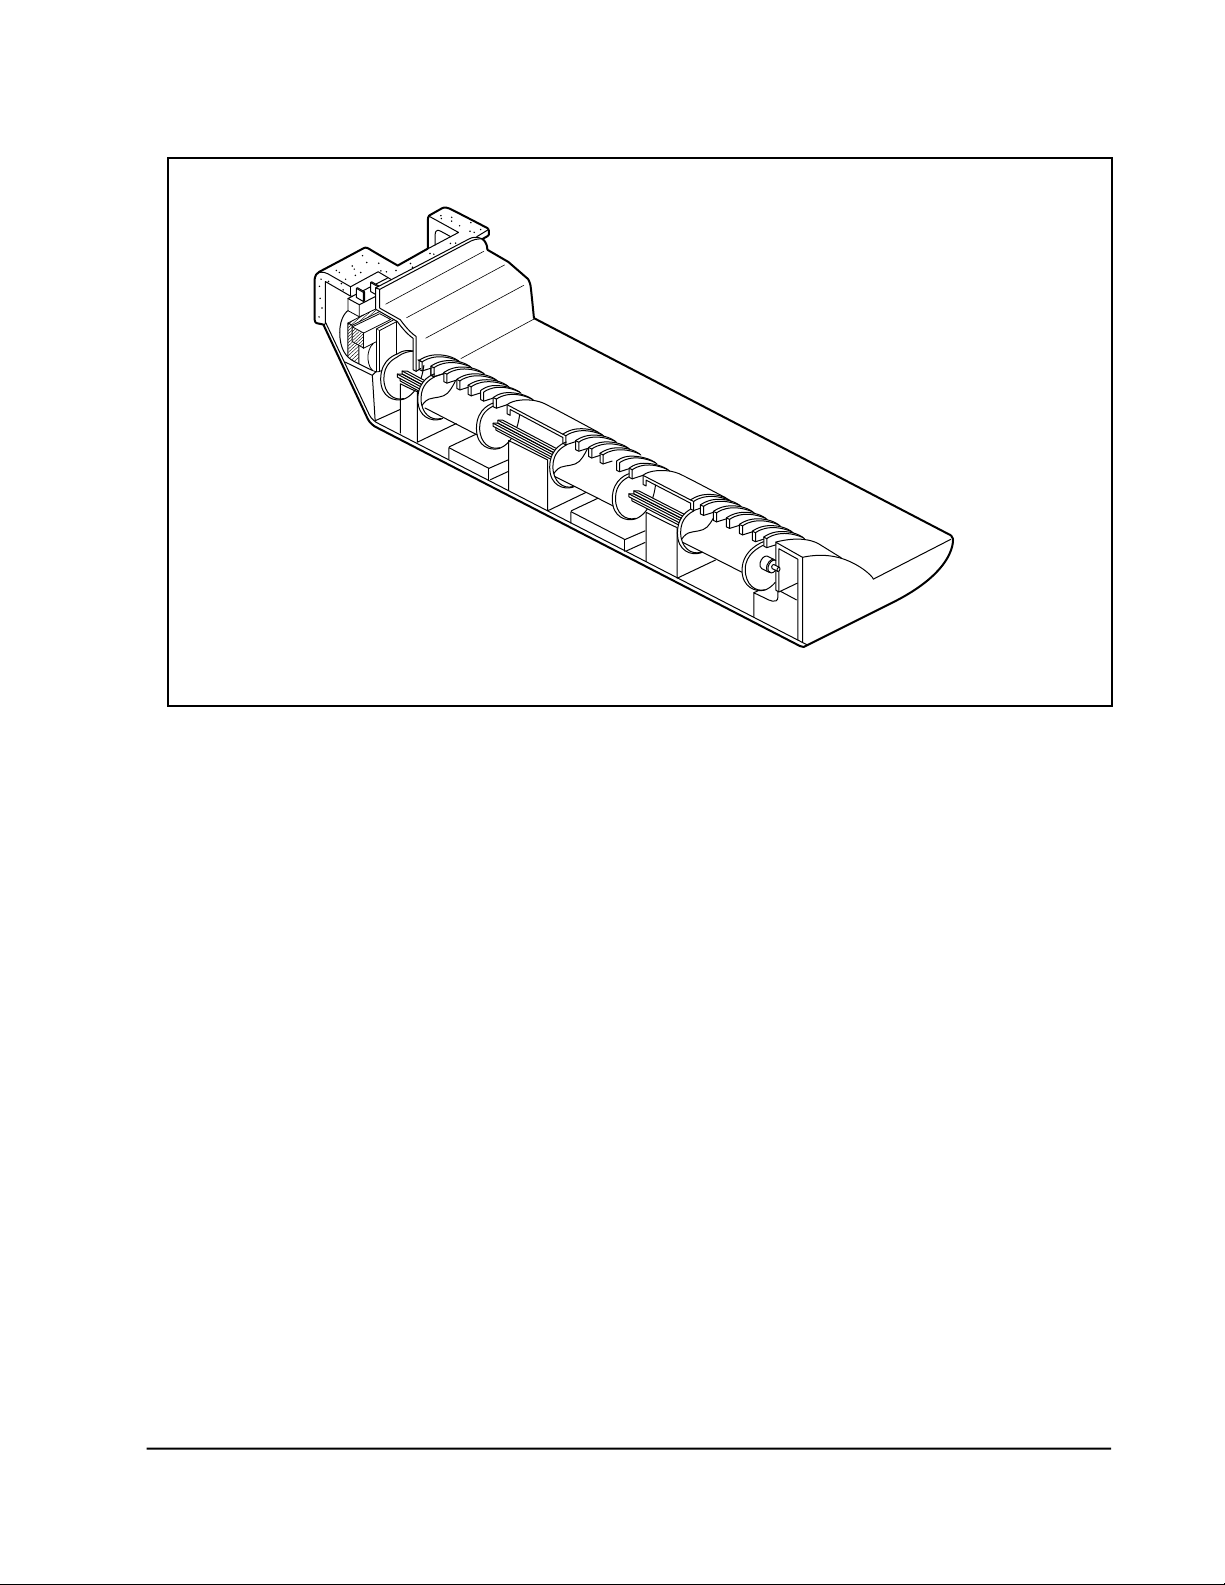
11-4 Disassemble of cooling part in the freezing room
1) Pull out the shelf.
1
2
2) Remove screws of evap cover and pull apart.
3) Disconnect the each terminal of wire housing
on top of the left side.
4) Remove screws of evap. Cover rear and
release the locking point using (-) driver.
Residual spread preventer
46 Samsung Electronics
♦ Assembly of the cooling cycle unit in the freezer
Maintains 45˚
(Coolant & noise
reduction)
Samsung Electronics 47

11-5 Assembling specifications of machinery room
1. remove screws of compressor cover
2. Assembling specifications of machinery room
Noise & Vibration
reduction rubber
48 Samsung Electronics

11-6 Assembling specifications of power supply part
1. Turn off the power of
refrigerator.
2. Remove the cover using (-) driver.
3. Assembling specifications of power supply part
TEST S/W
Condenser
D/C Trans
Samsung Electronics 49

11-7 Disassembling method and order of water dispenser
1. Disassembling method and order of cock part
1-1. Open the door and detach the water tank. Throw away waters in the tank.
1-2. Turn the cock on the bottom of the water tank to counterclockwise and apart.
1-3. Push part 6 to arrow direction and apart part 2 then part 5,6 automatically aparted. Puch the
locking point to arrow direcion to apart part 3.
1) Be careful not to damage the parts 1,2,5,7 ( It may cause a leak of water. )
2) Assembling is reverse of the disassembling order.
part 5
part 6
part 2
part 3
part 7
part 1
part 4
2. Disassembling method and order of lever
2-1. Close the door and turn the screw of the bottom of cover dispenser to counterclockwise using (+)
driver and pull out to arrow direction and apart the cover.
2-2. Release locking point of lever dispensor using (-) driver to the arrow direction and apart spring
and lever dispenser.
2-3. Push locking point using (-) driver and pull out key-lock to upside then apart dispenser locking
device.
2-4. Assembling is reverse of the disassembling order after inserting the spring to lever shaft.
50 Samsung Electronics

11-8 The operating theory and order of water dispenser
1. Push the knob lever(1-1) to the arrow direction.
2. Lever dispenser(1-2) rotates around spring-lever(1-
3) to the counterclockwise and push guide pin(2-1)
and press the spring dispenser(2-2) vertically.
3. O-ring(big)(2-4) inserted in guide-push(2-3) moves
vertically and aparts from cock-dispenser(2-5) then
water flows through path of guide-pin(2-1) to the
cup.
4. O-ring(small)(2-6) inserted in guide-pin(2-1) also
aparts from guide-push(2-3) to let air go through
that helps water flowing.
5. Stop pushing knob lever(1-1) when water filled to
certain point.
6. Lever-dispenser returns by expansive force of
spring-dispenser(2-2) and spring-lever(1-3) .
7. Guide-push(2-2), guide-pin(2-1), o-ring(small)(2-6)
and o-ring(big)(2-4) also retun and contact cockdispenser(2-5) then return to initial state.
W A T E R - D I S P E N S E R
2-7
Samsung Electronics 51

11-9 Dispenser unit list
NO CODE-NO PART
1
1 - 1
1 - 2
1 - 3
1 - 4
1 - 5
2
2 - 1
2 - 2
2 - 3
2 - 4
2 - 5
2 - 6
2 - 7
2 - 8
2 - 9
2 - 1 0
2 - 1 1
2 - 1 2
2 - 1 3
2 - 1 4
3
3 - 1
3 - 2
3 - 3
3 - 4
3 - 5
4
5
6
7
8
DA63-10905C
DA64-40173B
DA32-10105G
DA61-20146A
DA64-90138B
DA64-10896B
DA64-90136A
DA71-70158A
DA61-20147A
DA71-70159A
DA60-90103B
DA67-10402A
DA60-90103A
DA74-40142A
DA71-20159A
DA67-30214A
DA74-90115B
DA63-30011A
DA63-10383A
DA65-20004A
DA67-30005A
DA67-10403B
DA71-20264A
DA74-40144A
DA02-10143A
DA02-10142A
DA02-10014A
DA63-10010A
DA67-40295B
DA67-40294B
DA63-20158C
6002-000213
ASS’Y-COVER DISPENSER
KNOB(LEVER)
LEVER-DISPENSER
SPRING(LEVER)
KEY(LEVER)
COVER-DISPENSER
TANK-WATER ASS’Y
GUIDE-PIN
SPRING-DISPENSER
GUIDE-PUSH
RING-O
COCK-DISPENSER
RING-O
VALVE(WATER-TANK)
FIXER-FILTER
CAP-TANK UPP
TANK-WATER
GASKET-COMP V/PLATE
COVER TANK
CLAMP-TANK
CAP
CASE-DISPENSER
FIXER-CASE
VALVE(FIXER-CASE)
TAPE-AL, FOIL(B)
TAPE-AL, FOIL(A)
TAPE-AL
COVER-DISPENSER, B
TRAY-DISPENSER, A
TRAY-DISPENSER, B
GUARD-VARIETY, A
SCREW-TAP
SPEC. Q’TY REMARK
M-PROJECT
ABS
POM(TP-20)
STS-304(WPB)
ABS(HG-0760)
ABS(HG-0760)
M-PROJECT
PC
STS-304(WPB)
PC
SILICON(TSE-221)
PC-ABS
SILICON(TSE-221)
SILICON(TSE-221)
PE(HARD)
PE(SEMI-HARD)
ABS(INSERT)
SILICON(TSE-221)
ABS, WHT
PC ABS
ABS
ABS
ABS
SILICON(TSE-221)
AL(T=0.075)
AL(T=0.075)
TAPE AL, T0.05, W50, 1RL
ABS
ABS
ABS
GPPS
TH1 4X12 FZ-FZY
1
1
1
1
1
1
1
1
1
1
1
1
1
1
1
1
1
1
1
2
1
1
1
1
1
1
0.32MT
1
1
1
1
2
PART USED INSTEAD
OF WATER TANK
A/S IMPOSSIBLE
A/S IMPOSSIBLE
A/S IMPOSSIBLE
A/S IMPOSSIBLE
A/S IMPOSSIBLE
A/S IMPOSSIBLE
52 Samsung Electronics

11-10 General diagnosis of water dispenser
No water or too little water flow out
Check the water in the water tank
Normal
Normal
Check the fixed state of water tank
Normal
Water falls continueously
Check the contact state of o-ring ( burr, eveness, etc)
Normal
Fill in the water tank
( If the fixed state is bad the guide-pin doesn’ t work due to the
wrongly positioned cock-ass’ y)
Fix the water tank correctly ( Check guide-variety )
(It acn cause a leak of water.)
If gasket is missed or wrongly assembled, then fix the problem.
Check the gasket between cock-ass’ y and water tank
(Misse valve(water tank) cause a leak of water between cock-ass’ y and
water tank. )
If valve(water tank) is missed or wrongly assembled,
Normal
Change all the parts
Normal
Change refrigerator door
Samsung Electronics 53
then fix the problem.

8. Circuit operating theory
8-1 Power supply part
Voltage
(DC 12V)
Vcc (DC 5V)
V12 (DC 12V)
Secondary voltage output of DC trans is sourced 1~3 and 5~7 about 15V. On the ’a’ part, input is
rectified and regulated by MC 7812 and is about DC12V. This voltage is applied for relay running and
regulated again by 7805 to transformer. DC 5V is applied to display part after rectified and regulated by
MC7812.
Relay Operation
Power around MICOM & Sensor Detector
LED Display & S/W Detector
Circuit used
8-2 Resetpart
Reset part is intialize RAM of MICOM and others when
KA7533 RESET
+
29
power is on or power is interrupted for some time. It
will make whole program runs from the first status.
When power is supplied, reset voltage is ”low” status
for a few seconds and turn into ”High” status in the
normal operating.
16 Samsung Electronics

8-3 Door S/W sensing part
DOOR
F
R
Door Conditions
CLOSE
OPEN
CLOSE
OPEN
Door S/W Contact
CLOSE
OPEN
CLOSE
OPEN
CON06
PIN NO
1
3
Micom Input Voltage
1) When the door is opened, the door S/W closed and MICOM input is ‘Low’.
Then the door-open is sensed.
2) When the door is closed, the door S/W is opened and MICOM input is ‘high’.
Then the door closed is sensed.
8-4 “V” motor, location sensing part ( Reed S/W)
“HIGH”
“LOW”
“HIGH”
“LOW”
1) “V” motor’s location sensing which is for G.A. fuzzy control is done by reed S/W.
2) There occure a “high” to “Low” and “Low” to “High” conversion period on con02 pin6 by the
motion of swing fan. “V” motor’s location is detected by it
Samsung Electronics 17

8-5. Temp. sensing part
(Room Temp Sensor)
When Sensor is opened
MICOM input “HIGH”
1) Thermistor is used for sensing which has negative resistance coffiecient to the temperature.
2) MICOM input voltage, VF of sensor is ( Vcc: 5V, Rth : Sensor resistance )
3) Refer to conversion table for VF and RTH according to temperature.
VF= xVcc
RTH
RTH + R24
When sensor is cut off
MICOM input “LOW”
18 Samsung Electronics

8-6 Comp and defrosting heater operating
As it is seen above block diagram, 220V line is connected to the commons of Comp relay, Ry78 and
defrosting heater relay, Ry77, Ry71. When those relays are off state Comp and defrosting heater are also
off. As Comp relay moves to on and AC 220V applied to Comp load it starts operating. On the other
hand defrost heater runs if defrost heater relay moves to on. There is no chance that both Comp and
defrost heater runs together so it’s useful for safety aspect.
COMP
ON
ON
ON
ON
RELAY
Defrost H
OFF
OFF
OFF
OFF
Load
Comp Operation
Comp off, Defrost-Heater Off
Defrost-Heater On
Comp Off, Defrost-Heater Off
Remark
Defrost-Heater Power Off
Comp Power Off
Samsung Electronics 19

9. Failure diagnosis and repairment
Main PCB check
• Turn the power off and on again for self diagnosis check.
• Refer to belows for error code table
♦ Error code table
Item
Refrigerator
Freezer
CONTROL BOX
Display “LOW”
Room Temp s
F Sensor
F Defro. Sensor
R1 Sensor
R Defro. Sensor
R1 sensor
e n s o r
Room TEMP-Sensor
R2 Sensor
“LOW.Mid”
R2 sensor
F sensor
Freezer
Refrigerator
♦ Table for Vf and Rth according to temperature
T(˚C)
-35
-34
-33
-32
-31
-30
-29
-28
-27
-26
-25
-24
-23
-22
-21
-20
-19
R(ohm)
68648
65011
61595
58384
55366
52526
49854
47337
44967
42733
40626
38640
36765
34995
33323
31743
30250
V(v)
4.364
4.333
4.301
4.268
4.235
4.200
4.164
4.127
4.090
4.051
4.012
3.972
3.930
3.888
3.845
3.802
3.757
T(˚C)
-18
-17
-16
-15
-14
-13
-12
-11
-10
-9
-8
-7
-6
-5
-4
-3
-2
R(ohm)
28838
27502
26237
25040
23906
22832
21814
20848
19932
19062
18237
17453
16709
16001
15328
14688
14080
V(v)
3.712
3.666
3.620
3.573
3.525
3.477
3.428
3.379
3.329
3.279
3.229
3.178
3.127
3.076
3.025
2.974
2.923
“Mid”
R Defro.
s e n s o r
F Defro. sensor
T(˚C)
R(ohm)
-1
14051
0
12949
1
12424
2
11924
3
11447
4
10993
5
10559
6
10146
7
9752
8
9375
9
9016
10
8673
11
8345
12
8032
13
7732
14
7446
15
7172
“ M i d . H I G H ”
–
–
V(v)
2.872
2.821
2.770
2.719
2.668
2.618
2.567
2.518
2.468
2.419
2.370
2.322
2.274
2.227
2.180
2.134
2.088
T(˚C)
“LOW”
Swing fan motor
–
R(ohm)
16
6910
17
6659
18
6420
19
6190
20
5970
21
5759
22
5557
23
5363
24
5178
25
5000
26
4829
27
4665
28
4508
29
4357
30
4212
V(v)
2.043
1.998
1.954
1.911
1.869
1.828
1.786
1.745
1.705
1.666
1.628
1.590
1.553
1.517
1.481
20 Samsung Electronics

Check in advance
1. Check the power of consent and power code.
2. Check it based on the “References” on the next pages.
9-1 No Input Power
N
Y
Y
N
N
Y
Y
N
N
Y
Y
Y
Samsung Electronics 21

9-2 Self diagnosis failure
1) Outer temperature sensor failure
Start
Is main PCB connection
(CON 5) O.K. ?
Y
Is outertemp sensor O.K.
Y
Is input vltg of CON 05
pin2 O.K.
Change main PCB ass’ y
N
N
N
2) R1, R2, refrigerator temp. sensor failure
Start
Is temp. sensor O.K. ?
N
Connection failure
Change sensor
Wire open
Y
Is main PCB connection
(CON02) O.K. ?
Y
Is input vltg of CON 02
pin1,2 O.K.
Y
Is input vltg of CON 02
pin1,2 O.K.
Y
Change main PCB ass’ y
N
N
N
Change sensor
Connection failure
Connection between sensors open
Wire open
22 Samsung Electronics

3) Refrigerator’ s defrosting sensor failure
Start
Is main PCB connection
(CON 5) O.K. ?
Y
Is defrosting sensor O.K.
Y
Is connection of defrosting
sensor O.K.
Y
Is input vltg of CON 03
pin4 O.K.
Y
Change main PCB ass’ y
4) F1, Freezer temp. sensor failure
N
Connection failure
N
Change sensor
N
Connection failure
N
Wire open
Start
Is main PCB connection
(CON03) O.K. ?
Y
Is temp. sensor O.K.
Y
Is connection of temp.
sensor O.K.
Y
Is input vltg of CON 03
pin1 O.K.
Y
Change main PCB ass’ y
N
Connection failure
N
Change sensor
N
Connection failure
N
Wire open
Samsung Electronics 23

5) Freezer’ s defrosting sensor failure
Start
Is main PCB connection
(CON03) O.K. ?
Y
Is defrosting sensor O.K.
Y
Is connection
of defrosting sensor
O . K .
Y
Is input vltg of CON 03
pin5 O.K.
Y
Change main PCB ass’ y
N
Connection failure
N
Change sensor
N
Connection failure
N
Wire open
24 Samsung Electronics

9-3 In case of continuous alarming
references
• F/R door open alarms for ten seconds after 2 minutes later. If door opens continuously, door
open alarms for ten seconds with one minute cycle. ( ten times of “Ding-Dong”)
• If there is moisture in door S/W, it is shorted and alarms due to the MICOM’s misjudgement.
In this case the inside lamps of freezer and refrigerator turns off so the lamp do not turns on
though you open the door.
• If the door S/W is rusted, the signal of door open do not reach to MICOM and no alarms and
lamps turned off continuously.
1) In case of “Ding-Dong” alarming
Start
Is main PCB connection
(CON03) O.K. ?
Y
Is the door S/W O.K.
Y
Is main PCB connection
(CON06) O.K.
Y
Does the vltg of CON06
Pin 1,3 change?
Y
Change main PCB ass’ y
N
Connection failure
N
Change sensor
N
Connection failure
N
Wire open, Change door S/W
Samsung Electronics 25

2) In case of “Beep-Beep” alarming
Start
Is forced operating /
frosting selected ?
Y
Is it the same when
power on again?
Y
CON04 shorted. or touched
N
Cancel forced oper./defro.
N
Main PCB O.K.
references
• There is no “beep-beep” alarming except the forced deforst or sensing trouble during self
diagnosis.
• If self diagnosis sensed trouble, it is displayed on the panel PCB, so easy to check. If not , the
forced deforst or forced operation is selected the notch status are “High”-“Mid.High” at that
time.
3) In case of no panel PCB display
Start
Is the connection of
cover O.K. ?
Y
Is main PCB connection
(CON07) O.K. ?
Y
Is panel PCB
connection O.K. ?
Change panel PCB
N
Connection failure
N
Re-connection
N
Connection failure
26 Samsung Electronics

4) In case of the panel PCB key selection is impossible
Start
Is the connection of
cover O.K. ?
Y
Is main PCB connection
(CON07) O.K. ?
Y
Is panel PCB connection
O.K. ?
Y
Are there any keys
already pressed ?
Y
Change panel PCB
9-4 In case of fan do not run
N
Connection failure
N
Re-connection
N
Connection failure
N
Re-assemble panel PCB
references
‘Be sure to check cooling fan under forced operation. ’
1. F-fan, R-fan and Comp cooling fan are off when Comp is of f.
2. Though the Comp is on, the R-fan is not always on because the fan is off when the temperature
was reached to the set point.
3. There is delaying time to run the fan after door open (Co mp on state) . The delay time varys
from ten seconds to one minute. (Forced operation included)
Samsung Electronics 27

9-5 In case of swing fan in the refrigerator doesn’ trun.
Start
references
Does it run for
30 seconds when the
door open?
N
Is the door S/W O.K. ?
Y
Is the connection of
CON09 O.K. ?
Y
Is the vltg of both ends of
motor 220V
N
Change main PCB ass’ y
Y
Swing fan O.K.
N
Change door S/W
N
Connection failure
Y
Motor failure
1. Swing fan doesn’ t run at the off state of R-fan. ( door closed)
2. Swing fan runs for 30 seconds when the door is open but from then it doesn’ t work as the door
opened continuously. It’ s just runs for 30 seconds from the time the door is opened.
28 Samsung Electronics

1) In case of F-fan doesn’ t run
Start
Is it forced operation ?
Y
Does it run 1 min
after the door S/W pressed?
N
Is the connection of
CON10 O.K. ?
Y
Is the vltg of both ends of
F-fan 220Vac
N
Does the door S/W
works normally
Y
Change main PCB ass’ y
Forced operation
Y
F-fan O.K.
N
Re-connection
Y
F-fan failure
N
Change door S/W
Samsung Electronics 29

2) In case of R-fan doesn’ trun
Start
Select forced operation.
Does it run
1 min after the door S/W
p r e s s e d ?
N
Does the door S/W
works normally
Y
Is the connection of
CON09 O.K. ?
Y
Is the vltg of both ends of
F-fan 220Vac
N
Change main PCB ass’ y
Y
R-fan O.K.
N
Change door S/W
N
Re-connection
Y
F-fan failure
30 Samsung Electronics

10. Disassemble & assemble drawing and part list
10-1 Freezing Compartment
Samsung Electronics 31

NO CODE-NO ITEM SPECIFICATIONS Q’TY
R E M A R K
1
1-1
1-2
1-3
1-4
1-5
2
2-1
2-2
2-3
3
3-1
3-2
4
4-1
4-2
5
5-1
5-2
5-3
5-4
5-5
5-6
5-7
5-8
6
7
8
9
DA63-11041B
DA63-11041C
DA32-10109A
DA63-11030A
DA47-40112R
4713-000213
4713-001035
6002-000215
DA67-20163N
DA67-20135D
DA67-40299A
DA64-20194A
DA63-10403C
DA63-10338A
DA67-10205D
DA59-40245B, C, A, D
DA47-10148D
DA32-10105G
DA63-11044C, D, F, E
DA63-11035A
DA63-10364A
DA31-20103A
DA31-10109D
DA31-10109W
DA31-10109B
DA31-10109F
DA63-40119A
DA61-20128A
DA72-60042A
6002-000224
6002-000215
DA67-30266D
DA63-10402K
DA47-20208G
DA47-20208H
DA47-20208F
DA47-20208J
COVER LAMP FRE ASSY
COVER LAMP FRE ASSY
SENSOR FRE
COVER LAMP FRE
LAMP HOLDER
LAMP-INCANDESCENT
LAMP-INCANDESCENT
SCREW TAP TH
SHELF FRE ASSY
SHELF FRE
TRAY ICE
TRIM SHELF
CASE ICE
COVER CASE ICE
CASE ICE CUBE
EVAP-FRE ASSY
THERMO FUSE
SENSOR-REF
COVER-EVAP REAR(FRE)ASSY
COVER-EVAP REAR
COVER MOTOR FAN
FAN
MOTOR-FAN
MOTOR-FAN
MOTOR-FAN
MOTOR-FAN
GROMMET FAN MOTOR
SPRING FAN
BUMPON-MOTOR
SCREW TAP TH
SCREW TAP TH
CAP-SCREW
COVER-EVAP FR(FRE)ASSY
HEATER DRAIN
HEATER DRAIN
HEATER DRAIN
HEATER DRAIN
220V, 240V
110V, 127V
5 0 2 A T
M I P S
P B T
2 2 0 V ~ 2 4 0 V / 1 5 W
1 1 0 V ~ 1 2 7 V / 1 5 W
1-4X16FE, FXY
G P P S
G P P S
P P
P E
G P P S
H I P S
110V, 127V, 220V, 240V
250V, 10A
250V, 10.5A
110V, 127V, 220V, 240V
P P
P P
ABS, 120µ
110V, 2650RPM
127V, 2650RPM
220V, 2650RPM
240V, 2650RPM
N B R
S U S 2 7 W R
N B R
2S 4X16FE, FZY
1-4X16FE, FZY
P P
P P
1 1 0 V / 1 3 W
1 2 7 V / 1 3 W
2 2 0 V / 1 3 W
2 4 0 V / 1 3 W
1
1
1
1
1
1
1
2
1
1
2
4
1
1
1
1
1
1
1
1
1
1
1
1
1
1
2
1
1
1
6
4
1
1
1
1
1
32 Samsung Electronics

10-2 Refrizerating Compartment
Samsung Electronics 33

NO CODE-NO ITEM SPECIFICATIONS Q’TY
R E M A R K
1
1-1
1-2
1-3
2
2-1
2-2
2-3
2-4
3
4
5
5-1
5-2
5-3
5-4
6
7
8
9
9-1
9-2
9-3
9-4
9-5
9-6
9-7
9-8
10
11
11-1
12
13
14
15
16
17
17-1
17-2
17-3
17-4
17-5
DA59-40238C, E, A, B
DA47-10148D
DA32-10105G
DA63-40001A
DA63-11040D, C
DA63-11031A
4713-000213
4713-001035
DA47-40112T
DA61-70266A
DA02-90106E
DA63-11036A
DA67-40300D
DA66-10104A
DA71-20145A
DA64-20205A
DA64-20204A
DA63-11020D
DA63-10467A
DA32-10105B
DA63-10534L, R, J, K
DA63-10216A
DA63-10364A
DA31-20103A
DA31-0109D, W, B, F
DA61-20128A
DA72-60042A
6002-000224
DA63-40119A
6002-000215
DA72-40484A
DA39-20122E
DA63-10235F
DA67-30266D
6002-000215
DA67-20172B
DA63-10384G
DA63-10237J
DA63-10237E
DA63-10237L
DA63-10237F
DA63-10897E
DA31-20133B
DA31-20135B
DA72-30193A
DA72-60158C
EVAP-REF ASSY
THERMO FUSE
SENSOR-DEF
GROMMET EVAP
COVER-LAMP REF ASSY
COVER LAMP REF
LAMP-INCANDESCENT
LAMP-INCANDESCENT
HOLDER LAMP
SUPT LAMP
CATALYST-LTC
COVER-PURIFIER
TRAY-CHILL ROOM ASSY
ROLLER-FREE
FIXER ROLLER
TRIM TRAY, R
TRIM TRAY, L
COVER-CHILLED ASSY
COVER-SENSOR REF
SENSOR-ASSY
COVER EVAP REAR REF ASSY
COVER EVAP RE, (R)
COVER MOTOR FAN
FAN
FAN-MOTOR
SPRING FAN
BUMPON MOTOR
SCREW TAP TH
GROMMET FAN MOTOR
SCREW TAP TH
INS, COVER EVAP FR
WIRE HARNESS GEARED
COVER EVAP FRONT(REF)
CAP SCREW
SCREW-TAP TH
SHELF-REF ASSY
COVER-VEG ASSY
COVER-DUCT ASSY
COVER-DUCT ASSY
COVER-DUCT ASSY
COVER-DUCT ASSY
COVER-DUCT REF
BLADE AIR LOW
BLADE AIR UPP
SPACER DUCT, REF
SEAL DUCT, REAR
110V, 127V, 220V, 240V
250V, 10A
250B, 10.5A
NR
110~127V, 220~240V
SAN
220V~240V/15W
110V~127V/15W
PBT
STS
T15, W40, L70
PP
POM
NY-66
PE
PE
HIPS
502AT
110V, 127V, 220V, 240V
PP
PP
ABS
110V, 127V, 220V, 240V
SUS27WR
NBR
2S 4X12FE, FZY
NBR
1-4X16FE, FZY
PP,WHT
1-4X16FE, FZY
110V~127V
220V~240V
110V~127V
220V~240V
HIPS
ABS
ABS
FOAM-PS
FOAM-PE
1
1
1
1
1
1
2
2
2
2
1
1
1
2
2
1
1
1
2
2
1
1
1
1
1
1
1
1
2
2
1
1
1
2
2
2
1
1
SR-606(8)EV
1
SR-606(8)EV
1
S R - 6 4 6 ( 8 ) E V S R - 6 8 6 ( 8 ) E V
1
S R - 6 4 6 ( 8 ) E V S R - 6 8 6 ( 8 ) E V
1
1
1
1
1
34 Samsung Electronics

NO CODE-NO DESCRIPTION SPECIFICATIONS Q’TY
R E M A R K
17-6
17-7
17-8
17-9
17-10
17-11
17-12
18
18-1
18-2
18-3
DA72-60161D
DA31-10107D
DA31-10107E
DA60-40104A
DA31-20132A
DA63-40133A
DA31-20132A
DA63-11024A
DA67-10227F
DA67-10228A
DA66-10104A
DA71-20145A
SEAL DUCT, AIR
GEARD MOTOR
GEARD MOTOR
WASHER
BLADE-AIR GUIDE
GROMMET MOTOR
BLADE CONNECTING
COVER DUCT, FR
CASE-VEG ASSY
CASE VEG
ROLLER-FRE
FIXER ROLLER
PVC-FOAM
AC220V~240V
AC110V~127V
ID 04, T0.5
PP
NBR
HIPS
GPPS
POM
NY-66(PA)
1
1
1
1
7
1
1
1
1
1
4
4
Samsung Electronics 35

10-3 Cabinet and Unit Compartment
36 Samsung Electronics

NO CODE-NO
ITEM SPECIFICATIONS Q’TY
R E M A R K
1 0
1 1
1 2
1 3
1 4
1 5
1 6
1 7
1 8
1 9
2 0
2 1
2 2
2 3
2 4
2 5
2 6
2 7
2 8
2 9
3 0
3 1
3 2
3 3
3 4
1
2
3
4
5
6
7
8
9
DA90-10230P
DA61-40115B
DA61-10145D
DA61-30127B
DA59-50021A
DA59-50033A
DA59-50014A
DA59-50015A
DA34-10003P
DA34-10003P
DA34-10003W
DA34-10003G
DA35-10003H
DA35-10003H
DA35-10003L
DA35-10003N
DA63-10352A
DA32-10105F
DA65-20101A
DA63-40234C
DA34-10122D
DA73-30102A
DA60-10104B
DA60-10110A
DA62-20001C
DA63-40171B
DA67-30218P
DA39-10123
6002-000216
DA71-60123F
DA60-90101A
DA61-40101C
DA66-20112A
DA60-10107A
DA67-40176C
DA31-10110G
DA31-10110L
DA31-10110F
DA31-10110H
DA31-20102A
DA61-20128A
6002-000215
DA73-10314C
2501-001091
2401-000511
2501-000423
DA26-30112A
DA26-30112B
DA26-30110C
DA26-30110A
DA63-10243A
ASSY-CABI FOAM
CASTER-FRONT
HINGE-LOW
FOOT-ASSY
COMPRESSOR
COMPRESSOR
COMPRESSOR
COMPRESSOR
O/L PROTECTOR
O/L PROTECTOR
O/L PROTECTOR
O/L PROTECTOR
PTC
PTC
PTC
PTC
COVER-RELAY
SENSOR-ASSY(EXIT)
CLAMP-COMP
GROMMET-COMP
DOOR SWITCH
DRYER
SCREW TAP TITE
SCREW SPECIAL, C
TUBE-PVC
GROMMET-COMP
CAP-SCREW
POWER-CORD
SCREW TAP TITE
CHASSIS COMP ASSY
RIVET CASTER
CASTER REAR
SHAFT COMP
SCREW EARTH
TRAY DRAIN WATER ASSY
MOTOR-CIRCUIT
MOTOR-CIRCUIT
MOTOR-CIRCUIT
MOTOR-CIRCUIT
FAN-SIRRCOO
SPRING-FAN
SCREW TAPPING
PIPE SUB COND ASSY
CAPACITOR
CAPACITOR
CAPACITOR
TRANS-DC
TRANS-DC
TRANS-DC
TRANS-DC
COVER-COMP ASSY
PP
SCP1
PP
SK182C-L2W
SK182P-L2W
SK190H-L2U
SK190Q-L2U
4TM444NHBYY-53
4TM444NHBYY-53
4TM314RHBYY-53
4TM232SHBYY-53
PTHAS-T100M200B
PTHAS-T100M200B
PTHAR-T220M350D
PTHAS-T330M385D
PP
STC5, TO.6
NBR, BLK
WHT
CU. OD18.85, L119
SNC3
M5, STS
PVC
NBR
PP
L2500(OPTION)
PH1-4X20
MSWR10, ZPC
PP, NTR
SUM24,ZPC2(YEL)
BSBN, M4X10
110V
127V
220V
240V
ABS, P/120
STS27
TH1-4X16
TO.7, OD4.76, L969
5µF, 350VAC
12µF, 250VAC
125µF, 125VAC
105V/50,60HZ
127V
220V
240V
SECC1
1
2
1
2
1
1
1
1
2
4
1
1
1
3
2
4
1
1
2
1
2
2
2
1
1
1
1
1
1
1
1
2
1
1
1
1
1
1
1
1
1
Samsung Electronics 37

NO CODE-NO ITEM SPECIFICATIONS Q’TY REMAR
3 5
3 6
3 7
3 8
3 9
4 0
4 1
4 2
4 3
4 4
4 5
DA72-60019A
6002-000213
DA63-11029A
DA67-10105G
DA63-10212H
DA41-20146A
DA41-20105F
DA41-20146B
DA41-20105G
DA61-10205A
DA63-10920G
DA63-50145A
DA61-10146C
DA63-50146A
SEAL PAM ABSORB
SCREW TAPPING
COVER LEG, FRONT
CASE CONTROL BASE
COVER-PCB PANEL
ASSY-MAIN PCB
ASSY-MAIN PCB
ASSY-MAIN PCB
ASSY-MAIN PCB
HINGE-UPP
COVER-HINGE UPP
SHIM-HINGE UPP
HINGE-MID ASSY
SHIM-HINGE, LOW
T10, W170, L170
TH 4X12FR, FZY
PP
PP-VO
PP
SR-606(8)EV
SR-606(8)EV
SR-646(8), 680(8)EV
SR-646(8), 686(8)EV
SHP1, T3.2
PP
RD-PVC T1.0
SHP1 T4.0
RD-PVC T1.0
1
3
1
1
1
1SET
1SET
1SET
1SET
1
1
1
1
1
38 Samsung Electronics

10-4 Door Parts
Samsung Electronics 39

NO CODE-NO DESCRIPTION SPECIFICATION Q’TY
1
2
3
4
5
6
7
8
9
1 0
1 1
1 2
1 3
1 4
1 5
1 6
1 6 - 1
1 6 - 2
1 6 - 3
1 6 - 4
1 6 - 5
1 6 - 6
1 7
1 8
1 9
2 0
2 1
2 2
2 3
24
2 5
2 6
27
2 8
( 1 ) ( 2 ) ( 3 ) ( 4 )
DA91-10258L, M, N, P
( 1 ) ( 2 ) ( 3 ) ( 4 )
DA91-10258Q, R, S, T
DA91-10259M, N, P, Q
DA91-10260H, J, K, L
DA91-10259R, S, T, U
DA91-10260M, N, P, Q
DA91-10259V, W, X, Y
DA91-10259R, S, T, U
D A 6 3 - 3 0 1 7 8 N
D A 6 3 - 3 0 1 7 8 P
D A 6 3 - 2 0 1 6 0 B
D A 6 3 - 2 0 1 5 8 A
D A 6 3 - 2 0 1 5 9 B
D A 6 3 - 2 0 1 6 2 C
D A 6 3 - 2 0 1 6 1 C
D A 7 1 - 4 0 1 3 5 A
D A 6 3 - 4 0 1 1 8 A
D A 6 5 - 9 0 1 1 1 H
D A 7 1 - 4 0 1 6 9 A
D A 6 3 - 1 0 8 9 4 B
D A 6 3 - 1 0 9 8 4 B
D A 6 7 - 1 0 4 0 1 C
D A 6 4 - 4 0 1 3 5 C ( L )
D A 6 4 - 4 0 1 3 5 C ( R )
6 0 0 2 - 0 0 0 4 6 6
D A 6 3 - 1 0 8 9 4 A
6 0 0 2 - 0 0 0 4 5 3
D A 4 1 - 2 0 1 5 6 B
D A 7 1 - 1 0 2 7 2 B
D A 7 4 - 9 0 1 3 6 B
D A 7 1 - 1 0 2 7 2 A
D A 6 7 - 4 0 2 9 7 A
D A 6 7 - 4 0 2 9 8 A
D A 6 7 - 4 0 2 9 4 B
D A 6 7 - 4 0 2 9 5 A
D A 6 3 - 1 0 9 0 5 E
6 0 0 2 - 0 0 0 2 1 3
6 0 0 2 - 0 0 0 2 1 3
-
6 0 0 2 - 0 0 0 2 1 5
ASS ’Y FOAM DOOR FRE
ASS ’Y FOAM DOOR FRE
ASS ’Y FOAM DOOR FRE
ASS ’Y FOAM DOOR FRE
ASS ’Y FOAM DOOR FRE
ASS ’Y FOAM DOOR FRE
ASS ’Y FOAM DOOR FRE
ASS ’Y FOAM DOOR FRE
ASS ’Y FOAM DOOR FRE
ASS ’Y FOAM DOOR FRE
ASS ’Y FOAM DOOR FRE
GASKET DOOR FRE ASS ’Y
GASKET DOOR FRE ASS ’Y
GUARD FRE
GUARD VARIETY ,A
GUARD VARIETY ,B
GUARD BOTTLE
GUARD REF LOW
STOPPER MID
GROMMET HINGE MID
ASS ’Y AUTO CLOSE
STOPPER DOOR MID
STOPPER DOOR,C
SCREW TAP PH
CASE-PCB ASS ’Y
CASE-PCB
KNOB TOUTH
KNOB TOUTH
SCREW TAP PH
COVER PCB PANEL
SCREW TAP FH
PCB PANEL ASS ’Y
REINF HINGE.REF
TANK-WATER ASS ’Y
GUIDE BOTTLE
TRAY EGG,A
TRAY EGG,B
TRAY DISPENSER,B
TRAY DISPENSER,A
COVER DISPENSER ASS ’Y
SCREW TAP
SCREW TAP TH
SCREW-PH
SCREW TAP TH
( W I T H D I S P E N S E R )
( W I T H D I S P E N S E R )
( W I T H D I S P E N S E R )
SR-606, 608V
SR-646, 648EV, SR-686, 688EV
SR-606EV
SR-608EV
SR-646EV
SR-648EV
SR-686EV
SR-688EV
SR-606, 608EV
SR-606, 608EV
GPPS
GPPS SR-608, 648, 688EV
GPPS SR-608, 648, 688EV
GPPS
GPPS
STS304
POM
SR-60, 64, 68
SR-60, 64, 68
SR-60, 64, 68
M4X14 FE FZY
EXP ALL
EXP ALL
ABS MP-0160
ABS MP-0160
2S 3X8 FE, FZY
GPPS
FH1 4X12 STS304
EXP ALL
SHP1 T3.0
WITH DISPENSER
PP
GPPS
GPPS
ABS
ABS
WITH DISPENSER
TH1 4X12 FE FZY
1-4X12 FE, FZY
MAX25, FE, FZY
1-4X14 FE, FZY
1SET
1SET
1SET
1SET
1SET
1SET
1SET
1SET
1
1
2
1
1
1
1
1
1
1
1
1
2
1SET
1
2
2
2
1
3
1SET
1
1SET
1
1
1
1
1
1SET
1
1
1
2
R E M A R K
( 1 ) NOBLE-BEIG
( 2 ) MMD GRAY
( 3 )
MILKY WHITE
( 4 ) LIGHT GREEN
Indicated part is for eclectrical safety components
40 Samsung Electronics

12. Packaging method
♦ Packaging specifications of door and inside of cab
Tape:W50X100(2EA)
♦ C o m p l e t e d
p a c k a g i n g
s p e c i f i c a t i o n
PAD-PACKING IN:
SR-50:W520XL750
SR-54:W660XL779
SR-58:W660XL823
FOAM-PE:T17XW50X175
Tape:W50X150
♦ Packaging specifications of rear and front
HIGH CUSHION:3EA
Tape:W50XL150(1EA)
PriamentTape:W50XL100
FOAM-PS:T15x500xl500
P.E BAG:1EA
Tape : W50XL200(1EA)
Tape : W50xL300(2EA)
T10XW80XL180(2EA)
EPS:
Low CUSHION(R,L)
:846X145X160(2EA)
T15X60X825(2EA)
Corrugated cadrboard
box881X796X140(1EA)
54 Samsung Electronics

14. PCB Specification
14-1 Parts for service
N O
1
2
3
4
5
6
PART
D A 2 6 - 3 0 1 1 0 B
D A 2 6 - 3 0 1 1 2 A
D A 2 6 - 3 0 1 1 2 B
D A 2 6 - 3 0 1 1 0 C
D A 2 6 - 3 0 1 1 0 A
D A 3 2 - 1 0 1 0 5 B
D A 3 2 - 1 0 1 0 5 G
D A 3 2 - 1 0 1 0 5 F
D A 4 1 - 2 0 1 4 9 A
D A 4 1 - 2 0 1 0 5 F
S P E C .
T R A N S - D C
T R A N S - D C
T R A N S - D C
T R A N S - D C
T R A N S - D C
R, R2, F-SENSOR COMMON USE
R, F DEF-SENSOR
E X T - S E N S O R
PCB PANEL
PCB MAIN
SPEC.
1 0 5 V / 5 0 , 6 0 H Z
1 0 5 V / 5 0 , 6 0 H Z
1 2 7 V / 5 0 , 6 0 H Z
2 2 0 V / 5 0 , 6 0 H Z
2 4 0 V / 5 0 H Z
502 AT
502 AT
502 AT
SR-60, 64, 68
SR-60, 64, 68
VENOR
Y O U K Y U N G
S E G 1
D O N G K W A N G
D O N G K W A N G
D O N G K W A N G
SEOUL SEMI-CONDUCTOR
KWANGJU ELECTRONICS
Q’TY
1
3
2
1
1
1
REMARK
DISP NO
TOSHBA MICOM
58 Samsung Electronics

13 PCB Diagram circuit
Samsung Electronics 55

13-2 Part list
N O CODE-NOPART SPEC.
1
I C - M C U ( O T P )
2
R E S O N A T O R
3
R E L A Y
4
R E L A Y
5
I C - D R I V E R
6
I C - D R I V E R
7
P C B - M A I N
8
V O L T A G E - R E G
9
V O L T A G E - R E G
1 0
HEAT-SINK “S1”
1 1
F U S E - C L I P
1 2
F U S E
1 3
I C - R E S E T
1 4
R C - N E T W O R K
1 5
R C - N E T W O R K
1 6
B U Z Z E R
1 7
T A C T - S W
1 8
Z E R N E R - D I O D E
1 9
J U M P - W I R E
2 0
T R A N S I S T O R
2 1
OP-AMP IC
2 2
C O I L
2 3
S C R E W
2 4
D I O D E - R E C
2 5
C - E L E C
2 6
C - E L E C
2 7
C - E L E C
2 8
C - E L E C
2 9
C - E L E C
3 0
C - C E R A M I C
3 1
R - M E T A L
3 2
R - M E T A L
3 3
R - M E T A L
3 4
R - C A R B O N
3 5
R - C A R B O N
3 6
R - C A R B O N
T M P 8 7 P H 4 0 A N
C S T 4 . 0 0 M G W T F 0 1
V S B - 1 2 T B
JZ1 a FS - 1 2 V
U L N 2 9 8 1 A
U D N 2 0 0 3 A
1 3 5*197 FR-1
M C 7 8 1 2 C T
K I A 7 8 0 5 P I
AL L30
F H - 5 1 H
5 0 0mA / 2 5 0 V
K A 7 5 3 3
R C N - 1 0
S Q 1 2 0 1
C B E 2 2 2 0 B A
SKHV 10910A
UZ 5.1B, 5.1V
T A 0 . 6 P I / 5 2m m
K S R 1 0 0 5
L M 3 2 4
7 5mH / 1 0 %
PH-2S 3*8
1 N 4 0 0 4
2 2 0 0uF 35V
1 0 0 0uF 35V
1uF 50V
4 7 0uF 25V
3 3uF 25V
1 0 4 Z
3.9K-F 1/4W
1.0K-F 1/4W
10K-F 1/4W
1K-J 1/4W
1.2K-J 1/4W
4.7K-J 1/4W
4 B 4 0 0 2 - 0 5 9 5
4 B 1 2 8 3 - 0 0 5 3
4 B 3 0 6 8 - 0 0 0 4
4 B 3 0 6 8 - 0 0 7 2
4 2 1 0 9 - 1 0 1 - 0 2 1
4 2 2 1 9 - 7 0 1 - 0 0 8
4 6 0 2 9 - 0 0 3 4
4 A 4 0 0 8 - 0 1 7 8
4 1 1 2 9 - 6 0 2 - 0 2 2
4 1 1 2 4 - 0 0 4 3 - 0 0
4 A 3 0 6 4 - 0 0 2 1
4 A 3 0 6 5 - 0 1 5 6
4 A 4 0 0 8 - 0 7 5 4
4 A 1 1 1 4 - 0 0 0 6
4 A 1 1 1 4 - 0 0 0 7
4 A 1 3 0 5 - 0 0 1 2
4 A 3 0 1 8 - 0 0 4 7
4 A 4 1 0 6 - 0 0 4 8
4 0 5 0 9 - 4 0 0 - 1 0 8
4 A 4 0 6 8 - 0 0 0 8
4 A 4 0 0 8 - 0 7 7 4
4 A 1 1 3 0 - 0 0 8 5
4 7 0 0 8 - 1 3 0 - 0 8 1
4 A 4 1 0 4 - 0 1 0 9
4 A 1 1 0 4 - 0 0 8 7
4 A 1 1 0 4 - 0 6 4 1
4 A 1 1 0 4 - 0 5 0 0
4 A 1 1 0 4 - 0 0 5 7
4 A 1 1 0 4 - 0 0 2 5
4 A 1 1 0 0 - 0 3 4 0
4 A 1 0 0 0 - 0 4 0 9
4 1 0 1 8 - 2 7 5 - 1 0 2
4 1 0 1 8 - 2 7 5 - 1 0 3
4 A 1 0 0 0 - 0 1 5 1
4 A 1 0 0 0 - 0 0 0 5
4 A 1 0 0 0 - 0 1 7 4
Q ’ T Y U N I T REMARK
1
E A
1
E A
2
E A
6
E A
1
E A
2
E A
1
E A
2
E A
1
E A
2
E A
1
E A
1
E A
1
E A
1
E A
3
E A
1
E A
1
E A
1
E A
1 9
E A
3
E A
1
E A
1
E A
2
E A
9
E A
1
E A
2
E A
1
E A
2
E A
1
E A
1 8
E A
2
E A
4
E A
6
E A
8
E A
1
E A
7
E A
VENOR PART NO.
T O S H I B A
M U R A T A
T A K A M I S W A
M A T S U S H I T A
A L L E G R O
A L L E G R O
CHUNGJU ELECTRONICS
SAMSUNG SEMMI-CONDUCTOR
SAMSUNG SEMMI-CONDUCTOR
SHINDANG INDUSTRY
YUNHO ELECTRONICS
SAMJU ELECTRONICS
SAMSUNG SEMMI-CONDUCTOR
DOOSHIN ACCURACY
KEUMKANG ELECTRONICS
BUJUN ELECTRONICS PARTS
KYUNGIN ELECTRONICS
PYUNGCHANG TRADE
WON CONSTRUCTION
SAMSUNG SEMMI-CONDUCTOR
SAMSUNG SEMMI-CONDUCTOR
BUJUN INDUSTRY
TAIYANG METAL
PYUNGCHANG TRADE
SAMHWA ELECTRIC
SAMHWA ELECTRIC
SAMHWA ELECTRIC
SAMHWA ELECTRIC
SAMHWA ELECTRIC
DANGYANG HEREDITY
ABCO, HANRYUK
ABCO, HANRYUK
ABCO, HANRYUK
I C 0 1
X - T A L
RY77, RY78
R Y 7 1 - R Y 7 6
I C 0 5
IC02, IC04
P C B
R G 1 0 1 , R G 1 0 2
R G 1 0 3
R G 1 0 1 , R G 1 0 2
F U S E 2
F U S E 2
I C 0 3
A C 7 0 1
S P 7 1 - 7 3
B Z
T E S T - S W
Z D 5 0 1
J 0 1 - J 2 0
Q 8 0 1 , Q 8 0 2 , Q 8 0 3
I C 0 6
L 8 0 1
F U S E
D 1 0 1 - 1 0 8 , 6 0 1
C 1 0 3
C 1 0 4 , 1 0 5
C 2 0 3
C 1 0 6 , C 1 0 7
C 8 0 1
R 3 1 4
R 3 1 5 , 3 1 6 , 3 1 7 , 3 2 0
R301,303,305,
R 3 0 7 , 3 0 9 , 3 1 1
ABCO, HANRYUK
R 2 0 1 , 5 0 3 , 6 0 1 , 6 0 2 , R 6 0 3
, 6 0 4 , 6 0 5 , 9 0 4
ABCO, HANRYUK
ABCO, HANRYUK
R 5 0 2
R 4 0 1 , 4 0 3 , 4 0 5 , 5 0 4 , R 8 0 1
N E W ( P G M )
ACE COMMON USE
ACE COMMON USE
ACE COMMON USE
N E W
N E W
N E W
ACE COMMON USE
ACE COMMON USE
ACE COMMON USE
ACE COMMON USE
ACE COMMON USE
N E W
ACE COMMON USE
ACE COMMON USE
ACE COMMON USE
ACE COMMON USE
ACE COMMON USE
ACE COMMON USE
ACE COMMON USE
N E W
ACE COMMON USE
ACE COMMON USE
ACE COMMON USE
N E W
ACE COMMON USE
ACE COMMON USE
ACE COMMON USE
ACE COMMON USE
ACE COMMON USE
N E W
N E W
ACE COMMON USE
ACE COMMON USE
ACE COMMON USE
ACE COMMON USE
N E W
ACE COMMON USE
, 8 0 3 , 9 0 5
56 Samsung Electronics

N O CODE-NOPART SPEC.
Q ’ T Y U N I T REMARK
VENOR PART NO.
3 7
R - C A R B O N
3 8
R - C A R B O N
3 9
R - C A R B O N
4 0
R - C A R B O N
4 1
C O N N E C T O R
4 2
C O N N E C T O R
4 3
C O N N E C T O R
4 4
C O N N E C T O R
4 5
C O N N E C T O R
4 6
C O N N E C T O R
4 7
C O N N E C T O R
4 8
C O N N E C T O R
4 9
C O N N E C T O R
5 0
C O N N E C T O R
5 1
I C - M C U ( M S K )
10K-J 1/4W
12K-J 1/4W
47K-J 1/4W
4.7-J 1/4W
Y W 3 9 6 - 0 9 A V ( W H T )
Y W 3 9 6 - 0 9 A V ( R E D )
Y W 3 9 6 - 0 5 A V ( W H T )
S M W 2 5 0 - 0 7 ( W H T )
S M W 2 5 0 - 0 3 ( W H T )
S M W 2 5 0 - 0 7 ( Y E L )
S M W 2 5 0 - 0 6 ( W H T )
S M W 2 5 0 - 1 1 ( W H T )
S M W 2 5 0 - 0 2 ( W H T )
S M W 2 5 0 - 0 2 ( B L U )
T M P 8 7 P H 4 0 A N - X X X X
4 1 0 1 8 - 2 2 7 - 1 0 3
4 1 0 1 8 - 2 2 7 - 1 2 3
4 1 0 1 8 - 2 7 7 - 4 7 3
4 A 1 0 0 0 - 0 2 6 1
4 A 6 0 1 0 - 0 5 3 0
4 A 6 0 1 0 - 0 5 4 6
4 A 6 0 1 0 - 0 4 7 0
4 A 6 0 1 0 - 1 4 0 7
4 A 6 0 1 0 - 1 3 8 7
4 A 6 0 1 0 - 1 4 0 9
4 A 6 0 1 0 - 1 4 0 2
4 A 6 0 1 0 - 1 4 2 7
4 A 6 0 1 0 - 1 3 8 2
4 A 6 0 1 0 - 1 3 8 5
4 B 4 0 0 2 - 0 8 2 5
1 6
1
8
1
1
1
1
1
1
1
1
1
1
1
1
E A
ABCO, HANRYUK
E A
ABCO, HANRYUK
E A
ABCO, HANRYUK
E A
ABCO, HANRYUK
E A
YUNHO ELECTRONICS
E A
YUNHO ELECTRONICS
E A
YUNHO ELECTRONICS
E A
YUNHO ELECTRONICS
E A
YUNHO ELECTRONICS
E A
YUNHO ELECTRONICS
E A
YUNHO ELECTRONICS
E A
YUNHO ELECTRONICS
E A
YUNHO ELECTRONICS
E A
YUNHO ELECTRONICS
E A
T O S H I B A
R 2 0 2 , 3 0 2 , 3 0 4 , 3 0 6 ,
ACE COMMON USE
R 3 0 8 , 3 1 0 , 3 1 2 , 3 1 3 ,
R 3 1 8 , 4 0 2 , 4 0 4 , 4 0 6 ,
R 7 0 1 , 9 0 1 , 9 0 2 , 9 0 3
R 8 0 4
R 6 0 6 - 6 1 3
R 8 0 4
C O N 1 0
C O N 0 9
C O N 0 8
C O N 0 1
C O N 0 6
C O N 0 2
C O N 0 3
C O N 0 7
C O N 0 5
C O N 0 4
I C 0 1
ACE COMMON USE
ACE COMMON USE
ACE COMMON USE
ACE COMMON USE
ACE COMMON USE
ACE COMMON USE
ACE COMMON USE
ACE COMMON USE
ACE COMMON USE
ACE COMMON USE
ACE COMMON USE
ACE COMMON USE
ACE COMMON USE
N E W P G M )
Samsung Electronics 57

4. Electric Diagram
1. 110~115V/60Hz, 127V/60Hz, 220V/50Hz, 240V/50Hz
CIRCUIT-DIAGTAM
“A-1”:220-240V/50,60Hz
“A-2”:110-127V/60Hz
“B-1”, “C-1”:WITHOUT EARTH
“B-2”, “C-2”:WITH EARTH
RED-RED WHT-WHITE
BLUE-BLUE YEL-YELLOW
ORG-ORANGE BLK-BLACK
BRN-BROWN PRP-PURPLE
PINK-PINK W/BLK-WHITE/BLACK
GRY-GRAY S/BLU-SKY BLUE
P/BLUE-PINK/BLUE
Samsung Electronics 5

5. Out Package Specification
Model A B C D Remark
S R - 6 0 6 E V 8 1 4 8 9 9 1 8 0 6 5 0 –
S R - 6 0 8 E V 8 1 4 8 9 9 1 8 0 6 5 0 Dispenser applied
S R - 6 4 6 E V 8 9 9 1 8 5 8 5 0 S R - 6 4 8 E V 8 1 4 8 9 9 1 8 5 8 5 0 Dispenser applied
S R - 6 8 6 E V 8 1 4 899 1 9 0 2 5 0 –
S R - 6 8 8 E V 8 1 4 8 9 9 1 9 0 2 5 0 Dispenser applied
6 Samsung Electronics

15. Main components specifications
1) REGULATOR
3-TERMINAL 1A POSITIVE VOLTAGE GRGULATORS
The MC78XX/MC78XXA series of three-terminal positive regulators are available in
the TO-220 package and with several fixed output voltaes, making it useful in a
wide range of applicationes. These regulaators can provide local oncard regulation,
eliminating the distribution problems assciated with single point regulation. Each
type employs internal current limiting, thermal shut-down and safe area protection,
making it essentially indestructible. If adequate heat sinking is provided, they can
delive over aA output corrent. Although designed primarily as fixed voltage
regulators, these devices can be used with external components to obtain
adjustable voltages and currents. MC78XXI is characterized for operation from -40°
°Cto +125°c, and MC78XXC from 0°c to +125°c
TO-220 1 2 3 1 : Input 2 : GND 3 : Output
FEATURES
• UOutput Current up to 1.5A
• UOutput voltages of 5;6;8;9;10;11;12;15;18;24V
• UThermal Overload Protection
• UShort Circuit Protection
• UOutput Transistor SOA Protection
• UNo external components required
• UOutput current in excess of 1A
• UIndustrial and commercial temperature range
BLOCK DIAGRAM
ORDERING INFORMATION
Device
Device
MC78XXCT
MC78XXCT
MC78XXACT
MC78XXACT
MC78XXT
MC78XXT
Package
TO-220
TO-220
TO-220
Operating Temperature
0~+125°C
-40~+125°C
ABSOLUTE MAXIMUM RATINGS
Characteristic
Input Voltage (for Vo = 5V to 18V)
(for Vo = 24V)
Thermal Resistance Junction - Cases
Thermal Resistance Junction - Air
Operating Temperature Range MC78XXC/AC
MC78XXI
Storage Temperature Range
Symbol
VIN
VIN
θJC
θ♣JA
Topr
Tstg
Rating
35
40
5
65
0 ~ +125
-40 ~ +125
-65 ~ +150
Unit
V
V
°C/W
θ/W
°C
°C
°C
Samsung Electronics 59

2) REGULATOR(MC7812C)
ELECTRICAL CHARACTERISTICS MC7812
(Refer to test circuit, Tmin < Ti < Tmax, Vi = 500mA, Vi = 19V, Ci = 0.33µF, Co = 1.0µFunless otherwise specified)
Characteristic
Output Voltage
Line Regulation
Load Regulation
Quiescent Current
Quiescent Current Change
Output Voltage Drift
Output Noise Boltage
Ripple
Rejection
Dropout Voltage
Output Resistance
Short Circuit Current
Peak Current
Symbol
Vo
∆Vo
∆Vo
Id
∆Id
∆Vo/∆T
Vn
RR
VD
RO
ISC
Ipeak
Ti = 25°C
Ti = 25°C
Test Conditions
Ti = 25°C
5.0mA≤Io≤1.0A, P≤15W
Vin = 14.5V to 27V
Vi = 15.5V to 27V
Vi = 14.5V to 30V
Vi = 16V to 22V
Io = 5.0mA to 1.5V
Io = 250mA to 750mA
Ti = 25°C
Io = 5mA to 1.0A
Vi = 14.5V to 30V
Vi = 15V to 30V
Io = 5mA
f = 10Hz to 100KHz Ti = 25°C
fF = 120Hz
Vi = 15 to 25V
Io = 1A, Ti = 25°C
f = 1KHz
Vi = 35V, Ti = 25°C
Ti = 25°C
Min
11.5
11.4
55
MC7805C
Typ
12
12
10
3.0
12
4.0
5.1
-1
75
71
2
18
250
2.2
Max
12.5
12.6
240
120
240
120
8
0.5
1.0
Unit
V
mV
mV
mA
mA
mV/°C
µ/V
dB
V
mΩ
mA
A
* Tmin < Ti < Tmax
MC78XXI : Tmin = -40°C, Tmax = 125C
MC78XXC, Tmin = 0°C, Tmax = 125°C
* Load and line regulation are specified at constant junction temperature. Changes in Vo due to heating effects must be taken into
account separately. Pulse testint with low duty is used.
60 Samsung Electronics

MC 7805 AC(T)
ELECTRICAL CHARACTERISTICS MC7805
(Refer to test circuit, Tmin < Ti < Tmax, Io = 500mA, Vi = 10V, Ci = 0.33ßfi, unless otherwise specified)
Characteristic
Output Voltage
Line Regulation
Load Regulation
Quiescent Current
Quiescent Current Change
Output Voltage Drift
Output Noise Boltage
Ripple
Rejection
Dropout Voltage
Output Resistance
Short Circuit Current
Peak Current
Symbol
Vo
∆Vo
∆Vo
Id
∆‚Id
∆Vo/∆T
Vn
RR
VD
RO
ISC
Ipeak
Ti = 25°C
Ti = 25°C
Test Conditions
Ti = 25°C
5.0mA ≤ Io ≤ 1.0A, Po ≤ 15W
Vi = 7V to 20V
Vi = 8V to 20V
Vi = 7V to 25V
Vi = 8V to 12V
Io = 5.0mA to 1.5V
Io = 250mA to 750mA
˚C
Ti = 25
Io = 5mA to 1.0A
Vi = 7V to 25V
Vi = 8V to 25V
Io = 5mA
f = 10Hz to 100KHz Ti = 25
F = 120Hz
Vi = 8 to 18V
Io = 1A, Ti = 25
f = 1KHz
Vi = 35V, Ti = 25
Ti = 25
˚C
˚C
˚C
˚C
Min
4.8
4.75
62
MC7805C
Typ
5.0
5.0
5.0
1.5
9
3
5.0
-0.8
40
78
2
17
250
2.2
Max
5.2
5.25
100
50
100
50
8
0.5
1.3
U n i t
V
m V
m V
m A
m A
m V / ° C
µ / V
d B
V
mΩ
m A
A
* Tmin < Ti < Tmax
MC78XXI : Tmin = -40˚C, Tmax = 125
MC78XXC, Tmin = 0˚C, Tmax = 125
* Load and line regulation are specified at constant junction temperature. Changes in Vo due to heating effects must be taken into
account separately. Pulse testint with low duty is used.
˚C
˚C
Samsung Electronics 61

HIGH-VOLTAGE, HIGH-CURRENT
SOURCE DRIVERS
Series UDS2980H and UDS2980R hermetically sealed source
drivers link standard low-power digital logic and relays, solenoids,
magnetic print hammers, stepping motors, LEDs, and lamps in
applications requiring separate logic and load grounds, load supply
voltages to +80V, and load currents to 500 mA.
Types UDS2981H/R and UDS2983H/R are intended for use
with 5v logic systems(TTL, Schottky TTL. DTL and 5V CMOS).
UDS2982H/R and UDS2984H/R integrated circuits are intended for
MOS interface (PMOS and CMOS) operating from supply voltages
of from 6 to 16V.
Types UDS2981H/R and UDS2982H/R will withstand an output
OFF voltage of 50 V. UDS2983H/R and UDS2984H/R drivers will
withstand a maximum output OFF voltage of 80V.
Under normal operating conditions, the devices will sustain 50
mA continuously on each of the eight outputs at an ambient
temperature of +85°c and with a supply voltage of 15V. All types
include input current-limiting resistors and output transientsuppression diodes. In all cases, outputs are swiched ON by an
active high input level.
Note that the maximum current rating may not be obtained at 55°c because of reduced beta, or at +125°c because of package
power limitations.
Dwg No A 10243
ABSOLUTE MAXIMUM RATINGS
at +25°c Free-Air Temperature
Cutput Voltage Range, VCE
(UDS298t and
UDS2982H/R).......................................5V to 50V
(UDS2983 and
UDS2984H/R).....................................35V to 80V
Input Voltage, Vin
(UDS2981 and
UDS2983H/R).................................................15V
(UDS2982 and
UDS2984H/R).................................................30V
Output Current, Iout-........................................500 mA
Ground Terminal Current,
IGND........................................................................................................3.0A
Power Dissipation. PD
(any one driver).............................................1.1W
(total package).....................................See Graph
Operating Temperature Range,
TA.............................................................................-55˚Cto + 125
Storage Temperature Range,
Ts............................................................................-65˚Cto + 150
˚C
˚C
Series UDS2980H drivers are furnished in 18-pin
ceramic/metal(side-brazed) hermetic dual in-line packages. Series
UDS2980R drivers are supplied in ceramic/glass(cer-DIP) hermetic
packages. Both are processed to the requirements of MIL-STD-883.
Class B.
The same circuits are also available in 18-pin plastic dual in-line
packages (Series UDN2980A) for operation over a limited
temperature range, or where higher package power dissipation is
needes.
FEATURES
• TTL, DTL, PMOS, or CMOS Compatible Inputs
• 500 mA Output Source Current Capability
• Transient-Protected Outputs
• High-Reliability Screening to MIL-STD-883, Class B
• Operating Temperature -55°c to+125°c
Always order by complete part number, e.g.,
See table on next page for differences between devices.
UDS2981H883
62 Samsung Electronics

ELECTRICAL CHARACTERISTICS from -55°c to +125°c (unless otherwise specified).
Applicable
Chracteristic
Maximum Output
Leakage Current
Maximum
Collector-Emitter
Saturain Voltage
Maximum
Input Current
Maximum Output
Source Current
Maximum
Supply Current
(Outputs Open)
Maximum Turn-ON
Delay Time
Maximum Turn-OFF
Delay Time
Maximum Clamp Diode
Leakage Current
Maximum Clamp Diode
Forward Voltage
Symbol
ICEX
VCE(SAT)
IIN(ON)
IIN(OFF)
IOUT
IS
tPHL
tPHL
IR
VF
Devices
UDS2981/82
UDS2981/84
UDS2981/83
UDS2982/84
ALL
UDS2981/82
UDS2983/84
UDS2981/83
UDS2982/84
UDS2981
UDS2982
UDS2983
UDS2984
UDS2981/82
UDS2983/84
UDS2981/82
UDS2983/84
UDS2981/82
UDS2983/84
ALL
Temp.
˚C
-55
˚C
+25
+ 1 2 5
˚C
-55
˚C
+25
+125
+25
+25
+25
Test Conditions
VIN = 0.25 V, VS = 50 V
VIN = 0.25V, VS = 80 V
VIN = 2.4 V, IOUT = -100 mA
VIN = 2.4 V, IOUT = -200 mA
VIN = 2.4 V, IOUT = -350 mA
˚ C
˚ C
˚ C
˚ C
˚ C
VIN = 2.4 V, IOUT = -100 mA
VIN = 2.4 V, IOUT = -200 mA
VIN = 5.0 V, IOUT = -100 mA
VIN = 5.0 V, IOUT = -200 mA
VIN = 5.0 V, IOUT = -350 mA
VIN = 5.0 V, IOUT = -100 mA
VIN = 5.0 V, IOUT = -200 mA
VIN = 2.4 V
VIN = 3.85 V
VIN = 12 V
VIN = 0 V, VS = 50 V
VIN = 0 V, VS = 80 V
VIN = 2.4 V, VCE = 2.2 V
VIN = 5.0 V, VCE = 2.2 V
VIN = 2.4 V, VS = 50 V
VIN = 5.0 V, VS = 50 V
VIN = 2.4 V, VS = 80 V
VIN = 5.0 V, VS = 80 V
VS = 35 V, RL = 175 Ω
VS = 50 V, RL = 250 Ω
VS = 35 V, RL = 175 Ω
VS = 50 V, RL = 250 Ω
VIN = 0.25 V, VS = 50 V
VIN = 0.25 V, VS = 80 V
IF = 200 mA
Fig.
1
1
2
2
2
2
2
2
2
2
2
2
3
3
3
3
3
2
2
4
4
4
4
7
7
7
7
5
5
6
Limit
200 µA
200 µA
2.0 V
2.1 V
2.0 V
1.8 V
1.9 V
2.0 V
2.1 V
2.0 V
1.8 V
1.9 V
295 µA
600 µA
2.3 mA
10 µA
10 µA
-200 mA
-200 mA
10 mA
10 mA
10 mA
10 mA
2.0 µs
2.0 µs
10 µs
10 µs
50 µA
50 µA
1.75 V
*All inputs simultaneously.
**Pused test.
*Complete part number includes a terminal letter that indicates package (H = ceramic/metal side-brazed. R = ceramic/glass cer-DIP).
Samsung Electronics 63

KSR1005 NPN EPITAXIAL SILICON TRANSISTOR
SWITCHING APPLICATION (Bias Resistor Built In)
•Switching Circuit, Inverter, Interface circuit Driver circuit.
•Built in bias Resistor (R,=4.7KΩ, R=10KΩ)
•Complement to KSR2005
ABSOLUTE MAXIMUM RATINGS (Ta=25˚c)
Characteristic
Collector-Base Voltage
Collector-Emitter Voltage
Emitter-Base Voltage
Collector Current
Collector Dissipation
Junction Temperature
Storage Temperature
Symbol
VCBO
VCBO
VCBO
IC
PC
TI
Tstg
Rating
50
50
10
100
300
150
-55-150
ELECTRICAL CHARACTERISTICS (Ta=25˚C)
Characteristic
Collector-Base Breakdown Voltage
Collector-Emitter Breakdown Voltage
Collector Cutoff Current
DC Current Gain
Collector-Emitter Saturation Voltage
Output Capacitance
Current Gain-Bandwidth Product
Input Off Voltage
Input On Voltage
Input Resistor
Resistor Ratio
Symbol
BVCBO
BVCBO
ICBO
HC
VCE(sat)
Cob
Fr
Vi(off)
Vi(off)
R1
R1/R2
Test Condition
IC=10µA, IB=0
IC=100µA, IB=0
VCB=40V, IB=0
VCB=5V, IB=5mA
IC=10mA, IB=0.5mA
VCB=10V, IB=0
t=1MHz
VCB=10V, IC=5mA
VCB=5V, IC=100µA
VCB=0.3V, IC=20mA
Unit
V
V
V
mA
mW
˚C
˚C
Main
50
50
30
0.3
3.2
0.42
TO-92
1 Emitter 2 Collector 3 Base
Typ
3.7
250
4.7
0.47
Max
0.1
0.3
2.5
6.2
0.52
Unit
V
V
µA
V
pF
MHz
V
V
KΩ
Equivalent Circuit
64 Samsung Electronics
 Loading...