

Samsung SPRINT SPH-L600, SPRINT GALAXY MEGA User Manual

User Guide
[Sprint UG template version 13a]
SPH-L600_JB_MI6_TN_101013_F5

Table of Contents
Get Started .................................................................................................................................. 11
Your Phone at a Glance ...................................................................................................... 11
Set Up Your Phone .............................................................................................................. 11
Turn the Phone On ....................................................................................................... 14
Activate Your Phone ............................................................................................................ 15
Complete the Setup Screens ............................................................................................... 16
Set Up Voicemail ................................................................................................................. 18
Sprint Account Information and Help ................................................................................... 18
Sprint Account Passwords ........................................................................................... 18
Manage Your Account .................................................................................................. 19
Sprint Support Services ................................................................................................ 20
Phone Basics .............................................................................................................................. 21
Your Phone’s Layout ........................................................................................................... 21
Key Functions ............................................................................................................... 21
Turn Your Phone On and Off ............................................................................................... 23
Turn Your Screen On and Off .............................................................................................. 23
Touchscreen Navigation ...................................................................................................... 24
Your Home Screen ................................................................ .............................................. 29
Home Screen Overview ............................................................................................... 29
Customize the Home Screen ....................................................................................... 30
Extended Home Screens ............................................................................................. 31
Recent Apps ................................................................ ................................................. 32
Wallpapers ................................................................................................................... 32
Notification Panel ................................................................................................................. 33
Quick Settings .............................................................................................................. 34
Multi Window ....................................................................................................................... 35
Activate or Deactivate Multi Window ............................................................................ 36
Using Multi Window ...................................................................................................... 36
Hide Multi Window ........................................................................................................ 37
Relocate the Apps Tray and Tab .................................................................................. 37
TOC i

Customizing the Multi Window Apps ............................................................................ 38
Status Bar ............................................................................................................................ 39
Features............................................................................................................................... 41
Air View ........................................................................................................................ 41
Assistant Menu ............................................................................................................. 41
Motions and Gestures .................................................................................................. 43
Screen Capture ............................................................................................................ 44
Smart Screen ............................................................................................................... 44
Voice Control ................................................................................................................ 45
Enter Text ............................................................................................................................ 45
Touchscreen Keyboards .............................................................................................. 45
Text Input Methods ....................................................................................................... 45
Select a Default Text Input Method .............................................................................. 46
Google Voice Typing .................................................................................................... 46
Samsung Keyboard ...................................................................................................... 47
Swype ........................................................................................................................... 48
Editing Text .................................................................................................................. 49
Phone Calls ................................................................................................................................. 51
Make Phone Calls ................................................................................................................ 51
Call Using the Phone Dialer ......................................................................................... 51
Call from Call Logs ....................................................................................................... 51
Call from Contacts ........................................................................................................ 52
Call Using a Speed Dial Number .................................................................................. 52
Call a Number in a Text Message or Email Message .................................................. 52
Call Emergency Numbers ............................................................................................ 53
Receive Phone Calls ........................................................................................................... 53
Voicemail ............................................................................................................................. 54
Voicemail Setup ........................................................................................................... 54
Voicemail Notification ................................................................................................... 54
Retrieve Your Voicemail Messages ............................................................................. 55
Visual Voicemail .................................................................................................................. 56
Phone Call Options .............................................................................................................. 57
In-Call Options .............................................................................................................. 57
TOC ii

Caller ID ....................................................................................................................... 58
Call Waiting .................................................................................................................. 58
Conference Calling ....................................................................................................... 59
Call Forwarding ............................................................................................................ 60
Speed Dialing ...................................................................................................................... 61
Call Logs .............................................................................................................................. 62
Call Settings......................................................................................................................... 63
Contacts ...................................................................................................................................... 64
Get Started with Contacts .................................................................................................... 64
Access Contacts .................................................................................................................. 64
Add a Contact ...................................................................................................................... 64
Edit a Contact ...................................................................................................................... 65
Add or Edit Information for a Contact ........................................................................... 65
Assign a Picture to a Contact ....................................................................................... 65
Link a Contact .............................................................................................................. 66
Delete a Contact ........................................................................................................... 66
Add Contacts to Your Favorites ........................................................................................... 66
Share a Contact ................................................................................................................... 67
Create Groups ..................................................................................................................... 67
Create a New Group .................................................................................................... 67
Add a Contact to a Group ............................................................................................. 67
Send an Email to Group Members ............................................................................... 68
Accounts and Messaging ............................................................................................................ 69
Google Account ................................................................................................................... 69
Create a Google Account ............................................................................................. 69
Gmail ................................................................................................................................... 69
Send a Gmail Message ................................................................................................ 70
Read and Reply to Gmail Messages ............................................................................ 70
Email .................................................................................................................................... 71
Add an Email Account .................................................................................................. 71
Add a Microsoft Exchange ActiveSync Account ........................................................... 71
Compose and Send Email ............................................................................................ 72
View and Reply to Email .............................................................................................. 72
TOC iii

Manage Your Email Inbox ............................................................................................ 73
Text and Multimedia Messaging .......................................................................................... 74
Send a Message .......................................................................................................... 74
New Messages Notification .......................................................................................... 75
Managing Messages .................................................................................................... 75
Messaging Settings ...................................................................................................... 76
Social Networking Accounts ................................................................................................ 78
Flipboard ...................................................................................................................... 78
Messenger .................................................................................................................... 79
Google+ ........................................................................................................................ 79
Hangouts ...................................................................................................................... 79
YouTube ....................................................................................................................... 80
Apps and Entertainment ............................................................................................................. 81
Google Play Store................................................................................................................ 81
Find and Install an App ................................................................................................. 81
Create a Google Wallet Account .................................................................................. 82
Open an Installed App .................................................................................................. 82
Uninstall an App ........................................................................................................... 82
Google Play Books .............................................................................................................. 82
Google Play Magazines ....................................................................................................... 82
Google Play Movies & TV .................................................................................................... 83
Group Play ........................................................................................................................... 83
Music ................................................................................................................................... 84
Google Play Music ....................................................................................................... 84
Music (App) .................................................................................................................. 84
Google Maps ....................................................................................................................... 86
Navigation ............................................................................................................................ 86
Local .................................................................................................................................... 86
Samsung Link ...................................................................................................................... 86
Use Samsung Link to Share Media with Another Device ............................................. 87
Story Album ......................................................................................................................... 87
TripAdvisor........................................................................................................................... 88
WatchON ............................................................................................................................. 88
TOC iv

Web and Data ............................................................................................................................. 89
Internet ................................................................................................................................ 89
Chrome ................................................................................................................................ 89
Lumen Toolbar..................................................................................................................... 89
Data Services (3G and 4G) ................................................................................................. 89
Your Data Services User Name ................................................................................... 90
4G Services ......................................................................................................................... 90
Wi-Fi .................................................................................................................................... 91
Turn Wi-Fi On and Connect to a Wireless Network ..................................................... 91
Wi-Fi Settings ............................................................................................................... 92
Wi-Fi Direct .......................................................................................................................... 92
Bluetooth ............................................................................................................................. 93
Turn Bluetooth On or Off .............................................................................................. 93
Connect a Bluetooth Headset or Car Kit ...................................................................... 93
Reconnect a Headset or Car Kit ................................................................................... 94
Disconnect or Unpair from a Bluetooth Device ............................................................ 94
Bluetooth Settings ........................................................................................................ 95
Virtual Private Networks (VPN) ............................................................................................ 95
Prepare Your Phone for VPN Connection .................................................................... 95
Add a VPN .................................................................................................................... 96
Connect to a VPN ......................................................................................................... 96
Memory Card ....................................................................................................................... 96
Install a Memory Card .................................................................................................. 96
Remove a Memory Card .............................................................................................. 97
View Available Memory on microSD Card ................................................................... 98
Format a Memory Card ................................................................................................ 98
Unmount a microSD Card ............................................................................................ 98
Transfer Files Between Your Phone and a Computer ......................................................... 98
Kies via Wi-Fi ............................................................................................................... 98
Transfer Files Using a USB Cable ............................................................................... 99
Camera and Video .................................................................................................................... 100
Take Pictures ............................................................................................................. 100
Record Videos ............................................................................................................ 101
TOC v

Camera Modes ........................................................................................................... 102
Camera Settings ......................................................................................................... 103
Gallery ............................................................................................................................... 104
View Photos and Videos ............................................................................................ 105
Zoom In or Out on a Photo ......................................................................................... 106
Working with Photos ................................................................................................... 107
Share Photos and Videos ........................................................................................... 108
Video Player ...................................................................................................................... 108
Tools and Calendar ................................................................................................................... 109
Calculator........................................................................................................................... 109
Calendar ............................................................................................................................ 109
Add an Event to the Calendar .................................................................................... 109
View Events ................................................................................................................ 110
Erase Events .............................................................................................................. 110
Clock .................................................................................................................................. 111
Alarm .......................................................................................................................... 111
Downloads ......................................................................................................................... 111
Dropbox ............................................................................................................................. 112
Google Search ................................................................................................................... 112
Google Settings ................................................................................................................. 112
Help ................................................................................................................................... 112
S Memo ............................................................................................................................. 112
My Files ............................................................................................................................. 112
Samsung Apps .................................................................................................................. 113
S Translator ....................................................................................................................... 113
S Voice .............................................................................................................................. 113
Voice Search ..................................................................................................................... 113
Settings ..................................................................................................................................... 114
Accessing Settings ............................................................................................................ 114
Settings Tabs ..................................................................................................................... 114
Wi-Fi Settings .................................................................................................................... 115
Hotspot .............................................................................................................................. 116
Bluetooth Settings.............................................................................................................. 116
TOC vi

Data Usage Settings .......................................................................................................... 117
More Networks ................................................................................................................... 118
Airplane Mode ............................................................................................................ 118
Mobile Networks ......................................................................................................... 118
Tethering .................................................................................................................... 118
VPN ............................................................................................................................ 119
Roaming ..................................................................................................................... 119
NFC ................................................................................................................................... 119
Turn NFC On or Off .................................................................................................... 119
Android Beam ............................................................................................................. 120
S Beam .............................................................................................................................. 120
Turn S Beam On or Off .............................................................................................. 120
Nearby Devices ................................................................................................................. 120
Screen Mirroring ................................................................................................................ 121
Kies via Wi-Fi ..................................................................................................................... 121
Lock Screen ....................................................................................................................... 121
Swipe .......................................................................................................................... 122
Face Unlock ............................................................................................................... 122
Face and Voice .......................................................................................................... 122
Pattern ........................................................................................................................ 123
PIN ............................................................................................................................. 123
Password .................................................................................................................... 123
None ........................................................................................................................... 123
Display Settings ................................................................................................................. 124
Wallpaper ................................................................................................................... 124
Notification Panel ....................................................................................................... 124
Multi Window .............................................................................................................. 124
Screen Mode .............................................................................................................. 125
Brightness .................................................................................................................. 125
Auto Rotate Screen .................................................................................................... 125
Screen Timeout .......................................................................................................... 125
Daydream ................................................................................................................... 126
Font Style ................................................................................................................... 126
TOC vii

Font Size .................................................................................................................... 126
Increase Legibility ....................................................................................................... 126
Touch Key Light Duration ........................................................................................... 127
Show Battery Percentage ........................................................................................... 127
Edit After Screen Capture .......................................................................................... 127
LED Indicator ..................................................................................................................... 127
Sound ................................................................................................................................ 128
Volume ....................................................................................................................... 128
Vibration Intensity ....................................................................................................... 128
Ringtones ................................................................................................................... 128
Vibrations ................................................................................................................... 129
Default Notification Sound .......................................................................................... 129
Vibrate When Ringing ................................................................................................ 129
Dialing Keypad Tone .................................................................................................. 129
Touch Sounds ............................................................................................................ 129
Screen Lock Sound .................................................................................................... 129
Haptic Feedback ........................................................................................................ 130
Emergency Tone ........................................................................................................ 130
Adapt Sound ............................................................................................................... 130
Home Screen Mode ........................................................................................................... 130
Call Settings....................................................................................................................... 131
Set Up Call Rejection Messages ................................................................................ 131
Answering/Ending Calls ............................................................................................. 131
Turn Off Screen During Calls ..................................................................................... 131
Call Alerts ................................................................................................................... 132
Call Accessories ......................................................................................................... 132
Ringtones and Keypad Tones .................................................................................... 133
Personalize Call Sound .............................................................................................. 133
Noise Reduction ......................................................................................................... 133
Increase Volume in Pocket ......................................................................................... 133
US Dialing .................................................................................................................. 134
International Dialing .................................................................................................... 134
TTY Mode ................................................................................................................... 134
TOC viii

Hearing Aids ............................................................................................................... 134
DTMF Tones .............................................................................................................. 134
Voicemail Settings ...................................................................................................... 135
Voice Privacy .............................................................................................................. 135
Blocking Mode ................................................................................................................... 135
Driving Mode...................................................................................................................... 136
Power Saving Mode ........................................................................................................... 136
Power Saving Tips ..................................................................................................... 136
Accessory Settings ................................................................ ............................................ 137
Accessibility ....................................................................................................................... 137
One-Handed Operation ..................................................................................................... 139
Language and Input Settings ............................................................................................. 140
Choose a Default Language ....................................................................................... 140
Default Input Method .................................................................................................. 140
Google Voice Typing .................................................................................................. 140
Samsung Keyboard .................................................................................................... 141
Swype Settings ........................................................................................................... 142
Voice Search Settings ................................................................................................ 143
Text-To-Speech Options ............................................................................................ 144
Pointer Speed ............................................................................................................. 144
Motions and Gestures........................................................................................................ 144
Smart Screen ..................................................................................................................... 145
Smart Stay .................................................................................................................. 145
Air View.............................................................................................................................. 146
Voice Control ..................................................................................................................... 146
Accounts Settings .............................................................................................................. 147
Add an Account .......................................................................................................... 147
Cloud ................................................................................................................................. 147
Back Up and Reset Settings .............................................................................................. 147
Location Services .............................................................................................................. 148
Security Settings ................................................................................................................ 148
Encryption .................................................................................................................. 149
Make Passwords Visible ............................................................................................ 149
TOC ix

Device Administration ................................................................................................. 149
Credential Storage ..................................................................................................... 150
Application Manager .......................................................................................................... 151
Battery ............................................................................................................................... 151
Storage .............................................................................................................................. 151
Date and Time ................................................................................................................... 152
Activate This Device .......................................................................................................... 152
System Update .................................................................................................................. 152
About Device ..................................................................................................................... 153
Copyright Information ................................................................................................................ 154
Index ......................................................................................................................................... 155
TOC x
Get Started
The following topics give you all the information you need to set up your phone the first time.
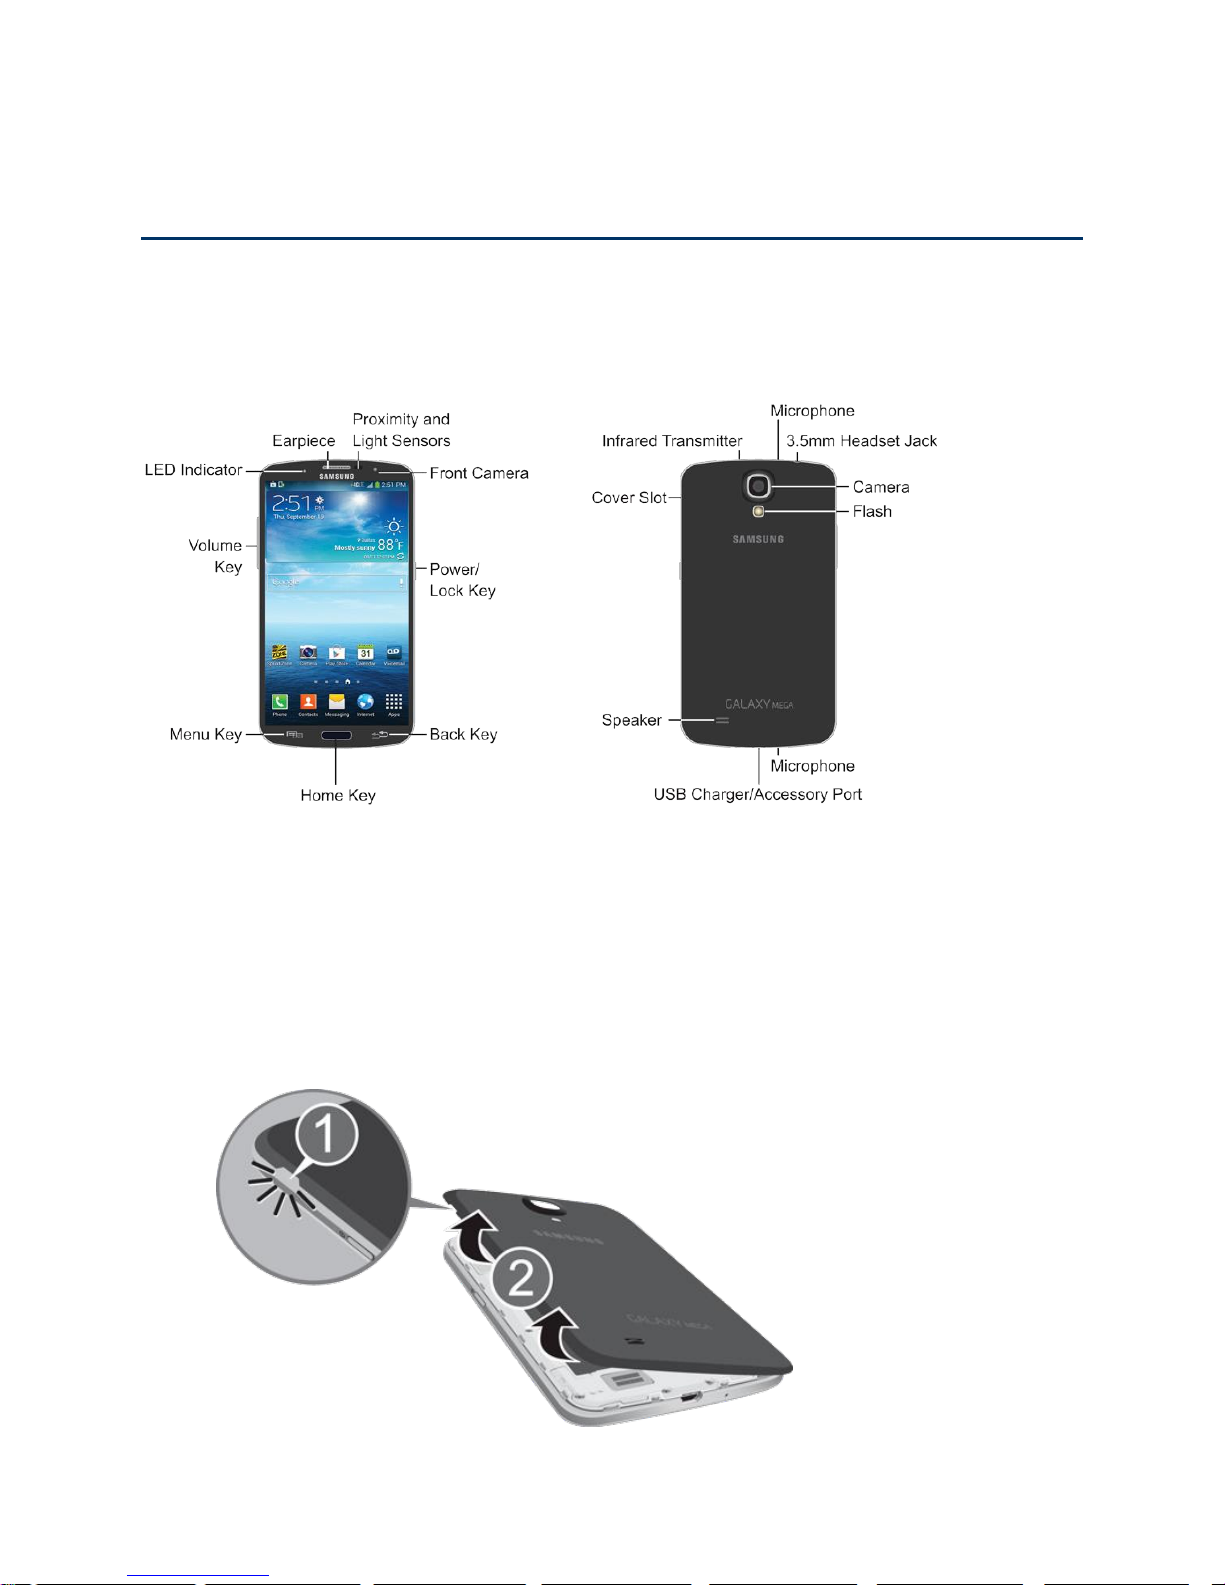
Your Phone at a Glance
The following illustration outlines your phone’s primary external features and buttons.
Set Up Your Phone
Prior to using the phone, it is necessary to install and charge the battery. An optional microSD
memory card (not included) can also be installed at this time.
Remove the Back Cover
1. Remove the back cover by placing your fingernail or a pointed object into the slot in the
side of the cover (1).
Get Started 11
2. Pull the cover up and then lift up and away from the phone (2).
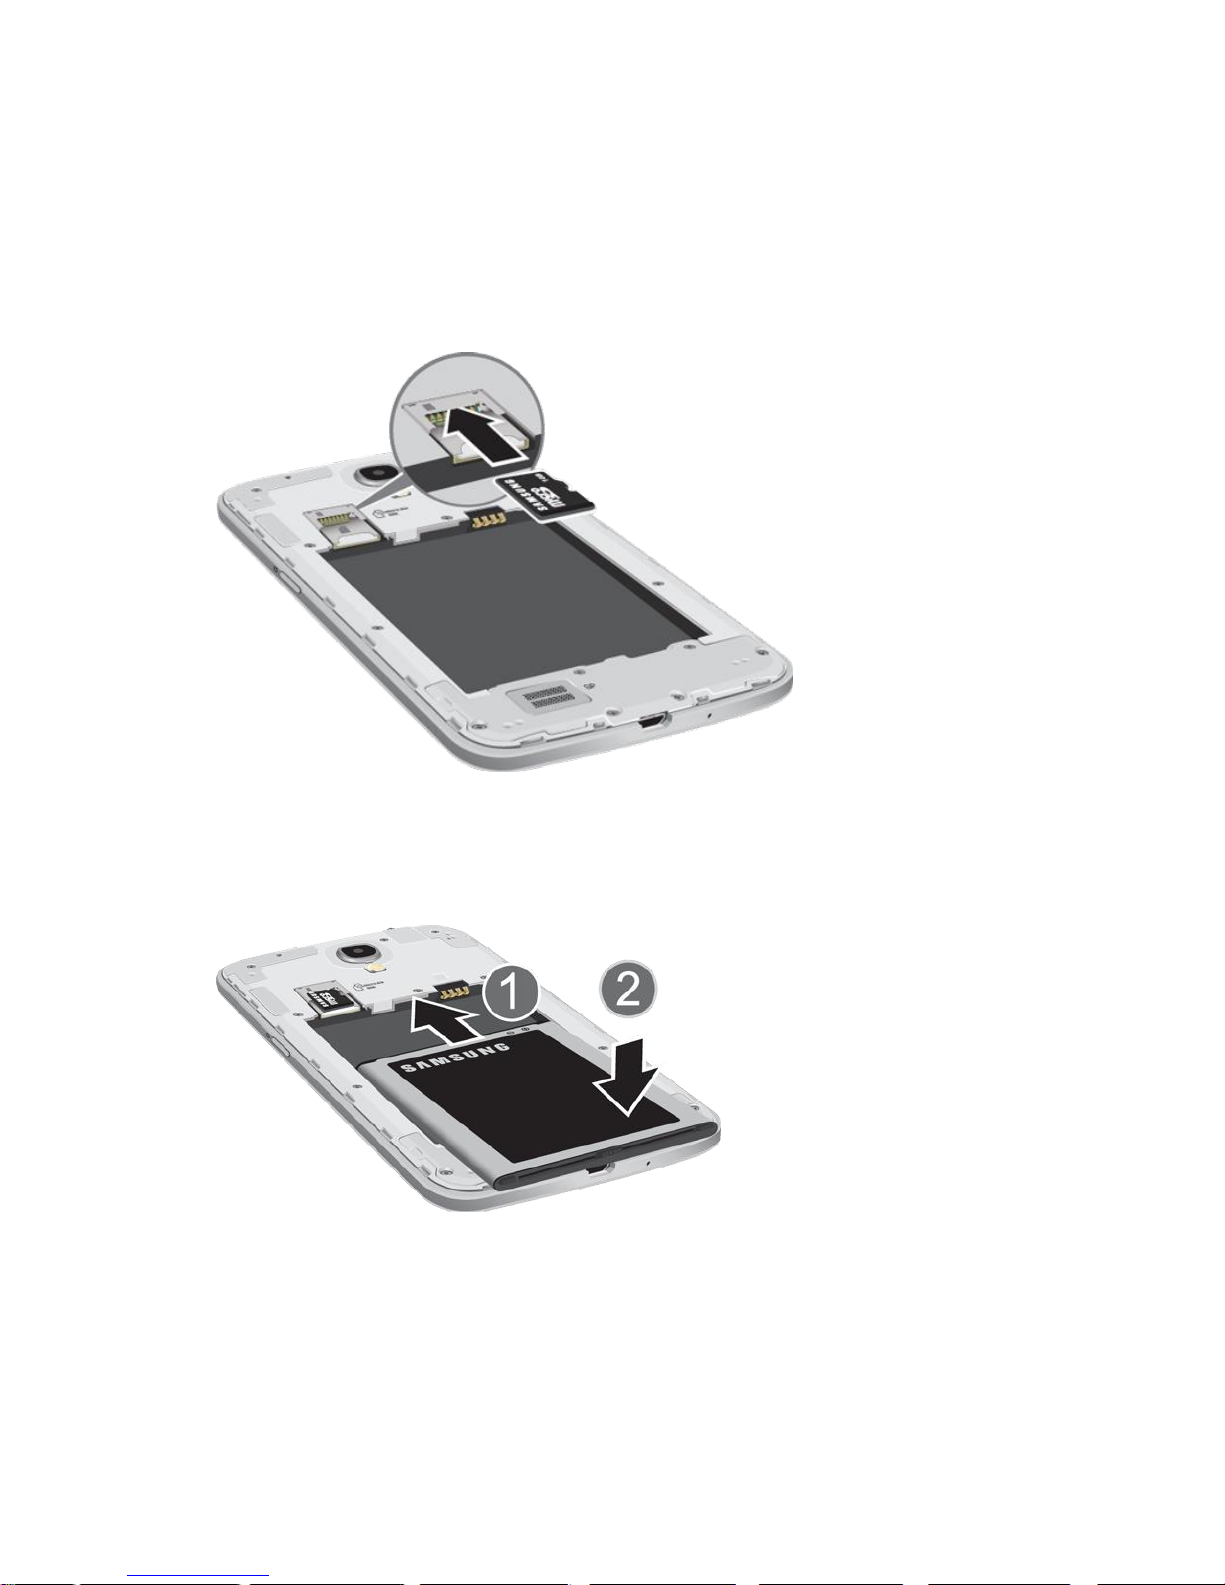
Install the Memory Card
■ To insert an optional microSD card (not included), carefully slide the memory card under
the top metal plate into the microSD card socket until the card locks into place. For more
information, see Memory Card.
Install the Battery
1. Insert the battery into the battery compartment, making sure that the connectors align
(1).
2. Gently press down to secure the battery (2).
Get Started 12
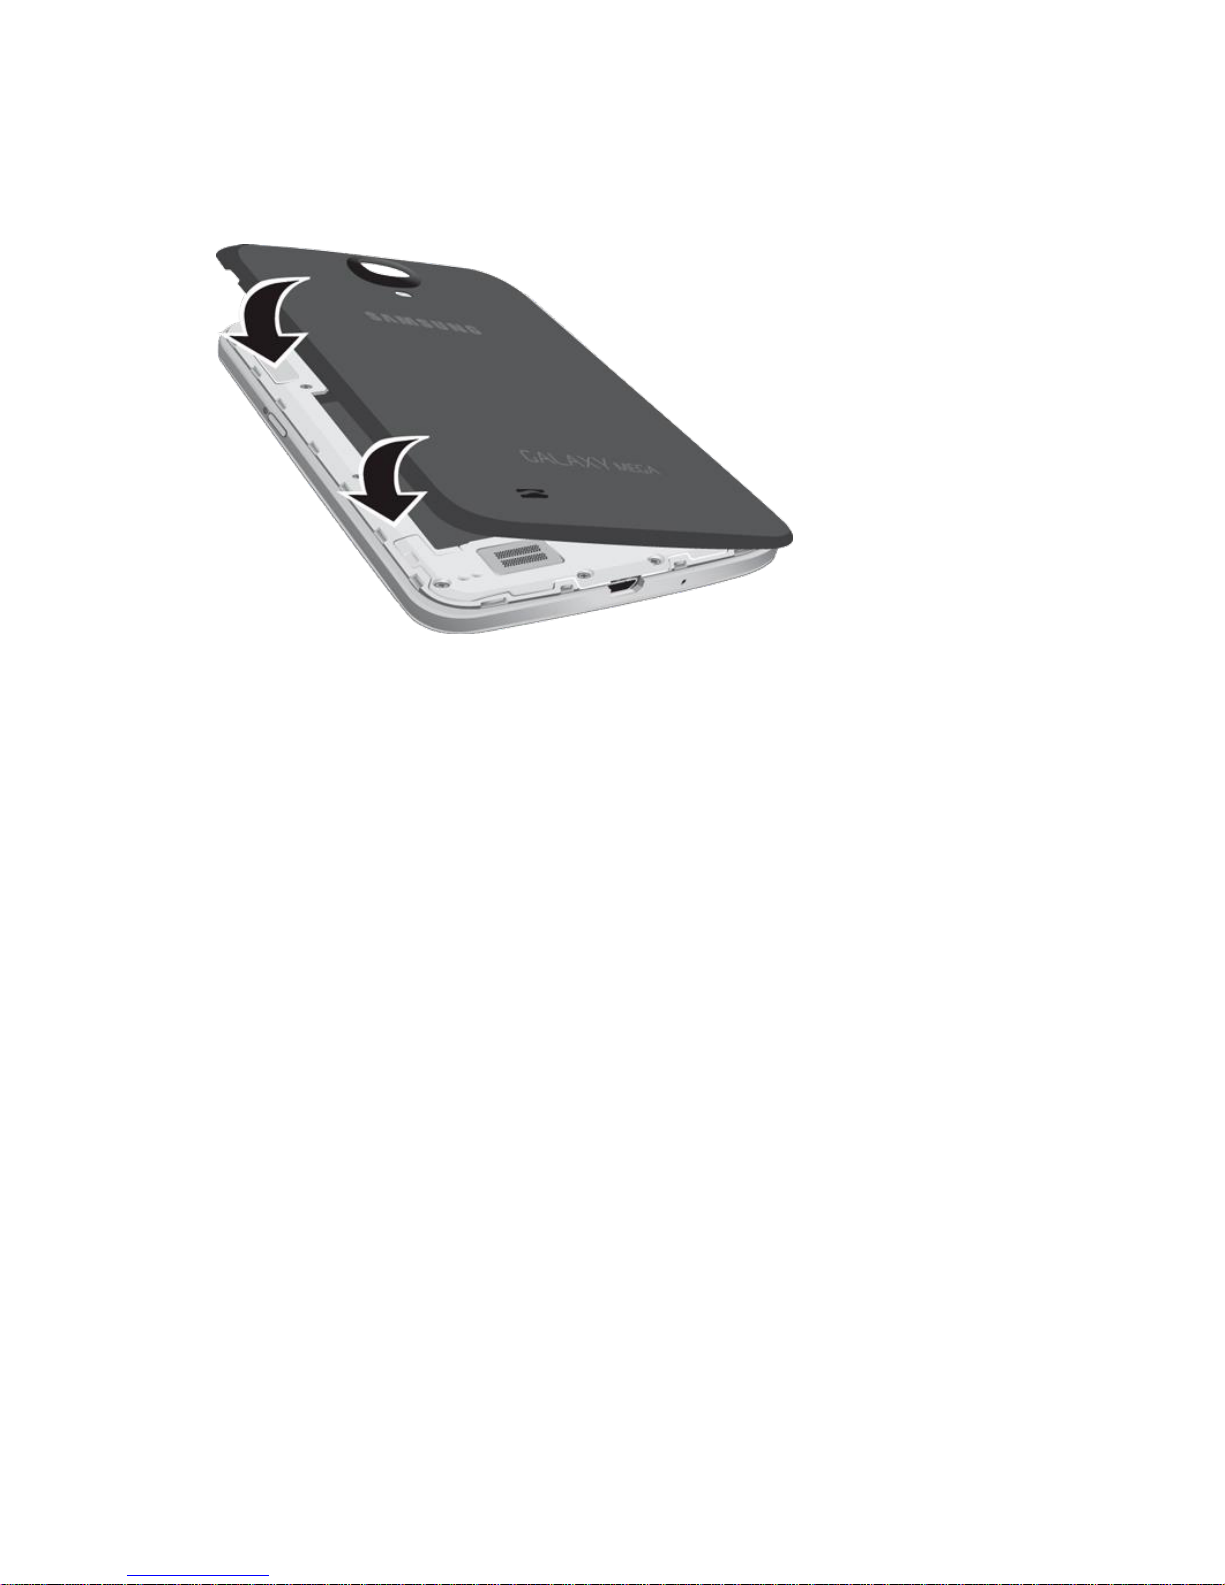
Replace the Back Cover
1. Place the battery cover onto the back of the phone and press down.
2. Press along the edge of the back cover until you have a secure seal.
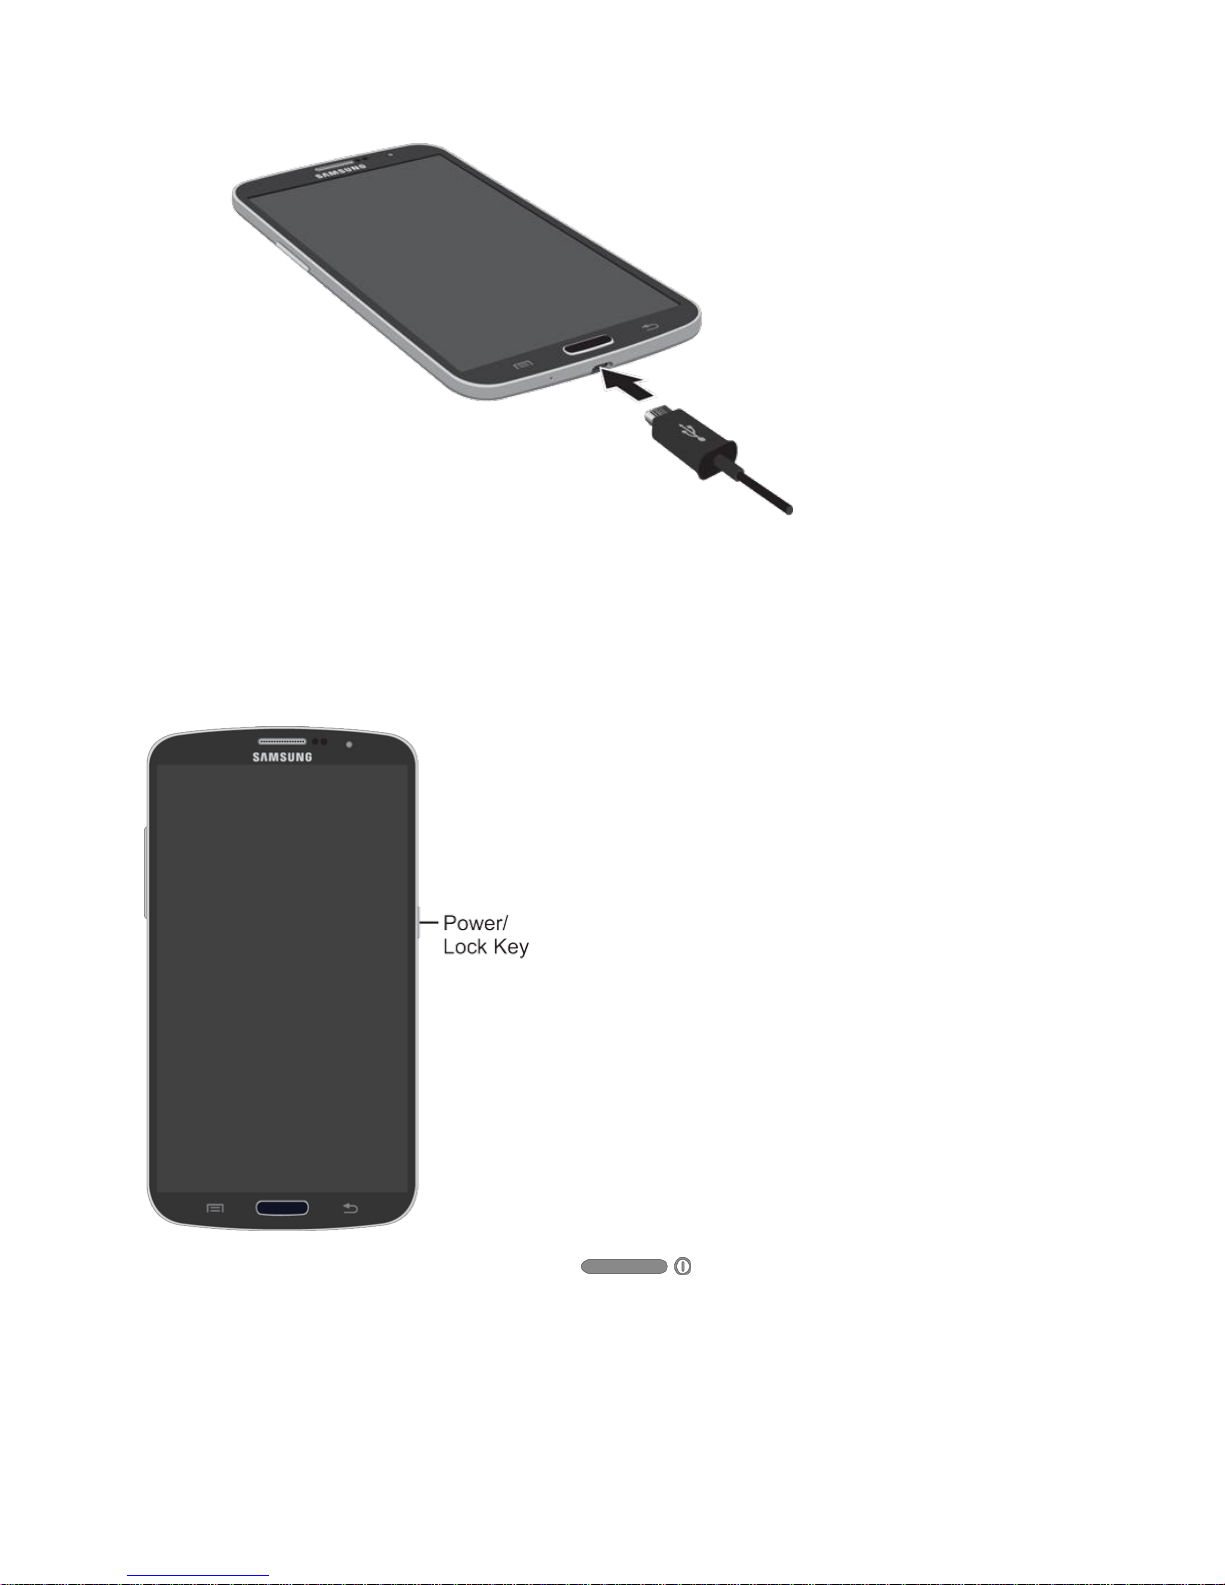
Charge the Battery
Your phone is powered by a rechargeable, standard Li-Ion battery. A Wall/USB Charger
(Charging Head and USB cable) is included with the phone for charging the battery. You will
need to charge the battery before using your phone.
Warning! Use only approved accessories to charge your phone. Approved accessories are
designed to maximize battery life. Using other accessories may invalidate your warranty and
may cause damage.
1. Plug the USB cable into the charger/accessory jack on the bottom of the phone.
2. Plug the USB cable into the charging head, and then plug the charging head into an
electrical outlet.
Get Started 13
3. When charging is finished, remove the USB cable from the charger/accessory jack on
the phone.
Turn the Phone On
Use the Power/Lock Key to turn the phone on.
■ Press and hold the Power/Lock Key to turn the phone on.
If your phone is activated, it will turn on, search for Sprint service, and begin the
setup application.
If your phone is not yet activated, see Activate Your Phone for more information.
Get Started 14

Activate Your Phone
Follow the instructions below to activate your phone if it has not already been activated.
Depending on your account or how and where you purchased your phone, it may be ready to
use or you may need to activate it on your Sprint account.
● If you purchased your phone at a Sprint Store, it is probably activated and ready to use.
● If you received your phone in the mail and it is for a new Sprint account or a new line of
service, it is designed to activate automatically.
When you turn the phone on for the first time, you should see a Hands Free
Activation screen, which may be followed by a PRL Update screen and a Firmware
Update screen. Follow the onscreen instructions to continue.
● If you received your phone in the mail and you are activating a new phone for an existing
number on your account (you’re swapping phones), you can activate on your computer
online or directly on your phone.
Activate on your computer:
• Go to sprint.com/activate and complete the online instructions to activate your
phone.
Activate on your phone:
• Turn on your new phone. (Make sure the old one is turned off.) Your phone will
automatically attempt Hands-Free Activation.
• Touch Activate to override auto-activation and start the manual activation
wizard.
• Follow the on-screen prompts to complete the activation process.
To confirm activation, make a phone call. If your phone is still not activated, visit
sprint.com/support for assistance. If you do not have access to the Internet, call Sprint
Customer Service at 1-888-211-4727 from another phone.
Tip: Do not press the Power button while the phone is being activated. Pressing the Power
button cancels the activation process.
Note: If you are having any difficulty with activation, visit sprint.com/support.
Get Started 15

Complete the Setup Screens
The setup screens help you set up certain features and preferences on your phone. Once your
phone has been turned on, you will see a Welcome message. You can then complete the setup
process.
Note: You may be able to complete the setup screens before your phone has been activated on
your Sprint account.
Note: During or after setup, you may see a Connections Optimizer notice. Read the notice
and touch I Agree to allow your phone to connect automatically to the best available data
network, including Wi-Fi. To turn Connections Optimizer off at any time, touch > >
Settings > Connections tab > More networks > Mobile networks > Connections optimizer
and uncheck the box.
1. From the Welcome screen, select a language (if prompted) and touch Next to get
started.
To skip any section, touch Next or Skip.
To go back to the previous screen, press the Back Key.
Note: On the Welcome screen, there is also an Accessibility button. If you are visually
impaired or hard of hearing, touch Accessibility to change the accessibility settings. For more
information, see Accessibility Settings.
2. Follow the onscreen instructions to complete each section. For each topic, you will have
the option to skip it and continue to the next screen.
Wi-Fi: If prompted, follow the prompts to sign in to an available Wi-Fi network. For
secured Wi-Fi networks, you will need to enter a password. See Wi-Fi for more
details.
Samsung Account: Touch Sign in to sign in to your current Samsung Account, or
touch Create new account and follow the instructions to set up a new Samsung
Account.
• Touch variety of services to learn more using your Samsung Account.
Got Google?: Touch Yes to sign in to your current Google Account, or touch No and
follow the instructions to set up a new Google Account.
Get Started 16

Make it Google: Touch Get an account and follow the instructions to create a new
Google Account, or touch Not now.
• Touch to learn about Google Accounts.
• This screen only displays if you did not previously sign in to your Google
Account.
Entertainment: Touch Set up credit card and follow the instructions to enter credit
card information for your Google Play account, or touch Not now.
• This screen only displays if you previously signed in to your Google Account.
Backup and Restore: Read the backup and restore information. Then enable either
or both options.
• This screen only displays if you previously signed in to your Google Account.
Google & Location: Read the information about location services. Then enable
either or both location services.
This phone belongs to… — Enter your first and last name. This information is used
by the phone to personalize certain apps.
• This screen only displays if you did not previously sign in to your Google
Account.
Dropbox Account — Touch Create account and follow the instructions to set up a
new Dropbox Account, or touch Sign in to sign into your Drop Box Account.
Learn about key features: Touch each feature to see more details. Touch OFF/ON
to enable/disable each feature.
Phone name: Enter your name or a phone name. This name is used to identify the
phone when using Bluetooth, Wi-Fi Direct, etc.
3. Touch Finish. Your setup is now complete.
Get Started 17

Set Up Voicemail
You should set up your voicemail and personal greeting as soon as your phone is activated.
Always use a password to protect against unauthorized access. Your phone automatically
transfers all unanswered calls to your voicemail, even if your phone is in use or turned off.
1. Touch > Phone > Keypad tab. (If your screen is locked, press the Power Key
to turn on the display and then swipe the screen to unlock it.)
2. Touch and hold to dial your voicemail number.
3. Follow the system prompts to:
Create your password.
Record your name announcement.
Record your greeting.
Important: Voicemail Password—It is strongly recommended that you create a password
when setting up your voicemail to protect against unauthorized access. Without a password,
anyone who has access to your phone is able to access your voicemail messages.
For more information, see Voicemail.
Sprint Account Information and Help
Find out about account passwords and information about managing your account and finding
help.
Sprint Account Passwords
You will need to create passwords to protect access to your personal account information, your
voicemail account, and your data services account. As a Sprint customer, you enjoy unlimited
access to all your information.
Account User Name and Password
If you are the account owner, you will create an account user name and password when you
sign on to sprint.com/mysprint. (Click Sign in/Register and then click Sign up now! to get
started.) If you are not the account owner (if someone else receives the bill for your Sprint
service), you can get a sub-account password at sprint.com/mysprint.
Voicemail Password
You will create your voicemail password when you set up your voicemail. See Set Up Voicemail
for more information on your voicemail password.
Get Started 18
Data Services Password
With your Sprint phone, you may elect to set up an optional data services password to control
access and authorize purchases.
For more information, or to change your passwords, sign on to sprint.com/mysprint.
Manage Your Account
Manage your Sprint account from your computer, your Sprint phone, or any other phone.
Online: sprint.com/mysprint
● Access your account information.
● Check your minutes used (depending on your Sprint service plan).
● View and pay your bill.
● Enroll in Sprint online billing and automatic payment.
● Purchase accessories.
● Shop for the latest Sprint phones.
● View available Sprint service plans and options.
● Learn more about data services and other products like games, ringtones, screen
savers, and more.
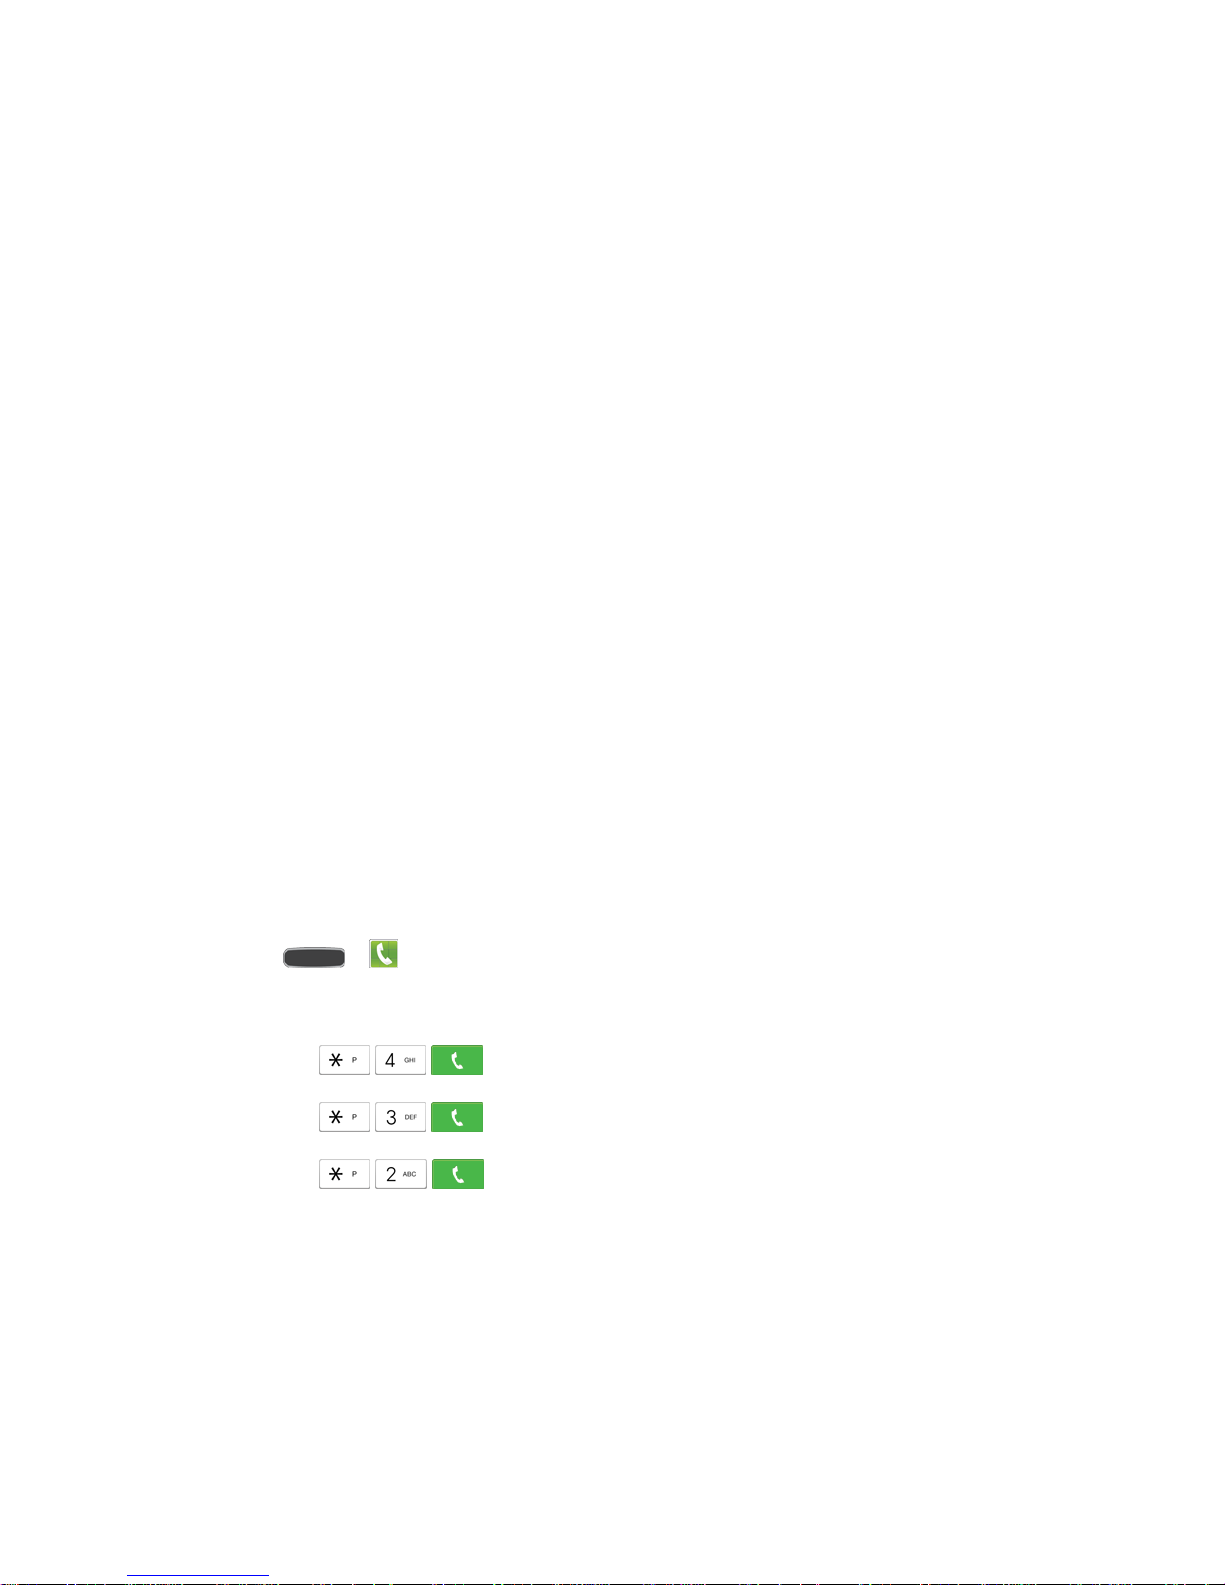
From Your Sprint Phone
1. Touch > Phone > Keypad tab.
2. Do any of the following:
Touch to check minute usage and account balance.
Touch to make a payment.
Touch to access a summary of your Sprint service plan or get
answers to other questions.
Get Started 19

Sprint Support Services
Sprint 411 and Sprint Operator Services let you easily access information and calling assistance
from your Sprint phone.
Sprint 411
Sprint 411 gives you access to a variety of services and information, including residential,
business, and government listings; movie listings or show times; driving directions, restaurant
reservations, and major local event information. You can get up to three pieces of information
per call, and the operator can automatically connect your call at no additional charge.
There is a per-call charge to use Sprint 411, and you will be billed for airtime.
■ Touch > Phone > Keypad tab, and then touch .
Sprint Operator Services
Sprint Operator Services provides assistance when you place collect calls or when you place
calls billed to a local telephone calling card or third party.
■ Touch > Phone > Keypad tab, and then touch .
For more information or to see the latest in products and services, visit us online at
sprint.com/mysprint.
Get Started 20
Phone Basics
Your phone is packed with features that simplify your life and expand your ability to stay
connected to the people and information that are important to you. The following topics will
introduce the basic functions and features of your phone.
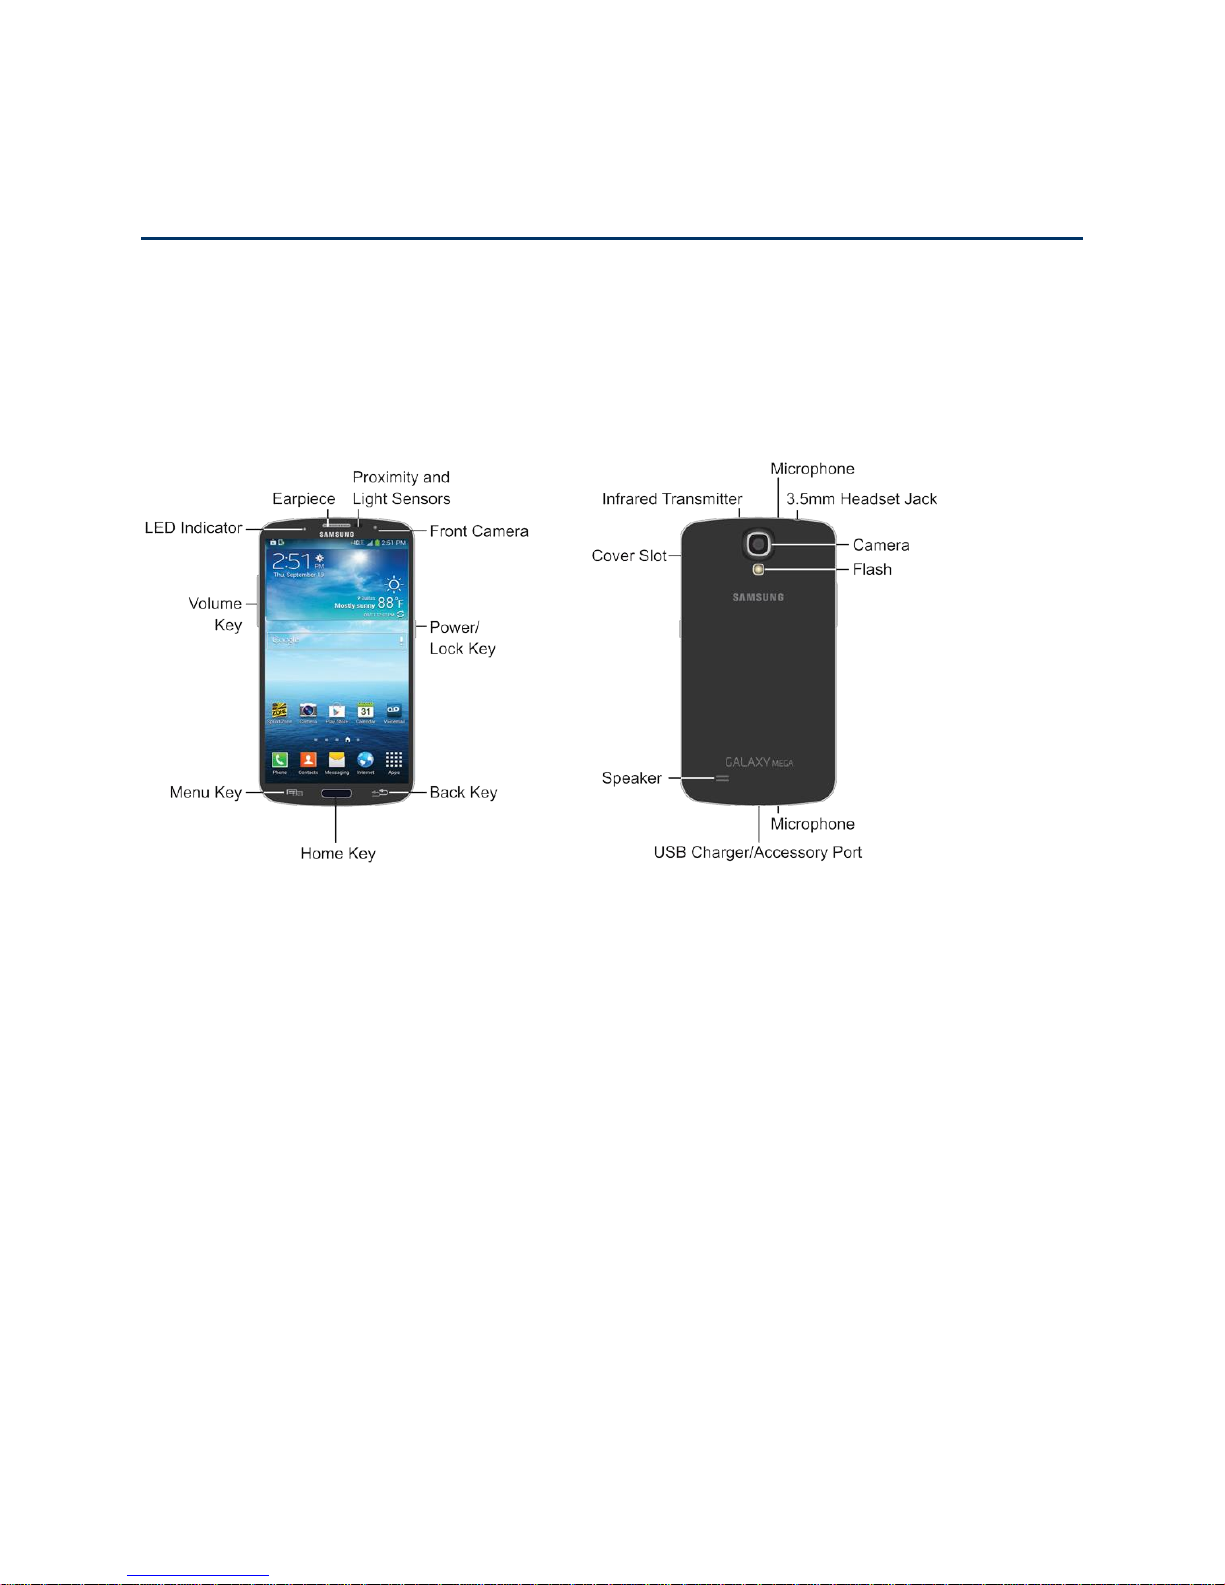
Your Phone’s Layout
The following illustration outline your phone’s basic layout.
Key Functions
The following list defines the features listed in the above illustrations.
● LED indicator displays red when charging, green when fully charged, blue when
powering up, and orange when a notification has arrived.
● Earpiece lets you hear the caller and automated prompts during calls.
● Proximity and Light Sensors detect the presence of objects near the phone, such as
when using motion settings. For example, while talking on the phone, the sensor detects
when it’s near your ear and turns off the screen to prevent accidental key presses.
● Power/Lock Key lets you turn the phone on or off, turn the screen on or off, or lock the
screen. Press and hold for a Device options menu. Options include Power off, Airplane
mode, and Restart. You can also quickly switch to Mute, Vibrate, and Sound.
● Back Key lets you return to the previous screen, or close a dialog box, options menu,
the Notification Panel, or onscreen keyboard.
Phone Basics 21

● Home Key returns you to the Home screen. Press and hold to open the recently used
applications window, and access Task Manager and Google Search.
● Menu Key allows you to access a menu from most of your phone’s screens.
● Volume Key adjusts the volume of your phone’s sounds. From the Home screen, press
to adjust master volume. During calls or playback, press to adjust volume. Press to mute
the ringtone of an incoming call.
● Cover Slot allows you to lift the cover from the back of your phone.
● Infrared transmitter allows you to control other phones, such as a TV, in conjunction
with apps like WatchON.
● Camera lets you take pictures and record videos.
● Flash helps illuminate subjects in low-light environments when the camera is focusing
and capturing a photo or video.
● Microphones allow callers to hear you when you are using the speakerphone, as well
as capture sound during recording.
● 3.5 mm Headset Jack allows you to plug in either a stereo headset or an optional
headset for convenient, hands-free conversations.
● Speaker plays ringtones and sounds. The speaker also lets you hear the caller’s voice
in speakerphone mode.
● USB Charger/Accessory Port allows you to connect the phone charger/USB cable
(included) and other optional accessories (not included).
CAUTION! Inserting an accessory into the incorrect jack may damage the phone.
Phone Basics 22

Turn Your Phone On and Off
The instructions below explain how to turn your phone on and off.
Turn Your Phone On
■ Press and hold the Power/Lock Key.
Turn Your Phone Off
1. Press and hold the Power/Lock Key to open the Device options menu.
2. Touch Power off to turn the phone off. Your screen remains blank while your phone is
off (unless the battery is charging).
Turn Your Screen On and Off
Your phone allows you to quickly turn the screen off when not in use and to turn it back on and
unlock it when you need it.
Turn the Screen Off When Not in Use
■ To quickly turn the screen off, press the Power/Lock Key.
To save battery power, the phone automatically turns off the screen after a certain period of
time when you leave it idle. You will still be able to receive messages and calls while the
phone’s screen is off.
Note: For information on how to adjust the time before the screen turns off, see Screen
Timeout.
Turn the Screen On and Unlock It
1. To turn the screen on, press the Power/Lock Key .
2. Swipe the screen in any direction to unlock the screen.
If you have set up a screen lock, you will be prompted to draw the pattern or enter
the password or PIN. For more information, see Lock Screen.
Phone Basics 23

Touchscreen Navigation
Your phone’s touchscreen lets you control actions through a variety of touch gestures.
Touch
When you want to type using the on-screen keyboard, select items on-screen such as
application and settings icons, or press on-screen buttons, simply touch them with your finger.
Touch and Hold
To open the available options for an item (for example, a contact or link in a Web page), touch
and hold the item.
Phone Basics 24

Swipe or Slide
To swipe or slide means to quickly drag your finger vertically or horizontally across the screen.
Drag
To drag, touch and hold your finger with some pressure before you start to move your finger.
While dragging, do not release your finger until you have reached the target position.
Phone Basics 25
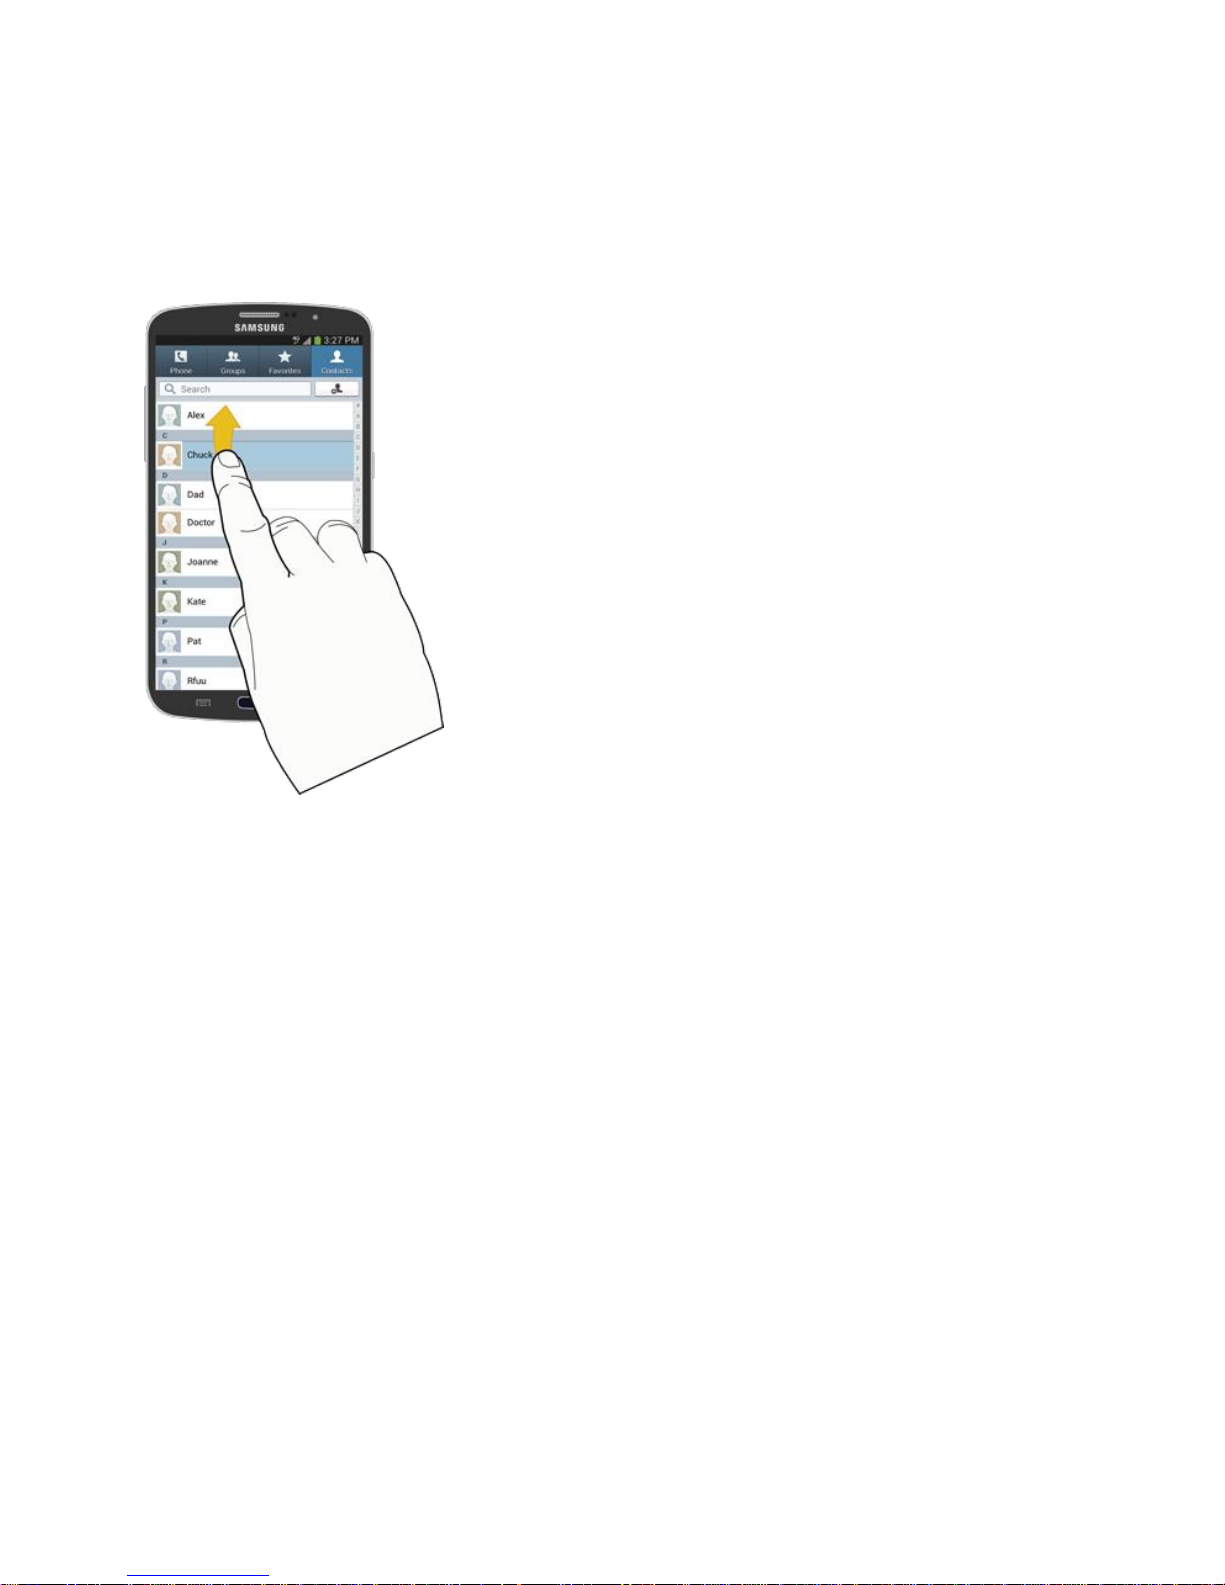
Flick
Flicking the screen is similar to swiping, except that you need to swipe your finger in light, quick
strokes. This finger gesture is always in a vertical direction, such as when flicking the contacts
or message list.
Phone Basics 26
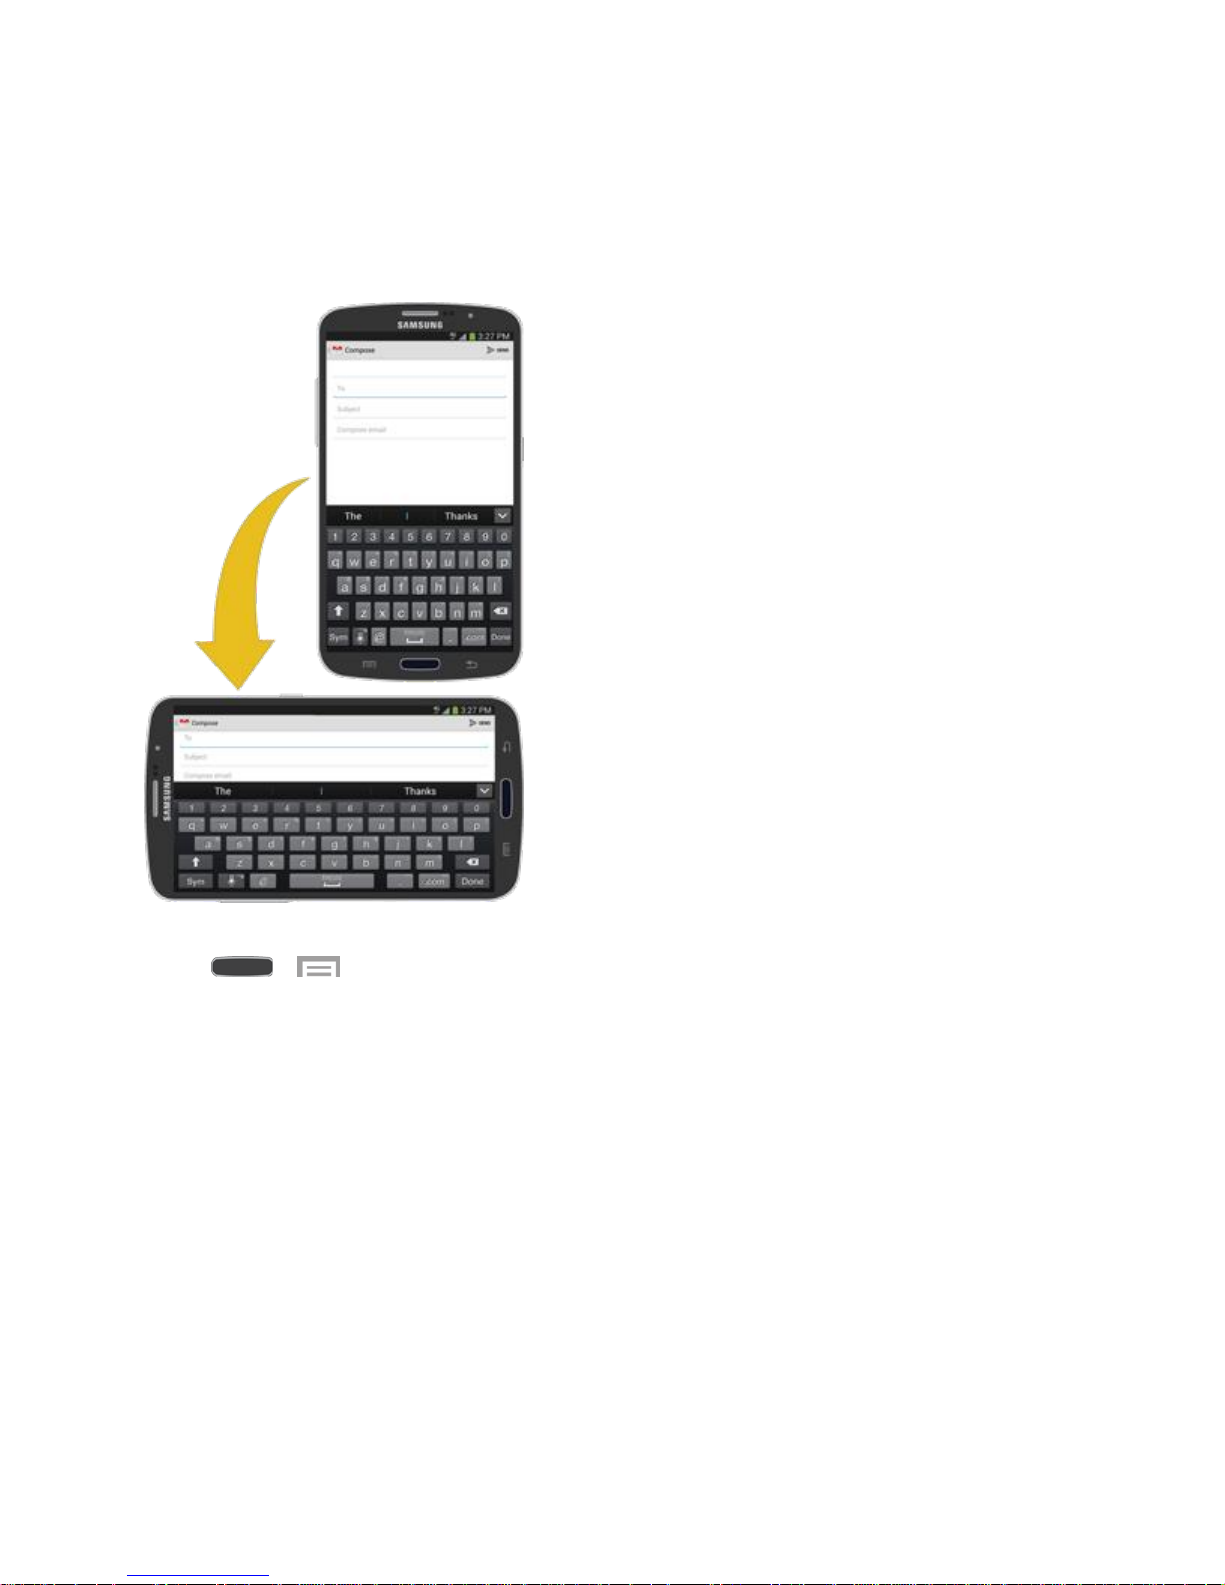
Rotate
For most screens, you can automatically change the screen orientation from portrait to
landscape by turning the phone sideways. When entering text, you can turn the phone sideways
to bring up a bigger keyboard. See Touchscreen Keyboards for more details.
Note: Screen rotation needs to be enabled for the screen orientation to automatically change.
Touch > > Settings > My Device tab > Display > Auto rotate screen.
Tip: You can also access the screen rotation setting from the Notifications screen. Pull down the
Notifications bar and touch Screen rotation to enable the option.
Phone Basics 27

Pinch and Spread
"Pinch" the screen using your thumb and forefinger to zoom out or "spread" the screen to zoom
in when viewing a picture or a Web page. (Move fingers inward to zoom out and outward to
zoom in.)
Tip: Pinching any Home screen will let you see thumbnails of all five Home screens. Touch a
thumbnail to go straight to another Home screen.
Phone Basics 28
Your Home Screen
The Home screen is the starting point for your phone’s applications, functions, and menus. You
can customize your home screen by adding application shortcuts, folders, widgets, and more.
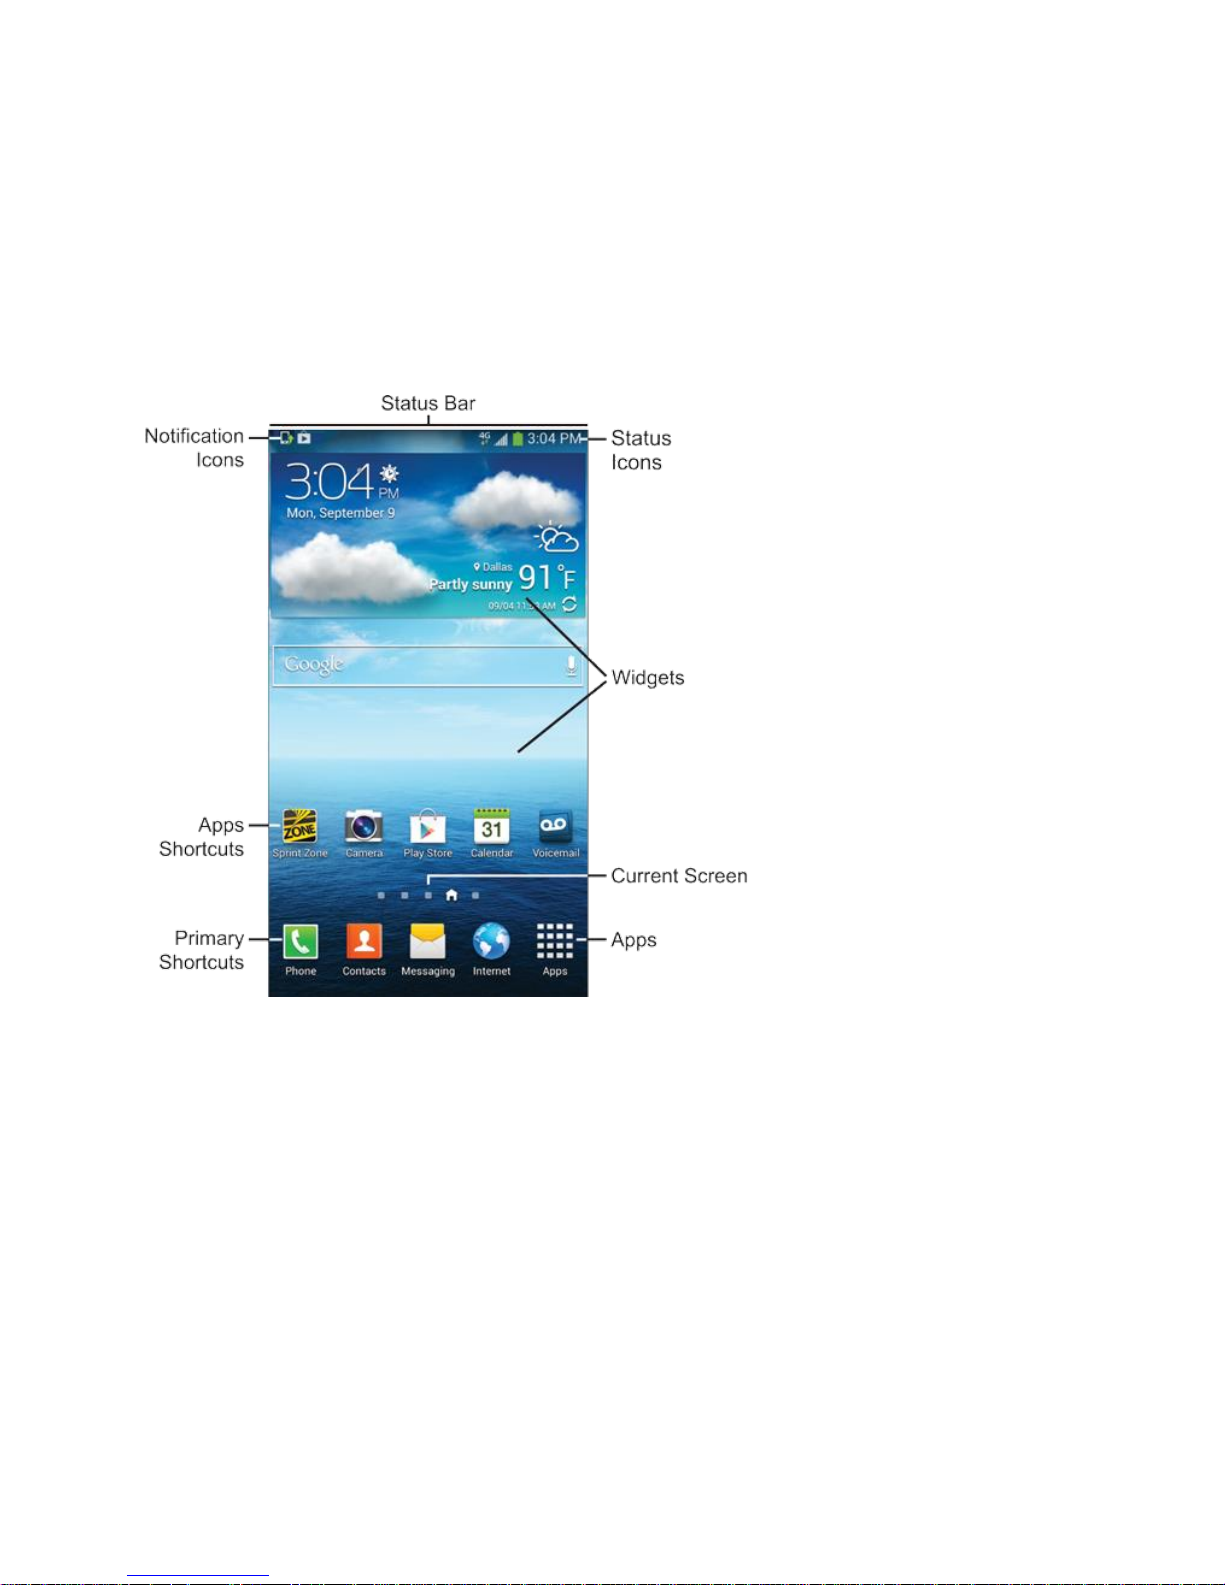
Home Screen Overview
Your home screen extends beyond the initial screen. Swipe the screen left or right to display
additional screens.
● Status Bar: Displays phone service and connection information on the right side and
notification alerts on the left. For more information, see Status Bar.
● Status Icons: Indicate the status of your phone.
● Widgets: Applications that run on the Home screens.
● Current Screen: Indicates which Home screen is being displayed. For more information,
see Extended Home Screens.
● Apps: Displays the Apps screen.
● Primary Shortcuts: Shortcuts to common features. Primary Shortcuts appear on every
Home screen.
Phone Basics 29
 Loading...