

Samsung Galaxy S III, Sprint Galaxy S III User Manual

User Guide
Samsung Galaxy S® III
Please Note
Some content in this user guide doesn’t apply to
CREDO phones. This includes:
o
Sprint customer service phone numbers
and account information
o
Sprint activation instructions
o
Sprint-specific services and features
(including tethering, Sprint Hotspot, Sprint
Zone, Sprint Wallet, Sprint TV & Movies,
NASCAR, and TeleNav GPS)
To activate your phone, please visit
credomobile.com/activate. For CREDO
customer service, please call 800-411-0848.

User Guide
©2012 Sprint. Sprint and the logo are trademarks of Sprint. Other marks are trademarks of their
respective owners.

Table of Contents
Get Started ................................................................................................................................ 1
Your Phone at a Glance ...................................................................................................... 1
Set Up Your Phone ............................................................................................................. 1
Activate Your Phone ........................................................................................................... 4
Complete the Setup Application ................................................................ .......................... 5
Set Up Voicemail ................................................................................................................ 6
Sprint Account Information and Help ................................................................................... 7
Sprint Account Passwords ........................................................................................... 7
Manage Your Account ................................................................................................. 7
Sprint Support Services ............................................................................................... 8
Phone Basics ............................................................................................................................10
Your Phone’s Layout and Key Functions ...........................................................................10
Turn Your Phone On and Off .............................................................................................12
Turn Your Screen On and Off ............................................................................................12
Touchscreen Navigation ....................................................................................................13
Your Home Screen ............................................................................................................18
Creating Shortcuts ......................................................................................................19
Adding and Removing Primary Shortcuts ...................................................................20
Adding and Removing Widgets ...................................................................................20
Extended Home Screens ............................................................................................21
Recently Used Applications ........................................................................................21
Status Bar ..........................................................................................................................22
Enter Text ..........................................................................................................................24
Touchscreen Keyboards .............................................................................................24
Text Input Methods .....................................................................................................24
Keyboard Input Options ..............................................................................................25
Text Entry Options ......................................................................................................27
Predictive Text ................................................................ ............................................28
Google Voice Typing ..................................................................................................30
Tips for Editing Text. ...................................................................................................30
TOC i

Phone Calls ..............................................................................................................................32
Make Phone Calls ..............................................................................................................32
Call Using the Keypad ................................................................................................32
Call from Logs ............................................................................................................33
Call from Contacts ......................................................................................................33
Call a Number in a Text Message ...............................................................................34
Call a Number in an Email Message ...........................................................................35
Call Emergency Numbers ...........................................................................................35
Receive Phone Calls ..........................................................................................................36
Answer an Incoming Call ................................................................ ............................36
Mute the Ringing Sound .............................................................................................37
Reject an Incoming Call ..............................................................................................37
Reject a Call with a Text Message ..............................................................................37
Voicemail (Traditional) .......................................................................................................38
Set Up Voicemail Through the Phone App ..................................................................38
Retrieve Your Voicemail Messages ............................................................................38
Voicemail Notification .................................................................................................39
Visual Voicemail ................................................................................................................39
Set Up Visual Voicemail..............................................................................................40
Review Visual Voicemail .............................................................................................40
Listen to Multiple Voicemail Messages .......................................................................41
Configure Visual Voicemail Options ............................................................................41
Configure Visual Voicemail Settings ...........................................................................42
Automatically Enable the Speakerphone ....................................................................43
Change Your Main Greeting via the Voicemail Menu ..................................................44
Edit the From Name via the Voicemail Menu ..............................................................44
Phone Call Options ............................................................................................................44
Dialing Options ...........................................................................................................45
Caller ID .....................................................................................................................45
Call Waiting ................................................................................................................46
3-way Calling ..............................................................................................................46
Call Forwarding ..........................................................................................................48
In-call Options .............................................................................................................49
TOC ii

Speed Dialing .............................................................................................................50
Logs ...................................................................................................................................51
View Logs ...................................................................................................................52
Logs Options ..............................................................................................................52
Clear Logs ..................................................................................................................53
Call Duration ...............................................................................................................53
Settings .....................................................................................................................................54
Wi-Fi Settings ....................................................................................................................55
Bluetooth Settings ..............................................................................................................55
Data Usage Settings ..........................................................................................................56
More Settings.....................................................................................................................56
Airplane Mode ............................................................................................................57
Kies via Wi-Fi® ............................................................................................................57
VPN ............................................................................................................................60
Tethering ....................................................................................................................60
NFC ............................................................................................................................61
Android Beam .............................................................................................................61
S Beam .......................................................................................................................62
Wi-Fi Direct .................................................................................................................62
Nearby Devices ..........................................................................................................62
Mobile Networks .........................................................................................................63
Roaming .....................................................................................................................63
Call Settings ......................................................................................................................64
Call Rejection .............................................................................................................64
Set Reject Messages ..................................................................................................65
Call Alert .....................................................................................................................65
Call Answering/Ending ................................................................................................65
Auto Screen Off During Calls ......................................................................................66
Accessory Settings for Calls .......................................................................................66
Use Extra Volume for Calls .........................................................................................66
In-call Sound EQ Settings ...........................................................................................66
Increase Volume in Pocket .........................................................................................66
Additional Settings ......................................................................................................67
TOC iii

US Dialing ..................................................................................................................67
International Dialing ....................................................................................................67
TTY Mode ...................................................................................................................67
DTMF Tones ...............................................................................................................68
Voicemail Settings ......................................................................................................69
Voice Privacy ..............................................................................................................70
Accounts .....................................................................................................................70
Use Internet Calling ....................................................................................................70
Sound Settings ..................................................................................................................70
Silent Mode.................................................................................................................71
Volume .......................................................................................................................71
Vibration Intensity ................................ .......................................................................71
Phone Ringtone ..........................................................................................................72
Device Vibration .........................................................................................................72
Default Notifications ....................................................................................................72
Sound and Vibration ...................................................................................................72
System Sound Settings ..............................................................................................73
Display Settings .................................................................................................................73
Brightness ..................................................................................................................73
Screen Timeout ..........................................................................................................73
Smart Stay ..................................................................................................................73
Auto-rotate Screen ......................................................................................................74
Touch Key Light Duration ...........................................................................................74
Font Style ...................................................................................................................74
Font Size ....................................................................................................................74
Auto Adjust Screen Tone ............................................................................................74
Display Battery Percentage ........................................................................................75
Gyroscope Calibration ................................................................................................75
Wallpaper Settings .............................................................................................................75
Home Screen Wallpaper .............................................................................................75
Lock Screen Wallpaper ...............................................................................................75
Home and Lock Screens Wallpaper ............................................................................76
LED Indicator Settings .......................................................................................................76
TOC iv

Motion Settings ..................................................................................................................76
Power Saving Settings .......................................................................................................77
Storage Settings ................................................................................................................78
Device Memory ...........................................................................................................79
SD Card ......................................................................................................................79
Battery Settings .................................................................................................................80
Application Manager ..........................................................................................................81
Manage Applications ..................................................................................................81
Running Services........................................................................................................81
Memory Use ...............................................................................................................82
Accounts and Sync Settings ..............................................................................................82
Set Up a New Account. ...............................................................................................82
Manage Existing Accounts ..........................................................................................82
Location Services Settings. ................................................................................................83
Use Wireless Networks ...............................................................................................83
Use GPS Satellites .....................................................................................................83
Location and Google Search ......................................................................................83
Security Settings ................................ ................................................................ ................84
Screen Lock................................................................................................................84
Encrypt Phone ............................................................................................................86
Encrypt SD Card .........................................................................................................86
Make Passwords Visible .............................................................................................87
Device Administrators ................................................................ .................................87
Unknown Sources.......................................................................................................88
Trusted Credentials ....................................................................................................88
Install from Device Storage .........................................................................................88
Clear Credentials ........................................................................................................88
Language and Input Settings .............................................................................................88
Language ...................................................................................................................88
Default Input Method ..................................................................................................89
Google Voice Typing ..................................................................................................89
Samsung Keyboard ....................................................................................................89
T9 Trace .....................................................................................................................90
TOC v

Voice cmd for Apps .....................................................................................................91
Voice Recognizer........................................................................................................91
Voice Search ..............................................................................................................91
Text-to-speech Output ................................................................................................92
Pointer Speed ................................................................ .............................................92
Back Up and Reset Settings ..............................................................................................93
Mobile Backup and Restore ........................................................................................93
Factory Data Reset .....................................................................................................93
Dock Settings.....................................................................................................................93
Date and Time Settings .....................................................................................................94
Accessibility Settings .........................................................................................................94
TalkBack Settings .......................................................................................................95
Developer Options Settings ...............................................................................................96
USB Debugging ..........................................................................................................96
Development Device ID ..............................................................................................96
Allowing Mock Locations.............................................................................................96
Desktop Backup Password .........................................................................................97
User Interface Options ................................................................................................97
Application Options .....................................................................................................97
Activate This Device ..........................................................................................................98
System Update Settings ....................................................................................................98
Update PRL ................................................................................................................98
Update Profile .............................................................................................................98
Update Samsung Software .........................................................................................99
Update Firmware ................................................................................................ ........99
About Device .....................................................................................................................99
Phone Status ..............................................................................................................99
Legal Information ...................................................................................................... 100
Contacts.................................................................................................................................. 101
Get Started With Contacts ............................................................................................... 101
Access Contacts ....................................................................................................... 102
The Contacts List ...................................................................................................... 102
Add a Contact .................................................................................................................. 103
TOC vi

Save a Phone Number ..................................................................................................... 106
Edit a Contact .................................................................................................................. 108
Add or Edit Information for a Contact ........................................................................ 108
Assign a Stored Picture to a Contact ........................................................................ 108
Assign a New Picture to a Contact ............................................................................ 109
Assign a Ringtone to a Contact................................................................................. 109
Join a Contact ........................................................................................................... 110
Delete a Contact ....................................................................................................... 110
Synchronize Contacts ...................................................................................................... 110
Add Entries to Your Favorites .......................................................................................... 112
Add Facebook Content to Your Contacts ......................................................................... 112
Create Groups ................................................................................................................. 113
Share a Contact ............................................................................................................... 114
Accounts and Messaging ........................................................................................................ 115
Gmail / Google ................................................................................................................. 115
Create a Google Account .......................................................................................... 115
Sign In to Your Google Account ................................................................................ 116
Access Gmail ............................................................................................................ 116
Send a Gmail Message ............................................................................................ 117
Read and Reply to Gmail Messages ......................................................................... 117
Email ............................................................................................................................... 118
Add an Email Account .............................................................................................. 118
Add a Corporate Email Account ................................................................................ 119
Compose and Send Email ........................................................................................ 120
View and Reply to Email ........................................................................................... 121
Manage Your Email Inbox ......................................................................................... 121
Corporate Email Features ......................................................................................... 122
Edit Email Account Settings ...................................................................................... 123
Delete an Email Account........................................................................................... 126
Add the Mail Widget .................................................................................................. 126
Text Messaging and MMS ............................................................................................... 126
Compose Text Messages ......................................................................................... 127
Send a Multimedia Message (MMS) ......................................................................... 127
TOC vii

Save and Resume a Draft Message ......................................................................... 128
New Messages Notification ....................................................................................... 128
Managing Message Conversations ........................................................................... 129
Text and MMS Options ............................................................................................. 131
Social Networking Accounts ............................................................................................. 133
Facebook .................................................................................................................. 133
YouTube ................................................................................................................... 134
Google Talk .............................................................................................................. 134
Google+ .................................................................................................................... 135
Google Messenger ................................................................................................... 135
ChatON .................................................................................................................... 136
Apps and Entertainment .......................................................................................................... 138
DivX ................................................................................................................................. 138
DivX Legal Information ............................................................................................. 138
Locating Your DivX VOD Registration Number ......................................................... 139
Register Your DivX Device for VOD Playback of Purchased Movies......................... 139
Google Play Store App .................................................................................................... 140
Find and Install an App ............................................................................................. 141
Create a Google Checkout Account .......................................................................... 141
Request a Refund for a Paid App ............................................................................. 142
Open an Installed App .............................................................................................. 142
Uninstall an App ....................................................................................................... 142
Get Help with Google Play ........................................................................................ 142
Navigation ........................................................................................................................ 143
Google Maps ............................................................................................................ 143
TeleNavTM GPS Navigation ....................................................................................... 144
Installing TeleNav GPS Navigator ............................................................................. 145
Registering TeleNav GPS Navigator ......................................................................... 145
TeleNav: Using TeleNav GPS Navigator .................................................................. 145
TeleNav: Getting Driving Directions .......................................................................... 146
TeleNav: Creating a Favorites Location .................................................................... 147
TeleNav: Sharing a Recent Location with Others ...................................................... 147
TeleNav: Configuring Your Navigation Preferences .................................................. 148
TOC viii

Google Navigation .................................................................................................... 149
Latitude ..................................................................................................................... 149
Music ............................................................................................................................... 149
Sprint Music Plus ...................................................................................................... 150
Music Player ............................................................................................................. 150
Google Play Music .................................................................................................... 151
Google Play Movies ......................................................................................................... 154
Sprint TV & Movies ................................................................................................ .......... 154
AllShare Play ................................................................................................................... 155
Configuring AllShare Settings ................................................................................... 156
Setting Up Web Storage ........................................................................................... 157
Sharing Files via Web Storage.................................................................................. 157
Sharing Media via AllShare Play to a Target Device ................................................. 158
AllShare Play Screen Sharing via Group Cast .......................................................... 159
Flipboard .......................................................................................................................... 159
Media Hub ....................................................................................................................... 159
Creating a New Media Hub Account ......................................................................... 160
Using Media Hub ................................................................................................ ...... 160
Media Hub Notices ................................................................................................... 161
NASCAR Sprint Cup Mobile ............................................................................................. 162
Web and Data ......................................................................................................................... 164
Wi-Fi ................................................................................................................................ 164
Turn Wi-Fi On and Connect to a Wireless Network ................................................... 164
Check the Wireless Network Status .......................................................................... 165
Connect to a Different Wi-Fi Network ........................................................................ 166
Data Services (Sprint 3G) ................................................................................................ 166
Your Data Services User Name ................................................................................ 166
Launch a Web Connection ........................................................................................ 167
4G Services ................................ ................................................................ ..................... 167
Virtual Private Networks (VPN) ........................................................................................ 168
Prepare Your Phone for VPN Connection ................................................................. 168
Set Up Trusted Credential Storage ........................................................................... 168
Add a VPN Connection ............................................................................................. 169
TOC ix

Connect to a VPN ..................................................................................................... 169
Disconnect from a VPN ............................................................................................ 169
Browser ........................................................................................................................... 169
Learn to Navigate the Browser ................................................................................. 170
Browser Menu .......................................................................................................... 171
Select Text on a Web Page ...................................................................................... 172
Go to a Specific Website........................................................................................... 172
Adjust Browser Settings ............................................................................................ 172
Reset the Browser to Default .................................................................................... 175
Set the Browser Home Page .................................................................................... 175
Create Bookmarks .................................................................................................... 175
Create a New Home Page ........................................................................................ 176
Add Bookmarks to Your Home Screen ..................................................................... 176
Sprint Hotspot .................................................................................................................. 176
Camera and Video .................................................................................................................. 178
Take Pictures ................................................................................................................... 178
Open the Camera ................................ ..................................................................... 178
Viewfinder Screen..................................................................................................... 179
Review Screen ......................................................................................................... 180
Take a Picture .......................................................................................................... 181
Close the Camera ..................................................................................................... 181
Record Videos ................................................................................................................. 182
Camera Settings .............................................................................................................. 182
View Pictures and Videos Using Gallery .......................................................................... 184
Open Gallery ............................................................................................................ 185
View Picturess and Videos ....................................................................................... 185
Zoom In or Out on a Picture ...................................................................................... 186
Watch Video ............................................................................................................. 186
Working with Pictures ................................................................................................ ...... 186
Photo Editor ..................................................................................................................... 187
Installing the Photo Editor App from Samsung Apps ................................................. 187
Using Photo Editor .................................................................................................... 188
Share Pictures and Videos............................................................................................... 189
TOC x

Send Pictures or Videos by Email ............................................................................. 189
Send a Picture or Video by Multimedia Message ...................................................... 189
Send Pictures or Videos Using Bluetooth ................................................................. 189
Share Pictures or Videos on Google+ ....................................................................... 190
Share Pictures on Picasa .......................................................................................... 190
Share Videos on YouTube ........................................................................................ 190
Tools and Calendar ................................................................................................................. 192
Calendar .......................................................................................................................... 192
Add an Event to the Calendar ................................................................................... 192
Event Alerts .............................................................................................................. 194
View Events .............................................................................................................. 195
Erase Events ............................................................................................................ 196
Alarm & Timer .................................................................................................................. 196
Calculator ........................................................................................................................ 197
S Memo ........................................................................................................................... 198
View the S Memo Screen ......................................................................................... 198
Create a New S Memo ............................................................................................. 199
S Suggest ........................................................................................................................ 200
My Files ........................................................................................................................... 200
Dropbox ........................................................................................................................... 201
Download the DropBox Desktop Application ............................................................. 201
Accessing Dropbox on Your Device .......................................................................... 201
Manually Uploading a Picture to Dropbox ................................................................. 202
Voice Services ................................................................................................................. 203
S Voice ..................................................................................................................... 203
Voice Recorder ......................................................................................................... 203
Bluetooth ......................................................................................................................... 204
Turn Bluetooth On or Off........................................................................................... 204
The Bluetooth Settings Menu .................................................................................... 205
Change the Phone Name ......................................................................................... 205
Connect a Bluetooth Headset or Car Kit ................................................................... 205
Reconnect a Headset or Car Kit ............................................................................... 206
Disconnect or Unpair from a Bluetooth Device .......................................................... 206
TOC xi

Send Information Using Bluetooth ............................................................................ 207
Receive Information Using Bluetooth ........................................................................ 208
Kies Air ............................................................................................................................ 209
microSD Card .................................................................................................................. 210
Remove the microSD Card ....................................................................................... 210
Insert a microSD Card .............................................................................................. 211
View the microSD Card Memory ............................................................................... 211
Format the microSD Card ......................................................................................... 211
Unmount the microSD Card ...................................................................................... 212
Update Your Phone ......................................................................................................... 212
Update Your Phone Firmware .................................................................................. 212
Update Your Android Operating System (Samsung Software) .................................. 214
Update Your Profile .................................................................................................. 214
Update Your PRL ..................................................................................................... 215
Index ....................................................................................................................................... 216
TOC xii

Get Started
The following topics give you all the information you need to set up your phone and Sprint
service the first time.
Your Phone at a Glance
Set Up Your Phone
Activate Your Phone
Set Up Voicemail
Sprint Account Information and Help
Your Phone at a Glance
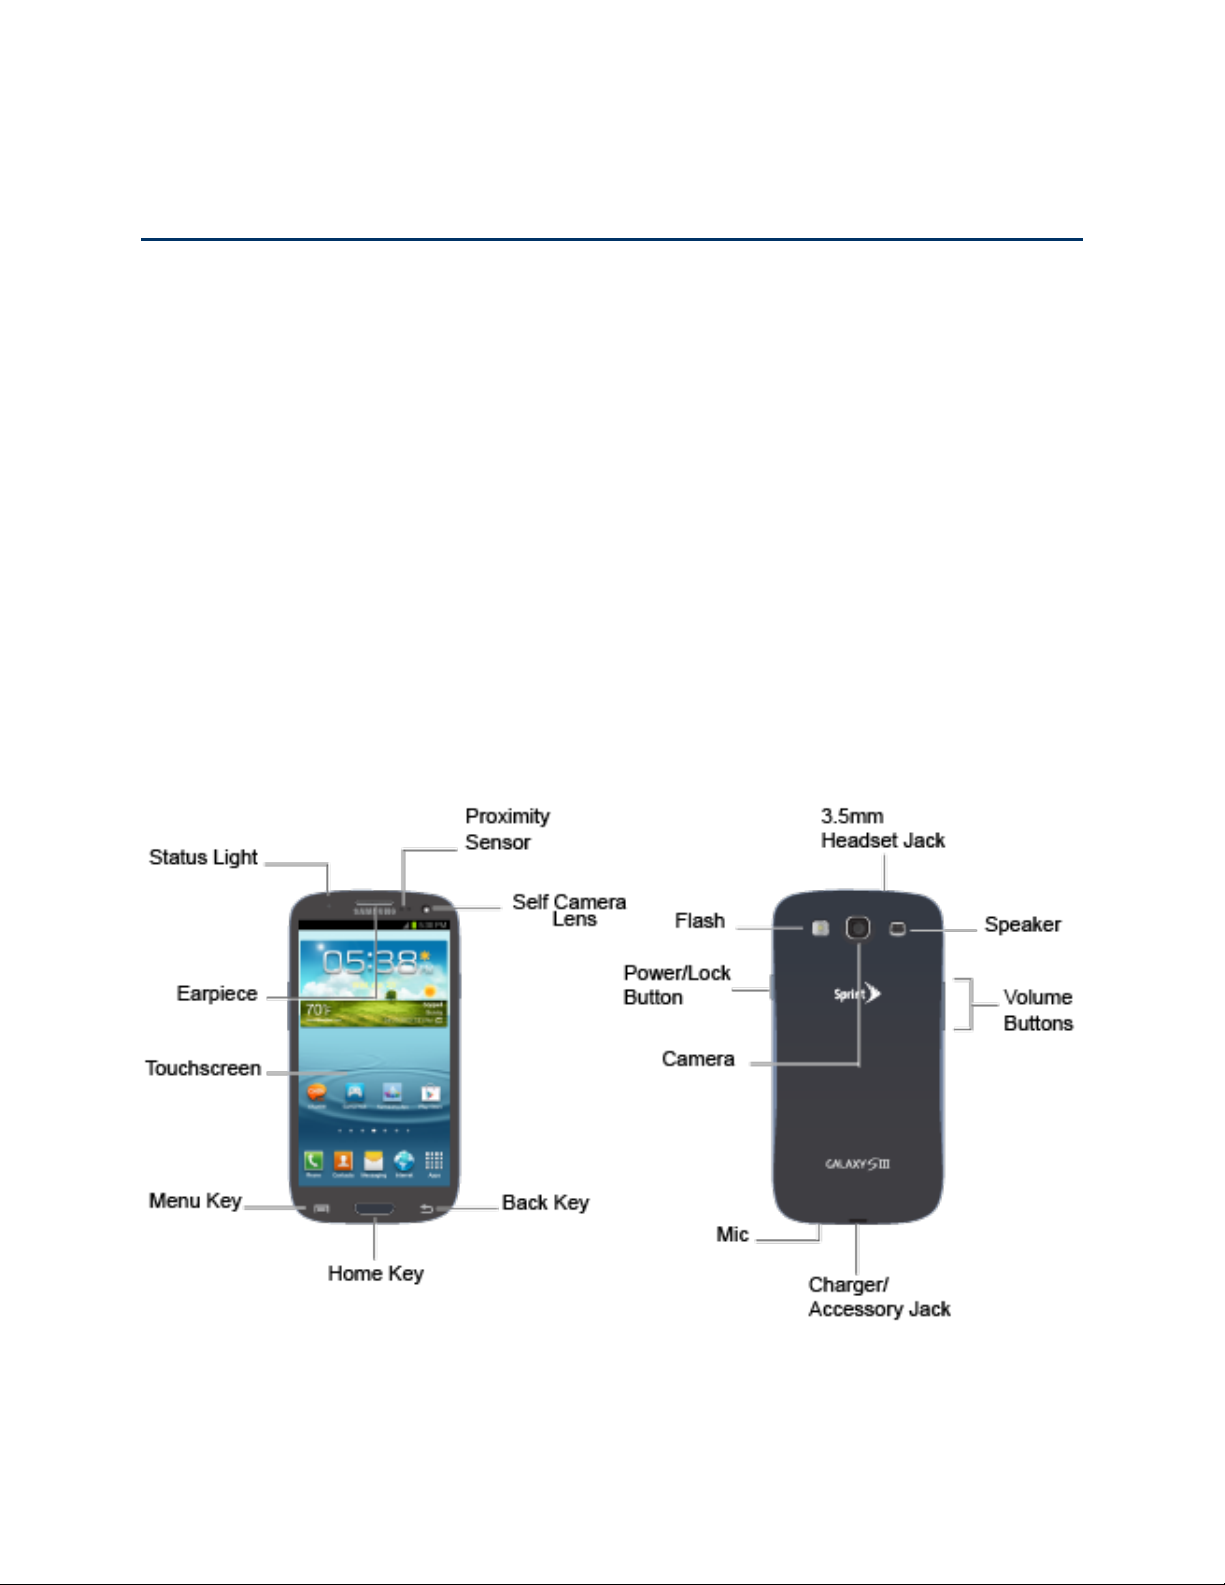
The following illustration outlines your phone’s primary external features and buttons.
Set Up Your Phone
You must first install and charge the battery to begin setting up your phone.
Install the battery. 1.
Insert a coin or other flat object into the slot at the bottom of the battery compartment
cover and lift the cover up gently.
Get Started 1
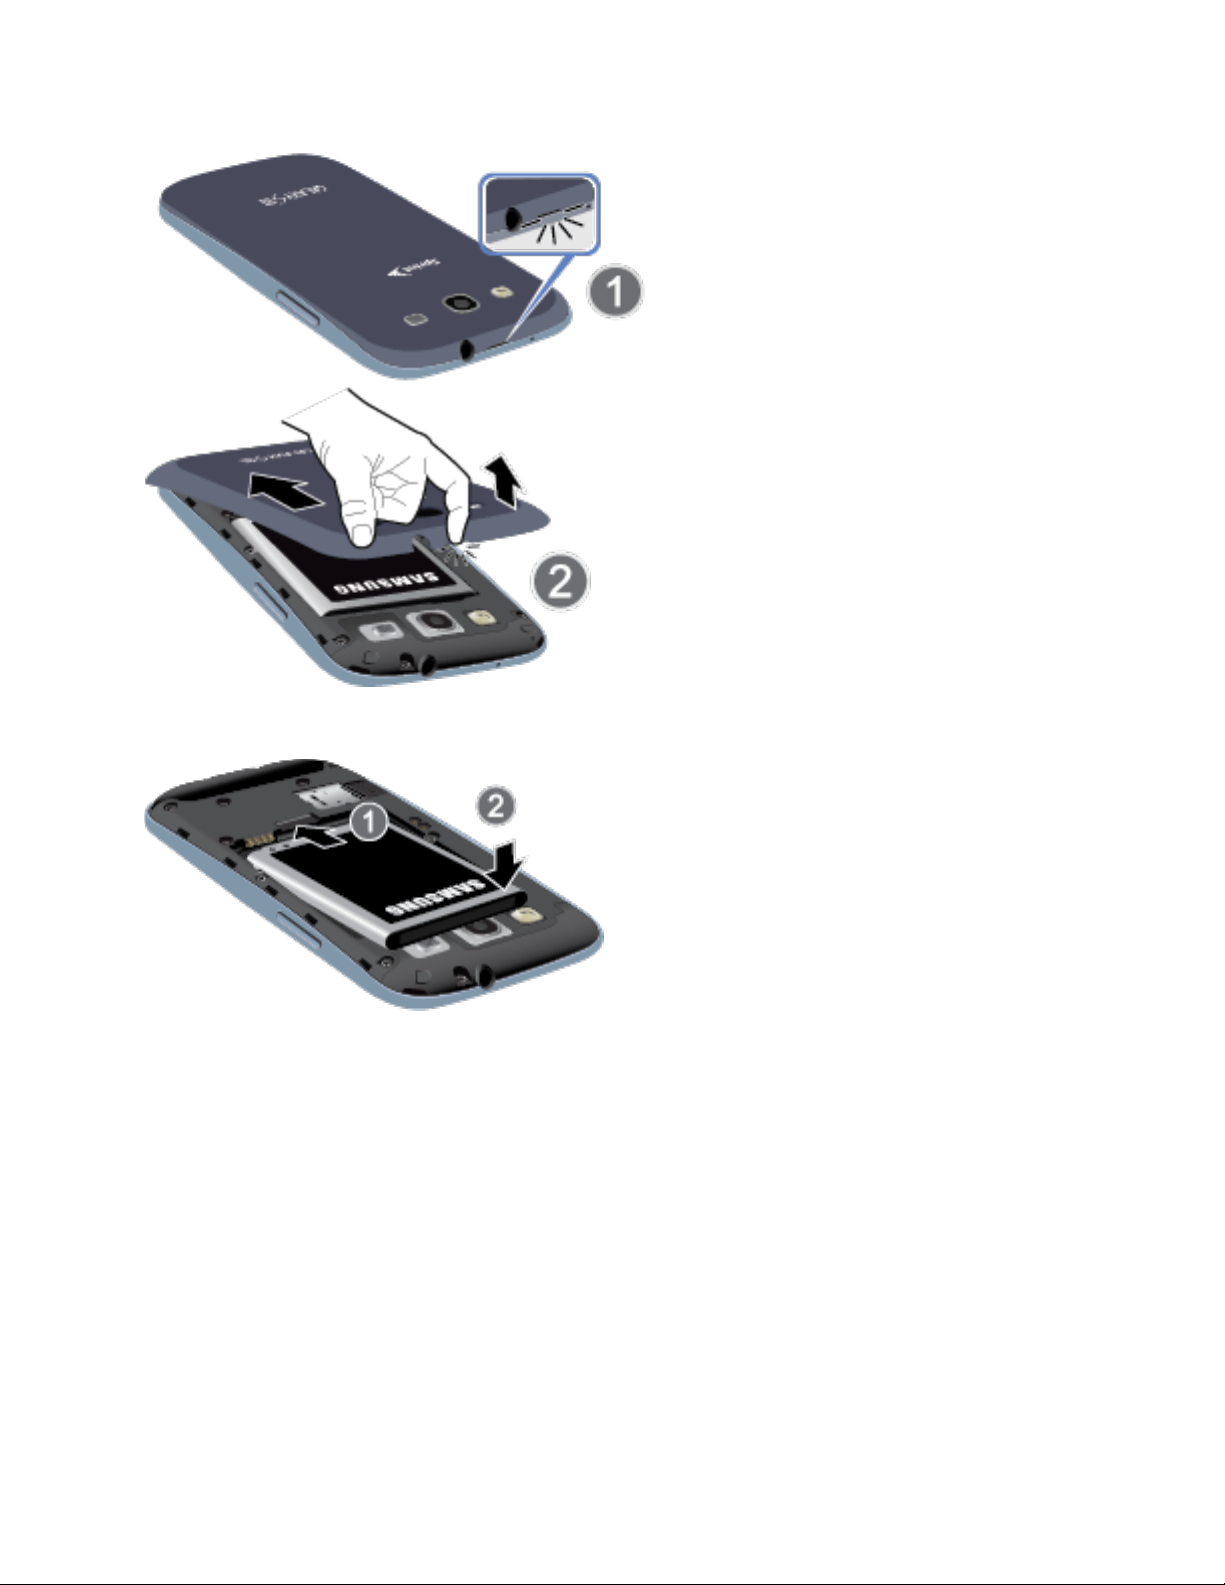
Insert the battery, contacts end first, and gently press the battery into place.
Replace the battery compartment cover, making sure all the tabs are secure and
there are no gaps around the cover.
Note: When you insert the battery, your phone may power on automatically.
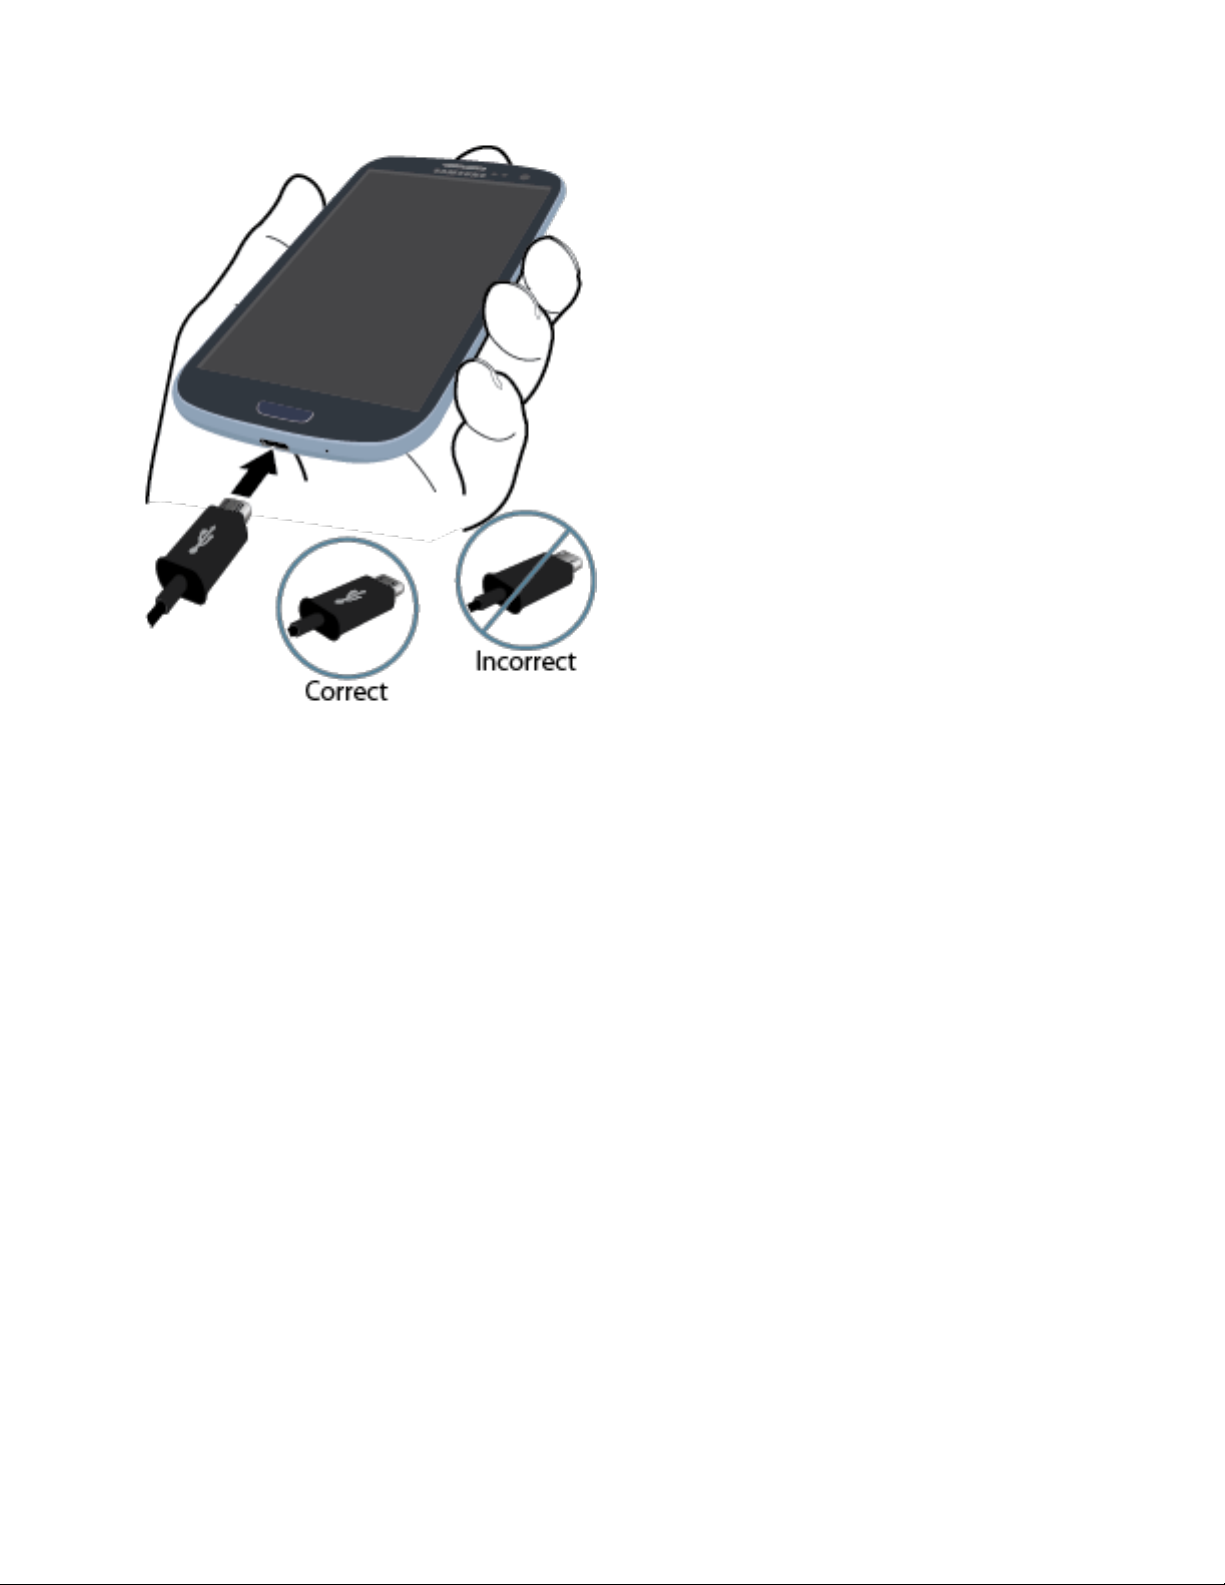
Plug the USB connector into the charger/accessory jack on the bottom of your phone. 2.
Warning! While the phone is charging, if the touch screen does not function due to an
unstable power supply, unplug the USB power adapter from the power outlet or
unplug the USB cable from the phone.
Get Started 2
Plug the AC adapter into an electrical outlet and charge your battery. Fully charging a 3.
battery may take up to three hours.
Note: Your phone’s battery should have enough charge for the phone to turn on and find a
signal, run the setup application, set up voicemail, and make a call. You should fully
charge the battery as soon as possible.
Press the Power button to turn the phone on. 4.
Get Started 3
If your phone is activated, it will turn on, search for Sprint service, and begin the
setup application.
If your phone is not yet activated, see Activate Your Phone for more information.
Activate Your Phone
Depending on your account or how and where you purchased your phone, it may be ready to
use or you may need to activate it on your Sprint account.
● If you purchased your phone at a Sprint Store, it is probably activated and ready to use.
● If you received your phone in the mail and it is for a new Sprint account or a new line of
service, it is designed to activate automatically.
When you turn the phone on for the first time, you should see a Hands Free
Activation screen, which may be followed by a PRL Update screen and a Firmware
Update screen. Follow the onscreen instructions to continue.
● If you received your phone in the mail and you are activating a new phone for an existing
number on your account (you’re swapping phones), you can activate on your computer
online or directly on your phone.
Activate on your computer:
• Go to sprint.com/activate and complete the online instructions to activate your
phone.
Get Started 4

Activate on your phone:
• Turn on your new phone. (Make sure the old one is turned off.) Your phone will
automatically attempt Hands-Free Activation.
• Tap Activate to override auto-activation and start the manual activation wizard.
• Follow the onscreen prompts to complete the activation process.
● To confirm activation, make a phone call. If your phone is still not activated or you do not
have access to the Internet, contact Sprint Customer Service at 1-888-211-4727 for
assistance.
Tip: Do not press the Power button while the phone is being activated. Pressing the Power
button cancels the activation process.
Note: If you are having any difficulty with activation, contact Sprint Customer Service by calling
1-888-211-4727 from any other phone.
Complete the Setup Application
The Setup application helps you set up certain features and preferences on your phone. Once
your phone has been turned on and activated, you will see a Welcome message. You can then
complete the Setup application.
Note: You may be able to complete the setup application before your phone has been
activated on your Sprint account.
Once your phone is activated, you will see the Welcome screen. Tap Start to get 1.
started.
Follow the onscreen instructions to complete each section. For each topic, you will have 2.
an option to skip it and continue to the next screen.
Make it Google - Complete the steps to sign in to your current Google account, or
tap Get an account to sign up for a new Google account right from your phone.
• Sign in - Enter your Gmail address and password and tap Sign in to sign in to
your current Google account.
• Get an account - Follow the instructions to sign up for a new Google account.
There will be screens to enter your first and last names, create an email address
(Gmail), create a password, enter recovery information (including a backup email
address and a recovery question in case you forget your Google account sign-in
information), an option to join Google+, and an option to enable purchases on
Google Play. Tap Next between each screen.
Backup or Backup and Restore - Select your Google account backup settings. If
you're signing in with an existing Google account, you can elect to restore your
Get Started 5

Google account information, such as apps, bookmarks, Wi-Fi passwords, and
contacts, to your new Samsung Galaxy S III. Tap Next to continue.
Use Google location - Select your Google location options and tap Next.
This phone belongs to... - If applicable, enter your first and last name and tap Next.
This information is used by the phone to personalize some apps.
When you see the Setup complete screen, tap Finish to continue to the Dropbox 3.
screen.
From the Dropbox screen, select an option and follow the onscreen instructions. 4.
Create a new Dropbox account - Tap to set up a Dropbox account to save your
pictures and videos to associated computers and to a Web-based storage area.
I already have an account - Tap to sign in to your current Dropbox account.
No thanks - Tap to skip the Dropbox setup screens.
Once you have completed the Dropbox screens, you may see a Sprint Connections 5.
Optimizer notice.
Read the notice and tap I Agree to allow your phone to automatically connect to
available configured Wi-Fi networks.
Tap Settings and uncheck the Sprint automatic connection option if you do not
wish to use the Sprint Connections Optimzer.
Your setup is now complete. Follow the onscreen instructions to learn about basic 6.
touch/tap menu navigation.
Set Up Voicemail
You should set up your Sprint Voicemail and personal greeting as soon as your phone is
activated. Always use a password to protect against unauthorized access. Your phone
automatically transfers all unanswered calls to your voicemail, even if your phone is in use or
turned off.
1. Press Home
turn on the display and then swipe your screen in any direction.) See Turn Your Screen
On and Off.
2. Touch and hold
and tap . (If your screen is locked, press (Power button) to
to dial your voicemail number.
3. Follow the system prompts to:
Create your password.
Get Started 6

Record your name announcement.
Record your greeting.
Note: Voicemail Password – Sprint strongly recommends that you create a password when
setting up your voicemail to protect against unauthorized access. Without a password,
anyone who has access to your phone is able to access your voicemail messages.
Sprint Account Information and Help
Find out about account passwords and information about managing your account and finding
help.
Sprint Account Passwords
Manage Your Account
Sprint Support Services
Sprint Account Passwords
As a Sprint customer, you enjoy unlimited access to your personal account information, your
voicemail account, and your data services account. To ensure that no one else has access to
your information, you will need to create passwords to protect your privacy.
Account User Name and Password
If you are the account owner, you will create an account user name and password when you
sign on to sprint.com. (Click Sign in/Sign up and then click Sign up now! to get started.) If you
are not the account owner (if someone else receives the bill for your Sprint service), you can get
a sub-account password at sprint.com.
Voicemail Password
You’ll create your voicemail password when you set up your voicemail. See Set Up Voicemail
for more information on your voicemail password.
Data Services Password
With your Sprint phone, you may elect to set up an optional data services password to control
access and authorize Premium Service purchases.
For more information, or to change your passwords, sign on to sprint.com or call Sprint
Customer Service at 1-888-211-4727.
Manage Your Account
Manage your Sprint account from your computer, your Sprint phone, or any other phone.
Online: sprint.com
Get Started 7
● Access your account information.
● Check your minutes used (depending on your Sprint service plan).
● View and pay your bill.
● Enroll in Sprint online billing and automatic payment.
● Purchase accessories.
● Shop for the latest Sprint phones.
● View available Sprint service plans and options.
● Learn more about data services and other products like games, ring tones, screen
savers, and more.
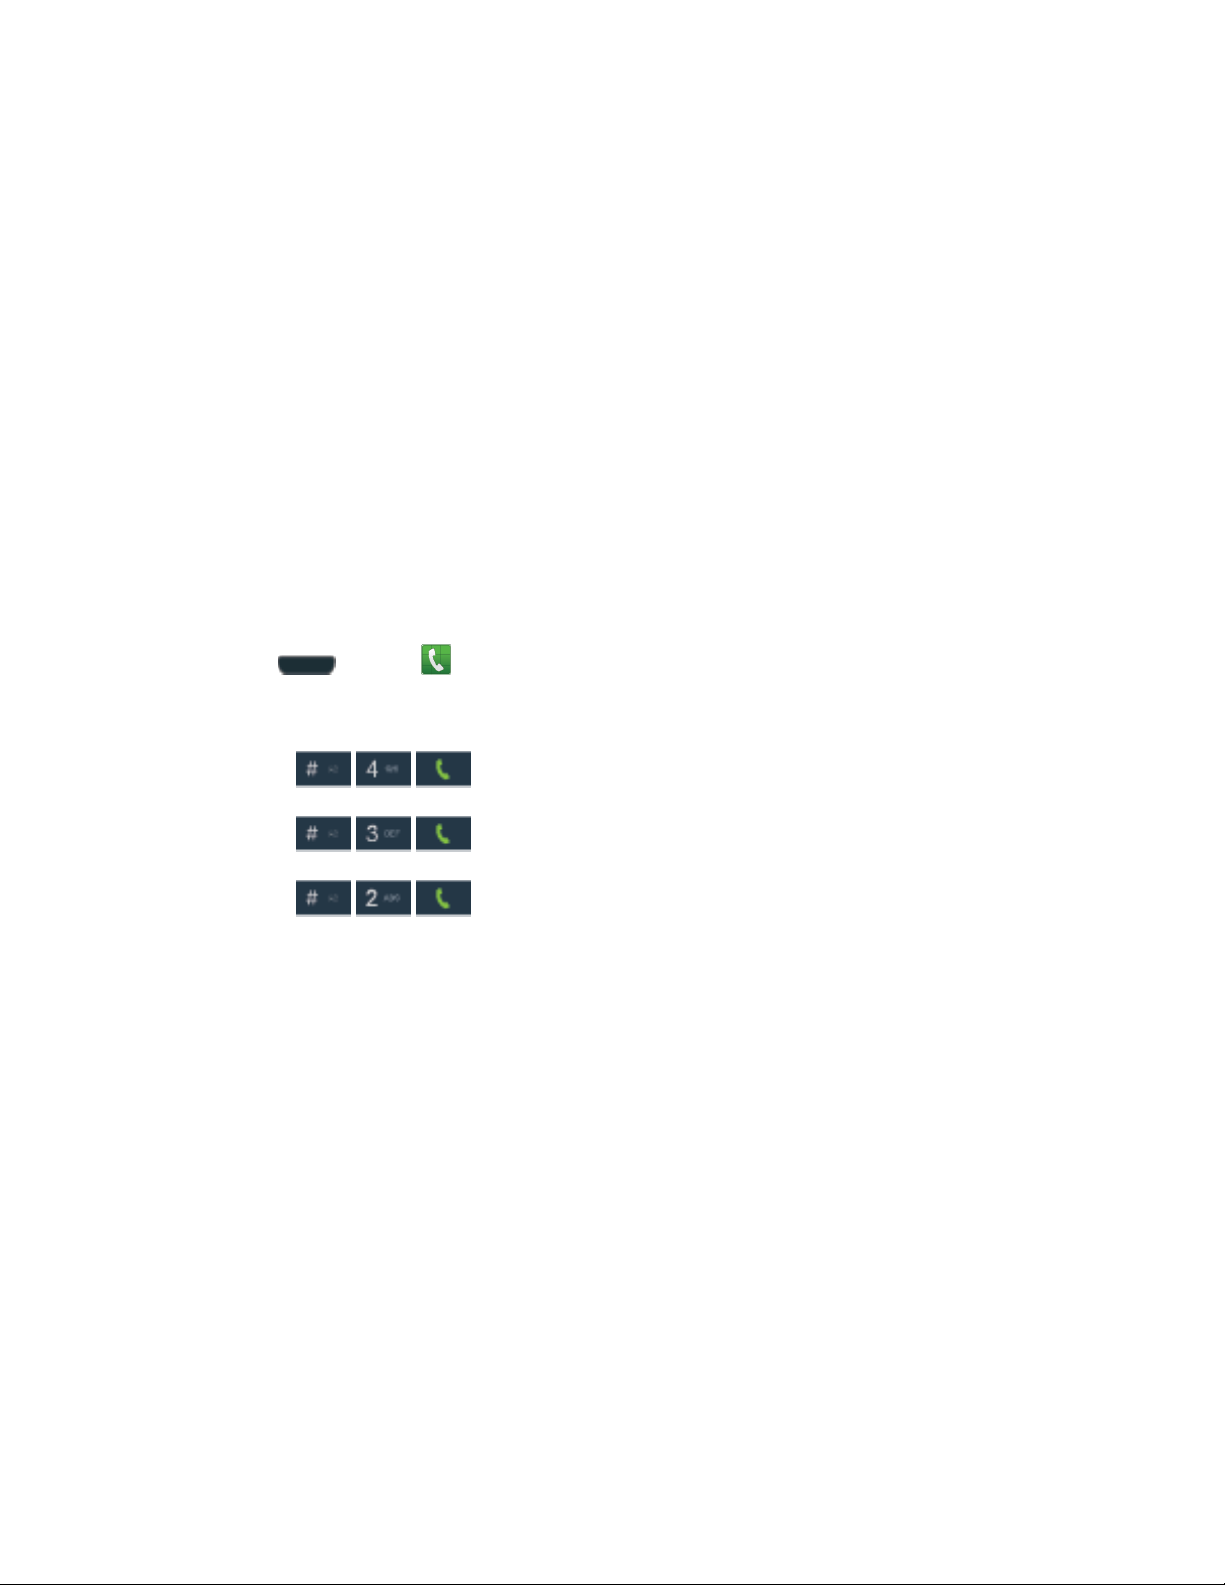
From Your Sprint Phone
Press
Do any of the following: 2.
From Any Other Phone
● Sprint Customer Service: 1-888-211-4727.
● Business Customer Service: 1-888-788-4727.
Tap
Tap
Tap
plan or to get answers to other questions.
and tap . 1.
to check minute usage and account balance.
to make a payment.
to access Sprint Zone and a summary of your Sprint service
Sprint Support Services
Sprint 411 and Sprint Operator Services let you easily access information and calling assistance
from your Sprint phone.
Sprint 411
Sprint 411 gives you access to a variety of services and information, including residential,
business, and government listings; movie listings or showtimes; driving directions, restaurant
reservations, and major local event information. You can get up to three pieces of information
per call, and the operator can automatically connect your call at no additional charge.
Get Started 8

There is a per-call charge to use Sprint 411, and you will be billed for airtime.
► Press
and tap , and then tap .
Sprint Operator Services
Sprint Operator Services provides assistance when you place collect calls or when you place
calls billed to a local telephone calling card or third party.
► Press
For more information or to see the latest in products and services, visit us online at
sprint.com.
and tap , and then tap .
Get Started 9
Phone Basics
Your phone is packed with features that simplify your life and expand your ability to stay
connected to the people and information that are important to you. The following topics will
introduce the basic functions and features of your phone.
Your Phone’s Layout
Turn Your Phone On and Off
Turn Your Screen On and Off
Touchscreen Navigation
Customize the Home Screen
Status Bar
Enter Text
Your Phone’s Layout and Key Functions
The following illustrations and definitions outline your phone’s basic layout and key functions.
Key Functions
The following list defines the features listed in the phone layout illustrations.
Phone Basics 10

● Status light displays red when charging, green when fully charged, blue when powering
up, and orange when a notification has arrived. Earpiece lets you hear the caller and
automated prompts.
● Earpiece allows you to hear the caller.
● Touchscreen displays all the information needed to operate your phone, such as the
call status, the Contacts list, and the date and time. Also provides one-touch access to
all of your features and applications.
● Menu Key allows you to access your phone’s main functions menu: Add, Wallpaper,
Search, Notifications, Edit, and Settings. While in a menu, press to open a list of actions
available from the current screen or onscreen option.
● Home Key returns you to the Home screen. Press and hold to open the recently used
applications window.
● Back Key lets you return to the previous screen, or close a dialog box, options menu,
the Notifications panel, or onscreen keyboard.
● Self Camera Lens allows you to take pictures and videos of yourself when you set the
camera shooting mode to Self shot.
● Proximity Sensor uses the ambient light level to adjust keypad access. If the light path
is blocked, for example, when holding the phone close to your ear, the touch screen will
turn off.
While talking on the phone, the sensor detects talk activity and locks the keypad to
prevent accidental key presses.
● Flash helps illuminate subjects in low-light environments when the camera is focusing
and capturing a picture or video.
● Power/Lock Button lets you turn the phone on or off, turn the screen on or off, enable
or disable data network mode or airplane mode, or restart the phone.
● Camera lets you take pictures and videos.
● Mic allows other callers to hear you when you are using the speakerphone.
● Charger/Accessory Jack allows you to connect the phone charger/USB cable
(included).
● Volume Buttons allow you to adjust the ringtone or media volume or adjust the voice
volume during a call.
Phone Basics 11

● Speaker lets you hear the different ringtones and sounds. The speaker also lets you
hear the caller’s voice in speakerphone mode.
● 3.5 mm Headset Jack allows you to plug in either a stereo headset or an optional
headset for convenient, hands-free conversations.
CAUTION! Inserting an accessory into the incorrect jack may damage the phone.
Turn Your Phone On and Off
The instructions below explain how to turn your phone on and off.
Turn Your Phone On
► Press and hold the Power button until you feel the phone vibrate.
Turn Your Phone On or Off
Press and hold the Power button to display the Device options screen. 1.
Tap Power off and then tap OK. 2.
Your screen remains blank while your phone is off (unless the battery is charging).
Turn Your Screen On and Off
Your phone allows you to quickly turn the screen off when not in use and to turn it back on and
unlock it when you need it.
Turn the Screen Off When Not in Use
► To quickly turn the screen off, press the Power button. Pressing the Power button again
or receiving an incoming call will turn on your phone screen and show the lock screen.
To save battery power, the phone automatically turns off the screen after a certain period of
time when you leave it idle. You will still be able to receive messages and calls while the
phone’s screen is off.
Note: For information on how to adjust the time before the screen turns off, see Screen
Timeout.
Turn the Screen On and Unlock It
1. To turn the screen on, press .
2. Swipe the screen in any direction to unlock the screen.
If you have set up a screen lock, you will be prompted to draw the pattern or enter
the password or PIN. See Screen lock.
Phone Basics 12
Touchscreen Navigation
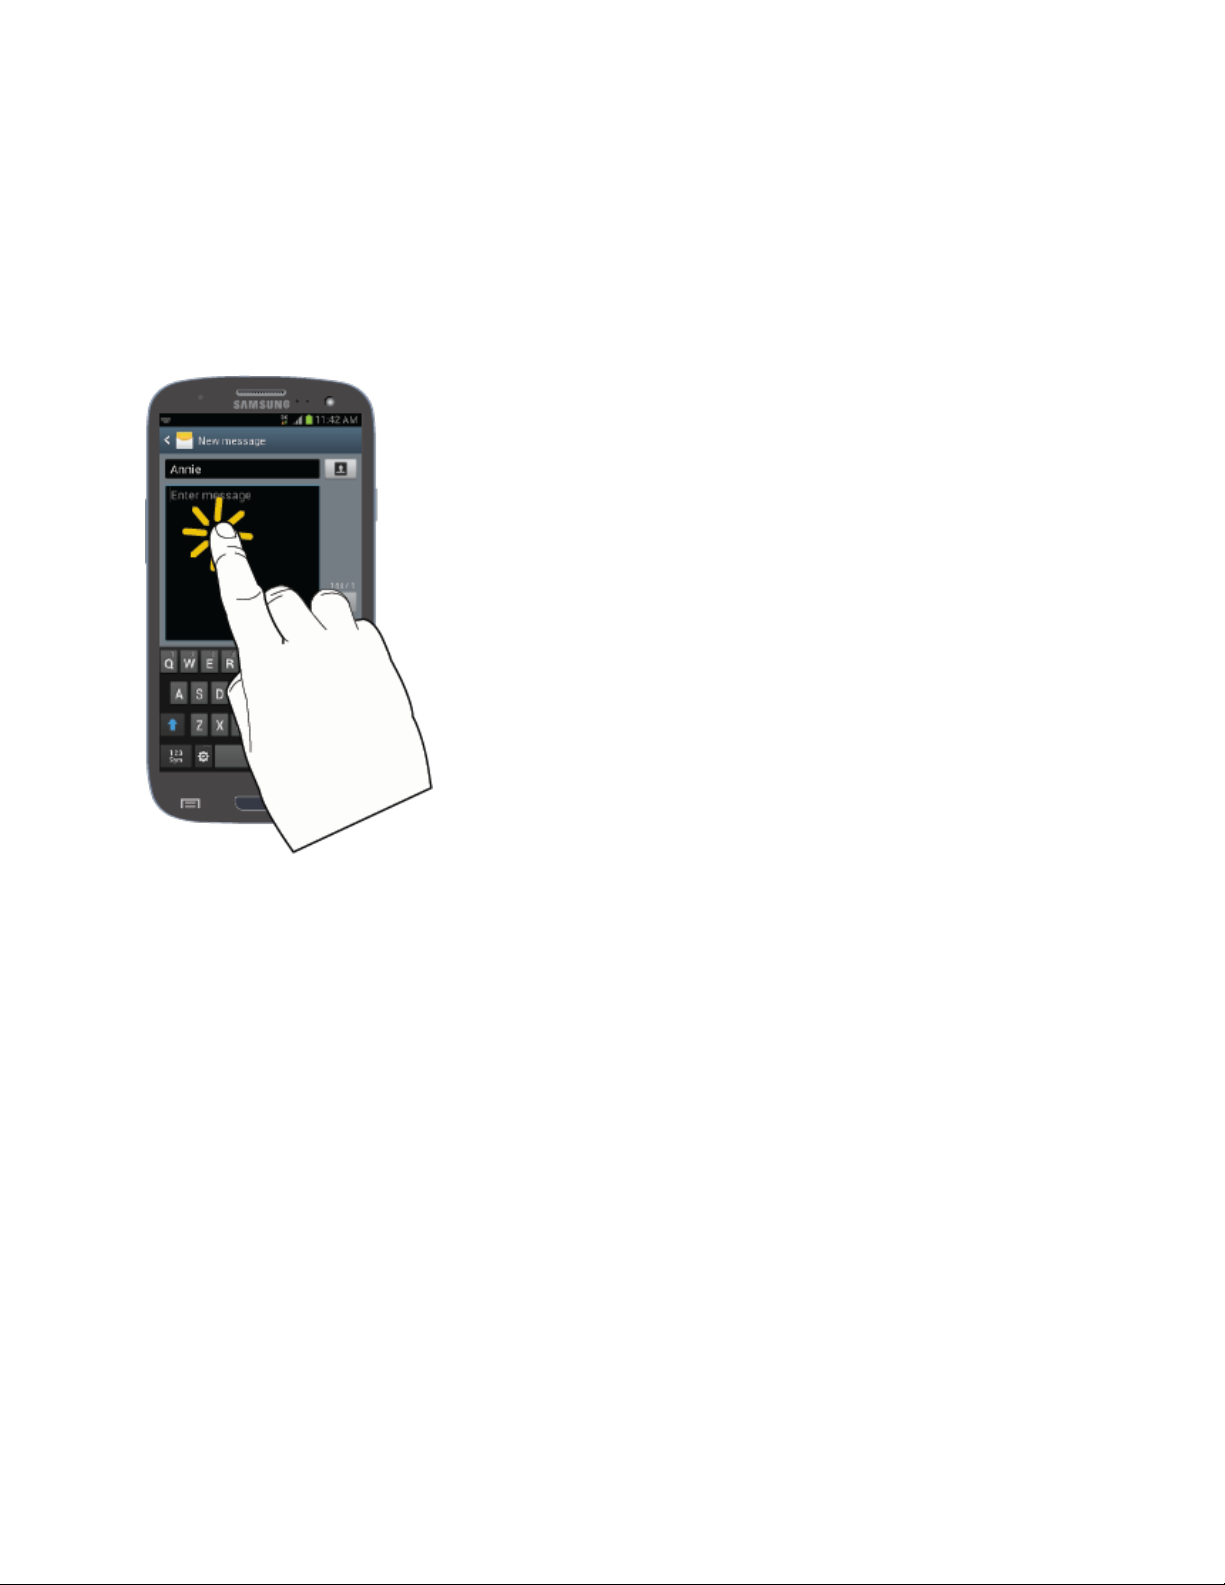
Your phone’s touchscreen lets you control actions through a variety of touch gestures.
Tap
When you want to type using the onscreen keyboard, select items onscreen such as application
and settings icons, or press onscreen buttons, simply tap them with your finger.
Phone Basics 13
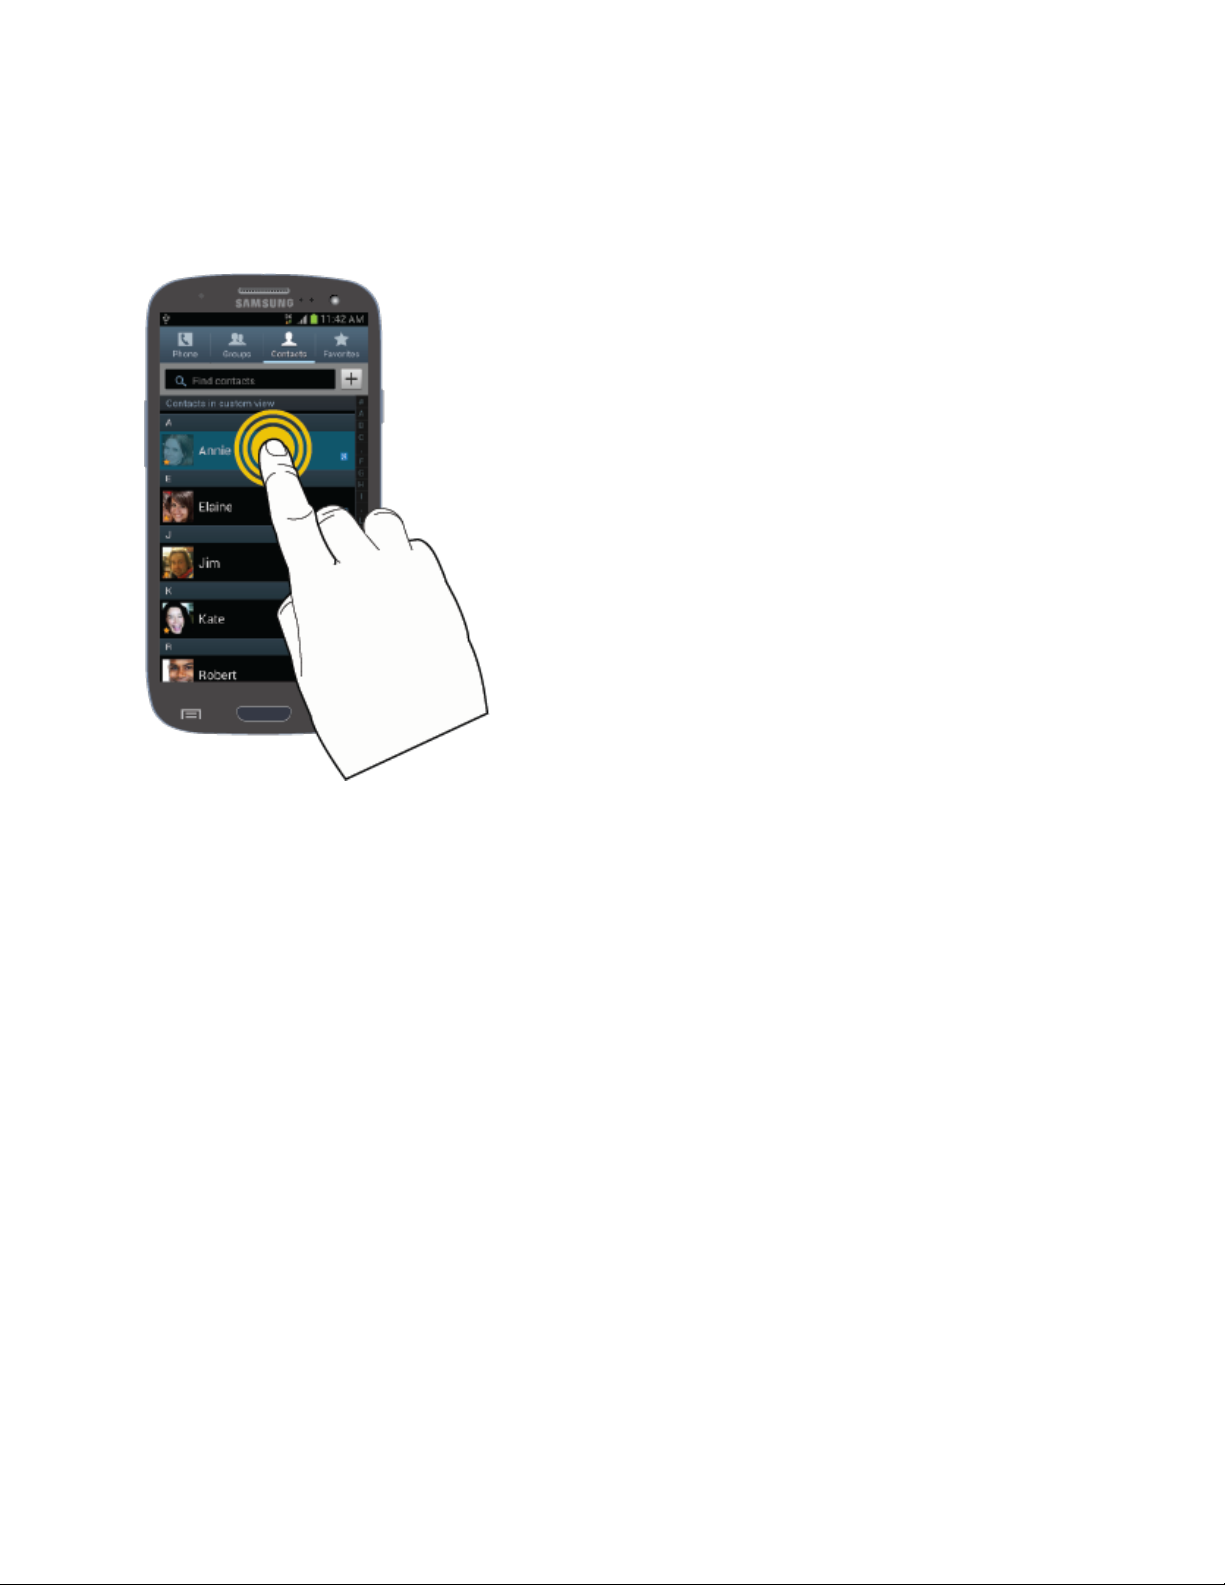
Touch and Hold
To open the available options for an item (for example, a contact or link in a Web page), touch
and hold the item.
Phone Basics 14
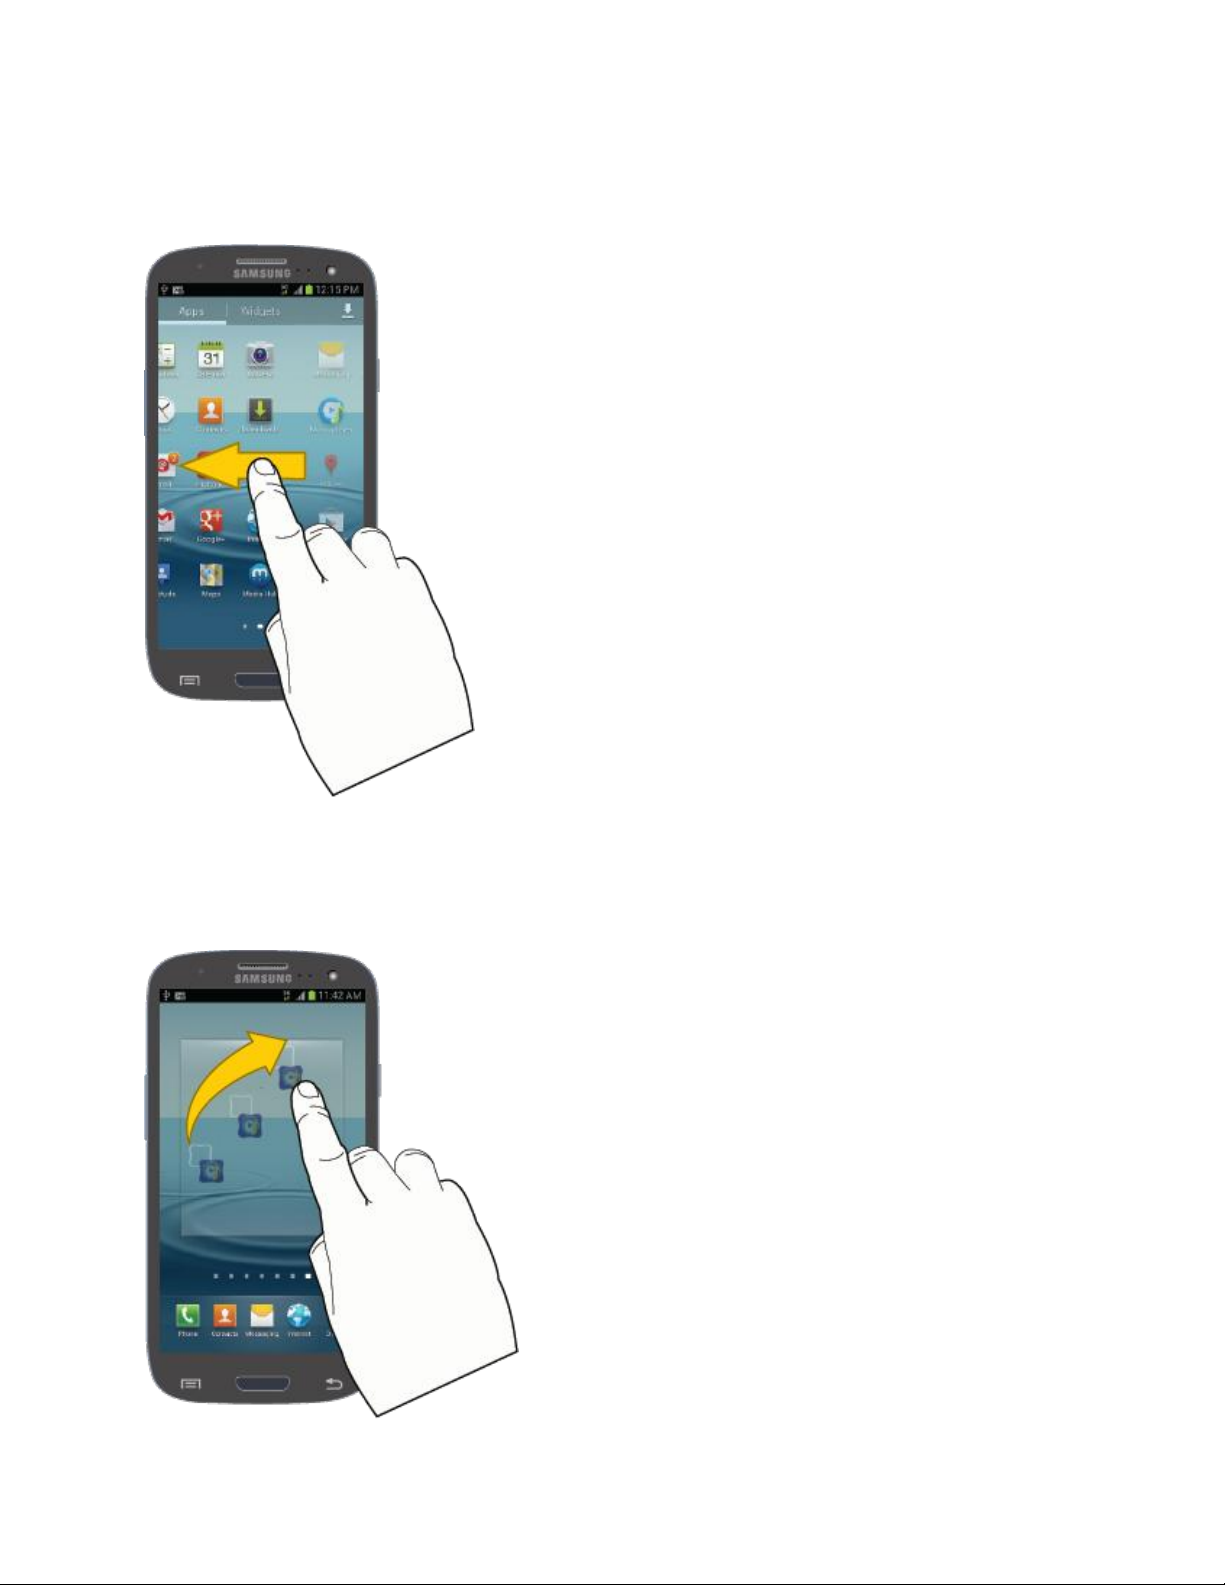
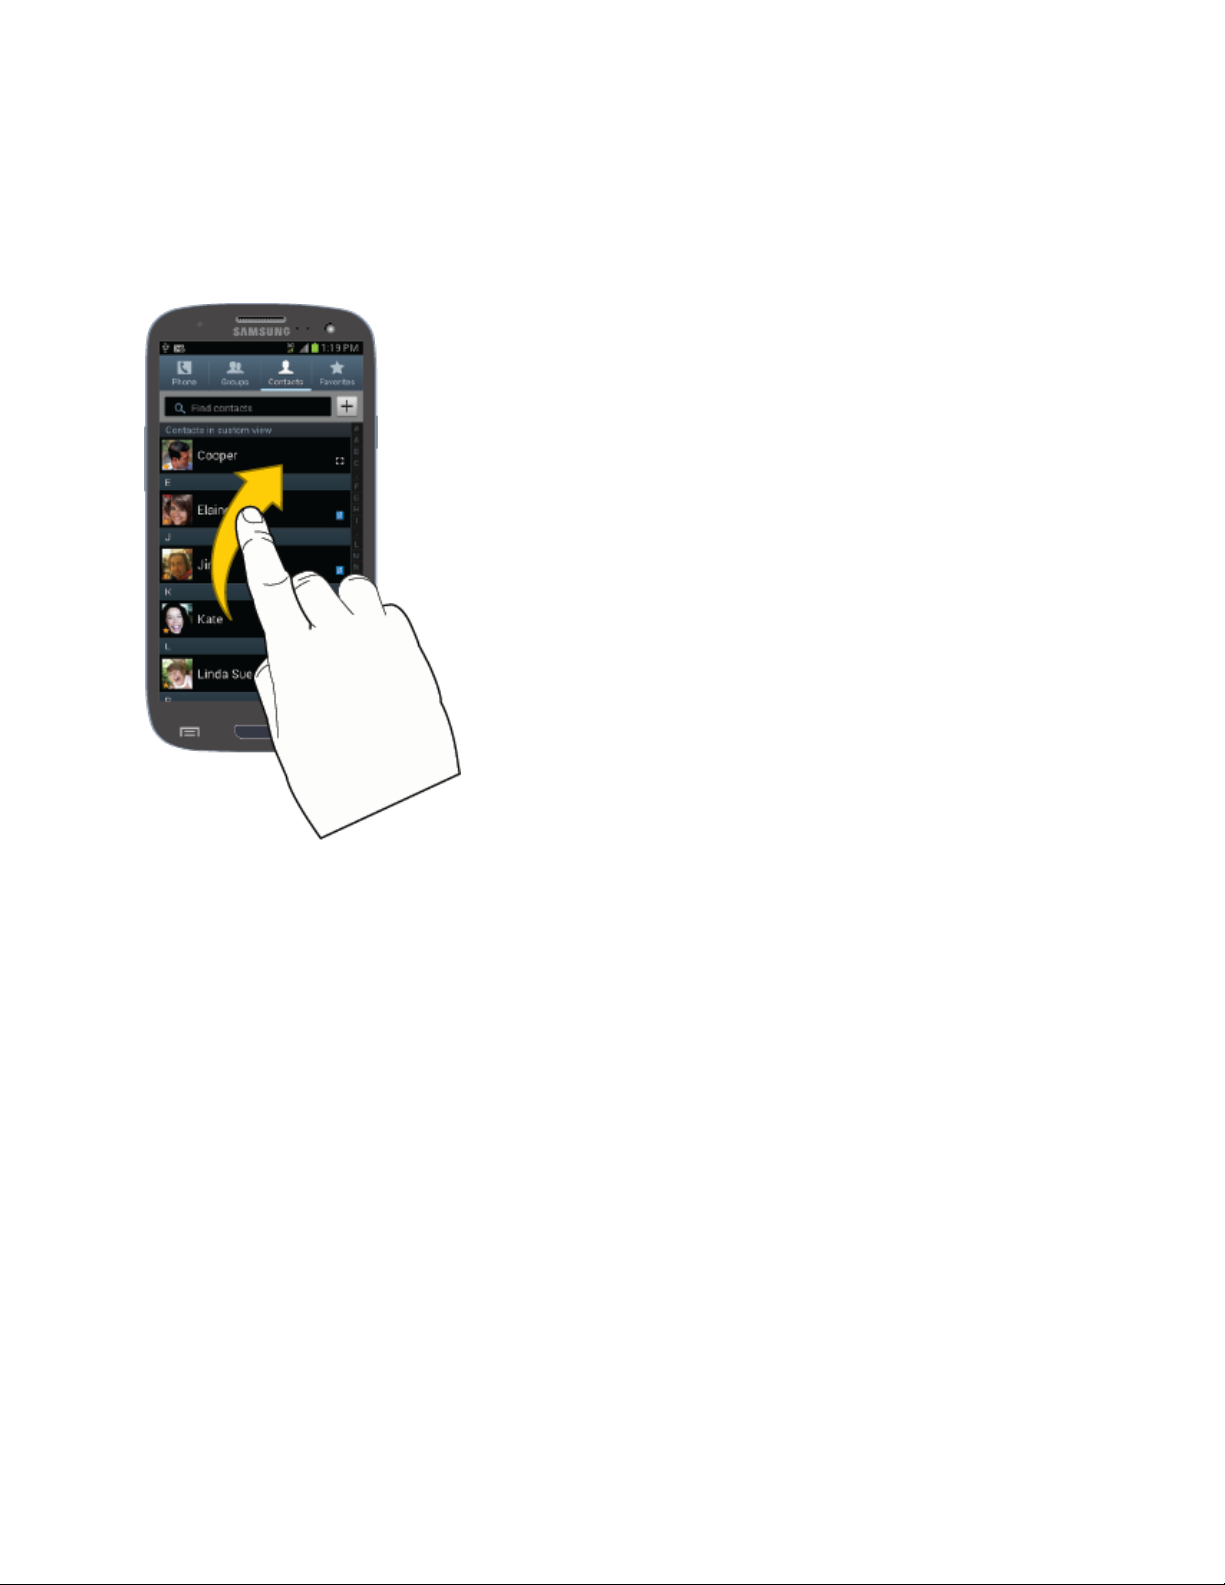
Swipe or Slide
To swipe or slide means to quickly drag your finger vertically or horizontally across the screen.
Drag
To drag, touch and hold your finger with some pressure before you start to move your finger.
While dragging, do not release your finger until you have reached the target position.
Phone Basics 15
Flick
Flicking the screen is similar to swiping, except that you need to swipe your finger in light, quick
strokes. This finger gesture is always in a vertical direction, such as when flicking the contacts
or message list.
Phone Basics 16
 Loading...