

Samsung SPHN105, SPHN100 Users Manual
SCH-N101
ELECT
ELECTRONICS
Series
DIGITAL
CELLULAR
TELEPHONE
CDMA
GH00-000000
‘2000/3. Rev. 1. 1
User Guide

Features
Congratulations on the purchase of your Samsung Phone.
Using the latest digital technlolgy,the Samsung Phone operates similar to other wireless phones,while providing superior resonanc and tone quality.
Your Samsung phone is packed with productive features that
are easy to use.Here are some of them:
◆ Answer and hang up calls just by opening the phone
◆ Large,easy-to-use Phone Book with 229 memory locations
◆ Turbo Dialing
◆ Voice Dialing-20 memory locations with one-touch access
◆ Event Scheduler,to-do list,world clock,and calculator
◆ Web Browser
◆ Data and Fax call capable
◆ Short Message Services (SMS) and Voicemail
◆ Fast Ringer Mute during incoming calls
◆ 10 ring tones,11 melodies,or Vibrate alert
◆ 10 Incoming and 10 Outgoing Call Logs with Caller ID
◆ Pause Dialing for tele-services
◆ Security features including Call Restriction
◆ Alarm Clock
◆ Dynamic Character Display

Table of Contents
Your Consumer Package 7
Getting to Know Your Phone 8
Turning your Samsung Phone On and Off 15
To Turn it On 15
To Turn it Off 15
The Top Line of the Display 16
Using the Battery 18
Installing the Battery 18
Removing the Battery 18
Charging the Battery 18
Charging with the Traveler Adapter 19
Your Phone’s Modes 20
Standby Mode 20
Conversation Mode 20
Power Save Mode 21
Basic Voice Call Functions 22
Making a Voice Call 22
Redialing Calls 22
Correcting Dialing Mistakes 23
Ending a Call 23
Incoming Call Notification 23
Answering a Call 24
Adjusting Ring Volume 24
Silencing the Ringer on an Incoming Call 25
Setting the Ringer Type 25
To Mute the Microphone During a Call 25
Adjusting Voice Volume 26
Using Caller ID 26
Three-Way Calling 27
1

Call Forwarding 27
Call Waiting 28
Answering a Call Waiting Call 28
Missed Calls 29
Dropped Calls 29
Failed Calls 29
Prepend Dialing 30
Emergency Dialing 31
Pause Dialing 32
Storing Pauses in a Phone Book Entry 32
Pause Dialing From a Stored Phone Book Entry 33
Manual Pause Dialing 33
Basic Setup of Your Phone 34
Automatic Retry 34
Automatic Answer 34
Automatic Hyphenation 35
Answer Options 35
Tone Length Setting 36
Setting the Time 36
Setting Your NAM 37
System Selection 38
How to Setup For a Voice,Data,or Fax Call 39
How to Setup the Web Browser Prompts 39
Audible Alerts 40
Minute Beep 40
Service Alert 40
Connect Alert 41
Disconnect Alert 41
Display Options 43
Backlight Control 43
Personal Greeting 44
Animation Display 44
Displaying your own Phone Number 45
2
Setting the Language of the Display 45
Displaying your phone’s Hardware and Software Version 46
Alarm 47
Setting the Alarm 47
To Change the Alarm Setting 48
To Cancel the Alarm 48
Sounds 49
Key Beep Volume Setting 49
Ringer Options 50
One-Touch Vibrate Ringer 50
Fast Ringer Mute 50
Ring type setting for Data and Fax Calls 51
Ring Volume Setting for all Incoming Calls 51
Differential Ring 53
Voice-Activated Dialing 54
Tips on Recording Names 54
Program the Phone for Voice-Activated Dialing 55
Voice Dialing Activation 56
Placing a Call using Voice Dialing 57
Reviewing Voice Dialing Entries 57
Erasing Voice Dialing Entries 58
Message Services 59
Incoming Messages 59
Incoming Message Memory Capacity 59
Reviewing Incoming Page,Text,or Browser Messages 60
Incoming Message Ringer 61
Incoming Messages and Lock Mode 61
Options when Reviewing Incoming Messages 61
Erasing Inbox Messages 62
Voicemail 63
Setting up your Voicemail 63
Reviewing Voicemail Messages 63
3

The Phone Book 64
Viewing Stored Entries 64
Storing Phone Numbers and Names 66
Storing phone numbers shortcuts 67
Storing phone numbers at the end of a call 67
Prepend a Phone Number 68
Adding a Name Ringer 69
Changing Your Phone Book 70
Editing Phone Book numbers 70
Secret Phone Book numbers 70
Erasing Phone Book Entries 71
Erasing the Phone Book 71
Set Speed Dial 71
Dialing numbers from your Phone Book 72
Memory Dialing Shortcuts 72
Your Phone’s Security Features 73
Lock Mode 73
Dialing in Lock Mode 73
Locking the Phone 74
Unlocking the Phone 75
Call Restriction Options 75
Lock Code Setting 76
Priority Numbers 77
Storing a Priority Number 77
Dialing Priority Numbers in Lock Mode 78
Personal Identification Number (PIN) 78
Erasing Your Phone Book (Clear Memory) 79
Hiding your Phone Number 79
Vocoder 80
Resetting Your Phone 81
Keeping Track of Your Calls 82
Displaying Your Call Logs 82
Erasing Call Logs 83
Reviewing Air Time 84
Scheduler 86
Today 86
View Month 88
Jump To Date 89
To Do List 90
Count Down 91
World Time 93
Calculator 94
Game 95
Fax and Data Calls 96
Receiving a Fax 96
Receiving a Data File 97
Sending a Fax or Data File 98
The Web Browser(WAP) 99
To Setup the Web Browser Prompts 99
Launching the Web Browser 100
To exit the Web Browser 101
The Web Browser Soft Keys 101
Navigating the Web Browser 102
Entering text,numbers,or symbols 104
Using Links 105
Initiating a Phone Call during a Web Browser Session 105
Receiving a phone call while in the Web Browser 105
Using Bookmarks 106
To Create a Bookmark 106
Finding a Bookmark 106
Orange Menu 107
Menus 108
Main Menu 108
In Use Menu 108
Navigating Menus 108
Your Phon’s Main Menu 109
54
Usage Guidelines:
All about Performance and Safety 110
Understanding Signal Strength 110
Understanding Power Save Mode 110
Understanding How Your Phone Operates 110
Specifications Subject to Change 110
Radio Frequency Safety 111
Emergency Calls IMPORTNAT NOTICE! PLEASE READ!
Maintaining Your Phone’s Peak Performance 112
Protecting Your Battery 112
Battery Disposal and Recycling 113
Operating a Motor Vehicle 114
Following Safety Guidelines 115
Turn off Your Phone Before Flying 115
Restricting Children’s Access to Your Phone 115
Cautions 115
FCC Notice 115
Storing Your Phone 115
Using Your Phone Near Other Electronic Devices 116
FCC Compliance Information 116
Liquefied Petroleum Gas 117
Turn Off Your Phone in Dangerous Areas or Posted Areas
Your Phone as a Network Device 117
Information To User 118
111
117
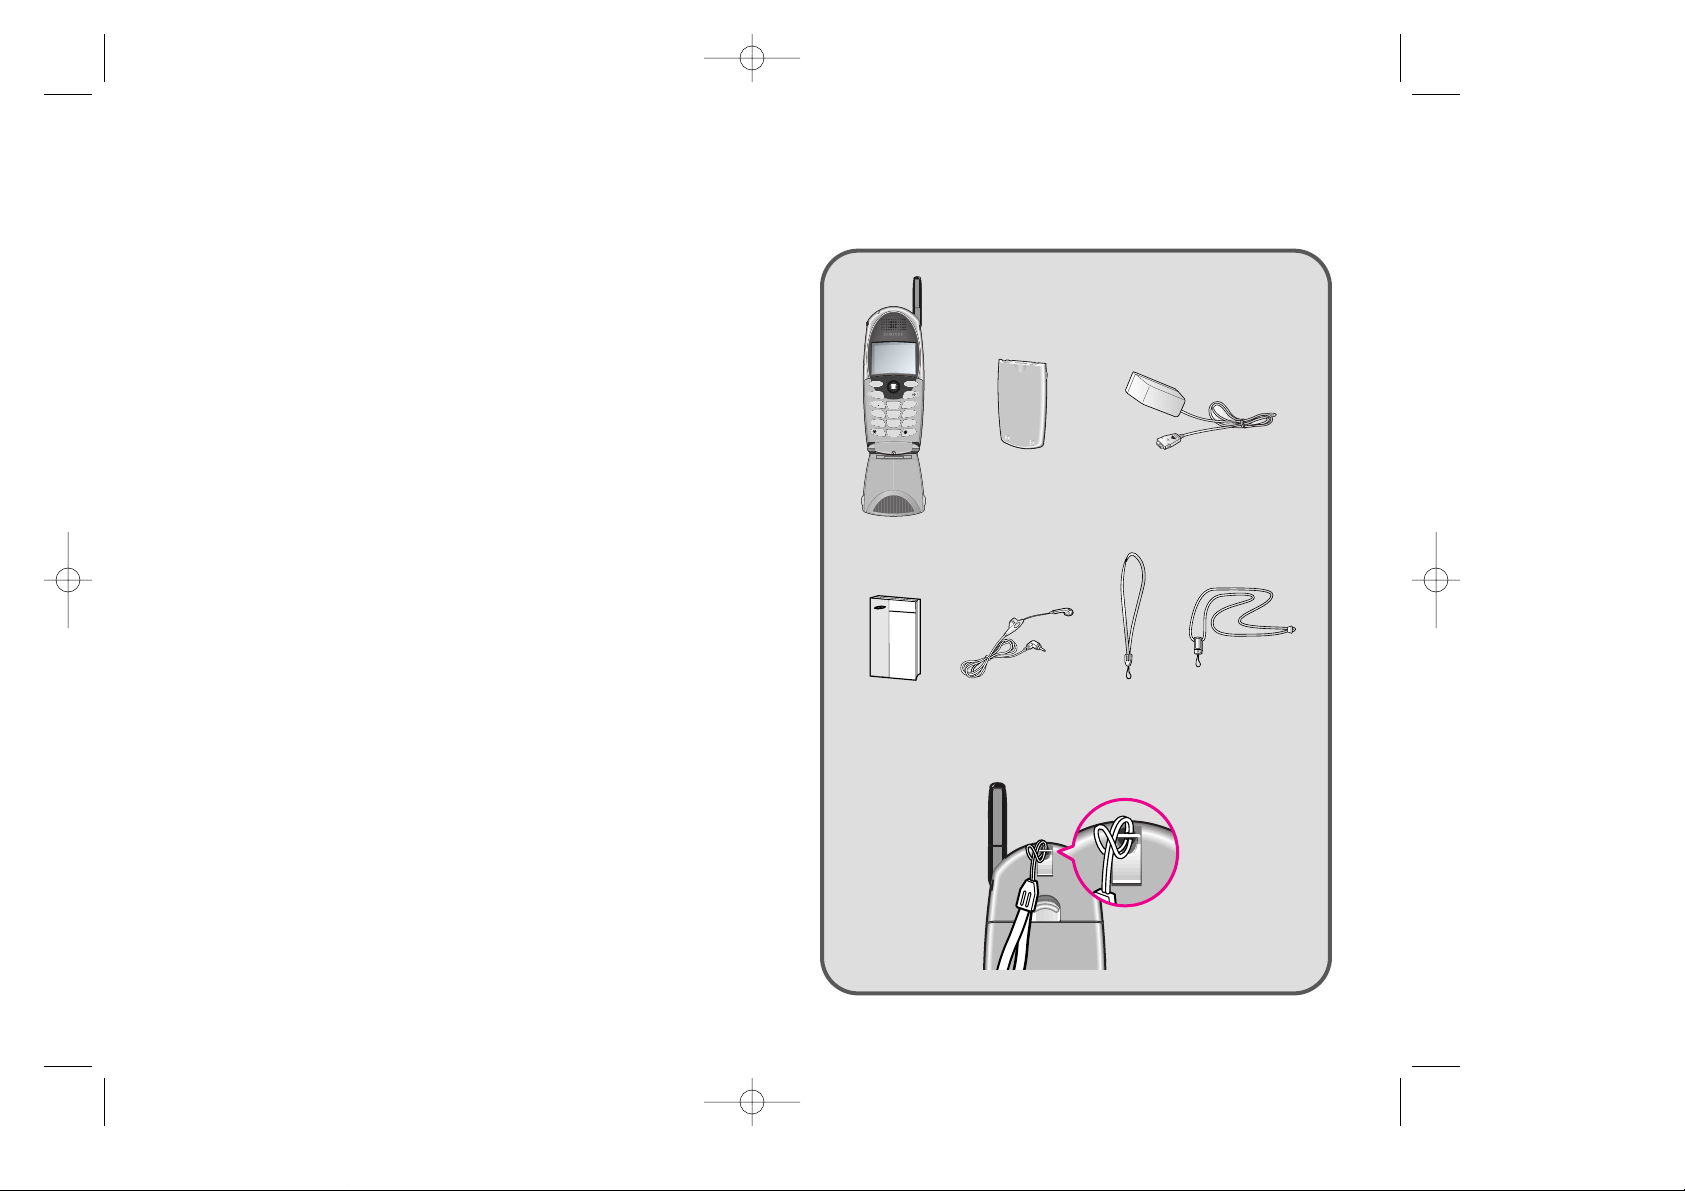
Your Consumer Package
Your consumer package contains the following items:
CLR
MENU
OK
OK
SEND END
DEF
'
.
1
3
ABC
2
GHI
MNO
4
6
JKL
5
PQRS
WXYZ
7
9
TUV
8
Space
Shift
Next
0
Battery Travel Adapter
Phone
Owner’s
manual
Earphone Hand
Strap
Necklace
Accessories 119
Batteries 119
Car Charger Kit 119
Hands-Free Car Kit 119
Travel Adapter 119
Index 120
76
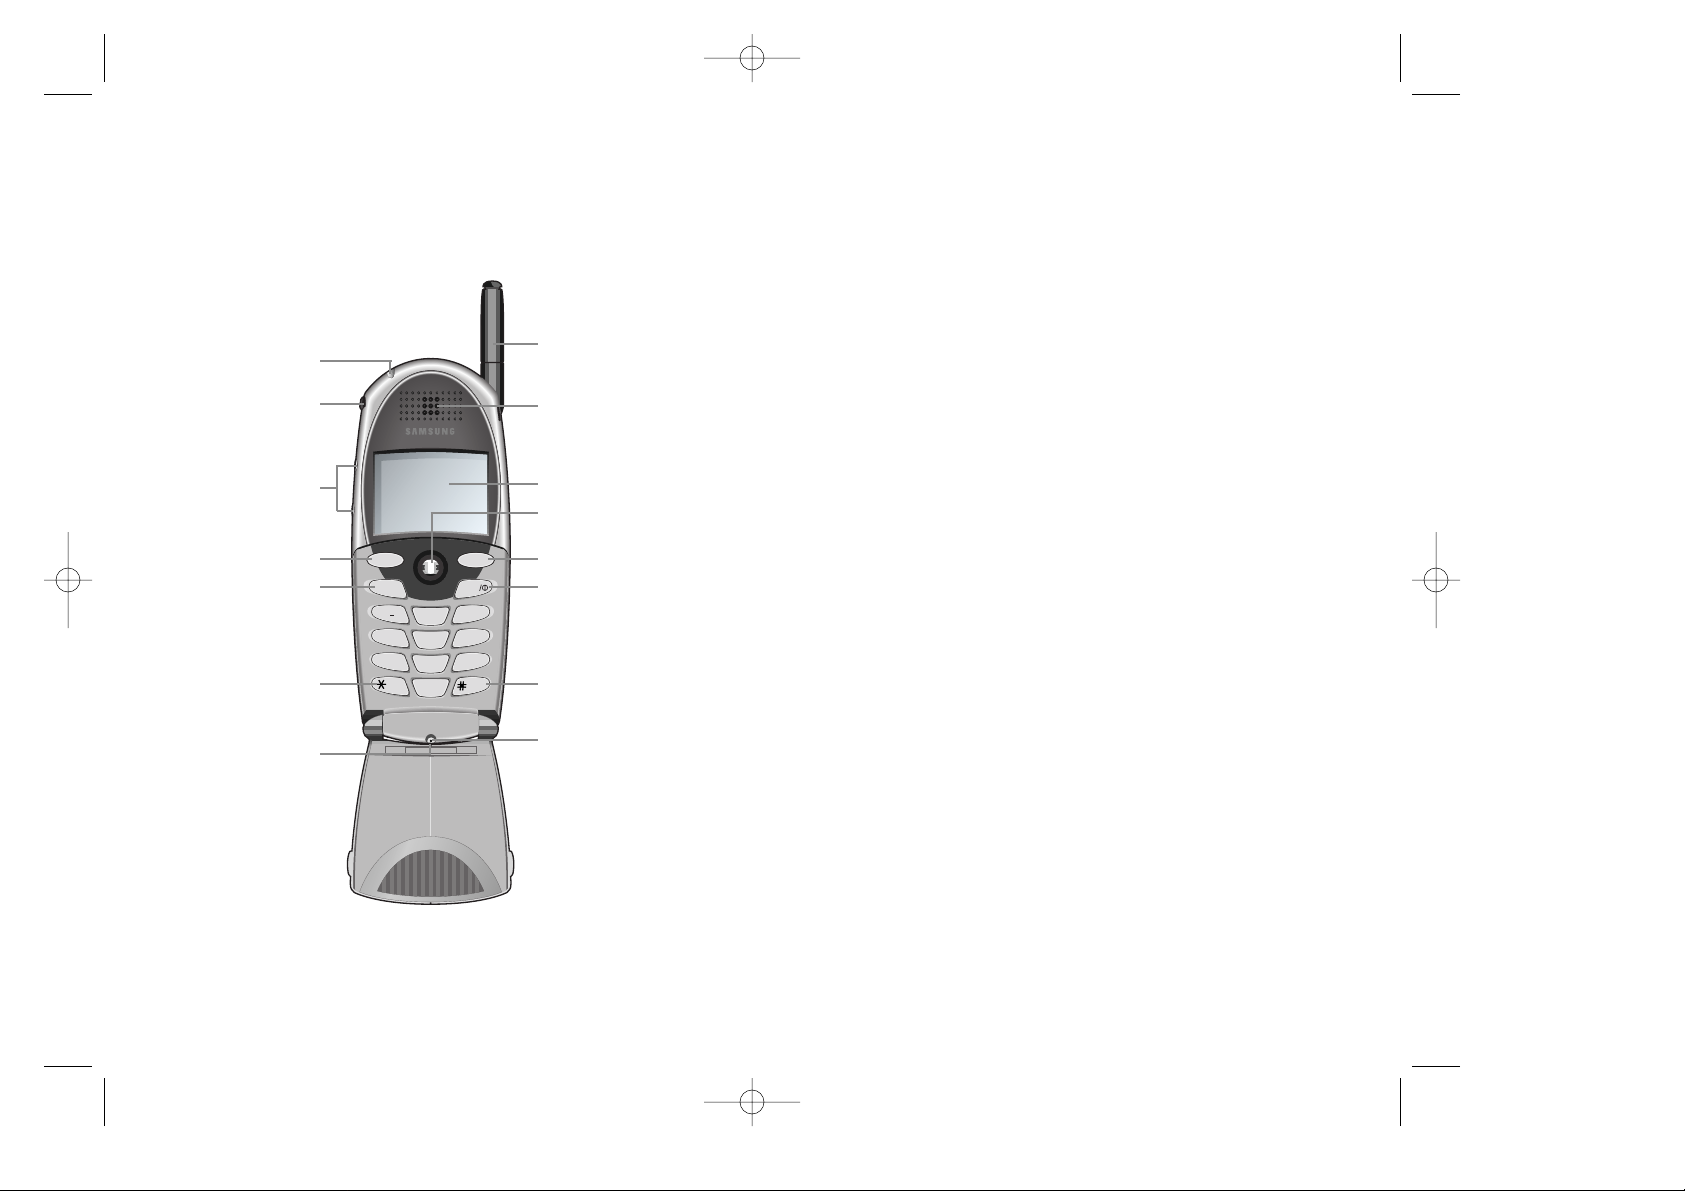
Getting to Know Your
Phone
LED Indicator
Headset Connector
Volume / Scroll Key
Menu Key
Send Key
Voice Dial / Shift Key
Accessories
Connector
MENU
SEND END
'
.
1
GHI
4
PQRS
7
Shift
OK
OK
2
5
8
0
ABC
JKL
TUV
Next
CLR
DEF
3
MNO
6
WXYZ
9
Space
Antenna
Earpiece
Display Screen
OK / Messages /
Navigation Key
CLR Key
End/Power Key
Vibrator / Space Key
Microphone
Getting to Know Your Phone (continued)
1. Active Flip Phone:Closing the phone will always end
your call and turn off the backlight.There are several
options you can set to happen when you open the phone.
When opening the phone you can:
◆ answer an incoming call.To set this option see
“Answering a Call”on page 24.
◆ voice dial someone.To set this option see“Voice Dialing
Activation”on page 56.
◆ control the backlight.To set this option see“Backlight
Control”on page 43.
2. Backlight Display Screen:The Display screen contains two
areas:
◆ The top line displays indications about your phone’s
operating mode (see “The Top Line of the Display”on
page 16).
◆ The lower area displays in-use information such as the
call timer,the name and number of the other party (if
available),Mute,Call Waiting,etc.Your menus also display in the lower area.
3. Headset Connector:This is where you connect the
optional headset.The headset includes an earpiece and
microphone in a convenient,lightweight unit so you can
converse without using your hands.
◆ What you see in the illustration to the left is really the
cover for the headset connector.Gently pry off the top
of the cover to expose the headset connector.
98

4. Microphone: Your typical voice microphone for conversation,but also accepts your voice commands for VoiceActivating Dialing.You can also mute the microphone dur-
MENU
.
ing conversation by simply pressing or
OK
OK
.
1
MENU
'
5. Accessories Connector:This is where you connect your
charging device.It can also be used to connect optional
accessories (sold separately).Accessories available for your
phone include:
◆ Travel or CLA charger.
◆ Wireless data device.
◆ hands-free car kit.
6. LED Indicator:Flashes to indicate an incoming call or
message.When you have the phone closed and the ringer
set to off,the LED indicator will notify you that you have
an incoming call or message.
◆ The LED also lights up (flashes) for a few seconds when
you turn on the phone.
7. Antenna:Makes the call sound clearest when it’s fully
extended.Your antenna is easily replaced by just screwing
in a new one.
8. OK / Messages / Navigation Key:This key performs several useful functions:
OK
OK
◆ From Standby or Conversation mode,press it
briefly to access the Messages Menu.
◆ When entering a phone number,press it once
to save the number to the Phone Book (then
follow a few prompts).
◆ When navigating a menu,press it to select the
highlighted item.
◆ When the alarm goes off,press it to silence the
alarm.
◆ In Standby or Conversation mode,Slide it up to
view your Phone Book (in numerical order).
◆ In Standby or Conversation mode,Slide it down
to view your Phone Book (in alphabetical
order).
◆ In Standby mode,Slide it right to launch the
Web Browser.
◆ In Standby mode,Slide it left to launch the
Scheduler.
10
11

9. Volume/Scroll Key:This key is actually two keys
(one up and one down) that are used to:
◆ Adjust voice volume during conversation.
◆ Adjust ringer volume in Standby mode.
◆ Mute the ringer during an incoming call.
◆ Scroll through menu options.
◆ Select AM / PM when setting clock,scheduler
event times,and alarms.
10. SEND Key: This key performs several useful
SEND
functions.
◆ Press it to answer calls.
◆ Dial a number and press it to connect.
◆ During a conversation,press it to initiate Three-
Way calling.
◆ During a conversation,press it to answer a Call
Waiting call.
◆ Press it once in Standby mode to quickly access
your Call Logs.
◆ Press it twice in Standby mode to redial the last
outgoing number.
11. * / Voice Dial key:This key has several functions:
Shift
◆ press for special star calling features.
◆ press and hold to initiate a voice dial call.
Space
12. # / Vibrate key:This key has two functions:
◆ This is the pound key.It’s used at various
times when you dial especially when using
tele-services.
◆ When you are in Standby mode,you can press
and hold to turn the vibrate alert on or off
(see “One-Touch Vibrate Ringer”on page 50).
CLR
13. CLR Key:This key is used to erase numbers or
characters you may have entered incorrectly,or
to return to a previous menu or Web Browser
screen.
◆ To erase one character from the display
screen,briefly press it once.
◆ To erase all characters,hold it down for one
second.
◆ To back up one menu or Web Browser level,
press it once.
◆ To return to Standby mode or your Web
Browser home page,press and hold it for one
second.
1312

14. END/ Power Key:This key performs several
END
important functions:
◆ Press to turn on your phone.
Turning your Samsung
Phone On and Off
◆ Press and hold to turn off your phone.
◆ Press this key to return to Standby mode
when ending a call,ending a Web Browser session,or from any menu.
◆ If the phone is already open,and you receive
an incoming call,you can mute the ringer by
pressing once.
15. MENU Key:When in Standby or Conversation
MENU
mode,press this key to access menu items,and
continue pressing it to scan menu items.When
you reach the menu item you want,press .
◆ When dialing numbers,this key is used to
enter a pause (see “Pause Dialing”on page 32).
MENU
To Turn it On
When you’re ready to turn your phone on,fully extend the
antenna for best reception.Simply press and three
END
things happen;the LED comes on,the phone beeps,and the
startup graphics begin to play.The phone will search for a
signal;when a signal is found,the icon appears and the
phone enters Standby mode.You can make and receive calls
now.
To Turn it Off
To turn your phone off,press and hold until the power
off graphics begin to play;then,the power off sound plays,
and the display goes blank.Notice that when the phone is
off,nothing is displayed on the screen.
Note:If is pressed for less than one second,the phone
END
will not turn off.This helps keep your phone from being
turned off accidentally.
END
1514

The Top Line of the Display
Display indicators (or icons) appear across the top of your
phone’s display screen.The Signal Strength and Battery
Strength icons always appear,other icons appear based on
your phone’s operating mode.
Message
(voice,page,text)
Service
Signal
strength
Roaming
R D
Signal Strength:This icon always appears when your
phone is on and shows your current signal strength.
More lines indicate greater signal strength.Four lines
indicate maximum strength,and one line indicates
least strength.
Service Indicator:This icon indicates a call is in
progress.If there is trouble with signal strength,this
indicator will have a diagonal line through it.See
below under “No service indicator”for a description
of this situation.
No Service Indicator:This icon indicates your phone
cannot find a signal because you’re outside a service
area.When this is displayed,you cannot make or
receive calls.Wait a little while for a signal or move
into an open area.
Digital
Mode
Vibrator
Strength
Battery
Note:The no service indicator will always appears
when you turn on your phone.This is not a problem.
It just indicates that your phone is searching for service.As soon as service is found,the indicator will
disappear.
Roaming:Displays when the phone is outside the
R
home service area but within the network.If you
are:
◆ in your home network this indicator does not dis-
play.
◆ in a preferred roaming area,this indicator will be
on but,not flashing.
◆ in a non-preferred roaming area,this indicator will
flash once every second.
Message Indicator:This icon indicates you have message(s) waiting.These message(s) can be voicemail
notification (VMN),page,text,or Web Browser mes-
OK
sage(s).Press to see the message menu.See
OK
“Message Services”on page 58 for more information.
Digital:Indicates that the phone is in Digital mode.
D
For Data/Fax calls,Web Browser calls,and Voice
Dialing,the phone must be in digital mode.
Vibrator on:This icon indicates that an incoming
call will vibrate the phone rather than ring it.This
feature can be used for quiet situations where you
don’t want your ringer to disturb others or for loud
situations where the ringer cannot be heard.
Battery Strength:This icon shows the level of your
battery charge.The more black bars you see,the
greater the charge.When the battery becomes very
low,an empty box appears and the phone
flashes an alert;this indicates that your phone is
about to turn itself off.
1716
Using the Battery
Your Samsung Phone comes with a partially charged,
rechargeable Lithium Ion (LiIon) Battery so that you can use
your phone immediately after it is activated.
Charging with the Traveler Adapter
Your phone is powered by a rechargeable Li-lon battery.A
travel adapter is provided with your phone.Use only
approved batteries and chargers.Ask your local SAMSUNG
dealer for further details.
Installing the Battery
To attach the battery to your Samsung Phone:
1.Hold the battery so that the metal contacts on the base of
the battery line up with the metal contacts on the base of
the phone.See the illustration.
2.Gently push the battery toward the top of the phone until
it snaps into place.
Removing the Battery
This is really easy.First,turn the phone off.Then just Slide
the battery latch (see illustration) and lift the battery up from
the base.You’re done.
Charging the Battery
You can easily tell if your battery needs to be recharged by
checking the indicator in the upper-right corner of
your phone’s display.aThe presence of all three bars indicates a full charge,two bars indicates a smaller charge,and
one bar indicates an even smaller charge.No bars (the battery icon is empty) means your battery must be charged.
When the battery charge level gets low,the battery sensor
blinks an empty battery icon ( ),sounds a tone,and displays a message.If the battery level gets too low,the phone
will turn off automatically.Unfortunately,if this happens
you’ll lose whatever you are doing,including dropping your
call.Watch the battery strength icon and make sure your battery is adequately charged.
The phone can be used while the battery is charging.
Note:You must fully charge the battery before using your
phone for the first time.
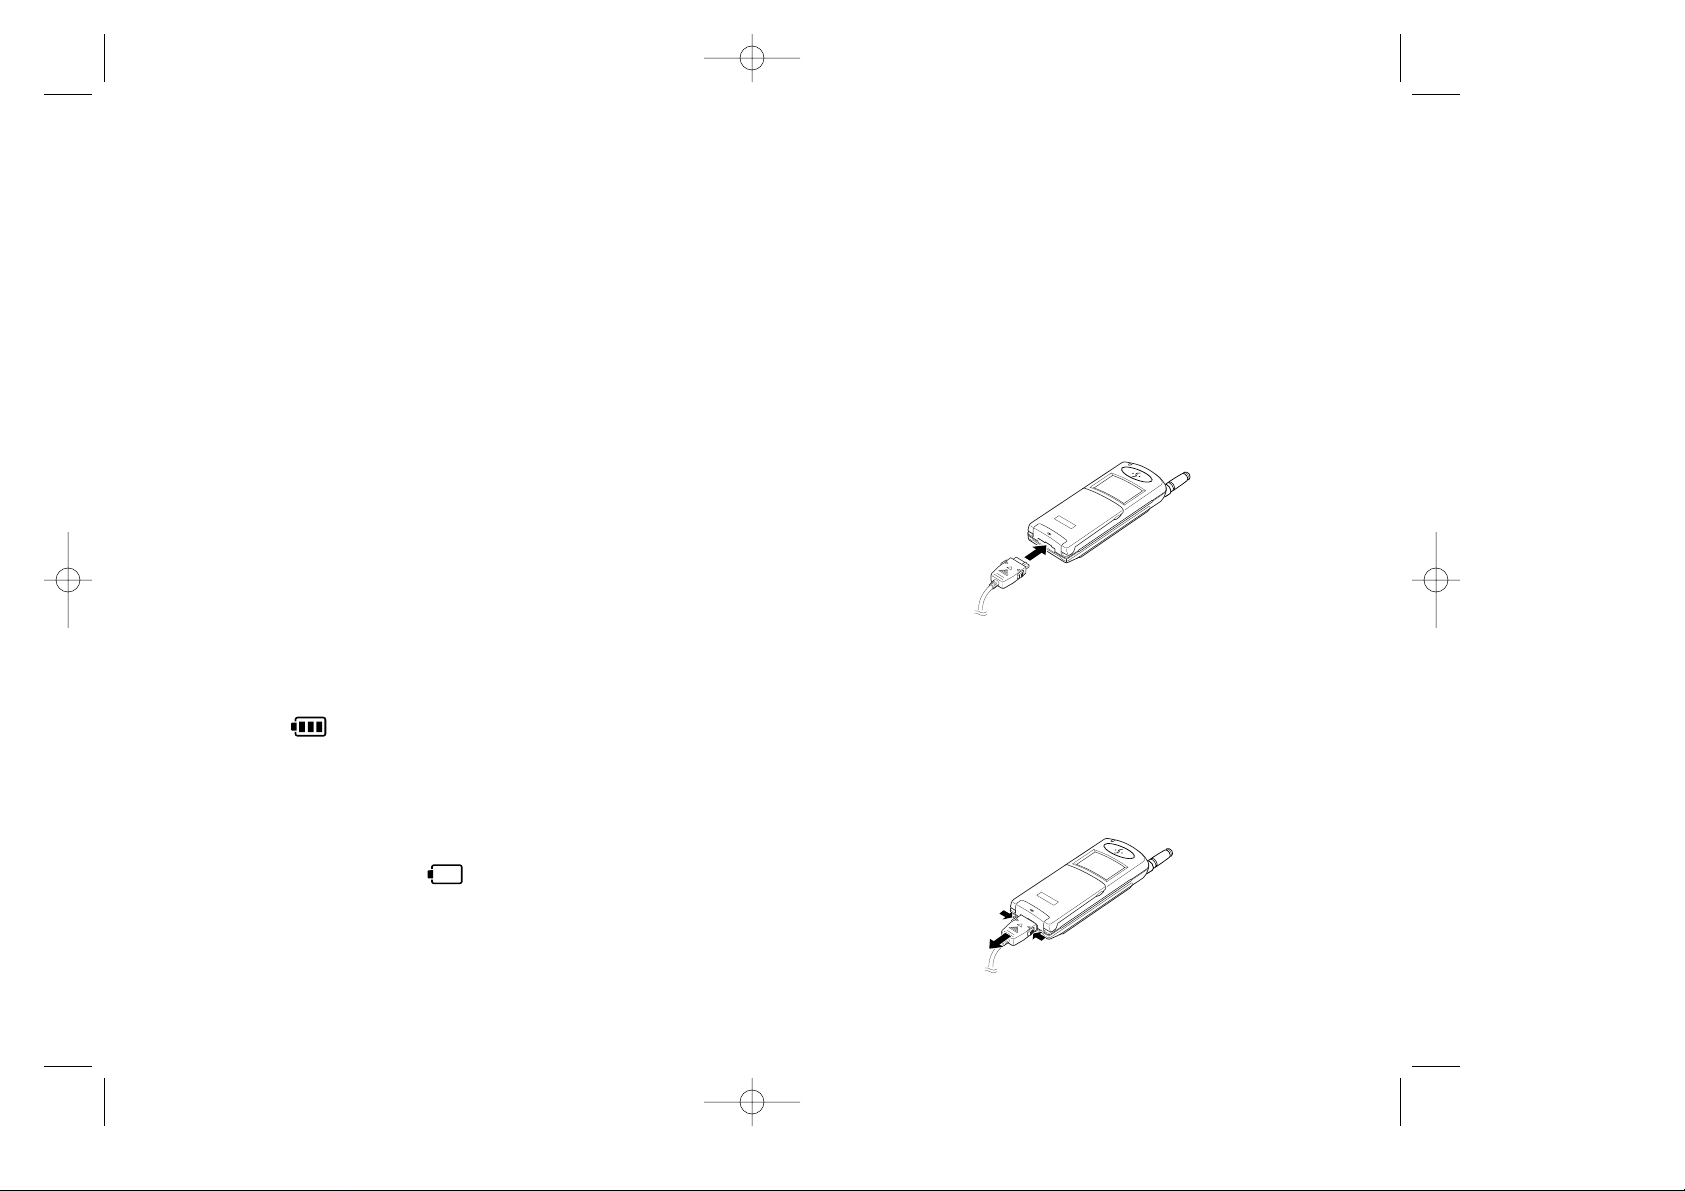
1.Connect the lead from the travel adapter to the bottom of
the phone.Check that arrow on the lead connector is facing towards the front of the phone.
2.Connect the adapter to a standard AC wall outlet.
When the battery is charging,the battery icon in the top
right-hand corner of the display fills repeatedly.
3.When charging is finished,disconnect the adapter from
the power outlet.
Disconnect the adapter from the phone by pressing the
grey tabs on either side of the connector and pulling the
connector out.
1918

Your Phone’s Modes
Standby Mode
Standby is the ready state of your Samsung Phone.The phone
goes into Standby mode soon after you turn it on,or whenever you briefly press at any time.When your phone is in
Standby mode,you will see the greeting (that’s the message
displayed when you turn on your phone).If you enter a
phone number,you can press to dial it,or press to
save it in the Phone Book.
END
Press at any time to return to Standby mode.Be careful;
if you’re on a call when you press ,you’ll return to
Standby mode,but it also disconnects the call.Press
several times or hold it down to return to Standby mode
without ending the call.
The Main Menu is accessed when you are in Standby mode.
See “Your Phone’s Main Menu”on page 109 for a listing of
the Main Menu.
Conversation Mode
END
SEND
END
OK
OK
CLR
Power Save Mode
Your Samsung Phone comes with a Power Save feature that
will automatically be activated if your phone is unable to find
a signal after 10 minutes of searching.While this feature is
active,the phone’s battery charge is conserved.After the
phone enters Power Save mode,it will automatically recheck
for a signal about every three minutes.A message on the display will let you know when your phone is operating in
Power Save mode.
To exit the Power Save Mode,press any key.
You can place and answer calls only when your Samsung
Phone is powered on.During a call,the phone is in
Conversation mode.
2120

Basic Voice Call Functions
Making a Voice Call
Note:Your phone makes several kinds of calls (voice,fax,data,
and Web Browser).This section explains voice calling only.For
Fax or Data calls see “Fax and Data Calls”on page 96.For web
browser calls see “The Web Browser”on page 99.
To place a voice call:
1.Press to power on your Samsung Phone.If you see
2.Enter the phone number (up to 32 digits) by pressing the
3.Press .The phone places the call to the entered
You can also make voice calls;
Redialing Calls
To redial the last call you made,press twice quickly.You
can also redial any of your last 10 incoming or outgoing calls
by accessing the Call Logs listings (see “Keeping Track of Your
Calls”on page 82).
END
indicators on the display,this indicates your phone is on.
Note that you will not hear a dial tone.
digit keys.The phone number displays from right to left.
SEND
phone number (if service is available).
◆ from your Phone Book (see “Dialing numbers from your
Phone Book”on page 72).
◆ from your Call Logs list (see “Displaying Your Call Logs”
on page 82).
◆ by using Turbo Dialing (see “Memory Dialing Shortcuts”
on page 72).
◆ by using Voice Dialing (see “Placing a Call using Voice
Dialing”on page 57).
SEND
Correcting Dialing Mistakes
To correct a misdialed digit(s):
◆ Press to erase one digit at a time.
◆ You can erase all the digits at once by pressing
CLR
CLR
and holding it down for one second.This returns your
phone to Standby mode where you can try your call
again.
Ending a Call
To end a call,close the phone or press .If you press ,
the call time (length of the call) flashes briefly,and the phone
returns to Standby mode automatically after a few seconds.
ENDEND
Incoming Call Notification
Your Samsung Phone signals an incoming call or message in
the following ways:
◆ The backlight illuminates.
◆ The red LED flashes.
◆ The ringer sounds (unless the ringer is set to Vibrate or
Off).
Incoming call notification continues until one of the following occurs:
◆ You answer the call.
◆ You press ,or silence the ringer before answering
the call.
◆ The calling party ends the call.
◆ The call is sent to your voicemail.
END
2322

Answering a Call
There are four ways to answer an incoming call!
Don’t worry - they’re all easy.You can answer a call by:
◆ pressing if the phone is already open.
SEND
◆ opening the phone (if set in the Main Menu).
◆ pressing any key except ,when the Any Key
END
Answer option is selected in the Main Menu.
◆ using Auto Answer.See “Automatic Answer”on page 34.
Your phone is preset to answer when you press the
SEND
key.You can easily change how your phone answers by setting the Answer Mode feature (press ) and
MENU
GHI
TUV
4
8
make your selection.For more information on this feature
see “Answer Options”on page 35.
Adjusting Ring Volume
In Standby mode,you can quickly adjust the ringer volume
by pressing the volume key ( ) on the side off the
phone.There are eight levels and a zero or “Ringer Off”level.
You’ll see a graphical indication as you
change the volume.
The illustration shown here is the maximum volume setting.
◆ the up key turns it up and the down key turns it down.
Press and hold to continuously move up or down.
◆ Turning it all the way down is a quick way to mute the
ringer for those important times when you want your
phone quiet.When you do this,“Ringer Off’will display
in Standby mode.
Silencing the Ringer on an Incoming Call
When your Samsung Phone rings,press or to
silence the ringer.You can also set the ringer to remain off by
using the Main Menu (see “Ring Volume Setting for all
Incoming Calls”on page 51).
END
Setting the Ringer Type
Your phone has numerous options for how it rings.To set
these options,see “Ringer Options”on page 50.You can even
set different rings for up to five people who call you often
(see “Differential Ring”on page 53).
To Mute the Microphone During a Call
You can mute the microphone during conversation by selecting the Mute option from the In Use Menu.When active,
“MUTE”displays,and the other party cannot hear conversation at your end of the call.The phone resets this condition
to the default Unmute setting at the end of your call.
To mute the microphone during a call:
1.During conversation,press to display the In Use
Menu.
'
.
2.Press to mute the microphone.You will hear the
1
other party’s conversation,but they will not hear anything
on your end of the call.“MUTE”displays on the screen.
3.To “unmute”the microphone during the same conversation,repeat steps 1 and 2.
MENU
◆ You can also save the settings for the ringer volume
using the Main Menu (see “Ringer Options”on page 50).
2524

Adjusting Voice Volume
Three-Way Calling
You can adjust the earpiece volume during a call using
the volume keys on the side of your phone.Briefly press
the volume key once to display your current earpiece
volume.Repeatedly press the volume key to adjust to
one of eight levels or off.
You’ll see a graphical indication as you
change the volume.
The illustration shown here is the maximum volume setting.
Using Caller ID
Note:See your service provider about activating Caller ID
service.
This feature tells you who is calling you by displaying the
caller’s number when the phone rings.If a caller’s name and
number are stored in your Phone Book,the corresponding
name is also displayed.If you call someone who has this feature,your phone number will be displayed on their phone.
Note:See your service provider about activating Three-Way
Calling service.
Three-Way Calling lets you conduct conference calls with
two different parties at the same time.The phone records
each party into the Outgoing Calls Log.
To place a three-way call:
1.During a conversation,simply press .The phone
SEND
places the other party on hold.
2.Enter the number for the third party,and press .
SEND
The phone dials the third party.
3.When you’re connected to the third party,press
SEND
again to begin your three-way call.
If one of the callers (not you) hangs up,you and the remaining caller stay connected.If you initiated the call and you
hang up first,all three parties are disconnected.
Call Forwarding
Note:See your service provider about activating Call
Forwarding service.
With Call Forwarding,you can have all of your incoming calls
forwarded to another phone number — even if your phone
is turned off.When Call Forwarding is activated,you can still
make calls from your phone.
2726

Call Waiting
Missed Calls
Note:See your service provider about activating Call Waiting
service.
Call Waiting lets you receive a second call during conversation.Your phone notifies you of a call waiting by beeping and
displaying “Call Waiting”.
Your phone provides the option of turning the Call Waiting
feature on and off (if you have subscribed to the service).
Call Waiting is on by default in the phone.If you choose to
have an undisturbed conversation,simply turn off the feature
for the current call.
Answering a Call Waiting Call
To answer a Call Waiting call:
1.Press .The phone connects the calling party and
2.Press again to switch between the two parties.
Note:If you do not respond to a Call Waiting notification,the
phone will forward the call to voicemail or another number
that you have setup.Contact your service provider for information on voicemail and other available options and services.
SEND
places the current party on hold.
SEND
Your phone notifies you of calls that were not answered.The
phone indicates a missed call by displaying a text notification
on the screen.When available caller identification displays for
missed calls.
Dropped Calls
A dropped call can occur during conversation in response to
a signal fade.In this case,the call ends and “Call Dropped”or
“Signal Faded”displays.
END
Press to clear the message and return to Standby mode.
If the dropped call was an outgoing call from your phone,
you can redial the number automatically by pressing
SEND
twice.
Failed Calls
A failed call can occur if your phone is out of calling range or
the network is temporarily busy.Your phone responds to a
failed call by displaying an appropriate text message:“Call
Failed.Out of Range.”or “Call Failed.Network Busy.”or “Signal
Faded”.
When you receive a failed call alert,cancel the call attempt
and return to Standby mode by pressing or ,and
then try the call again later.
END
CLR
2928

Prepend Dialing
The Prepend option lets you add digits such as area codes,
long distance access codes (for example 1 or 011),and network feature activation codes to a phone number that is in
your Phone Book or Call Logs.This is a useful feature when
you go out of town and want to call back home;just prepend
the number you want to call with your home area code and
SEND
press .You can prepend a number with up to 10 additional digits.
To prepend existing phone numbers in the Phone Book or
Call Logs:
1.Access the phone number (either from your Phone Book
or your Call Logs).
OK
2.Press to display the phone number’s information.
3.Press for more options.
4.Press:
5.Enter the area code or feature activation code by pressing
6.Press to call the prepended number.
OK
MENU
DEF
3
◆ to Prepend a call log or
GHI
4
◆ to Prepend a Phone Book entry.
the digit keys.For feature calls,press before dialing
Shift
the feature code.
SEND
Emergency Dialing
You can place calls to 999 even if your phone is locked or
outgoing calls are restricted (see “Lock Mode”on page 73).
To call 999:
WXYZ
WXYZ
WXYZ
1.Dial .
2.Press .
9
SEND
IMPORTANT NOTICE! PLEASE READ!
Because of various transmission methods,network parameters,and user settings used to complete a call from your
wireless phone,a connection cannot always be guaranteed.
Therefore,emergency calling may not be available on all
wireless networks at all times.
DO NOT depend on this phone as a primary method of dialing 999 or any other essential or emergency communications.
Remember to always turn your phone on and check for adequate signal strength before placing a call.
9
9
3130

Pause Dialing
When you call an automated system (like a bank or voicemail
“teleservice”),you are usually required to enter a password
or account number.Instead of entering the numbers manually each time,you can store the numbers in your Phone Book,
separated by special characters called pauses.
Here is the definition of how a pause works on your phone:
◆ A digit that stops the dialing sequence until you press the
SEND
button.
Your phone has two pause dialing methods:pause dialing
from the Phone Book (see “Pause Dialing From a Stored
Phone Book Entry”on page 33) and manual pause dialing
(see “Manual Pause Dialing”on page 33).
Pause Dialing From a Stored Phone Book Entry
Pause dialing from your Phone Book is easy:
1.Dial the teleservice number from your phone book in the
way you prefer (use the turbo dial or scroll to it method).
2.Wait to be prompted by the teleservice for the number
(credit card number,bank account number,etc.).
3.When prompted,press to send the DTMF number
SEND
that follows your pause.“SENDING DTMF”flashes on the
screen,and the transmitted tones are audible.
Manual Pause Dialing
Pauses are entered manually using the Digit Entry Menu during the dialing process.
Storing Pauses in a Phone Book Entry
To store a number in your Phone Book that contains pauses:
1.Enter the phone number you want to connect to (such as
the bank’s teleservice phone number).
2.Press to insert a pause.The letter “p”displays in the
Note:The digits before the “p”dial the tele-service.The “p”
stops the dialing and waits for the teleservice to prompt you
for a number.The number following the “p”is your account
number,PIN,etc.
3.Enter the digits that need to follow the pause (such as
4.Store the number as you normally would by pressing the
MENU
number,meaning that a hard pause will occur at that
point in the dialing sequence.
your account number).
OK
OK
key and entering a name.
To manually dial a number using a pause(s):
1.Enter the phone number of the service you want to connect to (such as the bank’s teleservice phone number).
For example,your bank’s teleservice phone number might
be a 1.800 number.
2.Press to insert a pause.The screen displays a “p”indi-
MENU
cating a pause.Enter the number to be sent after the
pause by pressing the digit keys,and then press .
SEND
3.After connecting,wait for the prompt from the teleservice.After the prompt,press again to transmit the
SEND
additional number.
3332

Basic Setup of Your Phone
Automatic Retry
This feature allows you to continue trying numbers that you
don’t reach successfully.The phone will automatically redial a
failed call until it connects.This feature is preset to “OFF”on
your phone.
To set the Automatic Retry feature:
setting.
setting.
MENU
8
.
1
MENU
8
2
TUV
'
OK
OK
TUV
ABC
OK
OK
1.Press to display the Main Menu.
2.Press for Phone Setup.
3.Press for Auto Retry.
4.Press the scroll keys to select On or Off.
5.When the desired option displays,press to save the
Automatic Answer
When this feature is set to on,the phone will automatically
answer the call after two rings (notice that when this feature
is on that there is no way to stop your phone from answering a call).The message “AutoAnswer”appears on the display
when this feature is set to on.This feature is preset to “OFF”
on your phone.
To set the Automatic Answer feature:
1.Press to display the Main Menu.
2.Press for Phone Setup.
3.Press for Auto Answer.
4.Press the scroll keys to select On or Off.
5.When the desired option displays,press to save the
Automatic Hyphenation
When you dial a number,hyphenation is performed automatically by the phone.The automatic hyphenation follows the
North American Numbering Plan,which hyphenates numbers as follows:
◆ 800-555-1234
Digits following a pause are not hyphenated (see “Pause
Dialing”on page 32).
It’s easy to turn off this hyphenation if you want to.Here it is:
1.Press to display the Main Menu.
2.Press for Phone Setup.
3.Press for Auto Hyphen.
MENU
8
3
TUV
DEF
4.Press the scroll keys to select On or Off.
OK
5.When the desired option displays,press to save the
OK
setting.
Answer Options
Your phone is preset to answer a call when you press the
SEND
key.You can easily change your phone to answer a call
when you open the phone,or when you press “Any Key”.
Here’s how to do it:
setting.
MENU
8
4
TUV
GHI
OK
OK
3534
1.Press to display the Main Menu.
2.Press for Phone Setup.
3.Press for Anykey Answer.
4.Press the scroll keys to select On or Off.
5.When the desired option displays,press to save the
 Loading...