

Samsung SPH-N100, SPH-N105 User Manual

Portable Cellular Phone
SPH-N100/SPH-N105
Owner’s Manual
World Wide Web
http://www.samsungmobile.com
Printed in Korea
Code No.: GH68-01367A
English. 2000/10. Rev.1.0

FCC RF EXPOSURE INFORMATION
Table of Contents
In August 1996 the Federal Communications Commission
(FCC) of the United States with its action in Report and
Order FCC 96-326 adopted an updated safety standard for
human exposure to radio frequency electromagnetic energy
emitted by FCC regulated transmitters.Those guidelines are
consistent with the safety standard previously set by both
U.S.and international standards bodies.The design of this
phone complies with the FCC guidelines and these international standards.
Use only the supplied or an approved antenna.Unauthorized
antennas,modifications,or attachments could impair call
quality,damage the phone,or result in violation of FCC regulations.
Do not use the phone with a damaged antenna.If a damaged
antenna comes into contact with the skin,a minor burn may
result.Please contact your local dealer for replacement antenna.
Body-worn Operation
This device was tested for typical body-worn operations
using a spacing of 2.0cm between the phone and the body.
To comply with FCC RF exposure requirements,a minimum
separation distance of 2.0cm must be maintained between
the user’s body and the phone,including the antenna,
whether extended or retracted.The use of third-party beltclips/ holsters with no metallic components that provide the
minimum separation distance of 2.0cm can be used to satisfy
FCC RF exposure requirements.The use of non-tested accessories or other body-worn operations may not comply with
FCC RF exposure requirements and should be avoided.
Contact your local dealer for optional accessory items.
For more information about RF exposure,please visit the
FCC web site at www.fcc.gov
Your Consumer Package 6
Getting to know your phone 7
Turning your Samsung PCS Phone on and off
To turn it on 1 4
To turn it off 1 4
14
Operating Indicators 15
Using the battery 17
Installing the battery 1 7
R e m oving the battery 1 7
C h a rging the battery 1 8
Your phone’s modes 20
S t a n d by mode 2 0
Talk mode 2 0
Power Save mode 2 0
Basic voice call functions 21
Making a voice call 2 1
Redialing calls 2 1
C o rrecting dialing mistakes 2 2
Ending a call 2 2
Incoming call notification 2 2
A n swe ring a call 2 3
Adjusting voice volume 2 4
Adjusting ring volume 2 4
Silencing (or muting) the ri n ger during an incoming call 2 4
To mute the microphone during a call 2 5
W h e re you can use your phone 2 5
Setting your phone’s roaming ability 2 6
Roaming call guard 2 7
Using Caller ID 2 8
Call Waiting 2 9
A n swe ring a Call Waiting call 2 9
Using T h re e - Way Calling 3 0
Using Call Fo r wa rding 3 1
D i s p l aying your phone number 3 1
Missed calls 3 2
D ropped calls 3 2
1

Failed calls 3 3
Key beep volume setting 3 3
Advanced voice calling features 34
Tone length setting 3 4
Automatic hyphenation 3 4
P repend dialing 3 5
Fo u r - d i git dialing 3 6
Pause dialing 37
S t o ring pauses in an Internal Phone Book entry 3 7
Pause dialing from a stored Internal Phone Book entry 3 8
M a nual pause dialing 3 9
Audible alerts 40
S e rvice alert 4 0
M i nute beep 4 1
Display options 42
B a cklight control 4 2
Pe rsonal greeting 4 3
B a cklight contrast control 4 3
Setting the language of your phone 4 4
D i s p l aying your phone’s softwa re and hardwa re ve rs i o n s 4 4
Ringer options 45
R i n ger type setting for voice calls 4 5
R i n ger volume setting for voice and fax calls 4 6
R i n ger type setting for message calls 4 7
R i n ger volume setting for message calls 4 7
R i n ger type setting for your alarm 4 8
R i n ger volume setting for your alarm 4 8
R i n ger type setting for fax calls 4 9
R i n ger type setting for roaming calls 4 9
Voice-activated dialing 50
Tips on re c o rding names 5 0
P ro gramming the phone for Vo i c e - a c t i vated dialing 5 1
Vo i c e - a c t i vated dialing setup 5 2
Placing a call using voice dialing 5 3
R ev i ewing voice dialing entries 5 3
E rasing voice dialing entries 5 4
Emergency dialing 55
2
The Internal Phone Book 56
Vi ewing stored entries 5 6
Vi ewing stored entries in one step 5 6
Finding stored entries by name 5 7
Finding stored entries by location 5 7
S t o ring phone nu m b e rs and names 5 8
To add a new phone number to an existing entry 5 9
S h o rtcuts to storing phone nu m b e rs 6 0
D i s p l aying my phone number 6 0
S t o ring phone nu m b e rs at the end of a call 6 0
P repend a phone number 6 1
Adding a Name Ringer 6 2
Changing Your Internal Phone Book 63
Editing Internal Phone Book nu m b e rs 6 3
S e c ret Internal Phone Book nu m b e rs 6 3
E rasing Internal Phone Book entries 6 4
E rasing the Internal Phone Book 6 4
Set Speed Dial 6 4
Dialing numbers from your Internal Phone Book
S h o rtcuts to Memory Dialing 6 5
65
Calendar 66
To d ay 6 6
Month Vi ew 6 8
Jump To Date 6 9
To Do List 7 0
Count Down 7 1
A l a rm Clock 7 3
World Clock 7 5
Calculator 76
Voicemail 77
Setting up your Voicemail box 7 7
R ev i ewing Voicemail messages 7 7
O n e - To u ch Access to your Voicemail box 7 7
Messaging 78
Incoming Messages 7 8
Receiving a Message in Standby mode 7 8
Receiving a Message while on a call 7 8
R ev i ewing Numeric Page s ,Text Message s ,and Browser Message s
M e s s age options 8 0
7 9
3

E rasing individual messages 8 1
E rasing all Page / Text or Browser Messages 8 1
M e s s age ri n ging 8 1
M e s s age memory capacity 8 2
M e s s ages and Lock mode 8 2
Your phone’s security features 83
L o ck mode 8 3
L o ck code setting 8 4
L o cking the phone 8 4
Dialing in Lock mode 8 5
Special nu m b e rs 8 5
S t o ring special nu m b e rs 8 6
Dialing special nu m b e rs in Lock mode 8 6
Resetting your phone 8 6
E rasing Your Internal Phone Book 8 7
Keeping track of your calls 88
R ev i ewing Outgo i n g ,Incoming or Missed Calls 8 8
E rasing Call Logs 8 9
R ev i ewing airtime 9 0
The Wireless Web Browser 91
The MiniBrowser Start and End Prompts 9 2
L a u n ching the Wi reless Web Browser 9 2
To end the Wi reless Web Browser Session 9 3
N avigating the Wi reless Web Browser 9 4
The MiniBrowser soft keys 9 4
E n t e ring tex t ,nu m b e rs or symbols 9 6
Using Links 9 7
Initiating a phone call while using the Wi reless Web Brow s e r
Receiving a phone call while using the Wi reless Web Browser
Using Bookmarks 9 8
C reating a Bookmark 9 8
Finding a Bookmark 9 9
9 7
9 8
C h a n ging your phone back to voice calling 1 0 4
Ending a call 1 0 4
Menus 105
Main menu 1 0 5
In Use menu 1 0 5
M e nu navigation 1 0 5
Your Phone’s Main menu 1 0 6
Usage guidelines:
All about performance and safety 107
Keeping tabs on signal strength 1 0 7
U n d e rstanding Power Save mode 1 0 7
U n d e rstanding how your phone operates 1 0 8
Radio frequency safety 1 0 8
Maintaining your phone’s peak perfo rmance 1 0 9
P rotecting your battery 1 1 0
B a t t e ry disposal and re c y cling 1 1 1
Using your phone while driving 1 1 2
Fo l l owing safety guidelines 1 1 2
Tu rn off your phone befo re flying 1 1 2
R e s t ricting ch i l d re n ’s access to your phone 1 1 2
Using your phone near other electronic devices 1 1 3
Tu rn off your phone in dange rous areas 1 1 3
Cautions 1 1 4
FCC notice 1 1 4
L i q u e fied Pe t roleum Gas 1 1 4
S p e c i fications Subject to Change 1 1 4
FCC Compliance Info rmation 1 1 5
I n fo rmation To User 1 1 5
Samsung PCS Wireless Data Connection 100
Getting Started 1 0 0
A t t a ching the data cable 1 0 1
Installing the softwa re 1 0 1
Placing a call 1 0 1
Reading the Display 1 0 2
D u ring the call 1 0 2
Receiving a call 1 0 3
Receiving a fax call 1 0 3
4
5
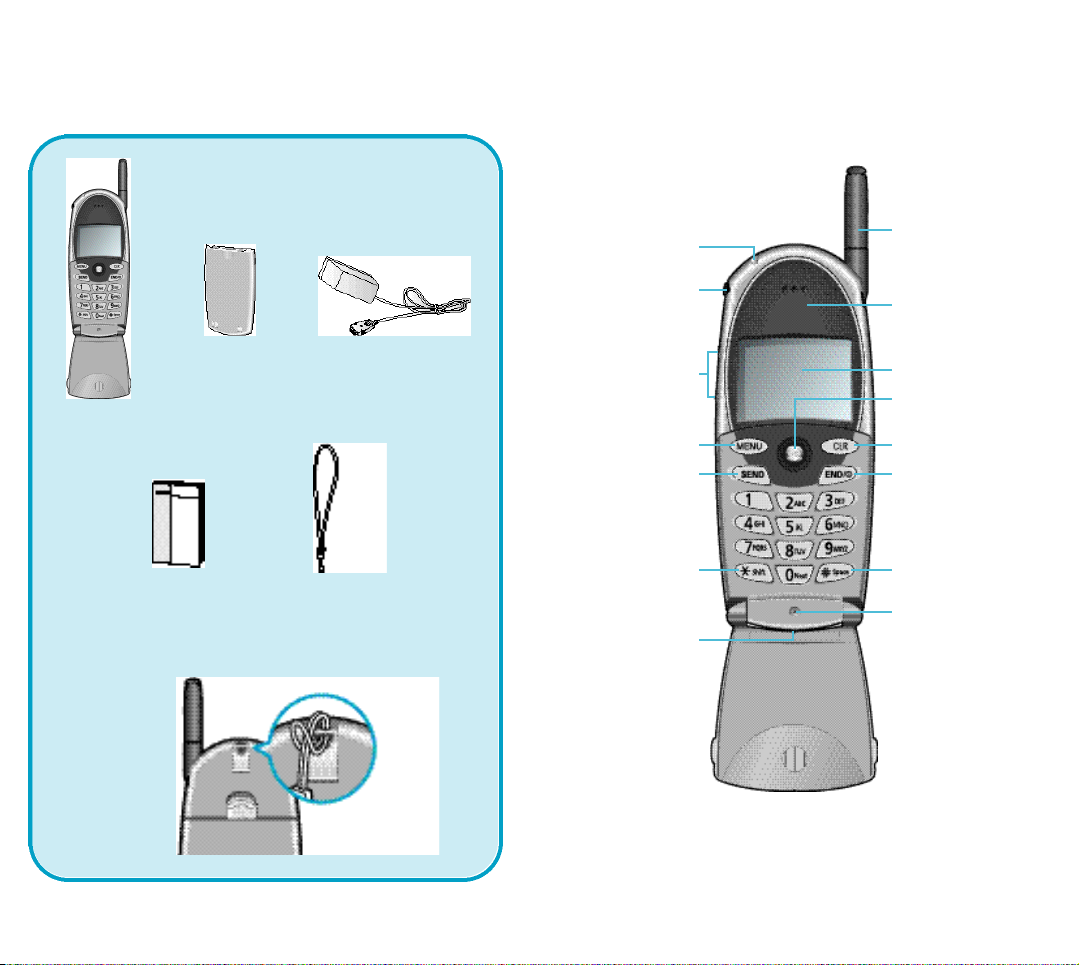
Your Consumer Package
Your consumer pack age contains the fo l l ow i n g s :
Getting to know your phone
P h o n e
B a t t e ry Travel ch a rge r
O w n e r ’s
H a n d s t ra p
m a nu a l
LED Indicator
H e a d s e t
C o n n e c t o r
Volume /
S c roll Key
M e nu Key
SEND Key
Shift Key
A c c e s s o ri e s
C o n n e c t o r
(hidden in
this view )
A n t e n n a
E a r p i e c e
D i s p l ay Scre e n
OK / Messages /
N avigation Key
CLR Key
E n d / Power Key
Space Key
M i c ro p h o n e
76

Getting to Know Your Phone (continued)
1. Active Flip Phone: Closing the phone will
a lways end your call and turn off the back l i g h t .
T h e re are seve ral options you can set to happen
when you open the phone.When opening the
phone you can:
◆ a n swer an incoming call.To set this option see
“A n swe ring a Call”on page 23.
◆ voice dial someone.To set this option see“Vo i c e
Dialing A c t i va t i o n ”on page 50.
◆ c o n t rol the back l i g h t .To set this option
s e e “ B a cklight Contro l ”on page 42.
4. M i c rophone: Your typical voice microphone fo r
c o nve rs a t i o n ,but also accepts your voice commands for Vo i c e - A c t i vating Dialing.You can also
mute the microphone during conve rsation by simp ly pressing or .
5. Accessories Connector: This is where you connect your ch a rging dev i c e .It can also be used to
connect optional accessories (sold separa t e ly ) .
A c c e s s o ries ava i l able for your phone incl u d e :
◆ Travel Charger or CLC
◆ Wi reless data dev i c e .
◆ h a n d s - f ree car kit.
2. Backlit Display Scre e n
◆ The screen displays phone’s operating indica-
t o rs or in-use info rmation such as the call timer,
the name and number of the other party (it
ava i l abl e ) ,M u t e ,Call wa i t i n g ,e t c .
3. Headset Connector: This is where you connect
the optional headset. The headset includes an earpiece and microphone in a conve n i e n t ,l i g h tweight unit so you can conve rse without using
your hands.
◆ What you see in the illustration to the left is re a l-
ly the cover for the headset connector.G e n t ly
p ry off the top of the cover to expose the headset connector.
6. LED Indicator: Flashes to indicate an incoming
call or message . When you have the phone cl o s e d
and the ri n ger set to off,the LED indicator will
notify you that you have an incoming call or mess age .
◆ The LED also lights up (flashes) for a few sec-
onds when you turn on the phone.
7. A n t e n n a : M a kes the call sound cl e a rest when it’s
f u l ly ex t e n d e d .Your antenna is easily replaced by
just screwing in a new one.
98

8. OK / Messages / Navigation Key: T h i s
key perfo rms seve ral useful functions:
◆ From Standby or Conve rsation mode,
p ress it bri e fly to access the Message s
M e nu , ,or press and hold it to access
the Voice mail.
◆ When entering a phone nu m b e r,p re s s
it once to save the number to the
Phone Book (then fo l l ow a few
p ro m p t s ) .
◆ When navigating a menu ,p ress it to
select the highlighted item.
◆ When the alarm goes off,p ress it to
silence the alarm .
◆ In Standby or Conve rsation mode,s l i d e
it up to view your Phone Book (in
nu m e rical ord e r ) .
◆ In Standby or Conve rsation mode,slide
it down to view your Phone Book (in
a l p h abetical ord e r ) .
◆ In Standby mode,slide it right to
l a u n ch the Web Brow s e r.
◆ In Standby mode,slide it left to launch
the Calendar.
9. Vo l u m e / S c roll Key:
This key is actually
t wo keys (one up and one down) that are
used to:
◆
Adjust voice volume during conve rs a t i o n .
◆ Adjust ri n ger volume in Standby mode.
◆ Mute the ri n ger during an incoming call.
◆ S c roll through menu options.
◆ Select AM / PM when setting cl o ck ,
s cheduler event times,and alarm s .
10. SEND Key: This key perfo rms seve ra l
useful functions.
◆ P ress it to answer calls.
◆ Dial a number and press it to connect.
◆ D u ring a conve rs a t i o n ,p ress it to initiate
T h re e - Way calling.
◆ D u ring a conve rs a t i o n ,p ress it to answe r
a Call Waiting call.
◆ P ress it once in Standby mode to quick ly
access your Call Logs.
◆ P ress it twice in Standby mode to re d i a l
the last outgoing nu m b e r.
1110

11. * / Shift key
◆ p ress for special star calling fe a t u re s .
12.
# / Space key:
This key has two functions:
◆ This is the pound key.I t ’s used at va ri-
ous times when you dial especially
when using tele-serv i c e s .
◆ When entering tex t ,p ress it to cre a t e
a space.
13. CLR Key: This key is used to era s e
nu m b e rs or ch a ra c t e rs you may have
e n t e red incorre c t ly,or to re t u rn to a previous menu or Web Browser scre e n .
◆ To erase one ch a racter from the dis-
p l ay scre e n ,b ri e fly press it once.
◆ To erase all ch a ra c t e rs ,hold it dow n
for one second.
◆ To back up one menu or We b
B rowser leve l ,p ress it once.
◆ To re t u rn to Standby mode or yo u r
Web Browser home page ,p ress and
hold it for one second.
14. END/ Power Key: This key perfo rm s
s eve ral important functions:
◆ P ress to turn on your phone.
◆
P ress and hold to turn off your phone.
◆ P ress this key to re t u rn to Standby
mode when ending a call,ending a
Web Browser session,or from any
m e nu .
◆ If the phone is alre a dy open,and yo u
re c e i ve an incoming call,you can
mute the ri n ger by pressing once.
15. MENU Key: When in Standby or
C o nve rsation mode,p ress this key to
access menu items,and continue pre s sing it to scan menu items.When yo u
re a ch the menu item you wa n t ,p re s s
.
◆ When dialing nu m b e rs ,this key is used to
enter a pause (see “ Pause Dialing”on page
3 7 ) .
16. 0 Next Key: This Key is used to display
the next matching wo rd when enteri n g
t ext in T9 Text Entry Mode.
1312
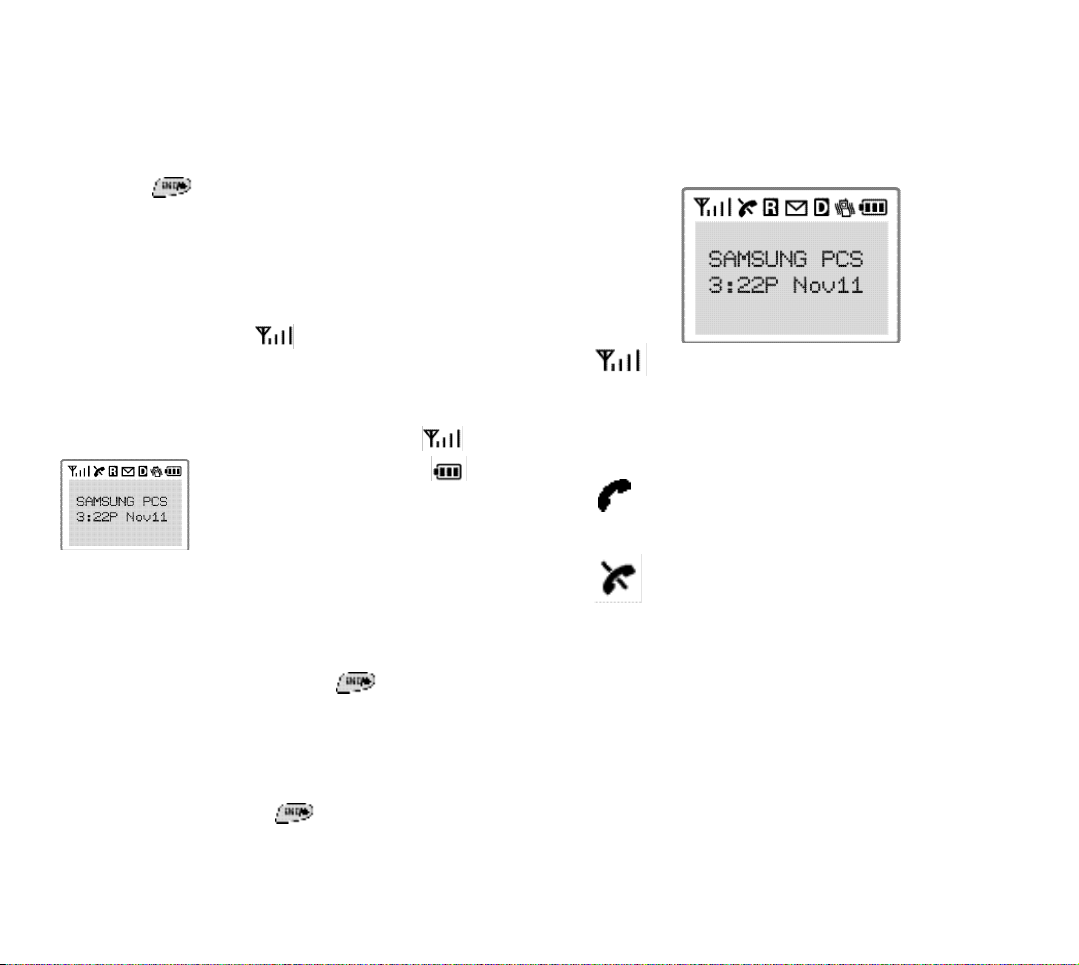
Turning your Samsung PCS
Phone on and off
To turn it on
S i m p ly press and three things happen:
The LED indicator fl a s h e s ,
the phone beeps and
the start-up graphics begin to play.
The phone will then begin searching for a netwo rk signal.
When a signal is fo u n d ,the icon appears and yo u r
phone enters Standby mode.The Standby mode screen is
s h own below and always contains the fo l l owing fo u r
t h i n g s :
Signal strength indicator .
B a t t e ry strength indicator .
Banner (here the banner is
“Samsung PCS”but you can personalize it).
Time and date.
You can make and re c e i ve calls now.
To turn it off
To turn your phone off,p ress and hold until the
p ower off graphics begin to play.The power off sounds will
then play and the display goes bl a n k .Notice that when the
phone is off,nothing is displayed on the scre e n ,and the
b a cklight is off.
Operating Indicators
D i s p l ay indicators (or icons) usually appear across the top
of your phone’s display scre e n .Somtimes they may not be
s h own on the scre e n .
Signal stre n g t h : This icon appears when yo u r
phone is on,and shows your current signal
s t re n g t h .M o re lines indicate more signal stre n g t h .
Four lines indicate maximum stre n g t h ,and one line
indicates least stre n g t h .
S e rvice indicator: This icon indicates a call is in
p ro gre s s .If there is tro u ble with signal stre n g t h ,
this indicator will have a diagonal line through it.
No service indicator: This icon indicates yo u r
phone cannot find a signal because yo u ’re outside
a service are a .When this is displaye d ,you cannot
m a ke or re c e i ve calls.Wait a little while for a signal
or move into an open are a .
N o t e :The no service indicator will appear when
you turn on your phone.As soon as service is
fo u n d ,the indicator disappears .
N o t e : If your phone is on and is pressed for less
than one second,the phone will not turn off.This fe a t u re
helps keep your phone from being accidentally turned off.
1514
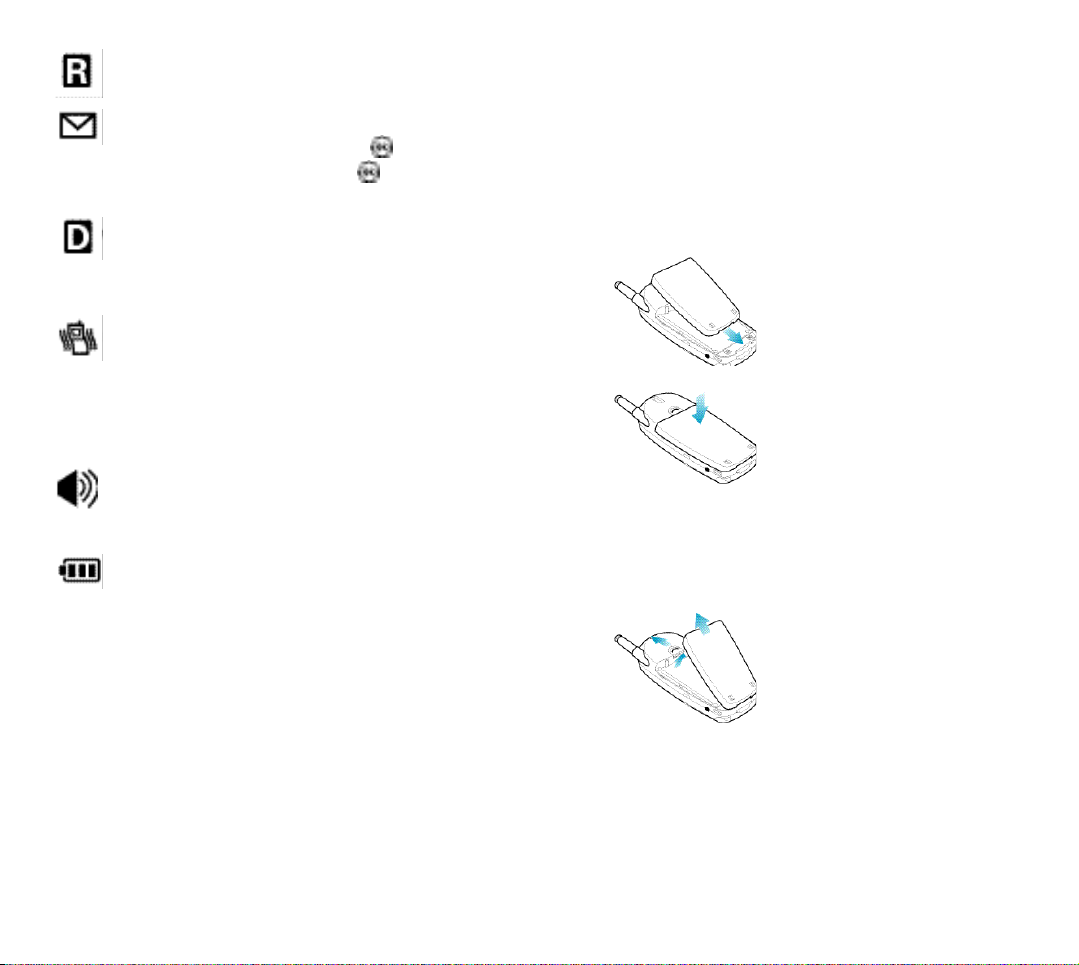
R o a m i n g : This icon indicates you are “ ro a m i n g ”
o ff the Netwo rk of your service prov i d e r.
Message indicator: This icon indicates you have
Voicemail message(s) wa i t i n g .P ress to see the
M e s s age menu ,or press and hold to be connected to Vo i c e m a i l .
Digital mode: This icon indicates that the phone
is in Digital mode.For Data/Fax calls,Web Brow s e r
c a l l s ,and voice Dialing,the phone must be in digital mode.
Vibrating Ringer: This icon indicates that an
incoming call will vibrate the phone rather than
ring it.This fe a t u re can be used for quiet situations
w h e re you don’t want your ri n ger to disturb others
or for loud situations where the ri n ger cannot be
h e a rd .
Ring Level: This icon indicates the level of ri n g
volume.The more bars you see,the larger the vo lu m e .
B a t t e ry stre n g t h : This icon is displayed when
your phone is on,and shows the level of your batt e ry ch a rge .The more bl a ck bars you see,t h e
greater the ch a rge .When the battery becomes ve ry
l ow,an empty box appears and the phone fl a s h e s
an alert ;this indicates your phone is about to turn
itself off.
Using the battery
Your Samsung PCS Phone comes pack aged with a part i a l ly
ch a rge d ,re ch a rge able Lithium Ion (LiIon) battery so that
you can use your phone immediately after it is activa t e d .
Installing the battery
To attach the battery to your Samsung PCS Phone:
1 . Align the tabs at the bottom
of the battery with the corresponding slots in the
p h o n e .
2 . Push the battery down until
you hear a cl i ck .
Removing the battery
To re m ove the battery from your Samsung PCS Phone:
1 . Tu rn the phone off.
2 . Push up and hold the catch
of the phone and lift the
b a t t e ry away.
1716

Charging the Battery
You can easily tell if your battery needs to be re ch a rge d
by ch e cking the indicator in the upper-right corner of your phone’s display. The presence of all thre e
b a rs indicates a full ch a rge ,t wo bars indicates a smaller
ch a rge ,and one bar indicates an even smaller ch a rge .
No bars ( ) means your battery must be ch a rge d .
When the battery ch a rge level gets low,the battery sensor blinks an empty battery icon ( ) ,sounds a tone.
If the battery level gets too low,the phone will turn off
a u t o m a t i c a l ly.U n fo rt u n a t e ly,if this happens yo u ’ll lose
w h a t ever you are doing,i n cluding dropping your call.
Wa t ch the battery strength icon and make sure your batt e ry is adequately ch a rge d .
Charging with the dual-slot desktop charger
Use only Samsung-approved ch a rge rs and adapters with
your Samsung PCS Phone.Use of any unauthorized access o ries may be dange rous and will invalidate the phone wa rranty if the accessories cause damage or a defect to the
p h o n e .
To ch a rge the battery using the dual-slot desktop ch a rge r :
1 . Plug the power cord of the ch a rger into a wall outlet.
2 . Select one of the fo l l owing three ch a rging confi g u ra-
t i o n s :
I n s e rt the entire phone with battery attached into the
f ront compartment of the ch a rge r.
Things to remember about the dual-slot desktop charger
To get the quickest ch a rge for any battery :
1 . Tu rn the phone off.
2 . Put the phone,with battery attach e d ,into the front slot.
3 . Do not put a battery in the rear slot.
When two batteries are in the ch a rge r,the batteri e s
ch a rge simu l t a n e o u s ly,but ch a rging time increases fo r
both batteri e s .
L e aving the battery in the ch a rger once it is fully
ch a rged does not harm the battery.
The LEDs on the front of the ch a rger indicate the fo ll ow i n g :
Red indicates that the battery is ch a rgi n g .
G reen indicates that the battery is fully ch a rge d .
Ye l l ow indicates that the battery is operating at a
t e m p e ra t u re that is too high or too low,or that
something is not plugged in corre c t ly.C h e ck the
ch a rger and battery for proper connections.
Using the dual-slot desktop ch a rge r,a completely disch a rged standard battery re ch a rges fully in approx i m a t e ly
2.5 hours .The extended battery re ch a rges in approx i m a t e ly
3 hours .
I n s e rt a single battery (alone,not attached to the
phone) into the rear compartment of the ch a rge r.
I n s e rt a single battery into the rear compartment and a
phone (with battery attached) into the front compartm e n t .
1918

Your phone’s modes
Standby mode
S t a n d by is the most basic state of your Samsung PCS Phone.
The phone goes into Standby mode soon after you turn it
o n ,or if your phone is on,w h e n ever you bri e fly press .
When your phone is in Standby mode,you will see the banner (the message displayed when you turn on your phone),
the time/date and the active top line icons.While in Standby
m o d e ,you can enter a phone nu m b e r,p ress to dial it,
or press to save it in the Internal Phone Book.
P ress at any time to re t u rn to Standby mode,but be care f u l ;
if yo u ’re on a call when you press ,yo u ’ll re t u rn to
S t a n d by mode but yo u ’ll also disconnect the call.P re s s
s eve ral times or hold it down to re t u rn to Standby mode
without ending a call.
The Main menu is accessed when you are in Standby mode
by pressing .See “ Your Phone’s Main menu ”on page
106 for a listing of the Main menu items.
Talk mode
You can place and answer calls only when your Samsung
PCS Phone is powe red on.D u ring a call,the phone is in Ta l k
m o d e .While you are in Talk mode,p ressing gi ves yo u
a list of options re fe rred to as “In-Use options.See “In Use
m e nu ”on page 105.
Power Save mode
Your Samsung PCS Phone comes with a Power Save fe a t u re
that will automatically be activated if your phone is unabl e
to find a signal after 15 minutes of search i n g .While this fe at u re is active ,the phone’s battery ch a rge is conserve d .T h e
phone will automatically re ch e ck for a signal peri o d i c a l ly.A
m e s s age on the display will let you know when your phone
is operating in Power Save mode.
Basic voice call functions
N o t e : Your phone makes seve ral kinds of calls (vo i c e ,fa x
and Wi reless We b ) .This section explains voice calling only.
Making a voice call
To place a voice call:
1 . P ress to power on your Samsung PCS Phone.I f
you see indicators on the display,this indicates yo u r
phone is on.Note that you will not hear a dial tone.
2 . Enter the phone number (up to 32 digits) by pre s s i n g
the digit key s .The phone number displays from left to
ri g h t .
3 . P ress .The phone places the call to the entere d
phone nu m b e r.
You can also make voice calls:
From your Internal Phone Book (see “ S h o rtcuts to
M e m o ry Dialing”on page 65).
From your Call Logs list (see “ R ev i ewing Outgo i n g ,
Incoming or Missed Calls”on page 88).
By using One-,Two- or T h re e - To u ch Dialing (see
“ S h o rtcuts to Memory Dialing”on page 65).
By using Voice A c t i vated Dialing (see “ Vo i c e - a c t i va t e d
dialing setup”on page 52).
Redialing calls
To redial the last call you made,p ress t w i c e .
You can also easily redial any of your last ten incoming,o u t-
going or missed calls by accessing the Call Logs listings
(see “ R ev i ewing Outgo i n g ,Incoming or Missed Calls”o n
p age 88).
2120

Correcting dialing mistakes
To correct a misdialed digi t :
P ress to erase one digit at a time.
You can erase all the digits at once by pressing
and holding it down for one second.
Ending a call
To end a call,close the phone or press .If you end a
call by pressing ,the call time (length of the call) disp l ay s ,along with the name and number of the called part y
(if ava i l abl e ) .A l s o ,if the number is not stored in yo u r
I n t e rnal Phone Book,your phone prompts you to save the
number by pressing .If you do nothing,the phone autom a t i c a l ly re t u rns to Standby mode after approx i m a t e ly fi ve
s e c o n d s .
Incoming call notification
Your Samsung PCS Phone signals an incoming call or mess age in the fo l l owing way s :
The backlight illuminates.
The red LED on the top of the handset fl a s h e s .
The ri n ger sounds (unless you have set the ri n ger to
Vi b rate or Off ) .
Incoming call notification continues until one of the fo ll owing events occurs :
You answer the call.
You press or to silence the ri n ge r
b e fo re answe ring the call.(when the A ny Key A n swe r
option is selected in the Main menu ) .
The calling party ends the call.
The call is sent to the Vo i c e m a i l .
Your Samsung PCS Phone provides the fo l l owing voice call
n o t i fication fe a t u re s .
Six ring volume settings including Vi b ra t e ,O ff and 1B e e p .
Nine unique ring types and four melody tones (see
“ R i n ger type setting for voice calls”on page 45).
Name display with Caller ID (if the name is programmed into your Internal Phone Book).
Automatic storage of an incoming call’s info rmation in
the Call Logs (the last 10 calls you answe red are store d
in the Incoming Call logs and the last 10 calls yo u
missed are stored in the Missed Call Logs).See “ M i s s e d
c a l l s ”on page 32.
Answering a call
T h e re are three ways to answer an incoming call.
P ress if the phone is alre a dy open.
Open the phone (when the Flip Open option is set in
the Main menu ) .
P ress any key except (when the A ny Key
A n swer option is selected in the Main menu ) .
Your phone is preset to answer when you press .Yo u
can easily ch a n ge how your phone answe rs by setting the
Call A n swer fe a t u re as explained here :
1 . P ress to display the Main menu .
2 . P ress for Setup / To o l .
3 . P ress for Call A n swe r.
4 . Use the scroll keys to toggle between “Flip Open”,
“A ny Key ” ,or “SEND key ” .
5 . P ress to save the setting.
2322

Adjusting voice volume
To mute the microphone during a call
You can adjust the earpiece volume during a call
using the volume keys on the side of your phone.
B ri e fly press the appro p riate volume key to incre a s e
or decrease the vo l u m e .
Adjusting ring volume
From Standby mode you can quick ly adjust the volume of
the ri n ger by pressing the volume keys on the side of the
p h o n e .You can also ch a n ge the settings for your phone’s
ring volume from the Main menu (see “ R i n ger options”o n
p age 45).
Silencing (or muting) the ringer during an
incoming call
When the phone is open and ri n gi n g ,p ress t o
silence the ri n ge r.When the phone is closed and
ri n gi n g ,p ress the volume keys to quick ly silence the
ri n ge r.(When the A ny Key A n swer option is not
selected in the Main menu . )
You can also set the ri n ger to remain off.From Standby
m o d e ,p ress the down volume key until “Ring Volume Off”
is displaye d ,or use the Main menu (see “ R i n ger type setting
for voice calls”on page 45).
You can mute the microphone during conve rsation by
selecting the Mute option from the In-Use menu .W h e n
Mute is active ,“ M U T E ”d i s p l ay s .The phone resets this condition to the default (Un)Mute setting at the end of yo u r
c a l l .
To mute the microphone during a call:
1 . D u ring a conve rs a t i o n ,p ress to display the In-Use
m e nu .
2 . P ress (or ) to mute the micro p h o n e .You will
hear the other part y ’s conve rs a t i o n ,but they will not
hear your conve rs a t i o n .“ M U T E ”d i s p l ays on the scre e n .
3 . To “ u n mu t e ”the microphone during the same conve rs a-
t i o n ,repeat steps 1 and 2.Selecting the (Un)Mute option
toggles Mute on and off.
Where you can use your phone
Your Samsung PCS Phone can used it to make and re c e i ve
calls in many places.
In any city where your service provider provides PCS
s e rv i c e .
On other CDMA netwo rks where your serv i c e
p rovider has implemented roaming agre e m e n t s .
(SPH-N100 only*) On other conventinal analog cellular
n e t wo rk where your service provider provides analog
s e rvice or has implemented roaming agre e m e n t .
When you use your phone outside your service prov i d e r ’s
PCS Netwo rk ,i t ’s called ro a m i n g .
* SPH-N100 is dual-band.
2524

Setting your phone’s roaming ability
(SPH-N100 only * )
Your Samsung PCS Phone allows you to control your ab i l i t y
to ro a m .The roaming ability is determined by the “ m o d e ”
that you select in the Main menu .
Au t o m a t i c : The phone will search for your serv i c e
p rov i d e r ’s service fi rs t . When this service is not ava i labl e ,it will search for an alternate system automatically.
Home Only or No Roaming: This setting allows you to
select only your service prov i d e r ’s Netwo rk to preve n t
ro a m i n g .
A n a l o g : The phone will acquire analog serv i c e ,b u t
will reve rt to Home Only or Automatic(depending on
your setting) the next time you turn on your phone.
To select the service mode:
1 . P ress to display the Main menu .
2 . P ress for Setup/To o l
3 . P ress for Roaming.
4 . P ress for Set Mode.
5 . P ress the scroll keys to scan options.
Roaming call guard
N o t e :This menu may not be shown depending on your service prov i d e r.
Your phone can be set to display a confi rmation message
when a roaming call is about to be placed or re c e i ve d .T h i s
is helpful if you want to avoid roaming ch a rge s .To ch a n ge
your roaming call guard setting:
1 . P ress to display the Main menu .
2 . P ress for Setup/To o l .
2 . P ress for Roaming.
3 . P ress for Call Guard .
4 . Select Yes or No using the scroll key s .
5 . When the desired setting display s ,p ress to save the
setting or to exit without sav i n g .
6 . When the desired service mode display s ,p ress t o
s ave the setting or to exit without sav i n g .
* SPH-N100 is dual-band.
2726

Using Caller ID
Call Waiting
This fe a t u re tells you who is calling you by displaying the
c a l l e r ’s number when the phone ri n g s .If a caller’s name
and number are stored in your Internal Phone Book,t h e
c o rresponding name is also displaye d .If you call someone
who has this fe a t u re ,your phone number is displayed on
their phone.
To bl o ck your phone number from being displayed for a
p a rticular outgoing call,ask your service prov i d e r.
Call Waiting lets you re c e i ve a second call during conve rs at i o n .When a Call Waiting call comes in,the incoming call
a l e rt sounds (this sound is audible to you but not your fi rs t
c a l l e r ) ,and a text notification display s .
Your Samsung PCS Phone provides the option of turning the
Call Waiting fe a t u re on or off.Call Waiting is on by defa u l t .I f
you choose to have an undisturbed conve rs a t i o n ,s i m p ly
t u rn off the fe a t u re for the current call.
Answering a Call Waiting call
To answer a Call Waiting call:
1 . P ress .The phone connects the calling party and
places the current party on hold.
2 . P ress again to sw i t ch between the two part i e s .
N o t e : If you do not respond to a Call Waiting notifi c a t i o n ,
the phone logs the call in the Missed Calls Log and then
sends the call to the Vo i c e m a i l .
2928

Using Three-Way Calling
Using Call Forwarding
T h re e - Way Calling lets you talk with two diffe rent people
at the same time.When you use this fe a t u re ,you will be
ch a rged normal airtime rates for each of the two calls yo u
m a ke .The phone re c o rds each called party in the Outgo i n g
Calls Log.
D u ring a thre e - way call,if one of the callers hangs up,yo u
and the remaining caller will stay connected.If you initiated the call and you hang up fi rs t ,all three parties are disc o n n e c t e d .
T h e re are two methods for making a thre e - way call;t h e
SEND key method and by using the In-Use menu .
To place a thre e - way call using the SEND key method:
1 . D u ring a conve rs a t i o n ,s i m p ly press .The phone
places the current call on hold.
2 . N ex t ,enter the number for the third part y,and pre s s
.
3 . When yo u ’re connected to the third part y,p ress
again to begin your thre e - way call.
To place a thre e - way call using the In-Use menu :
1 . D u ring a conve rs a t i o n ,s i m p ly press and
for T h re e - Way Calling.
2 . N ex t ,enter the number for the third part y,and pre s s
.The phone places the current call on hold.
With Call Fo r wa rd i n g ,you can have all of your incoming
calls fo r wa rded to another phone number — even if yo u r
phone is turned off.When Call Fo r wa rding is used,you can
still make calls from your phone.
To use Call Fo r wa rding ask your service prov i d e r.
Displaying your phone number
The phone number of your Samsung PCS Phone display s
eve ry time you turn on your phone.You can easily display
your phone number by two methods.
To view your phone number from Standby mode:
1 . P ress to display the Main menu .
2 . P ress for Phone Book.
3 . P ress for My Phone #.
4 . P ress to re t u rn to the previous scre e n .
To view your phone number while in a conve rs a t i o n :
1 . P ress to display the In-Use menu .
2 . P ress for Phone Book menu .
3 . P ress for My Phone #.
3 . When yo u ’re connected to the third part y,p ress
again to begin your thre e - way call.
3130

Missed calls
Your phone keeps a list of calls that you do not answe r
when the phone is on and service is ava i l abl e .The phone
indicates a missed call by displaying a text notification on
the scre e n .A d d i t i o n a l ly,if caller info rmation is ava i l abl e ,a
Missed Call Log entry is cre a t e d ,and the screen display s
the phone number of the most recent missed call.
Your phone gi ves you two ve ry convenient options when
you have missed a call:
P ress to call the displayed nu m b e r.
P ress to save the number in the Internal Phone
B o o k .
To view a list of your missed calls,see “ R ev i ew i n g
O u t go i n g ,Incoming or Missed Calls”on page 88.
P ress to clear the “Missed Call”m e s s age fro m
the display and re t u rn to Standby mode.
Dropped calls
A dropped call can occur during a conve rsation in
response to a signal fade or leaving a service are a .In this
c a s e ,the call ends and “Signal Fa d e d ”d i s p l ay s .
P ress to clear the message and re t u rn to Standby
m o d e .
Failed calls
A failed call can occur if your Samsung PCS Phone is out of
calling ra n ge or the netwo rk is tempora ri ly busy.Yo u r
phone responds to a failed call by displaying an appro p riate text message : “Call not completed out of ra n ge ” .
Cancel the call attempt and re t u rn to Standby mode by
p ressing or and try the call again later.
Key beep volume setting
The keys on your phone beep when they are pre s s e d .T h e
volume of the beeps can be easily set to one of three leve l s .If you don’t want the keys to beep at all,you can turn
them off.
To set the key beep vo l u m e :
1 . P ress to display the Main menu .
2 . P ress for Setup / To o l .
3 . P ress for Sounds.
4 . P ress for Key Beep.
5 . P ress the scroll keys to view and listen to the key beep
volume options:H i g h ,M e d ,L ow or Off.
6 . When the desired volume level display s ,p ress t o
s ave the setting.
If the dropped call was an outgoing call from your phone,
you can redial the number automatically by pressing
t w i c e .
3332

Advanced voice calling features
Tone length setting
The tone length setting enables you to select short or long
DTMF (dual-tone mu l t i - f requency) tones.DTMF tones are
sent by your phone to access teleservices (such as a bank
account or voicemail system).The system used by the bank
or other service determines if you need short or long
D T M F.If the service is digi t a l ,s h o rt DTMF tones will almost
a lways wo rk .H oweve r,some new systems and almost all
older (analog) systems re q u i re you to use long DTMF
t o n e s .
To set tone length:
1 . P ress to display the Main menu .
2 . P ress for Setup / To o l .
3 . P ress for Sounds.
4 . P ress for Tone Length.
5 . P ress the scroll keys to toggle between Short and Long.
6 . When the desired option display s ,p ress to save the
s e t t i n g .
Automatic hyphenation
When you dial a nu m b e r,hyphenation is perfo rmed autom a t i c a l ly by the phone.This hyphenate nu m b e rs as fo l l o sw :
0 0 0 - 0 0 0 - 0 0 0 0
Prepend dialing
The prepend option lets you add digits such as area codes
and netwo rk fe a t u re activation codes (for ex a m p l e ,to temp o ra ri ly cancel call waiting) to a phone number that is
s t o red in your Internal Phone Book or Call Logs.To
p repend existing phone nu m b e rs in the Internal Phone
B o o k :
1 . P ress to display the Main menu .
2 . P ress for Internal Phone Book.
Remember you can access the Internal Phone Book by
Name simply by sliding u p / d ow n .
3 . Find the number that you want to pre p e n d ;
p ress to Find Name or press to Find Entry.
4 . Use the navigation key ( ) to scroll to the
nu m b e r / p e rson you want to prepend and press .
5 . P ress or for more options.
6 . P ress for Pre p e n d .
7 . Enter the prepend digits (area code or fe a t u re activa t i o n
code) by pressing the digit key s .For fe a t u re calls,p re s s
b e fo re dialing the fe a t u re code.
8 . P ress to call the prepended nu m b e r.
To prepend a phone number from your Call Logs:
1 . P ress to display the Main menu .
2 . P ress for Calls.
3 . P re s s :
to prepend a number in the Outgoing Call Log
to prepend a number in the Incoming Call Log
to prepend a number in the Missed Call Log.
Using the navigation key ( ) scroll to the
4 .
nu m
b e r / p e rson you want to prepend and press .
5 . P ress or for more options.
3534
 Loading...