

Page 1

This document is watermarked because certain important information in the document has not yet been verified.
This document has been sent to you as a draft and for informational purposes only.
The document should only be used for internal purposes and may not be distributed outside of the company.
Distributing the document outside of the company could result in legal exposure to the company if the preliminary,
unverified information in the draft turns out to be inaccurate.
DRAFT
FOR INTERNAL USE ONLY
FPO
User Guide
©2013 Sprint. Sprint and the logo are trademarks of Sprint. Other marks are trademarks of their
respective owners.
(Sprint UG template version 12c)
SPT_L520_UG_Eng_ME7_TE_070913_D1
Page 2

DRAFT
FOR INTERNAL USE ONLY
Table of Contents
Get Started ................................................................................................................................ 1
Your Phone at a Glance ...................................................................................................... 1
Set Up Your Phone ............................................................................................................. 2
Activate Your Phone ........................................................................................................... 3
Complete the Setup ............................................................................................................ 4
Set Up Voicemail ................................................................................................................ 5
Sprint Account Information and Help ................................................................................... 6
Sprint Account Passwords ........................................................................................... 6
Manage Your Account ................................................................................................. 6
Sprint Support Services ............................................................................................... 7
Phone Basics ............................................................................................................................. 9
Your Phone’s Layout ........................................................................................................... 9
Key Functions .............................................................................................................. 9
Turn Your Screen On and Off ............................................................................................11
Features ............................................................................................................................12
Motions and Gestures .................................................................................................12
Smart Screen ..............................................................................................................13
Voice Control ..............................................................................................................13
Touchscreen Navigation ....................................................................................................14
Tap .............................................................................................................................14
Touch and Hold ..........................................................................................................14
Swipe or Slide .............................................................................................................15
Drag ...........................................................................................................................15
Flick ............................................................................................................................16
Rotate .........................................................................................................................16
Pinch and Spread .......................................................................................................17
Your Home Screen ............................................................................................................18
Create Shortcuts .........................................................................................................18
Add and Remove Primary Shortcuts ...........................................................................19
Add and Remove Widgets ..........................................................................................20
TOC i
Page 3

DRAFT
FOR INTERNAL USE ONLY
Extended Home Screens ............................................................................................20
Recent Applications ....................................................................................................20
Status Bar ..........................................................................................................................21
Enter Text ..........................................................................................................................22
Text Input Methods .....................................................................................................22
Google Voice Typing ..................................................................................................23
Samsung Keyboard ....................................................................................................24
Swype .........................................................................................................................25
Tips for Editing Text ....................................................................................................26
Phone Calls ..............................................................................................................................27
Make Phone Calls ..............................................................................................................27
Call Using the Keypad ................................................................................................27
Call from Logs ............................................................................................................27
Call from Contacts ......................................................................................................28
Call a Number in a Text Message ...............................................................................28
Call a Number in an Email Message ...........................................................................28
Call Emergency Numbers ...........................................................................................28
Receive Phone Calls ..........................................................................................................29
Answer an Incoming Call ............................................................................................29
Mute the Ringing Sound .............................................................................................29
Reject an Incoming Call ..............................................................................................29
Reject a Call with a Text Message ..............................................................................30
Phone Call Options ............................................................................................................30
Dialing Options ...........................................................................................................30
Caller ID .....................................................................................................................31
Call Waiting ................................................................................................................31
3-Way Calling .............................................................................................................31
Call Forwarding ..........................................................................................................32
In-call Options .............................................................................................................32
Speed Dials ................................................................................................................33
Voicemail ...........................................................................................................................34
Set Up Voicemail ........................................................................................................34
Retrieve Your Voicemail Messages ............................................................................35
TOC ii
Page 4

DRAFT
FOR INTERNAL USE ONLY
Voicemail Notification .................................................................................................35
Visual Voicemail ................................................................................................................36
Logs ...................................................................................................................................36
View Logs ...................................................................................................................36
Logs Options ..............................................................................................................37
Clear Logs ..................................................................................................................37
Contacts....................................................................................................................................38
Get Started With Contacts .................................................................................................38
Access Contacts .........................................................................................................38
Contacts Options ........................................................................................................39
Add a Contact ....................................................................................................................40
Save a Phone Number .......................................................................................................41
Edit a Contact ....................................................................................................................41
Add or Edit Information for a Contact ..........................................................................41
Assign a Picture to a Contact ......................................................................................42
Assign a Ringtone to a Contact...................................................................................42
Join a Contact .............................................................................................................42
Delete a Contact .........................................................................................................43
Add Entries to Your Favorites ............................................................................................43
Create Groups ...................................................................................................................43
Share a Contact .................................................................................................................44
Accounts and Messaging ..........................................................................................................46
Google Account .................................................................................................................46
Create a Google Account ............................................................................................46
Sign In to Your Google Account ..................................................................................47
Access Gmail ..............................................................................................................47
Send a Gmail Message ..............................................................................................47
Read and Reply to Gmail Messages ...........................................................................48
Samsung Account ..............................................................................................................48
Email .................................................................................................................................48
Add an Email Account ................................................................................................49
Add a Microsoft Exchange ActiveSync Account ..........................................................50
Compose and Send Email ..........................................................................................51
TOC iii
Page 5

DRAFT
FOR INTERNAL USE ONLY
Reply or Forward Email ..............................................................................................52
Manage Your Email Inbox ...........................................................................................52
Edit Email Settings ......................................................................................................53
Delete an Email Account.............................................................................................56
Text and Multimedia Messaging.........................................................................................56
Send a Text Message (SMS) ......................................................................................56
Send a Multimedia Message (MMS) ...........................................................................57
Save and Resume a Draft Message ...........................................................................58
New Messages Notification .........................................................................................58
Managing Message Conversations .............................................................................58
Text and MMS Settings ..............................................................................................60
Social Networking Accounts ...............................................................................................62
Flipboard ....................................................................................................................62
Google Messenger .....................................................................................................62
Google+ ......................................................................................................................63
Google Talk ................................................................................................................64
YouTube .....................................................................................................................64
Apps and Entertainment ............................................................................................................65
DivX ...................................................................................................................................65
DivX Legal Information ...............................................................................................65
Locate Your VOD Registration Number ......................................................................65
Register Your DivX Device for VOD Playback of Purchased Movies...........................65
Google Play Store ..............................................................................................................66
Find and Install an App ...............................................................................................66
Create a Google Wallet Account .................................................................................67
Open an Installed App ................................................................................................67
Uninstall an App .........................................................................................................68
Navigation ..........................................................................................................................68
Google Maps ..............................................................................................................68
Google Local ..............................................................................................................68
Google Navigation ......................................................................................................69
TripAdvisor ........................................................................................................................69
TOC iv
Page 6

DRAFT
FOR INTERNAL USE ONLY
Get assistance finding hotels, restaurants, and attractions in any destination. See millions
of reviews, opinions and candid photos from travelers just like you. ...................................69
Samsung Apps ..................................................................................................................69
Music .................................................................................................................................69
FM Radio ....................................................................................................................69
Google Play Music ......................................................................................................69
Music ..........................................................................................................................70
Google Play Movies & TV ..................................................................................................72
Google Play Books ............................................................................................................73
Google Play Magazines .....................................................................................................73
Group Play .........................................................................................................................73
Samsung Link ....................................................................................................................74
Configure Samsung Link Settings ...............................................................................75
Use Samsung Link to Share Media with Another Device ............................................76
Web and Data ...........................................................................................................................77
Wi-Fi ..................................................................................................................................77
Turn Wi-Fi On and Connect to a Wireless Network .....................................................77
Connect to a Different Wi-Fi Network ..........................................................................78
Data Services (Sprint 3G and 4G) ......................................................................................79
Your Data Services User Name ..................................................................................79
Launch the Browser ....................................................................................................79
4G Services .......................................................................................................................80
Virtual Private Networks (VPN) ..........................................................................................80
Prepare Your Phone for VPN Connection ...................................................................80
Add a VPN ..................................................................................................................81
Connect to a VPN .......................................................................................................81
Disconnect from a VPN ..............................................................................................82
Chrome ..............................................................................................................................82
Internet ..............................................................................................................................82
Pictures and Video ....................................................................................................................83
Camera ..............................................................................................................................83
Open the Camera .......................................................................................................83
Take a Pictures ...........................................................................................................84
TOC v
Page 7

DRAFT
FOR INTERNAL USE ONLY
Record Videos ............................................................................................................84
Camera Options .........................................................................................................85
Quick Camera Settings ...............................................................................................86
Advanced Camera Settings ........................................................................................86
Gallery ...............................................................................................................................87
View Photos and Videos .............................................................................................89
Zoom In or Out on a Photo .........................................................................................90
Working with Photos ...................................................................................................91
Share Photos and Videos ...........................................................................................92
Samsung Hub ....................................................................................................................94
Use Samsung Hub ......................................................................................................94
WatchON ...........................................................................................................................96
Story Album .......................................................................................................................97
Video .................................................................................................................................97
Tools and Calendar ................................................................................................................. 100
Calendar .......................................................................................................................... 100
Add an Event to the Calendar ................................................................................... 100
Event Alerts .............................................................................................................. 101
View Events .............................................................................................................. 102
Erase Events ............................................................................................................ 103
Alarm and Timer .............................................................................................................. 104
Calculator ........................................................................................................................ 104
Dropbox ........................................................................................................................... 105
Download the Desktop Application ........................................................................... 105
Accessing Dropbox on Your Device .......................................................................... 105
Manually Uploading a Picture to Dropbox ................................................................. 106
Google Now ..................................................................................................................... 106
Google Settings ............................................................................................................... 106
Help ................................................................................................................................. 106
S Memo ........................................................................................................................... 107
My Files ........................................................................................................................... 109
Voice Services ................................................................................................................. 109
S Translator .............................................................................................................. 109
TOC vi
Page 8

DRAFT
FOR INTERNAL USE ONLY
S Voice ..................................................................................................................... 109
Voice Recorder ......................................................................................................... 110
Voice Search ............................................................................................................ 111
Bluetooth ......................................................................................................................... 111
Turn Bluetooth On or Off........................................................................................... 111
The Bluetooth Settings Menu .................................................................................... 111
Connect a Bluetooth Headset or Car Kit ................................................................... 111
Reconnect a Headset or Car Kit ............................................................................... 112
Disconnect or Unpair from a Bluetooth Device .......................................................... 112
Send Information Using Bluetooth ............................................................................ 113
Receive Information Using Bluetooth ........................................................................ 115
microSD Card .................................................................................................................. 116
Remove a microSD Card .......................................................................................... 116
View microSD Card Memory ..................................................................................... 116
Format a microSD Card ............................................................................................ 116
Unmount a microSD Card ......................................................................................... 117
Transfer Files Between Your Phone and a Computer ...................................................... 117
Update Your Phone ......................................................................................................... 118
Before Updating Your Firmware ................................................................................ 118
Update your Phone ................................................................................................... 119
Sprint Worldwide Wireless Service .......................................................................................... 120
Activate Sprint Worldwide Service on Your Account ........................................................ 120
Your SIM Card ................................................................................................................. 120
Enable Global Roaming Mode ......................................................................................... 121
Make and Receive Worldwide Calls ................................................................................. 122
Sprint Voicemail Service .................................................................................................. 123
Set Up Your Voicemail Access Number .................................................................... 123
Access Your Voicemail ............................................................................................. 123
Voicemail Troubleshooting ........................................................................................ 124
International Data Roaming ............................................................................................. 124
Get Started With Data Services ................................................................................ 124
Access Email and Data Services on GSM/UMTS Networks ...................................... 125
Access Email and Data Services on CDMA Networks .............................................. 125
TOC vii
Page 9

DRAFT
FOR INTERNAL USE ONLY
Status Messages ............................................................................................................. 126
Contact Sprint for Assistance ........................................................................................... 127
Settings ................................................................................................................................... 129
Wi-Fi Settings .................................................................................................................. 129
Turn Wi-Fi On or Off ................................................................................................. 129
Configure Wi-Fi Settings ........................................................................................... 130
Other Wi-Fi Settings ................................................................................................. 130
Wi-Fi Direct ............................................................................................................... 131
Bluetooth ......................................................................................................................... 131
Turn Bluetooth On or Off........................................................................................... 132
Bluetooth Settings..................................................................................................... 132
Data Usage ...................................................................................................................... 133
More Networks Settings ................................................................................................... 134
Airplane Mode .......................................................................................................... 134
Mobile Networks ....................................................................................................... 134
VPN .......................................................................................................................... 135
Roaming ................................................................................................................... 135
NFC ................................................................................................................................. 136
Turn NFC On or Off .................................................................................................. 136
Android Beam ........................................................................................................... 136
S Beam ............................................................................................................................ 136
Turn S Beam On or Off ............................................................................................. 137
Nearby Devices ............................................................................................................... 137
Screen Mirroring .............................................................................................................. 138
Kies via Wi-Fi ................................................................................................................... 138
Lock Screen ..................................................................................................................... 138
Screen Lock.............................................................................................................. 138
Lock Screen Options ................................................................................................ 139
Display ............................................................................................................................. 142
Wallpaper ................................................................................................................. 142
Notification Panel ...................................................................................................... 142
Screen Mode ............................................................................................................ 143
Brightness ................................................................................................................ 143
TOC viii
Page 10

DRAFT
FOR INTERNAL USE ONLY
Auto-rotate Screen .................................................................................................... 143
Screen Timeout ........................................................................................................ 143
Daydream ................................................................................................................. 143
Font Style ................................................................................................................. 144
Font Size .................................................................................................................. 144
Touch Key Light Duration ......................................................................................... 145
Show Battery Percentage ......................................................................................... 145
Edit After Screen Capture ......................................................................................... 145
Auto Adjust Screen Tone .......................................................................................... 145
LED Indicator ................................................................................................................... 146
Sound .............................................................................................................................. 146
Volume ..................................................................................................................... 146
Ringtones ................................................................................................................. 147
Vibrations ................................................................................................................. 147
Notifications .............................................................................................................. 147
Vibrate When Ringing ............................................................................................... 148
Dialing Keypad Tone ................................................................................................ 148
Touch Sounds .......................................................................................................... 148
Screen Lock Sound .................................................................................................. 148
Emergency Tone ...................................................................................................... 149
Adapt Sound ............................................................................................................. 149
Home Screen Mode ......................................................................................................... 149
Call Settings .................................................................................................................... 150
Set Up Call Rejection Messages ............................................................................... 150
Answering/Ending Calls ............................................................................................ 150
Turn Off Screen During Calls .................................................................................... 150
Call Alerts ................................................................................................................. 150
Call Accessories ....................................................................................................... 151
Ringtones And Keypad Tones .................................................................................. 152
Personalize Call Sound ............................................................................................ 152
Noise Reduction ....................................................................................................... 153
Increase Volume In Pocket ....................................................................................... 153
Us Dialing ................................................................................................................. 153
TOC ix
Page 11

DRAFT
FOR INTERNAL USE ONLY
International Dialing .................................................................................................. 153
TTY Mode ................................................................................................................. 154
DTMF Tones ............................................................................................................. 154
Voicemail Settings .................................................................................................... 154
Voice Privacy ............................................................................................................ 154
Blocking Mode ................................................................................................................. 155
Power Saving Mode ......................................................................................................... 156
Accessory ........................................................................................................................ 156
Accessibility ..................................................................................................................... 157
Language and Input ......................................................................................................... 159
Choose a Default Language ..................................................................................... 159
Set a Default Input Method ....................................................................................... 159
Google Voice Typing Settings ................................................................................... 159
Samsung Keyboard Settings .................................................................................... 160
Swype Settings ......................................................................................................... 161
Voice Search Settings .............................................................................................. 162
Text-To-Speech Options ........................................................................................... 163
Pointer Speed ........................................................................................................... 163
Motions and Gestures ...................................................................................................... 163
Smart Screen ................................................................................................................... 164
Smart Stay ................................................................................................................ 164
Voice Control ................................................................................................................... 165
Accounts .......................................................................................................................... 165
Add an Account ........................................................................................................ 165
Backup Options ........................................................................................................ 166
Location Services ............................................................................................................ 166
Security ............................................................................................................................ 167
Encryption ................................................................................................................ 168
Passwords ................................................................................................................ 168
Device Administration ............................................................................................... 168
Credential Storage .................................................................................................... 169
Application Manager ........................................................................................................ 169
Battery ............................................................................................................................. 169
TOC x
Page 12

DRAFT
FOR INTERNAL USE ONLY
Storage ............................................................................................................................ 170
Date and Time ................................................................................................................. 170
Activate This Device ........................................................................................................ 171
System Update ................................................................................................................ 171
About Device ................................................................................................................... 171
Index ....................................................................................................................................... 173
TOC xi
Page 13
DRAFT
FOR INTERNAL USE ONLY
Get Started
The following topics give you all the information you need to set up your phone and Sprint
service the first time.
Your Phone at a Glance
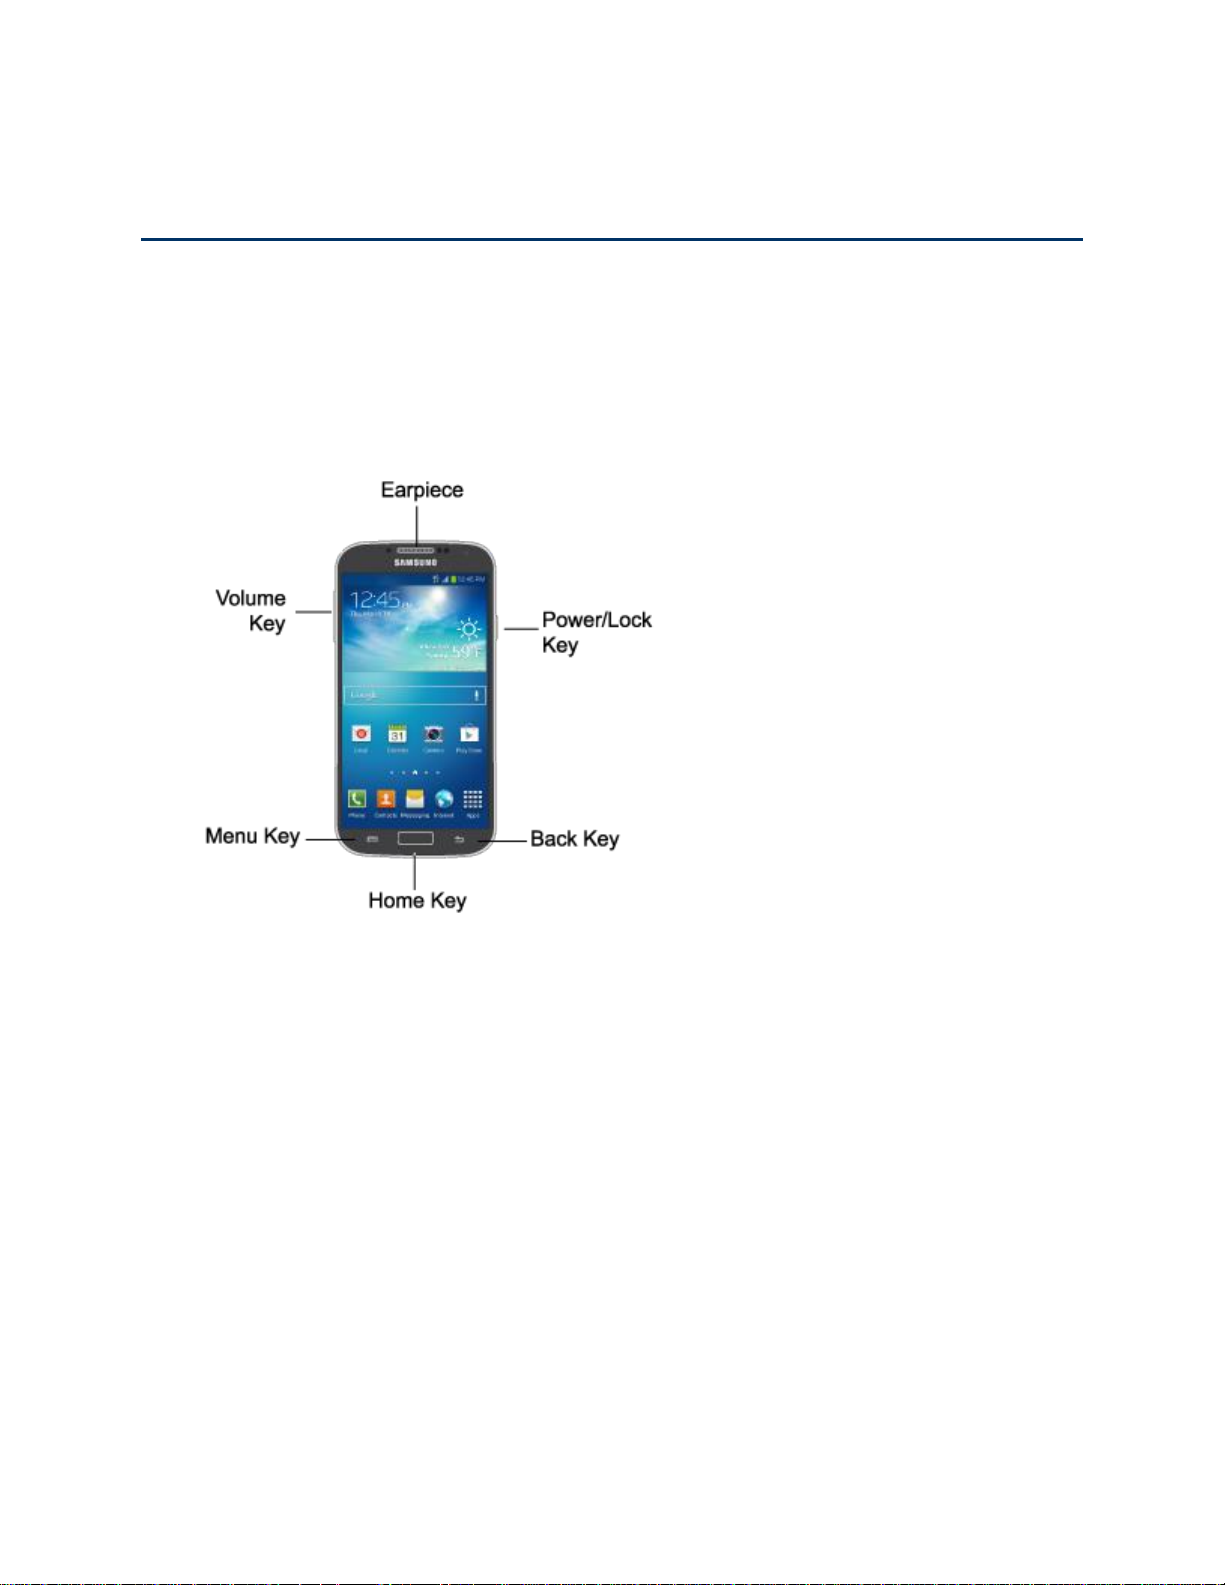
The following illustration outlines your phone’s primary features.
Get Started 1
Page 14
DRAFT
FOR INTERNAL USE ONLY
Set Up Your Phone
You must first install and charge the battery to begin setting up your phone.
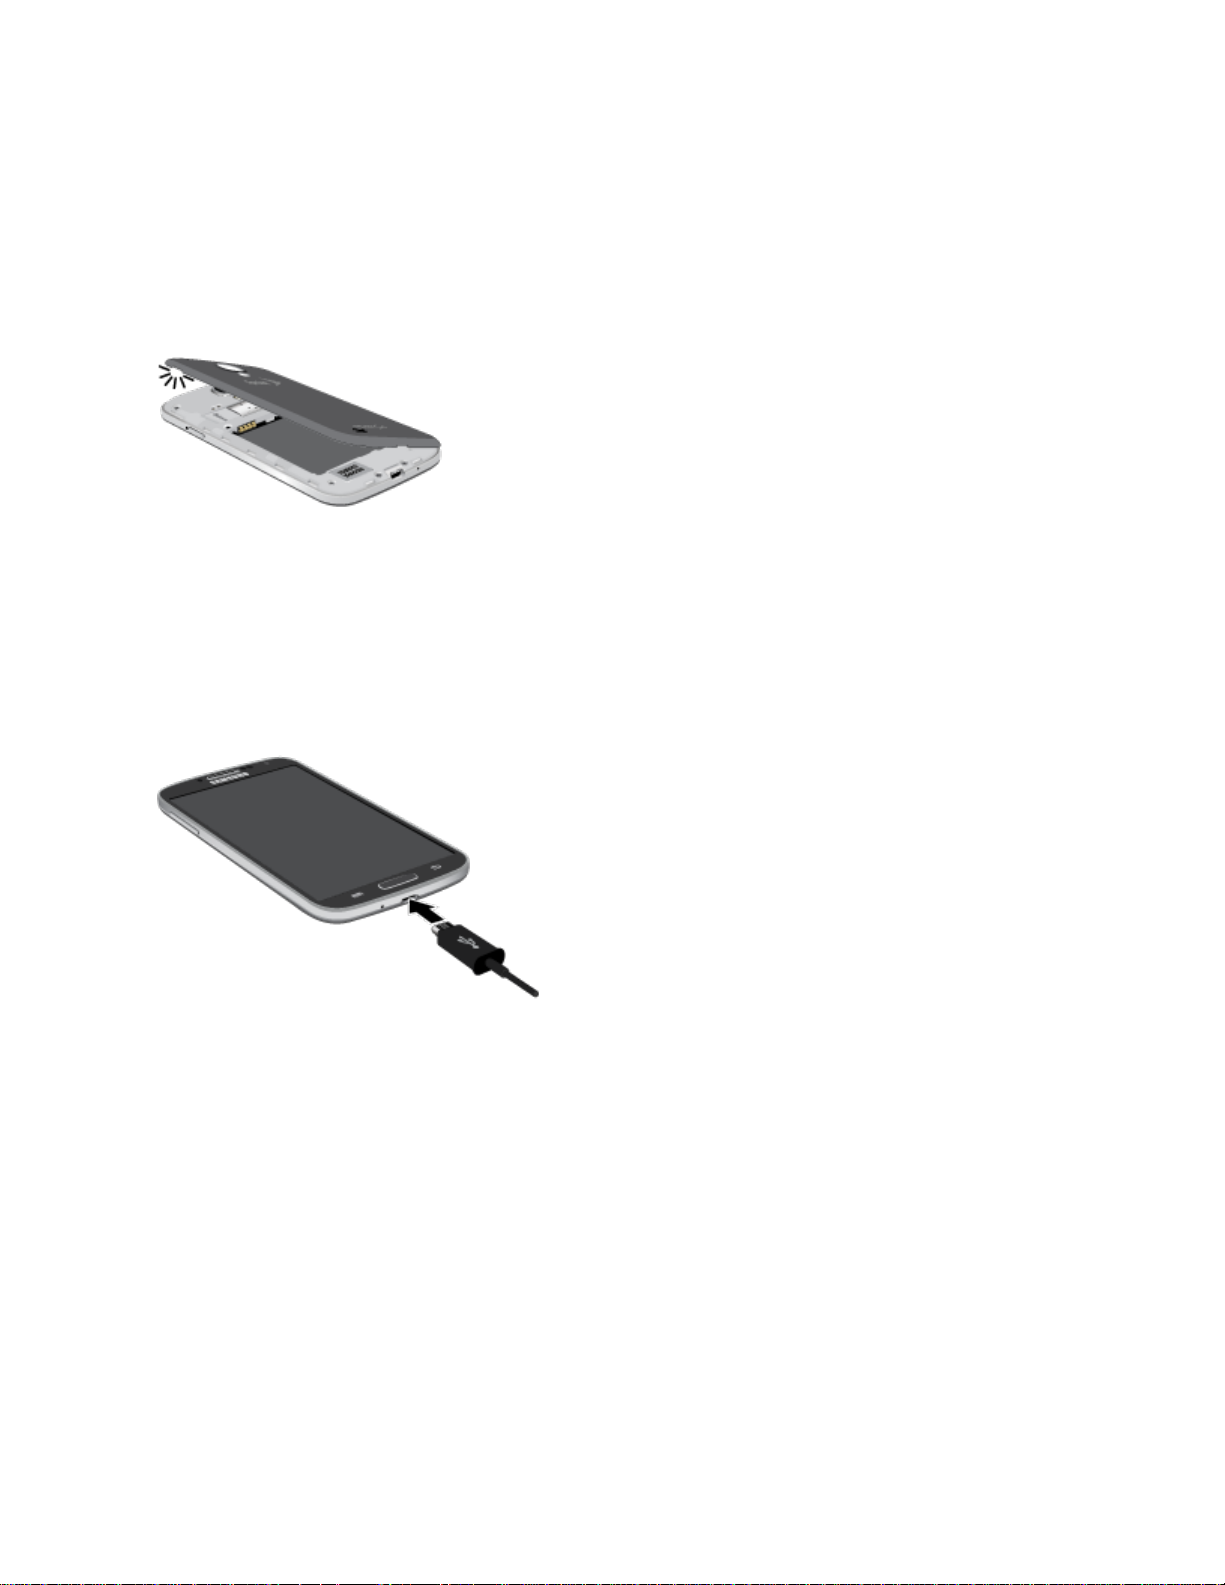
1. Install the battery.
Using the slot provided, gently lift the cover off the phone.
Insert the battery, aligning the gold contacts on the battery with the gold contacts on
the phone, and gently press the battery into place.
Replace the battery compartment cover, making sure all the tabs are secure and
there are no gaps around the cover.
2. Plug the USB cable into the Charger/Accessory Jack on the bottom of the phone.
3. Plug the other end of the USB cable into the Charging Head, and then plug the Charging
Head into an electrical outlet to charge your battery. Fully charging a battery may take
up to three hours.
Note: Your phone’s battery should have enough charge to turn the phone on and find a signal,
run the setup application, set up voicemail, and make a call. You should fully charge the
battery as soon as possible.
4. Press and hold the Power/Lock Key to turn the phone on.
If your phone is activated, it will turn on, search for Sprint service, and begin the
setup application.
If your phone is not yet activated, see Activate Your Phone for more information.
Get Started 2
Page 15

DRAFT
FOR INTERNAL USE ONLY
Activate Your Phone
Depending on your account or how and where you purchased your phone, it may be ready to
use or you may need to activate it on your Sprint account.
● If you purchased your phone at a Sprint Store, it is probably activated and ready to use.
● If you received your phone in the mail and it is for a new Sprint account or a new line of
service, it is designed to activate automatically.
When you turn the phone on for the first time, you should see a Hands Free
Activation screen, which may be followed by a PRL Update screen and a Firmware
Update screen. Follow the onscreen instructions to continue.
● If you received your phone in the mail and you are activating a new phone for an existing
number on your account (you’re swapping phones), you can activate on your computer
online or directly on your phone.
Activate on your computer:
• Go to sprint.com/activate and complete the online instructions to activate your
phone.
Activate on your phone:
• Turn on your new phone. (Make sure the old one is turned off.) Your phone will
automatically attempt Hands-Free Activation.
• Follow the onscreen prompts to complete the activation process.
● To confirm activation, make a phone call. If your phone is still not activated or you do not
have access to the Internet, contact Sprint Customer Service at 1-888-211-4727 for
assistance.
Tip: Do not press the Power/Lock Key while the phone is being activated. Pressing the
Power/Lock Key cancels the activation process.
Note: If you are having any difficulty with activation, contact Sprint Customer Service by calling
1-888-211-4727 from any other phone.
Get Started 3
Page 16

DRAFT
FOR INTERNAL USE ONLY
Complete the Setup
After you turn on your phone and activate it, your phone displays a Welcome screen. From the
Welcome screen follow the prompts to set up features and preferences on your phone.
Note: In some cases, you may be able to complete the setup process before your phone has
been activated on your Sprint account.
During setup and activation, you may see Sprint Connections Optimizer notice. Read the
notice and tap I Agree to use Sprint Connections Optimizer, or tap Settings and
uncheck option if you do not wish to use the Sprint Connections Optimizer.
1. At the Welcome screen, follow the onscreen instructions to complete setup for each
topic. Tap Next, or the right arrow, to move through the steps. You can skip topics to
continue to the next one.
Language: Choose the default language for your phone’s operation, and then tap
Next.
Wi-Fi: By default, your phone prompts you to use Wi-Fi when accessing data
services. Tap a Wi-Fi access point, or tap Next to continue setup using your phone’s
connection to the network.
Date and time: By default, your phone uses the date and time provided by the
wireless network. Configure options, or tap Next to use the defaults and continue.
Samsung account: Your Samsung account is used with some apps and features.
Tap Sign in to sign in to your Samsung account, or tap Create new account to sign
up for a new Samsung account.
Got Google?: Complete the steps to sign in to your current Google account, or sign
up for a new Google account right from your phone.
• Yes: Enter your Gmail address and password and tap the right arrow to sign in to
your current Google account.
• No: Tap Get an account, and then follow the instructions to sign up for a new
Google account, or tap Not now to continue without setting up a Google account
on your phone. You can always set up a Google account later. Tap the right
arrow to move to the next screen.
Google & location: Select Google location options, and then tap the right arrow to
continue.
This phone belongs to: Enter your First and Last name, and then tap the right
arrow to continue.
Get Started 4
Page 17

DRAFT
FOR INTERNAL USE ONLY
Dropbox: Dropbox allows you to save your photos and videos to associated
computers and to a Web-based storage area. Tap Create a new Dropbox account
or I already have an account, or tap Next to skip the step and continue.
Learn about key features: Tap features to view details, and tap the ON/OFF switch
to turn the feature On or Off.
Device name: Your device name is how you and other devices identify your device,
such as when sharing via Bluetooth or Wi-Fi Direct. If you want to use a different
name, tap the field and enter a name.
2. Tap Finish to complete setup. Follow the onscreen instructions to learn about basic
touch/tap navigation.
Set Up Voicemail
Your phone automatically transfers all unanswered calls to voicemail, even if your phone is in
use or turned off. You should set up your Sprint Voicemail and personal greeting as soon as
your phone is activated. Always use a password to protect against unauthorized access.
1. Press Home
If your screen is locked, press the Power/Lock Key to turn on the display and then
swipe your screen in any direction. See Turn Your Screen On and Off.
2. Touch and hold
3. Follow the system prompts to:
Create your password.
Record your name announcement.
Record your greeting.
Note: Voicemail Password – Sprint strongly recommends that you create a password when
setting up your voicemail to protect against unauthorized access. Without a password,
anyone who has access to your phone is able to access your voicemail messages.
and tap Phone.
to dial your voicemail number.
Get Started 5
Page 18

DRAFT
FOR INTERNAL USE ONLY
Sprint Account Information and Help
Find out about account passwords and information about managing your account and finding
help.
Sprint Account Passwords
As a Sprint customer, you enjoy unlimited access to your personal account information, your
voicemail account, and your data services account. To ensure that no one else has access to
your information, you will need to create passwords to protect your privacy.
Account User Name and Password
If you are the account owner, you will create an account user name and password when you
sign on to sprint.com. (Click Sign in/Sign up and then click Sign up now! to get started.) If you
are not the account owner (if someone else receives the bill for your Sprint service), you can get
a sub-account password at sprint.com.
Voicemail Password
You’ll create your voicemail password when you set up your voicemail. See Set Up Voicemail
for more information on your voicemail password.
Data Services Password
With your Sprint phone, you may elect to set up an optional data services password to control
access and authorize Premium Service purchases.
For more information, or to change your passwords, sign on to sprint.com or call Sprint
Customer Service at 1-888-211-4727.
Manage Your Account
Manage your Sprint account from your computer, your Sprint phone, or any other phone.
Online: sprint.com
● Access your account information.
● Check your minutes used (depending on your Sprint service plan).
● View and pay your bill.
● Enroll in Sprint online billing and automatic payment.
● Purchase accessories.
● Shop for the latest Sprint phones.
Get Started 6
Page 19
DRAFT
FOR INTERNAL USE ONLY
● View available Sprint service plans and options.
● Learn more about data services and other products like games, ring tones, screen
savers, and more.
From Your Sprint Phone
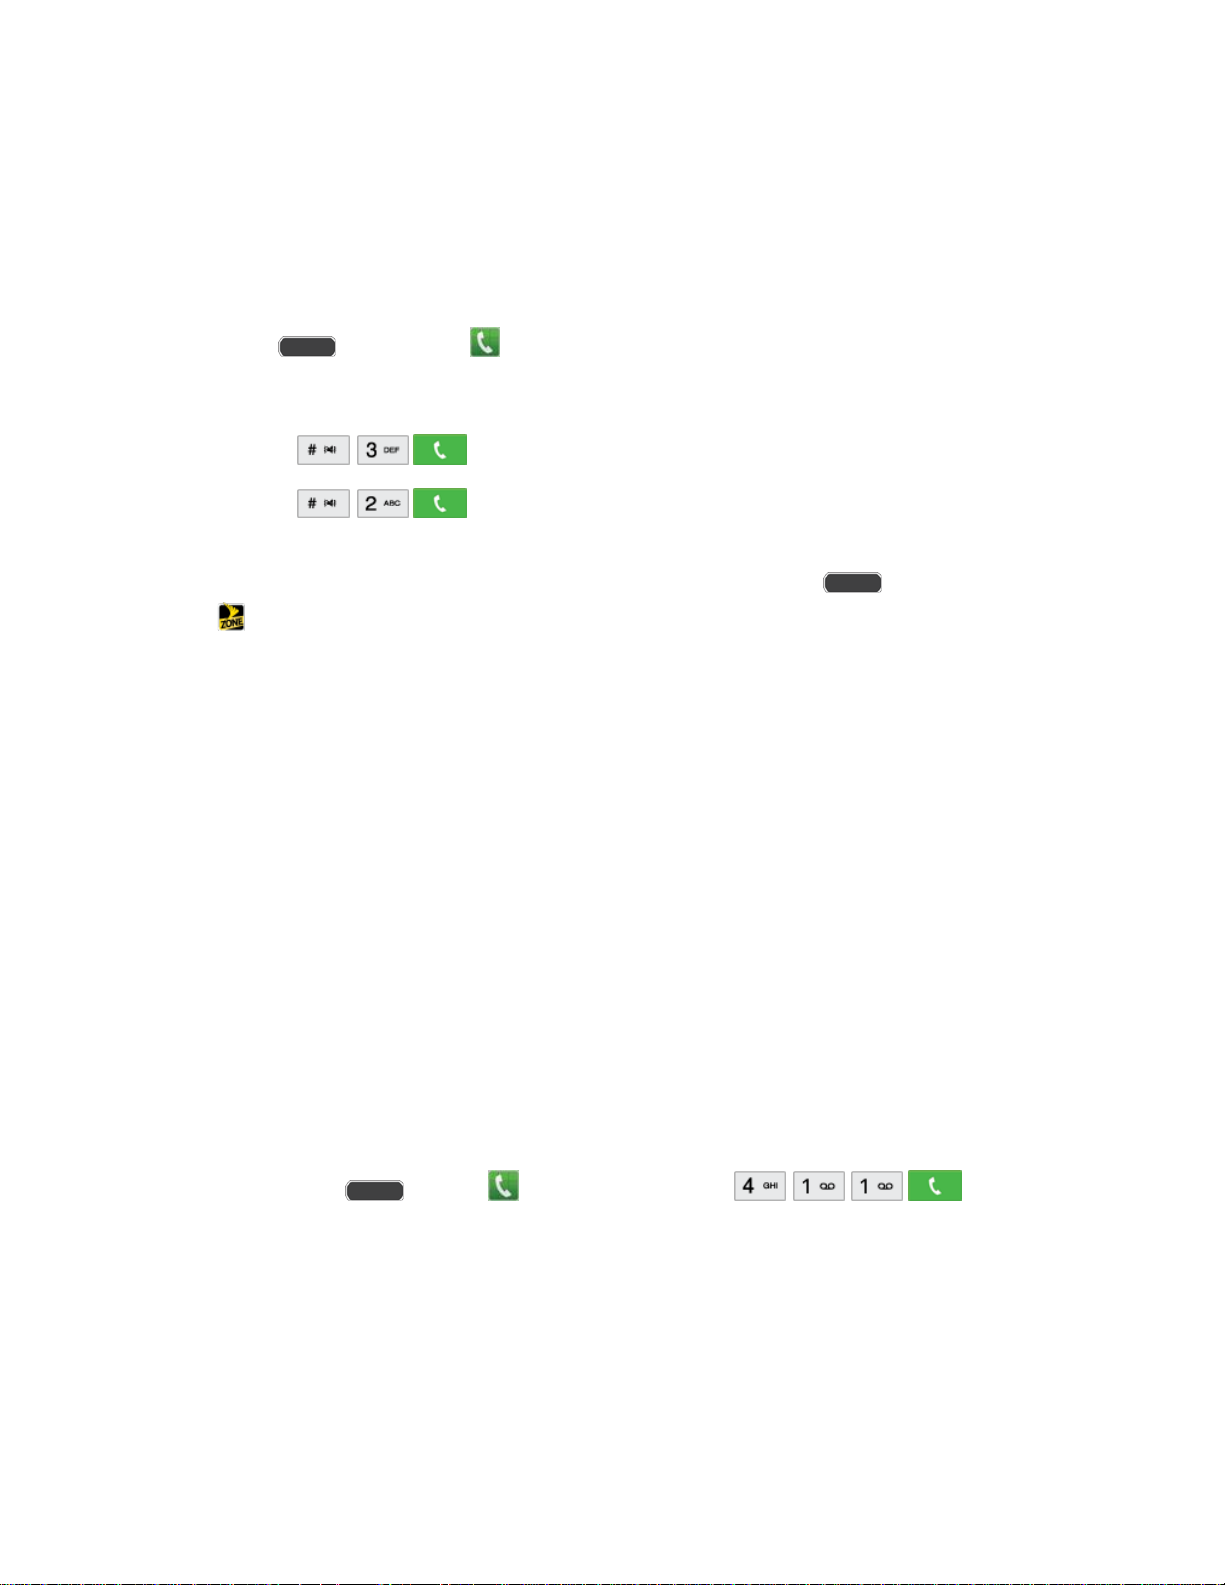
1. Press and then tap Phone.
2. Do any of the following:
Tap
Tap
plan or to get answers to other questions.
Note: You can also access Sprint Zone app from your device. Press and then tap
Sprint Zone.
From Any Other Phone
● Sprint Customer Service: 1-888-211-4727.
● Business Customer Service: 1-888-788-4727.
to make a payment.
to access Sprint Zone and a summary of your Sprint service
Sprint Support Services
Sprint 411 and Sprint Operator Services let you easily access information and calling assistance
from your Sprint phone.
Sprint 411
Sprint 411 gives you access to a variety of services and information, including residential,
business, and government listings; movie listings or show times; driving directions, restaurant
reservations, and major local event information. You can get up to three pieces of information
per call, and the operator can automatically connect your call at no additional charge.
There is a per-call charge to use Sprint 411, and you will be billed for airtime.
► Press Home
Get Started 7
and tap Phone, and then tap .
Page 20

DRAFT
FOR INTERNAL USE ONLY
Sprint Operator Services
Sprint Operator Services provides assistance when you place collect calls or when you place
calls billed to a local telephone calling card or third party.
► Press Home
For more information or to see the latest in products and services, visit us online at
sprint.com.
and tap Phone, and then tap .
Get Started 8
Page 21
DRAFT
FOR INTERNAL USE ONLY
Phone Basics
Your phone is packed with features that simplify your life and expand your ability to stay
connected to the people and information that are important to you. The following topics will
introduce the basic functions and features of your phone.
Your Phone’s Layout
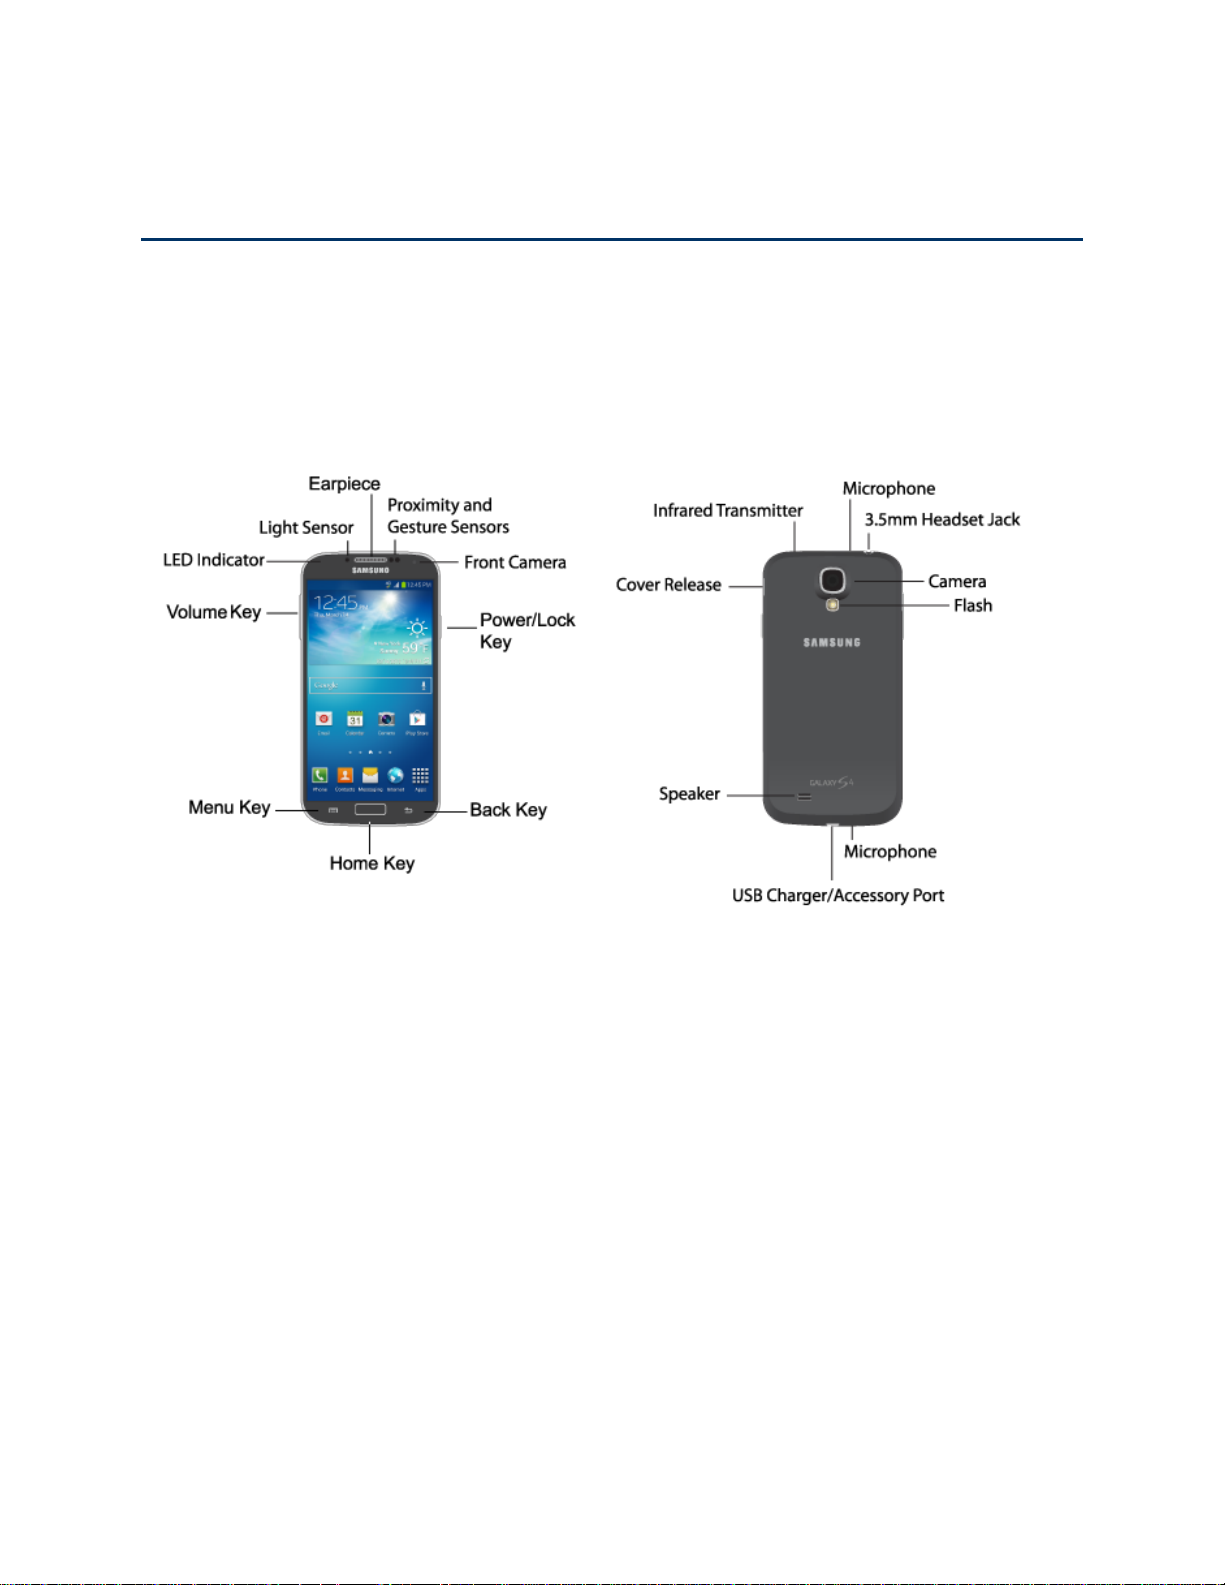
This illustration outlines your phone’s basic layout.
Key Functions
The following list defines the features listed in the above illustrations.
● LED indicator displays red when charging, green when fully charged, blue when
powering up, and orange when a notification has arrived.
● Light Sensor detects the ambient light level, such as when setting screen brightness
when Automatic brightness is enabled, and when using the Camera.
● Earpiece lets you hear the caller and automated prompts during calls.
● Proximity and Gesture Sensors detect the presence of objects near the phone, such
as when using motion settings. For example, while talking on the phone the sensor
detects when it’s near your ear and turns off the screen to prevent accidental key
presses.
● Front Camera allows you to take pictures and videos of yourself.
Phone Basics 9
Page 22

DRAFT
FOR INTERNAL USE ONLY
● Power/Lock Key lets you turn the phone on or off, turn the screen on or off, or lock the
screen. Press and hold for a Device options menu, where you can turn the phone off or
restart it, or for easy access to Airplane mode, and to Mute, Vibrate, and Sound modes.
● Back Key lets you return to the previous screen, or close a dialog box, options menu,
the Notifications panel, or onscreen keyboard.
● Home Key returns you to the Home screen. Press and hold to open the recently used
applications window, and access Task Manager and Google Search.
● Menu Key allows you to access a menu from most of your phone’s screens.
● Volume Key adjusts the volume of your phone’s sounds. From the Home screen, press
to adjust master volume. During calls or playback, press to adjust volume. Press to mute
the ringtone of an incoming call.
● Cover Release allows you to lift the cover from the back of your phone.
● Infrared Transmitter allows you to control other devices, such as a TV, in conjunction
with apps like WatchON.
● Camera lets you take pictures and record videos.
● Flash helps illuminate subjects in low-light environments when the camera is focusing
and capturing a photo or video.
● Microphones allow other callers to hear you when you are using the speakerphone, and
captures sound during recording.
● 3.5 mm Headset Jack allows you to plug in either a stereo headset or an optional
headset for convenient, hands-free conversations.
● Speaker plays ringtones and sounds. The speaker also lets you hear the caller’s voice
in speakerphone mode.
● USB Charger/Accessory Port allows you to connect the phone charger/USB cable
(included) and other optional accessories (not included).
CAUTION! Inserting an accessory into the incorrect jack may damage the phone.
Phone Basics 10
Page 23

DRAFT
FOR INTERNAL USE ONLY
Turn Your Phone On and Off
Use the Power/Lock Key to turn the phone On or Off.
Turn Your Phone On or Off
► Press and hold the Power/Lock Key.
The screen remains blank while your phone is off. If the phone is off during charging, the screen
displays a charging animation.
Turn Your Screen On and Off
Your phone allows you to quickly turn the screen off when not in use and to turn it back on and
unlock it when you need it.
Turn the Screen Off When Not in Use
► To quickly turn the screen off, press the Power/Lock Key. Pressing the Power/Lock
Key again will turn on the screen and display the lock screen.
To save battery power, the phone automatically turns off the screen (times out) after a certain
period of time when you leave it idle. You will still be able to receive messages and calls while
the phone’s screen is off.
Note: For information on how to adjust the time before the screen turns off, see Screen
Timeout.
Turn the Screen On and Unlock It
1. To turn the screen on, press the Power/Lock Key.
2. Unlock the screen:
If you are using the default screen lock, swipe the screen in any direction to unlock it.
If you have set up a screen lock, use your screen lock. See Screen lock.
Phone Basics 11
Page 24

DRAFT
FOR INTERNAL USE ONLY
Features
Your phone offers new features for using gestures to interact with your phone.
Motions and Gestures
Interact with your phone using motions of the phone itself, or with gestures you make with your
hands.
Motion
Control your phone with natural movements, like putting the device to your ear to call a contact
displayed on the screen.
Motions include:
● Direct call: When On, you can lift the device to your ear while viewing a contact to call
the contact.
● Smart alert: When On, you can lift the phone to receive notifications of missed calls and
notifications that occurred while the device was stationary.
● Zoom: When On, you can tilt the phone to zoom in or out when viewing pictures in
Gallery.
● Move an icon: When On, you can move the phone left or right while touching an icon to
reposition it to another page.
● Browse an image: When On, you can move the phone in a side-to-side motion to pan
from side to side while viewing an image.
● Mute/pause: When On, you can mute incoming calls and pause playback by turning the
phone screen-side down.
● Palm motion: When On, you can control your device by touching the screen with the
palm of your hand.
• Mute/pause: When On, you can mute incoming calls and pause playback by
covering the screen with your hand.
To enable Motion gestures:
► Press and tap > Settings > My Device > Motions and gestures > Motion.
For more information, see Motions and Gestures.
Phone Basics 12
Page 25

DRAFT
FOR INTERNAL USE ONLY
Smart Screen
Smart screen features allow you to have your phone automatically detect when you are looking
at the screen.
Smart screen features include:
● Smart stay: The screen will not time out as long as you are looking at it.
Smart screen uses the front camera to detect when you are facing the screen. Some factors
that may affect the ability of the front camera to detect your face are:
● When the phone is not docked or held upright, for example when placed on a table.
● When the front camera cannot detect your face and eyes.
● When the front camera is being used for the current application.
● When the source of light is behind you, or when using the phone in the dark.
Configure Smart Screen
Enable Smart screen features, and learn about using them.
► Press and tap > Settings > My Device > Smart screen.
Voice Control
Use spoken commands to control and interact with your phone, such as:
● Incoming calls: When enabled, you can answer or reject calls with the voice commands
“Answer” and “Reject”. When you answer a call with the voice command, the Speaker
will automatically be turned on for hands-free talking.
● Alarm: When enabled, you can stop or snooze alarms with the voice commands “Stop”
and “Snooze”.
● Camera: When enabled, you can take pictures with the voice commands “Smile”,
“Cheese”, “Capture” and “Shoot”.
● Music: When enabled, you can control the music player with the voice commands
“Next”, “Previous”, “Pause”, “Play”, “Volume Up”, and “Volume Down”.
Configure Voice Control
Enable Voice control features, and learn about using them.
► Press and tap > Settings > My Device > Voice control.
Phone Basics 13
Page 26
DRAFT
FOR INTERNAL USE ONLY
Touchscreen Navigation
Your phone’s touchscreen lets you control actions through a variety of touch gestures.
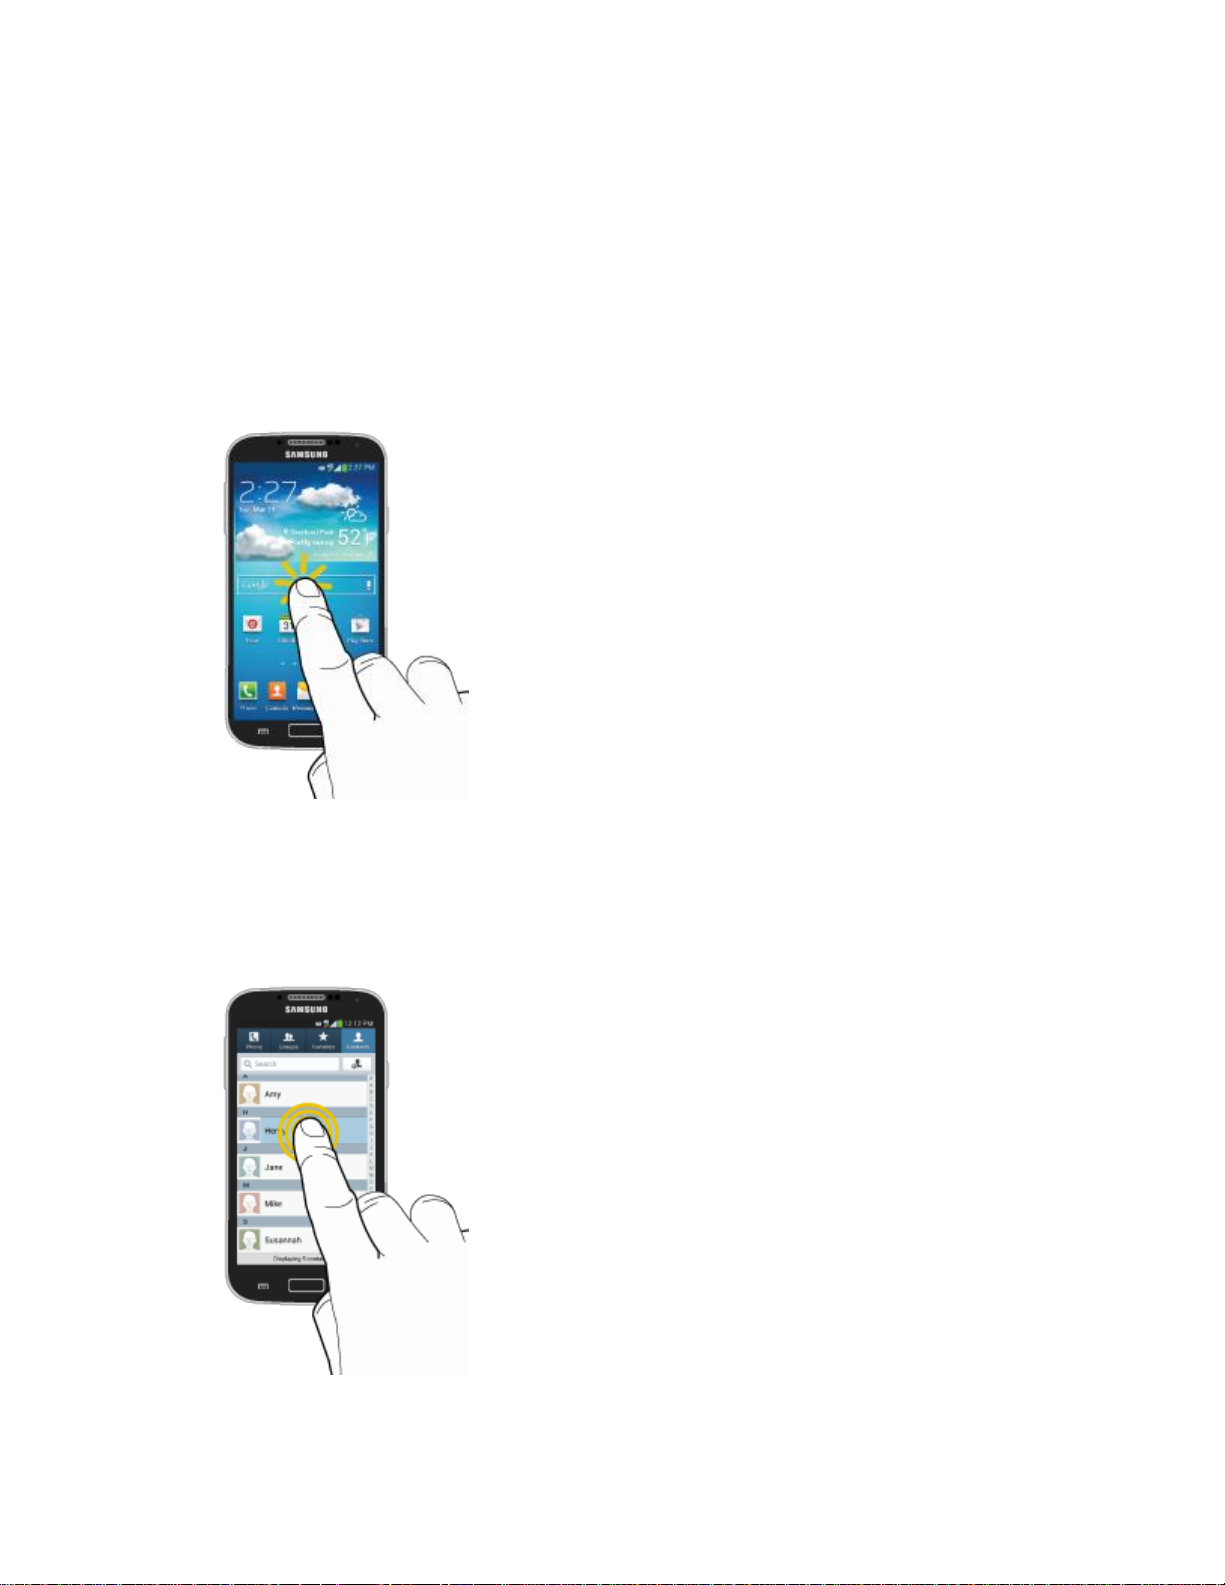
Tap
When you want to type using the onscreen keyboard, select items onscreen such as application
and settings icons, or press onscreen buttons, simply tap them with your finger.
Touch and Hold
To open the available options for an item (for example, a contact or link in a Web page), touch
and hold the item.
Phone Basics 14
Page 27
DRAFT
FOR INTERNAL USE ONLY
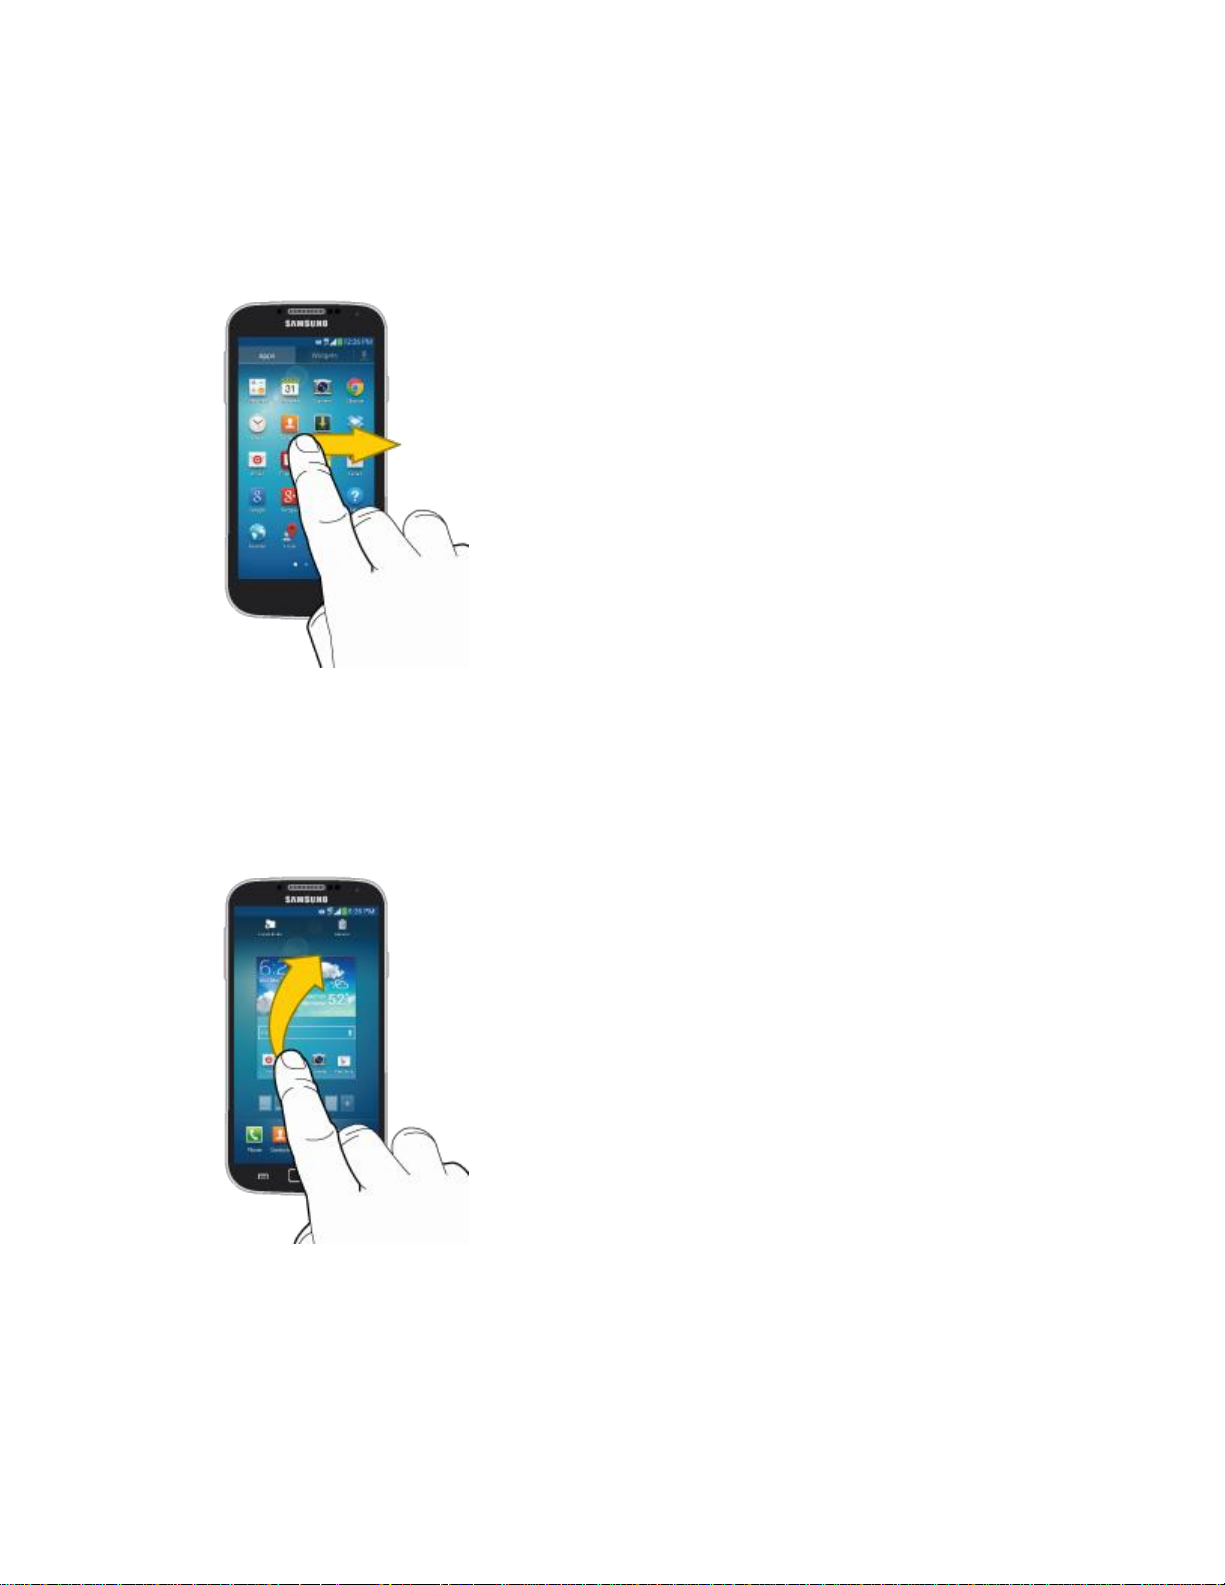
Swipe or Slide
To swipe or slide means to quickly drag your finger vertically or horizontally across the screen.
Drag
To drag, touch and hold your finger with some pressure before you start to move your finger.
While dragging, do not release your finger until you have reached the target position.
Phone Basics 15
Page 28
DRAFT
FOR INTERNAL USE ONLY
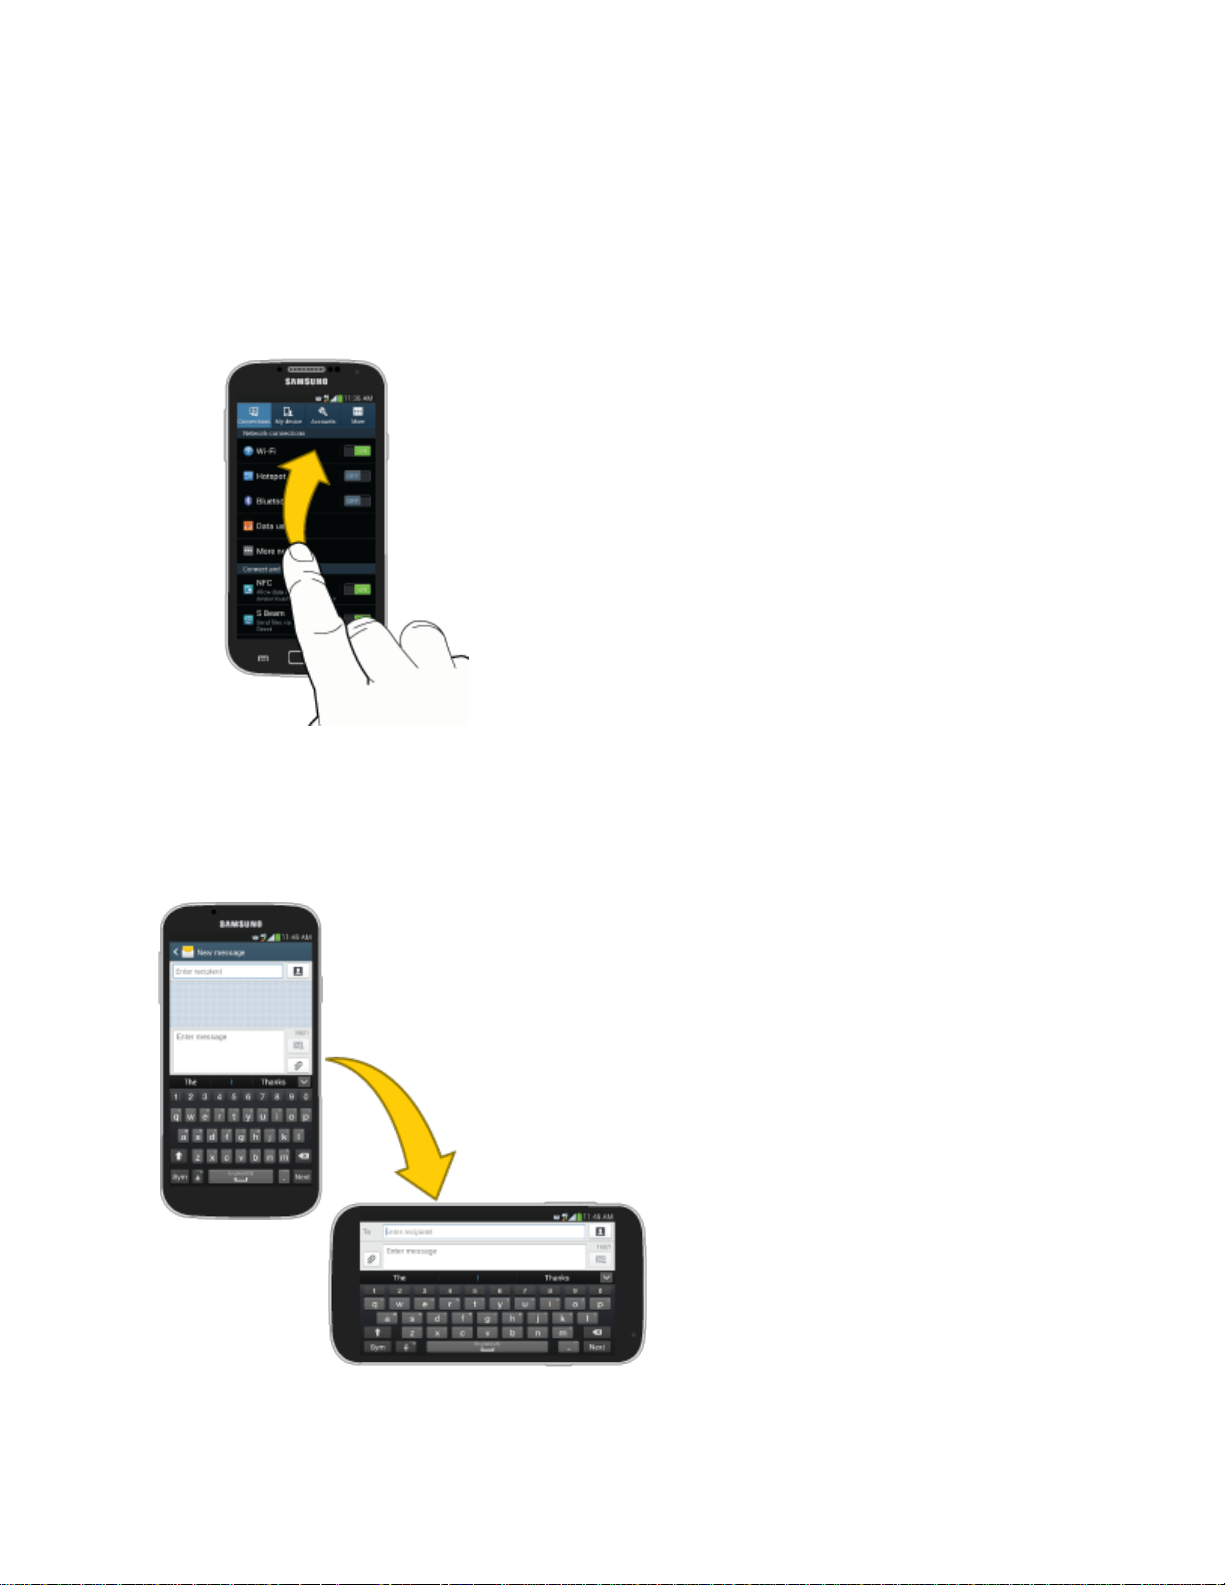
Flick
Flicking the screen is similar to swiping, except that you need to swipe your finger in light, quick
strokes. This finger gesture is always in a vertical direction, such as when flicking the contacts
or message list.
Rotate
For most screens, you can automatically change the screen orientation from portrait to
landscape by turning the phone sideways. When entering text, you can turn the phone sideways
to bring up a bigger keyboard.
Phone Basics 16
Page 29
DRAFT
FOR INTERNAL USE ONLY
Note: You can control screen rotation with the Auto-rotate screen setting. To make this
selection, press and then tap > Settings > My Device > Display > Auto-
rotate screen. See Auto-rotate screen for more information.
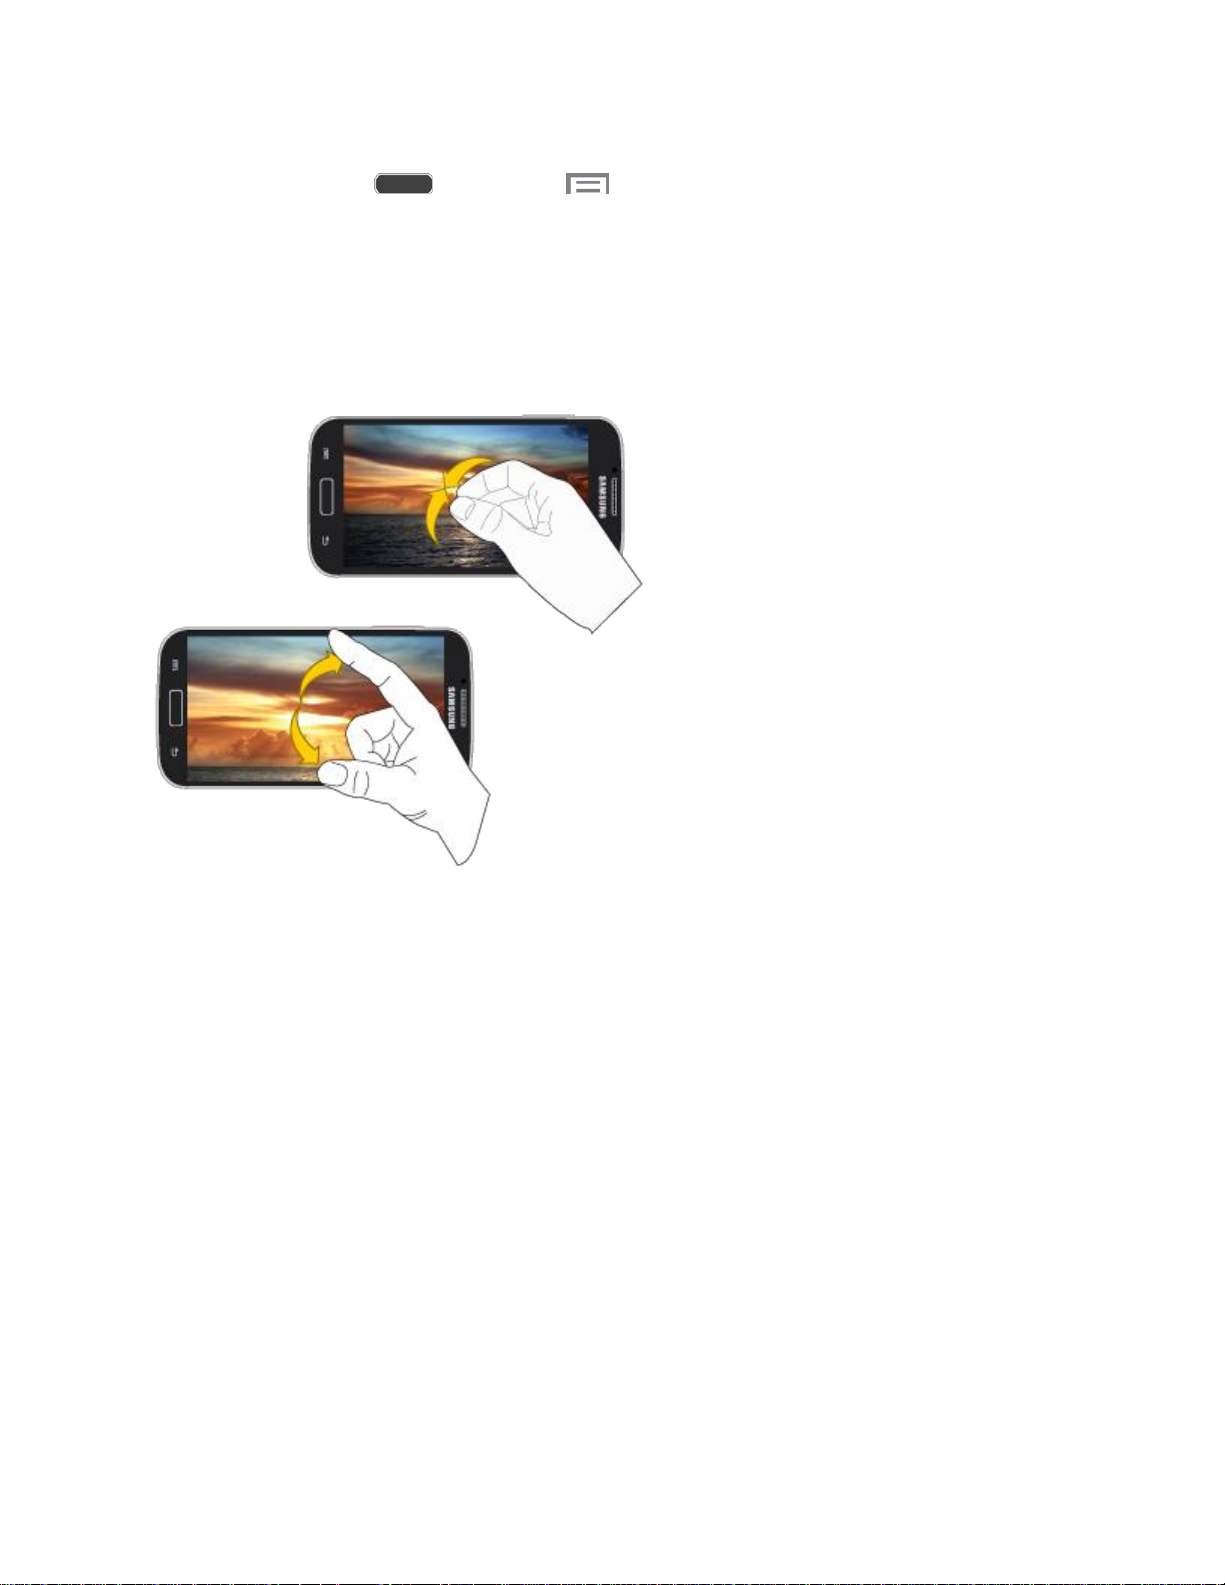
Pinch and Spread
“Pinch” the screen using your thumb and forefinger to zoom out or “spread” the screen to zoom
in when viewing a picture or a Web page. (Move fingers inward to zoom out and outward to
zoom in.)
Tip: Pinching any Home screen will let you see thumbnails of all seven Home screens. Tap a
thumbnail to go straight to another Home screen.
Phone Basics 17
Page 30
DRAFT
FOR INTERNAL USE ONLY
Your Home Screen
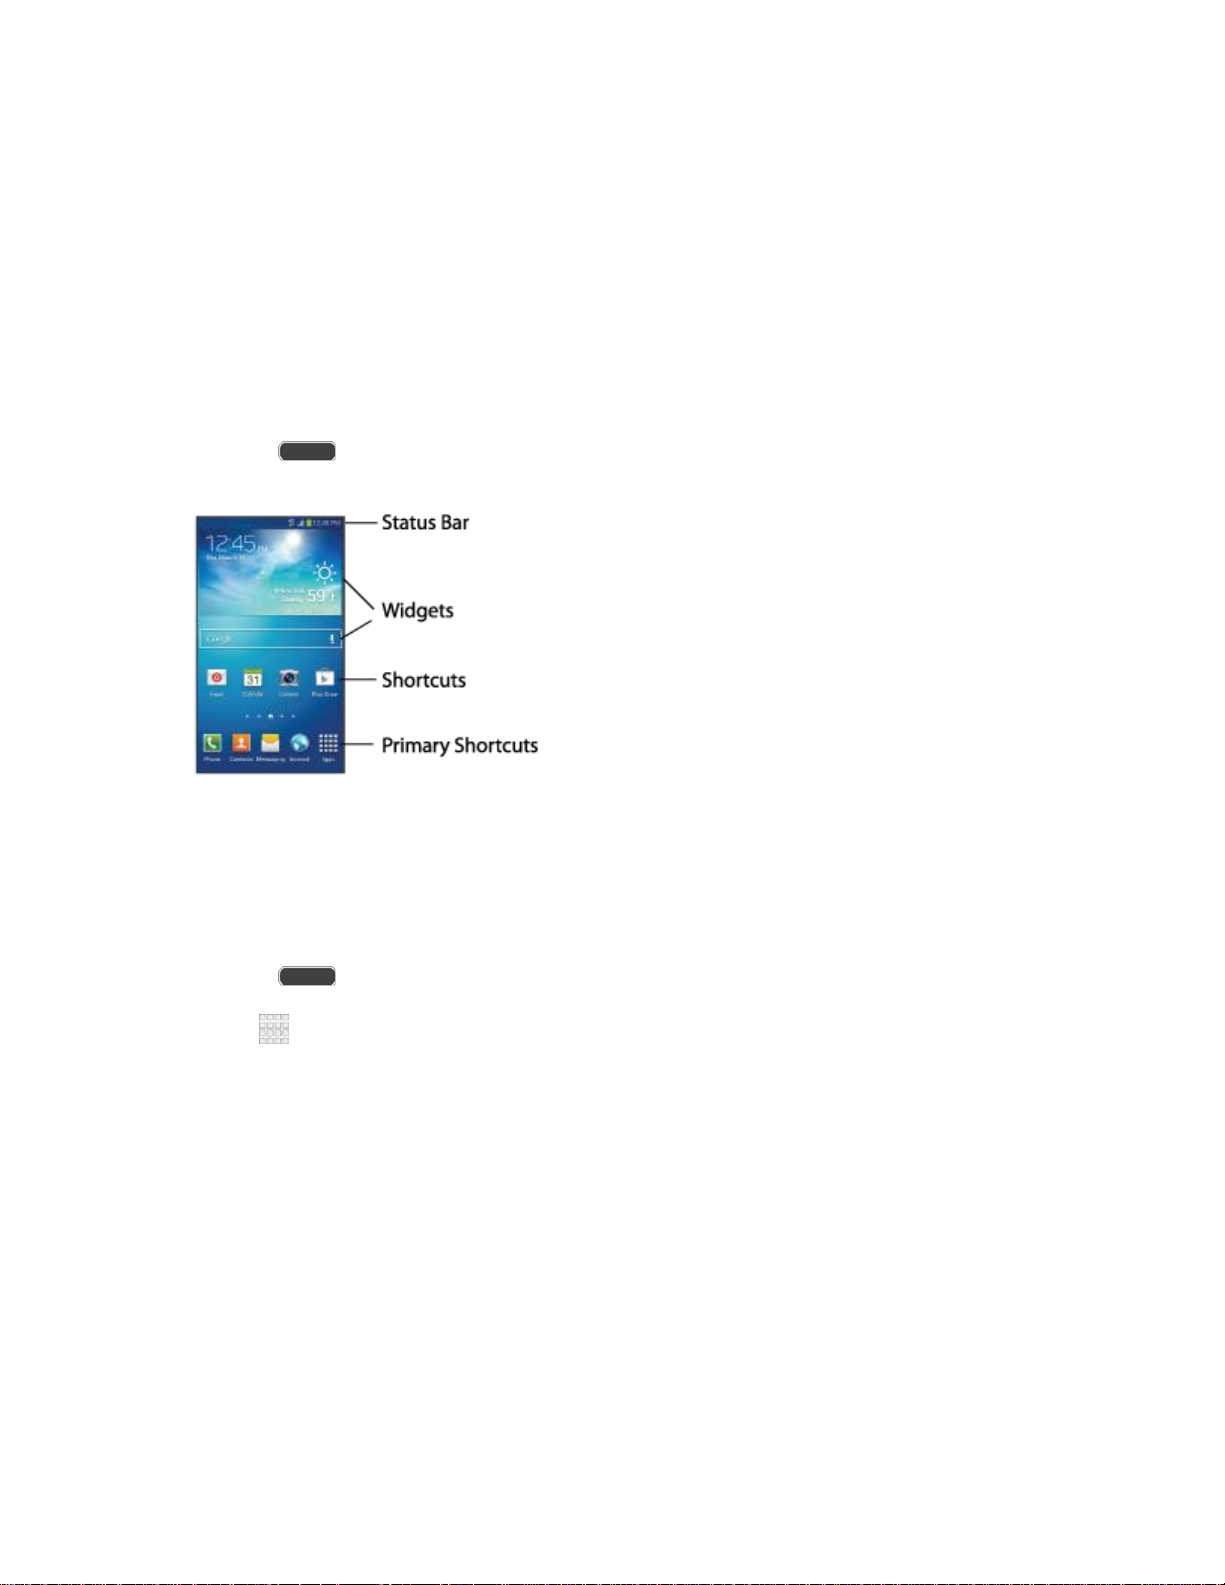
The home screen is the starting point for your phone’s applications, functions, and menus. You
can customize your home screen by adding application icons, shortcuts, folders, widgets, and
more. Your home screen extends beyond the initial screen. Swipe the screen left or right to
display additional screens.
Note: You can keep swiping in one direction to move through all the home screens, back to the
home screen. The small circles toward the bottom of the screen let you know your
current screen position.
Tip: Press to return to the main Home screen from any other screen.
Create Shortcuts
Learn how to add, move, or remove items from the home screen.
Add Shortcuts from the Applications Menu
1. Press to display the main Home screen, and then navigate to the desired screen.
2. Tap Apps to display applications, then scroll to locate your desired application.
3. Touch and hold the application icon, and then drag it to a position on the home screen.
4. Release the shortcut to place it on the screen.
Phone Basics 18
Page 31

DRAFT
FOR INTERNAL USE ONLY
Add Shortcuts from the Home screen
1. Press to display the main Home screen, and then navigate to the desired screen.
2. Touch and hold an empty area of the Home screen, and then tap Apps and widgets.
3. Touch and hold the application icon, and then drag it to a position on the home screen.
4. Release the shortcut to place it on the screen.
Remove a Shortcut
1. Press to display the main Home screen.
2. Touch and hold the desired shortcut to unlock it from its location on the current screen.
3. Drag the icon to the Remove icon and release it. As you place the shortcut into the
Trash, both items turn red.
Note: Removing a shortcut does not delete the application, it simply removes the shortcut from
the home screen.
Add and Remove Primary Shortcuts
Primary shortcuts appear at the bottom of the main Home screen by default (Phone, Contacts,
Messaging, Internet, and Apps).
You can change any of your primary shortcuts, except the Apps shortcut.
Note: Before replacing a primary shortcut, you must first add the replacement shortcut to the
Home Screen. For more information, see Create Shortcuts.
1. Press to display the main Home screen.
2. Touch and hold the primary shortcut you want to replace and then drag it to an empty
space on any Home screen.
3. Scroll the Home screen to find the shortcut you want to add as the new primary shortcut.
4. Touch and hold the new shortcut and then drag it to the empty space in the row of
primary shortcuts. The new primary shortcut will now appear on all Home screens.
Phone Basics 19
Page 32

DRAFT
FOR INTERNAL USE ONLY
Add and Remove Widgets
Widgets are self-contained applications that reside either in your Widgets tab or on the main or
extended Home screens. Unlike a shortcut, the Widget appears as an onscreen application.
Widgets can include Contacts shortcuts, bookmarks, Facebook® status windows, Gmail and
email accounts, and many other types of apps.
Add a Widget
1. Press to display the main Home screen, and then navigate to the desired screen.
2. Touch and hold an empty area of the Home screen, and then tap Apps and widgets >
Widgets.
3. Touch and hold a widget, and then drag it to a position on the home screen.
4. Release the widget to place it on the screen.
Remove a Widget
1. Press to display the main Home screen.
2. Touch and hold the desired widget. This unlocks it from its location on the current
screen.
3. Drag the widget to the Remove icon and release it. As you place the widget into the
Trash, both items turn red.
Note: Removing a widget does not delete the widget, it simply removes the widget from the
current screen.
Extended Home Screens
In addition to the main home screen, your phone has six extended home screens to provide
more space for adding icons, widgets, and more. Touch and hold the icon or widget and then
drag across the screen to move from the main screen to an extended screen.
Note: You can have up to seven screens, including the Main home screen.
Recent Applications
You can access recently-used applications through a display of shortcuts to the applications
themselves.
1. Press and hold from any screen to display recently used applications.
2. Tap an application to open it.
Phone Basics 20
Page 33
DRAFT
FOR INTERNAL USE ONLY
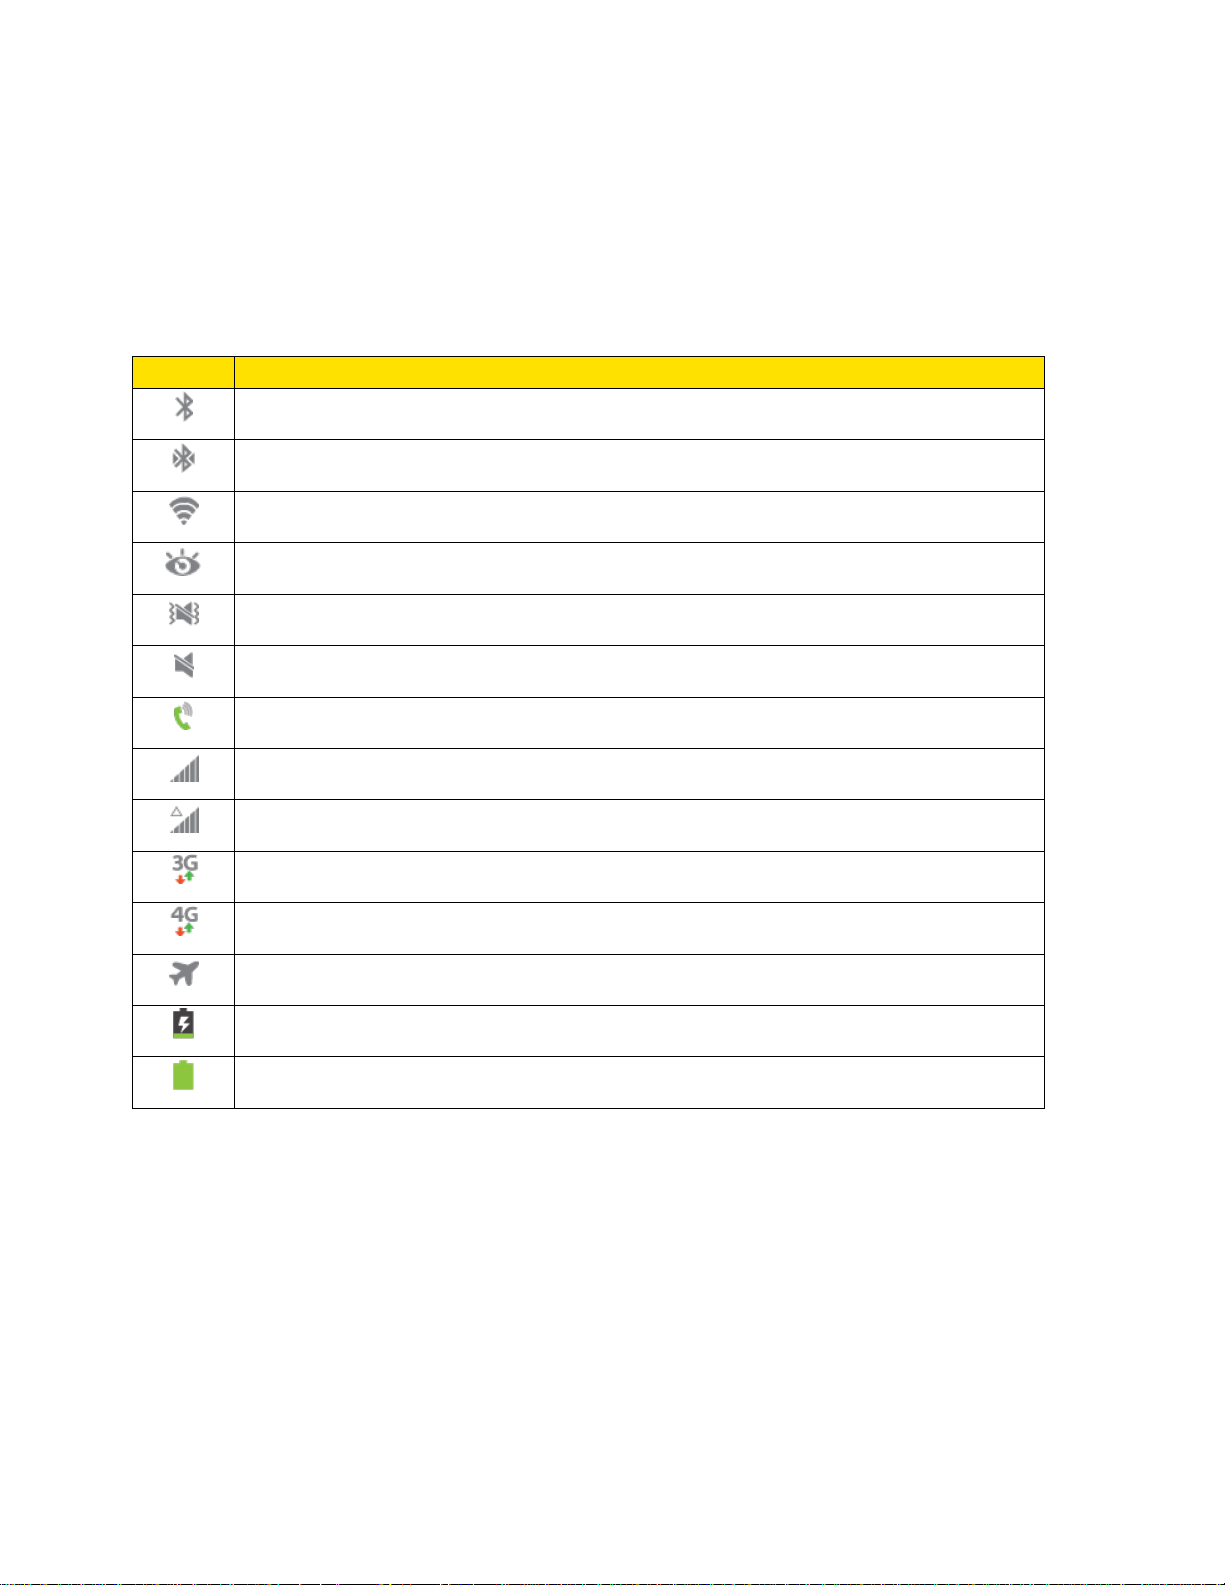
Status Bar
Icon
Description
Bluetooth® is On
Bluetooth® paired
Wi-Fi® active
Smart screen enabled
Vibrate
Mute
Speakerphone Active
Network (full signal)
Network (roaming)
3G (data service)
4G (data service)
Airplane Mode
Battery (charging)
Battery (full charge)
The status bar at the top of the home screen provides phone and service status information on
the right side and notification alerts on the left. To view notification alerts, touch and hold the
status bar and drag it down.
Status Icons
Phone Basics 21
Page 34
DRAFT
FOR INTERNAL USE ONLY
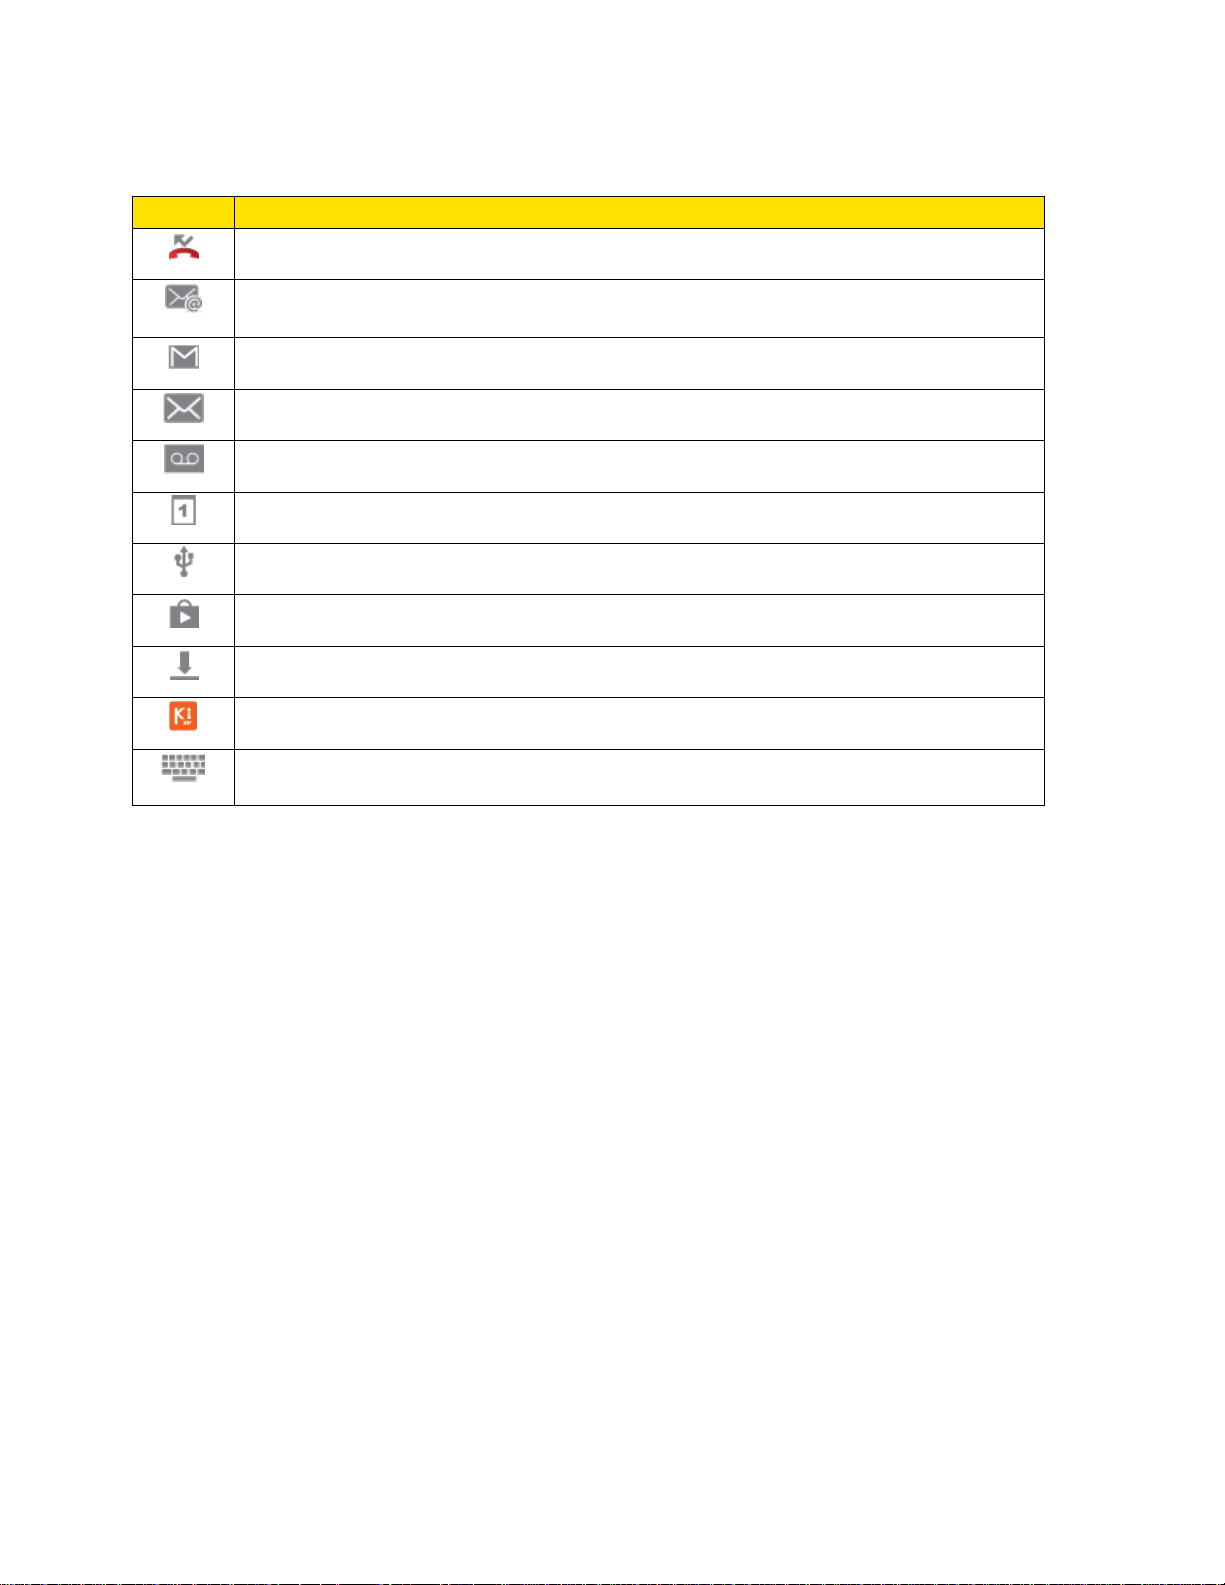
Notification Icons
Icon
Description
Missed call
New email
New Gmail
New message
New voicemail
Event
USB connection
Updates available
Downloading
Connected to a PC using Kies air.
Keyboard active
Enter Text
You can type on your device using the available touchscreen QWERTY keyboard, or by
speaking your inputs.
Text Input Methods
Your device offers several text input methods.
● Google voice typing allows you to speak your entries.
● Samsung keyboard allows you to enter text by touching keys on a virtual QWERTY
keyboard. Samsung keyboard includes optional predictive text, which matches your key
touches to common words so you can select a word to insert it into your text.
● Swype lets you enter words by swiping across the virtual QWERTY keyboard. Instead of
tapping each key, use your finger to trace over each letter of a word. You can also tap
letters to enter words.
Phone Basics 22
Page 35

DRAFT
FOR INTERNAL USE ONLY
Select a Default Text Input Method
You can select a default Text Input Method from Settings, or choose on at any time while
entering text.
From Settings:
► Press and tap > Settings > My Device > Language and input > Default.
While entering text:
1. From a screen where you can enter text, drag down from the top of the screen to open
the Notifications panel.
2. Tap Select input method, and then choose a text entry method.
Google Voice Typing
This feature uses Google voice recognition to convert your spoken words into text.
Use Google Voice Typing to Enter Text
1. From a screen where you can enter text, drag down from the top of the screen to open
the Notifications panel, and then tap Google voice typing.
2. Speak into the microphone and watch your text being entered onscreen.
3. If the text is incorrect, tap DELETE.
4. Once you have completed entering your text, tap Done. The onscreen keyboard will
reappear.
Note: Select a language by tapping at the bottom of the Listening area. Tap Add more
languages to assign a new language via the Google voice typing menu. Removing the
check mark from the Automatic field allows you to select additional languages.
Configure Google Voice Typing
► Press and tap > Settings > My Device > Language and input, and then
tap next to Google voice typing.
Phone Basics 23
Page 36

DRAFT
FOR INTERNAL USE ONLY
Samsung Keyboard
With Samsung Keyboard, it's easy to enter text, symbols, and numbers.
Use Samsung Keyboard to Enter Text
1. From a screen where you can enter text drag down from the top of the screen to open
the Notifications panel, and then tap Samsung keyboard.
2. Tap keys to enter text. While entering text, use these options:
If you make a mistake, tap to delete incorrect characters. Touch and hold
to delete a whole word or field.
Tap to change the case of the text. Tap twice to switch to all capitals.
Tap to switch to a symbols keyboard, to enter symbols. There are two symbol
keyboards.
Tap to switch to Google Voice typing, to enter text by speaking.
Configure Samsung Keyboard
► Press and tap > Settings > My Device > Language and input, and then
tap next to Samsung keyboard.
Note: For more information about Samsung Keyboard settings, see Samsung Keyboard
Settings.
Phone Basics 24
Page 37

DRAFT
FOR INTERNAL USE ONLY
Swype
Swype lets you enter words by tracing over the letters on the virtual QWERTY keyboard.
Instead of tapping each key, use your finger to trace over each letter of a word. You can also
tap letters to enter words.
Swype provides next-letter prediction and regional error correction, which can compensate for
tapping the wrong keys on the virtual QWERTY keyboards.
Use Swype to Enter Text
1. From a screen where you can enter text drag down from the top of the screen to open
the Notifications panel, and then tap Swype.
2. Swipe your finger continuously over the letters to form a word. As you swipe over letters,
words matching your pattern display at the top of the Swype keyboard. To enter a word,
lift your finger, or tap a word at the top of the keyboard.
3. While entering text, use these options:
If you make a mistake, tap to delete a single character. Touch and hold
to delete an entire word or field.
By default, Swype starts with a capital at the beginning of text. Tap to start with
a capital letter, or tap twice to enter all capitals.
Tap to switch to a symbols keyboard, and then tap keys to enter symbols.
Configure Swype
► Press and tap > Settings > My Device > Language and input, and then
tap next to Swype.
- or -
From the Swype keyboard, touch and hold .
Note: For more information about Swype settings, see Swype Settings.
Phone Basics 25
Page 38

DRAFT
FOR INTERNAL USE ONLY
Tips for Editing Text
These tips allow you to cut or copy selected text and paste it into a separate selected area.
1. In a text entry field, double-tap the text.
2. Touch and drag the sliders to highlight and select the desired text.
3. Tap an onscreen option from the Edit text menu bar. You can drag your finger along the
menu bar to see all the options:
Select all: Highlights all the text in the field.
Cut: Removes the selected text and saves it to the clipboard.
Copy: Copies the selected text to the clipboard.
Translate: Launch S Translator to translate the selected text.
Paste: Insert the last copied or cut text into the current field.
Clipboard: Display the clipboard to choose previously cut or copied text.
Phone Basics 26
Page 39

DRAFT
FOR INTERNAL USE ONLY
Phone Calls
With the Sprint National Network and your phone’s phone, you can enjoy clear calling across
the country.
Make Phone Calls
There are several convenient ways to place calls from your phone.
Call Using the Keypad
The most “traditional” way to place a call is by using the phone’s dialer screen.
1. Press and tap Phone.
2. Tap the number keys on the keypad to enter the phone number. As you enter digits,
Smart Dial searches for contacts that match. If you see the number you want to dial, tap
it to place the call immediately without entering the rest of the number.
3. Tap to call the number.
4. To end the call, tap .
Call from Logs
All incoming, outgoing and missed calls are recorded in the Call log. You can place a call to
numbers or contacts that display in this area.
1. Press and tap Phone.
2. Tap the Logs tab. A list of recent calls displays.
3. Tap the entry, then tap to the right of a number or contact to place a call.
For additional options, tap the name or number.
Tip: You can also swipe the entry from left to right to place a call, or from right to left to send
a message.
Phone Calls 27
Page 40

DRAFT
FOR INTERNAL USE ONLY
Call from Contacts
You can place calls directly from your Contacts list using either of the following procedures.
Note: You can access Contacts directly from the Phone app. Tap and then tap the
Contacts tab at the top of the screen.
1. Press and tap Contacts.
2. Tap a contact and then tap .
- or -
Swipe your finger across the contact from left to right.
Call a Number in a Text Message
While viewing a text message, you can place a call to a number that is in the body of the
message. For more information, see Text and Multimedia Messaging.
1. Press and tap Messaging.
2. Open the message with the phone number and tap the phone number.
3. Tap Call to dial the number.
Call a Number in an Email Message
While viewing an email or Gmail message, you can place a call to a number that is in the body
of the message.
1. Press and tap > Email.
2. Open the message with the phone number and tap the phone number.
3. The Phone screen opens with the phone number automatically entered and ready to be
dialed. To place the call, tap .
Call Emergency Numbers
You can place calls to 911 even if the phone’s screen is locked or your account is restricted.
Note: To call the 911 emergency number when the phone’s screen is locked, press to
turn the screen on, and then touch Emergency call at the bottom of the lock screen.
1. Press and tap Phone.
2. Tap .
Phone Calls 28
Page 41

DRAFT
FOR INTERNAL USE ONLY
Enhanced 911 (E911) Information
This phone features GPS (Global Positioning System), which is used for E911 emergency
location service, where available.
When you place a call to 911, the GPS feature of your phone provides information about your
approximate location. Depending on several variables, including availability and access to
satellite signals, it may take up to 30 seconds or more to determine and report your approximate
location.
Important! Always report your location to the 911 operator when placing an emergency call.
Some designated emergency call takers, known as Public Safety Answering
Points (PSAPs), may not be equipped to receive GPS location information from
your phone.
Receive Phone Calls
When you receive a phone call from a contact, the Incoming call screen appears and displays
the caller ID icon, name, and phone number of the calling party. When you receive a phone call
from someone who is not stored in Contacts, only the default caller ID icon and phone number
appear on the Incoming call screen.
Note: If your phone is turned off, all calls automatically go to voicemail.
Answer an Incoming Call
The following procedure shows you how to answer an incoming call.
► When the call comes in, touch and slide to the right to answer the call.
Mute the Ringing Sound
You can mute the ringtone without rejecting the call by doing either of the following.
● Press the Volume Key down.
● Place the phone face down on a level surface. See Motions and Gestures for options,
including the Mute/pause Motion to mute incoming calls by turning over the phone.
Reject an Incoming Call
The following procedure shows you how to reject and incoming call.
► When the call comes in, touch and slide to the left.
Phone Calls 29
Page 42

DRAFT
FOR INTERNAL USE ONLY
Reject a Call with a Text Message
You can automatically reject an incoming call by sending a text message to the caller.
1. Touch and drag Reject call with message toward the top of the screen.
2. Select an existing message and tap .
- or Tap Create new message to send a new text message.
Phone Call Options
The Phone app provides many useful features and options to help you make the most of your
calling experience.
Dialing Options
1. Press and tap Phone.
2. While dialing a call, tap for options, including:
Send message: Send a text message to the number you dialed.
Add to contacts: Save the number to a new contact, or update an existing contact.
See Add a Contact for more information.
Speed dial setting: View speed dials.
Add 2-sec pause: Insert a 2-second pause into the number you are dialing. This can
be useful when storing numbers for automated phone menus.
Add wait: Insert a pause into the number you are dialing, to wait for input from you.
This can be useful when storing numbers for automated phone menus.
Call settings: Configure call settings. For more information, see Call Settings.
Phone Calls 30
Page 43
DRAFT
FOR INTERNAL USE ONLY
Caller ID
Caller ID identifies a caller while the phone is ringing, by displaying the number of the incoming
call.
Block Caller ID
You can block your Caller ID (visible to other when you make a call), before making a call. The
blocking only lasts for that call, then returns to regular Caller ID.
To permanently block your number, you must call Sprint Customer Service.
1. Press and tap Phone.
2. Tap .
Call Waiting
When you’re on a call, Call Waiting alerts you to incoming calls by sounding a tone. Your
phone’s screen informs you that another call is coming in and displays the caller’s phone
number (if it is available).
To respond to an incoming call while you’re on a call:
1. Slide to the right. (This puts the first caller on hold and answers the second call.)
2. To switch back to the first caller, tap Swap.
3-Way Calling
With 3-Way Calling (also known as Conference calling), you can talk to two people at the same
time. When using this feature, the normal airtime rates will be charged for each of the two calls.
1. Press and tap Phone.
2. Tap the number keys to enter a phone number, and then tap .
3. Once you have established the call, tap Add call and dial the second number. (This puts
the first caller on hold and dials the second number.)
4. When you’re connected to the second party, tap Merge. If one of the people you called
hangs up during your call, you and the remaining caller stay connected. If you initiated
the call and are the first to hang up, all callers are disconnected.
5. To end the three-way call, tap .
Phone Calls 31
Page 44
DRAFT
FOR INTERNAL USE ONLY
Call Forwarding
Call Forwarding lets you forward all your incoming calls to another phone number – even when
your phone is turned off. You can continue to make calls from your phone when you have Call
Forwarding is activated.
Note: You are charged a higher rate for forwarded calls.
To activate Call Forwarding:
1. Press and tap Phone.
2. Tap .
3. Enter the area code and phone number to which you want your calls forwarded.
4. Tap . (You will hear a tone to confirm the activation of Call Forwarding.)
To deactivate Call Forwarding:
1. Press and tap Phone.
2. Tap .
3. Tap . (You will see a message and hear a tone to confirm the deactivation.)
In-call Options
While you’re on a call, you will see a number of onscreen options. Tap an option to select it.
● Add call: displays the keypad so you can dial another call.
● Keypad: displays the keypad, where you can enter numbers using DTMF (Dual Tone
Multi-Frequency). This can be useful if you need to enter an access code or other
information while on an active call.
● End call: terminates the call.
● Speaker: controls whether the call audio plays through the speaker or the earpiece.
Tap Speaker to play the audio through the speaker. (You can adjust the speaker
volume using the Volume Key.) A green line appears under the Speaker button.
Tap Speaker again to use the phone’s earpiece. The green line will disappear when
Speaker is not activated.
Warning! Because of higher volume levels, do not place the phone near your ear during
speakerphone use.
Phone Calls 32
Page 45

DRAFT
FOR INTERNAL USE ONLY
● Mute: turns the onboard microphone either on or off.
Tap Mute during a call to mute the microphone. A green line will appear under the
Mute button.
Tap Mute again to unmute the microphone. The green line will disappear when Mute
is not activated.
Note: If Mute is activated, the speaker mode is deactivated.
● Headset: connects to a Bluetooth headset.
Tap Headset during a call to activate a Bluetooth headset. A green line will appear
under the Headset button.
Tap Headset again to de-activate the Bluetooth headset. The green line will
disappear when the Headset is not activated.
● Tap for more options:
Contacts: Launches Contacts.
Memo: Launches Memo, to create memo during a call.
Message: Launches Messaging, to create a new message.
Speed Dials
You can assign a shortcut number to a phone number in your Contacts List for speed dialing.
There are one hundred available numbered spaces. Speed dial 1 is reserved for Voicemail.
Assign Speed Dials
1. Press and tap Phone.
2. Tap > Speed dial setting.
3. Tap an unused space and then select a contact to assign to the number. The selected
contact number will display in the speed dial list.
Remove Speed Dials
1. Press and tap Phone.
2. Tap > Speed dial setting.
3. Tap > Remove, and then tap the X next to the speed dials you want to remove.
Phone Calls 33
Page 46

DRAFT
FOR INTERNAL USE ONLY
Edit Speed Dials
1. Press and tap Phone.
2. Tap > Speed dial setting.
3. Tap > Change order, and then tap the entry you want to move. This will highlight
the entry.
4. Tap an unassigned space. (For example, if you select an entry in space 12, and space 8
shows "Not assigned," you can tap space 8 to move the entry.)
Making a Call Using a Speed Dial
1. Press and tap Phone.
2. Touch the speed dial digits, holding the last digit until the number dials.
Voicemail
Your phone automatically transfers all unanswered calls to your voicemail, even if your phone is
in use or turned off. You should set up your Sprint Voicemail and personal greeting as soon as
your phone is activated. Always use a password to protect against unauthorized access.
Set Up Voicemail
The following steps will guide you through setting up your standard voicemail from the Phone
app.
For information about setting up voicemail using the Visual Voicemail app, see Visual Voicemail.
You should set up your Sprint Voicemail and personal greeting as soon as your phone is
activated. Always use a password to protect against unauthorized access. Your phone
automatically transfers all unanswered calls to your voicemail, even if your phone is in use or
turned off.
1. Press and tap Phone.
2. Press and hold .
3. Follow the system prompts to:
Create your password.
Record your name announcement.
Record your greeting.
Phone Calls 34
Page 47
DRAFT
FOR INTERNAL USE ONLY
Note: Voicemail Password – Sprint strongly recommends that you create a password when
setting up your voicemail to protect against unauthorized access. Without a password,
anyone who has access to your phone can access your voicemail messages.
Retrieve Your Voicemail Messages
You can access your voicemail by using the following process.
1. Press and tap Phone.
2. Press and hold .
3. Follow the system prompts to enter your voicemail password and manage voicemail.
Note: You can also access Visual Voicemail from the Phone keypad by tapping .
Voicemail Notification
There are several ways your phone alerts you to a new message.
● By sounding the notification ringtone.
● By displaying in the Notifications area of the Status bar when a new voicemail
message(s) are received.
● By displaying the number of new voicemail message(s) on the Voicemail app icon.
Note: Your phone accepts voicemail even when it is turned off. However, your phone only
notifies you of new messages when it is turned on and you are in a Sprint service area.
When you are outside the Nationwide Sprint Network, you may not receive notification of
new voicemail messages. Sprint recommends that you periodically check your voicemail
by dialing 1 + area code + your wireless phone number. Roaming rates apply when you
access voicemail while outside the Nationwide Sprint Network.
Phone Calls 35
Page 48

DRAFT
FOR INTERNAL USE ONLY
Visual Voicemail
Visual Voicemail offers a new way to manage your voicemail. Use Visual Voicemail to:
● View your voicemails as text.
● Choose messages to view. You don’t have to listen to them in the order they arrived.
● Archive important messages.
● Compose new messages, and send them to Email, as a text message, or directly to
Voicemail.
● Share messages via Email and text message.
● With a Premium account, you can read your voicemails, have them auto-forwarded to
Email, or share them with Facebook® or Twitter.
1. Press and tap Apps > Voicemail.
2. Follow the prompts to set up an account and learn about using Visual Voicemail.
Note: You can also access Visual Voicemail from the Phone keypad by tapping .
Logs
The Logs tab of the Phone application lists all recent incoming, outgoing, and missed calls.
View Logs
The following procedures will guide you through viewing your call logs list.
1. Press and tap Phone > Logs.
2. To choose logs to display, tap > View by, then tap All calls, Missed calls, Dialed
calls, Received calls, or Rejected calls to filter the list.
Phone Calls 36
Page 49

DRAFT
FOR INTERNAL USE ONLY
Logs Options
The following procedures will guide you through accessing and understanding your call log
options.
1. Press and tap Phone > Logs.
2. Touch and hold a call to display the options list.
Copy to dialing screen
Send number
Add to contacts/View contact
Delete
Clear Logs
Follow these steps to clear the Logs list.
1. Press and tap Phone > Logs.
2. Tap > Delete.
3. Tap Select all or tap individual entries to select them.
4. Tap Delete.
Phone Calls 37
Page 50

DRAFT
FOR INTERNAL USE ONLY
Contacts
The Contacts application lets you store and manage contacts from a variety of sources,
including contacts you enter and save directly in your phone as well as contacts synchronized
with your Google account, your PC, compatible email programs (including Exchange Server),
and your Facebook friends.
Get Started With Contacts
Before using Contacts, it’s best to learn a few basics.
Your phone automatically sorts the Contacts entries alphabetically. You can create a Google
contact, a phone contact, or a Corporate (Microsoft Exchange ActiveSync) contact.
● Google contacts are synchronized between your phone and a Google account you set
up on your phone.
● Microsoft Exchange ActiveSync contacts are synchronized between your phone and
an Exchange Server or Microsoft® Outlook® account set up on your phone.
● Device contacts are stored locally on the phone.
Note: If the phone is ever reset to its factory default parameters, locally stored contacts (phone
contacts) can be lost.
Access Contacts
There are a few ways to display Contacts.
► Press and tap Contacts.
- or -
Press and tap Phone > Contacts tab.
Tip: To quickly move to a specific section in your contact list, tap a letter on the right side of
the list to go directly to that letter in the alphabetical list.
Contacts 38
Page 51

DRAFT
FOR INTERNAL USE ONLY
Contacts Options
1. Press and tap Contacts.
2. Tap
Delete: Allows you to choose contacts to erase.
Import/Export: Imports or exports the selected contact information from a specified
Merge accounts: Combines phone contacts with a Google or Samsung account.
Accounts: Displays accounts set up on your phone.
Speed dial setting: Allows you to assign a speed dial number to a selected contact.
Send message/email: Allows you to create a new text message or email to selected
Contacts to display: Allows you choose contacts to display, from accounts set up
Settings: Displays options for viewing contacts, including whether to show only
to display the contacts list options.
location.
contacts.
on your phone, or other sources.
contacts with phone numbers and whether to list or display by first name or last
name. There is also an option to specify how contacts are transferred to another
device, either individually or as a full group.
Help: Displays information about how to use Contacts.
Contacts 39
Page 52

DRAFT
FOR INTERNAL USE ONLY
Add a Contact
You can add contacts directly from the Contacts application. Enter details such as name, phone
numbers, email addresses, mailing addresses, and more.
1. Press and tap Contacts.
2. Tap at the top of the screen.
3. Tap Device to store the contact on your phone, or tap an account to store the contact.
4. Touch contact fields to enter information.
Tap and assign a picture to the new entry:
• Image: Choose a picture from Gallery.
• Pictures by people: Choose pictures by tags.
• Take picture: Take a new picture.
• S Memo: Choose an image from S Memo.
Tap the Name field and use the onscreen keyboard to enter the full name. Tap
next to the Name field to display additional name fields.
Tap the Phone number field, and then enter a phone number. Tap , and then
choose a label for the number. Tap to add another phone number.
Tap the Email field, and then enter an email address. Tap , and then choose a
label for the number. Tap to add another email address.
Tap Groups to assign the contact to a group.
Tap Ringtone to choose a ringtone to play for calls from the contact.
Tap Message alert to choose a ringtone to play for new messages from the contact.
Tap Vibration pattern to choose a vibration to play for new calls or messages from
the contact.
Tap Add another field to add new fields for the contact.
5. Tap Save to save the new contact.
Contacts 40
Page 53

DRAFT
FOR INTERNAL USE ONLY
Save a Phone Number
You can save a phone number to Contacts directly from the phone keypad.
1. Press and tap Phone.
2. Enter a phone number using the onscreen keypad.
3. Tap Add to Contacts, and then tap Create contact or Update existing.
4. Select an account for the contact, and then continue adding information for the contact,
as desired.
5. Tap Save to save the contact.
Note: If you have accounts set up on your phone, you can save the contact to an account.
Edit a Contact
Once you’ve added a contact, you can add or edit any of the information in the entry, assign a
caller ID picture, customize with a unique ringtone, and more.
Add or Edit Information for a Contact
You can modify existing contact information to keep your information up-to-date.
1. Press and tap Contacts.
2. Tap a contact to display it, and then tap
Tip: You can also touch and hold the contact and then tap Edit.
3. Tap any field you want to change or add. See Add a Contact.
4. Add or edit the information, and then tap Save.
> Edit.
Contacts 41
Page 54

DRAFT
FOR INTERNAL USE ONLY
Assign a Picture to a Contact
Adding a picture to a contact entry creates a more personal and easily recognized entry. For
example, when receiving a call from one of your contacts, the associated picture will display.
You can assign a picture from Gallery, or take a new picture with Camera.
1. Press and tap Contacts.
2. Tap a contact to display it, and then tap
3. Tap , or the currently assigned picture, and then choose an option:
Image: Choose a picture from Gallery. See Gallery for more information.
Pictures by people: Choose a picture from tagged pictures in Gallery.
Take picture: Launch Camera to take a new picture.
S Memo: Launch S Memo to create a memo image.
4. Follow the prompts to save the picture to the contact.
Tip: You can also touch and hold the contact and then tap Edit.
> Edit.
Assign a Ringtone to a Contact
You can assign a special ringtone to individual contacts for more personalization.
1. Press and tap Contacts.
2. Tap a contact to display it.
3. Tap the Ringtone field and choose a ringtone. You can choose a ringtone preloaded on
your phone, or tap Add to choose a sound from Music.
4. Tap OK to assign the ringtone.
Join a Contact
When you have contacts from various sources (Gmail, phone, Facebook, etc.), you may have
multiple similar entries for a single contact. Your phone’s Contacts application lets you link
multiple entries into a single contact.
1. Press and tap Contacts.
2. Tap a contact to display it, and then tap > Join contact.
3. Tap another entry to link it to the original contact.
Note: You can join up to five contacts in a single entry.
Contacts 42
Page 55

DRAFT
FOR INTERNAL USE ONLY
Delete a Contact
You can delete a contact from the contacts details page.
1. Press and tap Contacts.
2. Tap a contact to display it, and then tap
Tip: You can also touch and hold the contact and then tap Delete.
3. Tap OK.
> Delete.
Add Entries to Your Favorites
The Favorites tab is a listing that can help you quickly access your most used or preferred
Contacts entries.
1. Press and tap Contacts.
2. Touch and hold the entry name from the Contacts tab listing.
3. From the Contacts Entry context menu, tap Add to Favorites.
Note: You can also use the star icon on the Contact’s details page to indicate favorites. Tap
the star; the star turns yellow when the contact is a favorite.
Create Groups
This feature allows you to add a new or existing contact to a call group. This group can be one
of the already present groups (Family, Friends, or Work) or a user-created group.
To create a new group:
1. Press and tap Contacts.
2. Tap the Groups tab, and then tap > Create.
3. Tap fields to enter information about the group:
Tap Group name to enter a name for the new group.
Tap Group ringtone to select a ringtone for notifications for incoming calls from
group members.
Tap Message alert to select a ringtone for notifications for new messages from
group members.
Tap Vibration pattern to select a vibration pattern for alerts to incoming calls or
messages from group members.
Contacts 43
Page 56

DRAFT
FOR INTERNAL USE ONLY
4. Tap Add member and select a member or members to add to the new group, and then
tap Done.
5. Tap Save to save the new group.
To add a contact to a group:
1. Press and tap Contacts.
2. Tap the Groups tab, and then tap a group.
3. Tap at the top of the screen.
4. From the list of contacts, tap the contact(s) you want to add. (A green check-mark
appears next to the selected entries.)
5. Tap Done > Save.
To send a message to a group:
1. Press and tap Contacts.
2. Tap the Groups tab, and then tap a group.
3. Tap > Send message.
4. Select the recipients of the new message (indicated by a green checkmark) and then tap
Done.
5. Type your message, and then tap .
Share a Contact
You can quickly share contacts using Bluetooth, Email, Gmail, Messaging, or Wi-Fi Direct.
1. Press and tap Contacts.
2. Tap a contact to display it, and then press > Share namecard via.
3. Choose a sending method, then follow the prompts to send the contact:
Bluetooth: Send the information via Bluetooth. See Bluetooth for information on
pairing and sending via Bluetooth.
Email: Attach the contact to a new Email message. If prompted, select an email
account. Address the message, add a subject and a message, and then tap Send.
See Compose and Send Email for details on sending email.
Contacts 44
Page 57

DRAFT
FOR INTERNAL USE ONLY
Gmail: Send the information as a Gmail attachment. Address the message, add a
subject and a message, and then tap Send. See Send a Gmail Message for details.
Messaging: Attach the contact to a message(converts the message to MMS). Select
a contact or enter a wireless phone number or email address, enter any additional
information, and then tap Send. For more information on text messaging, see Text
and Multimedia Messaging.
Wi-Fi Direct: Transfer the contact via a peer-to-peer Wi-Fi connection.
Contacts 45
Page 58

DRAFT
FOR INTERNAL USE ONLY
Accounts and Messaging
With Sprint service and your phone’s messaging capabilities, you have the opportunity to share
information through many different channels and accounts.
Google Account
Many of your phone’s applications, such as Gmail, Google Maps, Google Talk, and the Google
Play Store, require a Google account. To use these applications, you must set up your Google
account on your phone. Setting up your account on your phone syncs your phone and your
online Google account.
Create a Google Account
If you do not already have a Google account, you can create one online or using your phone.
Note: You can also create and sign into your Google/Gmail account through your phone’s
Setup application.
Although you need a Gmail account to use certain features of your phone, such as
Google Play, you do not need to use Gmail as the default account for your phone.
Create a Google Account Online
1. From a computer, launch a Web browser and navigate to google.com.
2. On the main page, click Sign in > SIGN UP.
3. Follow the onscreen prompts to create your free account.
Create a Google Account Using Your Phone
1. Press and tap > Settings.
2. Tap Accounts > Add account > Google > New.
3. Follow the onscreen prompts to create your free account.
Accounts and Messaging 46
Page 59

DRAFT
FOR INTERNAL USE ONLY
Sign In to Your Google Account
If you have a Google Account but have not yet signed in with your phone, follow these
instructions to sign in to your Google Account.
1. Press and tap > Settings.
2. Tap Accounts tab > Add account > Google > Existing.
3. Follow the prompts to enter your Google account and password, and choose options for
your account on your phone.
Access Gmail
After you set up your Google account on your phone, you are automatically signed in to your
Gmail account, and you can access Gmail from your phone.
1. Press and tap Apps > Gmail.
2. Do any of the following:
View more email messages: If the Inbox is full, swipe your finger up the screen to
view more messages and conversations.
Read a new email message: Tap a message or conversation with an new message
(unread items display in bold).
Select messages and conversations: Tap the box before the email or
conversation.
View the Inbox of another Gmail account: If you have more than one Google
account set up on your phone, tap Inbox at the top of the screen and then choose
an account to view.
Send a Gmail Message
Send and receive Gmail from your phone.
1. Press and tap Apps > Gmail.
2. From the Inbox, tap .
3. Enter the message recipient’s email address in the To field. You can add as many
message recipients as you want.
Note: To send a carbon copy (Cc) or a blind carbon copy (Bcc) of the email to other recipients,
tap > Add Cc/Bcc.
4. Tap the Subject field and enter the email subject.
Accounts and Messaging 47
Page 60

DRAFT
FOR INTERNAL USE ONLY
5. Tap the Compose email field and compose your email. To add an attachment, tap
> Attach picture or Attach video.
6. To send the message, tap .
To save the current email as a draft, tap > Save draft. To view your draft email
messages, from the Inbox, tap Inbox and then tap Drafts.
To delete the current email message, tap > Discard.
Read and Reply to Gmail Messages
Below are procedures for reading and replying to Gmail messages.
1. Press and tap Apps > Gmail.
2. Tap a message to display its contents.
Tip: You can also access new messages through the Notifications bar. When a new Gmail
message arrives, you’ll see the icon in the Notifications bar. Touch and hold the bar and
slide it down to display notifications. Tap a message to display it.
3. Tap to display the reply screen.
4. Tap the menu at the top of the screen, and then tap Reply, Reply All, or Forward.
5. To send the message, tap .
Samsung Account
Create a Samsung account, for access to Samsung apps and services, such as Samsung Hub,
Samsung Apps, Samsung Link, and much more.
When you sign in to your Samsung account on your phone, can access Samsung-specific
content and features.
1. Press and tap > Settings.
2. Tap Accounts tab > Add account >Samsung account, and then tap Sign in or Create
new account.
3. Follow the prompts to sign into your account, or create a new account.
Note: Tap Help for more information about Samsung accounts, or for help with your account.
Use the Email application to send and receive email from your webmail or other accounts. You
can also access your Exchange ActiveSync email on your phone.
Accounts and Messaging 48
Page 61

DRAFT
FOR INTERNAL USE ONLY
Add an Email Account
Email allows you to send and receive email using various email services. You can also receive
text message alerts when you receive an important email.
1. Press and tap Apps > Email.
2. Enter your email address in the Email address field.
3. Enter your password in the Password field. To see your password as you enter it, tap
Show password.
4. Tap Next to start automatic email setup. If you need to configure custom settings, tap
Manual setup and then enter your settings. These may include mail type, user name,
password, server, security type, etc.
5. Follow the onscreen prompts to configure options for the account.
6. Tap Done to complete setup.
Note: You can also add email accounts from Settings. Press and tap > Settings >
Accounts tab > Add account.
Accounts and Messaging 49
Page 62

DRAFT
FOR INTERNAL USE ONLY
Add a Microsoft Exchange ActiveSync Account
The Email application also provides access to your Microsoft Exchange account from your
phone. If your company uses Microsoft Exchange Server 2003, 2007, or 2010 as the corporate
email system, you can use this email application to wirelessly synchronize your email, Contacts,
and Task information directly with your company’s Exchange server.
Use the following procedure to synchronize your phone with a corporate email account.
Note: You can set up multiple Microsoft Exchange ActiveSync accounts on your phone.
1. Press and tap Apps > Email.
2. Enter your email address in the Email address field.
3. Enter your password in the Password field. To see your password as you enter it, tap
Show password.
4. Tap Next to start automatic email setup. For systems that require custom settings, tap
Manual setup and then enter your settings. You may need to consult your network
administrator for this information:
Domain\Username: Enter your network domain and username, separated by “\”.
Password: Enter your network access password (case-sensitive).
Exchange Server: Enter your system’s Exchange server remote email address.
Obtain this information from your company network administrator.
Use secure connection (SSL): Tap to place a checkmark in the box, if your system
requires SSL encryption.
Use client certification: Tap to place a checkmark in the box, if your system
requires certification.
5. Follow the onscreen prompts to configure options for the account.
4. Tap Done to complete setup.
Note: You can also add email accounts from Settings. Press and tap > Settings >
Accounts > Add account.
Accounts and Messaging 50
Page 63

DRAFT
FOR INTERNAL USE ONLY
Compose and Send Email
Compose and send email using any account you have set up on your phone. Increase your
productivity by attaching files such as pictures, videos, or documents to your email messages.
1. Press and tap Apps > Email.
2. From the Inbox, tap .
3. Tap fields to compose your message:
Tap the To field and enter the recipient’s email address. You can add multiple
message recipients.
To send a carbon copy (Cc) or a blind carbon copy (Bcc) of the current email to other
recipients, tap the Cc/Bcc field.
Tap the Subject field and enter the email subject.
Tap the text entry field and compose your email.
To add an attachment, tap , and then select a file to attach:
• My Files: Choose a file from your device or optional memory card.
• Image: Choose a picture from Gallery.
• Take picture: Launch the Camera to take a photo, and then add it to your email
by tapping Save.
• Video: Choose a video from Gallery.
• Record video: Launch the Camera to record a video, and then add it to your
email by tapping Save.
• Audio: Choose a sound from Music.
• Record audio: Launch Voice Recorder to record a new sound.
• S Memo: Launch S Memo to choose or create a memo. For more information,
see S Memo.
• Calendar: Add an event from your calendar.
Accounts and Messaging 51
Page 64

DRAFT
FOR INTERNAL USE ONLY
• Contacts: Add a contact entry (namecard) to the message.
• Location: Attach a map showing your location.
Tap for more options, including Send email to myself, Schedule sending,
Priority, Tracking options, and Security options.
4. To send the message, tap .
Reply or Forward Email
Reading and replying to email on your phone is as simple as on your computer.
1. Press and tap Apps > Email.
2. On the email account Inbox, tap a message to view it.
3. Tap (Reply), (Reply all) to reply to the original recipient list, or tap
(Forward) to forward the message to new recipient(s) in the To field.
4. Enter a message (if desired) and then tap .
Manage Your Email Inbox
The following procedures allow you to view, refresh, sort, and delete your email messages.
View Your Email Inbox
1. Press and tap Apps > Email.
2. If you have multiple accounts set up on your phone, tap the toolbar at the top of the
screen and then choose one from the menu.
Synchronize an Email Account
Whatever your automatic synchronization settings are, you can also synchronize your sent and
received email messages manually at any time.
1. Press and tap Apps > Email.
2. Select an email account.
If you are already in an email account, tap the account name field (upper-left) to
open the complete email account list page.
Select an available email account.
3. Tap Sync.
Accounts and Messaging 52
Page 65

DRAFT
FOR INTERNAL USE ONLY
Sort Email Messages
1. Press and tap Apps > Email.
2. On the email account Inbox, tap > Sort by .
3. Select an option to sort email messages.
Delete Email Messages
1. Press and tap Apps > Email.
2. On the email account Inbox, tap the check boxes beside each email message you want
to delete.
3. Tap Delete.
Edit Email Settings
You can edit general preferences, which apply to all email accounts, or configure settings for
specific email accounts, such as email address and password, name display and signature,
frequency of retrieval, and more.
Note: Available settings depend on the type of email account.
Edit General Preferences
1. Press and tap Apps > Email.
2. Tap > Settings > General settings to configure settings. Available settings depend
on the type of email account, and may include:
Auto fit content: Shrink email content to fit the screen.
Auto advance: Choose how the email list displays after you delete or move an
email.
Message preview line: Choose the number of lines displayed in the email list to give
you a preview of an email’s contents.
Title line in list: Choose the title line (in bold for unread messages), to display the
sender or the subject.
Confirm deletions: Choose whether the phone prompts you to confirm the action
when you mark emails for deletion.
Quick responses: Create and edit text strings that you can add to an email to
respond quickly.
Accounts and Messaging 53
Page 66

DRAFT
FOR INTERNAL USE ONLY
Spam addresses: Create a list of email addresses and domains, to block emails
from these senders.
Priority sender settings: Maintain a list of email addresses to ensure that emails
from the addresses receive priority handling.
Rules for filtering: Set filters and manage filtered email.
Email notifications: Choose whether notifications for new emails are displayed in
the Status bar at the top of the screen.
Delay email sending: Delay the sending of emails so that they can be cancelled if
needed. When enabled, a Cancel button will display for a specified time after tap
Send. If you enable Delay email sending, use the Set length of delay option to
choose how long to delay.
Default image size: Set the default size of images you attach to emails.
Edit Account Settings
You can edit settings for your individual email accounts, such as email address and password,
name display and signature, frequency of retrieval, and more.
Note: Available settings depend on the type of email account.
1. Press and tap Apps > Email.
2. Tap > Settings, and then tap an account to configure settings:
Email notifications: When enabled, an icon displays in the Status bar when you
receive new emails.
Select ringtone: Choose a ringtone to play for new email notifications.
Vibrate: When enabled, vibration plays for new email notifications.
Sync Email: When enabled, your phone maintains synchronization with your email
account. The last synchronization is displayed.
Sync schedule: Set options for synchronizing your phone with your email account.
Available when Sync Email is enabled.
Period to sync Email: Choose a period of time to maintain synchronization between
your phone and email account.
Size to retrieve emails: Choose a maximum size for emails, for your phone to
automatically retrieve during synchronization. For larger emails, your phone will
prompt you to download the contents when you open them.
Accounts and Messaging 54
Page 67

DRAFT
FOR INTERNAL USE ONLY
Signature: When On, a text signature is automatically added to emails you send.
Tap the ON/OFF switch to turn signatures On or Off. After turning signatures On, tap
Signature to edit the default text signature.
Default account: Assign an account as the default email account for outgoing
messages. When you launch an email from other apps, the email will automatically
be from this account.
More settings: Configure other options, including the account name, carbon copy
and blind carbon copy, synchronization, and security options.
• Account name: Enter a name to identify this email account.
• Always Cc/Bcc myself: Choose options for sending a copy of emails you send
to yourself, as a copy (Cc) or blind copy (Bcc).
• Forward with attachments: Choose whether to automatically include
attachments when forwarding an email.
• Show images: Choose whether to automatically display embedded images in
the body of an email.
• Auto download attachments: Choose whether the phone automatically
downloads email attachments when you are connected to Wi-Fi. You might use
this option to control how and whether you use your plan’s data services to
download attachments.
• Auto resend times: Choose the number of times the phone attempts to resend
an email after a delivery failure.
• Folder sync settings: Choose folders to synchronize between your phone and
account.
• Period to sync Calendar: Choose the period for synchronizing calendar events
between your phone and account.
• Sync Contacts: Choose whether contacts are synchronized between your
phone and the account.
• Sync Calendar: Choose whether calendar events are synchronized between
your phone and the account.
• Sync Task: Choose whether emails are synchronized between your phone and
the account.
• In case of sync conflict: Choose whether information from the server or phone
has priority when there is a conflict.
Accounts and Messaging 55
Page 68

DRAFT
FOR INTERNAL USE ONLY
• Security options: Configure advanced security options, including encryption.
• Exchange server settings: Configure the Domain\user name, Password, and
other Exchange server settings.
Delete an Email Account
If you no longer want an email account on your phone, you can remove it.
1. Press and tap Apps > Email.
2. Tap > Settings, and then tap .
3. Tap an account to mark it for deletion.
4. Tap Delete, and then follow the prompts to delete the account.
Text and Multimedia Messaging
With Text Messaging (SMS), you can send and receive text messages between your phone and
another phone that supports messaging.
Multimedia messages, (MMS), can contain text and pictures, recorded voice, audio or video
files, picture slideshows, contact namecards (vCard), or calendar events (vCalendar).
See your service plan for applicable charges for messaging.
Send a Text Message (SMS)
Quickly compose and sent text messages on your phone.
1. Press and tap Messaging.
2. Tap .
3. Tap Enter recipient, and then enter a contact name, a mobile phone number, or an
email address using the onscreen keyboard. As you enter letters, possible matches from
your accounts and contacts display on the screen. Touch a match to add it to the
message.
4. Tap Enter message and enter your message.
5. Review your message and tap .
Accounts and Messaging 56
Page 69

DRAFT
FOR INTERNAL USE ONLY
Send a Multimedia Message (MMS)
When you need to add a little more to a text message, you can send a multimedia message
(MMS) text and pictures, recorded voice, audio or video files, picture slideshows, contact
namecards (vCard), or calendar events (vCalendar).
Composing MMS messages is the same as composing text messages, except that you attach a
file to the message.
1. Press and tap Messaging.
2. Tap .
3. Tap Enter recipient, and then enter a contact name, a mobile phone number, or an
email address using the onscreen keyboard. As you enter letters, possible matches from
your accounts and contacts display on the screen. Touch a match to add it to the
message.
4. Tap Enter message and enter your message.
5. To add an attachment, tap , and then select a file to attach:
Image: Choose a picture from Gallery.
Take picture: Launch the Camera to take a photo, and then add it to your message
by tapping Save.
Video: Choose a video from Gallery.
Record video: Launch the Camera to record a video, and then add it to your
message by tapping Save.
Audio: Choose a sound from Music.
Record audio: Launch Voice Recorder to record a new sound.
S Memo: Launch S Memo to choose or create a memo. For more information, see S
Memo.
Calendar: Add an event from your calendar.
Location: Attach a map showing your location.
Contacts: Add a contact entry (namecard) to the message.
6. When done, tap to send the message.
Accounts and Messaging 57
Page 70

DRAFT
FOR INTERNAL USE ONLY
Save and Resume a Draft Message
If you tap while composing a text or multimedia message, or leave the Messaging screen,
the message is automatically saved as a Draft.
To resume composing a Draft message:
1. Press and tap Messaging.
2. On the Messaging screen, tap the message marked as Draft.
3. When you are ready to send the message, tap .
New Messages Notification
Depending on your notification settings, the phone will play a ringtone, vibrate, or display the
message briefly in the status bar when you receive a new text or multimedia message. To
change the notification for new text and multimedia messages, see Text and MMS Settings for
details.
A new message icon also appears in the notifications area of the status bar to notify you of
a new text or multimedia message. The Messaging application icon also displays the
number of new messages.
To open the message, touch and hold the status bar, and then slide the Status Bar down to
open the Notifications panel. Tap the new message to open and read it. For information on
reading and replying to messages see Managing Message Conversations.
Managing Message Conversations
Text and multimedia messages that are sent to and received from a contact (or a number) are
grouped into conversations or message threads in the All messages screen. Threaded text or
multimedia messages let you see exchanged messages (similar to a chat program) with a
contact on the screen.
To read a text message:
● On the Messaging screen, tap the text message or message thread to open and read it.
● If you have a new message notification, slide the status bar down to open the
Notifications panel. Tap the new message to open and read it.
Note: To view the details of a particular message, in the message thread, touch and hold the
message to open the options menu, and then tap View message details.
If a message contains a link to a Web page, tap the message and then tap the link to
open it in the Web browser.
Accounts and Messaging 58
Page 71

DRAFT
FOR INTERNAL USE ONLY
If a message contains a phone number, tap the message and then tap the phone
number to dial the number or add it to your contacts.
To view a multimedia message (MMS):
1. Press and tap Messaging.
2. From the message list, tap a message to display it.
3. While the message is open, tap the play icon (on a video or audio file) to play back the
file or tap an image to view a picture.
Note: The file attachment on the MMS message can be saved to an optional installed memory
card (not included). Touch and hold on the attachment, and then tap Save attachment.
Select the attachment check box and tap Save.
To reply to a text or multimedia message:
1. Press and tap Messaging.
2. From the message list, tap a message.
3. Tap the Enter message field and then type your reply message.
4. Once complete, tap .
To protect a message from deletion:
You can lock a message so that it will not be deleted even if you delete the other messages in
the conversation.
1. Press and tap Messaging.
2. On the Messaging screen, tap a message thread.
3. Touch and hold the message that you want to lock.
4. Tap Lock message on the options menu. A lock icon displays at the lower right hand
side of the message.
To delete a message thread:
1. Press and tap Messaging.
2. Touch and hold the message thread that you want to delete.
3. Tap Delete thread and follow the prompts to delete the thread.
Accounts and Messaging 59
Page 72

DRAFT
FOR INTERNAL USE ONLY
To delete several message threads:
1. Press and tap Messaging.
2. Tap > Delete threads.
3. Select the message threads you want to delete and tap Delete.
Note: Locked messages will not be deleted, unless you select the Include protected
messages check box before confirming the deletion.
To delete a single message:
1. Press and tap Messaging.
2. While viewing a message thread, touch and hold the message that you want to delete.
Note: If the message is locked, tap Unlock message on the Message options menu and then
touch and hold the message to display the options menu again.
3. Tap Delete message on the options menu, and then follow the prompts to confirm the
deletion.
To view contact details and communicate with a contact:
When you receive a message from someone in your stored contacts, you can tap the contact’s
photo or icon in the message thread to open a menu of options. Depending on the stored
contact information, you can view the contact details, phone, or send an email message to the
contact, and more.
Text and MMS Settings
The messages settings menu lets you control options for your text and MMS messages
including message limits, size settings, and notifications.
1. Press and tap Messaging.
2. Tap > Settings.
3. Configure message settings:
Delete old messages allows the phone to automatically delete the oldest messages
when the maximum number of messages is reached. Set the maximum number of
messages with the Text message limit and Multimedia message limit settings below.
Text message limit allows you to set the maximum number of text messages per
conversation.
Accounts and Messaging 60
Page 73

DRAFT
FOR INTERNAL USE ONLY
Multimedia message limit allows you to set the maximum number of multimedia
messages per conversation.
Text templates allows you to create and manage text strings that you can add to
messages.
Auto combination allows you to choose whether long messages that are received
in multiple parts are automatically re-assembled to display as a single message.
Group messaging allows you to control how messages to multiple recipients are
handled. When enabled, a single message is sent to multiple recipients. When
disabled, a separate message is sent to each recipient.
Auto retrieve allows you to choose whether message attachment(s) are
automatically downloaded when you display a multimedia message. If you disable
this option, only the message header displays in the message list, and you’ll be
prompted to download the attachment(s).
Roaming auto retrieve allows you to choose whether message attachment(s) are
automatically downloaded while your phone is in roaming mode.
MMS alert allows you to have the phone alert you when you make a change to a
message that will convert the message to a multimedia message (MMS).
Bubble style allows you to choose how messages appear on the screen. Bubbles
are the boxes that surround each message.
Background style allows you to choose the background of the message screen.
Use the volume key allows you to change the text size while reading a message by
pressing the Volume Key up or down.
Notifications allows you specify whether notifications for new messages display in
the status bar.
Select ringtone allows you to set the ringtone for your message notifications.
Vibrate allows you to choose whether vibration plays along with the ringtone for new
message notifications.
Message alert repetition allows you to choose how often your phone notifies you of
new message(s).
Preview message allows you to choose whether a preview of a new message
appears in the status bar with the message notification.
Emergency Alerts allows you to configure emergency alert settings. You can enable
or disable some alerts: Extreme Alert, Severe Alert, Amber Alert, and Emergency
alert test messages. You cannot disable Presidential alerts.
Accounts and Messaging 61
Page 74

DRAFT
FOR INTERNAL USE ONLY
Important! The Commercial Mobile Alert System (CMAS) system provides the government
the ability to send geographically targeted notifications of emergencies, such as
threats to public safety, severe weather events, a hazardous material spill or a
missing child in the phone user’s area.
Emergency notification preview allows you to play a sample emergency alert tone.
Tap Stop to cancel the playback.
Vibrate allows you to select vibrate options for emergency messages.
Alert reminder allows you to configure the reminder interval.
Add signature allows you add a text signature to all messages you send.
Signature text allows you to enter a text signature, when Add signature is enabled.
Spam settings allows you to filter incoming messages for spam messages.
Add to spam numbers allows you to enter telephone numbers, to automatically flag
messages from the numbers as spam, when Spam settings is enabled.
Add to spam phrases allows you to enter a text phrase, to automatically flag
messages as spam when they contain the phrase. Available when Spam settings are
enabled.
Block unknown senders allows you to automatically block messages from numbers
that are not stored as contacts on your phone.
Social Networking Accounts
Stay in touch on the go with all your social networking accounts. Post updates on Facebook and
Twitter®, review your LinkedIn® contacts, see what everyone’s talking about on YouTube™, and
more.
Use Flipboard to create a personalized digital “magazine” out of everything being shared with
you. Access news stories, personal feeds and other related material. Flip through your
Facebook newsfeed, tweets from your Twitter account, photos from friends and much more.
► Press and tap Apps > Flipboard.
Google Messenger
Messenger allows you to bring groups of friends together into a simple group conversation.
When you get a new conversation in Messenger, Google+ sends an update to your phone.
Accounts and Messaging 62
Page 75

DRAFT
FOR INTERNAL USE ONLY
Messenger is part of your Google account, and uses your Google account sign-in. Before using
Messenger, set up your Google account on your phone. For more information, see Create a
Google Account or Sign In to Your Google Account.
1. Press > Apps > Messenger.
2. If prompted, configure the Instant Upload parameters as desired and tap Continue.
3. If prompted, configure the Sync contacts parameter (Sync contacts or Don’t sync) and
tap Continue. If you are signed into more than one Google account, select the account
you would like to use with Google+. (Messenger is a component of Google+.)
4. Follow any onscreen setup instruction.
Google+
Google+™ makes messaging and sharing with your friends a lot easier. You can set up Circles
of friends, visit the Stream to get updates from your Circles, use Messenger for fast messaging
with everyone in your Circles, or use Instant Upload to automatically upload videos and photos
to your own private album on Google+.
Visit google.com/mobile/+ for more information.
Google+ is part of your Google account, and uses your Google account sign-in. Before using
Google+, set up your Google account on your phone. For more information, see Create a
Google Account or Sign In to Your Google Account.
1. Press > Apps > Google+. The app will sign in to your Google account. If
you are signed into more than one Google account, select the account you would like to
use with Google+.
2. Follow the onscreen instructions to use Google+.
Accounts and Messaging 63
Page 76

DRAFT
FOR INTERNAL USE ONLY
Google Talk
Google Talk is a free Windows and Web-based application for instant messaging offered by
Google. Conversation logs are automatically saved to a Chats area in your Gmail account. This
allows you to search a chat log and store them in your Gmail accounts.
1. Press > Apps > Talk.
2. Tap ADD ACCOUNT to add a Google account to Google Talk. Tap New to create a new
Google account, or tap Existing to sign in to an existing Google account.
3. After entering your user name and password, tap Sign in.
4. Begin using Google Talk.
Note: If you have already signed into your Google account, it displays on the Talk application
screen.
YouTube
YouTube is a video sharing website on which users can upload and share videos. The site is
used to display a wide variety of user-generated video content, including movie clips, TV clips,
and music videos, as well as video content such as video blogging, informational shorts, and
other original videos.
YouTube is a data-intensive feature. Sprint recommends that you upgrade to an unlimited data
plan to avoid unexpected data charges.
1. Press > Apps > YouTube.
2. Tap to enter keywords in the Search field to search for specific videos, scroll down to
browse through the main page thumbnails, or scroll to the bottom to explore additional
options.
3. To view a video, tap an available preview thumbnail or tap the title link.
Note: It is not necessary to sign in to the YouTube site to view content. However, if you wish to
sign in to access additional options tap the ACCOUNT tab. Select an account (if
available) or create a new account. (Even if you sign in to YouTube via the Web, you
must separately sign in via your phone.)
Accounts and Messaging 64
Page 77

DRAFT
FOR INTERNAL USE ONLY
Apps and Entertainment
All your phone’s features are accessible through the Applications list.
DivX
DivX® is a digital media format that provides your phone with high-quality videos.
DivX Legal Information
DivX®, DivX Certified® and associated logos are trademarks of Rovi Corporation or its
subsidiaries and are used under license.
DivX Certified® to play DivX® video up to HD 720p, including premium content.
ABOUT DIVX VIDEO: DivX® is a digital video format created by DivX, LLC, a subsidiary of Rovi
Corporation. This is an official DivX Certified® device that has passed rigorous testing to verify
that it plays DivX video. Visit divx.com for more information and software tools to convert your
files into DivX videos.
ABOUT DIVX VIDEO-ON-DEMAND: This DivX Certified® device must be registered in order to
play purchased DivX Video-on-Demand (VOD) movies. To obtain your registration code, locate
the DivX VOD section in your device setup menu (tap Apps > Settings > More > About device
> Legal information > License settings > DivX® VOD > Register). Go to vod.divx.com for
more information on how to complete your registration.
Important! DivX VOD content is protected by a DivX DRM (Digital Rights Management)
system that restricts playback to registered DivX Certified devices.
Locate Your VOD Registration Number
Follow these procedures to locate your VOD registration number.
► Press and tap > Settings > More tab > About device > Legal information
> License settings > DivX® VOD > Register.
Register Your DivX Device for VOD Playback of Purchased Movies
To play purchased DivX movies on your phone, you will first need to complete a one-time
registration using both your phone and your computer.
1. Locate your VOD Registration code. Press and tap > Settings > More >
About device > Legal information > License settings > DivX® VOD > Register.
2. Open the DivX Player on your computer. To download the free player for your computer,
visit divx.com.
Apps and Entertainment 65
Page 78

DRAFT
FOR INTERNAL USE ONLY
3. From the DivX Player on your computer, choose the VOD menu and select Register a
DivX Certified Device. Follow the prompts to log in, or create a DivX account if you don’t
already have one.
4. Follow the instructions in DivX Player to enter your phone’s VOD registration code and
create a phone nickname.
5. Choose a location on your computer to download the DivX registration video, then
download the file.
6. Connect your phone to the computer via USB and transfer the DivX registration video to
your phone. From the Registration screen (Transfer), select USB (the phone) as the
target destination for the DivX registration video and tap Start. Return to the DivX VOD
Manager screen (from within your computer’s DivX Player) and confirm both your
computer and your new phone appears in the list of registered DivX devices.
Note: There is no special registration or configuration necessary to play back DRM-free DivX
movies. Registration of your phone is only required for playback of DivX material.
Google Play Store
The Google Play™ Store app is the place to go to find new Android apps, games, movies,
music, and books for your phone. Choose from a wide variety of free and paid apps ranging
from productivity apps to games. When you find an app you want, you can easily download and
install it on your phone.
To access the Google Play Store app, you must first connect to the Internet using your phone’s
Wi-Fi or Sprint 4G or 3G data connection and sign in to your Google Account. See Web and
Data and Google for details.
Important! Sprint’s policies often do not apply to third-party applications. Third-party
applications may access your personal information or require Sprint to disclose
your customer information to the third-party application provider. To find out how
a third-party application will collect, access, use, or disclose your personal
information, check the application provider’s policies, which can usually be found
on their website. If you aren’t comfortable with the third-party application’s
policies, don’t use the application.
Find and Install an App
When you install apps from the Google Play Store app and use them on your phone, they may
require access to your personal information (such as your location, contact data, and more) or
access to certain functions or settings of your phone. Download and install only apps that you
trust.
Note: You need a Google Wallet™ account to purchase items from the Google Play Store app.
See Create a Google Wallet Account to set up a Google Wallet account if you do not
have one.
Apps and Entertainment 66
Page 79

DRAFT
FOR INTERNAL USE ONLY
1. Press and tap Apps > Play Store.
2. Browse through the categories to find an app you're interested in, and tap the name.
3. Read the app descriptions.
4. Tap Install or Download (for free applications) or the price (for paid applications).
5. The subsequent screen notifies you whether the app will require access to your personal
information or access to certain functions or settings of your phone. If you agree to the
conditions, tap Accept & download (for free apps) or Accept & buy (for paid apps) to
begin downloading and installing the app.
Warning! Read the notification carefully! Be especially cautious with apps that have
access to many functions or a significant amount of your data. Once you agree to
the download and installation on this screen, you are responsible for the results
of using this item on your phone.
Create a Google Wallet Account
You must have a Google Wallet account associated with your Google Account to purchase
items from the Google Play Store app.
The first time you turn on your phone, the setup process will prompt you to create a Google
Wallet account. If you did not create one at setup, you can create an account at any time using
one of these methods:
► On your computer, go to google.com/wallet/ to create a Google Wallet account.
– or –
► The first time you use your phone to buy an item from Google Play, follow the prompts to
enter your billing information to set up a Google Wallet account.
Warning: When you’ve used Google Wallet once to purchase an application from the
Google Play Store app, the phone remembers your password, so you don’t need
to enter it the next time. For this reason, you should secure your phone to
prevent others from using it without your permission. (For more information, see
Lock screen.)
Open an Installed App
There are several options for opening an installed app.
► Press and tap Apps, and then tap the app icon.
Apps and Entertainment 67
Page 80

DRAFT
FOR INTERNAL USE ONLY
Uninstall an App
You can uninstall any app that you have downloaded and installed from Google Play.
1. Press and tap and tap Settings > More > Application manager >
Downloaded.
2. Tap the app you want to uninstall, and then tap Uninstall.
3. When prompted, tap OK to remove the app from your phone.
4. Once the app is removed, tap OK again to return to the Application manager.
Navigation
Your phone offers a number of location-based navigation programs to help you figure out where
you are and get you where you’re going.
Google Maps
Use the Google Maps™ app to find directions, location information, business addresses, etc.
Determine your current location with or without GPS, get driving and transit directions and get
phone numbers and addresses for local businesses.
For more information about Google Maps, visit maps.google.com.
To use Google Maps, enable your phone’s GPS location services and agree to share location
information with Google.
To enable your phone’s GPS Location feature:
1. Press and tap > Settings > More tab > Location services.
2. Tap Use GPS satellites. A green checkmark indicates the GPS location feature is
enabled.
To launch the Google Maps application:
► Press and tap Apps > Maps.
Google Local
Google Local uses your location to help you find nearby destinations, such as restaurants, bars,
hotels, attractions, ATMs and gas stations, or you can enter a location. The Local service is
accessible through the Google Maps app.
► Press and tap Apps > Local.
Apps and Entertainment 68
Page 81

DRAFT
FOR INTERNAL USE ONLY
Google Navigation
Another Google Maps navigation application is available on your phone. It uses your current
location (provided by the GPS feature of your phone) to provide various location-based
services.
For more information about Google Maps, visit google.com/mobile/maps.
► Press and tap Apps > Navigation.
TripAdvisor
Get assistance finding hotels, restaurants, and attractions in any destination. See millions of
reviews, opinions and candid photos from travelers just like you.
1. Press and tap Apps > TripAdvisor.
2. Follow the on-screen instructions.
Samsung Apps
Browse, search, and find apps to download and install on your phone. Log in to your Samsung
account to manage your downloads.
► Press and tap Apps > Samsung Apps.
Music
Your phone lets you discover, download, and listen to your favorite music through a variety of
applications.
Note: For information about loading music onto your phone, see Transfer Files Between Your
Phone and a Computer.
FM Radio
Listen to local FM radio stations on your phone.
► Press and tap Apps > FM Radio.
Google Play Music
Google Play Music lets you browse, shop, and play back songs purchased from the Google
Play Store app, as well as songs you have loaded from your own music library. The music you
choose is automatically stored in your Google Music library and instantly ready to play or
download.
For more information about Google Play Music, visit music.google.com.
Apps and Entertainment 69
Page 82

DRAFT
FOR INTERNAL USE ONLY
Note: For information about loading music onto your phone, see Transfer Files Between Your
Phone and a Computer.
► Press and tap Apps > Play Music.
Music
The Music app plays music files. Use Music to browse your music library, play songs, and
create playlists. You can also set songs as ringtones for incoming calls, or as alarm tones.
Note: For information about loading music onto your phone, see Transfer Files Between Your
Phone and a Computer.
When you close the Music screen, playback will continue in the background, so you can listen to
music while you use other features of your phone. When music is playing in the background,
you can access playback controls from Notifications.
Play Music
1. Press and tap Apps > Music.
2. Tap the category tabs at the top of the screen. The default tabs are Songs, Playlists,
Albums, Artists, Music square, and Folders. You may have to swipe your finger right
or left along the tabs to see all of them.
3. Scroll through the list and tap a song to begin. While playing music, use these controls:
Tap to move to the previous song. Tap to move to the next song.
Tap the repeat button to control playback. Choose to play all songs once.
Choose to repeat all songs. Choose to repeat the current song.
Tap the shuffle button to control the order songs are played. Choose to play
songs in the order they appear in the list. Choose to play songs in random order.
Tap to mark a song as a favorite. When a song is a favorite, the star is orange.
Favorite songs are included in the Favorites playlist.
Tap to set the volume. You can also set volume by pressing the Volume Key on
the side of the phone.
Tap to share music with nearby devices using Group Play.
4. To close Music and stop playback, tap > End.
Apps and Entertainment 70
Page 83

DRAFT
FOR INTERNAL USE ONLY
Use Playlists
Create playlists to group songs, so you can listen to them together.
1. Press and tap Apps > Music.
2. Tap the Playlists tab, and then use these options:
Tap an existing playlist to play its songs.
Tap > Create playlist to create a new playlist. Follow the prompts to name the
playlist, and then select songs for the playlist.
Tap for other options, including Edit title, to rename playlists.
Note: While playing music, you can touch and hold on a song to choose Add to playlist.
Set a Song as a Ringtone or Alarm Tone
You can set a song as a ringtone for all incoming calls, or for a contact. You can also set a song
as an alarm tone.
1. Press and tap Apps > Music.
2. Scroll through the list to find a song, and then touch and hold on the song.
3. Tap Set as, and then choose:
• Phone ringtone: Plays the song for all incoming calls.
• Caller ringtone: Plays the song for calls from a Contact.
• Alarm tone: Plays the song as the notification for alarms.
4. After choosing options, tap OK, and then follow the prompts to complete the setup.
Music Options
1. Press and tap Apps > Music.
2. Tap for options. Available options depend on the tab:
Add to playlist/Create playlist: Depending on the tab, you can add songs to a
playlist, or create a new playlist.
Via Bluetooth: Share music with another Bluetooth-compatible device. For more
information about using Bluetooth, see Bluetooth.
Edit title: Rename a playlist.
Apps and Entertainment 71
Page 84

DRAFT
FOR INTERNAL USE ONLY
Delete: On the Songs or Playlists tabs, you can choose songs to delete, or delete
playlists.
Thumbnail view/List view: Display entries in a list or as thumbnails.
Search: Enter keywords to search for songs.
Scan for nearby devices: Search for nearby DLNA-compatible devices, to share
music. For more information, see Nearby devices.
Settings: Configure settings for music and playback, including:
• SoundAlive: Choose a setting to match the type of music.
• Adapt Sound: Customize sound output when you are listening with earphones.
Only available when earphones are inserted into the earphone jack.
• Play speed: Touch and drag the slider to set the default speed for music
playback.
• Music menu: Choose categories for the tabs on the main Music screen.
• Music auto off: Choose a time period for music to play, after which Music will
end.
• Lyrics: When enabled, lyrics display for songs as they play, if the lyric
information is stored in the music file.
• Smart volume: When enabled, Music automatically adjusts the volume of all
songs to an equal level.
• Voice control: When enabled, you can control music playback by speaking
commands. Follow the prompts to configure Voice control settings.
End: Close Music.
Google Play Movies & TV
The Google Play Movies & TV application allows you to connect to the Google Play Store and
download a movie or TV show to watch instantly. Choose from thousands of movies and TV
shows, including new releases and HD titles in Google Play and stream them instantly on your
Android phone. Previously rented movies are automatically added to your My Movies library
across your phones.
To learn more about Google Play Movies & TV, visit: play.google.com/about/movies.
► Press and tap Apps > Play Movies & TV.
Apps and Entertainment 72
Page 85

DRAFT
FOR INTERNAL USE ONLY
Google Play Books
Discovering your favorite books and authors has never been easier. With Google Play Books,
you can shop the world's largest selection of e-books and read them anywhere you like—on a
tablet, phone, e-reader, or the Web.
► Press and tap Apps > Play Books.
Google Play Magazines
Enjoy your favorite magazines, anywhere you go.
Discover hundreds of bestselling magazines on Google Play. You can shop a wide selection of
titles, from cooking to technology, travel, fashion, sports, photography, and so much more.
It's never been easier to find a great read to enjoy on vacation, lounging at home or on your
morning commute. Buy new issues or back issues, subscribe and get free 14 or 30-day trials,
and customize your reading experience for your Android phone.
► Press and tap Apps > Play Magazines.
Group Play
Use Group Play to share media from your phone to other devices, via Wi-Fi, using your phone
as an AP (Access Point).
Many of your phone’s apps offer sharing via Group Play. Tap to find sharing options,
usually from the Share via list of options.
To use Group Play, all participants must be connected to the same Wi-Fi network.
Important: If you are using Group Play via an unsecured Wi-Fi network, your information
may be vulnerable to unauthorized third parties while being transferred.
Use Group Play only for personal and non-profit purposes. Using Group Play for
commercial use violates copyright law. The company is not responsible for
copyright infringement by users.
Create a Group and Share
Note: To use Group Play, all participants must be connected to the same Wi-Fi network.
1. Press and tap Apps > Group Play.
2. Check Set group password, then tap Create group and then follow the prompts to
create a group. You’ll need to set up a group password, which participants will use to
join your Group Play session.
Apps and Entertainment 73
Page 86

DRAFT
FOR INTERNAL USE ONLY
3. After you create the group, your phone turns on the mobile AP (Access Point). Follow
the onscreen directions to bring other devices back-to-back with your phone to join the
group.
4. Choose options for sharing:
Share music: Select music stored on your phone or on an optional installed memory
card (not included).
Share pictures: Select pictures stored on your phone or on an optional installed
memory card (not included).
Share documents: Select documents stored on your phone or on an optional
installed memory card (not included).
Play games: Play games with other participants.
Note: For more information about using Group Play, tap > Help.
Join a Group
1. Press and tap Apps > Group Play.
2. Tap Join Group. Your phone scans for nearby available groups. Your device can only
detect groups on the same Wi-Fi network your phone is connected to.
3. Select a group to join. After connecting, you can see and interact with the group’s shared
media.
Samsung Link
Samsung Link makes staying connected easy. You can wirelessly synchronize your Samsung
device with your TV, stream content, and even keep tabs on who calls or sends text messages
with real-time, on-screen monitoring.
Samsung Link allows users to share their in-device media content with other external devices
using DLNA certified™ (Digital Living Network Alliance) Devices. These external devices must
also be DLNA-compliant. Wi-Fi capability can be provided to TVs via a digital multimedia
streamer.
Samsung Link uses your Samsung account. For more information, see Samsung Account.
Both your device, and the devices that connect to your device, must be on the same Wi-Fi
access point (AP). For more information about using Wi-Fi, see Wi-Fi.
1. Press and tap Apps > Samsung Link.
2. Follow the prompts to sign in to your Samsung account and learn about Samsung Link.
Apps and Entertainment 74
Page 87

DRAFT
FOR INTERNAL USE ONLY
3. On the Samsung Link screen, swipe your finger left or right across the screen to scroll
between:
MY RECENT CONTENT: Media you’ve recently viewed.
DEVICES & STORAGE: Choose an option:
• Registered storage: Add storage service(s) to view multimedia files anywhere.
Storage services include Web storage, such as Dropbox or other services. Web
storage is sometimes referred to as the “cloud.”
• Registered devices: Stream or share multimedia content from your device to
other DLNA-compliant devices connected to the same Wi-Fi network. When you
launch Samsung Link, compatible devices on the same Wi-Fi network display
automatically in Registered devices.
Configure Samsung Link Settings
Configure Samsung Link options, such as storage location, account information, and registered
storage services.
1. Press and tap Apps > Samsung Link.
2. Tap > Settings for options:
Registered storage: Add a Web storage service, to view or share files.
My device: View your device name, used by other devices to identify your device.
Tap to change the device name.
Save to: Choose a default file storage location. You can save to your phone’s
internal memory or to an optional installed memory card (not included).
Auto upload: When turned On, photos and videos from your device will be
automatically uploaded to a Web storage service. You can also choose how files are
uploaded. Turn On Use mobile network to allow your phone to use your phone’s
connection to the wireless data network, or turn it Off to only allow uploads when
connected to Wi-Fi.
Video optimization: When turned On, video quality for streamed video content is
optimized depending on current network conditions.
Password lock: When turned On, access to Samsung Link on your device is
password-protected. You must enter your Samsung account password to start
Samsung Link.
My account: Access information about your Samsung account.
Apps and Entertainment 75
Page 88

DRAFT
FOR INTERNAL USE ONLY
Customer support: Contact the Samsung Link team via email. You must have an
email account set up on your phone to use this option.
About this service: Learn about Samsung Link.
Use Samsung Link to Share Media with Another Device
Share media with another DLNA-compliant device via Samsung Link.
Both your device, and the device(s) that connect to your device, must be on the same Wi-Fi
access point (AP). For more information about using Wi-Fi, see Wi-Fi.
1. Press and tap Apps > Samsung Link.
2. Launch AllShare Play or Samsung Link on the target device.
3. On the DEVICES & STORAGE screen, tap your device, and then tap media file(s) to
select them for streaming.
4. Tap , and then choose a device for sharing. Your device requests permission for
sharing from the target device.
5. Follow the prompts on the target device to allow sharing.
Apps and Entertainment 76
Page 89

DRAFT
FOR INTERNAL USE ONLY
Web and Data
The following topics address your phone’s data connections and the built-in Web browser.
Additional data-related features can be found in Accounts and Messaging, Applications and
Entertainment, and Tools and Calendar.
Your phone’s data capabilities let you wirelessly access the Internet or your corporate network
through a variety of connections, including:
Wi-Fi
Wi-Fi provides wireless Internet access over distances of up to 300 feet. To use your phone’s
Wi-Fi, you need access to a wireless access point or “hotspot”.
The availability and range of the Wi-Fi signal depends on a number of factors, including
infrastructure and other objects through which the signal passes.
Turn Wi-Fi On and Connect to a Wireless Network
By default, your phone’s Wi-Fi feature is turned off. Turning Wi-Fi on makes your phone able to
discover and connect to compatible in-range Wi-Fi networks (or WAPs - wireless access points).
Turn Wi-Fi on:
1. Press and tap > Settings > Connections > Wi-Fi.
2. Tap the ON/OFF switch to turn Wi-Fi On.
Tip: You can also turn Wi-Fi on and off through the Notifications panel. Drag the Notifications
panel down and tap Wi-Fi.
Note: Wi-Fi networks are self-discoverable, which means no additional steps are required for
your phone to connect to a Wi-Fi network. It may be necessary to provide a user name
and password for certain closed wireless networks.
Web and Data 77
Page 90

DRAFT
FOR INTERNAL USE ONLY
Scan and connect to a Wi-Fi network:
1. Press and tap > Settings > Connections > Wi-Fi.
2. The network names and security settings (Open network or Secured with xxx) of
detected Wi-Fi networks are displayed.
When you select an open network, you will be automatically connected to the
network.
When you select a secured network, you will need to enter the wireless password to
connect to the network. Enter the password and tap Connect. You can use the
show password option to display the password as you enter it.
Add a new Wi-Fi network manually:
1. Press and tap > Settings > Connections > Wi-Fi.
2. Tap Add Wi-Fi network.
3. Enter the Network SSID. This is the name of the Wi-Fi network.
4. Tap the Security field and select the security method used by the Wi-Fi network. If a
password is required, enter it in the Password field.
5. Tap Connect to store the new information and connect to the Wi-Fi network.
Note: The next time your phone connects to a previously accessed or secured wireless
network, you won’t prompted to enter the wireless password again, unless you reset
your phone back to its factory default settings.
Connect to a Different Wi-Fi Network
The following information is designed to help you connect your device to a different Wi-Fi
network.
1. Press and tap > Settings > Connections > Wi-Fi.
2. Detected Wi-Fi networks are displayed. To manually scan for available Wi-Fi networks,
on the Wi-Fi settings screen, tap Scan.
3. Tap another Wi-Fi network to connect to it.
Note: If the wireless network you want to connect to is not in the list of detected networks,
scroll down the screen, and tap Add network. Enter the wireless network settings and
tap Save.
Web and Data 78
Page 91

DRAFT
FOR INTERNAL USE ONLY
Data Services (Sprint 3G and 4G)
With your Sprint service, you are ready to start enjoying the advantages of data services. The
following topics will help you learn the basics of using your data services, including managing
your user name, launching a data connection, and navigating the Web with your phone.
Important! Certain data services requests may require additional time to process. While your
phone is loading the requested service, the touchscreen keyboard may appear
unresponsive when in fact it is functioning properly. Allow the phone some time
to process your data usage request.
Your Data Services User Name
When you buy your phone and sign up for service, you’re automatically assigned a user name,
which is typically based on your name and a number, followed by “@sprintpcs.com”. (For
example, the third John Smith to sign up for Sprint data services might have
[email protected] as his user name.)
When you use data services, your user name is submitted to identify you to the Nationwide
Sprint Network. Your user name is automatically programmed into your phone. You don’t have
to enter it.
Update Your User Name
If you choose to change your user name and select a new one online, or make any changes to
your services, you must then update the profile on your phone.
1. Press and tap > Settings > More > System Update.
2. Tap Update Profile.
Launch the Browser
The Browser automatically launches when a Web link is touched from within either an email or a
text message.
To launch the browser to connect browse the Internet:
► Press and tap Internet.
Note: The first time you access the Web on your phone, you may be prompted to sign in with
your phone number. Enter your number and tap Ok.
Web and Data 79
Page 92
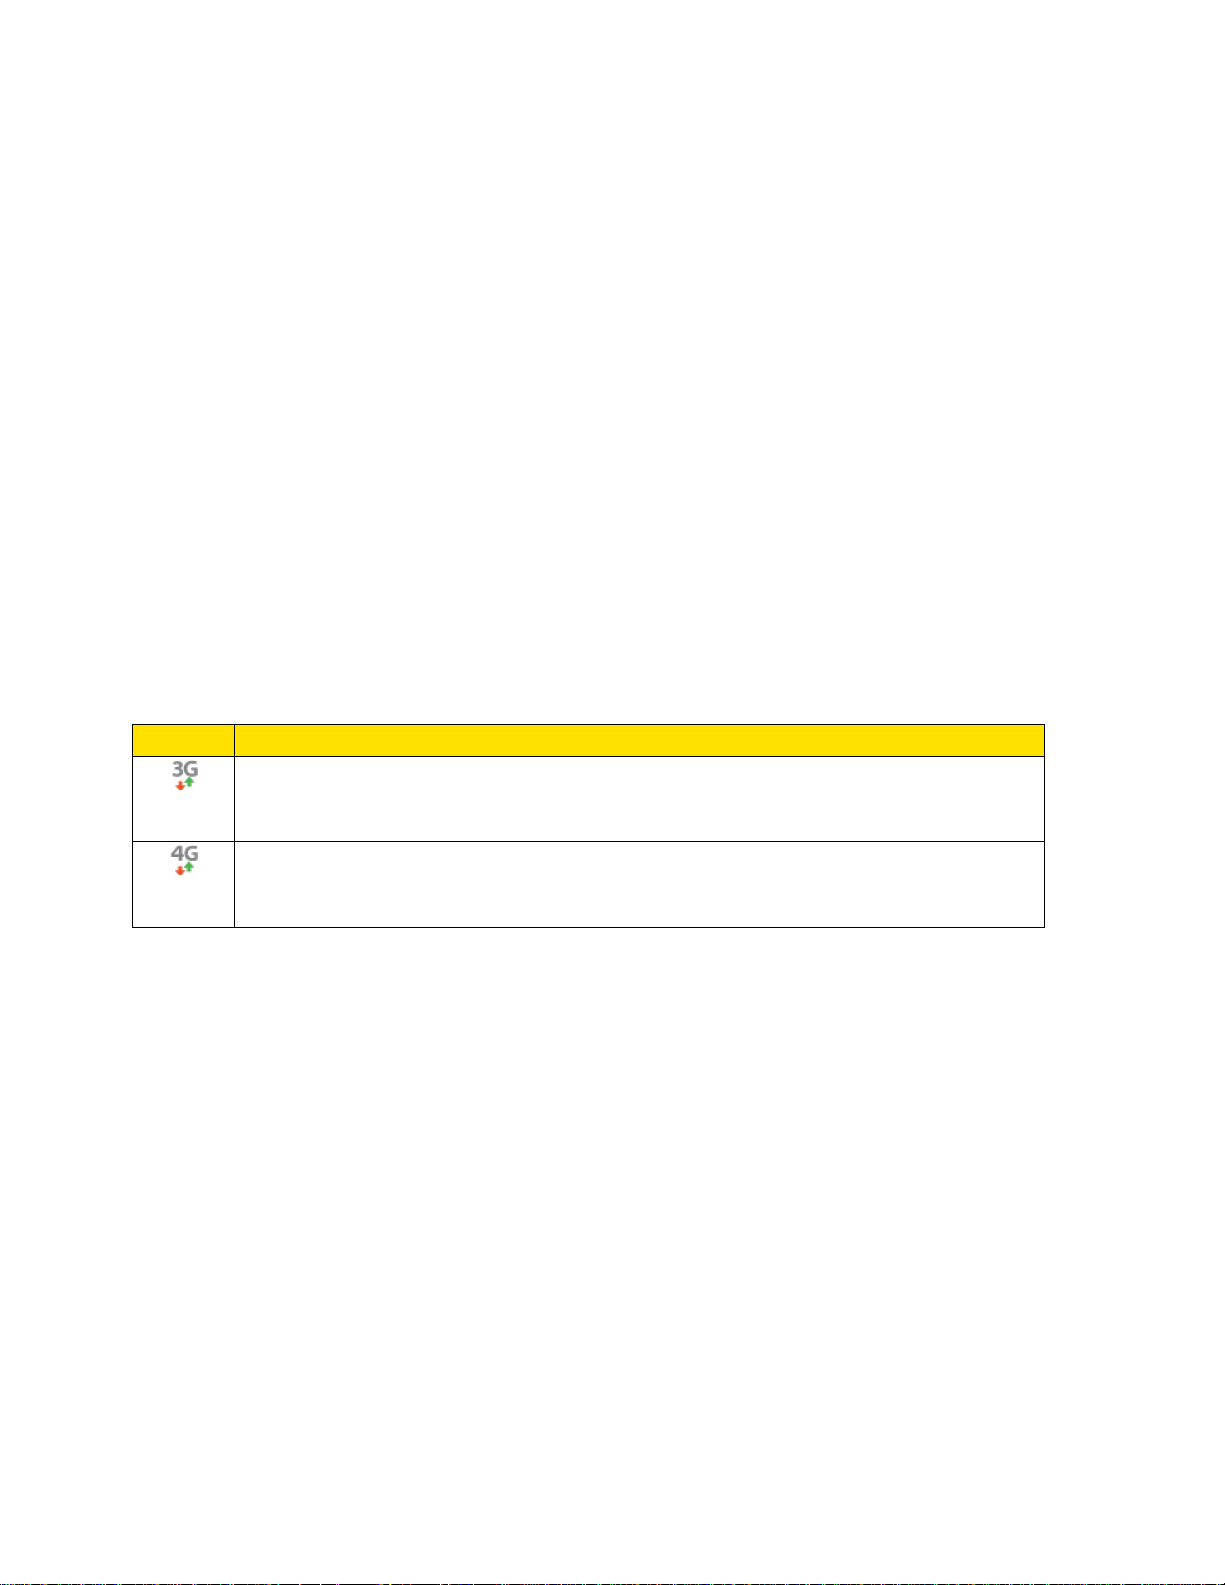
DRAFT
FOR INTERNAL USE ONLY
Icon
Description
3G Coverage: The phone is connected to the Sprint 3G network. The arrows are
colored when data is being transferred.
4G Coverage: The phone is connected to the Sprint 4G network. The arrows are
colored when data is being transferred.
4G Services
4G is a service that must be included in your service plan and also available within your area.
4G coverage is currently available in only certain markets. For more details on 4G availability go
to: www.sprint.com/4G and click the See the coverage map link.
Note: If 4G service is not included in your service plan, the 4G icon will not appear in the
Notifications area.
4G is up to 10x faster than 3G (based on download speed comparison of 3G's ~600
kbps vs. 4G's ~ 6 Mbps). (Actual speeds may vary.)
Not all services are available on 4G and coverage may default to 3G/separate network
where 4G is not available.
Important! 4G service must be added to your account before attempting a connection to the
4G network.
Depending on which icons appear within the Notifications area, your services and features will
change. The following table indicates what functions and features are available when
combinations of these service icons appear:
Virtual Private Networks (VPN)
From your phone, you can add, set up, and manage virtual private networks (VPNs) that allow
you to connect and access resources inside a secured local network, such as your corporate
network.
Prepare Your Phone for VPN Connection
Depending on the type of VPN, you may be required to enter your login credentials or install
security certificates before you can connect to your company’s local network. You can get this
information from your network administrator.
To connect to a VPN, you must have Mobile data enabled, or your phone must be connected to
a Wi-Fi network. For information about setting up and using these connections on your phone,
see Data usage and Turn Wi-Fi On and Connect to a Wireless Network.
Web and Data 80
Page 93

DRAFT
FOR INTERNAL USE ONLY
Set a Screen Lock
Before setting up a VPN, you must set a screen lock to prevent access to your phone by
unauthorized users. Pattern, PIN, or password screen locks provide sufficient security to set up
trusted credential storage.
1. Press and tap > Settings > My device.
2. Tap Lock screen > Screen lock.
3. Choose a screen lock, from Pattern, PIN, or Password.
4. Follow the prompts to configure the screen lock. For more information, see Screen lock.
Add a VPN
Configure a connected to a VPN. You must have a Pattern, PIN, or Password screen lock set
before adding a VPN.
1. Press and tap > Settings > Connections.
2. Tap More networks > VPN.
3. Tap to add a VPN with these options:
Name: Enter the name of the VPN.
Type: Choose the type of VPN, from PPTP, L2TP/IPSec PSK, L2TP/IPSec RSA,
IPSec Xauth PSK, IPSec Xauth RSA, or IPSec Hybrid RSA.
Server address: enter the VPN server address.
PPP Encryption (MPPE): Tap to enable, if applicable for the VPN.
Show advanced options: Tap to set other options, depending on the type of VPN.
3. Tap Save to save the VPN.
Connect to a VPN
Connect to a VPN that’s already set up on your phone.
1. Press and tap > Settings > Connections.
2. Tap More networks > VPN.
3. In the VPNs section, tap a VPN.
4. Follow the prompts to enter your login credentials, and connect. When you are
connected, the VPN connected icon appears in the notifications area of the Status Bar.
Web and Data 81
Page 94

DRAFT
FOR INTERNAL USE ONLY
Disconnect from a VPN
The following describes how to disconnect from a VPN connection.
1. Touch and hold the title bar, and then drag down to open the Notifications panel.
2. Tap the VPN connection to return to the VPN settings screen, and then tap the VPN
connection to disconnect from it.
When your phone has disconnected from the VPN, the VPN disconnected icon displays in the
notification area of the title bar.
Chrome
Use Chrome for Mobile to browse fast and sign in to bring your Chrome experience from your
computer, anywhere you go.
For more information, visit: google.com/intl/en/chrome/browser/mobile.
► Press and tap Apps > Chrome.
Internet
Your phone’s Internet browser gives you full access to both mobile and traditional websites on
the go, using your phone’s 3G or 4G Mobile data or Wi-Fi connections.
► Press and tap Apps > Internet.
Note: The first time you launch Internet, you may be prompted to enter your 10-digit wireless
phone number to access the Sprint Web home page.
Web and Data 82
Page 95
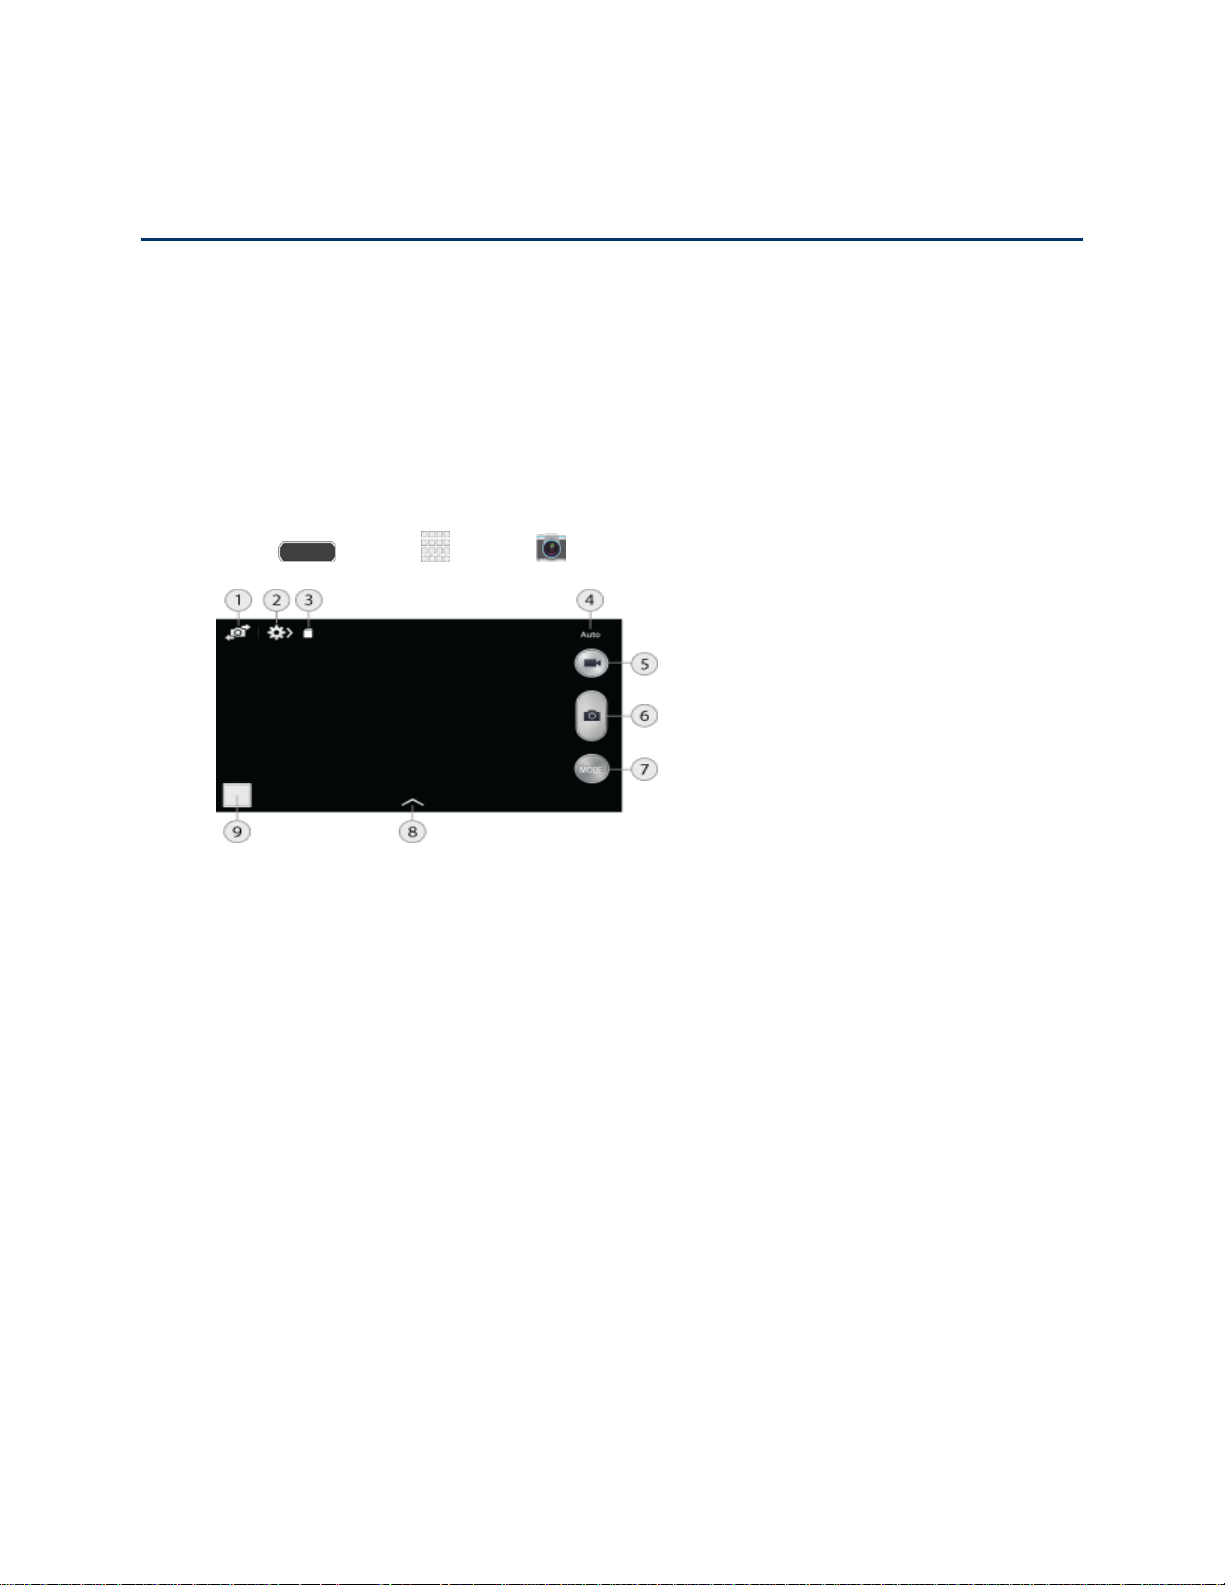
DRAFT
FOR INTERNAL USE ONLY
Pictures and Video
Camera
You can use the camera or camcorder to take and share pictures and videos.
Taking pictures with your phone’s built-in camera is as simple as choosing a subject, pointing
the camera, then pressing the camera key.
Open the Camera
Follow the below procedure to access your phone’s camera.
► Press and tap Apps > Camera.
1. Front/Back Camera: Switch between the front and back cameras.
2. Settings: Access camera settings.
3. Storage Location: Indicates the current storage location for photos and videos.
4. Mode Indicator: Displays the current shooting mode, chosen with Mode Selector.
Shooting modes allow you to choose modes for automatically adjusting settings to suit
conditions, or to access special features like panorama or other specialty shots.
5. Record: Tap to record video.
6. Capture: Tap to take a picture.
7. Mode Selector: Tap to choose a shooting mode. The current mode displays on the
camera screen.
8. Effects: Choose an effect to add to pictures or videos as you take them.
9. Gallery: View your pictures or videos.
Pictures and Video 83
Page 96

DRAFT
FOR INTERNAL USE ONLY
Take a Pictures
You can take pictures with your phone’s front or back camera, or combine shots with Dual
mode.
1. Press and tap Apps > Camera.
2. Using the phone’s screen as a viewfinder, compose your shot by aiming the camera at
the subject. While composing your picture, use the onscreen options, or these gestures:
Press the Volume Key up or down to zoom in or out, or touch the screen with two
fingers and pinch or spread them on the screen to zoom in or out.
Tap the screen to focus on the area you tapped.
3. Tap Capture to take the picture.
Note: To include your location in photos, turn on GPS tag in Settings. For more information,
see Advanced Camera Settings.
Record Videos
In addition to taking pictures, you can record, view, and send videos with your phone’s built-in
video camera.
1. Press and tap Apps > Camera.
2. Using the phone’s screen as a viewfinder, compose your shot by aiming the camera at
the subject. While composing your shot, use the onscreen options, or these gestures:
Press the Volume Key up or down to zoom in or out, or touch the screen with two
fingers and pinch or spread them on the screen to zoom.
Tap the screen to focus on the area you tapped.
3. Tap Record to begin recording. While recording, you can use these options:
Tap the screen to change the focus area to the area you tapped.
Tap Capture to take a still picture while continuing recording.
Tap Pause to temporarily stop recording.
Tap Stop to stop recording.
Pictures and Video 84
Page 97

DRAFT
FOR INTERNAL USE ONLY
Camera Options
Camera options are special options that you can choose, right on the camera screen, to make
your pictures or videos special.
1. Press and tap Apps > Camera.
2. Tap an option:
Front/Back Camera: Tap to switch between the front and back cameras. With
the front camera, you can take self-portraits or record yourself. With the back
camera, you can take pictures or record what’s in front of you.
Mode: Tap to choose a shooting mode. Scroll available modes, and then tap a
mode to select it. Modes include:
• Auto: Automatically adjusts the exposure to optimize the color and brightness of
pictures. In Auto mode, you can take single or burst shots (take burst shots by
holding Capture button to take multiple shots until you lift your finger).
• Beauty face: Automatically enhances facial features.
• Best photo: Allows you to select the best shot from multiple shots you take at
the same time.
• Continuous shot: Captures a series of photo continuously at a rate of 3 per
second for as long as you touch and hold the Capture button (maximum of 20
photos at a time). These photos are saved together as a group in a folder in
Gallery.
• Best face: Allows you to select the best shot of each subject, to get the best
possible group shot.
• Sound & shot: Adds a few seconds of background sound to enhance pictures.
• Rich tone (HDR): Allows you to take pictures in various exposures and merge
them to create pictures with rich color.
• Panorama: Take multiple pictures to merge into one expansive panoramic
picture.
• Sports: Allows you to capture clear shots of a moving subject.
• Night: Allows you to take clearer, brighter pictures in low light.
Pictures and Video 85
Page 98

DRAFT
FOR INTERNAL USE ONLY
Quick Camera Settings
Use Quick settings to quickly configure settings while you take pictures and record videos.
1. Press and tap Apps > Camera.
2. From the Camera screen, tap to access settings:
Advanced settings: Tap to access advanced camera settings. For more
information, see Advanced Camera Settings.
Flash: Tap to choose a flash setting.
Voice control: Tap to access voice control settings, for using voice commands
to take pictures and record video. For more information, see Voice Control.
Timer: Tap to choose a timer setting to delay the taking of pictures or recording.
Recording mode: Tap to choose a mode for recording. Choose Limit for MMS
to restrict recordings to a size that can be attached to a multimedia message.
Choose Normal, Slow motion, or Fast motion to control the speed of recording.
Share: Tap to choose a method for sharing pictures and videos. You can choose
Share shot, Buddy photo share, ChatON photo share, or Remote viewfinder.
Hide Settings: Tap to hide Quick camera settings.
Advanced Camera Settings
Use Advanced settings to configure default options for pictures and videos.
1. Press and tap Apps > Camera.
2. From the Camera screen, tap and then tap for these settings:
Photos:
• Photo size: Choose the default size for pictures.
• Face detection: When On, the Camera will automatically adjust settings for
taking pictures of faces.
• Metering: Set how the Camera measures the light source.
• ISO: Set the sensitivity of the camera’s light meter.
• Anti-Shake: When turned On, the camera compensates for movement of the
phone when taking pictures.
Pictures and Video 86
Page 99

DRAFT
FOR INTERNAL USE ONLY
Videos:
• Video size: Choose the default size for videos.
General:
• GPS tag: When On, GPS location information is stored in picture files.
• Review: When On, pictures display briefly after you take them so you can review
them.
• Volume Key: Choose a function for the Volume Key while using the Camera.
• Timer: Choose a timer setting to delay the taking of pictures or recording.
• White balance: Choose a setting for current light conditions.
• Exposure value: Adjust the brightness of pictures.
• Guidelines: When On, guidelines display on the screen to aid in composition.
• Flash: Choose a flash setting.
• Voice control: When On, you can take pictures or record videos by speaking
commands. For more information, see Voice Control.
• Contextual filename: When On, filenames include GPS information. GPS tag
must be enabled to use contextual filenames.
• Storage: If you have an optional memory card installed (not included), you can
choose whether to save files to device memory or to the memory card.
• Reset: Return settings to the factory defaults.
Gallery
Using the Gallery application, you can view pictures and watch videos that you’ve taken with
your phone’s camera, downloaded, or copied to an optional memory card (not included).
For pictures stored on an optional memory card, you can do basic editing such as rotating and
cropping. You can also set a picture as your contact picture or wallpaper and share pictures with
your friends.
While viewing pictures in the Gallery, scroll up the screen to view more albums. Simply tap an
album to view the photos or videos in that album.
If you have pictures or videos stored on an optional memory card (not included), they will be
display folders they are stored in, and folders are treated as albums. The actual folder names
will be used as the album names. If you have downloaded any photos and videos, these will be
placed in the All downloads album.
Pictures and Video 87
Page 100

DRAFT
FOR INTERNAL USE ONLY
Note: Tap > Help to learn about Gallery.
1. Press and tap Apps > Gallery.
2. Browse files stored in your device’s memory, or on an optional installed memory card
(not included). From the main Gallery screen, you have these options:
Tap the menu in the toolbar to display files by Albums, All, Locations, People, or
Favorites.
Tap a picture or video to display it in full screen view.
Touch and hold thumbnails to select them (indicated by a check mark).
Tap to create a New album. Give the album a name, and then select and drag
thumbnails to the album to move or copy files to the new album.
Tap to launch the Camera app.
Tap for Gallery options (options vary depending on the view):
• Select album/Select item: Depending on the view, tap albums or items to select
them. After selection, you can tap again for options you can use with the
selected item.
• Slideshow: Choose options to create a slideshow for viewing your pictures and
videos.
• Sort by oldest/latest: Sort items by date.
• Content to display: Select content to display. Options are All content, Content
in device, Content in Dropbox, Content in Facebook, and Content in Picasa.
• Scan for nearby devices: Scan for Wi-Fi devices to share photos and videos.
• Settings: Configure Gallery settings.
• Help: Get help using Gallery.
Pictures and Video 88
 Loading...