

Samsung SPH-M920ZKASPR User Manual
©2010 Sprint. SPRINT and the logo are trademarks of Sprint.
Other marks are the property of their respective owners.
10/ 8/10
User Guide
www.sprint.com

Consejo: Para encontrar esta guía para usuarios en español,
por favor visita a
Support > Devices.
To find this user guide in Spanish, please visit
www.sprint.com and click Support > Devices.
Important Privacy Message – Sprint’s policies often do not
apply to third-party applications. Third-party applications may
access your personal information or require Sprint to disclose
your customer information to the third-party application
provider. To find out how a third-party application will collect,
access, use or disclose your personal information, check the
application provider’s policies, which can usually be found on
their website. If you aren’t comfortable with the third-party
www.sprint.com y haz clic en
application’s policies, don’t use the application.
Open Source Software – Some software components of this
product incorporate source code covered under GNU General
Public License (GPL), GNU Lesser General Public License
(LGPL), OpenSSL License, BSD License and other open
source licenses. To obtain the source code covered under the
open source licenses, please visit:
http://opensource.samsungmobile.com/index.jsp.
This device uses open source software. Press
Settings > About phone > Legal information on the
and tap
device for more details
SPH-M920_UG_DI01_PS_100810_F6
>
Table of Contents
Tip: Looking for something? If you don’t see it in the headings
listed here, try the Index on page 213.
Introduction . . . . . . . . . . . . . . . . . . . . . . . . . . . . . . . . . i
Your Device’s Menu . . . . . . . . . . . . . . . . . . . . . . . . . . i
Section 1: Getting Started . . . . . . . . . . . . . . . . . 1
1A. Setting Up Service . . . . . . . . . . . . . . . . . . . 2
Setting Up Your Device . . . . . . . . . . . . . . . . . . . . . . 2
Activating Your Device . . . . . . . . . . . . . . . . . . . . . . 4
Setting Up Your Voicemail . . . . . . . . . . . . . . . . . . . 7
Sprint Account Passwords . . . . . . . . . . . . . . . . . . . 8
Getting Help . . . . . . . . . . . . . . . . . . . . . . . . . . . . . . . 8
Section 2: Your Device . . . . . . . . . . . . . . . . . . . 11
2A. Device Basics . . . . . . . . . . . . . . . . . . . . . . 12
Your Device . . . . . . . . . . . . . . . . . . . . . . . . . . . . . . . 13
Viewing the Display Screen . . . . . . . . . . . . . . . . . 17
Turning Your Device On and Off . . . . . . . . . . . . . 20
Battery and Charger . . . . . . . . . . . . . . . . . . . . . . . 21
Device Function Keys . . . . . . . . . . . . . . . . . . . . . . 24
Navigation and Customization . . . . . . . . . . . . . . 28
Displaying Your Phone Number . . . . . . . . . . . . . 42
Entering Text Using the Onscreen Keyboard . . 42
Entering Text Using the QWERTY Keyboard . . 46
Creating a Google Account . . . . . . . . . . . . . . . . 50
2B. Making and Answering Calls . . . . . . . . . 51
Making Calls . . . . . . . . . . . . . . . . . . . . . . . . . . . . . 51
Dialing Options . . . . . . . . . . . . . . . . . . . . . . . . . . . 52
Answering Calls . . . . . . . . . . . . . . . . . . . . . . . . . . 52
Missed Call Notification . . . . . . . . . . . . . . . . . . . . 53
Calling Emergency Numbers . . . . . . . . . . . . . . . 53
In-Call Options . . . . . . . . . . . . . . . . . . . . . . . . . . . . 55
End-of-Call Options . . . . . . . . . . . . . . . . . . . . . . . 56
Additional Calling Options . . . . . . . . . . . . . . . . . . 56
Saving a Phone Number . . . . . . . . . . . . . . . . . . . 57
Finding a Phone Number . . . . . . . . . . . . . . . . . . 58
Dialing From the Contacts List . . . . . . . . . . . . . . 58
Using Favorites . . . . . . . . . . . . . . . . . . . . . . . . . . . 58
Plus (+) Code Dialing . . . . . . . . . . . . . . . . . . . . . . 59
2C. Settings . . . . . . . . . . . . . . . . . . . . . . . . . . . . 60
Sound Settings . . . . . . . . . . . . . . . . . . . . . . . . . . . 60
Display Settings . . . . . . . . . . . . . . . . . . . . . . . . . . . 63

Language Settings . . . . . . . . . . . . . . . . . . . . . . . . 66
Location Settings . . . . . . . . . . . . . . . . . . . . . . . . . 66
Synchronizing Accounts . . . . . . . . . . . . . . . . . . . . 67
Search Settings . . . . . . . . . . . . . . . . . . . . . . . . . . . . 70
Call Settings . . . . . . . . . . . . . . . . . . . . . . . . . . . . . . 71
Airplane Mode . . . . . . . . . . . . . . . . . . . . . . . . . . . . 72
TTY Use With Sprint Service . . . . . . . . . . . . . . . . 72
Security Settings . . . . . . . . . . . . . . . . . . . . . . . . . . . 74
2D. Call Log . . . . . . . . . . . . . . . . . . . . . . . . . . . . 81
Viewing Call Log . . . . . . . . . . . . . . . . . . . . . . . . . . . 81
Call Log Options . . . . . . . . . . . . . . . . . . . . . . . . . . 82
Making a Call From Call Log . . . . . . . . . . . . . . . 84
Saving a Number From Call Log . . . . . . . . . . . . 84
Altering a Number From Call Log . . . . . . . . . . . 85
Erasing the Call Log . . . . . . . . . . . . . . . . . . . . . . . 85
2E. Contacts . . . . . . . . . . . . . . . . . . . . . . . . . . . 86
Creating a New Contacts Entry . . . . . . . . . . . . . 86
Confirming Contact Synchronization . . . . . . . . 88
Contacts Menu Options . . . . . . . . . . . . . . . . . . . 89
Contacts Entry Options . . . . . . . . . . . . . . . . . . . . 90
Editing a Contacts Entry . . . . . . . . . . . . . . . . . . . . 91
Adding a Number to a Contacts Entry . . . . . . . 92
Editing a Contacts Entry’s Number . . . . . . . . . . . 92
Sending Contacts . . . . . . . . . . . . . . . . . . . . . . . . . 93
Assigning a Picture to an Entry . . . . . . . . . . . . . . 93
Deleting Entries . . . . . . . . . . . . . . . . . . . . . . . . . . . 94
Adding Entries to Your Favorites . . . . . . . . . . . . . 94
2F. Calendar & Tools . . . . . . . . . . . . . . . . . . . 95
Before You Begin . . . . . . . . . . . . . . . . . . . . . . . . . . 95
Calendar . . . . . . . . . . . . . . . . . . . . . . . . . . . . . . . . . 95
Alarm Clock . . . . . . . . . . . . . . . . . . . . . . . . . . . . . 101
Calculator . . . . . . . . . . . . . . . . . . . . . . . . . . . . . . . 102
Updating Your Device Firmware . . . . . . . . . . . . 103
Updating Your Android Operating System . . . 105
Updating Your Profile . . . . . . . . . . . . . . . . . . . . . 105
Updating Your PRL . . . . . . . . . . . . . . . . . . . . . . . 106
2G. Voice Services . . . . . . . . . . . . . . . . . . . . 107
Voice Dialing . . . . . . . . . . . . . . . . . . . . . . . . . . . . . 107
Opening Menus With Voice Dialer . . . . . . . . . . 109
Text-to-Speech . . . . . . . . . . . . . . . . . . . . . . . . . . . 109
Voice Search . . . . . . . . . . . . . . . . . . . . . . . . . . . . 110

2H. microSD Card . . . . . . . . . . . . . . . . . . . . . 111
Your Device’s microSD Card and Adapter . . . 111
Connecting Your Device to Your Computer . . 113
microSD Card Settings . . . . . . . . . . . . . . . . . . . . 116
Important Connection Information . . . . . . . . . . 117
2I. Camera . . . . . . . . . . . . . . . . . . . . . . . . . . . 118
Taking Pictures . . . . . . . . . . . . . . . . . . . . . . . . . . . 118
Recording Videos . . . . . . . . . . . . . . . . . . . . . . . . 124
2J. Bluetooth . . . . . . . . . . . . . . . . . . . . . . . . . . 127
Turning Bluetooth On and Off . . . . . . . . . . . . . . 127
Using the Bluetooth Settings Menu . . . . . . . . . 128
Pairing Bluetooth Devices . . . . . . . . . . . . . . . . . 129
Sending Contacts via Bluetooth . . . . . . . . . . . . 131
Disconnecting Bluetooth Connection
During an Active Call . . . . . . . . . . . . . . . . . . . . . 132
Section 3: Sprint Service. . . . . . . . . . . . . . . . 133
3A. Sprint Service: The Basics . . . . . . . . . . 134
Visual Voicemail . . . . . . . . . . . . . . . . . . . . . . . . . . 134
Text Messaging (SMS) . . . . . . . . . . . . . . . . . . . . 139
Multimedia Messaging (MMS) . . . . . . . . . . . . . 141
Caller ID . . . . . . . . . . . . . . . . . . . . . . . . . . . . . . . . . 145
Call Waiting . . . . . . . . . . . . . . . . . . . . . . . . . . . . . 145
Making a 3-Way Call . . . . . . . . . . . . . . . . . . . . . 146
Call Forwarding . . . . . . . . . . . . . . . . . . . . . . . . . . 147
Roaming . . . . . . . . . . . . . . . . . . . . . . . . . . . . . . . . 147
3B. Web and Data Services . . . . . . . . . . . . . 151
Getting Started With Data Services . . . . . . . . . 151
Navigating the Web . . . . . . . . . . . . . . . . . . . . . . 153
Wi-Fi . . . . . . . . . . . . . . . . . . . . . . . . . . . . . . . . . . . 160
Email . . . . . . . . . . . . . . . . . . . . . . . . . . . . . . . . . . . 162
Using the Android Market . . . . . . . . . . . . . . . . . 174
Sprint Applications . . . . . . . . . . . . . . . . . . . . . . . 175
3C. Entertainment: TV and Music . . . . . . . . 180
Getting Started with Sprint TV and Music . . . 180
Sprint TV . . . . . . . . . . . . . . . . . . . . . . . . . . . . . . . . 181
Music . . . . . . . . . . . . . . . . . . . . . . . . . . . . . . . . . . . 181
Streaming Music . . . . . . . . . . . . . . . . . . . . . . . . . 183
YouTube . . . . . . . . . . . . . . . . . . . . . . . . . . . . . . . . 184
3D. GPS Navigation . . . . . . . . . . . . . . . . . . . . 185
GPS Services . . . . . . . . . . . . . . . . . . . . . . . . . . . . 185
Google Maps . . . . . . . . . . . . . . . . . . . . . . . . . . . . 185
TeleNav GPS Navigator . . . . . . . . . . . . . . . . . . . 187

Getting Driving Directions . . . . . . . . . . . . . . . . . 189
Navigation . . . . . . . . . . . . . . . . . . . . . . . . . . . . . . 194
Section 4: Safety and Warranty
Information . . . . . . . . . . . . . . . . . . . . . . . . . . . . . 195
4A. Important Safety Information . . . . . . . . 196
General Precautions . . . . . . . . . . . . . . . . . . . . . . 196
Maintaining Safe Use of and Access to
Your Phone . . . . . . . . . . . . . . . . . . . . . . . . . . . . . . 197
Using Your Phone With a Hearing
Aid Device . . . . . . . . . . . . . . . . . . . . . . . . . . . . . . 198
Caring for the Battery . . . . . . . . . . . . . . . . . . . . 200
Radio Frequency (RF) Energy . . . . . . . . . . . . . 201
Owner’s Record . . . . . . . . . . . . . . . . . . . . . . . . . 203
User Guide Proprietary Notice . . . . . . . . . . . . . 203
4B. Manufacturer’s Warranty . . . . . . . . . . . . 204
Manufacturer’s Warranty . . . . . . . . . . . . . . . . . . 204
Index . . . . . . . . . . . . . . . . . . . . . . . . . . . . . . . . . . . . 213
Introduction
Your Device’s Menu
This User Guide introduces you to Sprint® service and
all the features of your new device. It’s divided into four
sections:
⽧ Section 1: Getting Started
⽧ Section 2: Your Device
⽧ Section 3: Sprint Service Features
⽧ Section 4: Safety and Warranty Information
Note: Because of updates in phone software, this printed
guide may not be the most current version for your
phone. Visit
to access the most recent version of the user guide.
WARNING: Please refer to the Important Safety Information
www.sprint.com and sign on to My Sprint
section on page 196 to learn about information
that will help you safely use your phone. Failure to
read and follow the Important Safety Information
in this phone guide may result in serious bodily
injury, death or property damage.
The following table outlines your device’s main menu
structure. For more information about using your
device’s menus, see “Navigation and Customization”
on page 28.
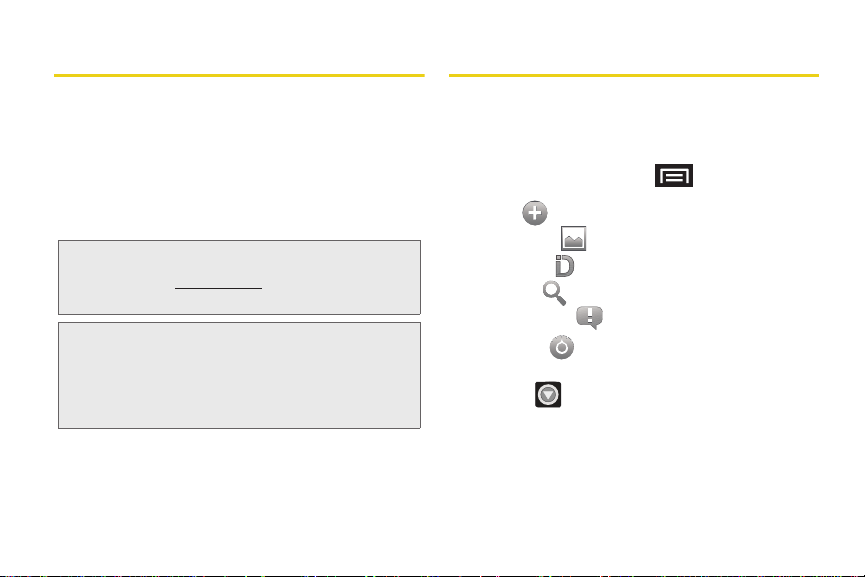
From the Home screen, press
to open the
menu:
䡲 Add ( )
䡲 Wallpaper ( )
䡲 Sprint ID ( )
䡲 Search ( )
䡲 Notifications ( )
䡲 Settings ( )
Device menus with additional options (“sub-options”)
appear with adjacent to the list entry.
Tap this onscreen button to reveal these additional
options and features.
i
ii
> Add
1: Shor tcuts
1: Applications 2: Bookmark
3: Contact 4: Direct dial
5: Direct message 6: Directions & Navigation
7: Gmail label 8: Latitude
9: Music playlist 10: Settings
2: Widgets
1: Analog clock 2: Latitude
3: Music 4: Picture frame
5: Power Control 6: Search
7: Sprint Tutorial Widget #1
8: Sprint Tutorial Widget #2
9: Sprint Tutorial Widget #3
10: Sprint Tutorial Widget #4
11: Sprint Tutorial Widget #5
12: Voicemail 13: YouTube
3: Folders
1: New folder 2: All contacts
3: Contacts with phone numbers
4: Google Contacts 5: Starred contacts
4: Wallpapers
1: ID wallpapers 2: Pictures
3: Wallpaper gallery
> Wallpaper
1: ID wallpapers
2: Pictures
3: Wallpaper gallery
> Sprint ID
1: My ID 2: Get New
> Search
> Notifications
> Settings > Wireless & networks
1: Airplane mode (On/Off)
2: Wi-Fi (On/Off)
3: Wi-Fi settings
1: Wi-Fi (On/Off) 2: Network notification (On/Off)
3: Add Wi-Fi network
4: Bluetooth (On/Off)
5: Bluetooth settings
1: Bluetooth (On/Off) 2: Device name
3: Discoverable (On/Off) 4: Scan for devices
6: VPN settings
7: Mobile networks
1: Data roaming (On/Off)
2: Call Guard (On/Off)
3: Data Roaming Guard (ON/OFF)
4: System select (Home only/Automatic)
8: Dial Up Networking (On/Off)
> Settings > Call settings
1: North American dialing (On/Off)
2: International dialing
3: DDTM
1: OFF 2: ON
4: TTY
1: TTY Off 2: TTY HCO
3: TTY VCO 4: TTY Full
5: Voicemail settings
1: Notifications 2: Pictures (On/Off)
3: Speakerphone (On/Off)
4: Change greeting 5: From name
6: Check for upgrade 7: About Voicemail
> Settings > Sound & display
Sound settings:
1: Silent mode (On/Off)
2: Ringer volume
1: Use incoming call volume for notifications
3: Media volume
4: Phone ringtone
5: Phone vibrate (On/Off)
6: Notification ringtone
7: Audible touch tones (On/Off)
8: Audible selection (On/Off)
9: Haptic feedback (On/Off)
10: SD card notifications (On/Off)
Display settings:
1: Orientation (On/Off)
2: Animation
1: No animations 2: Some animations
3: All animations
iii
3: Auto Brightness (On/Off)
4: Brightness
5: Screen timeout
1: 8 seconds 2: 15 seconds
3: 30 seconds 4: 1 minute
5: 2 minutes 6: 10 minutes
7: 30 minutes
6: Keyboard timeout
1: 3 seconds 2: 6 seconds
3: 20 seconds 4: 1 minute
5: Same as Screen timeout
> Settings > Location & security
My Location:
1: Use wireless networks (On/Off)
2: Use GPS satellites (On/Off)
Screen unlock pattern:
1: Set unlock pattern
2: Require pattern (On/Off)
3: Use visible pattern (On/Off)
4: Use tactile feedback (On/Off)
iv
Passwords:
1: Visible passwords (On/Off)
Credential storage:
1: Use secure credentials (On/Off)
2: Install from SD card
3: Set password
4: Clear storage
> Settings > Applications
1: Unknown sources (On/Off)
2: Quick launch
3: Manage applications
4: Running services
5: Development
1: USB debugging (On/Off)
2: Stay awake (On/Off)
3: Allow mock locations (On/Off)
> Settings > Accounts & sync
General sync settings:
1: Background data (On/Off)
2: Auto-sync (On/Off)
Manage accounts:
> Settings > Privacy
Location:
1: Use My Location (On/Off)
Personal data:
1: Factory data reset
> Settings > SD card & phone
storage
SD card:
1: Total space
2: Available space
3: Unmount SD card
4: Format SD card
Internal phone storage:
1: Available space
> Settings > Search
Web search:
1: Google search settings
1: Show web suggestions
2: Search history 3: Manage search history
Quick Search Box:
1: Searchable items
1: Browser (On/Off) 2: Apps (On/Off)
3: Contacts (On/Off) 4: Voicemail (On/Off)
5: YouTube (On/Off) 6: Music (On/Off)
2: Clear search shortcuts
> Settings > Language & keyboard
1: Select locale
1: English 2: Español
Text settings:
1: Android keyboard (On/Off)
v
2: Android keyboard
1: Vibrate on keypress (On/Off)
2: Sound on keypress (On/Off)
3: Auto-capitalization (On/Off
4: Voice input (On/Off)
5: Quick fixes (On/Off)
6: Show suggestions (On/Off)
7: Auto-complete (On/Off)
3: Device keyboard
1: Auto-replace (On/Off) 2: Auto-cap (On/Off)
3: Auto-punctuate (On/Off)
4: User dictionary
> Settings > Accessibiltiy
1:Accessibility (On/Off)
Accessibility services:
1: TalkBack (On/Off)
2: SoundBack (On/Off)
3: KickBack (On/Off)
> Settings > Text-to-speech
1: Listen to an example
2: Install voice data
vi
3: Always use my settings (On/Off)
4: Speak incoming caller ID (On/Off)
Default settings:
1: Speech rate
2: Language
1: American English 2: Spanish
> Settings > Date & time
1: Automatic (On/Off)
2: Set date
3: Select time zone
4: Set time
5: Use 24-hour format (On/Off)
6: Select date format
1: No rm al (12/31/2 010)
2: 12/31/2010
3: 31/12/2010
4: 2010/12/31
> Settings > About phone
1: System Updates
1: Update Firmware 2: Update Profile
3: Update PRL 4: Update Android
2: Status
1: Battery status 2: Phone number
3: MIN 4: PRL Version
5: MEID 6: Network
7: Signal strength 8: Mobile network type
9: Service state 10: Roaming
11: Mobile network state 12: Wi-Fi MAC address
13: Bluetooth address 14: Up time
3: Battery use
4: Legal information
1: Open source licenses 2: Google legal
3: Privacy Alert from Sprint
5: System tutorial
6: Model number
7: Firmware version
8: Baseband version
9: Kernel version
10: Bu ild n umbe r
11: Hardware version
In Use Menu
While in an active call, press to display the
following options:
1: Show/Hide dialpad 2: Add call
3: End call 4: Mute/Unmute
5: Speaker (On/Off) 6: Bluetooth (On/Off)
WARNING: If your device has a touchscreen display,
please note that a touchscreen responds best to
a light touch from the pad of your finger. Using
excessive force or a metallic object when
pressing on the touchscreen may damage the
tempered glass surface and void the warranty.
See “Manufacturer’s Warranty” on page 204.
vii


Section 1
Getting Started

⽧ Setting Up Your Device (page 2)
1A. Setting Up Service
Release Latch
⽧ Activating Your Device (page 4)
⽧ Setting Up Your Voicemail (page 7)
⽧ Sprint Account Passwords (page 8)
⽧ Getting Help (page 8)
Setting Up Your Device
1. Install the battery.
䡲 Remove the battery from its packaging.
䡲 Grasp the device firmly and locate the cover
release latch.
䡲 Place your fingernail in the opening and firmly
“pop” the cover off the device (similar to a soda
can).
2 1A. Setting Up Service
䡲 Insert the battery into the opening in the back of
the device, making sure the connectors align.
Gently press down to secure the battery.
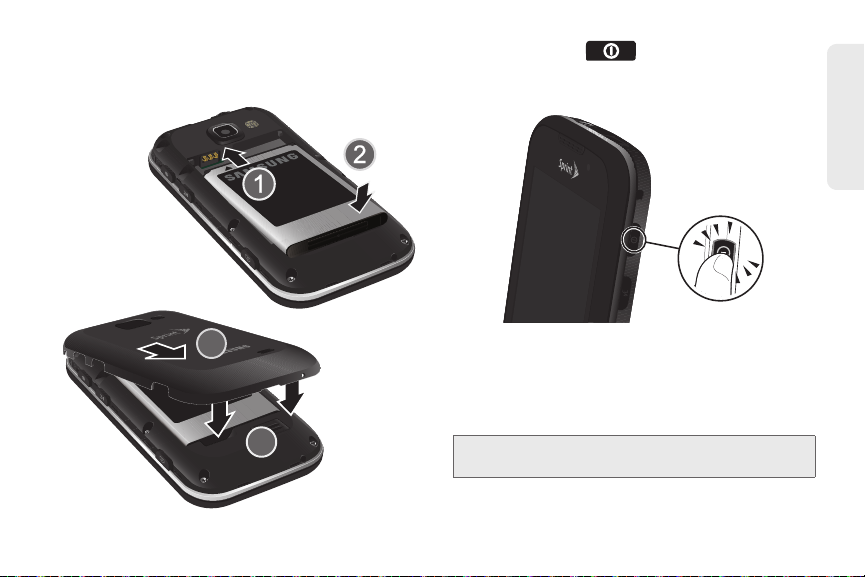
䡲 Position the battery cover over the battery
compartment and press down until you hear a
click.
2. Press and hold to turn the device on.
䡲 If your device is activated, it will turn on, search for
Sprint service and enter standby mode.
Setting Up Service
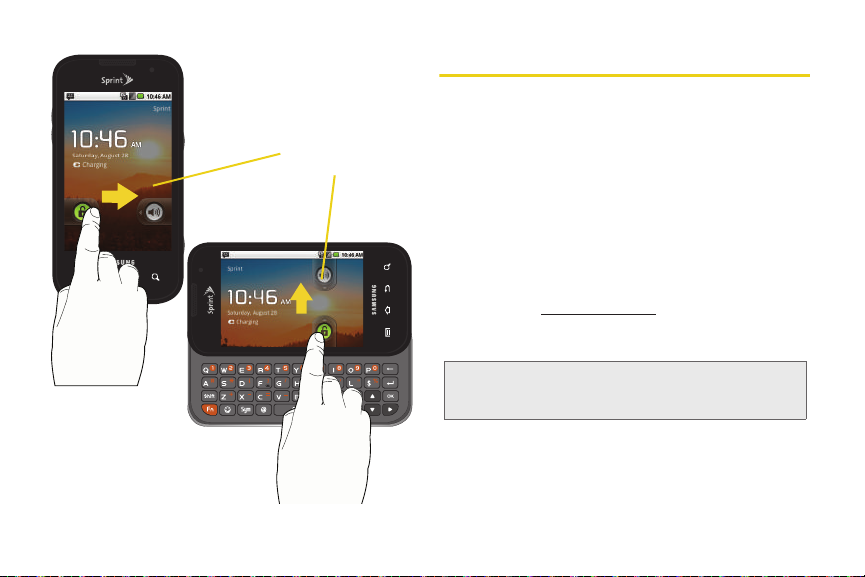
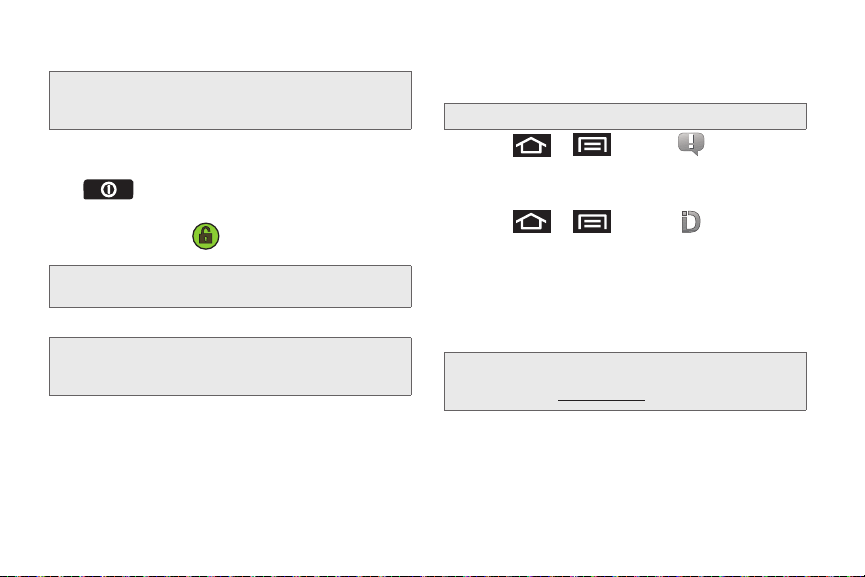
Unlocking Your Device Screen
䊳 To unlock your phone from this screen, touch and
drag the lock icon across the screen or slide the
QWERTY keyboard out.
Note: The screens can be different and are based on the
installed screen image that users pack
1A. Setting Up Service 3
Unlock Screen
4 1A. Setting Up Service
Activating Your Device
䢇 If you purchased your device at a Sprint Store, it is
probably activated and ready to use.
䢇 If you received your device in the mail and it is for a new
Sprint account or a new line of service, it is designed to
activate automatically. To confirm your activation,
make a phone call.
䢇 If you received your device in the mail and you are
activating a new device for an existing number on your
account, (you’re swapping phones), you can activate
on your computer online or directly on your phone.
䡲 Activate on your computer:
● Go to sprint.com/activate and follow the
instructions.
䡲 Activate on your phone:
Important: For security reasons, you will need your Sprint
1. Turn on your new phone. (Make sure the old one is
phone number and PIN to use this activation
method.
turned off.) Your phone will automatically attempt
Hands-Free Activation.
Note: Your phone will need to complete one hands-free
activation attempt before you can continue.
2. Tap Activate to override auto-activation and start
the manual activation wizard.
Note: If you don’t override Hands-Free Activation, your phone
will attempt to auto activate five times. Wait for
appear on your screen. Tap
Activate.
Retry and then tap
Retry to
3. Follow the on-screen prompts to complete the
activation process.
4. After you have completed the wizard, make a
phone call to confirm your activation.
If your device is still not activated or you do not have
access to the Internet, contact Sprint Customer
Service at
Tip: Do not press while the device is being activated.
Note: If you are having difficulty with activation, contact Sprint
1-888 -211- 4727 for assistance.
Pressing cancels the activation process.
Customer Service by dialing
other phone.
1-888-211-4727 from any
Sprint ID
Once your device is activated, the next thing you will
need to do is to install an ID Pack. ID Packs are
bundles of applications, ringtones, wallpapers, settings,
and more. ID Packs are installed using an application
called Sprint ID.
You can have up to six ID Packs installed at any one
time, and you can easily switch from one ID Pack to
another without losing any applications already
installed.
For example, when you install the Sprint ID pack, Sprint
applications such as Sprint TV, TeleNav™ GPS
Navigator, NASCAR Sprint Cup Mobile, and Sprint
Football Live will remain in your applications.
Before you can begin using your newly activated device,
you must first install a Sprint ID Pack.
1A. Setting Up Service 5
Setting Up Service
Installing Your First ID Pack
Note: Your device must be activated, your battery should be
fully charged, and you should be in a network coverage
area before you install an ID Pack.
1. Tap Install an ID on the Welcome to Sprint ID screen.
䡲 If your device is in PowerSave mode, press
to reactivate the screen.
䡲 If the lock screen appears, unlock it by dragging
the
Unlock icon to the right side of the
screen.)
Note: You also have the ability to place an emergency call
directly from the Welcome to
2. Touch an ID Pack on the Sprint ID screen.
Note: The Sprint ID pack comes with wallpapers, ringtones,
and applications such as
Football, and NASCAR.
3. Read the information screen for a description of
the ID Pack and touch
4. Tou ch Agree to accept the Terms & Conditions of
the ID Pack.
6 1A. Setting Up Service
Sprint ID screen.
Sprint TV, Navigation, Music,
Install.
5. If prompted, touch Continue on any following
screens until you see the Downloading... progress
icon in the upper-left corner of your screen.
WARNING: DO NOT interrupt the download process.
6. Press > and tap (Notifications)
and tap
ID ready to install to install the ID Pack.
Switching ID Packs
1. Press > and tap (Sprint ID).
2. Tap an ID Pack to replace your current pack.
– or –
Get New to install a new ID Pack and follow
Tap
steps 2–5 of “Installing Your First ID Pack” on
page 6.
Note: Certain features of Sprint ID are subject to change. For
the most up-to-date information about using Sprint ID,
please visit
www.sprint.com.
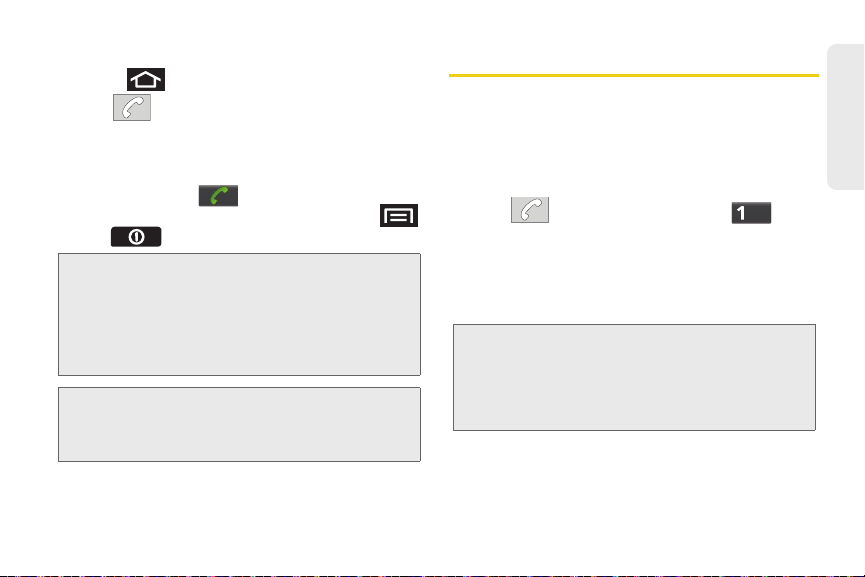
Making Your First Call
1. Press to access the Home screen and
tap to access the onscreen dialpad.
䡲 If your device is locked, touch and drag the lock
icon to the right.
2. Use the onscreen dialpad to enter a phone
number and tap .
䡲 If your device is in PowerSave mode, press
or to reactivate the screen.
WARNING: If your device has a touchscreen display, please
Note: Your device’s battery should have enough charge for
note that a touchscreen responds best to a light
touch from the pad of your finger. Using
excessive force or a metallic object when
pressing on the touchscreen may damage the
tempered glass surface and void the warranty.
(See “Manufacturer’s Warranty” on page 204.)
your device to turn on and find a signal, set up your
voicemail and make a call. You should fully charge
your battery as soon as possible.
Setting Up Your Voicemail
Your device automatically transfers all unanswered
calls to your voicemail, even if your device is in use or
turned off. You should set up your Sprint Voicemail and
personal greeting as soon as your device is activated.
Always use a password to protect against unauthorized
access.
1. Tap and then touch and hold .
2. Follow the system prompts to:
䡲 Create your password.
䡲 Record your name announcement.
䡲 Record your greeting.
Note: Voicemail Password
Sprint strongly recommends that you create a
password when setting up your voicemail to protect
against unauthorized access. Without a password,
anyone who has access to your device is able to
access your voicemail messages.
For more information about using your Visual
Voicemail, see “Visual Voicemail” on page 134.
1A. Setting Up Service 7
Setting Up Service

Sprint Account Passwords
As a Sprint customer, you enjoy unlimited access to
your personal account information, your voicemail
account, and your data services account. To ensure
that no one else has access to your information, you
will need to create passwords to protect your privacy.
Account Username and Password
If you are the account owner, you will create an account
username and password when you sign on to
www.sprint.com. (Click Sign in and then click Sign up
now! to get started.) If you are not the account owner (if
someone else receives the bill for your Sprint service),
you can get a sub-account password at
Voicemail Password
You’ll create your voicemail password (or passcode)
when you set up your voicemail. See “Setting Up Your
Voicemail” on page 7 for more information on your
voicemail password.
8 1A. Setting Up Service
www.sprint.com.
Data Services Password
With your Sprint device, you may elect to set up an
optional data services password to control access and
authorize Premium Service purchases.
For more information, or to change your passwords,
sign on to
Service at
www.sprint.com or call Sprint Customer
1-888-211-4727.
Getting Help
Managing Your Account
Online: www.sprint.com
䢇 Access your account information.
䢇 Check your minutes used (depending on your Sprint
service plan).
䢇 View and pay your bill.
䢇 Enroll in Sprint online billing and automatic payment.
䢇 Purchase accessories.
䢇 Shop for the latest Sprint phones.
䢇 View available Sprint service plans and options.
䢇 Learn more about data services and other products
like Sprint Picture Mail, games, ringers, screen savers
and more.
From Your Sprint Phone
䢇 Tap to check minute usage and
account balance.
䢇 Tap to make a payment.
䢇 Tap to add a new line of
service, upgrade your device, purchase accessories
or access other account services.
䢇 Tap to access a summary of
your Sprint service plan or get answers to other
questions.
From Any Other Phone
䢇 Sprint Customer Service: 1-8 88-211-4727.
䢇 Business Customer Service: 1-800-927-2199.
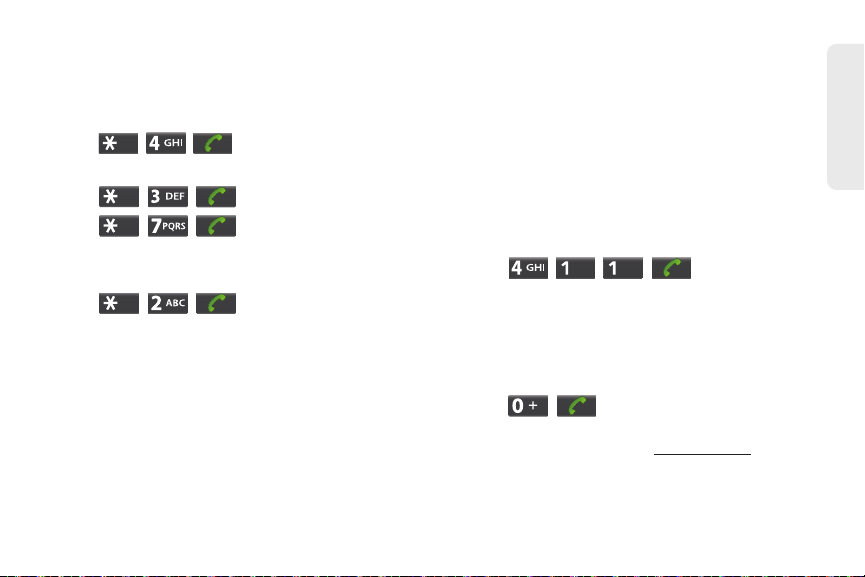
Sprint 411
Sprint 411 gives you access to a variety of services and
information, including residential, business and
government listings, movie listings or showtimes,
driving directions, restaurant reservations and major
local event information. You can get up to three pieces
of information per call, and the operator can
automatically connect your call at no additional charge.
There is a per-call charge to use Sprint 411, and you
will be billed for airtime.
䊳 Tap .
Sprint Operator Services
Sprint Operator Services provides assistance when you
place collect calls or when you place calls billed to a
local telephone calling card or third party.
䊳 Tap .
For more information or to see the latest in products
and services, visit us online at
www.sprint.com.
1A. Setting Up Service 9
Setting Up Service


Section 2
Your Device
⽧ Your Device (page 13)
2A. Device Basics
⽧ Viewing the Display Screen (page 17)
⽧ Turning Your Device On and Off (page 20)
⽧ Battery and Charger (page 21)
⽧ Device Function Keys (page 24)
⽧ Navigation and Customization (page 28)
⽧ Displaying Your Phone Number (page 42)
⽧ Entering Text Using the Onscreen Keyboard (page 42)
⽧ Entering Text Using the QWERTY Keyboard (page 46)
⽧ Creating a Google Account (page 50)
12 2A. Device Basics
Tip: Device Software Upgrades – Updates to your device’s
software may become available from time to time. Sprint
will automatically upload critical updates to your device.
• You can also use the menu to check for and
download updates. Press > and tap
Settings > About phone > System Updates >
Update Firmware to search for and download
available updates.
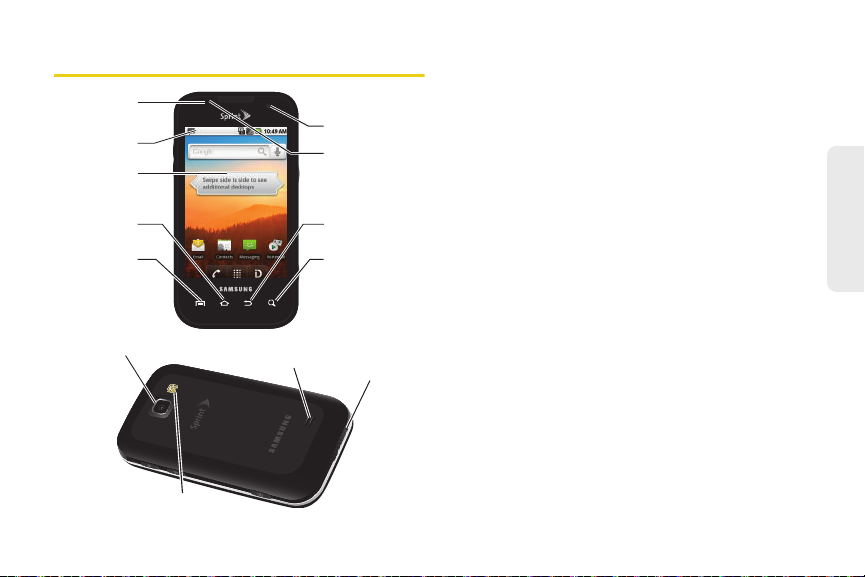
Your Device
3. Touchscreen
Display
9. External
Speaker
5. MENU Key
1. Light
Sensor
2. Status Bar
Icons
4. HOME Key
8. Microphone
12. Proximity
Sensor
10. SEARCH Key
11. BACK Key
7. Flash
6. Camera
Lens
13. Self Camera
Lens
Key Functions
1. Light sensor lets you use the ambient light level to
adjust the screen brightness/contrast.
䡲 In a bright light condition (outdoors), the sensors
cause the device to increase the brightness and
contrast for better viewing.
䡲 In dim light conditions, the device increases the
screen brightness to compensate.
2. Status Bar Icons provide information about your
device’s status and options, such as signal
strength, wireless technology, roaming, ringer
setting, messaging, and battery charge.
3. Touchscreen Display displays all the information
needed to operate your device, such as the call
status, the Contacts list, and the date and time.
Also provides one-touch access to all of your
features and applications.
4. HOME Key returns you to the Home screen. Press
and hold to open the recently-used applications
window.
2A. Device Basics 13
Device Basics

5.
MENU Key allows you to access your device’s main
functions menu: Add, Wallpaper, Sprint ID, Search,
Notifications, and Settings. While in a menu, press
to open a list of actions available from the current
screen or onscreen option.
䡲 During an active call, press to open additional call
options such as Add call, Merge calls, Mute, or
Bluetooth.
6. Camera Lens, as part of the built-in 3.0 megapixel
camera, this lens lets you take pictures and videos.
7. Flash, as part of the built-in camera, provides an
additional light source for pictures and videos
during low-light conditions.
8. Microphone allows other callers to hear you clearly
when you are speaking to them.
9. External Speaker lets you hear the different ringers
and sounds. You can mute the ringer when
receiving incoming calls by pressing the volume
button. The speaker also lets you hear the caller’s
voice in speakerphone mode.
14 2A. Device Basics
10. SEARCH Key displays the Quick Search box that
can be used to search for a key term both on the
device and online (page 25).
䡲 For example, entering the word “Pa”, will display
any matching entries from your device’s Contacts
list, current device applications, online Android/
Google apps, or from any online Web page via
Google™ search.
䡲 Press and hold to launch Voice Search where you
can initiate a Google™ search by verbally entering
a text string. The device recognizes your spoken
words and initiates a Web search.
11. BACK Key deletes characters from the display in
text entry mode. When in a menu, pressing the
Back key returns you to the previous menu, closes
a dialog box, or exits an onscreen menu/option.
12. Proximity Sensor detects how close an object is to
the surface of the screen. This is typically used to
detect when your face is pressed up against the
screen, such as during a phone call.
䡲 While talking on the phone, the sensor detects
talk activity and locks the dialpad to prevent
accidental key presses.
13. Self Camera Lens allows you to take pictures while
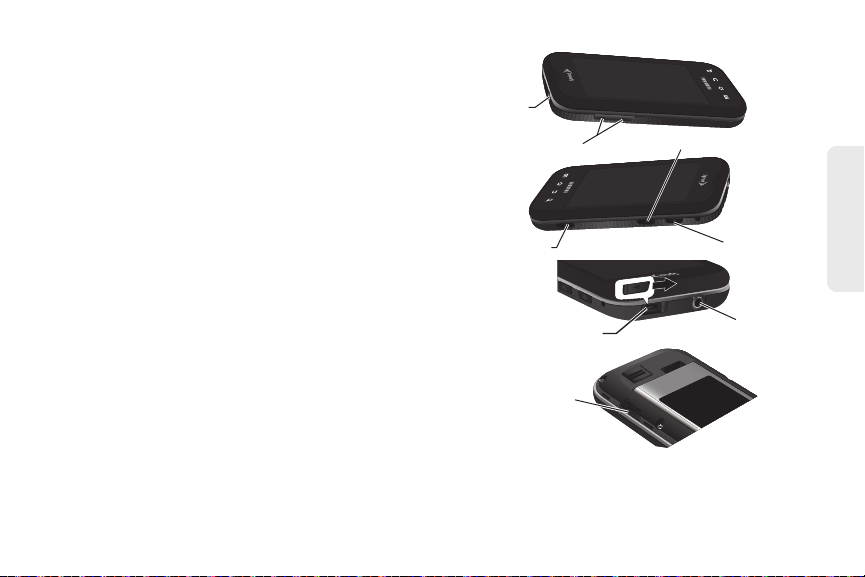
15. Volume
Button
17. Charger/Accessory
Jack
16. Camera
Button
14. Earpiece
19. Headset Jack
21. Voice Dialer Button
20. Power
Button
18. microSD
Card Slot
facing the screen.
14 . Earpiece lets you hear the caller and automated
prompts.
15. Volume Button allows you to adjust the ringer
volume in standby mode, the voice volume during
a call, and media playback volume.
16. Camera Button lets you activate the camera and
camcorder and take pictures and videos.
17. Charger/Accessory Jack allows you to connect the
phone charger or a USB cable (included).
CAUTION! Inserting an accessory into the incorrect
jack may damage the device.
18. microSD Card Slot lets you use a microSD card to
expand the memory of your phone. (A 2GB
microSD card comes pre-installed in your
Samsung Transform™.)
Device Basics
2A. Device Basics 15

19.
Landscape Mode
5. Space Key
9. Delete Key
7. OK
Key
8. Return
Key
2. Shift
Key
3. Fn Key
6. Navigation Keys
4. Smiley Key
1. QWERTY
Keyboard
Headset Jack allows you to plug in an optional
headset for convenient, hands-free conversations.
CAUTION! Inserting an accessory into the incorrect
jack may damage the device.
20. POWER Button lets you turn the device on or off,
or turn off the touchscreen display.
䡲 When the screen is turned off, press once to
return to Screen lock mode.
䡲 While the device is unlocked and not on an active
call, press and hold to display the Phone options
menu (Silent mode, Airplane mode, Power off).
21. Voice Dialer Button activates the Voice Dialer (Voice
Control) function that lets you dial phone numbers,
launch applications and launch other actions by
speaking a name, command, or a phone number.
Landscape Phone Features
1. QWERTY Keyboard provides an alphanumeric
character keyboard layout. Lets you enter numbers,
letters, and characters, as well as navigate within
menus.
16 2A. Device Basics
2. Shift Key lets you toggle alphabet characters
between mixed case, uppercase, and lowercase.
Character case remains as selected until the Shift
key is pressed again.
3. Fn Key (Function) key lets you enter the
alternate character or symbol displayed on each
key on the QWERTY keyboard.
 Loading...