

Page 1
Samsung Intercept
User Guide
™
Page 2

Intellectual Property
All Intellectual Property, as defined below, owned by or which is otherwise the property of Samsung or its
respective suppliers relating to the SAMSUNG Phone, including but not limited to, accessories, parts, or software
relating there to (the “Phone System”), is proprietary to Samsung and protected under federal laws, state laws,
and international treaty provisions. Intellectual Property includes, but is not limited to, inventions (patentable or
unpatentable), patents, trade secrets, copyrights, software, computer programs, and related documentation and
other works of authorship. You may not infringe or otherwise violate the rights secured by the Intellectual Property.
Moreover, you agree that you will not (and will not attempt to) modify, prepare derivative works of, reverse
engineer, decompile, disassemble, or otherwise attempt to create source code from the software. No title to or
ownership in the Intellectual Property is transferred to you. All applicable rights of the Intellectual Property shall
remain with SAMSUNG and its suppliers.
Samsung Telecommunications America (STA), LLC
Headquarters:
1301 E. Lookout Drive
Richardson, TX 75082
Toll Free Tel:
Internet Address:
©
2010 Samsung Telecommunications America, LLC is a registered trademark of Samsung Electronics America,
Inc. and its related entities.
Do you have questions about your Samsung Mobile Phone?
For 24 hour information and assistance, we offer a new FAQ/ARS System (Automated Response System) at:
http://www.samsung.com/us/support
http://www.samsungusa.com
Customer Care Center:
1000 Klein Rd.
Plano, TX 75074
1.888.987.HELP (4357)
Page 3

T9 Text Input is licensed by Tegic Communications and is covered by U.S. Pat. 5,818,437; U.S. Pat. 5,953,541; U.S.
Pat. 6,011,554 and other patents pending.
ACCESS® and NetFront™ are trademarks or registered trademarks of ACCESS Co., Ltd. in Japan and other
countries.
The Bluetooth® word mark, figure mark (stylized “B Design”), and combination mark (Bluetooth word mark and “B
Design”) are registered trademarks and are wholly owned by the Bluetooth SIG.
microSD™ and the microSD logo are Trademarks of the SD Card Association.
Openwave® is a registered Trademark of Openwave, Inc.
Google, the Google logo, Android, the Android logo, Android Market, Gmail, Google Mail, Google Maps, Google Talk,
Picasa, and YouTube are trademarks of Google Inc.
Wi-Fi is a registered trademark of the Wireless Fidelity Alliance, Inc.
Open Source Software
Some software components of this product incorporate source code covered under GNU General Public License
(GPL), GNU Lesser General Public License (LGPL), OpenSSL License, BSD License and other open source licenses.
To obtain the source code covered under the open source licenses, please visit:
http://opensource.samsungmobile.com/index.jsp
.
Virgin_VMU-M910_UG_DI06_LH_092710_F3
Page 4

Disclaimer of Warranties; Exclusion of Liability
EXCEPT AS SET FORTH IN THE EXPRESS WARRANTY CONTAINED ON THE WARRANTY PAGE ENCLOSED WITH THE
PRODUCT, THE PURCHASER TAKES THE PRODUCT "AS IS", AND SAMSUNG MAKES NO EXPRESS OR IMPLIED
WARRANTY OF ANY KIND WHATSOEVER WITH RESPECT TO THE PRODUCT, INCLUDING BUT NOT LIMITED TO THE
MERCHANTABILITY OF THE PRODUCT OR ITS FITNESS FOR ANY PARTICULAR PURPOSE OR USE; THE DESIGN,
CONDITION OR QUALITY OF THE PRODUCT; THE PERFORMANCE OF THE PRODUCT; THE WORKMANSHIP OF THE
PRODUCT OR THE COMPONENTS CONTAINED THEREIN; OR COMPLIANCE OF THE PRODUCT WITH THE
REQUIREMENTS OF ANY LAW, RULE, SPECIFICATION OR CONTRACT PERTAINING THERETO. NOTHING CONTAINED
IN THE INSTRUCTION MANUAL SHALL BE CONSTRUED TO CREATE AN EXPRESS OR IMPLIED WARRANTY OF ANY
KIND WHATSOEVER WITH RESPECT TO THE PRODUCT. IN ADDITION, SAMSUNG SHALL NOT BE LIABLE FOR ANY
DAMAGES OF ANY KIND RESULTING FROM THE PURCHASE OR USE OF THE PRODUCT OR ARISING FROM THE
BREACH OF THE EXPRESS WARRANTY, INCLUDING INCIDENTAL, SPECIAL OR CONSEQUENTIAL DAMAGES, OR LOSS
OF ANTICIPATED PROFITS OR BENEFITS.
Page 5

Table of Contents
Section 1: Getting Started ................ 1
Setting Up Your Device . . . . . . . . . . . . . . . . . . .1
Battery and Charger . . . . . . . . . . . . . . . . . . . . . 3
Your Device’s microSD Card and Adapter . . . . .4
Turning Your Device On and Off . . . . . . . . . . . .6
Creating a Google Account . . . . . . . . . . . . . . . .6
Section 2:
Understanding Your Phone ............8
Features of Your Phone . . . . . . . . . . . . . . . . . .8
Your Device . . . . . . . . . . . . . . . . . . . . . . . . . . .8
Viewing the Display Screen . . . . . . . . . . . . . . 11
Device Function Keys . . . . . . . . . . . . . . . . . . . 14
Navigation and Customization . . . . . . . . . . . .17
Opening Menus With Voice Dialer . . . . . . . . . .28
Section 3: microSD Card ................29
microSD Icon Indicators . . . . . . . . . . . . . . . . .29
microSD Write Protection . . . . . . . . . . . . . . . .29
Connecting Your Device to Your Computer . . .29
microSD Card Settings . . . . . . . . . . . . . . . . . .30
Important Connection Information . . . . . . . . .31
Section 4: Setting Up Service ......... 32
Activating Your Device . . . . . . . . . . . . . . . . . .32
Setting Up Your Voicemail . . . . . . . . . . . . . . .32
Getting Help . . . . . . . . . . . . . . . . . . . . . . . . . .32
Section 5: Call Functions ................34
Displaying Your Phone Number . . . . . . . . . . .34
Making and Answering Calls . . . . . . . . . . . . .34
Voice Dialing . . . . . . . . . . . . . . . . . . . . . . . . . 40
Caller ID . . . . . . . . . . . . . . . . . . . . . . . . . . . . .42
Call Waiting . . . . . . . . . . . . . . . . . . . . . . . . . .42
Call Forwarding . . . . . . . . . . . . . . . . . . . . . . .43
Section 6: Contacts ........................44
Creating a New Contacts Entry . . . . . . . . . . . .44
Saving a Phone Number . . . . . . . . . . . . . . . . .45
Confirming Contact Synchronization . . . . . . . .46
Groups . . . . . . . . . . . . . . . . . . . . . . . . . . . . . .47
Contacts Menu Options . . . . . . . . . . . . . . . . .47
Contacts Entry Options . . . . . . . . . . . . . . . . . .48
Editing a Contacts Entry . . . . . . . . . . . . . . . . .48
Adding a Number to a Contacts Entry . . . . . . .49
Editing a Contacts Entry’s Number . . . . . . . . .49
Selecting a Ringtone Type for an Entry . . . . . .49
Assigning a Picture to an Entry . . . . . . . . . . . .50
Deleting Entries . . . . . . . . . . . . . . . . . . . . . . .50
Adding Entries to Your Favorites . . . . . . . . . . .50
Section 7: Entering Text ................. 51
Entering Text with Onscreen Keyboard . . . . . .51
Entering Text using the QWERTY Keyboard . . .53
Section 8: Messaging ..................... 57
Types of Messages . . . . . . . . . . . . . . . . . . . .57
Composing Text Messages . . . . . . . . . . . . . . .57
Multimedia Messaging (MMS) . . . . . . . . . . . .58
Email . . . . . . . . . . . . . . . . . . . . . . . . . . . . . . .61
Google Mail (Gmail) . . . . . . . . . . . . . . . . . . . .62
Corporate Email (Exchange) . . . . . . . . . . . . . .65
Google Talk . . . . . . . . . . . . . . . . . . . . . . . . . .69
Section 9: Media ............................. 70
Taking Pictures . . . . . . . . . . . . . . . . . . . . . . .70
Recording Videos . . . . . . . . . . . . . . . . . . . . . .73
Music . . . . . . . . . . . . . . . . . . . . . . . . . . . . . . .75
YouTube . . . . . . . . . . . . . . . . . . . . . . . . . . . . .77
Page 6

Section 10: GPS Services ................78
GPS Services . . . . . . . . . . . . . . . . . . . . . . . . 78
Google Maps . . . . . . . . . . . . . . . . . . . . . . . . 78
Voice Search . . . . . . . . . . . . . . . . . . . . . . . . 79
Navigation . . . . . . . . . . . . . . . . . . . . . . . . . . 79
Section 11: Connections .................81
About Bluetooth . . . . . . . . . . . . . . . . . . . . . . 81
Turning Bluetooth On and Off . . . . . . . . . . . . 81
Using the Bluetooth Settings Menu . . . . . . . . 81
Pairing Bluetooth Devices . . . . . . . . . . . . . . . 82
Sending Contacts via Bluetooth . . . . . . . . . . 84
Disconnecting Bluetooth Connection
During an Active Call . . . . . . . . . . . . . . . . . . 84
Web and Data Service . . . . . . . . . . . . . . . . . 85
Navigating the Web . . . . . . . . . . . . . . . . . . . 86
Browser Menu . . . . . . . . . . . . . . . . . . . . . . . 87
Wi-Fi . . . . . . . . . . . . . . . . . . . . . . . . . . . . . . 91
Using the Wi-Fi Settings Menu . . . . . . . . . . . 92
Using the Android Market . . . . . . . . . . . . . . . 92
Applications . . . . . . . . . . . . . . . . . . . . . . . . . 93
Data Services FAQs . . . . . . . . . . . . . . . . . . . 93
Section 12: Tools ............................95
Before You Begin . . . . . . . . . . . . . . . . . . . . . 95
Calendar . . . . . . . . . . . . . . . . . . . . . . . . . . . 95
My Files . . . . . . . . . . . . . . . . . . . . . . . . . . . . 99
Memo Pad . . . . . . . . . . . . . . . . . . . . . . . . . . 99
Alarm Clock . . . . . . . . . . . . . . . . . . . . . . . . . 99
Calculator . . . . . . . . . . . . . . . . . . . . . . . . . . 101
Updating Your Android Operating System . . 101
Section 13: Settings ......................102
Sound Settings . . . . . . . . . . . . . . . . . . . . . . 102
Display Settings . . . . . . . . . . . . . . . . . . . . . 104
Language Settings . . . . . . . . . . . . . . . . . . . 106
Location Settings . . . . . . . . . . . . . . . . . . . . 106
Synchronizing Accounts . . . . . . . . . . . . . . . 107
Search Settings . . . . . . . . . . . . . . . . . . . . . 109
Messaging Settings . . . . . . . . . . . . . . . . . . 109
Text-to-Speech . . . . . . . . . . . . . . . . . . . . . 110
Call Settings . . . . . . . . . . . . . . . . . . . . . . . . 111
Airplane Mode . . . . . . . . . . . . . . . . . . . . . . 111
TTY Use . . . . . . . . . . . . . . . . . . . . . . . . . . . 112
Security Settings . . . . . . . . . . . . . . . . . . . . 113
Section 14:
Health and Safety Information ... 118
Health and Safety Information . . . . . . . . . . . 118
Please Note the Following Information
When Using Your Phone . . . . . . . . . . . . . . . 119
Samsung Mobile Products and Recycling . . 119
UL Certified Travel Adapter . . . . . . . . . . . . . 120
Consumer Information on Wireless Phones . 120
Road Safety . . . . . . . . . . . . . . . . . . . . . . . . 126
Responsible Listening . . . . . . . . . . . . . . . . . 128
Operating Environment . . . . . . . . . . . . . . . . 129
Using Your Phone Near Other
Electronic Devices . . . . . . . . . . . . . . . . . . . 130
FCC Hearing-Aid Compatibility (HAC)
Regulations for Wireless Devices . . . . . . . . 130
Potentially Explosive Environments . . . . . . . 132
Emergency Calls . . . . . . . . . . . . . . . . . . . . . 132
FCC Notice and Cautions . . . . . . . . . . . . . . 133
Other Important Safety Information . . . . . . . 133
Product Performance . . . . . . . . . . . . . . . . . 134
Availability of Various Features/Ringtones . . 135
Battery Standby and Talk Time . . . . . . . . . . 135
Battery Precautions . . . . . . . . . . . . . . . . . . 135
Care and Maintenance . . . . . . . . . . . . . . . . 136
Page 7

Section 15:
Warranty Information ................. 138
Standard Limited Warranty . . . . . . . . . . . . . .138
End User License Agreement for Software . .141
Index ..............................................145
Page 8
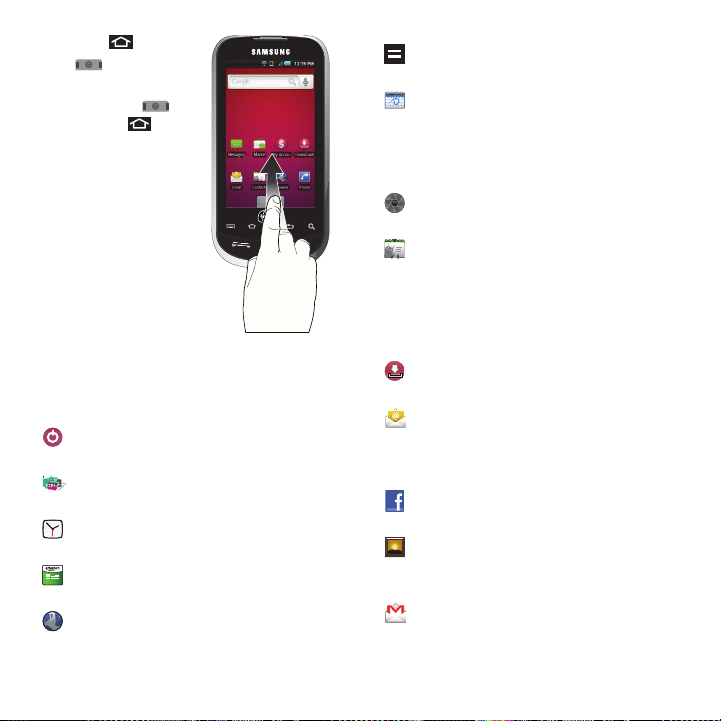
Section 1: Getting Started
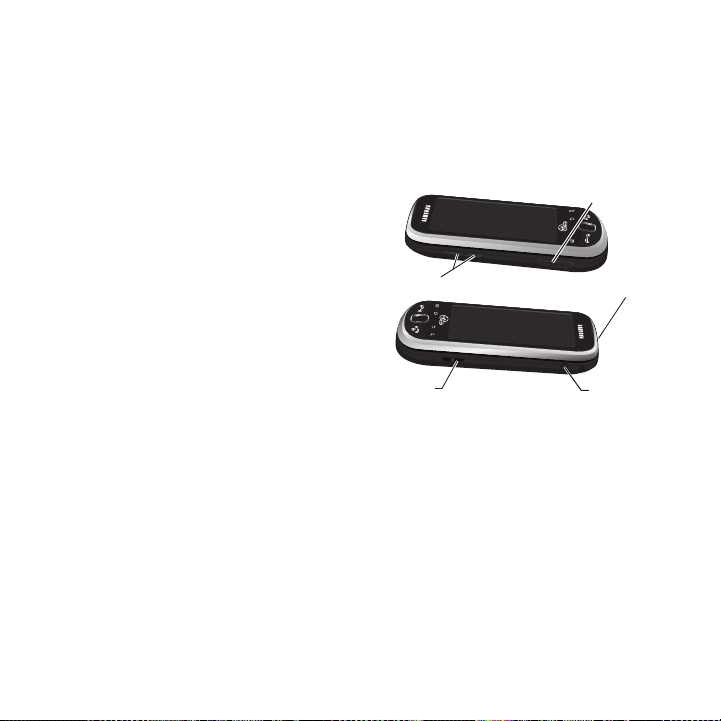
Release Latch
This section describes information about managing
your device, maximizing its performance and
creating a Google account.
Setting Up Your Device
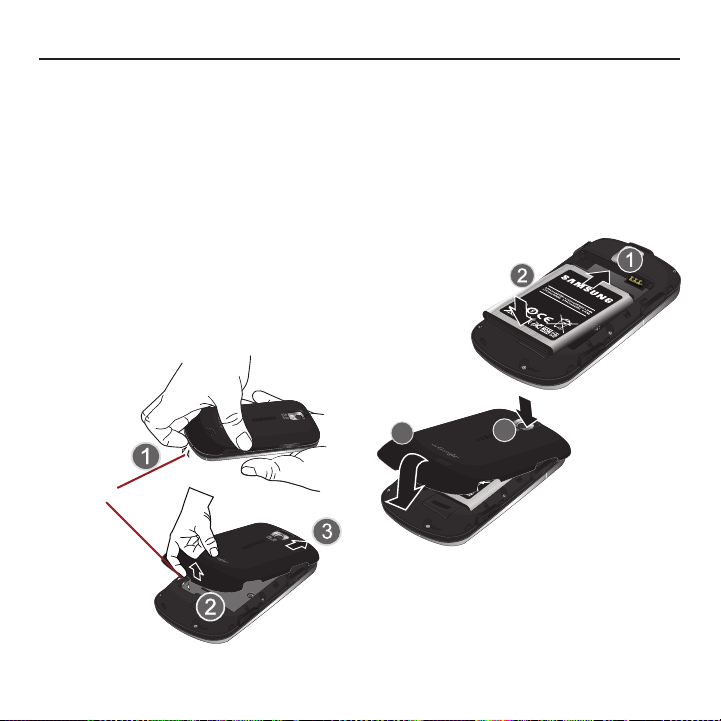
Installing the Battery
1. Remove the battery from its packaging.
2. Grasp the device firmly and locate the cover
release latch.
3. Place your fingernail in the opening and firmly
“pop” the cover off the device (similar to a
soda can).
4. Insert the battery into the opening in the back
of the device, making sure the connectors
align. Gently press down to secure the battery.
5. Position the battery cover over the battery
compartment and press down until you hear a
click.
Getting Started 1
Page 9
Removing the Battery
1
2
3
4
Charging Head
USB Cable
1. Make sure the power is off so that you don’t
lose any stored numbers or messages.
2. Place your fingernail in the battery cover and
firmly “pop” the cover off the device (similar to
a soda can).
3. Carefully remove the battery from the device.
Warning!:
Do not handle a damaged or leaking Li-Ion battery as
you can be burned.
Charging the Battery
Keeping track of your battery’s charge is important. If
your battery level becomes too low, your device
automatically turns off, and you will lose any
information you were just working on.
Note:
Although the battery comes partially charged. It is
recommended you fully charge the battery before using
your device for the first time.
1. Connect the USB cable to the charging head.
Incorrect
Correct
2. Insert the USB cable into the device’s charger/
accessory jack.
3. Plug the charging head into a standard AC
power outlet.
2
Page 10
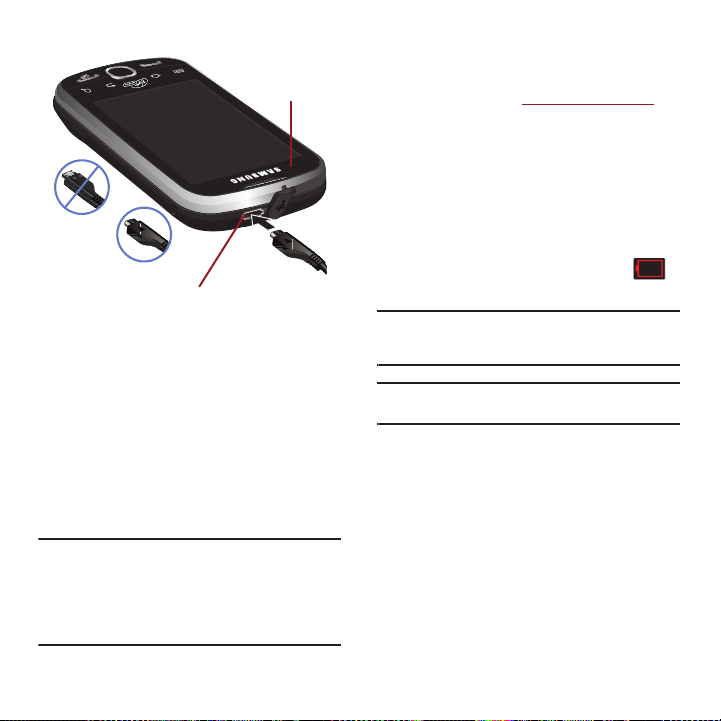
䊳
Correct
Incorrect
Sensors
Charger/Accessory Jack
Plug the flat end of the charger into the device’s
charger jack and the other end into an electrical
outlet. The device turns on with the screen locked
and indicates both its charge state and percent of
charge.
With the Virgin Mobile-approved Li-Ion battery, you
can recharge the battery before it becomes
completely run down.
Battery and Charger
Warning!:
Use only Virgin Mobile-approved or Samsungapproved batteries and chargers with your device.
The failure to use a Virgin Mobile-approved or
Samsung-approved battery and charger may
increase the risk that your device will overheat,
catch fire, or explode, resulting in serious bodily
injury, death, or property damage.
Virgin Mobile-approved or Samsung-approved
batteries and accessories can be found at stores or
through Samsung; or call 1-866-866-7509 to order.
They’re also available at
www.virginmobileusa.com
Battery Capacity
Your device is equipped with a Lithium Ion (Li-Ion)
battery. It allows you to recharge your battery before
it is fully drained. The battery provides up to 5 hours
of continuous digital talk time.
At 3% of charge capacity, there are only a few
minutes of talk time left, the device sounds an
audible alert, displays a critical charge icon ( ),
and then turns off.
Note:
Long backlight settings, searching for service, vibrate
mode, browser use, and other variables may reduce the
battery’s talk and standby times.
Tip:
Watch your device’s battery level indicator and charge the
battery before it runs out of power.
Extending Your Battery Life
•
Active applications, light levels, Bluetooth usage, and
GPS functionality all act to drain your battery. The
following is a list of helpful tips that can help conserve
your battery power:
•
Reduce your backlight on time. See “Changing the
Backlight Time Length” on page 104
•
Turn Bluetooth off when not is use. See “Turning
Bluetooth On and Off” on page 81
•
Turn Wi-Fi off when not is use. See “Turning Wi-Fi On and
Off” on page 91
Getting Started 3
.
Page 11
•
Deactivate the GPS when not needed. Most applications
using this function will periodically query the GPS
satellites for your current location; each query drains your
battery. See “Activating Location Mode” on page 78
•
Do not wait until your battery is completely depleted
before charging your device. Repeating this process of a
complete discharge and recharge can over time reduce
the storage capacity of any battery.
•
Turn off Automatic application sync. See “Synchronizing
Accounts” on page 107
•
Use the Power Control Widget to deactivate hardware
functions such as Wi-Fi, Bluetooth, GPS, Synchronization,
or LCD brightness setting. See “Adding and Removing
Widgets” on page 23
•
Check the Running Services and close any unnecessary
applications. See “Manage Running Services” on
page 116
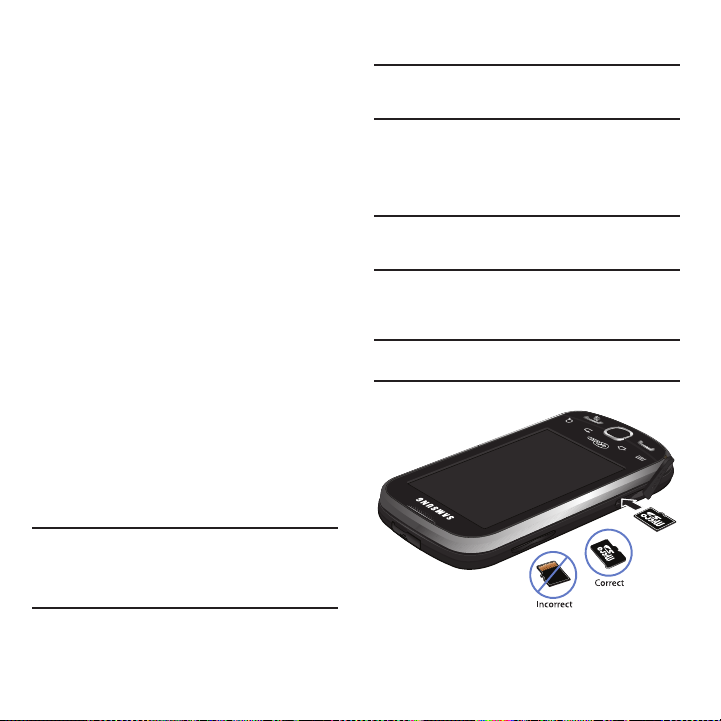
Your Device’s microSD Card and Adapter
The microSD Card
Your device is equipped with a preinstalled 2GB
microSD™ (Secure Digital) memory card. It allows
you to store images, videos, music, and voice data in
your device.
Important!:
Camera, Camcorder, and Music playback features
are dependant on having a microSD memory card
installed. Although the Samsung Intercept™ comes
with a pre-installed 2GB card, it can support
microSD cards of up to 32GB.
4
Inserting the microSD Card
Warning!:
The microSD card and its adapter can be easily
damaged by improper operation. Please be careful
when inserting, removing, or handling it.
1. Locate the microSD card slot along the side of
the device.
2. Flip open the side microSD cover.
Caution!:
Be sure to use only recommended microSD cards
(<32GB). Using non-recommended microSD cards
could cause data loss and damage your device.
3. Firmly press the card into the slot until you hear
a clicking sound.
Note:
Make sure the microSD card's gold contacts are facing
down.
4. Replace the microSD card cover over the open
slot.
Page 12
Removing the microSD Card
Unlock Screen
1. Locate the microSD card slot along the side of
the device.
2. Flip open the side microSD cover.
Note:
You can easily damage the microSD card and its adapter
by improper operation. Please be careful when inserting,
removing, or handling it.
3. Firmly press the card into the slot and release
it. The card should pop partially out of the slot.
Warning!:
Do not over-insert the card as this can damage the
contact pins.
4. Remove the card from the slot.
5. Replace the microSD card cover over the open
slot.
Adapter
The supplied microSD adapter allows you to use
microSD cards in other SD-compatible devices, like
computers, cameras, and printers. Before using the
microSD card with an SD-compatible device, you will
need to insert the microSD card into the microSD
adapter.
To insert the microSD card into the microSD adapter:
䊳
With the label side of the microSD card facing up,
insert the card into the supplied microSD adapter,
and gently slide the card until it is fully inserted.
To remove the microSD card from the microSD
adapter:
䊳
Hold the front edge of the microSD card, and gently
pull it out to remove it from the adapter.
Getting Started 5
Page 13
Turning Your Device On and Off
Turning Your Device On
䊳
Press and hold .
Once your device is on, it may display “Searching for
Service.” When your device finds a signal, it enters
standby mode – the device’s idle state. At this point,
you are ready to begin making and receiving calls.
If your device is unable to find a signal after 15
minutes of searching, a Power Save feature is
automatically activated. When a signal is found, your
device automatically returns to standby mode.
In Power Save mode, your device searches for a
signal periodically without your intervention. You can
also initiate a search for Virgin Mobile service by
pressing any key (when your device is turned on).
Tip:
The Power Save feature conserves your battery power
when you are in an area where there is no signal.
Turning Your Device Off
1. Press and hold for two seconds until you
see the powering-down animation on the
display screen.
2. Touch
Power off
( ) to power off the device.
Your screen remains blank while your device is off
(unless the battery is charging).
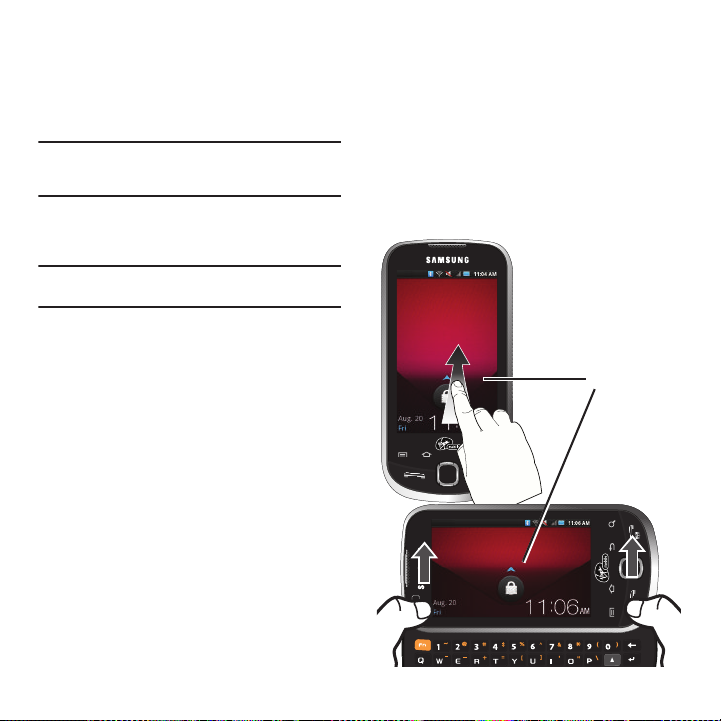
Locking and Unlocking the Phone
Locking Your Device
When your device is locked, you can only receive
incoming calls or make calls to 911.
䊳
Press . Locking the screen prevents
accidental screen touches from activating phone
functions.
Unlocking Your Device
1. Press to awaken the device.
2. Touch and drag the screen up or slide the
QWERTY keyboard out.
Creating a Google Account
You will need a Google account to access several
device features such as Gmail™, Google Maps™,
Google Talk™, and the Android™ Market
applications. Before you are able to access Google
applications, you must enter your account
information. These applications sync between your
device and your online Google account.
1. From a computer, launch your preferred Web
browser and navigate to
2. On the main page, click
account now
3. Follow the onscreen prompts to create your
.
www.google.com
Sign-in
➔ Create an
free account.
.
6
Page 14

4.
Log into your provided email address, locate
the email from Google, and respond to the new
email to both confirm and activate your new
account.
Signing Into Your Google Account
1. Launch the application that requires a Google
account (such as Android Market or Gmail).
2. Click
Next
➔
Sign in
.
Note:
If you do not already have a Google account, touch
Create and follow the onscreen prompts to create your
new account.
3. Touch the
Username
and
Password
fields and
enter your information. See “Entering Text with
Onscreen Keyboard” on page 51 or “Entering
Text using the QWERTY Keyboard” on page 53.
4. Create a new Gmail username by entering a
prefix for your
5. Tap
@gmail.com
Next.
Your device then communicates with
email address.
the Google servers to confirm your information.
For additional information about synchronizing
accounts, see “Synchronizing Accounts” on
page 107.
Getting Started 7
Page 15
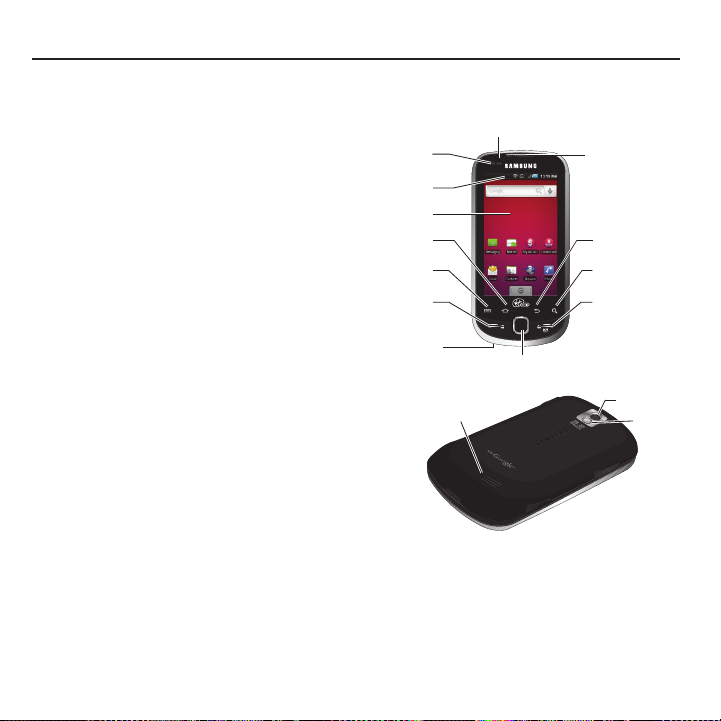
Section 2: Understanding Your Phone
3. Display
Screen
9. External
Speaker
5. MENU Key
16. Proximity
Sensor
15. Earpiece
2. Status Bar
Icons
4. HOME Key
6. TALK Key
7. Microphone
8. Optical Joystick
10. Mirror
11. Camera
Lens
12. END/POWER
Key
13. SEARCH Key
14. BACK Key
1. Light
Sensor
This section outlines key features of your phone. It
also describes the phone’s keys, screen and the icons
that display when the phone is in use.
Features of Your Phone
Your phone is lightweight, easy-to-use and offers
many significant features. The following list outlines a
few of the features included in your phone.
•
Touchscreen with virtual QWERTY keyboard
•
Solid Android platform
•
Wi-Fi Capability
•
Bluetooth enabled
•
Full integration with Google applications (Gmail, YouTube,
Google Maps)
•
Multiple Messaging Options: Email, Audio Postcard,
Instant Messaging, Picture Messaging, Google Talk,
Google Search, Video Messaging, Text Messaging,
Predictive Text
•
Supports synchronizing with a corporate email account
•
3.2 Megapixel camera and video with auto focus, flash,
multi shot 8x digital zoom
•
Brilliant widescreen TFT display
•
MP3 player with Multitasking features
•
Assisted GPS (TeleNav GPS Navigation)
•
Webkit-based browser (3G speed)
•
Downloadable applications from the Android Market
•
Up to 32GB expandable memory slot
Your Device
8
Page 16

Key Functions
1.
Light sensors
let you use the ambient light level
to adjust the screen brightness/contrast.
•
In a bright light condition (outdoors), the sensors
cause the device to increase the brightness and
contrast for better viewing.
•
In a dim light condition (while talking on the phone)
the sensors detect talk activity and lock the keypad to
prevent accidental key presses.
2.
Status Bar Icons
provide information about your
device’s status and options, such as signal
strength, ringtone setting, messaging, signal
strength, and battery charge.
3.
Display Screen
displays all the information
needed to operate your device, such as the call
status, the Contacts list, and the date and time.
4.
HOME Key
returns you to the Home screen.
Press and hold to open the recently-used
applications window.
5.
MENU Key
allows you to access your device’s
main functions menu: Add, Wallpaper, Search,
Notifications, and Settings. While in a menu,
touch to open a list of actions available from
the current screen or onscreen option.
•
During an active call, press to open additional call
options such as: Contacts or Memo.
6.
TALK Key
allows you to place or receive calls,
answer Call Waiting or activate Voice Dial.
•
While a Contacts entry or phone number is
highlighted, tap to call that contact or phone number.
7.
Microphone
allows other callers to hear you
clearly when you are speaking to them.
8.
Optical Joystick
lets you highlight and select
(tap) onscreen items.
9.
External Speaker
lets you hear the different
ringtones and sounds. You can mute the
ringtone when receiving incoming calls by
pressing the volume button. The speaker also
lets you hear the caller’s voice in
speakerphone mode.
10.
Mirror
, as part of the built-in camera, lets you
see yourself when taking a self-portrait
picture.
11.
Camera Lens
, as part of the built-in camera,
this 3.2 megapixel camera lets you take
pictures and videos.
12.
END/POWER Key
lets you turn the device on or
off, end a call, or turn off the LCD.
•
When the screen is turned off, press once to return to
Screen lock mode.
•
While the device is unlocked and not on an active
call, press and hold to display the Phone options
menu (Silent mode, Flight mode, Power off).
Understanding Your Phone 9
Page 17
13.
y
SEARCH Key
displays the Quick Search box that
can be used to search for a key term both on
the phone or online. It’s the ultimate search
field (page 15).
•
For example, entering the word “Pa” will display any
matching entries from your device’s Contacts list,
current device applications, online Android/Google
apps, or from any online Web page via Google search.
•
Press and hold to launch
Voice Search
where you
can initiate a Google™ search by verbally entering a
text string. The device recognizes your spoken words
and initiates a Web search.
14.
BACK Key
deletes characters from the display in
text entry mode. When in a menu, pressing the
Back key returns you to the previous menu,
closes a dialog box, or exits an onscreen menu/
option.
15.
Earpiece
lets you hear the caller and automated
prompts.
16.
Proximity Sensor
detects how close an object is
to the surface of the LCD. This is typically used
to detect when your face is pressed up against
the LCD, such as during a phone call.
17.
Volume Button
allows you to adjust the ringtone
volume in standby mode, the voice volume
during a call, and media playback volume.
18.
Camera Button
lets you activate the camera and
camcorder and take pictures and videos.
19.
Headset Jack
allows you to plug in an optional
headset for convenient, hands-free
conversations. CAUTION! Inserting an
accessory into the incorrect jack may damage
the device.
21. microSD Card
Slot
17. Volume
Button
18. Camera
Button
20.
Charger/Accessory Jack
20. Charger/Accessor
Jack
19. Headset Jack
allows you to connect
the phone charger or a USB cable (included).
CAUTION! Inserting an accessory into the
incorrect jack may damage the device.
21.
microSD Card Slot
lets you use a microSD card
to expand the memory of your phone.
10
Page 18
Landscape Phone Features
26. Space Key
29. Delete Key
28. Enter
Key
24. Shift
Key
23. Fn Key
27. Menu Key
25. Smiley Key
22. QWERTY
Keyboard
Landscape Mode
22.
QWERTY Keyboard
character keyboard layout. Lets you enter
numbers, letters, and characters, as well as
navigate within menus.
23.
Fn Key
(Function) key , toggle to access
the numbers/symbols atop each key on the
QWERTY keyboard.
24.
Shift Key
between mixed case, uppercase and
lowercase. Character case remains as selected
until the Shift key is pressed again.
25.
Smiley Key
lets you access Smiley icons (Emoticons).
provides an alphanumeric
lets you toggle alphabet characters
(when used with the key)
26.
Space Key
lets you add spaces between words
and characters.
27.
Menu Key
allows you to access your device’s
main functions menu while in Landscape
mode: Add, Wallpaper, Search, Notifications,
and Settings. While in a menu, touch to open a
list of actions available from the current screen
or onscreen option.
28.
Enter Key
lets you enter additional lines of text.
29.
Delete Key
deletes characters from the display
in text entry mode.
Viewing the Display Screen
Your device’s display screen provides information
about your device’s status and options. This list
identifies the symbols you’ll see on your device’s
display screen:
Activation Not Completed
– Your automatic
device activation process failed, please
retry.
Signal Strength
– Shows your current
signal strength. (More bars = stronger
signal.)
No Service
– Your device cannot find a
usable signal.
Understanding Your Phone 11
Page 19
Airplane Mode On
– Your device will not
make or receive calls, or provide data
access. Local applications are still
available.
3G Available
3G Communicating
– Data service is active.
– Data service is active
and communicating. When active, the
icon is animated.
3G Dormant
– Data service is currently
dormant.
3G Data Service Available
– Broadband
data service is available.
3G Data Service Communicating
– Data
service is active and communicating. See
“Data Connection Status and Indicators”
on page 85.
3G Data Service Unavailable
– Data service
is currently unavailable.
Call in Progress
– A voice call is in progress.
Audio is routed through either the earpiece
or external speaker.
Bluetooth Call in Progress
– A voice call is
being routed through a Bluetooth headset.
Missed Call
– You have missed an
incoming call.
Call Muted
– The device microphone has
been muted.
Speaker
– Speakerphone feature is
enabled.
Battery Strength
– Shows your current
battery charge level. (Icon shown is fully
charged.)
Battery Low
– Shows your current battery
charge level is very low.
Device Power Critical
– Shows your current
battery only has three percent power
remaining and will immediately
shutdown. Represented as a blinking icon.
Bluetooth Active
– Bluetooth technology is
active and enabled.
Bluetooth Connected
– Bluetooth
technology is active and communicating
with an external device.
GPS Location On
– Device location feature
is on and available for location-based
services such as GPS Navigation. See
“GPS Services” on page 78.
GPS Communicating
– Device location
feature is on and communicating.
Wi-Fi Connected
– Wi-Fi is connected,
active, and communicating with a
Wireless Access Point (WAP).
Wi-Fi Connection Issue
– Wi-Fi is active but
there is a communication issue with the
target Wireless Access Point (WAP).
12
Page 20
microSD Unmounted
1
– The internal
microSD card has been disconnected
(unmounted) from the device and is now
ready for either removal or formatting.
Preparing for Mounting
– The internal
microSD card is being prepared for
mounting to the device. This is required for
communication with the internal microSD
card.
USB Connection
– The device has detecte d
an active USB connection.
USB Debug Connection
– The device has
detected an active USB connection and is
in a USB Debugging mode.
Sign-in/Sync Error
– There has been an
issue with your connection to the Google
server, or you were not properly signed
into your account. In order to use Google
application or sync features, you must set
up and sign into an active Google account.
Silence All
– All incoming sounds are
turned off.
Vibrate Only
– The ringer is set to vibrate
only.
Data Synchronization
– Application sync is
active and synchronization is in progress
for Gmail, Calendar, and Contacts.
System Updates Available
– A new system
update is available for download.
Files Downloading
– The device is
downloading select files.
Download Successful
– A recent software
download was successfully downloaded.
Calendar Reminder
– Shows you have a
reminder of an upcoming Calendar event.
Text Message
– You have new text (SMS) or
multimedia (MMS) messages.
Voicemail Message
– You have new
voicemail messages.
New Email message
– Shows you have
received either a new Internet email
message or Exchange email message via
an Exchange server.
Alarm
– You have an alarm event.
Understanding Your Phone 13
Page 21
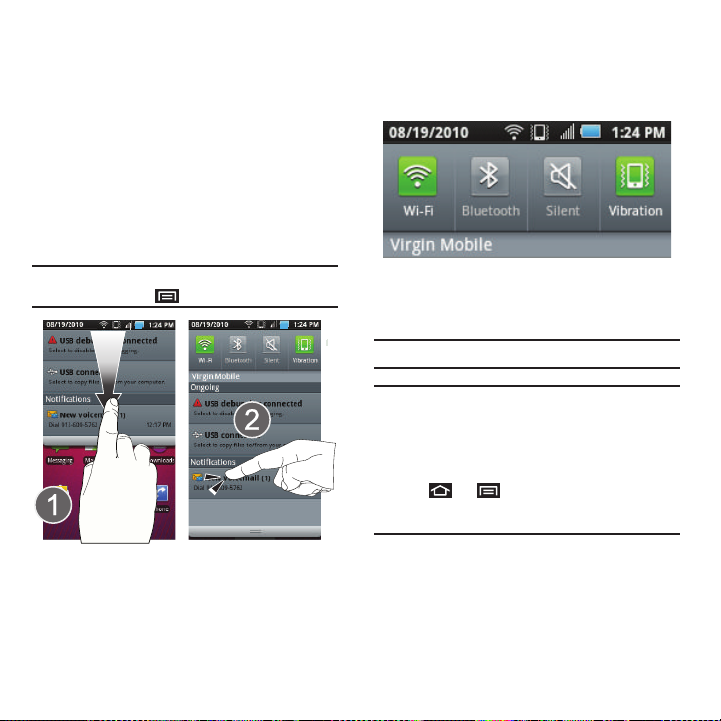
Using the Notifications Panel
The Notification area indicates new message events
(data sync status, new messages, calendar events,
call status, etc). You can expand this area to provide
more detailed information about the current onscreen
notification icons.
1. Touch and hold the Status bar, then slide your
finger down the screen.
2. Tap a notification entry to open the associated
application.
Note:
The Notifications panel can also be opened on the Home
screen by pressing and then tapping Notifications.
Launching Additional Panel Functions
In addition to notifications, this panel also provides
quick and ready access to four device functions.
These can be quickly activated or deactivated
The following functions can either be activated
(green) or deactivated (grey):
or
Vibration
.
Note:
Only
Silent
or
Vibrat ion
Tip:
Device Software Upgrades – Updates to your device’s
software may become available from time to time. Virgin
Mobile will automatically upload critical updates to your
device.
- You can also use the menu to manually check for and
download updates.
Press
➔ and tap
System Updates
download available updates.
➔
Wi-Fi, Bluetooth, Silent
can be active at the same time.
Settings
➔
Update Android
About phone
to search for and
Device Function Keys
The Intercept™ comes equipped with four main
function keys that can be used on any screen to
provide added functionality.
,
➔
14
Page 22
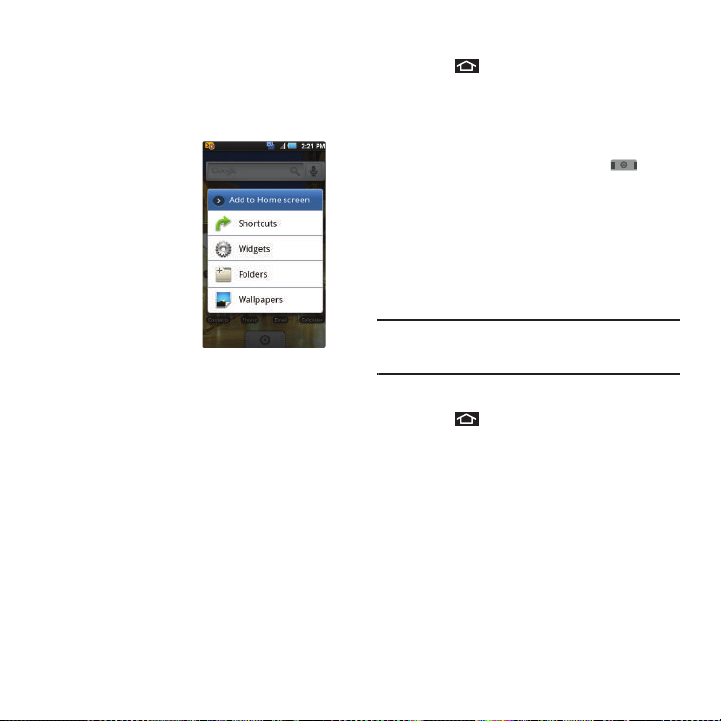
Menu Key
The
Menu
key ( ) activates an available menu
function for the current screen or application. When
on the Home screen, the following menu options are
available:
•
Add
( ) adds one of the following functions to a
selected screen. Options include: Shortcuts, Widgets,
Folders, and Wallpapers.
•
Wallpaper
( ) provides the ability to customize the
current screen’s wallpaper image. This image can be
obtained from either your Pictures folder or from any of
the available images within the device’s Wallpaper
gallery. See “Changing the Display Screen” on page 105.
•
Search
( ) displays the Quick Search box that can be
used to search for a key term both on the phone or
online. It’s the ultimate search field. See “Using the
Search Key” on page 15.
–
For example, entering the word “Pa”, will display any
matching entries from your device’s Contacts list, current
device applications, online Android/Google apps, or from
any online Web page via Google search.
•
Notifications
( ) allows you to expand popup
notifications area to provide more detailed information
about the current onscreen notification icons. See “Using
the Notifications Panel” on page 14.
•
Settings
( ) provides quick access to the device’s
settings menu. See “Settings” on page 102. The Settings
menu can also be accessed by pressing and
touching ➔ .
Home Key
The
Home
key ( ) takes you back to your Home
screen (screen 1 of the 3 total available screens).
Back Key
The
Back
key ( ) returns you to the previously
active screen. If the onscreen keyboard is currently
open, this key closes the keyboard.
Using the Search Key
The
Search
key ( ) displays the Quick Search box
that can be used to search for a key term both on the
phone or online. It’s the ultimate search field. In some
instances, this key only opens a search box specific
to only the current application.
•
Press to launch the Quick Search box.
•
Press and hold to launch the Voice Search function.
Understanding Your Phone 15
Page 23
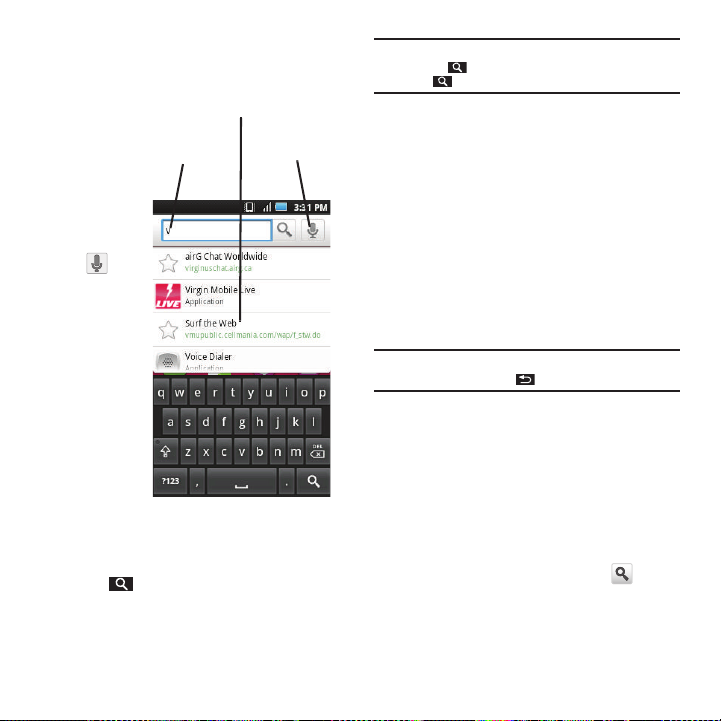
Using your Device to Search
Quick Search
Box
Search Matches
(Device & Web Services)
Voice Search
The Quick Search
box can be used to
manually enter a
term or number
that is searched
for automatically
on both your
device and on the
Web.
Touching Voice
Search ( )
initiates the same
search function
but without the
need to use the
onscreen or
QWERTY
keyboards.
This feature can
also be used to
dial a phone
number and is a
supplement to the
current Automatic Speech Recognition (ASR) feature.
(See “Voice Dialing” on page 40.)
To search the phone and Web by entering text:
1. Press to launch the Quick Search box.
Note:
There might be instances within an application where
pressing reveals only an application-specific search.
Press twice to open the Quick Search box.
2. Use either the QWERTY or onscreen keyboard
to enter your search term. See either “Entering
Text with Onscreen Keyboard” on page 51 or
“Entering Text using the QWERTY Keyboard” on
page 53
•
As you type, matching items on your device and matches
from Google’s Web search are added to the onscreen list
of previously chosen search results.
•
Search preferences and settings can be configured to
display suggestions in a different manner. See “Search
Settings” on page 109.
Note:
To hide the onscreen keyboard and see more of your
search matches, press .
3. Touch a desired match from the list of
suggestions, phone search results, or
previously chosen search matches. Once
touched, the item opens in the appropriate
application.
– or –
If what you’re searching for is not in the current
list, touch the Google Search icon ( ) in
Quick Search Box or on the keyboard to initiate
a new search on the web.
16
Page 24

To search the phone and Web via Voice Search:
1. Press and hold .
– or –
Touch (microphone icon on the side of the
Quick Search box).
Note:
Touching in an a pplication’s search box, searches the
application by voice, not the Web.
2. From the open dialog, speak the words you
want to search for.
3. Once complete, the Voice Search application
analyzes your spoken words and displays a list
of matching keyword terms.
Note:
It is recommended that you use this feature in a quiet
room. Loud ambient or background noises can confuse
the application and result in inaccurate search results.
To use additional Voice Search functions:
From an open Voice Search dialog, speak the
following words to access additional features:
•
Call
allows you to initiate a call to a current Contacts
entry based on Name, Number, Phone Number type
(Work, Mobile, etc.).
•
Directions to
allows you to initiate a navigation session
via Google maps. Use either an Address name, Business
name, business type, or other navigation information to
get the desired directions.
•
Navigate to
allows you to receive turn-by-turn directions.
Use either an Address name, Business name, business
type, or other navigation information to get the desired
directions.
•
Map of
allows you to view a map of an area via Google
maps. Use either an Address name, Business name, zip
code, or other navigation information.
Navigation and Customization
The Samsung Intercept™ is a touch-sensitive device
which allows you to not only select an onscreen
option with a single tap, but also scroll through long
menu lists. Simply slide up and down through the
display with your fingertip.
Note:
The Optical Joystick on your device lets you scroll
through onscreen items. Many menus feature a scroll bar
on the right to help you keep track of your position in the
menu.
Tip:
Some menu options are also accessed by pressing and
holding an onscreen item, such as a Contact entry from
the Contacts tab.
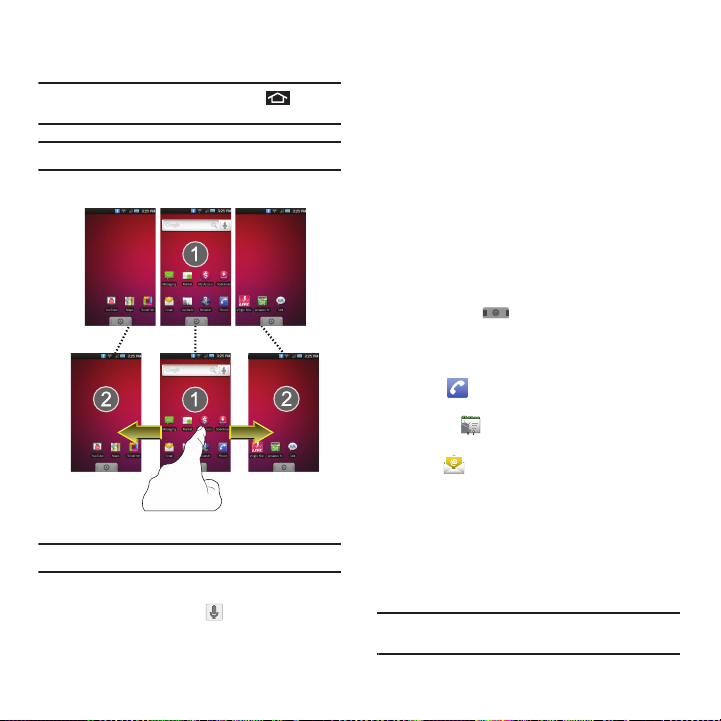
Home Screen Overview
The Home screen is the starting point for many
applications and functions, and it allows you to add
items like application icons, shortcuts, folders, or
Google widgets to give you instant access to
information and applications. This is the default page
and accessible from any menu by pressing .
Understanding Your Phone 17
Page 25
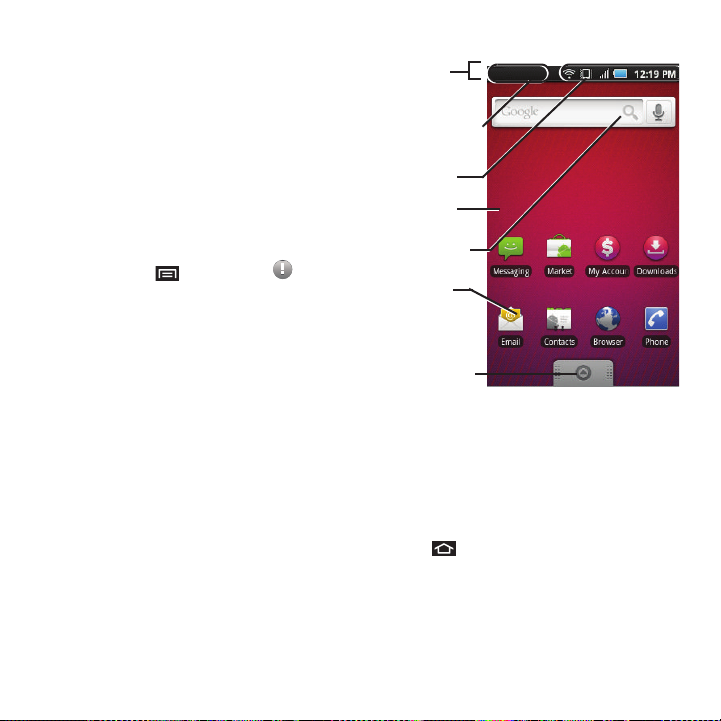
•
Status Bar
Notification area
Status area
Main Home
Screen
Google search
Shortcuts
Application tab
Status bar
: located at the top of the screen, displays both
Notification and Status icons.
•
Notification area
displays icons associated with end-user
notifications such as: email messages, calls (missed, call
in progress), new voicemail, upcoming event, USB
connection, emails, Text/MMS messages. See “Using the
Notifications Panel” on page 14.
–
These notifications appear at the top-left of the screen
(within the Status bar) and display important user
information.
–
This information can be accessed by either swiping down
from the Status bar (page 9) or by accessing the
Notifications panel
•
Status area
displays icons associated with the status of
➔
Notifications
the device such as communication, coverage, Bluetooth
and Wi-Fi communication, battery levels, GPS, etc.
•
Main Home Screen
information about notifications and device status, allows
access to application Widgets.
: a customizable screen that provides
().
•
Extended Home Screens
: the device’s screen extends
beyond the current visible screen width to provide more
space for adding icons, widgets, and more.
–
There are three available screens, each populated with its
own default shortcuts or widgets. Each of these screens
can be customized and the current screen is indicated at
the top by a larger numeric circle.
–
Press to access the main Home screen (1) which
appears as the default “page” on the device and then
slide your finger horizontally across the screen to go to the
left or right extended screens (2). There are two additional
screens apart from the main Home screen.
18
Page 26
–
Extended Screen
(left)
Extended Screen
(right)
Think of it as having a desktop so wide that your screen
can only display a portion at a time.
Tip:
While on an extended Home screen, press to return
to the main Home screen.
Note:
The Status bar is visible across all Home screens.
Note:
Screen #1 is the Home screen.
•
Google search
: an onscreen Internet search engine
powered by Google™. Touch to access the Voice
Search feature where you can verbally enter a search
term and initiate an online search.
•
Widgets
: are self-contained onscreen applications (not
shortcuts). These can be placed onto any of the available
screens (Home or Extended). See “Adding and Removing
Widgets” on page 23.
•
Shortcuts
: are icons that launch available device
applications such as Voicemail, Contacts, Phone, Email,
Alarm Clock, etc. These function the same as shortcuts
on your computer.
–
Although some are already found on the Extended Home
screens, the majority can also be found within the
Applications tab.
–
Shortcuts can be pulled out from this tab or pulled into it
(removed from an Extended Home screen). See “Creating
Shortcuts” on page 22.
•
Application tab
( ): houses all of your available
applications. Some of these applications also exist as
Widgets that can be actively placed onto an available
screen. Some sample shortcuts are:
–
Phone
( ) launches the phone-related screen
functions (Keypad, Call Log, and Favorites.
–
Contacts
( ) launches the Contacts-related screens
(Contacts, Groups, History, and Activities).
–
Email
( ) launches the email application that
manages both Internet-based and Corporate email
accounts.
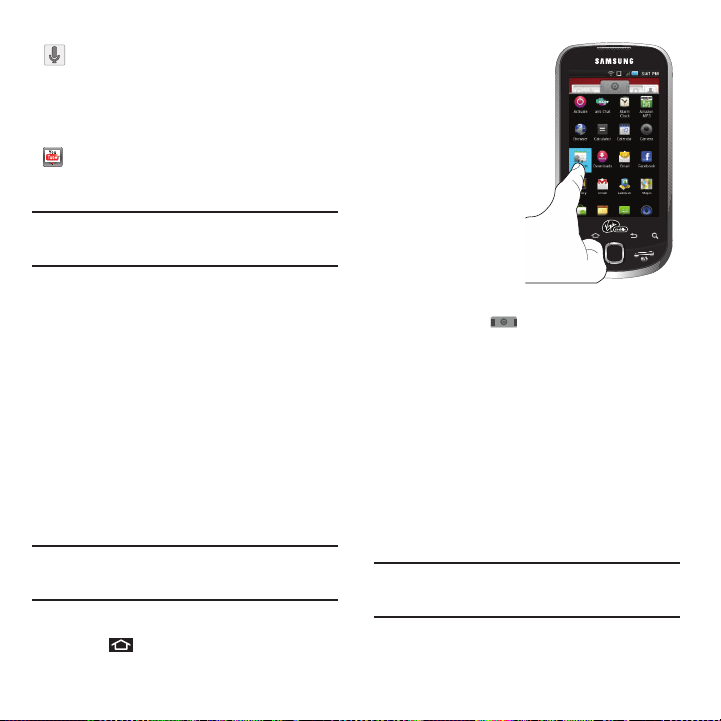
Using the Applications Tab
All of your device’s applications are located within the
Applications tab. This tab houses shortcuts to your
currently available applications.
Note:
This tab houses all default and downloaded applications
(installed from Android Market or from the Web).
Understanding Your Phone 19
Page 27
1.
Press and tap
to open the tab.
•
To close the Applications
screen, tap again
or press .
2. Scroll though the list
and tap an icon to
launch the associated
application.
•
The screens contains
device applications such
as Alarm Clock, Browser,
Calculator, Camera,
Market, and much more.
Applications
The following is a listing of the current applications
available on both the Home/Extended screens and via
the Applications tab.
Activate - Begins the device activation
process.
AirG Chat – Accesses an interactive and
interest-categorized mobile community.
Alarm Clock – Accesses the Alarm Clock
application (page 99).
MP3
Amazon MP3 – Launches the Amazon
MP3 music download service (page 75).
Browser – Launches the Web browser
(page 87).
Calculator – Launches the onscreen
calculator application (page 101).
Calendar – Launches the Calendar
applications that syncs it self to either your
Google or Exchange Work calendar
(page 95). Events can only be synched to
a managed account (page 46).
Camera – Launches the built-in camera
(page 70).
Contacts – Displays the Contacts tab
listing current contacts, synced from
either your Google or Exchange account
(page 107 and page 108). Contacts can
only be synched to a managed account
(page 46).
Downloads - Launches an application
allowing you to view downloaded content.
Email – Provides access to both your
Exchange work email and Internet email
accounts (such as Google, Yahoo, etc).
(page 61).
Facebook – Launches the Facebook Web
page via the browser (page 87).
Gallery – Displays a Gallery of camera
images and video stored in the microSD
card (page 72)
Gmail – Provides access to your Gmail
account (page 62).
20
Page 28
Latitude - Allows you to broadcast your
/,9(
location to select friends and family.
Maps – Launches a Web-based dynamic
map that helps you find local businesses,
locate friends, view maps and get driving
directions (page 78).
Market – Browse and search for
applications on Android Market (page 92).
Memo – Creates new text memos
(page 99).
Messaging – Provides access to your text
messaging application (SMS) (page 57).
Music – Launches the built-in Music
Player (page 75).
My Account - Allows you to view your
account information, including monthly
bills, payment history, and current usage.
My files – Launches a file browser that
allows you to view only supported image
files and text files (page 99).
Navigation - Launches the Google Maps
Navigation application, allowing you to
speak or type a destination and acquire
step-by-step directions. (page 79)
Phone – Access the phone keypad
(page 34).
Places - Launches a Facebook application
that allows you to see places that are
popular and trendy among your friends,
view popular places in your friends’
networks, and get real-time feed about
your friends’ current locations.
Settings – Access the device’s built-in
Settings menu (page 102).
Talk – Launches a Web-based Google Talk
application that lets you chat with family
and friends over the Internet for free.
ThinkFree Office – Provides access to a
Microsoft® Office-compatible Office®
suite. It also provides a centralized
location for the management of your
online and offline files.
/,9(
Virgin Mobile Live - Launches a
customizable mobile entertainment
application. It provides the latest
ringtones, wallpapers, and games. You
can also download albums and DRM free
tracks and sync them to your computer.
Voice Dialer – Launches your device’s
built-in automatic speech recognition
(ASR) software, called Voice Control, to
dial a phone number in your Contacts or to
launch phone functions (page 41).
Understanding Your Phone 21
Page 29
Voice Search – Launches your device’s
built-in automatic speech recognition
(ASR) software and initiates a Google
search based on the recognized text
(page 79).
YouTube – Launches the YouTube
webpage via the browser (page 77).
Note:
The Email application includes access to both Exchange
Server-based email (also known as Work email) and other
Internet-based email providers such as Yahoo and Gmail.
Customizing Your Home Screen
You can customize your Home screen by doing the
following:
•
Creating Shortcuts
•
Adding and Removing Widgets on the current screen
•
Repositioning Widgets
•
Creating Folders
•
Changing the Background (Wallpaper)
Creating Shortcuts
Shortcuts are different than the current Home screen
Widgets that only launch an application. Shortcuts
activate a feature, action, or launch an application.
Note:
To move a shortcut from one screen to another, it must
first be deleted from its current screen. Activate the new
screen, then add the shortcut.
To add a shortcut from the Applications tab:
1. Press to activate the Home screen.
2. Select a location
(screen) for your
new shortcut by
scrolling across
your available
screens until you
reach the desired
one. See “Home
Screen Overview”
on page 17.
3. Tap t he
Applications
( ) tab to reveal all your current
applications. By default, the applications are
listed in a Grid view.
4. Scroll down through the list and locate your
desired application.
5. Touch and hold the onscreen icon. This creates
an immediate shortcut of the selected icon and
closes the Applications tab. The new shortcut
then appears to hover over the currently active
screen.
Note:
The same shortcut can be added to any of the available
screens (Home or Extended). The application you add to
the screen will still appear within the
Applications
tab.
22
Page 30
6.
While still holding the onscreen icon, position it
on the current screen. Once complete, release
the screen to lock the shortcut into its new
position.
To add a shortcut via the
Add to Home screen:
1. Press to activate
the Home screen.
2. Touch and hold on
an empty area of
the screen.
3. From the
Add to
Home screen
window tap
Shortcuts
.
4. Tap a selection from the available list:
•
Applications
•
Bookmark
•
Contact
•
Direct dial
•
Direct message
•
Directions & Navigation
•
Gmail label
•
Music playlist
•
Settings
5. Follow the onscreen instructions to add the
new shortcut to your current Home screen.
To delete a shortcut:
1. Press to activate the Home screen.
2. Touch and hold the desired shortcut. This
unlocks it from its location on the current
screen.
3. Drag the icon over the Delete tab ( ) and
release it.
Adding and Removing Widgets
Widgets are self-contained applications that reside in
either your Applications tab or on the Home or
Extended screens. Unlike a shortcut, this Widget
appears as an onscreen application.
Note:
To move a Widget from one screen to another, it must
first be deleted from its current screen. Activate the new
screen, then add the Widget.
To add a Widget:
1. Press to activate the Home screen.
2. Touch and hold on an empty area of the
screen.
3. From the
4. Tap an available Widget to place it on your
Widgets
.
Add to Home screen
window tap
current screen.
•
Choices include:
Analog clock, Facebook,
Latitude, Music, Picture frame, Power Control,
and
YouTube
.
Understanding Your Phone 23
Page 31

To remove a Widget:
1. Touch and hold a Widget until you can move it
around on the screen.
2. Touch and hold the desired widget. This
unlocks it from its location on the current
screen.
3. Drag the widget over the
Delete
tab ( ) and
release it.
•
As you place the Widget into the Trash, both items
turn red.
•
This action
does not
delete the Widget, it just
removes it from the current screen.
To place a Widget onto a different screen:
1. Follow the steps to remove the Widget from the
current screen (page 23).
2. A Widget cannot be dragged from a current
screen to an adjacent screen. It must first be
removed from its current location, then added
back to a new current screen.
3. Touch and drag across your screen to view
another available screen (there are three
available screens [1 Home and 2 Extended
screens]) (page 18).
4. Follow the steps to add a Widget to the current
screen (page 23).
Creating and Managing Folders
Folders are located on any of the three available
screens and can contain both files (such as data and
images) and Contact information or entries.
To create a folder onscreen:
1. Press to activate the Home screen.
2. Touch and hold on an empty area of the screen.
3. From the
4. Tap an available folder type to place it on your
Folders
Add to Home
.
screen window tap
current screen.
•
Choices include
New folder, All contacts
,
Contacts with phone numbers, Facebook
Phonebook, Received list from Bluetooth,
Recent documents
Note:
Starred contacts are those Contact entries tagged as very
important.
, or
Starred contacts
.
Accessing Recently-Used Applications
Your device keeps a running list of your six most
recently used applications.
24
Page 32

1.
Portrait
View
Landscape
View
Press and hold
to open the
recently-used
applications
window.
2. Tap an icon to
open the related
application.
Changing the Screen
Orientation
The Samsung
Intercept™ is capable
of automatically changing the orientation of some
onscreen content. The device’s built-in
accelerometer senses movement and changes its
angle/orientation.
This allows the device to change the onscreen
content (images, video, Web pages) to properly
display based on the current angle (some screens
may not automatically change).
Although most screens will change orientation once
the QWERTY keyboard is opened, this feature can be
manually enabled to change the orientation for all
applicable screens when rotation is detected.
Note:
An example of a screen that does not automatically reorient is the Home screen. This screens requires you
slide out the QWERTY keyboard. An example of a screen
that automatically re-orients by moving the device is the
Contacts screen. This only requires you turn the device
on its side.
Understanding Your Phone 25
Page 33

To manually activate the auto-rotate feature:
Keypad
Keypad
Optical
Navigation
Keys
Joystick
Scrolling
Pressing
1. Press
display
2. Scroll down and tap
➔
and tap ➔
.
Orientation
. A checkmark
indicates the feature is enabled. See “Changing
the Screen Orientation” on page 25.
•
Clear the
Orientation
checkmark to disable this
automatic orientation adjustment.
Menu Navigation
There are three ways to navigate through a menu:
•
Using your finger (page 26)
•
Using the Optical Joystick (page 26)
•
Using the built-in keyboard’s navigation/arrow keys
(page 27)
Selecting Menu Items Using your Fingers
As you navigate through the menu, you activate menu
options by tapping the onscreen entry. Select any
option by tapping it.
1. Tap an onscreen
icon to launch a
menu or feature.
2. Scroll your finger
across the screen
to navigate through
a menu list (bottom
up or top down).
26
Sound &
3. Tap a menu item to make a selection or
activate a field.
To launch the Keypad using your fingers:
䊳
Tap from the Home screen.
– or –
Press and tap .
Selecting Menu Items Using the Optical Joystick
The Optical Joystick acts as a dual touch-sensitive
mouse and OK/Enter key. As you navigate through a
menu, options are highlighted. Select any option by
highlighting it and pressing .
The direction of your onscreen movements while
using the Optical Joystick is determined by the
current orientation of your device.
Page 34

•
When your QWERTY keyboard is visible, your device
is placed into Landscape mode.
•
When the keyboard is hidden, your device is placed
into Portrait mode.
To launch the Keypad using your joystick:
1. From the Home screen, use your finger to
scroll over the Optical Joystick.
2. Highlight . Scrolling over the Optical
Joystick highlights the Keypad icon on the
screen.
3. Press .
To view your text messages using your joystick:
1. Scroll across the Optical Joystick until is
highlighted and press .
2. Scroll down and highlight Messaging ( )
and press . (If you have any text
messages, they are displayed.)
3. Highlight an available message and press
to view its content.
Selecting Menu Items Using your Keyboard
As you navigate through a menu with these
navigation keys, options are highlighted. Select any
option by pressing a directional arrow from the
QWERTY keyboard and moving the onscreen
selection, highlighting it and pressing .
•
If the option is numbered, you can select it by
pressing the corresponding number on the phone’s
keypad.
Access the QWERTY keyboard and locate the
navigation keys, located at the right of the keyboard.
To view your text messages using the directional
keys:
1. Use the keys until is highlighted and
press .
2. Press the navigation keys until Messaging
( ) is highlighted and press . (If you
have any text messages, they are displayed.)
3. Press Up or Down to highlight an available
message and press to view its content.
Backing Up Within a Menu
To go to the previous menu:
䊳
Press .
To return to Home screen:
䊳
Press .
Understanding Your Phone 27
Page 35

Using Context Menus
Context menus (also called popup menus) contain
tools that apply to a specific item on the screen. They
function similar to those menu options available on
your computer when you use a right-mouse click.
You open a context menu by touching and holding an
onscreen item. You can also open an item’s context
menu by selecting it with the optical joystick and then
pressing and holding the optical joystick.
Not all items have context menus. If you touch and
hold an item that has no context menu, nothing
happens.
Opening Menus With Voice Dialer
You can jump directly to many menu items or
applications by saying “Go to” followed by a menu
option.
1. Press and hold
. You then
hear a prompt.
– or –
Press and
tap
➔
(
Voice
Dialer
).
2. When you see
“
Listening
,” say “
Open
.” A list of valid actions is
displayed.
3. Tap an action, the device opens the selected
menu.
Tip:
Tap and scroll through the onscreen list to reveal more
options.
28
Page 36

Section 3: microSD Card
Your device is equipped with a preinstalled 2GB
microSD™ (Secure Digital) memory card. It allows
you to store images, videos, music, and voice data in
your device.
Important!:
Camera, Camcorder, and Music playback features
are dependent on having a microSD memory card
installed. Although the Samsung Intercept™
comes with a pre-installed 2GB card, it can support
microSD cards of up to 32GB.
microSD Icon Indicators
The following icons show your microSD card
connection status at a glance:
The card has been unmounted (released
from use) from the device.
The card is being prepared for use and for
mounting.
The card has been removed.
Warning!: DO NOT
remove a microSD card while the device is
accessing or transferring files. Doing so will result in
loss or damage of data. Make sure your battery is
fully charged before using the microSD card. Your
data may become damaged or lost if the battery
runs out while you are using the microSD card.
microSD Write Protection
The microSD adapter has a built-in Write Protection
lock to prevent accidental overwriting or removal of
your data when the microSD card and adapter are
inserted in another device.
䊳
Slide the Write Protection lock tab down into the
“Lock” position to prevent overwriting of data. To
allow data to be added or removed from the
microSD card, slide the Write Protection lock tab
up into the normal position.
Connecting Your Device to Your Computer
Before using your device’s mass storage capabilities,
you need to prepare your device’s data services to
synchronize with your desktop or laptop computer.
Once you have connected the device to the computer,
you can transfer your data to or from the microSD
card.
Before You Begin
Here is what you will need to have before you can
successfully establish a connection between your
Samsung Intercept™ and PC.
•
microSD card (internally installed prior to start)
•
compatible USB cable (included)
microSD Card 29
Page 37

1.
With the microSD card installed, connect your
device to your computer using a compatible
USB cable. (Wait for the connection to be
completed. When connected, the host
computer will automatically detect your
device.)
2. The USB icon ( ) now appears in the top left
Notifications area on your device.
3. Touch and drag down the Status screen to
reveal the Notifications page (or from the Home
screen press and tap
4. Ta p
USB connected ➔ Mount
Notifications
to copy files
).
between your computer and your device's
microSD card.
Important!:
The internal microSD card MUST BE MOUNTED
before your computer detects it and your are able to
communicate with it.
5. Locate the newly created Drive letter on your
computer. You can now begin to use the
microSD card as a storage device.
To remove the connection:
䊳
When you have finished transferring data, click the
USB device icon on your computer's taskbar, and
follow the onscreen instructions to safely unplug
the USB cable.
microSD Card Settings
Viewing Memory in the microSD Card
The Samsung Intercept™ allows you to review the
memory allocation of both your device’s internal
storage and that of the microSD card.
1. Press
phone storage
2. Review the available information.
•
3. Press to return to the previous page.
➔
and tap ➔
SD card &
.
The storage capacity pag e is divided into two sections:
External SD card
and
Internal phone storage
.
Formatting the microSD Card
Formatting a microSD card permanently removes all
files stored on the card.
1. Press
phone storage
2. Tou ch
➔
and tap ➔
.
Unmount SD card
SD card &
to release the microSD
card from its use by the device. The icon
appears within the Notifications area to indicate
an unmounted internal microSD card.
Once released, tap
➔
Erase everything
•
Once completely formatted, the card is automatically
Format SD card ➔ Format SD card
.
re-mounted (reconnected for use by the device).
30
Page 38

Important!:
The formatting procedure erases all the data on the
microSD card, after which the files
retrieved. To prevent the loss of important data,
please check the contents before you format the
card.
CANNOT
Important Connection Information
•
To avoid loss of data, DO NOT remove the USB cable, the
microSD card, or the battery while accessing or
transferring files.
•
DO NOT use your computer to change or edit folder or file
names on the microSD card, and do not attempt to
transfer large amounts of data from the computer to the
microSD card. Doing so may cause the microSD card to
fail.
•
DO NOT turn off or restart your computer, or put it into
standby mode, while using a mass storage device. Doing
so will result in loss or damage of data.
•
The internal microSD card can only be mounted for use
by either the device or a connected computer. Prior to
accessing the card via a different method, it must first be
unmounted from its current device (phone or computerUSB).
Important!:
The internal microSD card can only share a
connection with one device at a time, either your
device or your computer (via its USB connection),
not both. You can not browse the contents of the
card via your device if they are currently being
browsed via your PC.
be
microSD Card 31
Page 39

Section 4: Setting Up Service
This section outlines details about activation, setting
up your voicemail and what to do when you need help
with your device.
Activating Your Device
After purchasing your Virgin Mobile Phone from an
authorized retailer, you will need to go online to
activate your new device.
䊳
From your computer’s Web browser, go to
www1.virginmobileusa.com/activate/
https://
and complete the
onscreen instructions to activate your device.
When you have finished, make a device call to
confirm your activation. If your device is still not
activated or you do not have access to the Internet,
contact Virgin Customer Service at
1-888-322-1122
assistance.
Setting Up Your Voicemail
Your device automatically transfers all unanswered
calls to your voicemail, even if your device is in use or
turned off. You should set up your voicemail and
personal greeting as soon as your device is activated.
Always use a password to protect against
unauthorized access.
1. From the phone standby mode, touch and hold
.
2. Follow the system prompts to:
•
Create your password.
•
Record your name announcement.
32
Note: Voicemail Password
Getting Help
Managing Your Account
Online:
•
View your monthly bills and payment history
•
View your current usage
•
View the status and information about a replacement
device
•
for
Update your Billing Address or switch to a paperless
billing statement
•
Make a Payment
•
Set up and manage Auto Bill Pay
•
Manage Referrals
•
Switch from one device to another, if you own multiple
devices
•
Manage your Add-On Services
•
Order Accessories
•
Get Downloads
You can check your account at any time by logging
into My Account at:
https://www1.virginmobileusa.com/myaccount/home.do
•
Record your greeting.
that you create a password when setting up your
voicemail to protect against unauthorized access. Without
a password, anyone who has access to your device is
able to access your voicemail messages.
- Virgin Mobile strongly recommends
www.virginmobileusa.com
.
Page 40

From your Phone:
Virgin Mobile at Your Service:
1-888-322-1122
.
Virgin 411
Virgin 411 gives you access to a variety of services
and information, including residential, business, and
government listings; movie listings or show times;
driving directions, restaurant reservations, and major
local event information.
There is a per-call charge to use Virgin 411, and you
will be billed for airtime.
䊳
Tap
– or –
text with “HELP” in the
subject line.
For more information or to see the latest in products
and services, visit us online at
www.virginmobileusa.com.
Setting Up Service 33
Page 41

Section 5: Call Functions
Keypad
Keypad
End call
End call
This section describes features and functionality
associated with making or answering calls, and the
Contacts list, which is used to store contact
information.
Displaying Your Phone Number
䊳
Press ➔ and tap ➔
Status
. (Your phone number and other information
About phone
about your device and account is displayed.)
Making and Answering Calls
Making Calls
1. Press and then tap .
– or –
Press and touch .
2. Enter a phone number using the onscreen
dialpad and tap .
•
If you make a mistake while dialing, touch to
erase the numbers.)
3. Press or tap when finished.
Tip:
To redial your last outgoing call, press twice.To redial
other recent numbers, press , tap a number from the
Call Log list, and press
the Nationwide Virgin Mobile Network, always dial using 11
digits (1 + area code + phone number).
Call
or . When making calls off
➔
Dialing Options
When you enter numbers within the Keypad, you will
see three onscreen options.
From the Keypad screen, you have the following
options:
•
Call
( ) to call the entered number.
•
Delete
( ) to delete digits from the current number.
•
Send message
( ) to send the current caller a text
message while still maintaining the current call active.
To initiate additional options, tap and the
onscreen button.
•
Add to Contacts
to add the current number to either a
new or existing Contacts entry.
•
Speed dial setting
to access the Speed Dialing menu
where you can assign a speed dial location to a current
Contacts entry. See “Speed Dialing” on page 39.
•
Add 2-sec pause:
to insert a two second pause to enter a
2 second delay within a number string (the phone
continues dialing after 2 seconds without any additional
keys being pressed).
•
Add wait
to insert a hard pause within the number string
(the phone waits for your input). A wait requires that any
consecutive numbers be manually sent by touching
Yes
.
34
Page 42

Answering Calls
Accept
Accept
End call
End call
1. Make sure your device is on. (If your device is
off, incoming calls go to voicemail.)
Note:
All call answering options listed below require you touch
and hold the button to activate the function. When
unlocked, some functions can be activated by tapping
the onscreen button.
2. Press or touch and hold to answer an
incoming call. Other options include:
•
Reject
( ) sends the call directly to your voicemail
Reject
Reject
box.
•
Silence
to temporarily mute the ringer.
•
Reject with msg
sends the call to your voicemail box
and immediately allows you to send that caller a text
message.
Pressing the Volume down button also mutes the
ringer.
Your device notifies you of incoming calls in the
following ways:
•
The phone rings or vibrates.
•
The backlight illuminates.
•
The screen displays an incoming call message.
If the incoming call is from a number stored in your
Contacts, the entry’s name is displayed. You may also
see the caller’s phone number, if available.
Ending a Call
䊳
Press .
– or –
Tap .
Missed Call Notification
When you do not answer an incoming call, the Status
bar indicates .
To display a Missed Call entry from the Home screen:
1. Touch and hold the Status bar, then slide your
finger down the screen.
2. Tap the Missed call entry ( ). This opens the
Call log
screen.
3. Tap an entry and select
Calling
.
– or –
Highlight an entry using the Optical Joystick
and press to return the call.
– or –
Touch and hold an entry from the Call Log list
and from the context menu, select
Call
[number]. See “Using Context Menus” on
page 28.
Calling Emergency Numbers
You can place calls to 911 (from the Keypad, enter
), even if your device is locked
or your account is restricted.
Note:
When you place an emergency call, your device
automatically enters Emergency mode.
During an emergency call, press to display your
options. Select an option.
Call Functions 35
Page 43

•
End call
End call
Speaker On
to activate speakerphone mode. (If you are in
speakerphone mode, the option is displayed as Speaker
Off to deactivate.)
•
Dialpad/Hide dialpad
to show or hide the onscreen
dialpad.
•
End call
to end the current call.
To exit Emergency mode:
1. Press or tap to end a 911 call.
2. Ta p
Exit
on the Emergency Call Back mode.
Note:
When you end the 911 call, you are returned to the
Emergency Call Back mode. Within the Emergency Call
Back mode, tap OK or press the
menu.
Enhanced 911 (E911) Information
Home
key to use another
This device features an embedded Global Positioning
System (GPS) chip necessary for utilizing E911
emergency location services where available.
When you place an emergency 911 call, the GPS
feature of your device seeks information to calculate
your approximate location.
Note:
Depending on several variables, including availability and
access to satellite signals, it may take up to 30 seconds
or more to determine and report your approximate
location.
Important!: Always report your location to the 911 operator when
placing an emergency call.
emergency call takers, known as Public Safety
Answering Points (PSAPs) may not be equipped to
receive GPS location information from your device.
Some designated
In-Call Options
•
Once you initiate a call,
you will see six onscreen
options. To select an
option, tap the
corresponding option.
Dialpad/Hide
to toggle
the appearance of the
onscreen dialpad.
•
End call
to end the
current call.
•
Speaker
to route the
device’s audio through
the speaker (On) or
through the earpiece
(
Off
).
–
Activate
Speaker
to route the device’s audio through the
speaker. (You can adjust the speaker volume using the
volume keys.)
–
Deactivate
Speaker
to use the device’s earpiece.
Warning!:
Because of higher volume levels, do not place the
device near your ear during speakerphone use.
•
Mute
to mute the microphone during an active call. Tap
again to unmute the microphone.
Note:
If Mute is activated, the speaker mode is deactivated.
•
Bluetooth
to route the device’s audio through the
connected Bluetooth headset (On) or through the speaker
(
Off
). See “Turning Bluetooth On and Off” on page 81.
36
Page 44

–
Keypad
Keypad
Call log
Call log
Call log
Call log
When the call is routed to a Bluetooth headset, the
current call area shows the
Note:
The Headset button is activated to show the current call
is routed to the connected Bluetooth headset.
•
To route the current call back to the device, tap
Bluetooth
Headset to temporarily use the device. Tap it again to
route the call back to the connected Bluetooth
headset.
–
When turned off, the call is routed through either the
earpiece or speaker and shows ( ).
Touch
Keypad
( ) to use the onscreen dialpad to
enter additional numbers, for example, an extension
or access code.
–
For example: When you call your bank’s 800 number, use
your dialpad to enter your account number and PIN.
Pressing during a call displays a list of available
in-call features. To select an option, tap the
corresponding option.
•
Contacts
to toggle the appearance of the onscreen
dialpad.
•
Memo
to create a new memo while remaining on the call.
call icon ( ).
End-of-Call Options
After you receive a call from or make a call to a
phone number that is not in your Contacts, the device
displays the following options:
•
Add to Contacts
to add the current new number to your
Contacts. (See “Creating a New Contacts Entry” on
page 44.)
•
Update existing
to add the current number to an existing
Contacts entry. (See “Adding a Number to a Contacts
Entry” on page 49.)
•
Call
to redial the selected number and call back the
recipient.
•
Message
to send the selected number a text message.
Note:
The End-of-Call options are not displayed for calls
identified as No ID, Restricted, or Unknown.
Additional Calling Options
To obtain additional options such as phone number
and the duration of the call, you must access the Call
Log screen. See “Missed Call Notification” on
page 35.
1. Press and then tap
➔
.
– or –
Press and touch
Call log
( ).
Call Functions 37
Page 45

2.
Keypad
Keypad
Contacts
Contacts
Tap an entry from the list and then tap:
•
Call
to dial the selected number and call the recipient.
•
Send message
to send the selected number a text
message.
•
Send email
to send the selected an email message.
Requires the entry to have an available email address.
•
Create contact
to add the new number to your
Contacts. (See “Saving a Phone Number” on
page 38.)
•
Update existing
to add the current number to an
existing Contacts.
– or –
Tap an entry from the Call log list, and then
press and tap
number before call
Note:
The End-of-Call options are not displayed for calls
identified as No ID, Restricted, or Unknown.
View contact, Delete
.
, or
Saving a Phone Number
The number of Contacts entries you can store in your
device is limited only by available memory space.
Your device automatically sorts the Contacts entries
alphabetically. Each entry’s name can contain an
unlimited number of characters. (For more
information, refer to “Contacts” on page 44.)
To save a new number from the Home screen:
1. Tap
➔
and enter a number.
Edit
2. Press and tap
Add to Contacts
– or –
Ta p
Add to Contacts
3. Ta p
Create contact
Note:
The Number you previously entered displays as the
contact’s Mobile phone number by default.
4. Touch the
name
field.
5. Use the onscreen
(located above the dialpad).
.
First
or QWERTY
keyboard to enter
the new contact
name and any
additional
information that
you want
associated with
this contact.
6. Touch
Save
to store and update the new entry.
Finding a Phone Number
You can search Contacts for entries by name.
1. Press and tap .
– or –
From the Keypad screen, tap .
.
38
Page 46

2.
Contacts
Contacts
Turn the device on its side and slide open the
QWERTY keyboard.
3. Enter the first letter or letters of an entry. (The
more letters you enter, the more specific the
search.)
4. To display contact details, tap an entry from
the list.
Dialing From the Contacts List
1. Press and tap .
Tip:
From Keypad screen, tap Contacts ( ) to list entries.
2. Scroll through the list and tap the entry you
want to call.
3. Tap the phone entry number.
– or –
Press to dial the entry’s default phone
number.
Speed Dialing
Dialing from Favorites
You can quickly dial contacts you call frequently by
adding them to your Favorites list. Although not
assigned to a speed dial number, this is a quick and
easy way to dial your favorite Contacts. See “Adding
Entries to Your Favorites” on page 50.
To speed dial a contact from Favorites:
1. Press and then tap
2. Scroll through the list and tap the contact.
3. Tap to place a
Call
or
➔
Favorites
Send Message
.
to send a
message to the contact.
Dialing a number from the
dialing one from the
Favorites
Contacts
tab. See “Dialing From
tab is similar to
the Contacts List” on page 39.
Assigning a Speed Dial Location
Only an existing Contacts entry can be assigned to an
available Speed Dial location.
Note:
Eight speed dial locations are available. Location 1 is
reserved for your voicemail.
To assign a Contacts entry to a Speed Dial location:
1. Press and tap .
– or –
Press and then tap ➔
2. Press and touch
3. Touch an empty speed dial location.
4. Scroll through your Contacts list and touch an
Speed dial
Contacts
.
.
entry’s phone number. Once complete, the
entry’s contact image and selected number are
added to the selected Speed Dial location.
Call Functions 39
Page 47

To call a speed dial number:
Keypad
Keypad
Keypad
Keypad
1. Press and then tap .
– or –
Press and touch
2. Press and hold a dialpad number. The phone
Keypad
().
number is then dialed.
– or –
3. Press and touch
[number]
with the desired key associated with
Speed dial setting
➔
the speed dial location. The phone number is
then dialed.
Plus (+) Code Dialing
When placing international calls, Plus Code Dialing
automatically enters the international access code for
your location (for example, 011 for international calls
made from the U.S.). See “Activating Plus Code
Dialing” on page 111.
1. Press and then tap .
– or –
Press and touch Keypad ( ).
2. Touch and hold until you see a “+” on the
display screen.
3. Dial the country code and phone number, and
then tap . (The device automatically adds
the access code for international dialing,
followed by the country code and phone
number.)
Calling in Lock Mode
When your device is locked, you can only receive
incoming calls or make calls to 911or Virgin Mobile At
Your Service.
1. Press to reveal the lock screen.
Note:
The Unlock Pattern applies if the
enabled.
2. Ta p
Emergency call
Require Pattern
setting is
to reveal the Emergency
Keypad to place your emergency call.
•
Draw your unlock pattern to regain access to the full
dialer and unlock the device.
Voice Dialing
You can use your device’s built-in automatic speech
recognition (ASR) software, called
Voice Dialer
, to dial
a phone number in your Contacts or to launch phone
functions. All you have to do is to talk into the phone,
and ASR will recognize your voice and complete tasks
by itself.
40
Page 48

Activating Voice Dialer
䊳
Press and hold .
You will then see a
prompt.
– or –
Press and
tap
➔
(
Voice Dialer
).
The screen displays
“
Listening
” and the
phone prompts you to
say the name of the
command you want to
use.
To complete your task, simply follow the voice
prompts or touch an onscreen option.
Available ASR commands include:
•
Call
<Name or #> to call an entry in your Contacts list or
a spoken phone number. (See “Making a Voice Call With
Voice Dialer” on page 41.)
•
Dial
<Name or #> to call an entry in your Contacts list or
a spoken phone number.
•
Redial
<Name or #> to callback an entry in your
Contacts list or a spoken phone number.
•
Open
<Menu> to jump directly to menu items or
applications. (See “Opening Menus With Voice Dialer” on
page 28.)
Tip:
Use Voice Dialer in a quiet environment so it can
accurately recognize your commands.
Making a Voice Call With Voice Dialer
1. Press and hold . You will then see a
prompt.
– or –
Press and tap
2. When you see “
Listening
➔ (Voice Dialer
,” say “
Call
” followed
by the name and the label for the phone
number you wish to call. For example, say
“
Call John Smith Mobile
number stored for the contact “
with the label “
•
You can also touch the onscreen
.” The device dials the
Mobile
.”
John Smith
Call <Name or #>
field to activate the function.
•
If the location is not recognized or the name does not
have a phone number stored in Contacts, your phone
will display a list possible options onscreen.
•
If a name has only a single number, or if you know the
name but are not sure which number to call, say
“
Call
” followed by the name only. For example, say
“
Call John
.” If the name is recognized and there is
only one phone number for the name, your device
immediately places the call.
Calling a Phone Number With Voice Dialer
1. Press and hold . You then hear a prompt.
– or –
Press and tap
➔ (Voice Dialer
).
”
).
Call Functions 41
Page 49

2.
Keypad
Keypad
Current call
Call options
New incoming call
When you see “
Listening
,” say “
Call
” followed
immediately by a valid string of digits to be
dialed, for example, say “
3. If the location is not recognized or the name
Call 555 555 5555
does not have a phone number stored in
Contacts, your phone will list possible options
onscreen.
Speak naturally and clearly and remember to speak
one digit at a time. For example, 1-800 should be
pronounced “One Eight Zero Zero.”
Caller ID
Caller ID allows people to identify a caller before
answering the phone by displaying the number of the
incoming call. If you do not want your number
displayed when you make a call, follow these steps.
1. Press and then tap
➔
to access
the onscreen dialer.
2. Tap .
PQRS
To permanently block your number, call Virgin Mobile
At Your Service.
Call Waiting
When you’re on a call,
.”
Call Waiting alerts you
to incoming calls by
sounding two beeps.
Your device’s screen
informs you that
another call is coming in
and displays the caller’s
phone number (if it is
available and you are in
digital mode).
To respond to an
incoming call while
you’re on a call:
䊳
Before accepting the
incoming call, tap
one of the following
onscreen options:
•
Accept
to answer the new call. The first caller is
placed on hold.
•
Reject
to send the call to your voicemail box.
•
Silence
mutes the ringtone.
•
Reject with msg to send the call to your voicemail box
and immediately send the caller a text message.
These Ignore messages can be created and stored on
the device.
42
Page 50

To switch back to the first caller:
Keypad
Keypad
PQRS
Keypad
Keypad
PQRS
䊳
From the In-Call options screen (shown here), tap
Swap
.
Tip:
For those calls where you don’t want to be interrupted, you
can temporarily disable Call Waiting by pressing
PQRS
before placing your call. Call Waiting is
automatically reactivated once you end the call.
Call Forwarding
Call Forwarding lets you forward all your incoming
calls to another phone number – even when your
device is turned off. You can continue to make calls
from your phone when you have activated Call
Forwarding.
To acti vate Ca ll Forwarding:
1. Press and then tap
➔
to access
the onscreen dialer.
2. Tap .
3. Enter the area code and phone number to
which you want your calls forwarded.
4. Tap . (The phone number appears within
the Talk button.) (You will see a message and
hear a tone to confirm the activation of Call
Forwarding.)
To deactivate Call Forwarding:
1. Press and then tap
➔
to access
the onscreen dialer.
2. Tap . (You will see a
message and hear a tone to confirm the
deactivation.)
Note:
You are charged a higher rate for calls you have
forwarded.
Call Functions 43
Page 51

Section 6: Contacts
This section explains how to use and manage your
Contacts List. You can save phone numbers to your
phone’s memory.
Creating a New Contacts Entry
If existing Google and
Corporate email accounts
have been synchronized to
your device, these will be
made available to your
device during the creation
of new entries. These new
Contacts entries can be
assigned or saved to
synched accounts such as
Phone, Google, or
Corporate.
Your device automatically sorts the Contacts entries
alphabetically. Each entry’s name can contain an
unlimited number of characters. You can create either
a
Phone, Google
•
Phone
Warning!:
•
Google
or
Corporate
contact.
contacts are stored locally on the device.
If the device is ever reset to its factory default
parameters, locally stored contacts can be lost.
contacts are shared with your existing Google
account and can also be imported to your device after you
have created a Google Mail account.
•
Corporate
(also known as Work or Exchange) contacts are
those contacts that are intended to be shared with either
an Exchange Server or from within Microsoft® Exchange.
1. Press and tap .
– or –
Press and tap ➔ Contacts
2. From the top of the screen, tap
Tip:
You can also enter the phone number from the Keypad and
press ➔ Add to contacts
3. Tap a destination type (
Corporate
).
Note:
You will not see the option to select a destination unless
you have previously established a Google or Corporate
account on the device.
4. Tap t he
First name
. Proceed with steps 4–5.
Phone, Google
and
Last name
().
Create contact
, or
fields, and
enter a name for the new entry. See Entering
Text with Onscreen Keyboard (page 51) or
Entering Text using the QWERTY Keyboard
(page 53).
Note:
Use the predictive text row to shortcut a name selection
by tapping the word.
.
44
Page 52

5.
Tap the label button (to the left of the
number
field) to select from an onscreen
category such as:
Fax, Pager, Assistant, Other,
6. Tap a phone number field and enter a phone
Mobile, Home, Work, Work
or tap
Phone
Custom
number.
•
Tap
Add phone number
to enter additional phone
numbers for the new Contacts entry.
•
Tap on the QWERTY keyboard to remove a
previously entered phone number.
7. Enter additional information such as: Email
addresses, IM chat addresses, Group
assignment, Ringtone, Company, Job Title, or
Add more fields
to input additional category
information.
•
Use your finger to slide the page up or down to see
additional fields and categories.
8. Tap
Save
to complete and store the new entry.
After saving the number, your device displays the
new entry within the Contact list. (See “Contacts
Entry Options” on page 48.)
Tip: ICE – In Case of Emergency
emergency personnel to identify important contacts, you
can list your local emergency contacts under “ICE” in your
device’s Contacts list. For example, if your mother is your
primary emergency contact, list her as “ICE–Mom” in your
Contacts. To list more than one emergency contact, use
“ICE1–___,” “ICE2–___,” etc.
- To make it easier for
Saving a Phone Number
To save a number from the Keypad:
1. Press and tap .
.
2. Enter a phone number using either the
onscreen dialpad or QWERTY keyboard.
3. Tap
Add to Contacts ➔ Create contact
.
– or –
Press and tap
contact
.
4. Tap a destination type (
Corporate
Note:
You will not see the option to select a destination unless
you have previously established a Google or Corporate
account on the device.
5. Tap the
First name
Add to Contacts ➔ Create
).
and
Phone, Google,
Last name
fields, and
or
enter a name for the new entry. See Entering
Text with Onscreen Keyboard (page 51) or
Entering Text using the QWERTY Keyboard
(page 53).
6. Tap the label button (to the left of the
number
field) to select from an onscreen
category such as:
Mobile, Home, Work, Work
Fax, Pager, Assistant, Other,
7. Tap a phone number field and enter a phone
or tap
Phone
Custom
..
number.
Contacts 45
Page 53

8.
Ta p
Save
to complete and store the new entry.
Confirming Contact Synchronization
Syncing data from your managed accounts allows you
to add and manage a new or existing contact from
your online or remote accounts to your device. Prior to
syncing, you need an active Google or Corporate
account with current Contact entries. You are also
required to login to your accounts via the device.
With syncing, any Contacts entries (with phone
numbers, email addresses, pictures, etc.) are updated
and synced with your Samsung Intercept™.
For more information about syncing existing managed
accounts, see “Synchronizing Accounts” on
page 107.
1. Press
sync
2. Tap within the desired account field to
➔
and tap ➔ Accounts &
.
reveal the account’s synchronization settings
screen.
3. To synchronize Gmail Contacts, tap
Contacts
. A checkmark indicates the feature is
Sync
enabled.
– or –
To synchronize Corporate Contacts, tap
Contacts
. A checkmark indicates the feature is
Sync
enabled.
Note:
Any change on either side (Device, Gmail, or Corporate/
Exchange Contacts), is reflected on the other side after a
sync process.The process of updating your Contacts tab
can take several minutes. If after 10-20 minutes, your list
has not been updated, repeat steps 2-3.
4. You r
Contacts
tab then reflects any updated
Contact information.
•
This update process works both ways. For example,
any changes on the device are updated to your Gmail
Contacts list after sync.
46
Page 54

Groups
This feature allows you to add a new or existing
contact to a call group. This group can be one of the
already present groups (Family, Friends, or Work) or a
user-created group.
To create a new group:
1. Press and tap
2. Press and tap
3. Tap the
Group
➔
Groups
.
Create
.
field, and enter a group name
and defining ringtone.
4. Tap
Save
to store the newly created group.
To add an existing contact to a current group:
1. Press and tap
group]
.
2. Tap
Add member
3. Locate an entry from the Contacts list.
4. From the list of contacts, tap the contact you
want to add or tap
.
Select all
➔
Group ➔ [name of
. (A green check-
mark appears next to the entry.)
5. Tap
Add
to add the contact to your group.
6. Touch an existing group.
To send a message to a group:
1. Press and tap
2. Tap an existing group, and press
message
.
➔
Groups
.
➔
Send
3. Use the QWERTY keyboard to type your
message, and tap
Send
.
Contacts Menu Options
1. Press and tap
.
2. Touch and hold an
entry and select
from the available
contact menu
options:
•
Edit
to edit the
currently selected
Contacts entry. See
“Editing a Contacts
Entry” on page 48.
•
Delete
to erase the currently selected Contacts entry.
See “Deleting Entries” on page 50.
•
Link contact
to link the current contact to another
current contact. Similar to a “see also” feature. If you
can’t remember a contact’s information, linking
entries can help you find the person you are looking
for.
•
Mark as default
to assign one the entry’s available
numbers as the default (main) contact number.
•
Add to favorites
to copy the current Contacts entry to
the list within the Favorites tab (page 50).
•
Remove from favorites
to remove the current
Contacts entry fromthe list within the Favorites tab.
Contacts 47
Page 55

•
Send namecard via
to send the current Contact
entry’s information to an external recipient via either
Bluetooth, Email
(Exchange or Internet), or
Entering Text with Onscreen Keyboard (page 51) or
Entering Text using the QWERTY Keyboard (page 53).
•
Add to group
to add the current contact to an
available group.
Note:
Prior to using the Bluetooth feature, it must first be
enabled, and the recipient’s device must be visible. Only a
Contact’s information can be sent via Bluetooth. No other
file type (video, image, or audio) can be sent using
Bluetooth.
Contacts Entry Options
To display a Contacts entry:
1. Press and tap .
2. Touch an entry to display the Contact entry’s
overview screen. This screen contains Name,
History, contacts numbers, email, and linked
contact information.
3. Press to reveal the context menu specific
to this entry.
4. Tap an available option:
•
Edit
to access the details page for the entry and begin
editing its information.
•
Delete
to delete the current Contacts entry from your
device (page 50).
•
Link contact
to link the current contact to another
current contact. Similar to a “see also” feature. If you
can’t remember a contact’s information, linking
entries can help you find the person you are looking
for.
48
Gmail
. See
•
Mark as default
to assign one the entry’s available
numbers as the default (main) contact number.
•
Send namecard via
to send the current Contact
entry’s information to an external recipient via either
Bluetooth, Email
(Exchange or Internet), or
Gmail
“Sending Contacts via Bluetooth” on page 84.
Note:
Prior to using this feature, Bluetooth must first be
enabled, and the recipient’s device must be visible. Only a
Contact’s information can be sent via Bluetooth. No other
file type (video, image, or audio) can be sent using
Bluetooth.
Editing a Contacts Entry
1. From the Contact’s overview screen, press
and tap
Edit
. Tap an option to begin editing.
•
[image icon]
to assign a picture to the entry. See
“Assigning a Picture to an Entry” on page 50.
•
First name/Last name
•
Phone number
to edit the current name.
to add or delete a phone number to
the entry. (See “Adding a Number to a Contacts Entr y”
on page 49.)
•
Email address
•
Google Talk
•
Groups
•
Ringtone
•
Company
to add or delete an email address.
to assign IM chat addresses.
to edit the group association.
to assign a unique ringtone to the entry.
to enter business information such as
company name.
•
Job Title
to enter your current business job title/
position.
•
Add more fields
to add additional categories such as:
Nickname, Postal address, Web address, Birthday,
Anniversary,
and
Note
.
. See
Page 56

2.
DEL
Tap
Save
to store your updates.
Adding a Number to a Contacts Entry
1. From the Contact’s overview screen, press
and tap
Edit
.
2. From the phone numbers area, tap
number
to create a new empty
Add phone
Phone number
field within the selected phone number
category.
3. Tap the label button (to the left of the
number
field) to select from an onscreen
category such as:
Fax, Pager, Assistant, Other,
4. Tap the
Mobile, Home, Work, Work
Phone number
or tap
field and use the
Phone
Custom
.
onscreen dialpad to enter the new number.
5. Tap
Save
to update the new number to the
existing Contacts entry.
Editing a Contacts Entry’s Number
1. From the Contact’s overview screen, press
and tap
Edit
.
2. Tap an existing phone number field.
Note:
Touch and hold the Phone number field to activate the
Edit text menu. You can select editing options such as:
Copy all
.
3. Tap to clear one digit at a time.
4. Re-enter or edit the number using the
onscreen dialpad.
Note:
To hide an onscreen keypad, dialpad or keyboard,
press .
5. Tap
Save
to update the number to the existing
Contacts entry.
Selecting a Ringtone Type for an Entry
Assign a ringtone type to a Contacts entry so you can
identify the caller by the ringtone type. (See
“Ringtone Types” on page 102.)
1. From the Contact’s overview screen, press
and tap
Edit
.
2. Use either your finger or the Optical Joystick to
scroll down the page and select within the
Ringtone
field to display the Ringtones menu.
3. Tap either
Default Ringtone, Sounds,
ringtone
.
•
Sound
allows you to access your microSD card and
select a compatible music/sound file and use it as a
ringtone.
•
Phone ringtone
allows to select from an available list
of device-specific ringtones.
4. Scroll through available ringtones. (To hear a
sample ringtone, highlight or tap a ringtone
entry.)
5. Tap
OK
to save the new ringtone type.
or
Phone
Contacts 49
Page 57

6.
Use either your finger or the Optical Joystick to
scroll down the page and select the
Save
to
complete the ringtone assignment.
Assigning a Picture to an Entry
Assign a picture to display each time a certain contact
calls you.
Assigning a picture via the device:
1. From the Contact’s overview screen, press
and tap
Edit
.
2. Tap a contact image (upper-left).
•
Tap an onscreen image to prepare it for use.
–
Press to return to the Select picture page where
you can now select the new image.
3. Touch and drag along the sides of the yellow
border box to begin cropping the desired area,
then tap
Save
to assign selected picture.
Applying a picture from within your online Gmail:
1. Log into your Gmail account and go to your
Contacts page.
2. Select your Contacts entry (with a checkmark)
and click the image area (
3. Click
Browse
to locate a local copy of your
Change Picture
).
image.
•
You can also choose an image from other sources
such as Picasa® Web.
4. Crop the visible area of your selected picture
and click
Apply Changes
50
.
5. Sync your new contact from your online Gmail
to your device. See “Confirming Contact
Synchronization” on page 46.
Deleting Entries
1. From the Contact’s overview screen touch and
hold an entry from the list
2. From the
3. Ta p
Contacts Entry
Delete
.
OK
to confirm the deletion.
context menu, tap
Adding Entries to Your Favorites
The Favorites tab is a listing that can help you quickly
access your most used or preferred Contacts entries.
1. Press and tap .
2. Touch and hold the entry name from the
Contacts tab listing.
3. From the
Note:
Another method to add or remove an entry from your
favorites is to toggle the state of the star icon on the
Contact’s details page (upper-right). Enable to add the
entry to your favorites (star is lit), tap again to remove.
to favorites
Contacts Entry
.
context menu, tap
Add
Page 58

Section 7: Entering Text
This section outlines how to select the desired text
input mode when entering characters into your
phone. This section also describes how to use the
Swype keyboard to ease the text entry method.
Entering Text with Onscreen Keyboard
When you activate a field where you can enter text,
numbers, symbols, etc., you can either use the
onscreen keyboard or QWERTY keyboard.
Onscreen keyboard entry can be done in either
Portrait or Landscape orientations. The Landscape
orientation provides more space and results in
slightly bigger onscreen keys. If you find that you
prefer to enter text via the onscreen keyboard, and
need bigger keys, use this orientation.
Activating the Landscape Keyboard
Although the device will automatically rotate its
screen orientation to Landscape once the QWERTY
keyboard slides out, the Samsung Intercept™ can
also be set to automatically change its orientation. To
use the onscreen keyboard in Landscape mode, this
feature must first be enabled.
See “Changing the Screen Orientation” on page 25.
Selecting a Text Input Mode
Your device provides convenient ways to enter
letters, numbers, and symbols whenever you are
prompted to enter text (for example, when adding a
Contacts entry or when using email and text
messaging).
In this section we’ll cover the steps necessary to
enter text using the onscreen keyboard, where the
touchscreen is the primary method of both text and
character entry.
Note:
Some characters and types, such as some symbols and
emoticons, are not accessible from the onscreen
keyboard.
1. From a screen where you can enter text, tap
the input field to reveal the onscreen keyboard.
2. Select one of the following Text mode options:
•ABC
to use alphabetic characters from the onscreen
keyboard (See page 52.)
• ?123
to enter numbers by pressing the numbers on
the onscreen keyboard. (See page 53.)
Tip:
When entering text, tap to change letter capitalization.
• Voice Input allows the device to use its built-in
voice recognition software to hear your voice and
transcript it directly into text.
To change the input method:
1. From an active text input screen, touch and
hold a text input field.
2. Select Input Method from the onscreen context
menu. See “Using Context Menus” on page 28.
Entering Text 51
Page 59

Onscreen Keyboard Overview
Recipient
Send
Entry field
Suggested
Delete
Caps/ALT
Text mo de
Voice input
Emoticons
words
?123
•
Entry field
: a field where text, number, or other
characters can be entered.
•
Suggested Word
choices based on the current set of entered text. Tap an
choices: a row of selectable word
onscreen choice to insert the selection into your text entry
field at the current cursor position. Tap the grey left and
right arrows on this field to reveal additional word
choices.
•
Delete:
deletes characters from the entry field.
•
CAPS/ALT:
When in
ABC
capitalization of the subsequent entered characters. When
in
?123
mode, this key can show additional symbol
characters.
52
mode, this key changes the
–
Capitalization in
Caps button. See “ABC Mode” on page 52.
–
Symbol used in
accessing additional symbol characters. See “Entering
Numbers and Symbols” on page 53.
•
Tex t mode:
?123
.
–
ABC
indicates .
–
?123
indicates .
•
Voice Input mode:
Abc
mode can be altered by using the
?123
mode can be enhanced by
There are two available modes;
mode contains only characters. Text mode button
?123
mode contains only symbols. Text mode button
ABC
ABC
Tapping this button activates the built-
in microphone and voice recognition software.
–
Speak clearly into the microphone. When complete, your
spoken words are recognized, converted to text, and
inserted into your current cursor position.
Note:
It is recommend that to avoid incorrect conversions, you
use this feature in an area relatively free from background
noises.
ABC Mode
In
ABC
mode, you can enter only alphabetic
characters from the onscreen keyboard. The text
mode shows .
1. Select the ABC mode. (See “Selecting a Text
Input Mode” on page 51.)
•
Capitalization in
ABC
mode can be altered by using
the Caps button.
and
Page 60

next character is lowercase.
DEL
DEL
ABC
ABC
ALT
ALT
only the next character is uppercase.
all subsequent characters are uppercase.
Note:
A green circle on the shift key above indicates the
keyboard is set to “Shift-Lock” where all characters are
entered in uppercase.
2. Tap the corresponding onscreen keys to begin
typing your word.
•
If you make a mistake, tap to erase a single
character. Touch and hold to erase an entire
word.)
By default, the first letter of an entry is capitalized
and the following letters are lower case. After a
character is entered, the cursor automatically
advances to the next space after two seconds or
when you enter a character on a different key.
Entering Numbers and Symbols
By using the onscreen keyboard in Portrait mode,
some symbols are not available (such as Emoticons
or Smileys). In
?123
mode, you can only enter
symbols characters from the onscreen keyboard. The
text mode shows .
To enter numbers:
1. Tap to enter the
2. Tap the appropriate numeric key. (See
?123
mode.
“Selecting a Text Input Mode” on page 51.)
To enter symbols:
ABC
1. Tap to enter the
2. Tap the appropriate numeric key.
?123
mode.
– or –
Tap to select from additional symbol
characters. The key shows when the
additional character set is active.
Entering Text using the QWERTY Keyboard
Accessing the QWERTY Keyboard
The Samsung Intercept™ has a built-in, keyboardstyle keypad, referred to as a full QWERTY keyboard.
The keyboard is located beneath the display screen
and is accessed by sliding it open. This orients the
device's display to Landscape (widescreen) mode.
Using the QWERTY keyboard, you can type letters,
numbers, punctuation, and other special characters
into text entry fields or other applications simpler and
faster than using the onscreen keyboard.
To open the device and access the keyboard:
1. Rotate the device 90 degrees counter-
clockwise.
2. Slide the top section of the device up to open,
as shown in the illustration. When you slide the
device open, the display rotates from a vertical
viewing mode (Portrait) to a horizontal viewing
mode (Landscape).
Entering Text 53
Page 61

Note:
Touch and hold the text input field to reveal an
context menu.
To reveal additional QWERTY text editing options:
1. Touch and hold the text entry field.
2. From the
Edit text
context menu, tap an
available function:
•
Select all
highlights all characters in the text message
field.
•
Select text/Stop selecting text
lets you manually
highlight characters in the text message field.
•
Cut all
deletes all characters in the current text
message field.
•
Copy
copies selected characters in the current text
message field.
•
Copy all
copies all characters in the current text
message field.
•
Paste
inserts the previously copied text into the
message field.
Edit text
•
Input method
provides additional text input methods.
The default is Android keyboard.
Using the Keyboard
In this section we’ll cover the steps necessary to enter
text using the QWERTY keyboard. Using your device's
QWERTY keyboard is just like using any standard
computer keyboard.
The following keys perform special functions when
entering text:
Fn: Allows you to use blue characters
displayed at the top of the QWERTY keys.
Examples: $, @, #, !
Shift: Changes the text input mode among
Upper/Lower/Mixed case mode.
Smiley: When used with , launches
the Smileys page. Scroll down and tap an
entry from the extensive list of emoticons.
Space: Inserts an empty space.
OK/Enter: Moves the insertion point to the
next line in a message.
Delete: Deletes the previous character,
similar to the backspace key on a
computer keyboard.
54
Page 62

From a text entry screen, use the keyboard to enter
Bill
BILL
different character types. Select one of the following
character types:
–
Letters to enter the alphabetic characters associated with
each key. (See page 55.)
–
Numbers to enter numbers by pressing the numbers on
the keyboard. (See page 55.)
–
Symbols to enter symbols. (See page 56.)
–
Smileys to enter smileys or “emoticons.” (See page 56.)
Tip:
When entering text, press to change letter
capitalization (ABC ➔ Abc ➔ abc).
The keyboard provides dual-use keys labeled with
alphabetic characters on the lower half and numbers
and symbols on the upper half. Press the key
corresponding to the blue character you want to
enter.
Entering Characters
The entered character (of a field or new sentence) is
always an initial uppercase letter. By default, text is
entered in lowercase characters unless altered by
pressing .
To enter uppercase and lowercase characters:
1. Press to make the next character
uppercase. Characters revert back to
lowercase after the next character is typed.
– or –
Press twice to make all subsequent
characters uppercase (all new characters are
in uppercase).
•
Pressing cycles through the capitalization
modes (all lowercase, initial uppercase, and all
uppercase).
2. Press the corresponding keys:
•
For example, to enter the word “Bill” within a text
field, type the keypad sequence below.
•
If you make a mistake, press to erase a single
character. Press and hold to erase all
previously entered text.
•
To enter all uppercase characters, quickly press
twice.
Entering Numbers
The keyboard can be used to enter numbers, letters,
and symbols. The number keys are located along the
top on the QWERTY keyboard.
1. Press the numeric key corresponding to your
desired number choice
•
If you make a mistake, press to erase a single
character. Press and hold to erase all
previously entered text.
•
For example, to enter “9:30,” you would use the
keyboard sequence shown below.
Entering Text 55
Page 63

Symbols and Smileys
9:30
I’m #1
Symbols are accessed by combining the key
with the correct number key. These symbols appear
in blue above the keyboard keys.
Smileys (emoticons) are accessed by pressing
and then selecting an image from the
Insert Smiley
page that is then inserted at your current cursor
position.
To enter symbols:
1. Position the cursor where you want the symbol
to appear within your message.
2. Press and then press the blue key
corresponding to the symbol you want to insert.
•
For example, to enter “I’m #1,” you would use the
keyboard sequence shown below.
To enter “smileys” (emoticons):
1. Position the cursor where you want the symbol
to appear within your message.
2. Press
➔
to open the onscreen
smiley page.
3. Scroll through the list and select a smiley by
touching the onscreen icon.
56
Page 64

Section 8: Messaging
With text messaging, you can send and receive
instant text messages between your wireless device
and another messaging-ready phone. When you
receive a new message, it will automatically display
on your device’s screen.
Messaging is available via the Messaging application
in your Applications screen. This icon ( )
appears in Status bar area when a new text message
is received.
Note:
See your service plan for applicable charges for text
messaging and SMS voice messaging.
Types of Messages
Your phone provides the following message types:
•
Text Messages
•
Multimedia (Picture, Video, and Audio) Messages
•
IM Messages
•
Email and Gmail Messages
•
Google Talk
Composing Text Messages
1. Press and tap
2. Press and tap Compose.
Note:
From the Messages screen, you can also touch New
message to begin creating a new outgoing message.
➔
(
Messaging
3. Tap the
To:
field and enter the recipient’s phone
number or email information using either the
onscreen or QWERTY keyboards.
•
Contact lookup allows you to enter either a phone
number or email address. If the information matches
a current contact's entry information, you will see a
match.
•
Use the keypad to enter a wireless phone number or
email address directly.
•
Select Email to use the recipients email address
4. Tap a matching entry from the onscreen drop-
down list. This list is populated by matches
found from your managed accounts.
5. Touch and hold the
Type to compose
field and
enter your message.
6. Insert an Emoticon or a Smiley.
•
To enter a smiley press and tap
Insert smiley
or
press and from the QWERTY
keyboard.
).
•
Make a selection from the onscreen list to then insert
it into your current message.
7. Review your message and tap
Send
.
Messaging 57
Page 65

Accessing Text Messages
To read an SMS Text message:
䊳
When you receive a text message, you will see it
listed within the Messaging screen. Touch the
message or use your Optical Joystick to open the
message and then scroll down and view its entire
content.
To reply to a text message:
1. While the message is open, tap the
compose
field and then type your reply
Type to
message.
2. Compose your reply or use the preset
messages or icons.
•
To type a message, use your keypad to enter your
message. (See “Entering Text with Onscreen
Keyboard” on page 51.)
3. Review your reply and press
Send
. (You may
select additional messaging options by
pressing .)
•
Options include:
Attach, Insert Smiley,
threads, and Add Contacts
Call, View contact, Add subject,
or
More [Delete thread, All
]).
Multimedia Messaging (MMS)
With multimedia messaging (MMS), you can send and
receive instant messages that contain text, pictures,
audio, recorded voice, or a picture slideshow.
Messaging is available via the Messaging application
in your Applications screen.
Note:
See your service plan for applicable charges text and
MMS messaging.
Composing MMS Messages
1. Press and tap
2. Press and tap Compose.
Note:
From the Messages screen, you can also touch New
message to begin creating a new outgoing message.
3. Tap t he
To:
field and enter the recipient’s phone
➔
.
number or email information. As you enter the
phone number or email address, matching
contacts appear onscreen.
•
Tap an available matching recipient or continue
entering the phone number or email address.
4. Touch the
Type to compose
field and enter your
message.
5. Press and tap
Attach
.
58
Page 66

6.
Volume meter
Recording duration
Controls
Record Play
Stop
Current image Image navigation
Caption field
Slideshow controls
Select a multimedia attachment type:
•
Pictures: Opens the Gallery application. Use the
onscreen navigation to select the picture you wish to
send with the outgoing message.
•
Capture picture: Opens the camera application. Take
a picture, then tap OK to use this image in your
message. See “Taking Pictures” on page 70.
•
Videos: Opens the Gallery application. Use the
onscreen navigation to select a video and attach it to
your outgoing message.
•
Capture video: Opens the camcorder application.
Shoot a video, then tap OK to use this video in your
message. See “Recording Videos” on page 73.
•
Audio: Opens the Select audio menu. Use the
onscreen navigation to select an audio file and tap
OK.
–
Record Duration: length of the recorded voice message.
–
Volume Meter: displays the current recording’s volume
level.
–
Record: starts recording your message.
–
Play: plays back the current recording.
–
Stop: stops the recording. Once stopped, tap either Use
this recording (attach it to your message), or Discard
(delete the current recording and re-record).
•
Slideshow: Opens the Edit slideshow menu.
–
Touch Add slide to create a new slide (this is a
placeholder for new images to be added, similar to a
playlist).
–
Touch the created slide (example, Slide 1), tap Add
picture, and then select the picture you want to add to
the slide.
–
Tap the text field below the image to enter a caption for
the picture.
–
When finished, tap Done to attach the slideshow to your
message.
•
Record audio: Opens the message recorder (shown
above).
Messaging 59
Page 67

Note:
To remove or replace a picture or audio attachment on the
Compose screen, tap the Remove button next to the
attachment.
7. When you are finished creating your new MMS
message, touch
Send
.
To view and play a multimedia message:
1. Press and tap
2. From the message list, tap a multimedia
➔
.
message to open its contents.
3. While the message is open, tap the play icon
(on the video file) to playback the file or tap the
image to view the picture.
Tip:
The file attachment on the MMS message can be saved to
the microSD card. To save the attachment, touch and hold
the file and tap Copy attached to SD card from the
Message options context menu.
To reply to a multimedia message:
1. Press and tap
2. From the message list, tap a multimedia
➔
.
message to open its contents.
3. While the message is open, tap the
compose
field and then type your reply
Type to
message.
4. Once complete, tap
Send
.
Note:
When replying to an SMS message with an MMS
message, first open the text message, press and tap
Add subject or Attach. The original text message is then
automatically converted into a multimedia message.
Deleting a Message or Message Thread
1. Press and tap
2. From the message list, use the Optical Joystick
➔
.
( ) to highlight a message.
3. Press .
– or –
Touch and hold the message entry to display
the context menu.
4. Ta p
Delete threads
Delete
to complete the process.
and once prompted, tap
Adjusting Message Settings
1. Press and tap
2. From within the Messaging screen, press
and tap
Settings
3. Adjust the following fields according to your
➔
.
.
needs:
•
Delete old messages: Enable this option to delete
older text messages that exceed the defined
maximum number of text messages limit set below.
•
Text message limit: Sets the maximum number of tex t
messages that can be stored on the device.
60
Page 68

•
Multimedia message limit: Sets the maximum
number of multimedia messages that can be stored
on the device (per conversation).
•
Auto-retrieve: Enable this option to automatically
retrieve the entire content of your MMS message.
When checked, the MMS message header, message
body, and any attachments will automatically
download to your device.
–
If you disable this option, only the MMS message header
will be retrieved and shown in the message list.
•
Notifications: Enable this option if you wish to receive
a notification in the status bar when a new text or
multimedia message arrives.
•
Select ringtone: Allows you to select a ringtone to
sound when a new message is received. Tap this
option, and then select a ringtone that is specific to
new text and multimedia messages. A sample will
briefly be played upon selection.
•
Vibrate: Enable this option if you want the device to
vibrate when a new text or multimedia message is
received.
Your device’s Email applications let you access and
manage multiple email accounts simultaneously in
one convenient location.
Although there is a separate Gmail application, the
main email application can manage both Internetbased email services (Gmail™ and Yahoo™) and
Corporate Work Email (Exchange).
The device can also be manually configured to
connect to other email systems.
Note:
If you have multiple email accounts, you must configure
each account with its own settings.
If you want to send and receive email messages
through an ISP (Internet Service Provider) account
(such as Exchange), or if you wish to use your device
to access your corporate email through a VPN (Virtual
Private Network), you will first need to set up an IMAP
or POP account.
•
IMAP (Internet Message Access Protocol) - This mail
retrieval protocol is frequently used in large networks and
commercial and institutional settings. IMAP4 is the
current standard.
•
POP (Post Office Protocol) - This protocol is supported by
most ISPs and is currently more common among
consumer applications. POP3 is the current standard.
Note:
For more information, review your email carrier’s
literature or contact your IT administrator.
Email Icons/Shortcuts
IMAP/POP3 Internet Mail shortcut
Gmail shortcut
Status Bar - Notifications
New email message received
Messaging 61
Page 69

Google Mail (Gmail)
This email client is Google’s web-based email service.
A Gmail/Google Mail is created once you sign-up for a
new Google account online. For more information,
refer to “Creating a Google Account” on page 6.
䊳
From a computer, launch your preferred Web
browser and navigate to
www.google.com
.
Depending on your synchronization settings, Google
Mail (along with calendar events, phone numbers and
other contact information) on your device are
automatically synchronized between your device and
your Gmail/Google Mail account on the Web.
Note:
You must have a valid and active Google account prior to
using this email client.
Important!:
You must log into Google after every power cycle of
your device. Logging into Gmail (via the device)
does not sign you into your Google account. Gmail
logging and access are separate from your main
Google account.
Setting Up a Gmail Account via the Device
1. Press and tap ➔ (
Gmail
).
– or –
Press and tap ➔ (
2. Follow the onscreen instructions to setup a
Email
).
Gmail account.
Warning!:
Tap Manual setup to configure your connection
settings manually (POP3 or IMAP). Follow the
onscreen prompts and enter the information specific
to your carrier.
Signal interruptions or incorrect username or
password information can cause completion issues.
For more information, refer to “Adding
Additional Internet Email Accounts” on
page 65.
Note:
You must have a valid and active Google account
(xxxxxx@gmail.com) prior to Gmail email setup and
configuration.
Your Gmail address is used to log in to your account via
the device.
Opening Gmail
1. Press and tap ➔ (
– or –
Press and tap ➔ (
2. Log into your account via the device.
The first time you connect, you are asked to
give this Internet mail account a unique
onscreen name and enter From name
(displayed in your outgoing emails within the
From field).
Note:
The unique account name is used to differentiate this
account from other email accounts accessed by your
device.
Gmail
Email
).
).
62
Page 70

3.
Tap
Done
to store the new information and
complete your connection.
To access your Gmail folder categories:
1. Press and tap ➔ (
2. Press and tap
View labels.
Gmail
To refresh your Gmail messages:
䊳
Press and tap Refresh.
Create and Send Email
1. Press and tap ➔ (
Gmail
– or –
Press and tap ➔ (
2. Tap
Inbox
to open the contents of your Gmail
Email
inbox.
3. Press and tap
4. Enter the message recipient’s email address in
Compose
.
the To field.
Note:
If you are sending the email to several recipients,
separate the email addresses with a comma.
You can add as many message recipients as you want.
5. Press and tap
Add Cc/Bcc
to send a
carbon copy (Cc) or a blind carbon copy (Bcc)
of the current email to other recipients.
6. Tap the
Subject
field and enter the email
subject.
7. Tap the
Compose Mail
field and compose your
email.
8. Tap (from the bottom of the screen) to add
).
a picture attachment.
9. Select the picture you want to attach.
10. Tap to delete a selected attachment from
your current email.
11. Tap
Send
when finished.
12. Tap
).
Save as draft
to save the current email as a
draft.
).
13. Tap the
Drafts
folder to later view your draft
email messages, from the Inbox.
14. Tap
Discard
to delete the current email
message.
Creating a Gmail Email Signature
1. From a computer, launch your preferred Web
browser and navigate to
2. From within your Gmail Settings page,
navigate to the
signature into the
Note:
By default, signature is turned off.
www.google.com
General
tab and enter your
Signature
.
field.
Messaging 63
Page 71

Accessing Email Messages
Status bar
Email
Email functions
New email
Screen
message
Depending on your email type, account settings,
Email notifications, ringtone notification, etc, the
device displays the email message in the status bar
when you receive a new email.
A new email message ( ) icon appears within the
Notifications area of the Status bar to notify you of a
new email.
To view a new email:
1. Press ➔ and tap .
– or –
Touch and hold the Status bar, then slide your
finger down the screen. See “Using the
Notifications Panel” on page 14.
2. Tap the new email from the
launch the
3. Scroll up and down the email by either
dragging your finger up and down the screen or
rolling your Optical Joystick ( ) up or down.
Inbox
tab.
Notifications
list to
To reply to an email message:
1. With the email message displayed, tap either
Reply
or
Reply all
.
2. Enter a new message body and tap
Send
To delete an email message:
䊳
With the email message displayed, tap
Delete
Configuring Gmail Settings
1. Press and tap ➔ (
2. Press and tap ➔
Gmail
Account settings
.
.
).
.
64
Page 72

Tip:
You can also get to the Account settings by opening the
Gmail-Inbox then tap ➔
Account Settings
.
Accounts
➔ ➔
The Account settings menu provides both field
information and settings:
• Signature
: Allows you to create an email signature
for your outgoing Gmail emails.
• Confirm delete
activates a dialog that displays before
deleting a conversation.
•Batch operations
allows label operations on more
than one conversation.
• Clear search history
removes all performed
searches.
•Labels
allows you to select which labels are
synchronized and the number of days wait between
each sync.
• Email notifications
: Activates the email notification
icon to appear within the Notifications area of the
Status bar when a new Internet mail (Gmail, etc.) is
received.
• Select ringtone
: Plays a selected ringtone once a
new email message is received.
•Vibrate
: Activates a vibration once a new email
message is received.
Adding Additional Internet Email Accounts
Using only reveals all currently added Email
accounts. By default, Gmail is already added to this
list of available Internet email providers. To view
additional email accounts within the main Email
screen, they must first be added.
1. Press ➔ and tap .
2. Press and tap
3. Follow the onscreen prompts to add additional
Accounts
➔
Add account
Internet-based email accounts such as Yahoo,
Gmail, AOL, etc.
Corporate Email (Exchange)
The main Email application ( ) provides also
provides access to your Exchange server via your
device. If your company uses Microsoft Exchange
Server 2003 or 2007 as the corporate email service,
you can use the Email application to wireless
synchronize your email, contacts, and tasks directly
with your company's Exchange server.
Setting Up a Corporate Email
1. Press and tap ➔ (
2. Press and tap
3. Enter your
information, then tap
Note:
Consult your Network Administrator for further details.
• Email address
•Password
Accounts
Email address
Next
: your Exchange work email address.
: typically your network access password
and
.
Email
➔
Add account
Password
).
(Case-sensitive).
4. Tap
Exchange account
(from the add new email
account screen).
.
.
Messaging 65
Page 73

5.
Scroll down the screen and tap
Next
when
prompted to provide additional detailed
information.
6. Enter a Domain\Username, Password, and
Exchange Server information and tap .
• Domain\Username
: enter your network
domain\desktop login username.
•Password
: typically your network access password
(Case-sensitive).
• Exchange Server
: your exchange server remote
email address. Typically starts with mail.XXX.com.
Obtain this information from your company network
administrator.
7. If your network requires SSL encryption, tap the
Use secure connection (SSL) field to place a
checkmark in the box and activate this
additional level of security.
Note:
If your exchange server requires this feature, leaving this
field unchecked, can prevent connection.
Signal interruptions or incorrect username or password
information can cause completion issues.
8. Read the onscreen activation disclaimer and
tap
Next
if prompted.
9. Configure your
to synchronize
Email check frequency, Amount
(days to synchronize between
your device and server), and activate any other
email settings, then tap
Next
.
10. Identify your new account with a unique name
and provide the outgoing name text then tap
Done
.
Important!:
You can synchronize over the air (not directly) with
an Exchange Server running Microsoft Exchange
Server 2003 Service Pack 2 (SP2) or Microsoft
Exchange Server 2007.
You can have multiple Work Email (Microsoft
Exchange ActiveSync) accounts active on your
device.
Opening Corporate Email
1. Press and tap ➔ (
2. Tap a message to read, manage, and reply to
Email
your email messages.
3. From your Inbox screen, press to select
options, such as
Account settings, Sort
4. While in a message, press to select
messaging options, such as
Reply, Reply all, Mark as unread
Calendar
Refresh, Compose, Accounts
, or
.
Search
.
Delete, Forward
, or
Save to
Create and Send Email
1. From the Inbox, press and tap
2. Enter the message recipient’s email address in
the
To:
field.
Compose
).
,
,
.
66
Page 74

3.
Choose recipients from the following sources:
• Recent
to access your list of recent contacts.
•Contacts
to access your current Contacts page
Group to access any available Groups (within which
are associated Contacts entries).
•Search
to search for a contact from within your
device.
Separate the email addresses with a comma If
you are sending the email to several recipients
You can add as many message recipients as
you want.
4. Press and tap
Add Cc/Bcc
to send an
additional carbon copy (Cc) or a blind carbon
copy (Bcc) of the current email to other
recipients.
5. Tap the
Subject
field and enter the email
subject.
6. Tap the
7. Tap
Body
field and compose your email.
Attach
(from the bottom of the screen) To
add a picture attachment.
Note:
You can access the internal microSD card and navigate to
the file you wish to attach.
8. Tap the file you wish to attach and tap
To reply to an email message:
1. From the Inbox, tap an email message.
OK
2. With the email message displayed, tap either
Reply or Reply all.
– or –
With the email message displayed, press
and tap either
Note:
If you select
recipients.
3. Enter a new message body and tap
Reply
or
Reply all
Forward
, you must specify the message’s
.
Send
.
To delete an email message:
䊳
Touch and hold an email (from your inbox list) and
select Delete from the onscreen context menu.
– or –
From the email message view, tap
Delete
.
Configuring Corporate Email Settings
After your initial setup, the Settings menu displays for
your new Work Email account.
Account Settings
: configures send and receive
settings, such as email signature, notifications,
syncing, and more.
1. Press ➔ and tap ➔
& sync
.
.
2. Tap within the
Corporate account
Accounts
field to
reveal the account’s synchronization settings
screen.
Messaging 67
Page 75

3.
Setting Options
Toggle either the
Sync Contacts
Sync Calendar
or
fields
to force the device
to manually re-sync
either the exchange
Contacts or
Calendar entries.
– or –
Ta p
Account settings
and configure any
other email
parameters you
wish to synchronize.
To configure Corporate Email settings:
1. Press ➔ and tap ➔
& sync
.
2. Tap within the Corporate account field to
Accounts
reveal the account’s synchronization settings
screen.
3. Tap the parameters you wish to synchronize.
• Account settings
–
Account name
track the account.
–
You r n ame
within your outgoing emails.
allows you to configure:
displays the name used by the device to
displays the name used in the From field
–
Email check frequency
which the device queries the remote server for new email
changes. Choose from: Automatic (Push), Never, Every 5
minutes, Every 10 minutes, Every 15 minutes, Every 30
minutes, or Every hour.
–
Amount to synchronize
your incoming and outgoing emails between your device
and your external exchange server. How many days
worth of emails should the device and server
synchronize. Choose from: One day, Three days, One
week, Two weeks, or One month.
–
Default account
used when sending out new emails.
–
Email notifications
status bar icon when new emails have been received.
–
Select ringtone
new or upcoming event is pending.
–
Vibra te
assigns a vibration when a new or upcoming
event is pending.
–
Incoming settings
password, and exchange server parameter fields.
–
Sync contacts
device and the remote exchange server. A checkmark
indicates the feature is enabled.
–
Sync calendar
entries between your device and the remote exchange
server. A checkmark indicates the feature is enabled.
–
Forward with files
include any currently attached files. A checkmark
indicates the feature is enabled.
–
Signature
allows you to create an outgoing email
signature attached to new emails sent from your device.
4. Press to return to the previous screen.
configures the frequency
to assign the sync range for
assigns this account as the default
enables the device to display a
assigns an audible ringtone when a
provides access to the Domain,
synchronizes the contacts between your
synchronizes your exchange calendar
causes any outgoing email replay to
68
Page 76

Note:
For more detailed Corporate email information, see
“Corporate Email (Exchange)” on page 65. For more
information on Corporate Calendar synchronizing,
Synchronizing Corporate Calendar Events (page 95).
To create a Corporate Email Signature:
This signature can differ from Email signatures on
your local Exchange client. This signature is applied
to outgoing emails originating on your device.
1. Press ➔ and tap ➔
& sync
.
2. Tap within the
Corporate account
Accounts
field to
reveal the account’s synchronization settings
screen.
3. Scroll to the bottom of the list and tap
Signature
.
4. Delete the default text and enter your new
email signature.
5. Tap
OK
to store the new signature.
Configuring Data Synchronization Settings
This feature allows you to determine which current
applications are synchronized with external server
and at what intervals.
1. Press ➔ and tap ➔
& sync
.
Important!:
These settings can affect data minute usage. Refer
to your current data plan for more details.
Accounts
2. Tap any of the following options:
• Background data
: Allows data synchronization to
occur as a background function. It does not affect any
current use of the device.
• Auto-sync
: Maintains synchronization with the
remote server, providing data to your selected
applications.
3. Press to store your changes and return to
the Home screen.
Google Talk
Google Talk is a free instant messaging application
offered by Google. Conversation logs are
automatically saved to a Chats area in your Gmail
account.
1. Press and tap
2. Press
Next
to set up a Google account or to
➔
.
Sign in.
3. Touch
Create
to create a new Google account.
– or –
Touch
Sign in
if you have an existing Google
account.
4. After entering your user name and password,
press the
Down
Navigation key.
5. Touch
6. Begin using Google Talk.
Note:
Sign in
.
The Network confirms your login and processes. This
could take up to 5 minutes to complete.
Messaging 69
Page 77

Section 9: Media
This section explains how to use the multimedia
features of your phone, including the Camera/
Camcorder, Music Player, and how to manage your
photos, images and sounds.
You can take photographs and shoot video by using
the built-in camera functionality. Your 5 megapixel
camera produces photos in JPEG format.
Warning!:
Important!: Do not take photos of people without their
permission. Do not take photos in places where
cameras are not allowed. Do not take photos in
places where you may interfere with another
person’s privacy.
Taking Pictures
Taking pictures with your device’s built-in camera is
as simple as choosing a subject, pointing the lens,
and pressing a button.
The storage card that comes installed on your device
allows you to use the camera and camcorder
features. All pictures and videos are stored on the
internal 2GB microSD card. The Samsung Intercept™
supports SDHC cards of up to 32GB.
70
To take a picture:
1. Press and hold the camera key ( ) located
on the side of the device.
– or –
Press and tap ➔ to activate
camera mode. (Additional camera options are
available through the camera settings page.
See “Camera Settings” on page 71.)
2. Using the device’s display screen as a
viewfinder, aim the camera lens at your
subject.
Page 78

3.
Press and tap either or until
the shutter sounds. (Your device automatically
saves the picture to the DCIM folder on the
microSD card.)
Camera Settings
1. From camera mode ( ), you can also move
the camera mode slider (right of the screen) to
the camcorder position ( ) (to switch from
camera to camcorder and record videos).
– or –
Touch and slide open (to the right) the
camera’s side panel and adjust any of the
following options:
•
Camera settings
to access camera hardware
settings:
–
Scene mode to select an camera setting for better
image capture under different lighting environments.
Choose from: Auto (default), Portrait, La ndscape,
Night, Beach, Snow, Sunset, and Fireworks.
–
White balance to compensate for color differences
found within different lighting conditions. Choose from:
Auto (default), Incandescent, Daylight, Fluorescent,
or Cloudy.
–
Colo r effec t to apply different color effects onto images.
Choose from: None (default), Mono, Sepia, Negative,
Aqua, or Whiteboard.
–
Metering determines the way in which the camera
determines the exposure. Choose from: Matrix, Center
(default), or Spot.
–
Store location to store the actual location (latitude and
longitude) where the image was taken so the photo can
later be displayed on Google Maps or used in other
social applications.
–
Pict ure size to set the size of your image. Choose from:
3M Pixels, 2M Pixels, 1M Pixel, or VGA Pixels.
–
Picture quality to set the image quality for your image.
Choose from: Super fine, Fine, or Normal.
–
Focus mode to set the focal properties of the camera
lens. Choose from Auto (default), I nfinity, or Macro
(close up images).
View Your Pictures
The Gallery is where you can access the Gallery of
stored camera images.
1. Press and tap
2. Select a location and tap an image to view your
➔
(
Gallery
picture.
•
Pressing reveals gallery-specific options such
as Capture picture, Capture video, Slideshow,
Multiselect, or Settings.
•
Tap an image to open it, and press for options
such as Share, Rotate, Delete, Crop, Set as, and
More.
•
Press to return to the previous screen.
).
Media 71
Page 79

Camera Galler y Options
Accessing the gallery provides access to pictures.
1. Press and tap
➔
to view the
gallery of images stored on the microSD card.
– or –
While in camera mode, press and tap
Gallery
.
2. Press to reveal gallery-specific options:
•
Capture picture
to return to the camera mode and
take another picture.
•
Capture video
to switch to the camcorder mode and
shoot a new video.
•
Slideshow
to activate the picture slideshow. This turns
your device into a picture frame.
•
Multiselect
to select multiple images from the Gallery.
•
Settings
to adjust general settings and make
modifications to the slideshow parameters.
–
Display size to change the size of the image or video
preview images on the gallery page. Options include:
Large (default) or Small.
–
Sort order to change the order in which the images or
videos are displayed on the Camera pictures gallery
page. Options include: Newest first (default) or Newest
last.
–
Confirm d eletions to require an additional onscreen
notification prior to completing the deletion of an image
or video.
–
Slideshow int erval to change the length of time each
slide appears onscreen during the slideshow. Options
include: 2 seconds (default), 3 seconds, or 4 seconds.
–
Slideshow transition to change the transition used
between each image displayed onscreen during the
slideshow. Options include: Fade in & out (default),
Slide left - right, Slide up - down or Random
selection.
–
Repeat slideshow to enable the repetition of the
slideshow. Once the last image in the current gallery is
displayed, the slideshow begins again with the first
image in the list.
–
Shuffle slides to display the slideshow images in a
random fashion and not by the order in which they
appear in the gallery.
3. Press to return to the previous screen.
Camera Image Settings
1. Press and tap
2. From Camera pictures gallery, tap an image
➔
.
icon to open the image.
•
Use the zoom buttons (below the image) to zoom in or
out.
Note: Picture options
holding the image from the gallery. These options include:
View, Share, Rotate, Delete, Crop, Set as, Details, Show on
Maps,
3. Press to display the following image menu
can also be accessed by touching and
and
Slideshow
.
options:
•
Share
to activate the picture share menu from which
you can choose to share the current image via one of
many options:
–
Email to attach your image to a new email message.
–
Facebook to insert your image into your Facebook page.
72
Page 80

–
Gmail to attach your image to a new Gmail email
message.
–
Messaging to insert your image into a new outgoing
MMS message (multimedia message).
–
Picasa to upload your current image to your Picasa
account. Tap Upload to complete the process.
•
Rotate
to pivot the current image. Options include:
Rotate left
or
Rotate right
.
•
Delete
to remove the current image.
•
Crop
to pare the current image. Crop the image and
tap
Save
to a new version of the original.
•
Set as
to assign the current image to either a current
Contact icon
(display image) or as the
Wallpaper
(Home screen background) (page 73).
•
More
to access additional image options such as:
Details, Show on Maps
–
Details to display image details such as file name, file
size, resolution and date taken.
–
Show on Maps to display the image overlaid over a
Google Map (only available if Map information was
previously embedded).
–
Slideshow to activate the slideshow feature. See
“Camcorder Gallery Options” on page 74.
–
Sett ings to adjust general settings for the picture gallery
and make modifications to the slideshow parameters.
See “Camera Gallery Options” on page 72.
, Slide Show, and
Settings
Assigning Pictures
After taking a picture, assign it as a picture ID for a
Contacts entry or as the Home screen background
image (wallpaper).
1. Press and tap
➔
.
Recording Videos
In addition to taking pictures, you can record, view,
and send videos with your device’s built-in video
camera.
.
2. From
Camera pictures
gallery, tap an image
icon to open the image.
3. With the picture displayed, press and tap
Set as
, and select an option.
•
Contact icon
to assign the picture to a Contacts entry
as a picture ID. Tap an entry from the Contacts tab,
crop the image and tap
•
Wallpaper
to assign the picture as a background
image, crop the image and tap
Save
to assign the picture.
Save
to assign the
picture.
1. Press and hold the camera key ( ) located
on the side of the device.
– or –
Press and tap ➔ to activate
camera mode. (Additional camera options are
available through the camera settings page.
See “Camera Settings” on page 71.)
2. Touch and slide the camera mode slider up to
camcorder mode ( ). Using the device’s
display screen as a viewfinder, aim the camera
lens at your subject.
3. Press and tap either or to begin
recording.
Media 73
Page 81

4.
Press and tap either or to stop
recording. (Your device automatically saves the
video within the DCIM folder on the microSD
card.)
Camcorder Settings
䊳
From camera mode ( ), move the camera mode
slider (right of the screen) to the camcorder position
( ) (to switch from camera to camcorder and
record videos).
– or –
Touch and slide open (to the right) the camera’s
side panel and adjust any of the following
options:
•
Camcorder settings
to access camcorder hardware
settings:
–
Video quality to set the image quality for your image.
Choose from: Low (for MMS messages) or High (for
SD card).
–
Video duration to set the length for your video. Choose
from: 30 seconds (sending the video in an MMS/video
message), 10 minutes (SD card storage), or 30
minutes (SD card storage).
–
White balance to compensate for color differences
found within different lighting conditions. Choose from:
Auto (default), Incandescent, Daylight, Fluorescent, or
Cloudy.
–
Color effect to apply different color effects onto videos.
Choose from: None (default), Mono, Se pia, Negative,
Aqua, or Whiteboard.
Camcorder Gallery Options
Accessing the gallery provides access to videos.
1. Press and tap
➔
.
– or –
While in camcorder mode, press and tap
Gallery
.
2. From
Camera videos
gallery, tap a video icon to
display the gallery of videos taken on your
device and stored on the microSD card.
– or –
Highlight a video icon and press to reveal
gallery-specific options for the Camera videos:
•
Capture picture
to return to the camera mode and
take another picture.
•
Capture video
to switch to the camcorder mode and
shoot a new video.
•
Multiselect
to select multiple video files from the
Gallery.
•
Settings
to adjust general settings and make
modifications to the slideshow parameters. See
“Camera Gallery Options” on page 72.
3. Press to return to the previous screen.
74
Page 82

Video Settings
1. Press and tap
2. From
Camera videos
➔
.
gallery, tap a video icon to
begin video playback.
– or –
Press and hold the video icon to display the
following video menu context menu options:
•
Play
to begin playback of the current video file.
•
Share
to activate the
Share video via
menu from
which you can choose to share the current video via
one of many options:
–
Email to attach your video to a new email message.
–
Gmail to attach your video to a new Gmail email
message.
–
Messaging to attach your video to a new MMS
message.
Note:
Tap
Add a New Place
added.
–
YouTube to upload your current video file to a YouTube
page. Tap Upload to complete the process.
•
Delete
•
Details
if no places have previously been
to delete the current video.
to display image details such as File name,
File size, Duration, Frame rate, Bit rate, Format, and
Date taken.
Music
The Amazon MP3 store lets you purchase and
download digital music files to play on your device or
computer. (You must have an amazon.com account to
purchase and download music from Amazon MP3.)
Purchasing and Downloading Music from
Amazon
1. Press and tap
MP3
).
2. Select an onscreen category (
➔
(
MP3
Amazon
Bestselling
Albums, Bestselling Songs, Browse By Genre
Search
).
3. Follow the onscreen instructions to locate the
desired track or album.
4. Tap the song title to listen to an audio preview.
5. Tap the song title again to stop playback.
•Preview
allows you to play an audio clip of the
selected song.
6. Once you have located a desired song title or
album, tap
Pressing
[price]
➔
Buy
.
BUY
allows you to purchase the song
and download it to your device’s microSD card.
•
When you select
Buy
, you will need to log into your
Amazon account. (If there is no microSD card
installed or if there is not enough free memory space
on the card, you will see an alert.)
•
Once the song has been downloaded to your
microSD card, you can use the Music application to
playback the file.
Accessing the Music Player
1. Press and tap
2. From the Music display, select an option:
➔
(
Music
Media 75
, or
).
Page 83

•Artists
to display your current local music files sorted
by artist.
• Albums
to display your current local music files sorted
by album.
• Songs
to browse through all of your downloaded
music and any additional songs you have loaded onto
your microSD card from your computer.
• Playlist
to select a customized playlist you’ve created
to organize your music.
3. Once you’ve displayed a list of songs, you can
browse through your available titles.
•
To play a song, tap it to display the title and track
information.
•
To listen to a song or playlist, tap it to begin playing
from the selected song. (You can also highlight the
playlist to begin listening.)
Creating a Playlist
1. Press and tap
➔
➔
Songs
Your device searches through your device and
microSD card for compatible music files and
then displays them onscreen.
2. Touch and hold a song you’d like to add to a
playlist. This action reveals an onscreen popup
menu.
3. Ta p
Add to playlist
playlist
or select
4. If you select
and select either a
New
(to create a new playlist).
New
, delete the current default
name, enter a name for your new playlist, and
tap
Save
.
.
Current
Assigning a Song as a Ringtone
1. Press and tap
2. Touch and hold a song you’d like to use as your
➔
➔
Songs
new ringtone. This action reveals an onscreen
popup menu.
3. Tap Use as phone ringtone to store the selected
song as your new default ringtone.
4. Confirm the song has been successfully
assigned by navigating to your Phone ringtone
menu.
5. Press ➔ and tap
display ➔ Phone ringtone
6. Confirm the new song is selected.
.
➔
➔
Sound &
Backing Up Your Downloaded Music Files
Virgin Mobile recommends you back up your
downloaded music files to your computer. Although
the downloaded files can only be played on your
phone and on your account, backing them up to your
computer lets you access the files in case your
microSD card is lost or damaged, or if you install a
new microSD card. See “Connecting Your Device to
Your Computer” on page 29.
1. Connect your phone using a USB cable or the
built-in connection on Bluetooth-enabled
phones.
2. Use your computer to navigate to the microSD
card’s Music folder.
.
76
Page 84

3.
Select and copy the music files to a folder on
your computer’s hard drive.
YouTube
YouTube™ is a video sharing website on which users
can upload and share videos. The site is used to
display a wide variety of user-generated video
content, including movie clips, TV clips, and music
videos, as well as video content such as video
blogging, informational shorts and other original
videos.
Note:
YouTube is a data-intensive feature. Virgin Mobile
recommends that you upgrade to an unlimited data plan
to avoid additional data charges.
Note:
It is not necessary to sign in to the YouTube site to view
content. However, if you wish to sign in to access
additional options, access the page via the Web browser
Sign in
and tap
or Google username and password, and tap
at the top right corner, enter your YouTube
Sign in
.
1. Press and tap
2. Read the disclaimer regarding data usage and
➔
(
YouTube)
.
touch Continue.
3. Press and tap to open the onscreen
keyboard, or slide up the Qwerty keyboard and
tap the Search field to search for specific
videos, scroll down to browse through the
main page thumbnails, or scroll to the bottom
To view a video, touch an available preview
thumbnail or touch the title link.
4. Press to return to the previous page.
Media 77
Page 85

Section 10: GPS Services
This section outlines the various entertainment
applications that are available on your device.
GPS Services
Your device’s built-in GPS capability gives you access
to a number of location-based services, including
Maps and Navigation.
Activating Location Mode
Before using any of the location-based services, you
must turn on your device’s location mode.
䊳
Press ➔ and tap
security
➔
Use GPS satellites
Note:
Enabling the GPS hardware can drain your battery faster.
Location &
.
Activating Using Wireless Networks
This additional location feature uses open Wi-Fi and
mobile network connections to assist in providing
additional location accuracy.
1. Press
security
➔
and tap
➔
Use wireless networks
Location &
.
Since this feature is based on Google’s location
service, you will need to agree to allow Google
to collect anonymous information.
2. Ta p
Agree
to accept the terms of service.
Google Maps
Use this application to find directions, location
information, business addresses, etc., all right from
your Samsung Intercept™. Determine your current
location with or without GPS, get driving and transit
directions, get phone numbers and addresses for
local businesses.
Before you begin using this feature you must activate
your GPS hardware and agree to share location
information with Google.
To enable your device’s GPS Location feature:
1. Press
security
2. Ta p
the GPS location feature is enabled.
information, refer to
➔
and tap
.
Use GPS satellites
Location &
. A checkmark indicates
For more
“Location Settings” on
page 106.
•
appears in the Notification area when the GPS
is active.
•
appears in the Notification area when the GPS
is communicating.
To launch the Google Maps application:
䊳
Press and tap ➔ (
Maps
).
78
Page 86

To utilize Google Maps:
1. Press and tap
•
If prompted, read the “What’s new” message and tap
OK
.
2. Tap the magnification
➔
.
icons to zoom in or
out of the current
map view.
– or –
Press to utilize other
Google Map features.
Choose from:
Search
,
Directions, Layers, My
Location, Join Latitude
, and More.
To search for a keyword:
1. Press and tap
2. Press and tap
3. Tap the search field (at the top of the screen),
Search
➔
.
.
enter a keyword, and tap .
This keyword can be a category name (such as
pizza, steak, burger), a business name
(Samsung, Virgin Mobile), or a Google friend
who is sharing their location.
4. Tap (bottom left) to reveal a detailed list
of information corresponding to those matches
now displayed on your screen with lettered
pins.
Voice Search
Functions in much the same manner as the Voice
Dialer. This function uses built-in voice recognition
software to listen to your spoken words, convert
those to text, then launch a Google search using that
text.
1. Press and tap
2. Speak clearly into the microphone. If an error
occurs, tap
3. From the onscreen Google search page, tap a
Try again
➔
(Voice Search)
.
.
matching entry.
For more information, refer to “Voice Dialing” on
page 40.
Navigation
Another Google Maps navigation application is
available on your device. It uses your current location
(provided by GPS communication to your device) to
provide various location-based services.
1. Press and tap >
2. Read the onscreen disclaimer and tap
(
Navigation).
Accept
.
GPS Services 79
Page 87

3.
Choose from the following onscreen options:
• Speak Destination
to use the voice recognition
feature to search for matching locations in your area.
• Type Destination
to manually enter a destination
address (via either QWERTY or onscreen keyboard).
•Contacts
to receive turn-by-turn directions to the
address stored for a selected Contacts entry.
• Starred Items
to obtain directions to locations that
have been starred within Google maps
(
maps.google.com
).
80
Page 88

Section 11: Connections
This section describes navigating the Google browser
to navigate the mobile web. It also explains how to
quickly pair and use a Bluetooth.
About Bluetooth
Bluetooth™ is a short-range communications
technology that allows you to connect wirelessly to a
number of Bluetooth devices, such as headsets,
hands-free car kits, Bluetooth-enabled handhelds,
computers, printers, and wireless devices. The
Bluetooth communication range is usually up to
approximately 30 feet.
Turning Bluetooth On and Off
By default, your device’s Bluetooth feature is set to
Off. Turning Bluetooth on activates the internal
Bluetooth antenna.
Note:
Activating Bluetooth can drain your battery faster and
reduce your available usage times. It is recommended
that if you do not need it active, turn it off.
It is also recommended to turn off your Bluetooth within
locations that prohibit its use.
To turn Bluetooth on:
1. Press ➔ and tap
networks
.
2. Tap the
Bluetooth
field to activate the feature
➔
Wireless &
(checkmark indicates active). When active,
appears within the Status area.
To turn Bluetooth off:
1. Press ➔ and tap
networks
.
2. Tap to remove the green checkmark and
➔
Wireless &
deactivate Bluetooth.
Bluetooth Status Indicators
The following icons show your Bluetooth connection
status at a glance:
Bluetooth is active
Bluetooth is connected (paired) and
communicating.
[no icon] Bluetooth is disabled (default status)
Using the Bluetooth Settings Menu
The
Bluetooth settings
menu allows you to set up
many of the characteristics of your device’s Bluetooth
service, including:
•
Entering or changing the name your device uses for
Bluetooth communication and description.
•
Setting your device’s visibility (or “discoverability”) for
other Bluetooth devices.
•
Displaying your device’s Bluetooth address.
Connections 81
Page 89

To access the Bluetooth Settings menu:
Bluetooth Active
Bluetooth Settings
Bluetooth Phone
Bluetooth Stereo
Bluetooth Computer
Headset
1. Press ➔ and tap
networks ➔
2. Set your Bluetooth options:
Discoverable
Bluetooth settings
, and
Scan devices
To change your Bluetooth name:
1. Verify your Bluetooth is active.
2. From the Bluetooth settings page, tap
name
.
3. Tap t he
4. Ta p
Device name
OK
to complete the rename process.
field, enter a new name.
➔
Wireless &
.
Device name
.
,
Device
To make your device visible:
1. Verify your Bluetooth is active.
2. From the Bluetooth settings page, tap
Visible
Making your device discoverable allows it to be
detected by other devices for pairing and
communication.
Note:
Your device is visible for up to 120 seconds (2 minutes).
This value appears as a countdown within this field.
To scan for Bluetooth devices:
1. Verify your Bluetooth is active.
2. From the Bluetooth settings page, tap
devices
to search for visible external Bluetooth-
Scan
compatible devices such as Headsets, devices,
printers, and computers.
Pairing Bluetooth Devices
Paired Devices
The Bluetooth pairing process allows you to establish
trusted connections between your device and another
Bluetooth device. When you pair devices, they share a
passkey, allowing for fast, secure connections while
bypassing the discovery and authentication process.
82
Page 90

To pair your device with another Bluetooth device:
1. Verify your Bluetooth is active.
2. From the Bluetooth settings page, tap
Visible
Your device must be visible to successfully pair
with an external device.
3. Tap
Scan devices
. (Your device will display a list
of discovered in-range Bluetooth devices,
page 82.)
4. Tap a device from the list to initiate pairing.
Note:
Pairing between two Bluetooth devices is a one-time
process. Once a pairing is created, the devices continue
to recognize their partnership and exchange information
without having to re-enter a passcode again.
5. Enter the passkey or PIN code and tap
OK
.
6. The external device will then have to also
Done
accept the connection and enter your device’s
PIN code.
Once successfully paired to an external device,
appears within the Status area.
Note:
Due to different specifications and features of other
Bluetooth-compatible devices, display and operations
may be different, and functions such as transfer or
exchange may not be possible with all Bluetoothcompatible devices.
➔
To disconnect a paired device:
Disconnecting a paired device breaks the connection
between the device and your Samsung Intercept™,
.
but retains the knowledge of the pairing. At a later
point when you wish to reconnect the device, there is
no need to setup the connection information again.
1. Verify your Bluetooth is active.
2. From the Bluetooth settings page, touch the
previously paired device (from the bottom of
the page).
3. Tap
OK
to confirm disconnection.
– or –
From the Bluetooth settings page, touch and
hold the name of the previously paired device,
and select
Note:
Disconnections are manually done but often occur
automatically if the paired device goes out of range of
your Samsung Intercept™ or it is powered off.
Disconnect
.
To delete a paired device (unpair):
Deleting a device from your list removes its
“connection record” and upon reconnection would
require that you re-enter all the previous pairing
information.
1. Verify your Bluetooth is active.
Connections 83
Page 91

2.
From the Bluetooth settings page, touch and
hold the name of the previously paired device
(from the bottom of the page). This opens the
connected device’s menu options.
3. Ta p
Disconnect & unpair
to confirm deletion.
To access a paired device’s settings:
1. Verify your Bluetooth is active.
2. From the Bluetooth settings page, touch and
hold the name of the previously paired device.
3. Ta p
Options
and configure the desired options.
4. Press to return to the previous page.
Sending Contacts via Bluetooth
Depending on your paired devices’ settings and
capabilities, you may be able to send pictures,
Contacts information, or other items using a Bluetooth
connection.
Note:
Prior to using this feature, enable Bluetooth and the
recipient’s device must be visible.
Only a Contact’s information can be sent via Bluetooth. No
other file type (video, image, or audio) can be sent using
Bluetooth.
1. If no devices are detected, tap
Scan devices
begin a new search.
2. Press and
tap .
3. Touch an entry
to open its
details page
(page 48).
4. Press and
tap
Send
namecard via
Bluetooth
5. Tap a new or
➔
.
paired device.
Note:
The external Bluetooth device must be visible and
communicating for the pairing to be successful.
Disconnecting Bluetooth Connection During an Active Call
䊳
During an active call, where the audio is being
routed through a connected Bluetooth device
(headset or hands-free connection), tap Bluetooth
to route the device’s audio through the connected
to
Bluetooth headset (On) or through the speaker (Off).
When the call is routed to a Bluetooth headset:
•
The current call area is surrounded by a blue box, the
Bluetooth button indicates it’s on, and shows the
Bluetooth call icon ( ).
84
Page 92

When turned off:
•
The call is routed through either the earpiece or speaker,
the call area is surrounded by a green box, the Bluetooth
button indicates its off, and shows ( ).
Note:
Communication can be toggled between the Bluetooth
headset and the device speaker by tapping the Headset
button On or Off.
Web and Data Service
Getting Started with Data Services
With your Virgin Mobile service, you are ready to start
enjoying the advantages of data services. This
section will help you learn the basics of using your
data services, including managing your user name,
launching a data connection, and navigating the Web
with your device.
Updating Your User Name
If you choose to change your user name and select a
new one online, you must then update the user name
on your device.
1. Press ➔ and tap ➔
phone ➔ System Updates
2. Tap
Update Android
.
.
About
Launching a Web Connection
䊳
Press and tap ➔
(Browser)
. (Your
data connection starts and you see the home
page.)
Note:
Connection to the Internet can be done via either your
Mobile network or via Wi-Fi (configured via the
➔
Wireless & networks
page).
Settings
Important!:
Certain data services requests may require
additional time to process. While your device is
loading the requested service, the touchscreen or
QWERTY keyboard may appear unresponsive when
in fact they are functioning properly. Allow the
device some time to process your data usage
request.
Your User Name
When you buy your device and sign up for service,
you’re automatically assigned a user name, which is
typically based on your Virgin Phone number,
followed by “@yrmobl.com.” (For example:
2145554444@yrmobl.com.)
While connecting, you may see an animation. Once
complete, you are connected to the default Web page
(Google).
Tip:
To change the default launch page to a current page, press
and tap
More ➔ Settings ➔ Set home page
Note:
The Browser automatically launches when a Web link is
touched from within either an email or text message.
.
Data Connection Status and Indicators
Your device displays the current status of your data
connection through indicators at the top of the
screen. The following symbols are used:
Connections 85
Page 93

Your device is connected to the highspeed Virgin Mobile Broadband Network
(EVDO). When the arrows are animated,
your device is transferring data (for
example, when you are opening a Web
page); when the triangles are gray, your
device is connected to the network but is
not currently transferring data (for
example, when you are viewing a Web
page that is completely open). In either
state, you can receive incoming calls.
Your device is on and is connected to the
Virgin 1xRTT data network. When the
arrows are animated, your device is
transferring data (for example, when you
are opening a Web page) and you cannot
receive calls. When the arrows are gray,
your device is connected to the network
but is not currently transferring data (for
example, when you are viewing a Web
page that is completely open), and you can
receive calls.
If you do not see an indicator, your phone does not
have a current data connection. To launch a
connection, see “Launching a Web Connection” on
page 85.
Navigating the Web
Navigating through menus and Websites during a
data session is easy once you have learned a few
basics.
Note:
Prior to gaining access to Virgin Mobile’s Web page, you
may be asked to enter your 10-digit PCS phone number
and tap OK. Entering your phone number is not required
for access to other Web pages.
Scrolling
As with other parts of your device’s menu, you’ll have
to drag up and down to see everything on some
Websites.
To scroll line by line through Websites:
䊳
Use the Optical Joystick to scroll over each
available line within a Web page or to move the
onscreen cursor around the page.
To scroll through a Website’s page:
䊳
In a single motion, touch and drag across the page.
Selecting
Once you have learned how to use the Optical
Joystick to scroll and drag around a page, you can
start navigating the Web.
To select onscreen items or links:
䊳
Drag across a page, then either touch an onscreen
link or use your Optical Joystick to select the link
and then press the joystick.
86
Page 94

Links, which are displayed as underlined text, allow
DEL
you to jump to Web pages, select special functions,
or even place phone calls.
Going Back
To go back one page:
䊳
Press on your device. Repeat this process to
keep going back through your Web page history of
recently visited pages.
Note:
You can use for deleting text (like a BACKSPACE
key) when you are entering text.
Going to a Web Page
1. Tap the
Address
field (top of the browser
window) and enter a new Web address.
As you enter the address, possible matches
are displayed within an onscreen list. Tap an
entry to launch the desired website.
2. Tap
Go
to launch the new page.
Browser Menu
The browser menu offers additional options to
expand your use of the Web on your device.
Opening the Browser Menu
The browser menu may be opened anytime you have
an active data session, from any page you are
viewing.
1. From any open Web page, press .
(You will see the browser menu.)
Options available within the browser menu include:
•
New window
: Launches a new Internet window while
maintaining the current Web page active.
•
Bookmarks
: Allows you to access and manage your
bookmarks.
•
Windows
: Displays the currently active browser windows
as an onscreen list. Tap a window entry to launch that
window.
•
Refresh
: Reloads the current Web page.
•
Forward
: Returns you to a previously viewed page.
•
More
: Provide additional browser options:
–
Add bookmark (Menu+a)
: Assigns the current Web
page as a new bookmark.
–
Find on page (Menu+f)
: Searches the current Web page
for a word.
–
Select text (Menu +e)
: Selects text from the current Web
page.
–
Page info (Menu+g)
: Displays the Name and URL
(website address) of the site you’re currently viewing.
–
Share page (Menu +s)
: Allows you to send a URL via
Facebook, Gmail, messaging, or email.
–
Downloads (Menu+d)
: Keeps a list of previously
downloaded content.
–
Settings (Menu+p)
: Lets you configure and manage your
browser settings.
Note:
These additional options can also be accessed via the
QWERTY keyboard by using a combination of the Menu
button ( ) and the specified key combination.
Connections 87
Page 95

Selecting Text on a Web Page
1. Press to open the browser menu while on
an active Web page.
2. Scroll to the area of the webpage containing
the desired text.
3. Ta p
More
➔
Select text
.
4. Touch and drag across the screen and highlight
the desired text. Any selected text displays
highlighted and can be copied to the device’s
clipboard.
Going to a Specific Website
To go to a particular website by entering a URL
(website address):
1. Tap the URL field and enter a website address.
2. As you type the address, if your desired website
displays within the suggested sites list, tap the
entry to begin surfing.
3. Ta p
Go
.
Note:
Not all Websites are viewable on your device.
Adjusting Browser Page Settings
1. Press to open the browser menu.
2. Ta p
More
➔
Settings
.
3. Navigate to the Page content settings area and
select from one of the following page settings:
•Text size
: Adjusts the current onscreen text size.
Options include: Tiny, Small, Normal, Large, or Huge.
• Default zoom
: Sets the default browser viewing size.
Choose from: Far, Medium, or Close.
• Open pages in overview
: Provides an overview of
recently opened pages.
• Text encoding
• Block pop-up windows
: Adjusts the current text encoding.
: Prevents popup
advertisement or windows from appearing onscreen.
Remove the checkmark to disable this function.
•Load images
: Allows web page images to be loaded
along with the other text components of a loaded
website.
• Auto-fit pages
: Allows web pages to be resized to fit
as much of the screen as possible.
• Landscape-only display
: Displays pages only in the
wider landscape screen orientation.
• Enable Javascript
: Enables Javascript for the current
Web page. Without this feature, some pages may not
display properly. Remove the checkmark to disable
this function.
• Enable plug-ins
: Enables browser plugins for the
current Web page. SOme pages may require plugins
to properly display or function.
• Open in background
: New pages are launched in a
separate page and displayed behind the current one.
Remove the checkmark to disable this function.
• Set home page
: Sets the current home page for the
Web browser (page 89).
88
Page 96

Adjusting Browser Privacy Settings
1. Press to open the browser menu.
2. Tap
More
➔
Settings
.
3. Navigate to the Privacy settings area and
select from one of the following privacy
settings:
• Clear cache
: Deletes all currently cached data. Tap
OK to complete the process.
• Clear history
: Clears the browser navigation history.
Tap OK to complete the process.
• Accept cookies
: Allows sites, that require cookies, to
save and read cookies from your device.
• Clear all cookie data
: Clears all current browser
cookie files.
• Remember form data
: Allows the device to store
data from any previously filled out forms. Remove the
checkmark to disable this function.
• Clear Form data
: Deletes any stored data from
previously filled out forms. Tap OK to complete the
process.
• Enable location
: Allows sites to request access to
your current location (using the built-in GPS).
• Clear location access
: Clears location access for all
Websit es.
4. Press to return to the browser.
Adjusting Browser Security Settings
1. Press to open the browser menu.
2. Tap
More
➔
Settings
.
3. Navigate to the Security settings area and
select from one of the following privacy
settings:
• Remember passwords
. Stores usernames and
passwords for visited sites. Remove the checkmark
to disable this function.
•Clear passwords
. Deletes any previously stored
usernames or passwords. Tap OK to complete the
process.
• Show security warnings
. Notifies you if there is a
security issue with the current website. Remove the
checkmark to disable this function.
4. Press to return to the browser.
Setting the Browser Home Page
1. Press to open the browser menu.
2. Tap
More
➔
Settings
➔
Set home page
3. Delete the current address and enter a new
Web page.
4. Tap
OK
to complete the process.
Resetting the Browser to Default
1. Press to open the browser menu.
2. Tap
More
➔
Settings
➔ Reset to default.
3. Tap
OK
to complete the process.
Creating Website Settings
1. Press to open the browser menu.
.
Connections 89
Page 97

2.
Ta p
More
➔
Settings
➔
Website settings
advanced settings that can be configured for
individual sites (ex: Clear location access).
3. Ta p
OK
to complete the process.
Creating Bookmarks
1. From any open Web page, press . (You will
see the browser menu.)
2. Ta p
Bookmarks
• Bookmarks
. Three tabs are revealed:
: Displays a list of your current Web
bookmarks.
• Most visited
: Displays a list of your most frequently
visited Websites. Tap an entry to launch the selected
page.
•History
: Displays a record of your browsing history.
These records are organized into folders such as:
Today, Yesterday, 5 days ago, and 1 month ago.
3. Ta p
Add
(first entry in the Bookmarks tab).
4. Enter a descriptive name for the new bookmark
and tap OK to store the new entry to your
Bookmarks list.
Creating Bookmarks from other Tabs
1. From any open Web page, press ➔
Bookmarks
.
2. Tap either
3. Touch and hold an entry from the list to display
Most visited
or the
History
tab.
an onscreen popup menu.
. These
4. Ta p
Add bookmark
to add the selected entry to
your current list of bookmarks.
– or –
Repeat steps 1 and 2.
5. Tap the star icon adjacent to a website address.
The star now turns gold. This adds the
“starred” website to your current Bookmarks
list.
Creating a New Homepage
1. From any open Web page, press ➔
Bookmarks
2. Tap either
3. Touch and hold an entry from the list to display
.
Most visited
or the
History
tab.
an onscreen popup menu.
4. Ta p
Set as homepage
to assign the selected
entry as your new homepage.
Adding Bookmarks to Your Home Screen
1. From any open Web page, press ➔
Bookmarks
2. Touch and hold an existing entry from the list to
.
display an onscreen popup menu.
3. Ta p
Add shortcut to Home
to add the selected
entry to your Home screen.
90
Page 98

Wi-Fi
About Wi-Fi
Wi-Fi (short for "wireless fidelity") is a term used for
certain types of wireless local area networks (WLAN).
These device types use an 802.11 wireless
specification to transmit and receive wireless data.
Wi-Fi communication requires access to an existing
and accessible Wireless Access Point (WAP). These
WAPs can either be Open (unsecured) as within most
Hot Spots, or Secured (requiring knowledge of the
Router name and password).
Turning Wi-Fi On and Off
By default, your device’s Wi-Fi feature is turned off.
Turning Wi-Fi on makes your device able to discover
and connect to compatible in-range WAPs.
Turn Wi-Fi on:
1. Press ➔ and tap ➔
networks
.
2. Tap the
Wi-Fi
field to activate the feature
Wireless &
(checkmark indicates active). The device scans
for available in-range wireless networks.
To turn Wi-Fi off:
1. Press ➔ and tap ➔
networks ➔ Wi-Fi
2. Tap to remove the green checkmark and
.
Wireless &
deactivate Wi-Fi.
Note:
Use of wireless data connections such as Wi-Fi and
Bluetooth can cause an added drain to your battery and
reduce your use times.
To connect to a Wi-Fi network:
䊳
Press ➔ and tap ➔
networks ➔ Wi-Fi settings
Wireless &
.
The network names and security settings (Open
network or Secured with WEP) of detected Wi-Fi
networks are displayed in the Wi-Fi networks section.
Note:
When you select an open network, you are automatically
connected to the network.
To manually add your new network connection:
1. Touch Add Wi-Fi network.
2. Enter the Network SSID. This is the name of
your Wireless Access Point.
3. Tap the Security field and select a security
option. This must match the current security
setting on your target WAP.
4. If secured, you will also need to enter your
WAP’s password. The show password option,
reveals the password as you type it vs only
showing asterisks (
5. Tap Save to store the new information and
****
).
connect to your target WAP.
Connections 91
Page 99

Note:
The next time your device connects to a previously
accessed or secured wireless network, you are not
prompted to enter the WAP key again, unless you reset
your device back to its factory default settings.
To manually scan for a Wi-Fi network:
1. Press ➔ and tap ➔
networks ➔ Wi-Fi settings
2. Press and tap Scan.
Wireless &
.
Wi-Fi Status Indicators
The following icons show your Wi-Fi connection
status at a glance:
Wi-Fi is connected and active.
Wi-Fi active but there is a communication
issue with the target Wireless Access Point
(WAP).
Using the Wi-Fi Settings Menu
The Wi-Fi settings - Advanced menu allows you to set
up many of your device’s Wi-Fi service, including:
•
Setting your Wi-Fi sleep policy
•
Viewing your device’s MAC Address
•
Configuring use of either a DHCP or Static IP
To access the Bluetooth Settings menu:
1. Press ➔ and tap ➔
networks ➔ Wi-Fi settings
2. Press and tap
92
Advanced
Wireless &
.
.
Using the Android Market
The Android Market provides direct access to a large
selection of applications which you can download and
install on your device.
Accessing the Market
1. Press and tap ➔ (
2. Ta p
Next
if you are not already logged in with
Market
).
your Google account.
3. Ta p
Sign in
and enter your Google account
information.
4. Touch
Accept
to agree to the Android Market
terms of service.
Selecting and Installing a Google Application
1. Press and tap ➔ (
2. Tap the desired onscreen application.
3. Read the application descriptions.
4. Ta p
Install
.
Important!:
Use caution with applications which request access
to any personal data, functions, or significant
amounts of data usage times.
5. If prompted, follow the onscreen instructions to
Market
).
pay for the application.
6. Check the progress of the current download by
opening the
Notifications
panel.
Page 100

After the item is downloaded and installed on
your device, the content download icon
displays in the notification area of the status
bar.
Launching an Installed Google Application
1. Press and tap .
2. Tap the newly installed application.
3. Read the application descriptions.
– or –
Press and tap ➔ ➔
Downloads
.
– or –
On the
Android Market
screen, tap
Downloads
tap the installed application in the list, and
then tap
Open
.
Reinstalling a Google Application
If the Android operating system is ever updated, any
data contained on the device will be erased. The only
data stored on the device are Google applications
available via the Android Market.
Note:
Pictures and music are stored on the microSD card.
Contacts and Calendars are stored remotely on with your
remote Google or Exchange servers.
1. Log into your Google account via the device.
2. Press and tap ➔ ➔
Downloads
.
3. Scroll through the list of previously
downloaded Google applications and choose
the one you wish to reinstall.
4. Select
Uninstall
and then select
unistallation is completed.
Applications
You can access a wide variety of applications in many
different categories with your phone and data
service. Your phone comes preloaded with links to
Google.
Important!: Privacy Message
,
do not apply to third-party applications. Third-party
applications may access your personal information
or require Virgin Mobile USA to disclose your
customer information to the third-party application
provider. To find out how a third-party application
will collect, access, use, or disclose your personal
information, check the application provider’s
policies, which can usually be found on their
website. If you aren’t comfortable with the thirdparty application’s policies, don’t use the
application.
– Virgin Mobile USA policies often
Data Services FAQs
How do I sign in for the first time?
You are automatically signed in to access data
services when you turn on your device.
How do I know when my device is connected to data
services?
Your device automatically connects when you use
data service or an incoming message arrives. You will
also see the or indicator.
Install
once
Connections 93
 Loading...