

Samsung SPH-M570 User Manual
©2010 Sprint. SPRINT and the logo are trademarks of Sprint.
Other marks are the property of their respective owners.
6/10/10
User Guide
www.sprint.com

Consejo: Para encontrar esta guía para usuarios en español,
por favor visita a
Support > Devices.
To find this user guide in Spanish, please visit
www.sprint.com and click Support > Devices.
Important Privacy Message – Sprint’s policies often do not
apply to third-party applications. Third-party applications may
access your personal information or require Sprint to disclose
your customer information to the third-party application
provider. To find out how a third-party application will collect,
access, use, or disclose your personal information, check the
application provider’s policies, which can usually be found on
their website. If you aren’t comfortable with the third-party
www.sprint.com y haz clic en
application’s policies, don’t use the application.
Open Source Software – Some software components of this
product incorporate source code covered under GNU General
Public License (GPL), GNU Lesser General Public License
(LGPL), OpenSSL License, BSD License and other open
source licenses. To obtain the source code covered under the
open source licenses, please visit:
http://opensource.samsungmobile.com/index.jsp.
M570_UG_DD26_PS_061010_F6

Table of Contents
Tip: Looking for something? If you don’t see it in the headings
listed here, try the Index on page 191.
Introduction . . . . . . . . . . . . . . . . . . . . . . . . . . . . . . . i
Your Phone’s Menu . . . . . . . . . . . . . . . . . . . . . . . . i
Section 1: Getting Started . . . . . . . . . . . . . . . . . 1
1A. Setting Up Service . . . . . . . . . . . . . . . . . . . 2
Setting Up Your Phone . . . . . . . . . . . . . . . . . . . . . . 2
Activating Your Phone . . . . . . . . . . . . . . . . . . . . . . . 3
Setting Up Your Voicemail . . . . . . . . . . . . . . . . . . . 4
Sprint Account Passwords . . . . . . . . . . . . . . . . . . . 4
Getting Help . . . . . . . . . . . . . . . . . . . . . . . . . . . . . . . 5
Section 2: Your Phone . . . . . . . . . . . . . . . . . . . . 7
2A. Phone Basics . . . . . . . . . . . . . . . . . . . . . . . . 8
Your Phone . . . . . . . . . . . . . . . . . . . . . . . . . . . . . . . . 8
Viewing the Display Screen . . . . . . . . . . . . . . . . . 11
Turning Your Phone On and Off . . . . . . . . . . . . . 16
Battery and Charger . . . . . . . . . . . . . . . . . . . . . . . 16
Navigating Through the Menus . . . . . . . . . . . . . . 19
Displaying Your Phone Number . . . . . . . . . . . . . 21
Making and Answering Calls . . . . . . . . . . . . . . . 22
Entering Text in Portrait Mode . . . . . . . . . . . . . . . 31
Entering Text in Landscape Mode . . . . . . . . . . . 35
2B. Navigating the Main Screen . . . . . . . . . . 42
Getting to Know Sprint One Click . . . . . . . . . . . 42
Personalizing the Carousel . . . . . . . . . . . . . . . . . 44
2C. Settings . . . . . . . . . . . . . . . . . . . . . . . . . . . . 48
Sound Settings . . . . . . . . . . . . . . . . . . . . . . . . . . . 48
Display Settings . . . . . . . . . . . . . . . . . . . . . . . . . . . 50
Location Settings . . . . . . . . . . . . . . . . . . . . . . . . . . 52
Messaging Settings . . . . . . . . . . . . . . . . . . . . . . . 53
Airplane Mode . . . . . . . . . . . . . . . . . . . . . . . . . . . . 54
TTY Use With Sprint Service . . . . . . . . . . . . . . . . 55
Phone Setup Options . . . . . . . . . . . . . . . . . . . . . . 56
Security Settings . . . . . . . . . . . . . . . . . . . . . . . . . . 57
2D. History . . . . . . . . . . . . . . . . . . . . . . . . . . . . . 62
Viewing History . . . . . . . . . . . . . . . . . . . . . . . . . . . 62
History Options . . . . . . . . . . . . . . . . . . . . . . . . . . . 63
Making a Call From History . . . . . . . . . . . . . . . . . 64
Saving a Number From History . . . . . . . . . . . . . 64

Erasing History . . . . . . . . . . . . . . . . . . . . . . . . . . . 65
2E. Contacts . . . . . . . . . . . . . . . . . . . . . . . . . . . 66
Adding a New Contacts Entry . . . . . . . . . . . . . . 66
Adding a New Group . . . . . . . . . . . . . . . . . . . . . . 67
Saving a Phone Number . . . . . . . . . . . . . . . . . . . 67
Contacts Entry Options . . . . . . . . . . . . . . . . . . . . 68
Editing a Contacts Entry . . . . . . . . . . . . . . . . . . . 68
Adding a Number to a Contacts Entry . . . . . . . 69
Editing a Contacts Entry’s Numbers . . . . . . . . . 69
Deleting a Contact . . . . . . . . . . . . . . . . . . . . . . . . . 70
Assigning Speed Dial Numbers . . . . . . . . . . . . . 70
Selecting a Ringer Type for an Entry . . . . . . . . . 71
Assigning a Picture to an Entry . . . . . . . . . . . . . . 72
Finding Contacts Entries . . . . . . . . . . . . . . . . . . . . 72
Secret Contacts Entries . . . . . . . . . . . . . . . . . . . . . 73
Dialing Sprint Services . . . . . . . . . . . . . . . . . . . . . 73
Wireless Backup . . . . . . . . . . . . . . . . . . . . . . . . . . . 74
2F. Calendar & Tools . . . . . . . . . . . . . . . . . . . . 76
Calendar . . . . . . . . . . . . . . . . . . . . . . . . . . . . . . . . . 76
File Manager . . . . . . . . . . . . . . . . . . . . . . . . . . . . . 80
Alarm Clock . . . . . . . . . . . . . . . . . . . . . . . . . . . . . . . 81
Memo Pad . . . . . . . . . . . . . . . . . . . . . . . . . . . . . . . 82
Calculator . . . . . . . . . . . . . . . . . . . . . . . . . . . . . . . . 83
Tip Calculator . . . . . . . . . . . . . . . . . . . . . . . . . . . . . 83
Eco Calculator . . . . . . . . . . . . . . . . . . . . . . . . . . . . 83
World Clock . . . . . . . . . . . . . . . . . . . . . . . . . . . . . . 84
Updating Your Phone . . . . . . . . . . . . . . . . . . . . . . 84
Updating the PRL . . . . . . . . . . . . . . . . . . . . . . . . . . 84
2G. Voice Services . . . . . . . . . . . . . . . . . . . . . 85
Automatic Speech Recognition (ASR) . . . . . . . . 85
Managing Voice Memos . . . . . . . . . . . . . . . . . . . 88
2H. microSD Card . . . . . . . . . . . . . . . . . . . . . . . 91
Your Phone’s microSD Card and Adapter . . . . 91
microSD Card Settings . . . . . . . . . . . . . . . . . . . . . 93
microSD Card Folders . . . . . . . . . . . . . . . . . . . . . 94
Connecting Your Phone to Your Computer . . . 95
2I. Camera . . . . . . . . . . . . . . . . . . . . . . . . . . . . . 97
Taking Pictures . . . . . . . . . . . . . . . . . . . . . . . . . . . . 97
Recording Videos . . . . . . . . . . . . . . . . . . . . . . . . 101
Storing Pictures and Videos . . . . . . . . . . . . . . . 102
Sending Pictures and Videos . . . . . . . . . . . . . . 104
Printing Pictures From Your Phone . . . . . . . . . . 107

Settings . . . . . . . . . . . . . . . . . . . . . . . . . . . . . . . . . 107
2J. Bluetooth . . . . . . . . . . . . . . . . . . . . . . . . . . 109
Turning Bluetooth On and Off . . . . . . . . . . . . . . 109
Using the Bluetooth Settings Menu . . . . . . . . . 110
Pairing Bluetooth Devices . . . . . . . . . . . . . . . . . 110
Sending Items via Bluetooth . . . . . . . . . . . . . . . 111
Section 3: Sprint Service. . . . . . . . . . . . . . . . 115
3A. Sprint Service: The Basics . . . . . . . . . . 116
Voicemail . . . . . . . . . . . . . . . . . . . . . . . . . . . . . . . . 116
Messaging (SMS/MMS) . . . . . . . . . . . . . . . . . . . 119
Caller ID . . . . . . . . . . . . . . . . . . . . . . . . . . . . . . . . . 121
Call Waiting . . . . . . . . . . . . . . . . . . . . . . . . . . . . . . 122
Making a 3-Way Call . . . . . . . . . . . . . . . . . . . . . . 122
Call Forwarding . . . . . . . . . . . . . . . . . . . . . . . . . . 123
Roaming . . . . . . . . . . . . . . . . . . . . . . . . . . . . . . . . 123
3B. Web and Data Services . . . . . . . . . . . . . 127
Getting Started With Data Services . . . . . . . . . 127
Browser Menu . . . . . . . . . . . . . . . . . . . . . . . . . . . 131
Accessing Messages . . . . . . . . . . . . . . . . . . . . . 135
Downloading Games, Ringers, and More . . . . 138
Applications . . . . . . . . . . . . . . . . . . . . . . . . . . . . . 141
Data Services FAQs . . . . . . . . . . . . . . . . . . . . . . 149
3C. Entertainment: TV and Music . . . . . . . . 151
TV . . . . . . . . . . . . . . . . . . . . . . . . . . . . . . . . . . . . . . 151
Music – Sprint Music Store . . . . . . . . . . . . . . . . 154
Streaming Music . . . . . . . . . . . . . . . . . . . . . . . . . 160
3D. GPS Navigation . . . . . . . . . . . . . . . . . . . . 162
GPS Services . . . . . . . . . . . . . . . . . . . . . . . . . . . . 162
Sprint Navigation . . . . . . . . . . . . . . . . . . . . . . . . . 162
Sprint Family Locator . . . . . . . . . . . . . . . . . . . . . 164
Getting Driving Directions . . . . . . . . . . . . . . . . . 164
Configuring Your Navigation Preferences . . . . 170
Launching the Product Tour . . . . . . . . . . . . . . . 172
Section 4: Safety and Warranty
Information . . . . . . . . . . . . . . . . . . . . . . . . . . . . . 173
4A. Important Safety Information . . . . . . . . 174
General Precautions . . . . . . . . . . . . . . . . . . . . . . 174
Maintaining Safe Use of and Access to
Your Phone . . . . . . . . . . . . . . . . . . . . . . . . . . . . . 175
Using Your Phone With a Hearing
Aid Device . . . . . . . . . . . . . . . . . . . . . . . . . . . . . . 176
Caring for the Battery . . . . . . . . . . . . . . . . . . . . . 178
Radio Frequency (RF) Energy . . . . . . . . . . . . . 179

Owner’s Record . . . . . . . . . . . . . . . . . . . . . . . . . . 181
User Guide Proprietary Notice . . . . . . . . . . . . . . 181
4B. Manufacturer’s Warranty . . . . . . . . . . . . 182
Manufacturer’s Warranty . . . . . . . . . . . . . . . . . . 182
Index. . . . . . . . . . . . . . . . . . . . . . . . . . . . . . . . . . . 191

Introduction
Your Phone’s Menu
This User Guide introduces you to Sprint® service and
all the features of your new phone. It’s divided into four
sections:
⽧ Section 1: Getting Started
⽧ Section 2: Your Phone
⽧ Section 3: Sprint Service Features
⽧ Section 4: Safety and Warranty Information
Note: Because of updates in phone software, this printed
guide may not be the most current version for your
phone. Visit
to access the most recent version of the user guide.
WARNING: Please refer to the Important Safety Information
www.sprint.com and sign on to My Sprint
section on page 174 to learn about information
that will help you safely use your phone. Failure to
read and follow the Important Safety Information
in this phone guide may result in serious bodily
injury, death, or property damage.
The following table outlines your phone’s main menu
structure. For more information about using your
phone’s menus and the carousel main screen, see
“Navigating Through the Menus” on page 19 and
section 2B “Navigating the Main Screen” on page 42.
OPTIONS (Left Softkey)
1: Main Menu
2: Personalize Carousel
3: Tutorial
4: Software Updates
5: Minimize Carousel
6: Reset One Click
7: About Sprint One Click
CONTACTS (Right Softkey)
Web
i
Maps
1: Sprint Navigation
2: Sprint Family Locator
Entertainment
1: Musi c
2: Sprint TV
3: Games
1: Get New Games 2: My Stuff Manager Games
3: Bejeweled Demo 4: Diner Dash Flo on the Go
5: Texas HoldEm Poker Demo
History
Missed Alerts
My Stuff
1: Application Manager
2: Games
1: Get New Games 2: My Stuff Manager Games
3: Bejeweled Demo 4: Diner Dash Flo on the Go
5: Texas HoldEm Poker Demo
ii
3: Ringers
1: Get New Ringers 2: My Stuff Manager Ringers
4: Screen Savers
1: Get New Screen Savers
2: My Stuff Manager Screen Savers
5: Applications
1: Get New Applications
2: My Stuff Manager Applications
3: NASCAR Sprint Cup Mobile
4: Scan Life 5: Social Zone
6: Sprint Football Live
6: Call Tones
Photos & Videos
1: C ame ra
Press right softkey to view the following options:
1: M ode
1: Camera 2: Camcorder
2: Shooting Mode
1: Single Shot 2: Continuous
3: Mosaic 4: Panorama
5: Night Shot
3: Resolution
1: 2M 2: 1.3M
3: High 4: Med
5: Low
4: White Balance
1: Auto 2: Daylight
3: Cloudy 4: Incandescent
5: Flourescent 6: Manual
5: Brightness
1: Brightness
6: Self Timer
1: Of f 2: 5 Se c
3: 10 Sec
7: Effect
1: None (default) 2: MONOCHROME
3: SEPIA 4: NEGATIVE
5: AQUA 6: GREEN
8: Quality
1: Fine 2: Normal
3: Economy
9: Shutter Sound
1: Off 2: Shutter 1
3: Shutter 2 4: Shutter 3
10: Auto-S end
1: On 2: Off
11: Storage
1: Phone 2: Card
2: Camcorder (Video Mail/Long Video)
Press the right softkey to view the following options:
1: M ode
1: Camera 2: Camcorder
2: White Balance
1: Auto 2: Daylight
3: Cloudy 4: Incandescent
5: Flourescent 6: Manual
3: Brightness
1: Brightness
4: Self Timer
1: Off 2: 5 Sec
3: 10 Sec
5: Effect
1: None (default) 2: MONOCHROME
3: SEPIA 4: NEGATIVE
5: AQUA 6: GREEN
iii
6: Quality
1: Fine 2: Normal
3: Economy
7: Auto -Send
1: On 2: Off
8: Storage
1: Phone 2: Card
3: My Photos & Videos
1: In Phone 2: Memory Card
4: My Places
1: Add New Place..
5: Auto-Send
1: Add-Send Places
6: Settings
1: Auto Save to 2: Status Bar
Messages
1: Voicemail
1: Call Voicemail 2: Clear Envelope
2: Send Message
iv
3: Messages
4: Email
5: Settings
1: Notification
1: Message & Icon 2: Icon Only
2: Callback Number
1: None 2: [your phone]
3: Other
3: Prest Messages
4: Signature
1: On 2: Off
5: Reset Envelope
Contacts
Settings
1: Display
1: Screen Saver
1: No Image 2: Take New Picture
3: My Albums 4: Downloaded
5: Preloaded

2: Picture ID
1: Contacts 2: Unsaved Numbers
3: Private/Unknown
3: Backlight Control
1: Backlight Dim 2: Backlight Off
3: Java Backlight
4: Brightness
5: PowerSave Mode
1: On 2: Off
2: Volume
1: Incoming Ringer Volume
2: Playback Volume
1: Use Ringer Volume
2: Seperate Volume
3: Key Beeps
1: Tone Type 2: Tone Volume
3: Ringers
1: Incoming Calls 2: Voicemail
3: Text Message 4: Alarm/Calendar
5: PowerUp/Down 6: Battery Alert
4: Auto Keyguard
1: On 2: Off
5: Text Entry
1: Word Complete 2: Next Word Complete
6: Phone Information
1: Phone Number/User ID
2: Memory Status 3: Icon Glossary
4: Version 5: Advanced
6: My Account
7: Lock Phone
1: Change Lock Code
2: Keep Existing Lock Code
3: Cancel
8: Location
1: On 2: Off
9: Parental Controls
1: On /O ff
2: Change Parental Control Code
3: Restrictions
0: Reset/Delete
v
Too ls
vi
*: Others
1: Abbreviated Dialing 2: Accessibility
3: Airplane Mode 4: Data
5: Contact Match 6: Roaming
7: Language 8: Contacts
9: Wireless Backup 10: TTY Options
1: A lar m
2: Calendar
1: Personal Calendar 2: Add Calendar
3: Bluetooth
1: On/Off 2: Visibility
3: Add new 4: Trusted Devices
5: My Bluetooth Info
4: Update Phone
1: Update Firmware 2: Update PRL
5: Mass Storage
1: Connect to PC 2: File Manager
3: Format Memory Card 4: Memory Info
6: Voice Service
7: Calculator
1: Calculator 2: Tip Calculator
3: Eco Calculator
8: Device Self Service
9: World Time
0: Memo Pad
*: Voice Memo
1: Record 2: Review
Shopping
In Use Menu
Press MUTE/UNMUTE (left softkey).
OPTIONS (right softkey) to display the following
Press
options:
1: Save/Contact Details
2: 3-way call 3: Contacts
4: Voice Memo 5: Phone Info
6: Key Mute/Unmute 7: Messaging
8: Recent History 9: Tools

Section 1
Getting Started
⽧ Setting Up Your Phone (page 2)
1A. Setting Up Service
Release Latch
⽧ Activating Your Phone (page 3)
⽧ Setting Up Your Voicemail (page 4)
⽧ Sprint Account Passwords (page 4)
⽧ Getting Help (page 5)
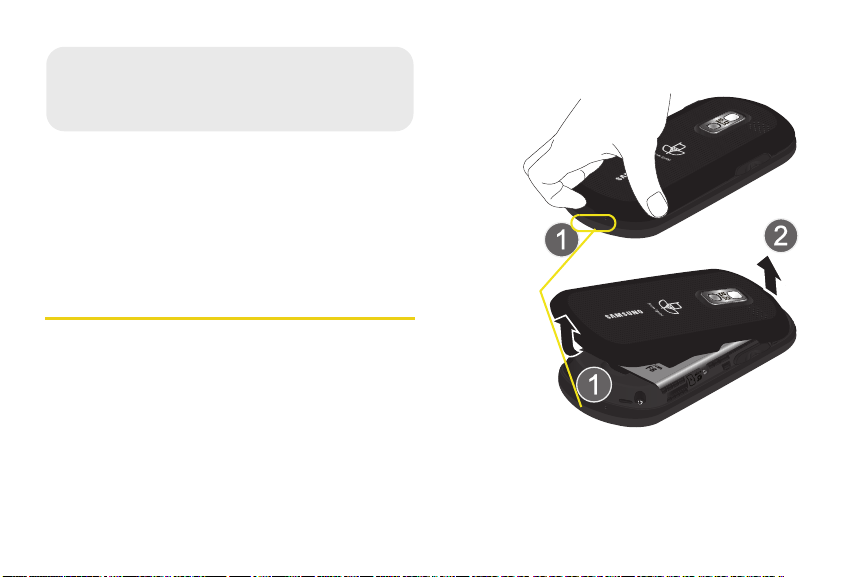
Setting Up Your Phone
1. Install the battery.
䡲 Remove the battery from its packaging.
䡲 Place your fingernail into the Release Latch
indention (adjacent to the microphone) and
carefully lift (1) the case off the rear of the
phone (2).
2 1A. Setting Up Service
● This is similar to popping the top off a soda
can.

䡲 Insert the battery into the opening in the back of
the phone (3), making sure the connectors align.
Gently press down to secure the battery (4).
䡲 Position the battery cover over the battery
compartment and press down until you hear a
click.
2. Press to turn the phone on.
䡲 If your phone is activated, it will turn on, search for
Sprint service, and enter standby mode.
䡲 If your phone is not yet activated, see “Activating
Your Phone” on page 3 for more information.
3. Make your first call.
䡲 Use your keypad to enter a phone number.
䡲 Press .
Note: Your phone’s battery should have enough charge for
your phone to turn on and find a signal, set up your
voicemail, and make a call. You should fully charge
your battery as soon as possible. See “Charging the
Battery” on page 18 for details.
Activating Your Phone
䢇 If you purchased your phone at a Sprint Store, it is
probably activated and ready to use.
䢇 If you received your phone in the mail and it is for a new
Sprint account or a new line of service, it is designed to
activate automatically. To confirm your activation,
make a phone call.
䢇 If you received your phone in the mail and you are
activating a new phone for an existing number on your
account, you will need to go online to activate your
new phone.
1A. Setting Up Service 3
Setting Up Service

䡲 From your computer’s Web browser, go to
www.sprint.com/activate and complete the
onscreen instructions to activate your phone.
When you have finished, make a phone call to
confirm your activation. If your phone is still not
activated or you do not have access to the Internet,
contact Sprint Customer Service at
1-888-211-4727
for assistance.
Tip: Do not press while the phone is being activated.
Pressing cancels the activation process.
Note: If you are having difficulty with activation, contact Sprint
Customer Service by dialing
other phone.
1-888-211-4727 from any
1. From standby mode, press and hold .
2. Follow the system prompts to:
䡲 Create your passcode.
䡲 Record your name announcement.
䡲 Record your greeting.
Note: Voicemail Passcode
Sprint strongly recommends that you create a
passcode when setting up your voicemail to protect
against unauthorized access. Without a passcode,
anyone who has access to your phone is able to
access your voicemail messages.
For more information about using your voicemail, see
“Voicemail” on page 116.
Setting Up Your Voicemail
Your phone automatically transfers all unanswered
calls to your voicemail, even if your phone is in use or
turned off. You should set up your Sprint Voicemail and
personal greeting as soon as your phone is activated.
Always use a passcode to protect against unauthorized
access.
4 1A. Setting Up Service
Sprint Account Passwords
As a Sprint customer, you enjoy unlimited access to
your personal account information, your voicemail
account, and your data services account. To ensure
that no one else has access to your information, you
will need to create passwords to protect your privacy.

Account Username and Password
If you are the account owner, you will create an account
username and password when you sign on to
www.sprint.com. (Click Need to register for access? to get
started.) If you are not the account owner (if someone
else receives the bill for your Sprint service), you can
get a sub-account password at
www.sprint.com.
Voicemail Password
You’ll create your voicemail password (or passcode)
when you set up your voicemail. See “Setting Up Your
Voicemail” on page 4 for more information on your
voicemail password.
Data Services Password
With your Sprint phone, you may elect to set up an
optional data services password to control access and
authorize Premium Service purchases.
For more information, or to change your passwords,
sign on to
Service at
www.sprint.com or call Sprint Customer
1-888 -211- 4727.
Getting Help
Managing Your Account
Online: www.sprint.com
䢇 Access your account information.
䢇 Check your minutes used (depending on your Sprint
service plan).
䢇 View and pay your bill.
䢇 Enroll in Sprint online billing and automatic payment.
䢇 Purchase accessories.
䢇 Shop for the latest Sprint phones.
䢇 View available Sprint service plans and options.
䢇 Learn more about data services and other products
like Sprint Picture Mail, games, ringers, screen
savers, and more.
From Your Sprint Phone
䢇 Press to check minute usage and
account balance.
䢇 Press to make a payment.
1A. Setting Up Service 5
Setting Up Service

䢇 Press to access a summary of
your Sprint service plan or get answers to other
questions.
䢇 Press to add a new line of service,
upgrade your phone, purchase accessories, or
access other account services.
From Any Other Phone
䢇 Sprint Customer Service: 1-8 88-211-4727.
䢇 Business Customer Service: 1-800-927-2199.
Sprint 411
Sprint 411 gives you access to a variety of services
and information, including residential, business, and
government listings; movie listings or showtimes;
driving directions, restaurant reservations, and major
local event information. You can get up to three pieces
of information per call, and the operator can
automatically connect your call at no additional charge.
There is a per-call charge to use Sprint 411, and you
will be billed for airtime.
䊳 Press .
6 1A. Setting Up Service
Sprint Operator Services
Sprint Operator Services provides assistance when you
place collect calls or when you place calls billed to a
local telephone calling card or third party.
䊳 Press .
For more information or to see the latest in products
and services, visit us online at
www.sprint.com.

Section 2
Your Phone

Your Phone
2A. Phone Basics
k
Portrait Mode
⽧ Your Phone (page 8)
⽧ Viewing the Display Screen (page 11)
⽧ Turning Your Phone On and Off (page 16)
⽧ Battery and Charger (page 16)
⽧ Navigating Through the Menus (page 19)
⽧ Displaying Your Phone Number (page 21)
⽧ Making and Answering Calls (page 22)
⽧ Entering Text in Portrait Mode (page 31)
⽧ Entering Text in Landscape Mode (page 35)
Tip: Phone Software Upgrades – Updates to your phone’s
software may become available from time to time. Sprint
will automatically upload critical updates to your phone.
You can also use the menu to check for and download
updates.
• Highlight and press
Phone
to search for and download available
updates.
> Tools > Update
8 2A. Phone Basics
1. Front LED
2. Status Bar
Icons
3. Display Screen
4. Navigation Key
5. Softkey (left)
Portrait Mode
6. SPEAKER Key
7. TALK Key
8. Keypad
14. Charger/Accessories
Jack
15. Volume Button
16. microSD Card
(internal)
13. Earpiece
12. MENU/OK
5. Softkey (right)
Portrait Mode
11. BACK/Clear Key
10. END/POWER Key
9. Microphone
20. Camera Lens
19. Headset Jac
18. Camera
Button
17. Cover Release
Latch

Key Functions
1. Front Indicator Light (LED) shows your phone’s
connection status at a glance.
2. Status Bar Icons provide information about your
phone’s status and options, such as signal
strength, roaming, ringer setting, messaging, and
battery charge.
3. Display Screen displays all the information needed
to operate your phone, such as the call status, the
Contacts list, the date and time, and the signal and
battery strength.
4. Navigation Key (similar to an optical joystick) uses
touch to scroll through the phone’s menu options.
Pressing it accepts an onscreen selection.
5. Softkeys Portrait Mode let you select left and right
softkey actions or menu items corresponding to
the bottom left and bottom right lines on the
Display Screen when the phone is in portrait mode.
6. SPEAKER Key lets you place or receive calls in
speakerphone mode.
7. TALK Key ( ) allows you to place or receive
calls, answer Call Waiting, use 3-Way Calling, or
activate Voice Dial.
8. Keypad lets you enter numbers, letters, and
characters, and navigate within menus. Press and
hold keys for speed dialing.
9. Microphone allows other callers to hear you clearly
when you are speaking to them.
10. END/POWER Key ( ) lets you turn the phone on
or off, end a call, or return to standby mode. While
in the main menu, it returns the phone to standby
mode and cancels your input. When you receive
an incoming call, press to enter silent mode and
mute the ringer.
11. BACK/Clear Key deletes characters from the
display in text entry mode. When in a menu,
pressing the Back key ( ) returns you to the
previous menu. This key also allows you to return
to the previous screen in a data session.
12. MENU/OK lets you access the phone’s menus and
selects the highlighted choice when navigating
through a menu.
2A. Phone Basics 9
Phone Basics
13.
Landscape Mode
Earpiece lets you hear the caller and automated
prompts.
14 . Charger/Accessory Jack allows you to connect the
phone charger or an optional USB cable.
CAUTION! Inserting an accessory into the incorrect
jack may damage the phone.
15. Volume Button allows you to adjust the ringer
volume in standby mode (with the phone open) or
adjust the voice volume during a call. The volume
button can also be used to scroll up or down to
navigate through the different menu options.
16. microSD Card (internal) lets you use a microSD
card to expand the memory of your phone. To gain
access to this slot, you must first remove the
battery cover.
17. Cover Release Latch lets you remove the battery
cover and expose both the internal battery
compartment and internal microSD card slot.
18. Camera Button lets you activate the camera and
camcorder and take pictures and videos.
10 2A. Phone Basics
19. Headset Jack allows you to plug in either a stereo
headset or an optional headset for convenient,
hands-free conversations.
CAUTION! Inserting an accessory into the incorrect
jack may damage the phone.
20. Camera Lens, as part of the built-in camera, lets
you take pictures and videos.
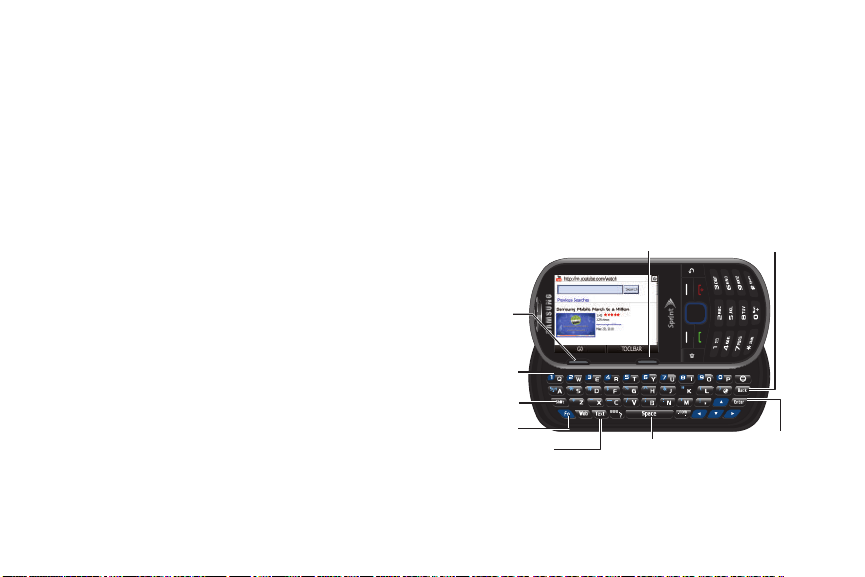
Landscape Phone Features
21. Softkey
(left)
22. QWERTY
Keyboard
23. Shift Key
24. Fn Key
25. Text Key
21. Softkey (right)
26. Space Key
28. Back Key
27. Enter/
OK Key
21. Softkeys Landscape Mode let you select left and
right softkey actions or menu items corresponding
to the bottom left and bottom right lines on the
Display Screen when the phone is in landscape
mode.
22. QWERTY Keyboard provides an alphanumeric
character keyboard layout.
23. Shift Key lets you toggle alphabet characters
between mixed case, uppercase and lowercase.
Character case remains as selected until the Shift
key is pressed again.
24. FN Key (Function) key, toggles to access the white
numbers/symbols on the QWERTY keyboard.
25. Te x t Ke y launches the New Text Message menu
from where you can initiate a new outgoing text
message.
26. Space Key lets you add spaces between words
and characters.
27. Enter/OK Key lets you perform the function
highlighted in the current menu. Press to enter
additional lines of text.
28. Back Key deletes characters from the display in text
entry mode. When in a menu, pressing
returns you to the previous menu. This key also
allows you to return to the previous screen in a
data session.
Viewing the Display Screen
Your phone’s display screen provides information
about your phone’s status and options. This list
identifies the symbols you’ll see on your phone’s
display screen:
Tip: To view a list of your phone’s icons and descriptions, from
the main menu select
Icon Glossary
Note: For information about using your phone’s main screen
carousel, see section 2B “Navigating the Main Screen”
on page 42.
Settings > Phone Information >
.
2A. Phone Basics 11
Phone Basics
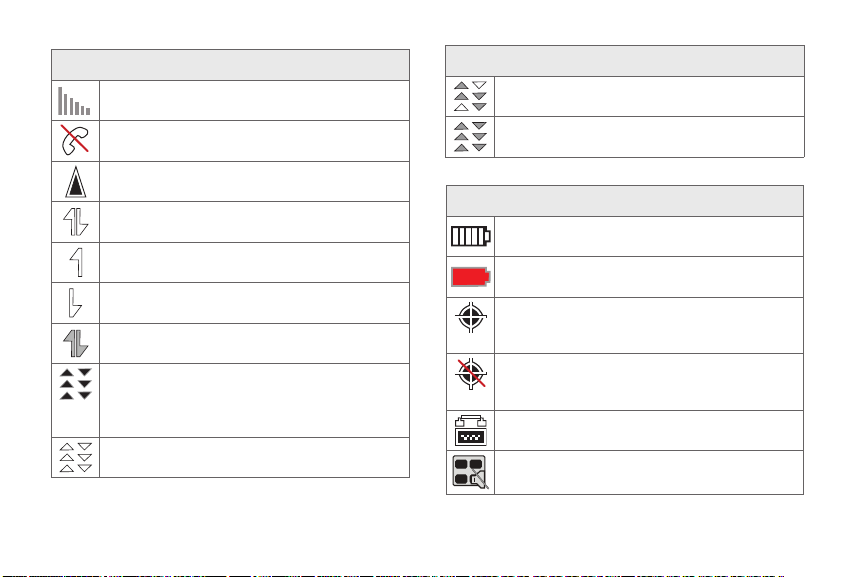
Status Bar – Service Icons
Signal Strength – Your current signal strength.
(More bars = stronger signal.)
No Service – Your phone cannot find a usable
signal.
Roaming – Your phone is “roaming” off the
Nationwide Sprint Network.
Data Status – Sprint 1xRTT data service is
available. When active, the icon is animated.
Data Sending – Sprint 1xRTT data service is
transmitting data.
Data Receiving – Sprint 1xRTT data service is
receiving data.
Data Dormant – Data service is currently
dormant.
EVDO Data Service Available – Sprint mobile
broadband data service (EVDO) is available.
When active and communicating, the icon is
animated.
EVDO Data Service Status – Current status of the
Sprint mobile broadband data service.
12 2A. Phone Basics
Status Bar – Service Icons
EVDO Data Service Active – Sprint mobile
broadband data service (EVDO) is active.
EVDO Data Service Dormant – Sprint mobile
broadband data service (EVDO) is dormant.
Status Bar – Status Icons
Battery Strength – Your current battery charge
level. (Icon shown is fully charged.)
Low battery – Your current battery charge level
is low.
Location On – Your phone’s location feature is
on and available for location-based services
such as GPS Navigation.
Location Off – Your phone’s location feature is
off. Your location is available only for 911 (see
page page 52).
TTY – Your phone is operating in TTY mode.
Keytones Muted – Your phone’s key tones are
muted.
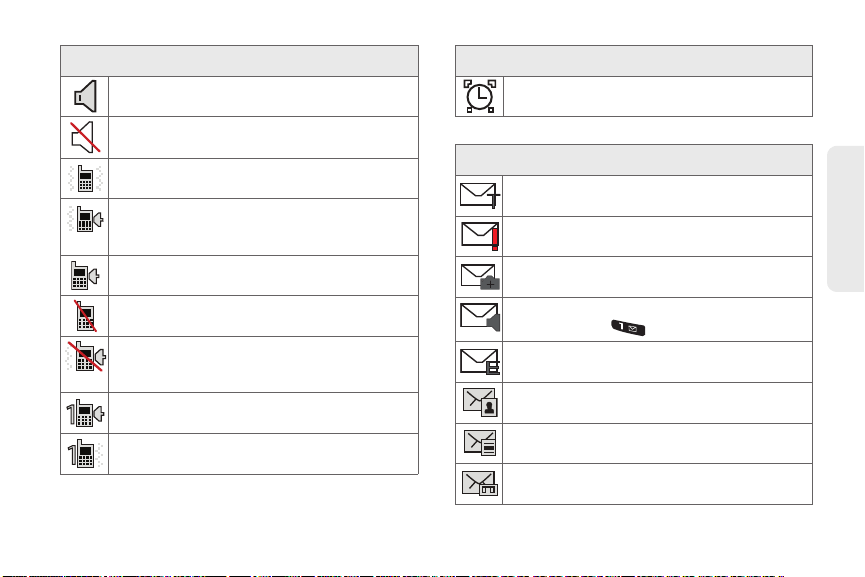
Status Bar – Status Icons
Speakerphone Enabled – Your phone’s
speakerphone feature is enabled.
Silence All – All incoming sounds are turned off.
Vibrate Only – The ringer is set to vibrate only.
Ring and Vibrate – Your phone has the ringer
volume set and the vibrate option checked
(enabled).
Ringer – The phone is set to ring only.
Ringer Off – The ringer is turned off and vibrate
mode is disabled.
Ringer Off and Vibrate – Your phone has the
ringer deactivated and the vibrate option
checked (enabled).
1 Beep – Your phone is set to beep when an
incoming call is received.
1 Beep and Vibrate – Your phone is set to beep
and vibrate when an incoming call is received.
Status Bar – Status Icons
Alarm – An alarm has been set on your phone.
Status Bar – Messaging Icons
Text Message – You have new text messages.
Urgent Message – You have new messages
marked as Urgent.
Picture Mail Message – You have new picture
mail messages.
Voicemail – You have new voicemail messages.
Press and hold
Email Message – You have new email
to call your voicemail box.
messages.
Missed Picture Mail Message – You have a new
Picture mail message.
Missed Text/Email Message – You have new
unread text or email messages.
Missed Voicemail Message – You have new
unheard vociemail messages.
2A. Phone Basics 13
Phone Basics

Locked Message – You have new text
AWB
messages.
Missed Scheduler – You have missed a
scheduled event.
Missed Alarm – You have missed an alarm
event.
Missed Call – You have missed an incoming
call.
Missed Call Alert – You have missed a call alert.
Multiple Alerts – You have multiple alert
messages.
Calendar Event – You have a pending event
scheduled.
Camera Mode – The camera is enabled and you
are in Camera Mode.
Camcorder Mode – The camcorder is enabled
and you are in Camcorder Mode.
14 2A. Phone Basics
Status Bar – Messaging Icons
Status Bar – Other Icons
Status Bar – Other Icons
Self Timer – The self-timer function is enabled.
White Balance (Auto) – The white balance has
been set to Automatic. This is used for taking
pictures indoors or outdoors using automatic
white balance settings.
White Balance (Daylight) – The white balance
has been set to Sunny. This is used for taking
pictures or movies outdoors on bright sunny
days.
White Balance (Cloudy) – The white balance has
been set to Cloudy. This is used for taking
pictures or movies outdoors under cloudy
conditions.
White Balance (Incandescent) – The white
balance has been set to Tungsten. This is used
for taking pictures or movies indoors under
normal lighting conditions.
White Balance (Fluorescent) – The white
balance has been set to Fluorescent. This is
used for taking pictures or movies indoors
under fluorescent lighting conditions.
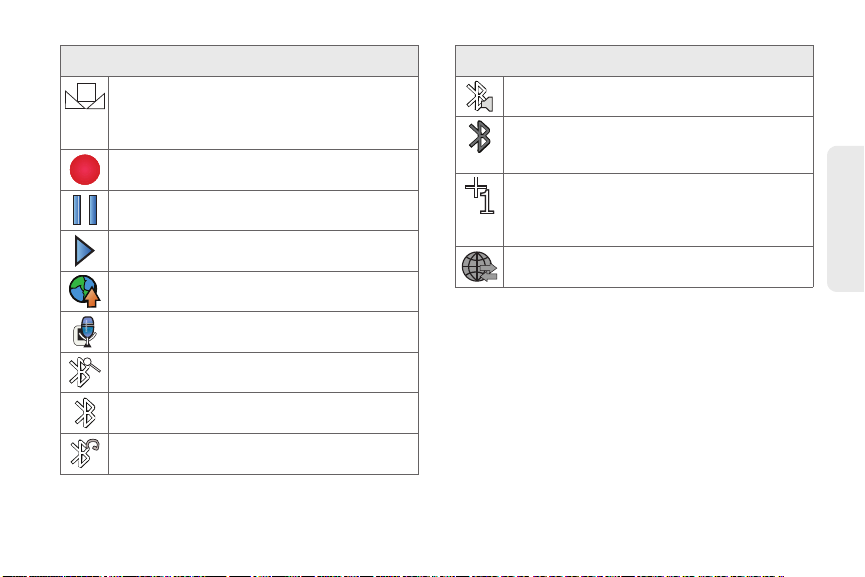
Status Bar – Other Icons
White Balance (Manual) – The white balance has
been set to Manual. This is used for taking
pictures indoors or outdoors using your own
custom settings.
Recording – A video or voice memo is currently
being recorded.
Paused– A voice memo or video has been
paused.
Play – A a voice memo or video is playing.
Media Upload – Files have been uploaded to an
online album or folder.
Voice Caption – Voice captioning is enabled and
that audio is currently being recorded.
Bluetooth (Enabled/Active) – The Bluetooth
technology is active and enabled.
Bluetooth (Connected) – The Bluetooth device is
connected.
Bluetooth (Headset Connected) – The Bluetooth
Headset is connected and visible.
Status Bar – Other Icons
Bluetooth (Stereo Connected) – The Bluetooth
stereo device is connected and visible.
Bluetooth (Hidden) – The device is hidden to
other Bluetooth devices and not transmitting its
information.
Background Application +1 – Indicates that
more than one application is currently running
and one has been minimized and placed in the
background.
Wireless Backup – A current wireless backup
session is in progress.
2A. Phone Basics 15
Phone Basics

Turning Your Phone On and Off
Turning Your Phone On
䊳 Press and hold for two seconds.
Once your phone is on, it may display “Searching for
Service.” When your phone finds a signal, it enters
standby mode – the phone’s idle state. At this point,
you are ready to begin making and receiving calls.
If your phone is unable to find a signal after 15 minutes
of searching, a Power Save feature is automatically
activated. When a signal is found, your phone
automatically returns to standby mode.
In Power Save mode, your phone searches for a signal
periodically without your intervention. You can also
initiate a search for Sprint service by pressing any key
(when your phone is turned on).
Tip: The Power Save feature conserves your battery power
when you are in an area where there is no signal.
16 2A. Phone Basics
Turning Your Phone Off
䊳 Press and hold for two seconds until you see
the powering-down animation on the display
screen.
Your screen remains blank while your phone is off
(unless the battery is charging).
Battery and Charger
WARNING: Use only Sprint-approved os Samsung-
Sprint-approved or Samsung-approved batteries and
accessories can be found at Sprint Stores or through
Samsung; or call 1-866-866-7509 to order. They’re
also available at
approved batteries and chargers with your
phone. The failure to use a Sprint-approved or
Samsung-approved battery and charger may
increase the risk that your phone will overheat,
catch fire, or explode, resulting in serious bodily
injury, death, or property damage.
www.sprint.com.

Battery Capacity
Your phone is equipped with a Lithium Ion (Li-Ion)
battery. It allows you to recharge your battery before it is
fully drained. The battery provides up to 6.0 hours of
continuous digital talk time.
When the battery reaches 5% of its capacity, the battery
icon blinks ( ). When there are approximately two
minutes of talk time left, the phone sounds an audible
alert and then turns off.
Note: Long backlight settings, searching for service, vibrate
mode, browser use, and other variables may reduce
the battery’s talk and standby times.
Tip: Watch your phone’s battery level indicator and charge the
battery before it runs out of power.
Installing the Battery
䊳 See “Setting Up Your Phone” on page 2.
Removing the Battery
1. Make sure the power is off so that you don’t lose
any stored numbers or messages.
2. Place your fingernail into the Release Latch
indention (adjacent to the microphone) and
carefully lift the case off the rear of the phone.
3. Lift the battery up (1) and remove the battery from
the phone (2).
WARNING: Do not handle a damaged or leaking Li-Ion
battery as you can be burned.
2A. Phone Basics 17
Phone Basics

4.
Position the battery cover over the battery
compartment. Align the case over the Battery
Latch, then in a single motion, press down and
snap the entire case over the compartment until
you hear a click.
18 2A. Phone Basics
䡲 Press along the entire edge of the cover to verify it
is securely in place.
WARNING: Do not handle a damaged or leaking Li-Ion
battery as you can be burned.
Charging the Battery
Keeping track of your battery’s charge is important. If
your battery level becomes too low, your phone
automatically turns off, and you will lose any
information you were just working on.
Always use a Sprint-approved or Samsung-approved
desktop charger, travel charger, or vehicle power
adapter to charge your battery.
Tip: It is recommended that you completely charge your
battery first before using your phone. This guarantees you
begin using your phone with a fully charged battery.
䊳 Plug the flat end of the charger into the phone’s
charger jack and the other end into an electrical
outlet.
 Loading...