

Samsung SPH-I350N User Manual

User Guide
www.sprint.com
©2009 Sprint. SPRINT and the logo are trademarks of Sprint. Other
marks are the property of their respective owners.
10/6/09

Consejo
Para encontrar esta guía para usuarios en español, por favor
www.sprint.com y haz clic en Support > Phones &
visita
Devices
.
To find this user guide in Spanish, please visit www.sprint.com
Support > Phones & Devices.
and click
Important
I350_UG_CI02_PS_100609_F4
Important Privacy Message – Sprint’s policies often do not
apply to third-party applications. Third-party applications may
access your personal information or require Sprint to disclose
your customer information to the third-party application
provider. To find out how a third-party application will collect,
access, use, or disclose your personal information, check the
application provider’s policies, which can usually be found on
their website. If you aren’t comfortable with the third-party
application’s policies, don’t use the application.

Table of Contents
Looking for something? If you don’t see it in the
Tip
headings listed here, try the Index on page 217.
Introduction . . . . . . . . . . . . . . . . . . . . . . . . . . . . . . . i
Your Device’s Menu . . . . . . . . . . . . . . . . . . . . . . . . i
Section 1: Getting Started . . . . . . . . . . . . . . . . . 1
1A. Setting Up Service . . . . . . . . . . . . . . . . . . . . 2
Setting Up Your Device . . . . . . . . . . . . . . . . . . . . . . 2
Activating Your Device . . . . . . . . . . . . . . . . . . . . . . 6
Setting Up Your Voicemail . . . . . . . . . . . . . . . . . . . 7
Sprint Account Passwords . . . . . . . . . . . . . . . . . . . 8
Getting Help . . . . . . . . . . . . . . . . . . . . . . . . . . . . . . . 9
Section 2: Your Device . . . . . . . . . . . . . . . . . . . 11
2A. Device Basics . . . . . . . . . . . . . . . . . . . . . . . 12
Your Device . . . . . . . . . . . . . . . . . . . . . . . . . . . . . . . 12
Viewing the Display Screen . . . . . . . . . . . . . . . . . 17
Turning Your Device On and Off . . . . . . . . . . . . . 19
Battery and Charger . . . . . . . . . . . . . . . . . . . . . . . 20
Navigating Through the Menus . . . . . . . . . . . . . . 23
Displaying Your Phone Number . . . . . . . . . . . . . 25
Making and Answering Calls . . . . . . . . . . . . . . . 26
Entering Text . . . . . . . . . . . . . . . . . . . . . . . . . . . . . . 35
2B. Settings . . . . . . . . . . . . . . . . . . . . . . . . . . . . . 39
Personalizing Your Device . . . . . . . . . . . . . . . . . . 39
Sound Settings . . . . . . . . . . . . . . . . . . . . . . . . . . . 41
Display Settings . . . . . . . . . . . . . . . . . . . . . . . . . . . 46
Location Settings . . . . . . . . . . . . . . . . . . . . . . . . . . 48
Messaging Settings . . . . . . . . . . . . . . . . . . . . . . . 49
Airplane Mode . . . . . . . . . . . . . . . . . . . . . . . . . . . . 51
TTY Use With Sprint Service . . . . . . . . . . . . . . . . 52
Device Setup Options . . . . . . . . . . . . . . . . . . . . . 53
Security Settings . . . . . . . . . . . . . . . . . . . . . . . . . . 56
2C. History . . . . . . . . . . . . . . . . . . . . . . . . . . . . . . 62
Viewing History . . . . . . . . . . . . . . . . . . . . . . . . . . . 62
History Options . . . . . . . . . . . . . . . . . . . . . . . . . . . 63
Making a Call From History . . . . . . . . . . . . . . . . . 64
Saving a Number From History . . . . . . . . . . . . . 65
Erasing History . . . . . . . . . . . . . . . . . . . . . . . . . . . . 65
2D. Contacts . . . . . . . . . . . . . . . . . . . . . . . . . . . . 66
Adding a New Contacts Entry . . . . . . . . . . . . . . 66
Saving a Phone Number . . . . . . . . . . . . . . . . . . . 67
Contacts Entry Options . . . . . . . . . . . . . . . . . . . . 67

Editing a Contacts Entry . . . . . . . . . . . . . . . . . . . . 69
Adding a Number to a Contacts Entry . . . . . . . 69
Editing a Contacts Entry’s Numbers . . . . . . . . . . 69
Deleting a Contact . . . . . . . . . . . . . . . . . . . . . . . . . 70
Assigning Speed Dial Numbers . . . . . . . . . . . . . 70
Adding a New Group . . . . . . . . . . . . . . . . . . . . . . 71
Selecting a Ringer Type for an Entry . . . . . . . . . 71
Assigning a Picture to an Entry . . . . . . . . . . . . . . 72
Finding Contacts Entries . . . . . . . . . . . . . . . . . . . 72
Dialing Sprint Services . . . . . . . . . . . . . . . . . . . . . 74
2E. Calendar and Tools . . . . . . . . . . . . . . . . . . 76
Calendar . . . . . . . . . . . . . . . . . . . . . . . . . . . . . . . . . 76
Alarm Clock . . . . . . . . . . . . . . . . . . . . . . . . . . . . . . 80
Wake-up Alarm . . . . . . . . . . . . . . . . . . . . . . . . . . . 81
Notepad . . . . . . . . . . . . . . . . . . . . . . . . . . . . . . . . . . 81
Using Tasks . . . . . . . . . . . . . . . . . . . . . . . . . . . . . . . 83
Office Mobile . . . . . . . . . . . . . . . . . . . . . . . . . . . . . . 87
Calculator . . . . . . . . . . . . . . . . . . . . . . . . . . . . . . . . 90
Tip Calculator . . . . . . . . . . . . . . . . . . . . . . . . . . . . . 91
Using the Smart Converter . . . . . . . . . . . . . . . . . . 91
Using the Stop Watch . . . . . . . . . . . . . . . . . . . . . . 91
World Clock . . . . . . . . . . . . . . . . . . . . . . . . . . . . . . 92
Updating Your Device . . . . . . . . . . . . . . . . . . . . . . 93
Updating the PRL . . . . . . . . . . . . . . . . . . . . . . . . . 93
2F. microSD Card . . . . . . . . . . . . . . . . . . . . . . . 94
Using a microSD Card . . . . . . . . . . . . . . . . . . . . . 94
microSD Card Memory . . . . . . . . . . . . . . . . . . . . 96
microSD Folders . . . . . . . . . . . . . . . . . . . . . . . . . . 97
Transferring Files Between Your Computer
and Your microSD Card . . . . . . . . . . . . . . . . . . . 98
2G. Synchronizing With Your Computer . . 101
Installing the Sync Program . . . . . . . . . . . . . . . 101
Running the Sync Program . . . . . . . . . . . . . . . . 102
Synchronization Overview . . . . . . . . . . . . . . . . . 102
ActiveSync Connection and Setup . . . . . . . . . 103
Setting Up Windows Media Player Sync . . . . 104
Syncing Music via Windows Media Player . . . 106
Creating a Custom Ring Tone . . . . . . . . . . . . . 107
2H. Camera . . . . . . . . . . . . . . . . . . . . . . . . . . . 108
Taking Pictures . . . . . . . . . . . . . . . . . . . . . . . . . . 108
Recording Videos . . . . . . . . . . . . . . . . . . . . . . . . 115
Storing Pictures and Videos . . . . . . . . . . . . . . . 118
Working With Pictures and Videos . . . . . . . . . . 119
Sending Pictures and Videos by Email . . . . . . 120
Printing Pictures via Bluetooth . . . . . . . . . . . . . 121

2I. Bluetooth . . . . . . . . . . . . . . . . . . . . . . . . . . 123
Turning Bluetooth On and Off . . . . . . . . . . . . . . 123
Using the Bluetooth Settings Menu . . . . . . . . . 124
Pairing Bluetooth Devices . . . . . . . . . . . . . . . . . 125
Sending Data via Bluetooth . . . . . . . . . . . . . . . . 127
Section 3: Sprint Service. . . . . . . . . . . . . . . . . 129
3A. Sprint Service: The Basics . . . . . . . . . . 130
Voicemail . . . . . . . . . . . . . . . . . . . . . . . . . . . . . . . . 130
Text Messaging (SMS) . . . . . . . . . . . . . . . . . . . . 133
Caller ID . . . . . . . . . . . . . . . . . . . . . . . . . . . . . . . . . 135
Call Waiting . . . . . . . . . . . . . . . . . . . . . . . . . . . . . . 136
Making a Three-Way Call . . . . . . . . . . . . . . . . . . 136
Call Forwarding . . . . . . . . . . . . . . . . . . . . . . . . . . 137
Roaming . . . . . . . . . . . . . . . . . . . . . . . . . . . . . . . . 137
3B. Web and Data Services . . . . . . . . . . . . . 141
Getting Started With Data Services . . . . . . . . . 141
Navigating the Web . . . . . . . . . . . . . . . . . . . . . . . 143
Email . . . . . . . . . . . . . . . . . . . . . . . . . . . . . . . . . . . 147
Instant Messaging . . . . . . . . . . . . . . . . . . . . . . . . 159
Sprint Software Store . . . . . . . . . . . . . . . . . . . . . . 160
Tellme . . . . . . . . . . . . . . . . . . . . . . . . . . . . . . . . . . . 161
Wi-Fi . . . . . . . . . . . . . . . . . . . . . . . . . . . . . . . . . . . . 164
Data Services FAQs . . . . . . . . . . . . . . . . . . . . . . 166
3C. Entertainment: TV and Music . . . . . . . 168
TV . . . . . . . . . . . . . . . . . . . . . . . . . . . . . . . . . . . . . . 168
Music – Sprint Music Store . . . . . . . . . . . . . . . . 171
Games . . . . . . . . . . . . . . . . . . . . . . . . . . . . . . . . . 173
NASCAR . . . . . . . . . . . . . . . . . . . . . . . . . . . . . . . . 174
NFL Mobile Live . . . . . . . . . . . . . . . . . . . . . . . . . . 175
YouTube . . . . . . . . . . . . . . . . . . . . . . . . . . . . . . . . 176
3D. GPS Navigation . . . . . . . . . . . . . . . . . . . . 178
GPS Services . . . . . . . . . . . . . . . . . . . . . . . . . . . . 178
Sprint Navigation . . . . . . . . . . . . . . . . . . . . . . . . . 178
3E. Sprint Worldwide Wireless Service . . 187
Your SIM Card . . . . . . . . . . . . . . . . . . . . . . . . . . . 187
Using Your Device While Traveling . . . . . . . . . 189
Retrieving Voicemail Messages . . . . . . . . . . . . 192
International Data Roaming . . . . . . . . . . . . . . . 193
Using Your SIM Card’s PhoneBook . . . . . . . . . 194
Setting GSM Services Options . . . . . . . . . . . . . 196
Contacting Sprint . . . . . . . . . . . . . . . . . . . . . . . . 198

Section 4: Safety and Warranty
Information . . . . . . . . . . . . . . . . . . . . . . . . . . . . . 199
4A. Important Safety Information . . . . . . . . 200
General Precautions . . . . . . . . . . . . . . . . . . . . . . 200
Maintaining Safe Use of and Access to
Your Device . . . . . . . . . . . . . . . . . . . . . . . . . . . . . 201
Using Your Device With a Hearing
Aid Device . . . . . . . . . . . . . . . . . . . . . . . . . . . . . . 202
Caring for the Battery . . . . . . . . . . . . . . . . . . . . 204
Radio Frequency (RF) Energy . . . . . . . . . . . . . 205
Owner’s Record . . . . . . . . . . . . . . . . . . . . . . . . . 207
User Guide Proprietary Notice . . . . . . . . . . . . . 207
4B. Manufacturer’s Warranty . . . . . . . . . . . . 208
Manufacturer’s Warranty . . . . . . . . . . . . . . . . . . 209
Index. . . . . . . . . . . . . . . . . . . . . . . . . . . . . . . . . . . 217

Introduction
Your Device’s Menu
This User Guide introduces you to Sprint® service and all
the features of your new device. It’s divided into four
sections:
⽧ Section 1: Getting Started
⽧ Section 2: Your Device
⽧ Section 3: Sprint Service
⽧ Section 4: Safety and Warranty Information
User
Guide
Note
WARNING
Because of updates in device software, this
printed guide may not be the most current
version for your device. Visit
and log on to
the most recent version of the user guide.
Please refer to the Important Safety
Information
about information that will help you safely use
your device. Failure to read and follow the
Important Safety Information in this User
Guide may result in serious bodily injury,
death, or property damage.
My Sprint Wireless to access
section on page 200 to learn
www.sprint.com
The list below summarizes the Main Menu options
available on your device. For more information about
using your device’s menus and the carousel main
screen, see “Navigating Through the Menus” on
page 23.
Press
from any screen to display the main Start
menu contaning your device’s Main Functions menus.
Menu options include:
䡲 Today, Phone, E-mail, Contacts, Internet Explorer,
Calendar, Settings, Getting Started, Pictures &
Videos, Windows Media, Marketplace, Messenger,
Microsoft My Phone, MSN Weather, Windows Live,
MSN Money, Calculator, Games, Notes, Tasks,
Office Mobile, File Explorer, ActiveSync, Internet
Sharing, Task Manager, Search Phone, Help,
Adobe Reader, Alarms, Anniversary, Audio Notes,
Camera, Google, Instant Messaging, NASCAR
Sprint Cup Mobile, NFL Mobile Live, Remote
Desktop Mobile, RSS Reader, Search Widget,
Smart Converter, SmartReader, Software Store,
Sprint Titan Manager, Sprint TV, SprintMusic
i

Store, SprintNav, Stop Watch, Tellme Tip
Calculator, Worls Clock, and YouTube.
During an active call, the following functions are
available:
In Use Menu
1: Speaker On/Off 2: Note
3: Talk 4: Mute/Unmute
5: Phone book 6: End
Press Menu (right softkey) to display the following
options:
1: Mute/Unmute 2: Turn Speakerphone On/Off
3: Turns Hands-free On/Off
4: Paste
5: Save to Contacts/View Contact
6: Create Note 7: Call History
8: Speed Dial 9: Options...
ii

Section 1
Getting Started

1A. Setting Up Service
⽧ Setting Up Your Device (page 2)
⽧ Activating Your Device (page 6)
⽧ Setting Up Your Voicemail (page 7)
⽧ Sprint Account Passwords (page 8)
⽧ Getting Help (page 9)
2 1A. Setting Up Service
Setting Up Your Device
1. Remove the battery cover.
䡲 Press down on the battery cover (1) and slide the
cover away from the camera lens (2).
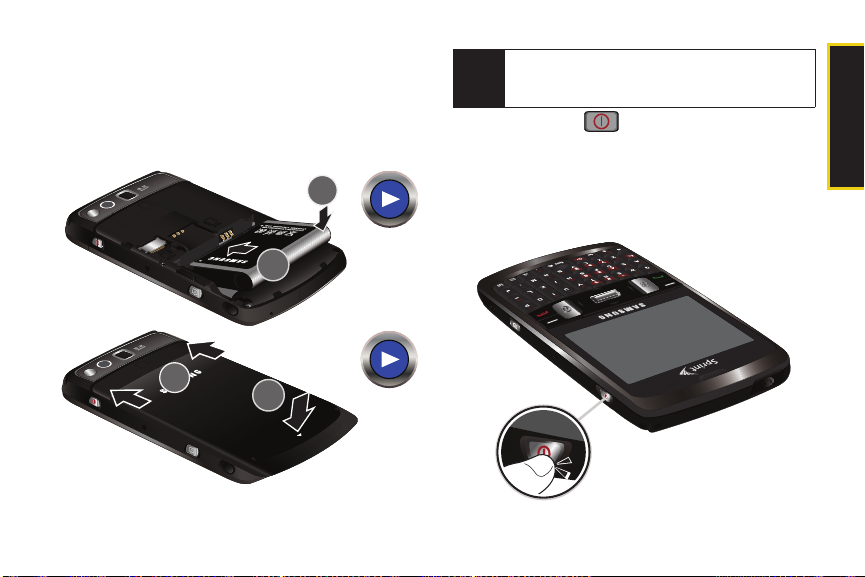
2. Install the battery.
䡲 Insert the battery into the opening on the back of
the device, making sure the connectors align (3).
Gently press down to secure the battery (4).
䡲 Position the battery cover (5) and firmly slide it in
until you hear a click (6).
If you have purchased an optional microSD memory
Note
card, insert it into the slot on the left side above the
battery, and then insert the battery.
3. Press and hold to turn the device on.
䡲 Your device will turn on, search for Sprint service,
and then show the Today screen.
䡲 If your device is not yet activated, or if it is locked,
see “Activating Your Device” on page 6 for more
information.
1A. Setting Up Service 3
Setting Up Service
WARNING
If your handset has a touchscreen display,
please note that a touchscreen responds best
to a light touch from the pad of your finger or
a non-metallic stylus. Using excessive force or
a metallic object when pressing on the
touchscreen may damage the tempered
glass surface and void the warranty. See
“Manufacturer’s Warranty” on page 209.
Initial Setup
If your device was not already configured and set up,
these procedures are required to set up the device
once it is powered on for the first time.
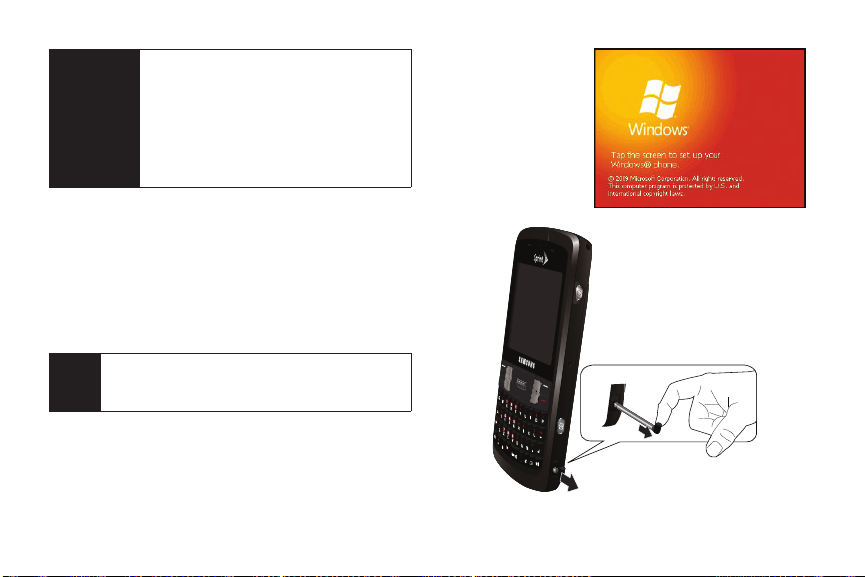
The first time you power on your device, it displays the
Windows Mobile
series of setup procedures.
Note
4 1A. Setting Up Service
®
screen which guides you through a
If you ever have to perform a hard reset of your
device (back to factory default settings), you will
need to repeat this initial setup process.
1. From the initial
startup screen
tap the screen
using the stylus.
(To remove the
stylus, see the
illustration
below.)
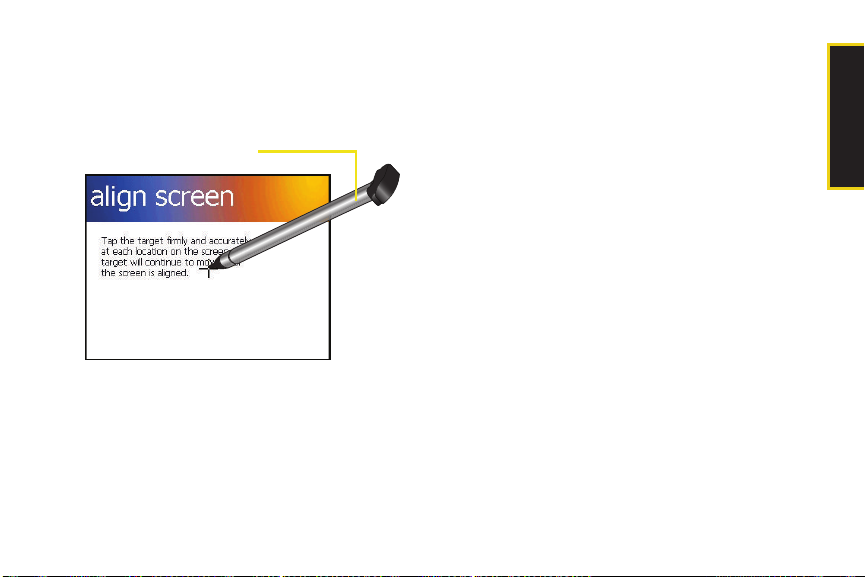
2. From the align screen, use your stylus to calibrate
Stylus
the touch accuracy of the screen by both
accurately and firmly tapping the center of each
target (crosshair). Repeat this process for every
target that appears until completed.
3. Review the onscreen tutorial screens by touching
Next to continue onto the next page.
– or –
Skip to move onto the password setup
Touch
portion of your initial setup where you can create a
password which must be used to access your
device’s features and data.
4. Touch Next to continue with the password setup.
– or –
Skip to set up a password at a later time and
Touch
continue onto step 10.
5. Touch the Prompt if device unused for checkbox to
enable the feature. (Enabling this option activates
the remaining fields.)
6. Select each field and enter the desired information:
䡲 Minutes: to select the amount of unused time (idle)
required before you are prompted for a password.
䡲 Passw ord type: to choose from one of the following
PIN types:
● Simple PIN: must be at least four characters in
length and cannot contain a simple sequence
such as 0000, 1111, or 1234.
● Strong alphanumeric: must be at least seven
characters in length and must contain at least
one character from each of the following
categories: uppercase/lowercase letters,
numerals, and symbols. Examples of strong
alphanumeric passwords are
%$VH5hW.
sb?8A!3 and
1A. Setting Up Service 5
Setting Up Service

䡲 Password: use the keypad to enter the desired
OK
password.
䡲 Confirm: use the keypad to re-enter the same
password.
7. To uch the Hint tab to enter a password reminder.
Important
Do not enter your password into this field.
Doing so can allow anyone using the device
to easily access it if it is locked.
8. Touch to store the new password and
continue with the setup process.
9. Touch the complete screen to end the process and
proceed to the Today screen.
Although your device’s battery should have enough
Note
charge to power on the device, find a signal, set up
your voicemail, and make a call, we recommend that
you fully charge your battery prior to its initial use.
See “Charging the Battery” on page 22.
6 1A. Setting Up Service
Activating Your Device
䢇 If you purchased your device at a Sprint Store, it should be
activated and ready to use.
䢇 If you received your device in the mail and it is for a new Sprint
account or a new line of service , it is designed to activate
automatically. To confirm your activation, make a
phone call or connect to the Internet.
䢇 If you received your device in the mail and you are activating a
new device for an existing number on your account, you will
need to go online to activate your new device.
䡲 From your computer’s Web browser, go to
www.sprint.com/activate and complete the onscreen
instructions to activate your device.
When you have finished, make a phone call to confirm
your activation. If your phone is still not activated, or you
do not have access to the Internet, contact Sprint
Customer Service at
Do not press while the phone is being activated.
Tip
Pressing during activation cancels the activation
process.
1-888-211-4727 for assistance.

If you are having difficulty with activation, contact
Note
Sprint Customer Service by dialing
from any other phone.
To enable Data Services:
1-888-211-4727
1. Press and touch Settings > System > EVDO Data.
(There is no charge to use this service during
phone activation.)
2. Touch Menu (right softkey) > Enable EVDO Data. (If the
option appears as
services are already enabled.)
Disable EVDO Data, your data
3. Touch Menu (right softkey) > Update Data Profile.
When finished, the device will display your status
as "EVDO Data Enabled" and your user name will
appear.
Locking Your Device
1. Press and hold to power on the device and
reveal the Today screen.
2. Press from the Today screen.
3. Touch Lock (left softkey).
Unlocking Your Device
䊳 Touch and drag the onscreen Lock button to either
the left or right of the screen to reveal the Today
screen.
Setting Up Service
Setting Up Your Voicemail
Your phone automatically transfers all unanswered
calls to your voicemail, even if your phone is in use or
turned off. You should set up your Sprint Voicemail and
personal greeting as soon as your phone is activated.
1. From standby mode, press and hold .
1A. Setting Up Service 7

2.
Follow the system prompts to:
䡲 Create your passcode.
䡲 Record your name announcement.
䡲 Record your greeting.
Voicemail Passcode
Note
Sprint strongly recommends that you create a
passcode when setting up your voicemail to protect
against unauthorized access. Without a passcode,
anyone who has access to your device can access
your messages and place outbound calls through
your wireless account.
For more information about using your voicemail, see
“Voicemail” on page 130.
Sprint Account Passwords
As a Sprint customer, you enjoy unlimited access to
your personal account information, your voicemail
account, and your data services account. To ensure
that no one else has access to your information, you
will need to create passwords to protect your privacy.
8 1A. Setting Up Service
Account Username and Password
If you are the account owner, you will create an account
username and password when you sign on to
www.sprint.com. (Click Need to register for access? to get
started.) If you are not the account owner (if someone
else receives the bill for your Sprint service), you can
get a sub-account password at
www.sprint.com.
Voicemail Password
You’ll create your voicemail password (or passcode)
when you set up your voicemail. See “Setting Up Your
Voicemail” on page 7 for more information on your
voicemail password.
Data Services Password
With your Sprint device, you may elect to set up an
optional data services password to control access and
authorize Premium Service purchases.
For more information, or to change your passwords,
sign on to
Service at
www.sprint.com or call Sprint Customer
1-888-211-4727.

Getting Help
Managing Your Account
Online: www.sprint.com
䢇 Access your account information.
䢇 Check your minutes used (depending on your Sprint
service plan).
䢇 View and pay your bill.
䢇 Enroll in Sprint online billing and automatic payment.
䢇 Purchase accessories.
䢇 Shop for the latest Sprint phones.
䢇 View available Sprint service plans and options.
䢇 Learn more about data services and other products
like Sprint Picture Mail, games, ringers, screen
savers, and more.
From Your Sprint Phone
䢇 Press to check minute usage and
account balance.
䢇 Press to make a payment.
䢇 Press to access a summary of your
Sprint service plan or get answers to other questions.
From Any Other Phone
䢇 Sprint Customer Service: 1-888-211-4727.
䢇 Business Customer Service: 1-800-927-2199.
1A. Setting Up Service 9
Setting Up Service

Sprint 411
Sprint 411 gives you access to a variety of services
and information, including residential, business, and
government listings; movie listings or showtimes;
driving directions, restaurant reservations, and major
local event information. You can get up to three pieces
of information per call, and the operator can
automatically connect your call at no additional charge.
There is a per-call charge to use Sprint 411, and you
will be billed for airtime.
䊳 Press .
Sprint Operator Services
Sprint Operator Services provides assistance when you
place collect calls or when you place calls billed to a
local telephone calling card or third party.
䊳 Press .
For more information or to see the latest in products
and services, visit us online at
10 1A. Setting Up Service
www.sprint.com.

Section 2
Your Device

2A. Device Basics
5. Softkey (right)
2. Earpiece
1. Headset Jack
14. Delete Key
13. Keyboard
9. Mirror
17. Enter/Settings
Key
16. OK Key
15. END Key
12. Microphone
11. Camera Lens
10. External Speaker
7. TALK Key
8. Speaker Key
6. Windows Key
5. Softkey (left)
4. Navigation Key
3. Display Screen
18. Status Bar Icons
19. Indicator LED
⽧ Your Device (page 12)
⽧ Viewing the Display Screen (page 17)
⽧ Turning Your Device On and Off (page 19)
⽧ Battery and Charger (page 20)
⽧ Navigating Through the Menus (page 23)
⽧ Displaying Your Phone Number (page 25)
⽧ Making and Answering Calls (page 26)
⽧ Entering Text (page 35)
12 2A. Device Basics
Device Software Upgrades – Updates to your
Tip
device’s software may become available from time
to time. Sprint will automatically upload critical
updates to your device. You can also use the menu
to check for and download updates. Press
Settings > System > Update Firmware to search for
and download available updates.
Your Device
>
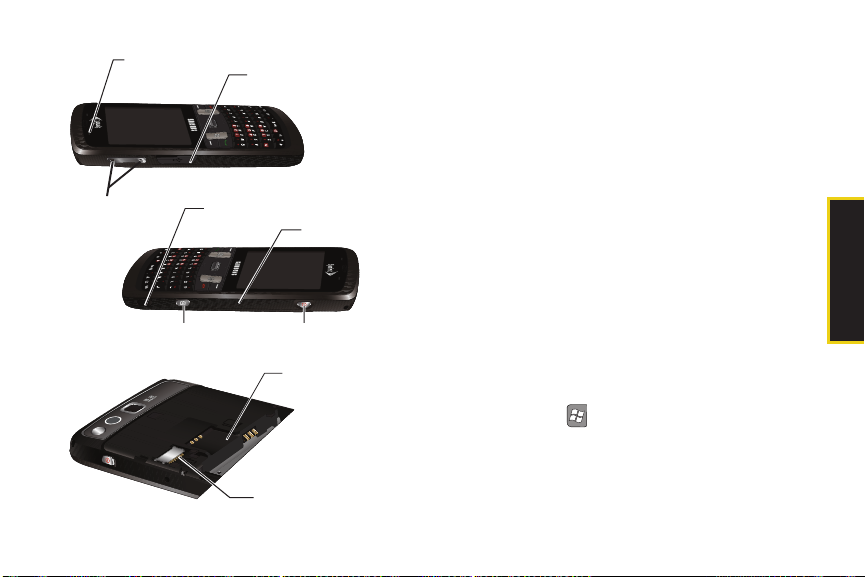
22. Volume
Button
23. Stylus
24. Reset Slot
25. Camera Button
26. Power Button
21. Charger/Accessory
Jack
20. Light Sensor
27. SIM Card Slot
28. microSD Card Slot
Key Functions
1. Headset Jack allows you to plug in either a stereo
headset (included) or other compatible headset,
for convenient, hands-free conversations.
CAUTION! Inserting an accessory into the incorrect
jack may damage the device.
2. Earpiece lets you hear the caller and automated
prompts.
3. Display Screen displays phone and device
information, including call status, the Contacts list,
the date and time, Windows Mobile menus, and
the signal and battery strength.
4. Navigation Key scrolls through the device’s menu
options.
5. Sof tkeys let you select softkey actions or menu
items corresponding to the bottom left and bottom
right lines on the display screen.
6. Windows Key ( ) provides access to the Windows
Mobile menu settings, applications, and other
configuration pages.
2A. Device Basics 13
Device Basics

7.
TAL K Key ( ) allows you to place or receive calls,
answer Call Waiting, use Three-Way Calling, or
activate Voice Dial.
䡲 In standby mode, press once to access the dialer.
䡲 In standby mode, press twice to call the most
recent phone number from the call history list.
8. Speaker Key lets you place or receive calls in
speakerphone mode.
9. Mirror displays your reflection while taking pictures
or shooting videos.
10. External Speaker allows you to hear the other caller
(while Speakerphone is on) and the different ring
tones or sounds offered by your device.
11. Camera Lens, as part of the built-in camera, lets you
take pictures and videos.
12. Microphone allows other callers to hear you clearly
when you are speaking to them.
13. Keyboard lets you enter letters, numbers, and
punctuation using the familiar QWERTY layout.
14. Delete Key deletes characters from the display in
text entry mode.
14 2A. Device Basics
15. END Key ( ) lets you turn the device’s phone
radio on or off, end a call, or return to standby
mode. While in the main menu, it returns the
device to standby mode and cancels your input.
When you receive an incoming call, press to
ignore the call.
16. OK Key ( ) stores the current menu page options
(acts the same as touching at the upper-right
OK
of a menu page or tab). When in a menu, pressing
this key stores the current page’s settings and
returns you to the Today screen.
17. Enter/Settings Key, when on the Today screen,
pressing accesses the Settings page from
where you can adjust the time and alarm settings.
From other pages, pressing this key acts as an
Enter key to then select the highlighted choice
when navigating through a menu.
18. Status Bar Icons provide information about your
device’s status and options, such as signal
strength, roaming, ringer setting, messaging, and
battery charge.
19. Indicator LED shows your device’s connection status
at a glance.

20. Light Sensor lets you use the ambient light level to
adjust both screen brightness/contrast and
keyboard access.
䡲 In a bright light condition (outdoors), the sensor
causes the device to increase the brightness and
contrast for better viewing.
䡲 In a dark light condition (while talking on the
device) the sensor causes the device to adjust the
brightness and contrast for better viewing.
21. Charger/Accessory Jack allows you to connect the
device charger or an optional USB cable
(included). CAUTION! Inserting an accessory into
the incorrect jack may damage the device.
22. Volume Button allows you to adjust the ringer
volume in standby mode or adjust the voice
volume during a call. The volume button can also
be used to scroll up or down to navigate through
the different menu options. press and hold the
volume down key to activate the vibration mode.
23. Stylus storage location of included stylus touch
pen. It is recommended that you use this pen
when making your onscreen selections. Using
your fingers can be less accurate, possibly scratch
the screen, and leave residue.
24. Reset Slot lets you reset your device and ends all
currently running applications. To reset your
device, insert your stylus firmly into the slot and
then quickly remove it.
25. Camera Button lets you activate the camera and
camcorder and take pictures and videos.
26. Power Button, located at the side of the device, lets
you either turn the device on or off (press and
hold) or help conserve power by toggling the
display screen on or off (single press).
䡲 This single press conserves power by temporarily
turning off the screen without shutting down the
device. To turn the screen back on, simply press
the button again.
䡲 Press and hold to turn the device on or off.
27. SIM Card Slot houses the pre-installed SIM card,
which allows global roaming on compatible GSM
and UMTS networks (service activation required).
See “3E. Sprint Worldwide Wireless Service” on
page 187 for details.
2A. Device Basics 15
Device Basics

28.
34. Space/
Silent Mode Key
38. Delete Key
35. Message Key
36. Wireless
Manager Key
37. Enter Key
30. Speaker Key
29. Fn Key
39. Tellme/Speak Key
31. Caps Key
32. Symbol Key
33. Plus Code
Dialing Key
microSD Card Slot lets you use an optional microSD
card (sold separately) to expand the memory of
your device. See page 94.
Keyboard Features
29. Fn Key (Function) lets you access the numbers or
symbols atop each key on the QWERTY keyboard.
Activate the feature by pressing and then
pressing the desired key.
30. Speaker Key lets you place or receive calls in
speakerphone mode.
16 2A. Device Basics
31. Caps Key lets you enter capital letters (like the Shift
key on a standard keyboard). See “Entering Text”
on page 35.
32. Symbol Key lets you access symbol characters.
33. Plus Code Dialing Key automatically dials the
international access code for the country in which
you are located (for instance, 011 for international
calls placed from the United States).
34. Space/Silent Mode Key lets you either add spaces
between words and characters or activates the
device’s silent mode.
䡲 Press to insert a space while typing.
䡲 Press and hold to put your device in silent mode.
35. Message Key lets you create a new text message
and access your configured email account and
initiate a new email message.
36. Wireless Manager Key provides access to the
Wireless Manager page from where you can
configure the Wi-Fi, Bluetooth, and Phone settings.
37. Enter Key lets you enter additional lines of text.

38. Delete Key deletes characters from the display in
text entry mode (like the Backspace key on a
standard keyboard).
39. Tellme/Speak Key activates the Tellme feature that
allows you to simply state a request (for
information, business locations, etc.) and get it
quickly. See “Tellme” on page 161.
The Windows (), Speaker, Symbol, Message,
Tip
Note
Tellme/Speak key functions can be reassigned
and
to different tasks. Press
Buttons > Program Buttons tab and select a key and
an action. The actions for the Windows, Speaker, and
Symbol keys are activated by pressing and holding
the key.
Standard voice, text and data rates apply according
to your wireless plan. This feature is only available on
GPS-enabled devices.
> Settings > Personal >
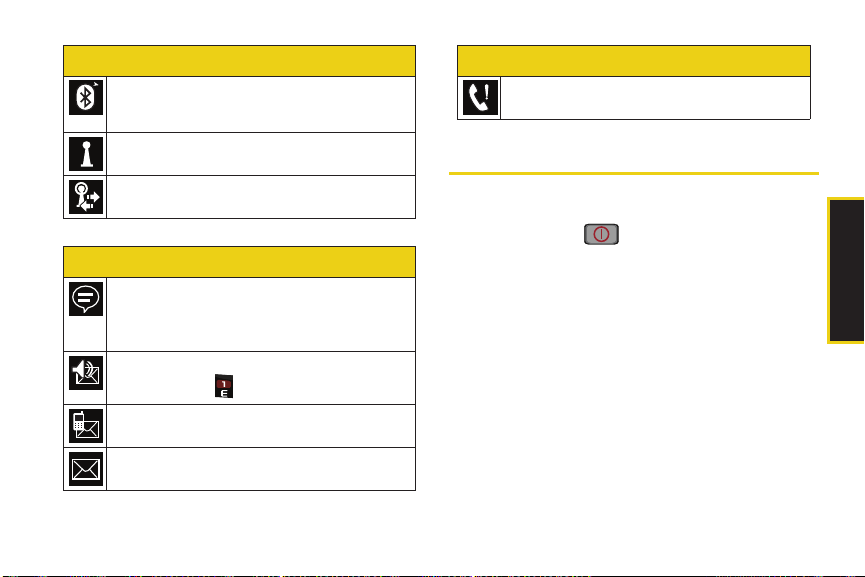
Viewing the Display Screen
Your device’s display screen provides information
about your device’s status and options. This list
identifies the symbols you’ll see on your device’s
display screen:
Status Bar – Service Icons
Signal Strength – Shows your current signal
strength. (More bars = stronger signal.)
No Service – Your device cannot find a usable
signal.
Phone Antenna Disabled – Your device’s internal
phone antenna has been turned off.
X
Call in Progress – Your device is currently is an
active call.
Roaming – Your device is “roaming” off the
Nationwide Sprint Network.
Sync Connected – Device is connected and
communicating with your computer via
ActiveSync or Windows Mobile Device Center.
2A. Device Basics 17
Device Basics

1X Data Sending/Receiving – Sprint 1xRTT data
X
OK
service is transmitting and receiving data.
1X Data Unavailable – Sprint 1xRTT data service is
unavailable.
EVDO Data Dormant – Sprint mobile broadband
data service (EVDO) is dormant.
EVDO Data Active – Sprint mobile broadband
data service (EVDO) is active.
Battery Charge Level – Shows your current battery
charge level. (Icon shown is fully charged.)
Low battery – Shows your current battery charge
level is low.
Battery Charging – Shows the device is
connected to a power cable and is currently
being charged.
Windows Start – Provides access to the Windows
Menu page.
18 2A. Device Basics
Status Bar – Service Icons
Status Bar – Status Icons
OK – Tap to accept and save the current page
settings, and then exit.
Cancel/Exit – Tap to leave the current page
X
without storing any changes.
Speaker On – Your device’s speaker is active. Tap
this icon to access the onscreen Volume slider
and adjust the volume level.
Vibrate – Your device’s the speaker is set to
vibrate only. Tap this icon to access the
onscreen Volume slider and adjust the volume
level.
Silence All – Your device has the ringer
deactivated and the vibrate option unchecked
(disabled). No sound is made by the device.
Alarm – An alarm has been set on your phone.
Bluetooth Enabled – The Bluetooth technology is
active and enabled.
Bluetooth Visible– The Bluetooth technology is
active and the device is visible.
Status Bar – Status Icons
Bluetooth Connected– The Bluetooth technology
is active and communicating (paired) with a
target Bluetooth device.
Wi-Fi Inactive – Your Wi-Fi connection is inactive.
Wi-Fi Active – Your Wi-Fi connection is active and
communicating.
Status Bar – Messaging Icons
Notification – Shows there is a device
notification that needs your attention, such
as hidden icons, messages, missed calls,
Bluetooth activity, etc.
Voice mail – You have a new voicemail message.
Press and hold to call your voicemail box.
Text Message – You have new text messages.
Email – You have new unread email messages.
Status Bar – Messaging Icons
Missed Call – You have missed an incoming call.
Turning Your Device On and Off
Turning Your Device On
䊳 Press and hold for two seconds.
Once your device is on, it will look for a signal. When
your device finds a signal, it enters standby mode – the
device’s idle state. At this point, you are ready to begin
making and receiving calls.
If your device is unable to find a signal after 15 minutes
of searching, a Power Save feature (page 48) is
automatically activated. When a signal is found, your
device automatically returns to standby mode.
In Power Save mode, your device searches for a signal
periodically without your intervention. You can also
initiate a search for Sprint service by pressing any key
(when your device is turned on).
2A. Device Basics 19
Device Basics

The Power Save feature conserves your battery
Tip
power when you are in an area where there is no
signal.
Turning Your Device Off
䊳 Press and hold for two seconds then touch
OK from the onscreen shutdown popup.
Your screen remains blank while your phone is off
(unless the battery is charging).
Battery and Charger
WARNING
Sprint-approved or Samsung-approved batteries and
accessories can be found at Sprint Stores or through
Samsung; or call 1-866-866-7509 to order. They’re
also available at
20 2A. Device Basics
Use only Sprint-approved or Samsung-
approved batteries and chargers with your
device. The failure to use a Sprint-approved or
Samsung-approved battery and charger may
increase the risk that your device will overheat,
catch fire, or explode, resulting in serious
bodily injury, death, or property damage.
www.sprint.com.
Battery Capacity
Your device is equipped with a Lithium Ion (Li-Ion)
battery. It allows you to recharge your battery before it is
fully drained. The battery provides up to 6.0 hours of
continuous digital talk time.
When the battery reaches 5% of its capacity, an
onscreen alert bubble appears. When there are
approximately two minutes of talk time left, the device
sounds an audible alert and then turns off.
Long backlight settings, searching for service, vibrate
Note
mode, browser use, and other variables may reduce
the battery’s talk and standby times.
Watch your device’s battery level indicator and
Tip
charge the battery before it runs out of power.
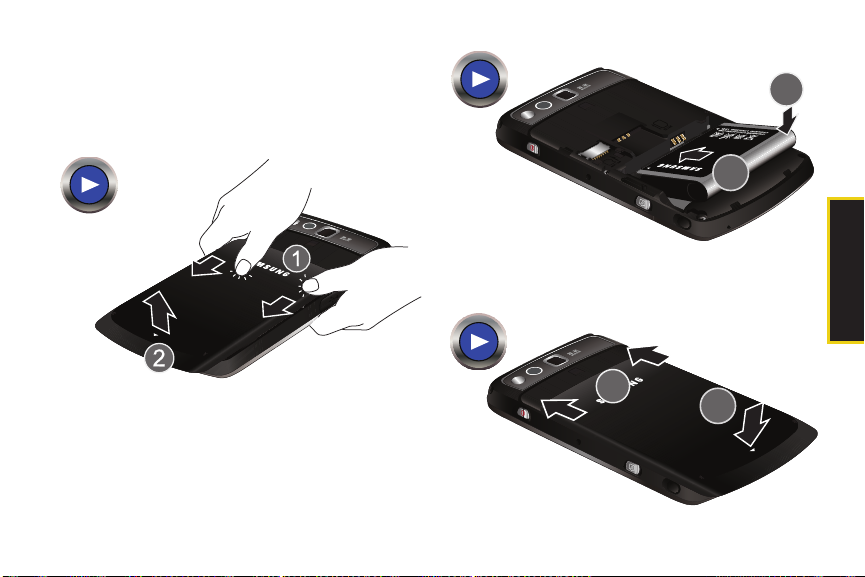
Installing the Battery
1. In a single motion, press down on the cover and
slide it away from the camera lens (1) and then
carefully lift the battery cover away from the
device (2).
2. Insert the battery into the opening, making sure to
line up the gold contacts (3). Gently press down to
secure the battery (4).
3. Replace the cover by lining up the tabs (5)
and then firmly slide it back on until you hear a
click (6).
2A. Device Basics 21
Device Basics
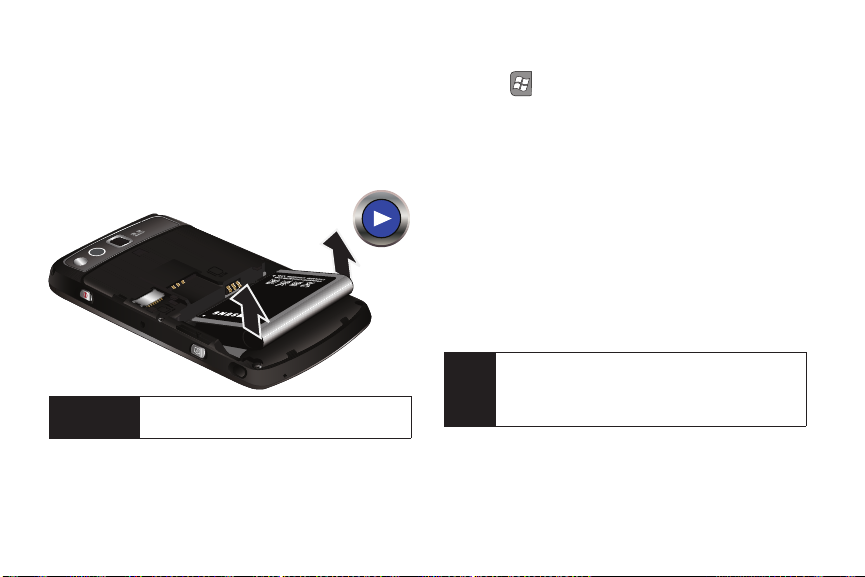
Removing the Battery
1. Make sure the power is off so that you don’t lose
any stored numbers or messages.
2. Remove the battery cover.
3. Grasp the bottom left and right sides of the battery
and lift it out of the compartment.
WARNING
Do not handle a damaged or leaking Li-Ion
battery as you can be burned.
22 2A. Device Basics
Reviewing the Battery Charge Level
1. Press > Settings > Power.
2. Touch the Battery tab.
䡲 This tab indicates the current charge state of the
internal battery.
Charging the Battery
Keeping track of your battery’s charge is important. If
your battery level becomes too low, your device
automatically turns off, and you will lose any
information you were just working on.
Always use a Sprint-approved or Samsung-approved
desktop charger, travel charger, or vehicle power
adapter to charge your battery.
It is recommended that you completely charge your
Tip
battery first before using your device. This guarantees
you begin using your device with a fully charged
battery.
䊳 Plug the flat end of the charger into the device’s
charger/accessory jack and the other end into an
electrical outlet.
 Loading...