

Samsung SPH-I330SS/XAR User Manual

LMI330_112102_F5
Online User’s Guide
Dual-Band Tri Mode PCS Phone
Model SPH-I330

Important Information Regarding the Local Serial Connection
For the i330 to properly HotSync with another computer, it must be setup
to connect using the Local Serial option in the HotSync configuration
settings. If this option is not selected, the i330 will not connect to the
other computer. The cable that connects the two devices was designed to
connect to a USB connector, thus allowing easier installation. It does not
however use a USB connection to HotSync the two devices together. The
devices still use a Local Serial connection to transfer and receive data. To
properly configure this option, see "Perform a HotSync the First Time" on
page 150.
ii

Welcome to Sprint
print built the largest all-PCS nationwide network with advanced
multimedia services and clear calls, reaching more than 230 million
S
people for clarity you can see and hear. We built our network to give you
what we believe you really want from a wireless phone, clear sound, private
conversations and time-saving features.
But with Sprint, you can do something even more far-reaching – simplify
your life. Our advanced technology is designed to grow with your
communications needs so that one day you'll be able to rely entirely on your
PCS Phone to stay connected.
This guide will familiarize you with our technology and with your new
PCS Phone through simple, easy-to-follow instructions. If you have already
reviewed the Start Here Guide, which was packaged with your new phone,
then you're ready to explore the advanced features outlined in this guide.
If you have not read your Start Here Guide, go to Section One - Getting
Started. This section provides all the information you need to quickly
activate your phone, set up your voicemail and much more. It also contains
information on how to contact Sprint should you have questions about
service, want to purchase additional products or services, or just to check
your account balance.
Thank you for choosing Sprint.
iii

Introduction to this
T
Online User’s Guide
his Online User’s Guide introduces you to PCS Service and all the
features of your new phone. It’s divided into four sections:
䊳 Section 1: Getting Started
䊳 Section 2: Understanding Your Phone
䊳 Section 3: Using PCS Service Features
䊳 Section 4: Safety and Warranty Information
Throughout the guide, you'll find tips that highlight special shortcuts
and timely reminders to help you make the most of your new phone and
service. The Table of Contents and Index will help you locate specific
information quickly.
You'll get the most out of your phone if you read each section. However, if you'd
like to get right to a specific feature, simply turn to that page. Follow the
instructions in that section and you'll be ready to use your phone in no time.
Tip: You can print out this guide to keep on hand or view it online. If you're
viewing it online, simply click on a topic in the Table of Contents or on any
page reference within a section to go directly to that topic.
iv

Table of Contents
SECTION 1: Getting Started ................. 9
Setting Up Service 10
Getting Started With PCS Service ..................................11
Setting Up Your Voicemail ............................................. 12
Getting Help ....................................................................12
SECTION 2: Understanding Your
Phone ....................................................14
Your PCS Phone: The Basics 15
Front View of Phone .......................................................16
Viewing the Display Screen ............................................ 19
Features of Your I330 .....................................................21
Turning Your Phone ON and OFF ................................22
Software Version ......................................................... 24
Using the Battery ............................................................24
Connecting the Cradle ................................................26
Displaying Your Phone Number ................................... 28
Making and Answering Calls .........................................28
Making Calls ............................................................... 28
One-Handed Dialing .................................................. 29
Answering Calls ........................................................... 29
Missed Call Notification ............................................. 30
Calling Emergency Numbers ..................................... 30
Using One/Two Touch Speed Dialing ....................... 30
Dialing Options ........................................................... 31
In-Call Options ........................................................... 31
End-of-Call Options .................................................... 33
Controlling Your Phone’s Settings 34
LMI330_103002_F3

Adjusting the Phone’s Volume Settings ........................ 35
Ringer Types ................................................................... 35
Selecting Ringer Types for Voice Calls ...................... 35
Selecting Ringer Types for Messages ......................... 36
Selecting a Roam Ringer ........................................... 36
Selecting a Tone Length ................................................ 36
Alert Notification ............................................................37
Silent Mode ..................................................................... 37
Changing the Greeting .................................................. 37
Changing the Backlight Time Length .......................... 38
Changing the Display Screen ........................................ 38
Wake Up Feature ......................................................... 39
Setting Your Phone’s Security 40
Accessing the Security Menu .......................................... 41
Locking Your Phone ....................................................... 41
Unlocking Your Phone .................................................. 42
Changing the Lock Code ................................................42
Calling in Lock Mode ..................................................... 42
Using Special Numbers ..................................................43
Resetting Your Phone .....................................................43
Controlling Your Roaming Experience 44
Understanding Roaming ...............................................45
Setting Your Phone’s Roam Mode ................................46
Controlling Roaming Charges Using
Call Guard ....................................................................... 47
Application Menus and Entering Text 48
Application Launcher ................................................. 49
Application Categories ................................................49
Applications Display ...................................................51
Elements of the Application Screen ........................... 51
LMI330_103002_F3

Menus ..........................................................................53
Online Help .................................................................53
Finding Records ..........................................................54
Sorting Records ........................................................... 54
Private Records ........................................................... 54
Attaching Notes ........................................................... 55
Choosing Fonts ........................................................... 56
Getting Application Information ............................... 57
Beaming Information ................................................ 57
Managing Call History 58
Viewing History ...............................................................59
Making a Call From Call History ...................................59
Saving a Phone Number From Call History ................. 60
Prepending a Phone Number From
Call History .....................................................................60
Erasing Call History ........................................................ 61
Using the Address Book..................................... 62
Creating an Address Book Entry ................................63
Address Details ............................................................65
Speed Dial ................................................................... 67
Voice Dial .................................................................... 68
Making Calls from the Address Book .........................69
Viewing Address Book Entries .................................... 70
Editing an Address Book Entry ..................................70
Looking up an Address Book Entry ........................... 71
Sorting the Address Book ............................................ 72
Beaming Address Book Entries .................................. 72
Address Book Menu Options ....................................... 73
Date Book 75
LMI330_103002_F3

Scheduling Events ......................................................76
Scheduling Untimed Events ......................................78
Rescheduling an Event .............................................. 79
Setting an Alarm for an Event ................................... 80
Marking an Event As Private ......................................80
Changing the Date Book View ................................... 81
Scheduling Repeating Events .................................... 84
Date Book Menus ........................................................86
Using Your Phone’s Voice Services 88
Using Voice-Activated Dialing ....................................... 89
Recording Memos .......................................................... 91
Getting to Know the Handheld Computer ........93
What is a Handheld Computer ..................................94
Tapping and Typing ................................................... 95
Opening an Application ............................................. 96
Customizing your Handheld Computer .................... 97
Troubleshooting ......................................................... 99
Resetting Your Handheld ...........................................99
Entering Information into the Handheld
Computer 101
Using the On-Screen keyboard ................................102
®
Graffiti
Writing ......................................................103
Importing Data .........................................................110
Expense Manager 112
Creating Expense Items ........................................... 113
Changing the Expense Date ..................................... 114
Entering Receipt Details ...........................................115
Entering the Expense Type Automatically .............. 116
Expense List Display Options ................................... 117
LMI330_103002_F3

Changing Currency and Symbol Display ................ 118
Importing Data into Microsoft Excel ...................... 119
Using Expense Report Templates ............................ 121
Expense Menus ......................................................... 123
Memo Pad........................................................... 124
Creating a New Memo .............................................. 125
Choosing a Memo Category ..................................... 126
Making a Memo Private ...........................................126
Reviewing or Editing Memos ................................... 127
Sorting Memos ..........................................................127
Deleting a Memo ......................................................128
Beaming a Memo .....................................................128
Memo Pad Menus .....................................................129
To Do List 130
Creating a To Do List Item ....................................... 131
Setting Priorities .......................................................132
Checking OFF To Do List Items ...............................133
Changing Priorities and Due Dates .........................133
Deleting a To Do List Item .......................................135
Displaying Completed and Due Items ..................... 135
To Do Menus .............................................................136
Calculator 137
Opening the Calculator ............................................ 138
Using the Calculator Buttons ................................... 138
Displaying Recent Calculations ...............................139
Managing Handheld Computer Software 141
Applications Launcher ............................................. 142
Installing Palm Applications ................................... 144
Deleting Handheld Computer Applications ............145
LMI330_103002_F3

Checking Memory Usage ......................................... 146
Beaming Capabilities ...............................................146
HotSync
®
Operations ....................................... 149
HotSync Manager and Technology ......................... 150
Performing Your First HotSync Operation .............. 150
Creating a User Profile .............................................152
Performing a Local HotSync Operation .................. 153
Selecting HotSync Setup Options ............................. 153
Customizing the HotSync Operation .......................155
Performing a HotSync Operation via a Network .... 156
Using File Link .......................................................... 157
IR HotSync Operations ............................................. 158
Performing an IR HotSync operation ..................... 159
Changing the Phone Off Screen .............................. 160
Adding Custom Keypad Skins .................................. 161
SECTION 3: Using PCS Service
Features .............................................. 162
PCS Service Features: The Basics 163
Using Voicemail ...........................................................164
Setting Up Voicemail ................................................164
Knowing When You Have Messages ........................ 164
Message Types ...........................................................164
New Voicemail Message Alerts ................................. 165
Retrieving Your Voicemail Messages ....................... 165
Clearing the Voicemail Message Icon ..................... 166
Using Caller ID ............................................................. 166
Responding to Call Waiting ......................................... 167
Three-Way Calling ....................................................167
Forwarding Your Calls ..............................................168
LMI330_103002_F3

PCS VisionSM....................................................... 169
Browsing the Web on Your Phone ............................... 170
Launching the Web ..................................................170
Your User Name ........................................................170
Net Guard ..................................................................171
Browsing the Web .....................................................171
PCS Business Connection
SM
Personal Edition ...........................................................174
PCS Vision FAQs ............................................................ 175
SM
PCS Voice Command
177
Getting Started With PCS Voice Command ................178
Creating Your Own Address Book ................................ 178
Making a Call With PCS Voice Command ..................179
Accessing Information Using
PCS Voice Command ...................................................179
SECTION 4: Safety Guidelines and
Warranty Information ....................... 180
Safety 181
Getting the Most Out of Your Reception ..................... 182
Maintaining Safe Use of and Access to
Your Phone ................................................................... 183
Caring for the Battery ................................................... 186
Acknowledging Special Precautions and the
FCC Notice .....................................................................187
Owner’s Record .............................................................189
User Guide Proprietary Notice .....................................189
Manufacturer’s Warranty ................................ 190
Manufacturer’s Warranty .............................................191
LMI330_103002_F3

LMI330_103002_F3

Section 1
Getting Started
Section 1
Getting Started 9

1A
T
Setting Up Service
In This Section
䊳 Getting Started With PCS Service
䊳 Setting Up Voicemail
䊳 Getting Help
his section walks you through the basics of setting up service for
your PCS Phone, including unlocking and activating your phone,
setting up your voicemail and how to contact Sprint for assistance with
your PCS Service.
Section 1: Getting Started
1A: Setting Up Service 10

Getting Started With PCS Service
Determine If Your Phone Is Already Activated
If you received your phone in the mail or purchased it at a Sprint Store, it
probably has been activated. All you need to do is unlock your phone.
If your phone is not activated, please refer to the Start Here Guide
included with your phone.
Unlocking Your Phone
Follow these steps to unlock your phone:
1. Press and hold to turn the phone on.
2. The System Lockout screen is displayed.
3. Enter your four-digit lock code using the on screen keyboard or
Graffiti writing area.
Tip: If you can’t recall your lock code, try using the last four digits of either
your Social Security number or PCS Phone Number or try 0000. If none of
these work, call PCS Customer Solutions at 1-888-211-4PCS (4727).
Activating Your Phone
To activate your phone, follow the directions in the Start Here Guide that
was included with your phone. Or visit
activate your phone online.
http://activate.sprintpcs.com and
Section 1: Getting Started
1A: Setting Up Service 11

Setting Up Your Voicemail
All unanswered calls to your PCS Phone are automatically transferred to
voicemail, even if your phone is in use or turned off. Therefore, you will
want to set up your voicemail and personal greeting as soon as your
PCS Phone is activated.
To set up voicemail:
1. From the Phone main menu, tap .
2. Select Messages and tap Voicemail.
3. The Voicemail screen is displayed.
4. Tap the Listen button.
5. Follow the message prompts to setup your voicemail.
Or:
1. Press and hold to connect to voicemail.
Note: The voicemail setup process may vary in certain Affilitate areas.
Getting Help
Visit Our Web Site
Stop by www.sprintpcs.com to get up-to-date information on PCS
Services, options and more.
You can also:
䊳 Review coverage maps
䊳 Learn how to use voicemail
䊳 Access your account information
䊳 Purchase accessories
䊳 Add additional options to your service plan
䊳 Check out frequently asked questions
䊳 And more
Section 1: Getting Started
1A: Setting Up Service 12
PCS Customer Solutions
Claire, your virtual service representative is also available to assist you
24 hours a day, seven days a week. Visit her at www.sprintpcs.com by
logging on and clicking on Claire’s Directory for Service Solutions.
Receiving Automated Invoicing Information
For your convenience, your phone gives you free access to invoicing
information on your PCS Account. This information includes balance
due, payment received, invoicing cycle and the amount of minutes used
since your last invoicing cycle. Follow these steps to access this
information:
䊳 Press .
Note: This service may not be available in all Affiliate markets.
PCS Directory Assistance
PCS Directory Assistance provides a variety of services, including
residential, business and government listings; assistance with local or
long-distance calls; movie listings; hotel, restaurant and shopping
information and major local event information. There is a per call
charge and you will be billed for airtime.
䊳 Press .
PCS Operator Services
PCS Operator Services can provide assistance in placing collect calls or
calls billed to a local telephone calling card or a third party.
䊳 Press .
For more information or to see the latest in products and services, visit us
online at
Note: PCS Operator Services may not be available in all
Affiliate markets.
www.sprintpcs.com.
Section 1: Getting Started
1A: Setting Up Service 13

Section 2
Understanding Your
Phone
Section 2
Understanding Your Phone 14

Section 2A
Y
Your PCS Phone: The Basics
In This Section
䊳 Front View of Phone
䊳 Viewing the Display Screen
䊳 Features of Your Phone
䊳 Turning Your Phone On and Off
䊳 Using the Battery and Charger
䊳 Displaying Your Phone Number
䊳 Making and Answering Calls
our PCS Phone is packed with features that simplify your life and
expand your ability to stay connected to the people and information
that are important to you. This section will guide you through the basics of
your phone and you’ll be on your way to using it in no time.
Section 2: Understanding Your Phone
2A: Your PCS Phone - The Basics 15
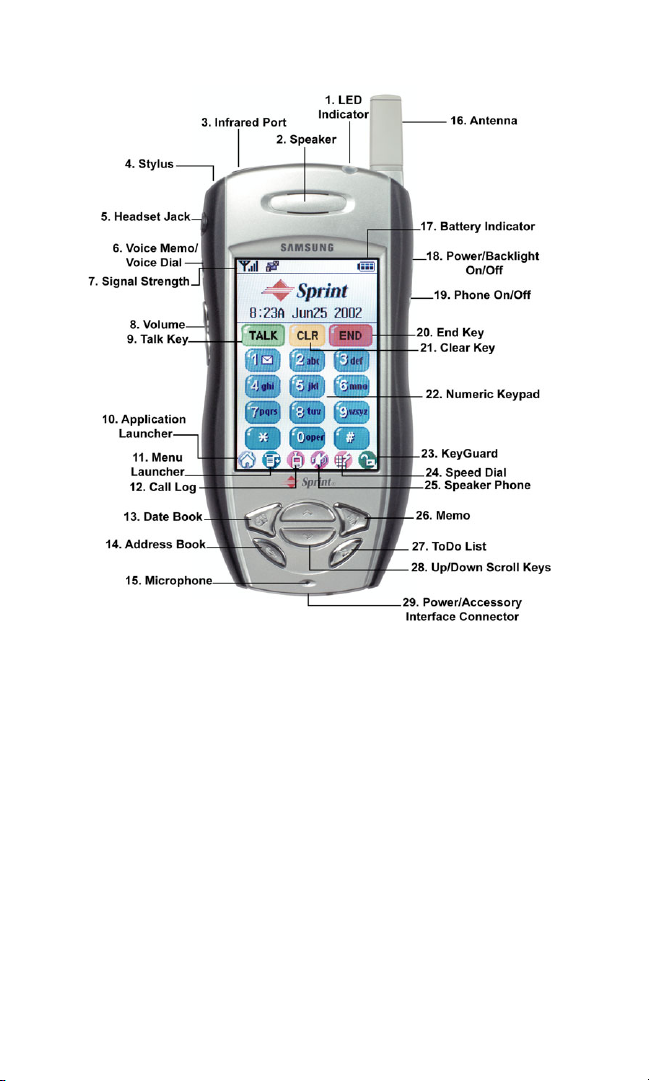
Front View of Phone
Section 2: Understanding Your Phone
2A: Your PCS Phone - The Basics 16

1. LED Indicator: The LED is used while charging the battery. For more
information, see "Charging the Battery" on page 25.
2. Speaker: The speaker allows you to hear the other caller and the
different ring tones and sounds offered by your phone.
3. Infrared Port: This option allows the handheld computer to accept
information from another IR device through the use of beaming.
4. Stylus: The stylus acts like a mouse to navigate the PCS Phone. Use it
to touch the screen to select the desired function.
5. Headset Jack: (located in the upper left side of the phone above the
Voice Memo key.) Allows you to plug in an optional headset for safe,
convenient hands-free conversations.
6. Voice Memo: Record a personal memo on the PCS Phone. Up to 15
memos can be stored on the phone.
7. Signal Strength Indicator: This icon represents the signal strength by
displaying bars. The more bars displayed, the better the signal
strength.
8. Volume Up/Down Key: Adjust the ringer volume in standby mode.
Adjust the voice volume during a call. In a menu, scroll up or down to
navigate through the menu options. Volume Keys also mute the ringer
during an incoming call.
9. TALK Key: Place or receive a call. In standby mode, tap the key once to
display the Outgoing call log. If you tap and hold the key down you
will initiate Voice Dial.
10. Application Launcher: The Application Launcher displays the icons
of the applications loaded on your phone.
11. Menu Launcher: The Menu Launcher displays the menu options
associated with the screen that is displayed on the phone.
12. Call Log: Displays the last 20 entries of outgoing, incoming, and
missed calls.
13. Date Book: Automatically launches the Date Book and allows you to
schedule an event.
Section 2: Understanding Your Phone
2A: Your PCS Phone - The Basics 17

14. Address Book: Automatically launches the Address Book and allows
you to save names, addresses, phone numbers, e-mail addresses, and
other information about your personal or business contacts.
15. Microphone: The Microphone allows the other caller to hear you
clearly when you are speaking to them.
16. Antenna: The antenna allows you to send and receive calls and
information while using your phone.
17. Battery Indicator: The battery indicator displays the amount of
remaining battery charge left in your phone. When the battery icon is
solid, the phone’s battery is fully charged. When it is clear, the phone’s
battery is completely discharged.
18. Power/Backlight On/Off: This option allows you to turn the screen
backlight Off. It will also turn off the screen if pressed once and then
released.
19. Phone On/Off: Press and hold the button for more than two seconds
to turn the phone On or Off. Press once and release to automatically
display the phone screen.
20. END Key: Tap this button to end a call.
21. CLR Key: Tap the clear key once to delete the last number or tap and
hold to delete all the numbers.
22. Numeric Keypad: Use these keys to enter numbers, letters, and
characters.
23. Keyguard: Activates or deactivates the keyguard option. This keeps
any keys from being pressed accidentally. During a call, this icon
changes to the Mute function.
24. Speed Dial: Tap this icon to gain instant access to the Speed Dial
screen.
25. Speaker Phone Key: This key allows you to turn the speaker phone
On or Off during a conversation.
26. Memo: Automatically launches the Memo Pad application to allow
you to create a quick note.
27. ToDo List: Automatically launches the ToDo List application and
allows you to enter or check off an item from the list.
Section 2: Understanding Your Phone
2A: Your PCS Phone - The Basics 18
28. Up/Down Arrows: Allows you to scroll up or down or navigate
through different applications.
29. Power /Accessory Interface Connector: This connector is used to
connect power or any available accessory cable to your phone.
Viewing the Display Screen
Main LCD
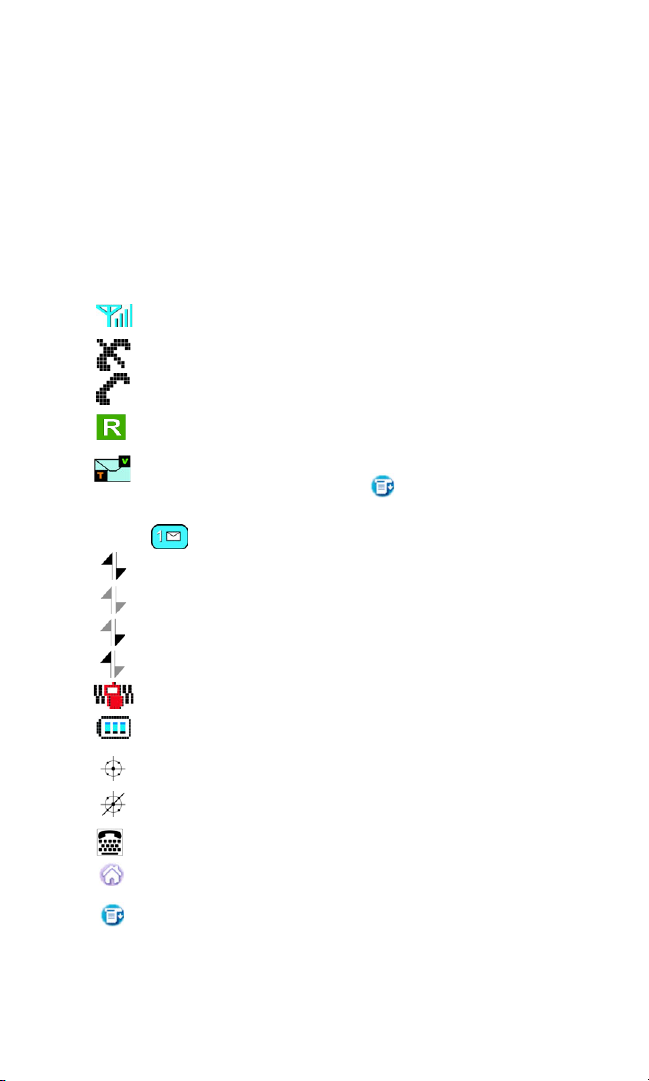
This list identifies the symbols you’ll see on your main LCD screen.
Displays your current signal strength.The more lines you
have, the stronger your signal.
Means your phone cannot find a signal.
Tells you a call is in progress.
Indicates you are “roaming” off the PCS
Nationwide Network.
Indicates you have voicemail, text, numeric pages, or PCS
Web Alert messages waiting. Tap and select “Messages”
to view pending voicemail and text messages or tap and hold
to dial voicemail box.
Indicates that 3G functionality is active.
Indicates that 3G functionality is dormant or inactive.
Indicates that you are receiving information.
Indicates that you are sending information.
Indicates your phone is in vibrate mode.
Shows your current battery charge strength. (Icon shown
fully charged.)
Indicates that position location is active.
Indicates that position location is inactive.
Indicates that TTY option is On.
Launches the handheld computer application screen. Tap this
to exit any screen and return to the main screen.
Launches the menu bar associated with each screen being
displayed. Tap the Menu Launcher to display a drop down list
of the available options.
Section 2: Understanding Your Phone
2A: Your PCS Phone - The Basics 19
Launches the call history application screen. You can see
missed, incoming, or outgoing call logs.
Activates the speaker phone option during a call. Cannot be
activated unless connected to another caller.
Tap this icon to gain instant access to the Speed Dial screen.
Activates or deactivates the key lock option. This keeps any keys
from being pressed accidentally.
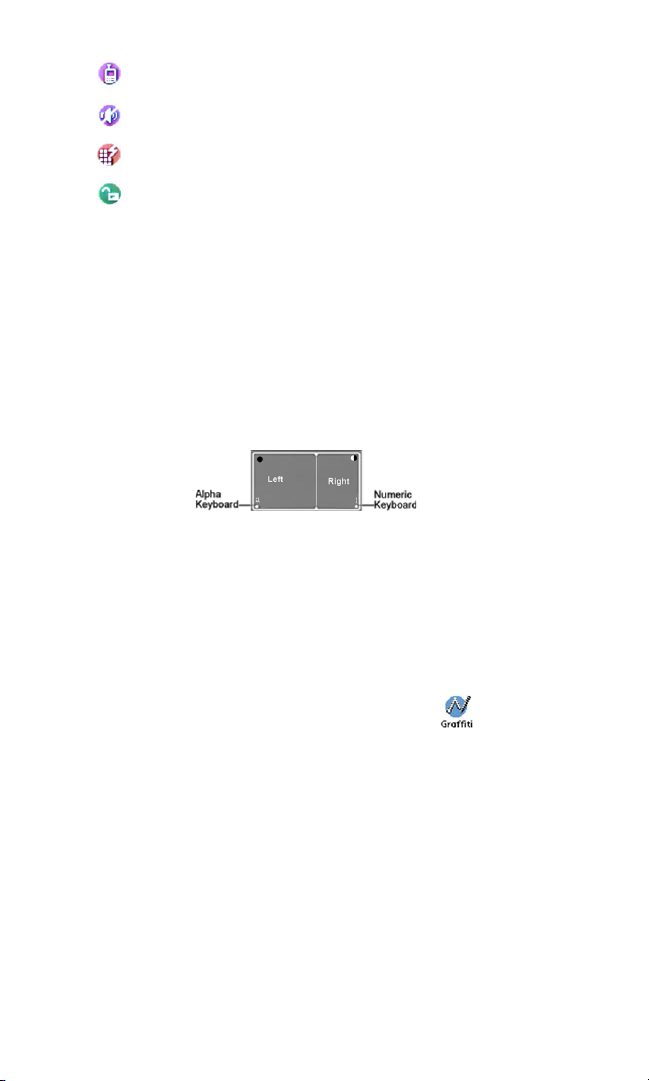
Entering Data in the Graffiti Writing Area of your Phone
Using the On-screen Keyboard:
1. Open an application that requires data entry.
2. Tap “a” for alpha, or “1” for a numeric keyboard in the graffiti area.
3. The on-screen keyboard is displayed. Use the stylus to tap the desired
keys.
4. Tap Done when finished.
Graffiti Writing
Graffiti is the method used to enter characters and symbols into the
handheld computer. Use the stylus in the Graffiti writing area to enter
characters on the display. To create letters, use the left side. For numbers,
use the right side.
To learn more about Graffiti, and practice entering characters:
1. From the applications screen, tap the Graffiti Icon .
2. Follow the instructions on the screen.
3. When finished, tap Done.
Section 2: Understanding Your Phone
2A: Your PCS Phone - The Basics 20

Using the Applications Launcher
The Application Launcher displays the icons of the applications loaded
on your handheld computer. Any application can be started by going to
the Application Launcher. Simply tap the Application Launcher icon
and the main menu is displayed.
Features of Your I330
Congratulations on the purchase of your PCS Phone (SPH-I330). This
phone is lightweight, easy-to-use, reliable and offers many significant
features and service options:
䊳 Tri-Mode capability provides access to other PCS digital and analog
networks where Sprint has implemented roaming agreements (page
45).
䊳 A Complete Palm Powered™ color screen.
䊳 Software included in this package helps you stay organized and up-
to-date by synchronizing the Palm
List and Memo Pad with the Microsoft
Contacts, Tasks, and Notes folders.
䊳 Sprint Vision™.
䊳 160x240 pixel full color graphic LCD display.
䊳 Polyphonic ringers for enhanced more realistic and rich sounding
ringers.
䊳 GPS position location enabled.
䊳 The Blazer browser can access most internet sites in full HTML color.
䊳 PCS Vision
䊳 PCS Voice Command
SM
provides access to the wireless Internet in digital mode.
SM
lets you dial phone numbers by speaking
someone’s name.
䊳 The date book allows you schedule important events.
䊳 Each phone book entry can store up to five phone numbers.
TM
Date Book, Address Book, To Do
R
OutlookR default Calendar,
Section 2: Understanding Your Phone
2A: Your PCS Phone - The Basics 21

Turning Your Phone ON and OFF
Turning Your Phone ON
Press for a few seconds. The phone will display “Powering On” until
it locates a signal, then it will automatically enter Standby mode — the
phone’s idle state. At this point, you’re ready to begin making and
receiving calls.
If your phone is unable to find a signal after 15 minutes of searching, a
Power Save feature is automatically activated. When a signal is found,
your phone automatically returns to Standby mode.
In Power Save mode, your phone searches for a signal periodically
without your intervention. You can also initiate a search for
PCS Service by pressing any key (when your phone is turned ON).
Tip : The Power Save feature helps to conserve your battery power when
you are in an area where there is no signal.
Turning Your Phone OFF
Press for a few seconds until you see the powering down animation
on the display screen.
Your screen remains blank while your phone is off (unless the battery
is charging).
Adjusting the Brightness & Contrast
To adjust the brightness from the PDA menu, tap the brightness icon
1.
located in the upper left corner of the alpha Graffiti writing
area.
2. Use the slider to adjust the desired brightness level. Tap Done to save
and exit.
22

Adjusting the Contrast
To adjust the contrast, tap the contrast icon located in the
1.
upper right corner of the numeric Graffiti writing area.
2. Use the slider to adjust the desired contrast level. Tap Done to save
and exit.
Application Buttons
The four buttons located on the bottom of your phone under the LCD
screen are called Application Buttons. By default, the following
applications are launched when they are pressed:
䊳 Date Book .
䊳 Address Book .
䊳 To Do List .
䊳 Memo .
Phone Application Buttons
The four application buttons can also be programmed to launch special
phone related applications when you are in the phone main menu.
These buttons will act normally if you are in the application main menu.
To modify the applications associated with the buttons:
1. Press to view the phone main menu.
2. Tap and select Options and then Preferences.
3. Tap the drop down arrow in the upper right corner and select
Buttons.
4. Tap the drop down arrow next to each icon and select the desired
application to associate with each one.
5. Tap when finished to save and exit.
Scroll Buttons
The Up/Down buttons located between the application buttons allows
you to scroll up or down on the screen.
Section 2: Understanding Your Phone
2A: Your PCS Phone - The Basics 23

Software Version
The hardware and software version of the phone can be accessed by
displaying the Version dialog box.
To Display the Version dialog box
1.
From the phone menu, tap the Menu Launcher icon.
2. Select the Options menu and tap Version.
Using the Battery
Battery Capacity
Your PCS Phone is equipped with a Lithium Ion (LiIon) battery. It allows
you to recharge your battery before it is fully drained. The battery
provides approximately 2.5 hours of continuous digital talk time
(1 hour in analog) or approximately 96 hours of continuous digital
standby time (14 hours in analog).
When the battery reaches 5% of its capacity, the battery icon blinks. When
there are approximately two minutes of talk time left, the phone sounds
an audible alert every 30 seconds and then powers down.
Note: Long backlight settings, searching for service, vibrate mode and
browser use affect the battery’s talk and standby times.
Tip: Be sure to charge your phone’s battery and watch your indicator to
ensure your levels are okay.
Installing the Battery
Your PCS Phone comes with a LiIon battery. Follow these steps to
install it:
1. Place the battery on the back of the phone, making sure that the
plastic tabs are aligned with the corresponding holes in the phone.
2. Gently push the battery down until it snaps into place.
Removing the Battery
To remove your battery for charging or for another reason, follow these
easy steps:
Section 2: Understanding Your Phone
2A: Your PCS Phone - The Basics 24
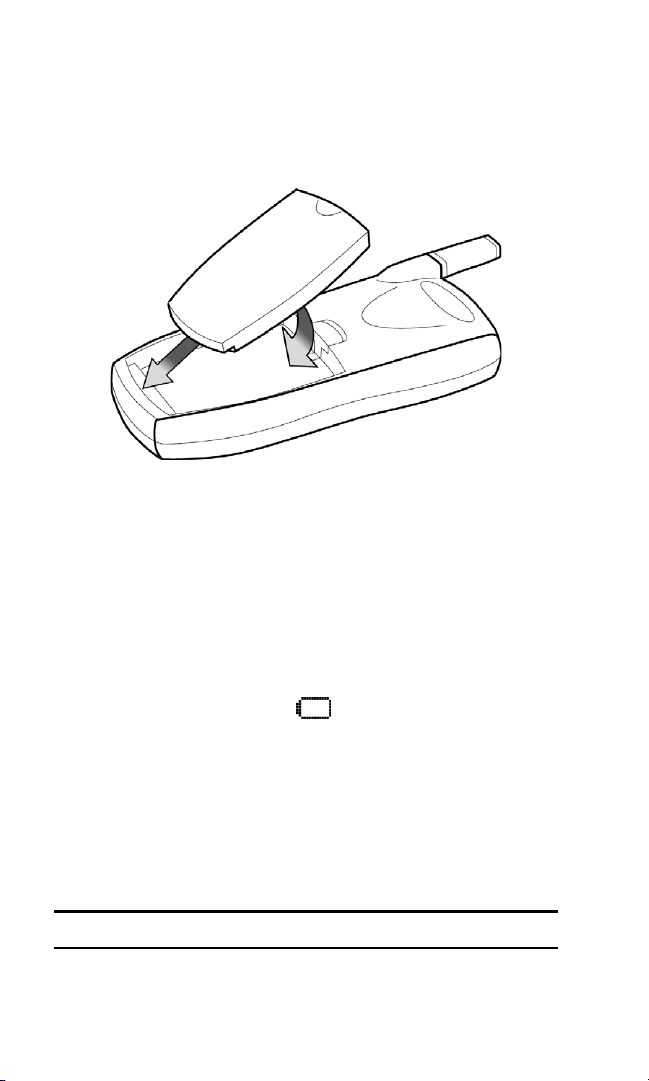
1. Make sure the power is off so that you don’t lose any stored numbers
or messages.
2. Push the battery release latch up and pull the battery away from the
phone at a 45 degree angle.
Charging the Battery
Your PCS Phone comes with a rechargeable battery. You should charge
the battery as soon as possible so you can begin using your phone.
Keeping track of your battery’s charge is important. If your battery level
becomes too low, your phone automatically turns off and you’ll lose
everything you were just working on. For a quick check of your phone’s
battery level, glance at the battery charge indicator located in the upperright corner of your phone’s display screen. If the battery charge is
getting too low, the battery icon ( ) blinks and t he phone sounds a
warning tone.
There is also an internal backup battery that saves all the settings in the
phone when the regular battery is discharged. An internal backup battery
needs to be charged initially for 24 hours. To make sure the internal
battery is charged, do not disconnect the main battery from the phone for
24 hours.
Note: The internal battery will maintain data for 15 hours.
Section 2: Understanding Your Phone
2A: Your PCS Phone - The Basics 25

Always use a Sprint-approved desktop charger, travel adapter or vehicle
power adapter to charge your battery.
Warning! Using the wrong battery charger could cause damage to your
phone and void the warranty.
It is vital that you use only the PCS-approved desktop charger specifically
designed for your phone. Use of unauthorized accessories could damage
your phone and invalidate your warranty.
To use the desktop charger provided with your phone:
1. Plug the adapter in the wall and set the phone in the cradle.
䊳 A red light on the charger lets you know the battery is charging.
䊳 A green light lets you know that the battery is at least 90 percent
charged.
䊳 A yellow light indicates that the battery is operating at a
temperature that is too high or low, or that the charger is not
plugged in correctly. Please check the charger and the battery.
It takes about 4 hours to fully recharge a completely rundown battery.
Connecting the Cradle
Your package includes a cradle for charging the battery and
synchronizing the Sprint PCS Phone™ with a desktop or laptop
computer. If you do not plan to synchronize the Sprint PCS Phone™
with a desktop computer, the cradle can be used as a battery charger only.
When the cradle is plugged into a wall outlet, the battery charger is fully
functional.
Note: Before you connect the i330 to the desktop/laptop computer, make
sure you install the i330 software drivers from the installation CD.
Connecting the Cradle to a Desktop Computer
Turn OFF the desktop computer.
1.
2. Connect the USB cable to the desktop computer.
Section 2: Understanding Your Phone
2A: Your PCS Phone - The Basics 26
 Loading...